Welcome to Week 13 of the Heart of Christmas blog hop.
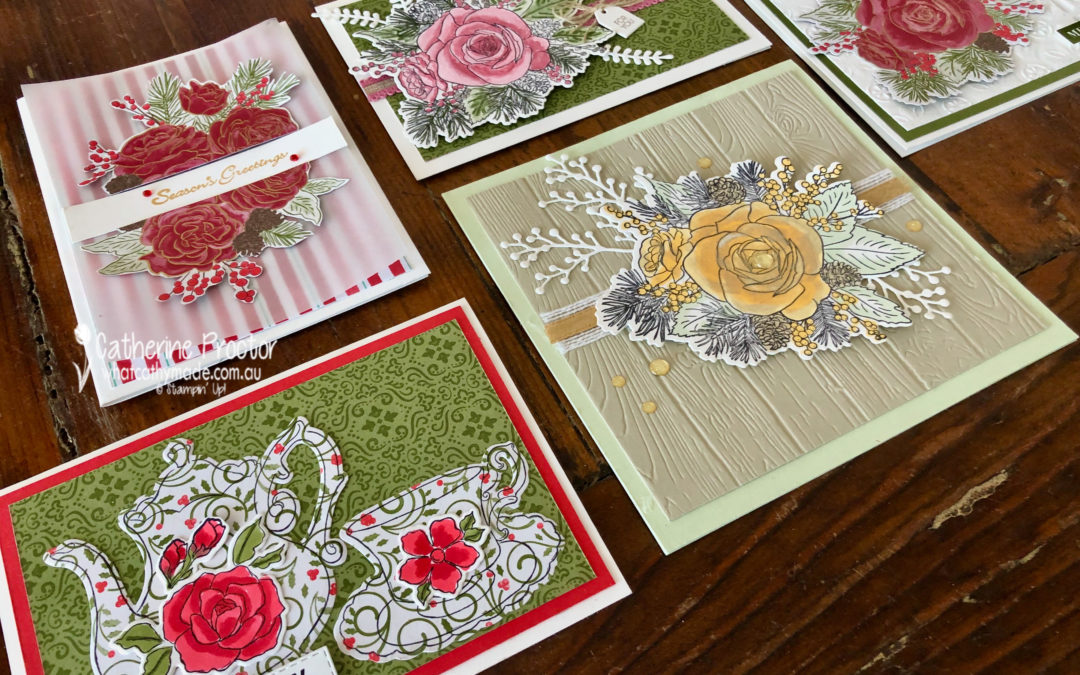
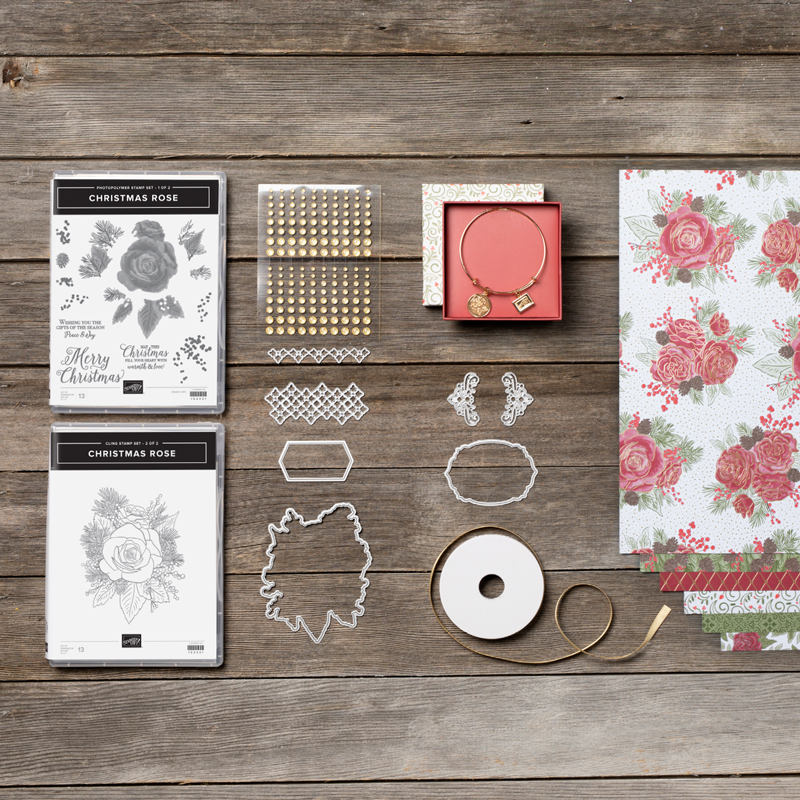
This week I’m sharing with you a variety of cards I’ve made using Stampin’ Up!’s brand new “Christmastime Is Here Suite”.
This suite is not in the Holiday Catalogue, but you can order it online here.
All of the products in the suite can either be ordered together or individually. This video gives you closer look.
Yes this is a Christmas suite, but the DSP patterns and the rose themed stamps and dies are also ideal for a variety of cards, including Christmas, birthday, Mother’s Day, thank you and sympathy cards.
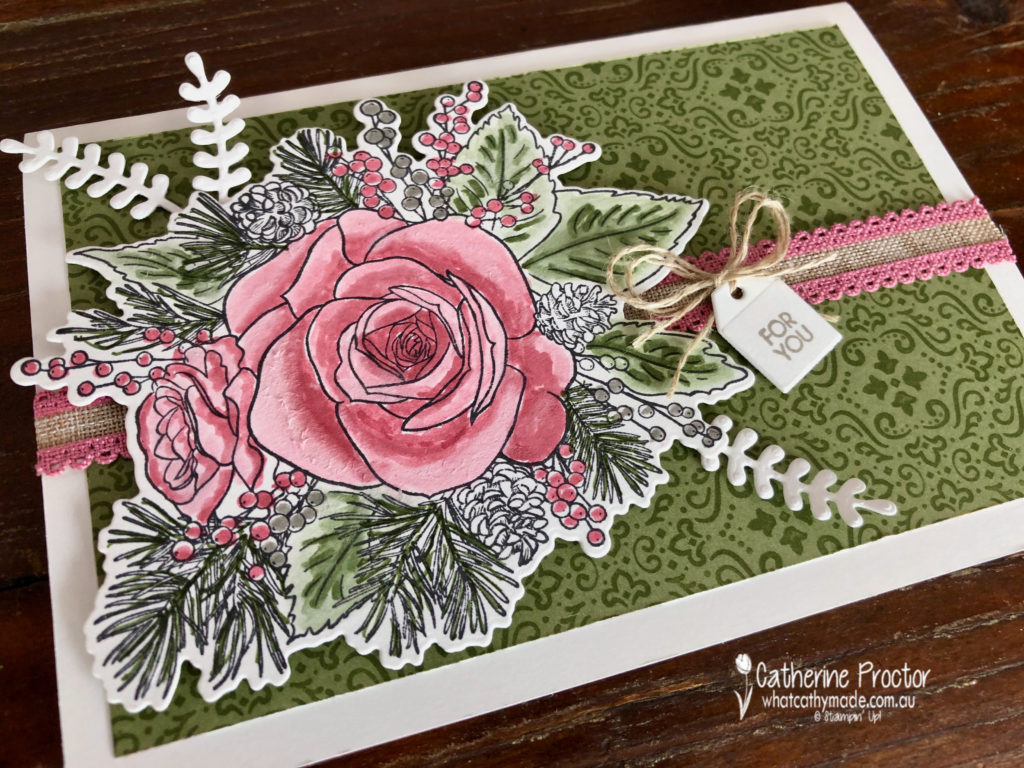
Card one is a “for you” card that I shared in a blog last week. Here it is again in case you missed it.
After stamping the rose image in Memento ink onto Whisper White card stock I used my marker pens in Rococo Rose, Mossy Meadow and Gray Granite to colour directly onto the stamped image and then I blended using the clear blender pen, NOT the stampin blends.
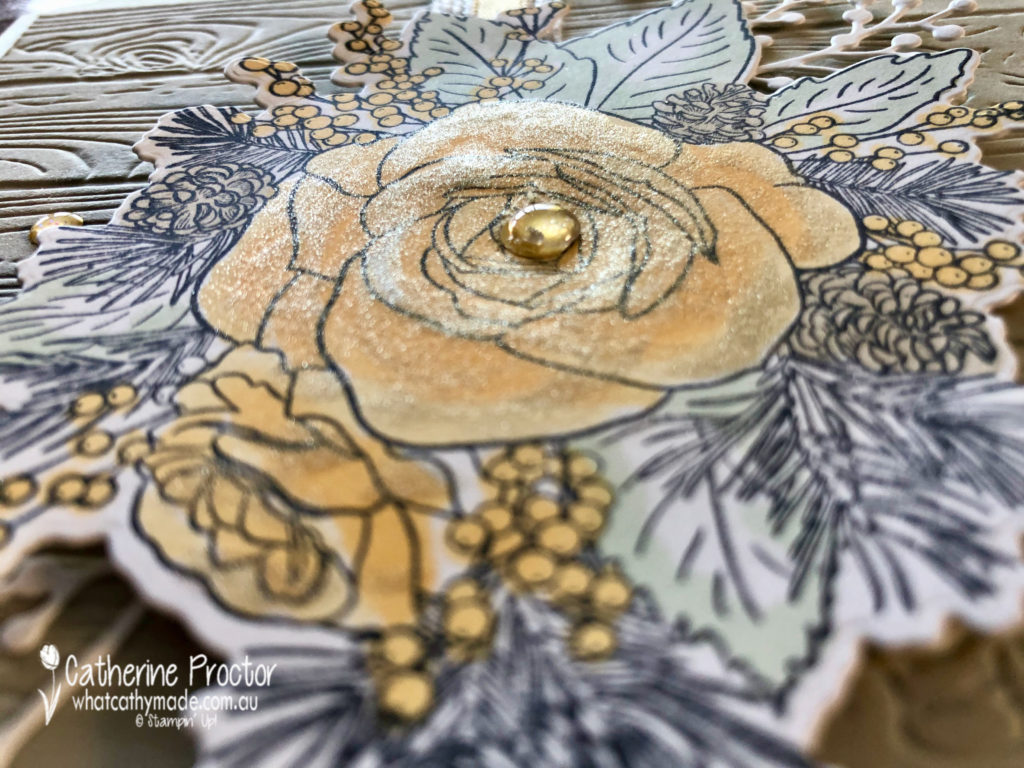
Card two uses exactly the same stamped image but colouring in with soft saffron and soft sea foam it gives it a totally different effect.
This time I made a square card and mounted the image onto a piece of Sahara Sand, embossed with the pinewood embossing folder.
I’ve also used the Gold 1/4″ (6.4 mm) Shimmer Ribbon and Gold Glitter Enamel Dots from the suite as well as branches die cut in Whisper White using the Frosted Bouquet dies.
I finished of with some Wink of Stella but did go a teeny weeny bit overboard, making my card very glittery!
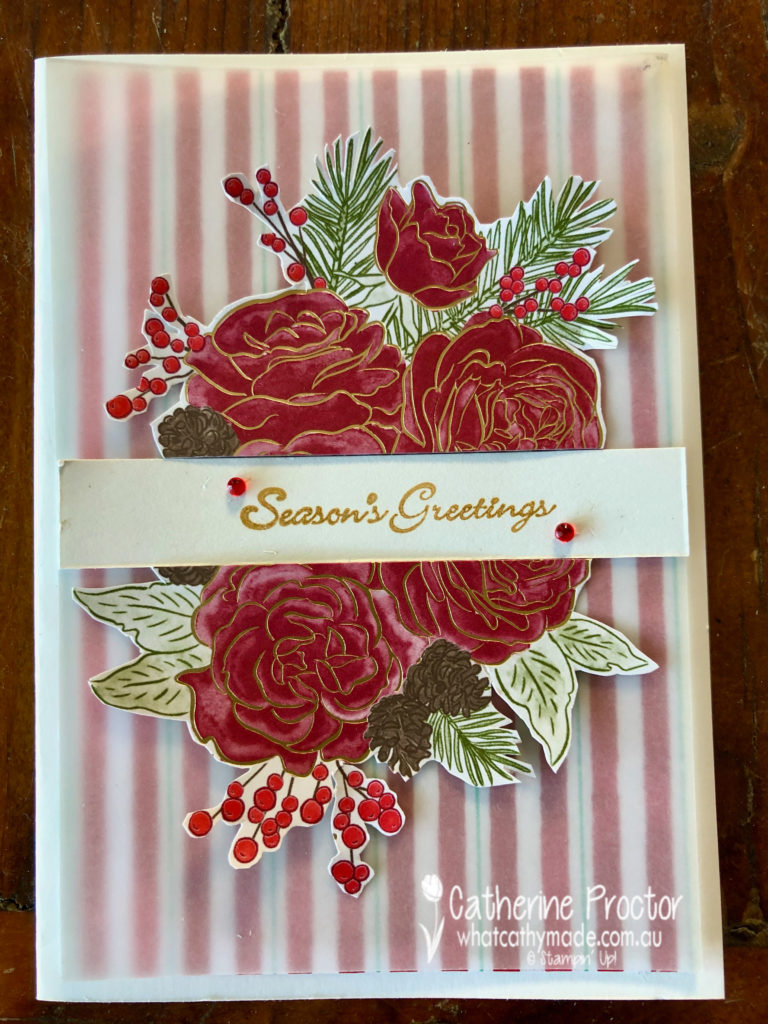
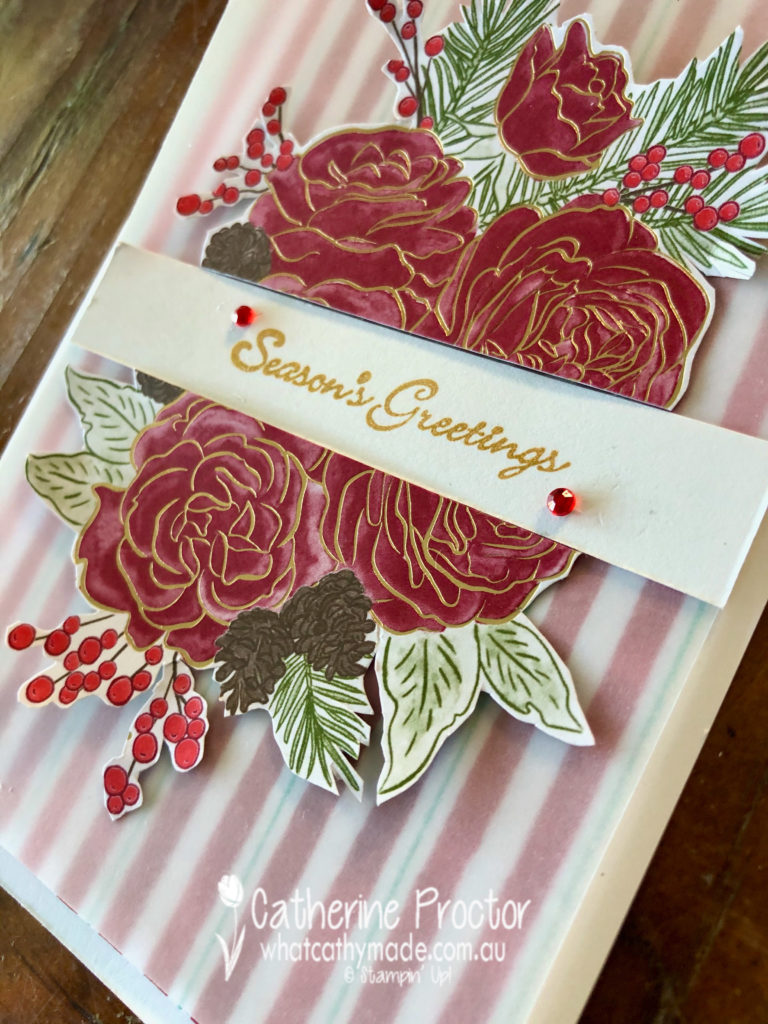
Card three is a Christmas card that uses a piece of Let it Snow DSP, overlaid with vellum. I fussy cut the image from the Christmastime is Here DSP, before cutting it in half to sit either side of the “Seasons Greetings” sentiment from Itty Bitty Christmas stamped in gold.
Red Rhinestones add a touch of bling and cover a smudge of ink!!!!
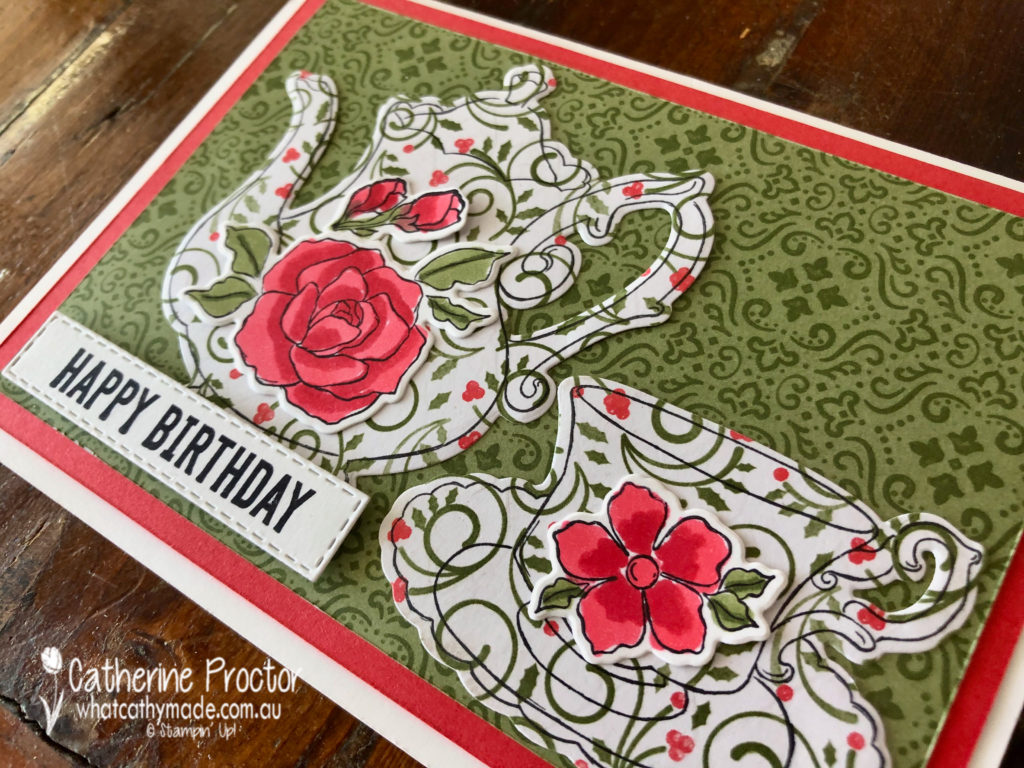
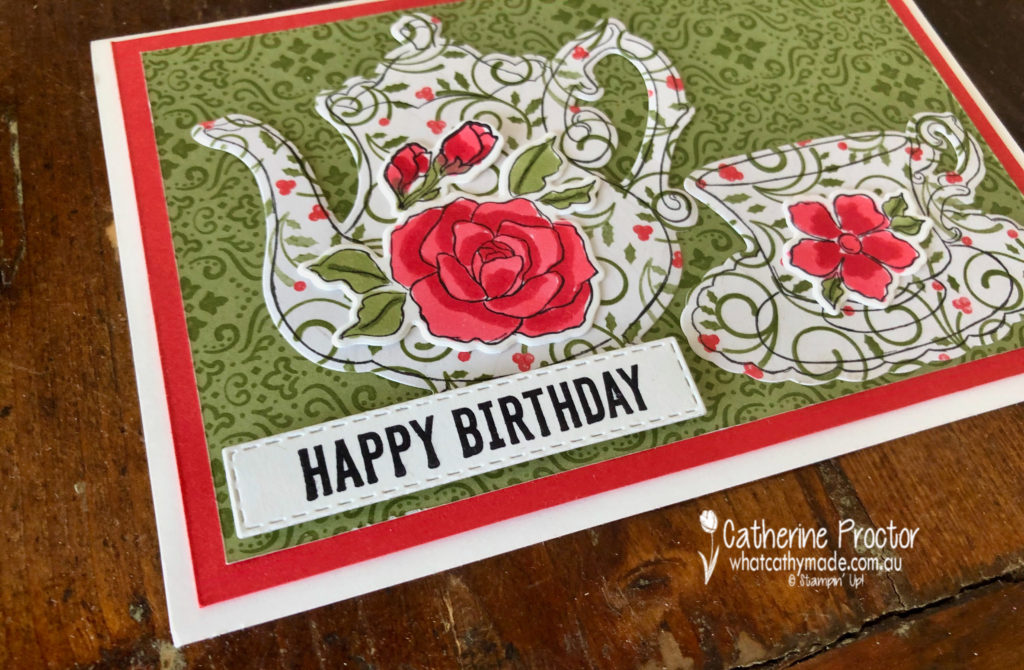
Card four uses two different patterns from the Christmastime Is Here DSP to make a birthday card that could very easily be used as a Mother’s Day card if I changed the sentiment.
I picked up on the Poppy Parade and the Mossy Meadow colours in the DSP and used my blender pens in these colours to colour in stamped flowers from the Tea Together stamp set. The teapot, cup and saucer were also stamped from this set and then all cut out using the matching dies.
The happy birthday sentiment is from the Itty bitty Birthdays stamp set die cut out with my stitched rectangle dies.
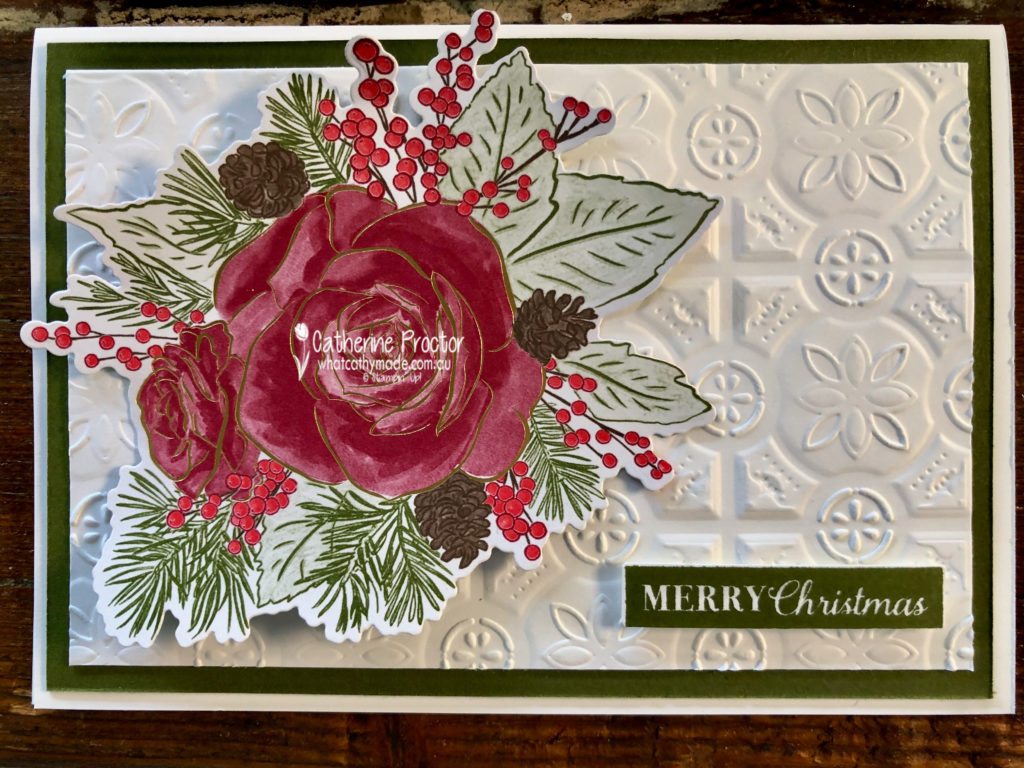
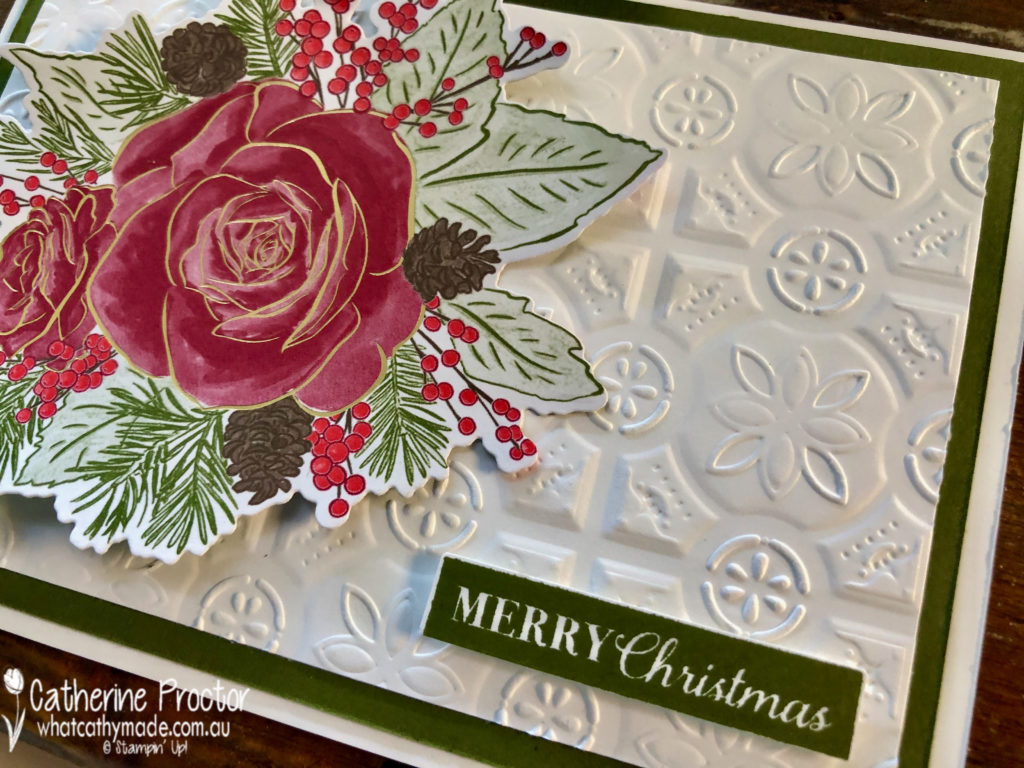
My final card is another one I shared with you last week and perhaps the most traditional of the lot – a Merry Christmas card.
I simply die cut out the image from the DSP , using the same die that I used to cut out my stamped rose in the other cards. Very quick and super easy.
The lovely Judy May is hosting our Heart of Christmas blog hop this week – to see what the rest of the team have made this week you can visit Claire’s page here.
To purchase any of the products I used in this project you can shop with me here.
If you’d like me to post you your very own copy of the brand new 2019 Stampin Up! Holiday Catalogue, the 2019-20 Stampin Up! annual catalogue or to simply find out about more about Stampin’ Up! contact me.
Welcome to week twelve of the 2019 Heart of Christmas blog hop.
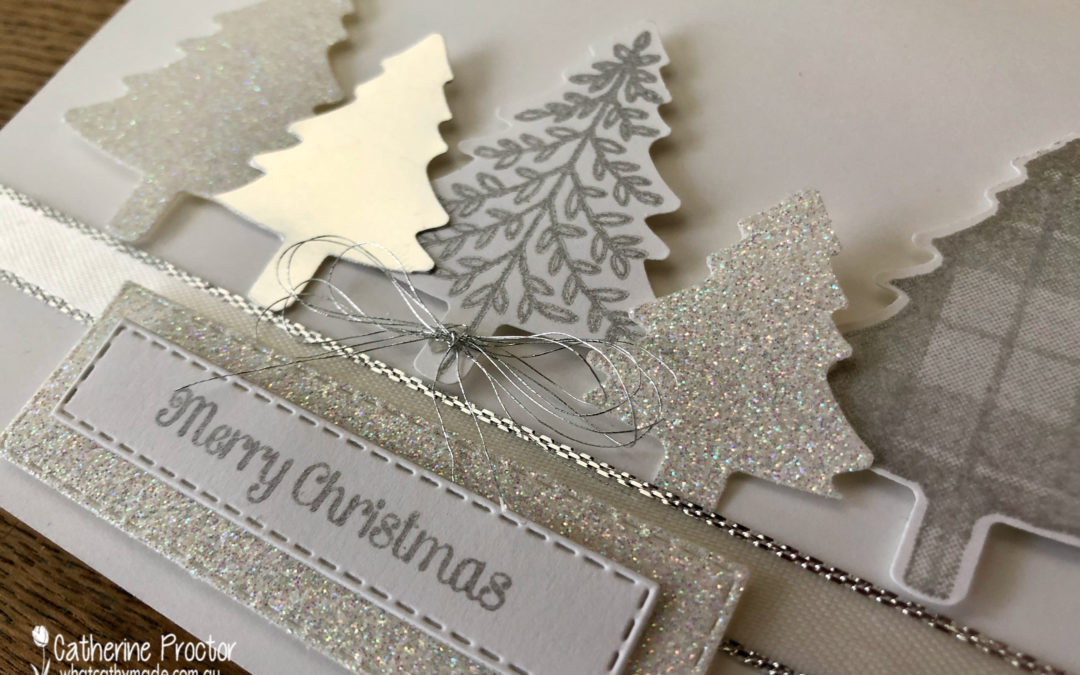
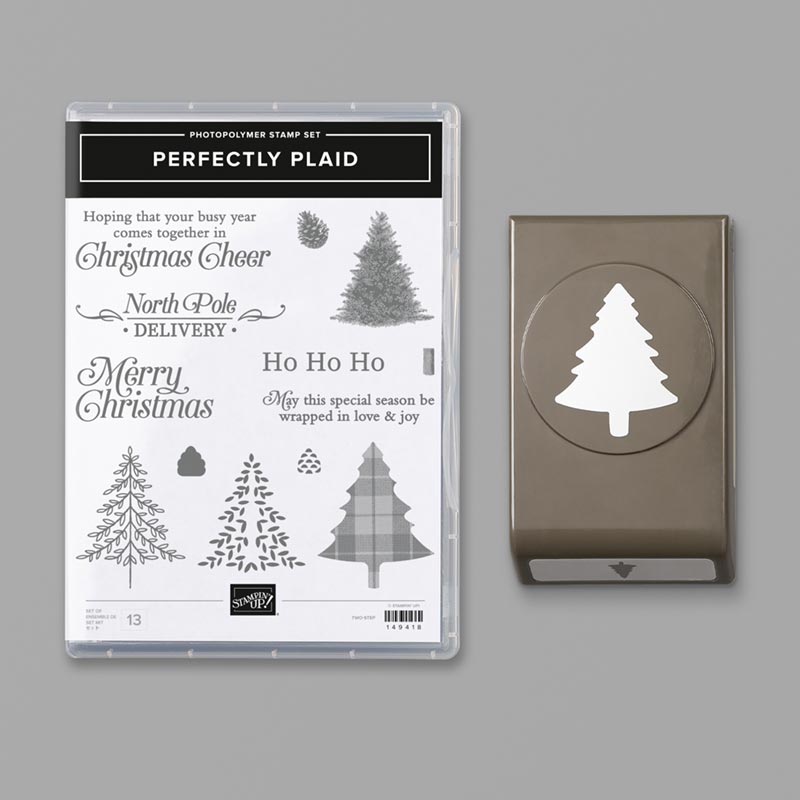
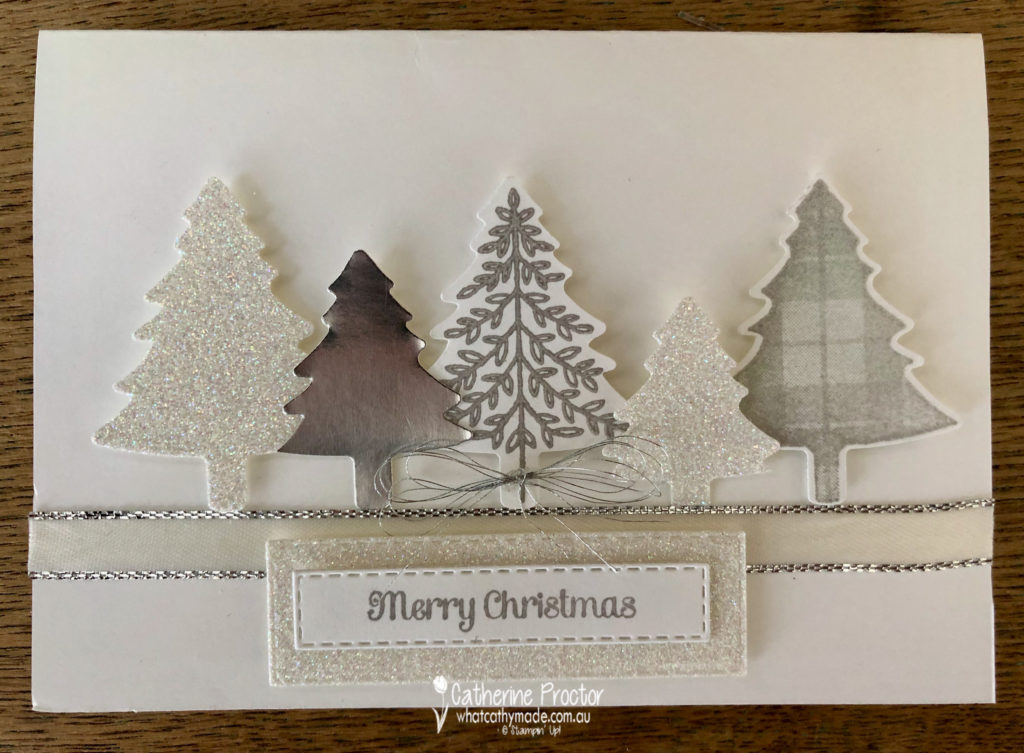
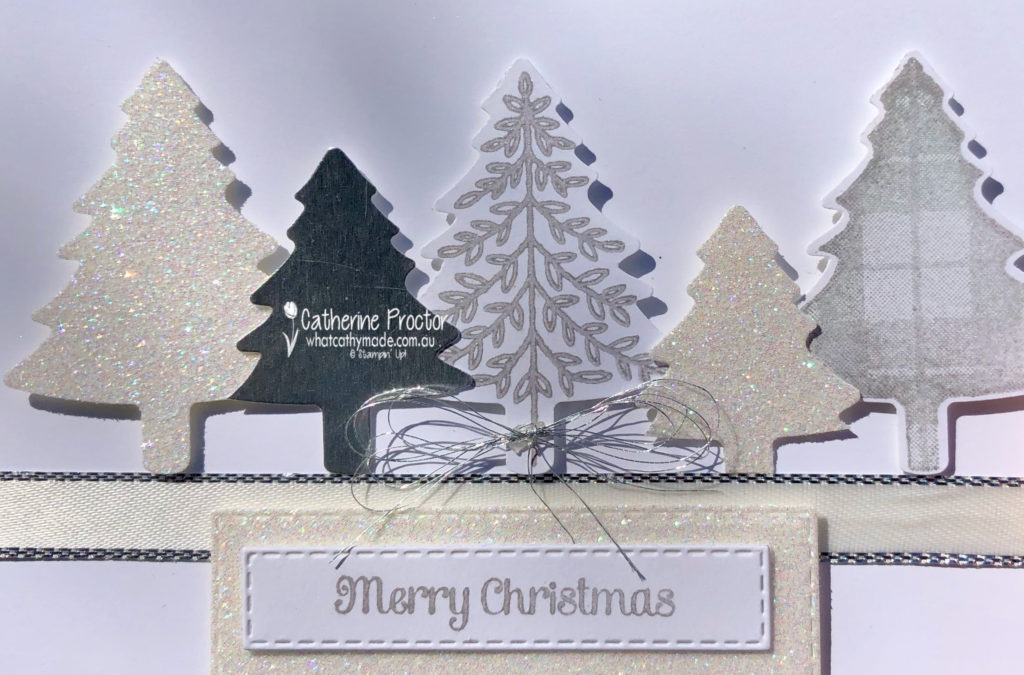
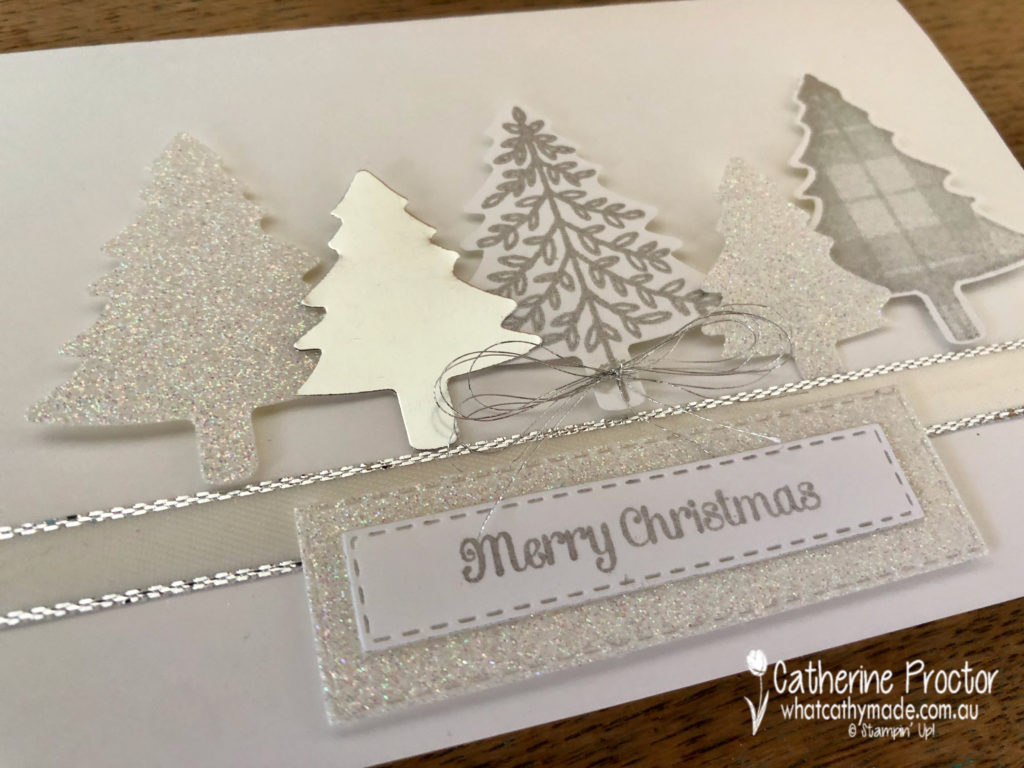
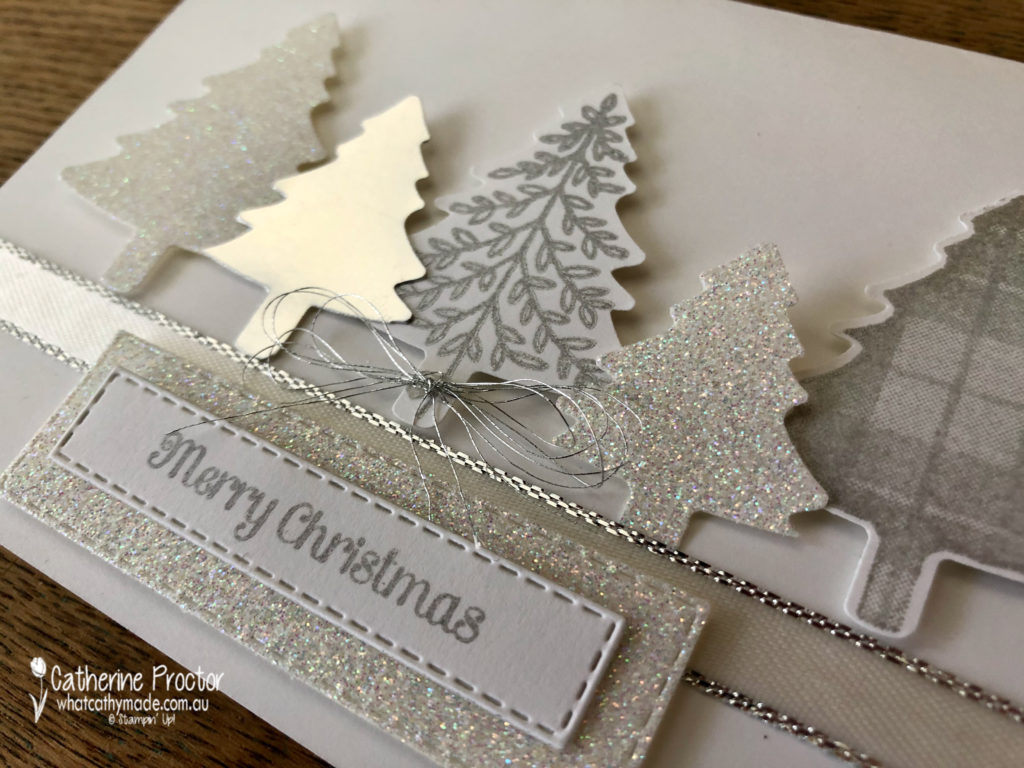
This week I’ve used the Perfectly Plaid Bundle (which includes the Pine Tree Punch and its co-ordinating Perfectly Plaid Photopolymer Stamp Set) to make a silver and white Christmas card.
I’ve used two neat little tricks that you may not realise you can do with your punches and your stamp sets.
The secret to both my tricks…Post It notes!
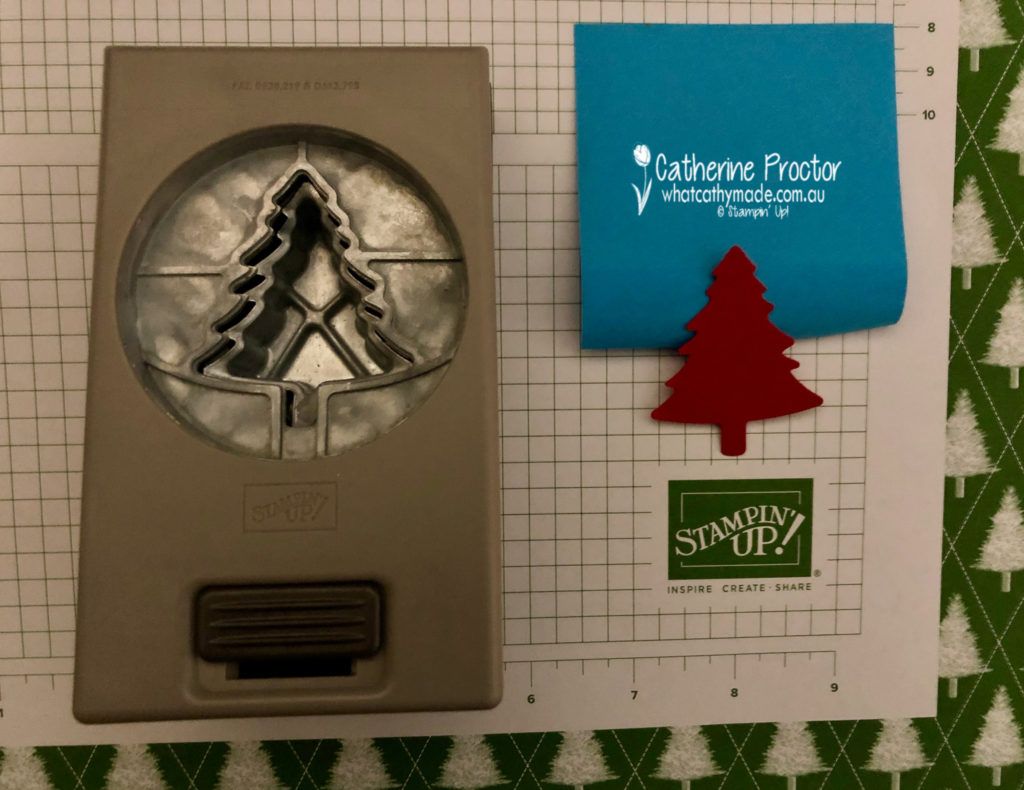
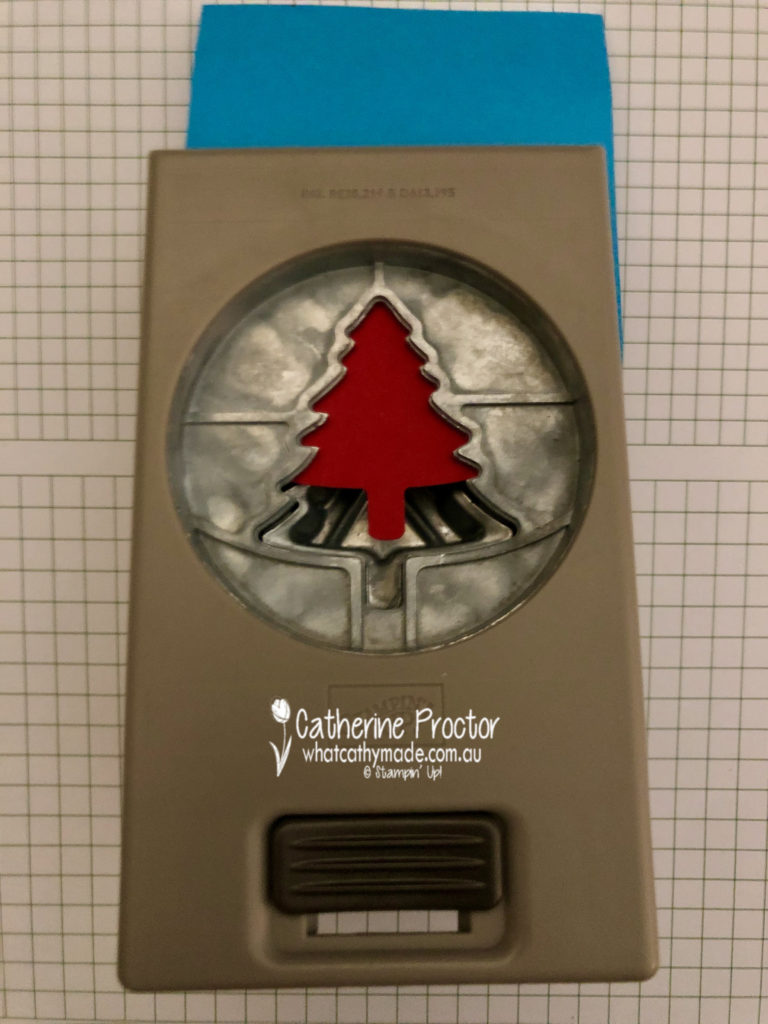
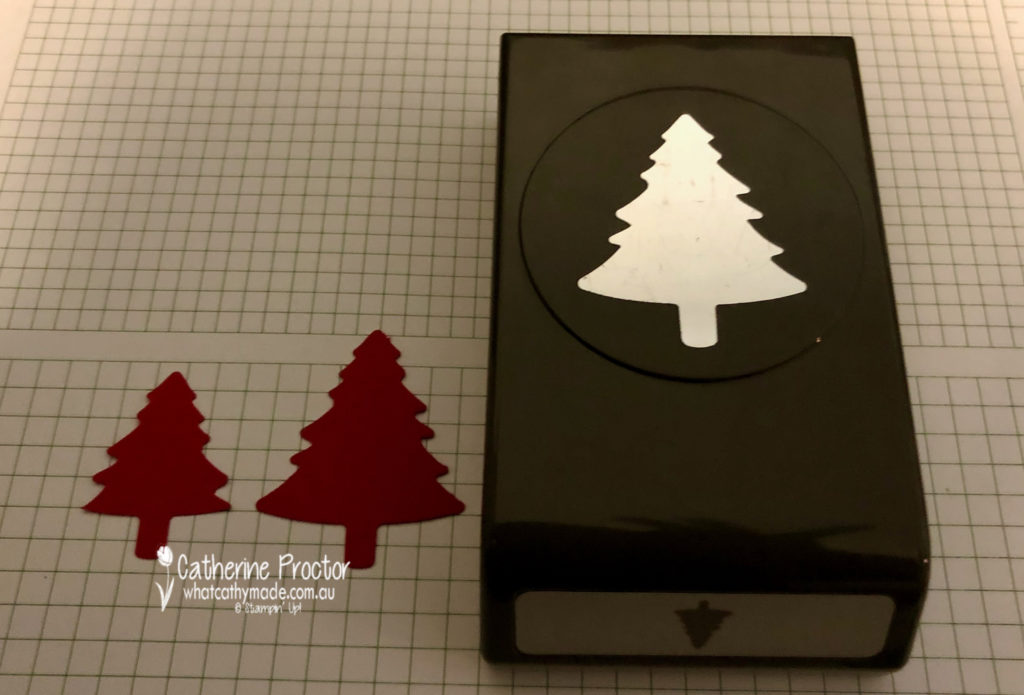
Did you notice the two smaller trees sitting between the three larger trees on my card? All five trees have been punched using the same Pine Tree Punch, so how did I get two different sizes?
After I punched my tree out I placed the tip of the tree onto the sticky part of a post it note.
The post it note gives me something to hold so I can place the punched tree back into the punch, line it up again and then punch out a smaller tree from the same shape.
The photo below shows how I did this.
Here’s how the two punched shapes look side by side. On the right is the tree punched out once and on the left is the smaller tree created by punching the shape out twice. How cool is that!
As well as different sized trees I used a mixture of papers for my card today, stamping two of them in the Silvery Shimmer Delicata Metallic Ink before punching them out as well as using silver foil sheets and shimmery white cardstock. I love the look of silver and white together.
My card is finished off with a strip of Silver 3/8″ Metallic-Edge Ribbon and a Merry Christmas sentiment stamped in Silvery Shimmer Delicata Metallic Ink onto Whisper White cardstock.
I die cut my sentiment with the smallest Stitched Shape Rectangle and layered it over a rectangle of shimmery white card stock die cut out with the next largest Stitched Shape Rectangle.
My second cool technique using Post It notes on this card is masking the sentiment for my card.
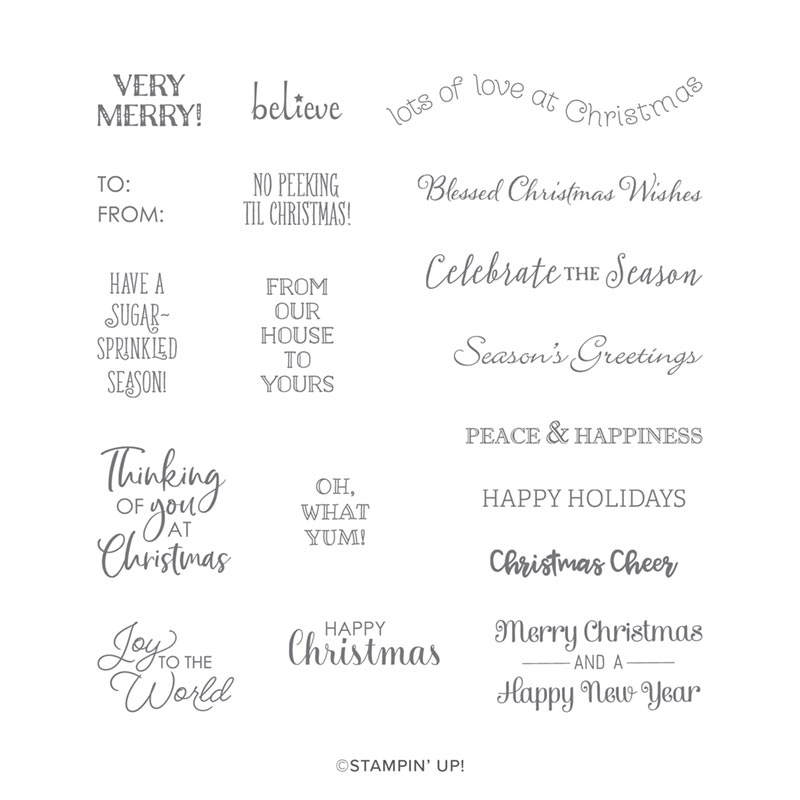
If you look at the images on the Itty Bitty Christmas stamp set below you’ll see the bottom right sentiment says “Merry Christmas and a Happy New Year” but I only wanted to stamp the Merry Christmas for this card.
I covered up the “and a Happy New Year” section of the sentiment with a post it note BEFORE I inked up my stamp and then removed the post it note before stamping onto the card stock. This ensured I only stamped the “Merry Christmas” section of the sentiment.
A bow of silver thread completes my silver and white Christmas card.
The lovely Claire Daly is hosting our Heart of Christmas blog hop this week – to see what the rest of the team have made this week you can visit Claire’s page here.
To purchase any of the products I used in this project you can shop with me here.
If you’d like me to post you your very own copy of the brand new 2019 Stampin Up! Holiday Catalogue, the 2019-20 Stampin Up! annual catalogue or to simply find out about more about Stampin’ Up! contact me.
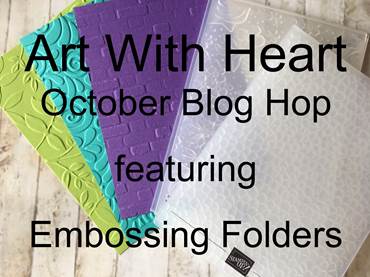
Welcome to another Art With Heart Blog Hop. This month we are featuring Stampin’ Up’s! versatile range of Embossing Folders.
There are new Embossing Folders available in every Stampin’ Up! catalogue and they are an inexpensive way of adding WOW! to your projects.
Currently there are 24 different Embossing Folders in the range and tonight we plan on showing you lots of ideas on how to use these folders.
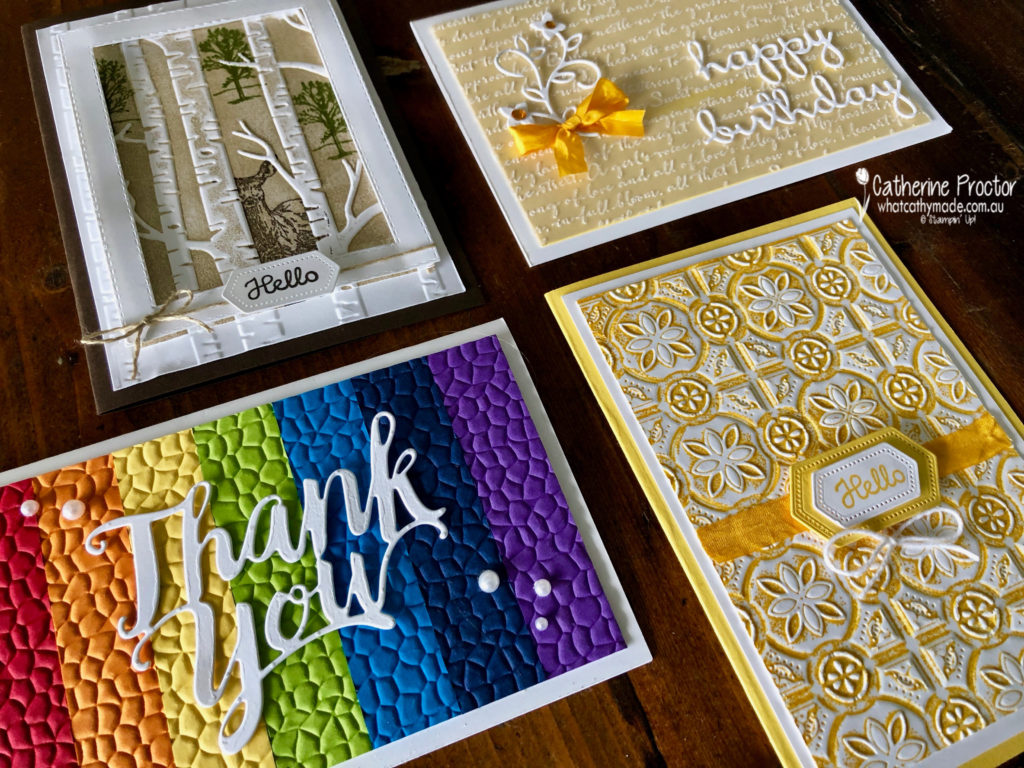
My four cards tonight show case some different techniques you might like to try when next using your embossing folders.
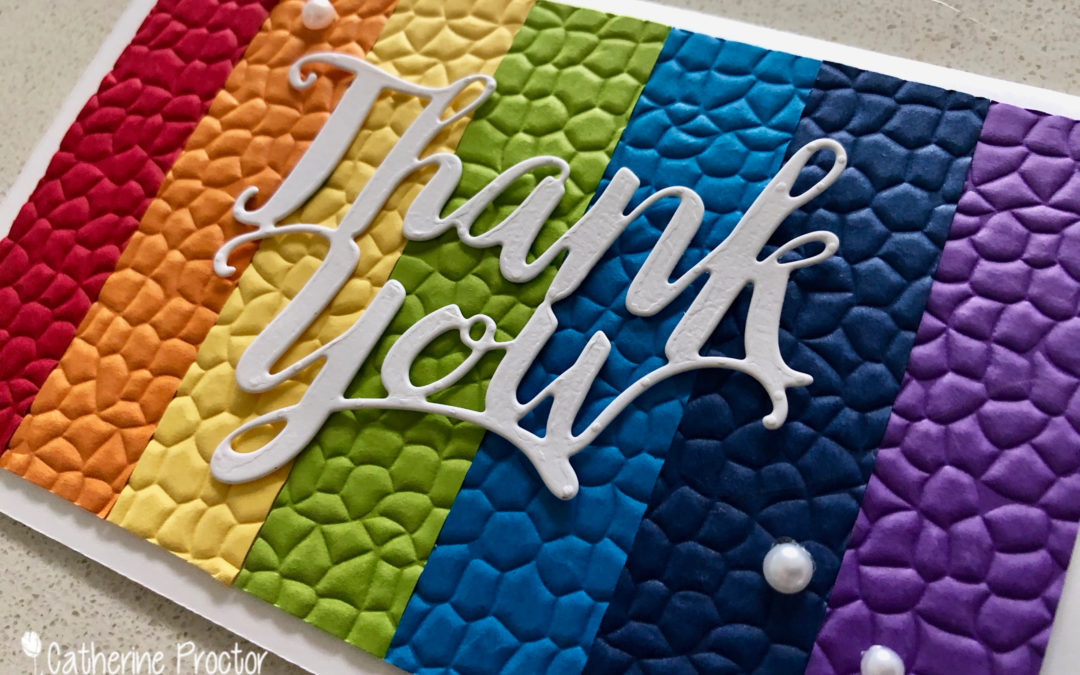
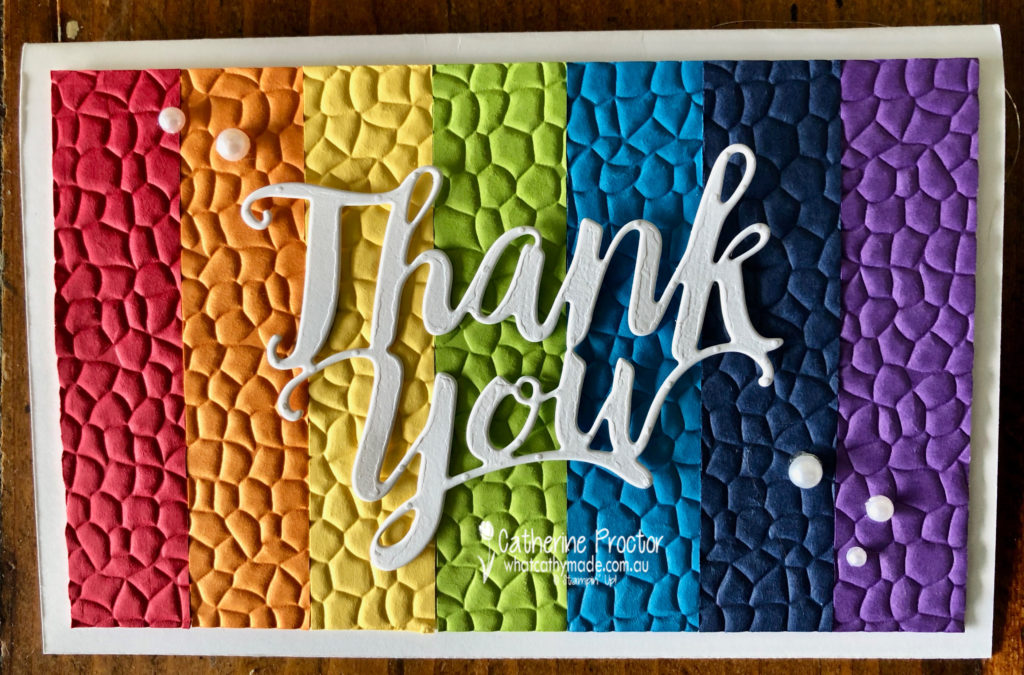
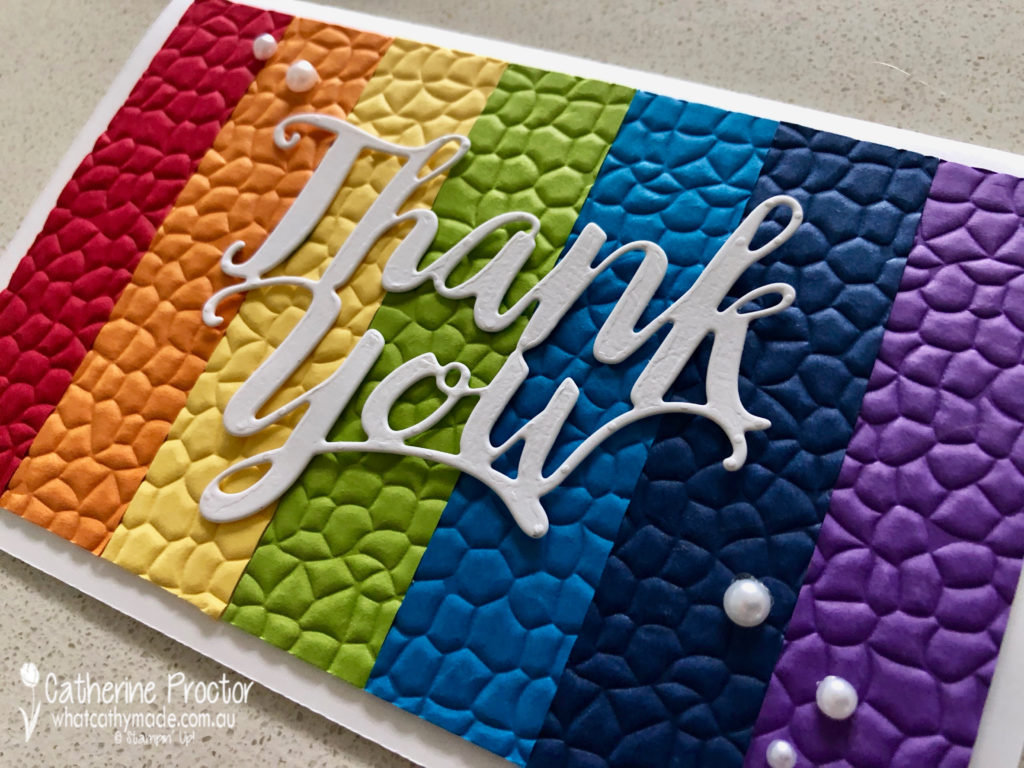
Card Strip Embossing
So simple but so effective…and a fabulous way to use up card strips! I’ve used the new hammered metal embossing folder for this card because this technique works best with an allover pattern.
Card stock colours left to right are Gorgeous Grape, Night of Navy, Pacific Point, Granny Apple Green, Daffodil Delight, Pumpkin Pie and Real Red. I cut 2cm wide strips, individually embossed them and then used tear’n’tape to adhere each strip to a base card stock rectangle.
The thank you die cut in Whisper White and a scattering of pearls finish the card off. Here’s a closer look at the hammered metal embossing folder pattern.
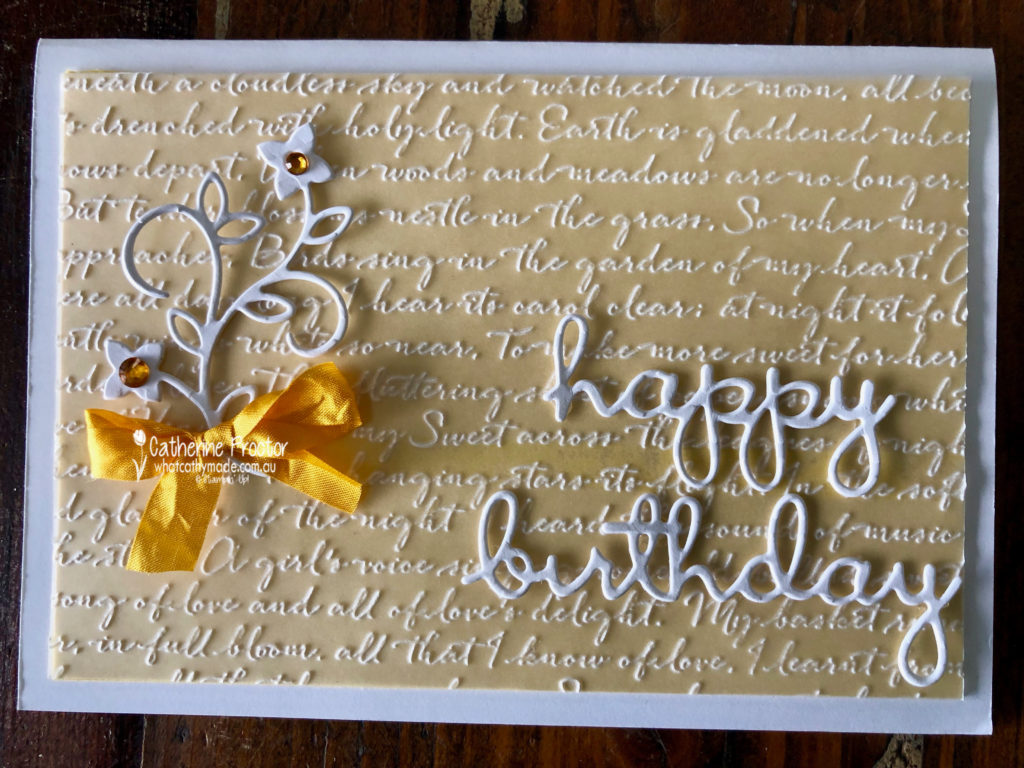
Vellum Embossing
Vellum embossing really highlights the pattern in the embossing folder. For card two I’ve used the scripty folder.
The great thing about embossing vellum is you can layer it over any colour card stock to instantly add a pop of colour.
I’ve finished this card off with a happy birthday sentiment cut from Whisper White cardstock using the Well Written Dies and a bow of Crushed Curry Crinkled Seam Binding Ribbon.
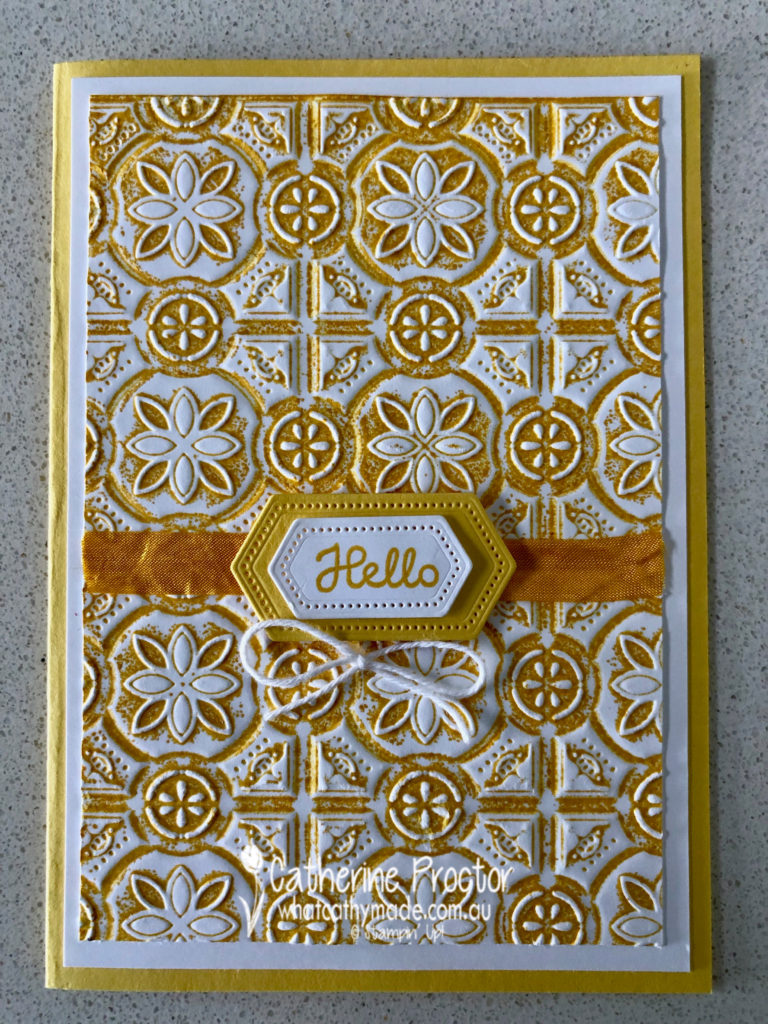
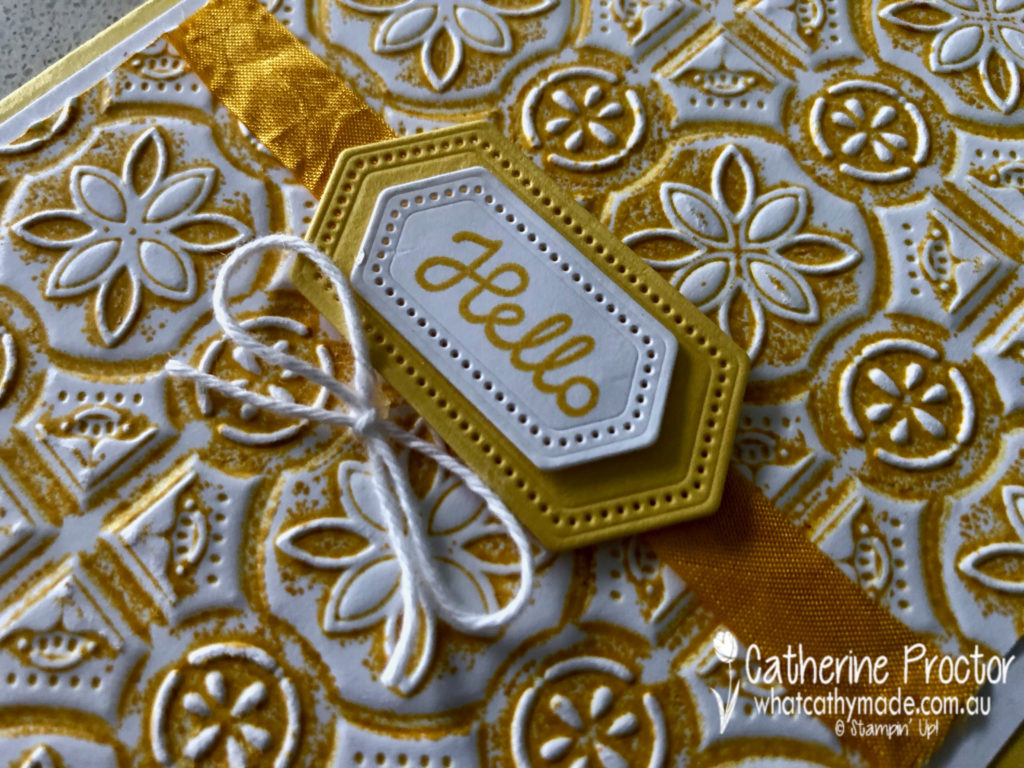
Reverse letterpress embossing
Card three uses a technique called reverse letterpress, where you use your ink pad to apply colour directly onto one side of your embossing folder before you emboss the paper.
I love the look this gives, especially using the tin tile embossing folder I used here. This techniques works with any colour ink but I’m feeling very mellow yellow today so I’ve used Daffodil delight again.
Make sure you ink up the side of your folder that says Sizzex. How cute is the little hello stamp die cut and mounted with the nested label dies?
Stamping on Embossing Folders
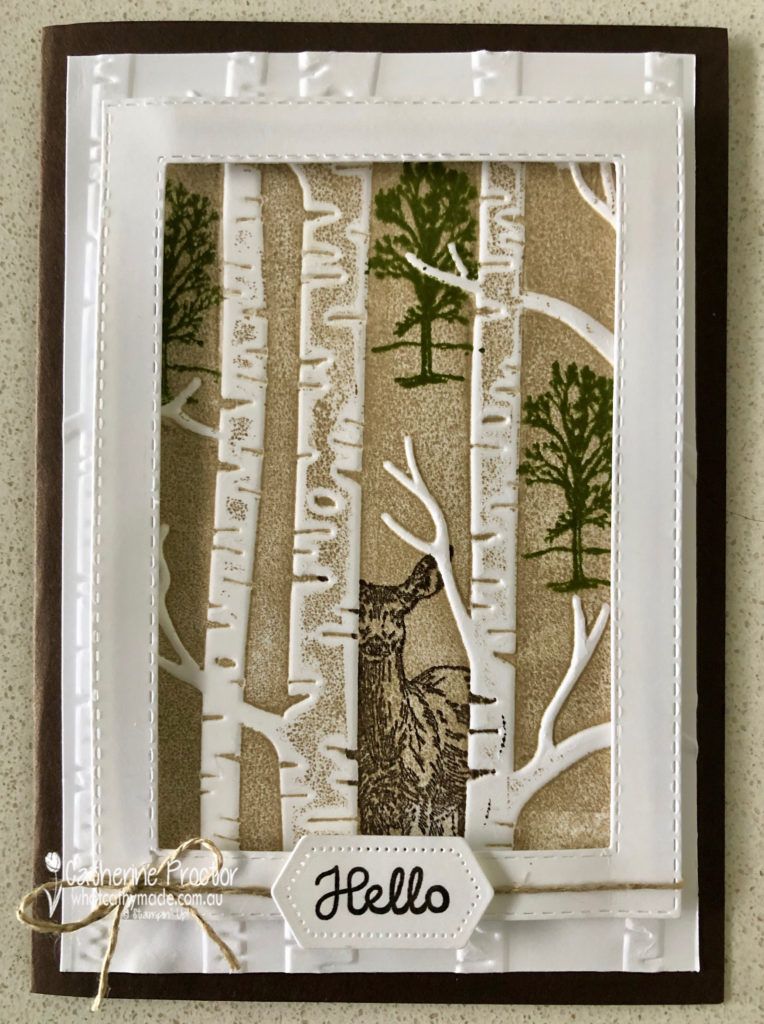
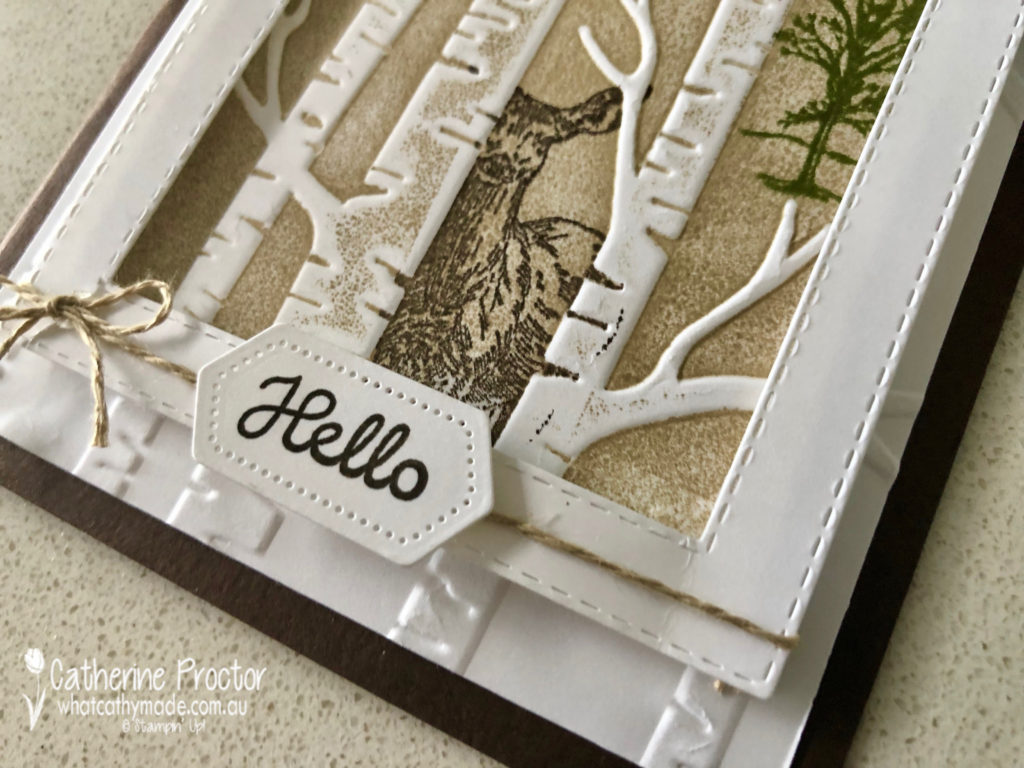
My final card is an absolute favourite technique called stamped embossing. I’ve used the Woodland embossing folder to create a scene using stamps from the Natures Beauty stamp set.
After inking the Sizzex side of my folder in Soft Suede ink I then stamped the deer and trees in Early Espresso and Mossy Meadow before embossing a piece of Whisper White card stock.
I then mounted my stamped section onto an embossed a piece of Whisper White card stock, making sure the embossed sections lined up. A framed made from the stitched rectangle dies, a bow of linen thread and a “hello” sentiment cut out with nested label dies completes the card.
Next up is the super talented Caroline Manwaring! I can’t wait to see what she has made.
If you find a broken link or have come to this blog hop from a different entry point, you can view all the participants below:
Tonight the Art with Heart team are sharing amazing projects featuring Stampin’ Up! Designer Series Paper, most of which is in the current promotions where you can buy 3 packs of Designer Series Paper and receive a pack for free! Only available until the 30th of September.
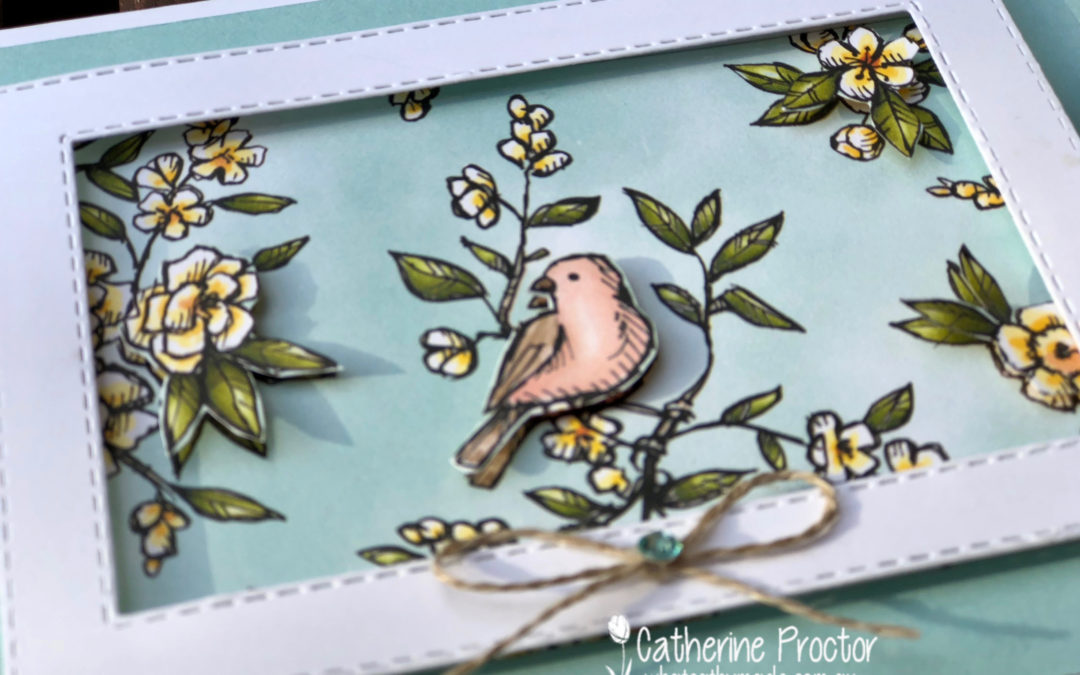
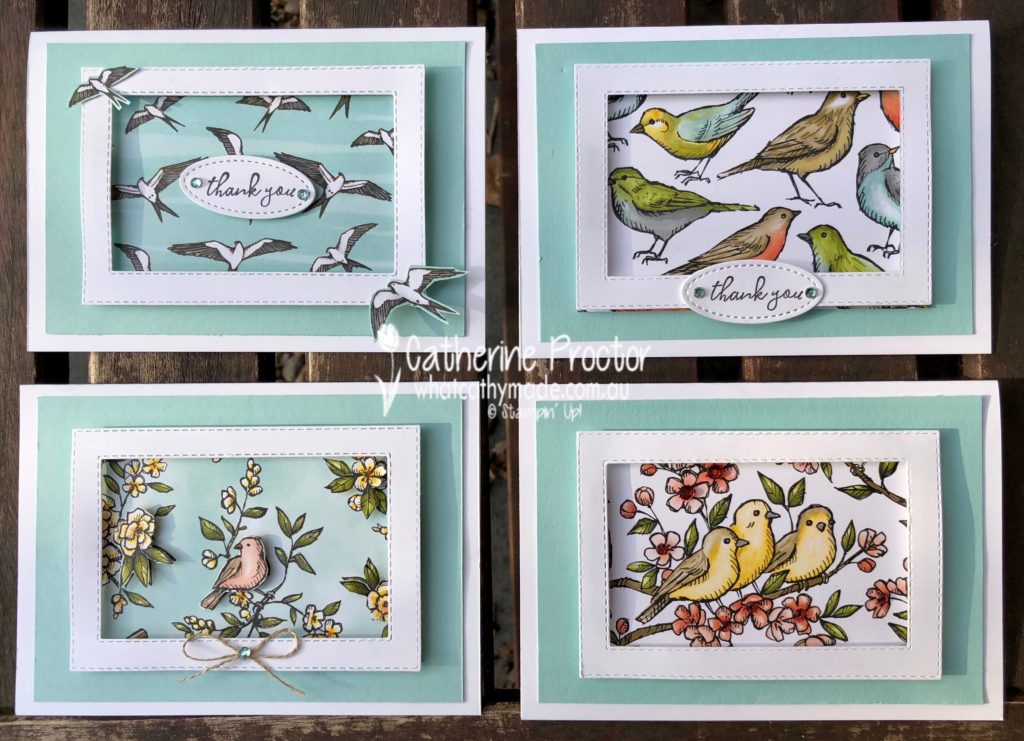
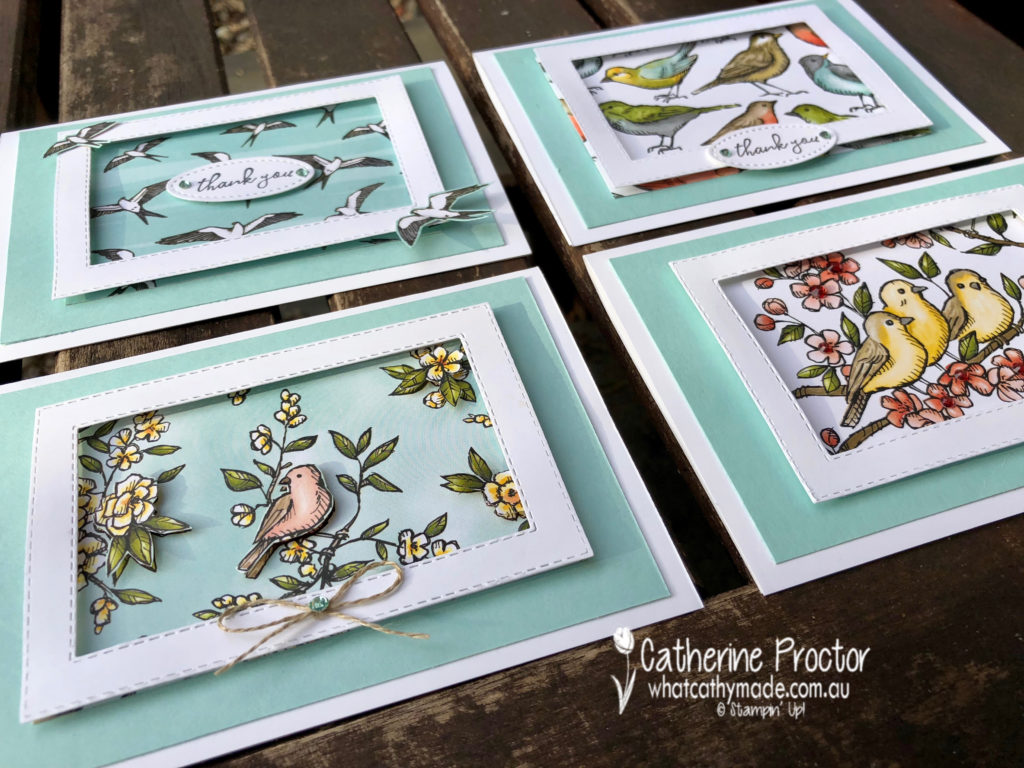
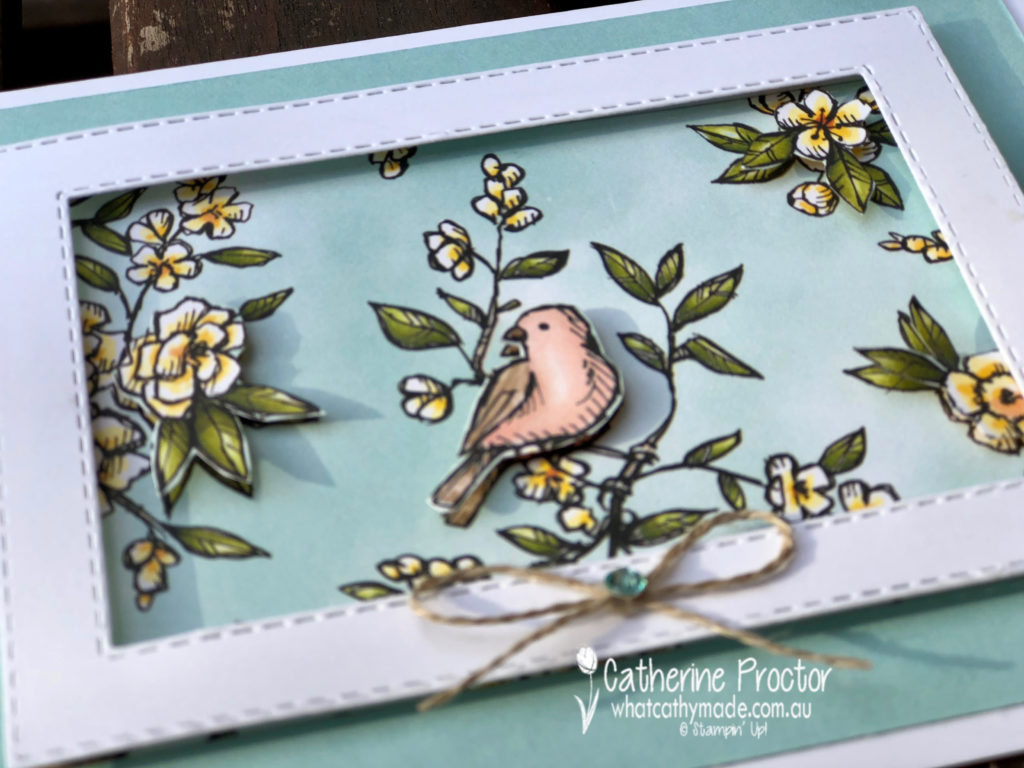
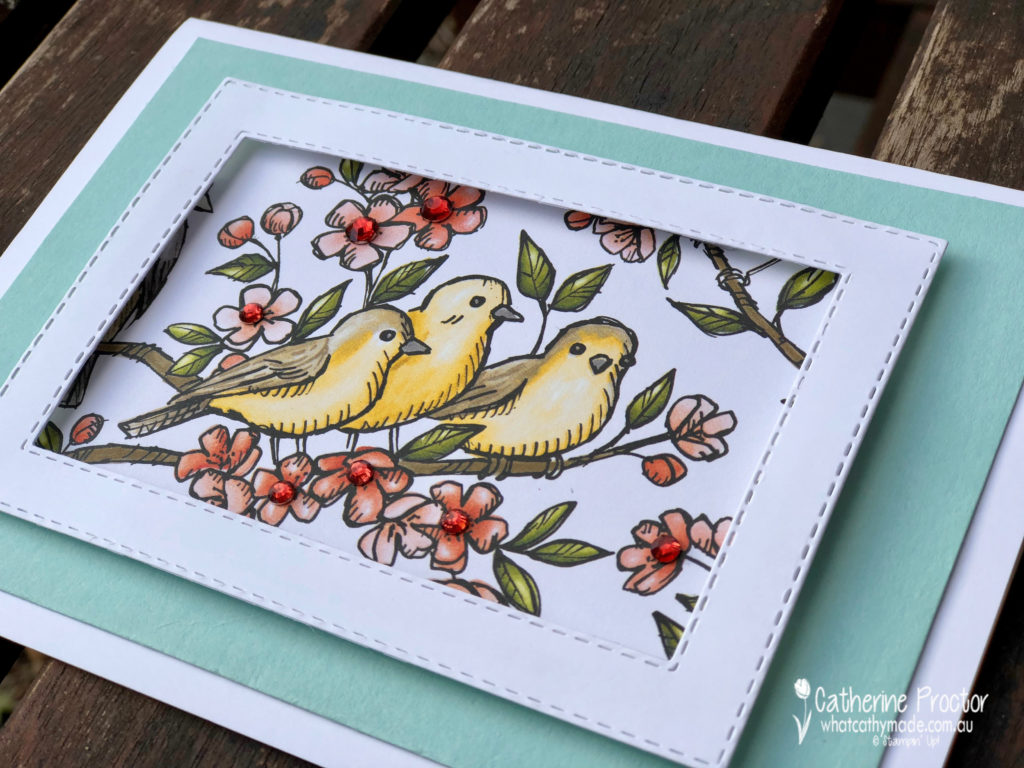
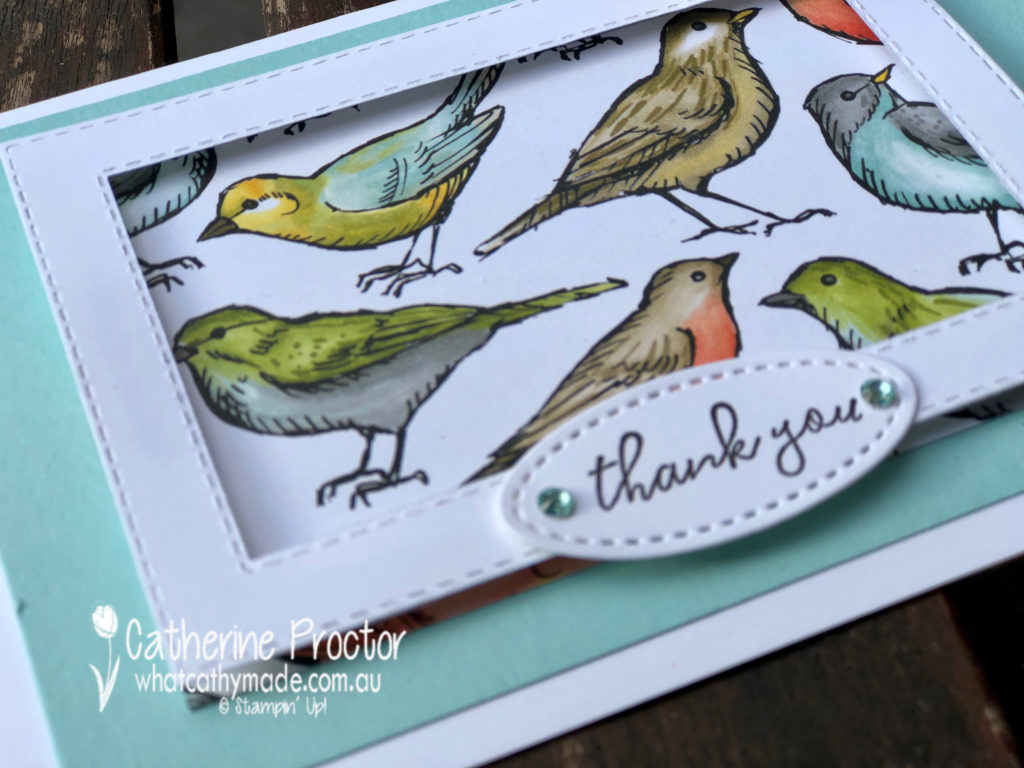
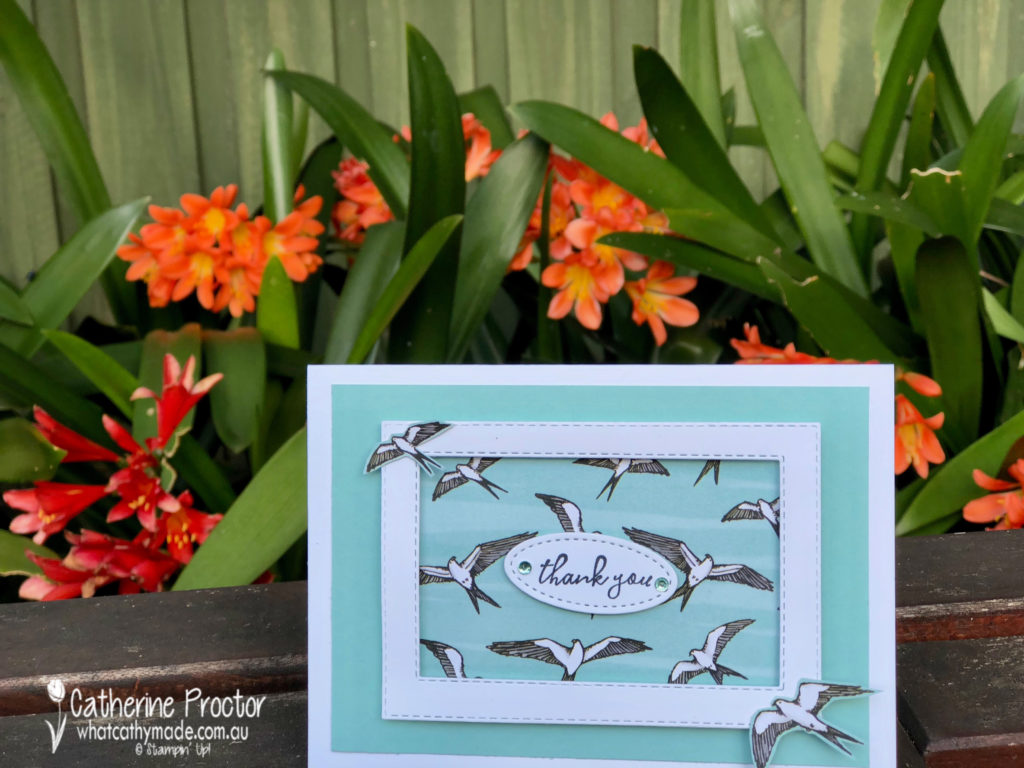
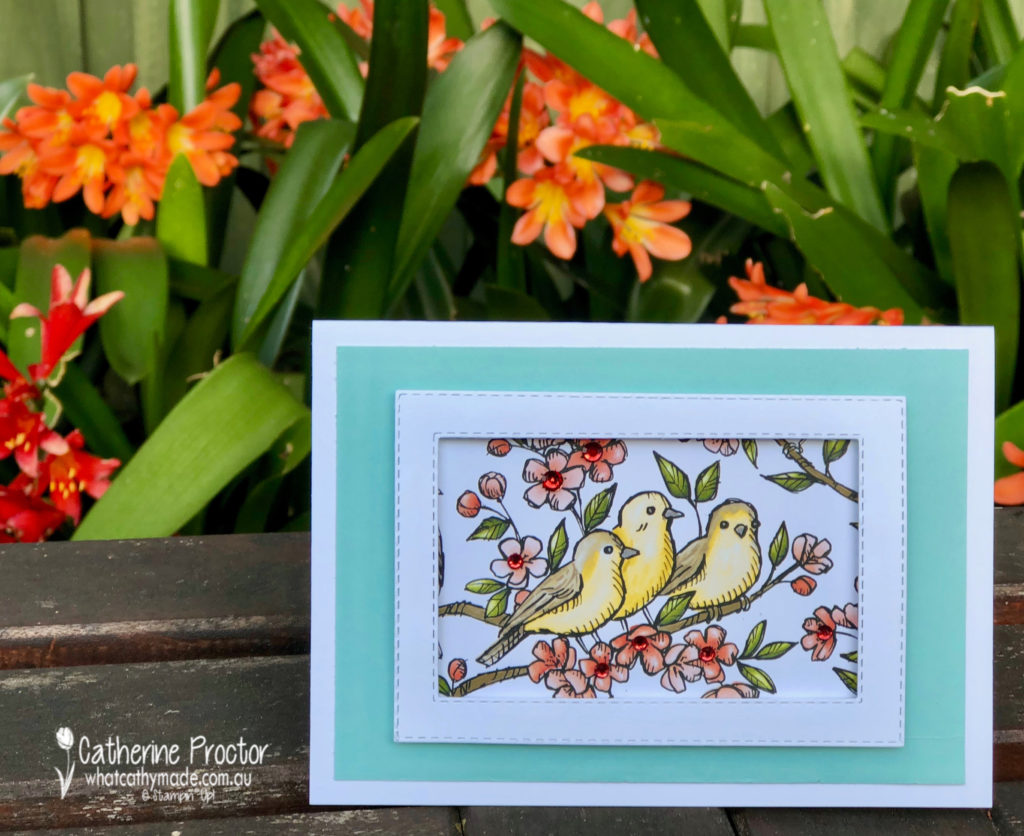
Sometimes I’m reluctant to use Design Series Paper in my card making because it’s just so beautiful I don’t want to cover it. So my solution for my cards tonight is to frame the paper instead!
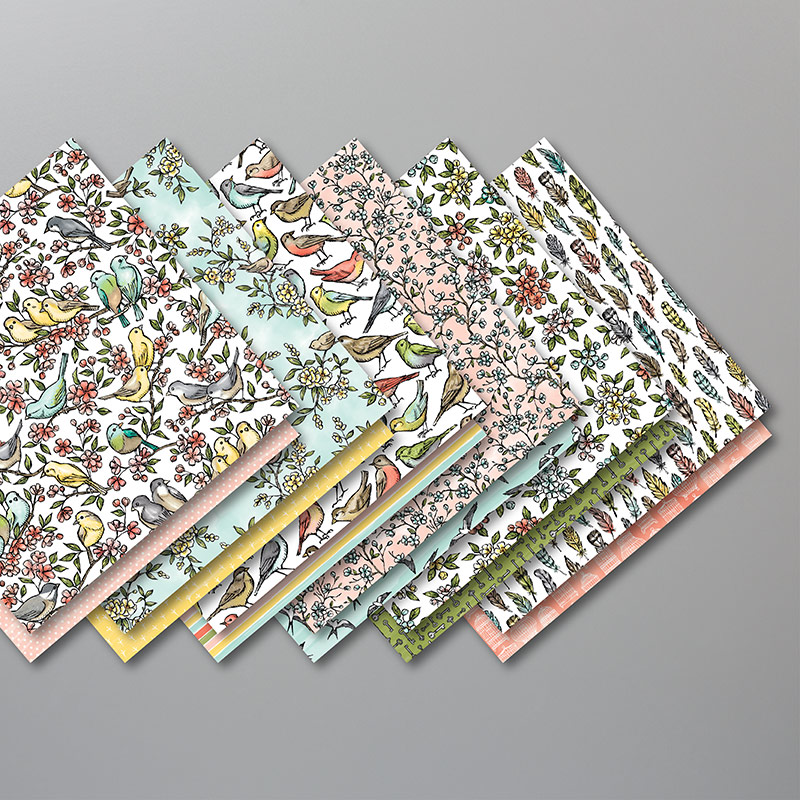
I’ve used my favourite Designer Series Paper from the Annual Catalogue: Bird Ballad DSP.
You can take a closer look at this stunning paper in this short video below.
I made the same sized frame for all four cards, using two of the rectangle stitched dies. Each card features a different piece of DSP from this set, mounted onto a rectangle of Pool Party card stock. Foam adhesive strips made it easy to lift the frames above the image, giving the effect of a picture frame.
In card one I used mini dimensionals to pop up some fussy cut images from the DSP and finished the card off with a bow of linen thread and a pool party rhinestone from the the Holiday Rhinestones Basic Jewels.
In card two I simply used more of the dimensionals from the Holiday Rhinestones Basic Jewels – this time in cherry cobbler – to add a bit of bling to the flowers.
Cards three and four have the stamped “thank you” from the co-ordinating Free as a Bird stamp set, die cut out with the smallest oval in the stitched shapes framelits.
All these photos were taken outside in my garden today – it is spring here and my garden is full of birds and blooming with colour. Because the DSP for card four was more of a background pattern I fussy cut a couple of the birds and adhered them to the edges of the frame for some visual interest and dimension.
Here’s another shot of my stunning clivia!
Now it’s time to hop on over to our next participant, the very talented, Caroline Manwaring.
If you find a broken link or have come to this blog hop from a different entry point, you can view the participants below:
Tonight the Art With Heart Team are sharing creative projects featuring in colour theme. Check out the new 2019 – 2021 in colours and let’s not forget the current 2018 – 2020 in colours.
If you would like a copy of the 2019 – 2020 annual catalogue, contact any of the girls on the blog hop and we will get in touch with you.
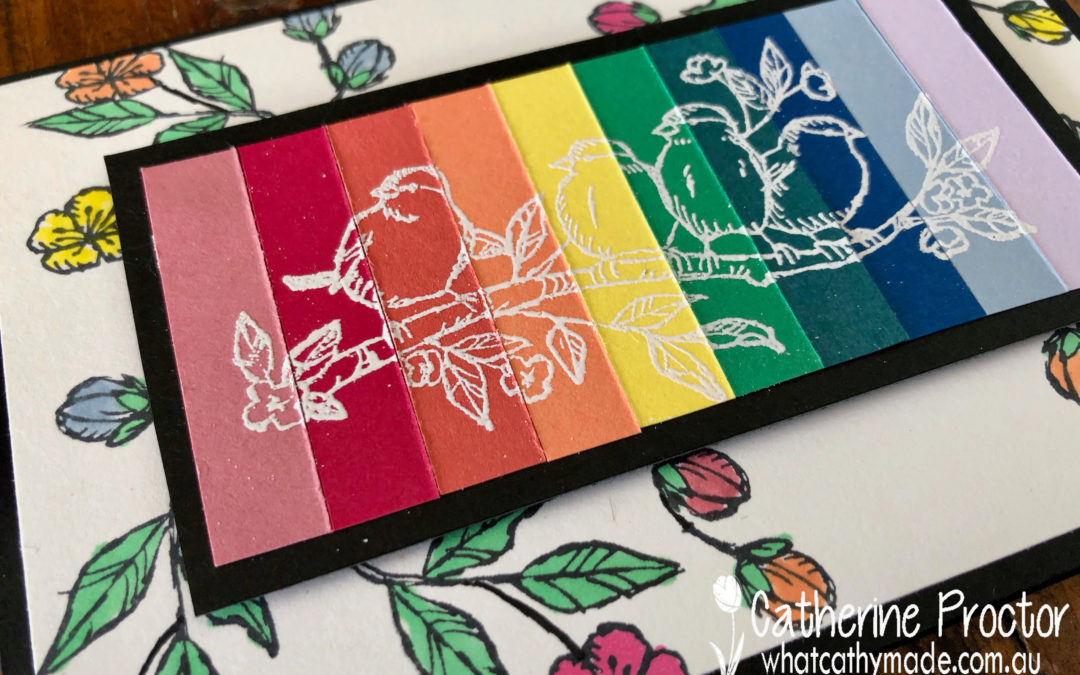
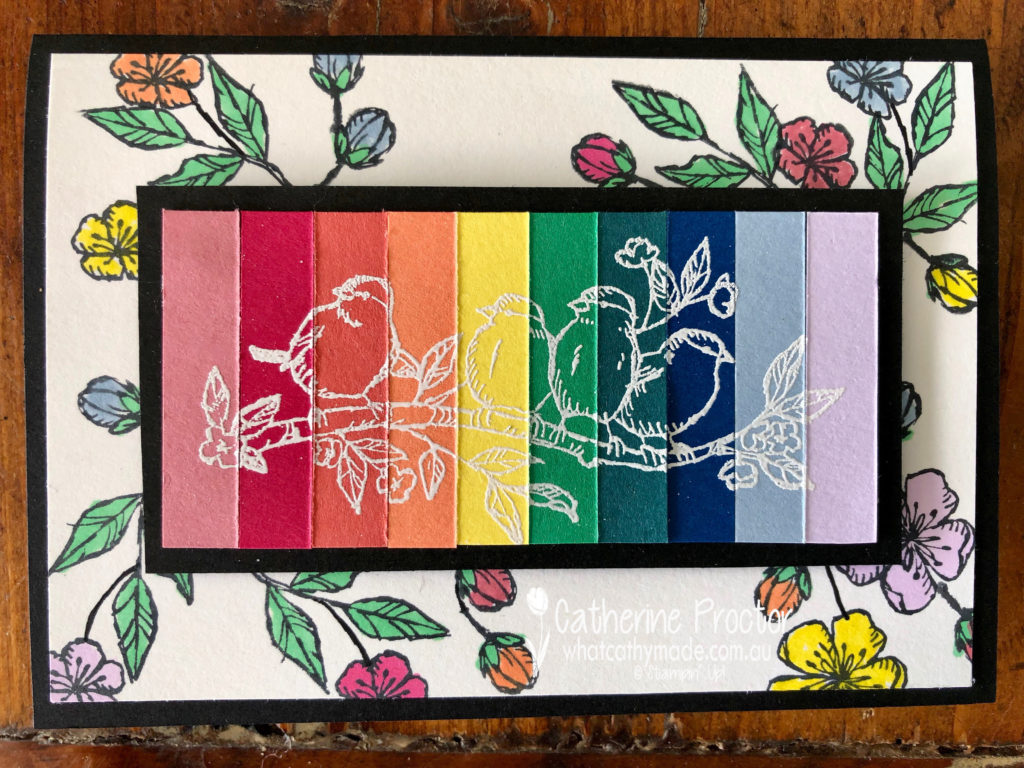
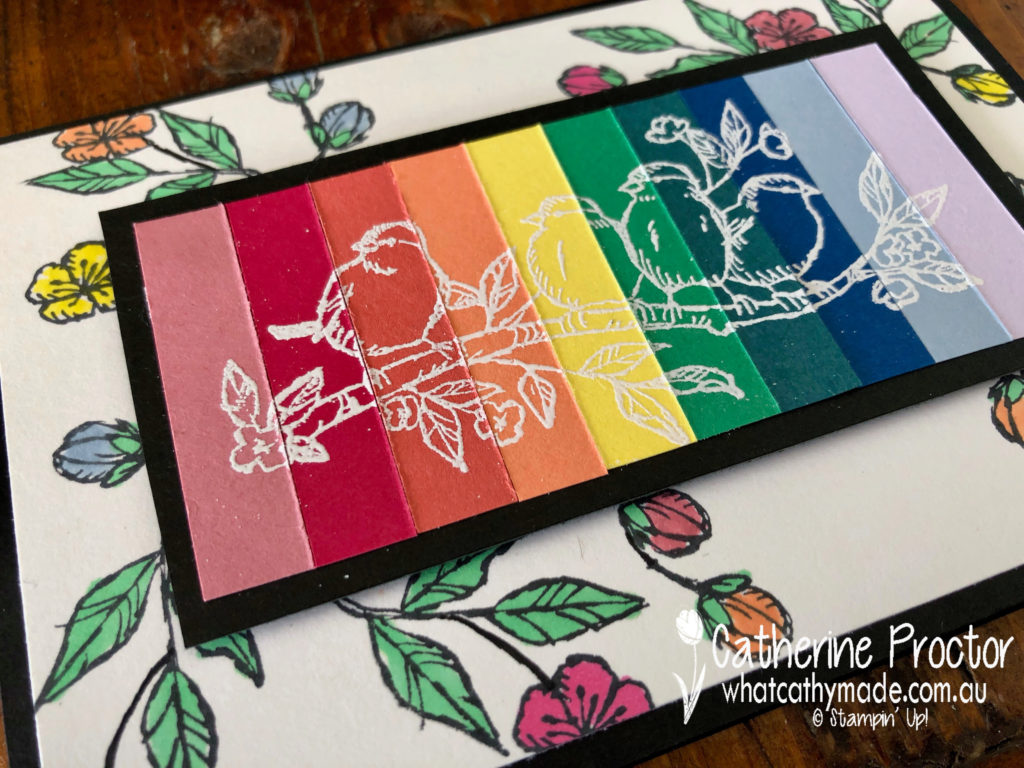
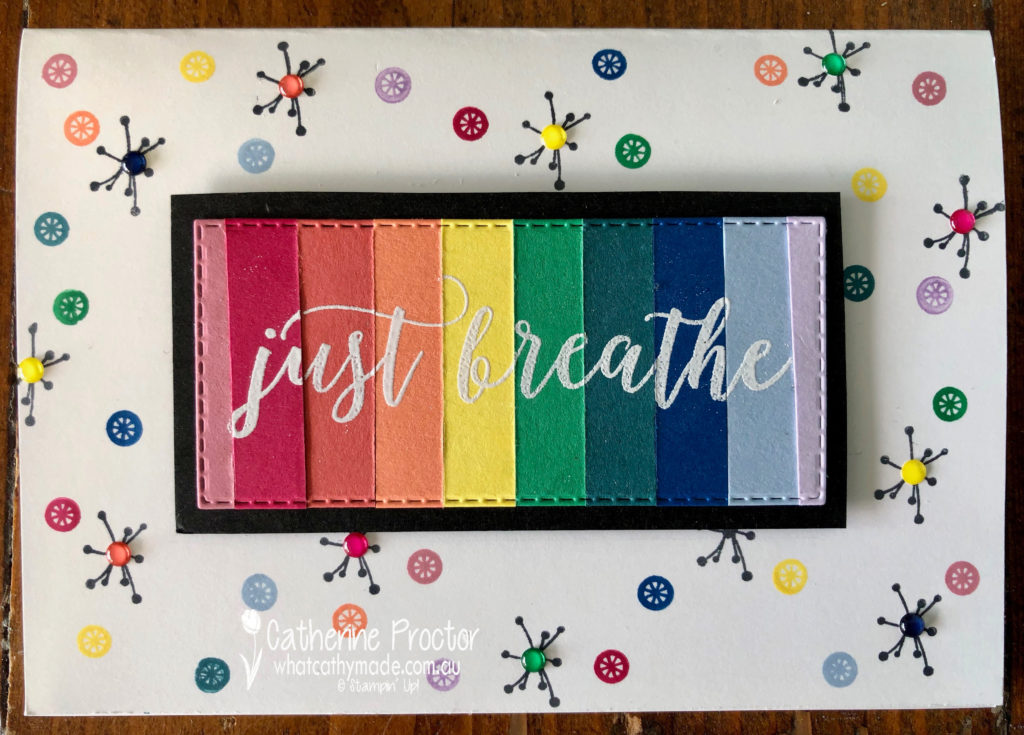
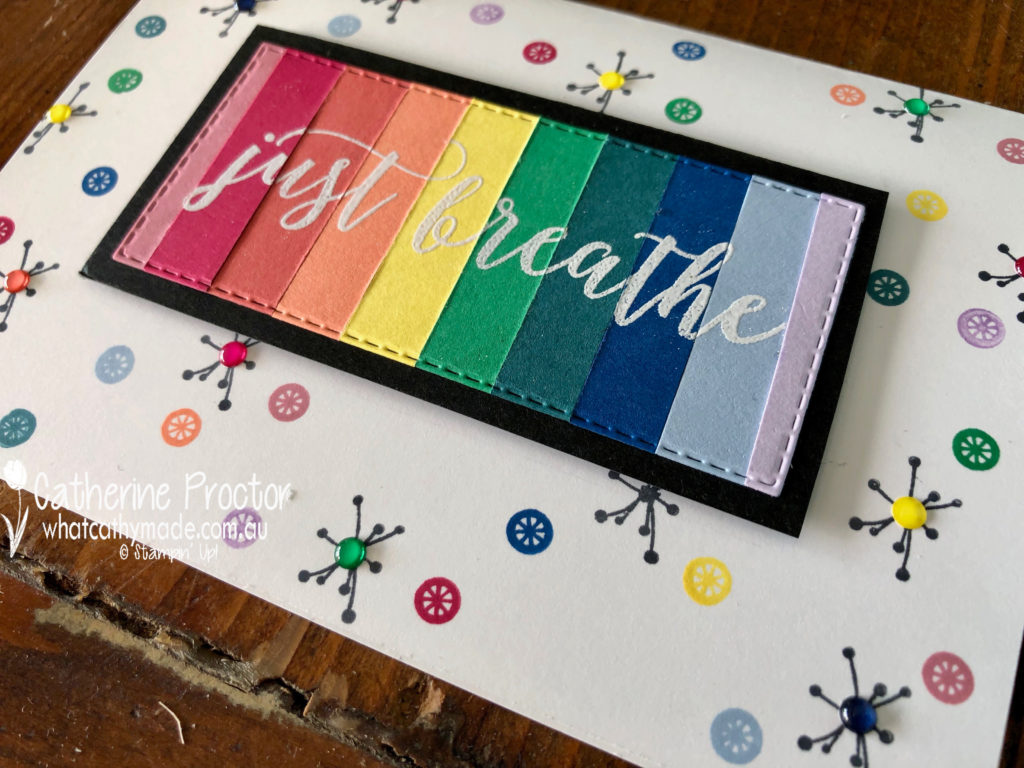
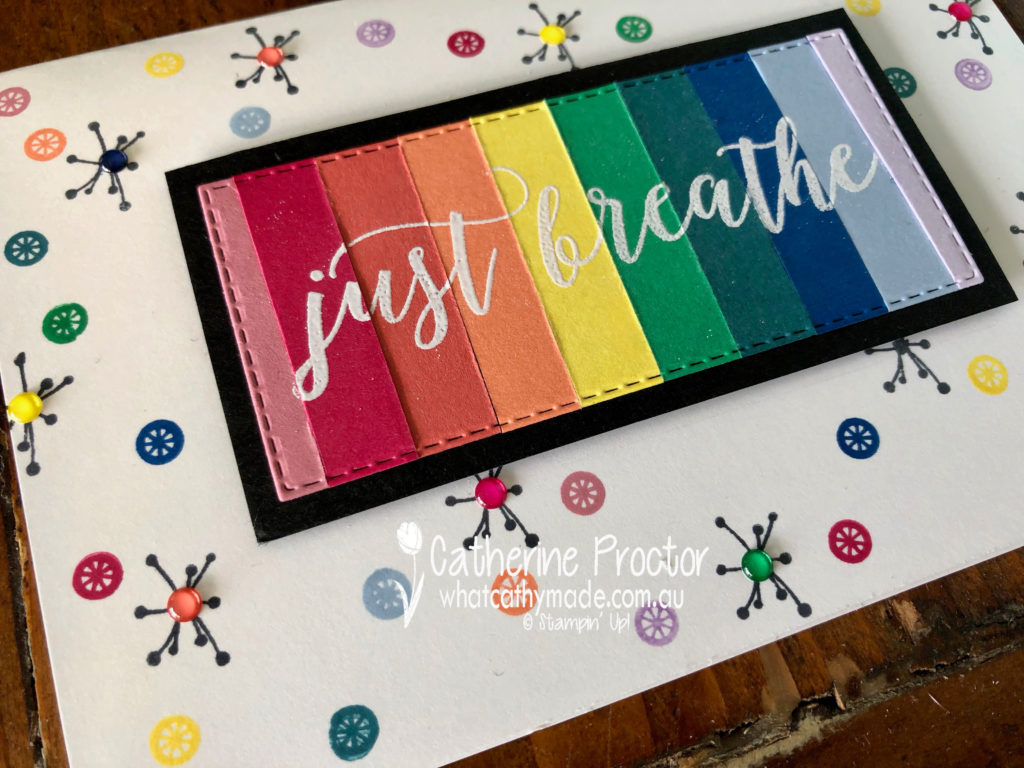
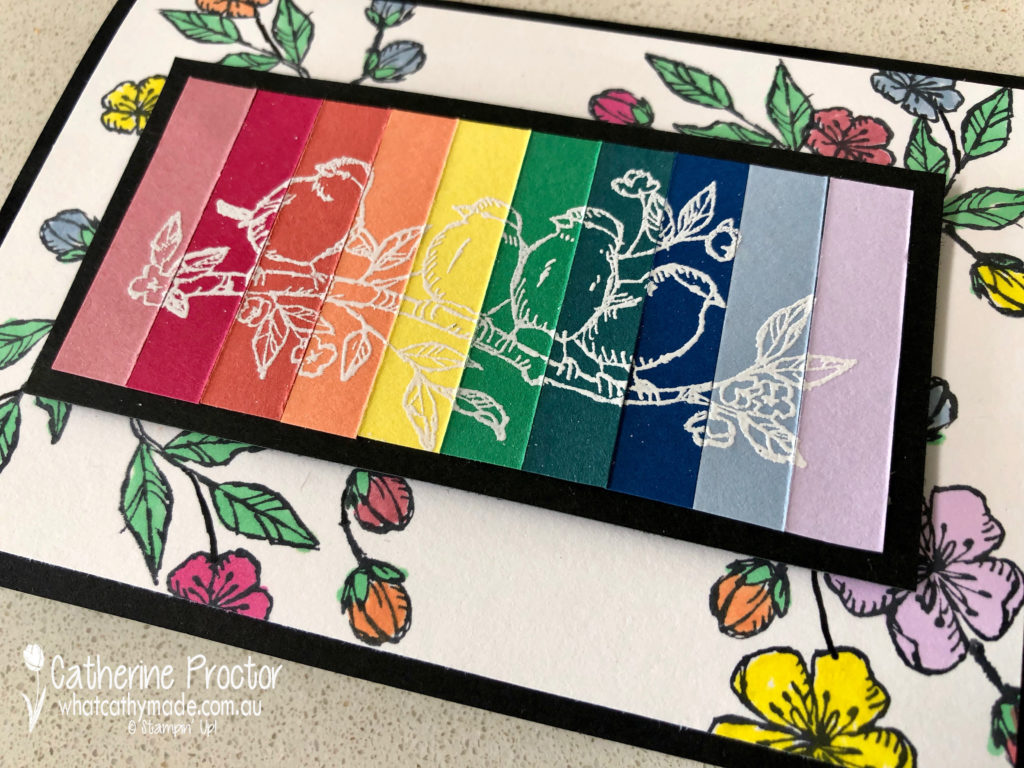
Why use just one In Colour when you can use all 10 together on your card. Lined up, side-by-side, they create such a stunning rainbow!
I’m excited to share not one but two cards with you this week.
The first card showcases all 10 In Colours, as well as the Free as a Bird stamp set.
The first step is to cut a 1cm strip of card stock from every In Colour. Line then up in rainbow order and adhere together with strips of tear and tape.
Next stamp your image or sentiment in Versamark, dust with white embossing power and heat emboss. Mount onto black card stock.
The background layer is a piece of Whisper White cardstock which has been stamped with black ink and coloured in with a variety of Blends and markers in the various In Colours. I love creating my own Designer Series Paper for my projects.
Mount the rainbow cardstock onto the middle of your DSP and adhere to a cardbase made from black cardstock.
I wasn’t planning on making a second card but I had leftover rainbow strips so I decided to see what they looked like with a sentiment stamped on top.
This time I used the Colourful Seasons stampset for my sentiment and the home made DSP. I deliberately die cut the cardstock on an angle using a stitiched rectangle die to add visual interest.
The background was stamped with two of the smallest dies in black and In Colours. Happiness Blooms Enamel Dots add texture and interest.
These rainbow colours just make me feel very happy and I hope they also put a smile on the face of whoever I post them to.
Now it’s time to hop on over to our next participant, the very talented, Kathryn Mangelsdorf.
If you find a broken link or have come to this blog hop from a different entry point, you can view the participants below:
Tonight the Art with Heart team are sharing creative products using supplies from the upcoming 2019 – 2020 annual catalogue.
If you would like a copy of the brand new annual catalogue, contact any of the girls on the blog hop and we will get in touch with you.
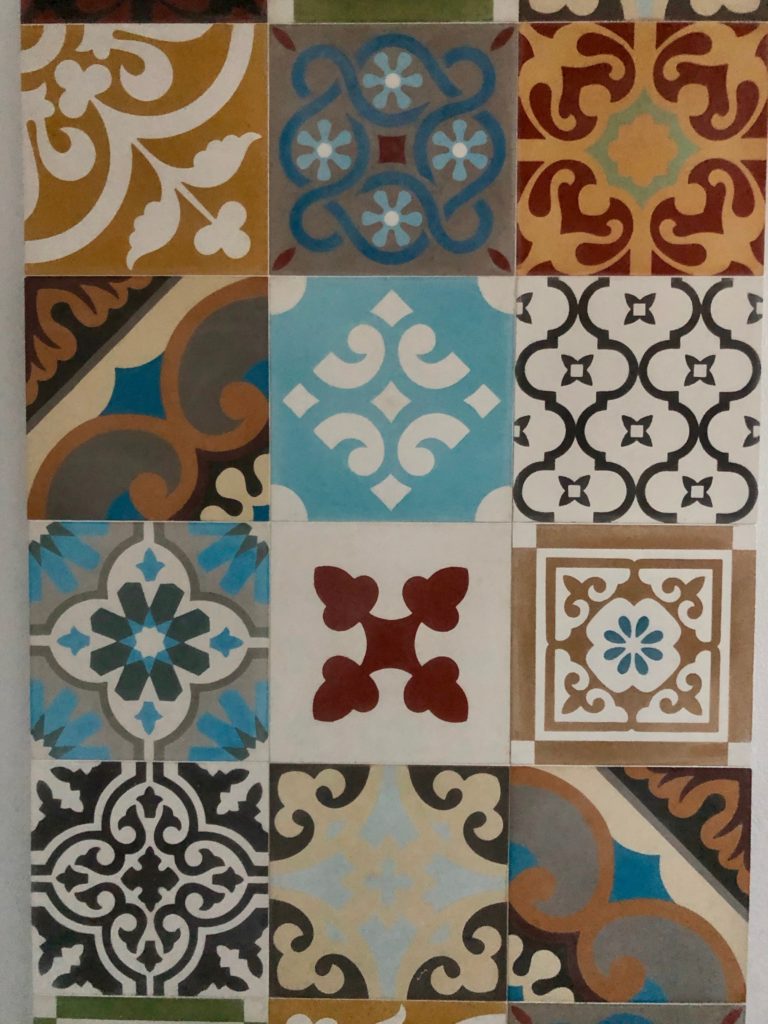
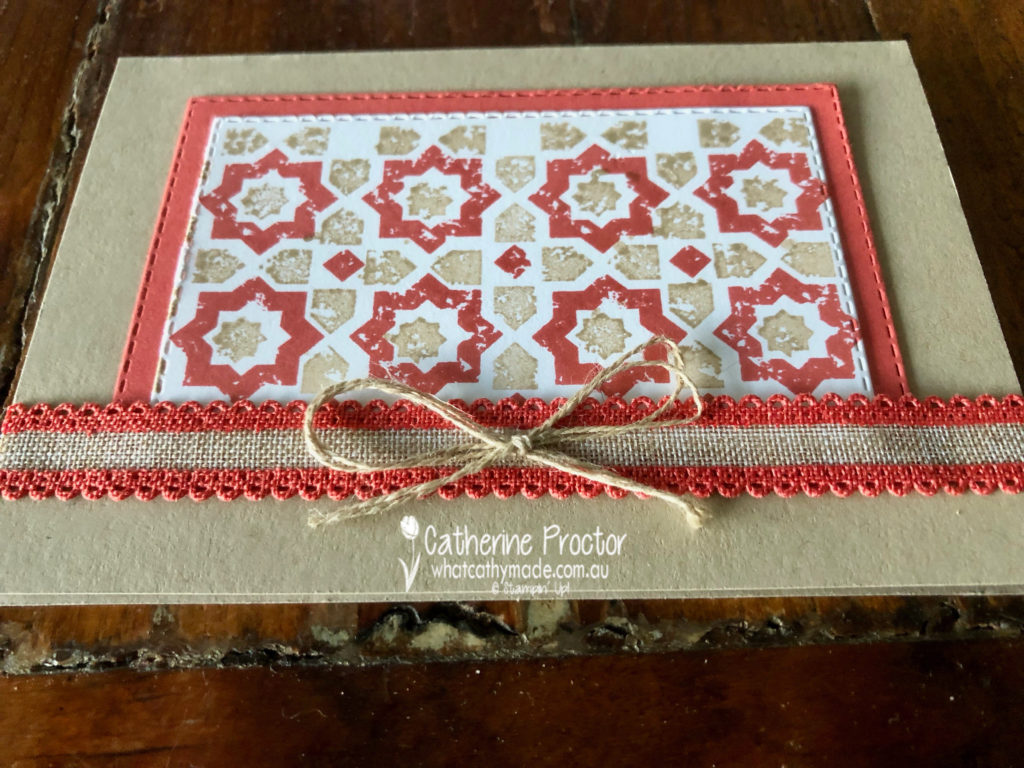
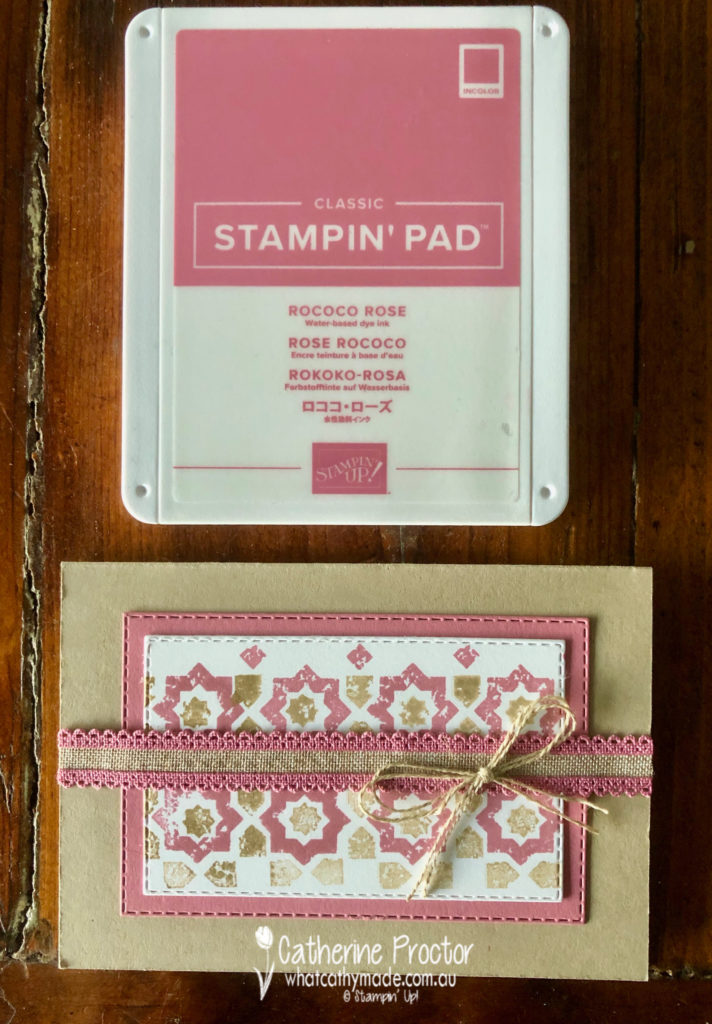
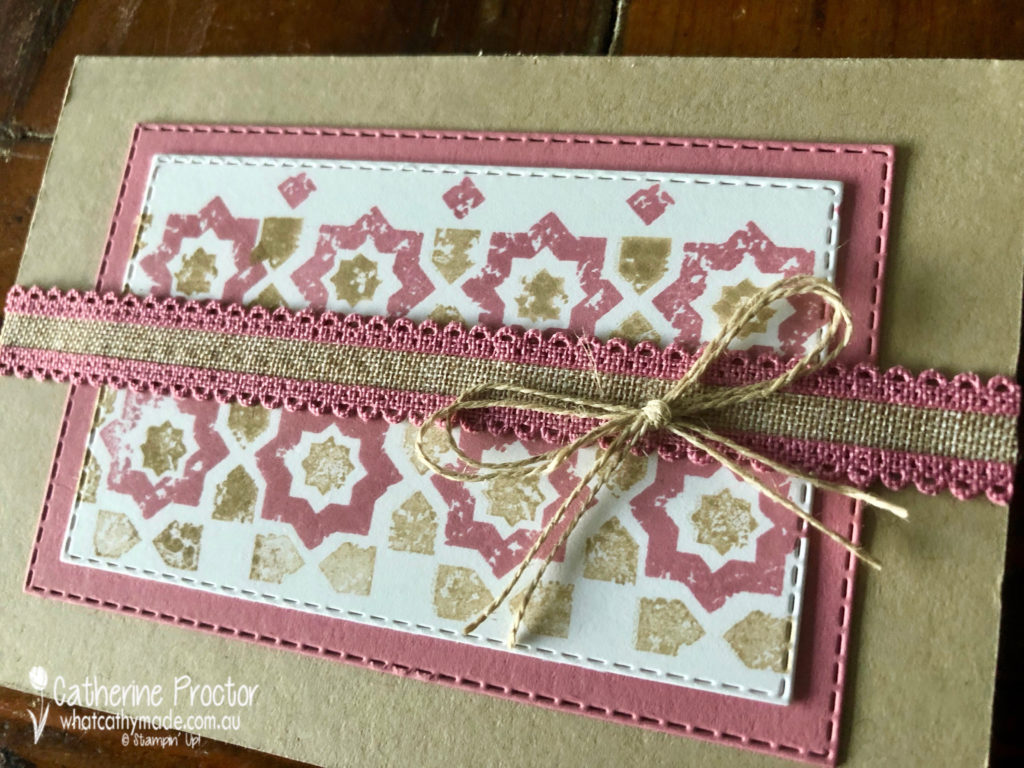
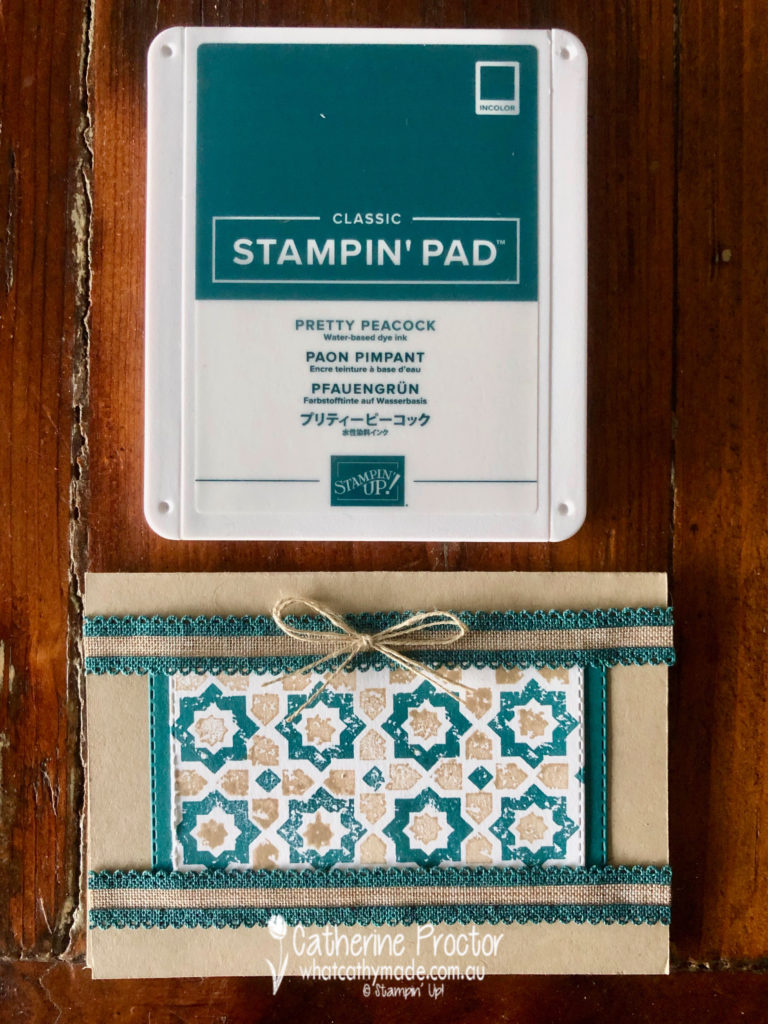
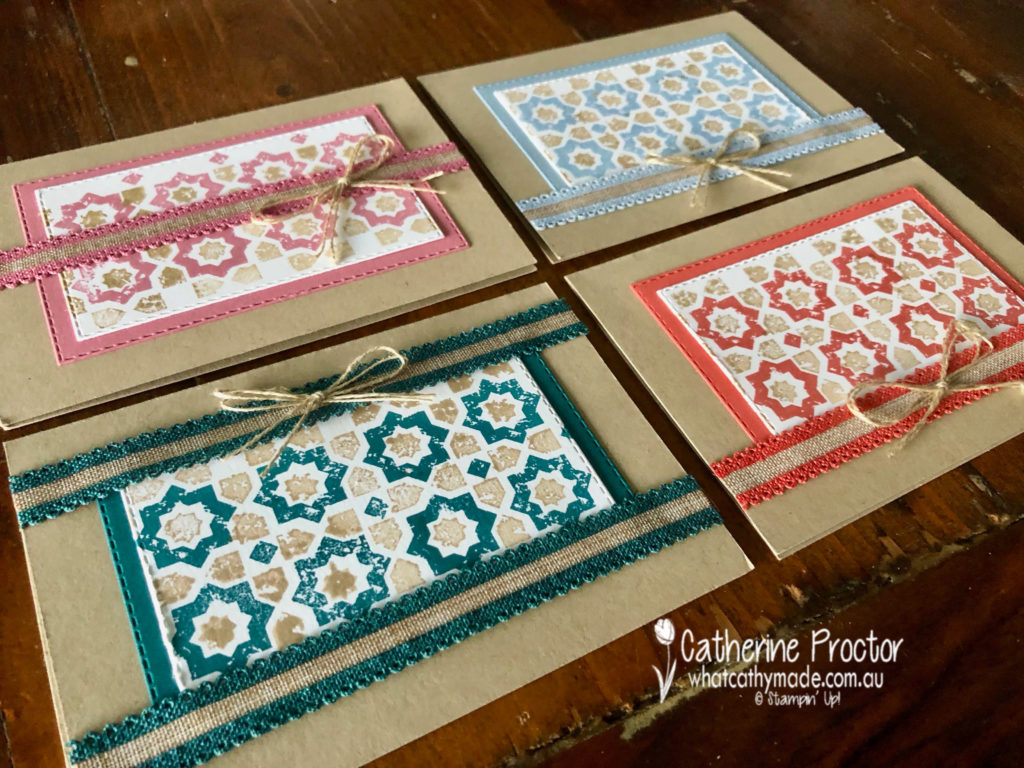
My cards tonight were inspired by the splashback in my powder room. It goes all the way from the basin to the ceiling but here’s just a snippet of these beautiful encaustic tiles.
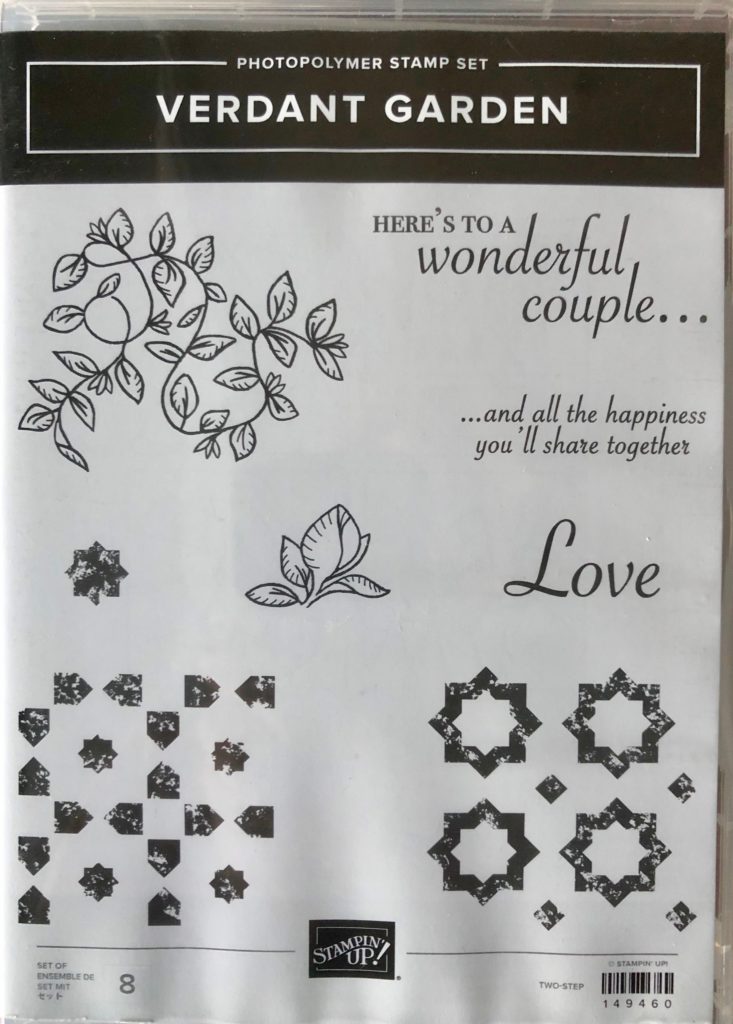
As soon as I saw the new Verdant Garden stamp set I knew I would use it to make a card inspired by the tiles in my splashback.
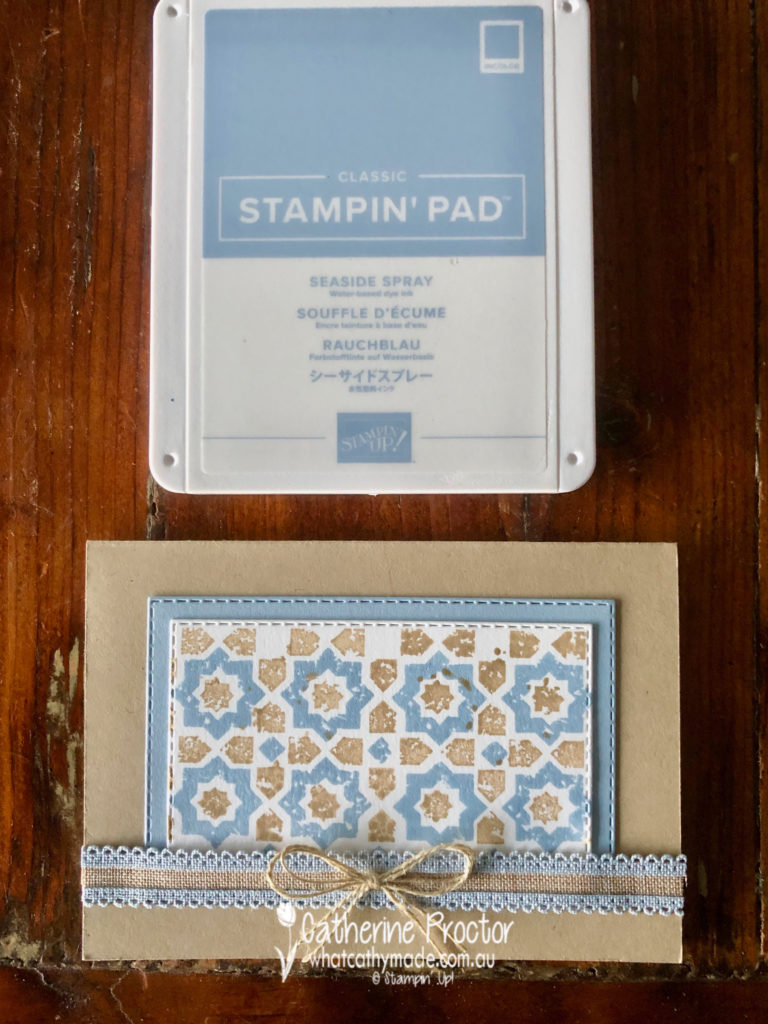
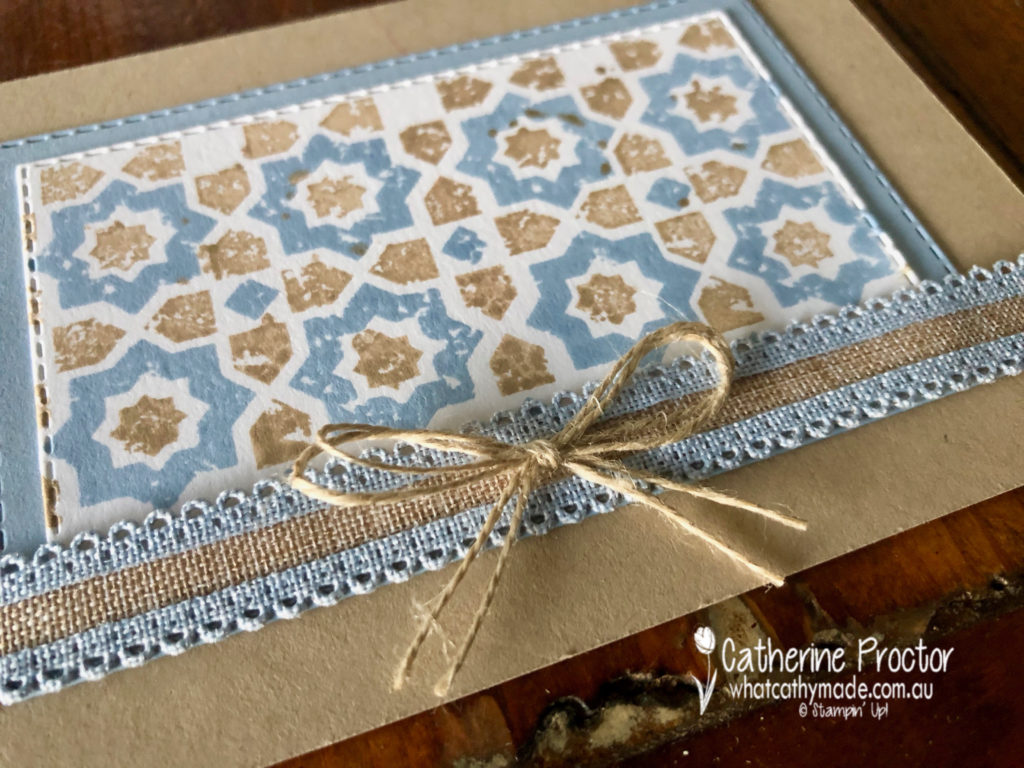
Combined with the colour scheme of the Scalloped Linen Ribbon (oh be still my beating heart!!!) it also proved to be an excellent opportunity to introduce you to the new 2019-20 in colours.
First cab off the rank? Seaside Spray.
Seaside Spray is definitely one of my new favourite colours. How good does it look with Crumb Cake? (And yes I have deliberately referenced ScoMo for his incredibly versatile “motherhood and apple pie” statement).
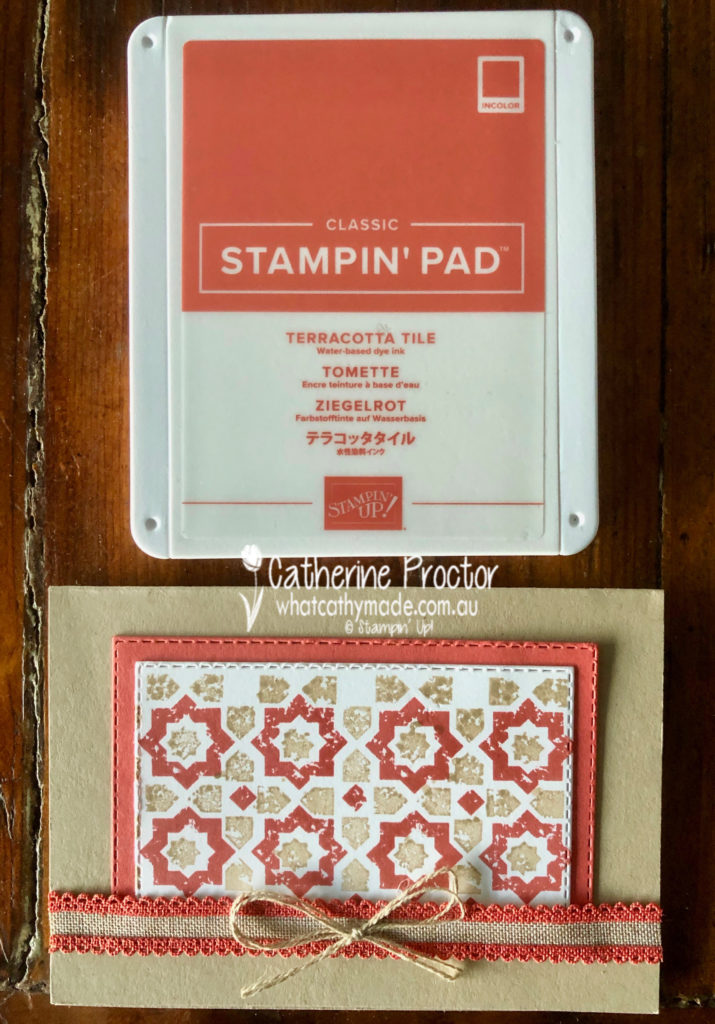
Next, I’d like to introduce you to Terracotta Tile. I think Terracotta tile is going to get on famously with its closest cousin, Cajun Craze.
Rococo Rose is another new favourite, such a soft and gentle pink I just know I’ll be using a lot.
Pretty Peacock is very dark and rich – I can’t wait to team it with Night of Navy!
There is one more lovely 2019-202 in colour called Purple Posy that I haven’t included this week because the ink pad is not orderable yet. If you’re wondering what it looks like it’s a very pale purple, sort of a love child of Highland Heather and Smokey Slate.
Here’s a closer look at the other 4 in colours.
Now it’s time to hop on over to our next participant, the very talented, Rachel Palmieri.
If you find a broken link or have come to this blog hop from a different entry point, you can view the participants below:
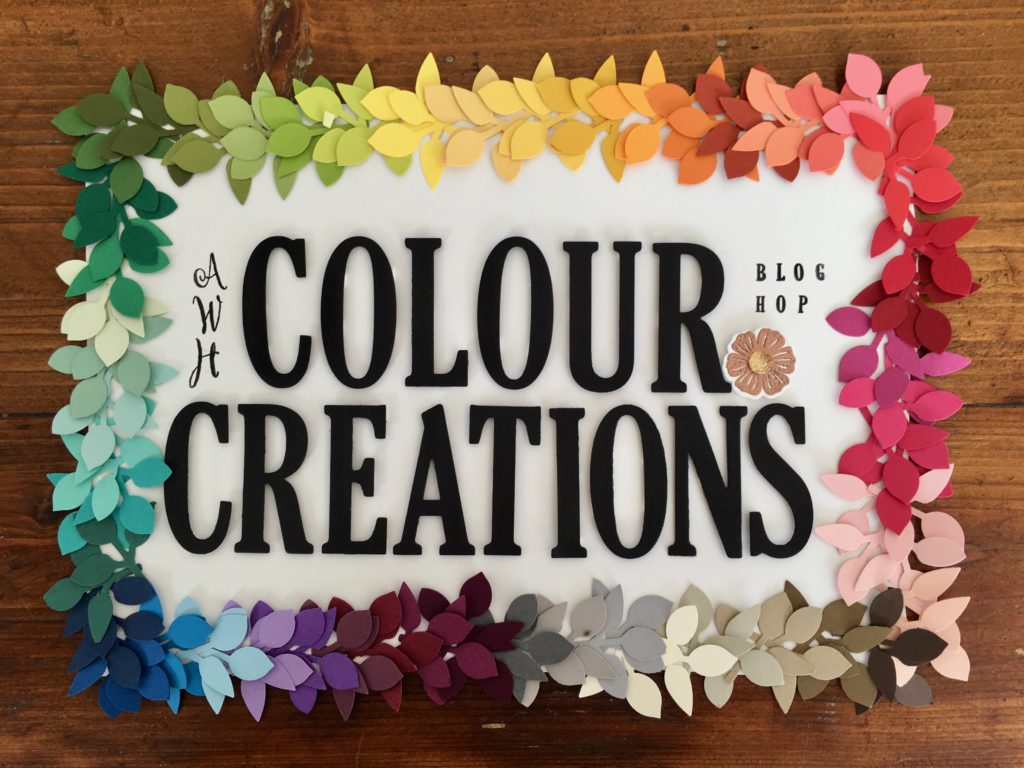
Welcome to week 36 of the Art With Heart Colour Creations Blog Hop!
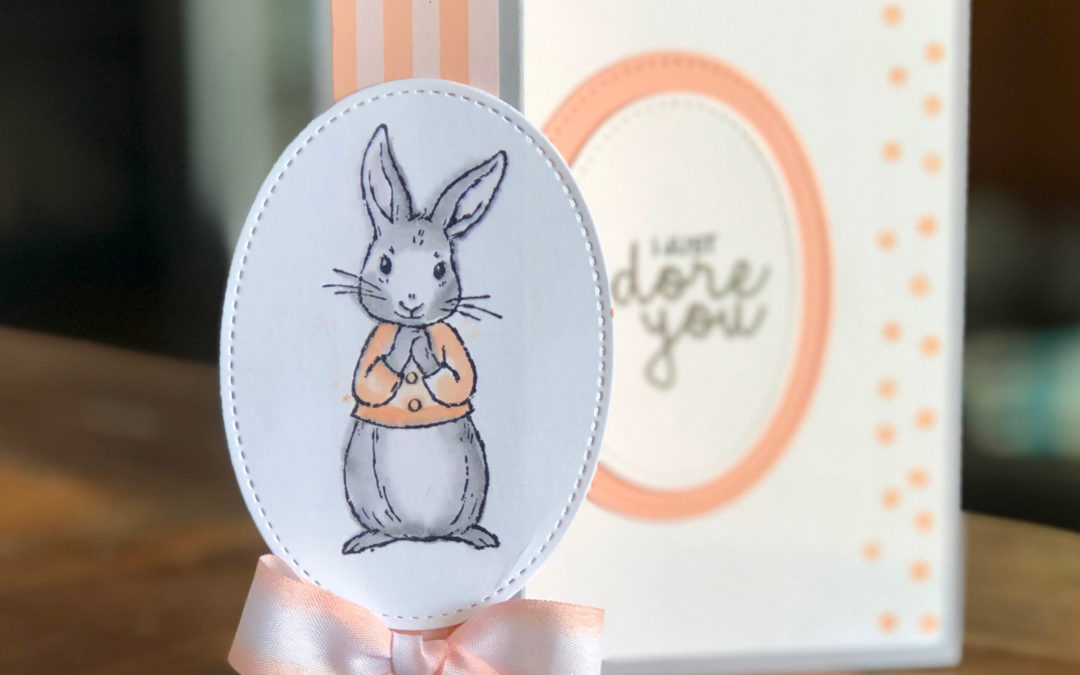
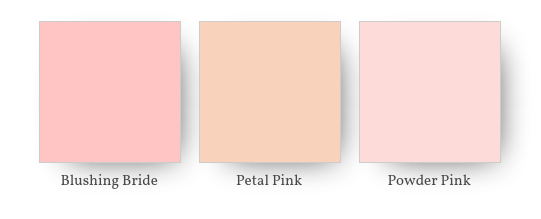
Our colour this week is another one from the subtles family: Petal Pink.
At first glance Petal Pink, Powder Pink and Blushing Bride all look very similar but when you line them up side by side Petal Pink has a lot more orange in it, which is why it makes such a great skin tone.
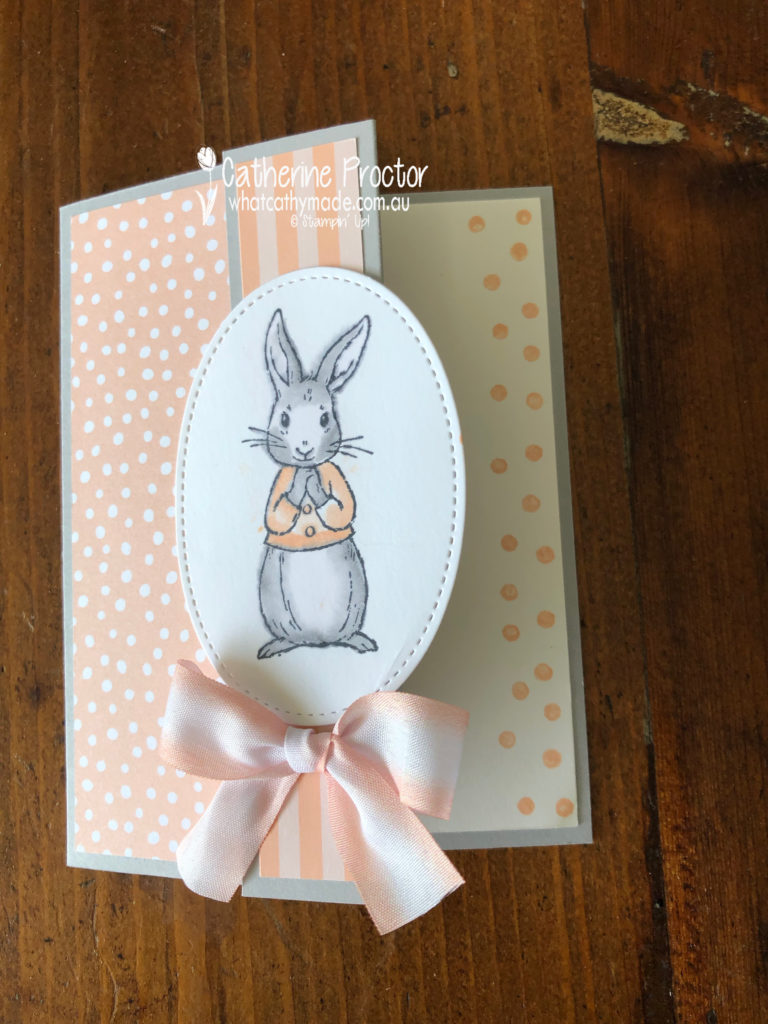
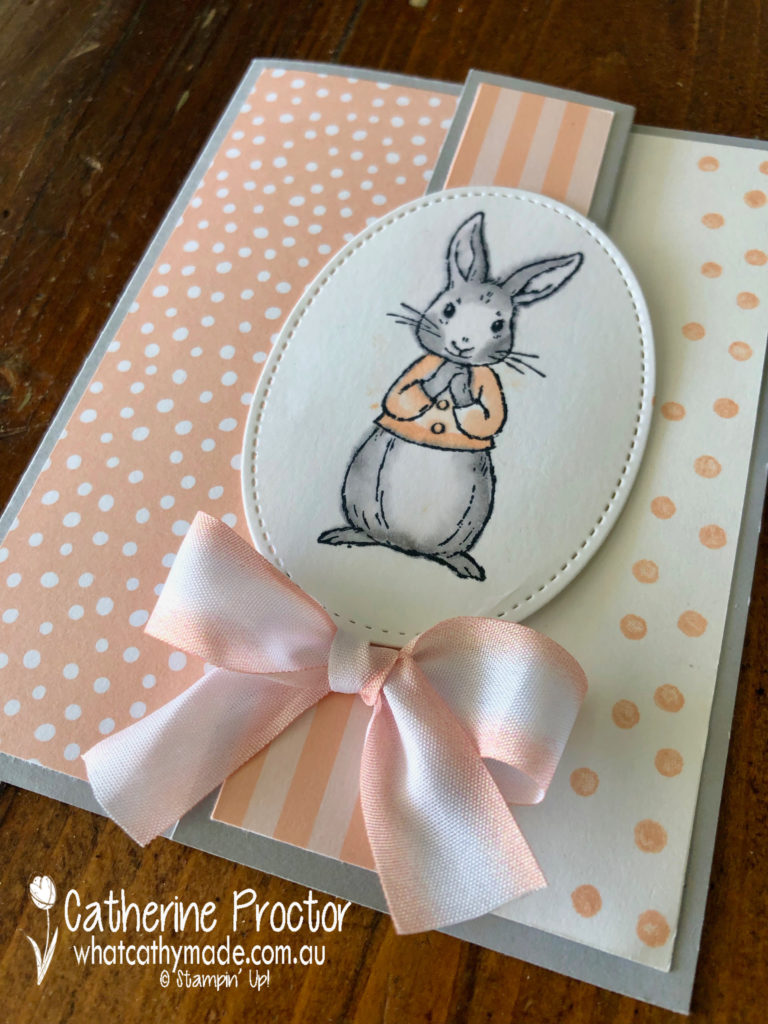
Petal Pink was the perfect colour for me to use for this gorgeous little bunny from the new Fable Friends stamp set. Although this staamp is reminiscent of Peter Rabbit with his little blue jacket I decided to mix it up and create a soft grey female bunny with a petal pink jacket.
After stamping the image, I coloured the bunny in with Smoky Slate and Petal Pink blender pens, die cut it out with the largest oval from the stitched framelits die set and made a fun fold card…although I’m not sure what this type of fold is actually called!
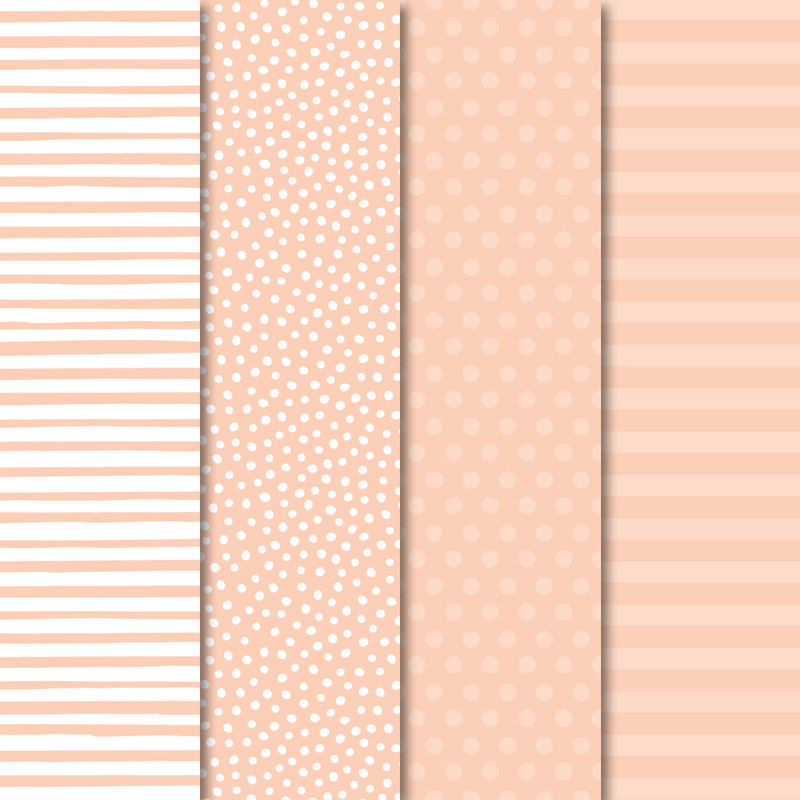
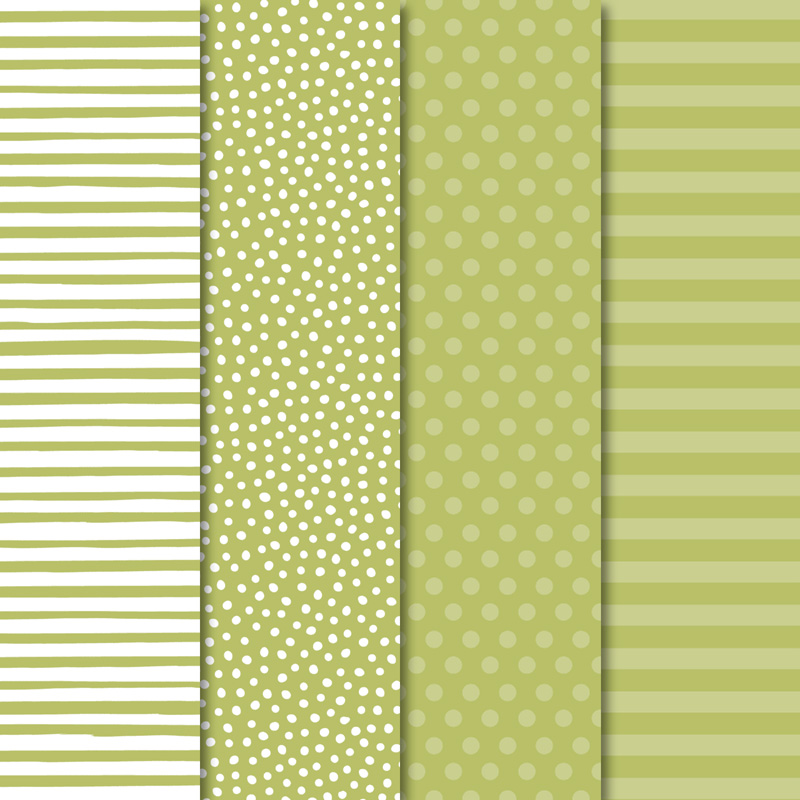
The beautiful DSP is from two sets: the striped paper and the spotted paper inside the card are from the Subtles Designer Series Paper, however the larger dotted paper on the outside of the card is from the Twinkle Twinkle Designer Series Paper.
In addition to the rabbit from Fable Friends, I used two stamps from the Incredible Like You Photopolymer Stamp Set: the “I adore you” sentiment and the dots I’ve stamped in Petal Pink down the right hand side of the card.
The final touch is a bow made from the new Petal Pink/Whisper White Variegated Ribbon.
To see what the rest of the team have made click on the links below.
To purchase any of the products I used in this project you can shop with me here. Or if you’d like me to post you your very own copy of any of the Stampin Up! catalogues or find out about more about Stampin’ Up! contact me.
We will be back again next week showcasing another 2018-20 in colour: Pineapple Punch. We hope you can along with us then.
Welcome to week 35 of the Art With Heart Colour Creations Blog Hop!
Our colour this week is from the subtles family: Pear Pizzazz.
Pear Pizzazz is yet another colour I have not paid enough attention to and certainly not used enough!
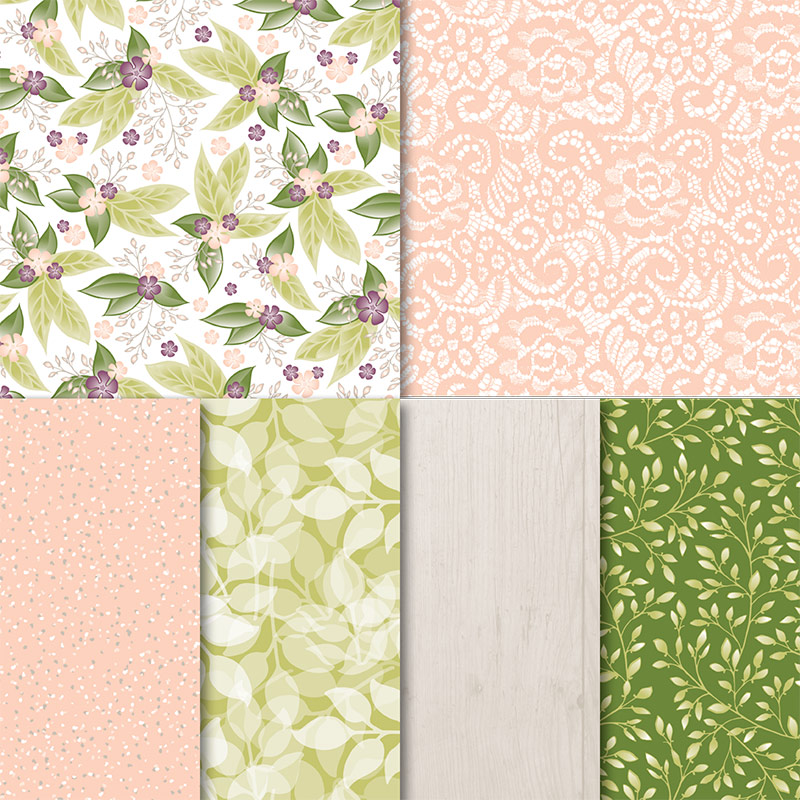
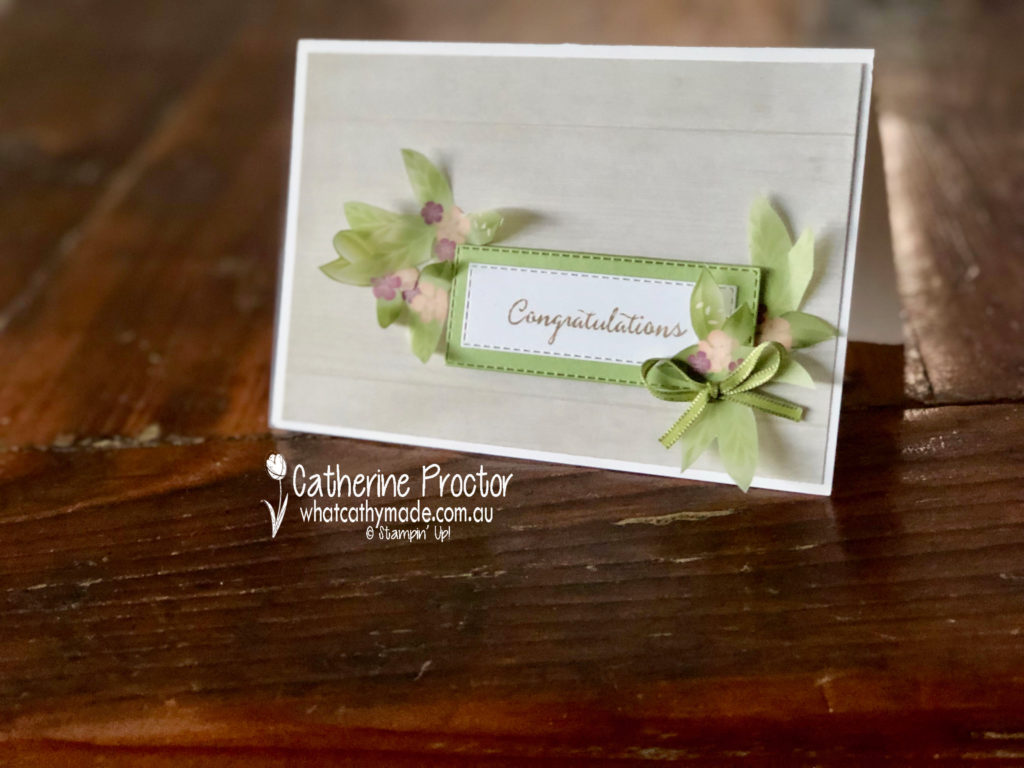
However, the colour combination in the stunning Floral Romance DSP pack really caught my eye (Fresh Fig, Mossy Meadow, Petal Pink, Sahara Sand, Whisper White and Pear Pizzaz) and so I decided to use it for my card this week.
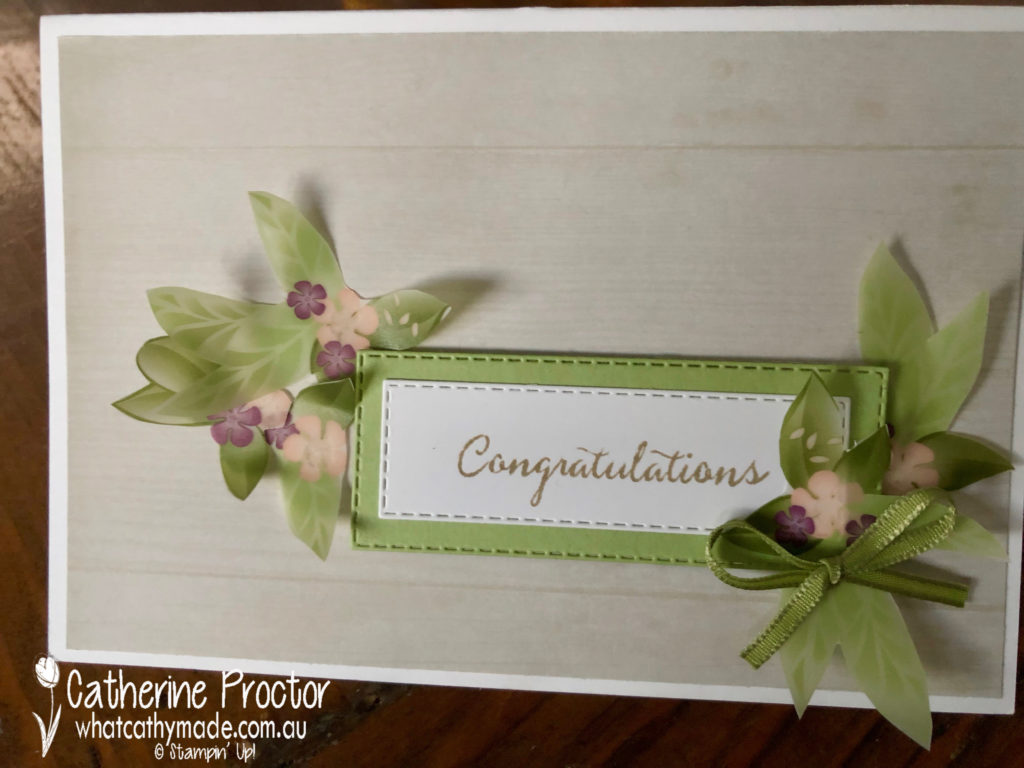
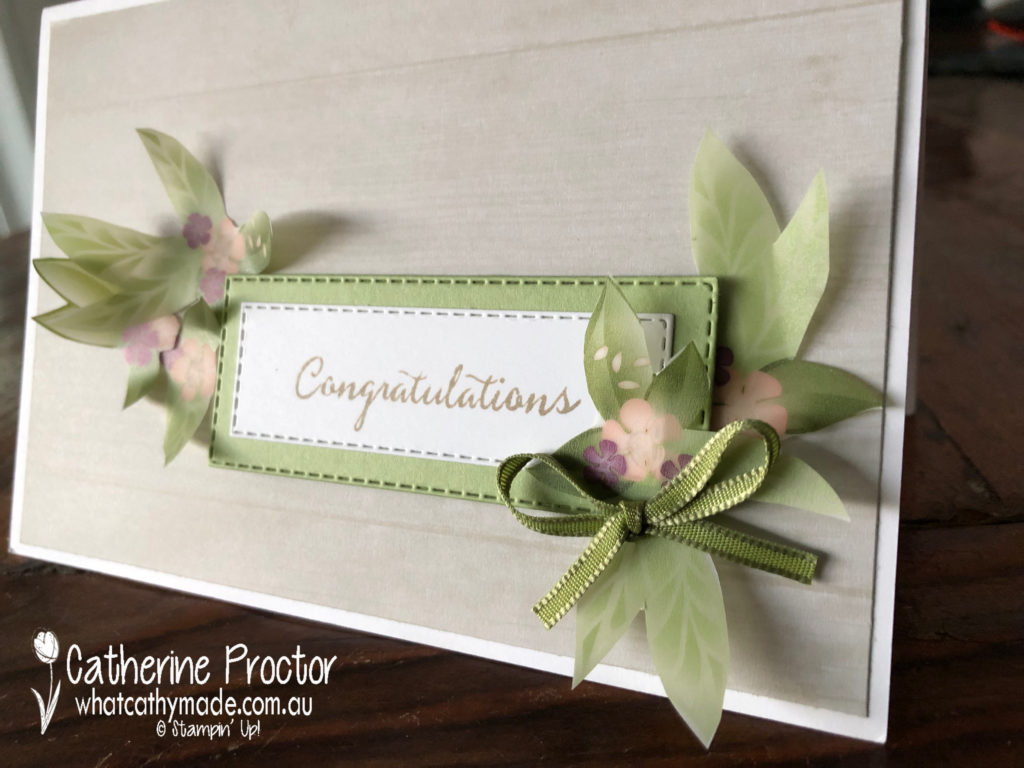
I started with a Memories and More Card onto which I mounted the soft wood grain patterned DSP in Sahara Sand. You can see this lovely neutral background more clearly on my card below.
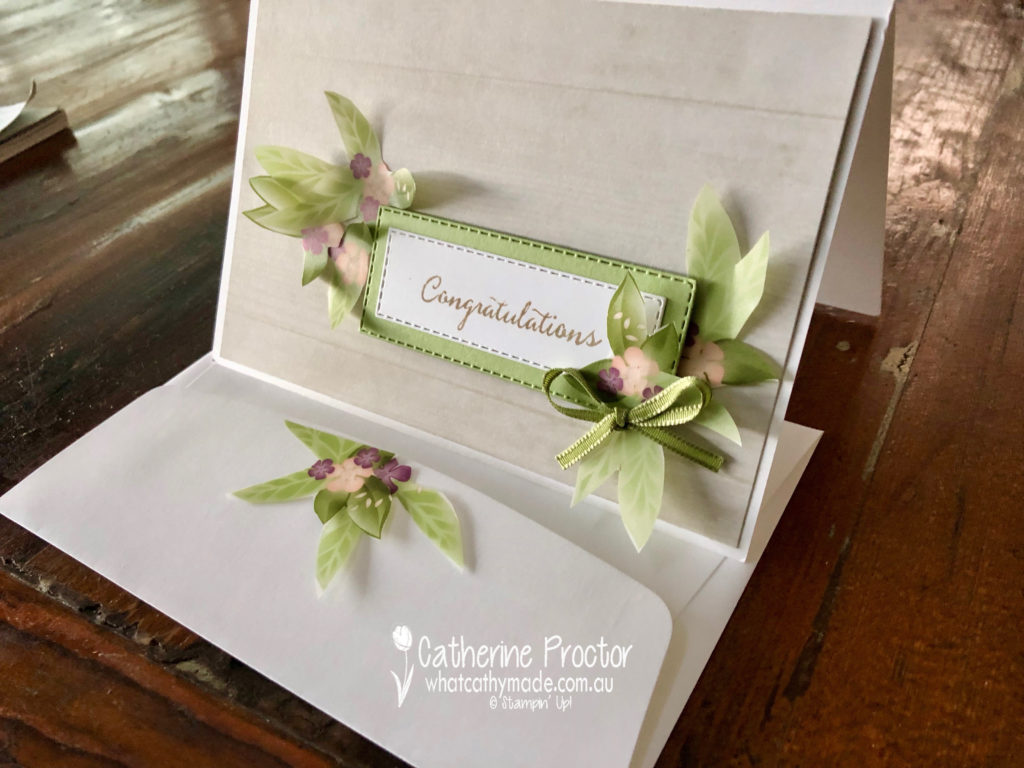
I then used two of the long thin Stitched Rectangle Framelits to cut out a rectangle of Pear Pizzazz and Whisper White. The congratulations sentiment comes from the Ballon Celebration stamp set…I love the long thin elegance of this font.
The gorgeous clusters of flowers and leaves I simply fussy cut using my paper snips from a sheet of the patterned vellum. To further add texture and dimension I used my bone folder to curl the leaves up.
I arranged the leaves and flower around the sentiment and adhered them using glue dots. A small bow of Old Olive sheer ribbon adds even more dimension.
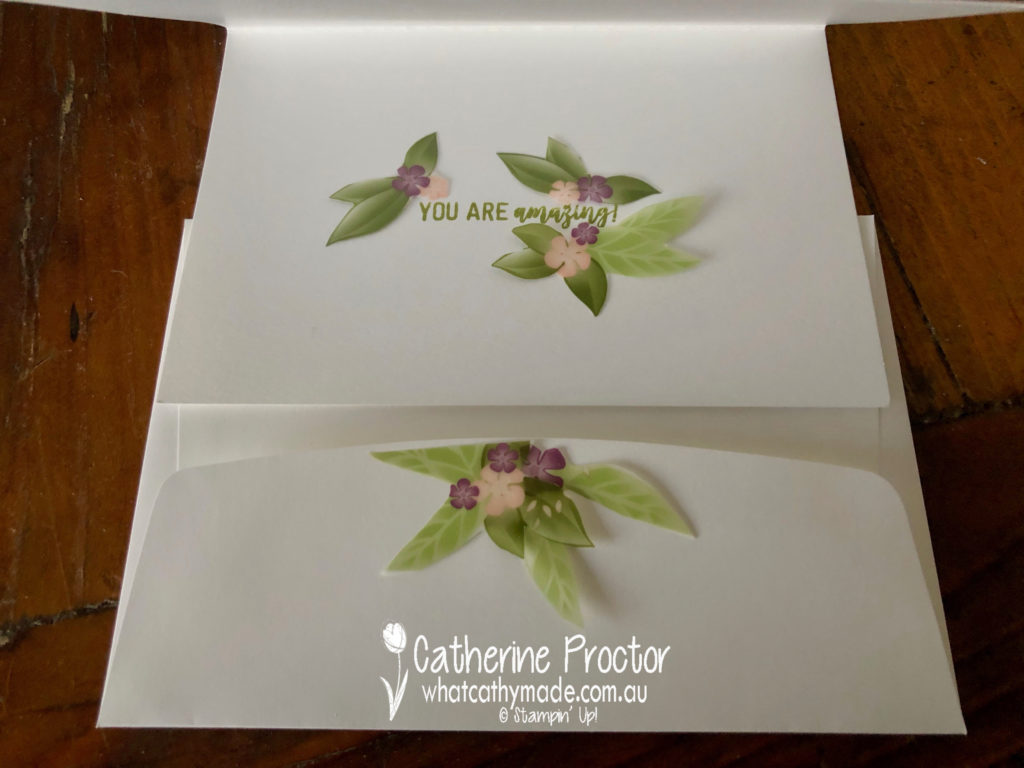
The remaining leaves and flowers I used to decorate the flap of the envelope as well as inside the card. The “you are amazing” sentiment inside the card comes from the Amazing Life stamp set.
To see what the rest of the team have made click on the links below.
To purchase any of the products I used in this project you can shop with me here. Or if you’d like me to post you your very own copy of any of the Stampin Up! catalogues or find out about more about Stampin’ Up! contact me.
We will be back again next week showcasing another member of the subtles family: Petal Pink. We hope you can along with us then.
Welcome to week 34 of the Art With Heart Colour Creations Blog Hop!
Our colour this week is from the bright’s family: Pacific Point.
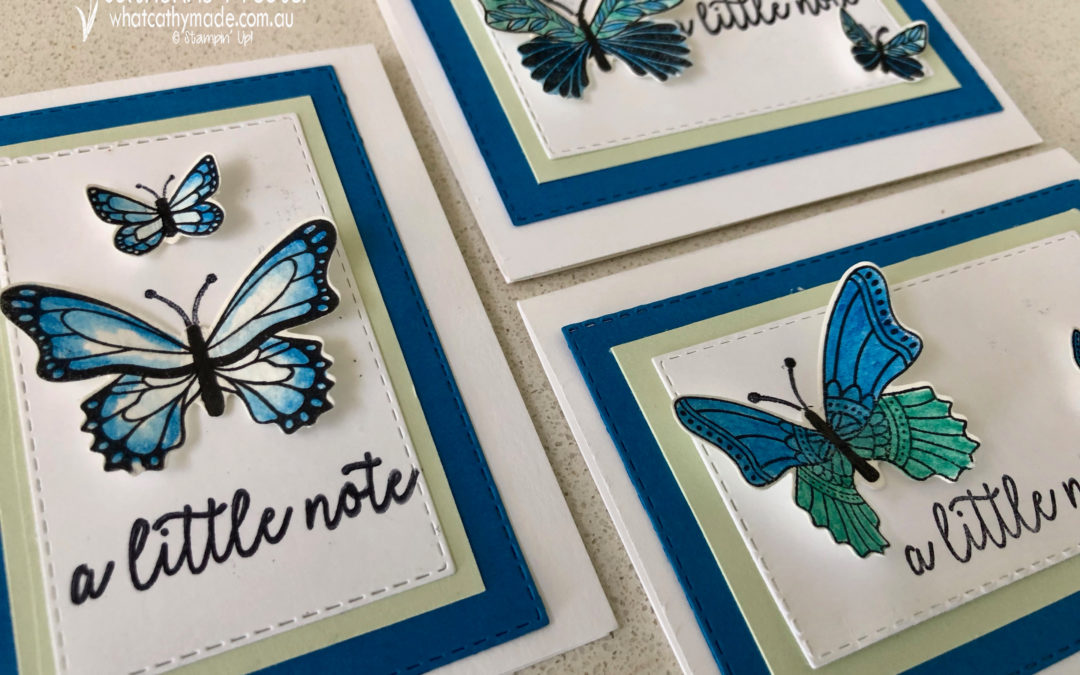
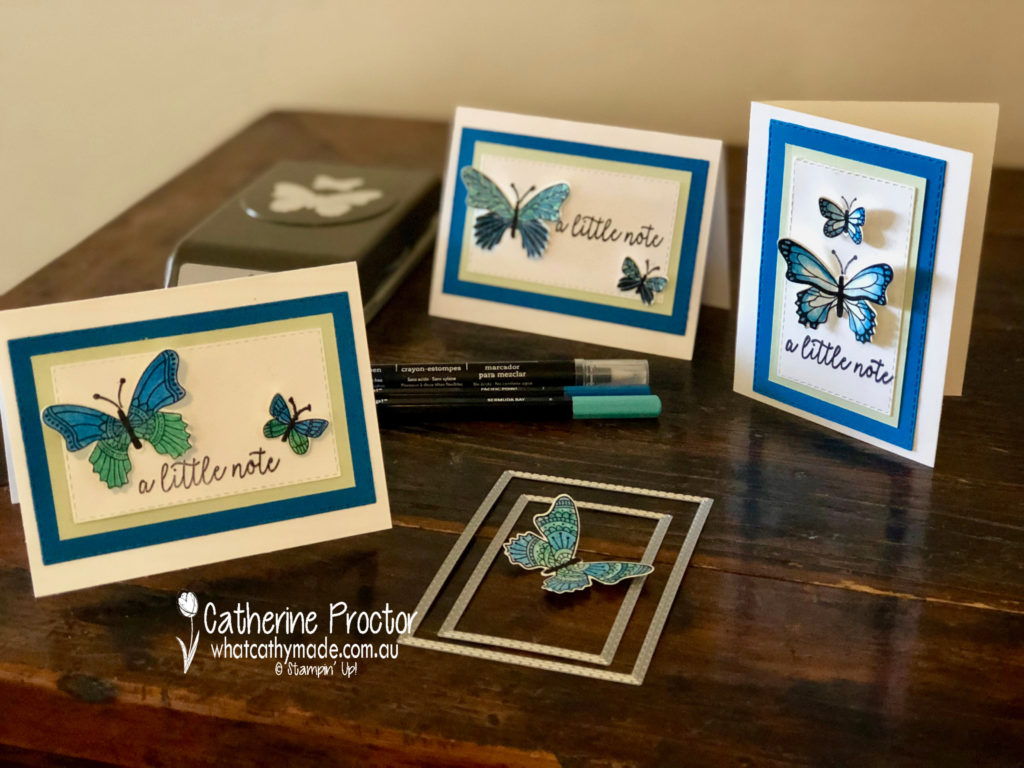
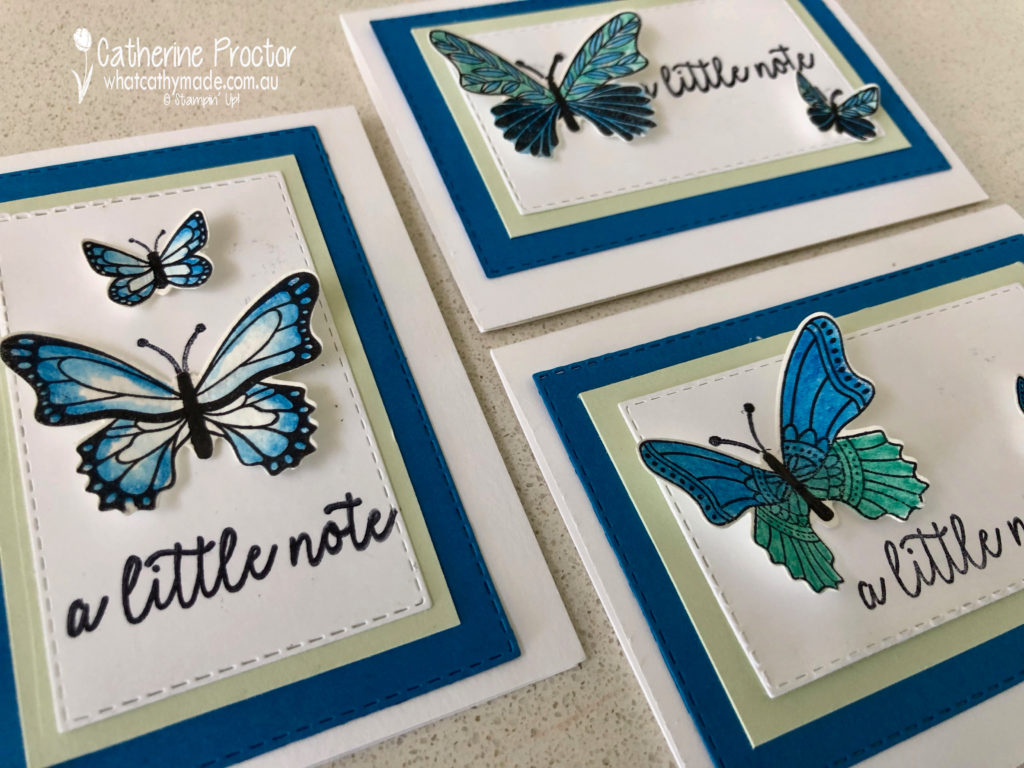
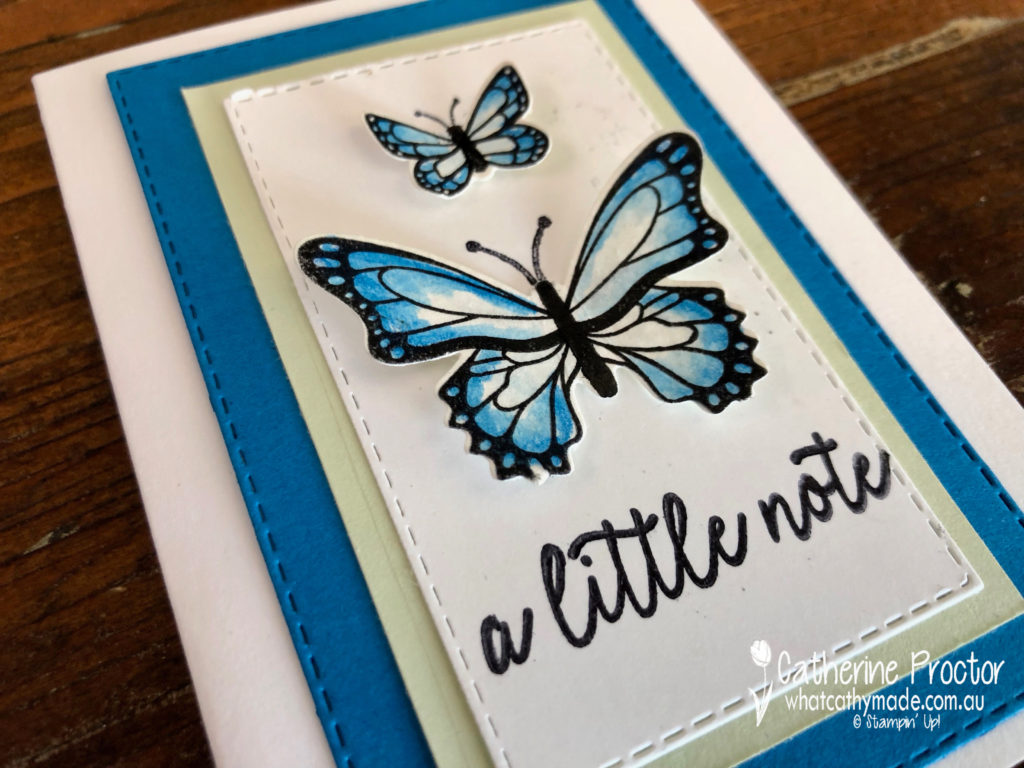
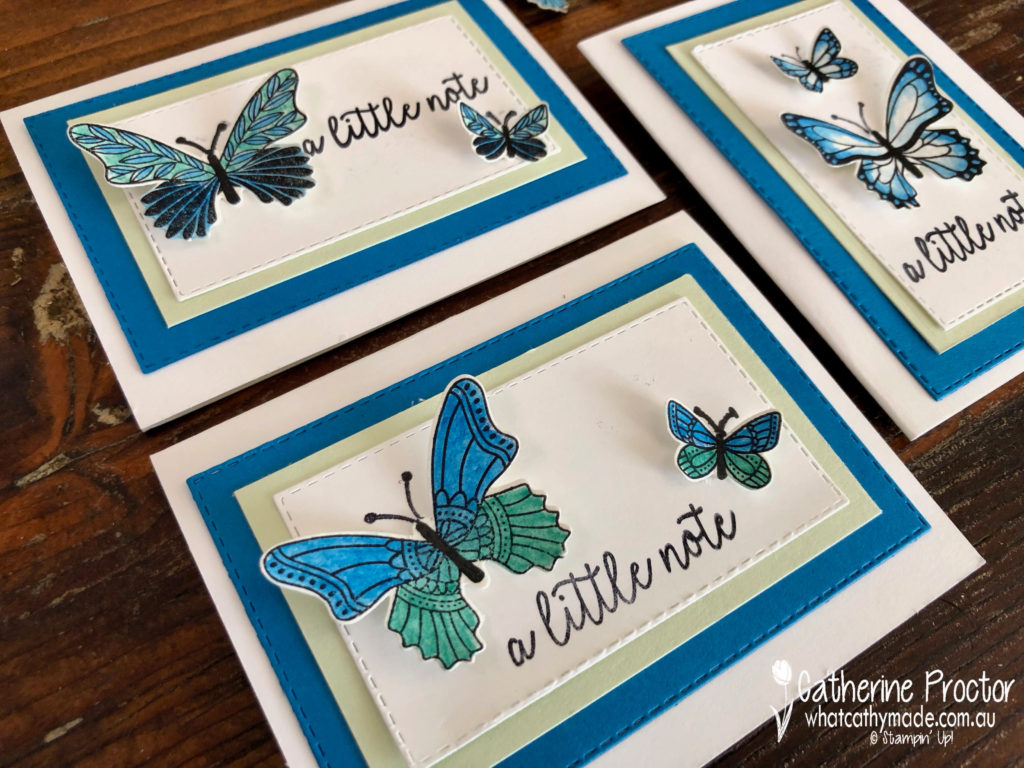
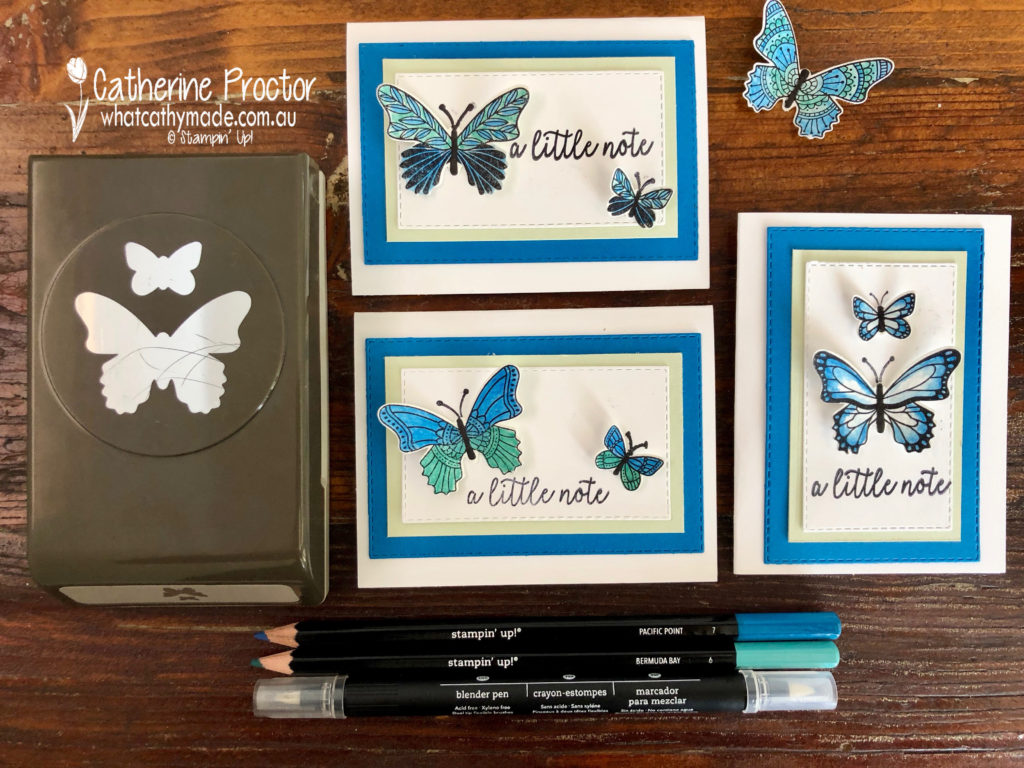
This is such a vibrant, beautiful blue…but I have to admit I rarely use it because Night of Navy is such a favourite of mine. But after using it this week (along with Bermuda Bay, Soft Sea Foam and Whisper White) to make these beautiful butterflies I think it’s a colour I’ll be using a lot more from now on.
If you look closely at the photo above you’ll see the new butterfly punch, watercolour pencils in Pacific Point and Bermuda Bay…
…and sorry (but not really sorry) the stitched rectangle framelits yet again!
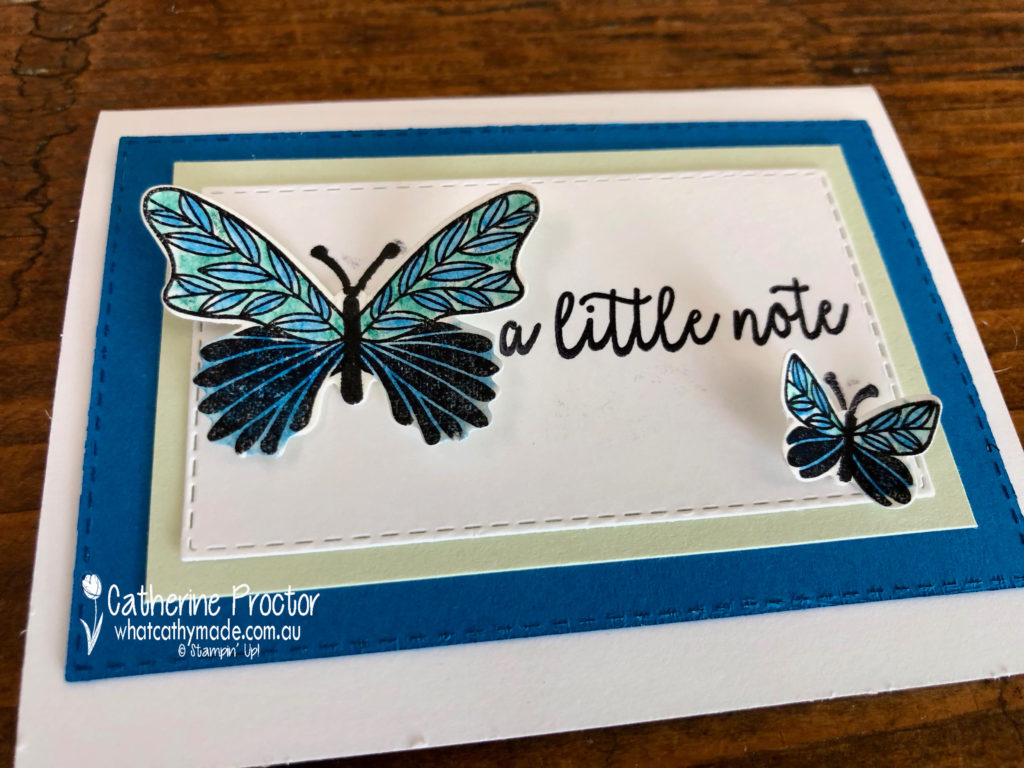
For my first card, I stamped in Stazon ink onto watercolour paper, then simply coloured the edges of my butterflies with the Pacific Point watercolour pencil and used the blender pen to blend the blue in, leaving some white space towards the centre of the butterfly.
After punching the butterflies out I stamped the body of the butterfly and attached it with glue dots to whisper white card stock. The antenna was stamped after the butterfly was attached.
For all three cards, I mounted the whisper white card stock onto some Soft Sea Foam card stock before mounting onto a rectangle of Pacific Point and then onto a Memories and More small card that comes with its own envelope.
I find most of the blues and greens usually work really well together.
My other two cards are horizontal, using two of the other butterfly stamps in the Butterfly Gala stamp set. I used both watercolour pencils in Pacific Point and Bermuda Bay, blending again with the blender pan.
I also played around with the positioning of the sentiment and the butterflies for my third card.
I love this stamp set because it is so easy to colour in different ways. You can stamp the colour using the stamps provided, use your markers, your blends, your watercolour pencils, or even lift the ink direct from your ink pad to colour the butterflies in.
And butterflies look incredible in any colour combination, thery are just so beautiful!
To see what the rest of the team have made click on the links below.
To purchase any of the products I used in this project you can shop with me here. Or if you’d like me to post you your very own copy of any of the Stampin Up! catalogues or find out about more about Stampin’ Up! contact me.
We will be back again next week showcasing a member of the subtles family: Pear Pizazz. We hope you can hop alomng with us then.
Welcome to week 33 of the Art With Heart Colour Creations Blog Hop!
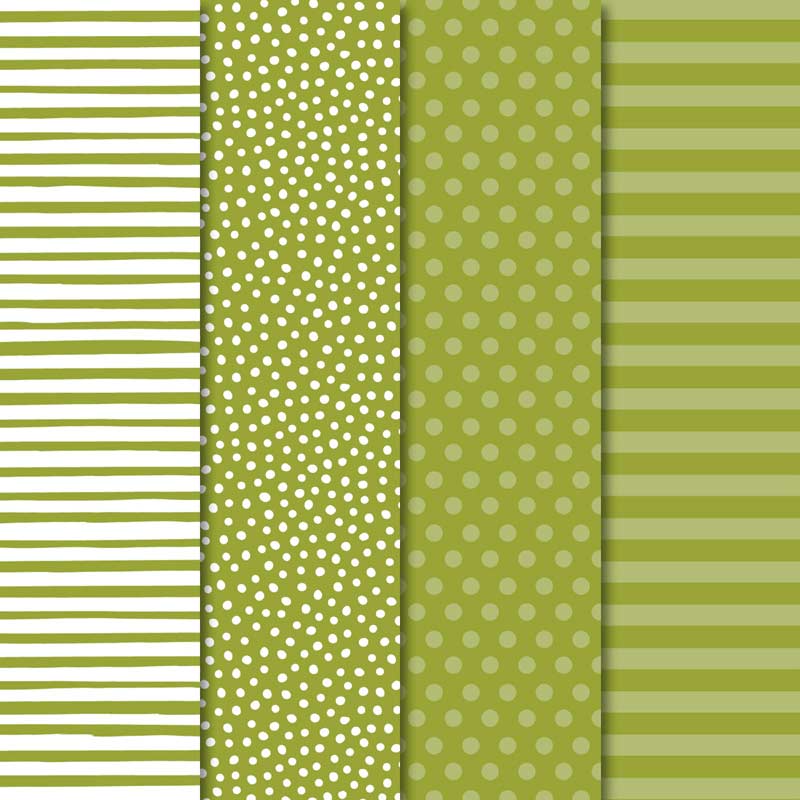
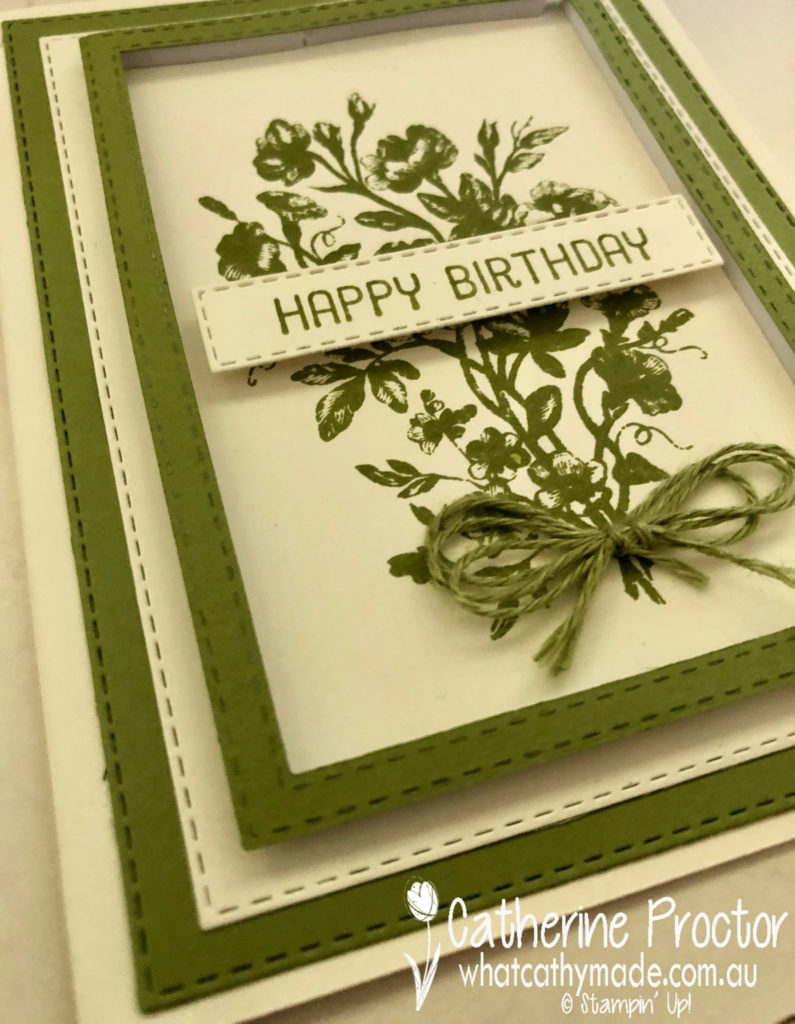
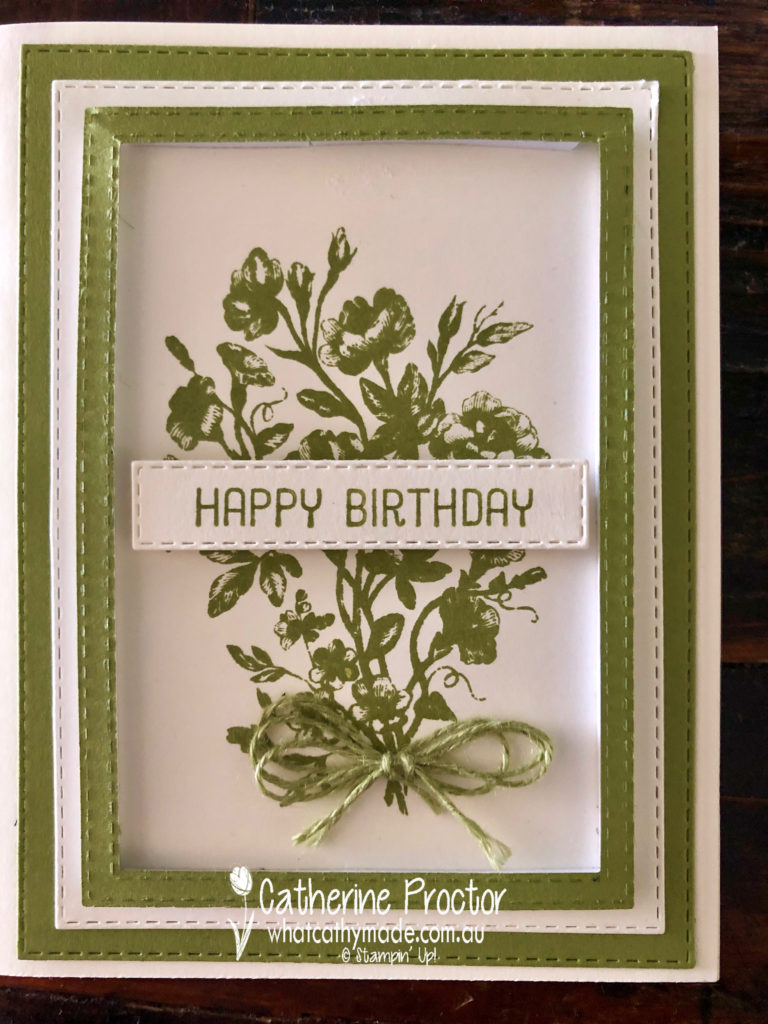
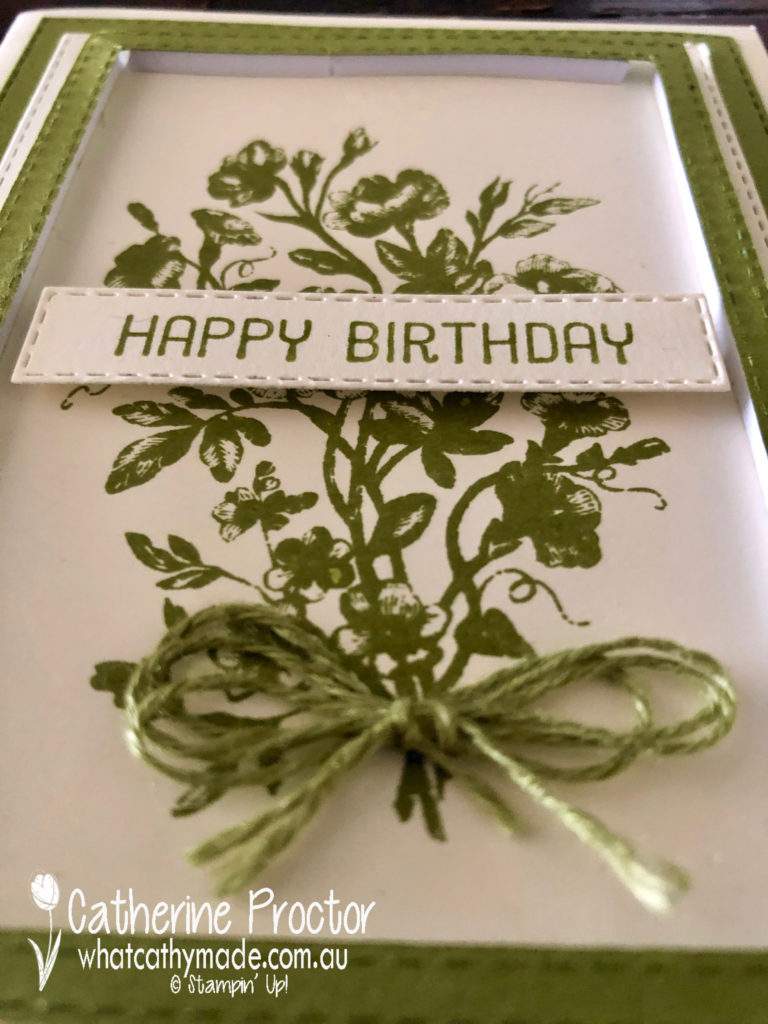
Our colour this week is probably my go-to green: Old Olive.
I just can’t seem to stop using these stitched rectangle framelits at the moment…I think I have an addiction!! I’ve just counted and realised I’ve used 5 different sizes in my card below.
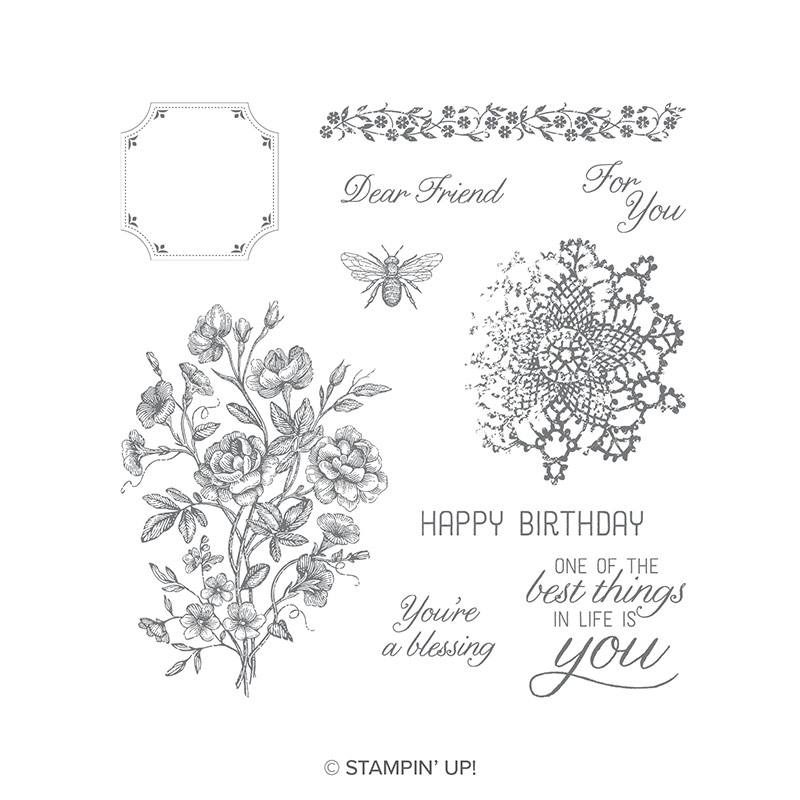
The stamp set is so stunning and its one of the host sets from the annual catalogue, called Very Vintage, I love this set because it has 5 great sentiments in different fonts, a stamp that matches the Darling Label punch, the cutest little bee stamp and the stunning floral stamp I’ve used on my card today!
The colour combination is so simple…Old olive and Very Vanilla. My default neutral is always Whisper White but Very Vanilla works better for shabby chic/vintage style designs and Old Olive looks great with either colour.
If you take a close look at my photos you’ll be able to see the adhesive strips I’ve used to lift up my frame and the happy birthday sentiment. The frame is so easy to make with the stitched rectangles because the stitching is on both sides of the die.
And take a closer look at the lovely Old Olive linen thread!
To see what the rest of the team have made click on the links below.
To purchase any of the products I used in this project you can shop with me here. Or if you’d like me to post you your very own copy of any of the Stampin Up! catalogues or find out about more about Stampin’ Up! contact me.
We will be back again next week showcasing a member of the brights family: Pacific Point.