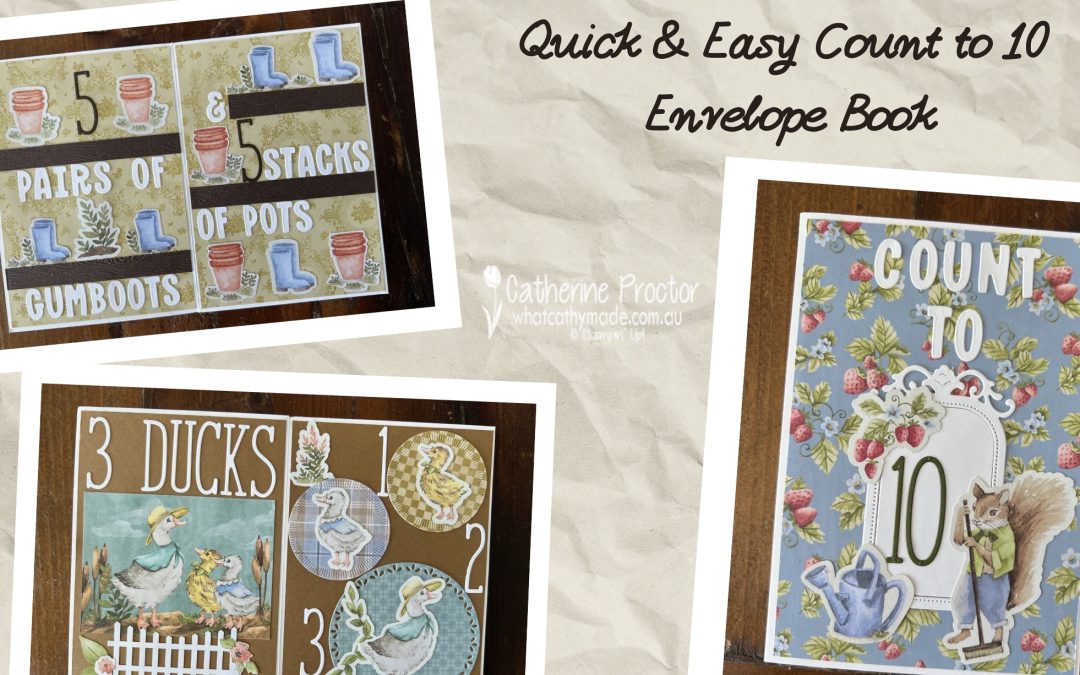
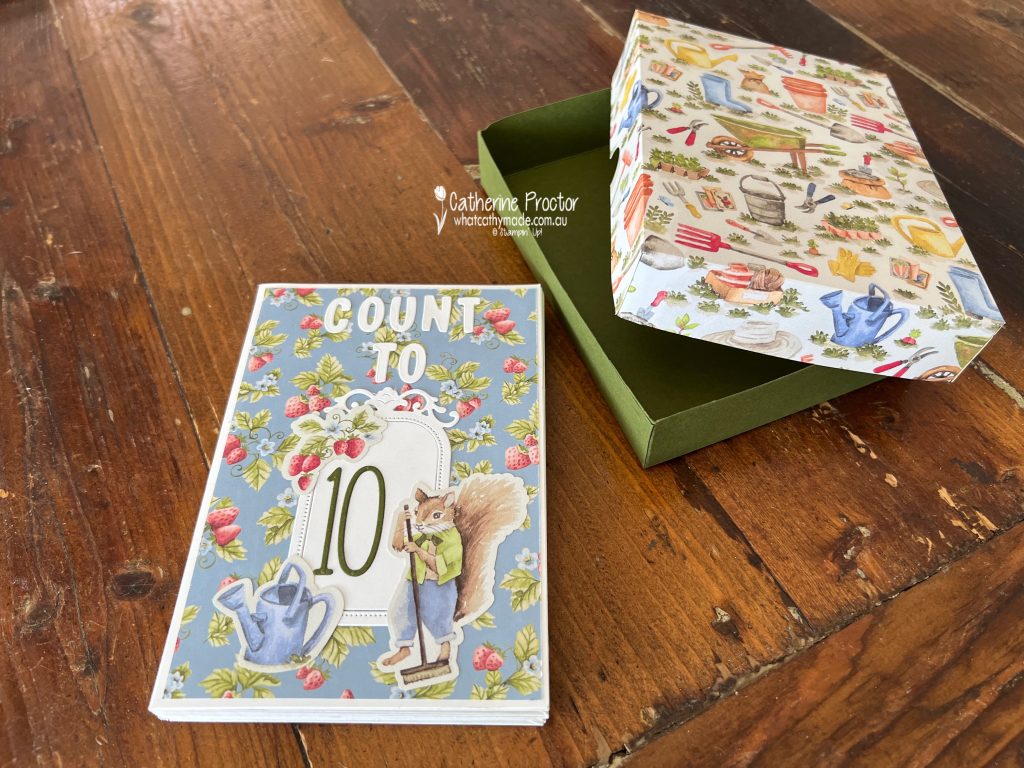
Hello crafty friends, I’m excited to be back with a brand new project for you, another of my envelope counting books!
Envelope books are quick and easy to make and they don’t require any measuring or cutting in the construction of the book pages.
Before we take a closer look at today’s project I just wanted to update you regarding my month long hiatus from crafting and posting and what has happened to the AWH Colour Creations Blog Hop.
To cut a long story short I was diagnosed with cancer just after Christmas, had surgery to remove the tumour and just this week received the all clear from my surgeon with no further treatment required at this stage. I’m so incredibly grateful and very happy to be finally back in my craft room again.
While I had treatment and I’m recovering, the AWH Colour Creations Blog Hop has been hosted by my friend Kate Morgan as an Instagram hop and I hope to rejoin it soon. I’m not sure ATM if it will remain as an Insta hop or not so for those of you not on Instagram I’ll also blog about my cards here. However, if you’d like to follow the AWH Colour Creations Blog Hop on Instagram, my Insta handle is whatcathymade and Kate’s Insta handle is craftwithkate.
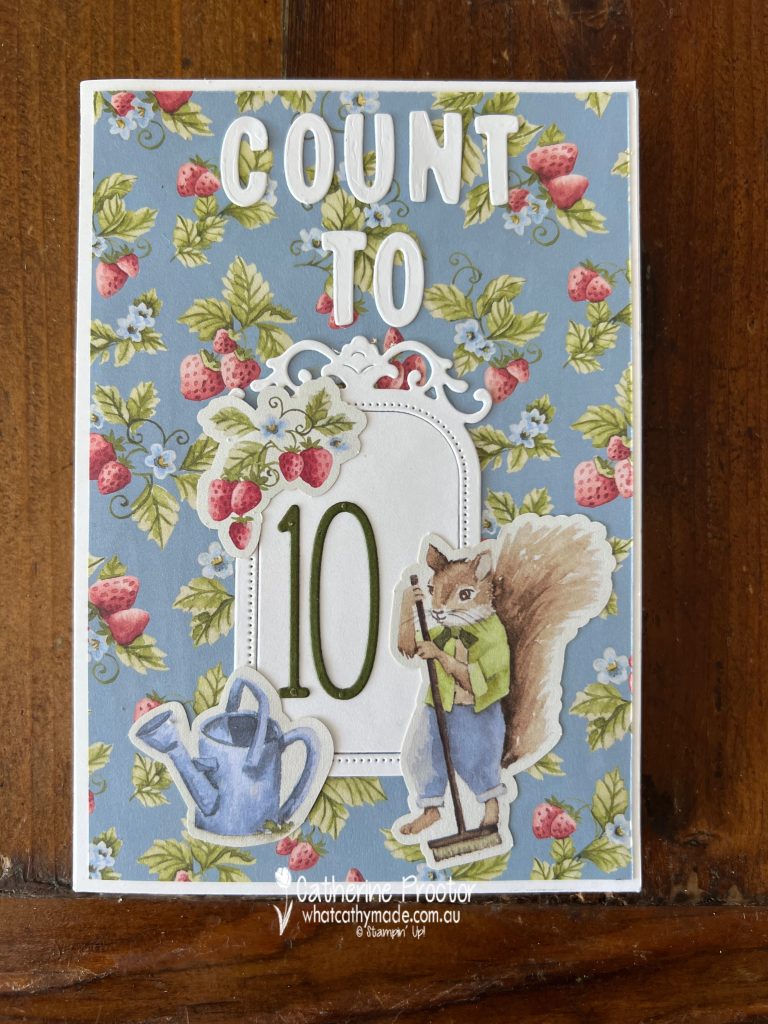
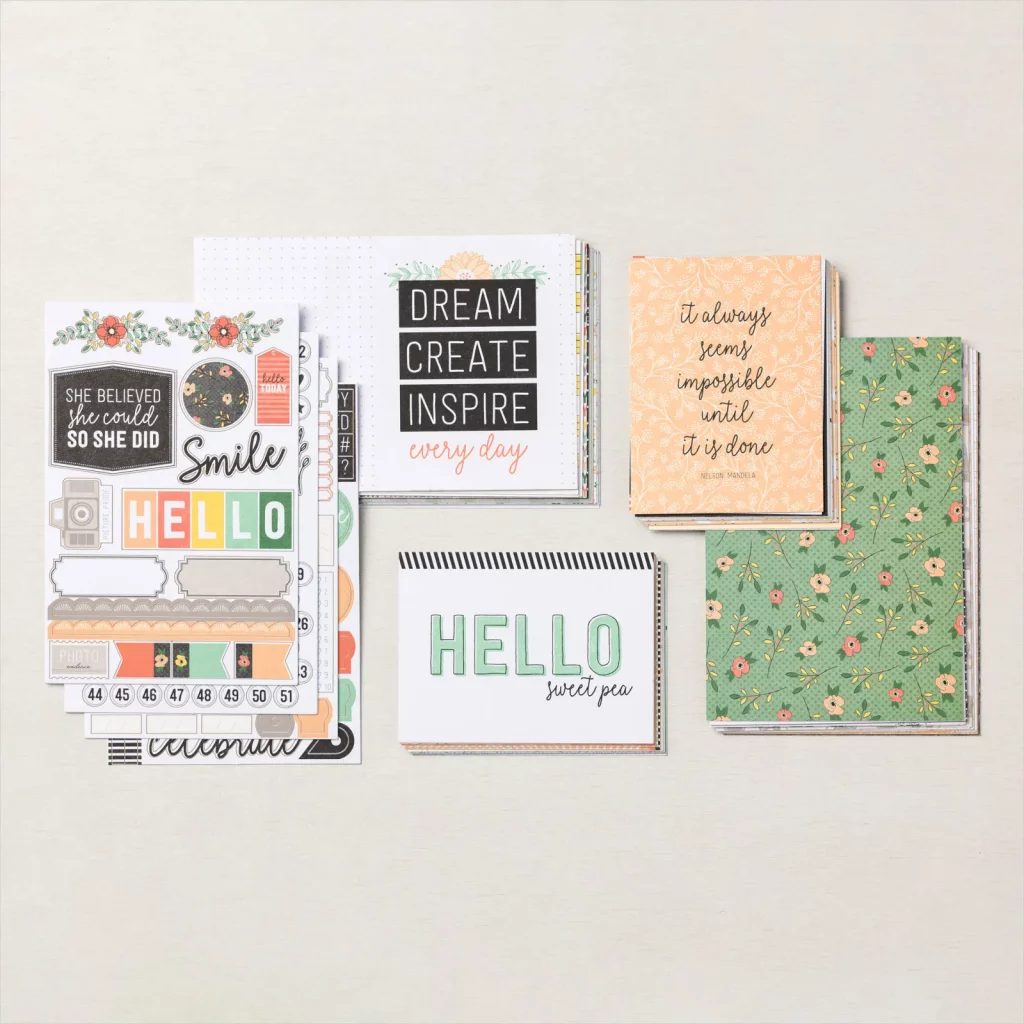
Storybook Moments Envelope Counting Book
While I was taking a little break, Stampin’ Up! added some of their existing products as SALE-a-Bration items you can redeem for FREE with any $100 purchase. You can take a look at all of the new SALE-a-Bration items here.
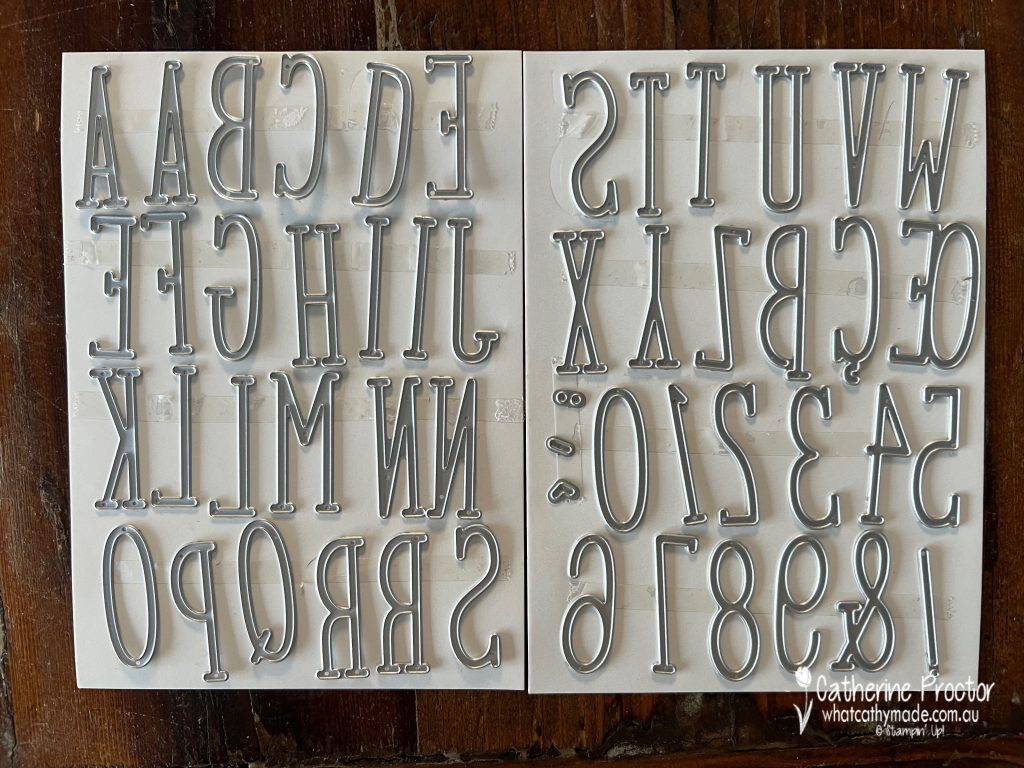
I’ve used one of these new products, the Alphabet A La Mode dies, in my counting book. NOTE: you need to use the new SALE-a-Bration item number (168074) when claiming these dies as your FREE SALE-a-Bration reward.
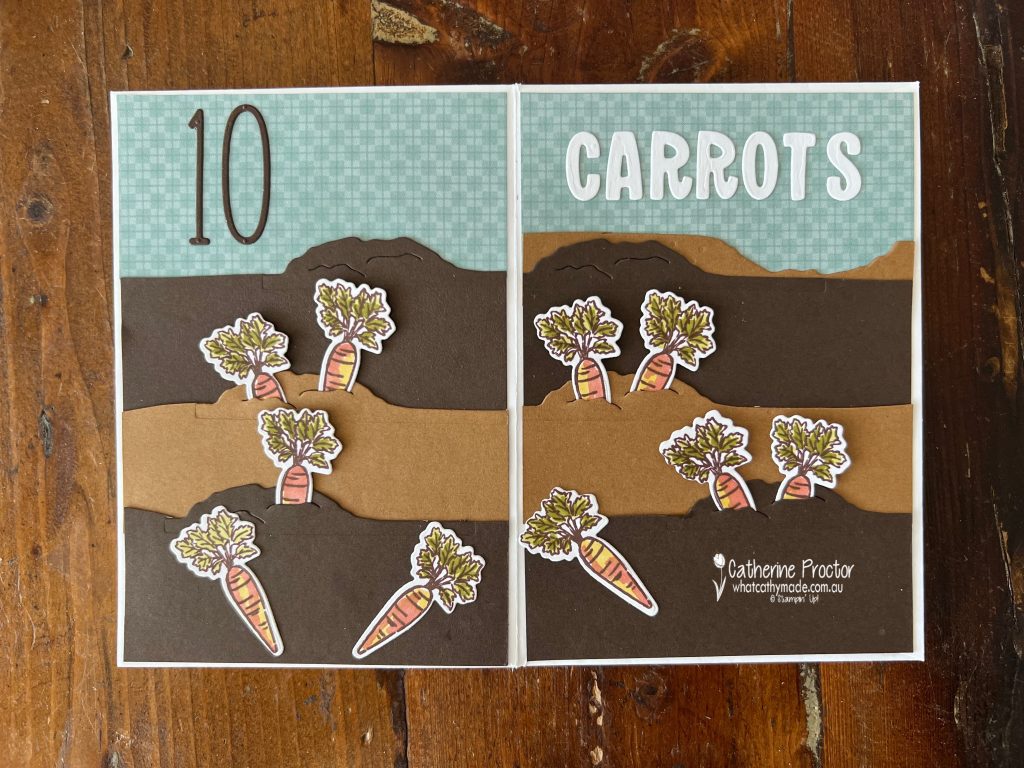
Here are some close up images of each of the pages in my book.
I always make a box to safely store my counting books too.
This 18 minute video shows how I’ve used different elements from the Storybook Moments Suite collection in the counting book and explains how I design and plan each layout and make a box to fit.
To see the construction method I used to create the envelope counting book, take a look at this video I made when I made another of my envelope books.
I’ll be back as soon as I can with some more crafty inspiration for you all!
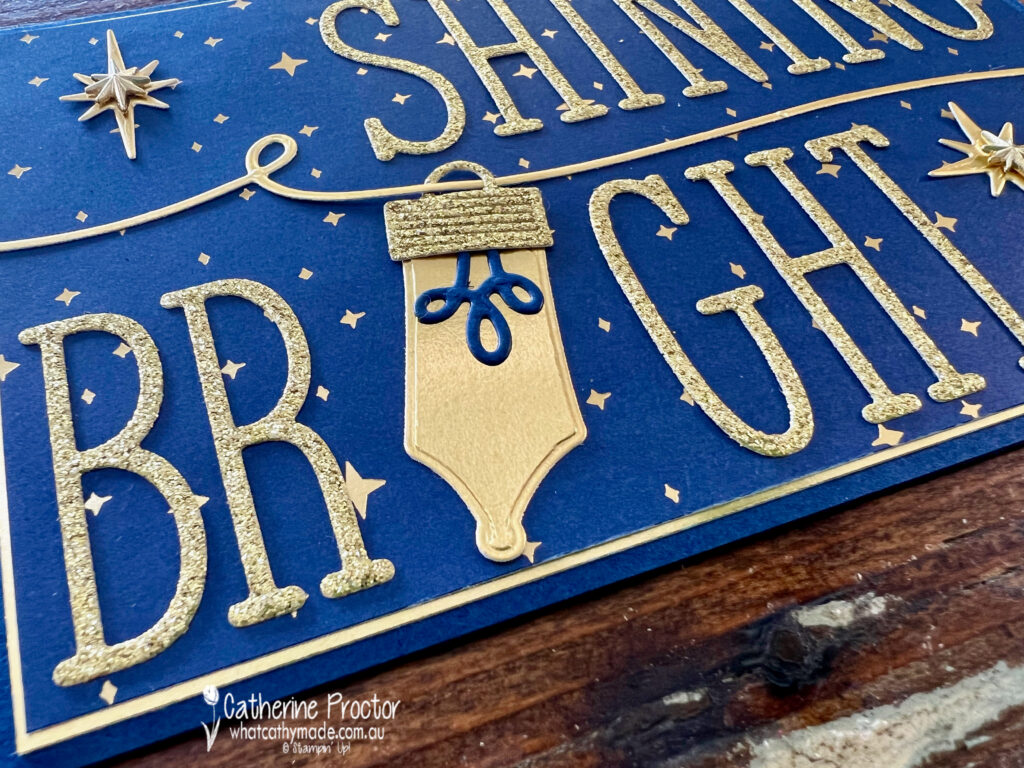
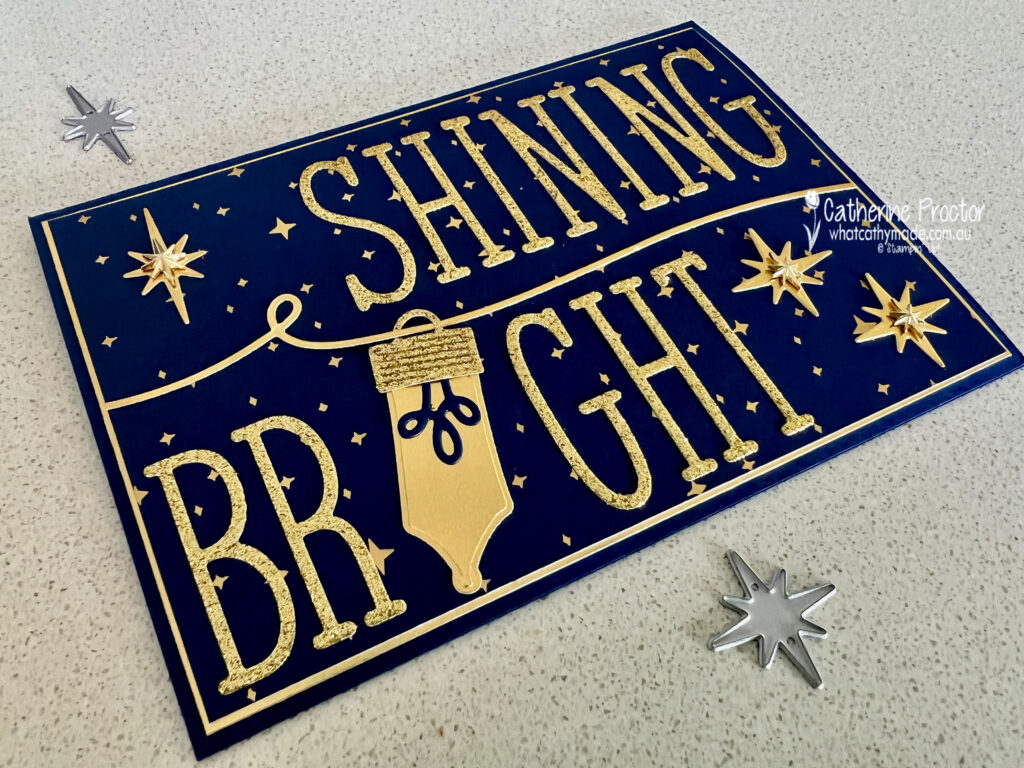
The #30DayChristmasCardMakingChallenge is a global challenge hosted by UK Artisan Stampin’ Up! demonstrator, Martin Stone, and the challenge for Day 1 is “Shining Bright”.
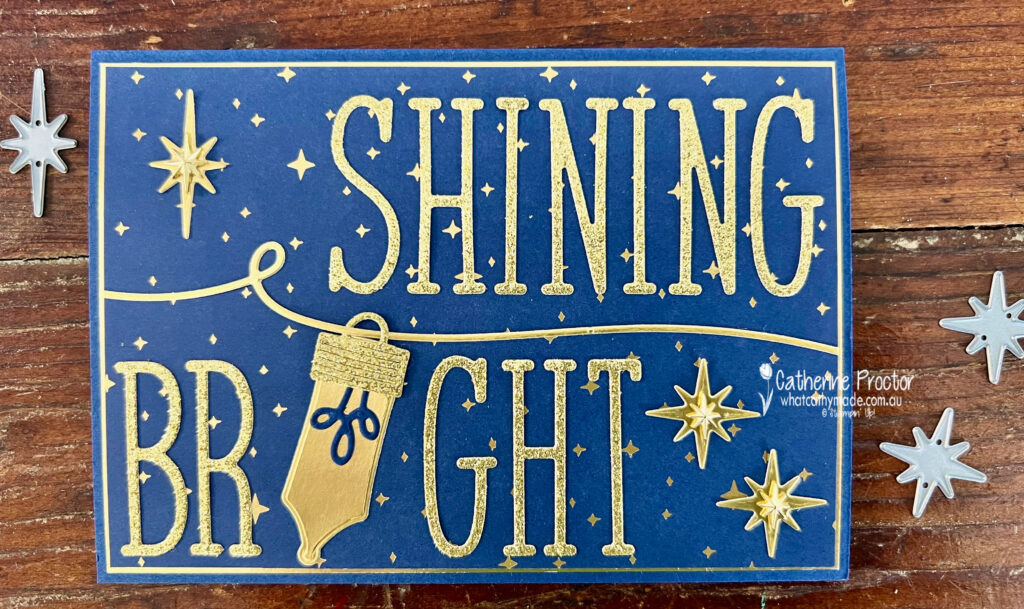
I’ve taken today’s challenge very literally, creating a Night of Navy and Gold card that uses the Shining Brightly Specialty Designer Series Paper, Adhesive Backed star trinkets, Alphabet a la Mode dies and the Merry & Bright dies.
The ‘Shining Bright’ sentiment was die cut using an exciting new online only product, Silver & Gold 12″ x 12″ (30.5 x 30.5 cm) Adhesive-backed Glimmer Paper. As soon as I die cut the letters out they became repositionable stickers – what a game changer!
The stars were die cut from gold foil that had first been attached to an adhesive sheet. No mess and no fuss!
Instead of the letter ‘I’ in ‘Bright’ I die cut one of the Christmas light bulbs from gold foil, adding a Night of Navy filament.
Adhesive Backed star trinkets add dimension to all three gold stars.
I’ll be back tonight with a Granny apple Green card for our Art With Heart Colour Creations blog, then I have another card to share with you for Day 2 of the 30 Day Christmas Card Making Challenge.
Wherever you are in the world, keep on crafting xxx
Welcome to week thirty six of our Art With Heart 2022-23 Colour Creations blog hop.
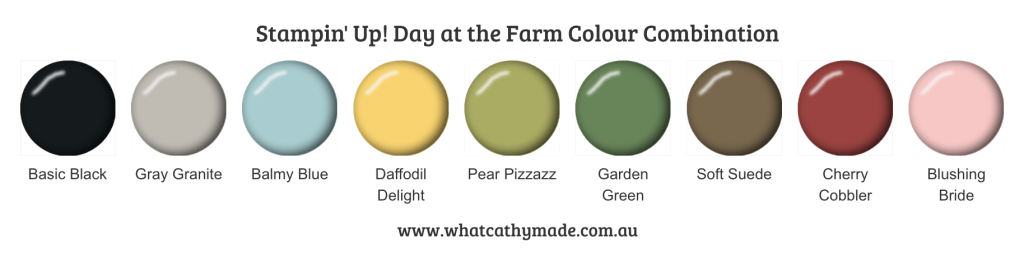
This is a weekly blog hop where we showcase the stunning range of Stampin’ Up! colours in alphabetical order over 12 months and this week we are featuring Pear Pizzazz from the Subtle family.
Today I’ve gone a bit rogue and created a project that uses not only Pear Pizzazz, but eight other colours too: Balmy Blue, Basic Black, Blushing Bride, Cherry Cobbler, Daffodil Delight, Garden Green, Gray Granite and Soft Suede!
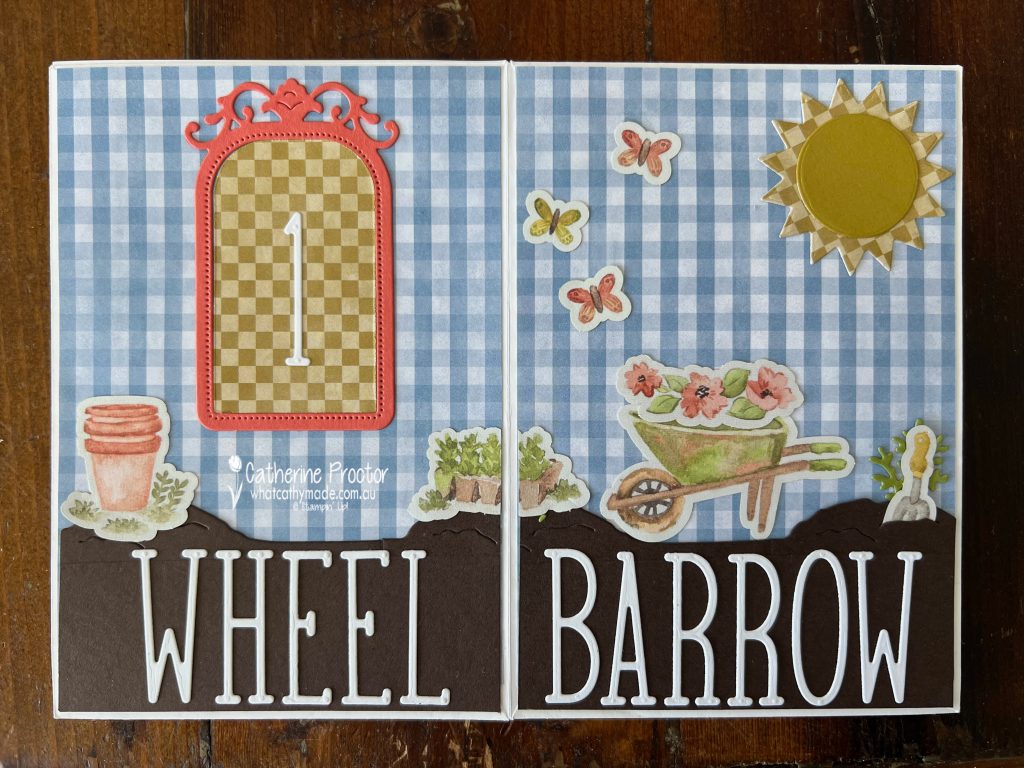
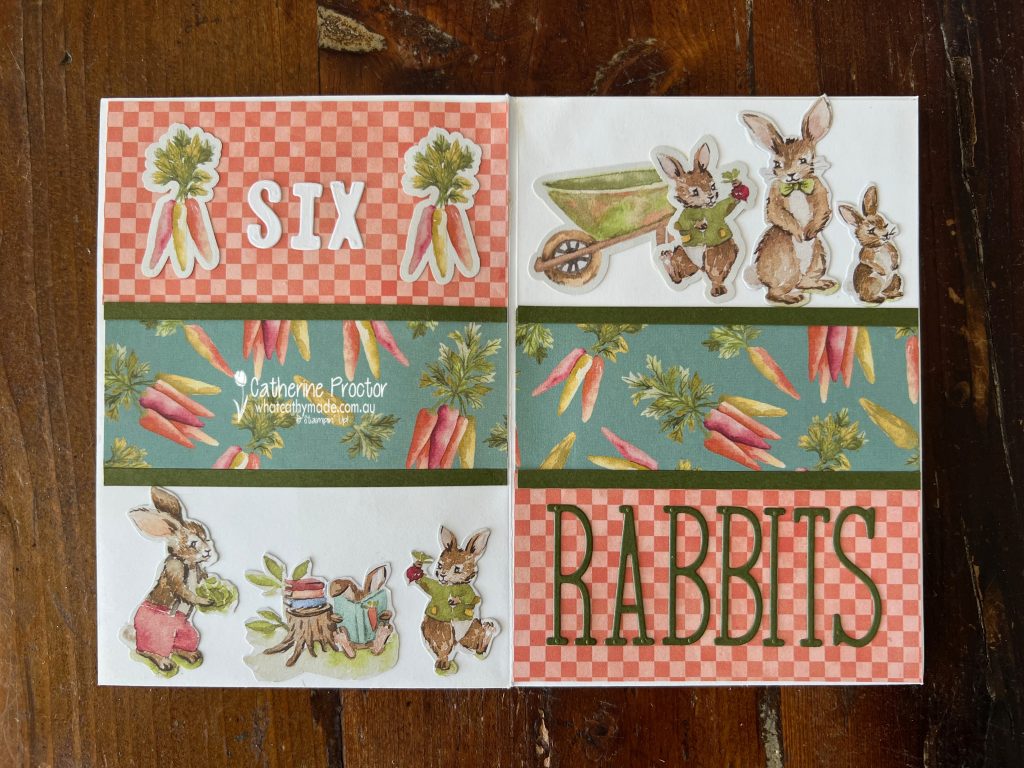
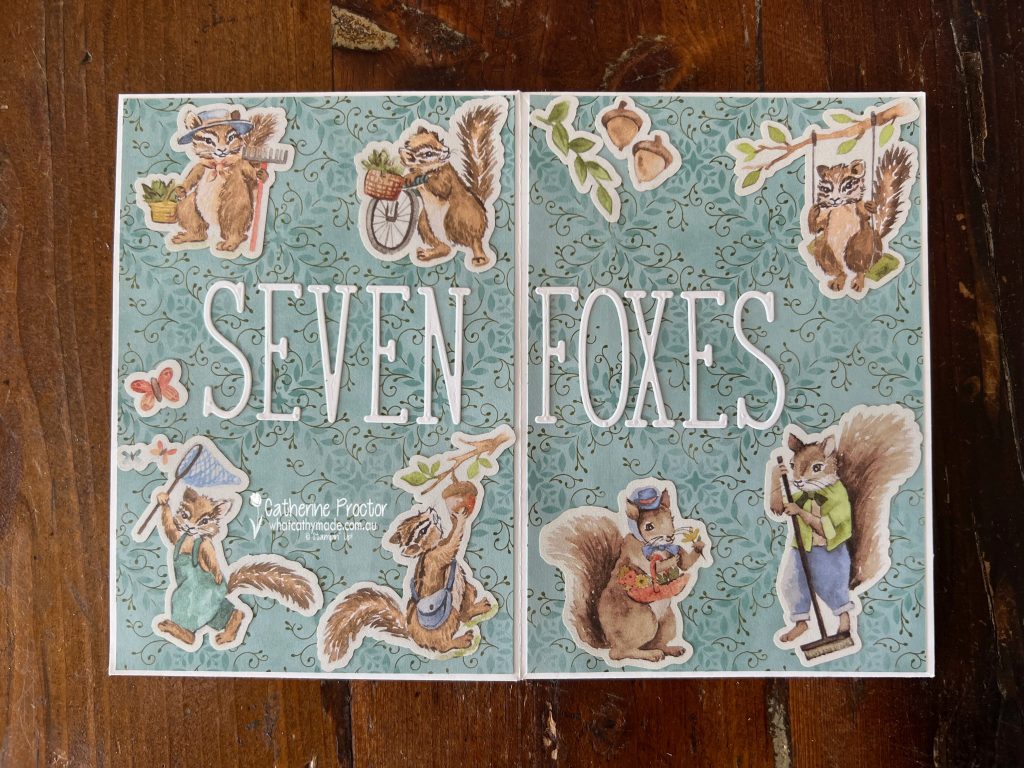
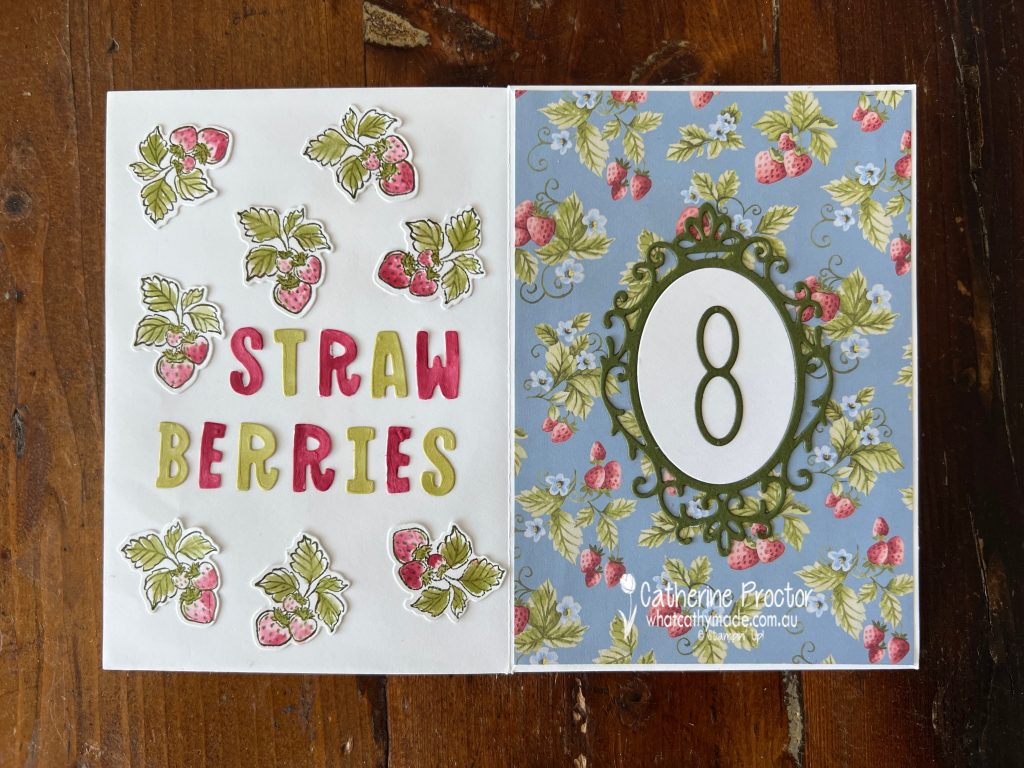
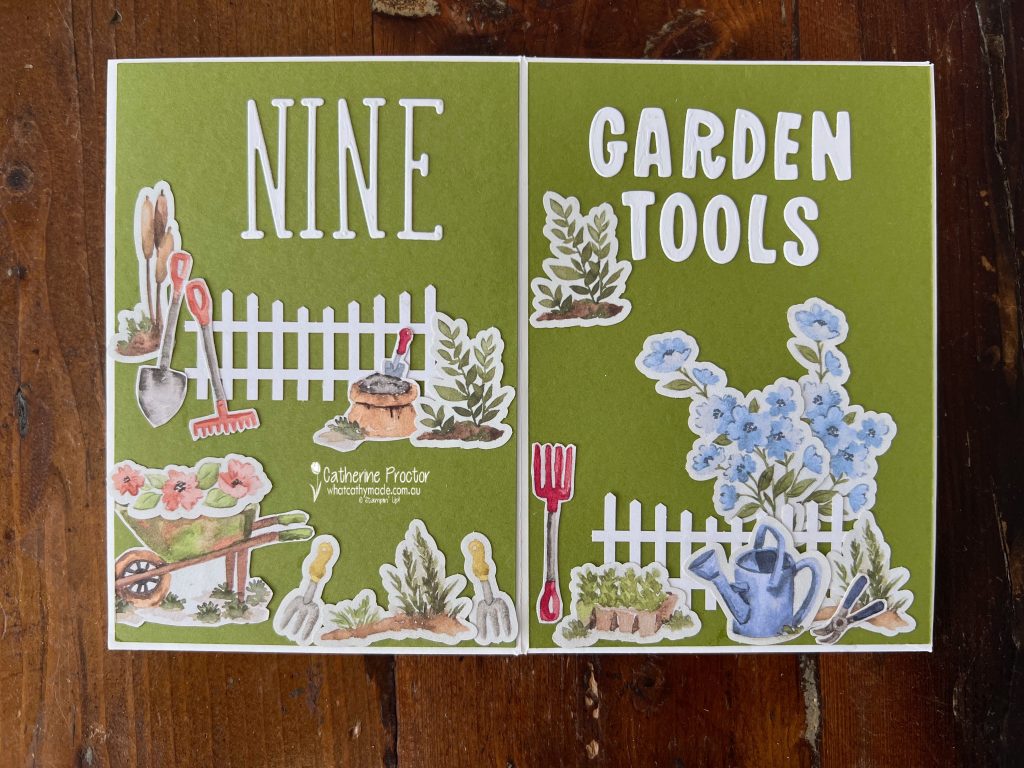
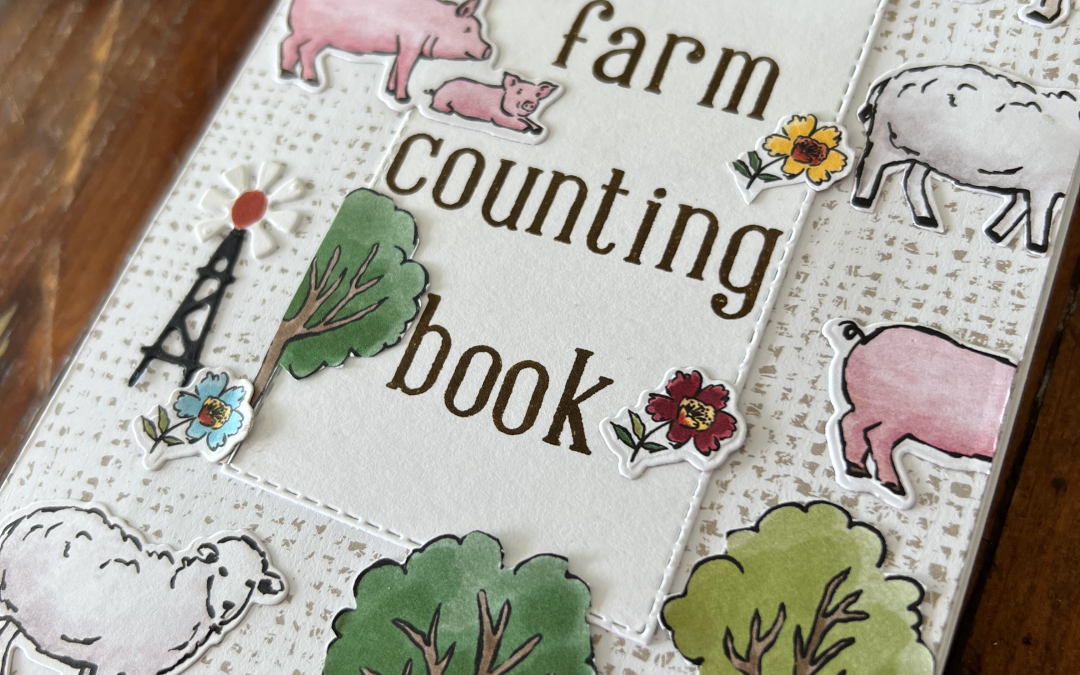
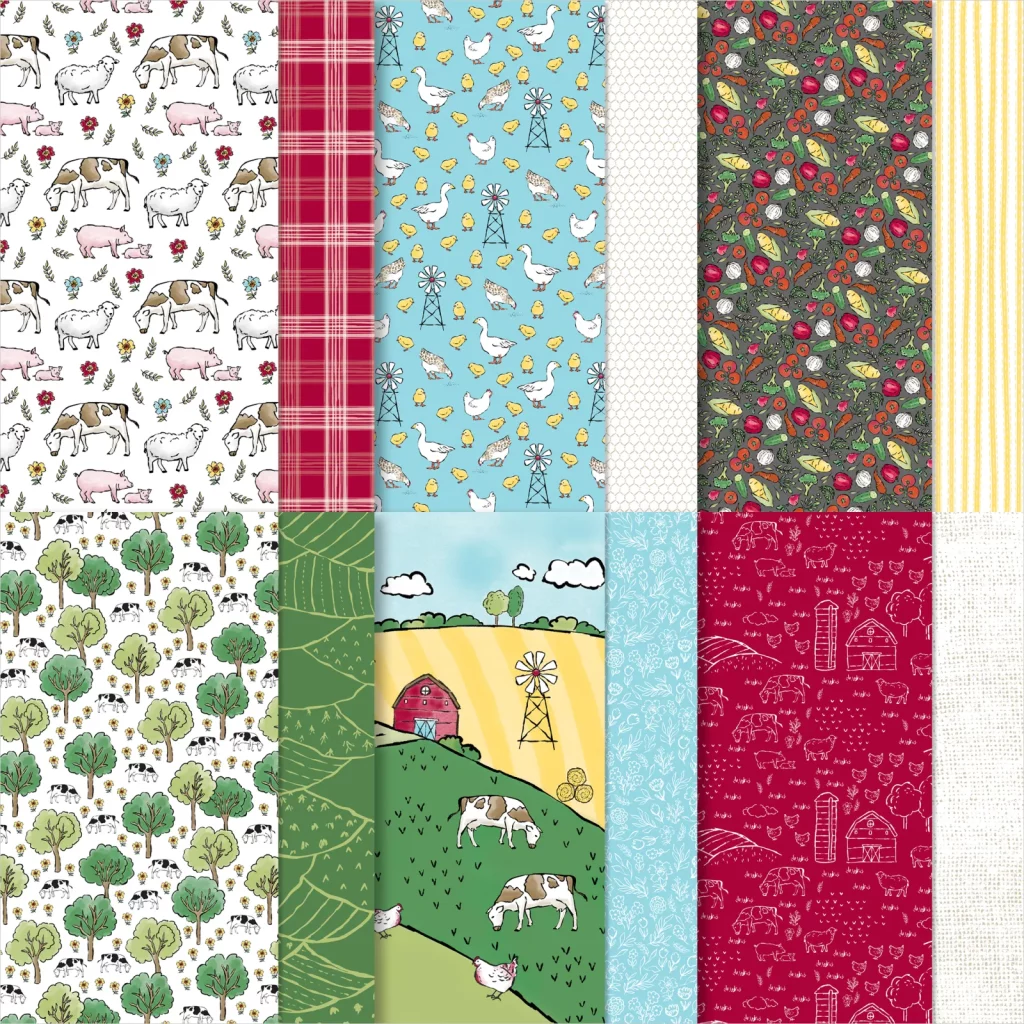
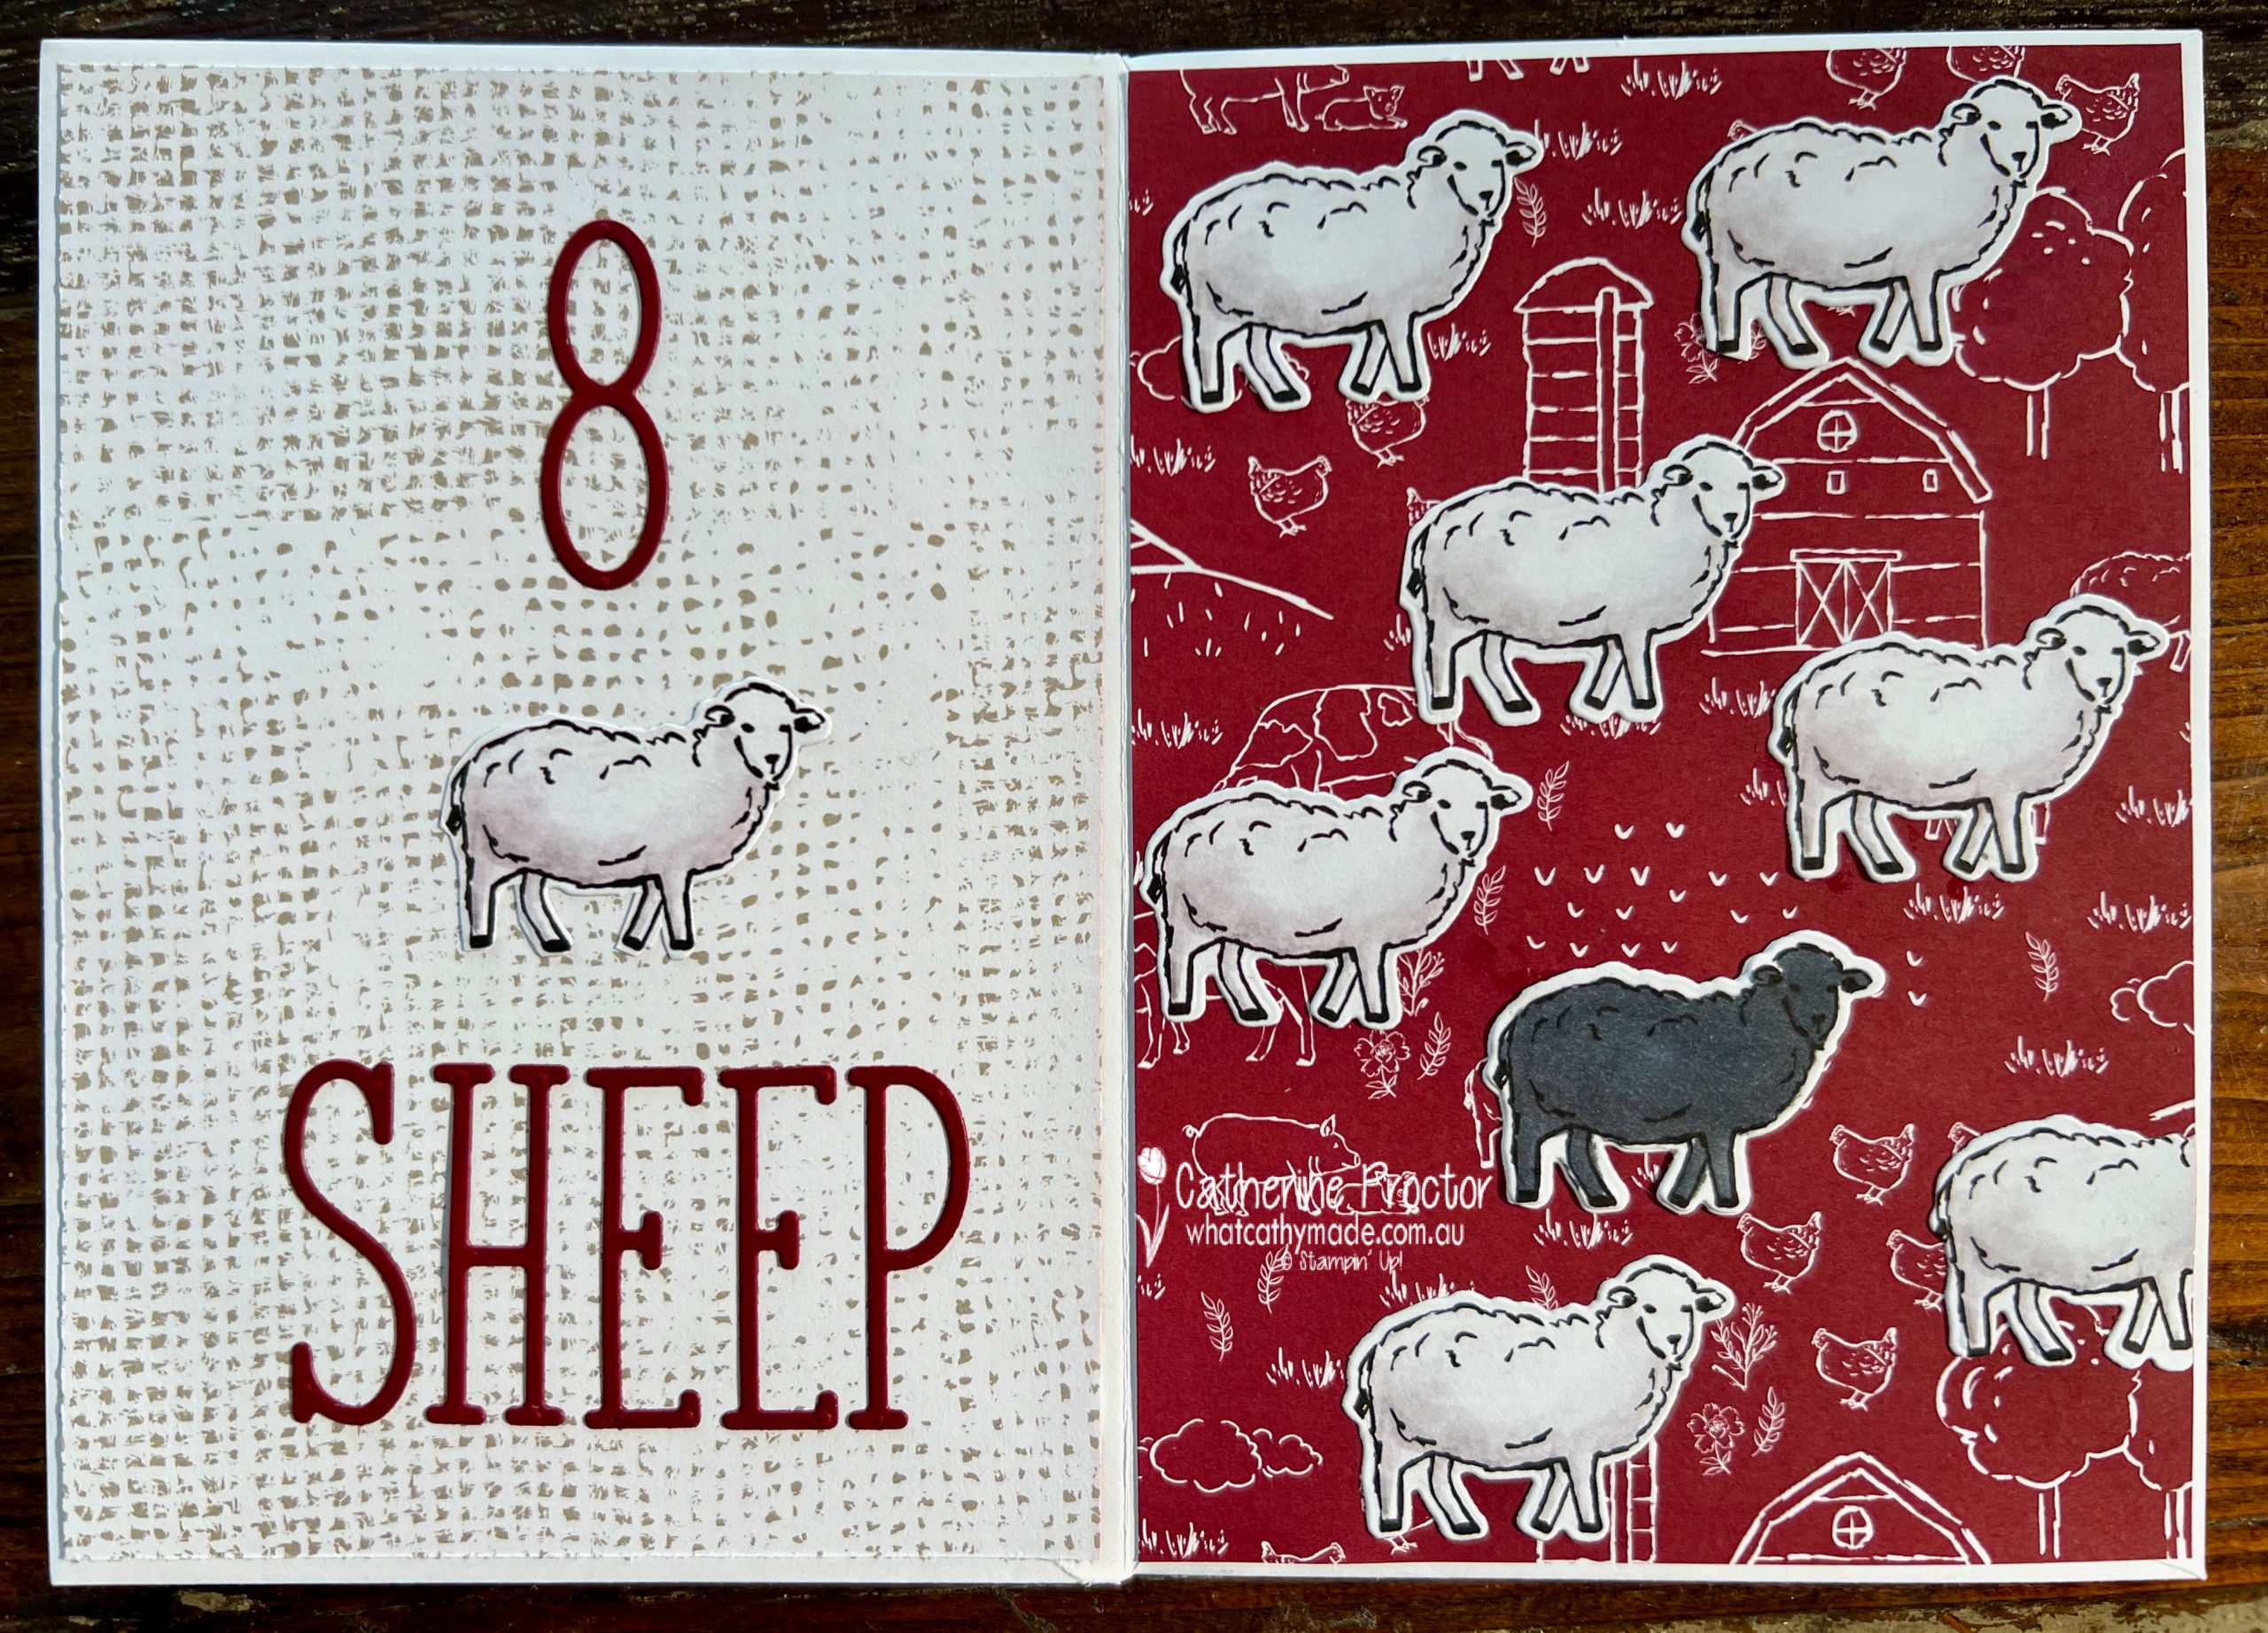
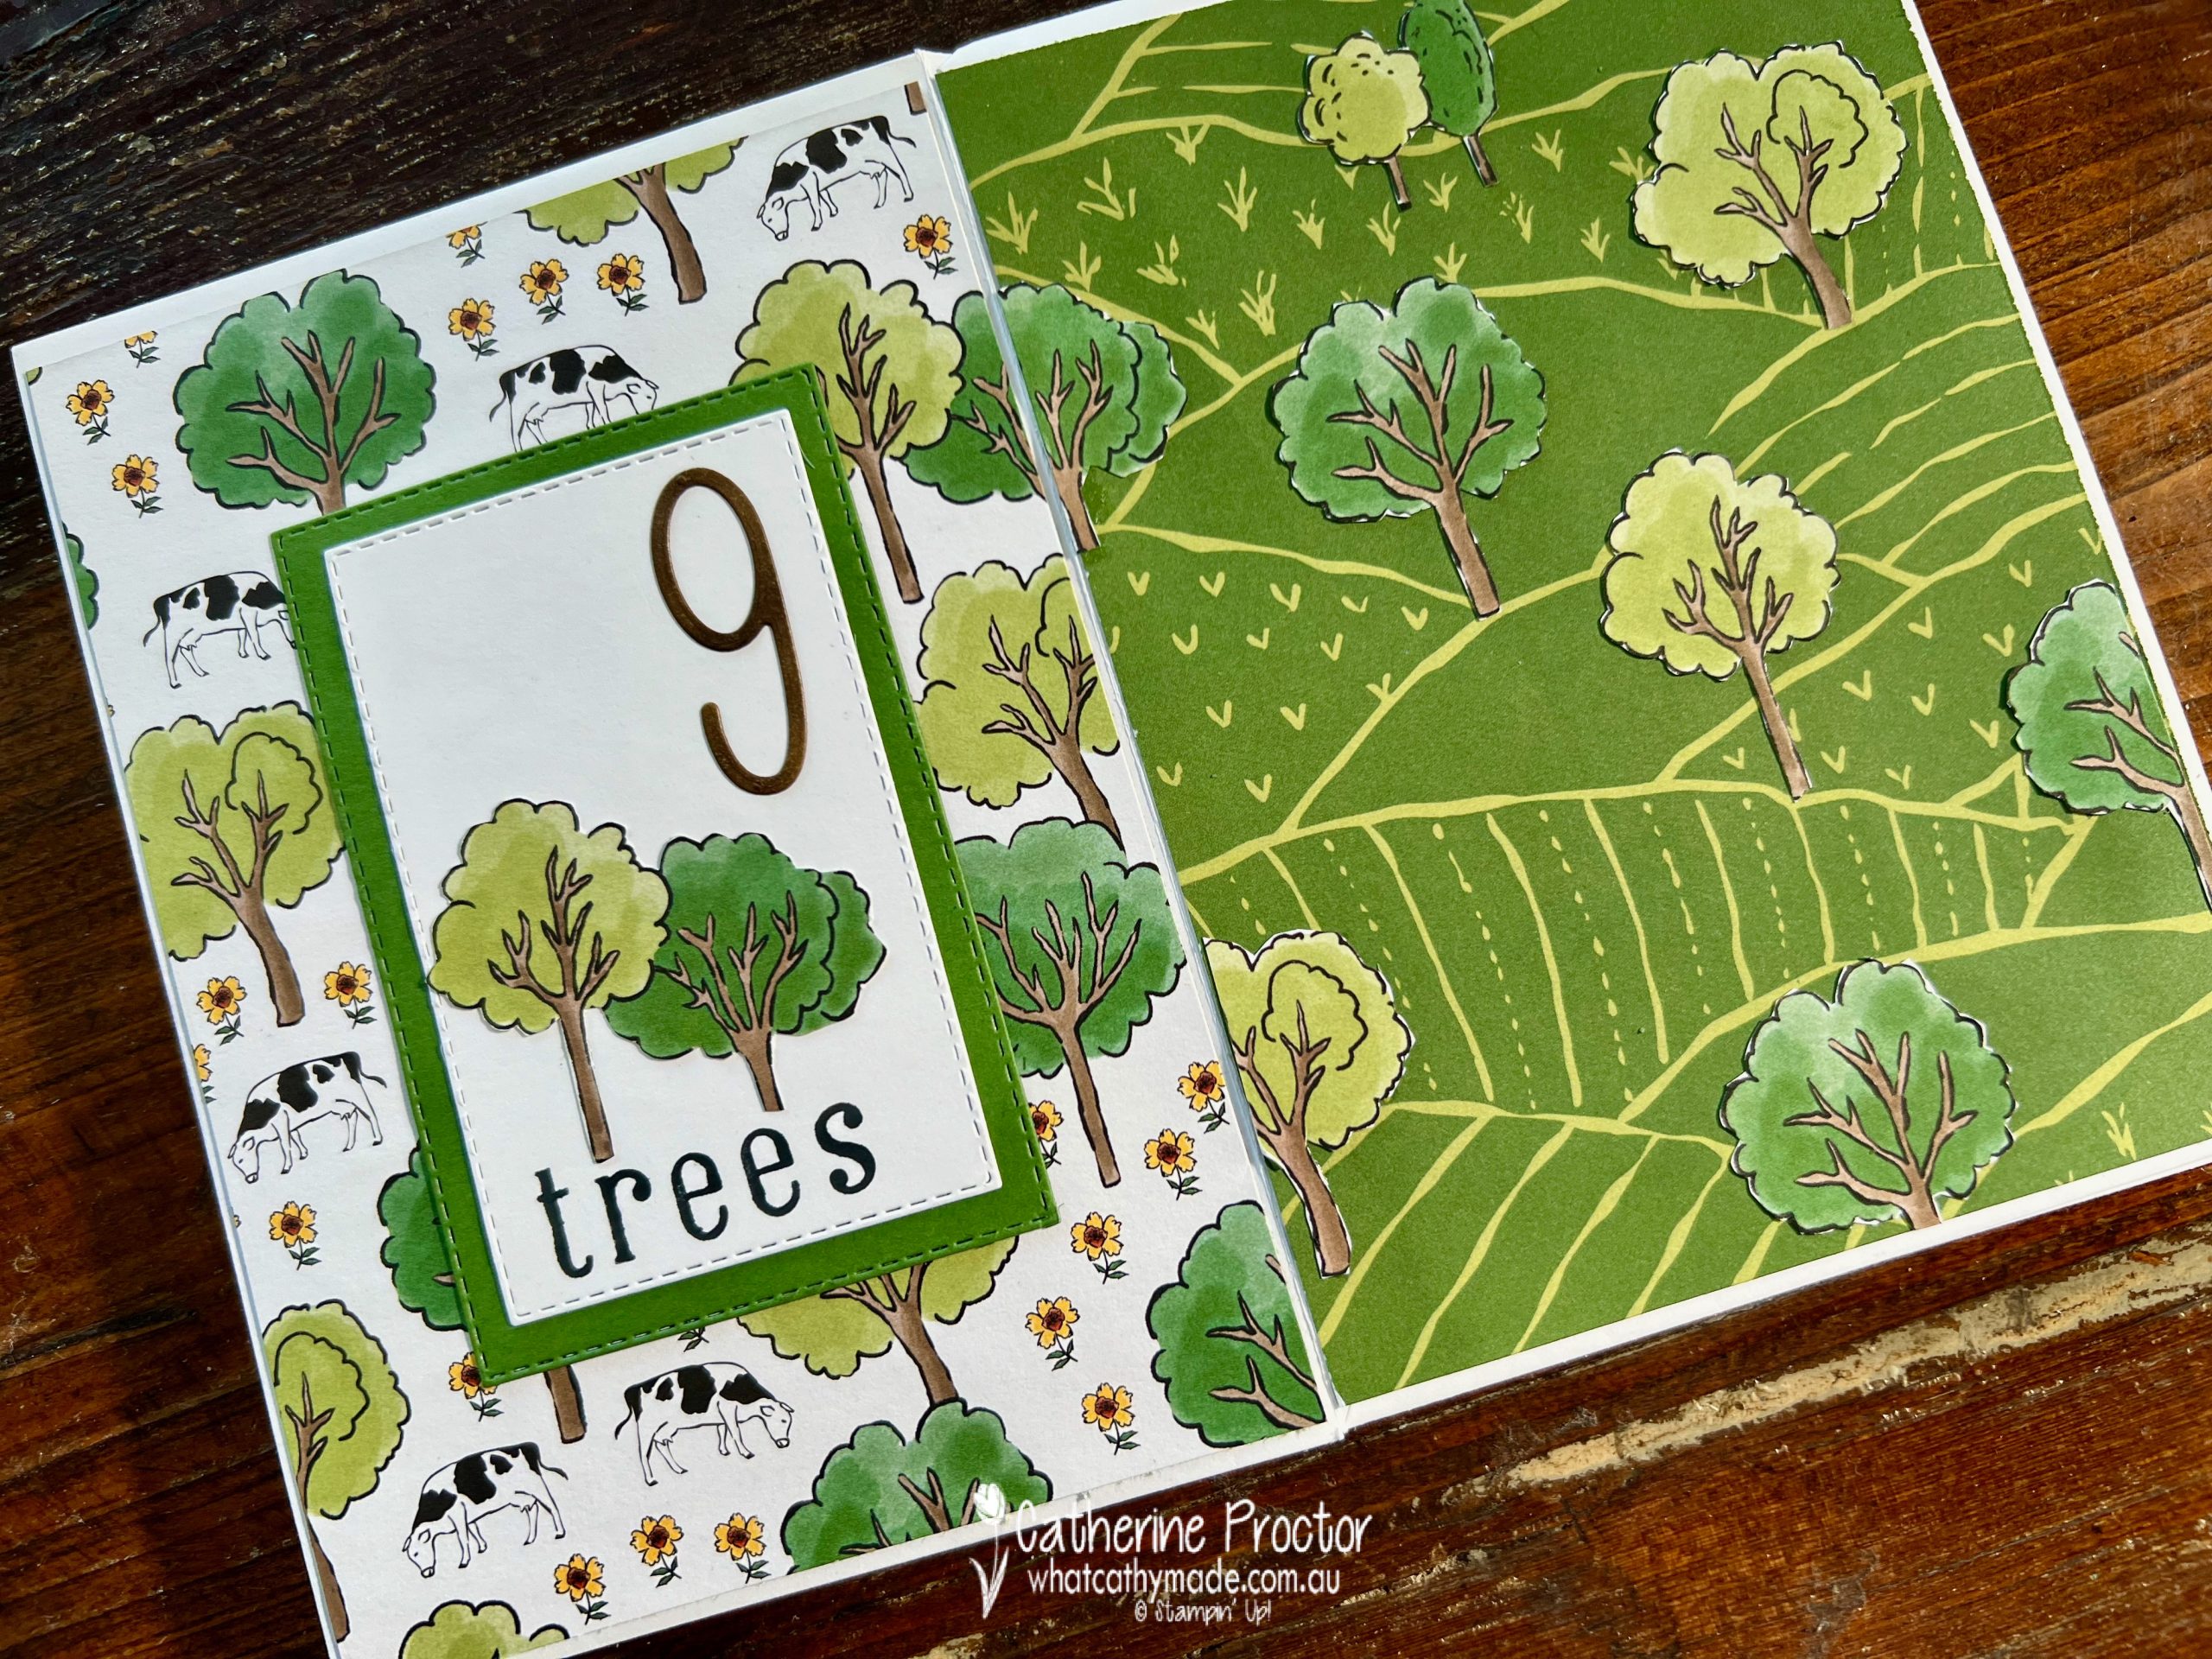
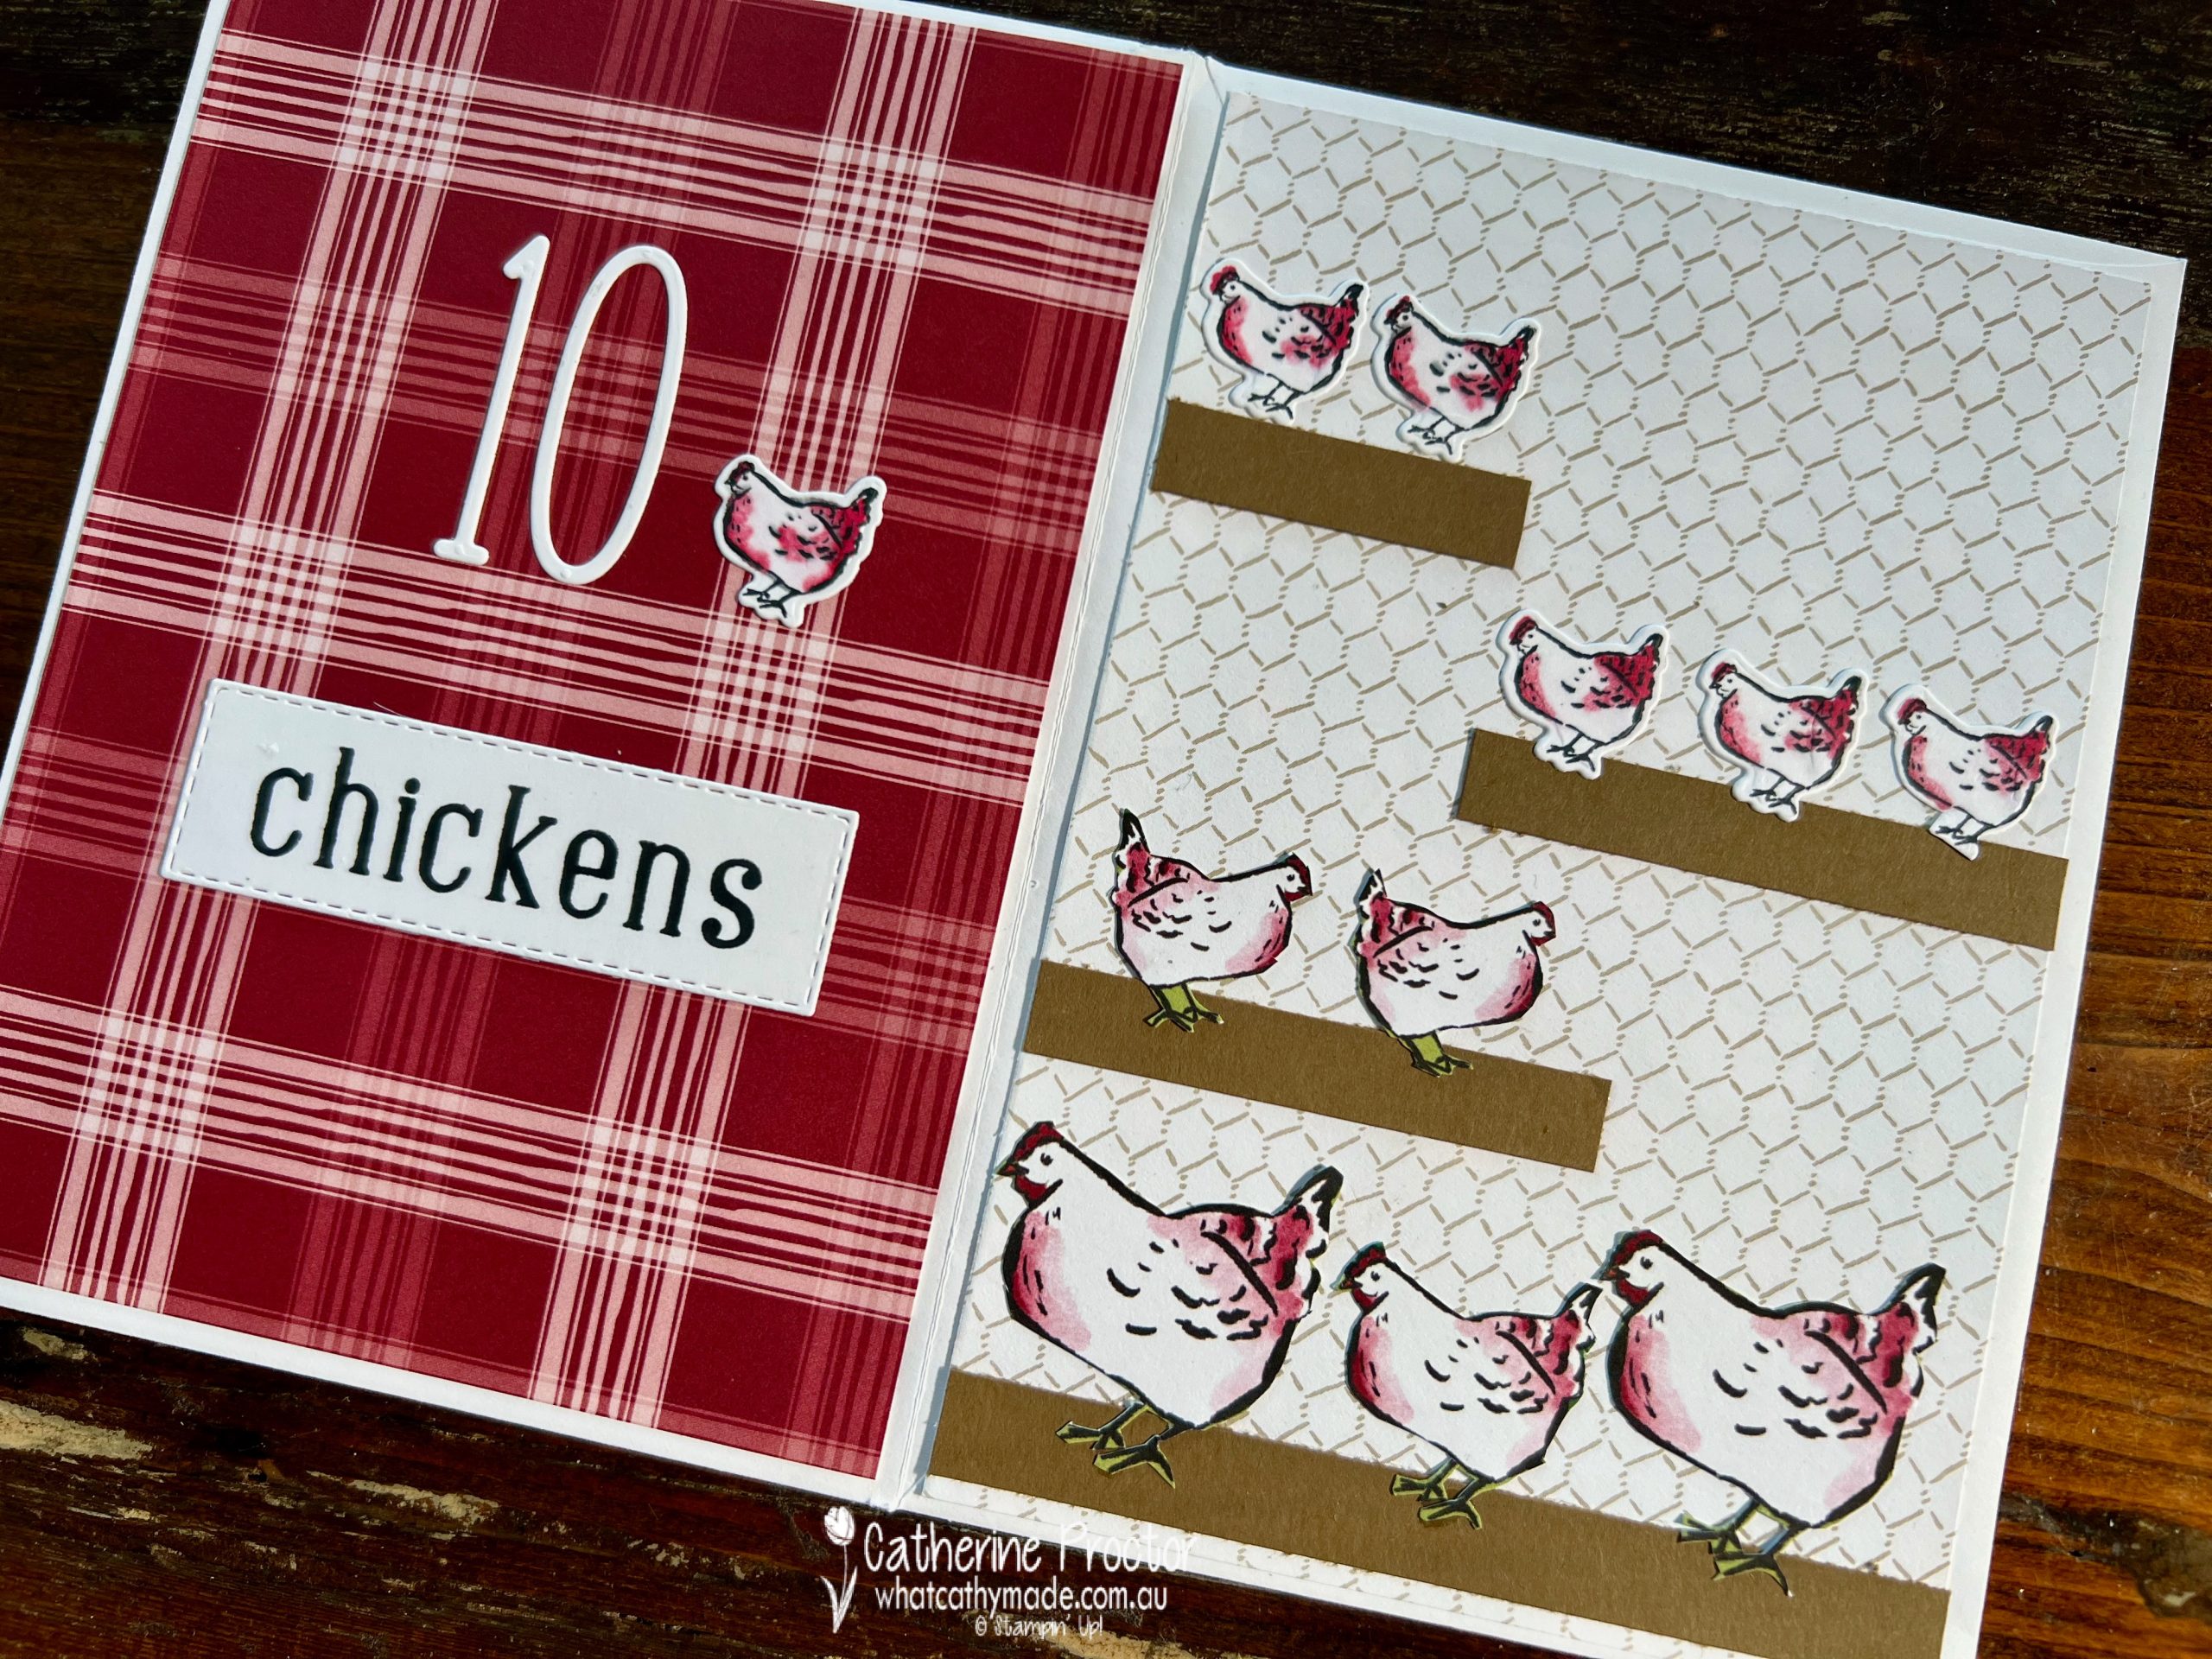
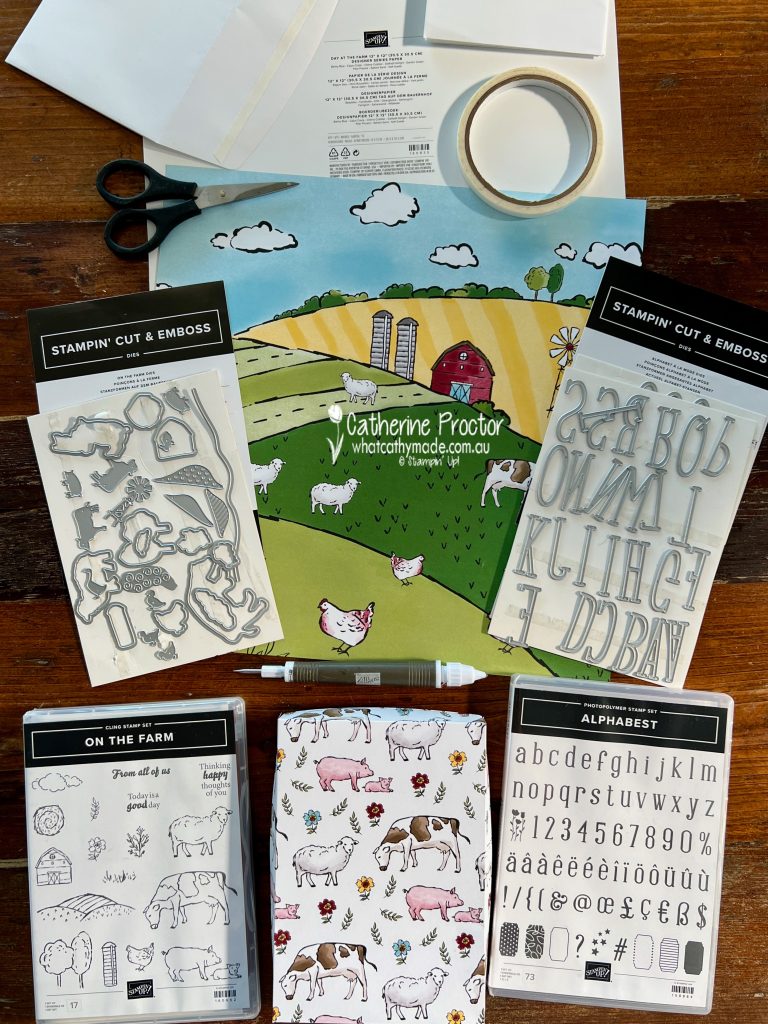
So why have I used so many colours for my project this week? One of the free SALE-a-bration items you can redeem for a $90 spend until 28th February 2023 is the Day at the Farm DSP and I’ve used this DSP to create a children’s counting book.
Here’s a short one-minute video to show you what the counting book looks like.
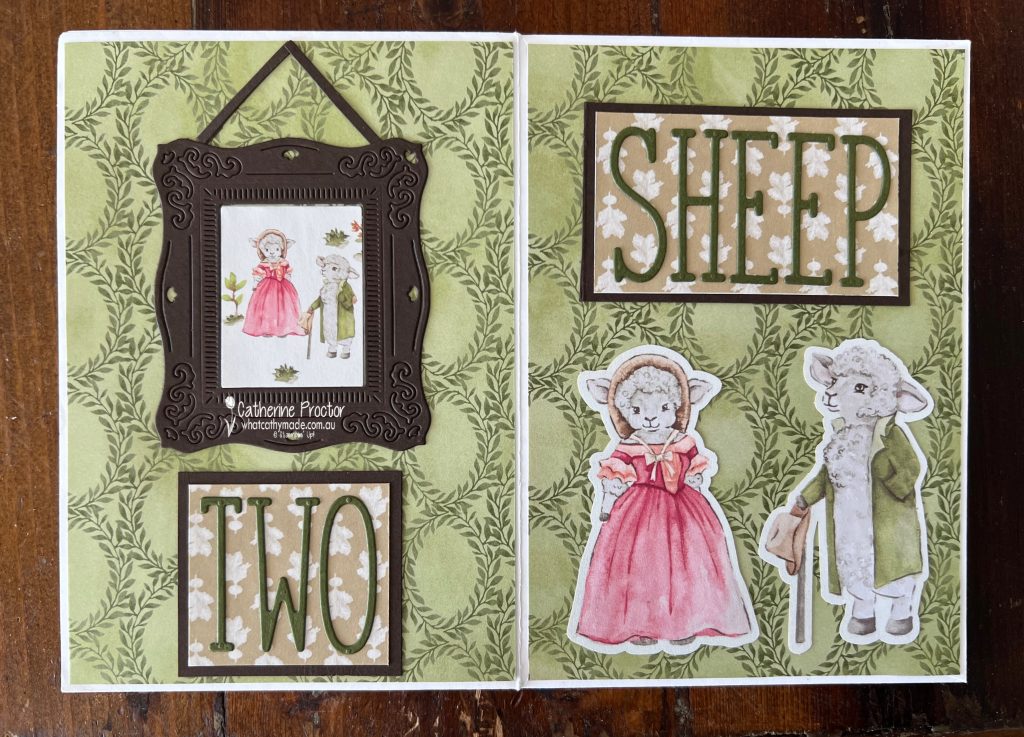
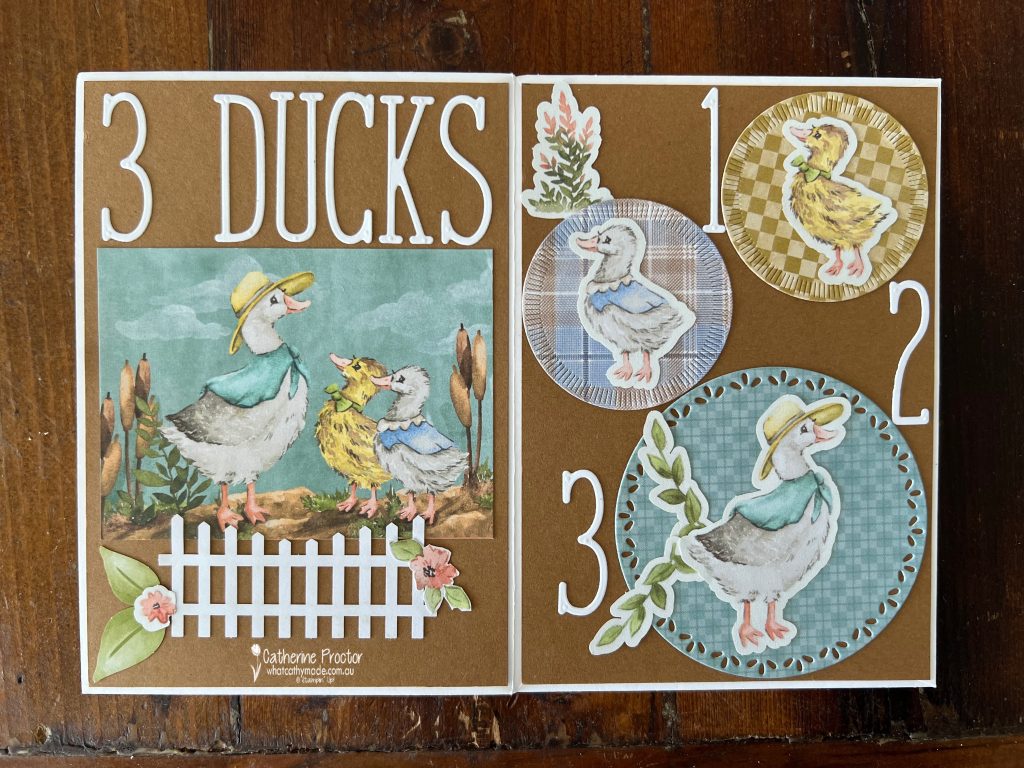
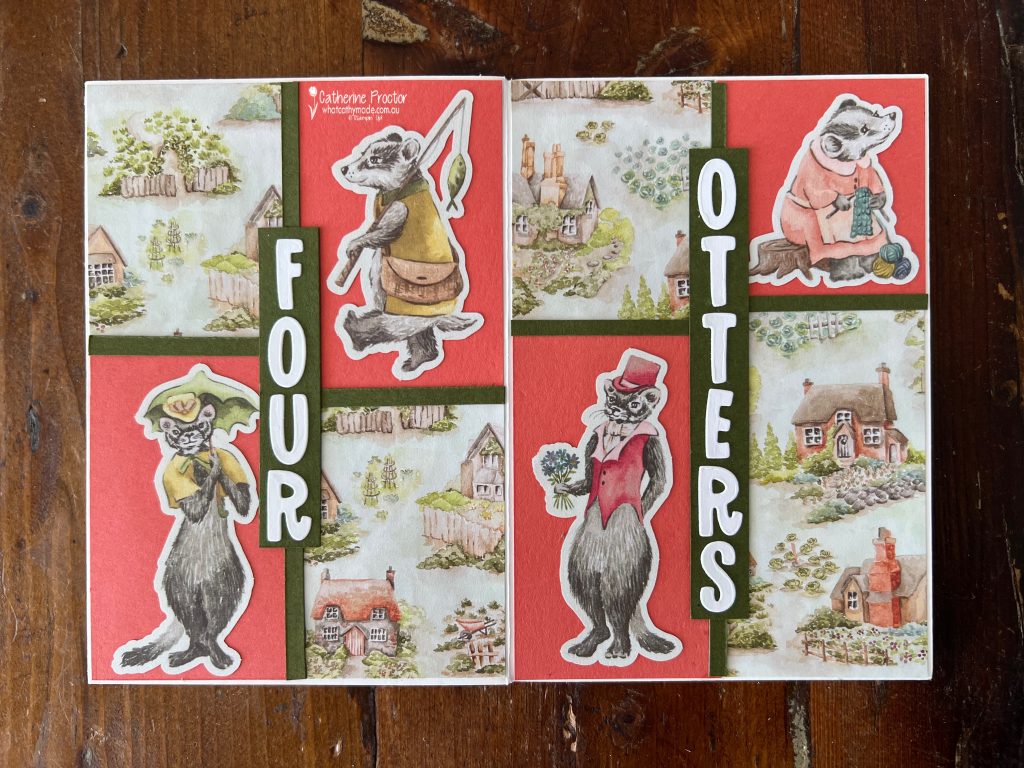
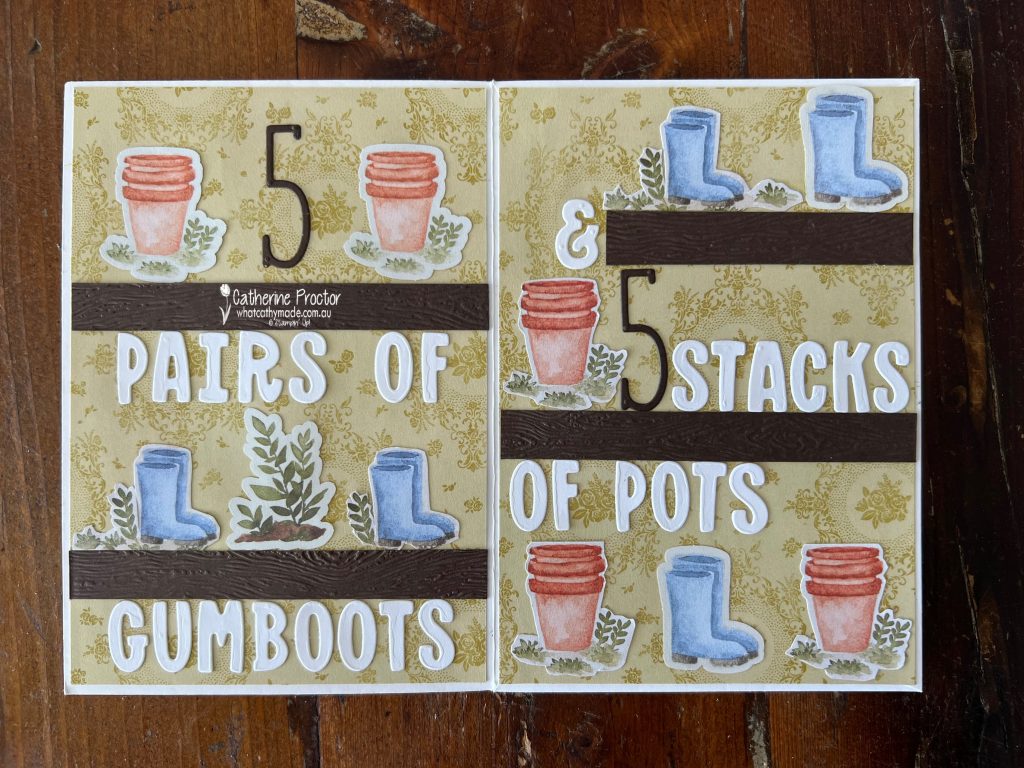
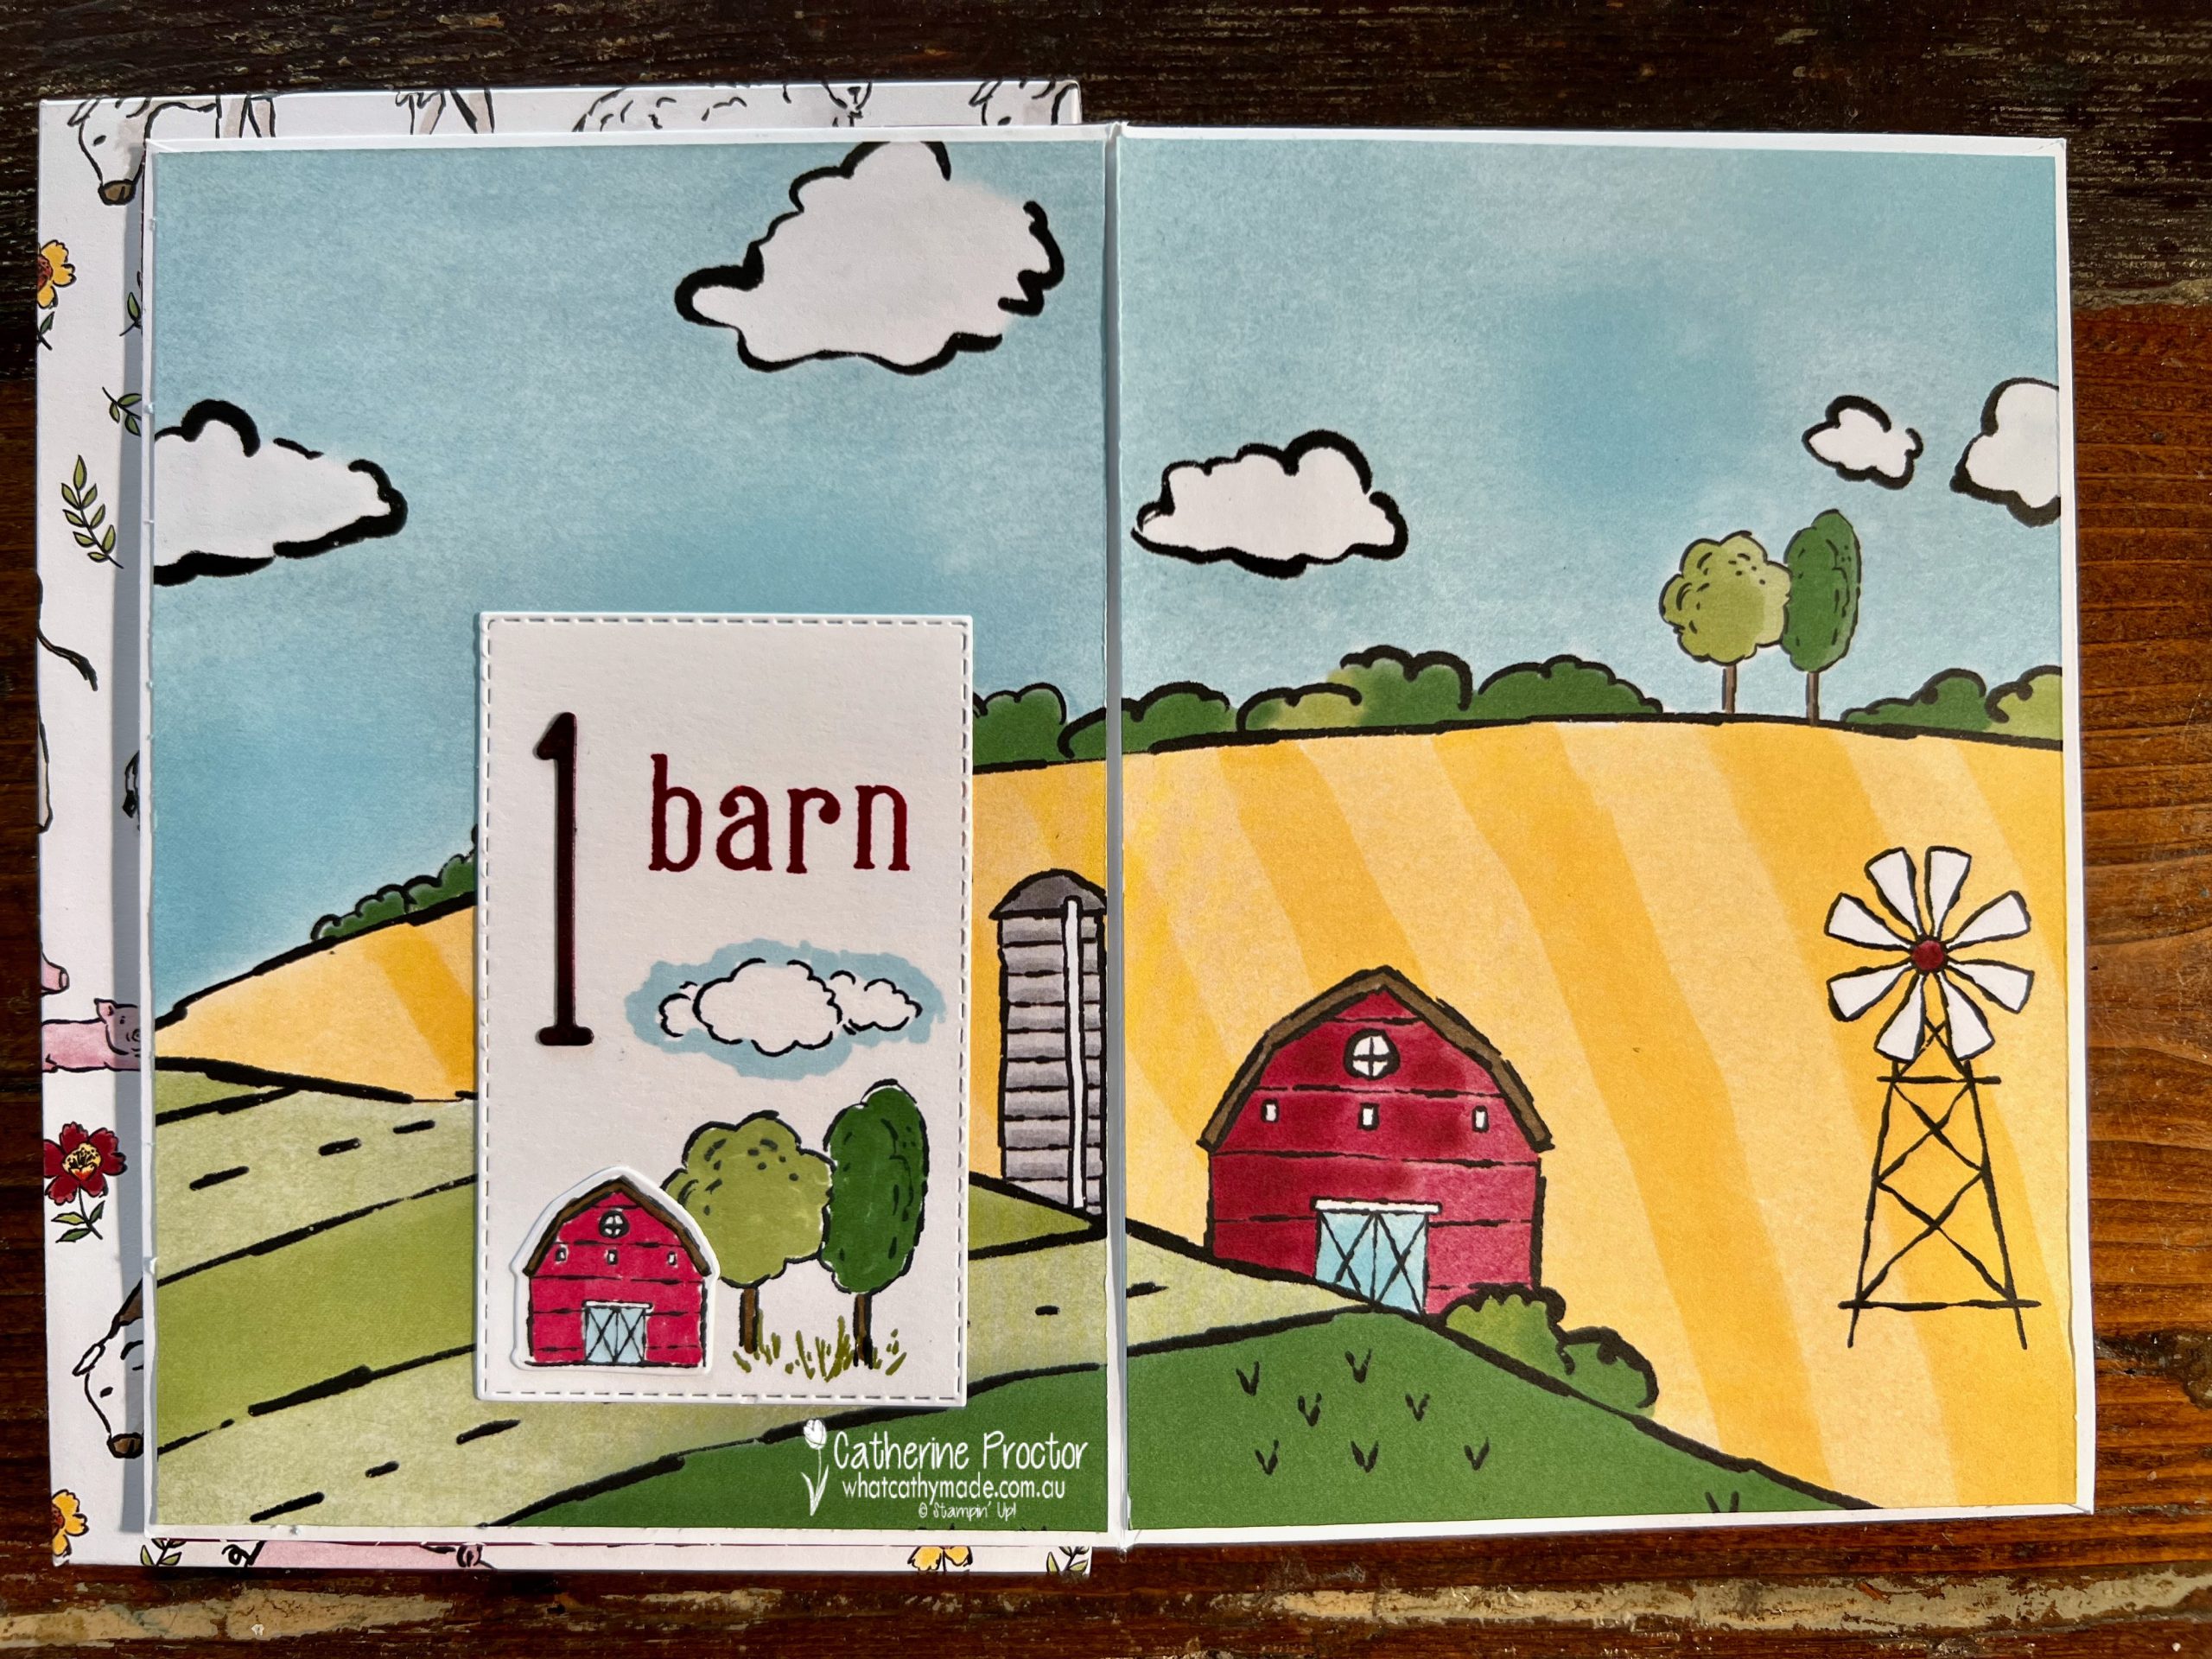
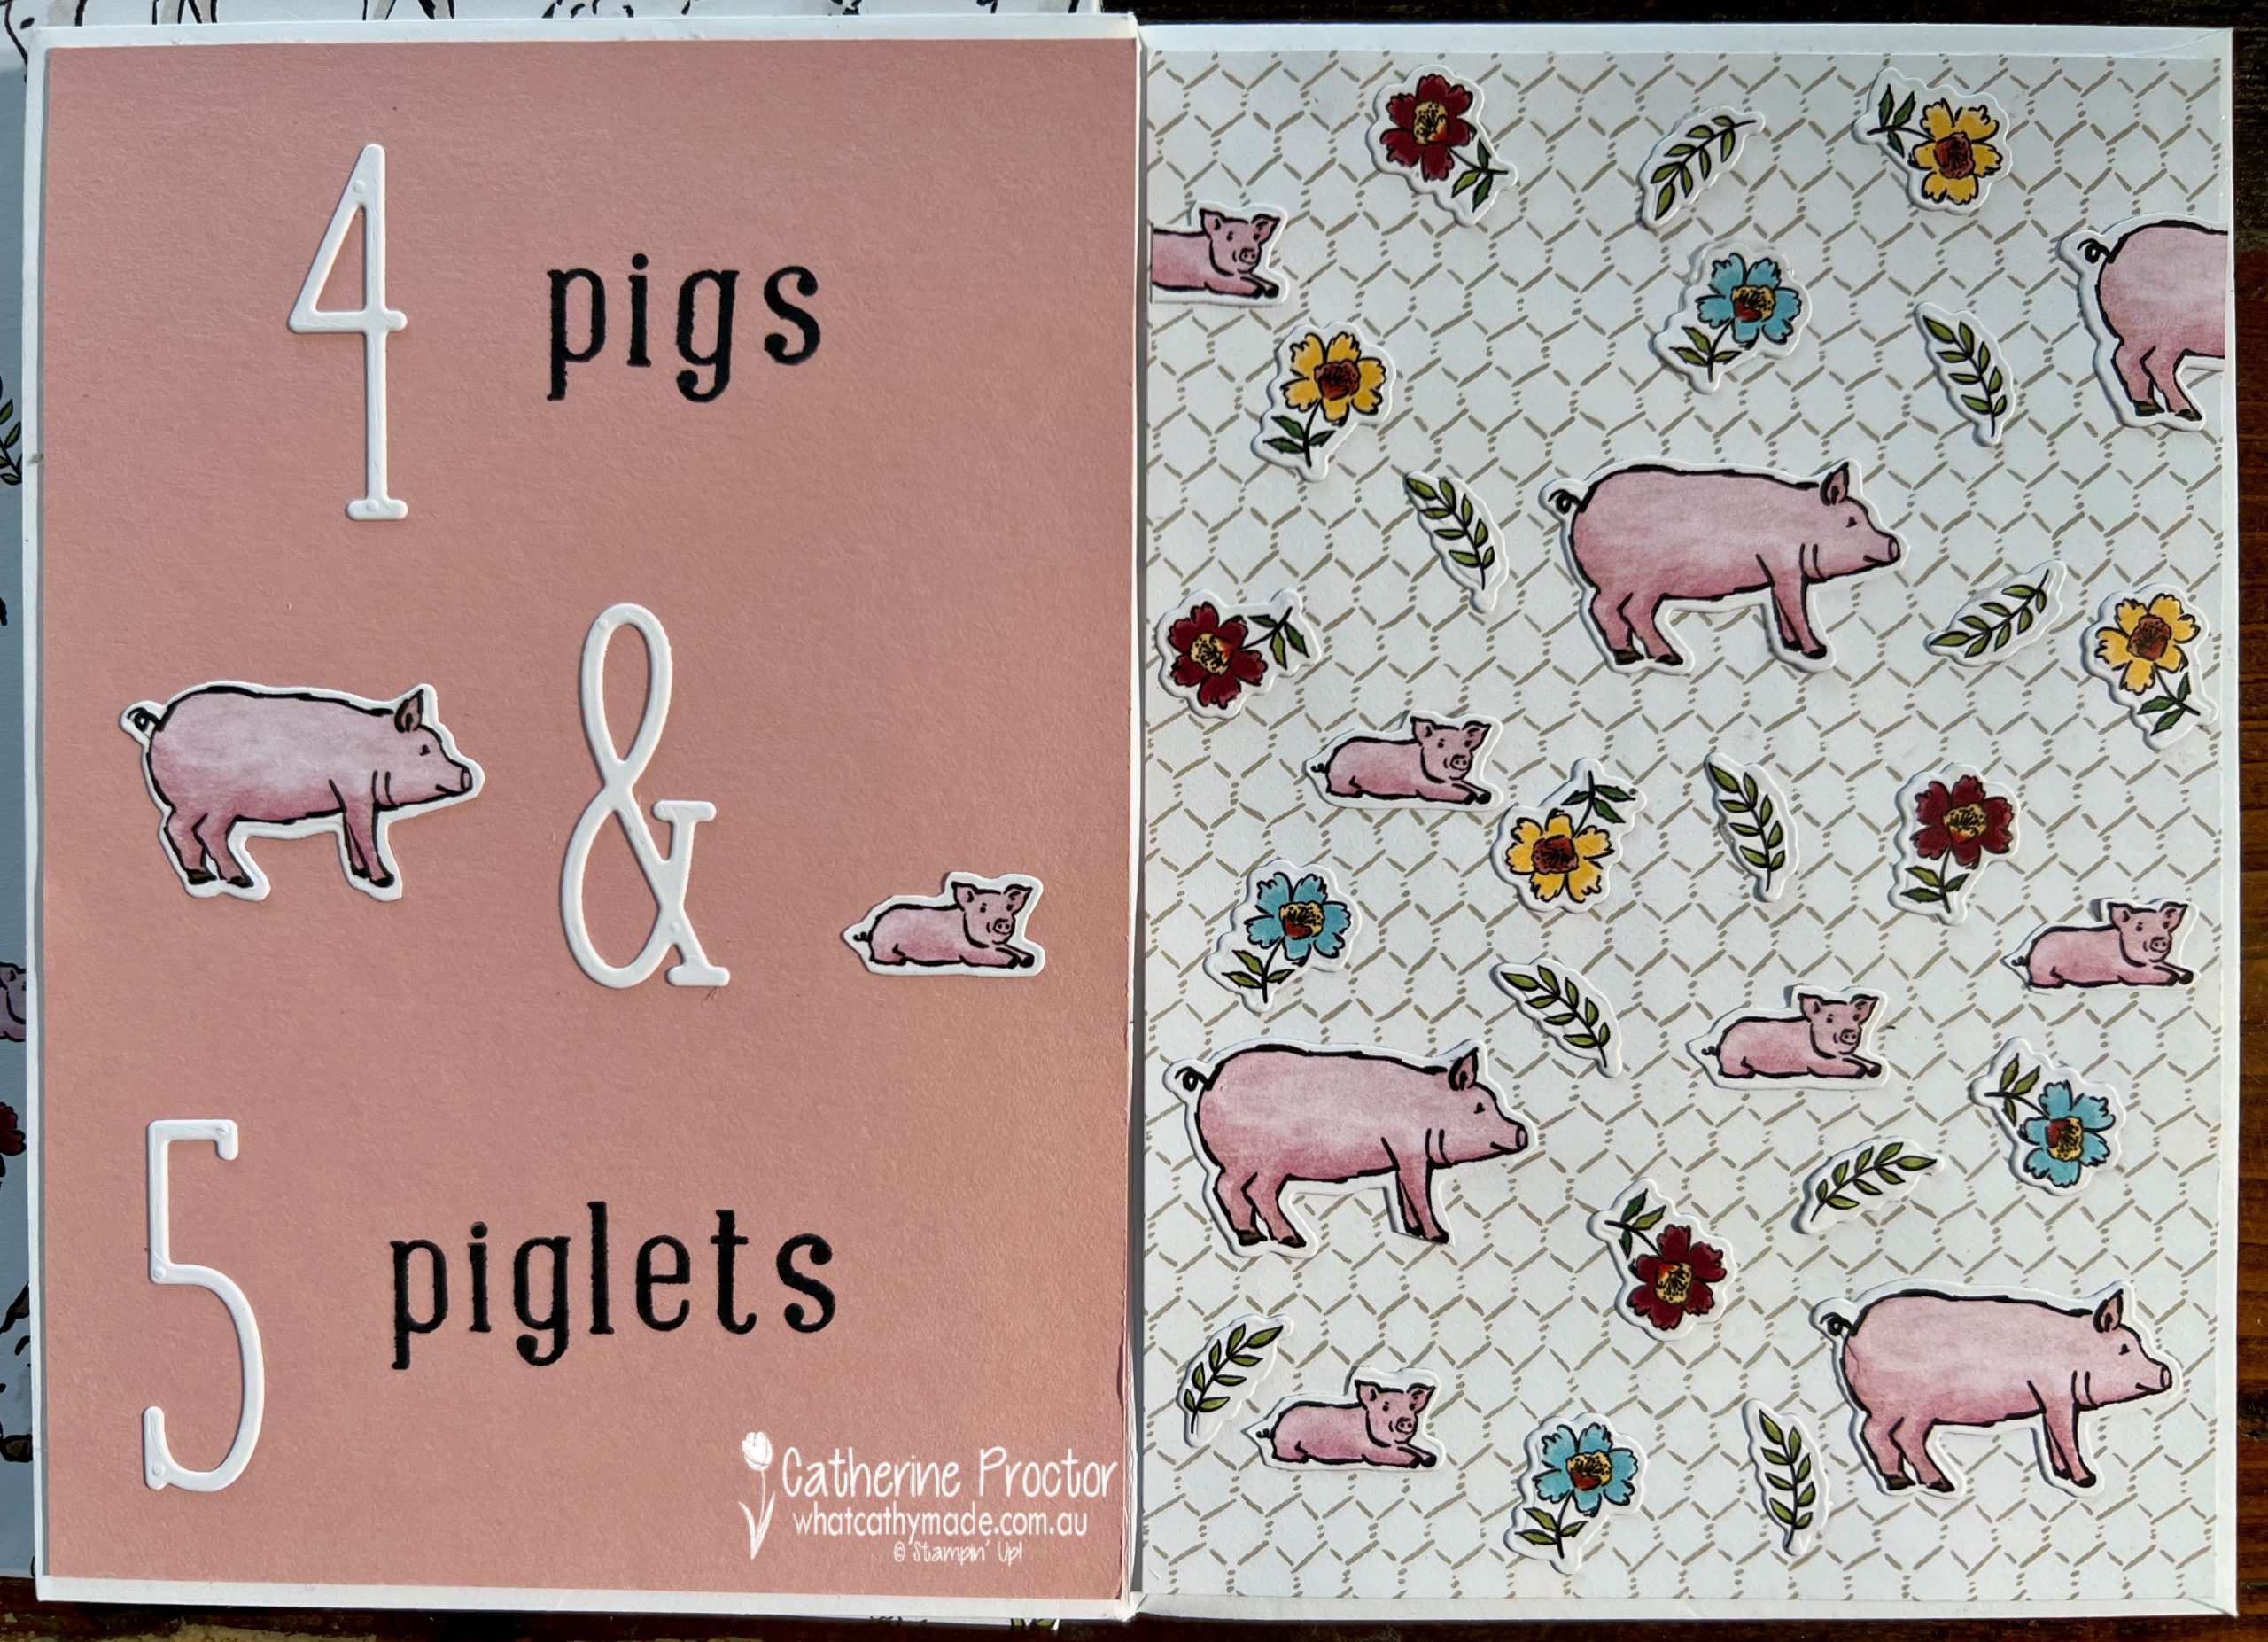
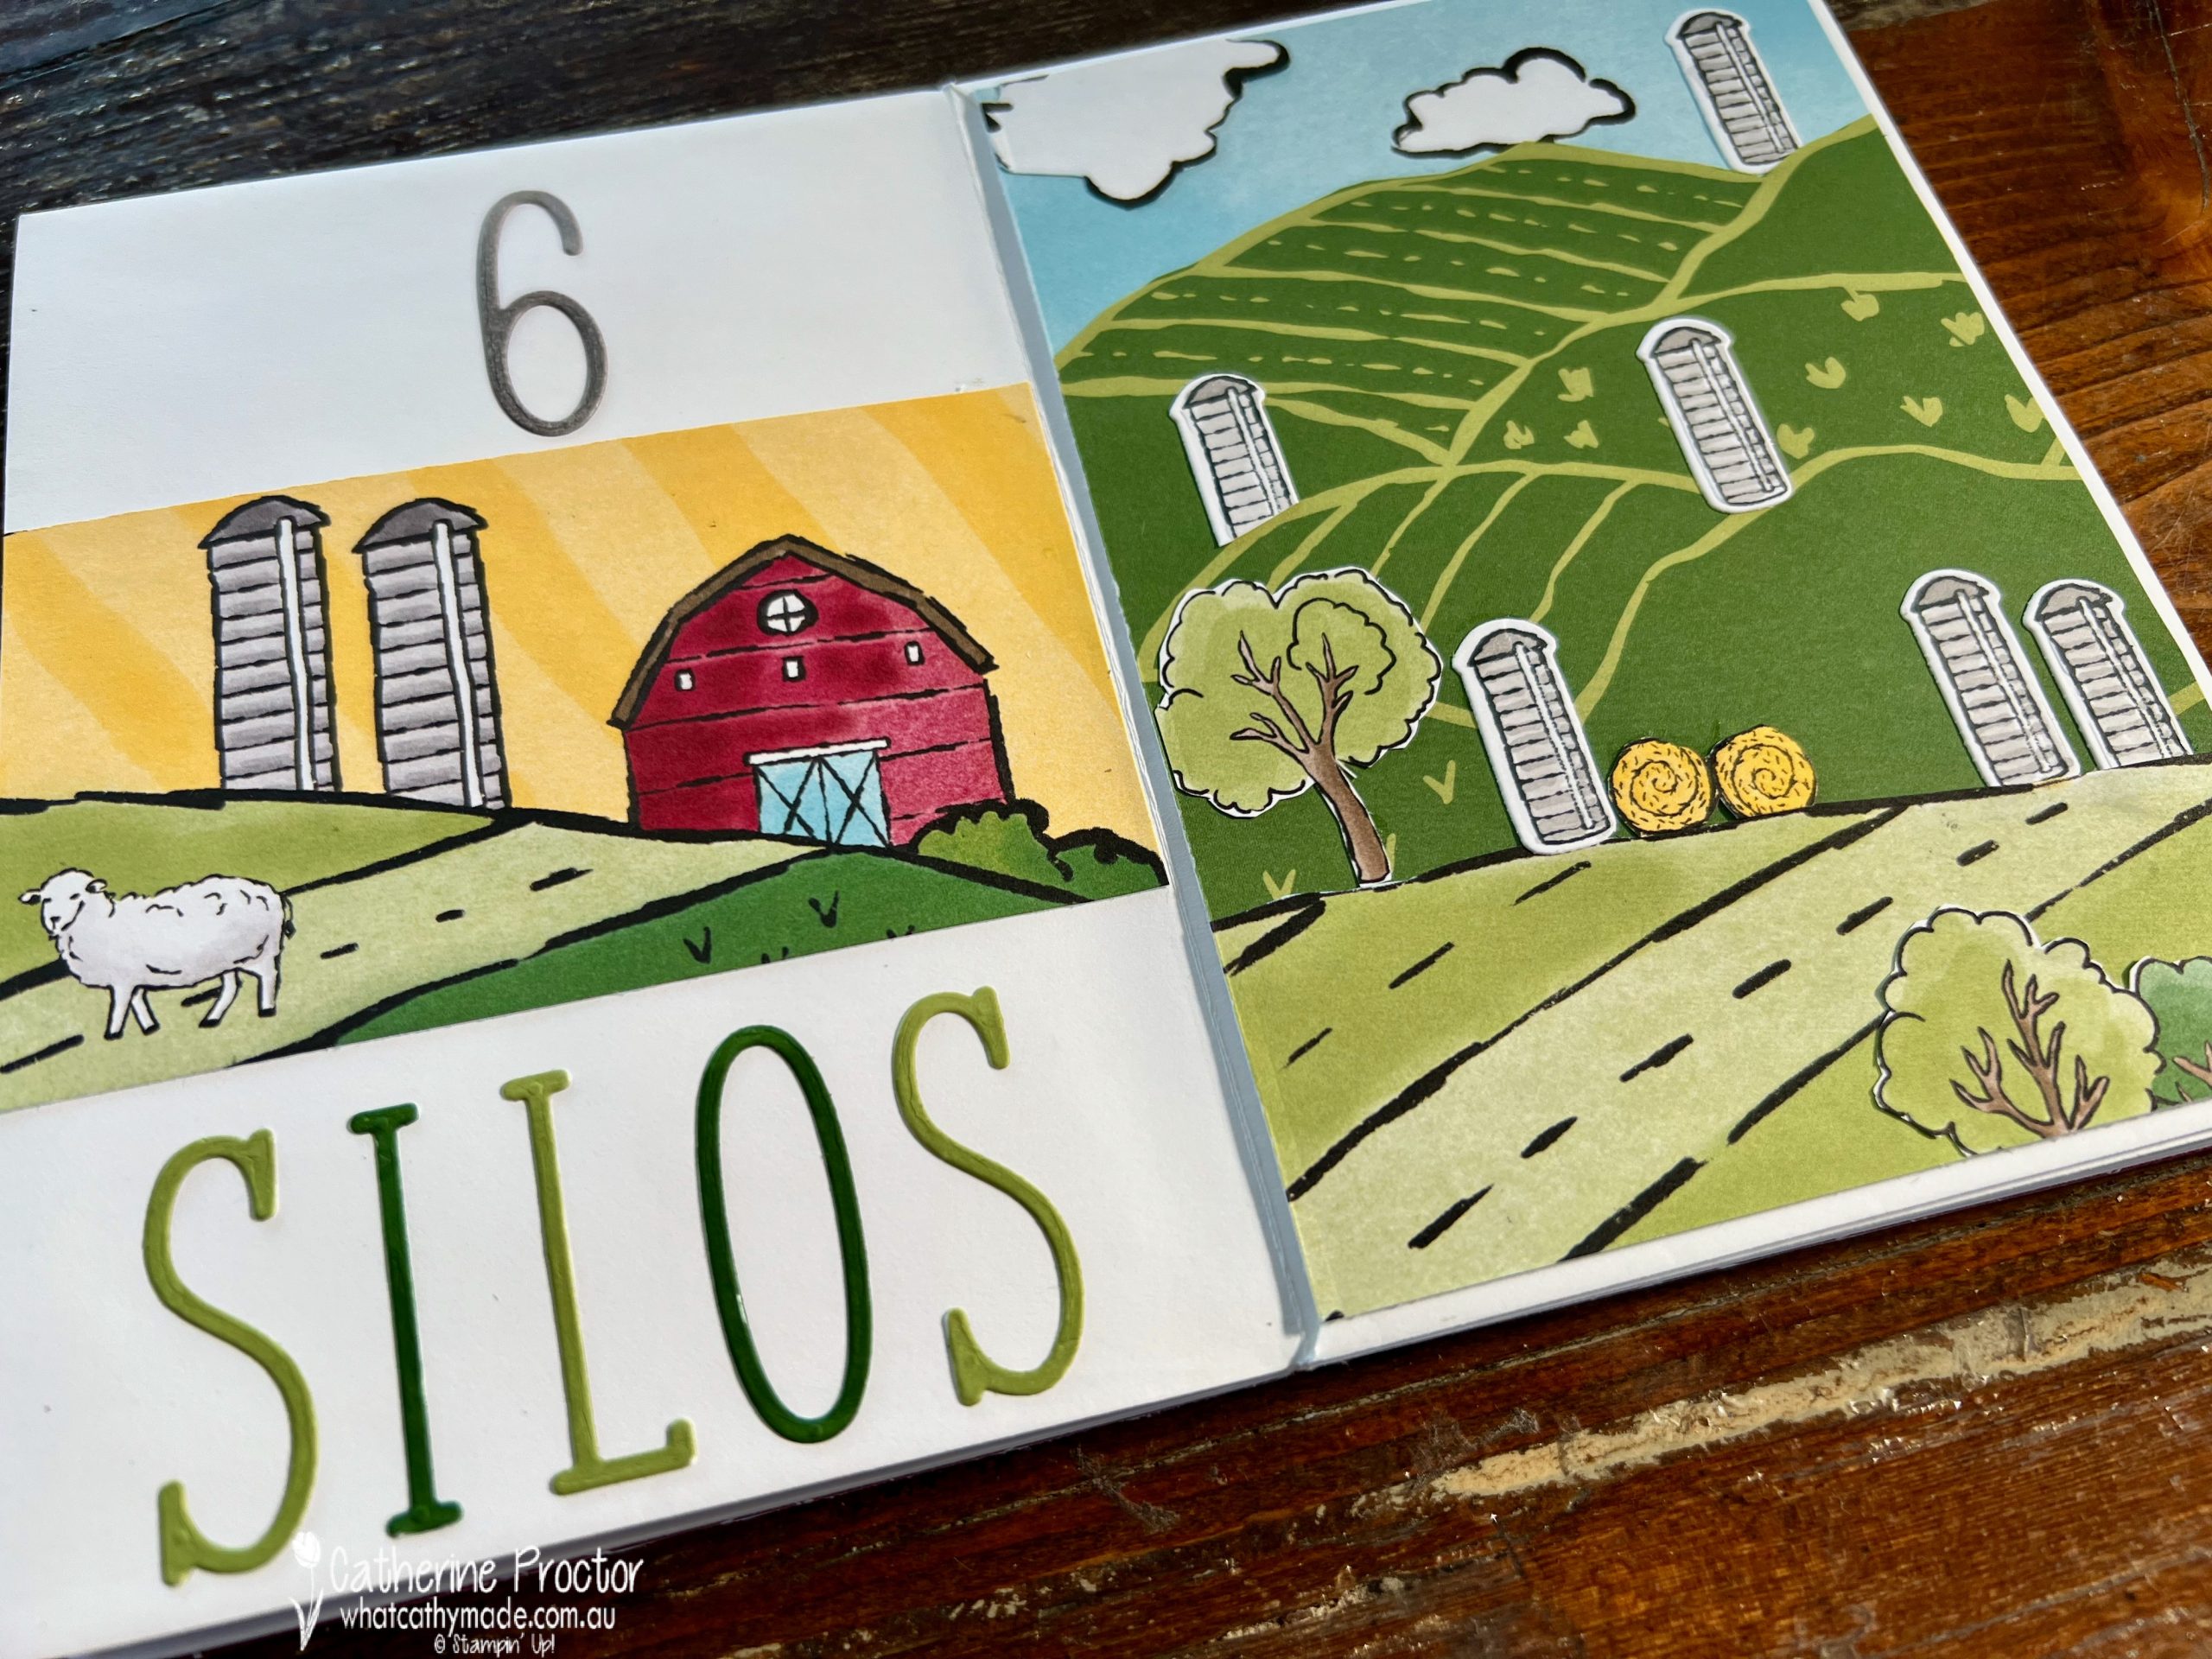
And here’s a closer look at each page.
In addition to the Day At The Farm DSP I’ve used the On the Farm Stamp and Dies (available as the On the Farm bundle), the Alphabest stamp set and the Alphabet a la Mode dies. The On the Farm Dies die cut out many of the images in the Day At The Farm DSP.
The counting book is made using envelopes – it’s a quick and easy alternative to making a chipboard album with a paper hinge and you don’t need a scoring board.
I’ve also created this 24 minute video on my YouTube channel that shows you how I made each page of this counting book and takes you through the process of making an envelope album, step by step.
Now it’s time to hop on over to our next participant, the lovely Andrea Sargent – I can’t wait to see what Andrea has made this week!
If at any time you find a broken link, you can find the complete list of all participants below.
If you live in Australia, you can find and purchase these products in my Stampin’ Up! Online Store once they are available to purchase tomorrow morning.
We’ll be back next Wednesday January 25 with projects showcasing another one of the Subtles, Petal Pink.
Welcome to week thirty four of our Art With Heart 2022-23 Colour Creations blog hop, our first hop for 2023!
This is a weekly blog hop where we showcase the stunning range of Stampin’ Up! colours in alphabetical order over 12 months and this week we are featuring Pacific Point from the Brights family.
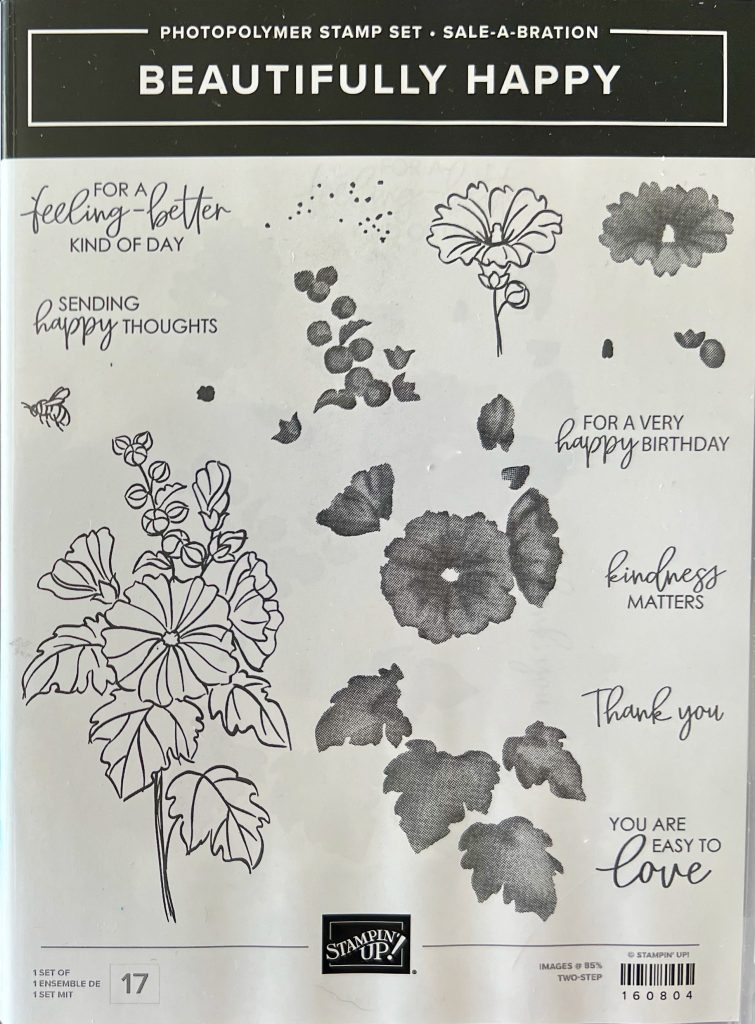
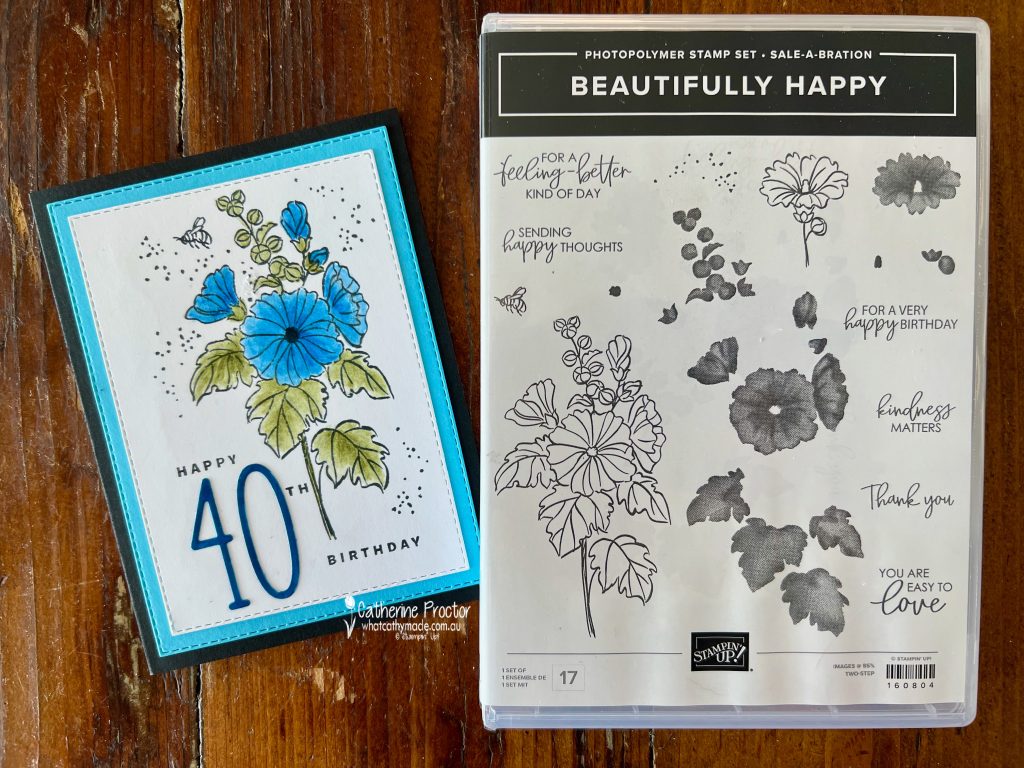
Tomorrow morning the new January-April Mini Catalogue and SALE-a-bration Catalogue are launched and one of the free SALE-a-bration items you can redeem for a $180 spend is the Beautifully Happy stamp set.
The Beautifully Happy stamp set is very versatile because it includes a good variety of sentiments, floral line drawings that can be coloured in, a “splatter” stamp, a tiny little bee stamp and “distinktive” stamps that allow you to stamp shaded colour inside the flowers and leaves instead of hand colouring.
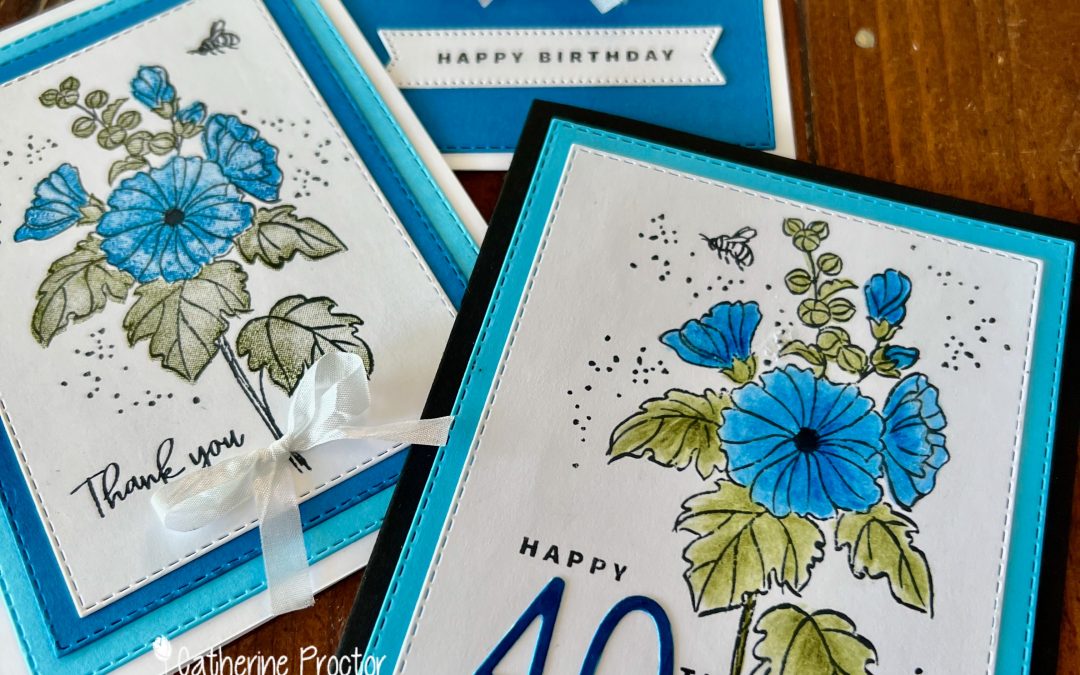
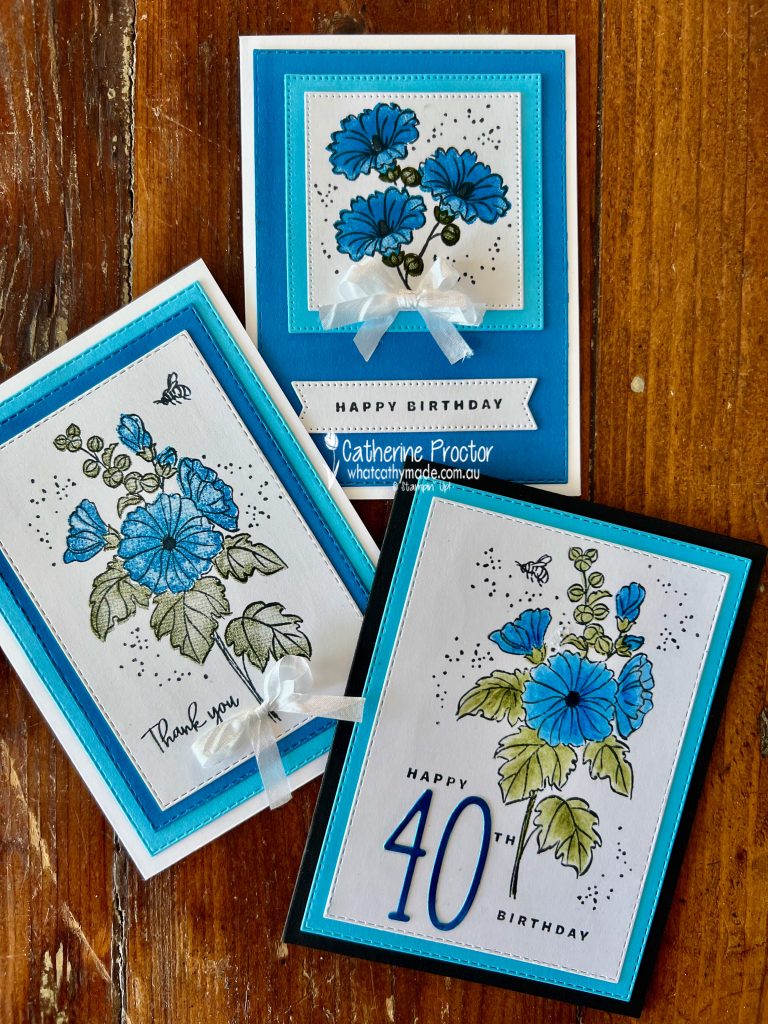
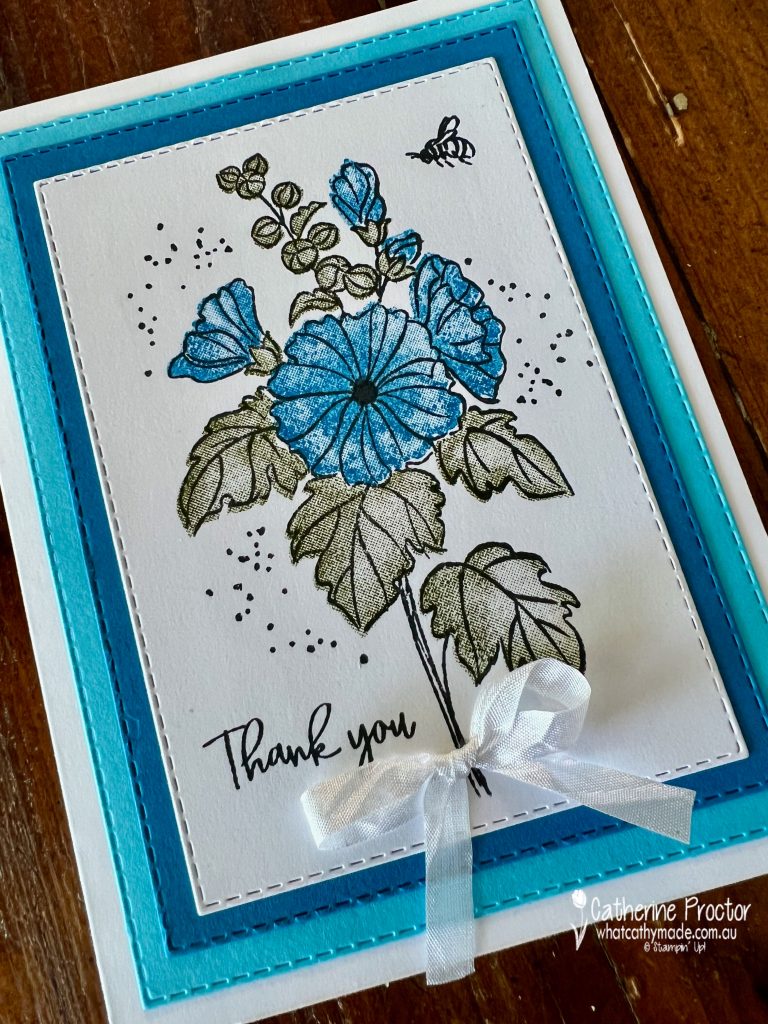
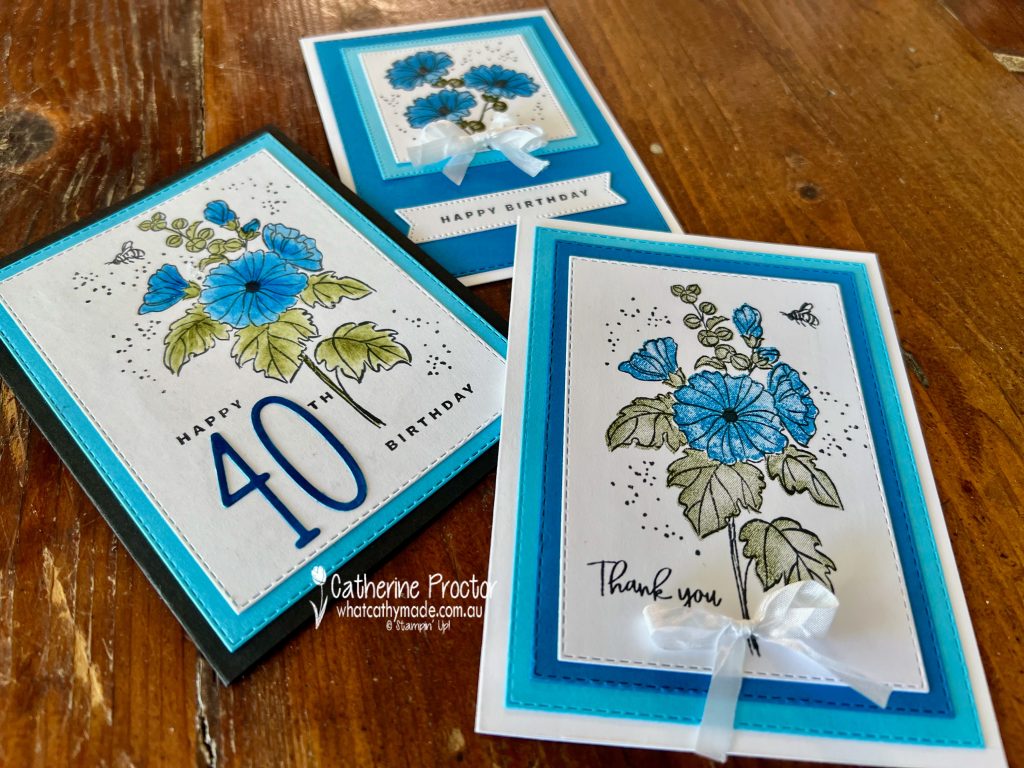
To show the versatility of this stamp set I have made three different cards using three different ways of colouring the stamped images. All three cards pair Pacific Point with Tahitian Tide – don’t these two blues look amazing together!
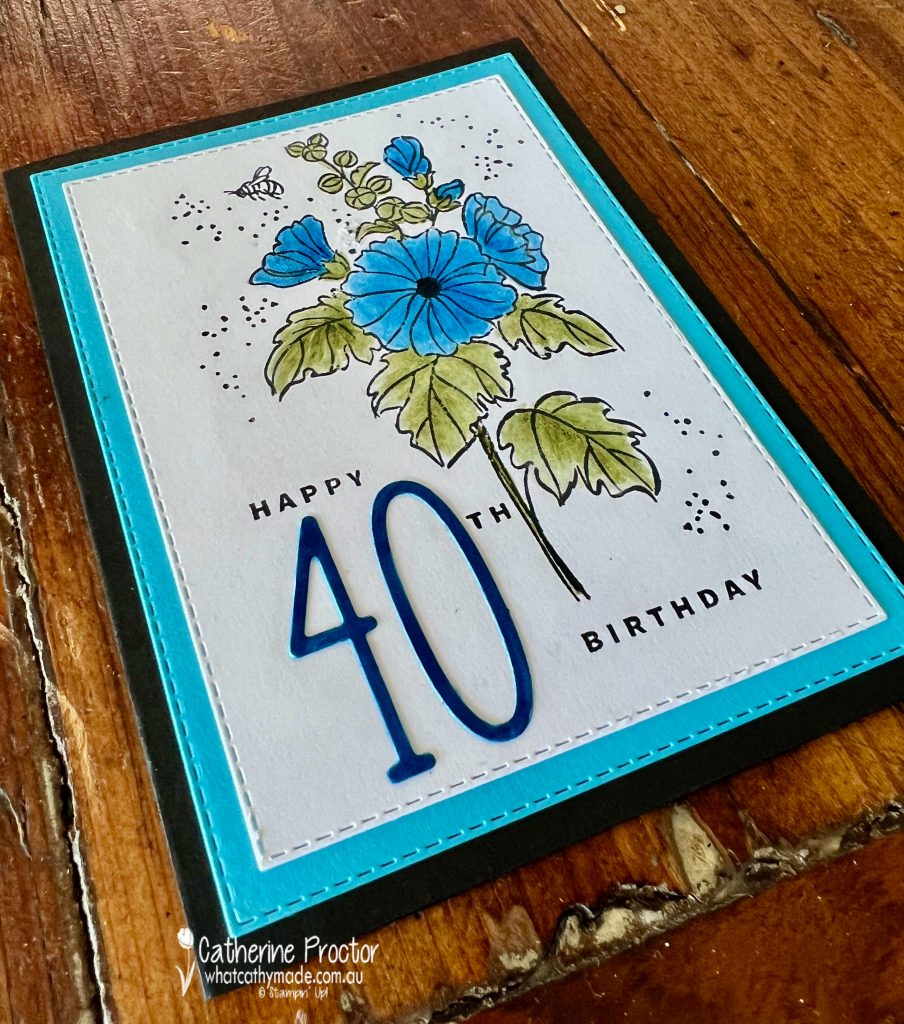
Card One is a birthday card for my sister-in-law who turns 40 next week. The 40 has been die cut with the new Alphabet A La Mode Dies and the “Happy Birthday” sentiment is from the Something Fancy stamp set, both available in the January-April mini catalogue.
I’ve coloured the flower and leaves using Pacific Point and Old Olive Watercolour Pencils, finally blending the watercolour pencil lines with a Blender Pen to smooth the colour out.
Stitched Rectangle dies create the card layers.
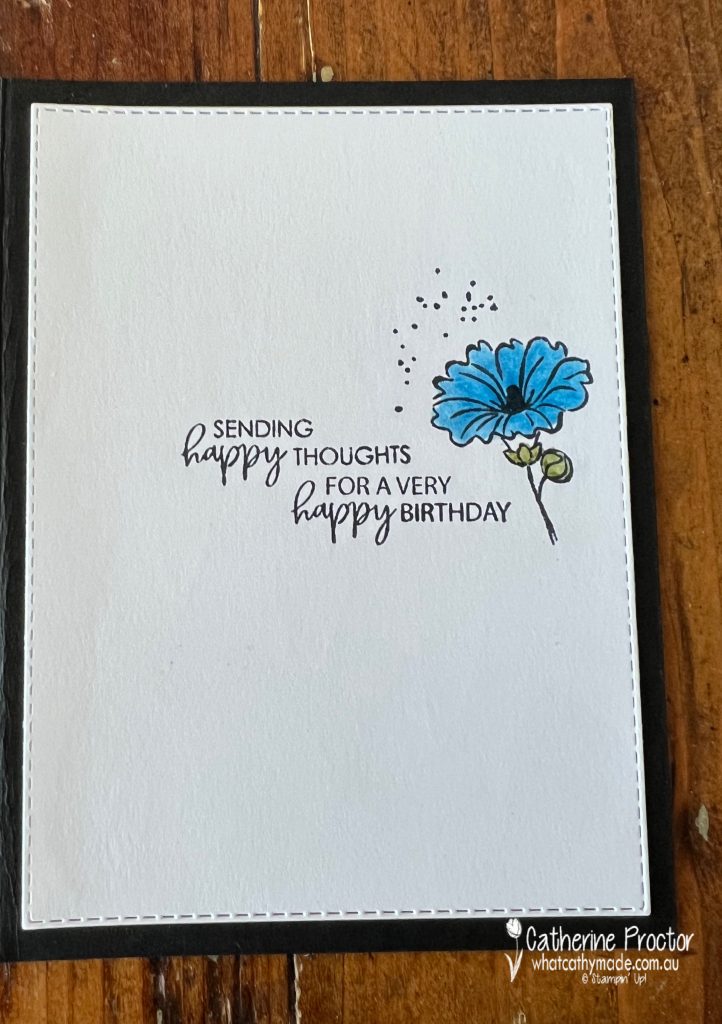
The inside of the card uses two of the sentiments from the Beautifully Happy stamp set. These sentiments are designed to be used on both the front and the inside of a card however I think they also work well when stamped together.
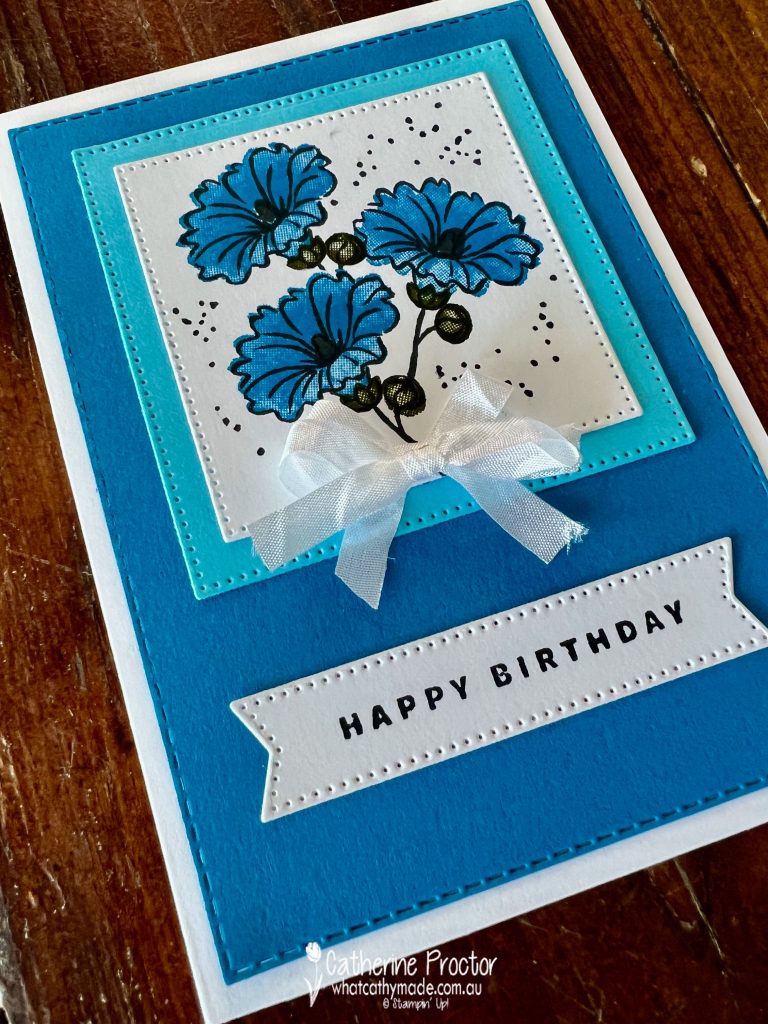
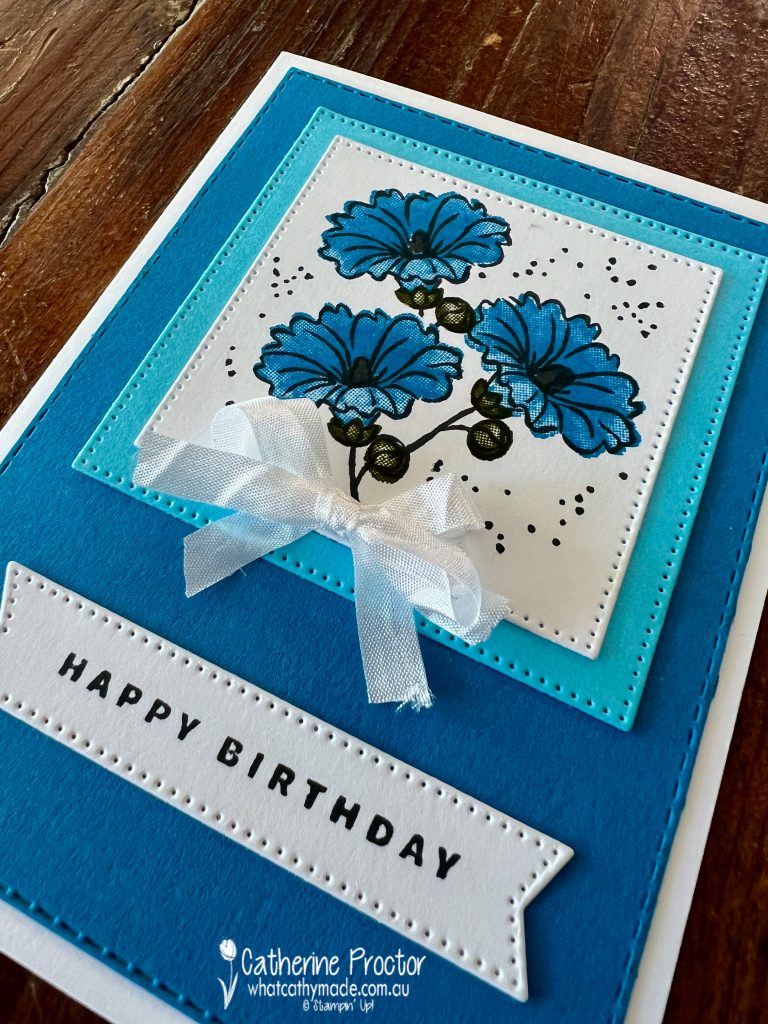
Card two is another birthday card that uses the smaller flower image, stamped three times. To colour these flowers I used the distinktive stamps from the Beautifully Happy stamp set, stamping both the Pacific Point and the Mossy Meadow ink at full strength.
The sentiment is the same “happy birthday” stamp from the Something Fancy stamp set that I used on the front of card one. Stylish Shapes dies cut the card front layers and the sentiment.
Card three is a thank you card that is coloured with the distinktive stamps, however this time the Pacific Point and the Mossy Meadow have been stamped off once onto scrap paper before stamping onto the card front.
Once again, the Stitched Rectangle dies create the front card layers.
I know I am going to get a lot of use from the Beautifully Happy stamp set as its variety of sentiments make it ideal for so many different occasions and it can be coloured in so many different ways.
Now it’s time to hop on over to our next participant, the lovely Tina Gillespie – I can’t wait to see what Tina has made this week!
If at any time you find a broken link, you can find the complete list of all participants below.
If you live in Australia, you can find and purchase these products in my Stampin’ Up! Online Store once they are available to purchase tomorrow morning.
We’ll be back next Wednesday January 11 with projects showcasing one of the 2021-23 In Colours, Pale Papaya.
Welcome to week thirty of our Art With Heart 2022-23 Colour Creations blog hop!
This is a weekly blog hop where we showcase the stunning range of Stampin’ Up! colours in alphabetical order over 12 months and this week we are featuring Mint Macaron from the subtles family.
Hands up if you’re excited about the drill die in Stampin’ Up!’s Rugged Icons dies!
That’s my hand you can see frantically waving in the background, as my youngest son, after trying university for a year, decided to become an electrician instead and he has never been happier.
I think he has finally found his tribe 🙏😍 … and I’ve found the perfect die for my tradie son!
When Ben turned 21 last weekend I knew I wanted to use the drill die from the Rugged Icons die and the die-cut pieces from the He’s The Man DSP, but I wasn’t sure what type of card I would make.
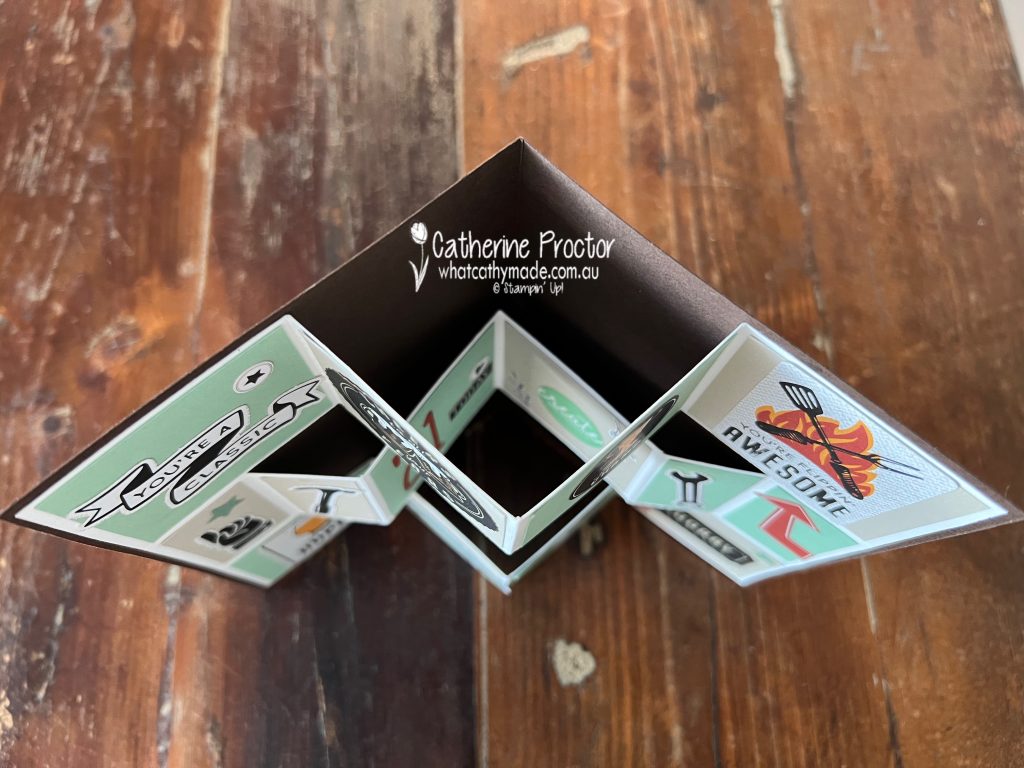
When I saw this fabulous Masculine Fun Fold 3D Shutter Card made by my fellow AWH teammate and friend, Kate Morgan, for our Colour Creations Merry Merlow blog hop last week I knew I’d found the perfect design.
Unfortunately, Kate’s template was too small for these die cuts, so I’ve created a new template for my card.
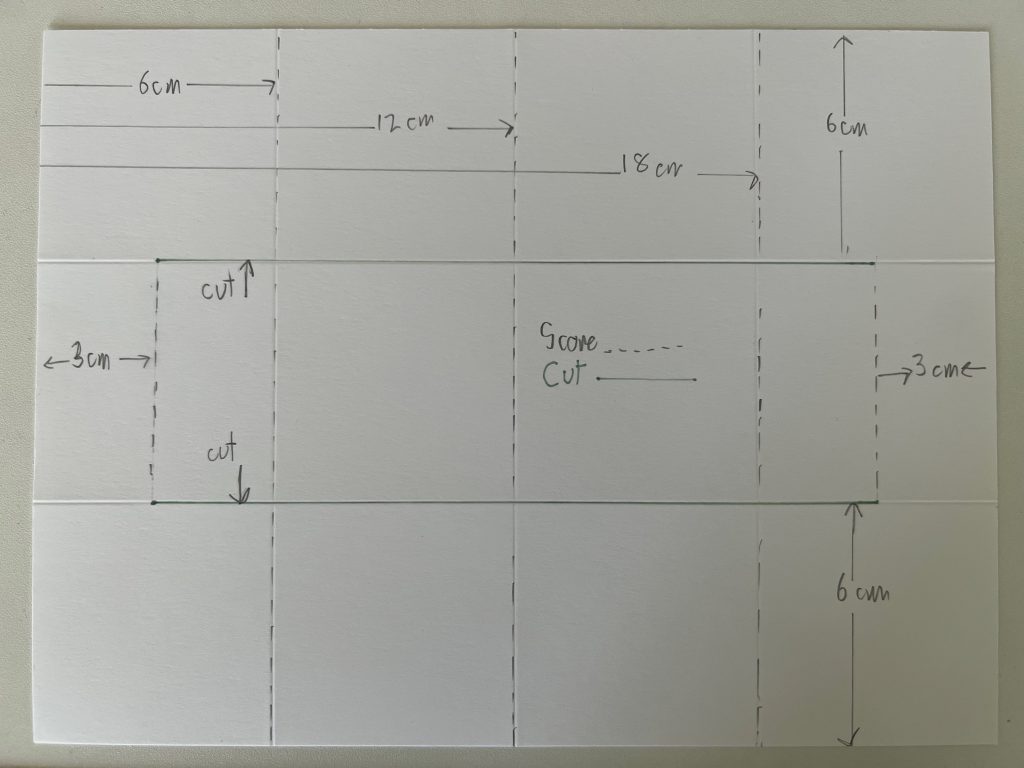
Trifold Shutter Card Template
Start with a piece of cardstock (this is for the inside fancy fold) measuring 24 cm wide x 18 cm high.
Cut, score and fold the cardstock as shown on the template to make the fancy fold.
Make an inner card base measuring 24.5 cm wide x 17.5cm high, scored at 12.25 cm and then folded in half.
After decorating the inside of your trifold shutter card, glue the outside panels to the inside of your card base as shown below.
I have to confess that it was not until I’d finished making the card that I realised the light green in the He’s The Man DSP was Soft Succulent, not Mint Macaron! So I’ve used Mint Macaron cardstock throughout but I think it still works okay?
All of the images inside the card are from the He’s the Man DSP apart from the centre 2 panels that have “21 today” and “create memories”. Can you guess where these are from?
The word “today”, the tiny heart above it, the “create memories” and the two sprigs are all stickers from the “Today Is the Day Memories & More Card Pack”.
The “21” on the inside of the card and the “Happy Birthday” on the front of the card are a brand new product from the forthcoming January – April mini catalogue: Alphabet À La Mode dies. These dies are 1 ½ inches (3.8cm) high and there are 52 dies in the set!
If didn’t already have your hand in the air for the Rugged Icons dies, I bet you do for these brand new Alphabet À La Mode dies!
I’ve also used these Alphabet À La Mode dies (always attach an adhesive sheet on the back of the card stock before die cutting) to make the Happy Birthday for the front of my card.
A card this size needs a homemade envelope, which leads me to a confession. It was when I used this sheet of He’s The Man DSP to make the envelope that I realised I’d mixed up my greens!!!!!
This photo also shows the back panel of the card for writing on. A couple of glue dots under the “Cheers to all your years” die cut make a resealable envelope for the card.
Now it’s time to hop on over to our next participant, the lovely Di Furniss – I can’t wait to see what Di has made this week!
If at any time you find a broken link, you can find the complete list of all participants below.