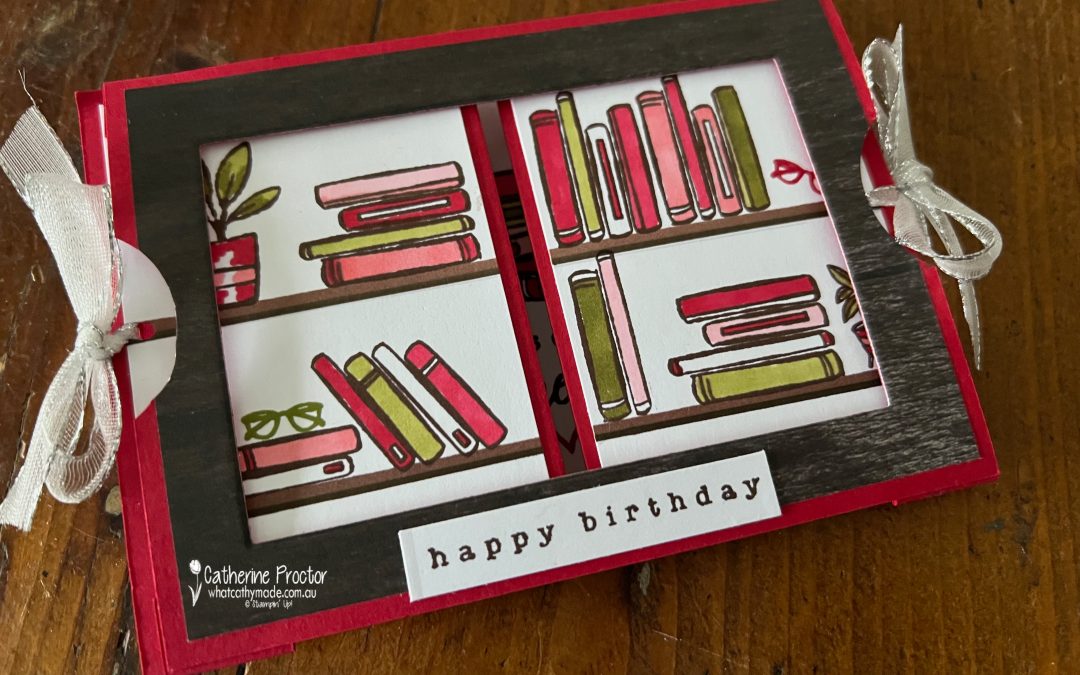
A group of the Art With Heart Team is hopping through the Stampin’ Up! colours in alphabetical order. Week 47 is all about Real Red.
I must confess I usually only use Real Red for Christmas cards, so it was good to challenge myself to use it for a birthday card this week. This is my colour combination and I love it!
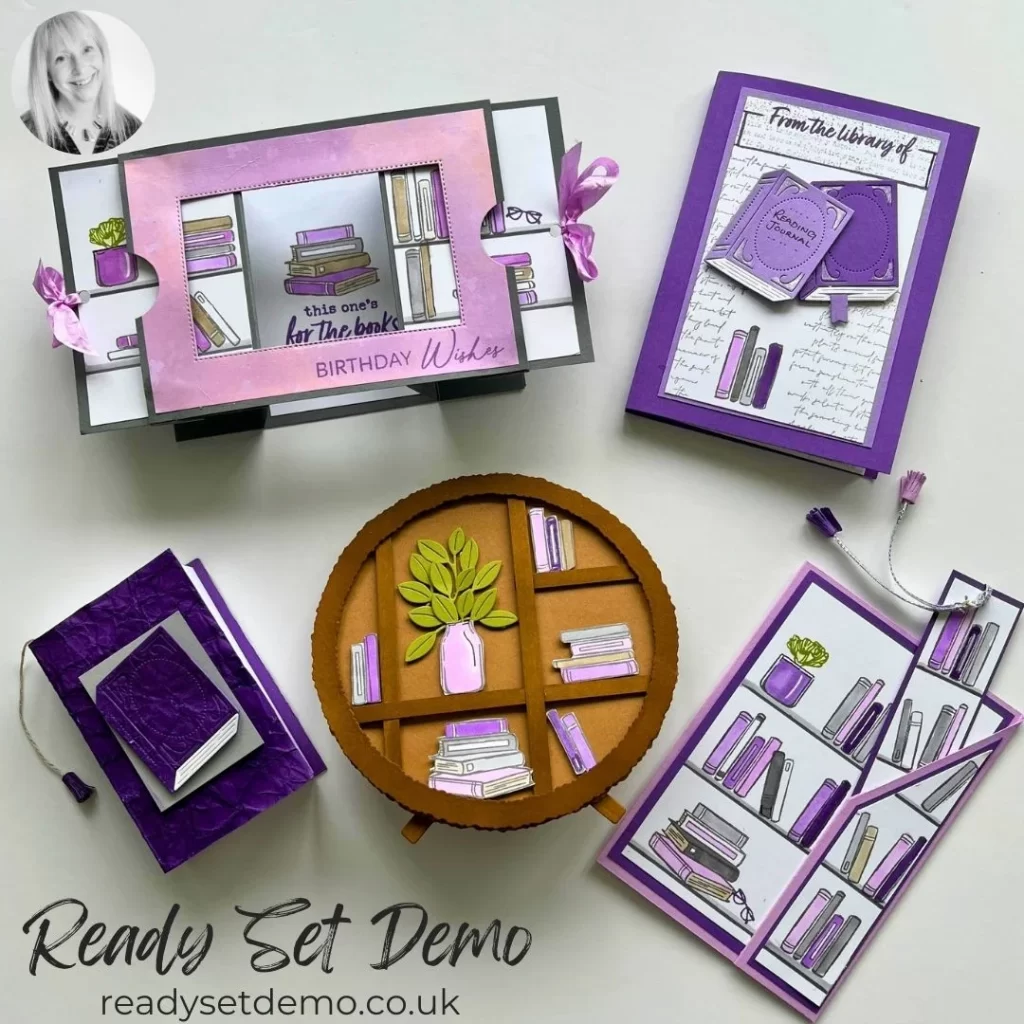
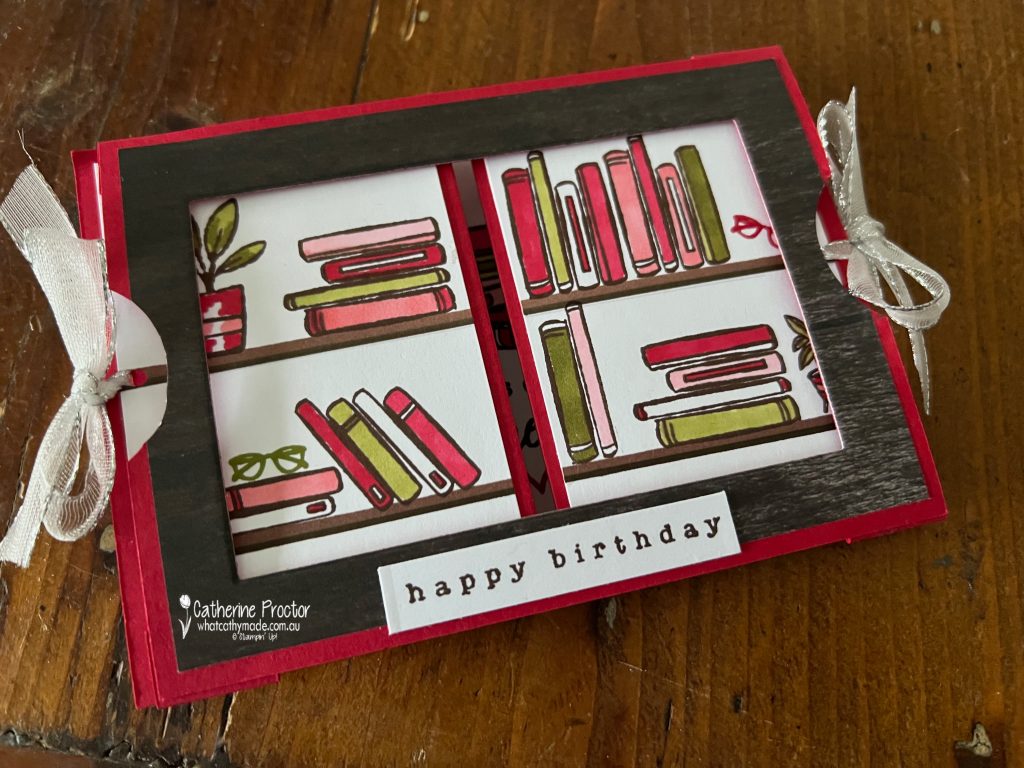
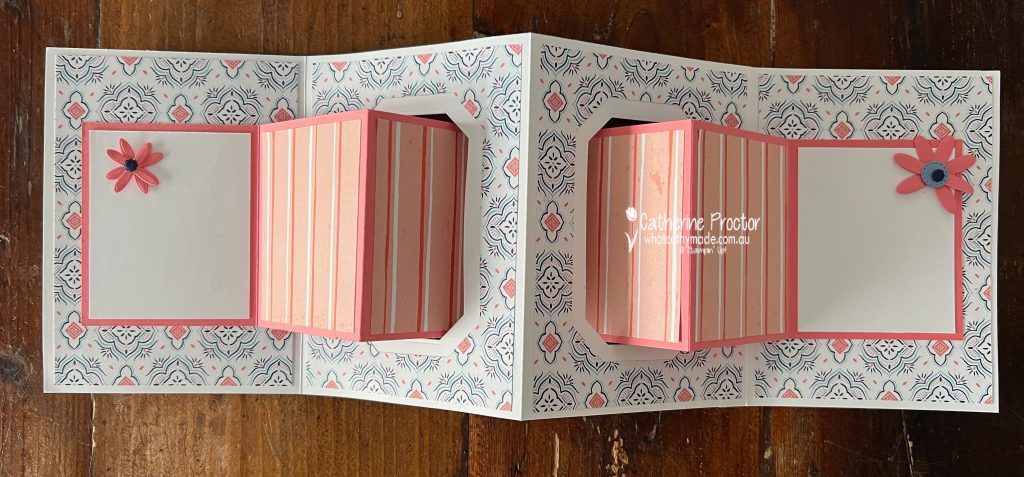
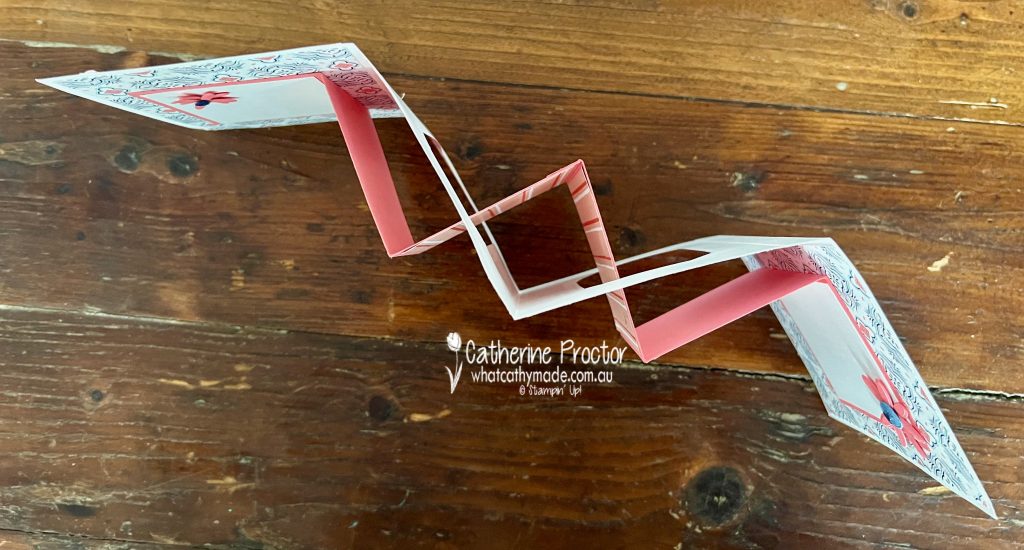
My card was made following an excellent template I purchased from an amazing UK Demonstrator called Liz Shannon. I bought this tutorial from her intending to make the adorable mid century bookcase but I ended up making the Secret Sliding card instead. I will make the other projects too.
Here is a picture of the projects included in her tutorial.
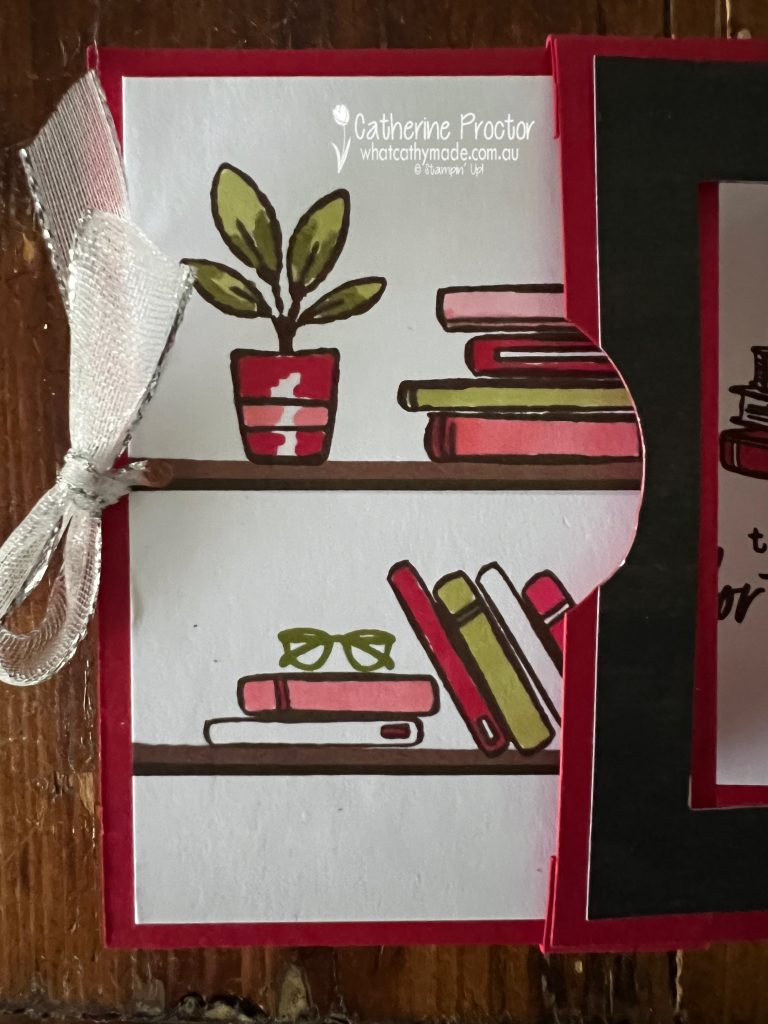
The alternative products I used in my card include the pot plant from the Attention Shoppers stamp set for the left hand panel.
Another pot plant from the new Online Exclusives stamp set, “She’s the Greatest” is stamped on the right hand panel.
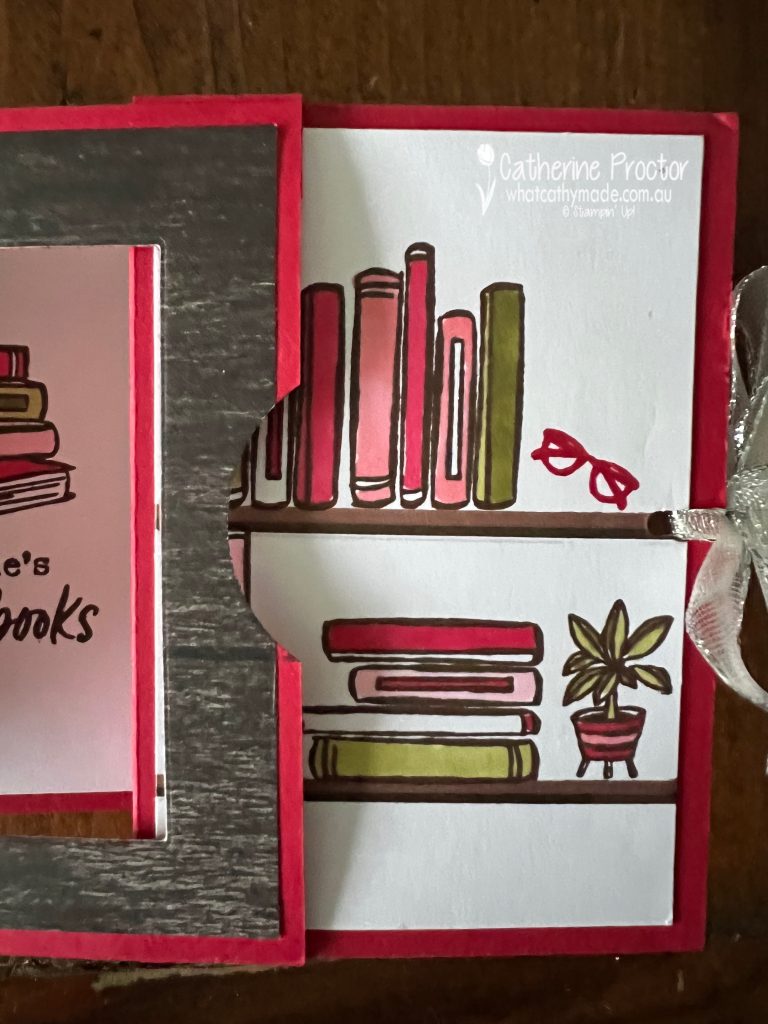
I’ve also used the “Happy Birthday” sentiment from the Country Birdhouse stamp set for the front of the card.
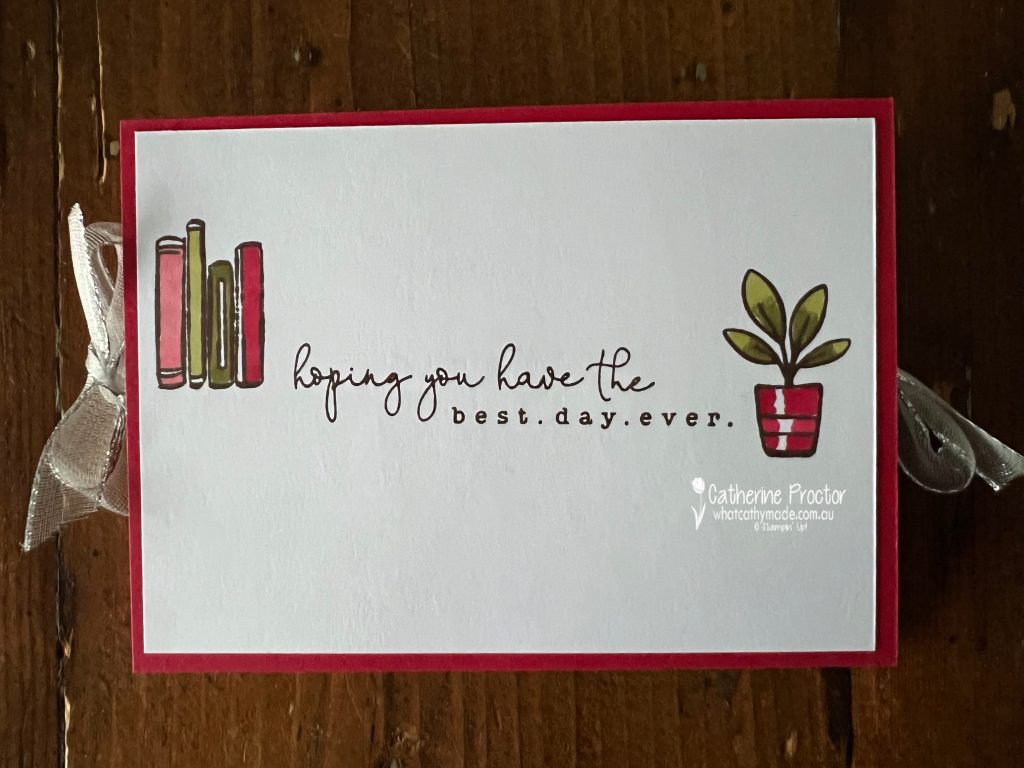
And another sentiment the Country Birdhouse stamp set on the writing panel on the back of the card too.
Here’s a short video to show you how this card opens and closes.
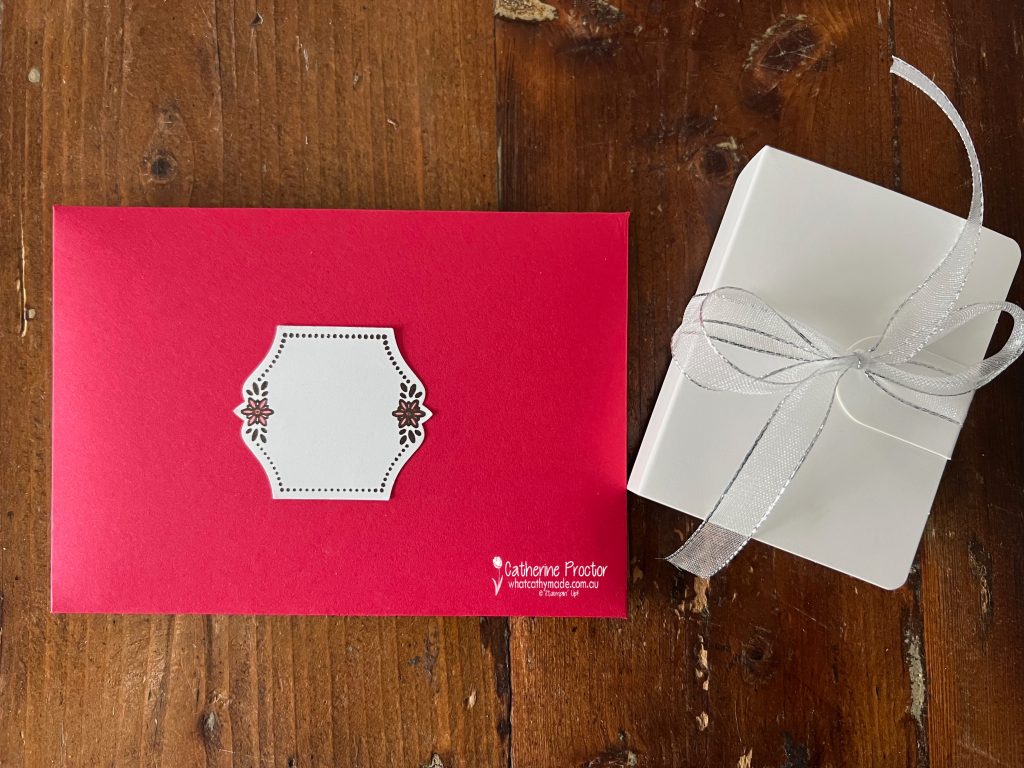
I made a custom made envelope out of Real Red cardstock to fit this special card and made a name label for the front of the card using the To the Point Label Punch and the coordinating Bright Borders Stamp Set.
Unfortunately, the book I’d ordered as the birthday gift did not arrive in time so I printed a copy of the book’s cover and popped it into one of the cute little Book Treat Boxes.
Our blog hop is now an Instagram hop but the good news is that you don’t need to have an Instagram account to view all of the other projects! Simply copy any of the Insta handles below into a new search window to follow the Instagram hop.
Next in our hop is Vicki @vickiboucher. Be sure to check out her gorgeous project/s.
The full list of this week’s Insta Hop are listed below:
I’m finally back with our Wednesday evening AWHT Colour Creations Hop and so glad you are here. In my absence we have made a change to how we are showcasing the full range of 50+ gorgeous Stampin’ Up! colours by moving from a blog hop to an Instagram hop.
I’ll continue to post my cards here as well, however if you want to follow along the blog hop you’ll need to visit my Instagram account 8pm on a Wednesday evening at @whatcathymade (https://www.instagram.com/whatcathymade/).
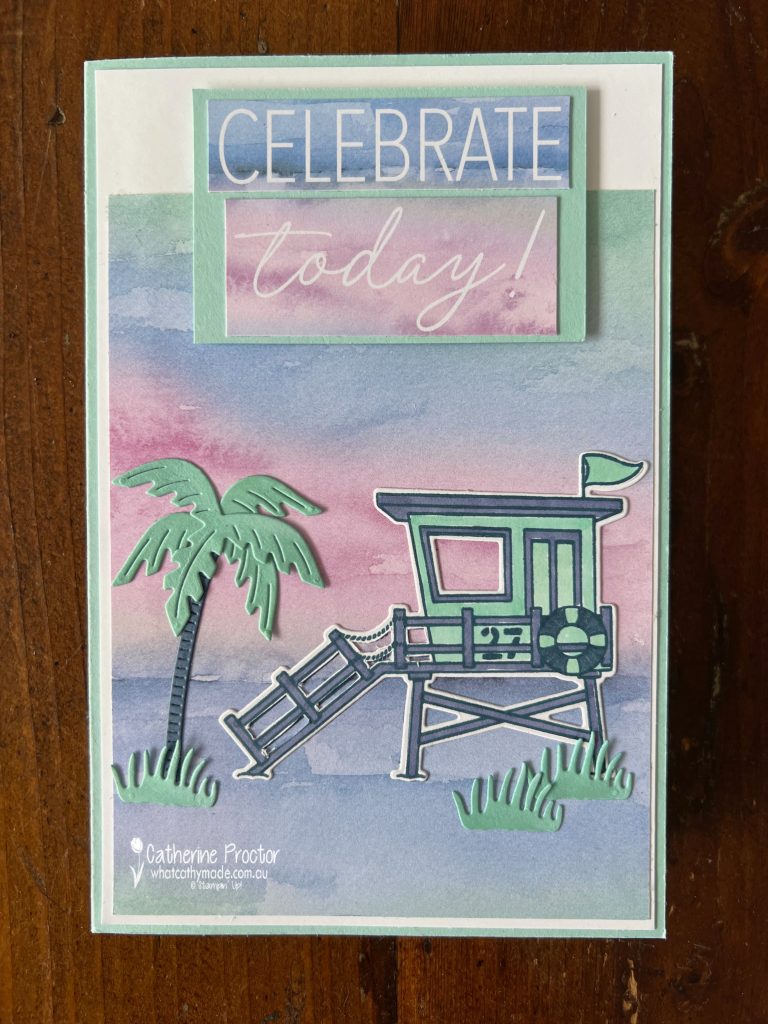
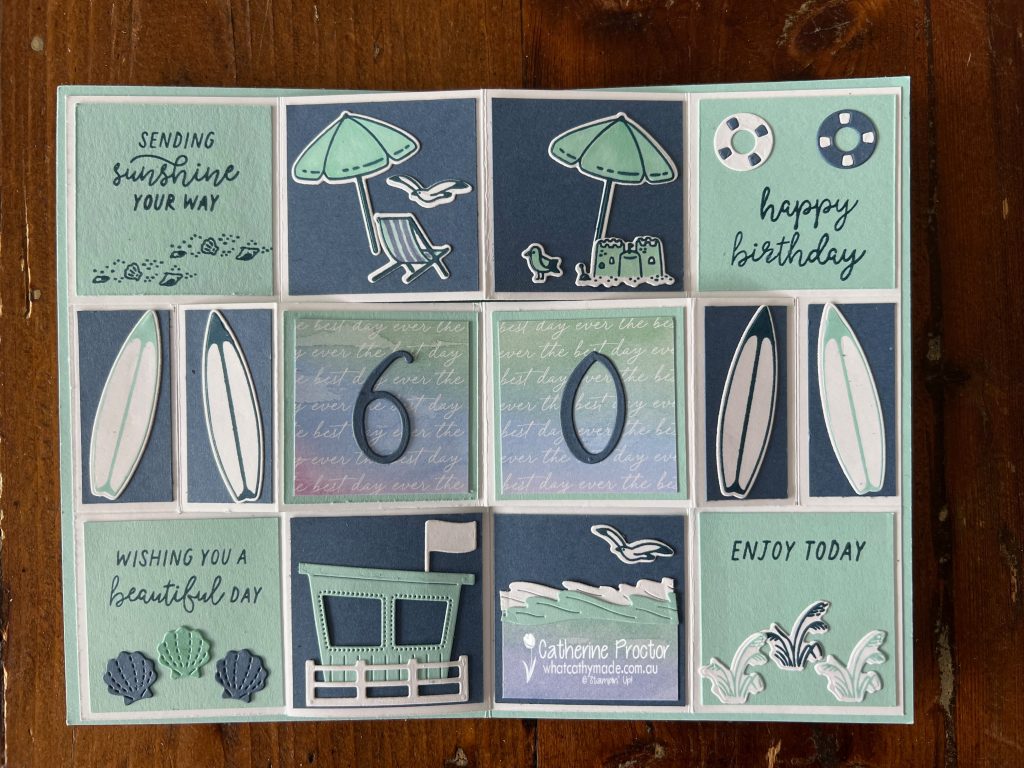
Our colour this week is Pool Party, a favourite colour of mine and just perfect for making a birthday card for my husband who turns 60 this week!
I’ve taken my colour combination from the sheet of gorgeous Thoughtful Journey 6″ x 6″ (15.2 x 15.2 cm) Designer Series Paper I’ve used for the front of the card, combining Pool Party with Misty Moonlight, Basic White and a touch of Petunia Pop.
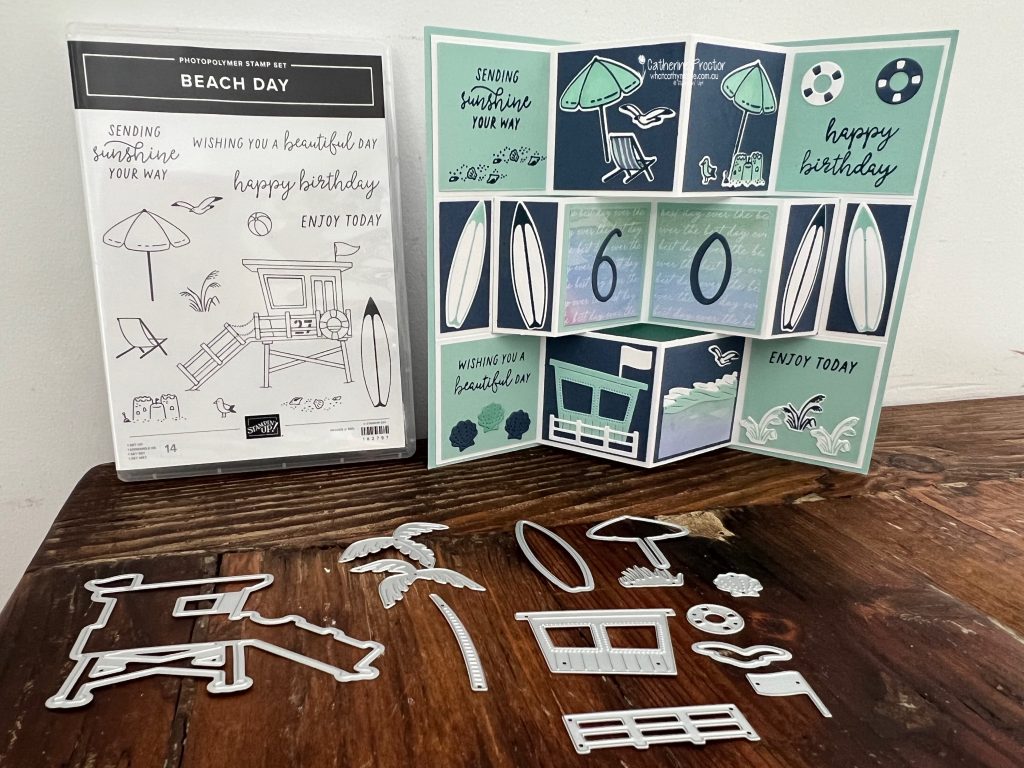
My husband loves to surf so the Beach Days bundle was just perfect for his birthday card. And as it is a special birthday that ends with a zero I decided to make a fancy fold.
This short video shows you the magic that happens when you open up the card!
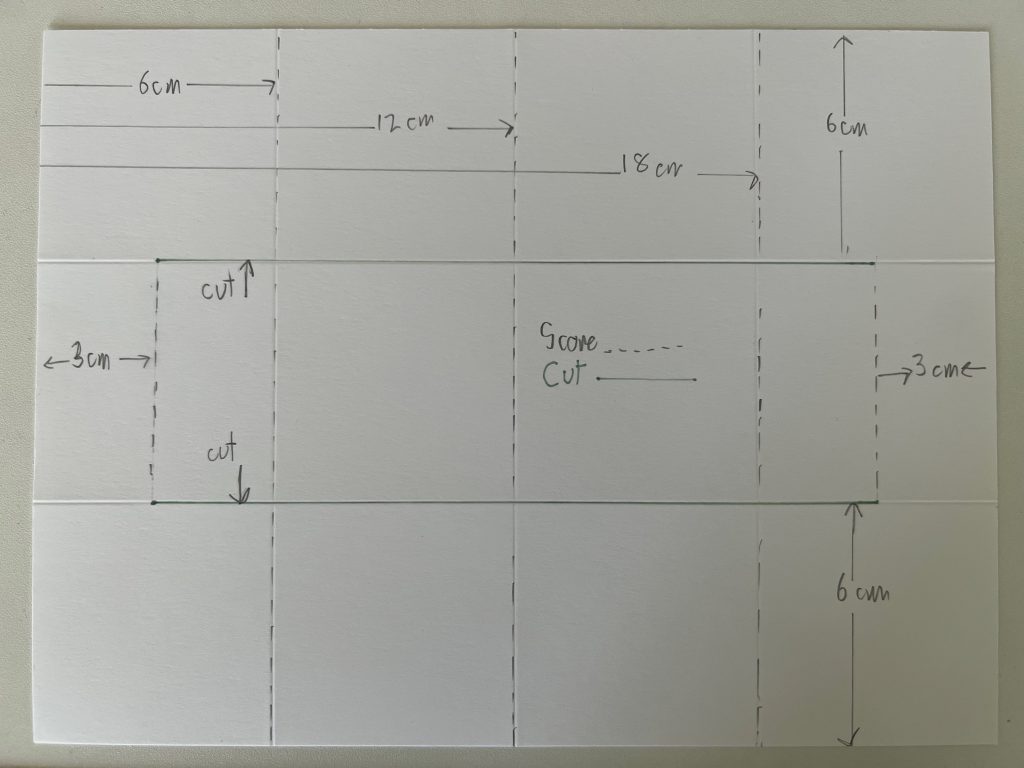
If you’ve never made a Trifold Shutter Card before, here’s a template I’ve created using metric measurements and A4 cardstock.
Trifold Shutter Card Template
Cut a piece of Pool Party cardstock (this is the outside card base) 24.5 cm wide x 18.5 cm high.
Score the outer card base at 12.25 cm along the 24.5 cm side and then fold in half along this score line.
Cut a Basic White inner card base (for the fancy fold) 24 cm wide x 18 cm high.
Score the inner card base at 12 cm and then fold in half along the score line.
Measure and draw with a pencil the cutting lines as per the template diagram below then carefully cut along these cutting lines.
Now measure and score all of the fold lines and then rub out any pencil marks.
Decorate each panel as desired.
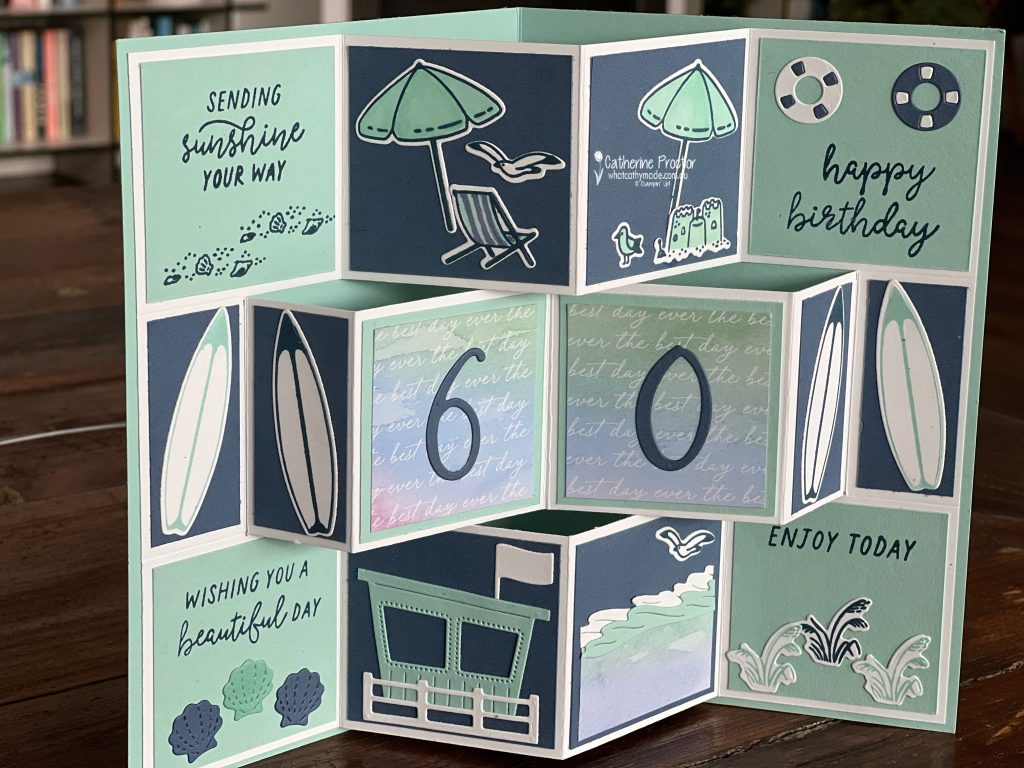
This photo shows the direction to fold the score lines. I cut the larger Pool Party and Misty Moonlight cardstock layers for the panels at 5.5cm square. The smaller cardstock panels behind the surfboards measure 5.5 x 2.5 cm.
I’ve decorated the inside of the card using stamps and dies from the Beach Days bundle.
Using Post It notes to mask off sections of my stamps as I inked them up (you then remove the Post It note before stamping), allowed me to stamp the “happy birthday” sentiment inside the card to fit onto one of the panels.
The 60 inside the card has been die cut using the brand new Birthday Celebration Dies.
After decorating the inside of your trifold shutter card, adhere it to the Pool Party card base. Make sure you only adhere the left and right sections of your fancy fold to the inside of your card base so the middle section of your trifold shutter card can open and close.
I’ve also used some of the Thoughtful Journey Memories & More Cards to decorate the front and the inside of the card and the handmade envelope.
Welcome to week thirteen of our Art With Heart 2024-25 Colour Creations blog hop!
This week we’re featuring Boho Blue, a gorgeous soft blue that is one of the 2023–2025 In Colors.
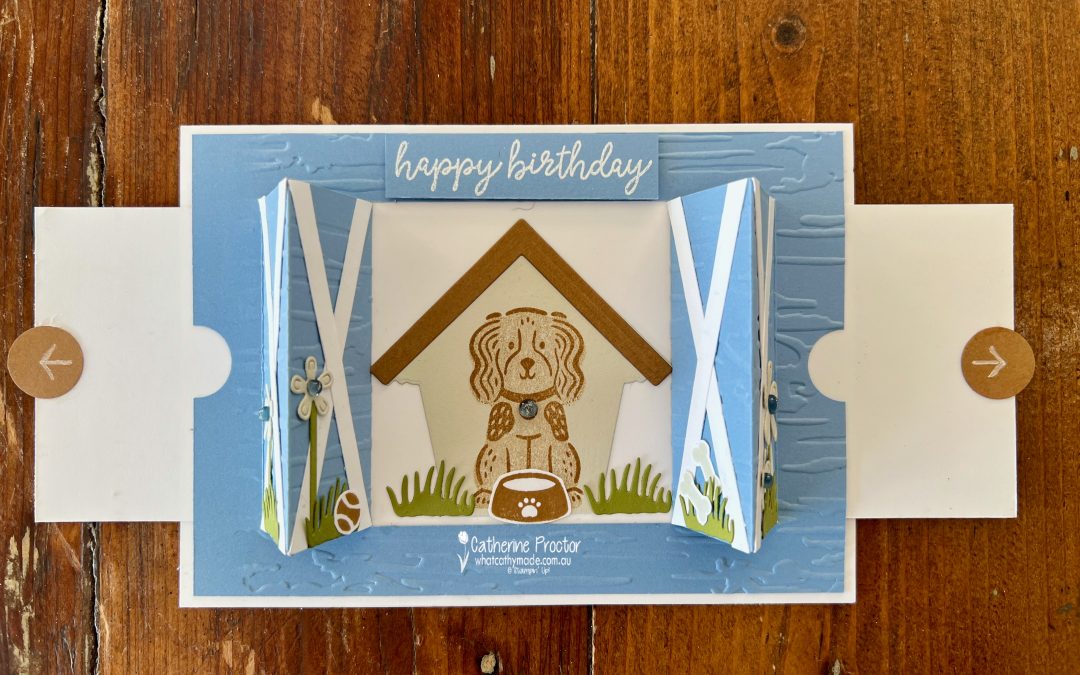
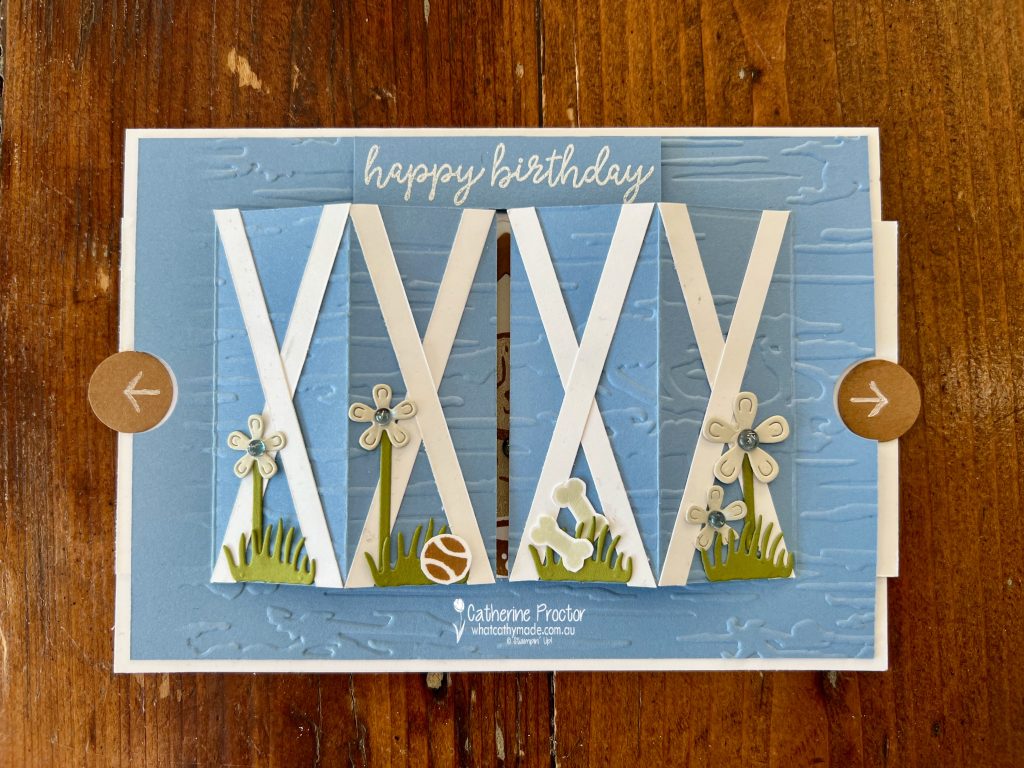
We have so many birthdays on both sides of our family in July so surprise, surprise, I’ve made another birthday card this week!
This fancy fold card is for my niece who turned 8 earlier in July however as she has been overseas we will be catching up for her birthday later in July.
Mimi recently told me her favourite colour has changed from purple to blue – luckily I discovered this before I made her card!
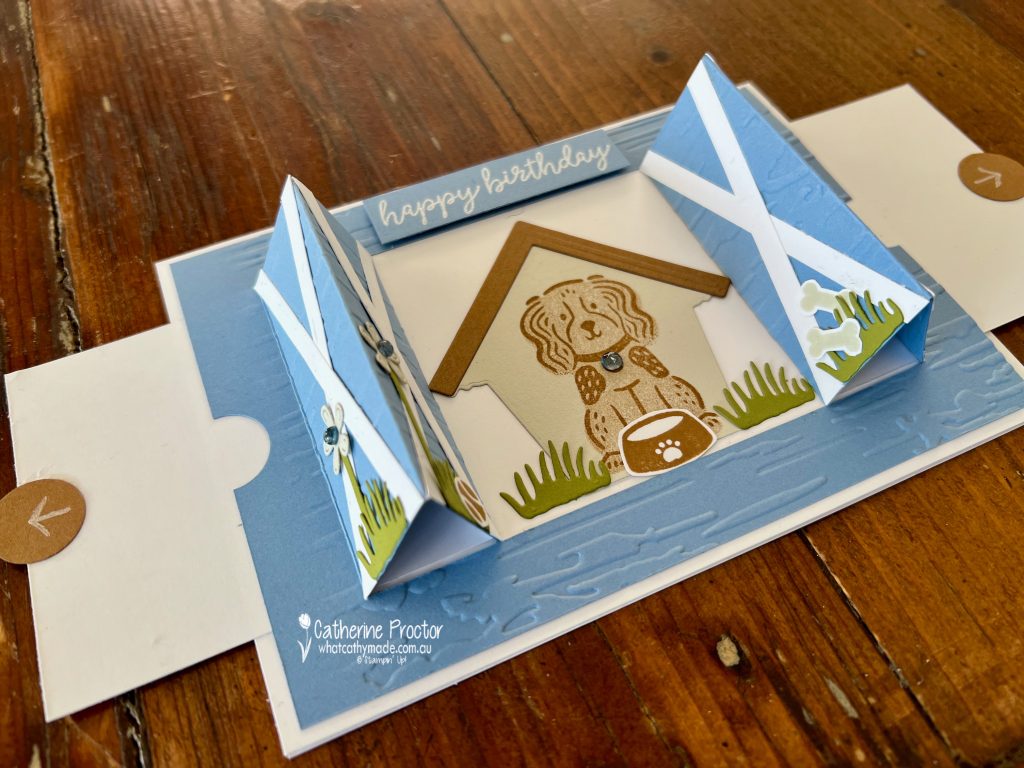
I love making cards that move for children, which is why I went searching for a shutter card tutorial. I discovered a video tutorial for an easy double shutter card by a paper crafter called Sam Callott (Mixed Up Craft) – here is her video if you’d like to watch her tutorial.
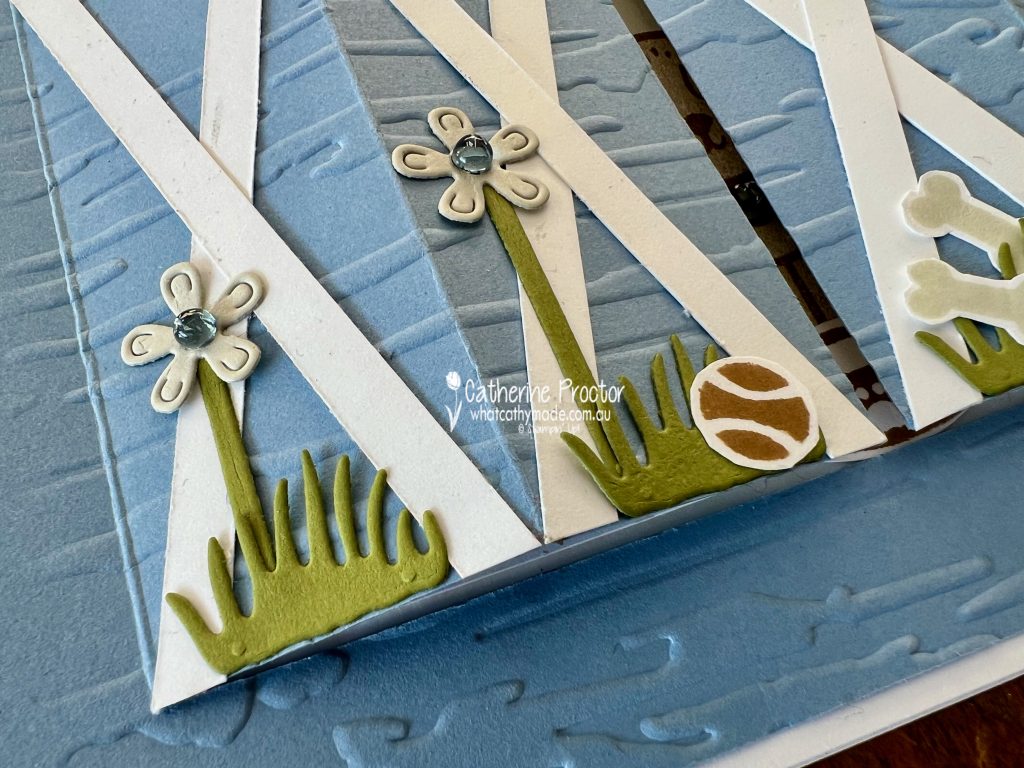
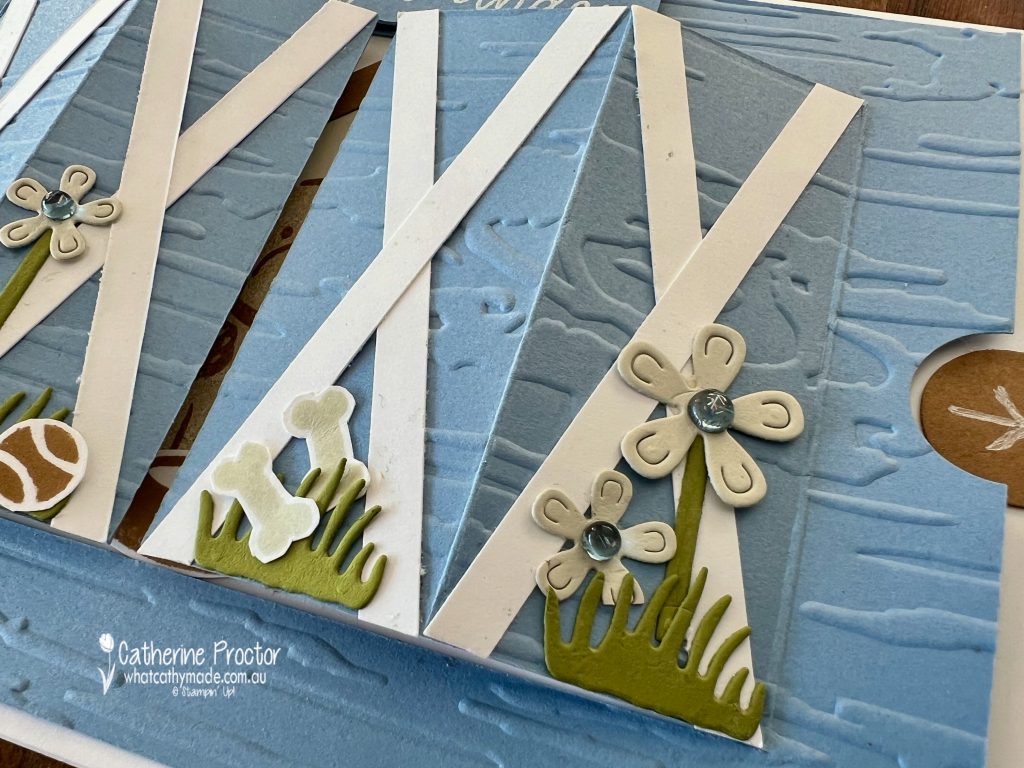
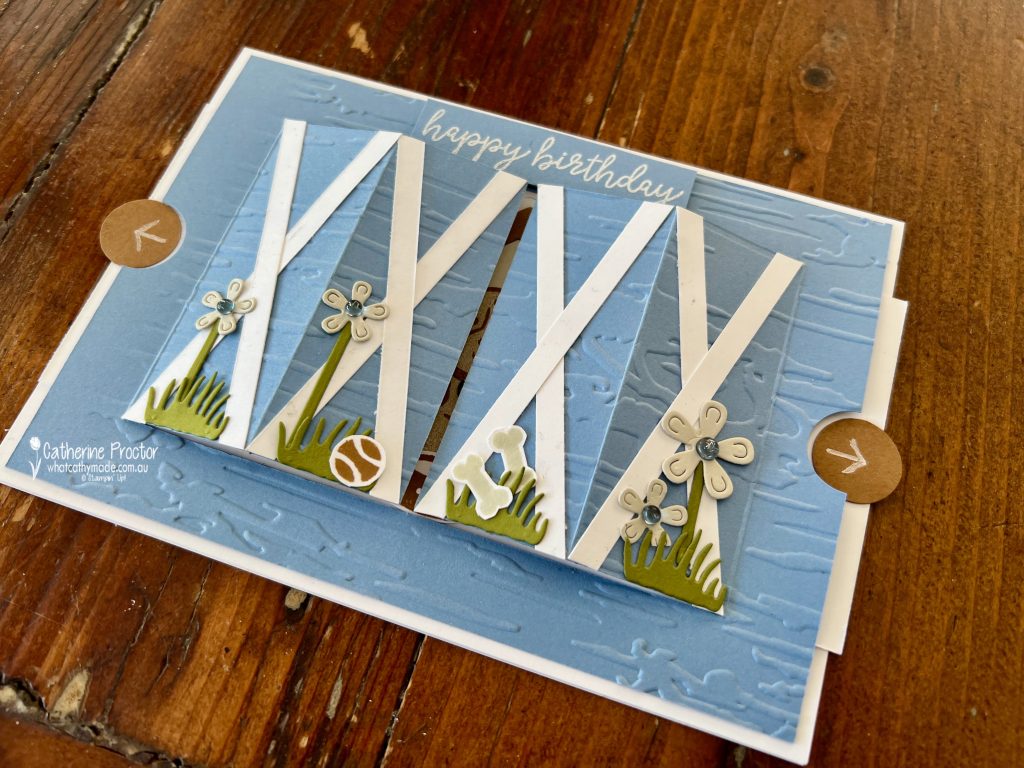
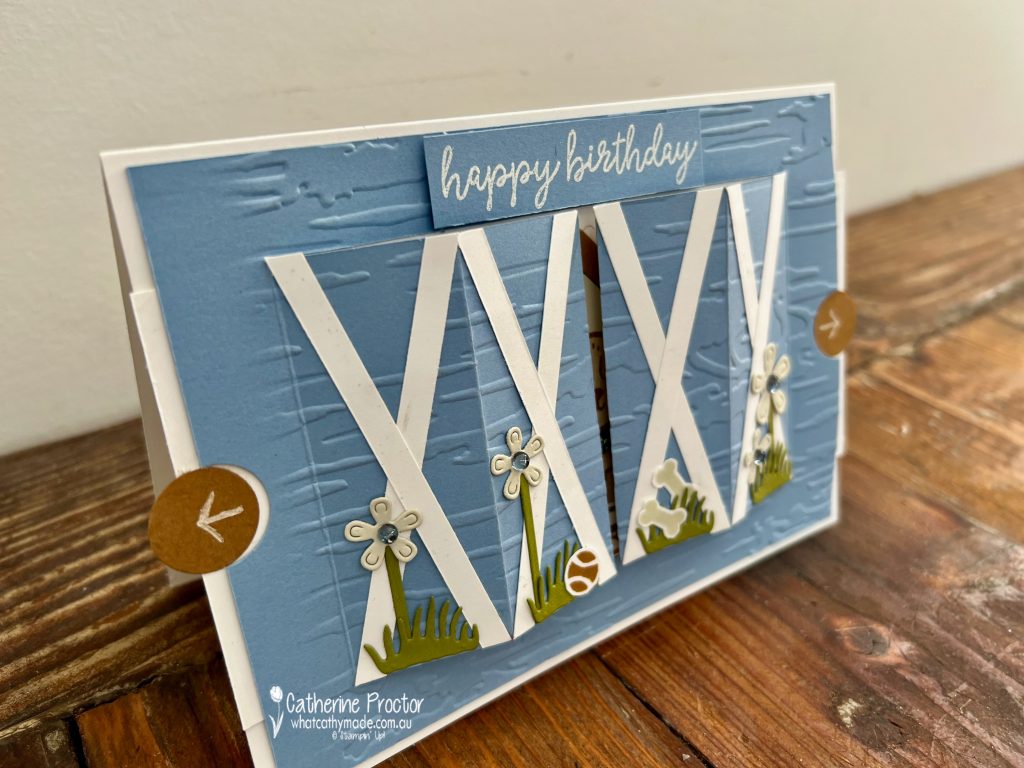
I’ve used the new Birch folder to emboss the Boho Blue cardstock barn doors and my double shutter card opens to reveal a dog. My dog’s name is Superman and Mimi adores him. In fact, I’m pretty sure he is her favourite cousin!
The grass is made from Old Olive cardstock that has been die cut using the grass dies from the Beach Days dies. The dog is from Pets & More stamp set, which is a reversible stamp set. I’ve stamped the reverse side of the stamp in Pecan Pie stamped off once and the front of the dog stamp is stamped in full strength Pecan Pie. The dog bowl is also stamped in Pecan Pie and fussy cut.
After photographing the card I realised one of Superman’s hairs is on the card. How perfectly apt!
The doghouse is made from the Country Birdhouse die with the base chopped off. The flowers are also from the Country Birdhouse dies and I created the stems using the narrow roof edging die from the same set. The thicker roof die has been used for the top of the dog house.
These bones and the dog ball from the Pets & More stamp set have been fussy cut.
I used a circle punch to create finger pulls and pull tabs.
The card sits on a 5 x 7 inch card base which I will stamp and decorate inside too before I give Mimi her birthday card next weekend.
Now it’s time to hop in over to our next participant, the lovely Andrea Sargent – I can’t wait to see what Andrea has made this week!
If at any time you find a broken link, you can find the complete list of all participants below.
Welcome to week eight of our Art With Heart 2024-25 Colour Creations blog hop!
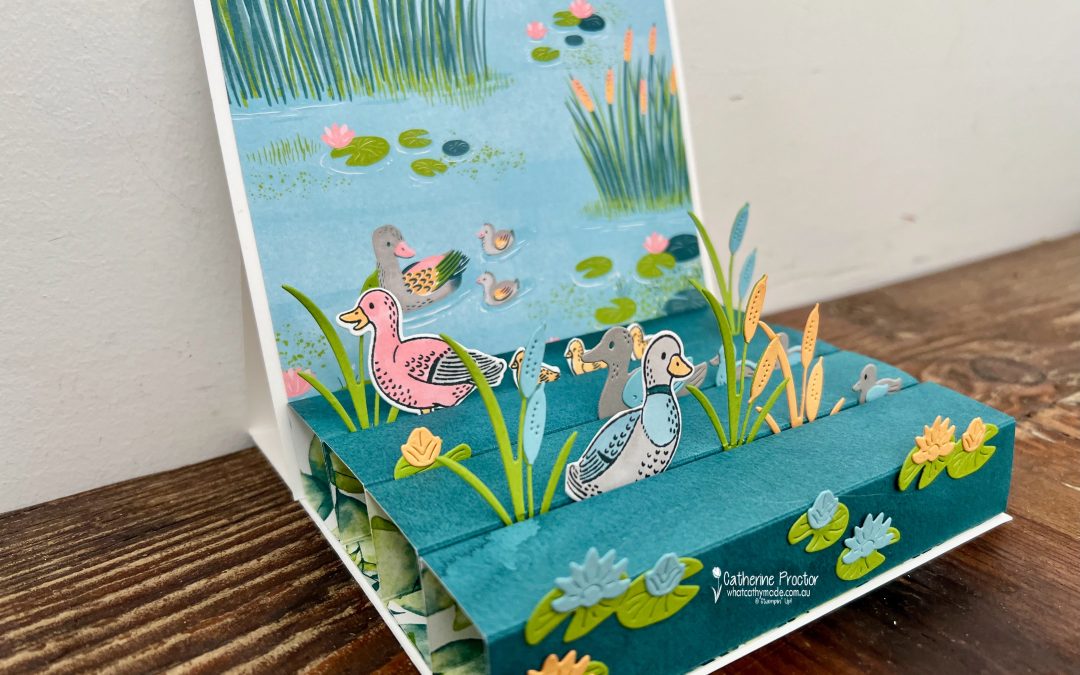
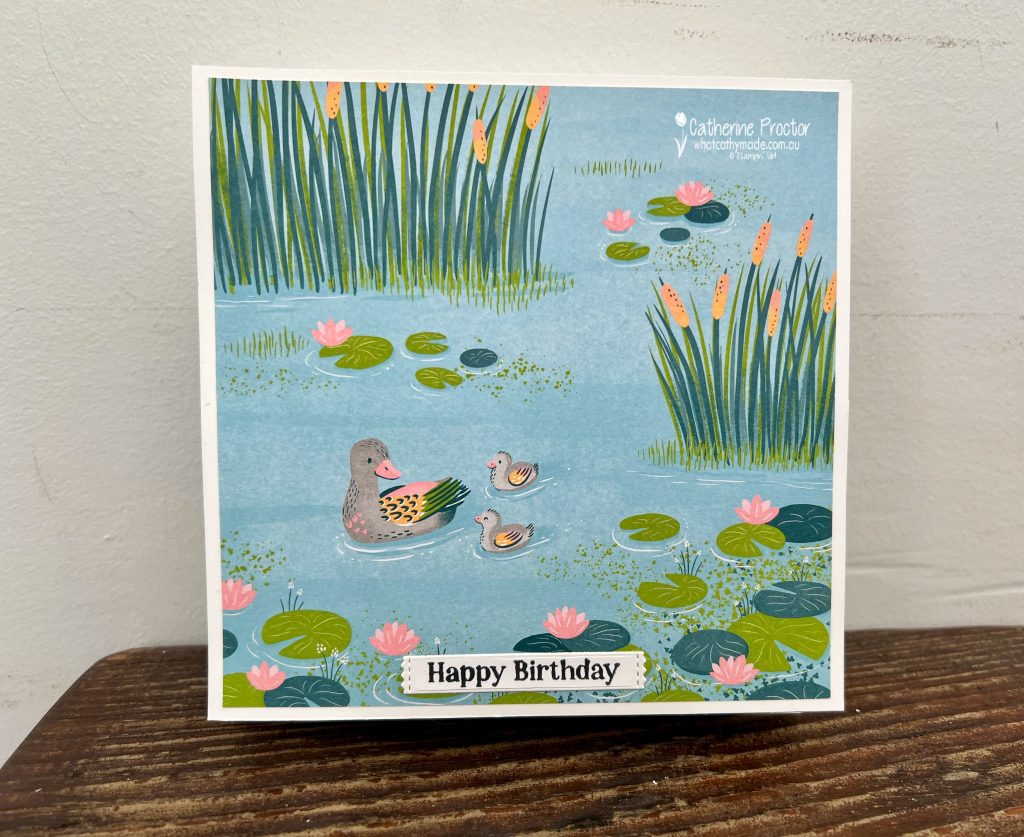
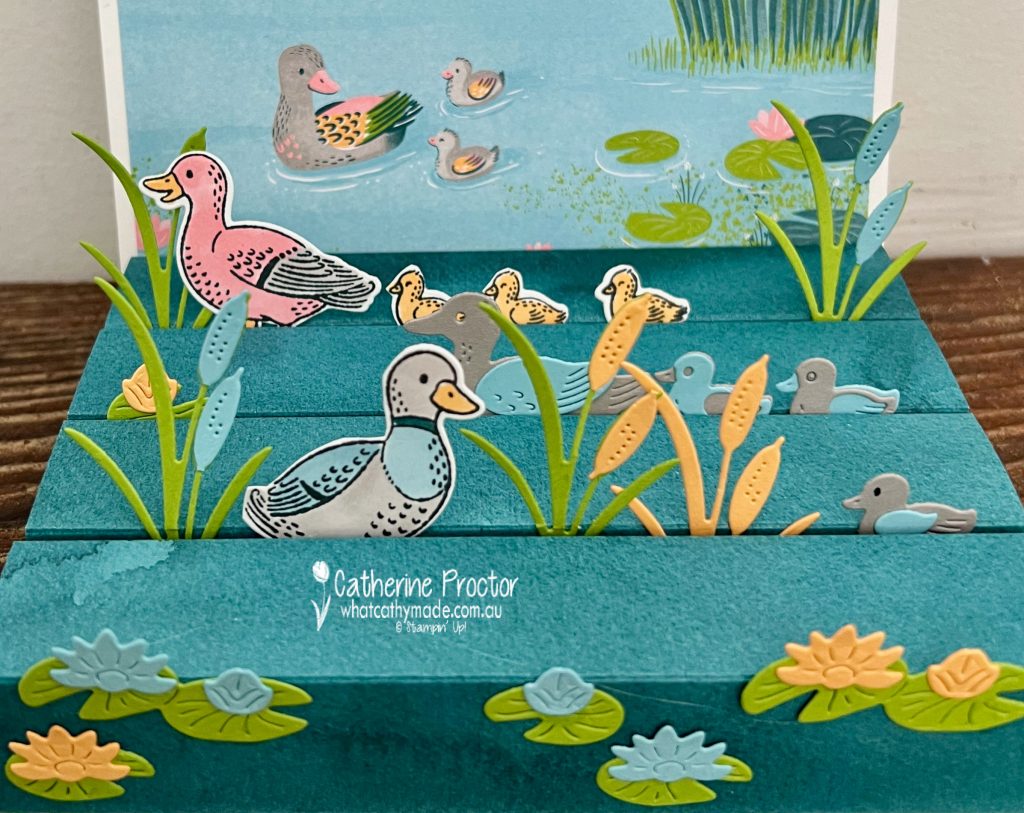
This week we’re featuring a lovely soft blue colour called Balmy Blue and I’ve created a duck pond scene card using the Lily Pond Lane suite.
The colours in my duck pond card are the colours from the Lily Pond Lane DSP: Balmy Blue, Granny Apple Green, Gray Granite, Peach Pie, Pretty In Pink, Pretty Peacock.
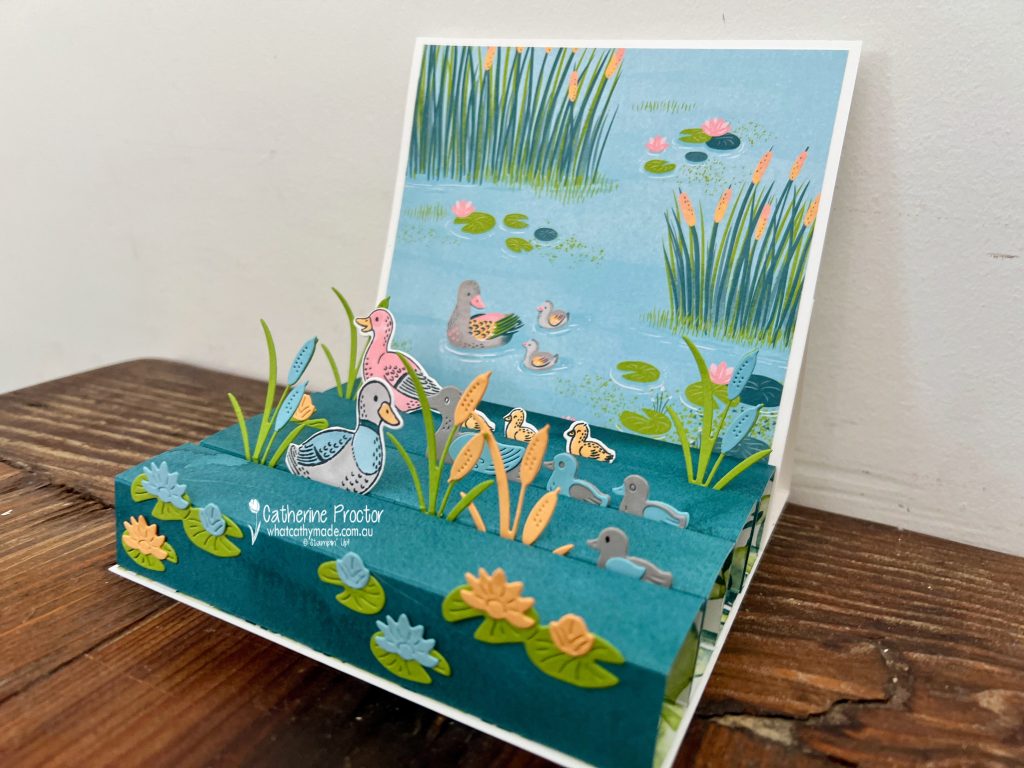
Call me Cathy or call me crazy (most people do!) for this week’s card I decided at the very last minute to make a fancy fold that I had no instructions for. This fancy fold is called an easel block card, a block easel card or a pop-up block easel card.
Here’s a video that show how this card opens up and looks from the side.
The easel card base is a 6 x 12 piece of Basic White cardstock, scored and folded at 6 inches and 3 inches.
A 6 x 6 piece of Basic White cardstock attached to the front 3 x 6 part of the easel card becomes the card front, decorated with a piece of Lily Pond Lane DSP ( 1/4 inch trimmed off the top and one side) and the Happy Birthday sentiment from the Lily Pond Lane stamp set .
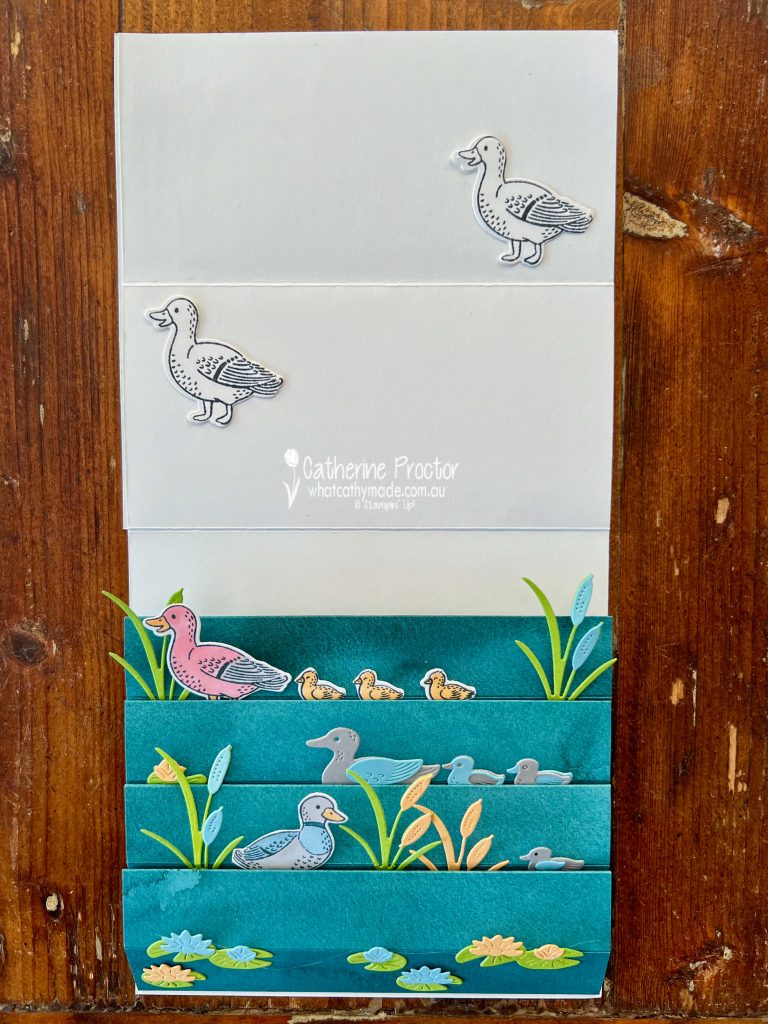
Here’s what it look like when opened up to reveal the inside. You can write your message on the top half of the inside of the easel fold. I’ve just laid a couple of extra ducks here for this photo.
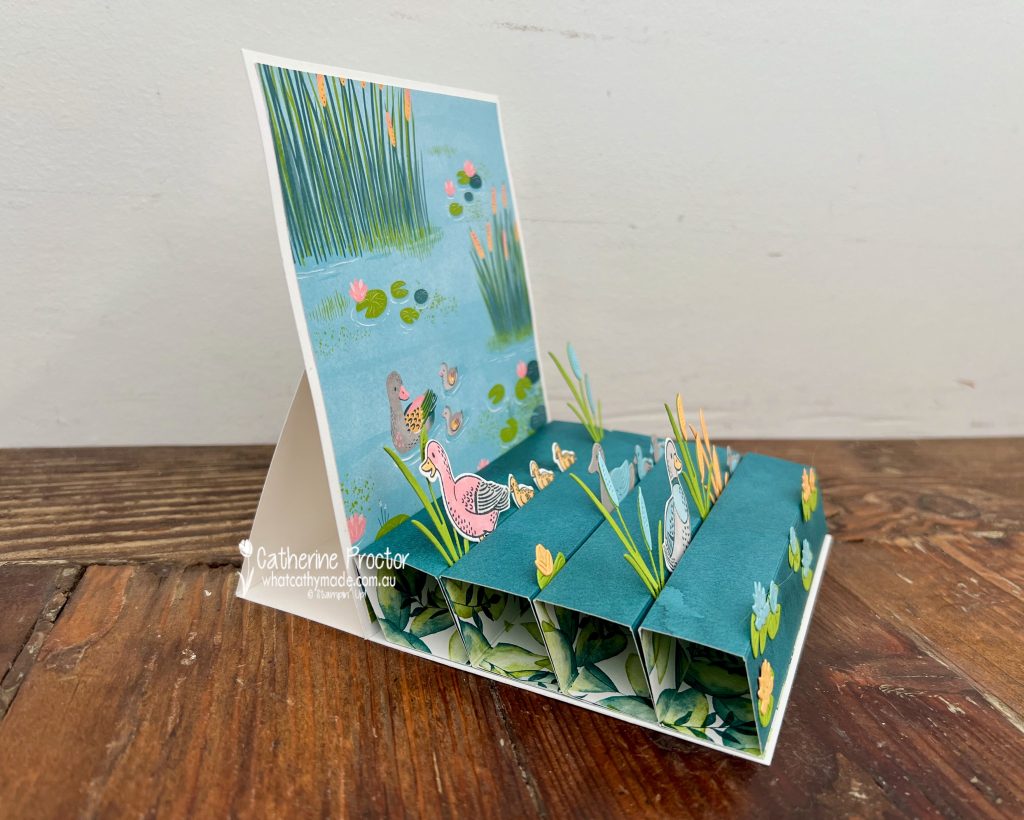
This top view (with easel folded over) shows how the blocks in this fancy fold hold the different elements at different depths. This is why this is such a great fancy fold for creating scene cards – you simply slot them in and adhere them.
To make the blocks at the base I used a 12 x 12 sheet of the Delightful Florals DSP in Pretty Peacock. Each block measures 5 3/4 x 5 3/4 inches, scored and folded at 1, 2, 3 and 4 inches.
I folded each piece of DSP along the score lines to create a 1 inch square block adhered with Tear-n-tape and then laid them side by side inside the card base, adhered again with Tear-n-tape.
I used scraps of Balmy Blue, Granny Apple Green, Gray Granite, Peach Pie, Pretty In Pink and Pretty Peacock cardstock to die cut the ducks, ducklings and vegetation, as well as Stampin’ Blends for colouring in the stamped and die cut ducks and duckings.
The lily pads were adhered to the front of the card and these blocks all fold back to lie flat so the card can be placed into an envelope.
Now it’s time to hop in over to our next participant, the lovely Andrea Sargent – I can’t wait to see what Andrea has made this week!
If at any time you find a broken link, you can find the complete list of all participants below.
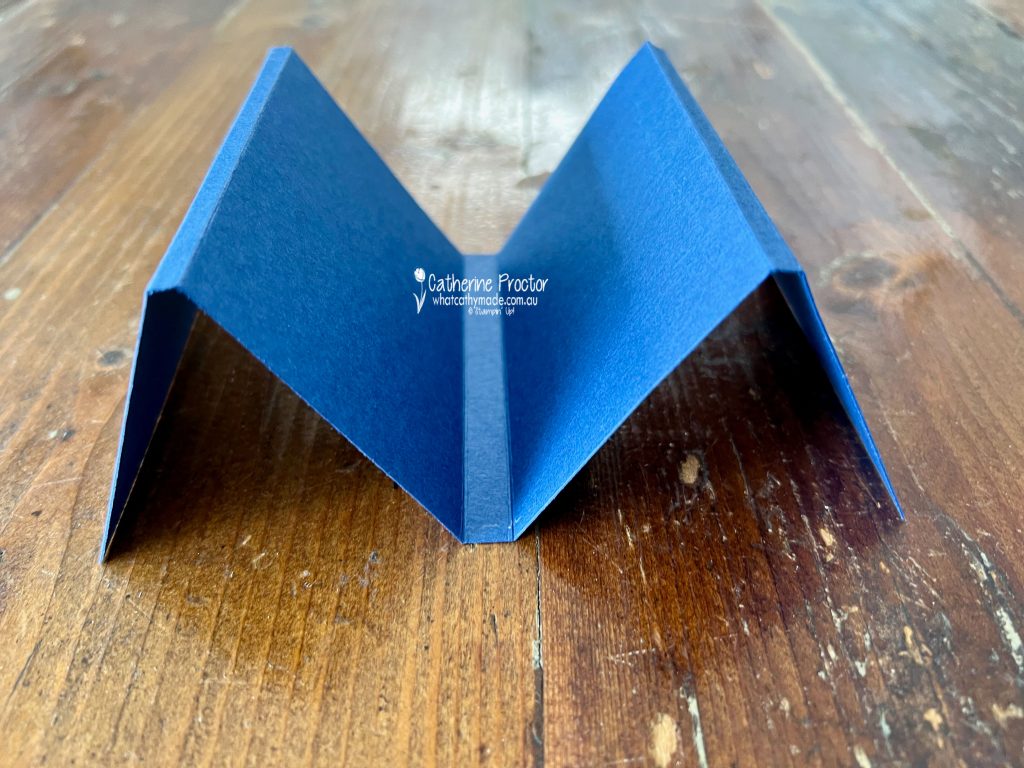
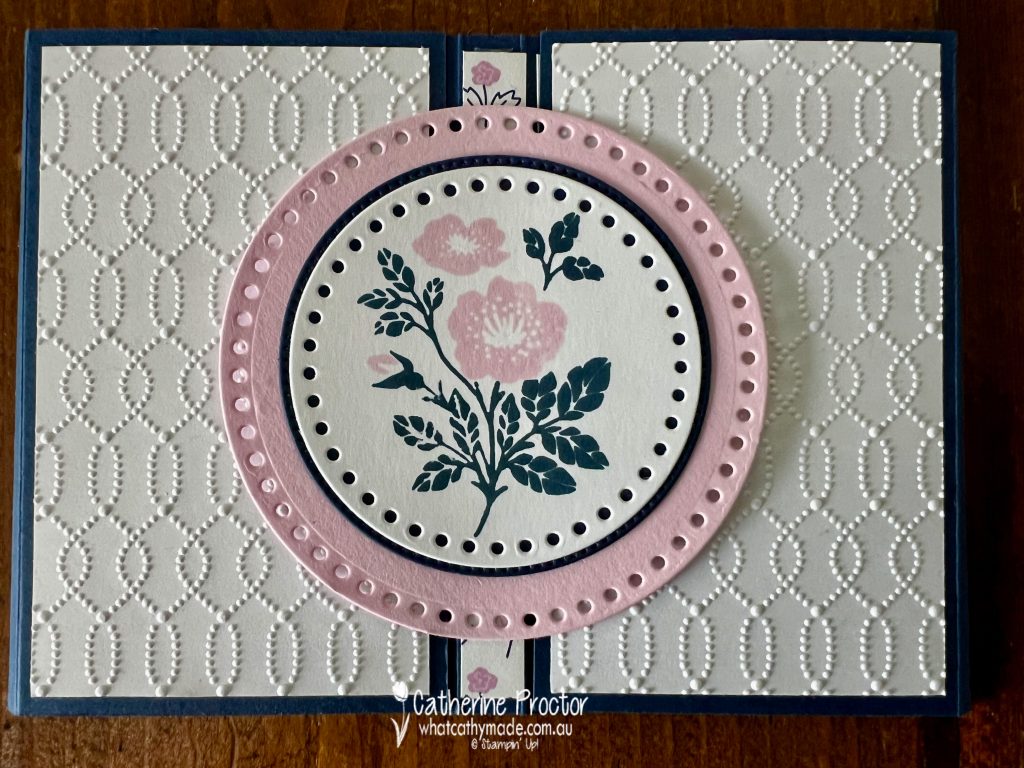
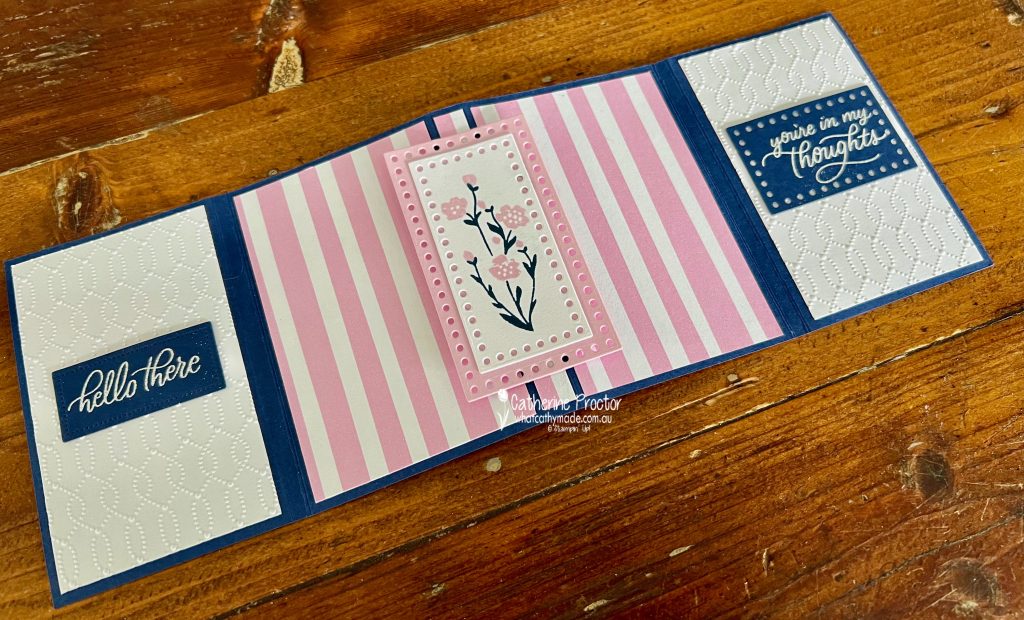
Welcome to week thirty-five of our Art With Heart 2023-24 Colour Creations blog hop!
Our colour this week is Night of Navy, one of my favourite colours. This Neutral colour works with most other colours and tonight I’ve paired it with Bubble Bath, Basic White and Misty Moonlight, drawing colour inspiration from the colours in the the Delightfully Eclectic 12″ x 12″ (30.5 x 30.5 cm) Designer Series Paper.
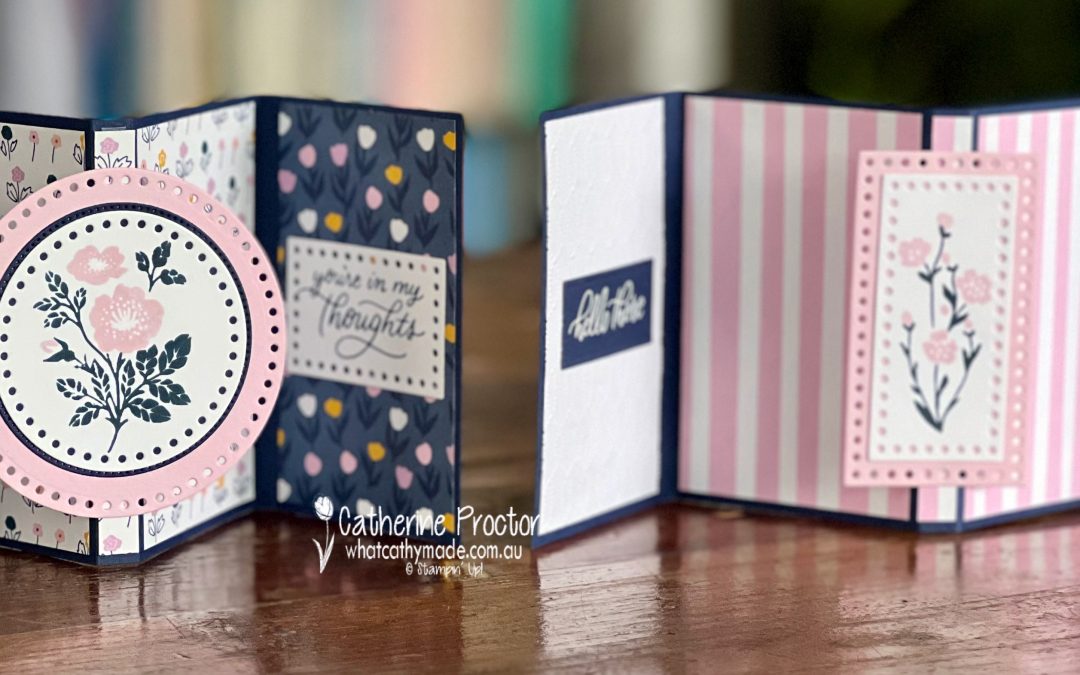
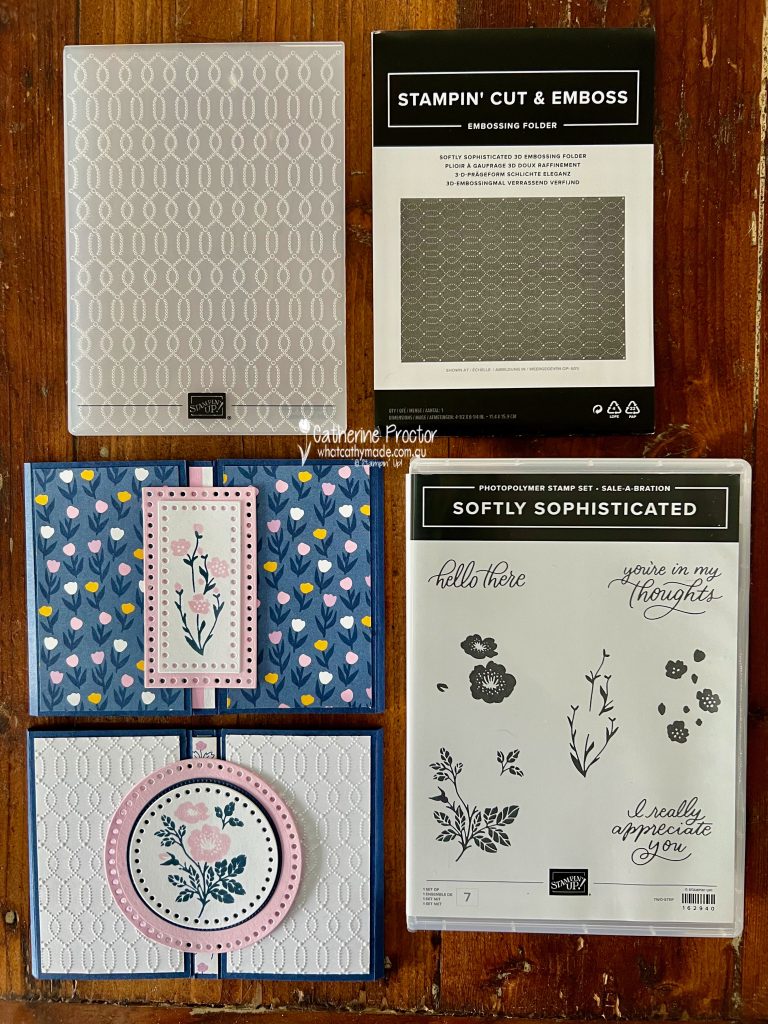
My two sympathy cards use products from the brand new January–April 2024 Mini Catalogue and the Sale-A-Bration catalogue: the Softly Sophisticated bundle (stamps and embossing folder) and the Everyday Details Dies.
The Softly Sophisticated bundle is a Sale-a-bration item that includes a stamp set and an embossing folder. You can earn it for FREE when you place any order over $180AUD.
I’ve CASED my cards from a fancy fold created by Susan Campfield, a Stampin’ Up! demonstrator based in the USA. The fancy fold is called “The Marvelous Fun Fold Card”. You can watch her video on how to make the M fold here.
I’ve altered Susan’s measurements to create a slightly different metric template that allows two card bases to be cut from one sheet of A4 cardstock.
Cut the A4 cardstock in half lengthways at 10.5cm to create two card bases. For each card base, score along the long side of the card base at 6.5, 7, 14, 15, 22, 22.5 and then cut the excess off at 29 cm. Then you fold along these lines to form an M shape.
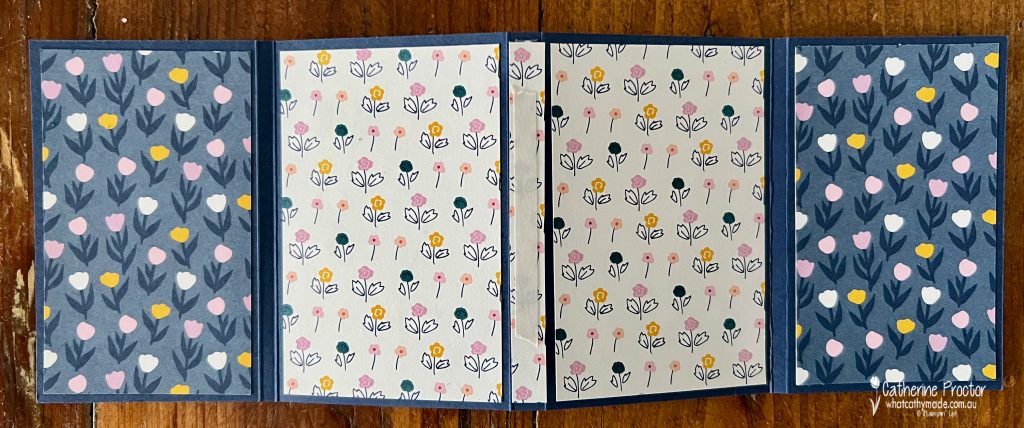
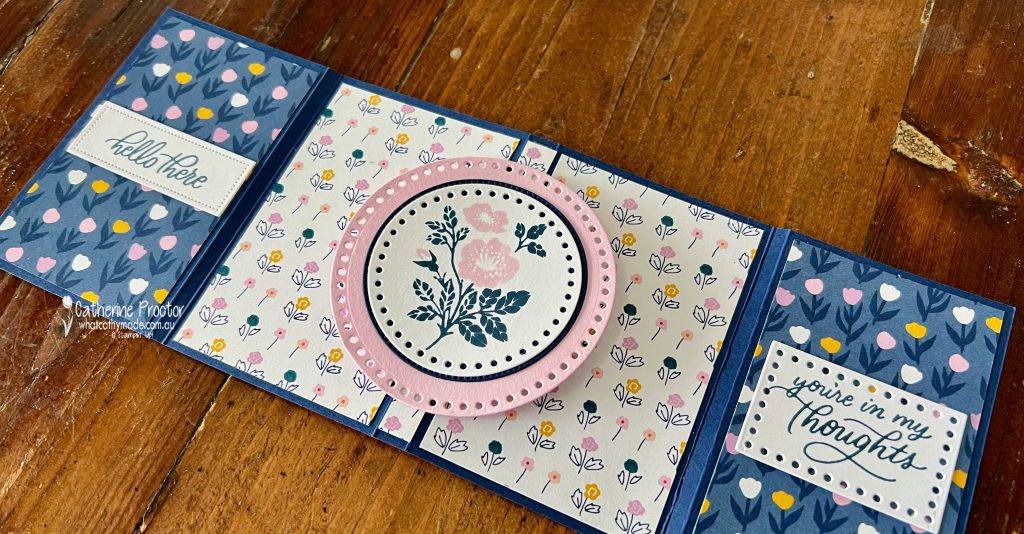
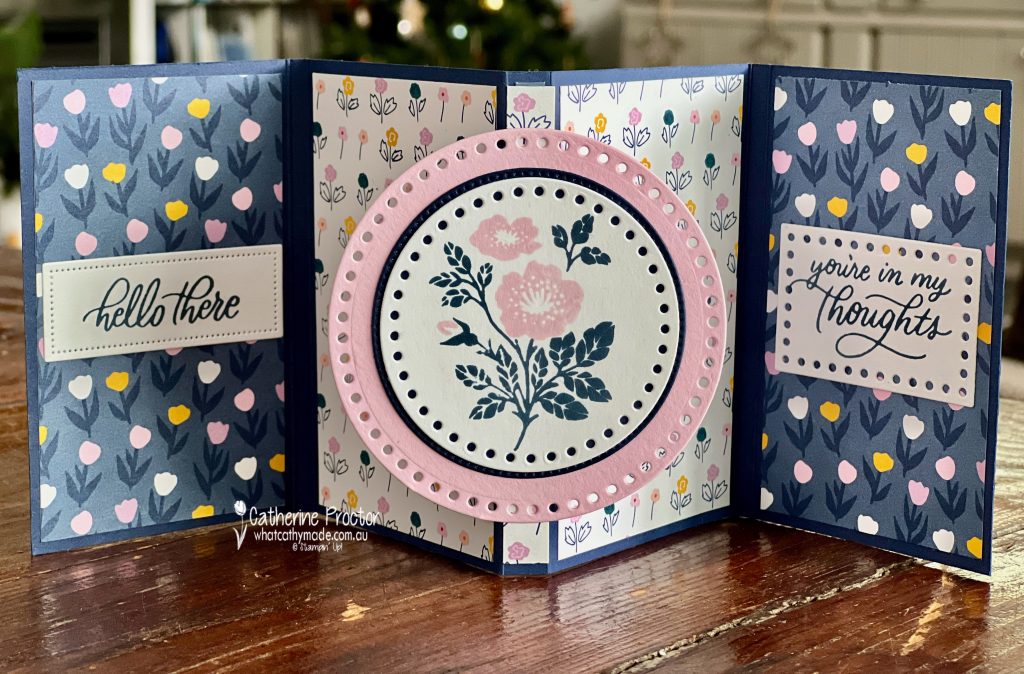
Decorate with Embossed cardstock panels and DSP panels before adhering a strip of Tear & Tape Adhesive to the middle 1cm wide panel – this is to adhere the centre image and make the fancy fold mechanism work.
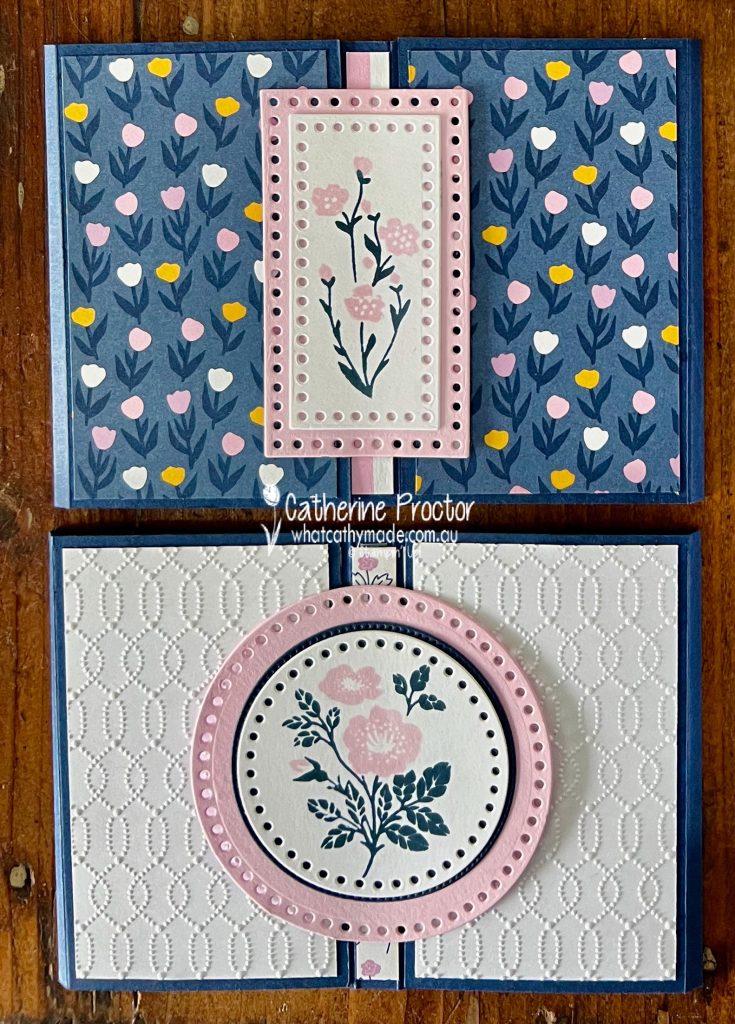
I’ve stamped the centre image in Misty Moonlight and Bubble Bath, using two stamps from the Softly Sophisticated bundle. The image is layered on circle dies from the new Everyday Details dies, as well as a middle circle cut from Night of Navy cardstock using the Stylish Shapes dies.
The sentiments on the inner side flaps are die cut using the Everyday Details dies, shortened where necessary.
The side flaps tuck in in behind this centre floral image to close the card. You can write your message on Basic White cardstock panels adhered to the back of the card.
For the second card, the embossed panels are placed inside the card, with the DSP on the front side flaps.
The centre image is stamped in Misty Moonlight and Bubble Bath, using two stamps from the Softly Sophisticated bundle, layered on rectangle dies from the new Everyday Details dies
This is such a cool fancy fold – here’s a short video to show how the card opens and closes.
Now it’s time to hop on over to our next participant, the lovely Kate Morgan – I can’t wait to see what Kate has made this week!
If at any time you find a broken link, you can find the complete list of all participants below.
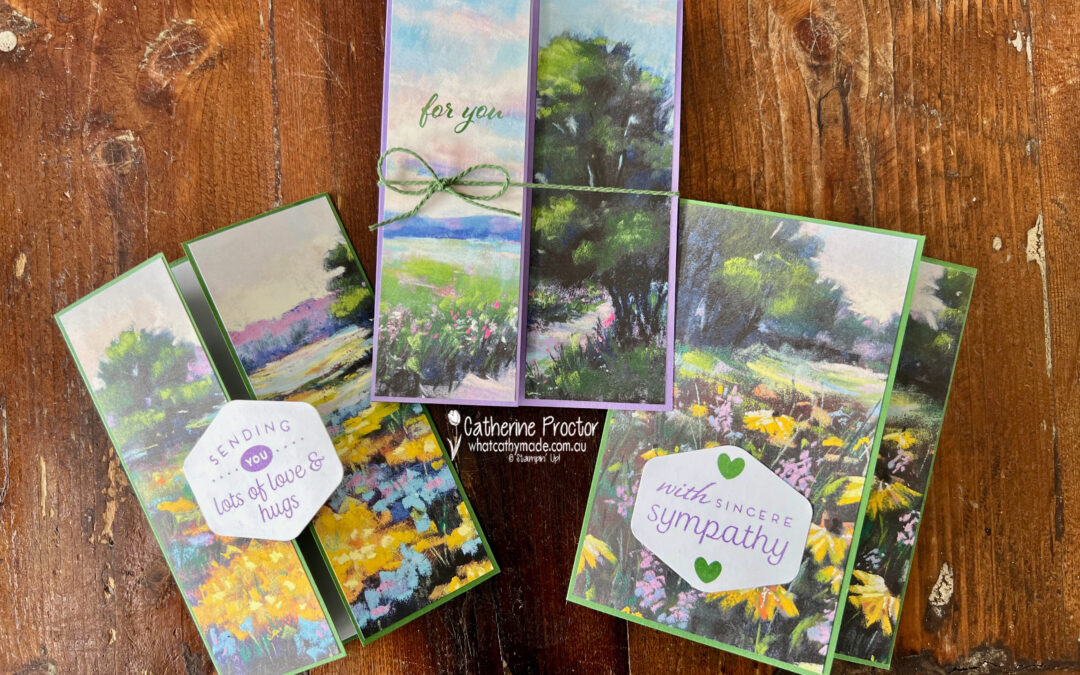
Welcome to week twenty five of our Art With Heart 2023-24 Colour Creations blog hop!
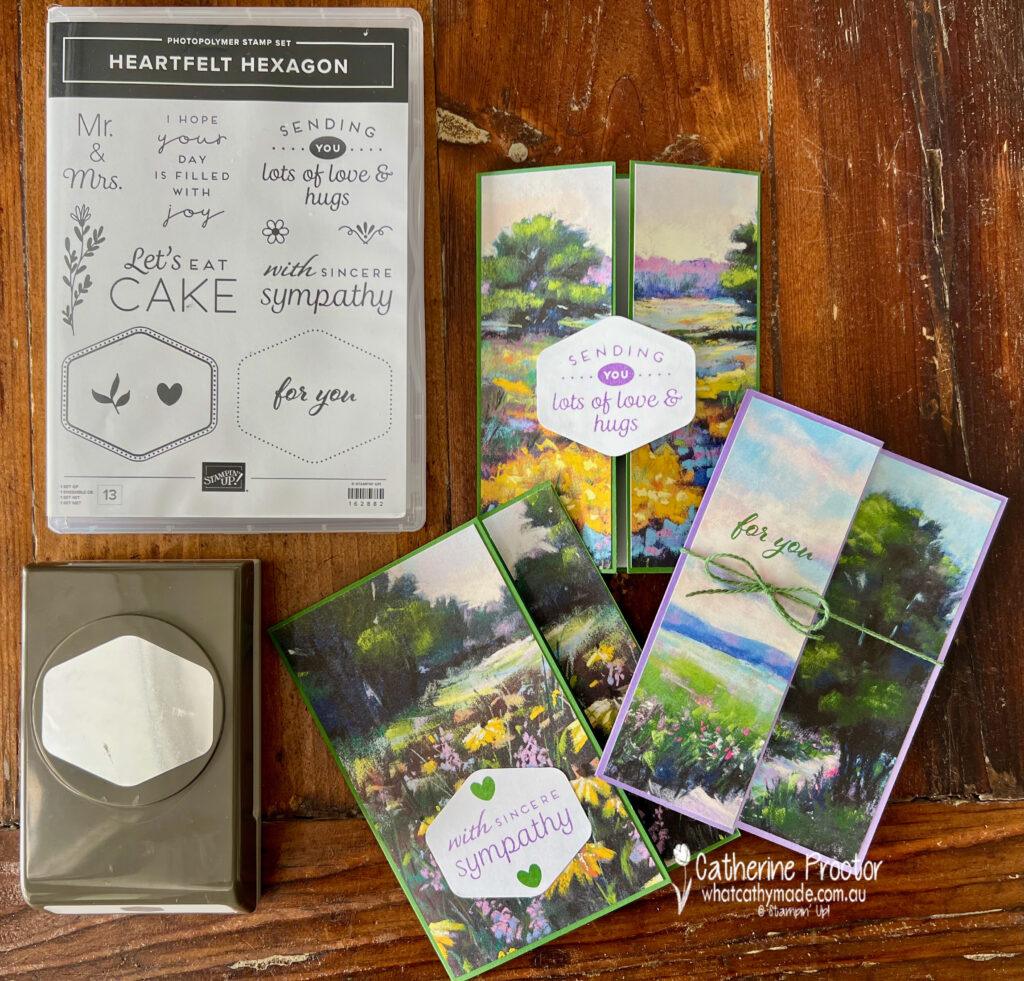
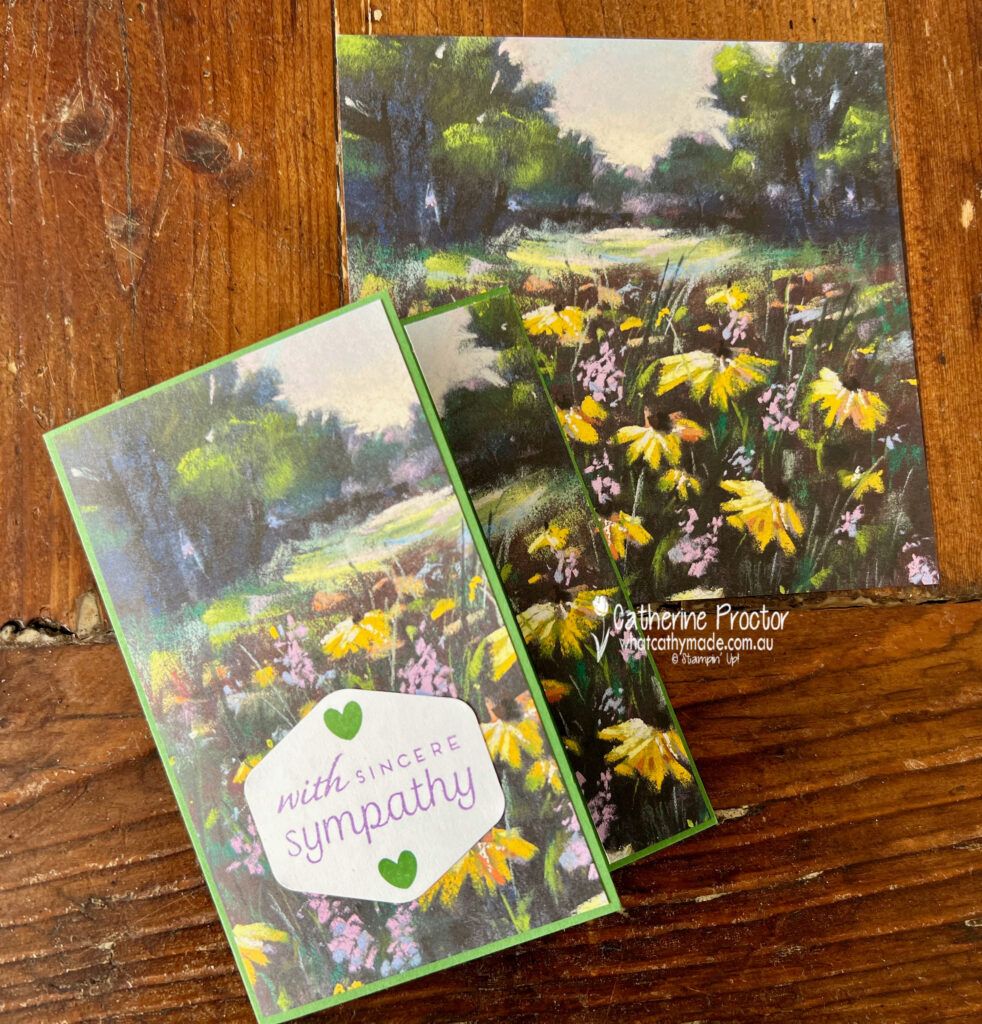
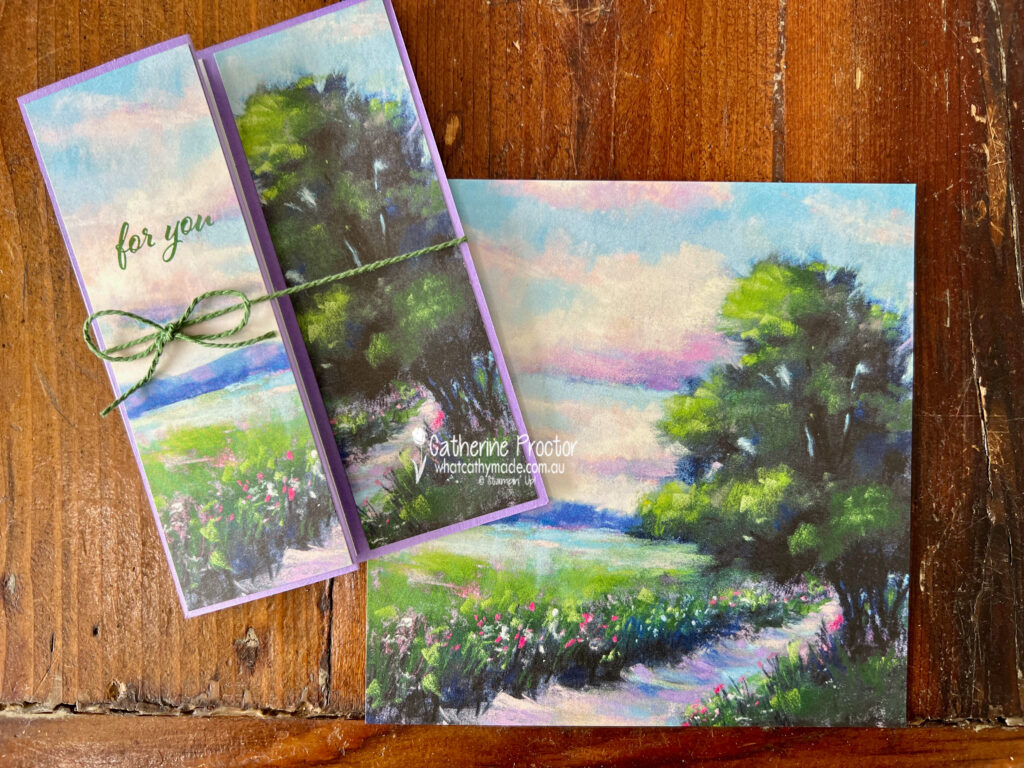
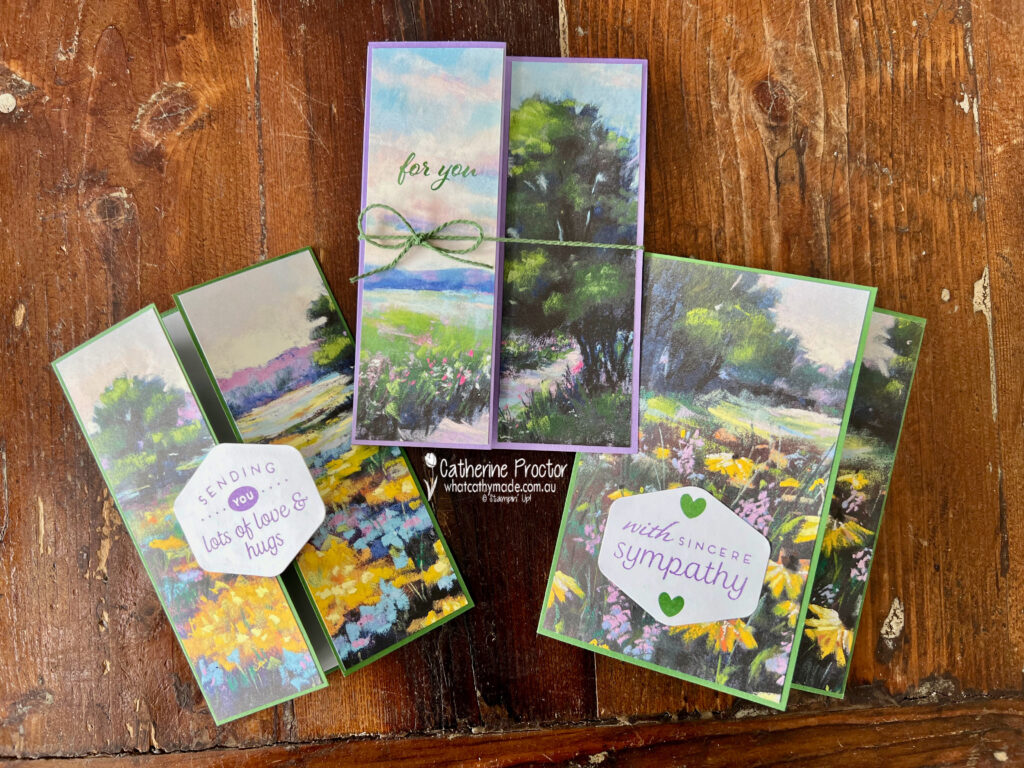
This week we are showcasing Garden Green and I’ve made some cards using a stunning new online exclusive designer series paper called the Wandering Meadows DSP, which was hand drawn by one of the Stampin’ Up! artists using pastels. It will be available to order from 7 November.
My three cards are CASED on some gorgeous fancy folds that also use this new DSP, made by US demonstrator Patty Bennett.
I’ve altered Patty’s card dimensions to fit our A4 metric card base sizes and altered her designs to use another online exclusive product, the Heartfelt Hexagon Bundle.
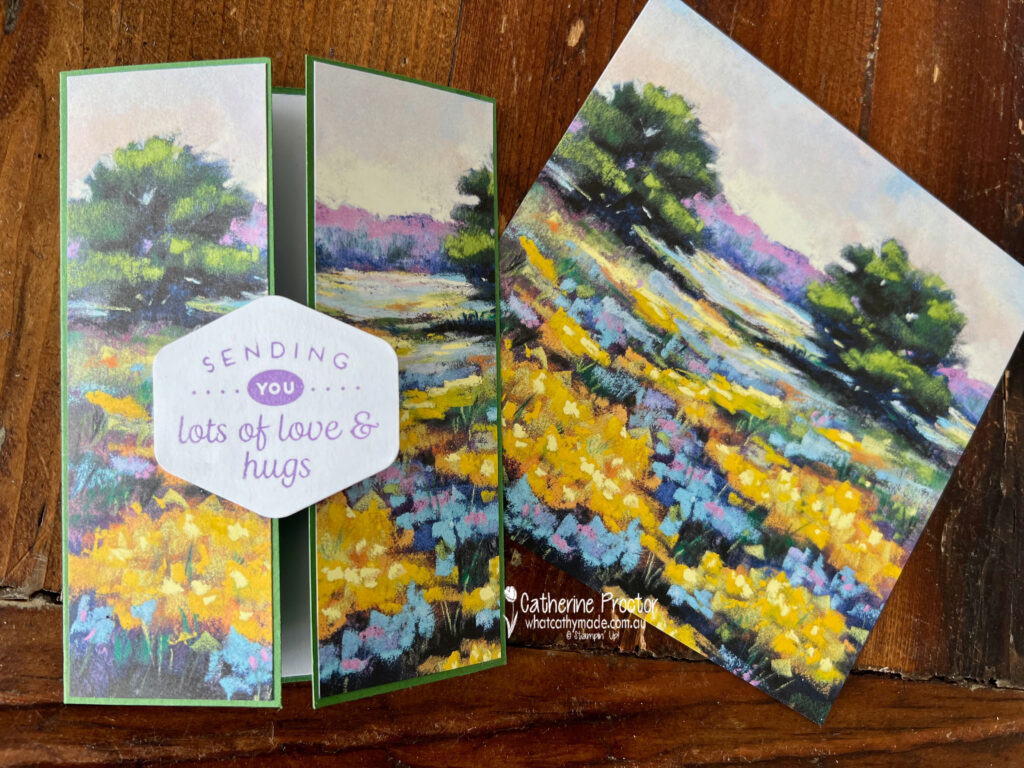
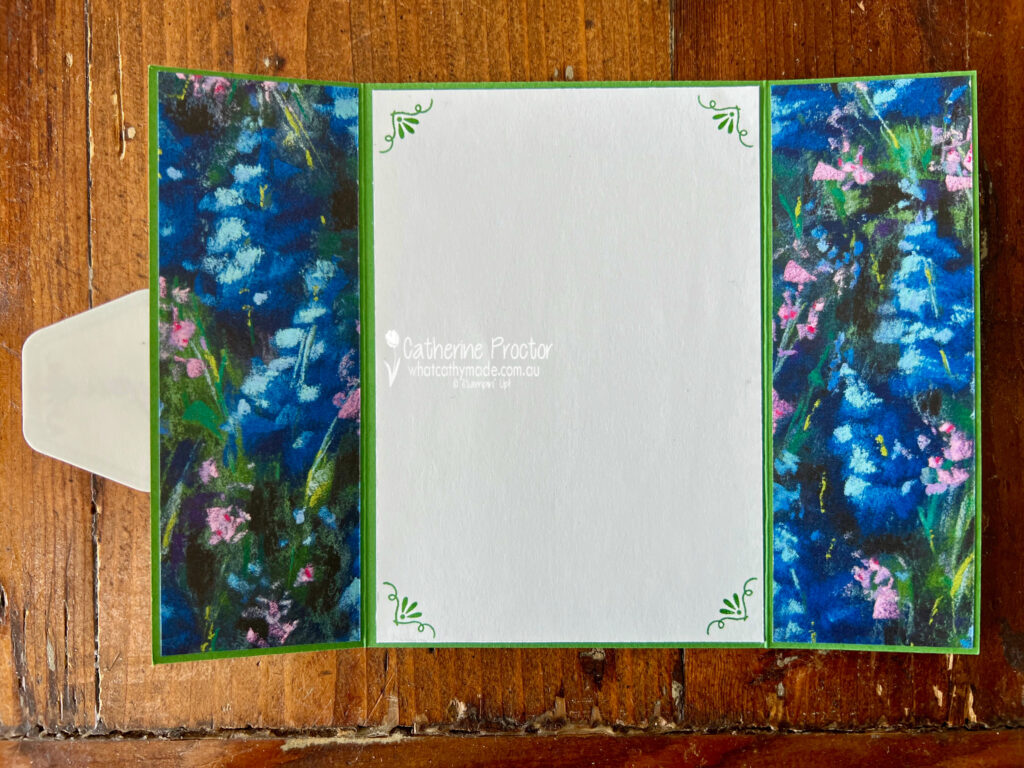
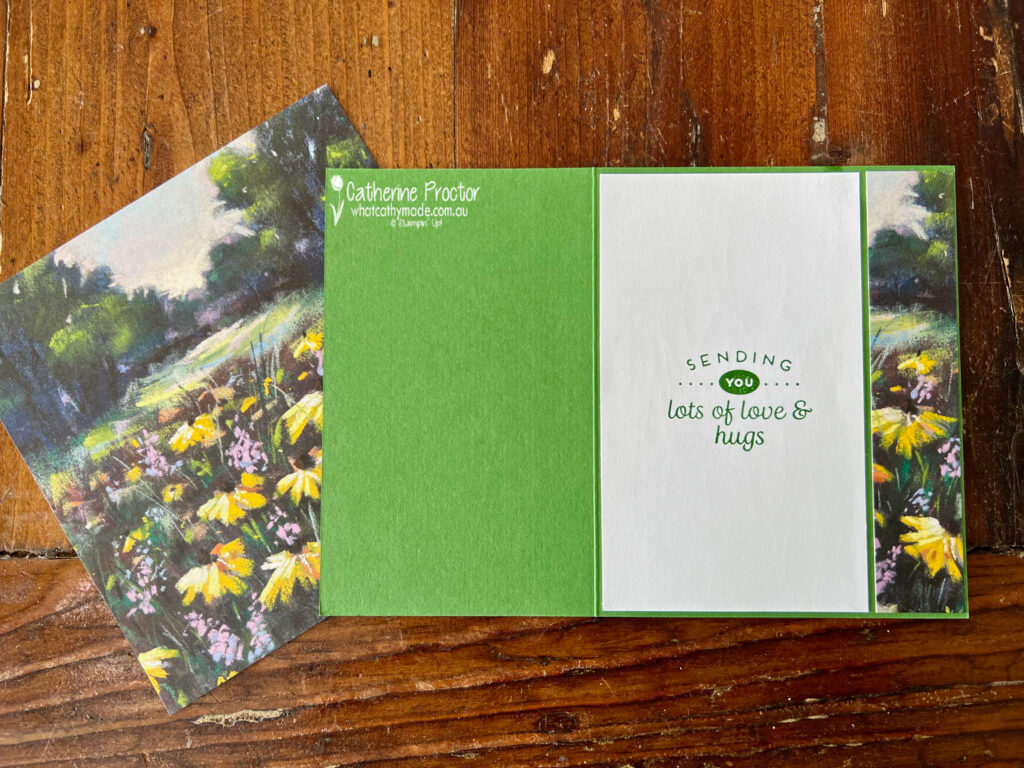
Card one is a gatefold card that uses the Wandering Meadows DSP both on the outside and the inside of the card. The card base is half a sheet of Garden Green A4 cardstock, scored at 5.25 cm from each side and folded inwards.
The DSP panels on the front and the inside of the side flaps measure 14.4 x 4.9 cm and the white card insert measures 14.4 x 10 cm.
Card two is a side fold card that can be used vertically or horizontally depending on the orientation of the DSP. The card base is half a sheet of Garden Green A4 cardstock, scored and folded at 9cm. The DSP front panel is 8.7 x 14.4 cm and the DSP side panel is 2.7 x 14.4 cm.
The white card insert measures 9.5 x 14.4 cm.
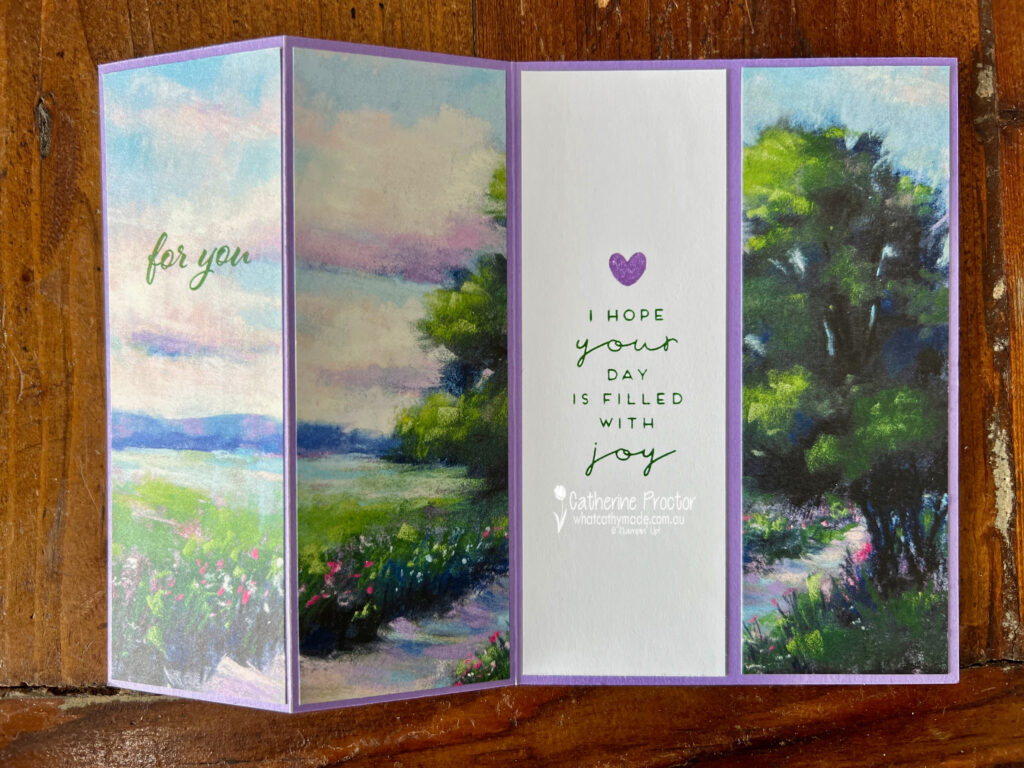
Card three is a triptych card with a Highland Heather cardstock base. Half a sheet of A4 cardstock has been scored and folded at 10.5 cm and 15.7 cm. The three DSP panels and the inside white cardstock panel each measure 4.9 x 14.4 cm.
As well as the sentiment stamped inside the card, I’ve also staped a sentiment directly onto the DSP on the front panel. I love the subtle effect of stamping on DSP.
The card is secured shut with some Garden Green twine from the Three Twine Combo Pack – this is a retired product but currently available in the clearance rack.
I hope my fancy folds have helped to showcase the beauty of this DSP – you really don’t have to do much to these amazing scenes. Do you have a favourite card?
Now it’s time to hop on over to our next participant, the lovely Christine Blain – I can’t wait to see what Christine has made this week!
If at any time you find a broken link, you can find the complete list of all participants below.
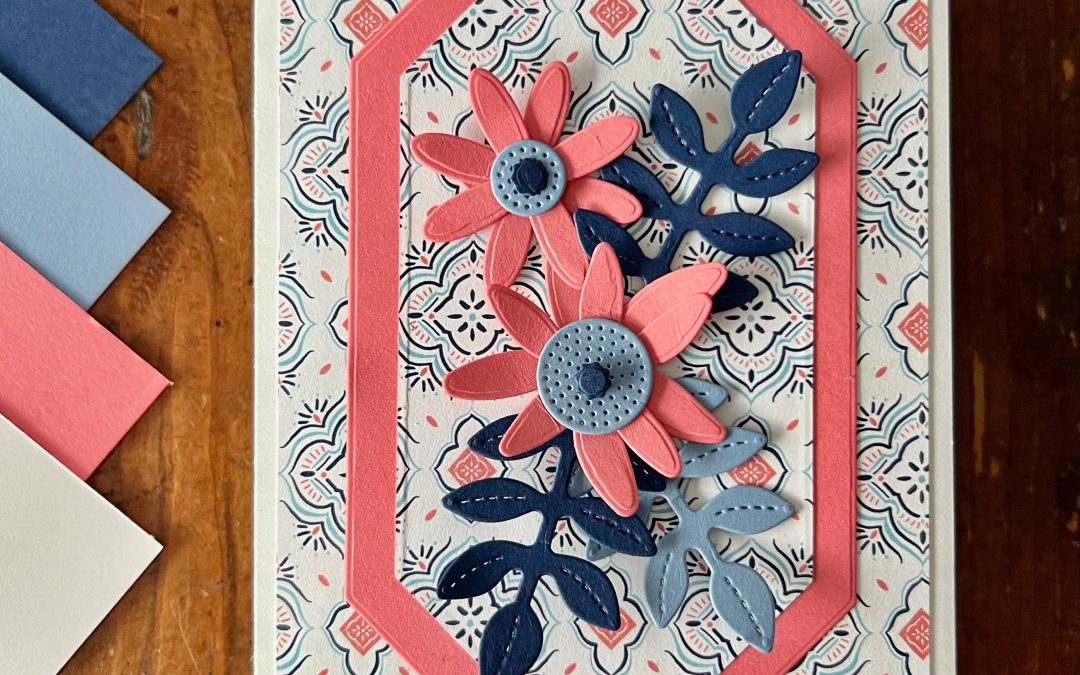
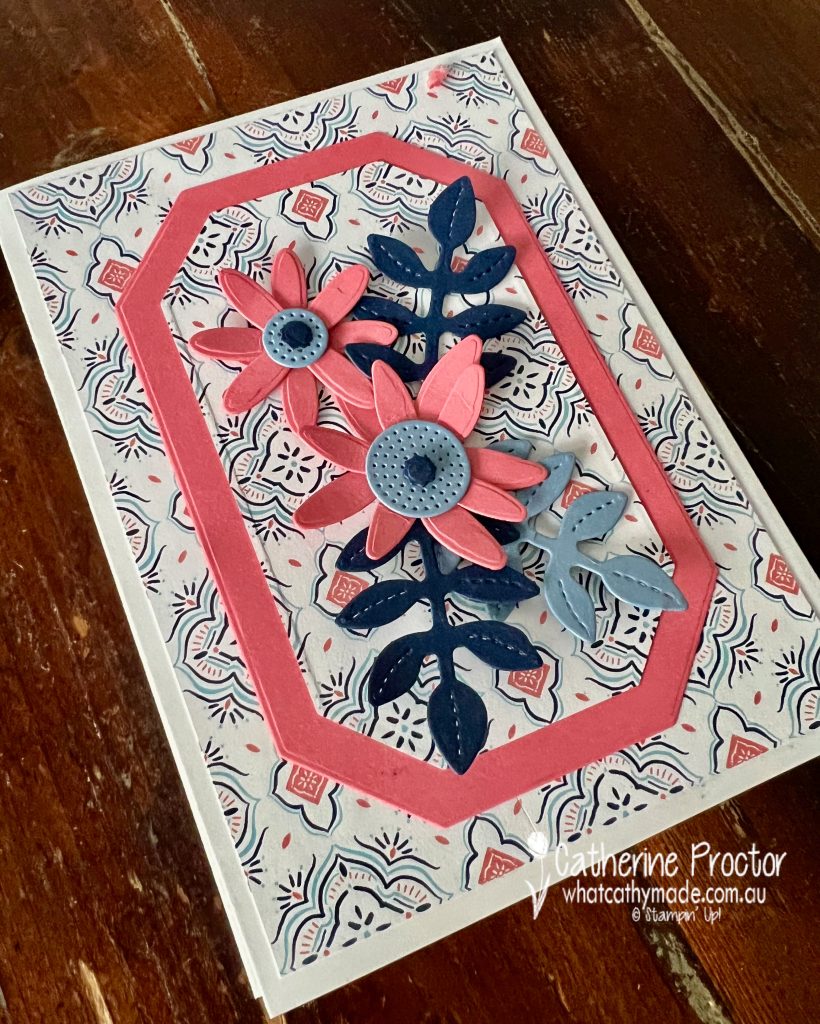
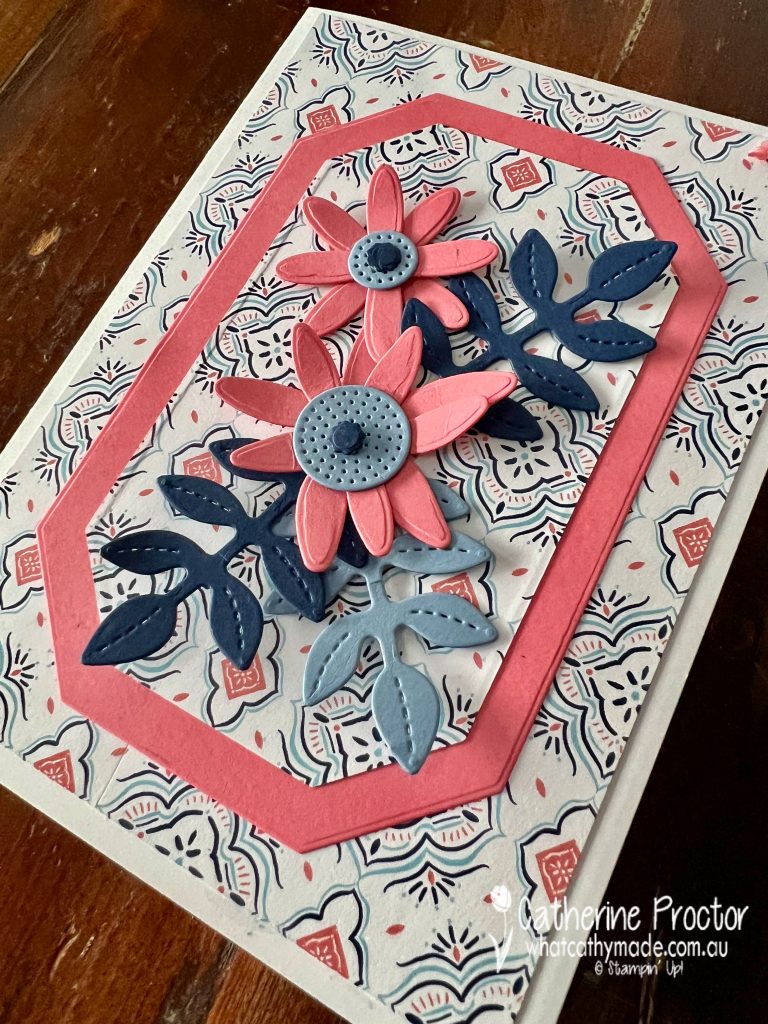
Welcome to week twenty three of our Art With Heart 2023-24 Colour Creations blog hop! This week we are showcasing Flirty Flamingo, a bright pink colour from the brights family.
I’ve taken my colour combination inspiration this week from this gorgeous sheet of Les Shoppes Designer Series Paper. The colours in this sheet of DSP are Balmy Blue, Flirty Flamingo, Night of Navy and Basic White.
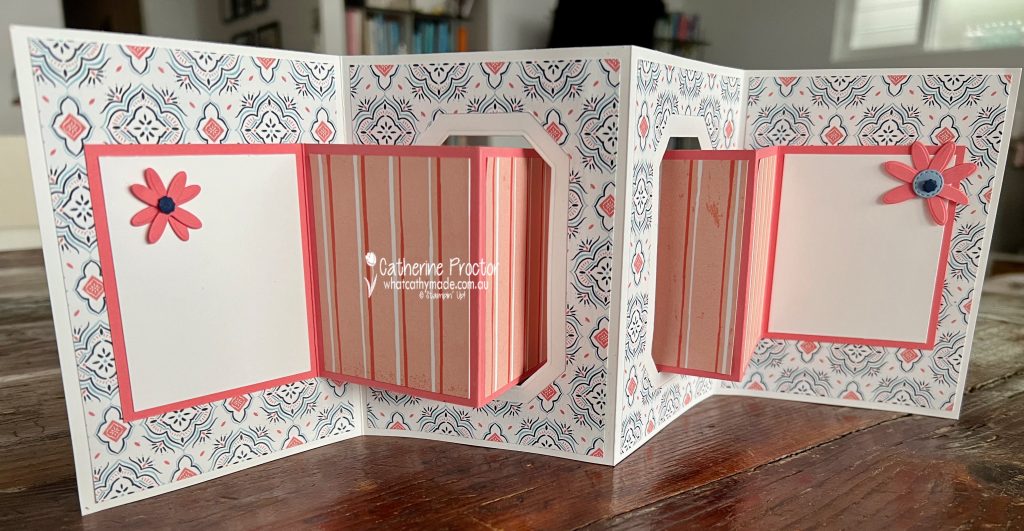
A fancy fold is often a wonderful way to use Designer Series Paper so I’ve created an Interlocking Accordion Card, following a template created by Lisa Curico from the USA.
You can find the instructions on how to make this card on Lisa’s YouTube channel and she also has a template with all the measurements here. I’ve used Lisa’s measurements, but made a totally different looking card by using a different DSP, different colours, different dies and not having any stamping on my card.
Here’s a short video to show you how this fancy fold opens up – for some reason the video is upside down and it won’t flip around for me tonight no matter how hard I try, however as there is no stamping on this card it’s not really a big deal.
This card also stands up for display really well – here’s what it looks like opened up for display.
Apart from adding a couple of leftover Paper Florist die cuts, I’ve left the first and last inside panels blank to allow room to stamp a sentiment on the first one and write a message to the recipient on the last panel.
Here’s what it looks like from above so you can see the way the inner card folds into and interlocks with the outer card.
The Countryside Corners dies were used to decorate the front of the card as well as to cut out the holes in the outside card so that the smaller inside card can thread through.
To match the colours in the DSP, I’ve used both the Countryside Corners Dies and the Paper Florist dies to die cut Balmy Blue, Flirty Flamingo and Night of Navy cardstock and decorate the front of the card.
Now it’s time to hop on over to our next participant, the lovely Tina Gillespie – I can’t wait to see what Tina has made this week!
If at any time you find a broken link, you can find the complete list of all participants below.
Your Christmas countdown continues – it’s exactly three months or 13 weeks today until Christmas Day!
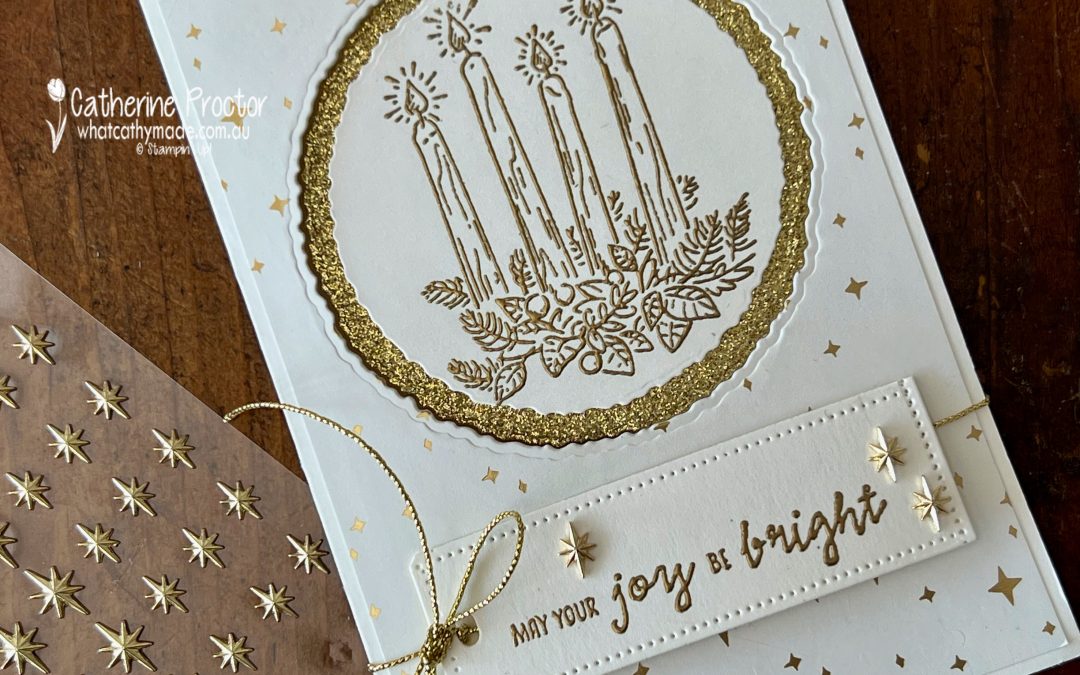
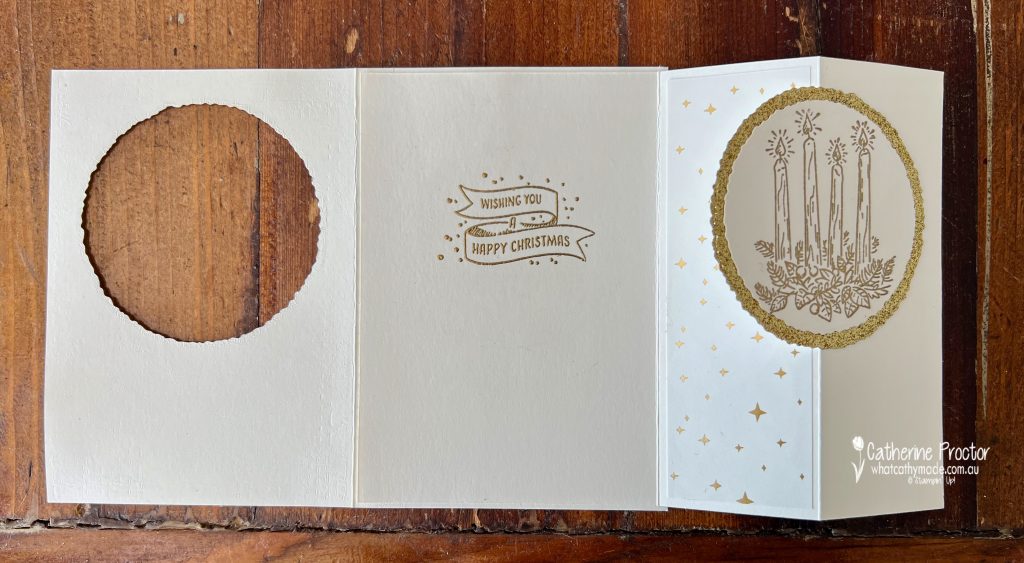
This week’s Christmas card is a fancy fold card – I’m not 100% sure of the name, however think it could be called a peek a boo flap card? Here’s a short video to show you how it works.
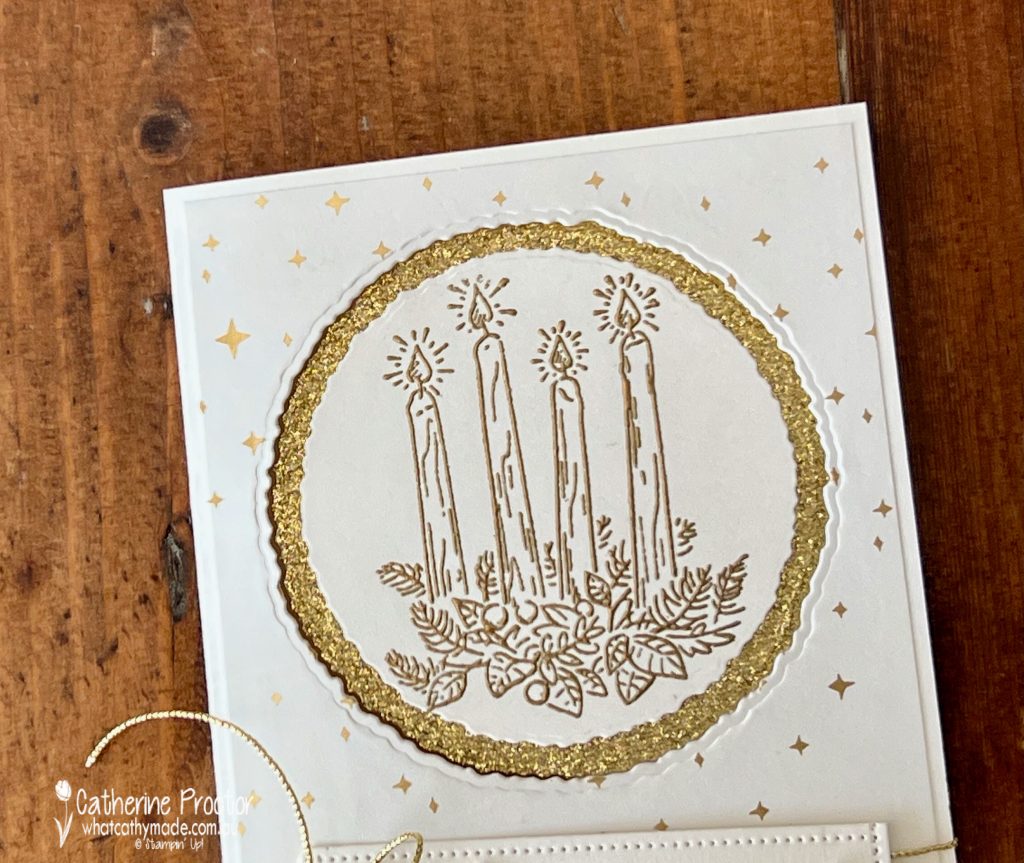
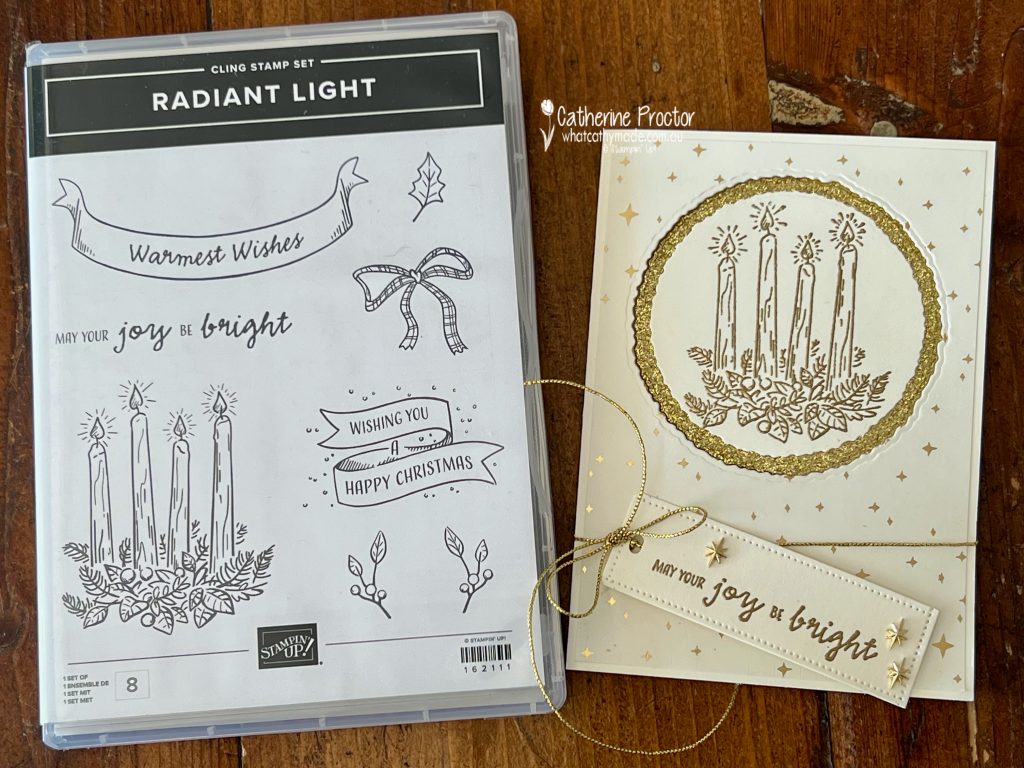
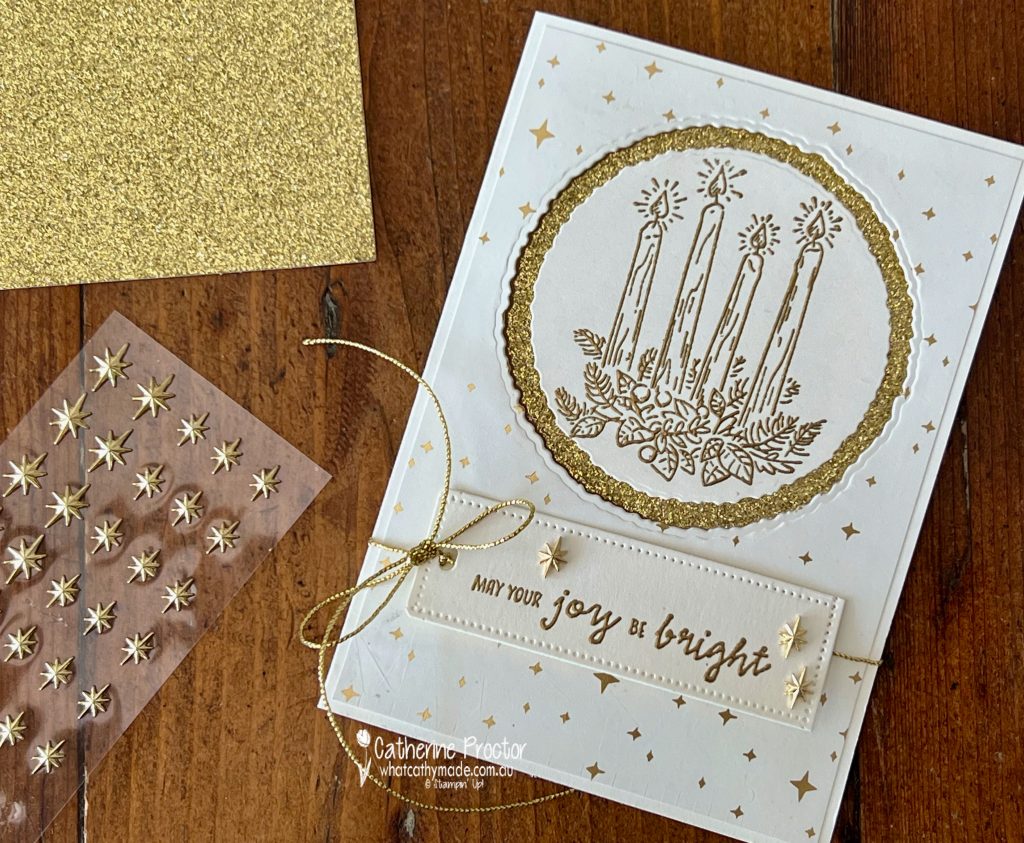
As you probably know, I love monochromatic cards. I’ve taken the colour scheme for my card from the stunning gold and Very Vanilla Shining Brightly 12″ x 12″ (30.5 x 30.5 cm) Specialty Designer Series Paper I’ve used on the front of the card and also inside it too.
The gorgeous candle image and both sentiments are all from the Radiant Light stampset.
The gold heat embossed candle image and the gold glimmer circle layer behind it are both die cut using the new Decked Circle Dies.
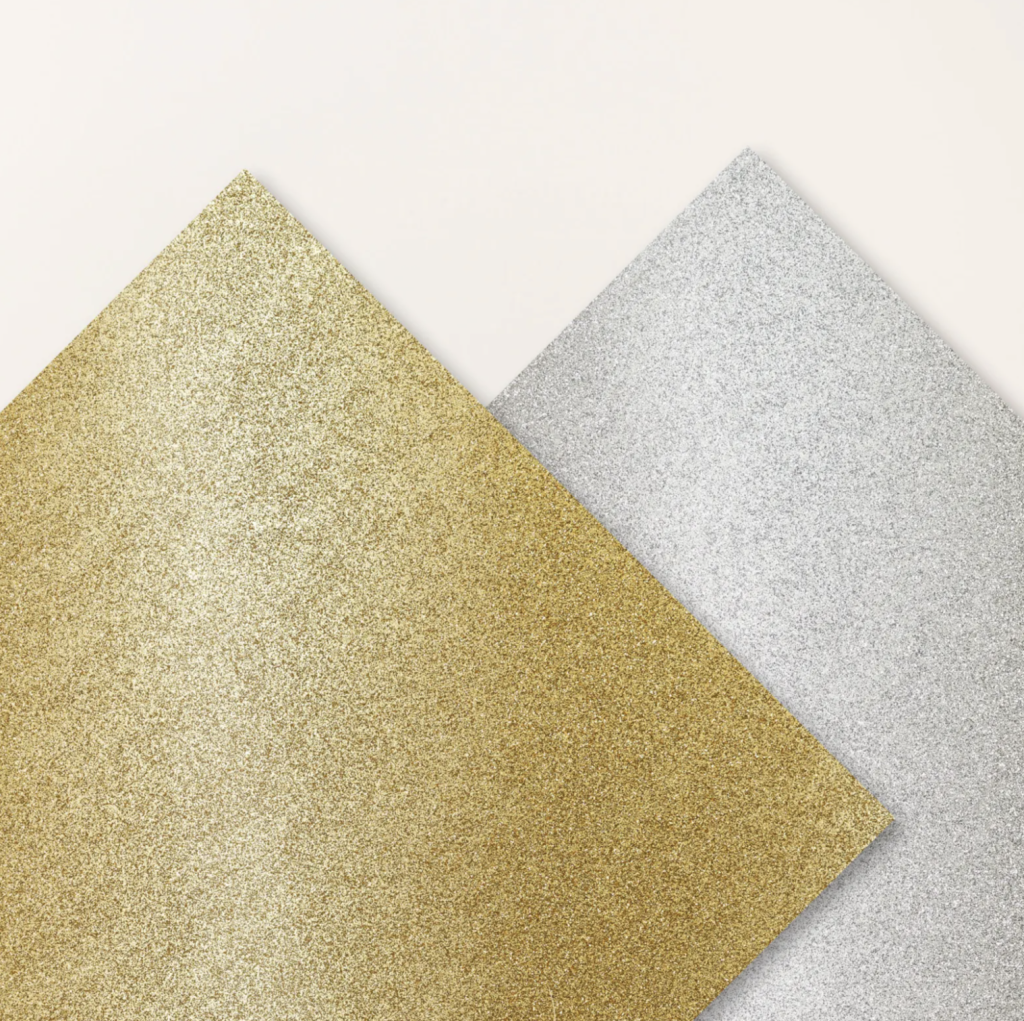
The Silver & Gold 12″ x 12″ (30.5 x 30.5 cm) Adhesive-backed Glimmer Paper is self adhesive and it is a brand new online only release.
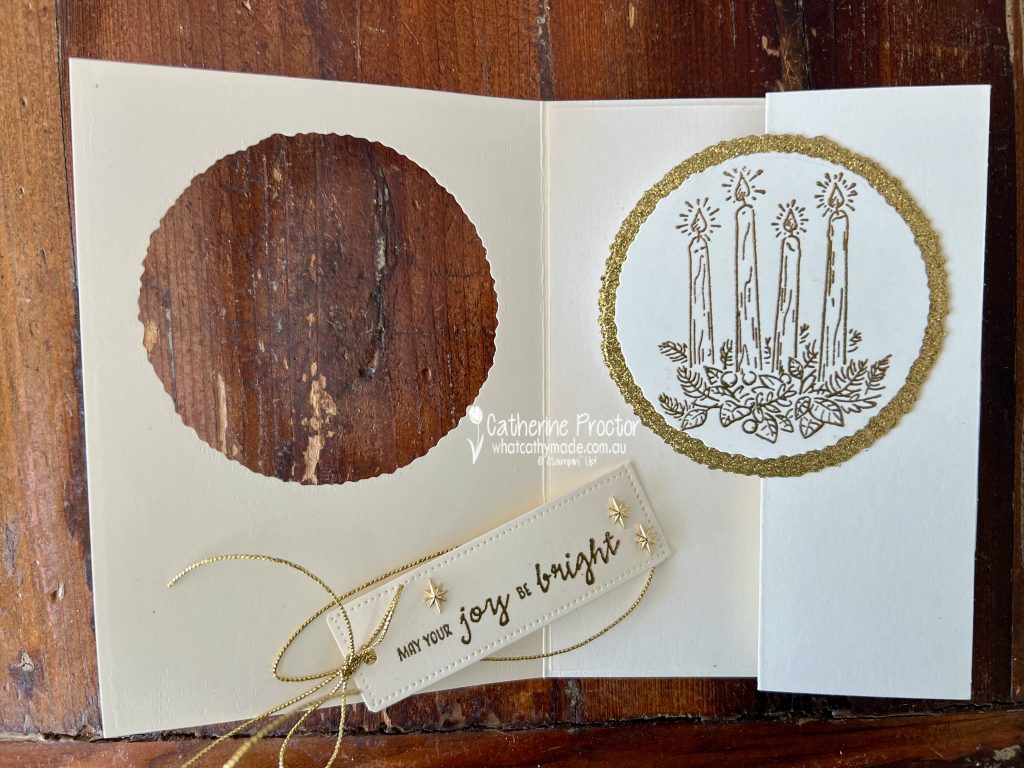
Here’s what the card looks like partially opened…
Here’s what the card looks like fully opened…
The Adhesive-Backed Star Trinkets on the front tag sentiment pick up the stars in the DSP – the perfect embellishment!
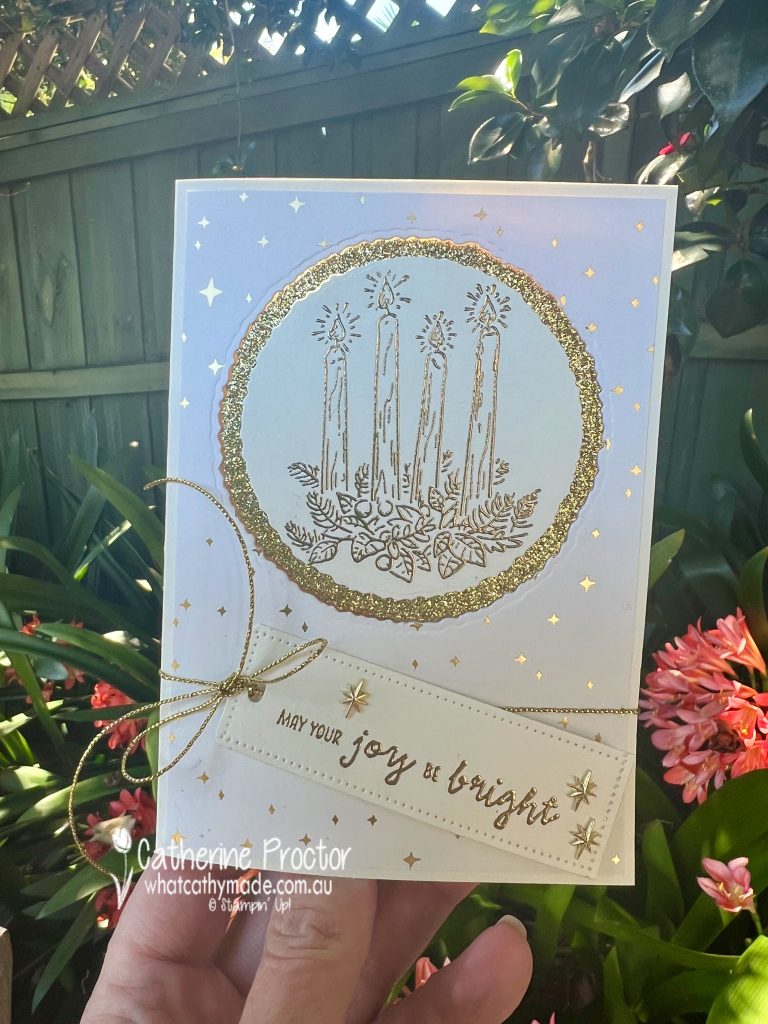
It’s so hard to photograph the glorious sparkly gold elements in my card so I also took a photograph outside in my garden.
Now it’s time to hop on over to our next participant, the lovely Caroline Manwaring. I can’t wait to see what Caroline has made this week.
If at any time you find a broken link, you can find the complete list of all participants on Sharon’s blog.
I’ll be back on Wednesday with the AWH Colour Creations blog where we will be showcasing Early Espresso – I’ve made another Christmas card for Wednesday night’s blog!
Happy first day of winter! Is it chilly where you are? I’m away in Yamba this week, 7 hours drive north of Sydney and it’s a bit cool at night but lovely and sunny and warm during the days. Perfect weather for crafting!
Instead of sending out a newsletter, I’ve decided to share all the exciting Stampin’ Up June 2023 Offers and New Products here. If you subscribe to my blog you’ll receive this as an email anyway.
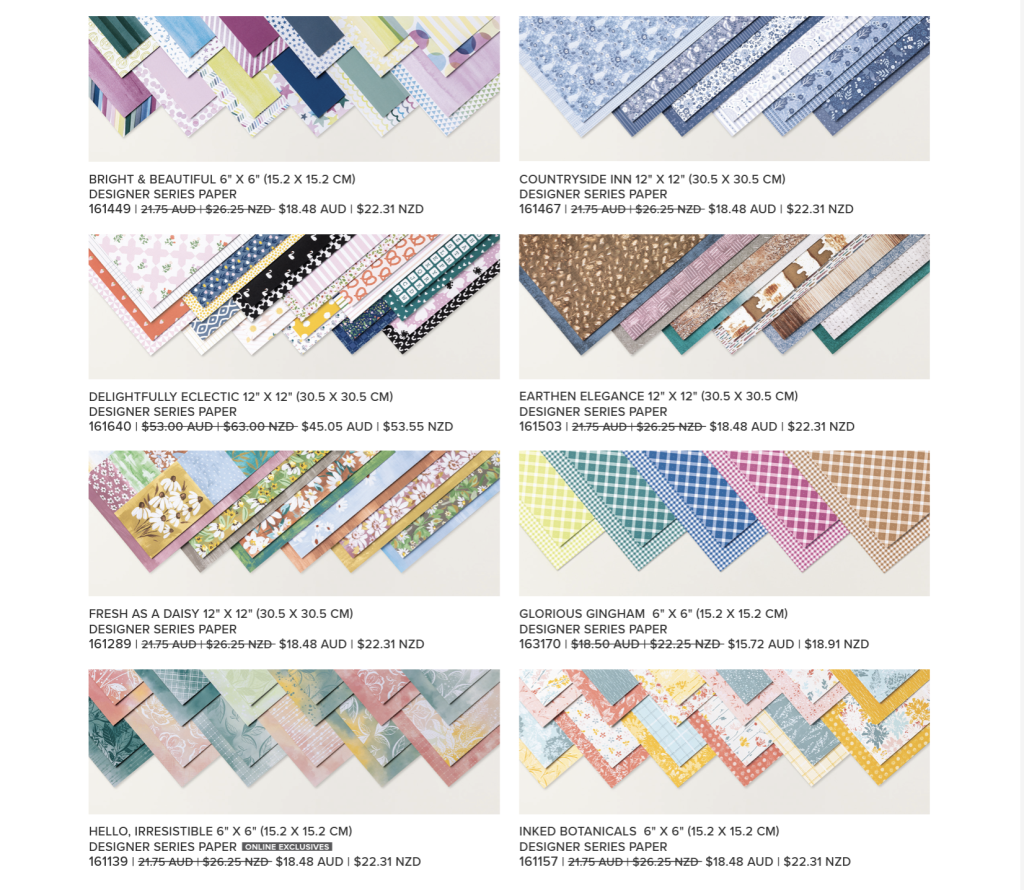
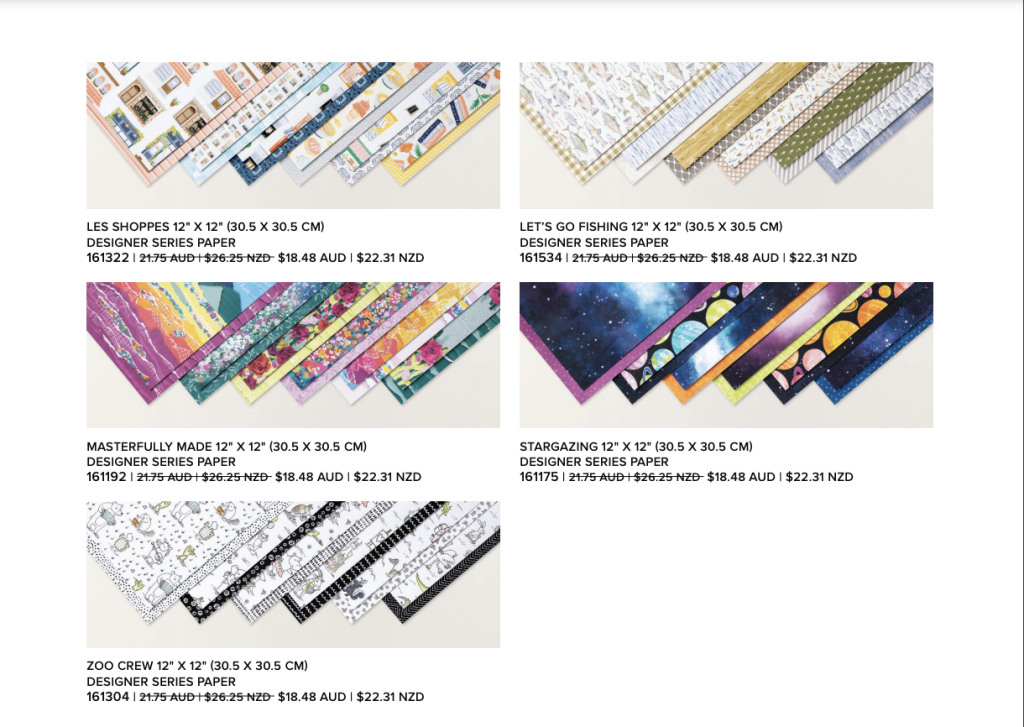
SAVE 15% ON SELECT DESIGNER SERIES PAPERS
During 1–30 June, you can save 15% discount on a wide range of Designer Series Papers from the new 2023–2024 Annual Catalogue and Online Exclusives.
Whether you’re a scrapbooker, a card maker or simply a paper lover, this is a great time to stock up and save on gorgeous paper so you have artistic and versatile paper designs on hand for your next projects!
Here is the full list of papers on sale. To purchase any of these designer series papers simply click on the images below.
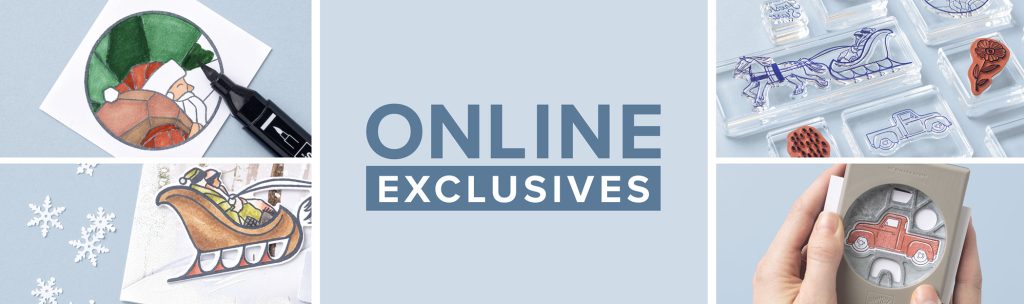
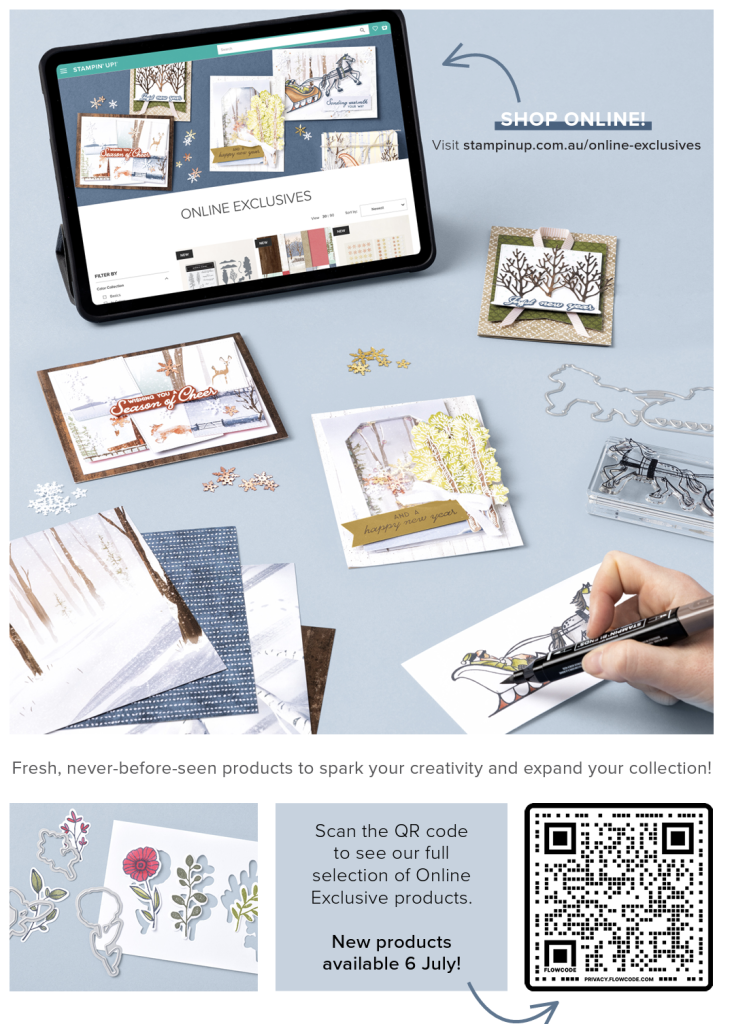
NEW SELECTION OF ONLINE EXCLUSIVES COMING SOON
From July 6, Stampin’ Up! will be releasing a new selection of online exclusives. You can order and see the current online exclusives here.
This flyer gives you a glimpse of what’s to come in July.
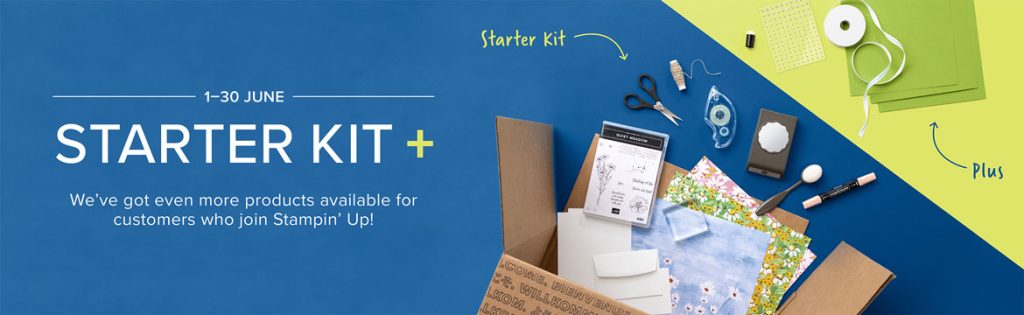
GET $169 OF STAMPIN’ UP! PRODUCTS FOR FREE WITH THE STARTER KIT!
Been thinking about becoming a Stampin’ Up! demonstrator?
June is a fabulous time to join Stampin’ Up! because you’ll get even more FREE products in your customisable Starter Kit.
Between 1–30 June, you’ll get $283 AUD worth of products for only $169 AUD + free business supplies + free shipping + all the fun being a part of Stampin’ Up!
That’s an additional $48 worth of free product on top of the normal joining offer!
As a demonstrator you get a 20% discount on all Stampin’ Up! products, including stamp sets, paper, and accessories. It’s a great way to support your love of stamping and paper crafting… and there’s no pressure to sell to anyone else if you’d just like to join for the discount.
You can find out more about joining Stampin’ Up! here.
I’ll be back next Wednesday, June 7, when the Art With Heart Colour Creations team will be showcasing a brand new colour, Azure Afternoon.
I hope you can join me then! Until then, stay safe and keep crafting!
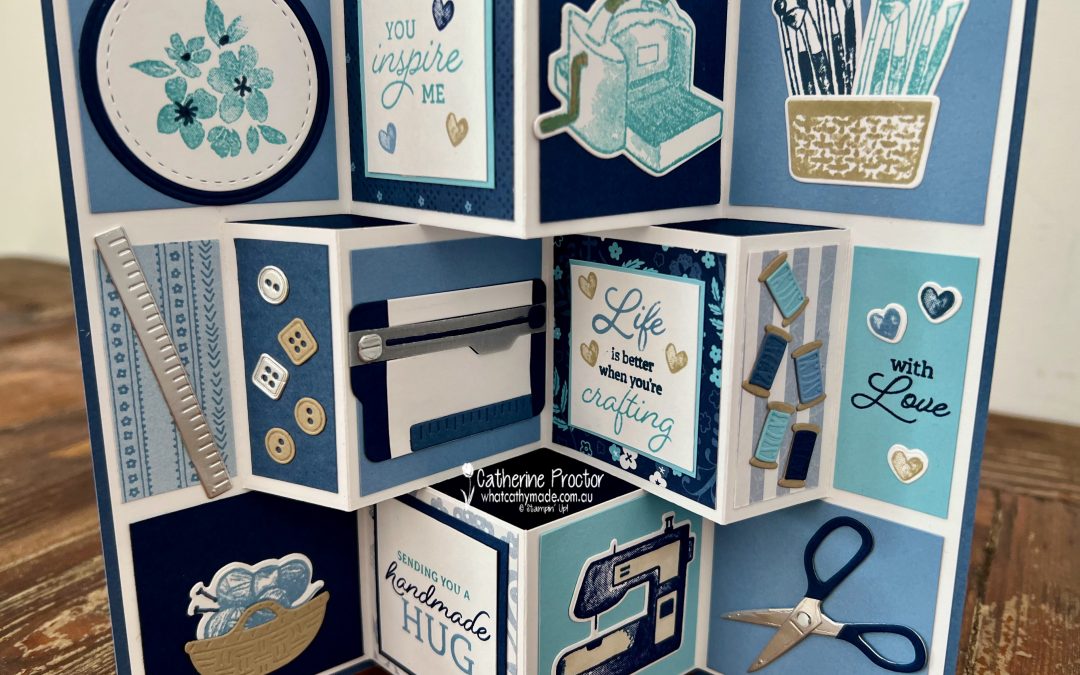
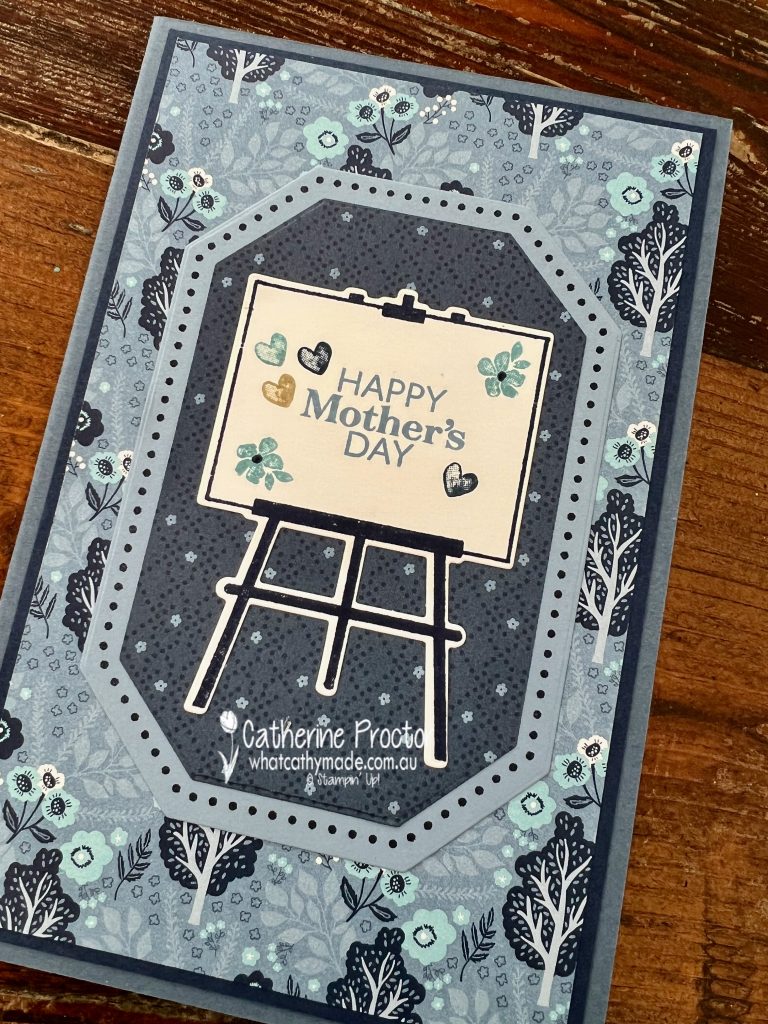
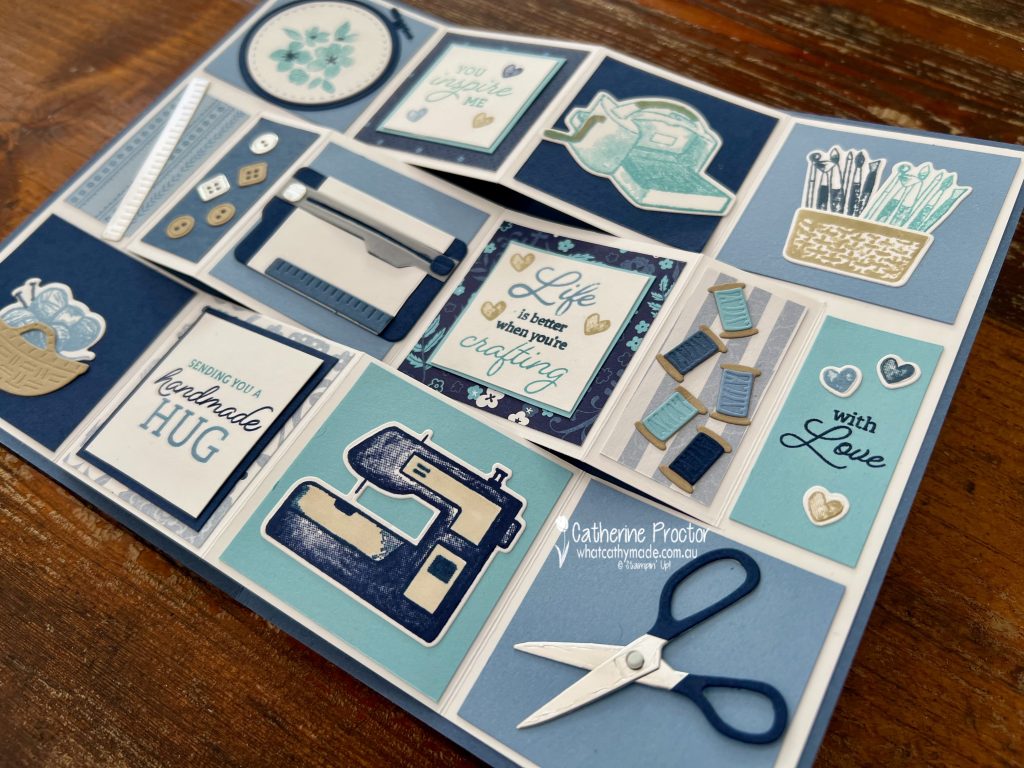
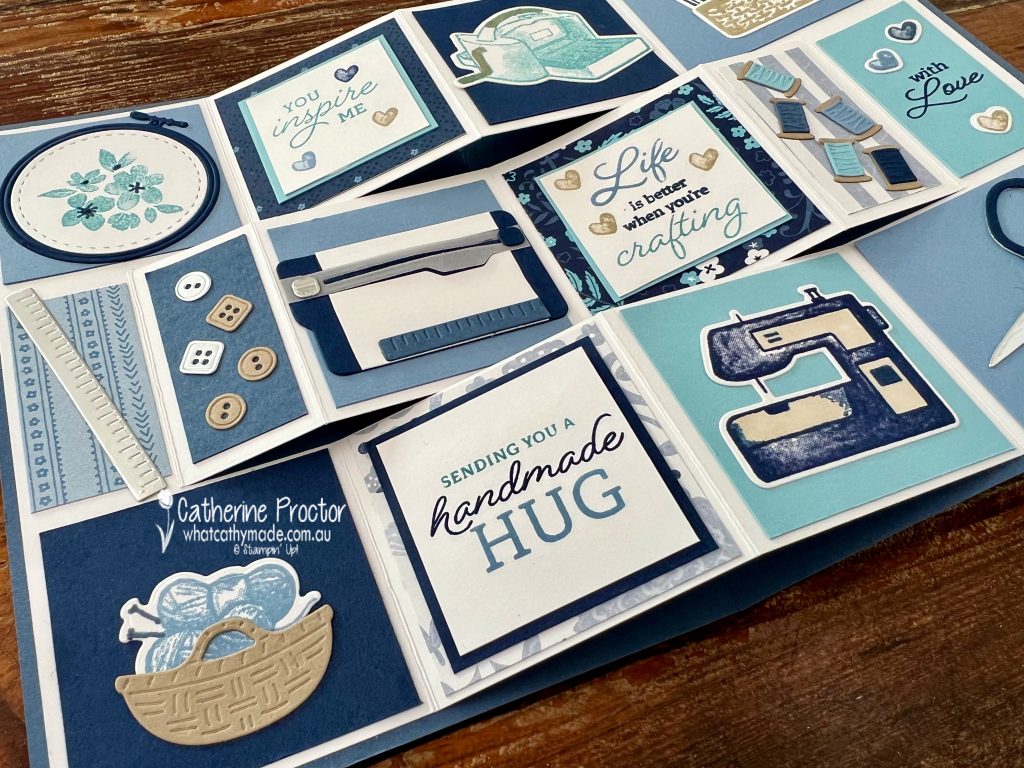
My mum is an amazing paper quiller, knitter and paper crafter so the new Crafting With You bundle was just perfect for making her Mother’s Day card this year.
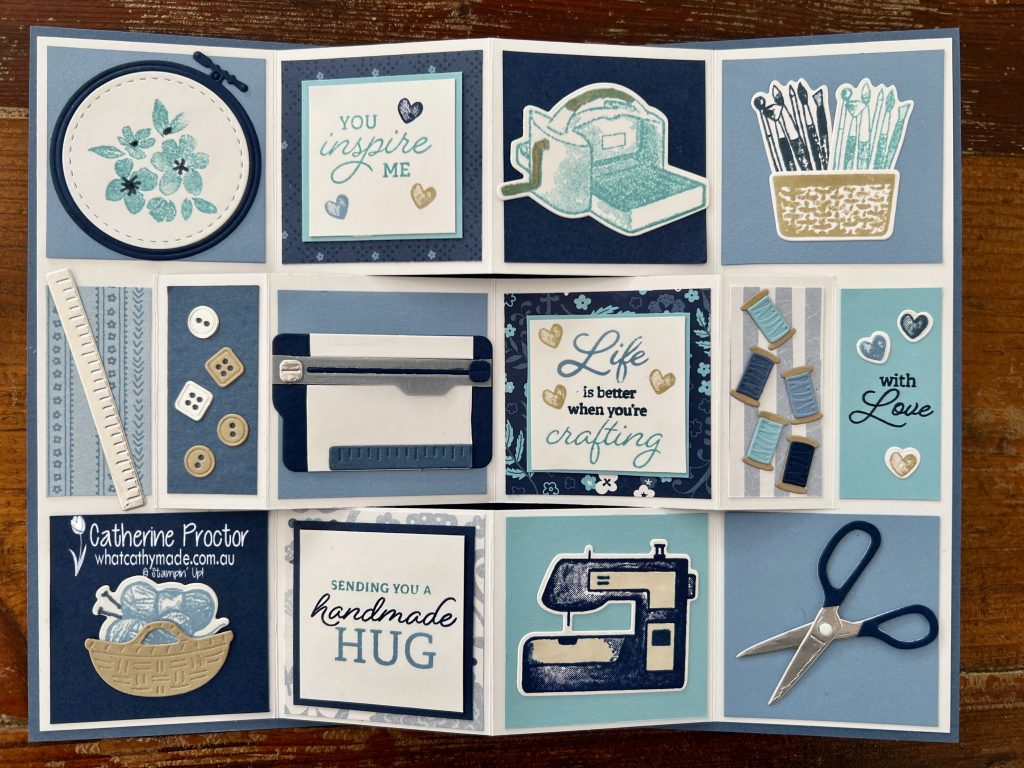
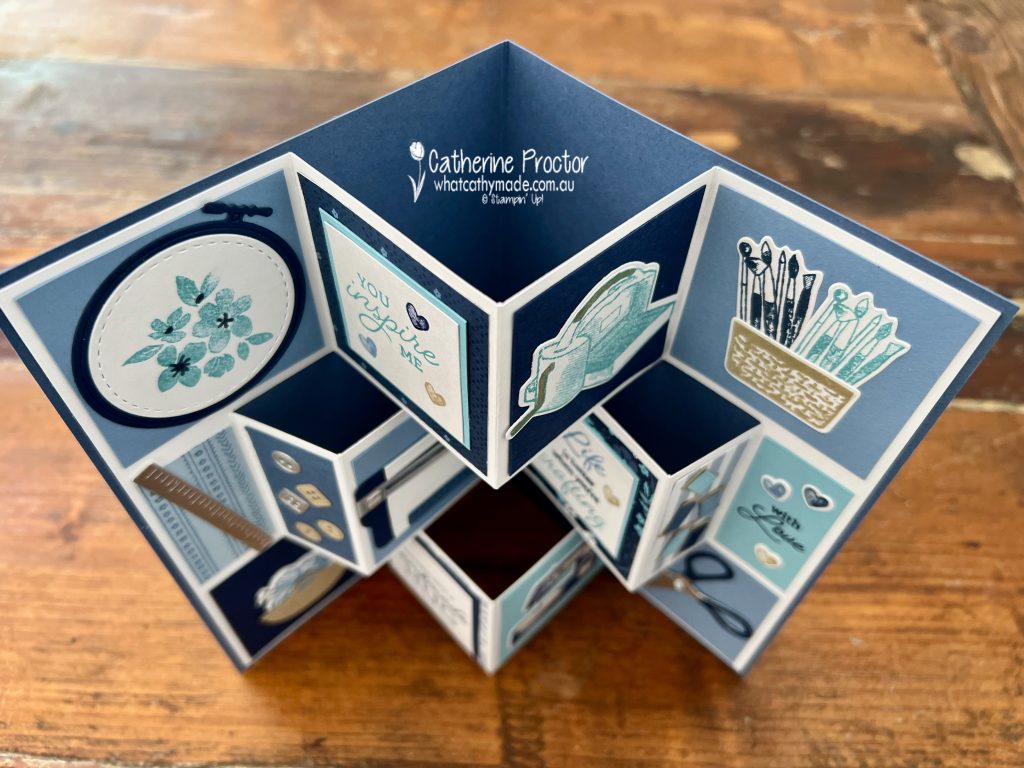
There are so many cute crafting elements in this stamp and die set. I wanted to include them all on the card so I made a Trifold Shutter Card.
Here’s what it looks like closed.
And here’s what it looks like inside the card!
If you’ve never made a Trifold Shutter Card before, here’s a template I’ve created using metric measurements and A4 cardstock.
Trifold Shutter Card Template
Cut a piece of Misty Moonlight cardstock (this is the outside card base) 24.5 cm wide x 18.5 cm high.
Score the outer card base at 12.25 cm along the 24.5 cm side and then fold in half along this score line.
Cut a Basic White inner card base (for the fancy fold) 24 cm wide x 18 cm high.
Score the inner card base at 12.25 cm and then fold in half along the score line.
Measure and draw with a pencil the cutting lines as per the template diagram below then carefully cut along these cutting lines.
Now measure and score all of the fold lines and then rub out any pencil marks.
Decorate each panel as desired.
Here’s what the Trifold Shutter Card looks like from above so you can see the direction to fold the score lines.
After decorating the inside of your trifold shutter card, adhere it to the Misty Moonlight card base. Make sure you only adhere the left and right sections of your fancy fold to the inside of your card base so the middle section of your trifold shutter card can open and close.
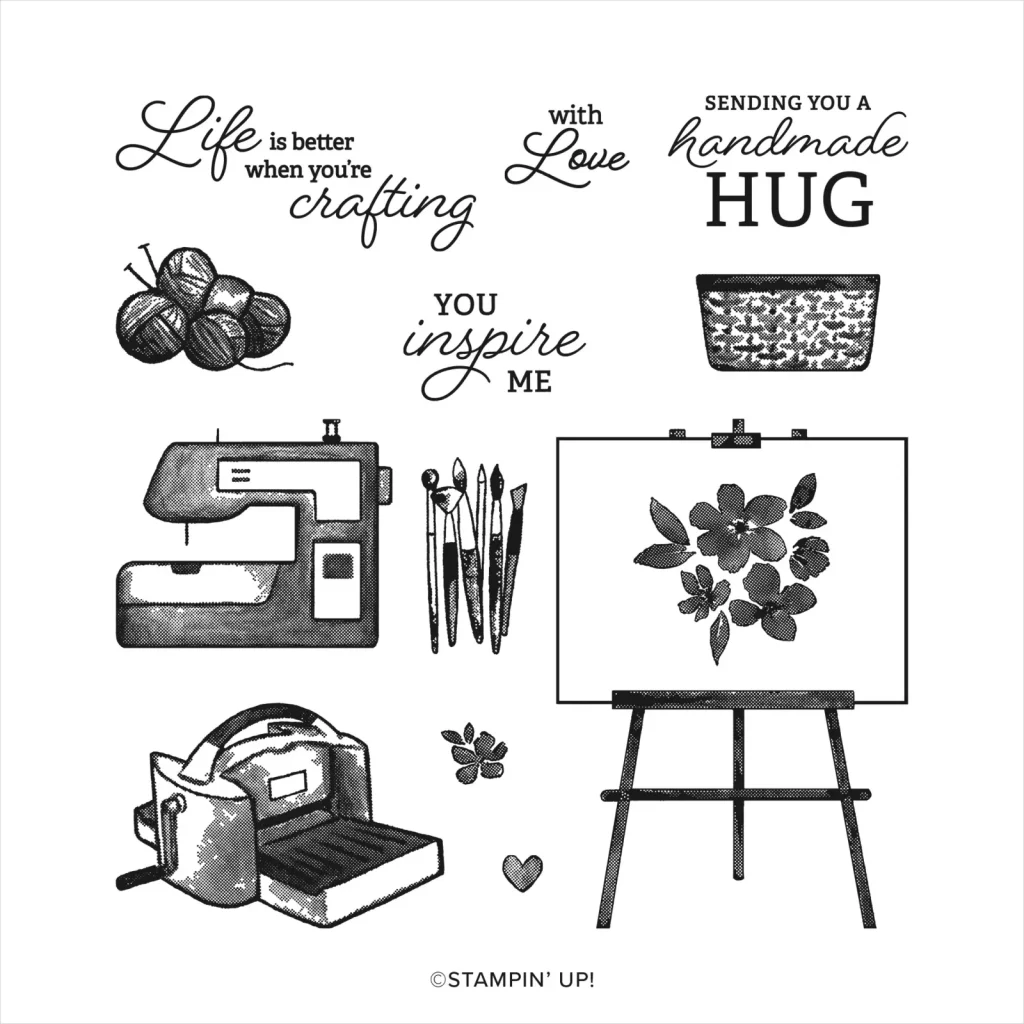
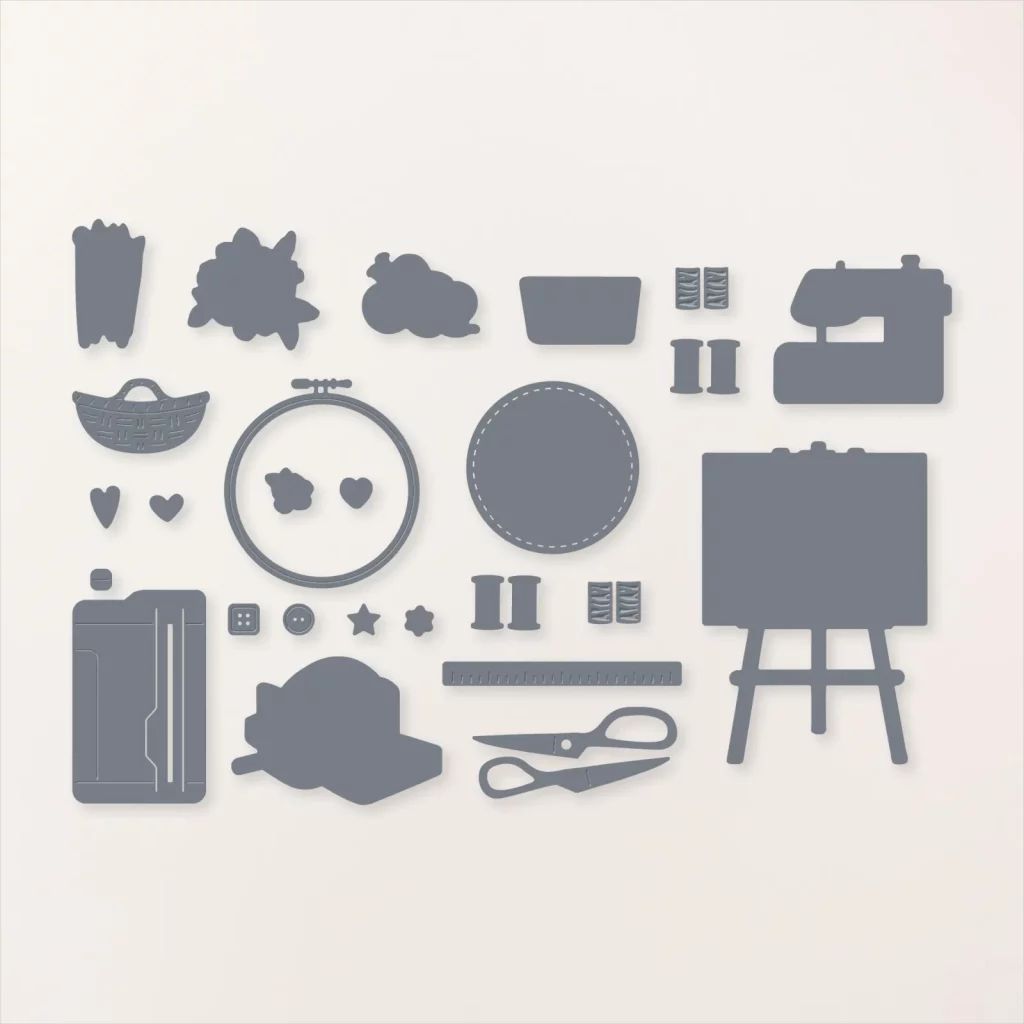
If you love crafting or miniatures you’re going to love the Crafting With You bundle. It includes stamps and/or dies for a Stampin’ Cut & Emboss Machine, a Paper Trimmer, a pair of scissors, embroidery hoop, ruler, spools of thread, knitting wool and needles, buttons, a sewing machine, paint brushes, baskets and more!
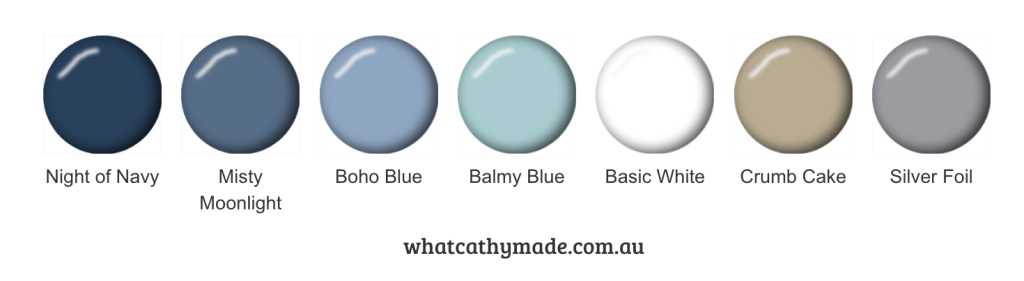
The colours in my card are the assorted blues used in the stunning Countryside Inn DSP, as well as Crumb Cake and silver foil. These are some of Mum’s favourite colours.
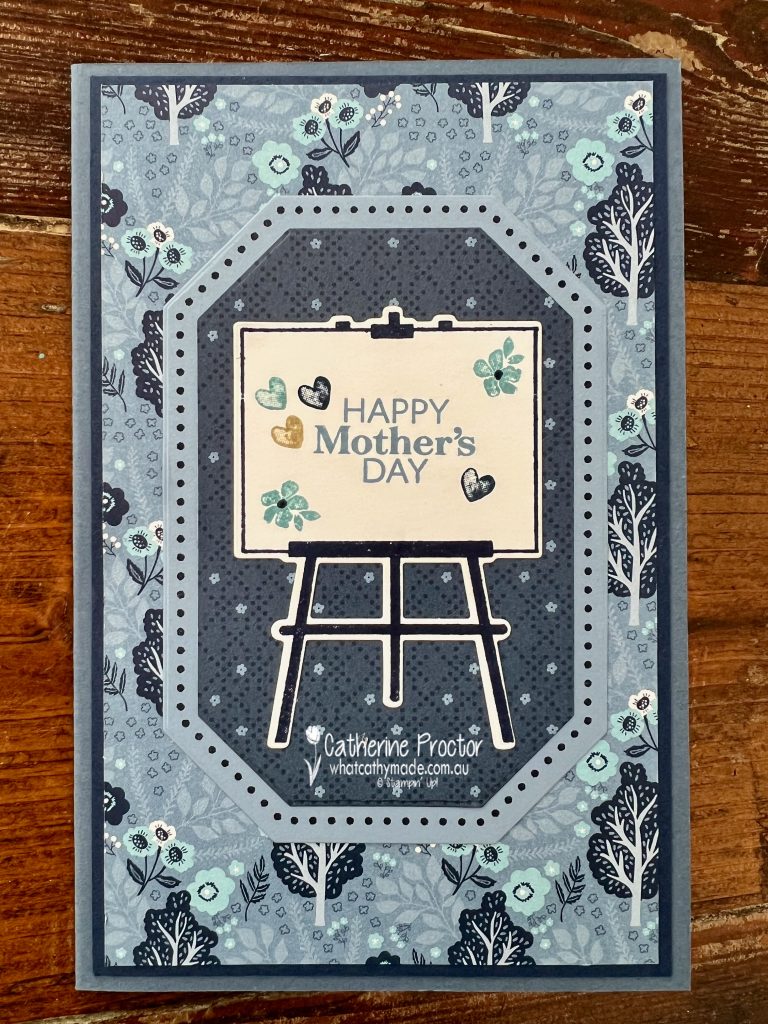
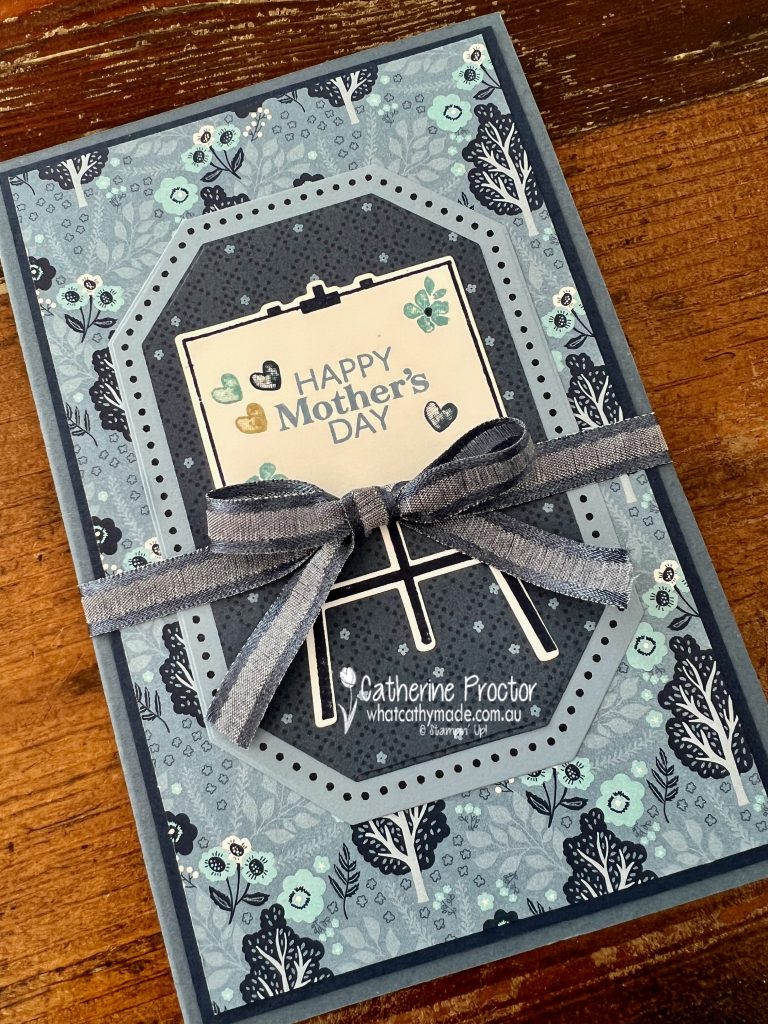
The front of the card features the Countryside Inn DSP, and the Countryside Corners bundle (stamps and dies). I used the art easel from the Crafting With You bundle to display my sentiment.
Don’t forget to use the stamp sets that come in kits on your other cards too. This “Happy Mothers Day” stamp is from the stamp set included in the Sentimental Rose All-Inclusive Card Kit.
As I was giving the card to my mum in person and it is so big, instead of making an envelope I simply tied a bow of the Night of Navy 3/8″ (1 cm) Bordered Ribbon around the card. This ribbon also helps to keep the card closed.
Using Post It notes to mask off sections of my stamps as I inked them up (you then remove the Post It note before stamping), allowed me to stamp some of the sentiments inside the card in a mix of blues.
It also allowed me to fit the “life is better when you’re crafting” sentiment onto one of the flaps of the fancy fold.
I’m so grateful for so many things about my mum, but especially for free rein she gave me from a very young age to pursue all my creative endeavours – cooking, sewing and any type of crafting!
I’ll be back on Wednesday night with our weekly AWH Colour Creations blog. This week we are showcasing one of the new 2023-25 In Colours – Moody Mauve.