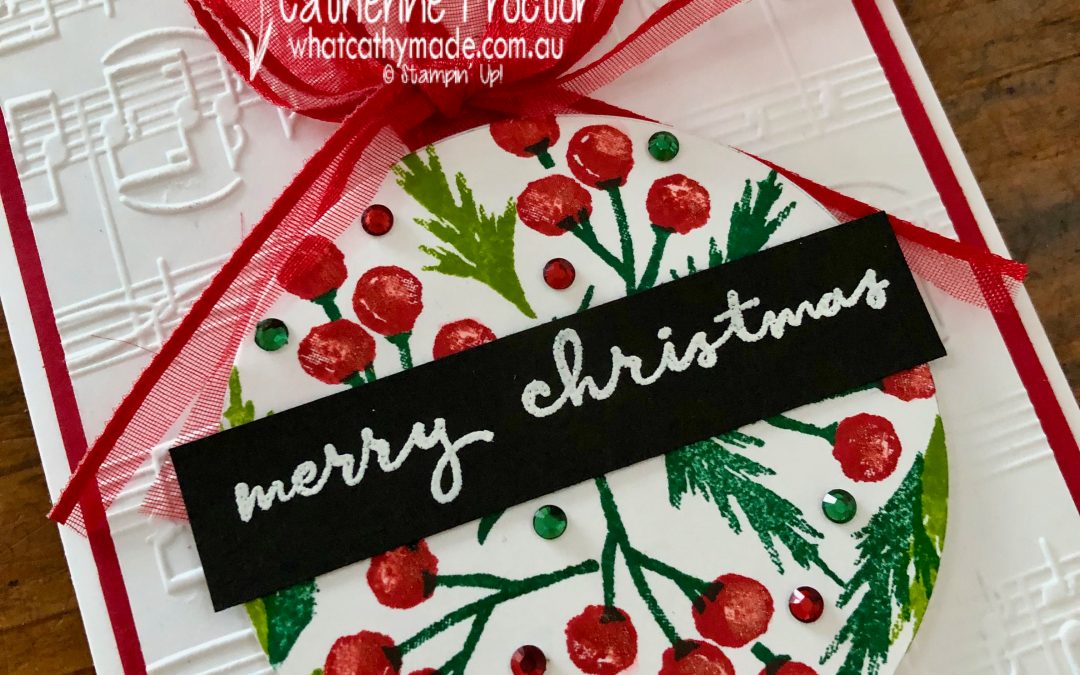
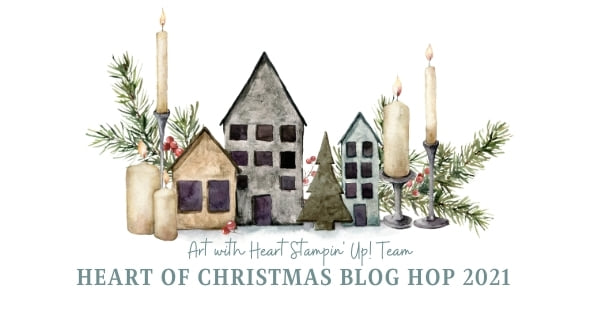
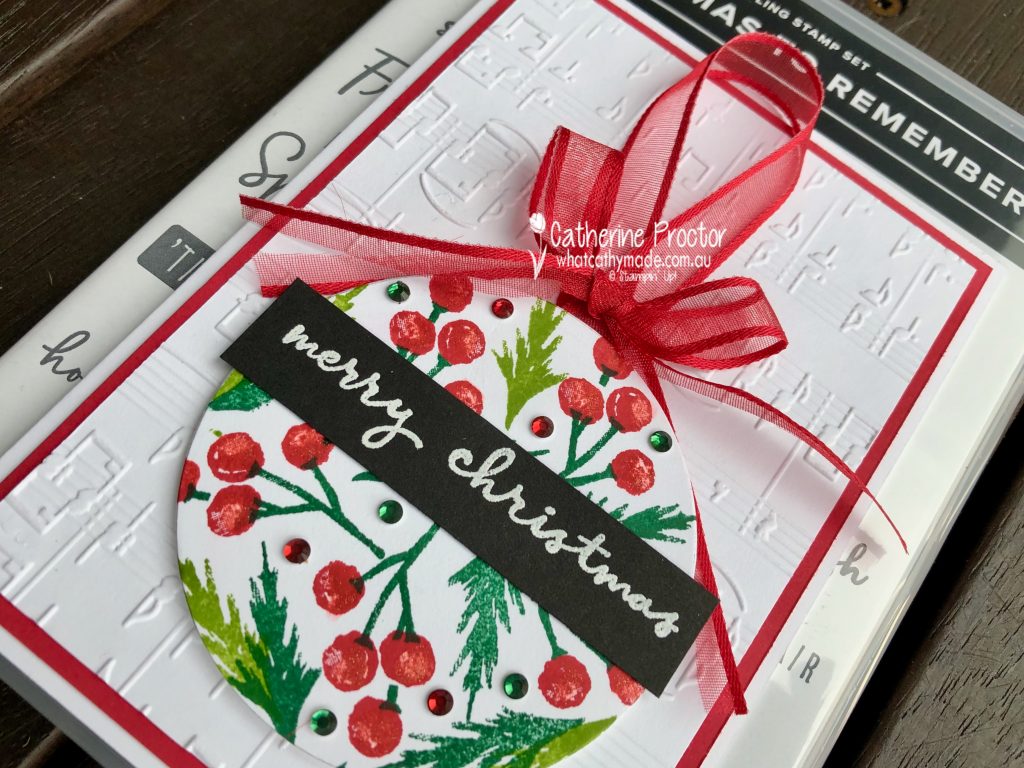
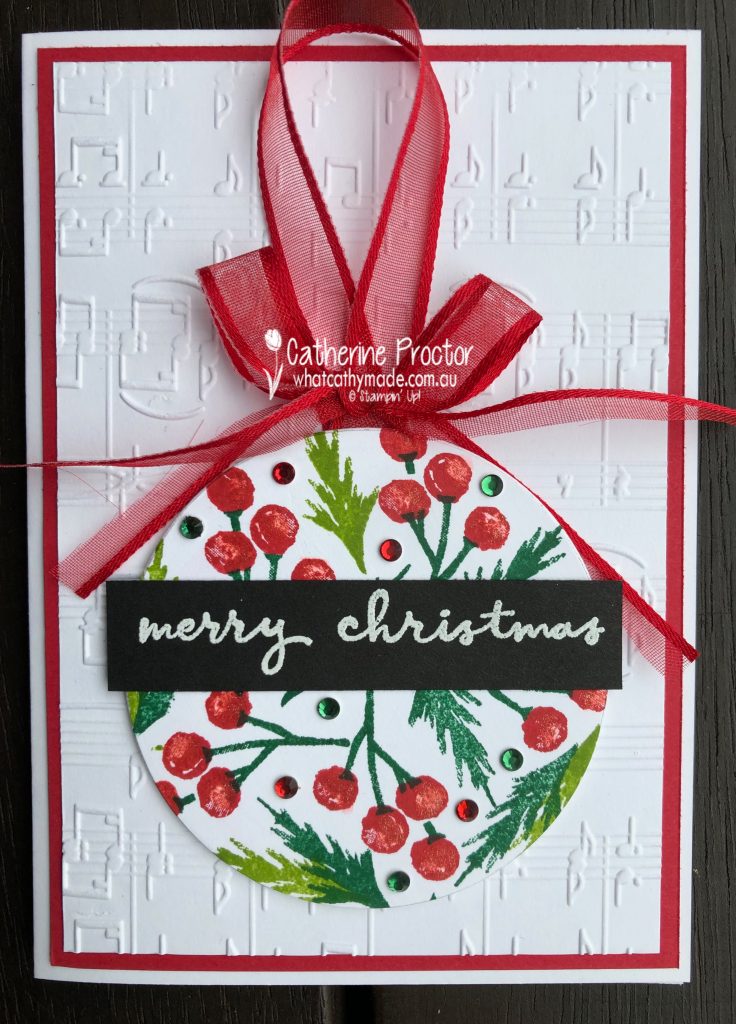
Hello crafters! This week I’ve made a Christmas Bauble card using the two stamp sets from the Painted Christmas Suite Collection: Christmas Season (a stamp set with images) and Christmas to Remember (a sentiment stamp set).
To create the bauble shape I used the largest of the layering circle dies as a guide to draw a pencil circle outline to stamp within.
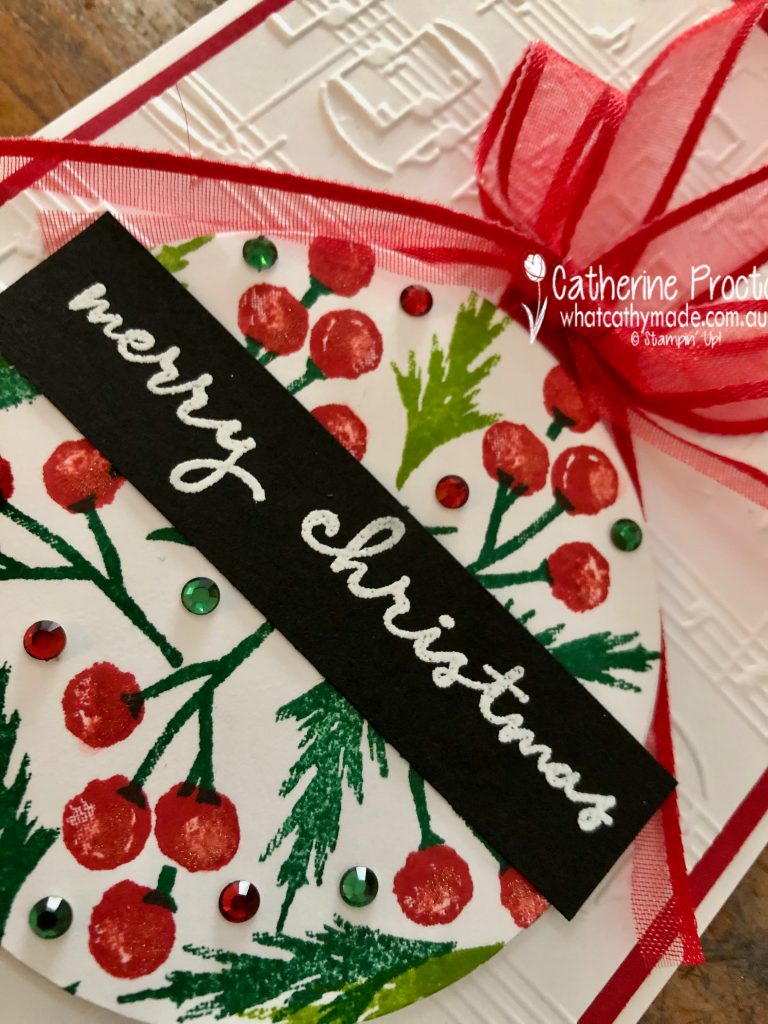
Then I stamped the leaves and berries in a traditional Christmas colour scheme – Shaded Spruce, Granny Apple Green and Real Red – before using the same large layering circle die to cut out my bauble.The Basic White card base has a layer of Real Red cardstock, topped with another layer of Basic White cardstock, embossed with the Merry Melody Embossing folder.The “Merry Christmas” sentiment is stamped in Versamark ink onto Basic Black cardstock before heat embossing with white embossing powder.
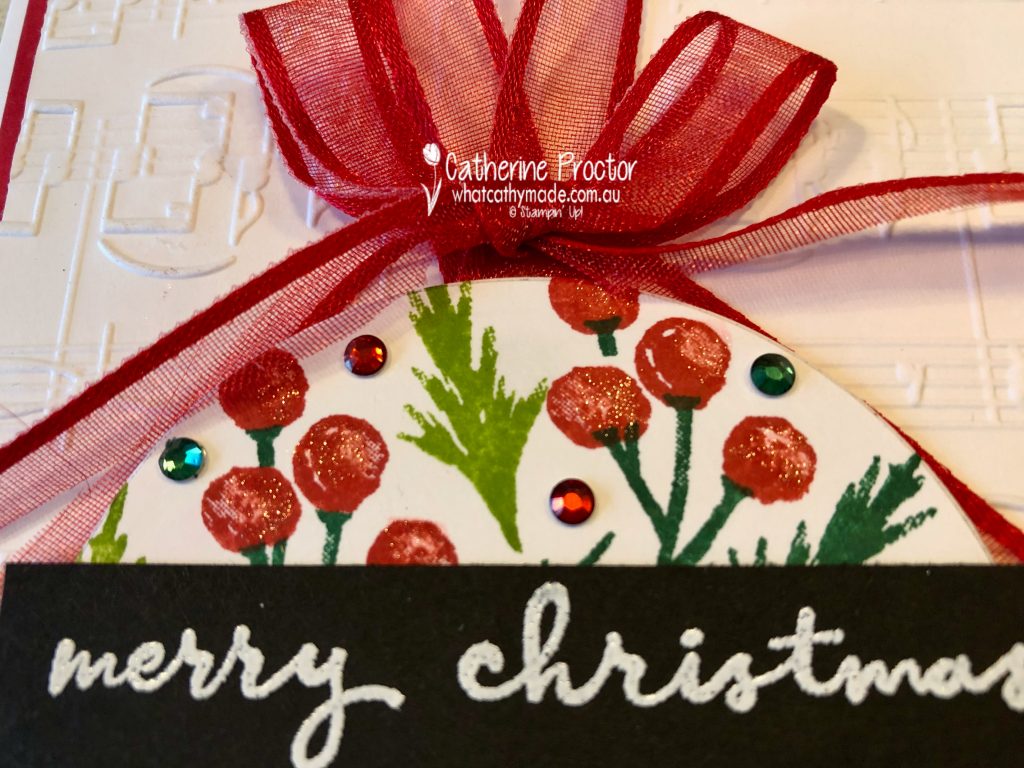
Some Cherry Cobbler and Shaded Spruce jewels from the Holiday Rhinestone Basic Jewels add sparkle to my Christmas bauble, as well as Wink of Stella applied to the berries.
To “hang” my bauble onto the card I’ve made a hanging loop and a bow of the Real Red Sheer Ribbon. I’ve cut the ribbon ties in half to add extra interest to my card.
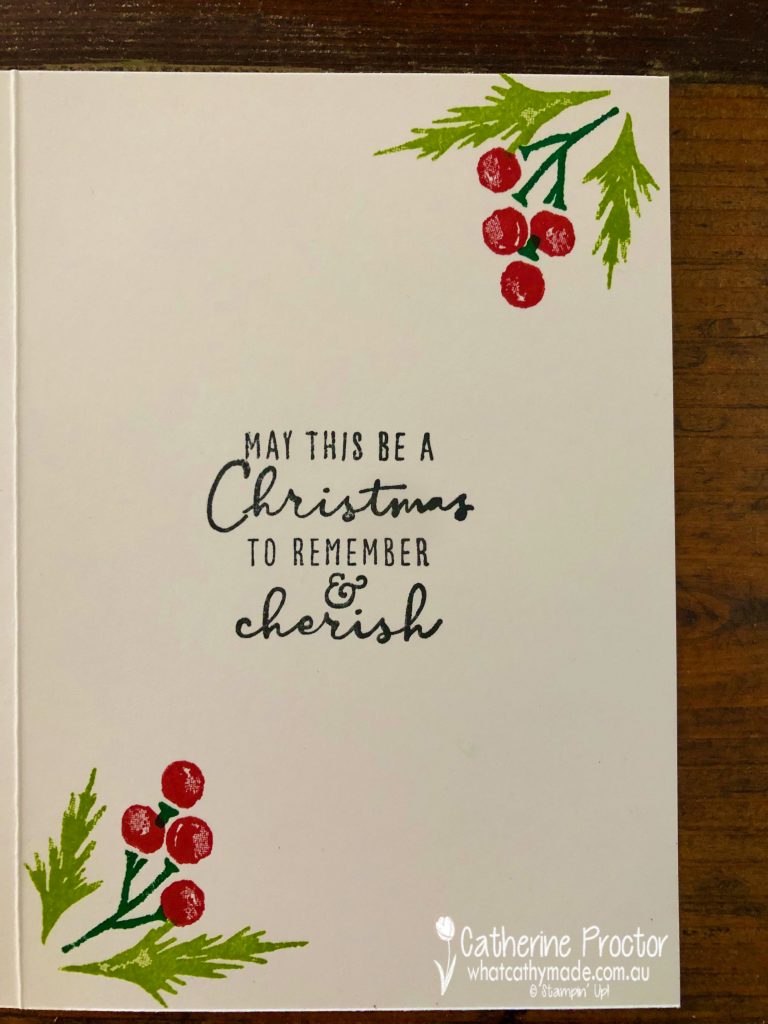
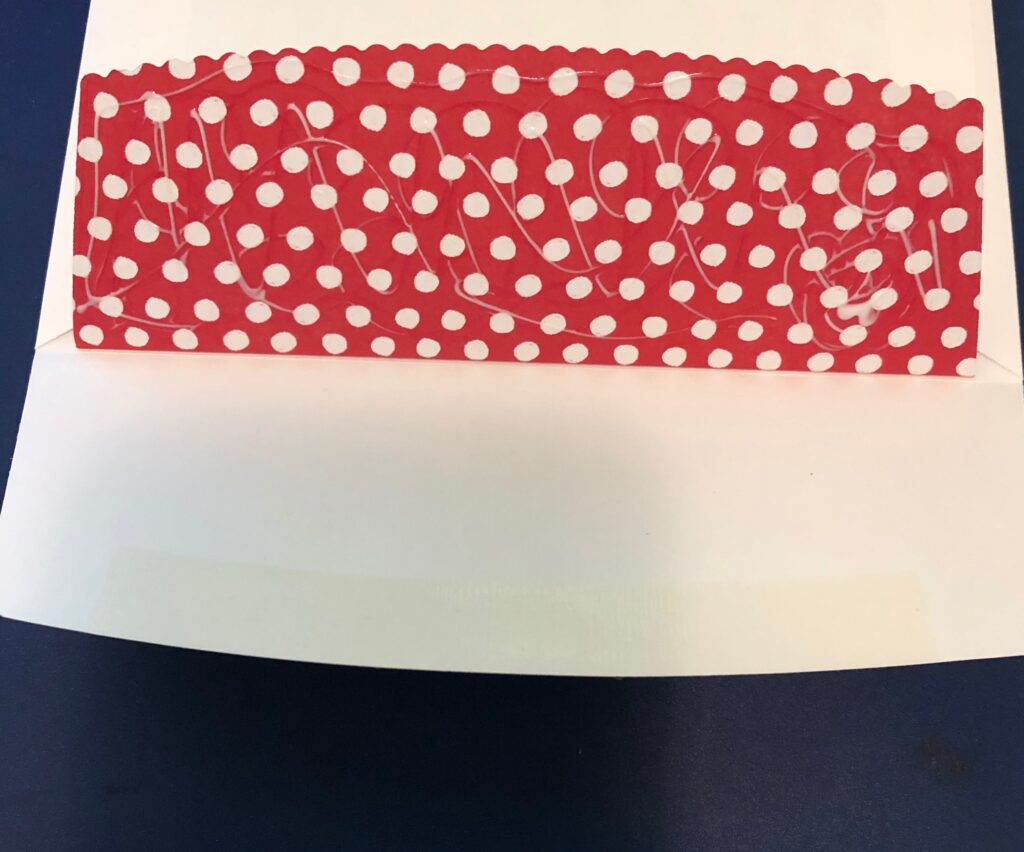
The inside has been stamped to match the font of the card, with another lovely sentiment from the Christmas to Remember stamp set.
Now it’s time to hop on over to our next participant, the lovely Sharon Davern. I can’t wait to see what Sharon shares with us today!
If at any time you find a broken link please head to the blog of this week’s host of The Heart Of Christmas Blog Hop, Sharon Davern, and she will have the list of all those participating.
Thanks for visiting my site. I’ll be back with another card on Wednesday.
In the meantime, wherever you are in the world, stay safe, stay calm … and keep on crafting xxx
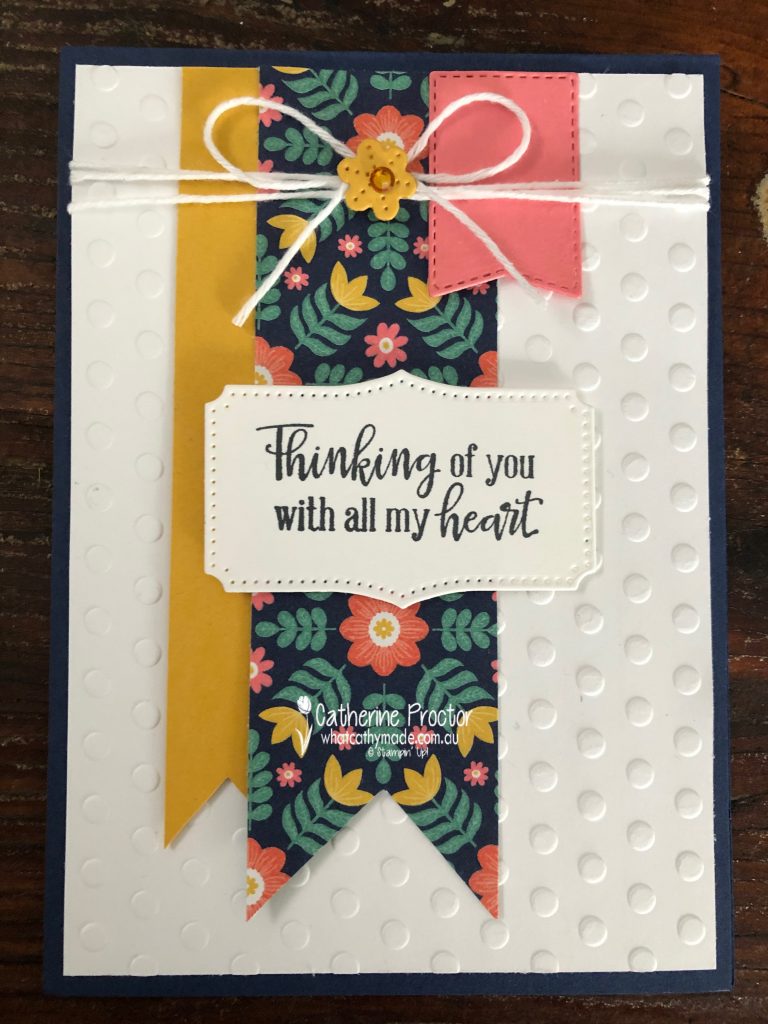
Welcome to week 7 of our 2021-22 Colour Creations blog hop! We are showcasing Bumblebee, a 2020-22 InColour.
Have you ever made a one sheet wonder? I’ve never made one before but as Stampin’ Up! has nine different packs of DSP on sale at the moment I thought it was a great opportunity to show just how far you can make your DSP go!
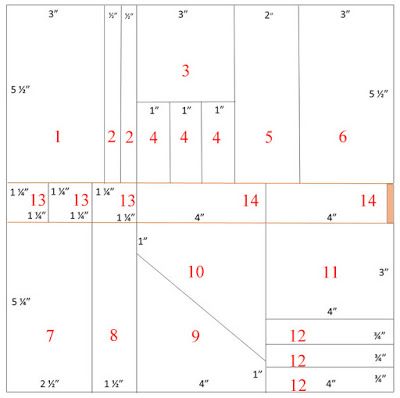
There are lots of different templates for one sheet wonders for both 12×12 and 6×6 papers – just take a look on Pinterest or Google “One Sheet Wonder Template”. This is the template I used to cut my 12×12 DSP.
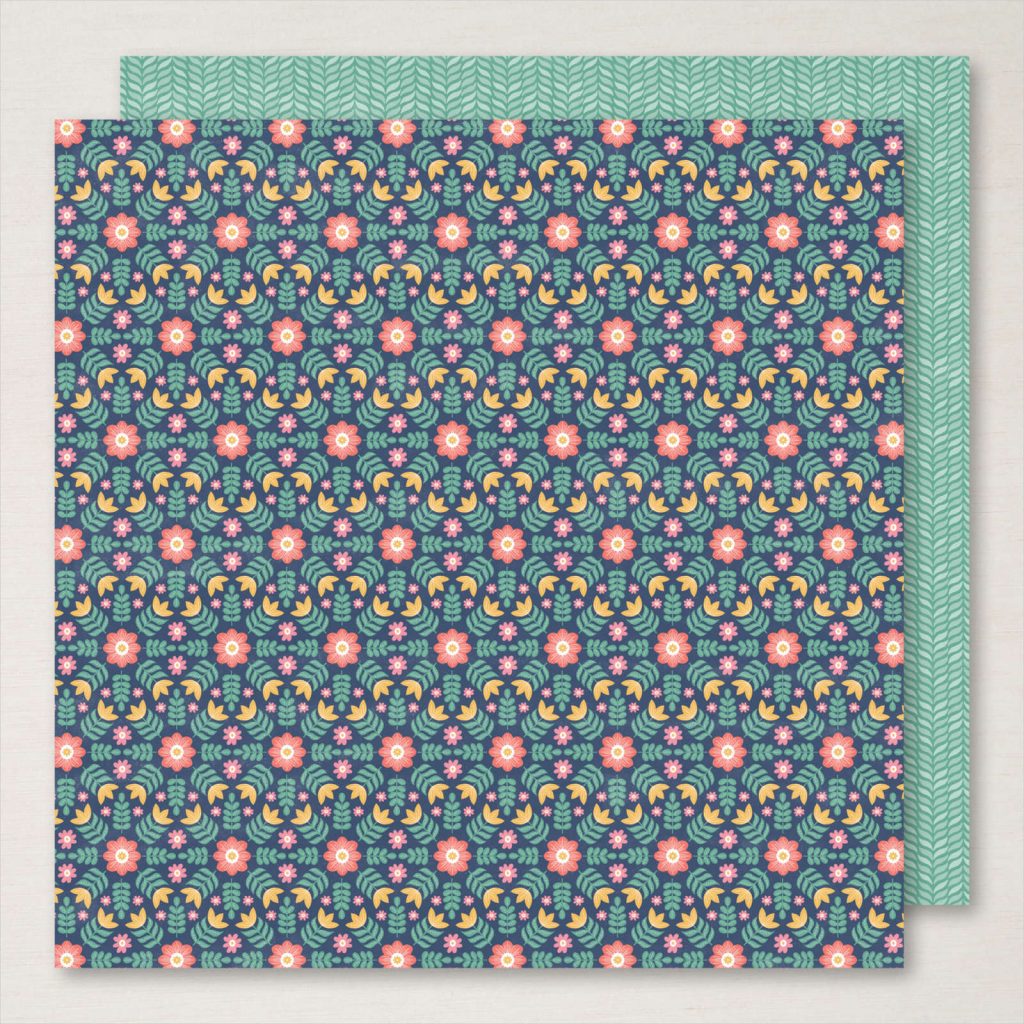
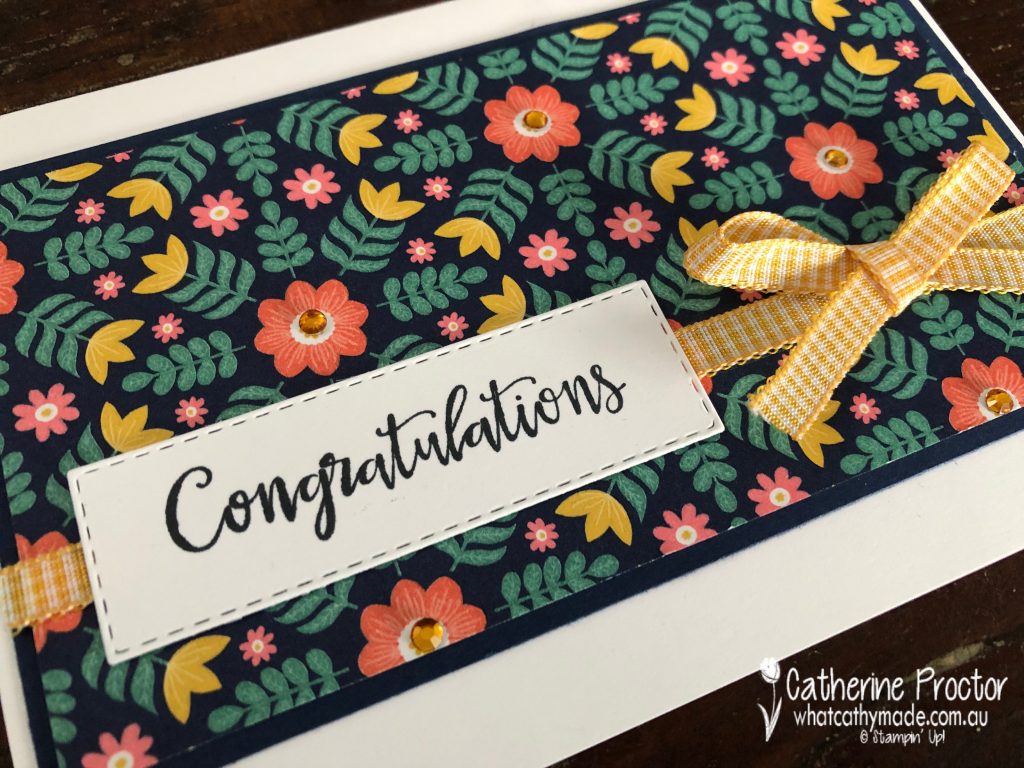
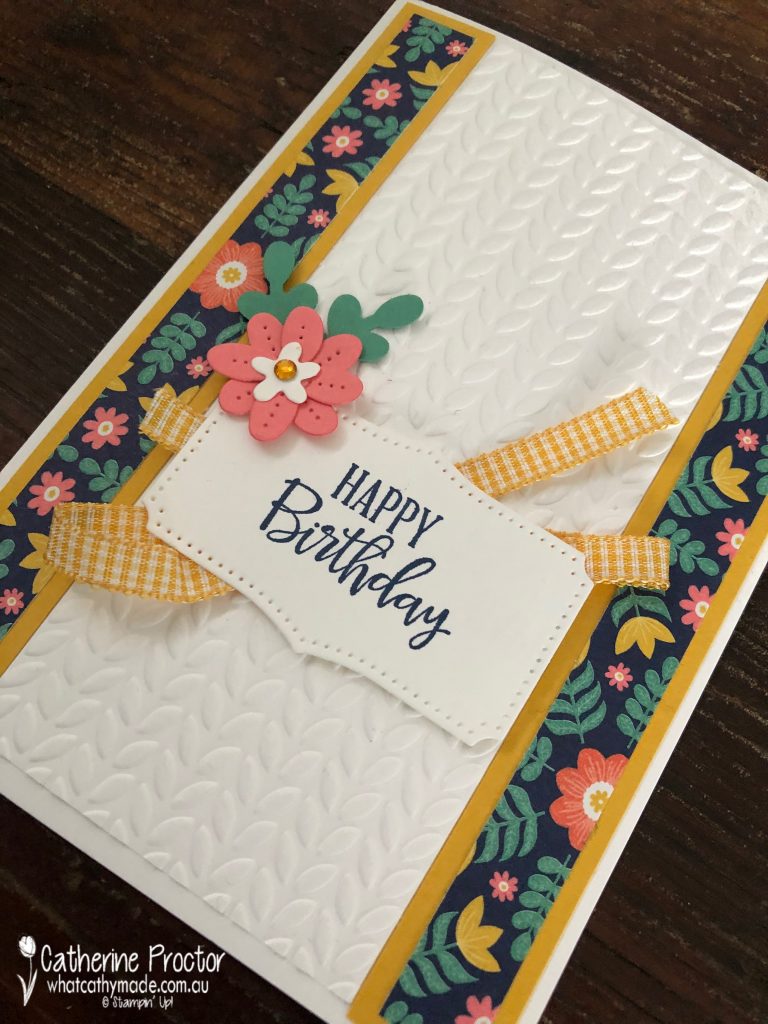
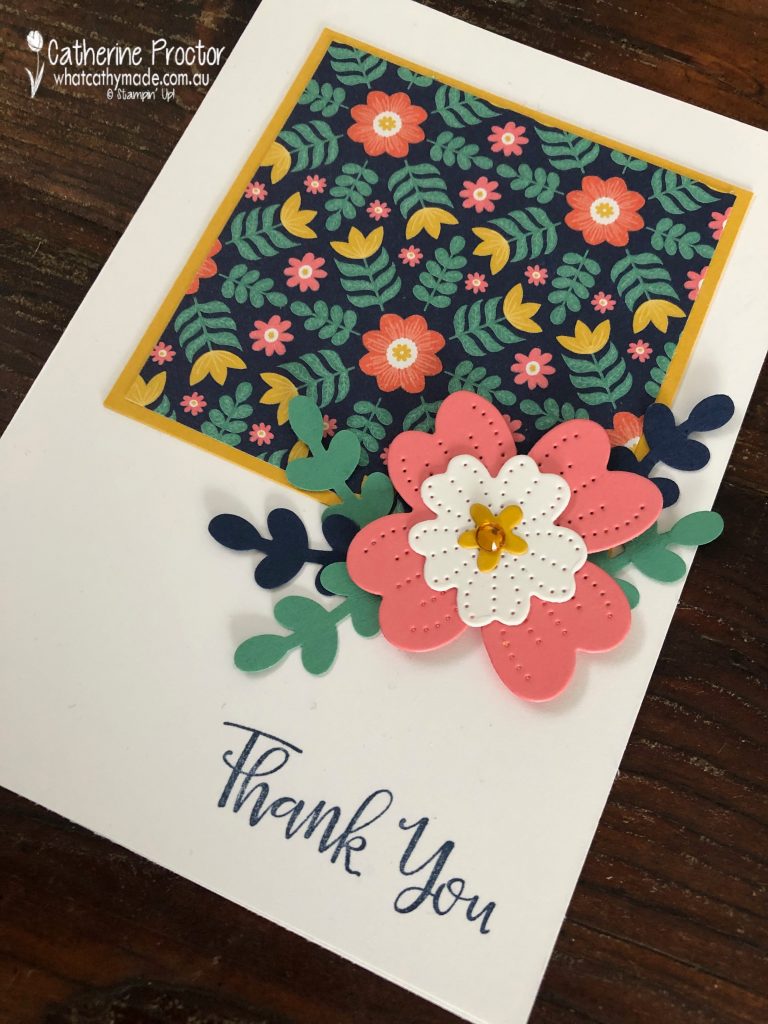
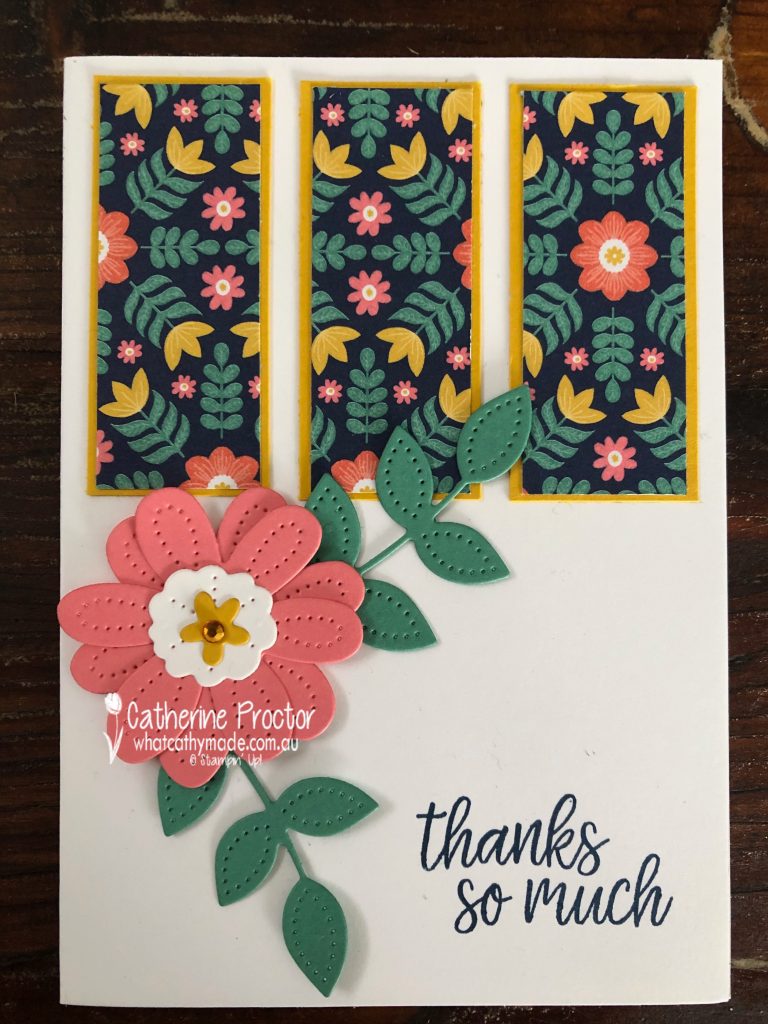
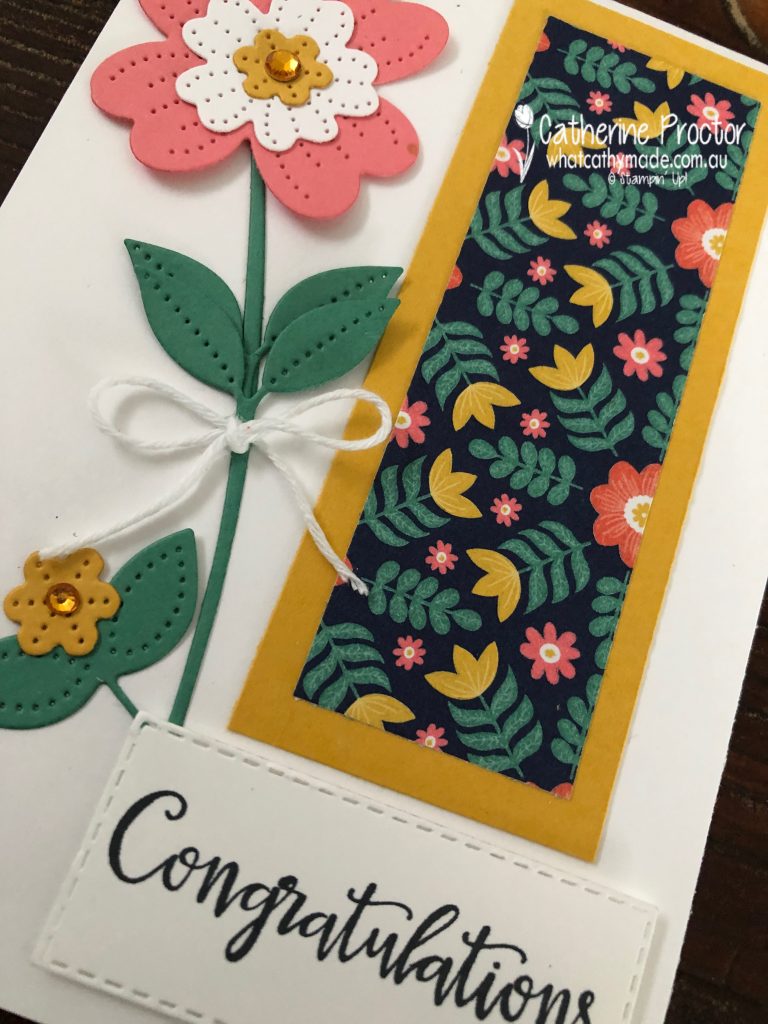
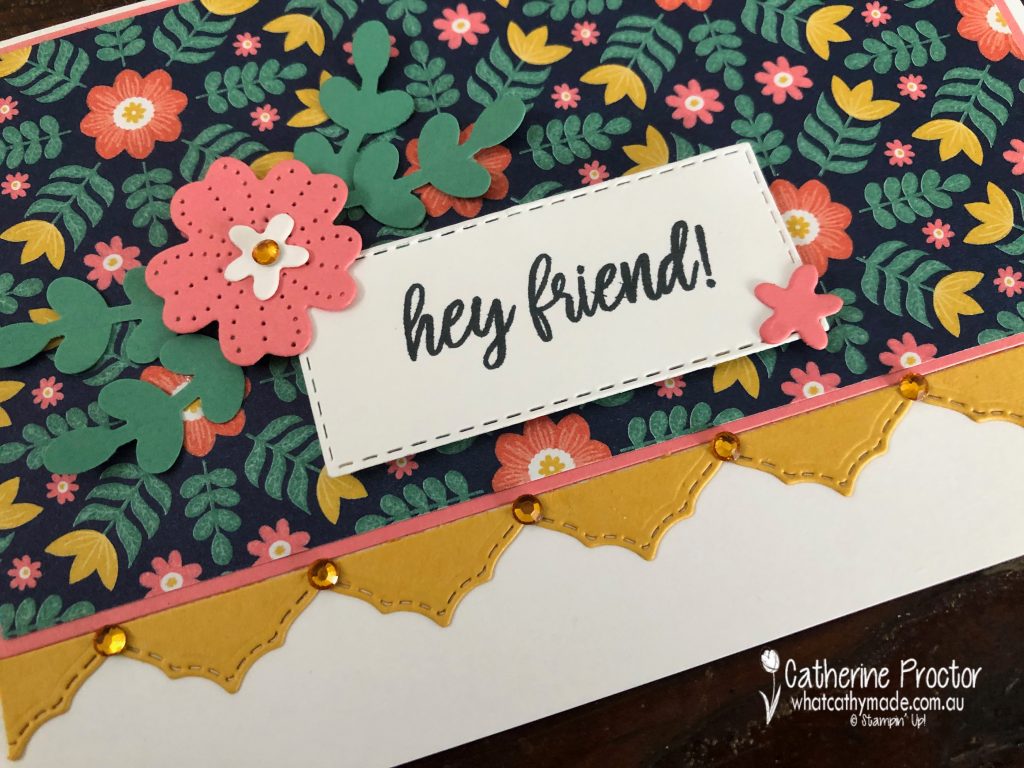
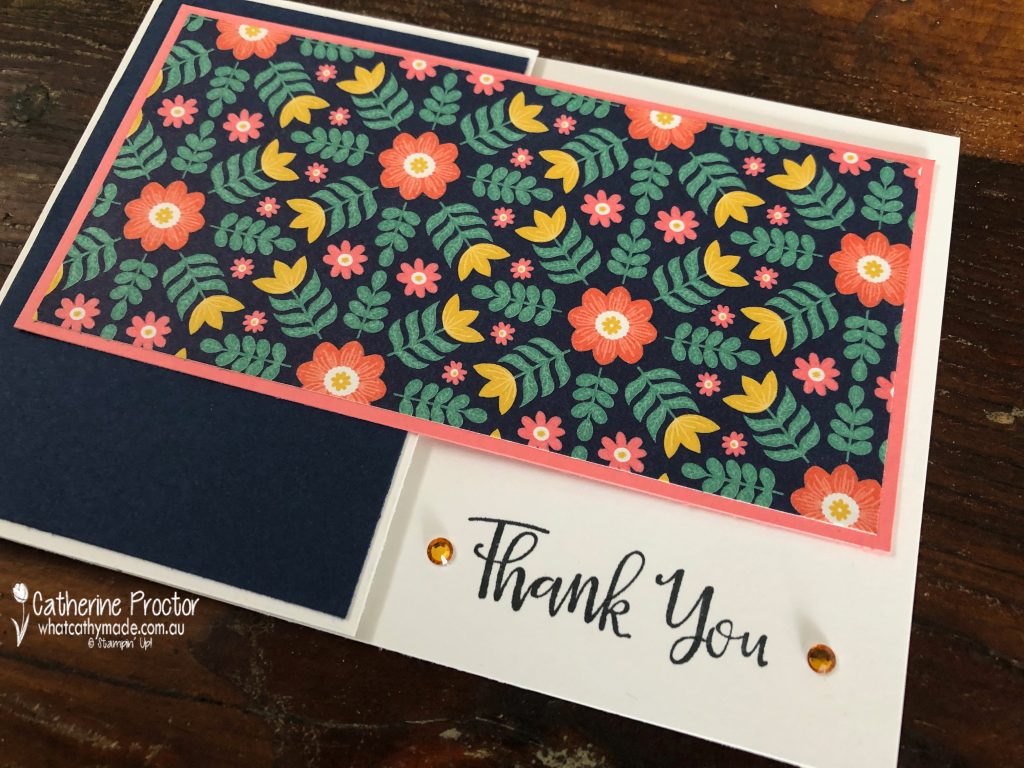
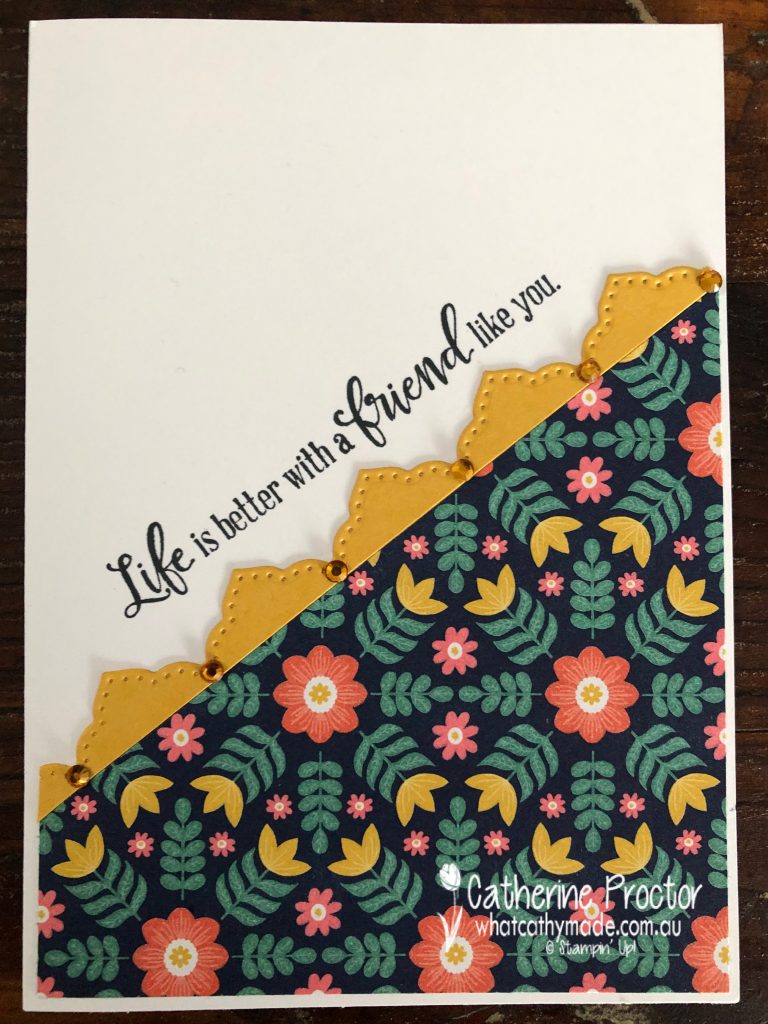
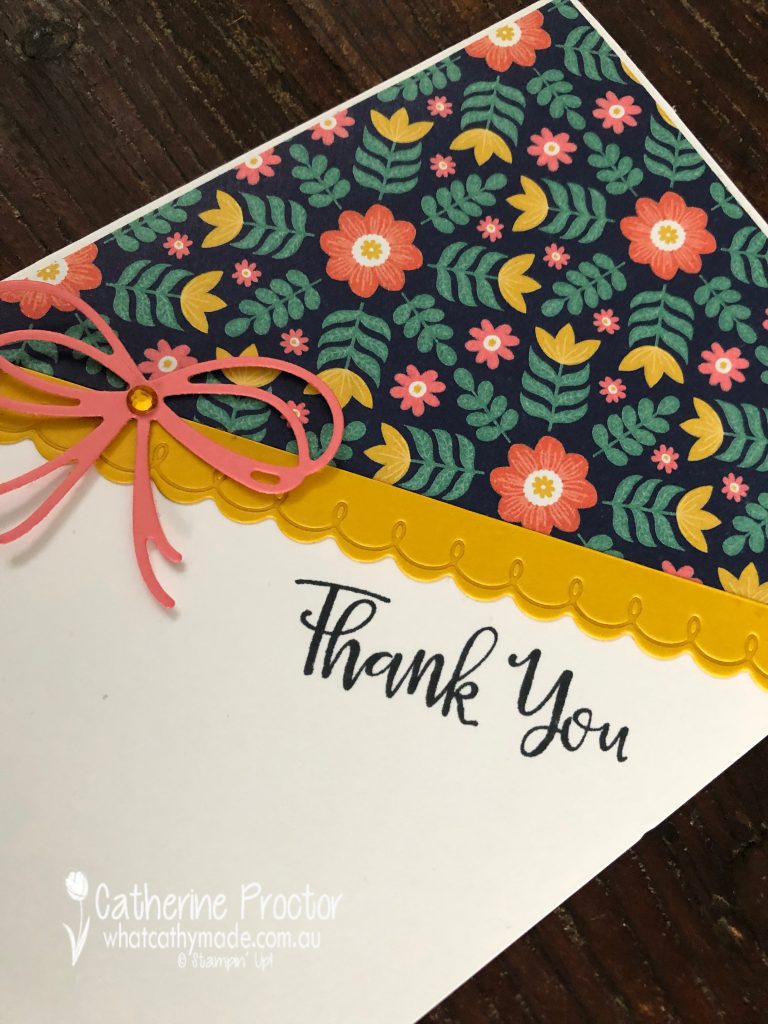
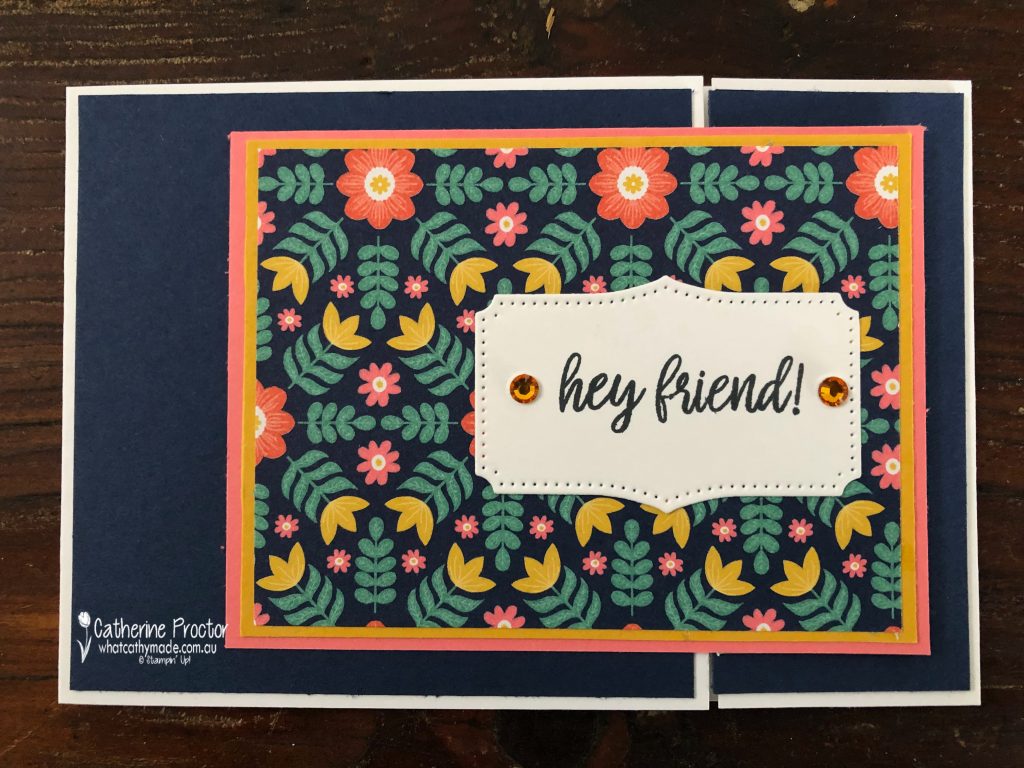
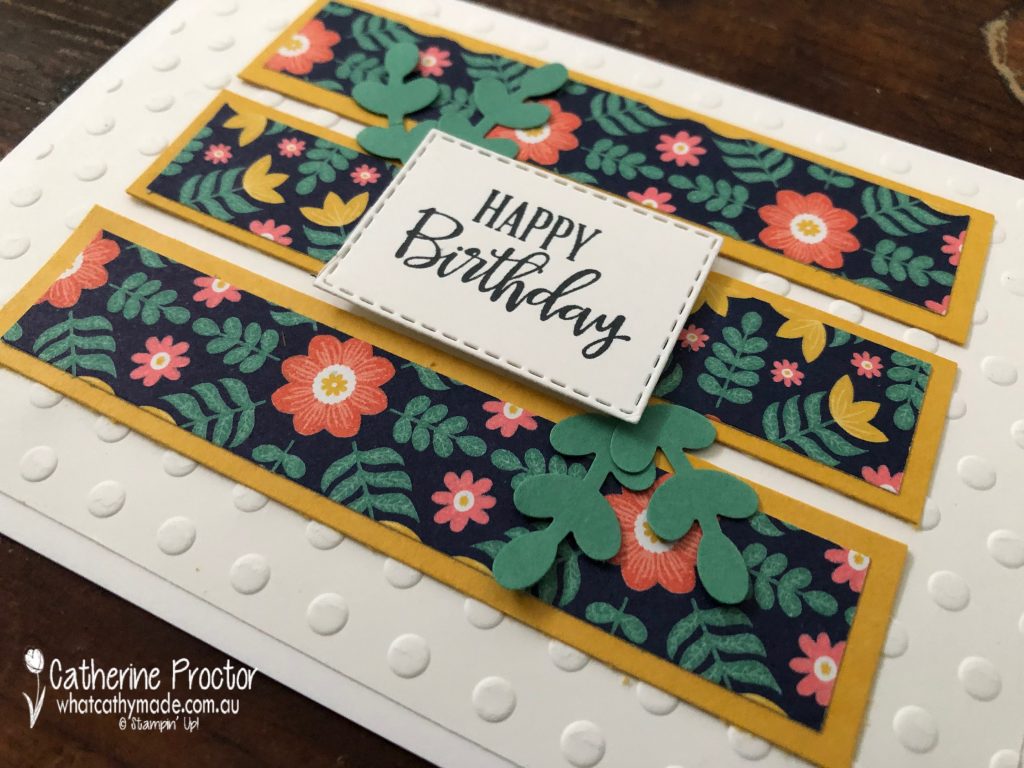
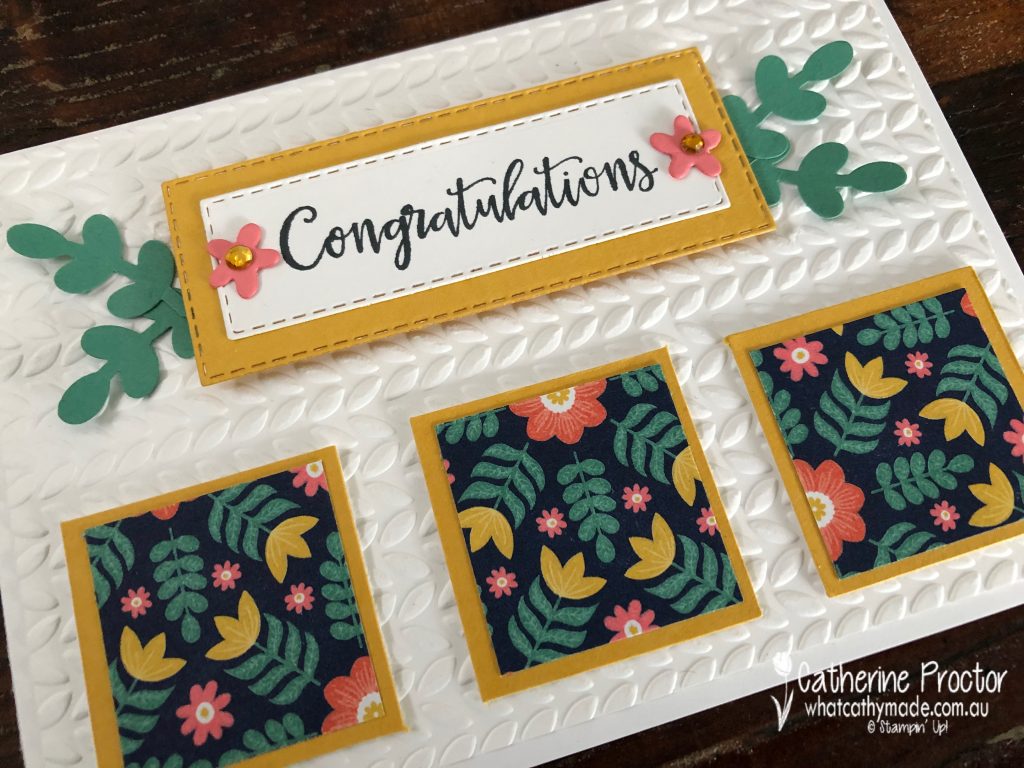
Because we are showcasing Bumblebee this week I chose this design from the Sweet Symmetry Designer Series Paper. Isn’t it pretty? Its colour combination pairs Bumblebee with Night of Navy, Flirty Flamingo, Just Jade and Basic White.
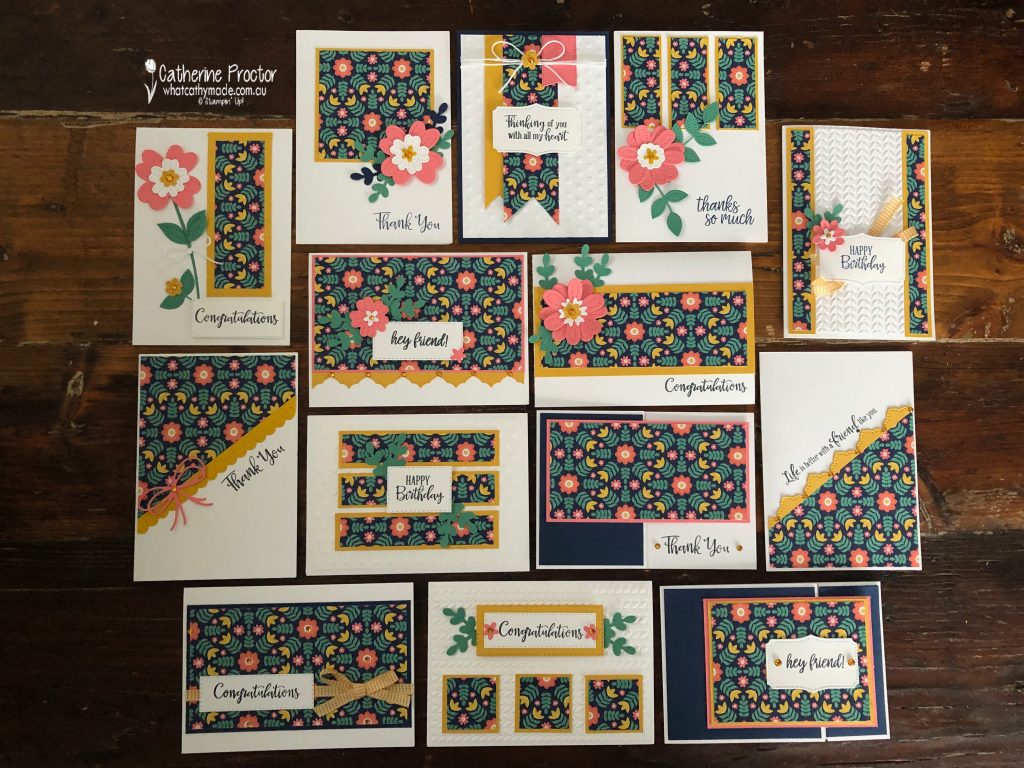
So just how many card can you make from one sheet of DSP? Well, I made 14 and here they all are!
The beauty of a One Sheet Wonder is that you can do it with any DSP and use the embellishments, ribbons, die cuts and punches you already have on hand. I made up these designs for my cards as I went along using a variety of Stampin’ Up! products.
The main products used throughout are:
Pierced Blooms dies as their shapes perfectly match the pattern in this DSP
Sentiments from In Symmetry and Peaceful Moments stamp sets
Bumblebee Gingham Ribbon and White Bakers Twine
Bumblebee, Night of Navy, Flirty Flamingo, Just Jade and Basic White card stock
Greenery and Dotted Embossing folders
Stitched Rectangle dies
Holiday Rhinestone Basic Jewels
Symmetrical Stems Border Punch
Lets see how my cards turned out. I’ve listed them in numerical order as per the numbers on the pieces in cutting template – to see which piece of DSP to use for each card refer back to the numbers on the cutting template.
Card 1
Card 2
Card 3
Card 4
Card 5
Card 6
Card 7
Card 8
Card 9
Card 10
Card 11
Card 12
Card 13
Card 14
You might be wondering where the other number 14 piece went? I used it to decorate the inside of the front flap on Card 11 (the front panel attached to the left flap folds over the right side flap) but it could be used to make a 15th card too!
Using a One Sheet Wonder Template is a great way to get more cards from your DSP – why not grab a packet of DSP while it is on sale and build up your supply of handmade cards?
Now it’s time to hop on over to our next participant, the very talented Caroline Manwaring. I can’t wait to see what she’s made this week!
If you find a broken link or have come to this blog hop from a different entry point, you can view the the full list of participants below:
Welcome to the Heart of Christmas 2020 where the Art with Heart team share their Christmas inspiration with you on the third Monday of each month.
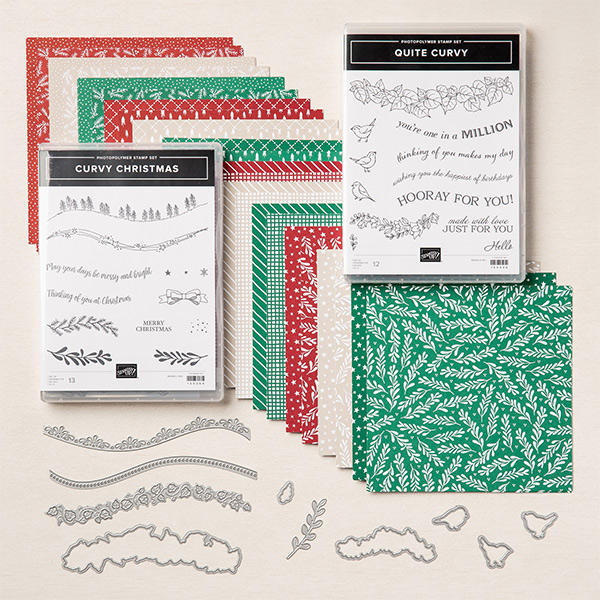
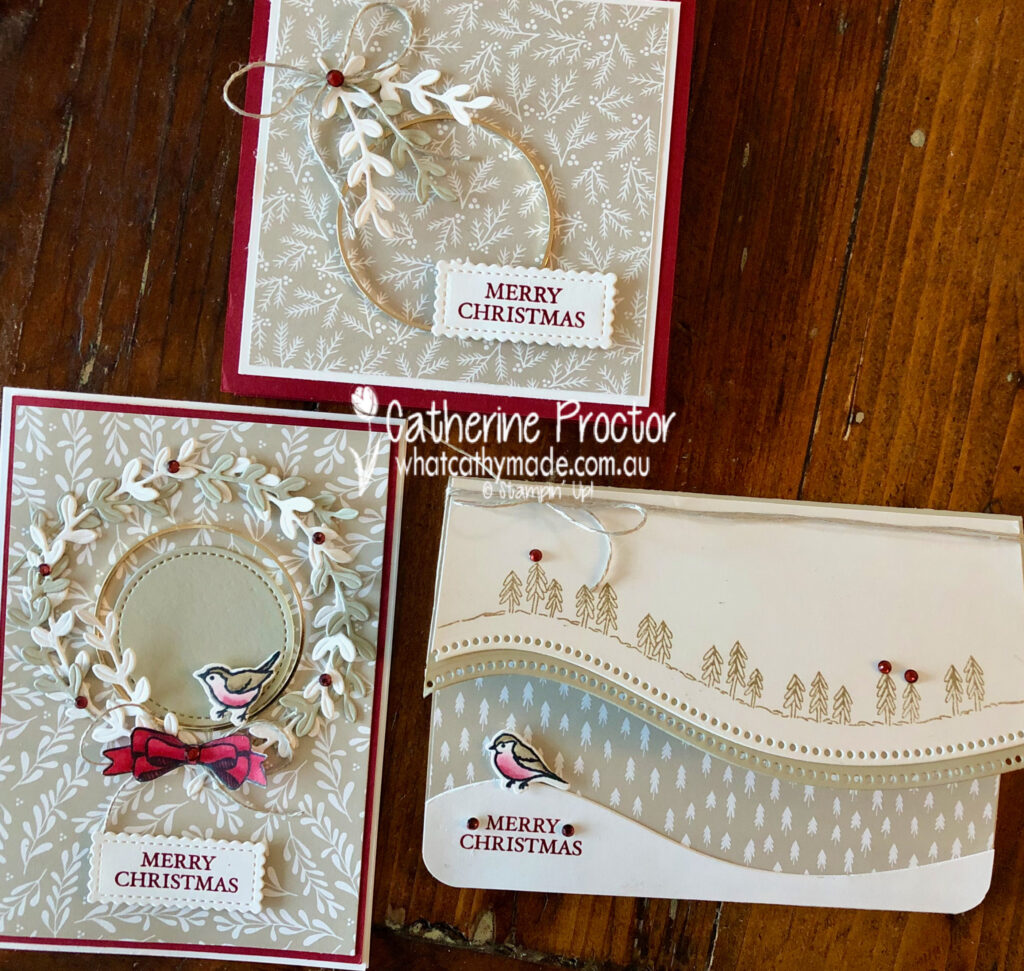
Today I’m sharing with you three cards that feature a brand new suite of products that will be available to purchase from 3rd November: the Curvy Celebrations bundle.
You can purchase these products together as a bundle and get 10% off or you can purchase these products individually.
Quite Curvy Stamp Set
Curvy Dies
Curvy Christmas Stamp Set
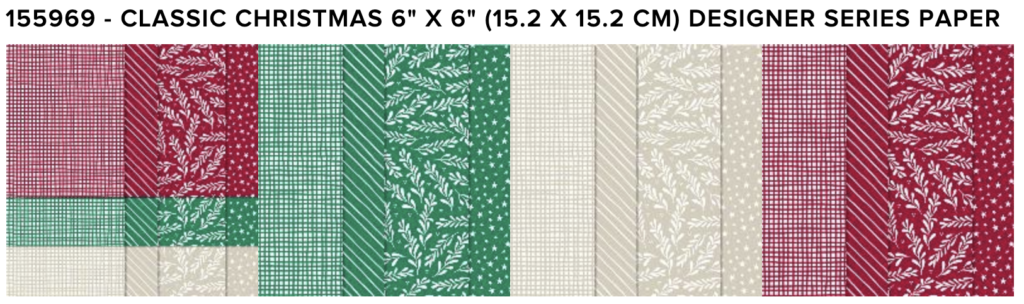
Classic Christmas 6″ x 6″ (15.2 x 15.2 cm) Designer Series Paper
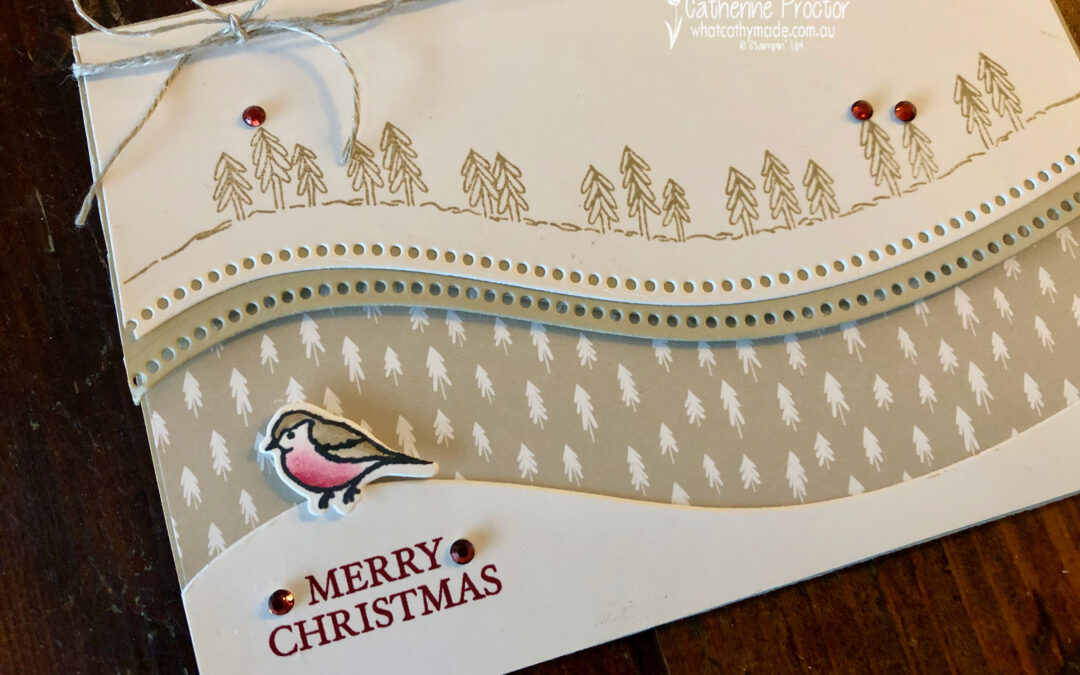
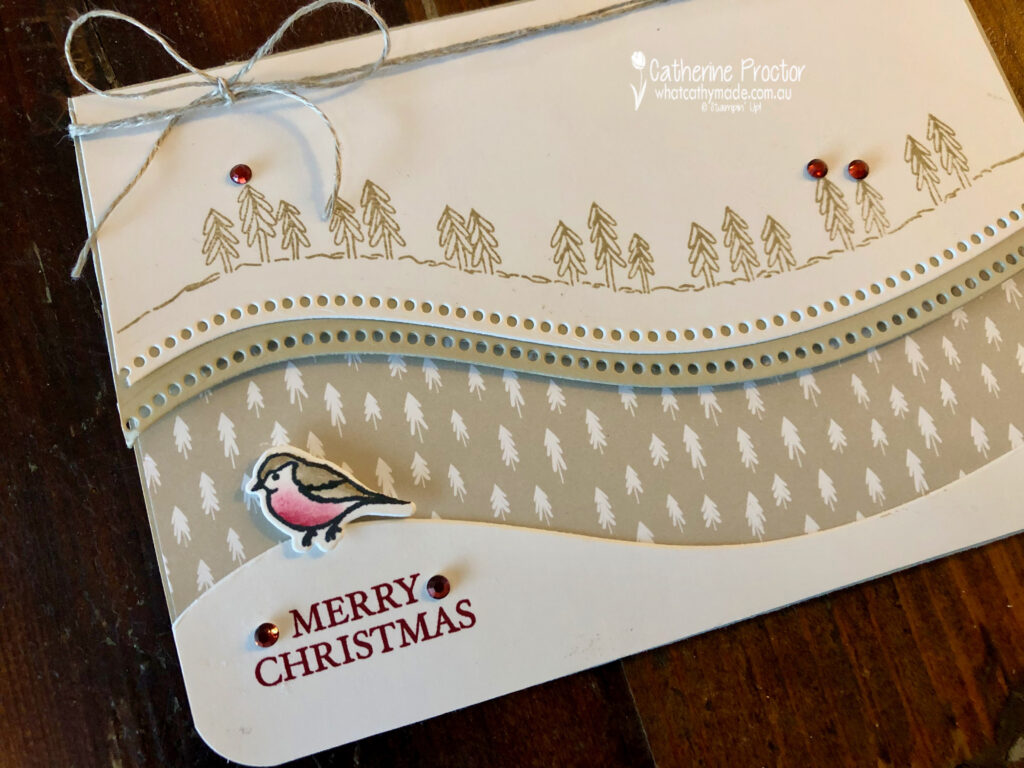
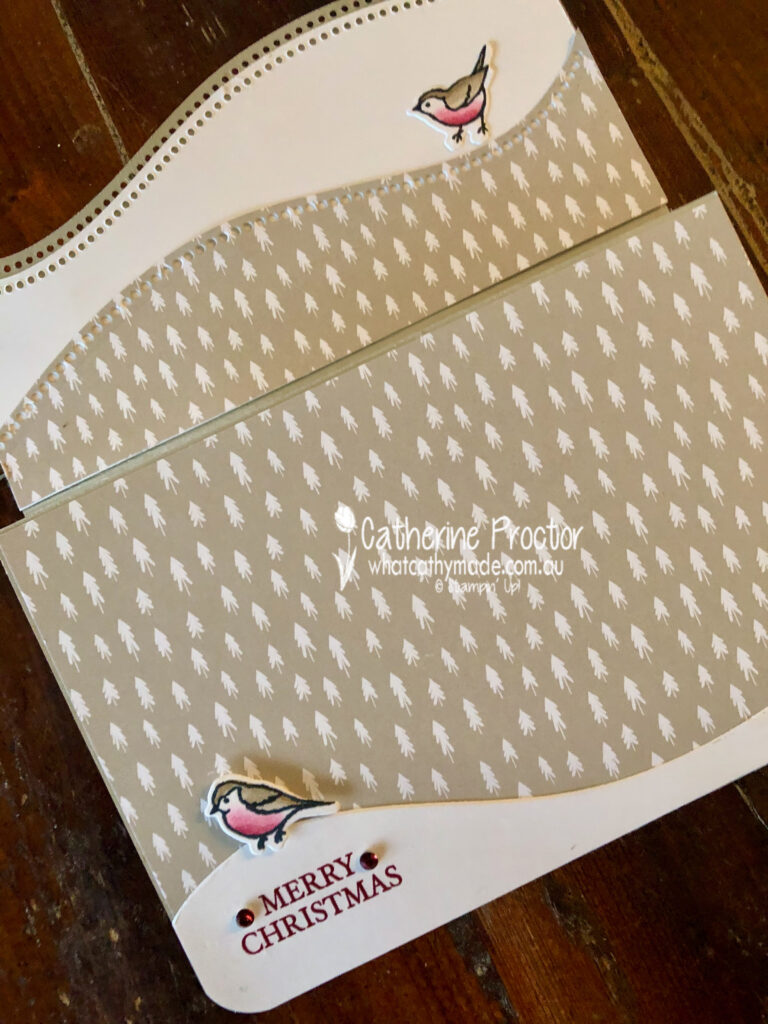
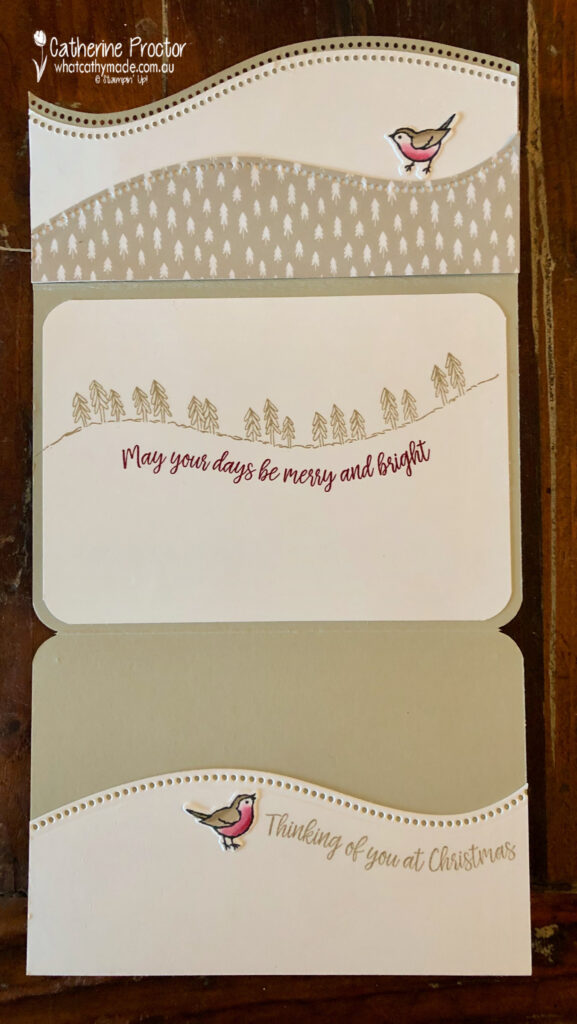
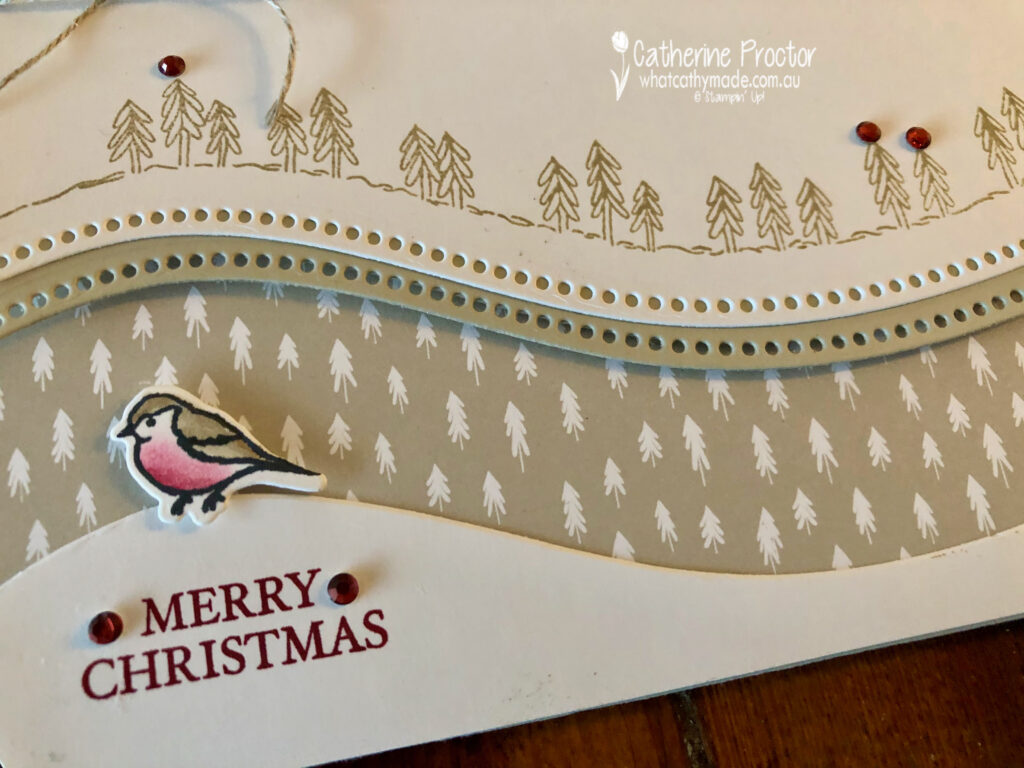
My first card is a simple folded card that uses one of the curvy dies to cut the card stock and the Classic Christmas 6″ x 6″ (15.2 x 15.2 cm) Designer Series Paper.
Here is it folded up.
Unfolded once.
And fully opened up.
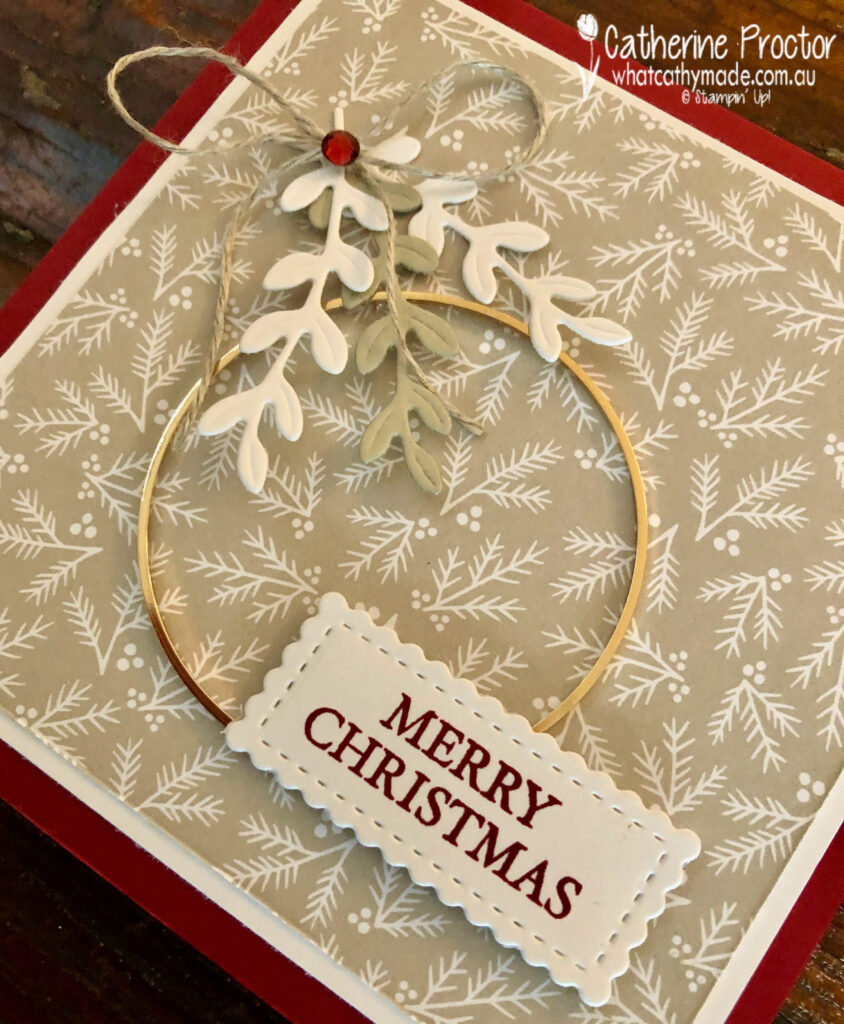
Look at this beautiful Designer Series Paper and the detail in these Curvy Dies. I’ve used the Sahara Sand tree pattern DSP for this card because it matches the Curvy Tree Stamp – how cute is this line of trees!
I really love this DSP – it comes in Sahara Sand, Cherry Cobbler and Shaded Spruce, 48 sheets of double-sided patterned paper; with 4 each of 12 designs.
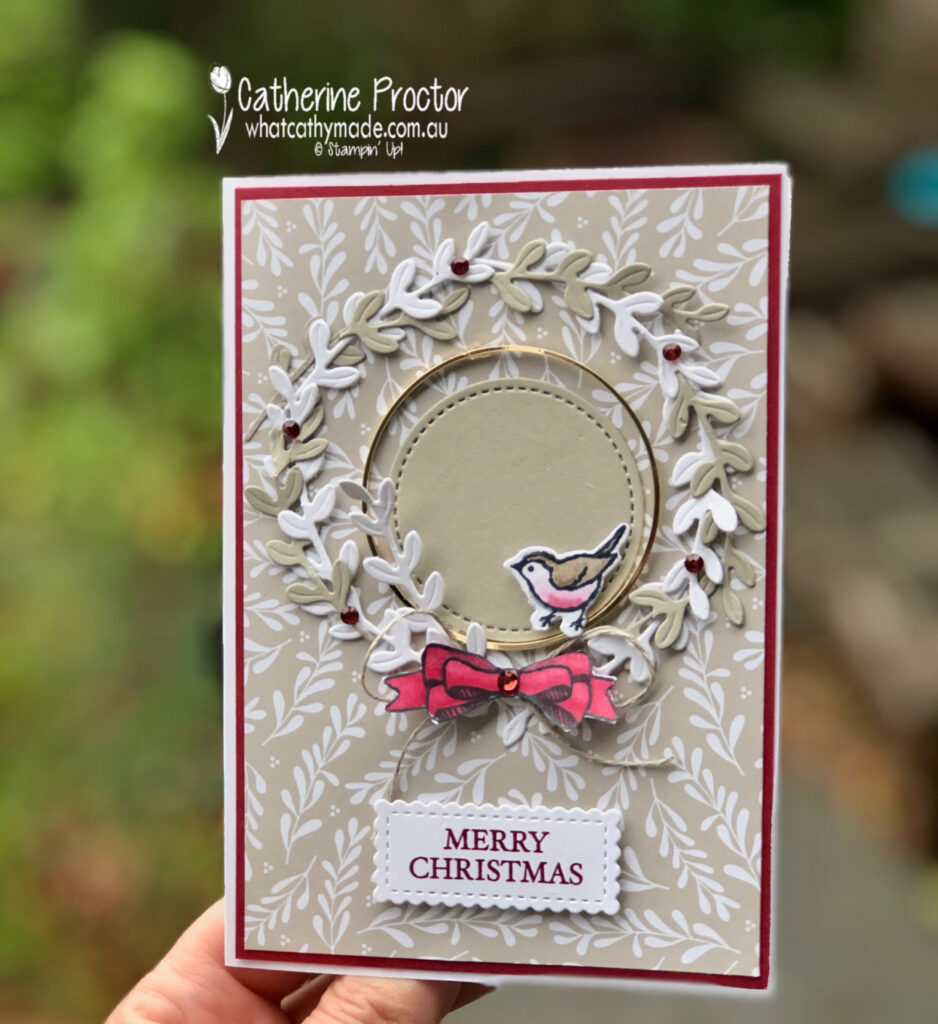
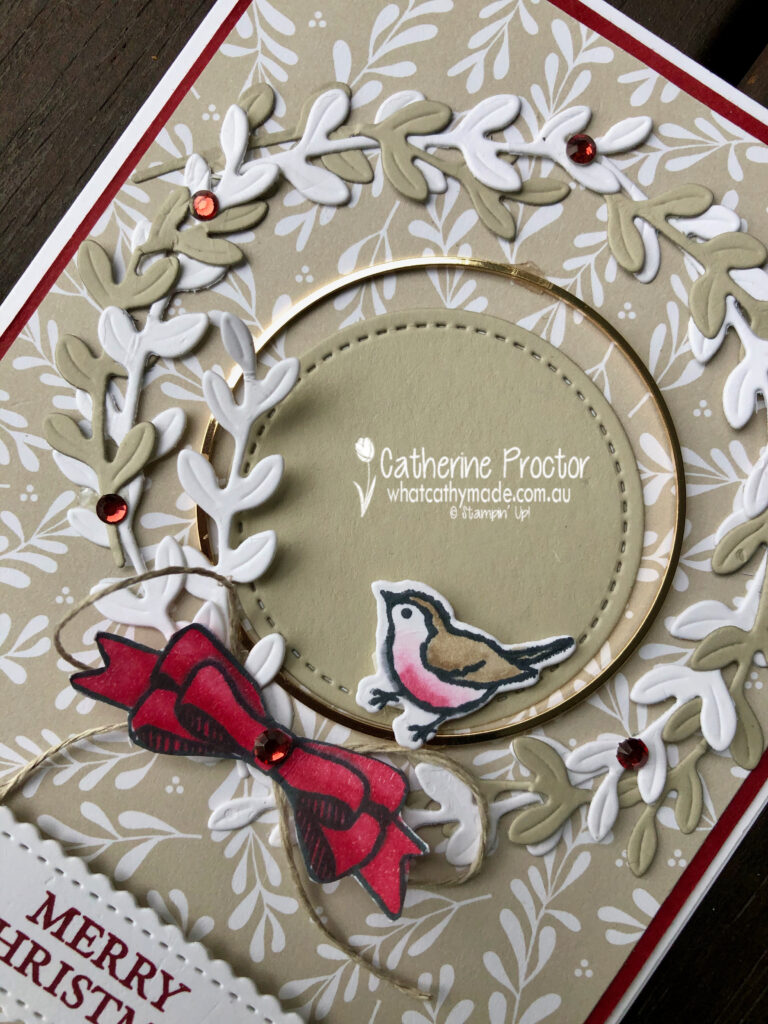
For my next card I used the sprig die to cut out Sahara Sand and Whisper White card stock sprigs to make a wreath.
My little red robin was coloured in using Crumb Cake and Cherry Cobbler Stampin’ blends and the bow was coloured in with Cherry Cobbler Stampin’ blends before fussy cutting out with my paper snips. Holiday Rhinestone Jewels add a touch of bling.
Lastly, for the square card I also used the Gold Hoop embellishments and the sprig dies.
There’s just so many possibilities with this amazing suite!
The lovely Judy May is hosting our Heart of Christmas showcase this year. To see the other Christmas creations go back to Judy’s post.
If you’d like me to post you your very own copy of the August – December Mini catalogue (AKA the Holiday Catalogue), the 2020-21 Stampin Up! Annual Catalogue, the 2020-21 Beginners Brochure, or to simply find out about more about Stampin’ Up! contact me.
In the meantime, wherever you are in the world, stay safe, stay calm…and keep on crafting xxx
Welcome to the Heart of Christmas 2020 where the Art with Heart team share their Christmas inspiration with you on the third Monday of each month.
Today I’m sharing with you a card that features some adorable new products from the Stampin’ Up! August – December mini catalogue.
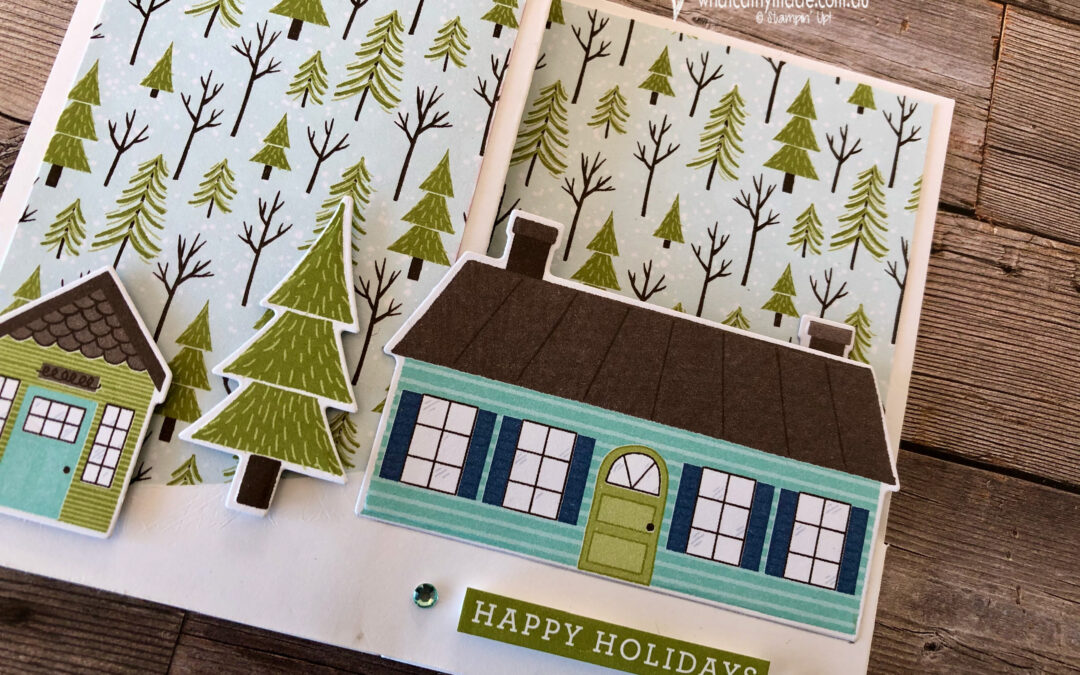
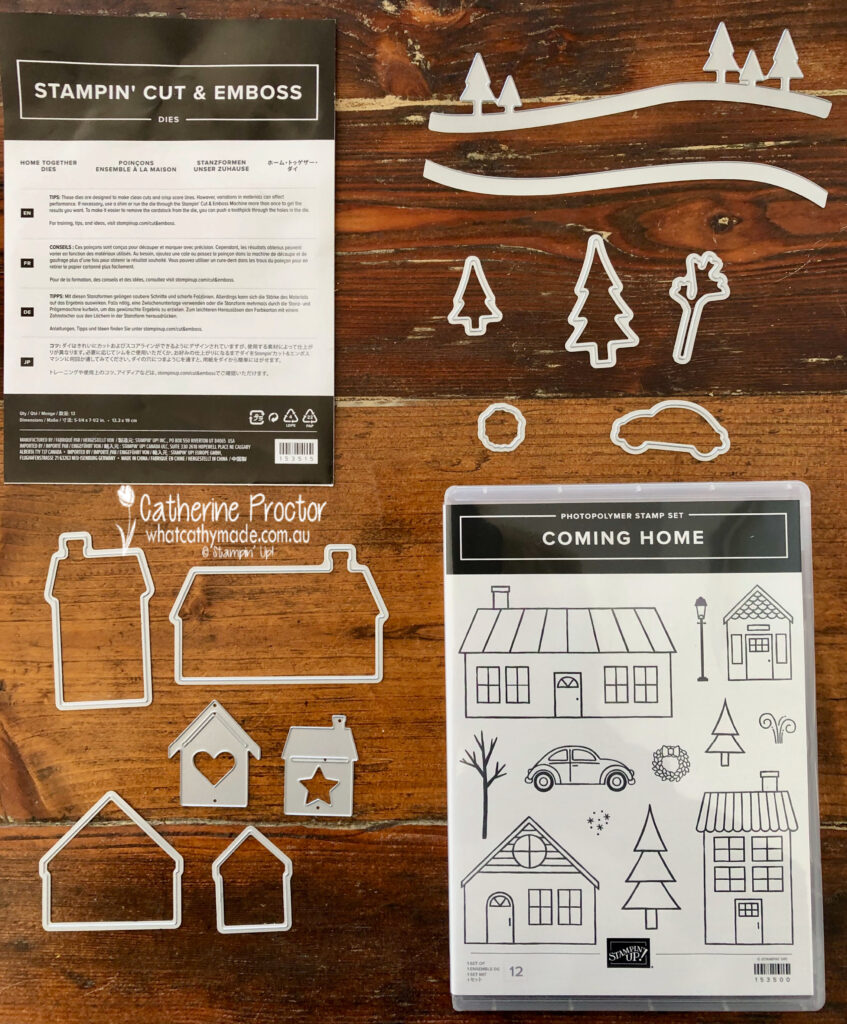
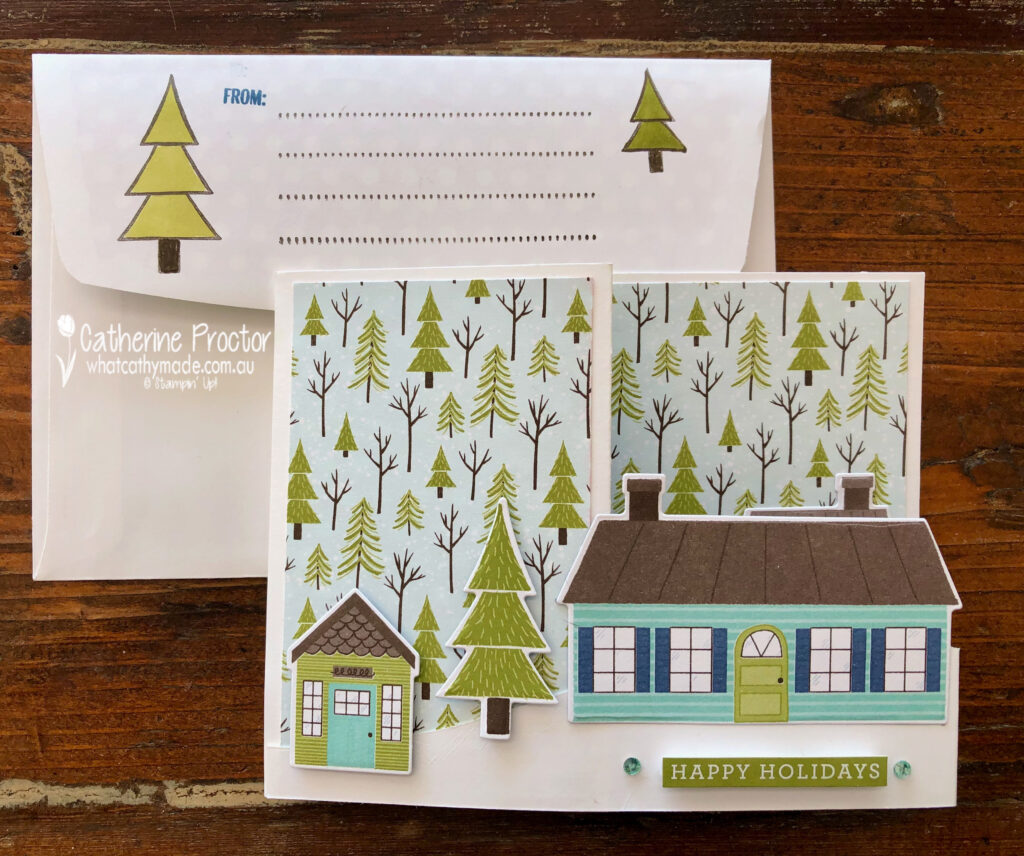
The Coming Home Bundle is part of the Trimming the Town Suite and one of my favourite items in the catalogue.
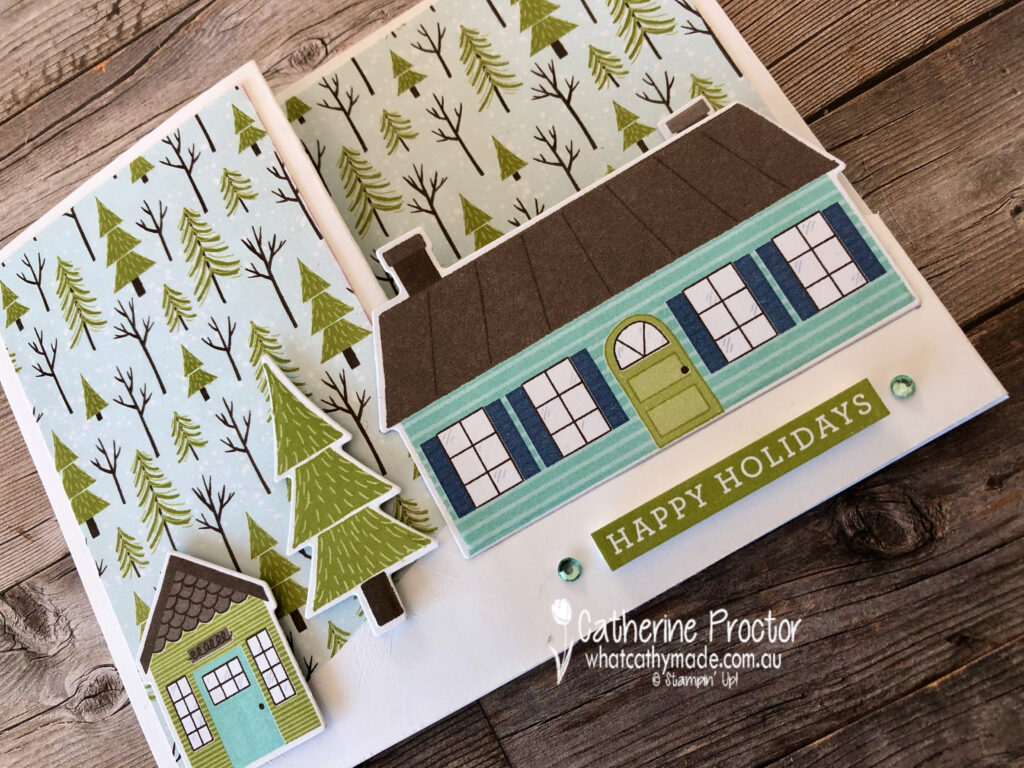
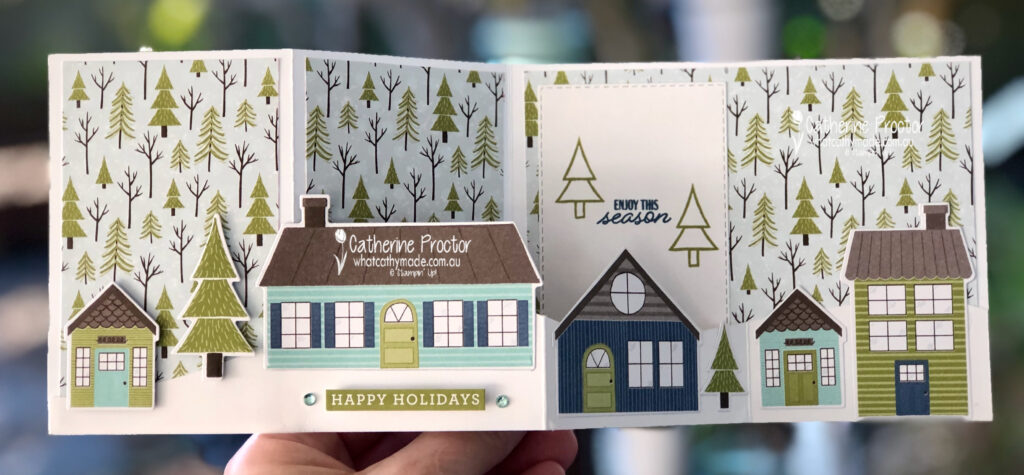
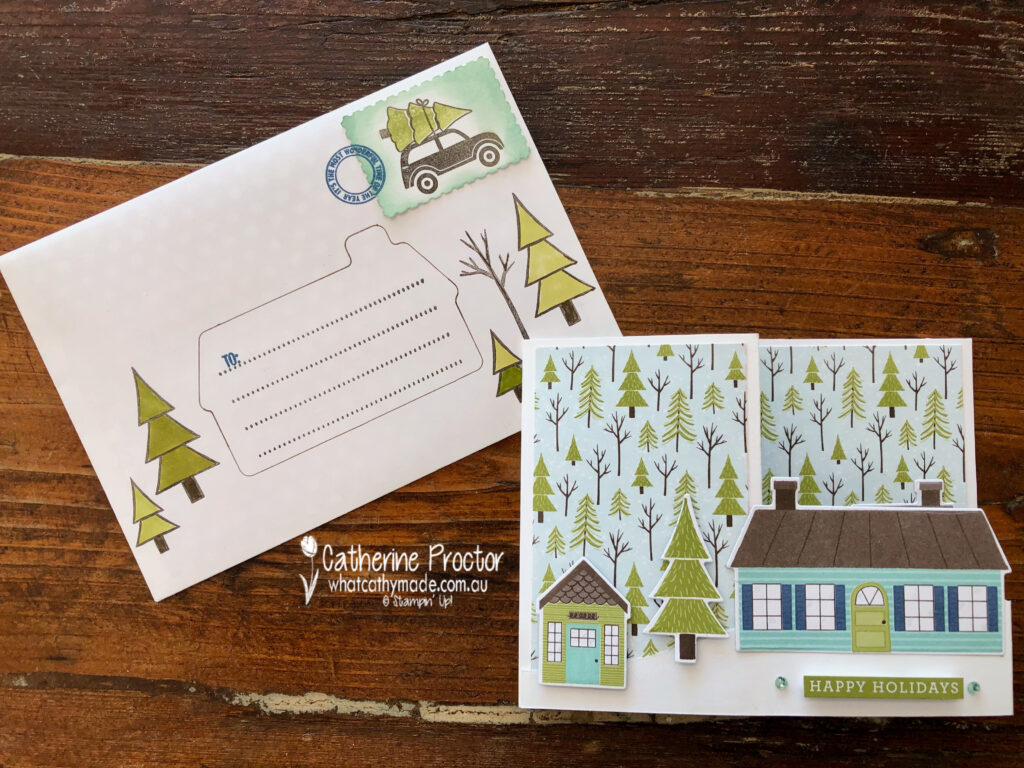
Last month I shared a blue, silver and white card I made using the Home Together dies, but this week I’ve used the same dies in a different way to create a double Z fold card.
A double Z fold card is one of the simplest and most versatile fancy folds you can make…and it always looks impressive!
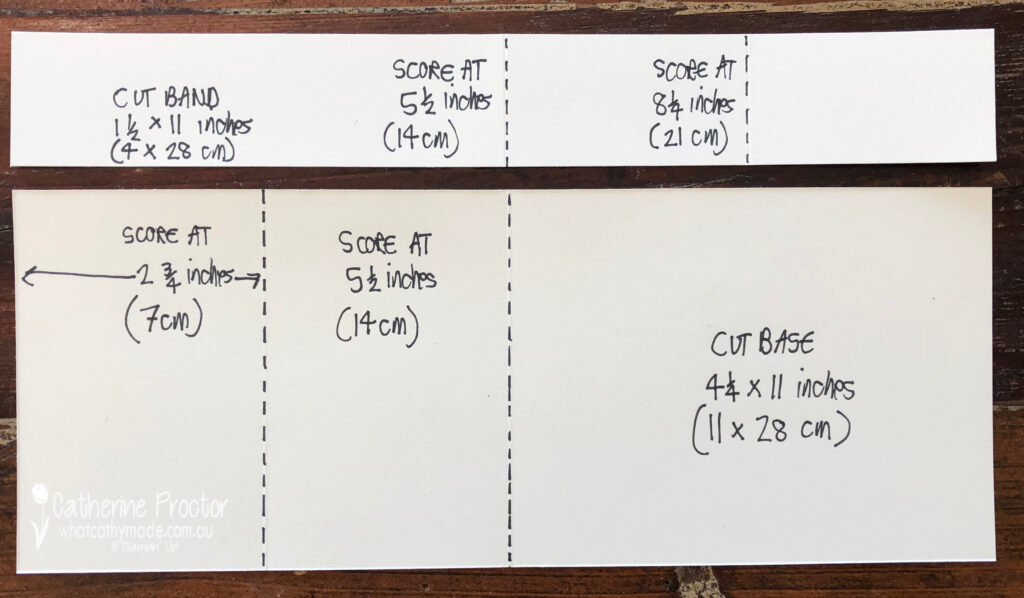
Here are the measurements for the card base and band, although you can make the band what ever width you want and position it at any height you prefer depending on the type of effect you want.
Double Z fold card template
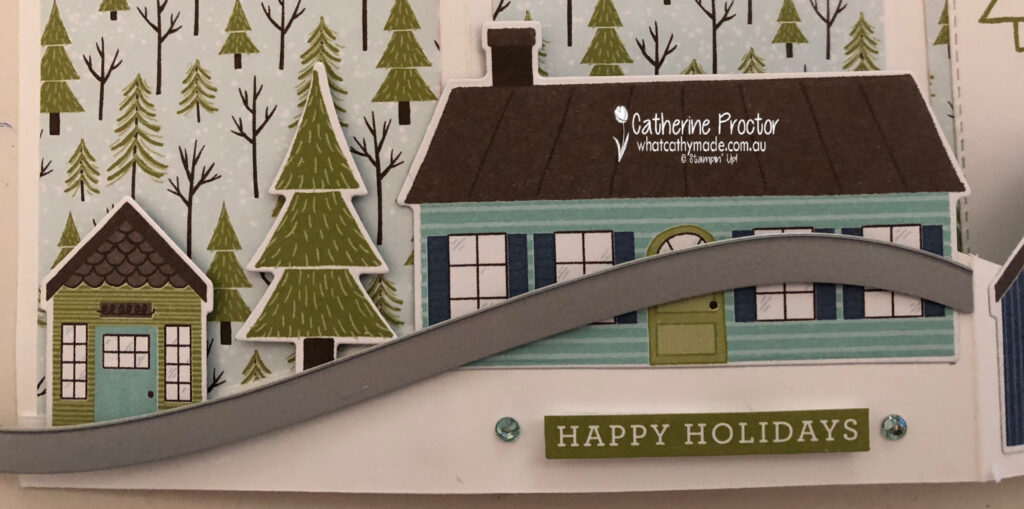
Once I’d cut and scored my base and band I used the long curved line die to die cut my band, creating a hilly base for my houses to sit on.
This is how I cut the 5 1/2 inch (14cm) front section of the band.
And this is how I cut the remaining two sections – I die cut them laying flat, not folded.
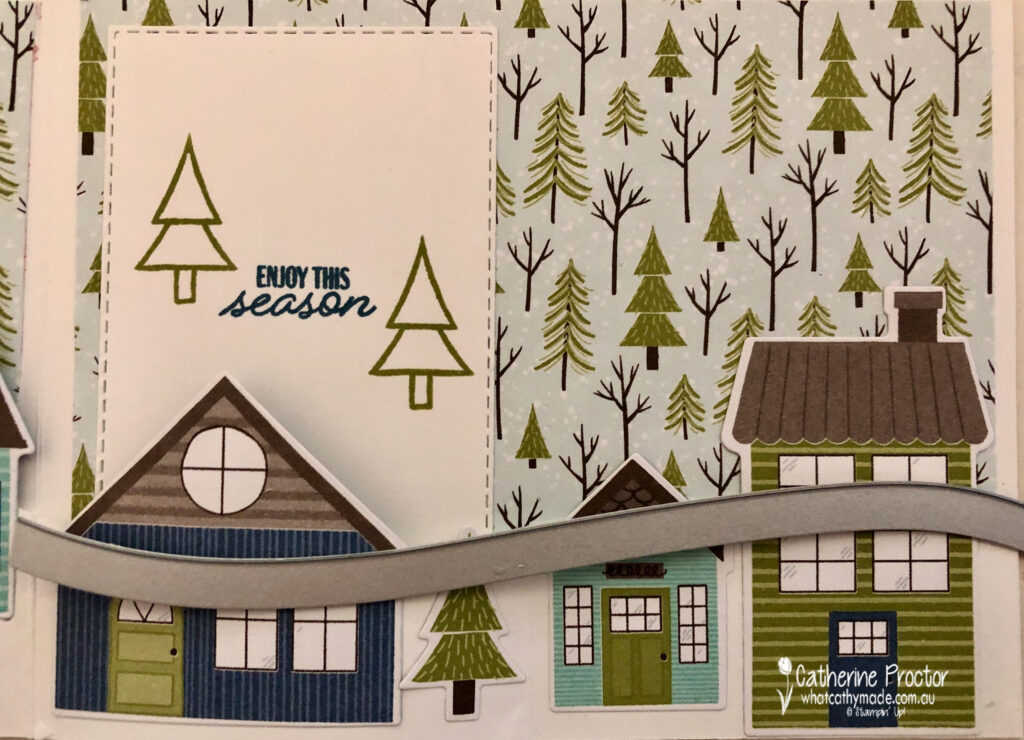
Before you attach your band to your card attach the DSP layer to the inside back of your card base. Attach the band and then work out exactly where you want the the little houses and trees to sit.
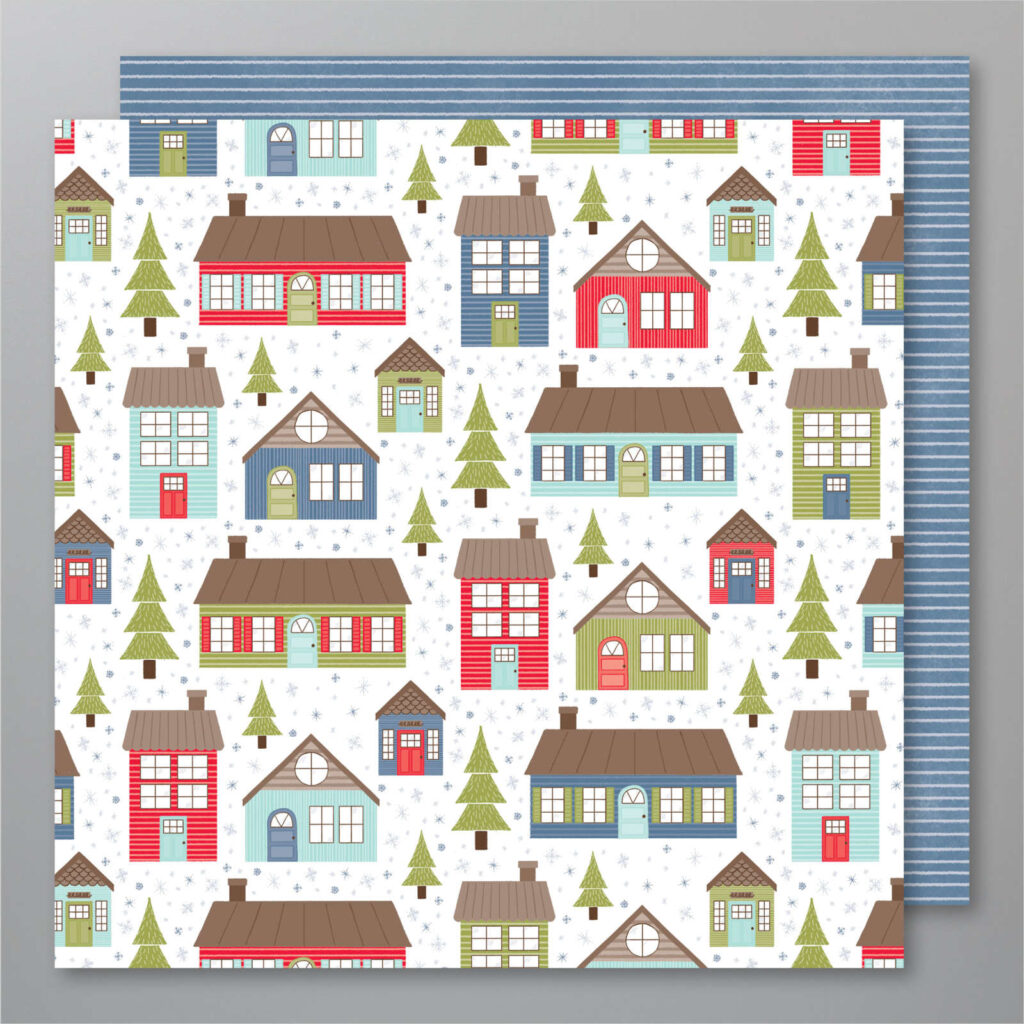
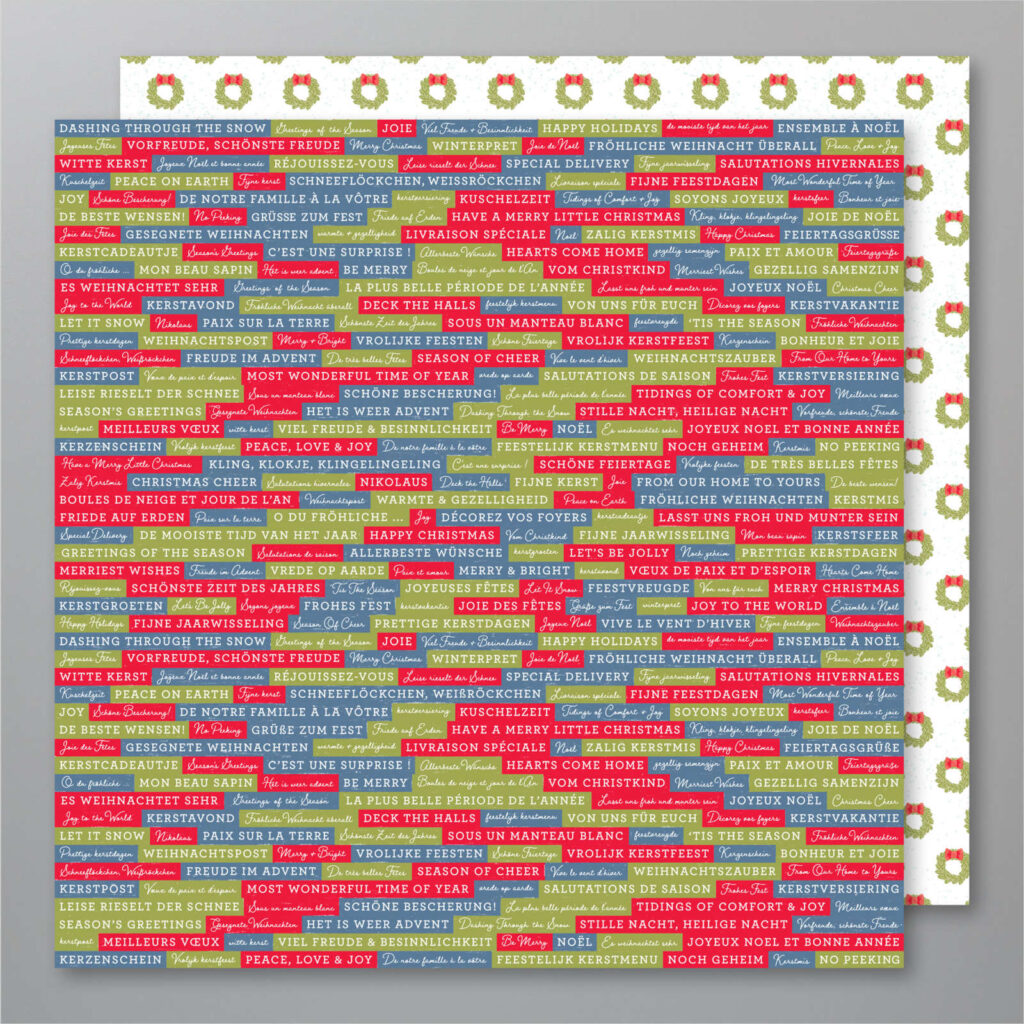
Did you realise the dies in this bundle cut out the trees and houses from the Trimming the Town Designer Series Paper? I just love this for quick and easy card making – it’s this sheet that co-ordinates with the dies.
I decided to narrow my colour palette to just Early Espresso, Misty Moonlight, Pool Party and Old Olive for this card. I then lined up my die cut houses and trees to ensure they looked good both when the card is closed and when it is open.
Here’s how it looks closed.
Standing up…
And fully open…
The sentiment inside and the little trees are stamped from the Coming Home stamp set but the cute “Happy Holidays” sentiment on the front of the card is cut from this sheet of DSP in the the Trimming the Town Designer Series Paper.
This DSP has sentiments in other languages too, which is great for overseas relatives!
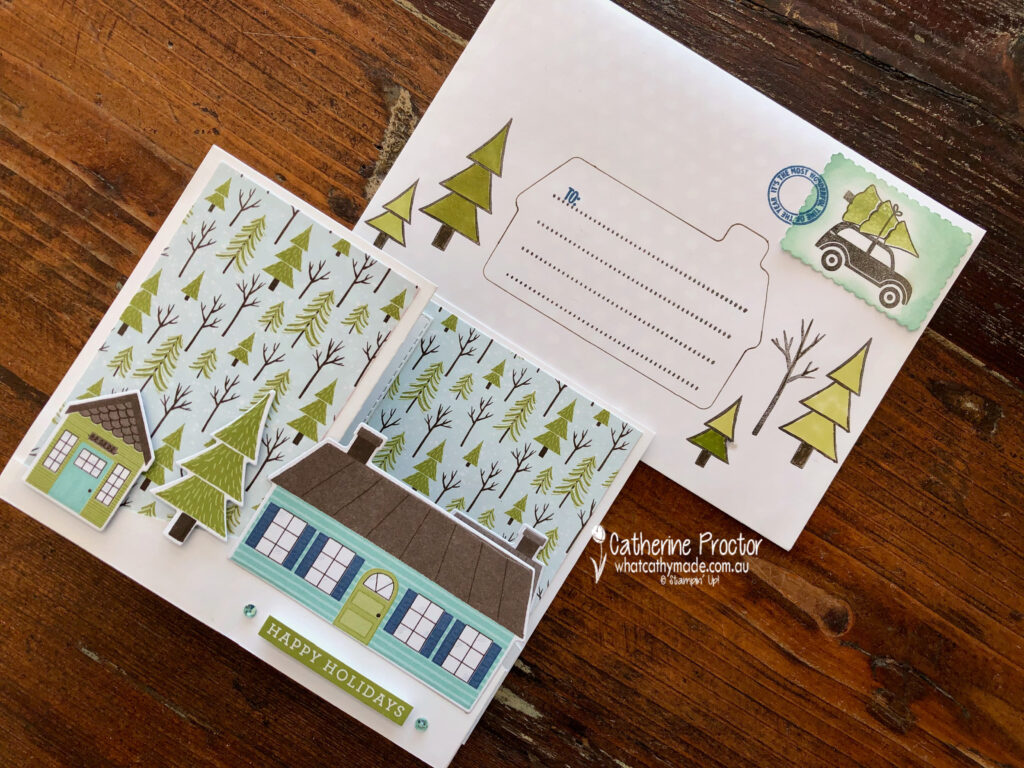
I wanted to make a special envelope for this special card and try my hand at some snail mail art, also known as mail art or envelope art. This is where you decorate an envelope to match a card and it’s so much fun!
I used a C6 Whisper White envelope, which is the perfect size for my Double Z Fold card.
The address panel was created by using an Early Espresso marker to trace around the largest house die. The dotted lines for the address are in the Ornamental envelope Stamp set.
I also stamped and coloured in some tress from the Coming Home stamp set using my Old Olive bends.
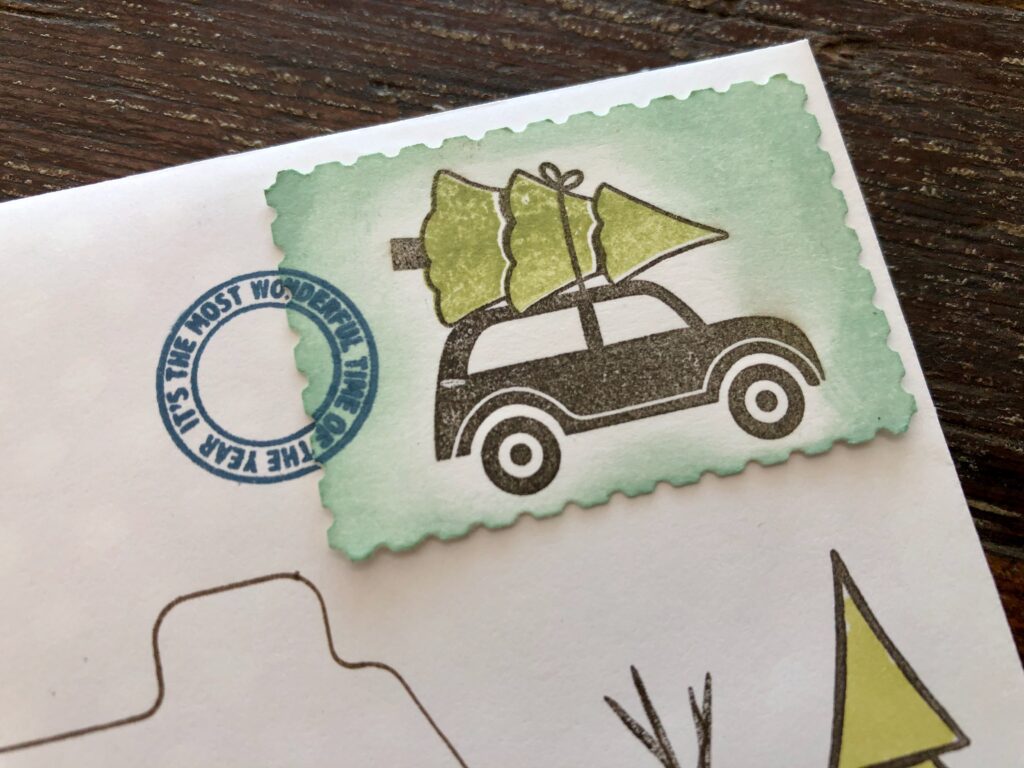
The postage stamp was created using the Festive Post stamp set and matching Rectangular Festive Postage Stamp Punch.
Pool Party was sponged around the outside of the postage stamp to give a vintage look.
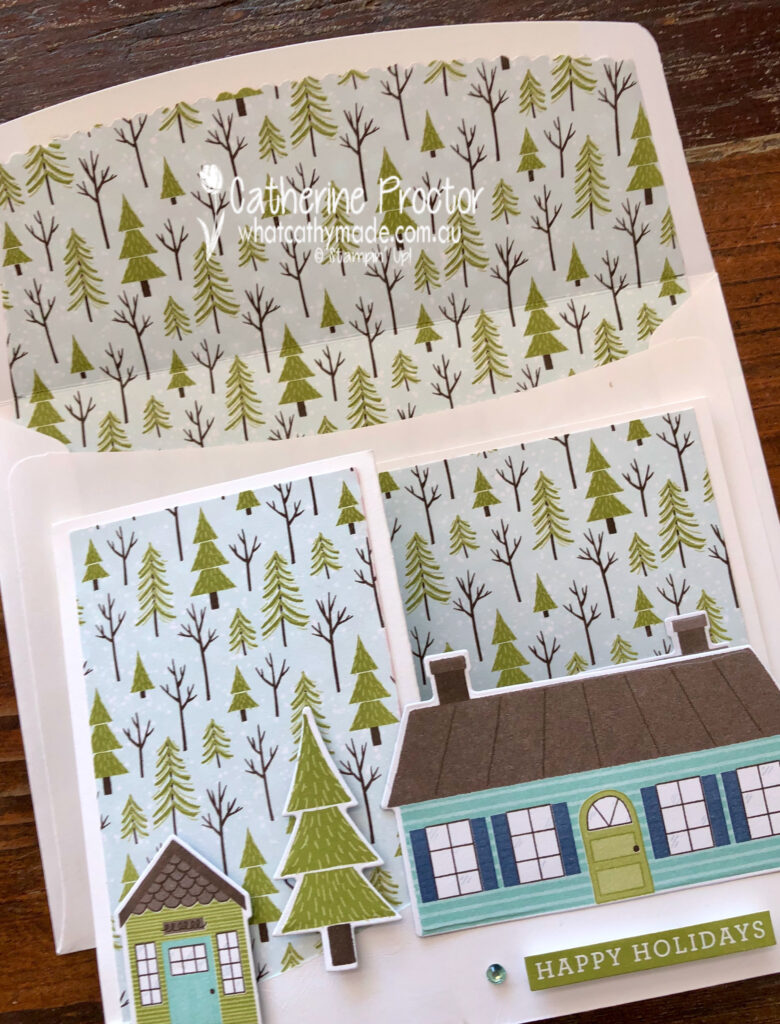
The inside of my envelope has been lined using matching DSP, die cut with the Envelope dies that coordinate with the Ornamental Envelopes Stamp set.
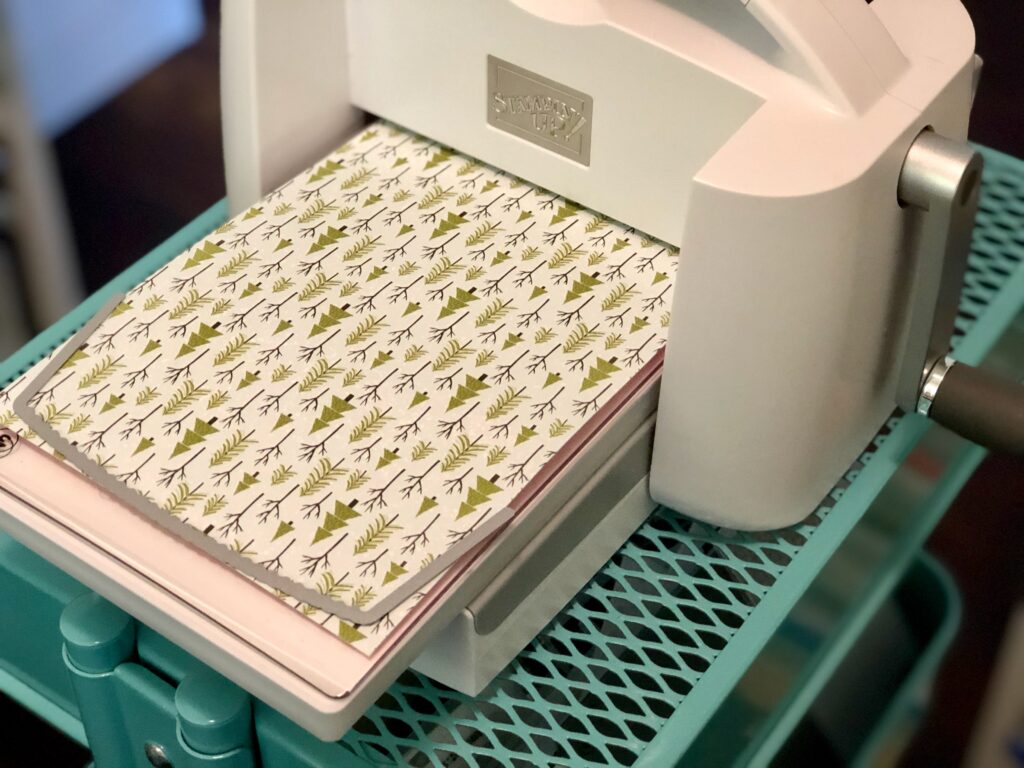
The C6 envelope takes the widest envelope liner die – cut a strip of DSP 15cm wide and then line up the die at the top of your insert.
Here it is being cut out on my new Stampin’ Cut & Emboss Machine – I love how well this machine cuts! It will be available to purchase from September.
Fold your insert so it lines up with the fold of the envelope and then all you need to do is trim the length to fit inside the envelope and glue the top flaps together.
You glue on the reverse pattern of your DSP lining.
The final touch was to embellish the outside back flap of my envelope to match the front of the envelope and the card.
I’ve had so much fun creating this fancy fold card and creating some snail mail envelope art!
The lovely Judy May is hosting our Heart of Christmas showcase this year. To see the other Christmas creations go back to Judy’s post.
To purchase any of the products featured in today’s post, simply contact your Stampin’ Up! demonstrator, any of the ladies in the AWH Colour Creations Showcase or click on the product links below.
If you’d like me to post you your very own copy of the August – December Mini catalogue (AKA the Holiday Catalogue), the 2020-21 Stampin Up! Annual Catalogue, the 2020-21 Beginners Brochure, or to simply find out about more about Stampin’ Up! contact me.
In the meantime, wherever you are in the world, stay safe, stay calm…and keep on crafting xxx
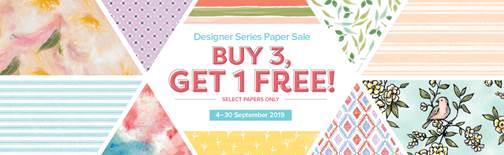
Tonight the Art with Heart team are sharing amazing projects featuring Stampin’ Up! Designer Series Paper, most of which is in the current promotions where you can buy 3 packs of Designer Series Paper and receive a pack for free! Only available until the 30th of September.
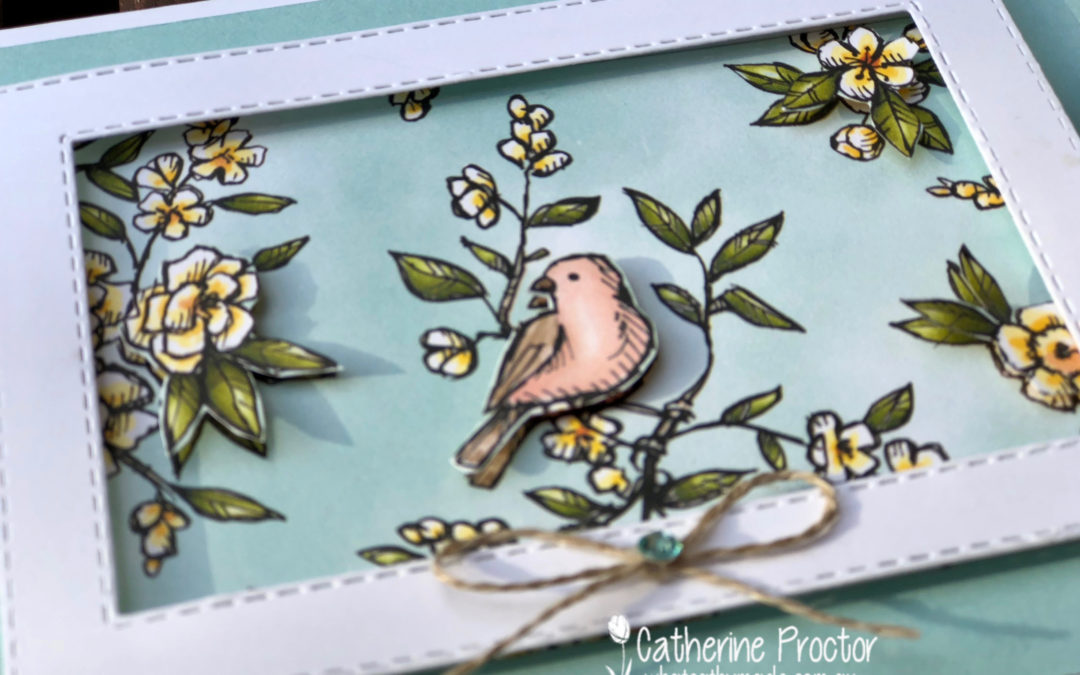
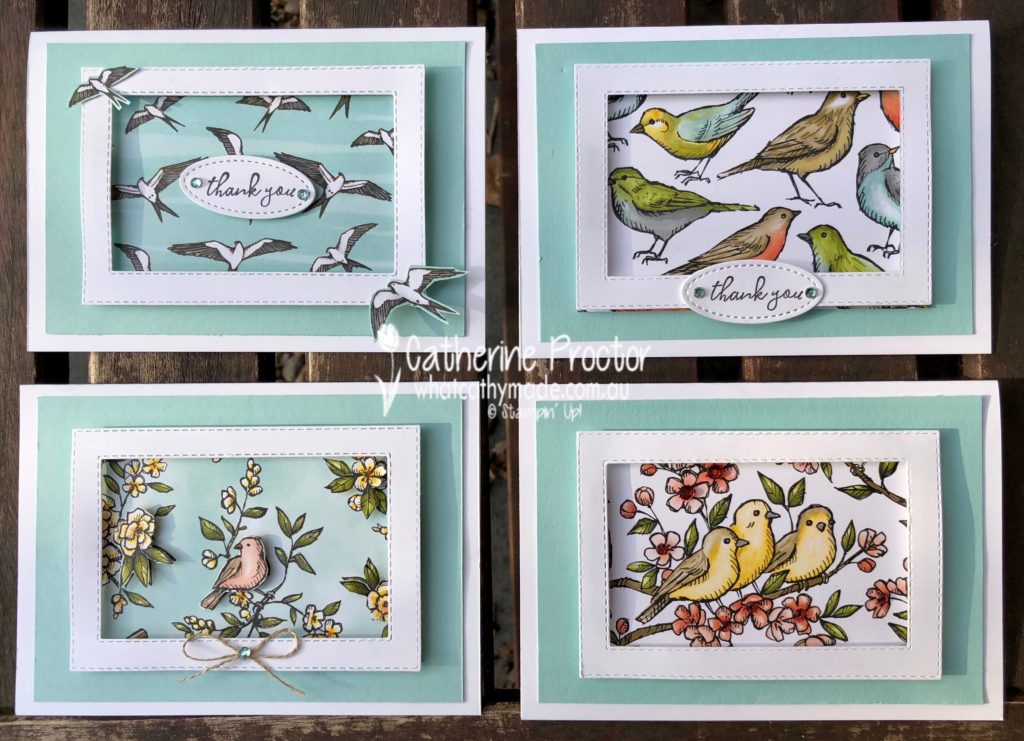
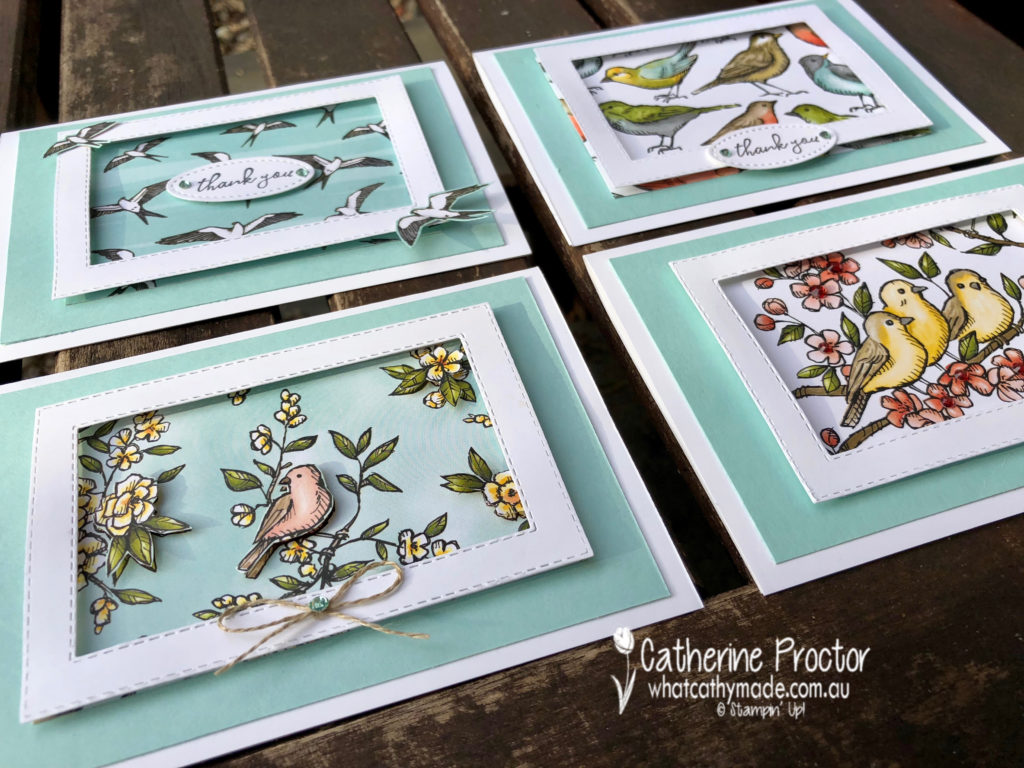
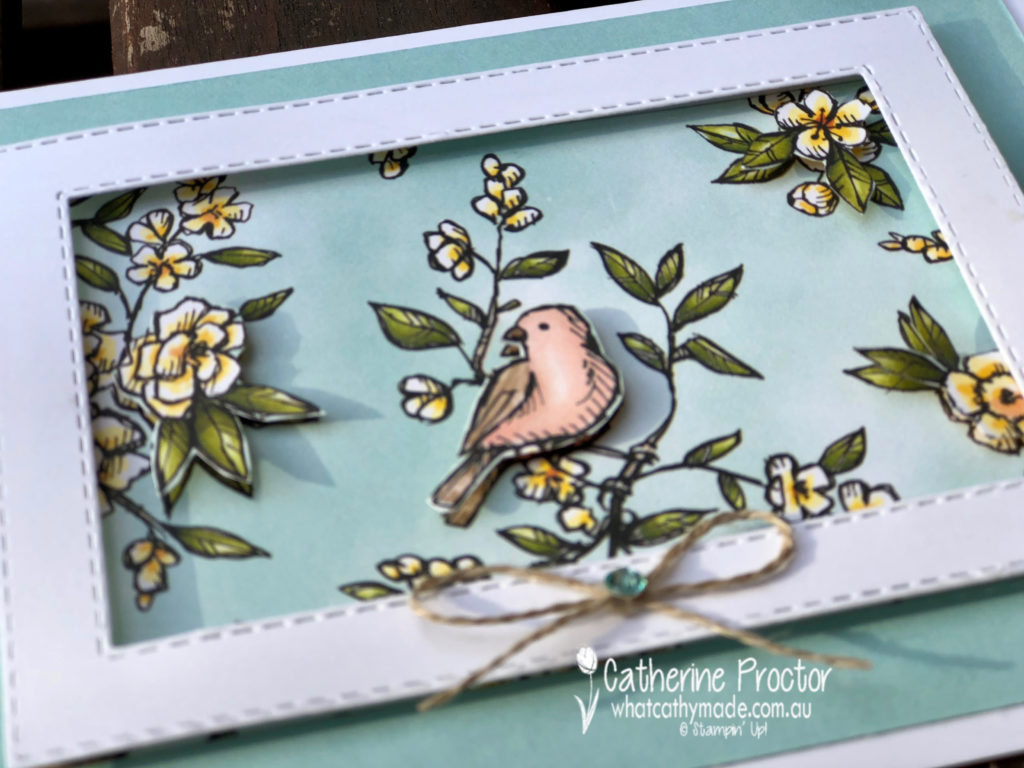
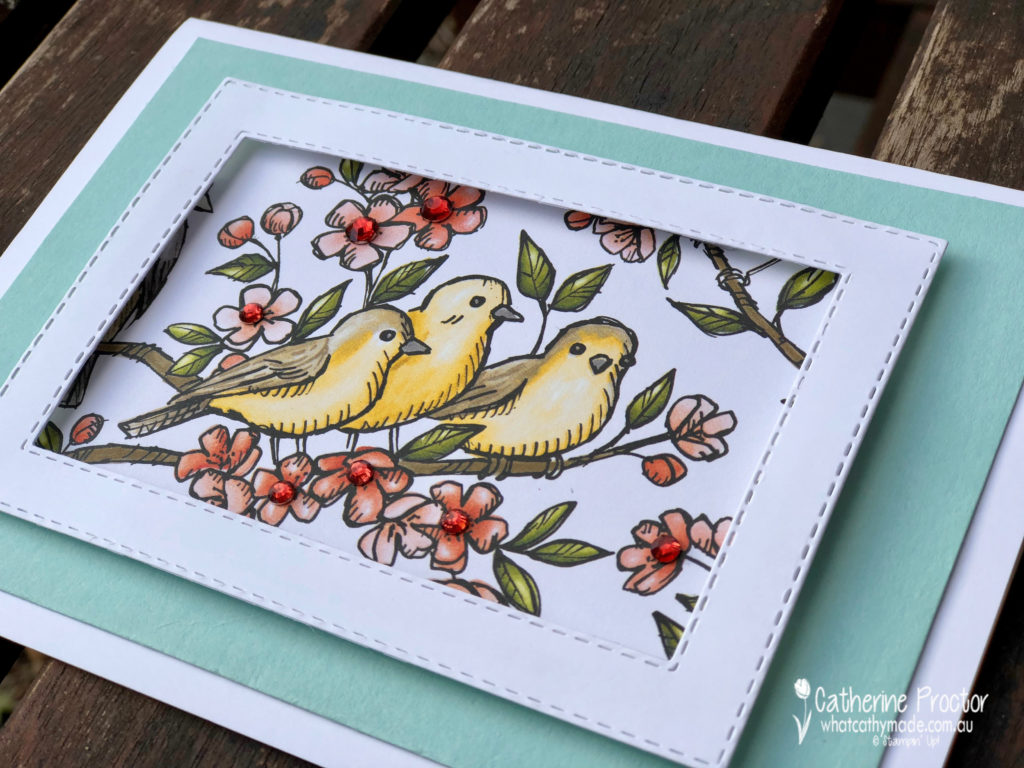
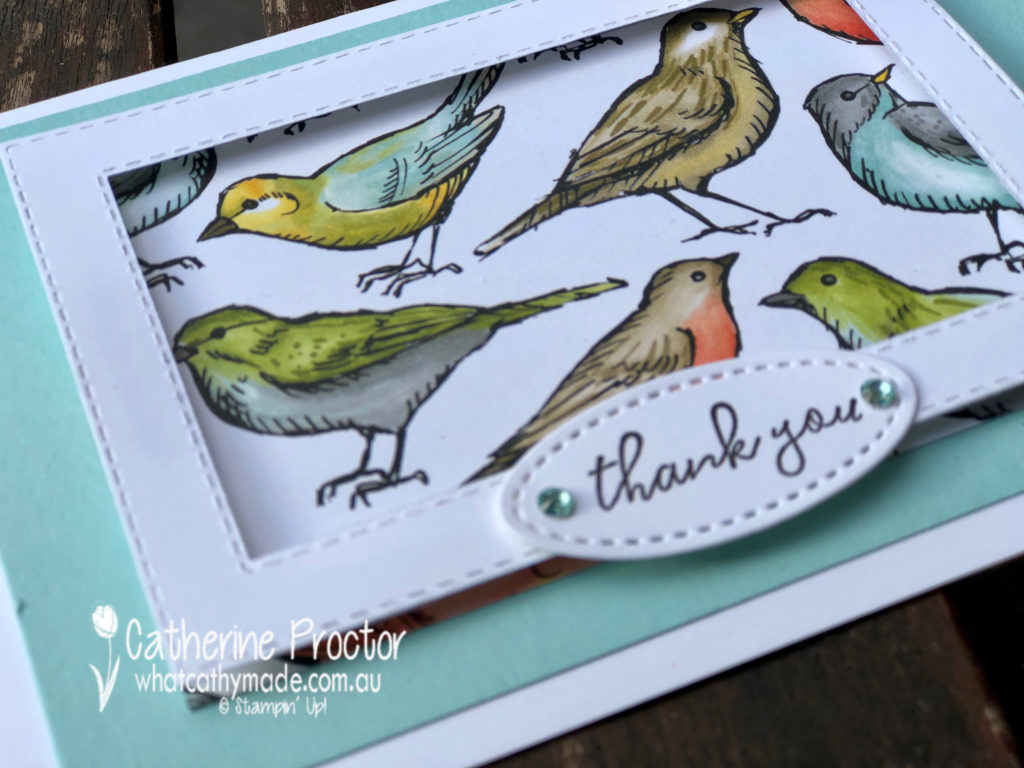
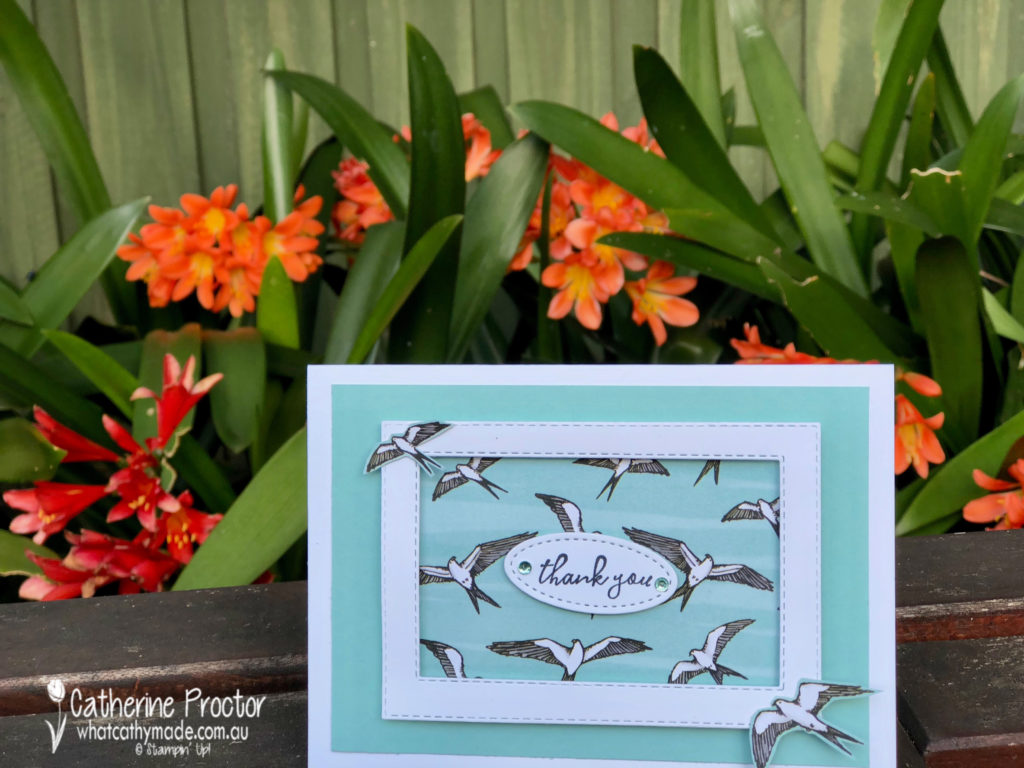
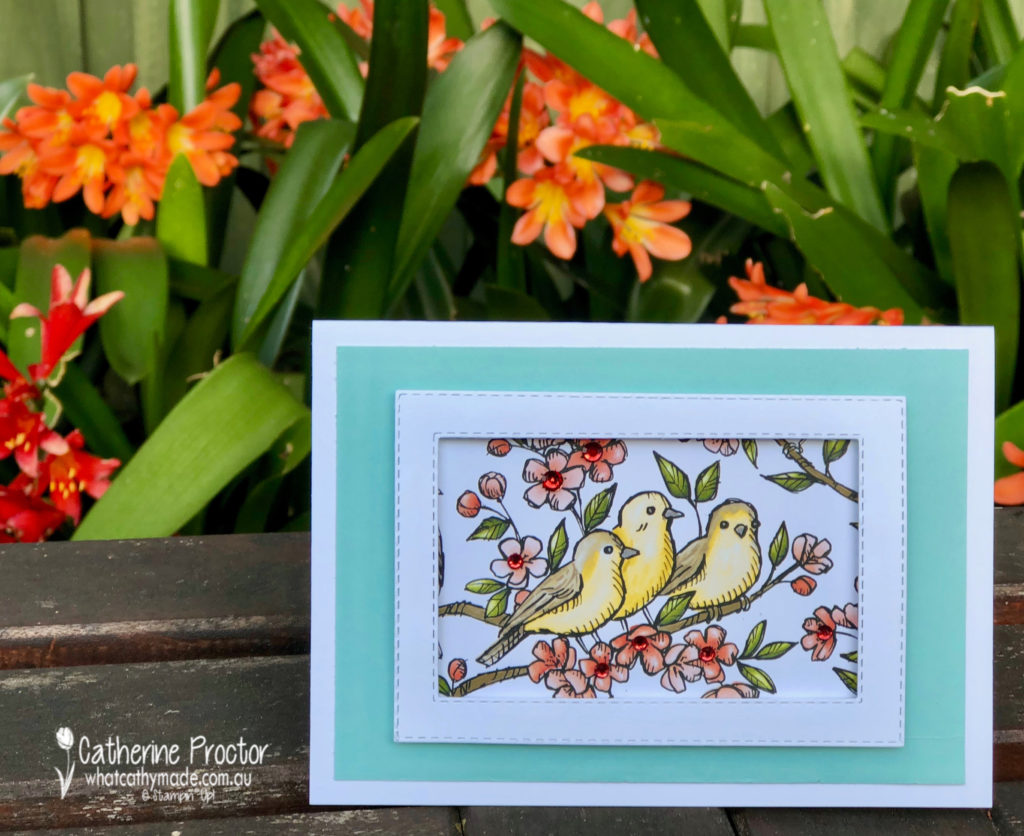
Sometimes I’m reluctant to use Design Series Paper in my card making because it’s just so beautiful I don’t want to cover it. So my solution for my cards tonight is to frame the paper instead!
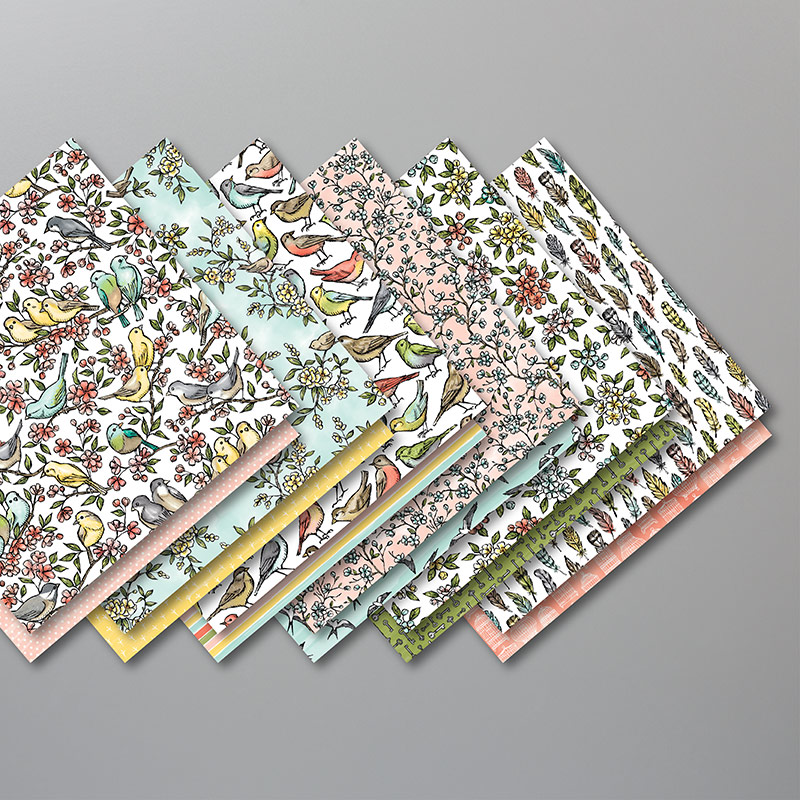
I’ve used my favourite Designer Series Paper from the Annual Catalogue: Bird Ballad DSP.
You can take a closer look at this stunning paper in this short video below.
I made the same sized frame for all four cards, using two of the rectangle stitched dies. Each card features a different piece of DSP from this set, mounted onto a rectangle of Pool Party card stock. Foam adhesive strips made it easy to lift the frames above the image, giving the effect of a picture frame.
In card one I used mini dimensionals to pop up some fussy cut images from the DSP and finished the card off with a bow of linen thread and a pool party rhinestone from the the Holiday Rhinestones Basic Jewels.
In card two I simply used more of the dimensionals from the Holiday Rhinestones Basic Jewels – this time in cherry cobbler – to add a bit of bling to the flowers.
Cards three and four have the stamped “thank you” from the co-ordinating Free as a Bird stamp set, die cut out with the smallest oval in the stitched shapes framelits.
All these photos were taken outside in my garden today – it is spring here and my garden is full of birds and blooming with colour. Because the DSP for card four was more of a background pattern I fussy cut a couple of the birds and adhered them to the edges of the frame for some visual interest and dimension.
Here’s another shot of my stunning clivia!
Now it’s time to hop on over to our next participant, the very talented, Caroline Manwaring.
If you find a broken link or have come to this blog hop from a different entry point, you can view the participants below:
Tonight the Art with Heart team are sharing creative Christmas projects, many featuring products from the upcoming Holiday Catalogue which starts on the 4th of September.
If you would like a copy of the 2019 – 2020 Annual catalogue or the new Holiday catalogue, contact any of the girls on the blog hop and we will get in touch with you.
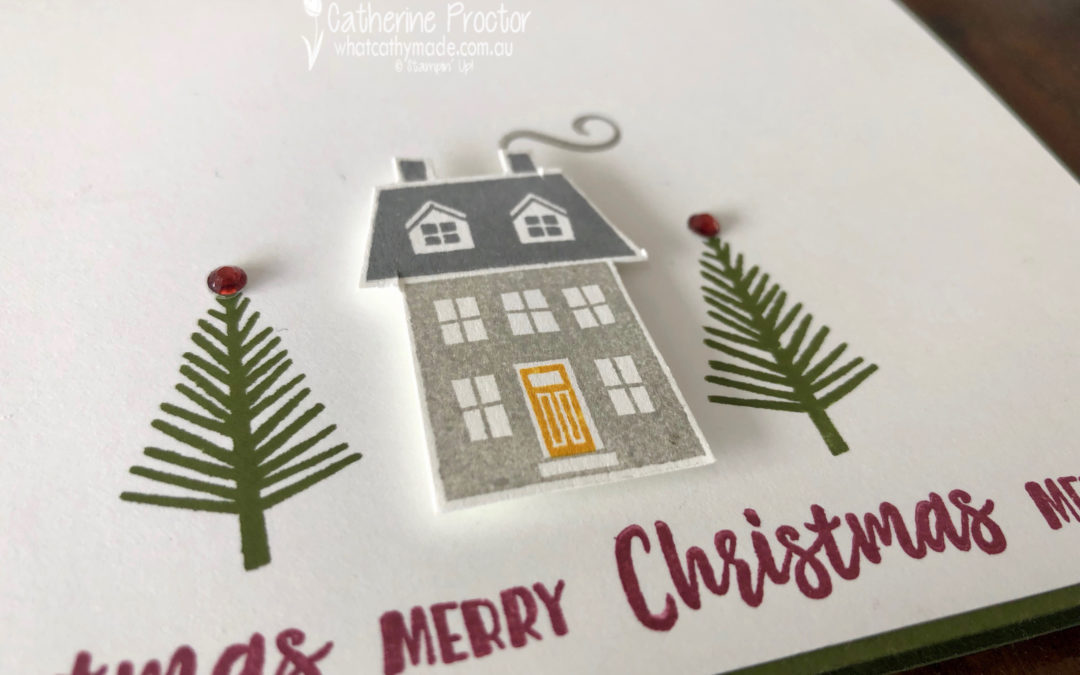
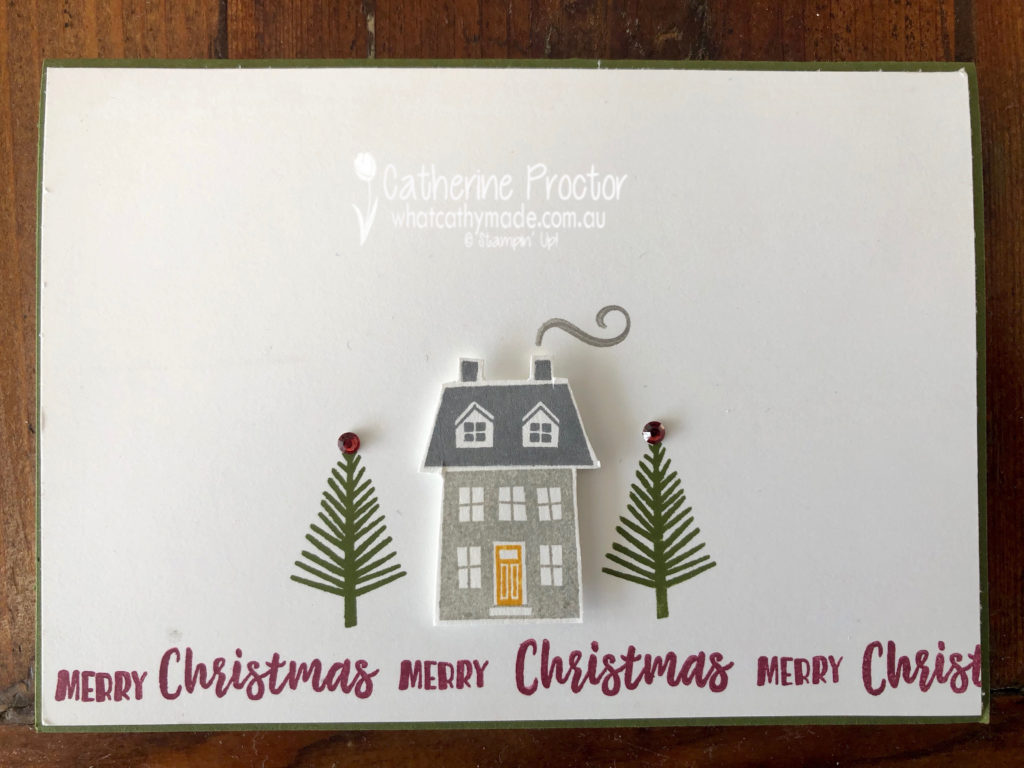
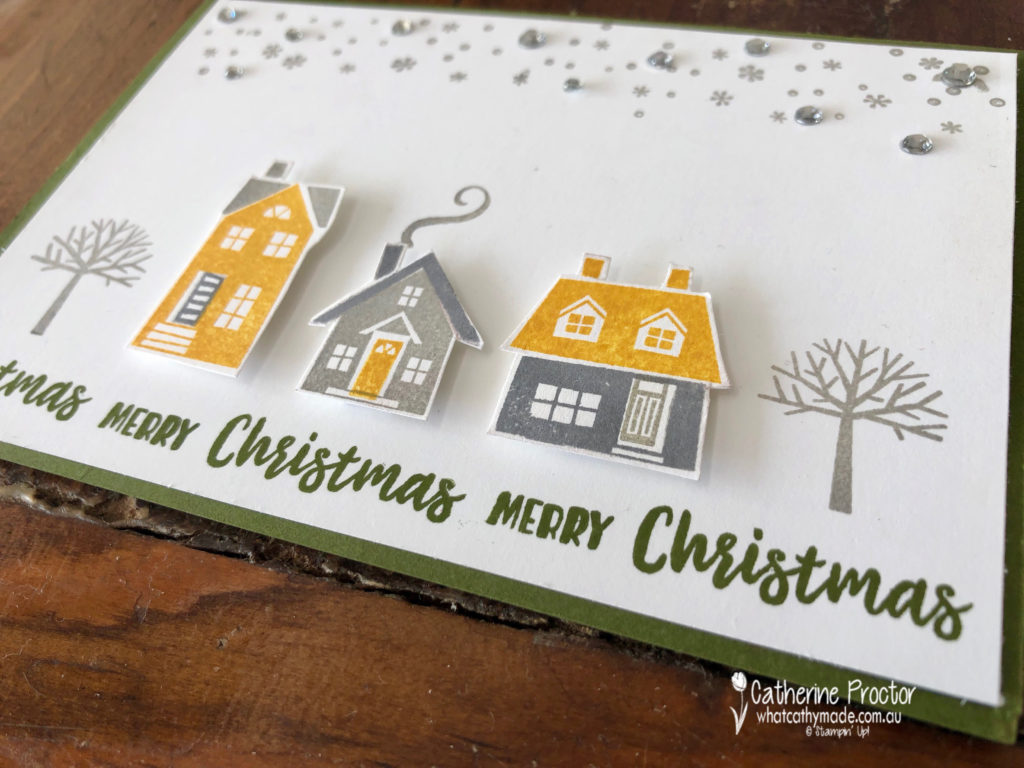
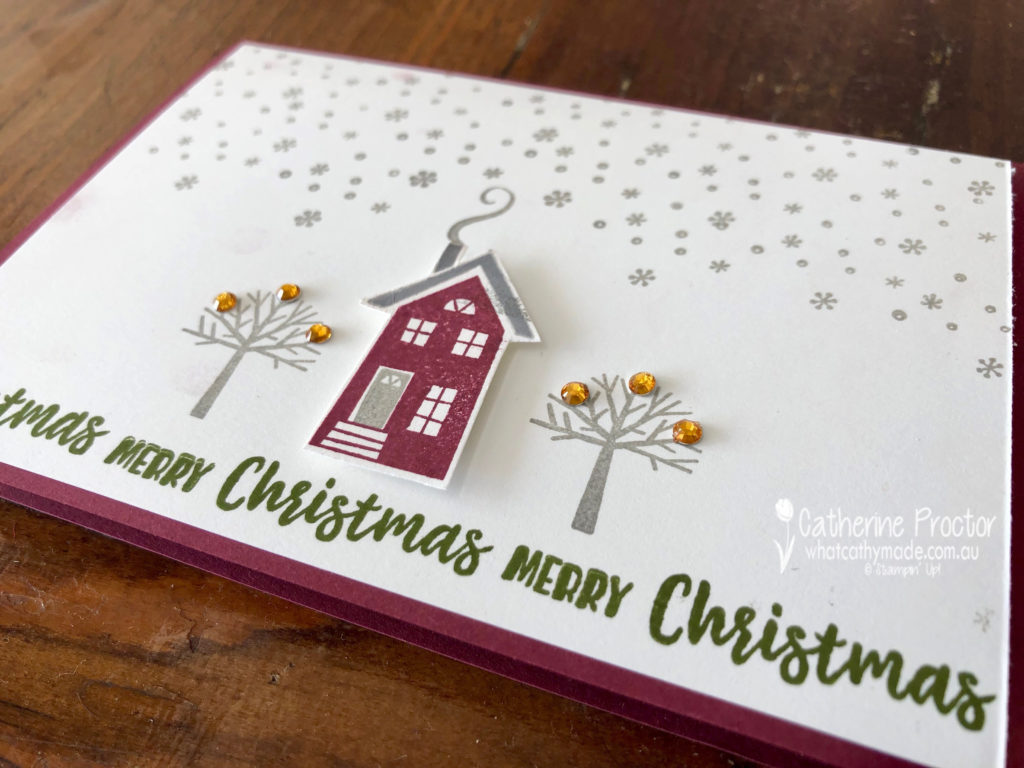
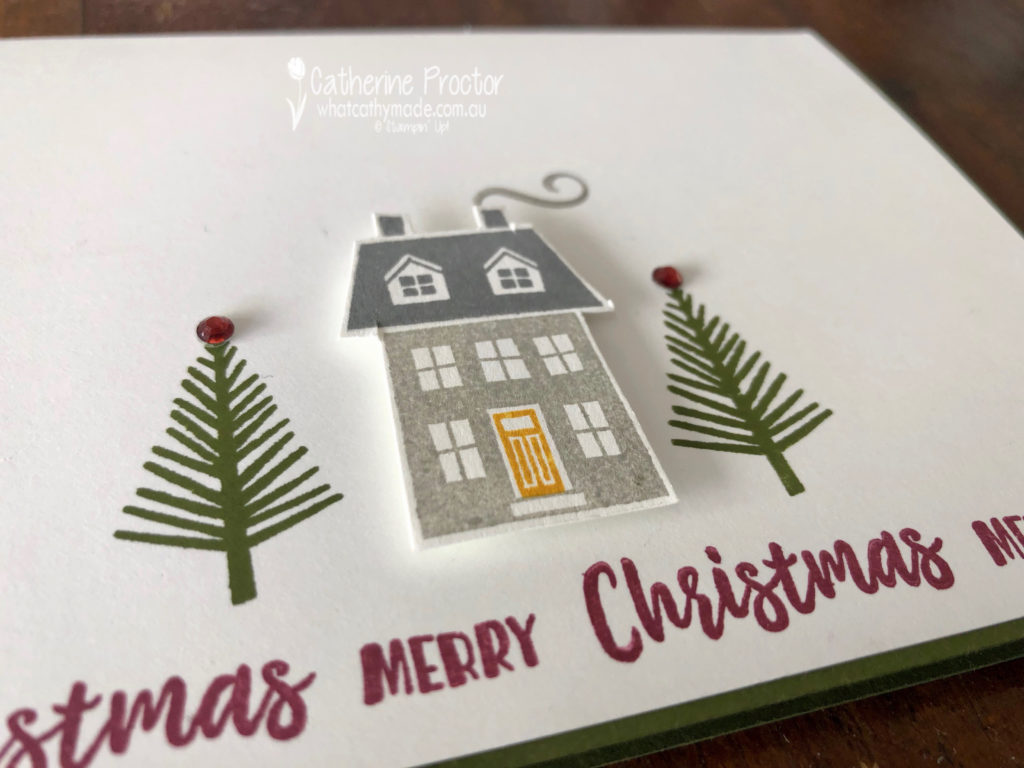
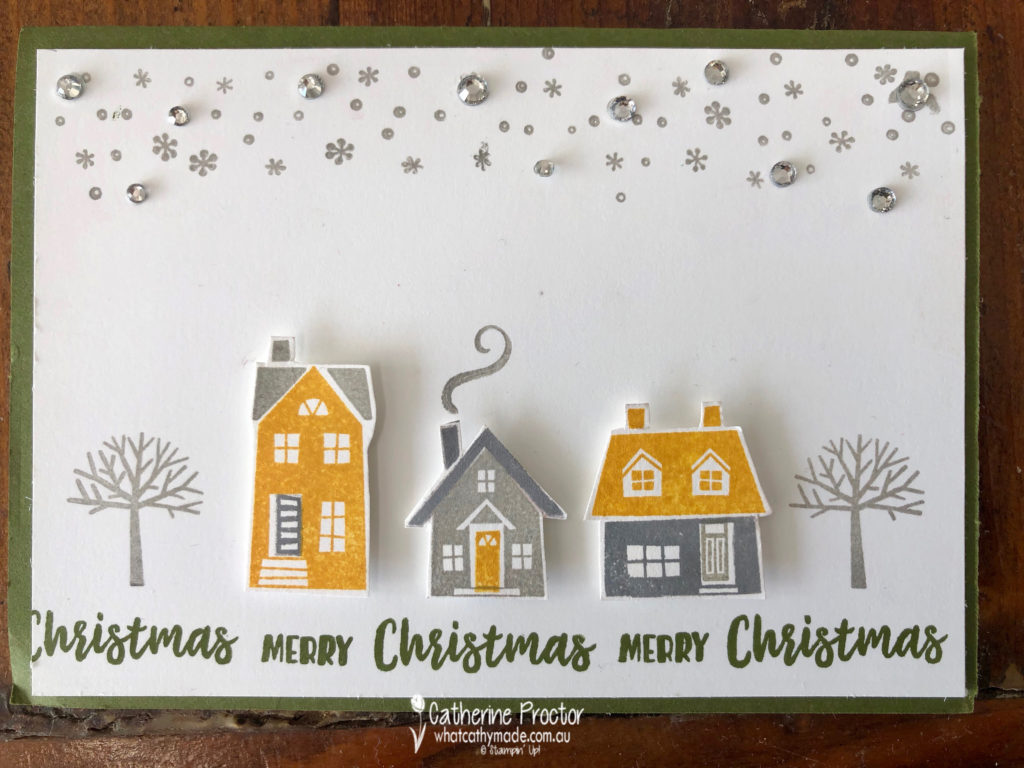
I have to admit I have a thing about stamp sets that feature buildings. Ever since I was a little girl I’ve loved floorpans, dolls houses, miniature models…I probably should have studied architecture. So as soon as I saw the “From Our Home to Yours” stamp set I just knew I had to have it!
This set has 33 photopolymer stamps and it stamps the images very crisply and clearly. It can be used for many other occasions apart from Christmas and it works with so many different colours.
It’s good value for money, versatile, easy to use…oh, and did I mention just how adorable the little houses are?
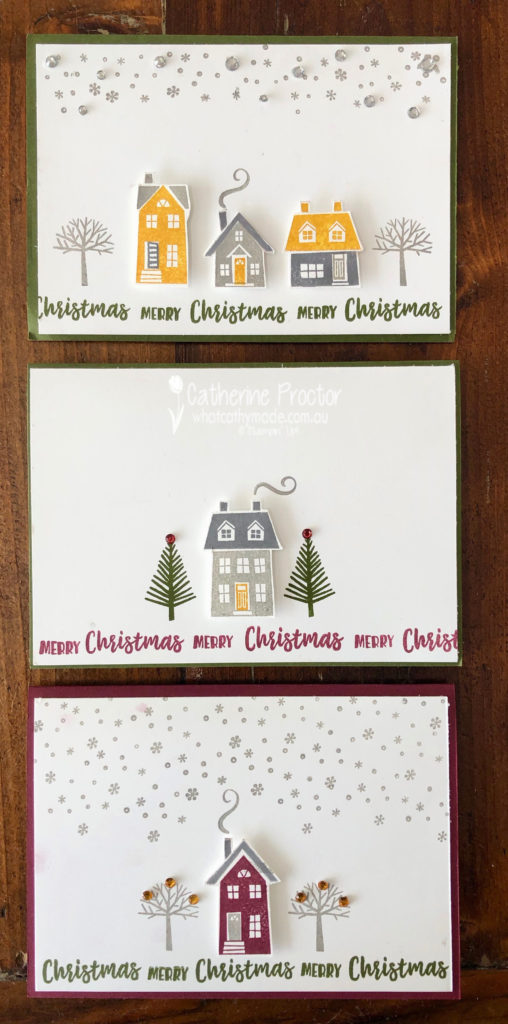
My colour scheme for my cards tonight kind of evolved as my cards did. I was only going to make one card but ended up making three!
I began stamping on my first card with the colours of my own home: a soft light grey on the walls (Smoky Slate), with a dark grey/black roof (Basic Gray), white windows and a bright yellow (Crushed Curry) front door to greet my friends and family.
I fussy cut my little house out and attached it with dimensionals to my card before stamping the smoke coming out of the chimney and the little pine trees in Mossy Meadow.
Cards two and three are variations on the same theme using different colours for the houses and different house stamps from the stamp set.
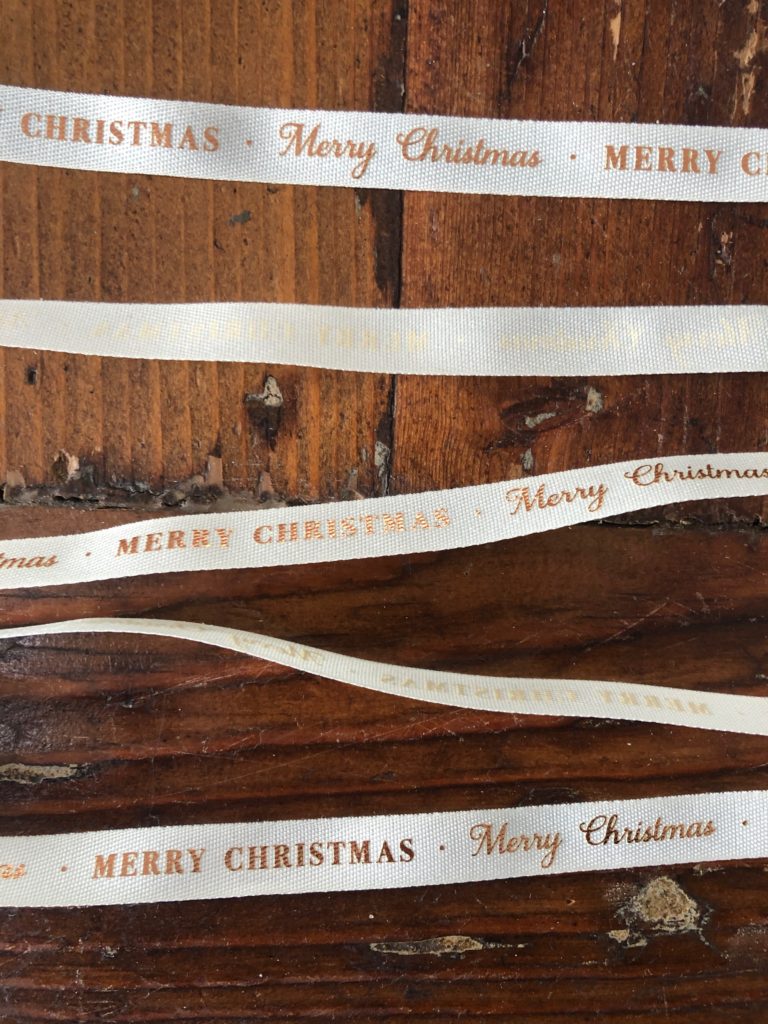
For all three cards I stamped two of the sentiments (Merry and Christmas) across the bottom of the card in either Merry Merlot or Mossy Meadow. I was inspired to do this after seeing the gorgeous new Classic Weave ribbon from the Holiday Catalogue. Here’s a sneak peek of it…
Holiday Rhinestones Basic Jewels in Cherry Cobbler top my pine trees in card one.
Rhinestone Basic Jewels (from the annual catalogue) add some sparkle to my snow in card two…and cover a mistake!!
Holiday Rhinestones Basic Jewels in Pumpkin Pie add the final touch of bling to my Smoky Slate trees in card three.
I nearly missed these rhinestones in the catalogue as they are hidden right at the back at the bottom of a page, but I’m so glad I saw them because they come in such beautiful colours.
Now it’s time to hop on over to our next participant, the very talented, Vicki Boucher. I can’t wait to see what Vicki’s created for us tonight.
If you find a broken link or have come to this blog hop from a different entry point, you can view the participants below: