Hello friends! Welcome to week fifteen of the 2019 Heart of Christmas blog hop!
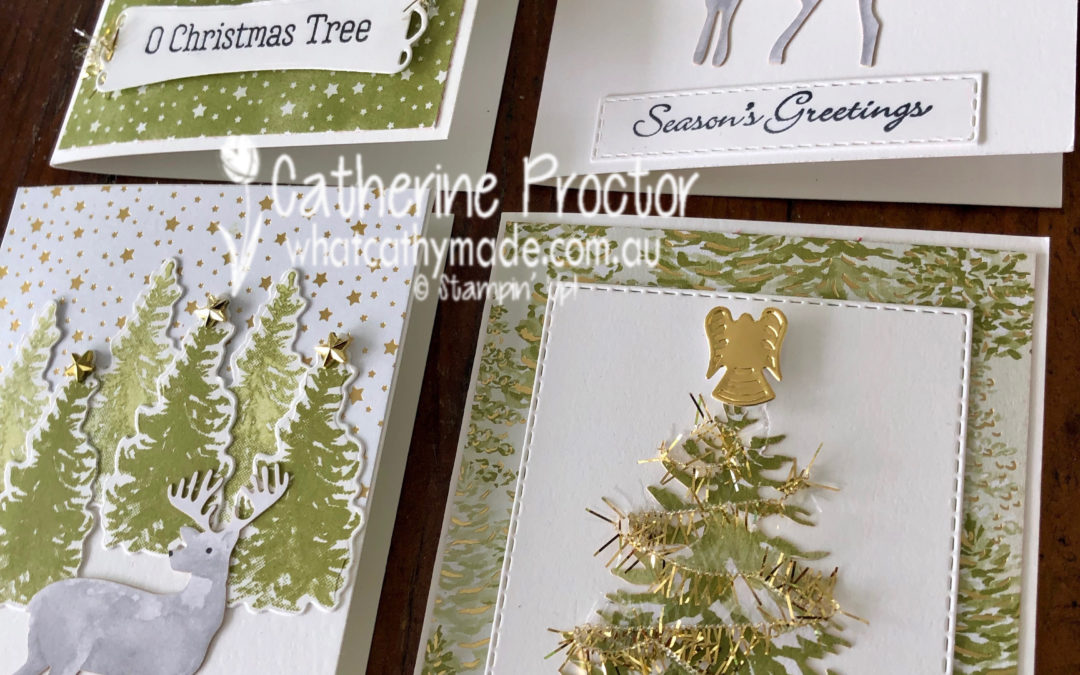
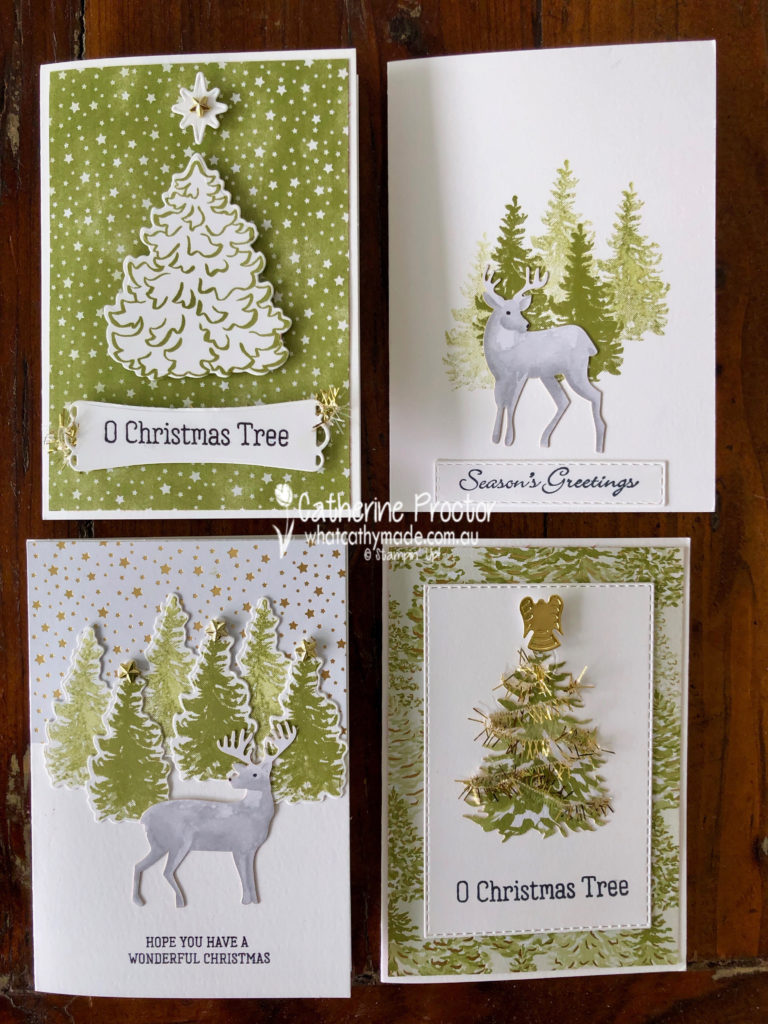
A month ago I shared with you two of the cards I made using The Most Wonderful Time Product Medley and this week I have four more I’d like to show you…this time featuring Old Olive with a touch of gold.
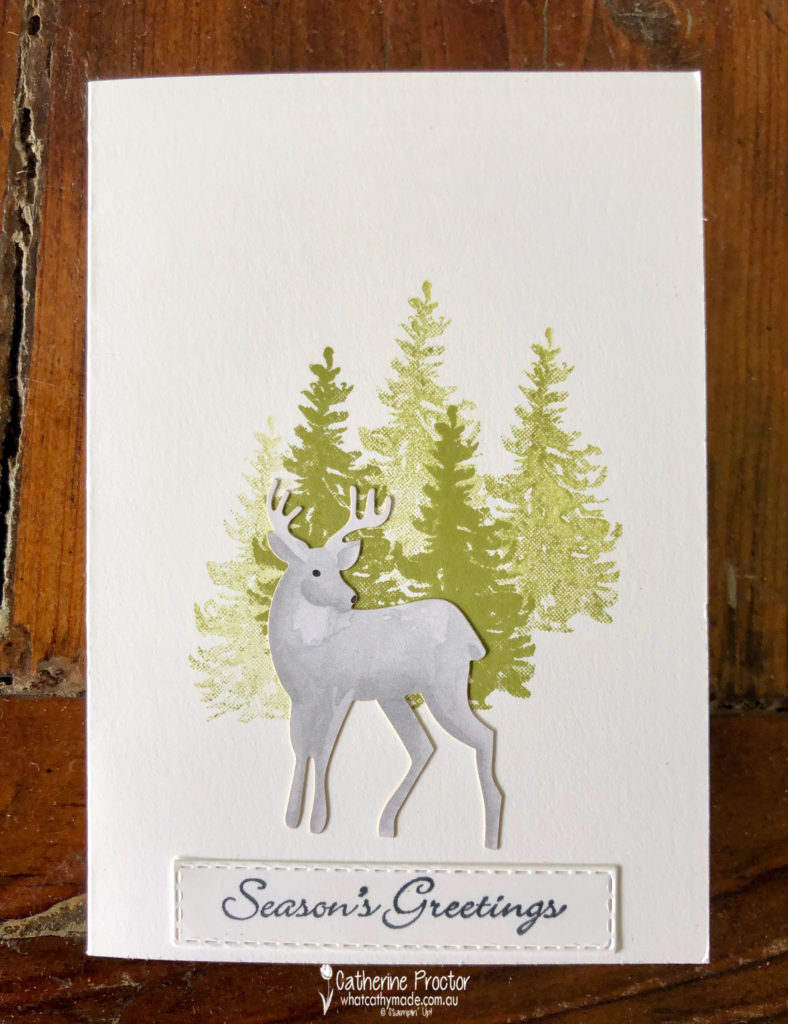
Two of these cards use the stunning deer stickers that come in this medley, making card making so quick and easy.
The “Season’s Greetings” sentiment has been die cut with the smallest stitched rectangle die and the trees are all stamped in Old Olive, some at full strength and some stamped off.
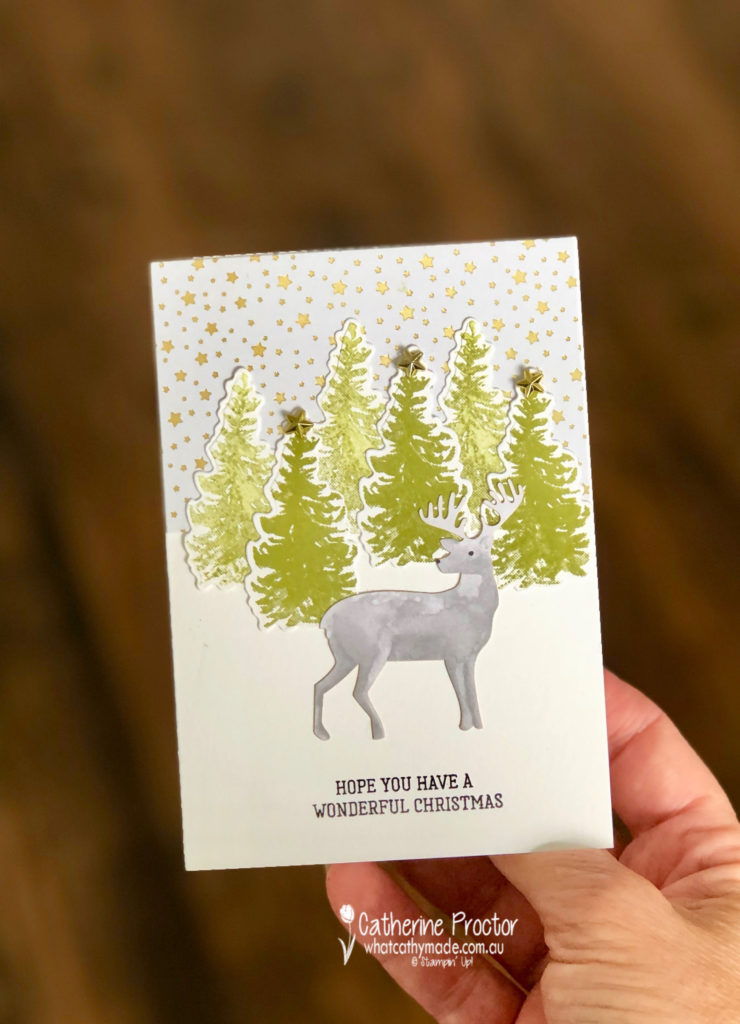
For card two I stamped and die cut some of my trees and layered them onto a piece of the star background card stock. Can you see the little gold faceted stars stuck to the top of my trees?
This time I stamped the sentiment straight onto my card.
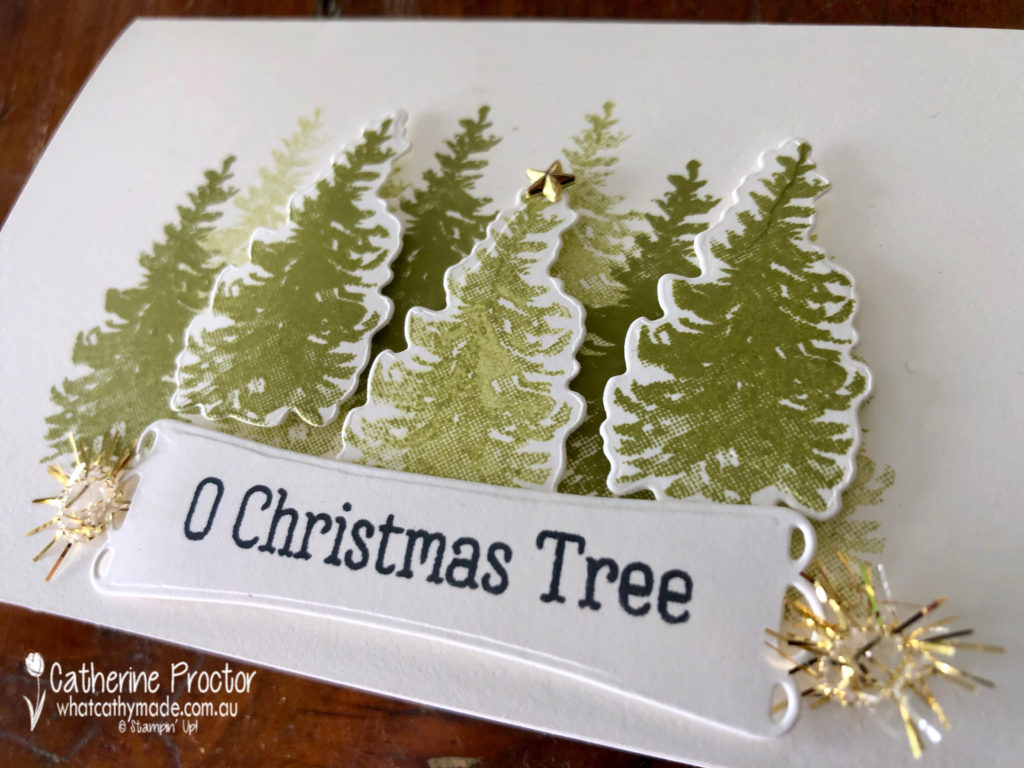
Card three and four are all about trees. I’ve stamped and die cut the trees again, stamping off once and twice to get the different depth of colour in the trees. One gold faceted star and a hint of gold tinsel add some bling, while the sentiment is die cut with a die that comes in the medley.
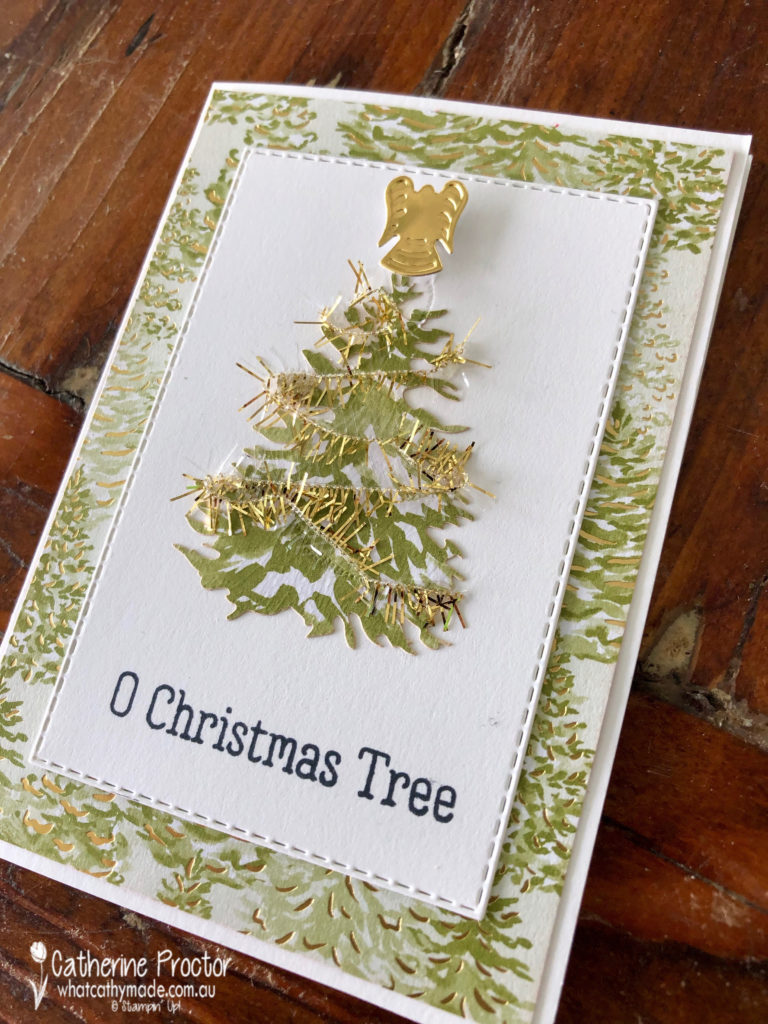
My final card features a single tree with a gorgeous little gold angel sitting at the top. This is die cut from gold foil – there is also also a die for a little star to sit on top of the tree, so cute!!!
I’ve wrapped the tree in some of the mini gold tinsel. The background DSP has touches of gold as well – hopefully you can see the gold touches in the photo below.
Just in case you missed it the first time I shared some cards I made using he Most Wonderful Time Medley, here’s a closer look at everything you get.
Christmas is coming fast, with less than a month to go now, so if you’re looking for a quick and easy way to make a lot of Christmas cards, I can highly recommend this medley.
All you need to add is your trimmer, ink and adhesives, because the medley includes: * an 11-piece Most Wonderful Time photopolymer stamp set * 48 sheets of 6″ x 6″ (15.2 x 15.2 cm) Designer Series Paper, 8 each of 6 double-sided designs * 12 gold foil card fronts, 4 each of 3 designs * 6 sticker sheets, 2 sheets each of 3 designs * Gold/white tinsel trim, 10 yards (9.1 m) * 58 adhesive-backed gold faceted stars * 6-piece Most Wonderful Time Dies (these co-ordinate with the Most Wonderful Time photopolymer stamp set)
Here’s the two cards I shared with you last month.
The lovely Michele Taylor is hosting our Heart of Christmas blog hop this week – to see what the rest of the team have made this week you can visit Michele’s page here.
To purchase any of the products I used in this project you can shop with me here.
If you’d like me to post you your very own copy of the 2019 Stampin Up! Holiday Catalogue, the 2019-20 Stampin Up! annual catalogue, the mini catalogue or the Sale-a-bration catalogue or to simply find out about more about Stampin’ Up! contact me.
Hello friends! Welcome to week eleven of the 2019 Heart of Christmas blog hop!
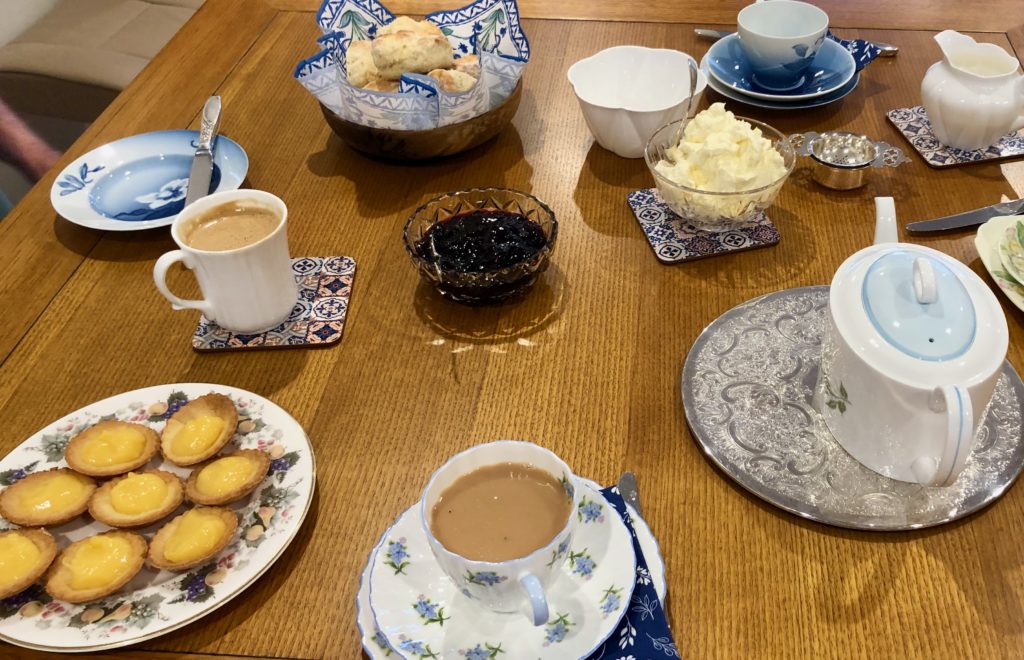
Last weekend I had the pleasure of an entire day spent making Christmas cards with my friend Jenny at my mum’s place – pure bliss! Take a look of the delicious scones and lemon tarts my mum served up in some of her vintage china. And yes, they tasted as good as they look!!!
Once we’d finished morning tea, I was very excited to finally crack open the Most Wonderful Time Medley and take a closer look at everything you get with this set.
There is so much product included in this medley, making it just perfect for when you’re crafting on the go. All you need to add is your trimmer, ink and adhesives, because the medley includes: * an 11-piece Most Wonderful Time photopolymer stamp set * 48 sheets of 6″ x 6″ (15.2 x 15.2 cm) Designer Series Paper, 8 each of 6 double-sided designs * 12 gold foil card fronts, 4 each of 3 designs * 6 sticker sheets, 2 sheets each of 3 designs * Gold/white tinsel trim, 10 yards (9.1 m) * 58 adhesive-backed gold faceted stars * 6-piece Most Wonderful Time Dies (these co-ordinate with the Most Wonderful Time photopolymer stamp set)
This very short video gives you a much better idea of just how much is included in this medley. I love the watercolour feel of this medley.
So what did I make with this set? I have to confess, I had so much fun playing with this set, I spent the whole day making cards with it and totally neglected my other stamp sets!
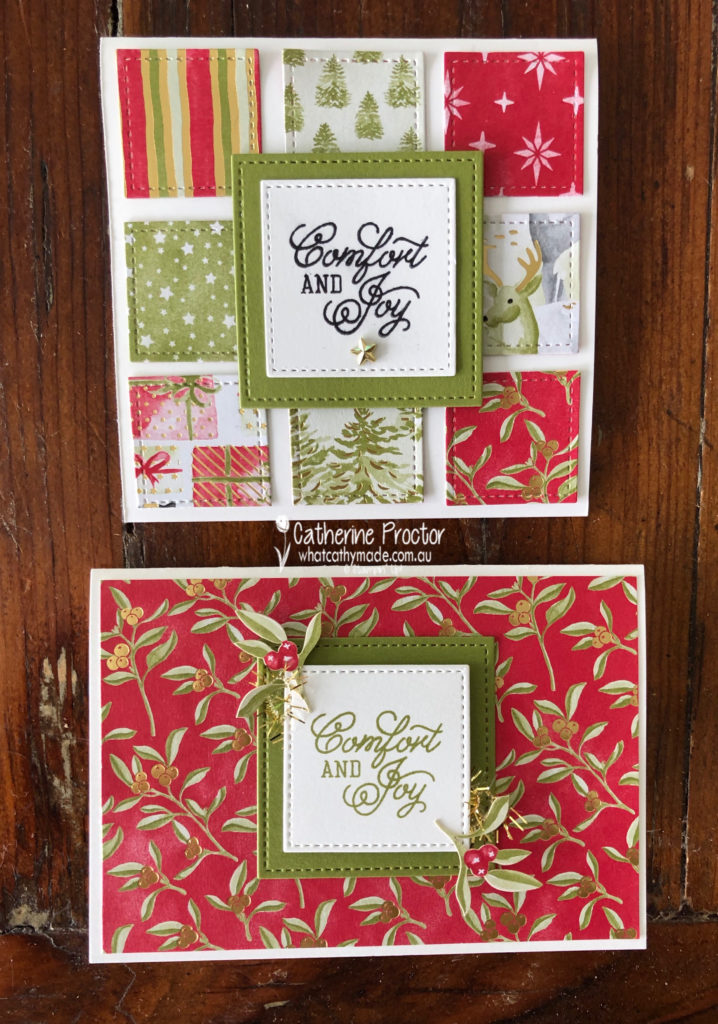
In fact, I made so many cards there are way too many to share in the one post, so I’ll just start with two of the cards today and show you the rest over the next few weeks.
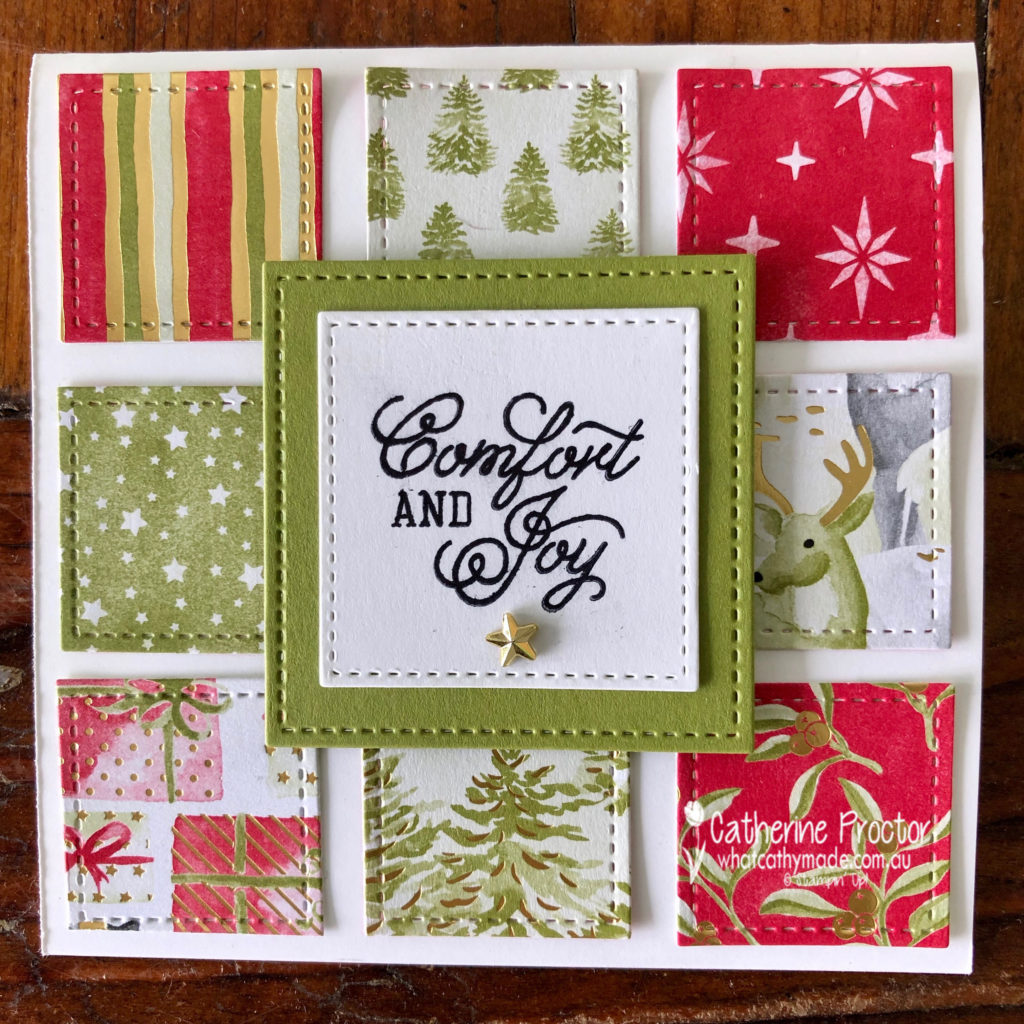
I’m sharing this card first because it gives you a really close-up view of a lot of the stunning DSP that comes in this medley. And it’s a really easy design that you can use with any double sided papers.
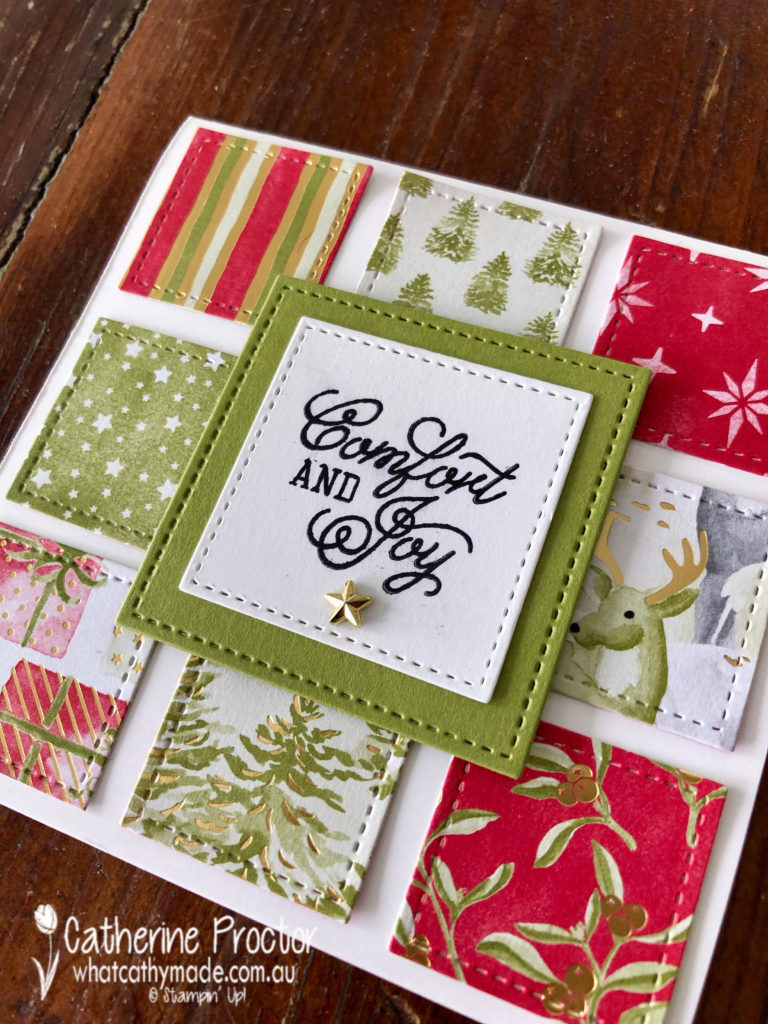
To begin, I used the smallest square die in the Stitched Shapes Dies to cut out the assorted DSP designs before adhering them evenly to a square card base.
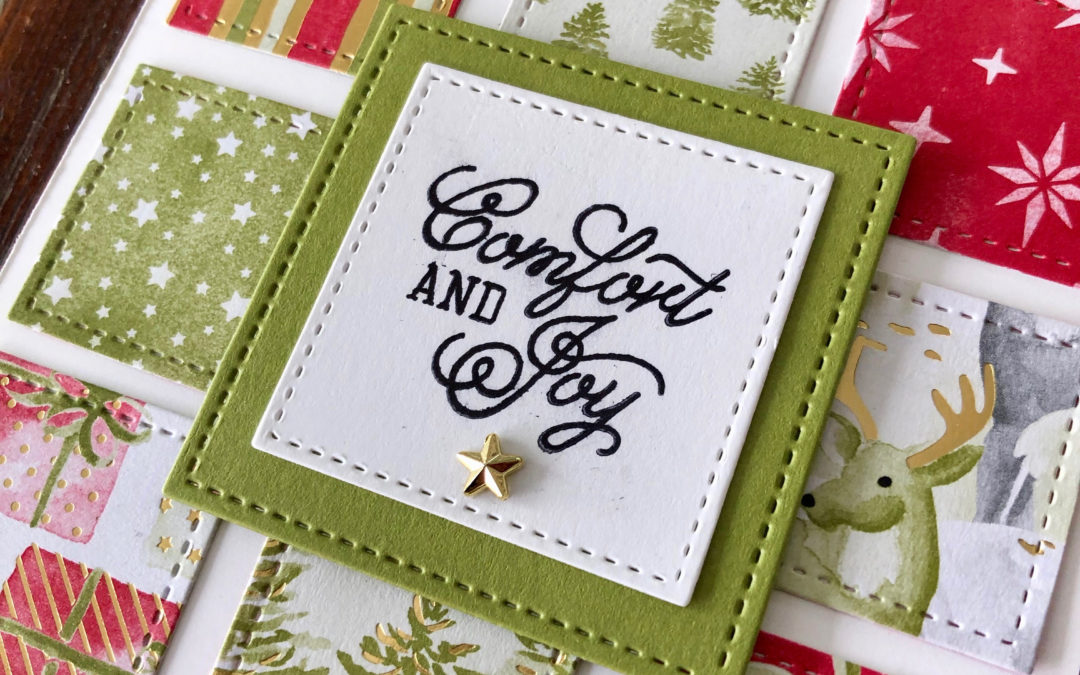
The “Comfort and Joy” sentiment is from the Most Wonderful Time stamp set, stamped in black, then die cut with the next largest square die in the Stitched Shapes Dies. It was then mounted onto a pice of old olive card stock die cut with the next largest square die in the Stitched Shapes Dies.
A little gold facetted star from the medley adds the finishing touch to the card.
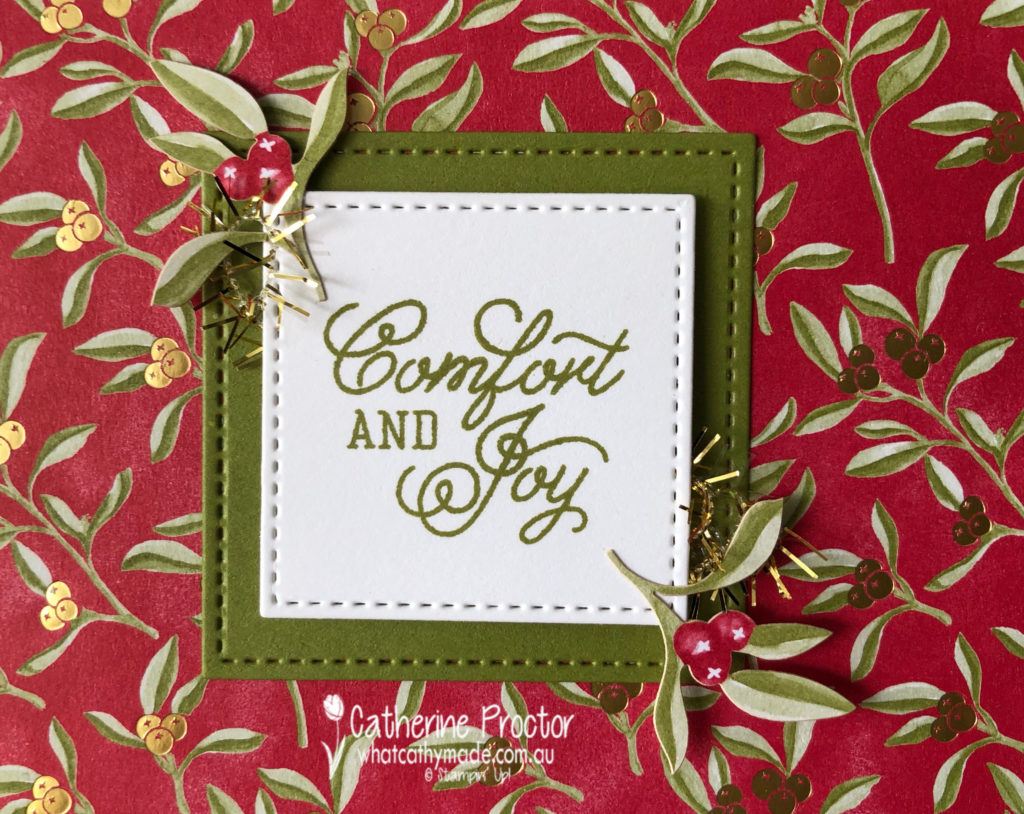
The other card I’d like to share with you today is one that features the same sentiment, as well as the tinsel and some of the stickers you get in the Most Wonderful Time Medley.
This time I stamped the sentiment in Old Olive and die cut using one of the square dies in the Stitched Shapes Dies. Again I mounted the sentiment onto a piece of old olive card stock die cut with the next largest square die in the Stitched Shapes Dies.
To finish my card off I simply used stickers and a tiny piece of the gorgeous tinsel that also comes in the Most Wonderful Time Medley. Can you see it under the holly stickers?
There are also tree and deer stickers that I’ll show you next time, but for this card I used the holly stickers to match the pattern on the DSP.
All of the cards I’ve created with this medley have been so very quick and easy – I can’t wait to share some more with you this week, so keep a look out for my next post.
The lovely Tina Gillespie is hosting our Heart of Christmas blog hop this week – to see what the rest of the team have made this week you can visit Tina’s page here.
To purchase any of the products I used in this project you can shop with me here.
If you’d like me to post you your very own copy of the brand new 2019 Stampin Up! Holiday Catalogue, the 2019-20 Stampin Up! annual catalogue or to simply find out about more about Stampin’ Up! contact me.
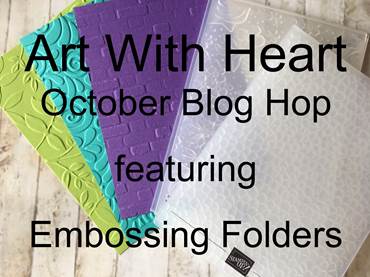
Welcome to another Art With Heart Blog Hop. This month we are featuring Stampin’ Up’s! versatile range of Embossing Folders.
There are new Embossing Folders available in every Stampin’ Up! catalogue and they are an inexpensive way of adding WOW! to your projects.
Currently there are 24 different Embossing Folders in the range and tonight we plan on showing you lots of ideas on how to use these folders.
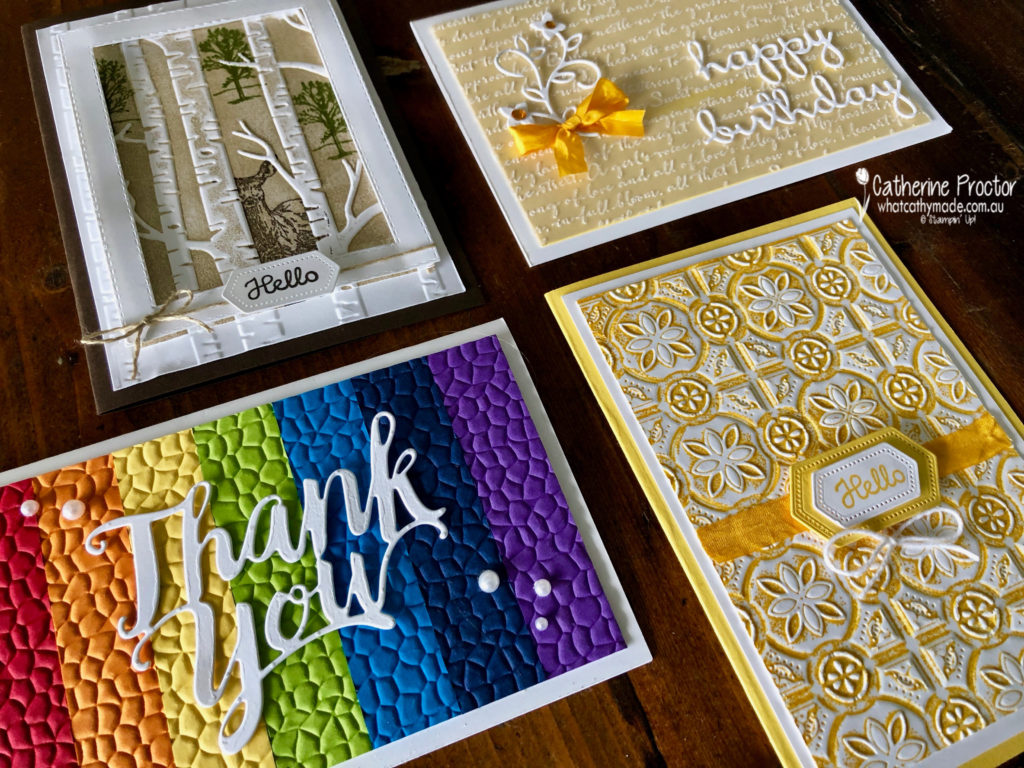
My four cards tonight show case some different techniques you might like to try when next using your embossing folders.
Card Strip Embossing
So simple but so effective…and a fabulous way to use up card strips! I’ve used the new hammered metal embossing folder for this card because this technique works best with an allover pattern.
Card stock colours left to right are Gorgeous Grape, Night of Navy, Pacific Point, Granny Apple Green, Daffodil Delight, Pumpkin Pie and Real Red. I cut 2cm wide strips, individually embossed them and then used tear’n’tape to adhere each strip to a base card stock rectangle.
The thank you die cut in Whisper White and a scattering of pearls finish the card off. Here’s a closer look at the hammered metal embossing folder pattern.
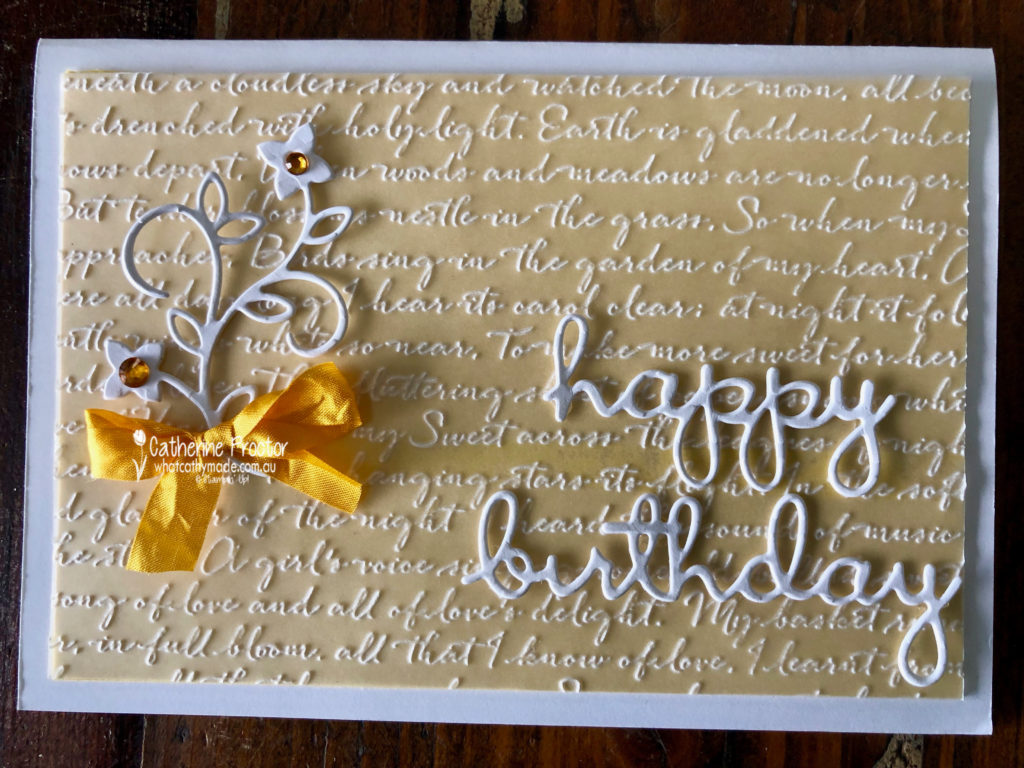
Vellum Embossing
Vellum embossing really highlights the pattern in the embossing folder. For card two I’ve used the scripty folder.
The great thing about embossing vellum is you can layer it over any colour card stock to instantly add a pop of colour.
I’ve finished this card off with a happy birthday sentiment cut from Whisper White cardstock using the Well Written Dies and a bow of Crushed Curry Crinkled Seam Binding Ribbon.
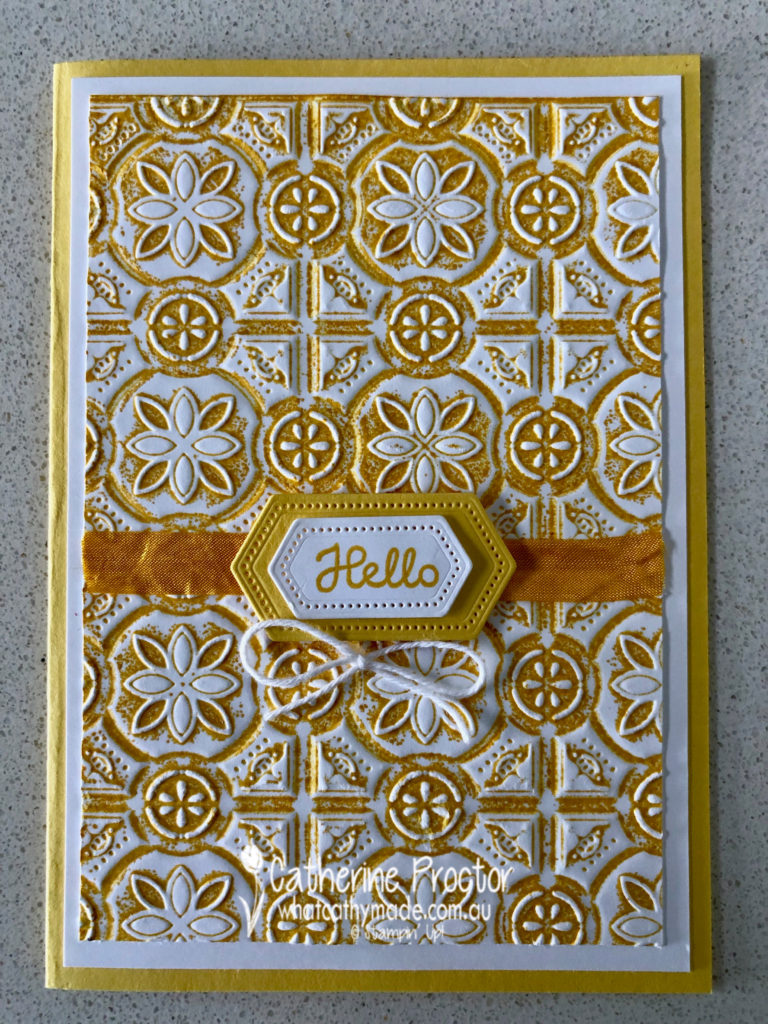
Reverse letterpress embossing
Card three uses a technique called reverse letterpress, where you use your ink pad to apply colour directly onto one side of your embossing folder before you emboss the paper.
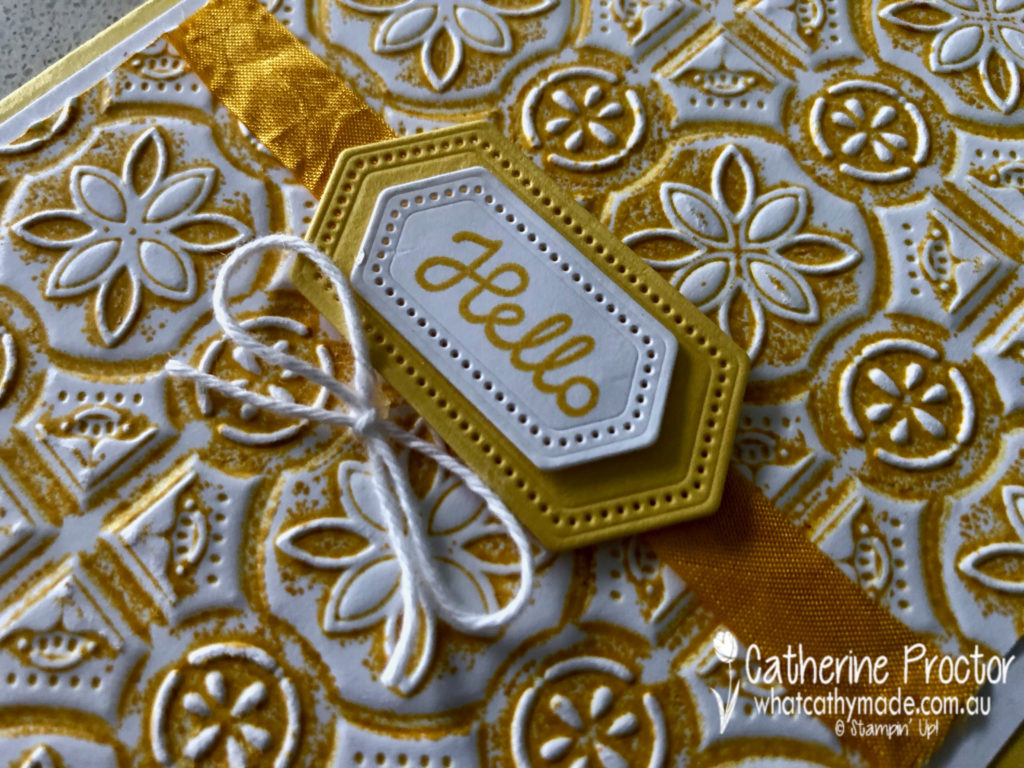
I love the look this gives, especially using the tin tile embossing folder I used here. This techniques works with any colour ink but I’m feeling very mellow yellow today so I’ve used Daffodil delight again.
Make sure you ink up the side of your folder that says Sizzex. How cute is the little hello stamp die cut and mounted with the nested label dies?
Stamping on Embossing Folders
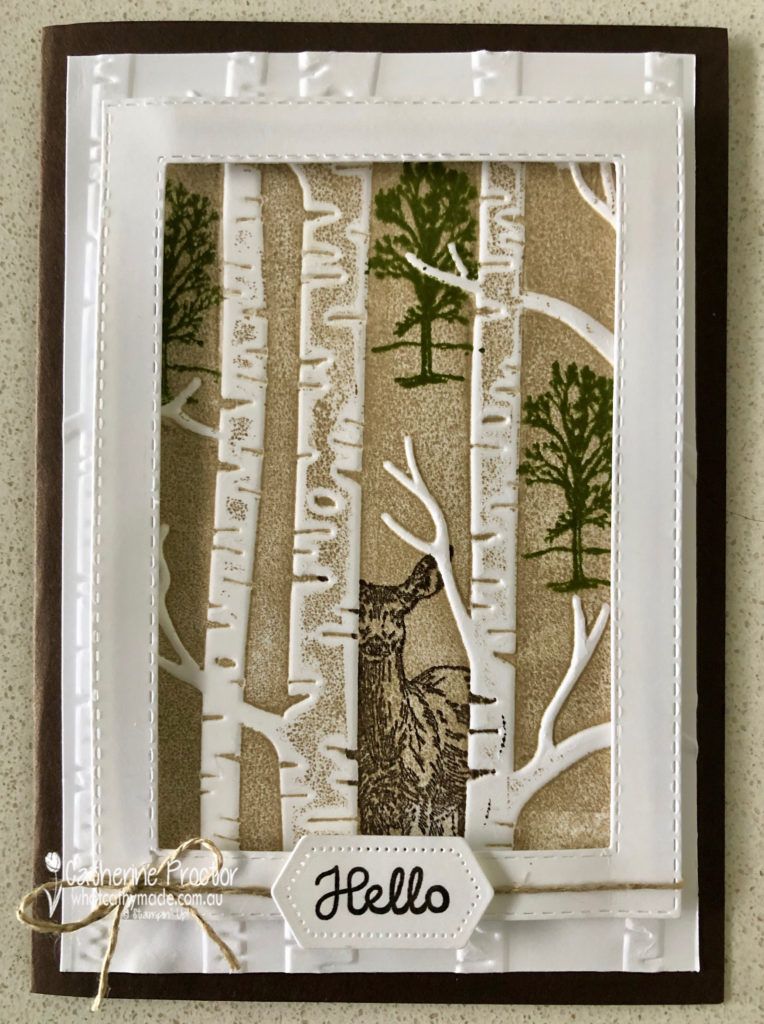
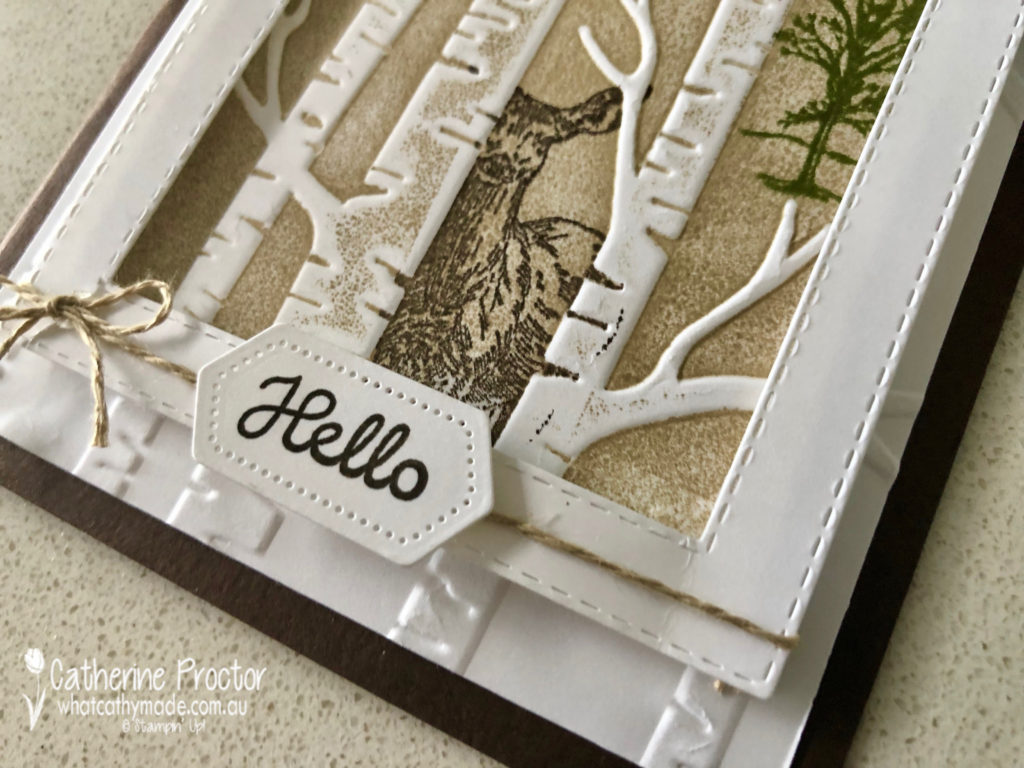
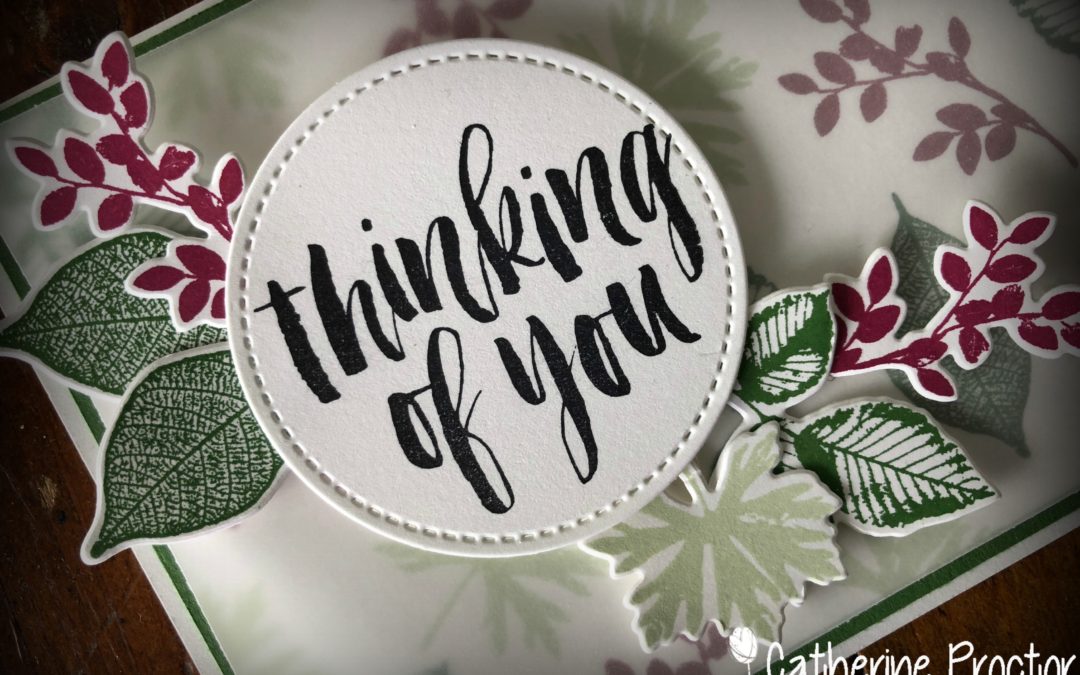
My final card is an absolute favourite technique called stamped embossing. I’ve used the Woodland embossing folder to create a scene using stamps from the Natures Beauty stamp set.
After inking the Sizzex side of my folder in Soft Suede ink I then stamped the deer and trees in Early Espresso and Mossy Meadow before embossing a piece of Whisper White card stock.
I then mounted my stamped section onto an embossed a piece of Whisper White card stock, making sure the embossed sections lined up. A framed made from the stitched rectangle dies, a bow of linen thread and a “hello” sentiment cut out with nested label dies completes the card.
Next up is the super talented Caroline Manwaring! I can’t wait to see what she has made.
If you find a broken link or have come to this blog hop from a different entry point, you can view all the participants below:
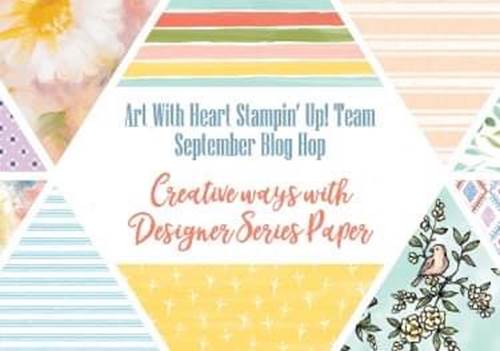
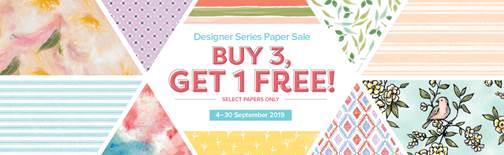
Tonight the Art with Heart team are sharing amazing projects featuring Stampin’ Up! Designer Series Paper, most of which is in the current promotions where you can buy 3 packs of Designer Series Paper and receive a pack for free! Only available until the 30th of September.
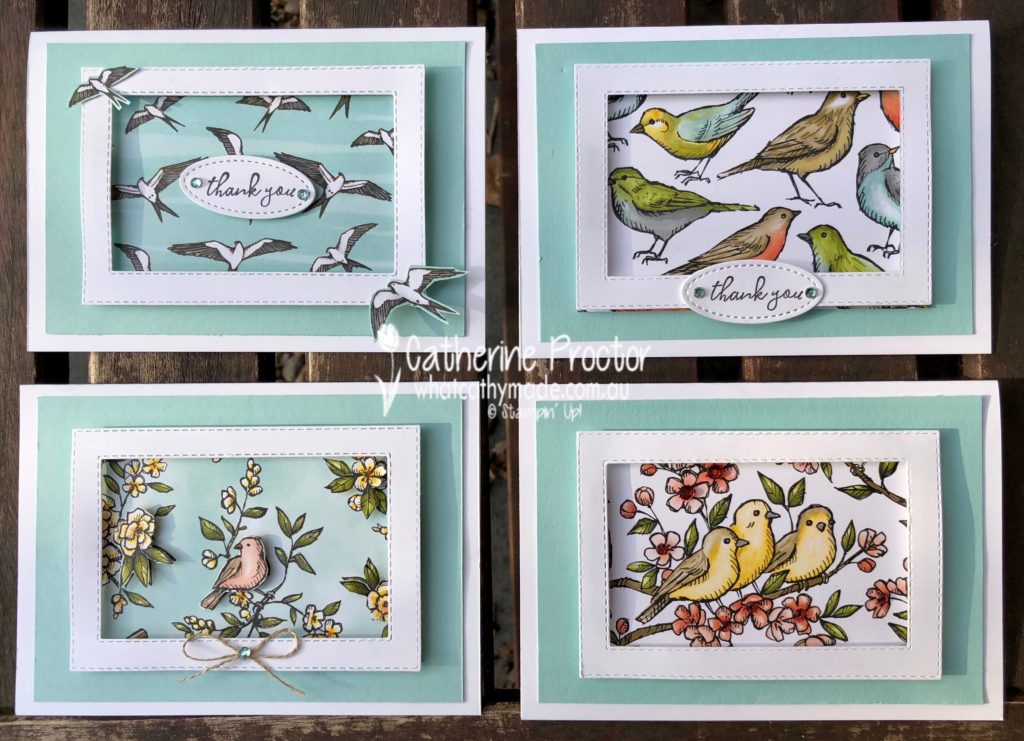
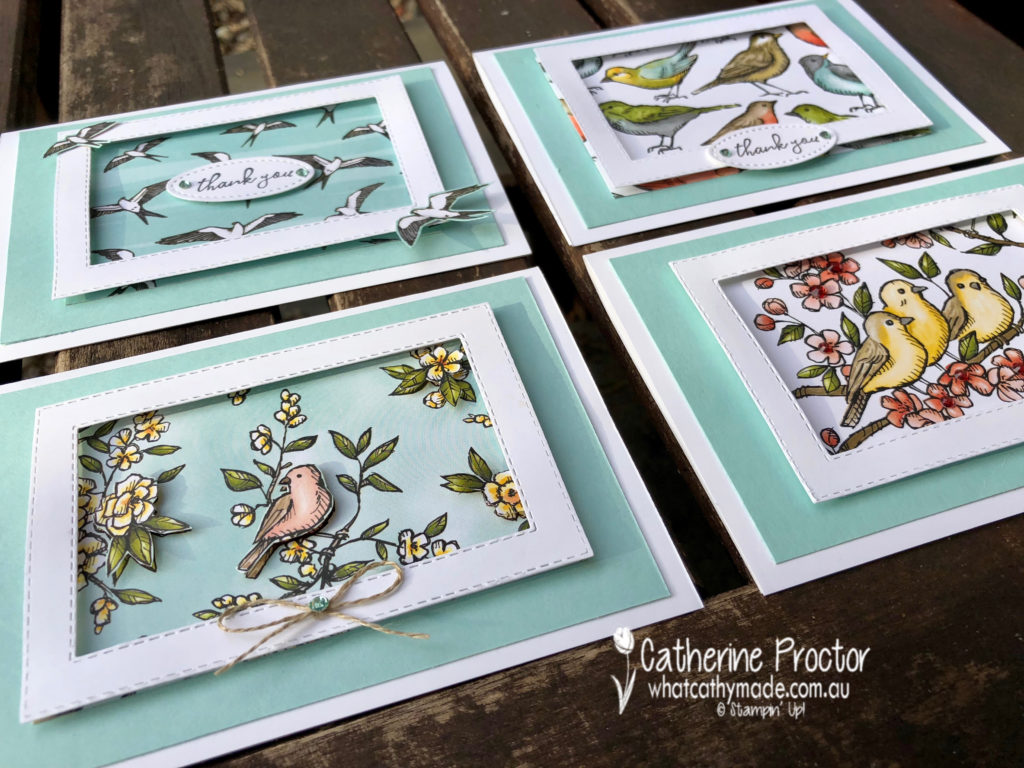
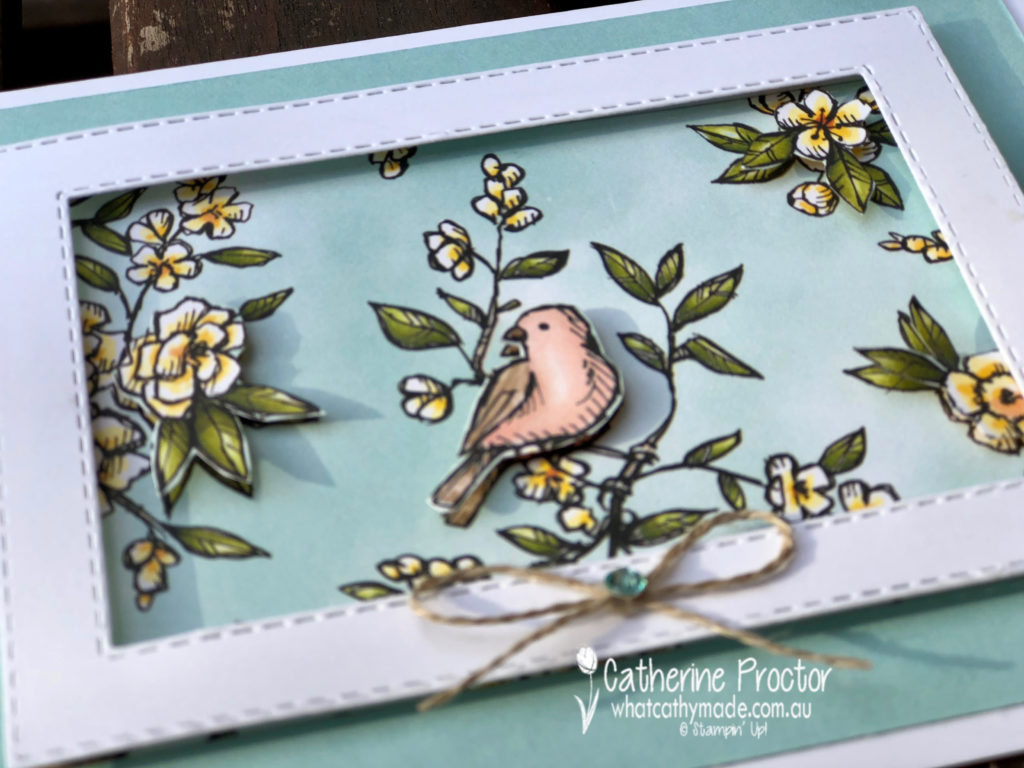
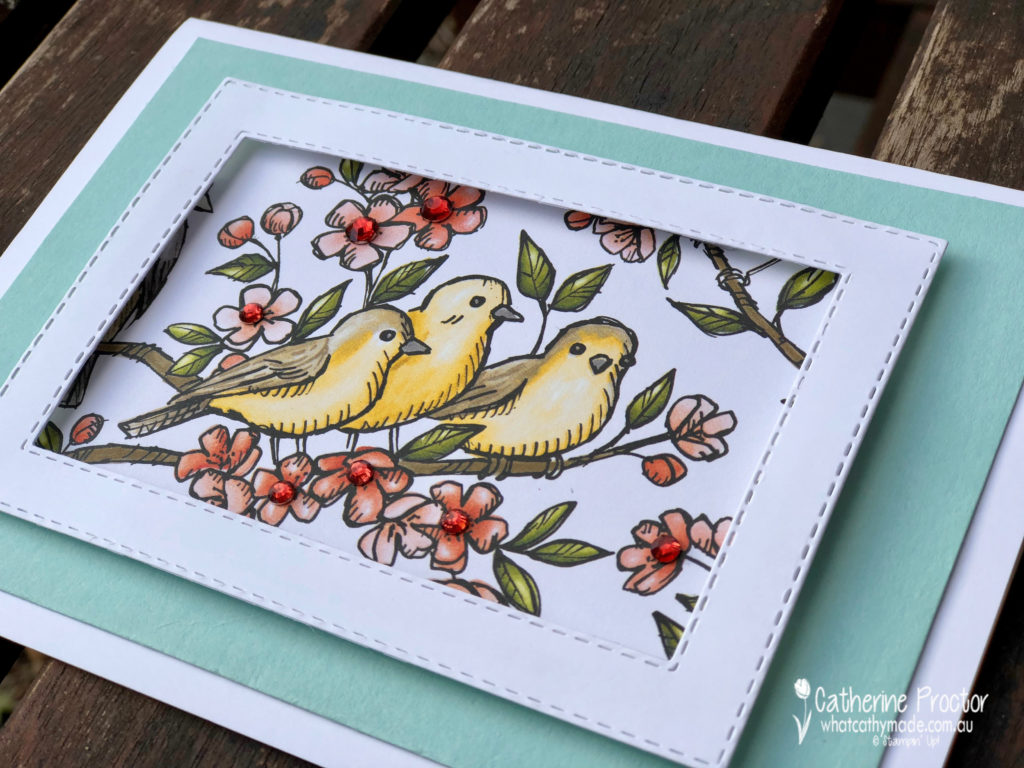
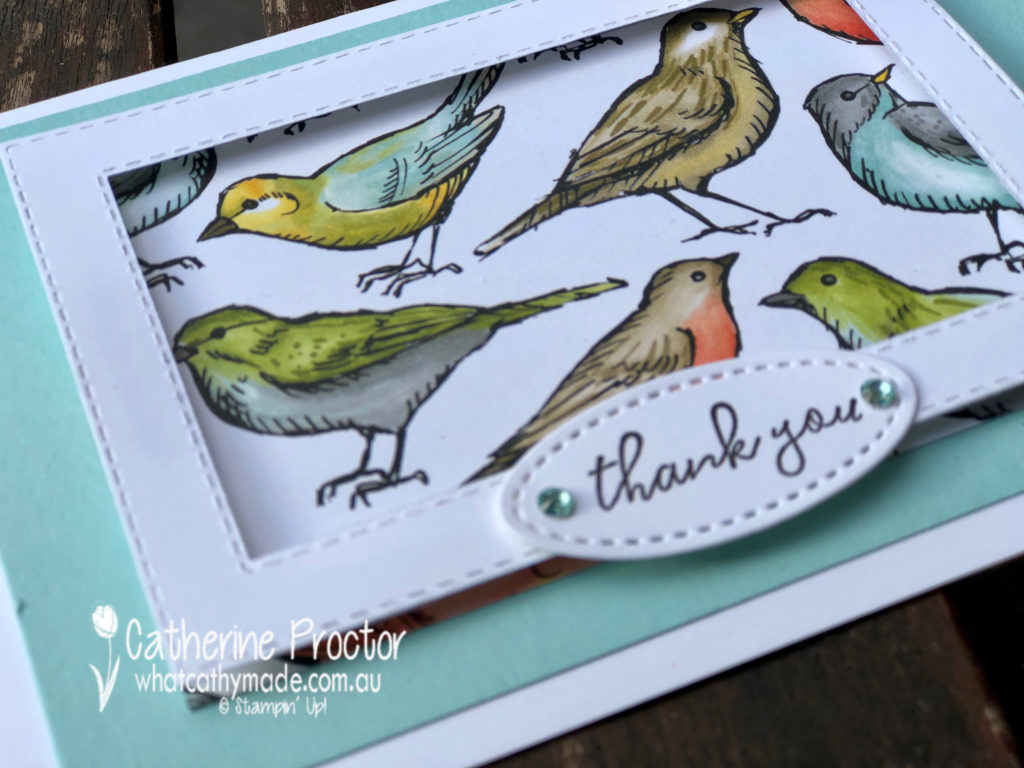
Sometimes I’m reluctant to use Design Series Paper in my card making because it’s just so beautiful I don’t want to cover it. So my solution for my cards tonight is to frame the paper instead!
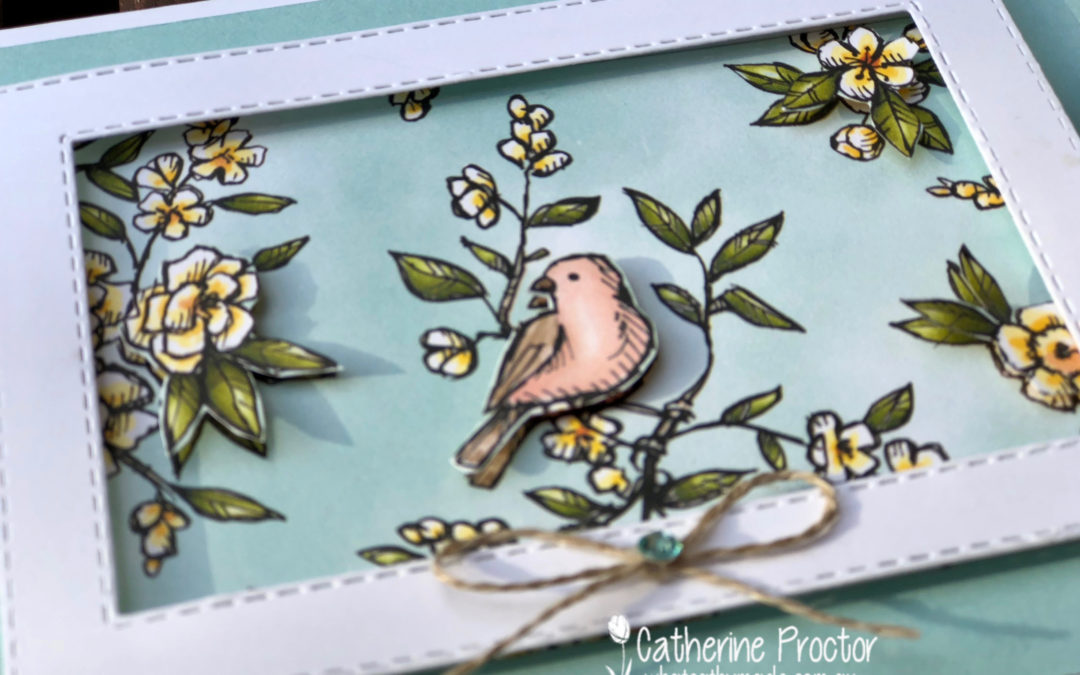
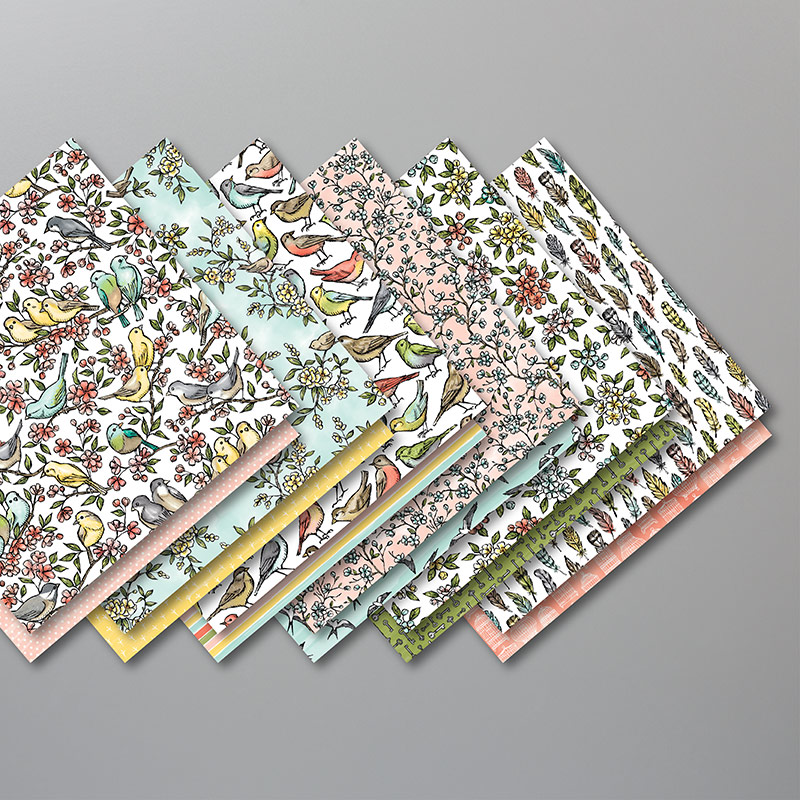
I’ve used my favourite Designer Series Paper from the Annual Catalogue: Bird Ballad DSP.
You can take a closer look at this stunning paper in this short video below.
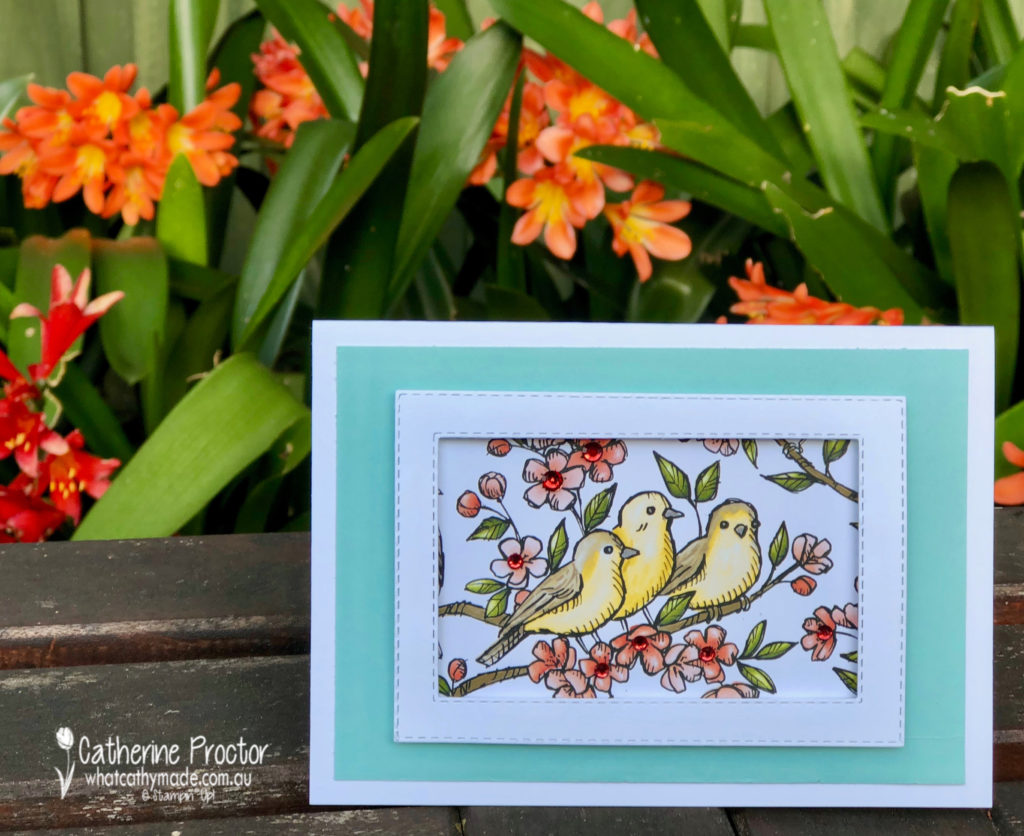
I made the same sized frame for all four cards, using two of the rectangle stitched dies. Each card features a different piece of DSP from this set, mounted onto a rectangle of Pool Party card stock. Foam adhesive strips made it easy to lift the frames above the image, giving the effect of a picture frame.
In card one I used mini dimensionals to pop up some fussy cut images from the DSP and finished the card off with a bow of linen thread and a pool party rhinestone from the the Holiday Rhinestones Basic Jewels.
In card two I simply used more of the dimensionals from the Holiday Rhinestones Basic Jewels – this time in cherry cobbler – to add a bit of bling to the flowers.
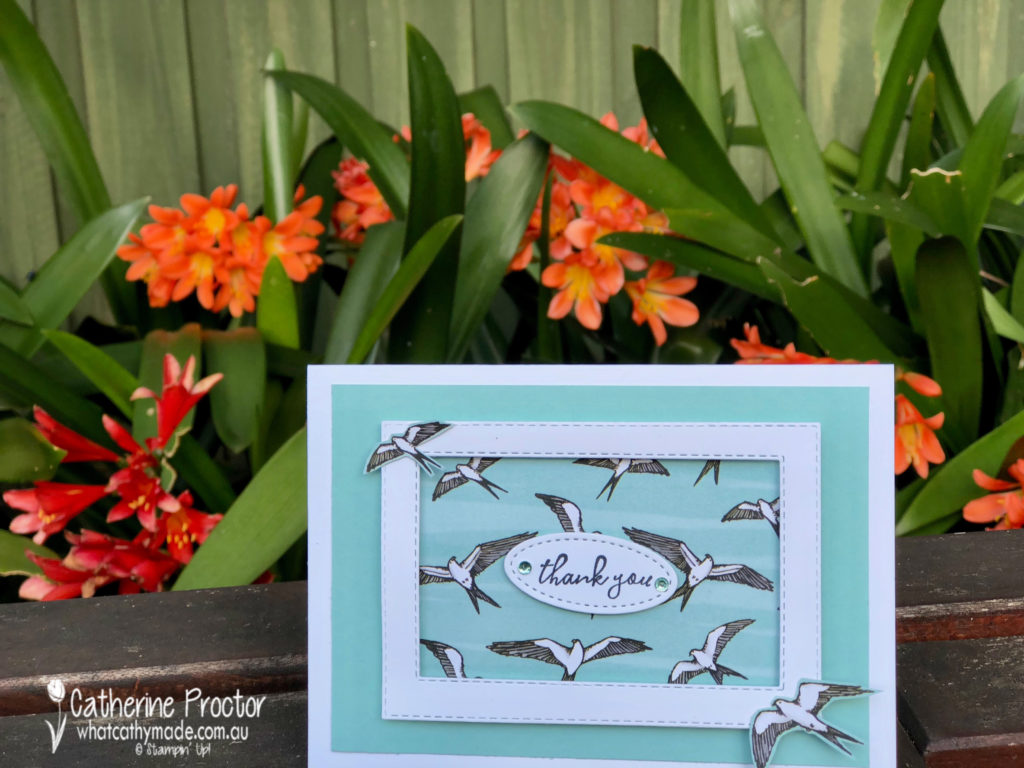
Cards three and four have the stamped “thank you” from the co-ordinating Free as a Bird stamp set, die cut out with the smallest oval in the stitched shapes framelits.
All these photos were taken outside in my garden today – it is spring here and my garden is full of birds and blooming with colour. Because the DSP for card four was more of a background pattern I fussy cut a couple of the birds and adhered them to the edges of the frame for some visual interest and dimension.
Here’s another shot of my stunning clivia!
Now it’s time to hop on over to our next participant, the very talented, Caroline Manwaring.
If you find a broken link or have come to this blog hop from a different entry point, you can view the participants below:
Welcome to week 19 of the Art With Heart Colour Creations Blog Hop!
This week we are showcasing one of the Regal Colours: Garden Green.
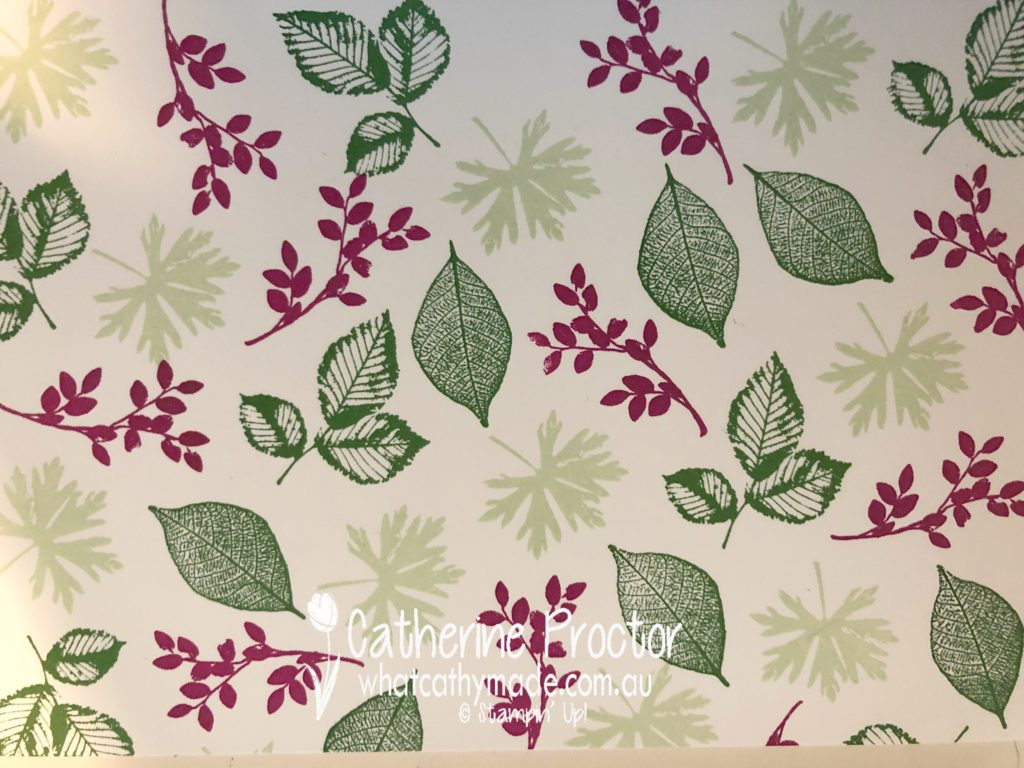
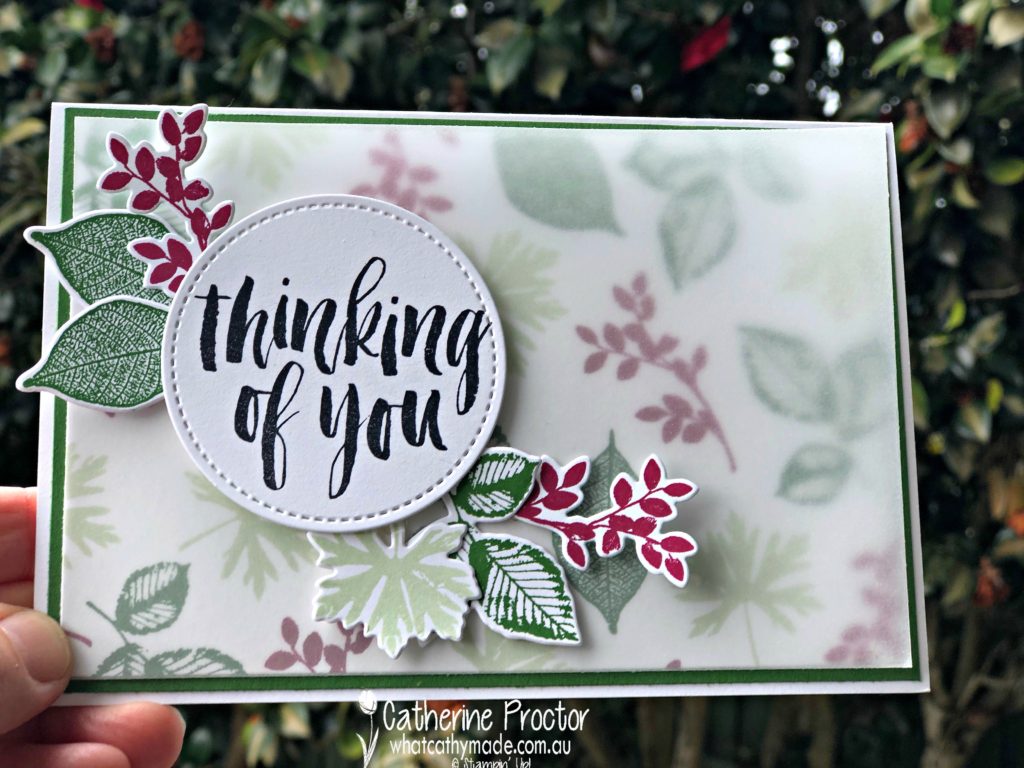
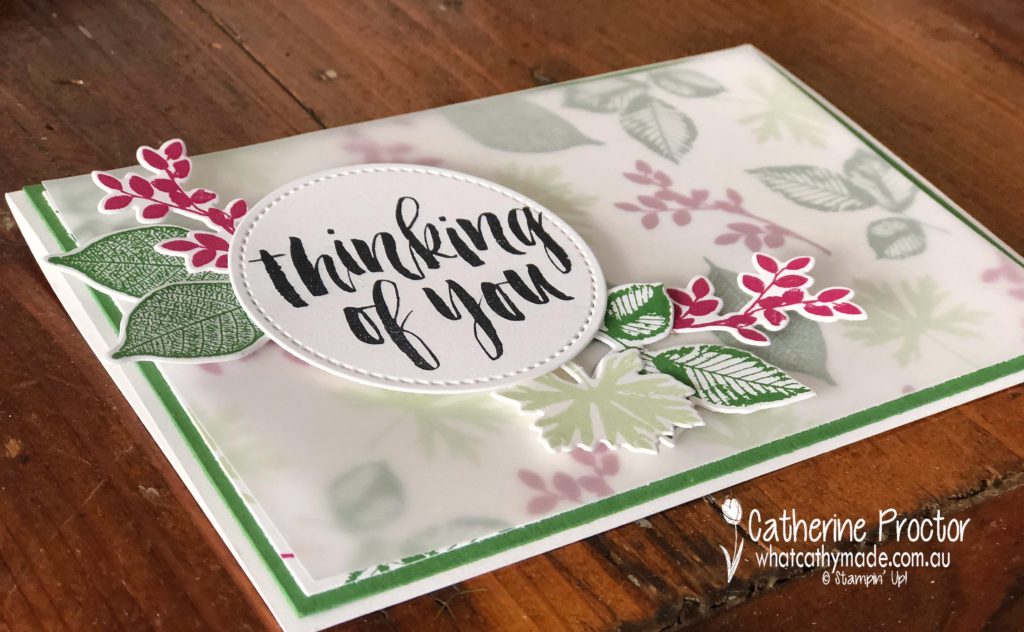
I couldn’t find a Designer Series Paper I wanted to use for my card this week so I began by making my project by making my own.
I used an A4 sheet of Whisper White cardstock, the “Rooted in Nature” stamp set and I stamped 4 of the images using Garden Green, Soft Seafoam and Berry Burst.
Doesn’t this colour combination and pattern look so pretty? It was super easy to create and I really just stamped randomly all over the paper.
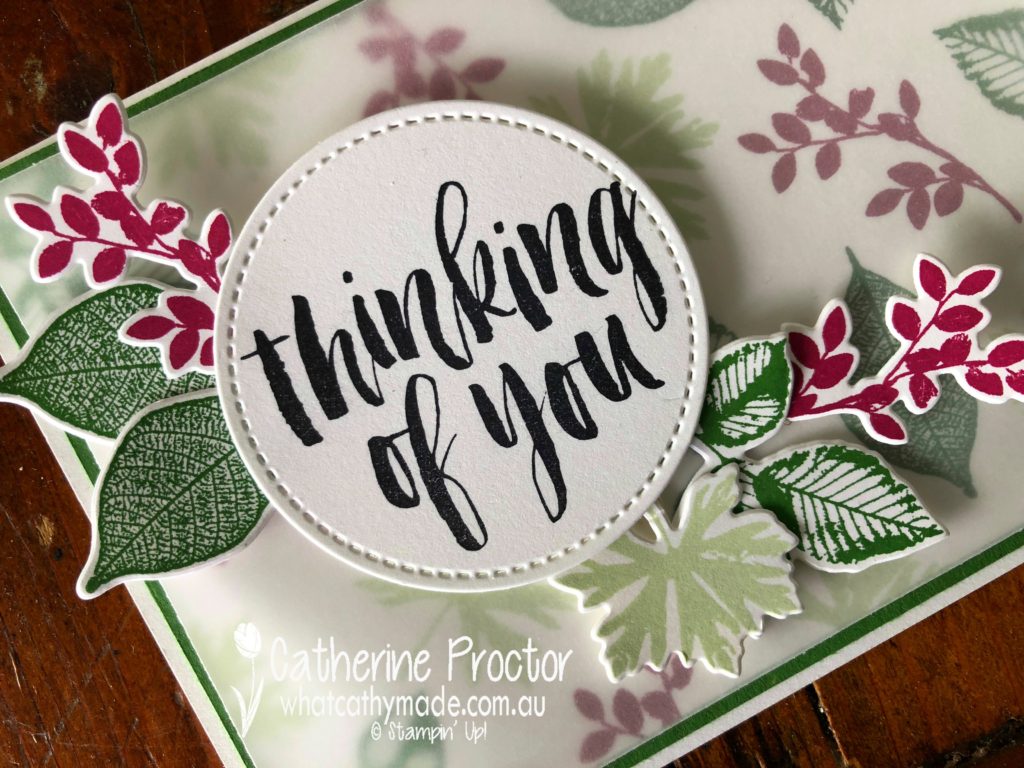
Once I’d created my sheet of DSP I used some scrap cardstock to stamp out some more images to decorate the top of my card and then I ran them through my Bigshot using the matching Natures Roots Framelits dies. Here they are on top of my finished card.
The “Thinking of You” sentiment is also from the Rooted in Nature stamp set. I stamped it in black before die cutting it out using one of the Stitched Shapes framelit circle dies.
My homemade DSP was cut to size and mounted onto some GardenGreen cardstock and then I softened the entire card by laying a piece of vellum over the DSP and under the sentiment and die cut pieces.
Creating my own DSP this week has really inspired me to do this more often, trying out different combinations of colours and stamp sets!
To see what the rest of the team have made click on the links below.
Thanks for hopping along with us today. To purchase any of the products I used in this project you can shop with me here. Or if you’d like me to post you your very own copy of the 2018-2019 annual catalogue or find out about more about Stampin’ Up! contact me.
Next Tuesday we’ll be showcasing one of the new Brights Colours: Gorgeous Grape!