Welcome to week thirty one of our Art With Heart 2022-23 Colour Creations blog hop!
This is a weekly blog hop where we showcase the stunning range of Stampin’ Up! colours in alphabetical order over 12 months and this week we are featuring Mossy Meadow from the subtles family.
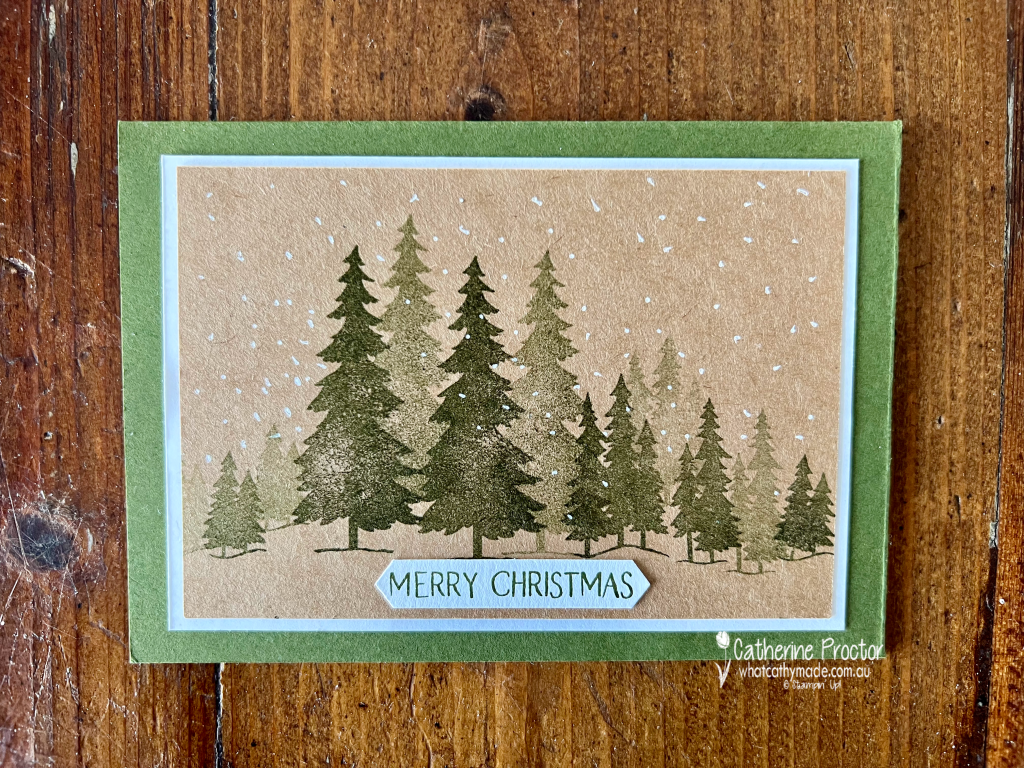
I love Mossy Meadow when it’s paired with other neutrals or with Kraft cardstock, which is what I’ve used today for my simple stamping card.
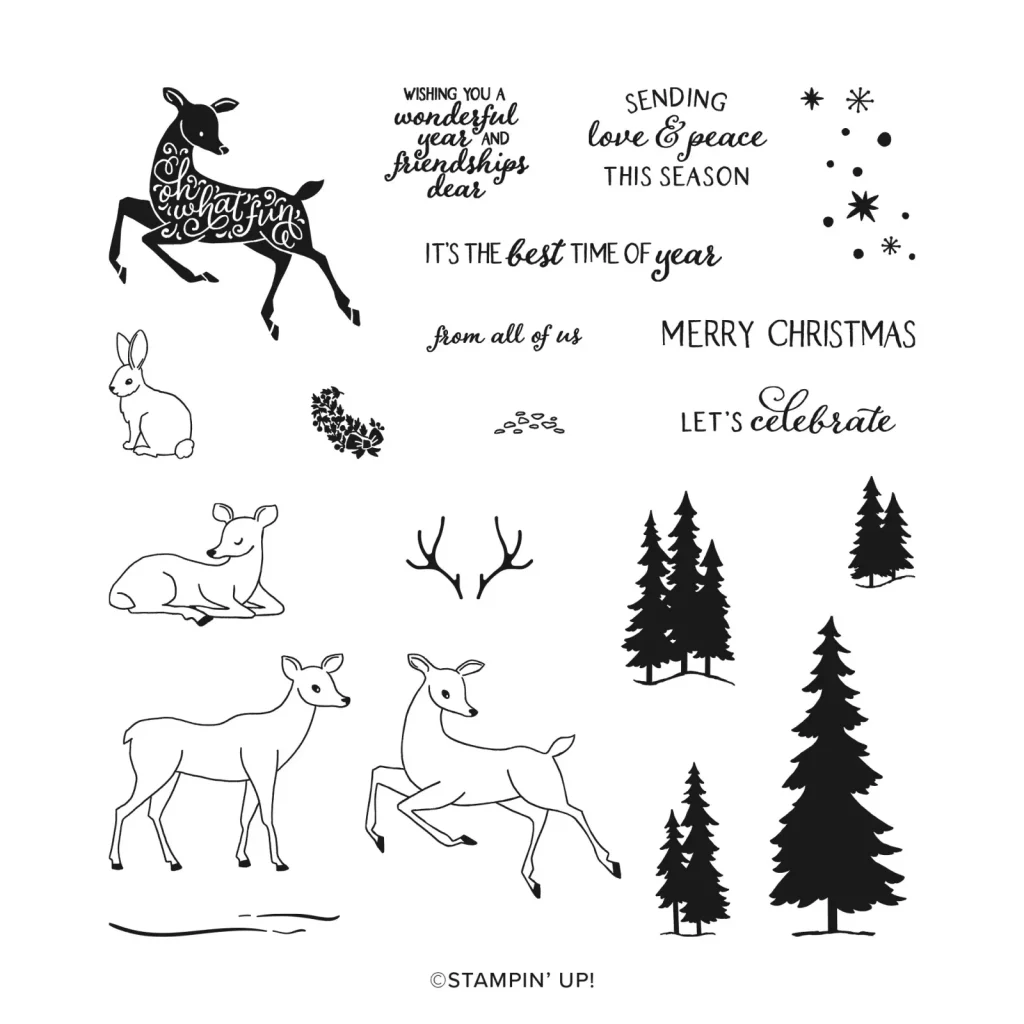
The Peaceful Deer stamp is perfect for this card design because it has four different tree stamps in different sizes, making it quick and easy to create a forest scene.
Although it looks like I’ve used two greens, my trees are all stamped in Mossy Meadow. I’ve stamped at full strength and then once again without reinking the stamp – this is called “stamping off” and it gives you two shades of the one colour, adding dimension to the card.
The snow was created with a white gel pen and the “Merry Christmas” sentiment can be simply cut out with a paper trimmer or even by hand using paper snips.
This is such a quick and easy simple stamping card – ideal if you haven’t started making your Christmas cards yet and you need to quickly build your stash.
Now it’s time to hop on over to our next participant, the lovely Rachel Palmieri – I can’t wait to see what Rachel has made this week!
If at any time you find a broken link, you can find the complete list of all participants below.
Welcome to week nineteen of the Heart Of Christmas Blog Hop!
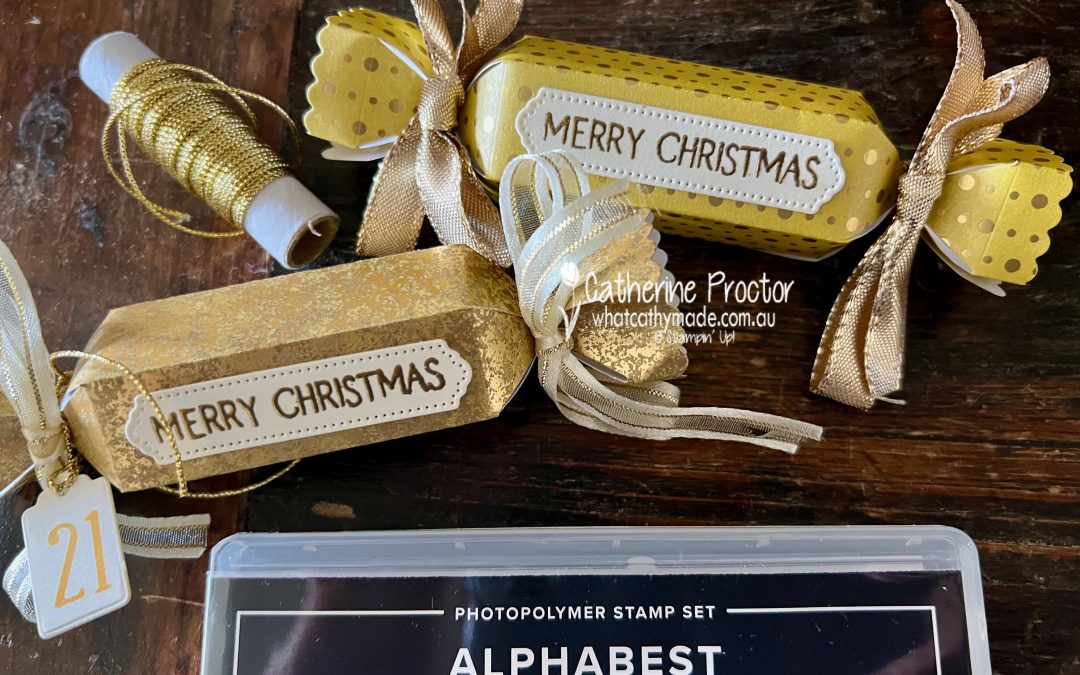
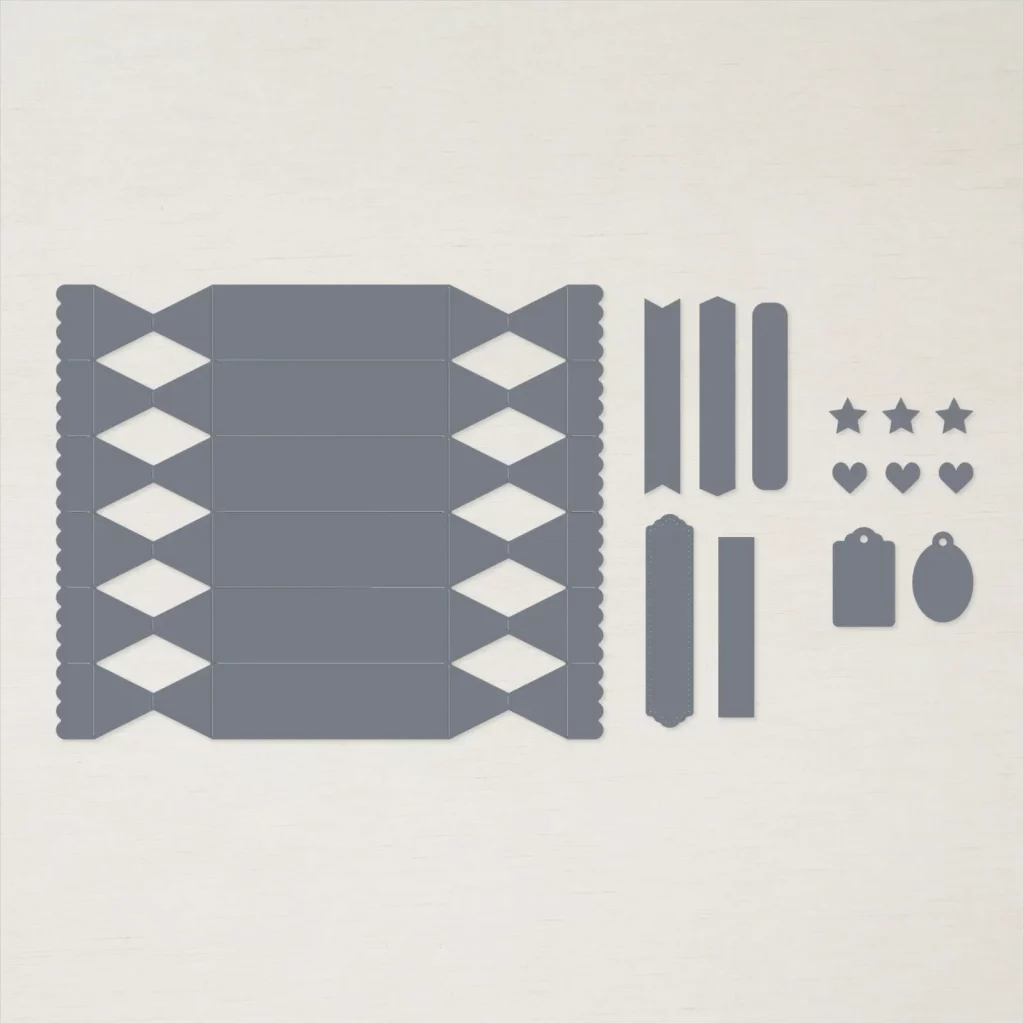
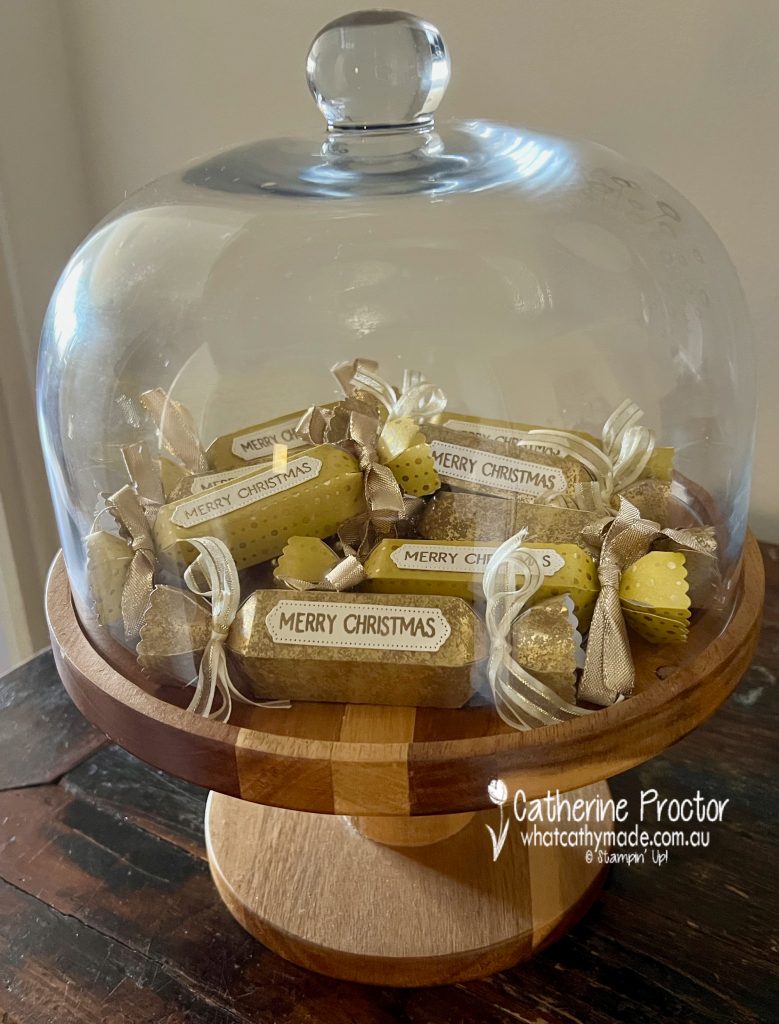
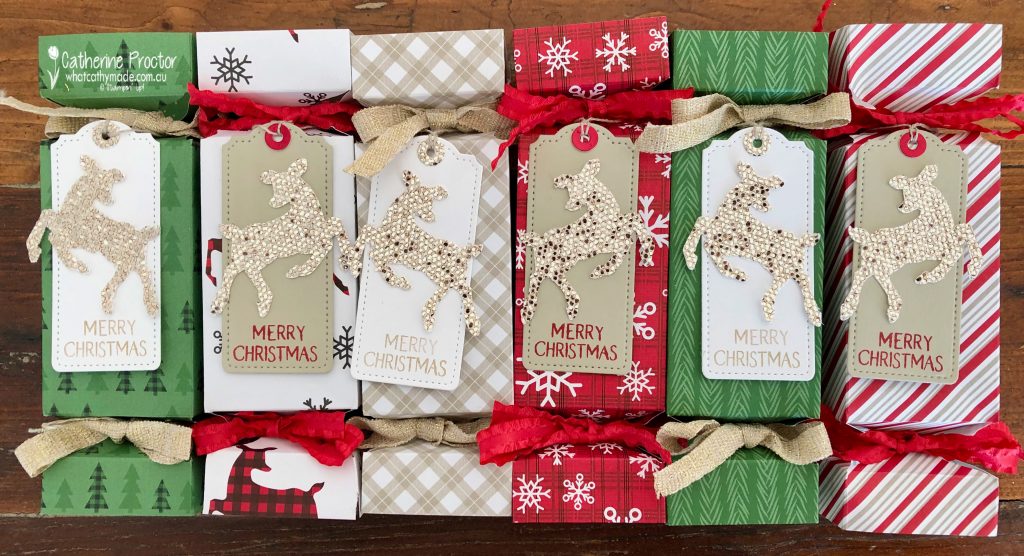
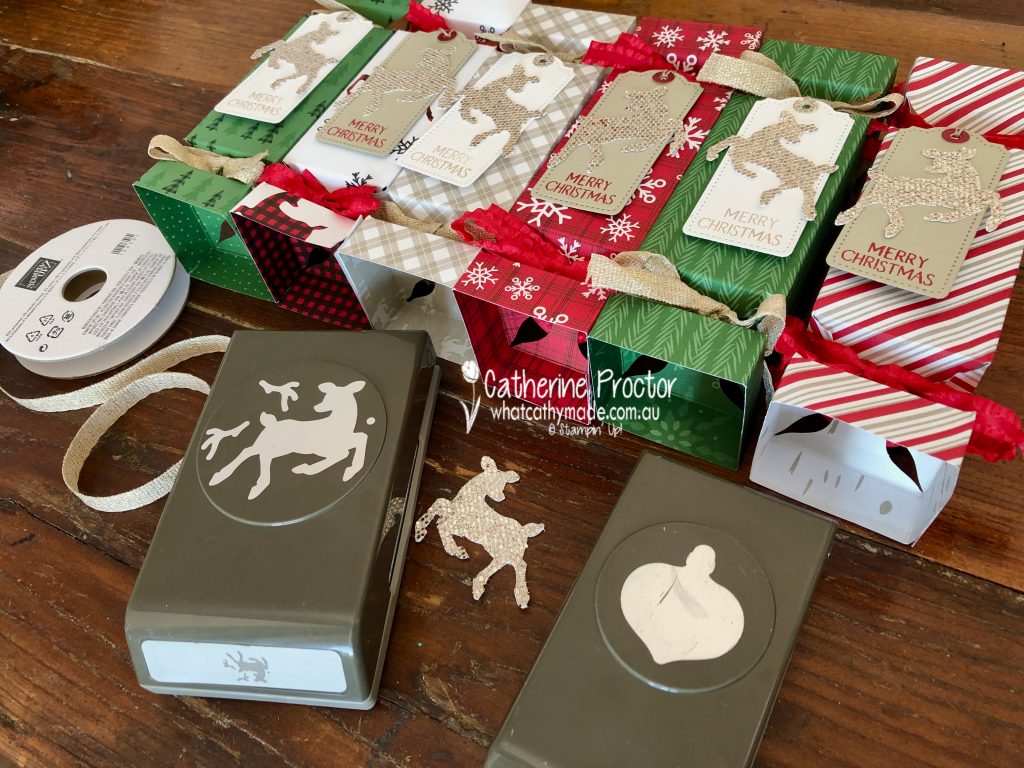
My project this week uses a set of dies from the Annual Catalogue that you may well have overlooked – the Cracker and Treat box dies.
This set of dies includes the cracker die, five labels, two tags, and dies for small hearts and stars you can use to embellish your crackers or as confetti or shakers inside a shaker card.
These cracker dies make mini crackers _ they are so adorable! Each cracker when made up and tied at either end with ribbon measures approximately 13 cm long and 3 cm across.
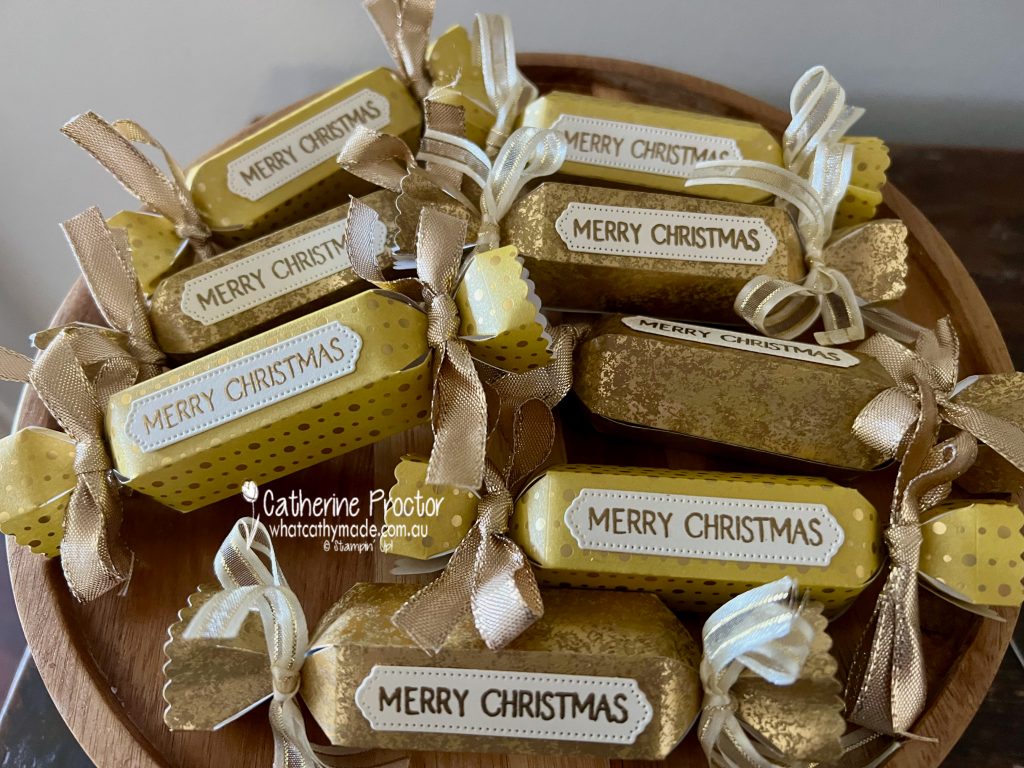
You will get one cracker per 6×6″ sheet of DSP or four crackers per 12×12″ sheet of DSP. I’ve made eight crackers today, using two papers that work well together – the Festive Foils DSP and the Distressed Gold paper.
The labels for my crackers are die cut using Very Vanilla cardstock, stamped with the “Merry Christmas” stamp from the Peaceful Deer stamp set, heat embossed in gold.
Even though cracker is a smaller size than a traditional cracker, it can be used in a multitude of ways!
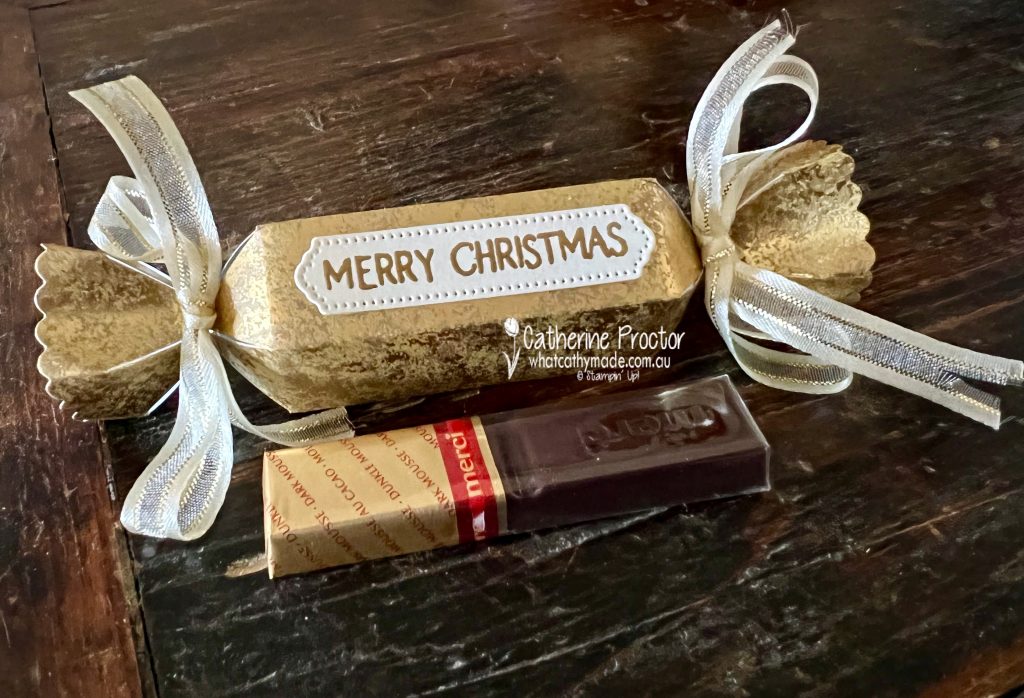
As is as a small Christmas cracker, filled with maybe a joke and a small chocolate or a sweet.
Adhere two cracker dies together to make a double Christmas cracker that you can fill with larger sweets and treats.
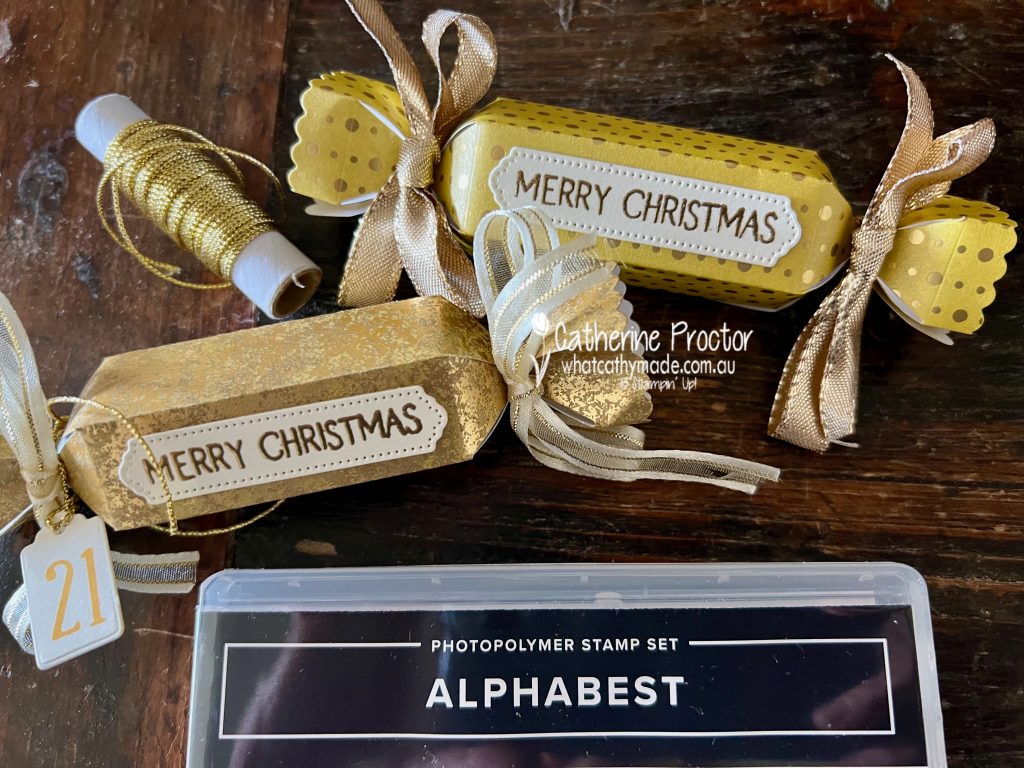
Die cut 24 crackers to make an Advent calendar, using one of the tag dies included in the Cracker & Treat dies to attach a number to each cracker.
As a name place holder for your Christmas day table. Handwrite in a gold pen each person’s name onto the sentiment label instead of stampin the “Merry Christmas” sentiment.
Use crackers as a Christmas decoration for your Christmas tree, mantlepiece or in the middle of your Christmas table.
Of course I had to check what type of chocolates fit into these smaller crackers! I’m pleased to report back that the delicious German Merci chocolates (sold at Aldi stores) fit perfectly, as do tiny candy canes or individually wrapped chocolates such as Fantales, Cadbury Favourites or Roses chocolates.
To fit a Lindt Ball or a Ferrero Rocher chocolate, you’ll need to make a wider cracker using two of the dies together.
To show you how to use these crackers as an advent calendar, I’ve used the Alphabest stamp set to stamp the number 21 on to this cracker on the left in the photo below.
Now it’s time to hop on over to our next participant, the lovely Sharon Davern, who is also the host of our hop!
If at any time you find a broken link, you can find the complete list of all participants on Sharon’s blog.
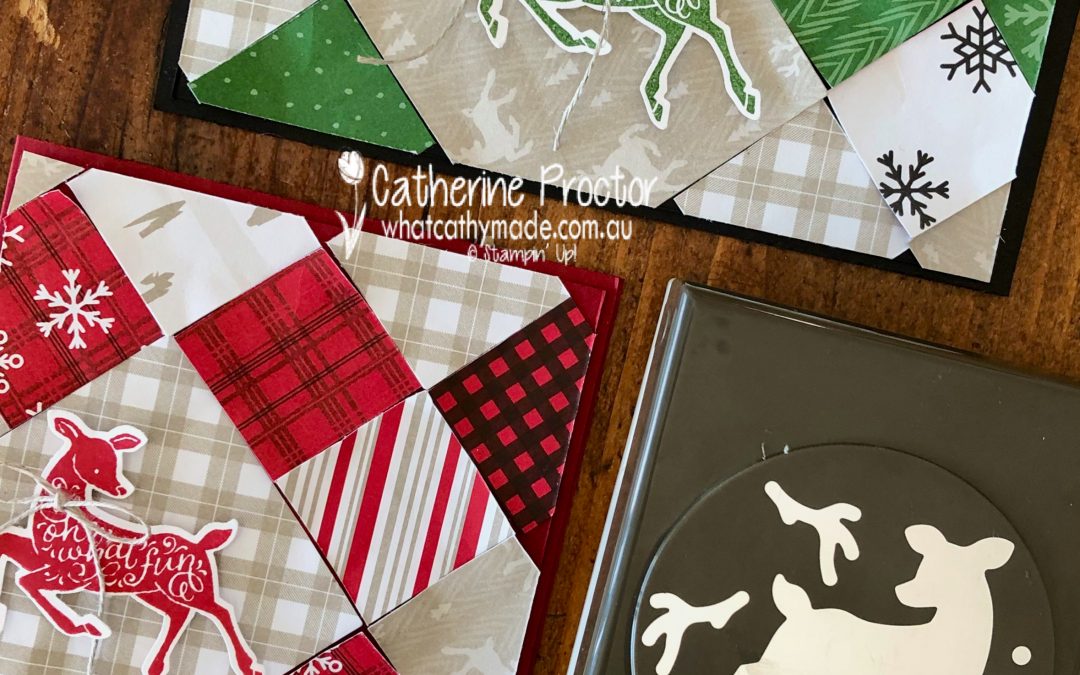
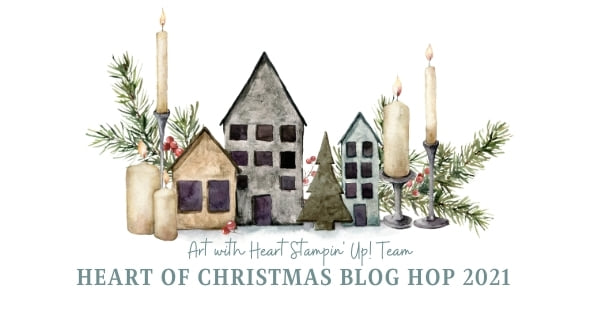
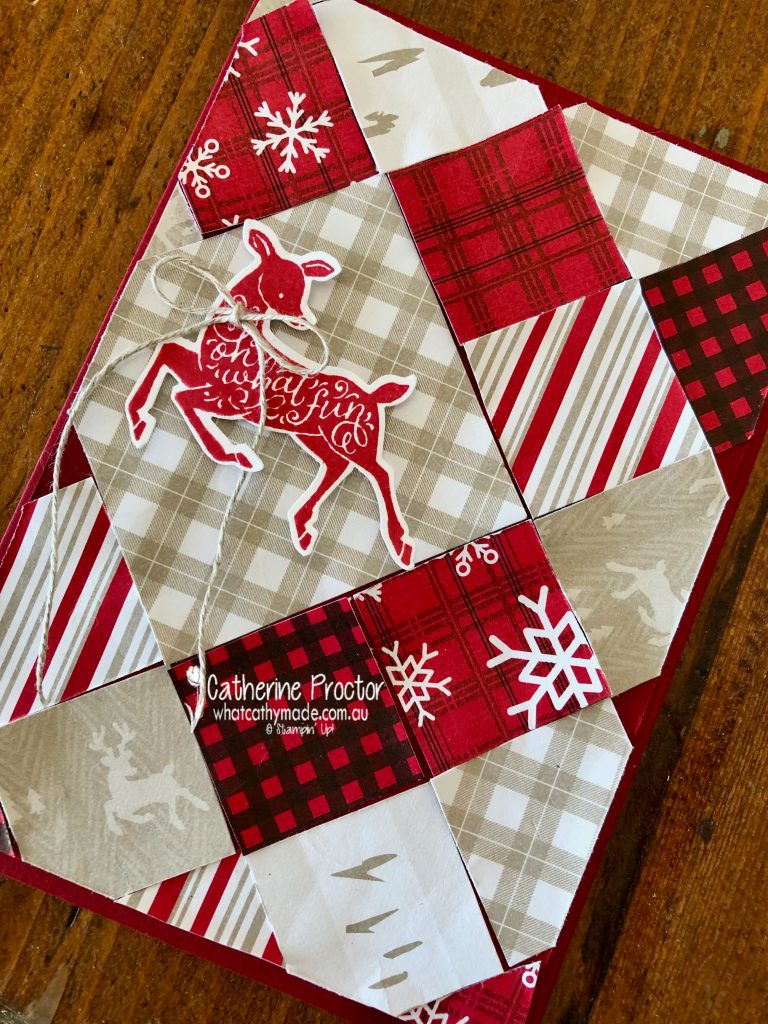
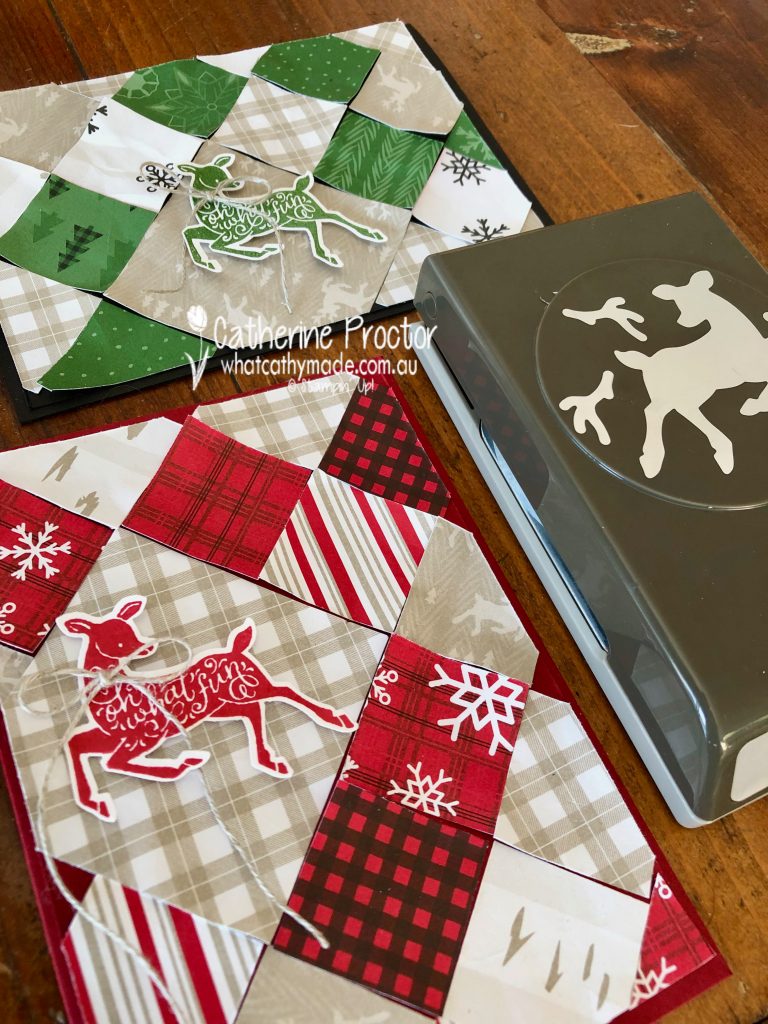
Hello crafters! I’ve got two cards for you this week that use a great technique for crafting with scraps of DSP. I was inspired to revisit this “paper patchwork” technique after seeing a Sweet Symmetry DSP paper patchwork card made by Martin Stone, one of the very talented Artisan Design members.
Although these cards use the FREE SALE-a-bration Peaceful Prints DSP, you can use this design/layout with any DSP. The secret to getting great texture is to scrunch up each square of DSP before adhering it to the card base. When you adhere, use Multipurpose glue and don’t adhere right to the edge of each square – let the edges stick up.
I split the Peaceful Prints DSP into the reds and greens and cut 3x3cm squares using my paper trimmer. Each card also has one larger 6x6cm square of DSP which I stuck down first and then added the other squares around it.
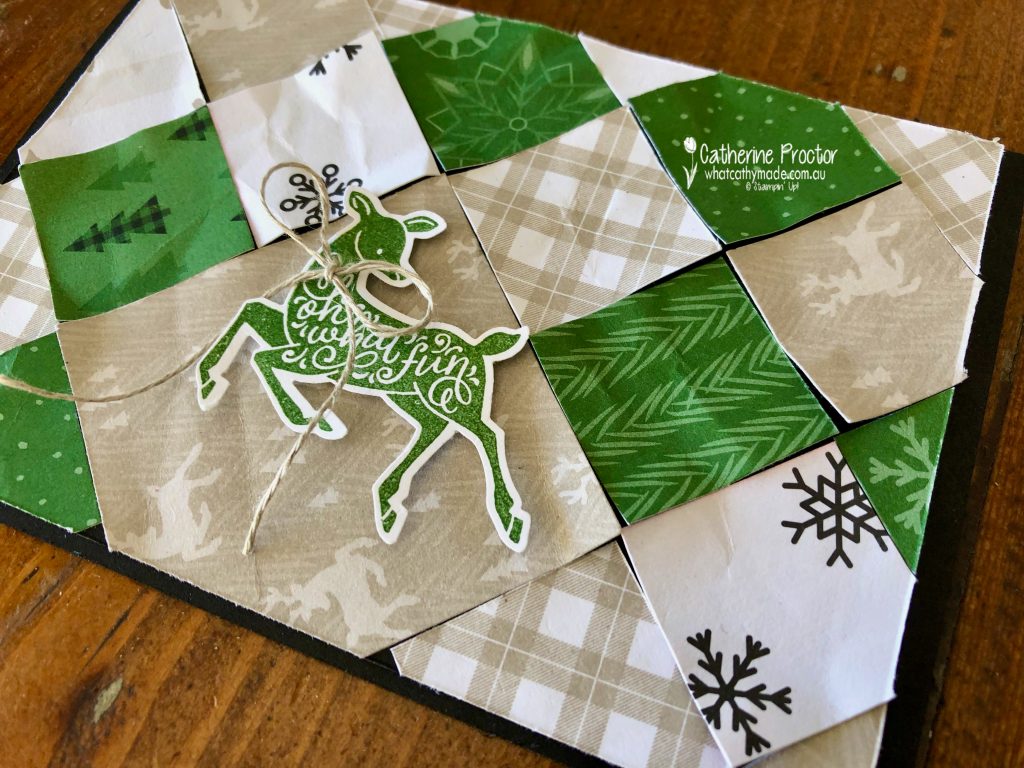
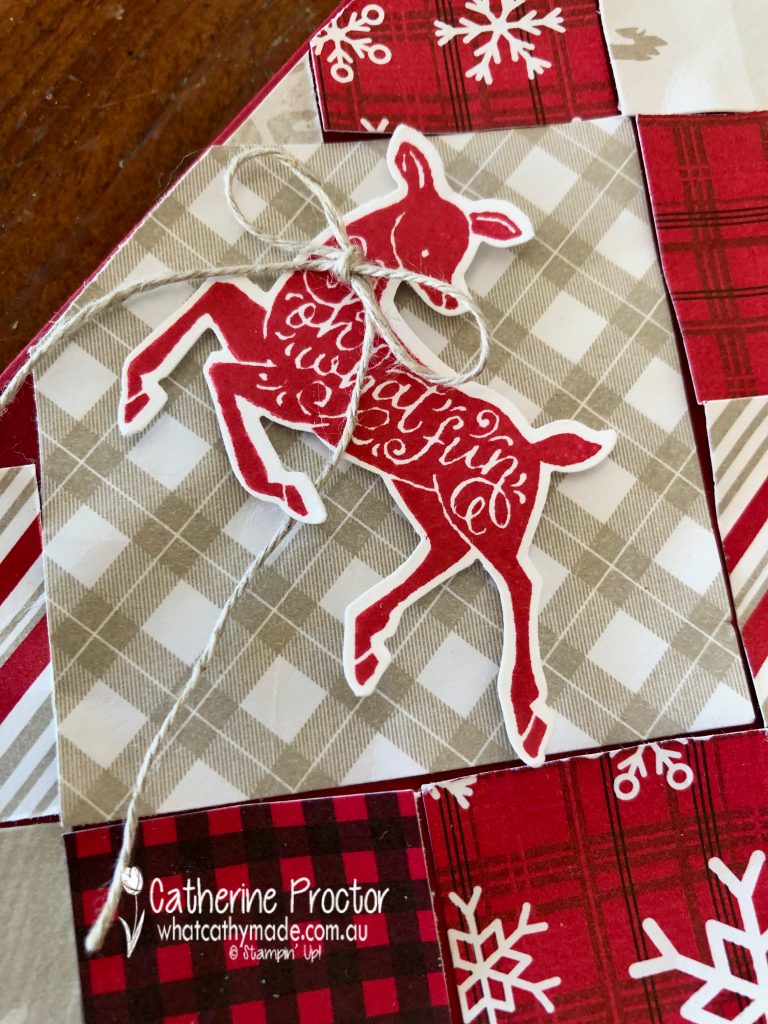
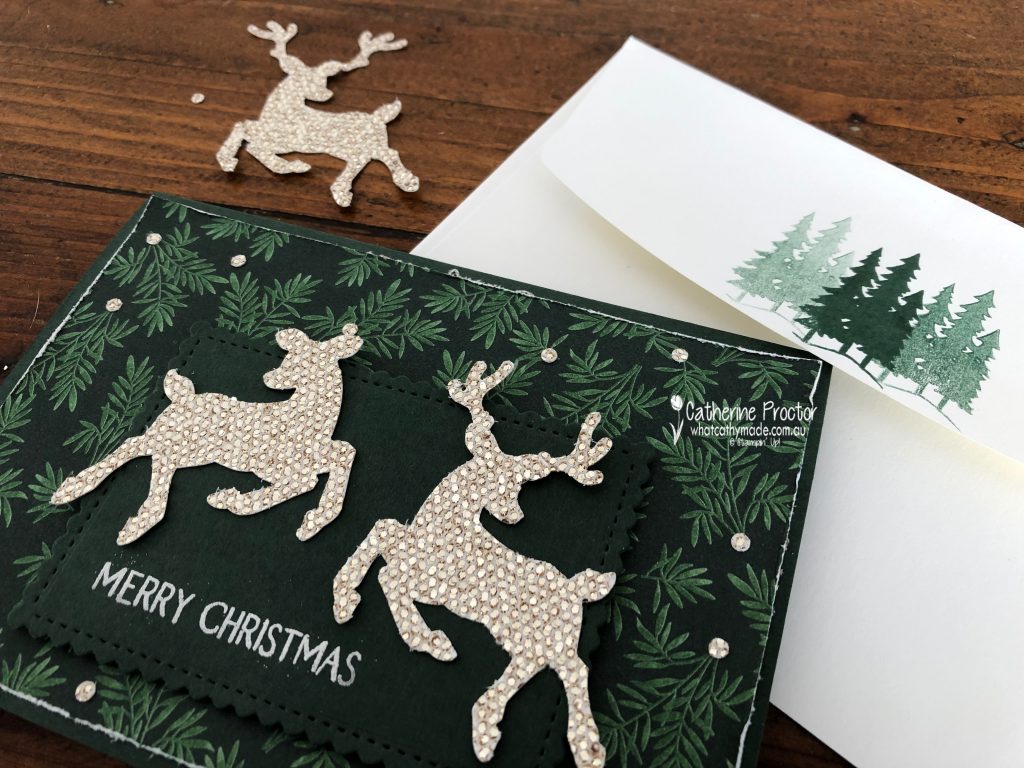
This red card uses the DSP in Real Red, Cherry Cobbler, Basic Black, Sahara Sand and Basic White. The card base is half an A4 sheet of Cherry Cobbler and the deer from Peaceful Deer is stamped in Real Red.
I added a bow of linen thread to the deer.
The green card has exactly the same size and layout – I just flipped the card over to landscape before attaching my Garden Green Deer and bow of linen thread. The card base is Basic Black and the DSP is Garden Green, Sahara Sand, Basic Black and Basic White.
After photographing my cards and uploading them to my website I suddenly realised the deer and the trees on the DSP are adhered upside down on my card, whoops! Hopefully the elegance of the stamped and punched deer draws your eye away from noticing my mistakes!
Red or green? Which card is your favourite?
Now it’s time to hop on over to our next participant, the lovely Christine Blain. I can’t wait to see what Christine shares with us today!
If at any time you find a broken link please head to the blog of this week’s Host of the Heart of Christmas Blog Hop, Tina Gillespie, as she has the full list of links for everyone who is participating.
You can purchase any of the products I’ve used tonight, here.
Thanks for visiting my site. I’ll be back with another card on Wednesday.
In the meantime, wherever you are in the world, stay safe, stay calm … and keep on crafting xxx
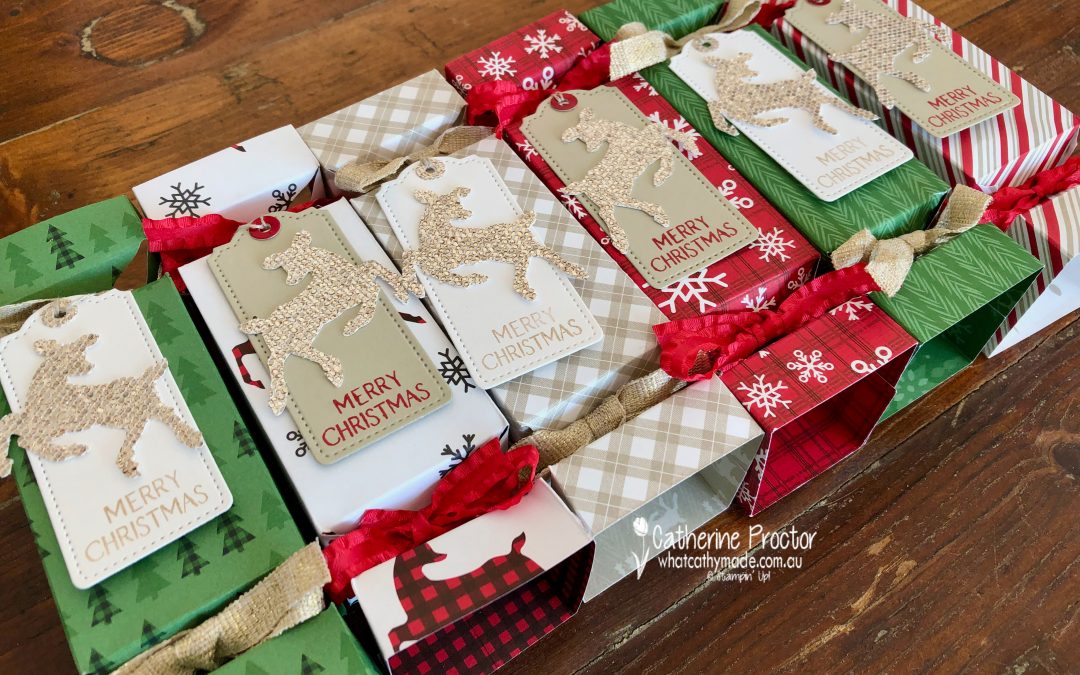
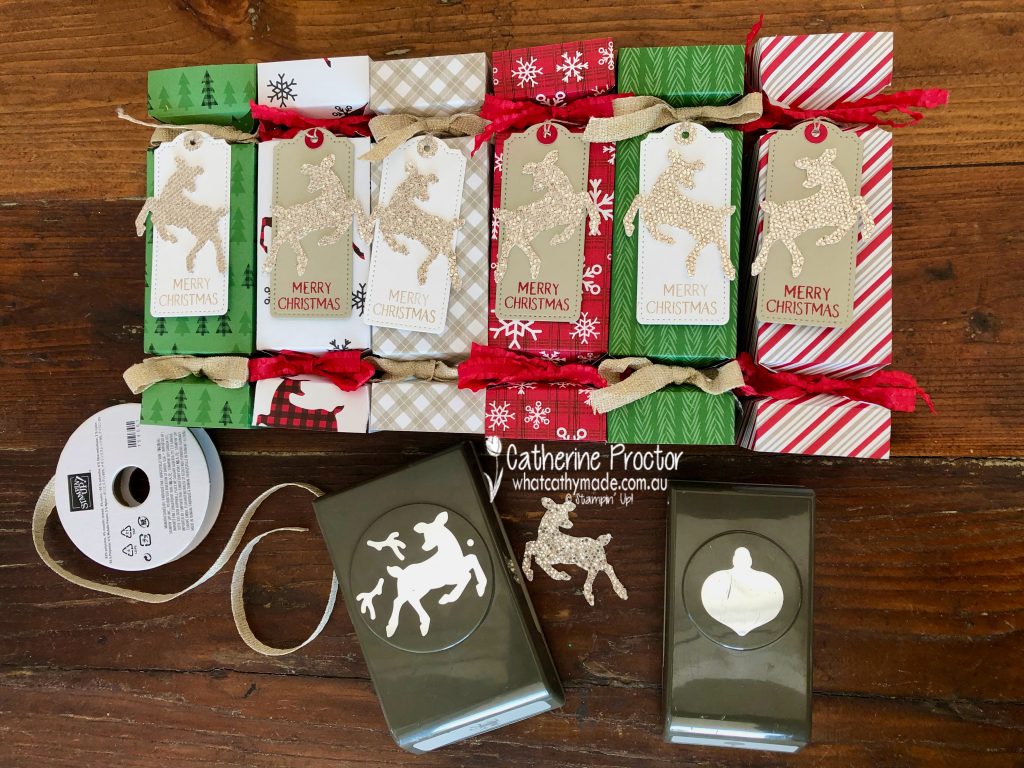
Do you use your Stampin’ Up! catalogues for inspiration? I find them such a wonderful source of ideas and this week I’ve taken my inspiration from the 2019 Stampin’ Up! Holiday catalogue.
The 2019 Stampin’ Up! Holiday catalogue had very clever instructions on how to use your paper trimmer and the small Gleaming Ornaments Punch to make quick and easy Christmas crackers. As these ornament punches are currently available to purchase in the clearance rack (on sale for $35.40) I thought I would adapt this design and make a set of Christmas Crackers using the FREE SALE-a-bration Peaceful Prints DSP.
I’ve used 6 of the patterns from the Peaceful Prints DSP to make 6 crackers – I will make another 6 crackers using the reverse sides of this DSP before Christmas.
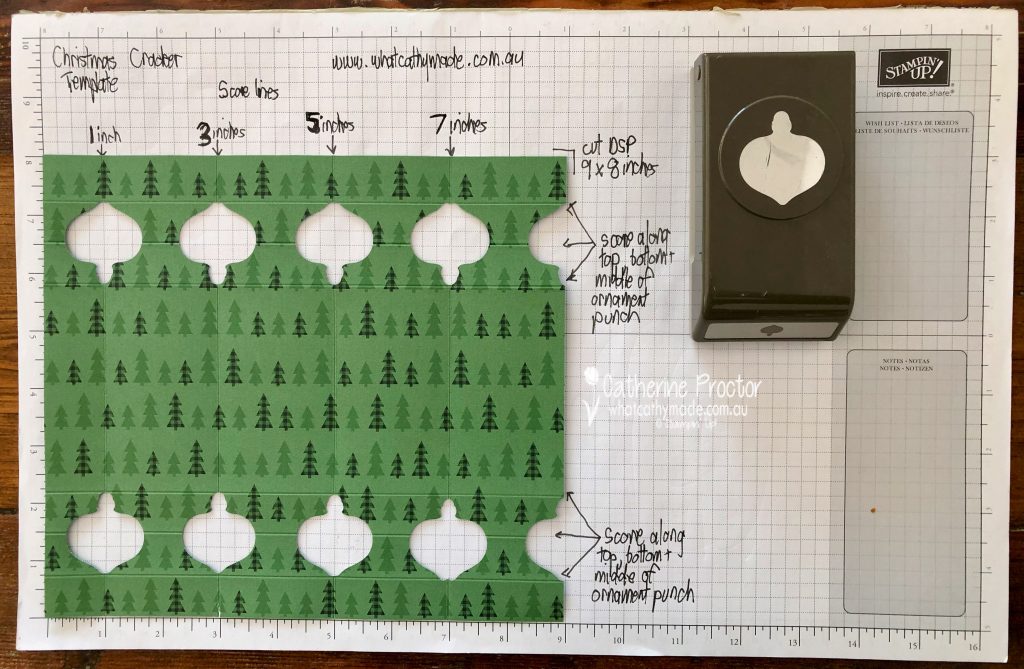
Here’s my template to make the crackers using the small ornament punch.
Trim a sheet of DSP to 9 x 8 inches
Score along the 8 inch side at 1 inch (this creates the flap for adhering the sides of the cracker together) and score again at 3, 5 and 7 inches
Fold along all these score lines
Fully insert small ornament punch to the edge of the DSP, ensuring the score line is in the centre of the ornament
Punch every score line at both ends of the DSP
Also punch at the 9 inch edge, lining up the centre of the punch with the edge of the DSP
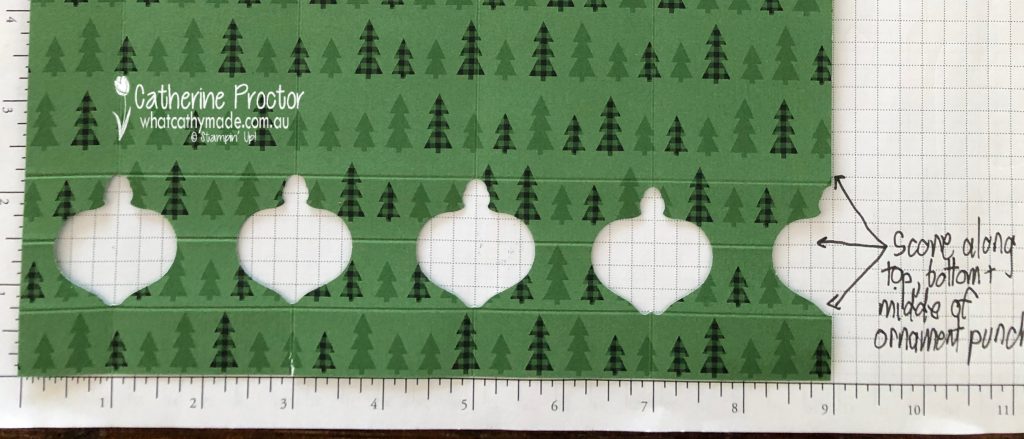
Now score in the opposite direction, along the width of the cracker at the top, bottom and the centre of the punched out areas (see photo above) and then fold these score lines as per the photo below.
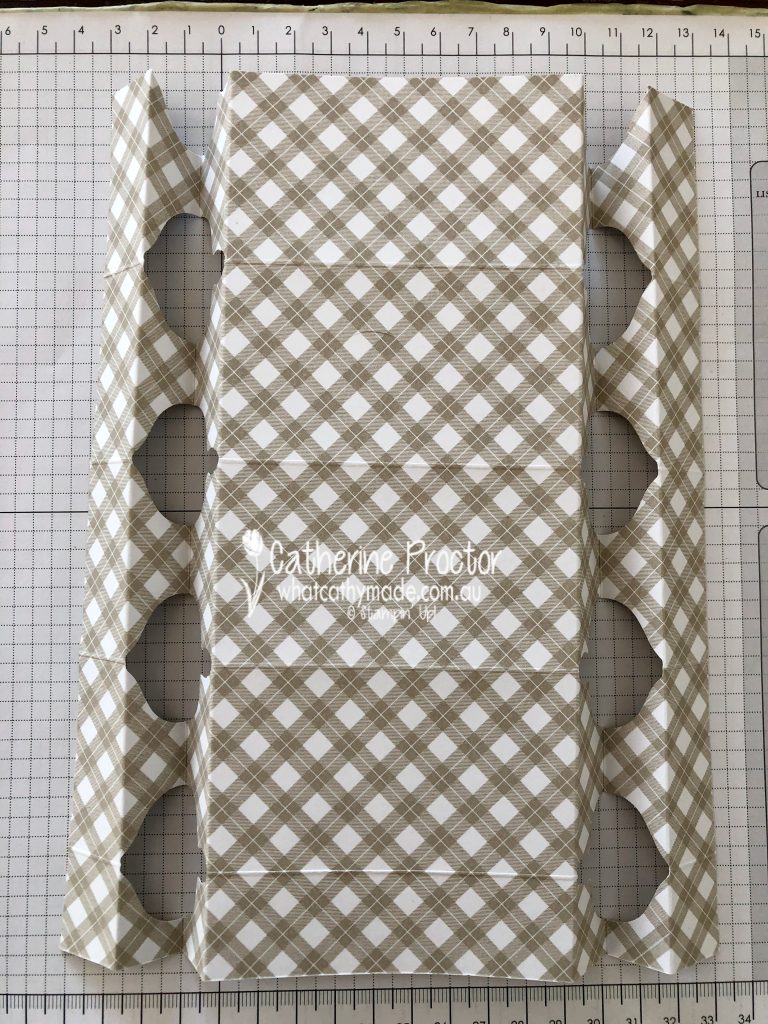
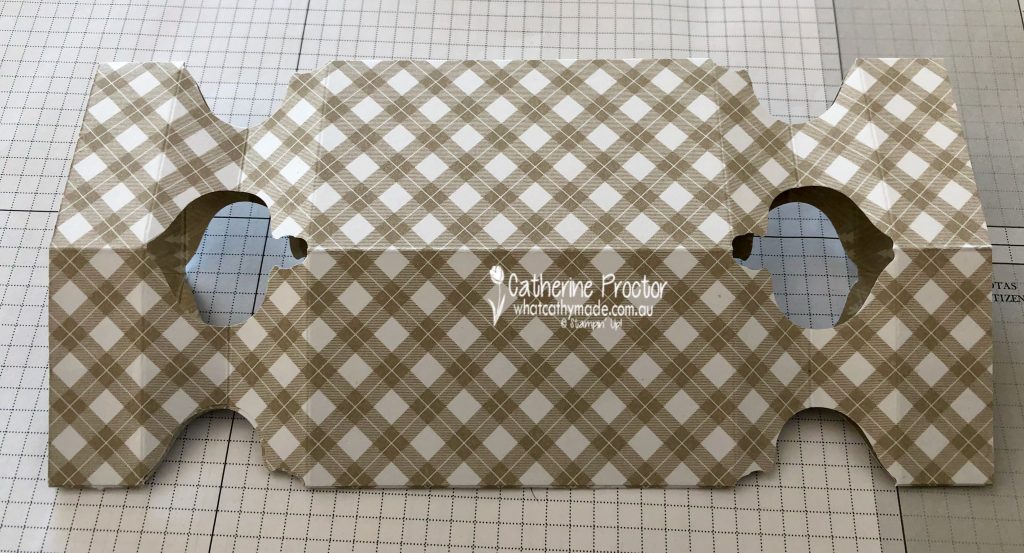
To assemble the cracker, fold up the 1 inch fold flap so that the DSP side that will be on the outside of the cracker is facing up.
Place Multipurpose Liquid Glue on this flap and fold over the cracker at the 5 inch fold, lining up the punched out areas. Press together to adhere.
Cut ribbon of choice into 14 inch (36 cm) lengths and tie into a bow at each end.
You can decorate the crackers any way you want. I used the Peaceful Deer bundle, the FREE SALE-a-bration Be Dazzling DSP and the Tailored Made Tags Dies to create coordinating deer tags for my crackers. I used some Sahara Sand twine to attach them to one end of the cracker, but you could also simply adhere them to the top of the cracker.
These crackers are empty right now because I am going to fill them with yummy treats closer to Christmas, such a Ferrero Rocher chocolate, Lindt Balls and little jokes. To fill them at a later time, simply untie the bow at one end, pop the treats inside and retie the bow.
You can make these Christmas crackers out of any DSP to match your Christmas table decoration.
Now it’s time to hop on over to our next participant, the incredible talented Michele Taylor. I wait to see what Michele shares with us today!
If at any time you find a broken link please head to the blog of this week’s Host of the Heart of Christmas Blog Hop, Sharon Davern, as she has the full list of links for everyone who is participating.
You can purchase any of the products I’ve used tonight here.
Thanks for visiting my site. I’ll be back with another card on Wednesday.
In the meantime, wherever you are in the world, stay safe, stay calm … and keep on crafting xxx
With our Art with Heart Team Christmas blog hop providing Christmas card inspiration for you every Monday night I should have all my Christmas cards made by December – I just need to remember to send them in time!
My pre-order of Christmas products from the July-December mini catalogue and the Sale-a-bration catalogue arrived this week. That’s right, Stampin’ Up! is holding TWO Sale-a-bration periods this year – this second Sale-a-bration period starts on August 3, the same day as the July-December mini catalogue.
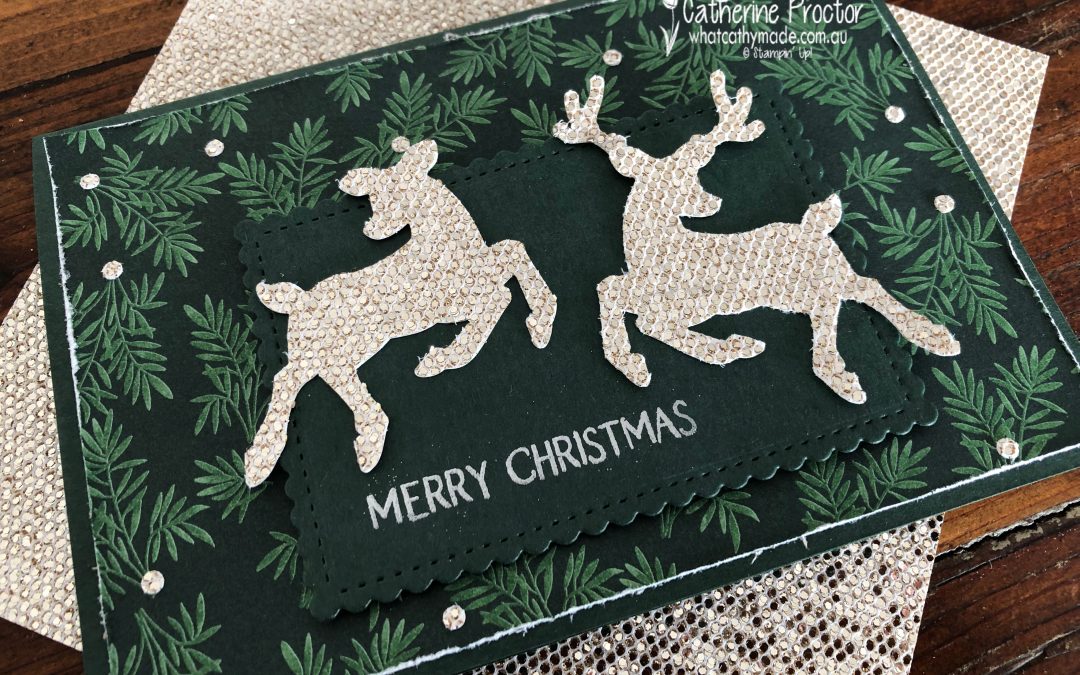
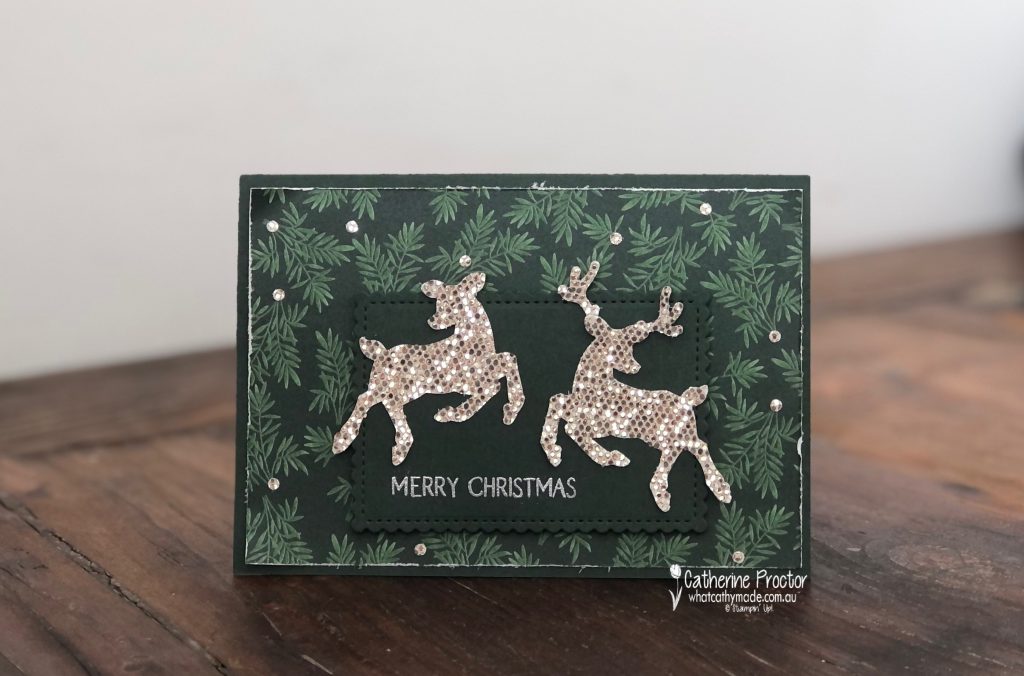
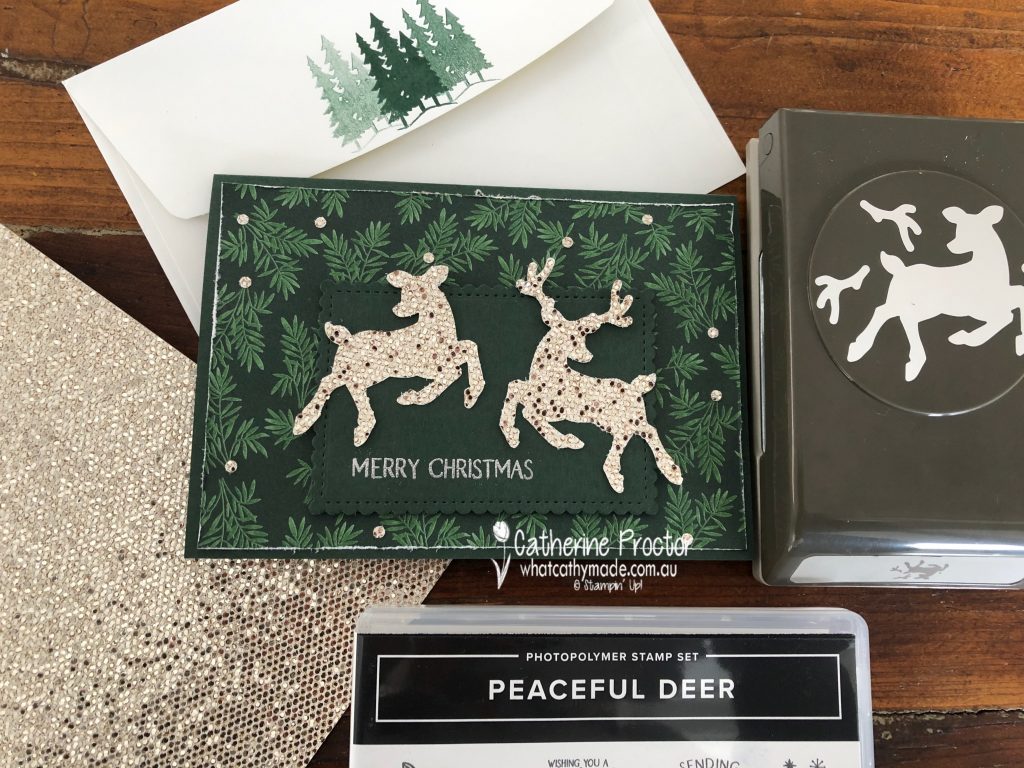
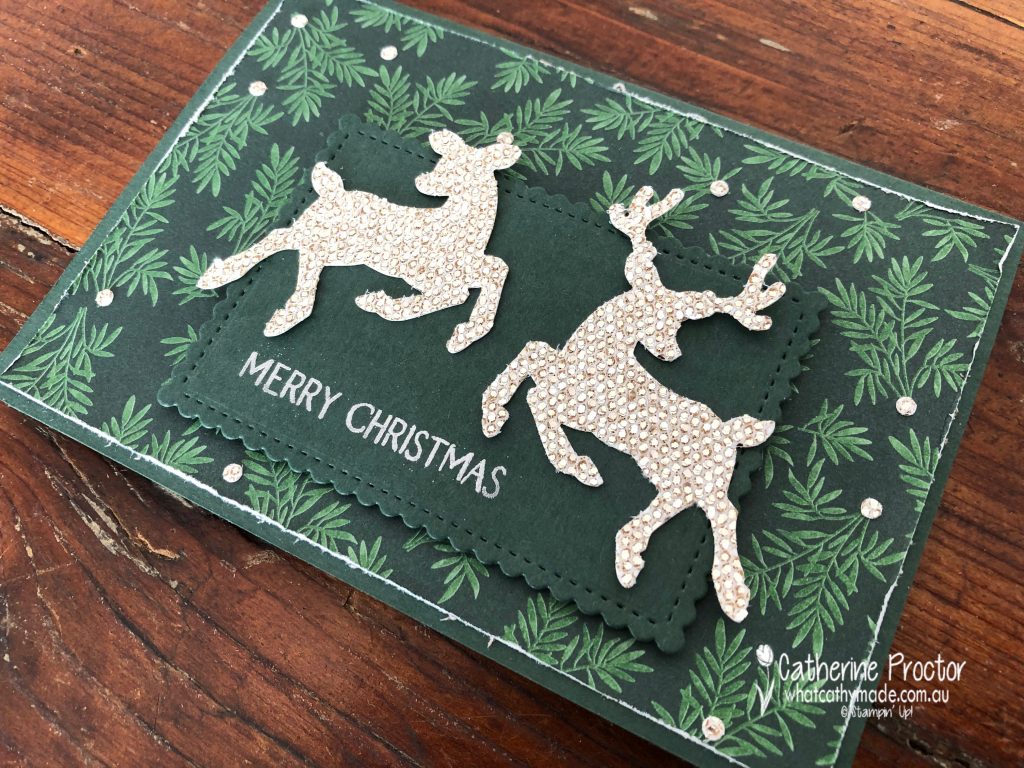
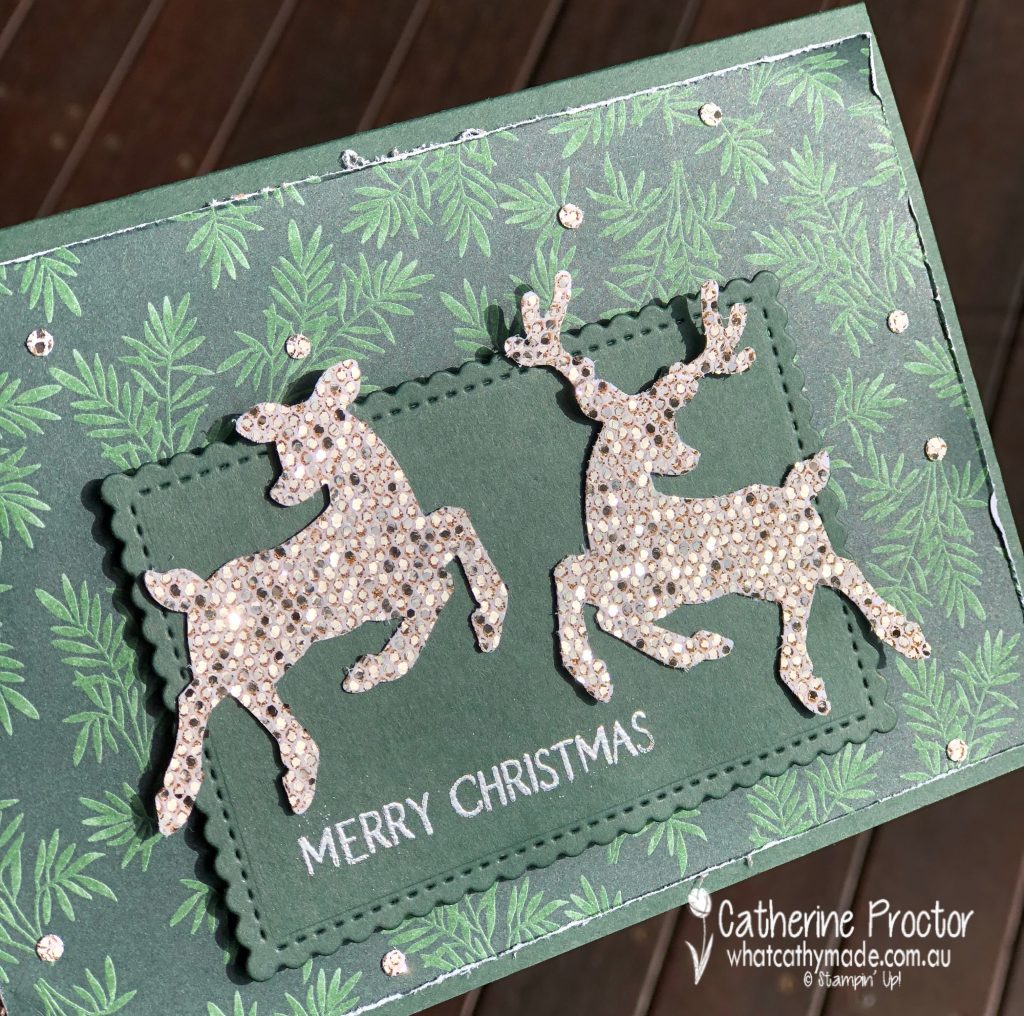
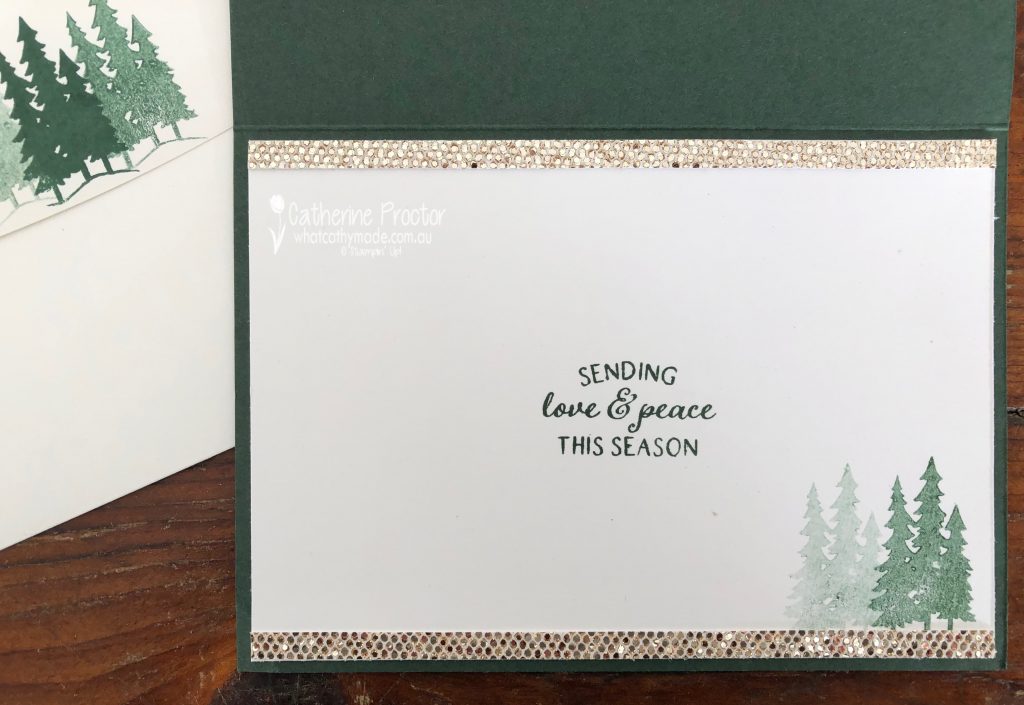
I’m so excited to share a card I made using one of these FREE Sale-a-bration products, the Be Dazzling 6″ X 6″ Specialty Paper.
Isn’t this Be Dazzling 6″ X 6″ Specialty Paper so stunning! It will definitely make any card feel extra special. The colour is hard to describe – it’s sort of a pale champagne colour that will coordinate with either silver or gold, as well as many of the neutrals, including Sahara Sand and Crumb Cake.
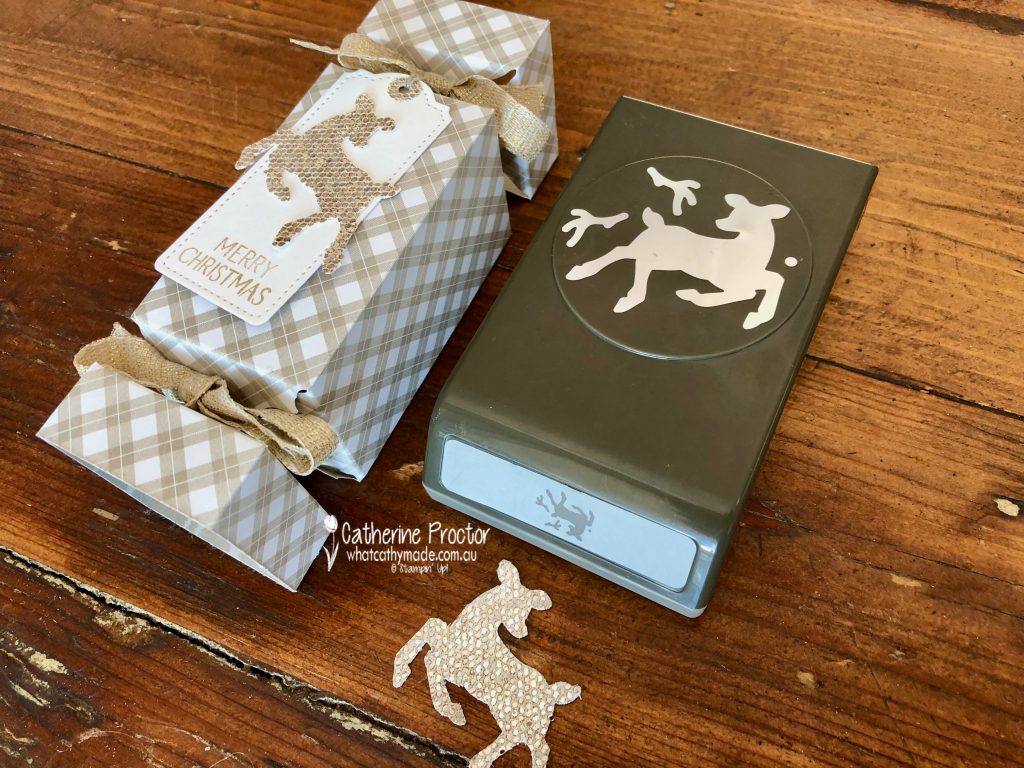
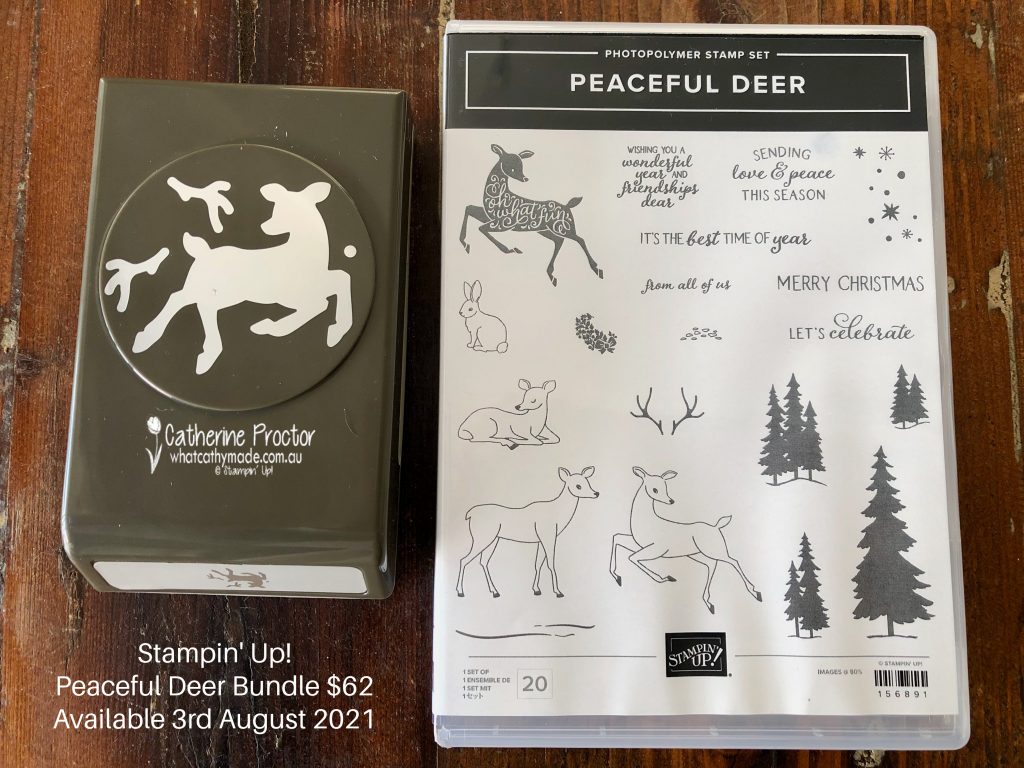
The other new products on this card are from the Peaceful Deer Bundle, which includes the Peaceful Deer Stamp Set and the Deer Builder Punch, both available from August 3.
At just $62 for the bundle, this is such an affordable and a versatile set. The Peaceful Deer Stamp Set has great sentiments and a good variety of images, including a deer that coordinates with the punch – perfect for crafters who don’t own a die cutting machine.
The beautiful Designer Series Paper I’ve used as my background is not a Christmas paper from the forthcoming July-December mini catalogue, however, I think it works really well on this card.
This Bloom Where You’re Planted Designer Series Paper is available now and on sale for $17.00 – I’ve used the sheet shown on the bottom left.
I wanted to add a few embellishments to my DSP as it is such a dark background. Looking at the scraps on paper on my craft desk I realised there is a very small circle shape in the Deer Builder Punch. I think it is meant to be the deer’s eye but I used it to punch out my own embellishments.
I love the effect of these embellishments – it’s a great way to use up the scraps! This photo – taken outside in a brief moment of sun on this rainy day – shows my embellishments close up, as well as how sparkly this paper is.
I stamped the inside of the card to match, using another sentiment and one of the tree stamps from the Peaceful Deer Stamp Set as well as adding a narrow strip of the Be Dazzling paper top and bottom.
To get the three shades of green for the trees on the back of the envelope flap, I stamped the tree stamp once at full strength in Evening Evergreen and then a second time and a third time without re-inking the stamp.
Now it’s time to hop on over to our next participant, the very talented, Sharon Davern. I wonder if she will share another fabulous fancy fold card with us?
If at any time you find a broken link please head to the blog of this week’s Host of the Heart of Christmas Blog Hop, Tina Gillespie, and she will have the list of all who are participating.
Thanks for visiting my site. I’ll be back with another card on Wednesday. If you’d like a copy of the forthcoming July-December mini catalogue and the Sale-a-bration catalogueplease get in touch.