Welcome to week five of the Heart Of Christmas Blog Hop!
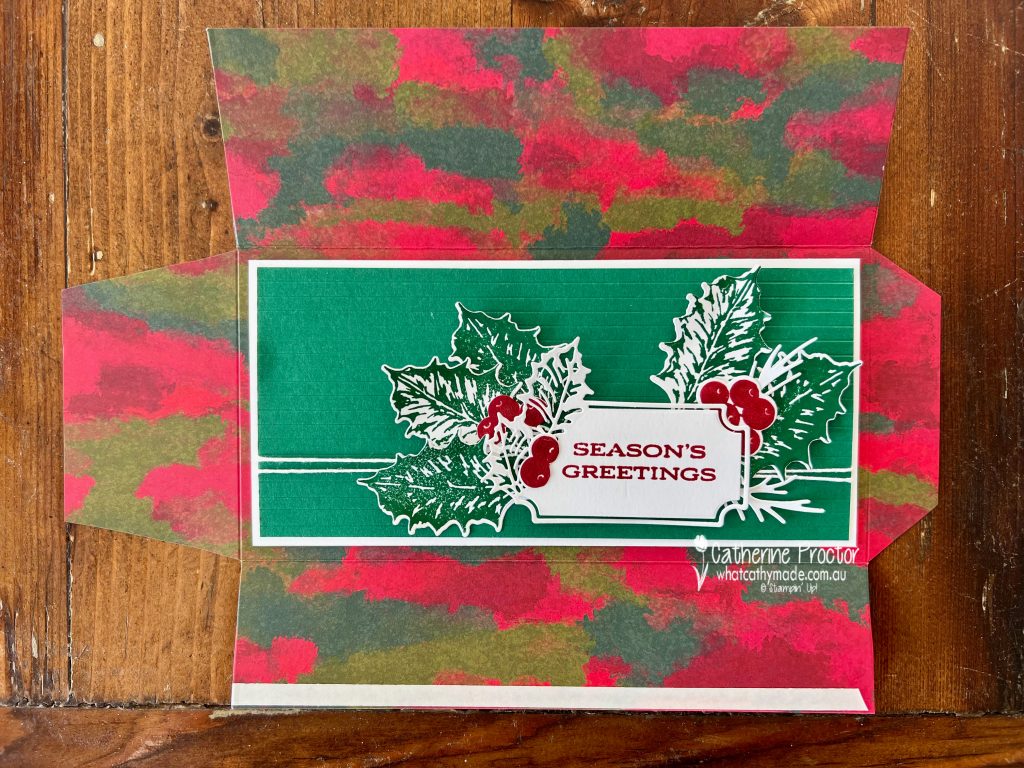
My card this week is brought to you by the stamped and die cut pieces I rejected from my Cherry Cobbler card last week, repurposed this week to make a slimline Christmas card!
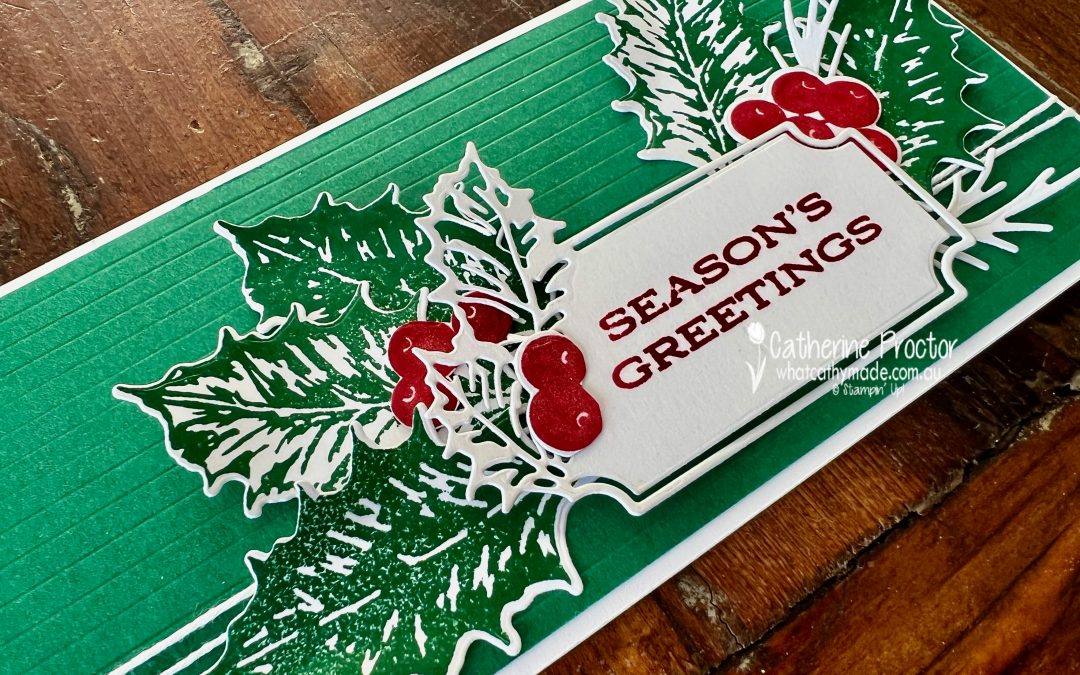
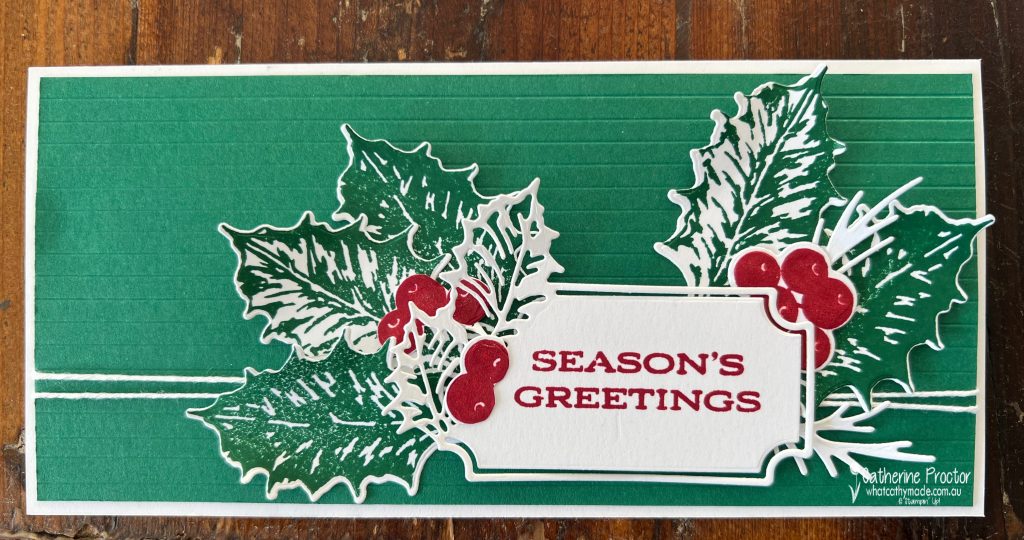
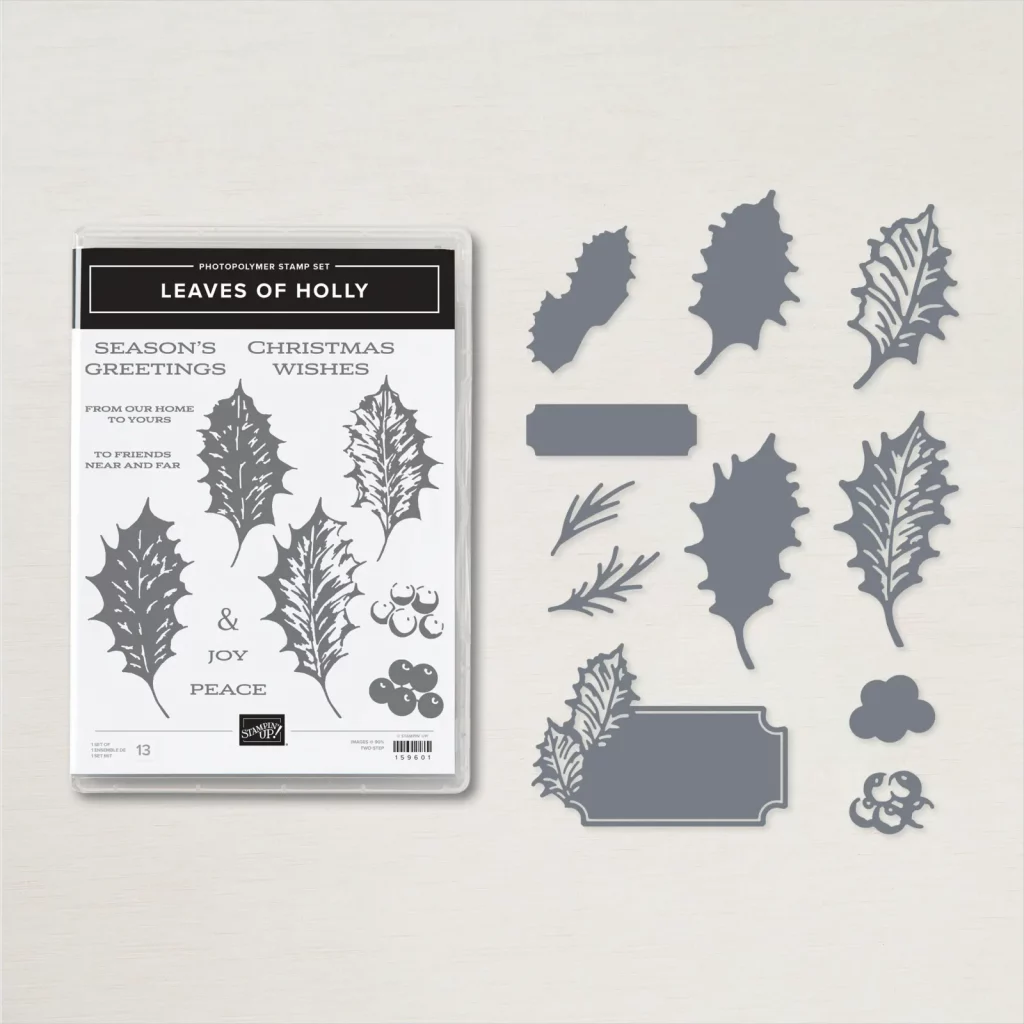
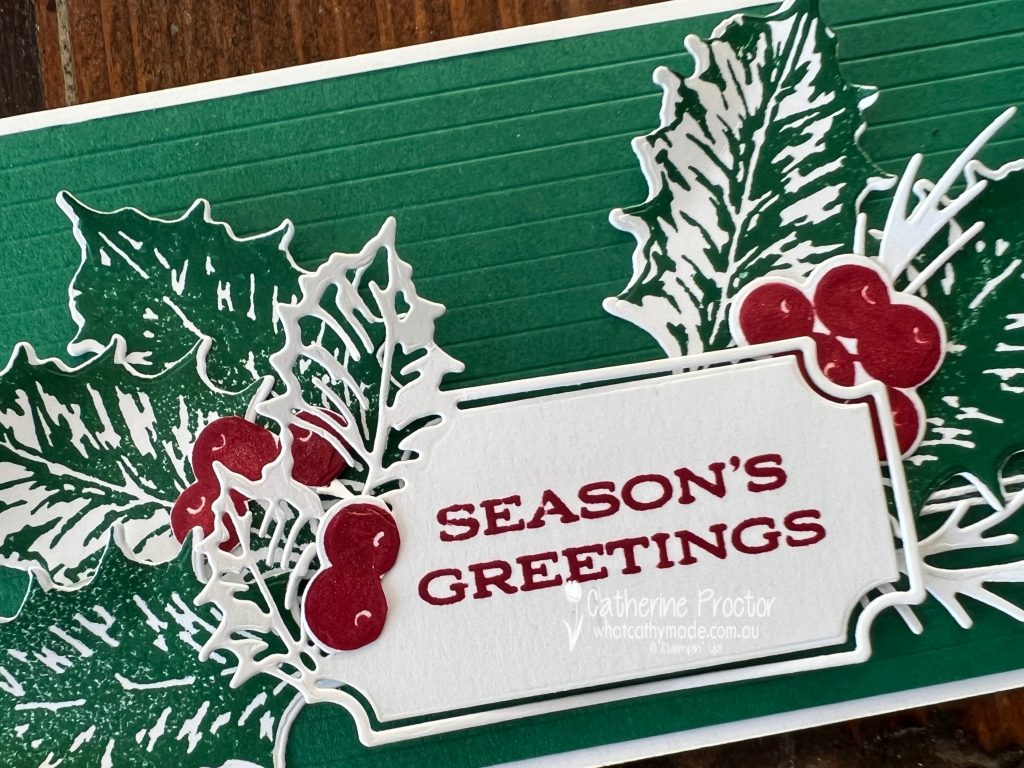
I have to confess I bought the Leaves of Holly Bundle (the Leaves of Holly Stamp Set and the Holly Berry Dies) mainly because I love this sentiment die with its holly frame!
I was worried about how to use the holly leaves and berries on a card as they are quite large, so I decided to leave the background layer quite plain, using cardstock instead of DSP and extending the length of the card to a slimline card.
I used the scoring blade on my paper trimmer to score the Shaded Spruce cardstock at 5 mm intervals, creating a clean and modern embossed layer that lets the oversized holly berries and leaves take centre stage.
A length of white bakers twine was wrapped twice around the Shaded Spruce layer before the stamped “Seasons Greetings” sentiment and holly leaves and berries were adhered to the front of the card.
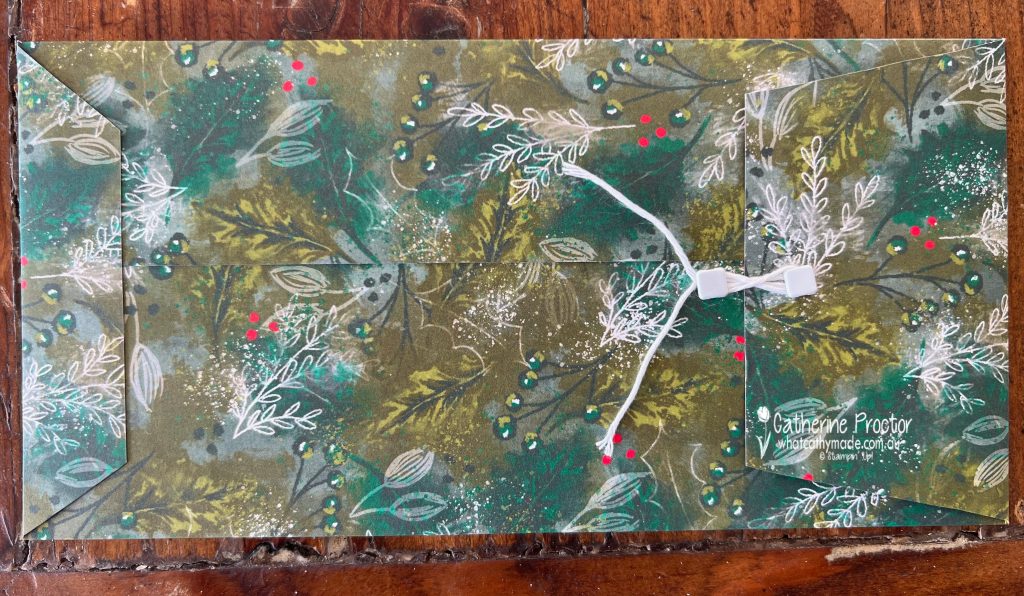
To make an envelope for my 20 x 10 cm slimline card I used the coordinating Boughs of Holly 12″ x 12″ (30.5 x 30.5 cm) Designer Series Paper.
It’s very simple to make a matching envelope for any sized card. All you need is a paper trimmer, tear’n’tape adhesive and some brads and bakers twine for the closing mechanism.
To work out the size of the envelope add 1 cm to the length and the height of the card so it has enough room to easily slide in and out. Then work out how much overlap is needed in the middle of the card to adhere the sides of the envelope together.
Slimline Envelope instructions for a 20×10 slimline card
Using 12×12 DSP, score at 7 cm and 18 cm and then cut at 23 cm
Rotate the DSP once and score at 2.5 cm and 24.5cm
Cut away the 4 corner pieces away
Add a strip of tear’n’tape to the length of the 5 cm side flap
Cut an angle in to both sides the top and the bottom flaps – I eyeball it, but it’s around 1cm at its widest point
Fold the sides in, adhering the 5cm flap over the top of the 7 cm flap.
Add tear’n’tape to the bottom 2.5cm flap and adhere it to form the base of the envelope
Form the closure using two brads and another length of white bakers twine.
For the front of the envelope that gorgeous sentiment die is used as an address label, decorated with holly berries.
Now it’s time to hop on over to our next participant, the lovely Sharon Davern – I can’t wait to see what Sharon has made this week!
If at any time you find a broken link, you can find the complete list of all participants on Sharon‘s blog. Sharon Davern is the host of our Heart of Christmas blog hop this year – thank you so much Sharon!!!
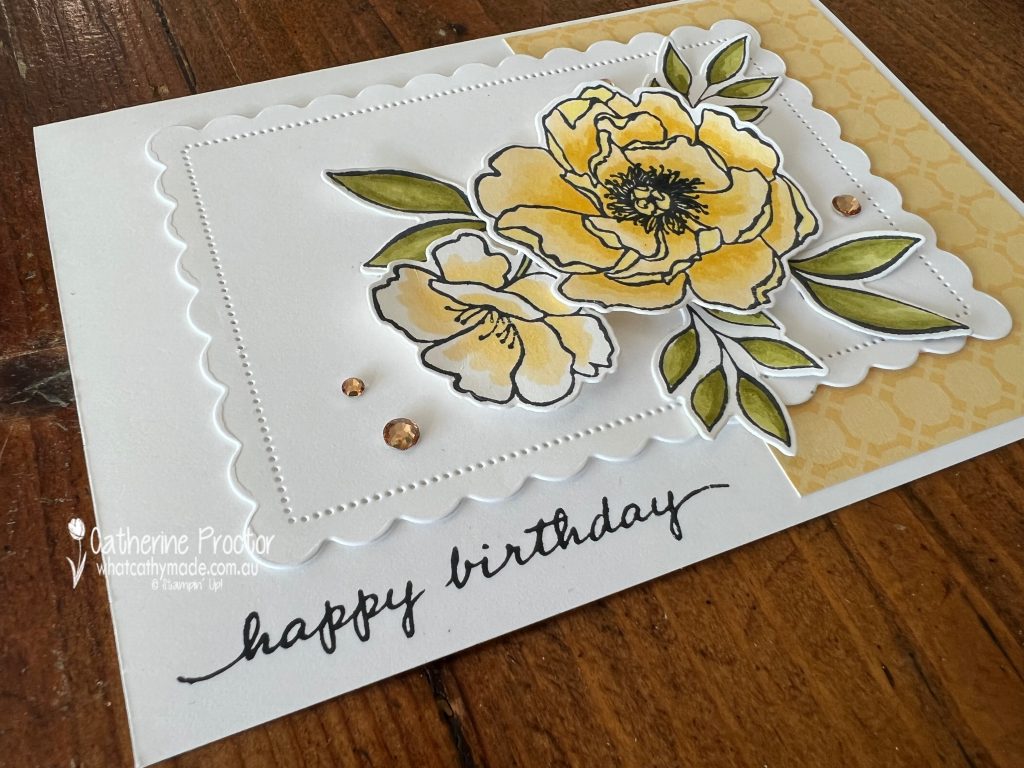
Welcome to week 44 of our 2021-22 Colour Creations blog hop! Tonight we are showcasing So Saffron from the Subtles family.
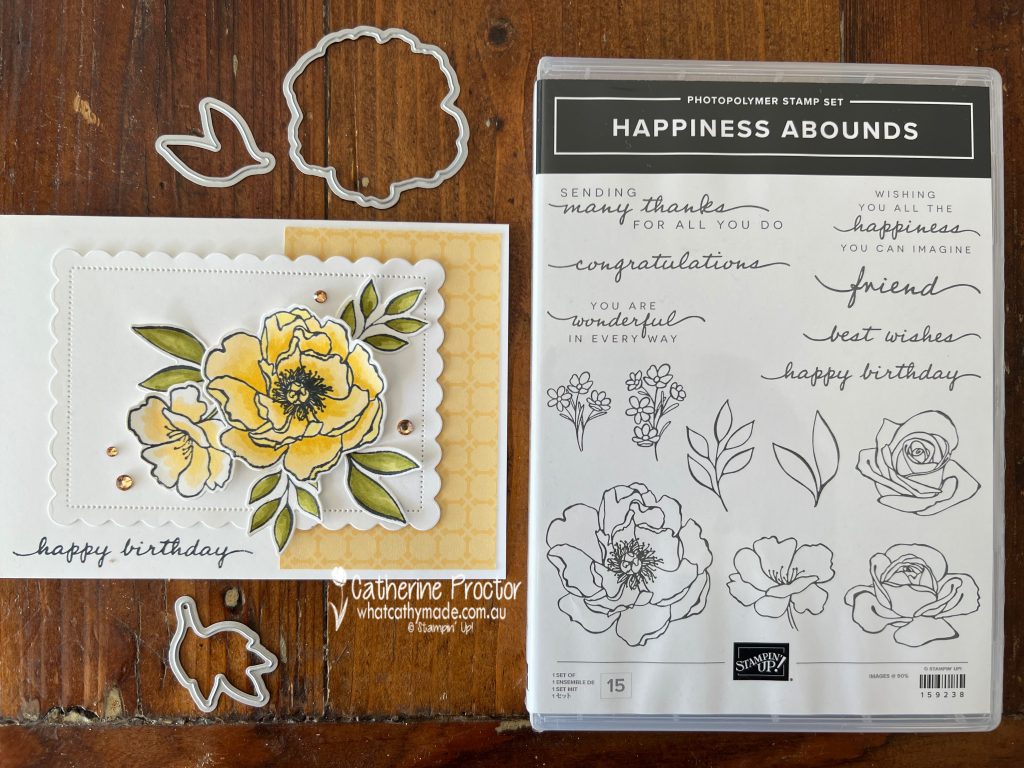
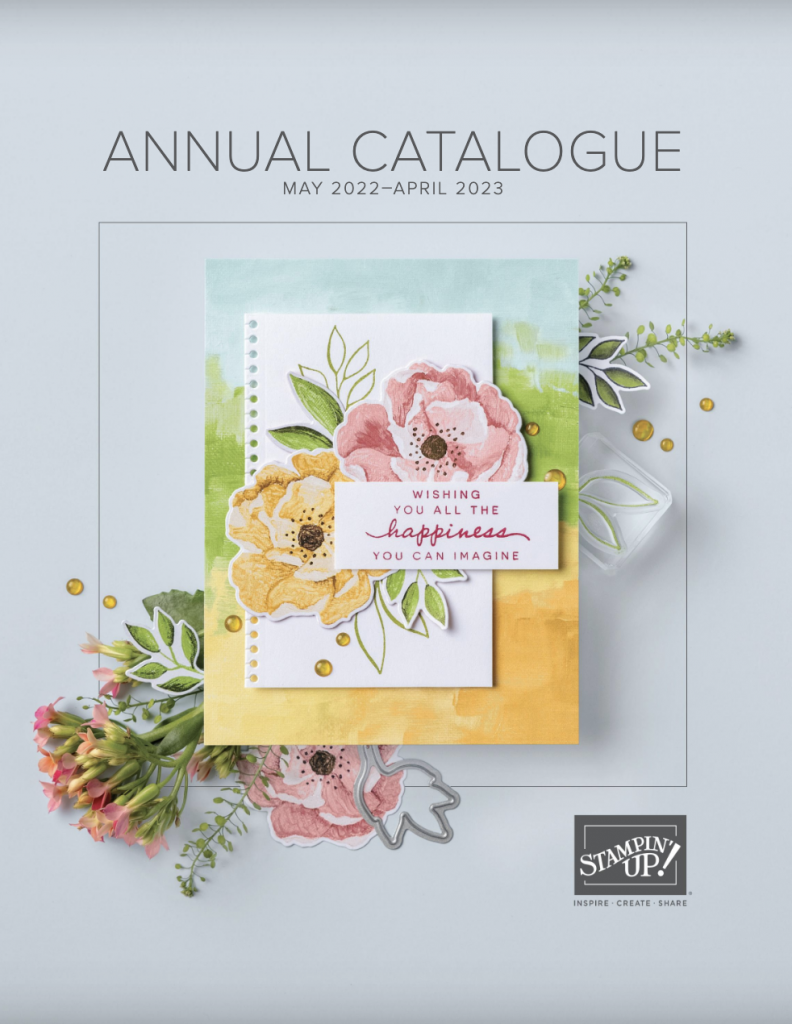
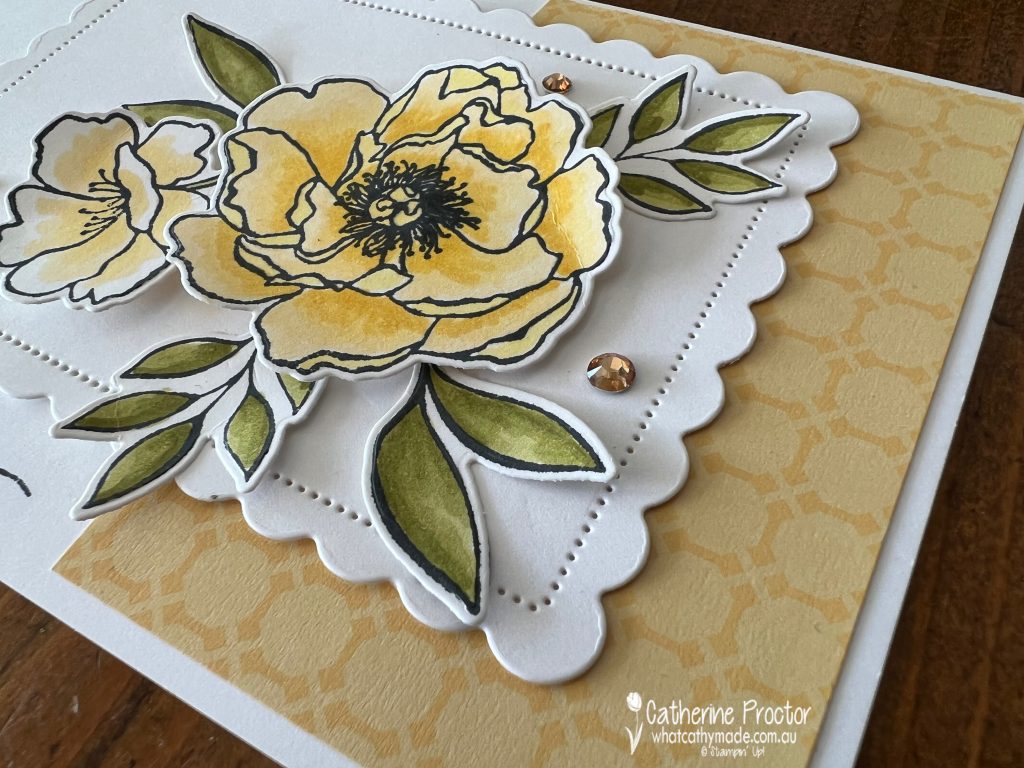
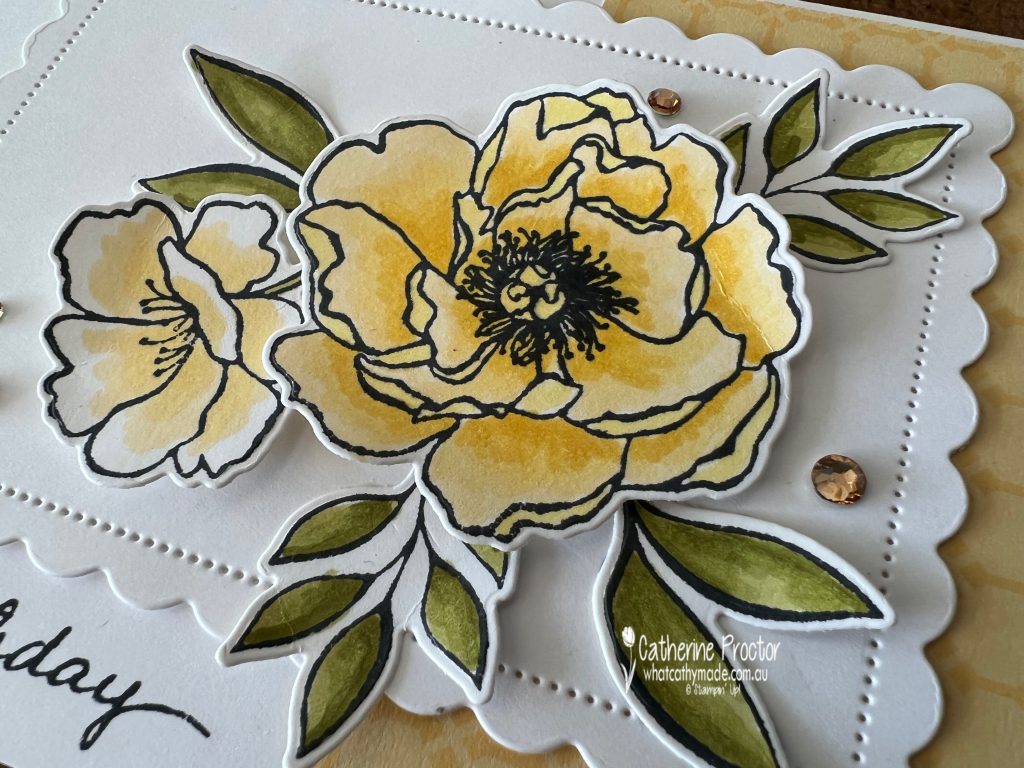
As a Stampin’ Up! demonstrator we get to see and order from the new catalogue early, so when my 2022-23 annual Catalogue preorder turned up this week I couldn’t resist giving you a sneak peek one of one of the new products. The Happiness Abounds bundle includes the Happiness Abounds stamp set and the Blossoming Happiness dies.
This gorgeous bundle is part of the Hues of Happiness suite collection featured on the front cover of the new catalogue. It comes with the most stunning DSP with images that you can die cut using the Blossoming Happiness dies.
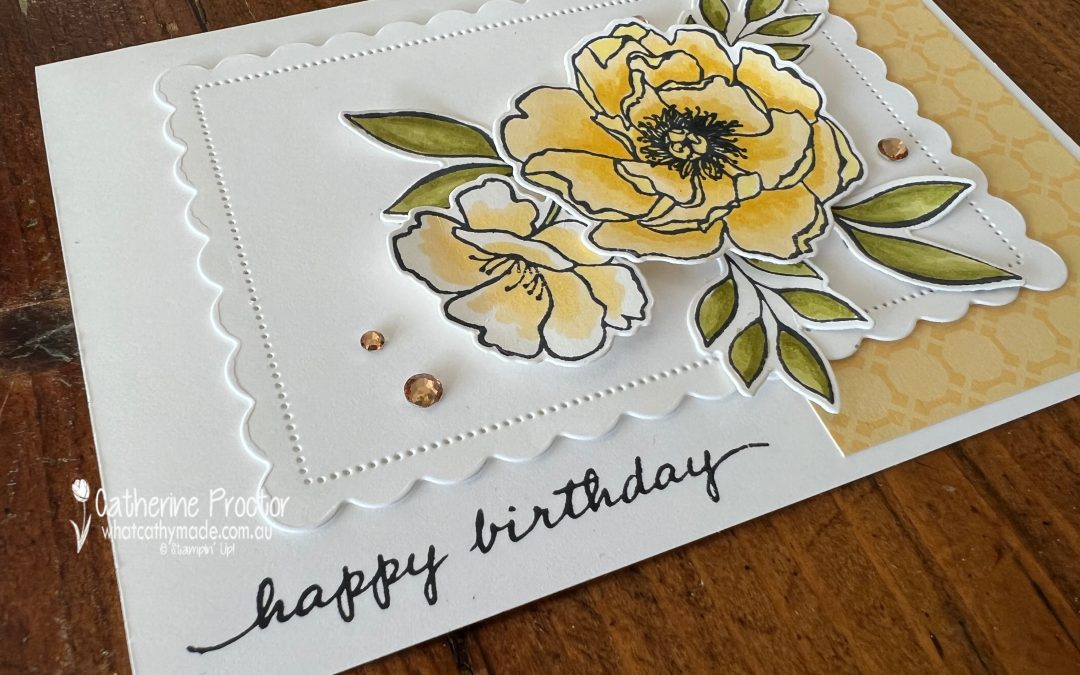
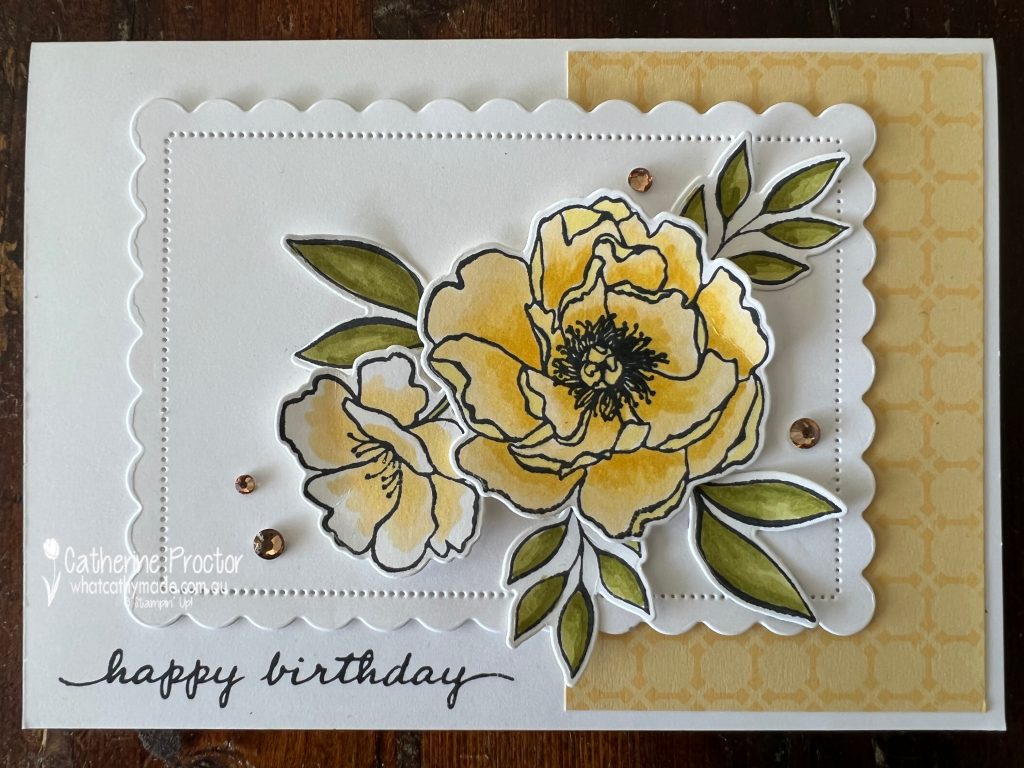
My card uses the Happiness Abounds bundle, with images coloured using my So Saffron, Daffodil Delight and Old Olive Stampin’ Blends.
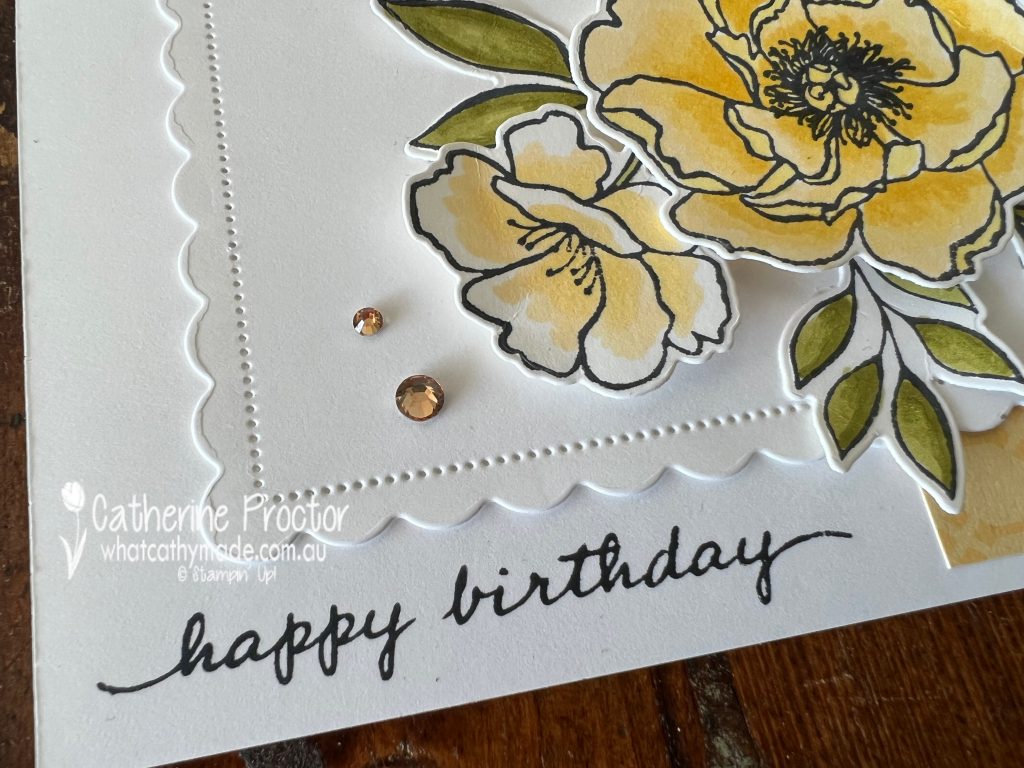
My yellow rose sits on a layer of Basic White cardstock die cut using one of the scalloped contour dies and a piece of Subtles 6″ x 6″ (15.2 x 15.2 cm) Designer Series Paper, on sale now for 50% off as it is retiring soon.
Isn’t this “happy birthday” sentiment just gorgeous?
I love the different depths of yellow that can be achieved by using the So Saffron and Daffodil Delight Stampin’ Blends.
The Champagne Rhinestone Basic Jewels add just a touch of bling.
Now it’s time to hop on over to our next participant, the lovely Caroline Manwaring – I can’t wait to see what Caroline has made this week!
If at any time you find a broken link, you can find the complete list of all participants below.
Welcome to week 43 of our 2021-22 Colour Creations blog hop! Tonight we are showcasing Smoky Slate from the Neutrals family.
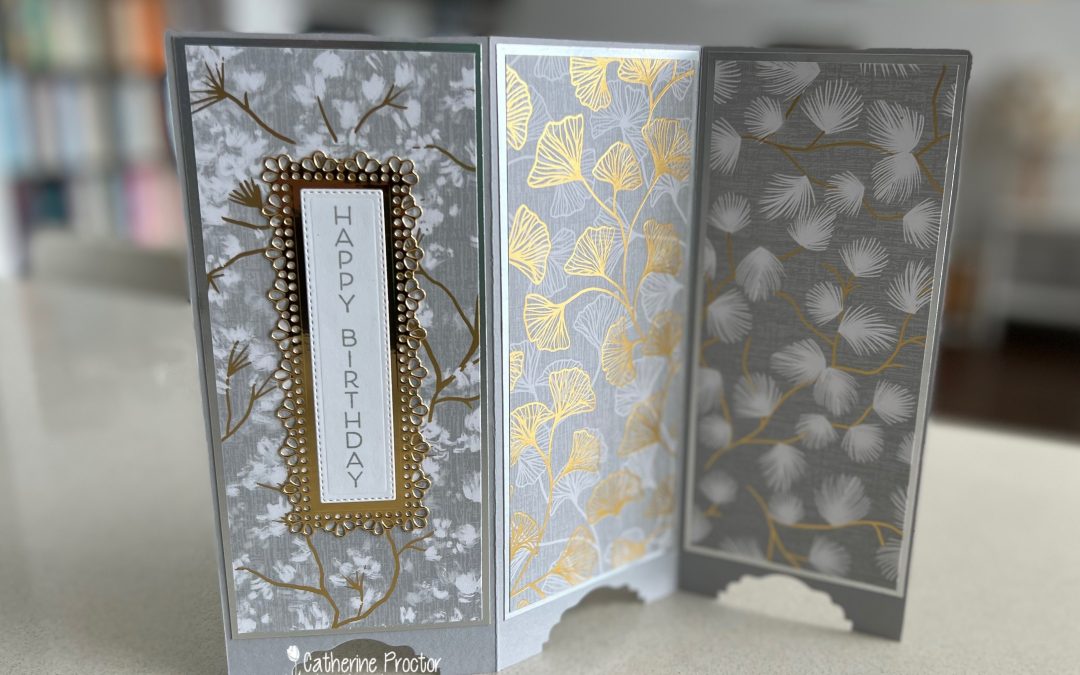
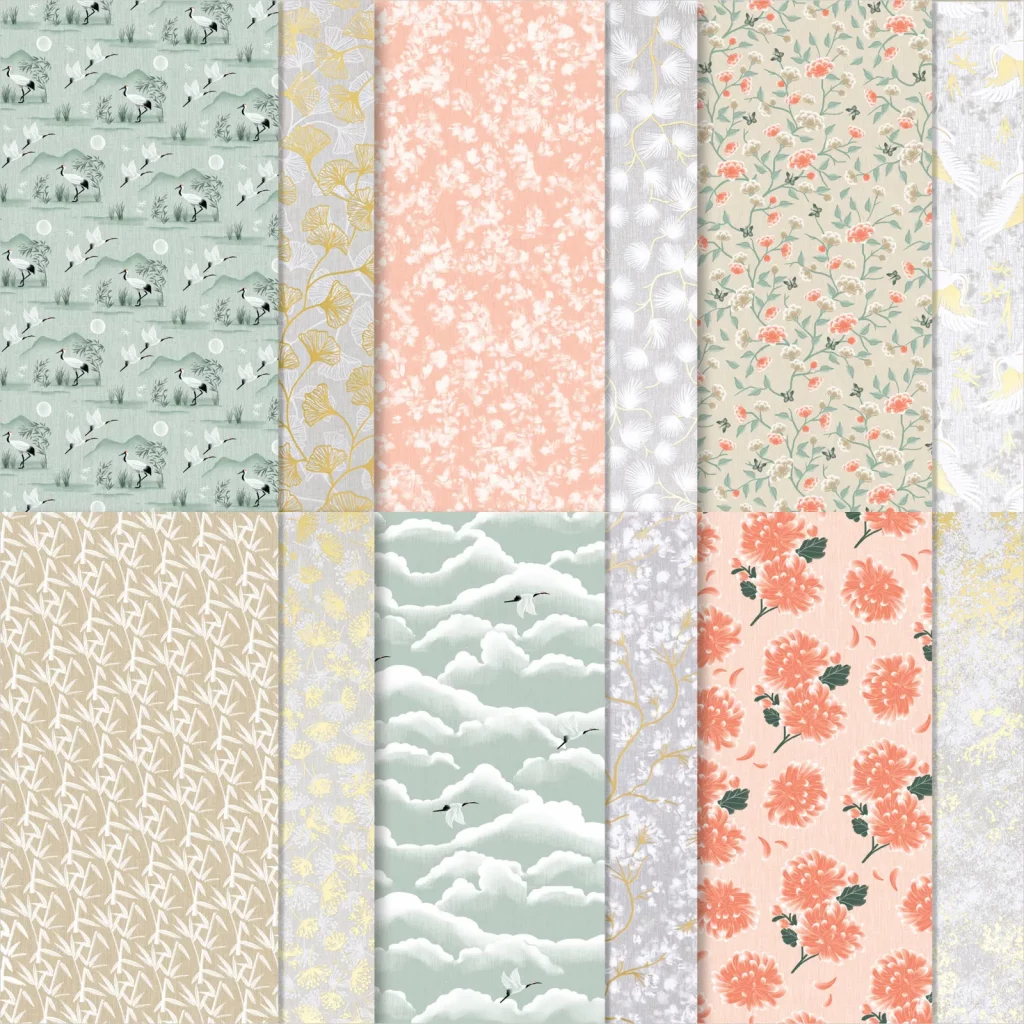
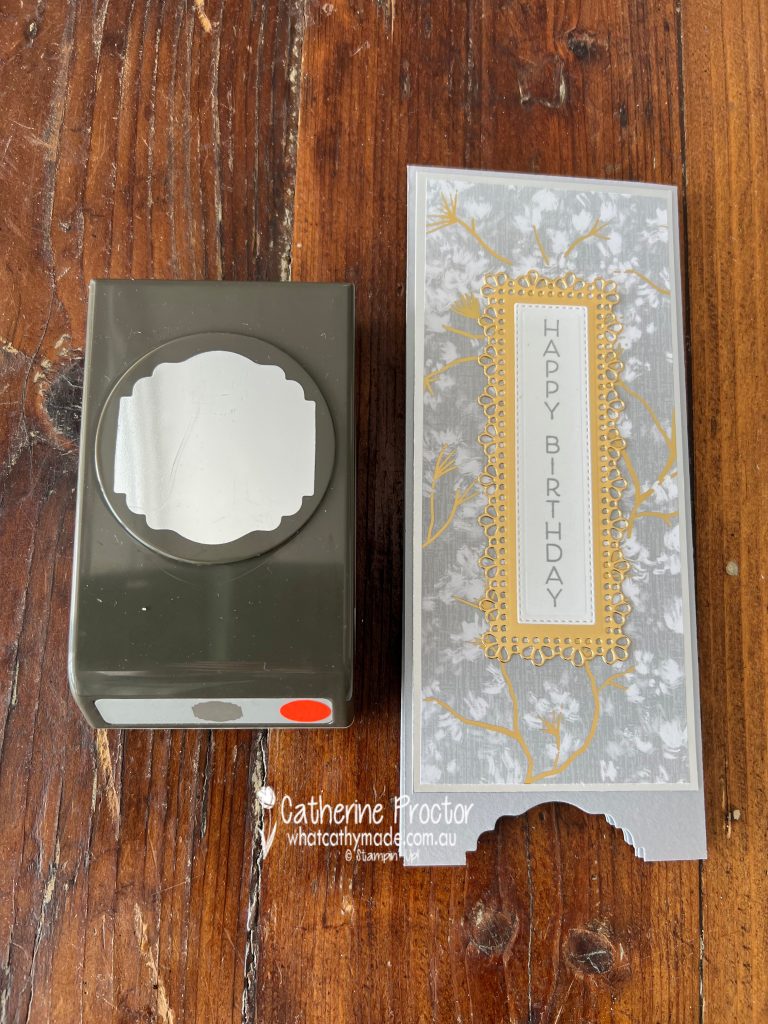
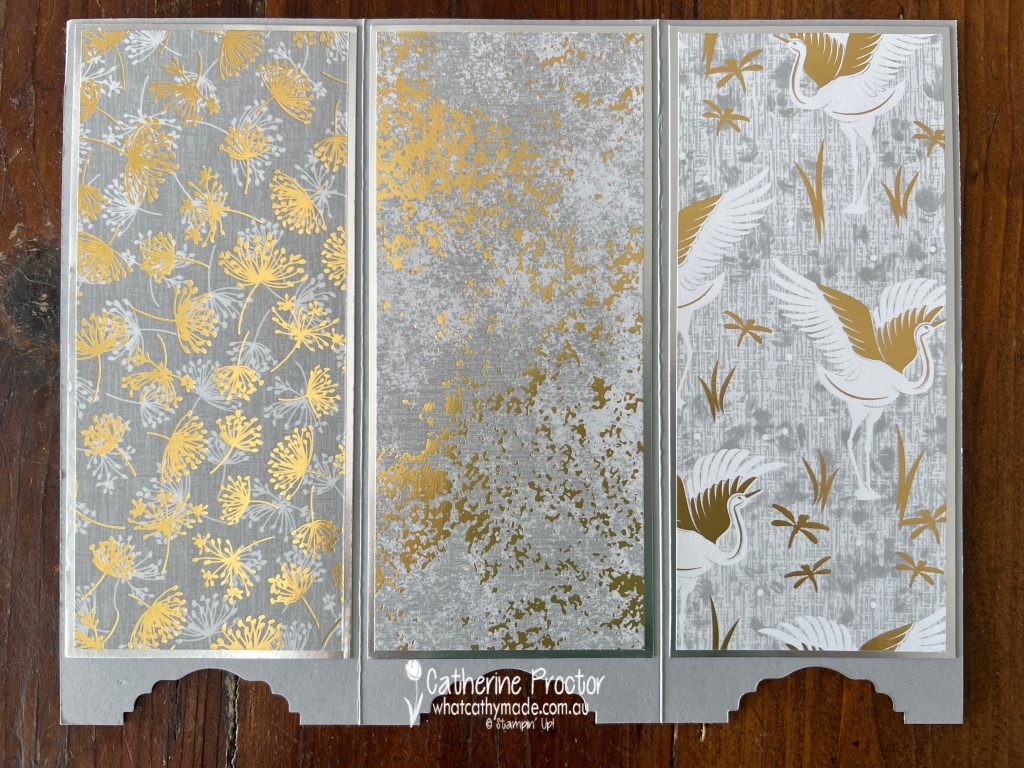
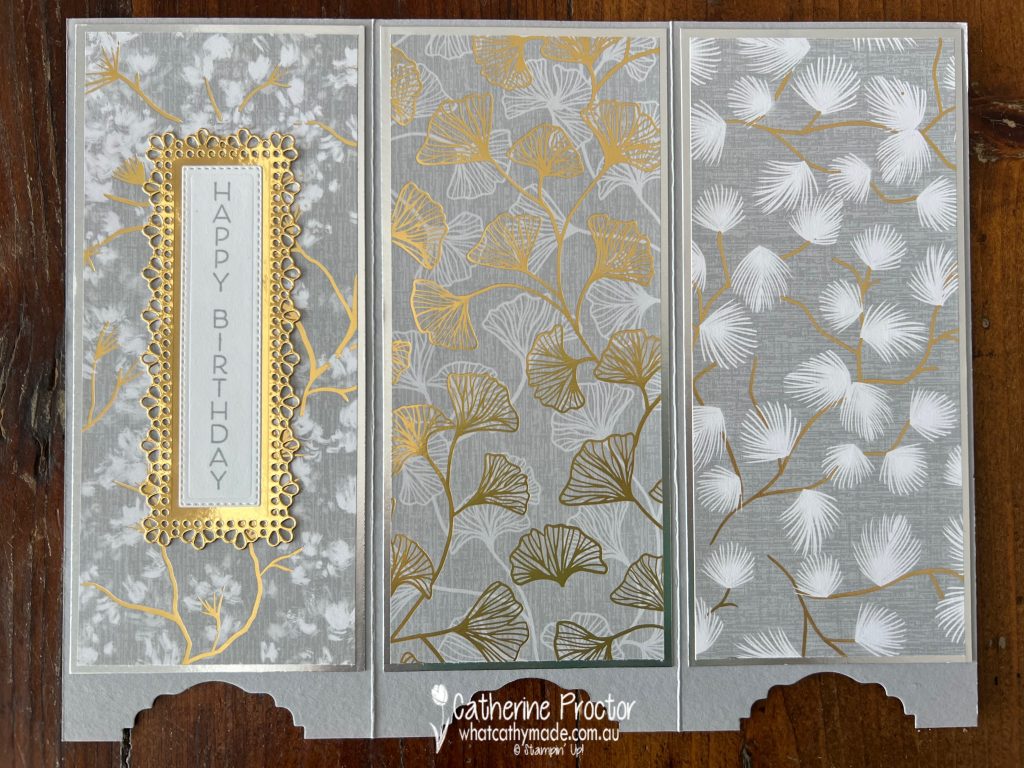
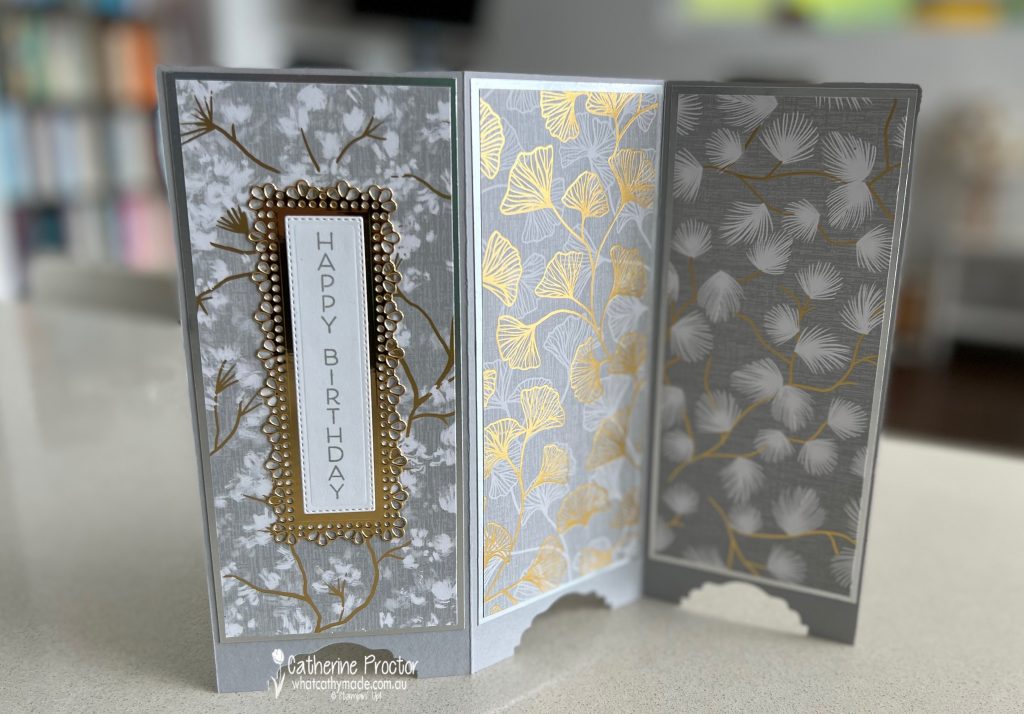
This gorgeous Symbols of Fortune Designer Series paper is so stunning I wanted to make a card that allowed me to showcase the 6 foiled sides that also feature Smoky Slate.
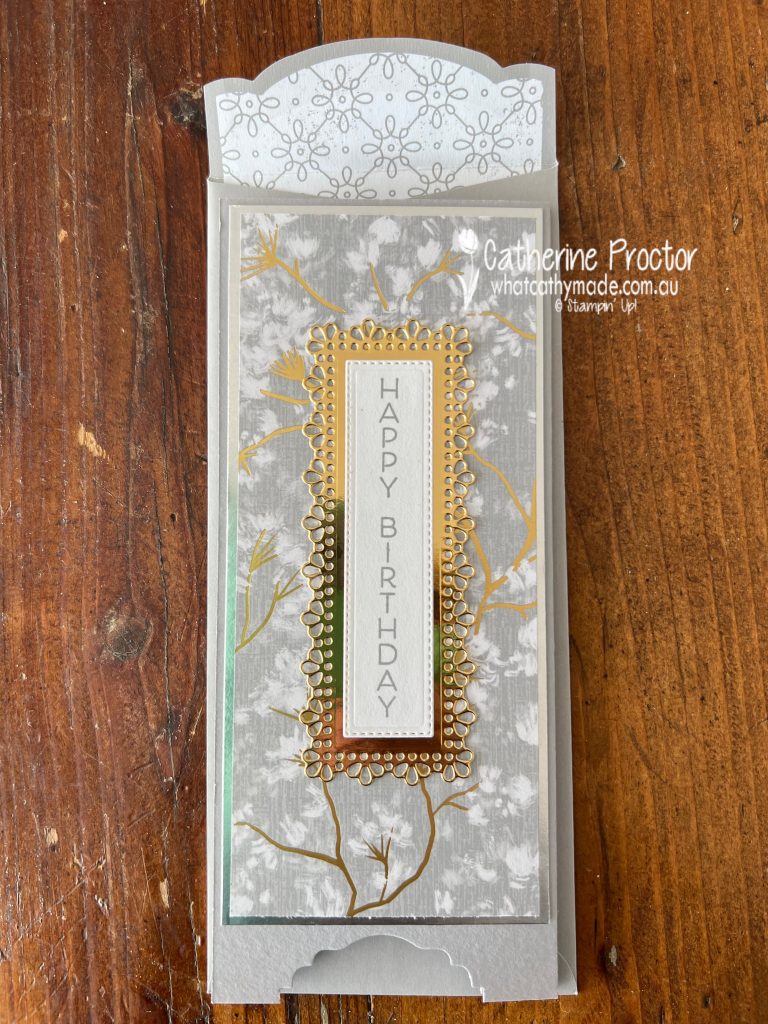
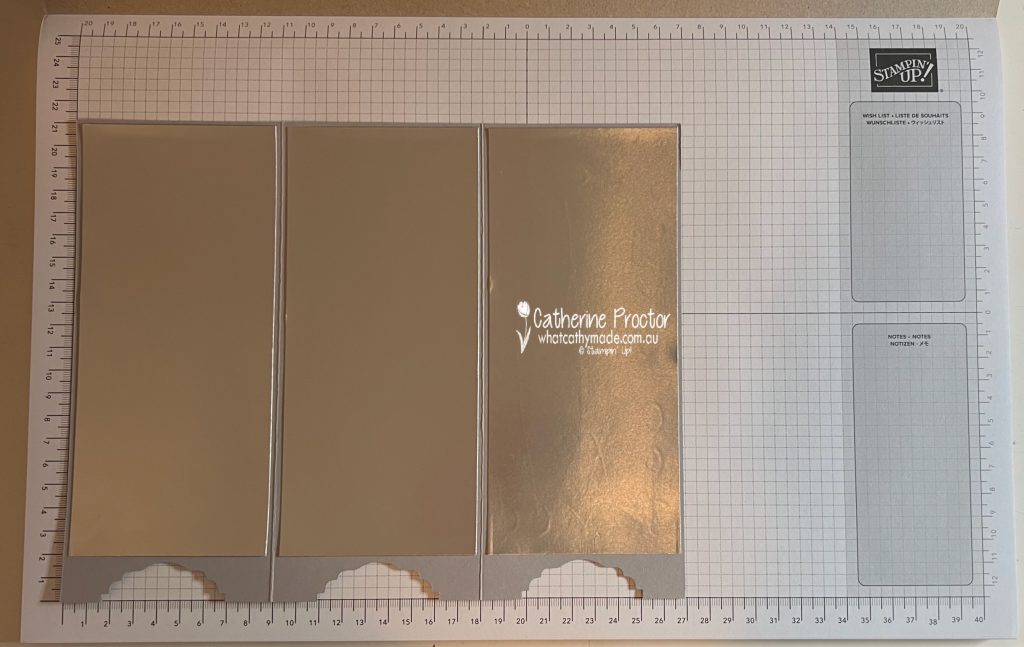
A screen card is the perfect type of fancy fold for this Asian-inspired DSP, so I designed a screen card using an A4 sheet of Smoky Slate cardstock, making it narrow enough to fit inside one of the new Slimline Envelopes.
To make the card base, trim 2.8 cm off the end of a piece of A4 card stock, then score and fold the cardstock at 9 cm and 18 cm. Cut 6 foil layers measuring 8.5 x 19 cm and adhere to both sides of the cardstock base as shown below. I didn’t have enough gold foil so I used silver foil instead.
To make the “feet” of the screen card I used the Label Me Lovely punch. Fold the card up and punch through all three layers at once so the feet align when the card is folded flat.
The DSP screen fronts measure 8 x 18.5 cm – there are 6 foiled patterns in the Symbols of Fortune DSP, so I used one of each design. This is the reverse side of the card – if you wanted somewhere to write a message you could add a panel of plain white cardstock to this side of the card.
The “happy birthday” sentiment is from Celebrate With flowers, stamped in Smoky Slate and die cut using the Ornate Layers dies.
I love how this vertical sentiment and the proportions of the Ornate Layer die both perfectly match the dimensions of this slimline card!
A scrap piece of Basic White cardstock was die cut using the same Ornate Layers die to create a matching address label for the front of the slimline card.
This fancy fold is a wonderful card design to send to someone who likes to display their cards as it stands up very well – it really does look like a mini screen!
Now it’s time to hop on over to our next participant, the lovely Kate Morgan – I can’t wait to see what Kate has made this week!
If at any time you find a broken link, you can find the complete list of all participants below.
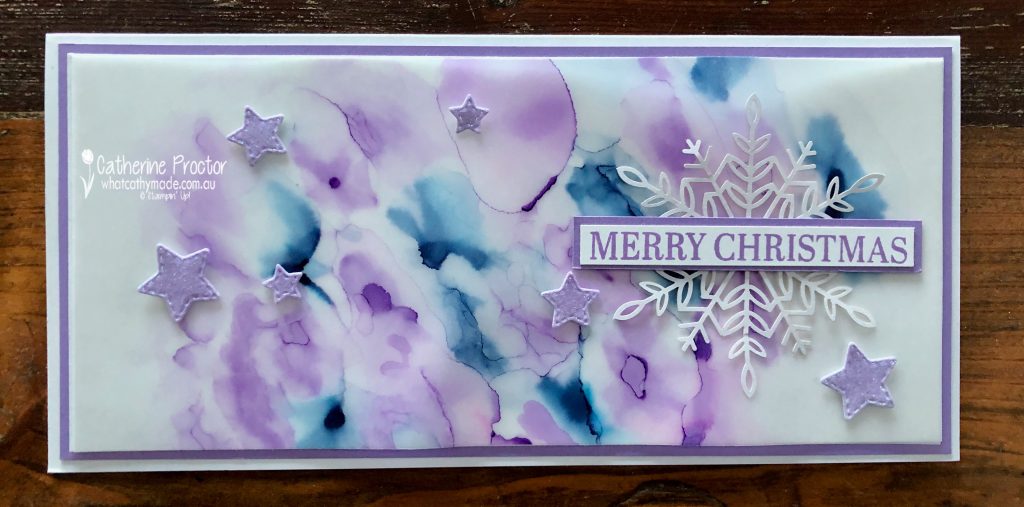
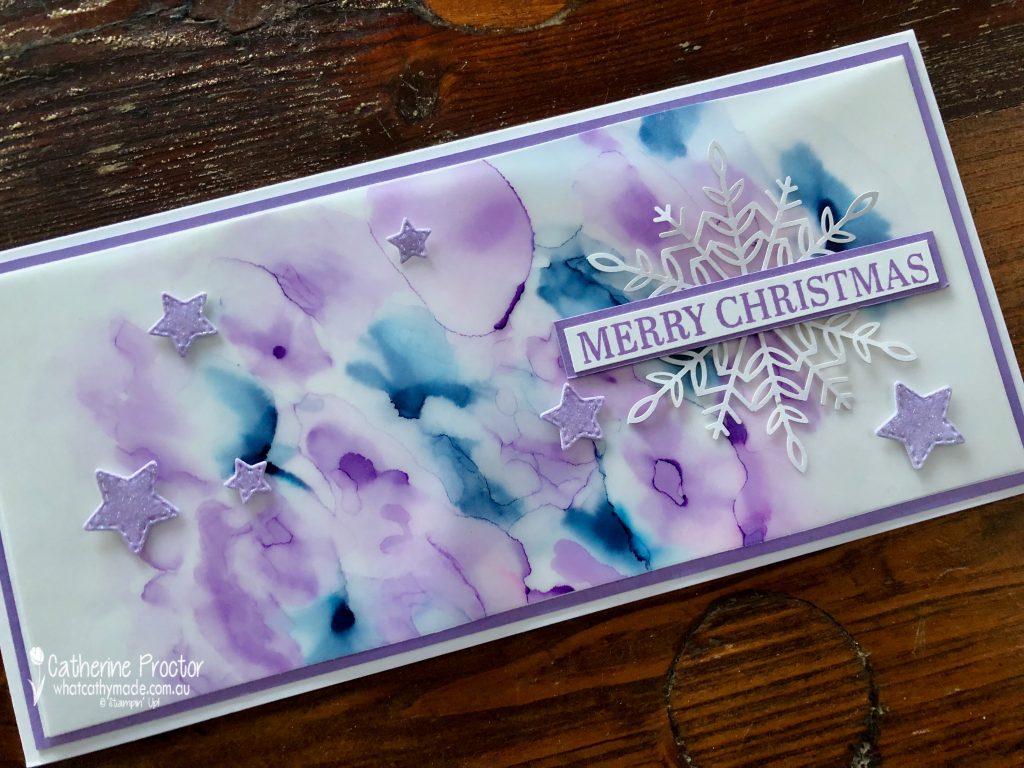
Welcome to week 22 of our 2021-22 Colour Creations blog hop! Tonight we are showcasing Highland Heather, a soft purple from the Subtles colour collection.
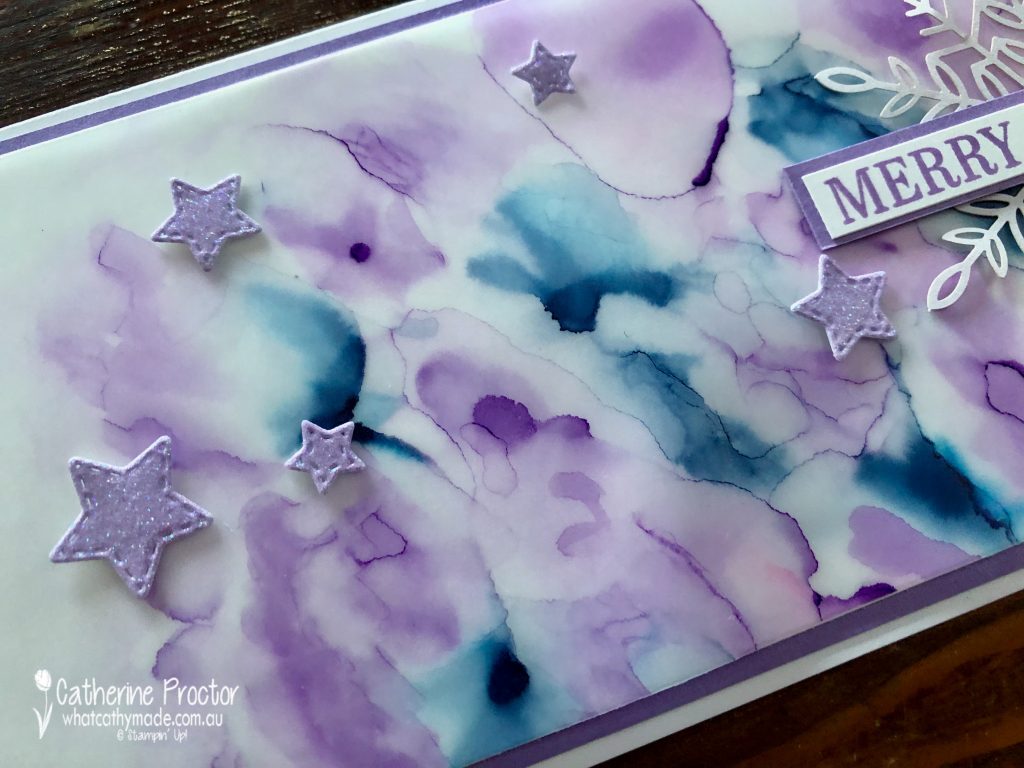
I know I’m a bit late to the party, but this week I finally tried the Stampin’ Blends alcohol technique. Oh my goodness, gracious me – what a fantastic technique this is! If you haven’t tried this technique yet, just give it a go. There is no right or wrong, it’s easy to do and you get a totally different effect every time. All you need are Stampin’ Blends, 100% Isopropyl Alcohol, vellum and a paintbrush.
For my slimline card (10 x 20 cm) I used my dark Highland Heather Stampin’ Blend and my dark Night of Navy Stampin’ Blend. I simply scribbled random “splotches” of each colour onto vellum and then used a paint brush to gently paint the edges of the splotches with 100% Isopropyl Alcohol.
If I felt the gaps between splotches were too big, I simply waited for the alcohol to dry, added more colour with the Stampin’ Blend and repeated the alcohol painting with my paintbrush.
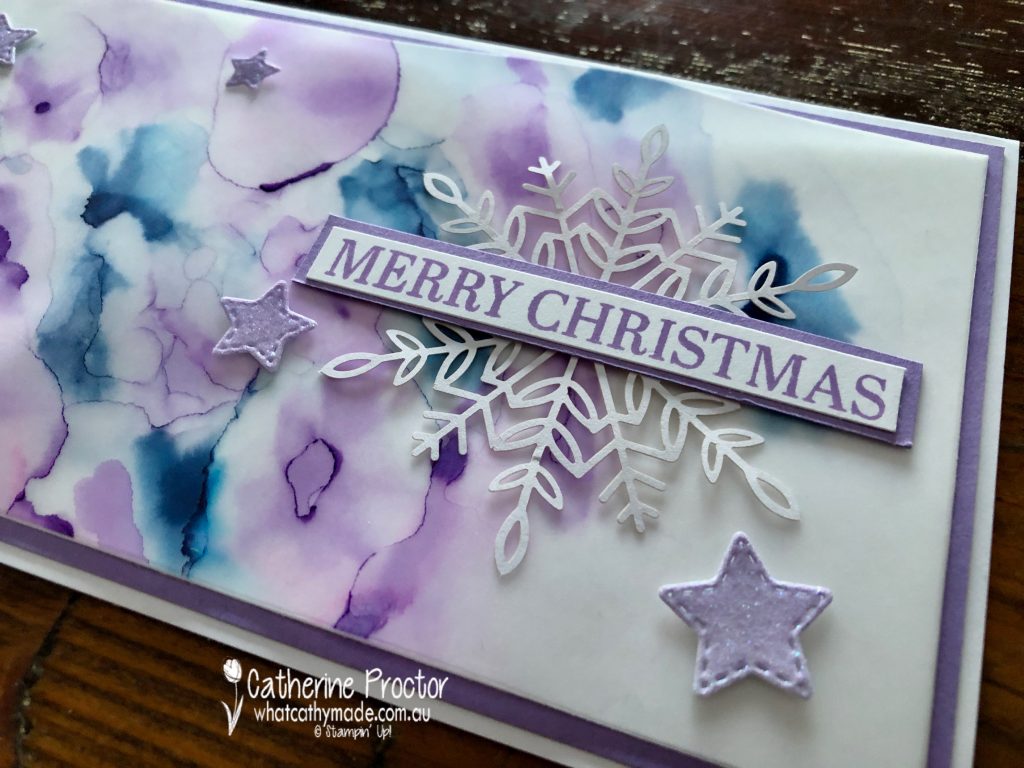
The sparkly stars are die cut from the from one of the glittering glimmery ombre specialty papers using the star dies from the Give It a Whirl dies. I used the Gorgeous Grape glittering glimmery ombre specialty papers – the lighter end of this ombre paper looks more like Highland Heather than Gorgeous Grape.
TIP: Once the alcohol has dried, adhere your embellishments to the front side of the vellum FIRST and them turn the vellum over and strategically place adhesive BEHIND where the embellishments sit so you can’t see the adhesive behind the vellum layer.
A snowflake from the Wonderful Snowflakes embellishments and the Merry Christmas sentiment from the Sparkle of the Season stamp set complete my Christmas card.
Now it’s time to hop on over to our next participant, the lovely Michele Taylor – I can’t wait to see what she’s made this week!
If you find a broken link or have come to this blog hop from a different entry point, you can view the the full list of participants below:
Welcome back to our Colour Creations Showcase as we continue our showcase of over 50 beautiful Stampin’ Up! colours in alpha order.
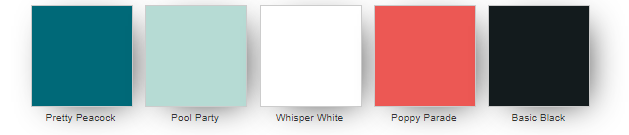
This week we are showcasing Pool Party, one of my favourite colours.
It was only after I finished my card that I realised my colour scheme has combined Pool Party with the next two colours in our Colour Creations showcase: Poppy Parade and Pretty Peacock. I love these colours together – it’s quite a retro colour combination and I think it reminds me of illustrations in a book that I had as a child.
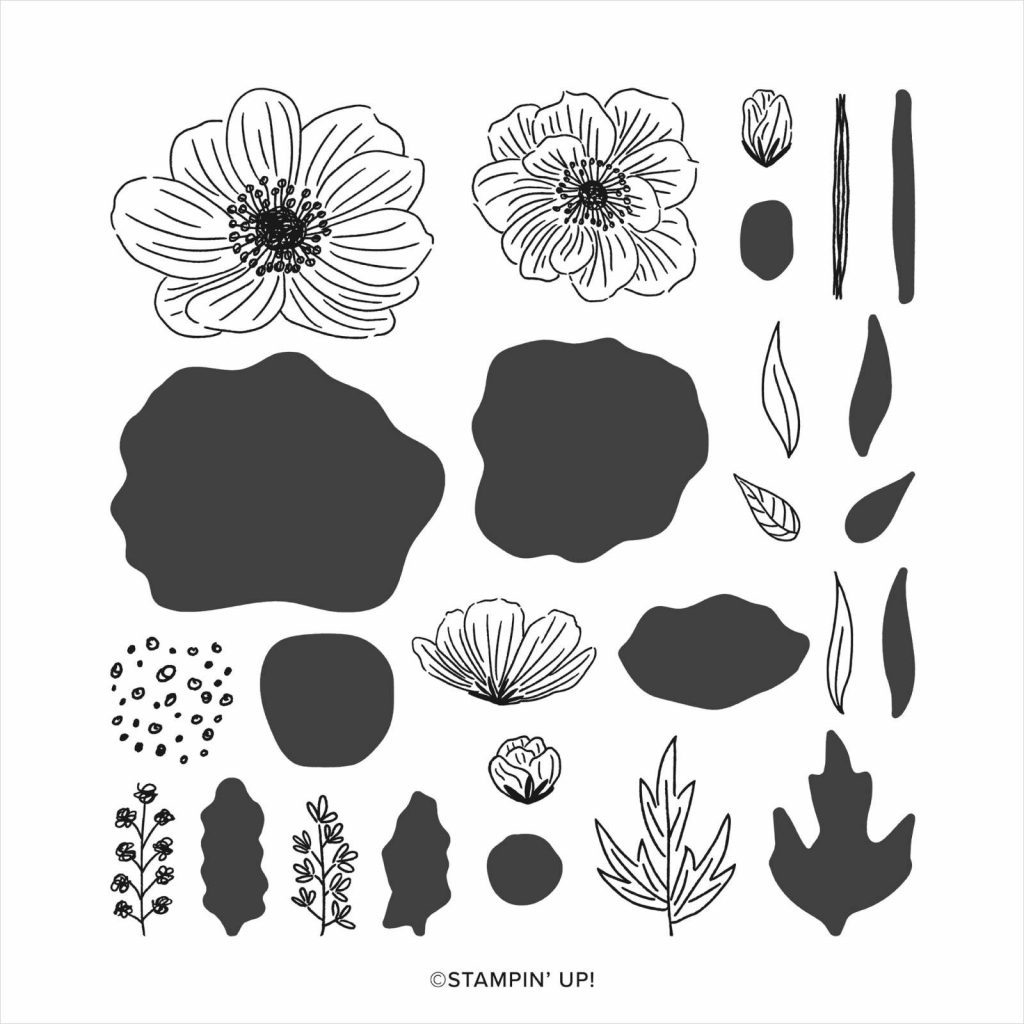
Ever used one of the Stampin’ Up! “Reversibles” stamp sets? These stamp sets make for quick and easy cards AND they are so fun to use!
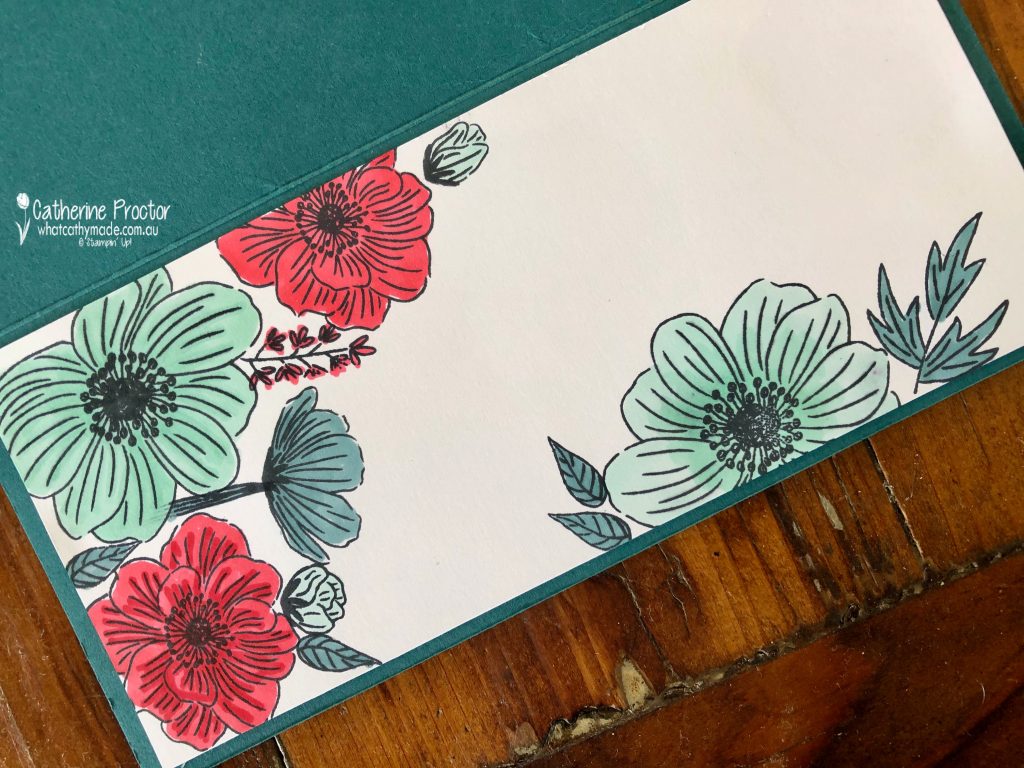
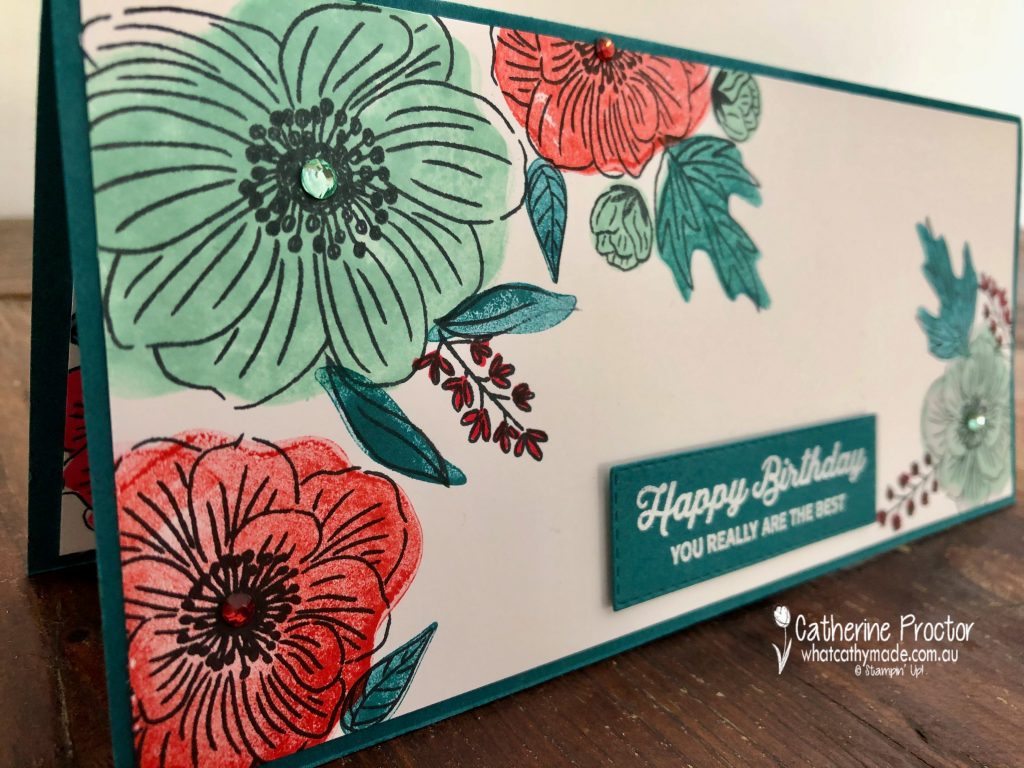
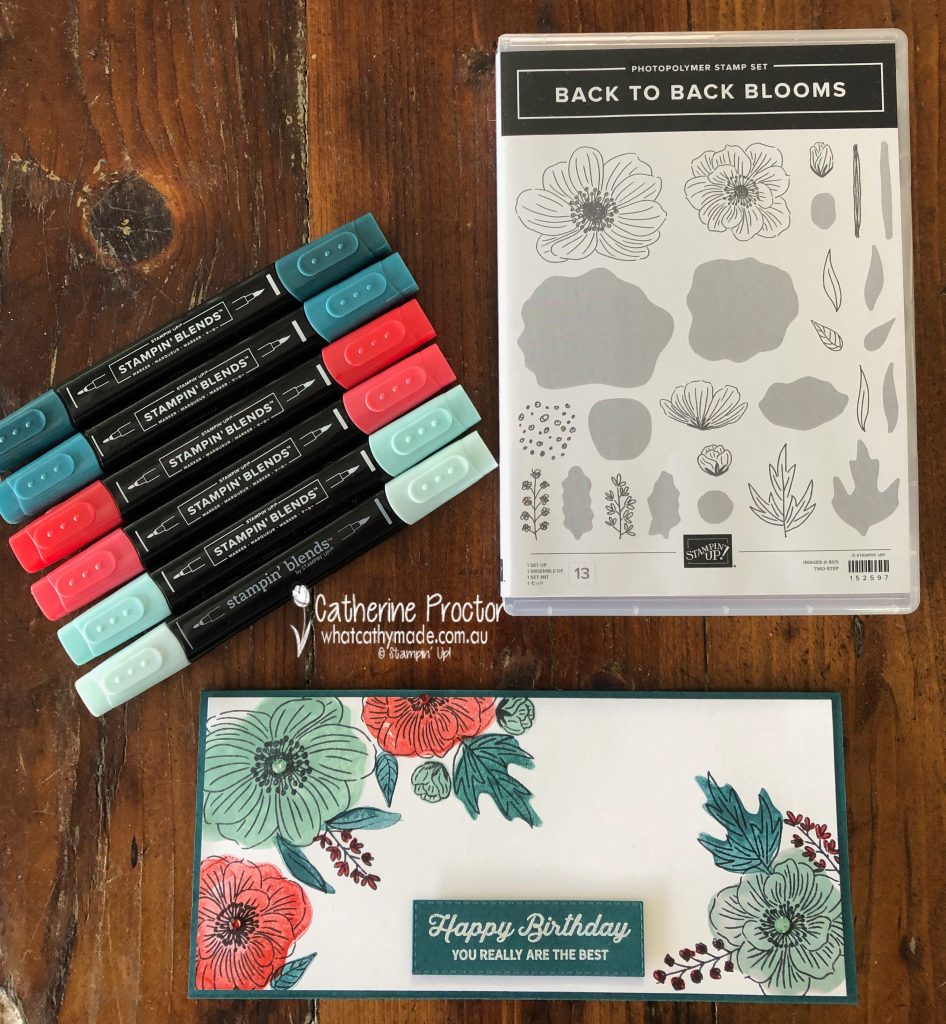
Today I’m using a new Reversibles stamp set from the January-June 2021 Mini Catalogue called Back to Back Blooms. With “Reversibles” you can stamp with both sides of the stamp – one side has the detailed outline image and the other side gives you a solid stamp to add a block of colour.
With the Back to Blooms stamp set the reverse side of the stamp does not perfectly align with the outline side of the stamp, but I personally really like this offset look. However, other “Reversibles” stamp sets, such as “Jar of Flowers”, do align because the reversible stamps are symmetrical.
If you don’t like this offset look, you can simply stamp the outline side of the stamps and then colour these line images in with your watercolour pencils, Stampin’ Blends, markers or even using your water painters or blender pen with your ink pads.
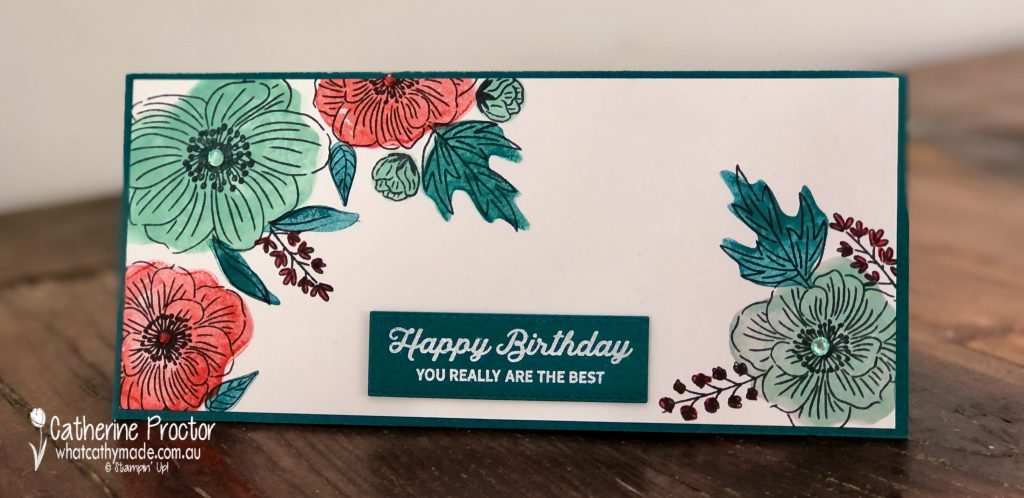
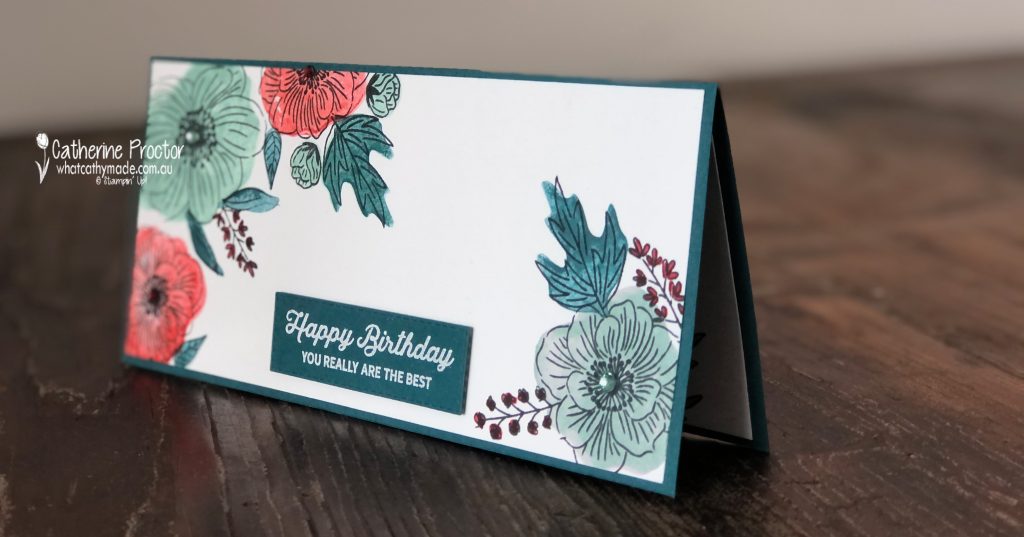
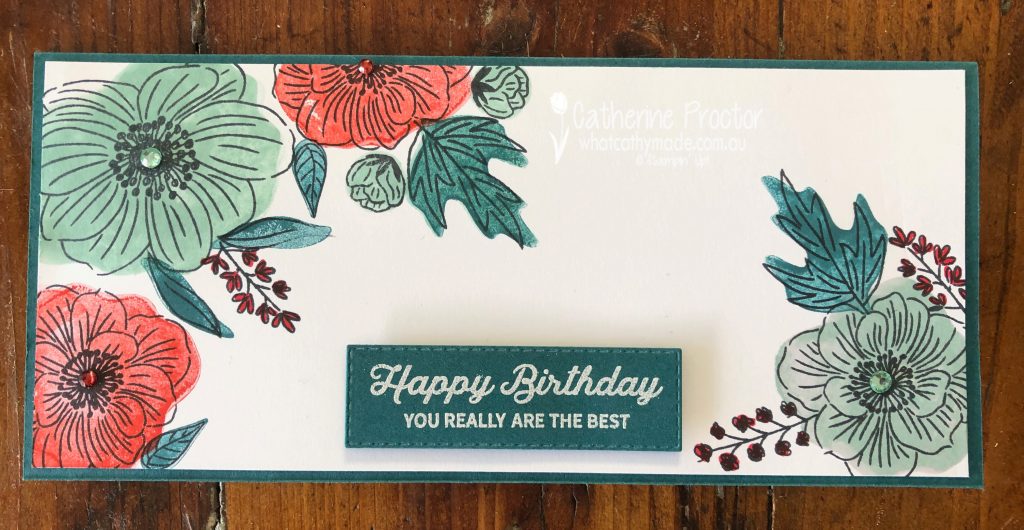
My slimline card was super easy to make – I simply stamped the outline stamps in Tuxedo Memento Black, flipped the stamp over and then I offset stamped in Pool Party, Poppy Parade (stamped off once) and Pretty Peacock (stamped off once).
To show you how you can use the outline stamp in this set and then colour in for a neater look, on the inside panel of my card below I’ve coloured the images with my Stampin’ Blends (instead of using the reverse side of the stamp to stamp the colour).
To finish the front of my slimline card off I used Holiday Rhinestone Basic Jewels in Cherry Cobbler and Coastal Cabana in the centre of my flowers. I find these Holiday Rhinestone Basic Jewels so incredibly versatile – the colours always seem to perfectly match whatever red, green, yellow, orange or yellow I use them with.
The Happy Birthday sentiment is from another new stamp set called “In Bloom” that I’ve stamped in Versamark and then heat embossed in white.
I wonder what look you prefer with this stamp set? Is it the water coloured offset look of reverse stamping on the front of my card or the more precisely coloured look of the inside flowers coloured using the blends?
Either way, I think you’ll probably agree that this is such a versatile and beautiful stamp set!
I can’t wait to see what the rest of the Art With Heart team have created with Pool Party today. Click on the links below to see what they’ve made.
If you’d like me to post you your very own copy of the January – June 2020 mini catalogue, the 2020 Sale-a-bration catalogue, the 2020-21 Stampin Up! Annual Catalogue, the 2020-21 Beginners Brochure, or to simply find out about more about Stampin’ Up! contact me.
When you shop online in my Stampin’ Up! Online Store don’t forget to use my monthly Host Code (if your order is between $50 – $250) and I will send you a thank you gift the following month. If your order is over $250 don’t use the host code because you will qualify for your own stamping rewards.
My February 2021 Host code is ZYAR6HTF and it is valid until midnight February 28.
Would you like to get a 20% discount on everything you order? Click here to join my team:
In the meantime, wherever you are in the world, stay safe, stay calm…and keep on crafting xxx
Welcome to week twenty-six of our 2020-2021 Art With Heart Colour Creations Showcase.
Each week various members of our Art With Heart Colour Creations team will be bringing you weekly colour inspiration as we showcase our range of over 50 beautiful Stampin’ Up! colours in alphabetical order.
Week 26 – Merry Merlot
Hello crafters. This week I’m sharing a Christmas card I’ve made using an entirely neutral colour palette – I really love any combination of neutrals together on a card.
Merry Merlot is our colour for this week and I’ve only used a tiny bit of it on my card because it is a very rich colour. Hopefully I’ve used enough to show you how nicely it pairs with these other neutrals.
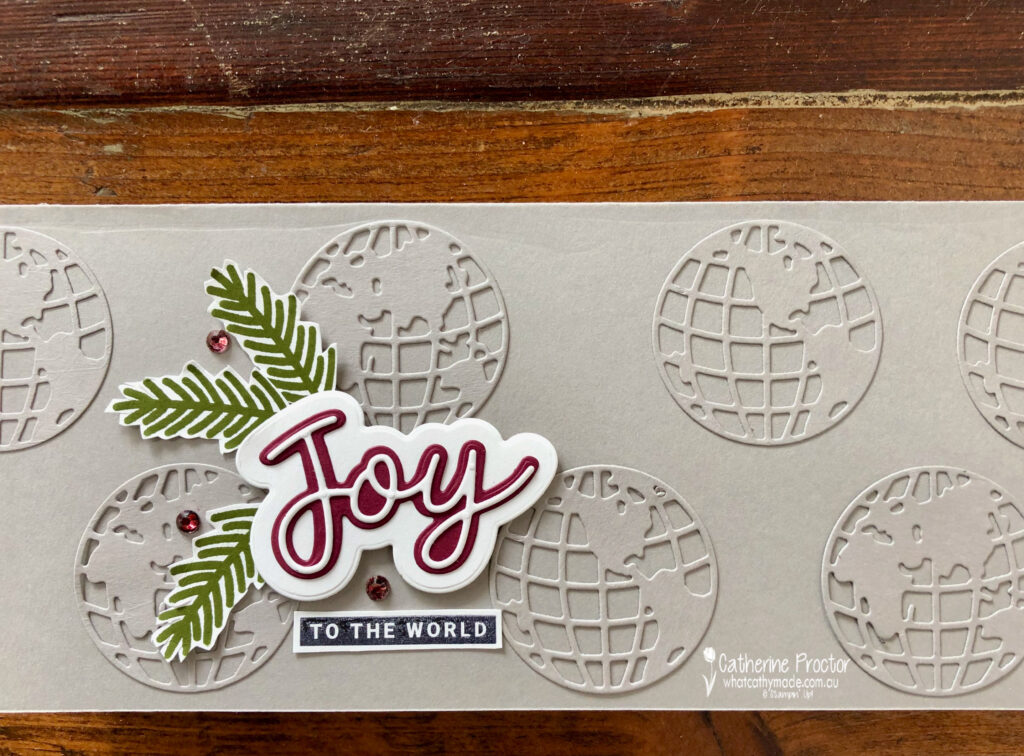
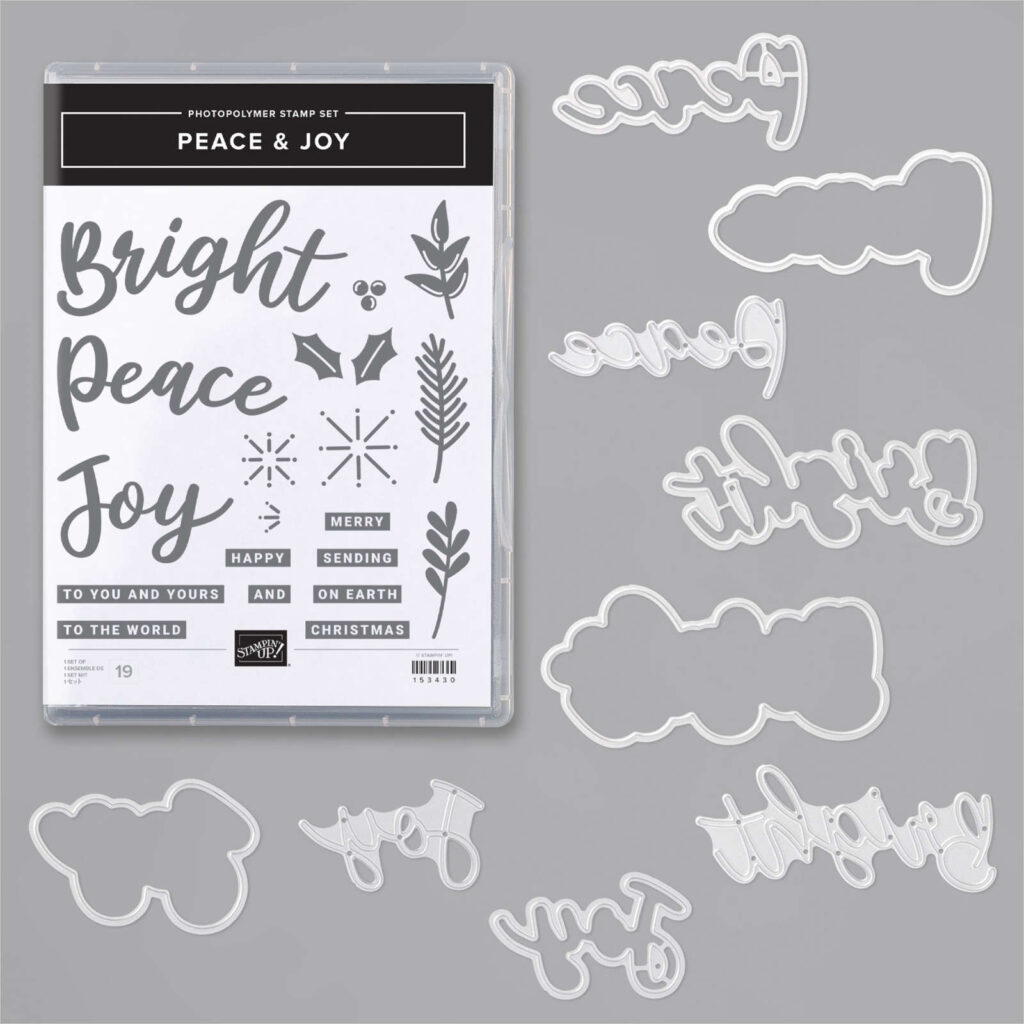
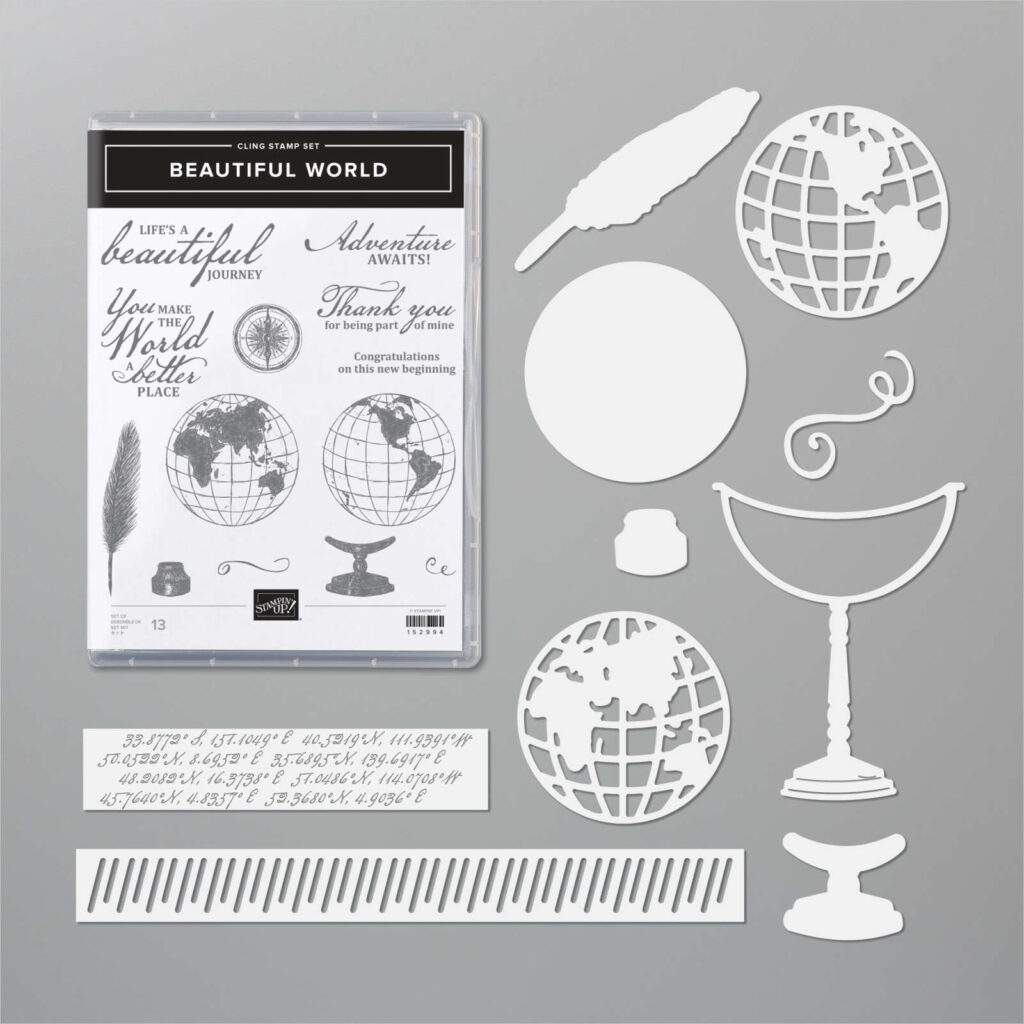
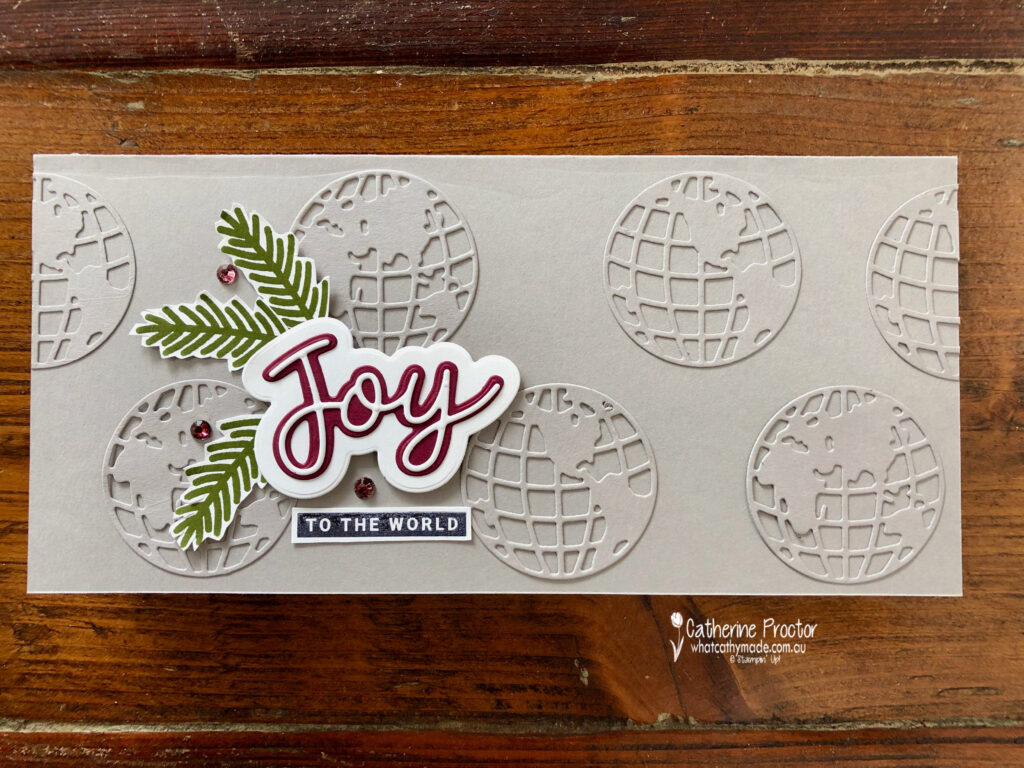
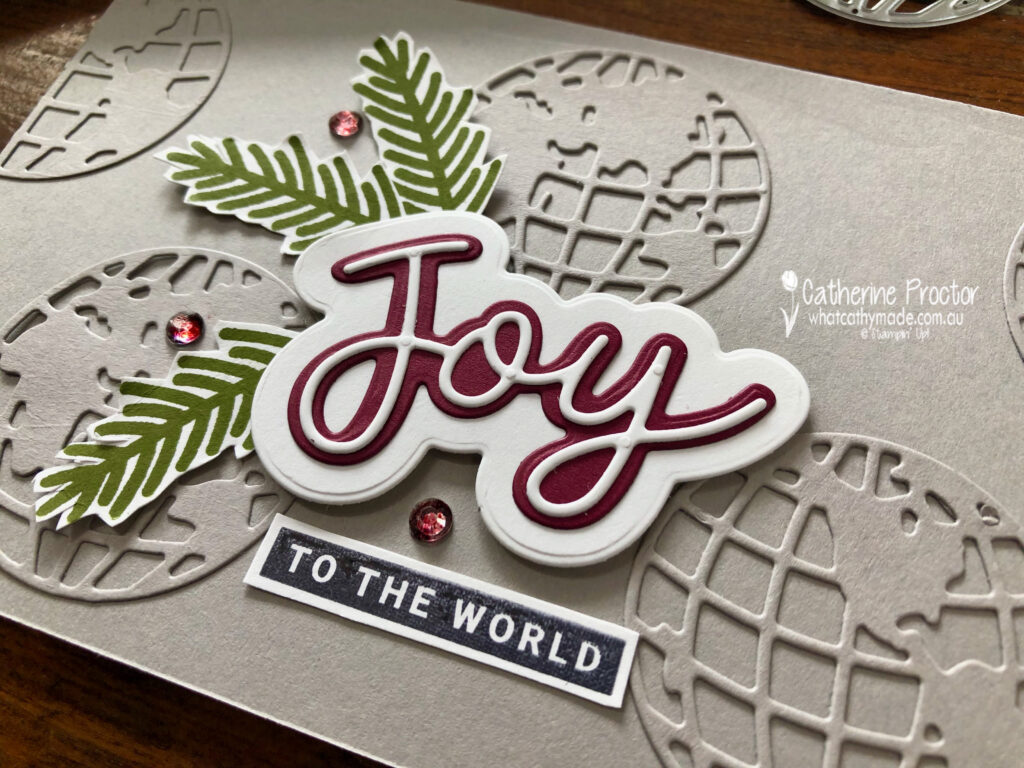
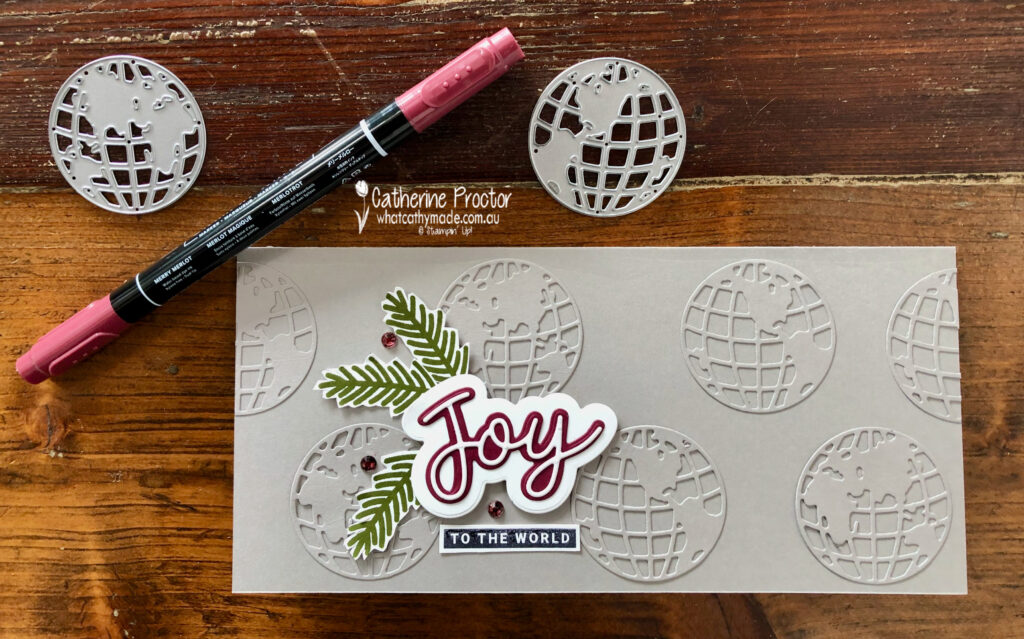
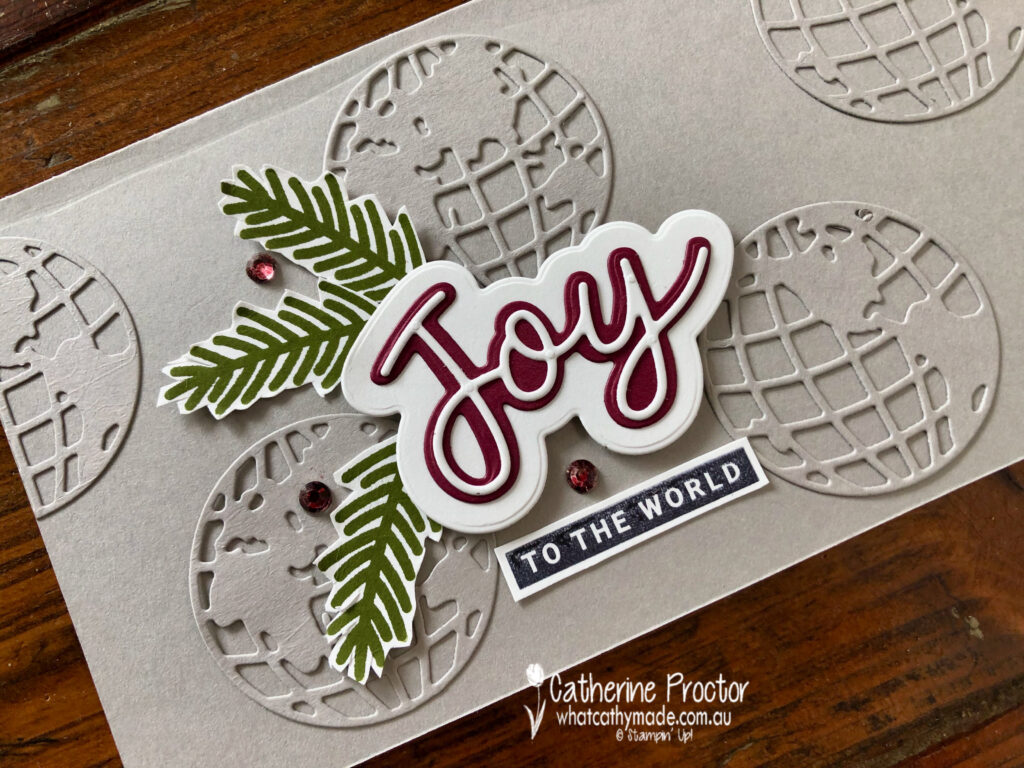
If there ever were two bundles just crying out to be used together it’s the Beautiful World bundle on p26 of the annual catalogue and the Peace & Joy bundle on page 18 of the August to December Mini catalogue. I love how Stampin’ Up! co-ordinate their products right through their range.
The “faux embossed” background of my Gray Granite slimline card was easy to make using the globe dies and adhesive sheets. Just remember to attach a sheet to the back of your card stock before you die cut. Next time I make this card I think I’ll add more globes and space them more closely together for even greater impact.
The joy sentiment uses all three joy die cuts from the Peace & Joy bundle. Adding adhesive sheet to the card stock for the thinest joy on the top layer makes it easy to adhere.
Apart from the middle layer of the joy sentiment the other touch of Merry Merlot on the card is the Rhinestone Basic Jewels which I have coloured using my Merry Merlot Stampin’ Write Marker.
The pine fronds were stamped in Mossy Meadow and fussy cut out using my paper snips.
I can’t wait to see what the rest of the Art With Heart team have created with Merry Merlot today. Click on the links below to see what they’ve made.
If you’d like me to post you your very own copy of the August–December 2020 Mini Catalogue, 2020-21 Stampin Up! Annual Catalogue, the 2020-21 Beginners Brochure, or to simply find out about more about Stampin’ Up! contact me.
In the meantime, wherever you are in the world, stay safe, stay calm…and keep on crafting xxx
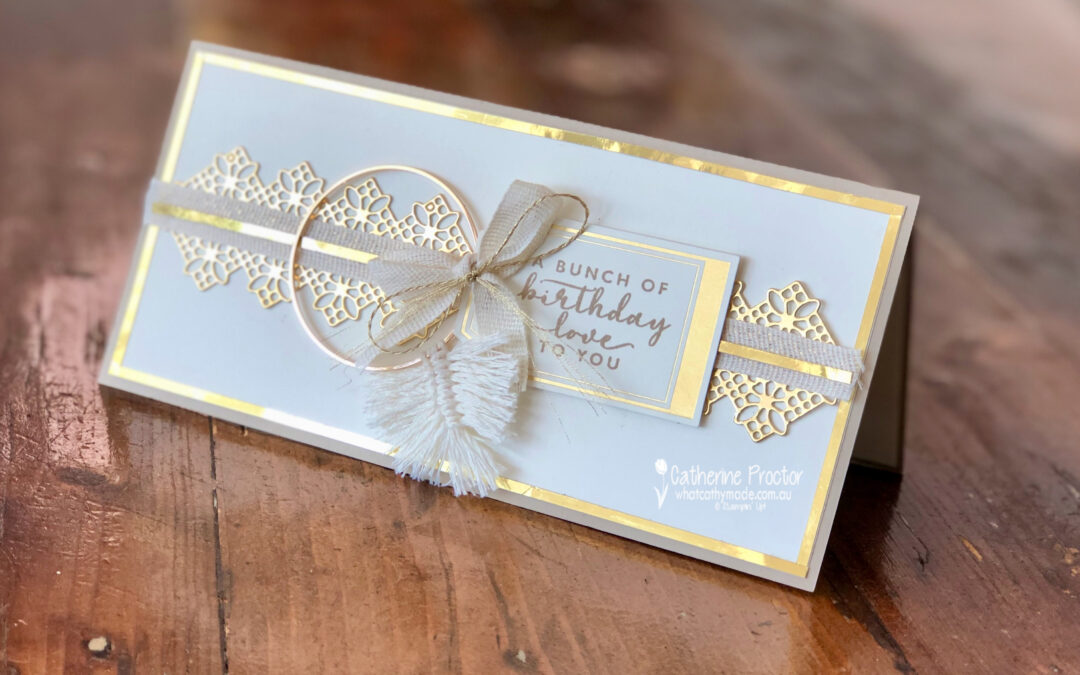
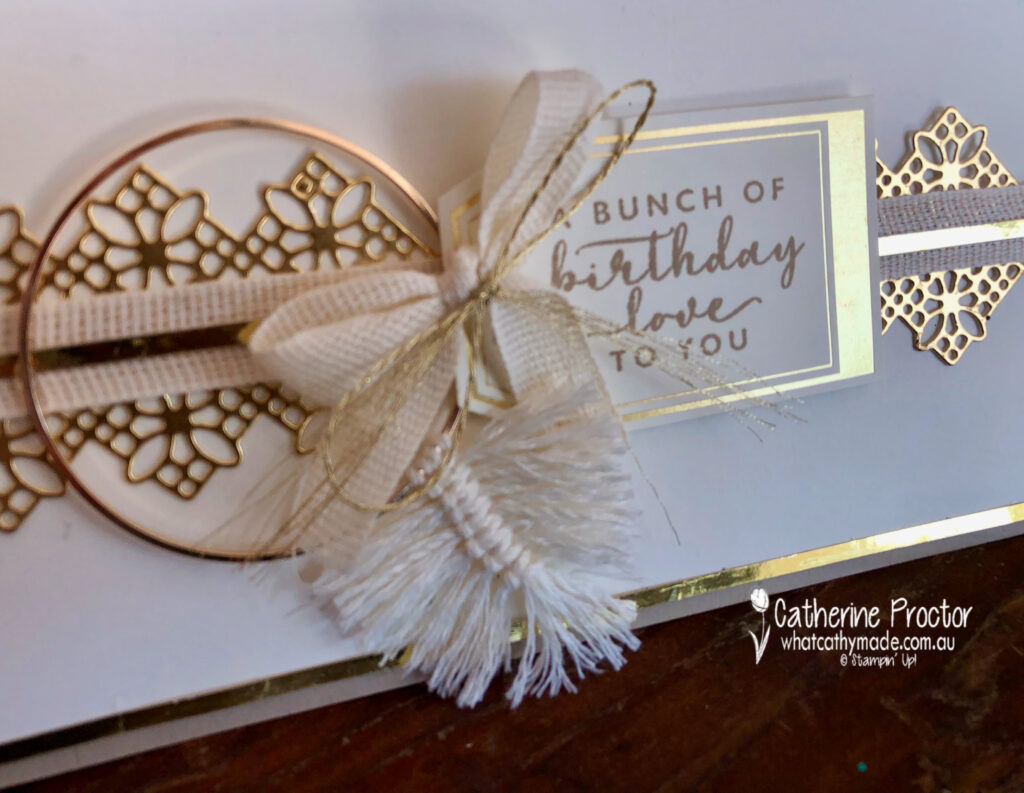
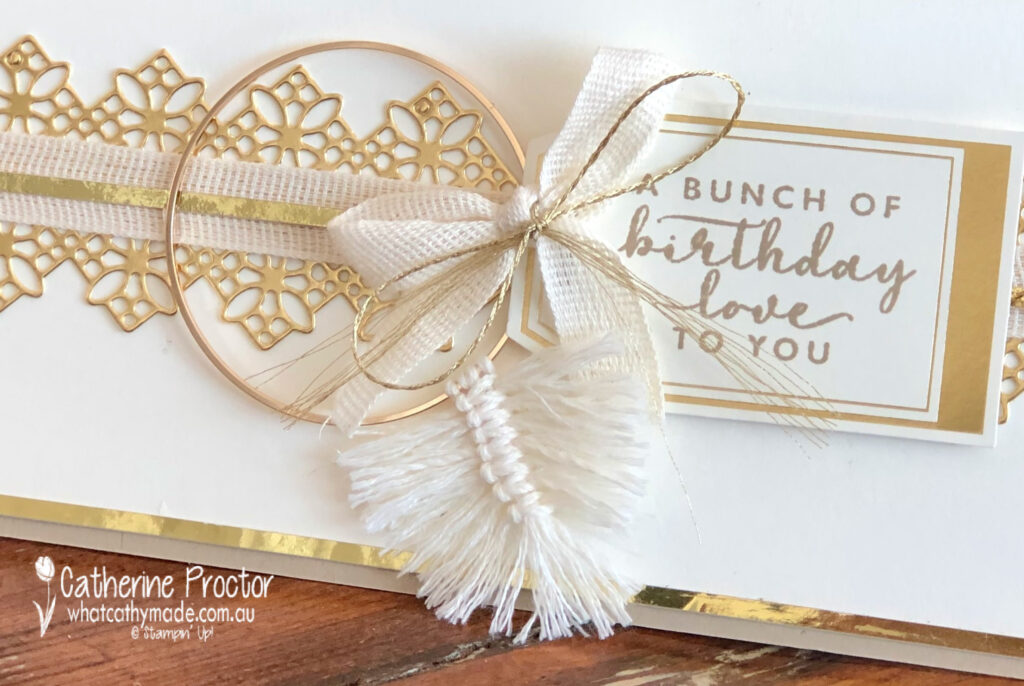
Have you ever made a macrame feather? Did you even know macrame feathers are a thing?
Last month I saw a beautiful handmade card with a macrame feather on social media and so I decided to design a birthday card featuring a macrame feather for my crafting partner in crime, Jenny Boffey, who loves to do macrame as much as she loves to make cards.
I don’t tend to use Very Vanilla as often as I prefer to use Whisper White, but Very Vanilla looks amazing with gold foil — and I wanted to use the tag from the Boho Indigo Product Medley to stamp my sentiment on.
The “A Bunch of Birthday Love to You” sentiment I stamped on my card is also from the Boho Indigo stamp set that comes in the Product Medley.
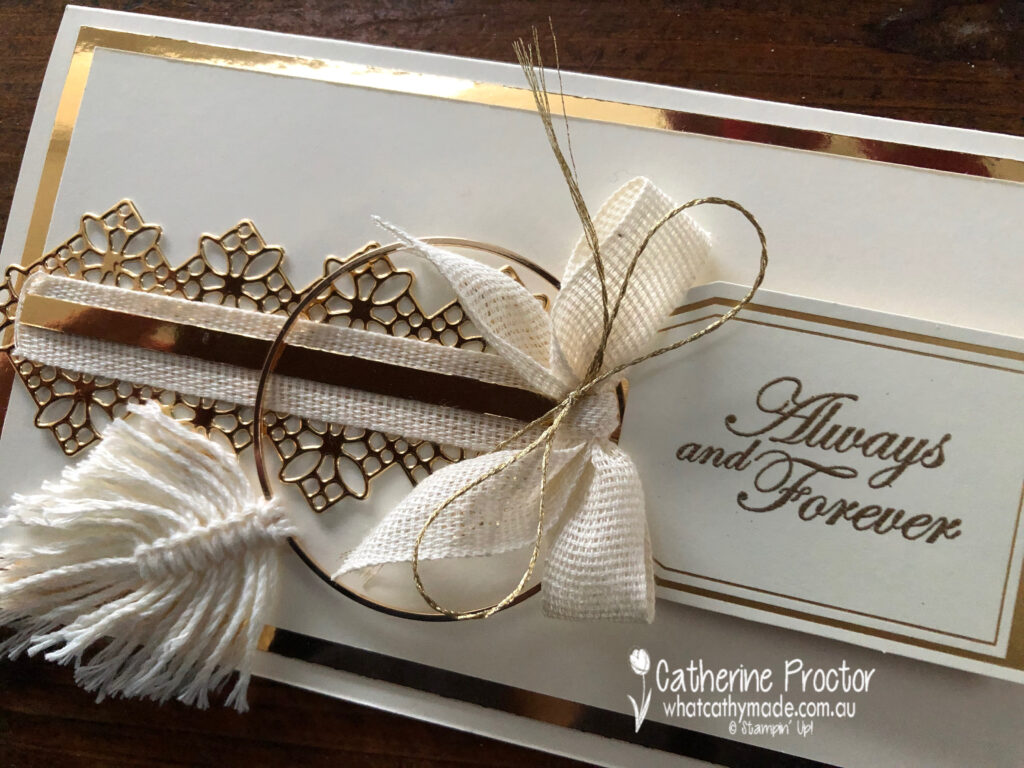
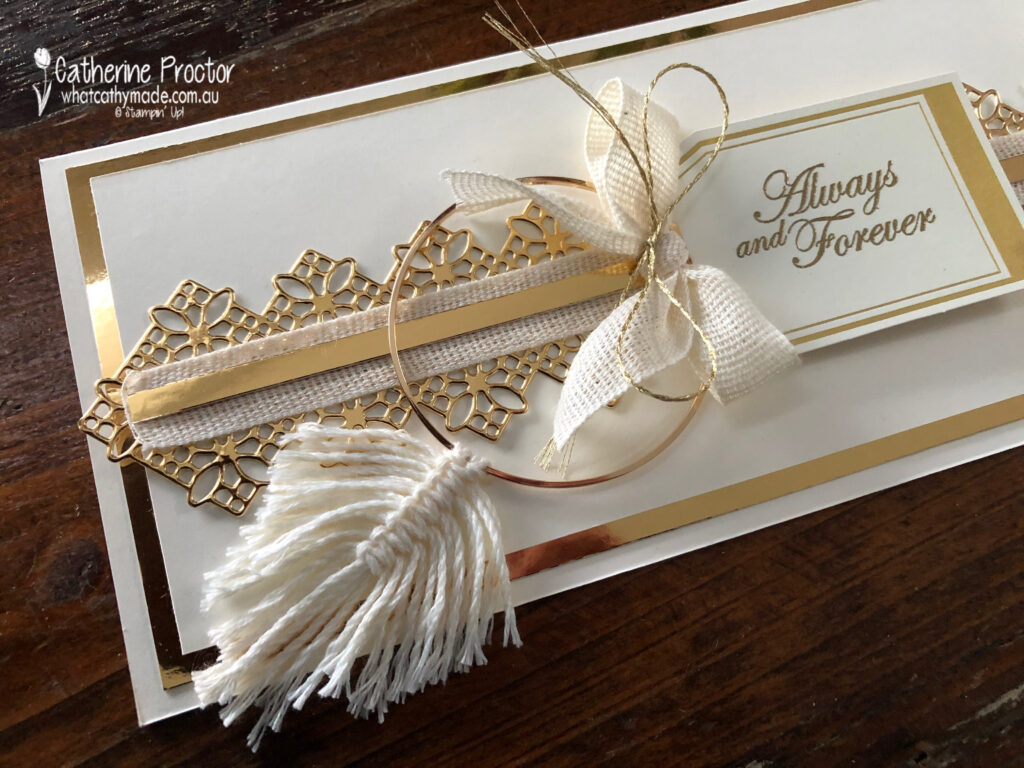
Here’s a close up of the macrame feather – it is knotted onto a Gold Hoop embellishment and made from some retired Very Vanilla bakers twine. The Forever Greenery trim combo pack co-ordinates perfectly and the largest die from the Fabulous Florals dies was used to die cut the gold foil background.
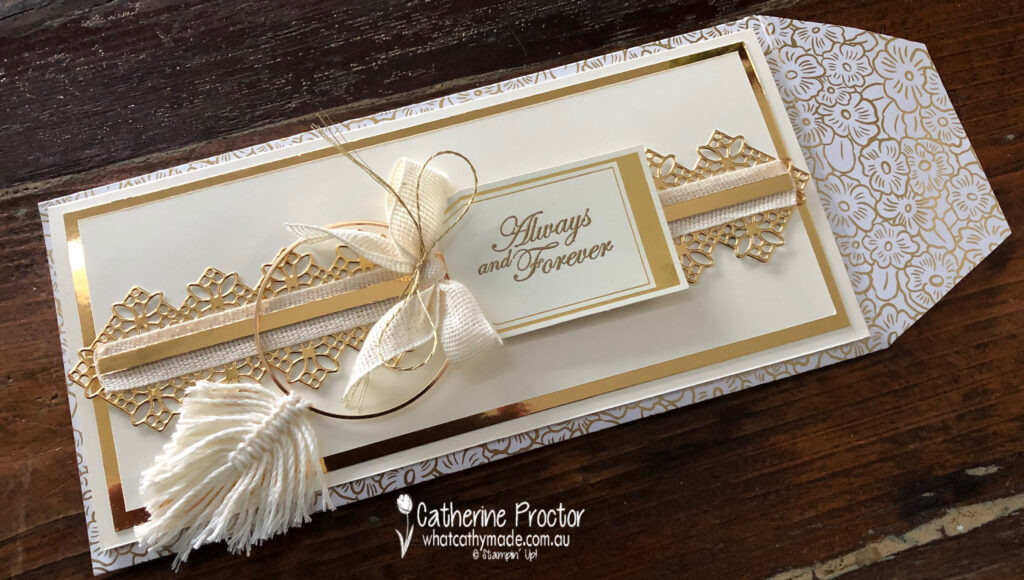
After I made this birthday card I was also been commissioned to make a couple of wedding cards featuring a macrame feather.
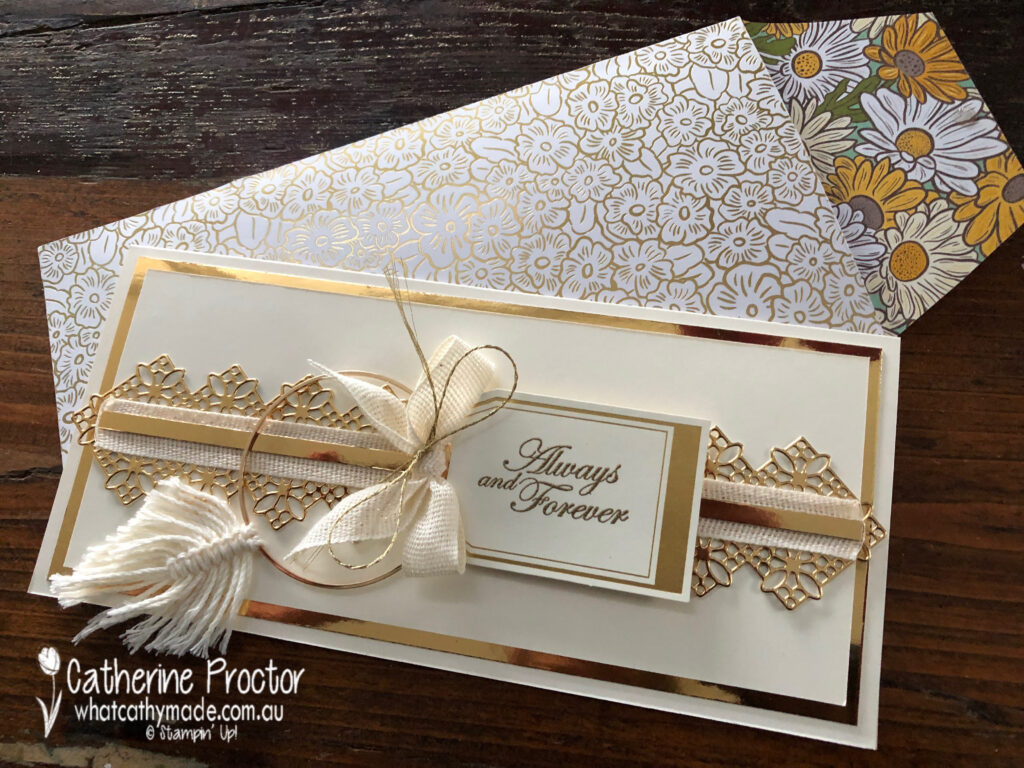
The basic design of the card is the same but I’ve used a different sentiment and swapped out the Crumb Cake card base for Very Vanilla.
For my wedding card design I’ve use the “always and forever” sentiment from the Forever Blossoms stamp set, stamped in Versamark ink before adding gold emboss powder and heat embossing it.
The feather is on a different angle on this card but made in exactly the same way as the macrame feather on the birthday card.
Did you notice the gold foiled envelope sitting under my card? I made it to match the gold and Very Vanilla colour theme using gold foiled DSP from the Ornate Garden DSP.
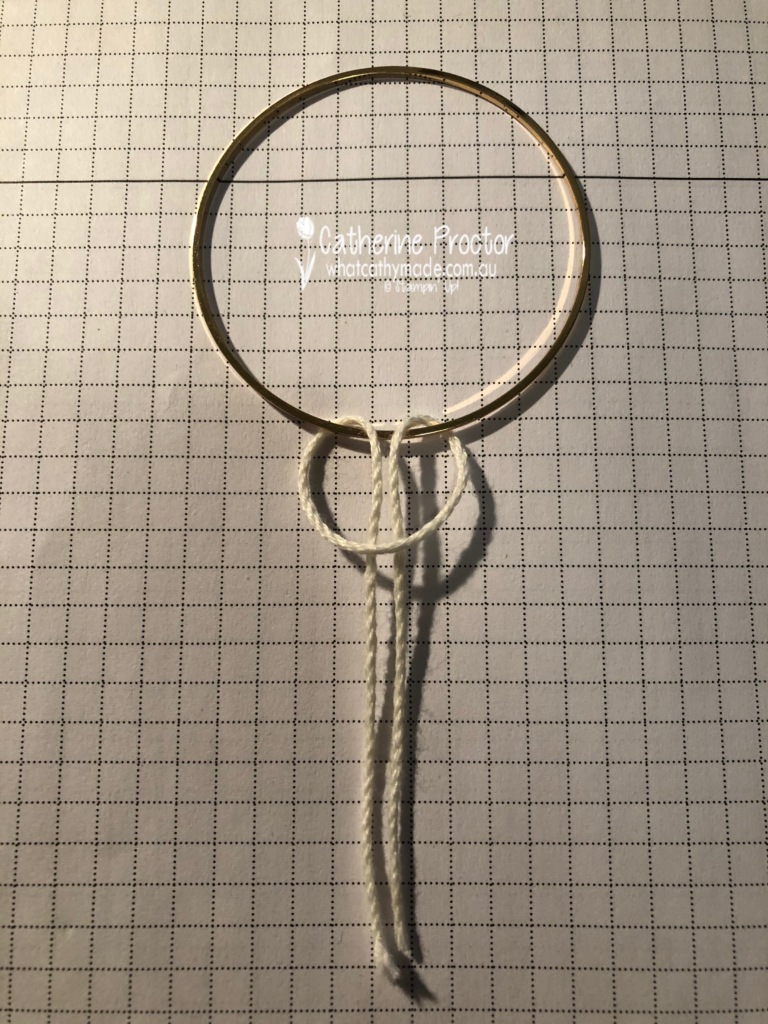
Want to make a macrame feather yourself?
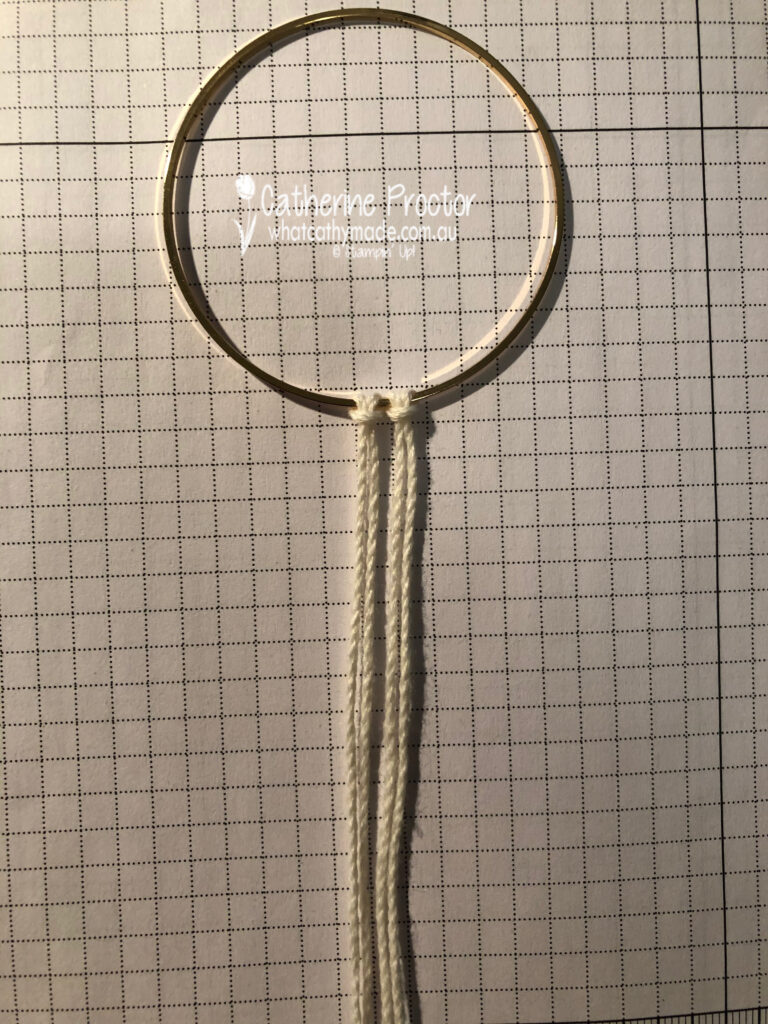
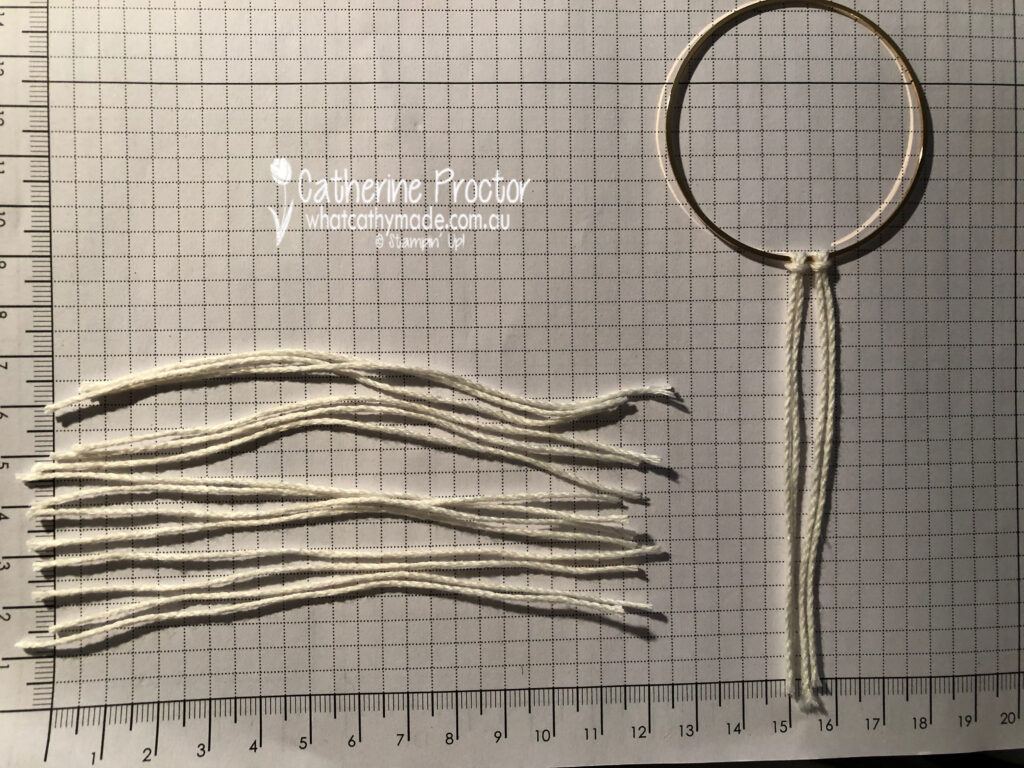
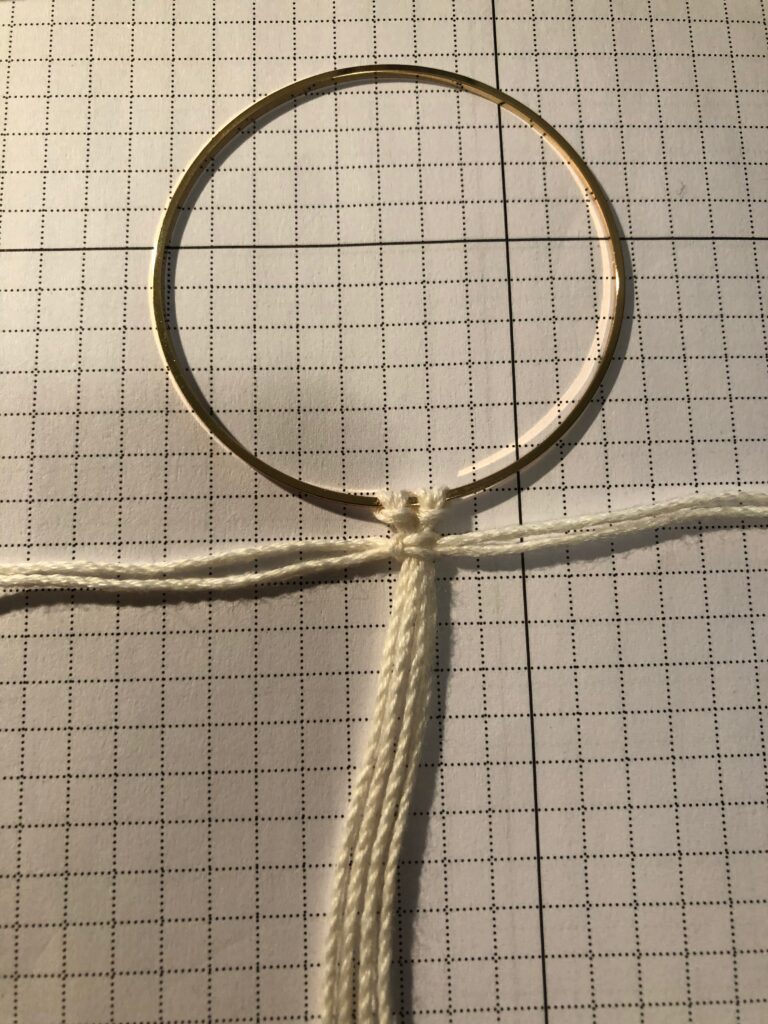
It’s easy to do, just a little bit fiddly working at this small scale. You’ll need a Gold Hoop embellishment, two 25 cm lengths of bakers twine and fourteen 12cm lengths of bakers twine. Then follow the steps below to make your feather.
Step 1
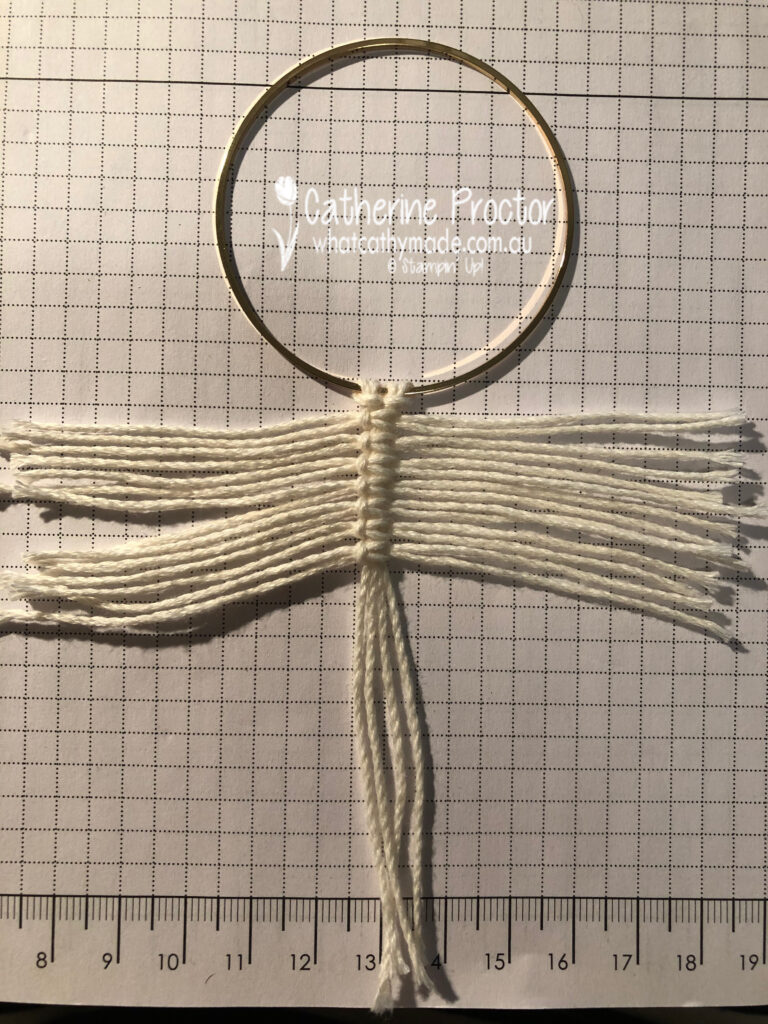
Step 2
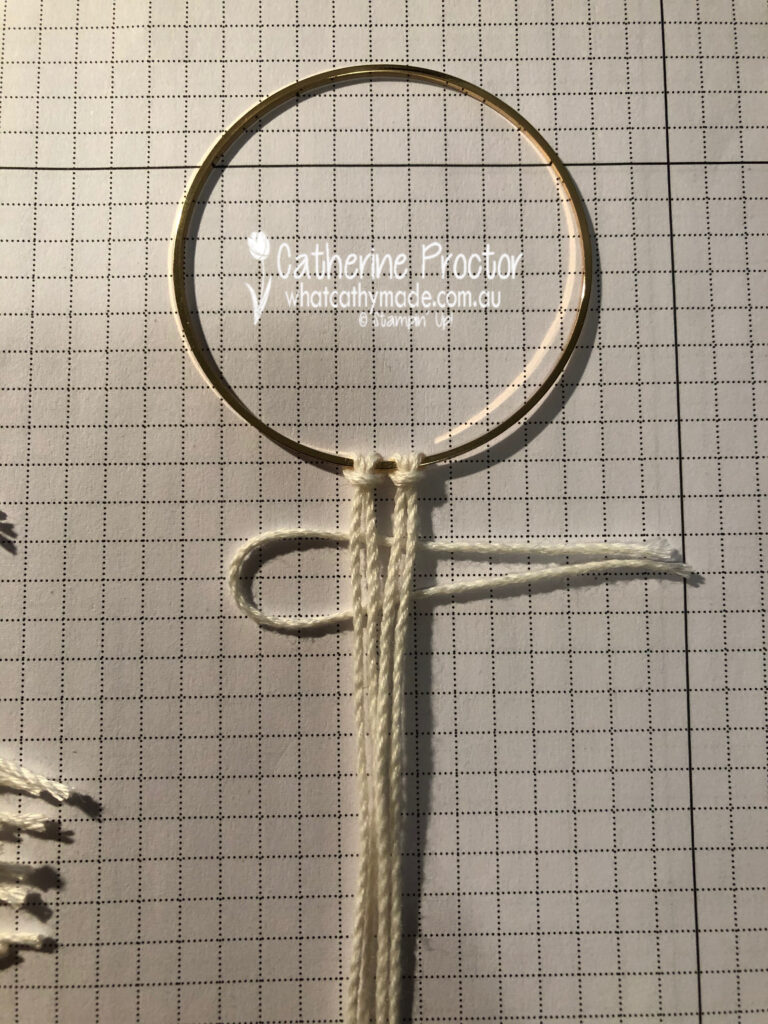
Step 3
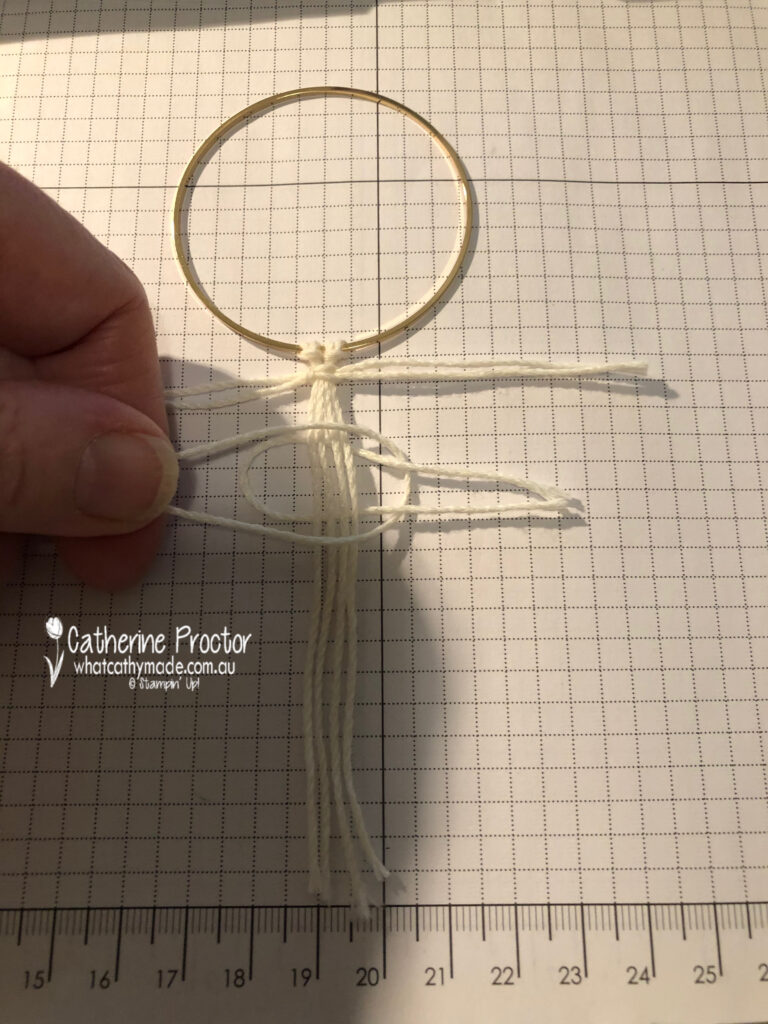
Step 4
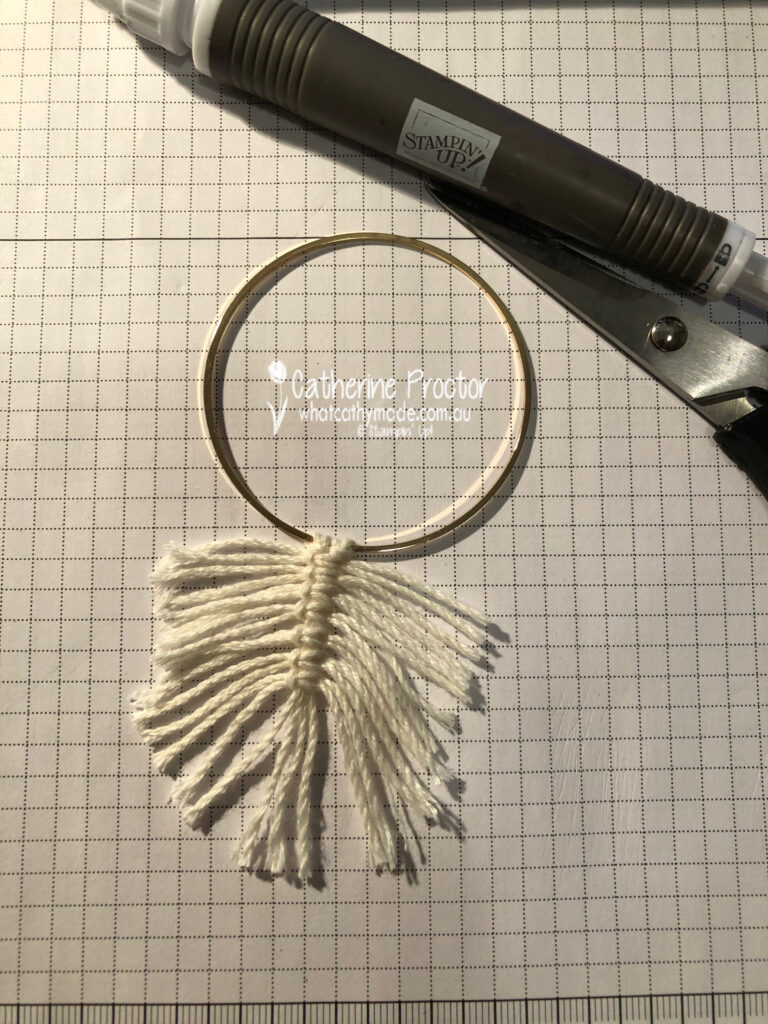
Step 5
Step 6
Step 7
Step 8
To purchase any of the products featured in today’s post, simply click on the product links below.
If you’d like me to post you your very own copy of the the August – December 2020 Mini Catalogue, the 2020-21 Stampin Up! Annual Catalogue, the 2020-21 Beginners Brochure, or to simply find out about more about Stampin’ Up! contact me.
In the meantime, wherever you are in the world, stay safe, stay calm…and keep on crafting xxx
Welcome to the Monthly Art With Heart Creative Showcase.
With all that’s happening worldwide at the moment the Art With Heart Team are here with a Rainbow theme Creative Showcase to brighten your day.
Every month the talented ladies share their inspirational ideas in a monthly Showcase and this month our projects are inspired by Rainbows.
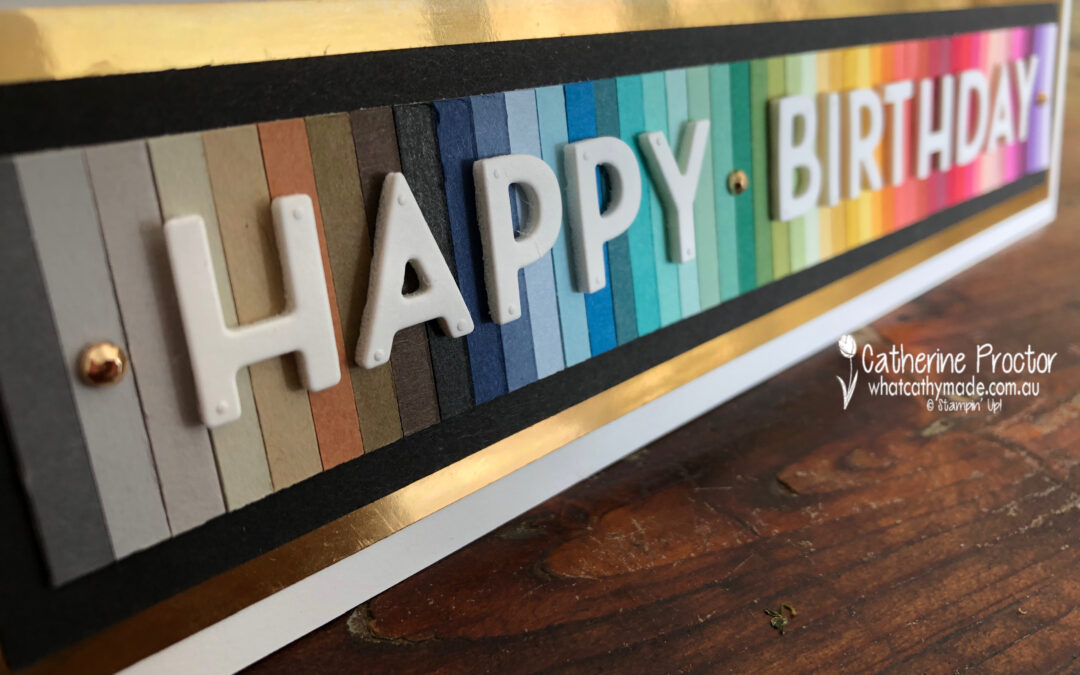
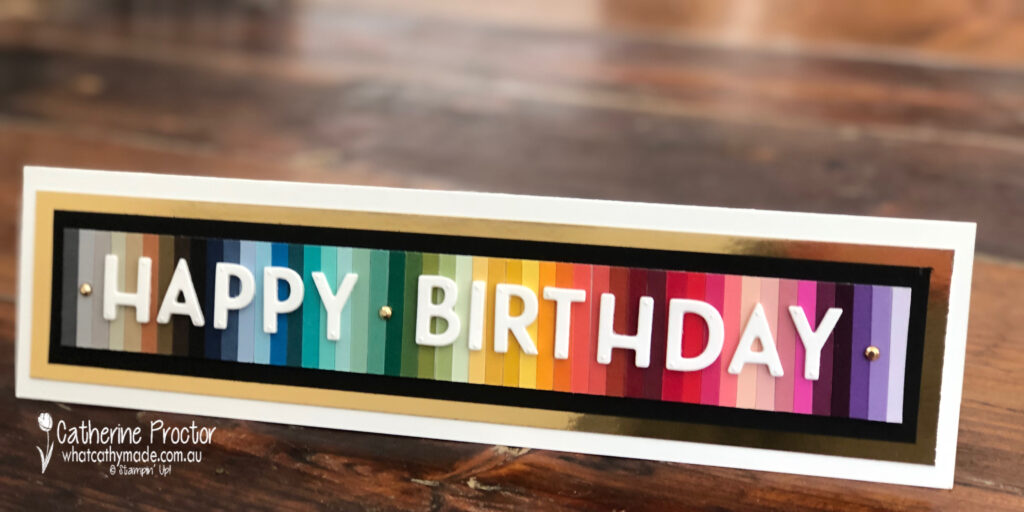
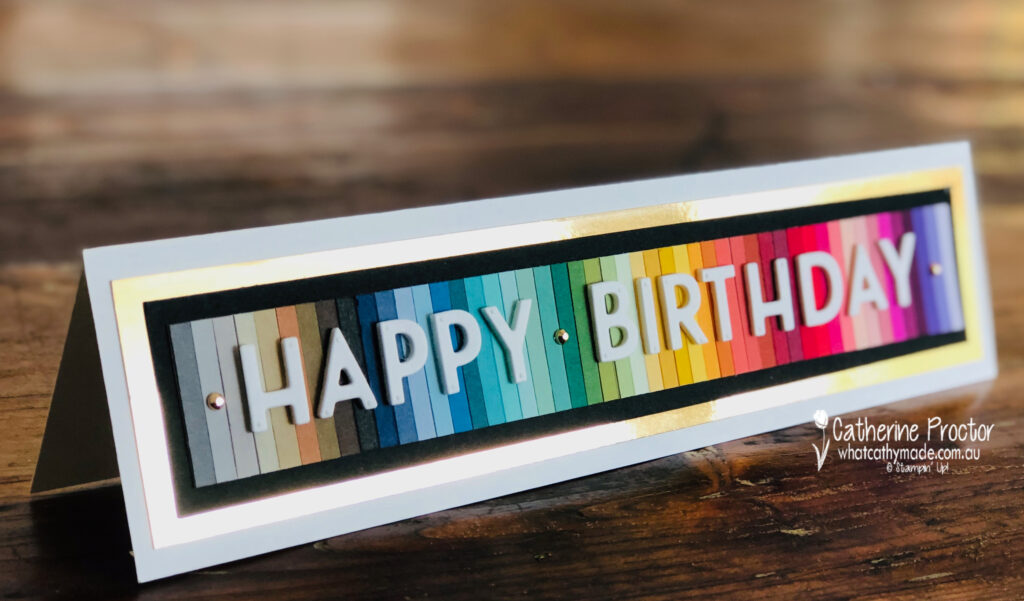
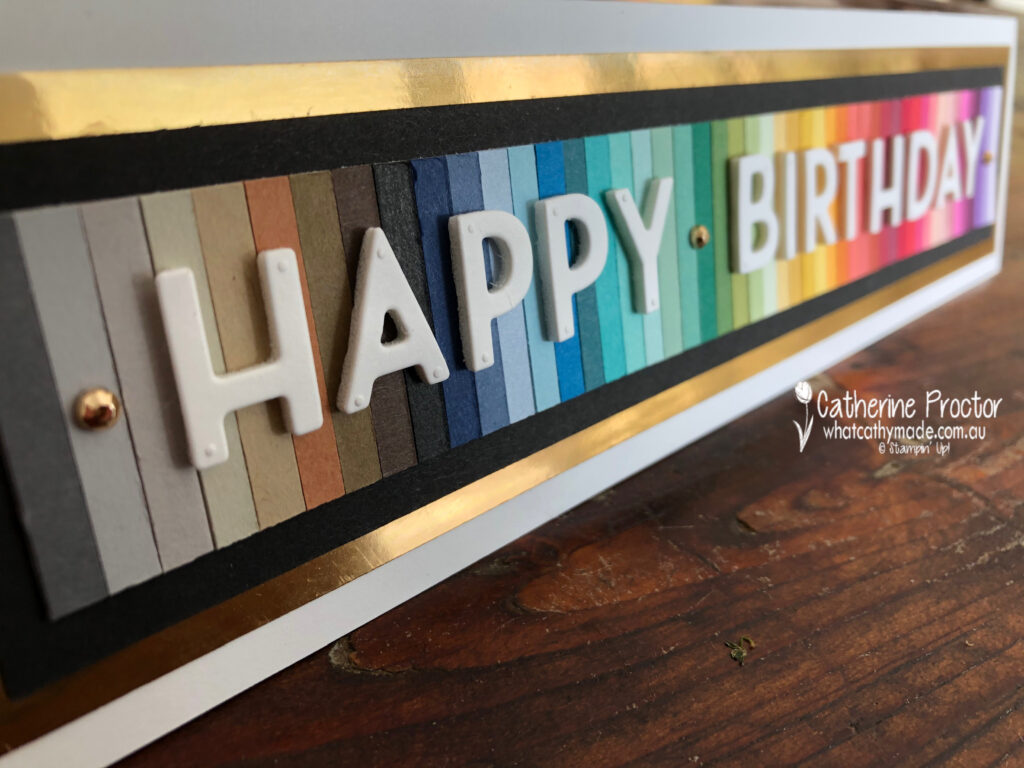
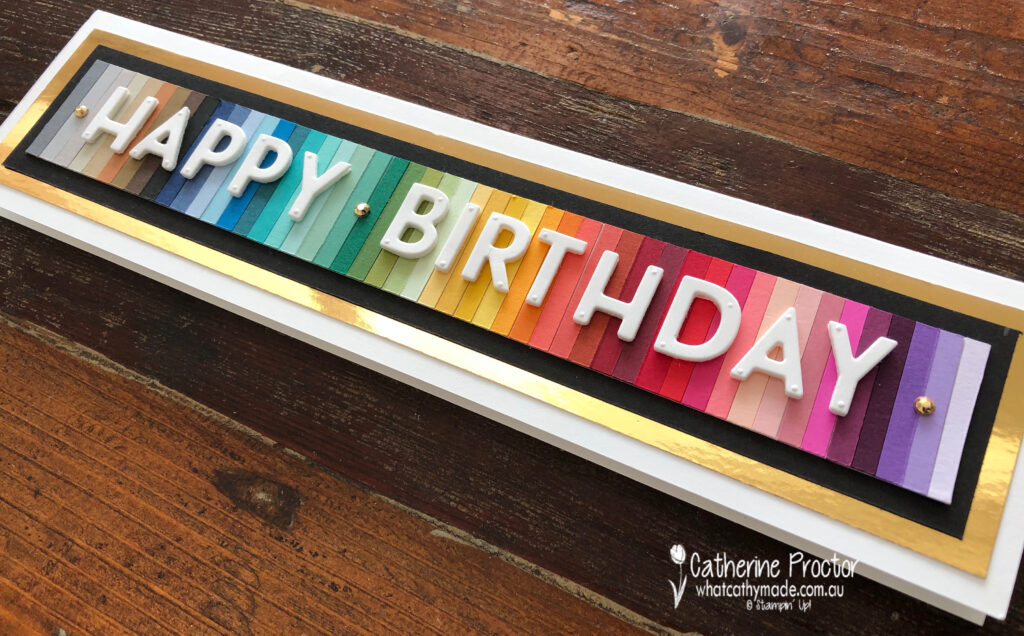
With 40 core colours, 10 in colours and the 3 basic colours of Whisper White, Basic Black and Very Vanilla I found it impossible to chose a just a few of these colours for my rainbow, so I decided to use them all!
The only way I could fit them onto one card was to create a slimline card. For each colour I cut a 5mm thick strip with my paper trimmer and then I organised them into rainbow order onto strips of tear & tape on a Whisper White base.
It took a while to decide on a colour order – there are so many ways you could arrange these colours!
The rainbow strip was trimmed to size, mounted onto a Basic Black card stock layer and a gold foil layer before attaching it all to a Whisper White slimline card base.
The “Happy Birthday” was cut out using the Playful Alphabet dies mounted onto the new foam adhesive sheets – I love the dimension it gives!
Three Gilded Gems add a final touch of bling to tie in the gold foil layer and finish off the card.
I do have a confession to share with you.
After I finished making and photographing my card I planned to list all the colours I used in their rainbow order, but when I counted the strips I realised I have left two colours out and I don’t know which ones they are!
I deliberately didn’t include Whisper White or Very Vanilla card stock in the rainbow strip but I did include Basic Black, which means I should have 51 strips – but I only have 49.
Can you help me out and tell me which two colours I’ve left out!
The next Art With Heart Team Member to share their colouring technique with you is the very talented Caroline Manwaring.
If you have a broken link or have come to this blog hop midway, you can view all the participants below:


")
 Specialty Designer Series Paper")


")


 Specialty Paper")


")


")
")