Welcome to week thirty eight of our Art With Heart 2022-23 Colour Creations blog hop.
This is a weekly blog hop where we showcase the stunning range of Stampin’ Up! colours in alphabetical order over 12 months and this week we are featuring Polished Pink from the 2021-23 family.
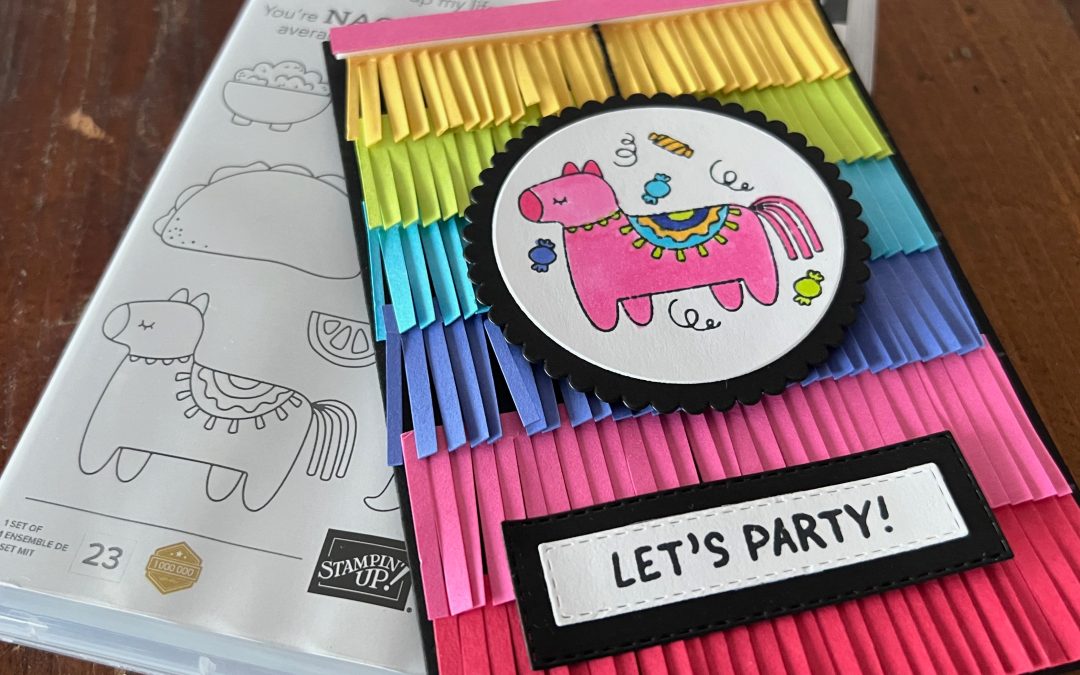
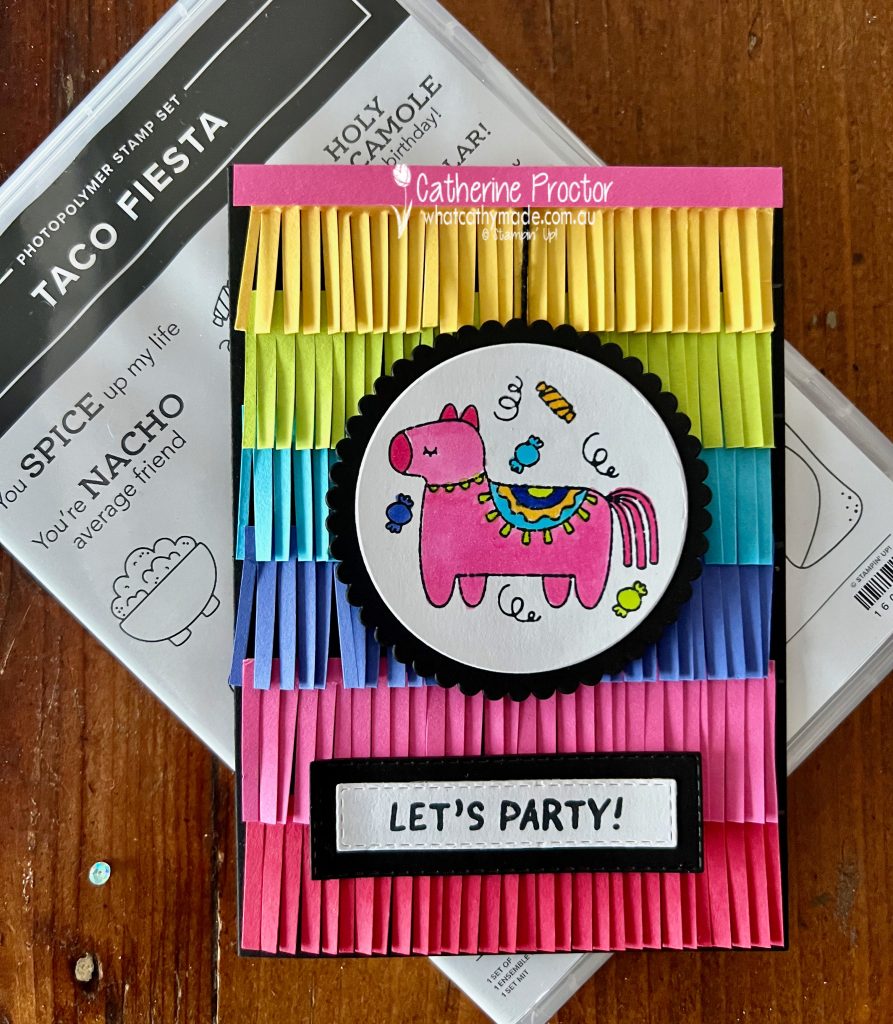
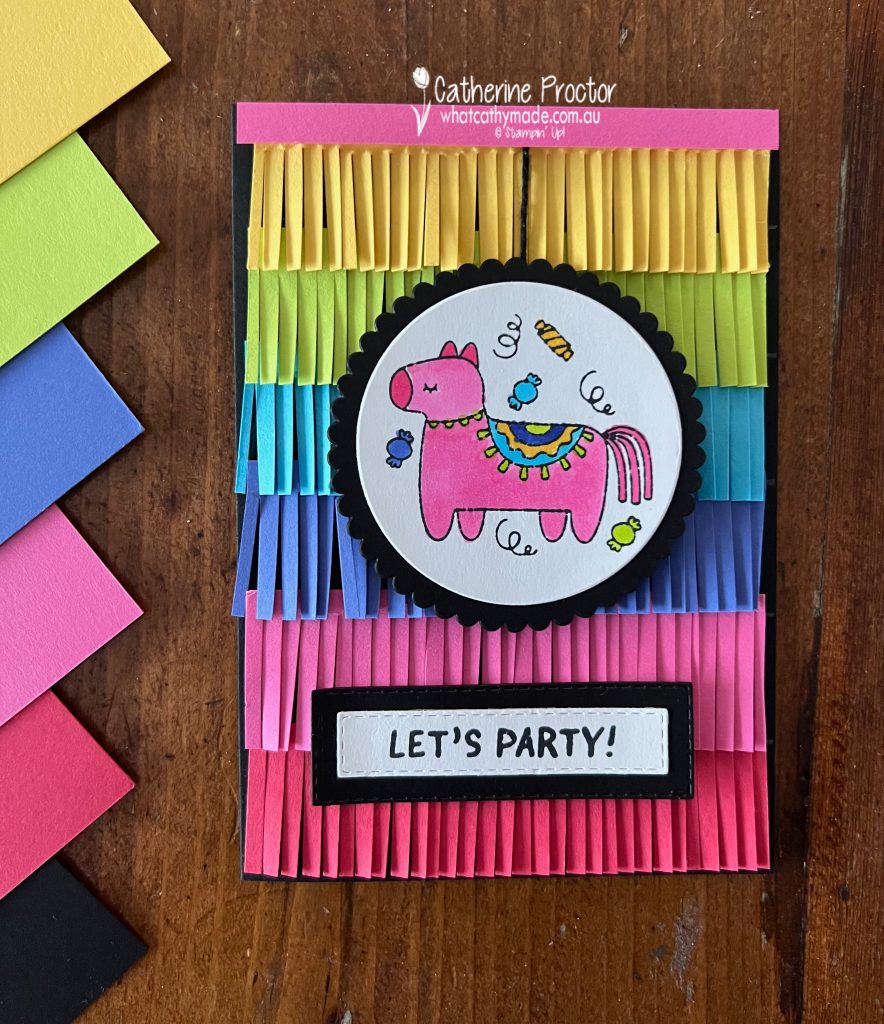
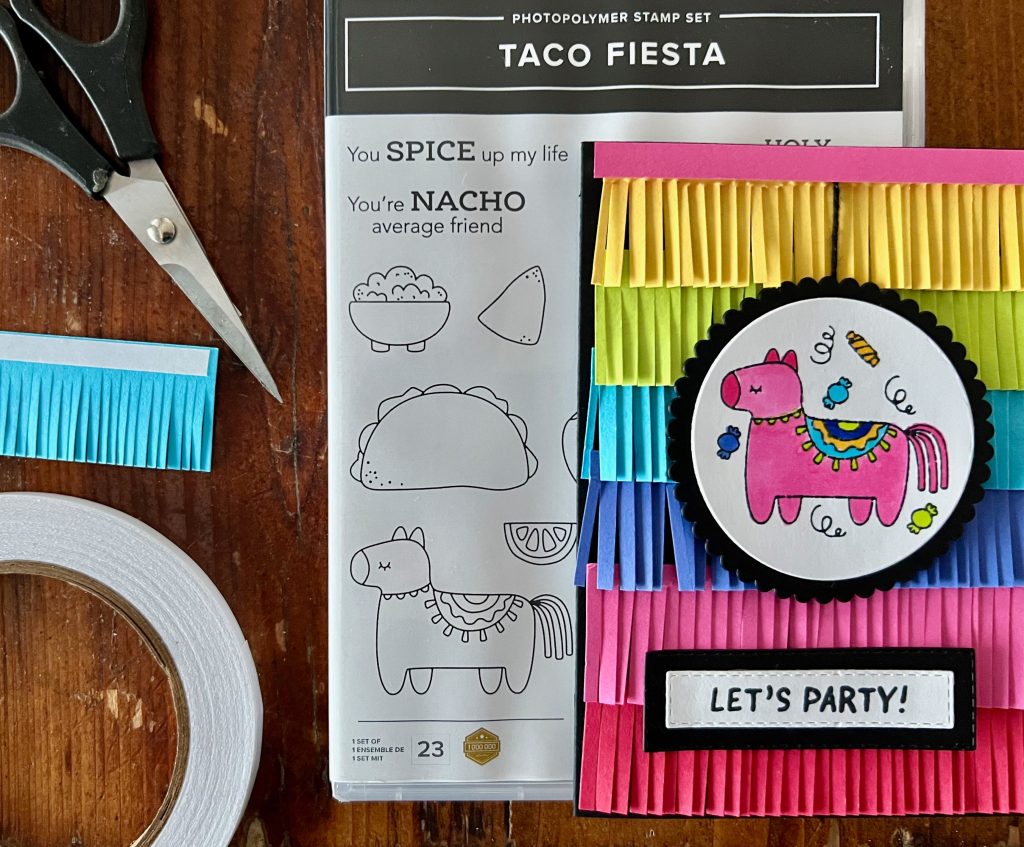
A fabulously fun colour like Polished Pink deserves to be paired with fabulously fun stamp set like Taco Fiesta!
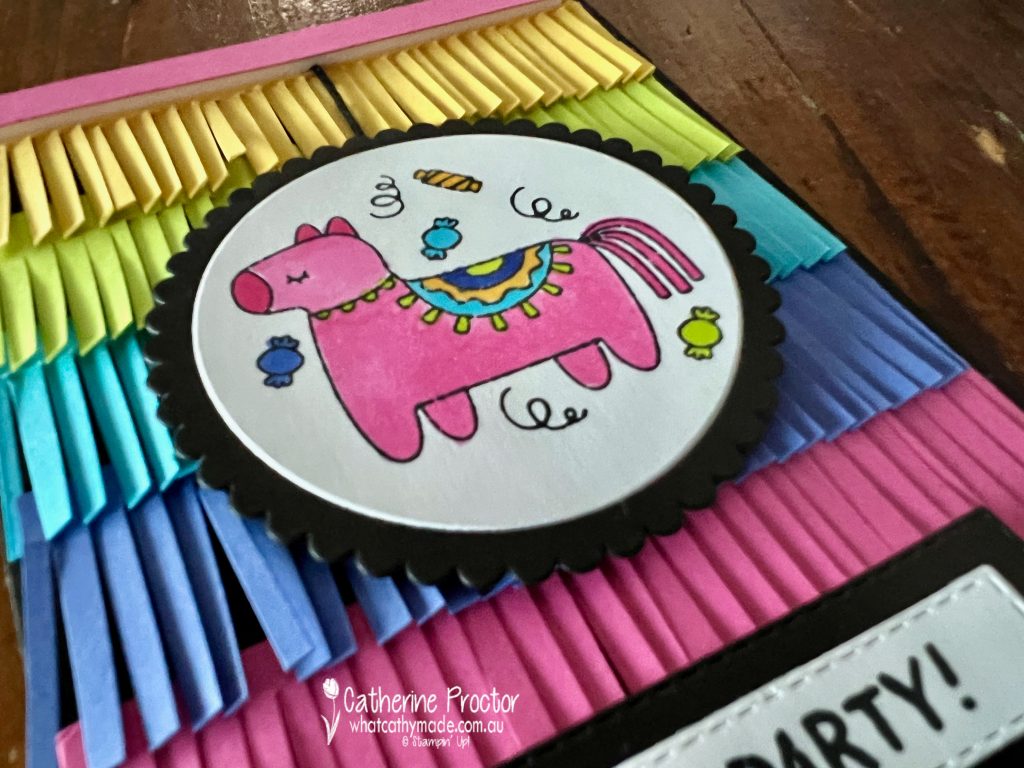
There are plenty of taco/guacamole/chilli related food images and sayings in this stamp set, however I just couldn’t resist using this adorable pinata image, coloured in with Stampin Blends in the colours of the cardstock used for the pinata fringing.
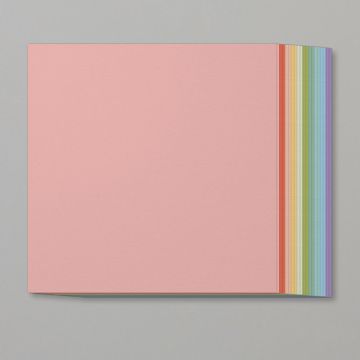
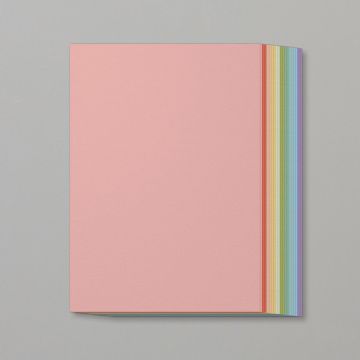
Polished Pink is gorgeous vibrant pink, so I paired it with other vibrant In Colours as well colours from the Brights family. From top to bottom in my card I’ve used Daffodil Delight, Parakeet Party, Orchid Oasis, Polished Pink and Sweet Sorbet, with a card base of Basic Black to make these colours pop even more.
The pinata fringing on the card front is super easy to make, either with fringing scissors or using your paper snips.
Pinata Fringing Technique
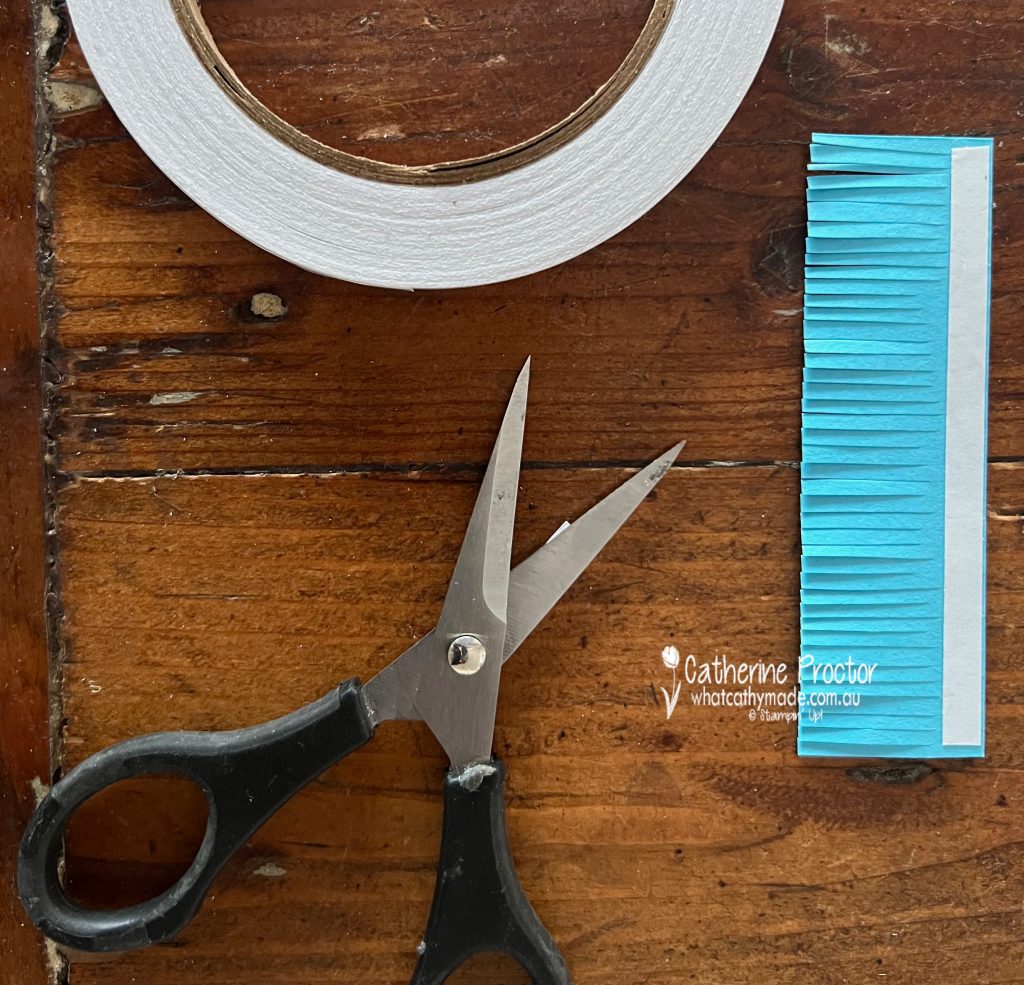
My card base measures 14.8 x 10.5cm (half an A4 sheet of cardstock that has been scored and fold in half) and I wanted to use 6 colours, so I used my trimmer to cut 6 different cardstock colours, each at 3 x 10 cm – this allows the layers of fringing to overlap each other.
Use a pencil to mark 5 lines, each spaced 2.5 cm apart (this gives room for overlap of fringing) measuring up from the bottom of the card and going all the way up to the top.
Attach one strip of tear & tape along the longer 10 cm edge on one side of each colour of cardstock.
With the side that has the tear & tape facing up, use Paper Snips or fringing scissors to cut fringes at all the way along the length of the cardstock, cutting up to the bottom of the tear & tape.
Once all of your colours have all been fringed, remove the backing off the tear & tape and attach the fringing to the card front along your pencil lines, working from the bottom of the card up so you can overlap the fringing as you go.
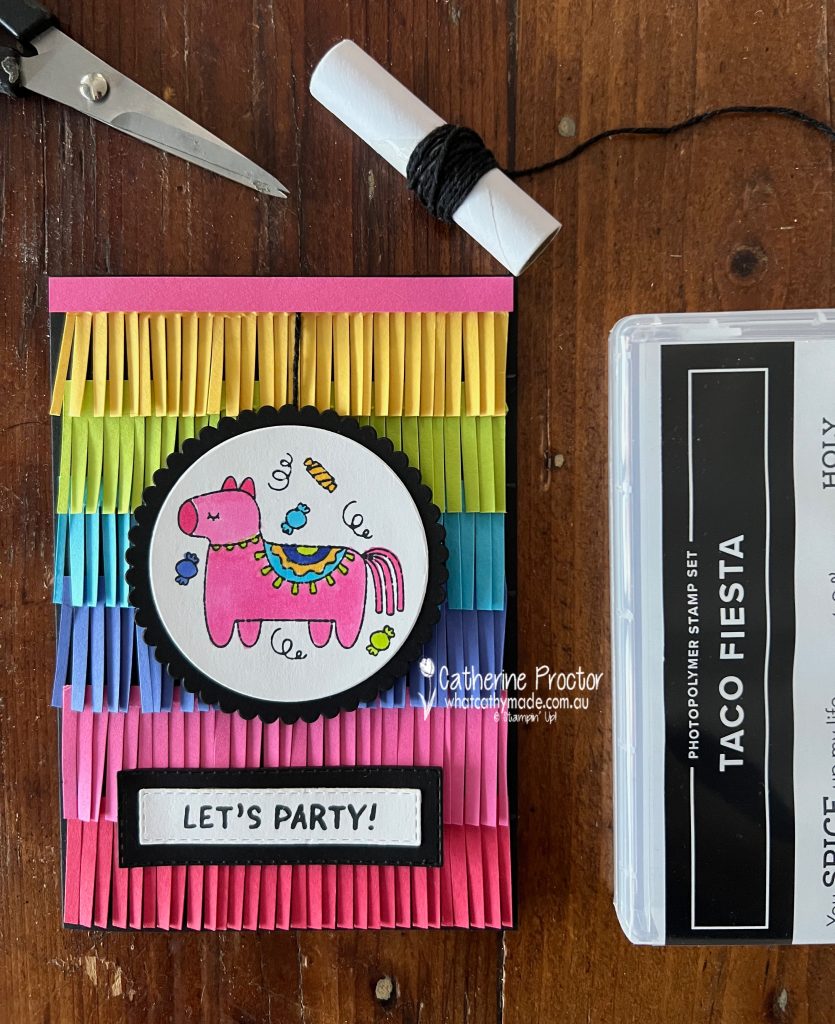
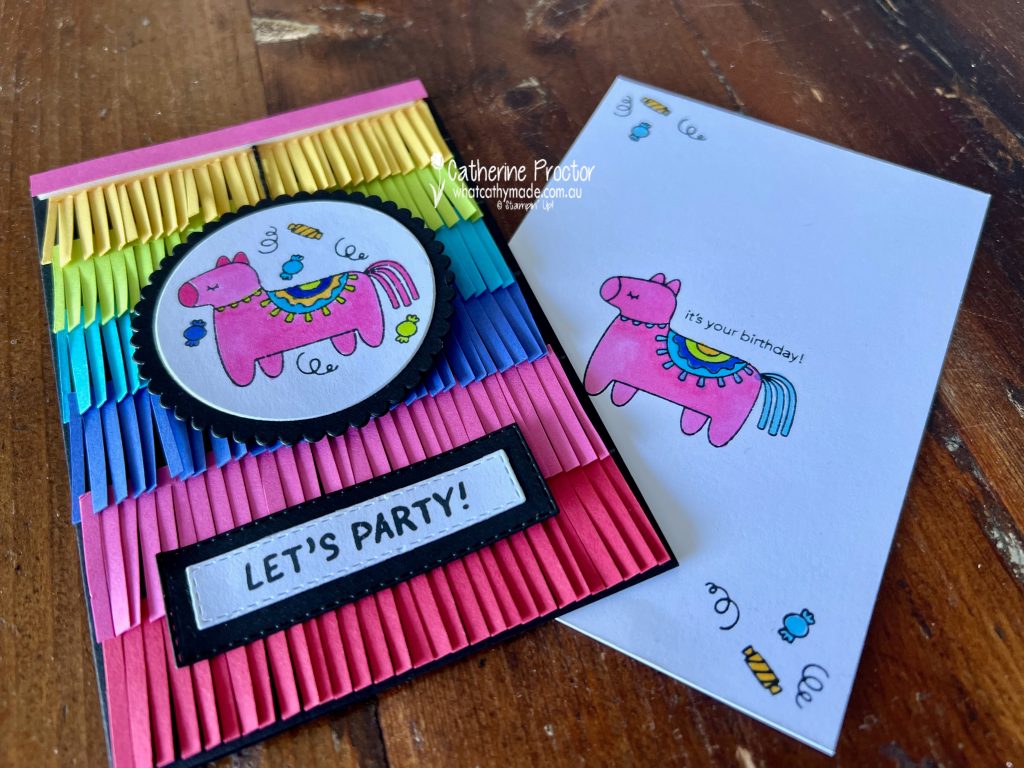
I’ve die cut the pinata image using a layering circle die and added a scalloped Basic Black layering circle behind it. The pinata is “hanging” from the strip of Polished Pink cardstock by a string of Basic Black Bakers twine.
The “Let’s Party” sentiment is part of a longer sentiment from the Breaking News stamp set. I bought this stamp set for my son’s university graduation, however I’ve used it on so many cards since.
Inside the card I’ve used part of a sentiment from the Taco Fiesta stamp set. To use just one a part of a sentiment simply place the sticky part of a post it note over the words you want covered. Ink up the stamp and then remove the post it note BEFORE stamping the sentiment onto the cardstock.
Now it’s time to hop on over to our next participant, the lovely Andrea Sargent – I can’t wait to see what Andrea has made this week!
If at any time you find a broken link, you can find the complete list of all participants below.
If you live in Australia, you can find and purchase these products in my Stampin’ Up! Online Store once they are available to purchase tomorrow morning.
We’ll be back next Wednesday, February 8, with projects showcasing a favourite colour for many people, Pool Party.
Welcome to week twenty nine of our Art With Heart 2022-23 Colour Creations blog hop!
This is a weekly blog hop where we showcase the stunning range of Stampin’ Up! colours in alphabetical order over 12 months and this week we are featuring Merry Merlot from the neutrals family.
My Merry Merlot card uses some gorgeous products that are currently on sale during the four day Stampin’ Up! Seasonal Sale.
Until 18 November, these products from the 2022–2023 Annual Catalogue are on sale with the following discounts:
10% off all punches
15% of all stamps (Host stamp sets are not included in this sale)
20% off all dies
20% off all embossing folders
20% off all non-specialty and non-assortment Designer Series Paper
Here are the three products I’ve used in this card that are on sale right now.
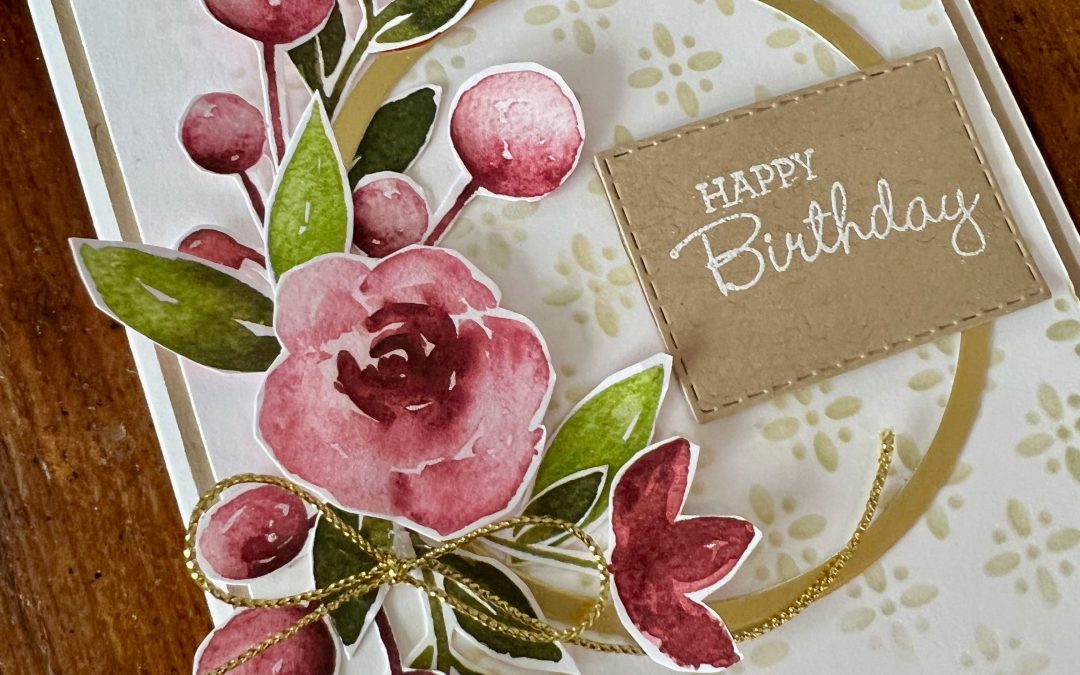
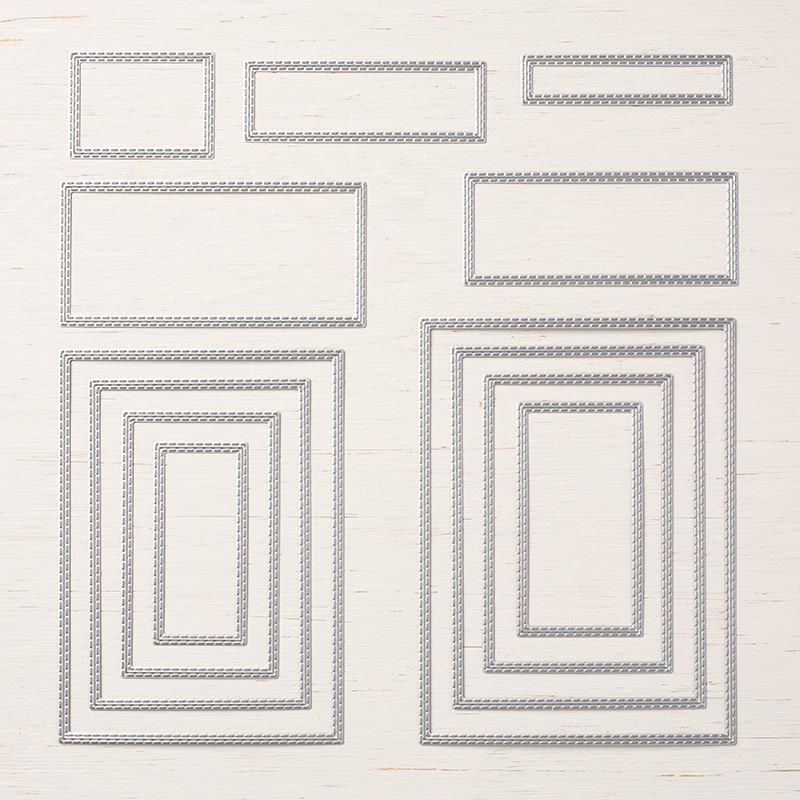
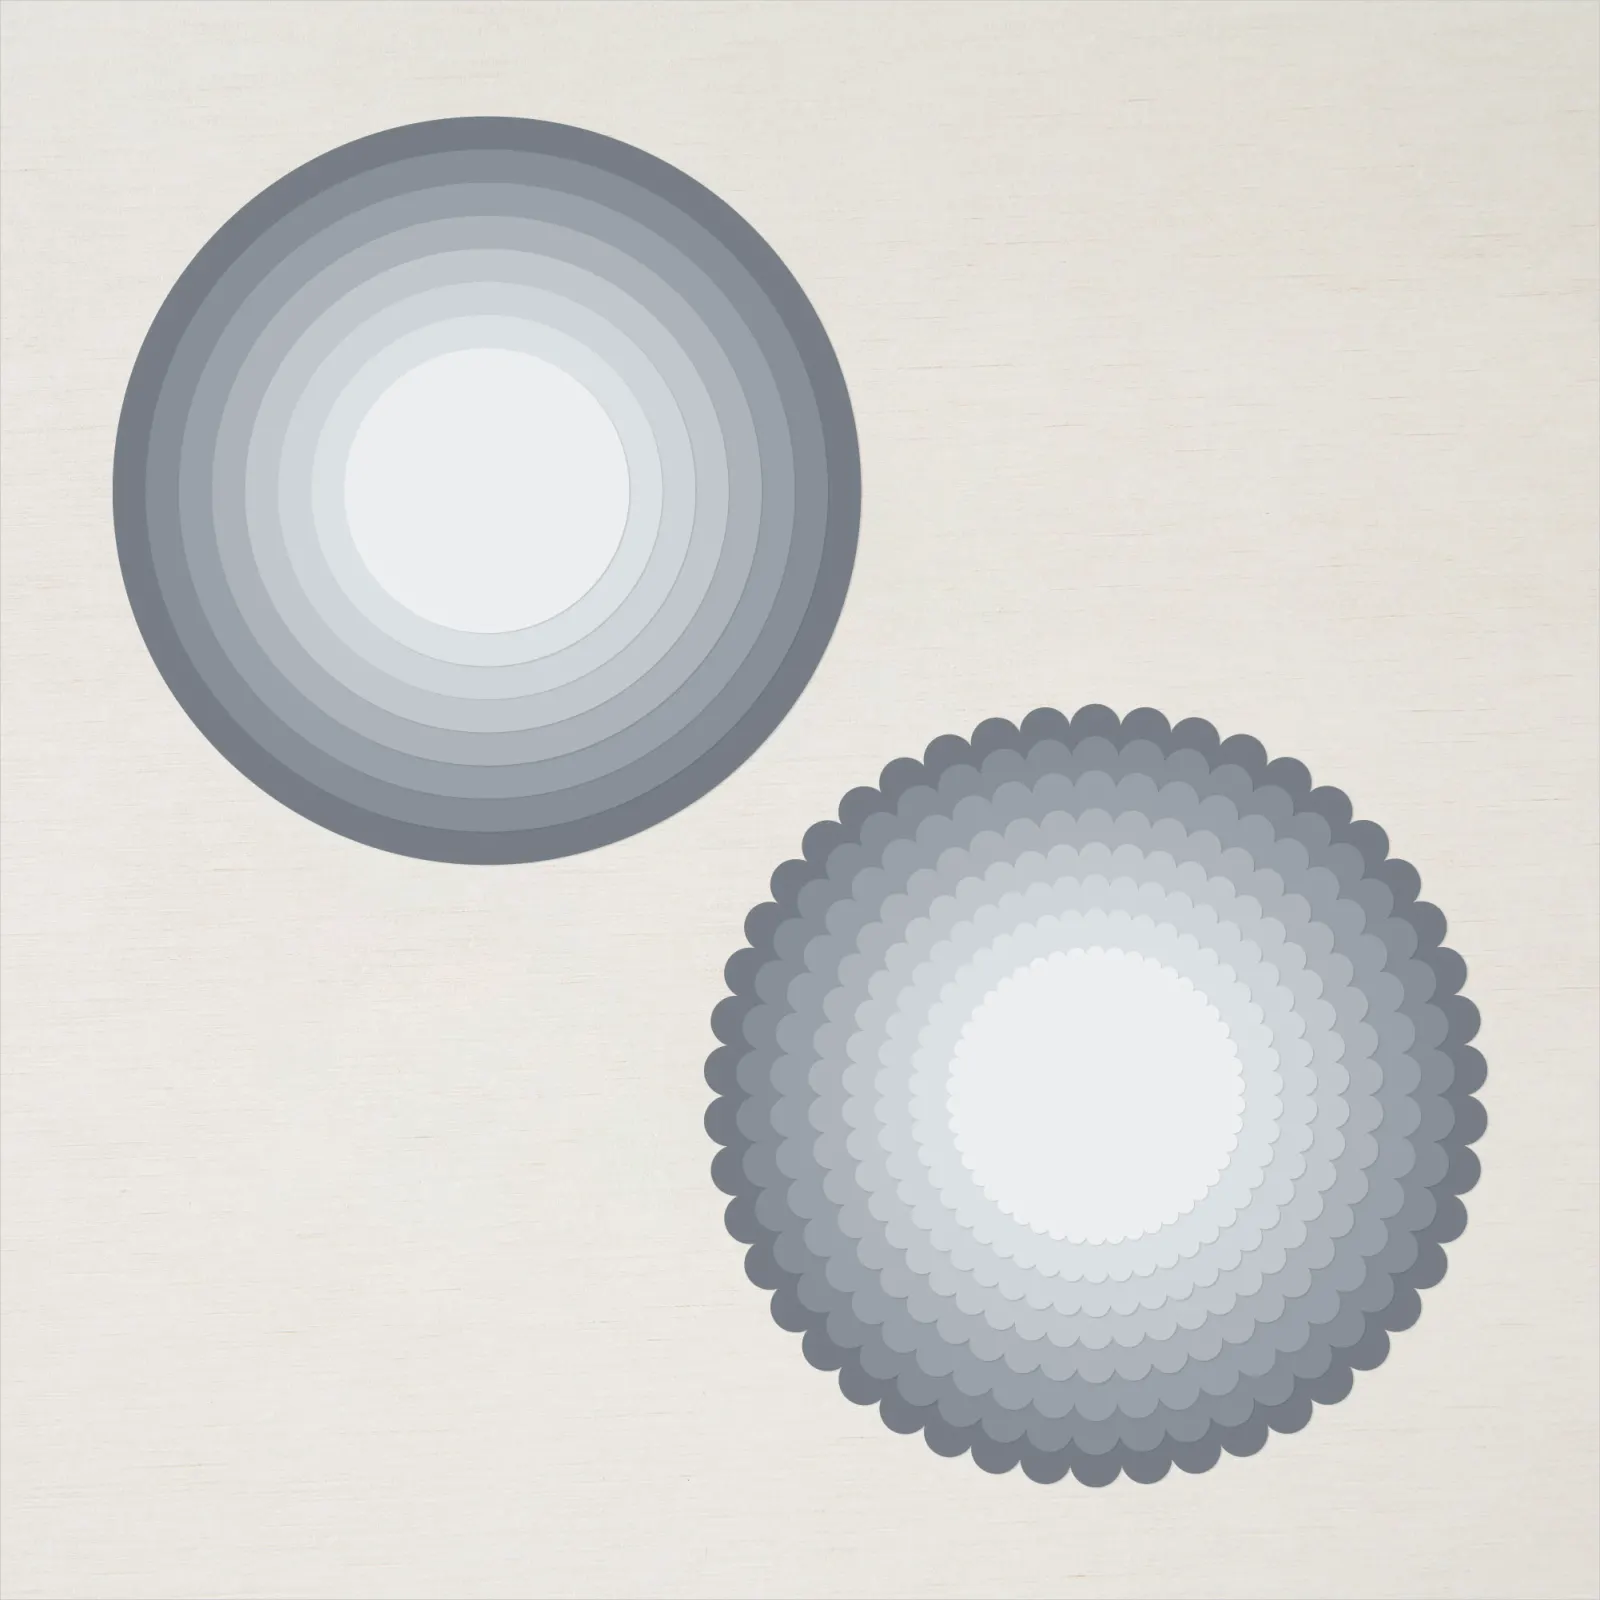
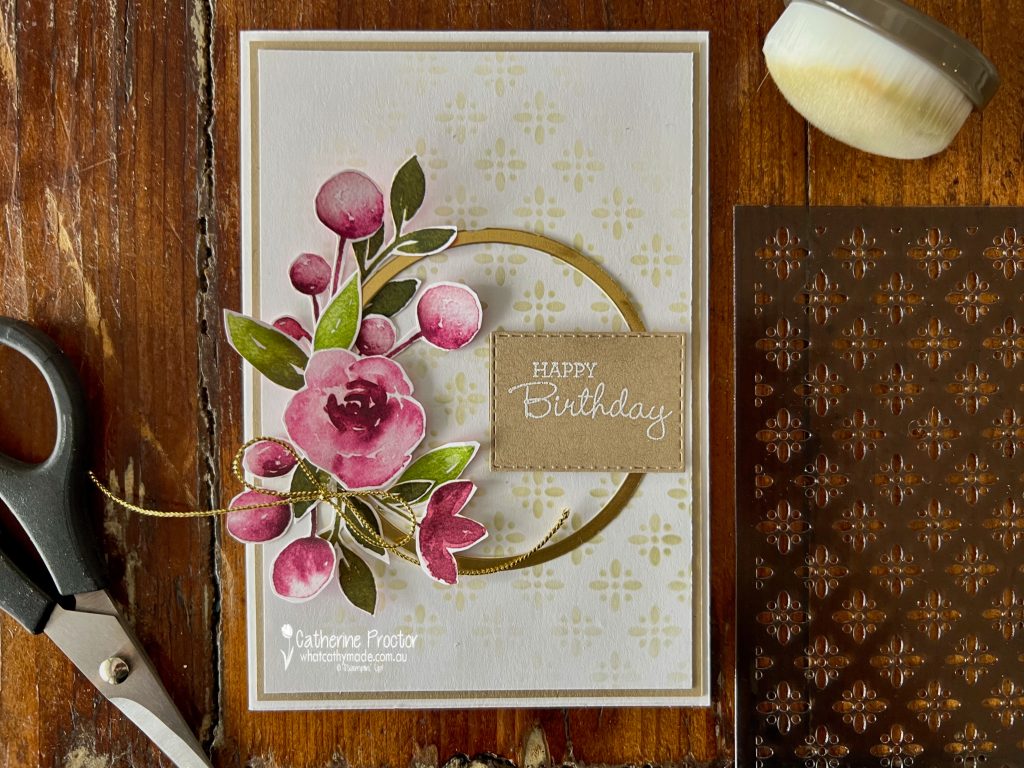
Awash in Beauty DSPStitched Rectangle diesLayering Circles Dies
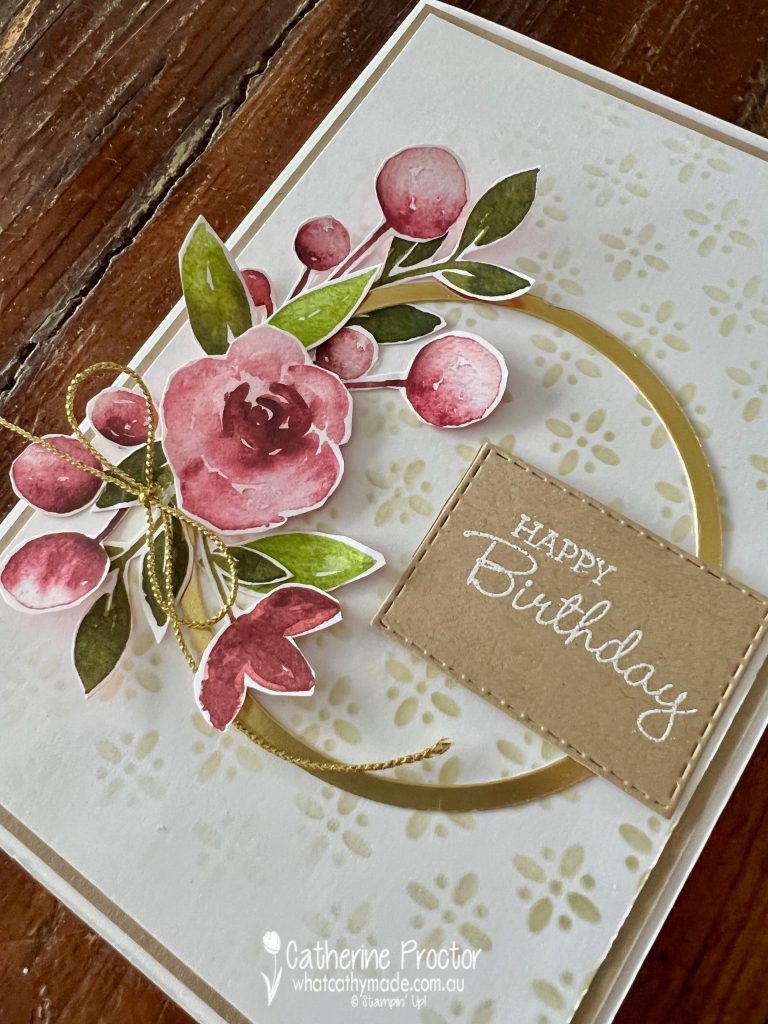
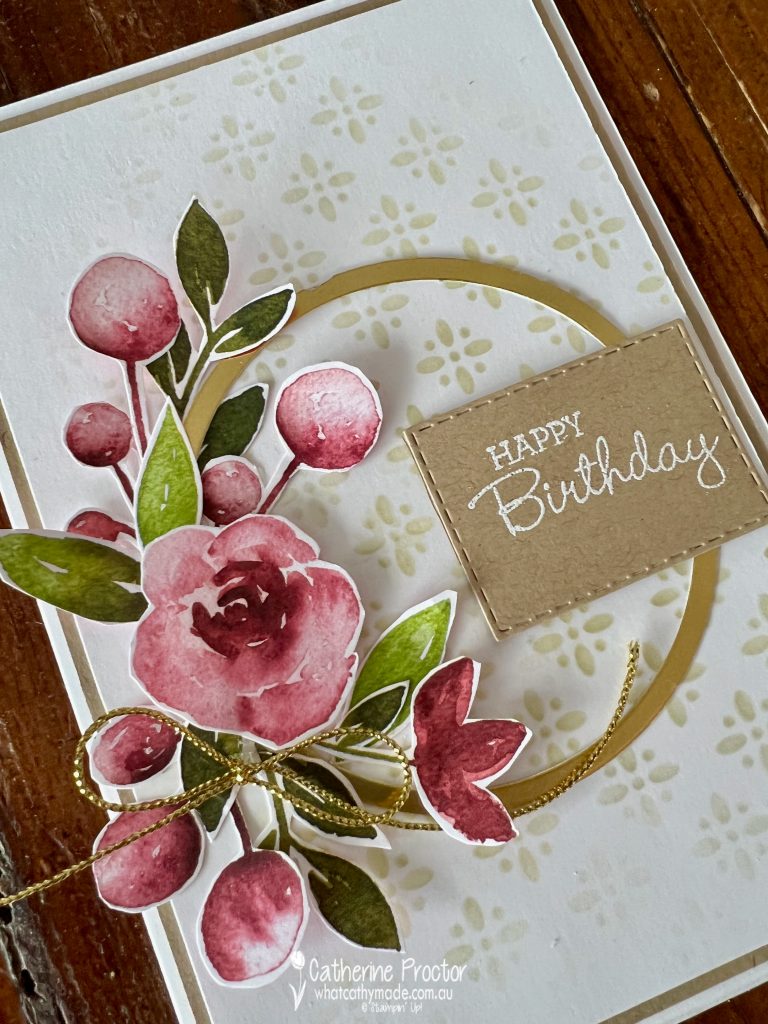
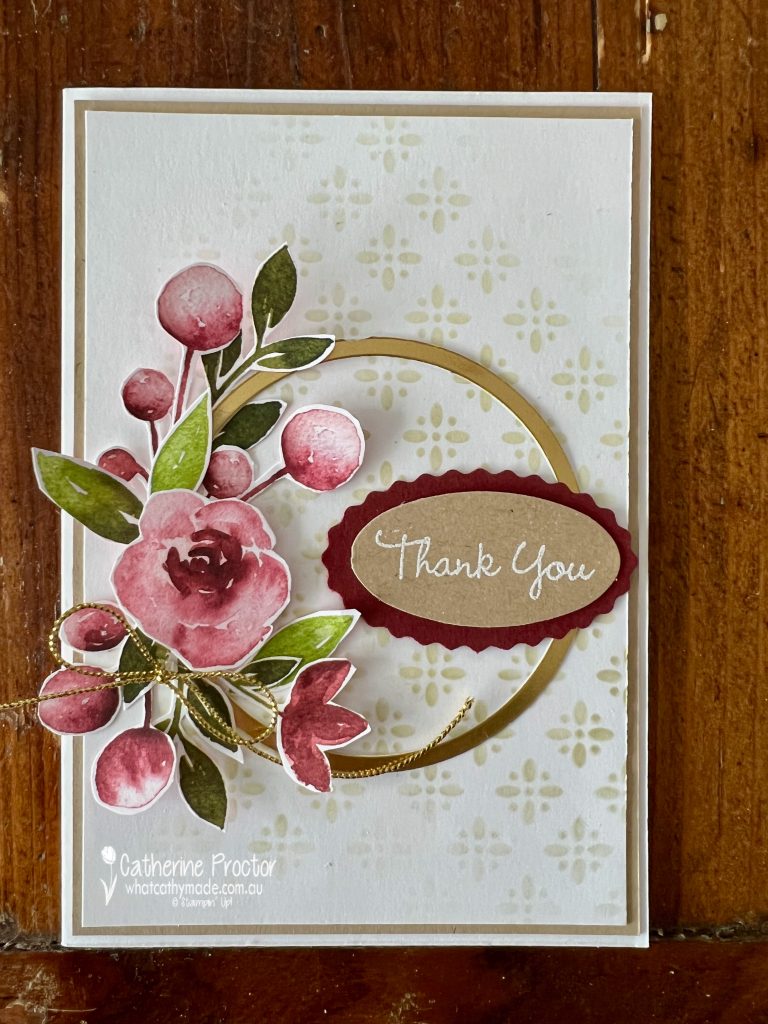
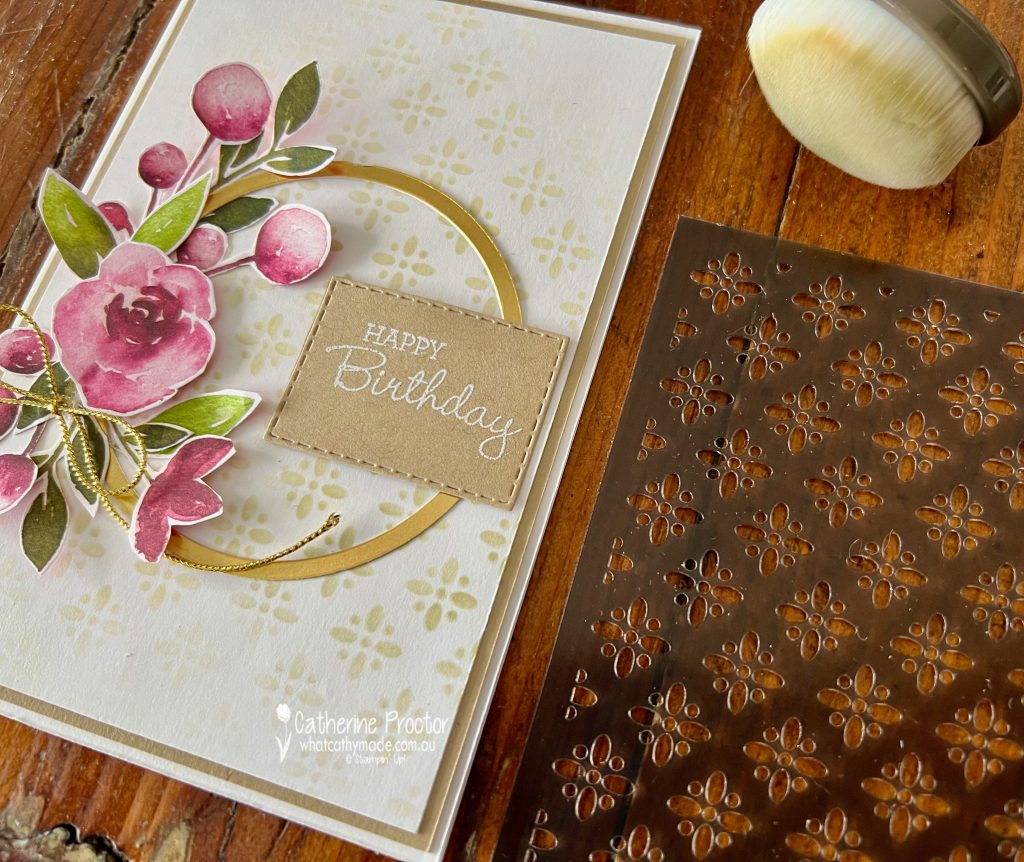
The background pattern on the card front is created using an Artistic Mix Decorative Mask with some Crumb Cake gently sponged over the top. This is such a quick and easy way to customise a background.
All of the flowers and leaves were fussy cut from this sheet of Awash in Beauty DSP – it was easy to fussy cut this DSP design.
I love Merry Merlot at different strengths – it’s a gorgeous shade of pink.
The gold hoop is made using the largest and second largest of the Layering Circle dies. Die cut the largest circle first and then it’s easy to line up the second largest circle die.
I’ve decided to try a new thing with my cards going forward. Wherever possible, I’m going to make a couple of different sentiments for each card and I’m not going to adhere the sentiment until I know what I am using the card for.
Here’s my alternate sentiment for this card.
This sentiment is stamped in Versamark Ink on Crumb Cake card stock, then heat embossed with white Emboss powder before it was die cut with a Stitched Rectangle die.
Now it’s time to hop on over to our next participant, the lovely Di Furniss – I can’t wait to see what Di has made this week!
If at any time you find a broken link, you can find the complete list of all participants below.
Welcome to week eighteen of the Heart Of Christmas Blog Hop!
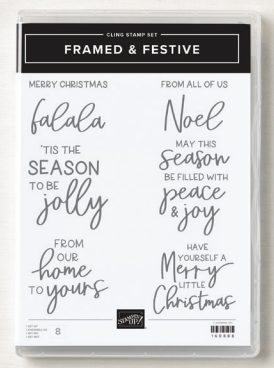
From tomorrow, November 1, the Fitting Florets Collection from the upcoming January – June Mini Catalogue will be available to order and it includes two products only available for limited time: the Framed & Festive Stamp Set and the Fitting Florets DSP.
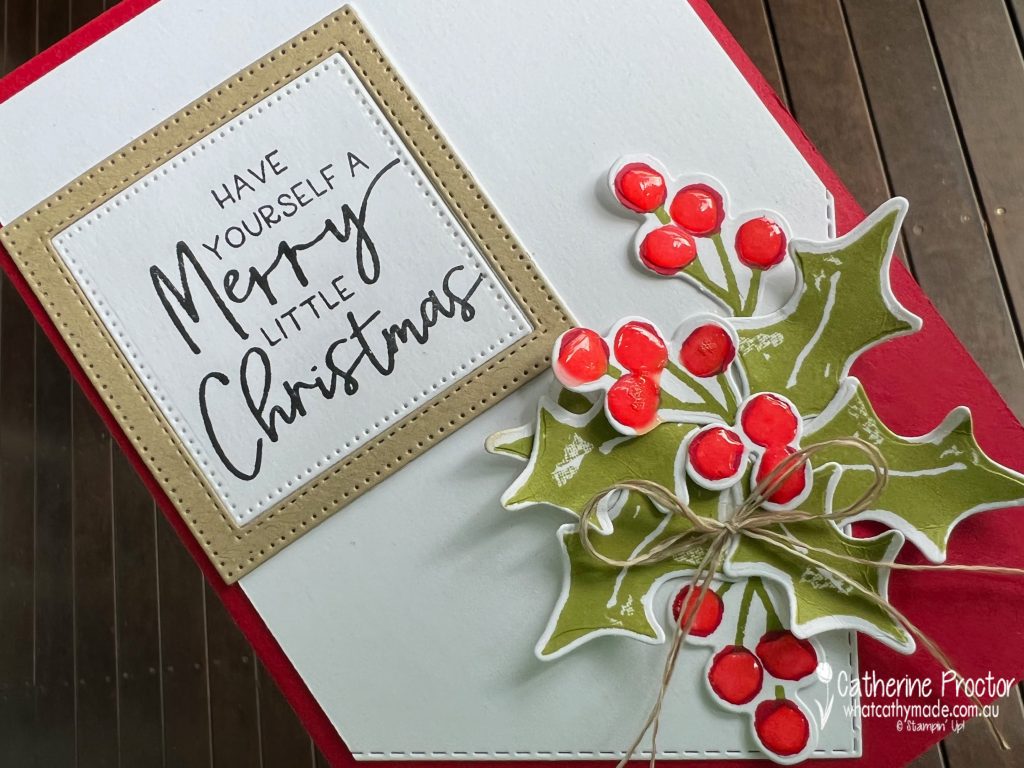
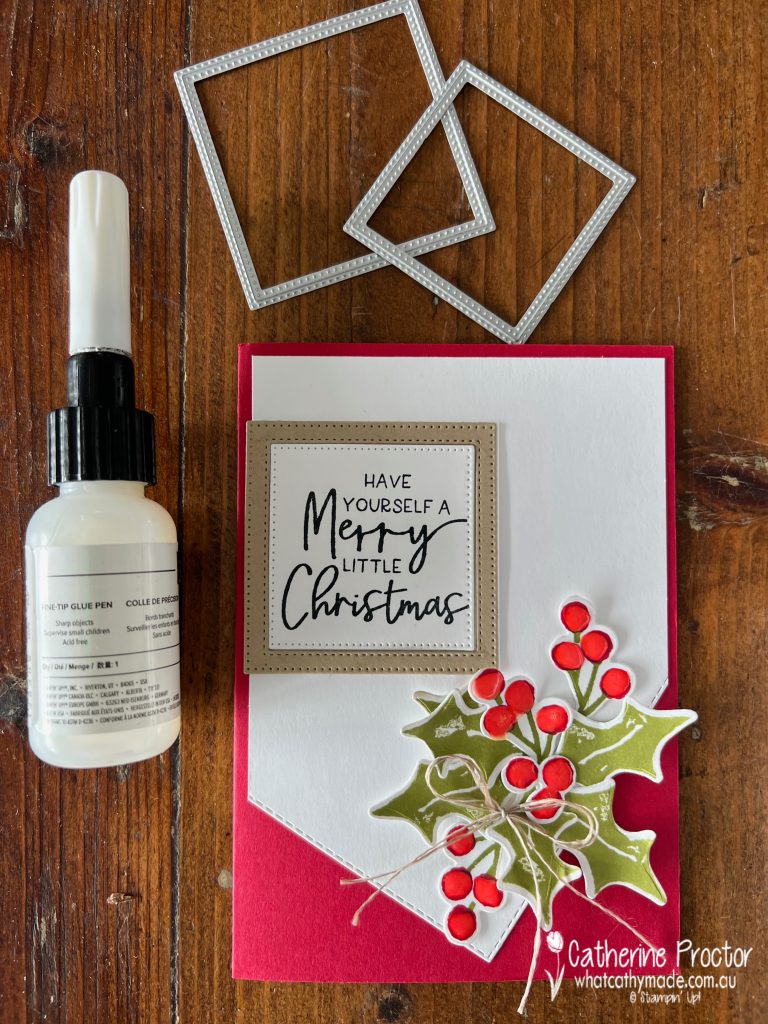
The Framed & Festive stamp set is a really versatile Christmas sentiment stamp set that works with any Christmas products. I’ve paired it with the Christmas Season stamp set and the coordinating Seasonal Labels dies for this week’s Heart of Christmas card.
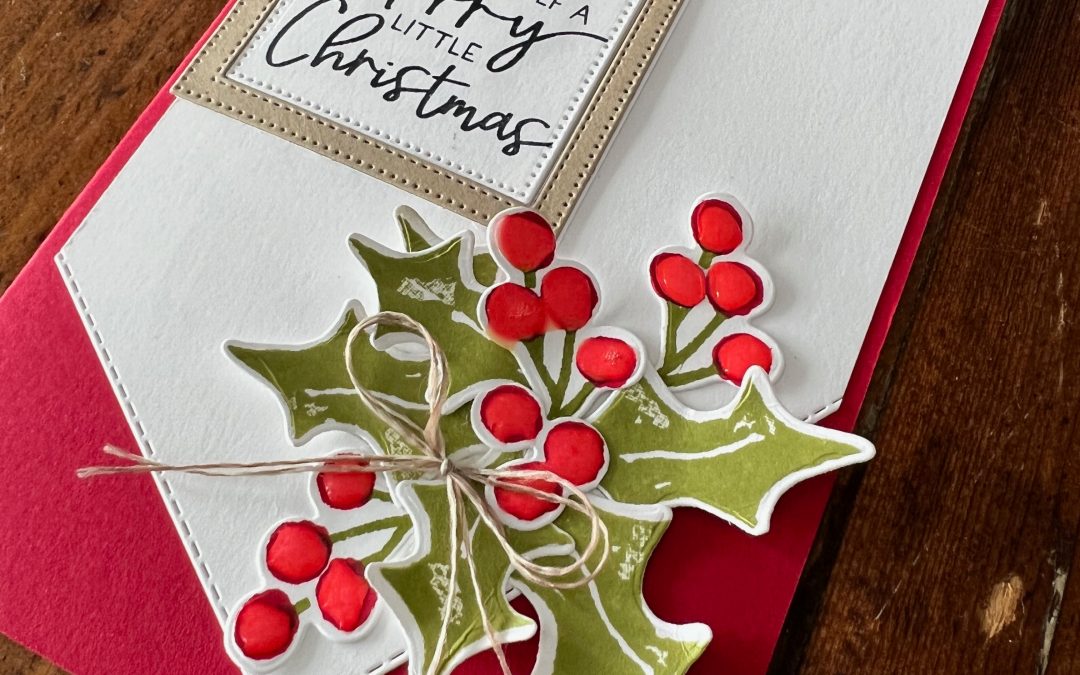
The Basic White layer has been die cut an angle using the largest of the stitched rectangle dies. This adds visual interest and draws your attention to the bunch of holly berries and leaves.
My traditional red and green colour combination uses Real Red, Pear Pizzazz, Crumb Cake and Basic White. Fine tipped glue has been added to the holly berries to make them shine.
The sentiment has been die cut and framed using the middle two square Stylish Shapes dies. I really like the mix of fonts in the Christmas sentiments in the Framed & Festive stamp set.
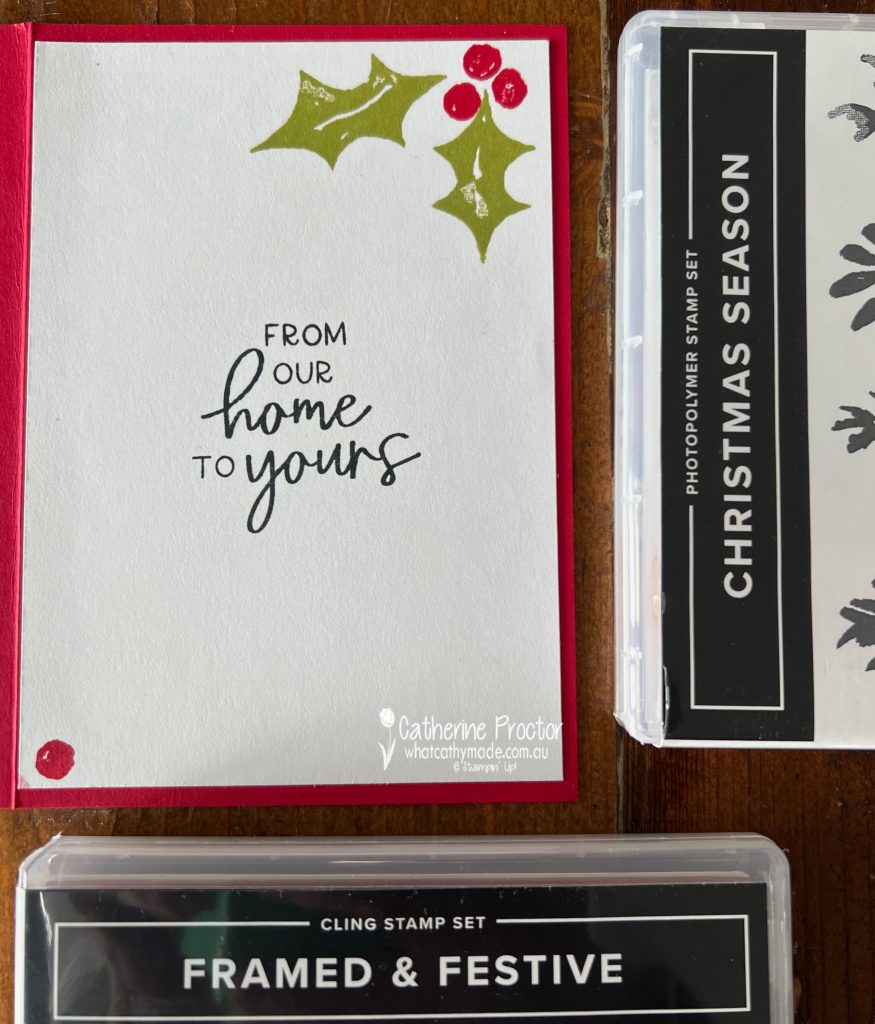
Another sentiment from the Framed & Festive stamp set has been used for the inside of the card – I think I will be using this sentiment a lot for my Christmas cards this year.
Now it’s time to hop on over to our next participant, the lovely Rachel Woollard – I can’t wait to see what Rachel has created today!
If at any time you find a broken link, you can find the complete list of all participants on Sharon‘s blog.
Welcome to week six of the Heart Of Christmas Blog Hop!
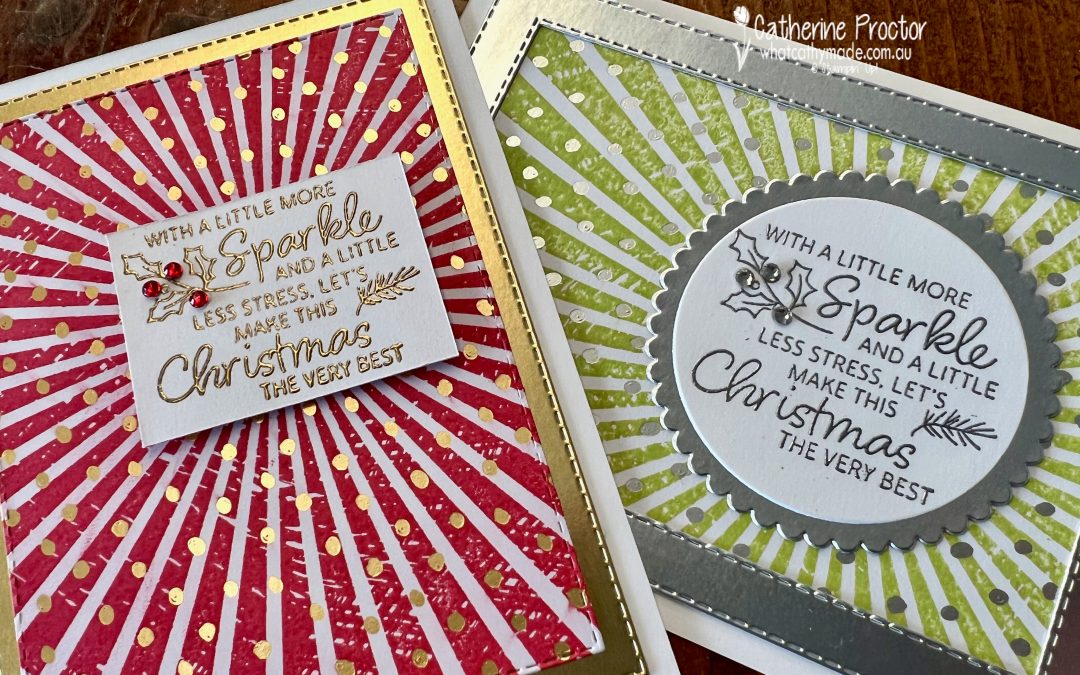
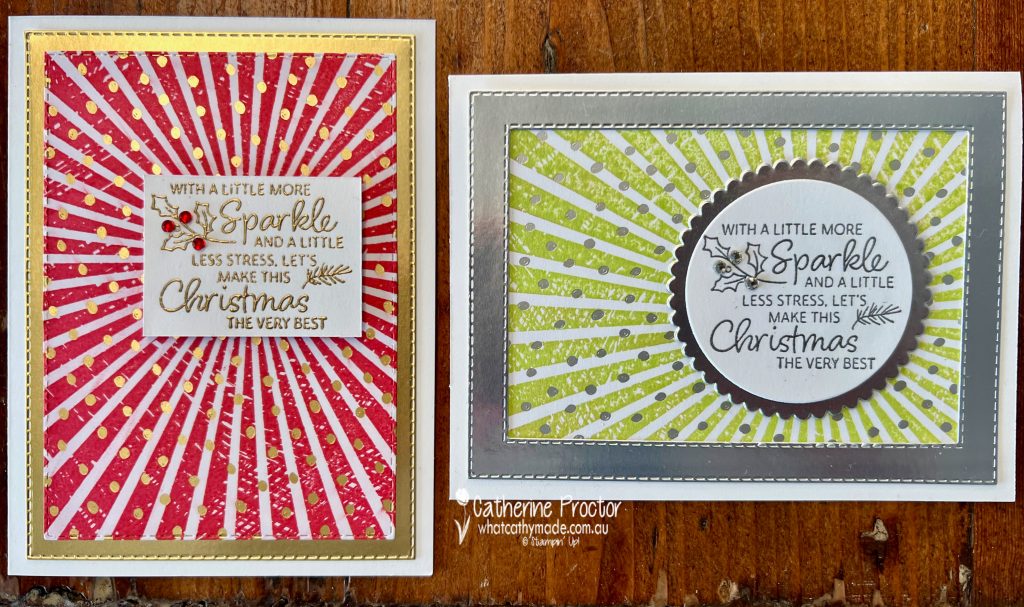
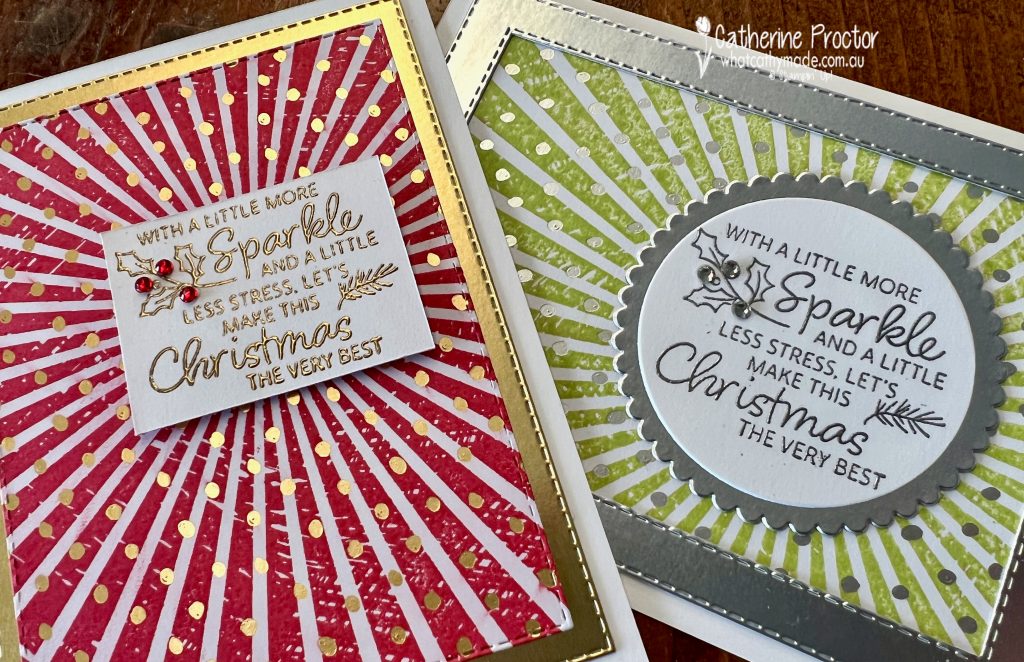
Ten more products have just been added to Sale-a-bration, so I’ve paired two of these new Sale-a-bration items – the gold foil from the Brushed Metallic cardstock pack and silver foil from the Silver Foil Specialty pack – with the existing Sale-a-bration Gold and Silver DSP for my two modern Christmas cards.
NOTE: If you would like to redeem your Sale-a-bration credits for these new items, make sure you use the codes below, instead of the original product codes they have in the catalogue they appear in.
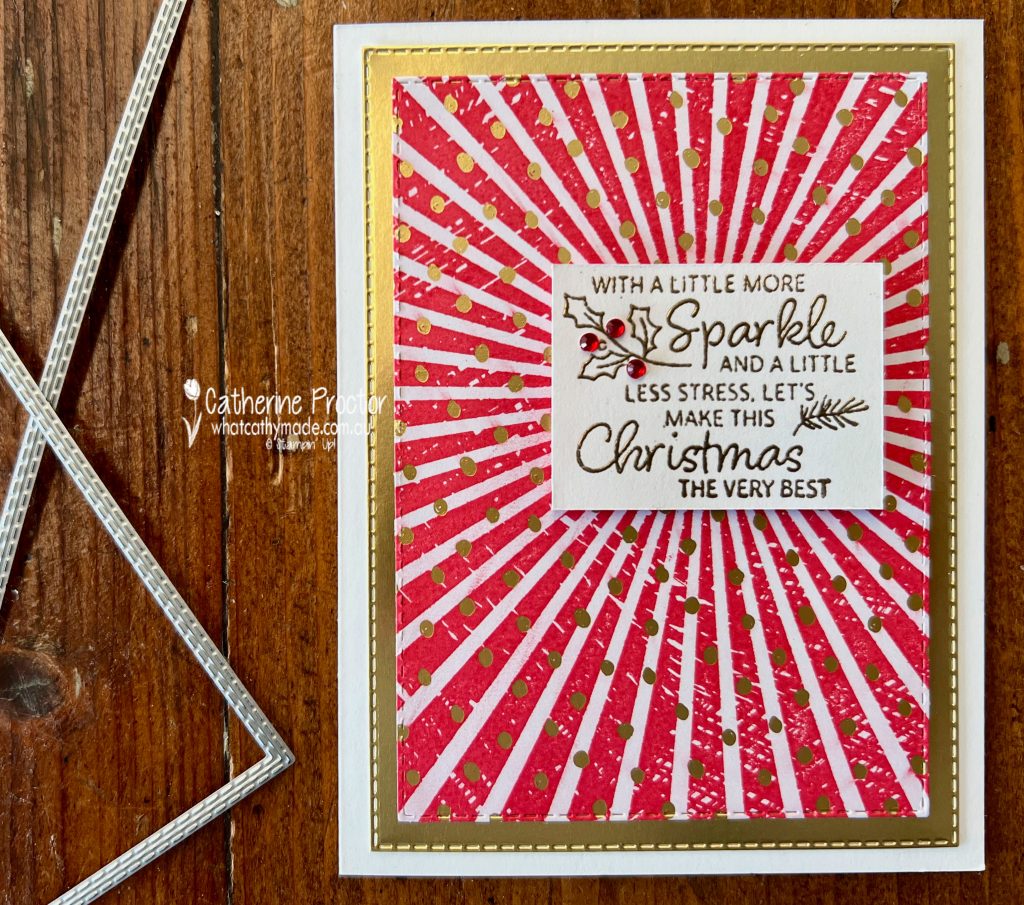
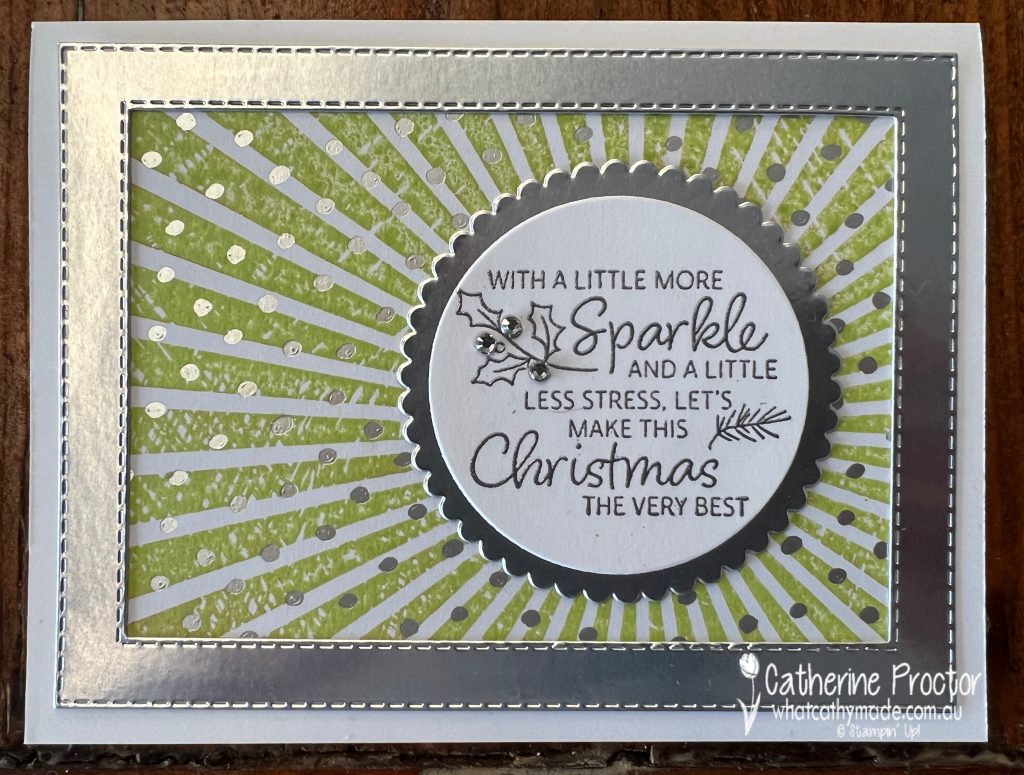
My “non-traditional” Christmas cards were inspired by a video where Stampin’ Up used the Rays of Light Stamp set to stamp on the Silver & Gold DSP.
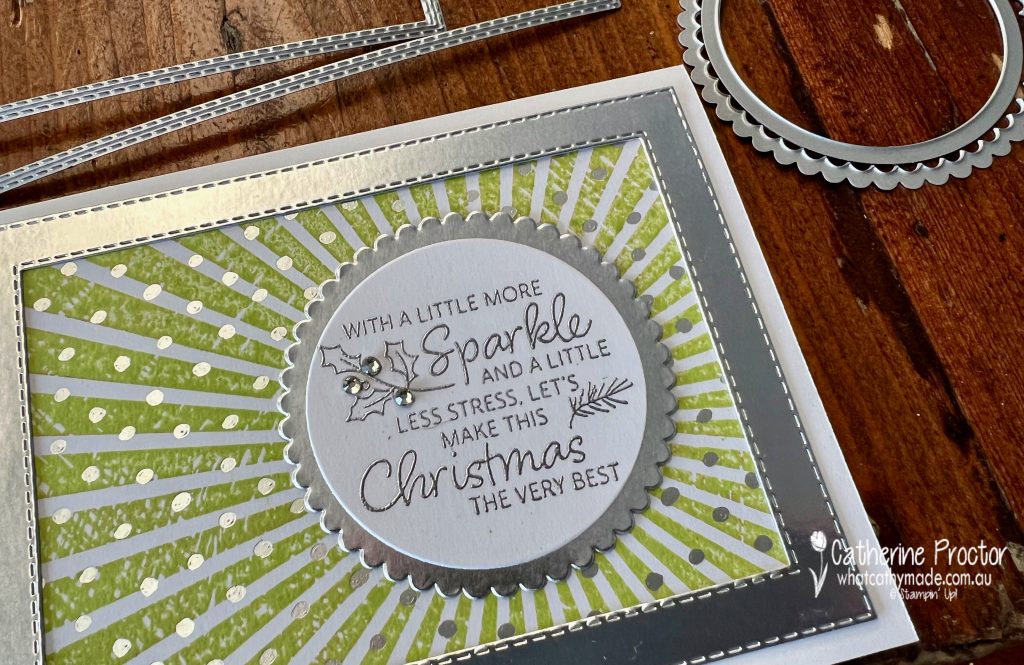
TOP TIP – use your Stamparatus to stamp large background stamps like this one.
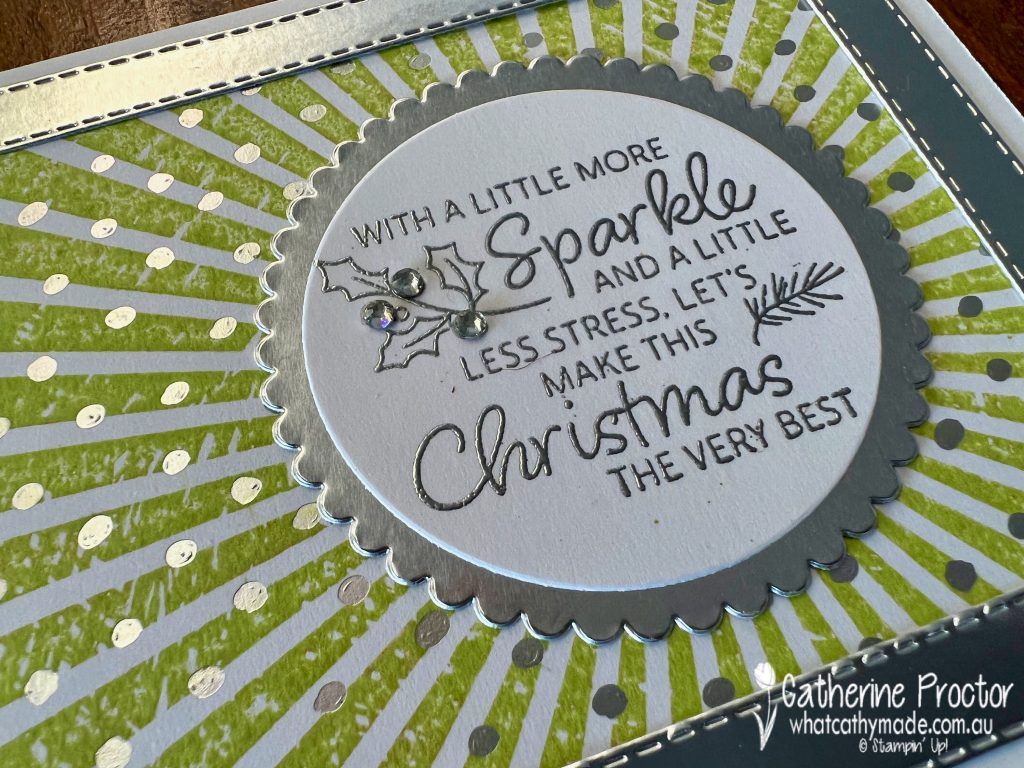
This sparkly Silver & Gold DSP works really well with the gorgeous sentiment stamp I’ve used from the “Very Best Occasions” stamp set. I love this sentiment – bring on the sparkle and banish the stress of Christmas, I say!
I’ve used two of the new 2022-24 In Colours for my cards today – Parakeet Party paired with silver foil and Sweet Sorbet paired with gold foil.
I used a paper trimmer to cut out the gold embossed sentiment, adding red rhinestones as holly berries to the sentiment.
The gold frame is created using the largest and third largest stitched rectangle dies, with the stamped DSP die cut out with the second largest stitched rectangle die.
While I layered the gold frame behind the DSP for the Sweet Sorbet card, I decided to place the silver frame over the top of the stamped DSP for the Parakeet Party card.
The sentiment for the Parakeet Party card was die cut using layering circle dies and Rhinestone Basic Jewels embellish the sentiment.
I know which card I like the best, but I’m curious to find out which variation you prefer? Do you think this design is too modern and graphic for Christmas cards?
Now it’s time to hop on over to our next participant, the lovely Rachel Woollard – I can’t wait to see what Rachel has made this week!
If at any time you find a broken link, you can find the complete list of all participants on Sharon‘s blog. Sharon Davern is the host of our Heart of Christmas blog hop this year – thank you so much Sharon!!
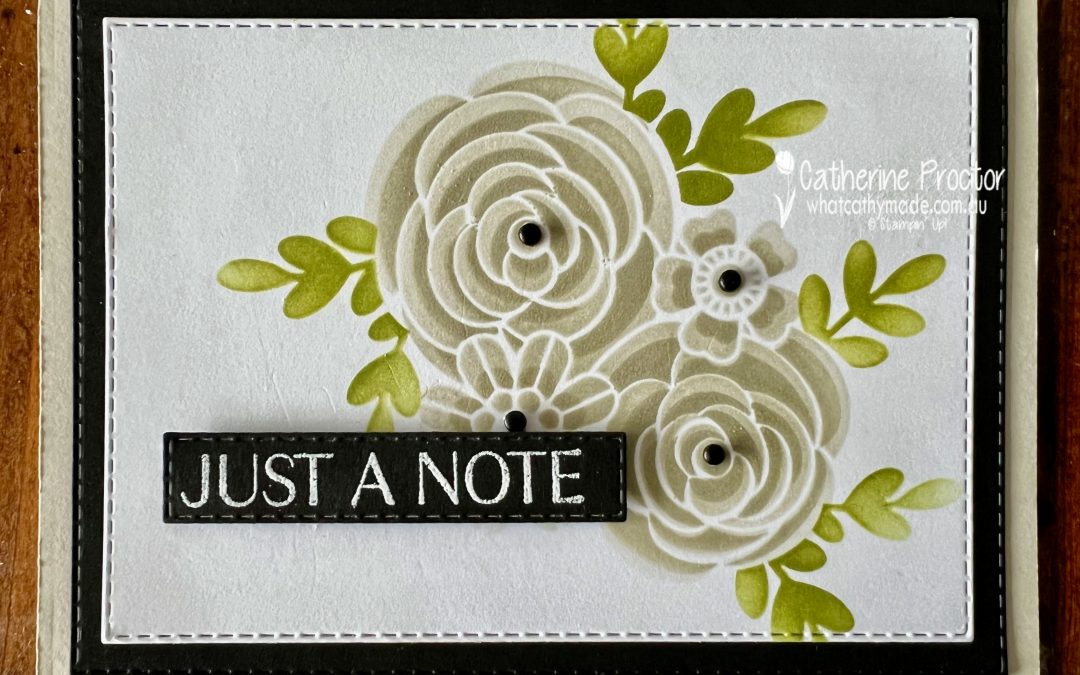
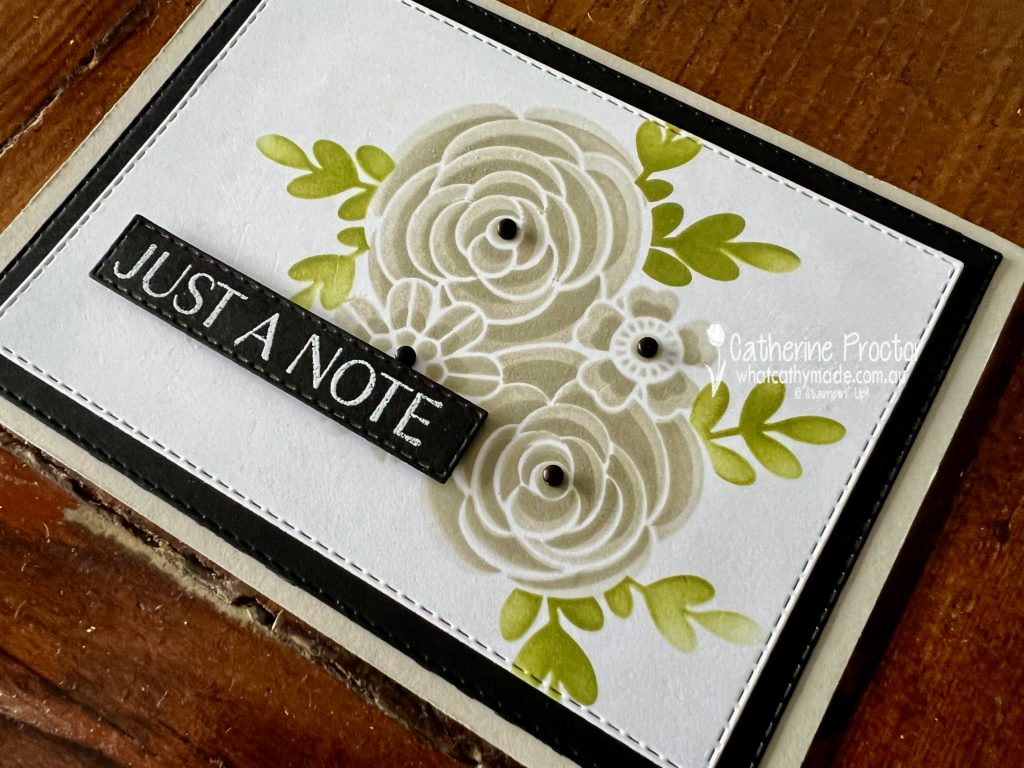
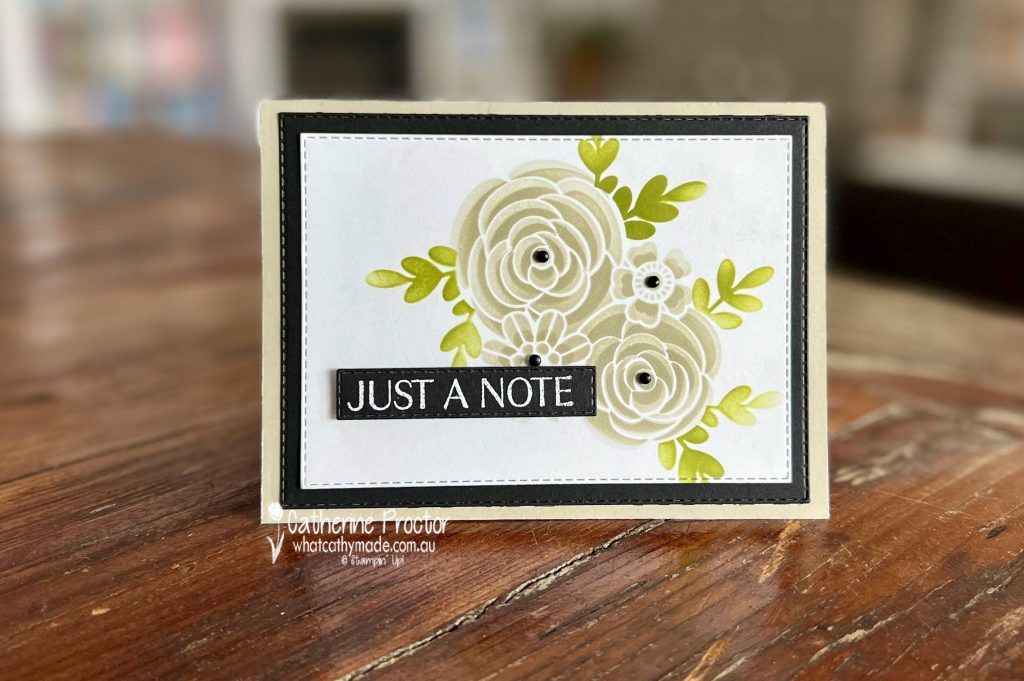
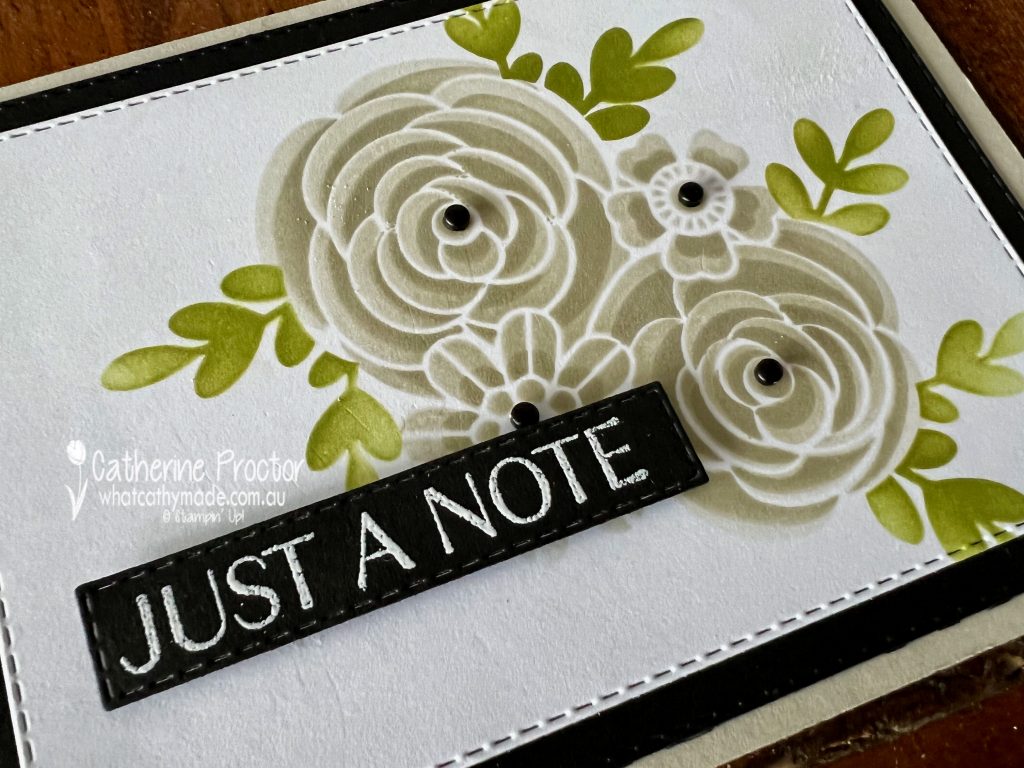
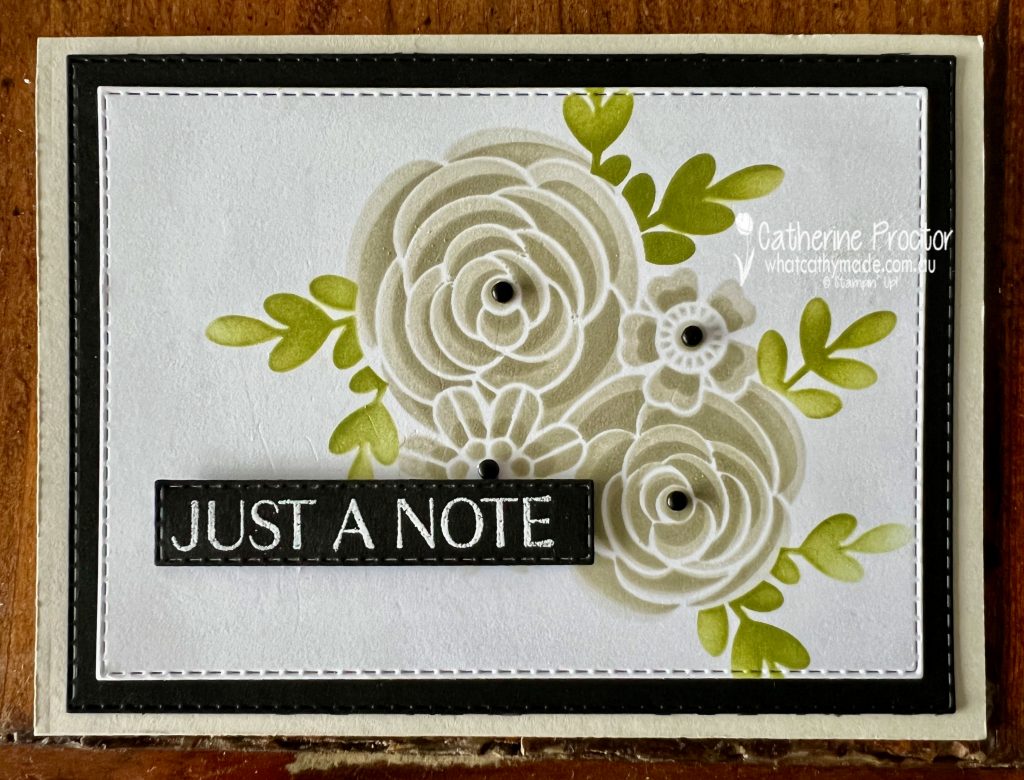
Welcome to week 41 of our 2021-22 Colour Creations blog hop! Tonight we are showcasing Sahara Sand from the Neutrals family.
Sahara Sand is the lightest neutral and such a versatile colour that really works well when paired with any colour.
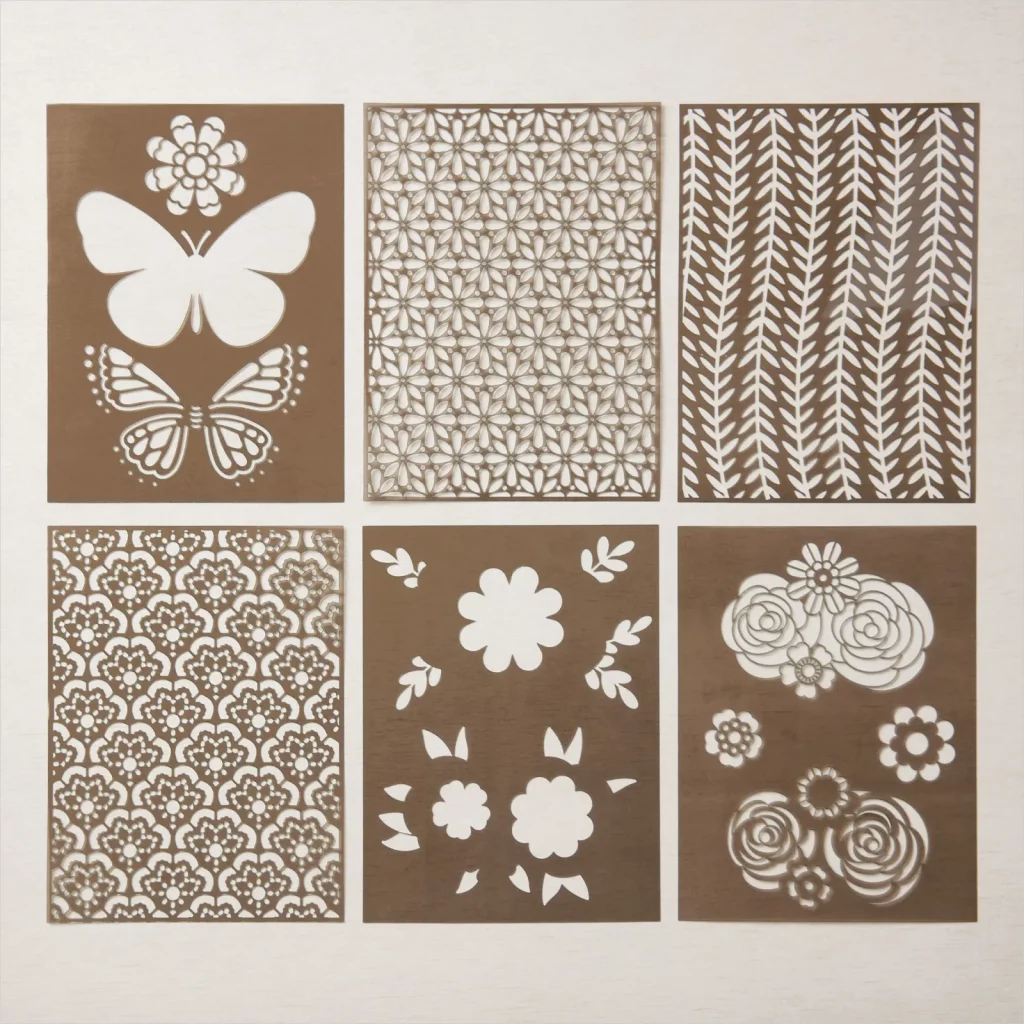
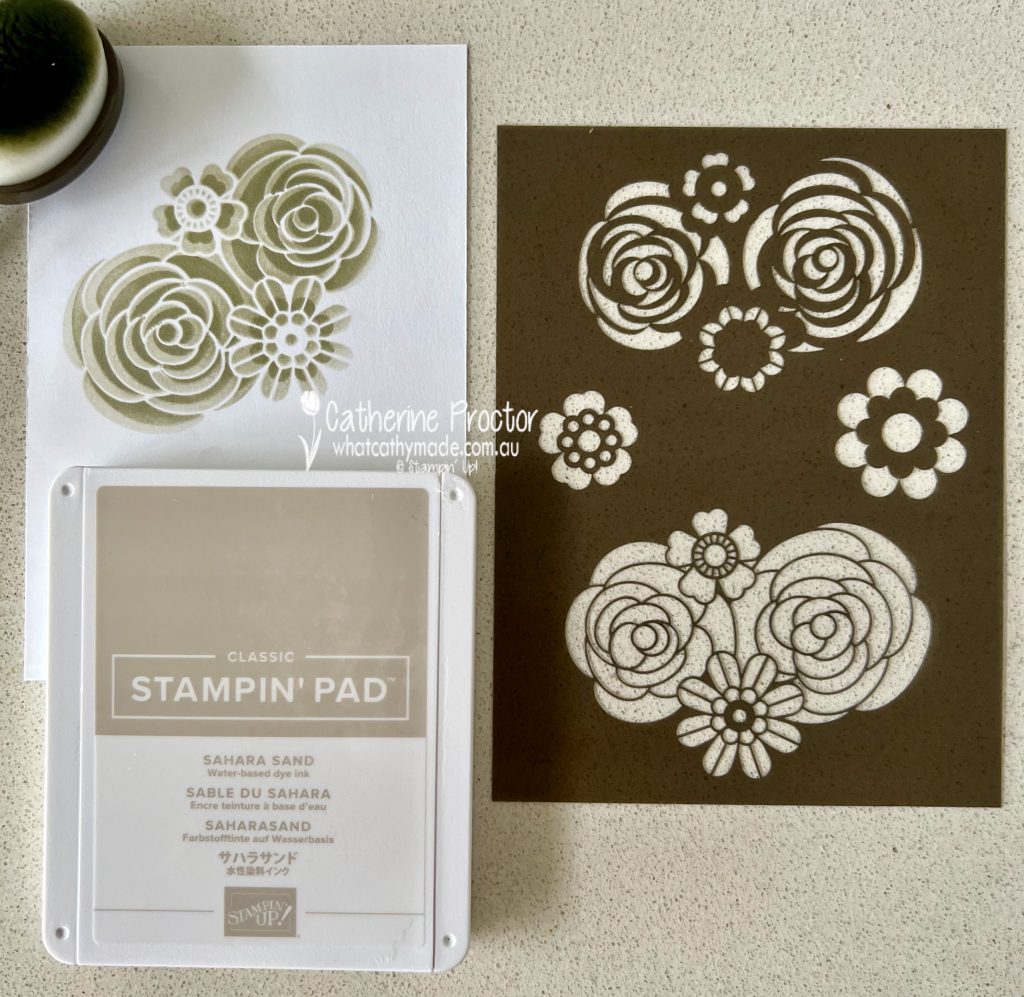
In particular, I like using Sahara Sand to add shadows to “ground” stamped images into a scene, however today I’m using my Sahara Sand ink pad and a blending brush to showcase the beautiful Butterflies & Flowers Layering Decorative Masks.
I’ve used the bottom middle and right masks for my card today.
This photo below shows how you can achieve an incredible two-tone effect using the same colour, just by colouring one section of the mask and then using another part of the mask to colour again on top of the first layer of colour.
I added masked leaves in Pear Pizzazz using the bottom middle mask – the leaves are just one layer of colour but I used my blending brush to blend in a natural looking variation in depth of colour.
I then used the stitched rectangles to die cut my flower layer, adding a layer of Basic Black underneath. I really love this colour combination of Sahara Sand, Pear Pizzazz and Basic Black!
The “Just a Note” sentiment is from the Flowering Flowers stamp set, stamped in Versamark ink, white heat embossed and die cut with another stitched rectangle die.
Instead of adding a bow of twine to embellish the card, I decided to use a few of the Classic Matte dots in the centre of the flowers instead.
Now it’s time to hop on over to our next participant, the lovely Andrea Sargent – I can’t wait to see what Andrea has made this week!
If at any time you find a broken link, you can find the complete list of all participants below.
Welcome to week twenty-seven of our 2020-2021 Art With Heart Colour Creations Showcase.
Each week various members of our Art With Heart Colour Creations team will be bringing you weekly colour inspiration as we showcase our range of over 50 beautiful Stampin’ Up! colours in alphabetical order.
Week 27 – Mint Macaron
Hello crafters!
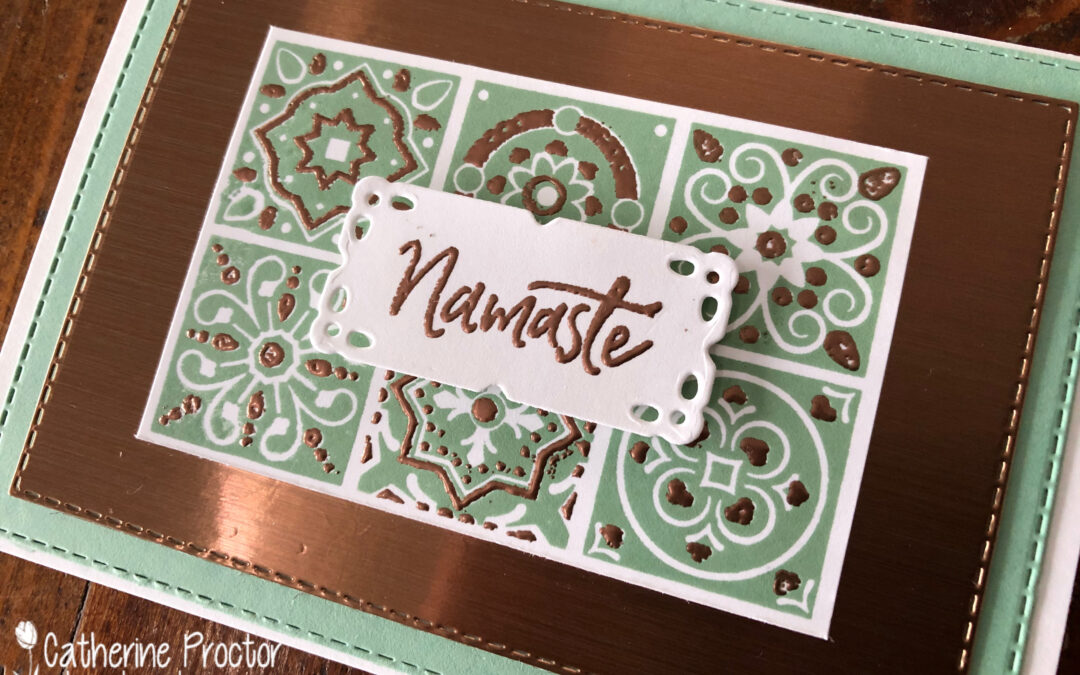
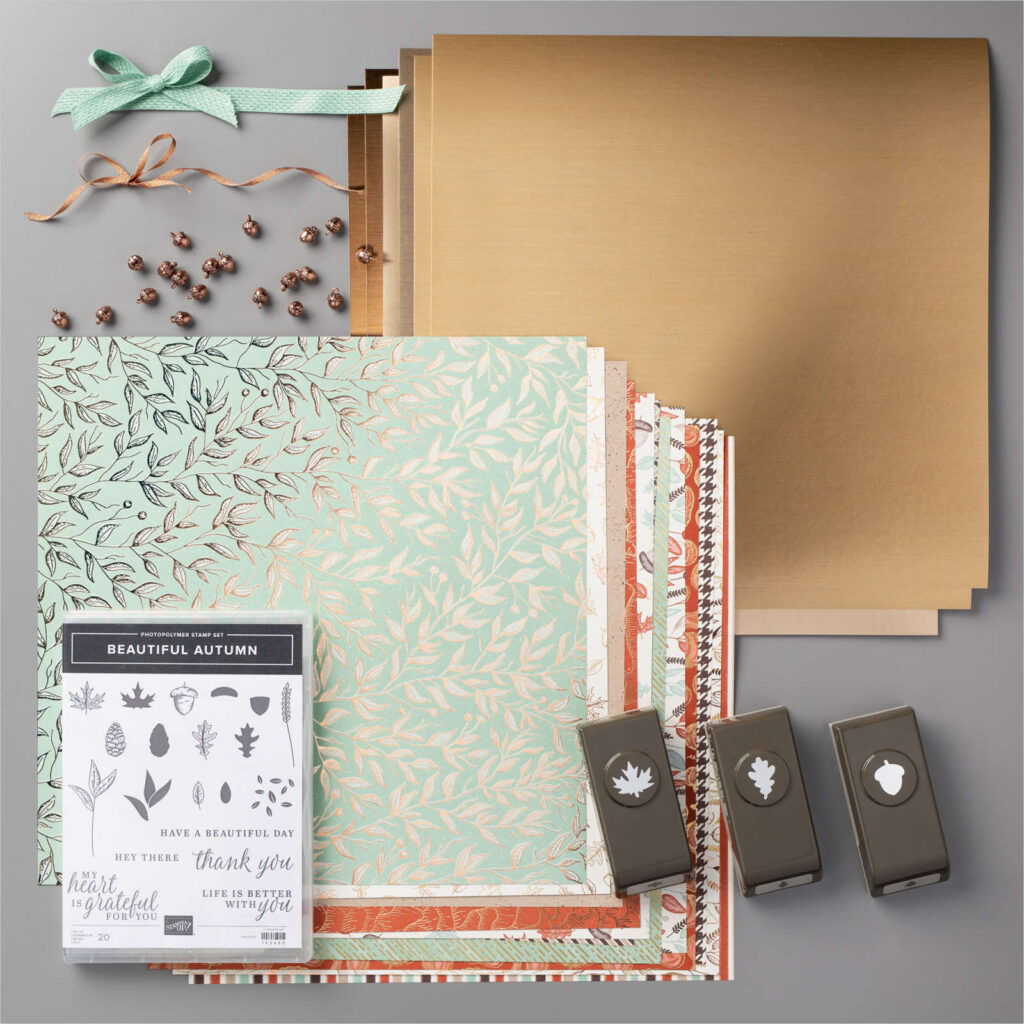
Our colour this week is Mint Macaron, a lovely soft green. There were so many possible projects I had in my mind for Mint Macaron but in the end I was inspired by the colour combination and several products from the Gilded Autumn Suite on page 45 of the July – December Mini Catalogue.
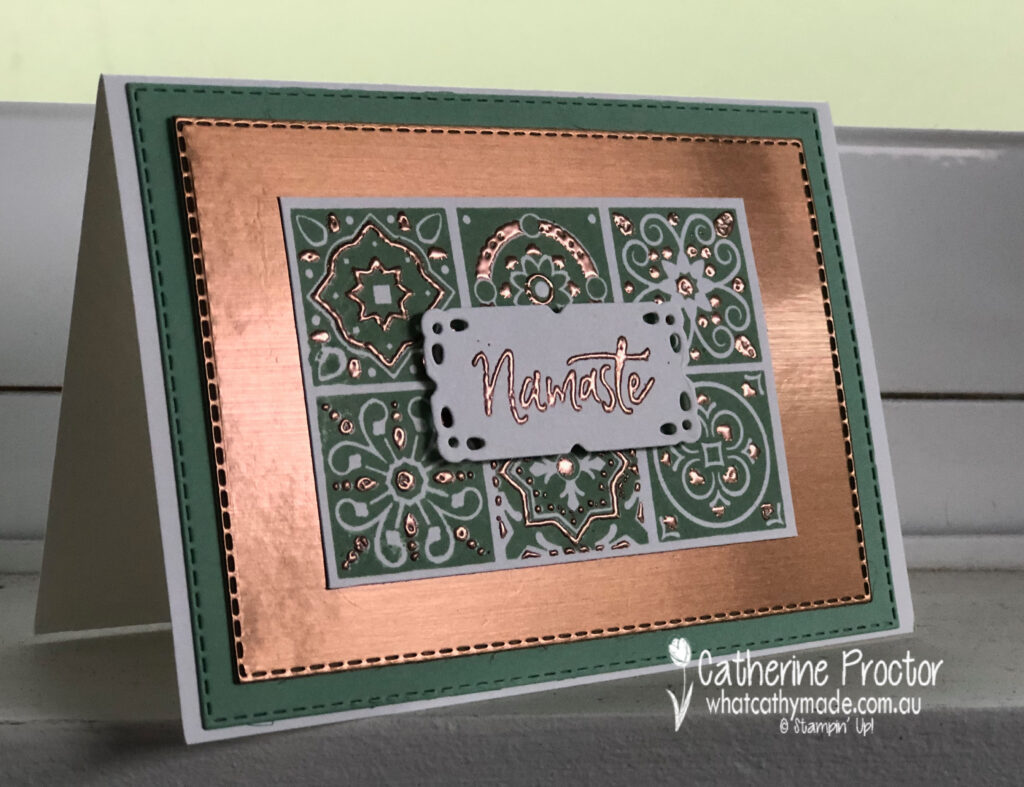
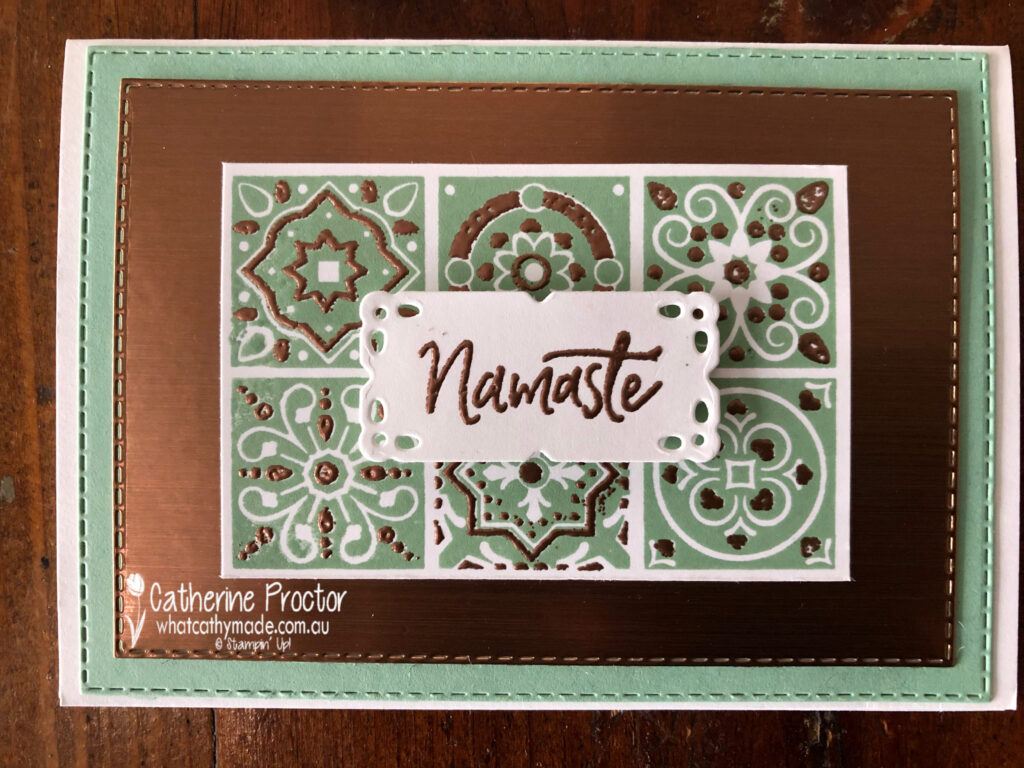
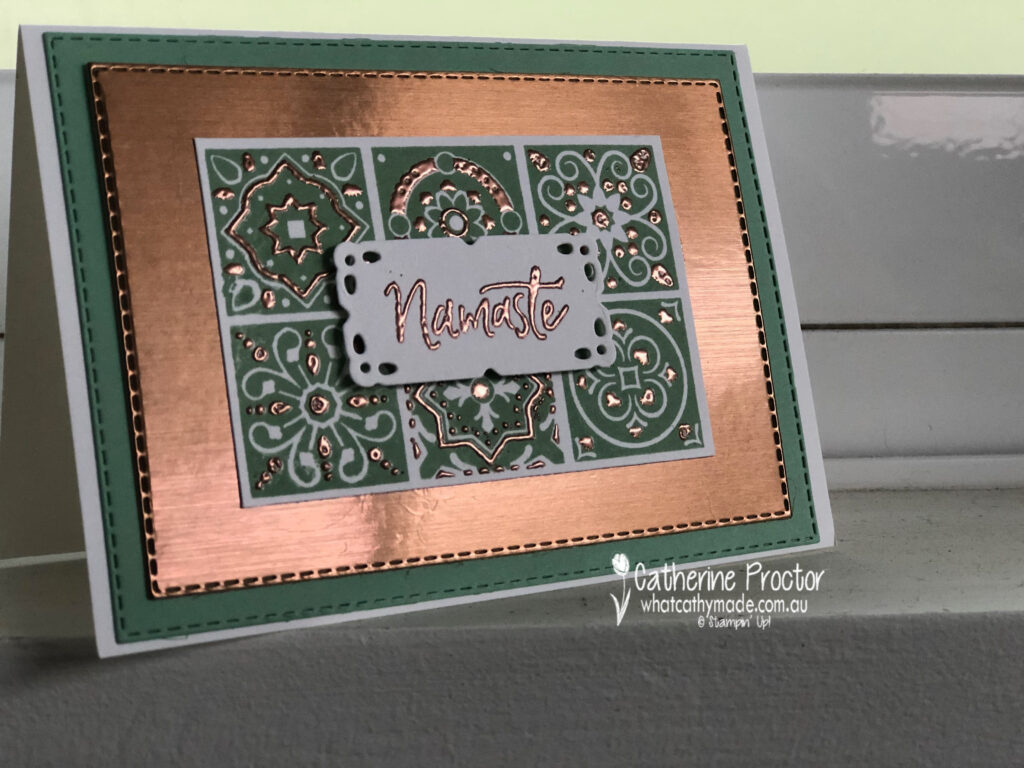
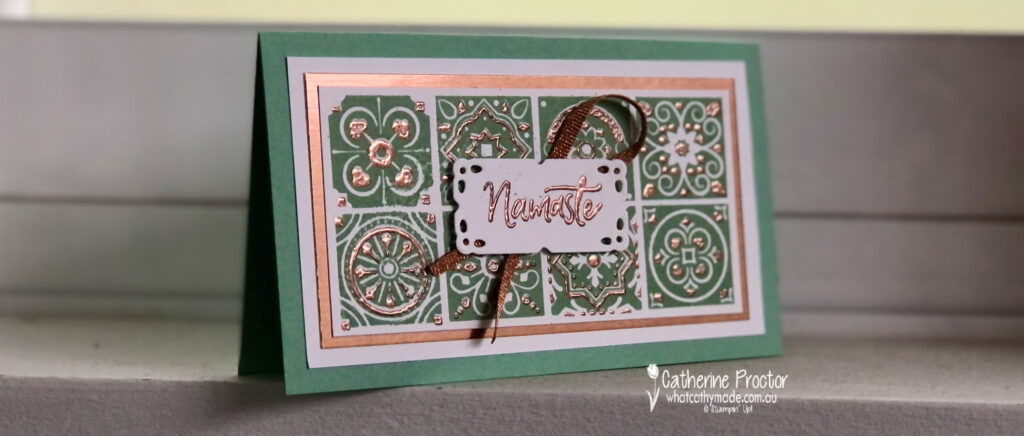
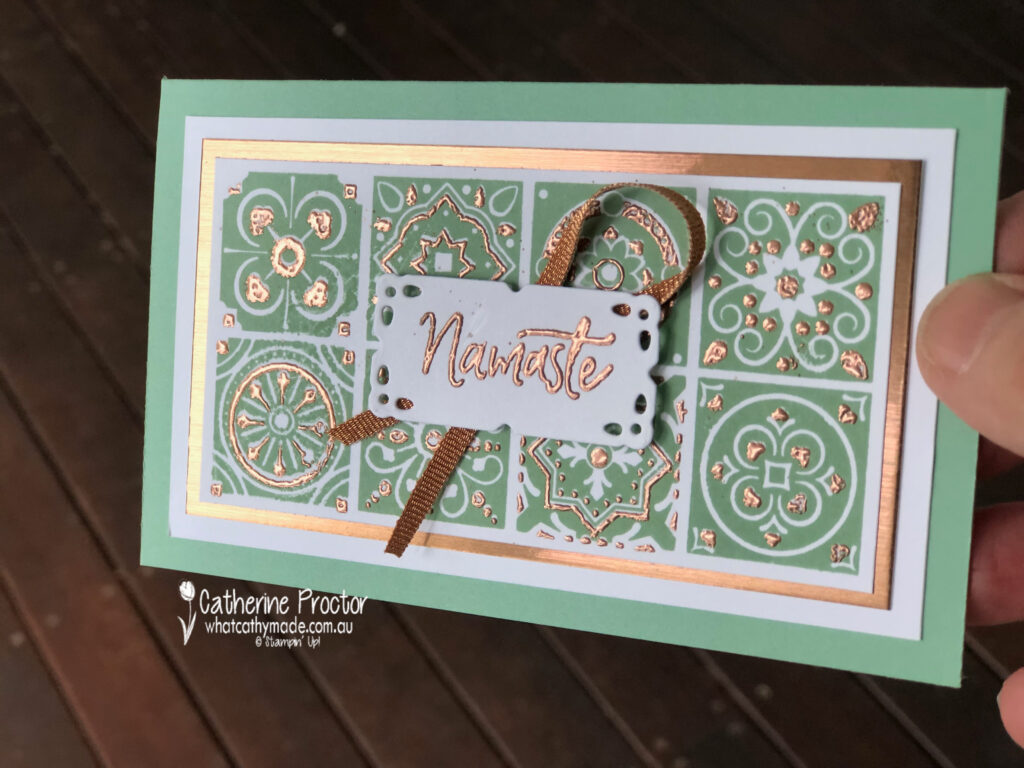
I just love Mint Macaron and Copper foil together on these beautiful foiled papers and the Brushed Metallic Card stock, however instead of using this DSP I decided to see what the Today’s Tiles would look like inked up in Mint Macaron, with the second layer heat embossed in copper.
This card is super hard to photograph – either you capture the shine of the beautiful brushed metallic copper card stock and the Mint Macaron looks very dark (photo above) or you capture the true colour of Mint Macaroon but not the shine of the brushed metallic copper card stock (photo below).
The key to lining up the layers of the tile stamp is your trusty Stamparatus. To achieve the copper foiled look I stamped in Versamark ink before applying copper emboss powder. (NOTE I’ve just realised this product is now retired but you could use the gold emboss instead and the gold brushed metallic card stock instead of the copper brushed metallic card stock).
I’ve used the Totally Tile stamp set on purpose because I’ve made these two cards as a thank you to two of my amazing yoga teachers. I was so excited when I saw that Stampin’ Up! had a stamp set with “Namaste”. If you don’t practice yoga you might not be familiar with this word. We say it with our teachers at the end of a class and it can mean “I bow to you” but apparently it is also colloquially used among Hindi speakers as a way of saying hello, especially when greeting someone older.
My second card also uses the “Namaste” sentiment and the same colour combination but I’ve mixed the design up a bit and added some of the Metallic Copper Grosgrain Ribbon from the Gilded Autumn Suite.
Doesn’t that metallic Copper Grosgrain ribbon look beautiful behind the sentiment? I really hope my yoga teachers enjoy receiving their personalised “Namaste” thank you card!
I can’t wait to see what the rest of the Art With Heart team have created with Mint Macaron today. Click on the links below to see what they’ve made.
If you’d like me to post you your very own copy of the upcoming January-June 2021 Mini Catalogue, the August–December 2020 Mini Catalogue, 2020-21 Stampin Up! Annual Catalogue, the 2020-21 Beginners Brochure, or to simply find out about more about Stampin’ Up! contact me.
In the meantime, wherever you are in the world, stay safe, stay calm…and keep on crafting xxx
Welcome to week twenty-four of our 2020-2021 Art With Heart Colour Creations Showcase.
Each week various members of our Art With Heart Colour Creations team will be bringing you weekly colour inspiration as we showcase our range of over 50 beautiful Stampin’ Up! colours in alphabetical order.
Week 24 – Mango Melody
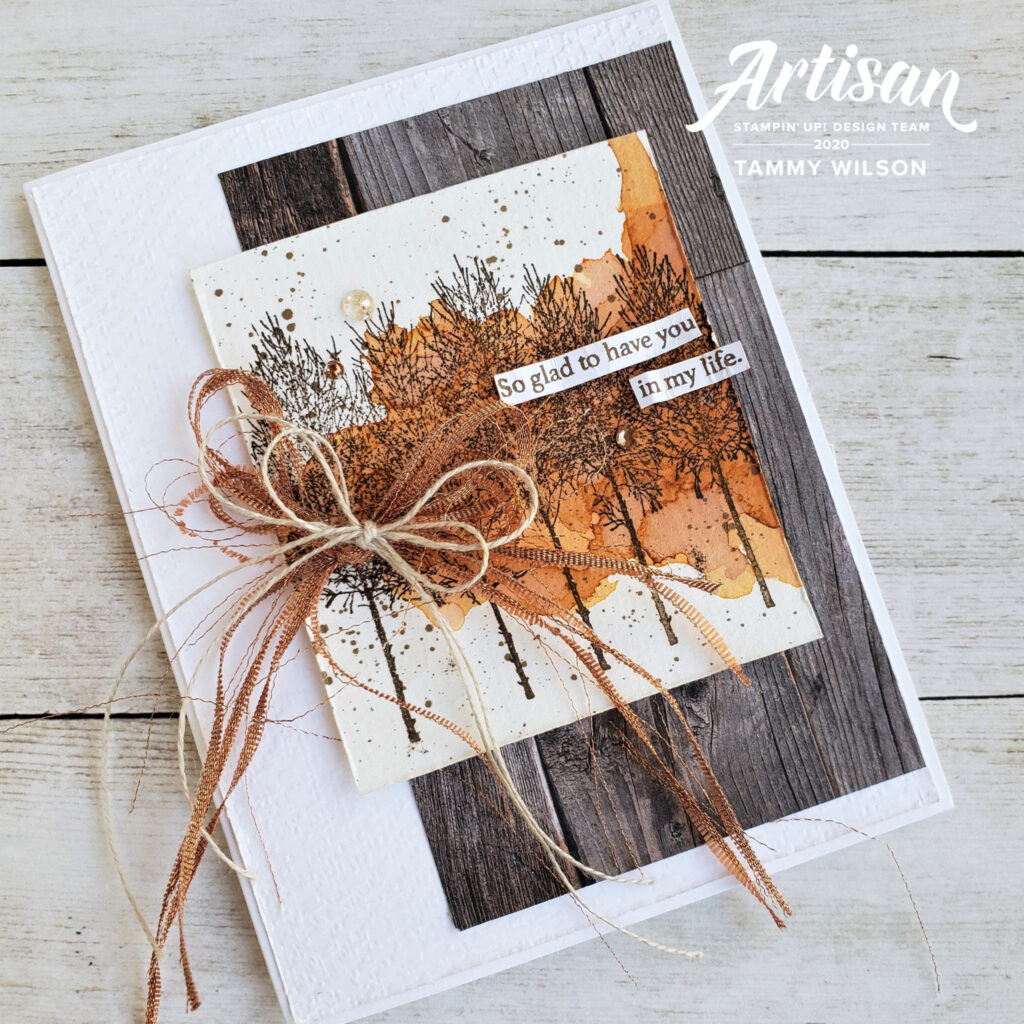
When I saw this beautiful card on Pinterest – created by Tammy Wilson, a USA Stampin’ Up! demonstrator and member of the Artisan Design Team – it instantly evoked a very special memory for me.
In 2018 I visited New York, Indianapolis and Hawaii with my husband and two sons – it was our first big holiday as a family and the first time all four of us went overseas together. We went to celebrate my 50th birthday and more importantly to finally meet and thank my amazing bone marrow donor Ben and his wife Christy.
This incredible trip was one of the happiest times of my life and now with COVID I’m forever grateful we were able to enjoy this special trip together.
Tammy’s card immediately reminded me of the stunning trees in Central Park, New York and Indianapolis – the soft colour of the sky and the shape of the tree branches is totally different to we have here in Australia. Here’s a few photos I took of this soft winter sky with the silhouettes of the winter trees.
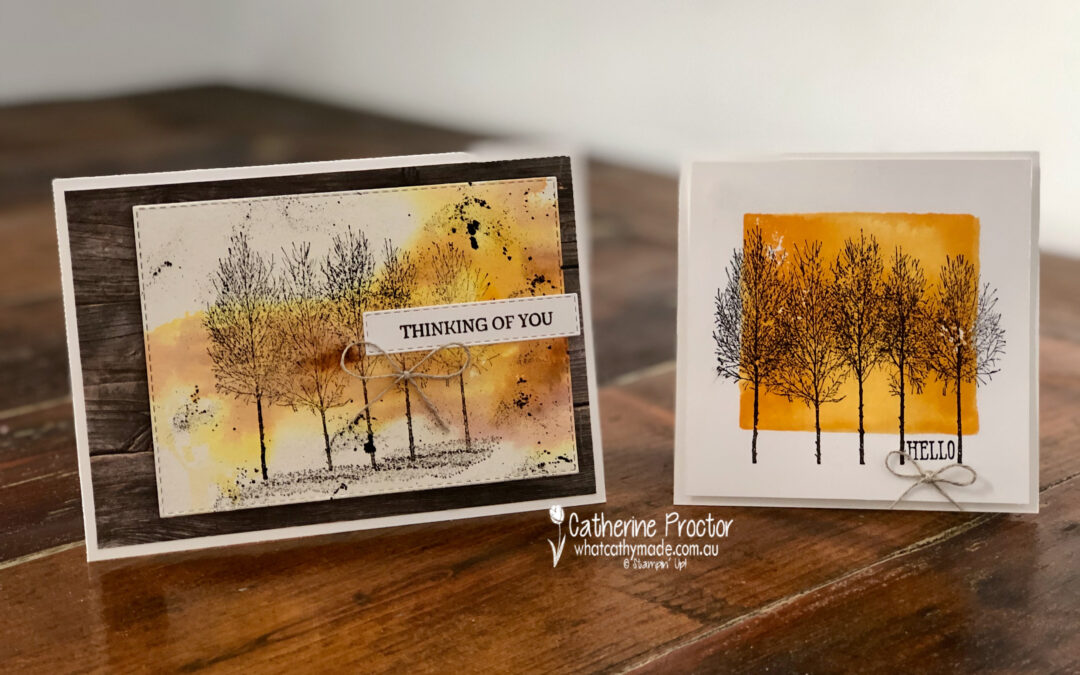
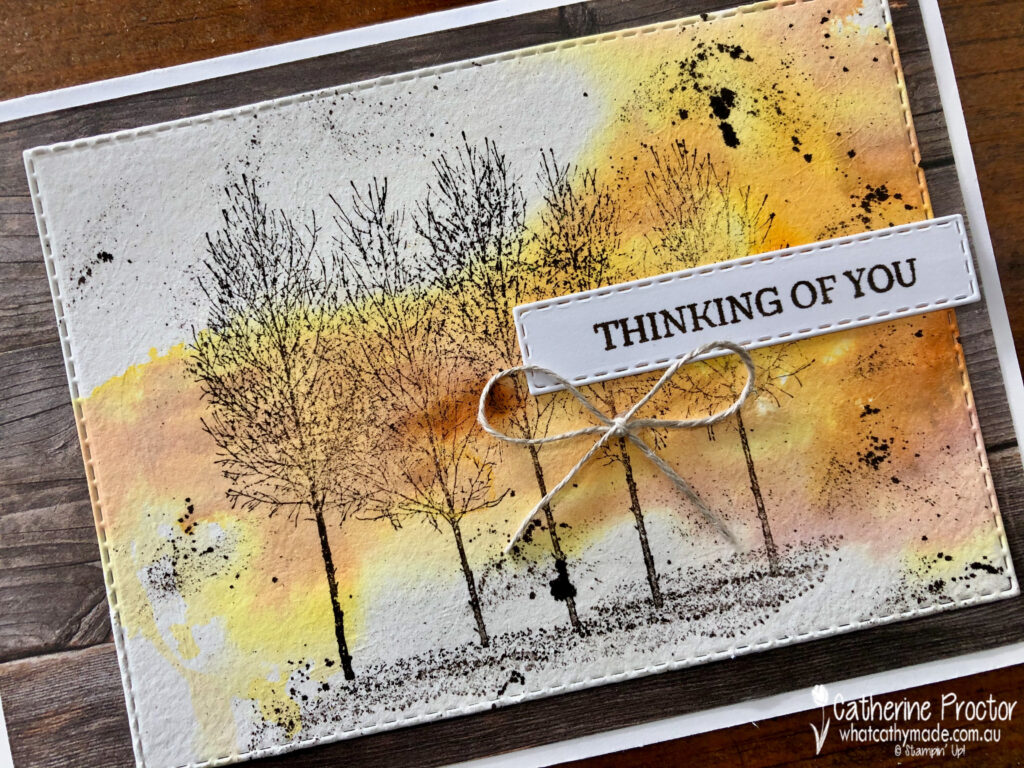
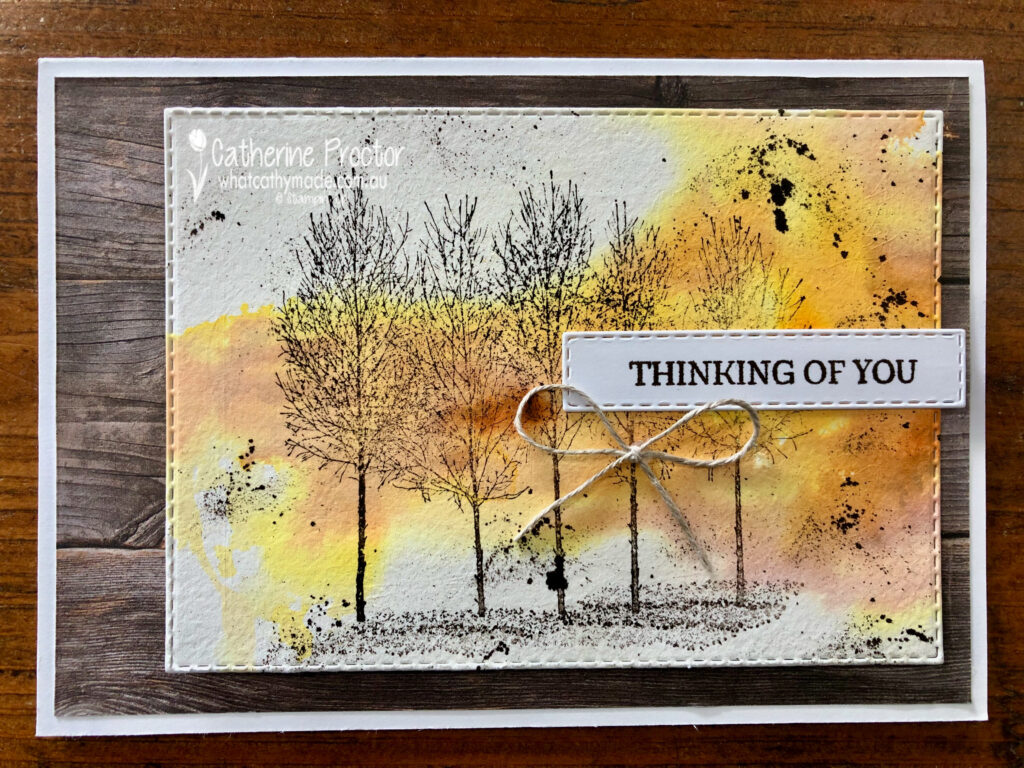
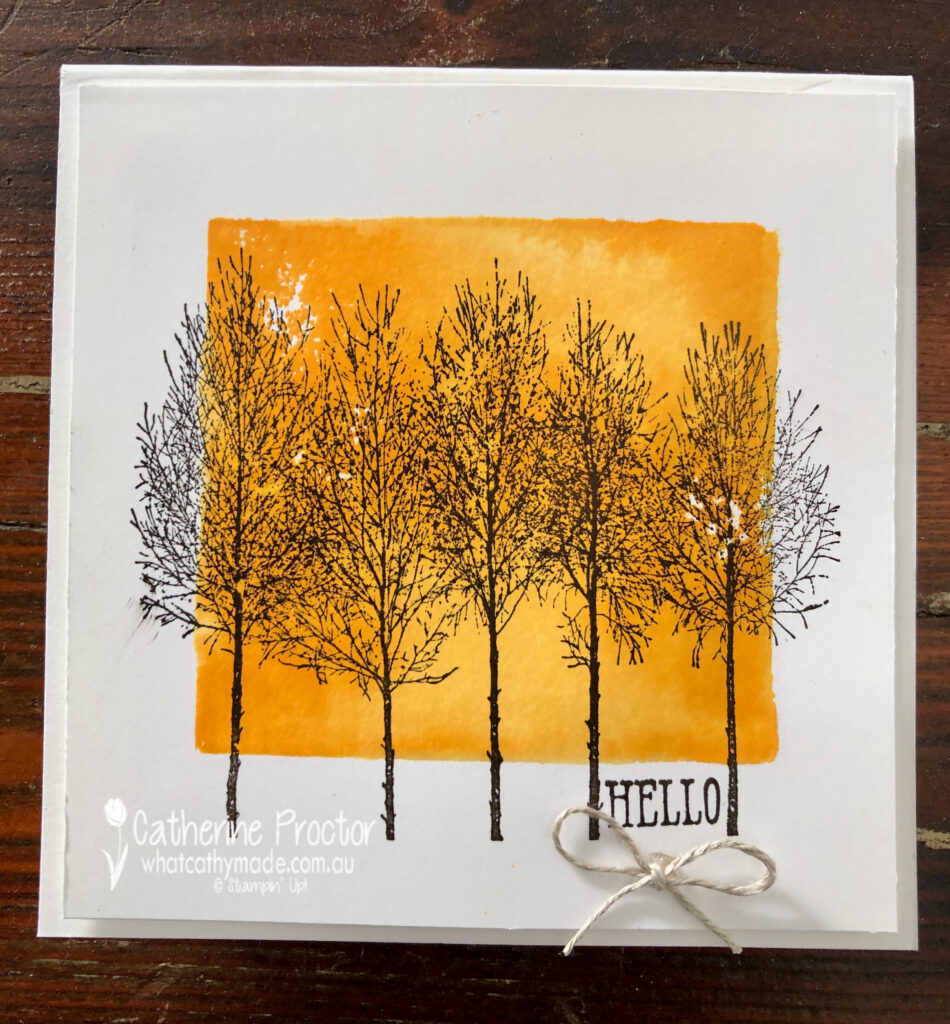
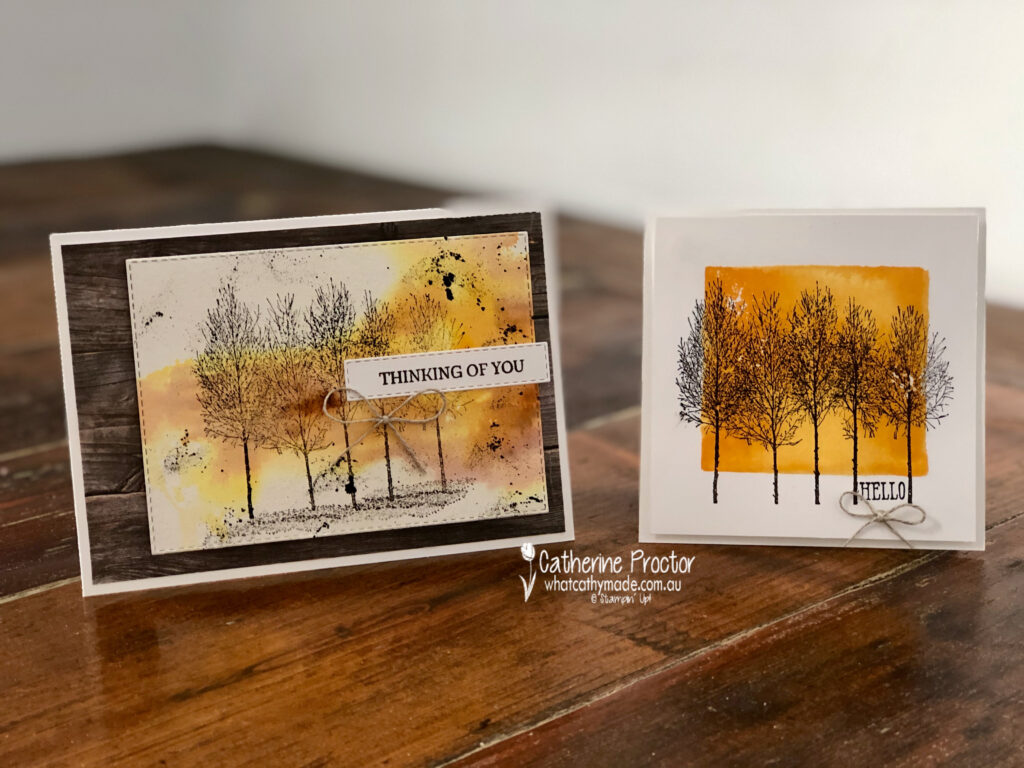
My first card today is a much simpler version of Tammy’s card and it uses slightly different colours. I love these shades of orange and brown together: Mango Melody, Cinnamon Cider, Early Espresso and Whisper White.
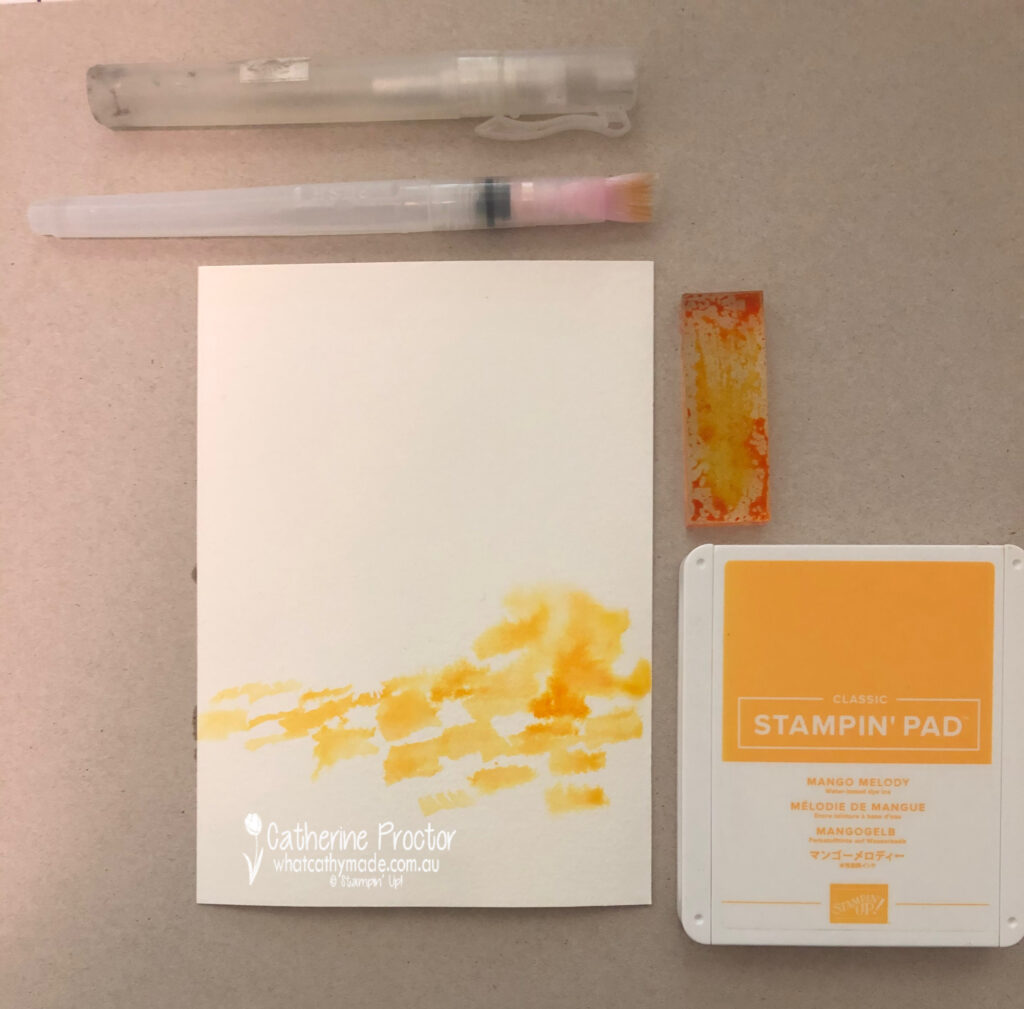
To create my background I’ve used a really fun watercolour technique that creates a different look every time.
Spritz a sheet of Fluid 100 Watercolour paper several times with your Stampin’ Spritzer
Tap an acrylic block onto Mango Melody ink pad to cover the surface of the block with the ink
Use your widest water painter to lift Mango Melody ink off your acrylic block and paint it onto the Fluid 100 Watercolour paper
Tap another acrylic block, this time onto your Cinnamon Cider ink pad and then use your widest water painter to paint some Cinnamon Cider ink onto your Fluid 100 Watercolour paper
Spritz the paper again with your Stampin’ Spritzer (watch the inks merge together at the edges) and then dry the ink using your heat tool
Stamp the largest tree stamp in Early Espresso ink, and then stamp the “shadows” stamp in Early Espresso ink underneath the group of trees
Flick the thick end of your Early Espresso Stampin’ Write marker with your finger to create splatters all over the card
My sentiment is also from the Winter Woods stamp set – I used my Early Espresso marker to colour just the “thinking of you” section of the sentiment before stamping and then die cutting the sentiment out with stitched rectangle die to match the larger stitched rectangle die I used to cut the water coloured layer.
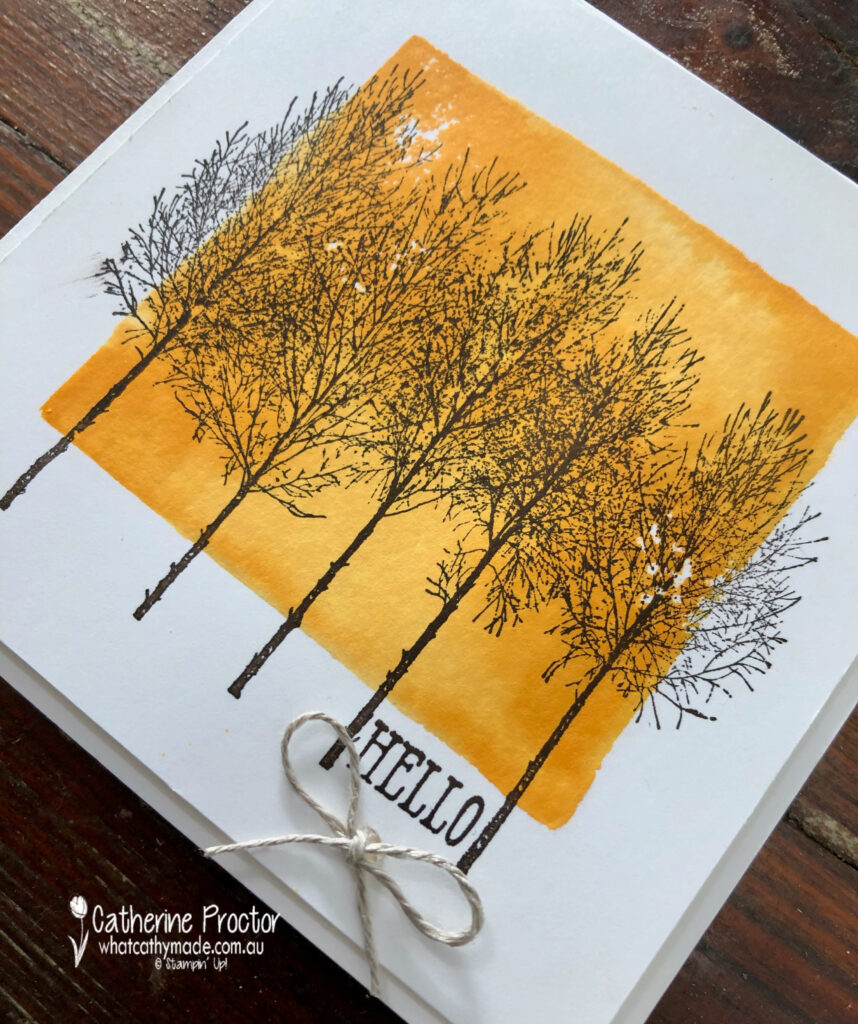
I couldn’t resist making one more card with this stamp set because it also is the perfect stamp set for the acrylic block stamping technique. If you’ve never tried this technique please give it a go – it is so easy and so effective.
You simply ink up an acrylic block (I used size C) by tapping it onto your stamp pad, then spritz it with your Stampin’ Spritzer and stamp the acrylic block directly to your paper. This time I used Whisper White but this technique looks great on watercolour paper too.
Once you’ve dried your ink background, stamp the tree stamp over the top in Early Espresso ink. I wanted a small sentiment to fit in the gap between the two tree branches on the far right and the “Hello” sentiment from the Well Said stamp set was the perfect fit.
Both my cards were finished off with a simple bow of linen thread.
I can’t wait to see what the rest of the Art With Heart team have created with Mango Melody today. Click on the links below to see what they’ve made.
If you’d like me to post you your very own copy of the August–December 2020 Mini Catalogue, 2020-21 Stampin Up! Annual Catalogue, the 2020-21 Beginners Brochure, or to simply find out about more about Stampin’ Up! contact me.
In the meantime, wherever you are in the world, stay safe, stay calm…and keep on crafting xxx
Welcome to week five of our 2020-2021 Art With Heart Colour Creations Showcase.
Each week various members of our Art With Heart Colour Creations team will be bringing you weekly colour inspiration as we showcase our range of over 50 beautiful Stampin’ Up! colours in alphabetical order.
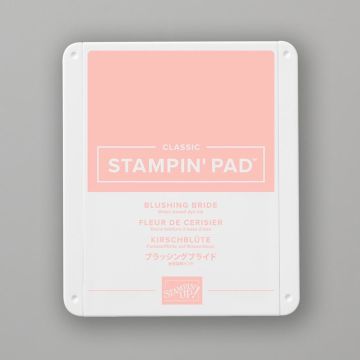
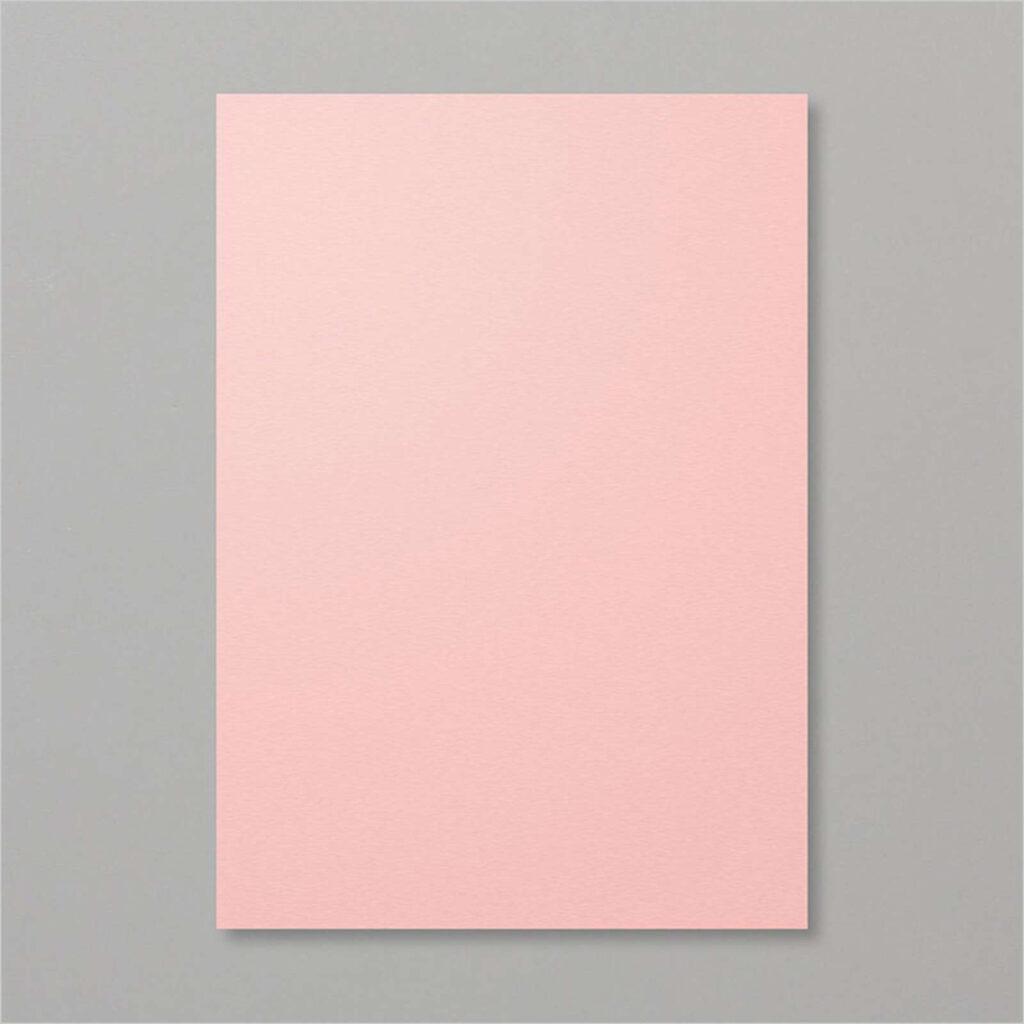
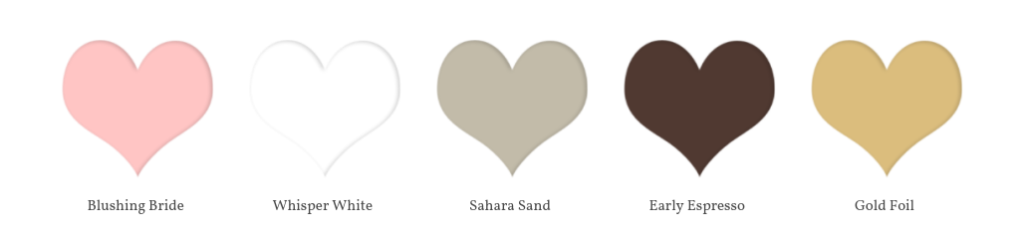
Week 5 -Blushing Bride
Blushing Bride is part of the Subtles collection of colours. It is available as a Classic Stampin’ Pad and ink refill, Stampin’ Write marker, Subtle Designer Series Paper and Gorgeous Posies Card Kit, or you can purchase it within any of the Subtles collections.
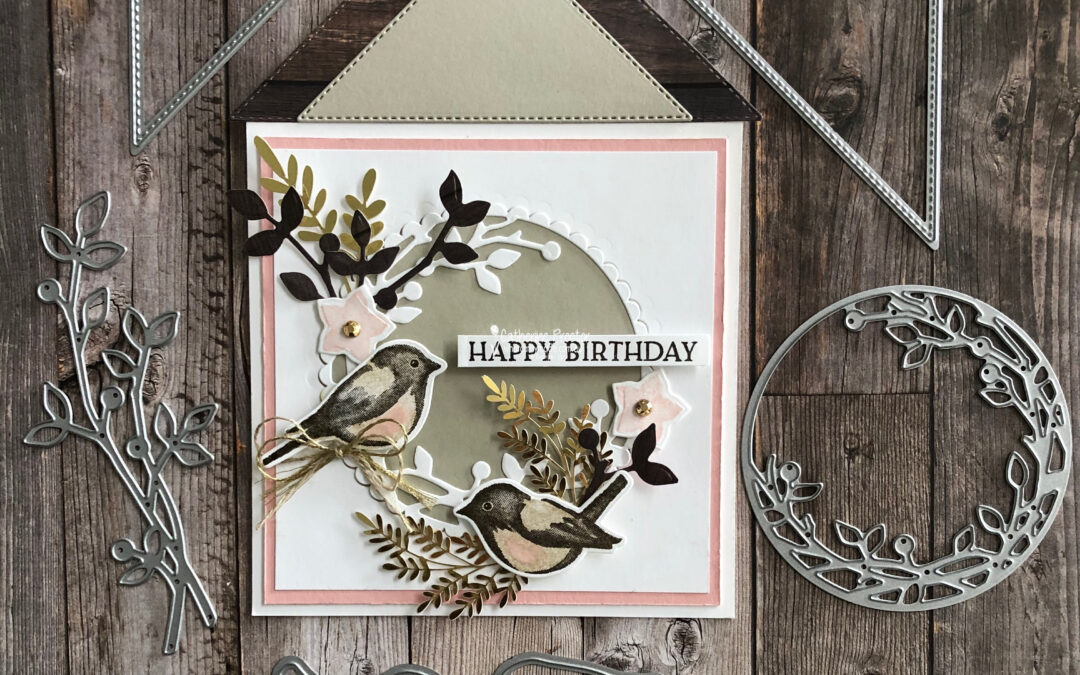
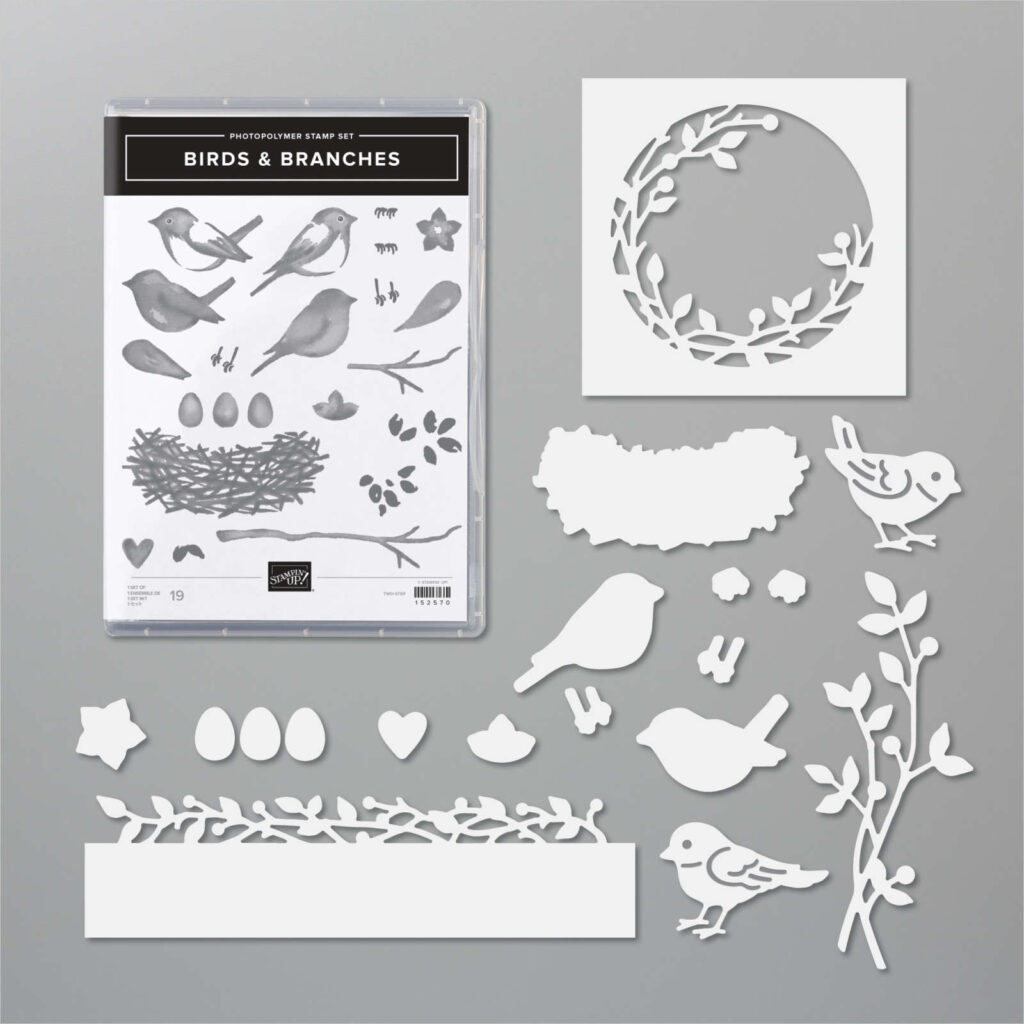
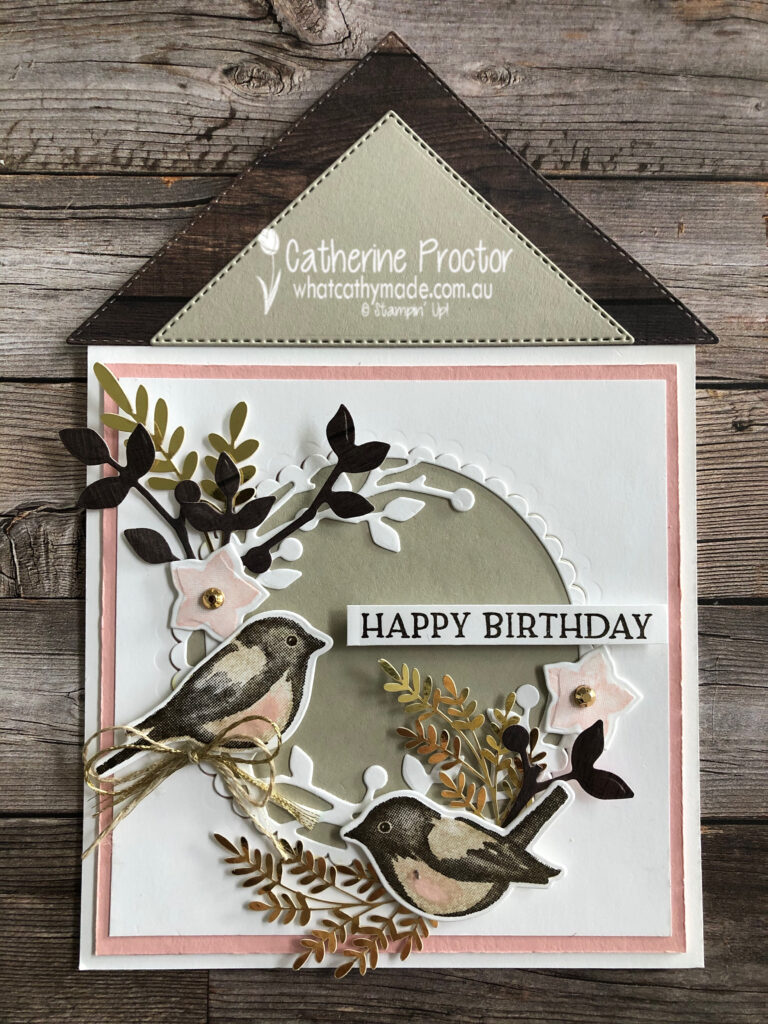
My card today is a sweet little birdhouse that features the Stampin’ Up! Birds & Branches Bundle. How cute are these little birds!
Blushing Bride looks amazing with any shade of brown so this is the colour combination I chose today.
I wanted to create a birdhouse very simply without using fussy templates so I decided to make a square card that folds at the top and then attach a roof to the top fold.
The new Triangle stitched dies made this super easy to do – I simply attached them to the top fold with Tear’n’tape after my card was completed.
Here’s a closer look at my sweet little birds. I stamped them in Sahara Sand and then Early Espresso – To create my birds with Two-Step Stampin’, I stamped the silhouette image in Sahara Sand and then stamped the detailed image in Early Espresso. I used my water painter to add a touch of Blushing Bride to their tummies.
The Forever Gold Laser-cut Specialty paper, Gold Metallic Trim and Gilded Gems in the middle of the Blushing Bride flowers are the final touch, with the Happy Birthday sentiment from the Blossoms in Bloom Stamp Set stamped in Early Espresso.
I can’t wait to see what the rest of the Art With Heart team have created with Blushing Bride today.
Just click on the links below to see what they’ve all made.
Thanks so much for hopping along with the Art With Heart Team on our weekly Colour Creations Showcase. If you missed any of the previous colours you can see them all here.
Next Tuesday we’ll be showcasing one of the new 2020-22 In Colours: Bumble Bee. We hope you can join us all then.
To purchase any of the products featured in today’s post, simply contact your Stampin’ Up! demonstrator, any of the ladies in the AWH Colour Creations Showcase or click on the product links below.
If you’d like me to post you your very own copy of the 2020-21 Stampin Up! Annual Catalogue, the 2020-21 Beginners Brochure, or to simply find out about more about Stampin’ Up! contact me.
In the meantime, wherever you are in the world, stay safe, stay calm…and keep on crafting xxx
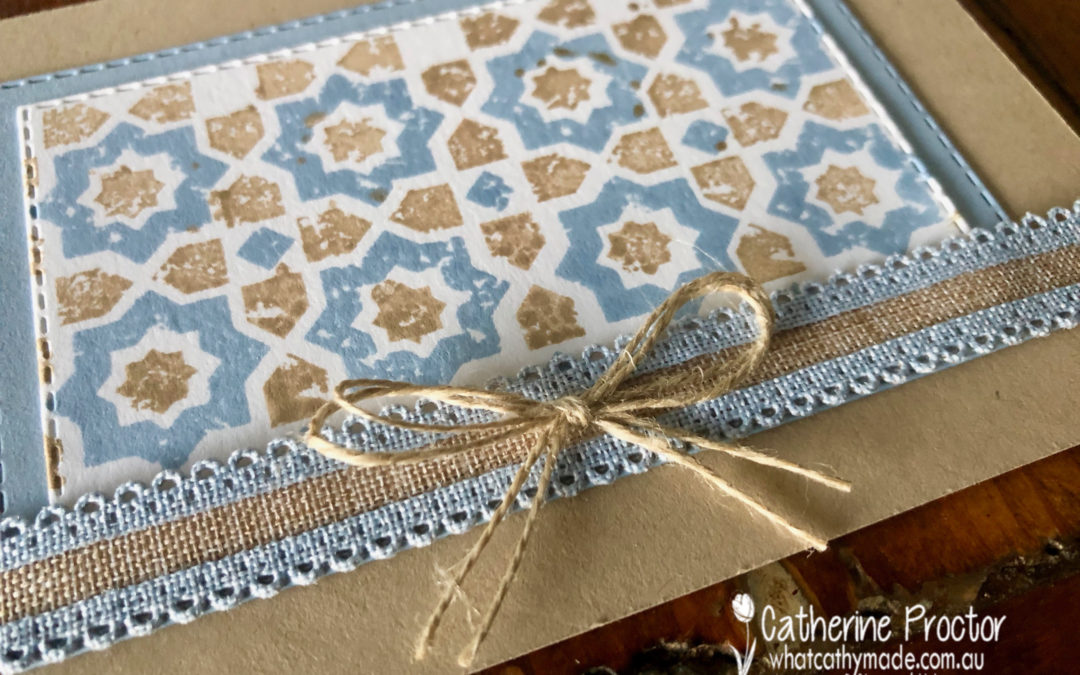
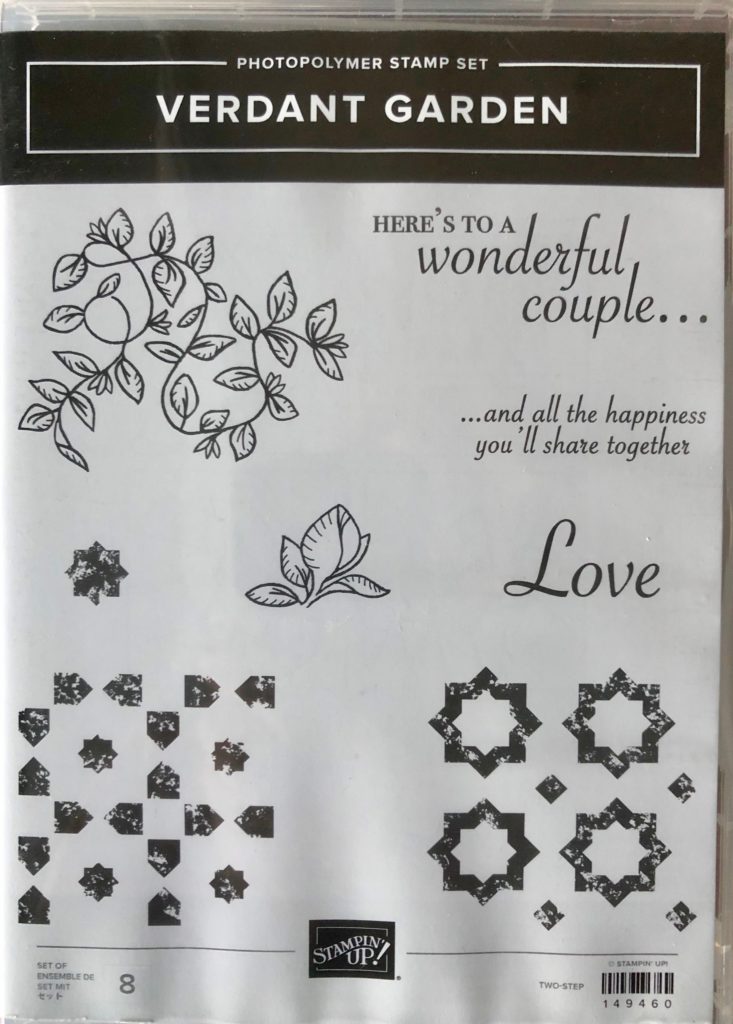
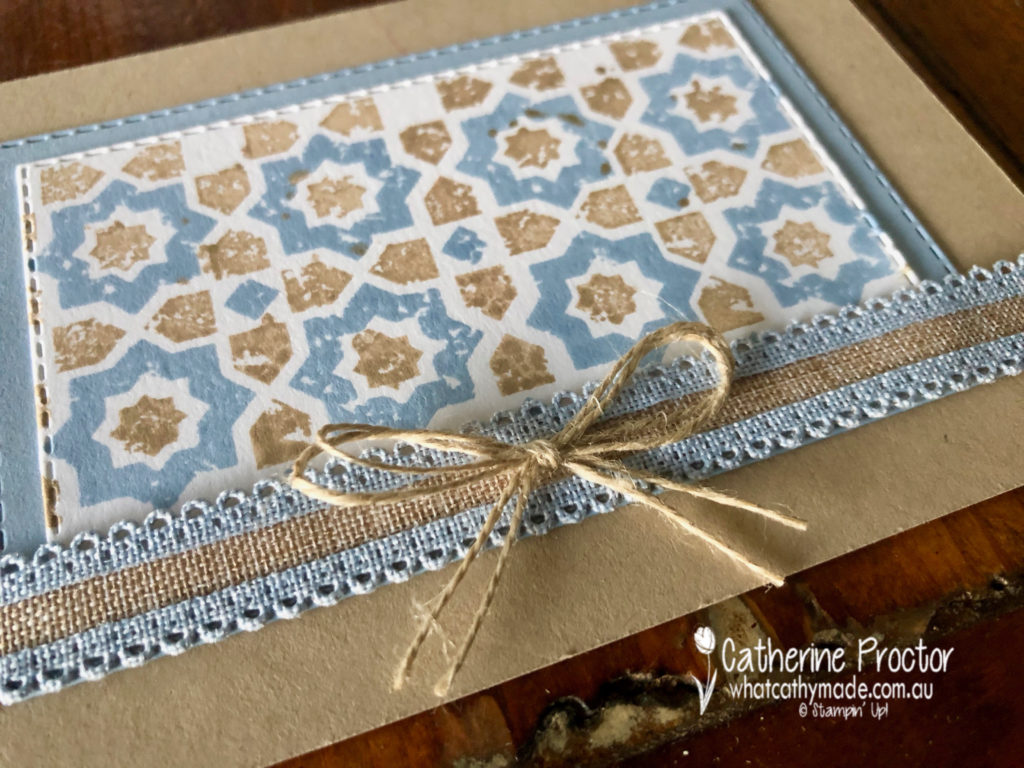
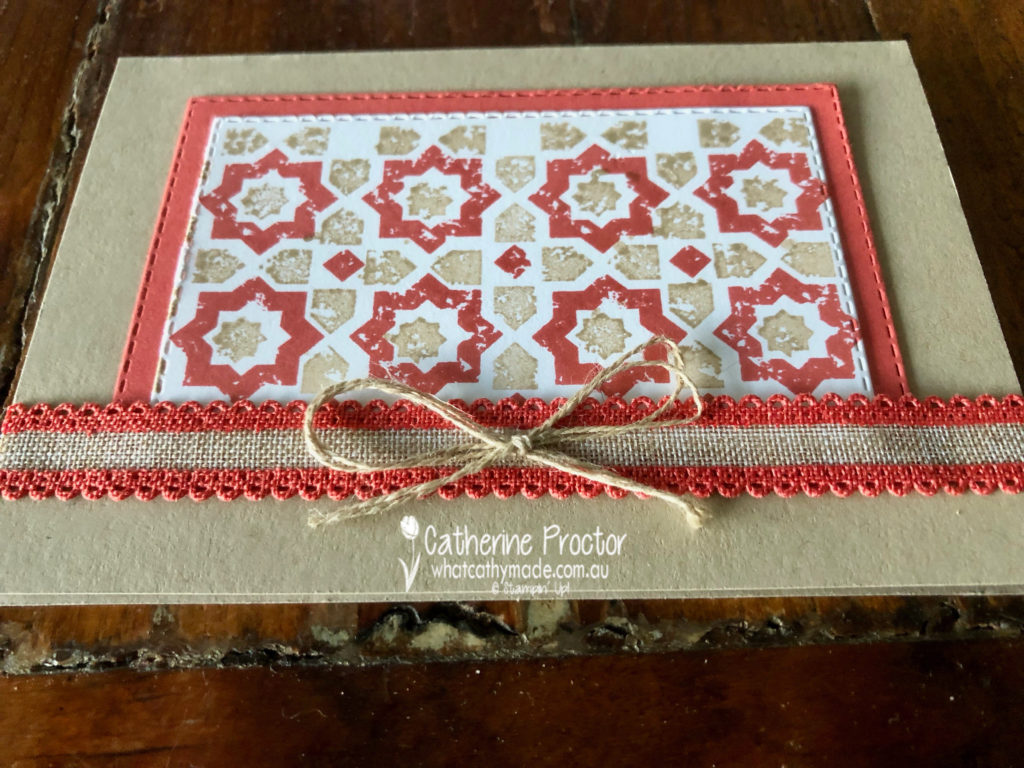
We’re already up to day eight of my farewell to retiring products and today we’re saying goodbye to the Verdant Garden stamp set.
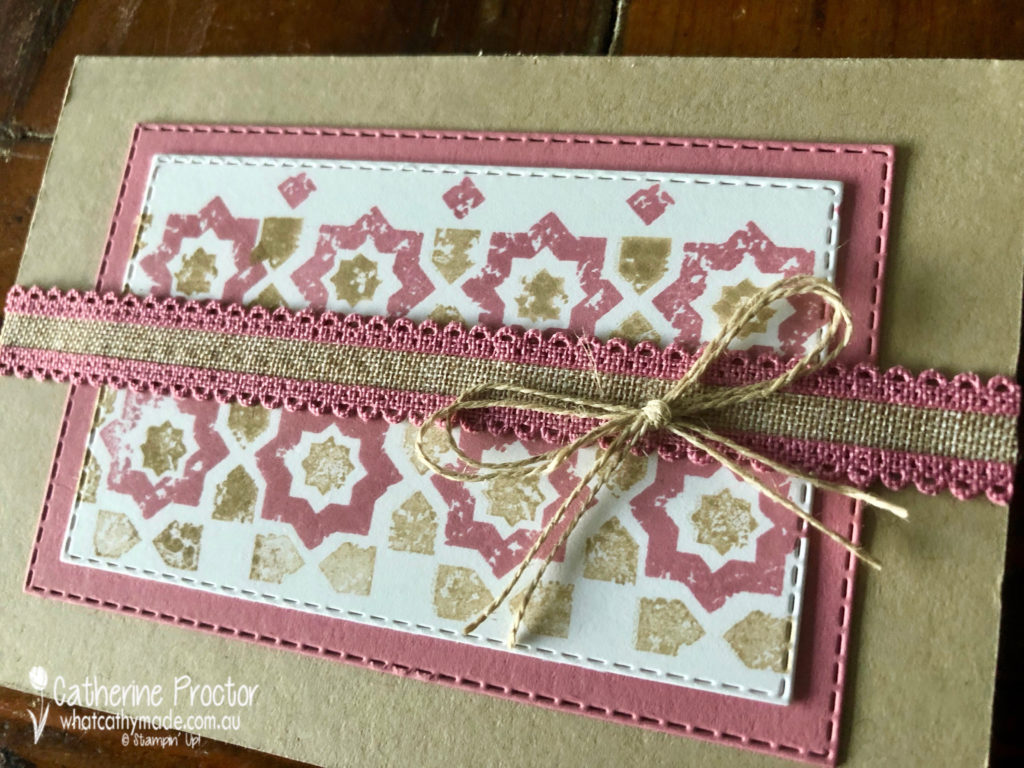
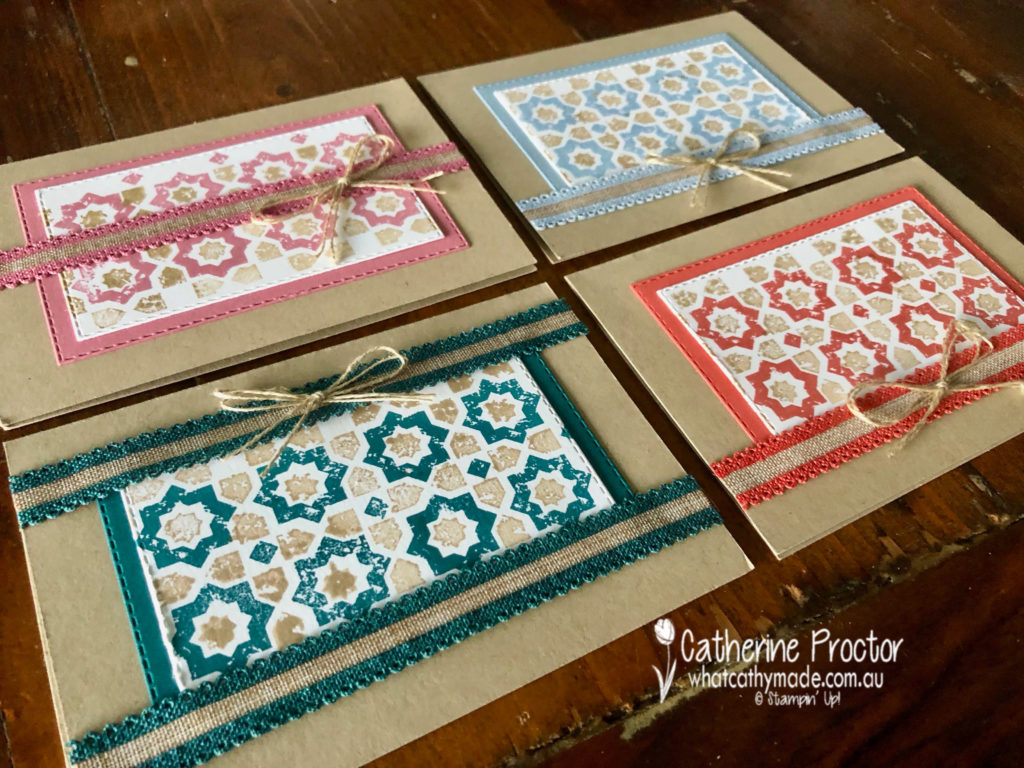
I’ve made a series of cards with this stamp set that feature four of the 2019-20 in colours: Seaside Spray, Terracotta Tile, Rococo Rose and Pretty Peacock.
First cab off the rank? Seaside Spray. I’ve used the two bottom stamps in this set – they are designed to be used together to create this lovely tile effect.
Next is Terracotta Tile and Crumb Cake. Each of these cards features the same stamped design and this lovely scalloped linen ribbon in each of the In Colours.
Rococo Rose is such a soft and gentle pink – this card might be my favourite!
Pretty Peacock is last but not least and it also looks fantastic with Crumb Cake.
Here’s a closer look at all four cards. I’ve just found out that these beautiful ribbons will be carrying over to the new 2020-21 annual catalogue, which is great, but sadly the Verdant Garden stamp set will be retiring very soon.
Tomorrow I will be featuring another stamp set that is retiring from the 2019 Annual Catalogue and the 2020 January to June Mini Catalogue, but in the meantime you can view all the retiring products in my online shop.
Would you like me your very own Stampin’ Up! 2020-21 Annual Catalogue?
If you’d like me to post you your very own copy of the 2020-21 Stampin Up! Mini Catalogue, the 2019-20 Stampin Up! annual catalogue, or to simply find out about more about Stampin’ Up! contact me.
Wherever you are in the world, stay safe, stay calm…and keep on crafting xxx
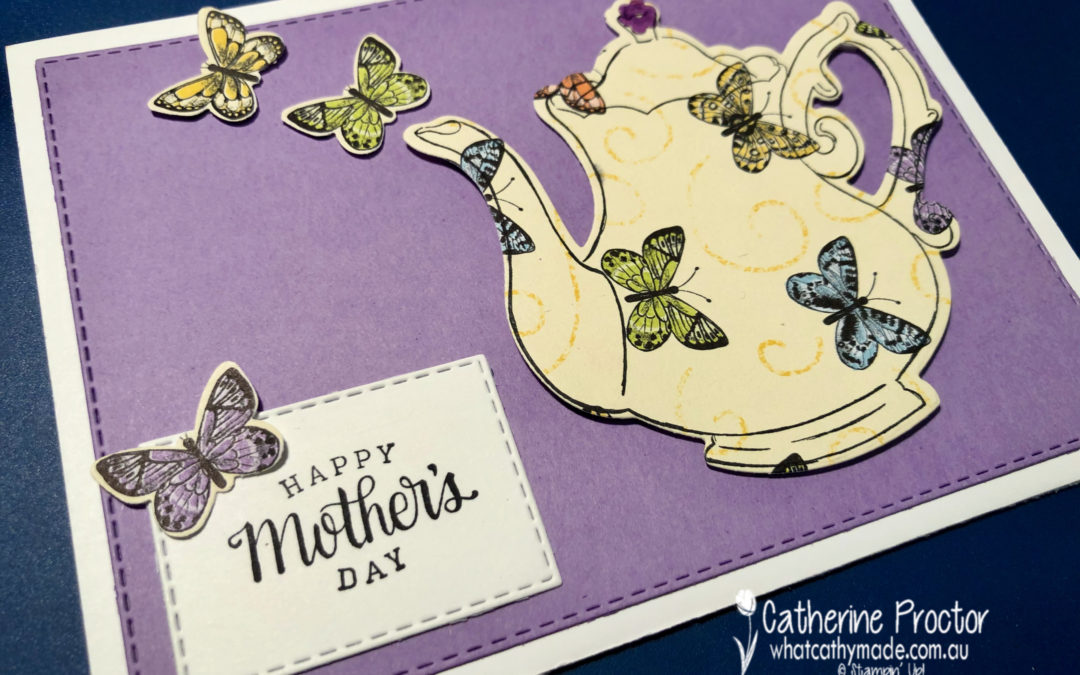
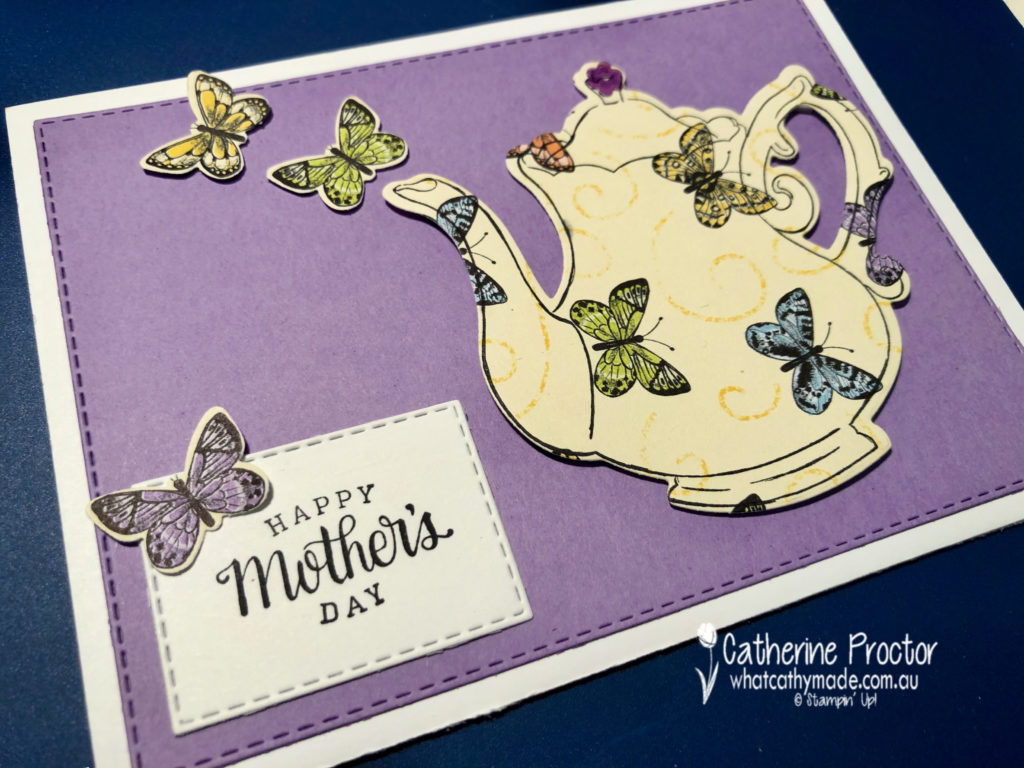
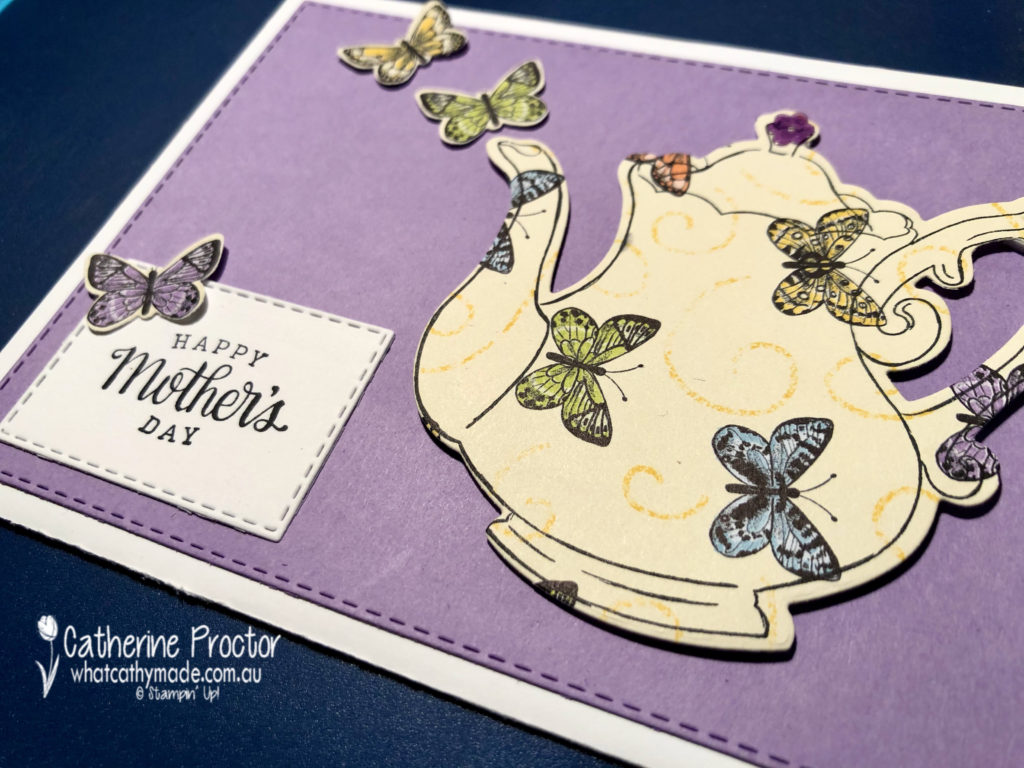
We’re up to day four of my “Marie Condo” farewell to retiring products and since it’s only a week until mother’s day I thought it would be the perfect time to farewell a stamp set with a mother’s day sentiment.
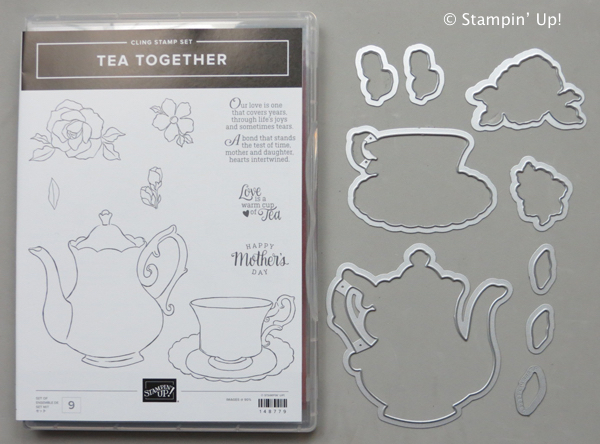
The Tea Together stamp set has matching tea time dies, which makes card making super fast and easy.
I’ve used this card to make both birthday cards and mother’s day cards – I love this mother’s day sentiment. I’ve made my teapot for this card using Gorgeous Grape card stock and some retired butterfly DSP but it looks lovely cut out of any patterned paper, especially floral designs.
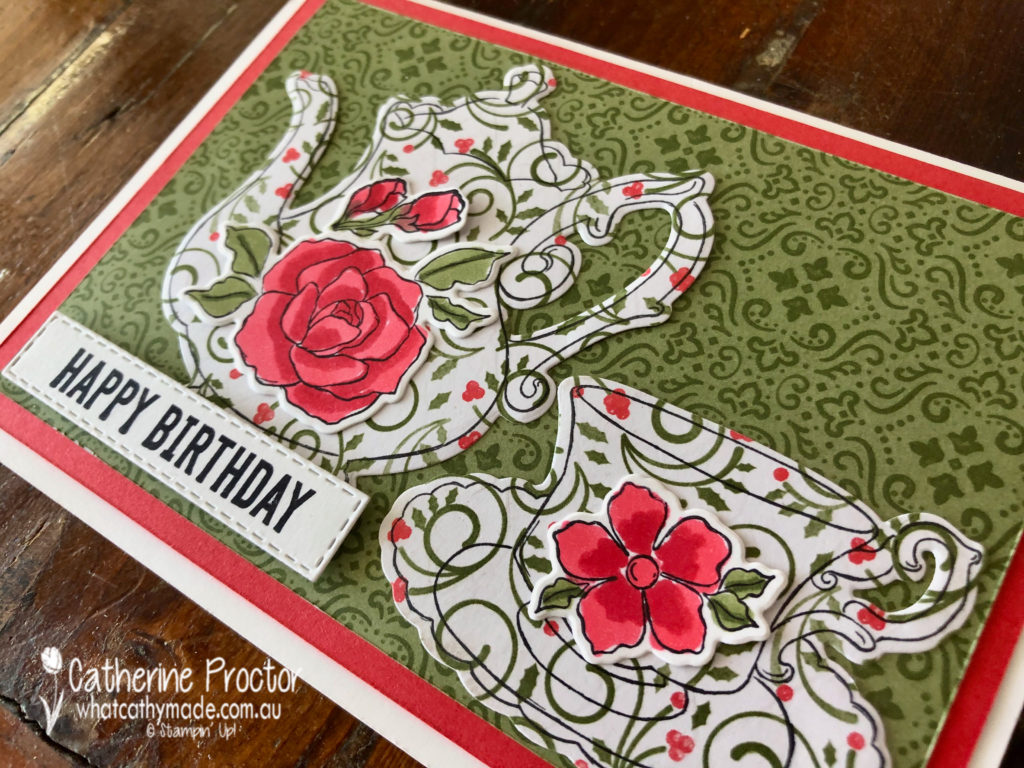
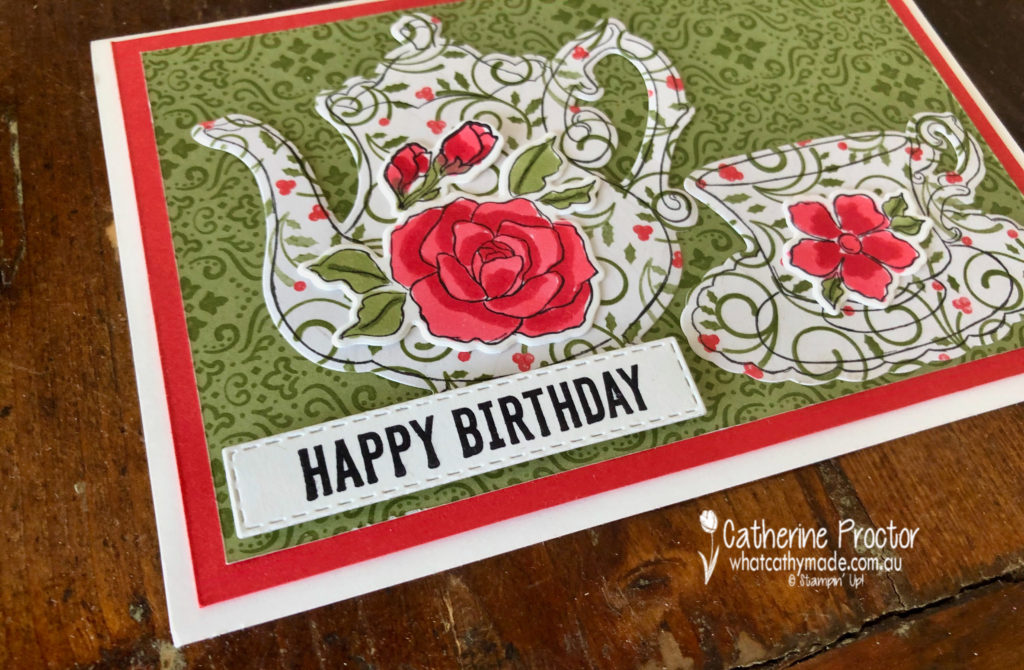
Here is another card i made with this set …this time using a Christmas paper to make a birthday card.
I picked up on the Poppy Parade and the Mossy Meadow colours in the DSP and used my blender pens in these colours to colour in stamped flowers from the Tea Together stamp set. The teapot, cup and saucer were also stamped from this set and then all cut out using the matching dies.
The happy birthday sentiment is from the Itty bitty Birthdays stamp set die cut out with my stitched rectangle dies.
I also used the stitched rectangle dies on my Mother’s Day card.
I hope you’re enjoying my farewell to retiring products?
Every day I will be featuring a stamp set that is retiring from the 2019 Annual Catalogue and the 2020 January to June Mini Catalogue and thank it for its service by showcasing a card (or two) that I’ve made with the stamp set.
You can view all the retiring products in my online shop.
Would you like me to send you your very own Stampin’ Up! 2020-21 Annual Catalogue?
If you’d like me to post you your very own copy of the 2020-21 Stampin Up! Mini Catalogue, the 2019-20 Stampin Up! annual catalogue, or to simply find out about more about Stampin’ Up! contact me.
I’ll be back tomorrow with another card or two to farewell another retiring stamp set.
In the meantime, wherever you are in the world, stay safe, stay calm…and keep on crafting xxx


")


 Designer Series Paper")
 Specialty Pack")
 Cardstock")