Welcome to week two of our Art with Heart 2022-23 Colour Creations blog hop! We are showcasing each of the 5 new In Colours for the first 5 weeks before we feature our core colours in alphabetical order.
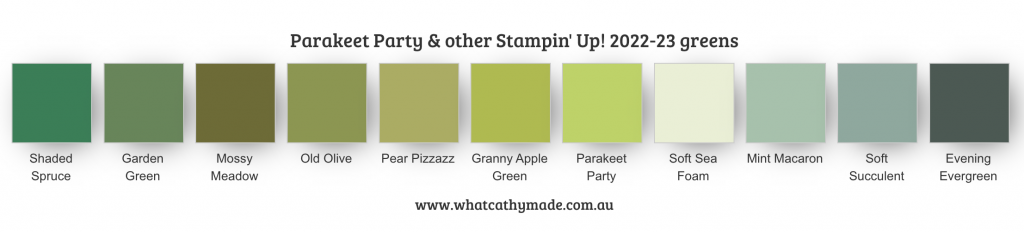
Our second new In Colour is Parakeet Party, a vibrant lime green that is almost fluorescent. This colour screams happy and demands to be noticed!
Here’s what Parakeet Party looks like in comparison to the other current Stampin’ Up! greens – we have so many gorgeous greens to choose from I had to shrink this image down to fit it on the page!
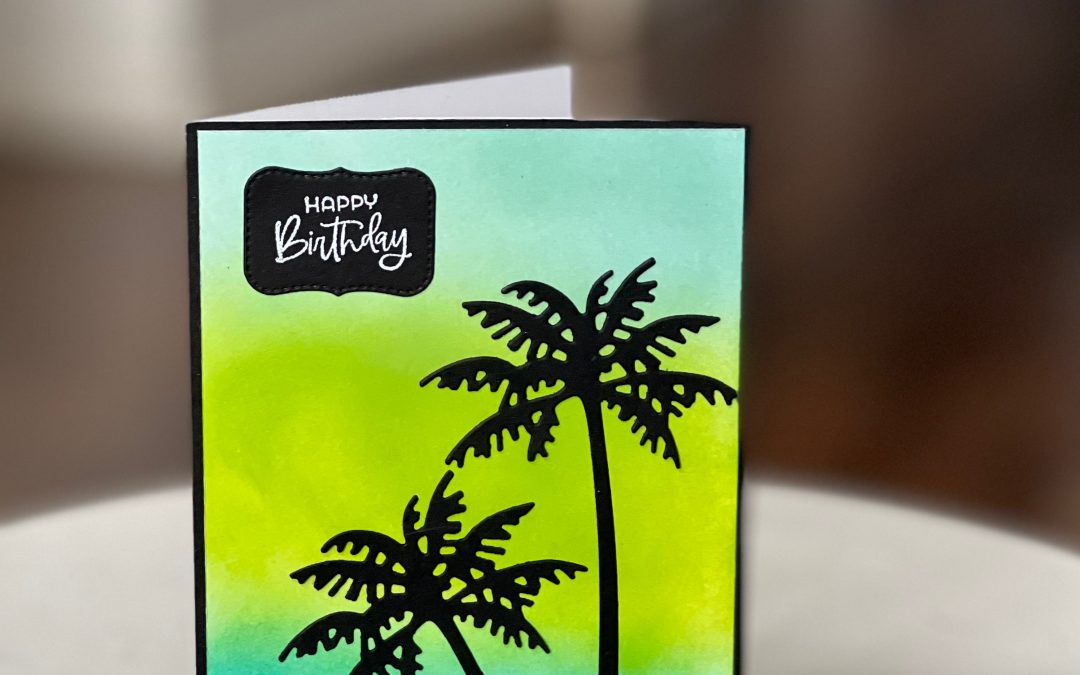
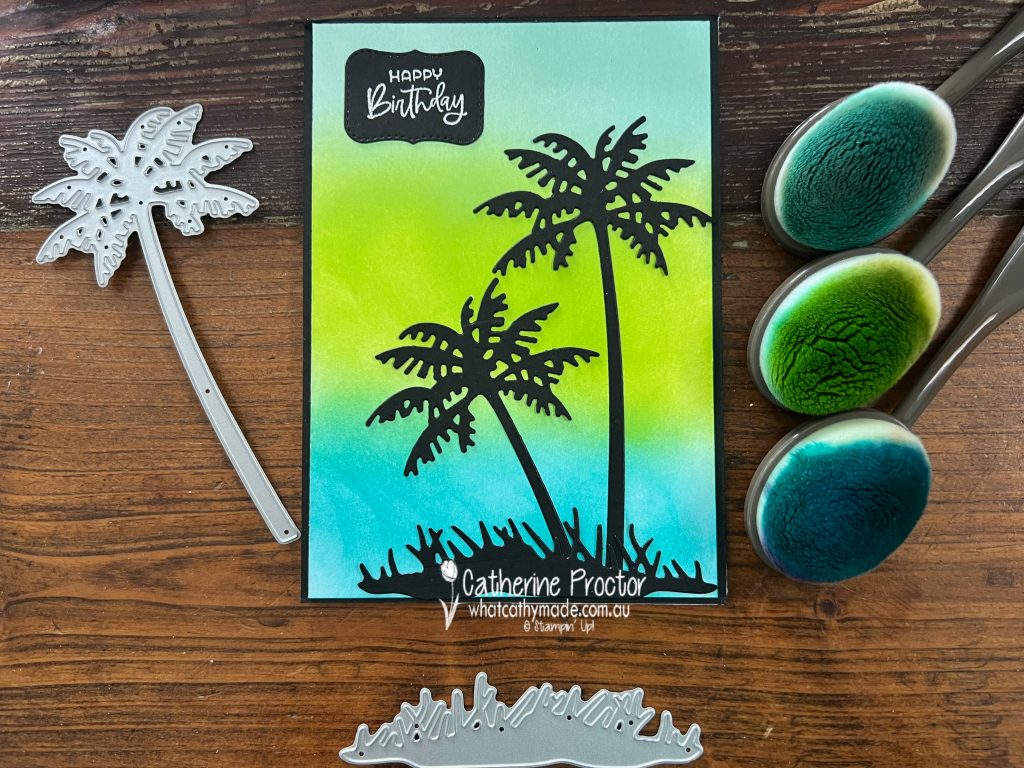
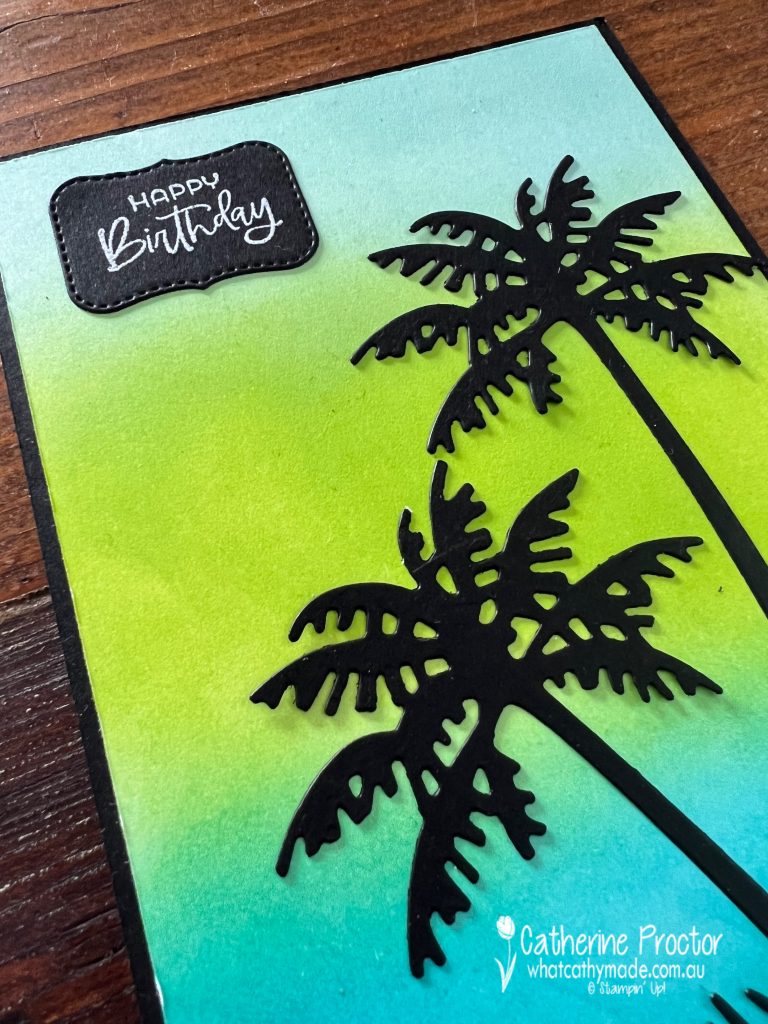
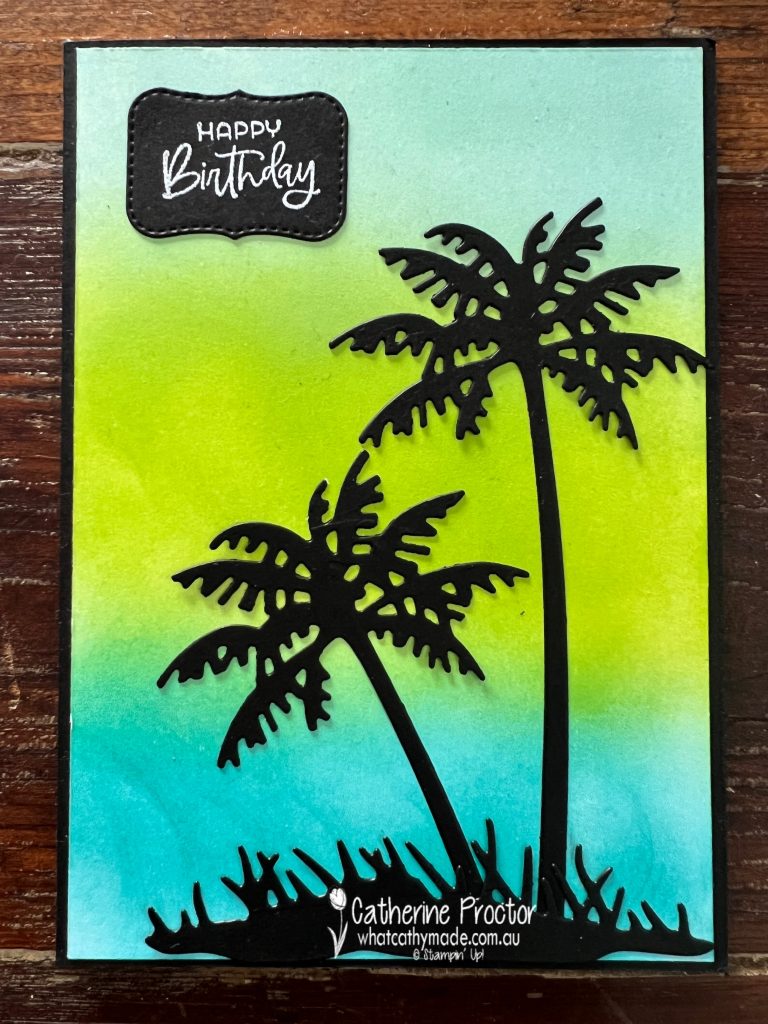
My card today is very quick and easy to make and shows just how gorgeous Parakeet Party looks with blue/green colours. The background is created using three different blending brushes and these three colours: Pool Party at the top, Parakeet Party in the middle and Bermuda Bay at the base.
The palm trees and grass die cut in Basic Black cardstock using the Paradise Palm dies really pop against this vibrant background.
The sentiment is from the Paradise Palm stamp set, heat embossed in white and die cut using a Potted Succulent die. I really enjoy making gender neutral designs because they are so versatile.
This scene takes me back to very happy time, sitting on a Hawaiian Beach and watching the sunset with my boys.
Now it’s time to hop on over to our next participant, the lovely Kathryn Ruddick – I can’t wait to see what Kathryn has made this week!
If at any time you find a broken link, you can find the complete list of all participants below.
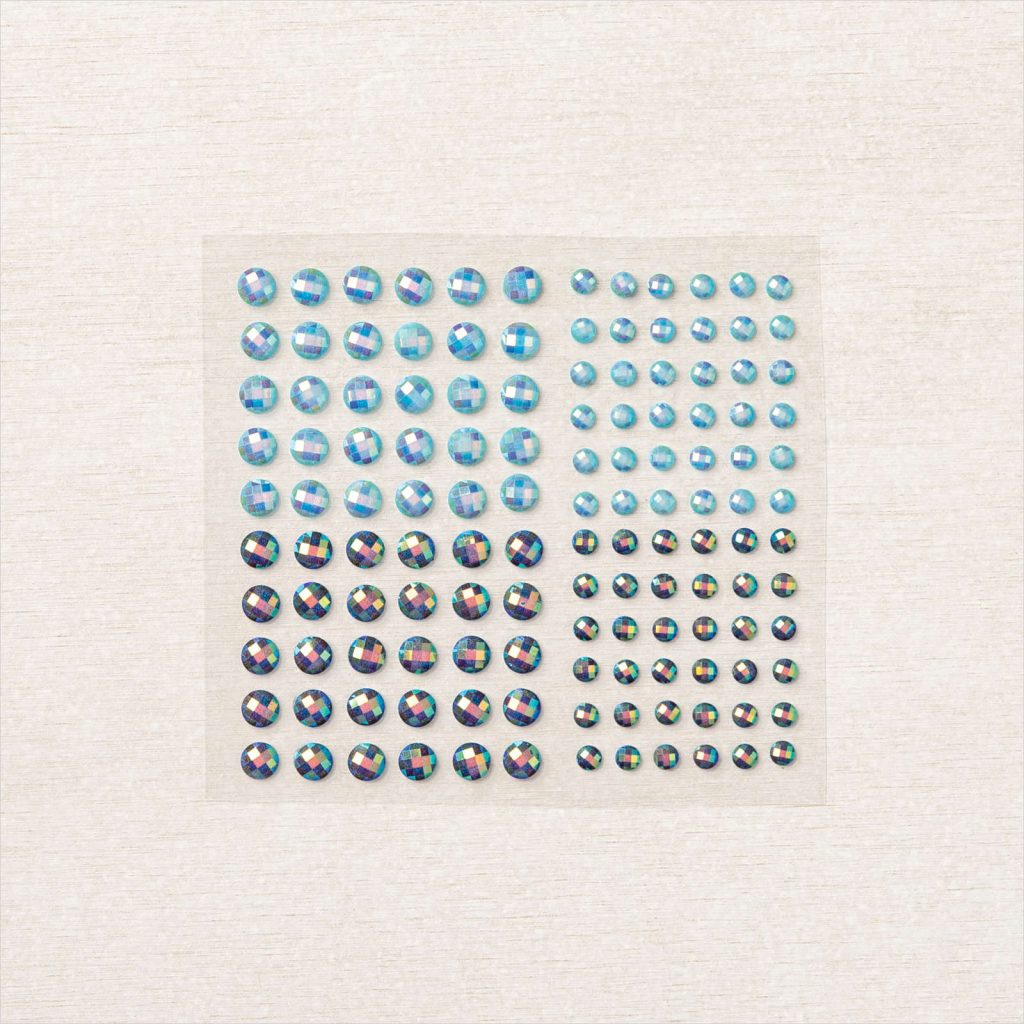
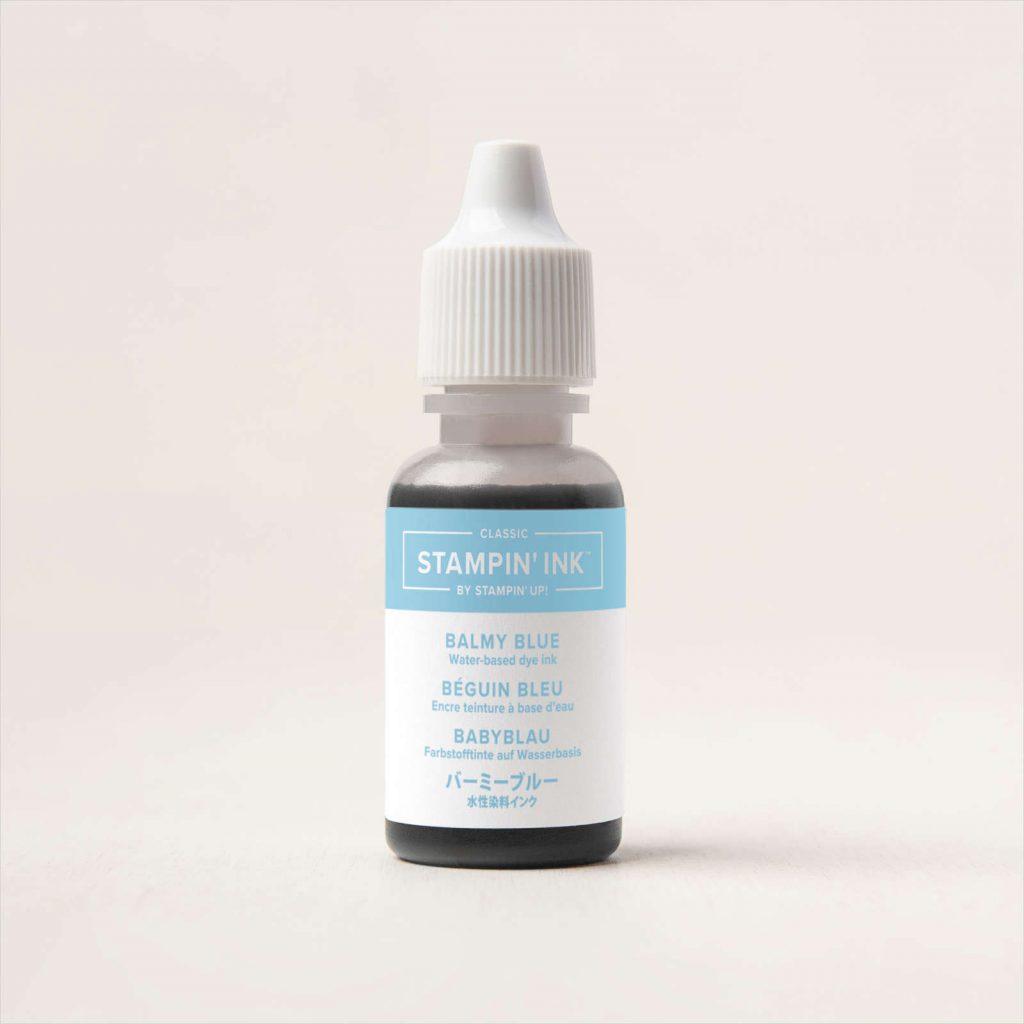
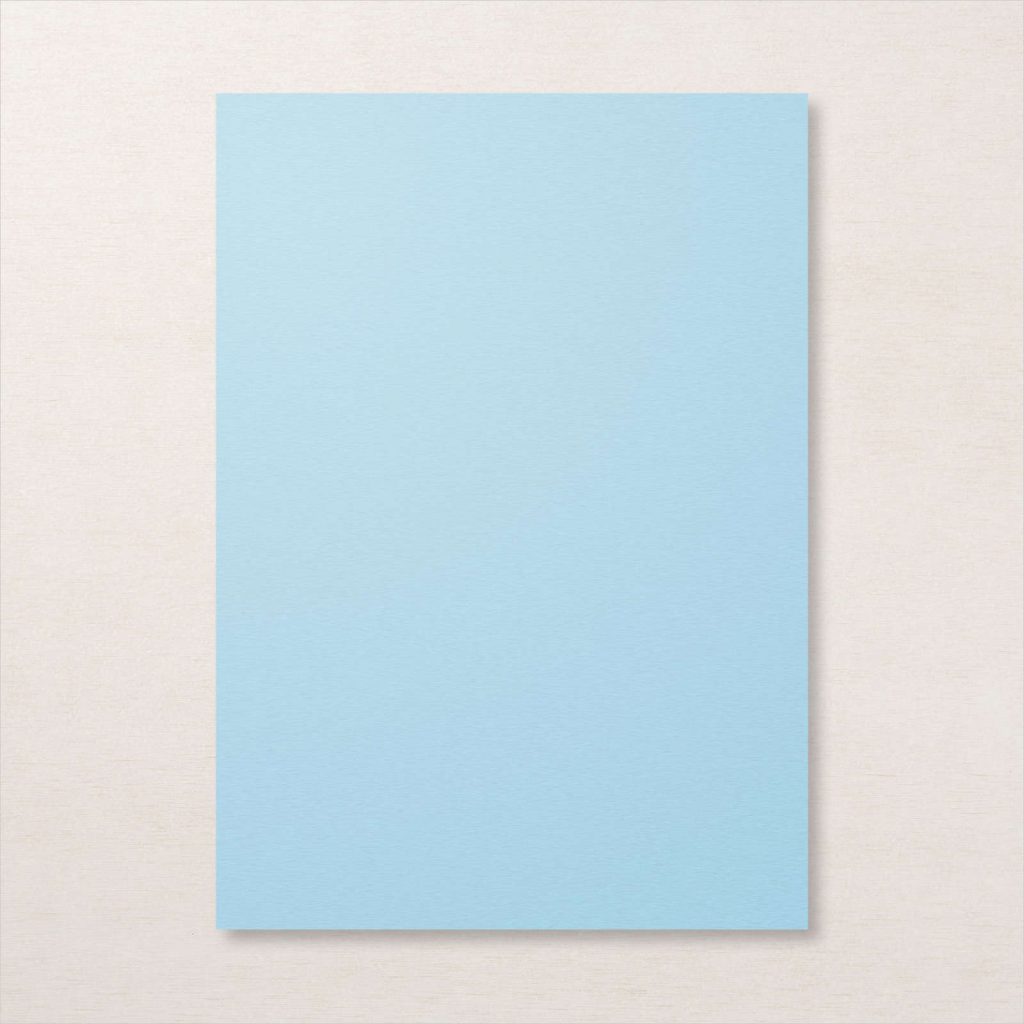
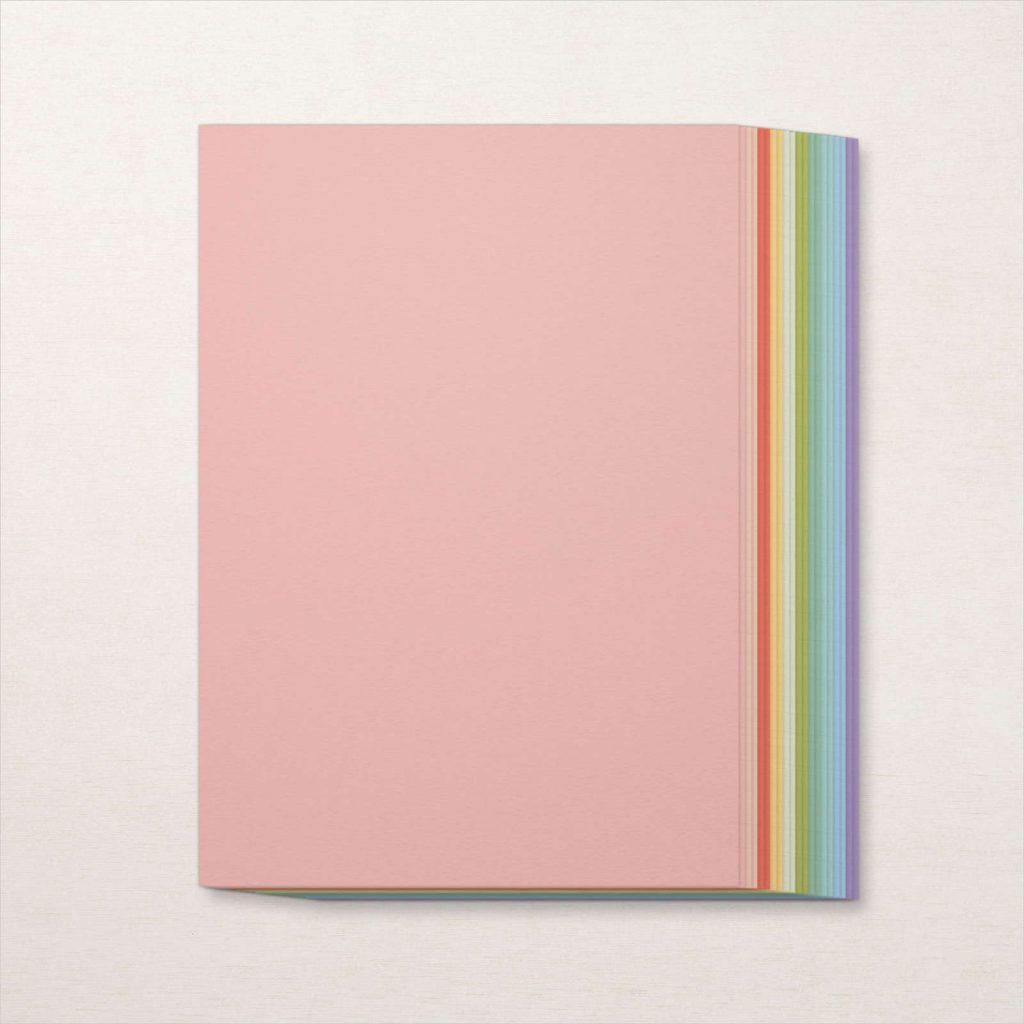
This week we’re showcasing Balmy Blue for week two of our Art With Heart Colour Creations Blog Hop 2020-21.
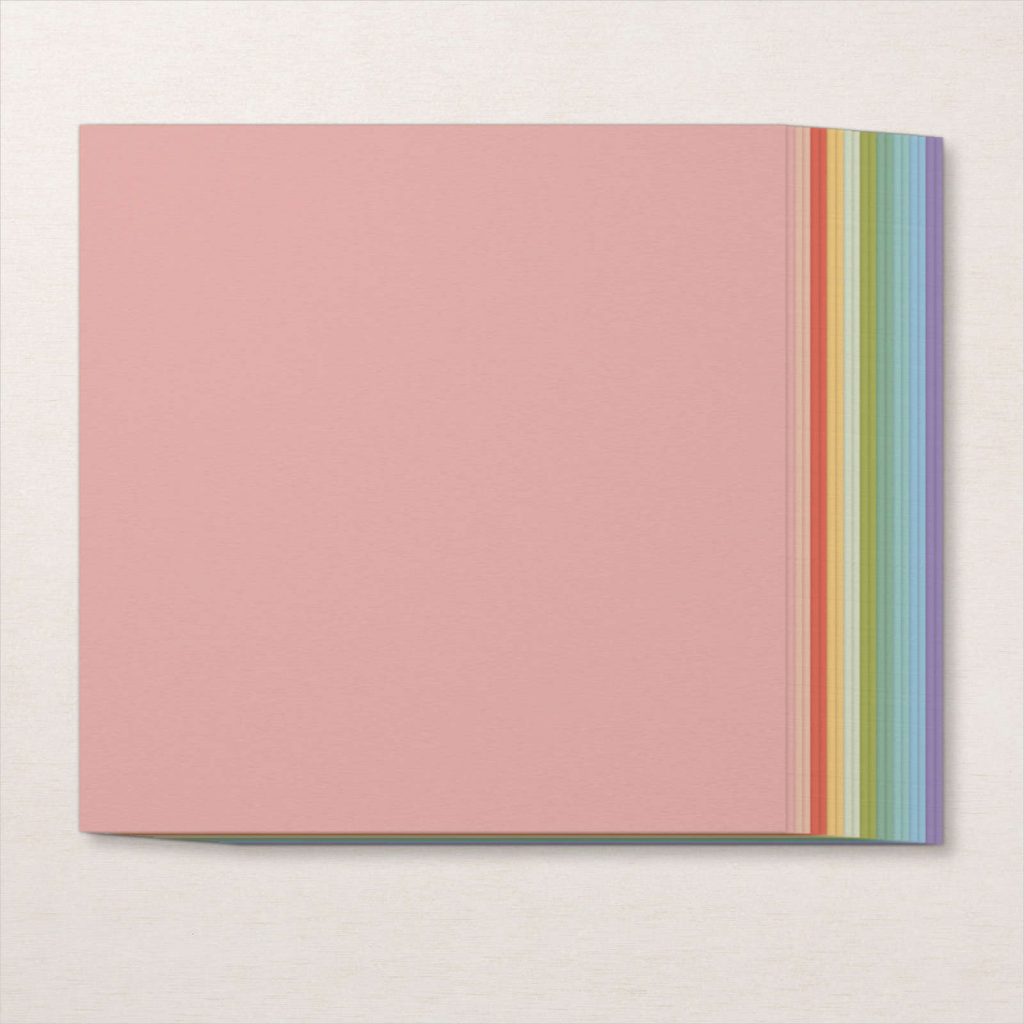
Balmy Blue is a lovely soft and powdery blue and part of the subtles family. It is available in the following products.
Classic Stampin’ Pad
Blue Adhesive-backed Gems
Balmy Blue Stampin’ Blends
Balmy Blue Classic Stampin’ Ink Refill
Balmy Blue A4 Card stock
Subtles A4 Card stock
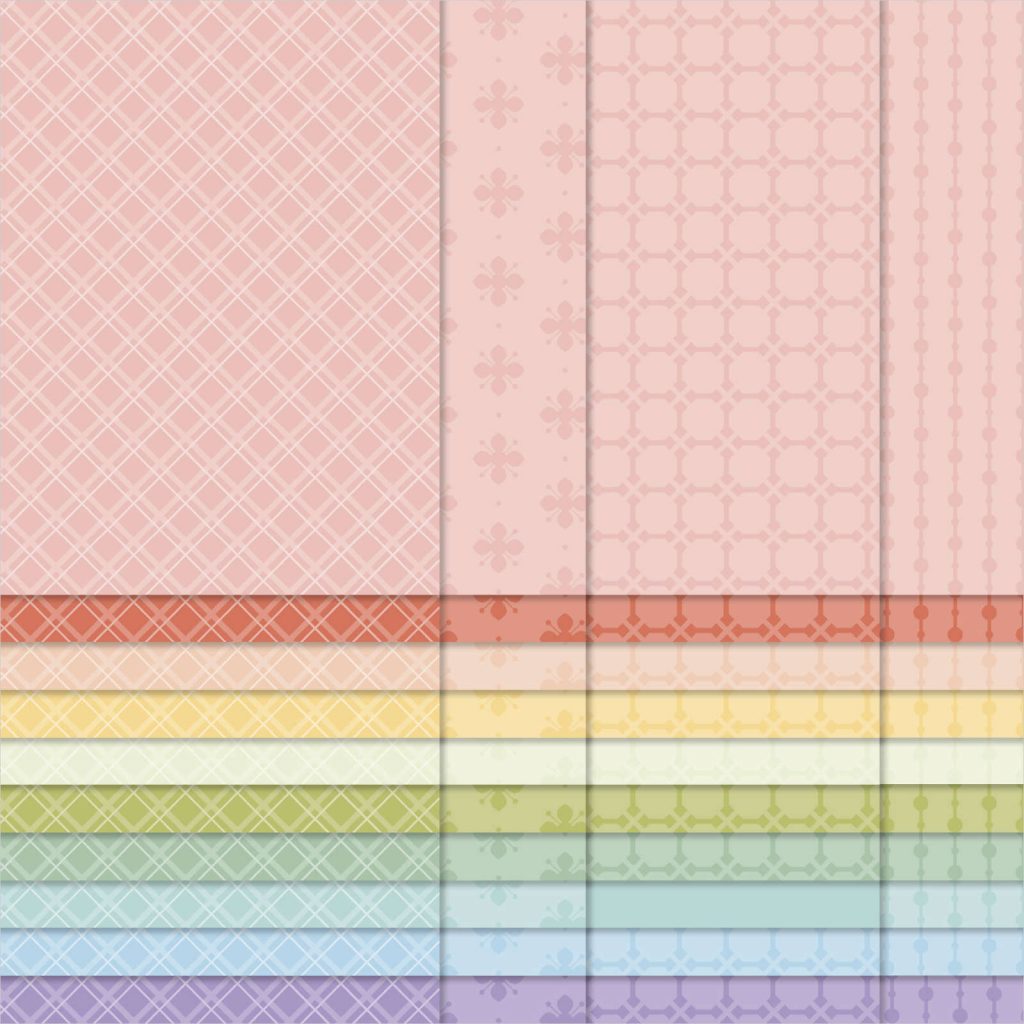
Subtles 12×12 Card stock
Subtles 6×6 DSP Assortment
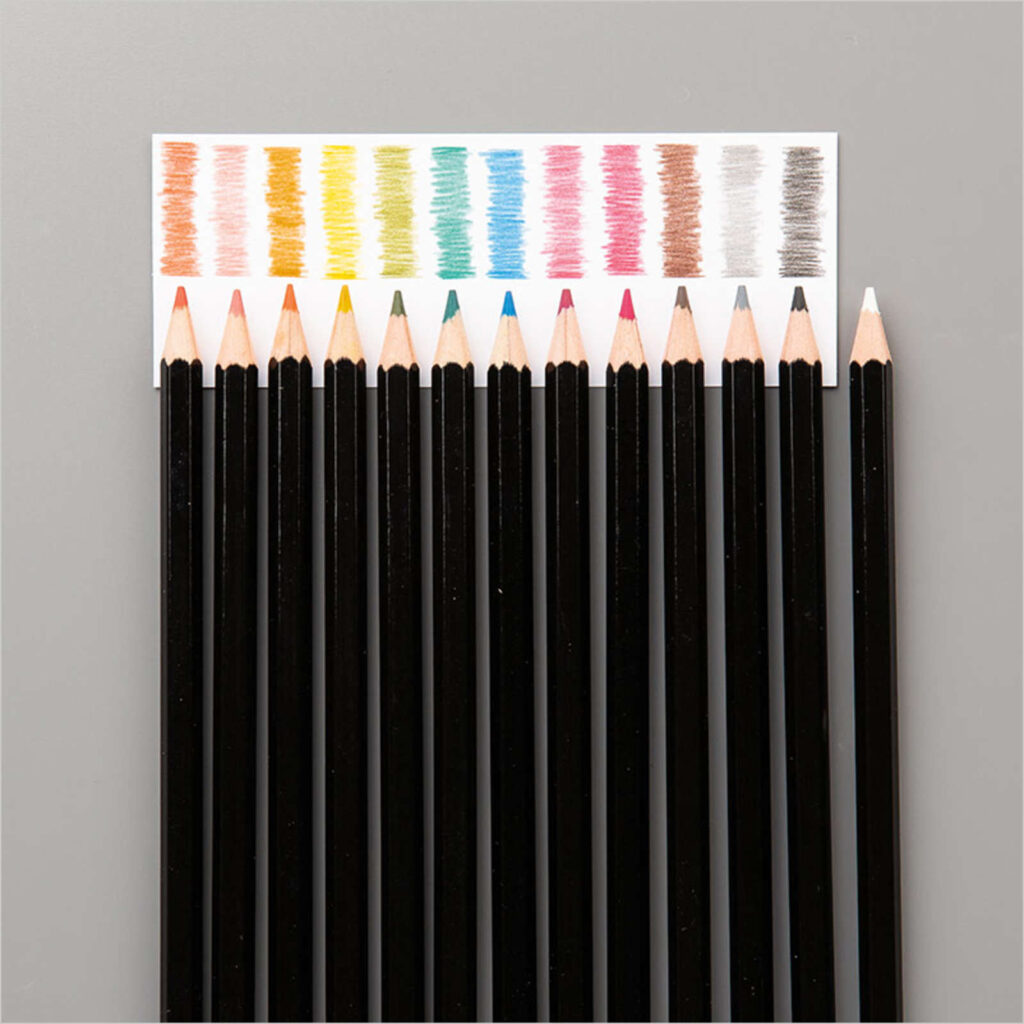
Watercolour Pencils assortment 2
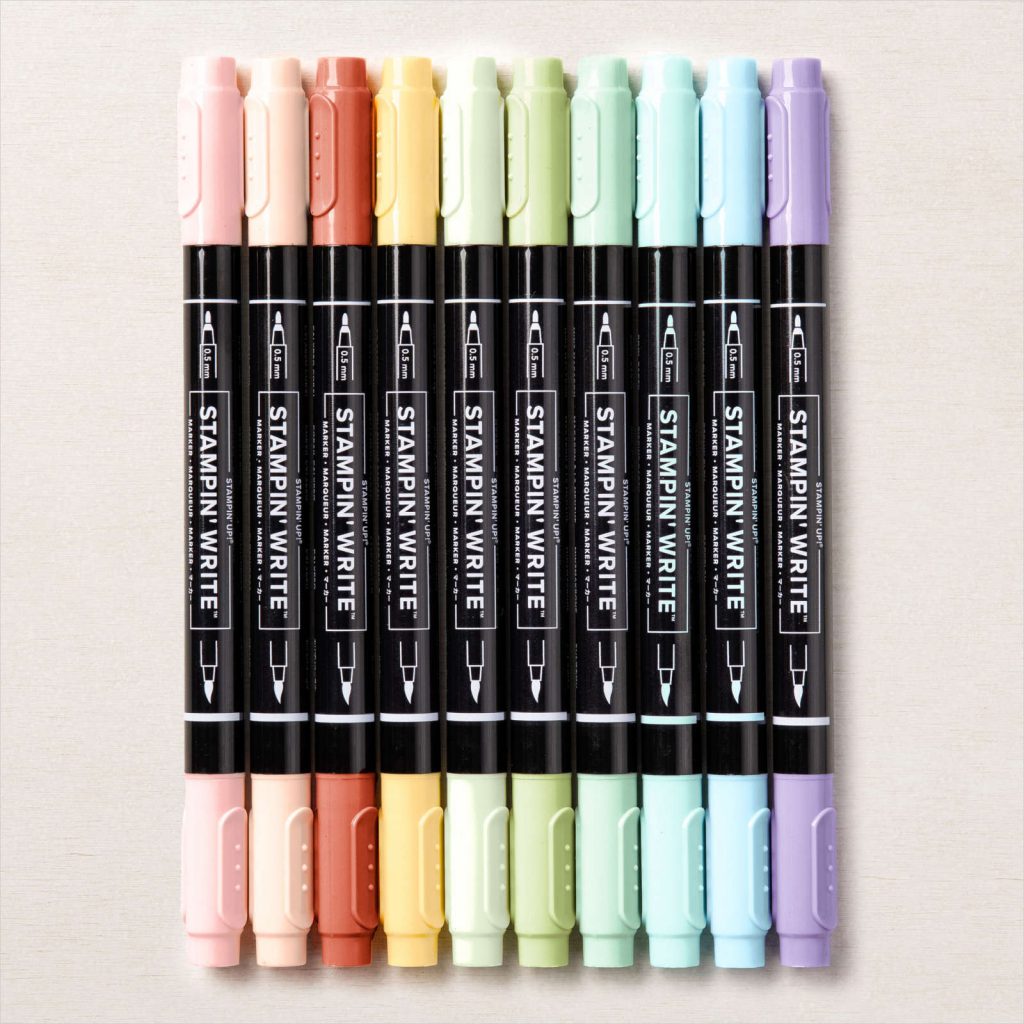
Subtles Stampin’ Write Markers assortment
You’re a Peach 12×12 DSP
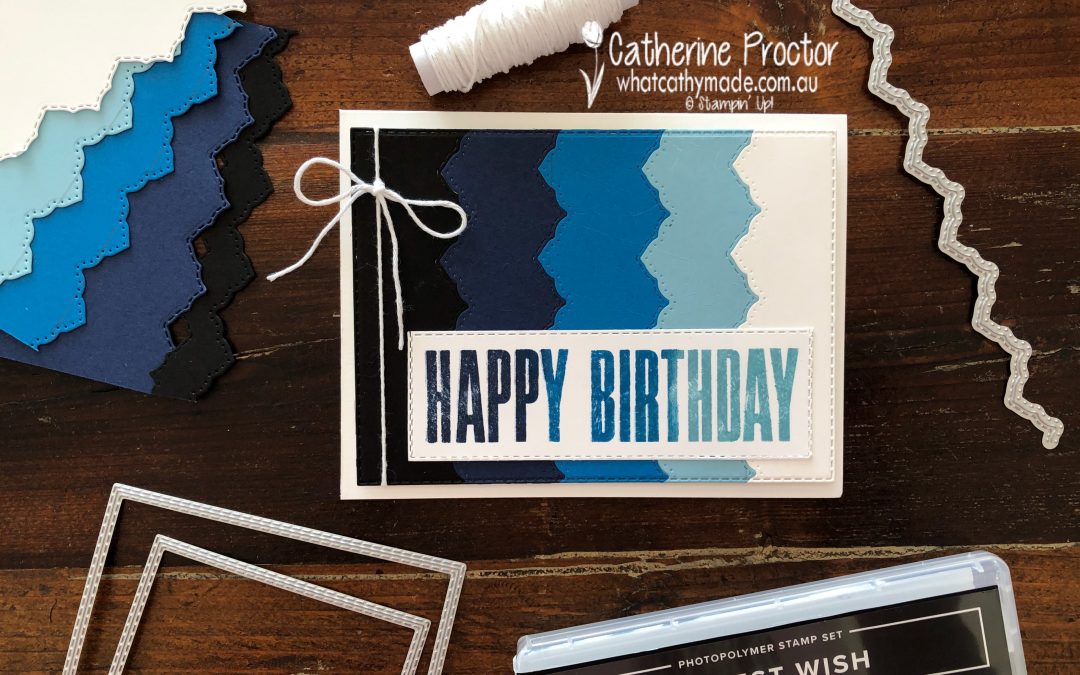
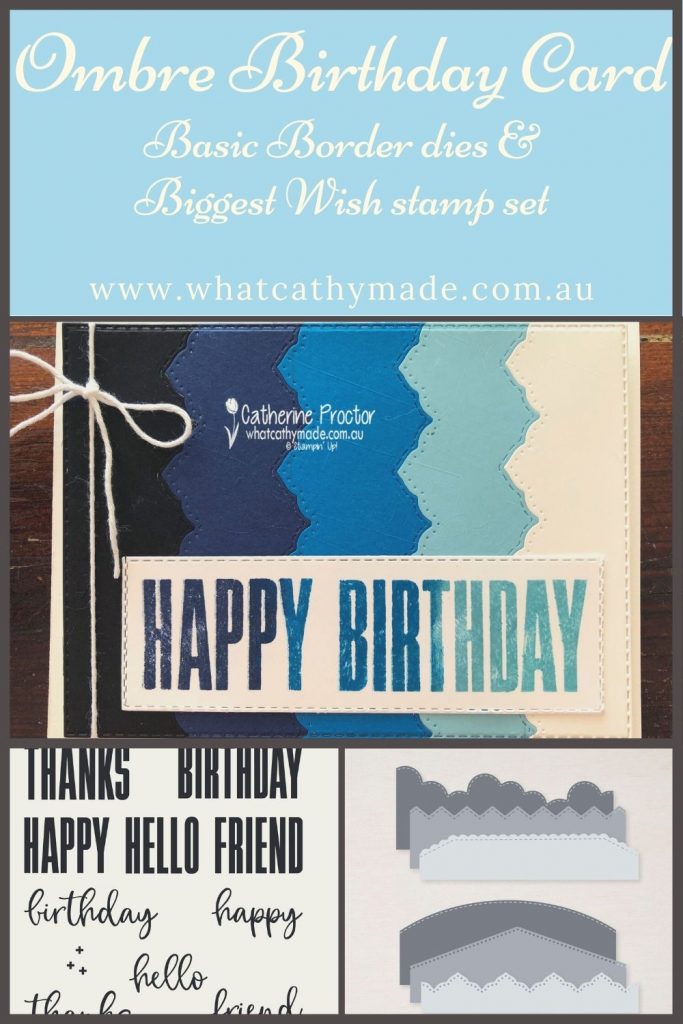
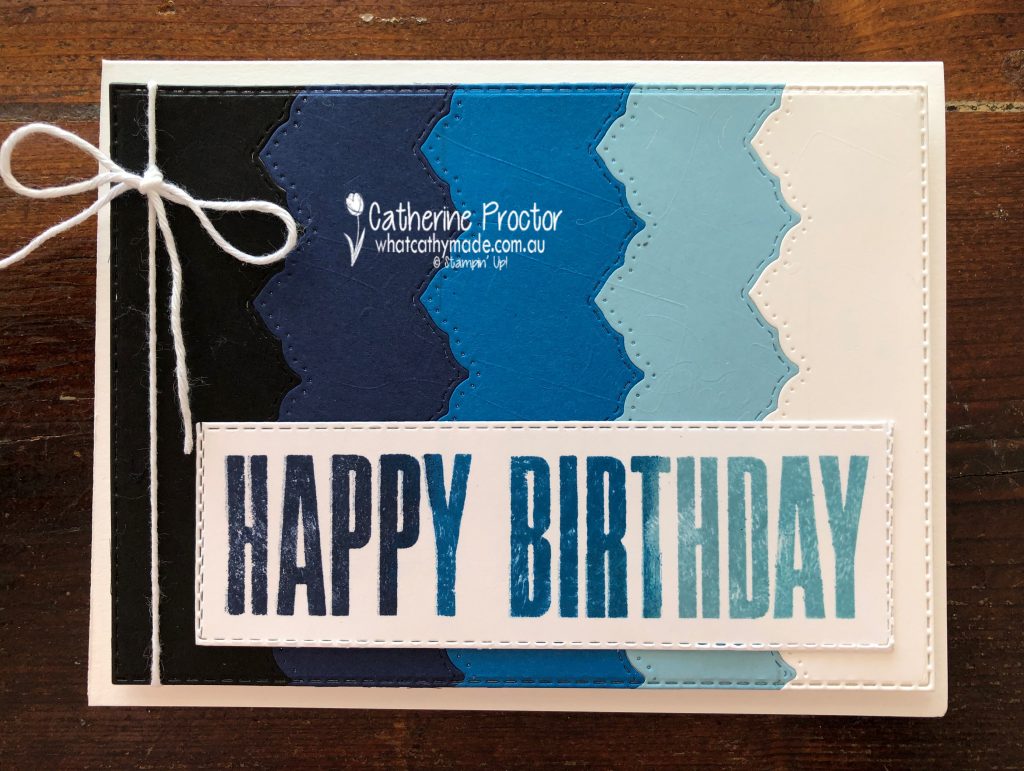
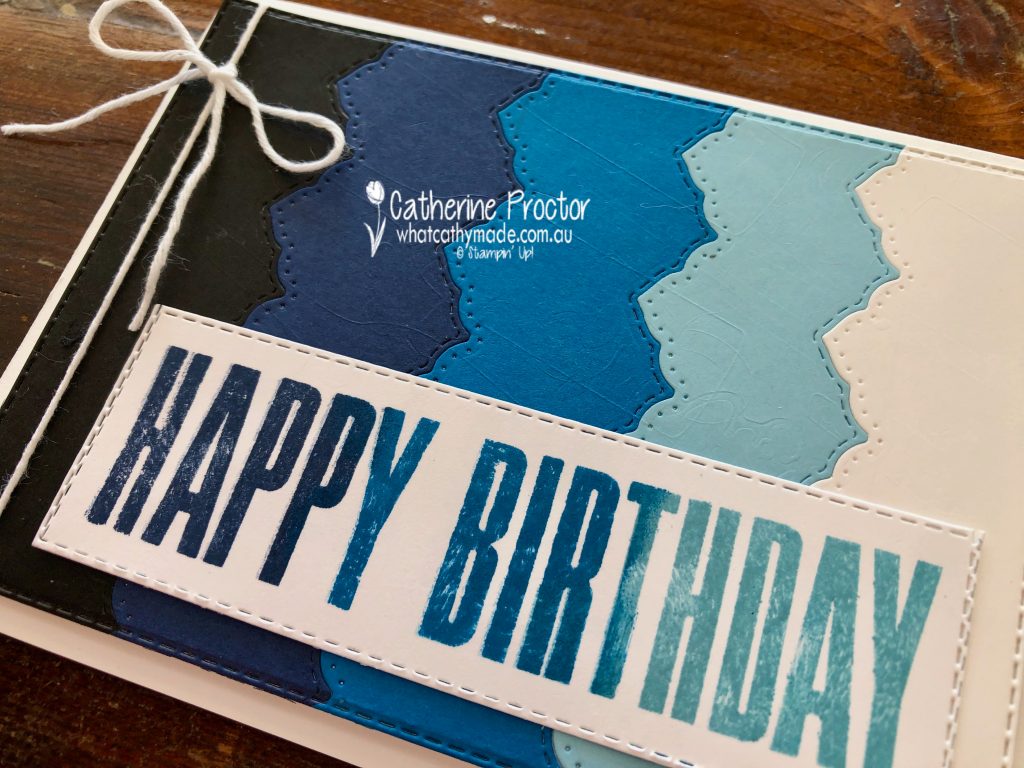
Today I’m sharing a card that uses two really versatile new products from the 2021-22 Annual catalogue: the Basic Border dies and the Biggest Wish stamp set.
To make an ombre card you simply chose a colour and fade from dark to light. Balmy Blue is our colour this week so I’ve paired it with the other blues as well as black and white to get an ombre effect.
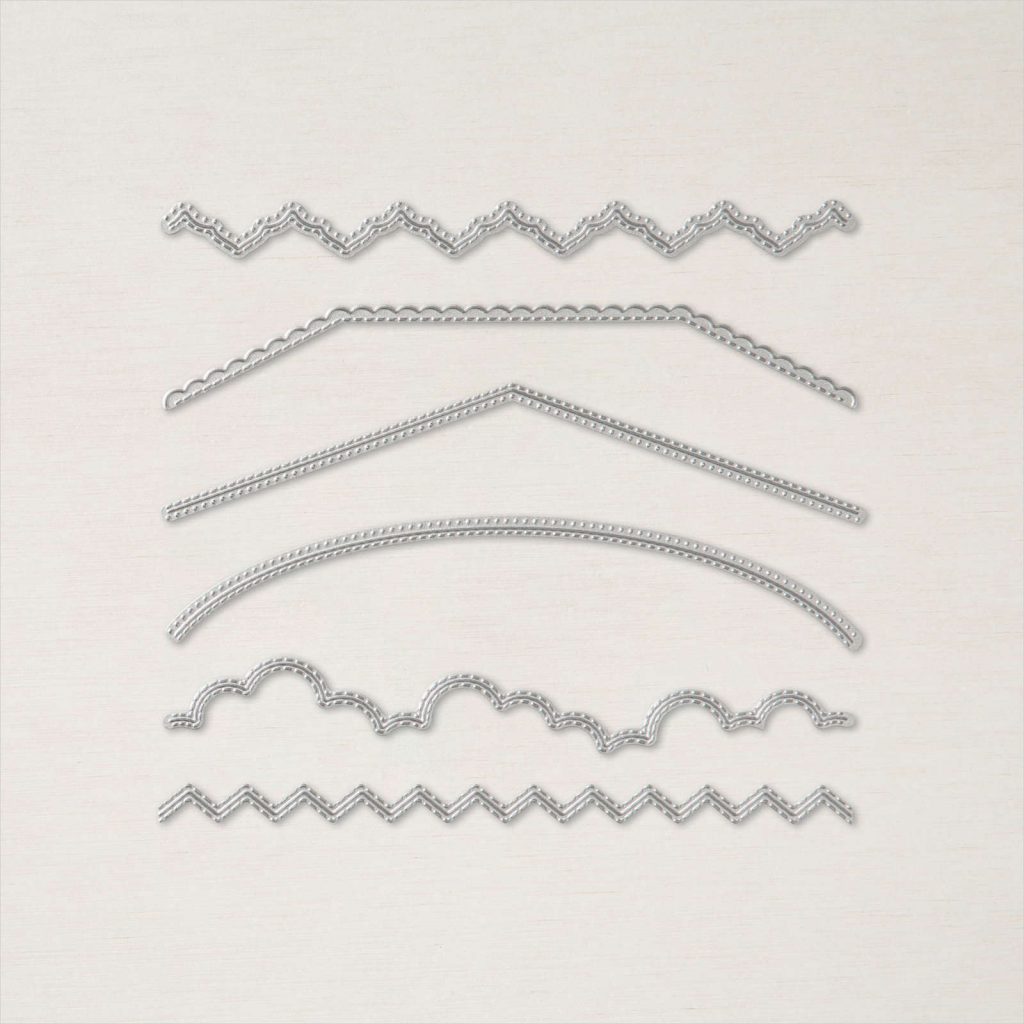
Each strip of card stock was die cut using one of the Basic Borders dies at approximately 3cm wide. Once all my card stock strips were die cut I carefully lined them up in ombre order, then adhered them to a piece of Basic White card stock. This ombre layer was then die cut using the largest stitched rectangle die. (Tip – if you place your rectangle die and card stock on a angle it is much easier to die cut.)
These Basic borders dies are incredible – there are six different shaped dies and the die I’ve used on my card leaves a stitched pattern on one side and a dotted pattern on the other side of the die cut.
My Stamparatus made creating an ombre sentiment quick and easy. I lined up the “happy” and the “birthday” stamps and then used sponge daubers and the Stamparatus to repeatedly stamp and gradually build up ombre colour. The ombre effect was created by stamping in Night of Navy, then Pacific Point and finally Balmy Blue.
A slightly smaller stitched rectangle die was used twice to die cut the sentiment and a single layer of Basic White twine from the Bakers Twine Essentials pack was wrapped around the side of the card.
Now it’s time to hop on over to our next participant, the very talented, Caroline Manwaring.
If you find a broken link or have come to this blog hop from a different entry point, you can view the participants below:
Welcome back to our Colour Creations Showcase as we continue our showcase of over 50 beautiful Stampin’ Up! colours in alpha order.
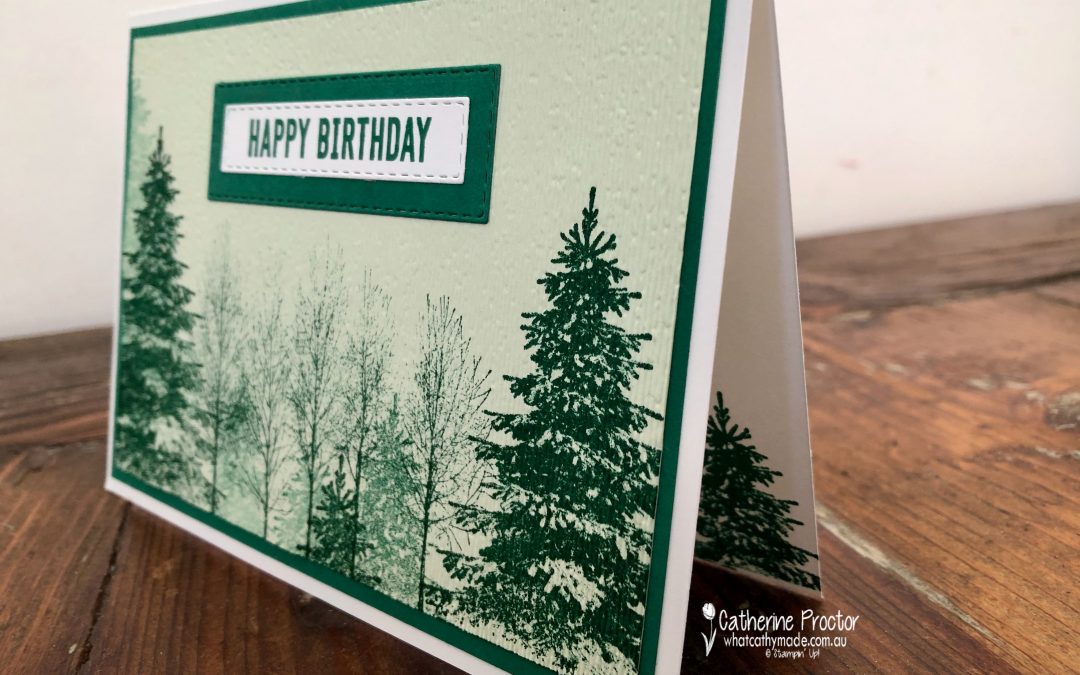
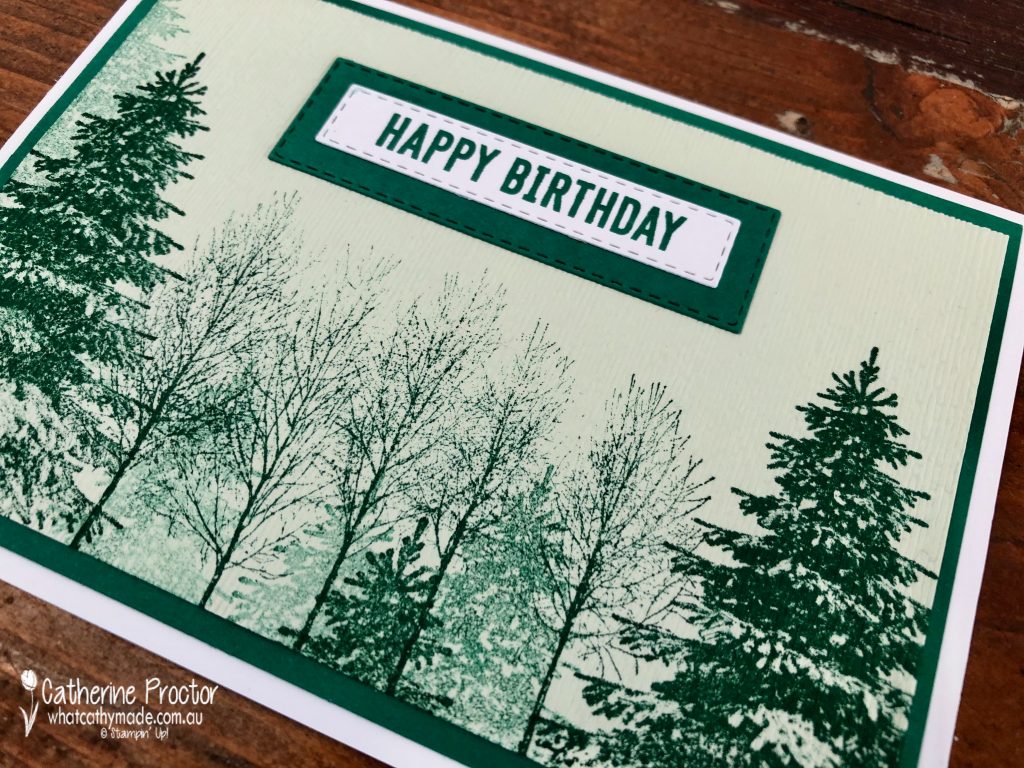
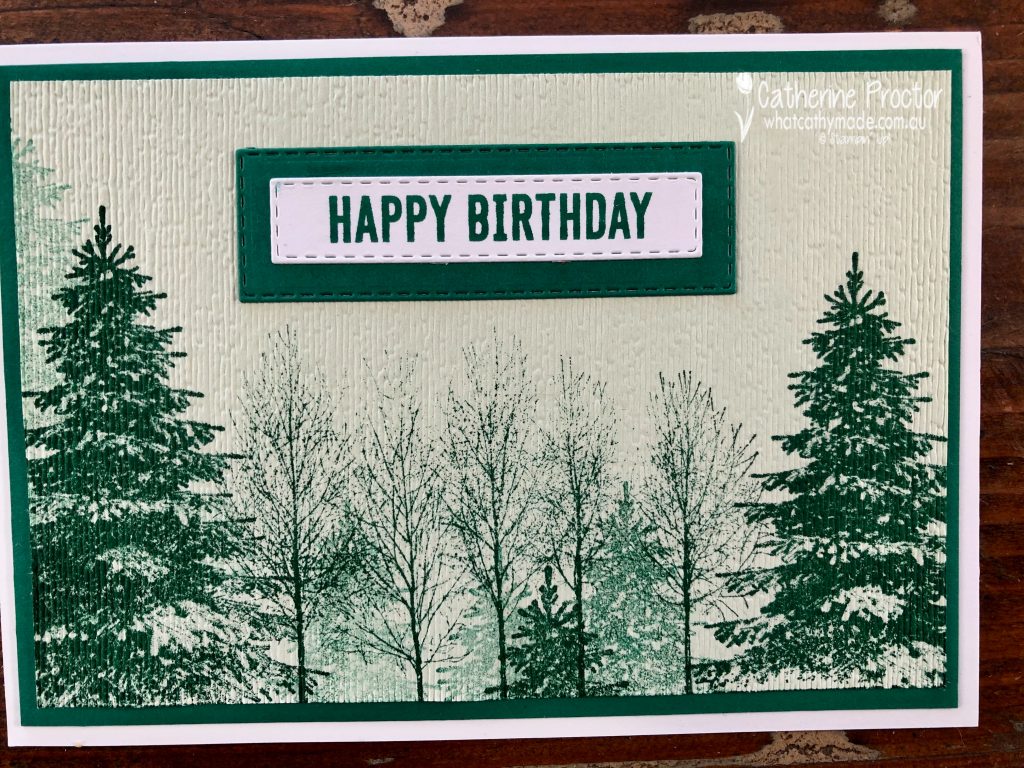
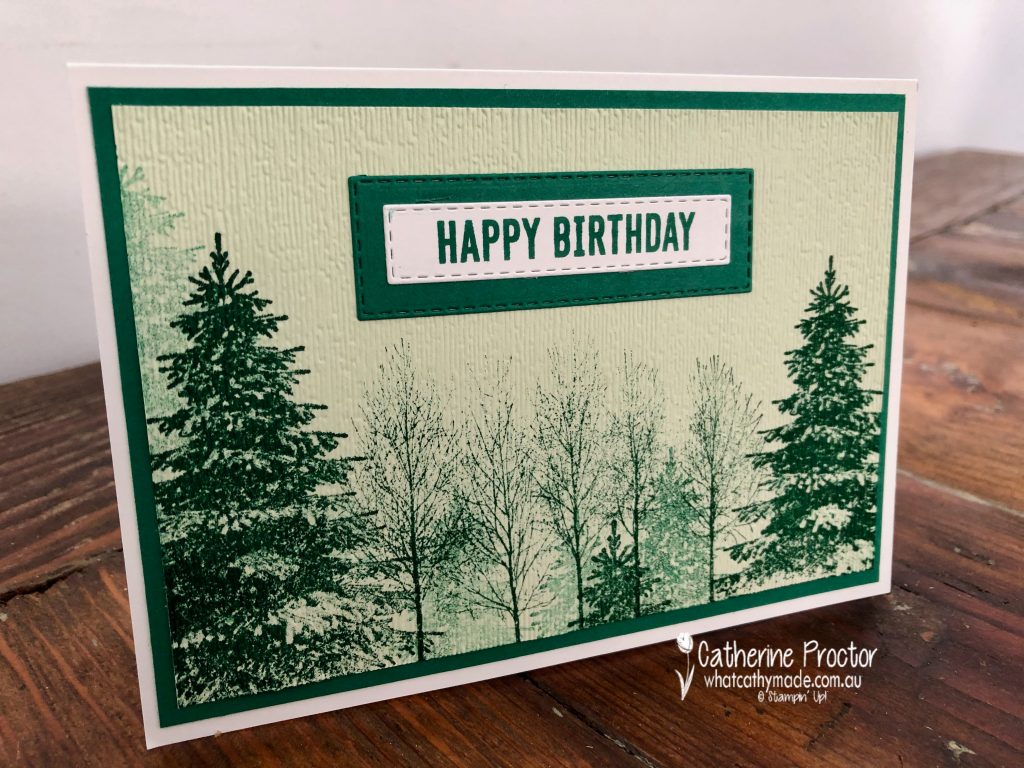
This week we are showcasing Shaded Spruce, a dark green colour from our Regals Family.
This is our last Colour Creations Showcase before the 2020-21 Annual Catalogue retires so I’m using some of my retiring favourites for this card: the Subtles Embossing folder, the Itty Bitty Birthdays stamp set and the Winter Woods stamp set.
I can’t take credit for the basic design of this card as I’ve CASED it from a beautiful Christmas card made by an overseas Stampin’ Up! demonstrator called Theresa McEntee. However, I felt April was was just a tad early to start making Christmas Cards so I’ve changed the sentiment and some elements of Theresa’s design to make a masculine birthday card instead.
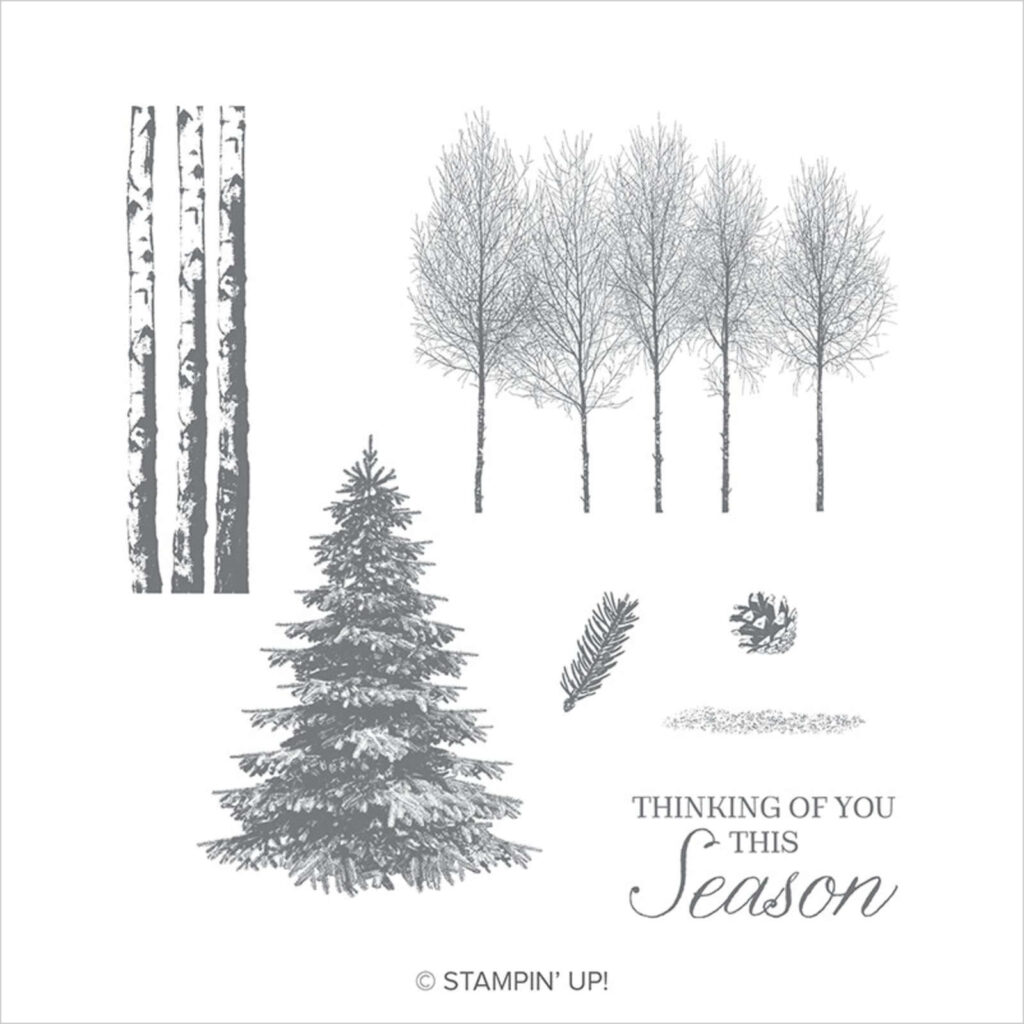
If you don’t already have the Winter Woods stamp set it’s one I definitely recommend adding to your collection for simple stamping and for masculine cards. Although this stamp set only has a Christmas sentiment, I turned it into a birthday card by simply using a “happy birthday” sentiment from the Itty Bitty Birthdays stamp set.
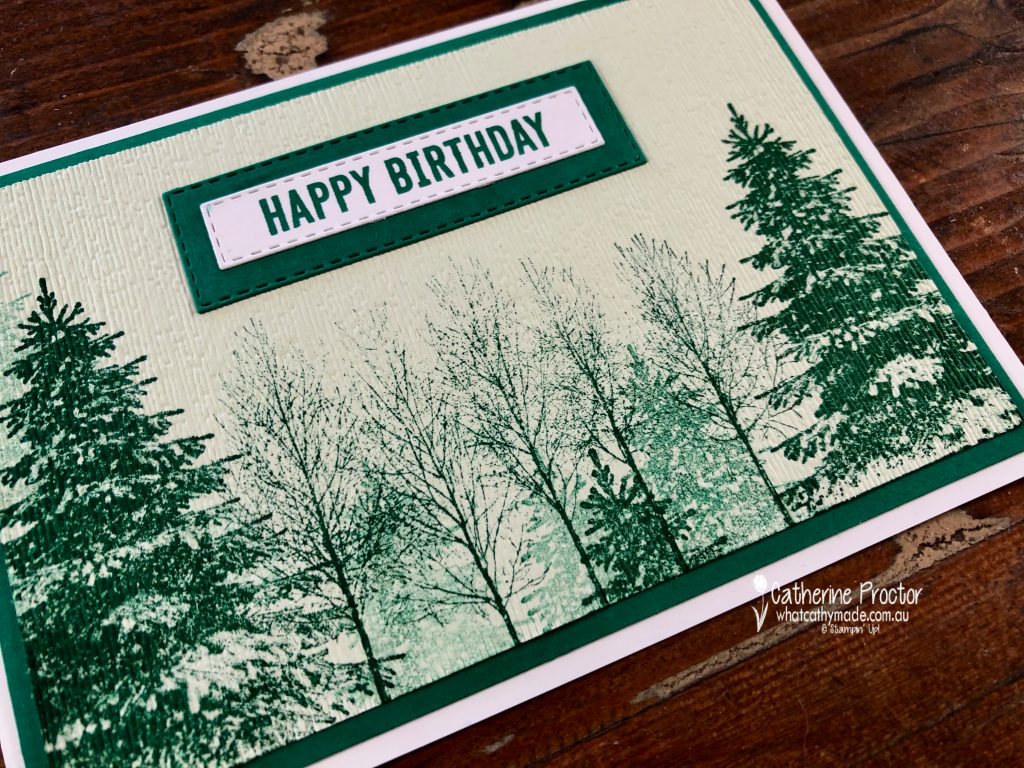
Can you see the lovely texture I’ve added to the stamped front panel using the subtle embossing folder? If you want to try this technique don’t forget to always stamp first and then emboss afterwards.
I love the colour combination of Shaded Spruce with Soft Sea Foam. Although they are the darkest and the lightest greens in the Stampin’ Up colour range they work really well together. All of the trees have been stamped in Shaded Spruce but I’ve “stamped off” some of the trees to create depth in my forest.
I can’t wait to see what everyone else has created with Shaded Spruce today!
If you’d like me to post you your very own copy of the forthcoming 2021-22 Stampin Up! Annual Catalogue, the January – June 2020 mini catalogue, or to simply find out about more about Stampin’ Up! contact me.
In the meantime, wherever you are in the world, stay safe, stay calm…and keep on crafting xxx
Welcome back to our Colour Creations Showcase as we continue our showcase of over 50 beautiful Stampin’ Up! colours in alpha order.
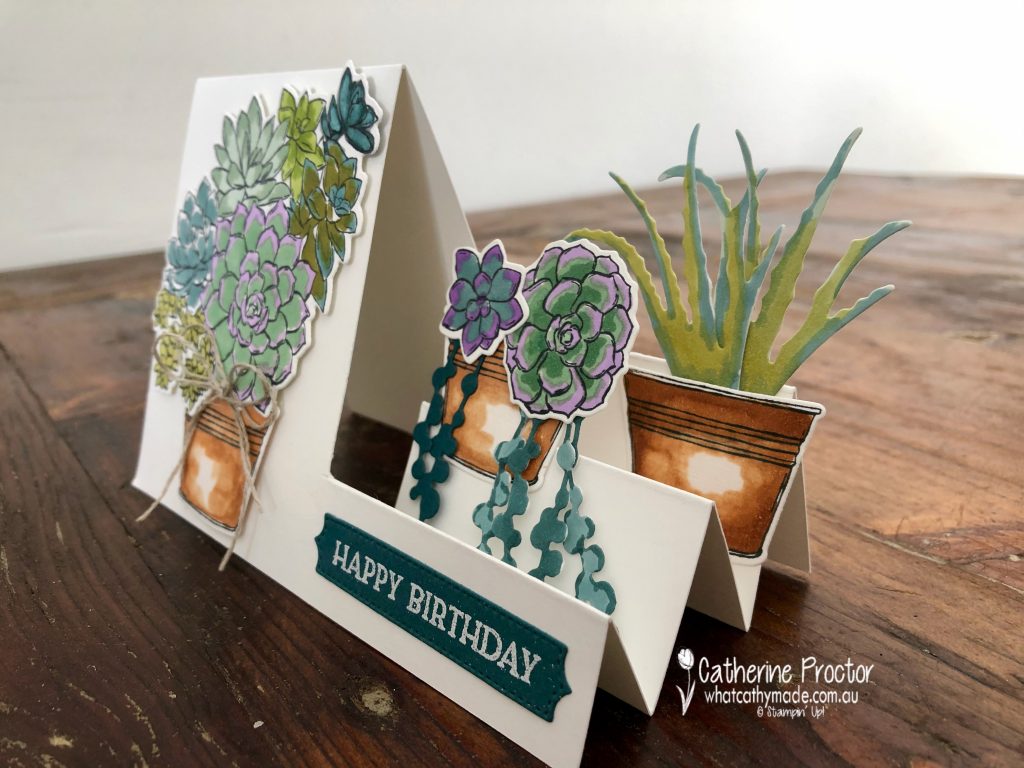
This week we are showcasing Pretty Peacock, a deep teal/turquoise blue/green which is one of the soon to be retired 2019-21 InColours.
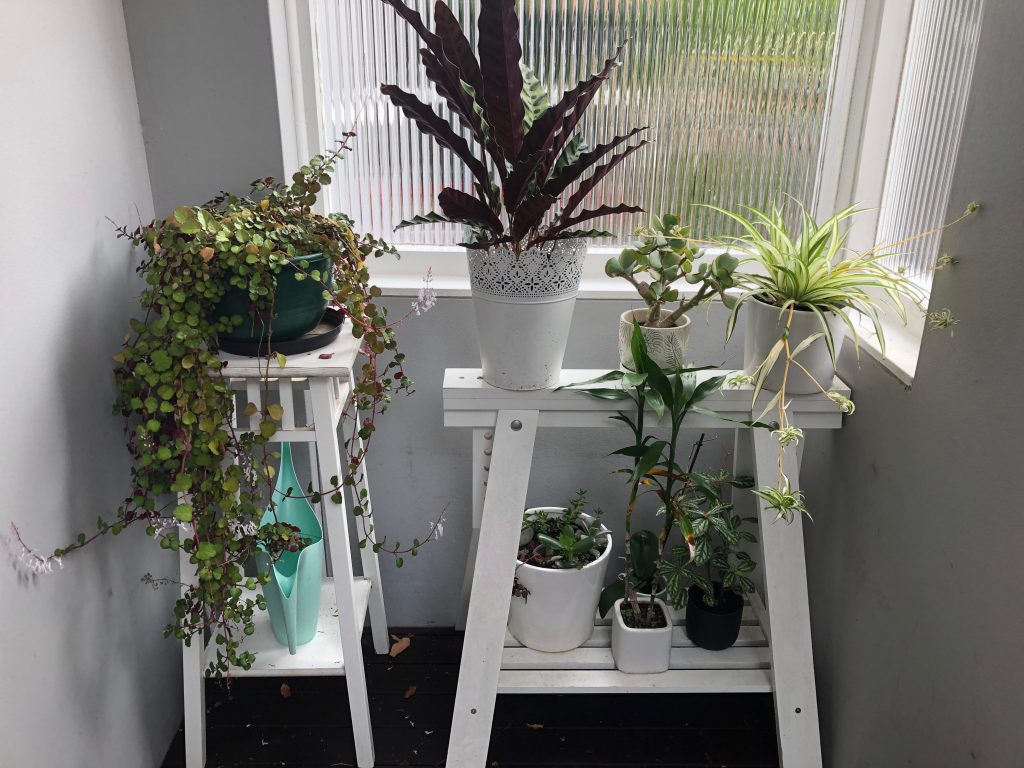
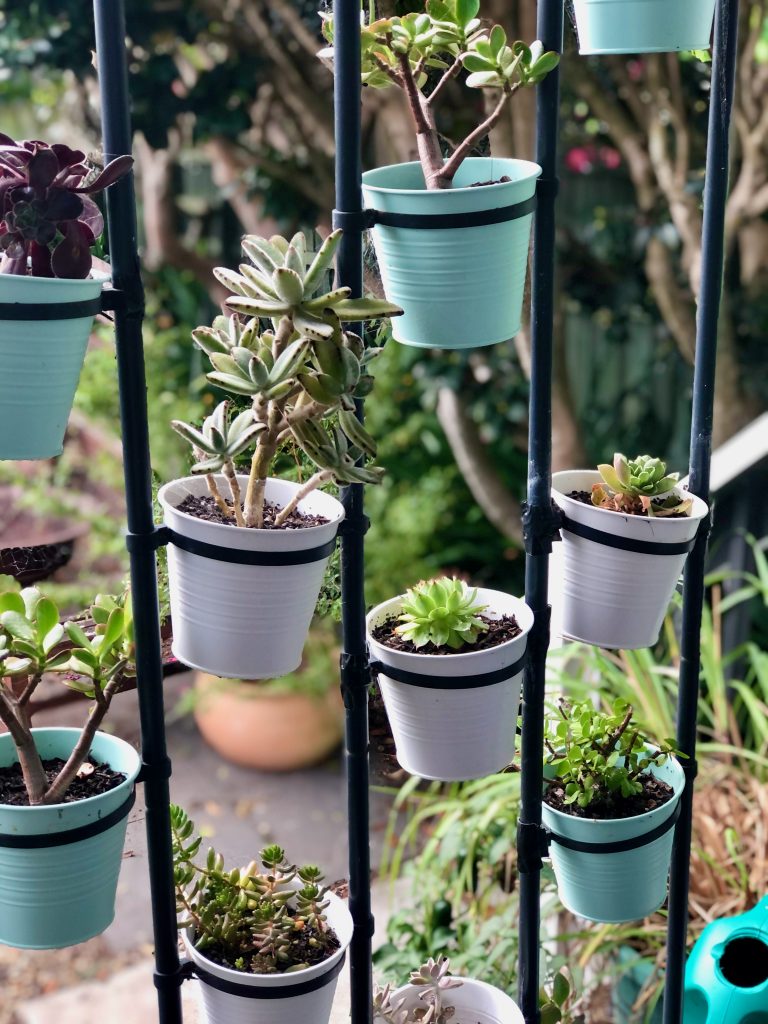
I don’t know about you, but I love succulents because they are so sculptural, come in amazing colours and shapes, are hard to kill, easy to propagate…and they survive and flourish where other plants don’t.
Plants can be tricky to grow at my home because it sits high on a hill near the sea, with the front of the house facing south and our back garden facing north. Our backyard is flooded with sun year round and at the front of the house southerly winds whip up the hill in the afternoons.
These plants at my front entrance have to survive both the strong salty southerlies AND the hot northern sun streaming through the glass.
On my back deck the only plants that survive the year-round northern sun are my succulents – please excuse the spider webs, it is constant battle!
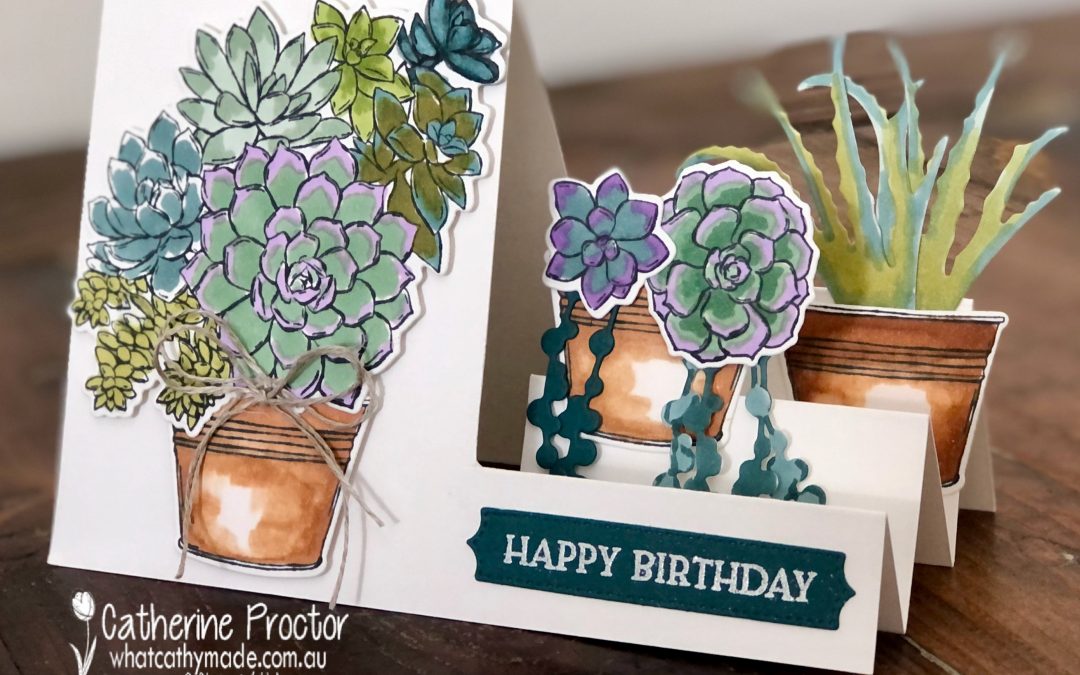
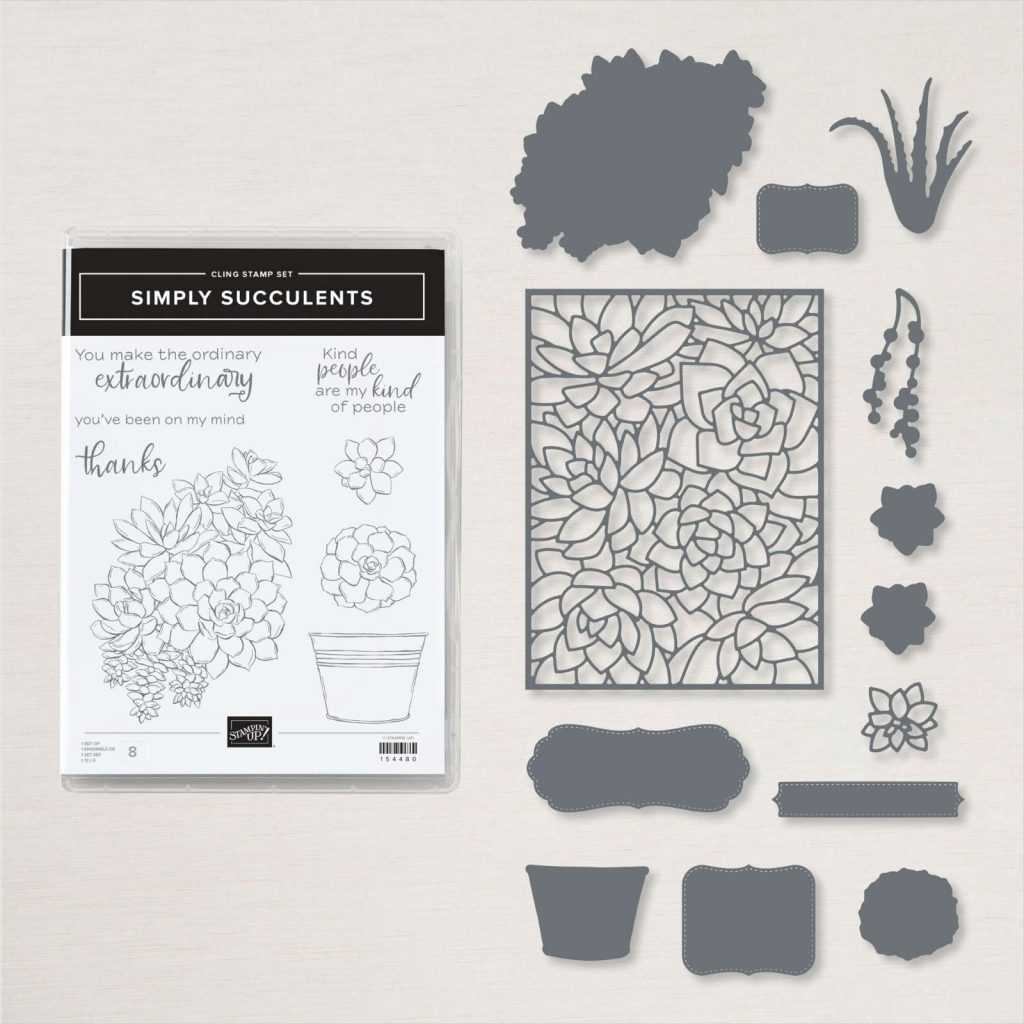
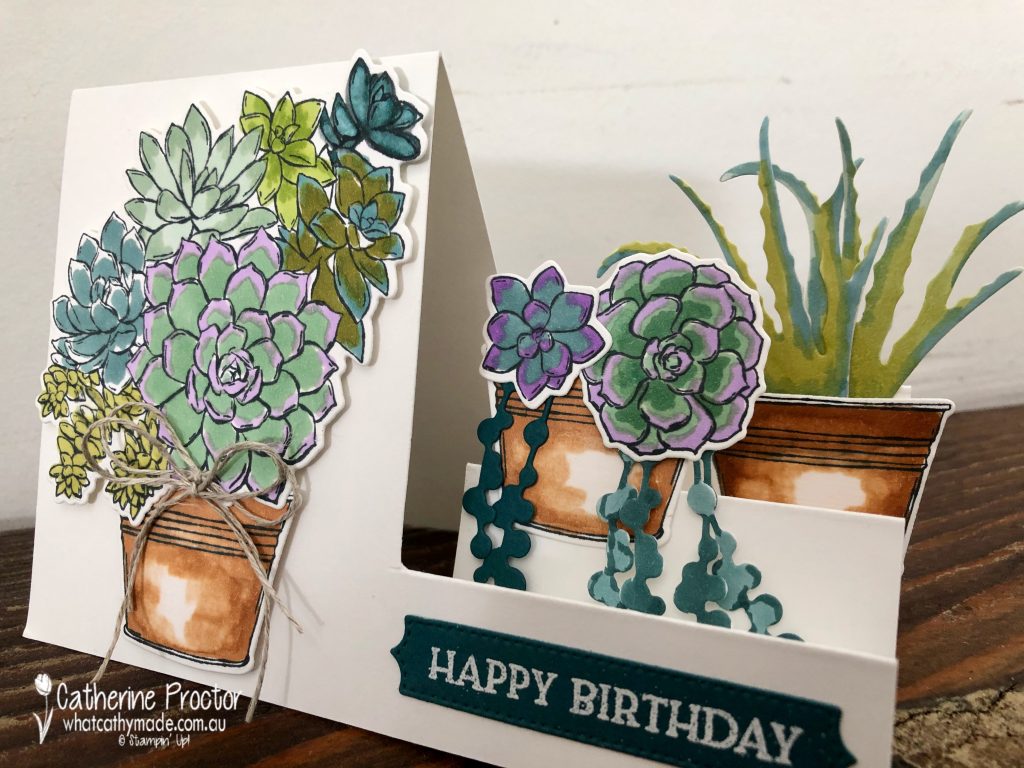
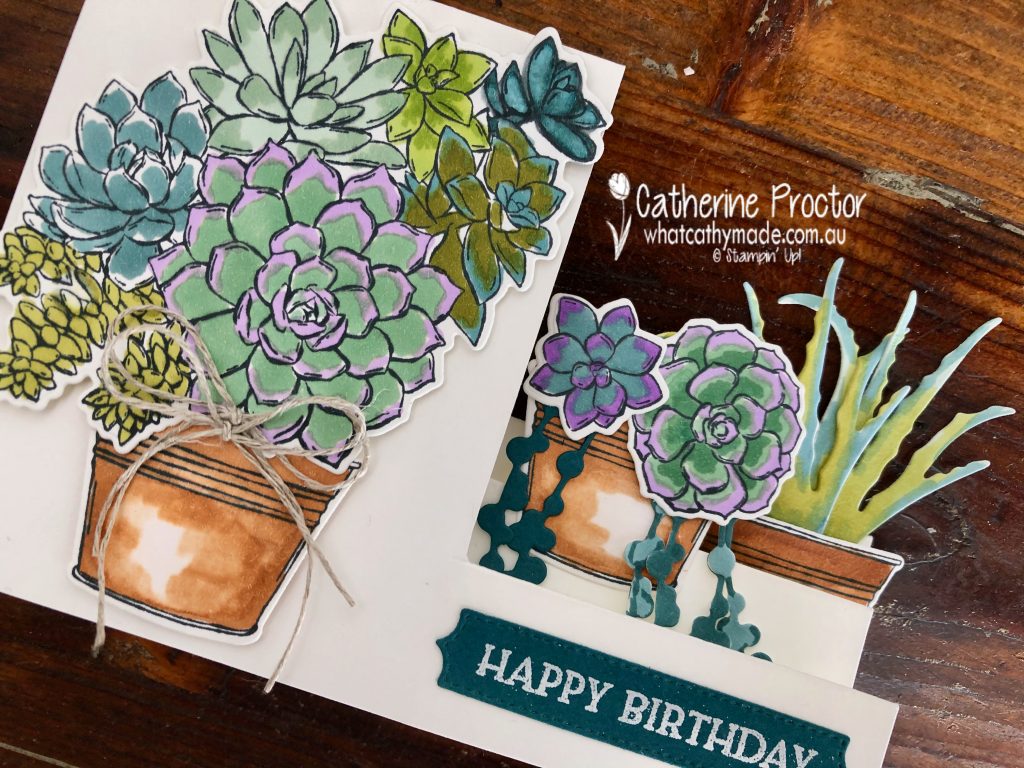
If you love succulents like I do, the simply succulents bundle from the January-June 2021 mini catalogue is a must have! Take a closer look at the dies – not only are there co-ordinating dies to cut out the pot and the three succulent stamps, but there are also dies for two other succulents (LOVE the hanging succulent), four stitched label dies and an enormous background succulent die!
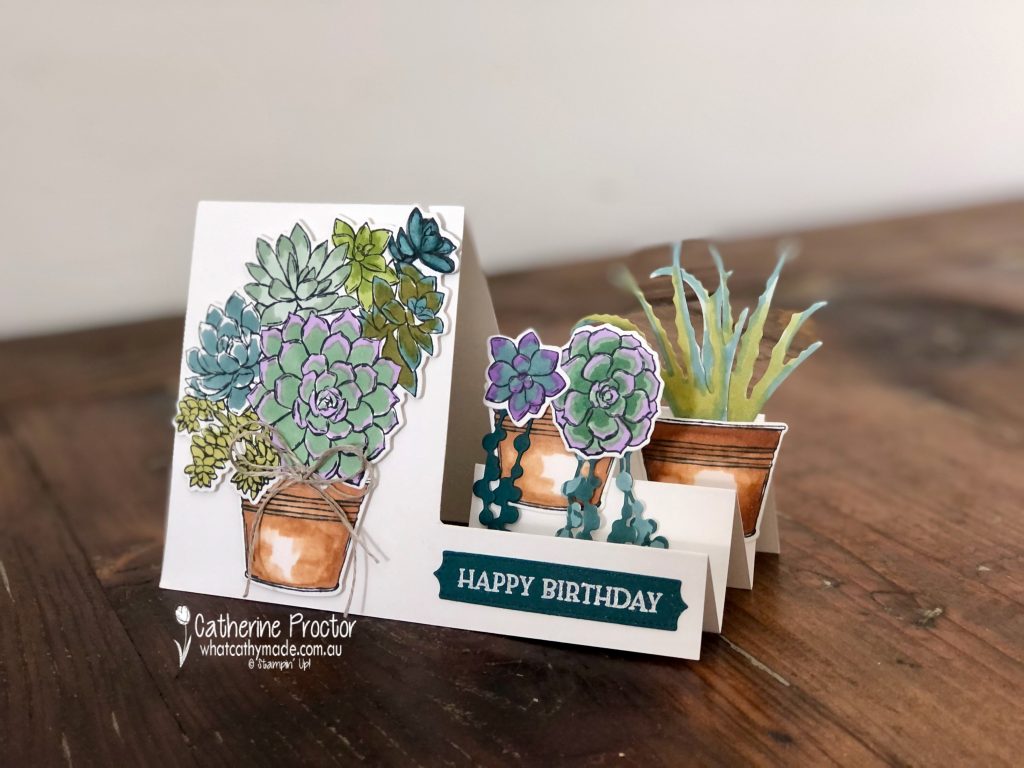
I was trying to work out how to make a card that reflected the different heights my succulents sit at both on my back deck and my front door, and I realised a side step card was the answer.
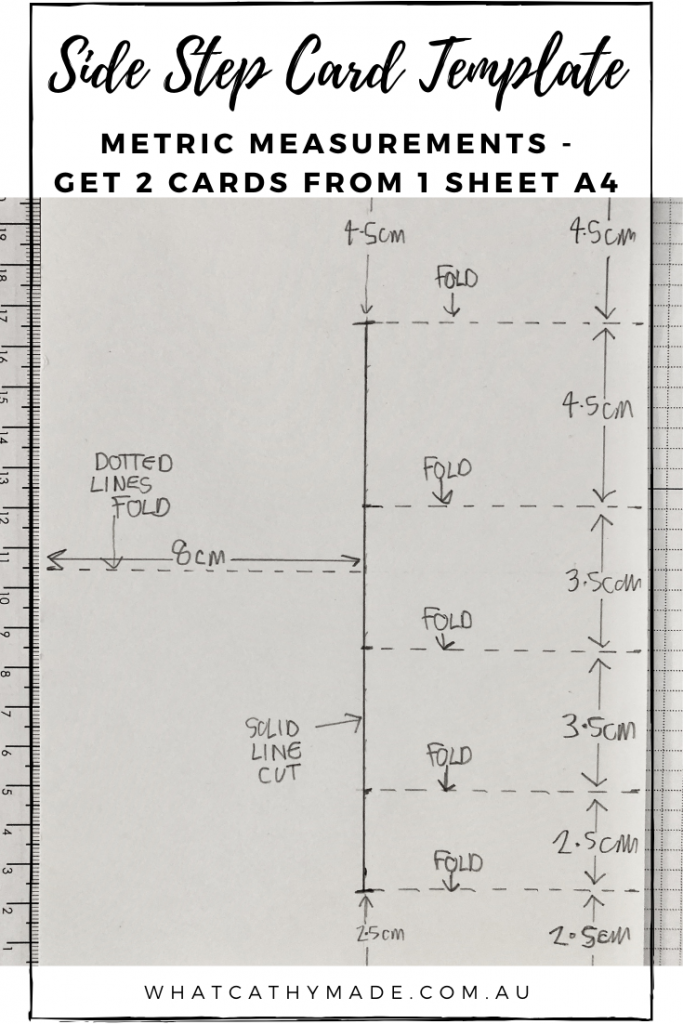
I couldn’t find a template for a side step card that worked with our paper sizes here in Australia, so I created one that gives you 2 cards bases from one sheet of A4 card stock.
Making a side step card is quite simple – there is only one single cut and a few folds. One sheet of A4 paper is enough for 2 card bases, each measuring 14.8cm x 21cm each. Use your paper trimmer to cut your A4 card stock in half and then cut and score as per the template below.
Measure in 8cm from the left on the 14.8cm side of your card base and draw a pencil line from top to bottom.
Along this line measure down 4.5cm from the top of the card stock and measure up 2.5cm from the base of the card stock. The solid line in between these 2 measurements is your only cutting line for this card- I’ve marked this as a solid black line in my template.
Cut along this solid line, being very carful not to cut above or below this line.
All the other dotted lines are fold lines – measure and score these with your paper trimmer.
Once you’ve scored these lines, rub out the pencil mark along your cut line and fold the score lines so the folds of your card look like this.
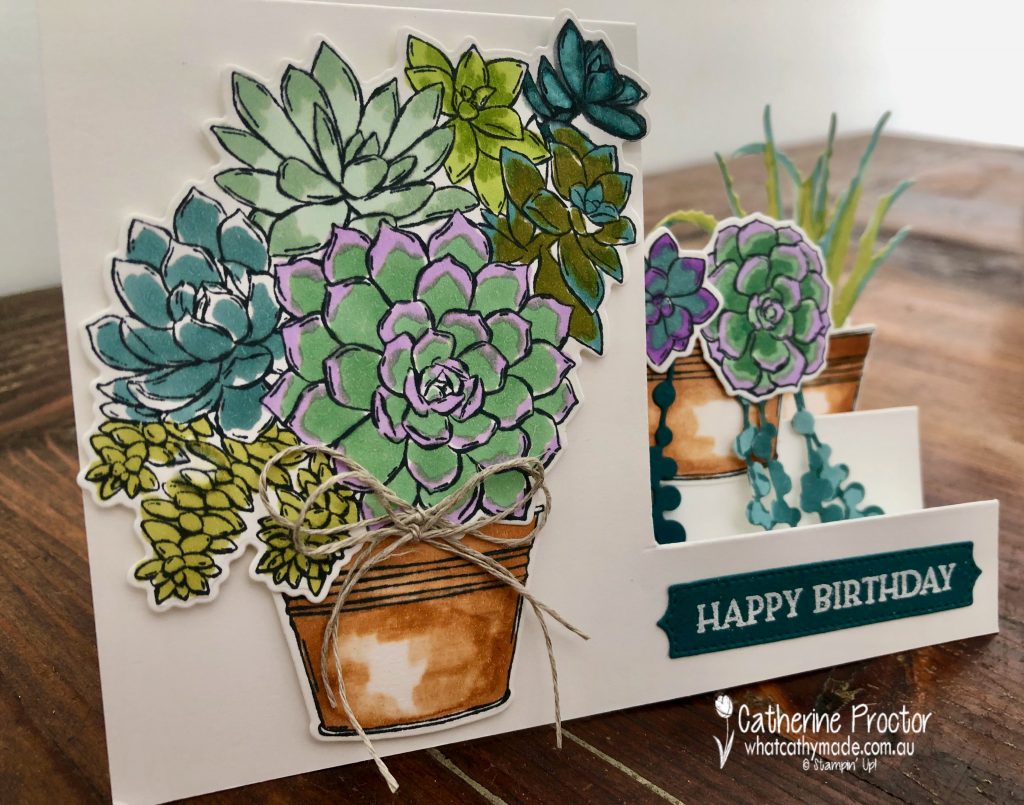
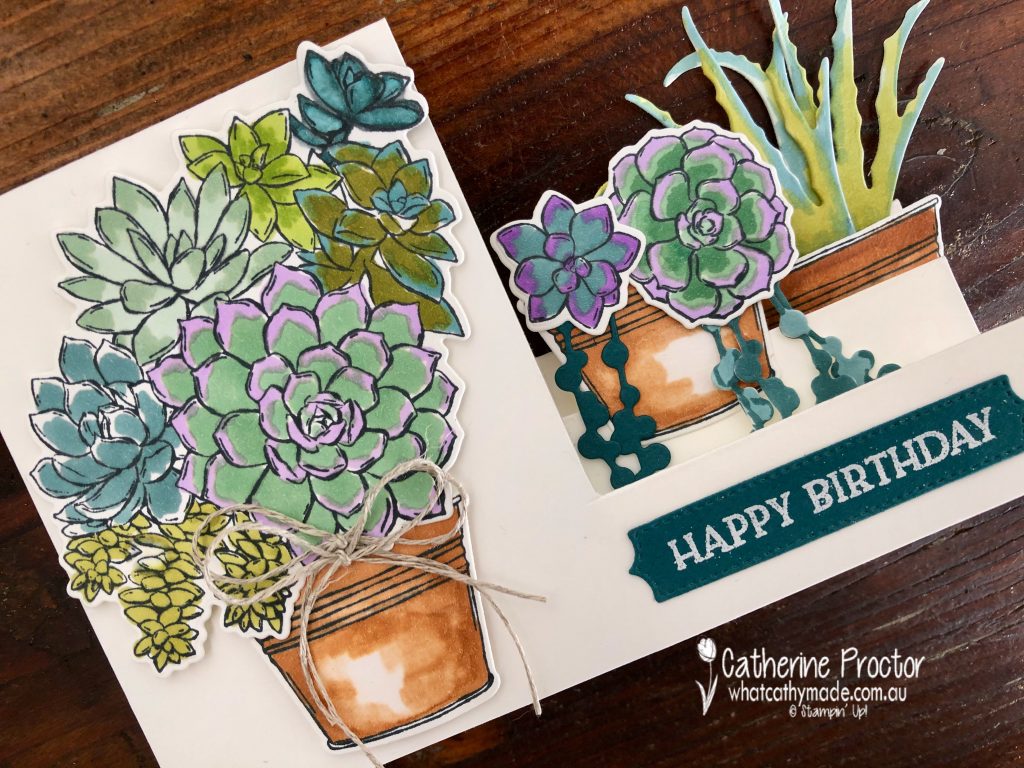
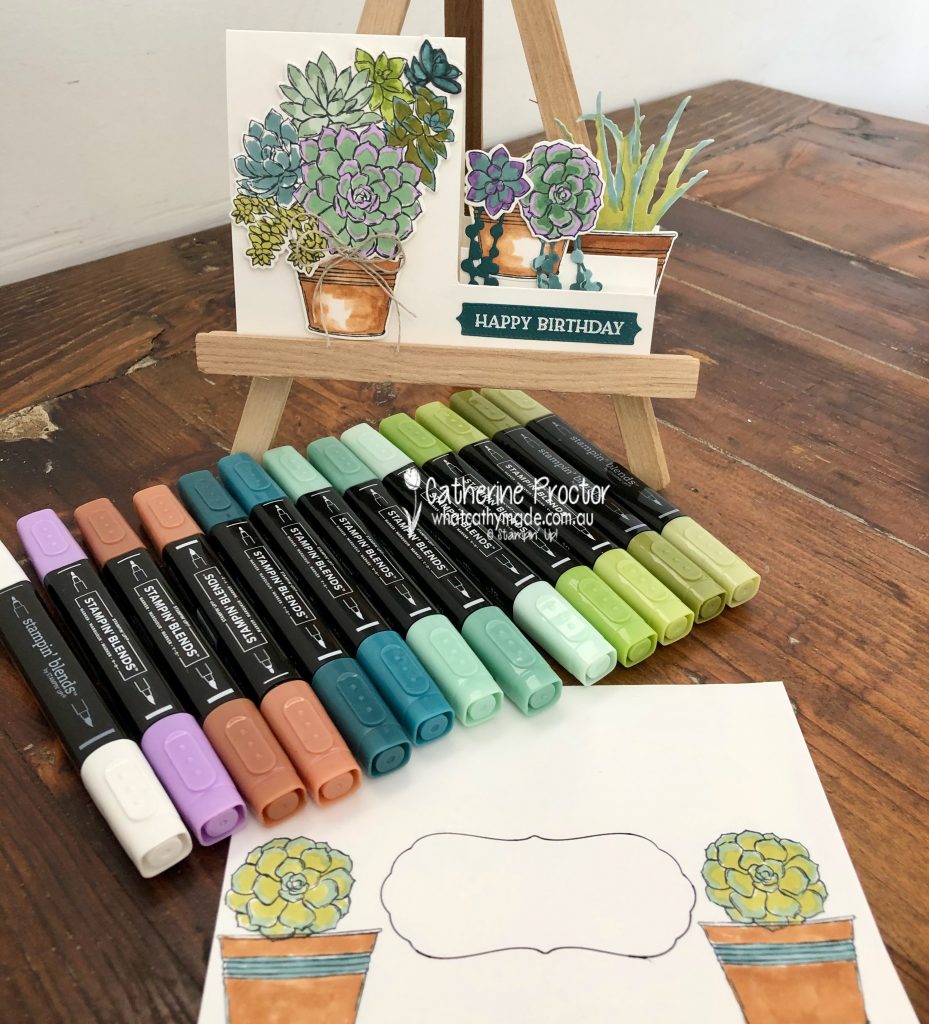
I’ve used a lot of different coloured Stampin’ Blends for my succulents, including light and dark Pretty Peacock, Just Jade, Mint Macaron, Old Olive, Granny Apple Green and Highland Heather. The terracotta pots are coloured with Cinnamon Cider Stampin’ Blends.
For the trailing succulents in the middle pot I die cut one from Pretty Peacock card stock and two in Basic White card stock. I used my dark and light Pretty Peacock Stampin’ Blends to colour the Basic White card stock. You can see in the picture below how this gives three different shades of Pretty Peacock.
The succulent on the back right hand side of the card was coloured by blending together Old Olive and light Pretty Peacock. I love this spiky succulent!
The “happy birthday” sentiment is from the Blossoms in Bloom stamp set, stamped in Versamark ink and then white heat embossed onto Pretty Peacock card stock. This sentiment perfectly fits into one of the stitched label dies from the Simply Succulent Bundle.
The final touches are a double bow of linen thread and a few stamped and coloured succulents to decorate a Basic White C6 envelope. I traced around another die from this bundle to create an address border on the front of the envelope.
I didn’t forget the back of the envelope either!
I can’t wait to see what the rest of the Art With Heart team have created with Pretty Peacock today. Click on the links below to see what they’ve made.
If you’d like me to post you your very own copy of the January – June 2020 mini catalogue, the 2020 Sale-a-bration catalogue, the 2020-21 Stampin Up! Annual Catalogue, the 2020-21 Beginners Brochure, or to simply find out about more about Stampin’ Up! contact me.
When you shop online in my Stampin’ Up! Online Store don’t forget to use my monthly Host Code (if your order is between $50 – $250) and I will send you a thank you gift the following month. If your order is over $250 don’t use the host code because you will qualify for your own stamping rewards.
My February 2021 Host code is ZYAR6HTF and it is valid until midnight February 28.
Would you like to get a 20% discount on everything you order? Click here to join my team:
In the meantime, wherever you are in the world, stay safe, stay calm…and keep on crafting xxx
Welcome to the Monthly Art With Heart Creative Showcase. Tonight we’re sharing some ideas for cards that only use five supplies or less – a challenge for many avid crafters.
Luckily we all agreed that paper trimmers, paper snips, acrylic blocks and adhesives were core supplies assumed to be already on hand, which meant we could chose five more supplies in addition to these basics.
Although technically you could argue that an all inclusive card kit could be counted as one supply I did feel that would be cheating for the purposes of this challenge, so after much deliberation I settled on the following five supplies:
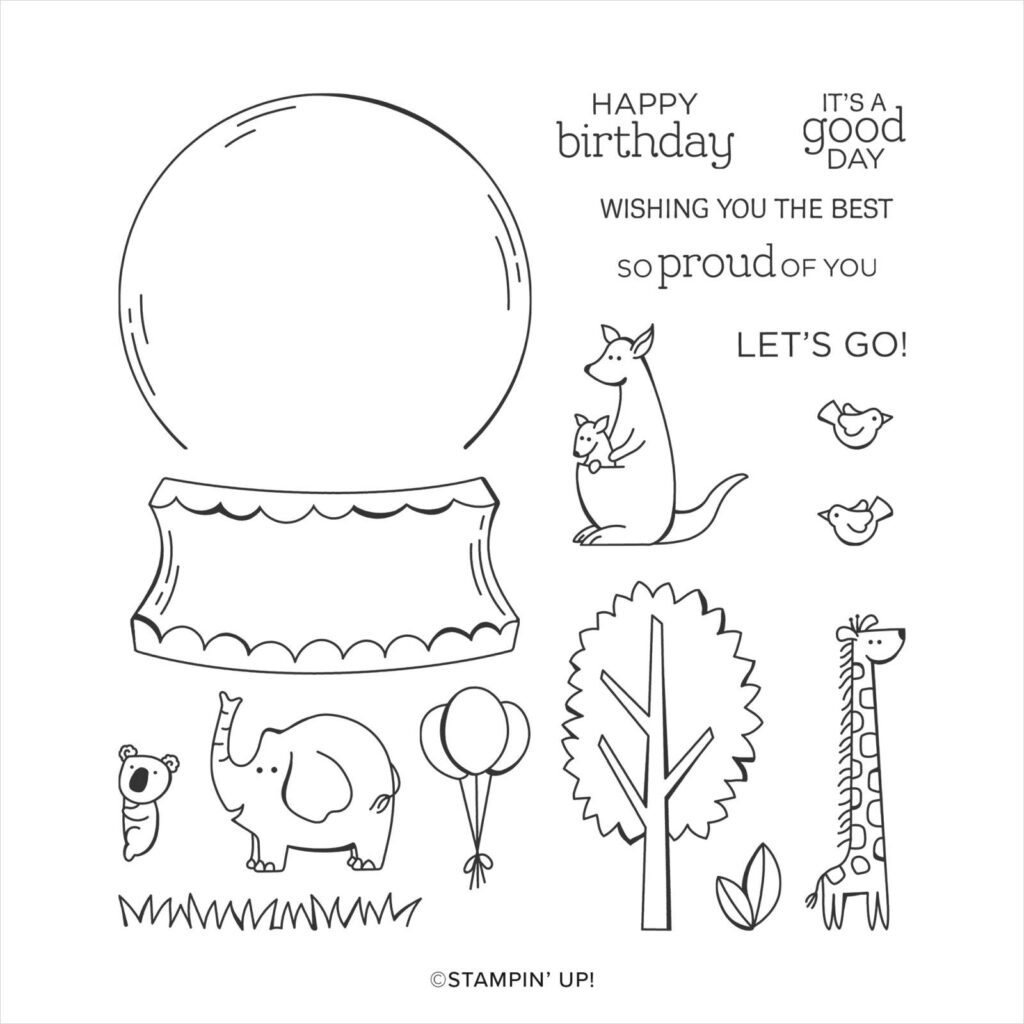
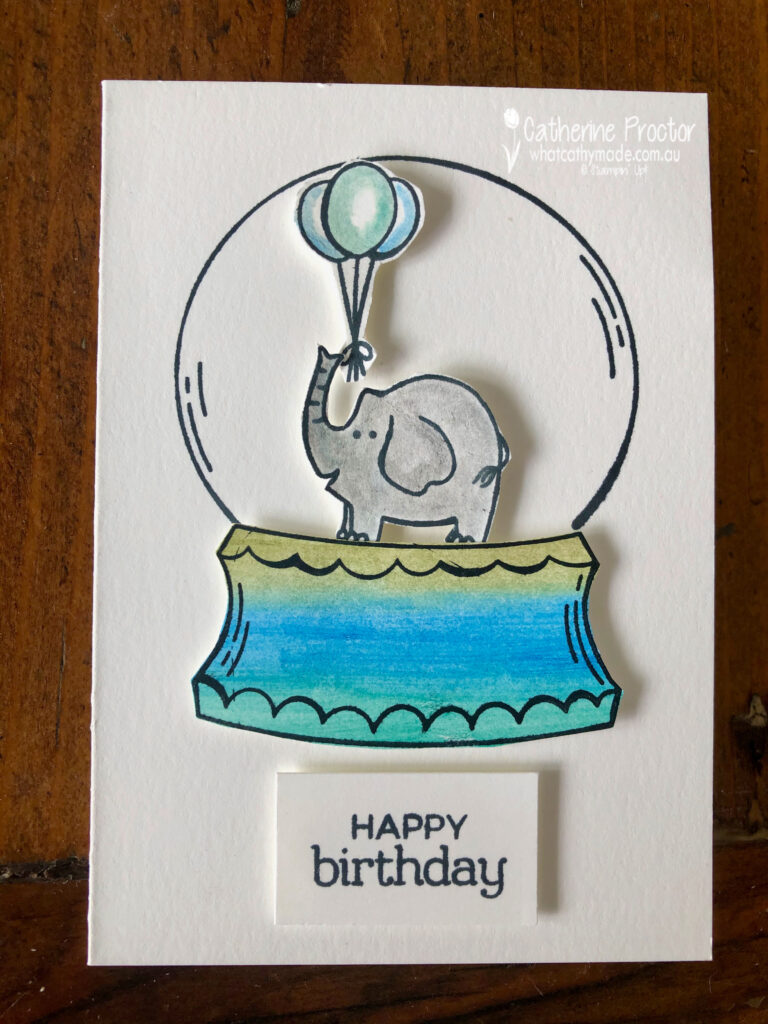
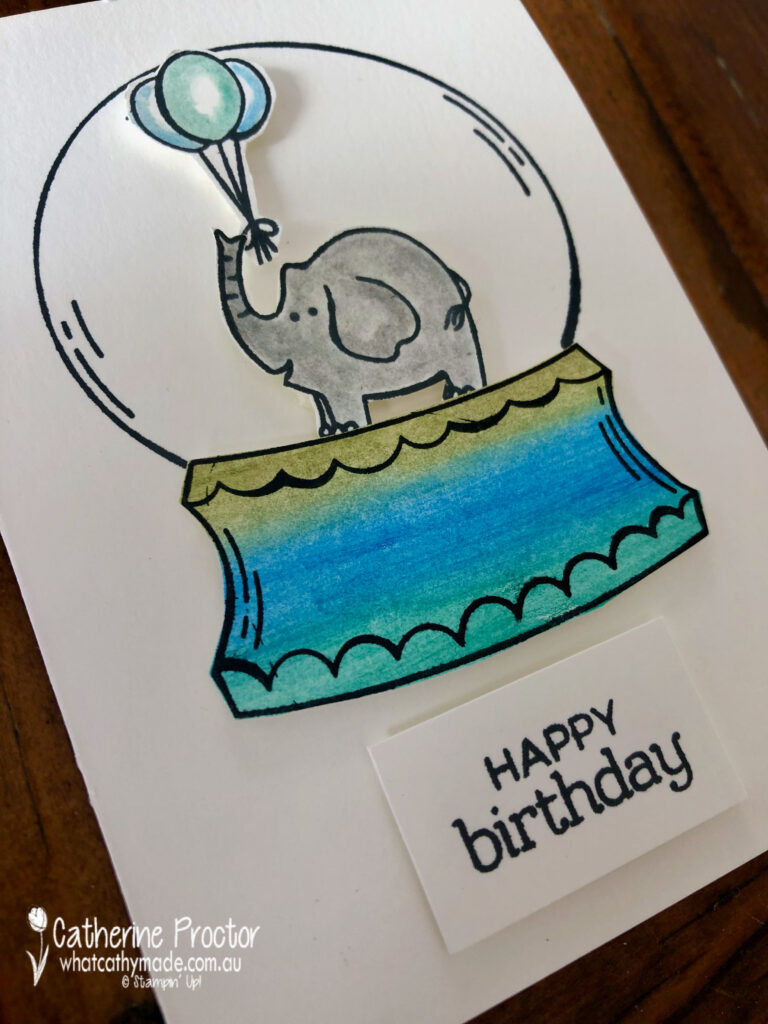
Zoo Globe Stamp Set – this set is perfect for colouring and has both sentiments and images
Watercolour Pencils – an affordable and easy way to get a wide range of Stampin’ up! colours
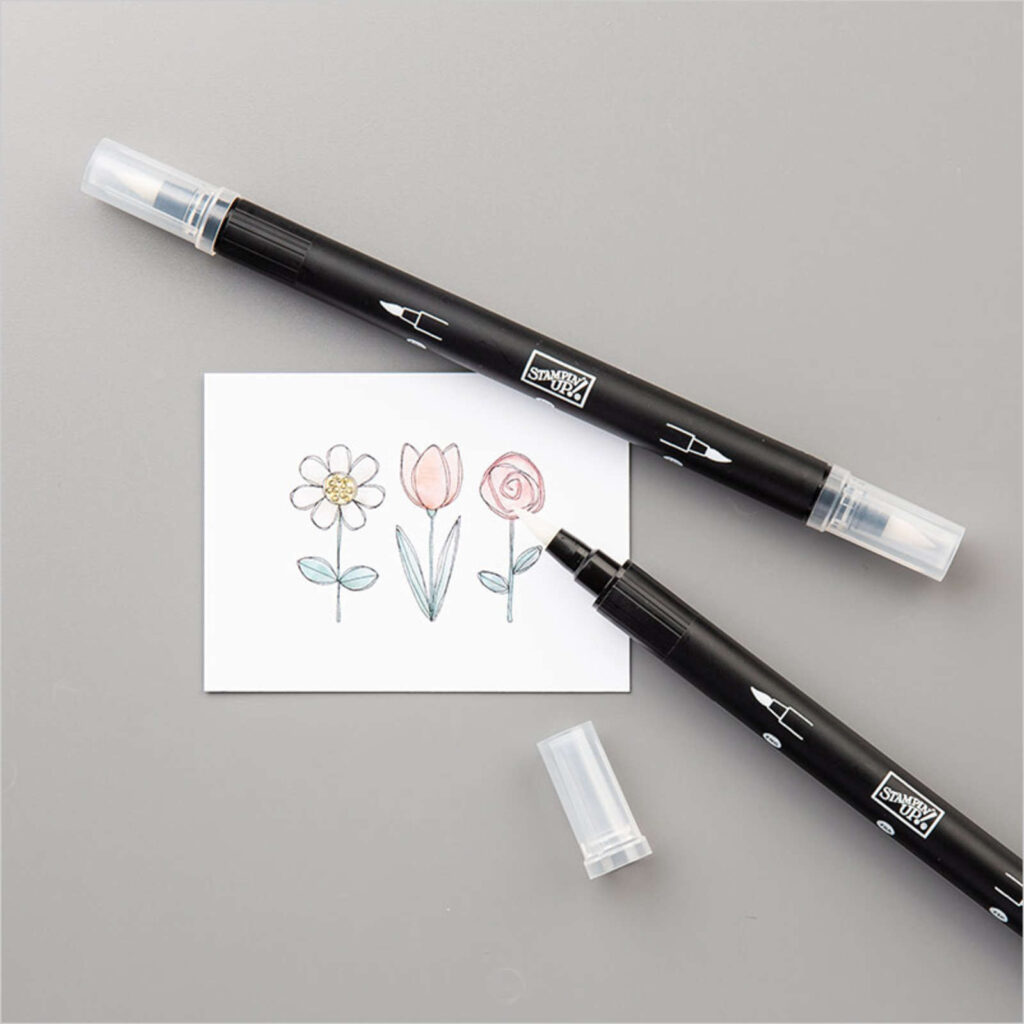
Blender Pen – brings watercolours to life and not as wet or messy on the card stock as water painters
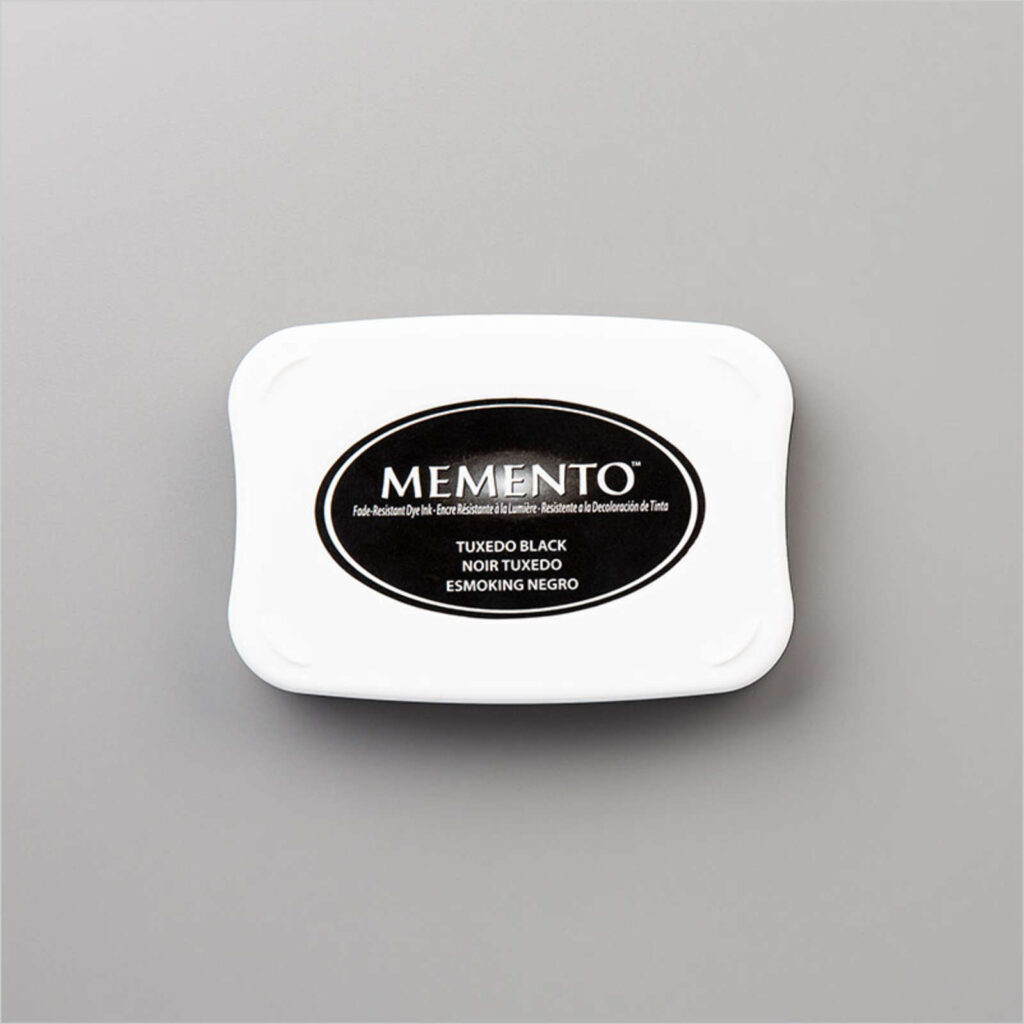
Memento Stamp Pad – versatile black stamp pad for images and sentiments
Whisper White card Stock – an essential and versatile basic for both making the card base and stamping the card layer
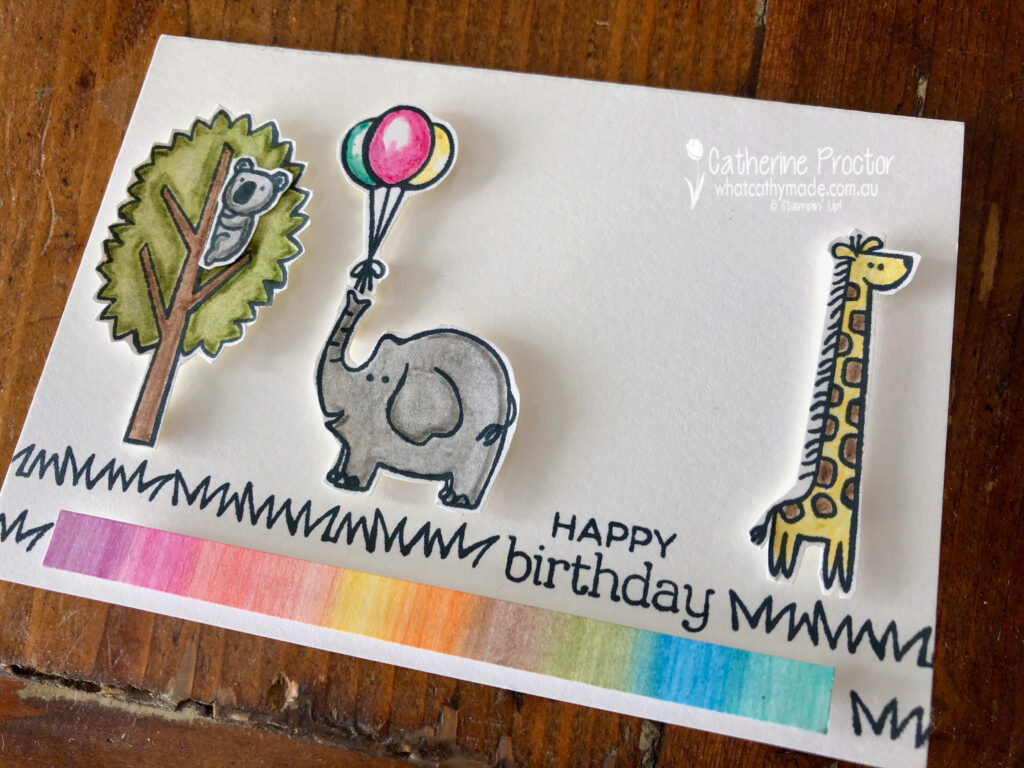
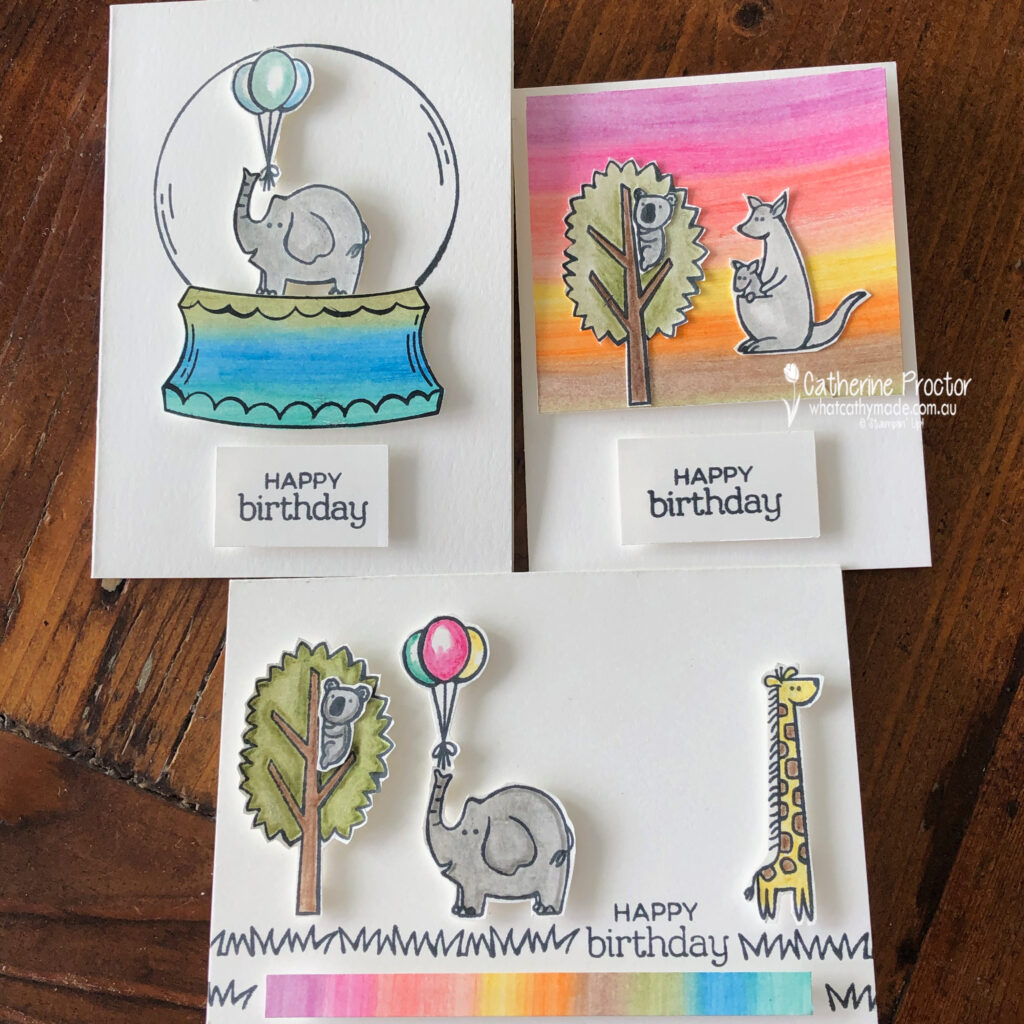
I had so much fun playing with the zoo globe stamp set I ended up making three cards to share with you several different techniques you can try even if you only have limited supplies.
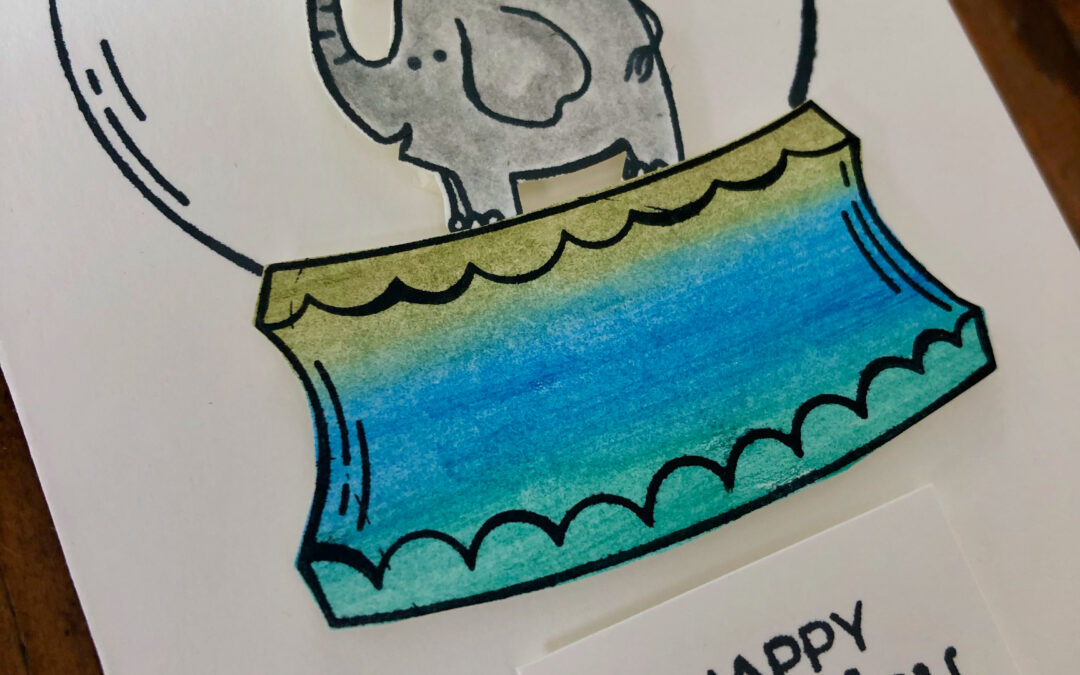
TECHNIQUES 1 AND 2: CREATING YOUR OWN DSP AND BLENDING WATERCOLOUR PENCILS WITH BLENDER PENS
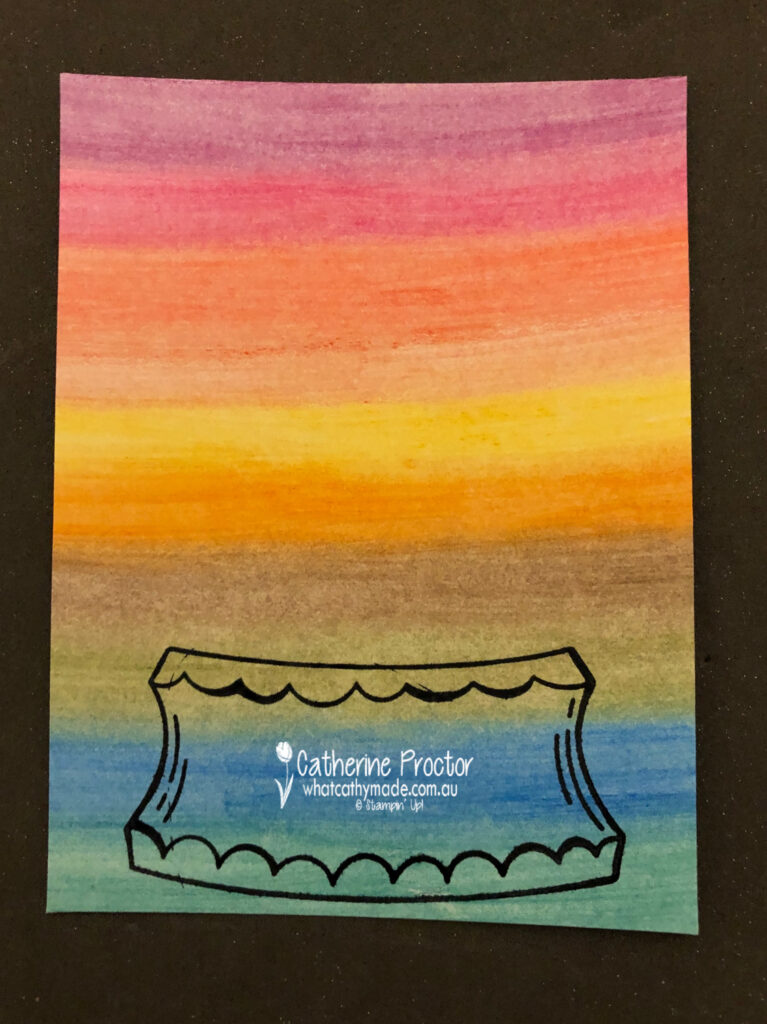
All three of my cards today begin with a piece of home made rainbow DSP. I created my rainbow DSP by simply using my watercolour pencils to scribble on my card stock in rainbow order. I could have also created a homemade patterned DSP by stamped images onto the card stock and either coloured them in or left it as black and white but this was much faster.
To blend the colours together I simply coloured over the top of my pencil marks with my blender pen – it’s amazing to watch the pencil lines smooth out with the blender pen. Once I’d finished I rubbed the nip of my blender pen onto some scrap paper until it ran clear. It doesn’t matter if your nib is stained – it’s now ready to use again with any colour.
The photo below shows my homemade DSP with the globe base stamp already stamped onto it, which leads to my next techniques….
TECHNIQUES 3 AND 4 : PAPER PIECING AND FUSSY CUTTING
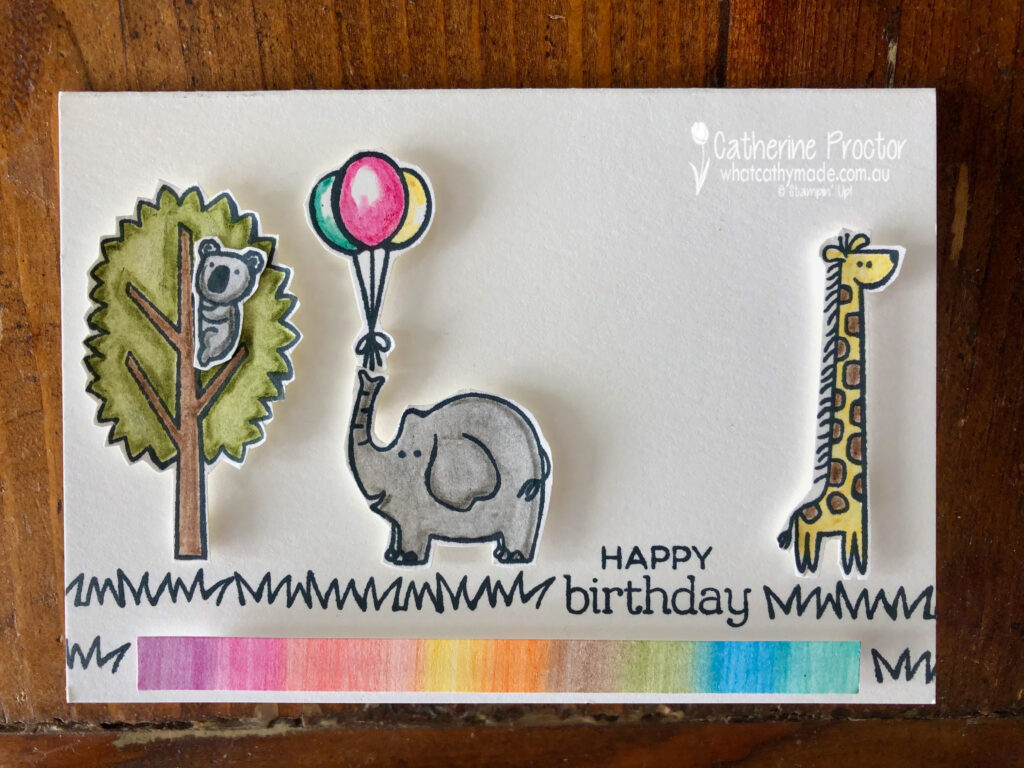
Once you’ve created your own DSP you can use it in a variety of ways. For card one I’ve stamped the base of the globe onto it before fussy cutting this piece out with my paper snips.
The dome of the globe was stamped directly onto my card base but the balloons, elephant and base of the globe were all coloured in with watercolour pencils and then blended with the blender pen before being fussy cut out and adhered to the card using Stampin’ Dimensionals.
Leaving a white space in the middle of the balloons gives them a real dimension.
The “happy birthday” sentiment was stamped onto scrap piece of Whisper White card stock before being trimmed to size with the paper trimmer and adhered using Stampin’ Dimensionals.
TECHNIQUES 5 AND 6: CREATING A BORDER WITH STAMPS AND THE BLENDER PEN DIRECT TO PENCIL COLOURING TECHNIQUE
For my second card I used a rainbow strip of my homemade DSP and the grass stamp to create a double border for the base of my card.
This time, when colouring my animals I first applied the nib of my marker to the tip of the pencil, lifting the colour off the pencil with my blender pen and then colouring the images with my blender pen.
You can also use your blender pen in this way to lift ink from the lid of your ink pad or ink from an acrylic block – it means your clear blender pen can be used to colour in any coloured pencil or ink that you have.
TECHNIQUE 7: USING HOMEMADE DSP AS BACKGROUND LAYER
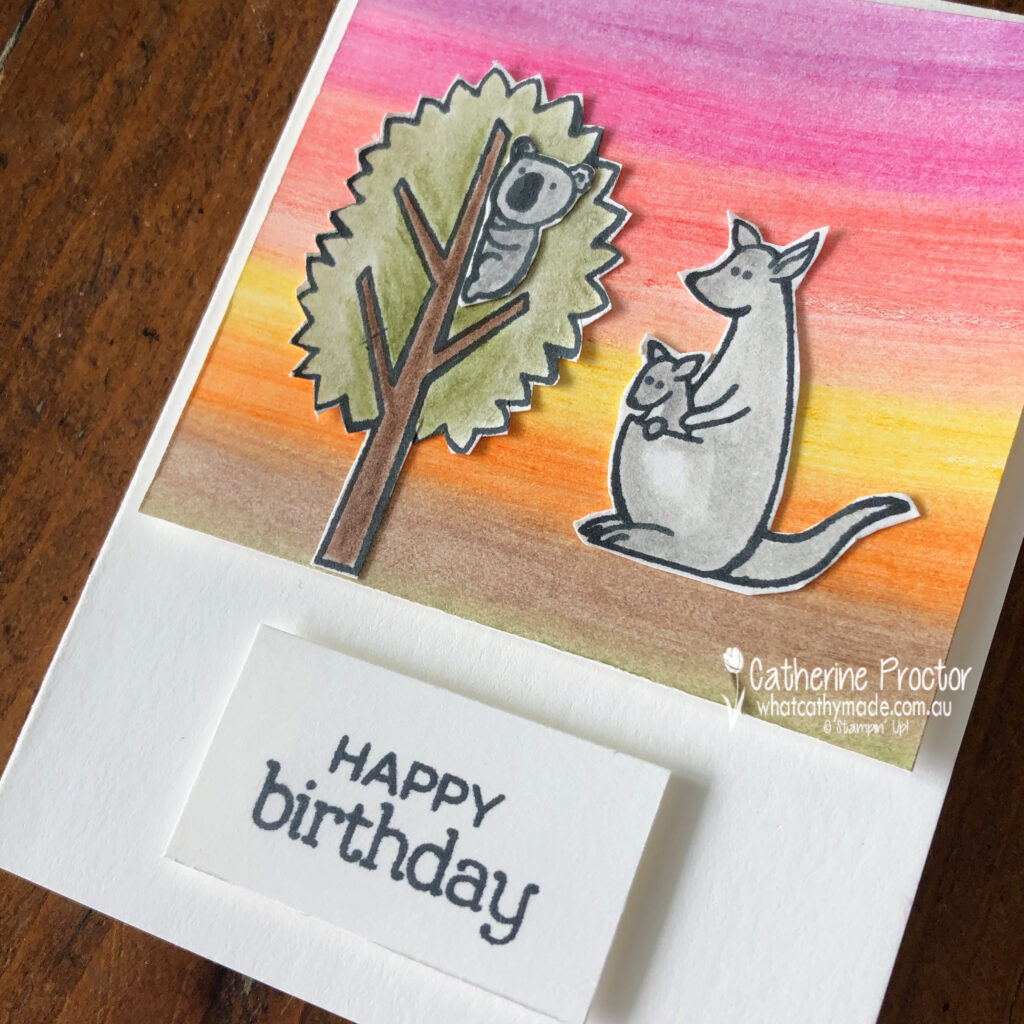
I hadn’t originally intended to make a third card but the colours on my remaining section of homemade DSP reminded me of the Australian outback…and I hadn’t used the adorable kangaroo and joey stamp yet!
This time I glued both of the stamped, water coloured and fussy cut images directly onto my home made DSP and added dimension behind the DSP by using Stampin’ Dimensionals to adhere it to the card base.
So what do you think of my 5 ingredient cards?
Simple cards made with few supplies can be really effective…especially if you have a few techniques and tricks up your sleeve that enable you to maximise whatever supplies you have on hand.
To see more Designer Series Paper inspiration from the AWH Team head back to Rachel‘s page as she is hosting our monthly blog hops.
To purchase any of the products I’ve used in my cards tonight simply click on the phots of the products below.
If you’d like me to post you your very own copy of the forthcoming January-June 2021 Mini Catalogue, the August – December 2020 Mini Catalogue, the 2020-21 Stampin Up! Annual Catalogue, the 2020-21 Beginners Brochure, or to simply find out about more about Stampin’ Up! contact me.
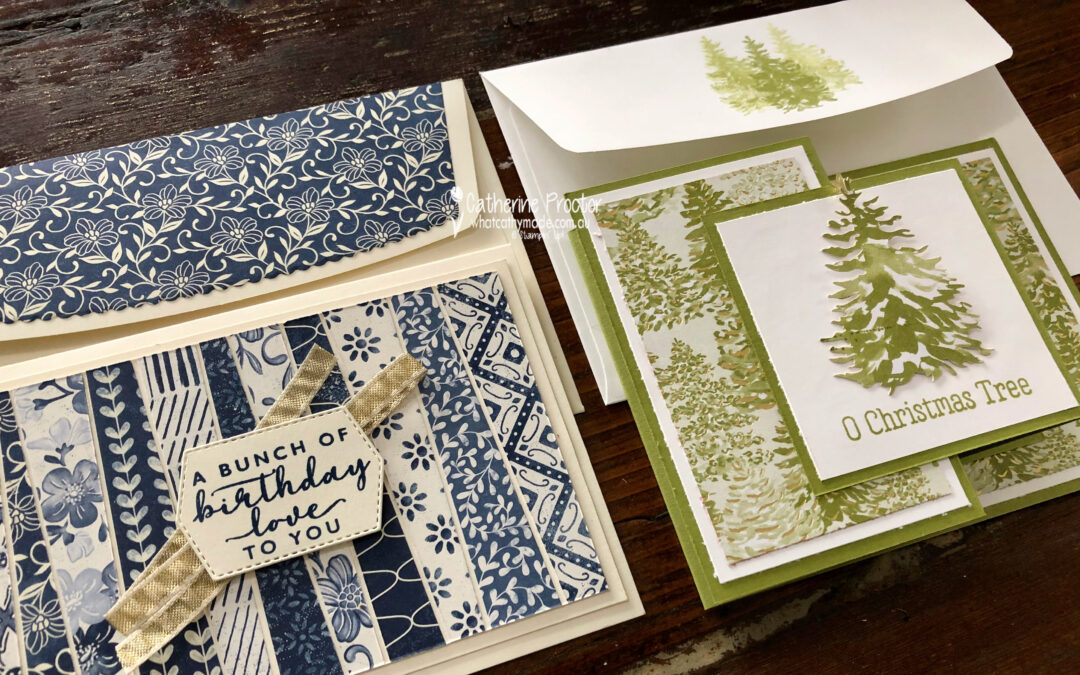
Welcome to the Monthly Art With Heart Creative Showcase. Tonight we’re sharing some ideas for using designer series paper because Stampin’ Up! have 15% off a select range of their stunning DSPs for the month of October. You can see the full list of papers on sale here.
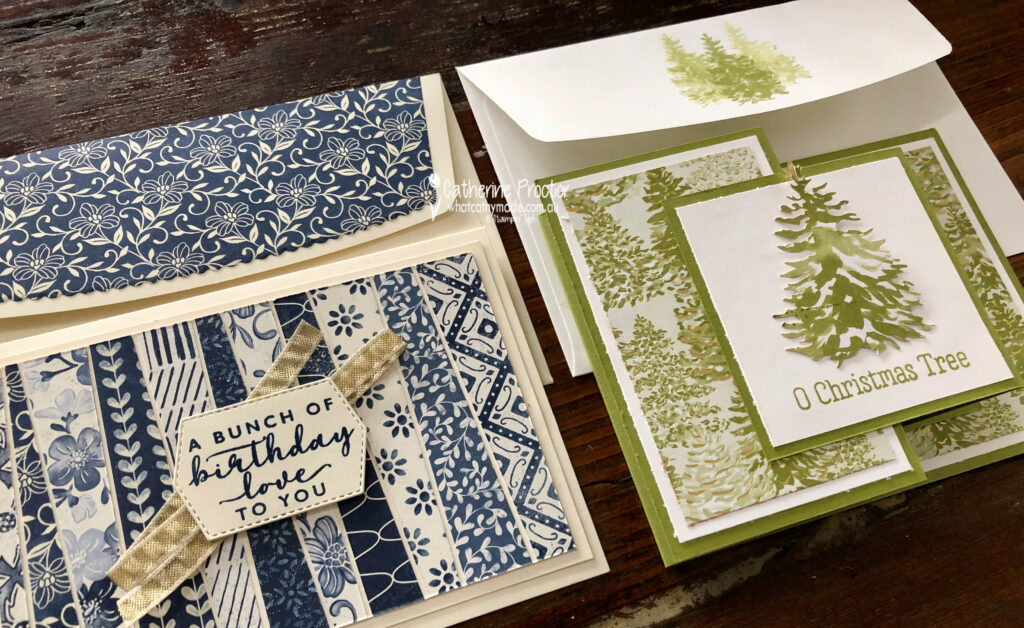
To celebrate World Card Making day last Saturday I held a class where I shared two card techniques that really showcase designer series papers: a double z-fold Christmas card and a “Scrappy Strip technique” birthday card.
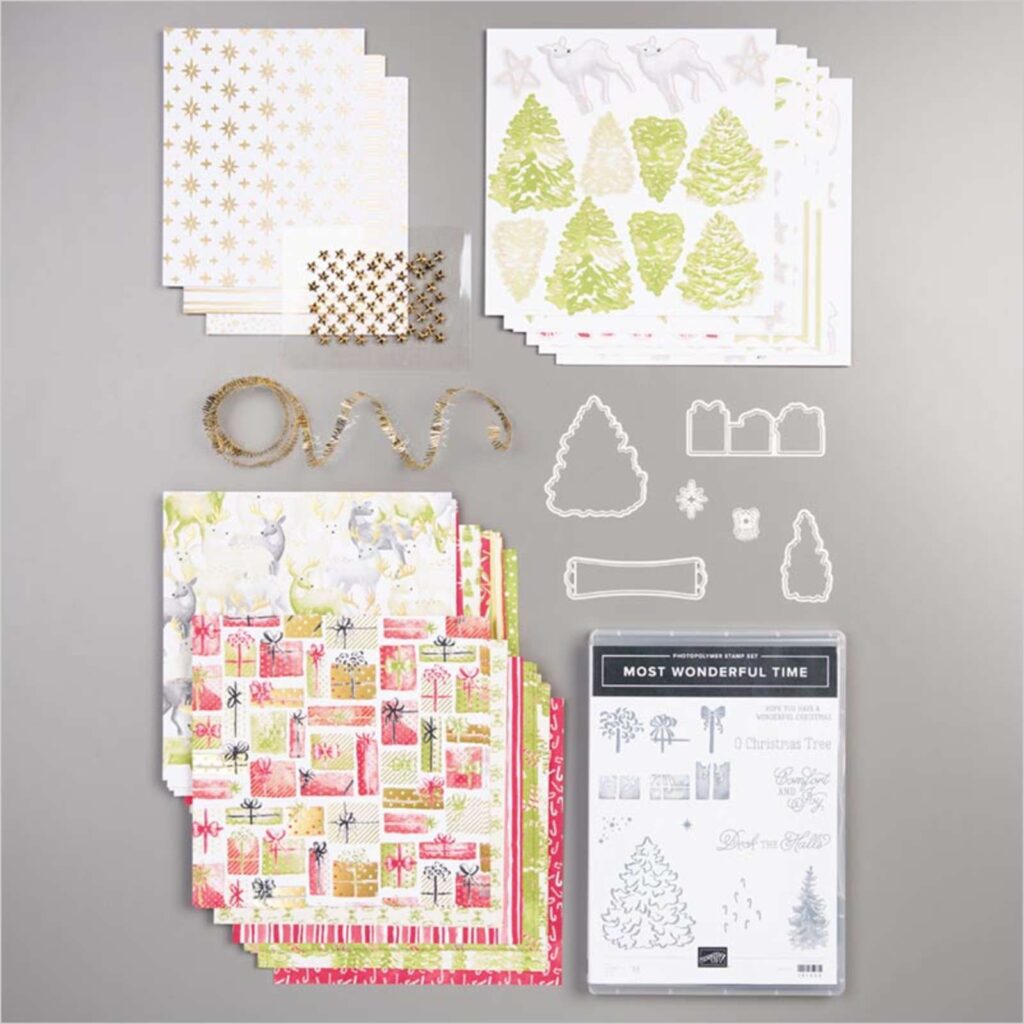
Both of these cards feature stunning designer series papers that can sometimes be overlooked because they are from Product Medleys, so they are not listed in the paper section of the Stampin’ up! website or the catalogues.
These designer series papers also come in refill packs, so you don’t have to purchase the entire product medley to get your hands on the DSP.
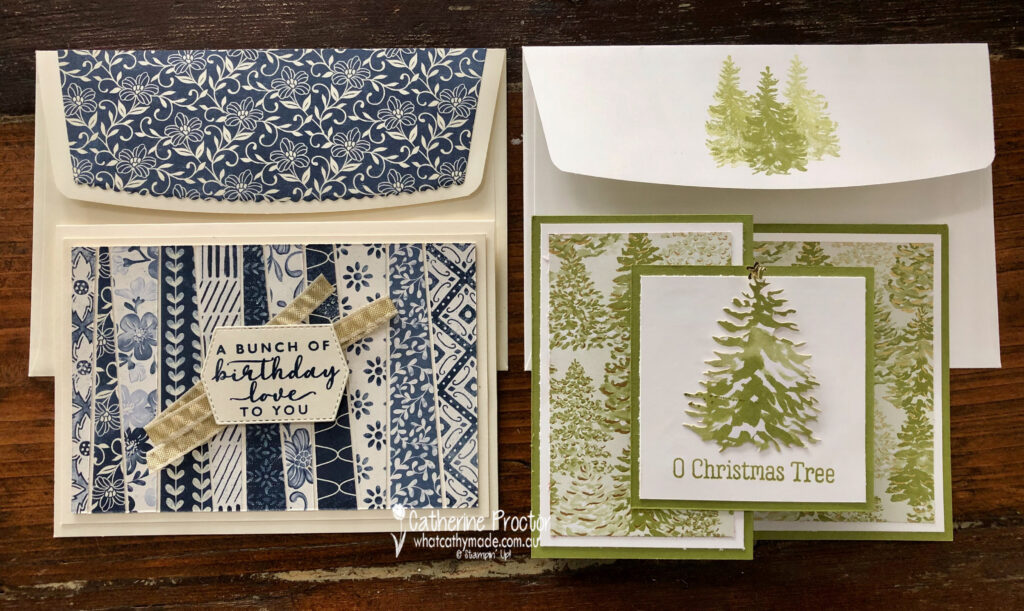
Most Wonderful Time
Boho Indigo
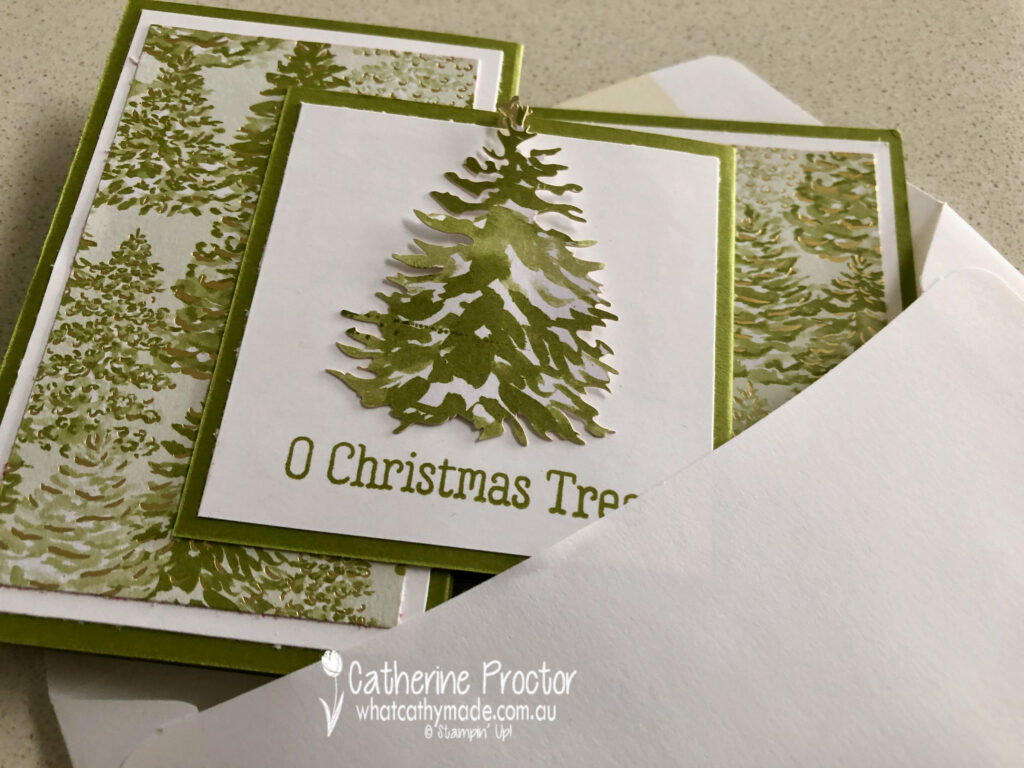
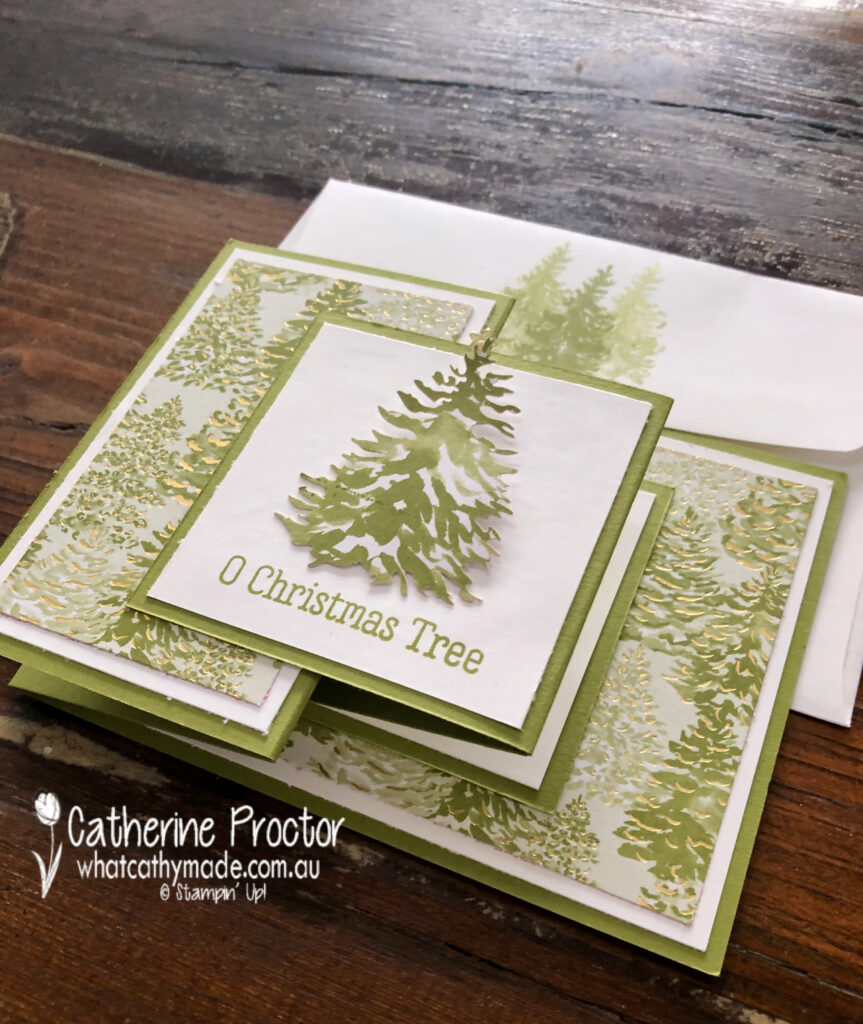
The double Z-fold card is a Christmas card and you could use any of the Christmas DSPs on sale to make this design too. For the front panel of the card you can use a sticker from the product medley or stamp a greeting or a different image – the possibilites are endless.
Here’s how it looks from the side.
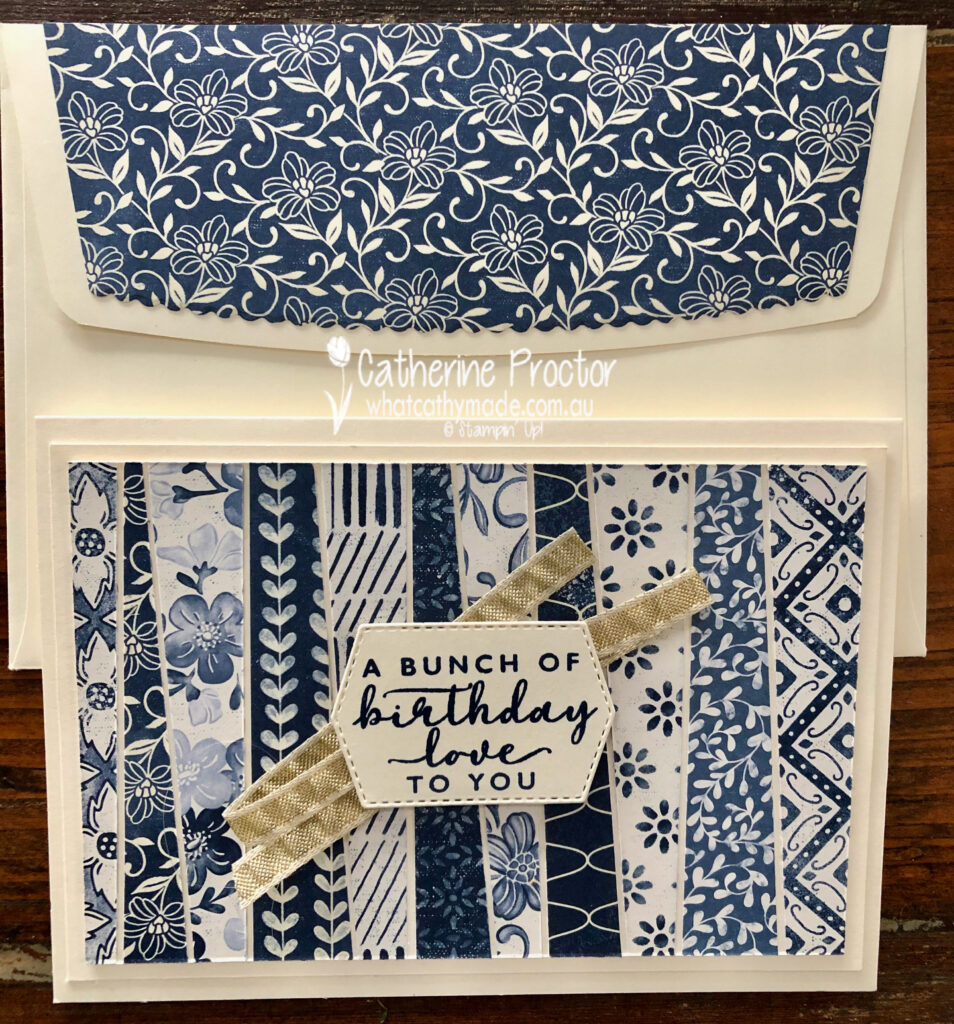
And here’s my matching envelope – I simply stamped off the Christmas Tree stamp on the back flap of a C6 envelope.
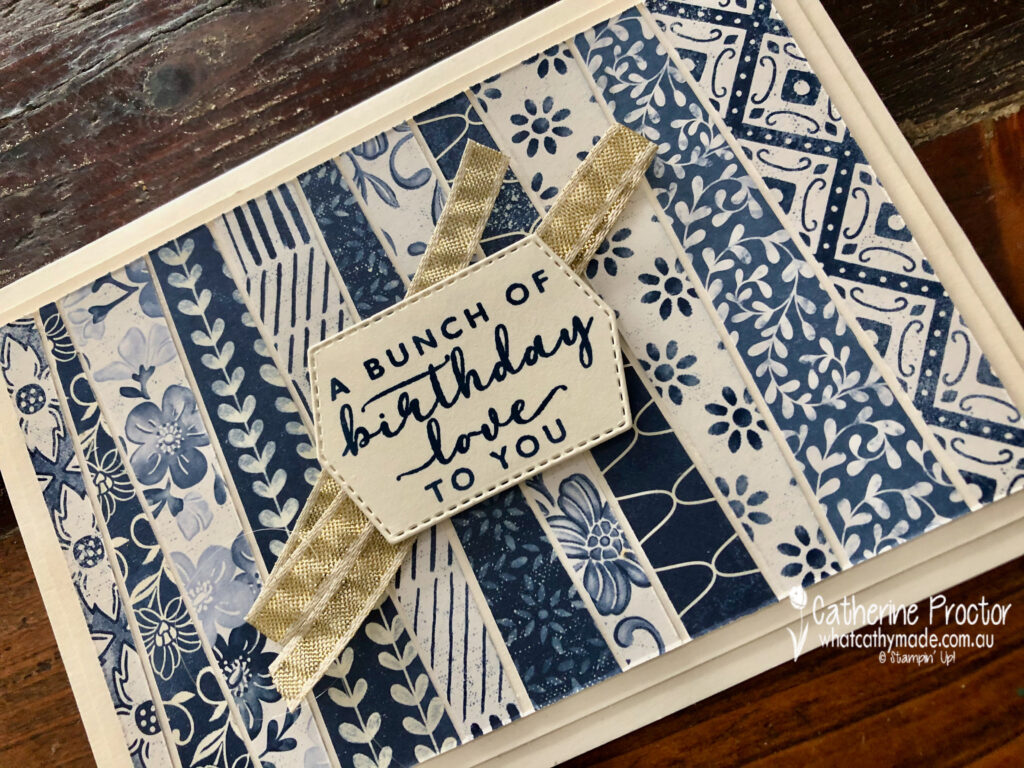
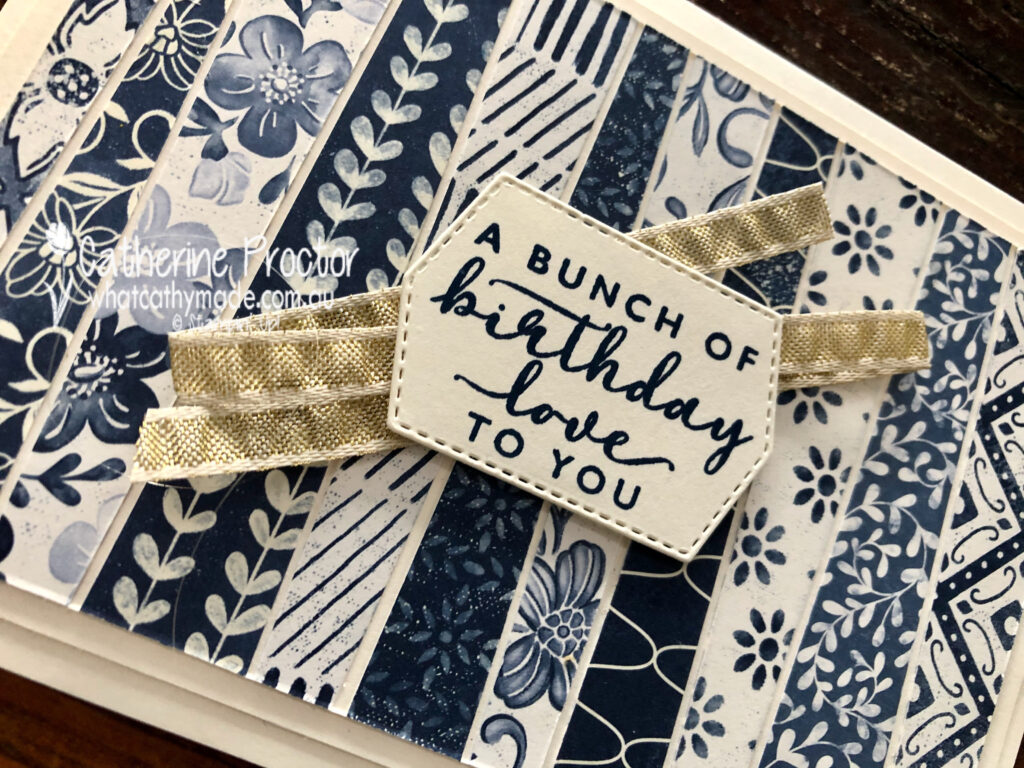
My scrappy strip technique birthday card uses the stunning blues and whites and creams of the Boho Indigo Product Medley.
To make a scrappy strip technique card you simply cut a piece of Very Vanilla A4 card stock in half and score and fold to make the card base. Cut the other piece of card stock in half and trim 1/4 inch (5cm) off the top and side – this is your middle layer. For the top layer, trim 1/2 inch (10cm) off the top and side.
Trim strips of DSP at an angle before lining them up (alternating dark and light) and lining them up with approximately the same gap between strips. Adhere the strips, turn over so the strips are under the top Very Vanilla layer and trim the strips back to the edges of the top layer.
Once you’ve adhered all your layers, add some ribbon behind your sentiment.
I used the Envelope dies to add DSP to the outer flap of a C6 envelope. The Envelope dies come in four different sizes (to match the four different envelope sizes Stampin’ Up! sells) and you can either use them inside as an envelope liner or outside as a feature flap as I’ve done below.
This scrappy strip technique is the perfect way to use up your scraps of DSP.
I’m going to make both these cards again, this time using some of the lovely DSP on sale this month.
To see more Designer Series Paper inspiration from the AWH Team head back to Rachel‘s page as she is hosting our monthly blog hops.
To purchase any of the products I’ve used in my cards tonight simply click on the phots of the products below.
If you’d like me to post you your very own copy of the August – December 2020 Mini Catalogue, the 2020-21 Stampin Up! Annual Catalogue, the 2020-21 Beginners Brochure, or to simply find out about more about Stampin’ Up! contact me.
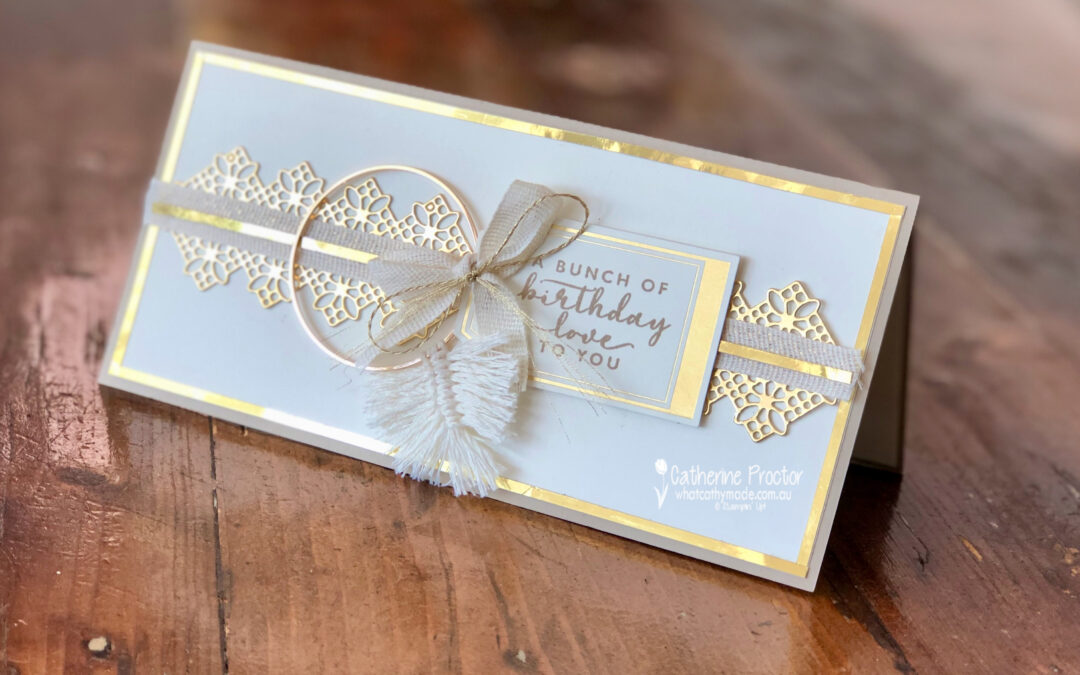
Have you ever made a macrame feather? Did you even know macrame feathers are a thing?
Last month I saw a beautiful handmade card with a macrame feather on social media and so I decided to design a birthday card featuring a macrame feather for my crafting partner in crime, Jenny Boffey, who loves to do macrame as much as she loves to make cards.
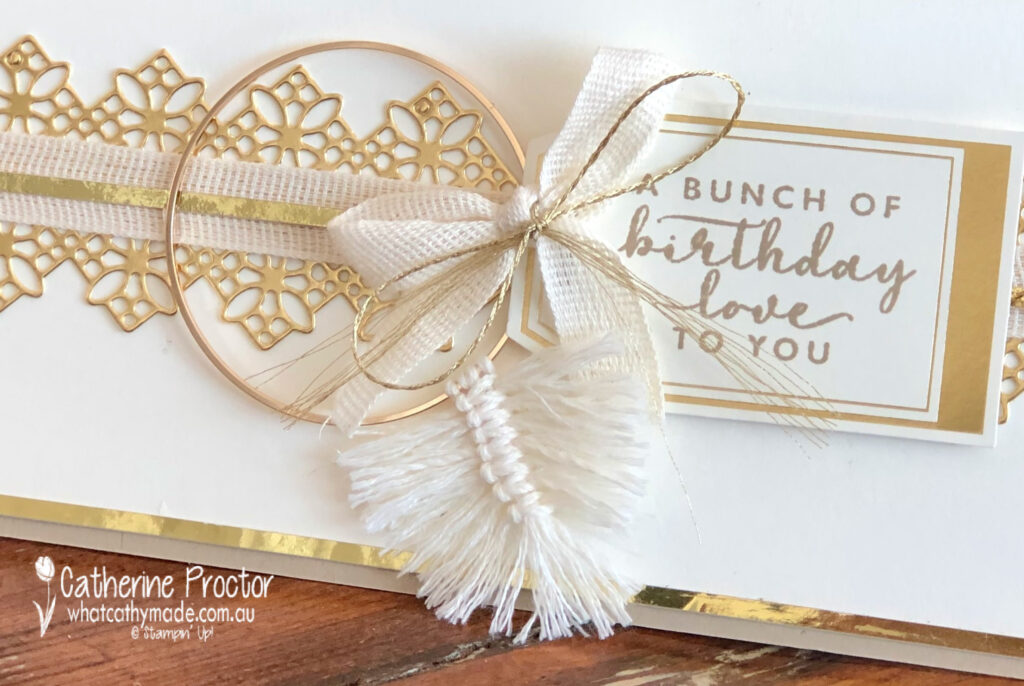
I don’t tend to use Very Vanilla as often as I prefer to use Whisper White, but Very Vanilla looks amazing with gold foil — and I wanted to use the tag from the Boho Indigo Product Medley to stamp my sentiment on.
The “A Bunch of Birthday Love to You” sentiment I stamped on my card is also from the Boho Indigo stamp set that comes in the Product Medley.
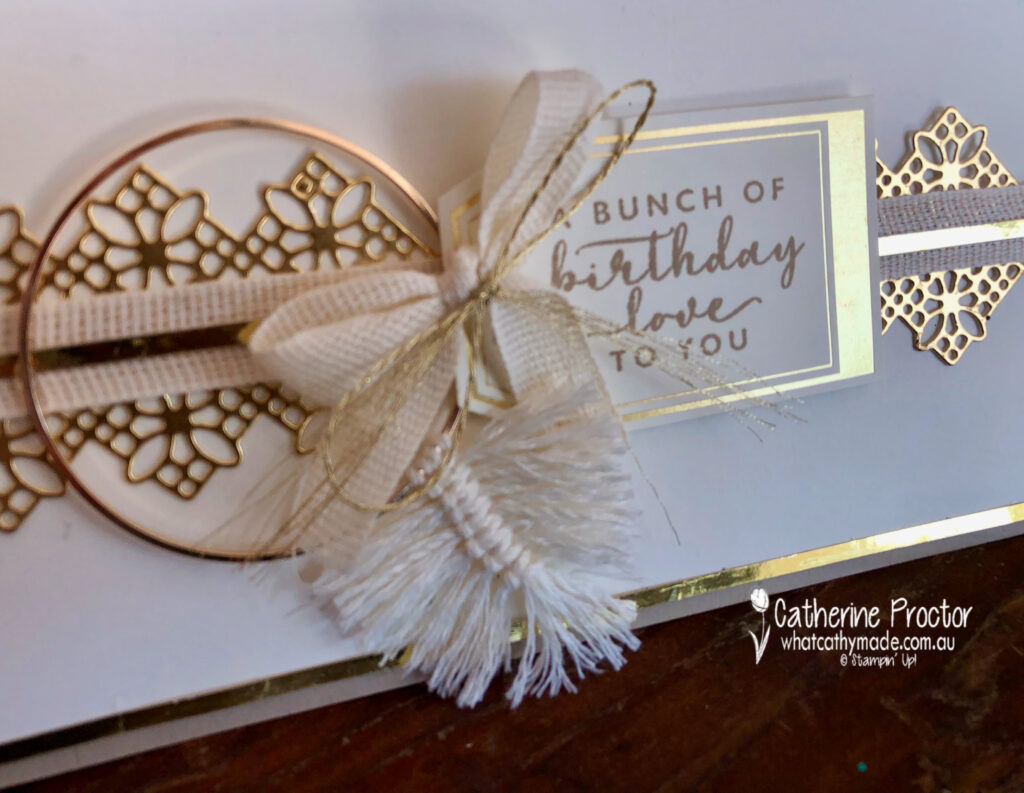
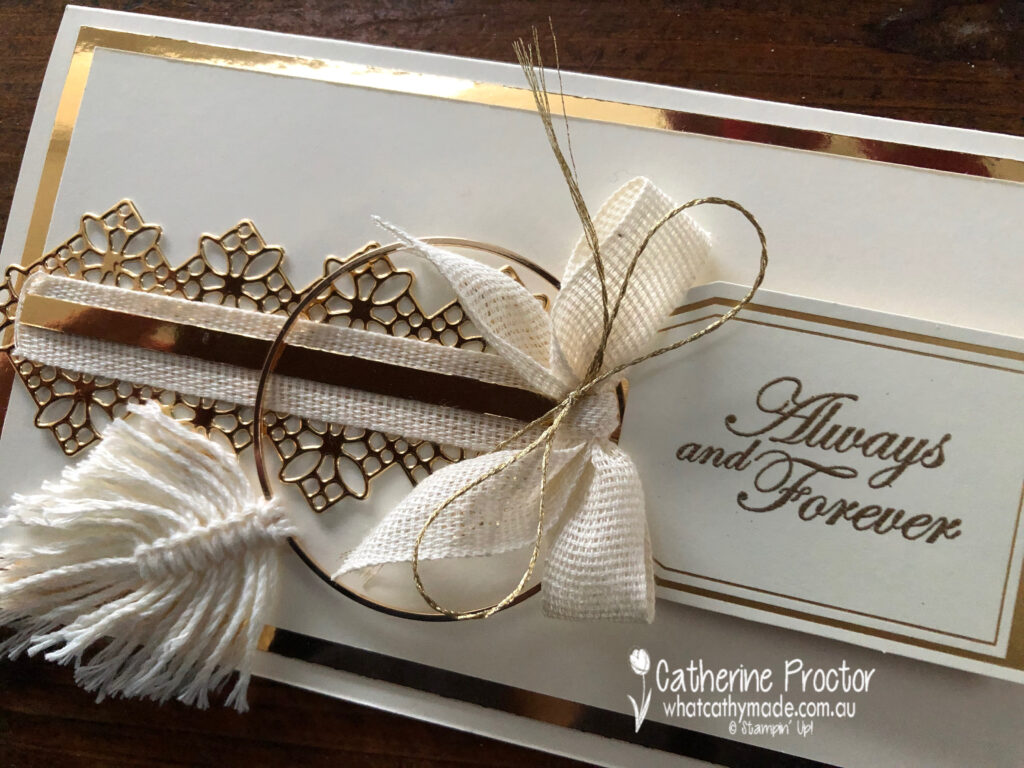
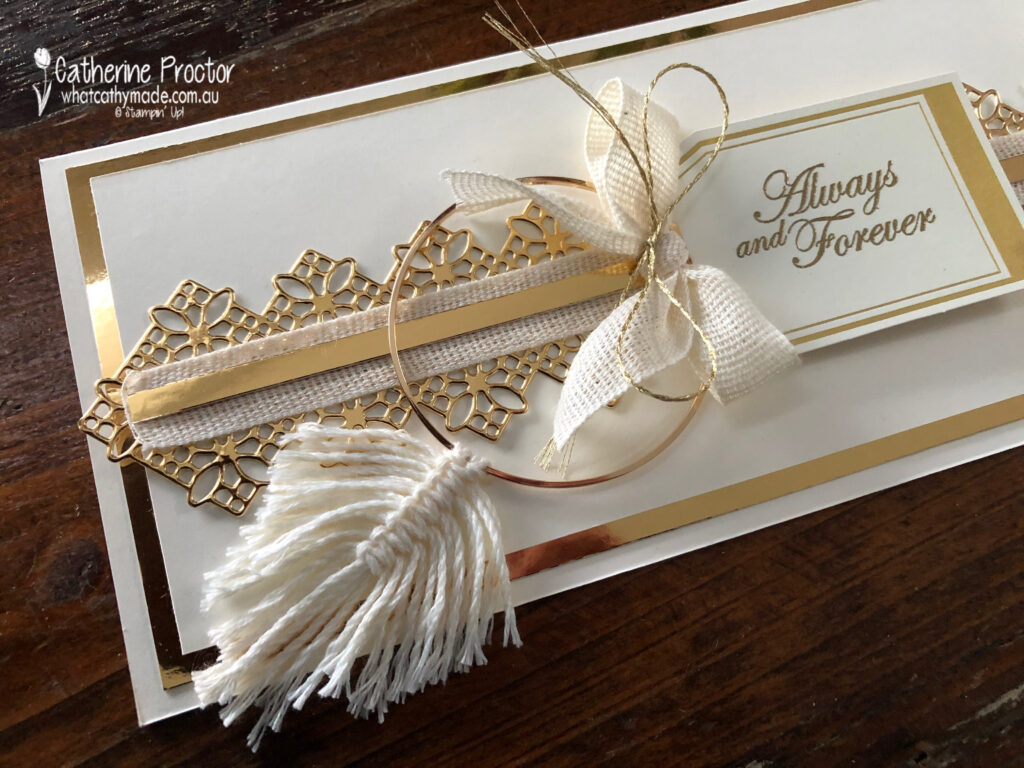
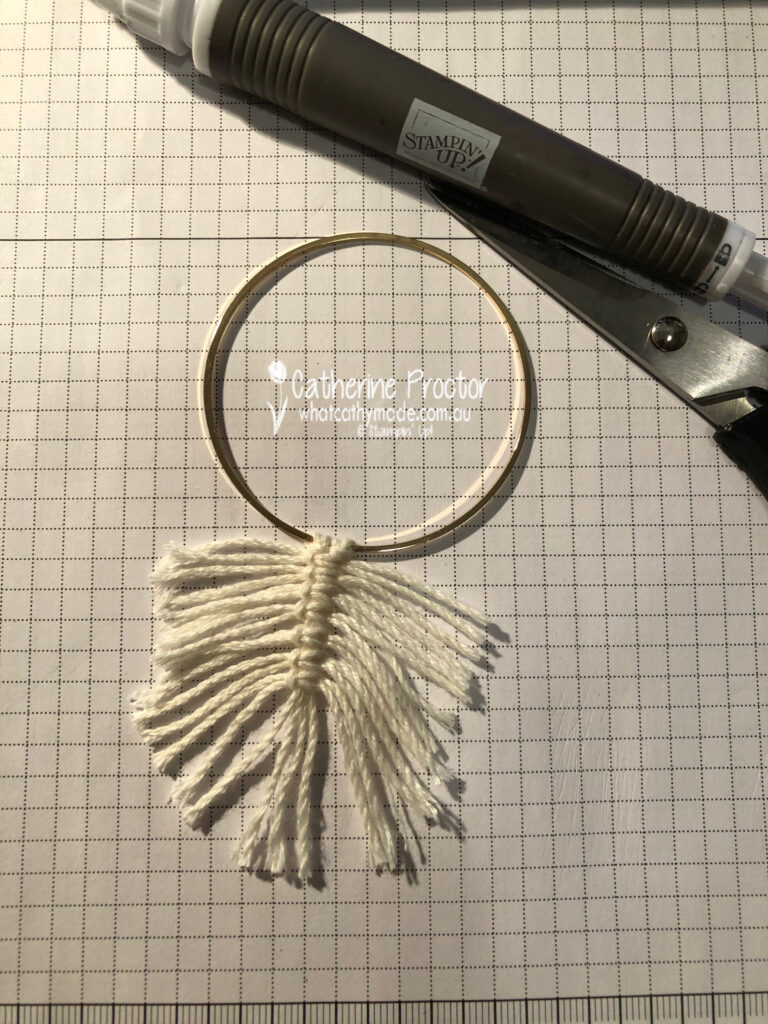
Here’s a close up of the macrame feather – it is knotted onto a Gold Hoop embellishment and made from some retired Very Vanilla bakers twine. The Forever Greenery trim combo pack co-ordinates perfectly and the largest die from the Fabulous Florals dies was used to die cut the gold foil background.
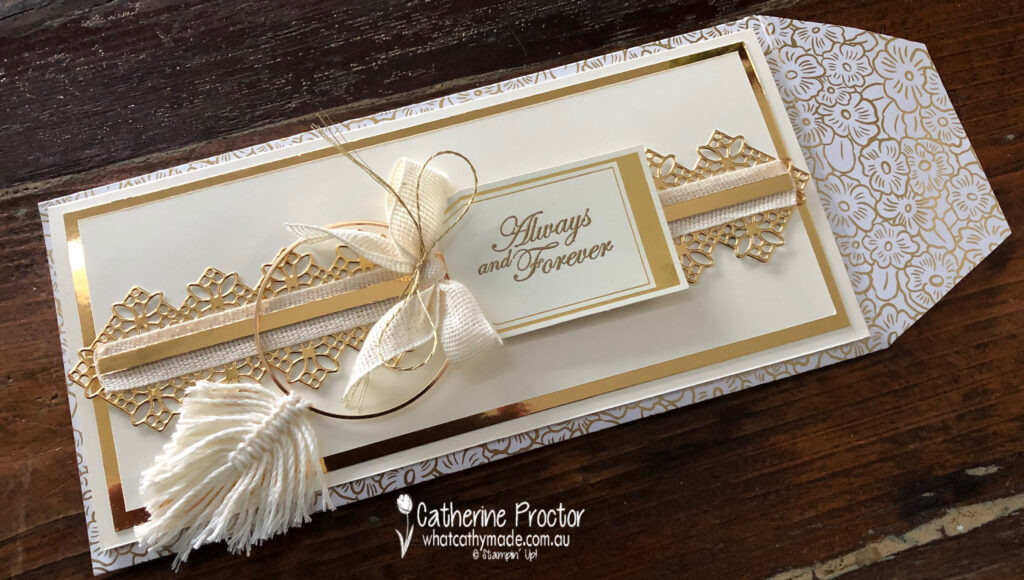
After I made this birthday card I was also been commissioned to make a couple of wedding cards featuring a macrame feather.
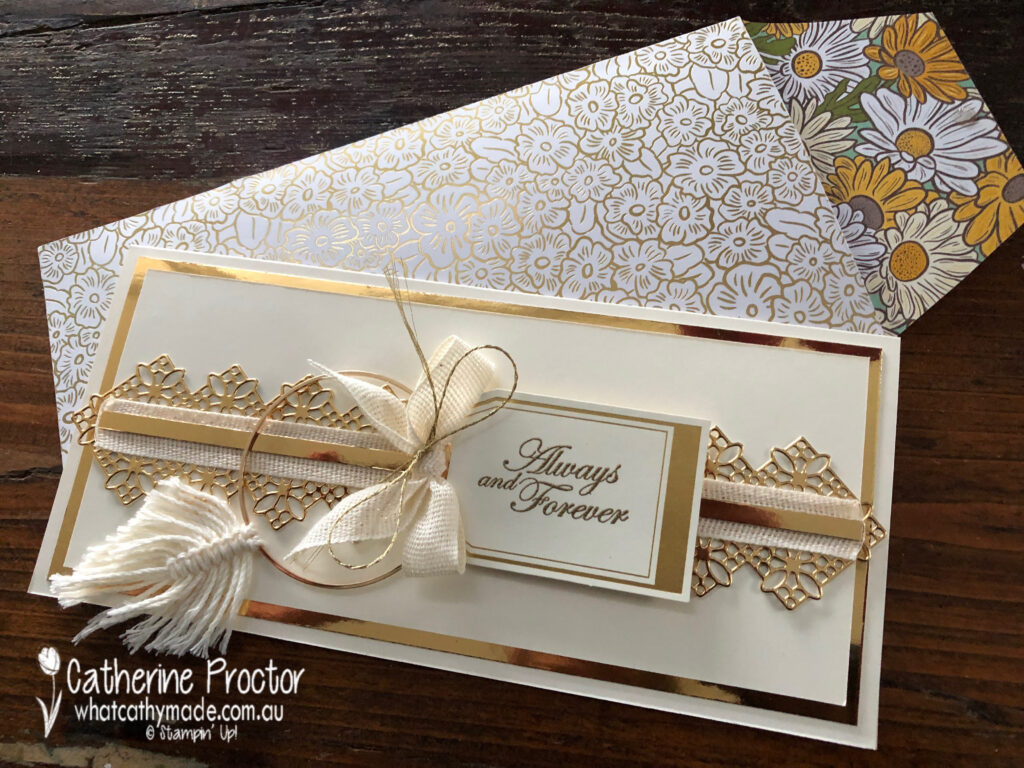
The basic design of the card is the same but I’ve used a different sentiment and swapped out the Crumb Cake card base for Very Vanilla.
For my wedding card design I’ve use the “always and forever” sentiment from the Forever Blossoms stamp set, stamped in Versamark ink before adding gold emboss powder and heat embossing it.
The feather is on a different angle on this card but made in exactly the same way as the macrame feather on the birthday card.
Did you notice the gold foiled envelope sitting under my card? I made it to match the gold and Very Vanilla colour theme using gold foiled DSP from the Ornate Garden DSP.
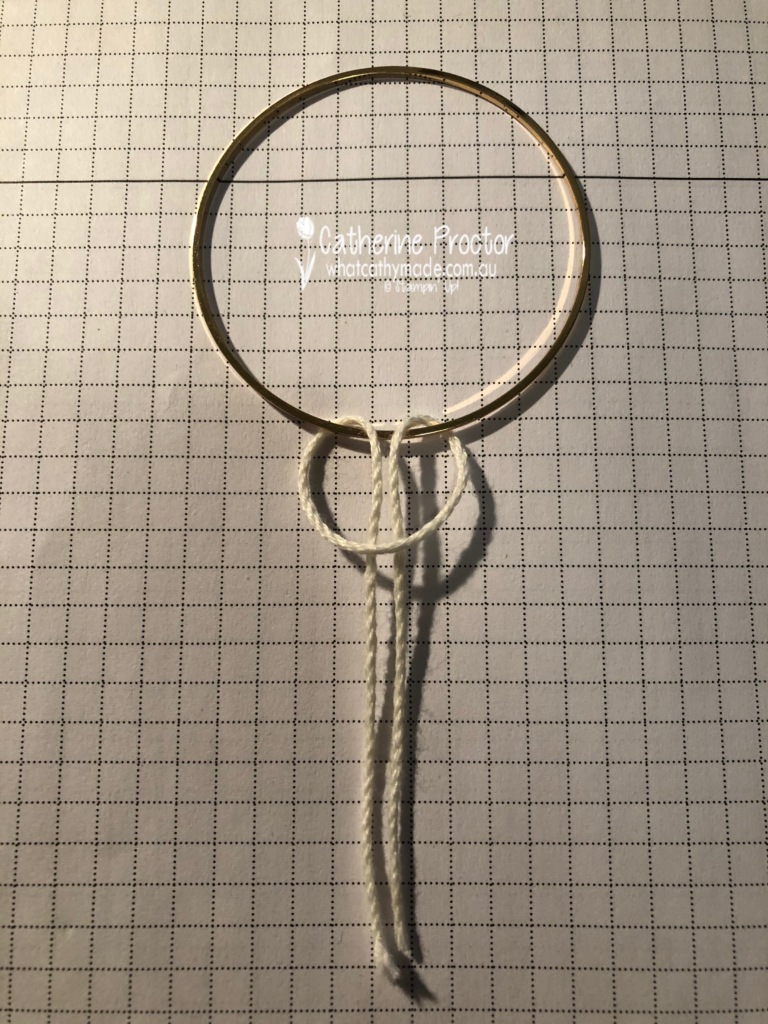
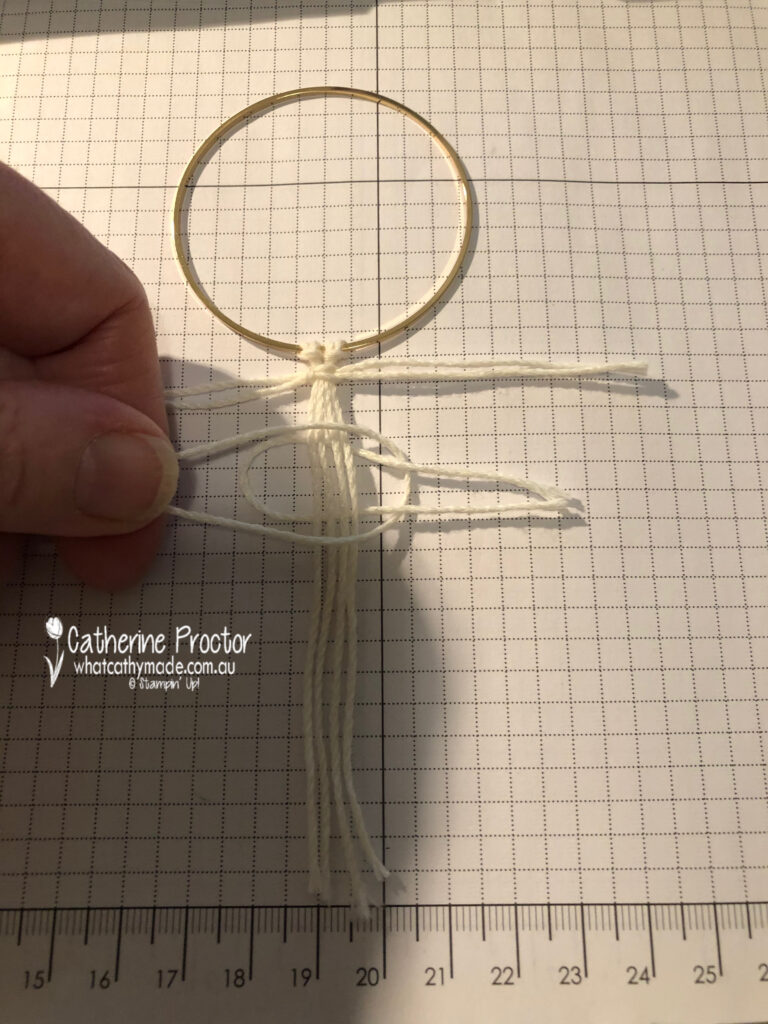
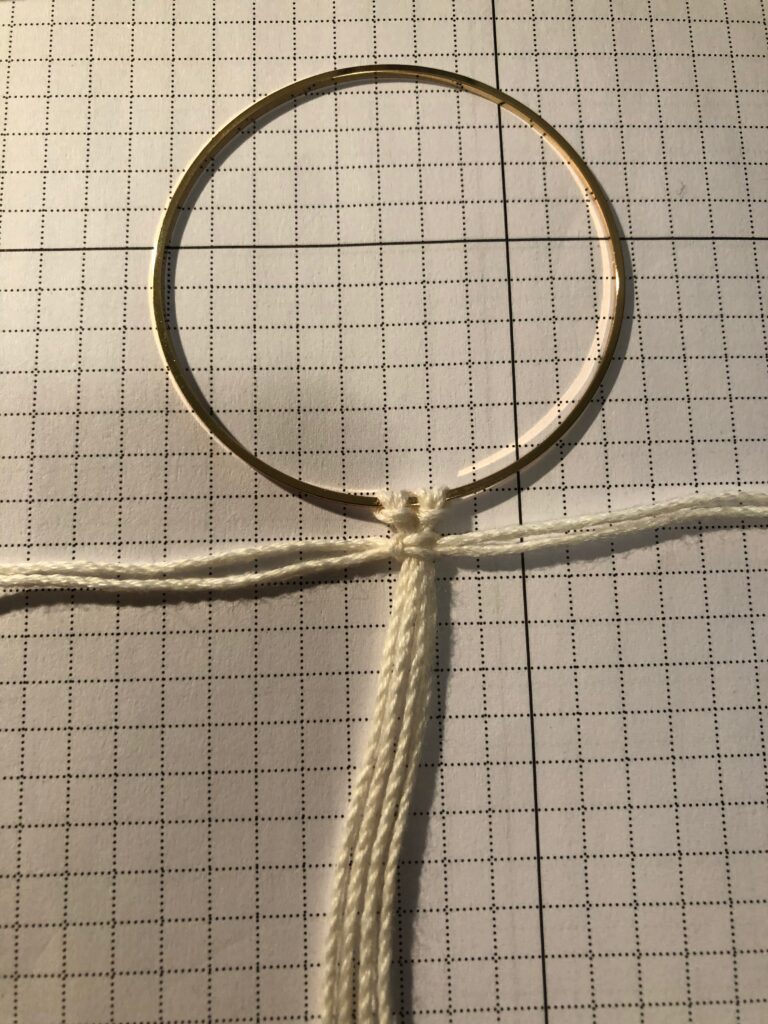
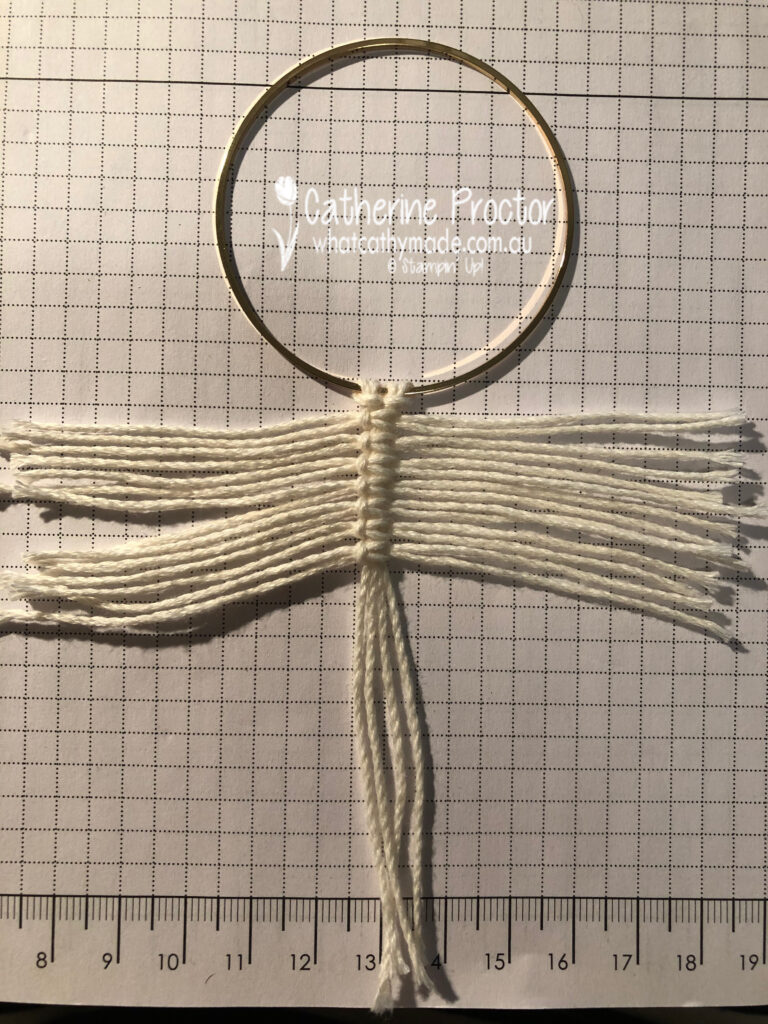
Want to make a macrame feather yourself?
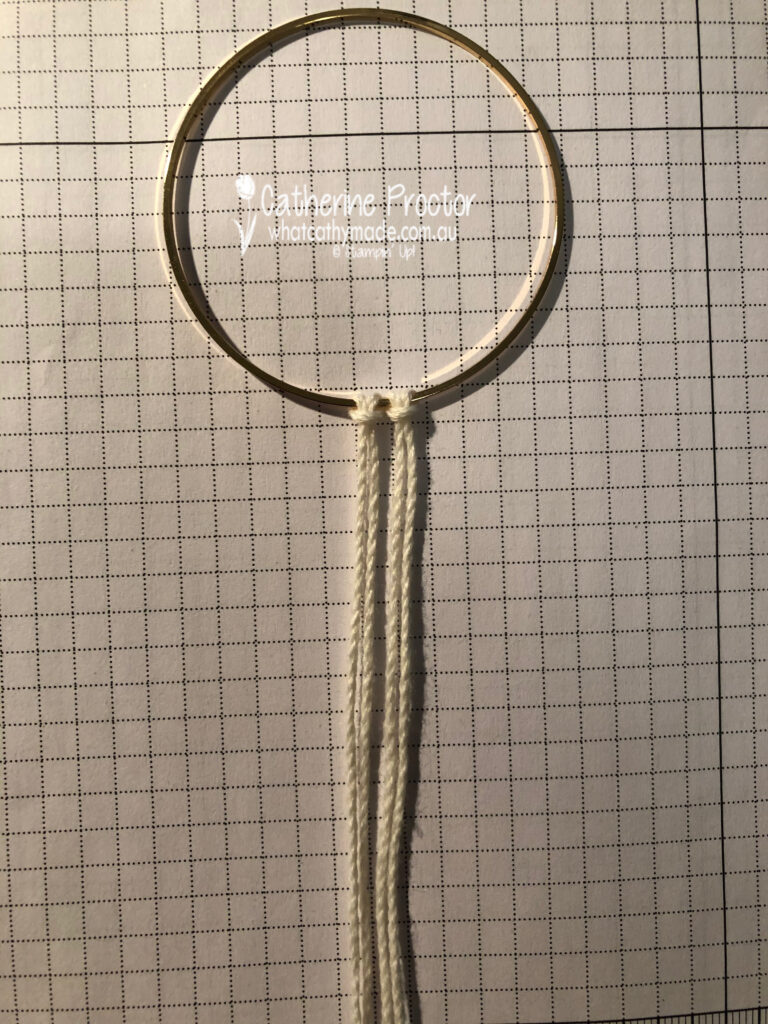
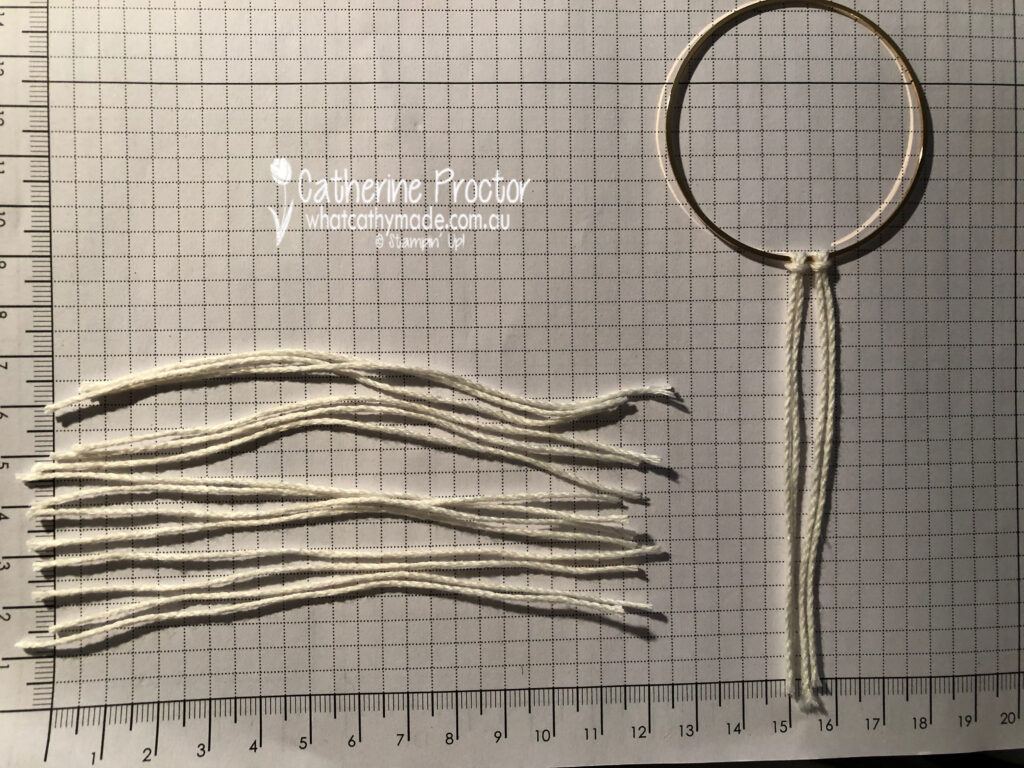
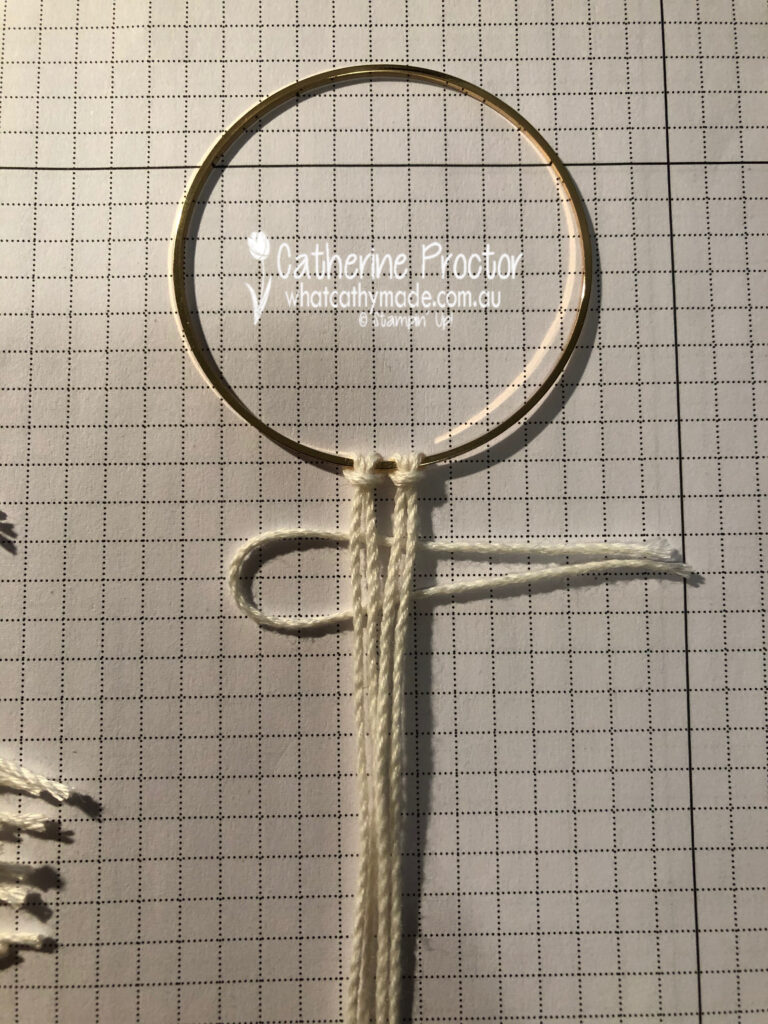
It’s easy to do, just a little bit fiddly working at this small scale. You’ll need a Gold Hoop embellishment, two 25 cm lengths of bakers twine and fourteen 12cm lengths of bakers twine. Then follow the steps below to make your feather.
Step 1
Step 2
Step 3
Step 4
Step 5
Step 6
Step 7
Step 8
To purchase any of the products featured in today’s post, simply click on the product links below.
If you’d like me to post you your very own copy of the the August – December 2020 Mini Catalogue, the 2020-21 Stampin Up! Annual Catalogue, the 2020-21 Beginners Brochure, or to simply find out about more about Stampin’ Up! contact me.
In the meantime, wherever you are in the world, stay safe, stay calm…and keep on crafting xxx
Welcome to the Monthly Art With Heart Creative Showcase. Tonight we’re sharing some ideas for masculine cards, something I know many of us can find challenging to make.
I recently made two masculine cards I’d like to share with you: the card I made for my dad’s birthday in July and the card I made last week for him for Father’s Day.
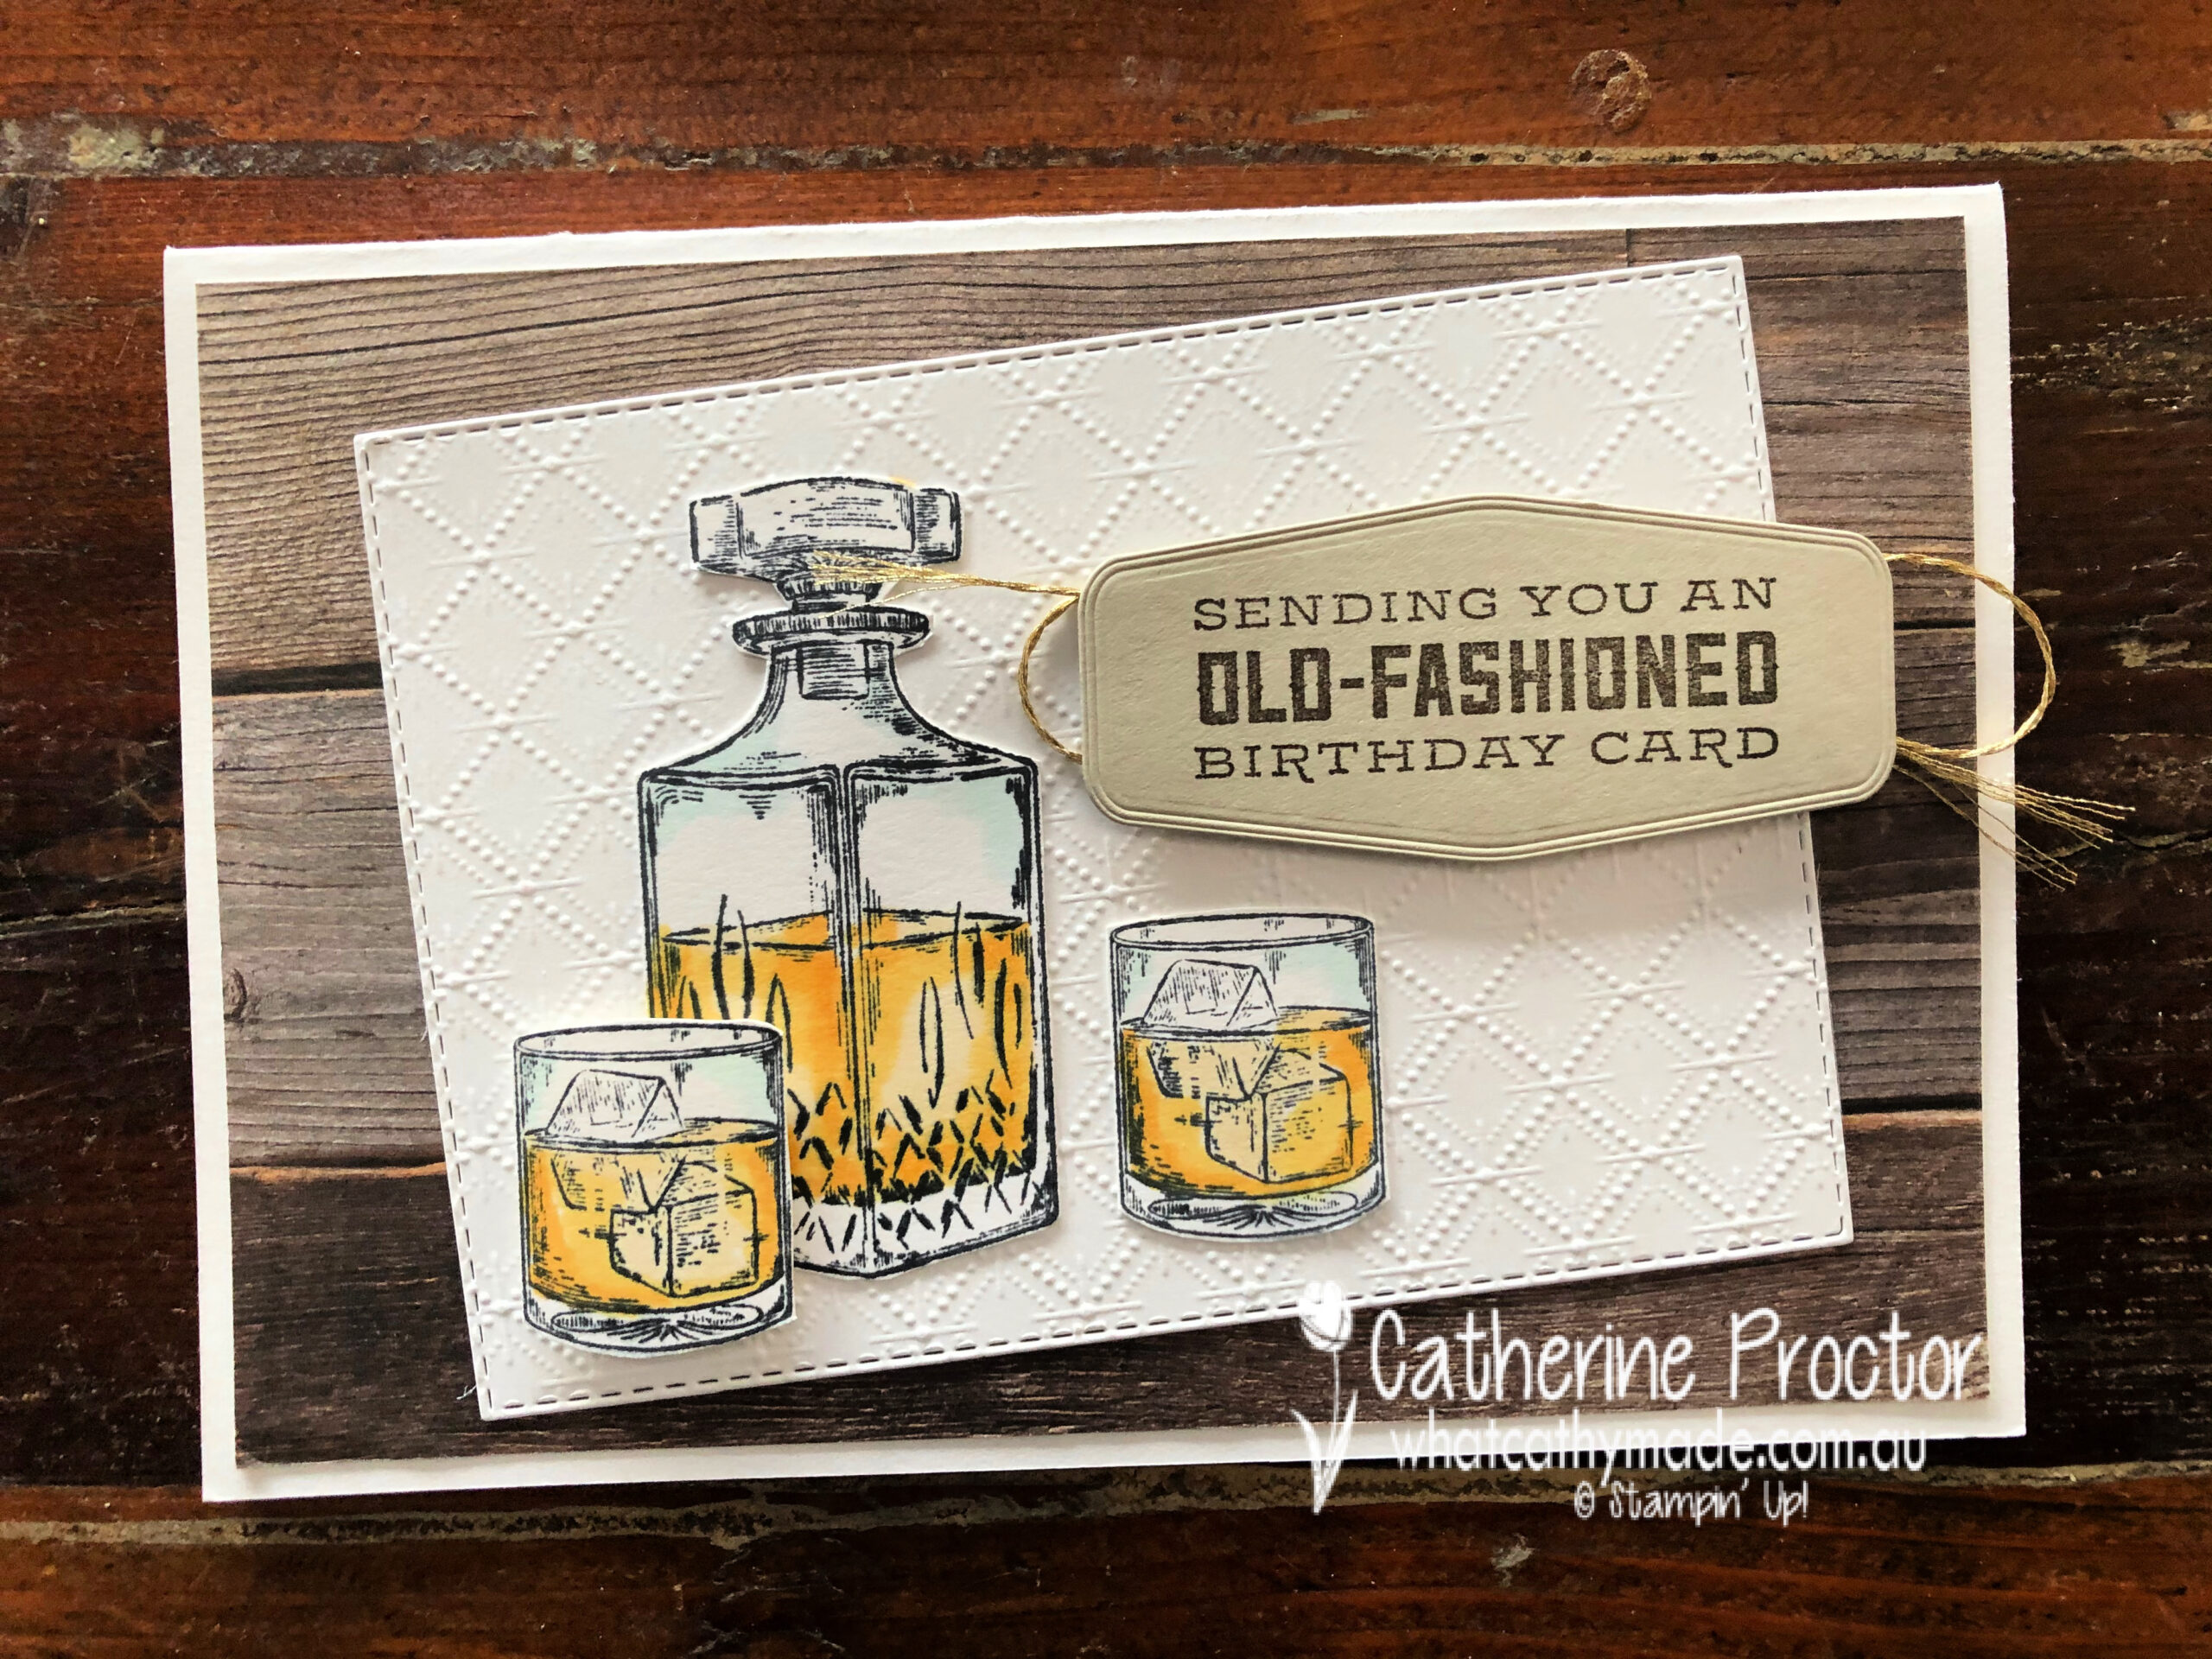
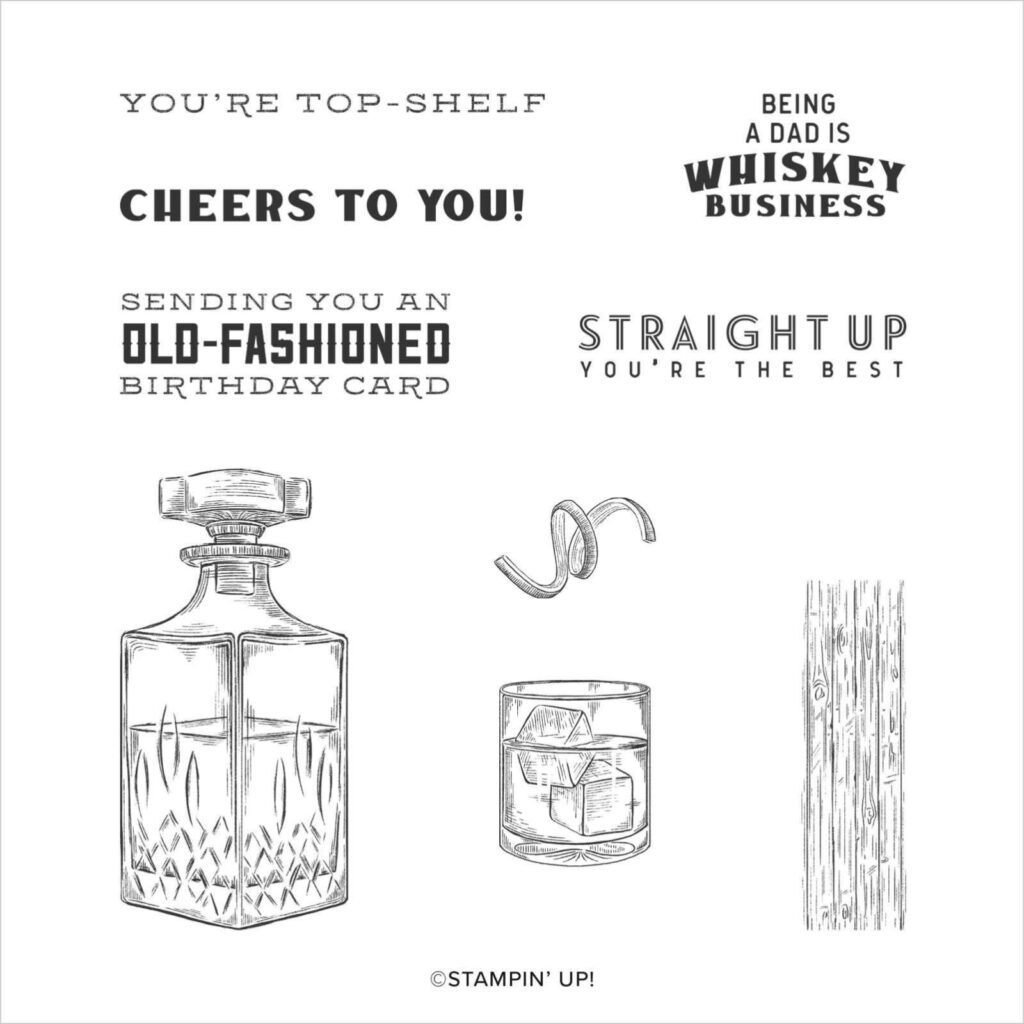
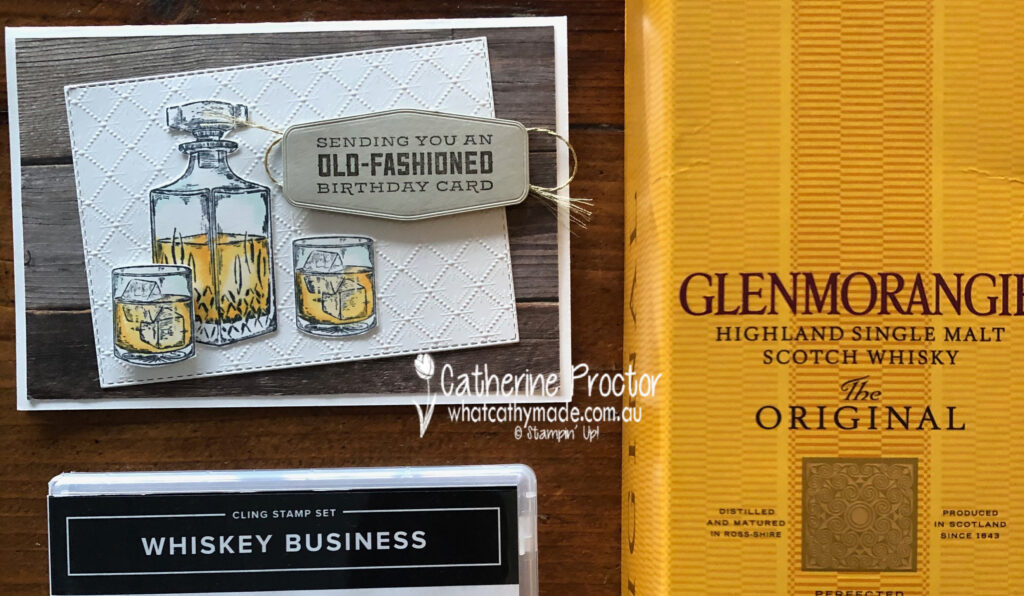
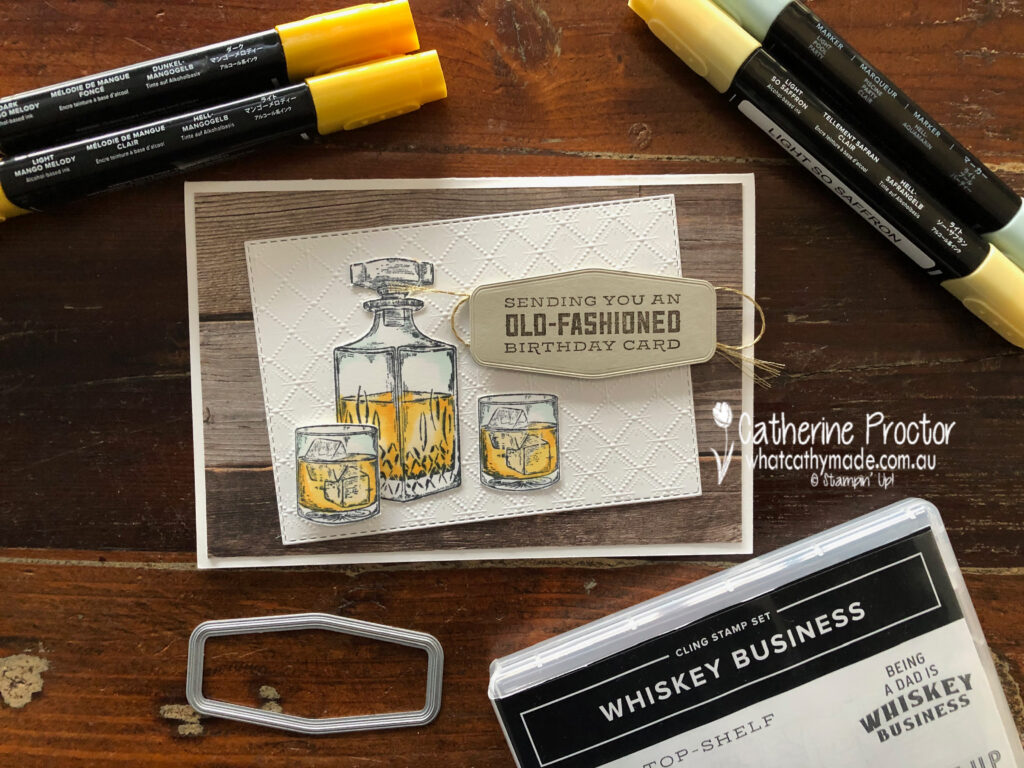
My dad is not a typical card game/car/fishing/treking/BBQ/sport kind of a dad and that can make designing masculine cards for him quite tricky. But there are two Stampin’ Up! stamp sets that perfectly matched the gifts I was giving to my dad: Whiskey Business and Press On.
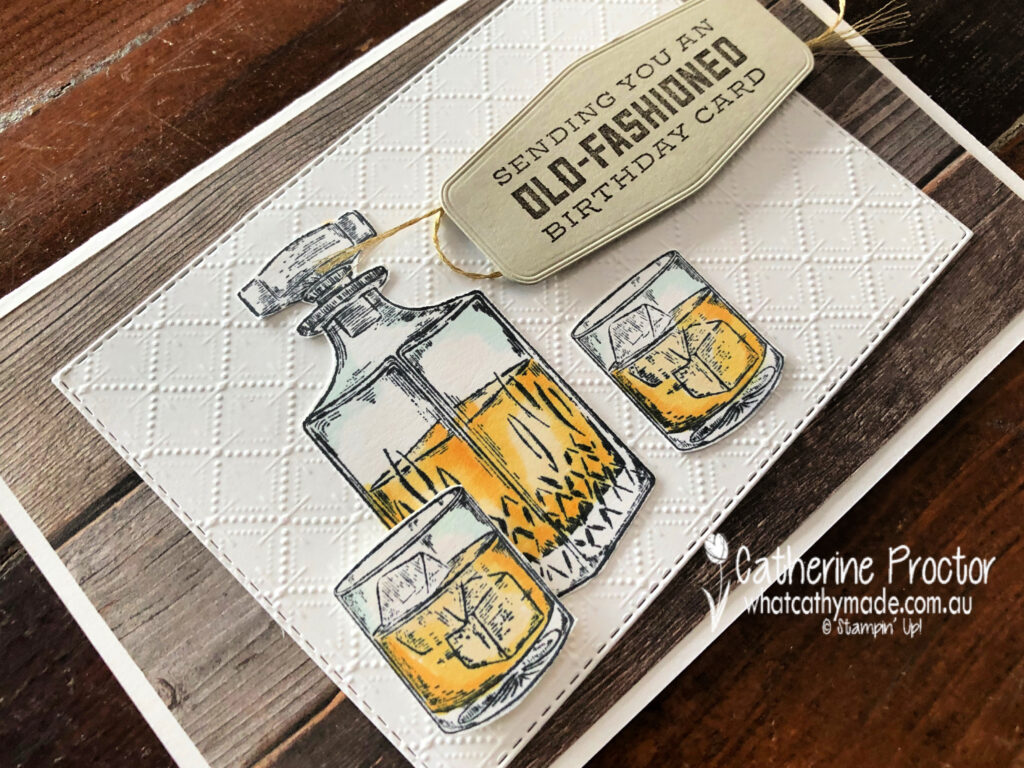
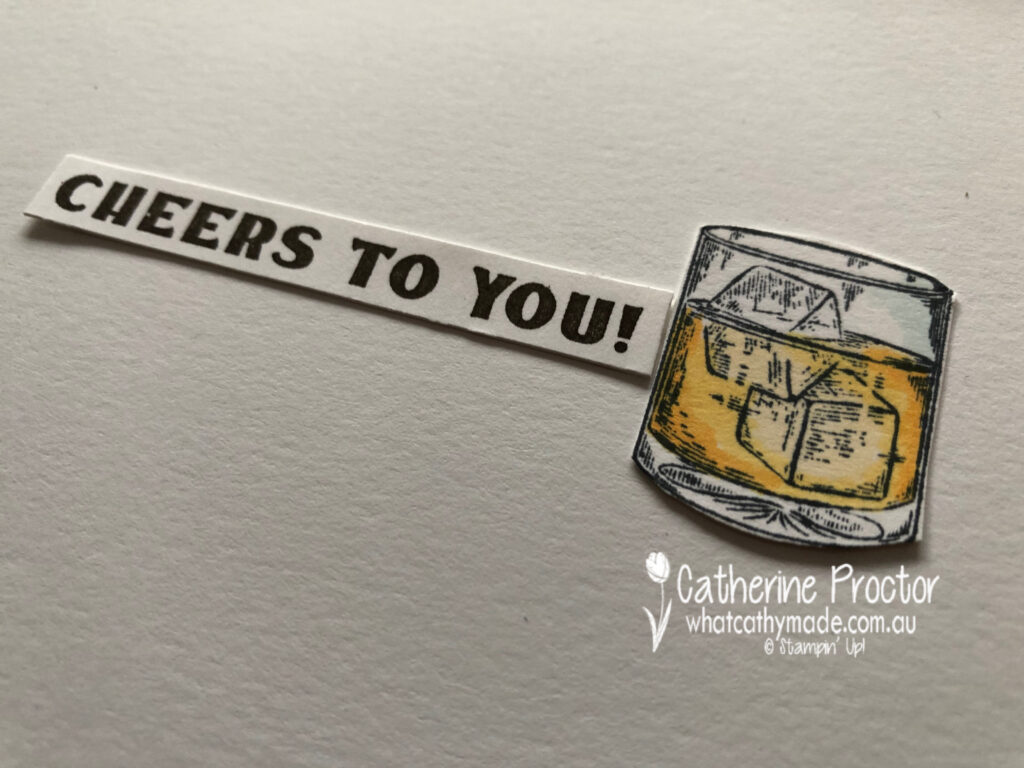
For Dad’s birthday card I used the Whiskey Business set… no prizes for guessing what I gave him for his birthday!
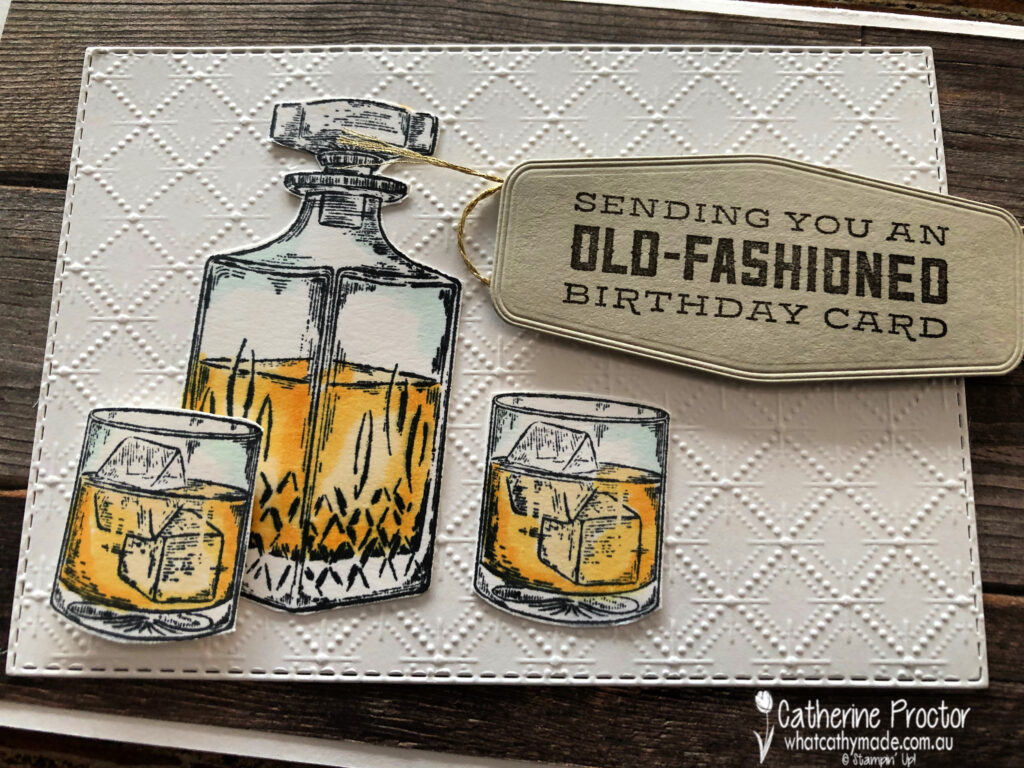
This card was CASED from the design of the card on page 33 of the Annual Catalogue but I made a few changes to make it my own. I just had to use the Dainty Diamonds embossing folder to emboss the Whisper White card stock because it looks just like the pattern in the cut crystal that the Whiskey decanter and whiskey glasses are made of.
The detailed line drawings of the Whiskey Business are so realistic and the Stampin’ Blends make it so easy to bring these stamps to life. I’ve used light Pool Party for the crystal, and light So Saffron, light Mango Melody and dark Mango Melody for the whiskey.
Here’s a close up showing the detail in this stamp set. I simply fussy cut my decanter and glasses using my paper snips before adhering them to the embossed Dainty Diamonds layer.
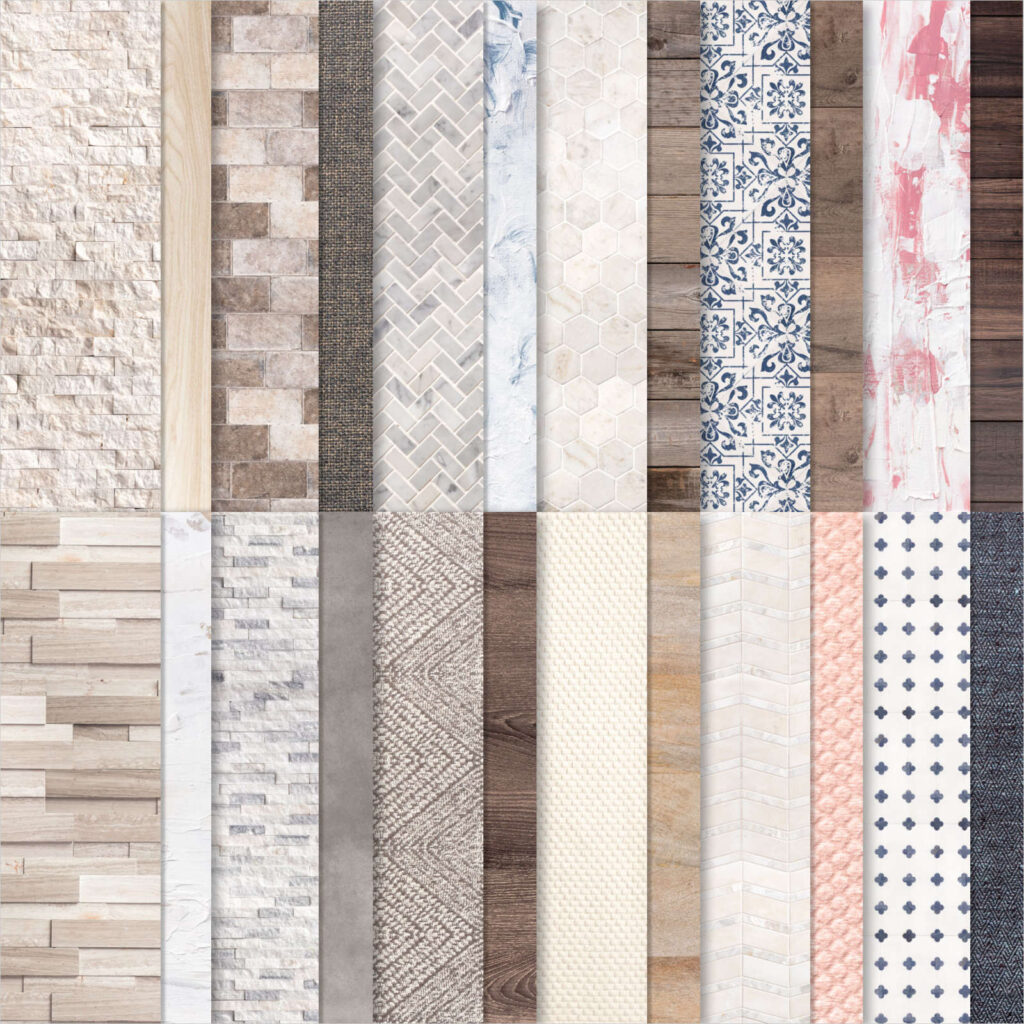
Speaking of realistic – how amazing is this wood patterned DSP from the In Good Taste DSP! All of this patterned paper was created from photographs of actual wood, stone, textiles, etc and it’s just perfect for masculine cards.
And finally, here’s the inside of the card.
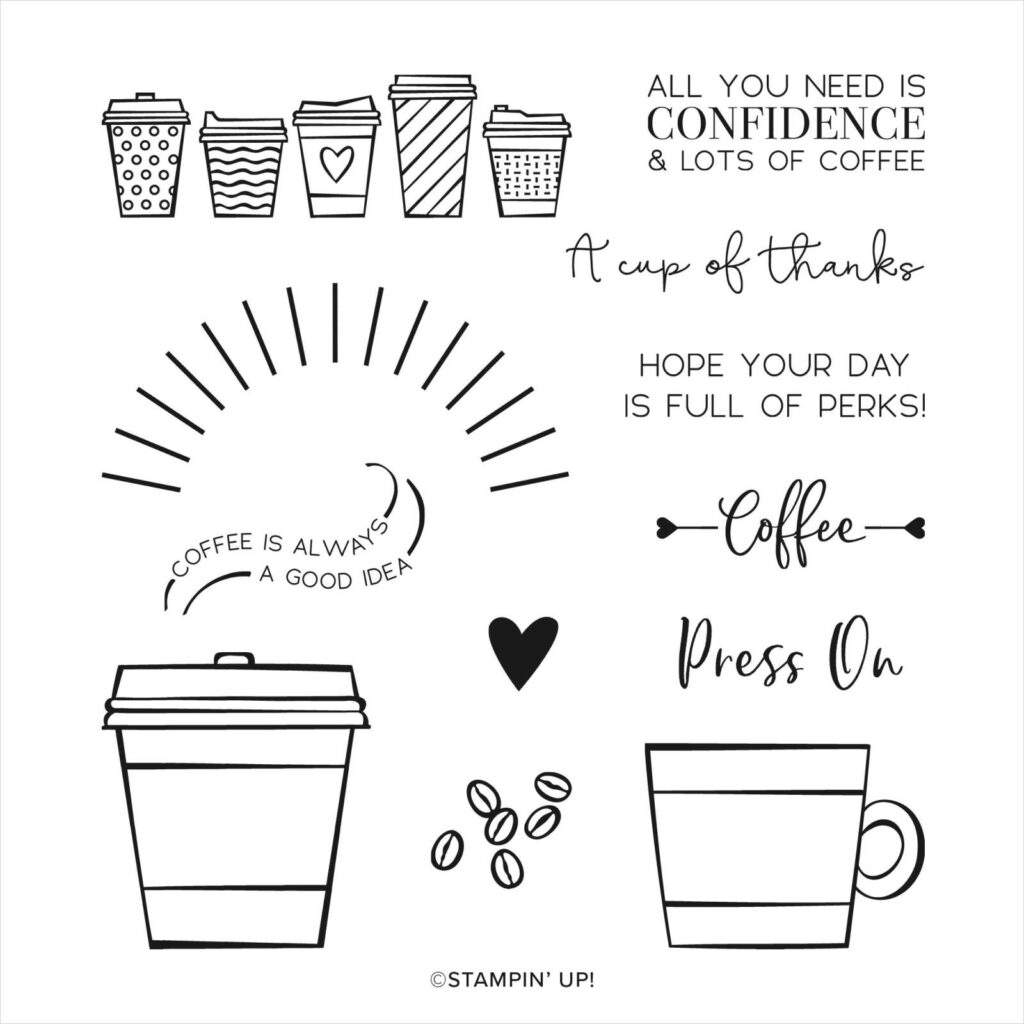
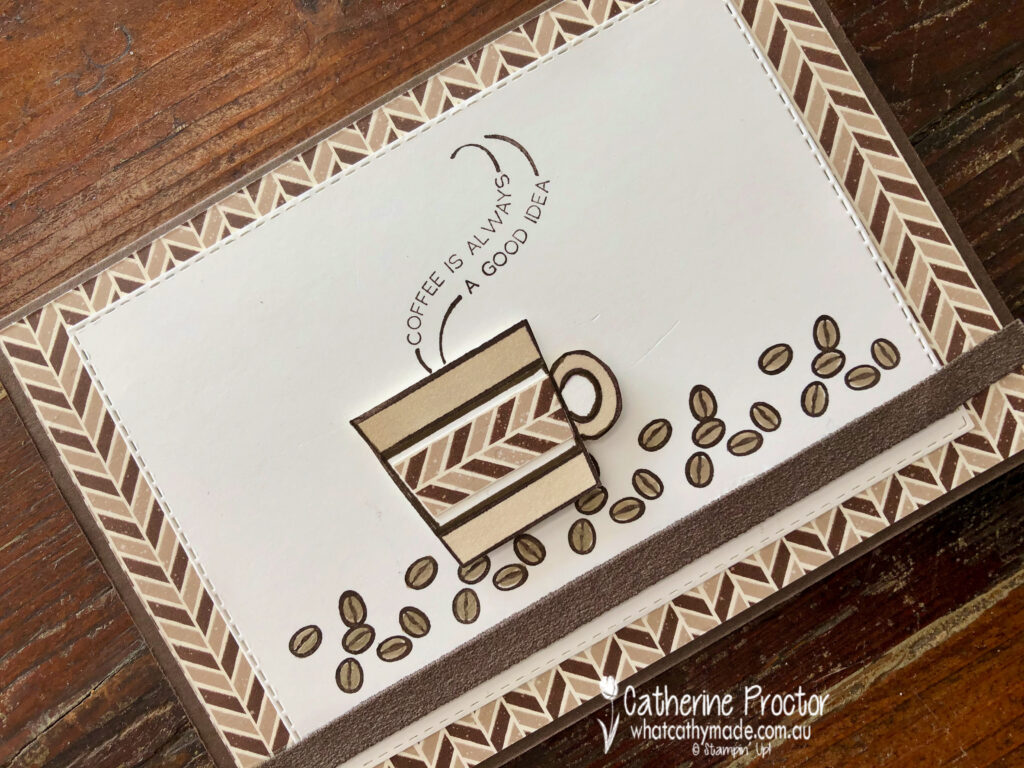
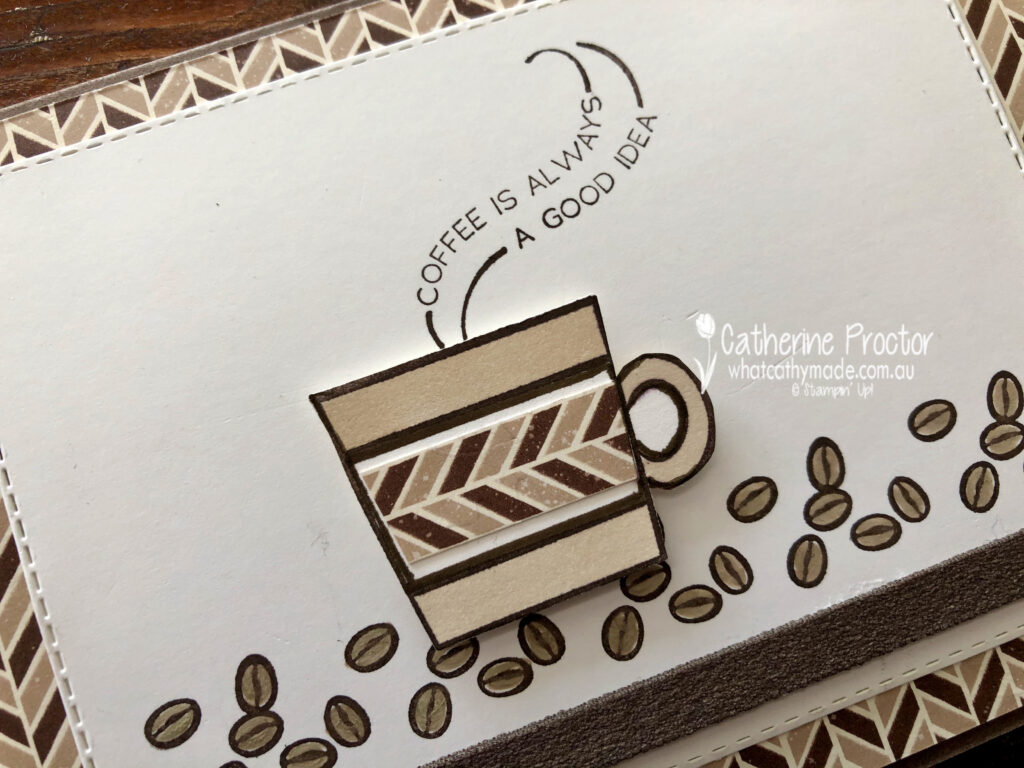
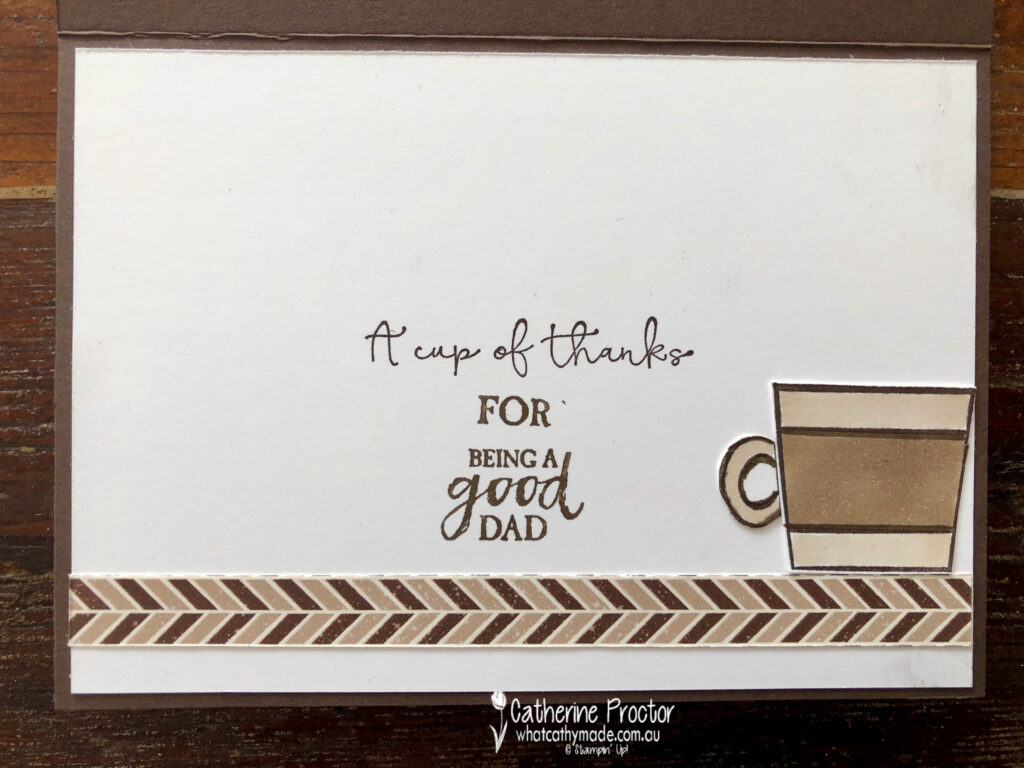
For my second card I’m sharing the one I made for Father’s Day to accompany a coffee machine and coffee, which is why I decided to use the Press On stamp set.
I kept this card very neutral, using coffee shades (Early Espresso and Crumb Cake) with Whisper White.
The lovely masculine chevron DSP is one you might have overlooked – I certainly did! This DSP is part of the Gilded Autumn specialty DSP which is found on page 45 of the August – December 2020 Mini Catalogue.
The coffee cup and beans were stamped in Early Espresso before being coloured in using Crumb Cake Stampin’ Blends and a Crumb Cake Stampin’ Write marker for the coffee beans.
The strip of early espresso faux suede ribbon along the base of the card co-ordinated perfectly and added a luxurious texture to the card.
Inside my card I used a variety of sentiments to create a meaningful Father’s Day message – I’m not sure if it really worked, but my dad seemed to appreciate it and that’s what really counts.
To see more masculine card inspiration from the AWH Team head back to Rachel‘s page as she is hosting our monthly blog hops.
To purchase any of the products I’ve used in my cards tonight simply click on the phots of the products below.
If you’d like me to post you your very own copy of the August – December 2020 Mini Catalogue, the 2020-21 Stampin Up! Annual Catalogue, the 2020-21 Beginners Brochure, or to simply find out about more about Stampin’ Up! contact me.
Welcome to the Monthly Art With Heart Creative Showcase.
With all that’s happening worldwide at the moment the Art With Heart Team are here with a Rainbow theme Creative Showcase to brighten your day.
Every month the talented ladies share their inspirational ideas in a monthly Showcase and this month our projects are inspired by Rainbows.
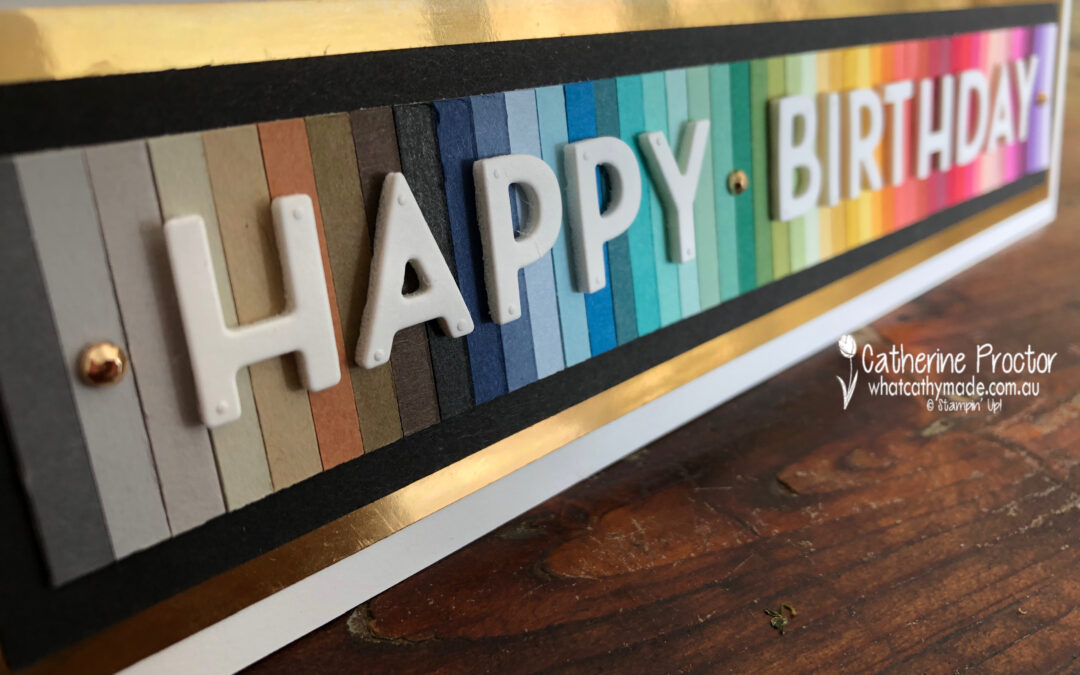
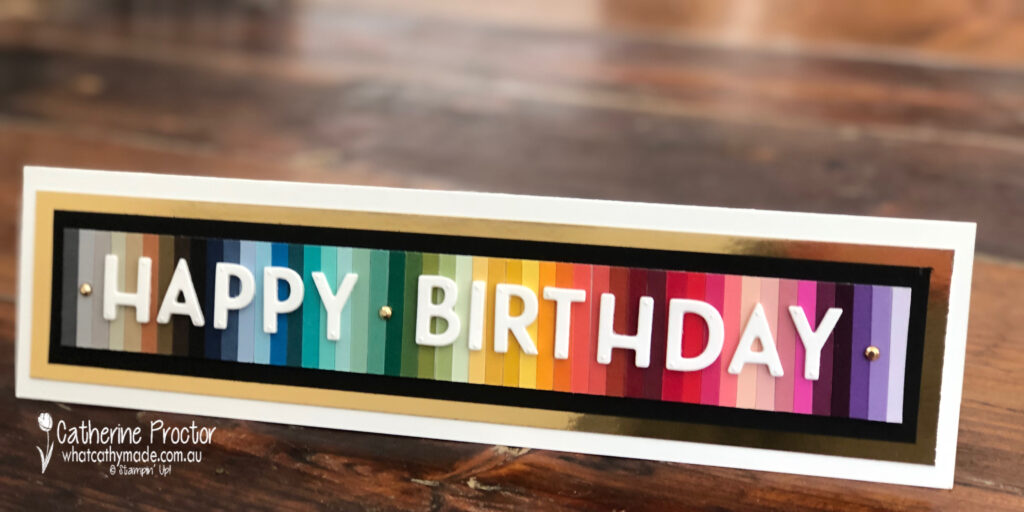
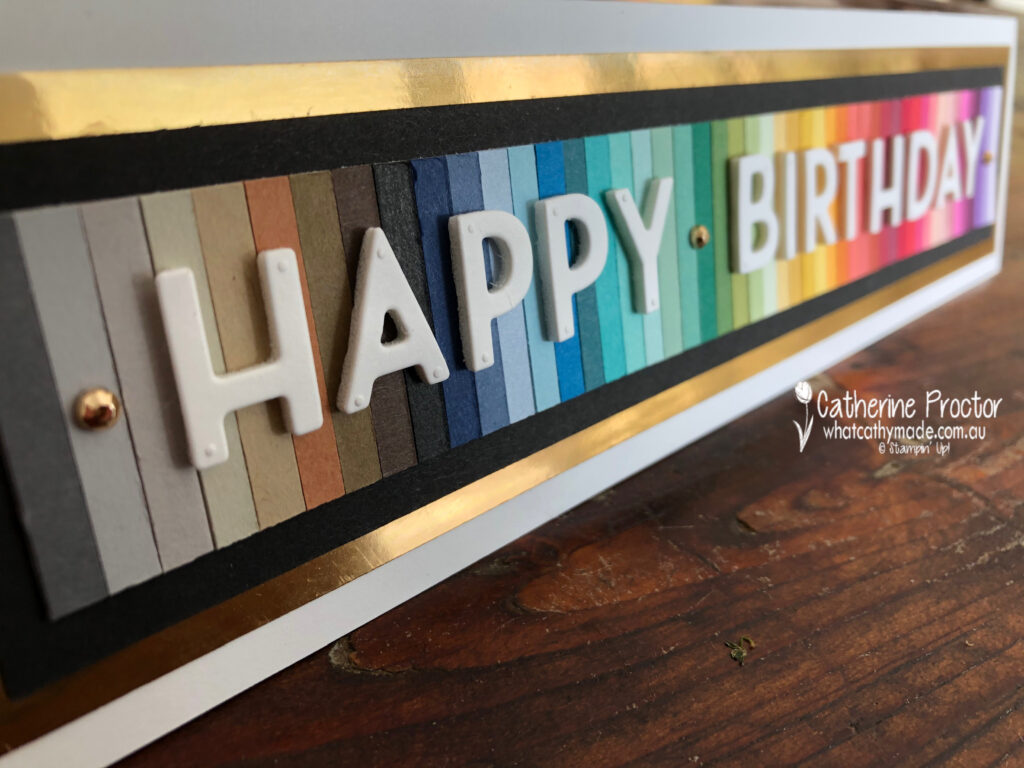
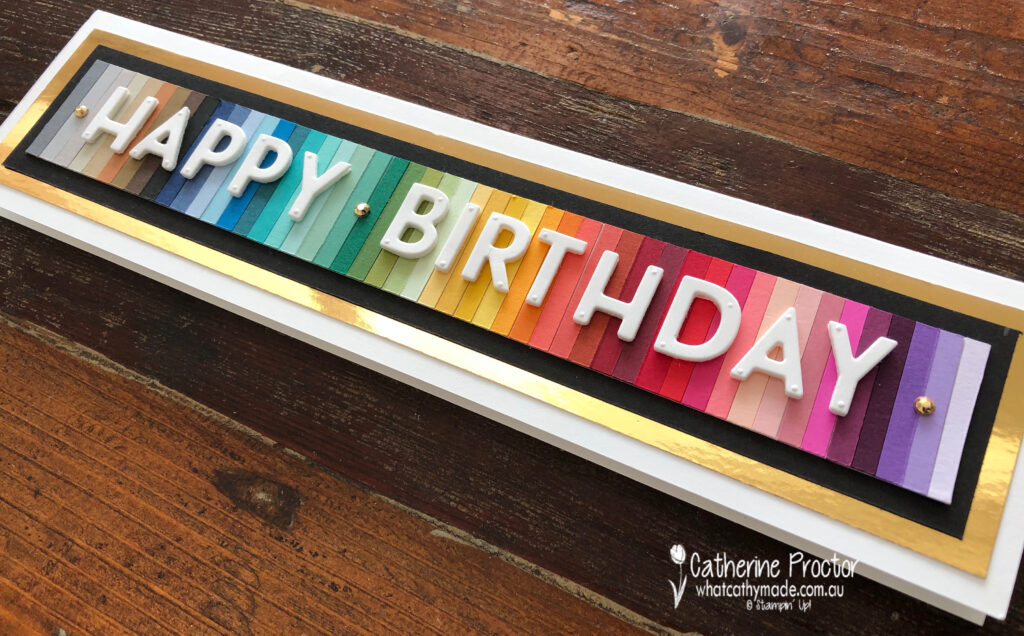
With 40 core colours, 10 in colours and the 3 basic colours of Whisper White, Basic Black and Very Vanilla I found it impossible to chose a just a few of these colours for my rainbow, so I decided to use them all!
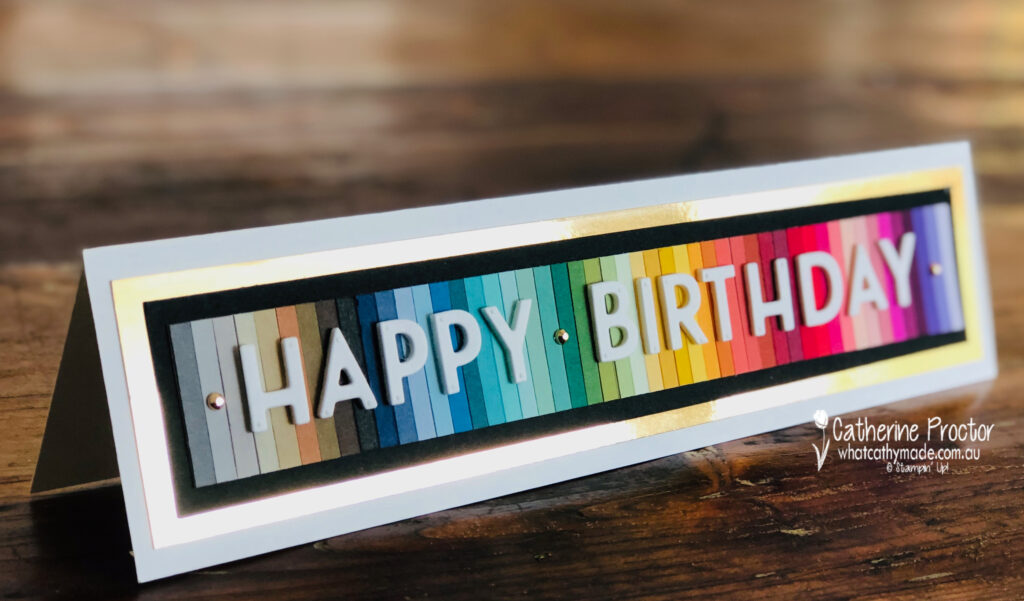
The only way I could fit them onto one card was to create a slimline card. For each colour I cut a 5mm thick strip with my paper trimmer and then I organised them into rainbow order onto strips of tear & tape on a Whisper White base.
It took a while to decide on a colour order – there are so many ways you could arrange these colours!
The rainbow strip was trimmed to size, mounted onto a Basic Black card stock layer and a gold foil layer before attaching it all to a Whisper White slimline card base.
The “Happy Birthday” was cut out using the Playful Alphabet dies mounted onto the new foam adhesive sheets – I love the dimension it gives!
Three Gilded Gems add a final touch of bling to tie in the gold foil layer and finish off the card.
I do have a confession to share with you.
After I finished making and photographing my card I planned to list all the colours I used in their rainbow order, but when I counted the strips I realised I have left two colours out and I don’t know which ones they are!
I deliberately didn’t include Whisper White or Very Vanilla card stock in the rainbow strip but I did include Basic Black, which means I should have 51 strips – but I only have 49.
Can you help me out and tell me which two colours I’ve left out!
The next Art With Heart Team Member to share their colouring technique with you is the very talented Caroline Manwaring.
If you have a broken link or have come to this blog hop midway, you can view all the participants below:
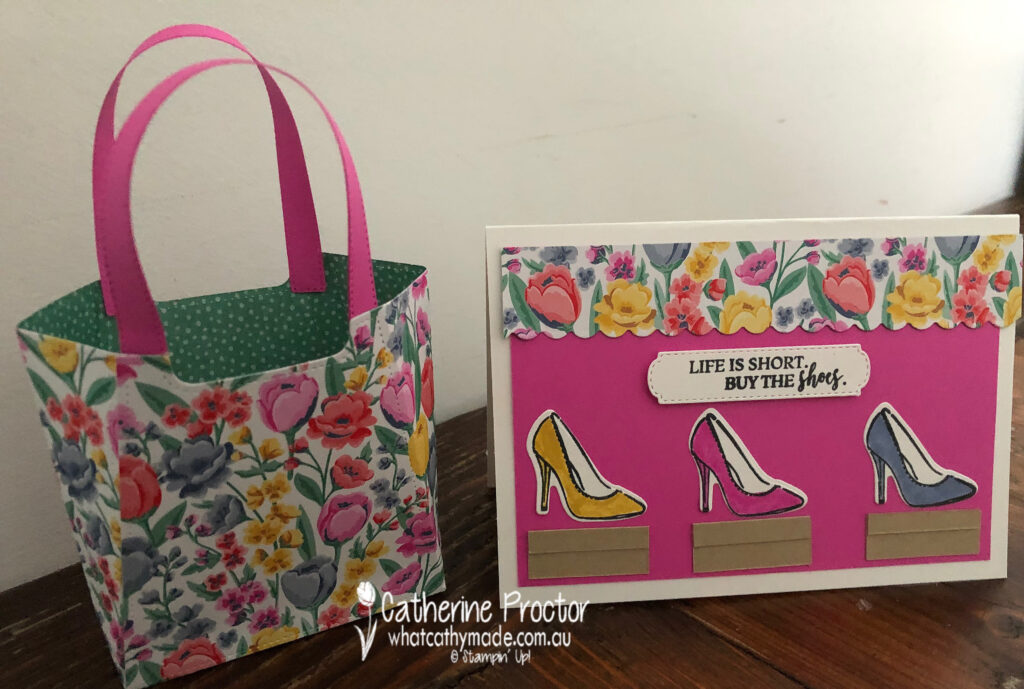
July is a big birthday month in our family – my dad, brother, 2 nieces and 2 nephews all have their birthdays in July! One of the big birthdays last month was my niece’s 21st and because I wasn’t able to see her in person I made a special card to celebrate her special birthday.
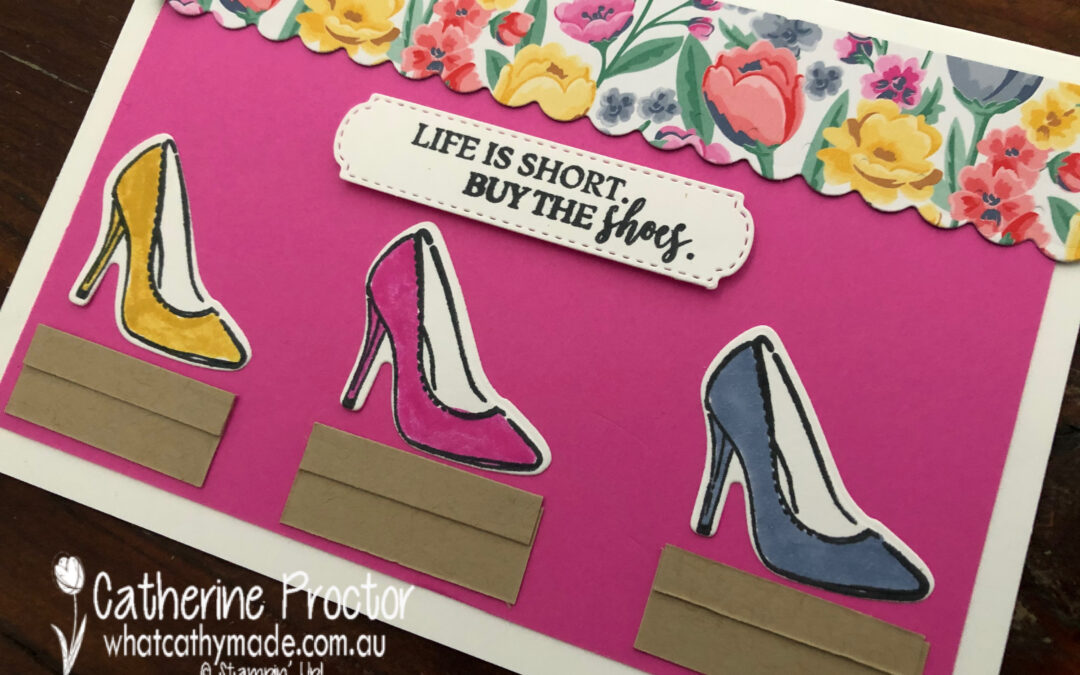
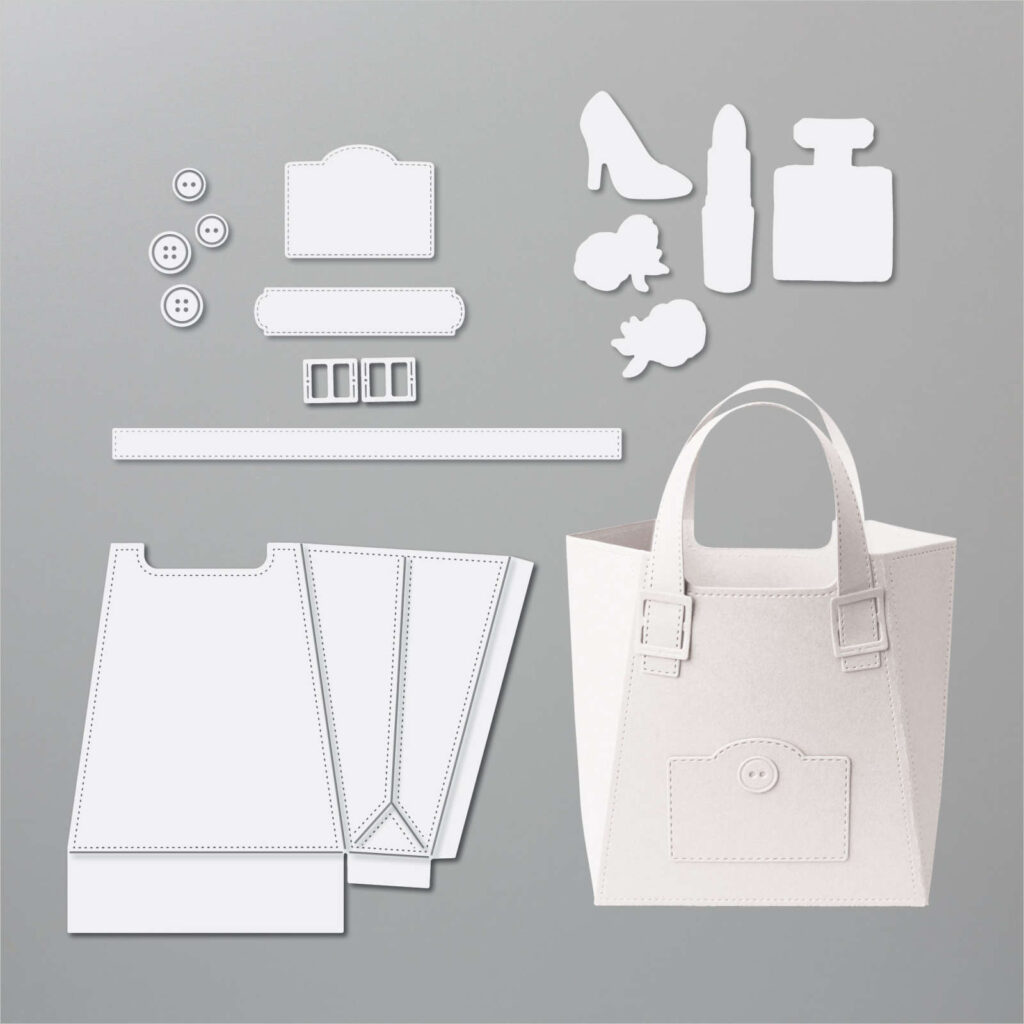
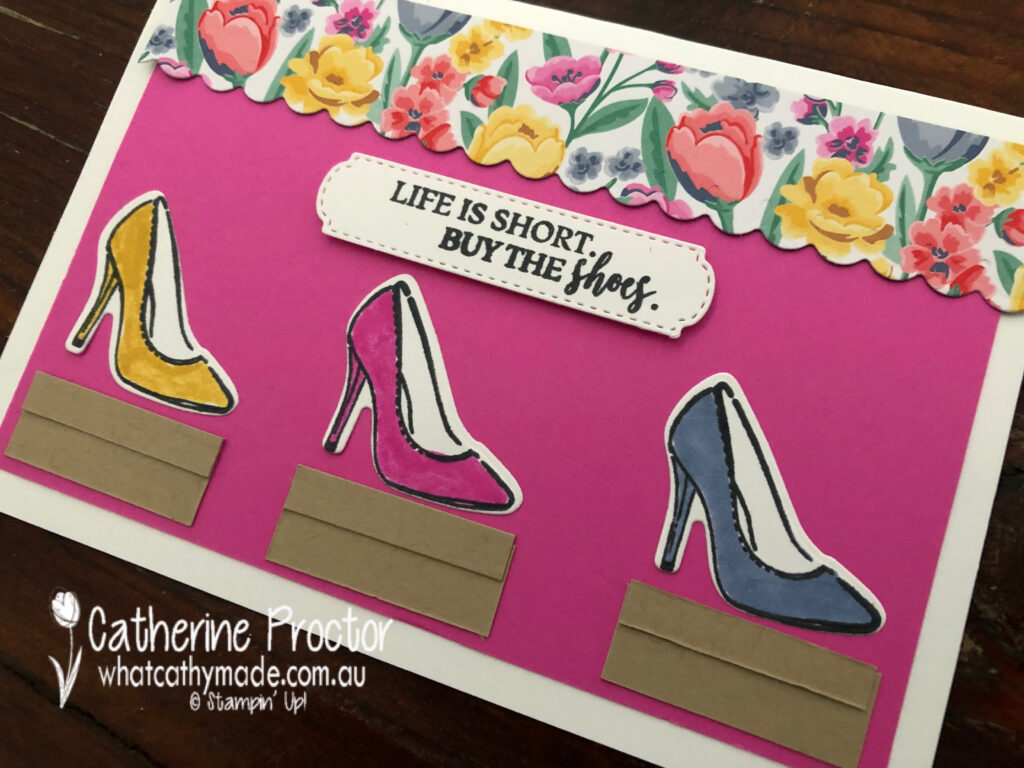
She is super sporty but also very girly. Like most 21 year old girls she loves clothes and shoes, which is why I thought the Dressed To Impressed stamp set would be the perfect set to use for her card.
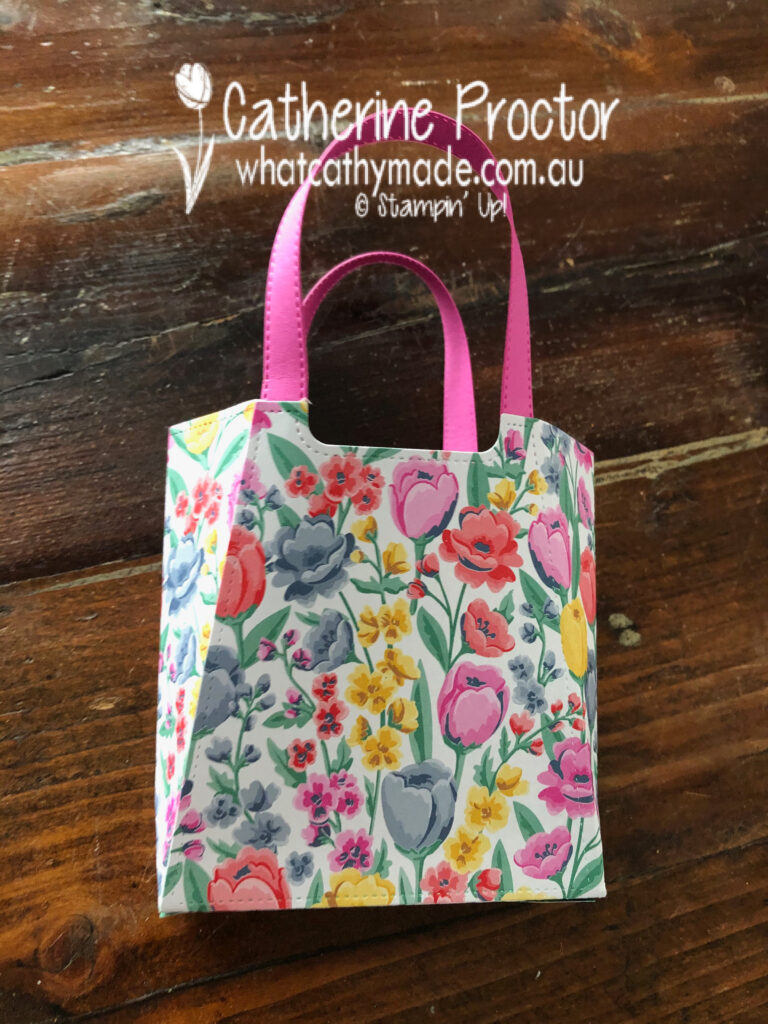
The co-ordinating All Dressed Up dies were also just perfect because we gave her a gift card for her birthday and this die set has a die to create a little bag which is big enough to fit a gift card.
I haven’t used the brand new hot pink, Magenta Madness, very much yet but I love it in this card. The shoes are coloured in using a Bumblebee marker and Magenta Madness and Misty Moonlight blends before cutting out with the co-ordinating shoe die.
The shoe boxes are easy to make using scraps of crumb cake cut down to size with the Stampin’ Up! paper trimmer.
This gorgeous floral paper is from the Flowers for Every Season 6×6 DSP pack and I also used it to make the gift card mini bag holder. There is a die for the bag handle and cut this out of Magenta Madness to match the card – can you see the cute stitched edging on the bag and the handle?
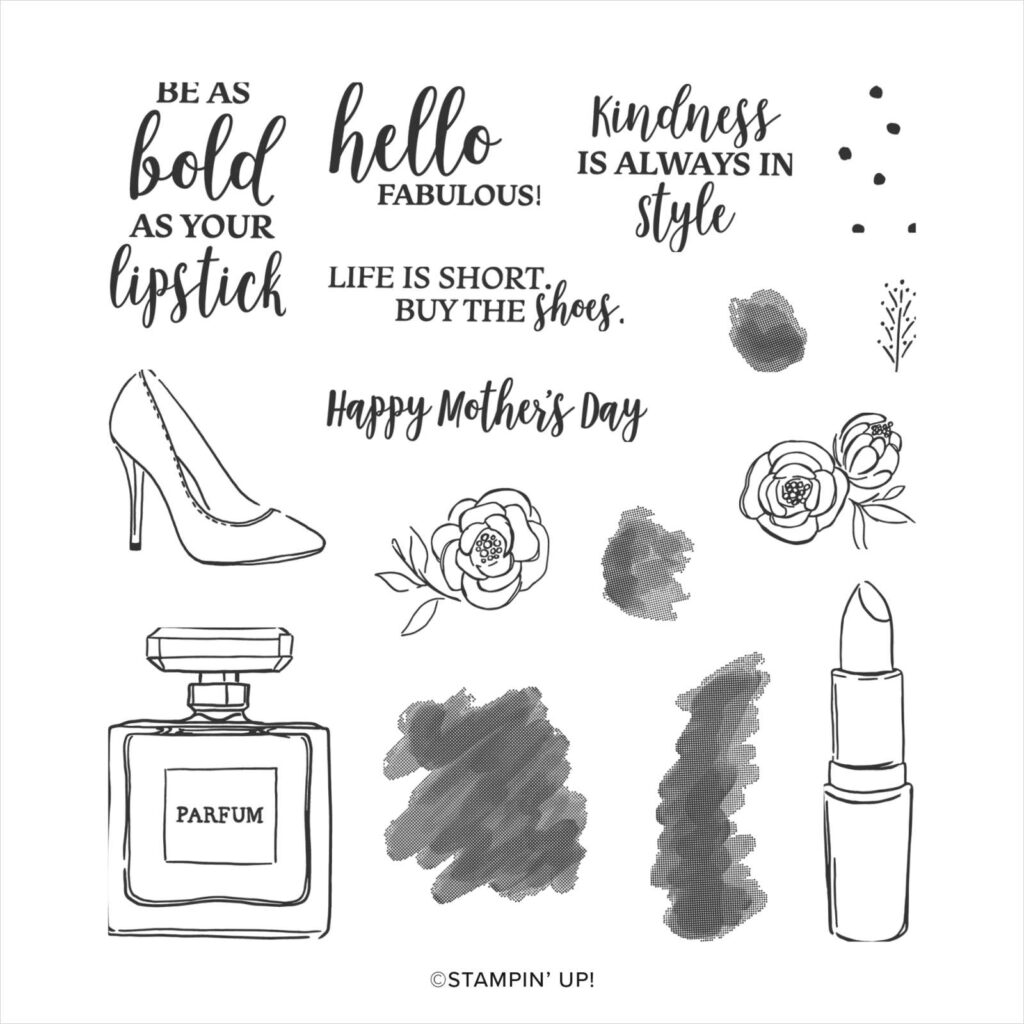
And how great is the “Life is Short. Buy the shoes” sentiment? I’m sure my niece will be using our gift card to buy some shoes very soon!
I’ll be back to share some colour inspiration on Wednesday but in the meantime to purchase any of the products featured in today’s post, simply click on the product links below.
If you’d like me to post you your very own copy of the August-December Mini Catalogue (AKA the holiday catalogue), 2020-21 Stampin Up! Annual Catalogue, the 2020-21 Beginners Brochure, or to simply find out about more about Stampin’ Up! contact me.
Dont forget the August-December Mini Catalogue goes live tomorrow morning and you can order from it then. There are so many wonderful new products to create with in the catalogue this year.
Wherever you are in the world, stay safe, stay well, stay calm…and keep on crafting xxx


")


")


")
")


")


")


 Faux Suede Trim")


")

 Designer Series Paper")


