This week we’re showcasing Daffodil Delight, a sunny, happy yellow from the Brights family.
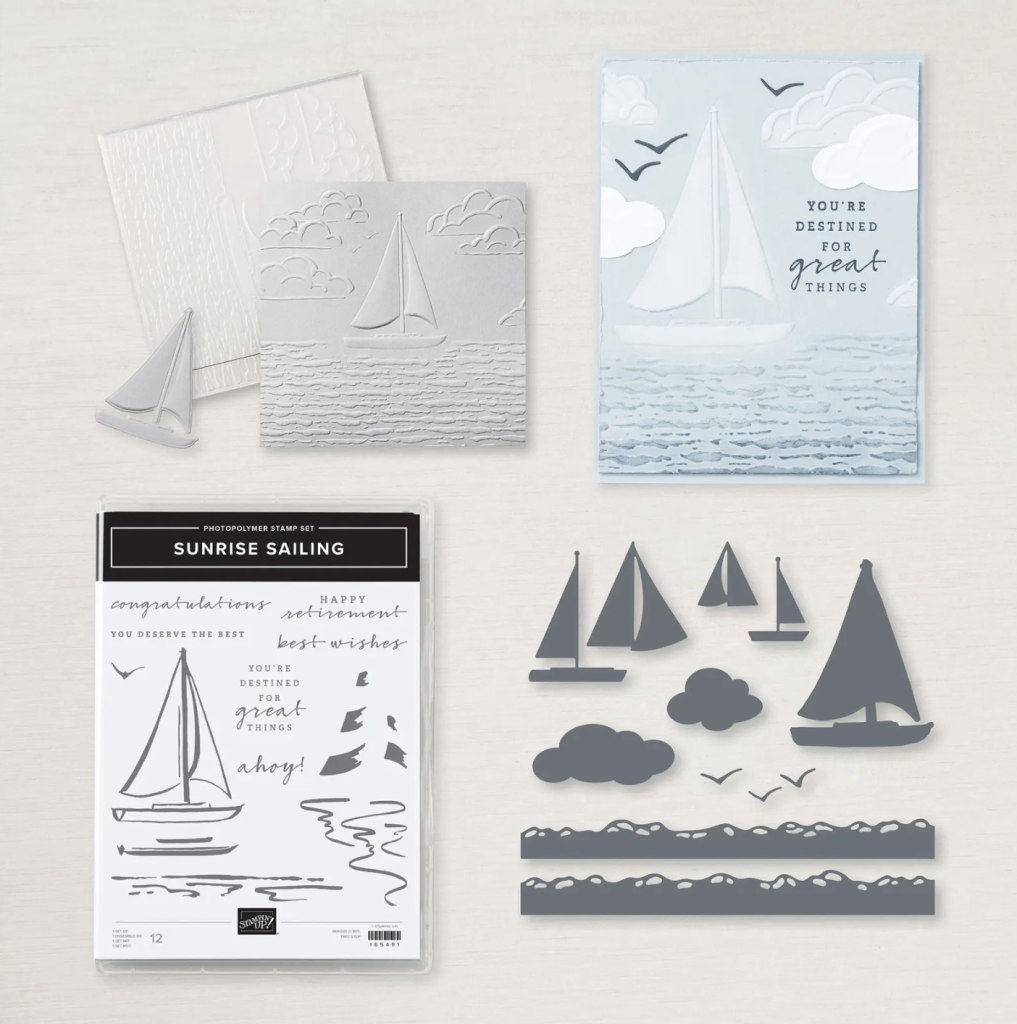
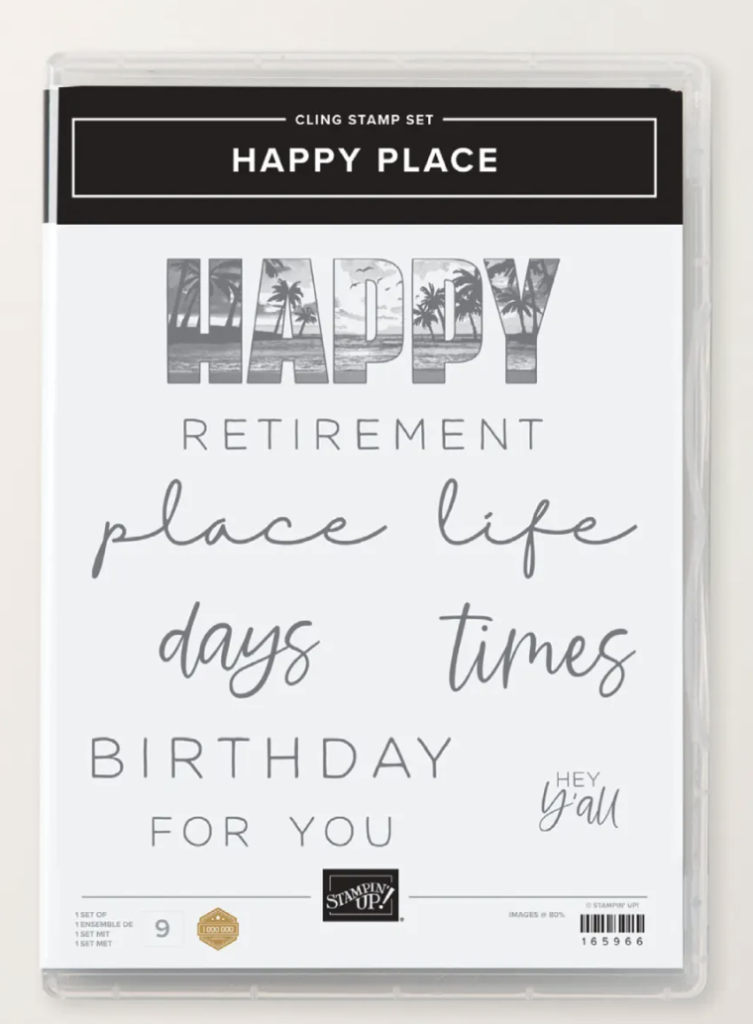
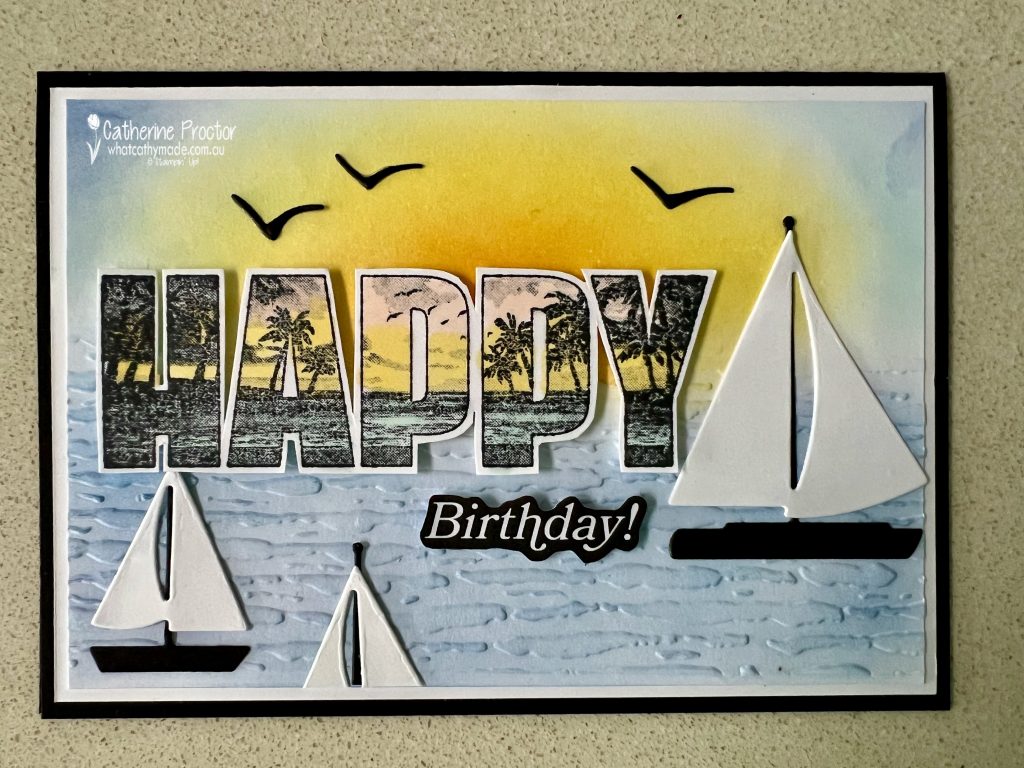
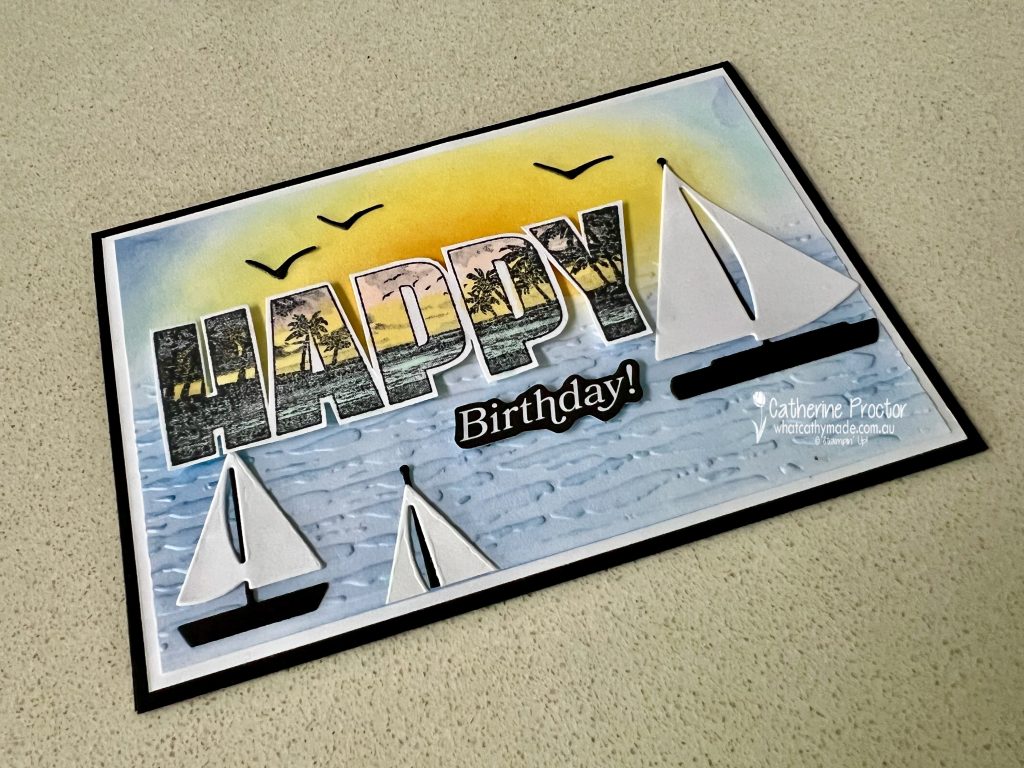
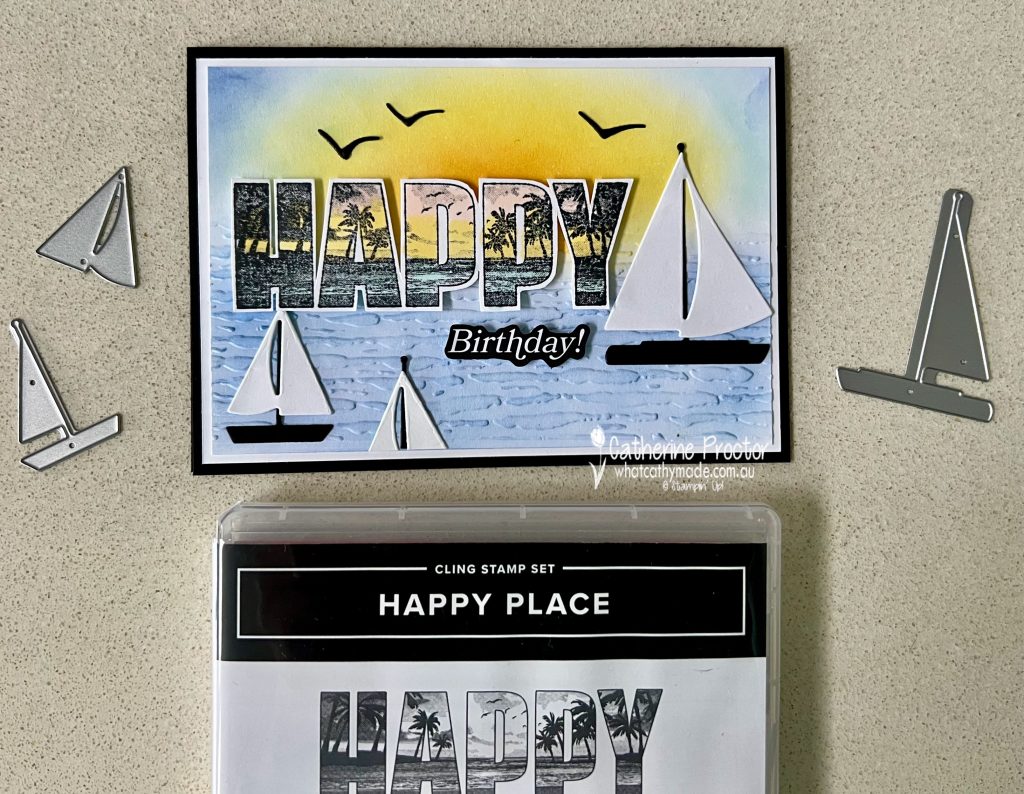
As soon as I saw the “Happy Place” stamp set in the new September – December catalogue I knew it would work perfectly with the Sunrise Sailing bundle!
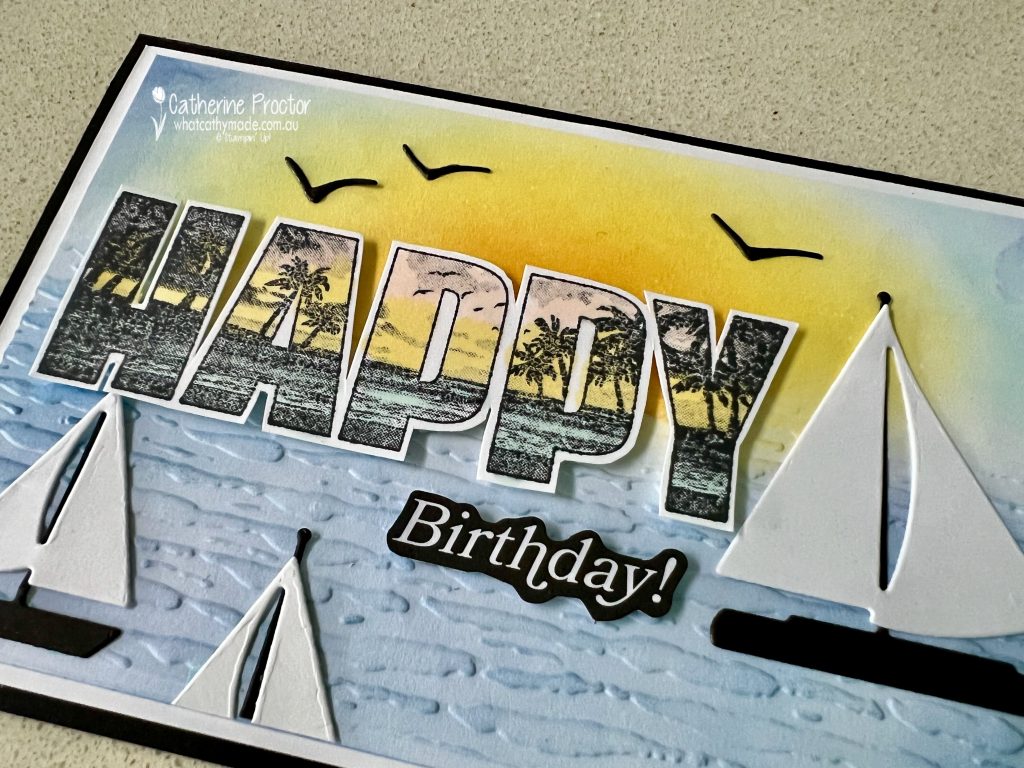
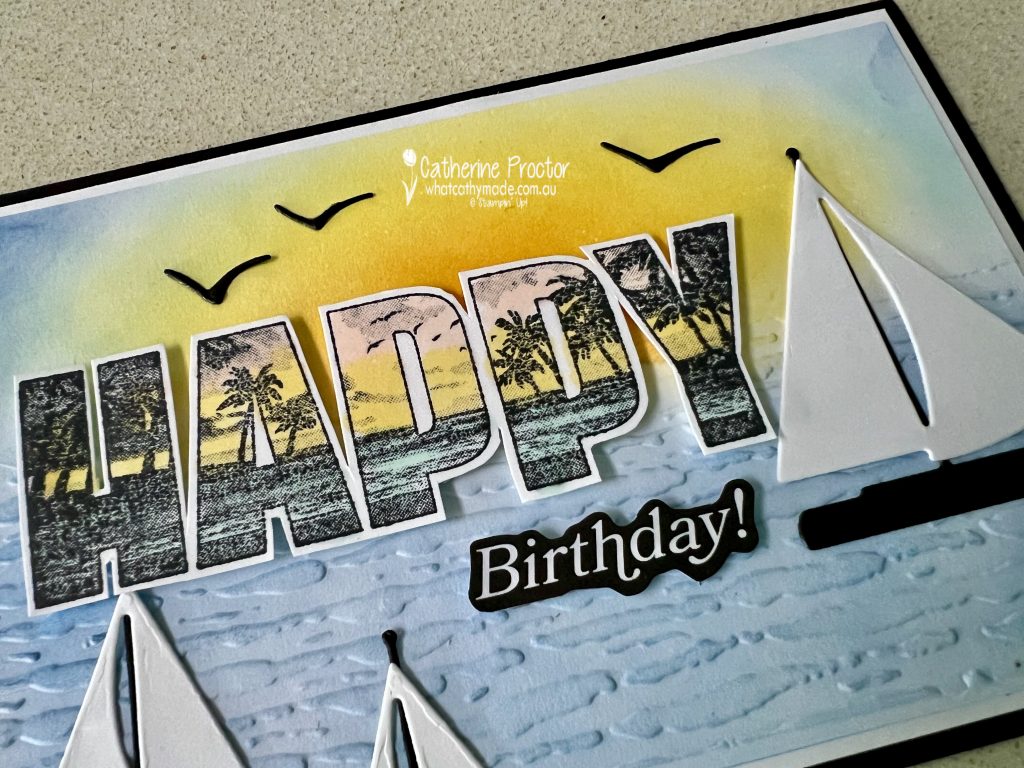
To create my sunrise scene I’ve used a mix of colours. The inks I’ve blended on the Basic White cardstock layer to create my sunrise are Daffodil Delight, Night of Navy, Peach Pie and Balmy Blue.
The Stampin’ Blend colours I used to colour in the “Happy” stamp are Daffodil Delight, Petal Pink and Pool Party. And the card base is Basic Black cardstock.
How to partially emboss a cardstock layer
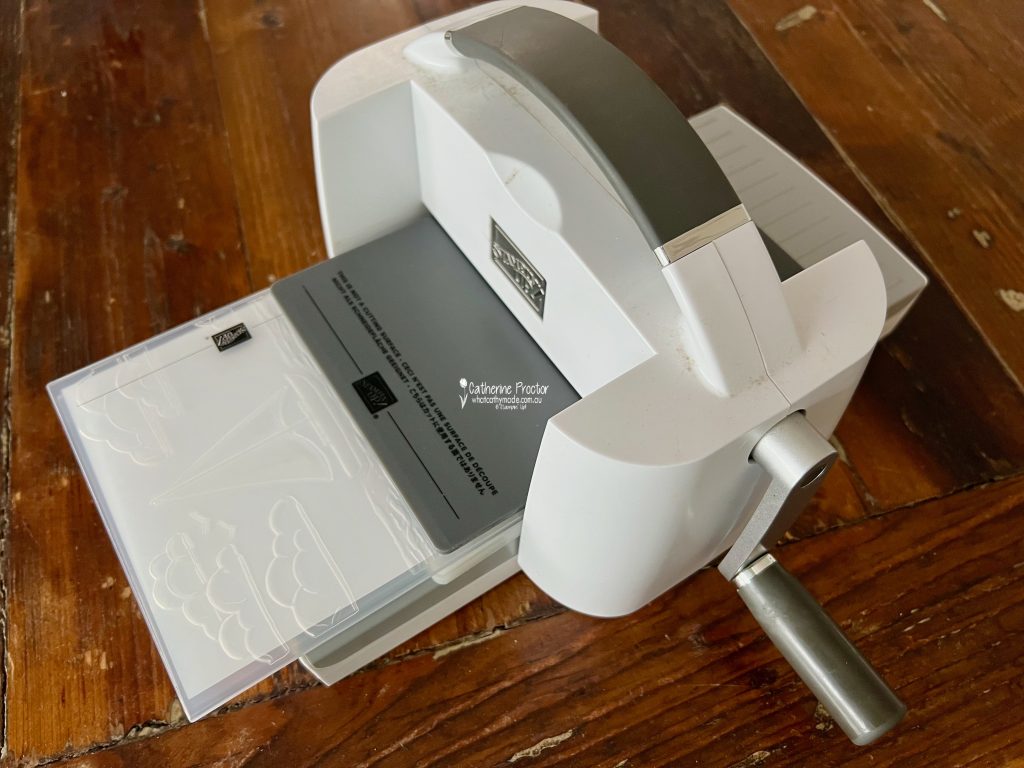
For my sunrise layer I wanted the texture of the sea underneath my blended sunrise, without the embossed image of the sail boat. To achieve this effect I simply embossed the bottom section of the Sunrise Sailing EF by rotating it 90 degrees and only running the lower section through the Stampin’ Up! Stampin’ Cut & Emboss Machine.
This image shows how I’ve extended most of the embossing folder off the edge of the embossing platform. NOTE: the Specialty Plate (Plate 4) only covers the area of the cardstock I want to emboss.
Blending and shading to create a sunrise.
Blending brushes make it easy to create a sunrise/sunset scene. I started at the centre with the Daffodil Delight, adding a touch of Peach Pie to darken the centre of the Daffodil Delight, then I blended the Balmy Blue and Night of Navy for the rest of the sky. The ocean is also Night of Navy.
I used stampin blends to colour in the “Happy” stamp and then I cropped the “birthday” from a “Happy Birthday” greeting in the Greetings for All Mix & Match Ephemera Pack.
The cute little sail boats and seagulls are all from the Sunrise Sailing bundle, die cut in Basic Black and Basic White.
Take a look at some more Daffodil Delight inspiration on our Insta Hop!
Our blog hop is now an Instagram hop but the good news is that you don’t need to have an Instagram account to view all of the other projects!
Simply copy any of the Insta handles below into a new search engine window to follow the Instagram hop at any point.
Next in our Hop is Kate @craftwithkate. Be sure to check out her gorgeous project/s.
The full list of this week’s InstaHop is listed below:
Kate @craftwithkate
Helen @apaperparadise
Andrea @andreaksargent
Kirsty @crafty.littlemiss
Leanne @createwithleanne2
Sharon @sharondaverncreates
Cathy @whatcathymade – you are here!
We’ll be back next Wednesday when we are showcasing the darkest of the neutrals: Early Espresso.
Looking for some Christmas card inspiration?
Our Heart of Christmas blog hop is back for 2025 and we will go live at 8pm (EAST) every Monday night with Christmas card inspiration. This hop is a traditional blog hop (not an Instahop) so you can follow along by reading my blog.
Welcome to week twenty-two of our Art With Heart 2024-25 Colour Creations blog hop!
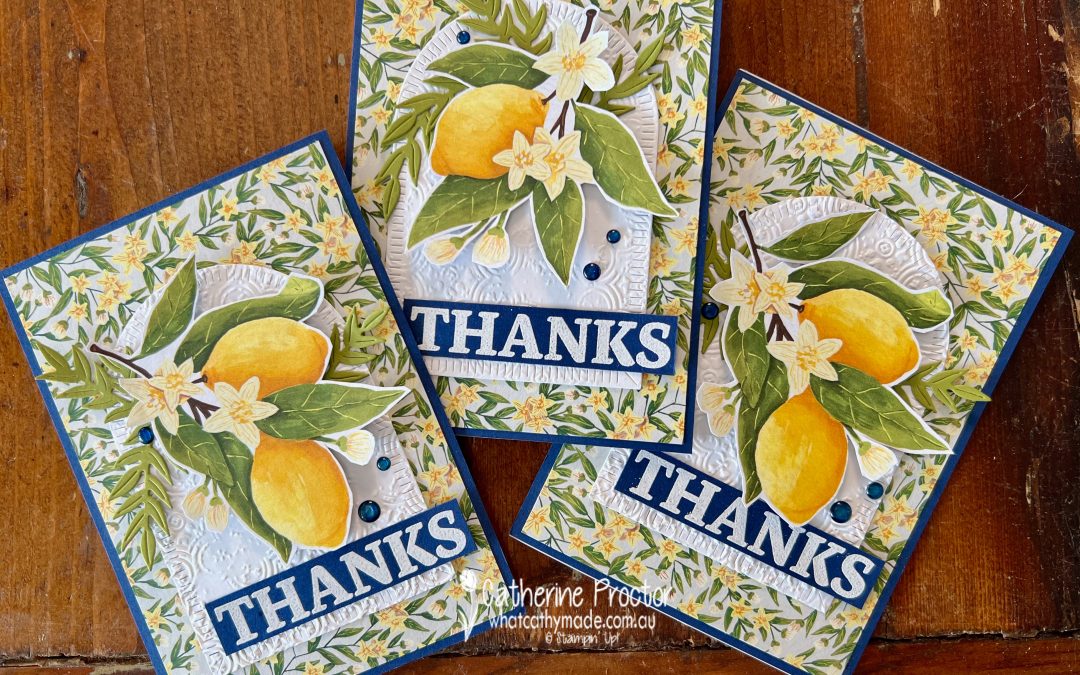
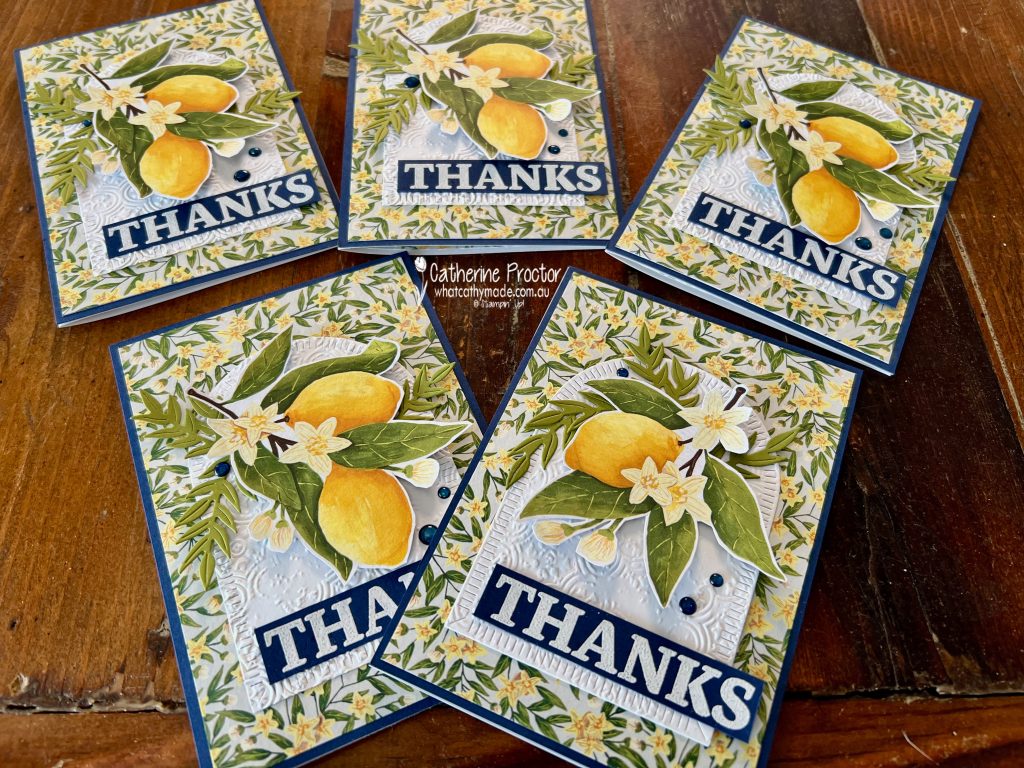
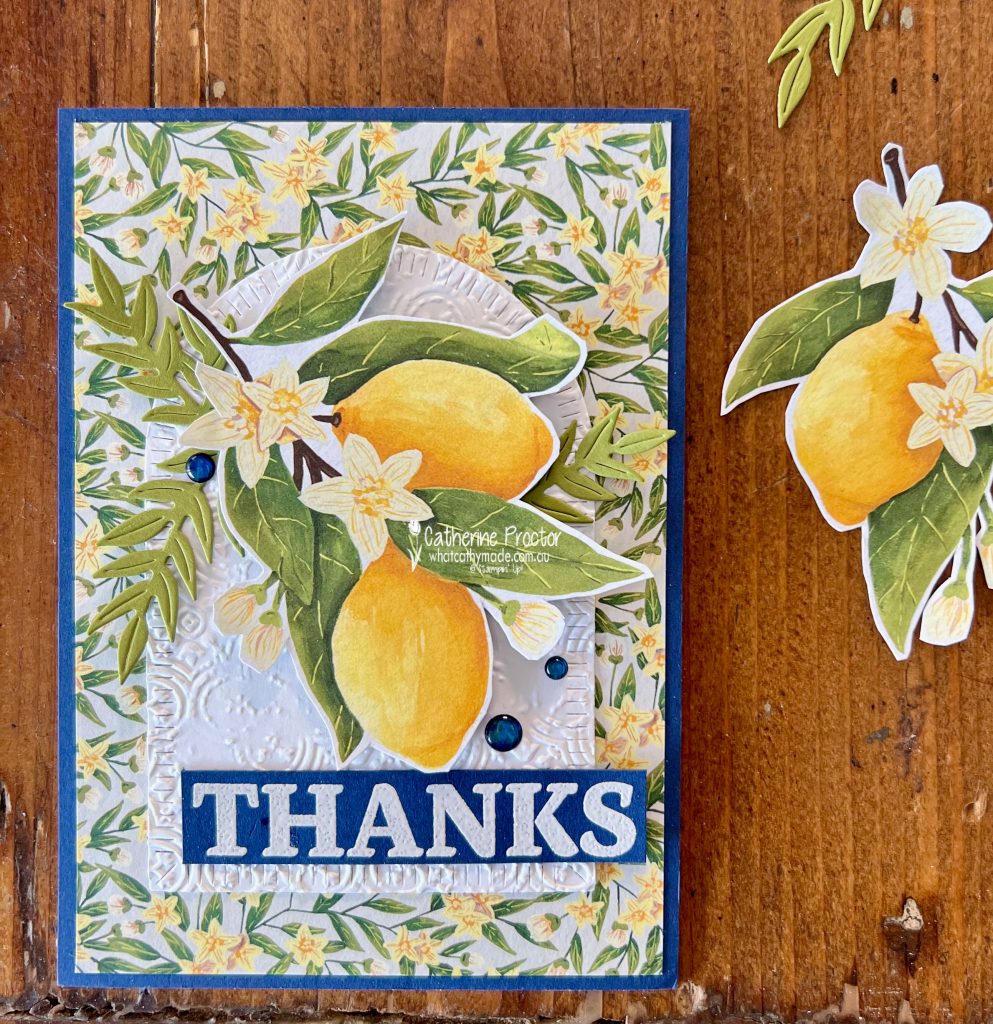
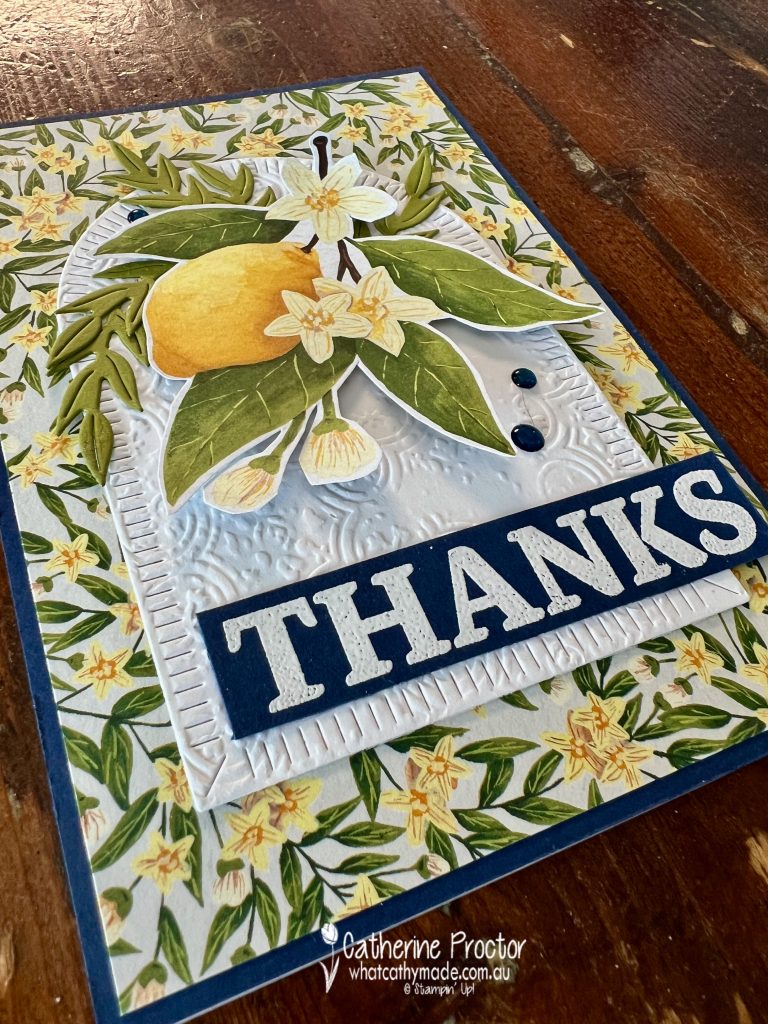
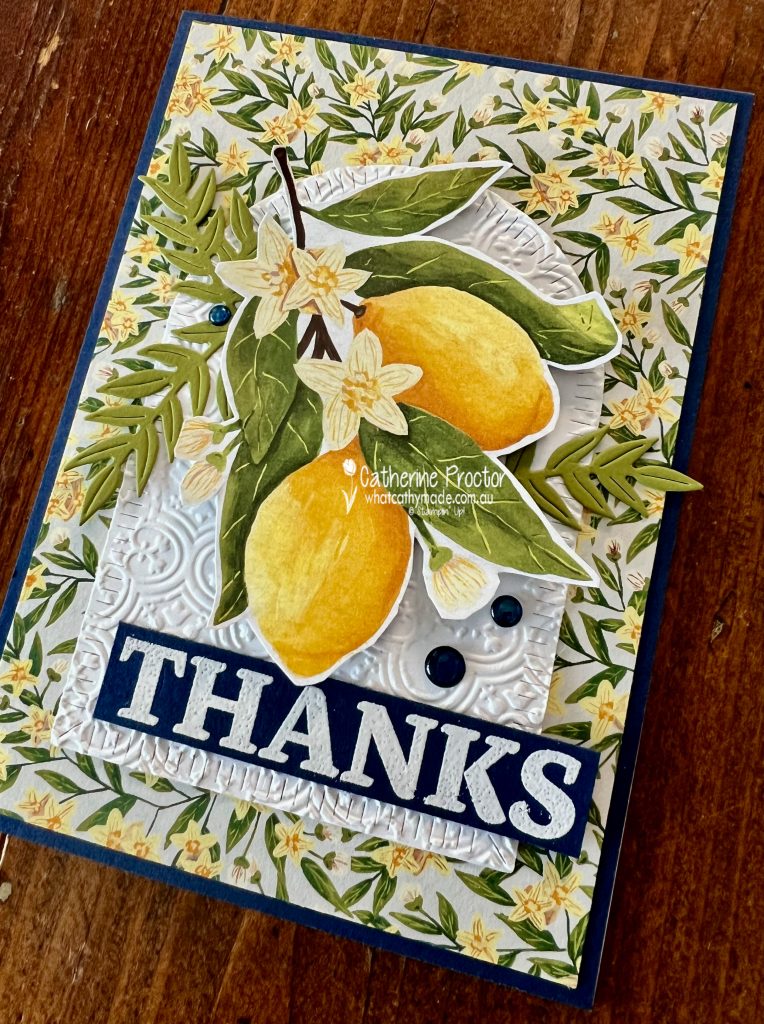
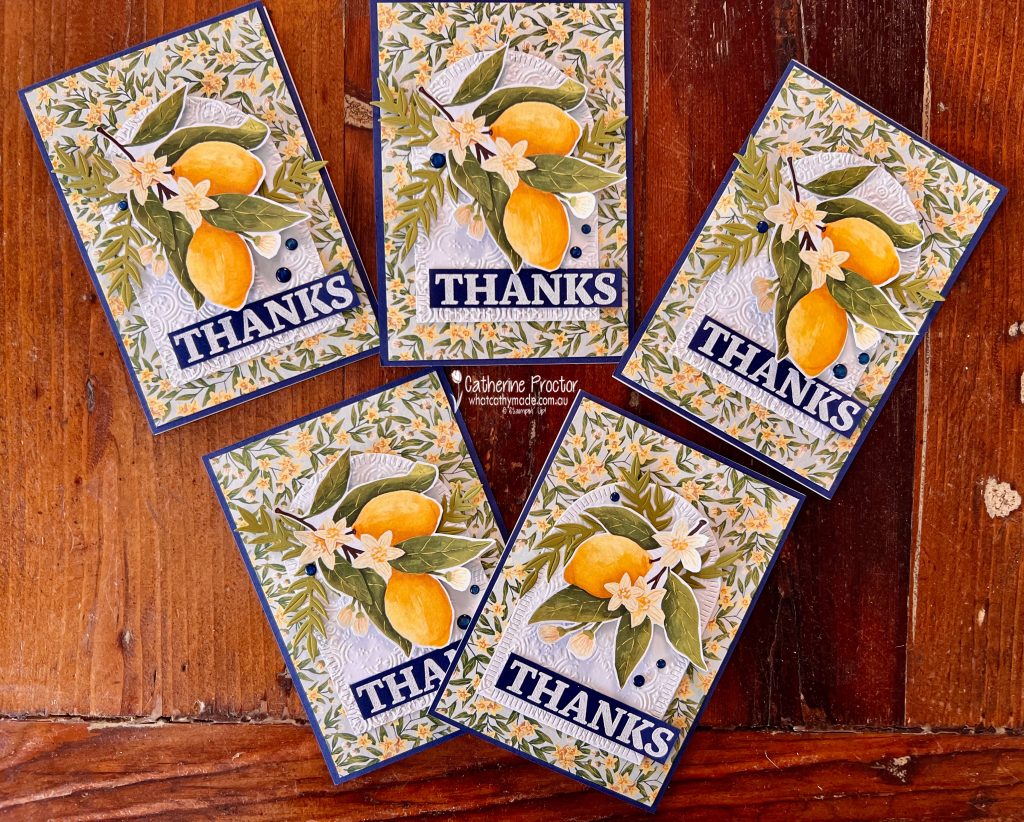
This week we’re featuring Daffodil Delight, a sunny and bright yellow from the Brights family. I’ve used the stunning Mediterranean Blooms Suite collection to make some thank you cards for my wonderful customers.
Some of the dies in the Citrus Blooms Dies die cut images from the Mediterranean Blooms DSP, however they die cut the patterns that feature oranges.
As we are featuring Daffodil Delight this week I chose to fussy cut the DSP pattern with the larger lemons that does not have a matching die. These images were very easy to fussy cut out.
I used the Distressed Tile 3D Embossing Folder to emboss the Basic White cardstock layer. This was also die cut out using the large arch die from the Garden Meadow Dies. As this arch has a very Mediterranean feel, it works really well with this suite!
The “Thanks” sentiment is from the My Small Business Stamp Set, white heat embossed onto Night of Navy cardstock. The Old Olive cardstock fronds are die cut using the loose foliage dies from the Citrus Blooms Dies.
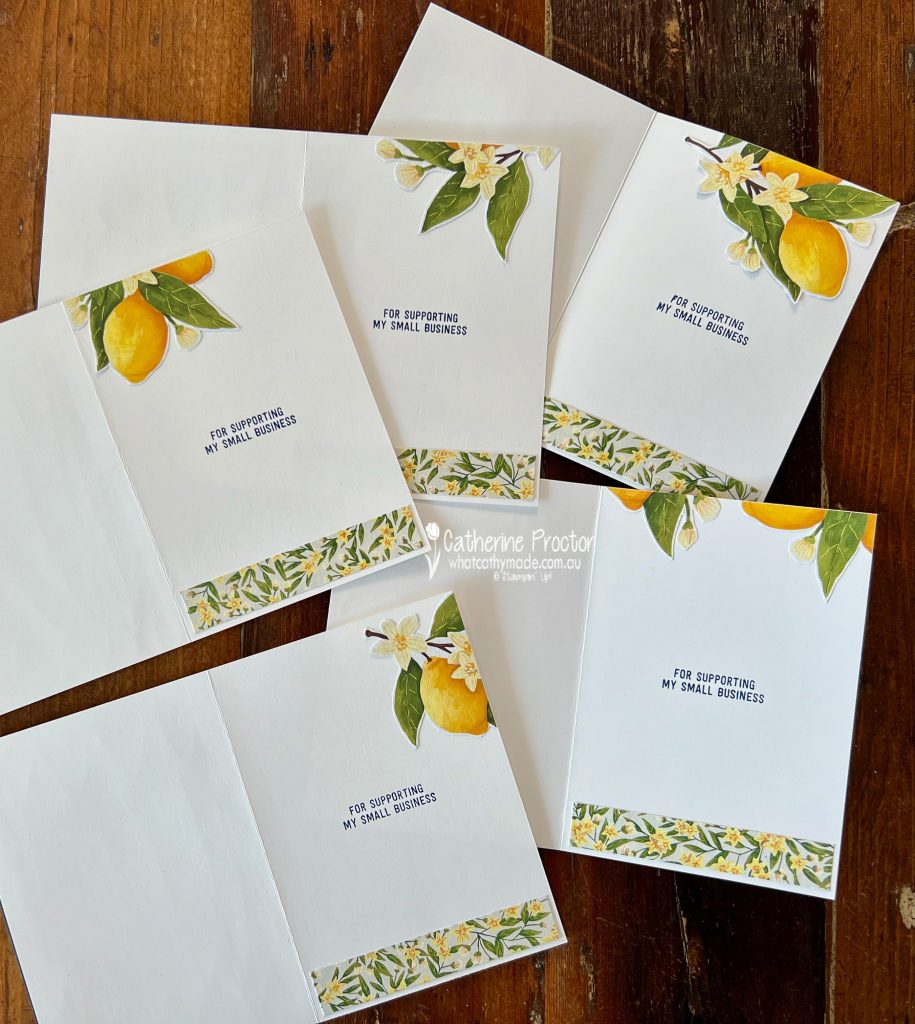
Never waste the edge pieces of a DSP design you have fussy cut! These pieces are perfect for decorating the inside of your cards. I’ve also used up leftover strips of the other Mediterranean Blooms DSP I used on the front of the card.
The inside sentiment is also from the My Small Business Stamp Set.
These cards were sent out on the weekend and I’ve already received some lovely messages from my happy customers who loved the cards and their thank you gifts.
Now it’s time to hop in over to our next participant, the lovely Rachel Palmieri. I can’t wait to see what Rachel has made this week!
If at any time you find a broken link, you can find the complete list of all participants below.
The AWH Colour Creations team will be back next Wednesday 2nd October, showcasing Early Espresso or you can join us on Monday night for some more Christmas inspiration.
Welcome to week twenty one of our Art With Heart 2023-24 Colour Creations blog hop! This week we are showcasing Daffodil Delight, a sunny yellow from the Brights family.
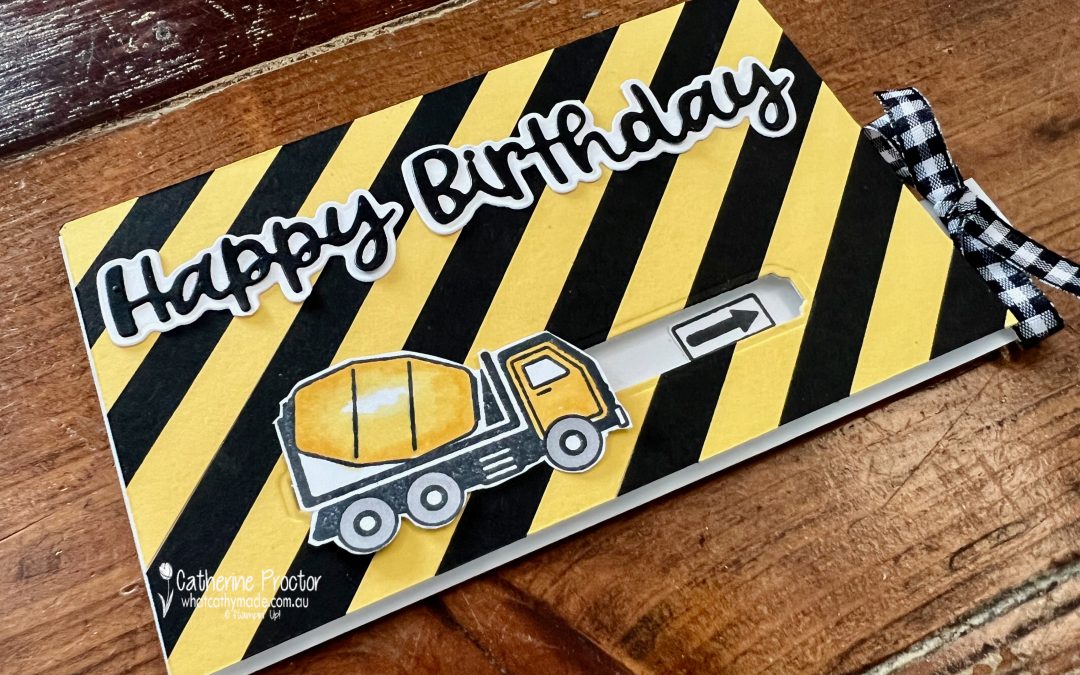
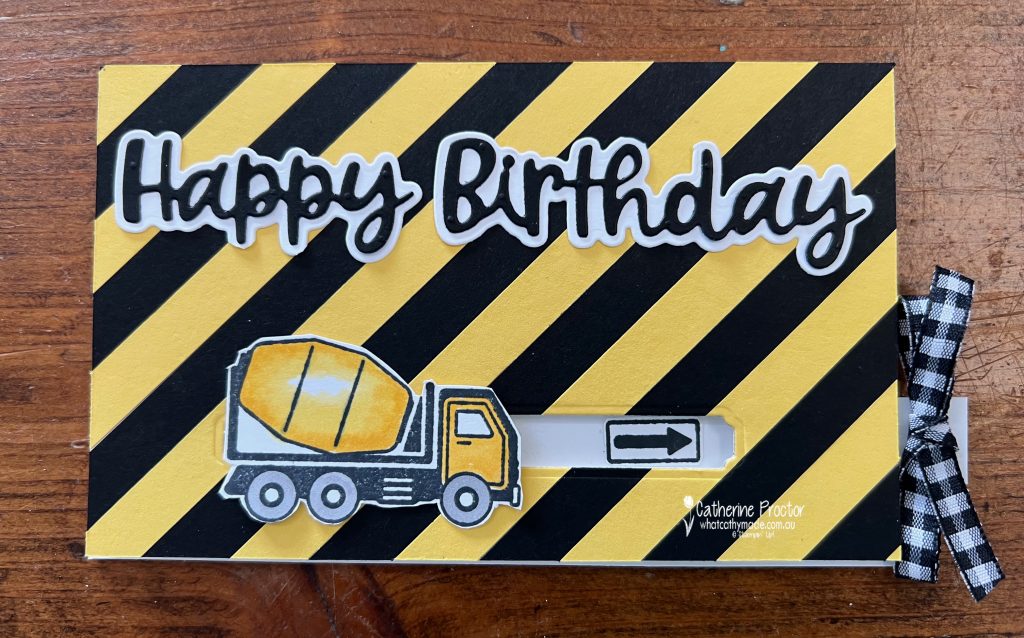
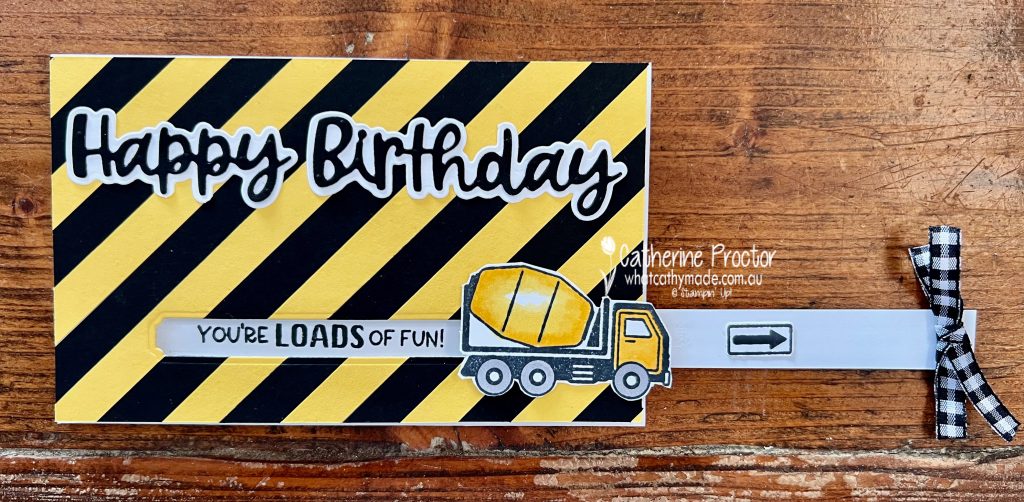
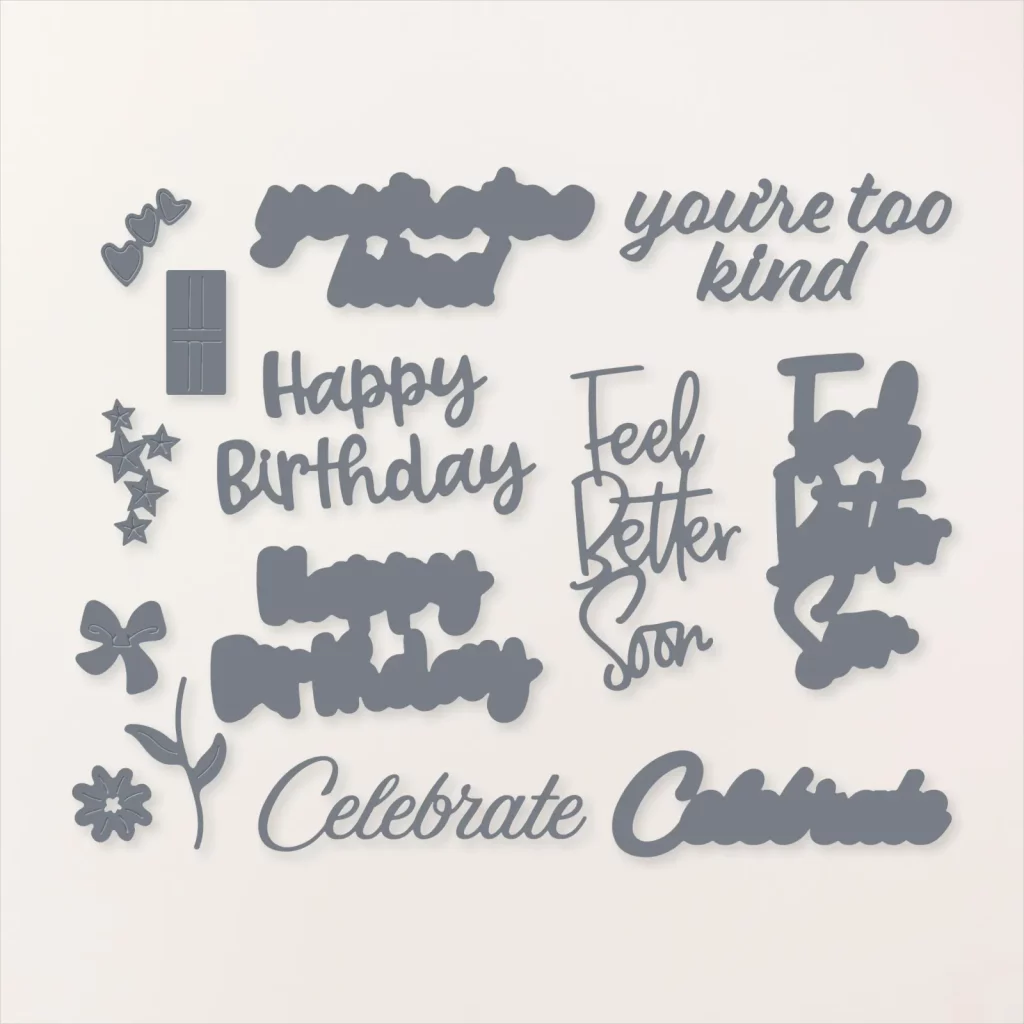
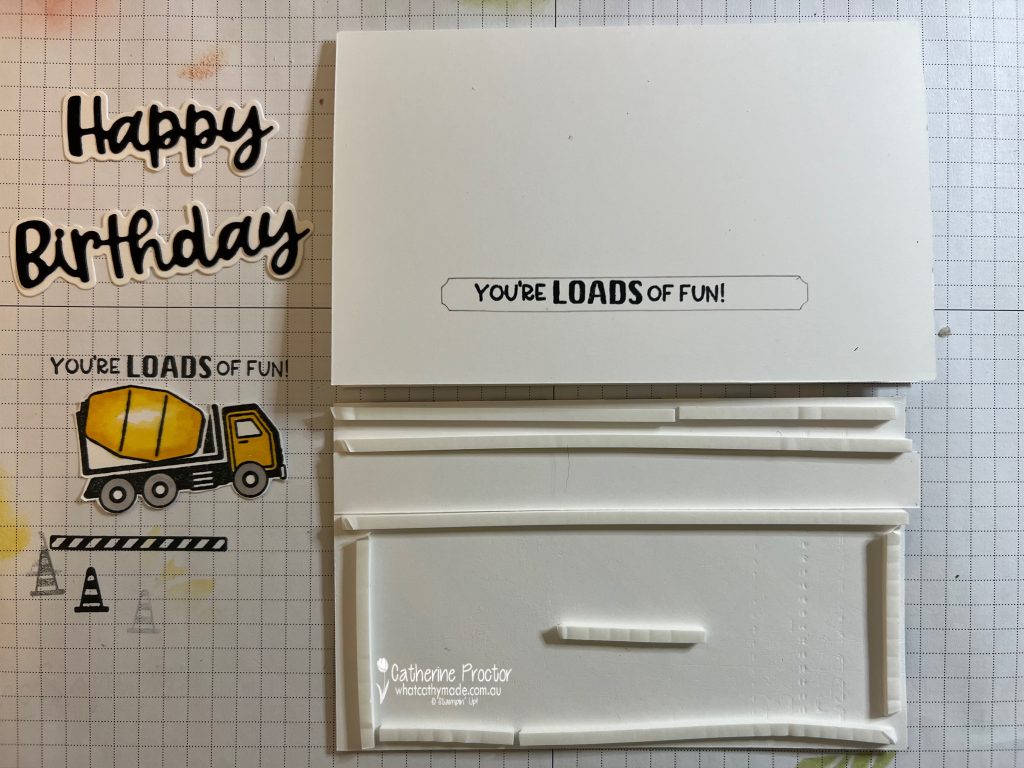
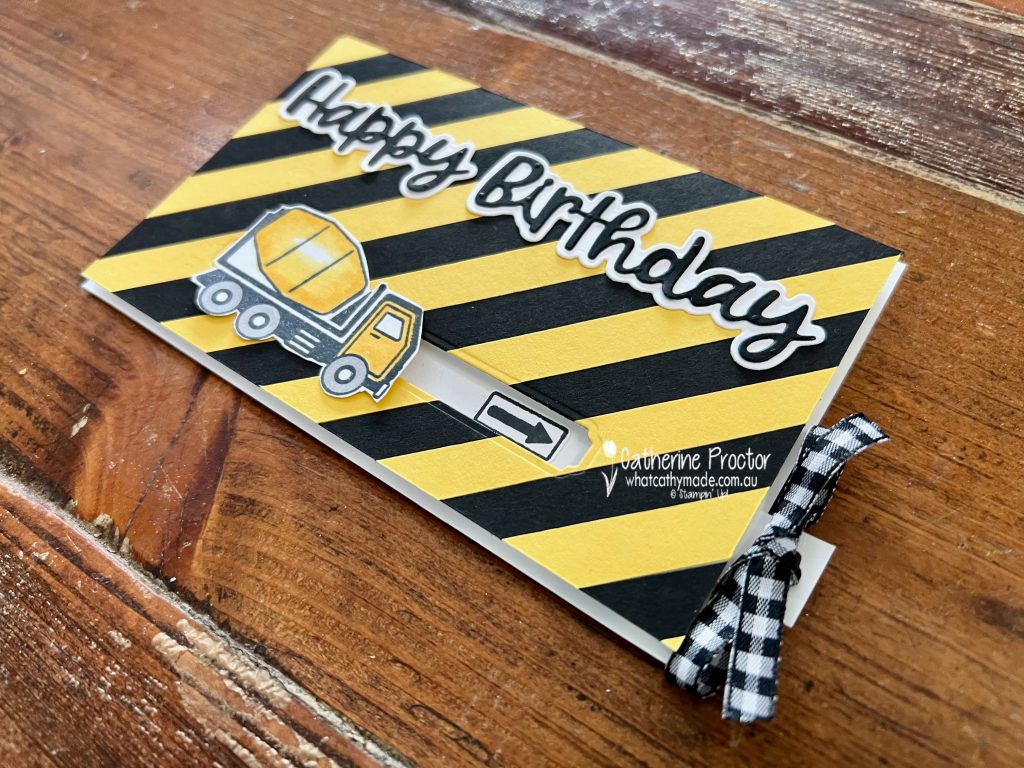
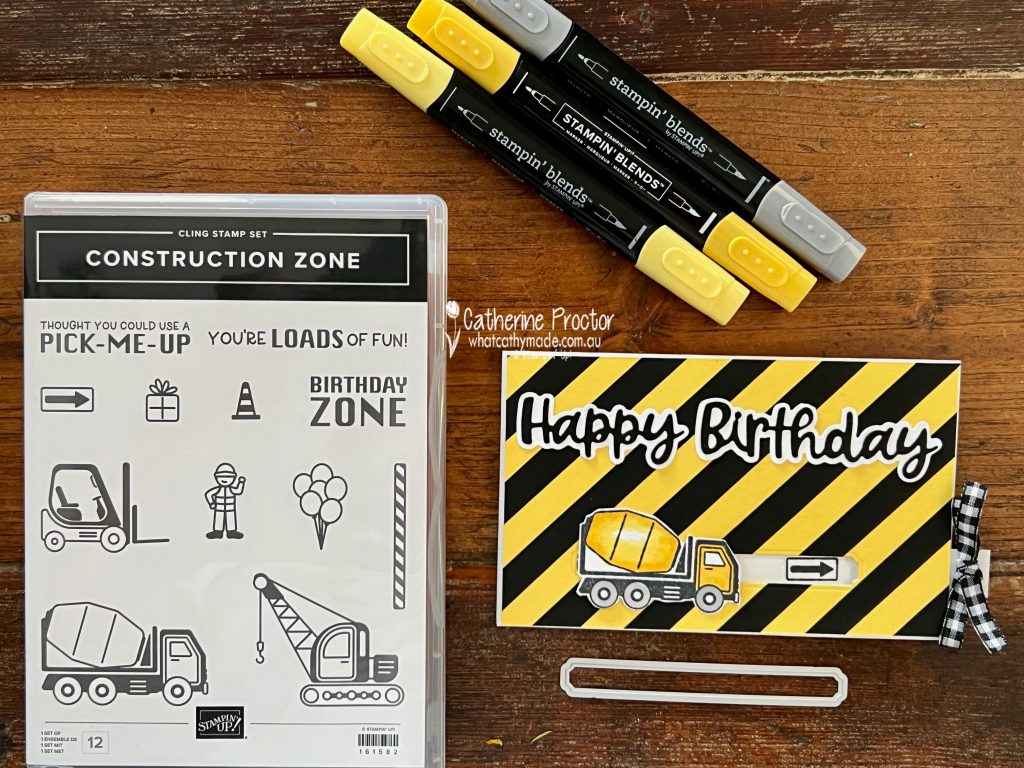
Have you seen any of the cards that use the Construction Zone stamp set, creating a “high vis” vibe by using strips of Daffodil Delight and Basic Black cardstock? Today I’ve stepped it up by creating a “high vis” card that is also a slider card.
Here is what the slider card looks like with the slider mechanism sitting inside the card…
And here it is with the slider pulled open…
The “You’re loads of fun” sentiment from the Construction Zone stamp set was the perfect size and shape to use as the sentiment for the slider reveal. The “Happy Birthday” sentiment is from the Wanted to Say dies, cut in half to create a horizontal sentiment.
To create the “high vis” vibe is relatively simple. I adhered adhesive sheets to Daffodil Delight and Basic Black cardstock before cutting the cardstock into 1cm wide strips.
These strips were then attached on a 45 degree angle to a piece of Basic White card stock to create the front layer.
The channel for the slider mechanism was then cut out of this front layer using the longest die from the Sending Dies.
Here’s a peek at the construction process – I made up the design of this card and the mechanism as I went along so I only took one (very messy) photo of the construction stage.
One important aspect of creating a slider card is to place the top layer over the front of the card (BEFORE adhering the top layer to the card front with foam strips) and trace the die-cut channel area onto the card. This shows you exactly where to stamp the slider reveal sentiment.
This photo also shows the reverse side of the slider strip sitting between the strips of foam that line the slider channel – line the slider strip up between theses foam strips to ensure it slides smoothly but is still snug BEFORE you attach the cement truck to the front slider strip using either foam strips or dimensionals.
This short video shows the slider card in action, as well as the back of the slider strip pull mechanism.
I’ve used the arrow stamp from the Construction Zone stamp set to indicate where to pull, using a bow of Black & White 1/4″ (6.4 mm) Gingham Ribbon adhered with a black Square Brad to the slider strip, which is 1.5cm wide.
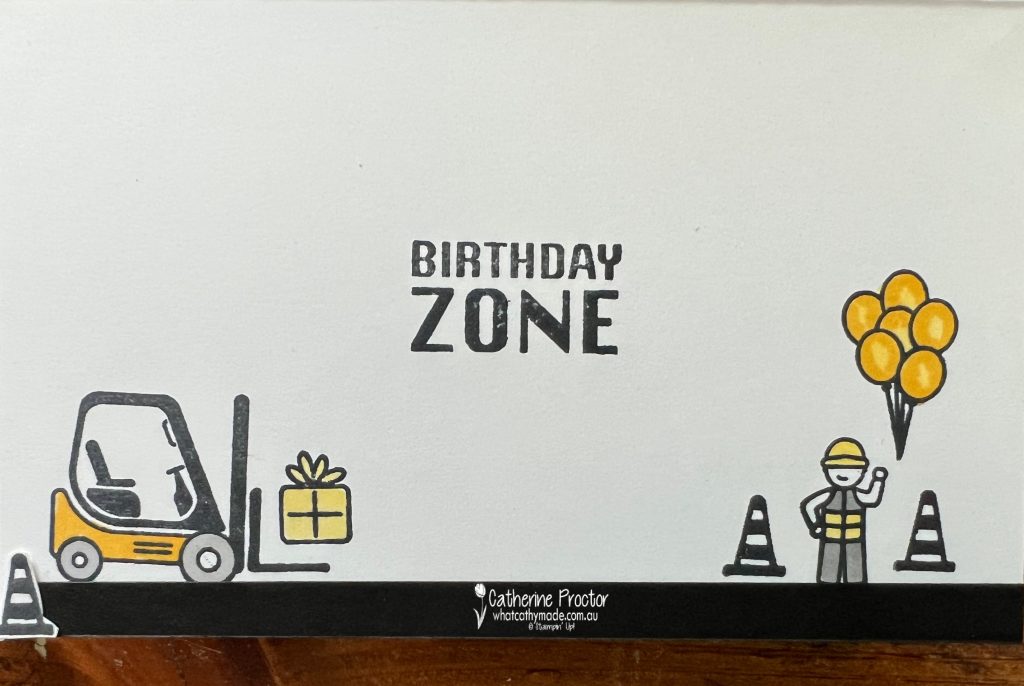
On the inside of the card I had fun playing with the other stamps from the construction Zone stamp set.
I’ve coloured the inside images and the cement mixer on the front of the card with Daffodil Delight and Smoky Slate stampin blends.
Now it’s time to hop on over to our next participant, the lovely Andrea Sargent – I can’t wait to see what Andrea has made this week!
If at any time you find a broken link, you can find the complete list of all participants below.
Today I’m sharing another card I made for the “G’day Fri’yay’ Card Making Challenges” Facebook group, a fortnightly Card Making Challenge with Aussie Themes. The last few times I forgot to add the banner for this group, so here it is.
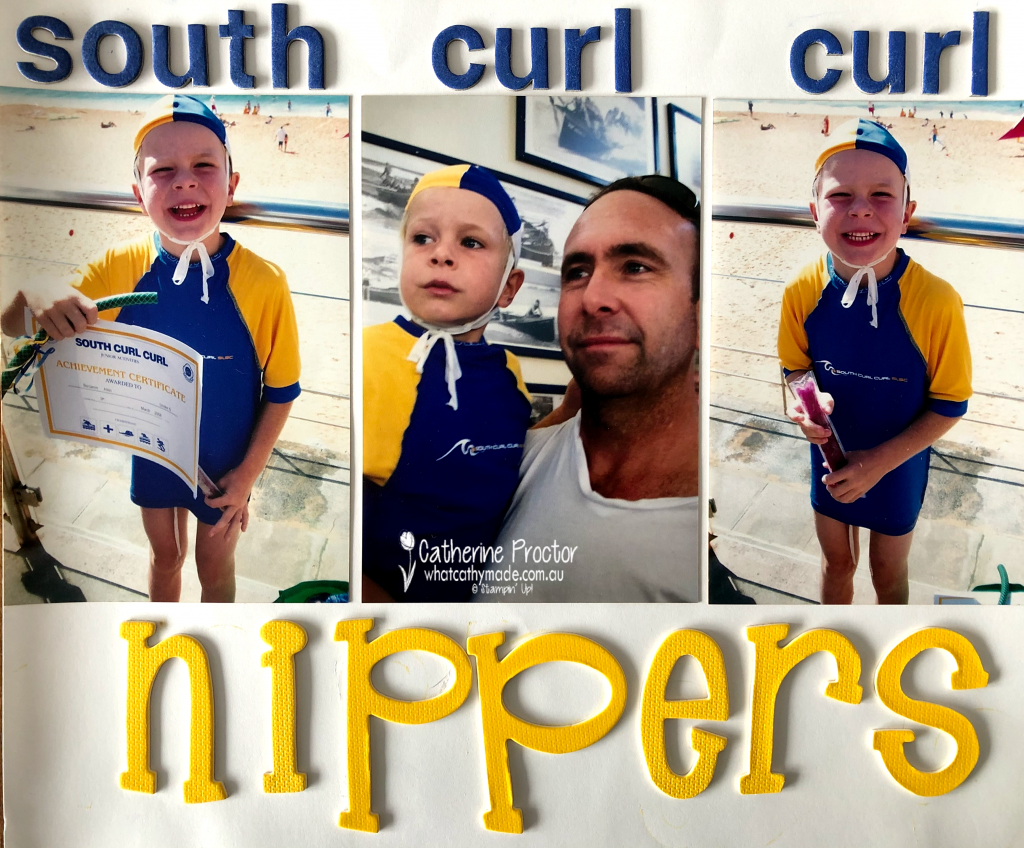
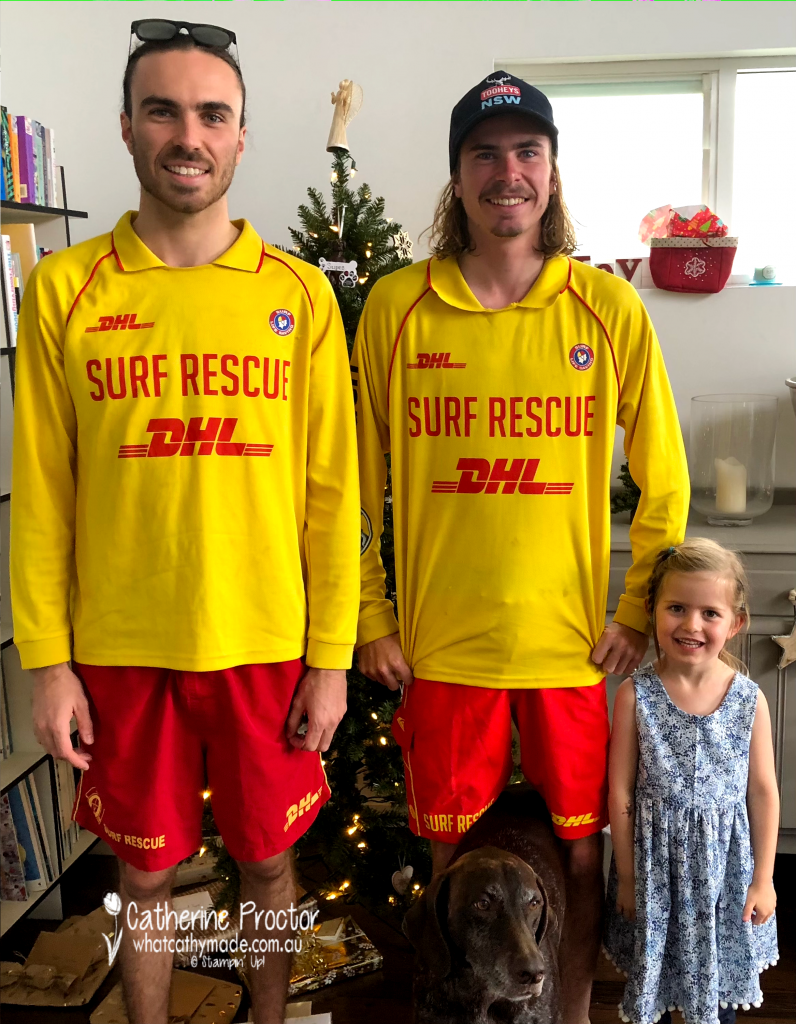
The theme for this challenge is “Aussie Sports” and although my boys play a lot of sport there is one quintessentially Aussie sport that my entire family are very involved in – surf life saving. We came to surf life saving the way that many families do, via their Junior Development Program, commonly known as nippers. As far as I am aware this is a sport that is only played in Australia.
My husband, Pete, is a die-hard surfer and we live at Freshwater beach, however he insisted our kids join the neighbouring South Curl Curl nippers program instead as it is one of the roughest beaches in Australia and he knew if they learnt to handle the waves there they would be safe at any beach. Pete was the age manager for my eldest son Samuel’s age group all the way through nippers, but this scrapbook layout shows Pete holding our youngest son Ben after he finished his first year of nippers.
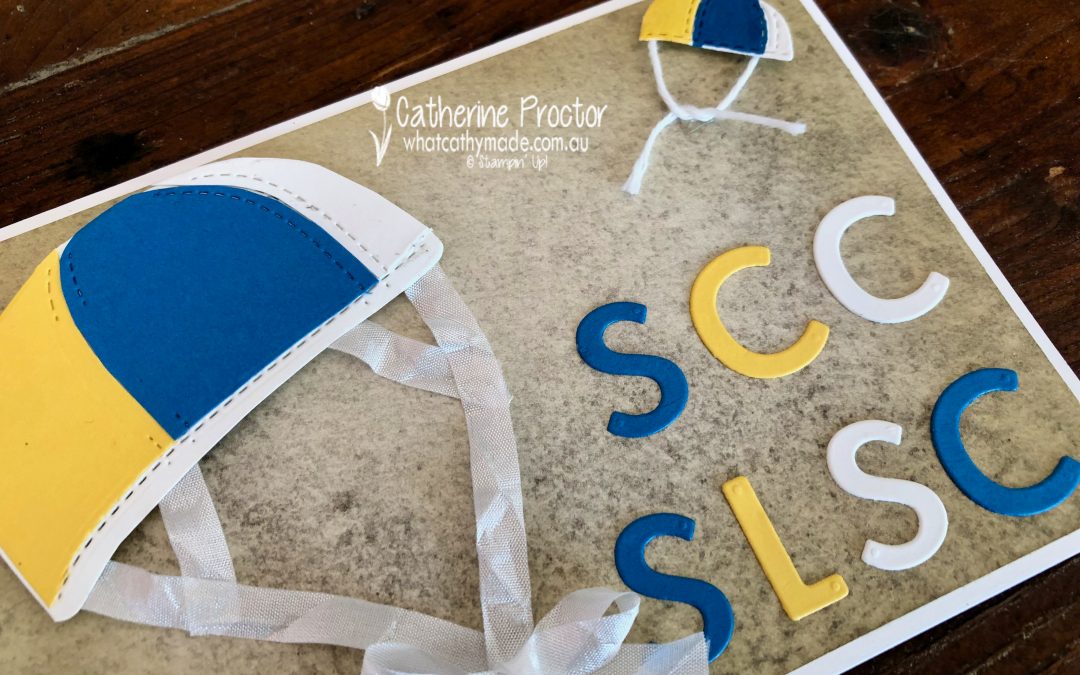
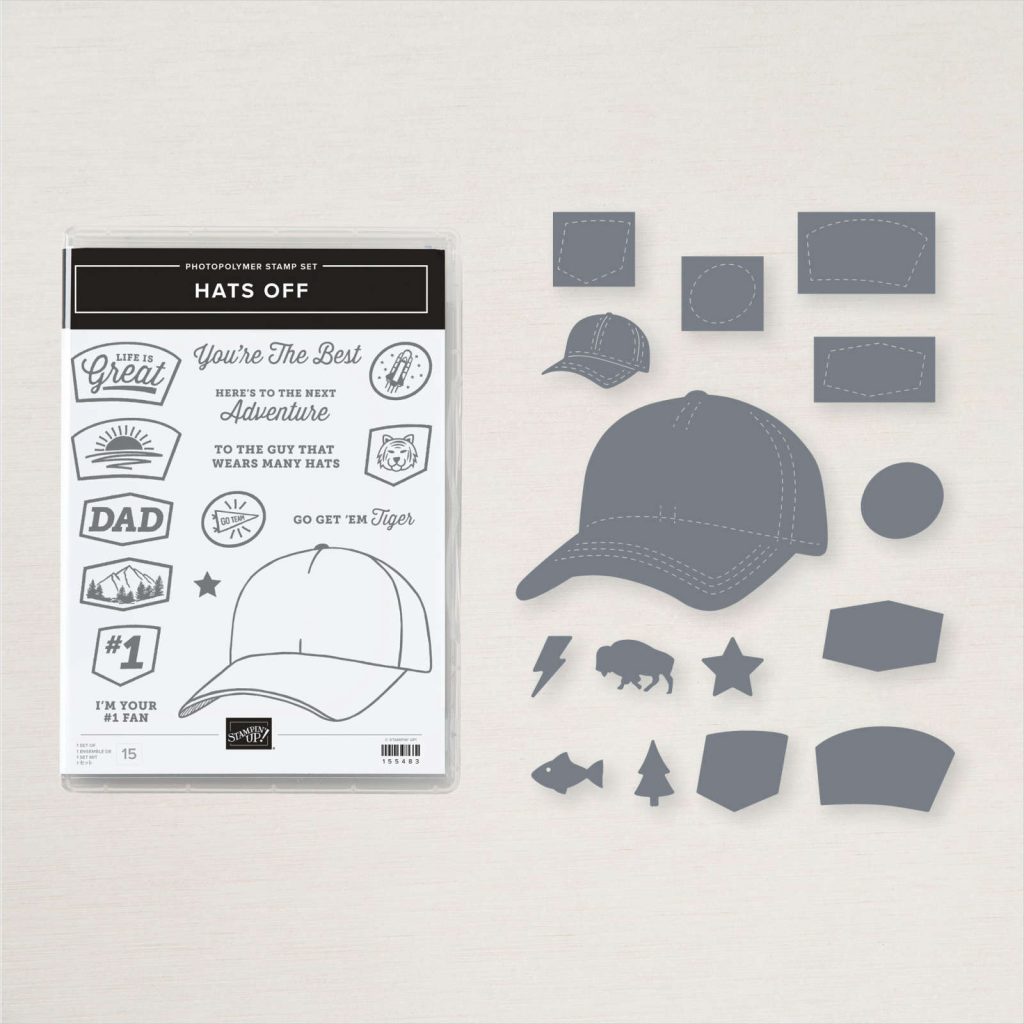
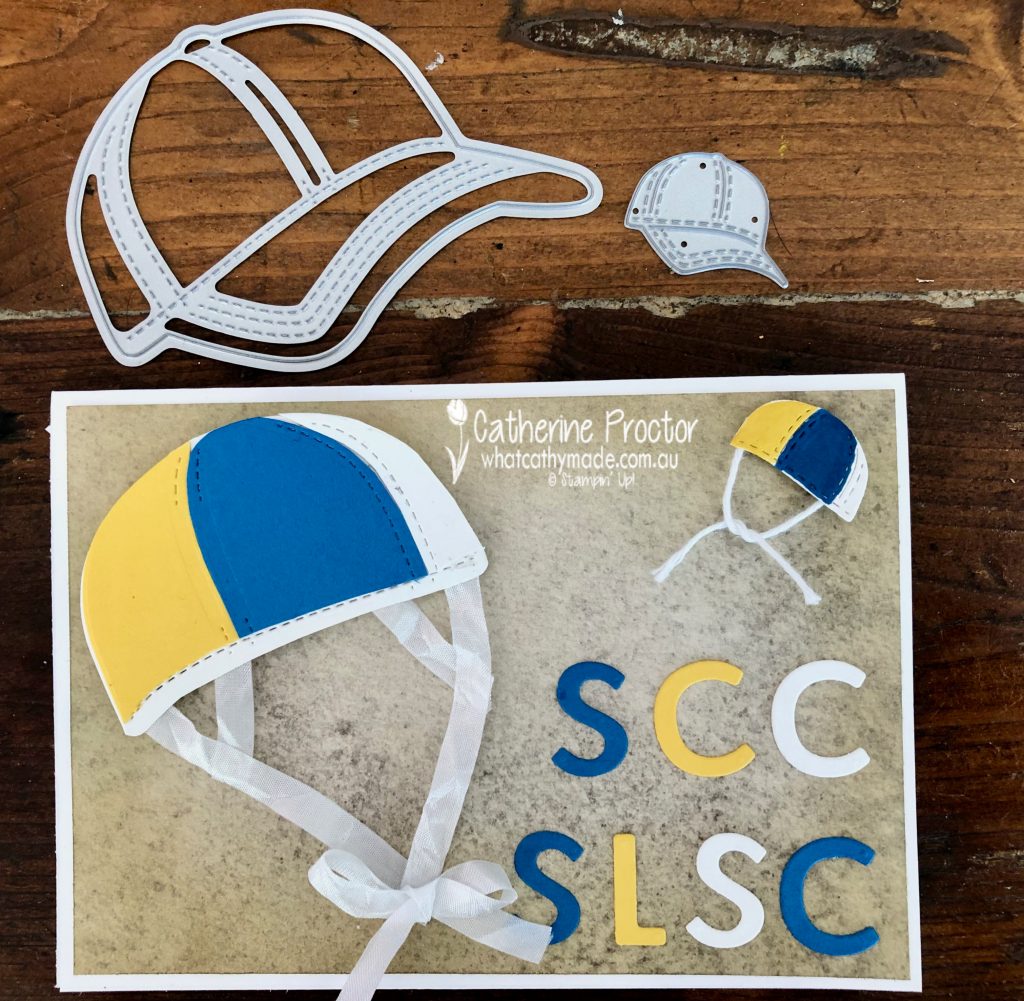
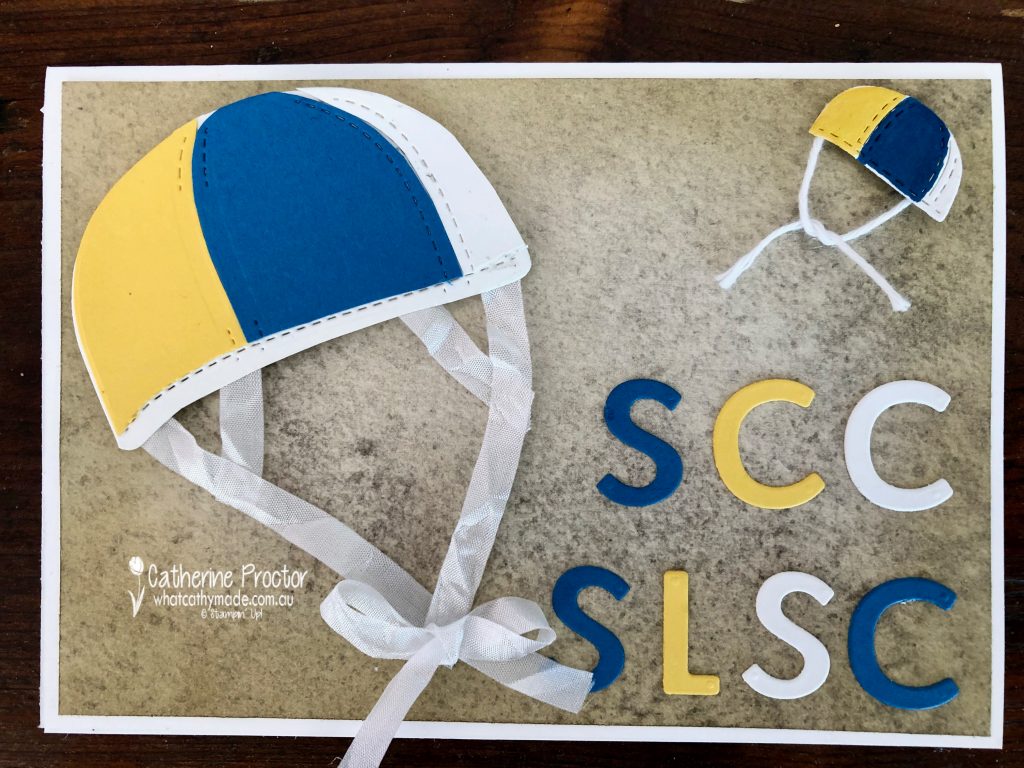
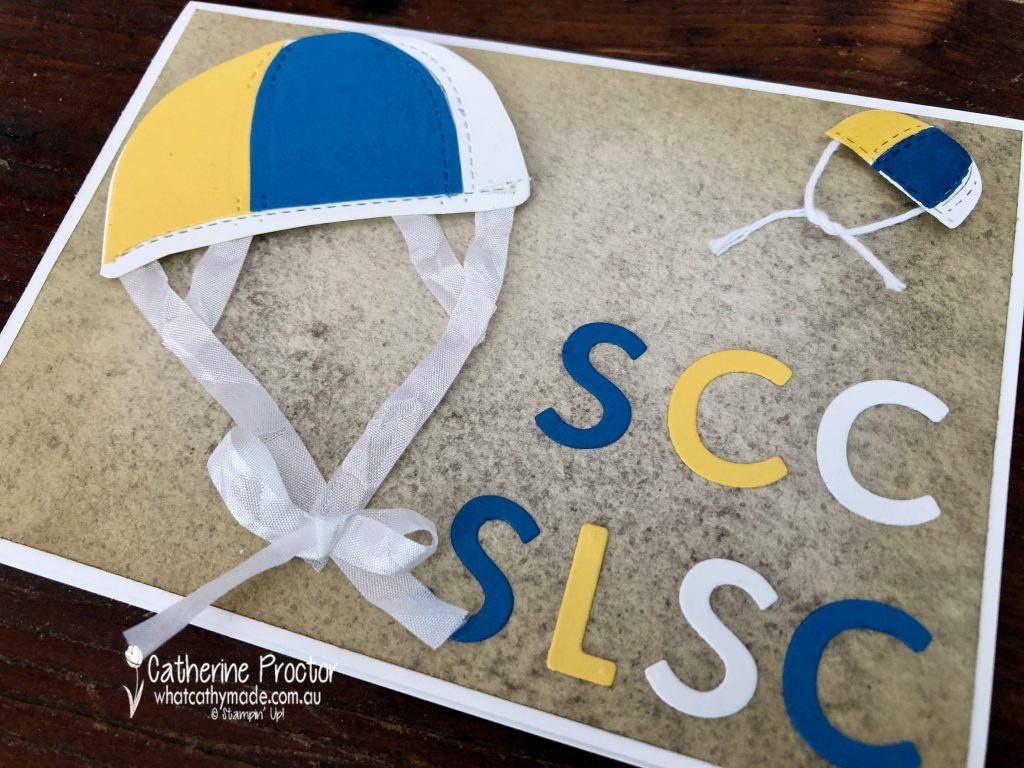
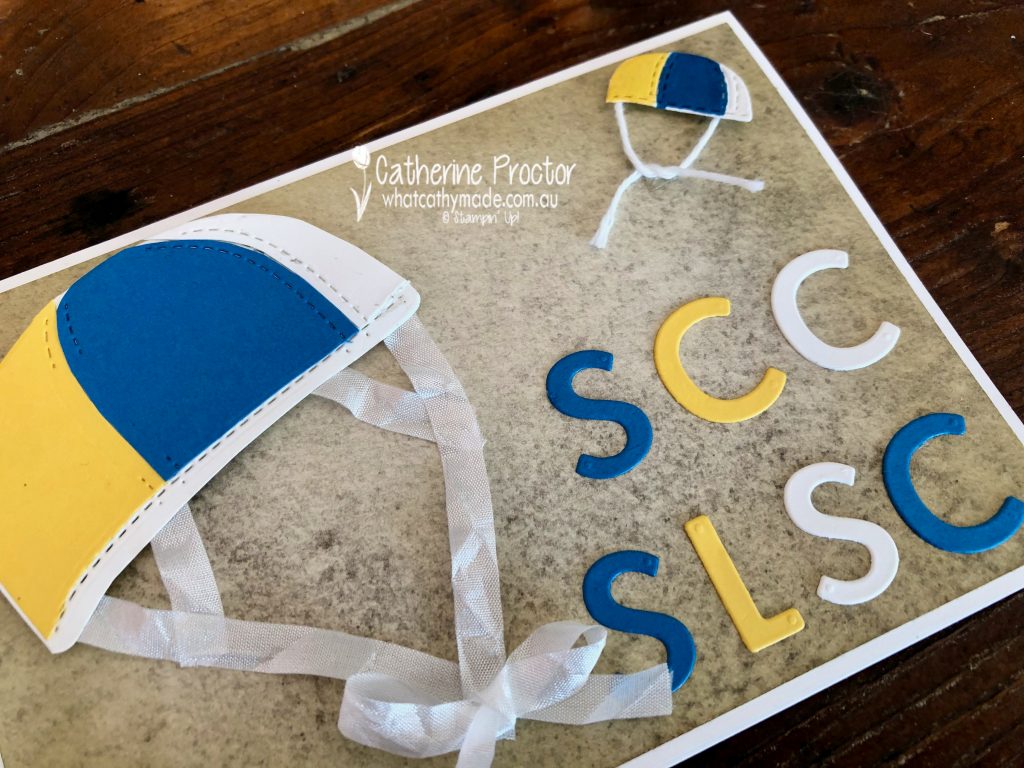
When I was wondering how to make a card for this sport I realised I could use Hat Builder dies from the fantastic masculine Stampin’ Up! bundle called Hats Off.
By cutting off the brim/visor off the large and the small hats it becomes the perfect shape for a nippers cap! How cool is that!
For the large nippers cap I die cut 2 large hats in Basic White and 1 hat in Pacific Point and 1 hat in Daffodil Delight. I used my paper snips to trim the visor off all 4 caps and cut the 3 colours of so there was one panel of each colour. I adhered these panels to the base cap in Basic White.
The smaller nippers cap is made from just 1 die cut cap with the visor trimmed off and 2 of the panels coloured with my Pacific Point and Daffodil Delight markers.
The ties for the nippers caps were made from White Crinkled Seam Binding Ribbon and Basic White bakers twine.
The DSP is the retired Sand & Sea DSP inked up with some Sahara Sand ink at the edge to look like the sand on South Curl Curl beach. The Playful Alphabet letters were cut from Pacific Point, Daffodil Delight and Basic White card stock to match our surf club colours and spell out the letters of our surf club: South Curl Curl Surf Life Saving Club.
Want to see what that little blond cherub looks like today? My husband and both my boys all patrol South Curl Curl as volunteer surf lifesavers – in fact, my husband is the patrol captain for the first patrol of the season this afternoon. This photo was taken last Christmas day as both my boys headed off the patrol the beach – my niece and dog decided to photobomb my boys! Ben is in the middle of the photo and is now 19, about to turn 20. Where do the years go!
Thanks for visiting my blog today. I’ll be back on Monday with a Christmas Card in the AWH Heart of Christmas blog hop and again on Wednesday in our weekly AWH Colour Creations Showcase – we are showcasing Flirty Flamingo this week.
If you live in Australia, you can find and purchase all these products in my Stampin’ Up! Online Store. Don’t forget to use my monthly Host Code (if your order is between $50 – $250) and I will send you a thank you gift the following month. If your order is over $250 don’t use the host code because you will qualify for your own stamping rewards.
My September Host Code is WVX3UYCR and it is valid until midnight September 30.
In the meantime, wherever you are in the world, stay safe, stay calm … and keep on crafting xxx
Welcome to week 15 of our 2021-22 Colour Creations blog hop! Tonight we are showcasing Daffodil Delight, a bold yellow from the Brights colour collection.
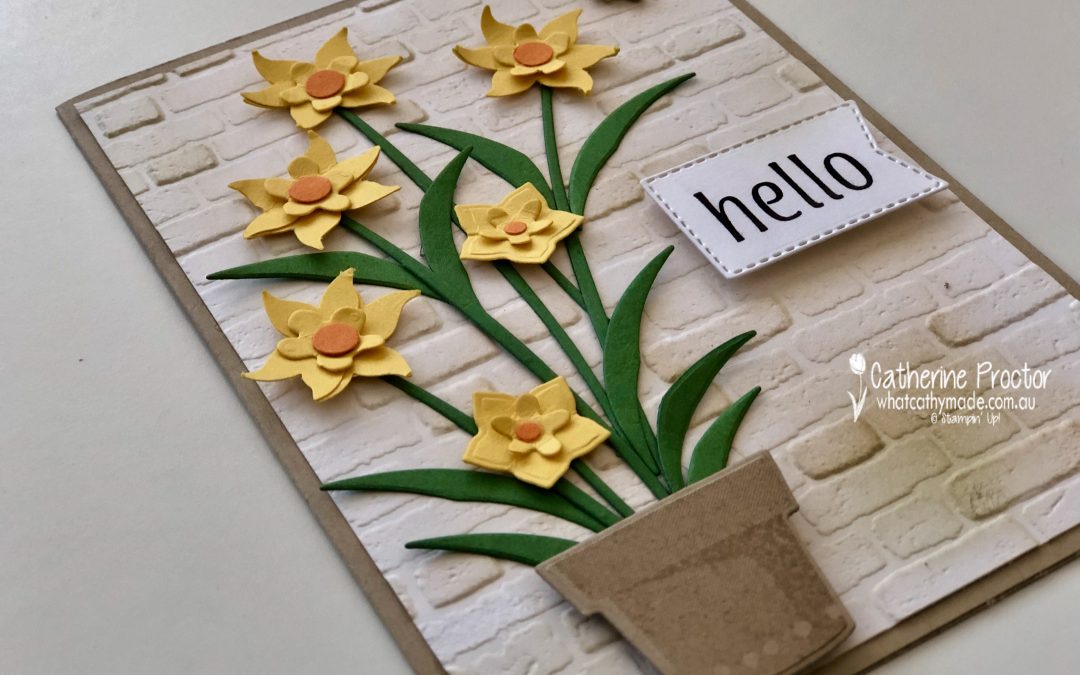
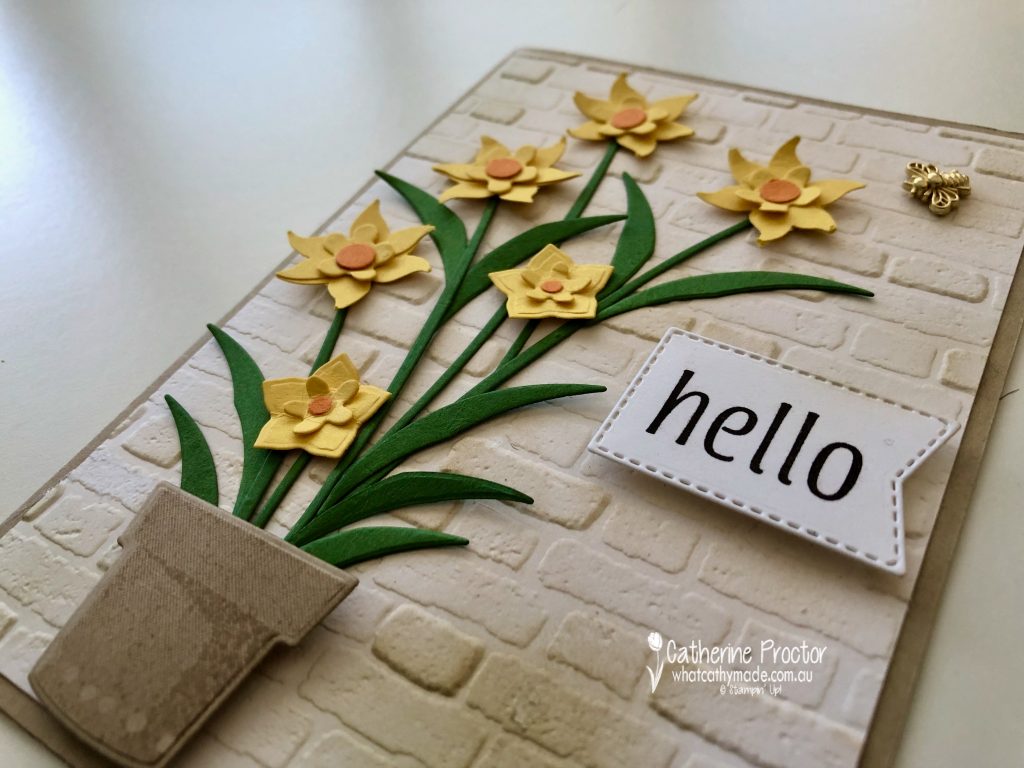
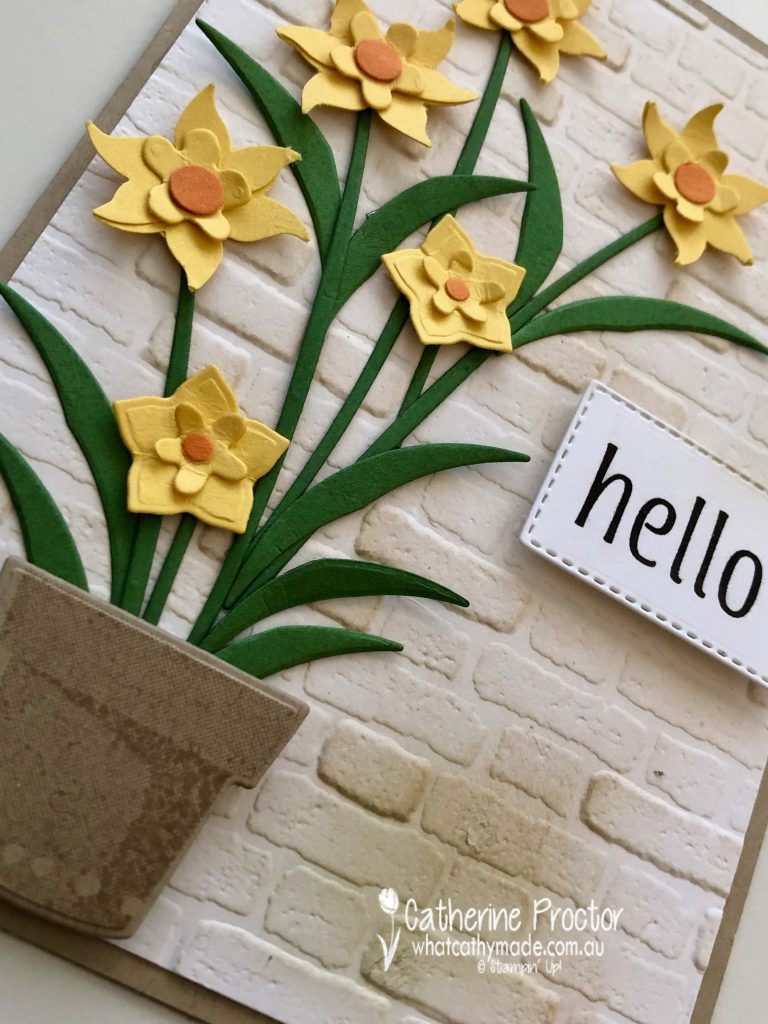
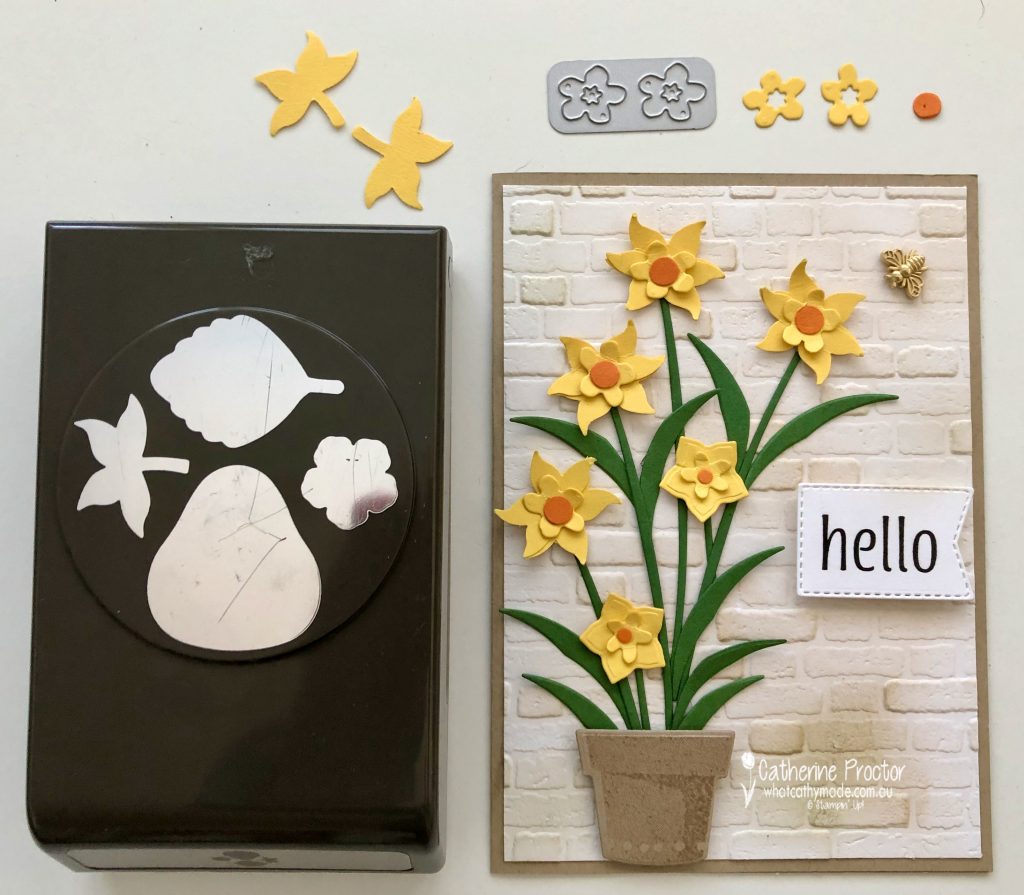
I really wanted to make a daffodil card for our Daffodil Delight blog hop, however as we only use current Stampin’ Up! products in these blog hops and I didn’t have any daffodil stamps, punches or dies. It was time to get creative.
I’m not sure just how botanically correct my daffodils are, so please allow me some artistic licence!
For the embossed Whisper White layer of my card front, I’ve deliberately inked my embossed brick wall darker in some places than others, applying both Crumb Cake and Garden Green with a blending brush to give a more realistic effect.
There are two sizes of daffodils on this card. For the back layer of the larger daffodil I punched two leaves in Daffodil Delight from the Strawberry Builder Punch. I them removed the leaf stems and overlapped the dies when gluing them together.
The middle layer of the large daffodil is die cut in Daffodil Delight using the small double flower dies from the Cherry Blossom Dies. The Pumpkin Pie circle in the centre of the flower is punched with a standard sized hole punch for ring binders.
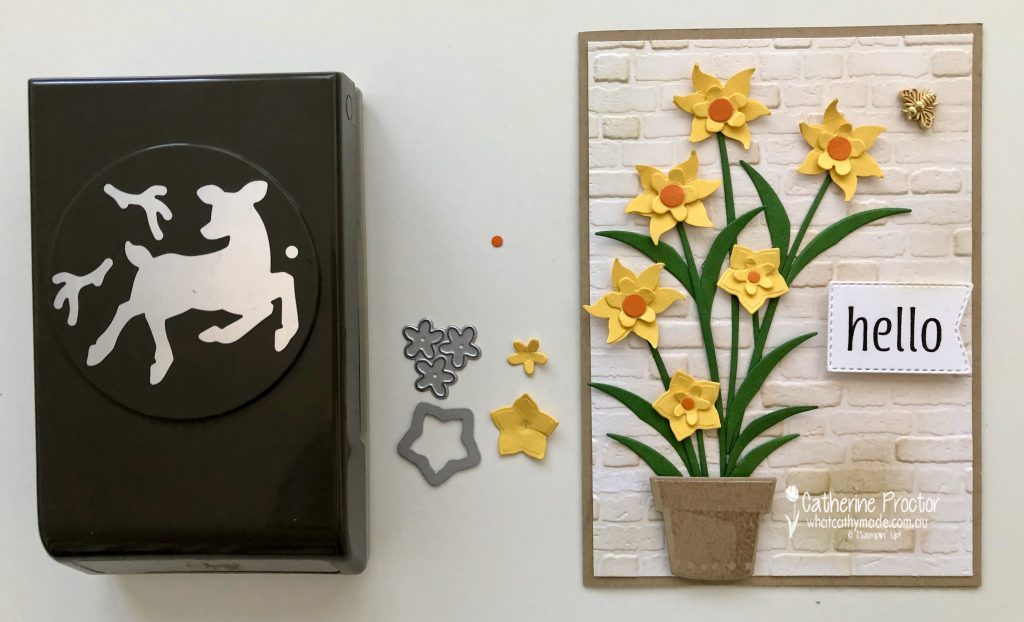
The two smaller daffodils use the flower die from Birds & More as the background layer and the triple flower die from Pierced Blooms for the middle layer, both cut from Daffodil Delight. The Pumpkin Pie flower centre is punched using the deer nose in the Deer builder punch.
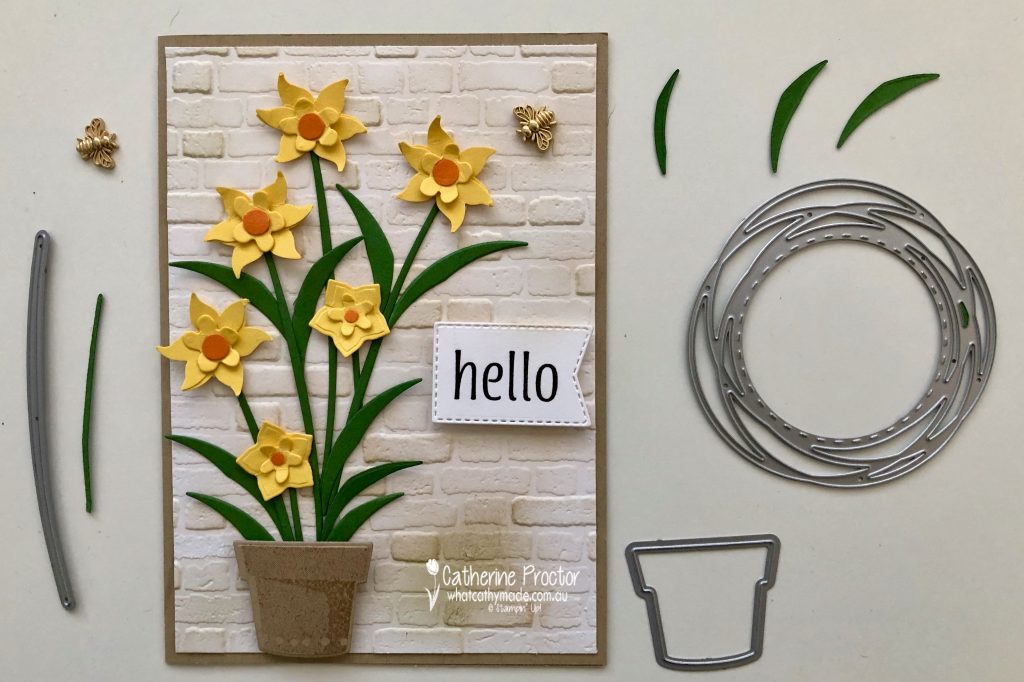
Stems and leaves are die cut from Garden Green card stock using the stem die from Pierced Blooms dies and the offcuts from the circle wreath die in the Painted Labels dies. The cute little pot was stamped in Crumb Cake using a stamp from the Plentiful Plants stamp set and then die cut from Crumb Cake card stock using the coordinating Perfect Plants Dies.
I’ve recently acquired the Artistically Inked bundle and just couldn’t resist adding this gorgeous “hello” sentiment to the front of the card – isn’t this font so eye catching? I die cut it out with one of the Tasteful Labels dies.
My final touch was a Bumblebee trinket. I’ve been hoarding these – it’s time I started adding these adorable embellishments to my cards!
Now it’s time to hop on over to our next participant, the very talented Rachel Woollard – I can’t wait to see what she’s made this week!
If you find a broken link or have come to this blog hop from a different entry point, you can view the the full list of participants below:
Today I’m sharing another card I made for the “G’day Fri’yay’ Card Making Challenges” Facebook group, a fortnightly Card Making Challenge with Aussie Themes.
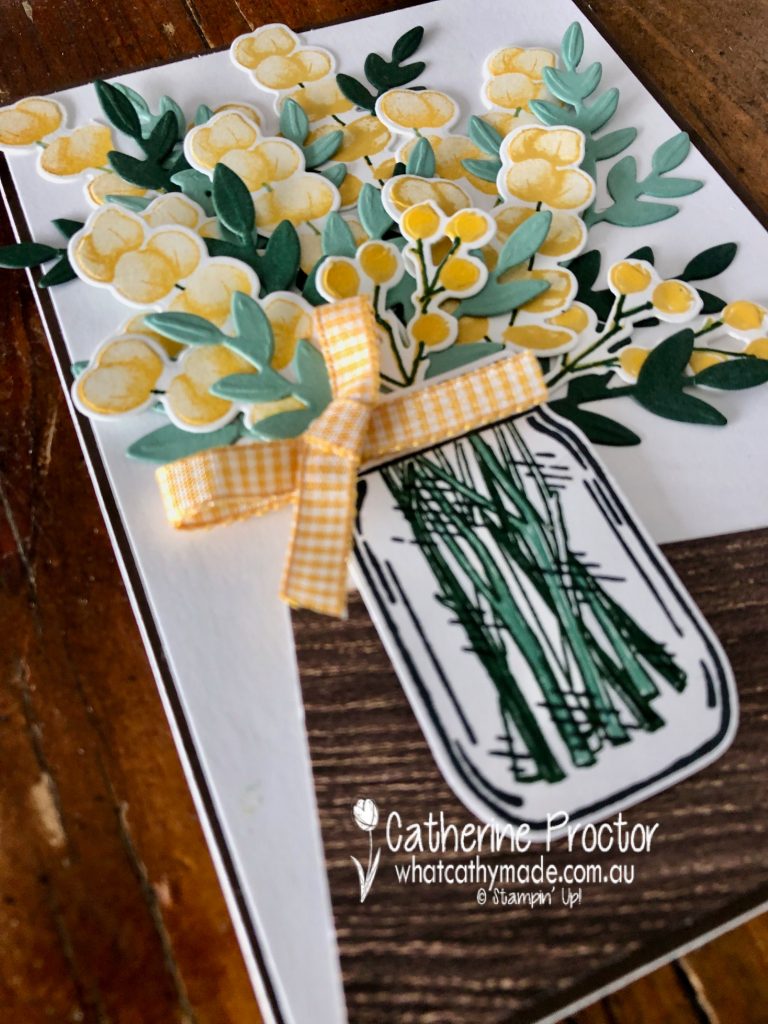
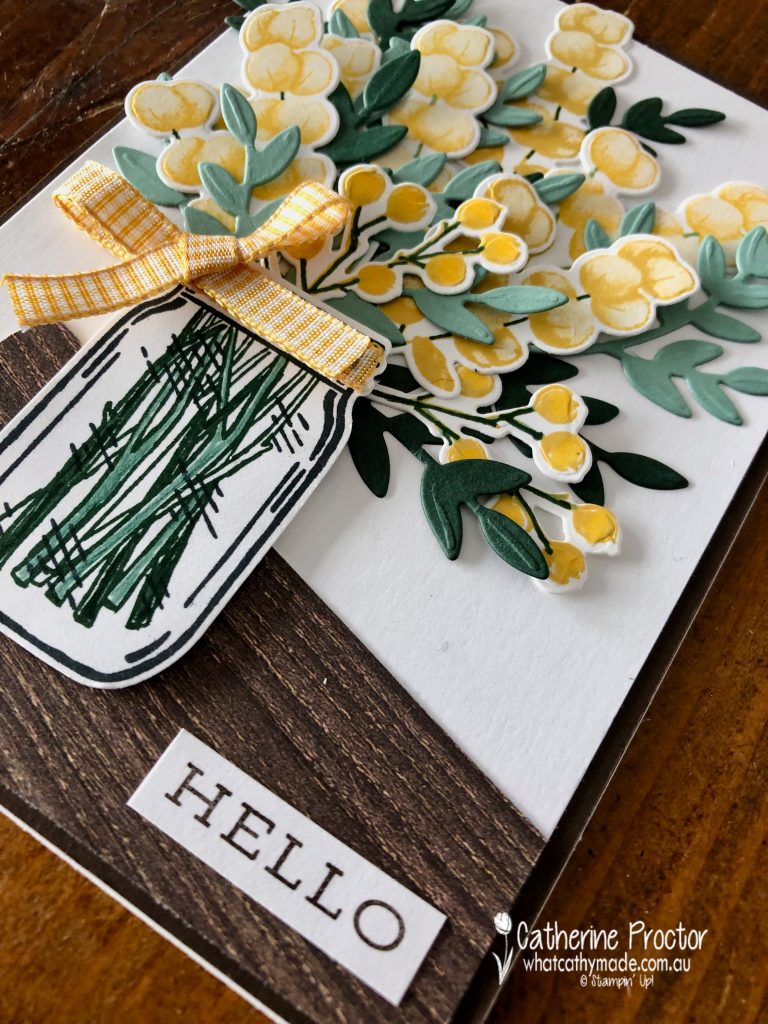
The theme for this challenge is “Spring” and for me nothing announces the start of spring in Australia like wattle does. September 1 is the start of spring as well as Wattle Day, a celebration of our national flower.
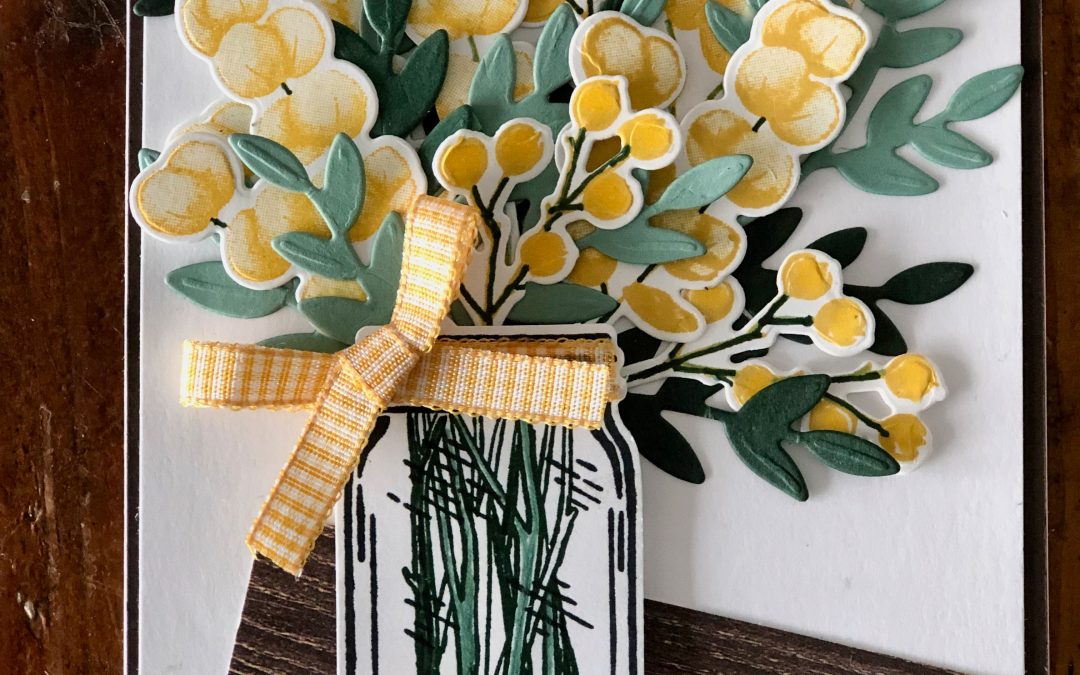
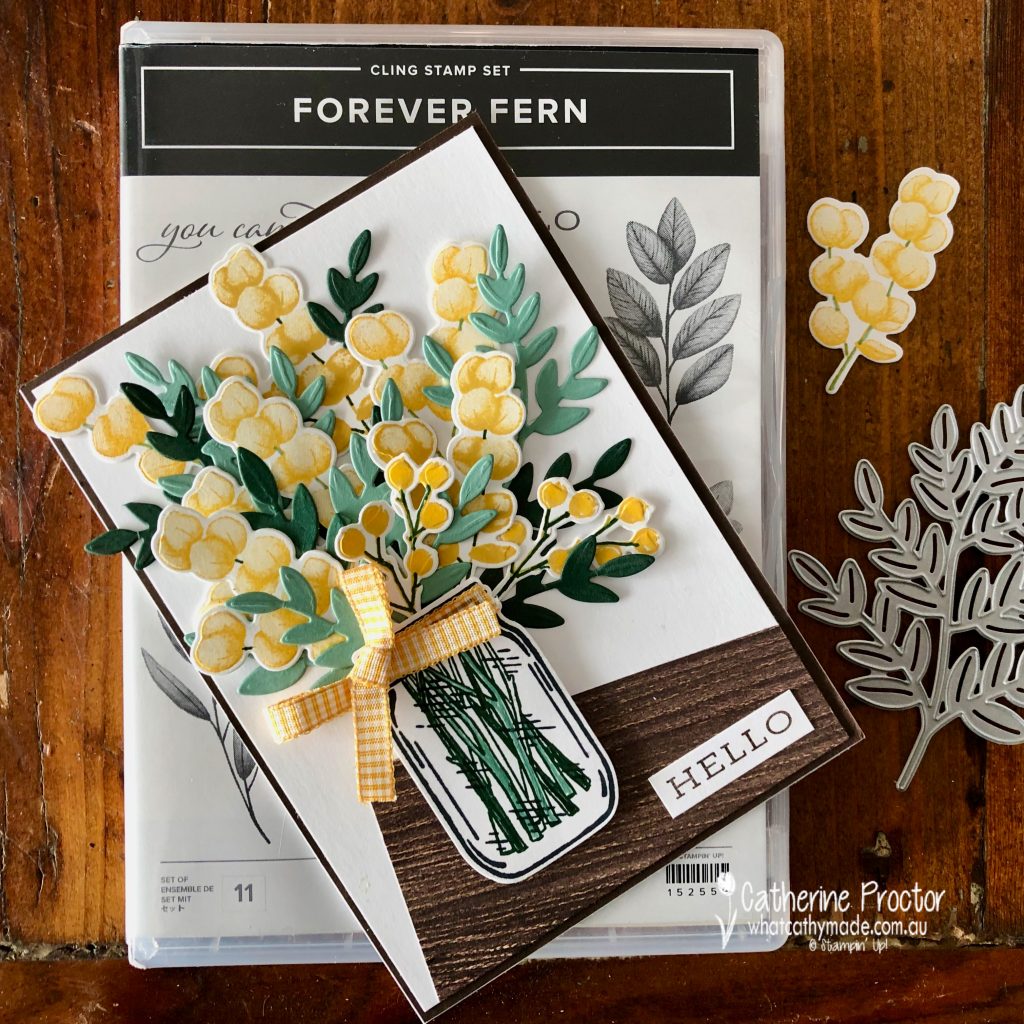
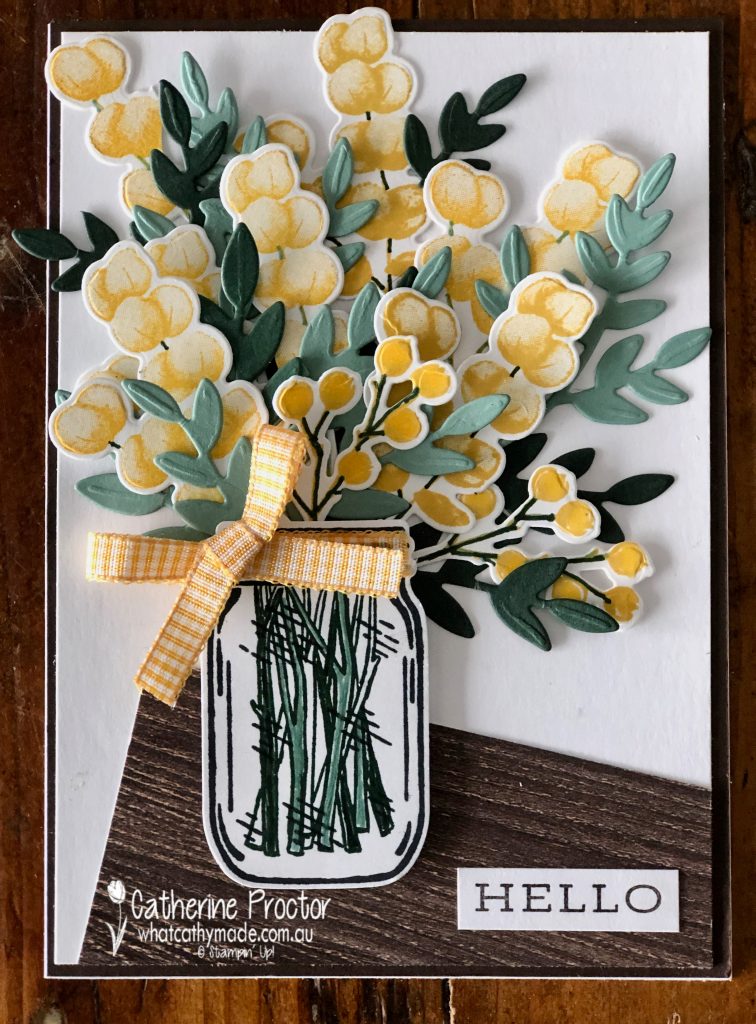
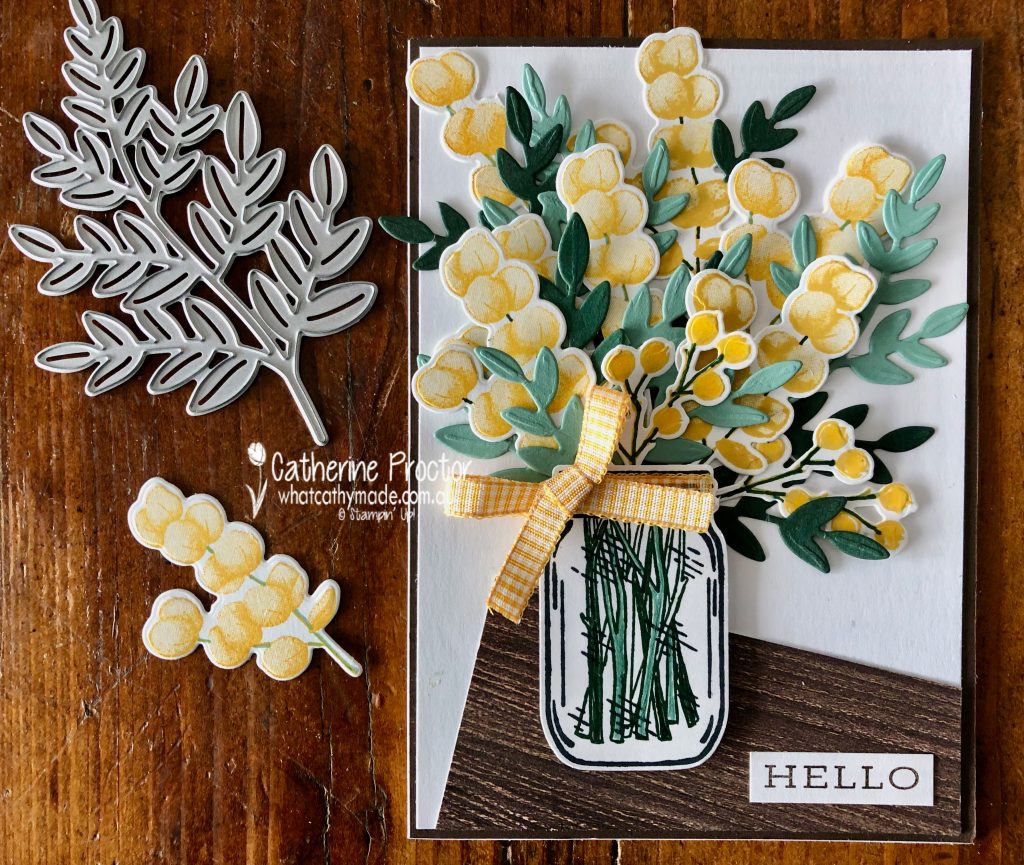
To celebrate the arrival of spring I’ve created a jar of wattle sitting on the edge of a wooden table, using the Forever Fern stamp set, the coordinating Forever Flourishing dies and the Jar of Flowers stamp set with coordinating Jar punch.
Three of the new In Colours (Bumblebee, Soft Succulent and Evening Evergreen) were paired with Daffodil Delight to stamp and die cut my wattle. I love how “Australian” Soft Succulent and Evening Evergreen look when used for foliage.
The wattle was all stamped in either Daffodil Delight or Bumblebee and then I used my Soft Succulent and Evening Evergreen markers to draw on the stems of the wattle and turn them from yellow to green. The smaller wattle springs at the front are stamped using the poinsettia petals stamp set.
The large fern die was used to die cut all my foliage and then it was simply a case of chopping up the foliage and arranging it with my flowers. I used my Soft Succulent and Evening Evergreen markers to also colour in the stamped stems in the jar – the jar and the stems are from the Jar of Flowers stamp set, punched out with the coordinating jar punch.
The Hello sentiment is also from the Forever Fern stamp set and a bow of Bumblebee gingham ribbon is the finishing touch.
I’ve used a piece of In Good Taste DSP set at an angle to creates the impression of the edge of a wooden table.
Thanks for visiting my blog today. I’ll be back tomorrow on our weekly AWH Colour Creations Showcase – we are showcasing Daffodil Delight this week.
If you live in Australia, you can find and purchase all these products in my Stampin’ Up! Online Store. Don’t forget to use my monthly Host Code (if your order is between $50 – $250) and I will send you a thank you gift the following month. If your order is over $250 don’t use the host code because you will qualify for your own stamping rewards.
My September Host Code is WVX3UYCR and it is valid until midnight September 30.
In the meantime, wherever you are in the world, stay safe, stay calm … and keep on crafting xxx
Welcome to week fourteen of our 2020-2021 Art With Heart Colour Creations Showcase.
Each week various members of our Art With Heart Colour Creations team will be bringing you weekly colour inspiration as we showcase our range of over 50 beautiful Stampin’ Up! colours in alphabetical order.
Week 14 – Daffodil Delight
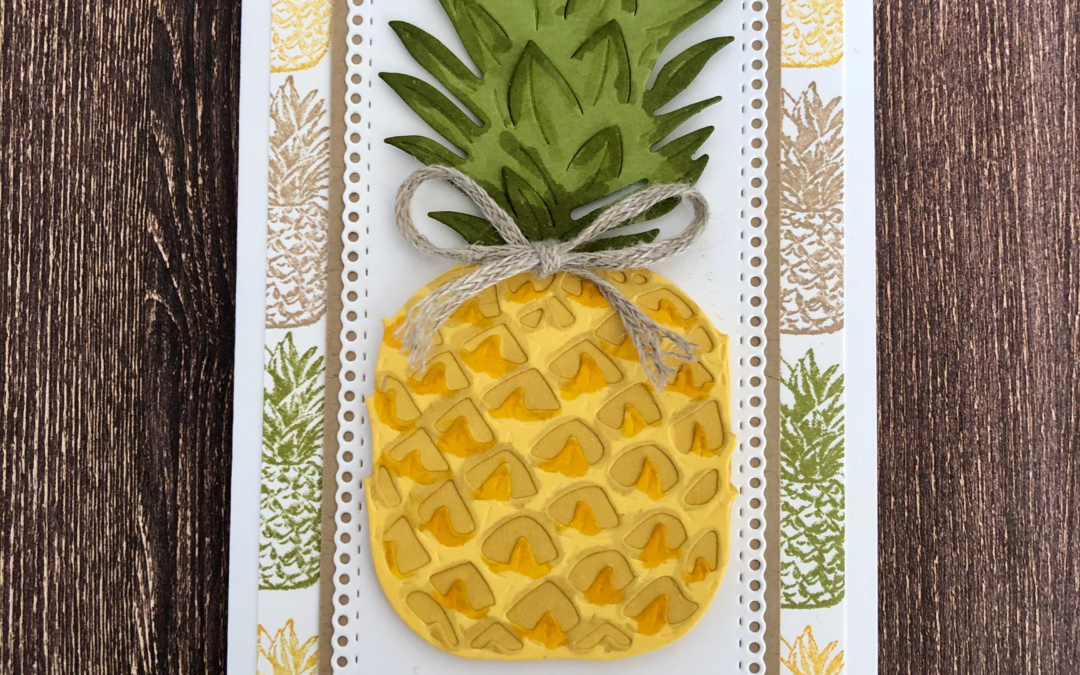
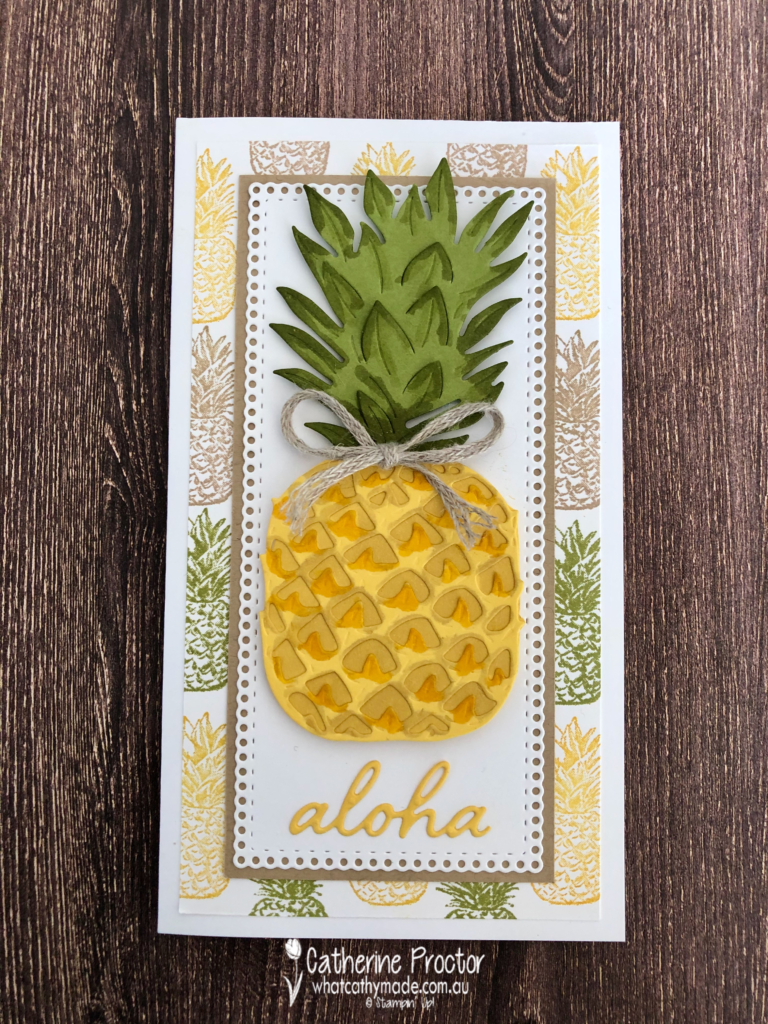
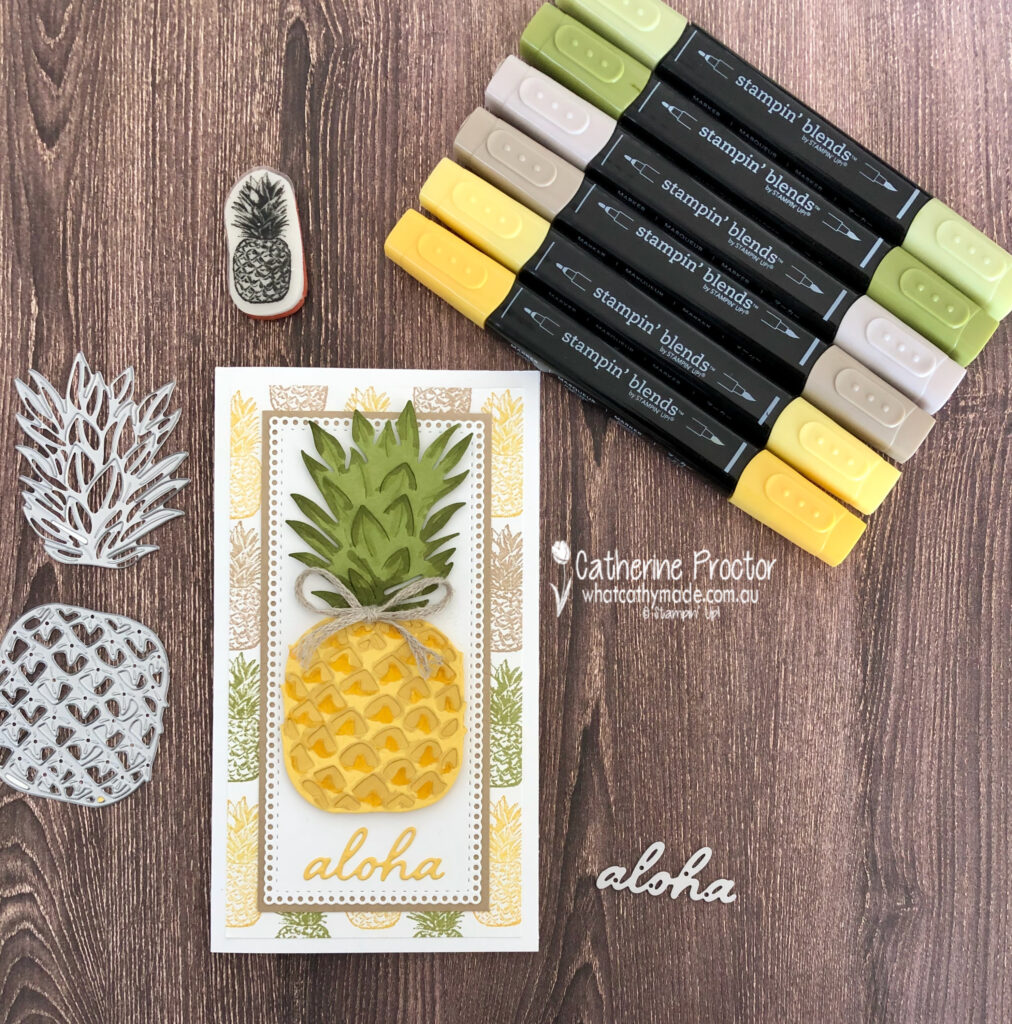
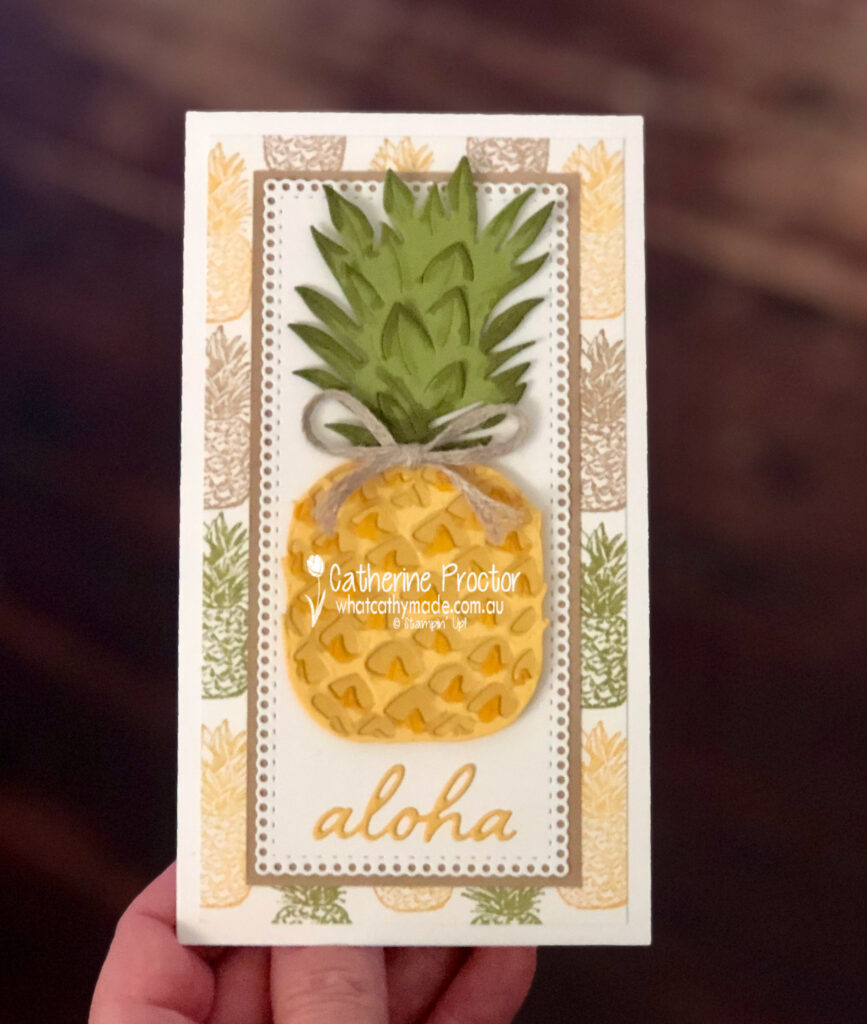
It’s the first week of spring here in Australia so I wanted to make a sunny, happy card using Daffodil Delight. And if there was ever a sunny happy stamp set that was begging to be inked up with Daffodil Delight it’s the Timeless Tropical stamp set with its co-ordinating In the Tropics dies.
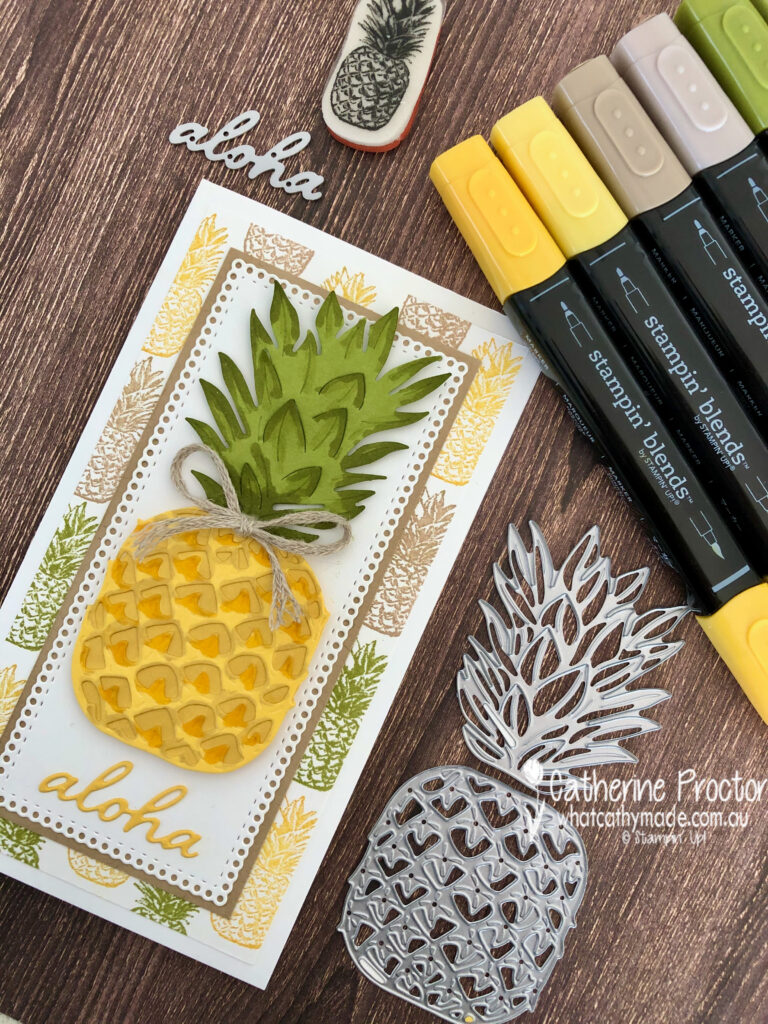
Originally I had intended to make a card by water colouring the hibiscus and the frangipani stamp set but when I opened my stamp I realised I had never used the the pineapple die and little pineapple stamp – and I knew they would look great in Daffodil Delight too.
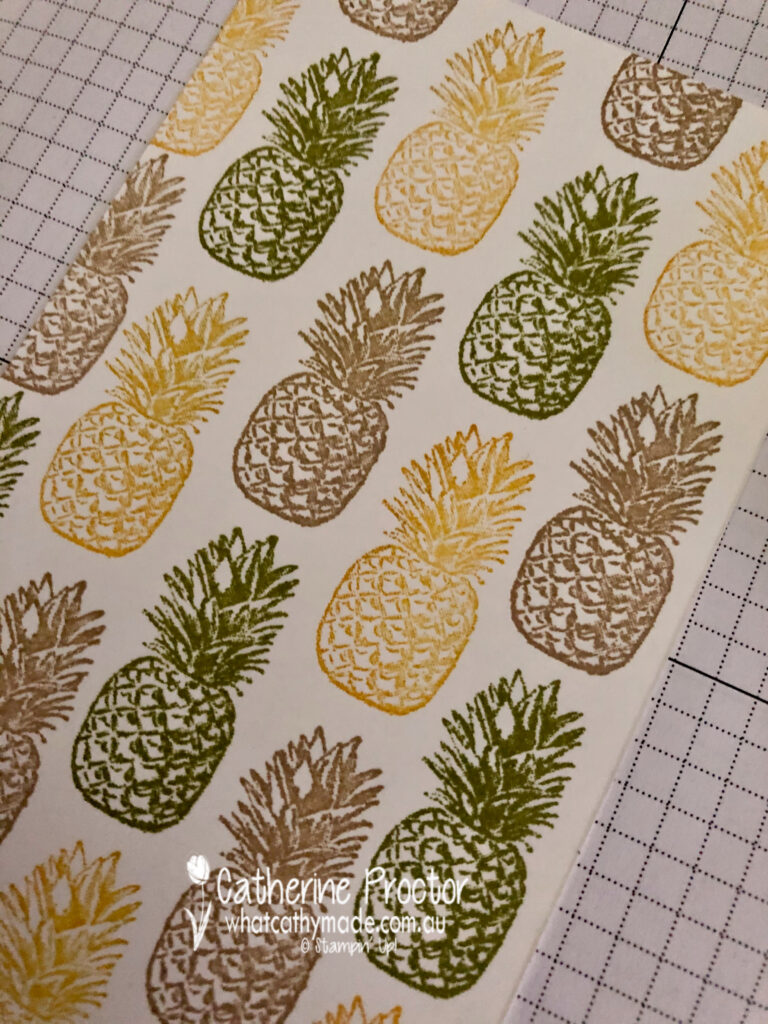
I began by creating a piece of homemade DSP for my background layer using Whisper White card stock.
This homemade DSP was quick and easy to do using just the one small pineapple stamp inked up with the following colour combination: Daffodil Delight, Old Olive and Crumb Cake.
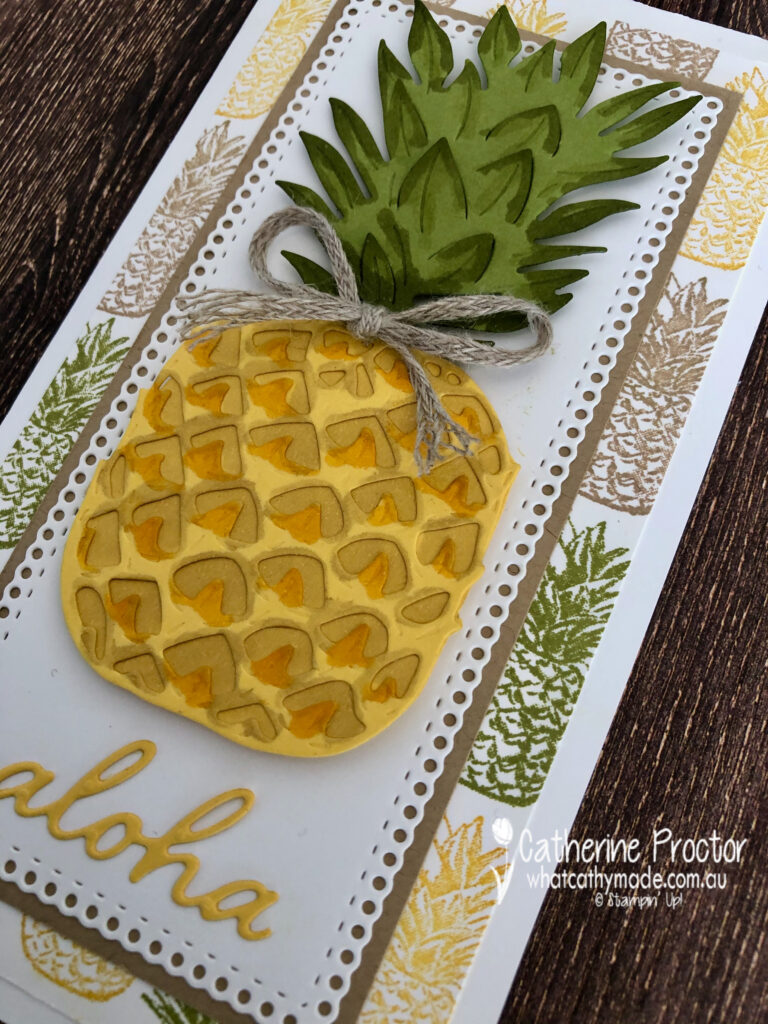
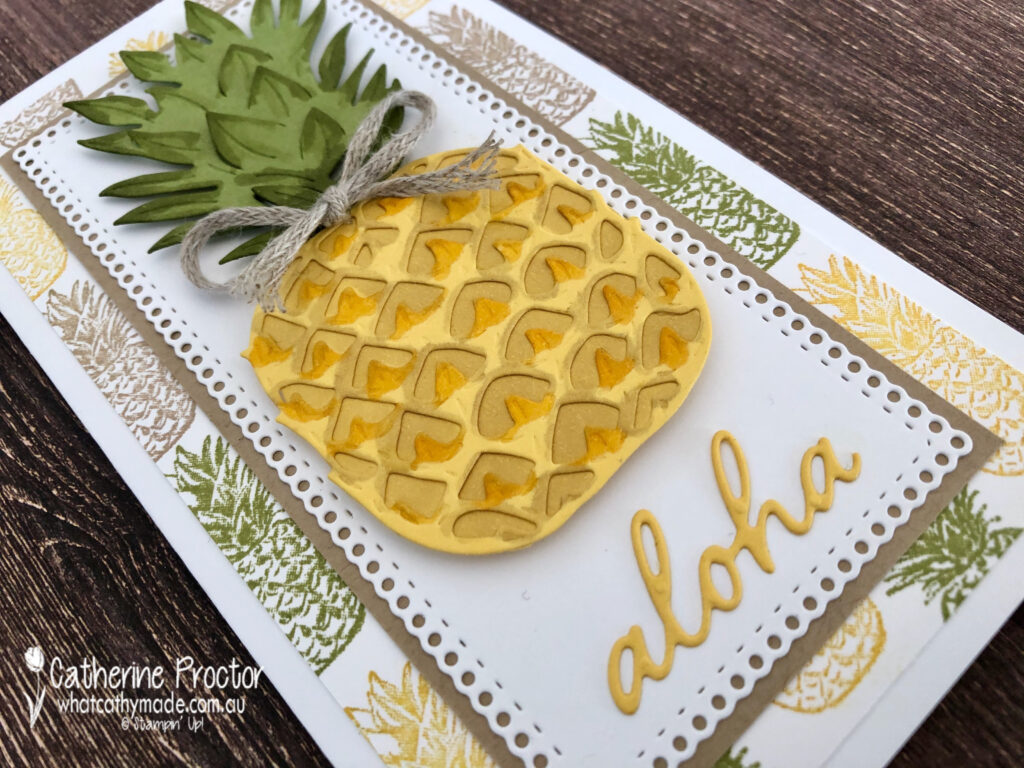
The body of the pineapple was created in two layers: die cutting the pineapple in Daffodil Delight card stock and then tracing around the outline of this pineapple die and fussing cutting the die shape out of another piece of Daffodil Delight card stock to layer under the die.
Having a second layer of Daffodil Delight card stock allowed me to use my Daffodil Delight and Crumb Cake Stampin’ Blends to colour inside the holes of the top layer pineapple die to highlight the “knobbly” bits on the pineapple.
Don’t you love the way this highlights the texture of the pineapple?
The leafy pineapple top was die cut from Old Olive card stock and I used my light and dark Old Olive Stampin’ Blends to add colour variation and texture to it as well.
The Whisper White card stock layer the pineapple is adhered to is die cut with a long rectangle die from the Ornate layers dies and it’s just perfect for the size of the pineapple.
Did you realise the In the Tropics dies include a gorgeous little “Aloha” greeting die? I’ve found the best way to cut and adhere this die is by first cutting a rectangle of card stock slightly larger than the Aloha die and then attaching this card stock to some adhesive sheet.
Once you die cut the Aloha sentiment the adhesive sheet helps keep the word straight, as well as providing the easiest way to adhere it to a card.
The final touch for my pineapple card is a simple bow made from Braided Linen Trim with the ends frayed.
I can’t wait to see what the rest of the Art With Heart team have created with Daffodil Delight today. Click on the links below to see what they’ve made.
If you’d like me to post you your very own copy of the August–December 2020 Mini Catalogue, 2020-21 Stampin Up! Annual Catalogue, the 2020-21 Beginners Brochure, or to simply find out about more about Stampin’ Up! contact me.
In the meantime, wherever you are in the world, stay safe, stay calm…and keep on crafting xxx
Welcome to week 15 of the Art With Heart Colour Creations Blog Hop!
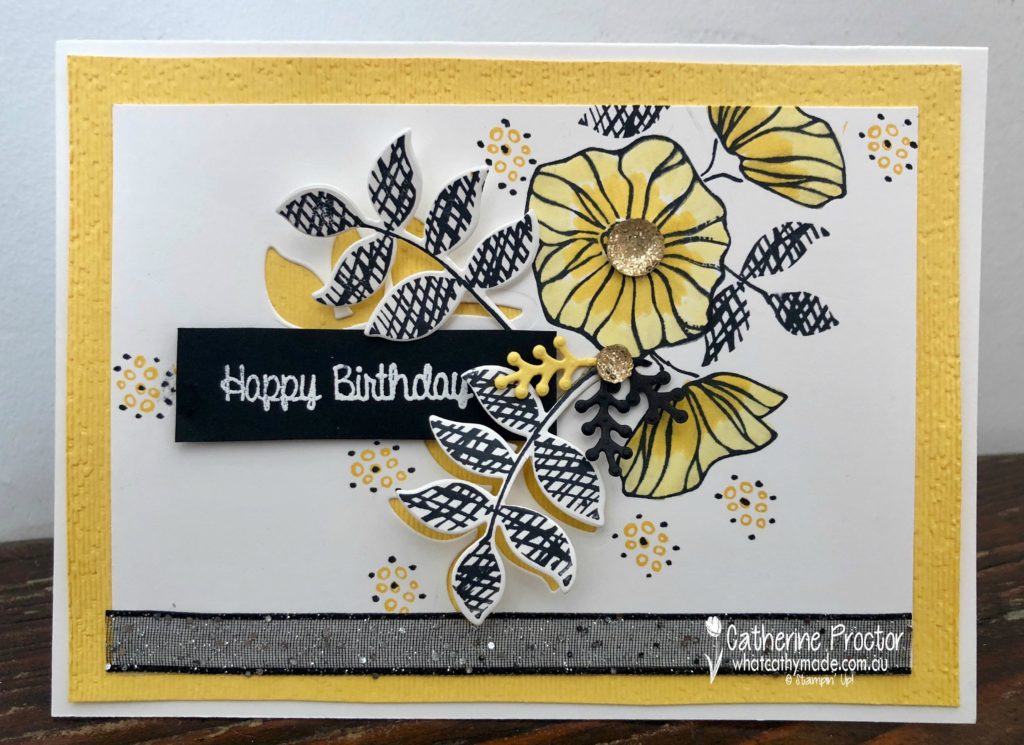
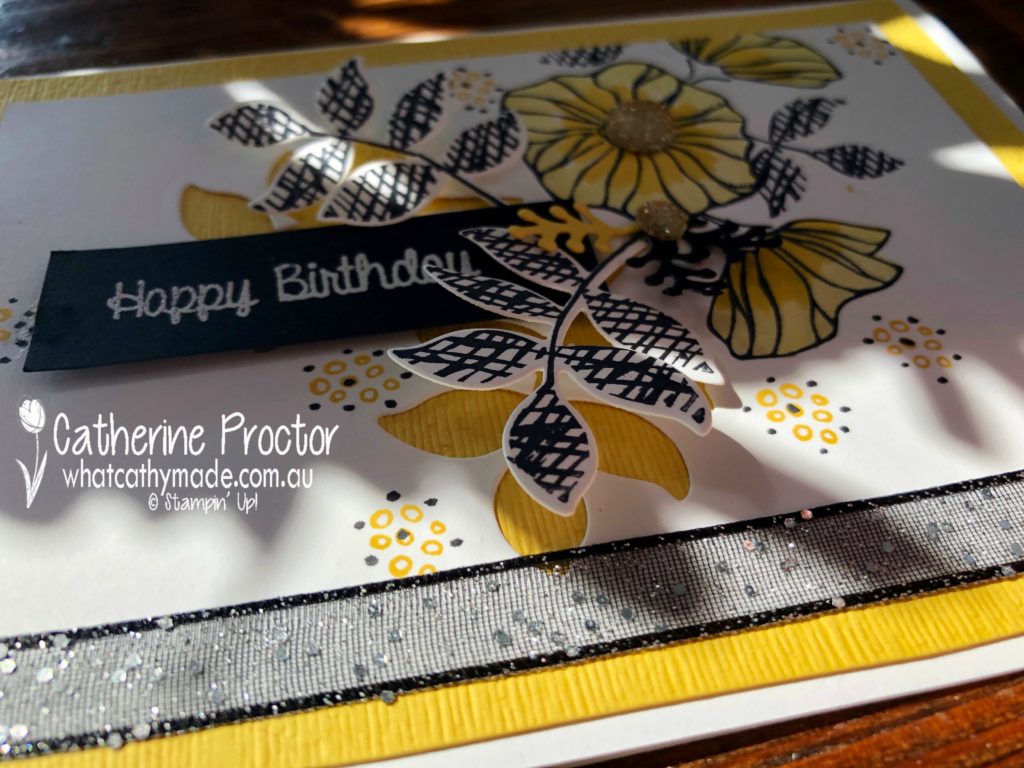
This week we are showcasing one of the brights colours: Daffodil Delight.
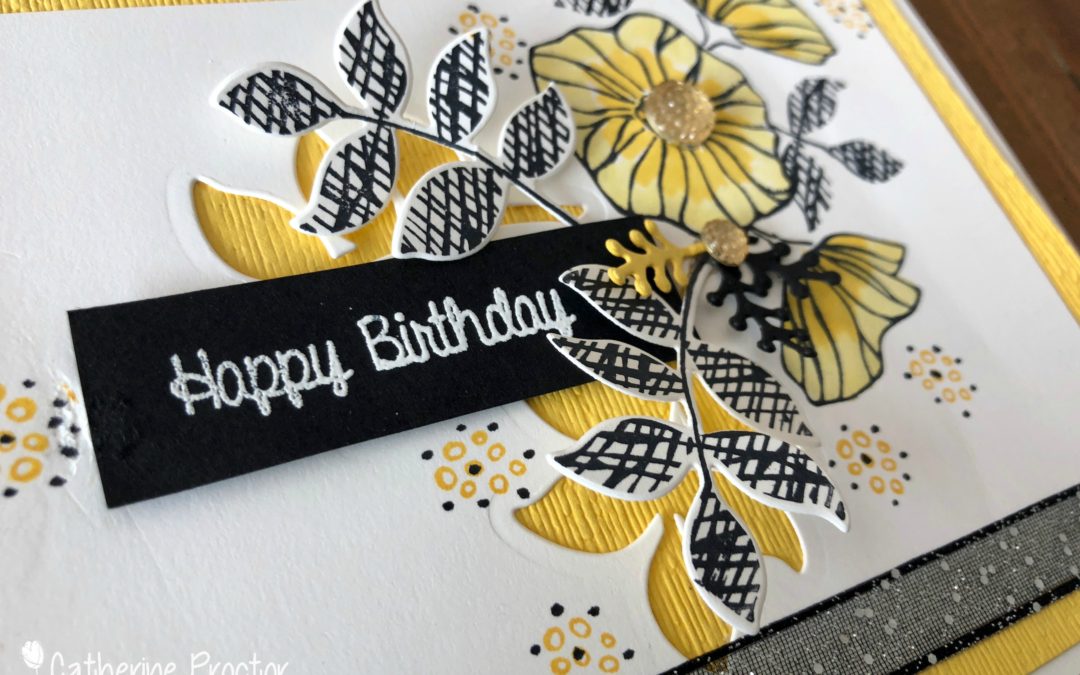
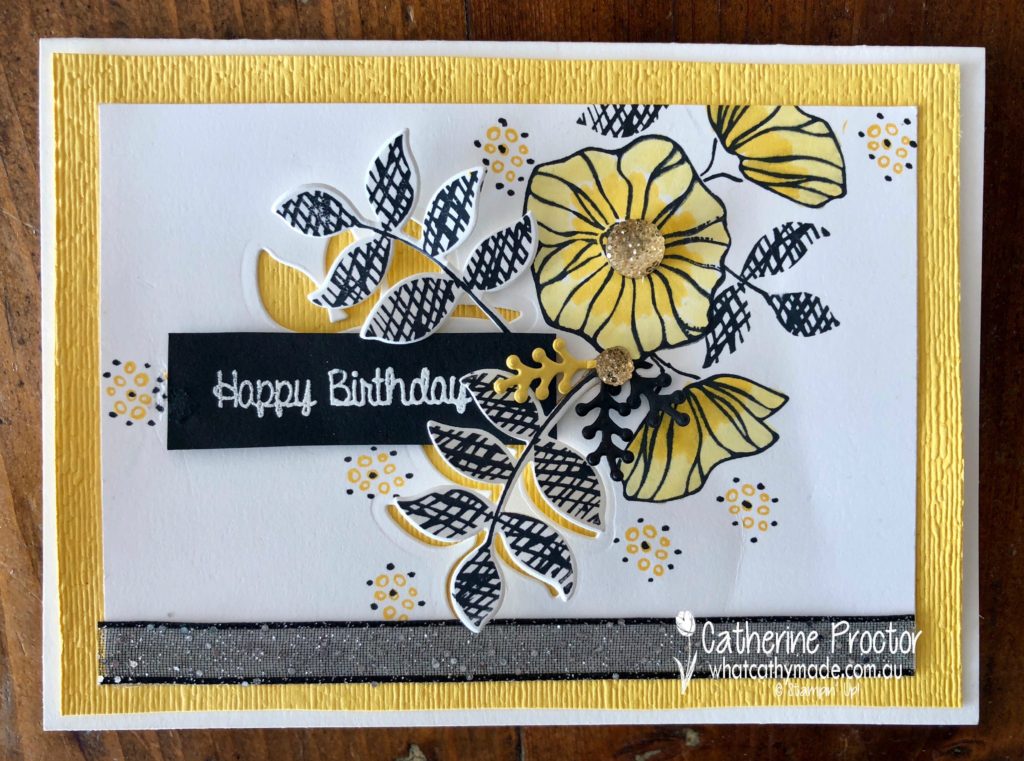
This bright and beautiful colour was just perfect for the card I needed to make this week: a birthday card for one of my very best friends: Rachel, who I originally met at mother’s group. In a few month’s time, our boys will turn 20 and they’re still wonderful friends, as are Rachel and I.
One of the many things I love about Rachel is that she always has a vase of freshly cut flowers in her home, so I decided to make her a floral birthday card in some of her very favourite colours using the Oh So Eclectic Stamp Set and matching Eclectic Layers Thinlits Dies.
I love using my marker pens to draw on top of my stamps and add extra interest and details to my background. For this card, I stamped one of the smallest stamps from the Oh So Eclectic set in Daffodil Delight and then added dots to the stamp using my Basic Black Marker.
A touch of bling was to add a strip of the Black Glittered Organdy Ribbon to the base of the card and a couple of gold facetted gems to the card. The Happy Birthday sentiment is from the Hand Delivered Hostess set, stamped in White Craft Ink onto Basic Black cardstock and heat embossed using white embossing powder.
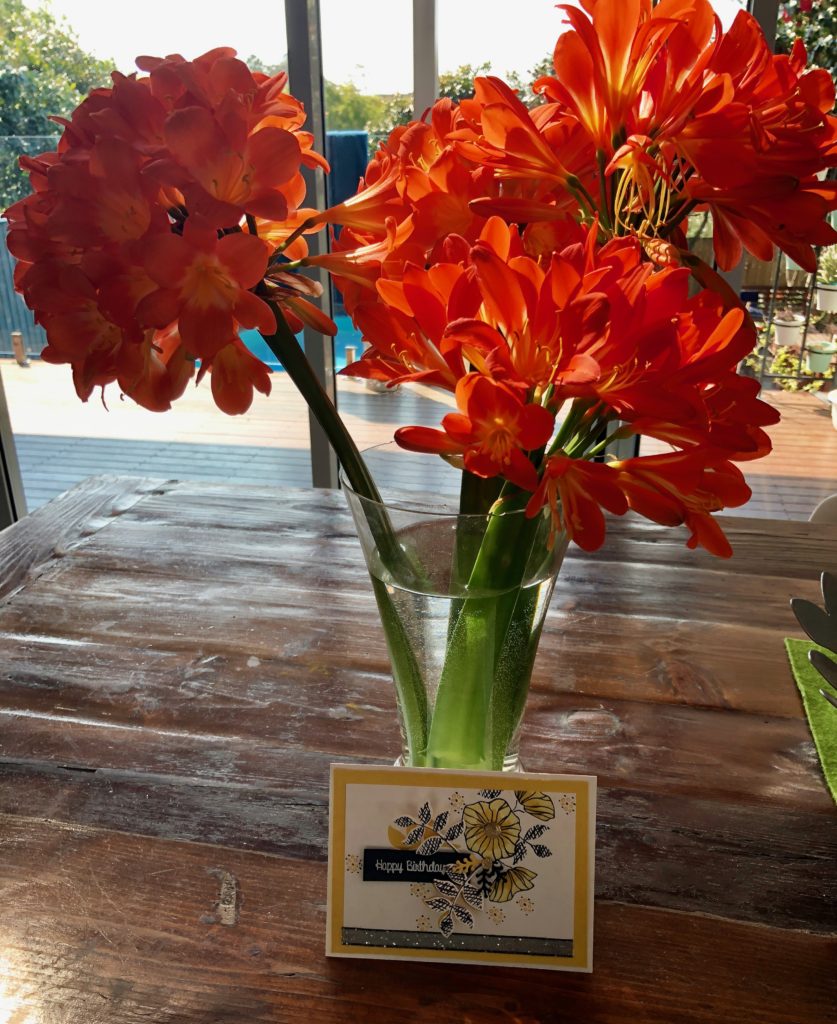
And just because it’s spring, here’s a photo of my card under a bunch of stunning clivias which are blooming in my garden at the moment.
To see what the rest of the team have made click on the links below.


")


 Braided Linen Trim")