Welcome to week forty two of our Art With Heart 2022-23 Colour Creations blog hop.
This is a weekly blog hop where we showcase the stunning range of Stampin’ Up! colours in alphabetical order over 12 months and this week we are featuring Real Red from the Regals family.
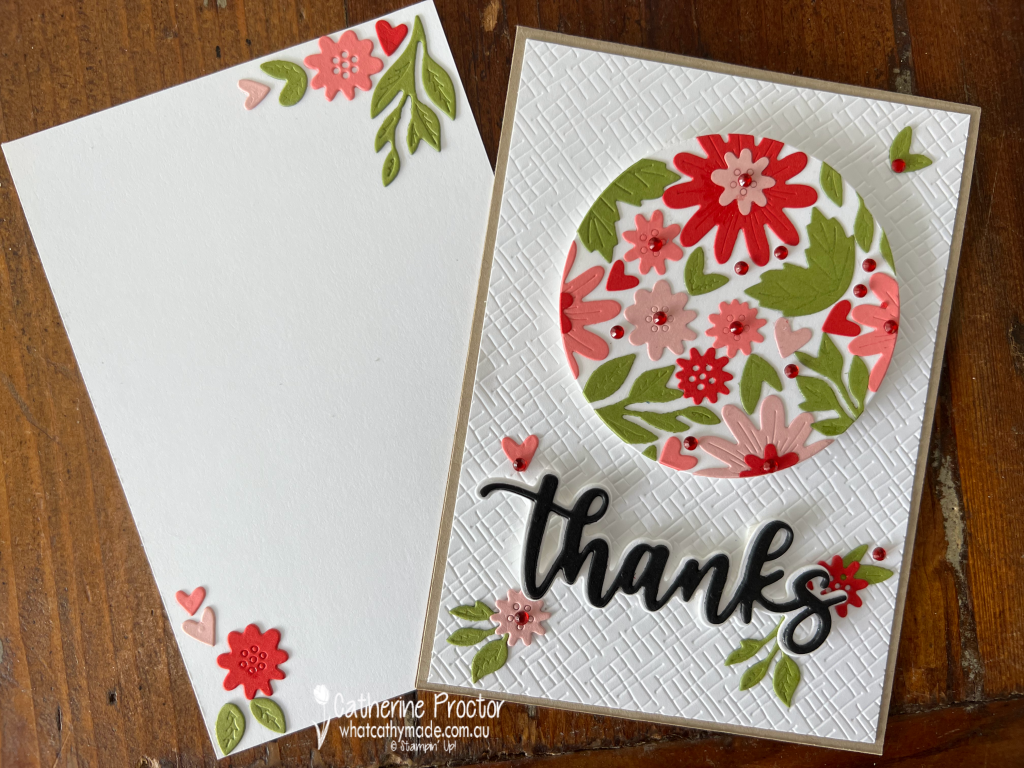
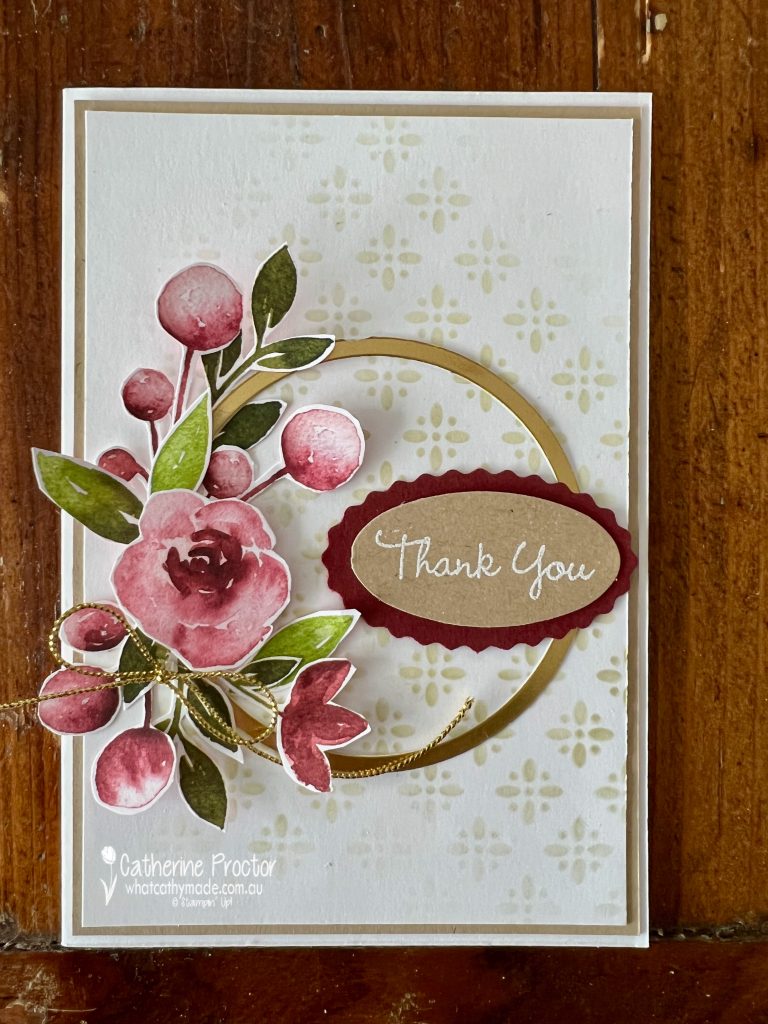
Sometimes you feel like stamping – sometimes you don’t!
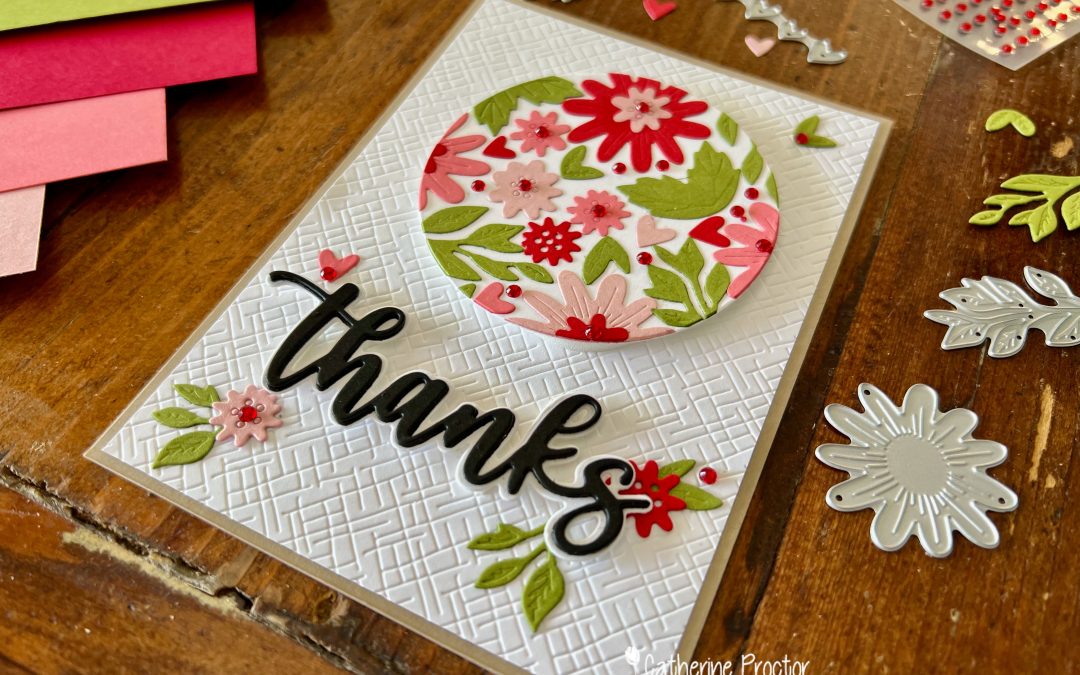
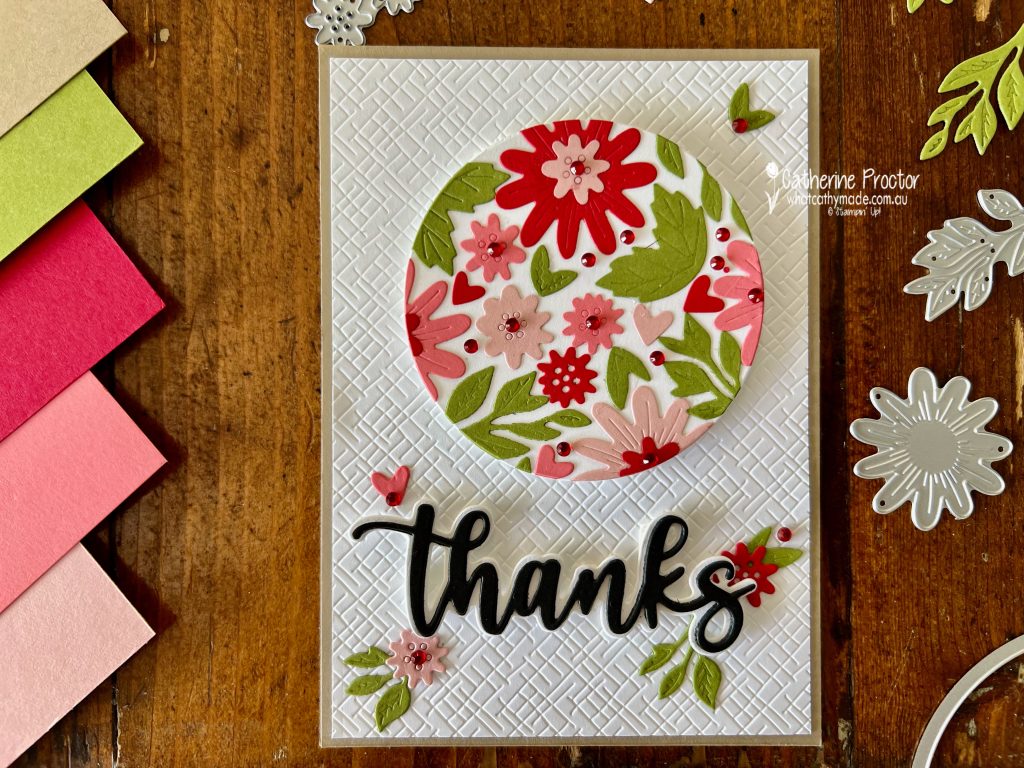
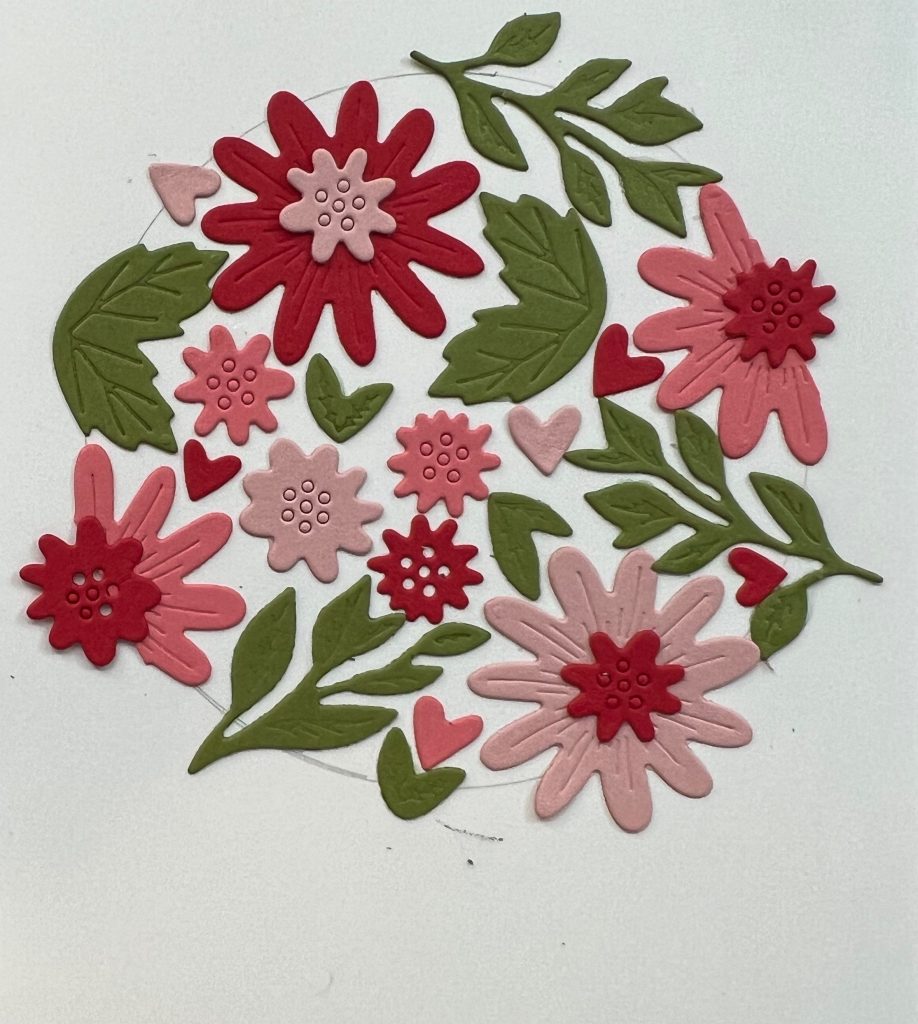
This Real Red card does not have any stamping thanks to the Amazing Thanks Dies and the Around The Bend Dies, which include multiple “stand alone” floral dies.
Stand alone floral dies do not die cut stamped images – they die cut and emboss flower and leaf pieces that you can layer or use on their own. The Around the Bend dies give you 20 floral pieces as well as four larger curved border dies.
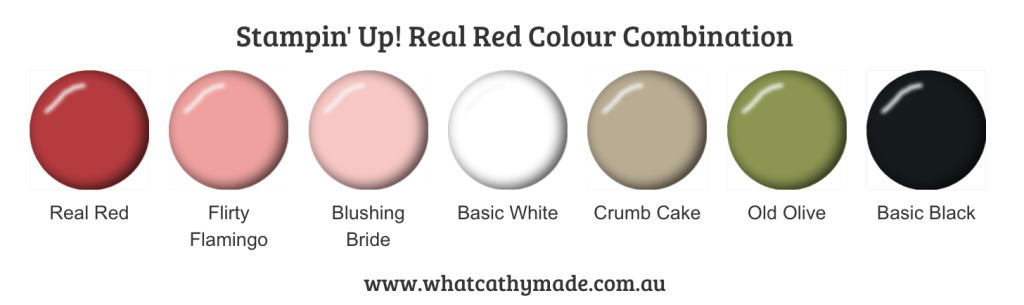
I have to confess that I don’t use Real Red very often outside of Christmas cards, however, I do love using red and pink together, hence my colour combination today.
This style of card is so easy to make – you can use any large die or shape template. I used a pencil to trace around the outside of the largest of the layering stitched circle dies.
After die cutting an assortment of flowers and leaves I arranged them within the circle shape, making sure the die cut pieces fit together snugly and overlap the circle outline. I always take a photo at this stage to use as a reference before I remove all the die cuts and then glue them back into the circle shape.
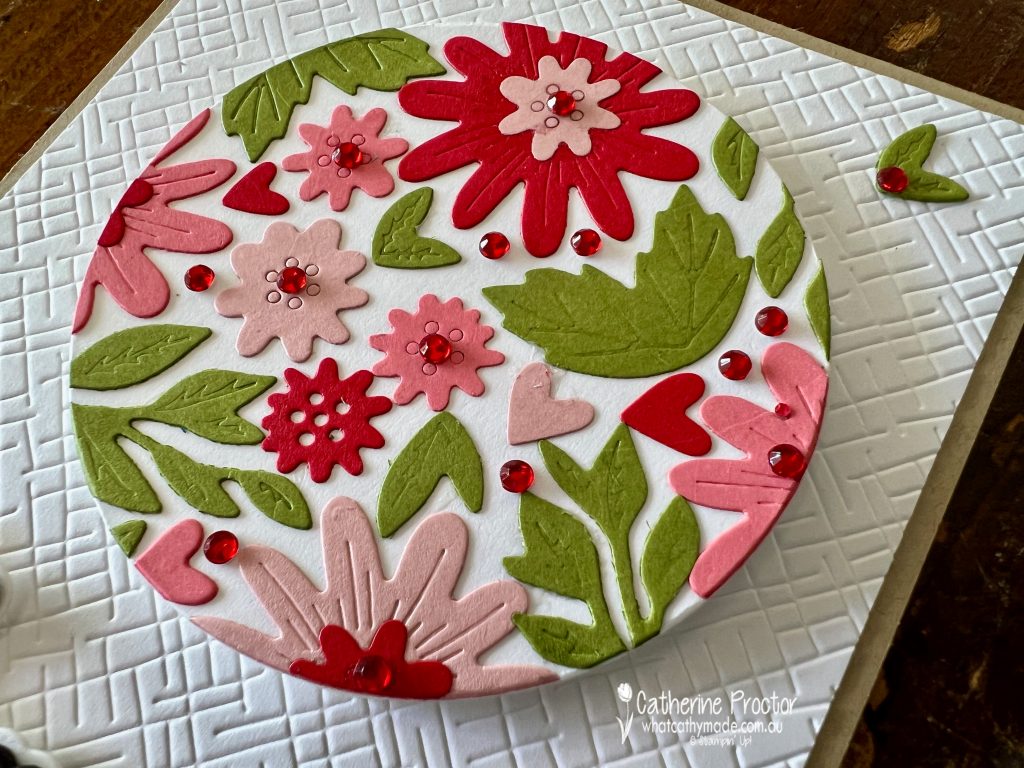
Once I’d adhered all of the die cut shapes I used the circle die to cut the floral circle out and adhere to my card base, adding red Rhinestone jewels. There’s no need to rub out the pencil marks as the layering circle die cuts the flowers INSIDE the pencil circle outline.
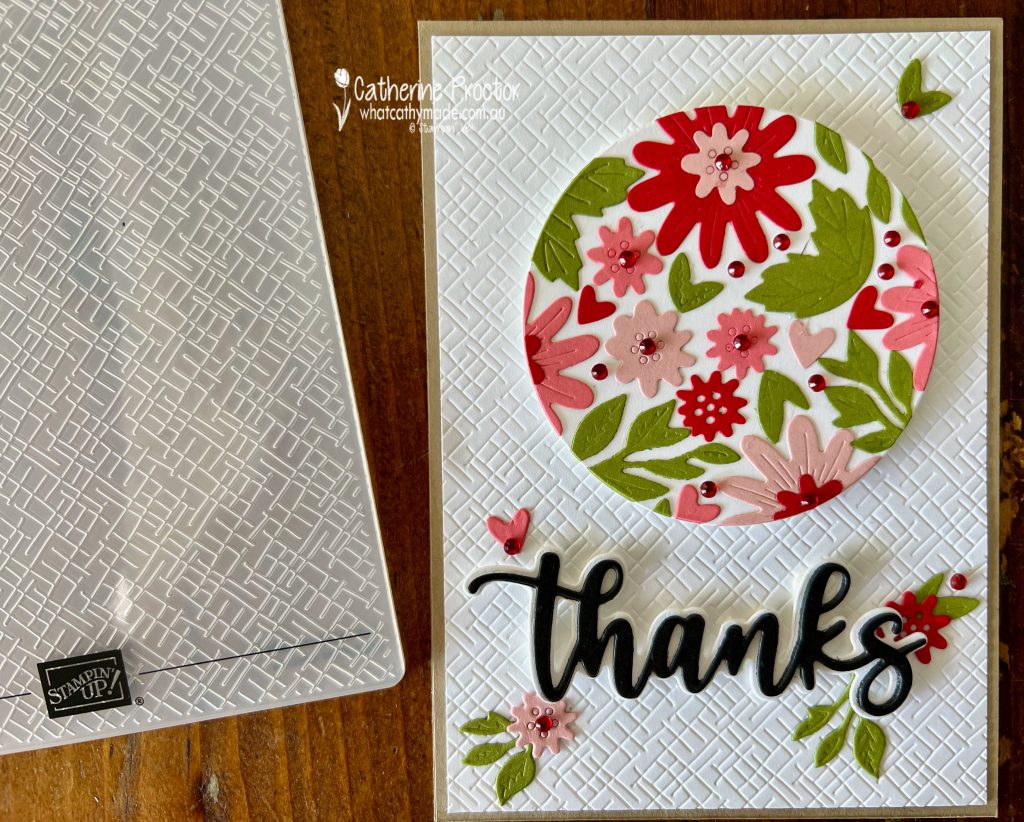
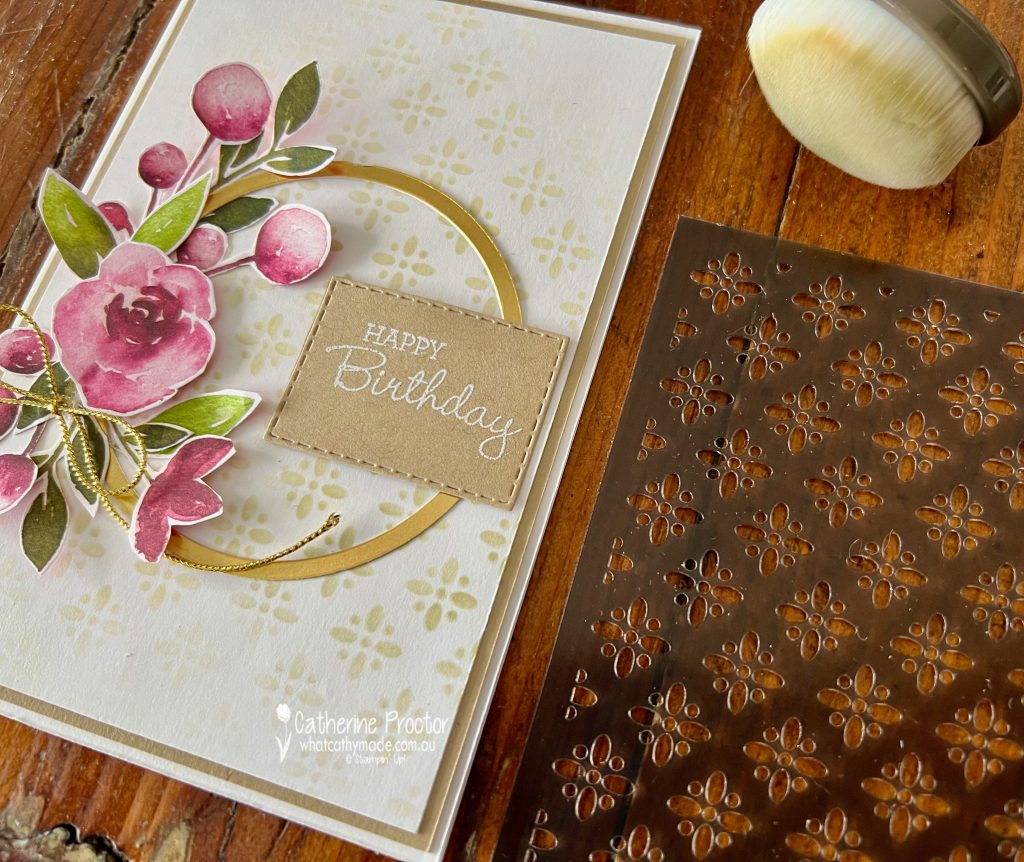
Did you notice the embossed background on this card? Today, Stampin ‘Up! has released online exclusive products and this embossing folder is part of a three pack called Basic 3D embossing folders.
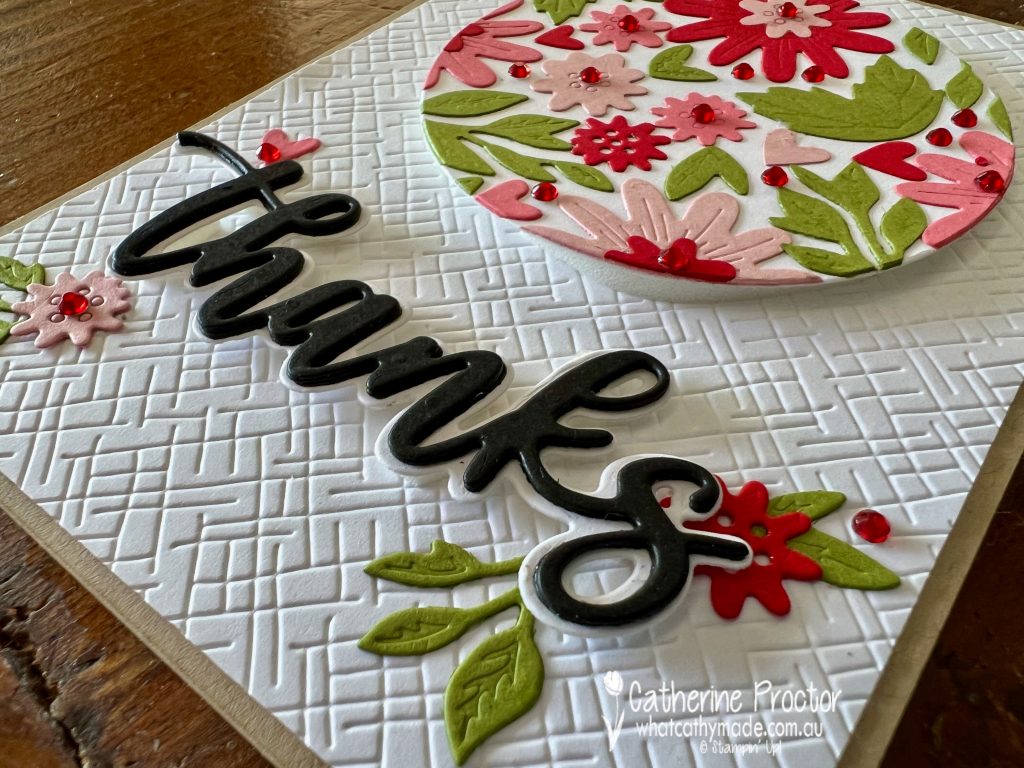
I’ve die stacked the “Thanks” die by cutting it out three times in Basic Black cardstock, gluing the three layers together and then adhering it to the “Thanks” die layer die cut in Basic White. You can see the incredible dimension from the side of the card.
I decided to leave the inside of the card blank, just using up some spare die cuts to decorate it. This truly is a no stamping card!
Now it’s time to hop on over to our next participant, the lovely Rachel Palmieri – I can’t wait to see what Rachel has made this week!
If at any time you find a broken link, you can find the complete list of all participants below.
Welcome to week thirty eight of our Art With Heart 2022-23 Colour Creations blog hop.
This is a weekly blog hop where we showcase the stunning range of Stampin’ Up! colours in alphabetical order over 12 months and this week we are featuring Polished Pink from the 2021-23 family.
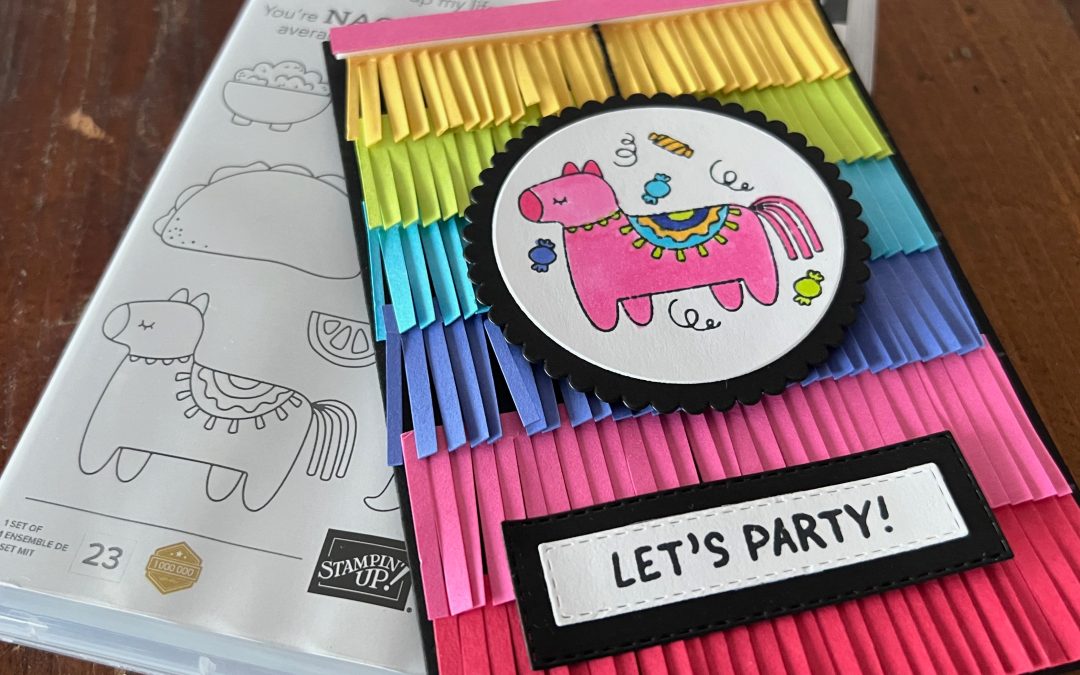
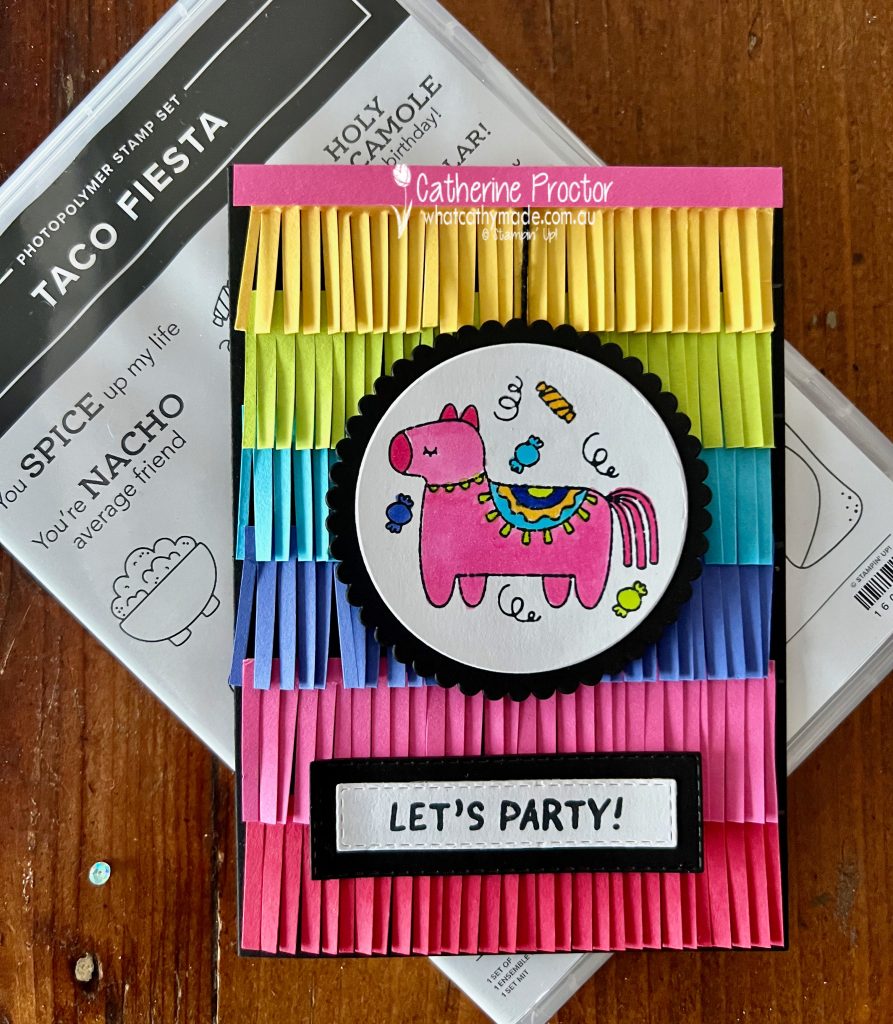
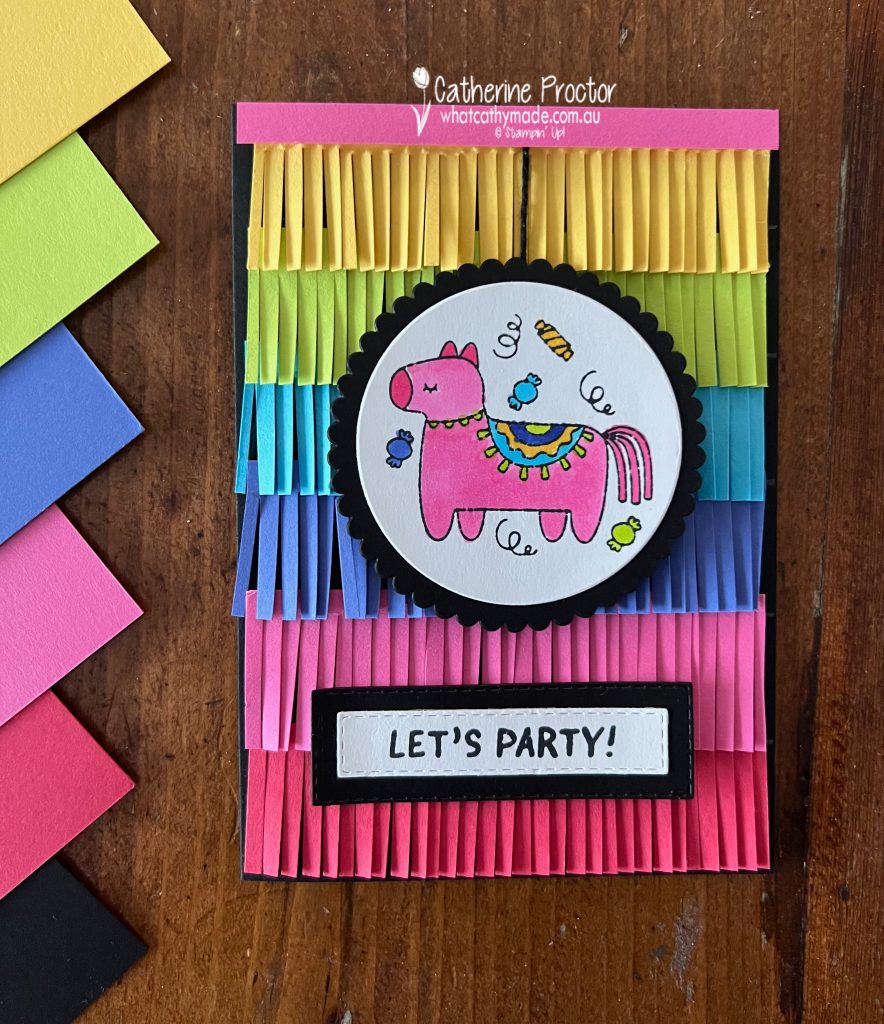
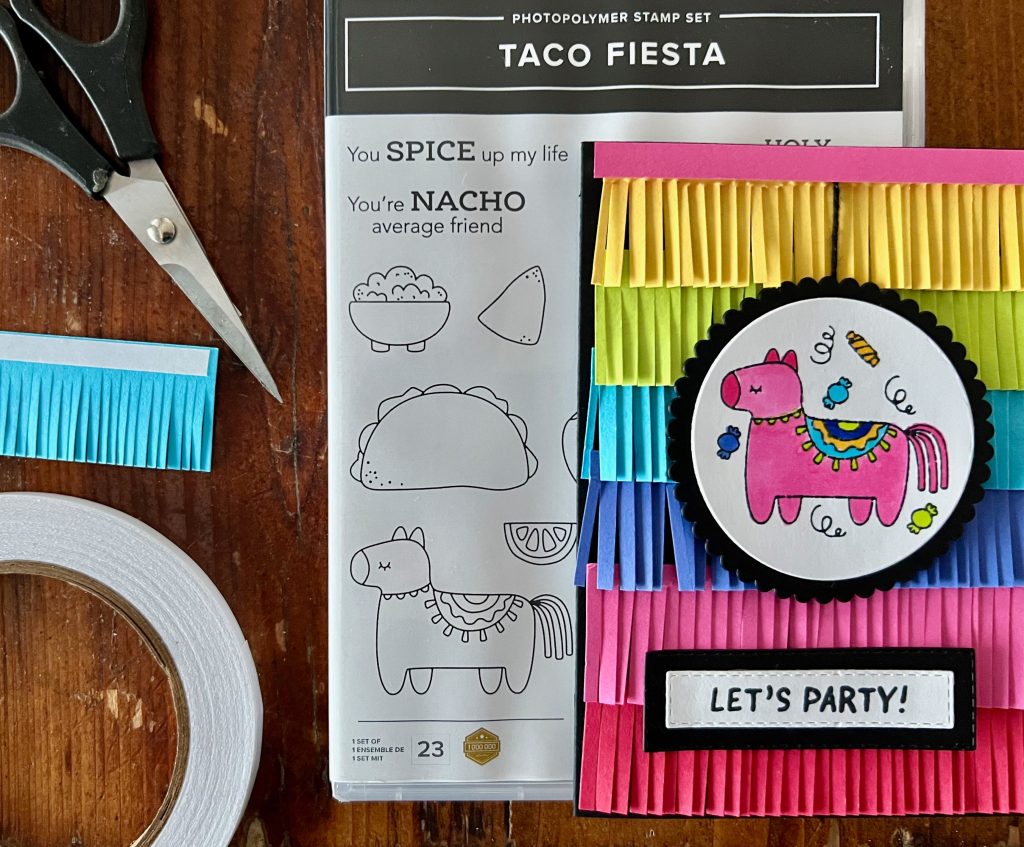
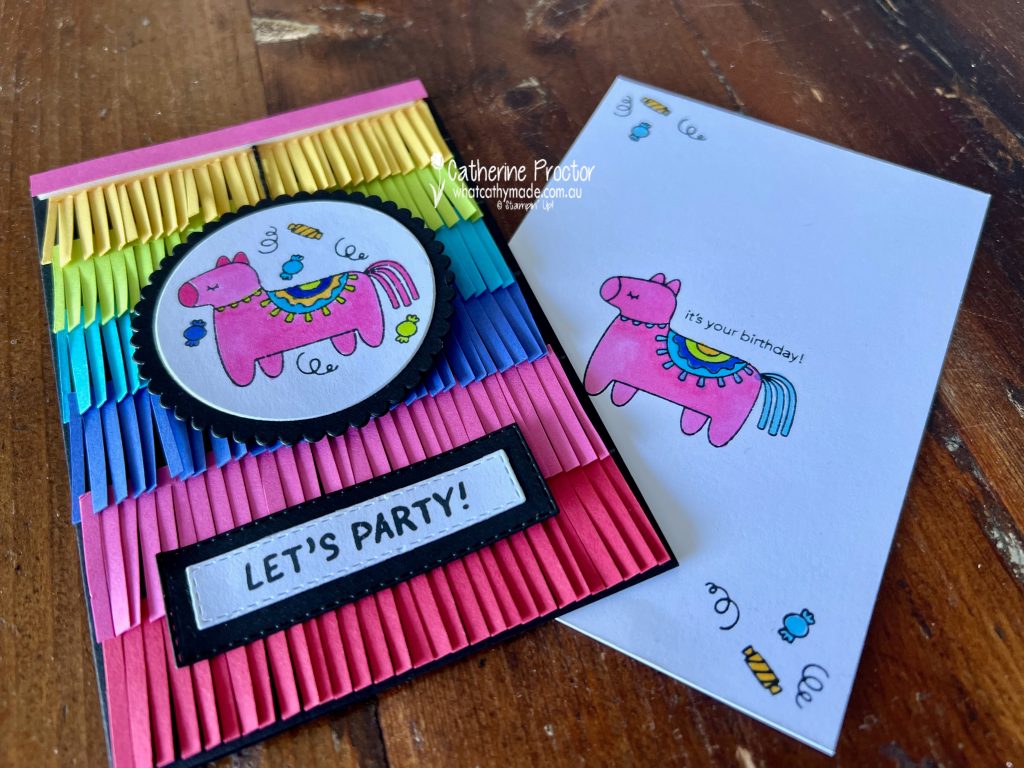
A fabulously fun colour like Polished Pink deserves to be paired with fabulously fun stamp set like Taco Fiesta!
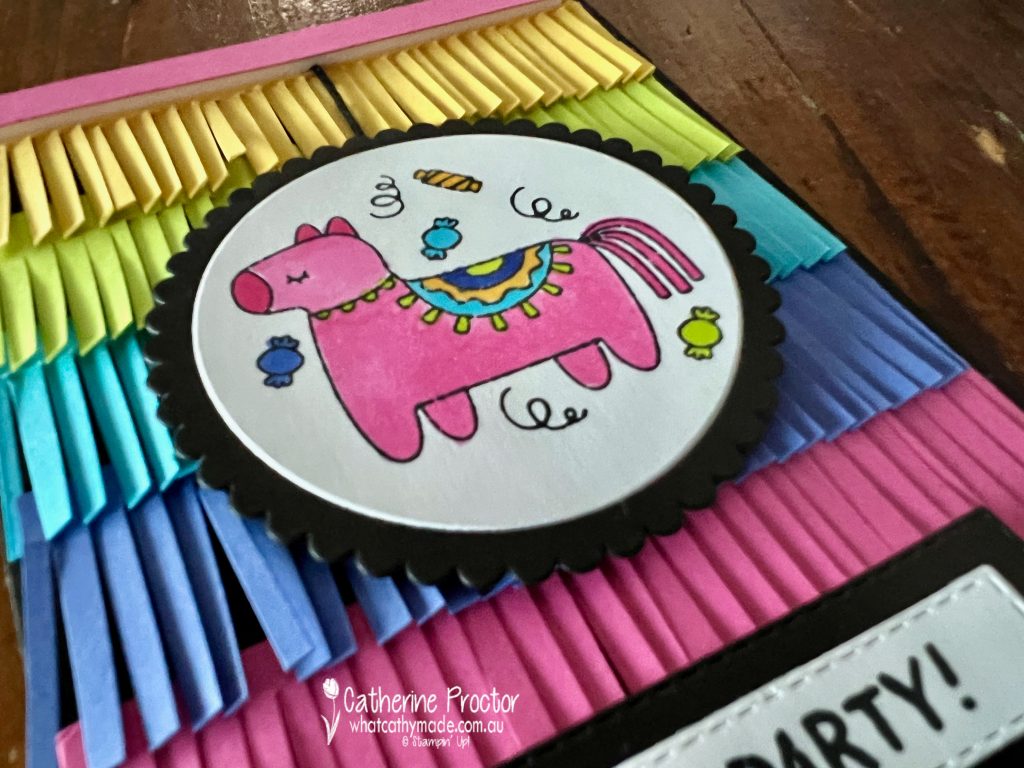
There are plenty of taco/guacamole/chilli related food images and sayings in this stamp set, however I just couldn’t resist using this adorable pinata image, coloured in with Stampin Blends in the colours of the cardstock used for the pinata fringing.
Polished Pink is gorgeous vibrant pink, so I paired it with other vibrant In Colours as well colours from the Brights family. From top to bottom in my card I’ve used Daffodil Delight, Parakeet Party, Orchid Oasis, Polished Pink and Sweet Sorbet, with a card base of Basic Black to make these colours pop even more.
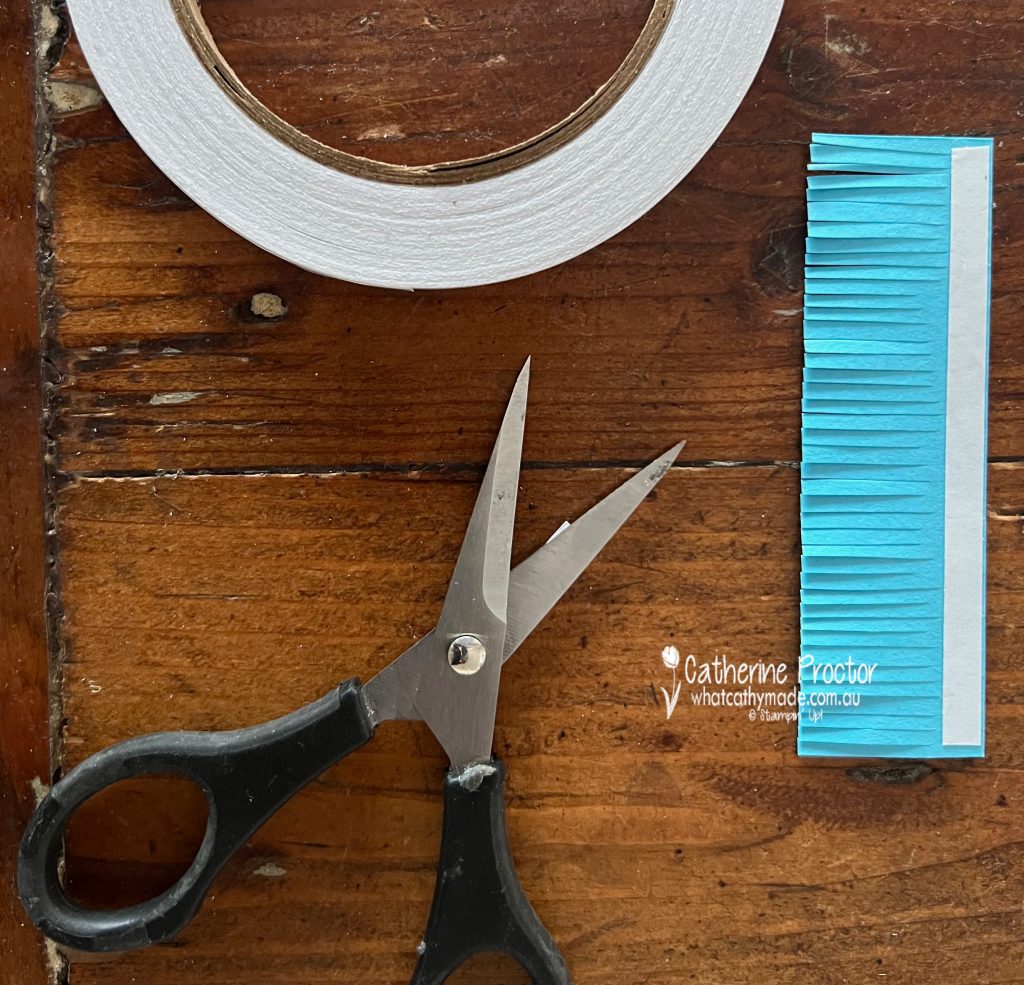
The pinata fringing on the card front is super easy to make, either with fringing scissors or using your paper snips.
Pinata Fringing Technique
My card base measures 14.8 x 10.5cm (half an A4 sheet of cardstock that has been scored and fold in half) and I wanted to use 6 colours, so I used my trimmer to cut 6 different cardstock colours, each at 3 x 10 cm – this allows the layers of fringing to overlap each other.
Use a pencil to mark 5 lines, each spaced 2.5 cm apart (this gives room for overlap of fringing) measuring up from the bottom of the card and going all the way up to the top.
Attach one strip of tear & tape along the longer 10 cm edge on one side of each colour of cardstock.
With the side that has the tear & tape facing up, use Paper Snips or fringing scissors to cut fringes at all the way along the length of the cardstock, cutting up to the bottom of the tear & tape.
Once all of your colours have all been fringed, remove the backing off the tear & tape and attach the fringing to the card front along your pencil lines, working from the bottom of the card up so you can overlap the fringing as you go.
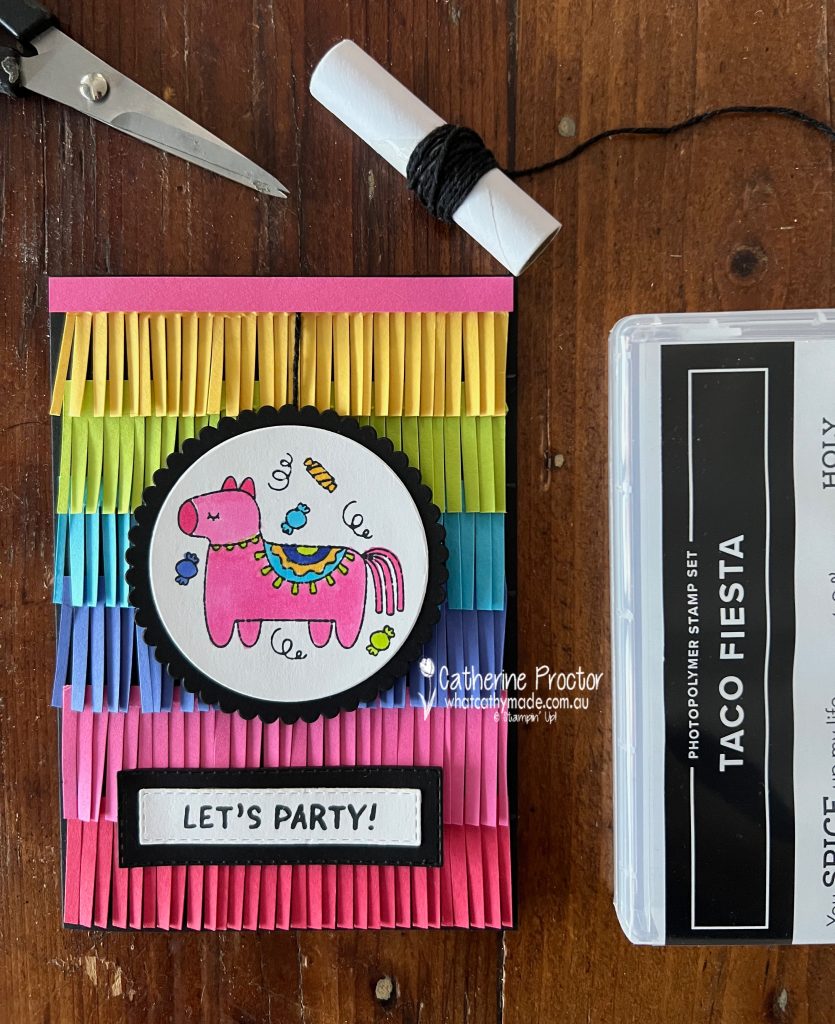
I’ve die cut the pinata image using a layering circle die and added a scalloped Basic Black layering circle behind it. The pinata is “hanging” from the strip of Polished Pink cardstock by a string of Basic Black Bakers twine.
The “Let’s Party” sentiment is part of a longer sentiment from the Breaking News stamp set. I bought this stamp set for my son’s university graduation, however I’ve used it on so many cards since.
Inside the card I’ve used part of a sentiment from the Taco Fiesta stamp set. To use just one a part of a sentiment simply place the sticky part of a post it note over the words you want covered. Ink up the stamp and then remove the post it note BEFORE stamping the sentiment onto the cardstock.
Now it’s time to hop on over to our next participant, the lovely Andrea Sargent – I can’t wait to see what Andrea has made this week!
If at any time you find a broken link, you can find the complete list of all participants below.
If you live in Australia, you can find and purchase these products in my Stampin’ Up! Online Store once they are available to purchase tomorrow morning.
We’ll be back next Wednesday, February 8, with projects showcasing a favourite colour for many people, Pool Party.
Welcome to week twenty nine of our Art With Heart 2022-23 Colour Creations blog hop!
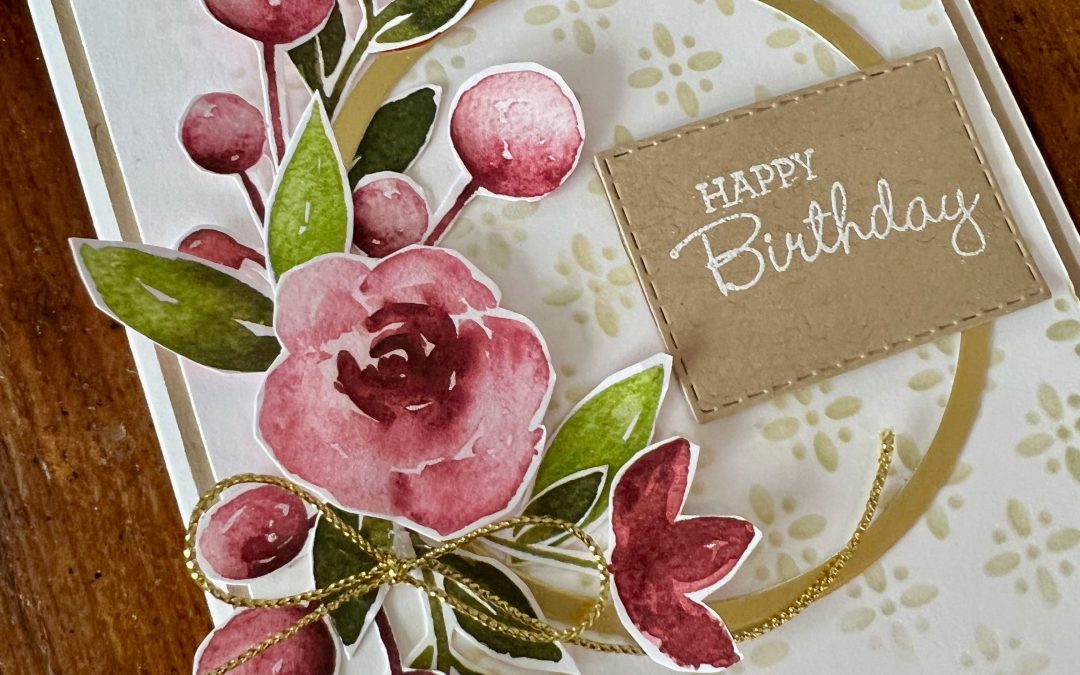
This is a weekly blog hop where we showcase the stunning range of Stampin’ Up! colours in alphabetical order over 12 months and this week we are featuring Merry Merlot from the neutrals family.
My Merry Merlot card uses some gorgeous products that are currently on sale during the four day Stampin’ Up! Seasonal Sale.
Until 18 November, these products from the 2022–2023 Annual Catalogue are on sale with the following discounts:
10% off all punches
15% of all stamps (Host stamp sets are not included in this sale)
20% off all dies
20% off all embossing folders
20% off all non-specialty and non-assortment Designer Series Paper
Here are the three products I’ve used in this card that are on sale right now.
Awash in Beauty DSPStitched Rectangle diesLayering Circles Dies
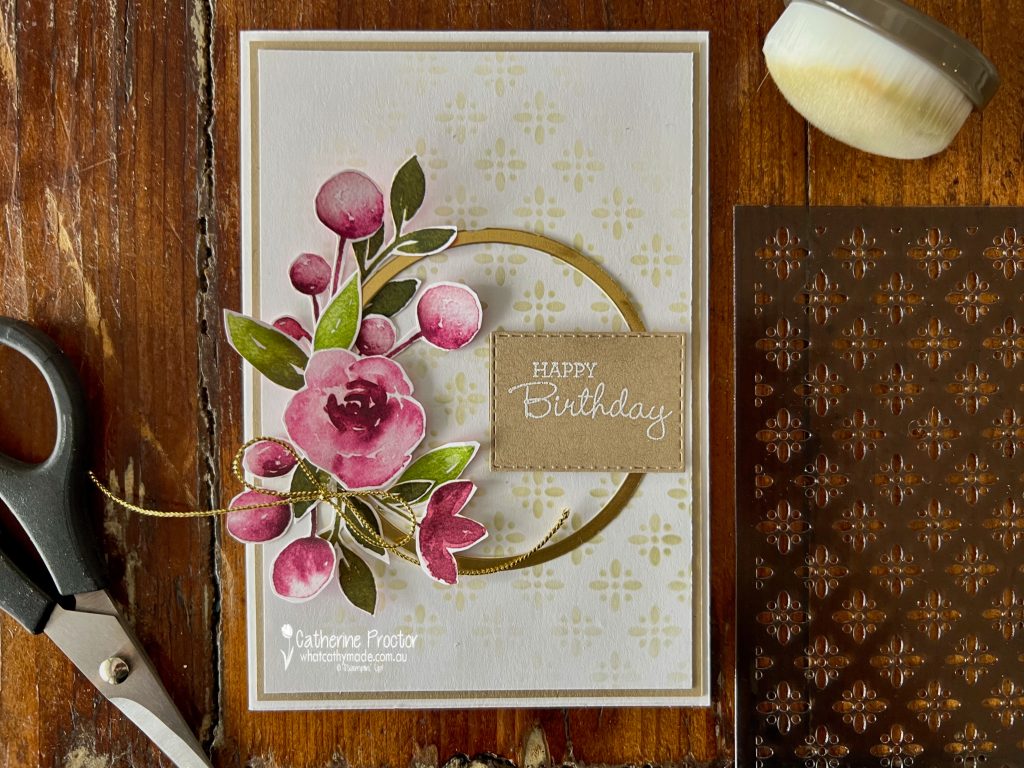
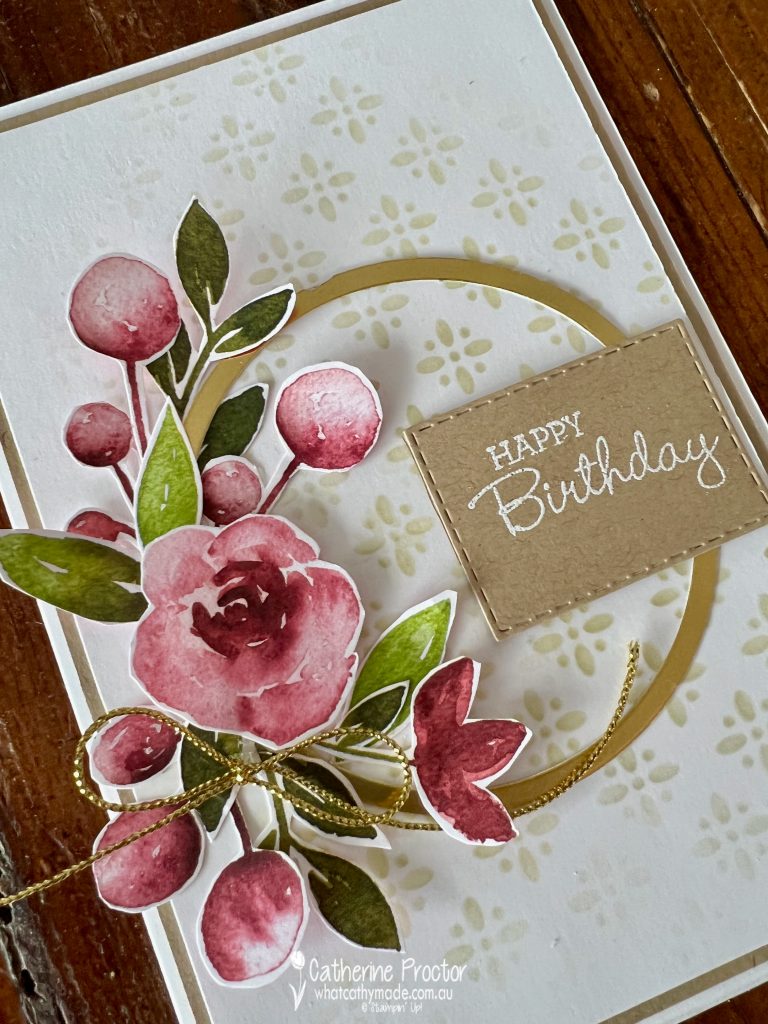
The background pattern on the card front is created using an Artistic Mix Decorative Mask with some Crumb Cake gently sponged over the top. This is such a quick and easy way to customise a background.
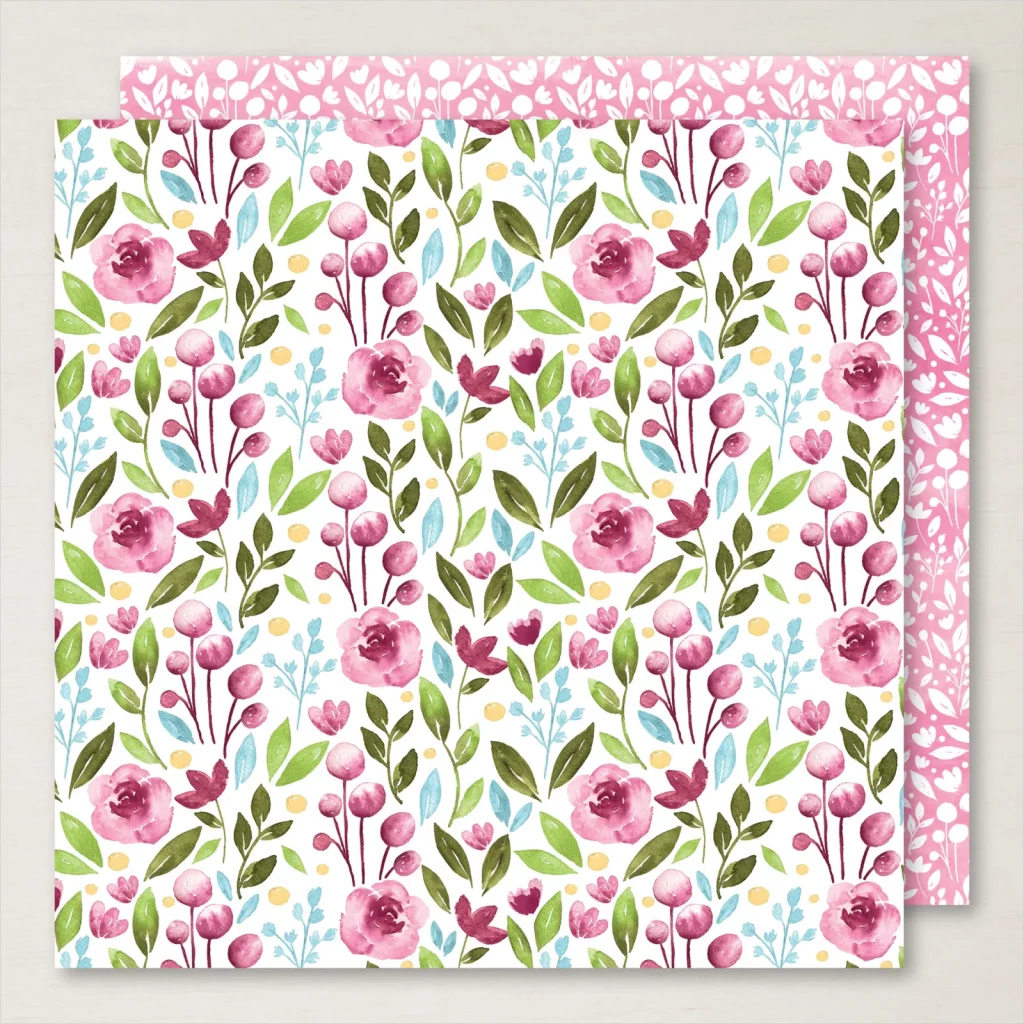
All of the flowers and leaves were fussy cut from this sheet of Awash in Beauty DSP – it was easy to fussy cut this DSP design.
I love Merry Merlot at different strengths – it’s a gorgeous shade of pink.
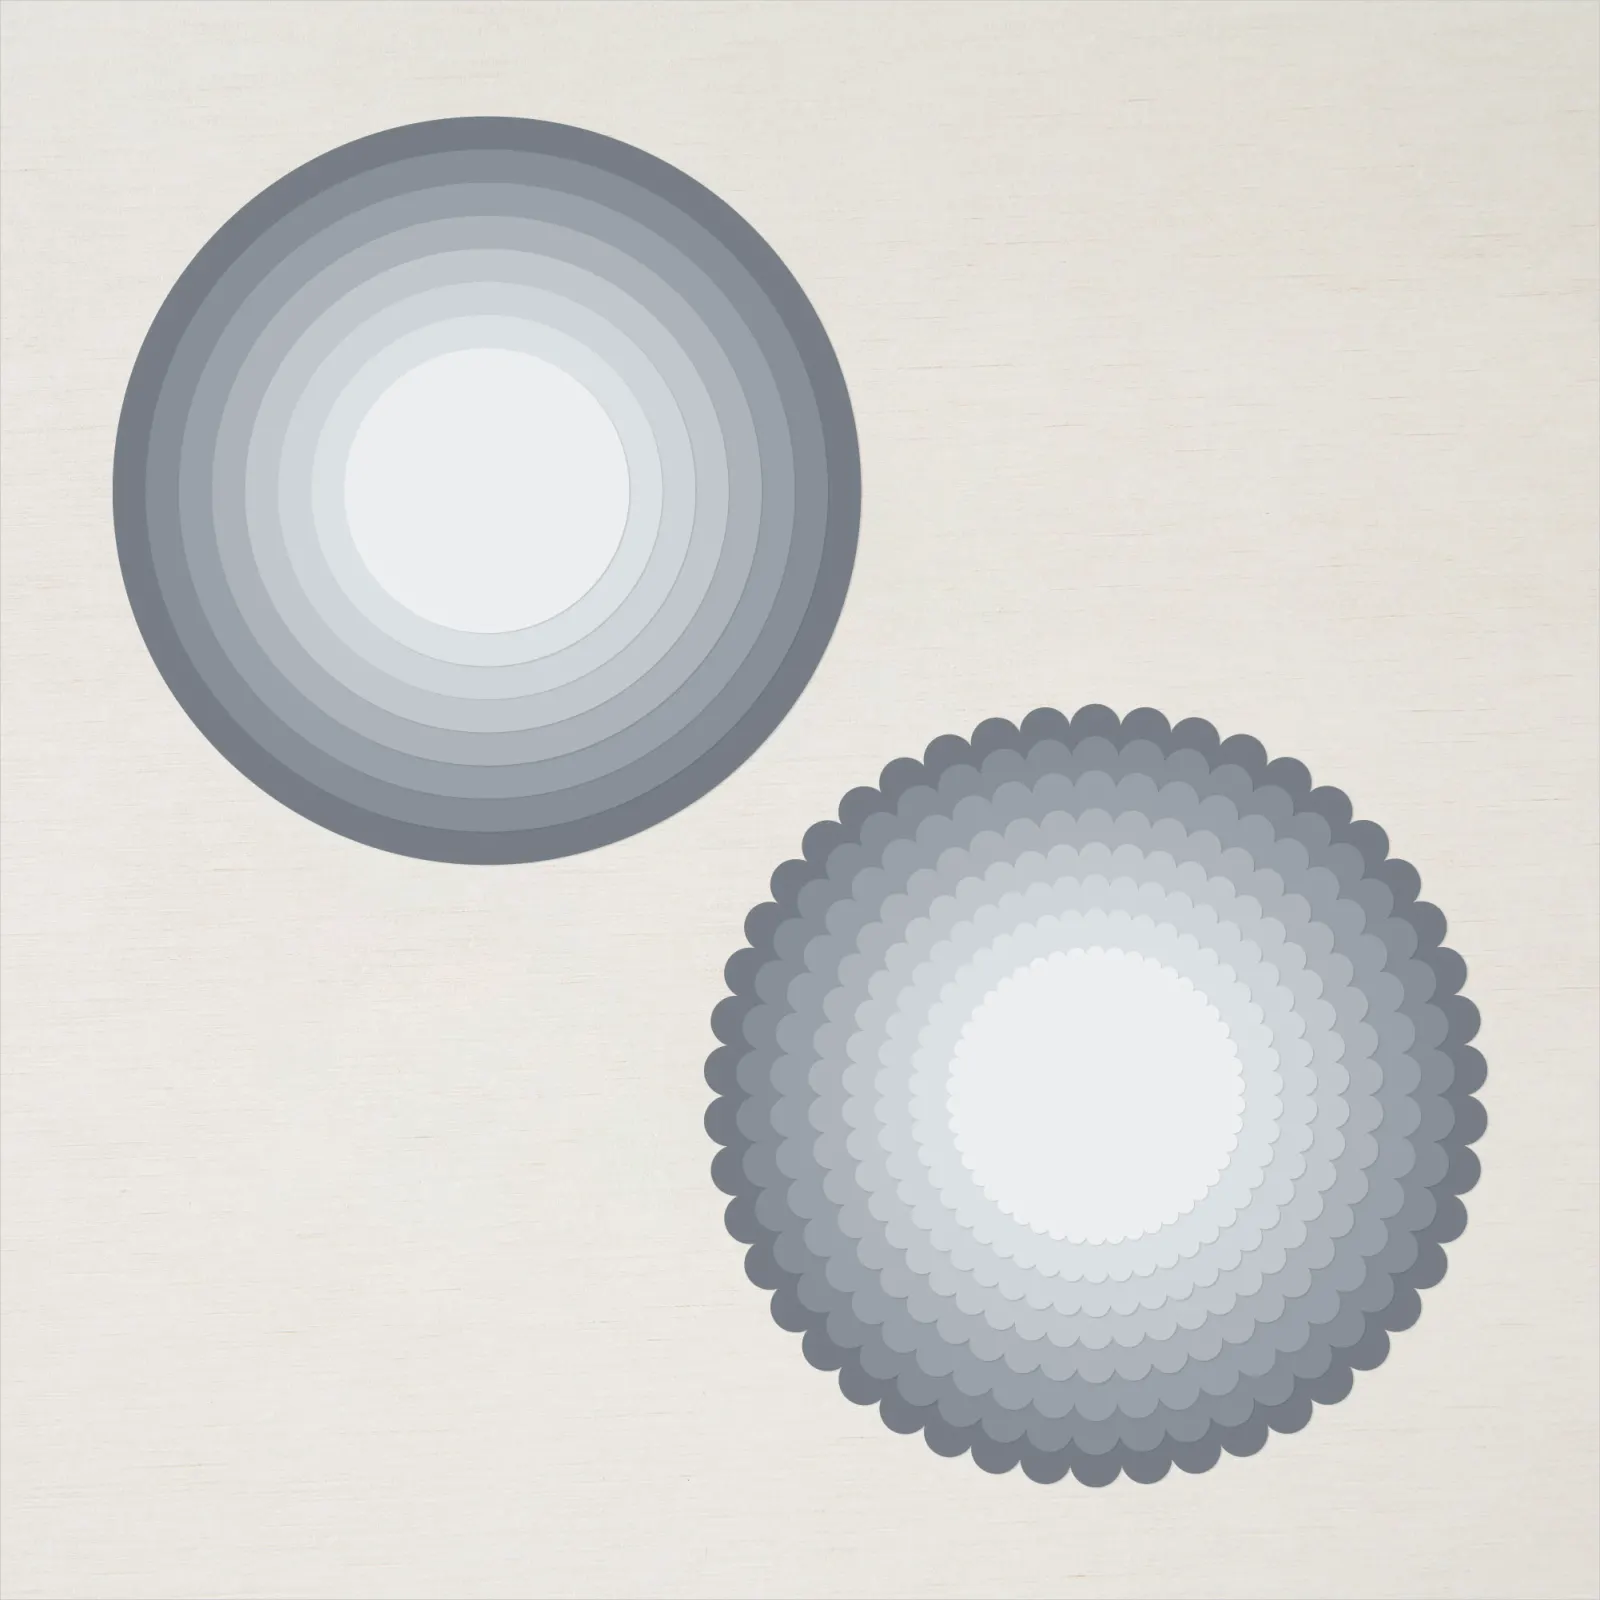
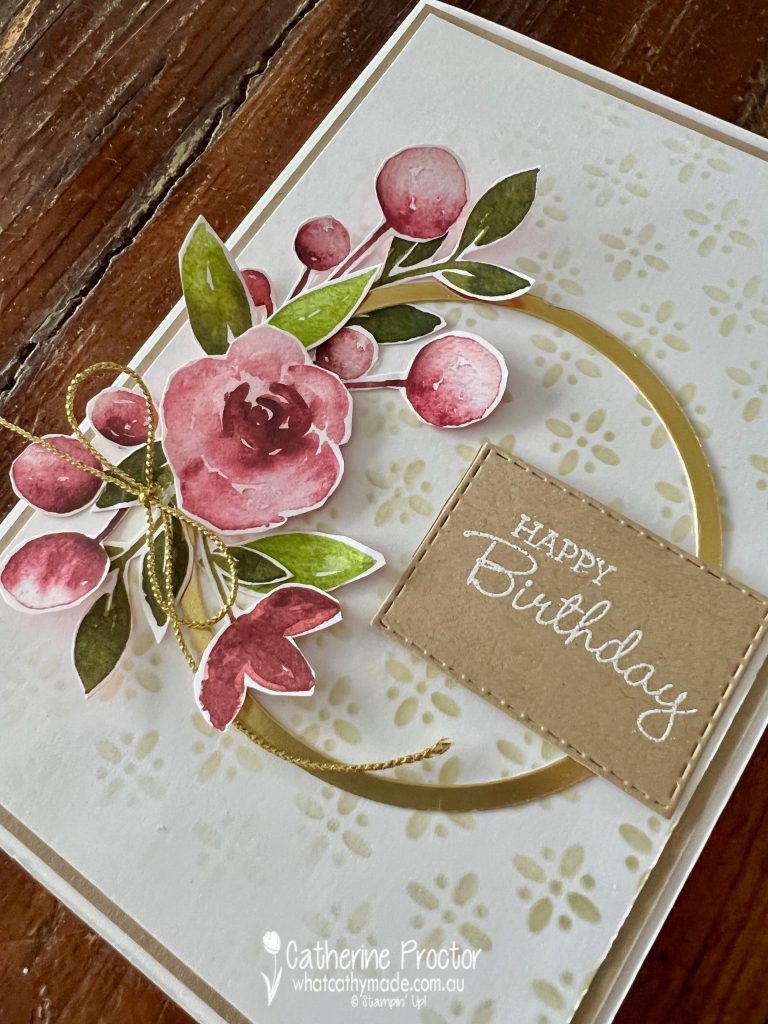
The gold hoop is made using the largest and second largest of the Layering Circle dies. Die cut the largest circle first and then it’s easy to line up the second largest circle die.
I’ve decided to try a new thing with my cards going forward. Wherever possible, I’m going to make a couple of different sentiments for each card and I’m not going to adhere the sentiment until I know what I am using the card for.
Here’s my alternate sentiment for this card.
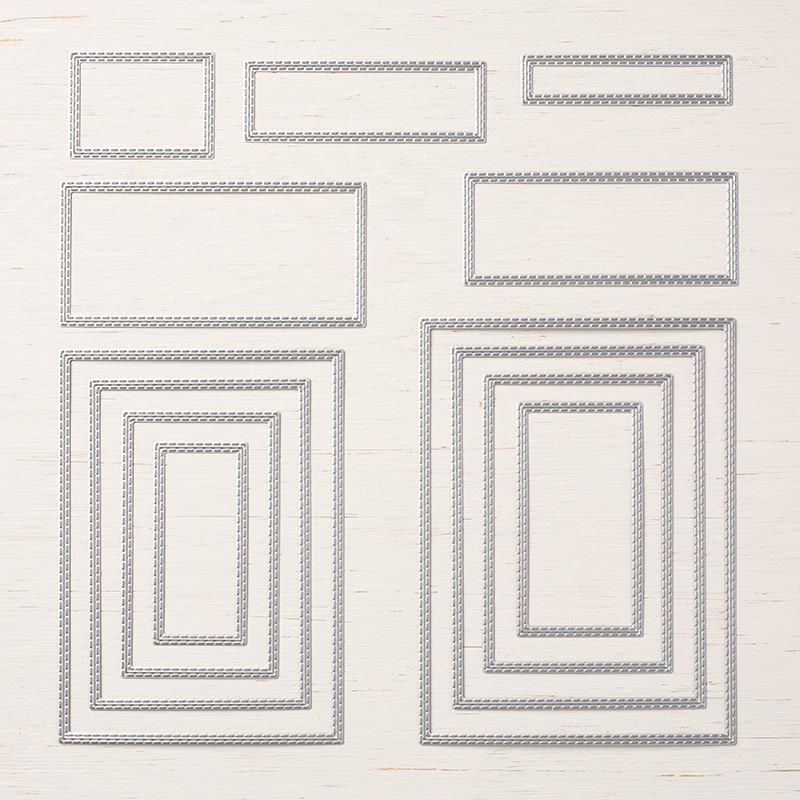
This sentiment is stamped in Versamark Ink on Crumb Cake card stock, then heat embossed with white Emboss powder before it was die cut with a Stitched Rectangle die.
Now it’s time to hop on over to our next participant, the lovely Di Furniss – I can’t wait to see what Di has made this week!
If at any time you find a broken link, you can find the complete list of all participants below.
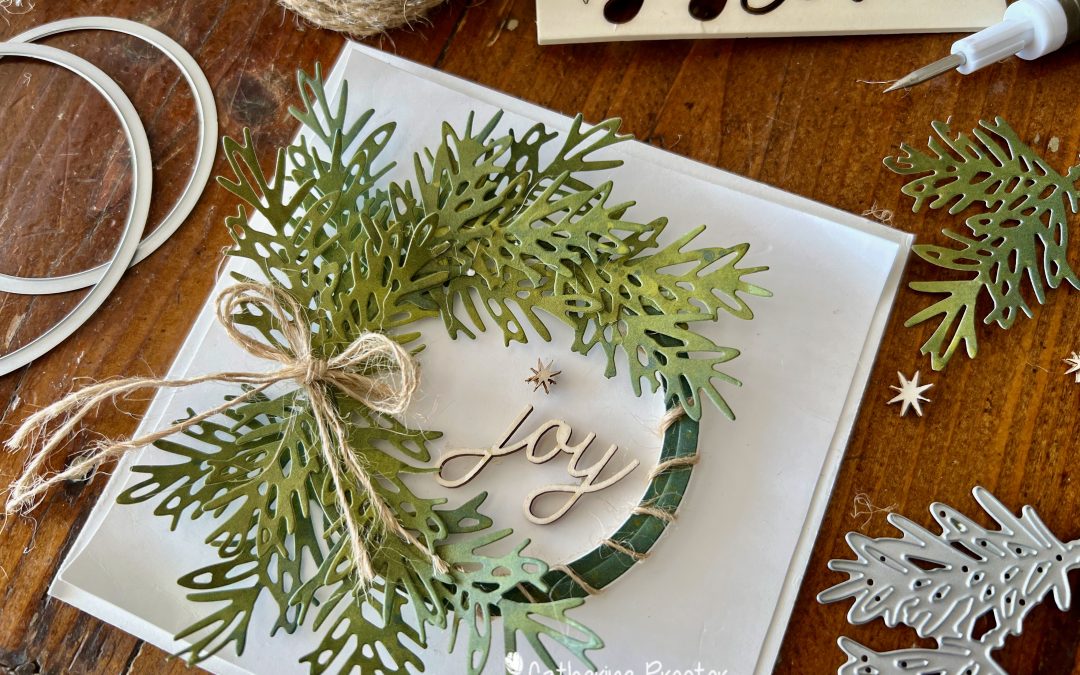
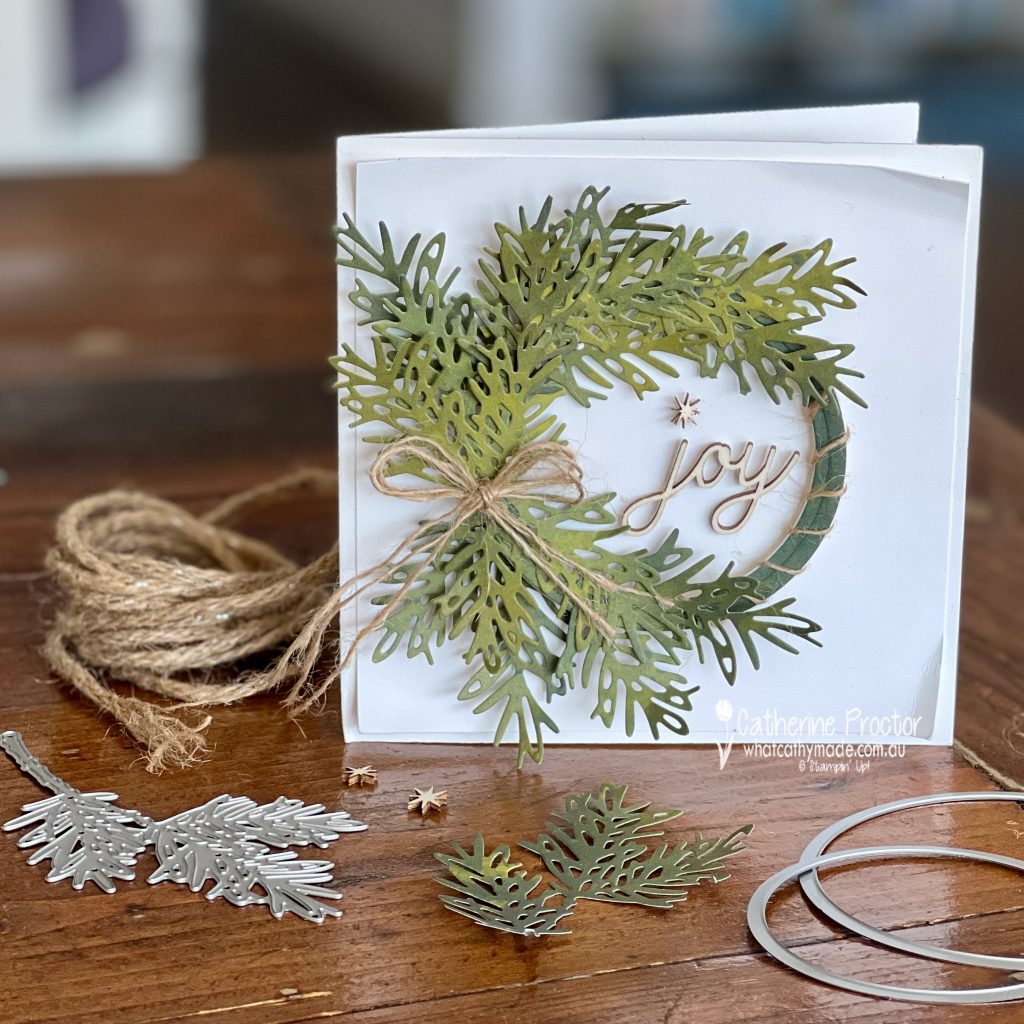
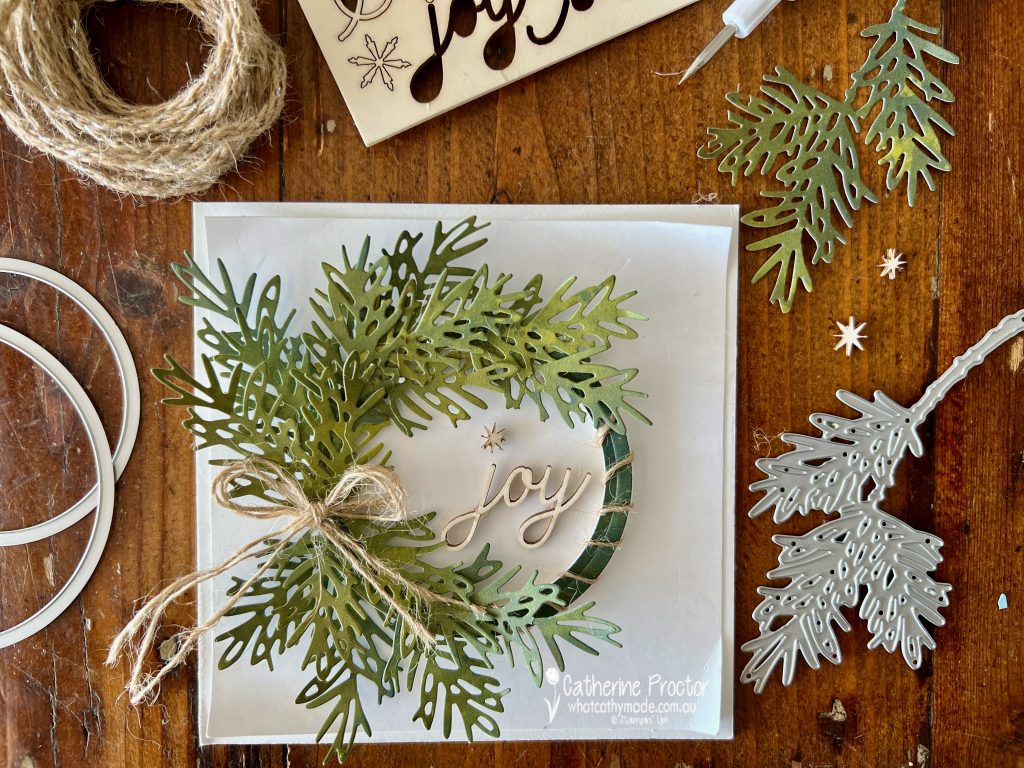
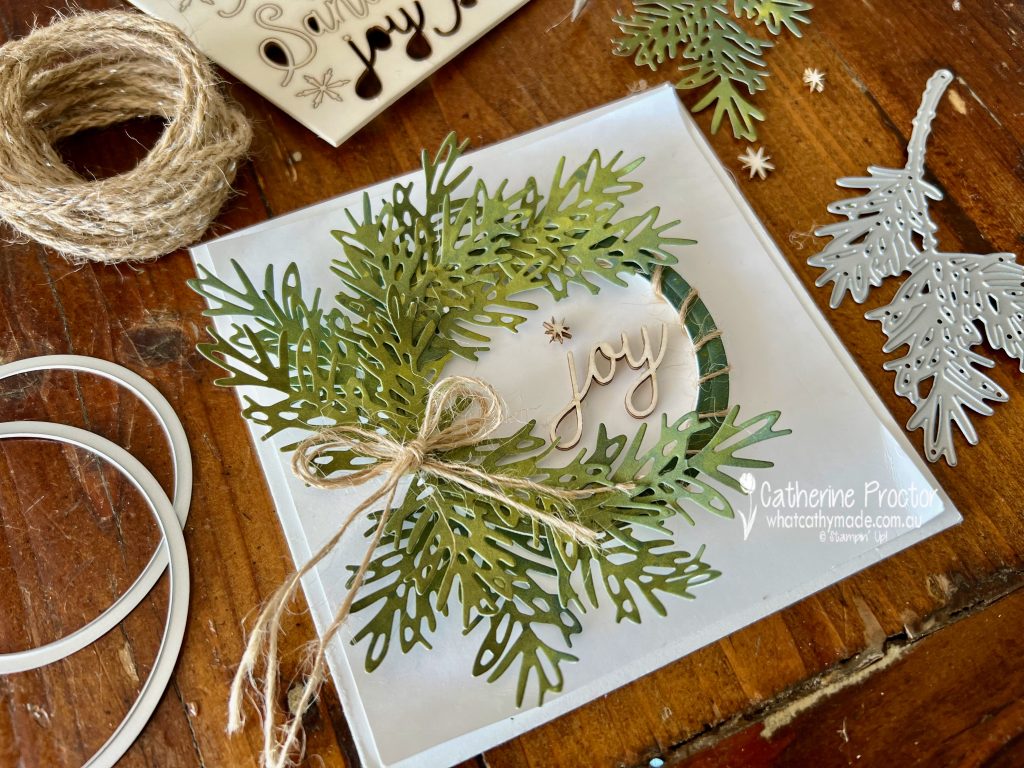
Day 6 of the #30DayChristmasCardMakingChallenge is “Something Green”.
With so many gorgeous greens in the Stampin’ Up! colour range, the hardest part of this challenge was deciding just which green to use!
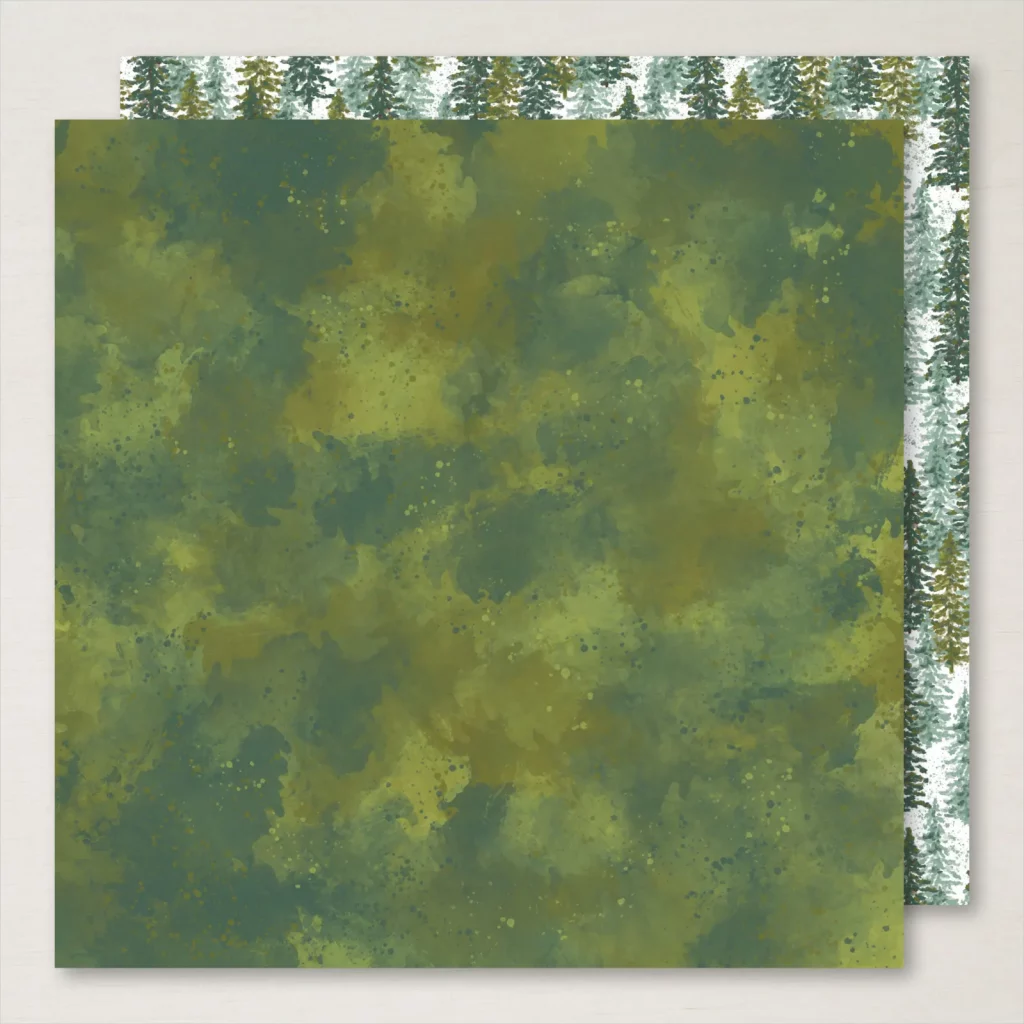
Eventually I decided to use this design from the beautiful Boughs of Holly DSP because it combines several greens on the one sheet of DSP: Evening Evergreen, Mossy Meadow, Old Olive, Shaded Spruce and Soft Succulent. Is that cheating or clever?
This paper was also the perfect shortcut to incorporate vergation of colour into my rustic wreath Christmas card without having to do any stamping. In fact this is a no stamping card!
The long branch die from the Decorated Pine dies is just perfect for making a wreath as it cuts 3 pine fronds with each branch that is die cut.
Rustic Wreath Christmas Card
Start by using two of the Layering Circle dies to die cut a hoop from the Boughs of Holly DSP
Mount the hoop to the card with an adhesive foam strip
Die cut branches from Boughs of Holly DSP, snip into smaller pieces and adhere to the wreath
Undo a length of the Silver Threaded Twine to wrap around the hoop and to make a bow
Finish the card with laser-cut embellishment words and shapes from the Santa Express Memories & More Card Pack
I couldn’t resist adding a few Basic Rhinestone Jewels to my card for some extra sparkle.
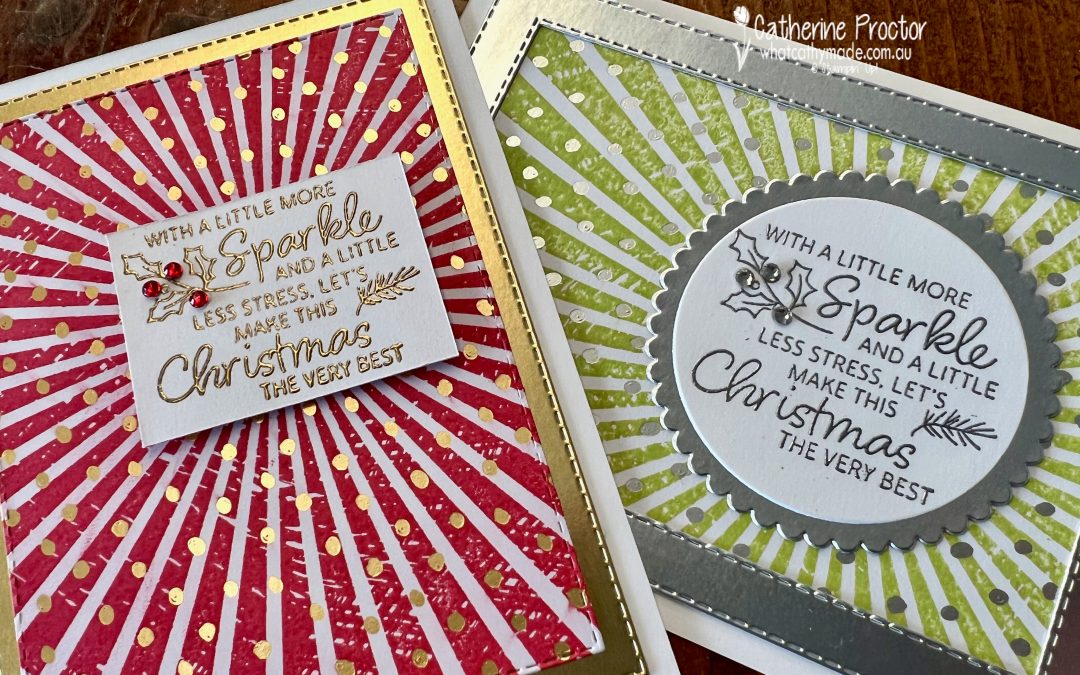
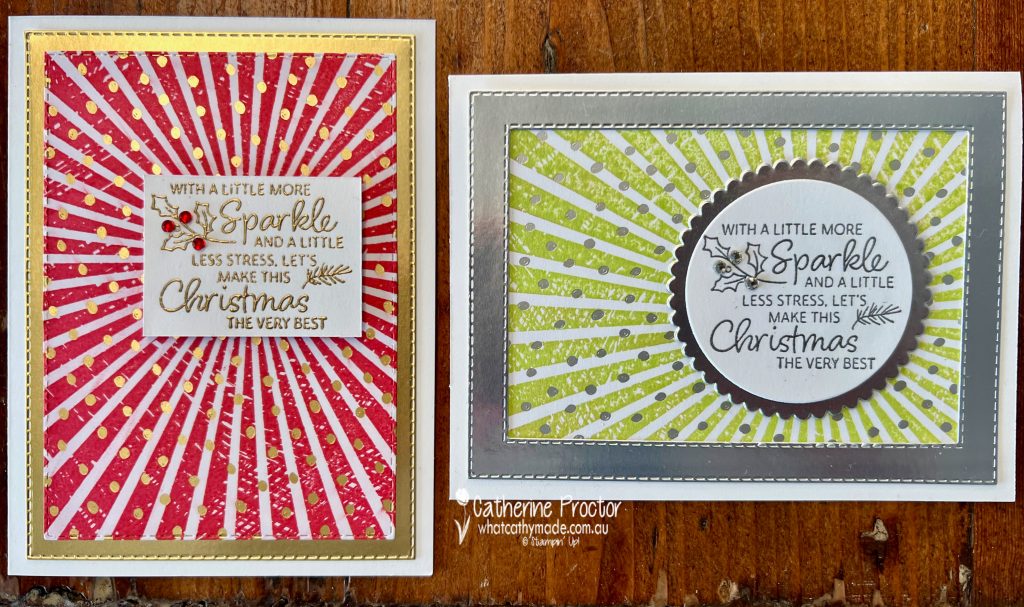
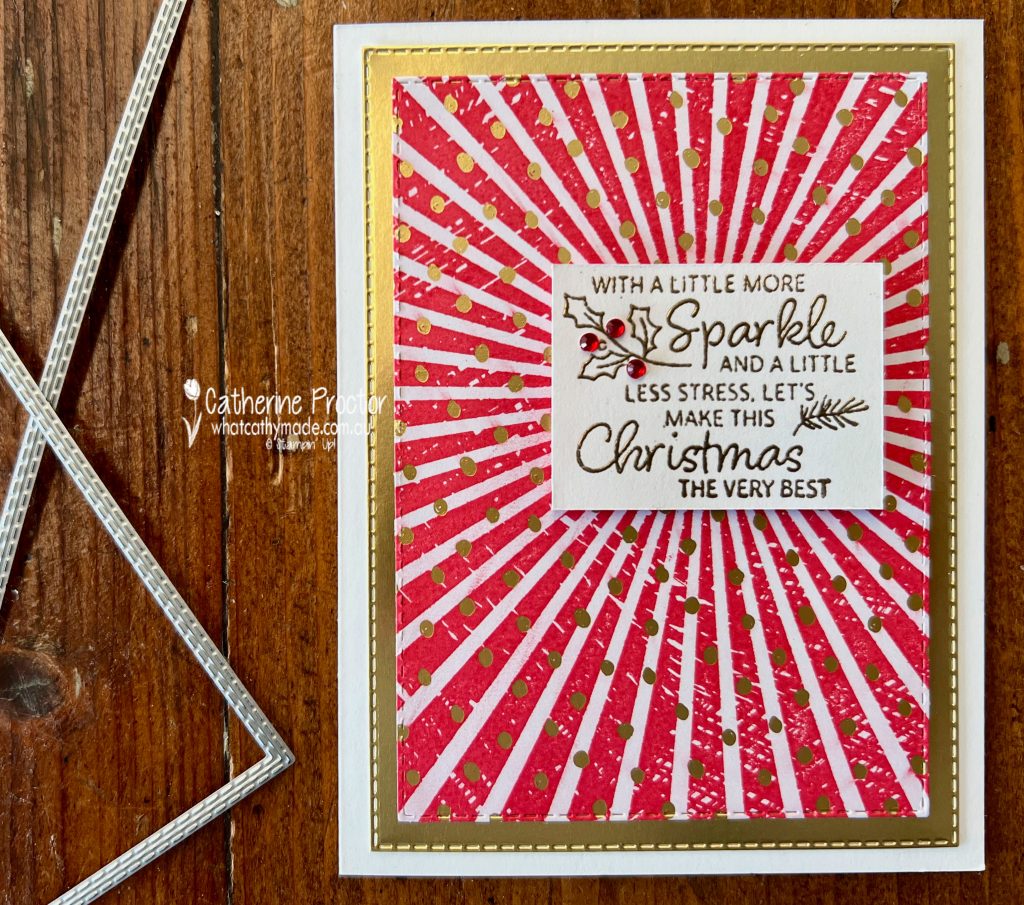
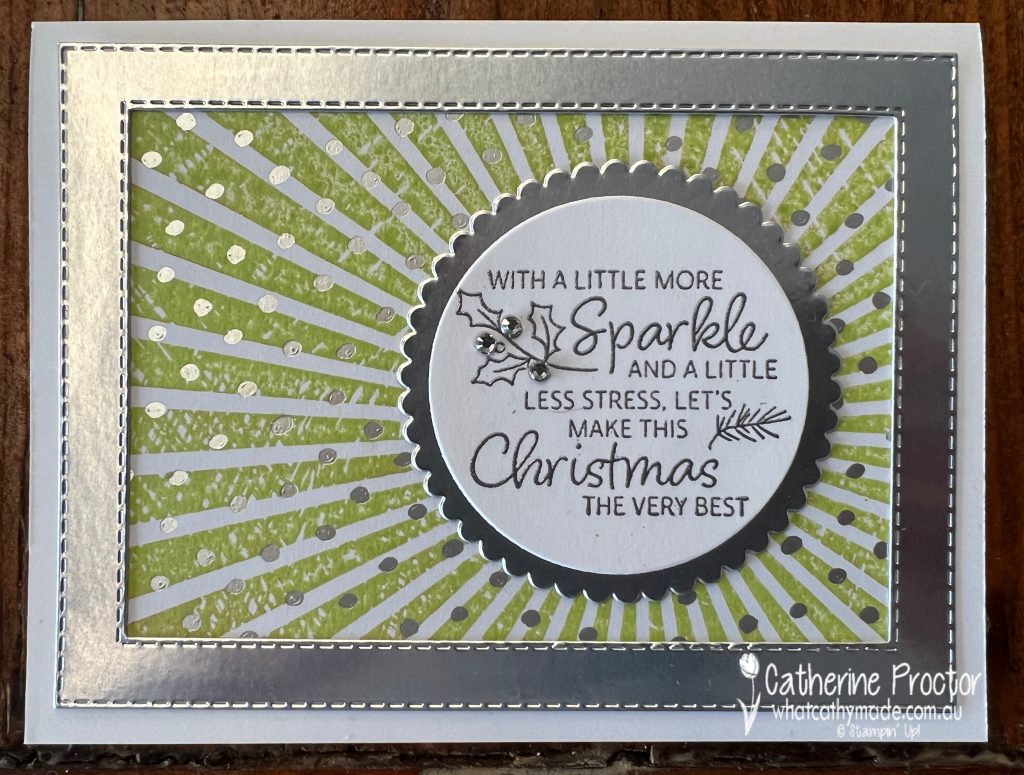
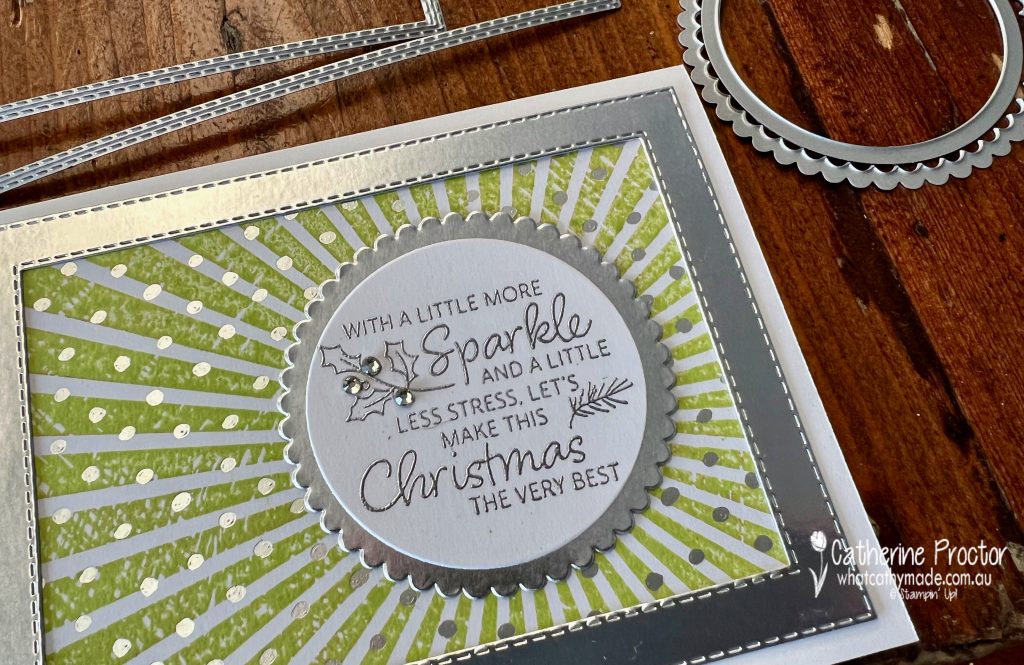
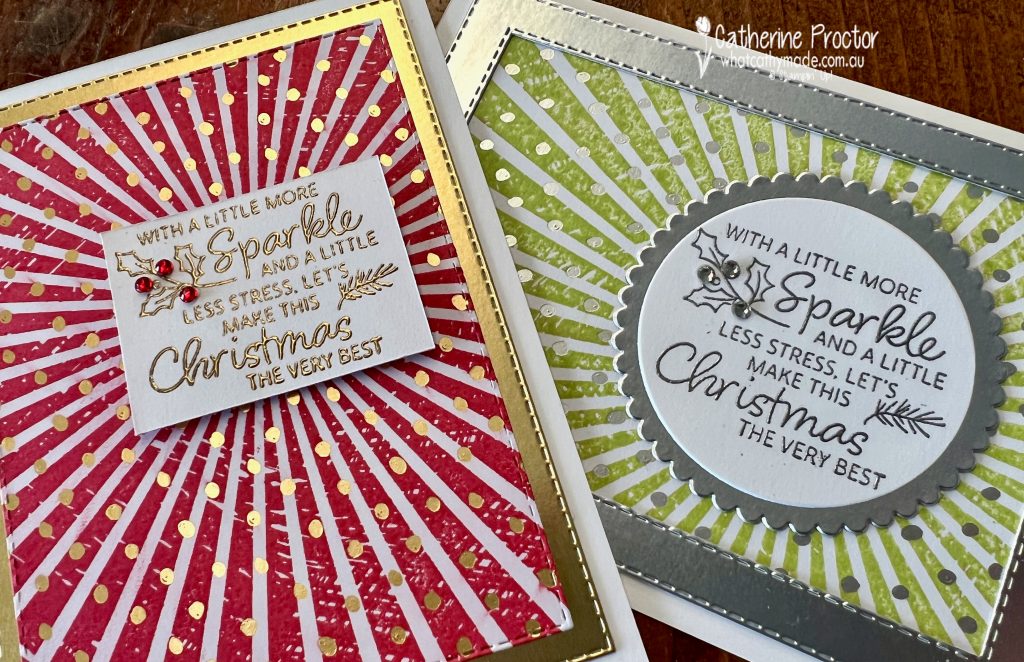
Welcome to week six of the Heart Of Christmas Blog Hop!
Ten more products have just been added to Sale-a-bration, so I’ve paired two of these new Sale-a-bration items – the gold foil from the Brushed Metallic cardstock pack and silver foil from the Silver Foil Specialty pack – with the existing Sale-a-bration Gold and Silver DSP for my two modern Christmas cards.
NOTE: If you would like to redeem your Sale-a-bration credits for these new items, make sure you use the codes below, instead of the original product codes they have in the catalogue they appear in.
My “non-traditional” Christmas cards were inspired by a video where Stampin’ Up used the Rays of Light Stamp set to stamp on the Silver & Gold DSP.
TOP TIP – use your Stamparatus to stamp large background stamps like this one.
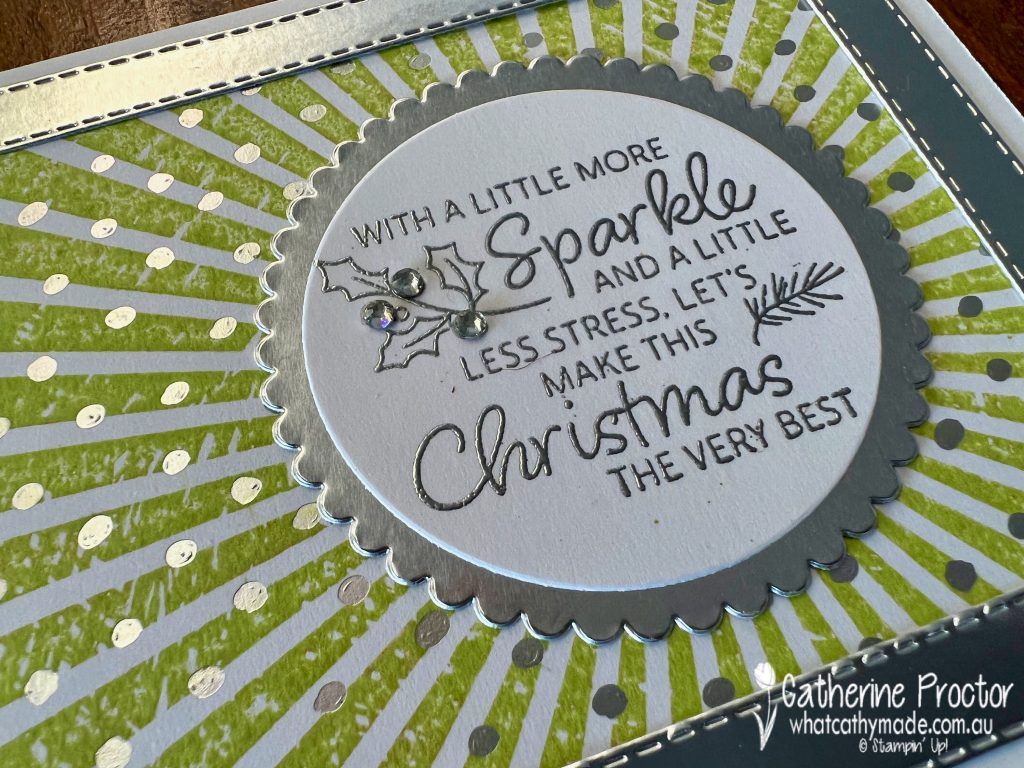
This sparkly Silver & Gold DSP works really well with the gorgeous sentiment stamp I’ve used from the “Very Best Occasions” stamp set. I love this sentiment – bring on the sparkle and banish the stress of Christmas, I say!
I’ve used two of the new 2022-24 In Colours for my cards today – Parakeet Party paired with silver foil and Sweet Sorbet paired with gold foil.
I used a paper trimmer to cut out the gold embossed sentiment, adding red rhinestones as holly berries to the sentiment.
The gold frame is created using the largest and third largest stitched rectangle dies, with the stamped DSP die cut out with the second largest stitched rectangle die.
While I layered the gold frame behind the DSP for the Sweet Sorbet card, I decided to place the silver frame over the top of the stamped DSP for the Parakeet Party card.
The sentiment for the Parakeet Party card was die cut using layering circle dies and Rhinestone Basic Jewels embellish the sentiment.
I know which card I like the best, but I’m curious to find out which variation you prefer? Do you think this design is too modern and graphic for Christmas cards?
Now it’s time to hop on over to our next participant, the lovely Rachel Woollard – I can’t wait to see what Rachel has made this week!
If at any time you find a broken link, you can find the complete list of all participants on Sharon‘s blog. Sharon Davern is the host of our Heart of Christmas blog hop this year – thank you so much Sharon!!
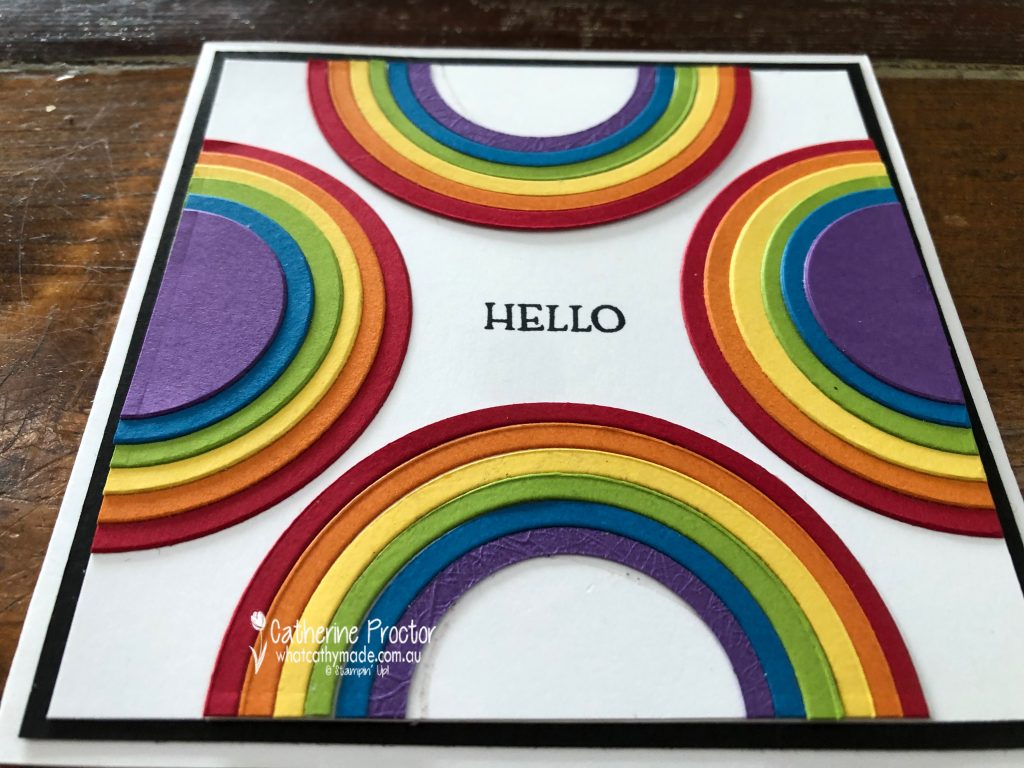
Welcome to week 20 of our 2021-22 Colour Creations blog hop! Tonight we are showcasing Granny Apple Green, a vivid green from the Brights colour collection.
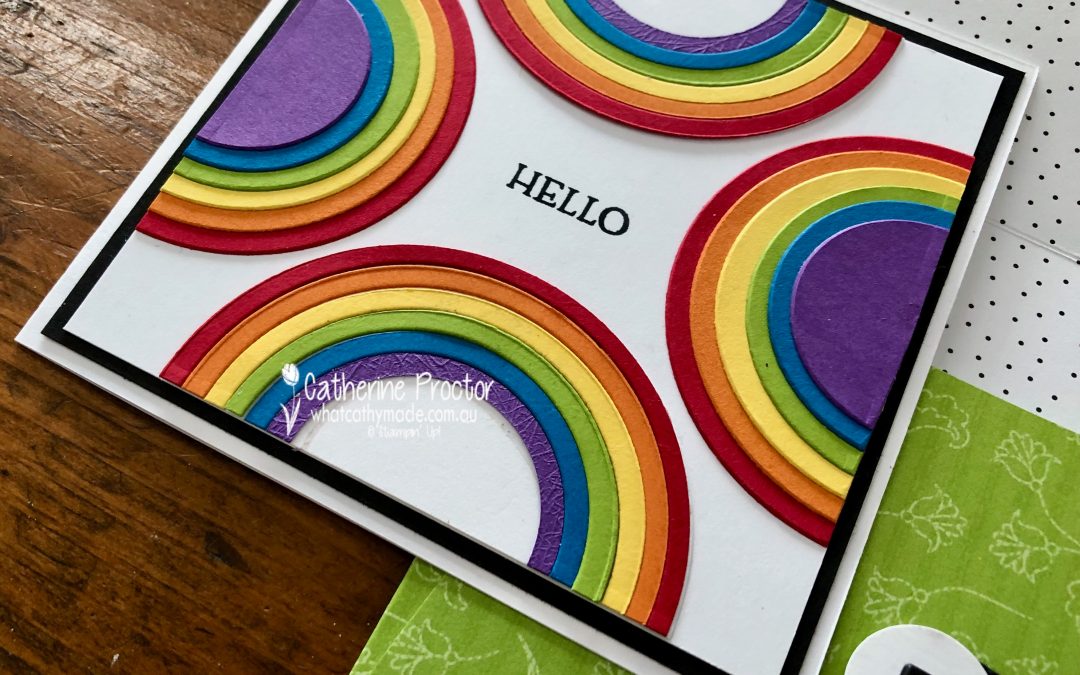
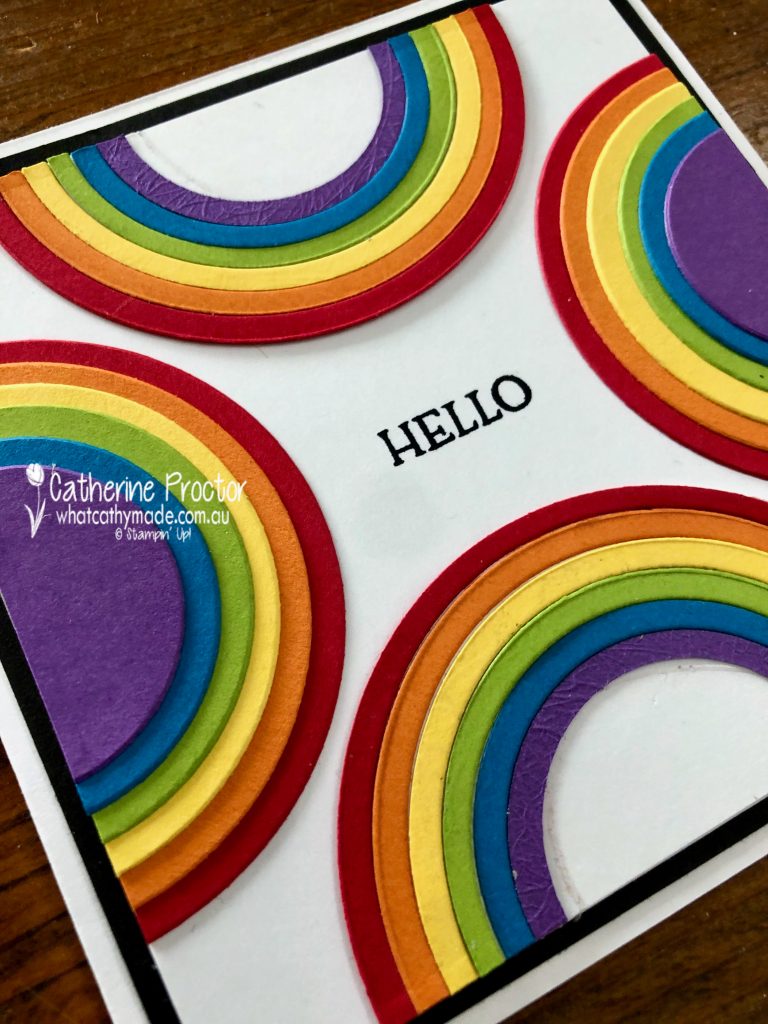
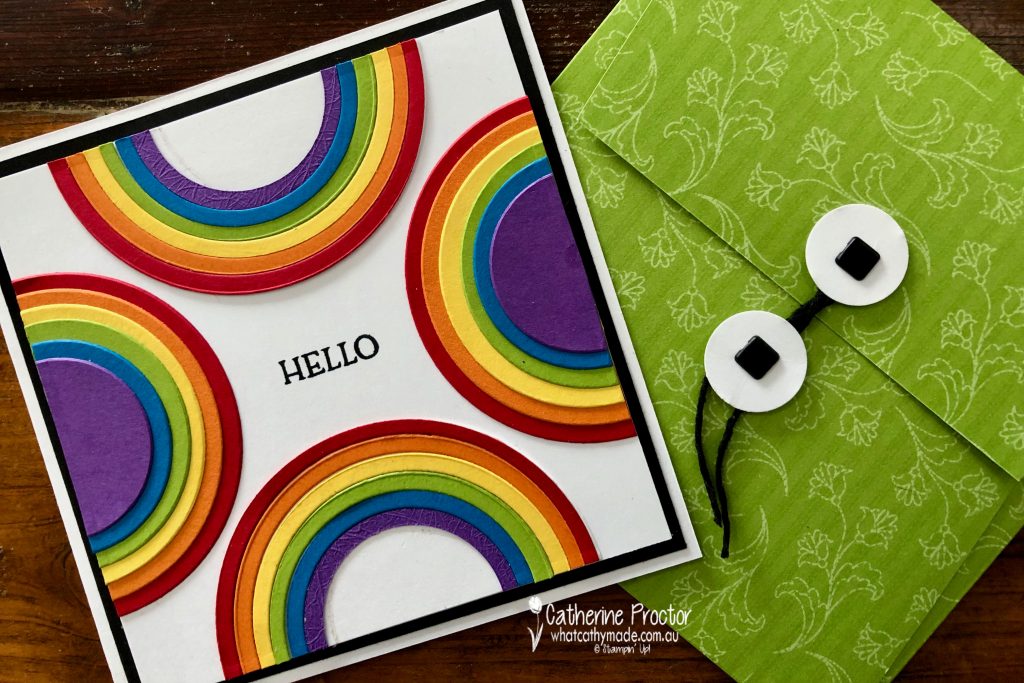
It’s such a cold, wet and windy day here in Sydney – the sort of weather that calls for a bright and happy rainbow card!
The rainbow colours on this card from top to bottom are:
Real Red
Pumpkin Pie
Daffodil Delight
Granny Apple Green
Pacific Point
Gorgeous Grape.
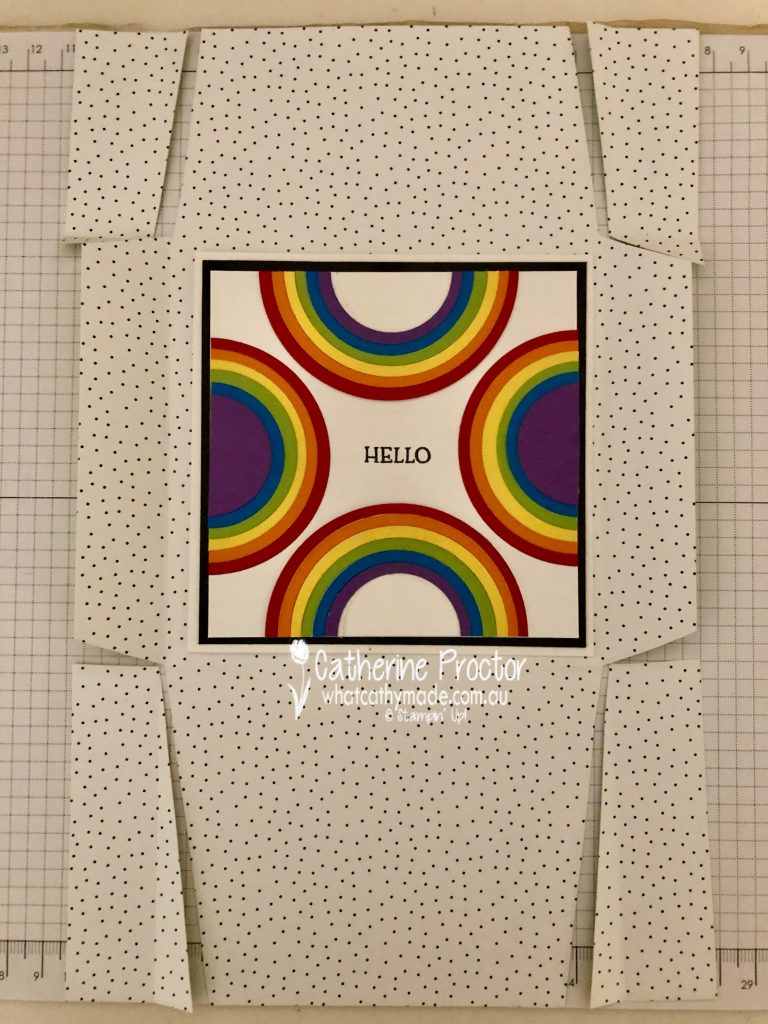
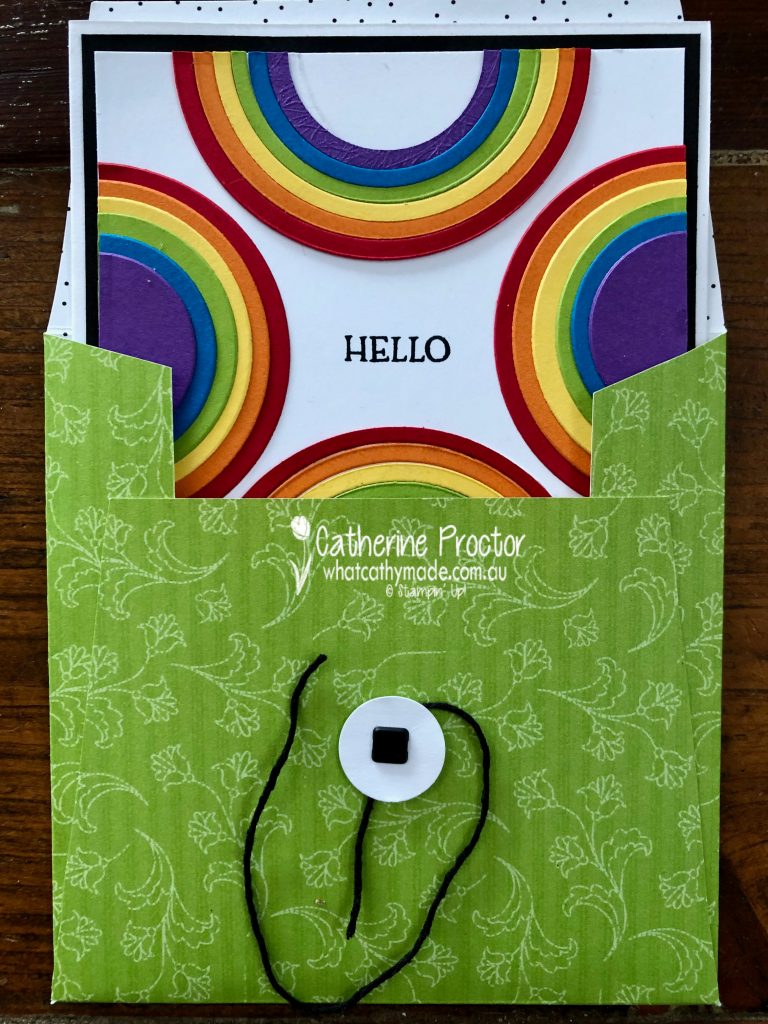
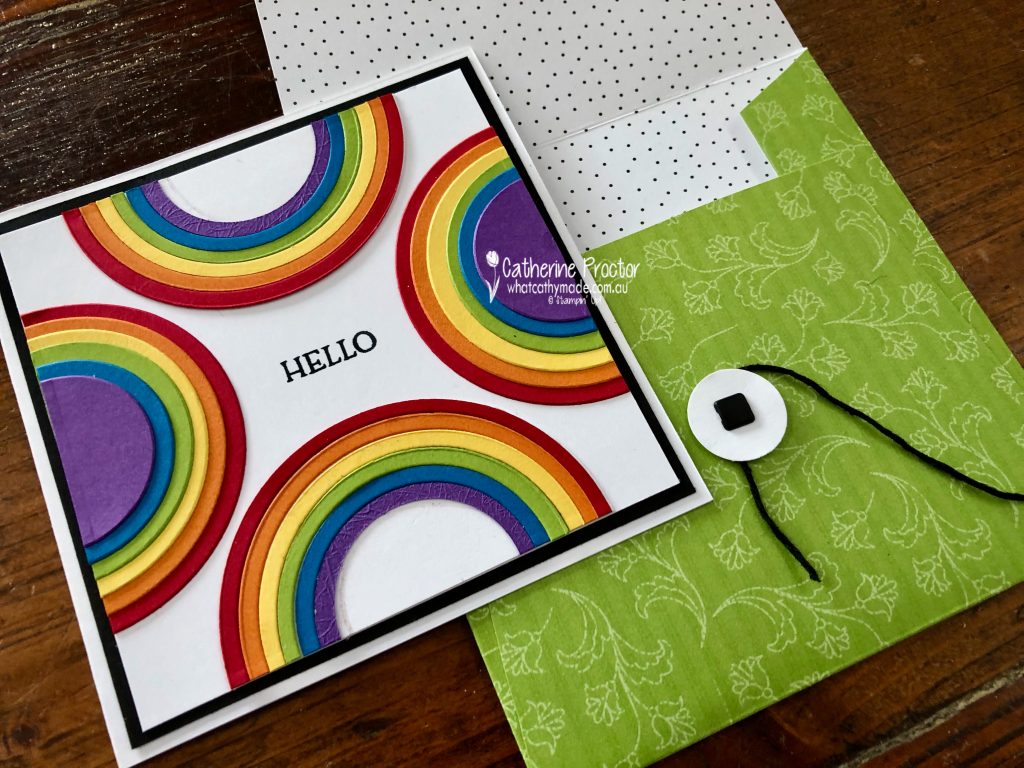
Because I didn’t feel there was enough Granny Apple Green in the card to justify using it for a Colour Creations Granny Apple Green blog hop, I made a matching envelope to showcase this vibrant green, using the Pattern Party DSP.
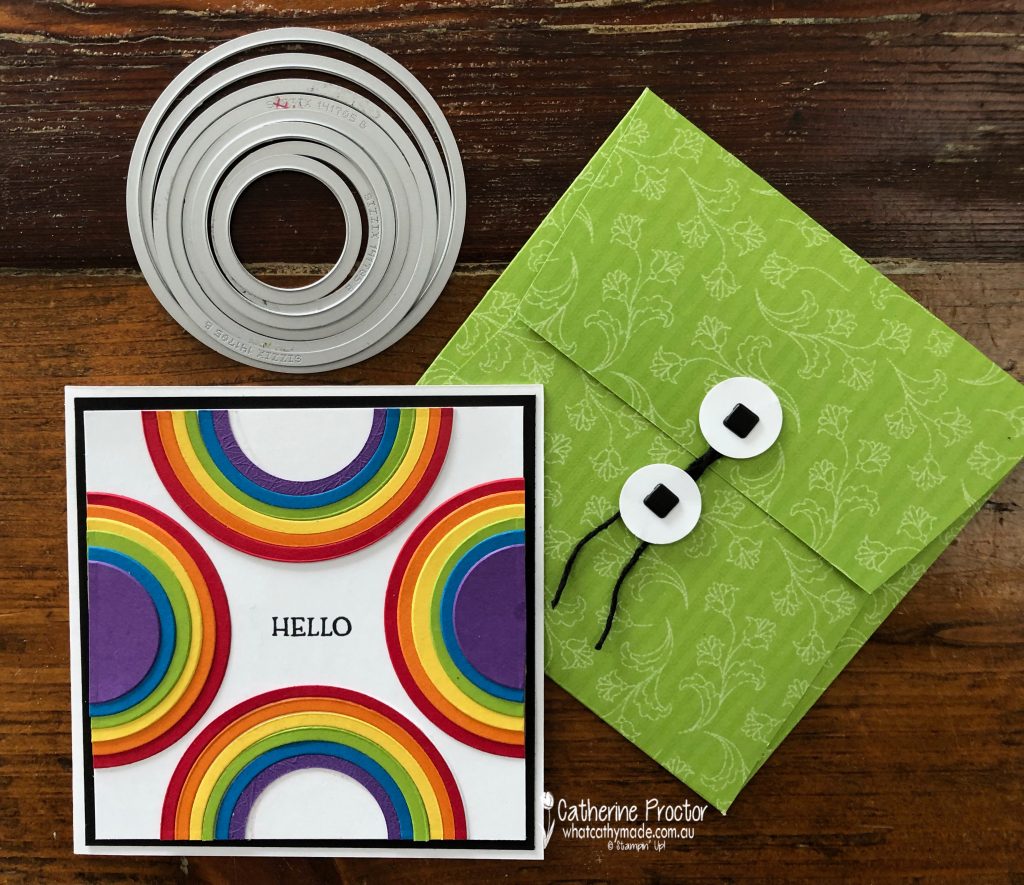
The layering circle dies make this card quick and easy to make. I created the top and bottom rainbows by die cutting a circle of Real Red with the largest circle die then die cutting it again with the next smallest sized circle and repeating that process with all the colours, using smaller and smaller circle dies. I carefully adhered the colours in rainbow order onto a circle of basic white and cutting it half. The rainbows on the sides of the card use the leftover circles, adhered in the same colour order.
TIP: adhere these circle in 2 sections of 3 layers each and cut them in half BEFORE adhering both sections together. These rainbows are 6 layers thick and too thick to be cut in half with paper trimmer all at once.
The scoring and cutting pattern for the envelope is shown in the photo below – whatever size your card is, make sure your finished envelope allows enough room for the card to slide in and out.
This card measures 11.5 x 11.5cm (4 1/2 x 4 1/2 inches) so I made my envelope 12.5 x 12.5 cm (5 x 5 inches). The flaps either side are scored at 2.5 cm (1 inch) wide and, the bottom flap is scored at 9.5 cm (3 3/4 inches) and the top flap is scored at 6cm (2 3/8 inches).
The back flap of the envelope closes with die cut Basic White circles secured to the card with square brads and a tie made using a short length of Basic Black Bakers Twine twisted around them. The “Hello” sentiment is from the Blossoms in Bloom stamp set.
Now it’s time to hop on over to our next participant, the lovely Rachel Woollard – I can’t wait to see what she’s made this week!
If you find a broken link or have come to this blog hop from a different entry point, you can view the the full list of participants below:


")


 Designer Series Paper")
 Specialty Pack")
 Cardstock")