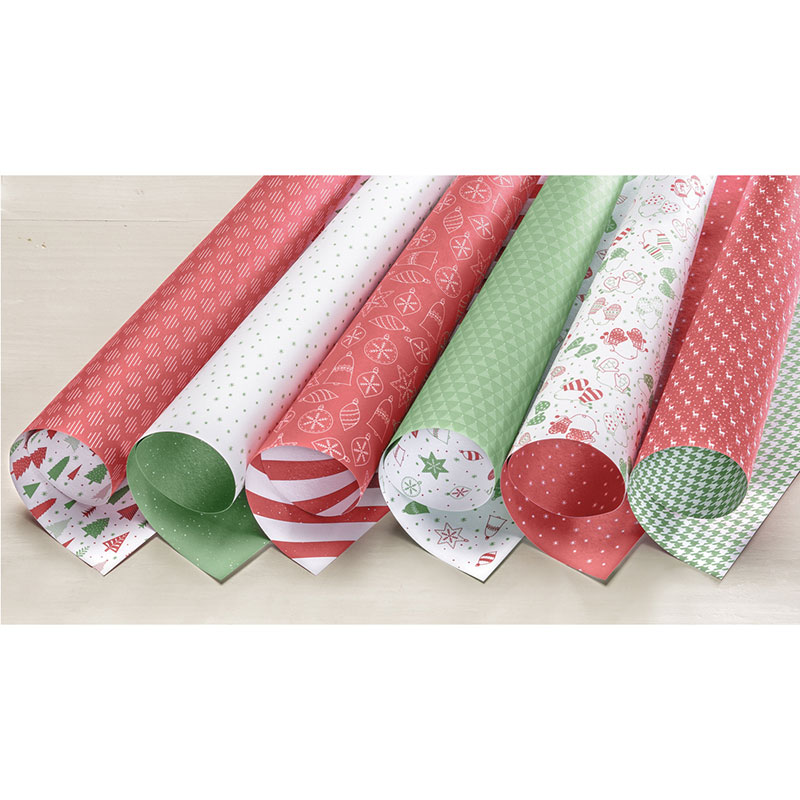
Tonight the Art with Heart team girls are sharing some wonderful ideas to inspire you with our Designer Series Papers. This month is the start of the new Stampin’ Up! year and we have a special promotion on our Designer Series Paper, buy 3 get 1 FREE for the month of October and there is no limit! I’m using one of the gorgeous papers available in this sale: “Be Merry Designer Series Paper”.
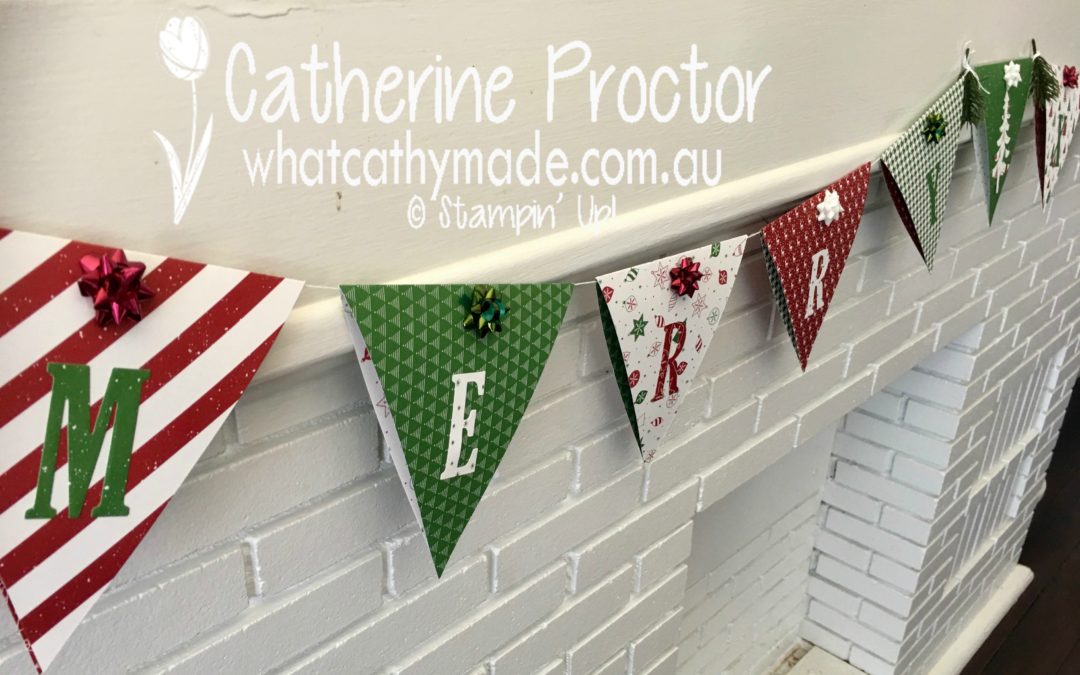
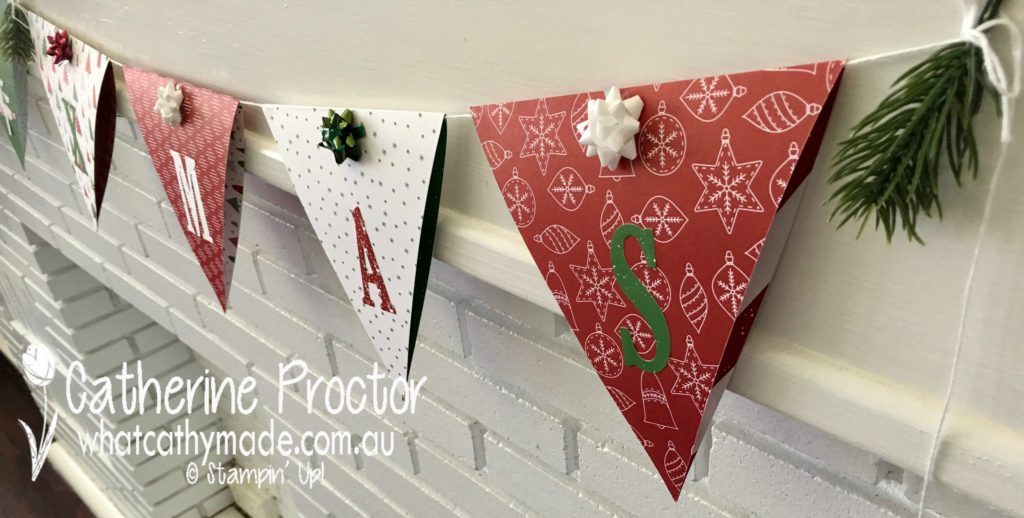
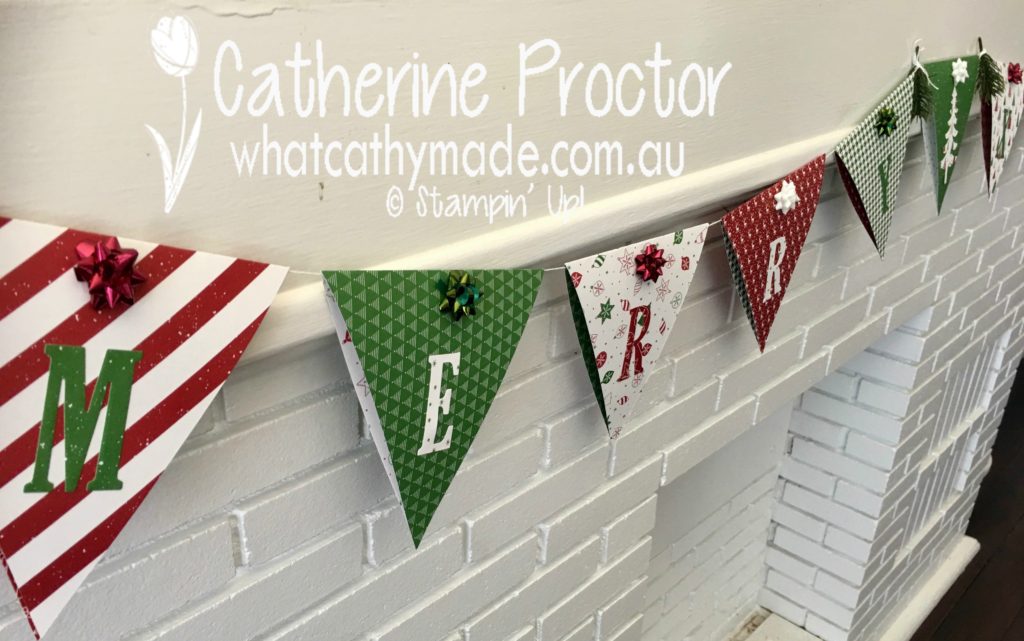
Have you ever made your own bunting? If you haven’t now’s the time to give it a go while the paper is on sale. I decided to make some Christmas bunting using the beautiful “Be Merry Designer Series Paper” and here it is hanging on my mantelpiece.
This is such a quick and easy project to make and you can use any of the gorgeous DSPs for this project. For my bunting I used less than half a packet of DSP…and that still left me with 7 full 12 x 12 inch sheets (one of each design and one spare sheet) and plenty of scraps to use for card making or other projects.
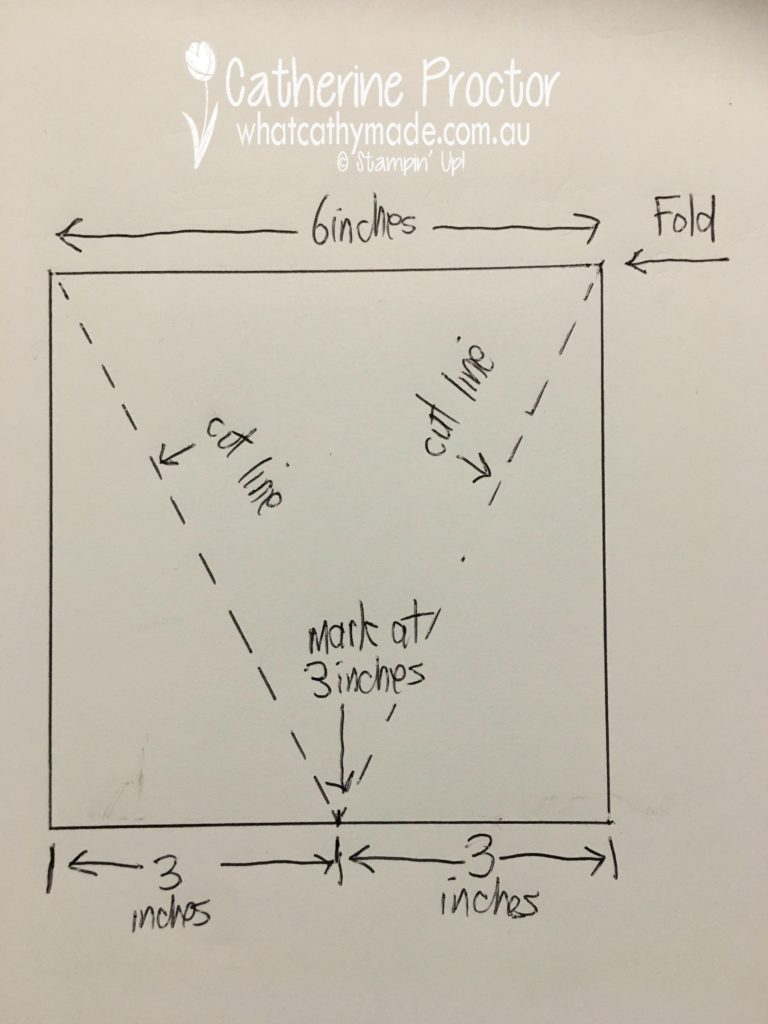
To make your bunting you simply use your paper trimmer to cut your paper in half lengthways (from top to bottom, ensuring any pattern is facing the right way up). Once you’ve cut your paper in half, take one piece and fold it in half so you now have a folded square that measures 6 x 6 inches. Mark the middle point (3 inches from either side) on the side opposite the fold, and then cut on the diagonal from your middle mark to the edges of the folded side, as shown in the diagram below.
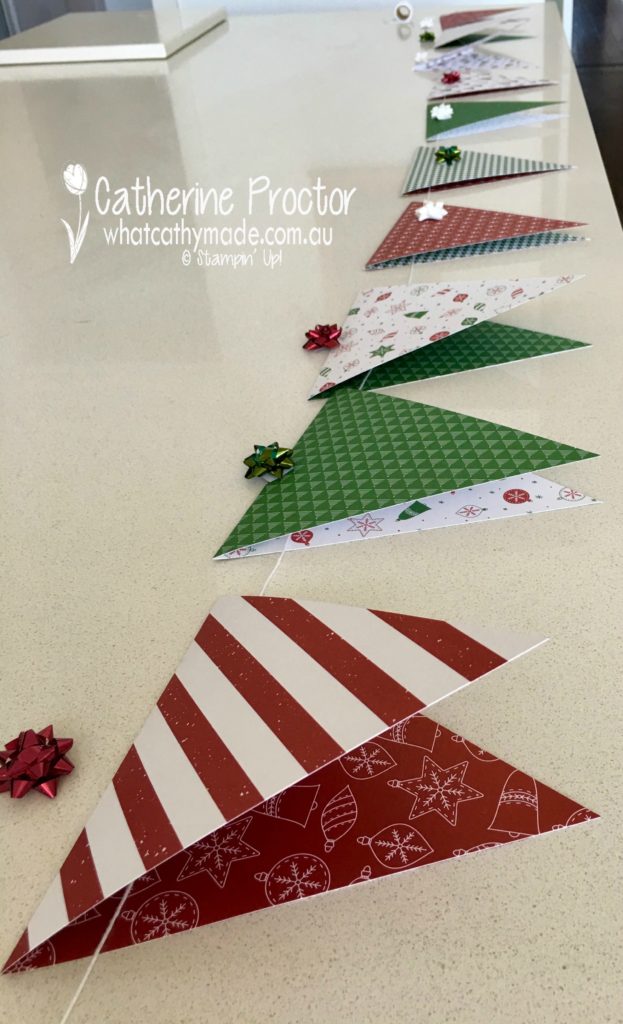
Save the offcuts to cut out your letters and repeat with the other half of your paper, this time folding it in the opposite direction so the other side of the patterned paper is used. I used 5 sheets of DSP for this project, making 10 bunting flags in total. To work out the order of bunting and space it apart I laid it all out on my kitchen bench so I could see how it looked.
I threaded whisper white bakers twine through the folded side of the flags and used a glue dot at either end of the fold to adhere the flag to the twine and close up the flag. I also used a glue dot at the bottom point of the flag. You can see in the picture below how nicely they hang…I left about 1 inch gap between the flags.
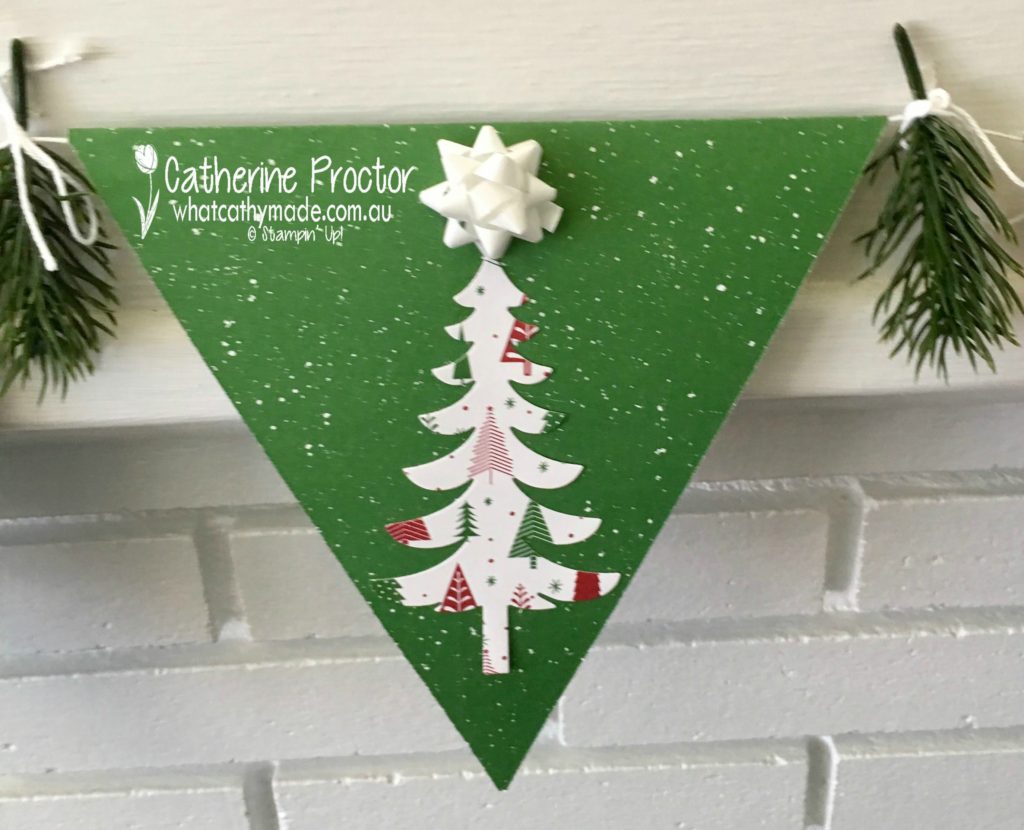
The finishing touch was to decorate the bunting with letters made from the DSP offcuts using the large letters framelits and a Christmas tree using a die from the Santa’s Sleigh die to break up the words “Merry” and “Xmas”.
The season of glitz mini gift bows are just the perfect size to add a little dimension (they come with their own adhesive backing), coupled with the green sprigs that I attached to the bunting with a bow of whisper white bakers twine.
You could make this bunting any length you wanted…I made mine to fit my mantelpiece…and you could leave your paper flags plain or decorate them with other punched or die cut shapes or words, such as “Peace, joy, love” or “ho, ho, ho”…it’s really up to you how you want to personalise your bunting.
Now it’s time to hop on over to our next participant, the very talented,Caroline Manwaring
If you find a broken link or have come to this blog hop from a different entry point, you can view the participants below:
Welcome back to the Heart of Christmas weekly blog.
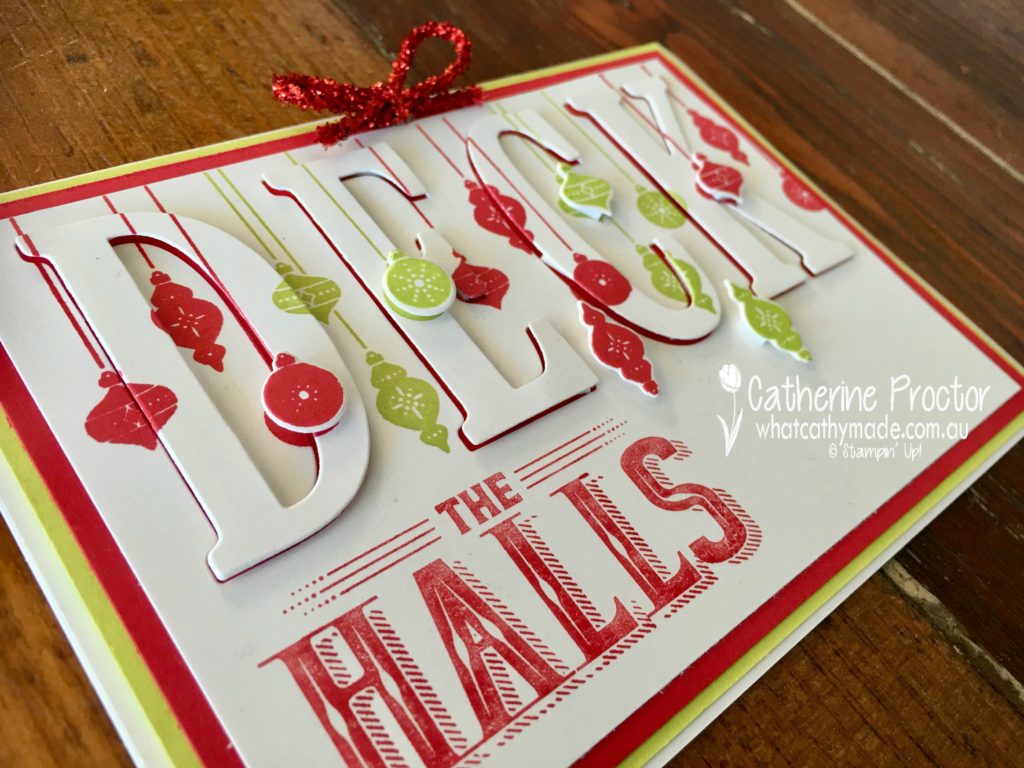
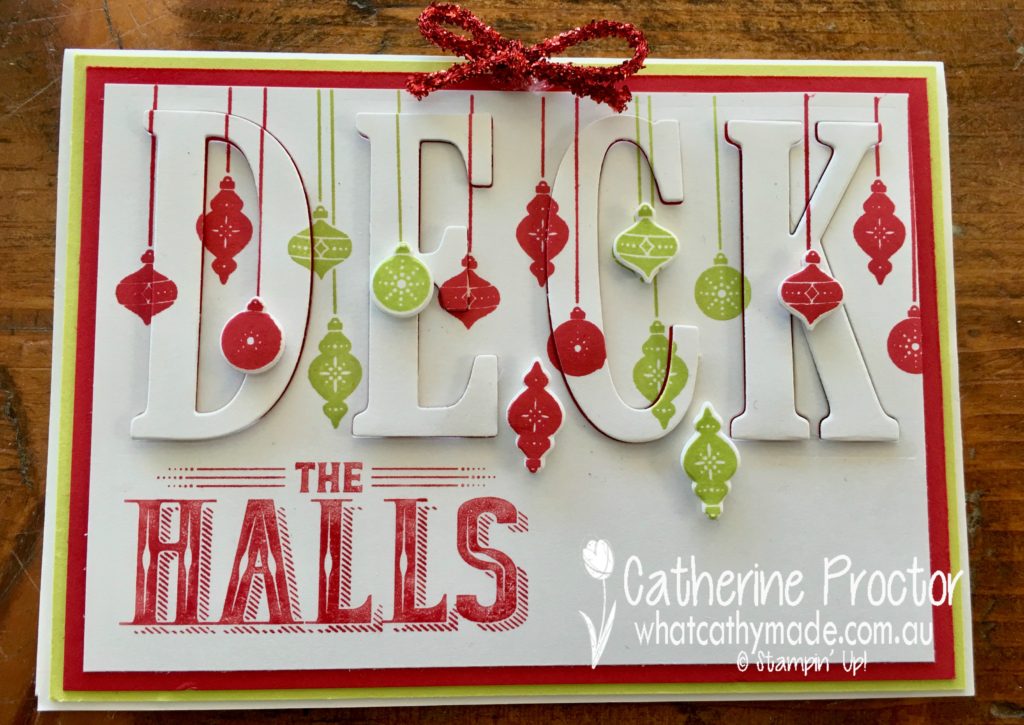
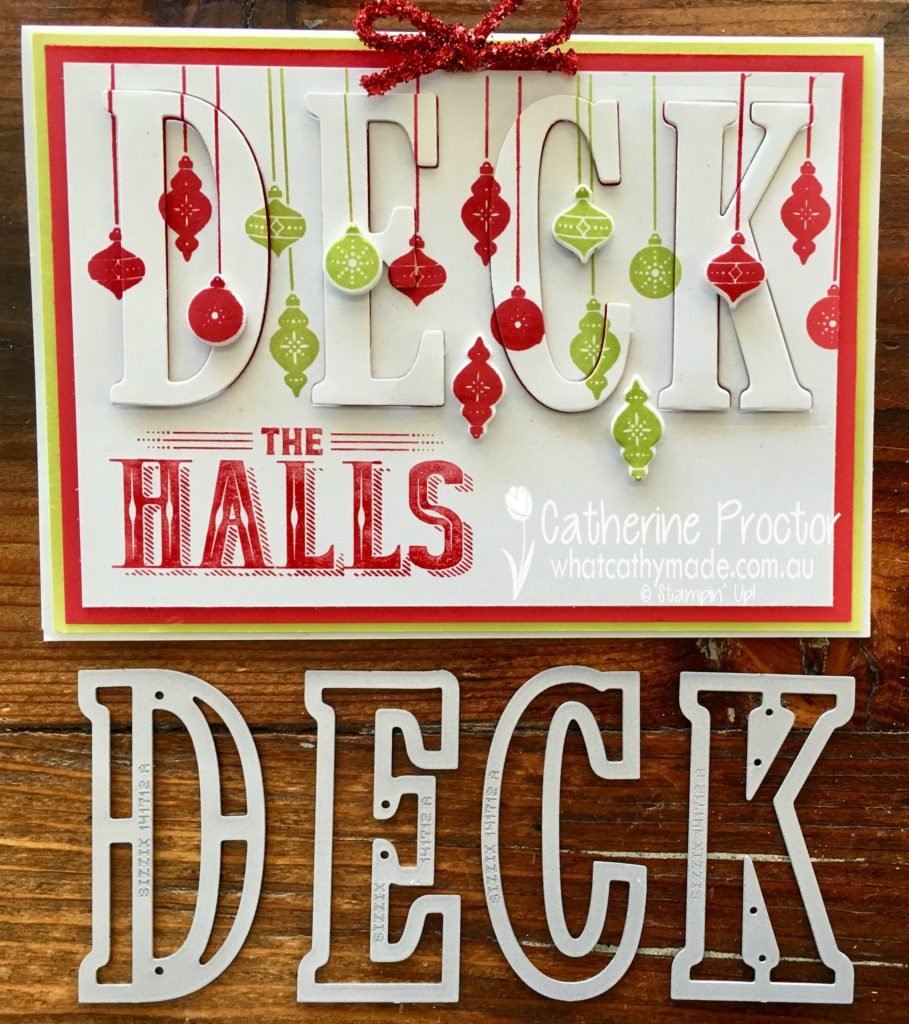
After seeing so many beautiful eclipse cards posted on social media I decided to hop on the bandwagon as well. My “deck the halls eclipse card” was CASED from one I saw on Pinterest, however the card that inspired me wasn’t watermarked and it didn’t link to a blog so I have no idea who to attribute the original idea to!
What I loved about the eclipse card I CASED was that it took one word from a Christmas sentiment and used the eclipse technique to create that word, then the rest of the sentiment was stamped. To do this on this first card I used my real red marker to only mark up the section of the Deck the Halls stamp I wanted to use, stamping with lemon lime twist and real red for the rest of the card.
Anyway, here are the two cards I made, inspired by an anonymous stranger on Pinterest!
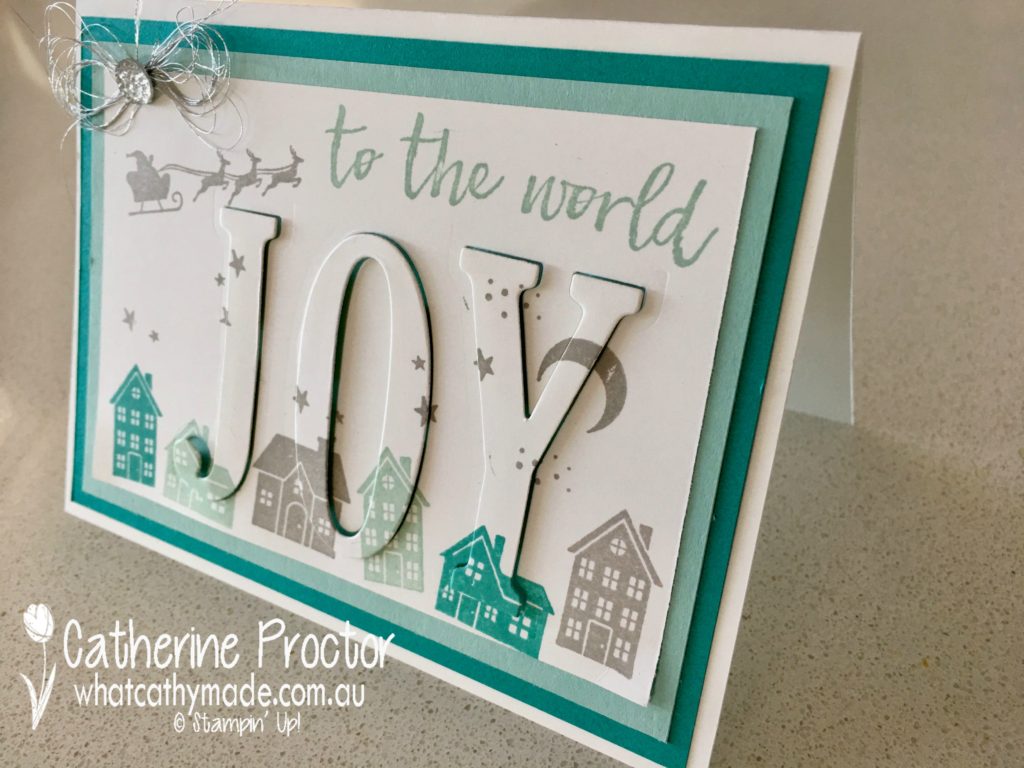
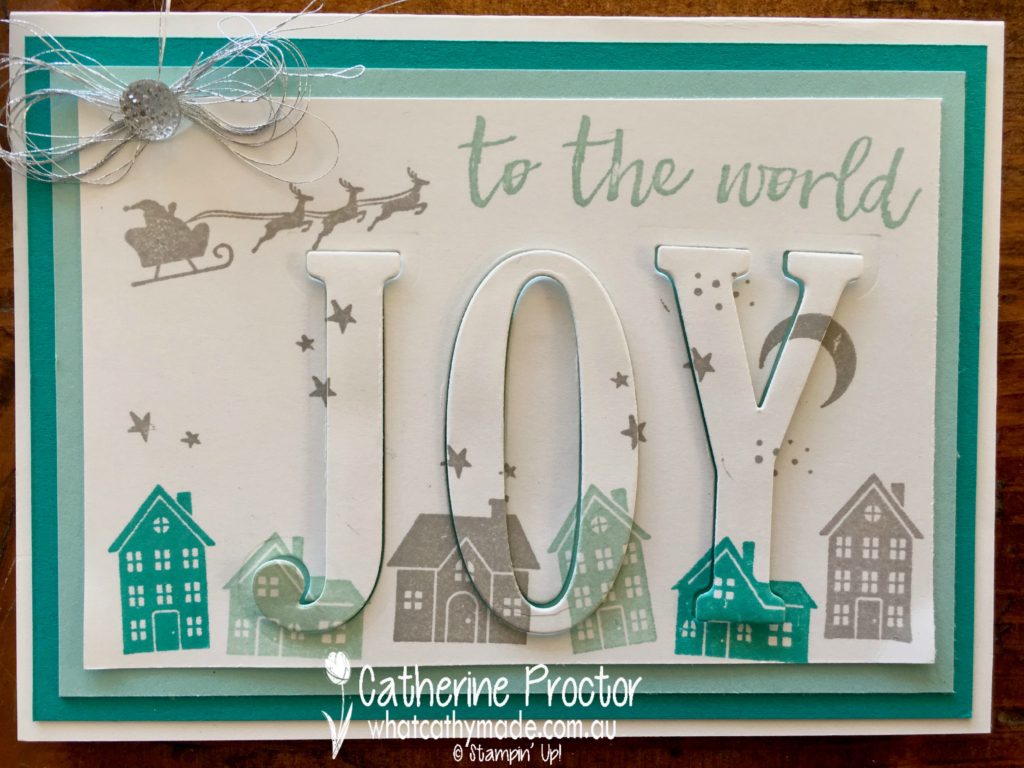
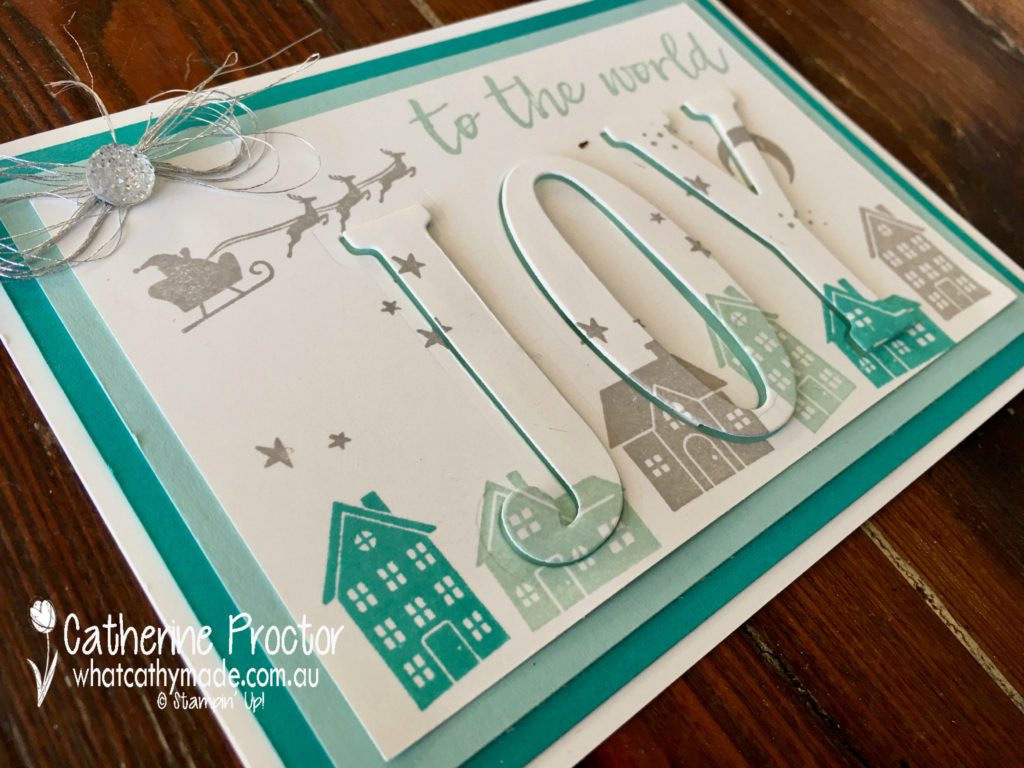
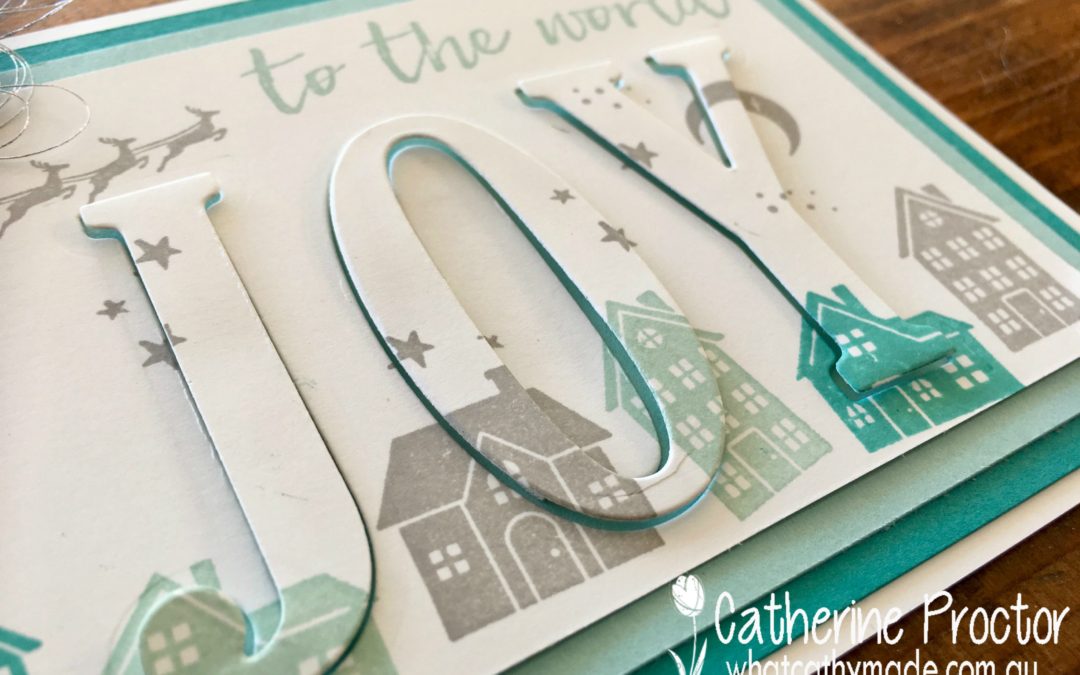
If you’ve never made an eclipse card before, you simply die cut your word with the large letter dies, but before you remove your die cut letters you stamp over them. When you’re done you lift up the letters and then adhere them with dimensionals so you can see the shadow of the coloured card stock below. I just love the dimension this technique adds to the card.
On my first card I stamped and die cut some extra baubles from the Carols of Christmas Stamp set and adhered them on top of the eclipse letters for added dimension. A tiny bow made out of the red tinsel trim completes the card.
For my second card I went for a cooler palette, using pool party, Bermuda bay and smoky slate ink. I used the same technique I described for the first card, this time making the word joy with the large letter dies and using the Hearts Come Home stamp set.
To complete my second card I made a bow with the silver thread and adhered it to my card with a clear facetted gem.
I hope you’ve enjoyed my eclipse cards today and I’ll be back tomorrow with a fancy fold card for you.
To see what the other members of the Art with Heart team have made for you today, please go back to the very talented Claire Daly’s blog.
And to purchase any of the products I’ve used you can click on the links below.

 Have you ever made your own bunting? If you haven’t now’s the time to give it a go while the paper is on sale. I decided to make some Christmas bunting using the beautiful “Be Merry Designer Series Paper” and here it is hanging on my mantelpiece.
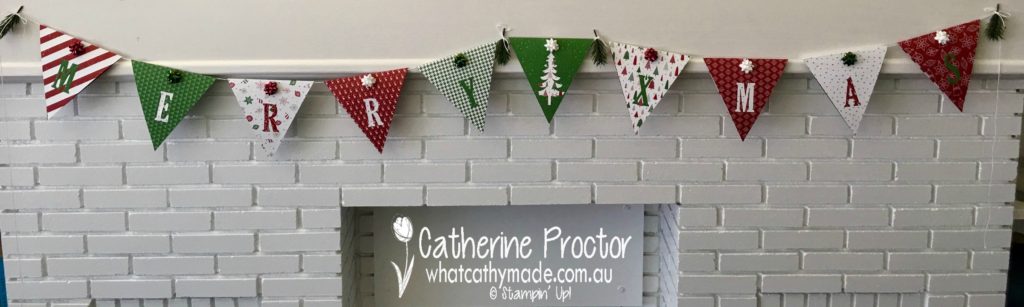 This is such a quick and easy project to make and you can use any of the gorgeous DSPs for this project. For my bunting I used less than half a packet of DSP…and that still left me with 7 full 12 x 12 inch sheets (one of each design and one spare sheet) and plenty of scraps to use for card making or other projects.
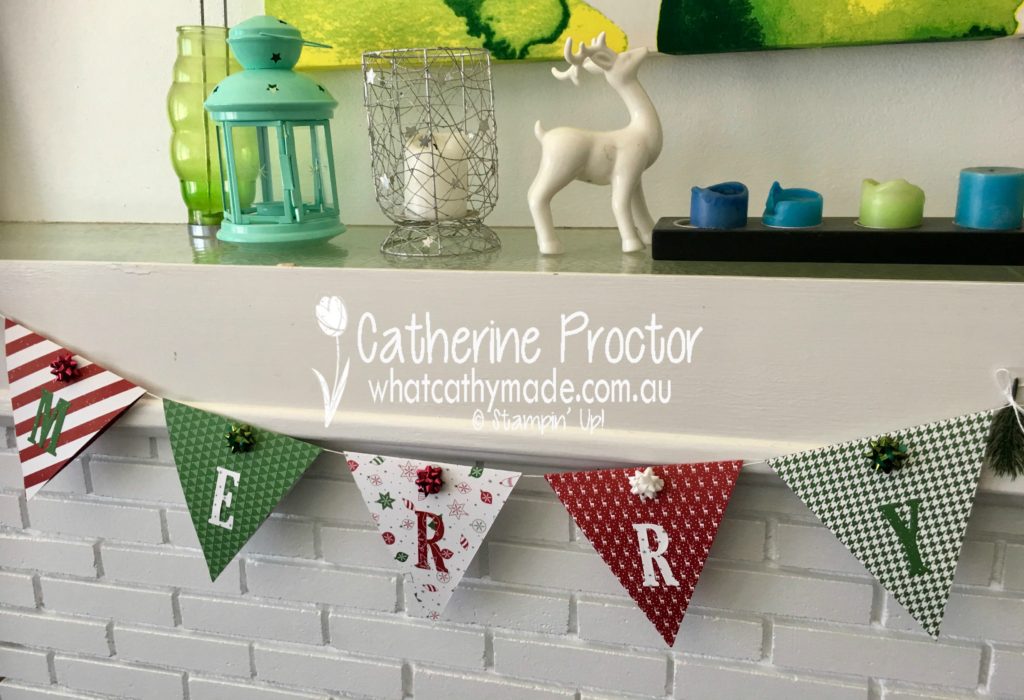


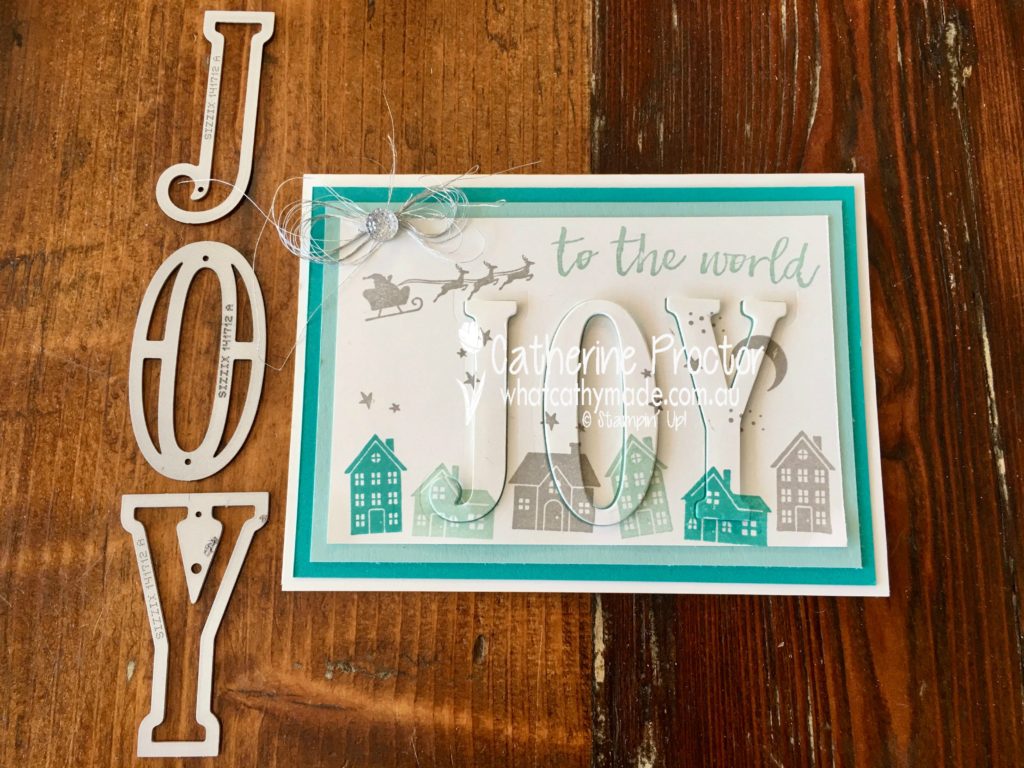 If you’ve never made an eclipse card before, you simply die cut your word with the large letter dies, but before you remove your die cut letters you stamp over them. When you’re done you lift up the letters and then adhere them with dimensionals so you can see the shadow of the coloured card stock below. I just love the dimension this technique adds to the card.