Today I’m sharing another card I made for the “G’day Fri’yay’ Card Making Challenges” Facebook group, a fortnightly Card Making Challenge with Aussie Themes.
The theme for this challenge is “Spring” and for me nothing announces the start of spring in Australia like wattle does. September 1 is the start of spring as well as Wattle Day, a celebration of our national flower.
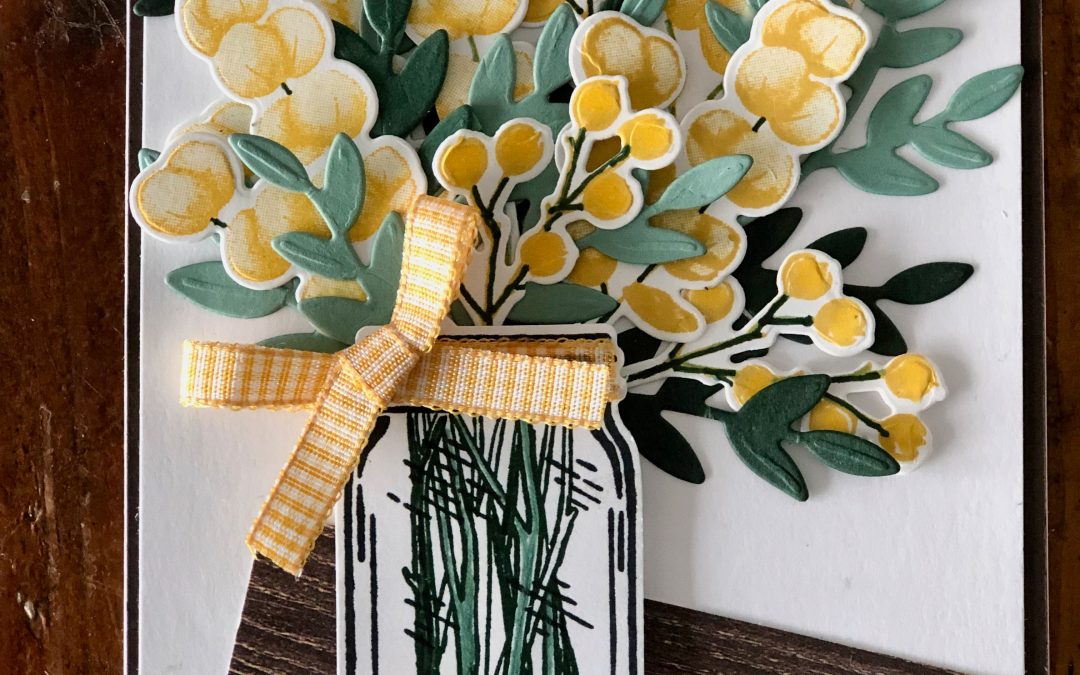
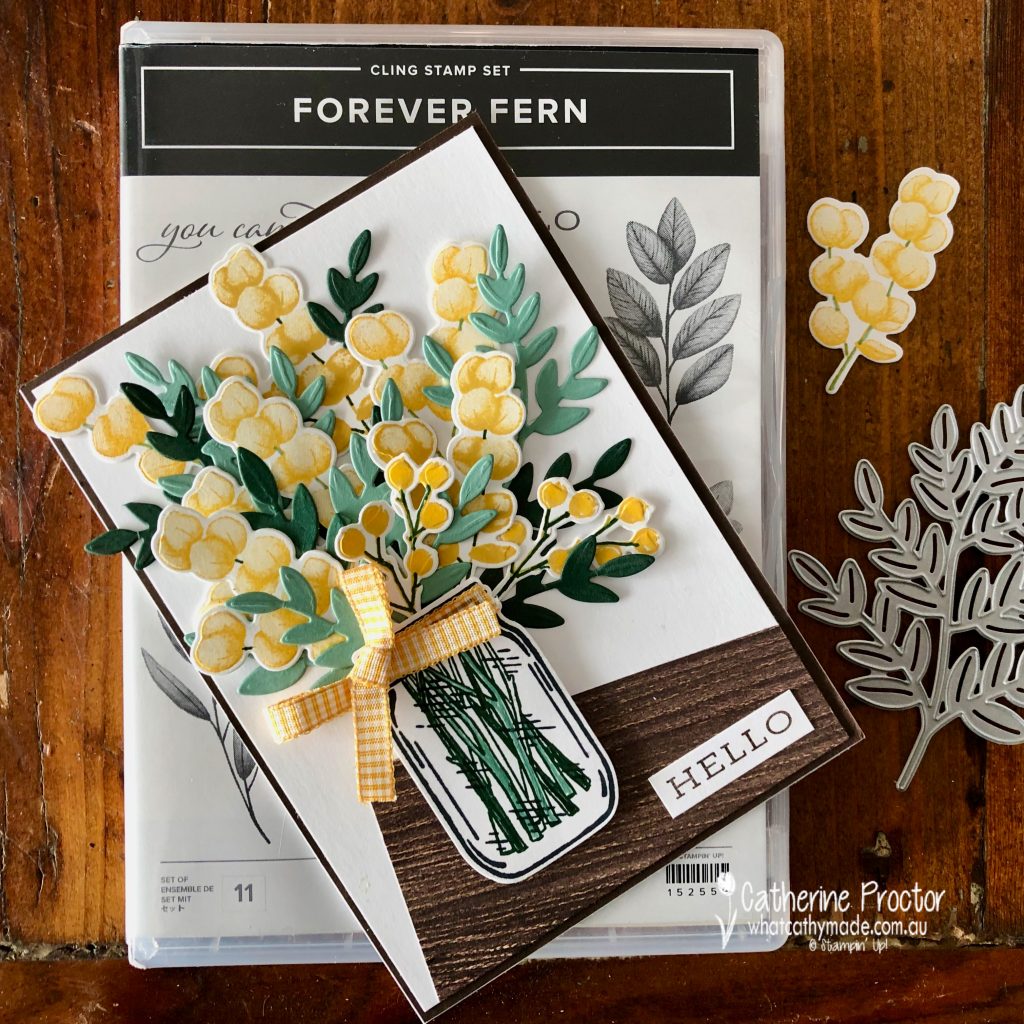
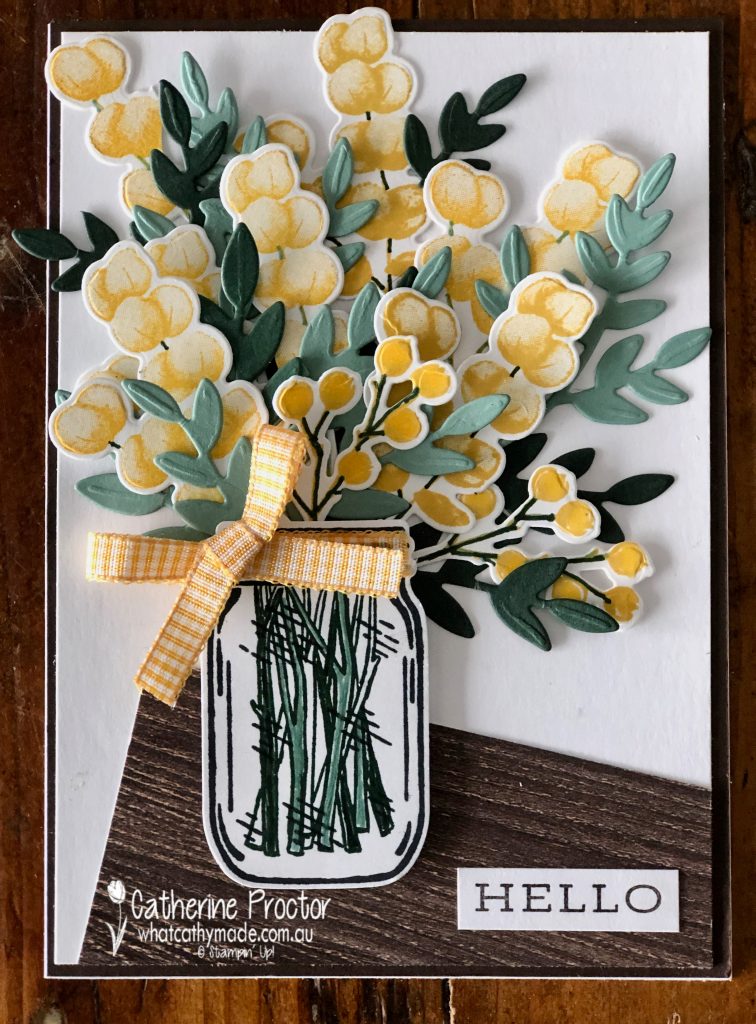
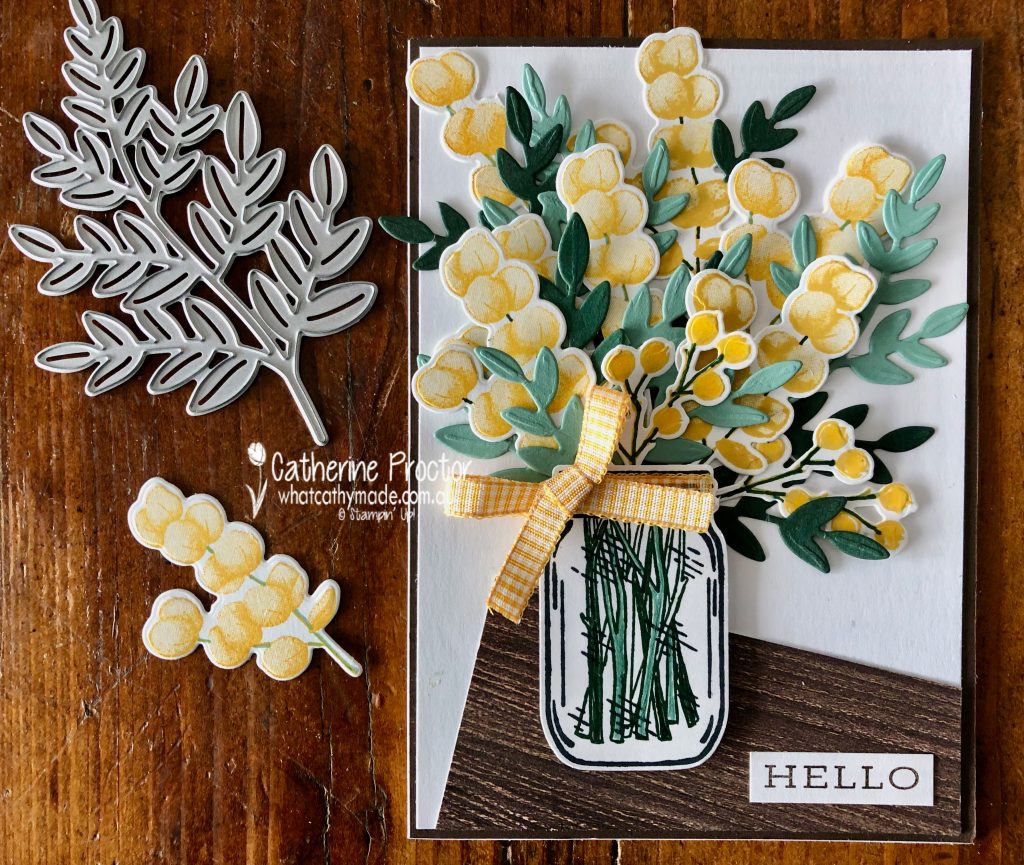
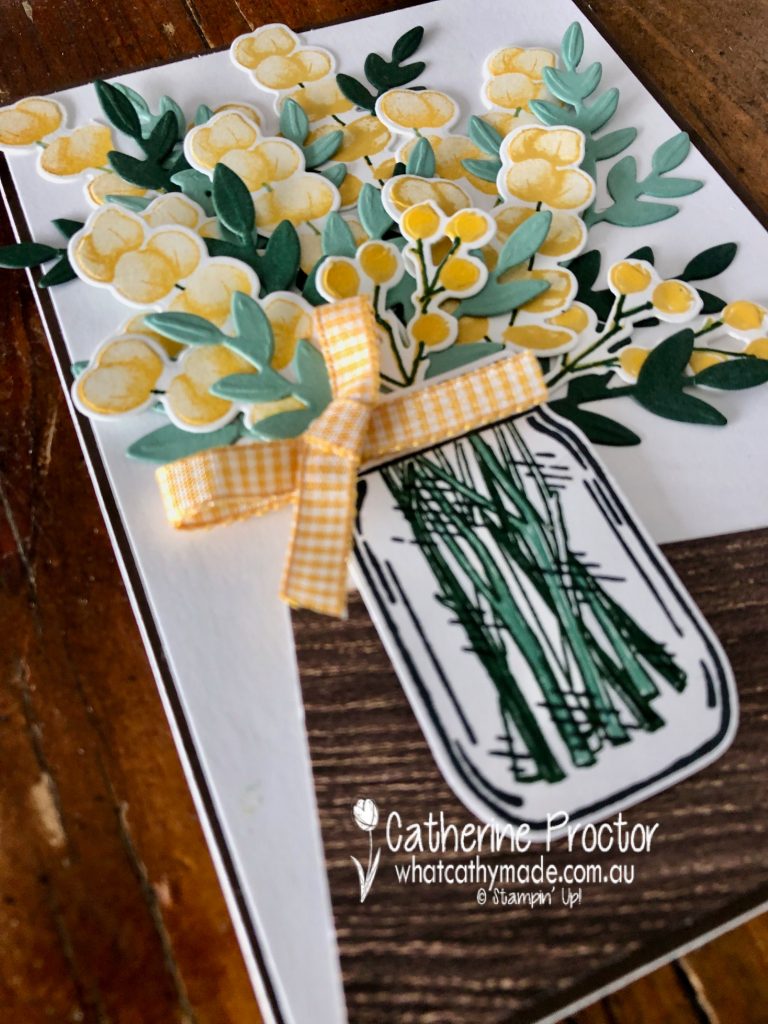
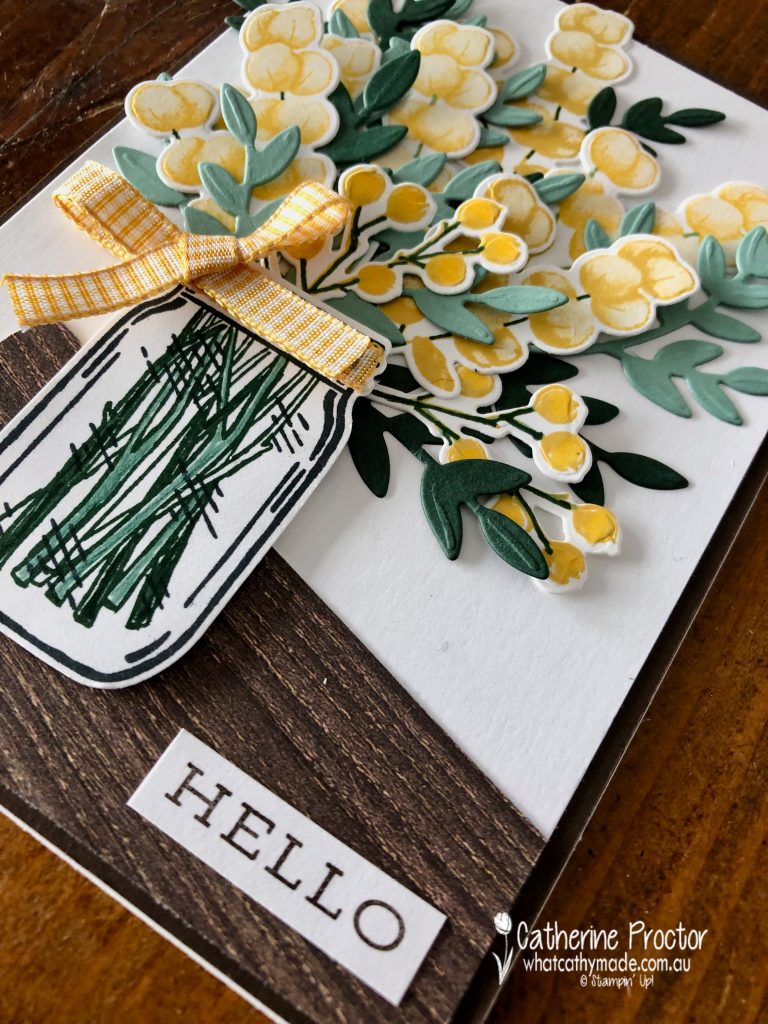
To celebrate the arrival of spring I’ve created a jar of wattle sitting on the edge of a wooden table, using the Forever Fern stamp set, the coordinating Forever Flourishing dies and the Jar of Flowers stamp set with coordinating Jar punch.
Three of the new In Colours (Bumblebee, Soft Succulent and Evening Evergreen) were paired with Daffodil Delight to stamp and die cut my wattle. I love how “Australian” Soft Succulent and Evening Evergreen look when used for foliage.
The wattle was all stamped in either Daffodil Delight or Bumblebee and then I used my Soft Succulent and Evening Evergreen markers to draw on the stems of the wattle and turn them from yellow to green. The smaller wattle springs at the front are stamped using the poinsettia petals stamp set.
The large fern die was used to die cut all my foliage and then it was simply a case of chopping up the foliage and arranging it with my flowers. I used my Soft Succulent and Evening Evergreen markers to also colour in the stamped stems in the jar – the jar and the stems are from the Jar of Flowers stamp set, punched out with the coordinating jar punch.
The Hello sentiment is also from the Forever Fern stamp set and a bow of Bumblebee gingham ribbon is the finishing touch.
I’ve used a piece of In Good Taste DSP set at an angle to creates the impression of the edge of a wooden table.
Thanks for visiting my blog today. I’ll be back tomorrow on our weekly AWH Colour Creations Showcase – we are showcasing Daffodil Delight this week.
If you live in Australia, you can find and purchase all these products in my Stampin’ Up! Online Store. Don’t forget to use my monthly Host Code (if your order is between $50 – $250) and I will send you a thank you gift the following month. If your order is over $250 don’t use the host code because you will qualify for your own stamping rewards.
My September Host Code is WVX3UYCR and it is valid until midnight September 30.
In the meantime, wherever you are in the world, stay safe, stay calm … and keep on crafting xxx
Welcome back to our Colour Creations Showcase as we continue our showcase of over 50 beautiful Stampin’ Up! colours in alpha order.
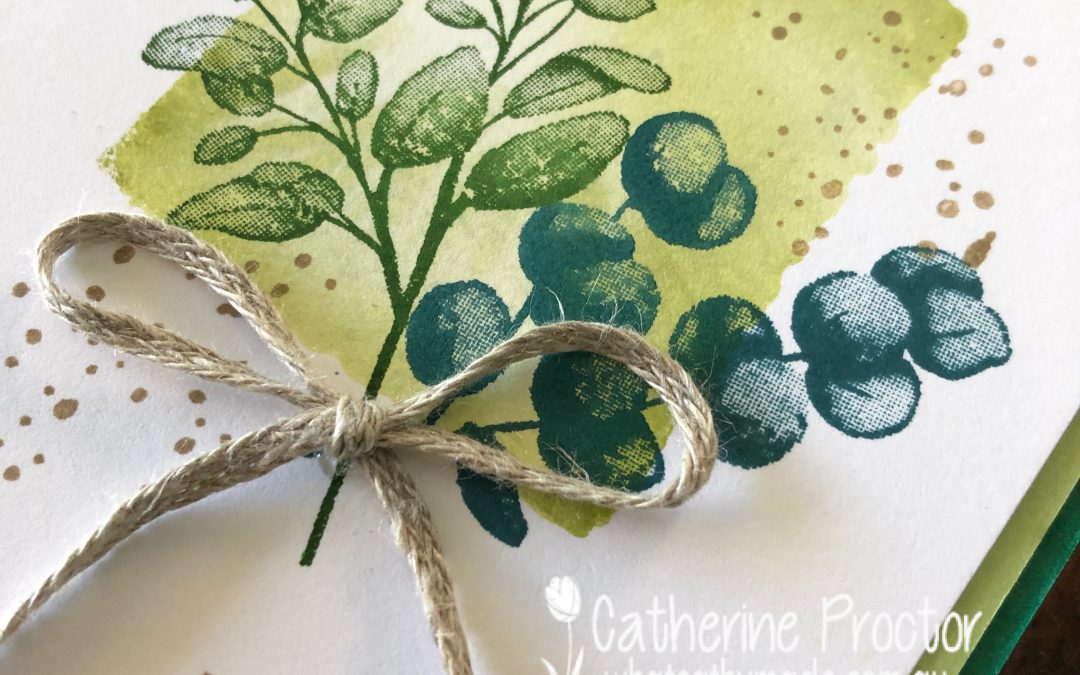
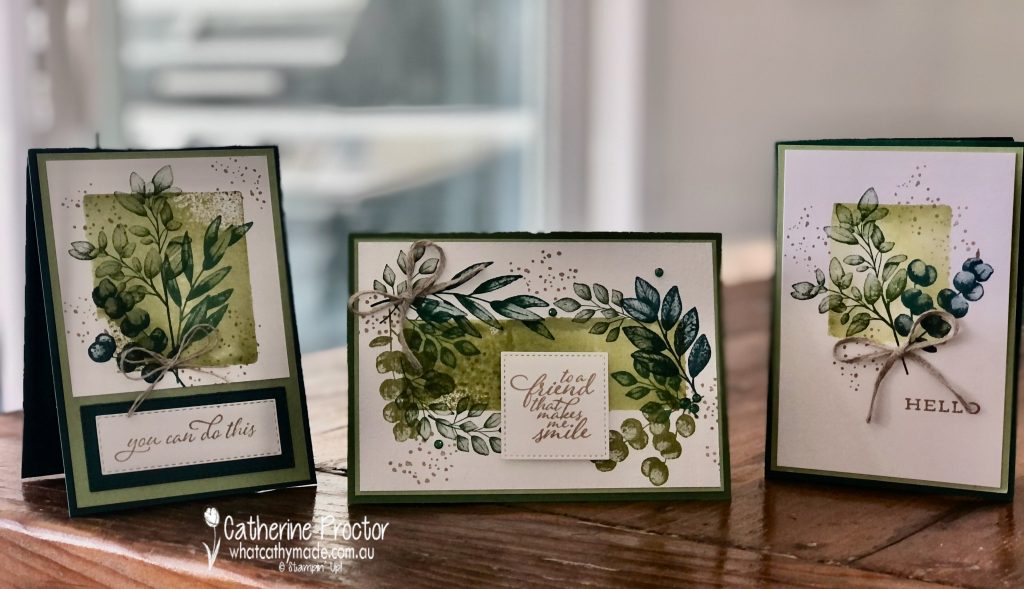
This week we are showcasing Pear Pizzazz, a light to mid shade of green from our subtles family.
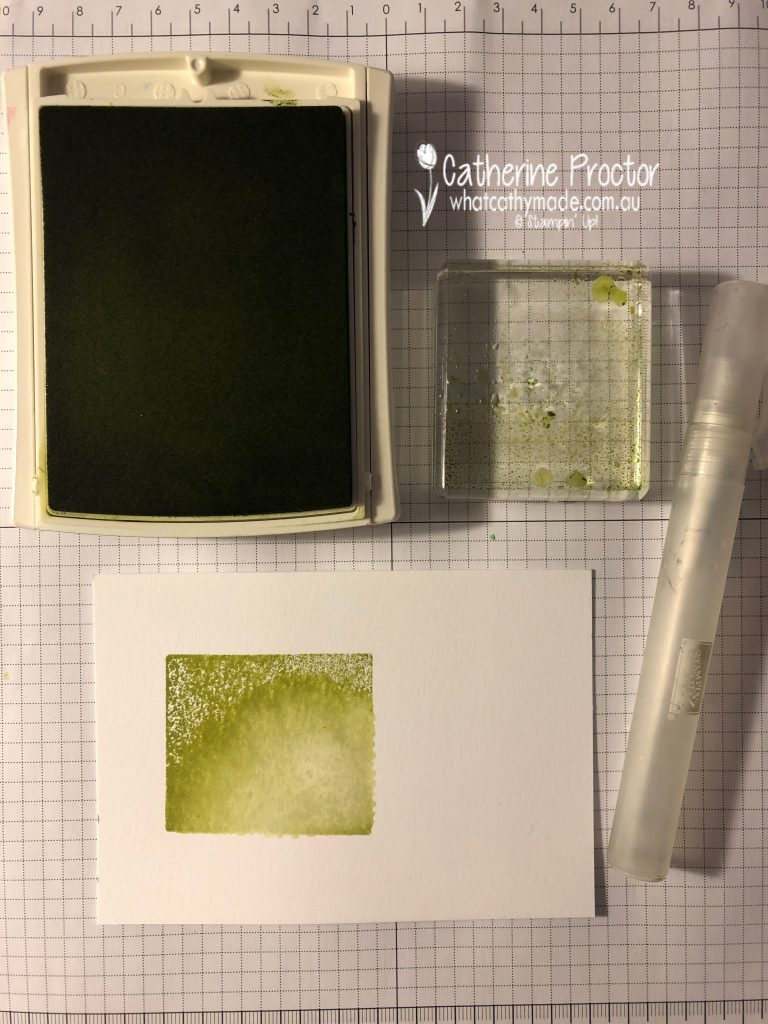
My three cards use the Forever Fern stamp set and the acrylic block stamping technique – one of my favourite techniques because it is so easy and it’s a fast way to create water-coloured looking backgrounds.
All you need for this technique are acrylic blocks, a Stampin’ Spritzer and the ink pad of your choice of colour. I used acrylic blocks sized D, H and C (left to right in the photo below).
My colour combination was inspired by the mix of colours in the beautiful Forever Greenery Designer Series Paper that co-ordinates with the Forever Fern stamp set – I also added a touch of my favourite neutral, Crumb Cake.
Although Pear Pizzazz is probably my least used green, I really love how it looks when it is used beside these other greens and blue greens. Because Pear Pizzazz has a yellow undertone, Crumb Cake is my preferred neutral to use with this colour.
To create the Pear Pizzazz background you simply ink up your acrylic block by stamping it directly onto your ink pad, mist it with a spray of water from your Stampin’ Spritzer and then press firmly into the Basic White card stock.
You can create beautiful water coloured backgrounds by pressing your acrylic block into several different colour ink pads but because I was stamping with multiple colours I simply used one colour for all three backgrounds today.
With this technique I prefer to either chose to use one colour for the background and then stamp over the top in multiple colours OR I create a multicolour background first and then use just one colour to stamp over the top.
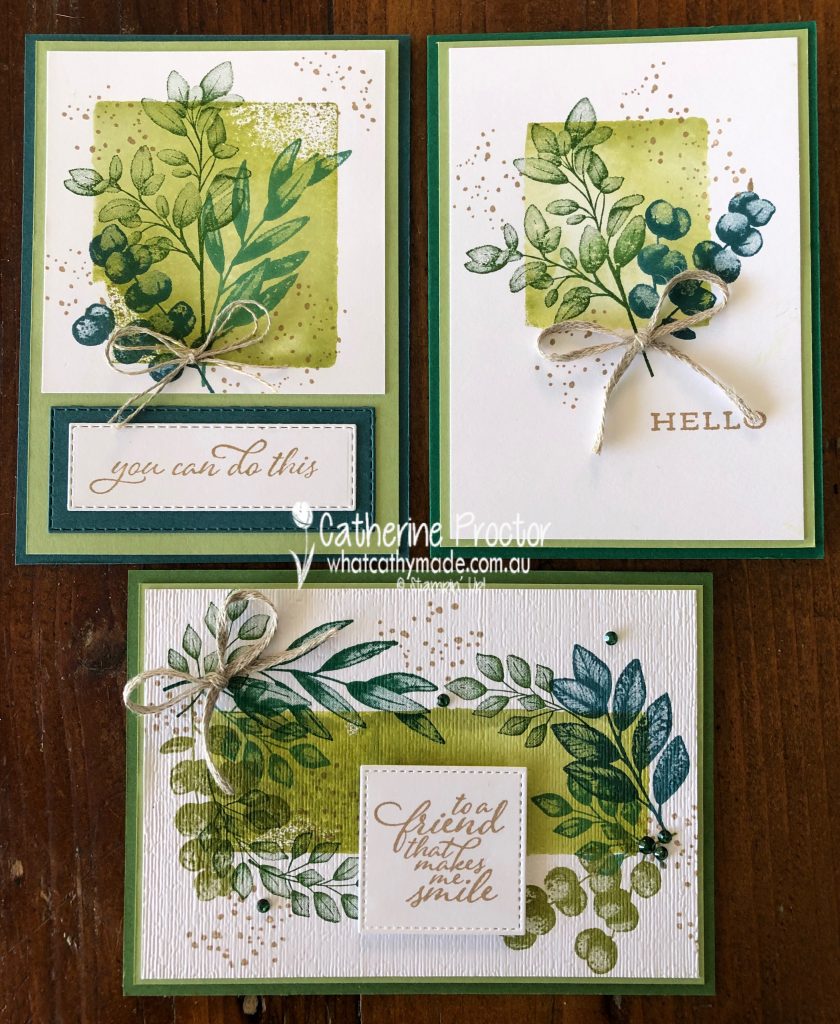
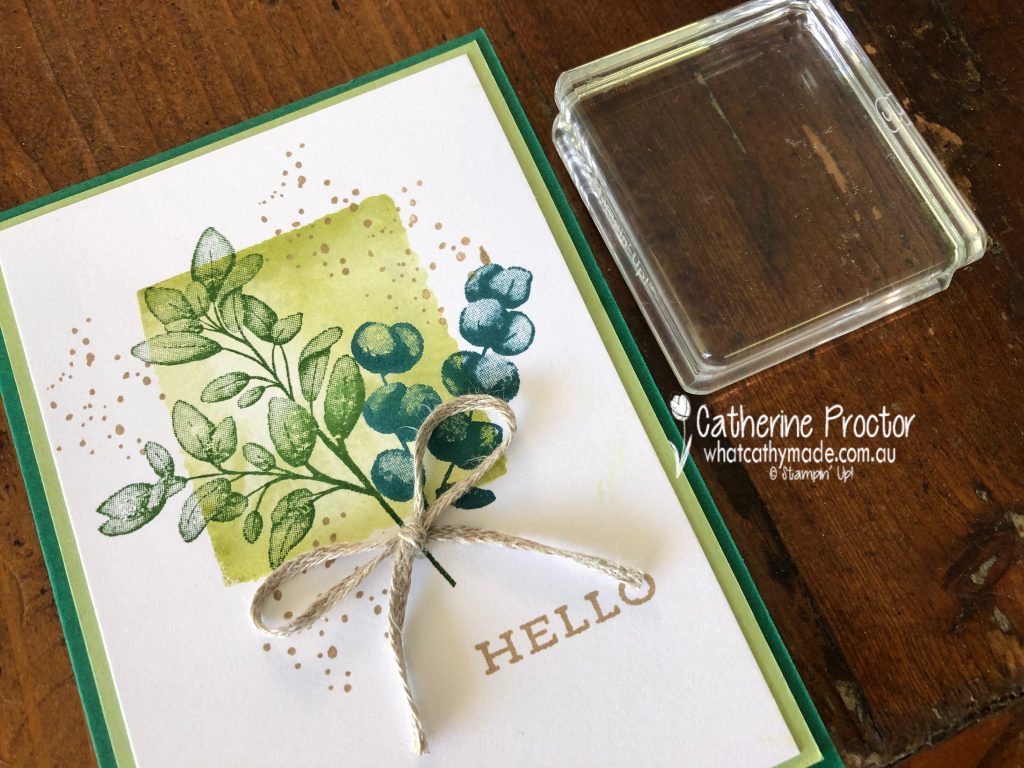
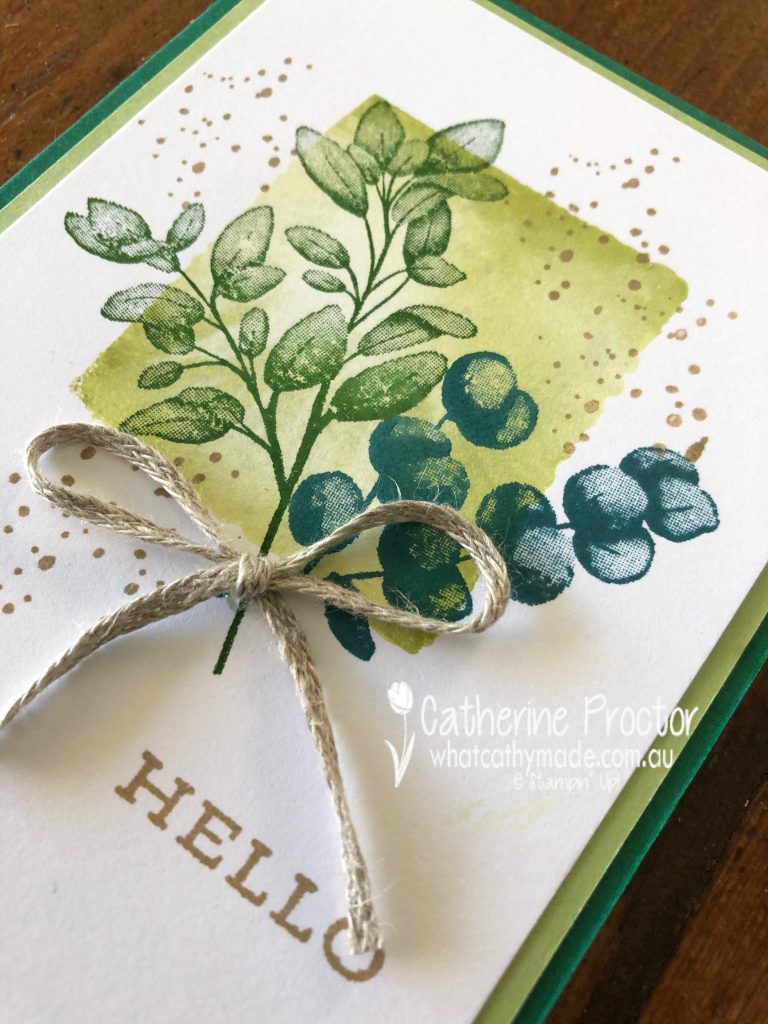
My “Hello” card has a Shaded Spruce card stock base (20 x 13.5 cm) scored and folded in half, topped with Pear Pizzazz card stock layer (9.5 x 13 cm) and a stamped Basic White layer (9 x 12.5cm). The acrylic block I used to create the Pear Pizzazz background is size C.
The Forever Fern stamp set has a great splatter stamp and I inked up this stamp and the “Hello” sentiment in Crumb Cake before finishing my card with a simple bow of braided linen thread.
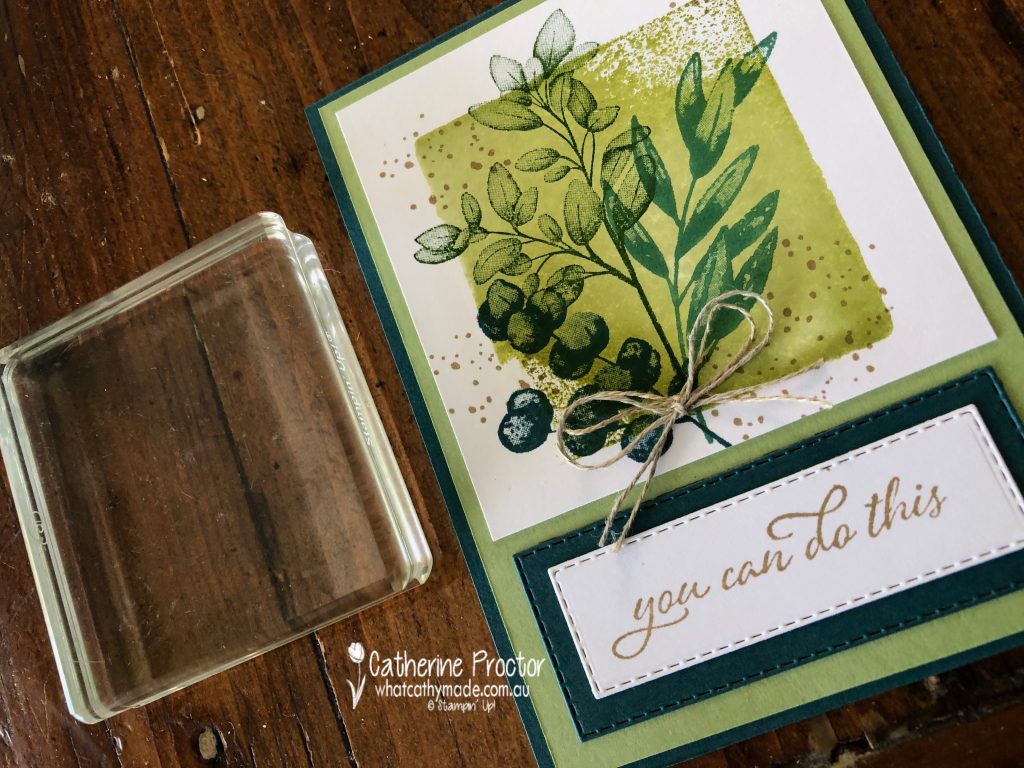
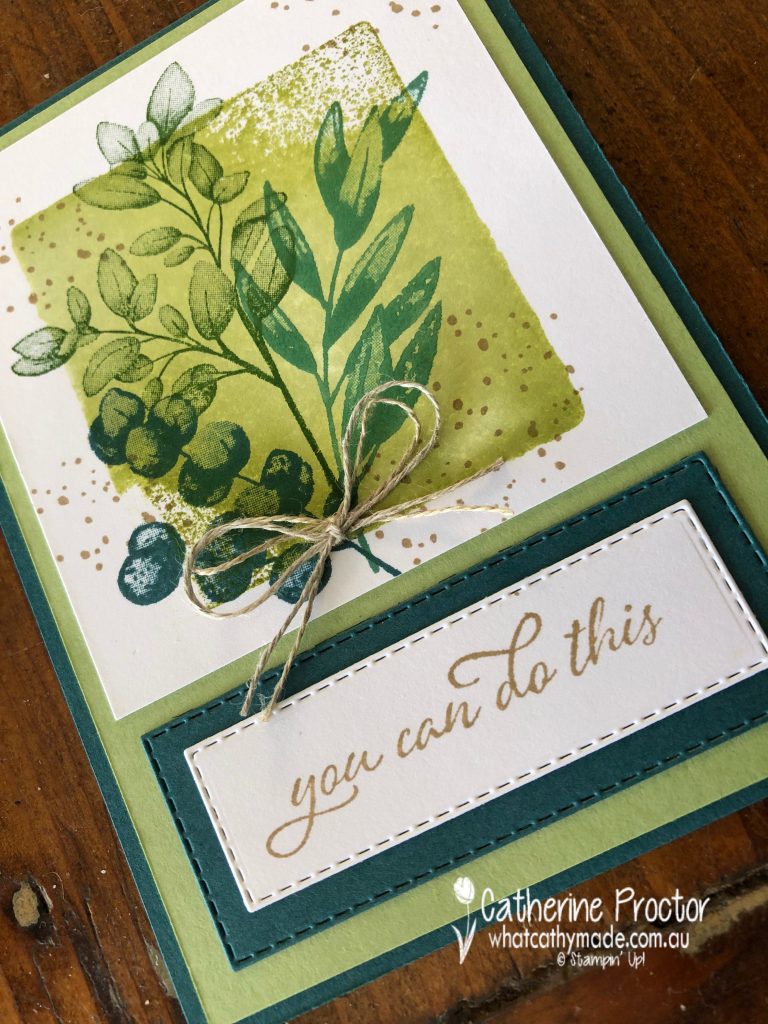
I used acrylic block size D for my next card on a Pretty Peacock card stock base (28 x 10 cm) that folds at the top. The Pear Pizzazz card stock middle layer is 13.5 x 9.5 cm and the stamped Basic White layer measures 9 x 9 cm.
This time I stamped and layered the sentiment separately to the main image using the stitched rectangle dies and I finished the card off with a double bow of linen thread.
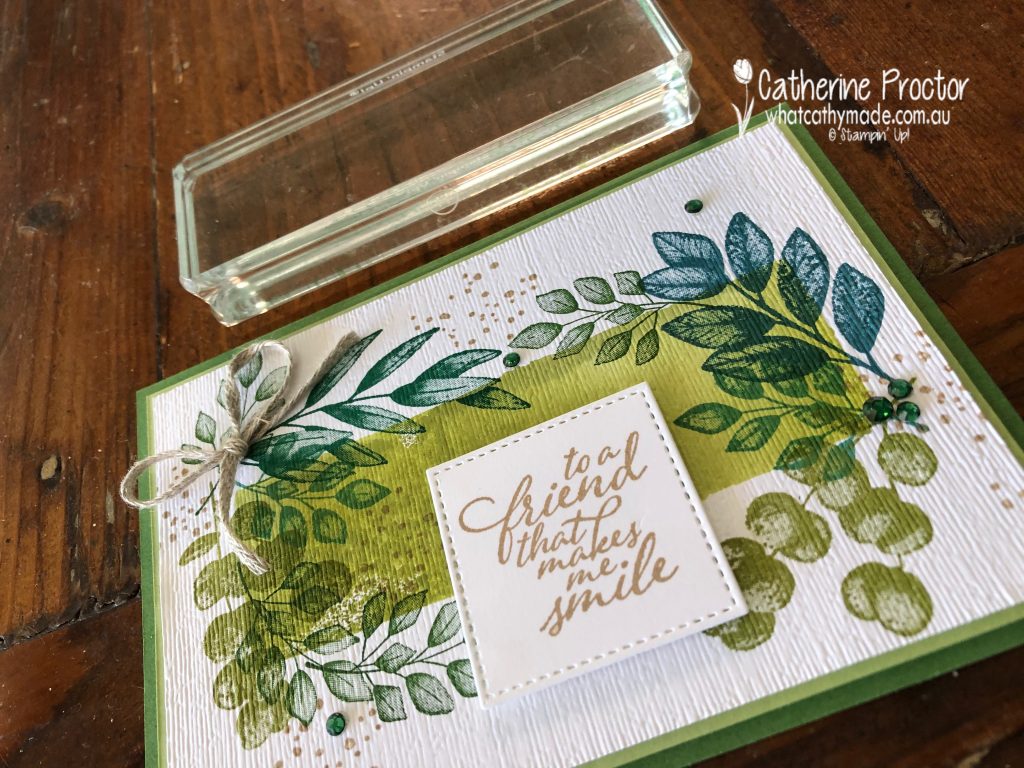
Card number three uses acrylic block H on a Garden Green card stock base (half an A4 sheet, scored and folded at the top) with a middle layer of Pear Pizzazz, but this time I embossed the stamped Basic White layer with the Subtle embossing folder (after stamping).
The sentiment is die cut out using a stitched square and attached with Stampin’ Dimensionals and I also added a bow of braided linen thread and some Shaded Spruce embellishments from the Holiday Rhinestone Basic Jewels.
I can’t wait to see what the rest of the Art With Heart team have created with Pear Pizzazz today. Click on the links below to see what they’ve made.
If you’d like me to post you your very own copy of the January – June 2020 mini catalogue, the 2020 Sale-a-bration catalogue, the 2020-21 Stampin Up! Annual Catalogue, the 2020-21 Beginners Brochure, or to simply find out about more about Stampin’ Up! contact me.
In the meantime, wherever you are in the world, stay safe, stay calm…and keep on crafting xxx
Welcome to week twenty-one of our 2020-2021 Art With Heart Colour Creations Showcase.
Each week various members of our Art With Heart Colour Creations team will be bringing you weekly colour inspiration as we showcase our range of over 50 beautiful Stampin’ Up! colours in alphabetical order.
Week 21 – Highland Heather
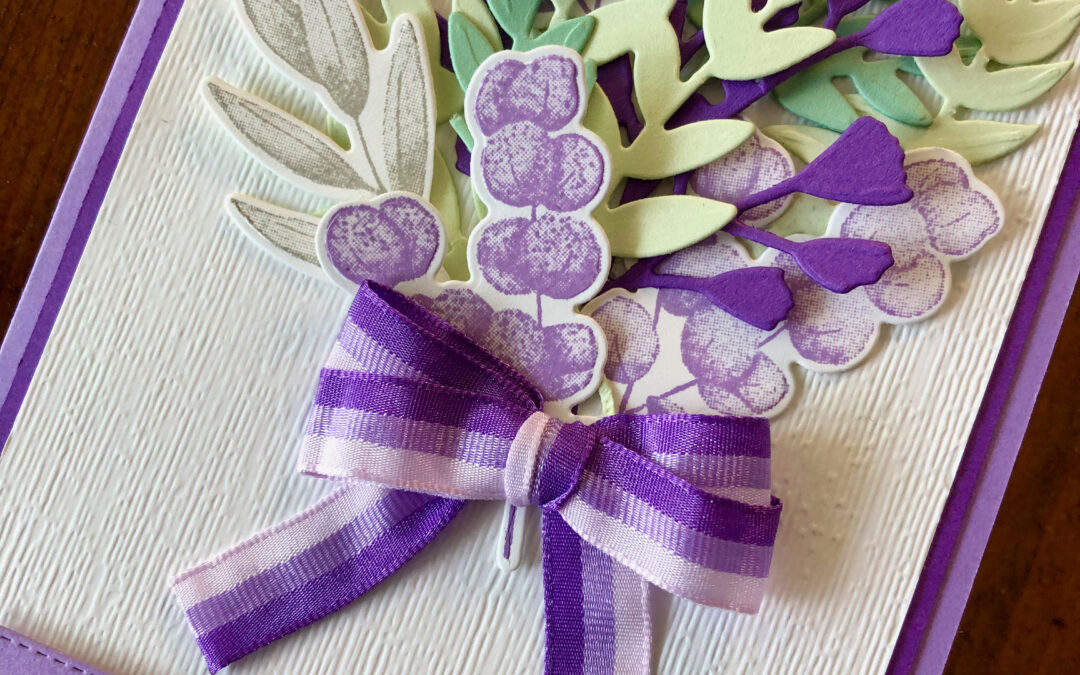
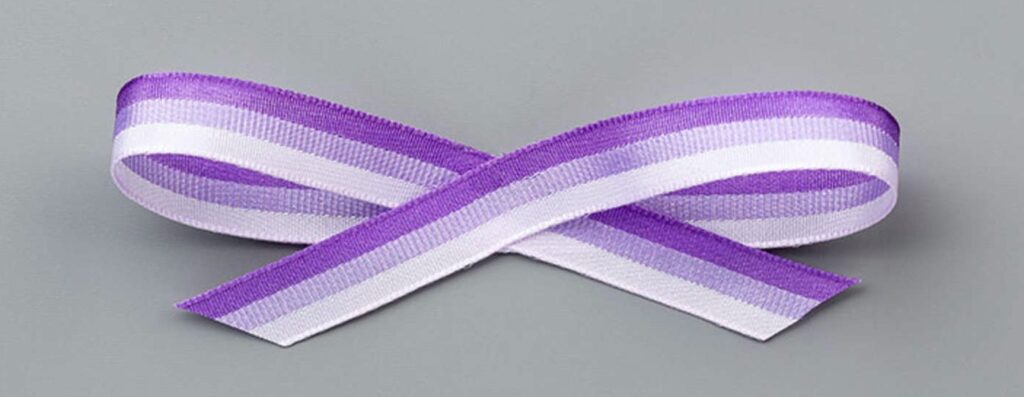
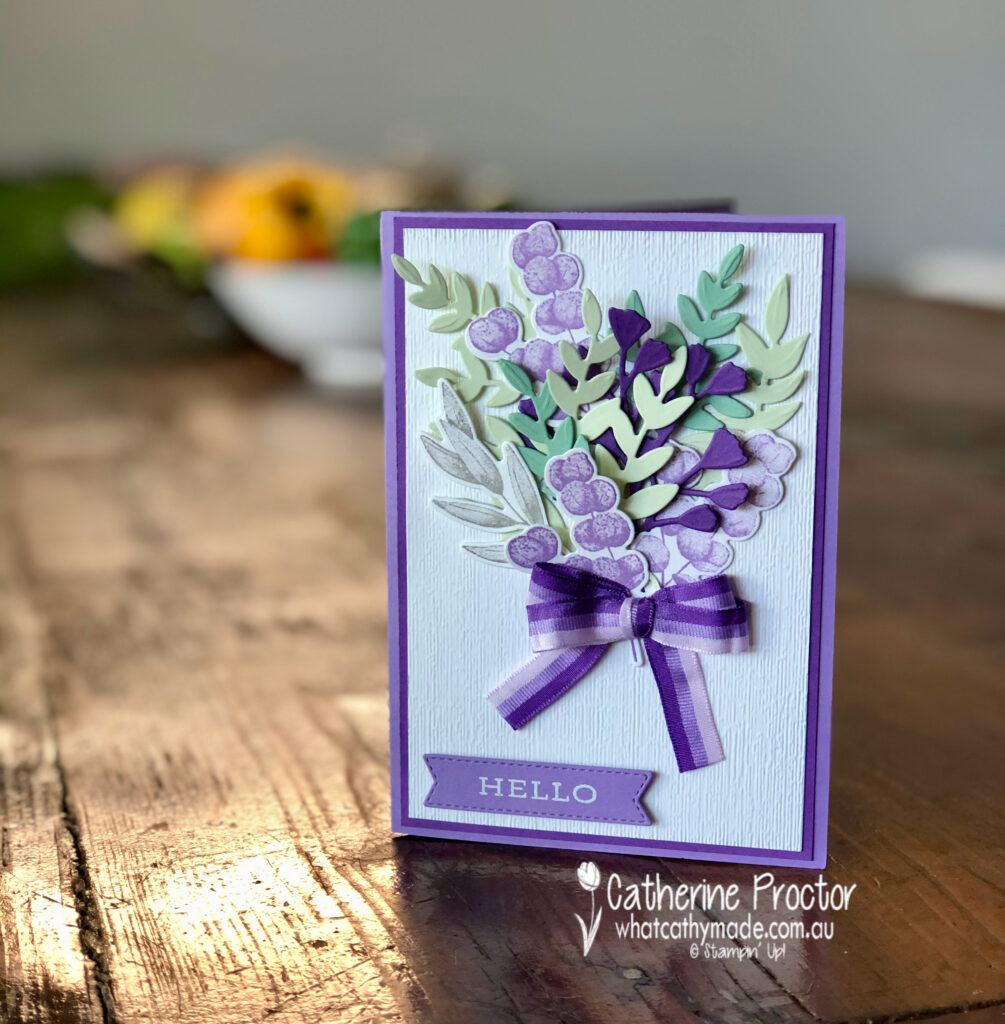
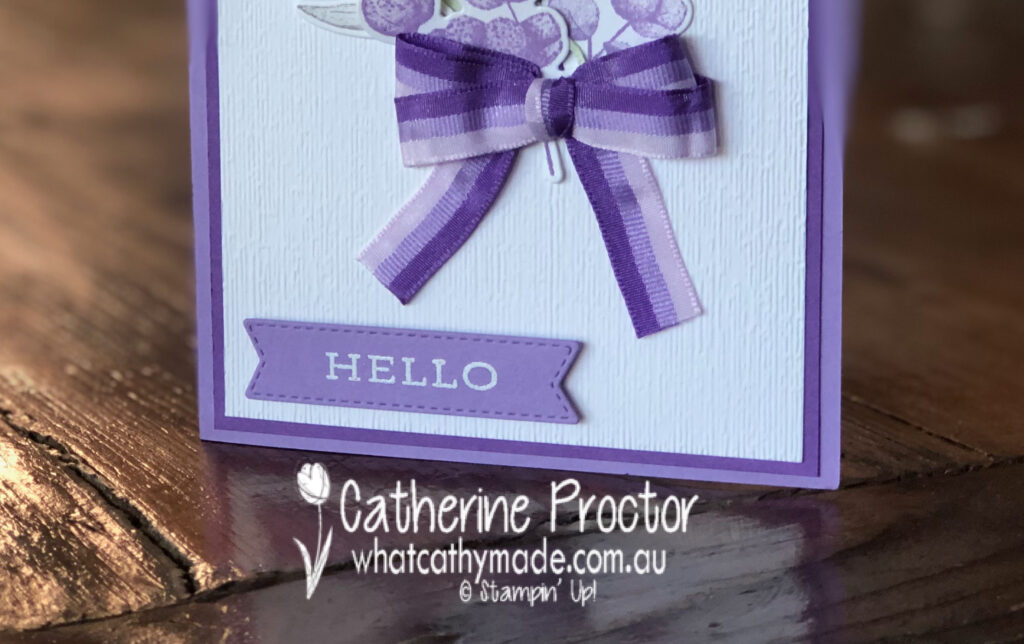
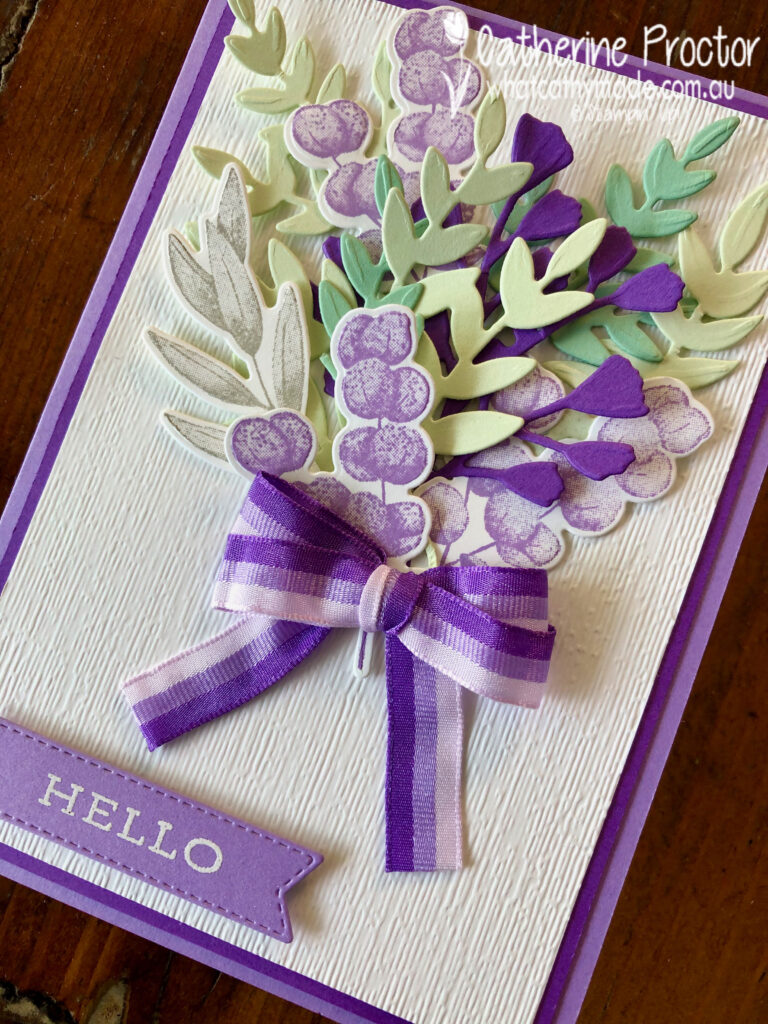
I love Stampin’ Up!’s stunning tricolour purple ribbon so much I designed my card around it this week, creating a bunch of flowers tied with a double bow of this ribbon – its three stripes are Purple Posy, Highland Heather (our colour this week) and Gorgeous Grape.
The other colours included in my bunch of flowers are Soft Sea Foam, Mint Macaron and Smoky Slate. This is such a soft and feminine colour combination.
The Forever Fern bundle was just perfect for this project – its impossible to make a bad card with this stamp set and co-ordinating Forever Flourishing dies, and there are so many way you can use this bundle.
Because I wanted to create a double bow with the stripes in same direction on both sides of my bow I used a bow maker to carefully tie the double bow. If you don’t have a bow maker you can use a fork or even your fingers – there are heaps of free tutorials on Pinterest that will show you how to make a perfect bow of any size.
Stampin’ up!’s subtle embossing folder gives a lovely texture to the Whisper White card stock layer. The “hello” sentiment was stamped in Versamark ink before being heat embossed using white emboss power.
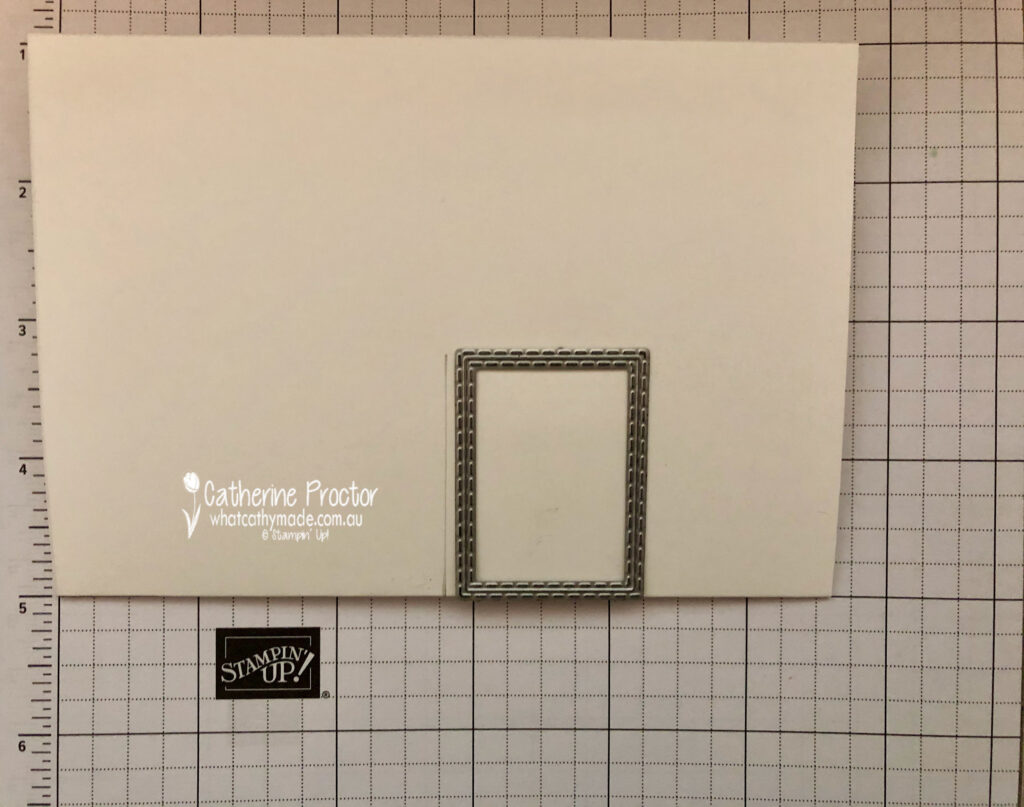
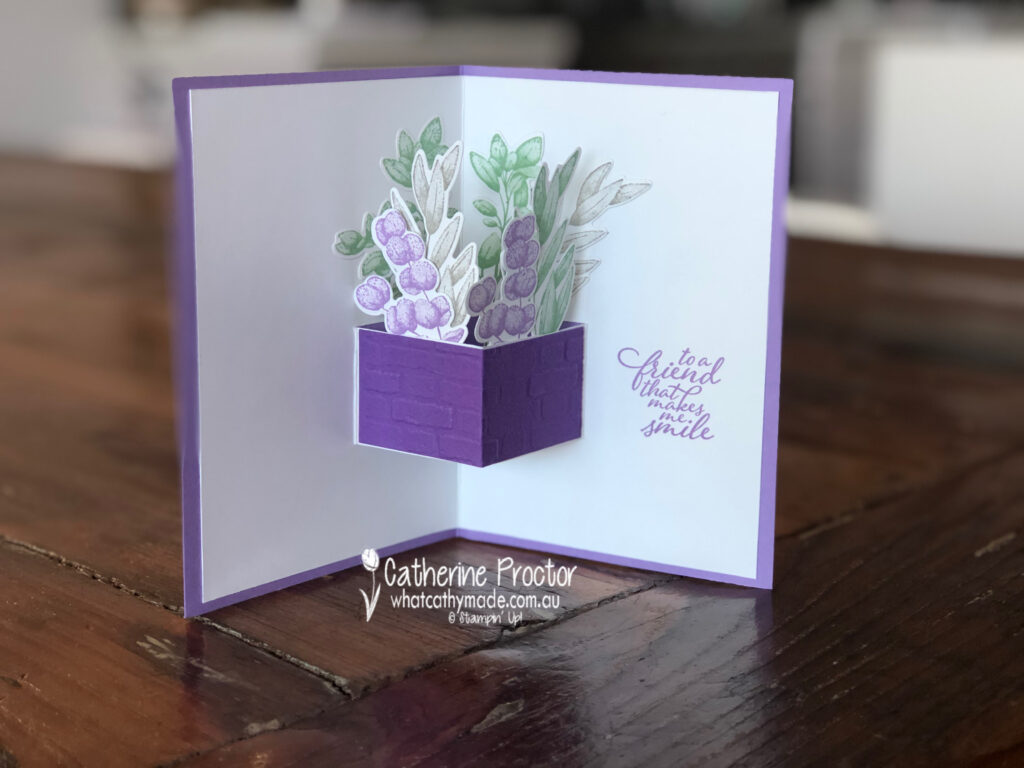
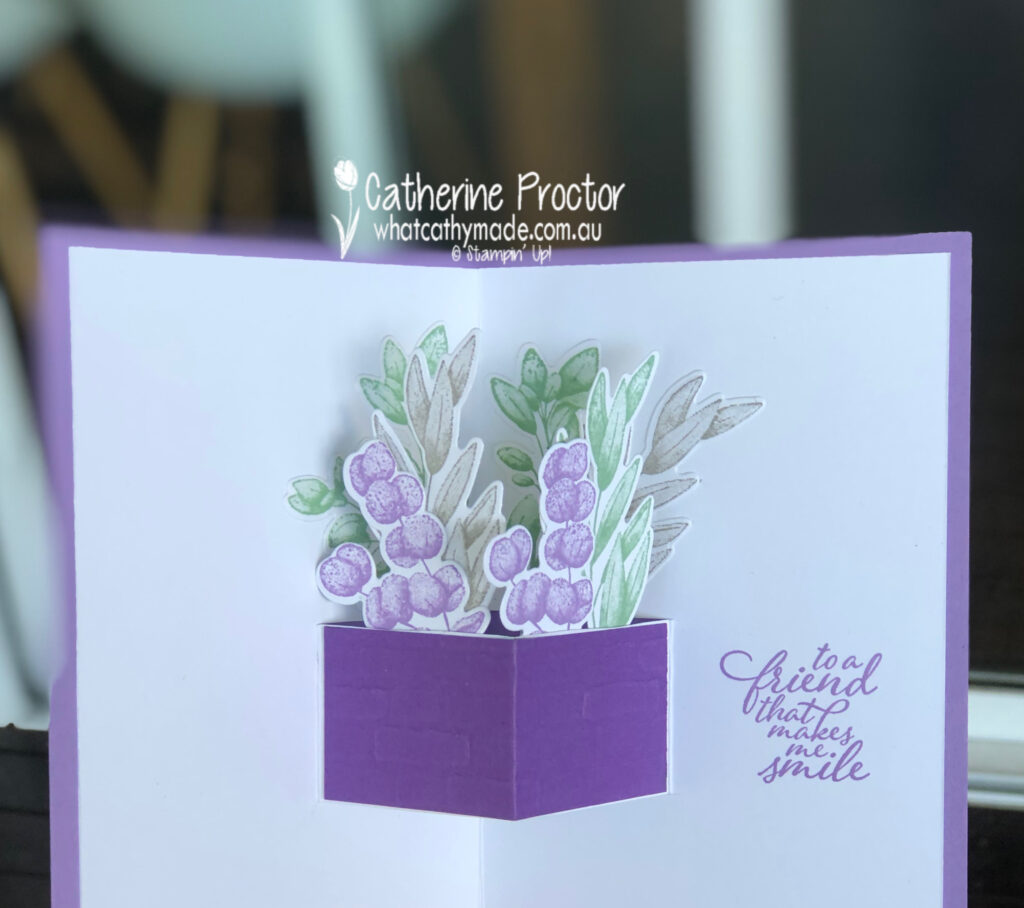
Because I had so many left over die cut pieces I decided to make a quick pop-up planter basket for the middle of my card. I traced around the smallest stitched rectangle to work out where to cut my pop-up mechanism and then simply used my paper snips to cut two side slits into a Whisper White insert.
Once I cut my two side slits I simply flipped out the pop-up mechanism (so it pops in the opposite direction to the card insert) and added a piece of Gorgeous Grape card stock embossed using the Brick & mortar Embossing Folder to create the planter box.
As well as attaching foliage pieces to the inside of the planter box pop-up section I also attached some to the inside of the Whisper White card base. Just a note of warning, when attaching die cut piece to your pop-up section just make sure they are positioned in a way that your card can close smoothly and they don’t stick out the sides when the card is closed.
Here’s a quick 17 second video showing you how my pop-up card moves.
The “to a friend that makes me smile” sentiment is the final touch for the inside of the pop-up card, stamped in Highland Heather.
I can’t wait to see what the rest of the Art With Heart team have created with Highland Heather today. Click on the links below to see what they’ve made.
If you’d like me to post you your very own copy of the August–December 2020 Mini Catalogue, 2020-21 Stampin Up! Annual Catalogue, the 2020-21 Beginners Brochure, or to simply find out about more about Stampin’ Up! contact me.
In the meantime, wherever you are in the world, stay safe, stay calm…and keep on crafting xxx
Welcome to week twelve of our 2020-2021 Art With Heart Colour Creations Showcase.
Each week various members of our Art With Heart Colour Creations team will be bringing you weekly colour inspiration as we showcase our range of over 50 beautiful Stampin’ Up! colours in alphabetical order.
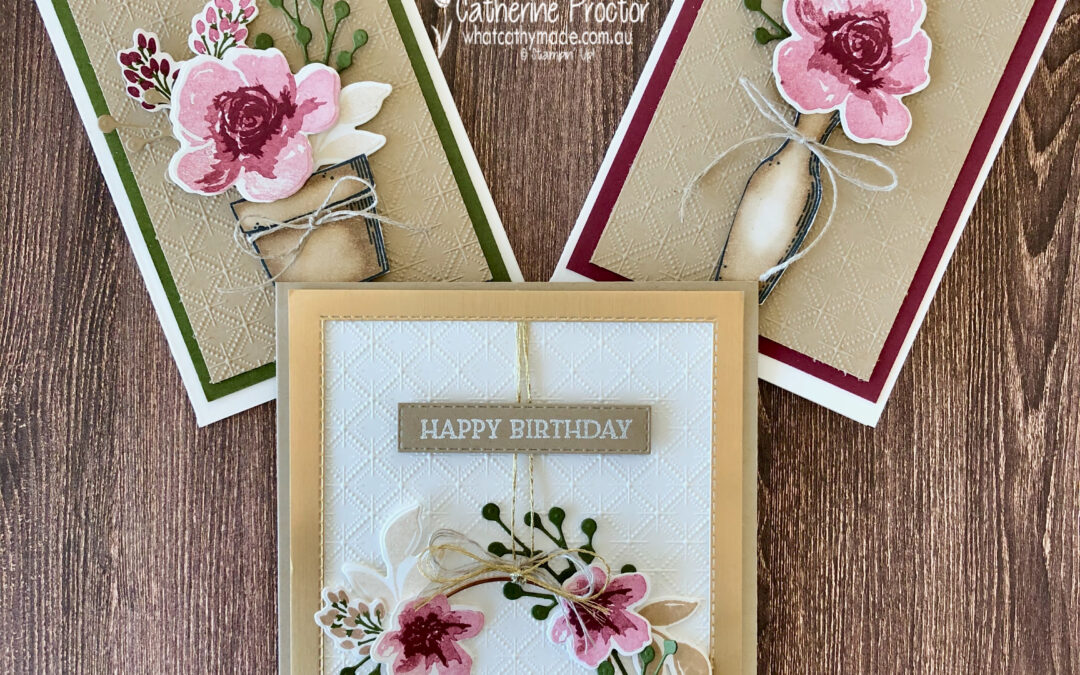
Week 12 – Crumb Cake
I have to confess that Crumb Cake is my favourite and most used Stampin’ Up! colour, although Gray Granite has given it a run for its money since joining the Neutrals family.
I like to think of Crumb Cake as a “bridesmaid” colour – not to dark, not too light. It sits beautifully in the background, complementing any colour it is paired with without vying for attention and yet it also looks amazing on its own. This is why for me, Crumb Cake really is the perfect neutral.
There were so many colour combinations I could have used for my projects today but in the end I decided to stick with a combination of neutrals, using stamping off to add some lighter shades to my colour palette.
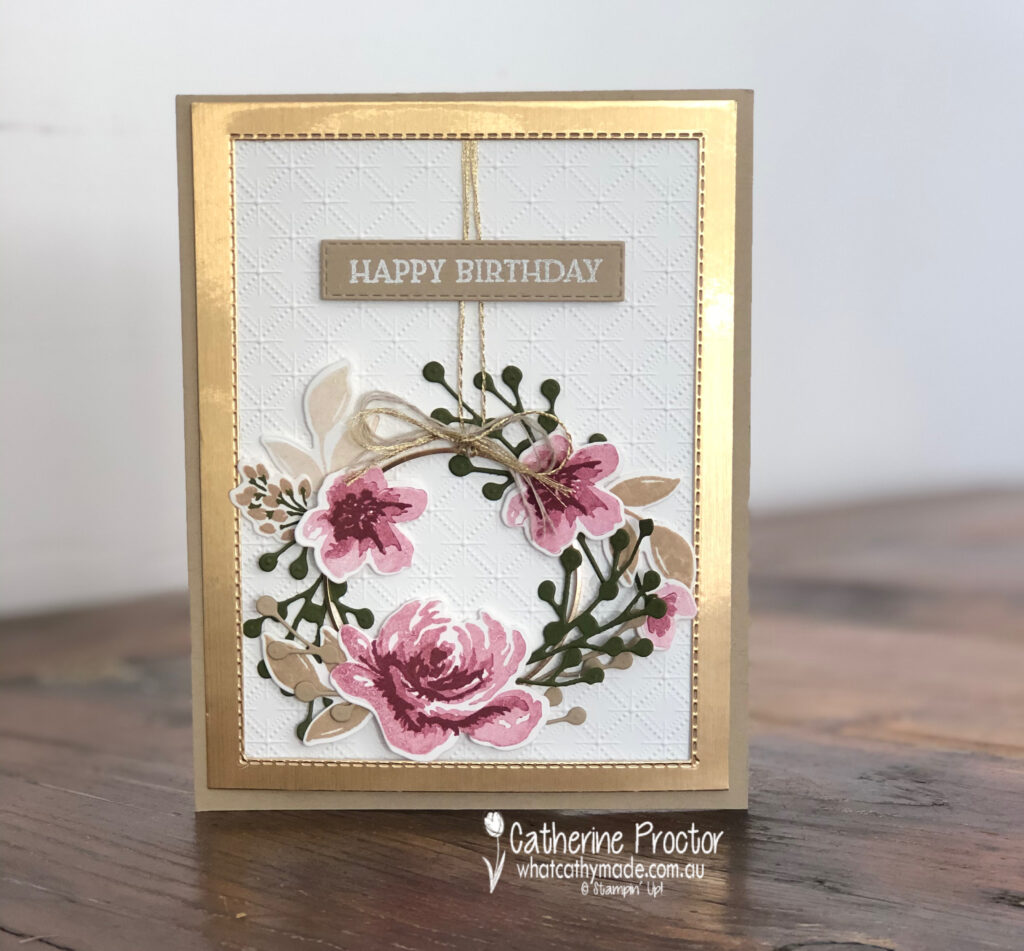
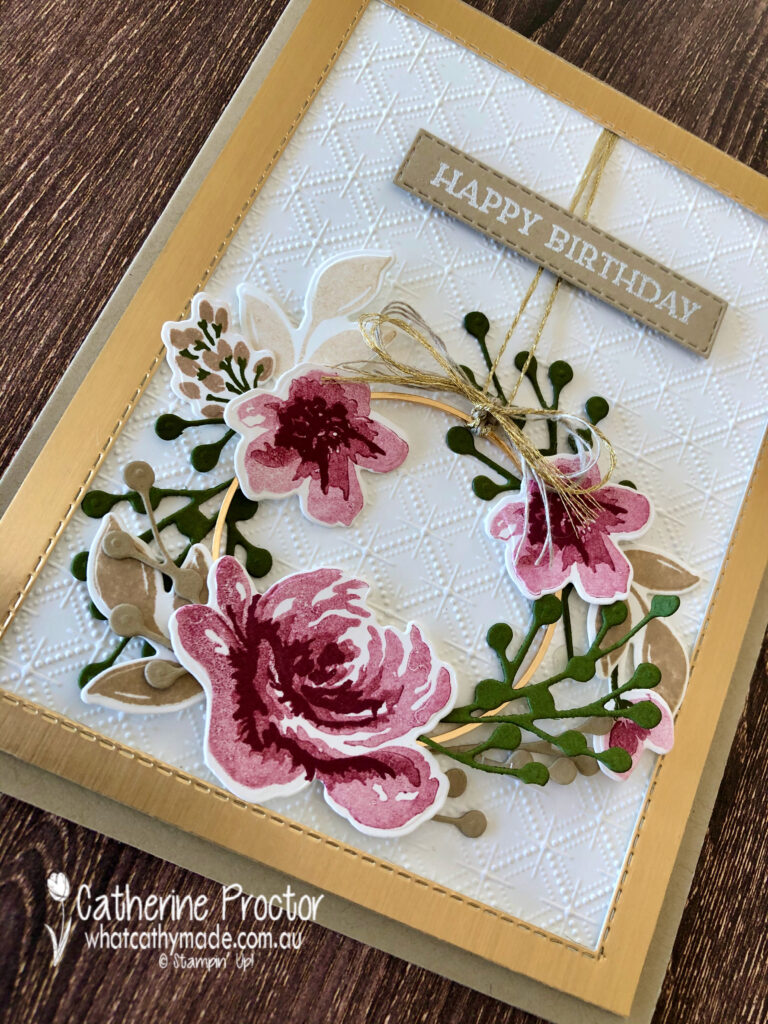
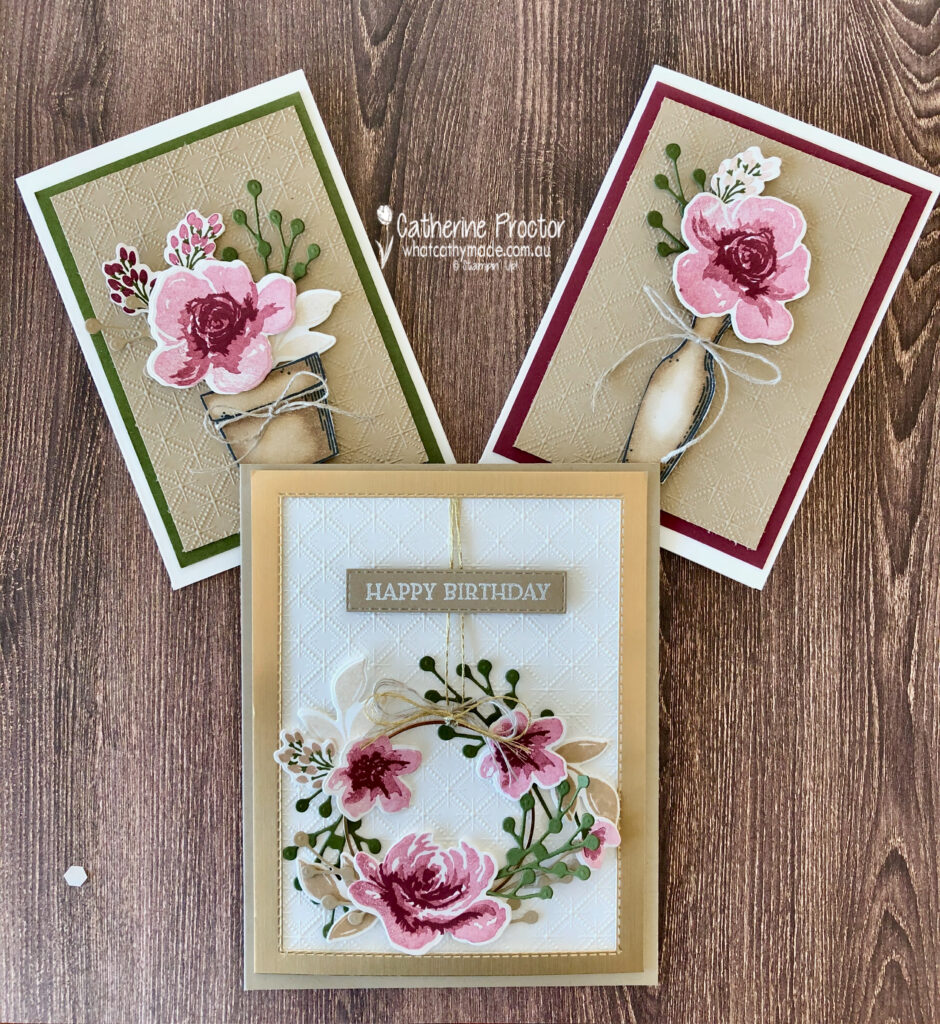
What started out as a clean and simple card has actually become the opposite, but that’s how I craft! And although this is not my usual style I actually love the soft, feminine and “vintagey” vibe of my wreath card.
The Dainty Diamonds embossing folder is fast becoming my favourite embossing folder – I can’t seem to stop using it! I’ve laid it onto a Crumb Cake card base and framed it with another new favourite – brushed metallic cardstock.
This photo better shows the burnished sheen the card stock gives – it is hard to photograph but simply luscious in real life!
I know it looks like I’ve used Rococo Rose to stamp my flowers, but it is actually Merry Merlot stamped off once, twice and also used at full strength for the middle of the flowers. I’ve also stamped off Crumb Cake to add variety to the leaves and buds.
Did you notice the beautiful Gold Hoop Embellishment that I used to create my wreath peeking out from beneath the foliage?
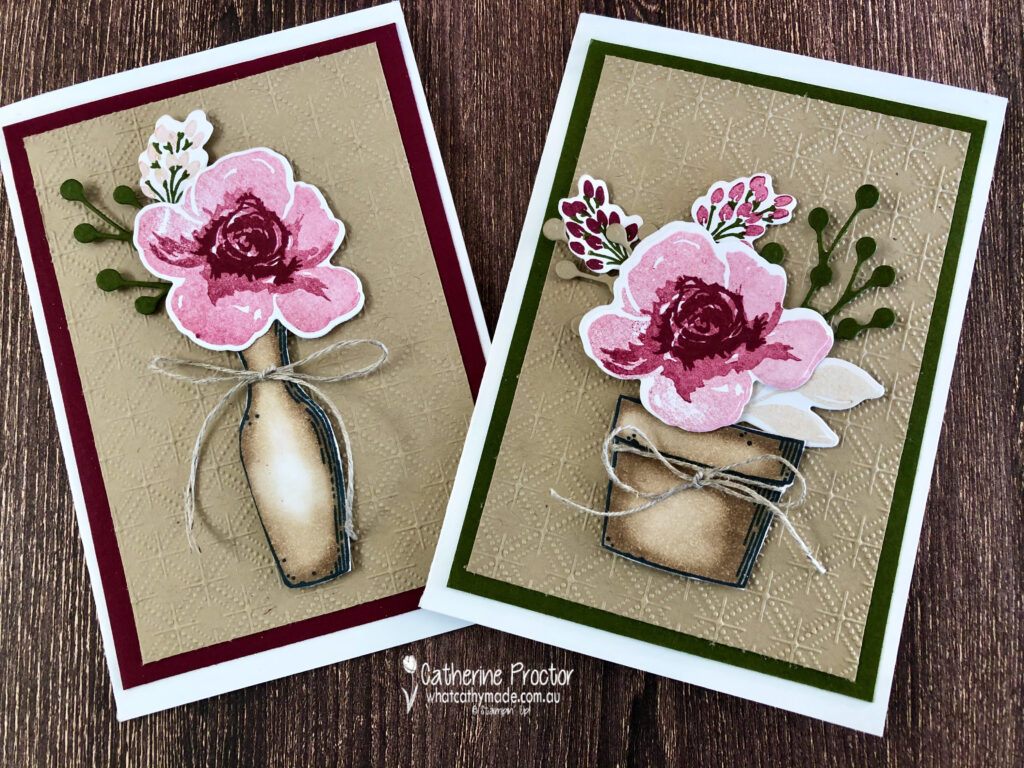
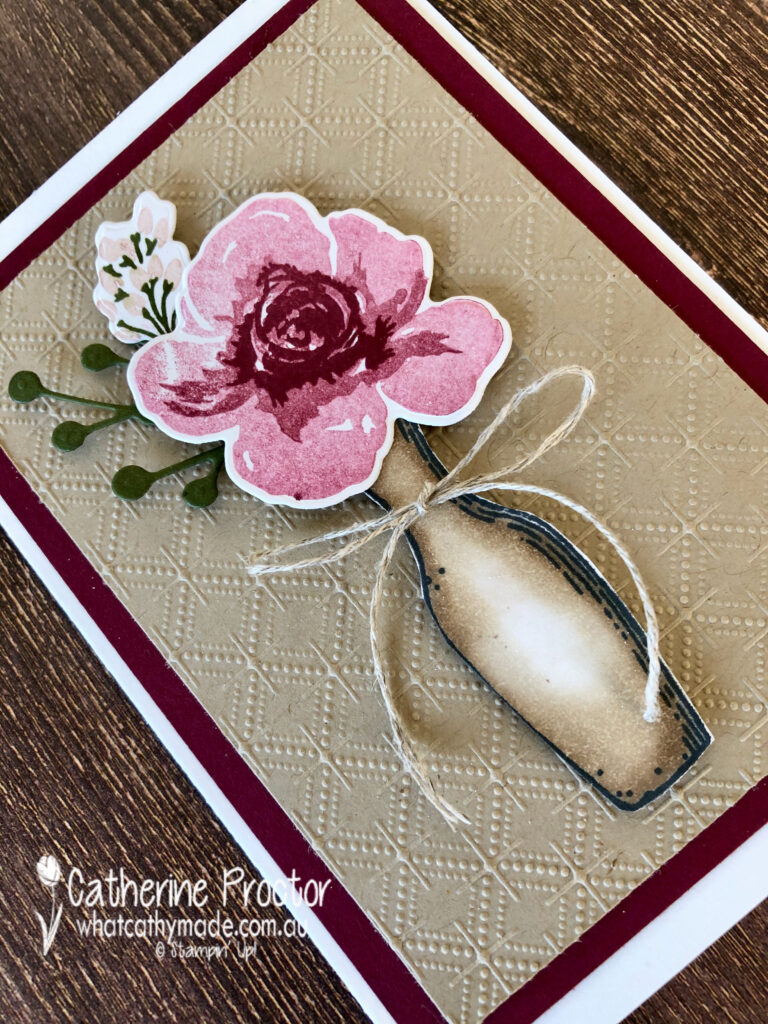
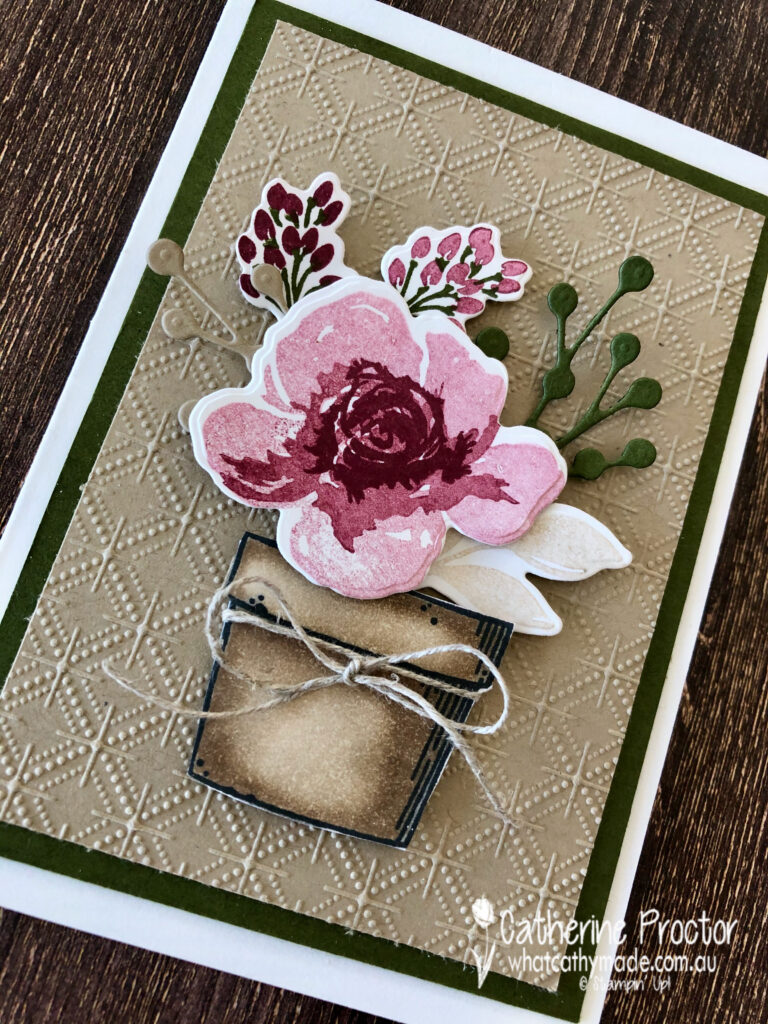
I had originally designed a card for today based on a pot and vase I had stamped in Memento before colouring in with my Crumb Cake blends, but I ended up making the wreath card instead.
Because I hate wasting leftovers (and I also had leftover flowers and foliage) I quickly made two note cards, this time using Crumb Cake card stock embossed with the Dainty Diamonds embossing folder.
The Crumb Cake blends make it super easy to give dimension to any image. I used the colour lifter bend pen in the middle of my vase card to create the shine that a vase would naturally throw.
The pot card, like the vase card, is finished off with a bow of linen thread – in my opinion linen thread and Crumb Cake really are a match made in heaven!
I have to admit I probably like my last minute leftover note cards as much as the intricate wreath card that took soooo much more time to make! Ain’t that often the way with crafting, LOL!
I deliberately left sentiments of my note cards so they can be used for any occasion. I often do this and leave my card insides blank so I can stamp the appropriate sentiment in the card as I need it.
I can’t wait to see what the rest of the Art With Heart team have created with Crumb Cake today. Click on the links below to see what they’ve made.
Next Tuesday we’ll be showcasing one of the Regals family: Crushed Curry. We hope you can join us all then.
To purchase any of the products featured in today’s post, simply contact your Stampin’ Up! demonstrator, any of the ladies in the AWH Colour Creations Showcase or click on the product links below.
If you’d like me to post you your very own copy of the August–December 2020 Mini Catalogue, 2020-21 Stampin Up! Annual Catalogue, the 2020-21 Beginners Brochure, or to simply find out about more about Stampin’ Up! contact me.
In the meantime, wherever you are in the world, stay safe, stay calm…and keep on crafting xxx
Welcome to the Monthly Art With Heart Creative Showcase.
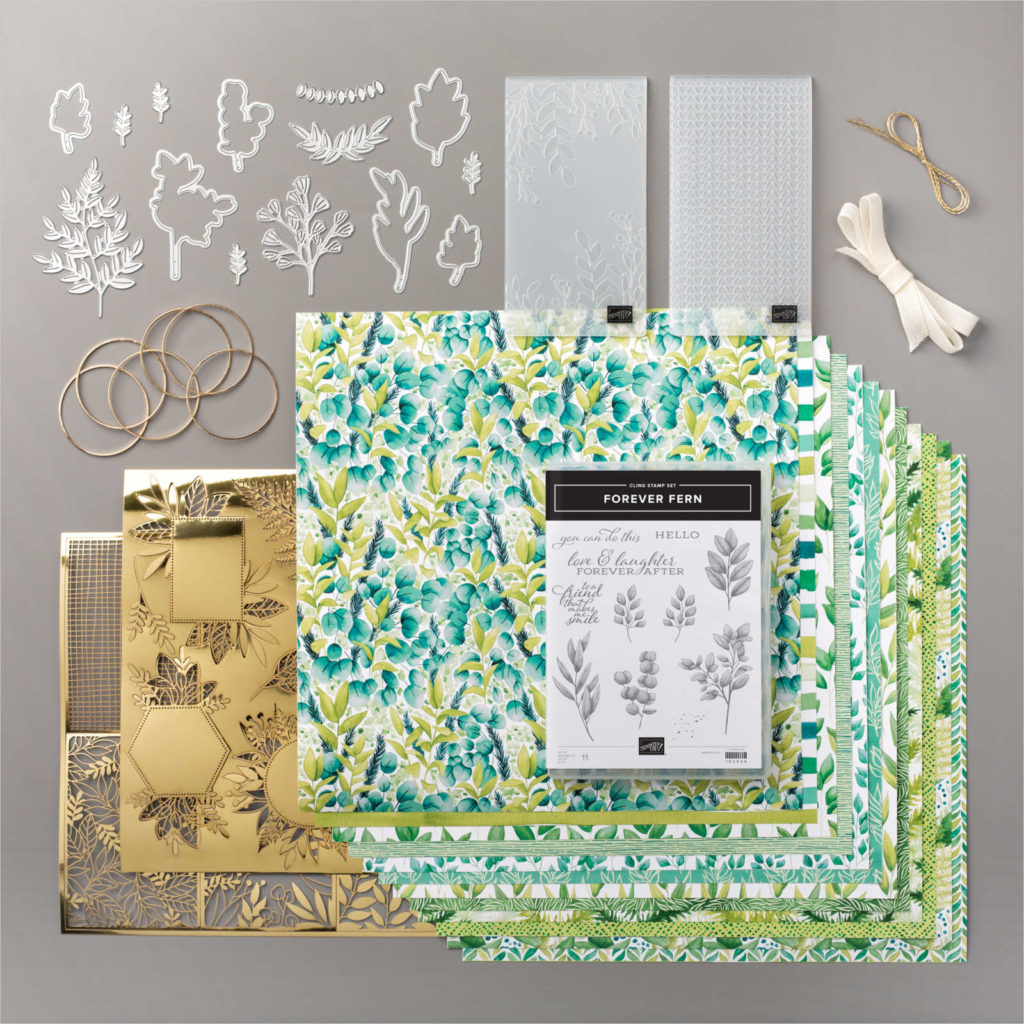
This month the team are featuring projects using their favourite products from the new Stampin’ Up! 2020-21 Catalogue. The new catalogue is full of amazing new stamp sets, some bundled with dies or punches. The range of kits, papers and accessories complete the range of products you will see featured in this Showcase.
I don’t know about you, but choosing a favourite product is like choosing a favourite child. Impossible to do! However after much consideration I decided to make some cards using products from the stunning Forever Greenery Suite.
I love everything about this suite – the DSP, especially. But I think my absolute favourite part of this suite is the Gold 1/16 ” trim that comes with Vanilla Ribbon in the Forever Greenery Trim combo pack.
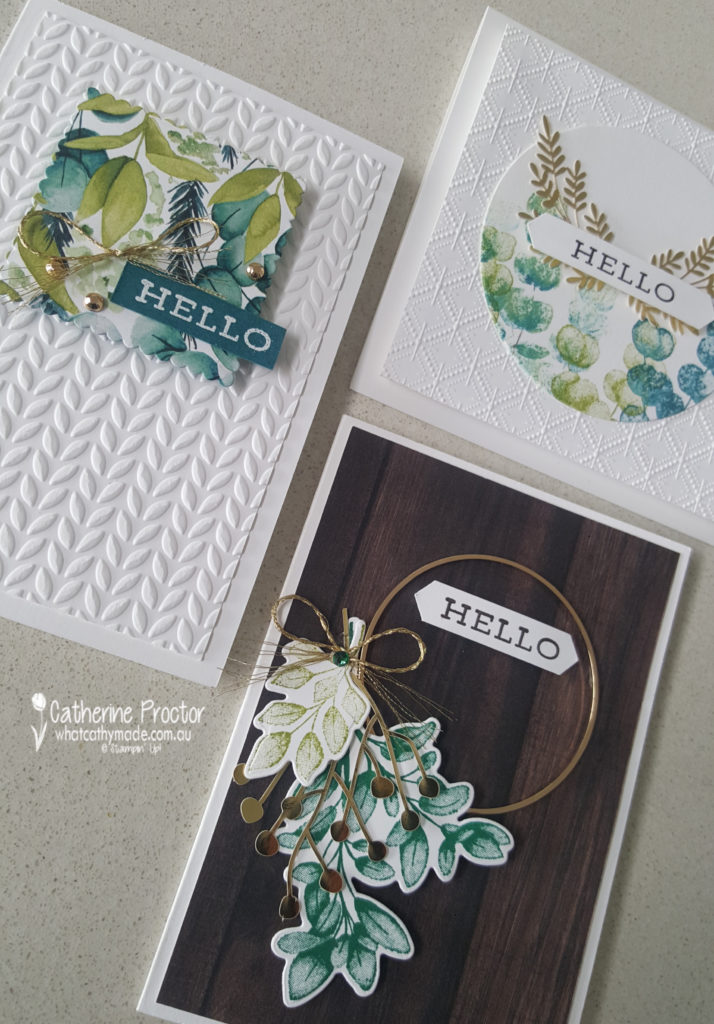
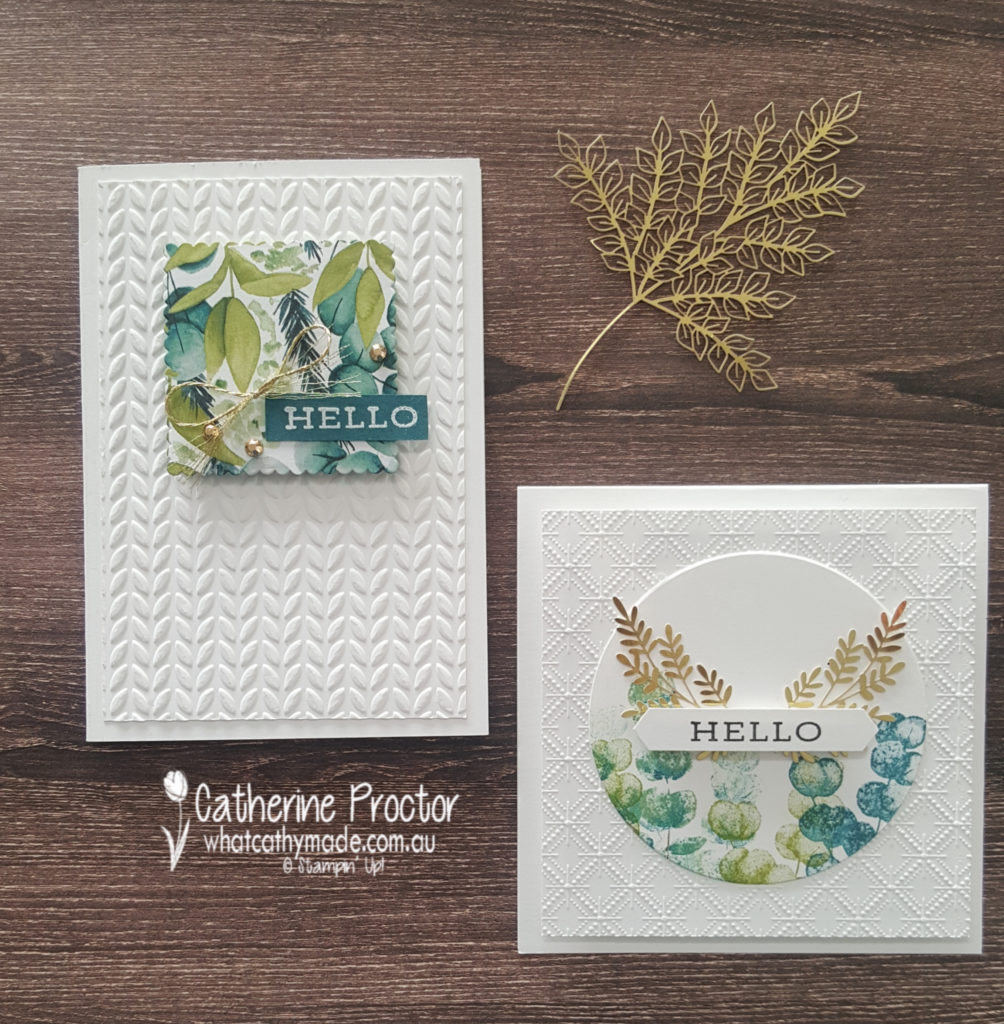
Tonight I made three different cards that all use the Forever Greenery Suite as well as some other new products.
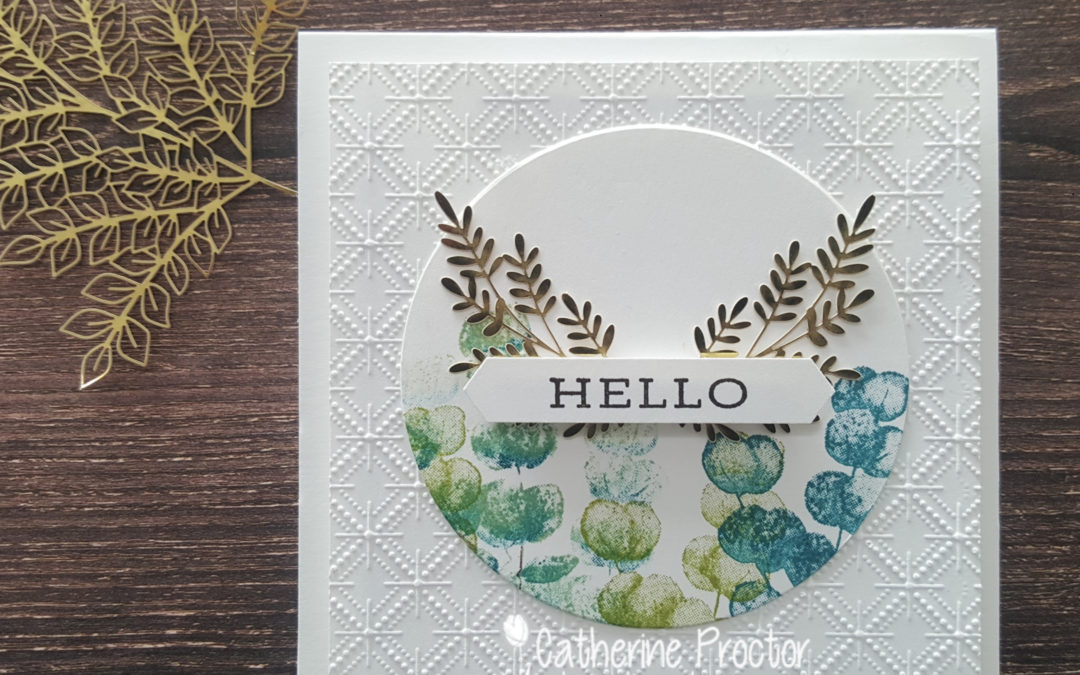
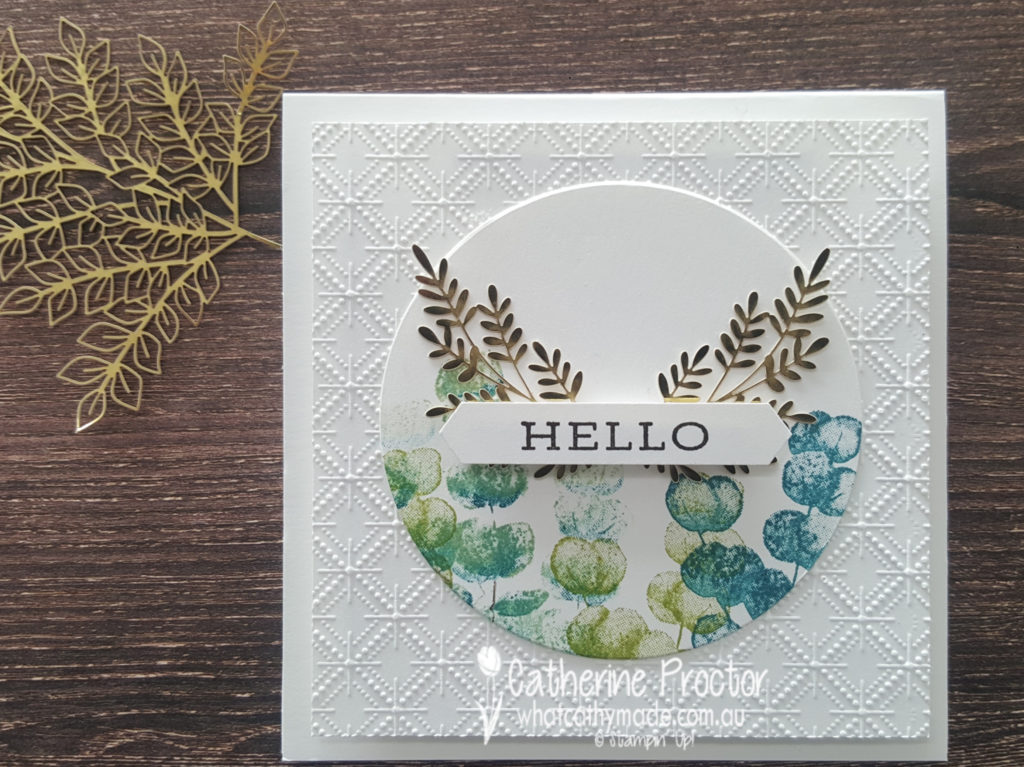
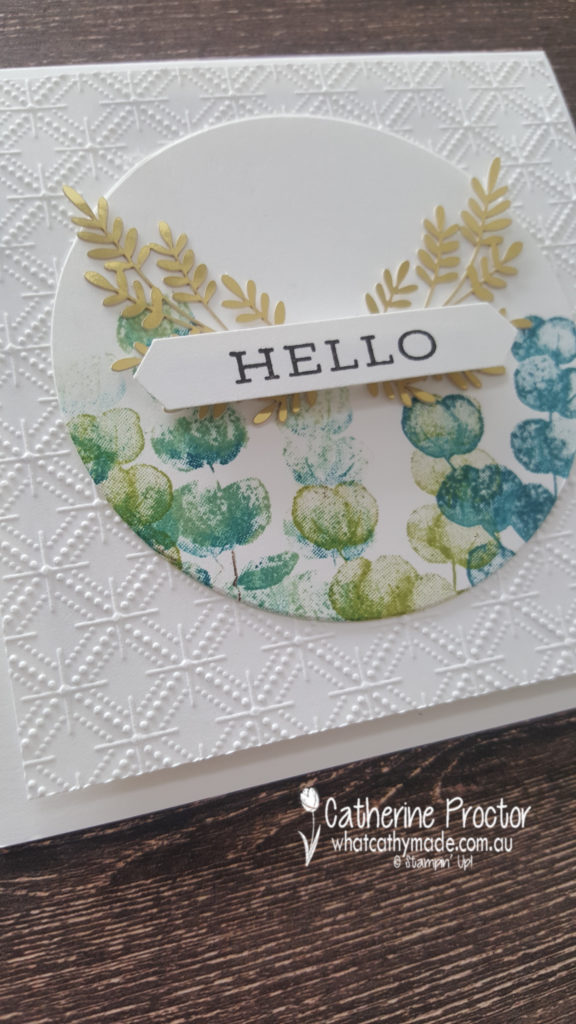
My first card is a square card that actually features a different embossing folder – the Dainty Diamonds embossing folder from the Peony Garden Suite. Isn’t this embossing folder just stunning?
The circle is cut out with the largest of the layering circles and I used one of the stamps from the Forever Fern stamp set, stamped in Pretty Peacock, Pear Pizzaz and some Early Espresso.
The Forever Gold Laser-cut Specialty Paper adds an elegant touch of bling.
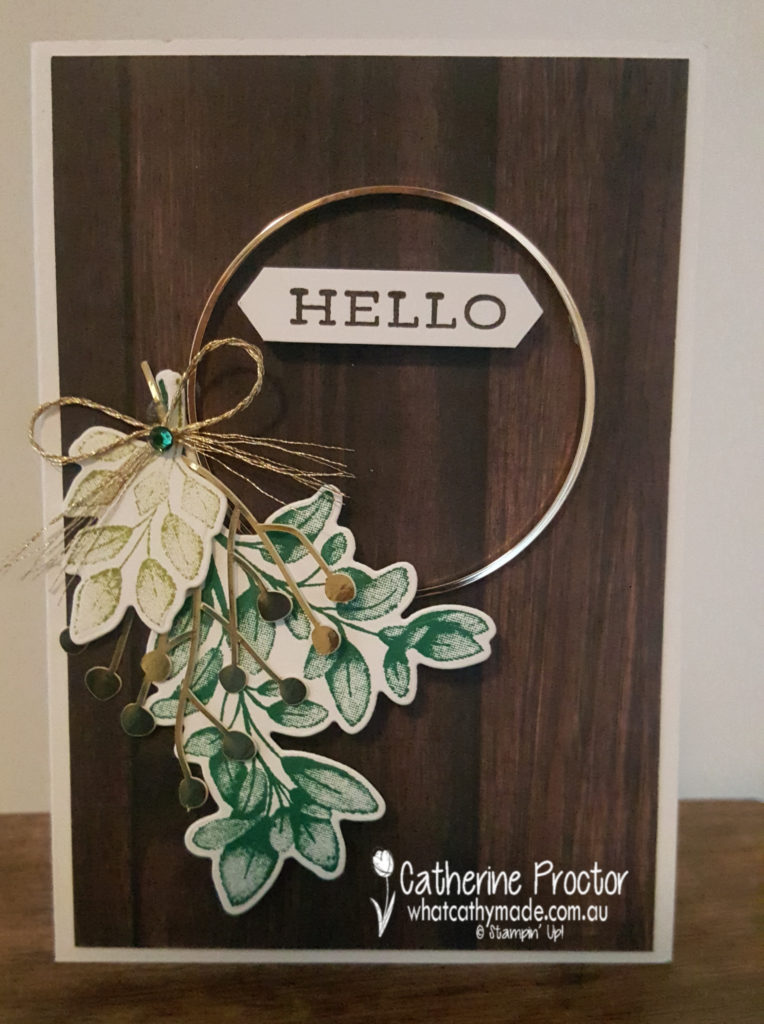
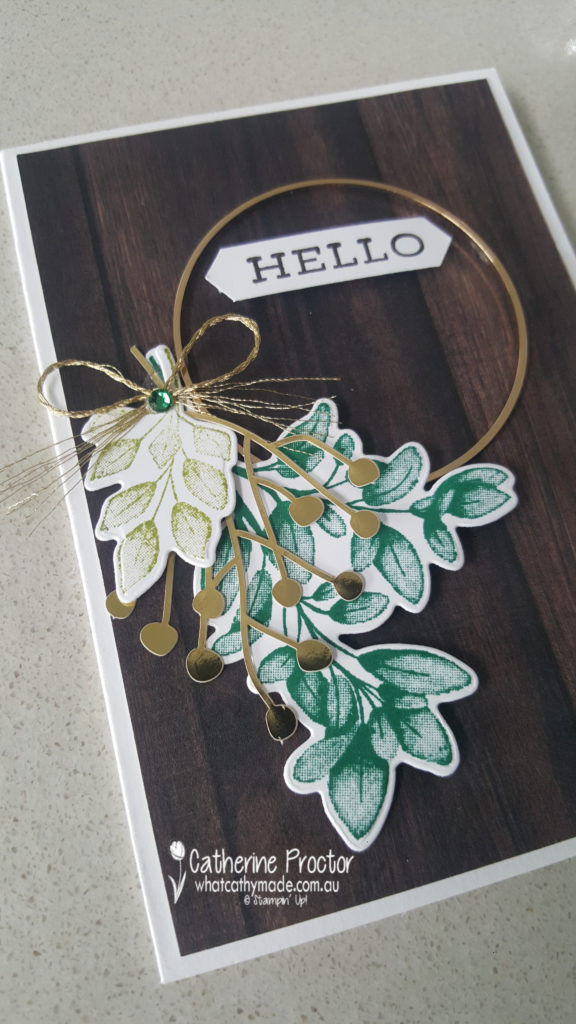
Card two uses a patterned paper from the In Good Taste Designer Series Paper pack. I love how this rich dark wooden paper makes the elements on top of the card really pop.
But of course the main focal point of this card is the gorgeous Gold Hoop Embellishment tied with a bow of Gold 1/16 ” from the Forever Greenery Trim combo pack and another die cut piece from the Forever Gold Laser-cut Specialty Paper. The different green foliage are stamped and die cut using the Forever Fern Bundle.
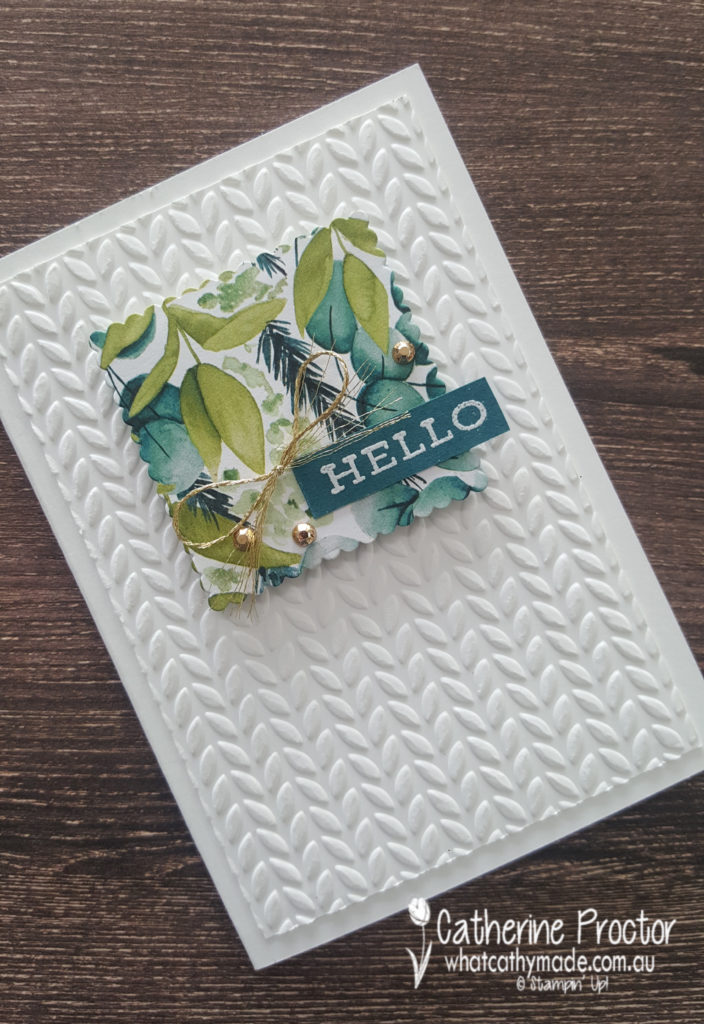
The layout for my final card is a design I cased from a card made by Dani Dziama, who was an Artisan Design team member a few years ago. I loved the amount of white space on her card, but I changed all the main elements to make it my own.
The embossed white panel has been embossed using one of the Greenery embossing folders and I used one of the scalloped square layering dies to cut out some of the gorgeous Forever Greenery DSP.
For many of my photos today I’ve used one of the sheets of the In Good Taste Designer Series Paper as my background because I love the way the cards look against this DSP. This paper below looks like real wood – it is amazing!
The next Art With Heart Team member to share their new catalogue projects is the super creative Andrea Sargent. I can’t wait to see what she’s made tonight.
If you have a broken link or have come to this blog hop midway, you can view all the participants below:


")


 Braided Linen Trim")


")


 Tricolor Ribbon")


")

")


")


