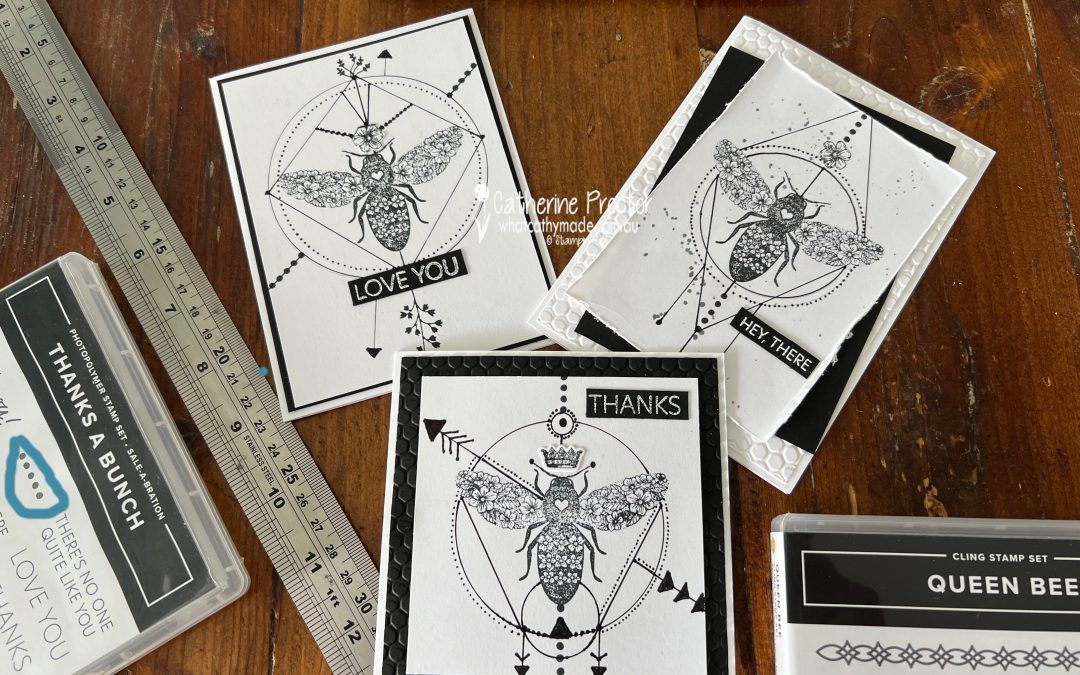
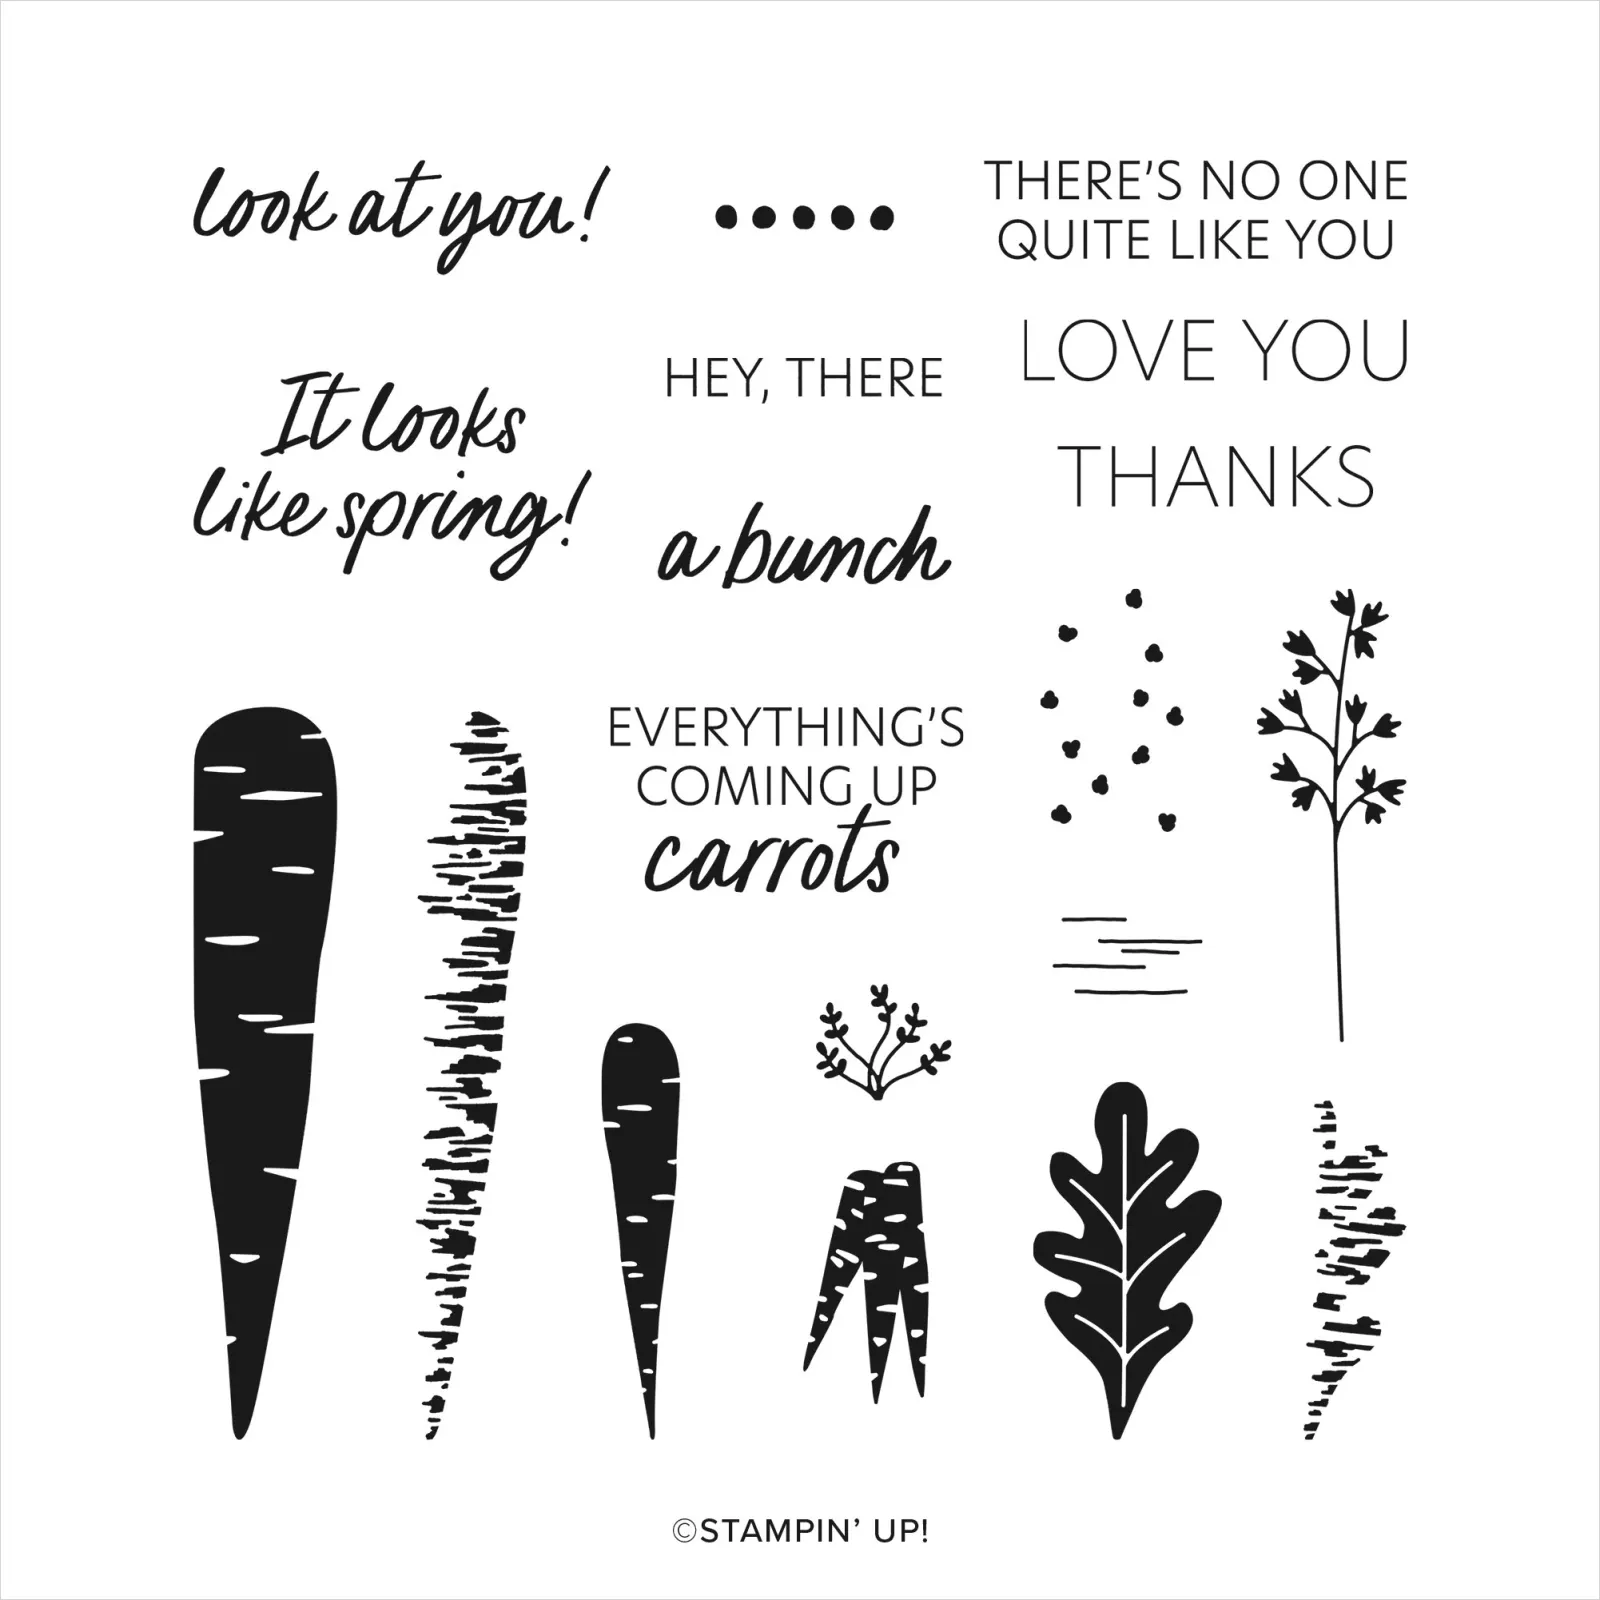
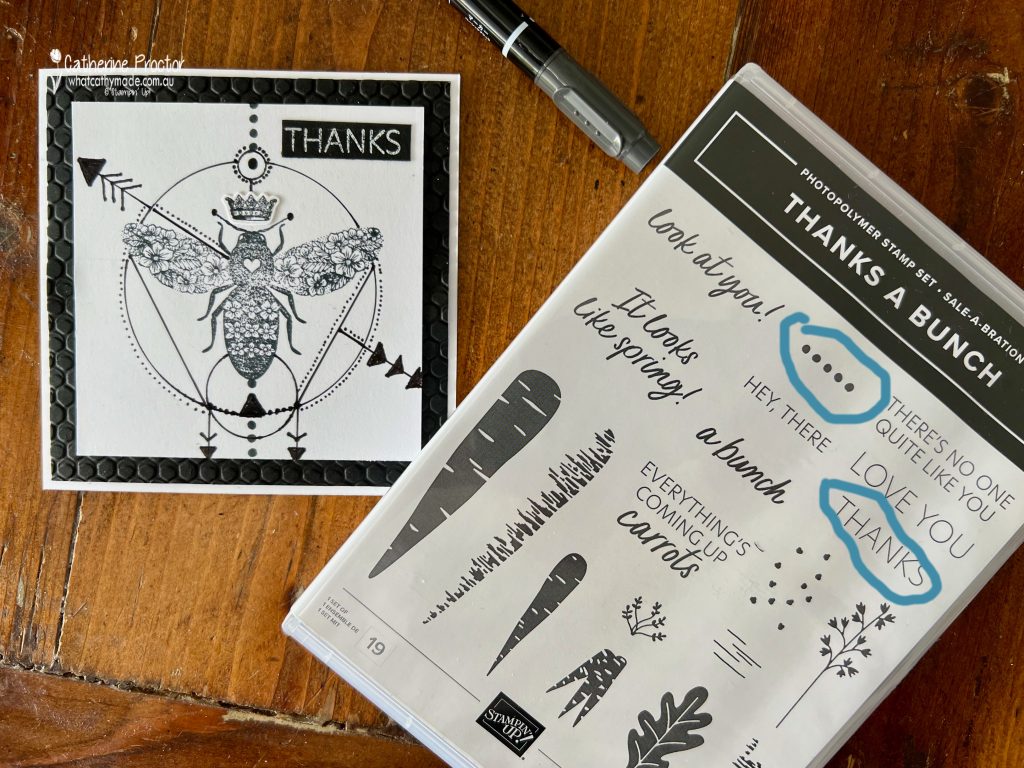
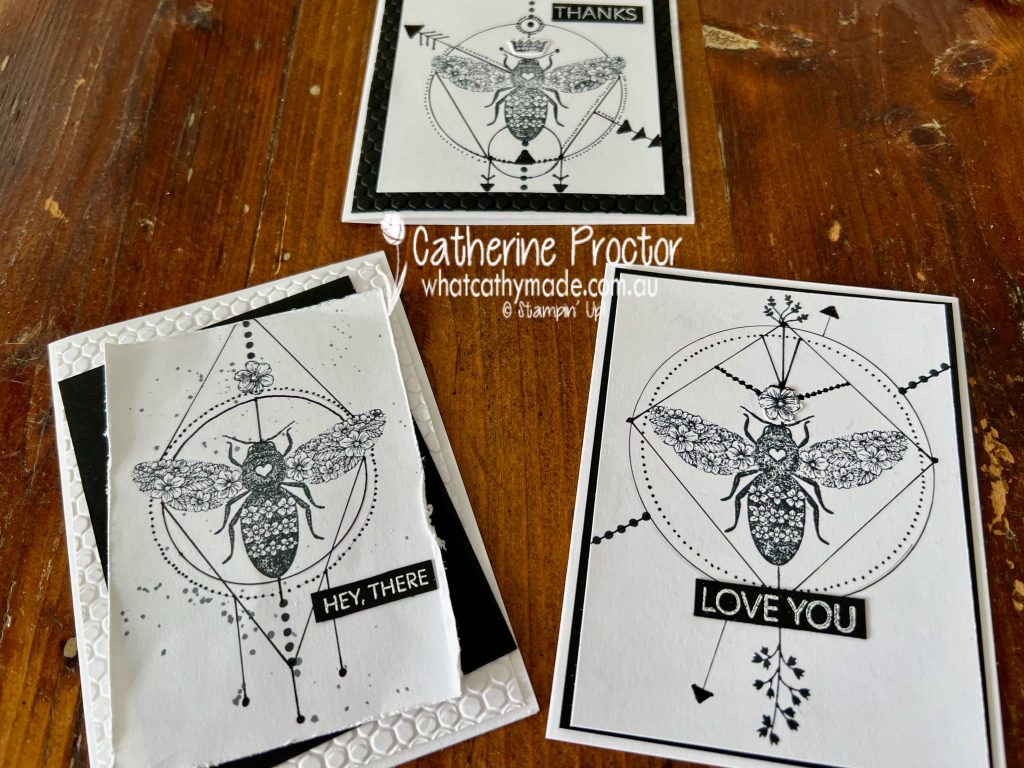
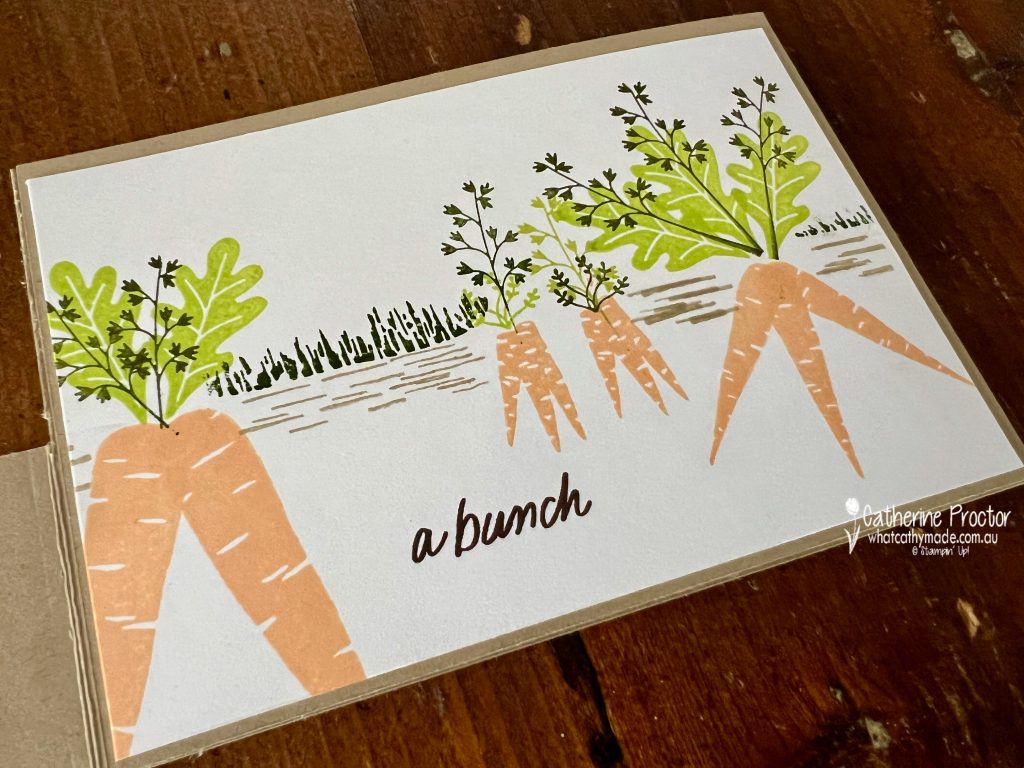
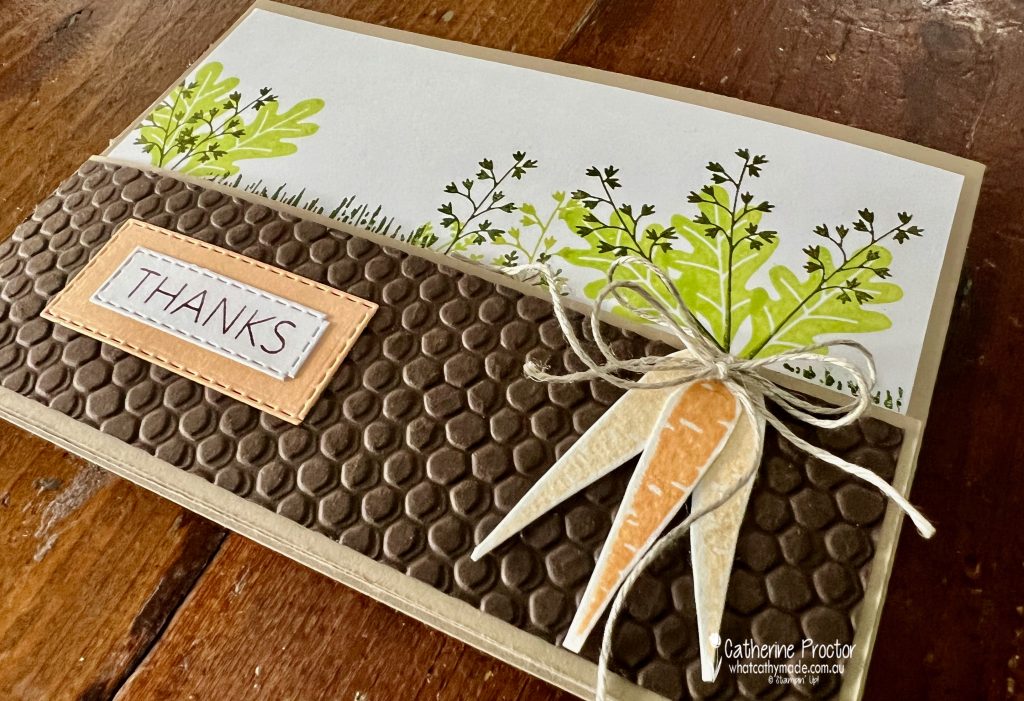
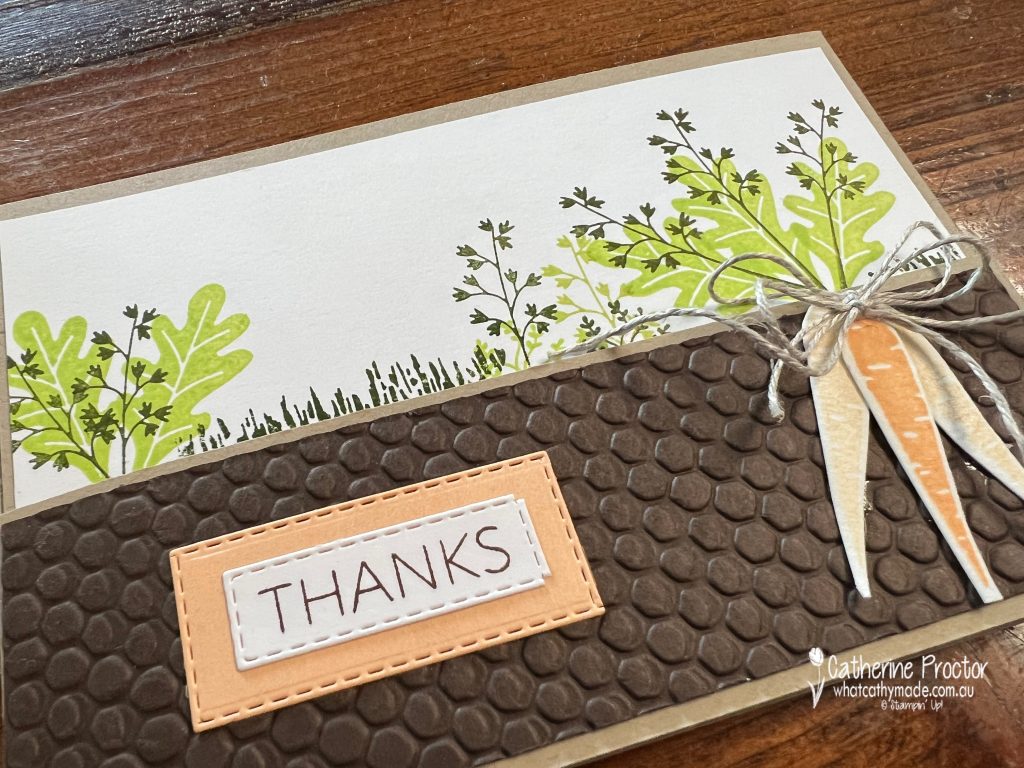
With only two days left until SALE-a-bration ends, I couldn’t resist sharing these three cards that bring together the Stunning Queen Bee stamp set with two of the FREE Sale-a-bration items: the Thanks a Bunch Stamp set and the Hive 3D embossing folder.
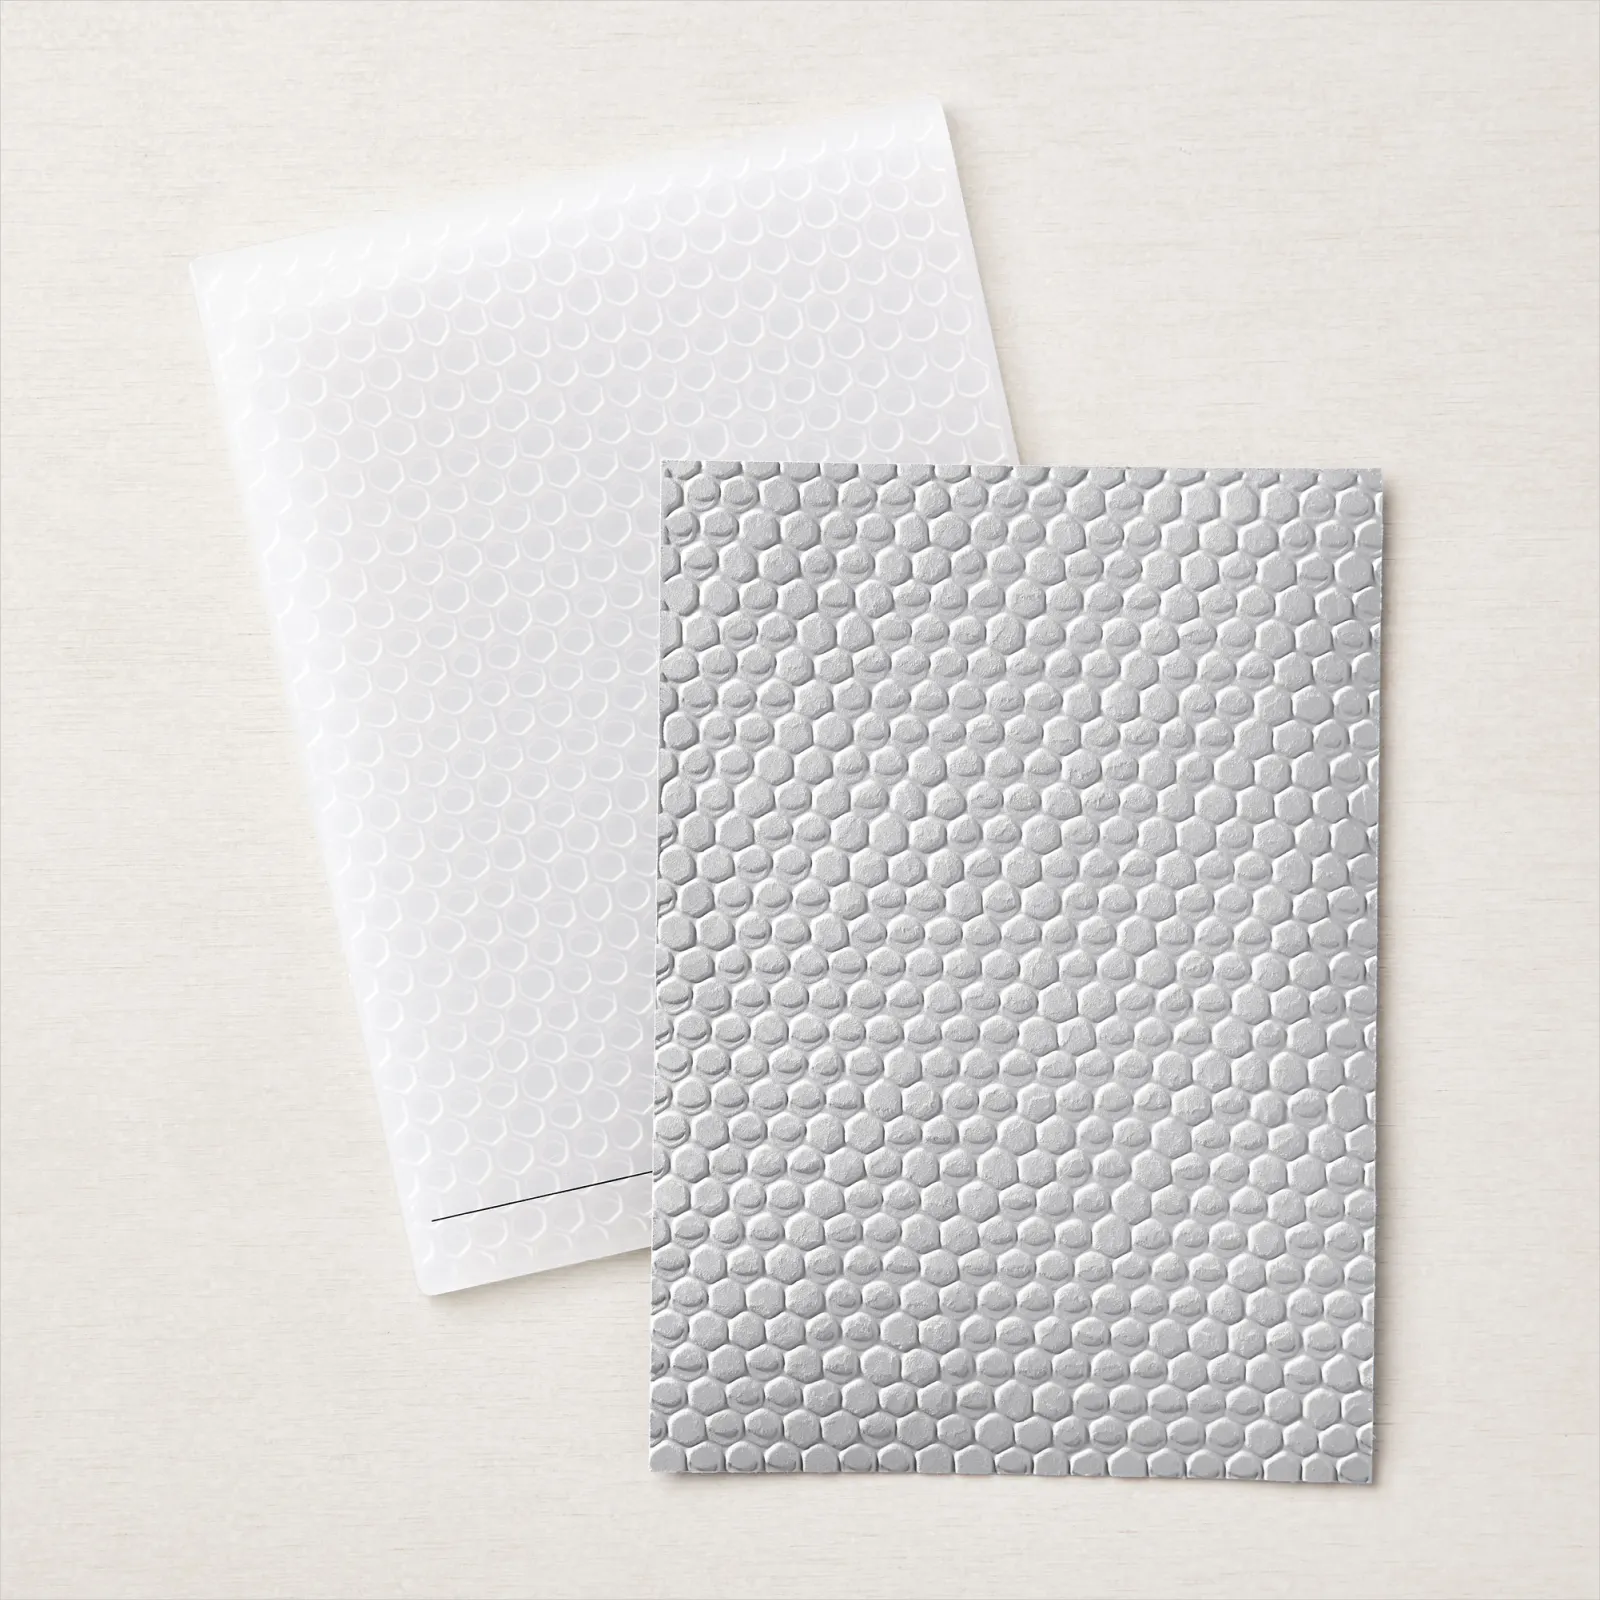
Thanks a Bunch Stamp SetHive 3D Embossing folder
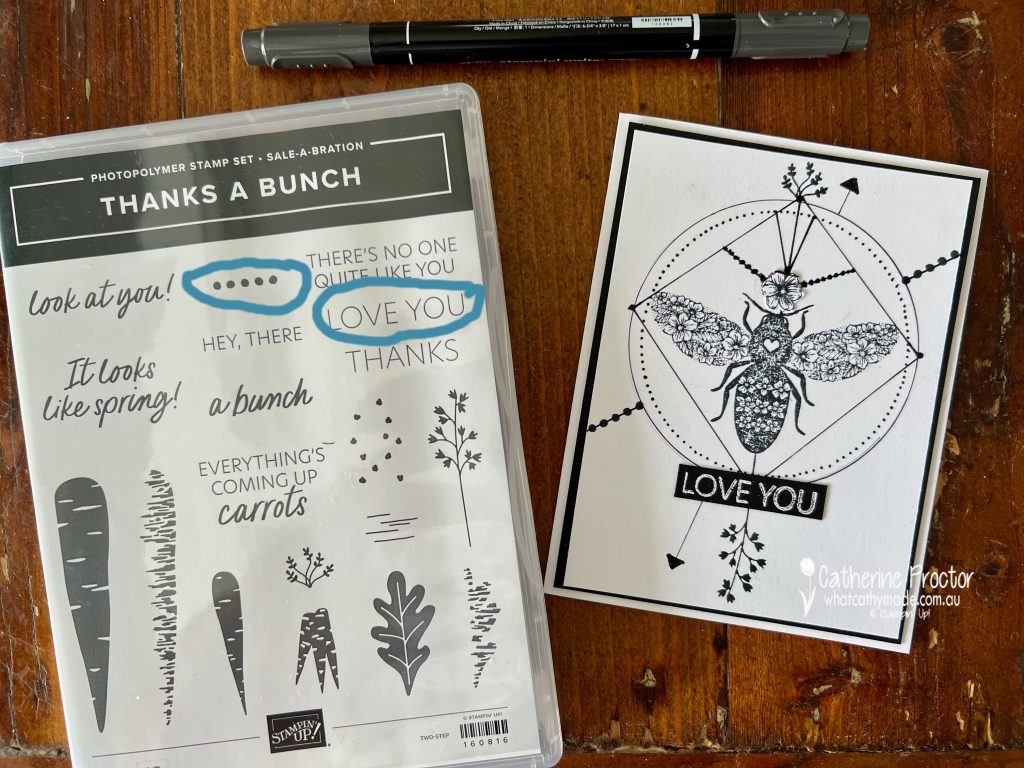
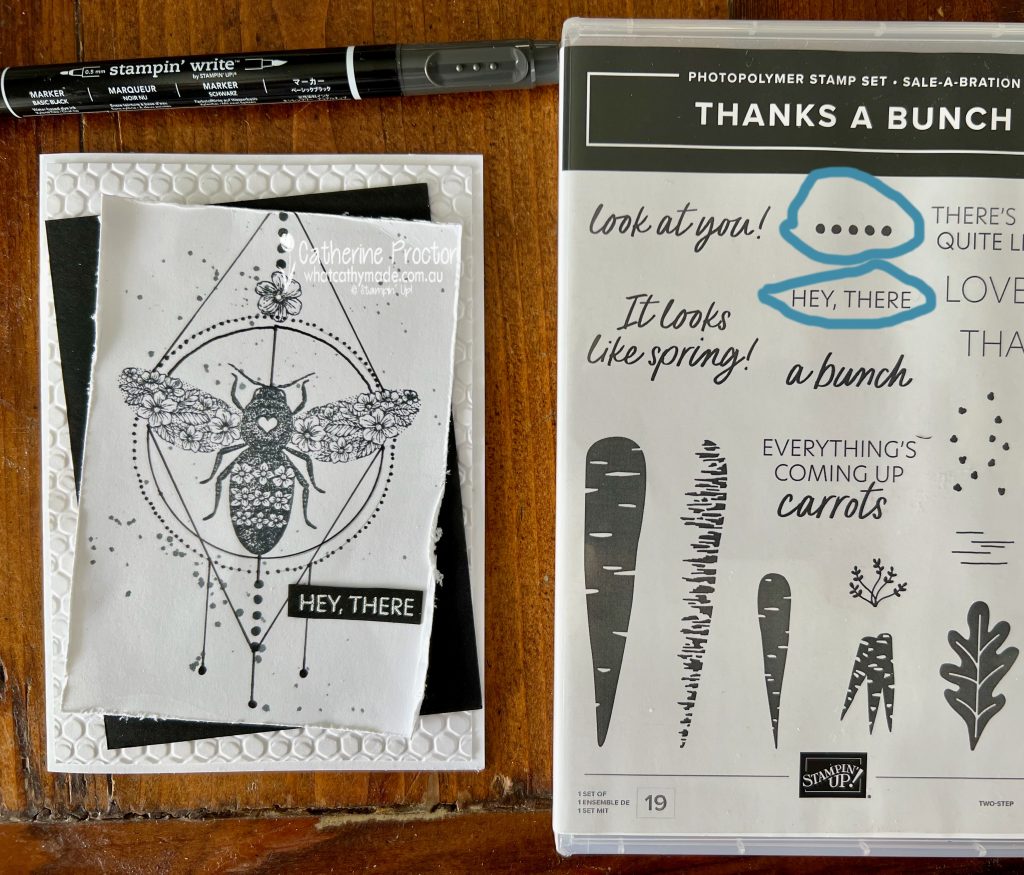
There’s a tiny stamp in the Thanks a Bunch stamp set that works really well on this graphic, tattoo style of card – the 5 dots in a row. I’ve used this dot stamp on all three cards below, along with other stamps from both stamp sets and freehand drawn lines using a ruler and a Black Stampin’ Write marker.
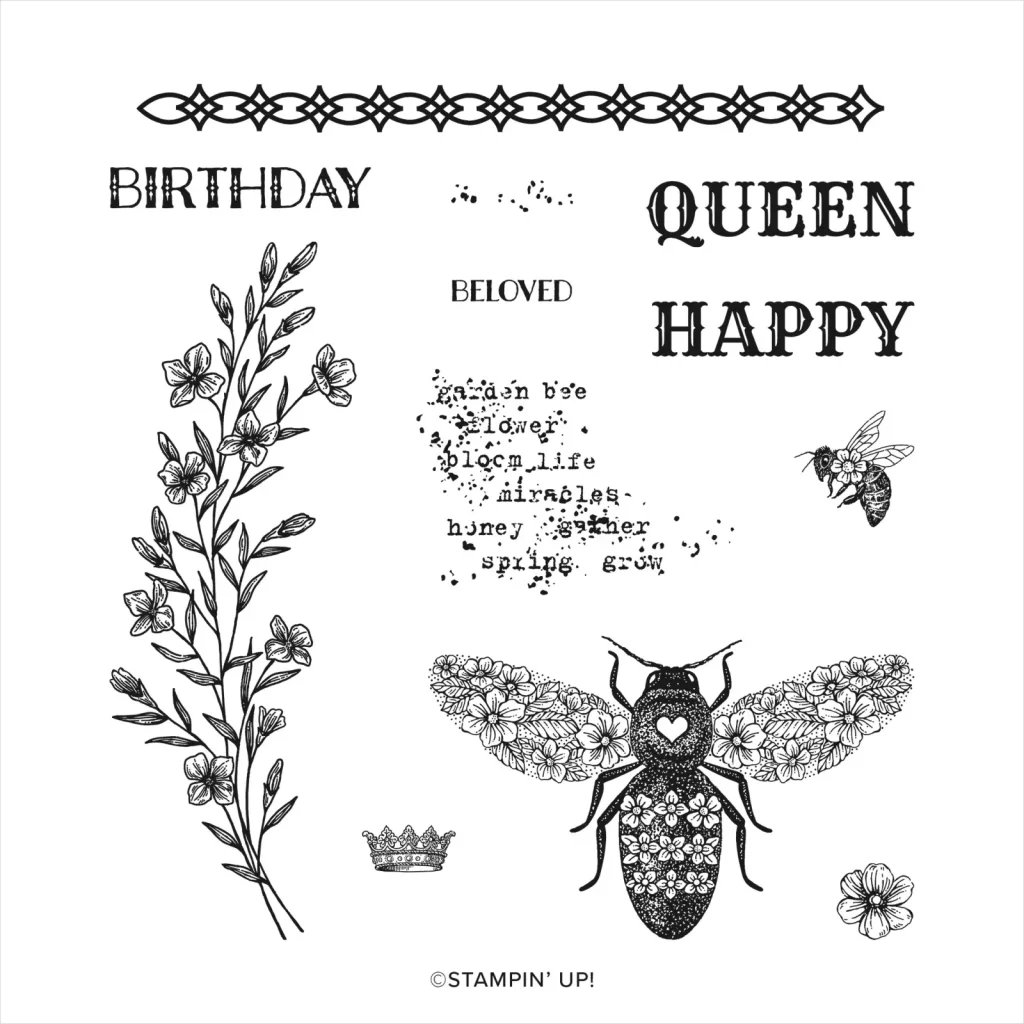
The square thanks card also uses the Hive 3D embossing folder as well as the large bee stamp, the crown stamp and the thanks sentiment from the Queen Bee stamp set.
The love you card also uses the two carrot tops from Thanks a Bunch.
The Hey, There card also uses the bee stamp and the flower stamp from the Queen Bee stamp set, as well as the Hive 3D embossing folder.
I love the freedom this style of cardmaking gives me to take stamped images and take them to the next level.
Don’t forget that SALE-a-bration ends midnight tomorrow so don’t miss out if you would like to add any of these gorgeous products to your craft collection.
I’ll be back this Wednesday March 1, with the AWH Colour Creations team to showcase Real Red. I hope you can join us then.
Welcome to week forty one of our Art With Heart 2022-23 Colour Creations blog hop.
This is a weekly blog hop where we showcase the stunning range of Stampin’ Up! colours in alphabetical order over 12 months and this week we are featuring Pumpkin Pie from the Regals family.
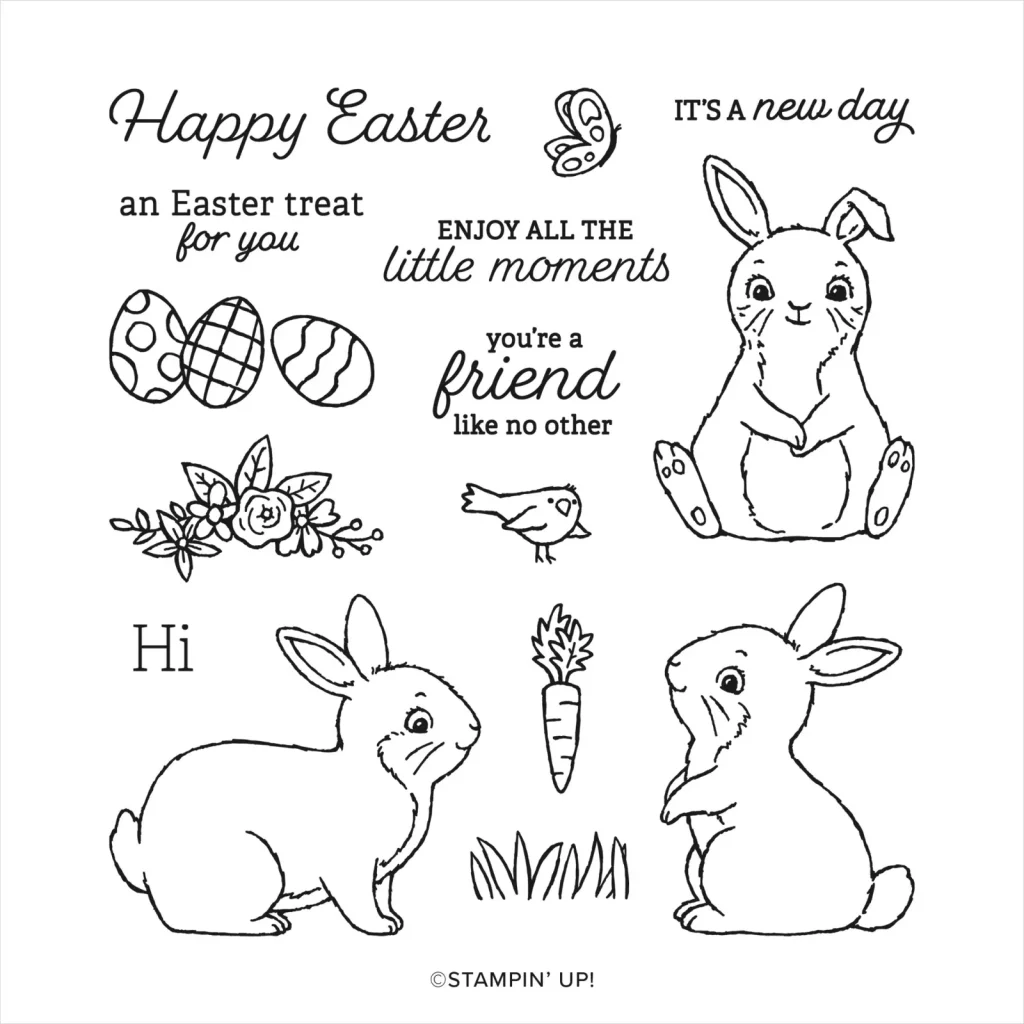
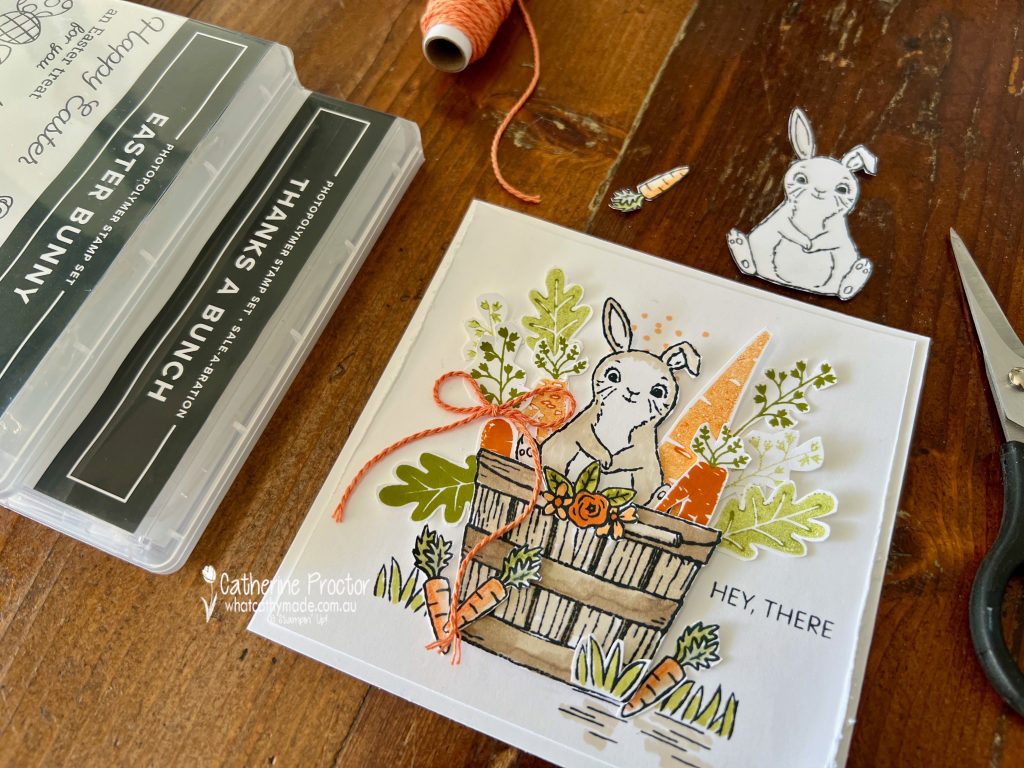
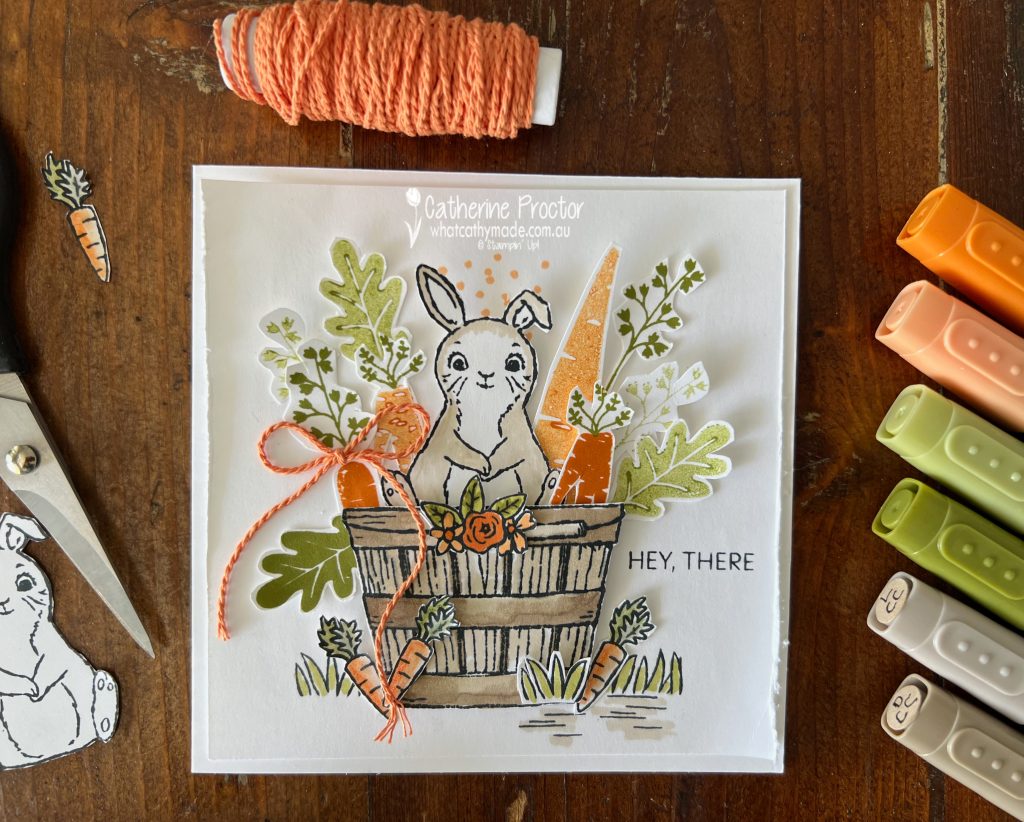
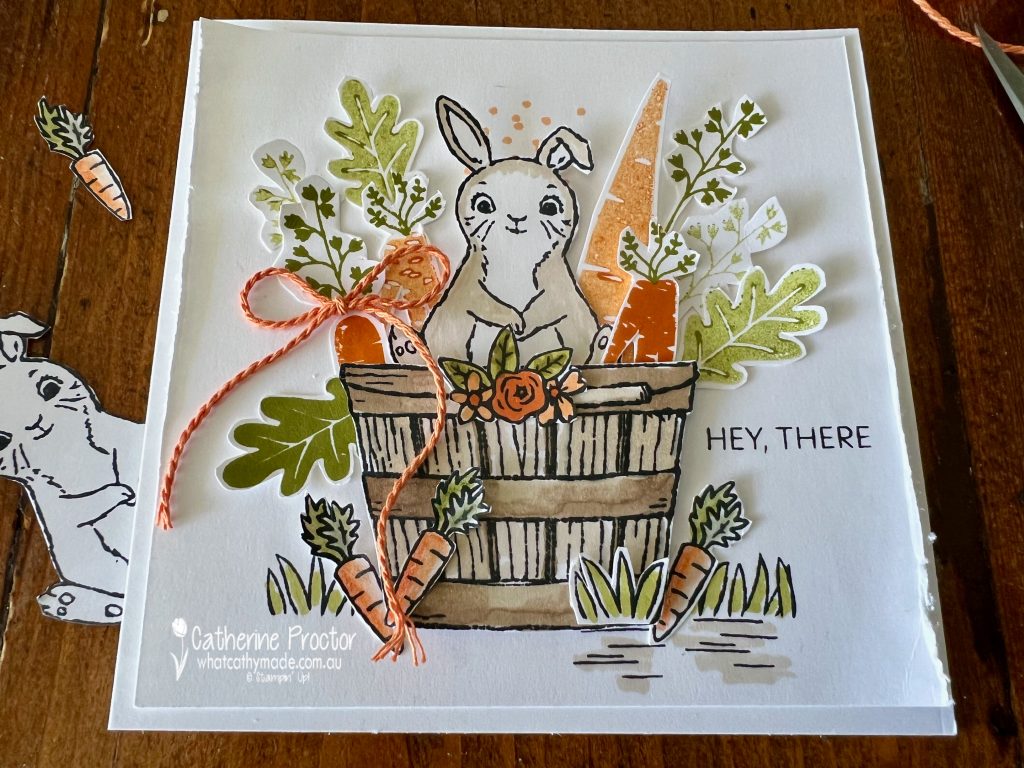
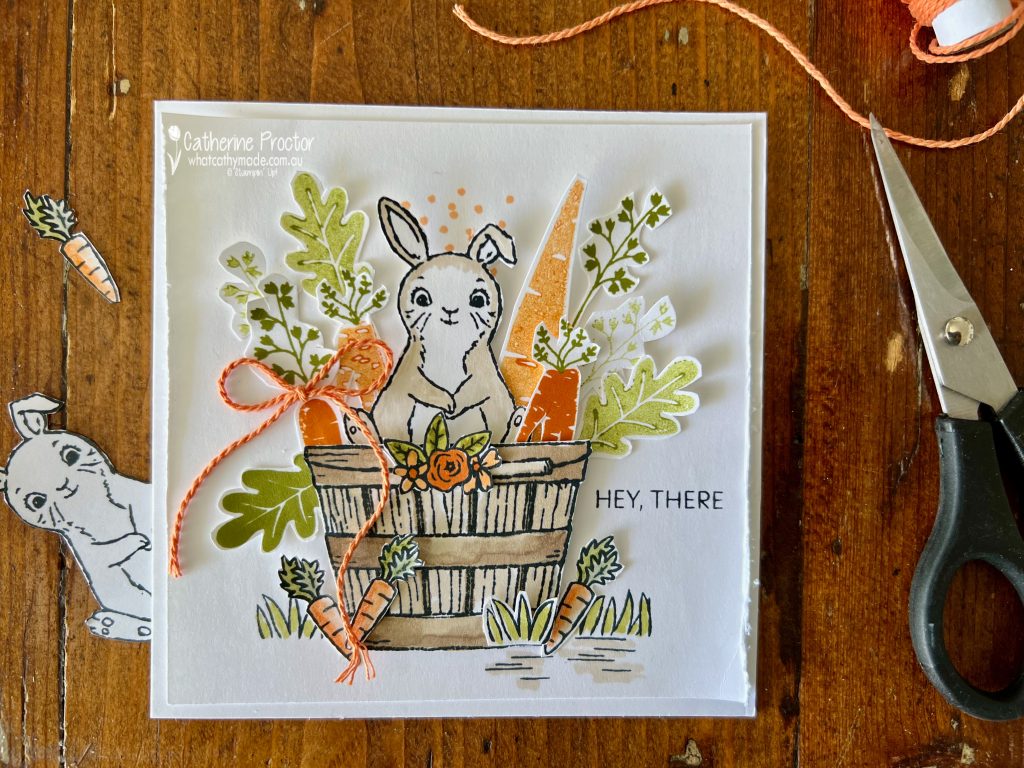
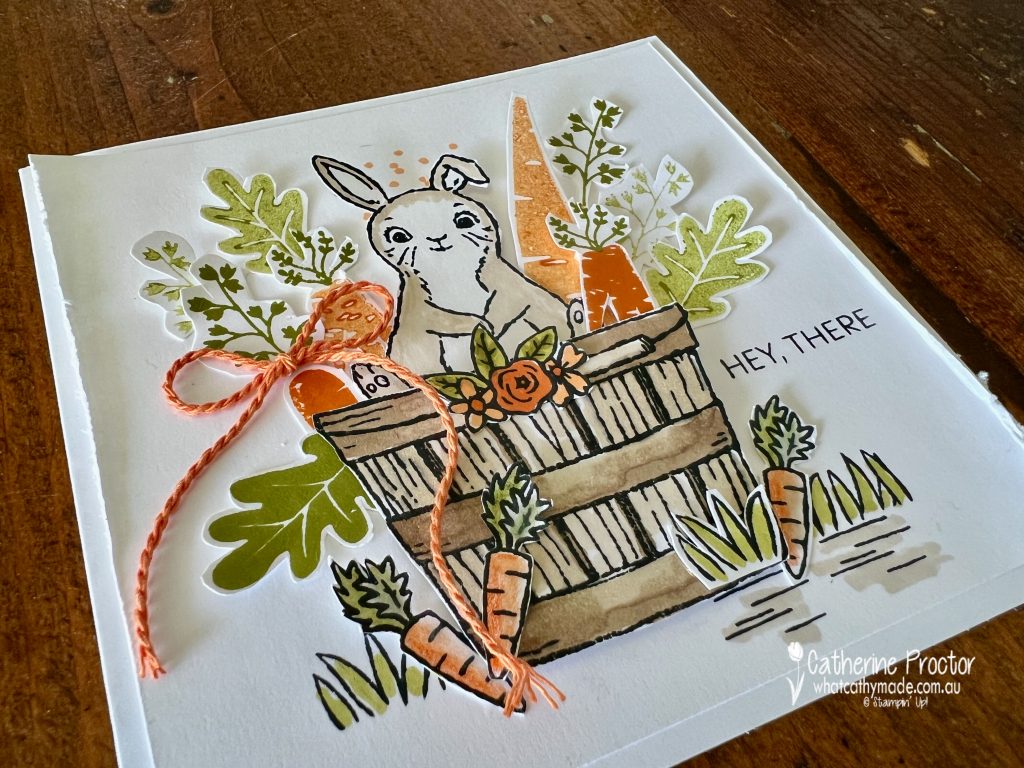
SALE-a-bration ends next Wednesday night so I decided to showcase the adorable SALE-a-bration Thanks a Bunch stamp set once again, this time combining it with the Easter Bunny stamp set.
My card was inspired by a gorgeous card made by a very talented German demonstrator called Mandy Pätzold, who combined these two stamp sets and popped her rabbit in a teacup – I’ve placed my rabbit in the wooden basket from the Cheerful Basket Stamp Set instead.
There are only three colours on this card: Pumpkin Pie, Old Olive and Crumb Cake. For all these colours I’ve used them at full strength as well as stamped off once for a lighter tone and I’ve used both the dark and the light Stampin’ Up! blends.
The larger carrots and carrot leaves and fernery from the Thanks A Bunch stamp set are stamped and fussy cut with paper snips. The smaller carrots and the bunny rabbit are from the Easter Bunny stamp set and the basket from the Cheerful Basket Stamp Set are stamped in Memento and coloured with Stampin’ blends.
I’m not going to lie, there is a bit of fuss cutting in this card, however I find it very relaxing. Do you enjoy fussy cutting? My top tip for curves and angles is to turn the paper, rather than your paper snips.
I’ve roughed up the side edges of the top Basic White layer using my paper snips and added a simple Pumpkin Pie bow from the Three Twine Combo Pack.
The “Hey, there” sentiment comes from the Thanks A Bunch stamp set – this is a great all purpose sentiment that allows me to use the card for a variety of reasons, depending on what I decide to stamp inside.
Now it’s time to hop on over to our next participant, the lovely Di Furniss – I can’t wait to see what Di has made this week!
If at any time you find a broken link, you can find the complete list of all participants below.
Welcome to week thirty five of our Art With Heart 2022-23 Colour Creations blog hop. This is a weekly blog hop where we showcase the stunning range of Stampin’ Up! colours in alphabetical order over 12 months and this week we are featuring Pale Papaya from the 2021-23 In Colours.
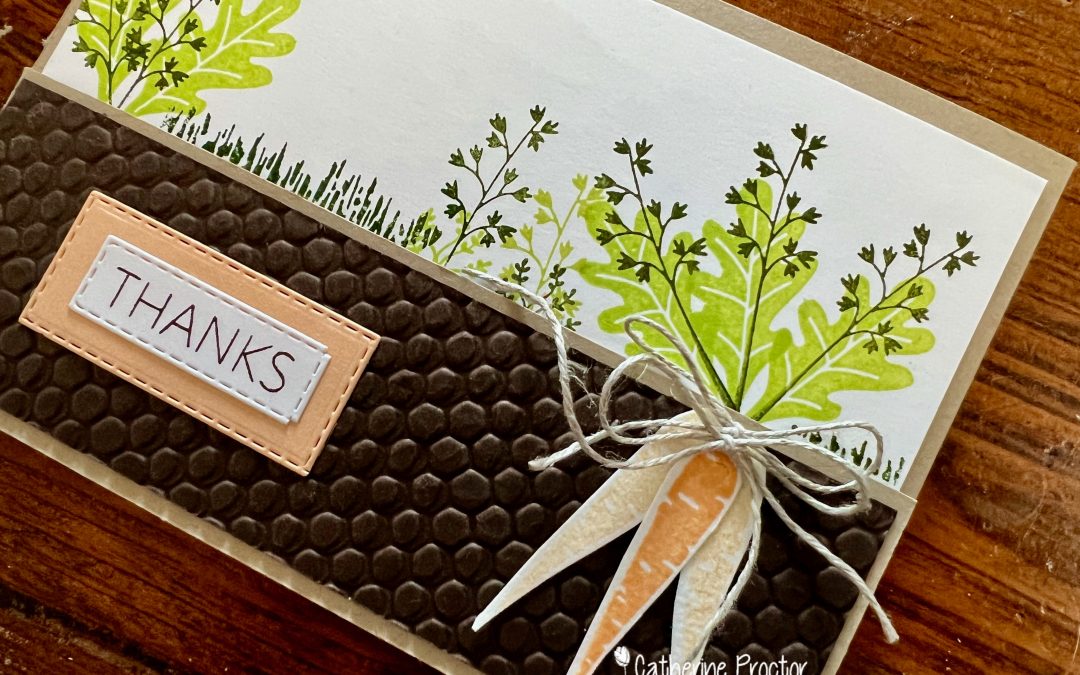
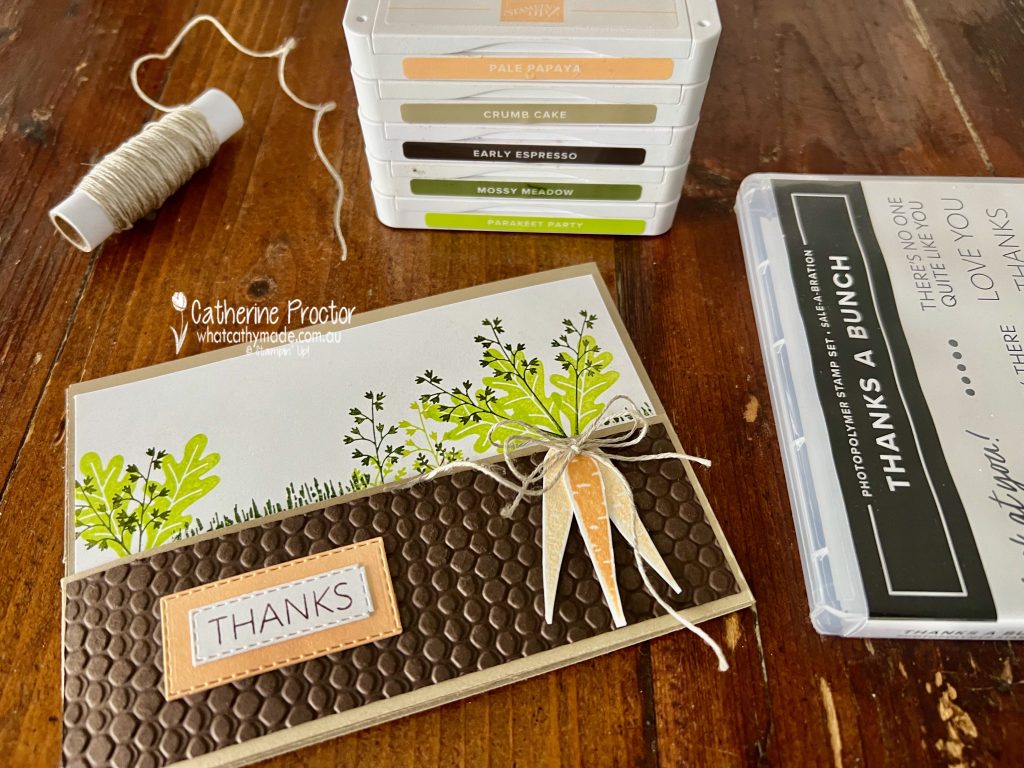
The new January-April Mini Catalogue and SALE-a-bration Catalogue launched last week and one of the free SALE-a-bration items you can redeem for a $90 spend is the Thanks A Bunch stamp set.
Pale Papaya is a great colour to use for carrots and I’ve used it both at full strength and stamped off once for the front of my split front, tri-fold fold card. Other colours used include Crumb Cake, Early Espresso, Mossy Meadow and Parakeet Party.
The Hive embossing folder was used to emboss Early Espresso cardstock to create soil for the front flap. As the split front, tri-fold fold card opens the layers of carrots are revealed.
The middle flap shows carrots above and below the ground. One of the carrot shading stamps works really well to create grass once it is turned on its side.
Split front, tri-fold fold card instructions
Cut a sheet of A4 Crumb Cake cardstock at 10.5cm down the middle to divide into two long halves that each measure 21cm wide x 10.5 cm high.
Score both pieces at 14.8cm and fold in half along the score line to make two cards.
One of these cards will become the card base and the left split front panel, while the other card will be used for the right panel.
To create the left split front panel measure and cut off the top 5cm across the top of the left panel of one of the cards.
To create the right panel with the other card, measure 2 cm parallel to the middle score line and cut all the way down the card. You will now have a right panel with a 2cm wide flap which you use to adhere to the back of the right hand side of the card base.
Fold the right flap over the card base and then fold the left split front panel over the right panel – I’ve adhered the embossed Early Espresso cardstock, the “Thanks” greeting and the bunch of tied carrots to the left split front panel.
Stamp and decorate the cardstock layers for your right card flap and card base BEFORE adhering to your split front, tri-fold fold card base.
All of the sentiments in this card are from the Thanks a Bunch stamp set, stamped in Early Espresso.
Now it’s time to hop on over to our next participant, the lovely Tina Gillespie – I can’t wait to see what Tina has made this week!
If at any time you find a broken link, you can find the complete list of all participants below.
If you live in Australia, you can find and purchase these products in my Stampin’ Up! Online Store once they are available to purchase tomorrow morning.
We’ll be back next Wednesday January 18 with projects showcasing one of the Subtles, Pear Pizzazz.
Welcome to week thirty four of our Art With Heart 2022-23 Colour Creations blog hop, our first hop for 2023!
This is a weekly blog hop where we showcase the stunning range of Stampin’ Up! colours in alphabetical order over 12 months and this week we are featuring Pacific Point from the Brights family.
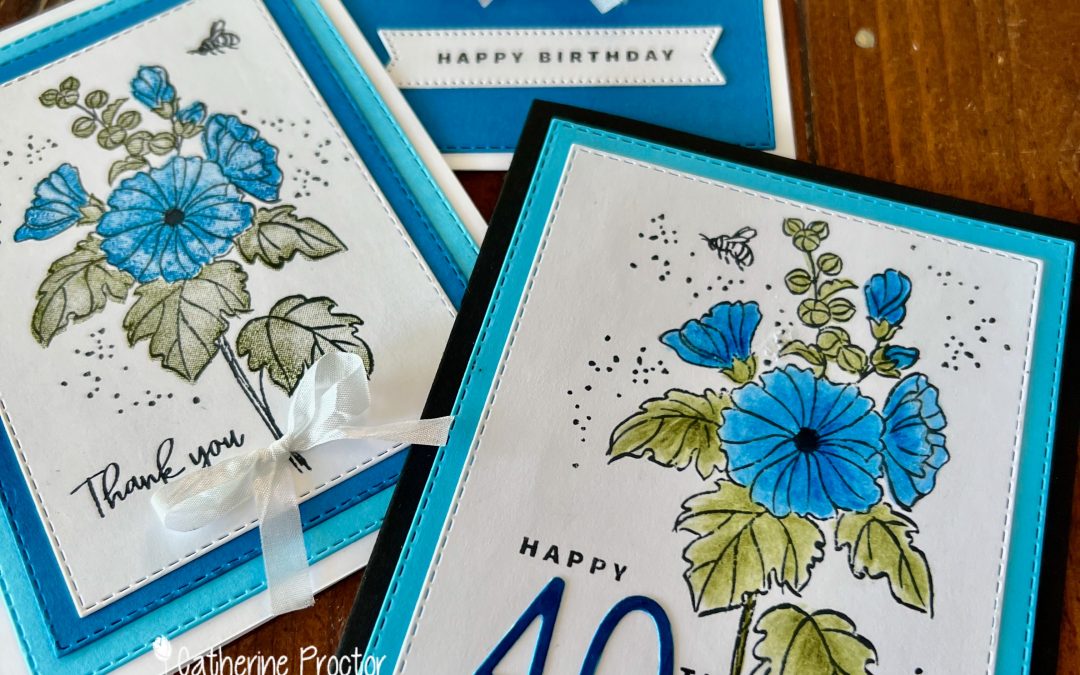
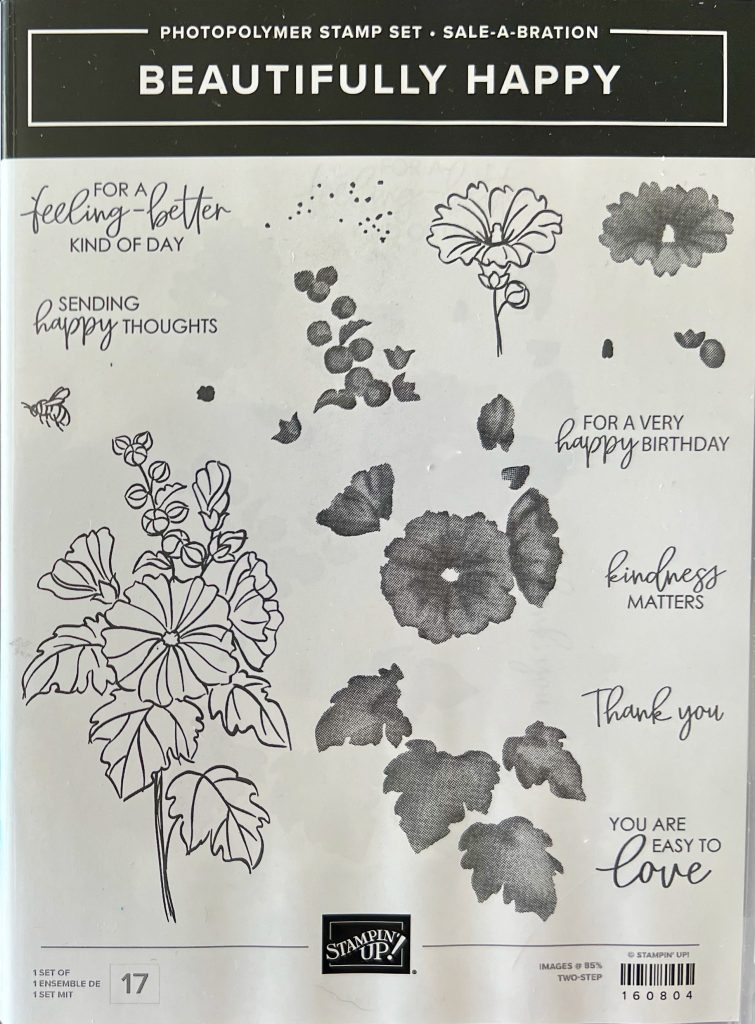
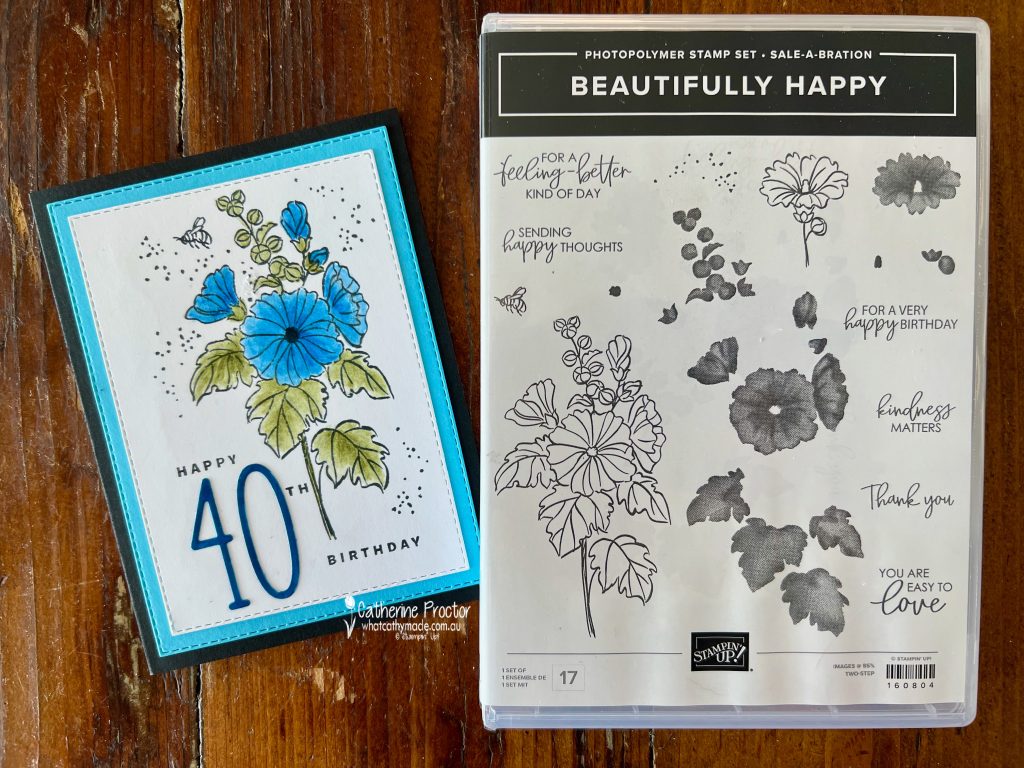
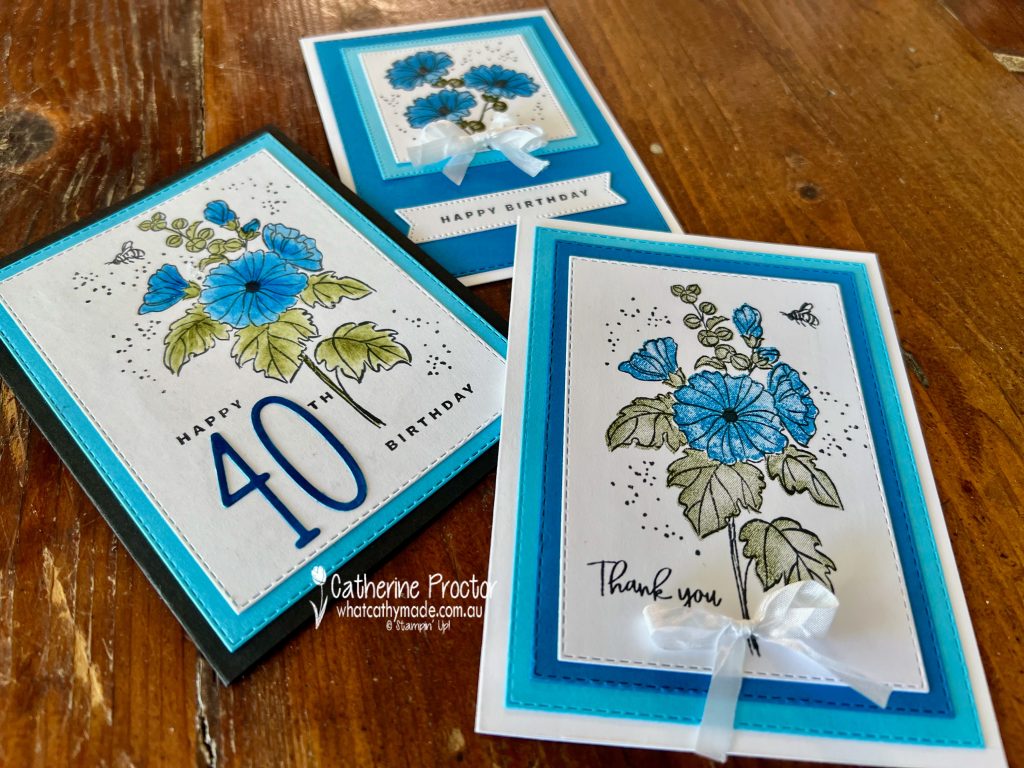
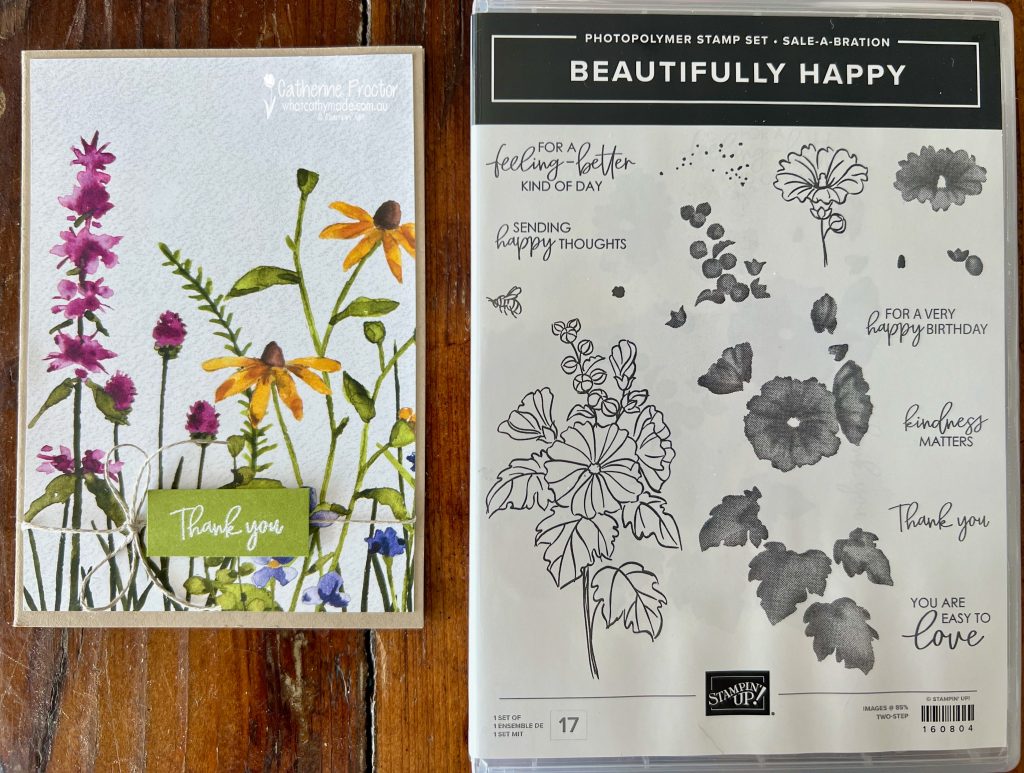
Tomorrow morning the new January-April Mini Catalogue and SALE-a-bration Catalogue are launched and one of the free SALE-a-bration items you can redeem for a $180 spend is the Beautifully Happy stamp set.
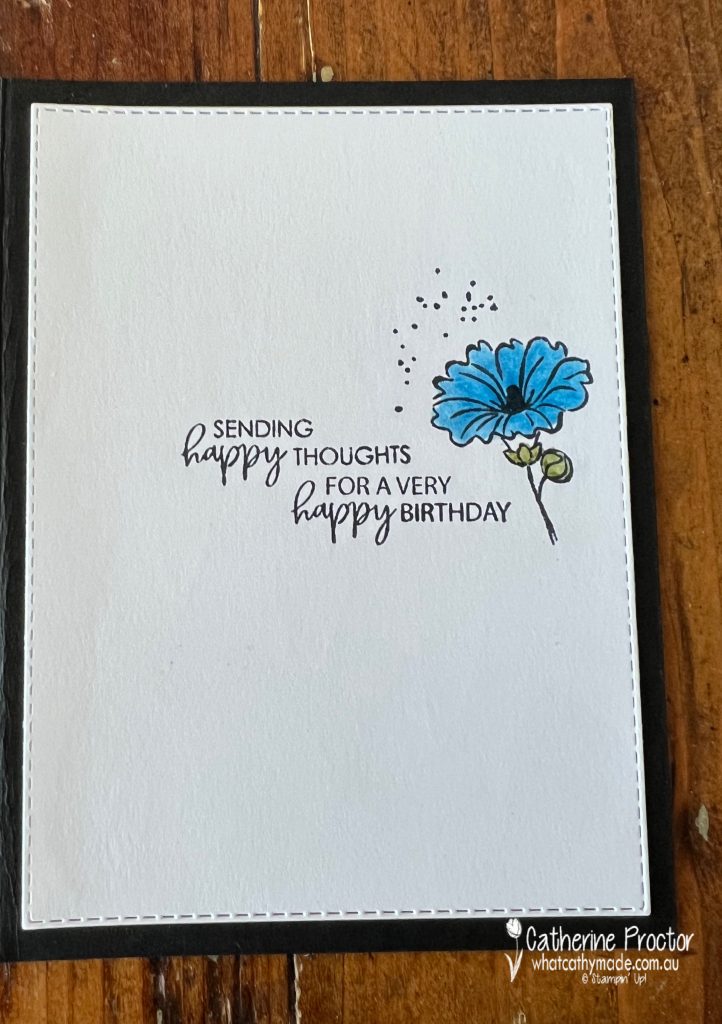
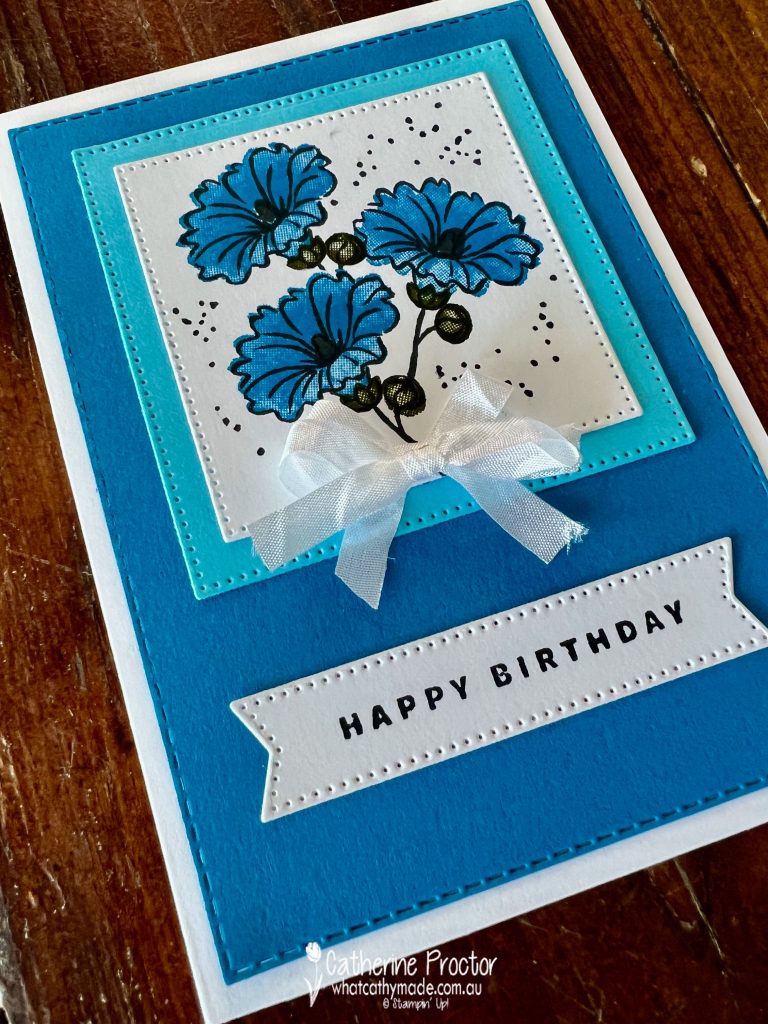
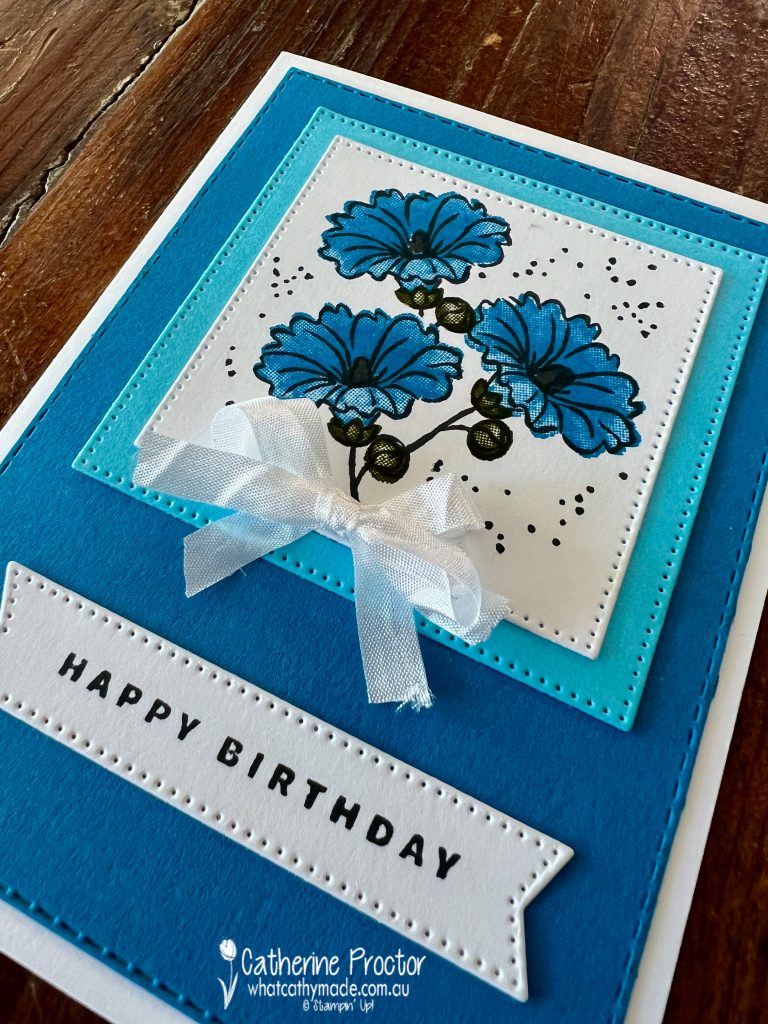
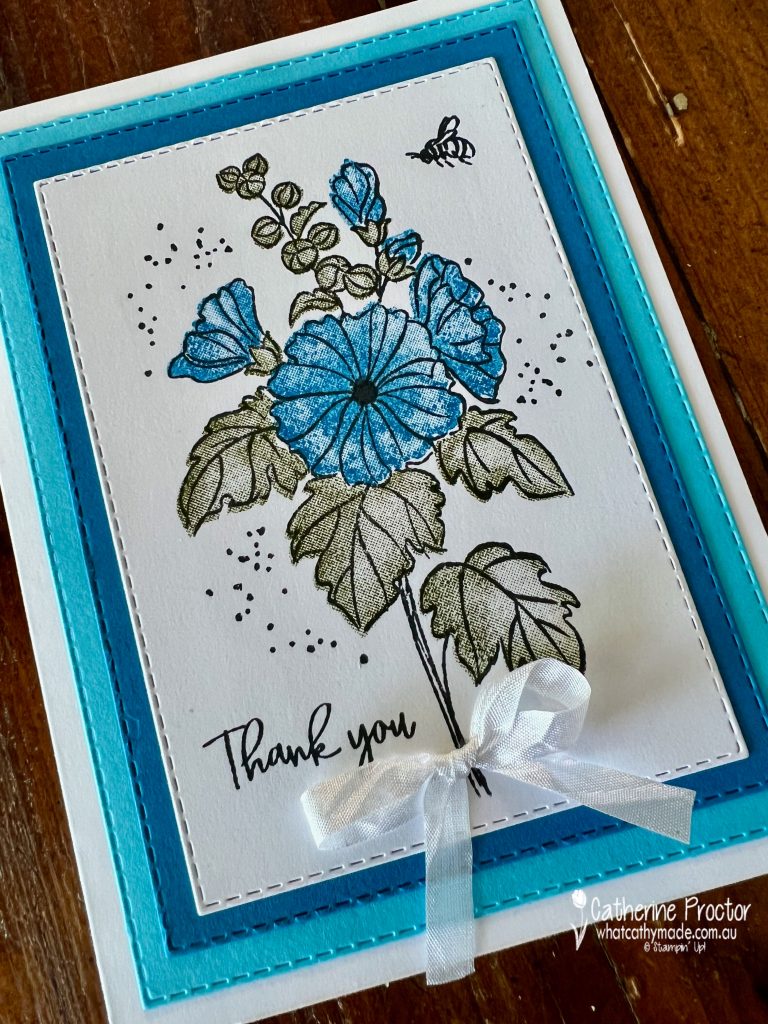
The Beautifully Happy stamp set is very versatile because it includes a good variety of sentiments, floral line drawings that can be coloured in, a “splatter” stamp, a tiny little bee stamp and “distinktive” stamps that allow you to stamp shaded colour inside the flowers and leaves instead of hand colouring.
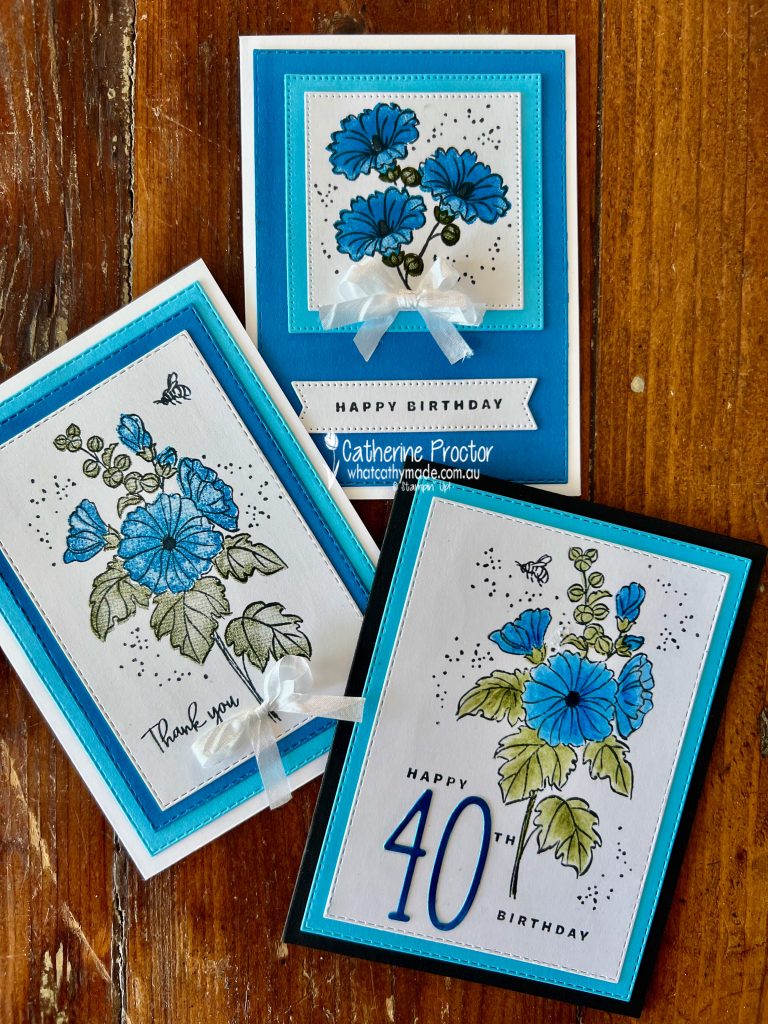
To show the versatility of this stamp set I have made three different cards using three different ways of colouring the stamped images. All three cards pair Pacific Point with Tahitian Tide – don’t these two blues look amazing together!
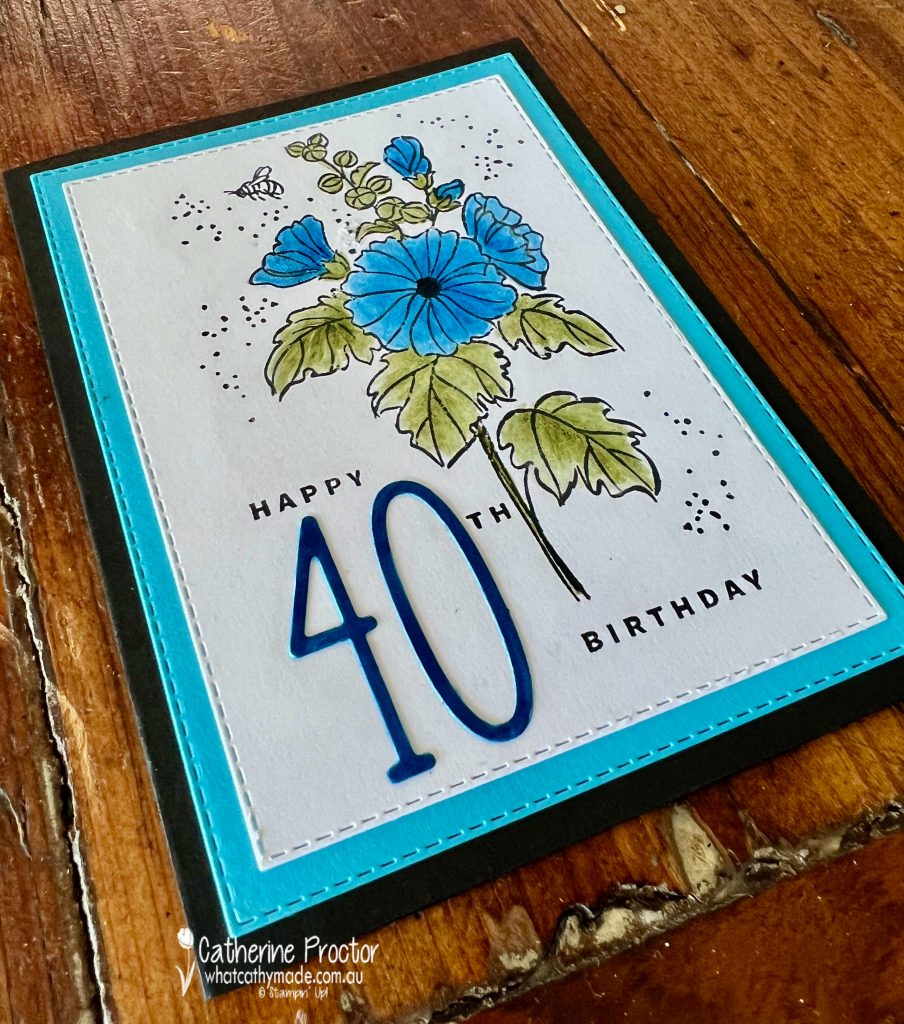
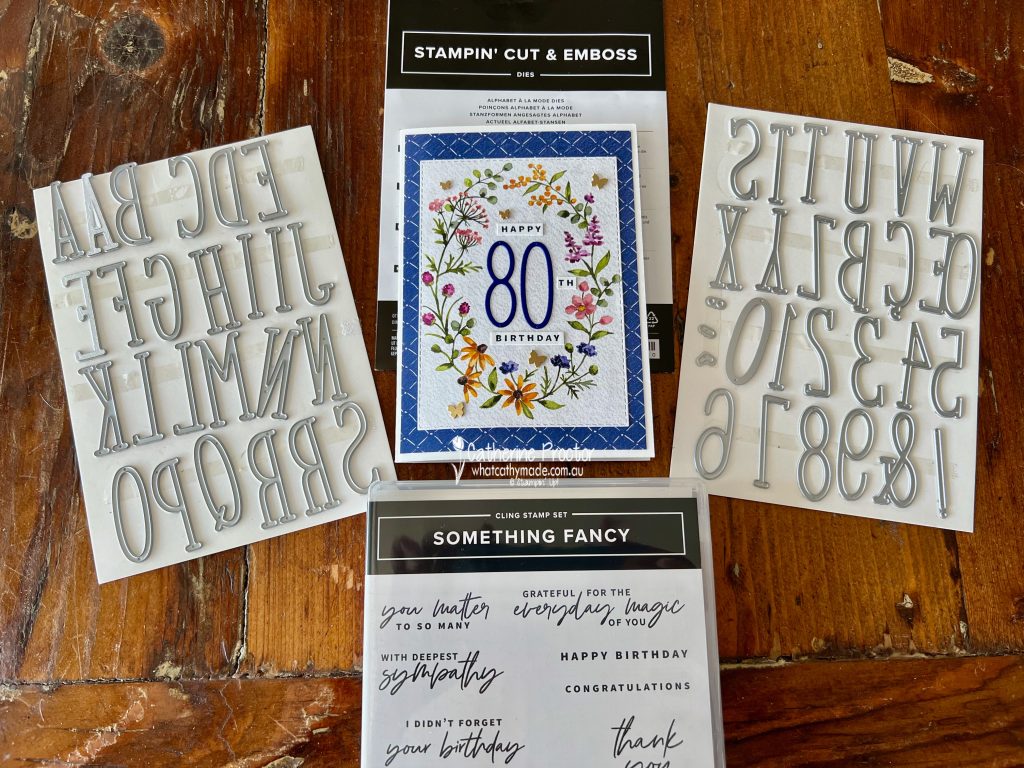
Card One is a birthday card for my sister-in-law who turns 40 next week. The 40 has been die cut with the new Alphabet A La Mode Dies and the “Happy Birthday” sentiment is from the Something Fancy stamp set, both available in the January-April mini catalogue.
I’ve coloured the flower and leaves using Pacific Point and Old Olive Watercolour Pencils, finally blending the watercolour pencil lines with a Blender Pen to smooth the colour out.
Stitched Rectangle dies create the card layers.
The inside of the card uses two of the sentiments from the Beautifully Happy stamp set. These sentiments are designed to be used on both the front and the inside of a card however I think they also work well when stamped together.
Card two is another birthday card that uses the smaller flower image, stamped three times. To colour these flowers I used the distinktive stamps from the Beautifully Happy stamp set, stamping both the Pacific Point and the Mossy Meadow ink at full strength.
The sentiment is the same “happy birthday” stamp from the Something Fancy stamp set that I used on the front of card one. Stylish Shapes dies cut the card front layers and the sentiment.
Card three is a thank you card that is coloured with the distinktive stamps, however this time the Pacific Point and the Mossy Meadow have been stamped off once onto scrap paper before stamping onto the card front.
Once again, the Stitched Rectangle dies create the front card layers.
I know I am going to get a lot of use from the Beautifully Happy stamp set as its variety of sentiments make it ideal for so many different occasions and it can be coloured in so many different ways.
Now it’s time to hop on over to our next participant, the lovely Tina Gillespie – I can’t wait to see what Tina has made this week!
If at any time you find a broken link, you can find the complete list of all participants below.
If you live in Australia, you can find and purchase these products in my Stampin’ Up! Online Store once they are available to purchase tomorrow morning.
We’ll be back next Wednesday January 11 with projects showcasing one of the 2021-23 In Colours, Pale Papaya.
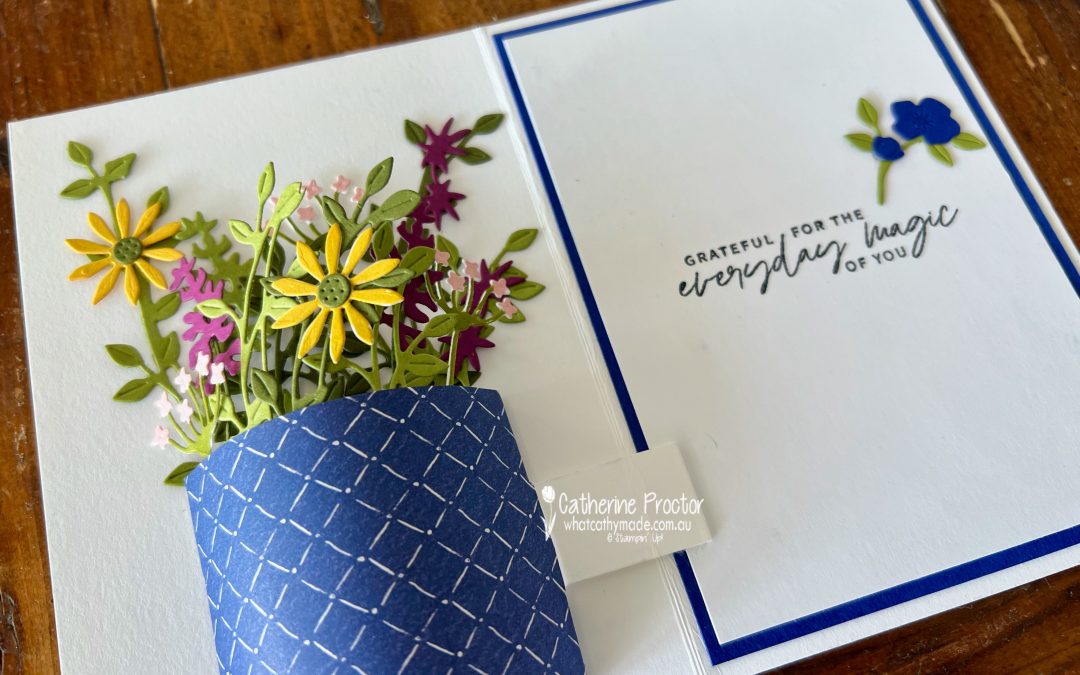
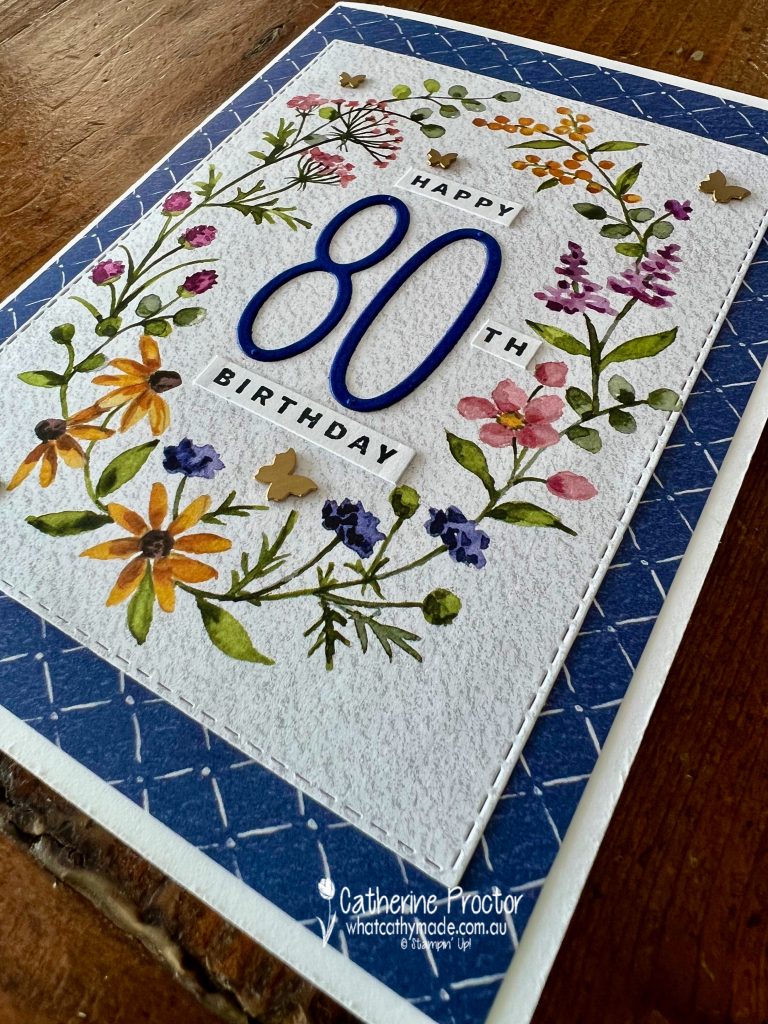
Something very special happened last Sunday. My gorgeous mum turned 80 and we went out for a special lunch to celebrate her birthday. Happy birthday Mum!!!
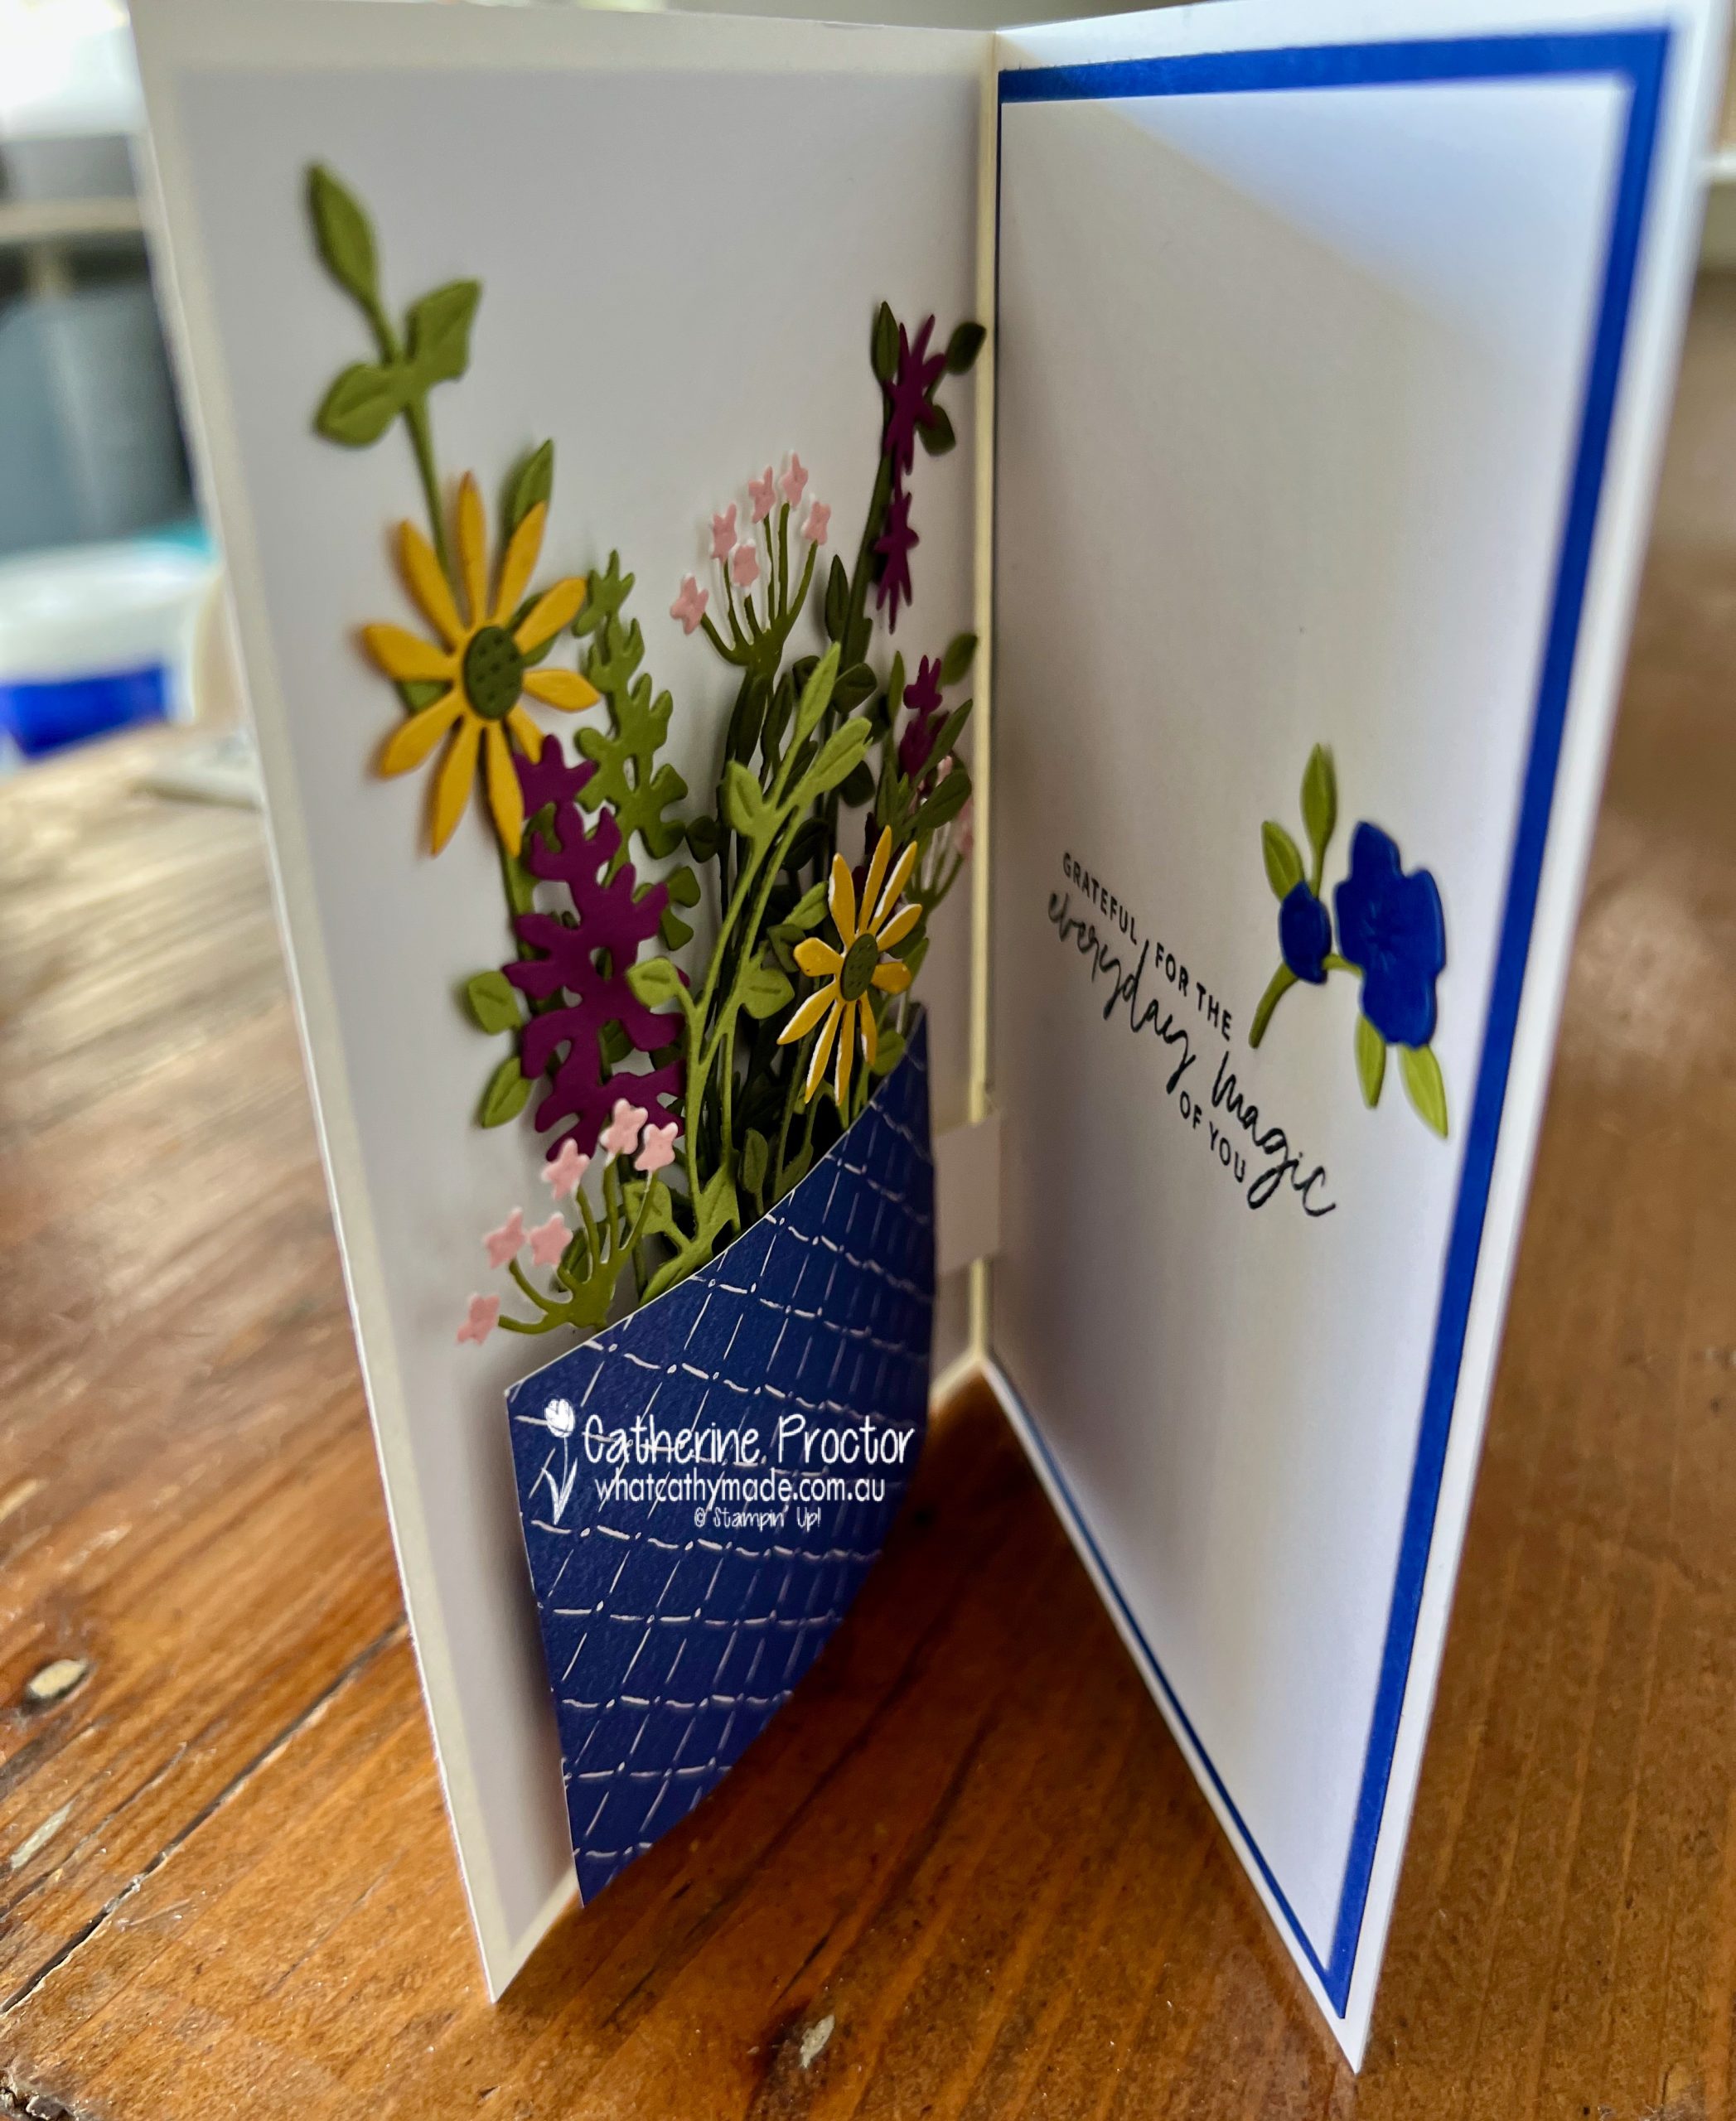
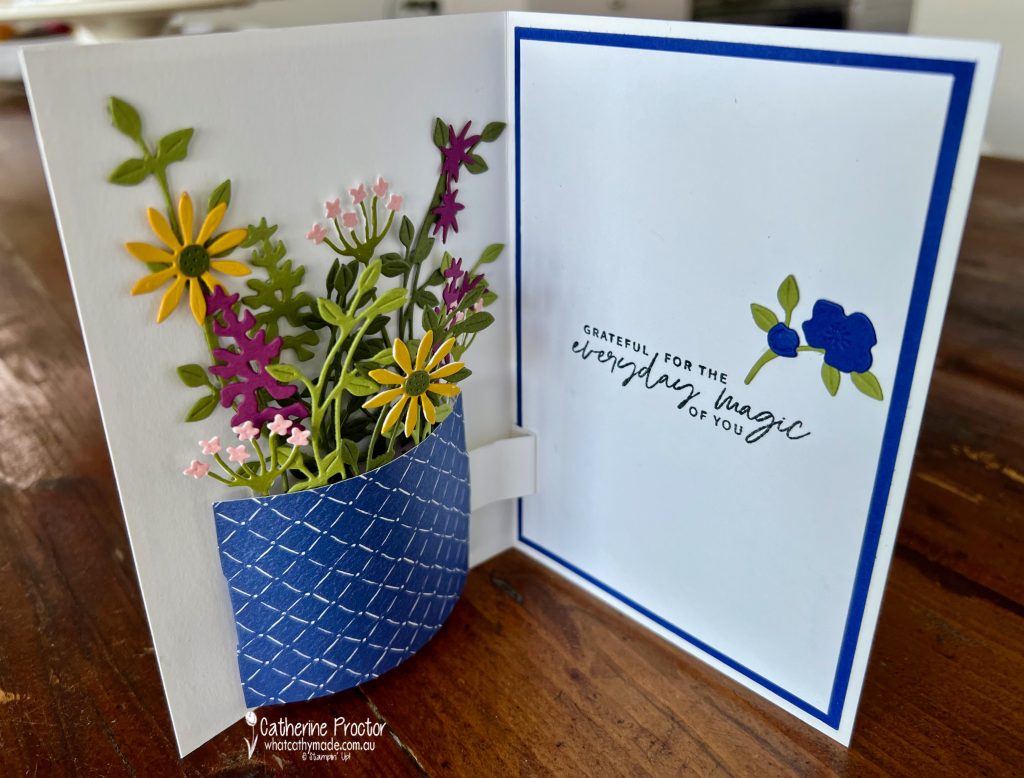
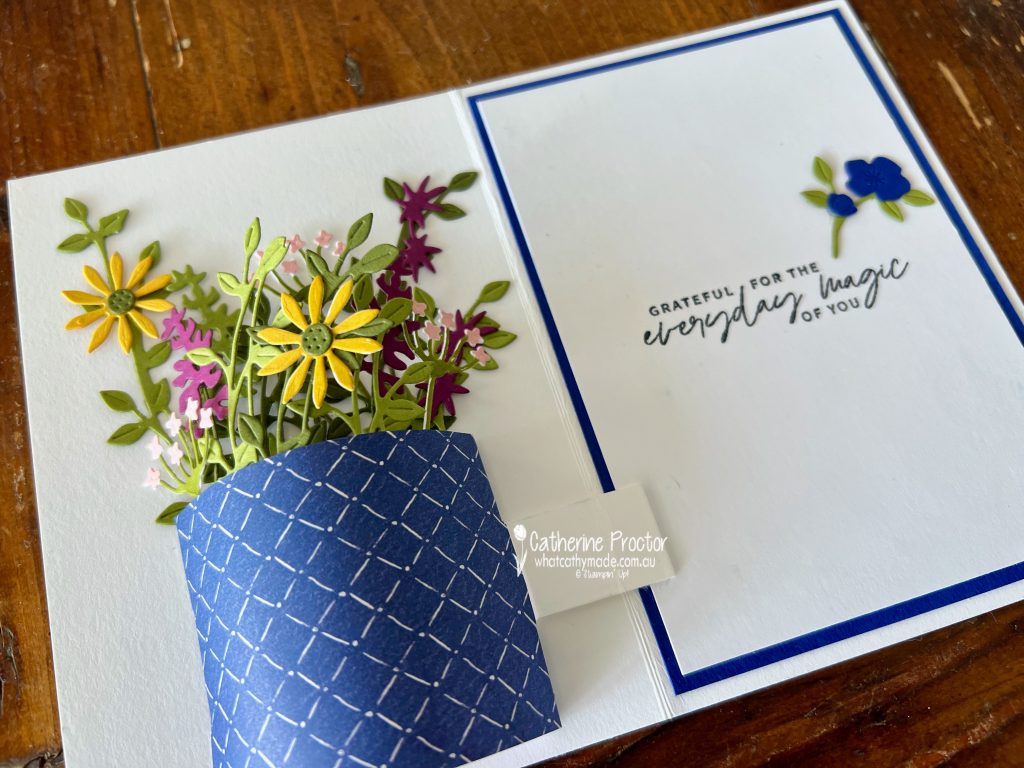
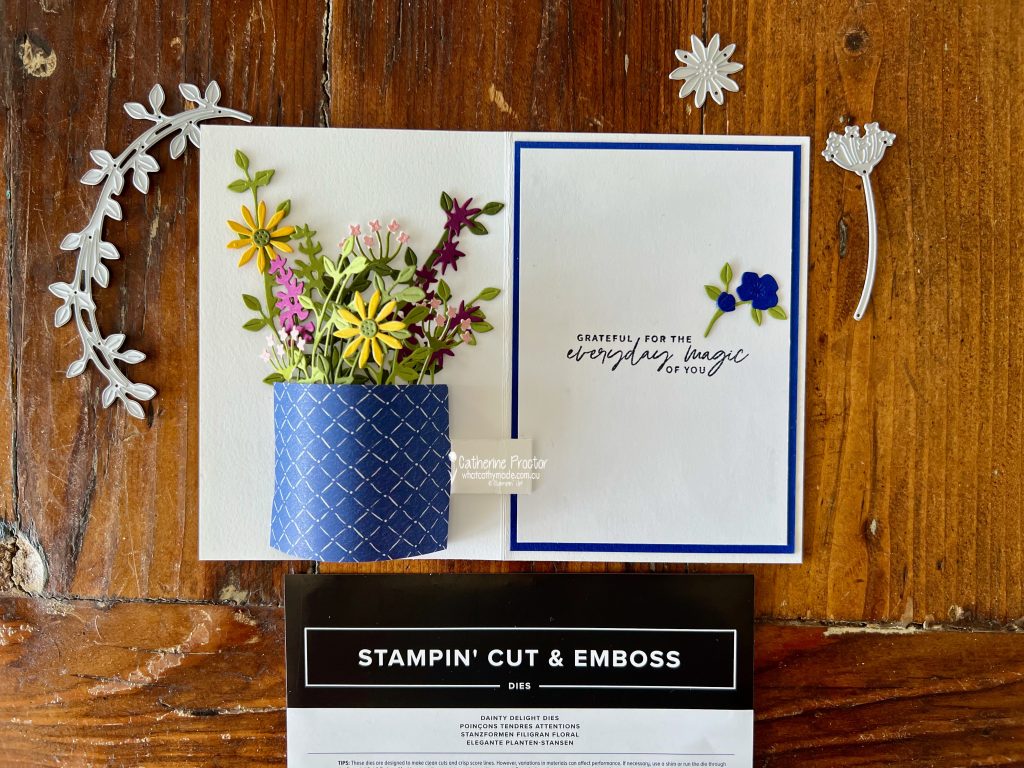
Mum is an amazing crafter and we love to craft together when we can, which unfortunately is not often enough as life and work keeps getting in the way! I love making special cards for Mum because she really appreciates them, so I decided to make a fancy fold card I’ve never made before – a pop-up vase card!
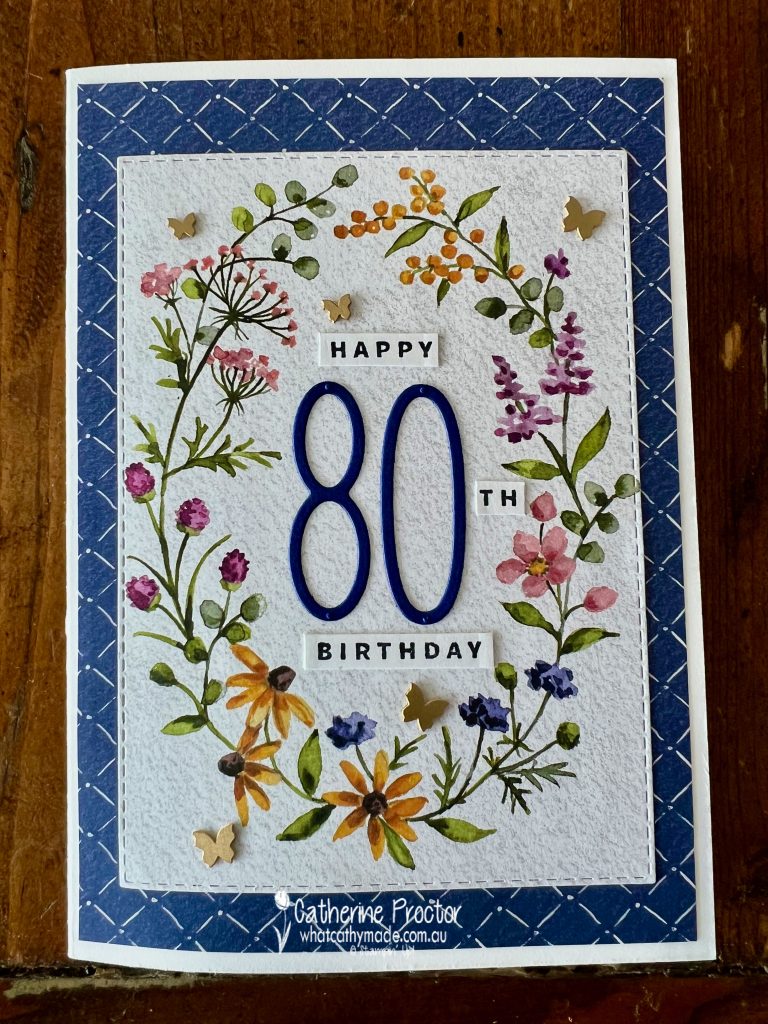
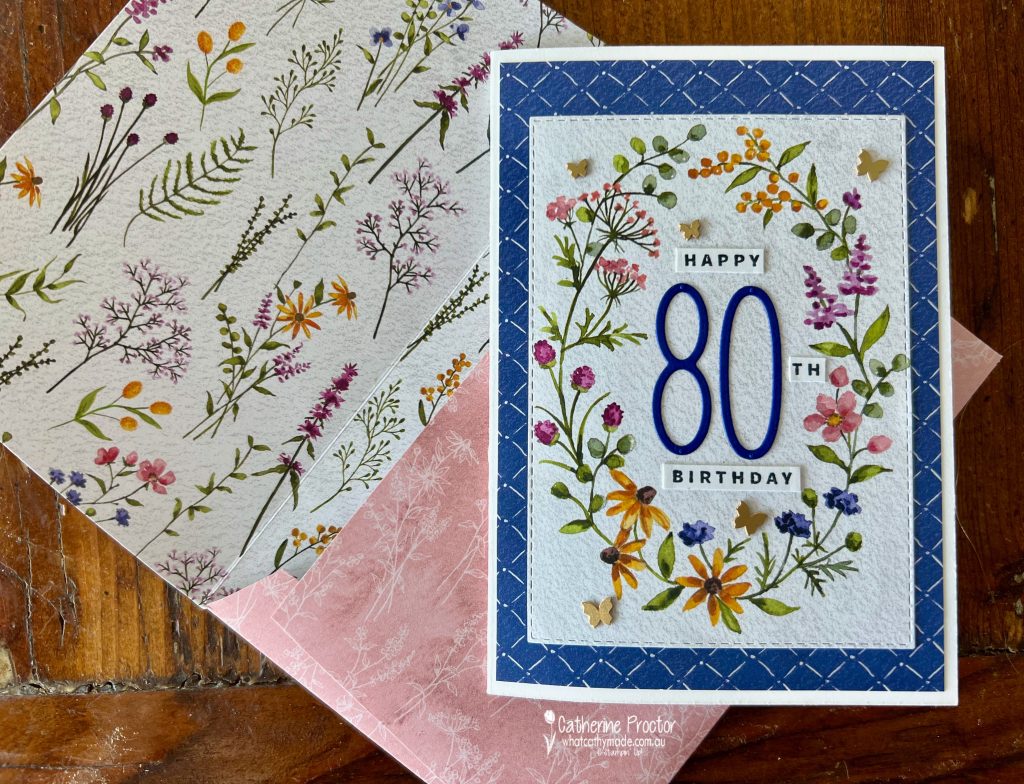
Here is the front of the card, featuring the stunning free SALE-a-bration Dainty Flowers DSP available from this Thursday.
The 80 has been die cut using a new set of alphabet and number dies called Alphabet A La Mode Dies and the “Happy Birthday” sentiment is from the Something Fancy stamp set, both available from this Thursday in the January mini catalogue.
A little trick to create the “th” for 80th – stamp the “happy birthday” sentiment again and cut the “th” from the word “birthday”.
Inside the card is where the magic happens. In the video below you can see how as the card opens the vase of flowers pops up!
Here is the card folded flat, ready to open…
Halfway open …
Laid flat with the vase fully popped up…
The flowers in the vase are all die cut using the Dainty Delight dies and the beautiful sentiment inside the card comes from the Something Fancy stamp set.
A special card needs a special envelope – this was made using another sheet of the SALE-a-bration Dainty Flowers DSP.
Did you notice the gorgeous Brushed Brass Butterflies that embellish the card front? They work perfectly with this DSP!
I’ll be back tomorrow, Wednesday January 4, with the AWH Colour Creations team to showcase Pacific Point and some more gorgeous SALE-a-bration products.
Welcome to week thirty three of our Art With Heart 2022-23 Colour Creations blog hop, our last hop for this year before we take a two week break over Christmas and New Year.
This is a weekly blog hop where we showcase the stunning range of Stampin’ Up! colours in alphabetical order over 12 months and this week we are featuring Old Olive from the Regals family.
Who’s ready for a sneak peek of some items from the new Mini Catalogue and SALE-a-bration Catalogue?
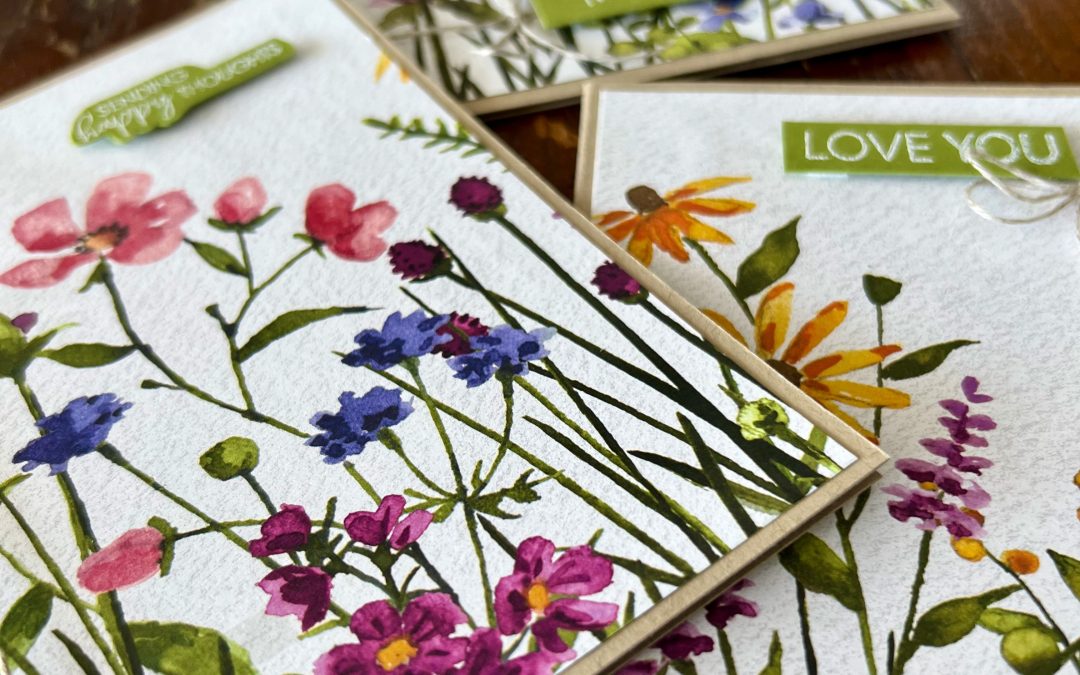
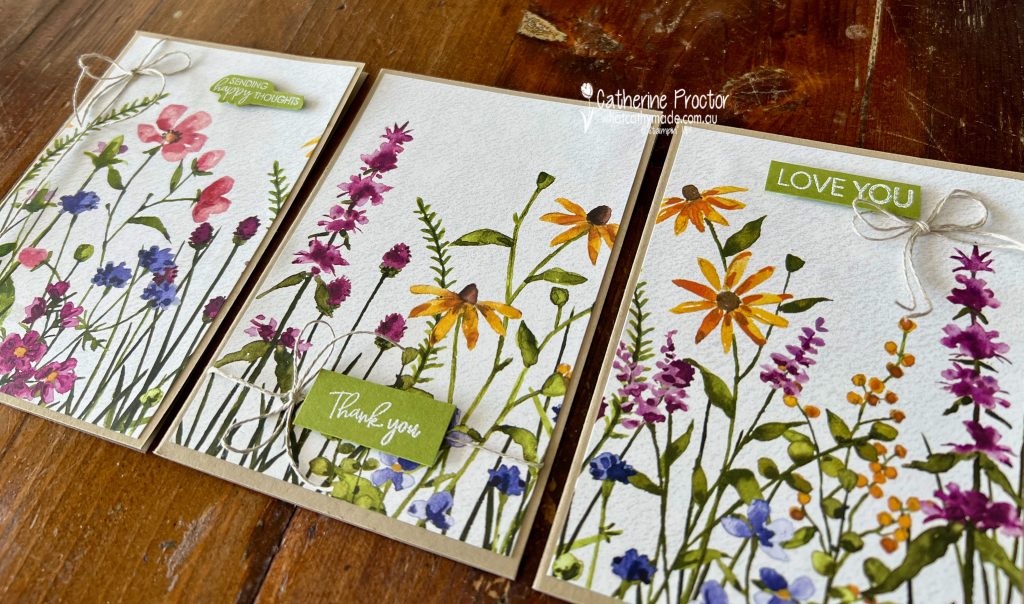
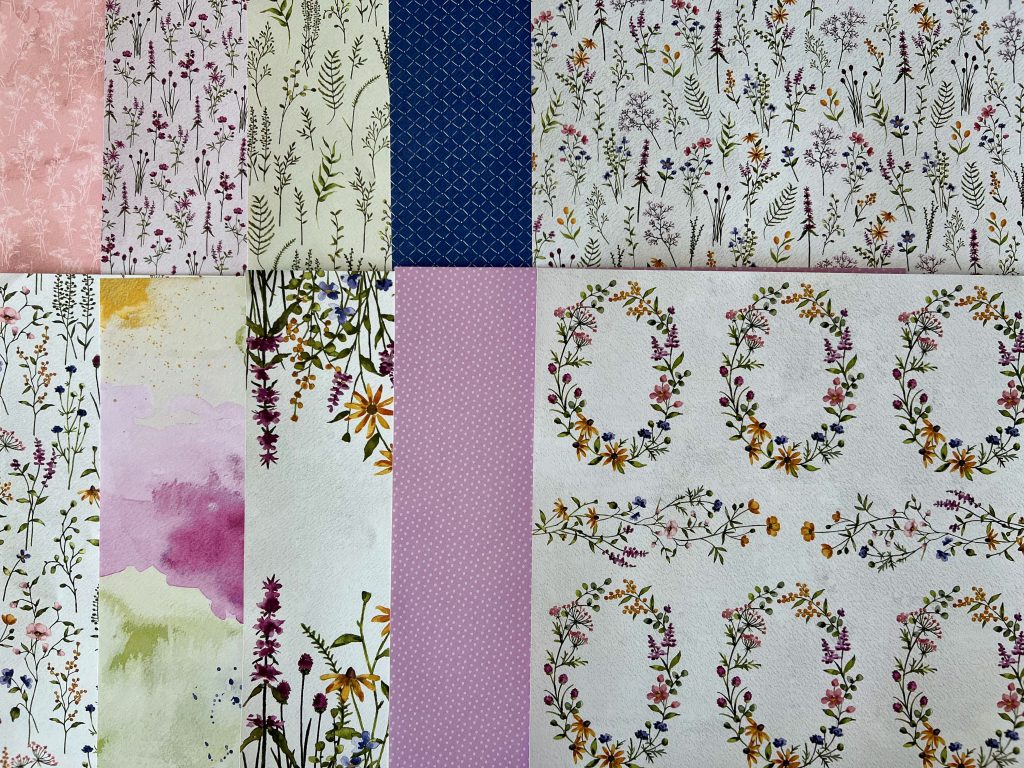
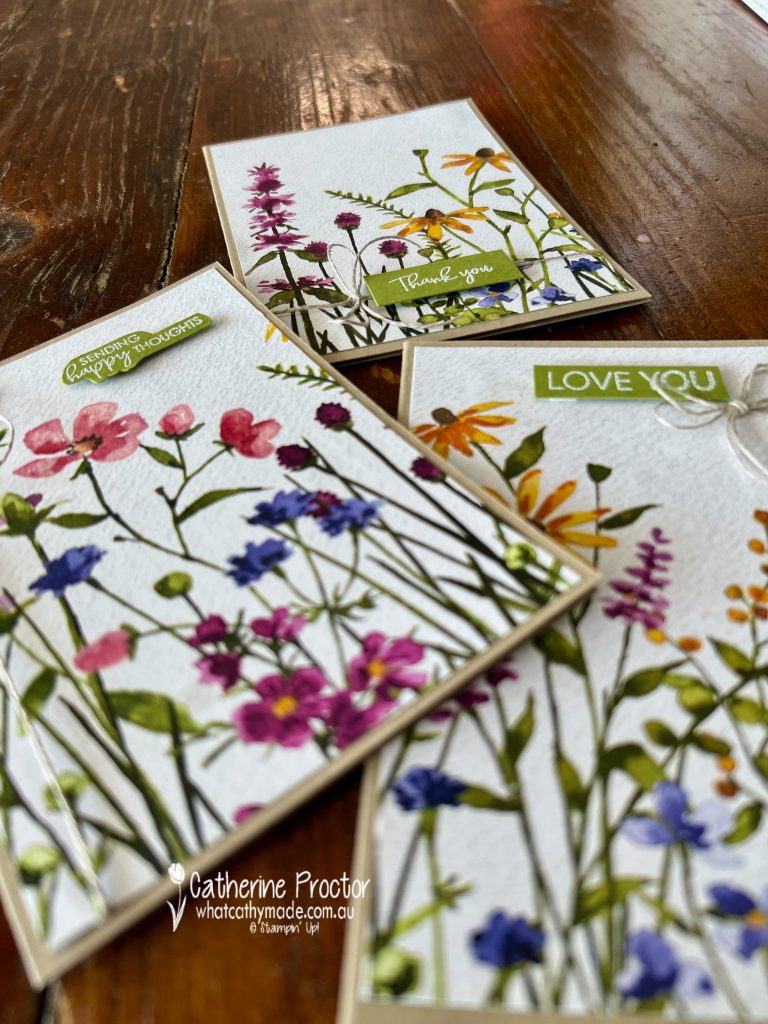
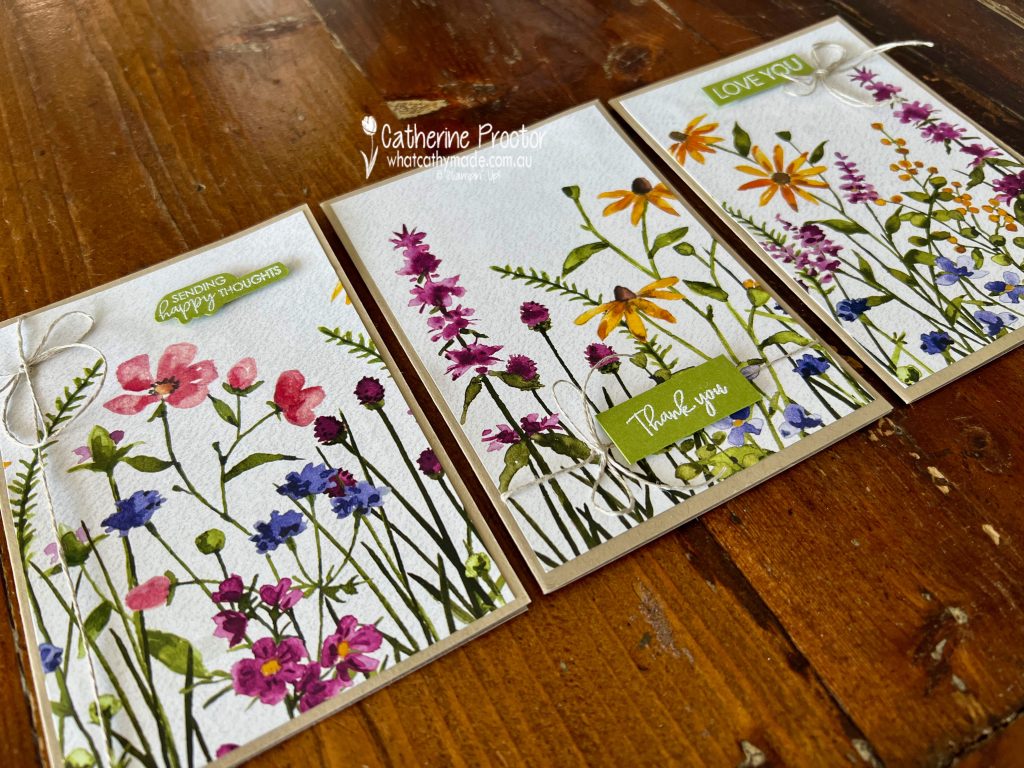
I’m excited to share with you three cards made using a stunning new SALE-a-bration DSP that will be available in just a few week’s time.
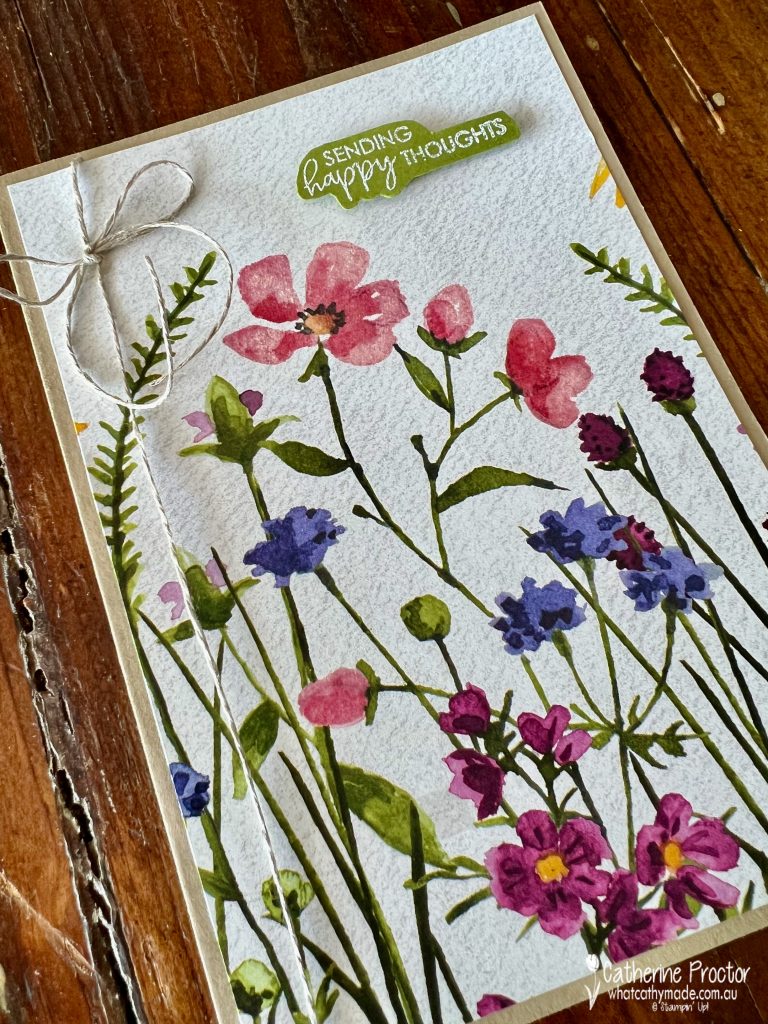
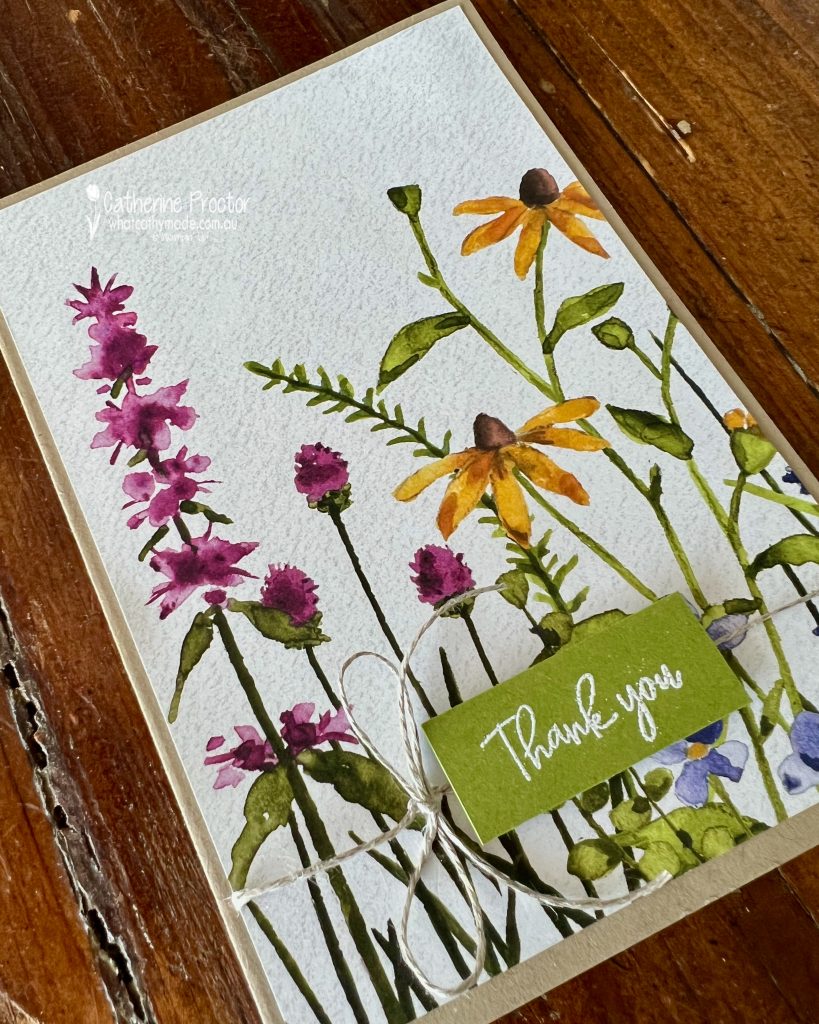
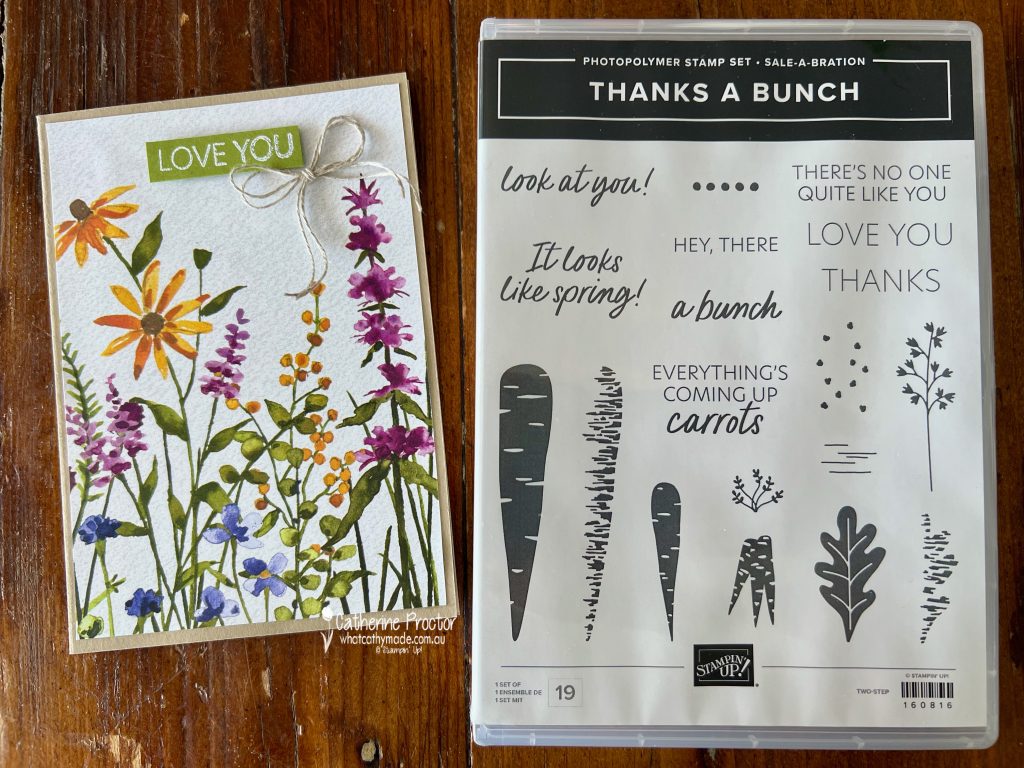
The Dainty Flowers DSP has been hand water coloured and it will be free to redeem with any order of $90 or over from January 5, 2023.
Photos don’t really do justice to just how beautiful this DSP is in real life. The water coloured floral pattern I’ve used for all three cards actually looks like it has been embossed!!
For the sentiments on all three cards, I stamped them in Versamark onto Old Olive cardstock and then heat embossed the sentiments with white emboss powder.
The “Love you” sentiment is from another forthcoming SALE-a-bration item, the Thanks A Bunch stamp set.
The “Thank You” and “Sending Happy Thoughts” sentiments are from yet another forthcoming SALE-a-bration stamp set, Beautifully Happy.
All three cards have a Crumb Cake cardstock base and the only embellishment is some linen thread.
After all, with Designer Series Paper this beautiful, you really don’t need to do much at all!
Now it’s time to hop on over to our next participant, the lovely Kate Morgan – I can’t wait to see what Kate has made this week!
If at any time you find a broken link, you can find the complete list of all participants below.