Two card designs ideal for using up your designer series paper (DSP), even the scraps!
This week for the Art With Heart Colour Creations we’re celebrating Real Red ❤️ and I’ve set myself a little challenge… use up some Designer Series Paper instead of saving it “for something special”!
I only had a small share of the Beautiful Love Notes DSP, so I wanted to create cards that:
used smaller pieces;
showcased multiple designs;
and made the most of every scrap.
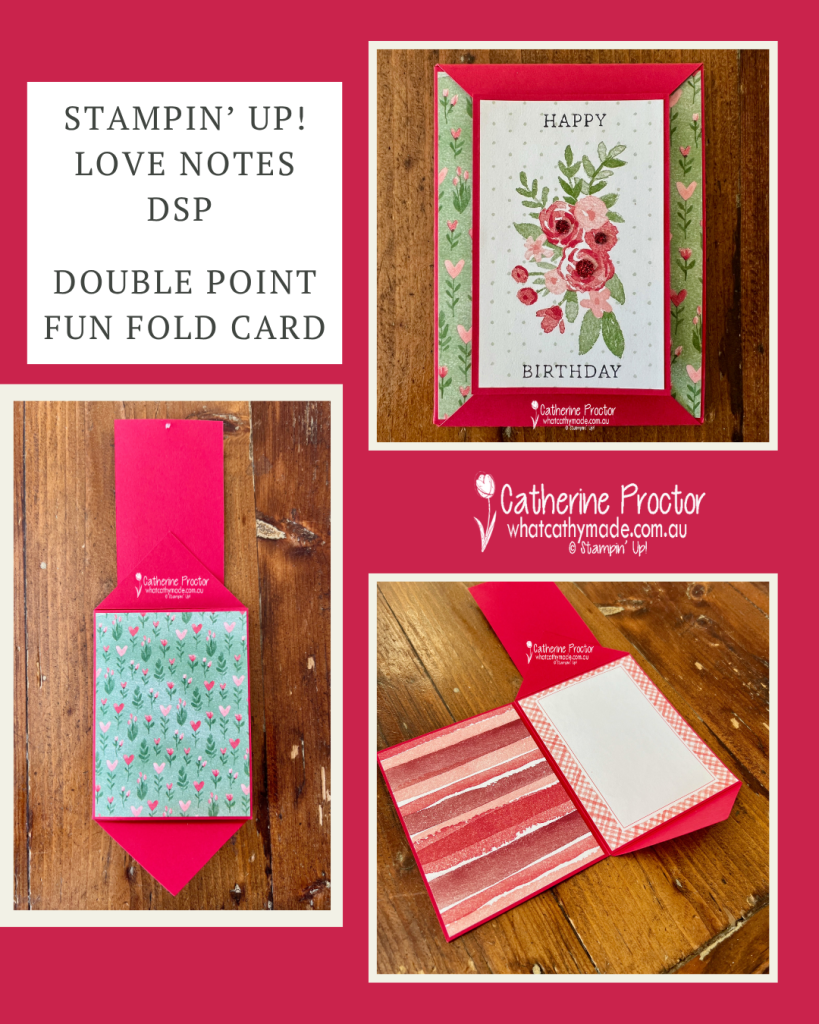
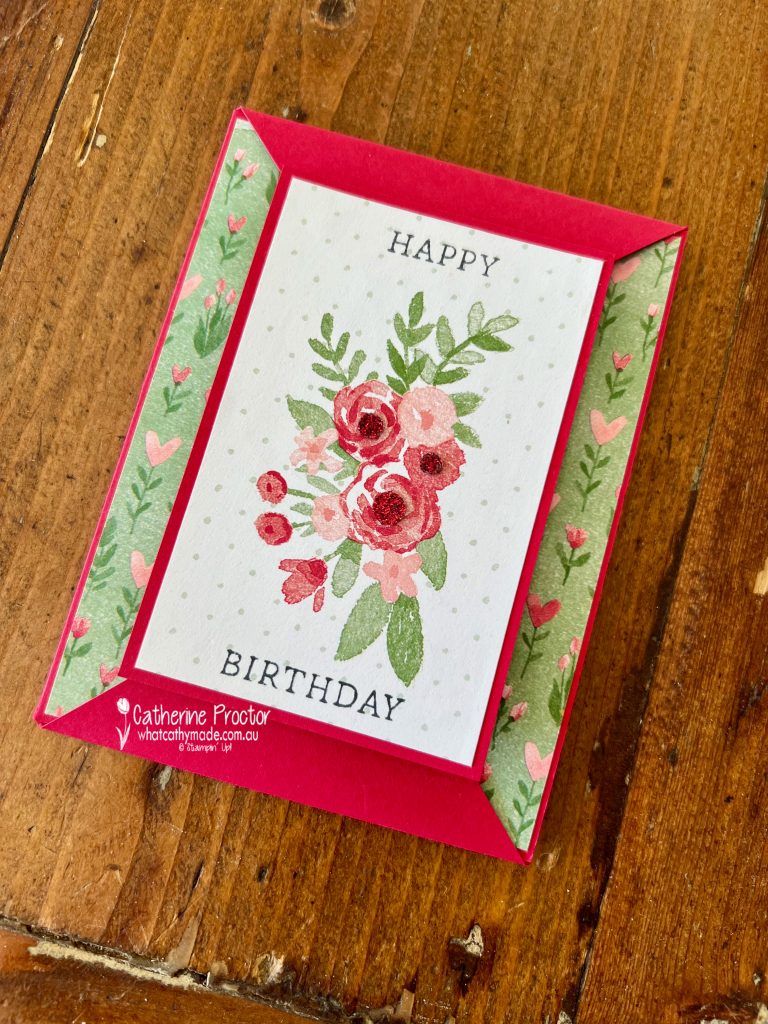
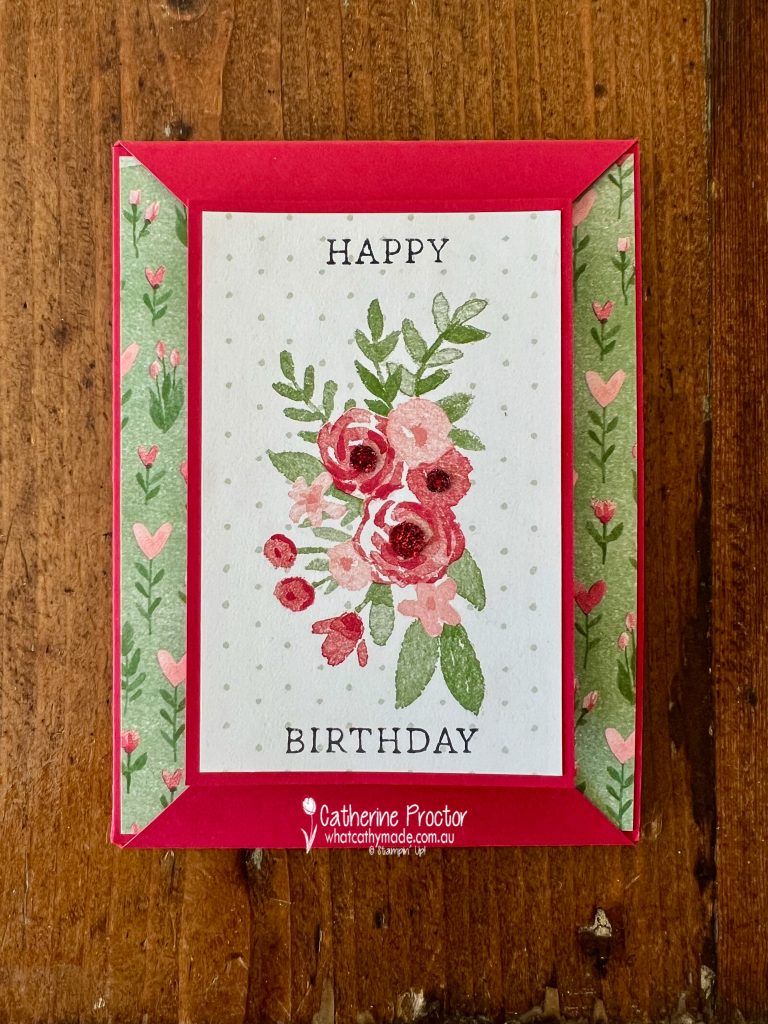
Double Point Fun Fold Card
I wanted to showcase my favourite DSP designs from of the Love Notes DSP and this fancy fold was just perfect with all its different layers.
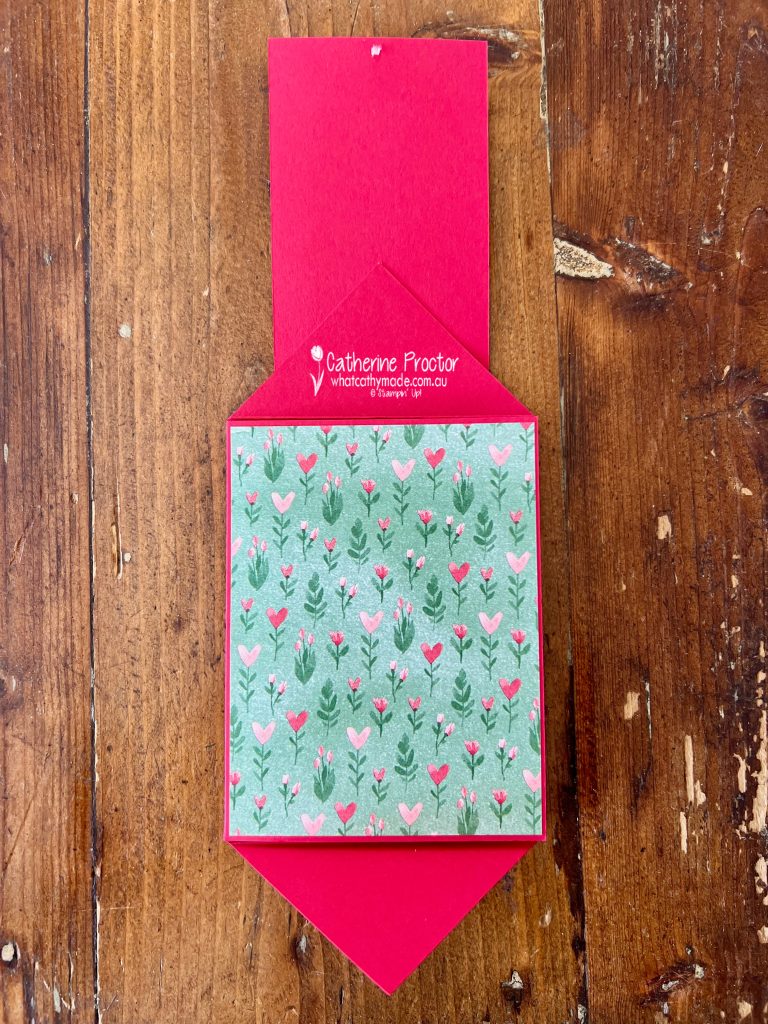
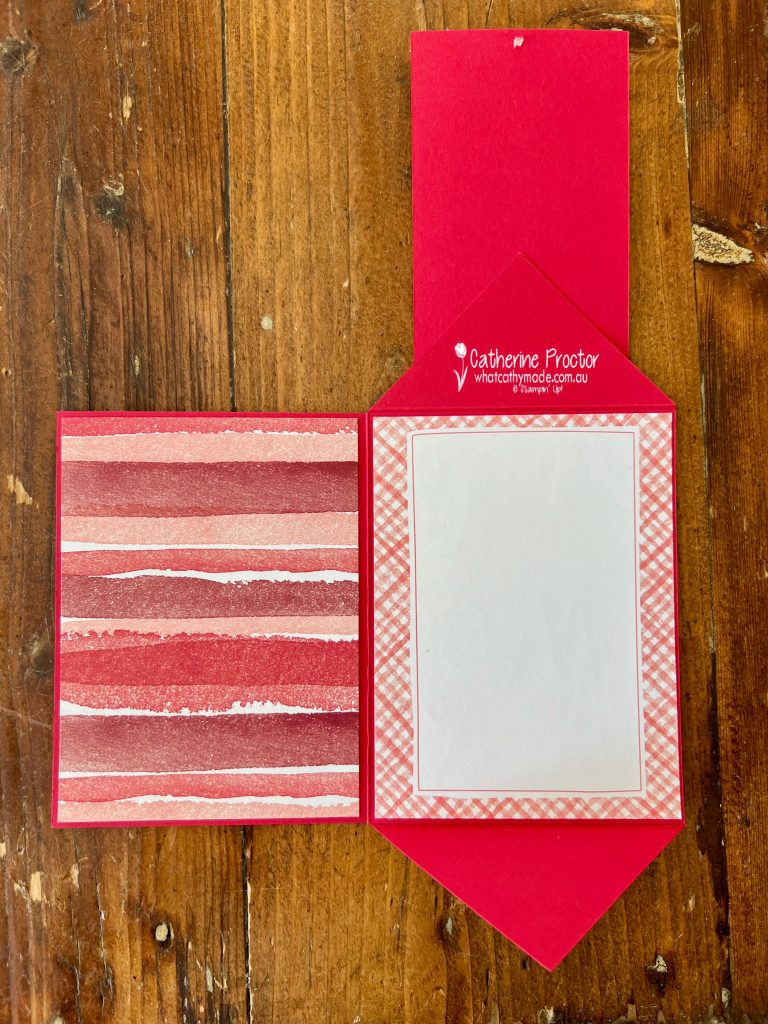
This graphic below shows the different layers that are revealed as you open up the card.
For the sentiment, I stamped the happy birthday stamp from the “Simply Said” stamp set onto the front layer of the card, stamping both above and below the central floral image.
This inside section is a “card within a card” and the card front features this gorgeous floral pattern from the Love Notes DSP.
The inside of the card features more of the designs from the Love Notes DSP, trimmed to fit the card base.
This is one of those fancy fold cards that looks impressive, but is incredibly easy to make.
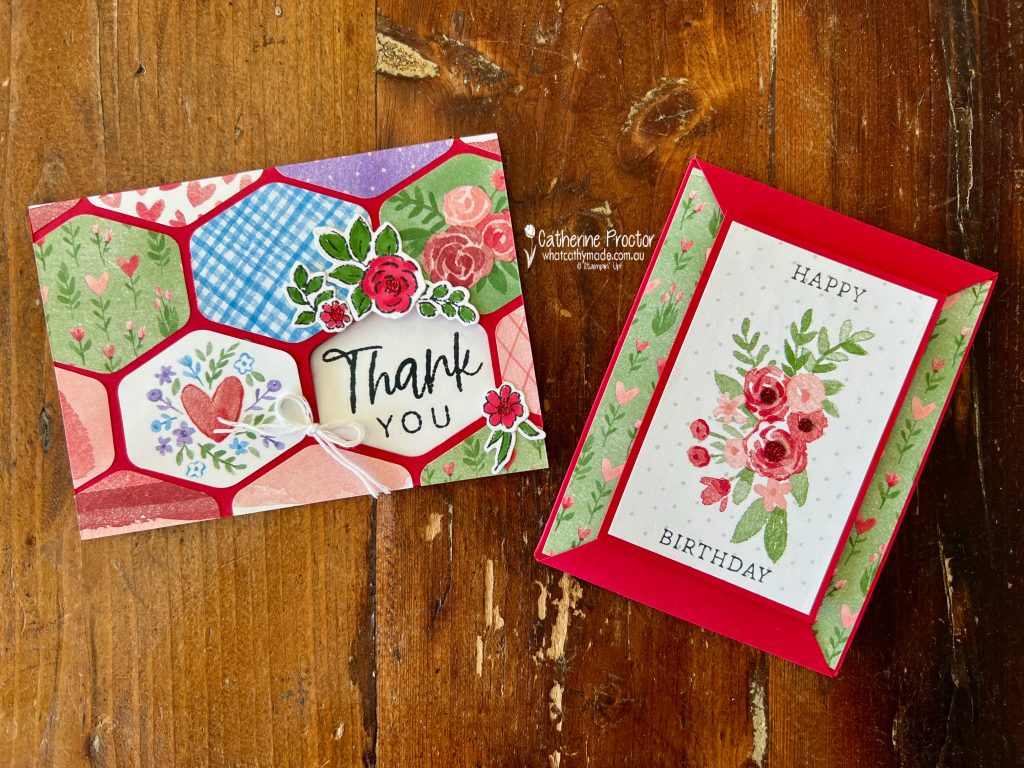
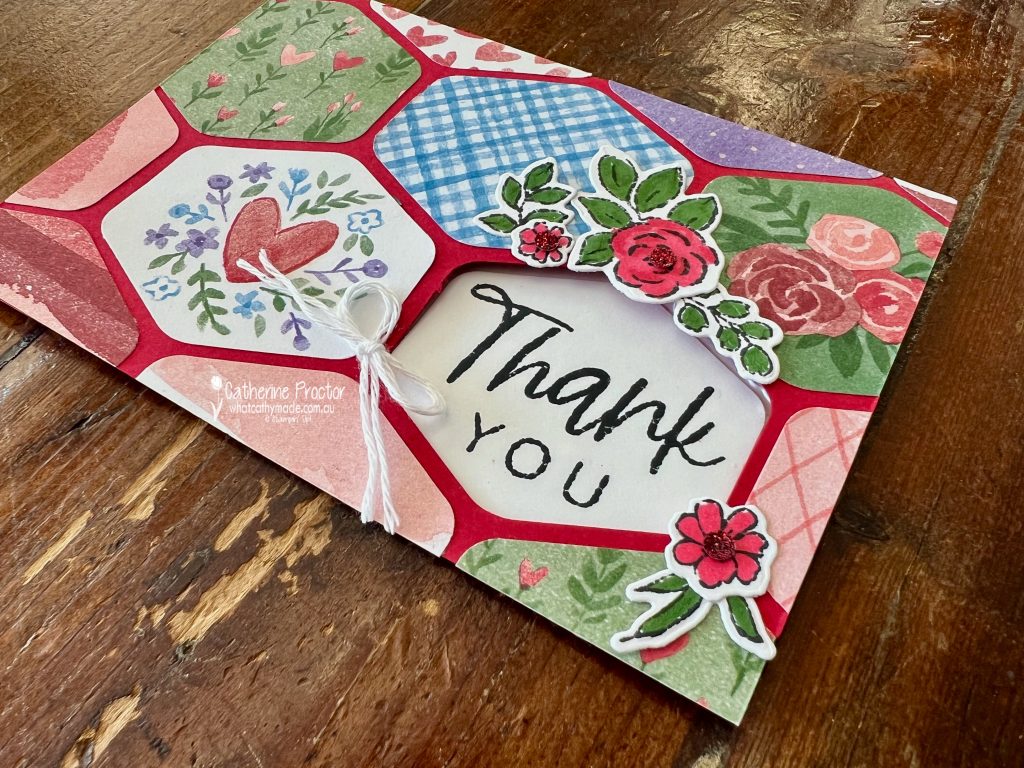
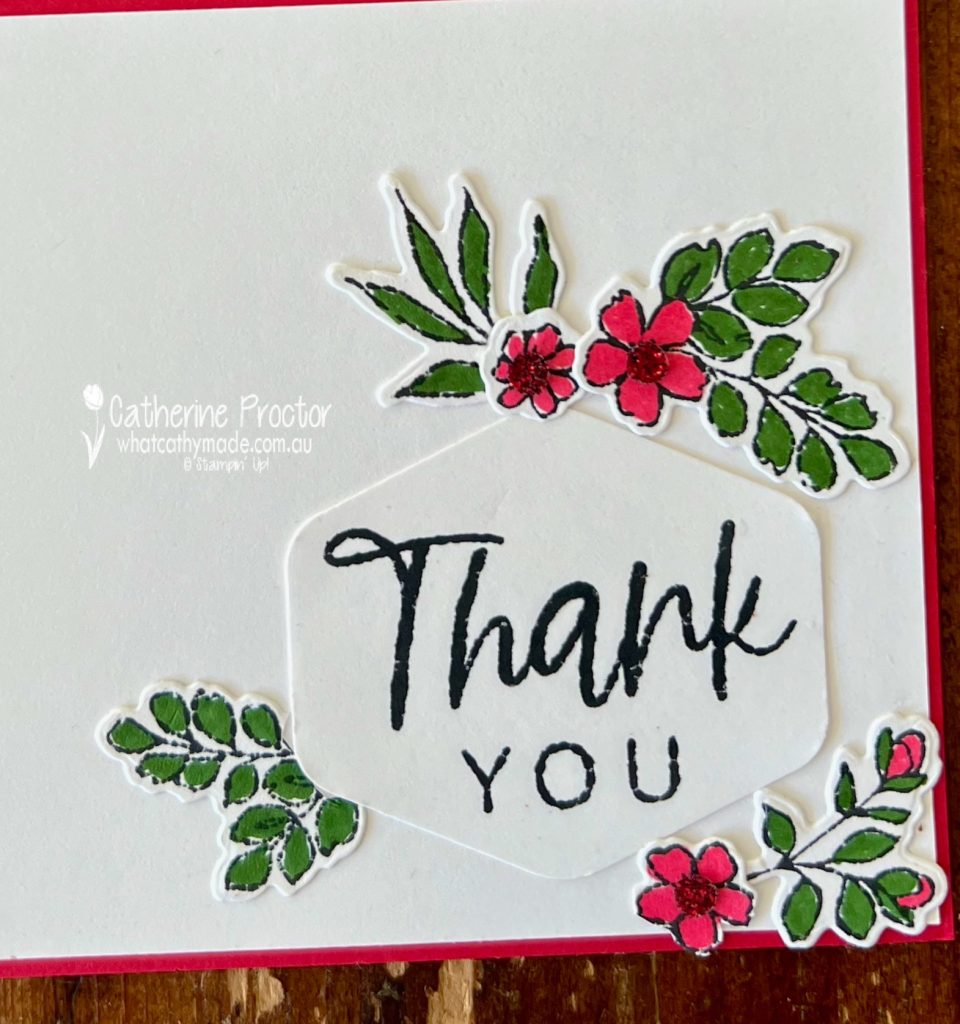
Heartfelt Hexagon Window Card
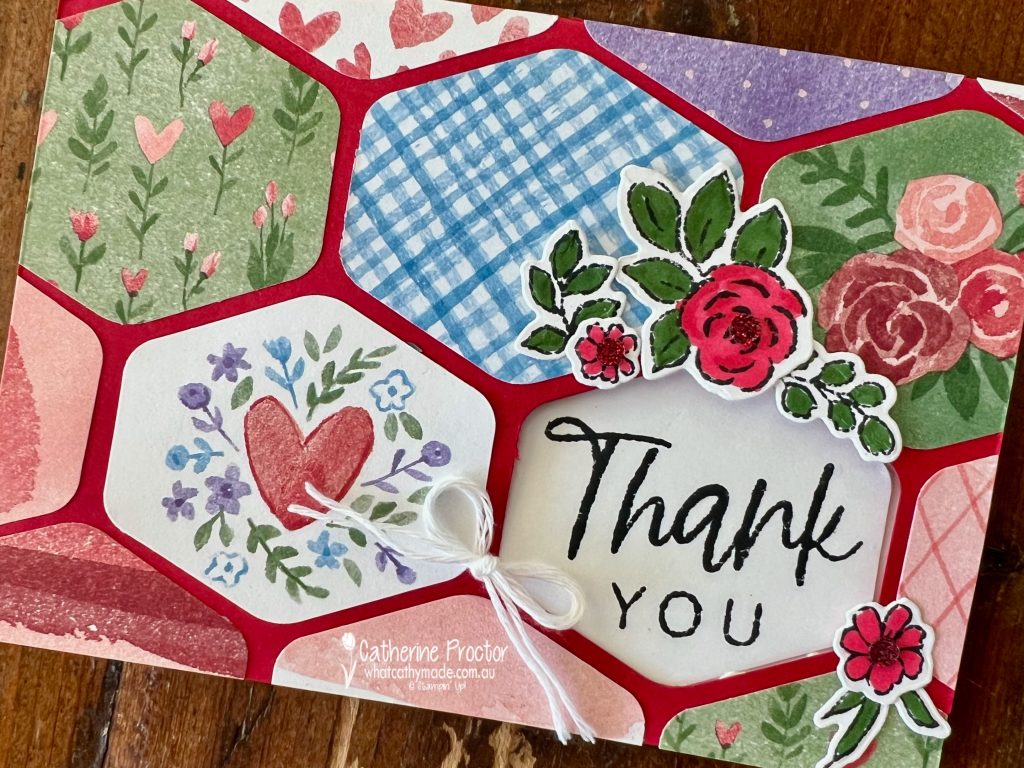
For my second project, I created a hexagon window card, using the Heartfelt Hexagon punch and his one is all about using up the smaller scraps.
After punching out a hexagon on the bottom right of the card front, I then punched lots of small pieces of DSP to create a patchwork-style front, featuring multiple patterns from the same pack.
I used the “Extraordinary Flora” bundle to created floral ephemera pieces that match the floral design and the main colours (Real Red and Garden Green) in the Love Notes DSP.
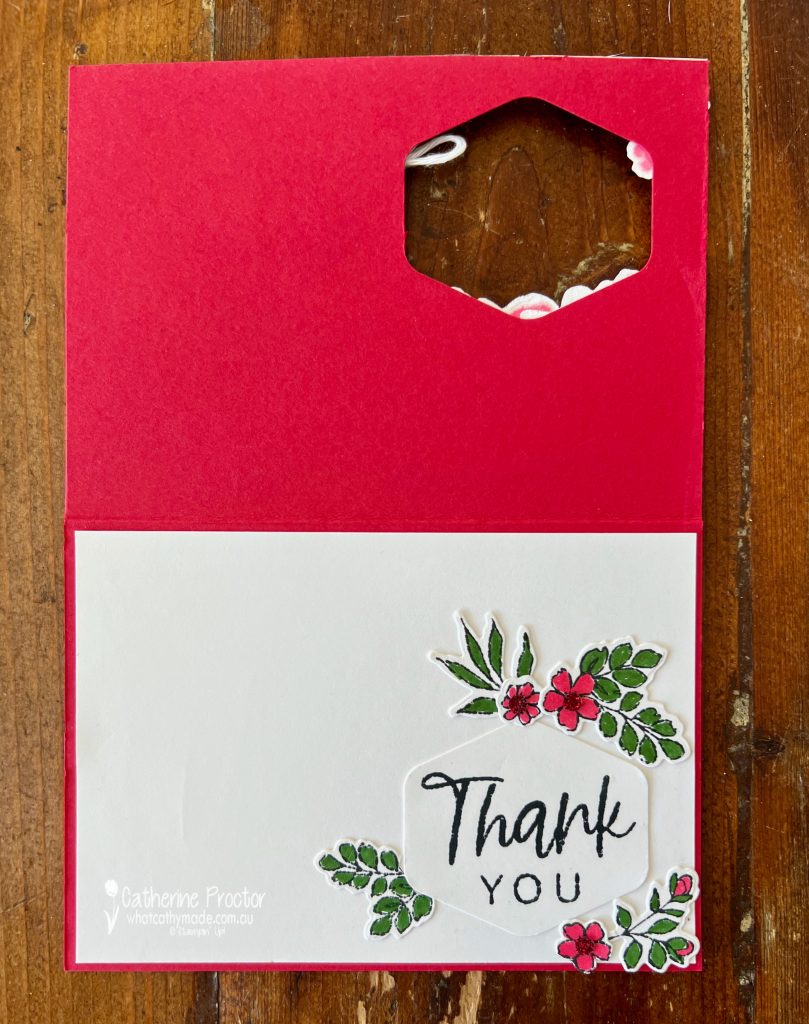
The hexagon window draws your eye straight to the sentiment, which is stamped on the inside of the card using the thank you stamp from the “With You in Mind” Stamp Set.
This is what the card looks like when opened up.
To decorate the inside of the card, I also added some extra Extraordinary Flora pieces around the sentiment.
Tips for Using Up Your Designer Series Paper
If your Designer Series Paper stash is growing (and growing 😅), here are a few easy ways to start using it:
Cut your paper into smaller panels instead of saving full sheets
Choose fun folds that naturally require multiple pieces
Stick to one colour family (like Real Red here) to keep everything cohesive
Try patchwork or mosaic layouts
Mix bold and subtle prints to create balance
These cards were such a good reminder that DSP is meant to be used, mixed, layered and enjoyed… not hidden away in a drawer!
Take a look at some more Real Red inspiration on our Insta Hop!
Our blog hop is now an Instagram hop but the good news is that you don’t need to have an Instagram account to view all of the other projects!
Simply copy any of the Insta handles below into a new search engine window to follow the Instagram hop at any point.
Next in our Hop is Kate @craftwithkate. Be sure to check out her gorgeous project/s.
The full list of this week’s InstaHop is listed below:
Kate @craftwithkate
Kirsty @crafty.littlemiss
Rosa @hum.and.stamp
Helen @apaperparadise
Cathy @whatcathymade – you are here!
Thank you for joining me for Week 45 of Colour Creations. We’ll be back next Wednesday when we are showcasing Shaded Spruce. I hope you can join us then.
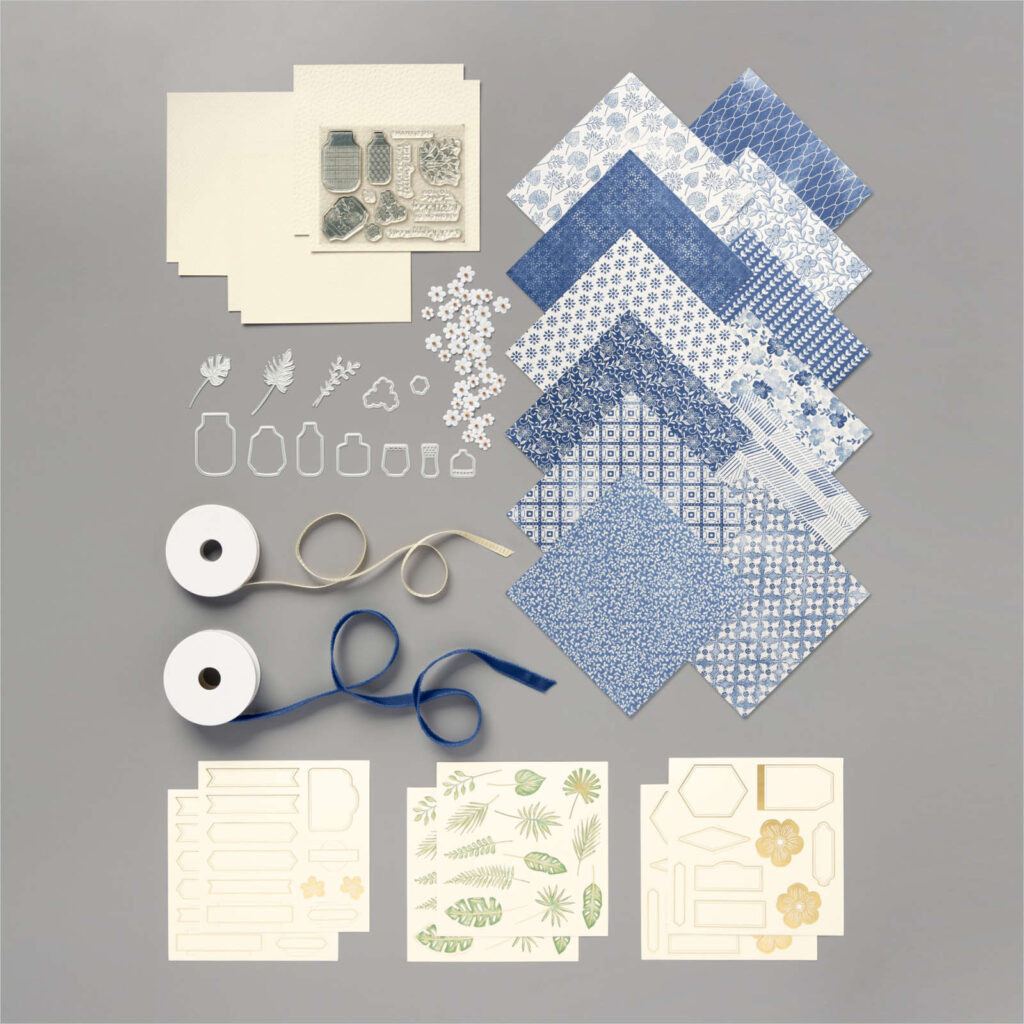
Welcome to the Monthly Art With Heart Creative Showcase. Tonight we’re sharing some ideas for using designer series paper because Stampin’ Up! have 15% off a select range of their stunning DSPs for the month of October. You can see the full list of papers on sale here.
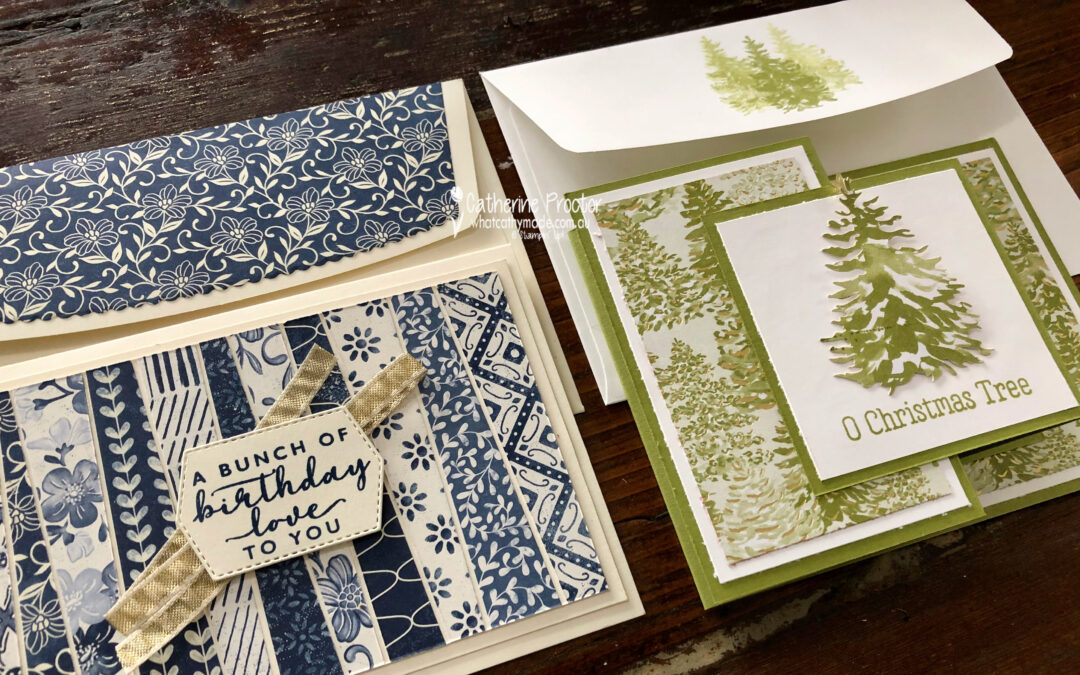
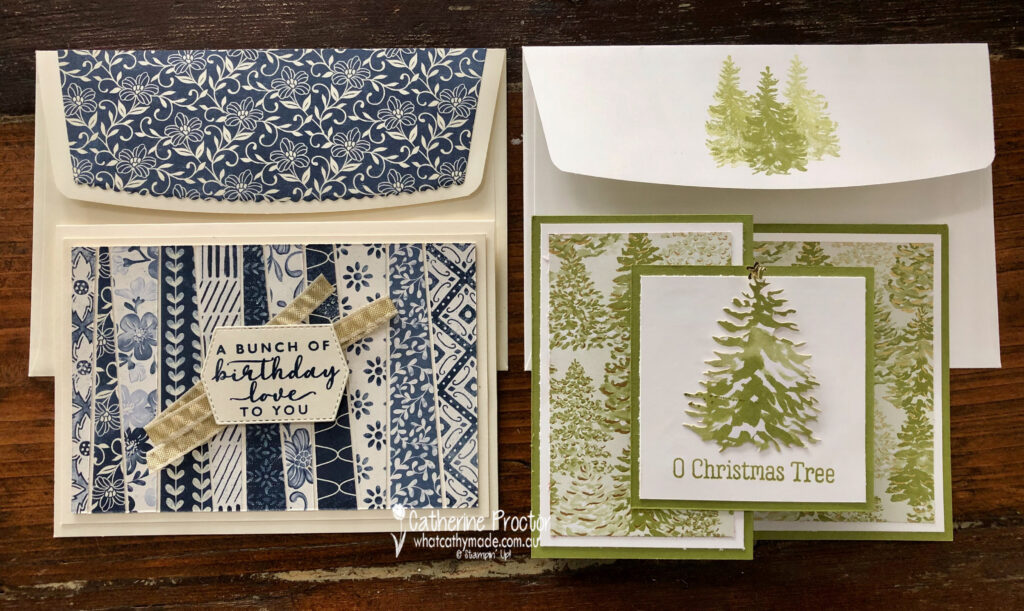
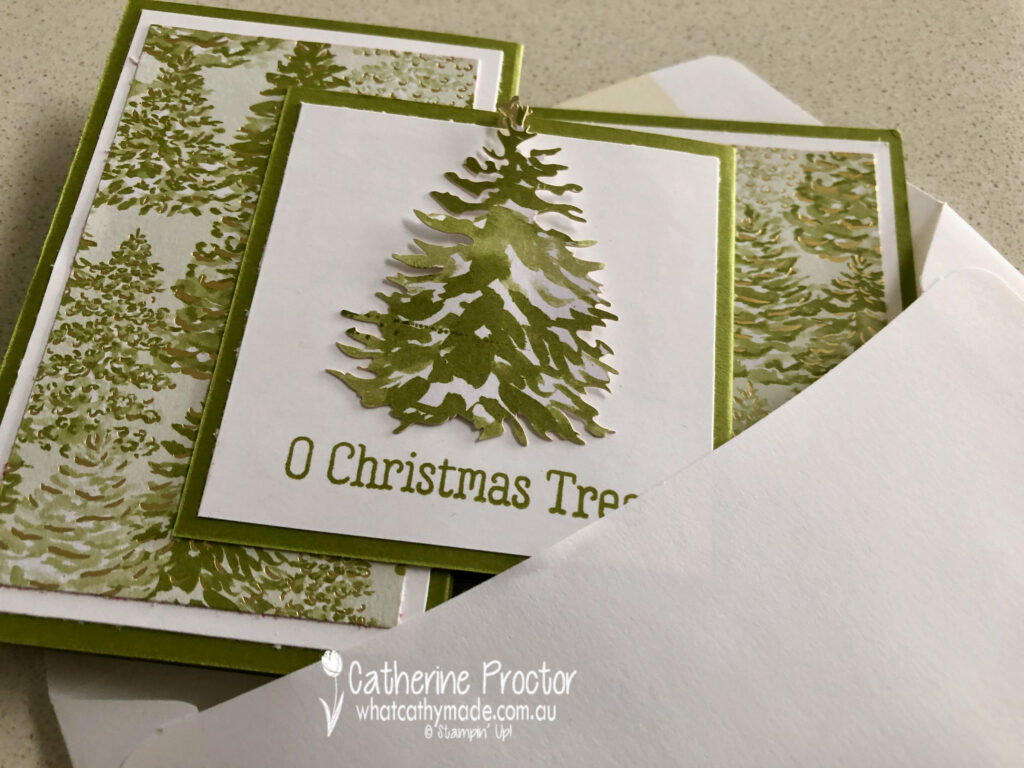
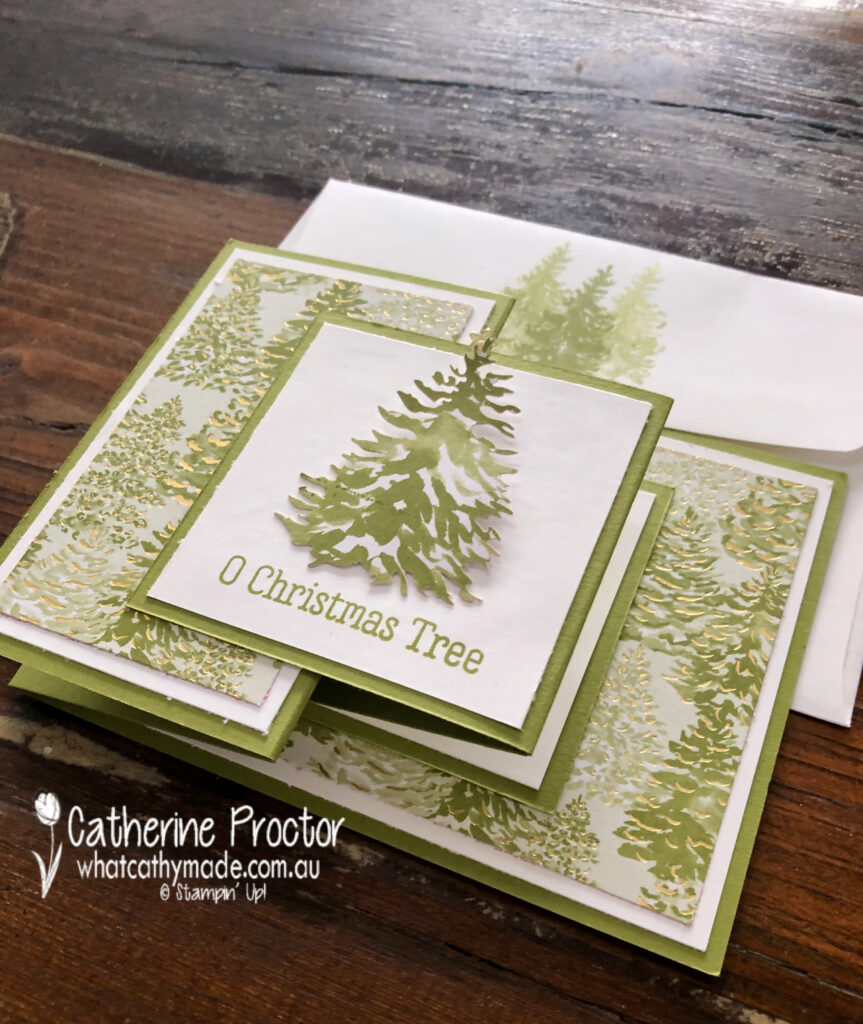
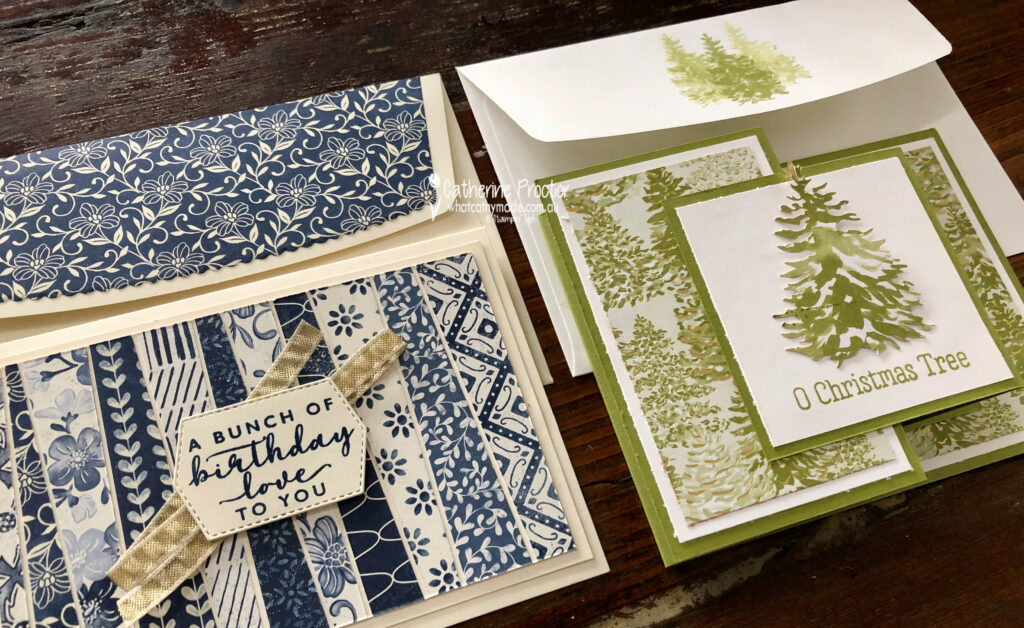
To celebrate World Card Making day last Saturday I held a class where I shared two card techniques that really showcase designer series papers: a double z-fold Christmas card and a “Scrappy Strip technique” birthday card.
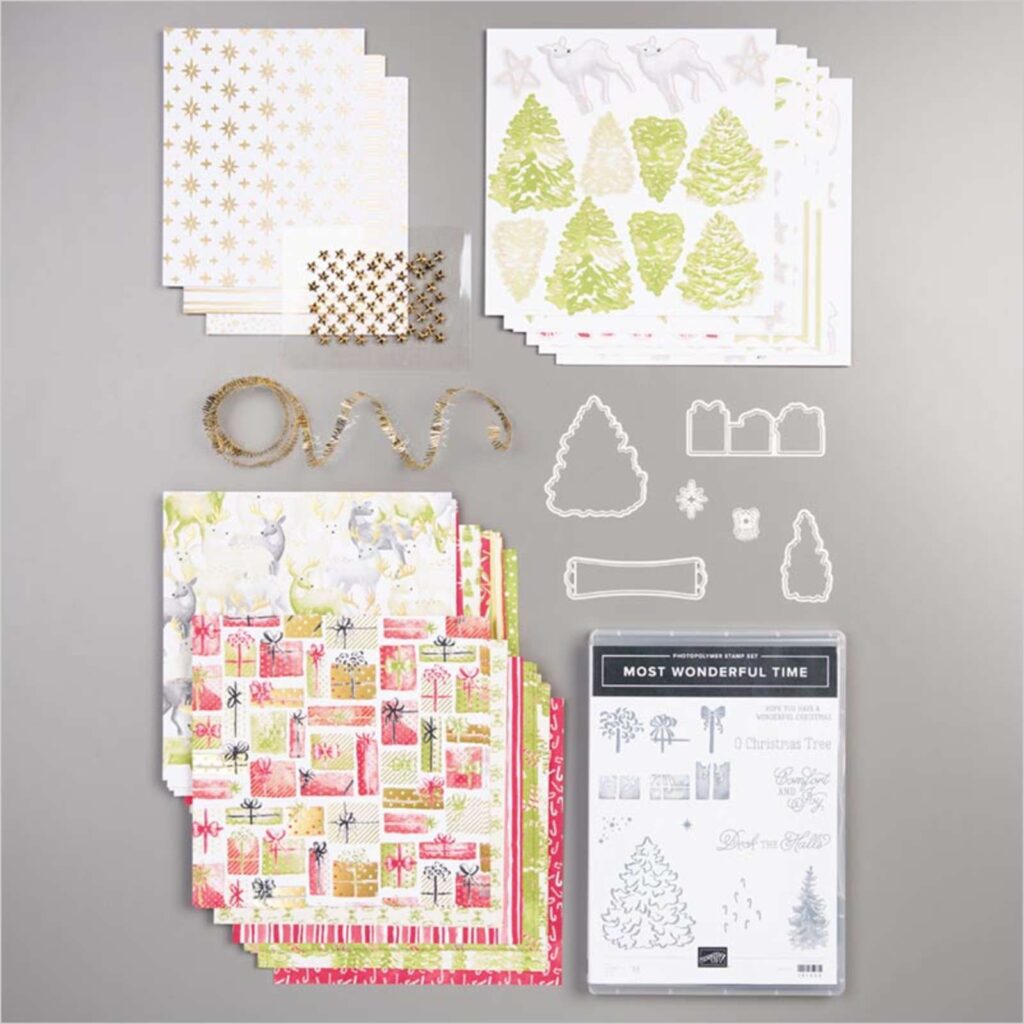
Both of these cards feature stunning designer series papers that can sometimes be overlooked because they are from Product Medleys, so they are not listed in the paper section of the Stampin’ up! website or the catalogues.
These designer series papers also come in refill packs, so you don’t have to purchase the entire product medley to get your hands on the DSP.
Most Wonderful Time
Boho Indigo
The double Z-fold card is a Christmas card and you could use any of the Christmas DSPs on sale to make this design too. For the front panel of the card you can use a sticker from the product medley or stamp a greeting or a different image – the possibilites are endless.
Here’s how it looks from the side.
And here’s my matching envelope – I simply stamped off the Christmas Tree stamp on the back flap of a C6 envelope.
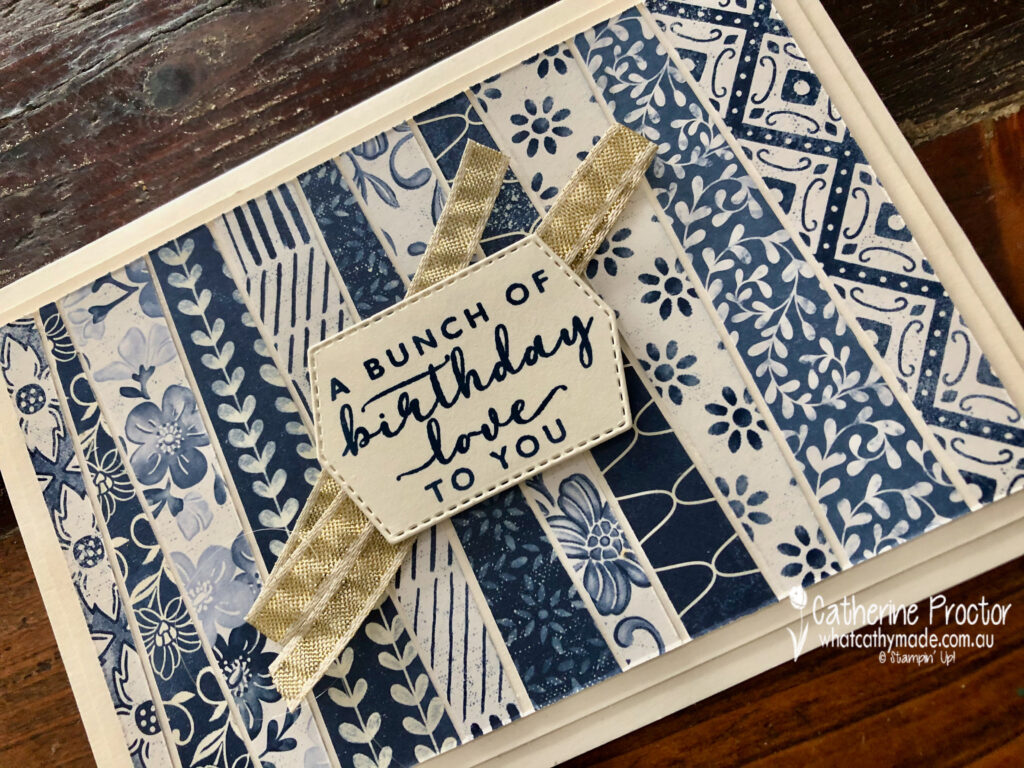
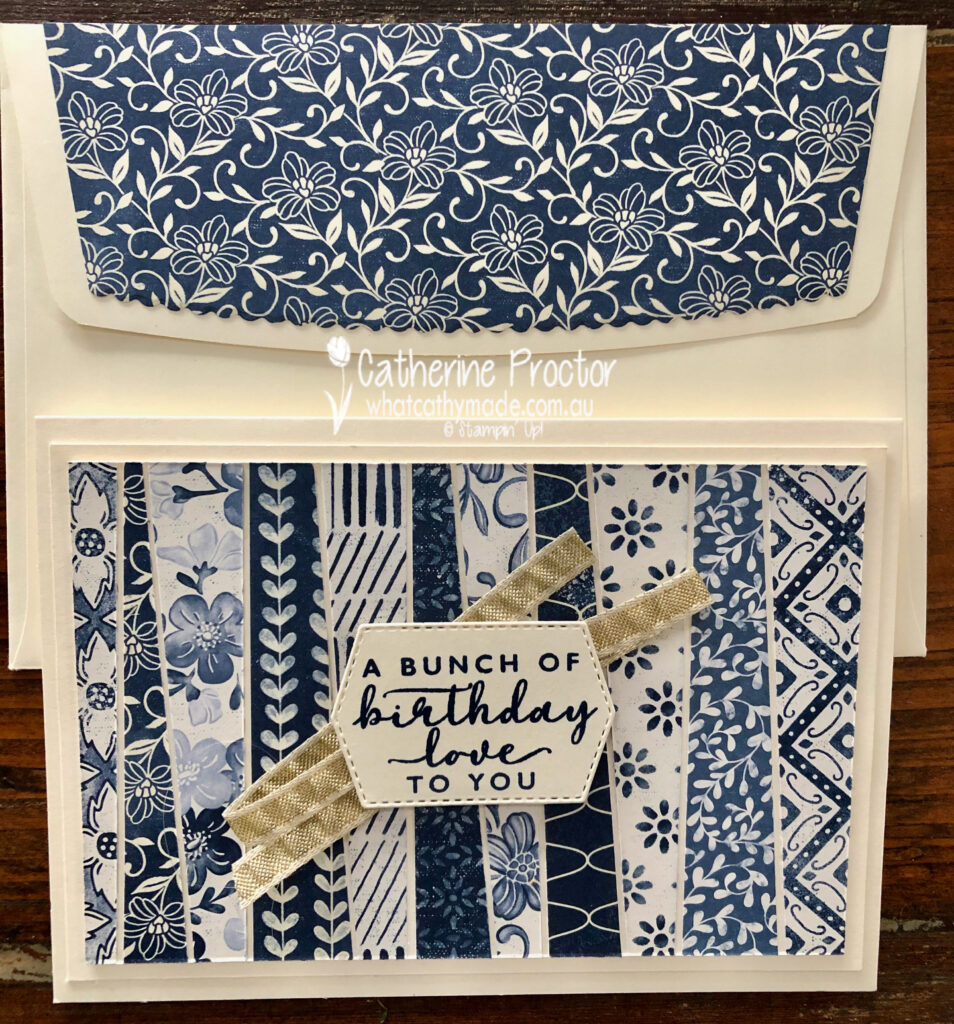
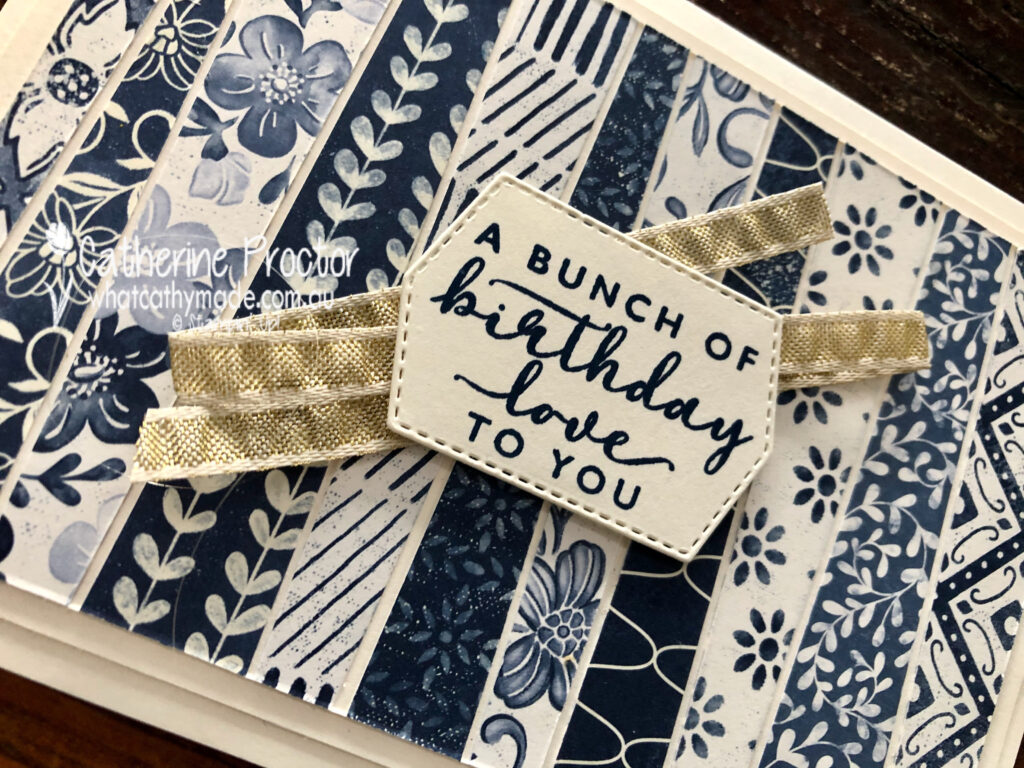
My scrappy strip technique birthday card uses the stunning blues and whites and creams of the Boho Indigo Product Medley.
To make a scrappy strip technique card you simply cut a piece of Very Vanilla A4 card stock in half and score and fold to make the card base. Cut the other piece of card stock in half and trim 1/4 inch (5cm) off the top and side – this is your middle layer. For the top layer, trim 1/2 inch (10cm) off the top and side.
Trim strips of DSP at an angle before lining them up (alternating dark and light) and lining them up with approximately the same gap between strips. Adhere the strips, turn over so the strips are under the top Very Vanilla layer and trim the strips back to the edges of the top layer.
Once you’ve adhered all your layers, add some ribbon behind your sentiment.
I used the Envelope dies to add DSP to the outer flap of a C6 envelope. The Envelope dies come in four different sizes (to match the four different envelope sizes Stampin’ Up! sells) and you can either use them inside as an envelope liner or outside as a feature flap as I’ve done below.
This scrappy strip technique is the perfect way to use up your scraps of DSP.
I’m going to make both these cards again, this time using some of the lovely DSP on sale this month.
To see more Designer Series Paper inspiration from the AWH Team head back to Rachel‘s page as she is hosting our monthly blog hops.
To purchase any of the products I’ve used in my cards tonight simply click on the phots of the products below.
If you’d like me to post you your very own copy of the August – December 2020 Mini Catalogue, the 2020-21 Stampin Up! Annual Catalogue, the 2020-21 Beginners Brochure, or to simply find out about more about Stampin’ Up! contact me.
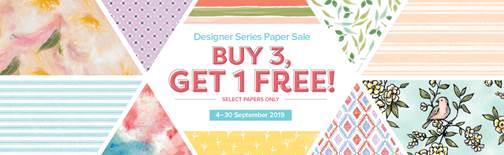
Tonight the Art with Heart team are sharing amazing projects featuring Stampin’ Up! Designer Series Paper, most of which is in the current promotions where you can buy 3 packs of Designer Series Paper and receive a pack for free! Only available until the 30th of September.
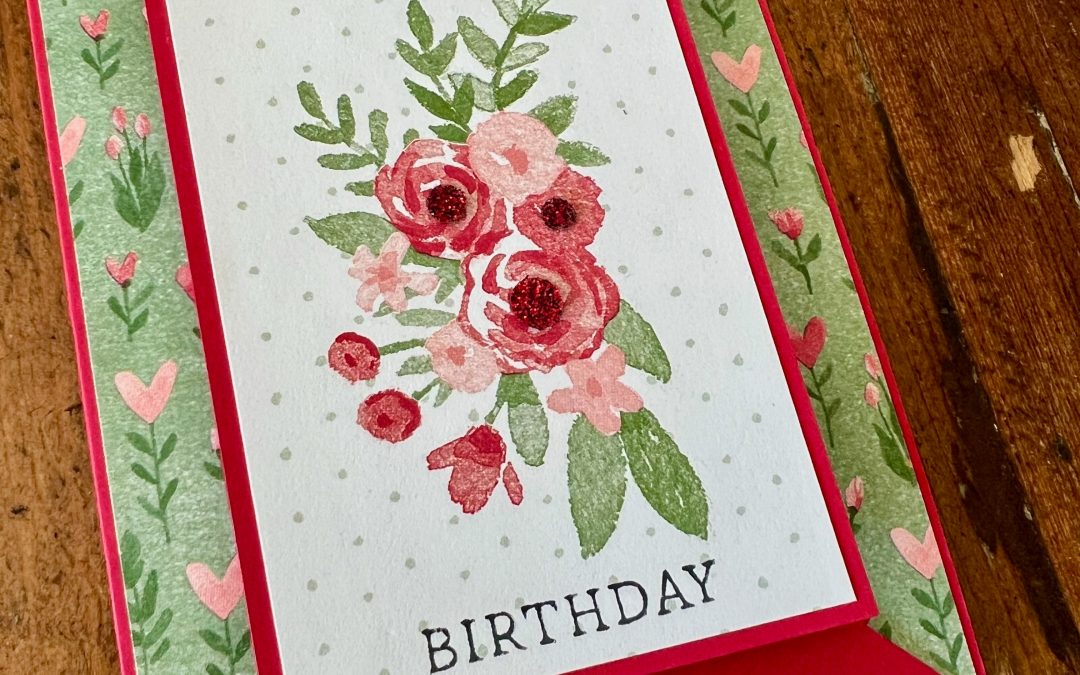
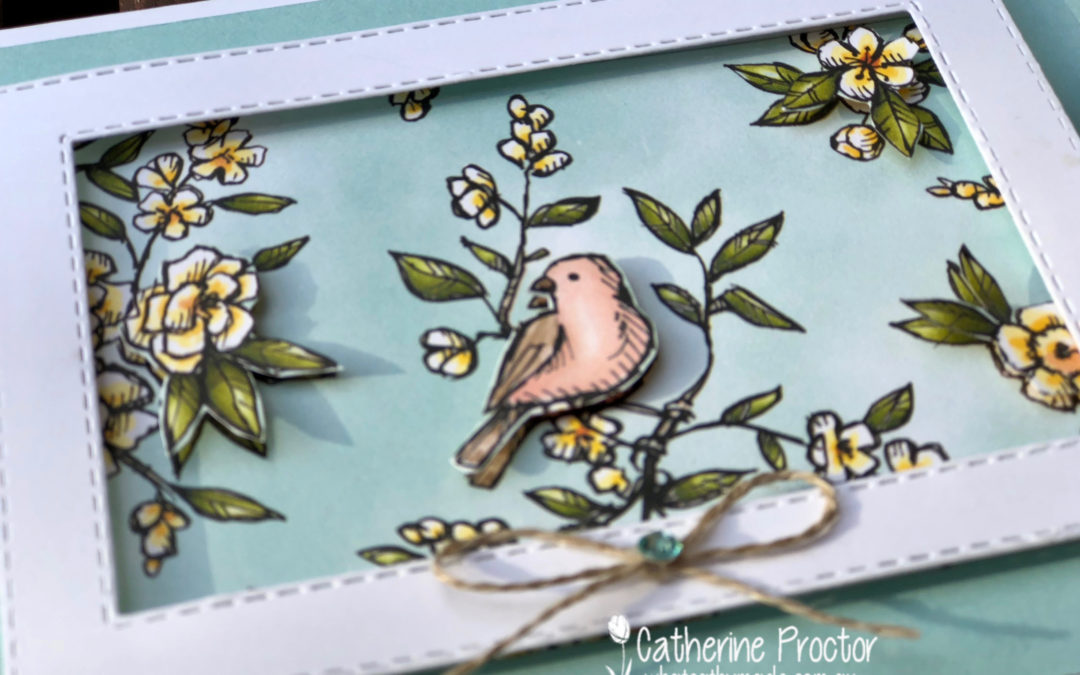
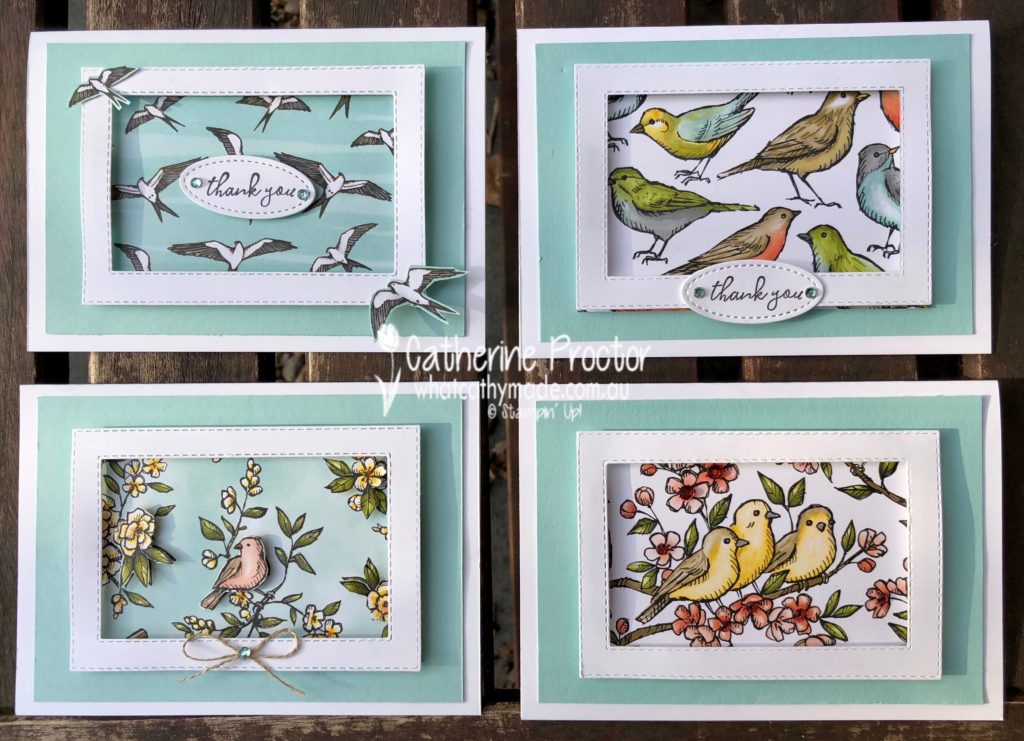
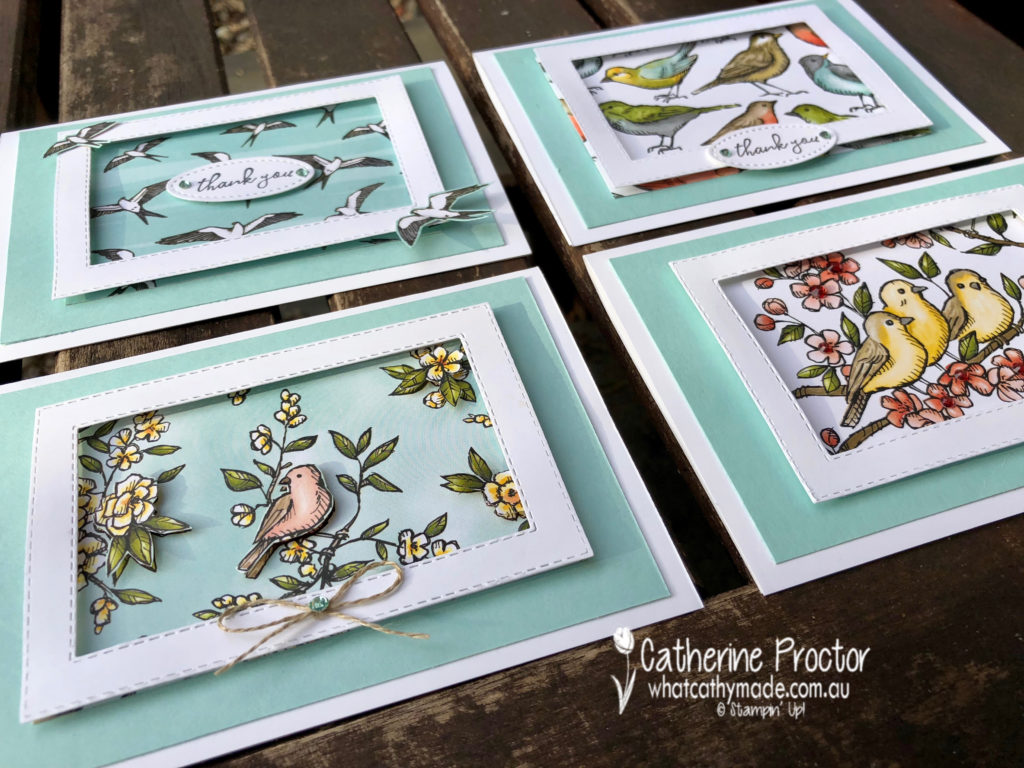
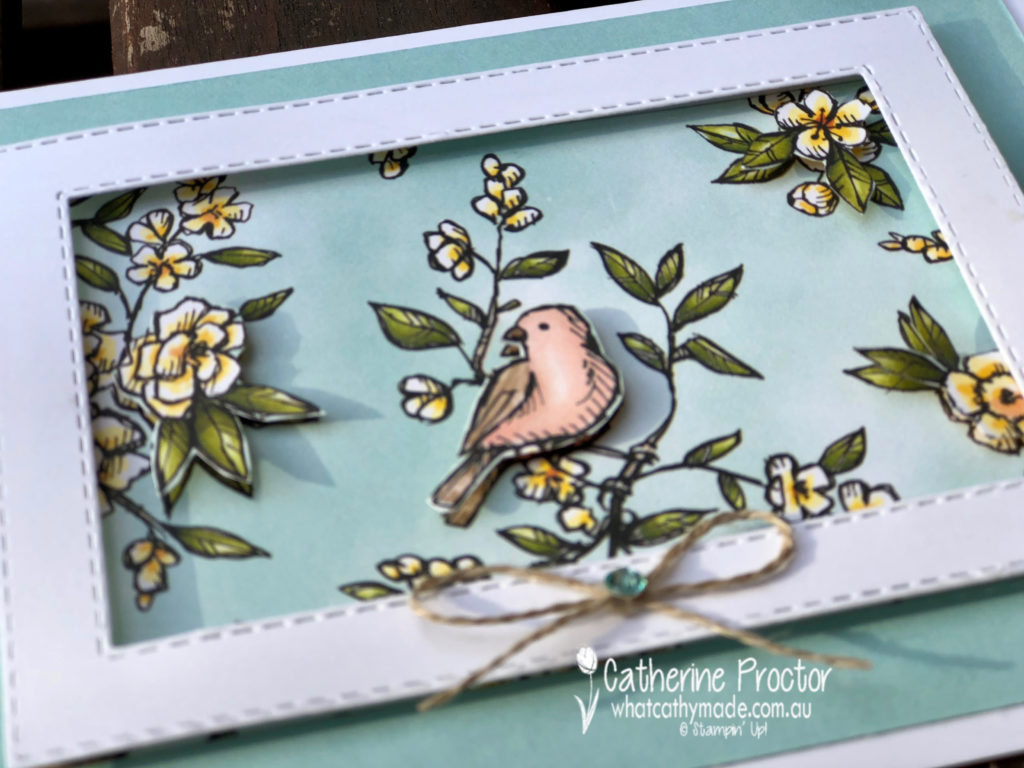
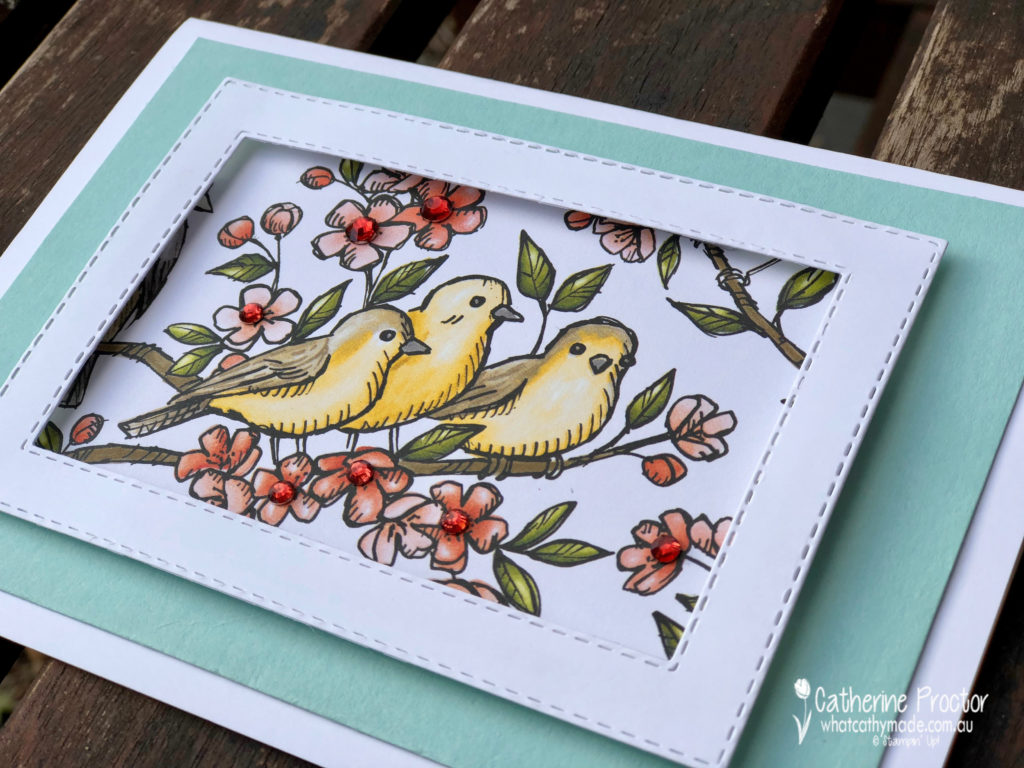
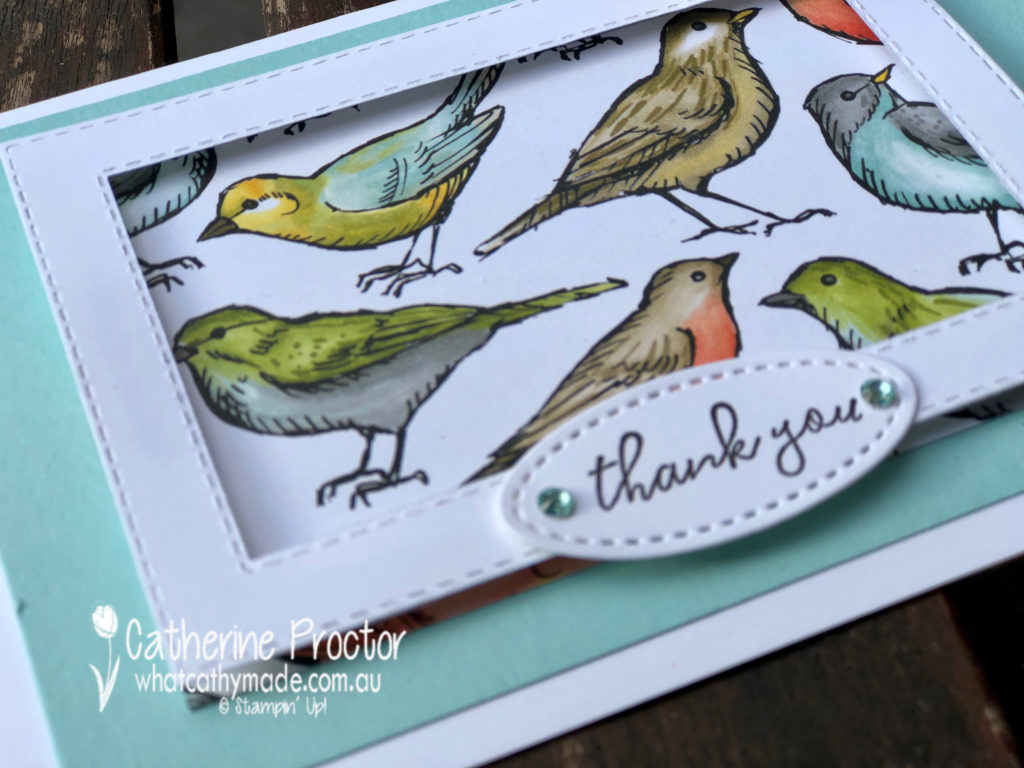
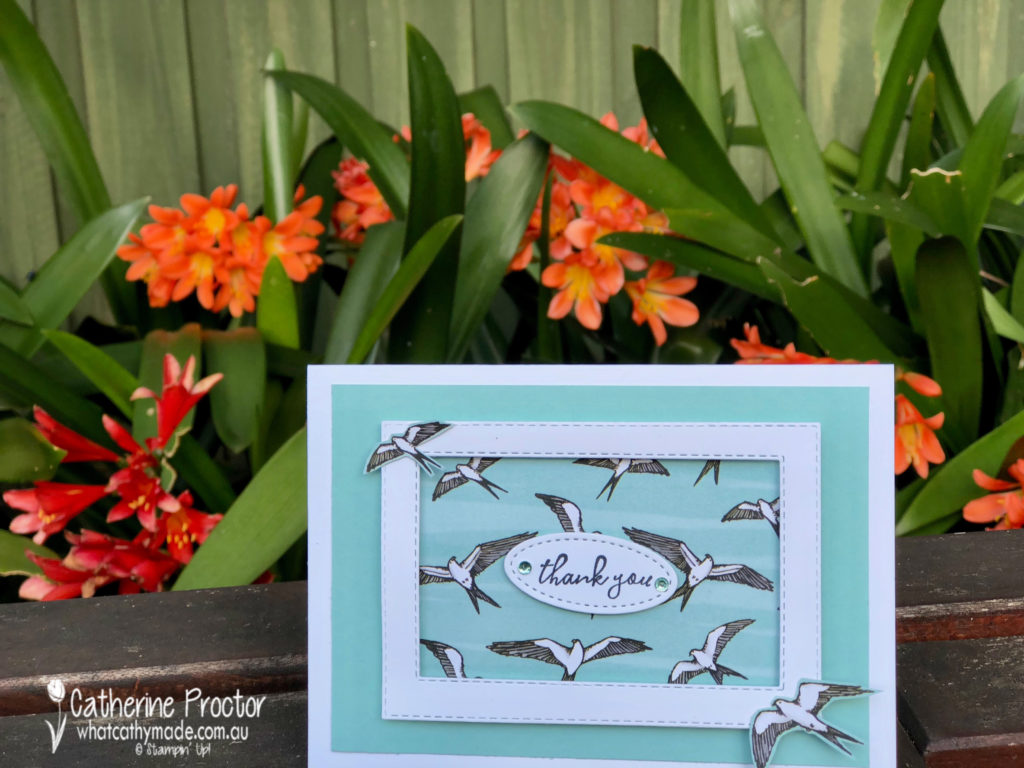
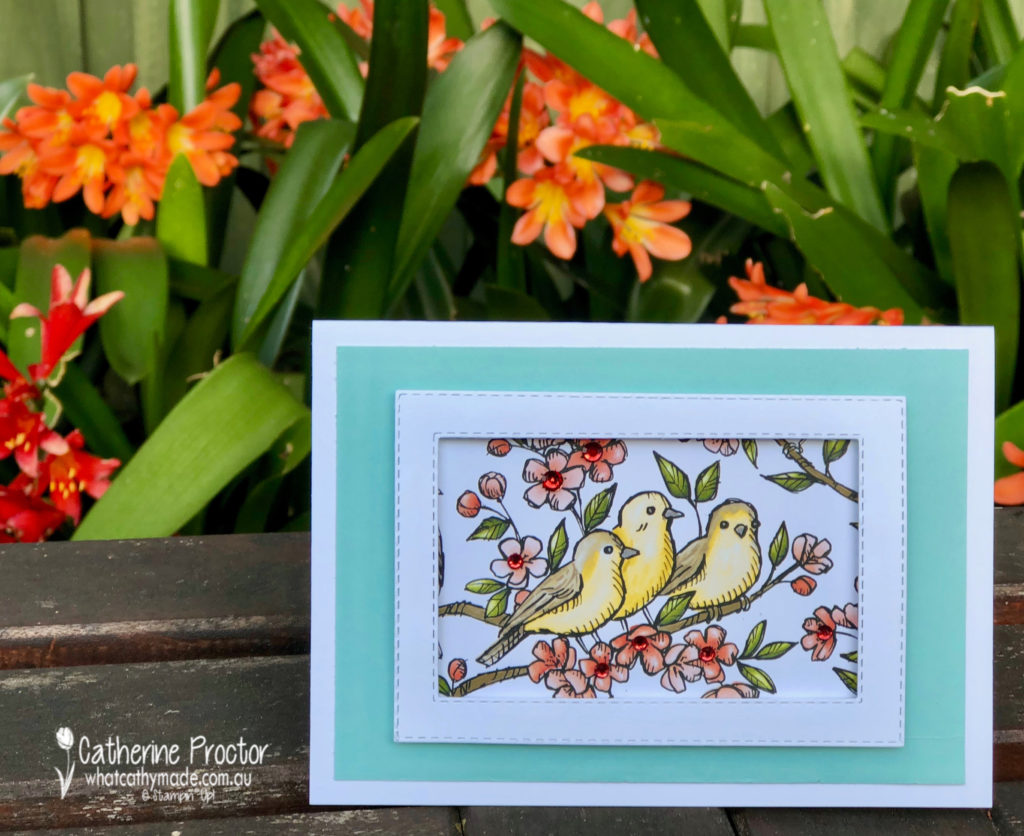
Sometimes I’m reluctant to use Design Series Paper in my card making because it’s just so beautiful I don’t want to cover it. So my solution for my cards tonight is to frame the paper instead!
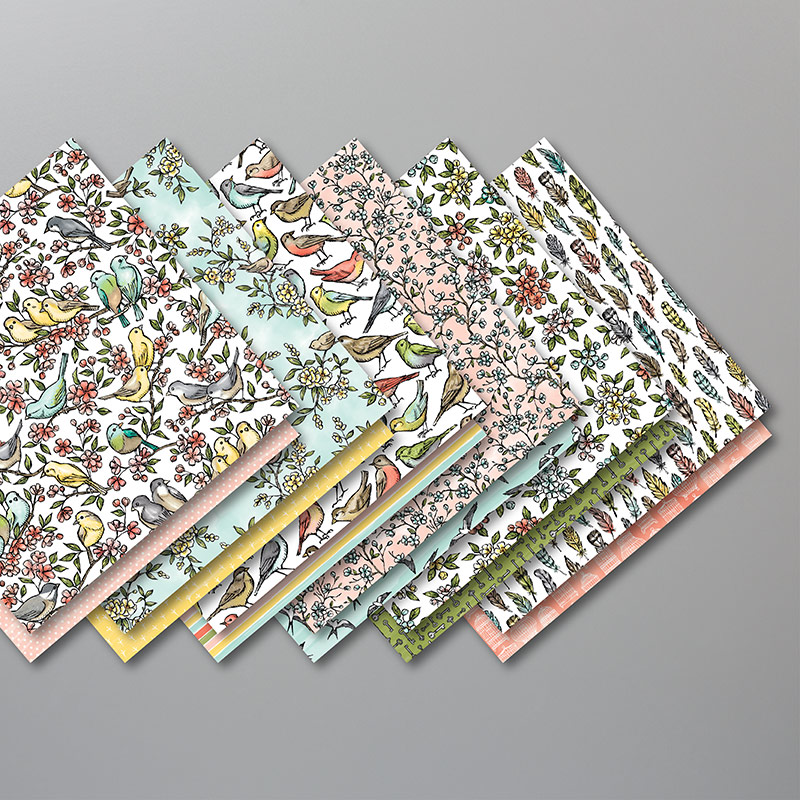
I’ve used my favourite Designer Series Paper from the Annual Catalogue: Bird Ballad DSP.
You can take a closer look at this stunning paper in this short video below.
I made the same sized frame for all four cards, using two of the rectangle stitched dies. Each card features a different piece of DSP from this set, mounted onto a rectangle of Pool Party card stock. Foam adhesive strips made it easy to lift the frames above the image, giving the effect of a picture frame.
In card one I used mini dimensionals to pop up some fussy cut images from the DSP and finished the card off with a bow of linen thread and a pool party rhinestone from the the Holiday Rhinestones Basic Jewels.
In card two I simply used more of the dimensionals from the Holiday Rhinestones Basic Jewels – this time in cherry cobbler – to add a bit of bling to the flowers.
Cards three and four have the stamped “thank you” from the co-ordinating Free as a Bird stamp set, die cut out with the smallest oval in the stitched shapes framelits.
All these photos were taken outside in my garden today – it is spring here and my garden is full of birds and blooming with colour. Because the DSP for card four was more of a background pattern I fussy cut a couple of the birds and adhered them to the edges of the frame for some visual interest and dimension.
Here’s another shot of my stunning clivia!
Now it’s time to hop on over to our next participant, the very talented, Caroline Manwaring.
If you find a broken link or have come to this blog hop from a different entry point, you can view the participants below:
Tonight the Art with Heart team are sharing creative projects featuring designer series paper. This month, Stampin’ Up! have a special on designer series paper, buy 3, get 1 free! We hope our blog hop inspires you to get crafting with your designer series paper.
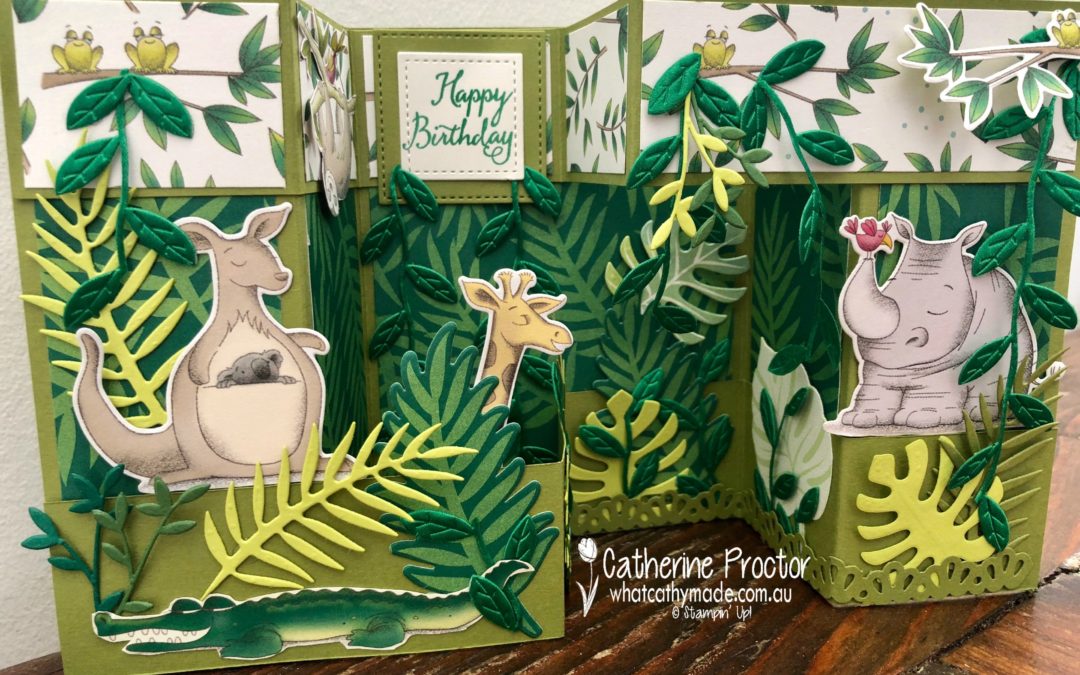
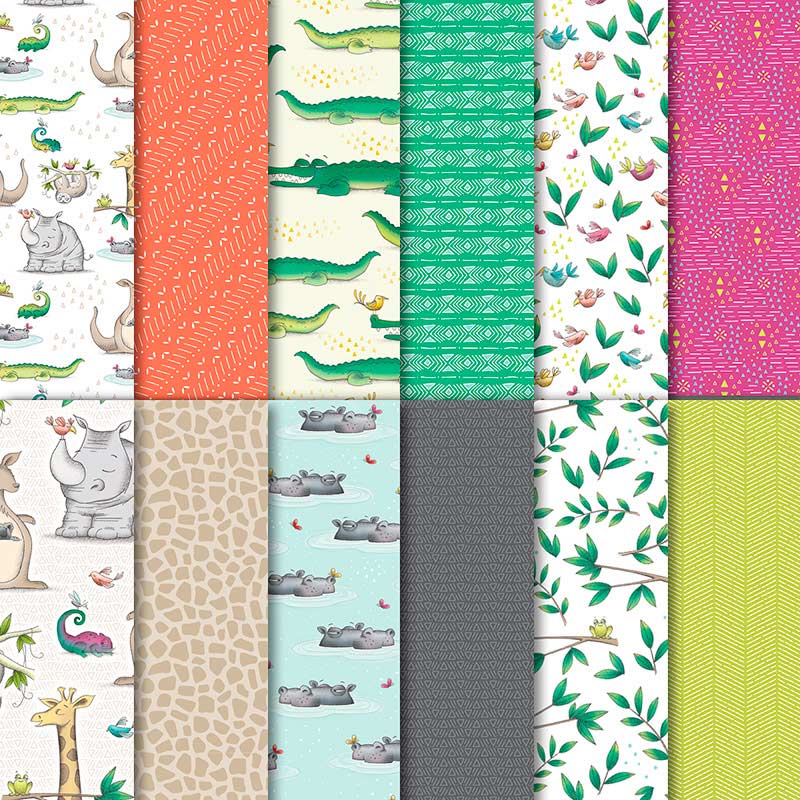
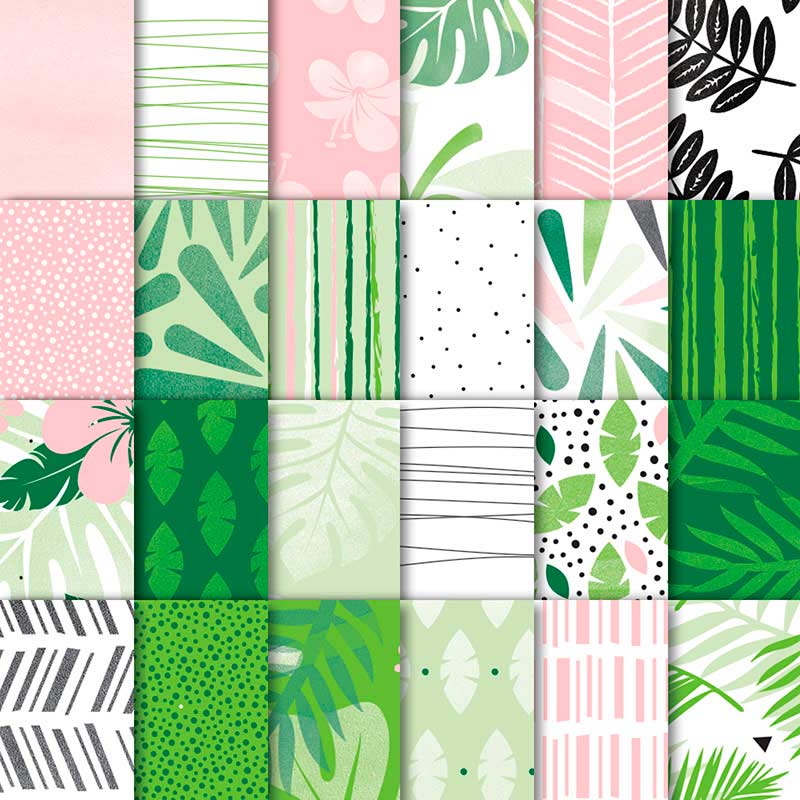
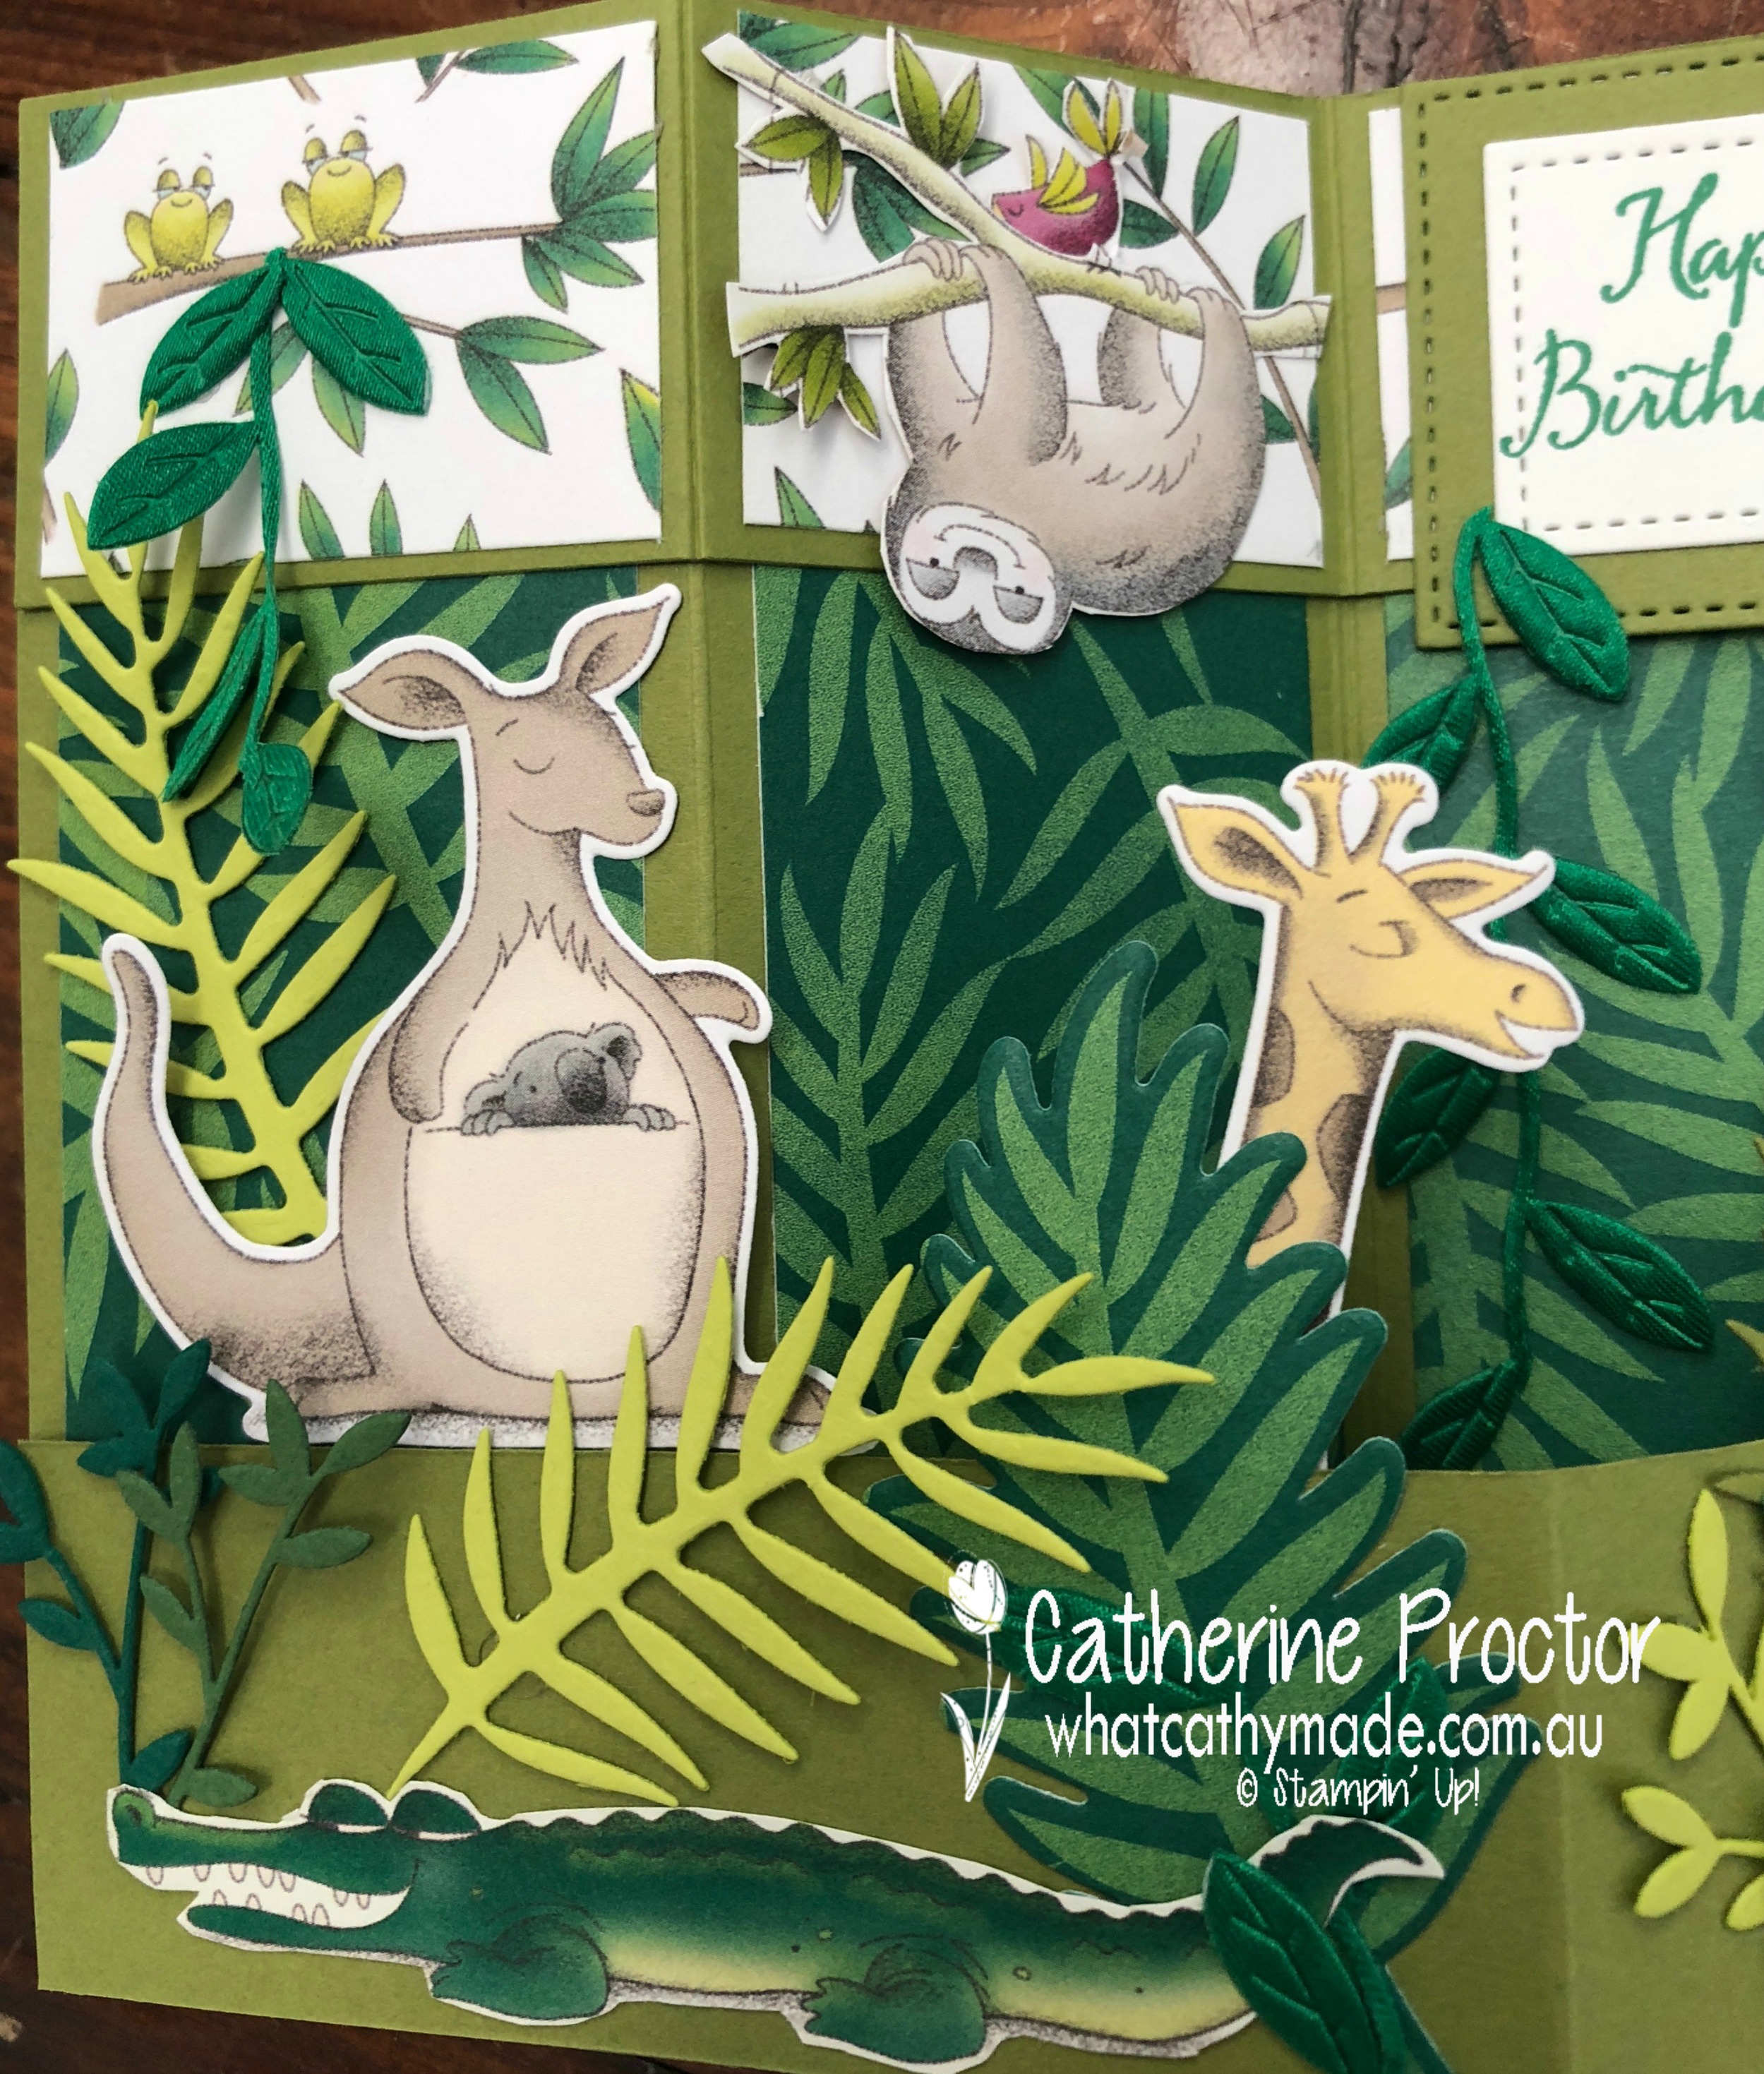
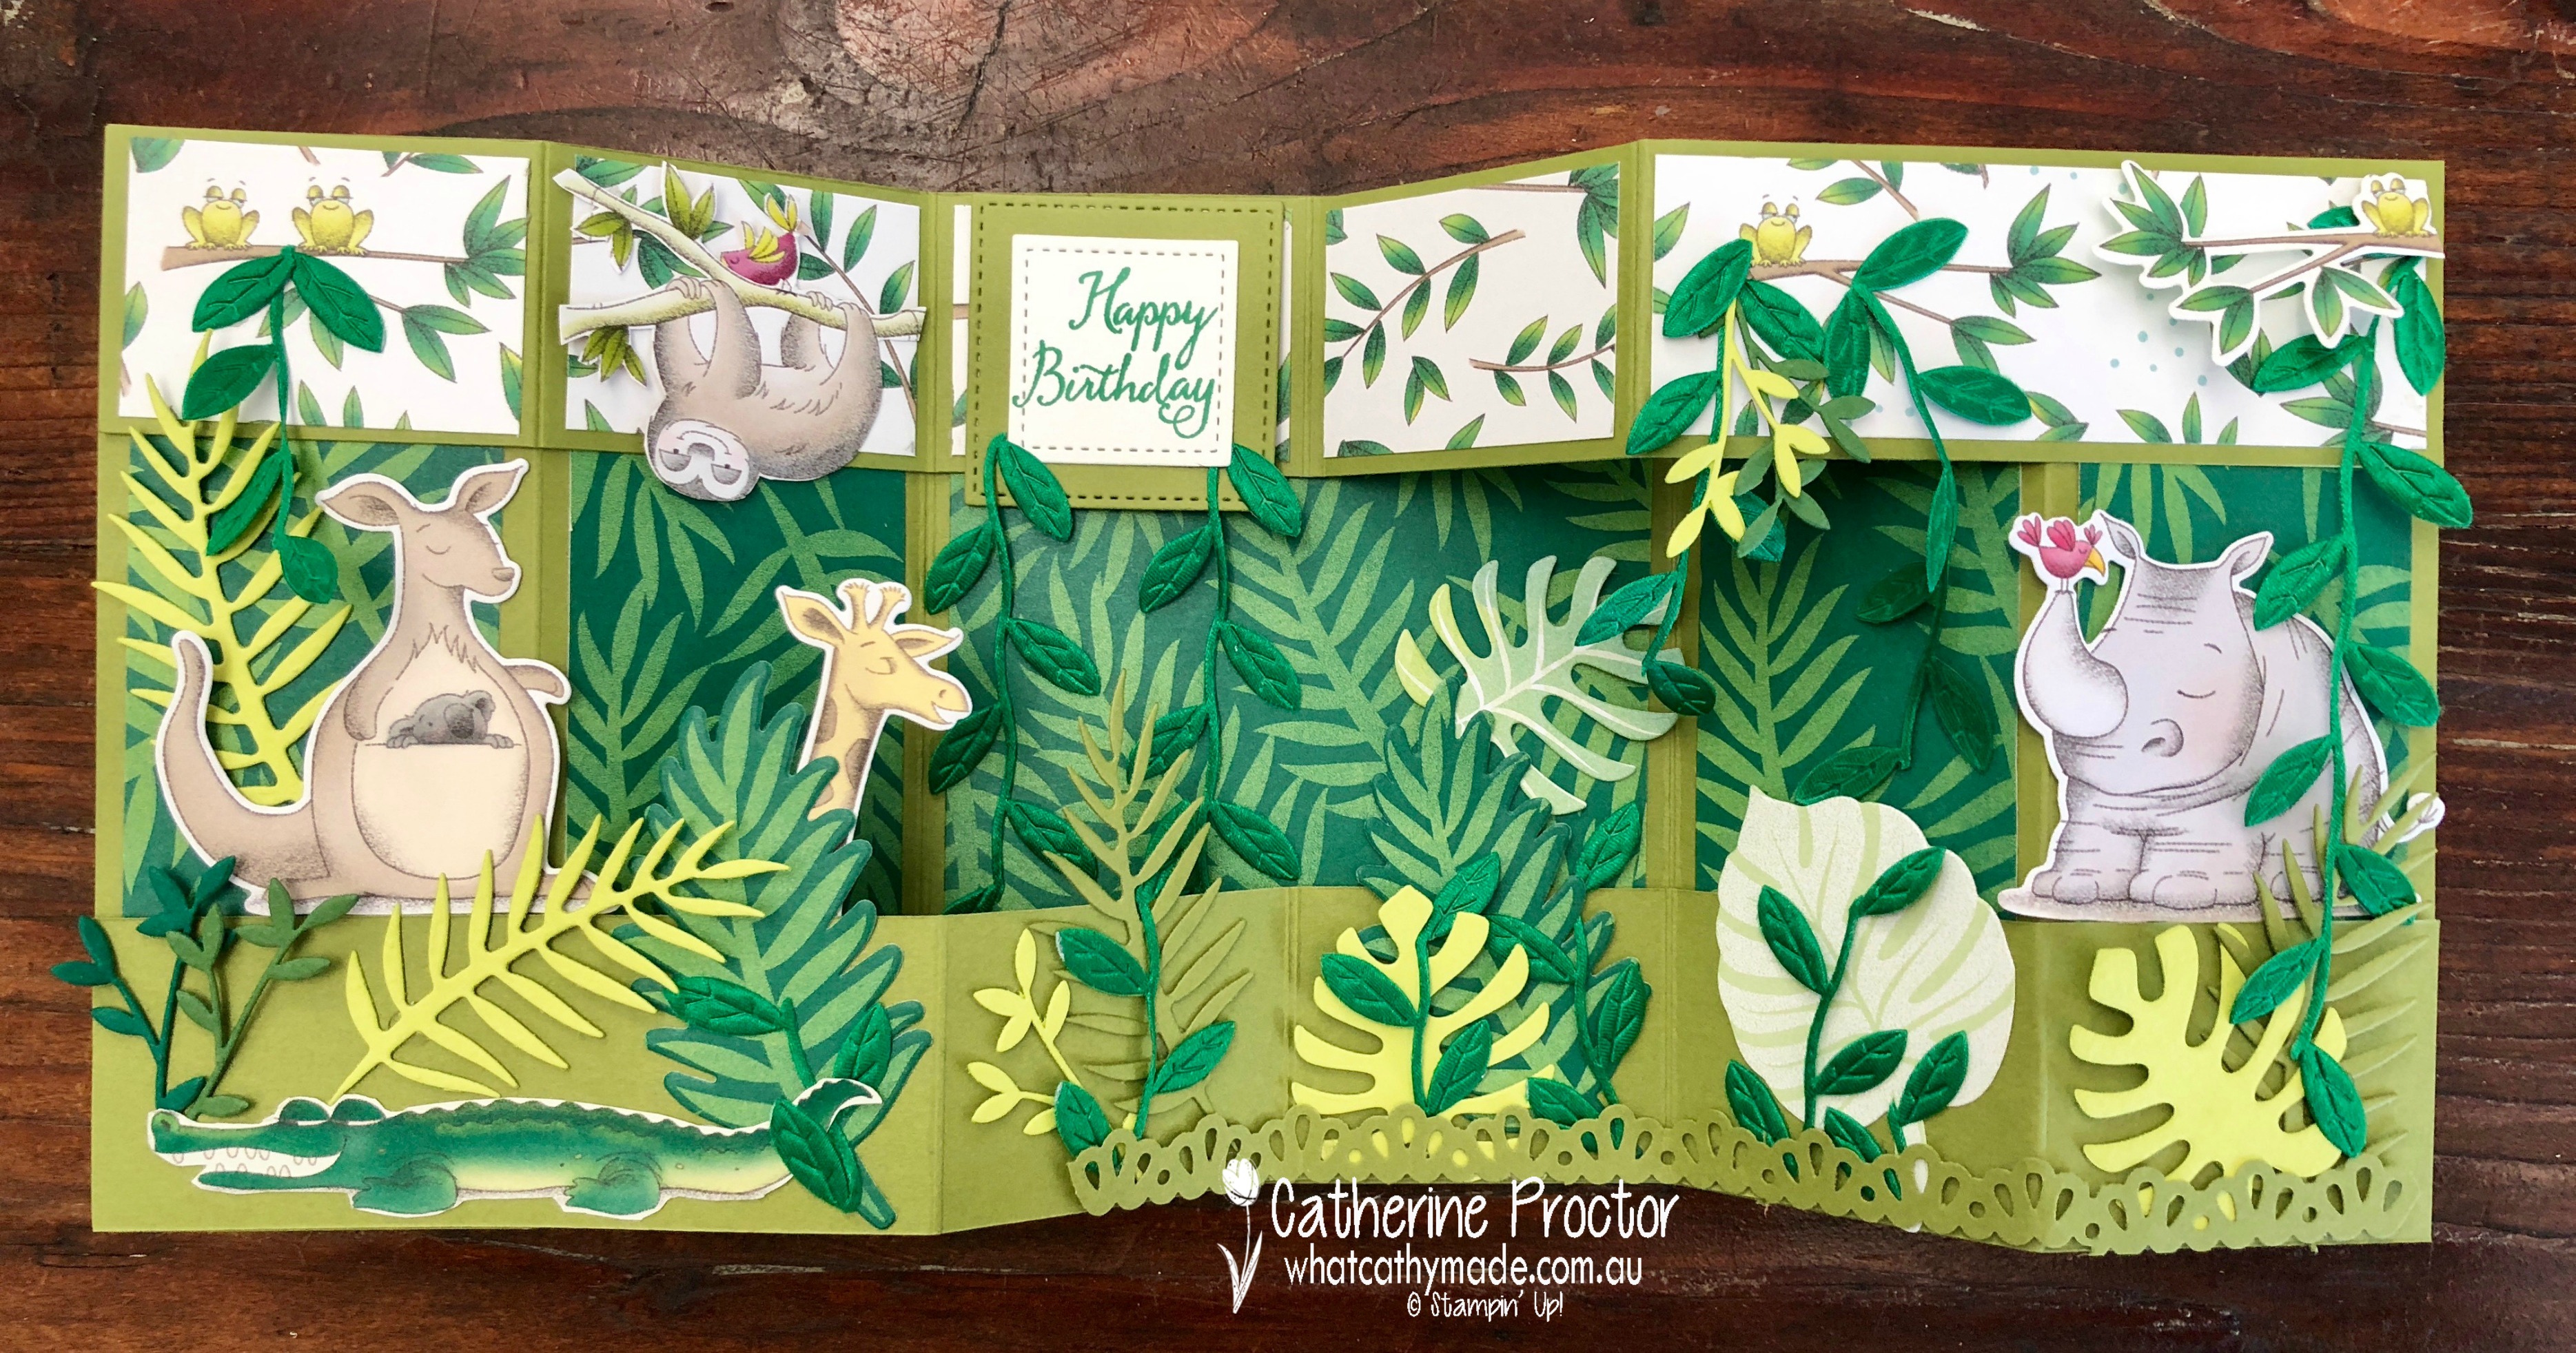
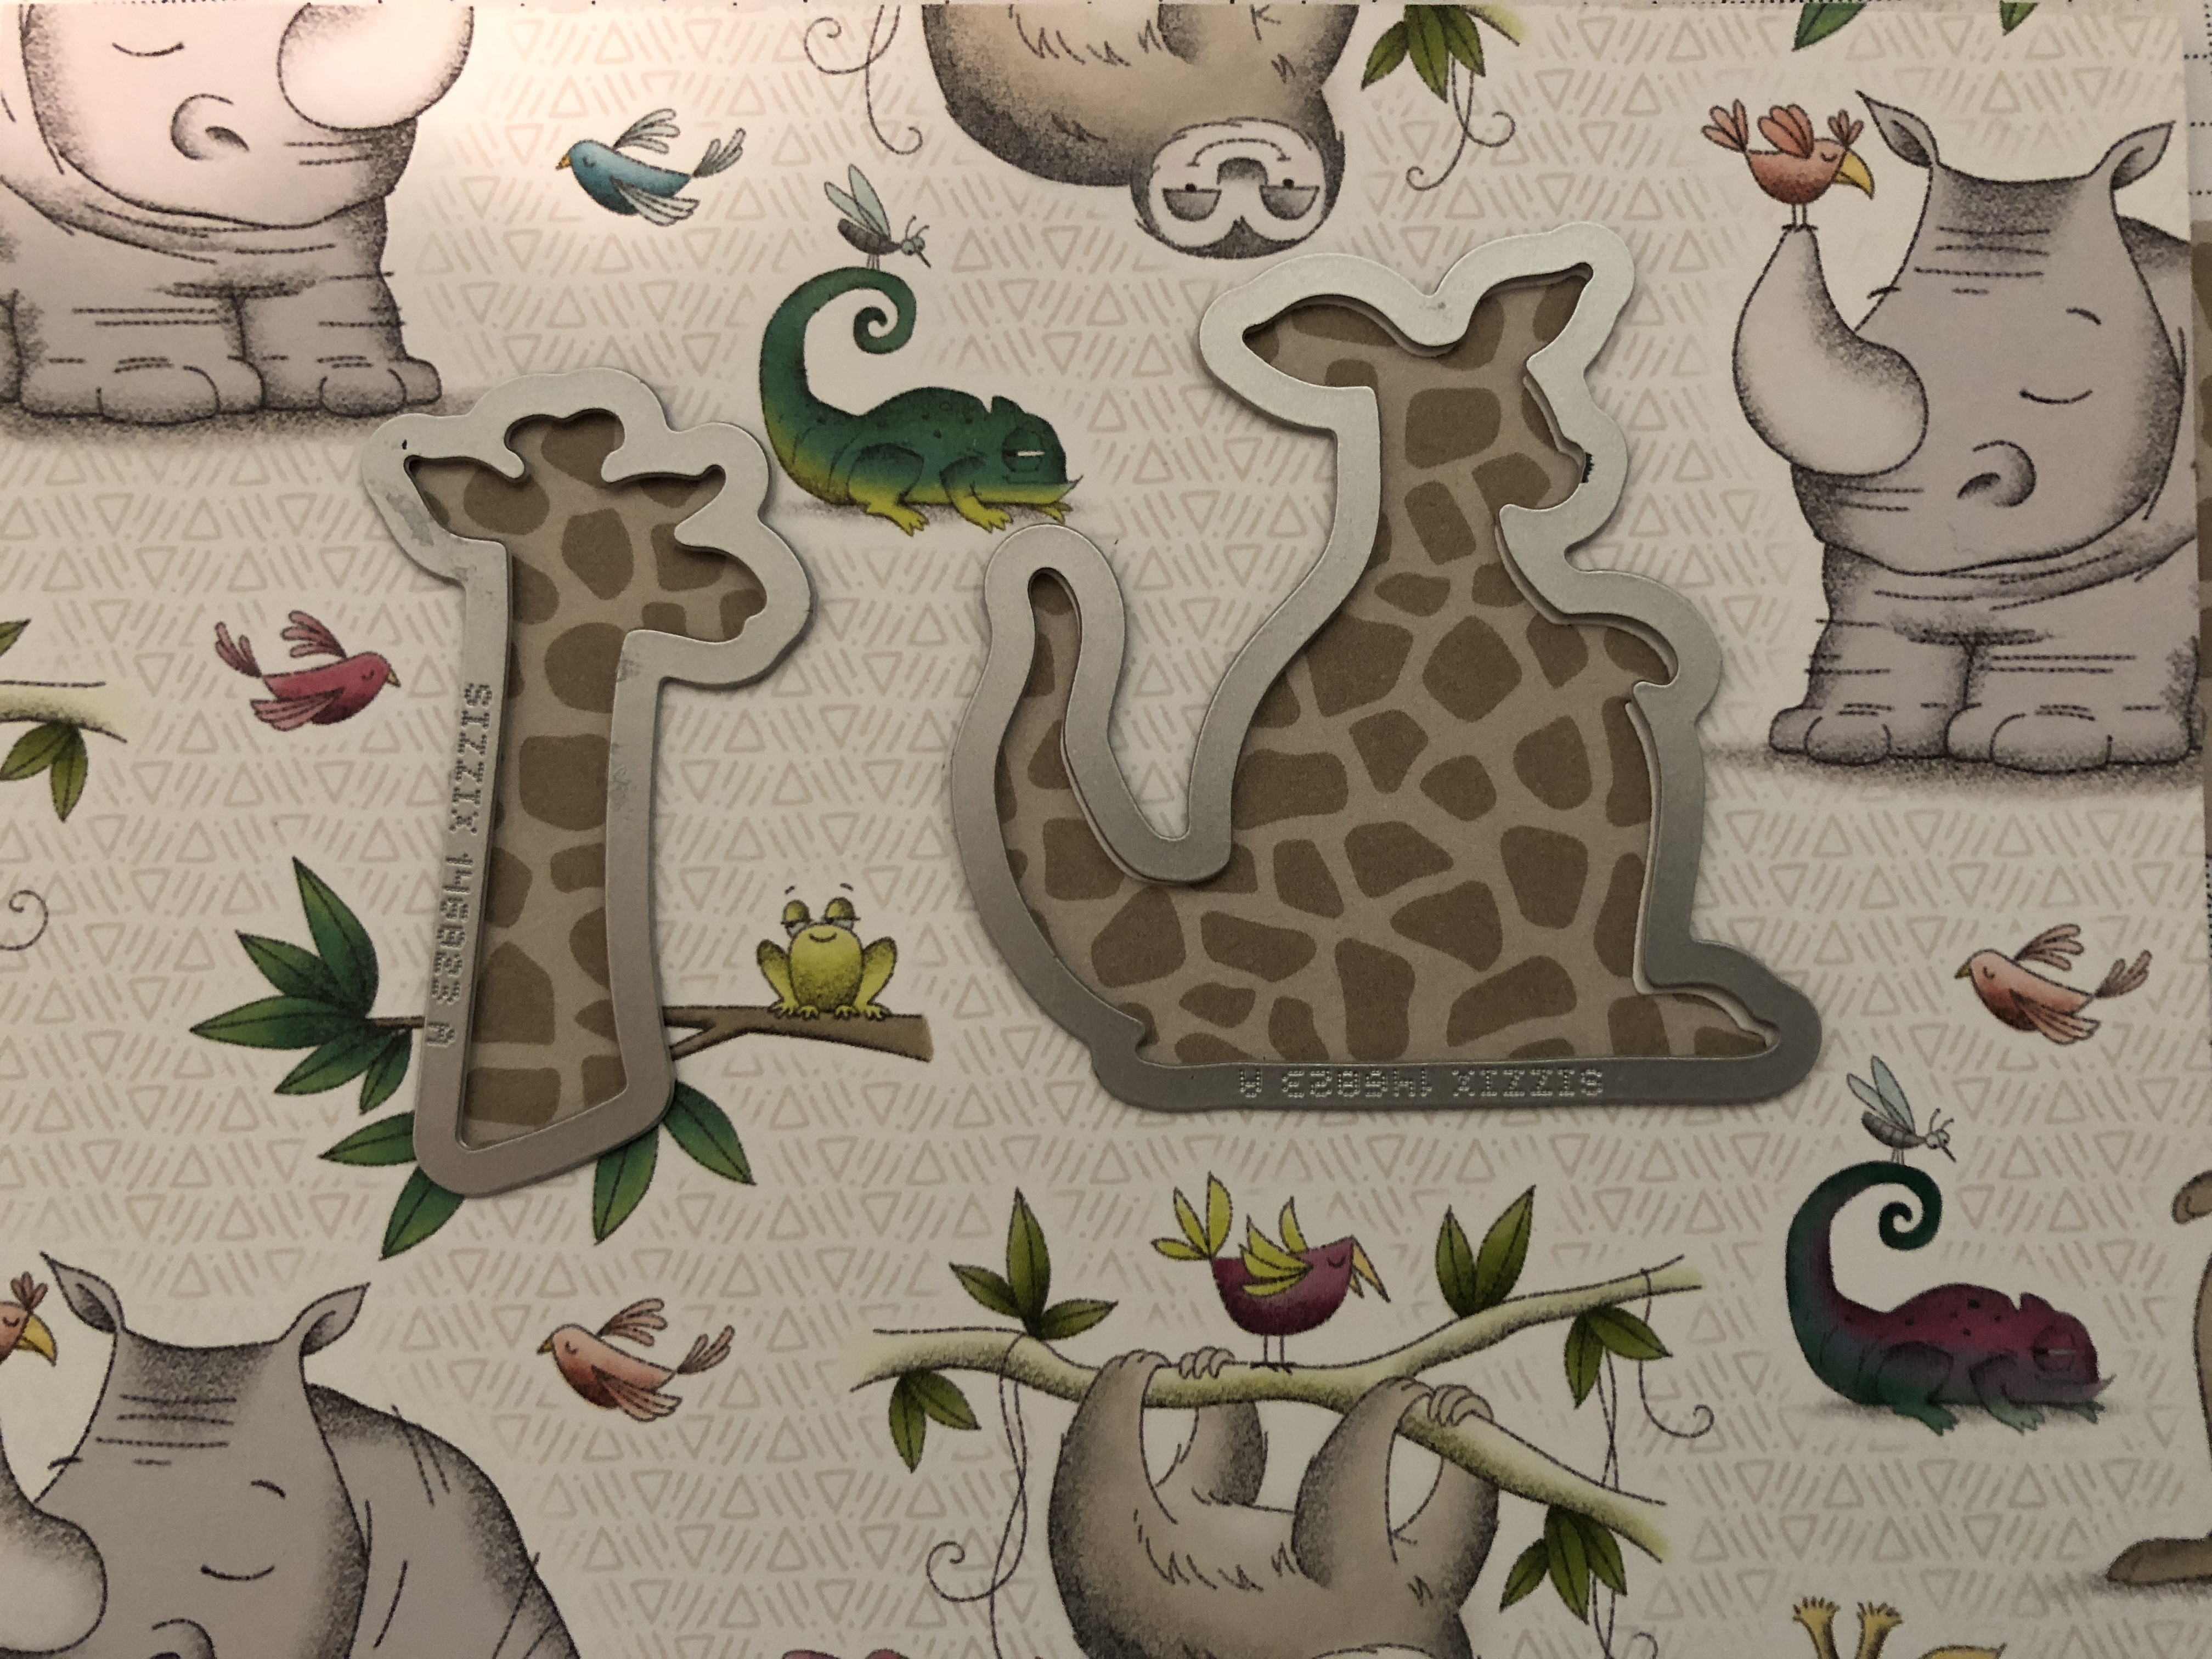
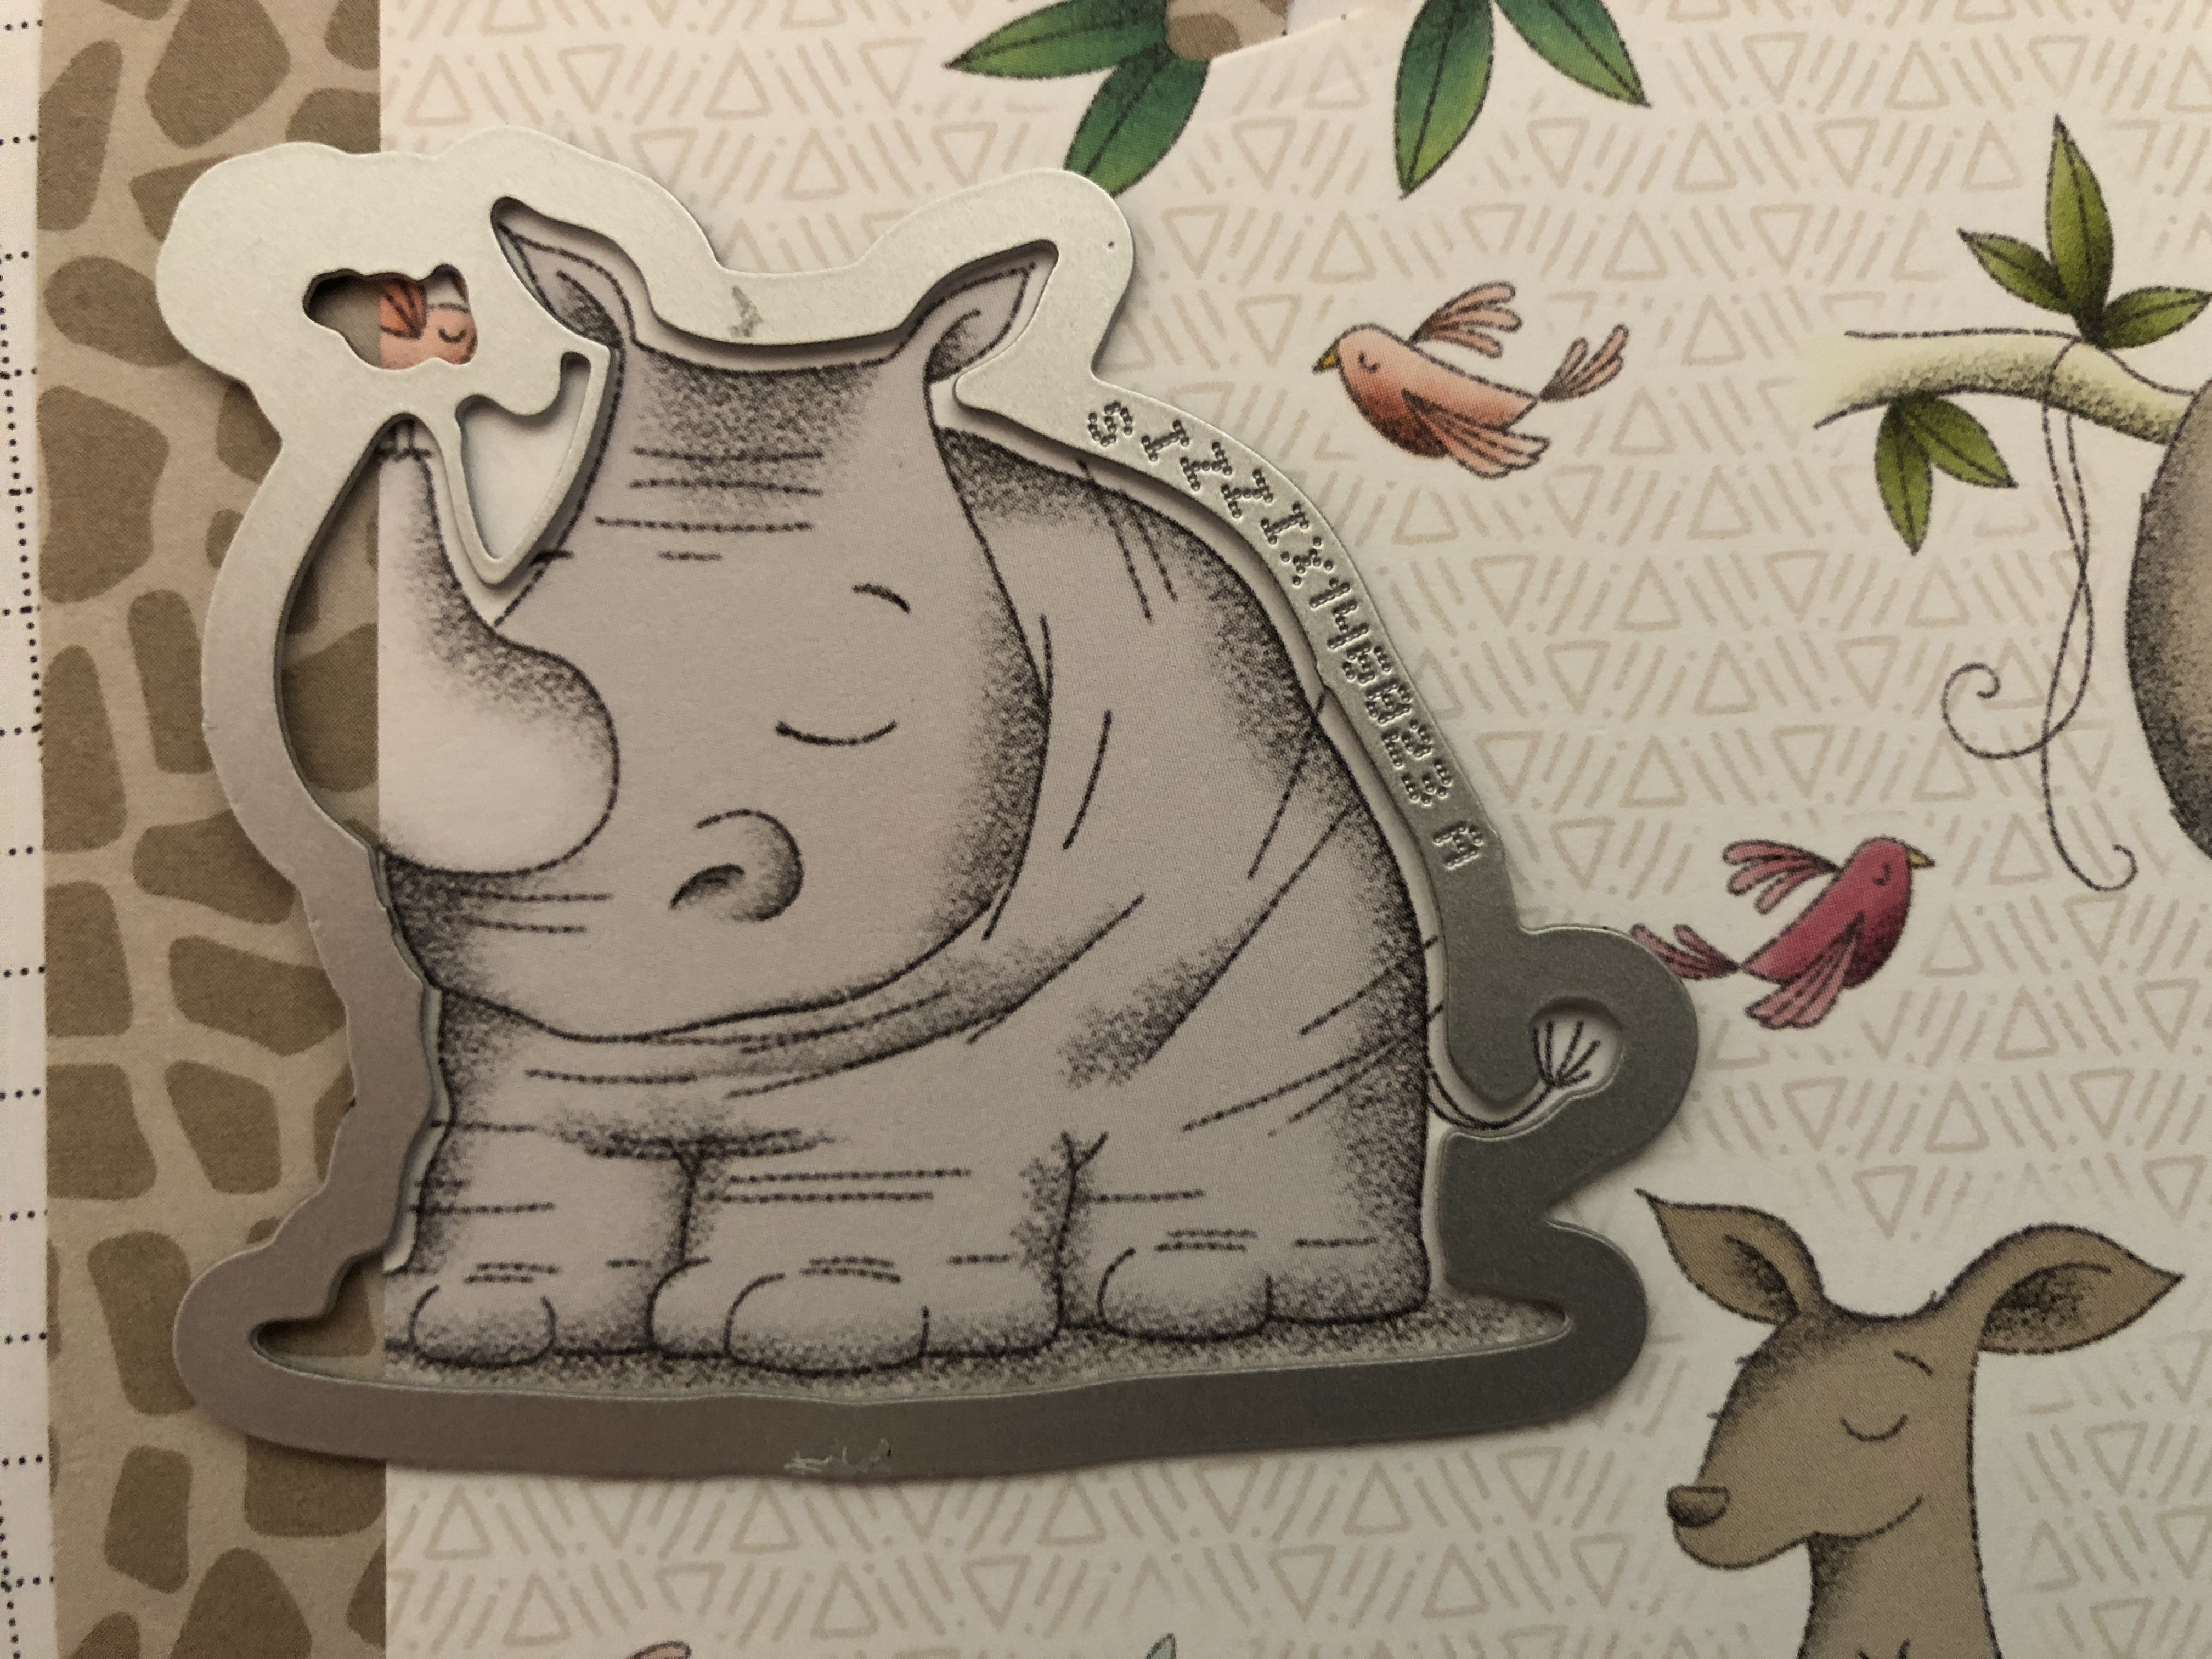
There are so many great Designer Series Papers in the Annual Catalogue to chose from, but there is something very special about the two designer series papers I chose for my project today: Tropical Escape DSP and Animal Expedition DSP.
Can you guess what is so special about these DSP papers by looking at my card?
Both of these papers have images that are designed to be cut out with Stampin’ Up! dies from their coordinating stamp set and die bundles! How cool is that!!!!!
This makes card making so very quick and easy, and it ensures everything coordinates perfectly. And speaking of coordinating, even though there are different greens used in each of these DSPs they all look amazing together in a jungle/bush setting, so don’t forget when you’re card making that you can mix and match different DSP’s together!
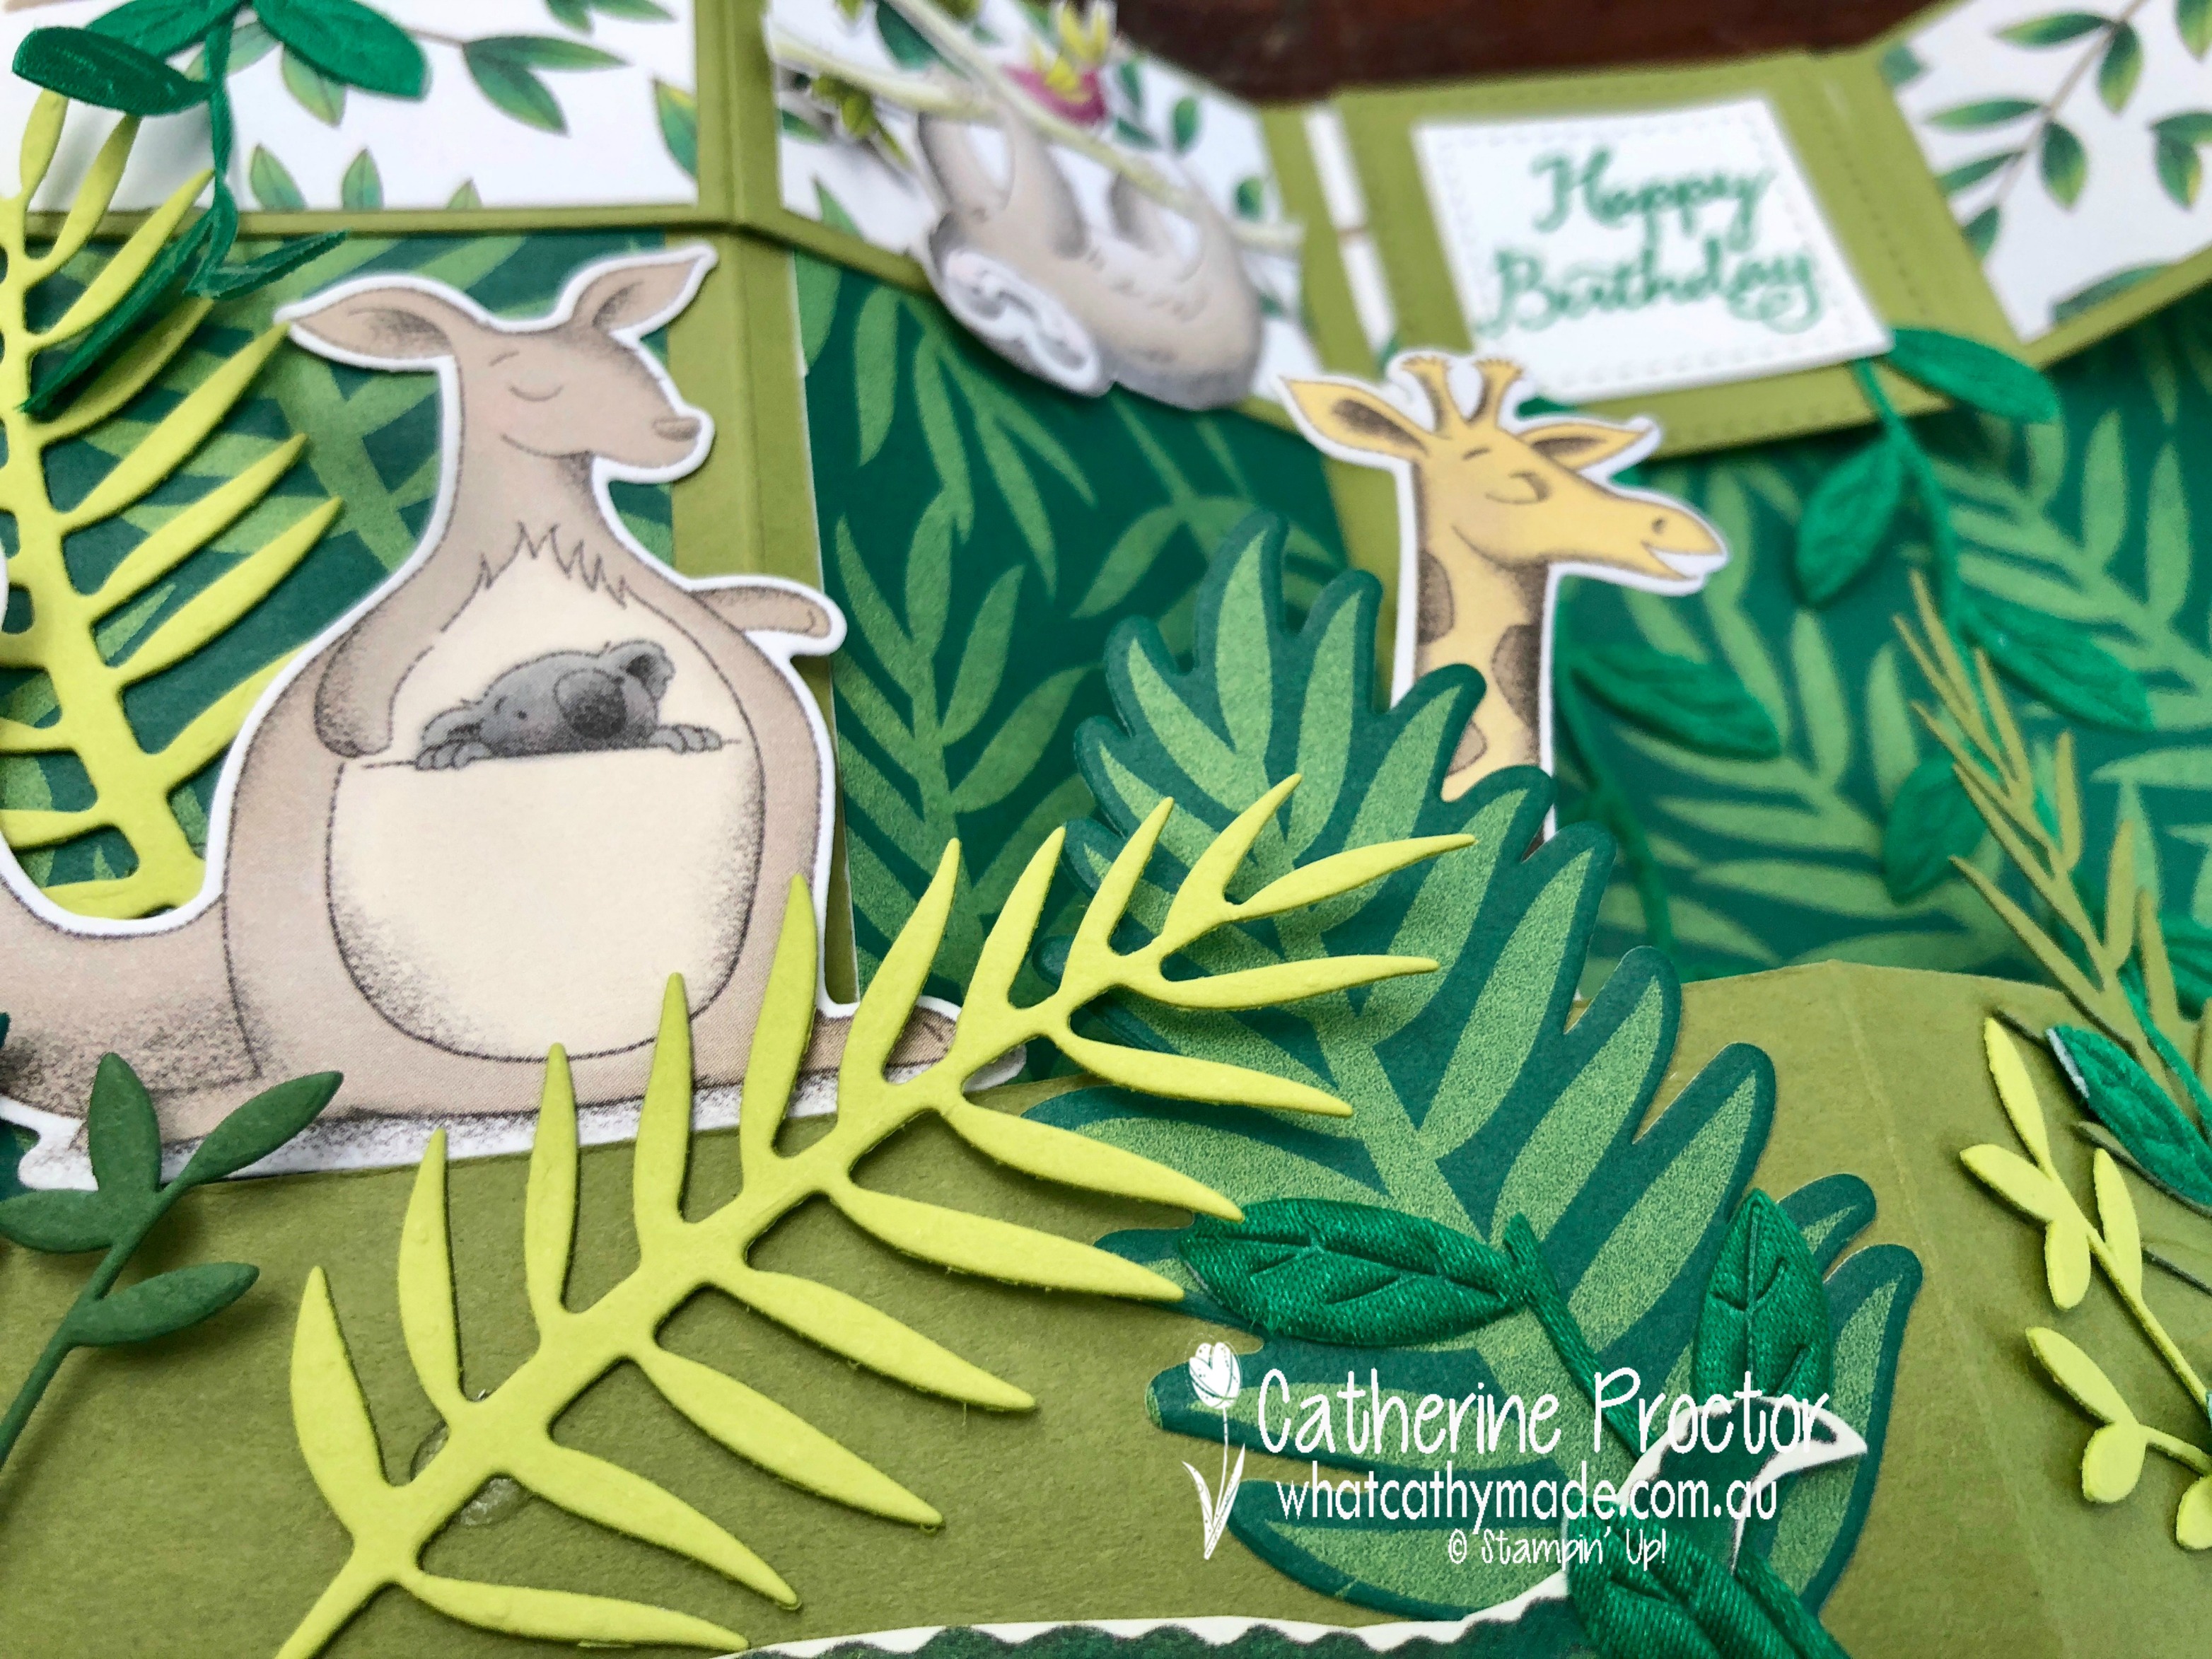
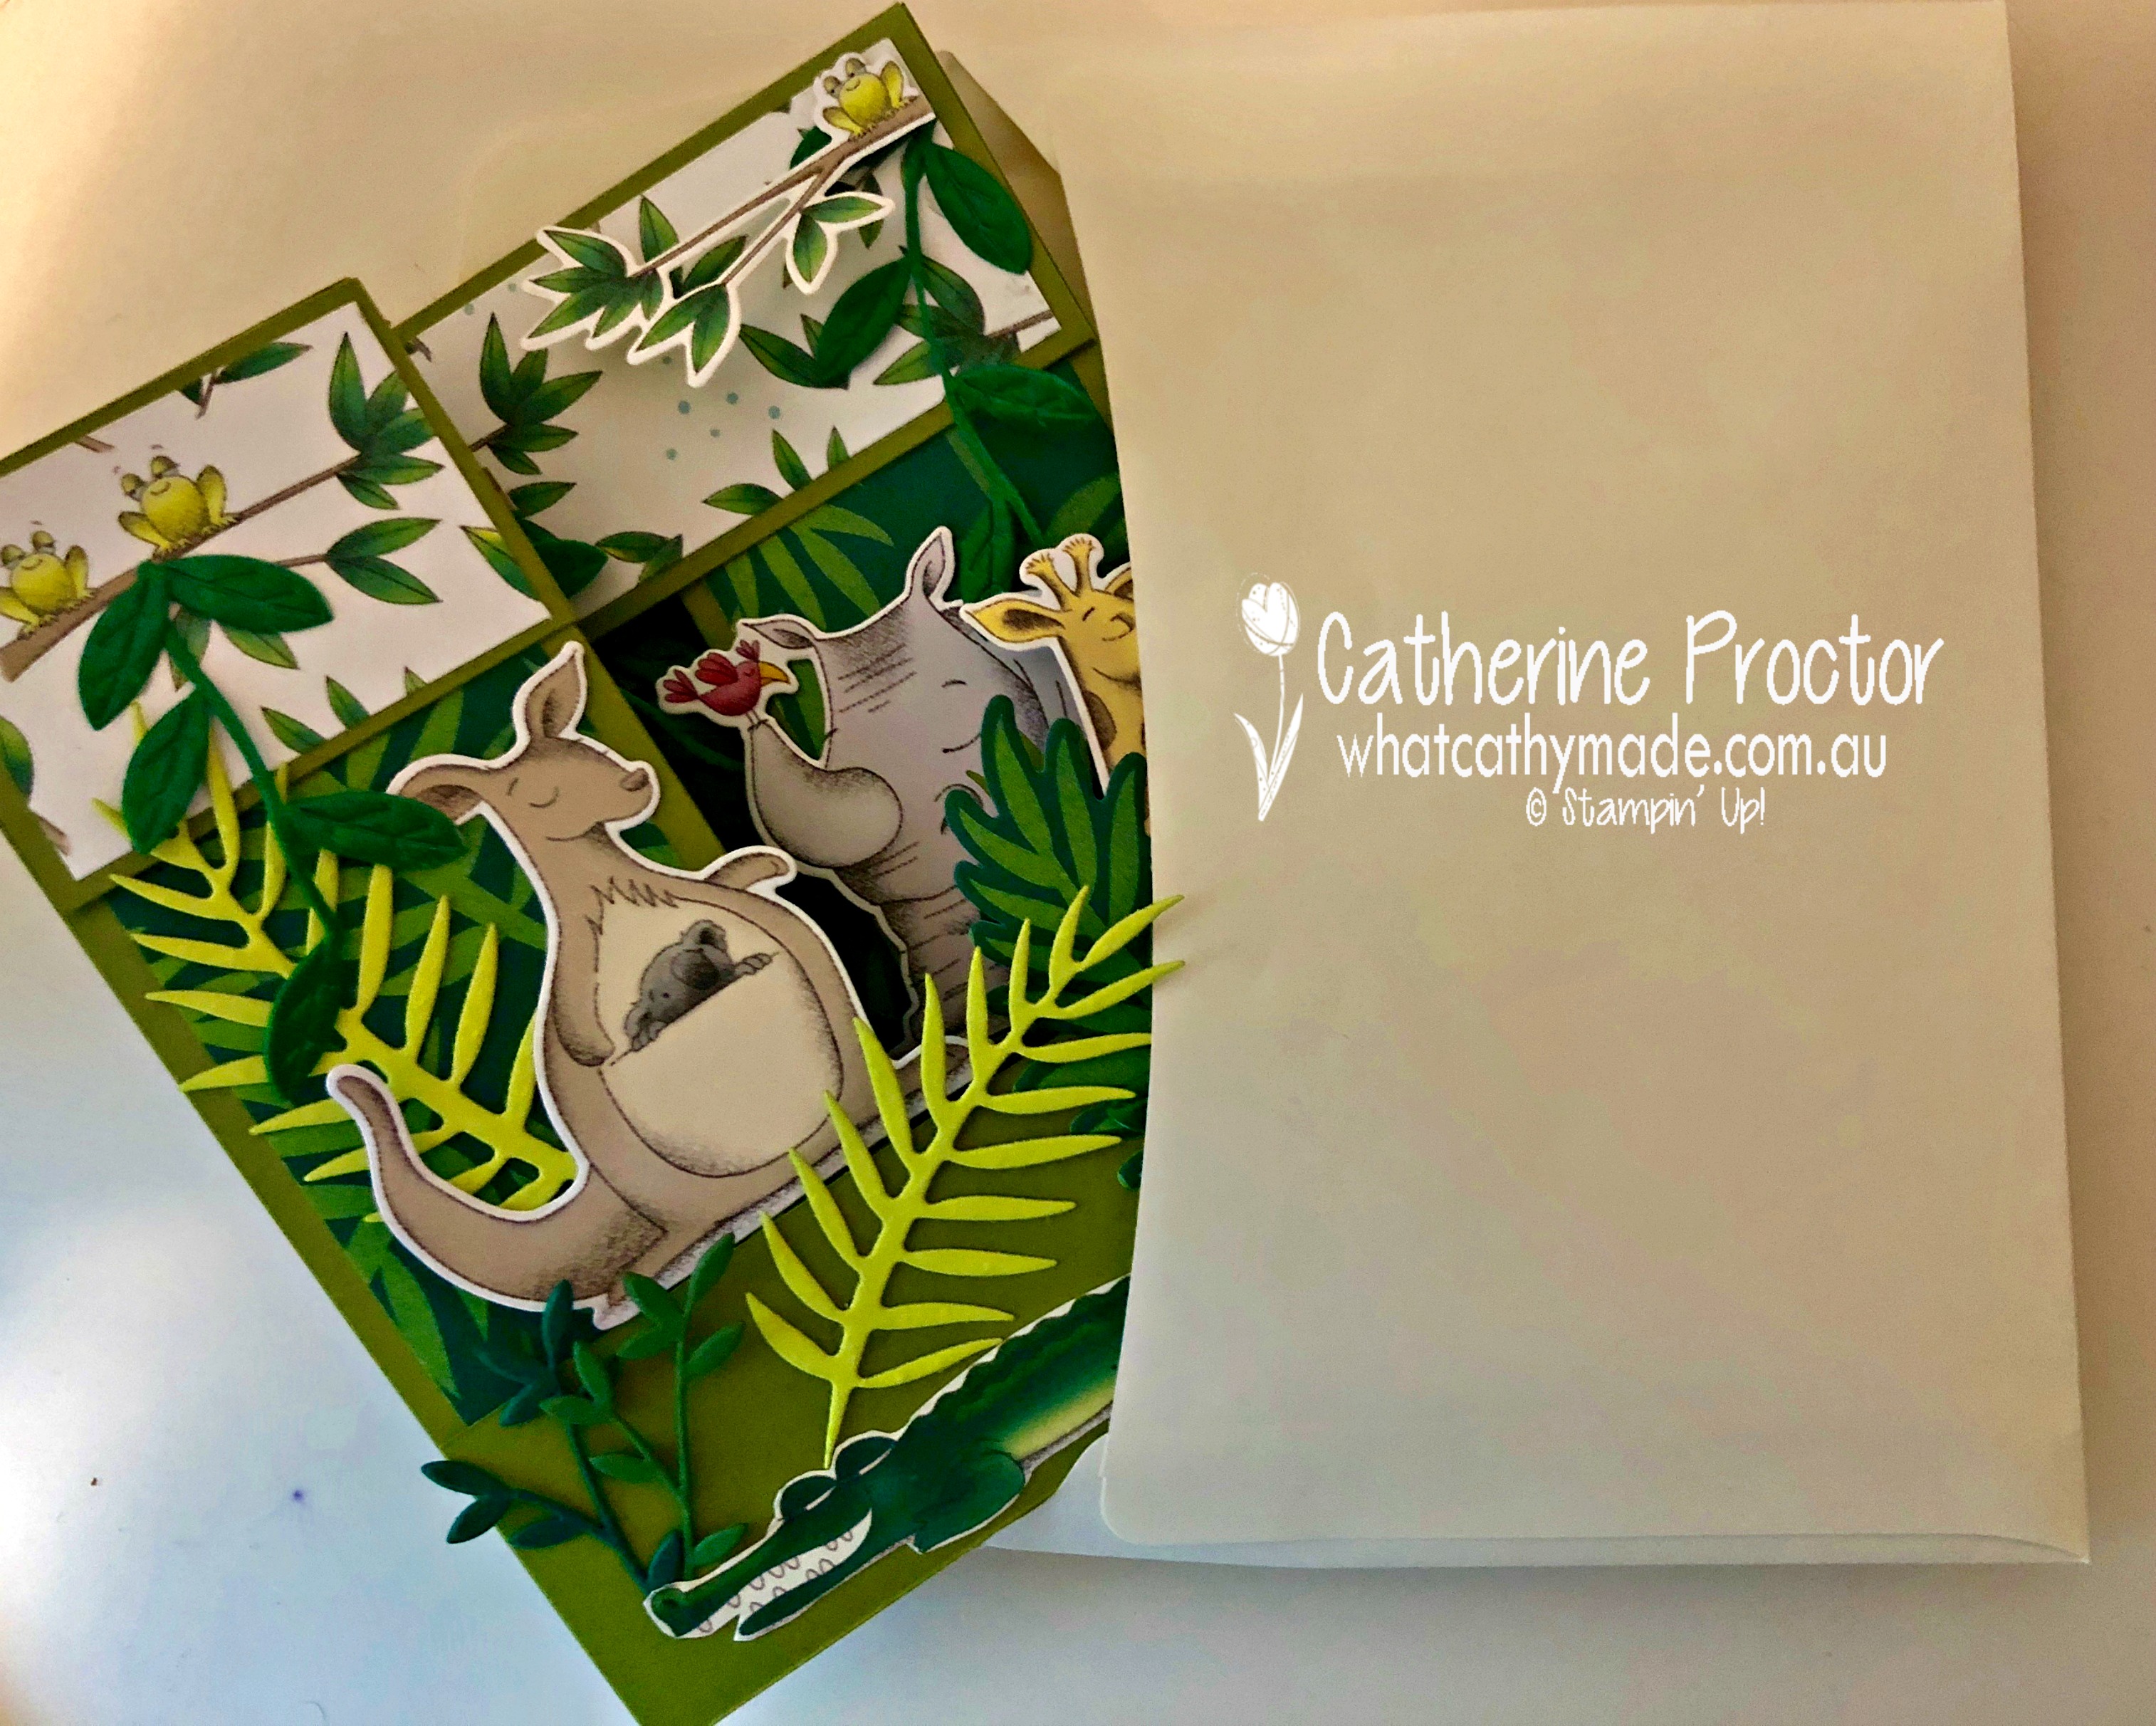
I made this animal card for a very special person…my niece, who turned two a few weeks ago. She’s been overseas with her family for a few months, but they finally return this weekend and we are having a get together at my place to celebrate all of the July birthdays in our family.
I’m wasn’t really sure what to call this card when I began to make it. Is it an Australian bush card because of the kangaroo? Or is it an African jungle card because of the giraffe, the sloth and the hippo? And is it a crocodile or an alligator? But then I had a brainwave. I’m calling it my Taronga Zoo card because this is where all of these animals are found together…and it’s also one of my niece’s favourite places to visit!
This card was inspired by a card I saw on Pinterest that was designed by a Tasmanian Stampin’ Up! demonstrator called Bronwyn Eastley. I bought her awesome tutorial to get the measurements and understand the mechanics of this card but I’ve adapted her original design to suit the DSP papers I wanted to use.
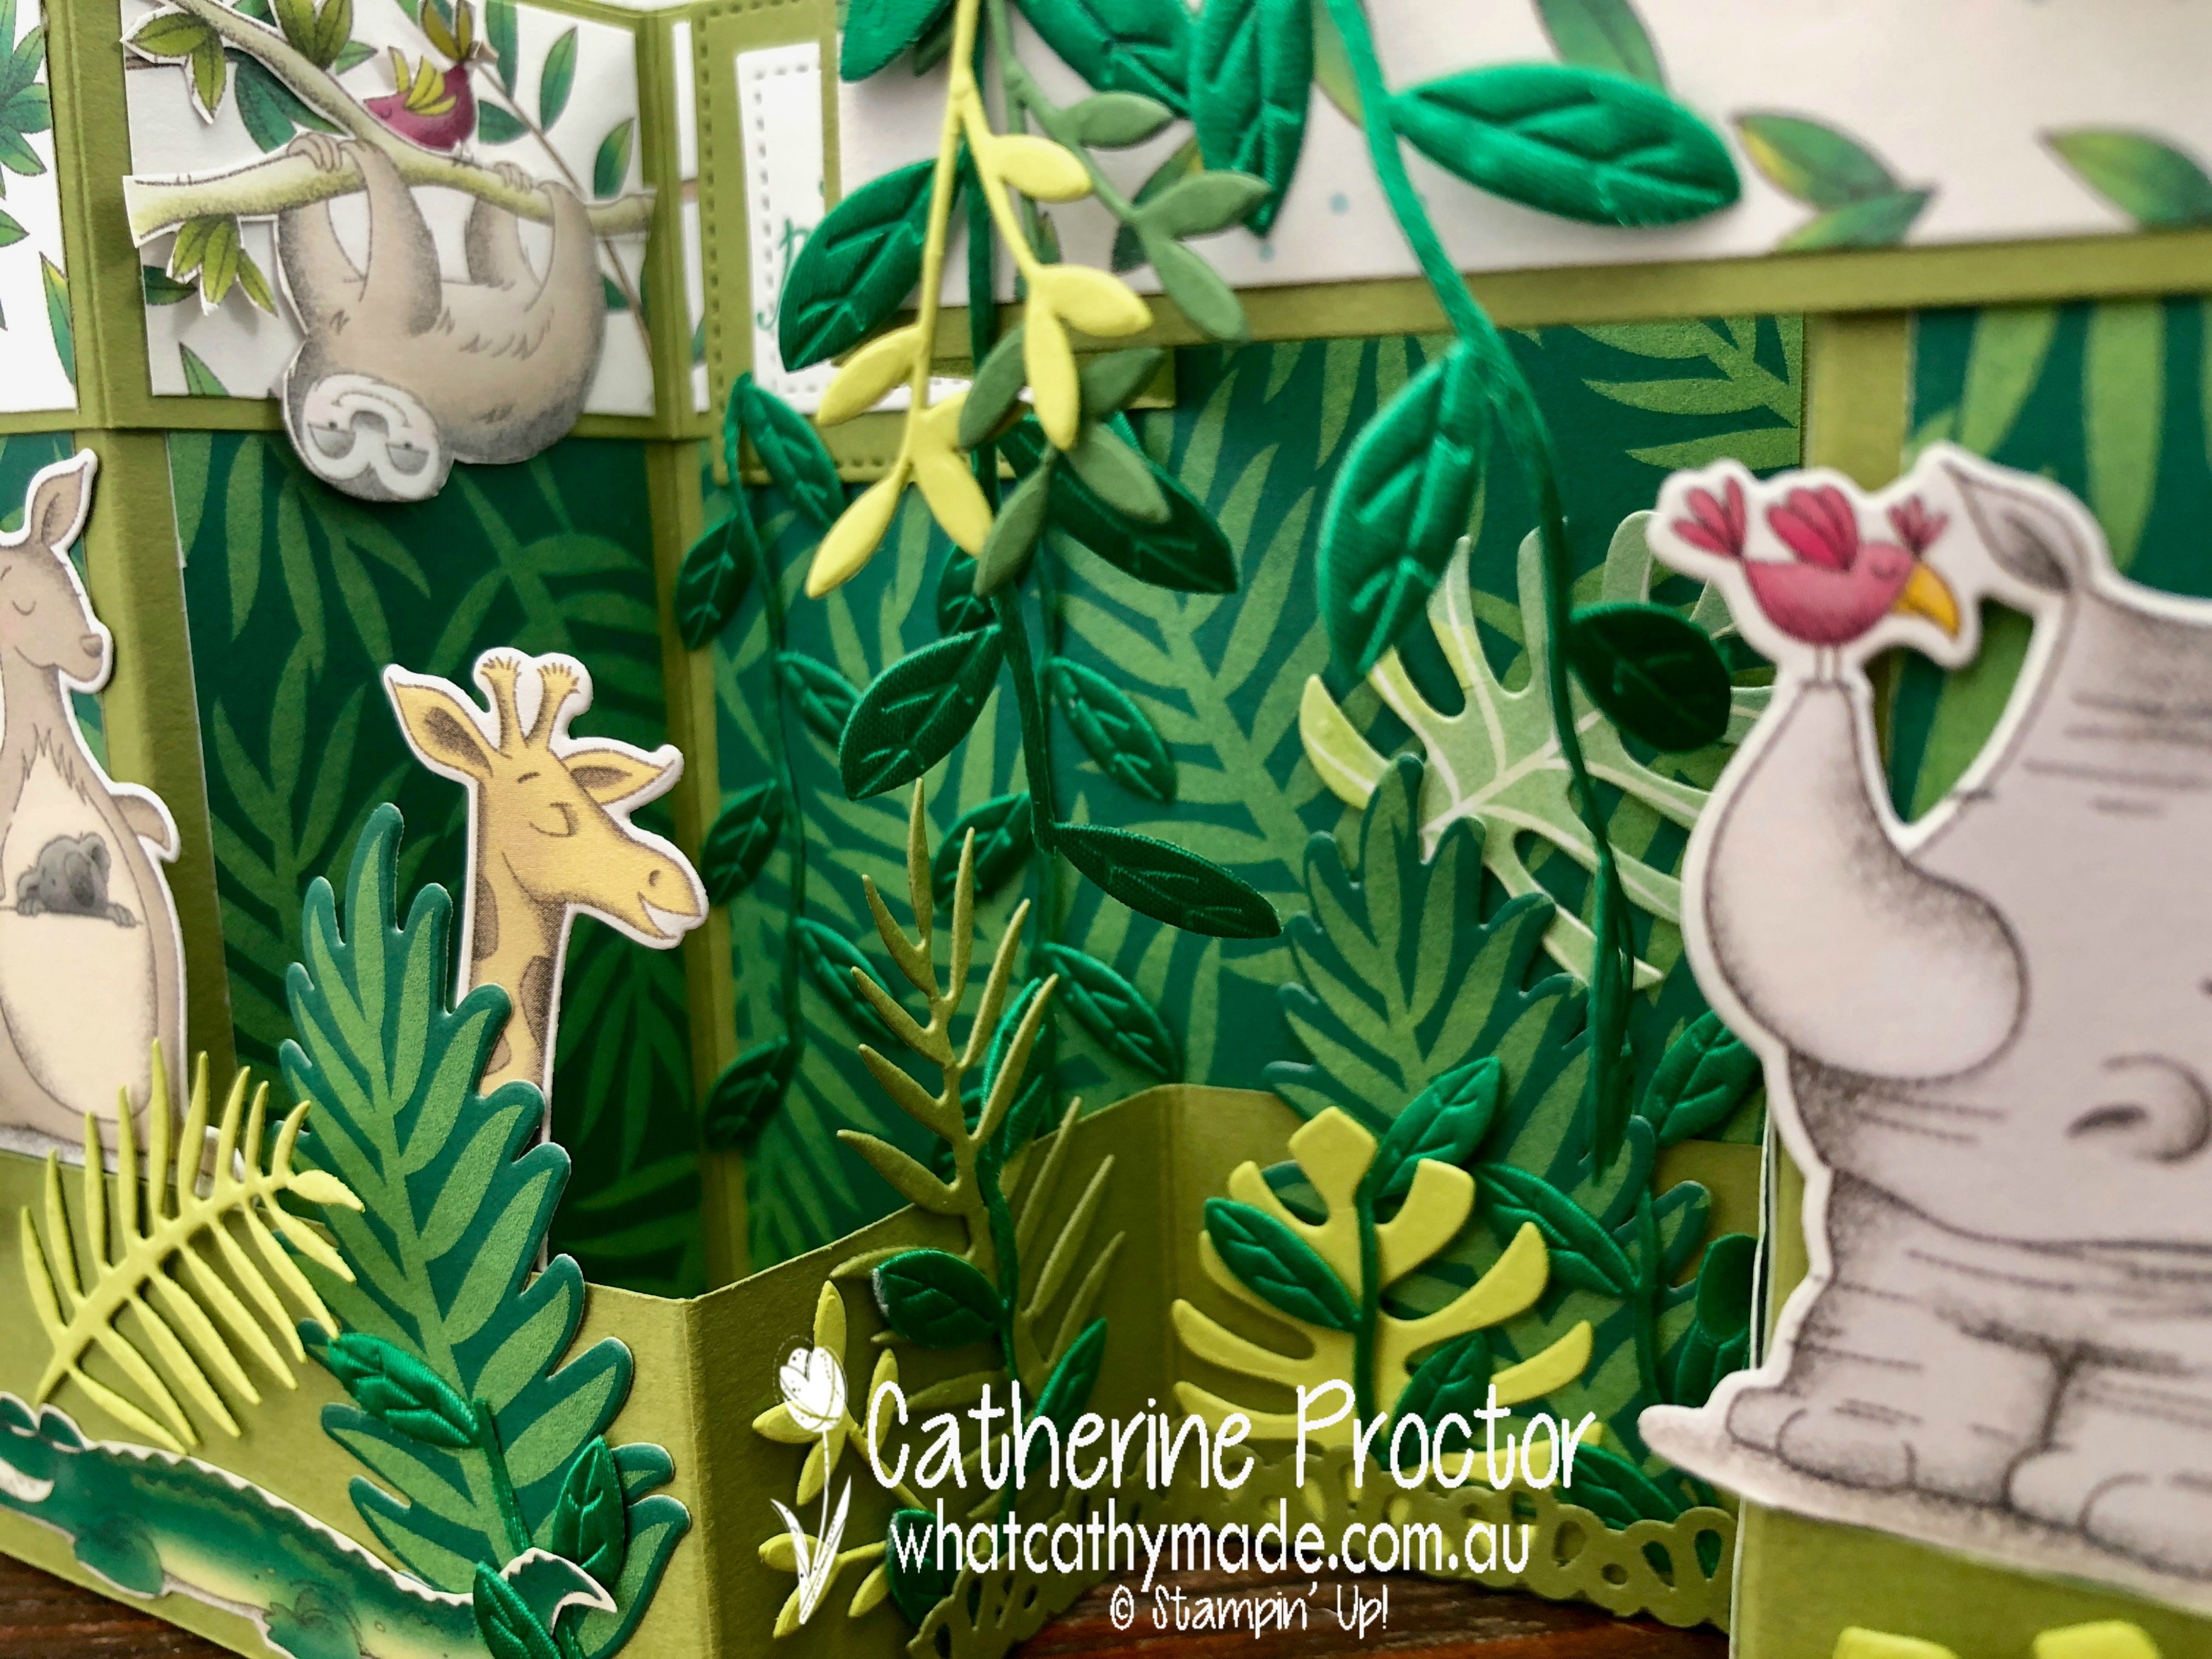
For the base of the card I used Old Olive cardstock, and then I covered all of the panels with the gorgeous Shaded Spruce and Granny Apple Green leaf patterned paper from Tropical Chic. The greens in the DSP across the top of the card that features the frogs on the branches are Call Me Clover and Lemon Lime Twist, and the gorgeous leaf ribbon (how cute is this ribbon!!!!) is also Call Me Clover.
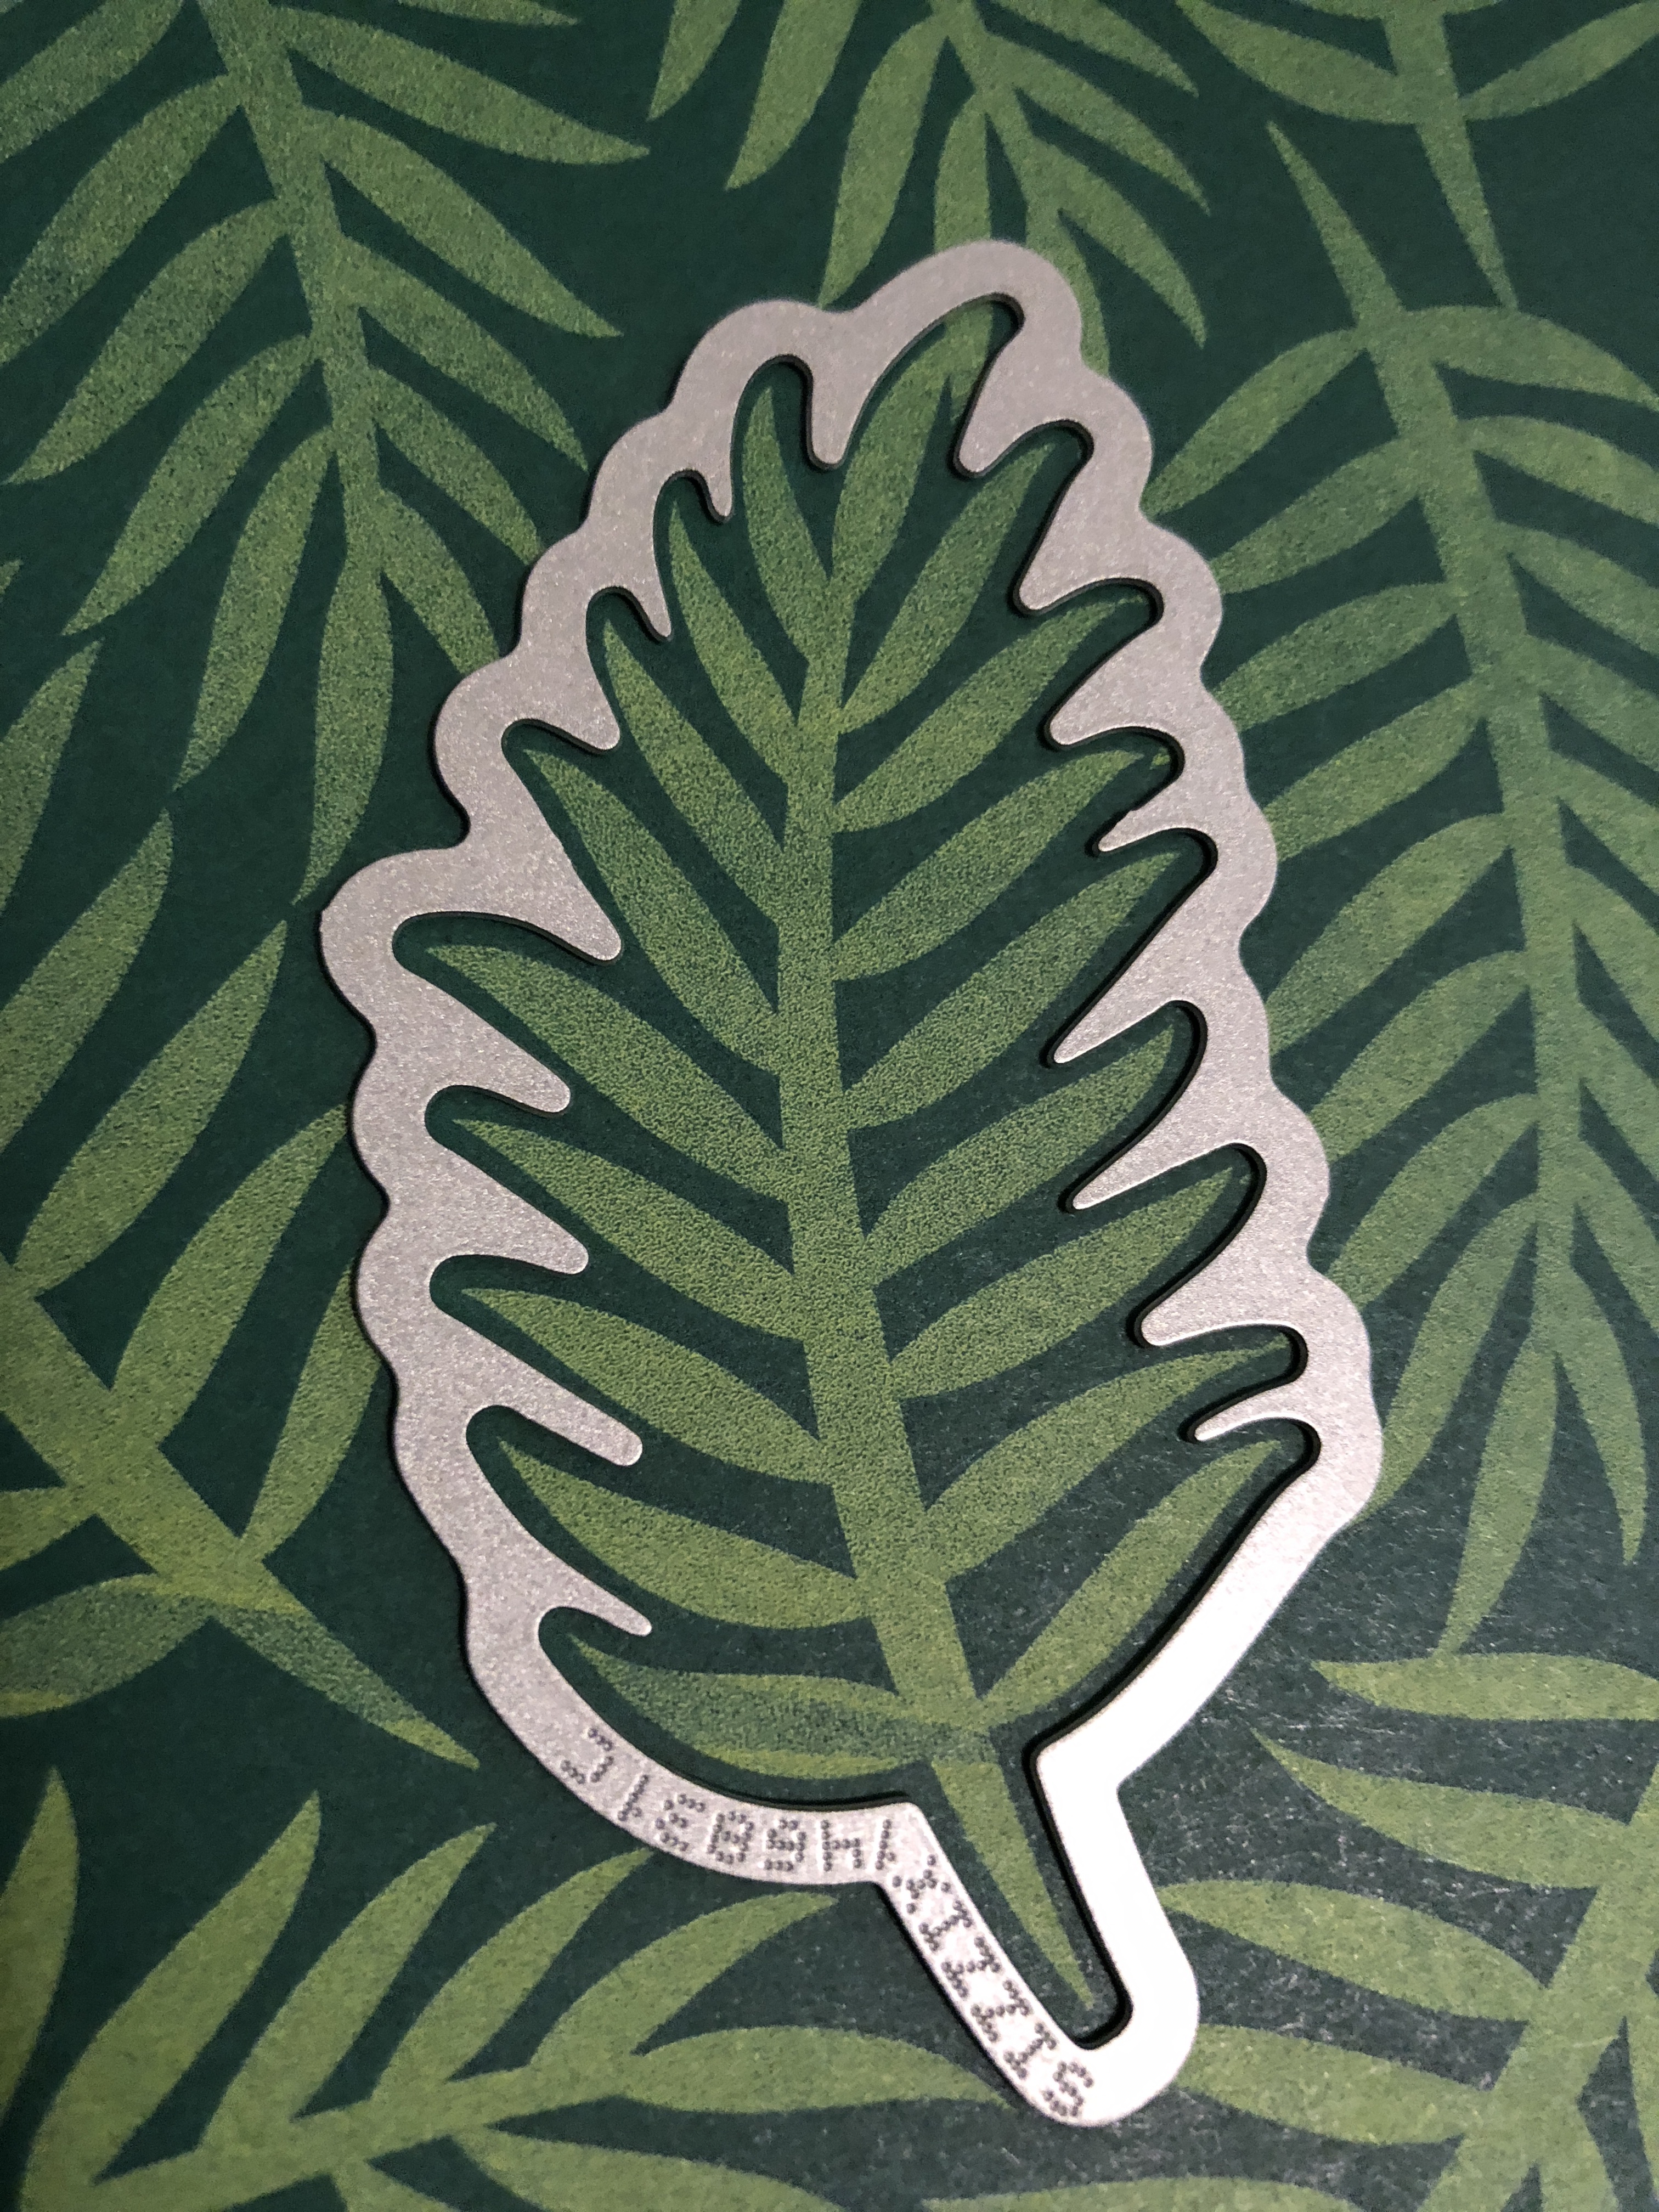
Once I’d constructed the base of this card and added the panels of DSP, I went crazy with my bigshot and started cutting out animals from the Animal Expedition DSP, leaves from the Tropical Escape DSP, and extra leaves from coordinating cardstock and just kept layering until my Taronga zoo card was full of leaves and animals.
I had to fussy cut the sloth on his branch and the crocodile, but all of the other animals had their own die, which made this card super easy to make.
This card folds down to fit into a standard card sized envelope, and I can’t wait to see the look on my niece’s face when she pulls the card out of the envelope and realises it opens up to create a 3-D zoo scene!
Now it’s time to hop on over to our next participant, the very talented, Kate Morgan.
If you find a broken link or have come to this blog hop from a different entry point, you can view the participants below:
Welcome to another week of Christmas inspiration with the Art with Heart team.
This week I’m playing with holly: holly paper, holly embossing folder, holly embellishments, and holly stamps, including a stamp set I hadn’t inked up yet.
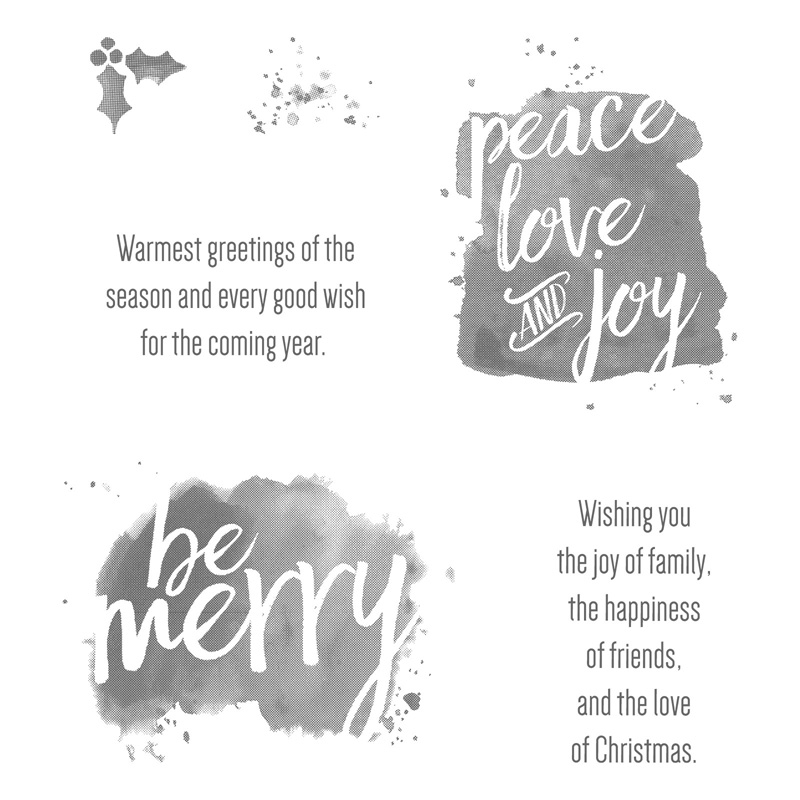
I was really attracted to the Every Good Wish stamp set because I’ve got a soft spot for holly. It’s just so classic and timeless…and so very Christmassy.
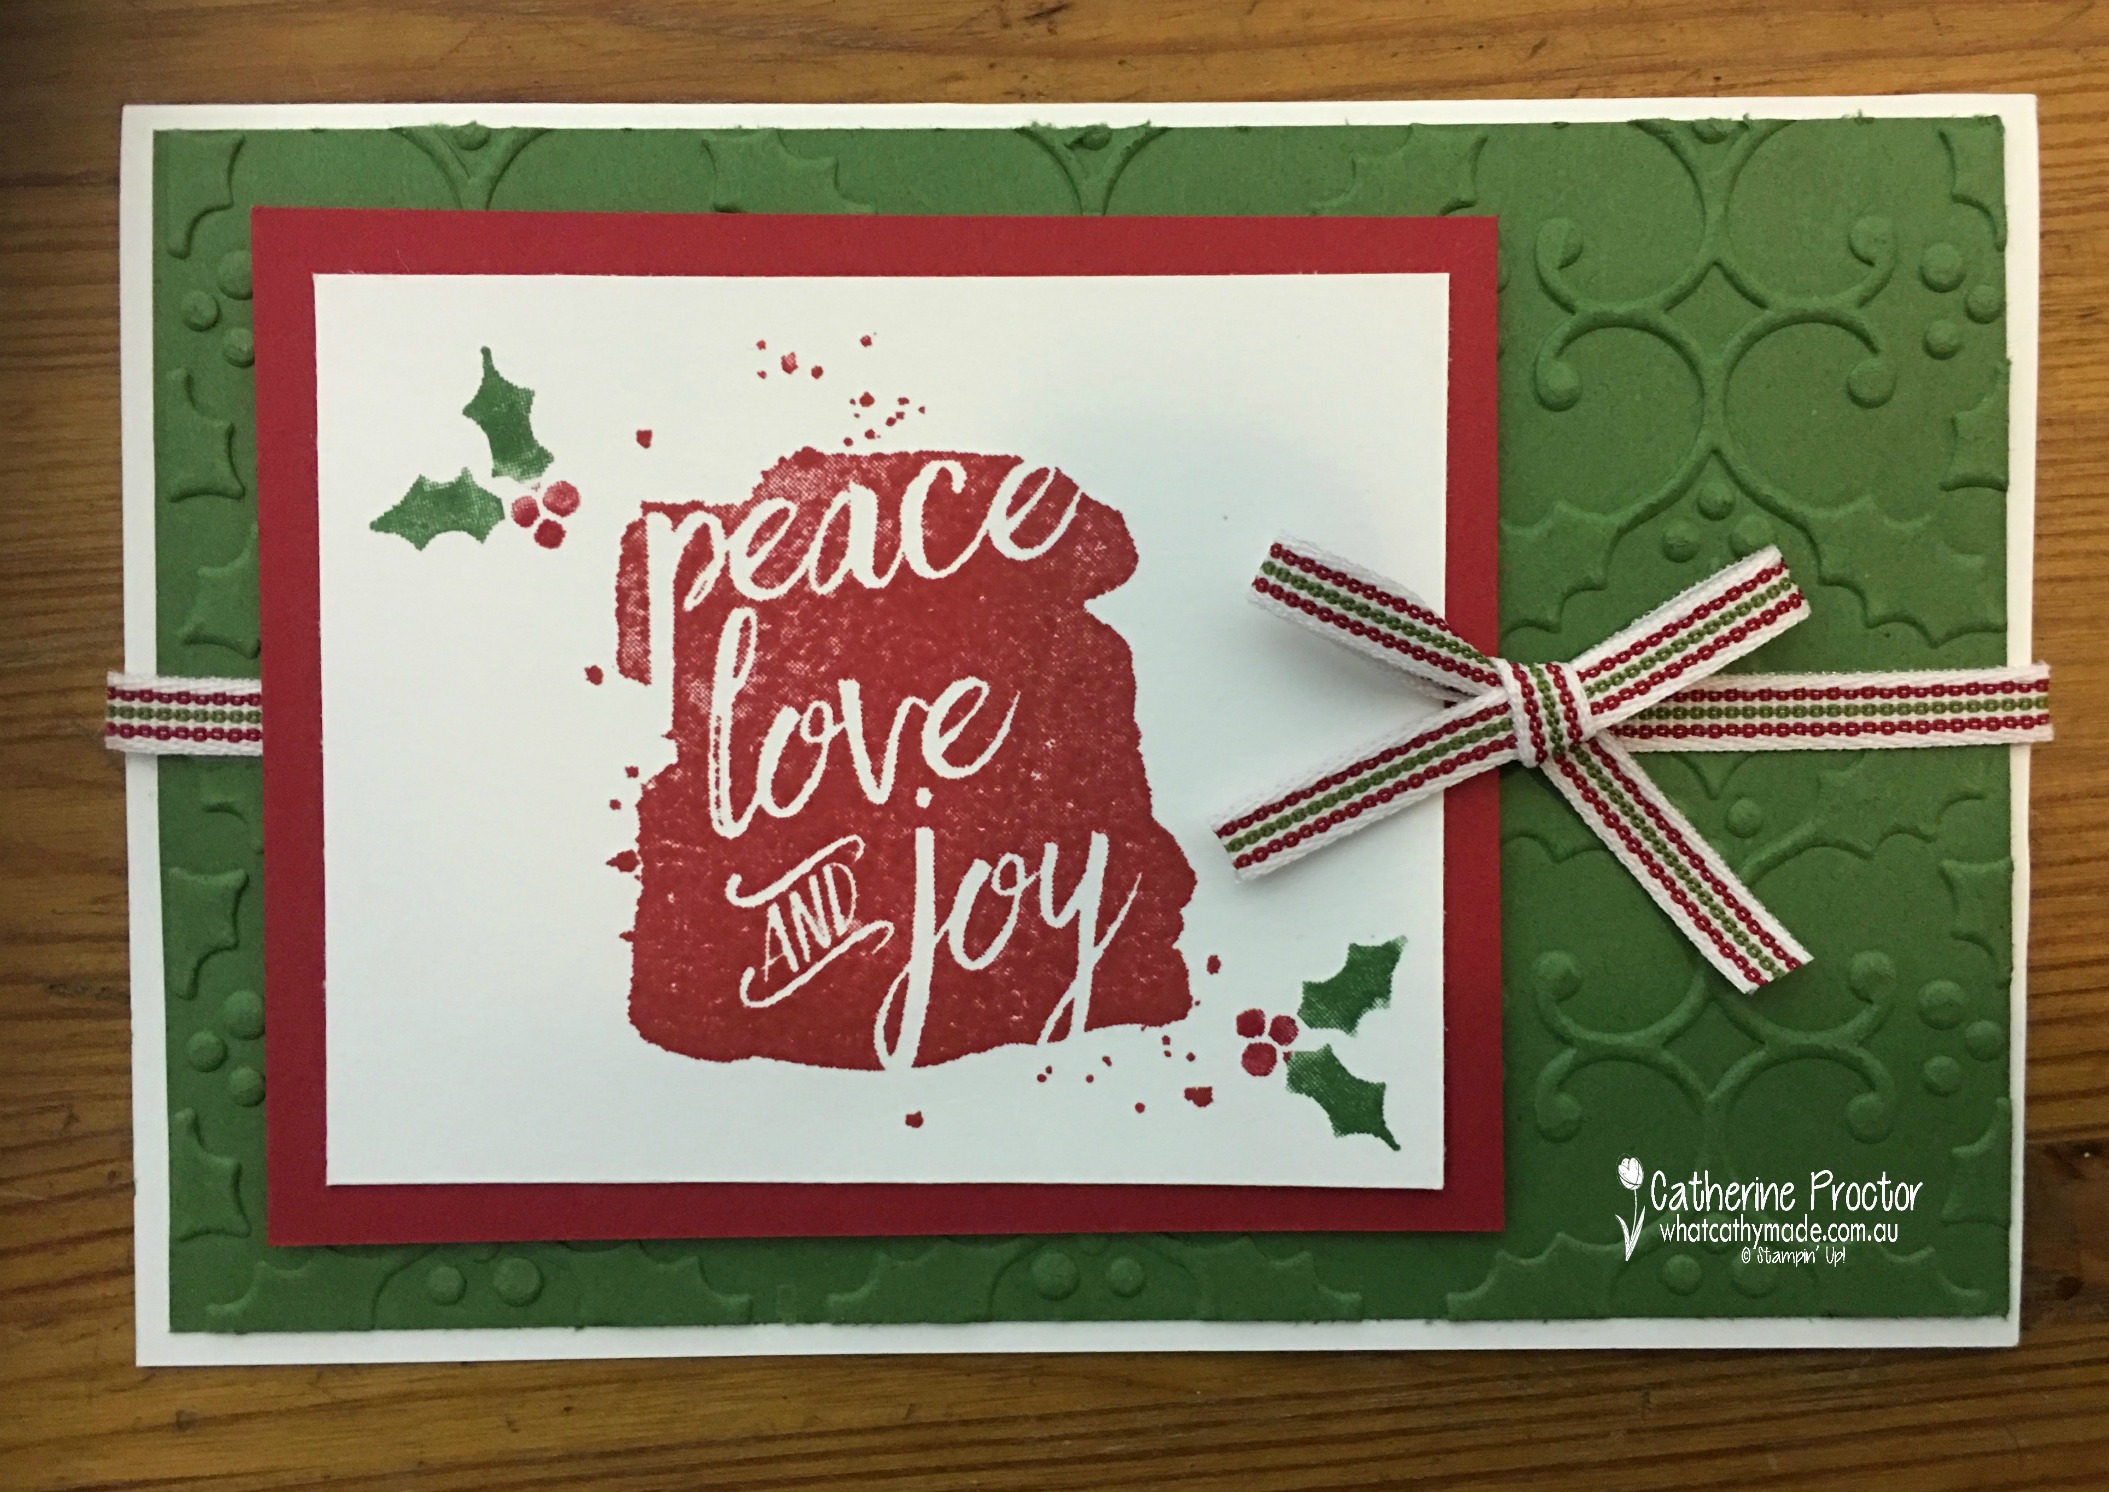
Here’s my first card. I’ve used real red and garden green for all of my holly cards…it’s such a great colour combination, at once both classic and crisp.
Don’t you just love the texture the Holly textured impressions embossing folder gives to this card?
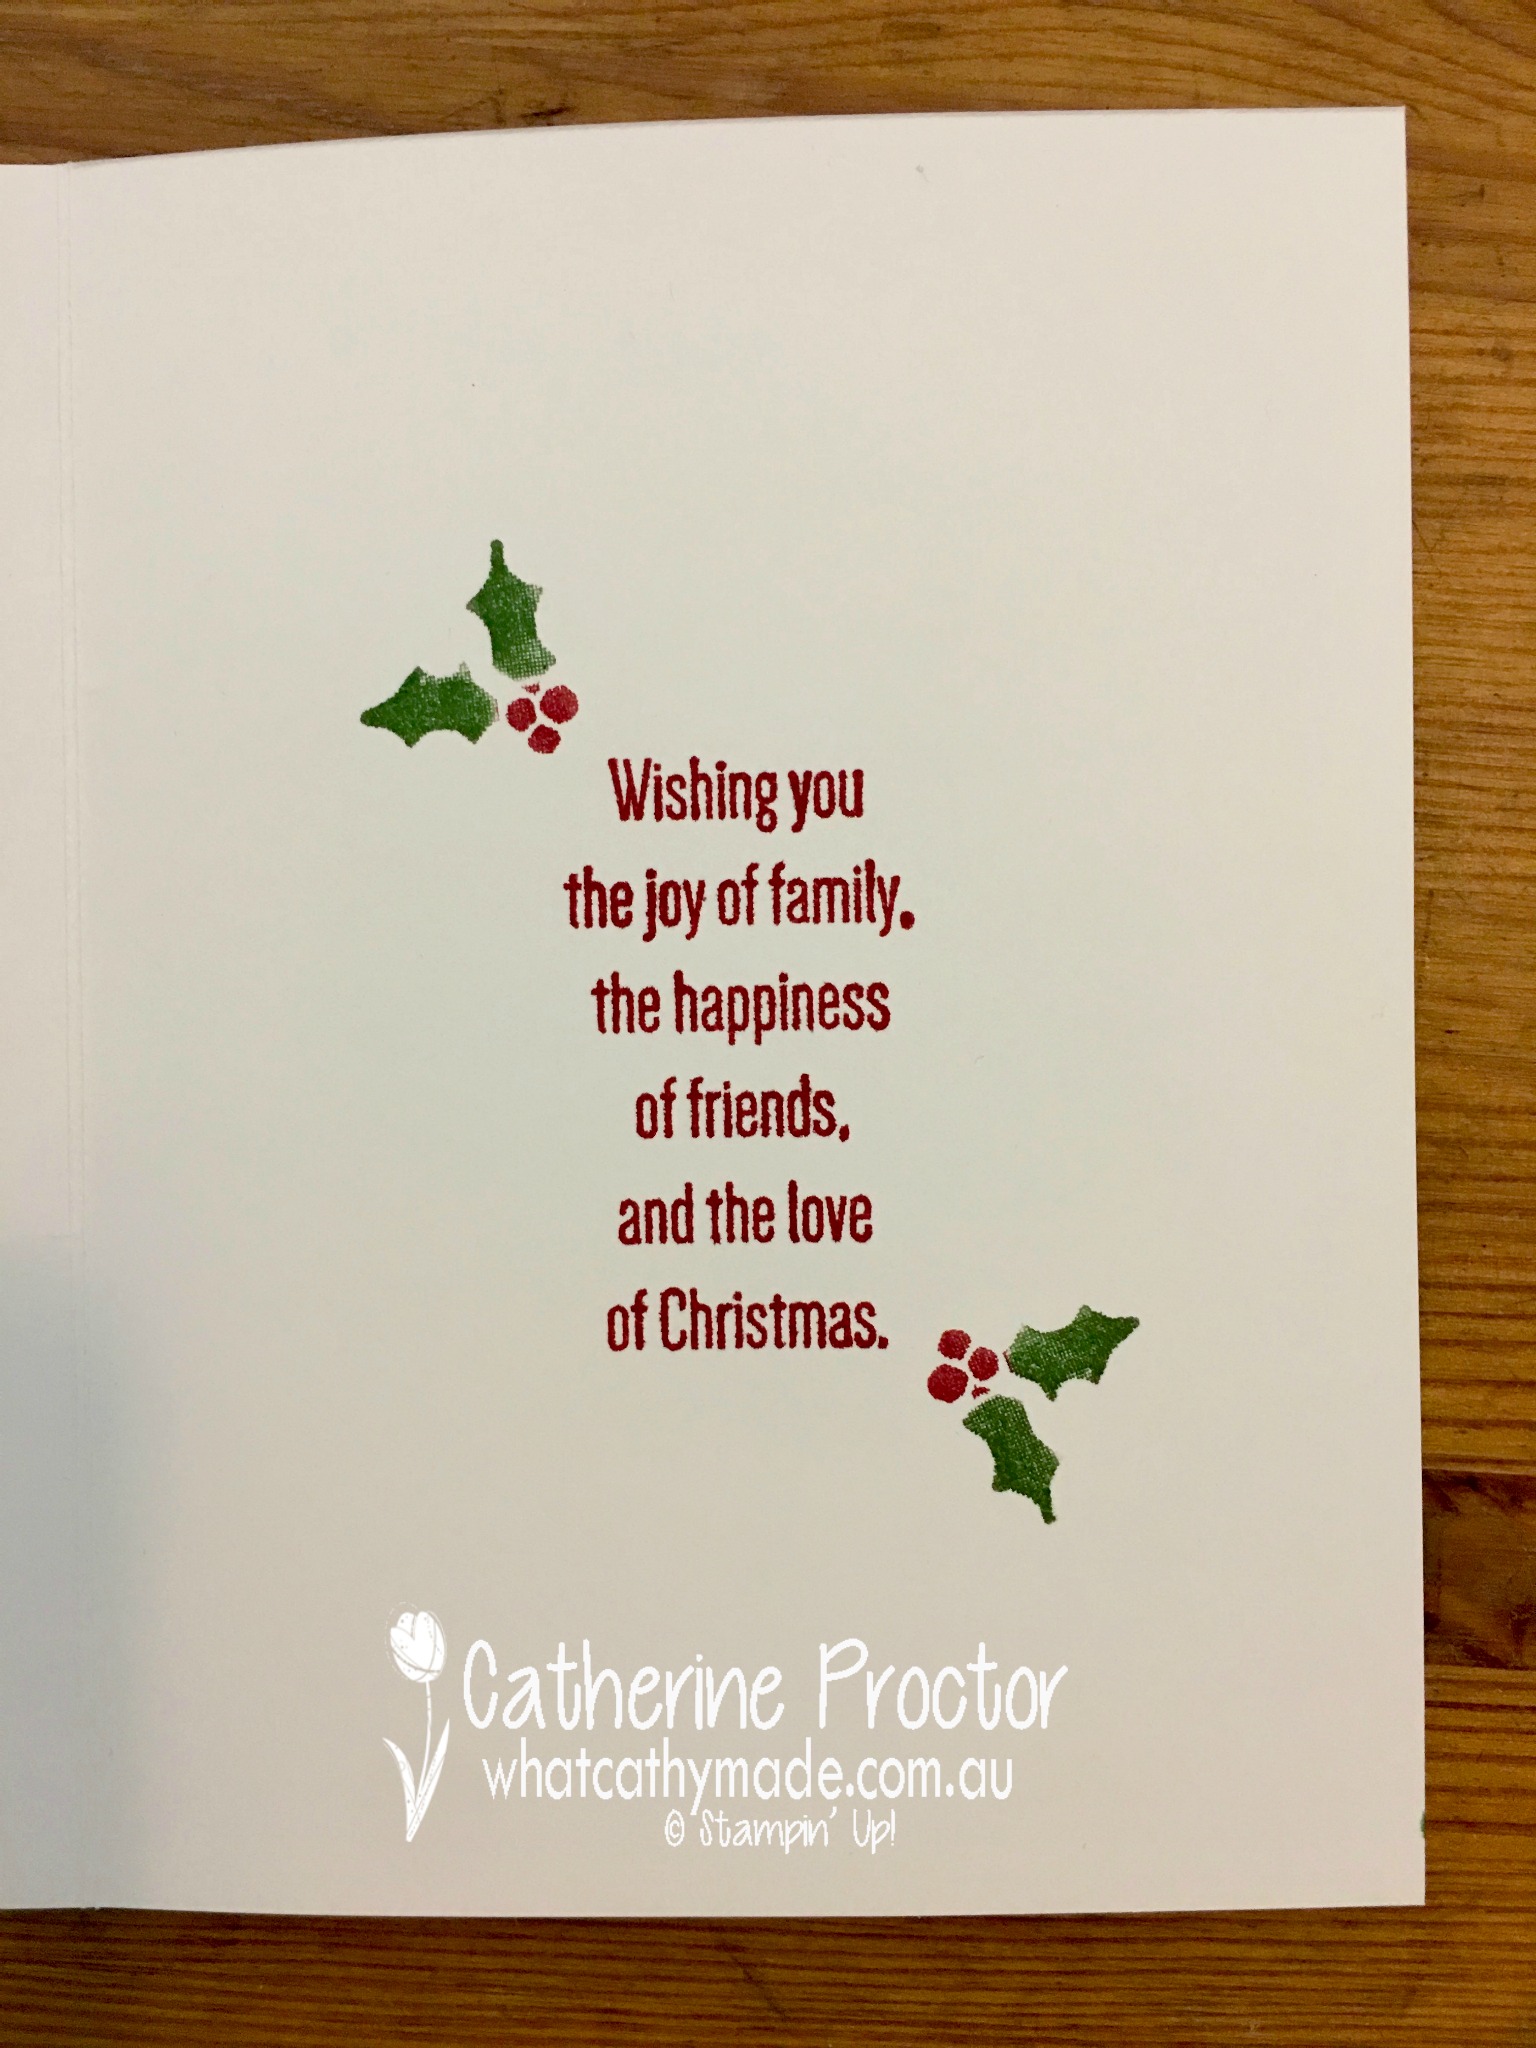
I love all of the stamps in the Every Good Wish stamp set and the inside sentiments are as lovely as the main images. I don’t usually ink up the inside of my cards but I just had to use these lovely sentiments to decorate the inside of my holly cards.
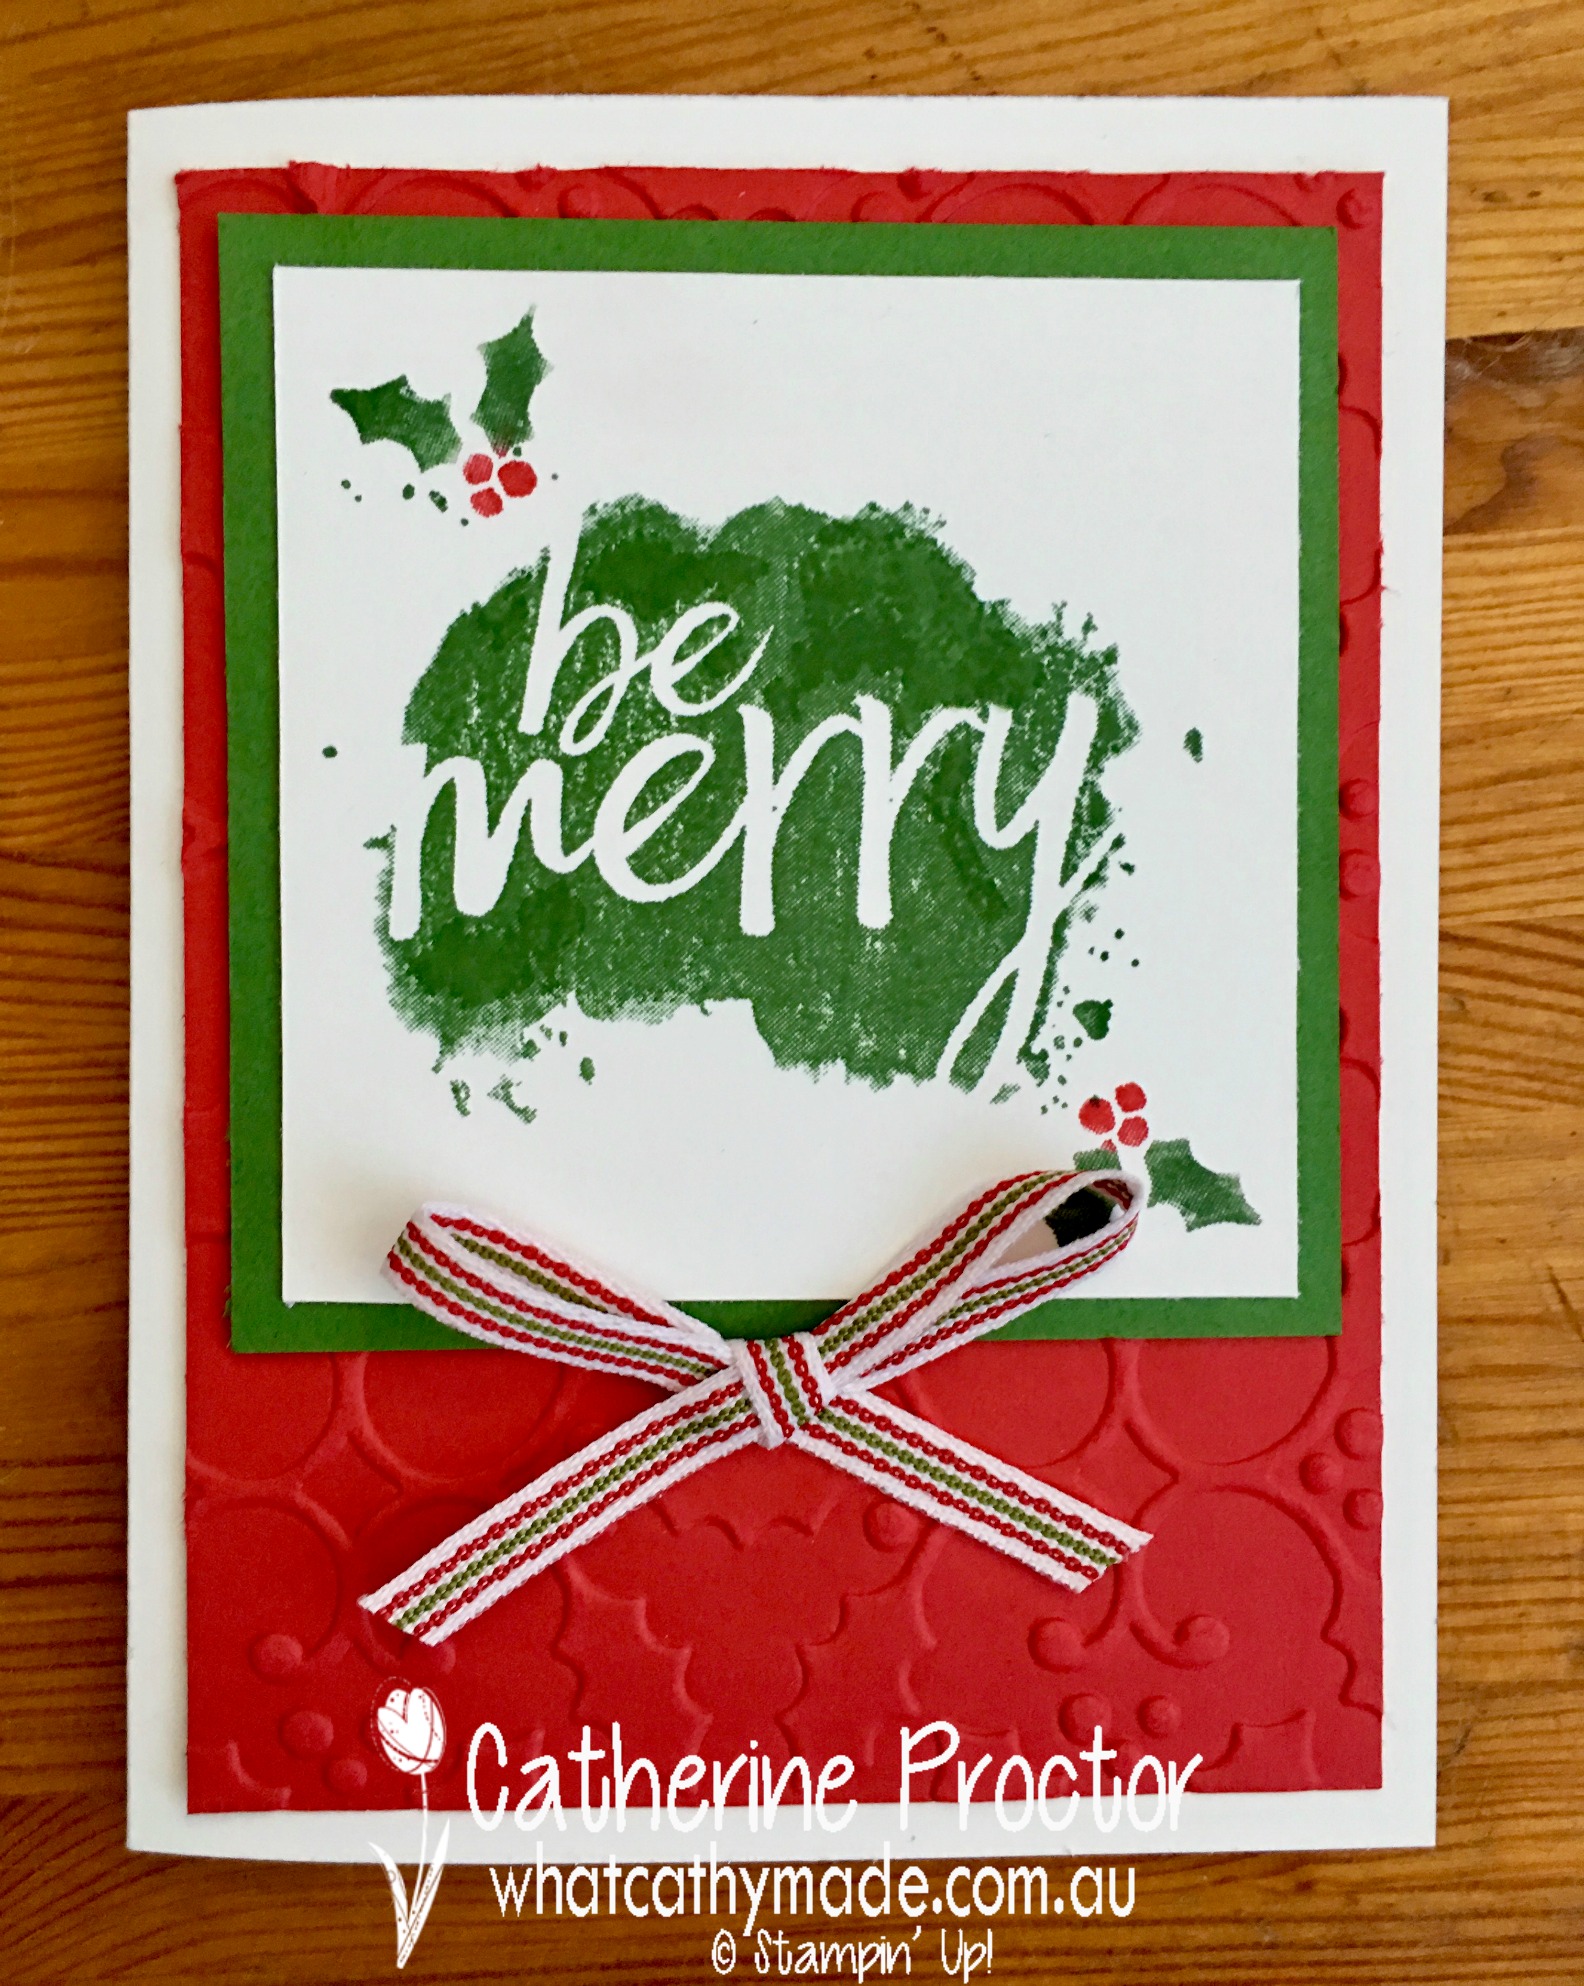
For my second card I made a variation of my first card, altering the colours and the orientation of the first card, and I also stamped a greeting on the inside of this one too. The gorgeous Quilted Christmas ribbon makes the perfect embellishment for this colour combination.
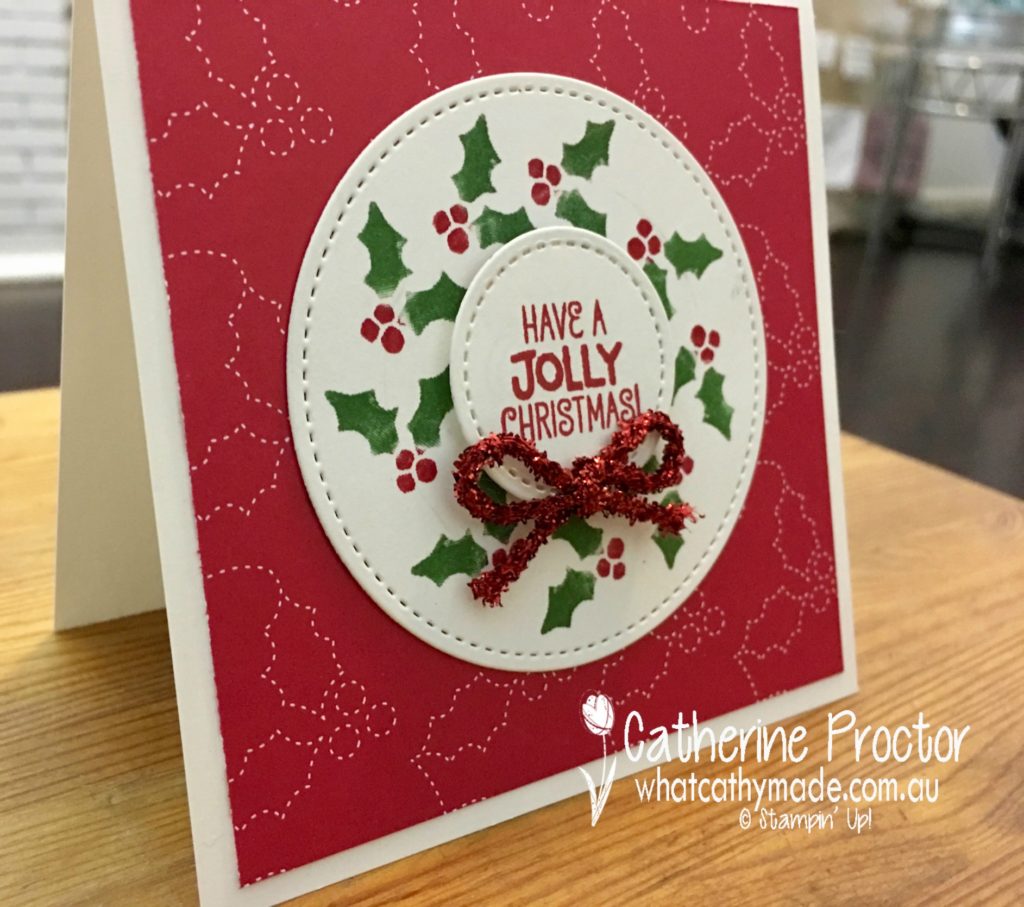
I was on a roll with my holly theme so I made 2 more cards…and I actually think these are my favourites! I used the same little holly stamp to make a wreath, this time mounting it onto holly DSP from the Quilted Christmas DSP.
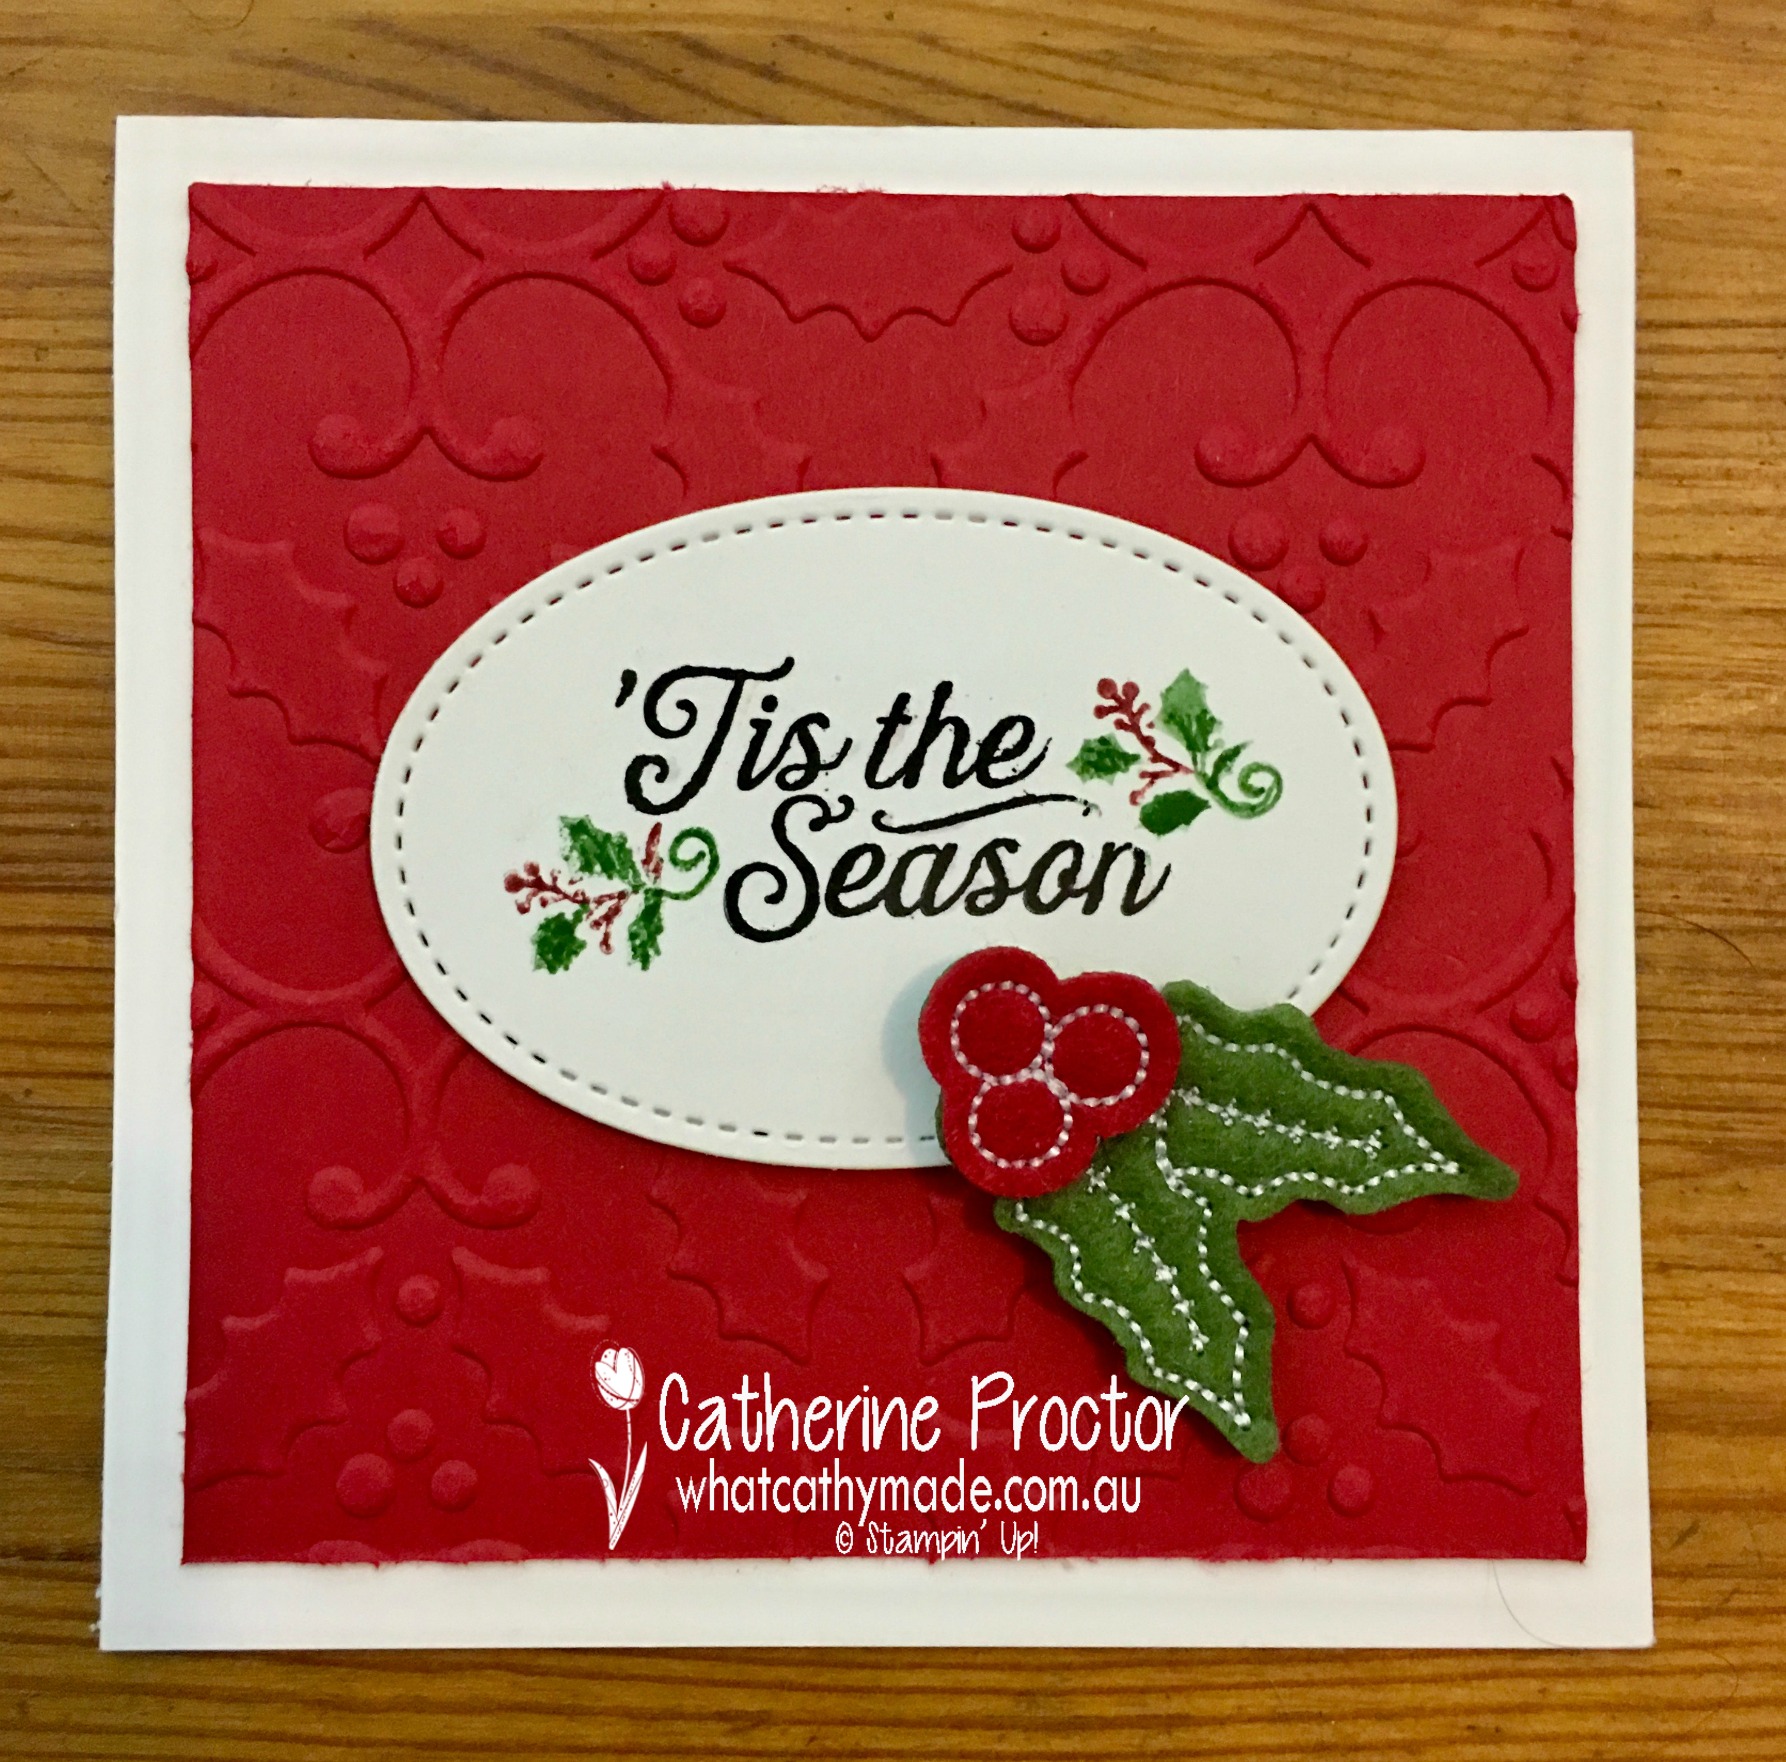
My final card uses the holly embossing folder again, this time with a stamp from the Oh, What Fun stamp set, embellished with a holly stitched felt embellishment.
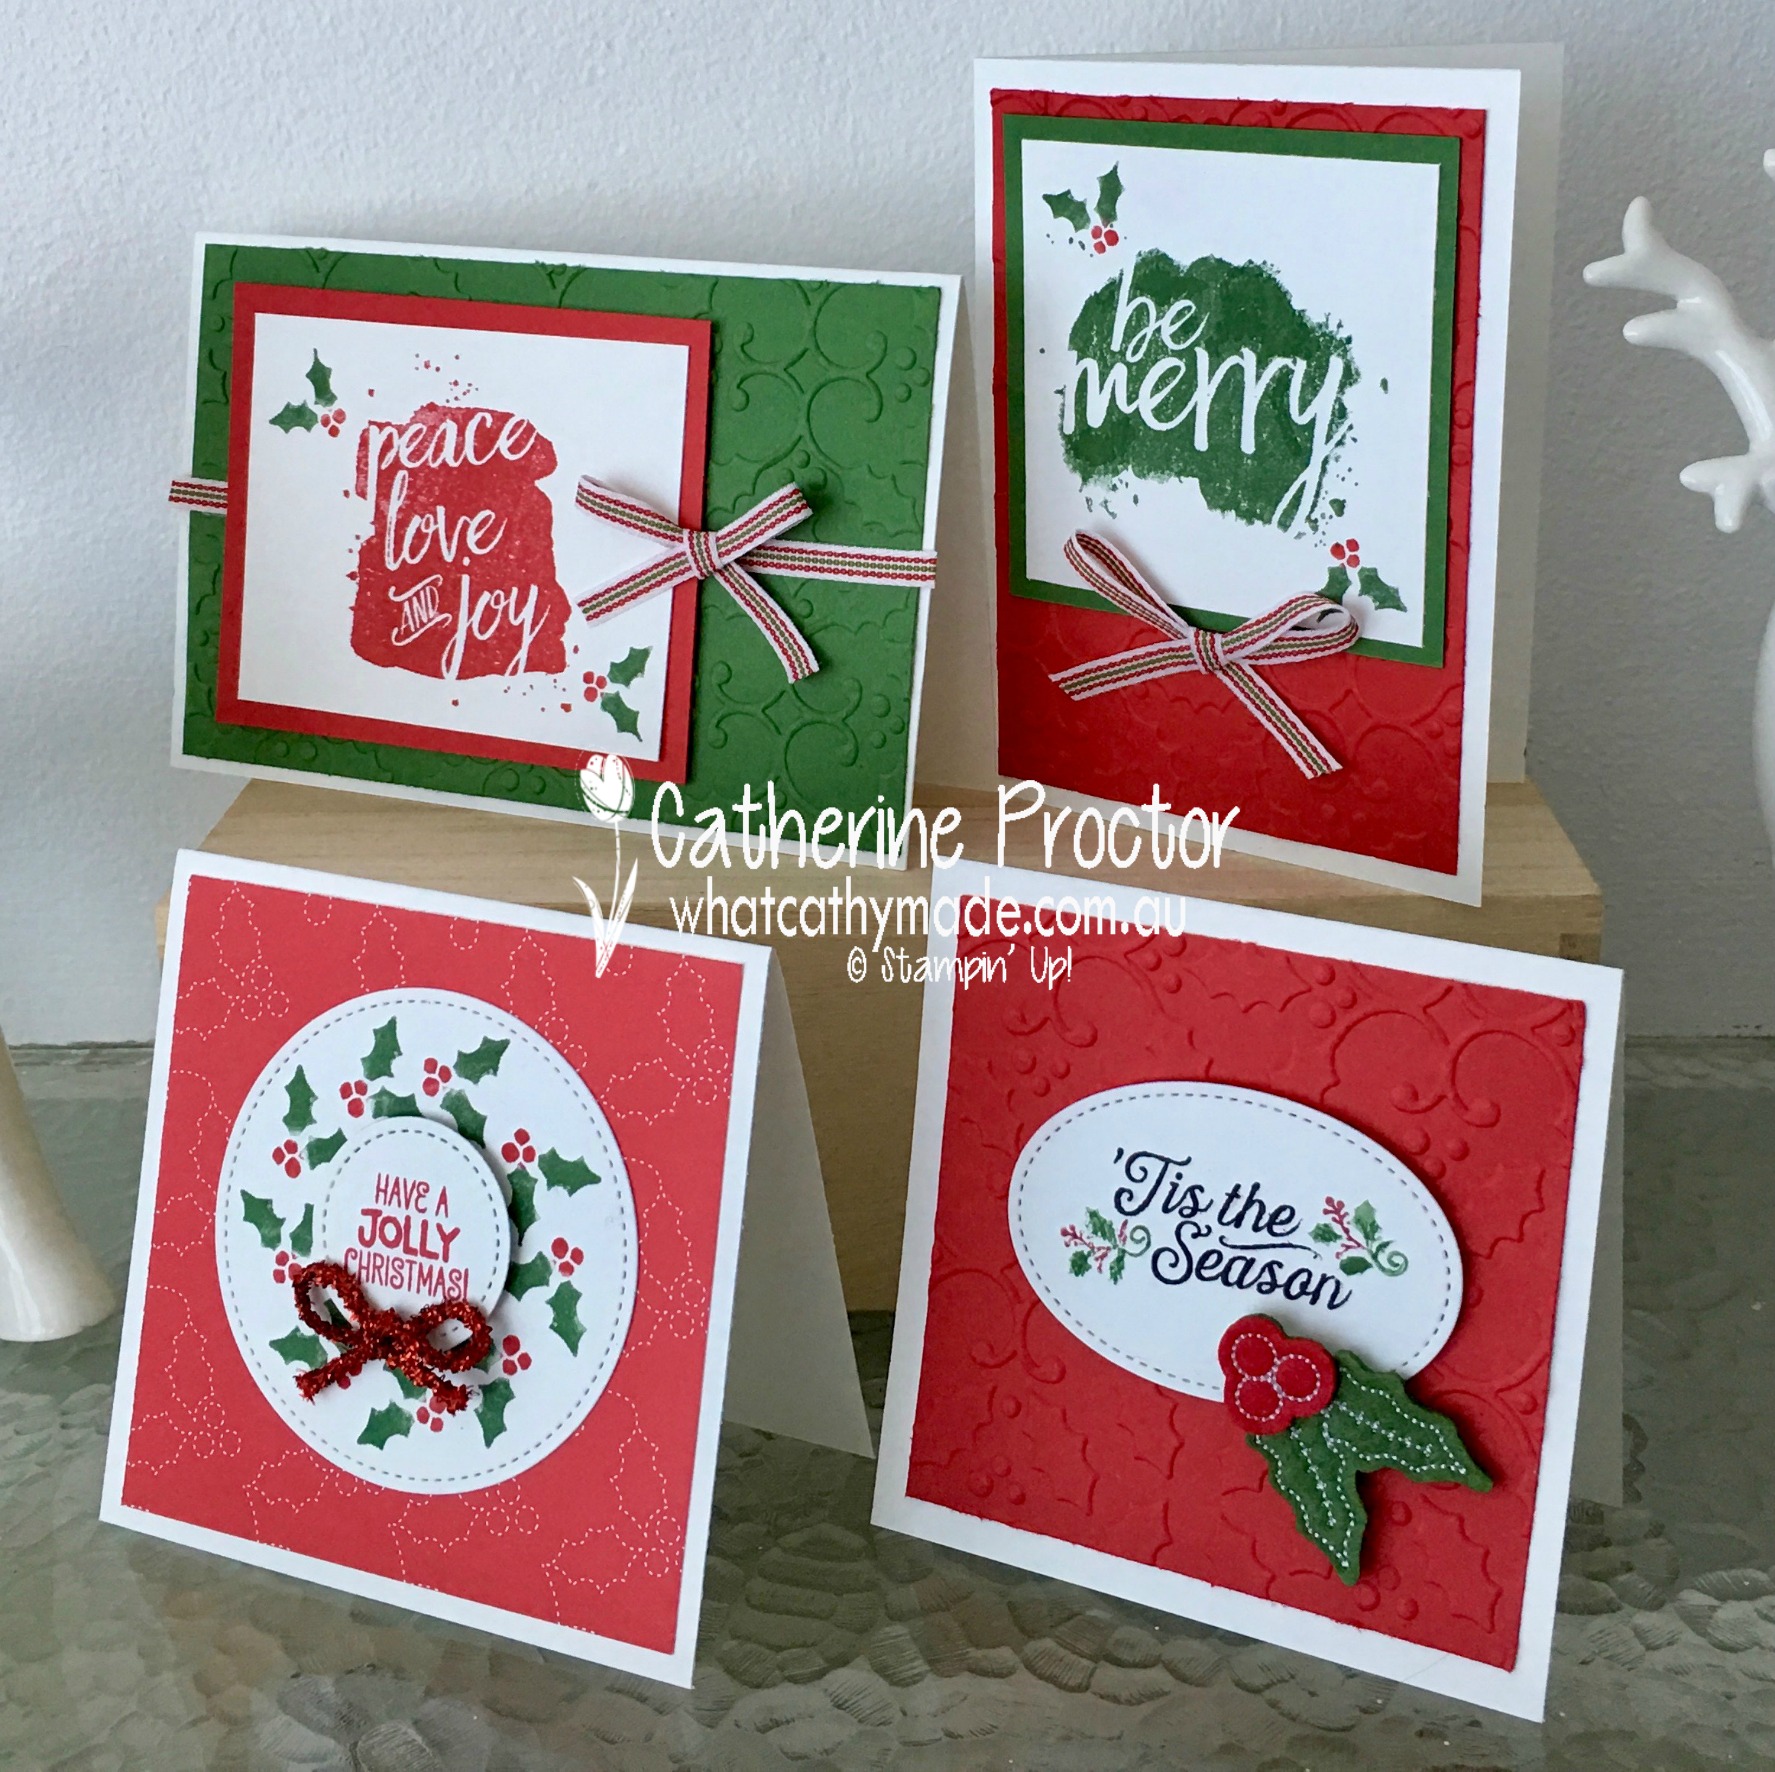
And here’s all my cards together! Which is your favourite?
To see what the rest of the team have made hop back to Claire’s blog and I’ll be back with some more Christmas inspiration next week.
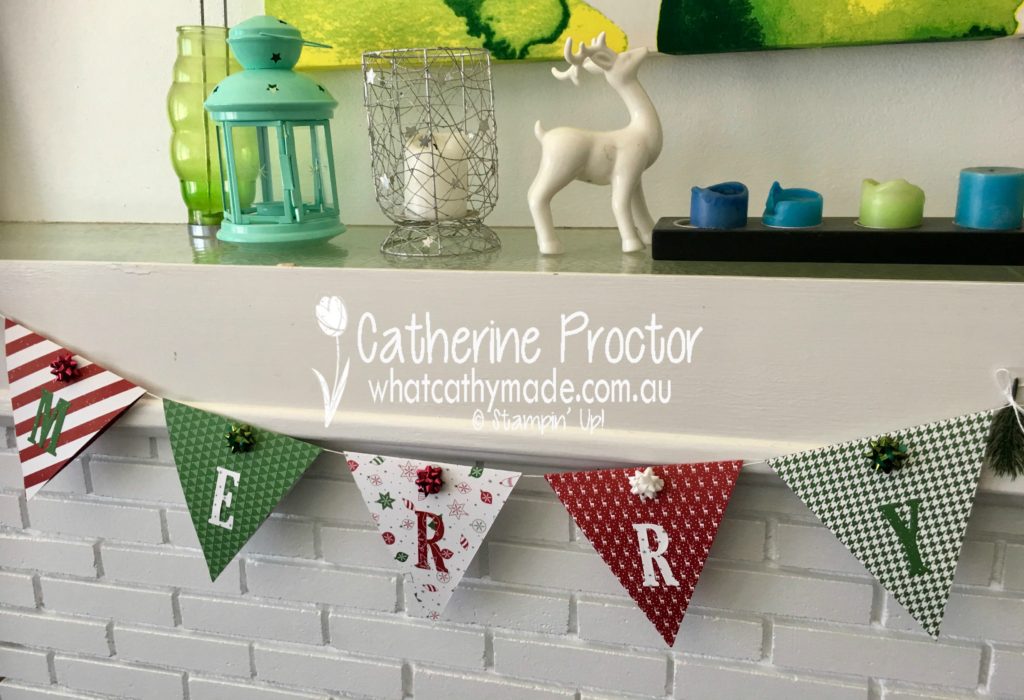
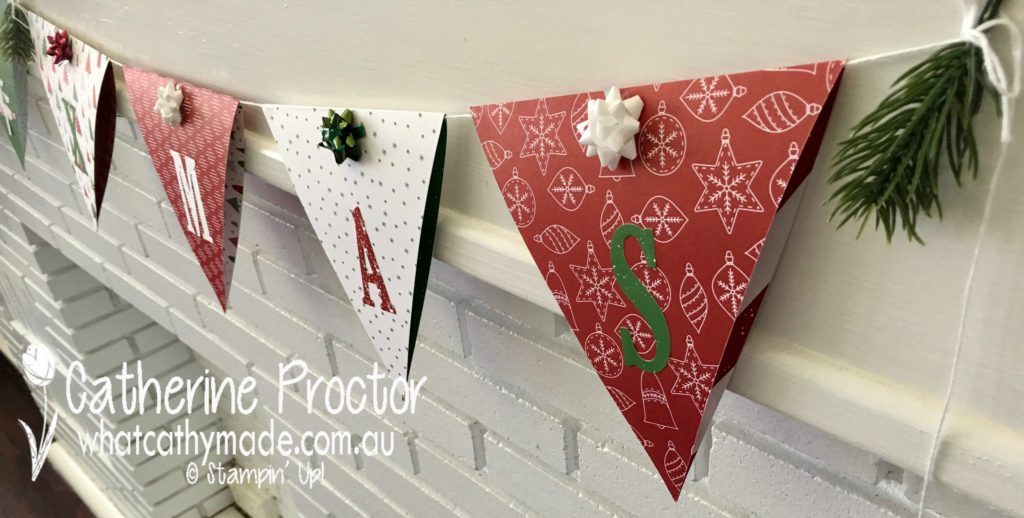
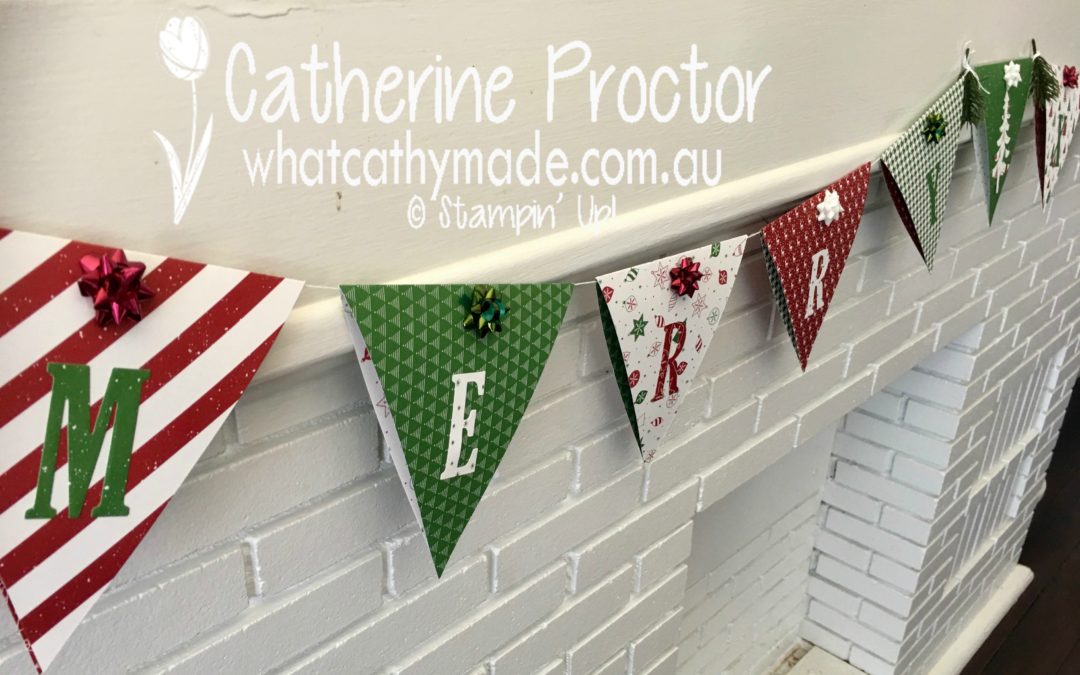
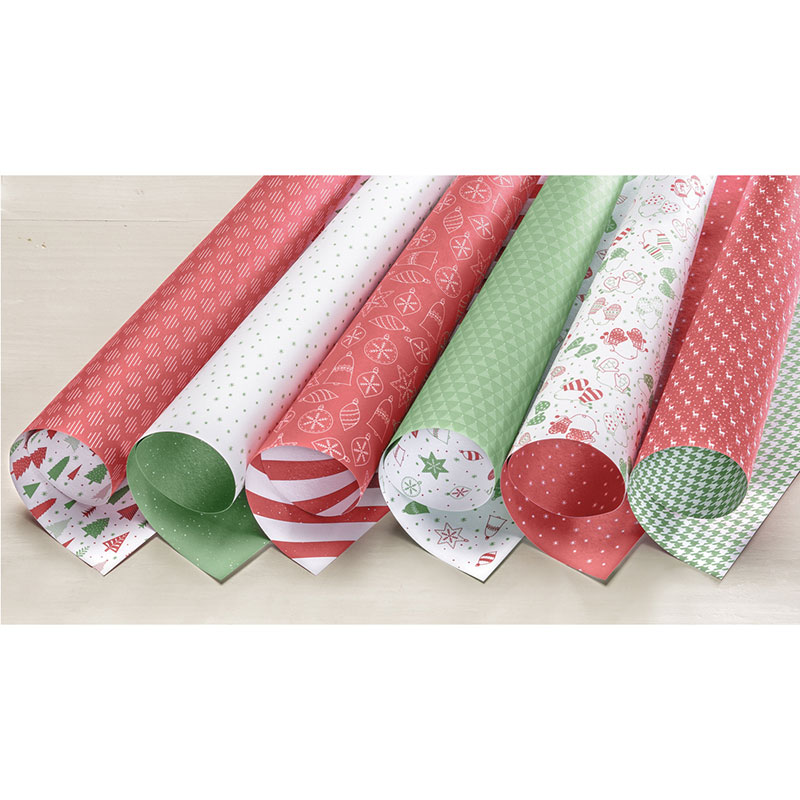
Tonight the Art with Heart team girls are sharing some wonderful ideas to inspire you with our Designer Series Papers. This month is the start of the new Stampin’ Up! year and we have a special promotion on our Designer Series Paper, buy 3 get 1 FREE for the month of October and there is no limit! I’m using one of the gorgeous papers available in this sale: “Be Merry Designer Series Paper”.
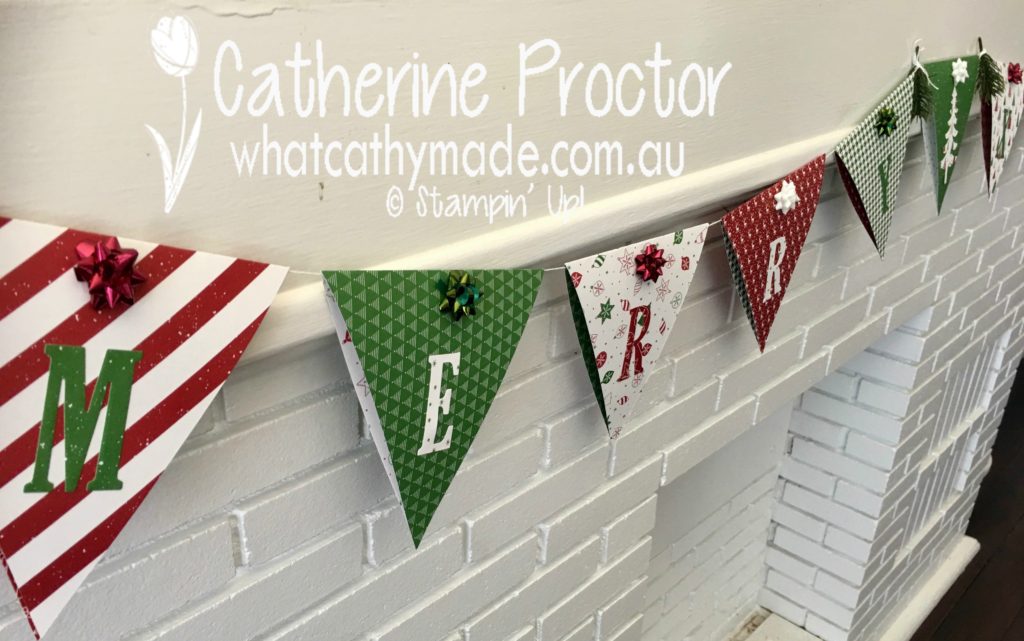
Have you ever made your own bunting? If you haven’t now’s the time to give it a go while the paper is on sale. I decided to make some Christmas bunting using the beautiful “Be Merry Designer Series Paper” and here it is hanging on my mantelpiece.
This is such a quick and easy project to make and you can use any of the gorgeous DSPs for this project. For my bunting I used less than half a packet of DSP…and that still left me with 7 full 12 x 12 inch sheets (one of each design and one spare sheet) and plenty of scraps to use for card making or other projects.
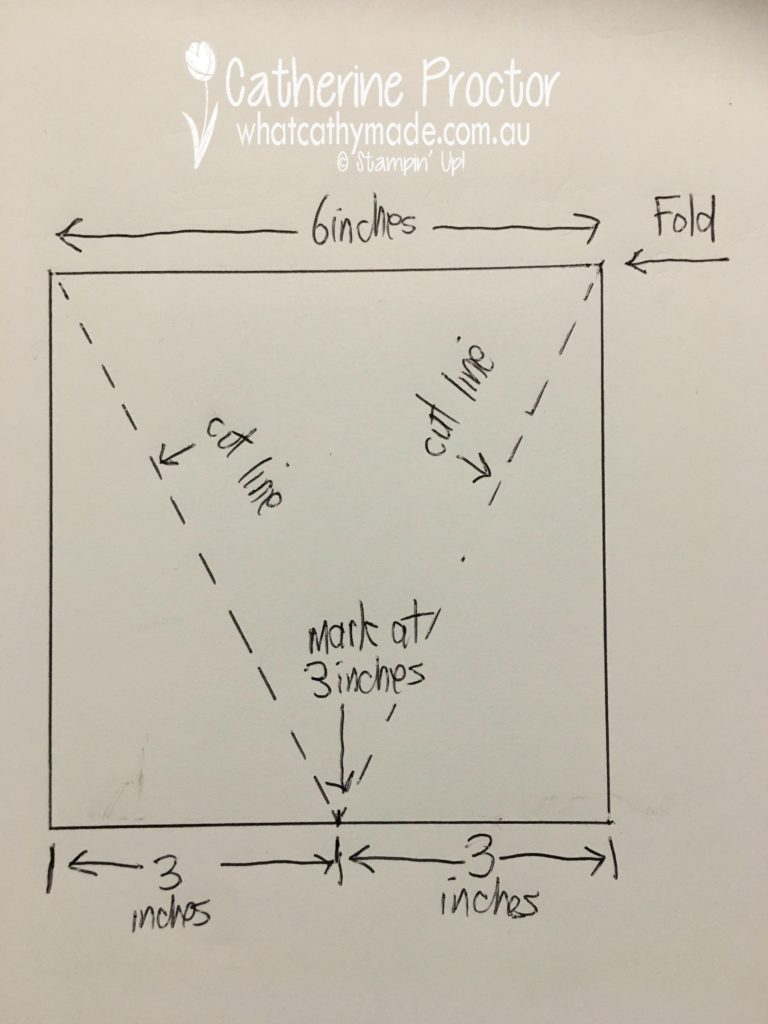
To make your bunting you simply use your paper trimmer to cut your paper in half lengthways (from top to bottom, ensuring any pattern is facing the right way up). Once you’ve cut your paper in half, take one piece and fold it in half so you now have a folded square that measures 6 x 6 inches. Mark the middle point (3 inches from either side) on the side opposite the fold, and then cut on the diagonal from your middle mark to the edges of the folded side, as shown in the diagram below.
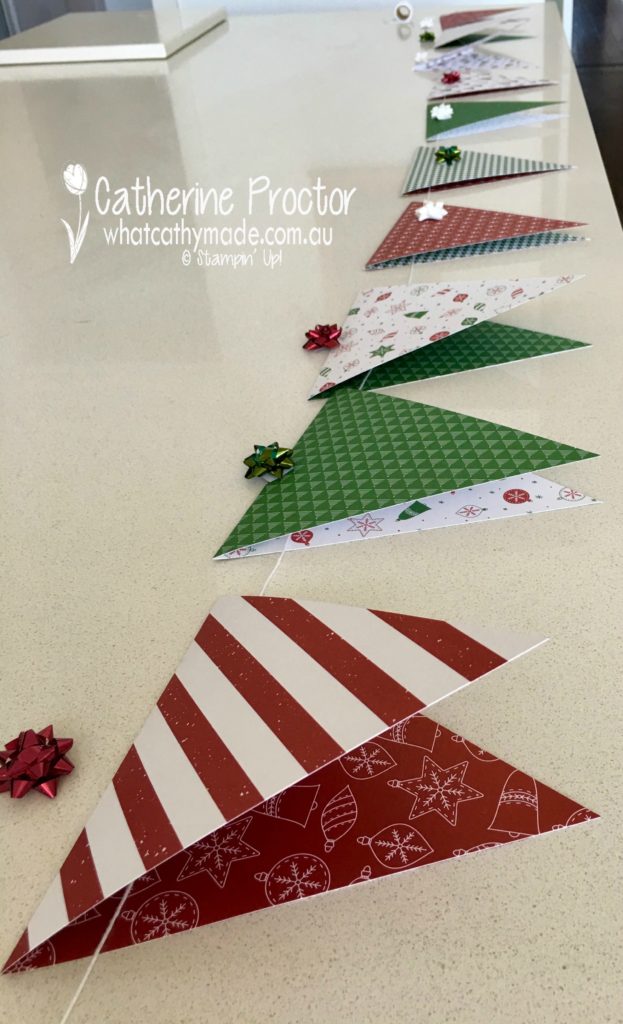
Save the offcuts to cut out your letters and repeat with the other half of your paper, this time folding it in the opposite direction so the other side of the patterned paper is used. I used 5 sheets of DSP for this project, making 10 bunting flags in total. To work out the order of bunting and space it apart I laid it all out on my kitchen bench so I could see how it looked.
I threaded whisper white bakers twine through the folded side of the flags and used a glue dot at either end of the fold to adhere the flag to the twine and close up the flag. I also used a glue dot at the bottom point of the flag. You can see in the picture below how nicely they hang…I left about 1 inch gap between the flags.
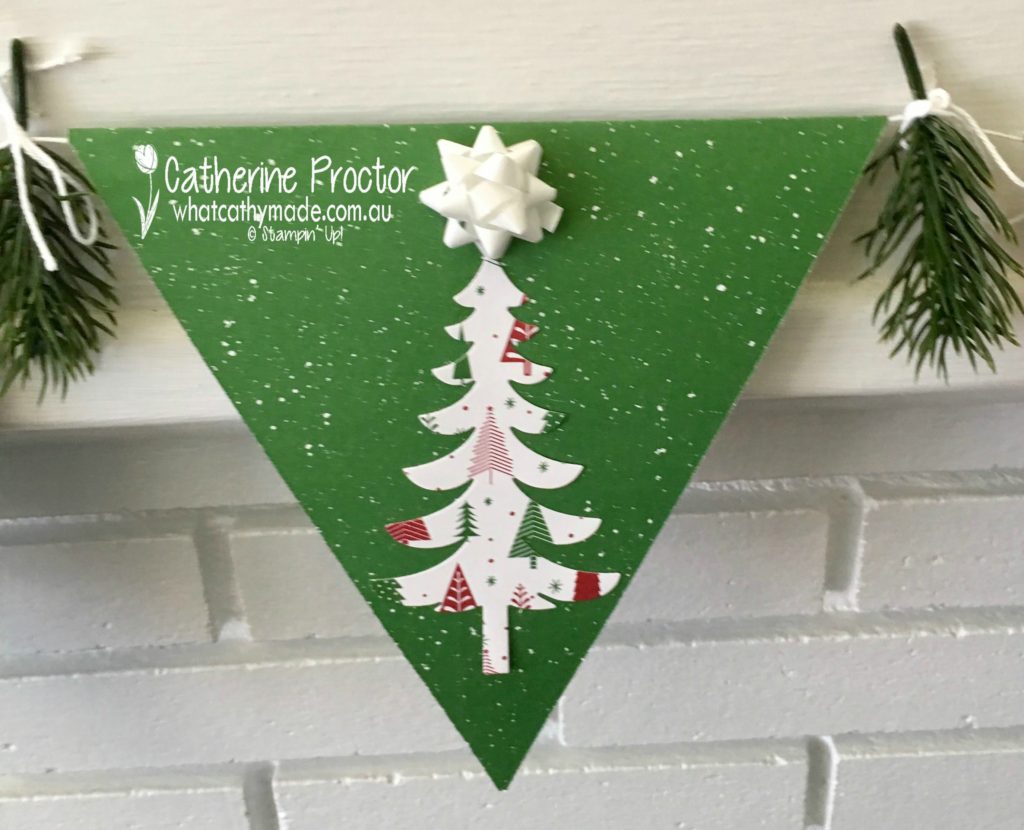
The finishing touch was to decorate the bunting with letters made from the DSP offcuts using the large letters framelits and a Christmas tree using a die from the Santa’s Sleigh die to break up the words “Merry” and “Xmas”.
The season of glitz mini gift bows are just the perfect size to add a little dimension (they come with their own adhesive backing), coupled with the green sprigs that I attached to the bunting with a bow of whisper white bakers twine.
You could make this bunting any length you wanted…I made mine to fit my mantelpiece…and you could leave your paper flags plain or decorate them with other punched or die cut shapes or words, such as “Peace, joy, love” or “ho, ho, ho”…it’s really up to you how you want to personalise your bunting.
Now it’s time to hop on over to our next participant, the very talented,Caroline Manwaring
If you find a broken link or have come to this blog hop from a different entry point, you can view the participants below:


")
")


 Don’t you just love the texture the Holly textured impressions embossing folder gives to this card?
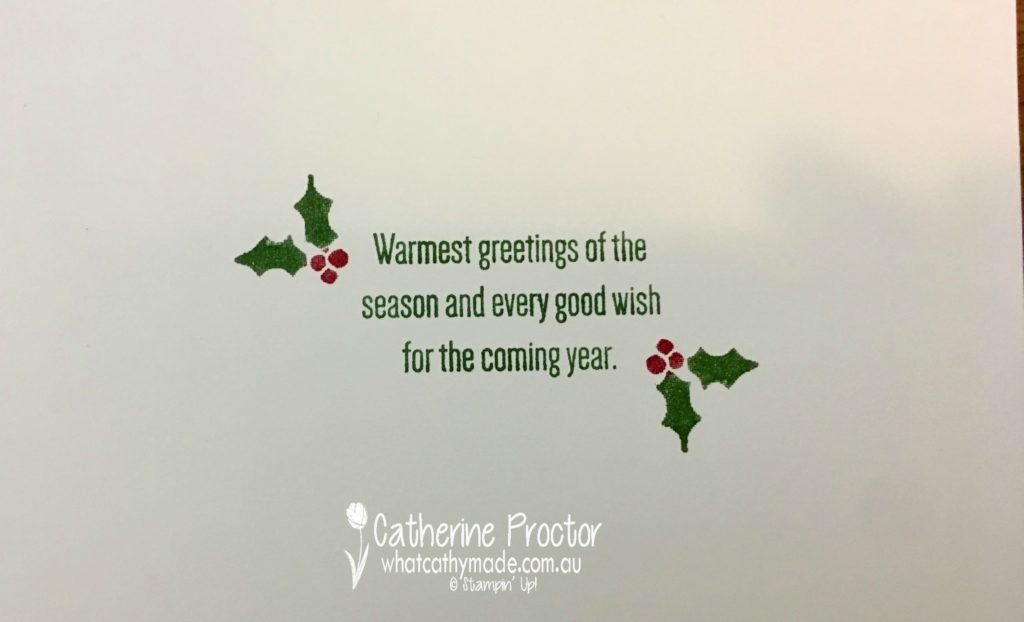
 Have you ever made your own bunting? If you haven’t now’s the time to give it a go while the paper is on sale. I decided to make some Christmas bunting using the beautiful “Be Merry Designer Series Paper” and here it is hanging on my mantelpiece.
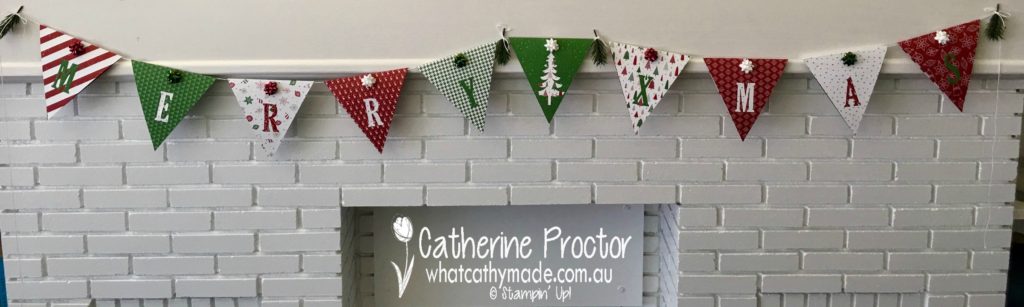 This is such a quick and easy project to make and you can use any of the gorgeous DSPs for this project. For my bunting I used less than half a packet of DSP…and that still left me with 7 full 12 x 12 inch sheets (one of each design and one spare sheet) and plenty of scraps to use for card making or other projects.