Welcome to week nine of our 2020-2021 Art With Heart Colour Creations Showcase. This week we are bringing you some Cherry Cobbler colour inspiration.
Each week various members of our Art With Heart Colour Creations team will be bringing you weekly colour inspiration as we showcase our range of over 50 beautiful Stampin’ Up! colours in alphabetical order.
Week 9 – Cherry Cobbler
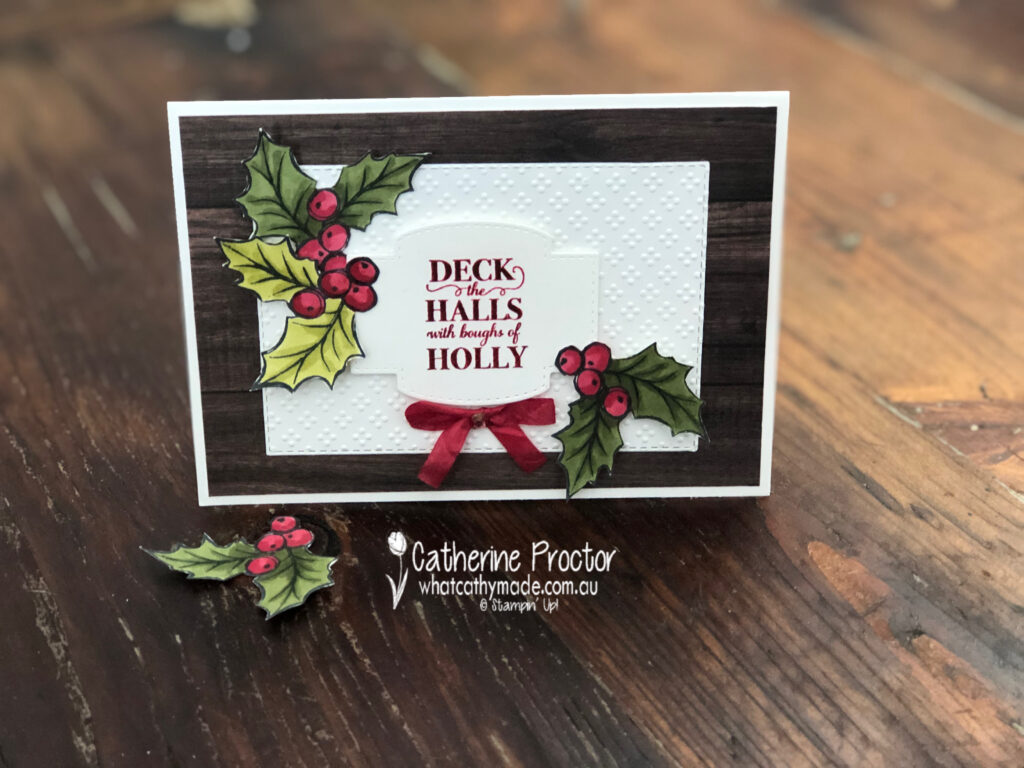
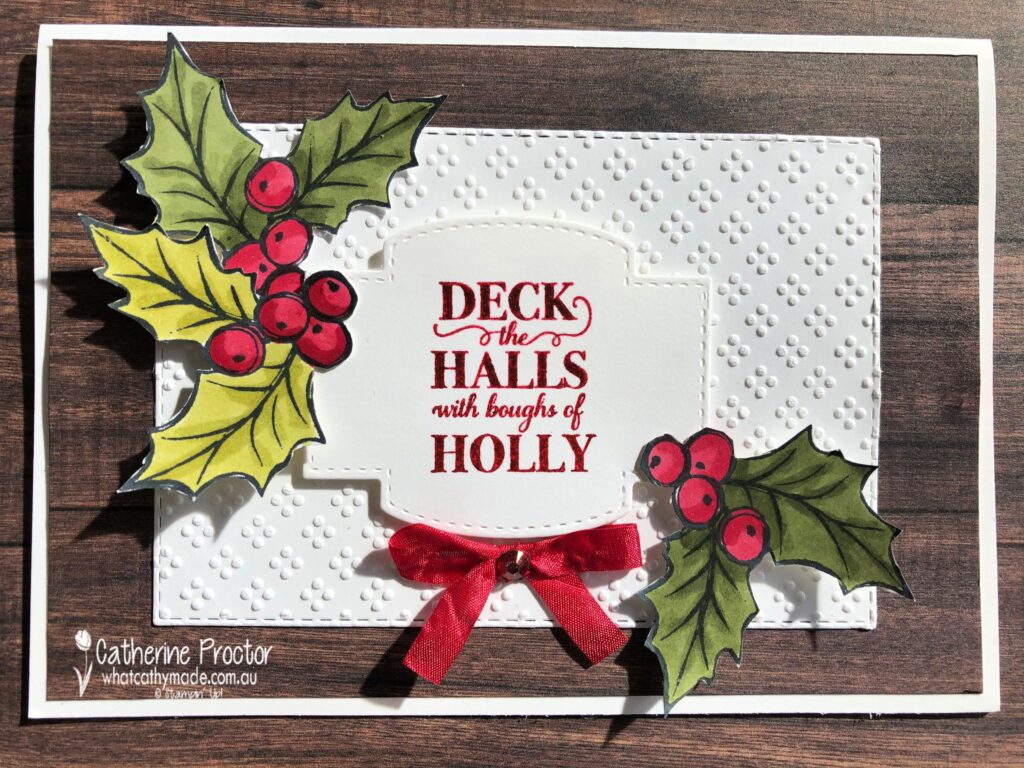
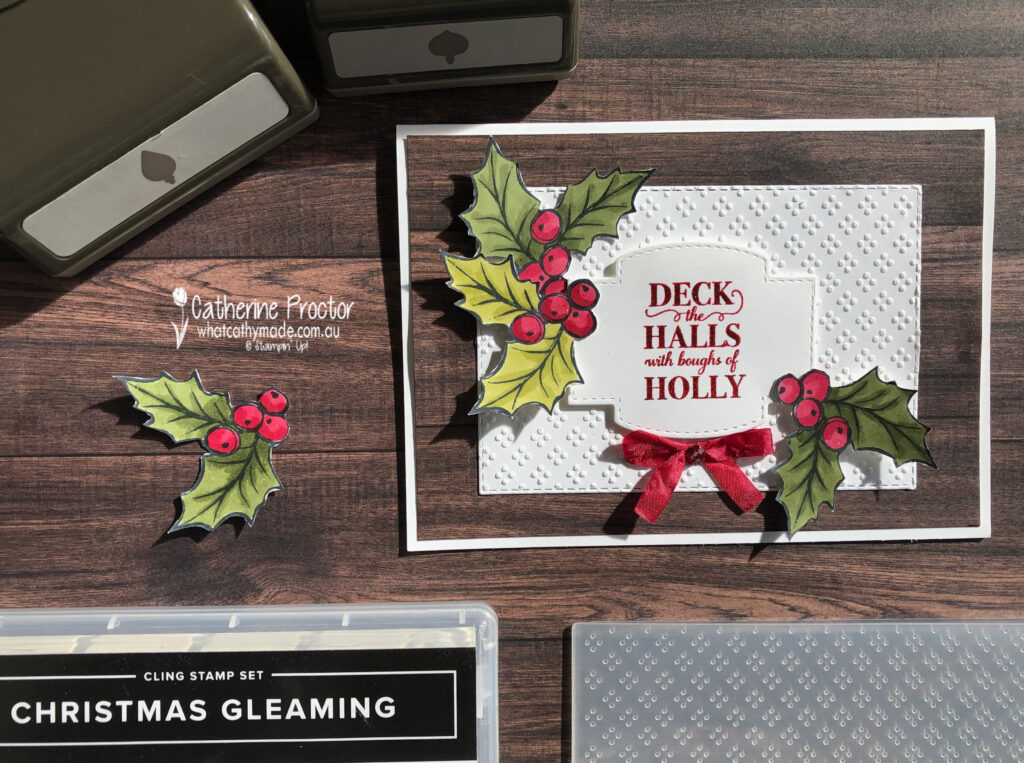
Cherry Cobbler is a deep rich red colour that always makes me think of Christmas and there are plenty of lovely new Cherry Cobbler products in the August-December catalogue (AKA the holiday catalogue), available to purchase from August 4, which is just next week.
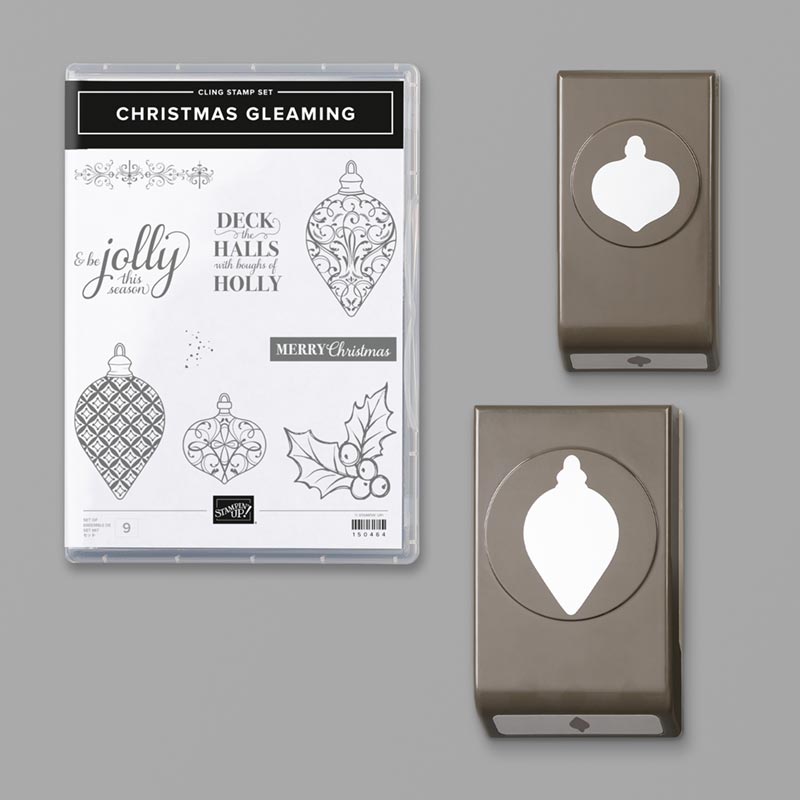
Today I’ve used a stamp set that is part of a punch bundle called Christmas Gleaming. You might already have because it was in last year’s holiday catalogue and it is returning this year.
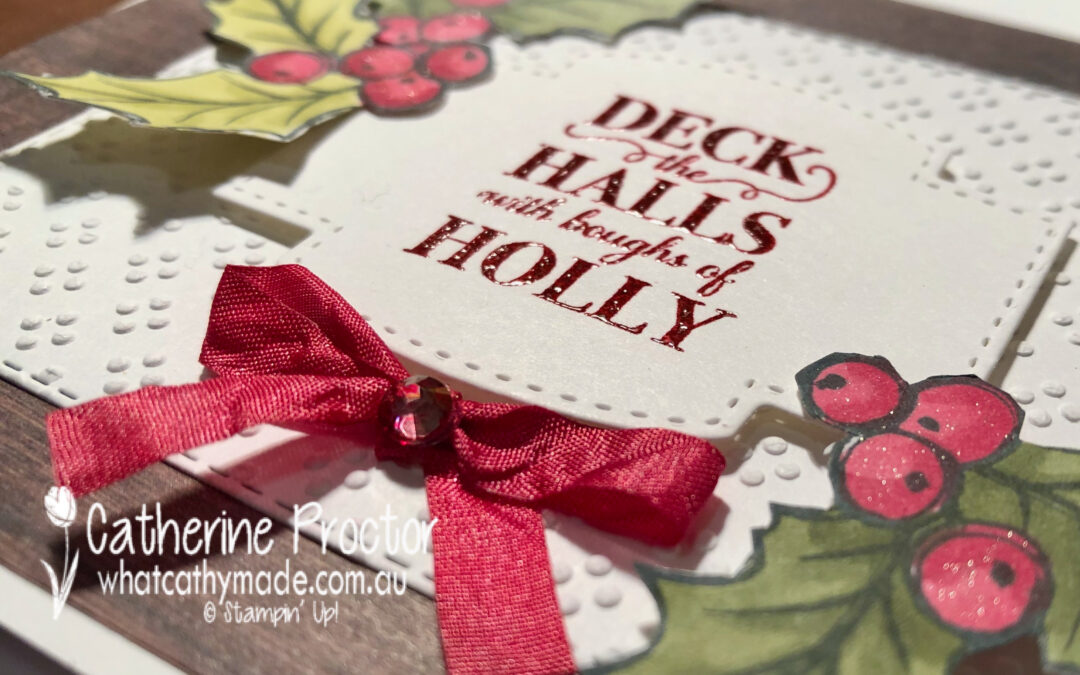
My “Deck the Halls with Boughs of Holly” card doesn’t use the Gleaming Ornaments punch pack – instead I’ve just used the Christmas Gleaming stamp set and simply fussy cut my holly leaves, which was super easy to do using my paper snips.
The holly leaves were stamped with Memento ink onto Whisper White card stock and then coloured them in with light and dark Cherry Cobbler, Old Olive and Mossy Meadow blends. I like the contrast between the lighter and the darker leaves.
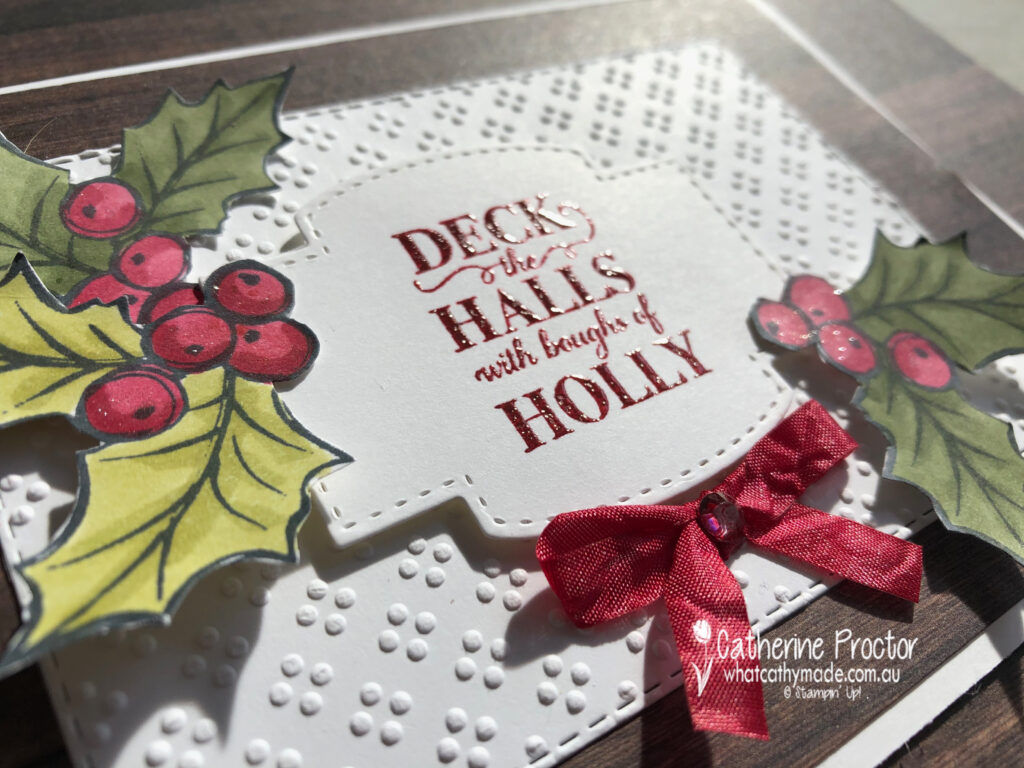
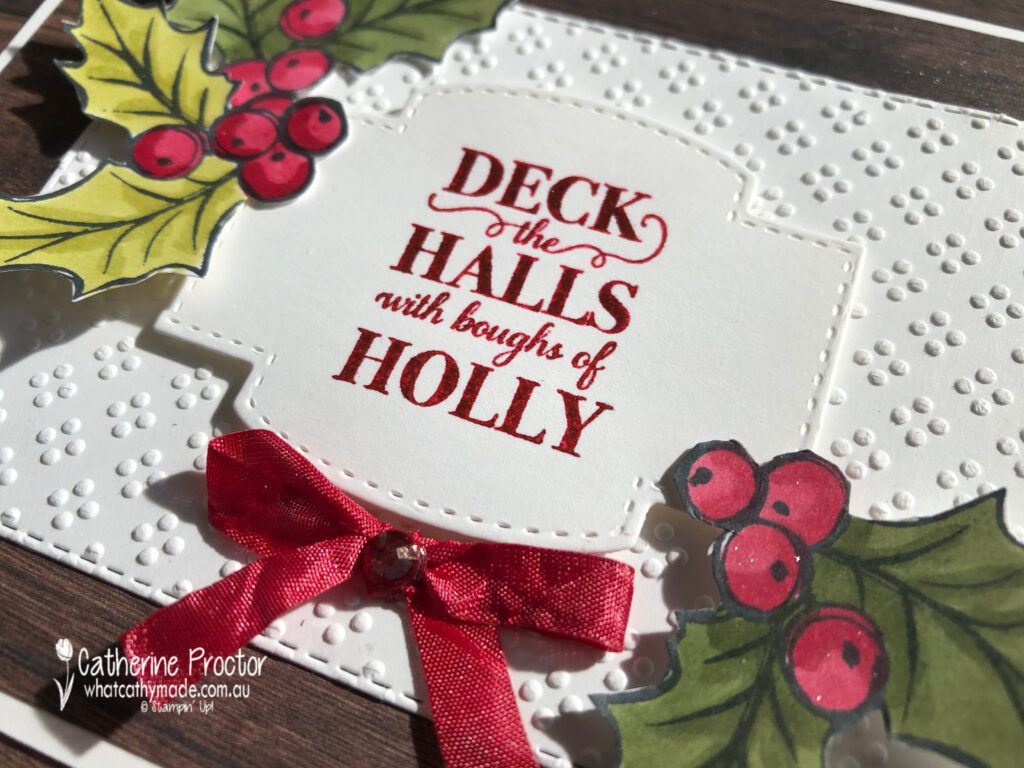
The Whisper White panel has been embossed with one of the new “Wrapped in Texture” embossing folders – these raised dots reminded me of the holly berries and I think they work well with the holly sprigs. The sentiment was die cut using one of the Stitched So Sweetly dies.
The Wink of Stella pen adds some sparkle and shine to the holly berries. I also heat embossed my sentiment with clear emboss power after I stamped it firstly in Versamark and then in Cherry Cobbler. This is a great technique to remember if you want to emboss in any colour.
Can you see the sparkle and shine? It’s so pretty in real life.
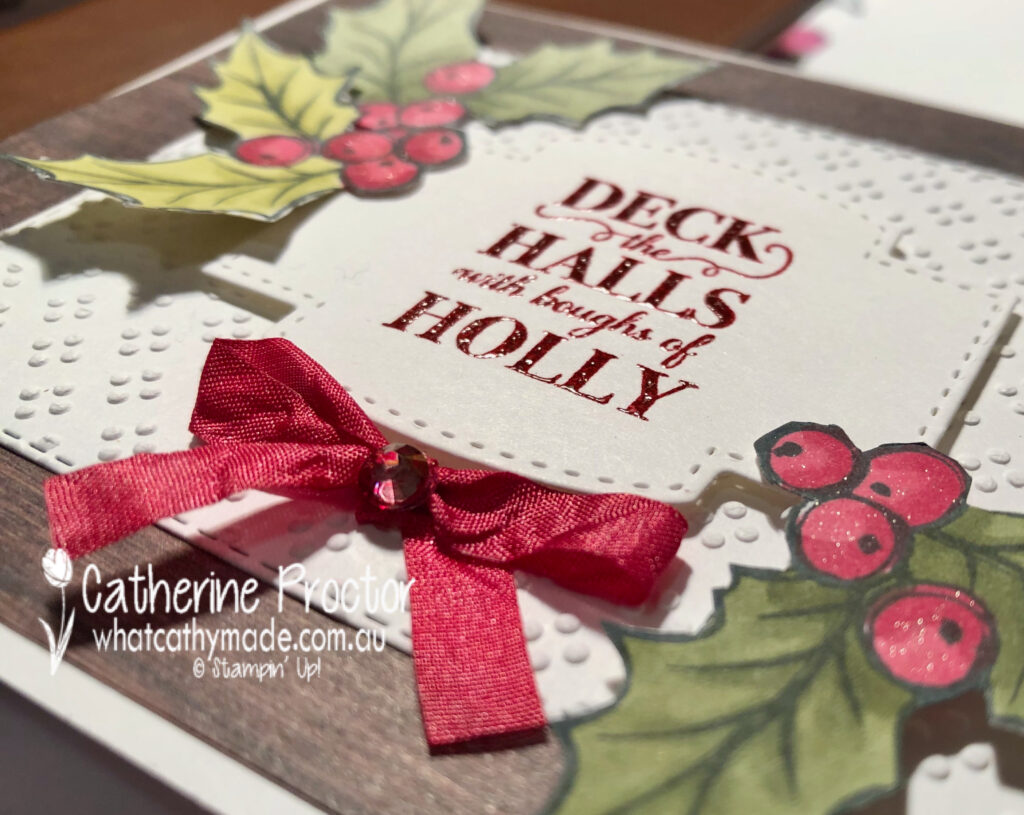
It’s super easy to make your own Cherry Cobbler ribbon and Cherry Cobbler rhinestone jewel. Simply use your dark Cherry Cobbler blend to colour in the Whisper White crinkled seam binding ribbon and the large rhinestone basic jewel and wait a few minutes for the colour to set before adhering to your card.
Hopefully this super close up gives you a better view of my home made Cherry Cobbler ribbon and Cherry Cobbler rhinestone jewel.
I’ll share some other cards I’ve made with this bundle (using the punches as well) later this week.
In the meantime I can’t wait to see what the rest of the Art With Heart team have created with Cherry Cobbler today. Click on the links below to see what they’ve made.
Next Tuesday we’ll be showcasing one of the 2020-22 In Colours: Cinnamon Cider. We hope you can join us all then.
To purchase any of the products featured in today’s post, simply contact your Stampin’ Up! demonstrator, any of the ladies in the AWH Colour Creations Showcase or click on the product links below.
Bonus Days are happening now! From July 1st to August 3rd you will earn a $9 bonus days coupon for every $90 you spend in one transaction (before post). Stampin’ Up! will email you your Bonus Days vouchers which you redeem for shopping in August.
If you’d like me to post you your very own copy of the 2020-21 Stampin Up! Annual Catalogue, the 2020-21 Beginners Brochure, the August – December Mini Catalogue (this is the Holiday/Christmas Catalogue) or to simply find out about more about Stampin’ Up! contact me.
In the meantime, wherever you are in the world, stay safe, stay calm…and keep on crafting xxx
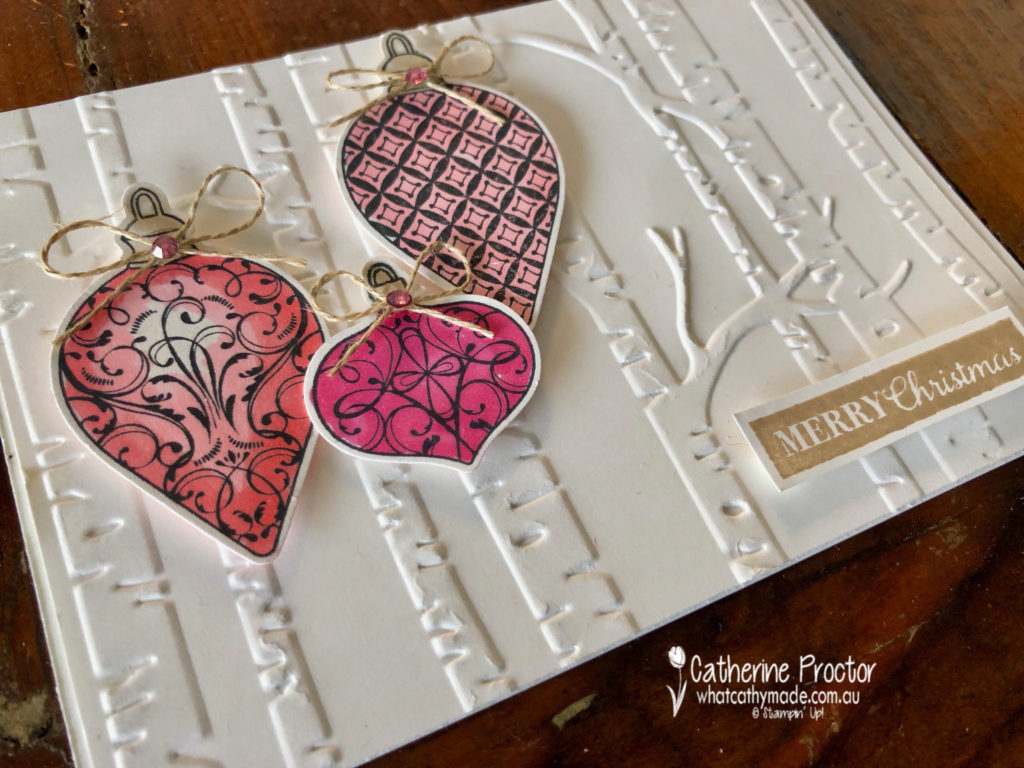
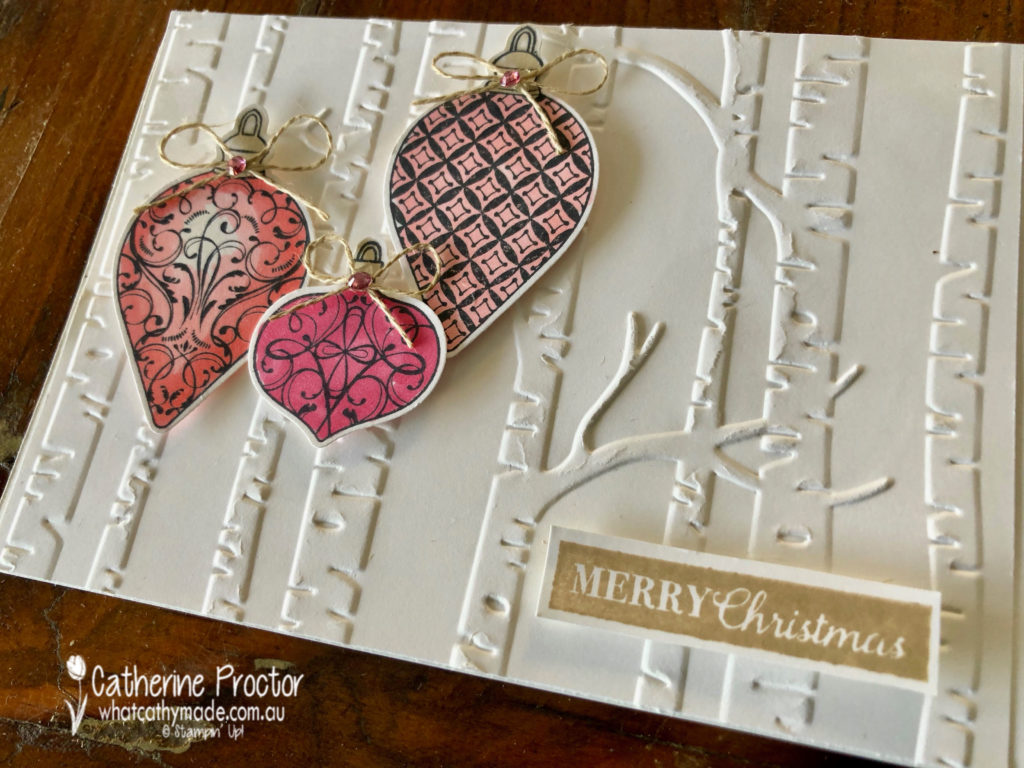
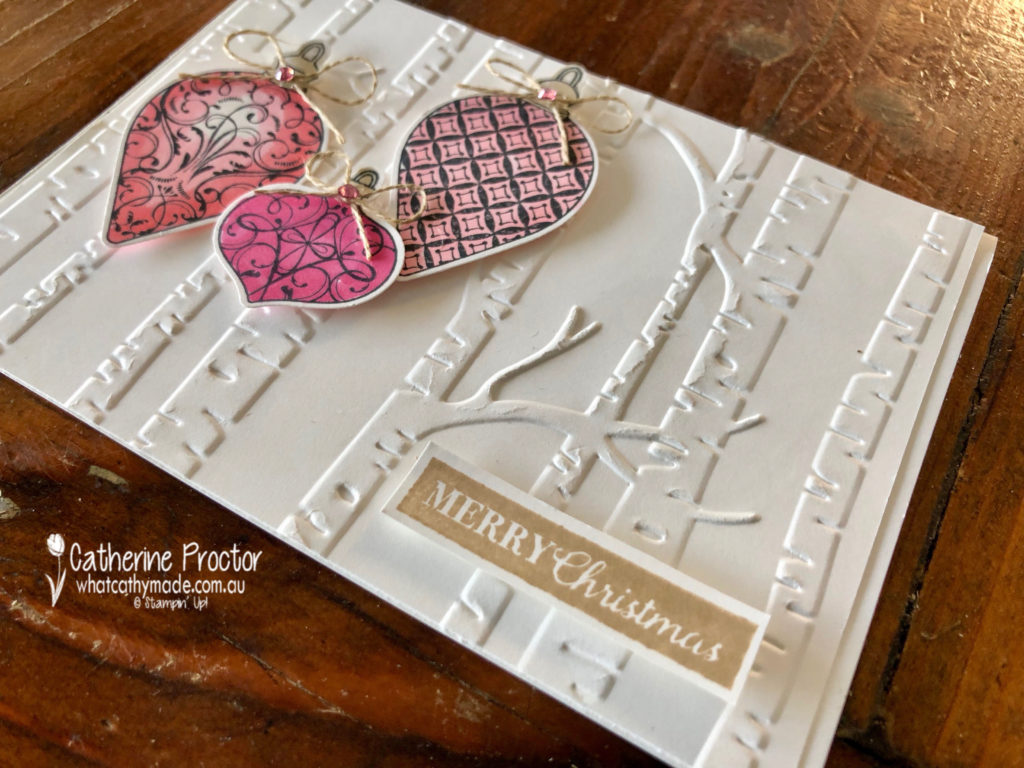
Welcome to week seven of the 2019 Heart of Christmas blog hop!
This week has been hectic at our place with my latest book going to print (code for lots of last minute corrections and working all weekend!), training a new writer at my work and then my youngest son graduating school…did I really just type that sentence????
So what does all of this have to do with my card tonight? Well, it means I only had a very brief window to design, make, photograph and watermark my card before blogging about it. So this week I reached for the tools that make card making super easy and super fast: punches and embossing folders!
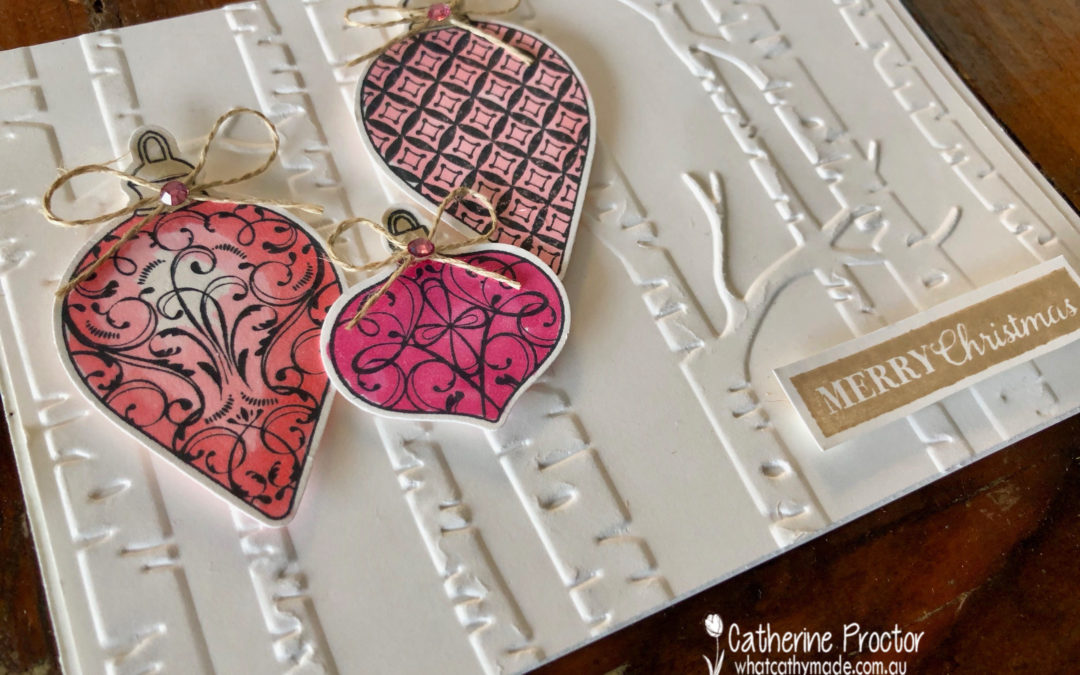
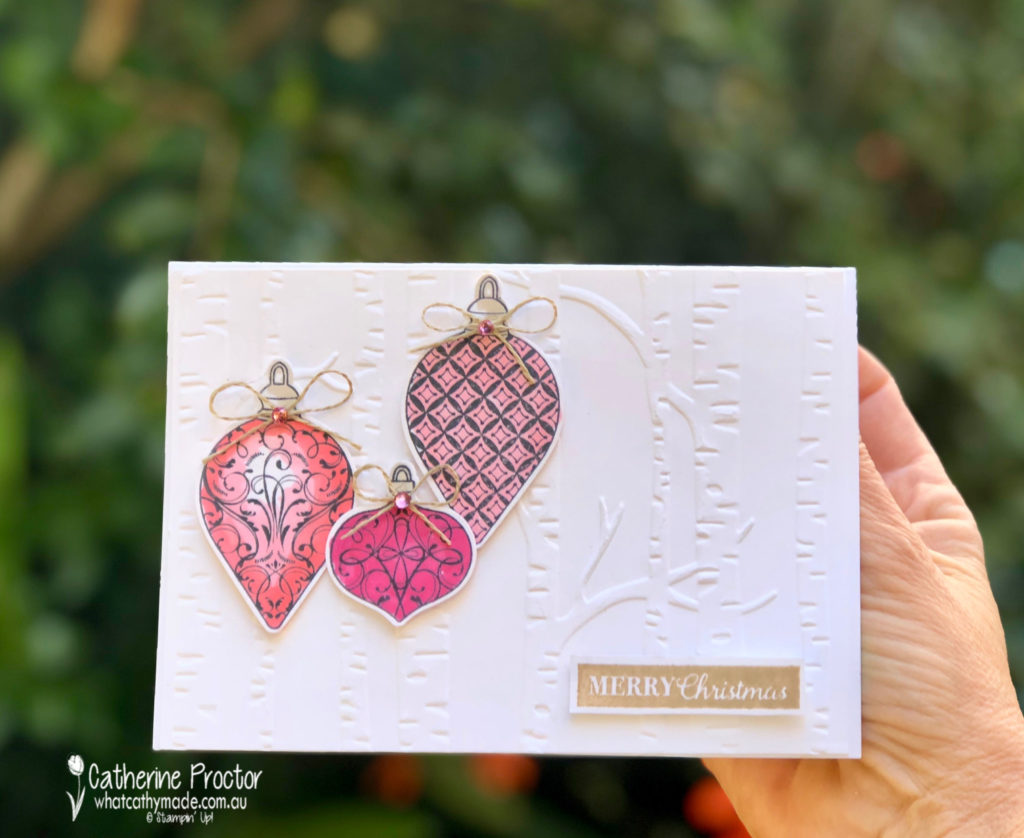
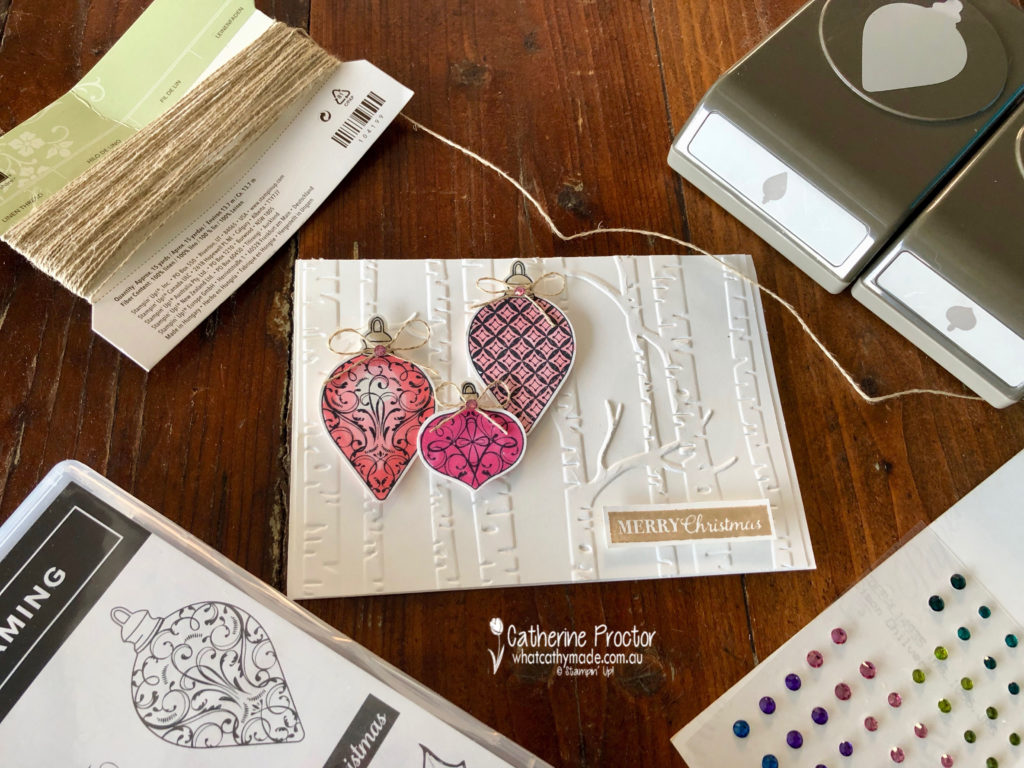
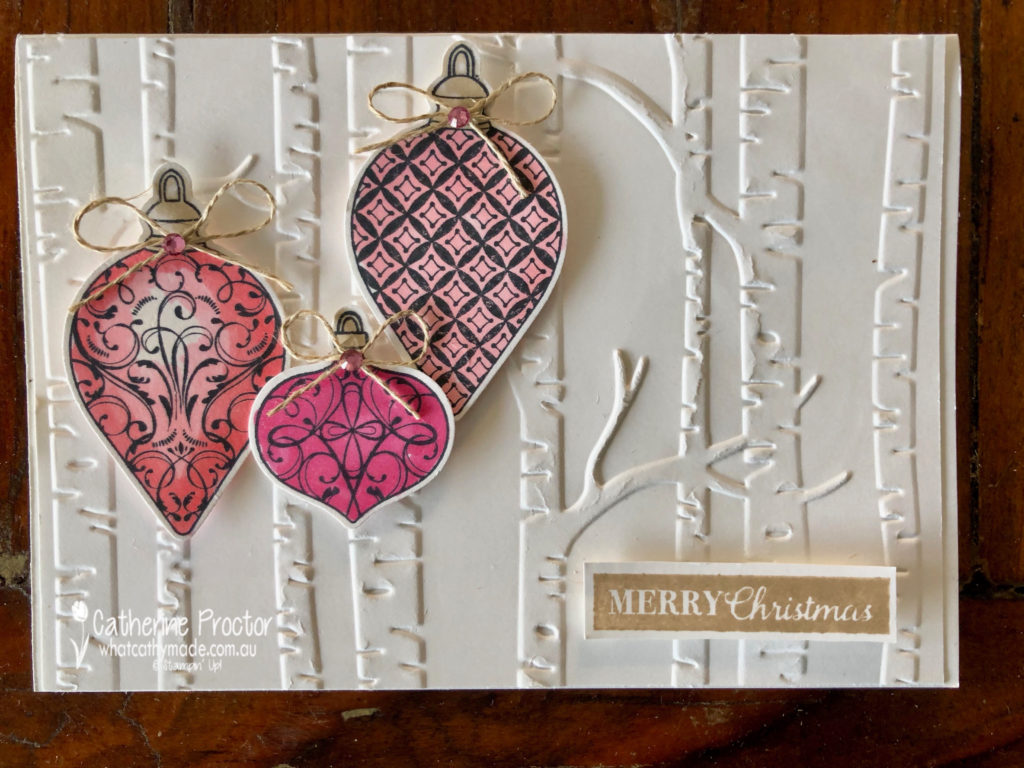
The three baubles were punched out using the Gleaming Ornaments punches after I stamped them in Momento Ink using stamps from the co-ordinating Christmas Gleaming stamp set.
Can you guess what coloured Stampin’ Up! blends I used to colour my ornaments? I stepped right outside of my comfort zone and went with an assortment of pinks: Flirty flamingo (dark and light) and the light Lovely Lipstick blender pen.
The “Merry Christmas” sentiment was stamped in Crumb Cake using a stamp from the same stamp set: Christmas Gleaming.
My card this week is finished off with a bows of linen thread and some Melon Mambo rhinestones from the Noble Peacock Rhinestones.
This card was so quick and easy to make and I really love how the woodland embossing folder on the base layer adds so much dimension and texture while also allowing me to make a very clean and simple card.
The lovely Claire Daly is hosting our Heart of Christmas blog hop this week – to see what the rest of the team have made this week you can visit Claire’s page here.
To purchase any of the products I used in this project you can shop with me here.
If you’d like me to post you your very own copy of the brand new 2019 Stampin Up! Holiday Catalogue, the 2019-20 Stampin Up! annual catalogue or to simply find out about more about Stampin’ Up! contact me.
Welcome to week five of the 2019 Heart of Christmas blog hop!
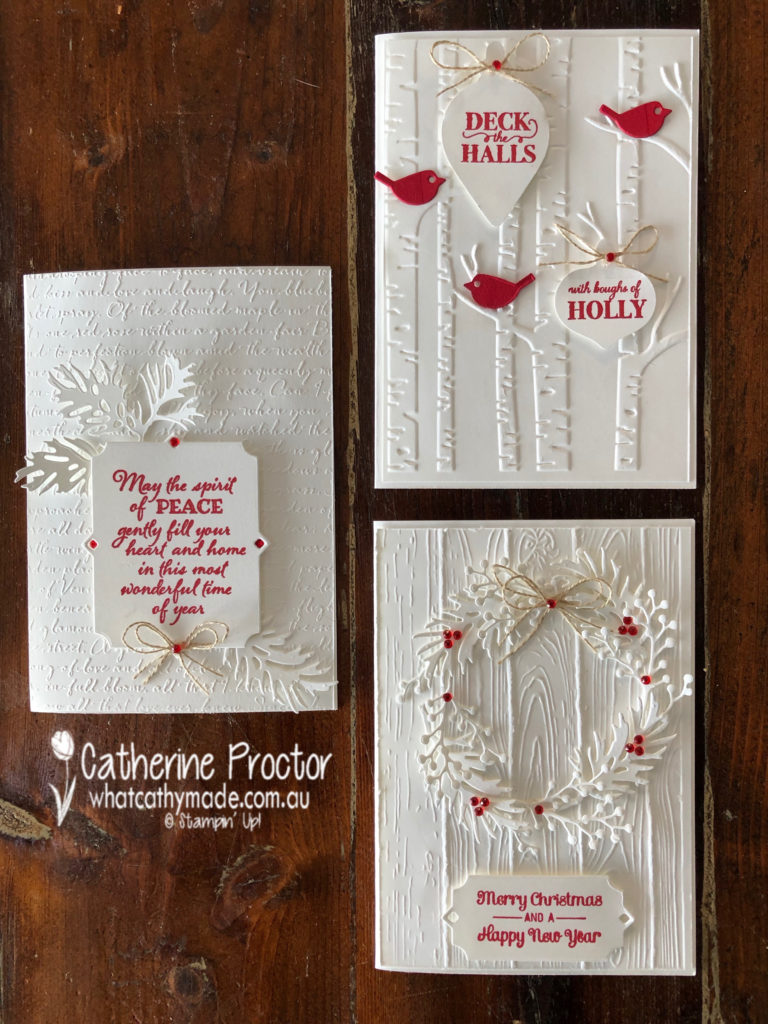
This week I’ve decided to challenge myself to use three different embossing folders to create my Christmas cards. I often to forget to use my folders because I’m so focussed on DSP, stamps and dies, which is really silly because embossing folders are so quick and easy to use.
With so many beautiful designs to chose from, can you guess which three I chose?
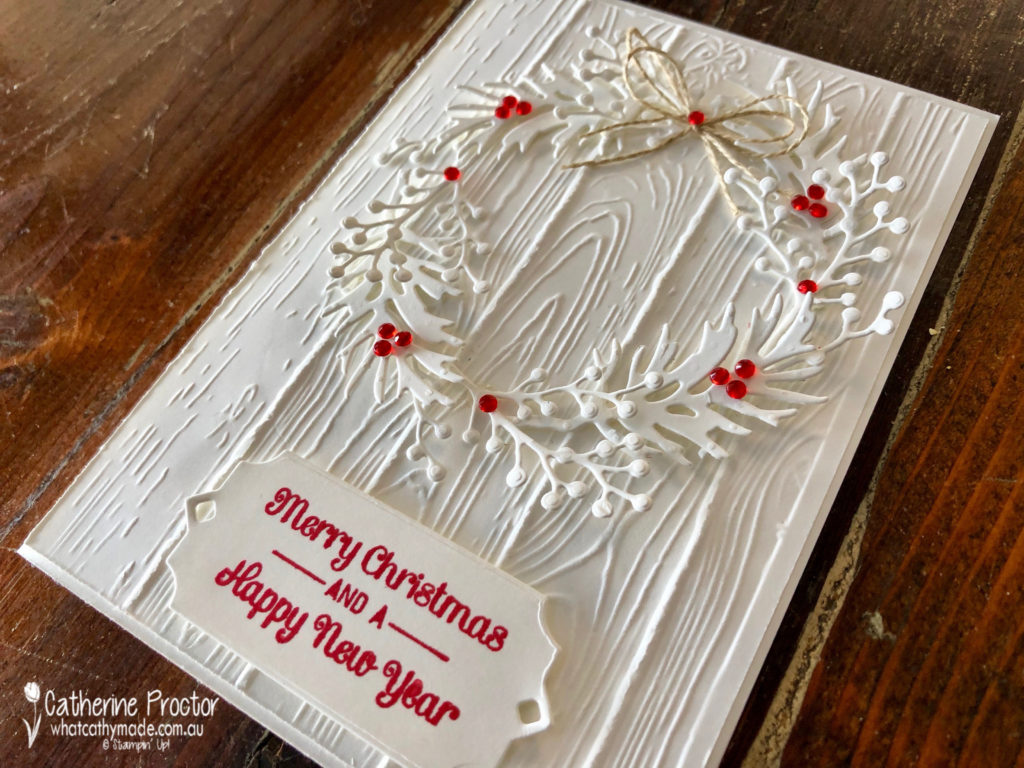
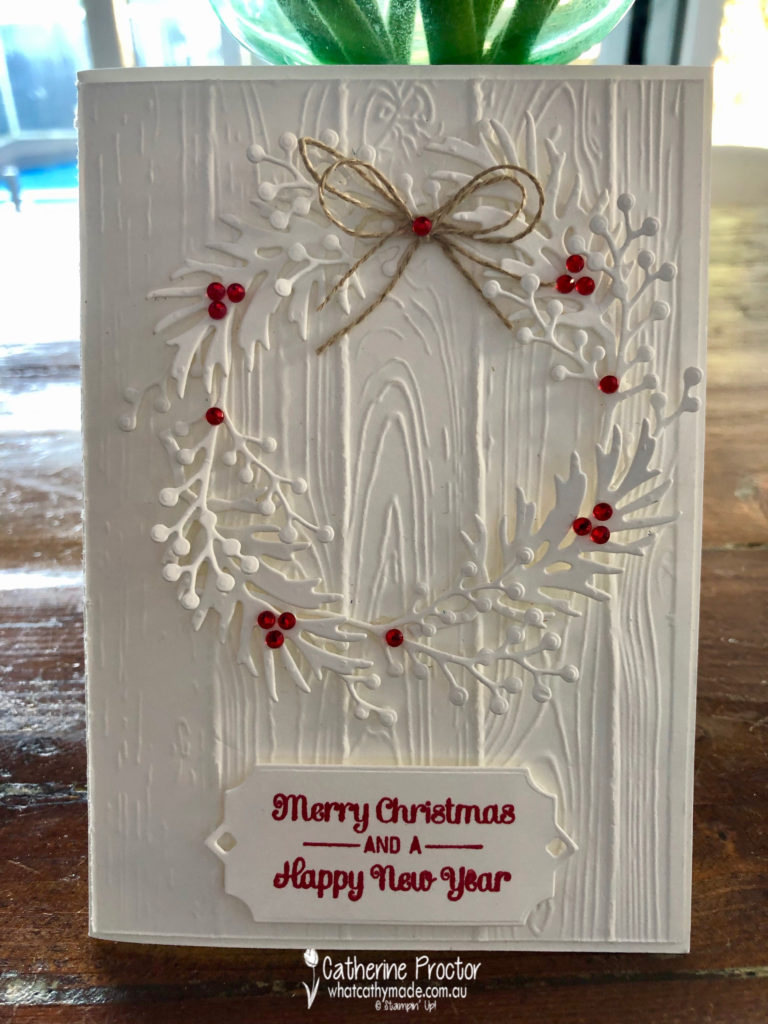
For my first card I used the Pinewood Planks embossing folder, which can be used either way up.
The wreath is made using a combination of dies from the Frosted Bouquet Dies and the Beautiful Boughs Dies.
How cute is that sentiment? It’s from the Itty Bitty Christmas Stamp set – I’m so glad I got this set. It has been die cut with the stunning frame from the Beautiful Boughs Dies.
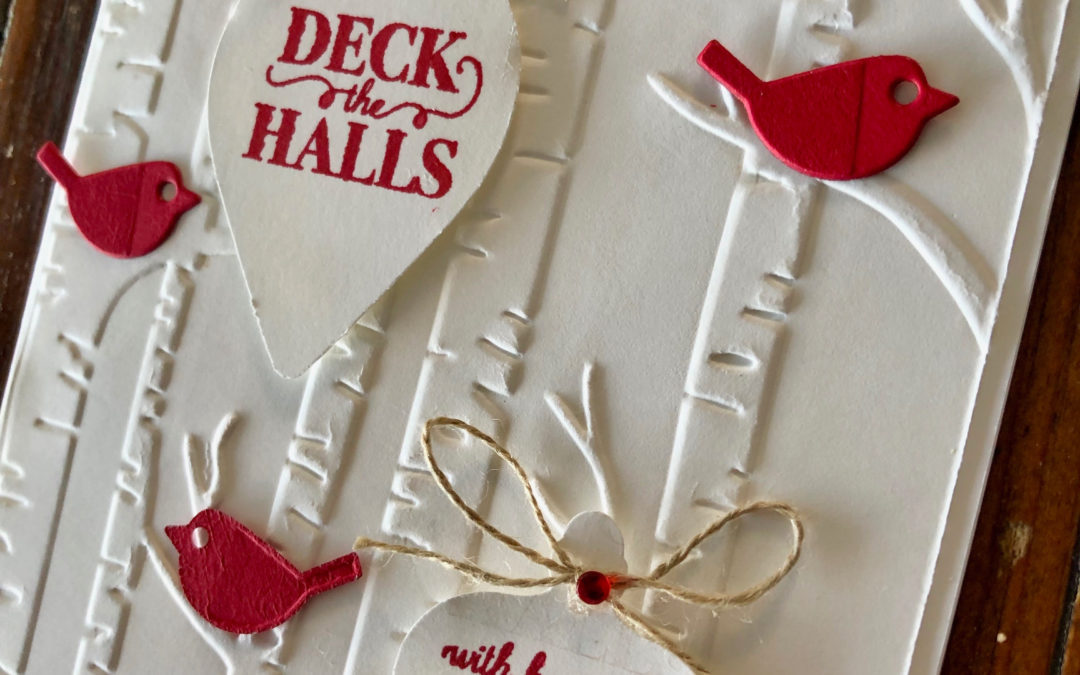
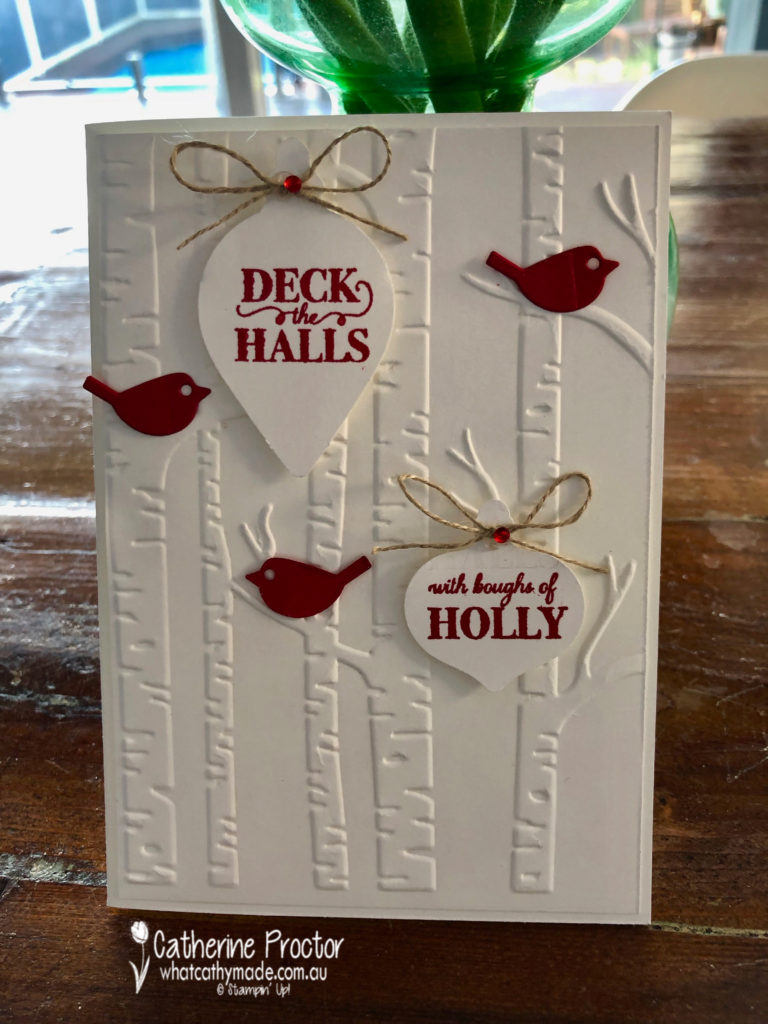
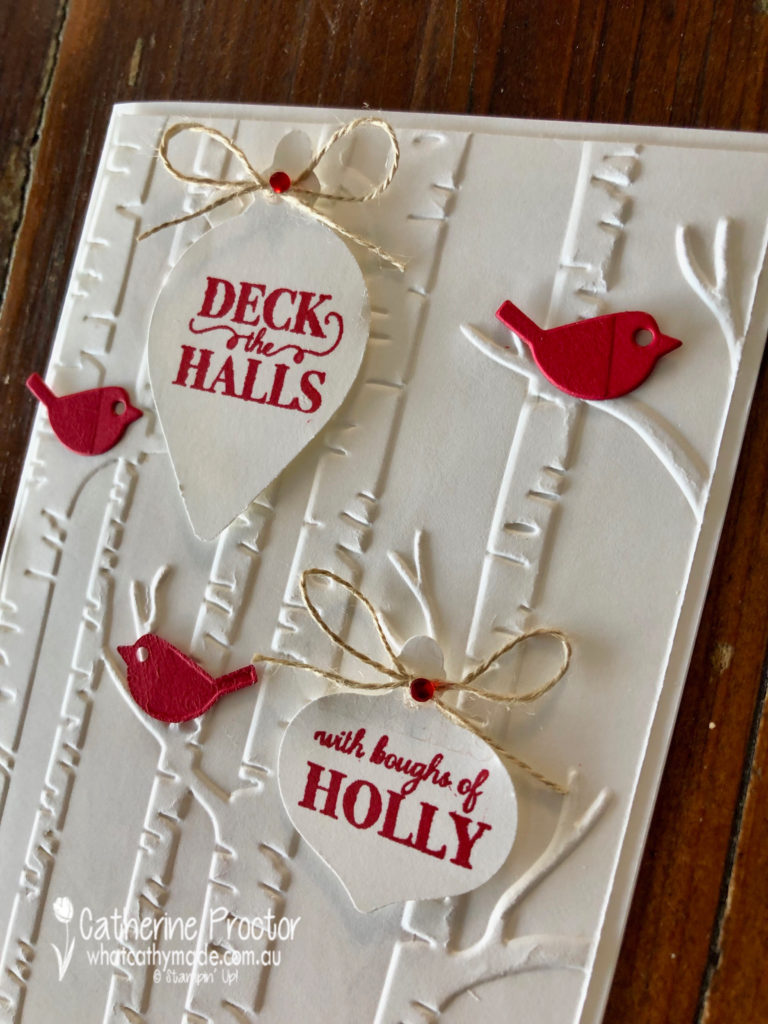
Card two continues the red and white theme, this time with the Woodland Embossing folder. Those branches were just crying out for some little birds – you might have overlooked these, they are in the Well Written die set.
The two baubles were punched out using the Gleaming Ornaments punches and then stamped with a stamp from the coordinatiing Christmas Gleaming stamp set.
To split the sentiment in half you can cut your stamp with scissors or do what I did and mask one side of your stamp with washi tape before inking up. Before you stamp, remove the washi tape and then stamp your image. Mask up the other side of your stamp with washi tape, ink your stamp, remove the washi and then stamp the other bauble.
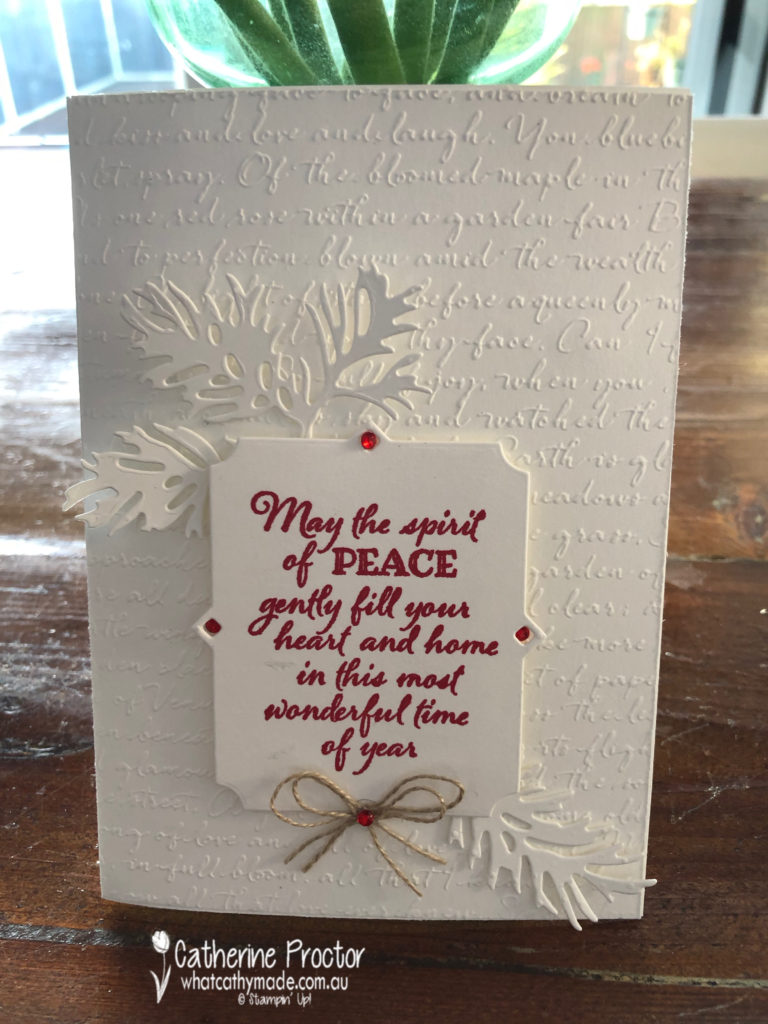
My final card uses the Scripty 3D embossing folder, topped with a sentiment from the Peaceful Boughs stamp set, die cut with the largest frame from the Beautiful Boughs Die set.
Here’s a close up of this gorgeous frame and the boughs I’ve die cut with the Peaceful Boughs Dies set. Can you see the lovely script effect this embossing folder gives?
All my cards this week are finished off with a bow (or two) of linen thread and some red rhinestones.
These cards were quick and easy to make and I really love how the embossing folders add so much dimension and texture while also allowing me to make very clean and simple cards.
I will definitely be reaching for my embossing folders more often!
The lovely Claire Daly is hosting our Heart of Christmas blog hop this week – to see what the rest of the team have made this week you can visit Claire’s page here.
To purchase any of the products I used in this project you can shop with me here.
If you’d like me to post you your very own copy of the brand new 2019 Stampin Up! Holiday Catalogue, the 2019-20 Stampin Up! annual catalogue or to simply find out about more about Stampin’ Up! contact me.
Welcome to the first week of the 2019 Heart of Christmas blog hop!
Around this time every year the Art With Heart Stampin’ Up! team begin our annual weekly blog hop, featuring the Christmas products in both the Annual Catalogue and the brand new forthcoming Holiday Catalogue, my ABSOLUTE FAVOURITE!!!! catalogue of the year.
You will be able to view and order from the 2019 Holiday Catalogue from the 4th September, but in the meantime here’s a peek at the cover.
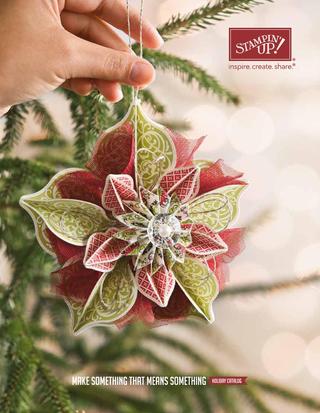
One of the first products to catch my eye in the brand new Stampin’ Up! 2019 Holiday Catalogue is a suite called the Brightly Gleaming Suite.
I love the beautiful blues and greens of the Brightly Gleaming DSP, the Star Designer Elements, the Hammered Metal 3D embossing folder but most of all I love that the Christmas Gleaming Stamp Set has not just one, but two coordinating punches!
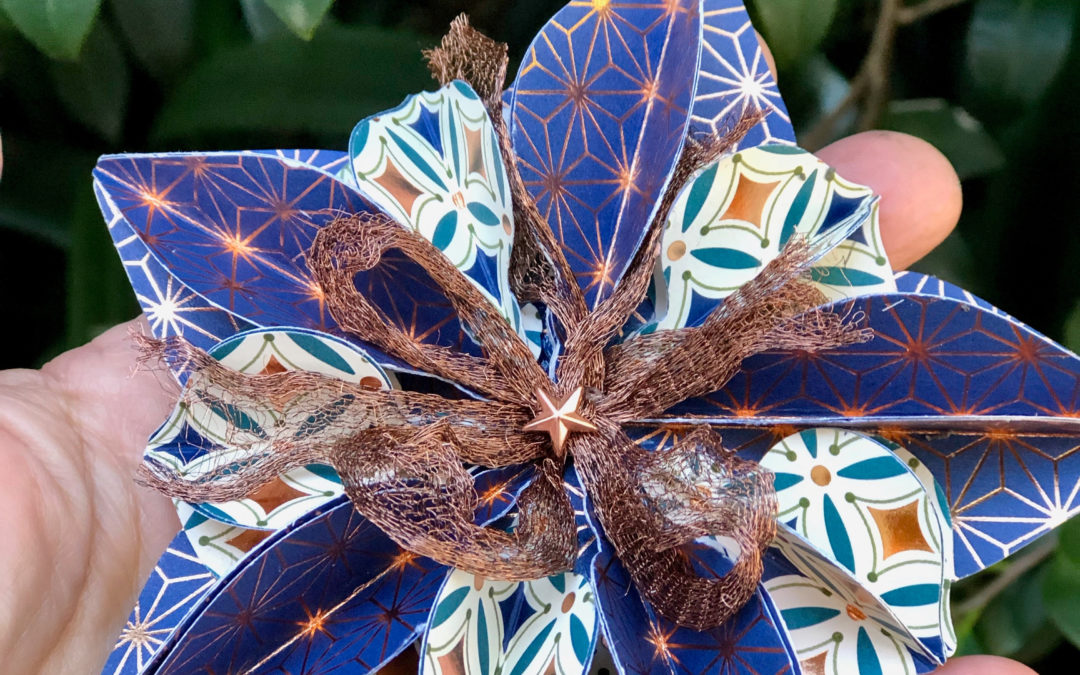
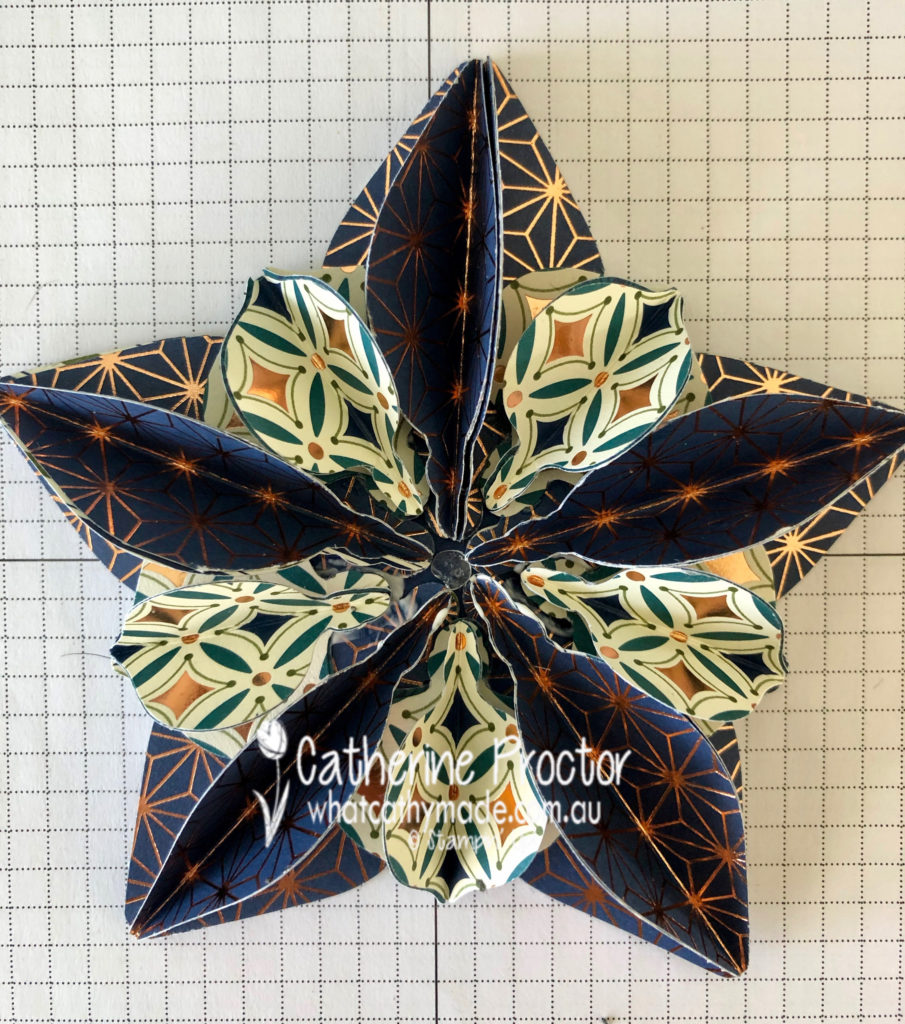
There are so many projects I’m planning to make with these punches but this week I decided to CASE a project I saw another demonstrator CASE from the cover of the 2012 Stampin’ Up! holiday catalogue. Isn’t this ornament simply gorgeous?
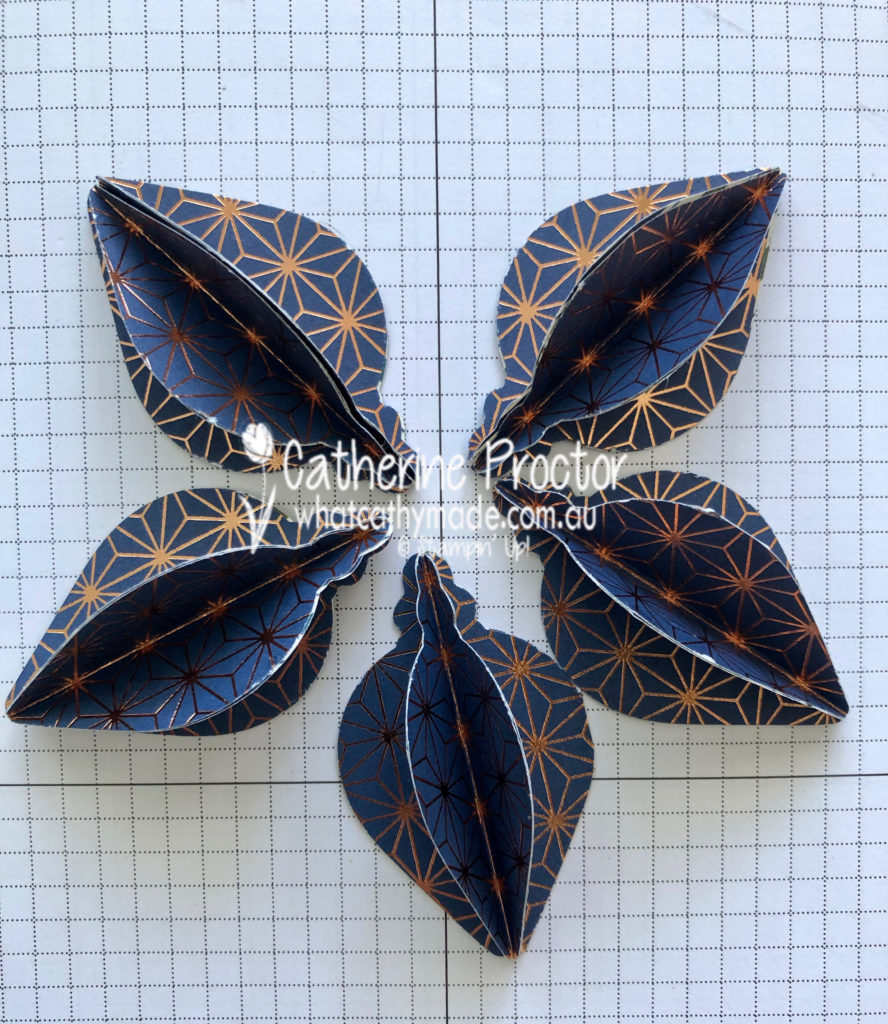
The other Stampin’Up! demonstrator used the Gleaming Ornaments punch to make this ornament by firstly stamping and then punching out the images, but I decided to make things even simpler by simply punching out my shapes from the Brightly Gleaming DSP.
Firstly I punched out 20 of the larger punch ornaments using the Night of Navy and Copper paper from the Brightly Gleaming DSP. The geometric design of this DSP made it very easy to score down the centre of 15 of the ornaments before using multipurpose liquid glue to glue them together.
I simply glued 3 of the scored ornaments together before adhering these to one of the unscored ornaments. Repeat 4 times.
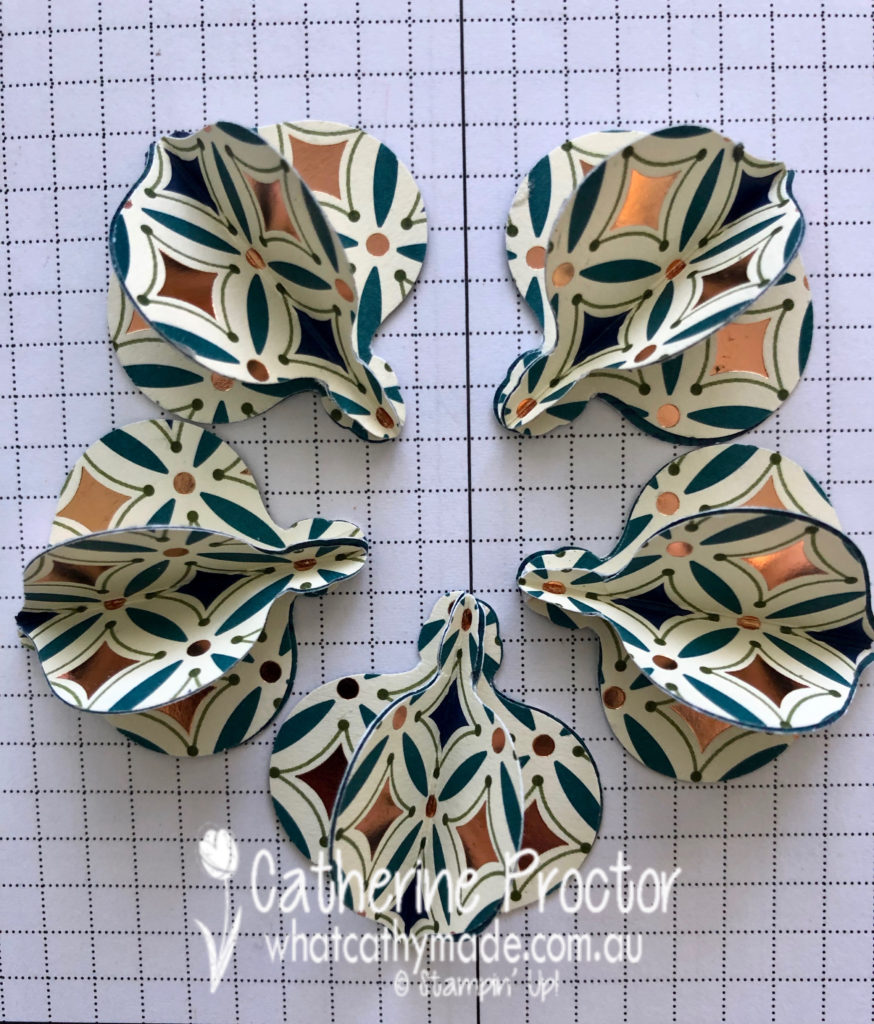
Follow the same steps, this time punching out 20 smaller ornaments from a different coloured DSP, and score and glue together.
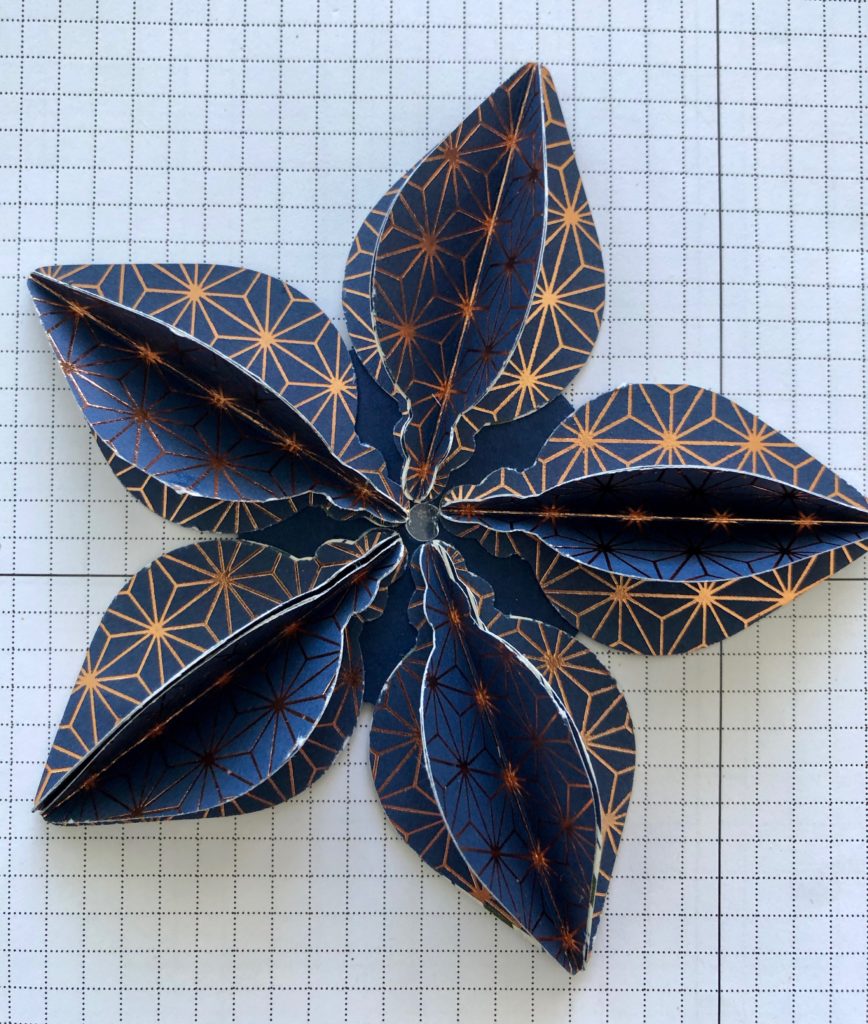
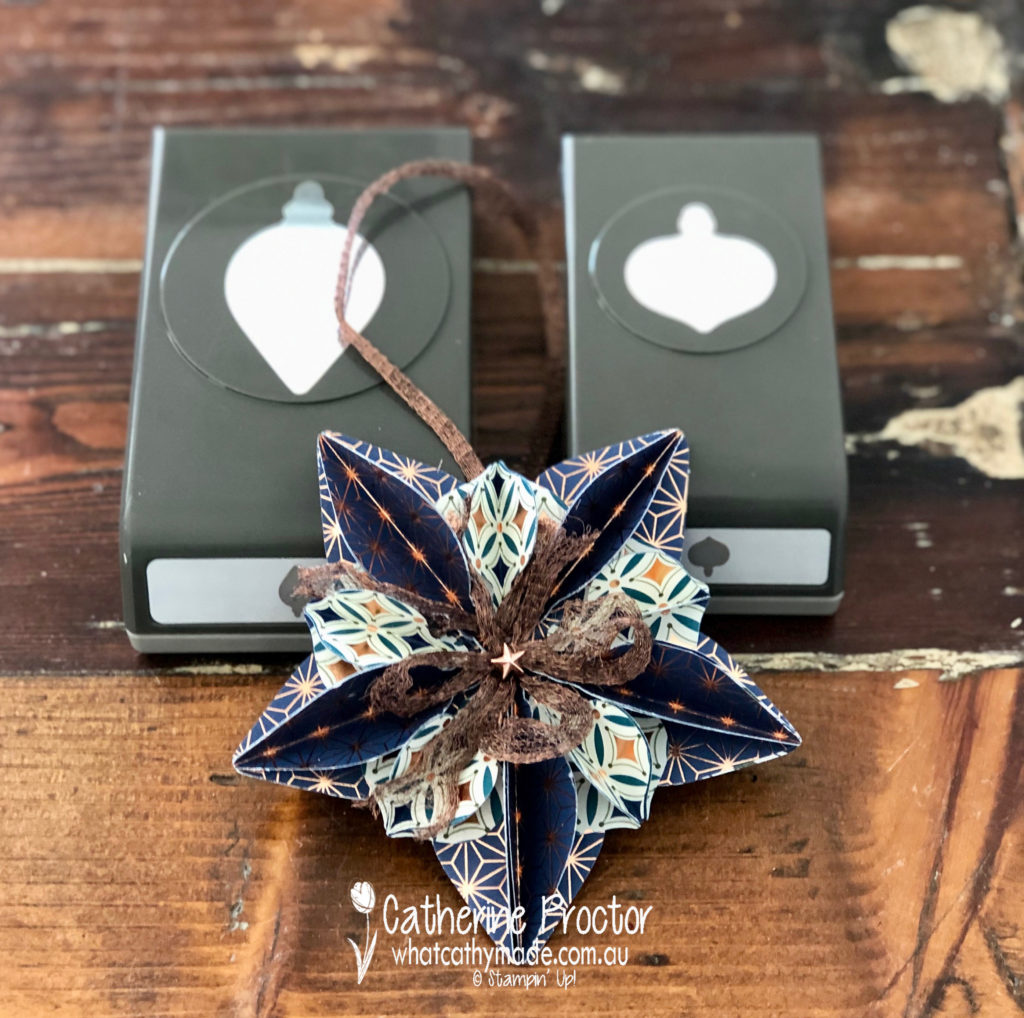
Punch a 2 inch circle out of Night of Navy cardstock and place a glue dot in the middle. Use your glue dot to position the larger shapes evenly around the circle and adhere the shapes to the with multipurpose liquid glue
Then glue the smaller shapes between the larger ornament shapes.
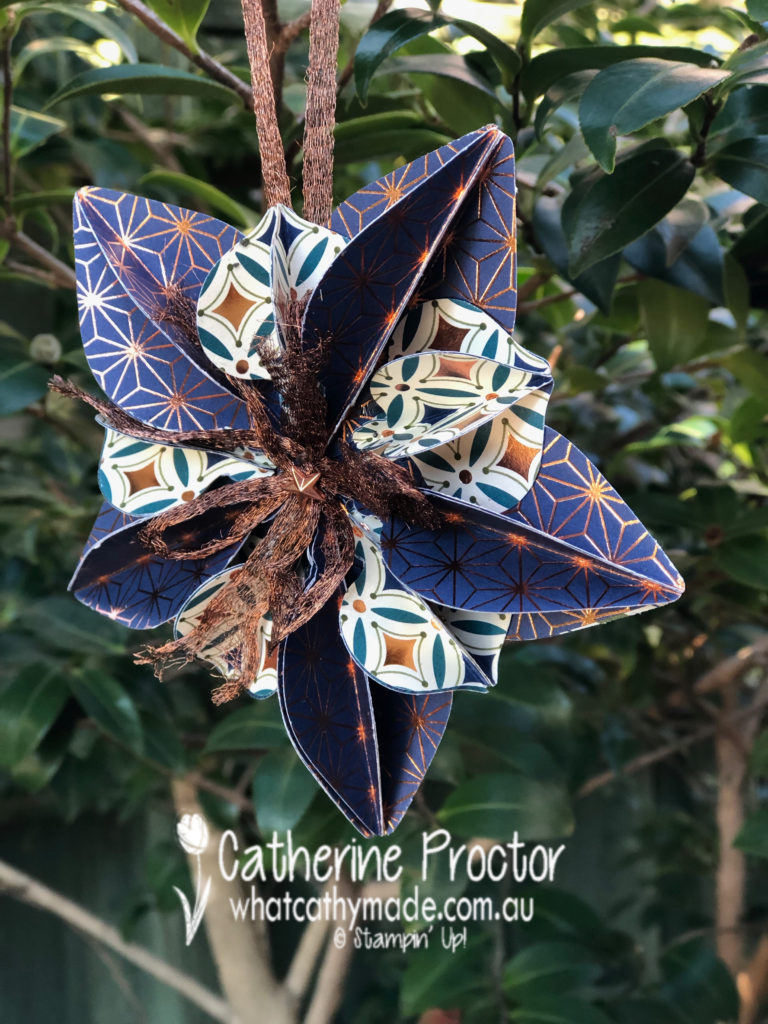
Tie two bows with the copper trim ribbon and then use your fingers to tease the ribbon out. Adhere these bows to the centre of your ornament using glue dots and then top with a copper star designer element.
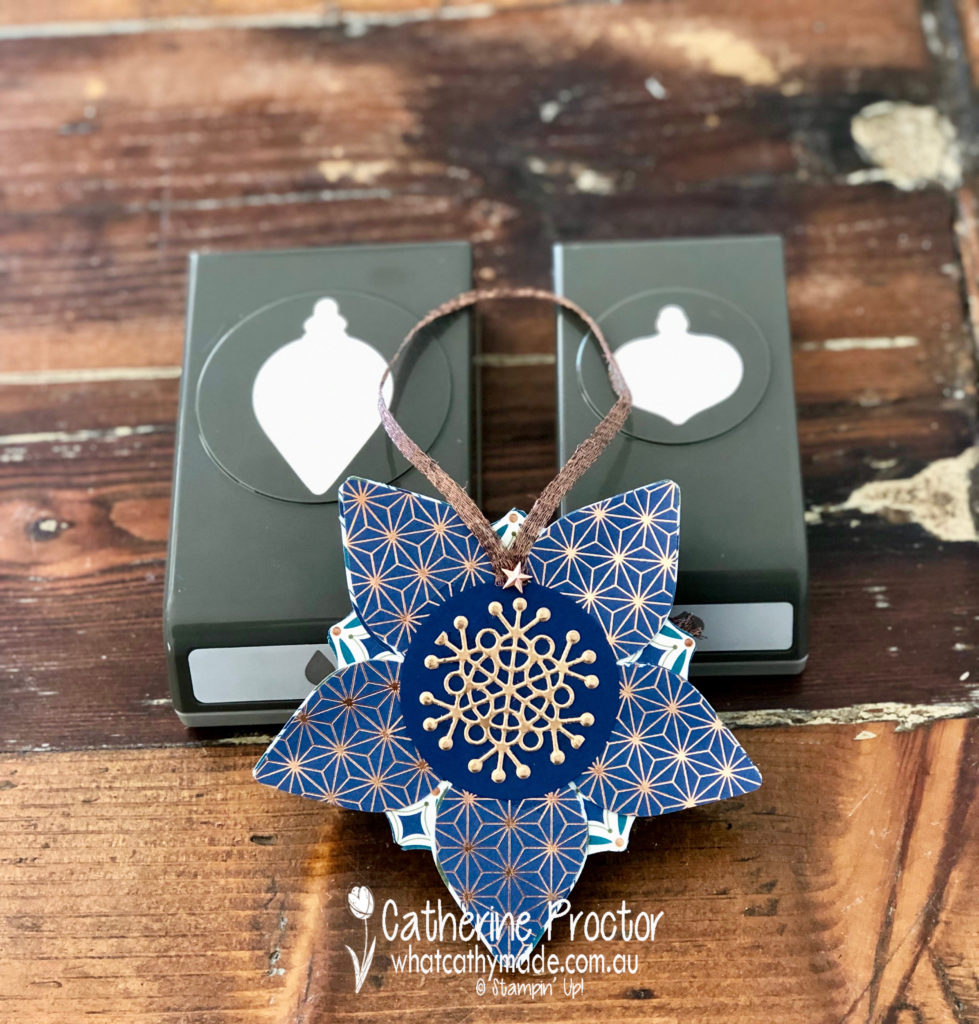
To finish off the reverse side die cut a snowflake from copper foil using the Seasonal Layers Thinlits dies and adhere to the middle of the Night of Navy circle with multipurpose liquid glue.
So you can hang your ornament, add a loop of copper trim ribbon to the back as well and adhere using glue dots. Use another copper star designer element to hide the ends of the copper trim ribbon and then hang from a tree!
The lovely Claire Daly is hosting our weekly Heart of Christmas blog hop – to see what the rest of the team have made this week you can visit Claire’s page here.
I’ll be back next week with two more Christmas blog hops. To purchase any of the products I used in this project you can shop with me here.
If you’d like me to post you your very own copy of the brand new 2019 Stampin Up! Holiday Catalogue, the 2019-20 Stampin Up! annual catalogue or to simply find out about more about Stampin’ Up! contact me.

")


 Crinkled Seam Binding Ribbon")