Welcome to week twenty one of our Art With Heart 2023-24 Colour Creations blog hop! This week we are showcasing Daffodil Delight, a sunny yellow from the Brights family.
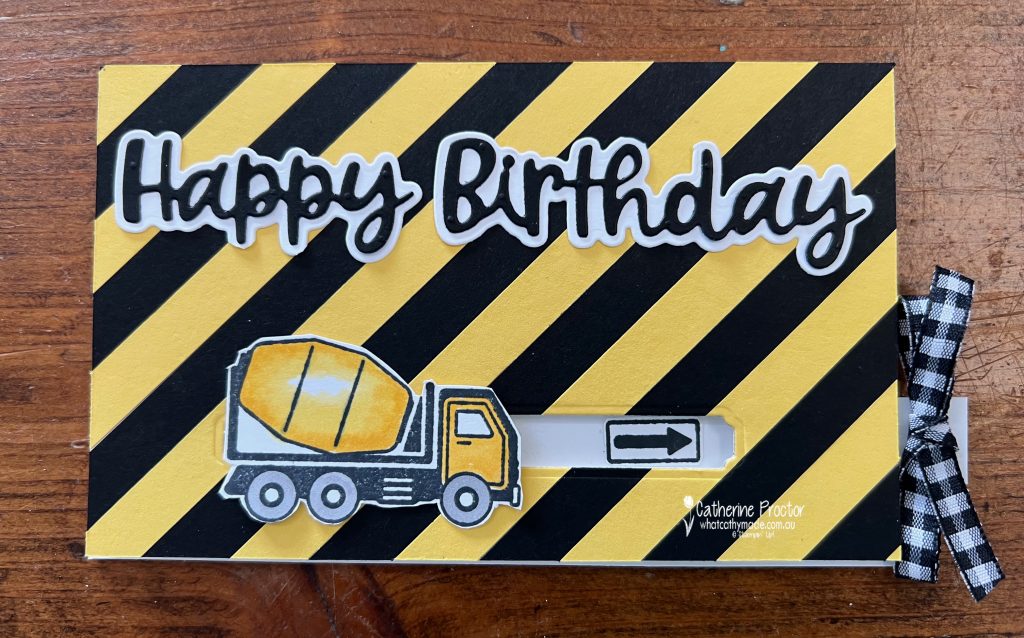
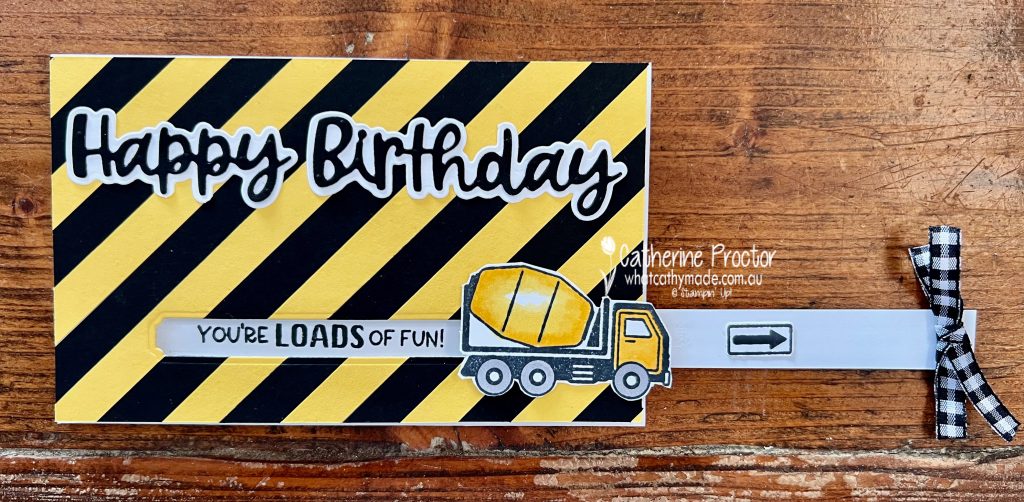
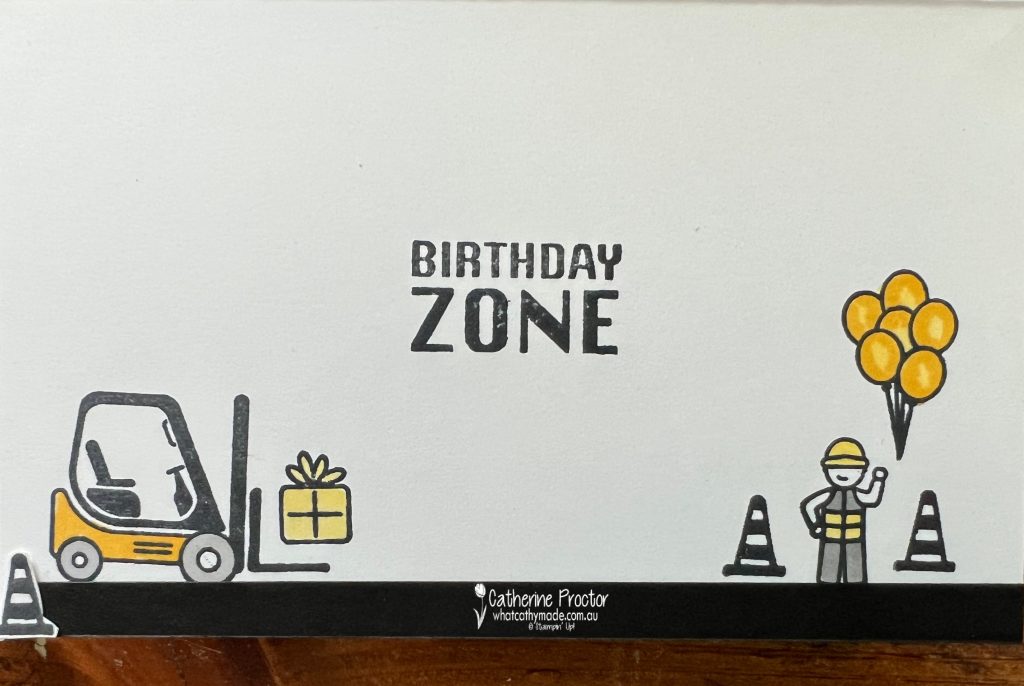
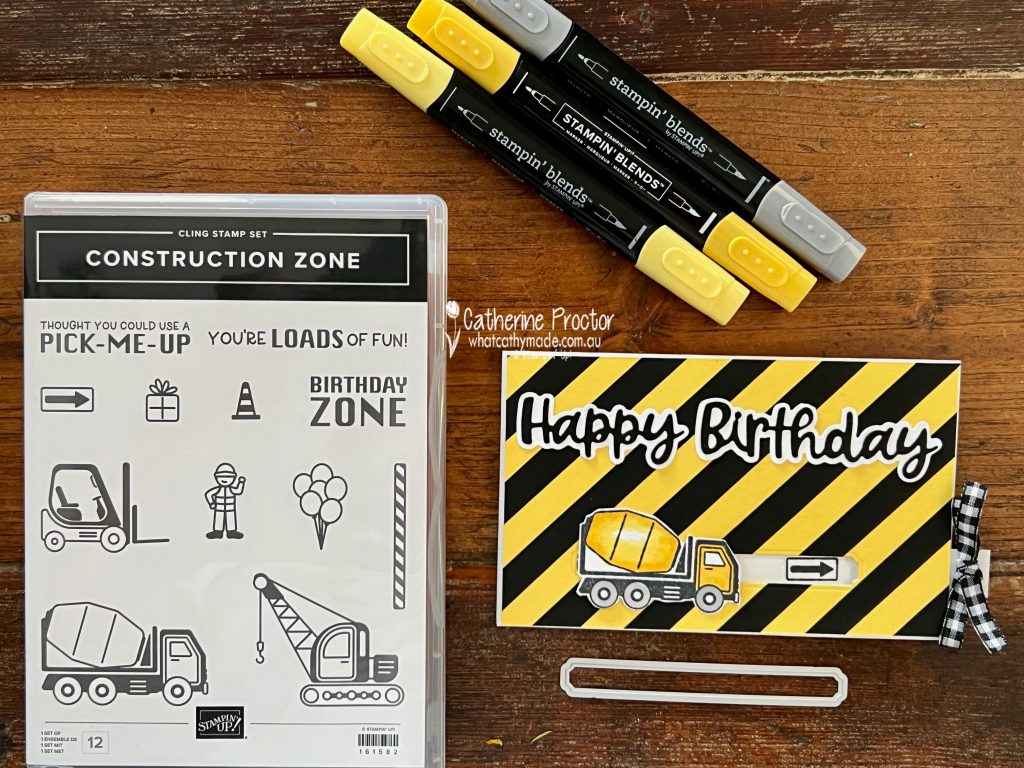
Have you seen any of the cards that use the Construction Zone stamp set, creating a “high vis” vibe by using strips of Daffodil Delight and Basic Black cardstock? Today I’ve stepped it up by creating a “high vis” card that is also a slider card.
Here is what the slider card looks like with the slider mechanism sitting inside the card…
And here it is with the slider pulled open…
The “You’re loads of fun” sentiment from the Construction Zone stamp set was the perfect size and shape to use as the sentiment for the slider reveal. The “Happy Birthday” sentiment is from the Wanted to Say dies, cut in half to create a horizontal sentiment.
To create the “high vis” vibe is relatively simple. I adhered adhesive sheets to Daffodil Delight and Basic Black cardstock before cutting the cardstock into 1cm wide strips.
These strips were then attached on a 45 degree angle to a piece of Basic White card stock to create the front layer.
The channel for the slider mechanism was then cut out of this front layer using the longest die from the Sending Dies.
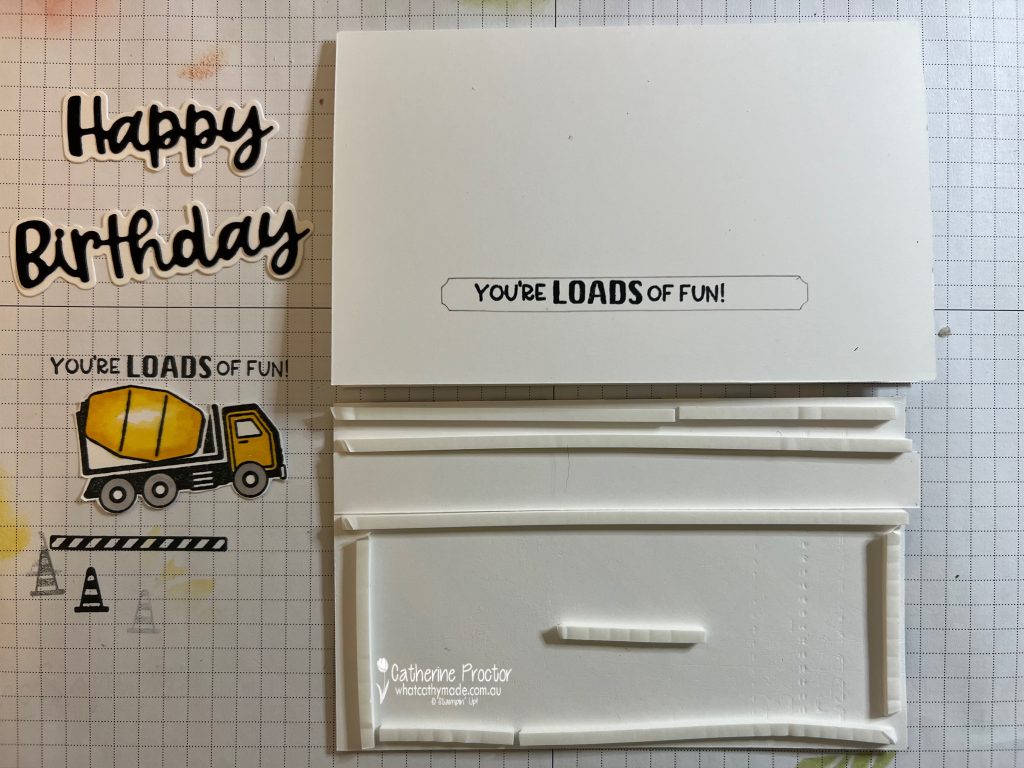
Here’s a peek at the construction process – I made up the design of this card and the mechanism as I went along so I only took one (very messy) photo of the construction stage.
One important aspect of creating a slider card is to place the top layer over the front of the card (BEFORE adhering the top layer to the card front with foam strips) and trace the die-cut channel area onto the card. This shows you exactly where to stamp the slider reveal sentiment.
This photo also shows the reverse side of the slider strip sitting between the strips of foam that line the slider channel – line the slider strip up between theses foam strips to ensure it slides smoothly but is still snug BEFORE you attach the cement truck to the front slider strip using either foam strips or dimensionals.
This short video shows the slider card in action, as well as the back of the slider strip pull mechanism.
I’ve used the arrow stamp from the Construction Zone stamp set to indicate where to pull, using a bow of Black & White 1/4″ (6.4 mm) Gingham Ribbon adhered with a black Square Brad to the slider strip, which is 1.5cm wide.
On the inside of the card I had fun playing with the other stamps from the construction Zone stamp set.
I’ve coloured the inside images and the cement mixer on the front of the card with Daffodil Delight and Smoky Slate stampin blends.
Now it’s time to hop on over to our next participant, the lovely Andrea Sargent – I can’t wait to see what Andrea has made this week!
If at any time you find a broken link, you can find the complete list of all participants below.
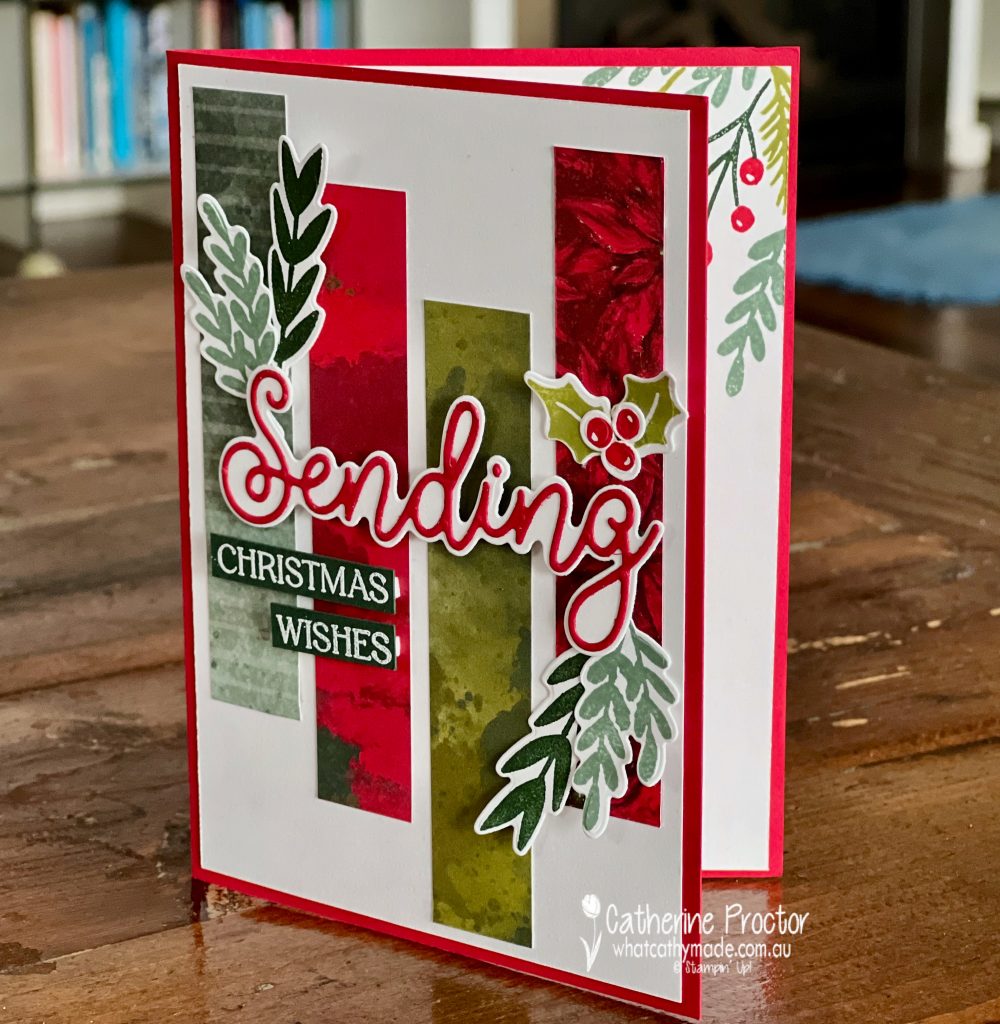
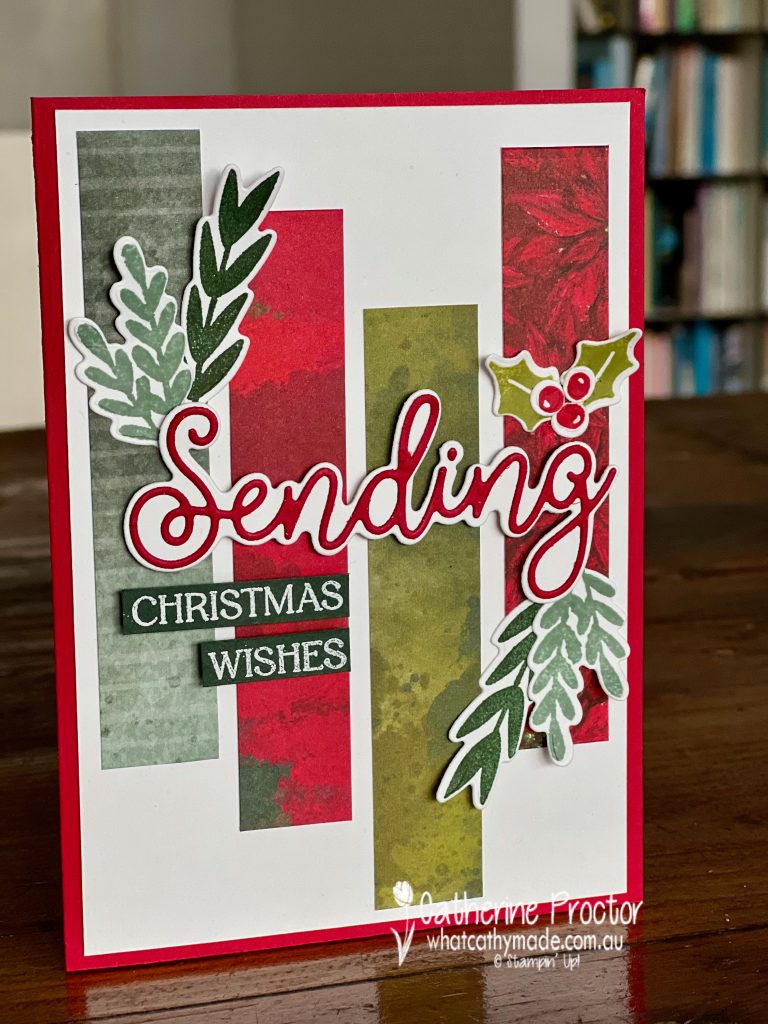
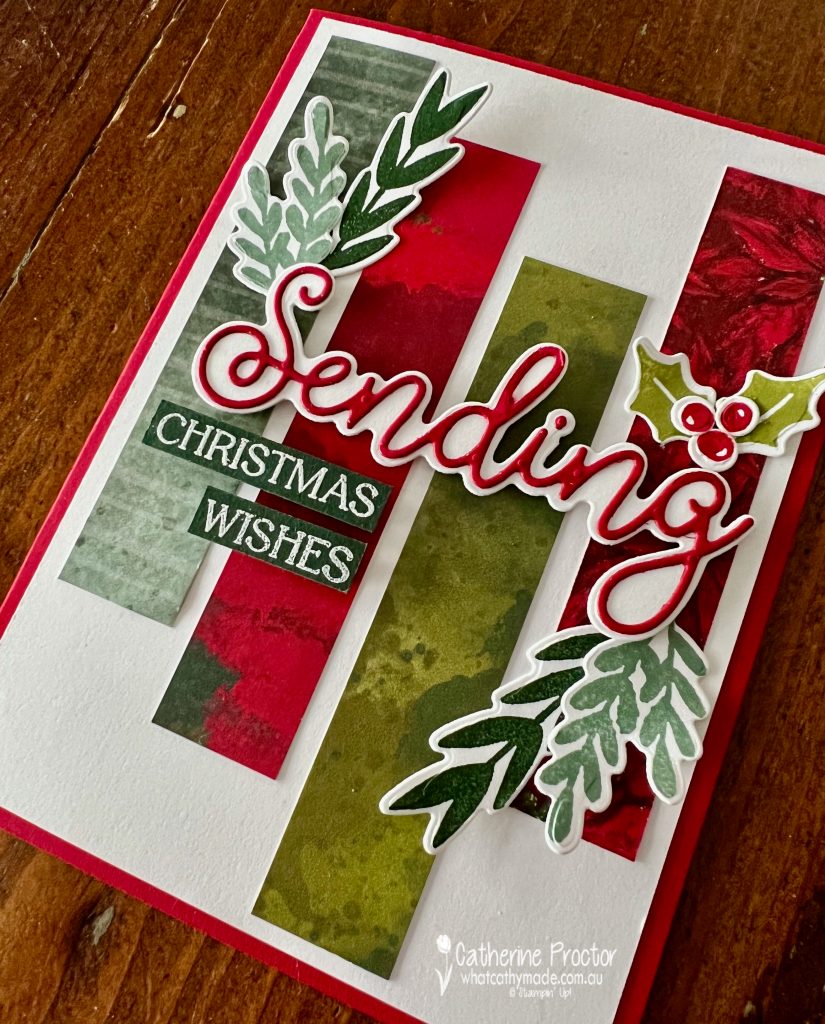
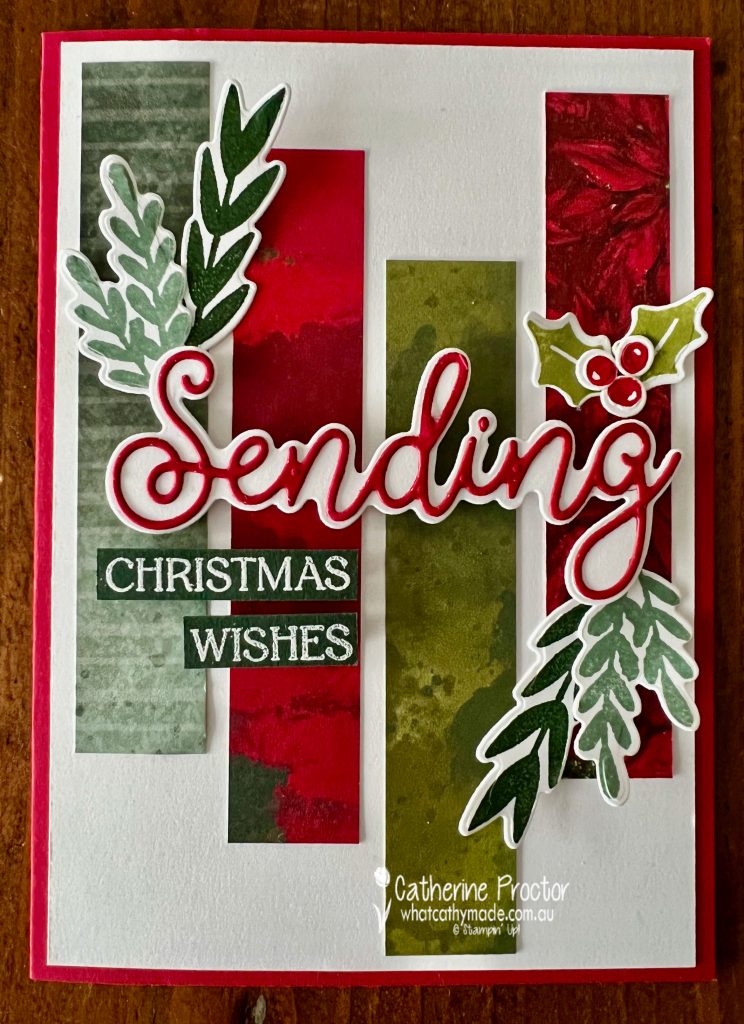
Welcome to week thirteen of the Heart Of Christmas Blog Hop!
Wondering how to use up your leftover strips of designer series paper or how to incorporate more than one DSP pattern on your card front? This simple layout is very effective and it can be made with virtually any DSP.
The trick to stop the background DSP competing with the foreground elements is to use a DSP that has a smaller pattern or more solid colours.
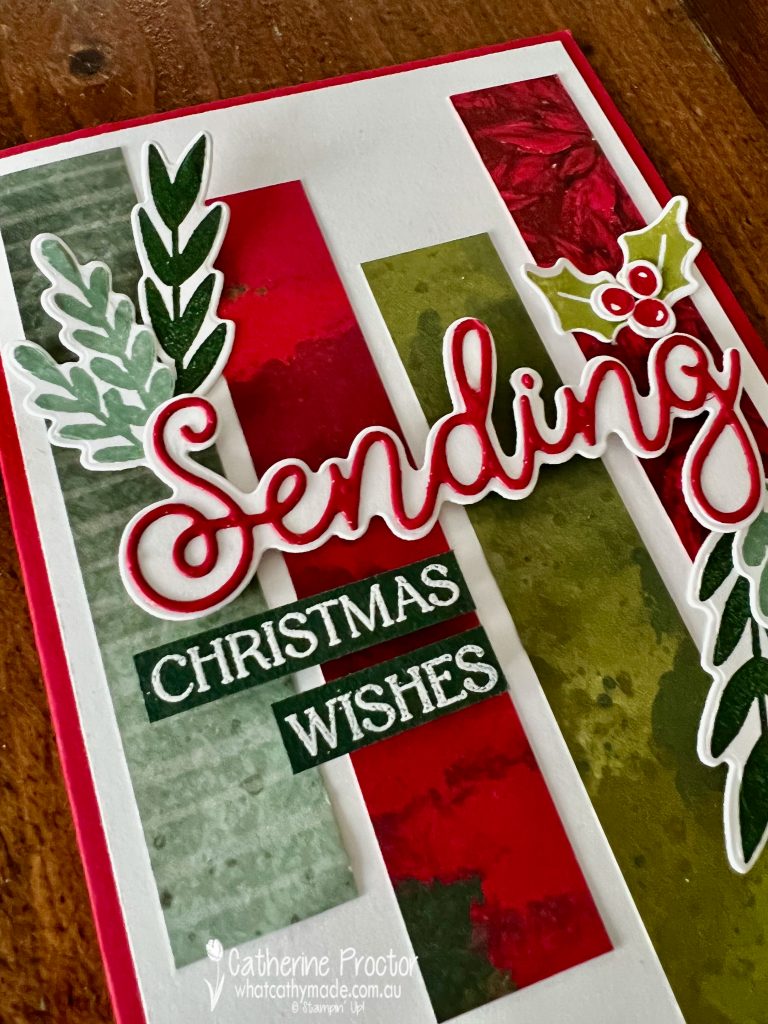
I originally intended to use the Painted Christmas DSP for this card, however I felt that the Boughs of Holly DSP was a better match as it really allowed the sentiment and foliage pieces to shine.
The foliage is stamped and die cut using the Christmas Banners Bundle in colours selected to match the Boughs of Holly DSP: Real Red, Evening Evergreen, Soft Succulent, Old Olive (stamped off) and Basic White.
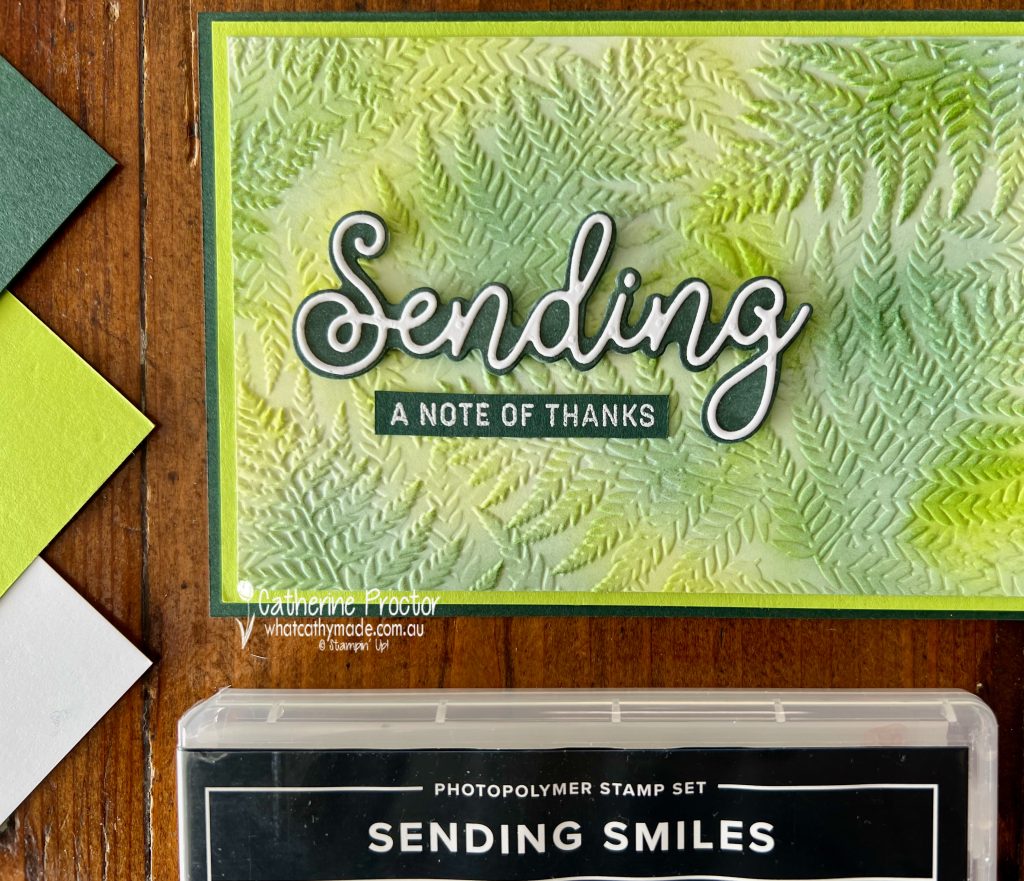
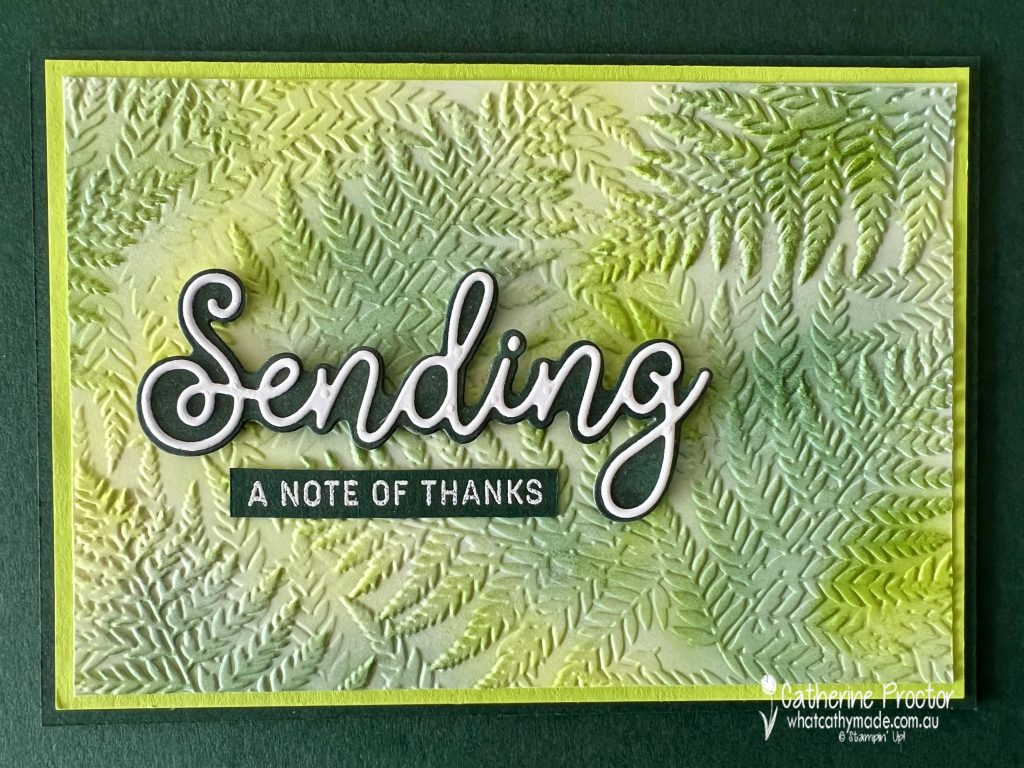
Stampin' Up! Boughs of Holly DSP colour combination
I love the versatility and impact of word dies. This layered “sending” sentiment is from the Sending Smiles dies and I reach for a lot. Don’t forget to use an adhesive sheet for the top word layer – it turns the word into a repositionable sticker and prevents any adhesive mess.
There is no Christmas sentiment in the Sending Smiles bundle, so I used the “Christmas” and the “wishes” sentiment from the Christmas Banners Stamp Set, stamped in Versamark ink onto scraps of Evening Evergreen cardstock and then white heat embossed.
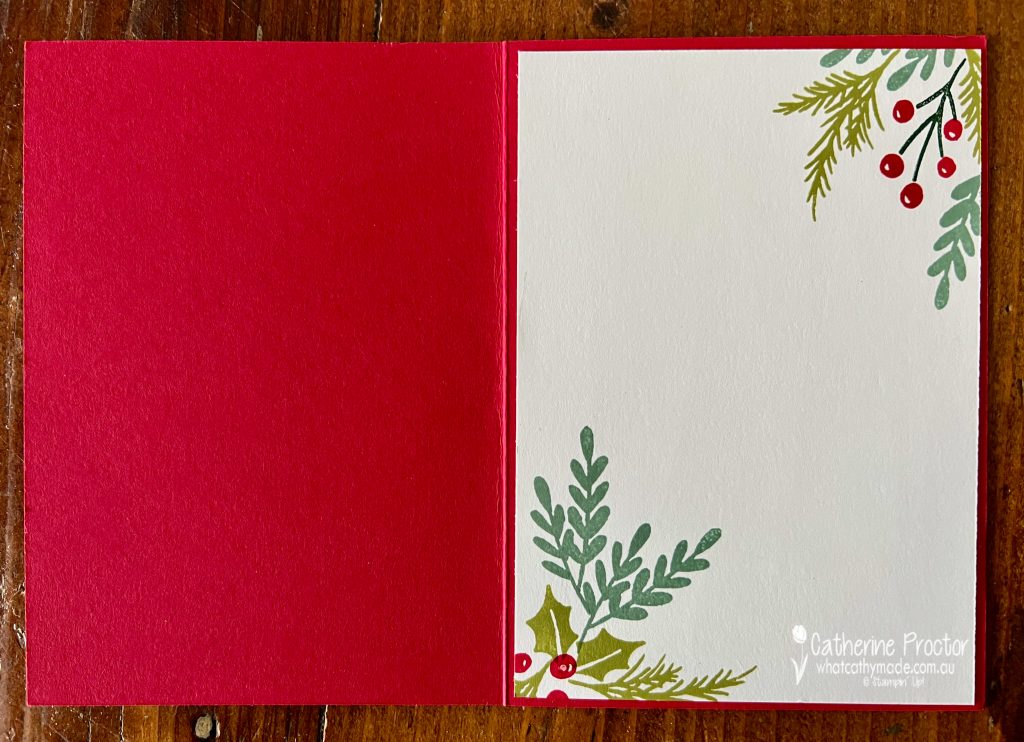
I’ve stamped some more of this gorgeous foliage from the Christmas Banners stamp set inside the card too.
Now it’s time to hop on over to our next participant, the lovely Rosa Leyden– I can’t wait to see what Rosa has created today!
If at any time you find a broken link, you can find the complete list of all participants on Sharon’s blog.
If you live in Australia, you can find and purchase these products in my Stampin’ Up! Online Store or by clicking on the links below.
Welcome to week nineteen of our Art With Heart 2022-23 Colour Creations blog hop!
This is a weekly blog hop where we showcase the stunning range of Stampin’ Up! colours in alphabetical order over 12 months and this week we are featuring Evening Evergreen, a very dark and dramatic 2021-2023 In Colour.
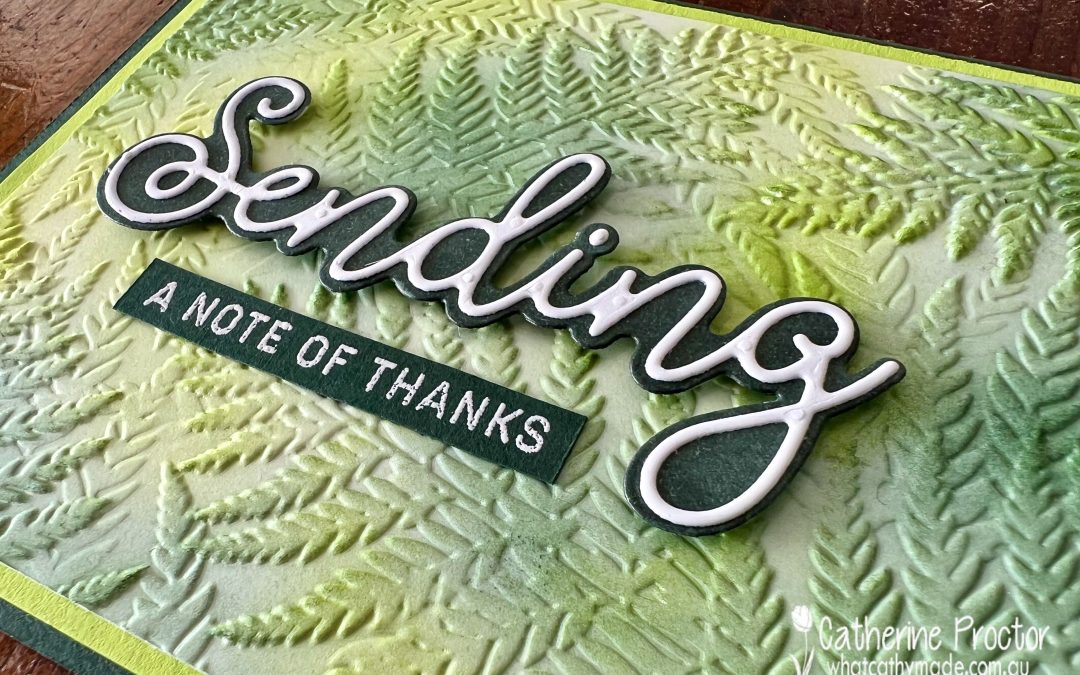
Because Evening Evergreen is the darkest of Stampin’ Up! greens I thought I would try pairing it with the brightest of Stampin’ Up! greens – Parakeet Party – and I’ve decided I really love this colour combination!
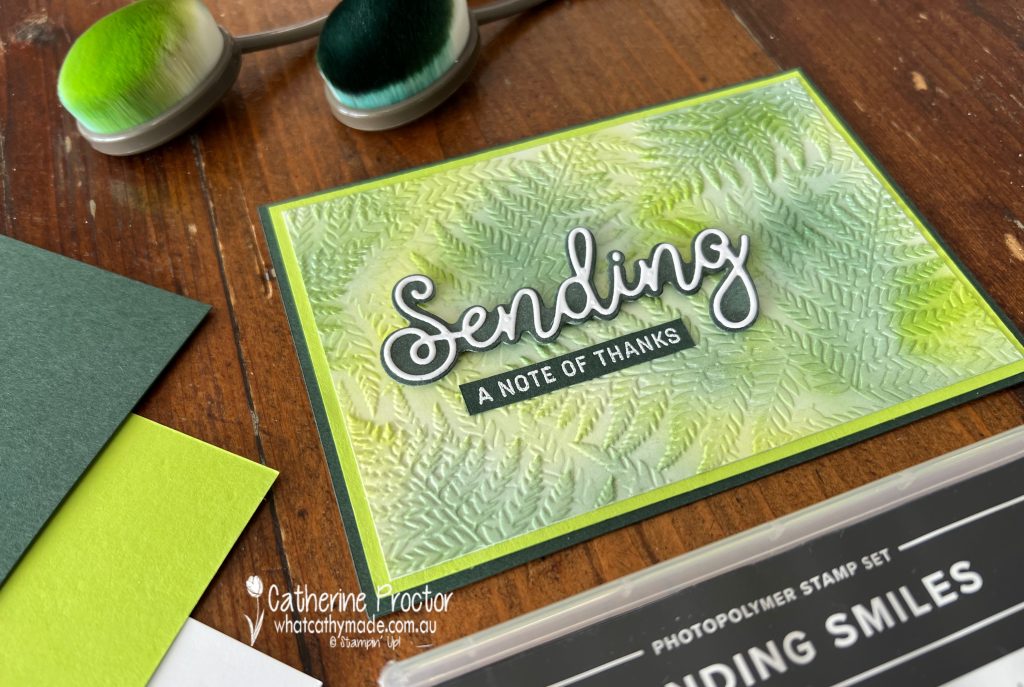
The embossed layer couldn’t be simpler. After embossing Basic White card stock with the Fern 3D Embossing folder use blending brushes to add Evening Evergreen and Parakeet Party ink to the ferns.
I trimmed the embossed layer to 9.5 x 13.8cm, adhered it to a Parakeet Party 10 x 14.3cm cardstock layer and then adhered both of these layers to a a 10.5 x 14.8 cm Evening Evergreen layer – half a A4 sheet of cardstock.
The “Sending” layered die is from the Sending Dies. The secret to success with using a layering word die like this is to add an adhesive sheet behind the cardstock BEFORE you die cut the word out. It turns your die into a sticker that you can easily reposition to get it perfectly aligned.
Now it’s time to hop on over to our next participant, the lovely Tina Gillespie – I can’t wait to see what Tina has made this week!
If at any time you find a broken link, you can find the complete list of all participants below.
Welcome to week eleven of our Art With Heart 2022-23 Colour Creations blog hop! This is a weekly blog hop where we showcase the stunning range of Stampin’ Up! colours in alphabetical order over 12 months and this week we are featuring Cajun Craze.
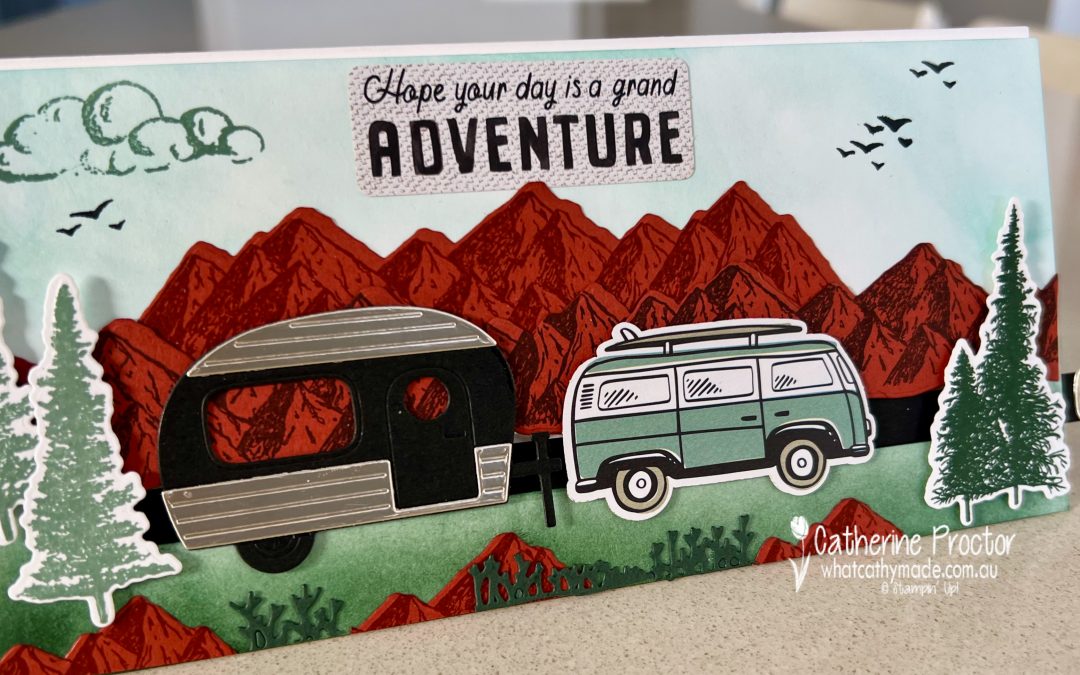
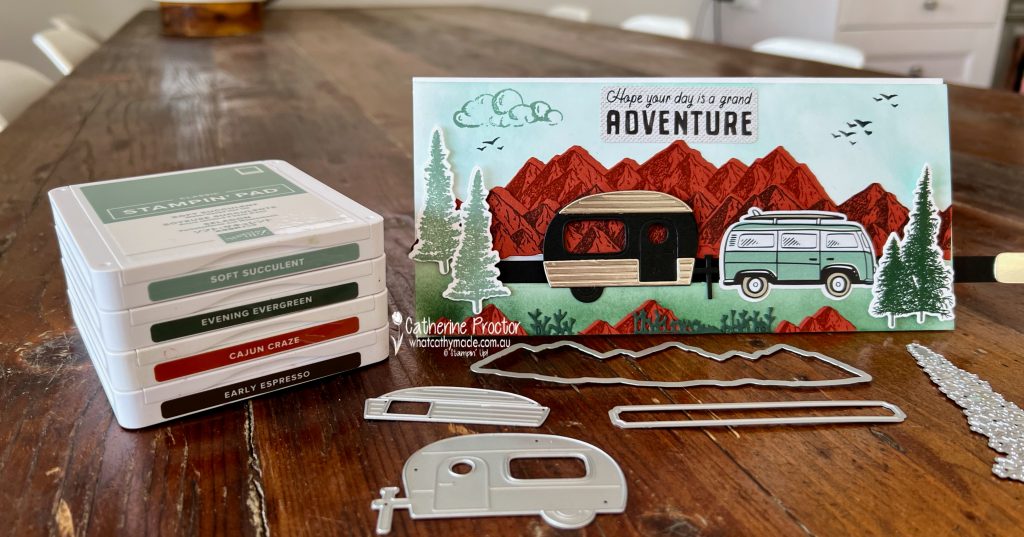
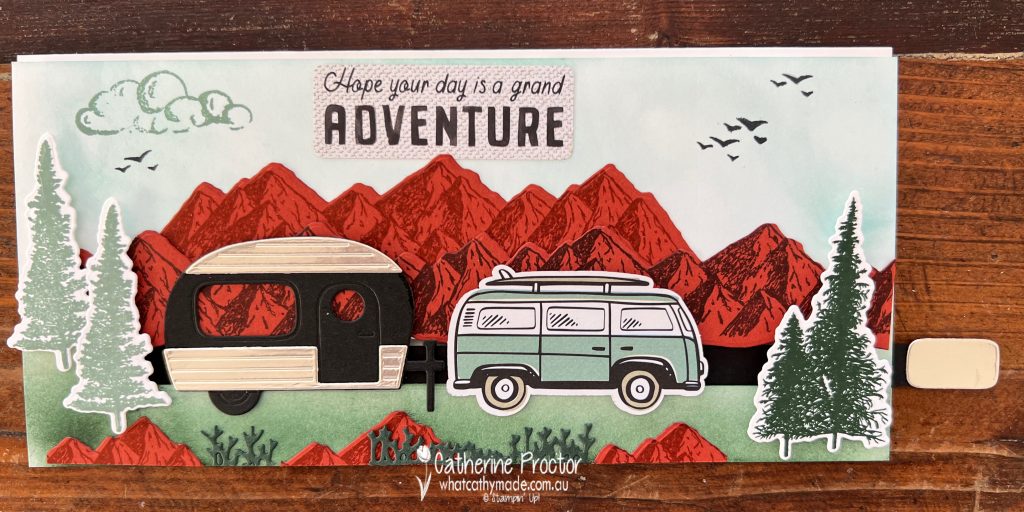
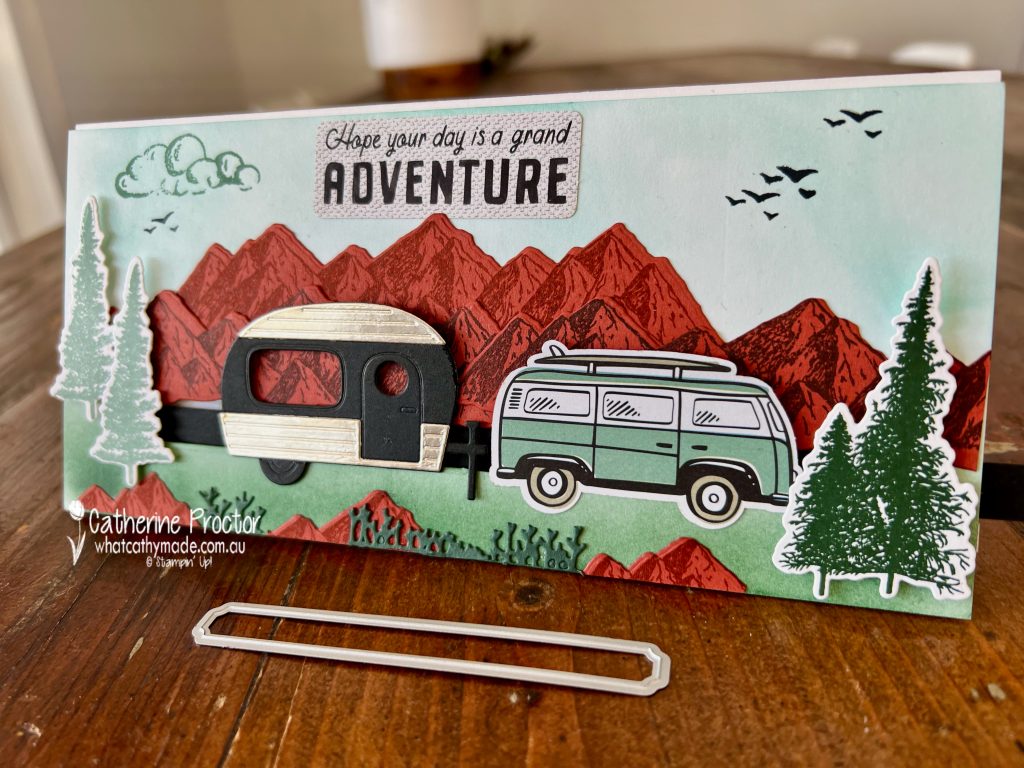
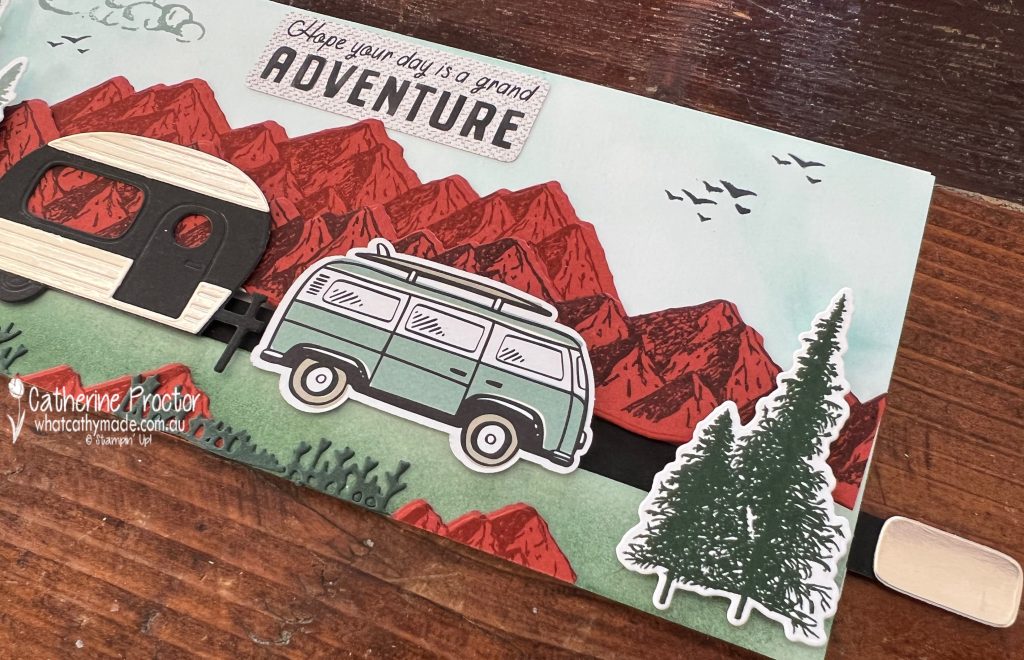
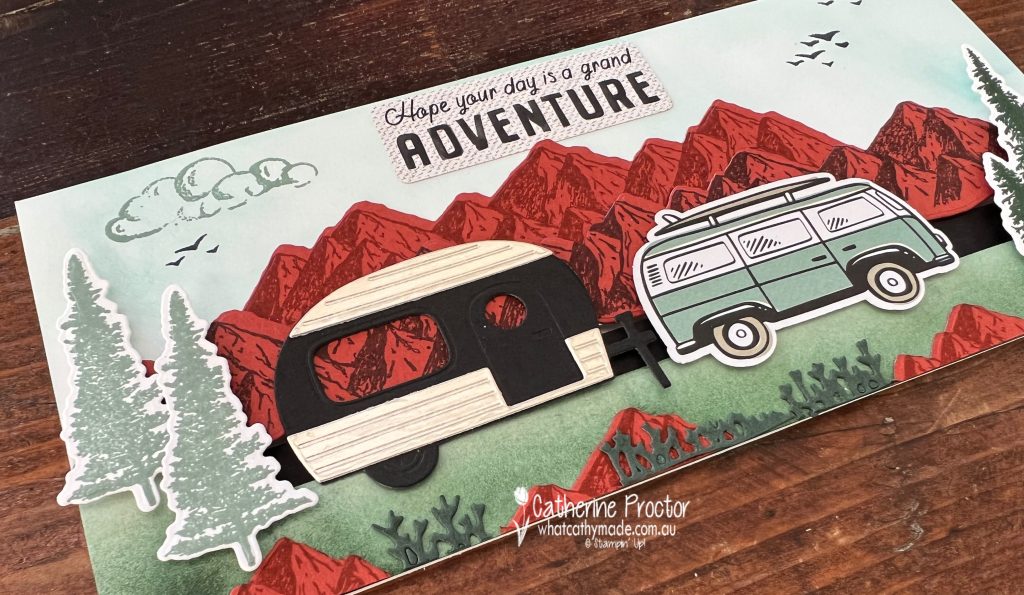
As soon as I saw this vintage Combi die cut in the “He’s the Man” designer series paper I knew exactly how I would use it – to tow the caravan from the free SALE-a-bration Tree Lot dies in a slimline slider card!
The colour combination for my Cajun Craze slimline slider card was also inspired by the retro colour combination in the “He’s the Man” designer series paper: Basic Black, Cajun Craze, Crushed Curry, Early Espresso, Sahara Sand, Soft Succulent, with the addition of some Evening Evergreen.
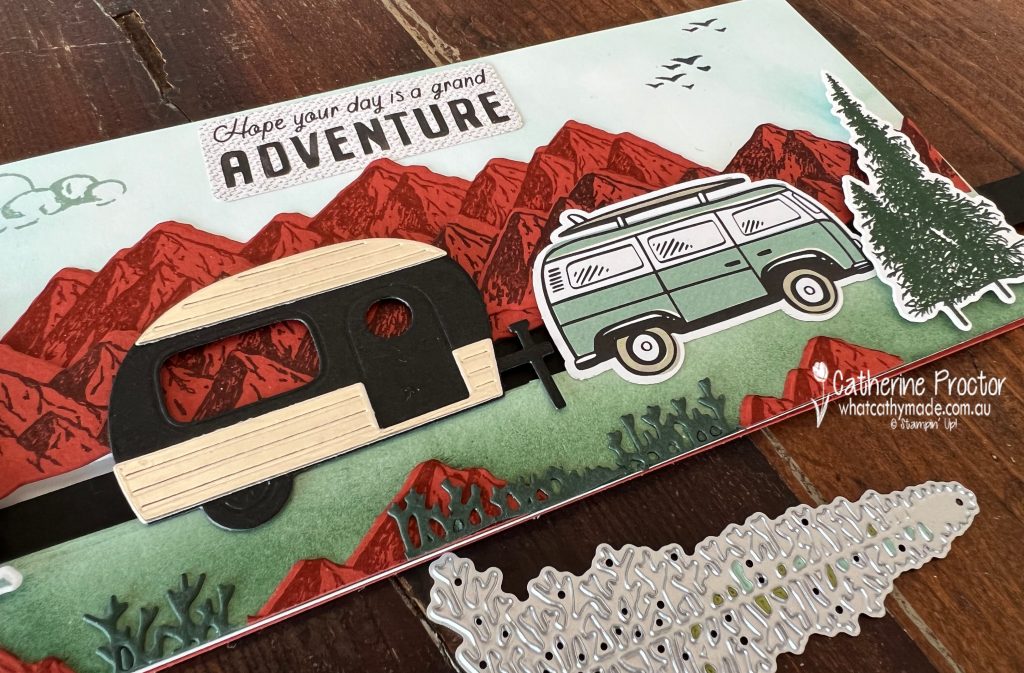
The Cajun Craze element of the card is the mountains and the rocks, stamped in both Early Espresso and Cajun Craze onto Cajun Craze card stock. Using the darker mountains stamped in Early Espresso at the front and the lighter mountains at the back gives instant dimension to the card.
The “grass” is made using the tallest Mountain Air tree die, used to die cut Evening Evergreen card stock with branches trimmed from the tree and adhered sideways to become grass. The “rocks” are trimmed tops of the mountains.
Here’s a quick 25 second video that shows you how my slimline slider card works, as well as the inside of my card.
The slot for the slider mechanism is created using the long thin die from Sending Dies. I die cut it twice to make one long channel.
There’s a great arrow die cut in the “He’s the Man” designer series paper that would work well for the end of the pull mechanism, however the negative window piece from the silver die cut caravan inside my card was sturdier and looked very smart, so I used that instead.
The blended background for the card is created with Evening Evergreen and Pool Party ink, applied with blending brushes.
The sentiment is another die cut from the “He’s the Man” designer series paper and the cloud and the little birds are both stamps from the Mountain Air stamp set.
Now it’s time to hop on over to our next participant, the lovely Amie McIlroy – I can’t wait to see what Amie has made this week!
If at any time you find a broken link, you can find the complete list of all participants below.


")
")


 Designer Series Paper")


")
 Specialty Designer Series Paper")
 Specialty Pack")


