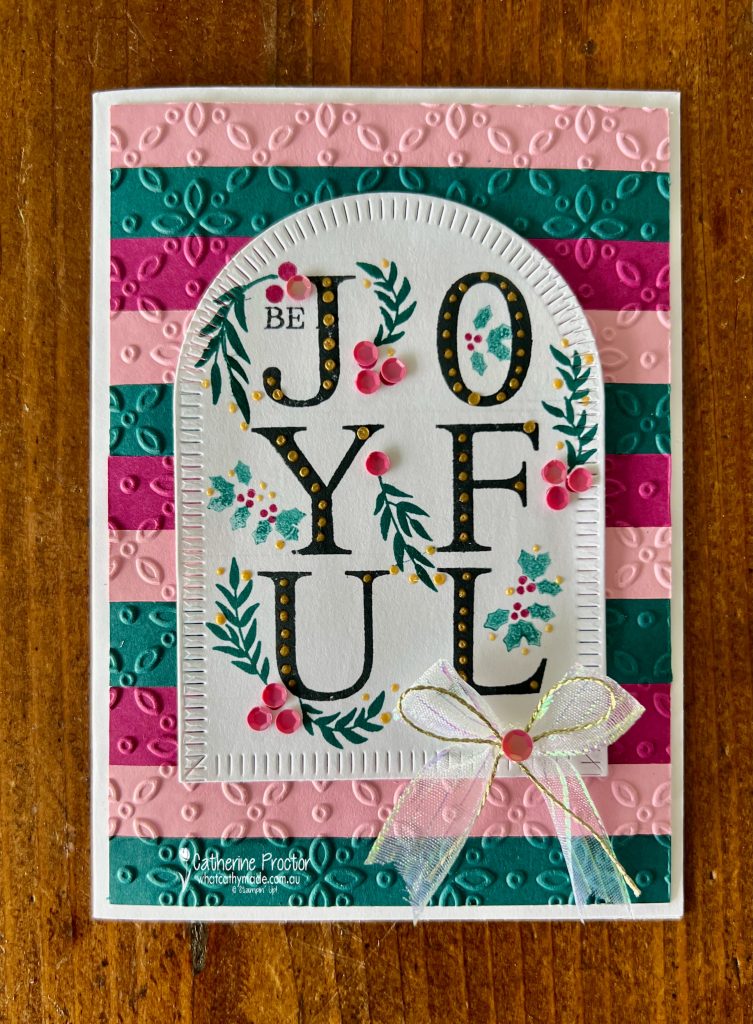
The challenge for Day 17 of the 30 Day Christmas Card Making Challenge is a colour challenge: Powder Pink, Plum and Teal Blue.
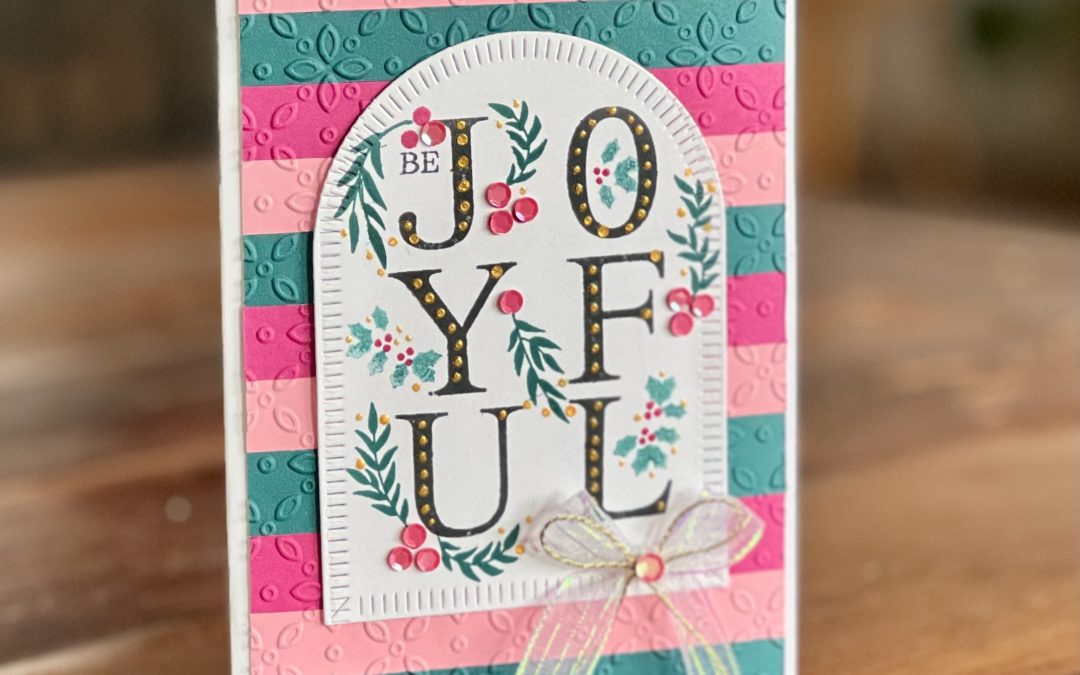
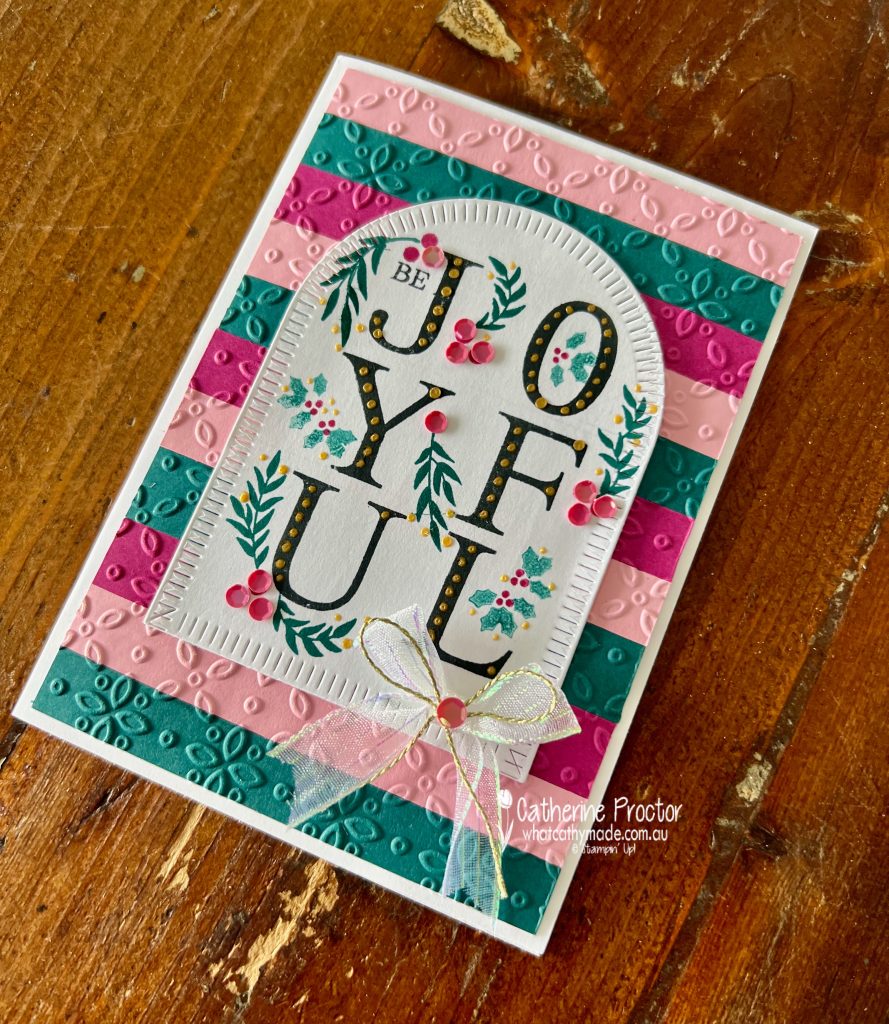
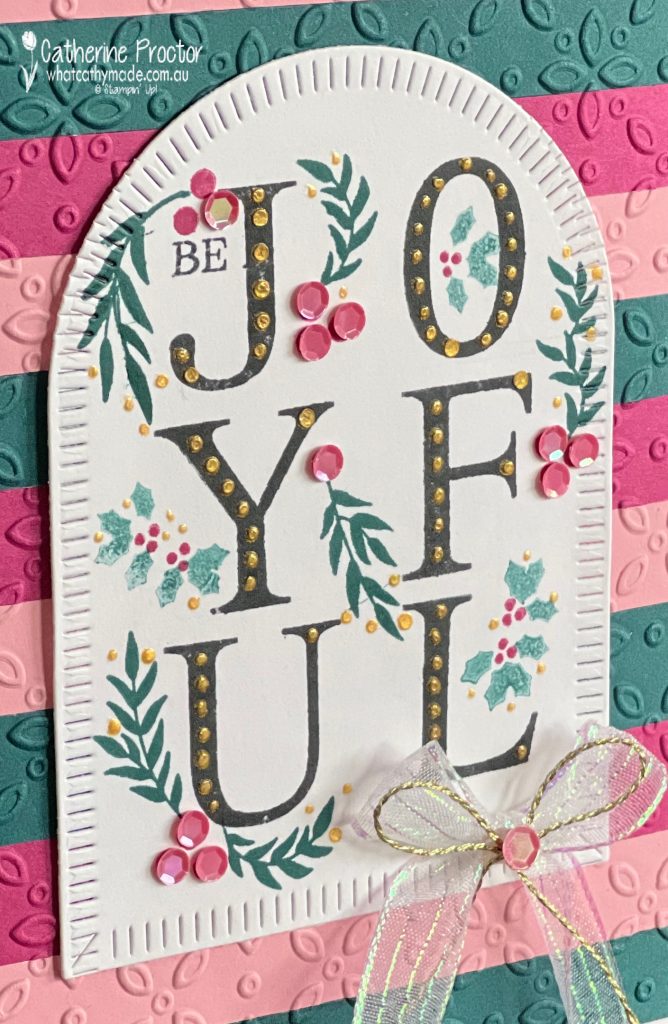
The Stampin’ Up! colours I’ve used for this colour challenge are Pretty Peacock, Pretty in Pink and Berry Burst. I’ve adhered strips of cardstock in these colours to a layer of Basic White cardstock before embossing with Eyelet Folder.
I’ve stamped the word “Joyful” in black using the Classic Letter stamp set, adding dots of Gold Metallic Enamel Effects add a touch of dimension and sparkle.
The curved greenery from the Classic Letters stamp set is stamped in Pretty Peacock and the holly stamp is from the Reindeer Fun stamp set, stamped in Pretty Peacock that has been stamped off once.
Adhesive-Backed Shiny Sequins in Melon Mambo and a double bow of Iridescent Striped Trim and Gold Twisted Thread finish off the card.
I’ll be back tomorrow blog hopping with the AWH Heart “Heart of Christmas” team and another “30 Days of Christmas” Christmas card.
Welcome to week forty-four of our Art With Heart 2023-24 Colour Creations blog hop!
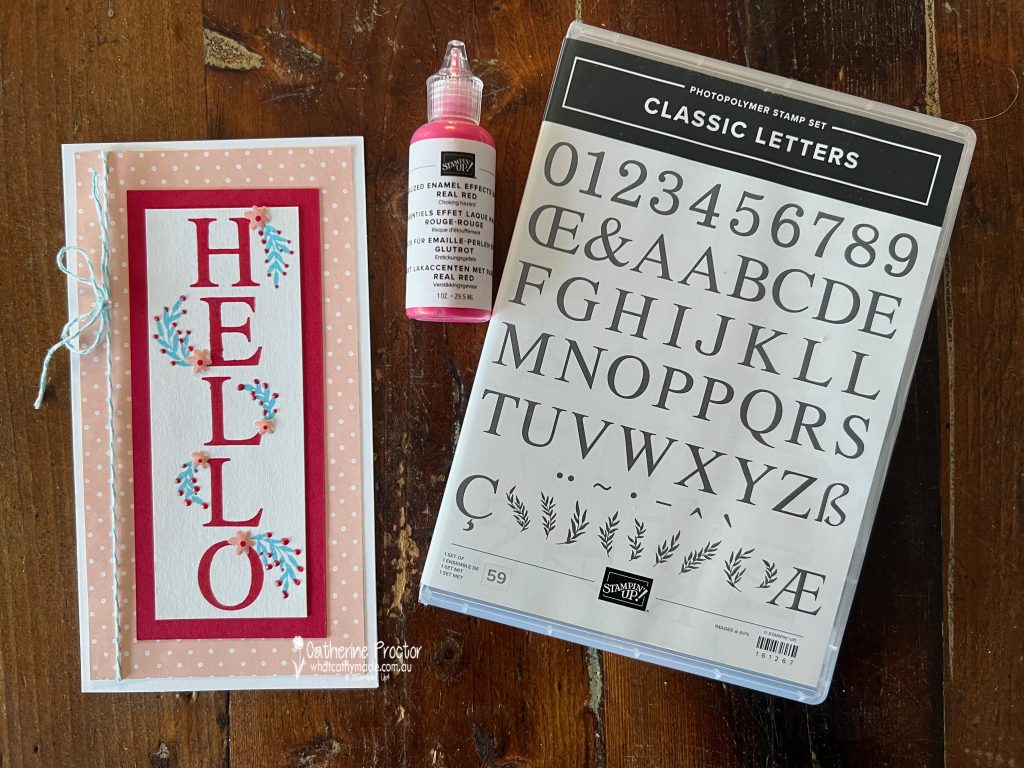
Our colour this week is Real Red, a true red from the brights colour family colour.
I’m using the Classic Letters stamp set for my quick and easy card this week. The Classic Letters stamp set is a fabulous alphabet and number set that is one of Stampin’ Up!’s Online Exclusive products. I love the greenery flourishes that can be added to any of the letters or numbers.
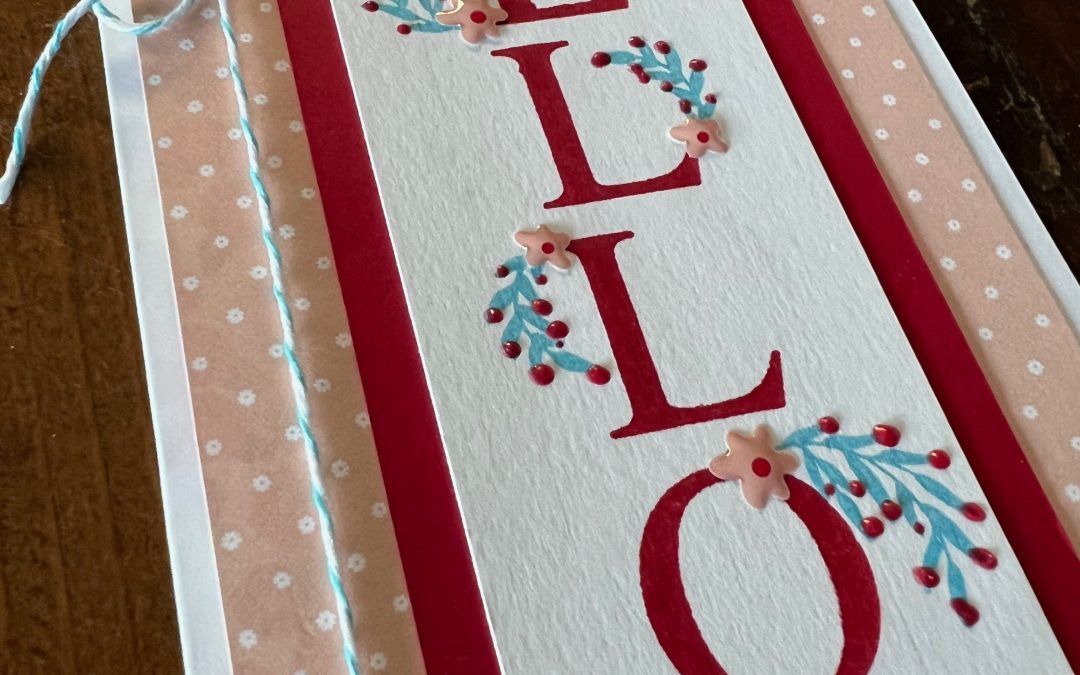
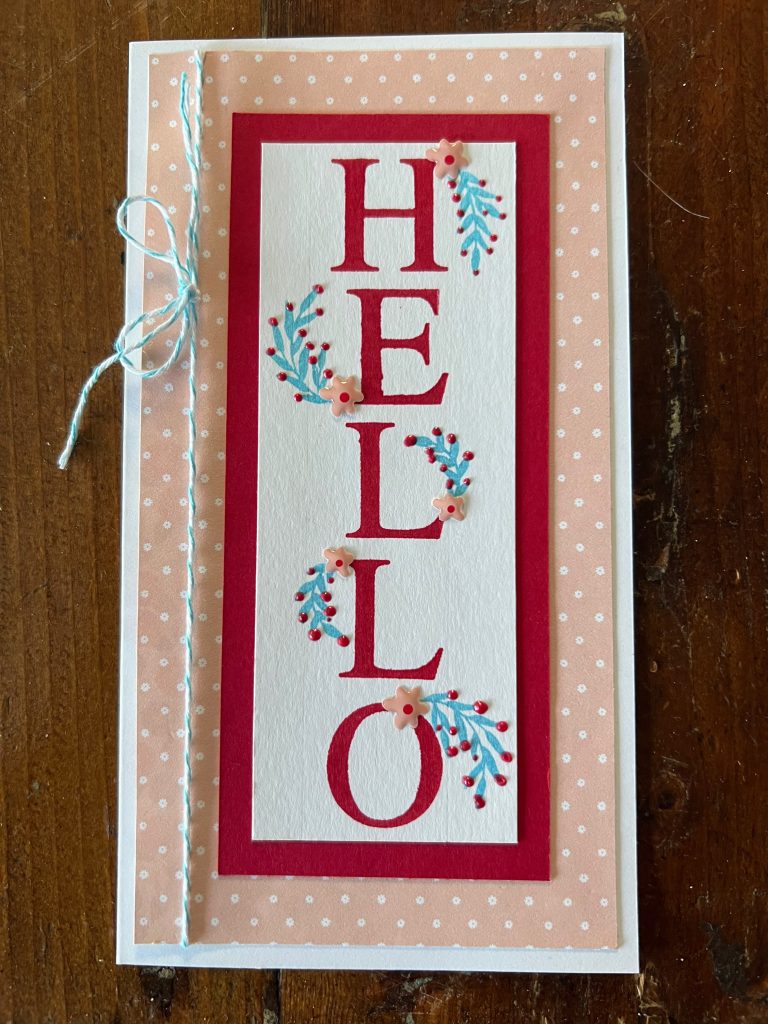
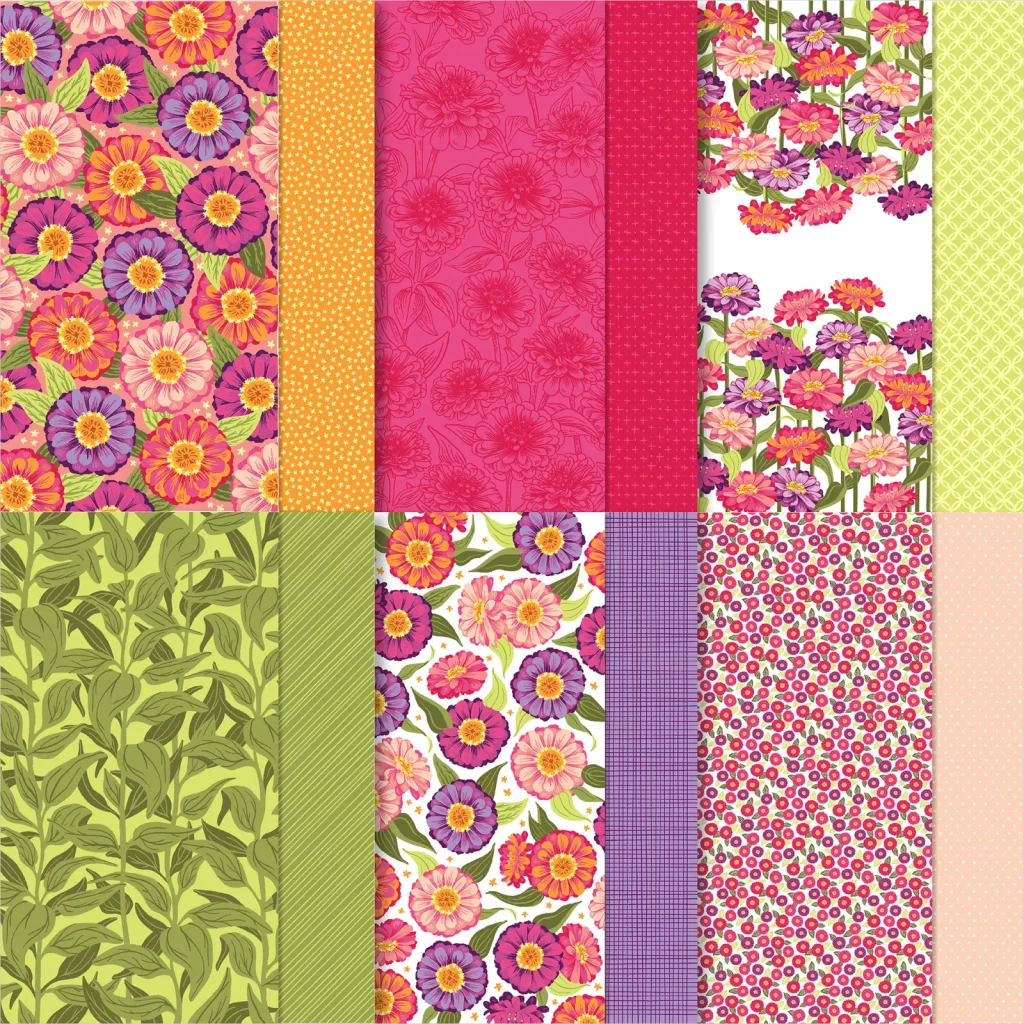
I was hoping to achieve a slightly vintage vibe with my Real Red, Petal Pink and Tahitian Tide colour combination. Does this colour combination give you vintage vibes?
The gorgeous spotted Petal Pink DSP is from another online exclusive product – the Flowering Zinnias 12″ x 12″ (30.5 x 30.5 cm) Designer Series Paper.
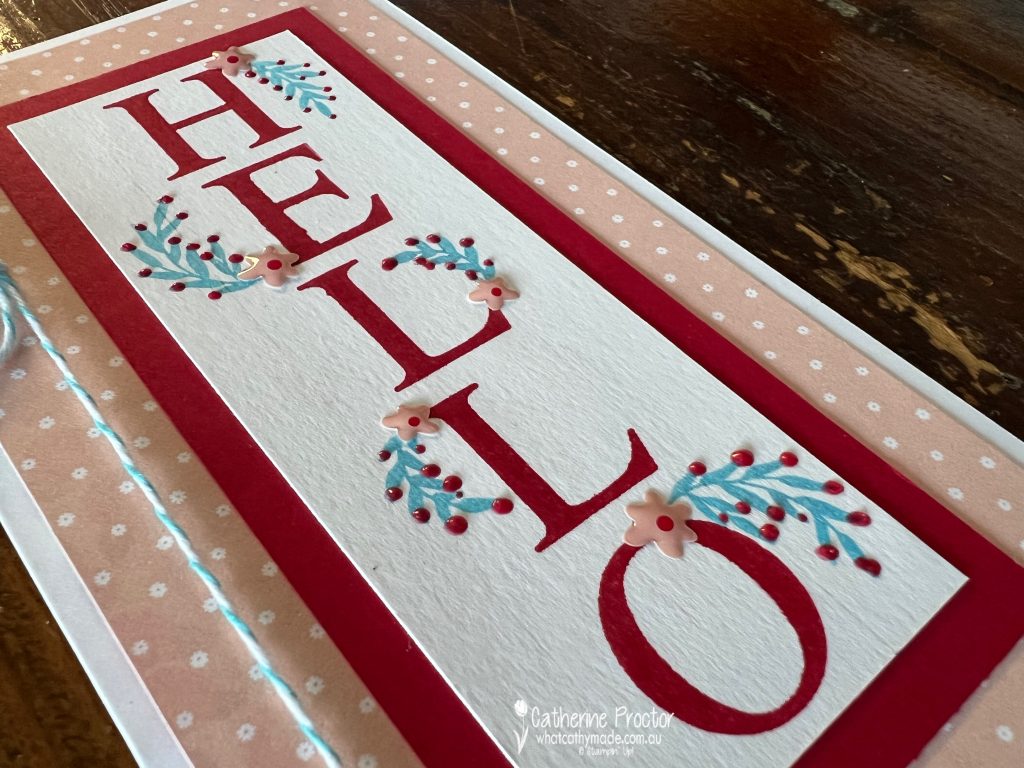
The slimline shape of my card was dictated by the finished size and shape of the my stamped “Hello”. I then stamped greenery flourishes in Tahitian Tide before adding dots of Pearlised Enamel Effects Basics lacquer in Real Red.
It’s hard to photograph the shine and dimension of the Pearlised Enamel Effects Basics – a side on view gives a better idea of what this card looks like in real life.
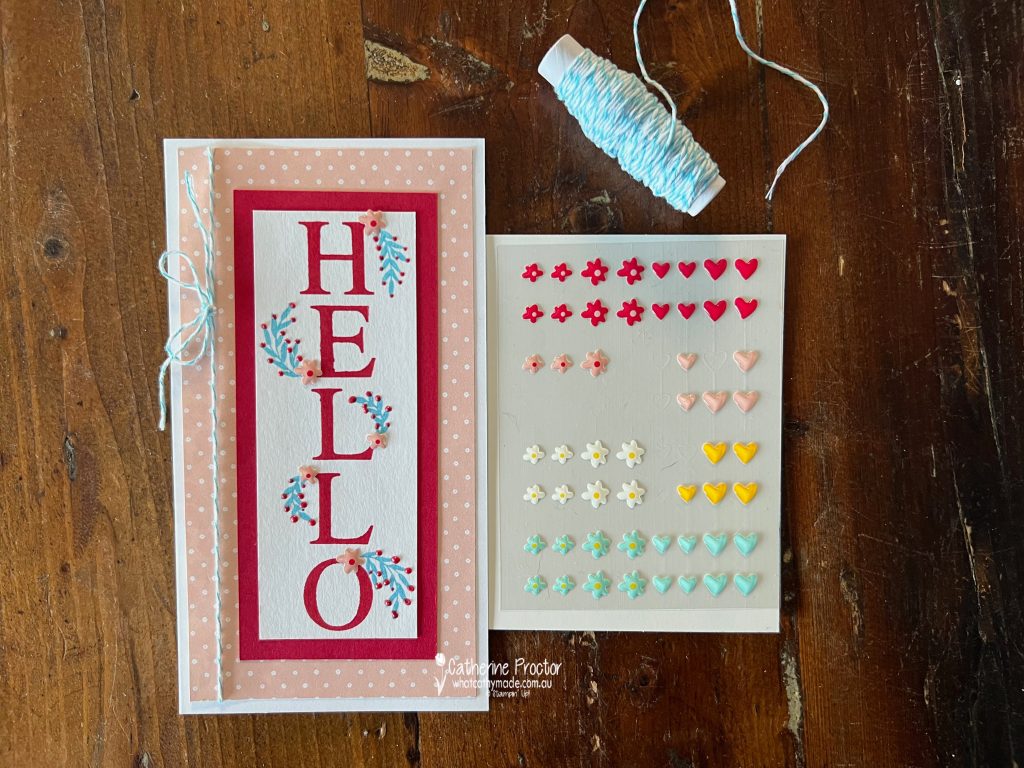
The Petal Pink flower embellishments are from the Adhesive-Backed Hearts & Flowers and the Tahitian Tide Bakers twine comes from the 2022–2024 In Color Baker’s Twine Pack.
All of the 2022–2024 In Color products (including Tahitian Tide) are about to retire so stock up now before they sell out!
I’m very excited to be heading to the Stampin’ Up! OnStage convention in Melbourne first thing tomorrow morning so hopefully by next Wednesday I’ll be able to share some of the brand new 2024-26 In Colours to share with you!
Now it’s time to hop on over to our next participant, the lovely Rachel Palmieri. I can’t wait to see what Rachel has made this week!
If at any time you find a broken link, you can find the complete list of all participants below.
Have you seen Stampin’ Up!’s new online specials? You won’t find these products in any catalogue as they are exclusively online.
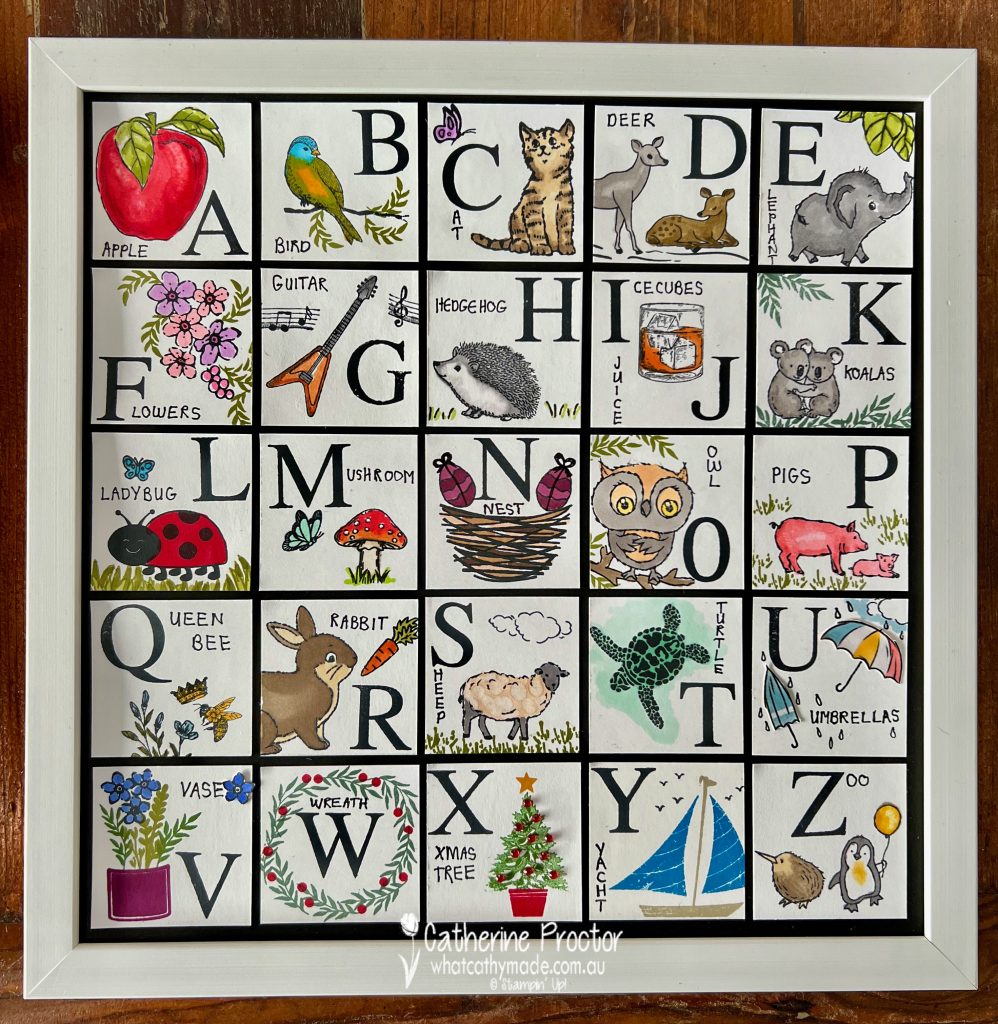
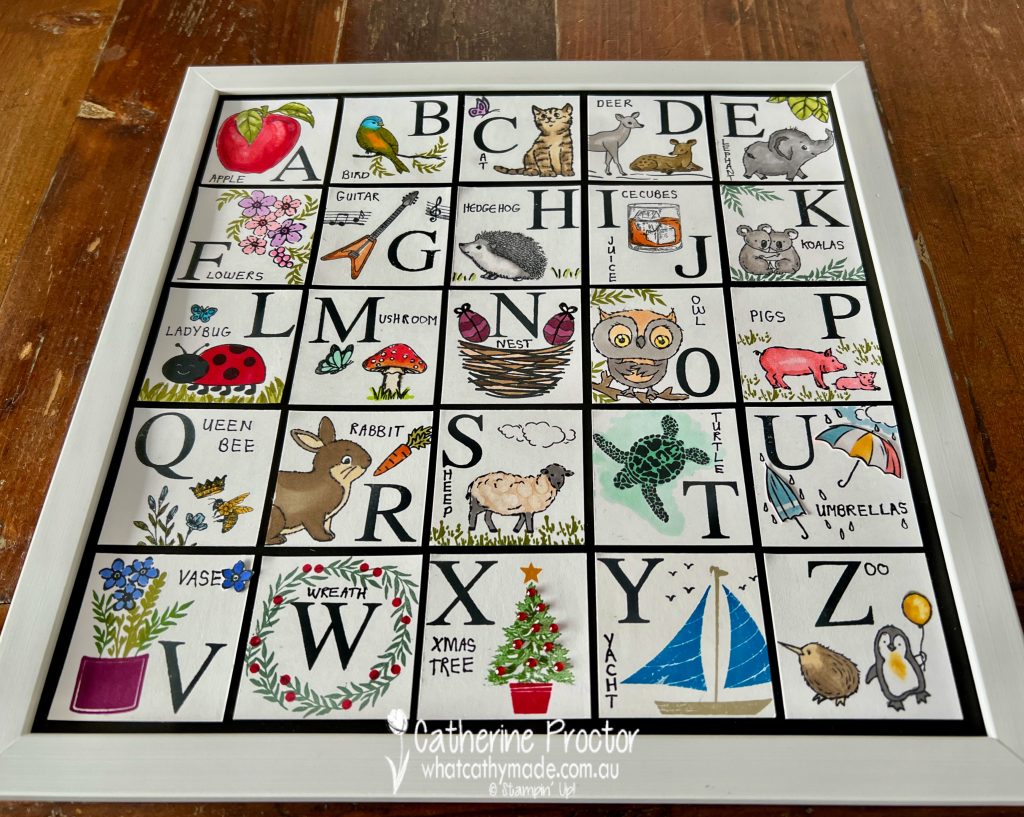
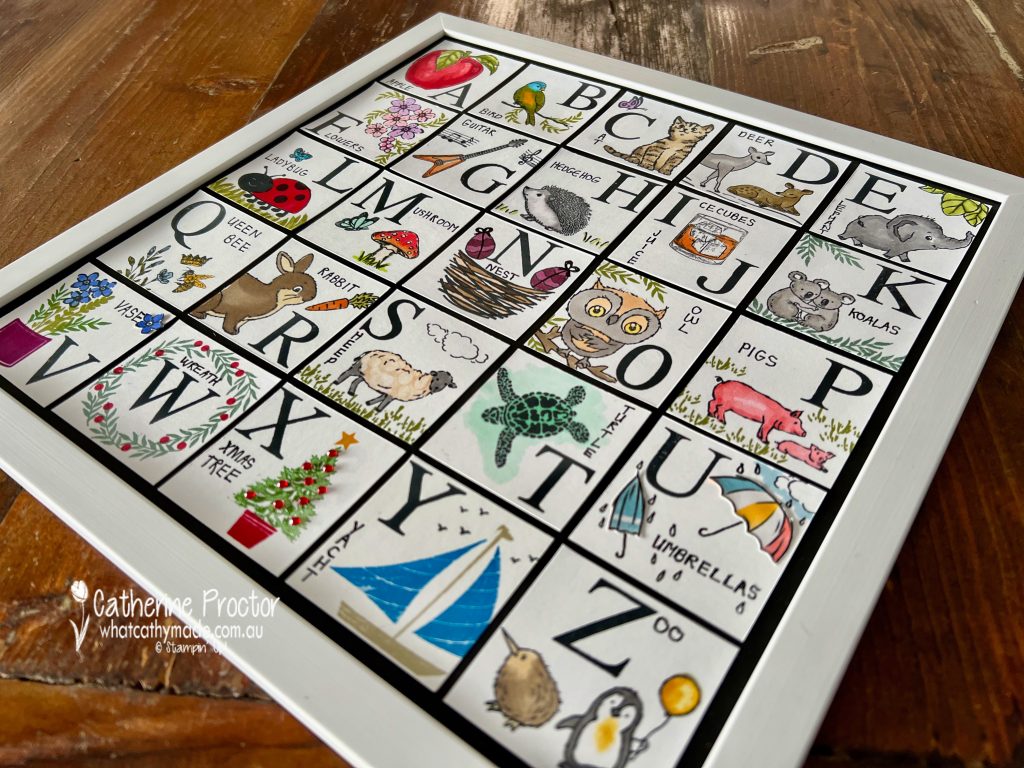
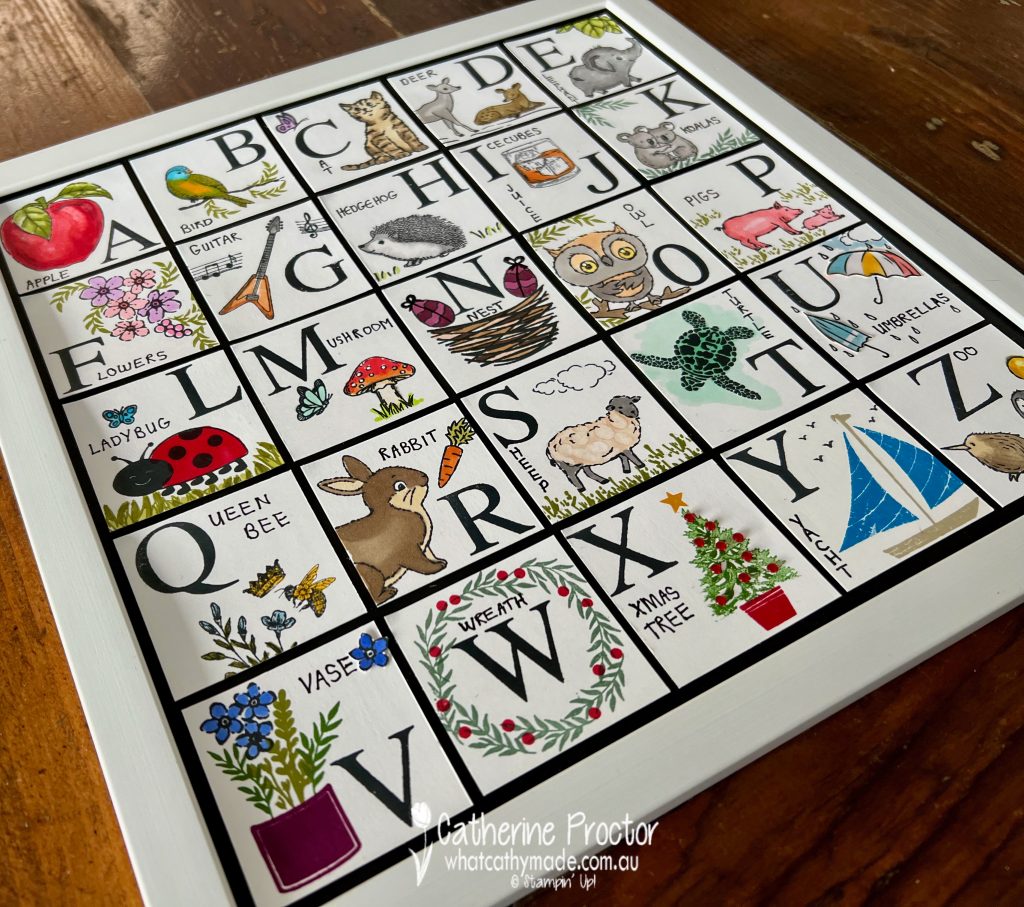
Today I wanted to share a project with you that used two of these online exclusives – the Classic Letters Stamp Set and one of the kits, the Celebrate Today Magnet Board.
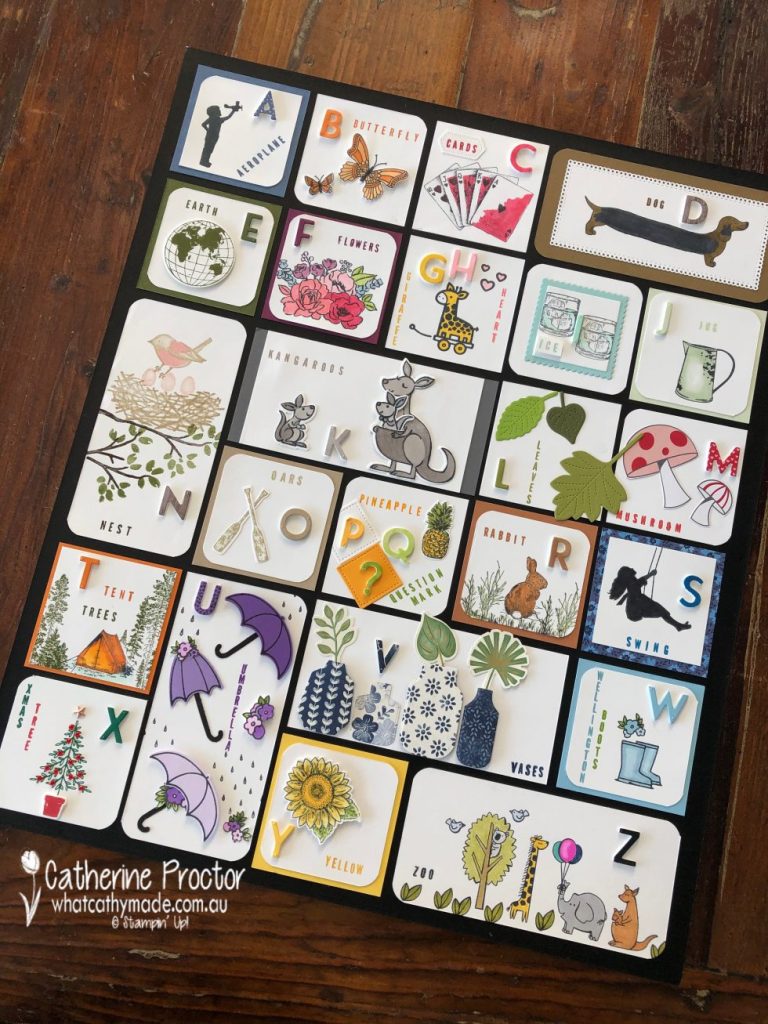
I’ve used both of these products, plus an wide assortment of stamp sets, dies, embellishments and ink to make an alphabet sampler.
At the time of publishing this blog post, all of these Stampin’ Up! products were current, bar one – the owl from the recent SALE-a-bration Adorable Owls stamp set. It was current when I began making this sampler!
I’ve previously made a much larger alphabet sampler using the now retired Playful Alphabet Dies, however you could make it using the Alphabet à la Mode Dies instead.
A larger frame gives you a lot more creative licence with the way you lay out your sampler and the size of stamps and dies you can use, so if you’d like to make this larger alphabet sampler instead, you can read about how I made it here.
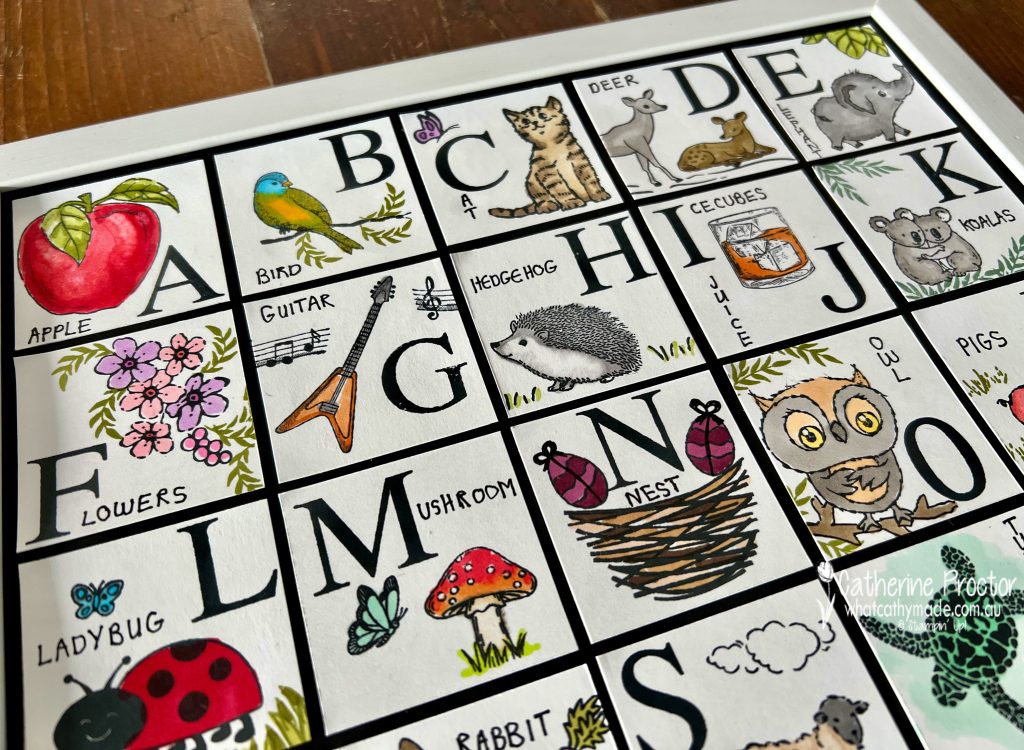
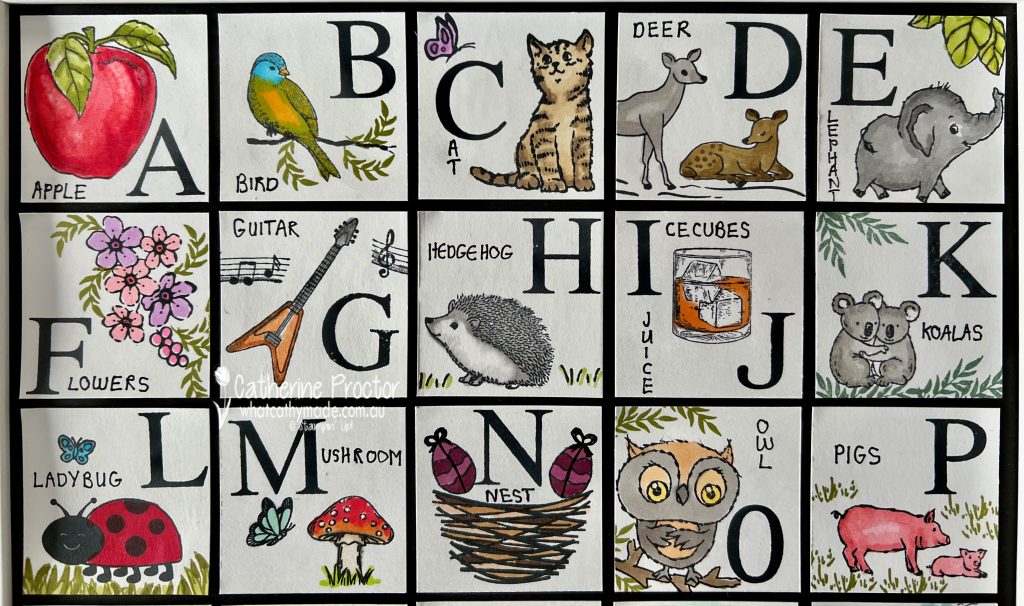
This smaller alphabet sampler was more of a challenge to make because I had to fit 26 letters onto a 12 x 12 inch piece of cardstock that could fit into the Celebrate Today Magnet Board Kit frame.
It took a bit of calculating, fiddling and adjusting, but I got there in the end!
Here’s how to make this smaller alphabet sampler.
Alphabet sampler instructions
Start with a frame that is designed to frame a 12 x 12 inch (30.5 x 30.5 cm) piece of cardstock – I used the one from the Celebrate Today Magnet Board and it measures 13 x 13 inches (33 x 33 cm).
You’ll also need a piece of 12 x1 2 inch (30.5 x 30.5 cm) cardstock as the backing layer. I think black is the best colour to make the alphabet squares really pop.
Most importantly, measure the dimensions INSIDE your frame so you can calculate the size of your alphabet squares. For the Celebrate Today Magnet Board the inside dimensions are 11.6 x 11.6 inches (29.5 x 29.5 cm).
Now take a look at your stamp collection and make a list of the stamps you could use for each letter – it’s important to do this at this stage of your project as you’ll need to fit two of your letters on the one square in order to fit your alphabet sampler into this size of frame. So think about one image that could illustrate two letters of the alphabet that sit next to each other.
There are 26 letter in the alphabet – ideally I would have liked to have 6 letters across and 6 down (36 squares in total) for visual interest and to give me more room to play, however it would not have allowed for squares that were large enough to fit in a letter, a word and an image.
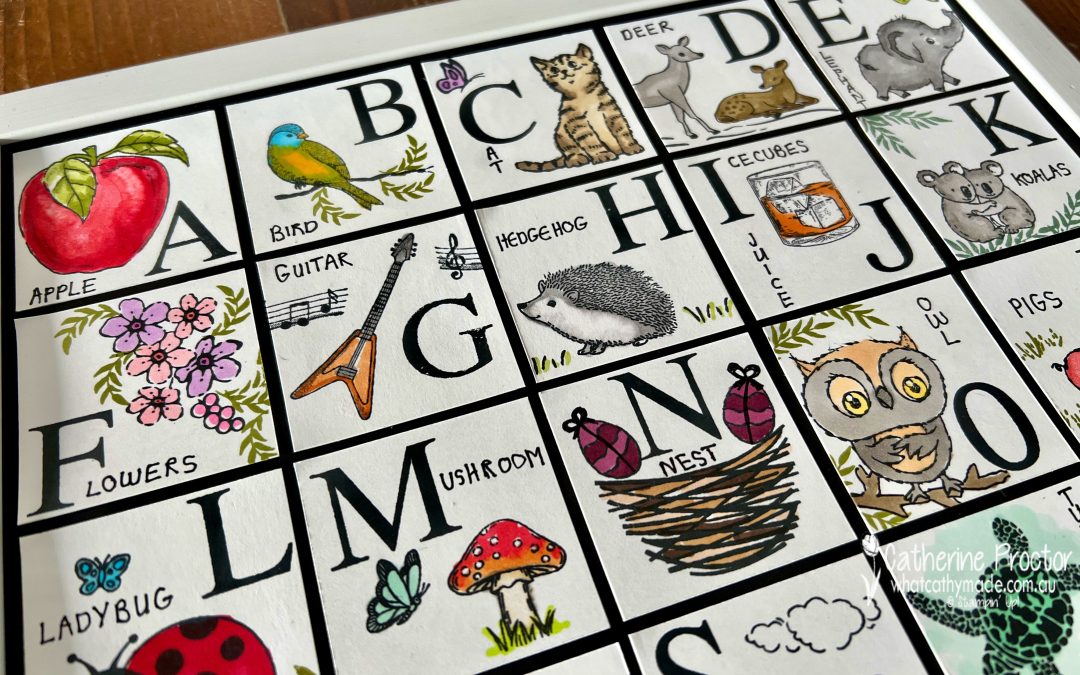
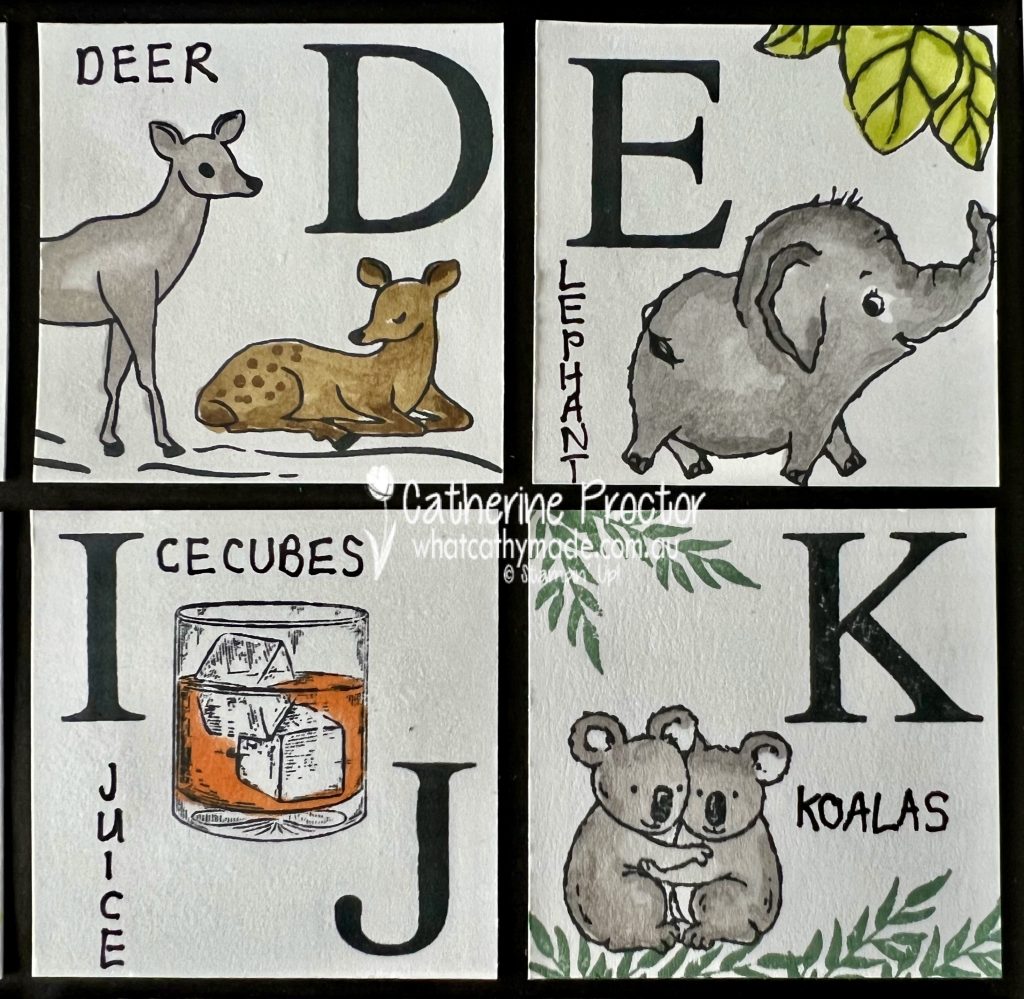
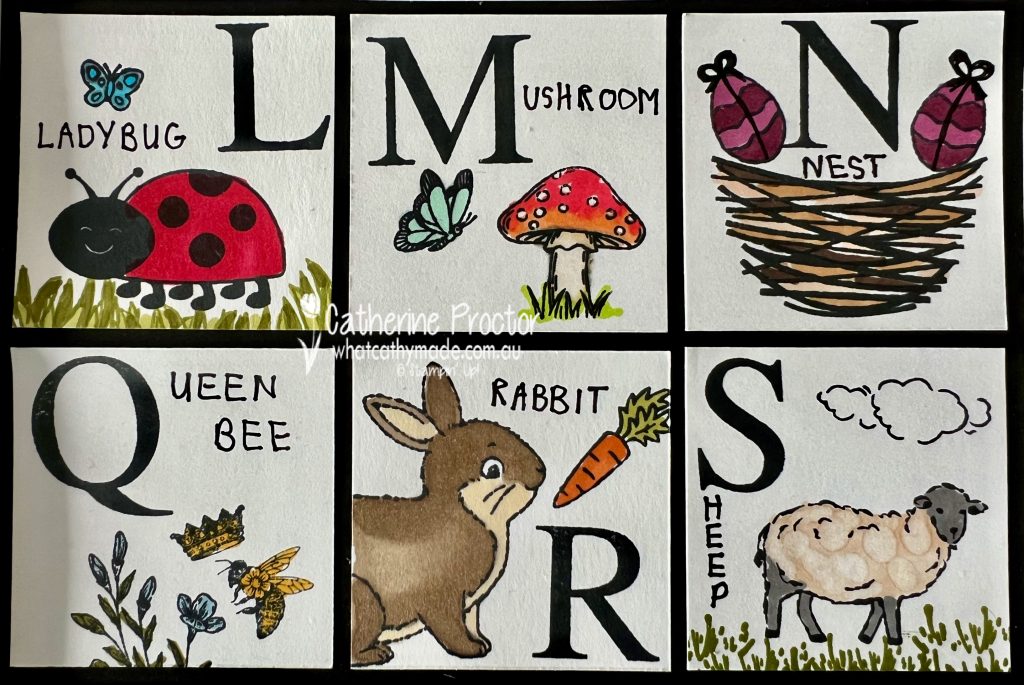
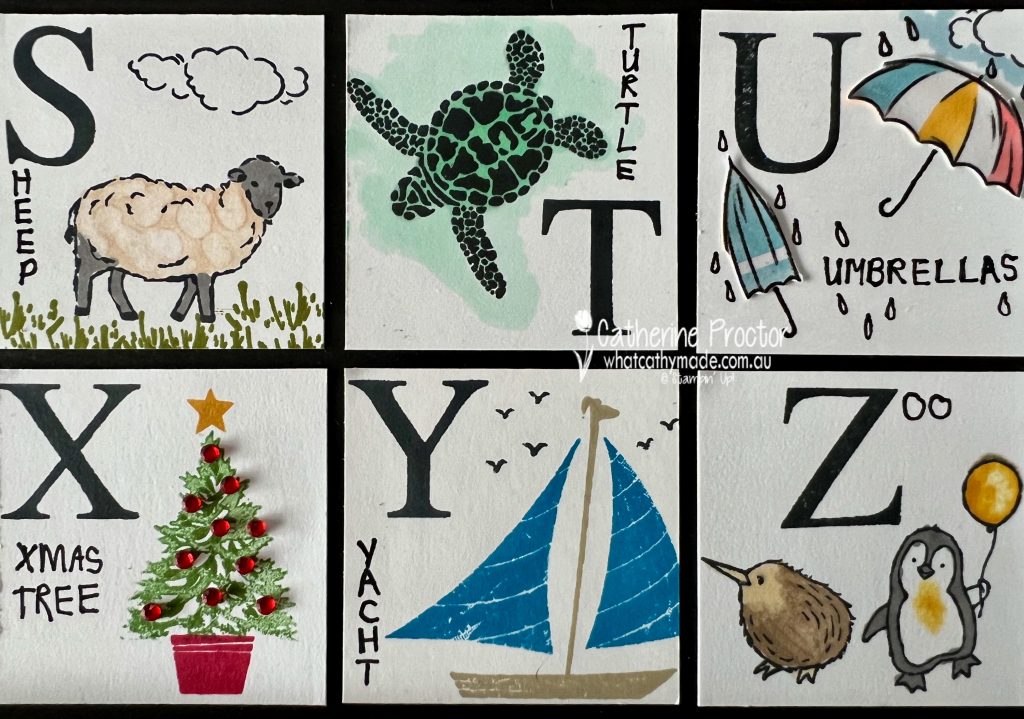
The solution? I decided on 5 squares across and 5 squares down (25 squares in total) and this meant I had to place 2 letters on the one alphabet square. I chose “I and J” for Ice and Juice – this allowed me to use the one image from Whiskey Business for both letters.
Each of my Basic White squares measure 5.5 x 5.5 cm – if you are calculating this in inches you could get away with slightly larger 2 1/4 inch squares for ease of measurement and cutting.
Just make sure that the size of your squares allows for enough room to show the backing cardstock – it really makes the alphabet squares pop!
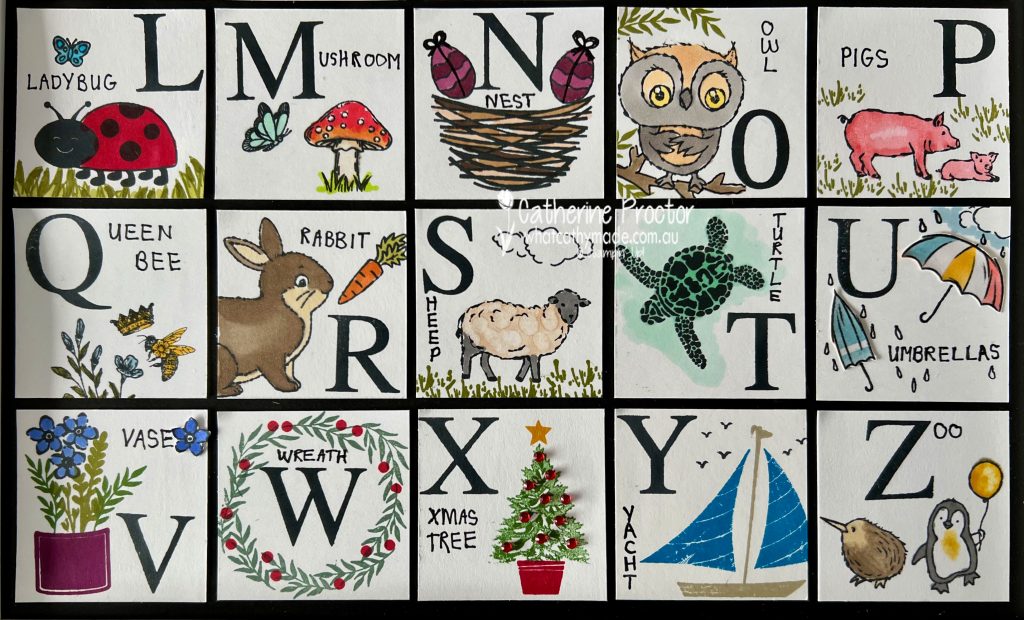
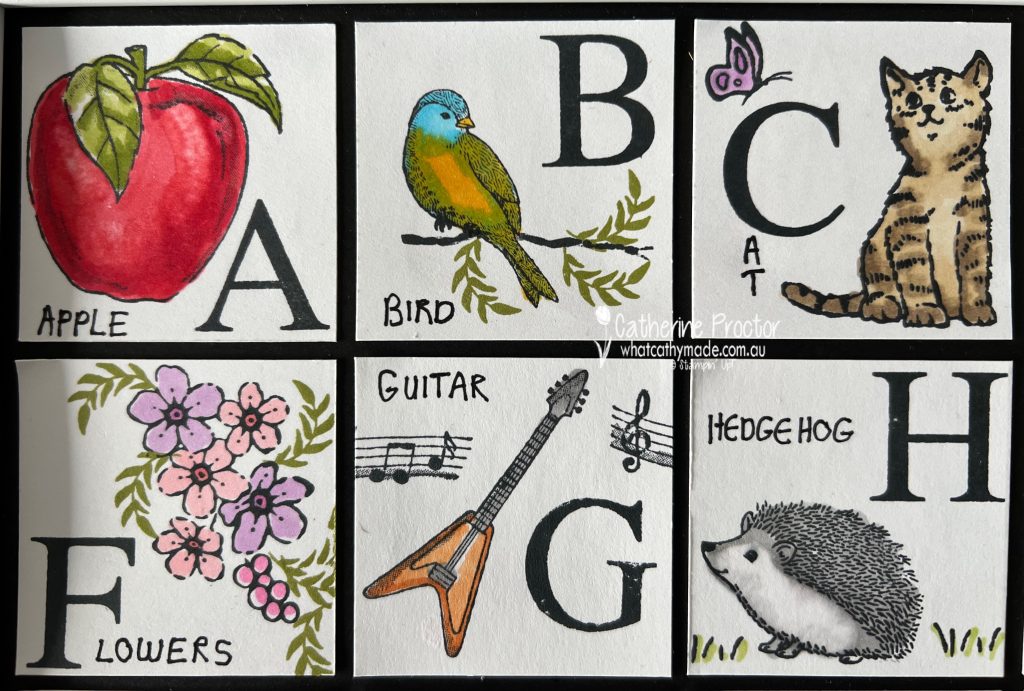
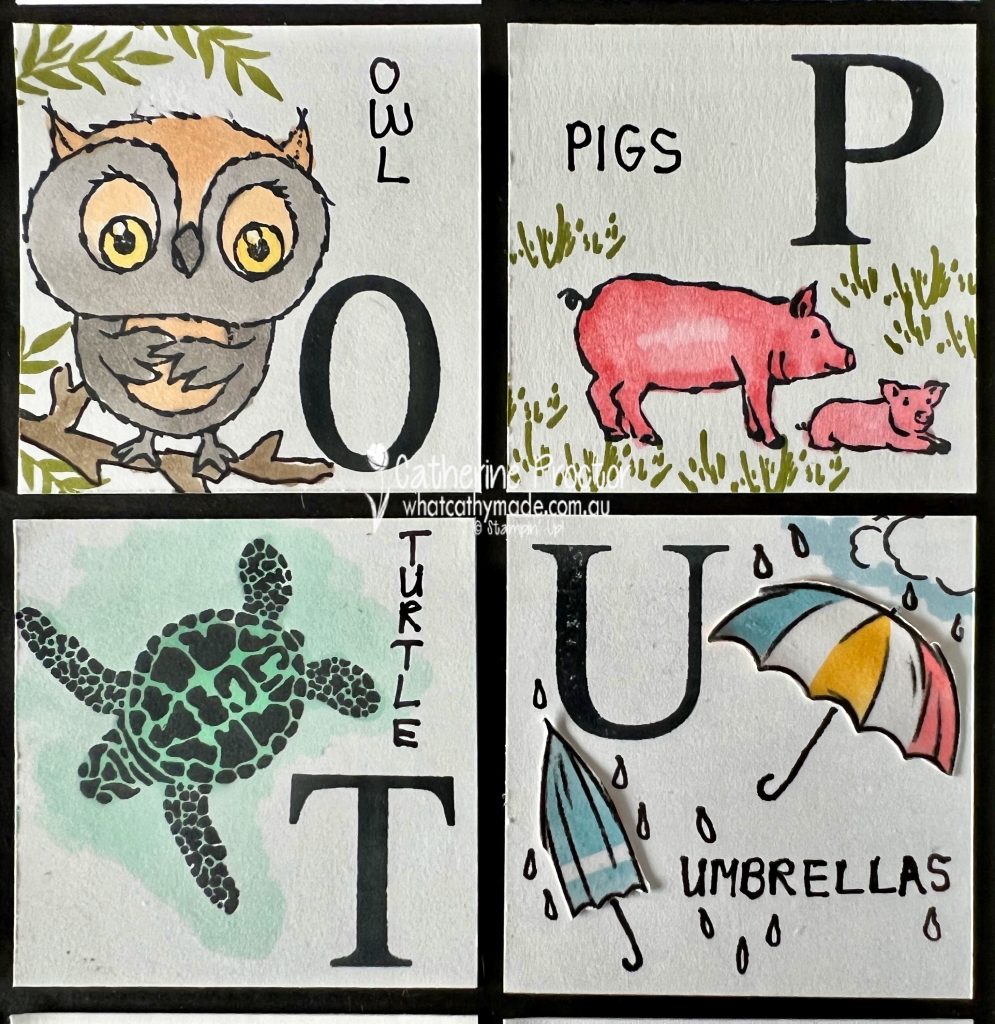
Here’s a closer look at each of the sections of the alphabet sampler.
Top half.
Bottom half.
These classic letters are the perfect size for this sampler and if you look closely you’ll also see I used the greenery flourishes from this stamp set in many of the squares as well.
I used a Stampin’ Write Marker in Basic Black to hand write the words so they were small enough to fit into the squares.
I’m a leftie and my handwriting is so messy – hopefully it adds to the handmade charm of the project!!!
I also used the Basic Black Stampin’ Write marker to add details to some of the squares, including the rain drops on the umbrella square. I didn’t have an umbrella stamp so I fussy cut umbrellas from the “Rain or Shine” DSP and then hand drew the umbrella handles.
Other tips for making this style of sampler?
Stamp the letters in different positions on each square, ensuring they work with the shape and orientation of each image and that they are nicely distributed throughout the sampler.
Once you’ve stamped each letter and the image, make sure you “ground” each image by adding some extra details and context, such as flowers, butterflies, branches, grass or clouds to create a mini scene.
Before you adhere the letter squares to the 12 x 12 cardstock, colour the images, ensuring there is a variety of colour throughout the sampler.
Write the name of each letter image and add then your own doodling to add visual interest, such as the bows on the top of these easter eggs in the nest and the rain drops on the U for umbrella.
Finally, adhere the squares to your background cardstock once it is inside the frame so you can evenly space the squares in the space.
Start with the row across the top and down the left hand side – once these letter squares are in and evenly spaced it makes it so much easier to line up the rest of the squares.
This was such a fun project to make – I wanted to use these stamps and colours before many of them retire at the end of April. You can use whatever you have in your stamp collection.
I’ll be back this Wednesday April 5, with the AWH Colour Creations team to showcase one of the retiring core colours – So Saffron. I hope you can join us then.