Welcome to week thirty four of our Art With Heart 2022-23 Colour Creations blog hop, our first hop for 2023!
This is a weekly blog hop where we showcase the stunning range of Stampin’ Up! colours in alphabetical order over 12 months and this week we are featuring Pacific Point from the Brights family.
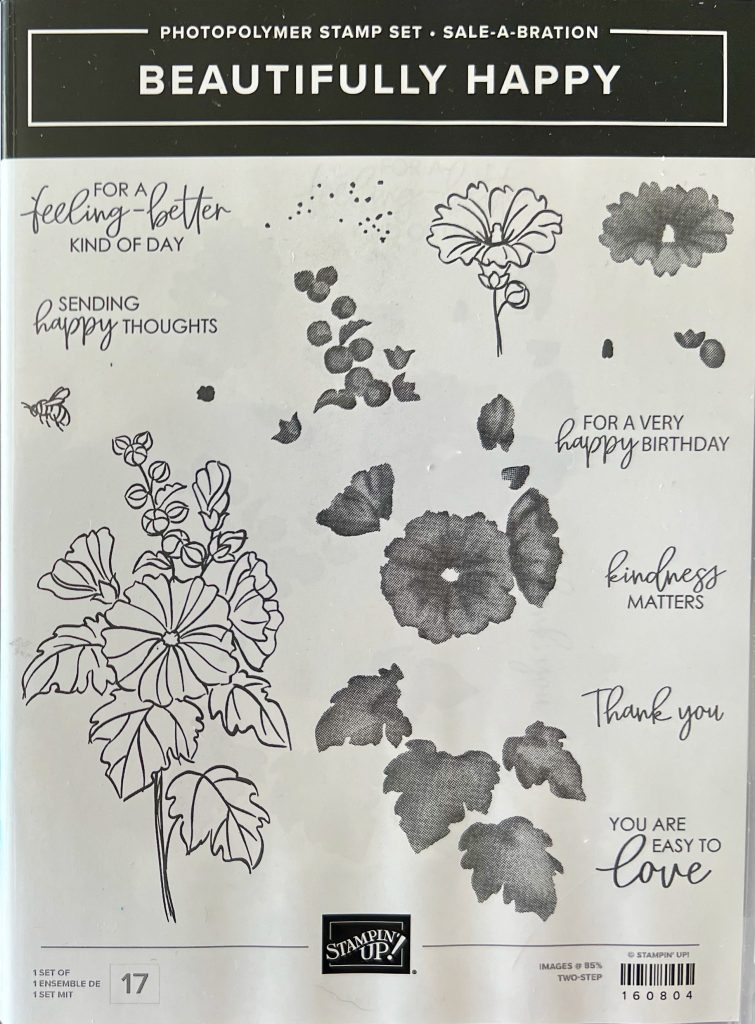
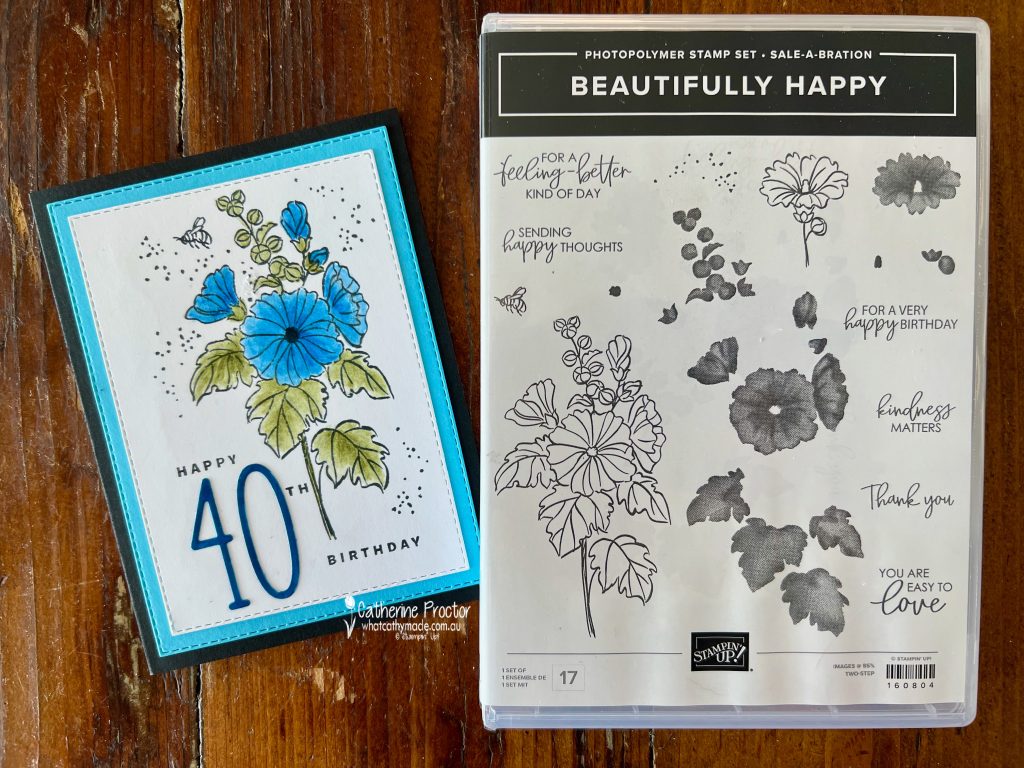
Tomorrow morning the new January-April Mini Catalogue and SALE-a-bration Catalogue are launched and one of the free SALE-a-bration items you can redeem for a $180 spend is the Beautifully Happy stamp set.
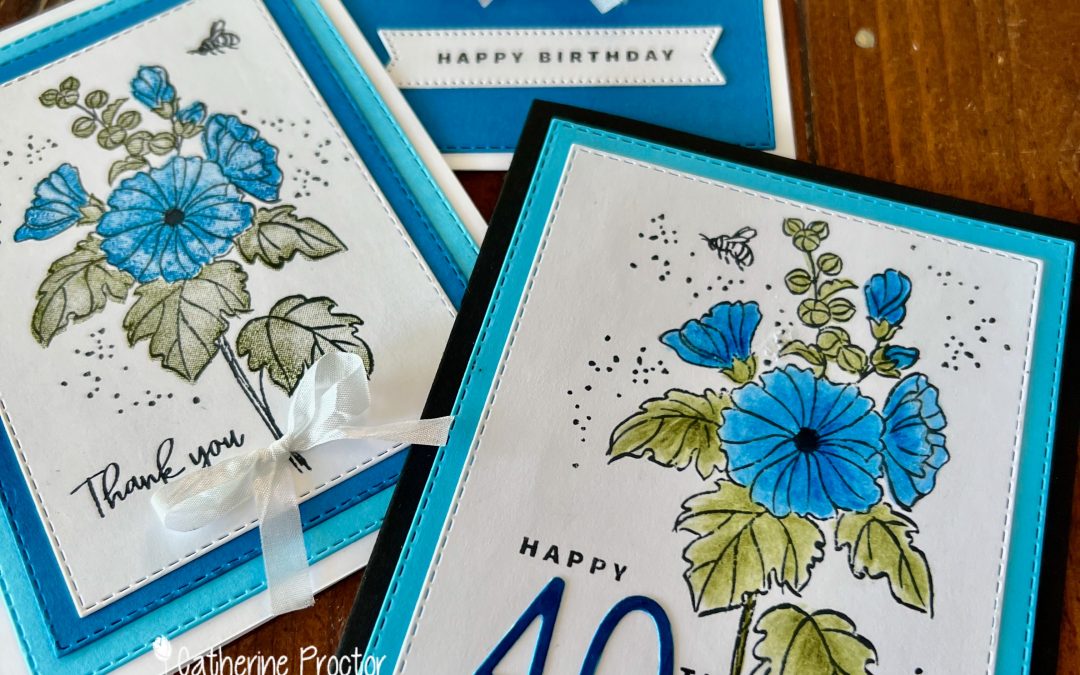
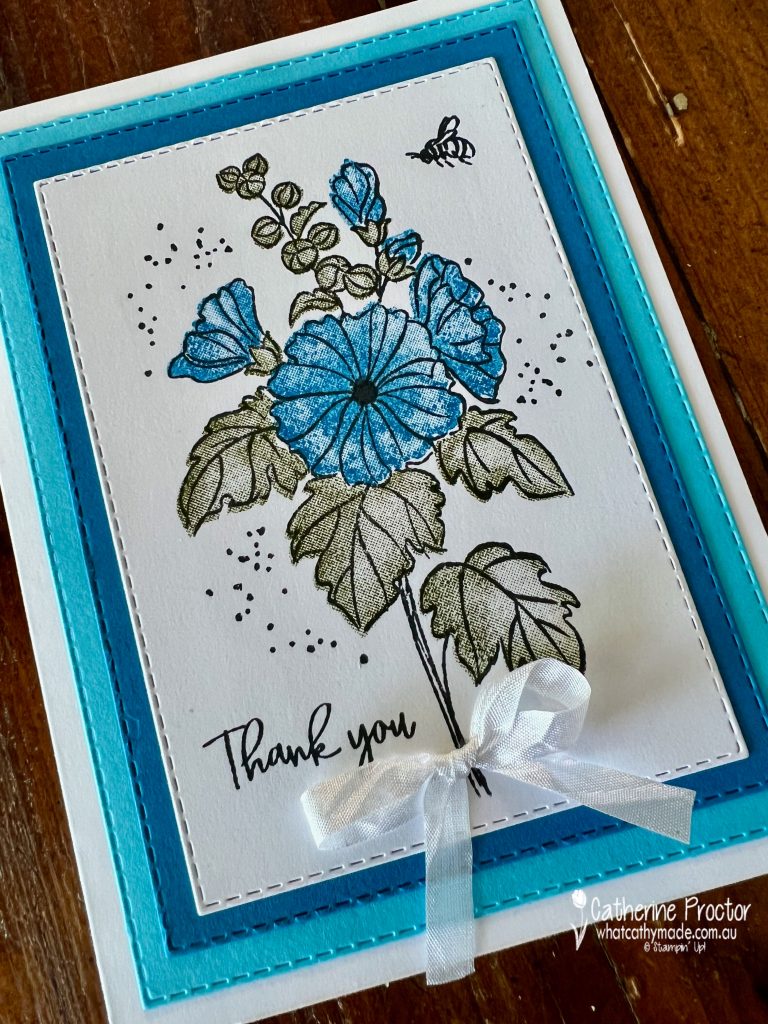
The Beautifully Happy stamp set is very versatile because it includes a good variety of sentiments, floral line drawings that can be coloured in, a “splatter” stamp, a tiny little bee stamp and “distinktive” stamps that allow you to stamp shaded colour inside the flowers and leaves instead of hand colouring.
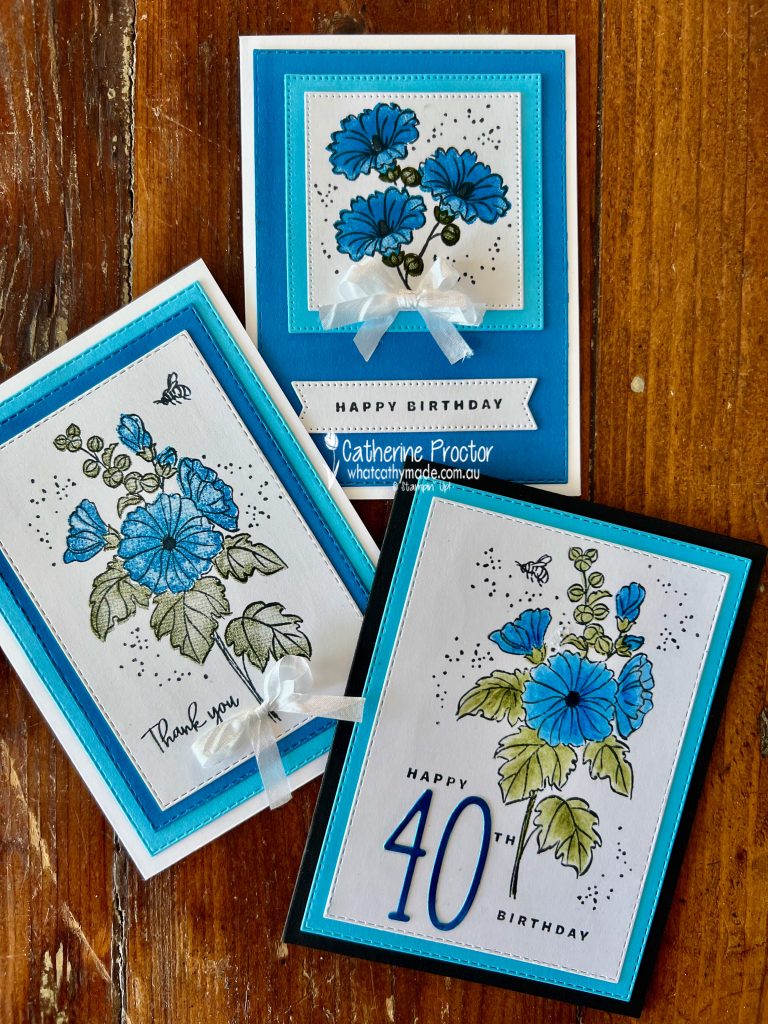
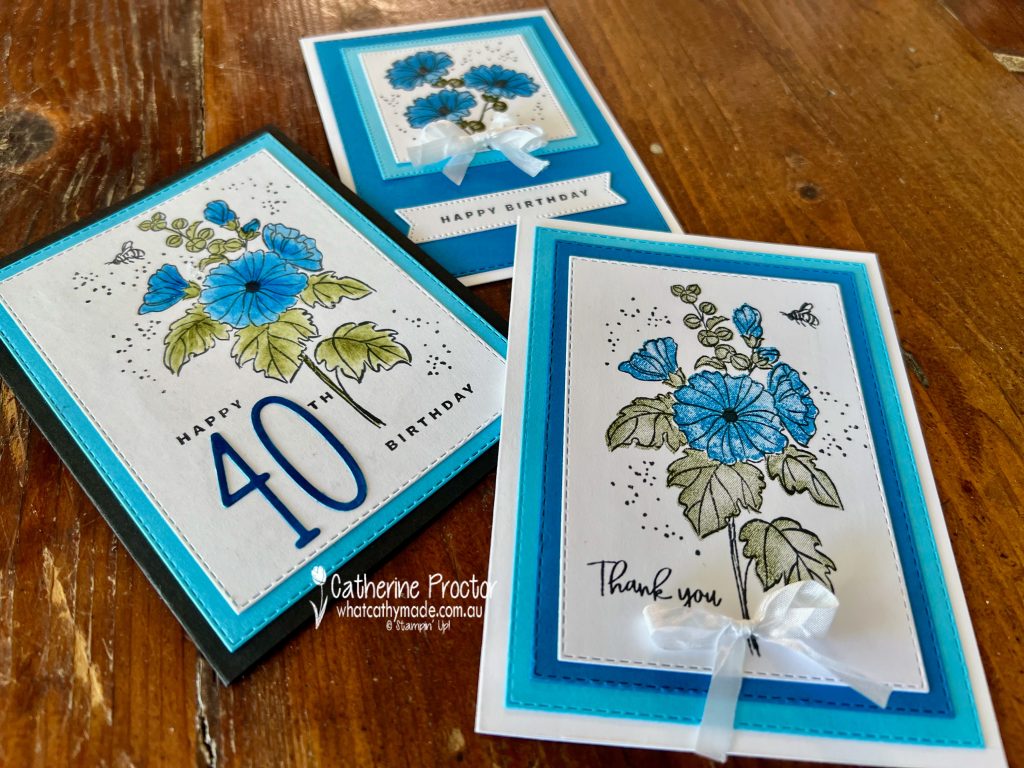
To show the versatility of this stamp set I have made three different cards using three different ways of colouring the stamped images. All three cards pair Pacific Point with Tahitian Tide – don’t these two blues look amazing together!
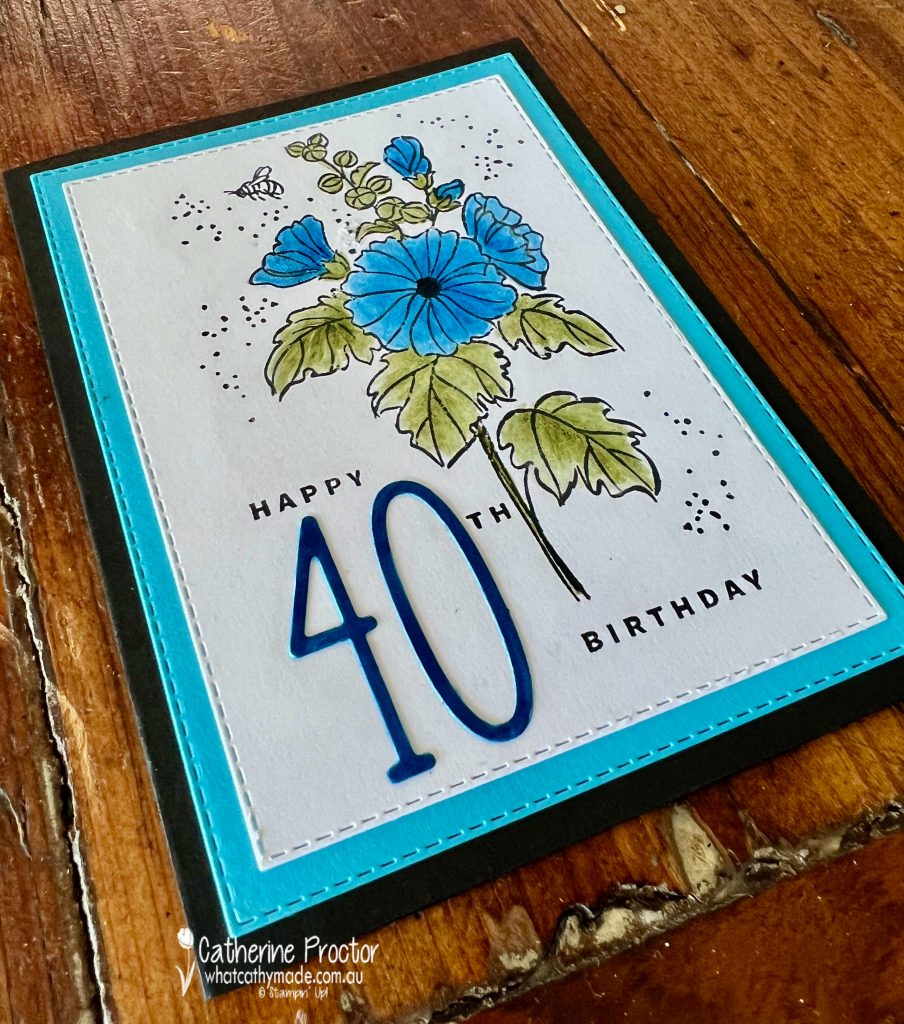
Card One is a birthday card for my sister-in-law who turns 40 next week. The 40 has been die cut with the new Alphabet A La Mode Dies and the “Happy Birthday” sentiment is from the Something Fancy stamp set, both available in the January-April mini catalogue.
I’ve coloured the flower and leaves using Pacific Point and Old Olive Watercolour Pencils, finally blending the watercolour pencil lines with a Blender Pen to smooth the colour out.
Stitched Rectangle dies create the card layers.
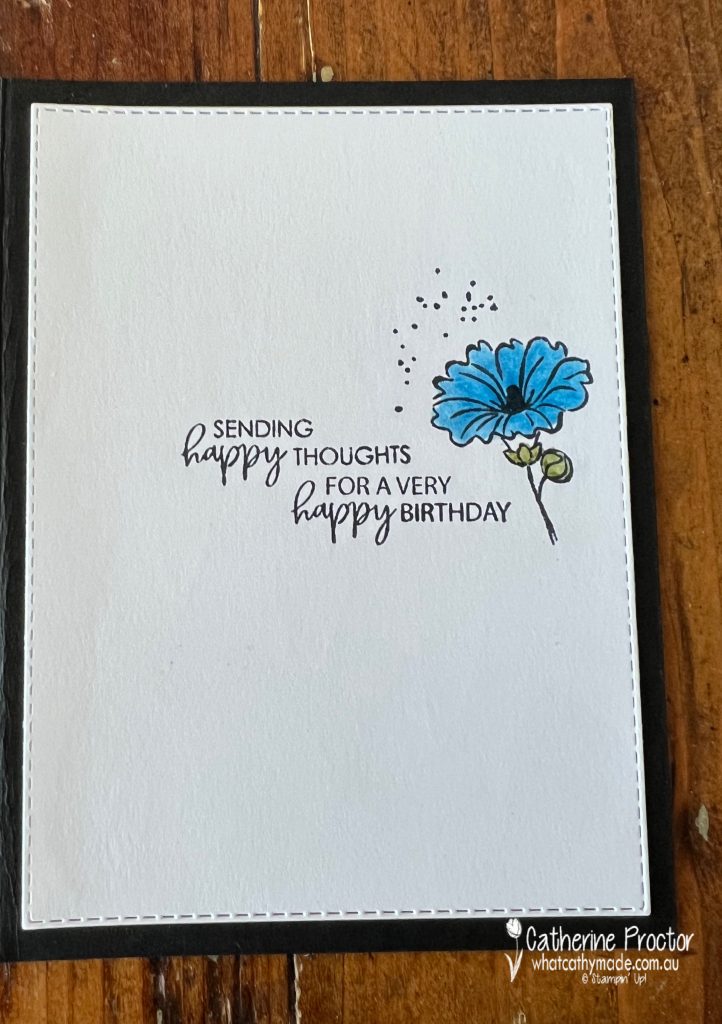
The inside of the card uses two of the sentiments from the Beautifully Happy stamp set. These sentiments are designed to be used on both the front and the inside of a card however I think they also work well when stamped together.
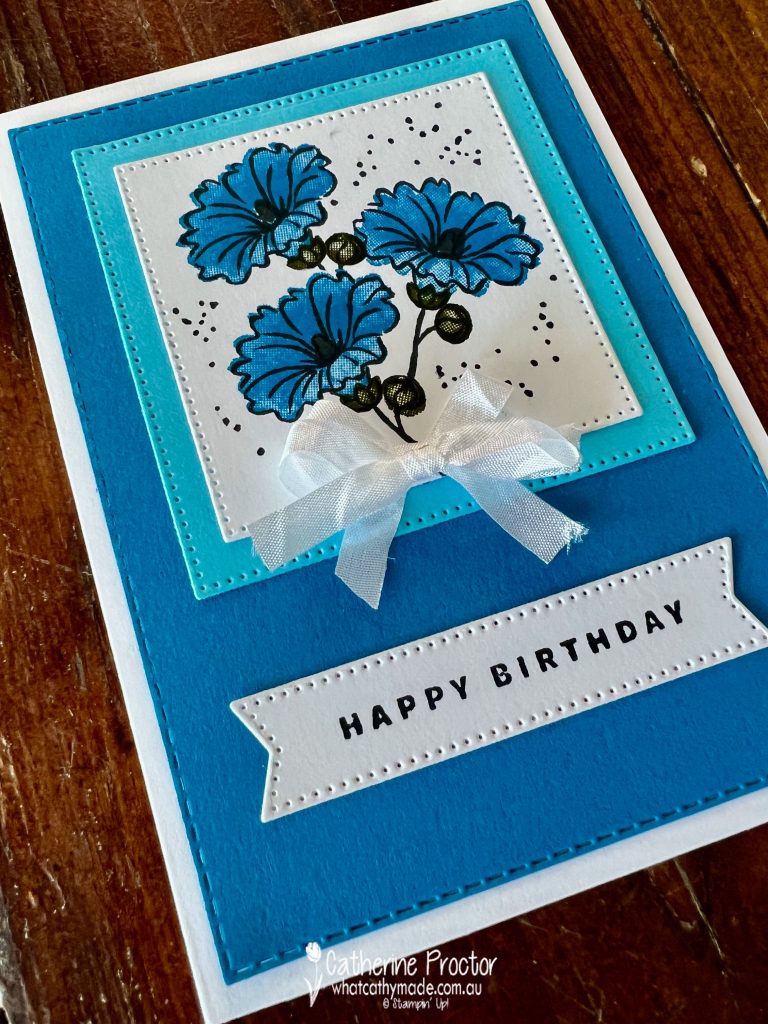
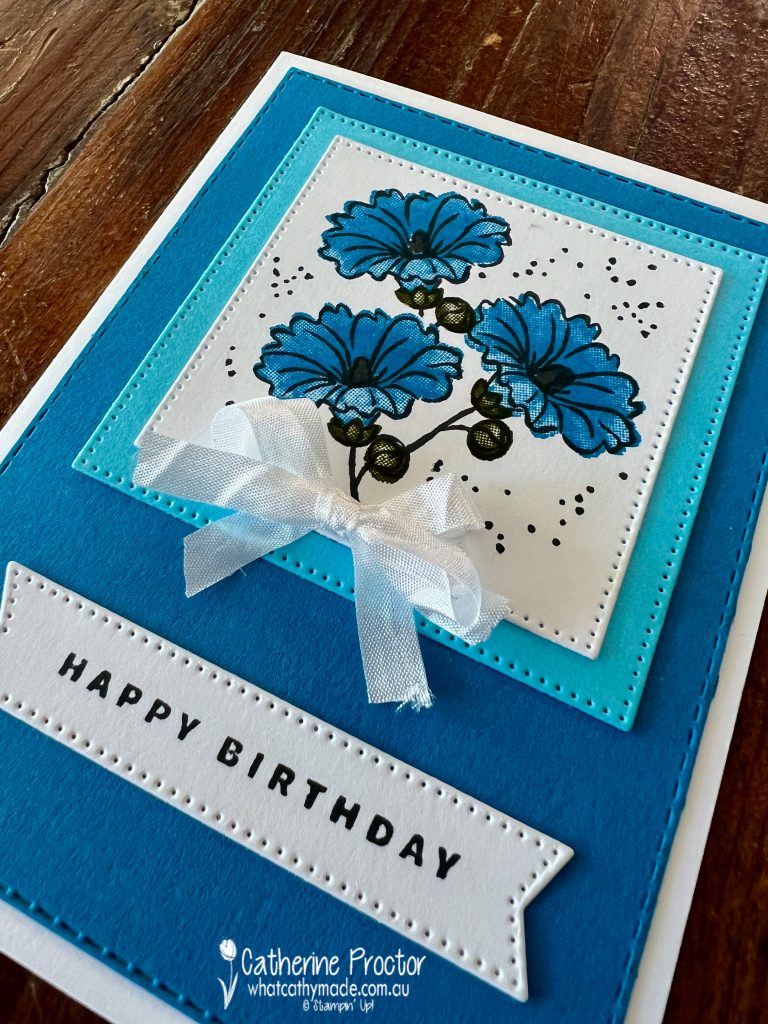
Card two is another birthday card that uses the smaller flower image, stamped three times. To colour these flowers I used the distinktive stamps from the Beautifully Happy stamp set, stamping both the Pacific Point and the Mossy Meadow ink at full strength.
The sentiment is the same “happy birthday” stamp from the Something Fancy stamp set that I used on the front of card one. Stylish Shapes dies cut the card front layers and the sentiment.
Card three is a thank you card that is coloured with the distinktive stamps, however this time the Pacific Point and the Mossy Meadow have been stamped off once onto scrap paper before stamping onto the card front.
Once again, the Stitched Rectangle dies create the front card layers.
I know I am going to get a lot of use from the Beautifully Happy stamp set as its variety of sentiments make it ideal for so many different occasions and it can be coloured in so many different ways.
Now it’s time to hop on over to our next participant, the lovely Tina Gillespie – I can’t wait to see what Tina has made this week!
If at any time you find a broken link, you can find the complete list of all participants below.
If you live in Australia, you can find and purchase these products in my Stampin’ Up! Online Store once they are available to purchase tomorrow morning.
We’ll be back next Wednesday January 11 with projects showcasing one of the 2021-23 In Colours, Pale Papaya.
Welcome to the Monthly Art With Heart Creative Showcase. Tonight we’re sharing some ideas for summer cards.
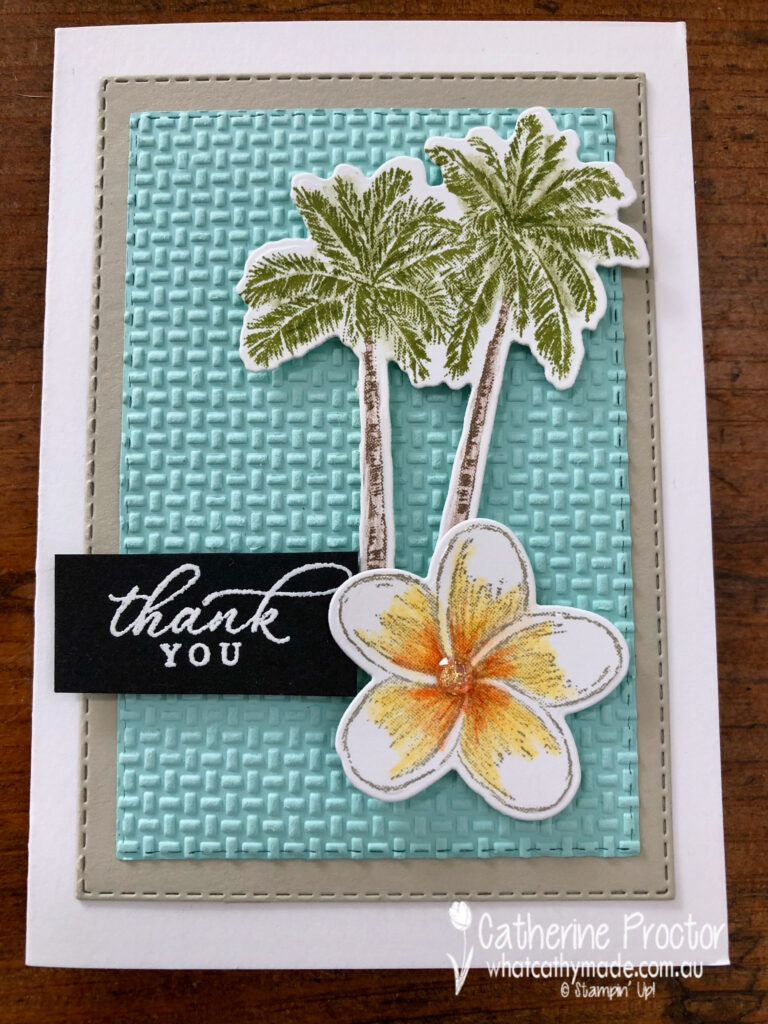
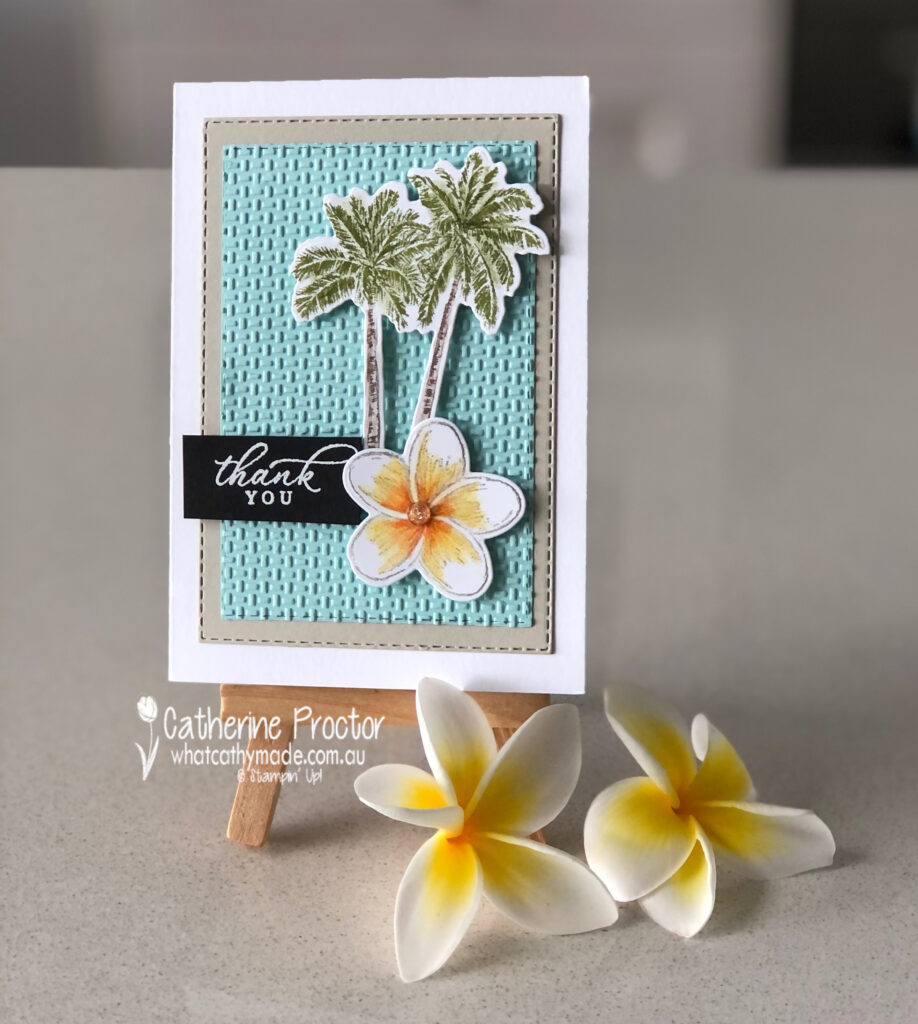
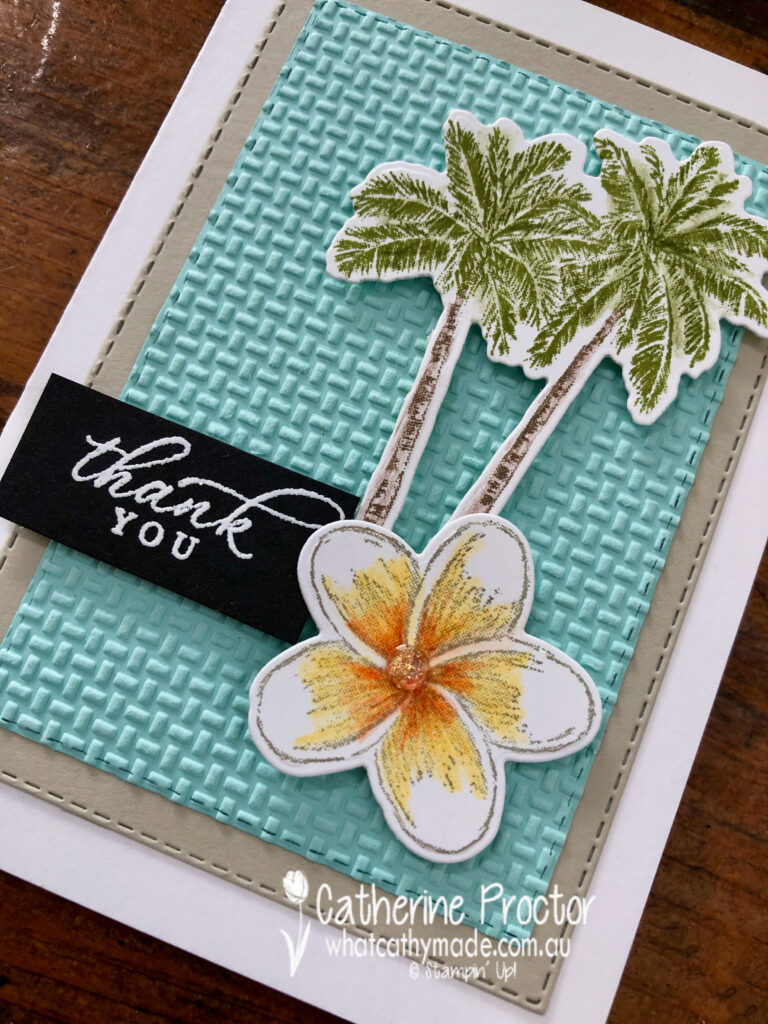
Summer for me means frangipanis, my favourite flower. I have many frangipani trees in my garden in various shades of yellow and pink and most of them have been grown from cuttings. My frangipanis are just coming into flower now and every year the yellow ones always flower before the pink ones do.
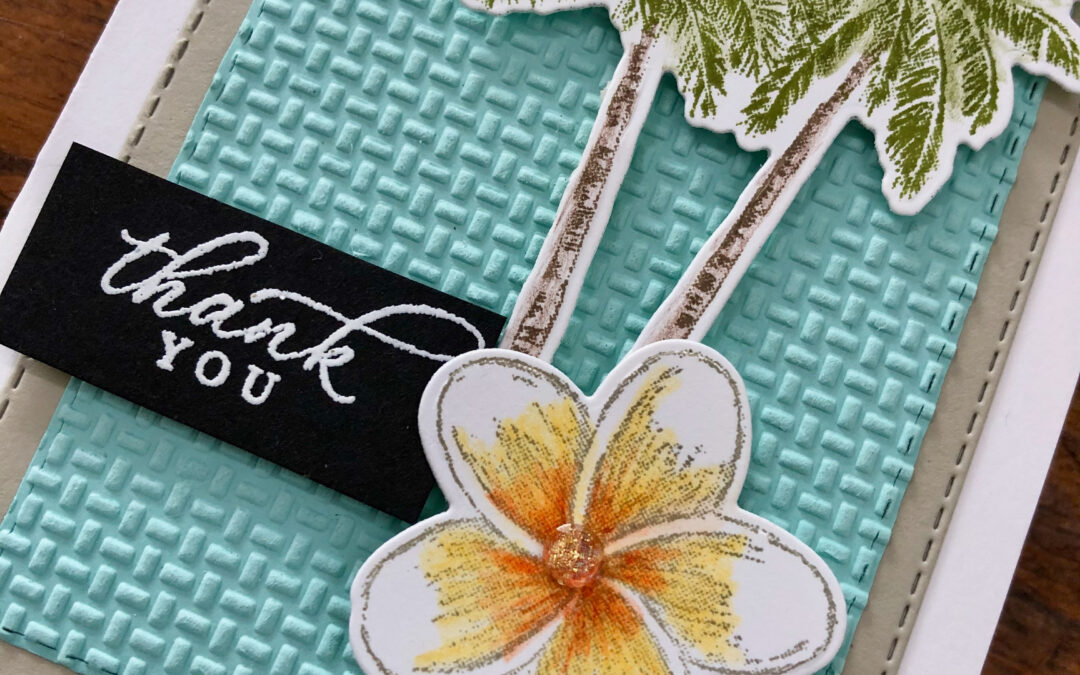
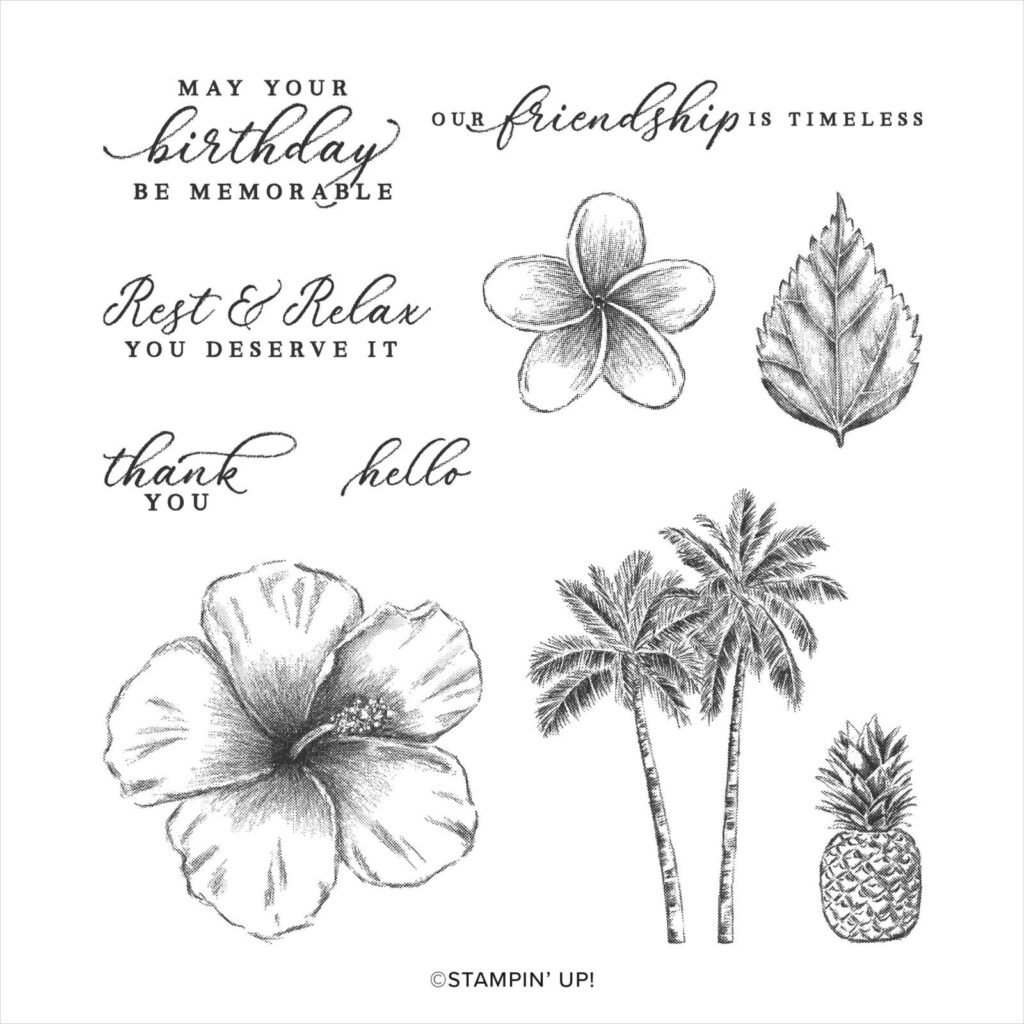
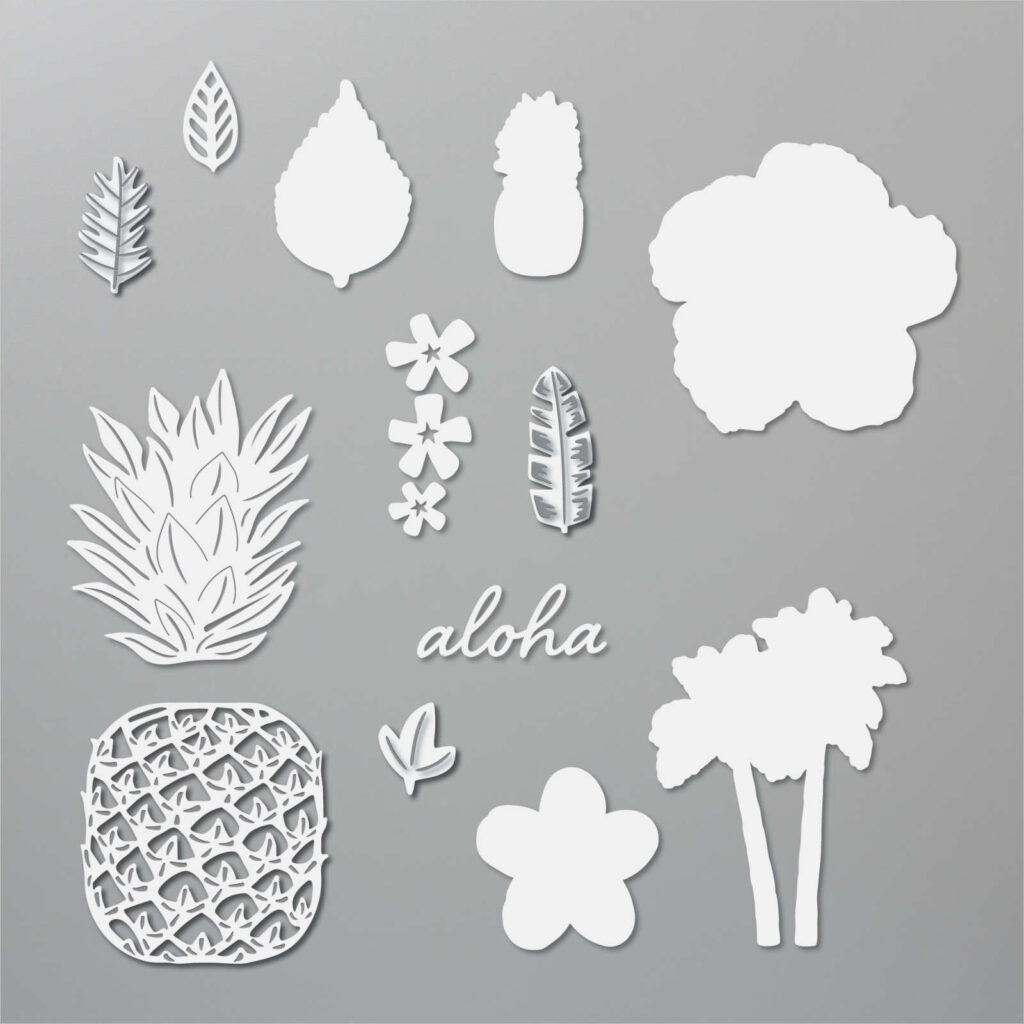
I’m sure it will come as no surprise when I tell you that I’ve used the Timeless Tropical stamp set and its co-ordinating In the Tropics dies for my card today. I have to admit I bought this entire bundle just for the frangipani flower and die, but I love this entire stamp and die set!
The palm tree is coloured using the marker technique – I used soft suede for the tree trunk and old olive for the palm branches. Once I coloured the stamp with my markers I “huffed” on it before stamping. To add colour and depth I used Watercolour pencils to lightly add some more old olive to the branches and some early espresso to the trunk.
The frangipani flower was stamped in smoky slate (stamped off once) and then coloured in using my daffodil delight and pumpkin pie watercolour pencils.
The pool party layer is die cut with a stitched rectangle die and embossed with the wrapped in texture embossing folder – on sale now at 50% off as it is retiring at the end of December or when sold out.
This pool party embossed layer is then layered onto Sahara Sand (also die cut with a stitched rectangle die) and adhered to a whisper white notecard.
The sentiment is also from the Timeless Tropical stamp set, stamped in versamark ink and heat embossed with White Emboss powder.
Did you notice the embellishment in the centre of the flower? It’s a clear wonderful gem from the August – December 2020 Mini Catalogue and it adds a lovely sparkle to my frangipani flower.
To see more summer card inspiration from the AWH Team head back to Rachel‘s page as she is hosting our monthly blog hops.
If you’d like me to post you your very own copy of the forthcoming January-June 2021 Mini Catalogue, the August – December 2020 Mini Catalogue, the 2020-21 Stampin Up! Annual Catalogue, the 2020-21 Beginners Brochure, or to simply find out about more about Stampin’ Up! contact me.
Welcome to the Monthly Art With Heart Creative Showcase. Tonight we’re sharing some ideas for cards that only use five supplies or less – a challenge for many avid crafters.
Luckily we all agreed that paper trimmers, paper snips, acrylic blocks and adhesives were core supplies assumed to be already on hand, which meant we could chose five more supplies in addition to these basics.
Although technically you could argue that an all inclusive card kit could be counted as one supply I did feel that would be cheating for the purposes of this challenge, so after much deliberation I settled on the following five supplies:
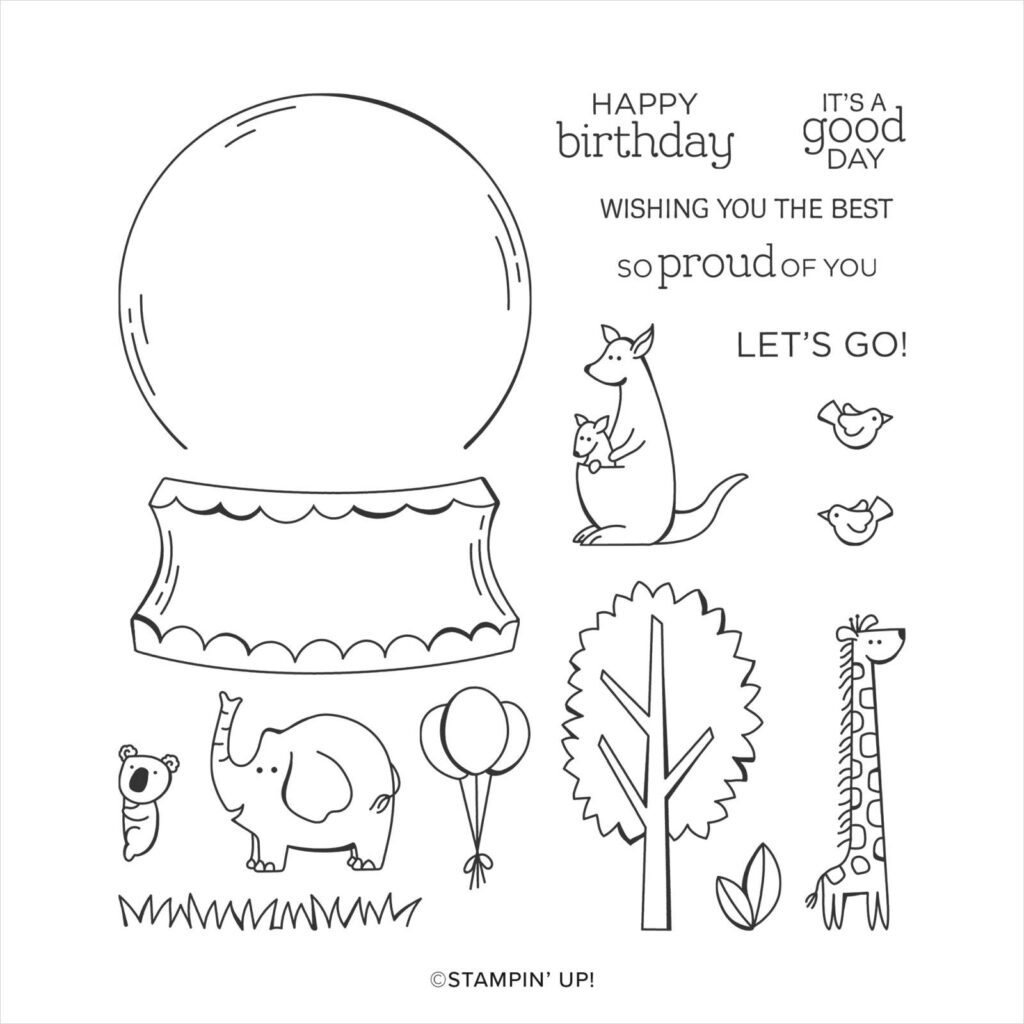
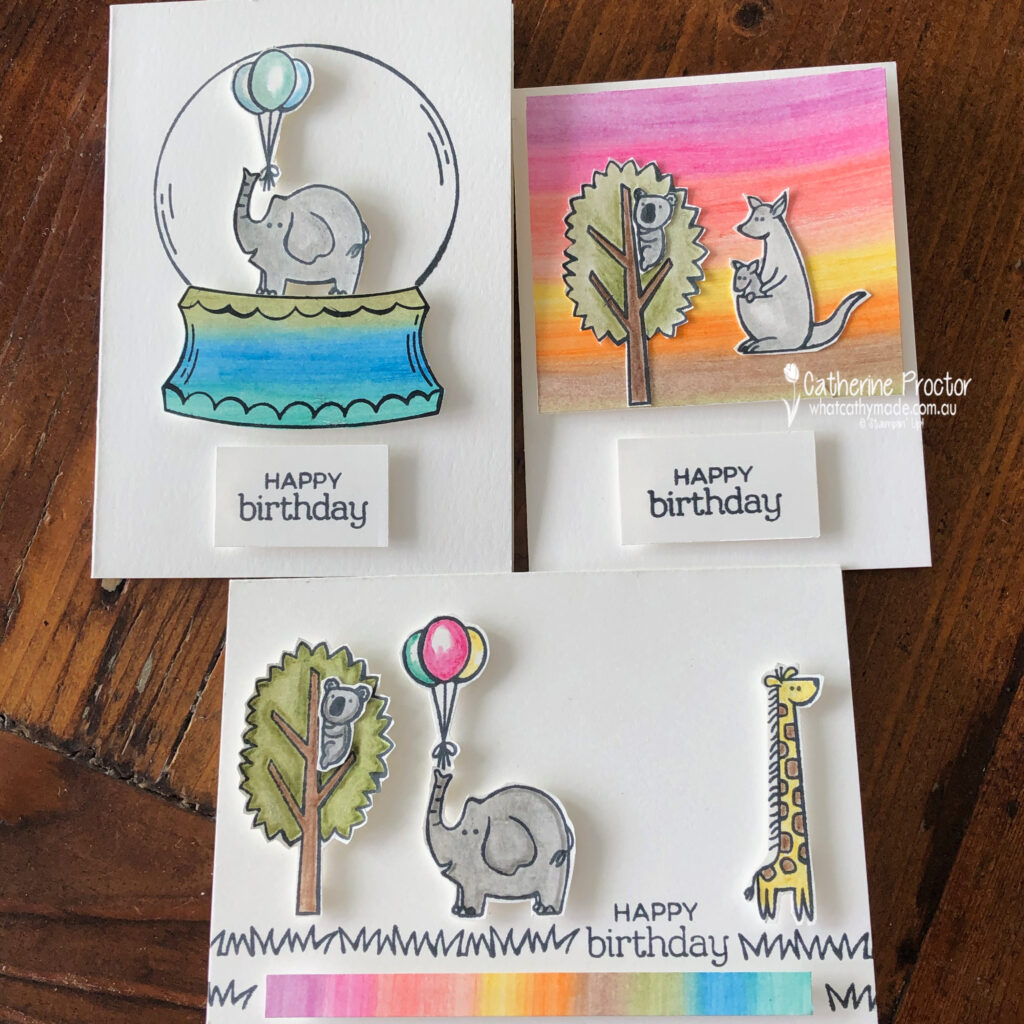
Zoo Globe Stamp Set – this set is perfect for colouring and has both sentiments and images
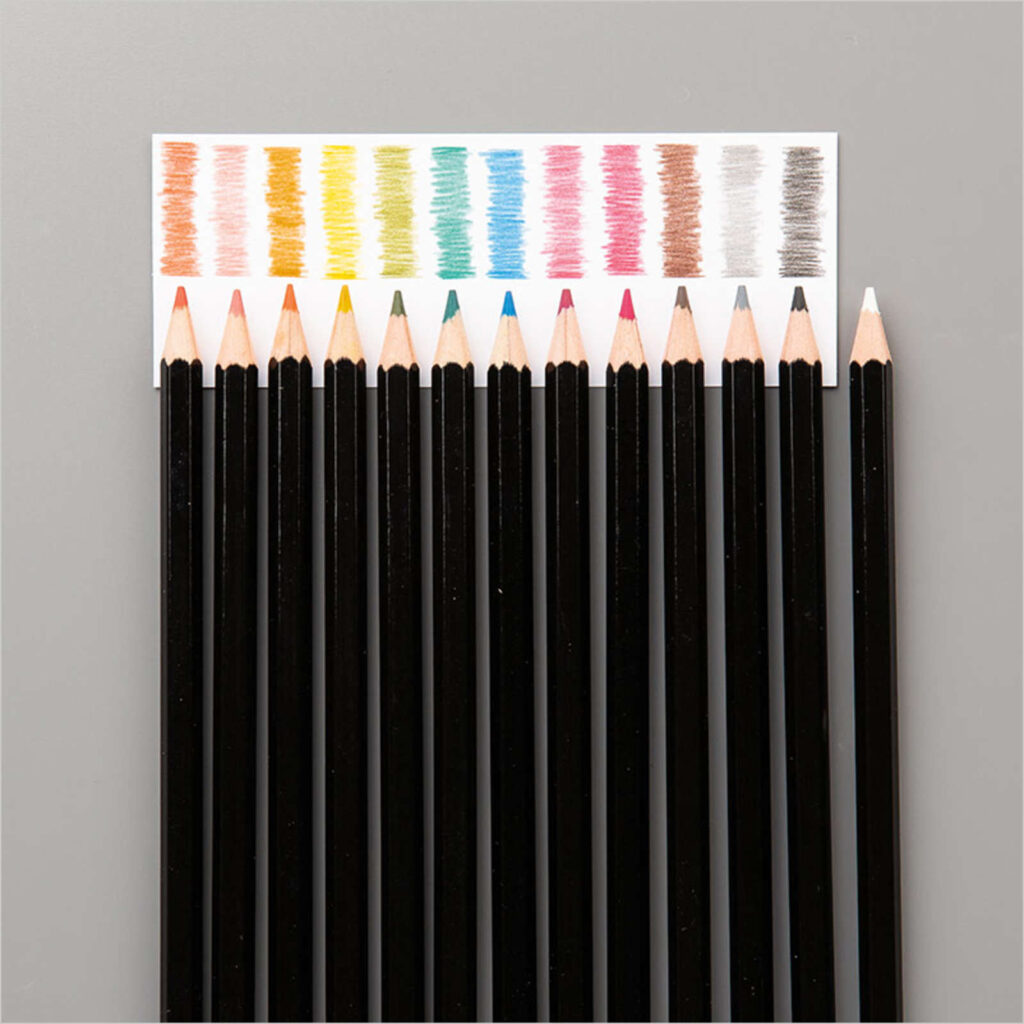
Watercolour Pencils – an affordable and easy way to get a wide range of Stampin’ up! colours
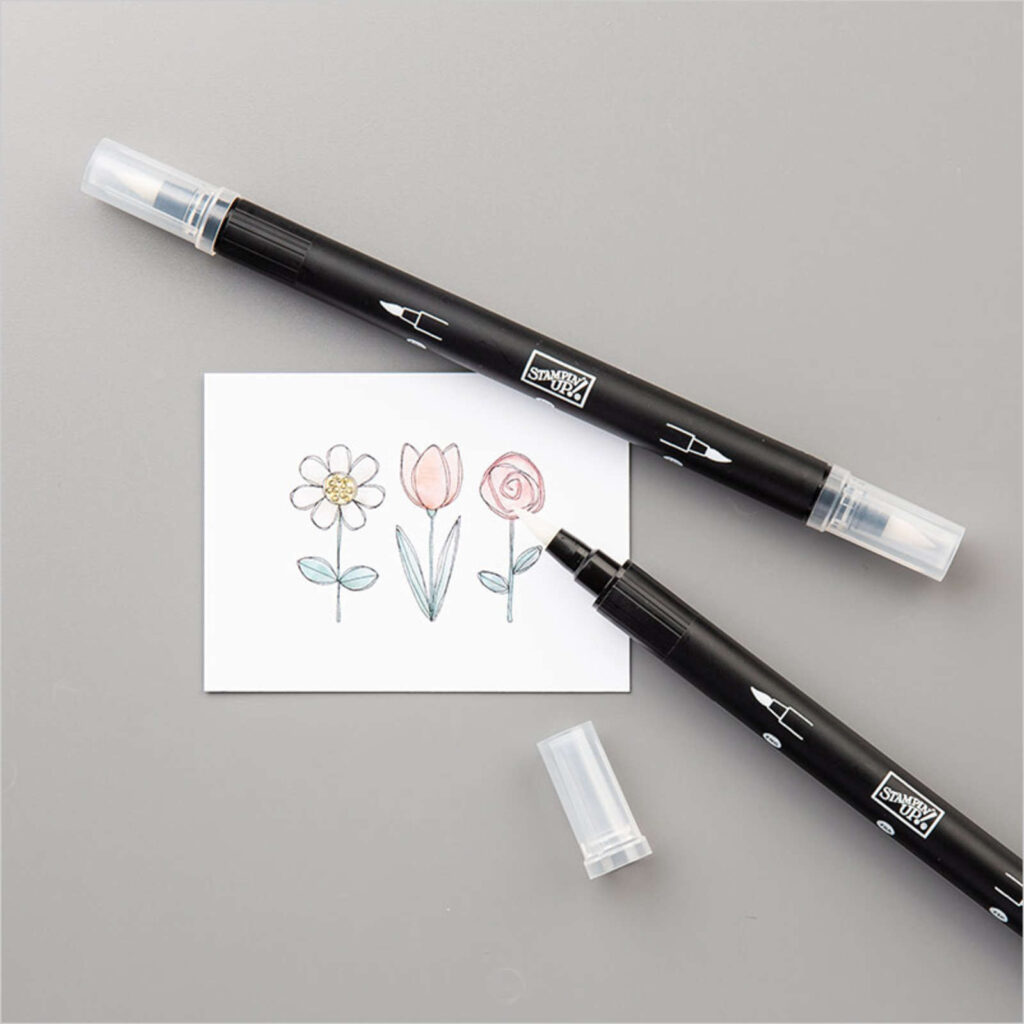
Blender Pen – brings watercolours to life and not as wet or messy on the card stock as water painters
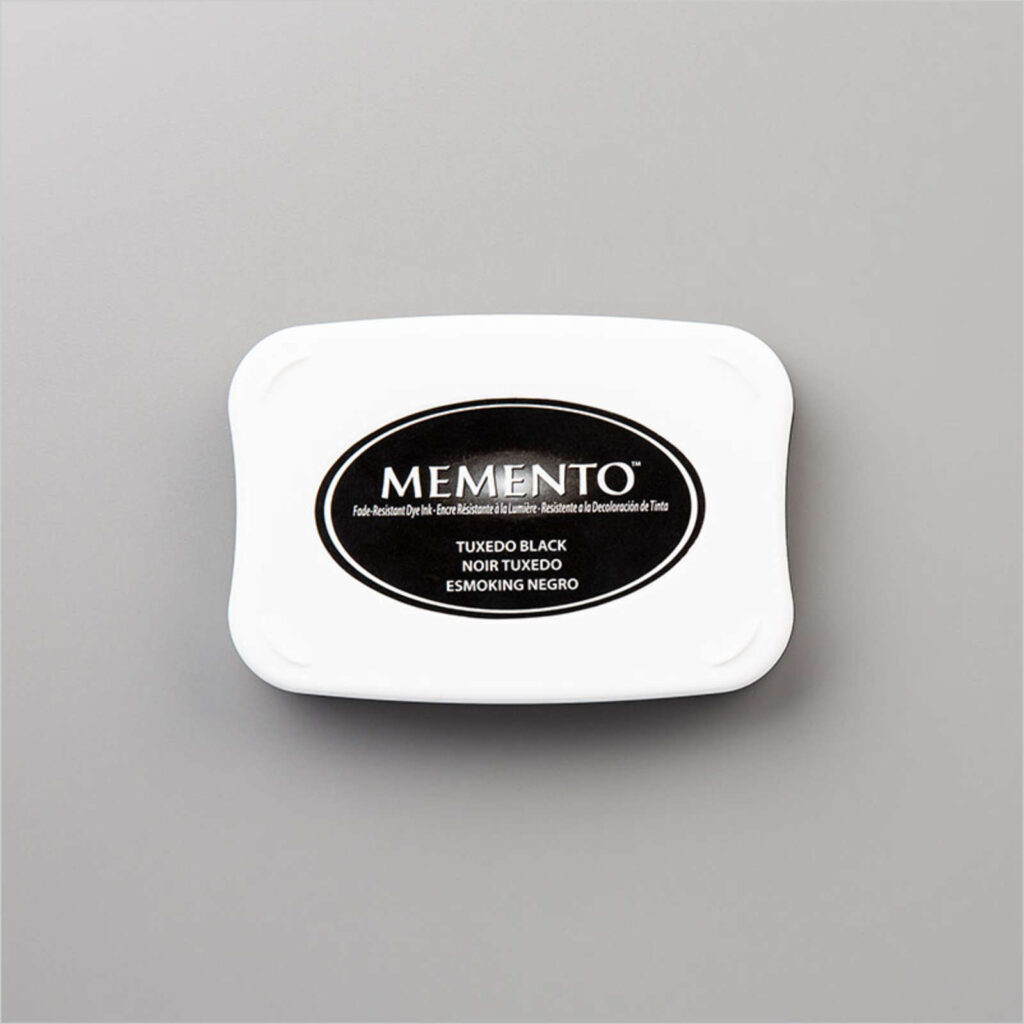
Memento Stamp Pad – versatile black stamp pad for images and sentiments
Whisper White card Stock – an essential and versatile basic for both making the card base and stamping the card layer
I had so much fun playing with the zoo globe stamp set I ended up making three cards to share with you several different techniques you can try even if you only have limited supplies.
TECHNIQUES 1 AND 2: CREATING YOUR OWN DSP AND BLENDING WATERCOLOUR PENCILS WITH BLENDER PENS
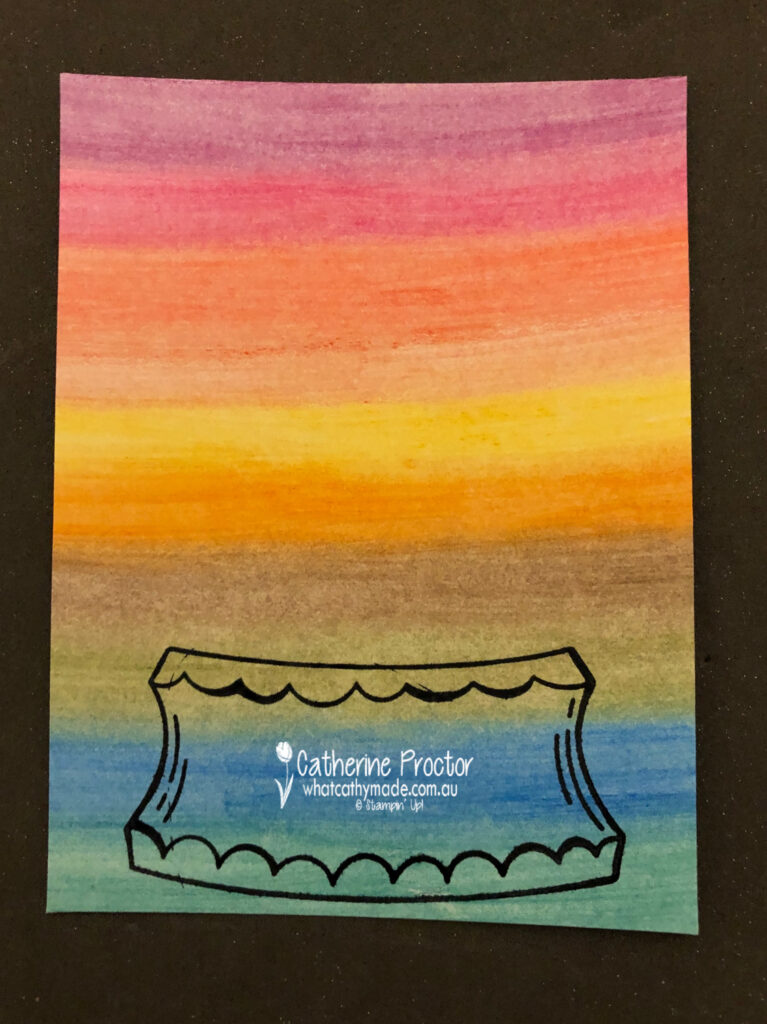
All three of my cards today begin with a piece of home made rainbow DSP. I created my rainbow DSP by simply using my watercolour pencils to scribble on my card stock in rainbow order. I could have also created a homemade patterned DSP by stamped images onto the card stock and either coloured them in or left it as black and white but this was much faster.
To blend the colours together I simply coloured over the top of my pencil marks with my blender pen – it’s amazing to watch the pencil lines smooth out with the blender pen. Once I’d finished I rubbed the nip of my blender pen onto some scrap paper until it ran clear. It doesn’t matter if your nib is stained – it’s now ready to use again with any colour.
The photo below shows my homemade DSP with the globe base stamp already stamped onto it, which leads to my next techniques….
TECHNIQUES 3 AND 4 : PAPER PIECING AND FUSSY CUTTING
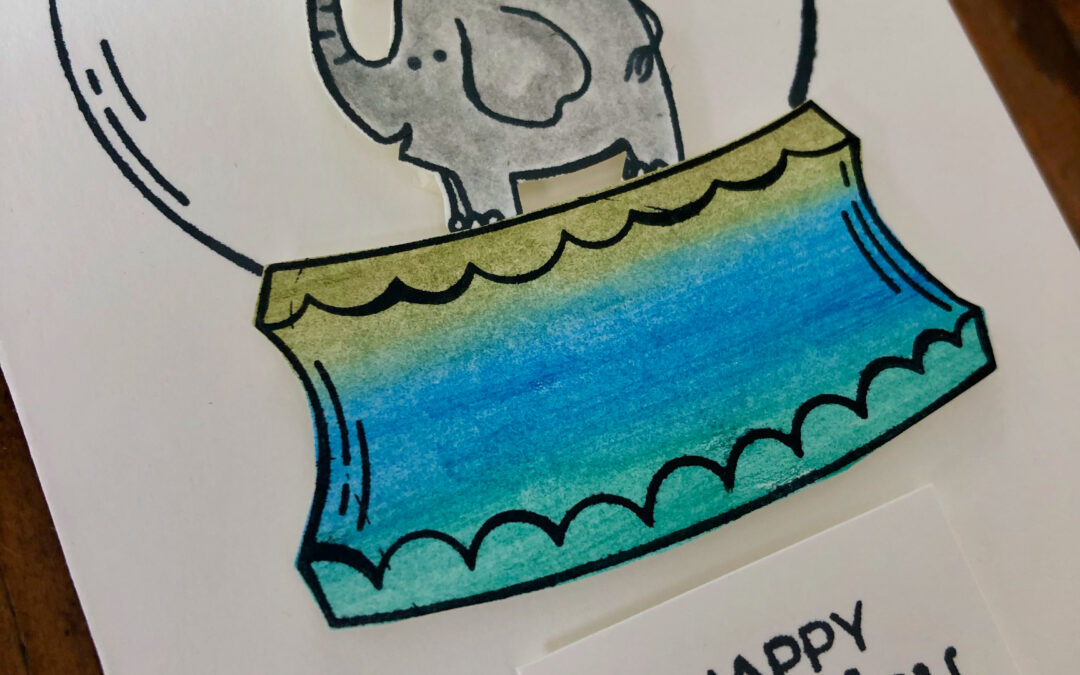
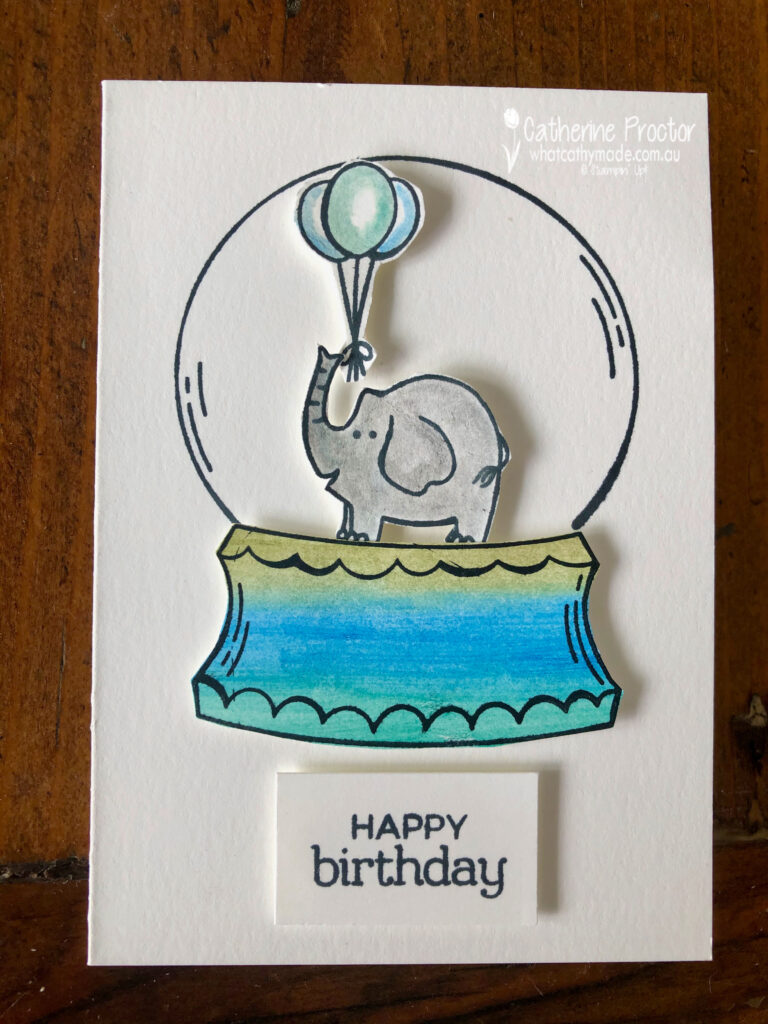
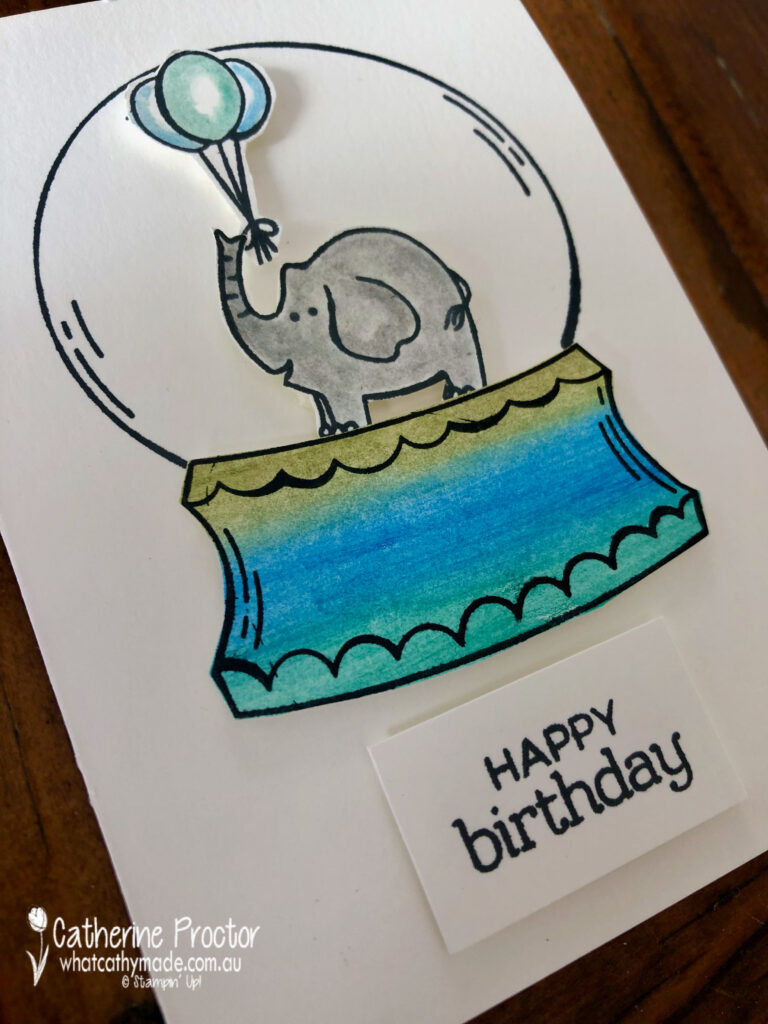
Once you’ve created your own DSP you can use it in a variety of ways. For card one I’ve stamped the base of the globe onto it before fussy cutting this piece out with my paper snips.
The dome of the globe was stamped directly onto my card base but the balloons, elephant and base of the globe were all coloured in with watercolour pencils and then blended with the blender pen before being fussy cut out and adhered to the card using Stampin’ Dimensionals.
Leaving a white space in the middle of the balloons gives them a real dimension.
The “happy birthday” sentiment was stamped onto scrap piece of Whisper White card stock before being trimmed to size with the paper trimmer and adhered using Stampin’ Dimensionals.
TECHNIQUES 5 AND 6: CREATING A BORDER WITH STAMPS AND THE BLENDER PEN DIRECT TO PENCIL COLOURING TECHNIQUE
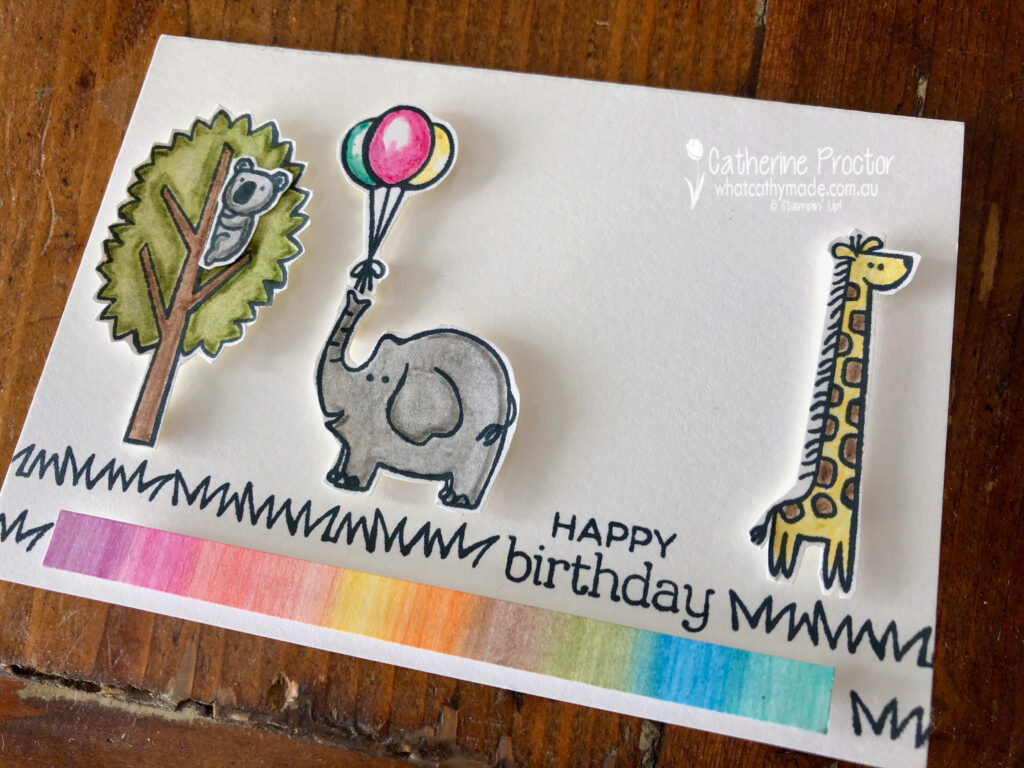
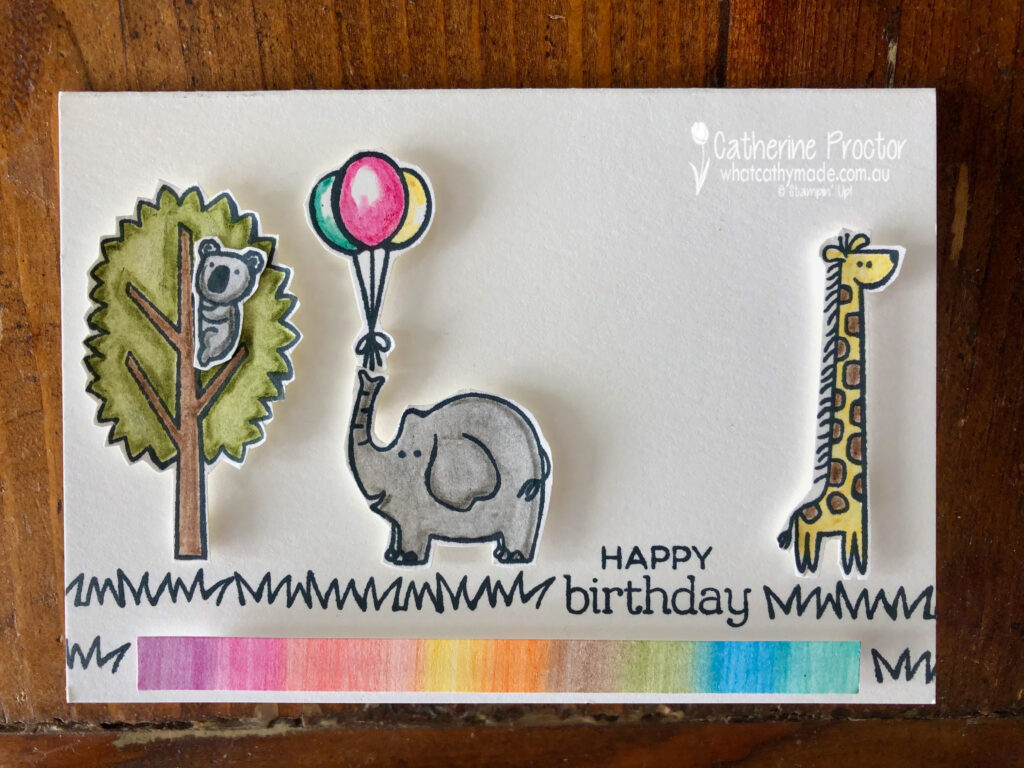
For my second card I used a rainbow strip of my homemade DSP and the grass stamp to create a double border for the base of my card.
This time, when colouring my animals I first applied the nib of my marker to the tip of the pencil, lifting the colour off the pencil with my blender pen and then colouring the images with my blender pen.
You can also use your blender pen in this way to lift ink from the lid of your ink pad or ink from an acrylic block – it means your clear blender pen can be used to colour in any coloured pencil or ink that you have.
TECHNIQUE 7: USING HOMEMADE DSP AS BACKGROUND LAYER
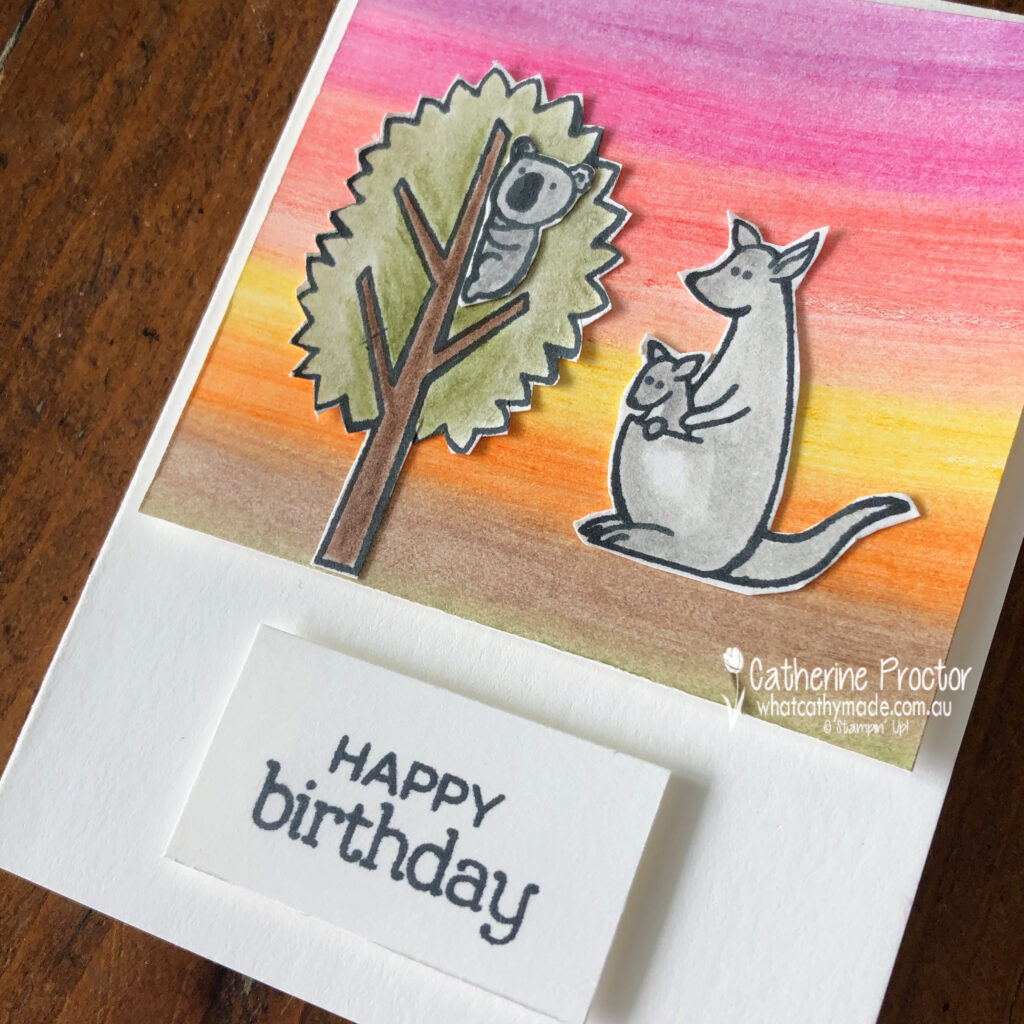
I hadn’t originally intended to make a third card but the colours on my remaining section of homemade DSP reminded me of the Australian outback…and I hadn’t used the adorable kangaroo and joey stamp yet!
This time I glued both of the stamped, water coloured and fussy cut images directly onto my home made DSP and added dimension behind the DSP by using Stampin’ Dimensionals to adhere it to the card base.
So what do you think of my 5 ingredient cards?
Simple cards made with few supplies can be really effective…especially if you have a few techniques and tricks up your sleeve that enable you to maximise whatever supplies you have on hand.
To see more Designer Series Paper inspiration from the AWH Team head back to Rachel‘s page as she is hosting our monthly blog hops.
To purchase any of the products I’ve used in my cards tonight simply click on the phots of the products below.
If you’d like me to post you your very own copy of the forthcoming January-June 2021 Mini Catalogue, the August – December 2020 Mini Catalogue, the 2020-21 Stampin Up! Annual Catalogue, the 2020-21 Beginners Brochure, or to simply find out about more about Stampin’ Up! contact me.
Tonight the Art with Heart team are sharing creative projects featuring stamp sets that you can colour in. We hope our blog hop inspires you to pick up some Stampin’ Write markers, watercolour pencils, Stampin’ Blends or another form of colouring medium and colour in with your stamps.
Don’t forget to contact any of the ladies on the blog hop to order any products, especially these limited edition Colour Your Season products (pictured below), only available until the end of August, or until supplies last.
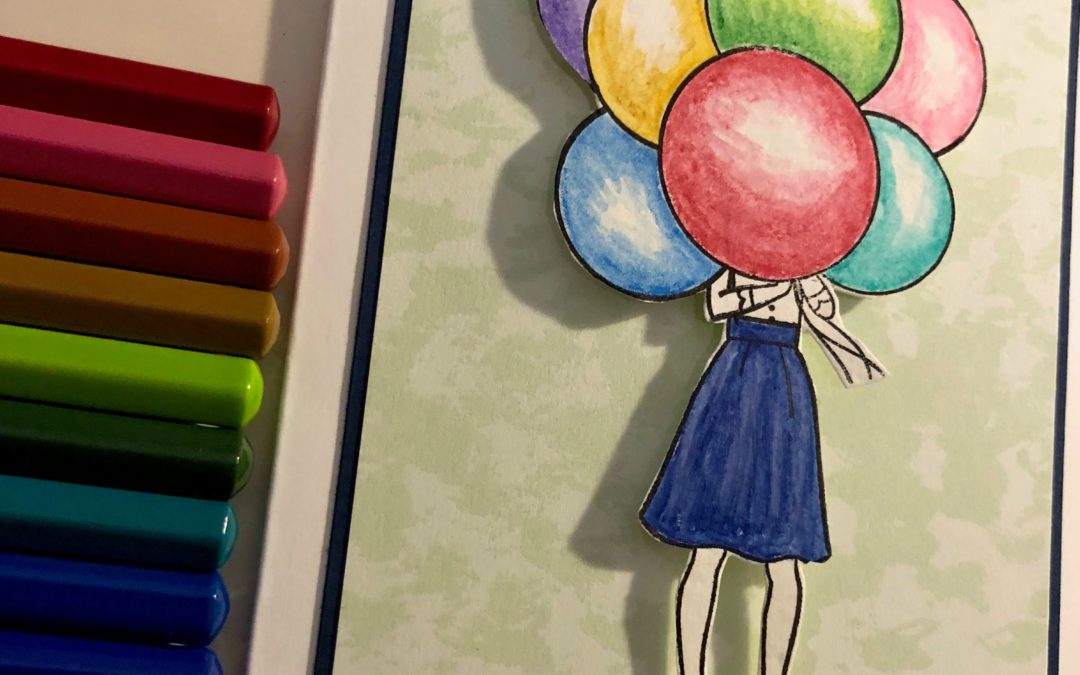
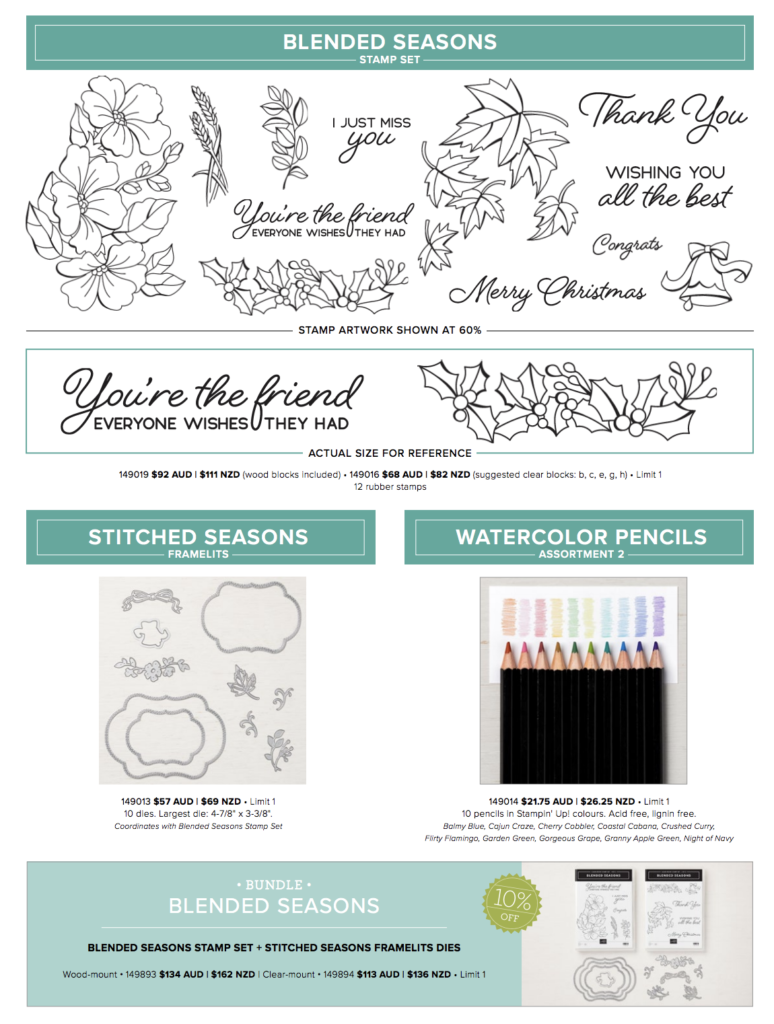
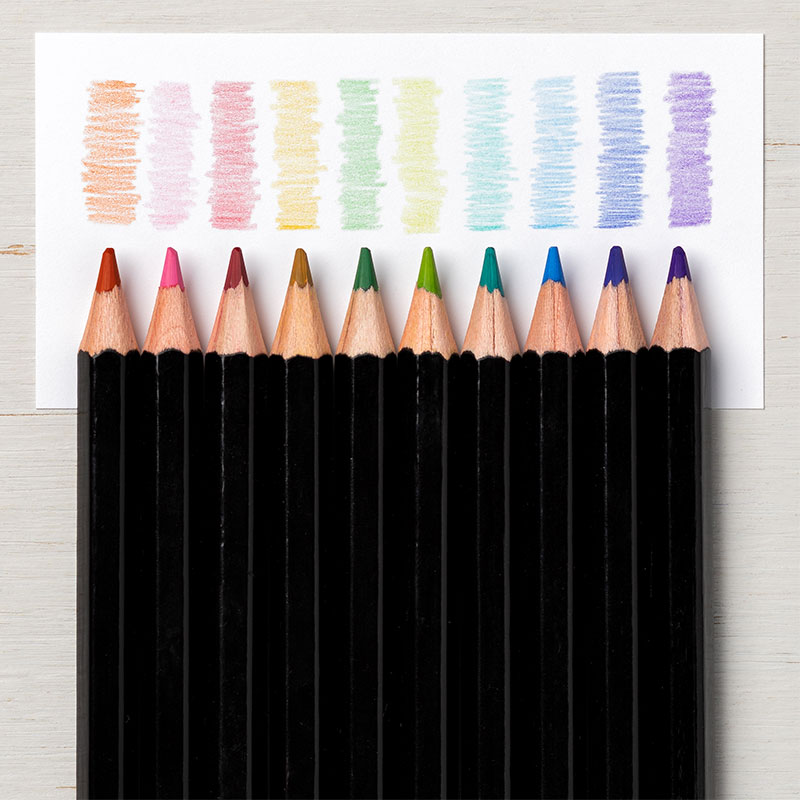
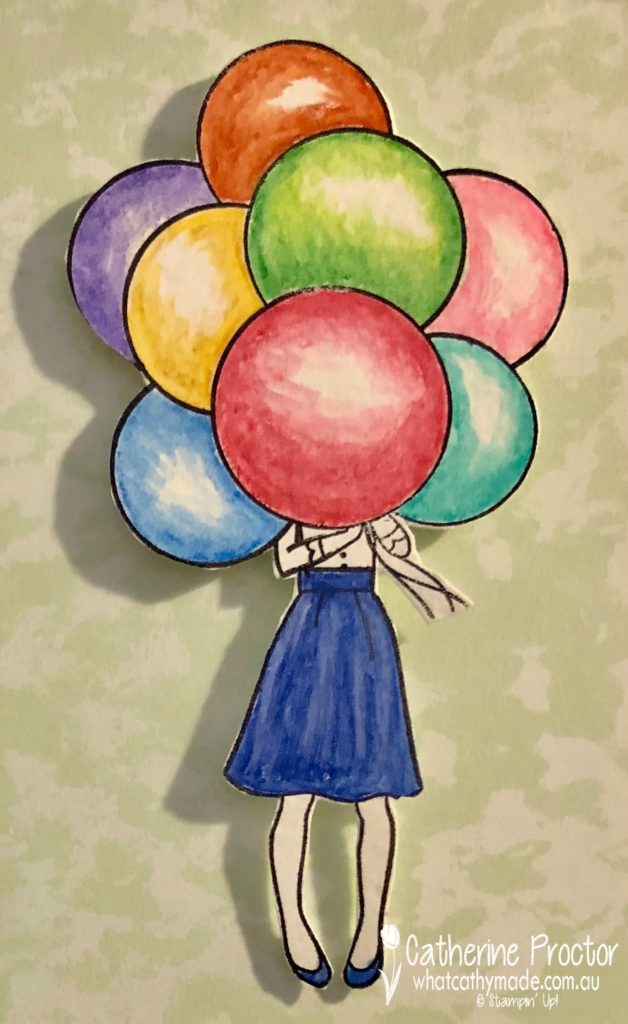
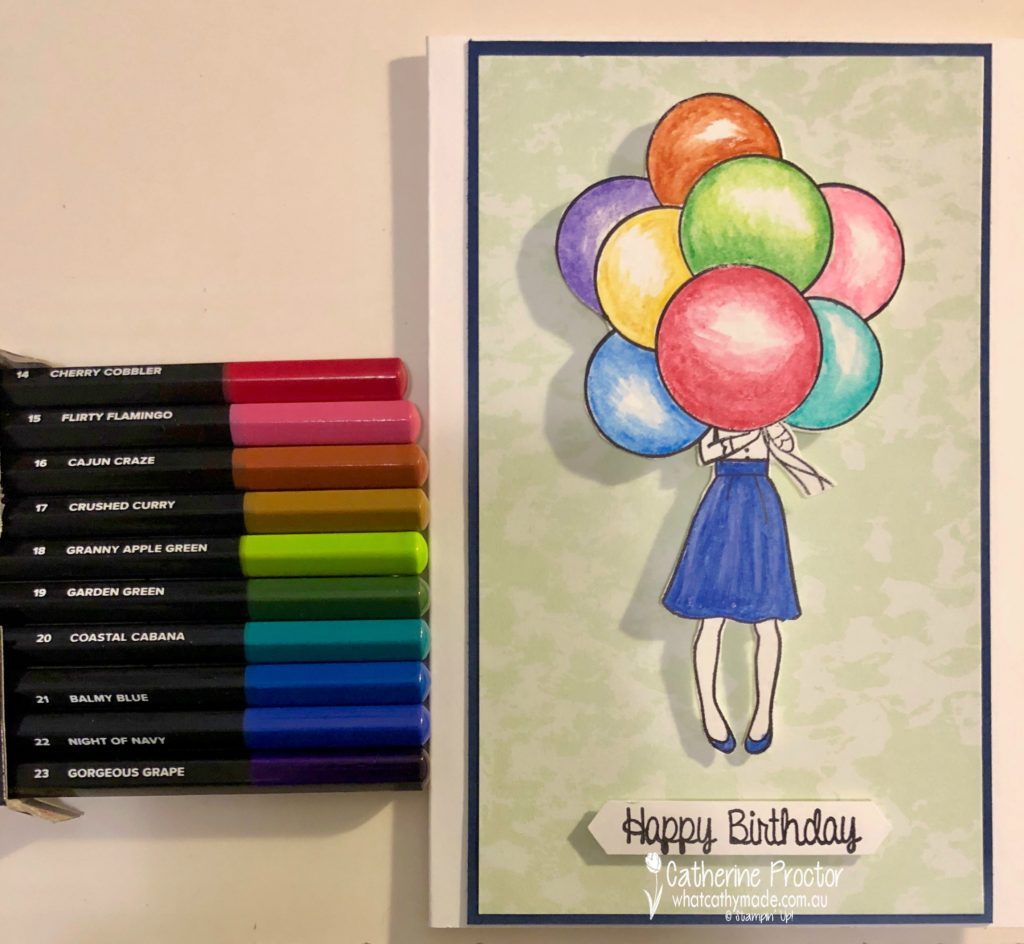
My project tonight uses the new watercolour pencils. Here’s a close up of these gorgeous high-quality pencils, available in 10 new colours: Balmy Blue, Cajun Craze, Cherry Cobbler, Coastal Cabana, Crushed Curry, Flirty Flamingo, Garden Green, Gorgeous Grape, Granny Apple Green, and Night of Navy.
These pencils are so easy to use and combined with the blender pen they give the most beautiful watercolour effect.
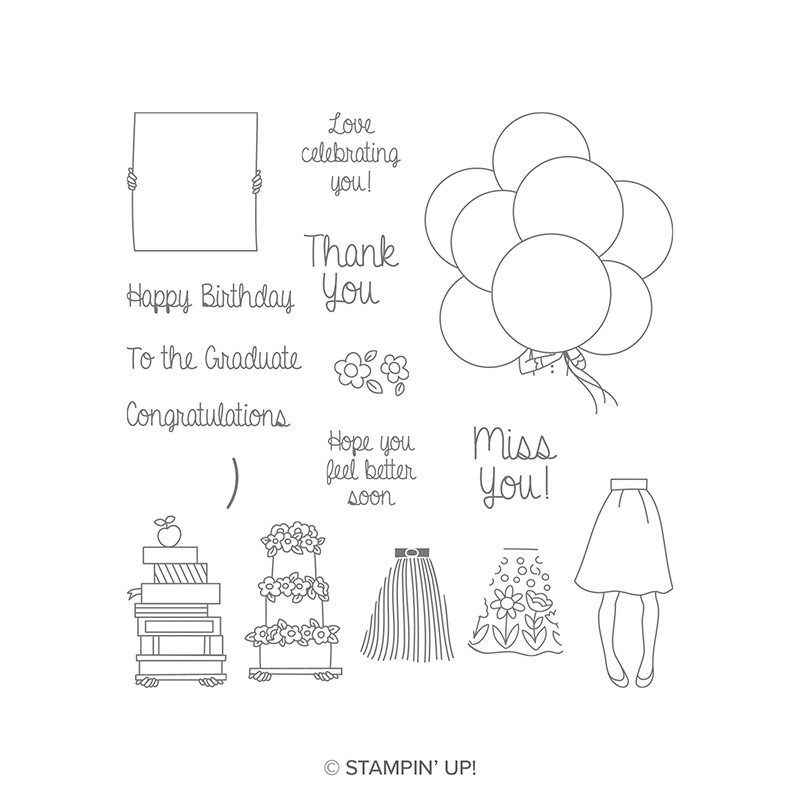
I’ve chosen a stamp set that allows me to showcase all of these gorgeous new watercolour pencils: it’s a hostess set called Hand Delivered.
You could colour these images in with your Stampin’ Markers, ink from your ink pads using an aqua painter as your brush, and Stampin’ Blends, or, as I have done on my card below, you can use watercolour pencils and blender pens.
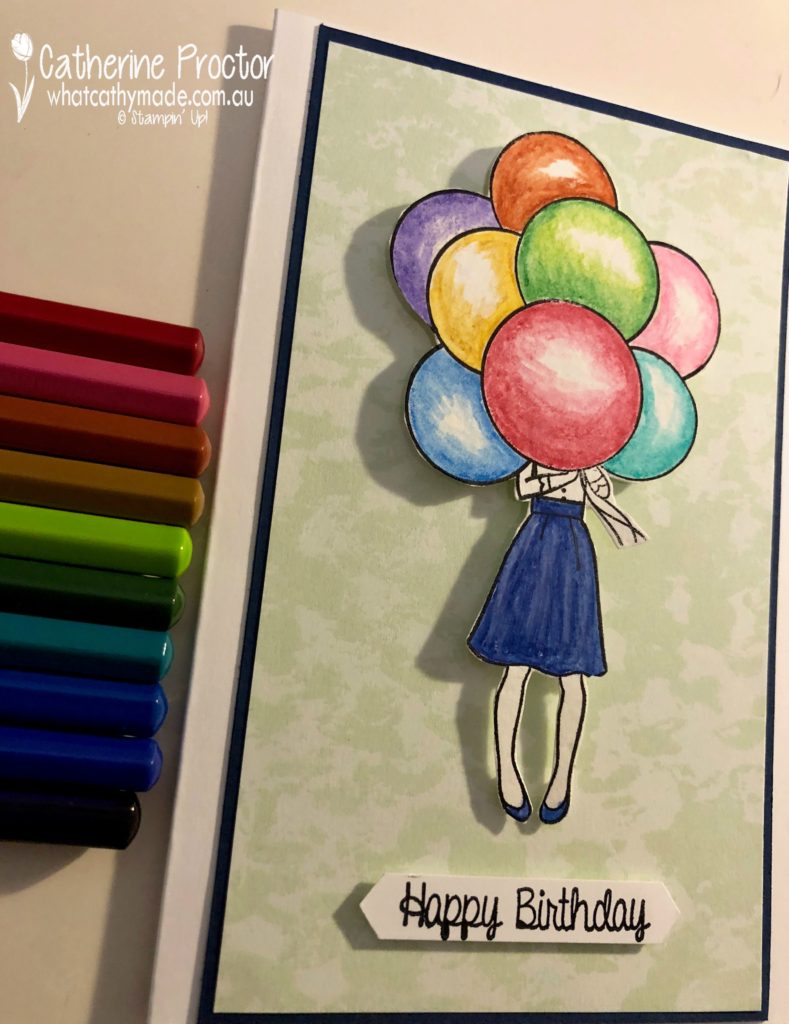
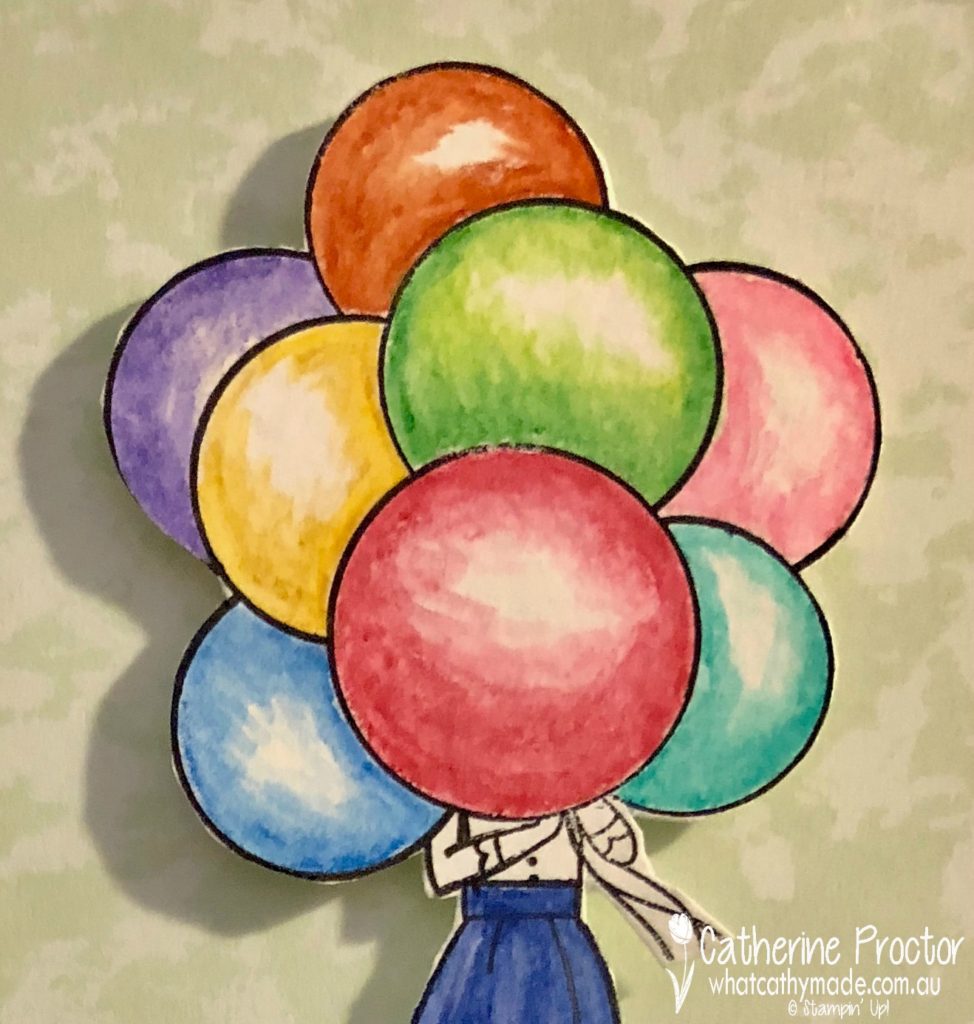
This colouring-in technique is so incredibly easy. You simply stamp your image in black ink and then colour in with your watercolour pencils, working from the outside in. The trick to getting dimension is to leave some white space in the middle of each balloon (where the light would reflect) and then use your blender pen to smooth out any pencil lines, being careful to keep the centre of each balloon white.
Here’s a close-up of the balloons…don’t they look so shiny and realistic?
Once I’d finished colouring in, I fussy cut my balloon lady out (using my paper snips) and mounted her onto the DSP with mini dimensionals, layered over a base of Night of Navy cardstock (to match her skirt) and a Whisper White card base.
My balloon lady reminds me of a Royal Doulton figurine my grandmother had…I think it was called the Balloon Seller? I loved looking at that figurine.
The final touch is the “Happy Birthday” stamp, which I punched out using my classic label punch.
Now it’s time to hop on over to our next participant, the very talented, Caroline Manwaring.
If you find a broken link or have come to this blog hop from a different entry point, you can view the participants below: