Today is an exciting day at Stampin’ Up! with the new 2025-26 Stampin’ Up! Annual Catalogue going live! There are so many beautiful products in the brand new catalogue.
You can view and download a digital version of the new catalogue here. Or get in touch with me for your very own physical copy of the new catty if I haven’t already sent you one.
May Online Exclusives and Two New Kits
In addition to the new 2025-26 Stampin’ Up! Annual Catalogue going live, there are two new kits and a heap of Online Exclusives added to the store today.
You take take a look at these gorgeous new products in my online store here.
Starter Kit Special
Want more products for free?
The Starter Kit Special includes:
$303 worth of products for only $169!
Your choice of ANY products, including BRAND NEW releases in the 2025–2026 Annual Catalogue and May Online Exclusives
Ongoing 20 – 25% discount on Stampin’ Up! products
Early access to new products
Opportunities to attend Stampin’ Up!’s OnStage and Creativity Now events
To find out more about the starter kit, contact me.
I’ll be back tomorrow with the first of our AWH Colour Creations 2025-2026 Insta hop where we will be showcasing Cloud cover, one of the new 2025-2026 InColours.
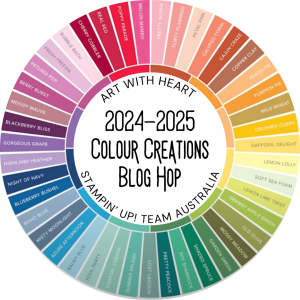
Welcome to week six of our Art With Heart 2024-25 Colour Creations blog hop!
Today we’re featuring another new colour, Basic Beige, which is a new addition to the Stampin Up! colour range. Basic Beige is a great replacement colour for the now retired Sahara Sand.
I’ve created this graphic to show how Basic Beige compares to the other light brown neutral/core colours in the Stampin Up! colour range.
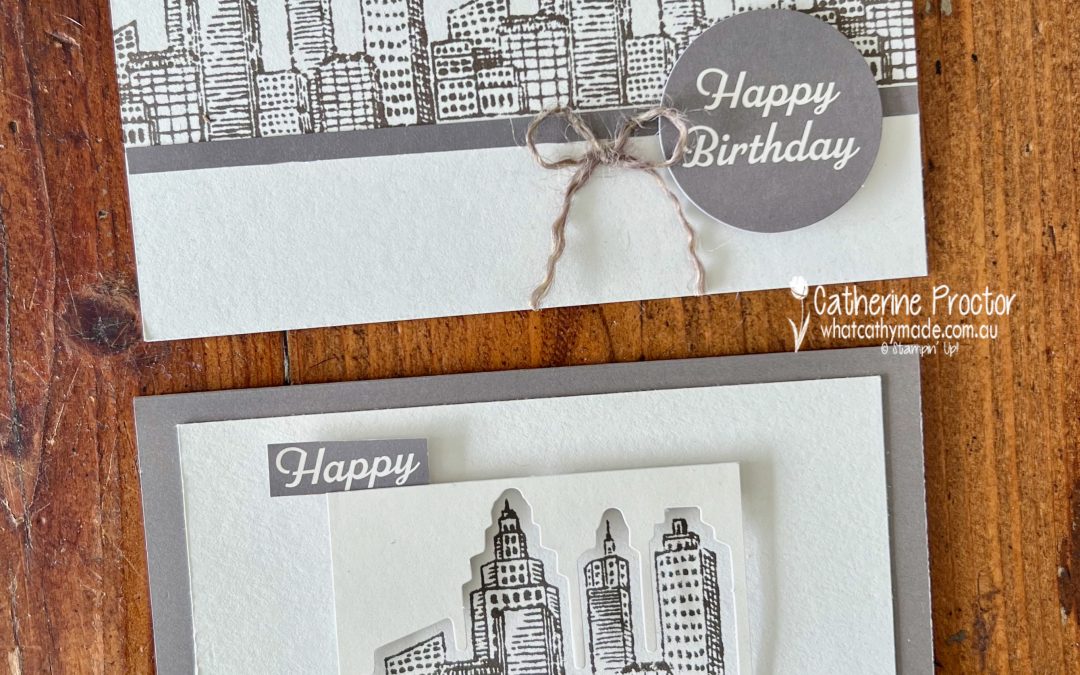
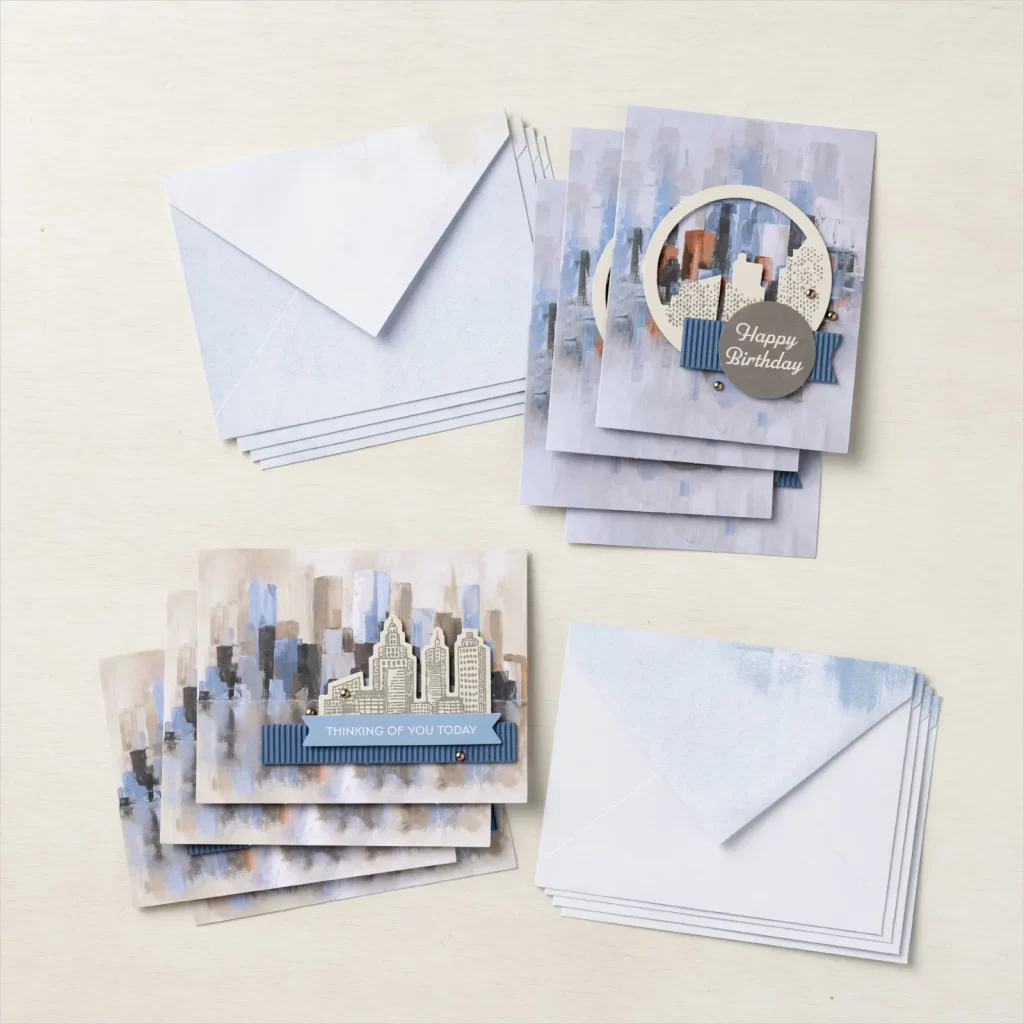
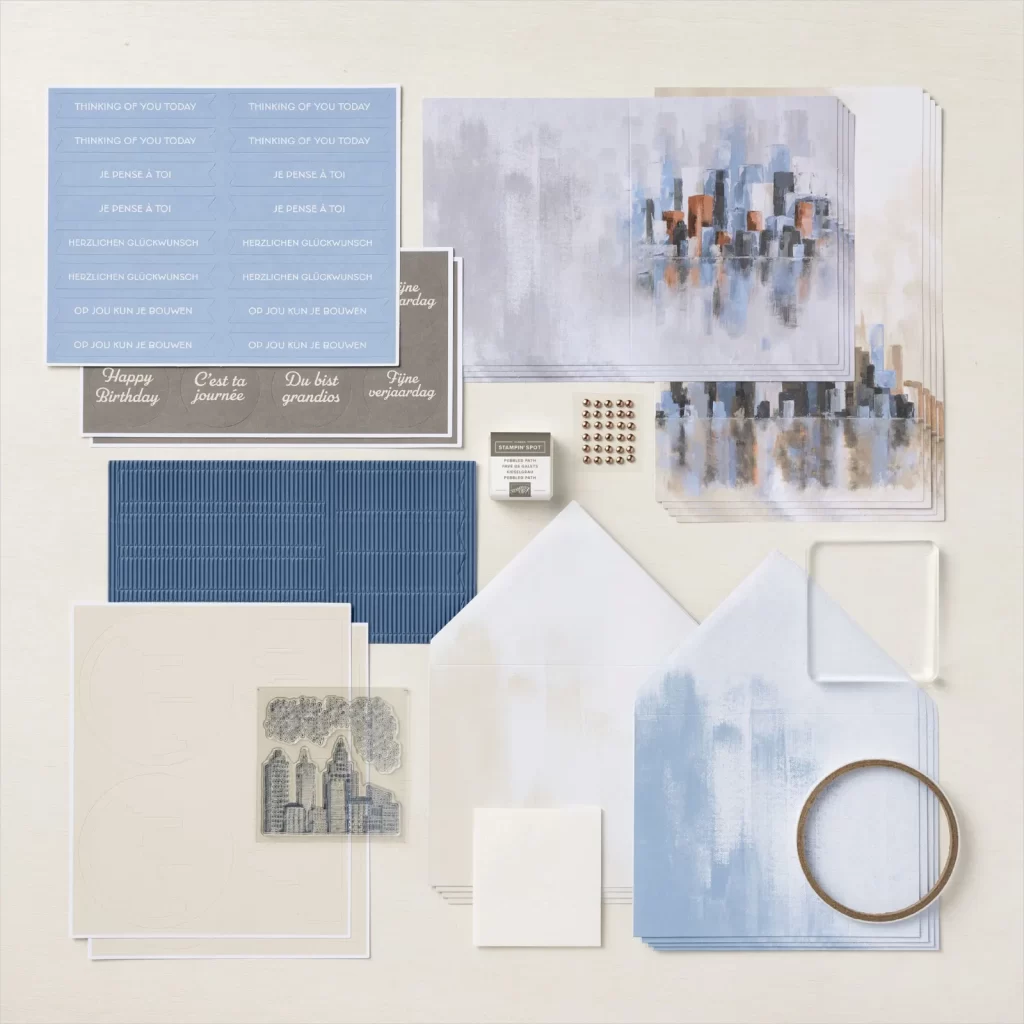
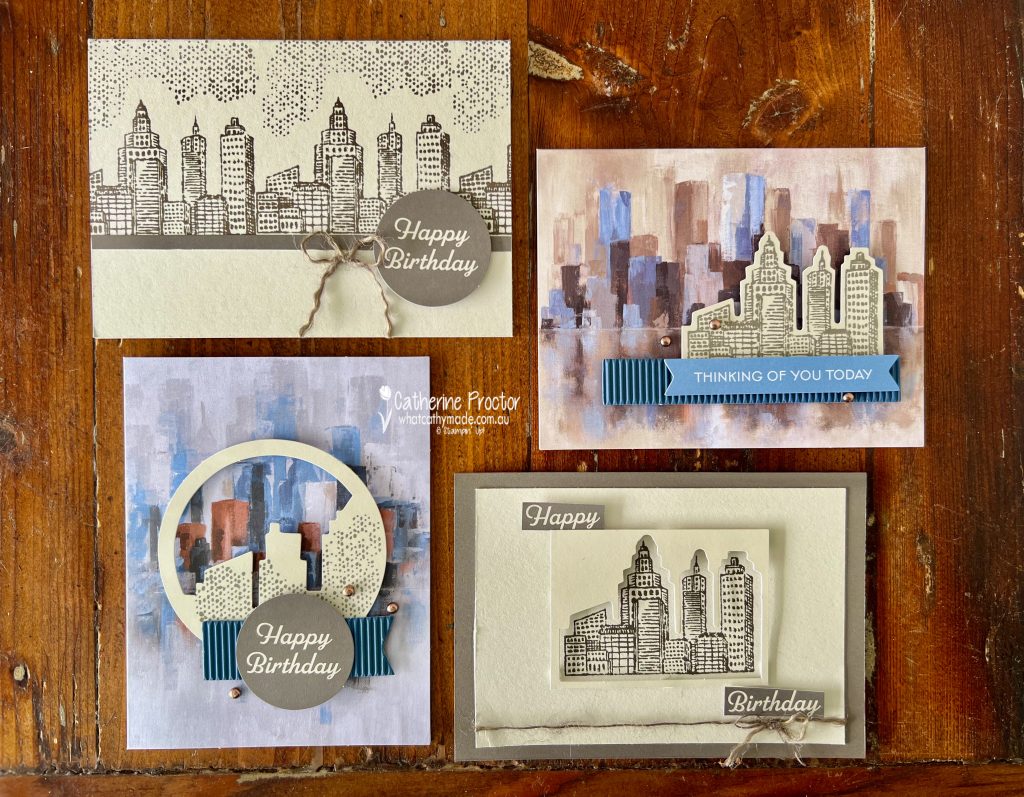
I’m always on the lookout for masculine cards and I love anything with buildings, so the new City Sights Kit was a kit I just couldn’t resist. I love these water coloured cityscape designs in neutral colours, its masculine charm, and these big city skylines.
As this is an all-inclusive kit it includes so many different elements! * City Sights Photopolymer Stamp Set * Pebbled Path Stampin’ Spot * 8 printed card bases and 8 printed envelopes * Shaped die cuts, printed sentiments and corrugated cardstock accent pieces * Copper metallic embellishments * Mini dimensionals and tear’n’tape * Acrylic block
My favourite element is this fabulous line drawing stamp set. It reminds me of happy times in New York.
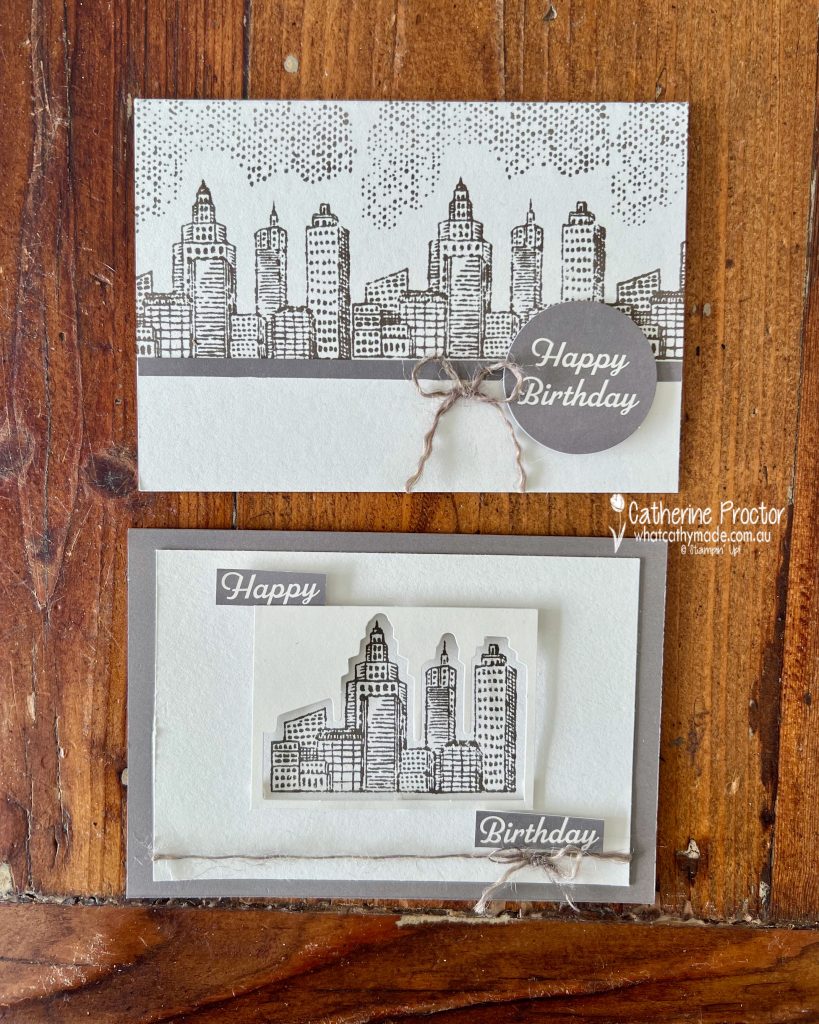
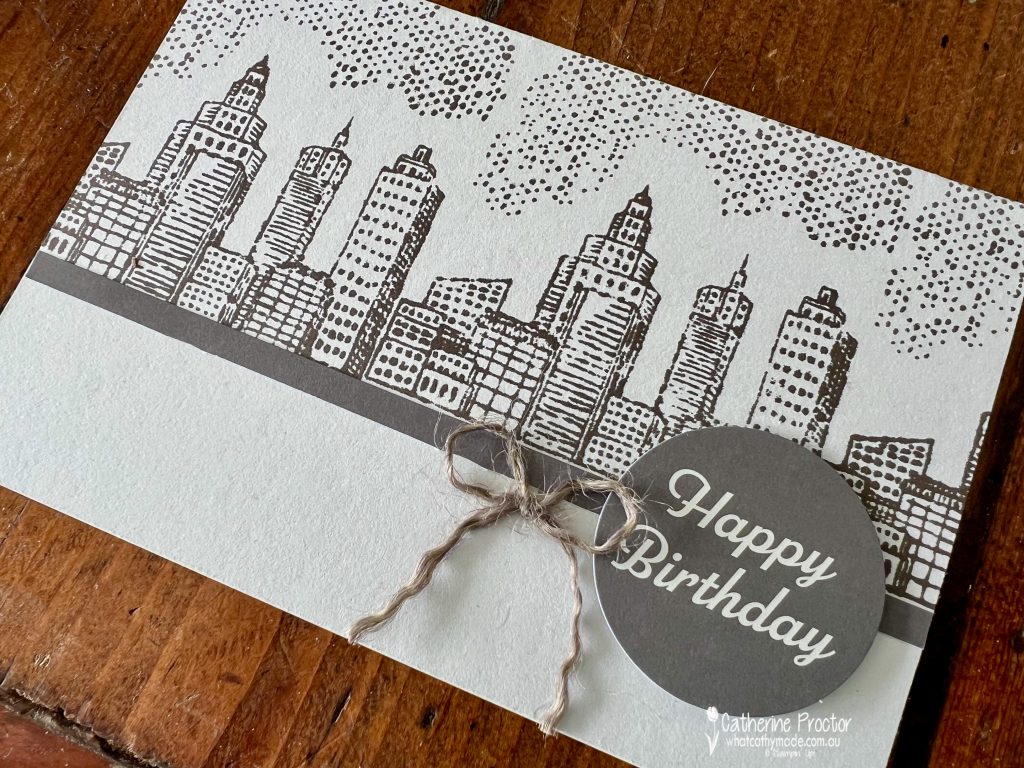
I’ve used this stamp set to make two alternative cards in a monochromatic colour scheme of Basic Beige and Pebble Path.
For card one I drew a line in pencil and stamped along the line to create a city horizon and added a narrow strip of Pebbled Path offcut from the printed sentiment sheet.
I used the dotted grid stamp to create a cloud effect in the sky.
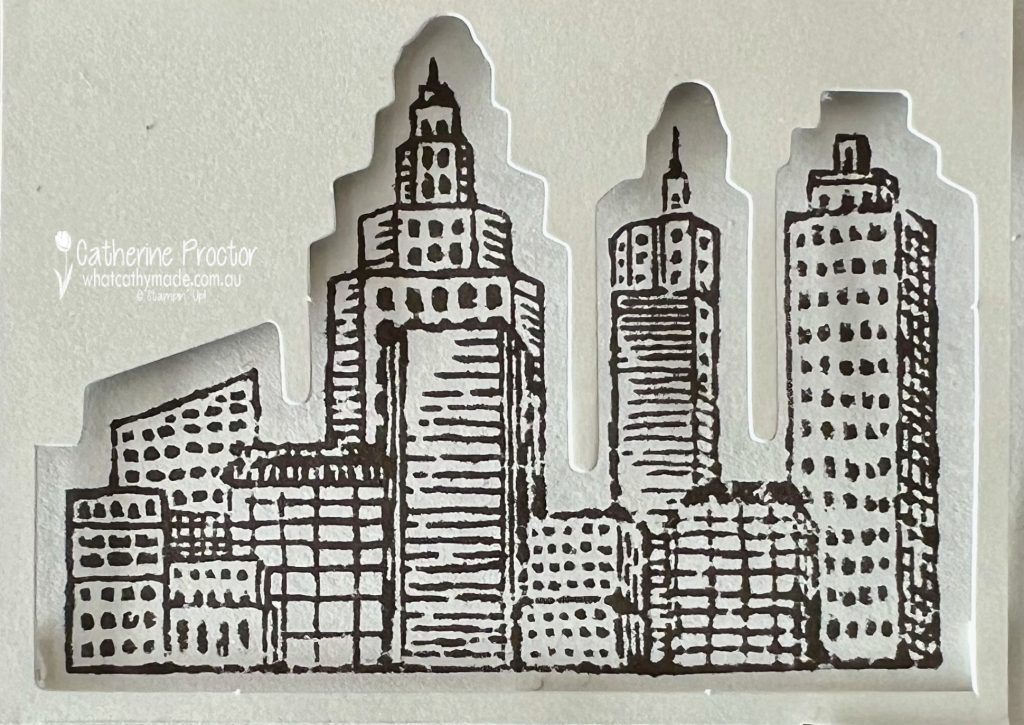
For card two I used the Basic Beige offcuts from the shaped die cuts to frame a single stamped image of the city sky.
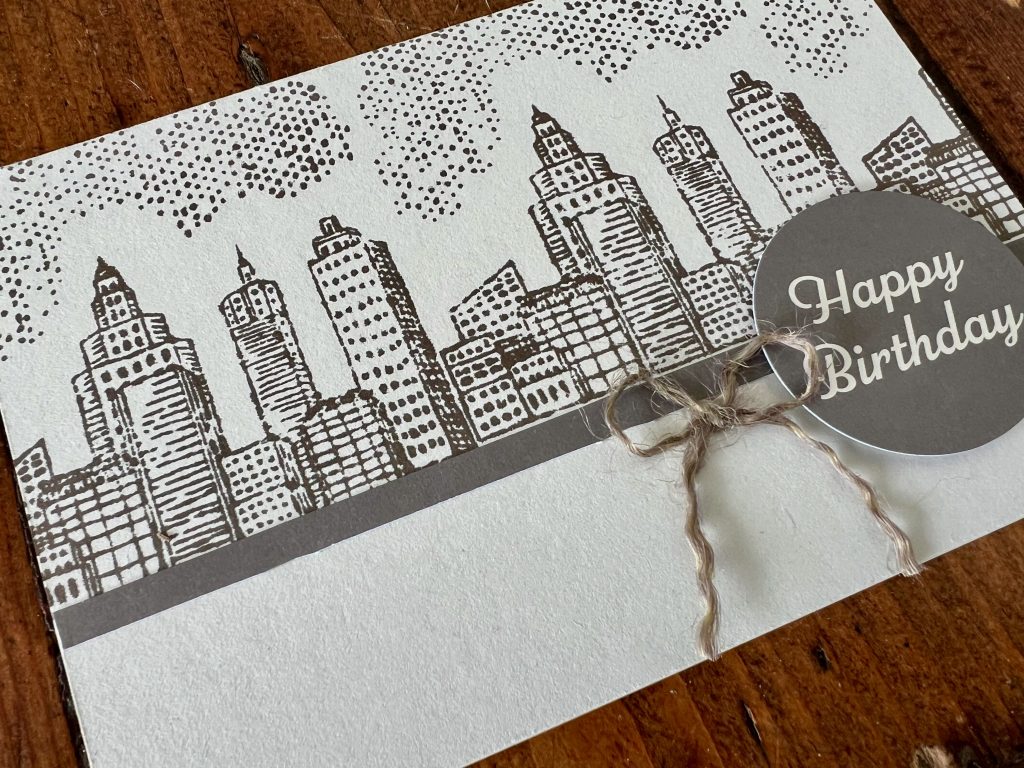
The Basic Beige offcut was adhered dusing the mini dimensionals – it gives a really cool effect that you can see in this close-up photo below.
One of the “happy birthday” printed sentiments was cut in half and placed top and bottom of the framed image.
I did also make a couple of the cards as per the instructions in the kit and I love these cards too. Here are the four cards I’ve made so far. I can’t wait to make some other designs using this city skyline stamp set.
Now it’s time to hop in over to our next participant, the lovely Andrea Sargent – I can’t wait to see what Andrea has made this week!
If at any time you find a broken link, you can find the complete list of all participants below.
The Christmas countdown continues – it’s 19 weeks today until Christmas Day! Have you started making Christmas cards yet?
Tonight I’m sharing some ideas on ways to use some of the Stampin’ Up! Christmas kits as they are all discounted for the month of August, so now’s the perfect time to purchase a Christmas kit.
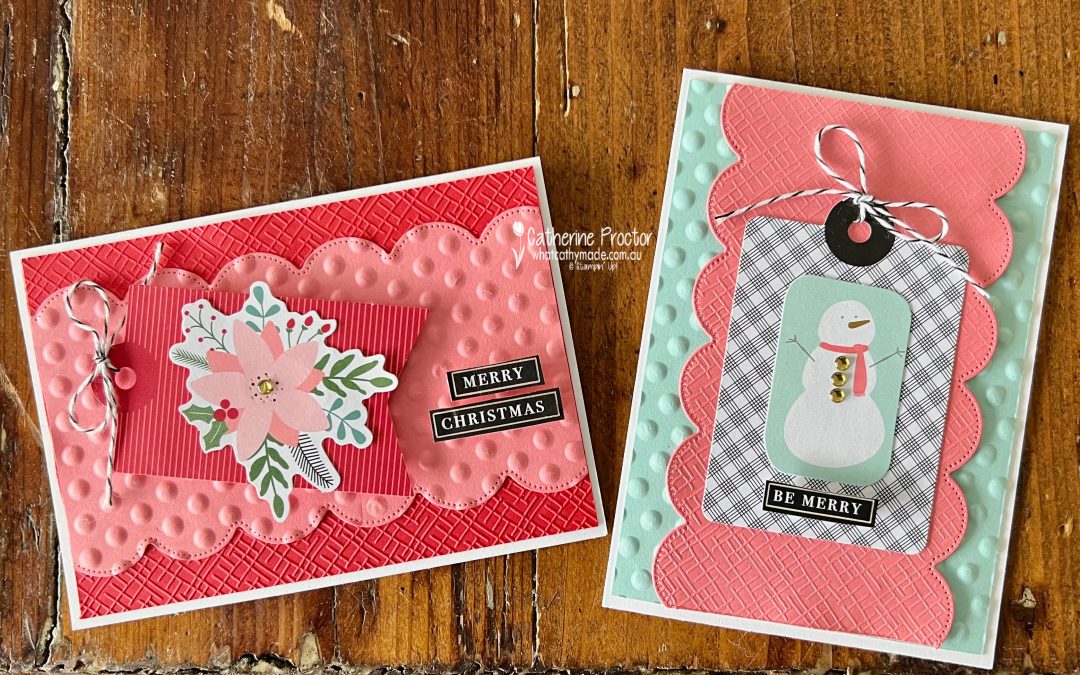
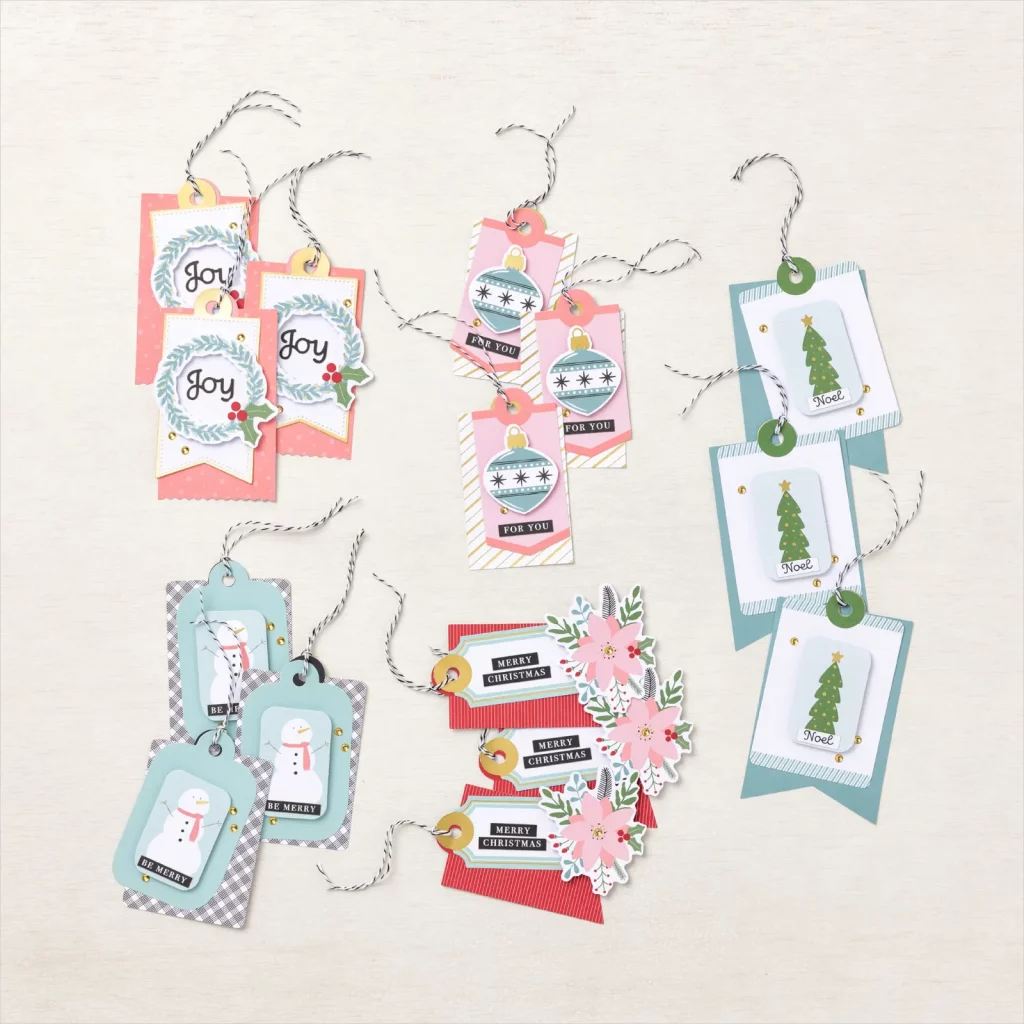
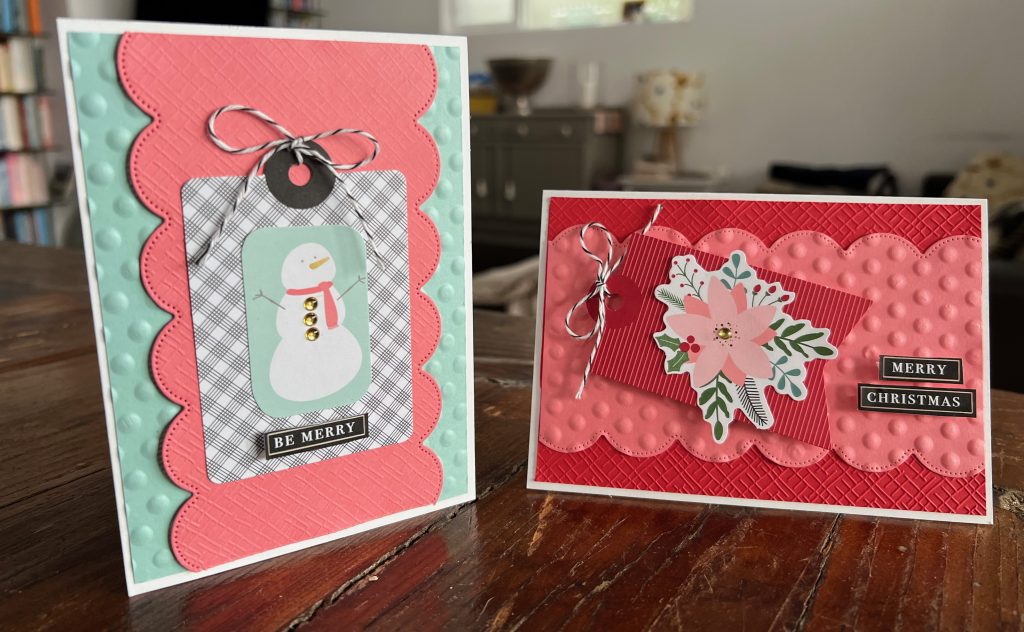
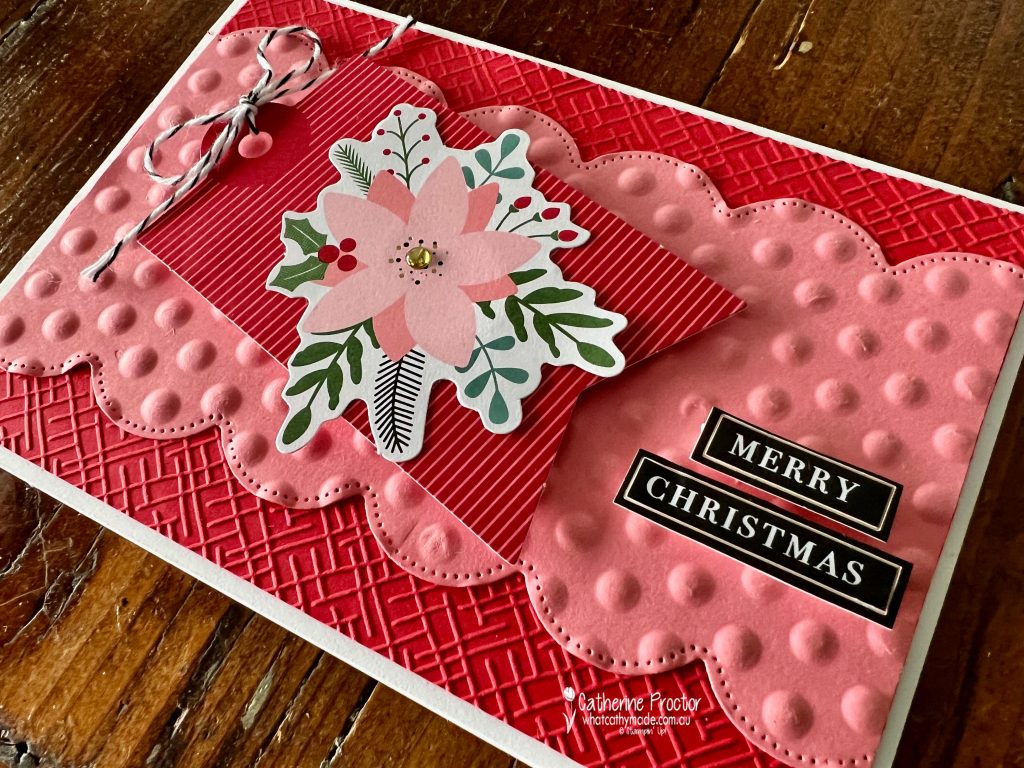
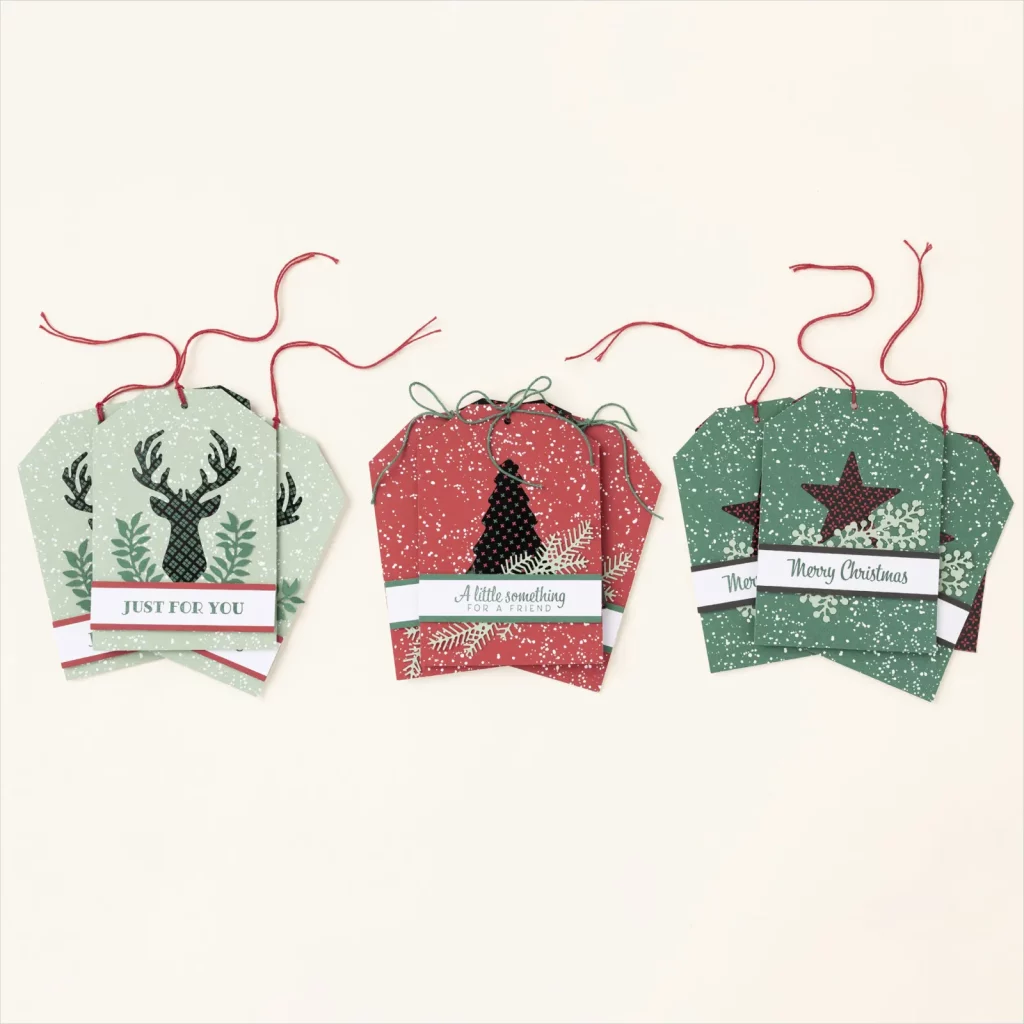
Currently, there are 5 kits to choose from and the kit I’ve used to create my cards today is the latest Stampin’ Up! kit, Festive Tags.
There is no stamping required to makes these tags and the sentiment pieces come in several languages.
I was lucky enough to watch Sara Douglass, Stampin’ Up! CEO, demonstrate this in person at a 35 for 35 event last month and she gave us all some samples to take home.
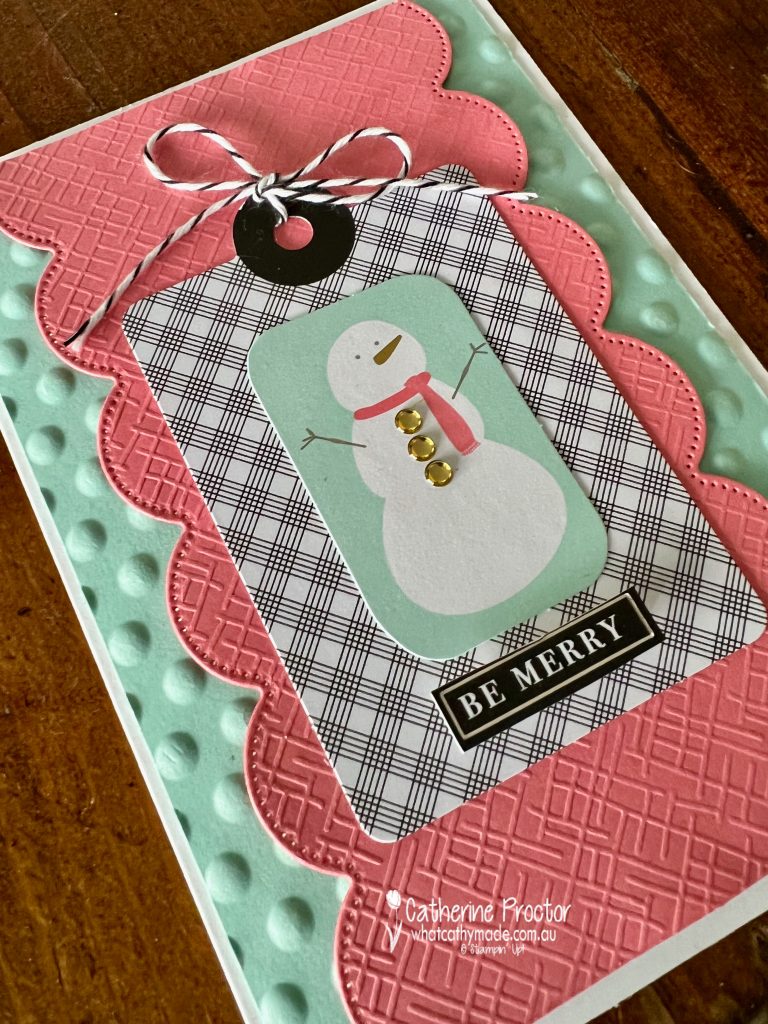
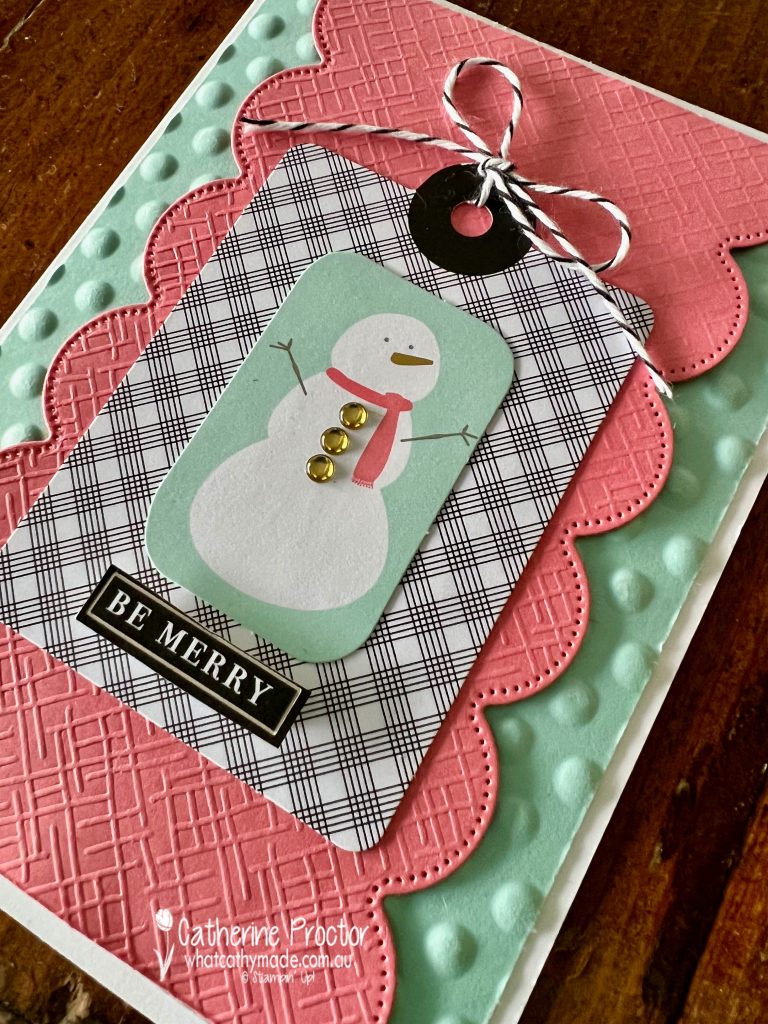
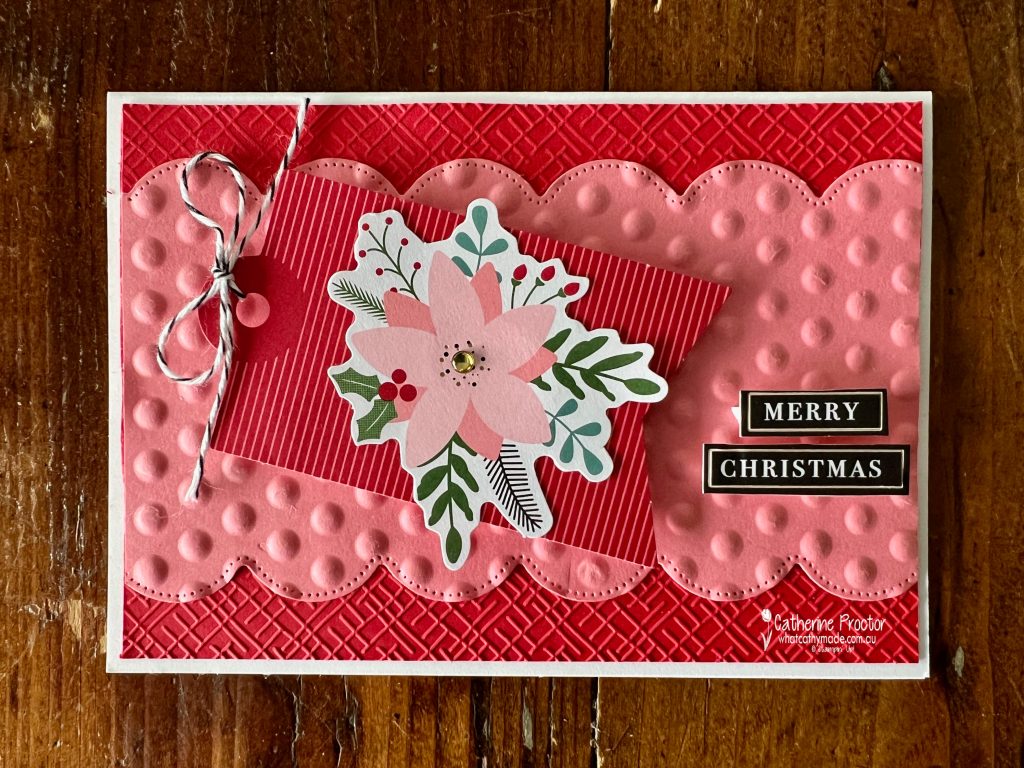
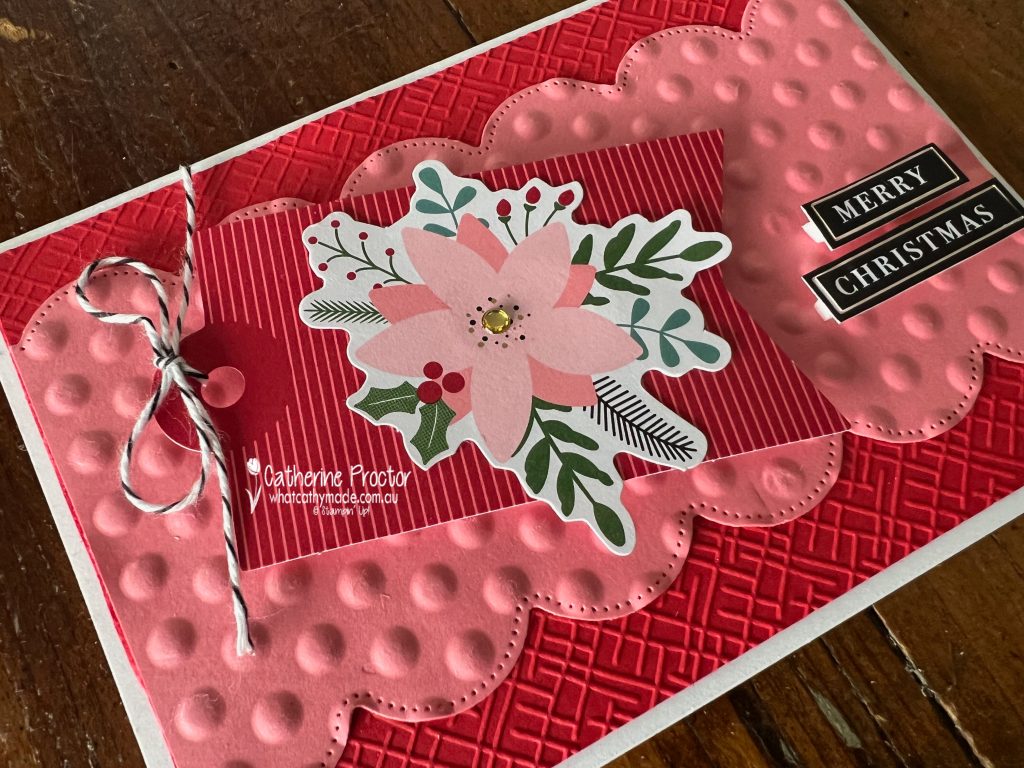
Although this is a tag kit, I’ve turned my sample tags into cards, by using a few extra supplies in the same colours used in the kit.
For the snowman card, I’ve embossed a layer of Pool Party card stock using the circles embossing folder from the Basics Embossing folders (online only).
The layer of Flirty Flamingo has been embossed using the crosshatch embossing folder from the Basics Embossing folders and a scalloped border die cut with the Scalloped Layers dies.
The floral Christmas card uses the same embossing folders and the Scalloped Layers dies to emboss and die cut Real Red and Flirty Flamingo card stock.
I love Flirty Flamingo and Real Red together!
The rest of the elements on my cards are all from the Festive Tags kit.
Some of the other Stampin’ Up! Christmas kits also have stamp sets, acrylic blocks and ink spots included.
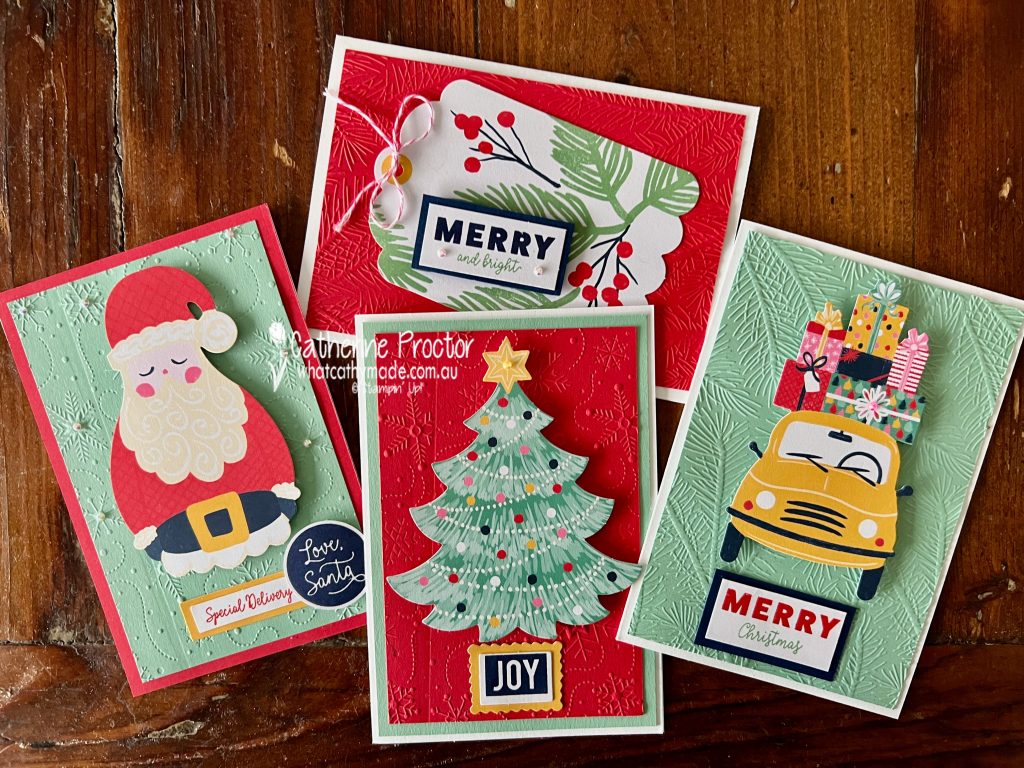
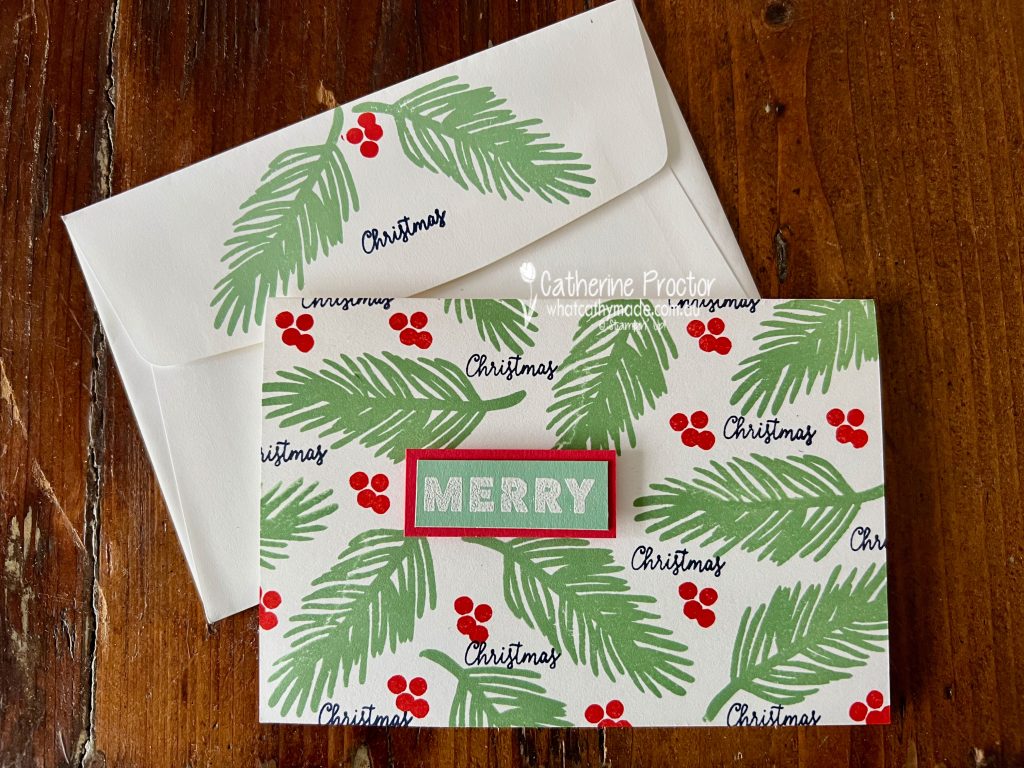
The Love, Santa Tag Kit makes very large tags and it has a fabulous stamp set too.
Here are variations on this kit I’ve previously shared – four cards using the tags, as well as another card with matching envelope using just the stamp set.
And here is the fabulous Christmas Whimsy card kit with its gold edged envelopes, stamp set and embellishments.
And here are my card variations – they only use the supplies included in the Christmas Whimsy card kit.
These are the other two Christmas kits, available online only. They both have stamp sets, acrylic blocks and ink spots included too.
It’s so fun and easy to get creative with the Stampin’ Up! Christmas kits – don’t forget to also use the stamps that come in the kits to create your own Christmas cards.
Now it’s time to hop on over to our next participant, the lovely Rachel Woollard. I can’t wait to see what Rachel has made this week.
If at any time you find a broken link, you can find the complete list of all participants on Sharon’s blog.
Welcome to week eight of our Art With Heart 2022-23 Colour Creations blog hop! This is a weekly blog hop where we showcase the stunning range of Stampin’ Up! colours in alphabetical order over 12 months and this week we are featuring Bermuda Bay.
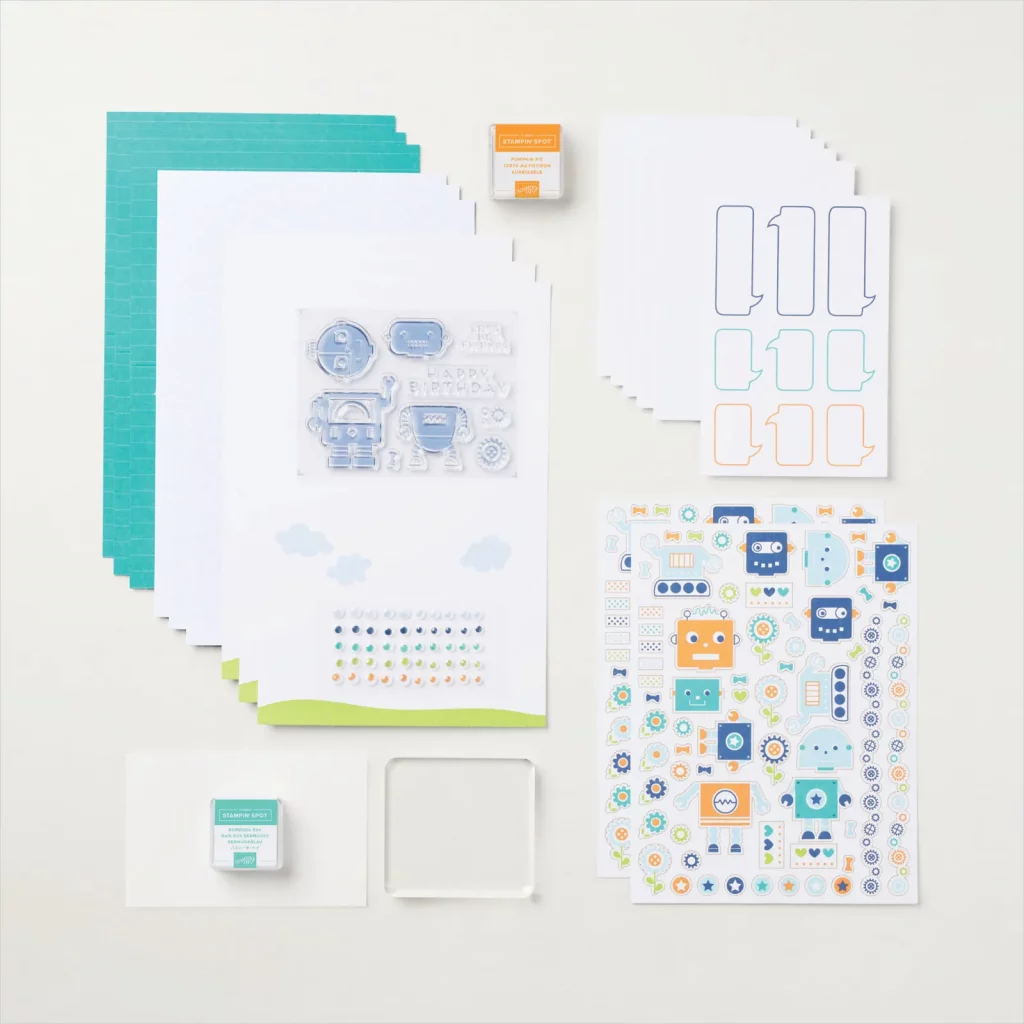
Since there is a “Buy One, Get One 50% Off” sale on all of the Stampin’ Up! Kits until 30 June, I couldn’t resist adding two of the adorable Robot Buddies Kids Card Kit to a recent order. The colours in this kit include Bermuda Bay, along with Balmy Blue, Granny Apple Green, Night of Navy and Pumpkin Pie.
The kit contains step-by-step instructions for nine cards in three different predesigned projects, but there are so many elements that let you make and design your own cards as well.
2 Classic Stampin’ Spots in Bermuda Bay and Pumpkin Pie
9 card bases and 9 envelopes
Robot Buddies Photopolymer Stamp Set
2 printed sticker sheets
1 printed die-cut sheet
1 sheet of adhesive-backed googly eye embellishments
Enough adhesive to complete the projects
A printed box for storage or crafting on the go
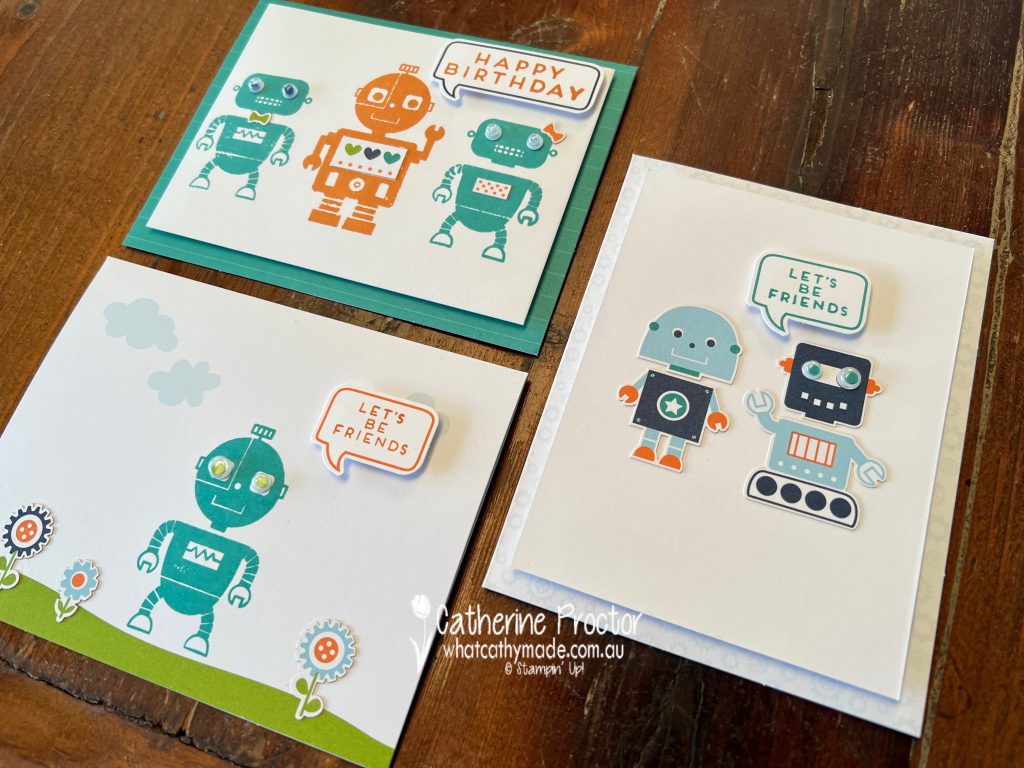
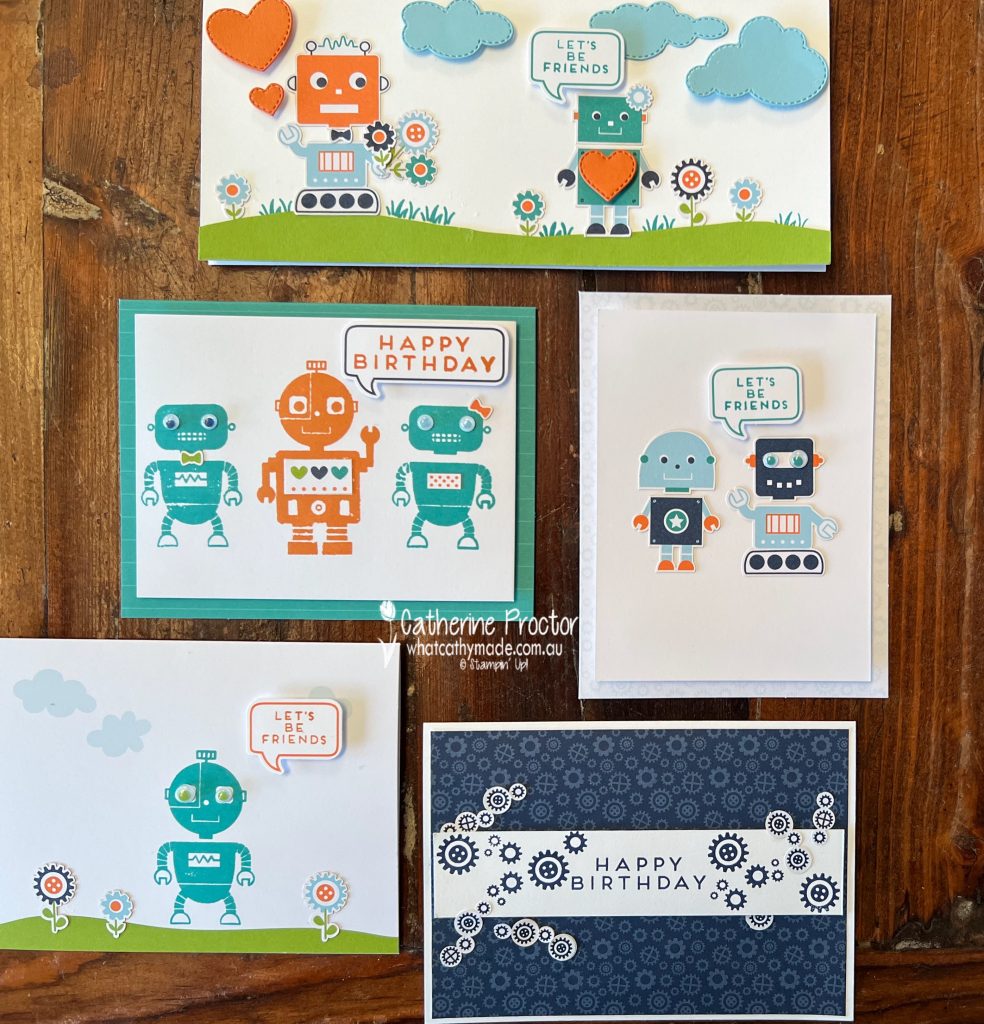
Whenever I receive a kit I always make up one of each of the set designs first before I head “off grid” with my designs!.
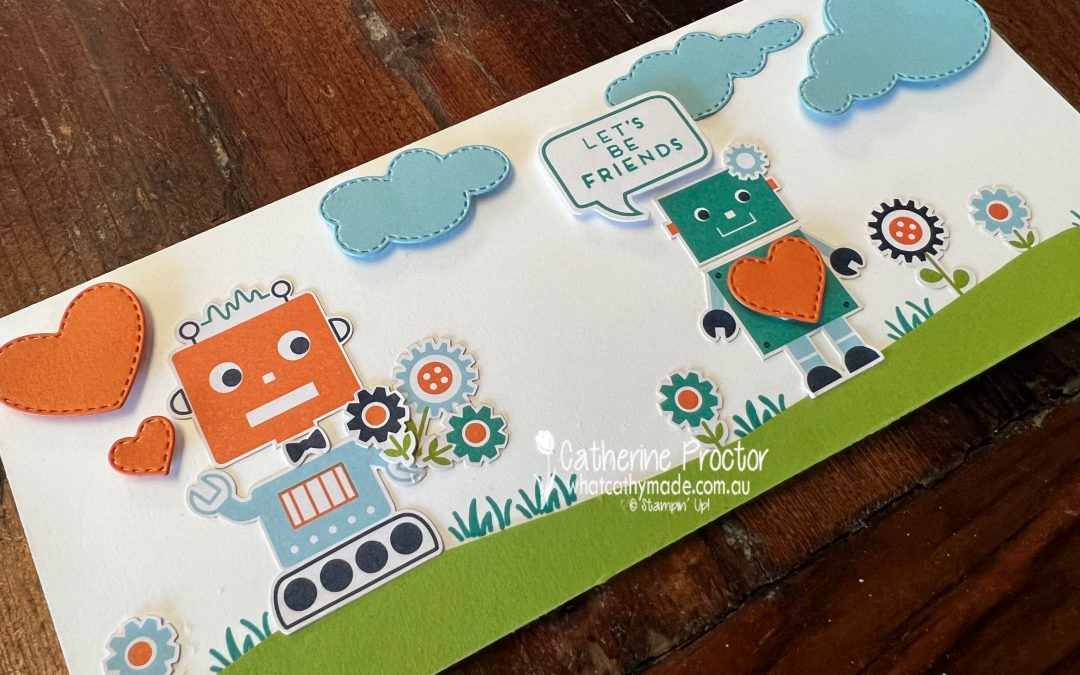
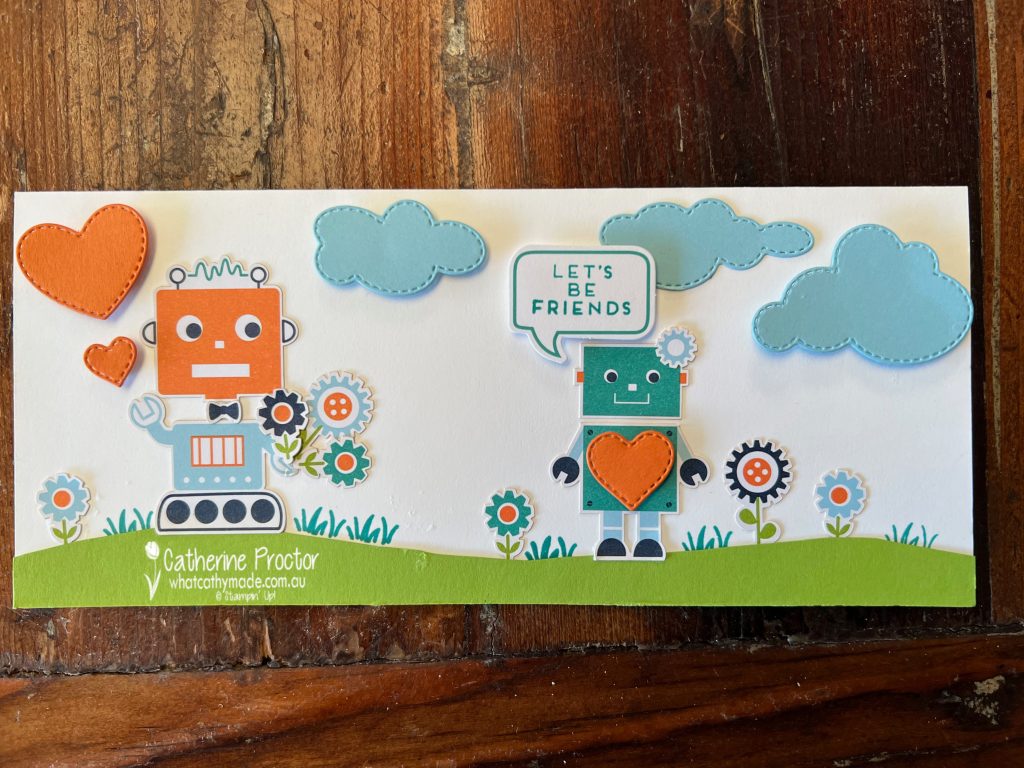
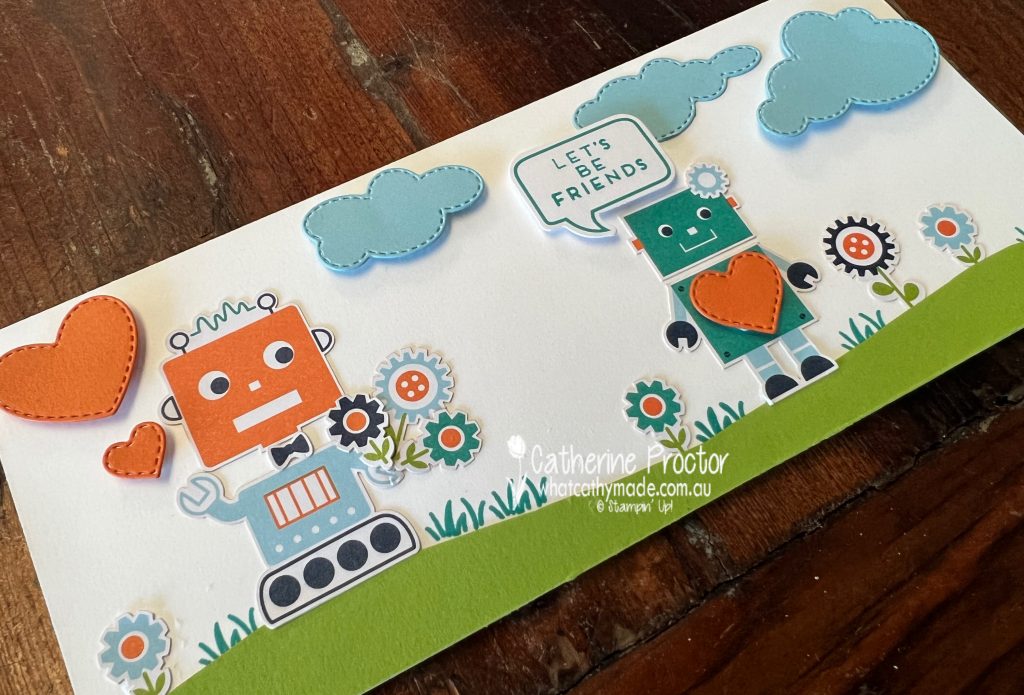
Don’t these these robots make you smile! I just love their googly eyes.
This slimline landscape slimline card was created by adding some clouds and hearts die cut using the “Give It a Whirl” dies in Balmy Blue and Pumpkin Pie.
The Bermuda Bay grass was stamped with the Happy Hedgehogs Stamp Set onto a hand cut Granny Apple Green lawn.
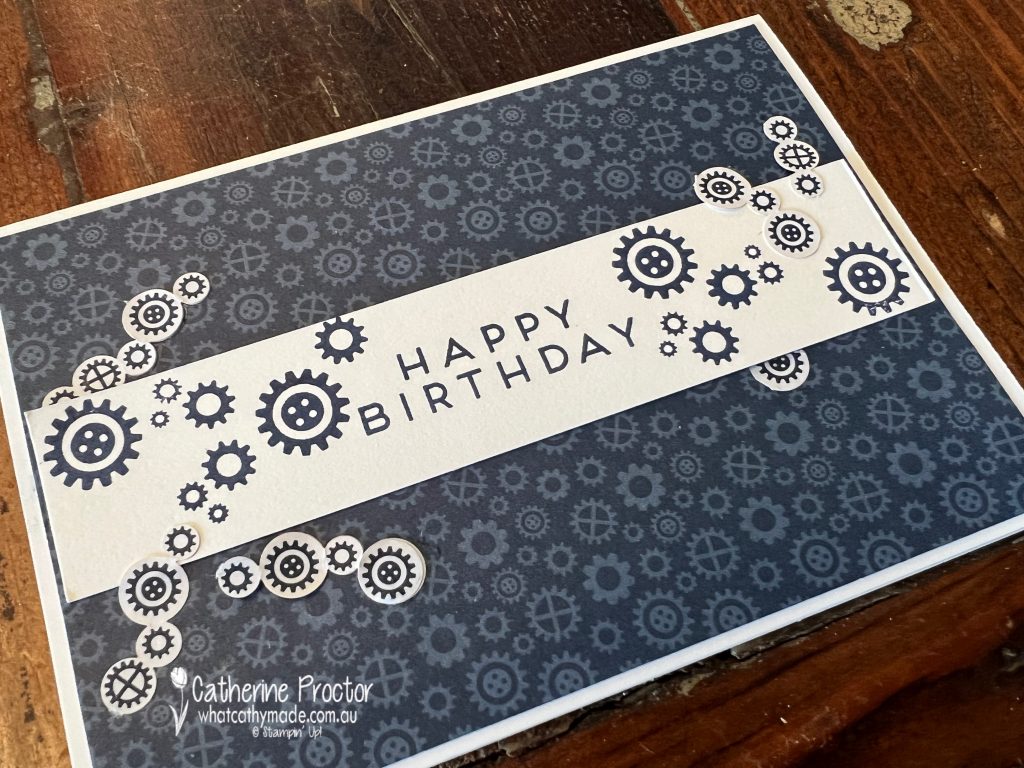
And finally, this quick and easy monochrome masculine birthday card was made using the Night of Navy DSP pattern from the inside of the envelopes, spare stickers from the kit (chopped up) and the gear stamps that are included in the kit’s stamp set.
I had so much fun creating with this kit. I’m giving the second one I purchased in the BOGO 50% off sale to my niece as part of her 6th birthday present and I can’t wait to create with her.
Now it’s time to hop on over to our next participant, the lovely Rosa Leyden – I can’t wait to see what Rosa has made this week!
If at any time you find a broken link, you can find the complete list of all participants below.
I’ll share another card I made with this kit later this week and next Wednesday we will be showcasing one of our regal Stampin’ Up! colours, Blackberry Bliss.
Wherever you are in the world, stay safe, stay calm … and keep on crafting xxx
Hello crafters! It’s a long weekend here in Sydney, Australia and Saturday was World Cardmaking Day. Did you make a card?
Normally, I love to host an open house on World Cardmaking Day, however, as we are still in lockdown I enjoyed a couple of online craft and chat zoom sessions instead. Not quite the same, but hopefully next year we can gather together in person again.
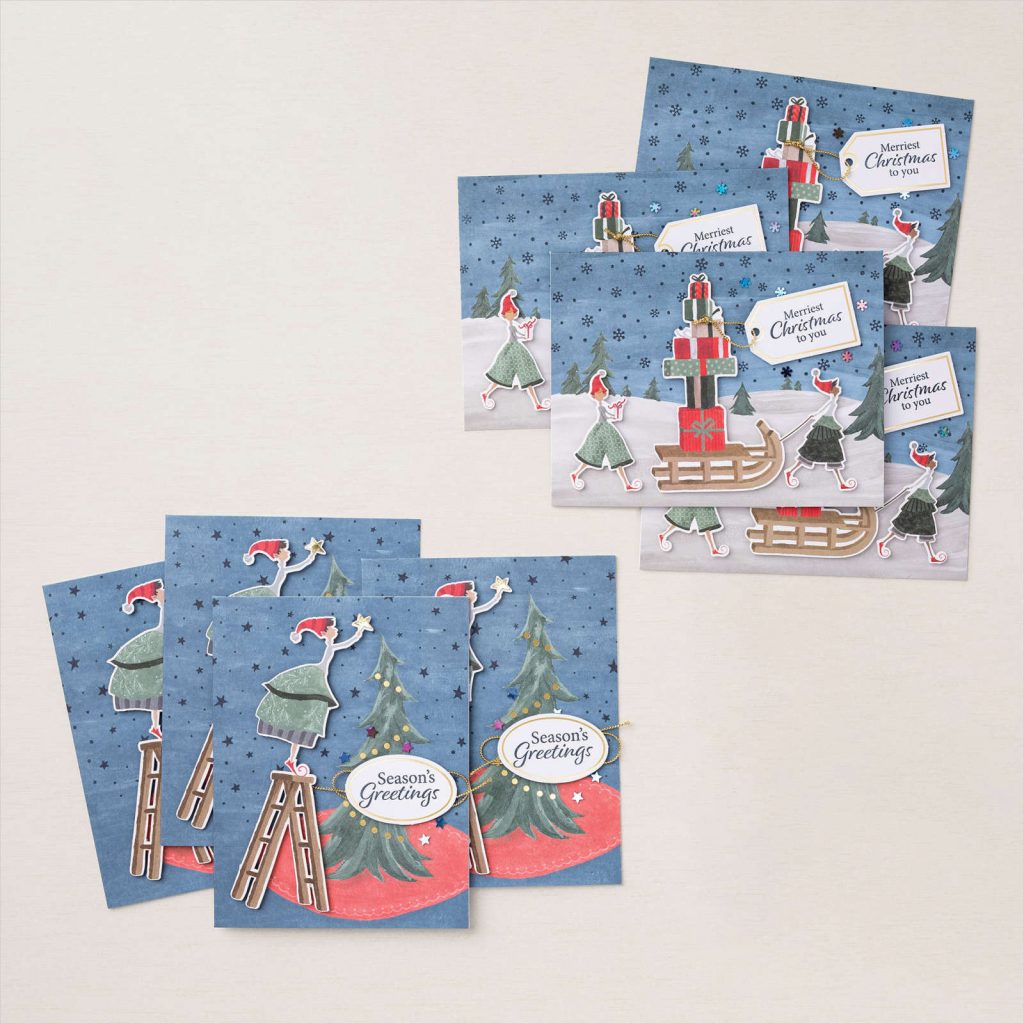
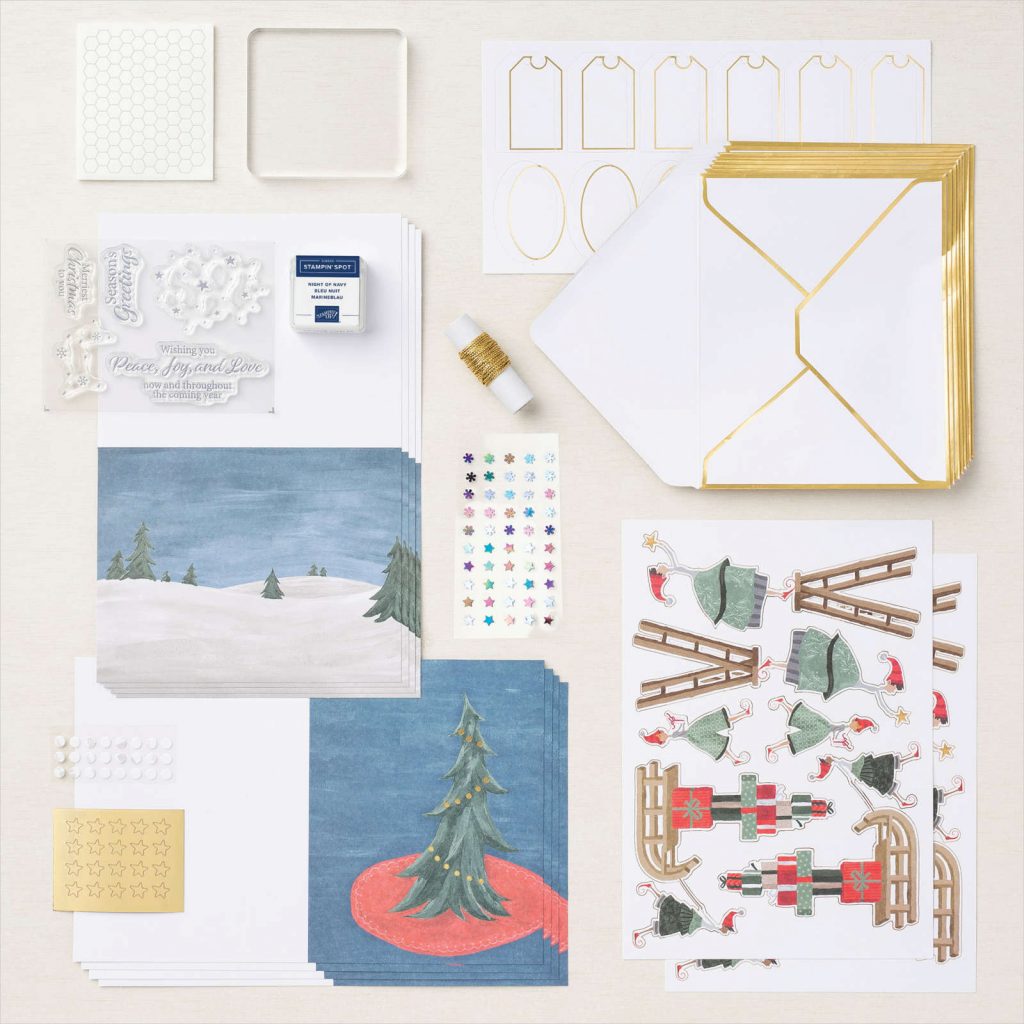
Even since I saw the Christmas Whimsy Card Kit on page 2-3 of the July – December 2021 Mini Catalogue I’ve been waiting for its release. On Saturday afternoon, four of us zoomed together as we created with this kit.
Here’s what you get in this kit – I love that the acrylic block and ink spot are included. After you make up your cards you still have a block, an ink spot and a stamp set that you can use to make even more cards!
Kits are ideal for this sort of virtual crafting as they are not complicated to make, everything you need is included in the kit and everyone has the same materials. With a kit there is no need to do any pre cutting either, which makes it so much faster to make a stack of cards!
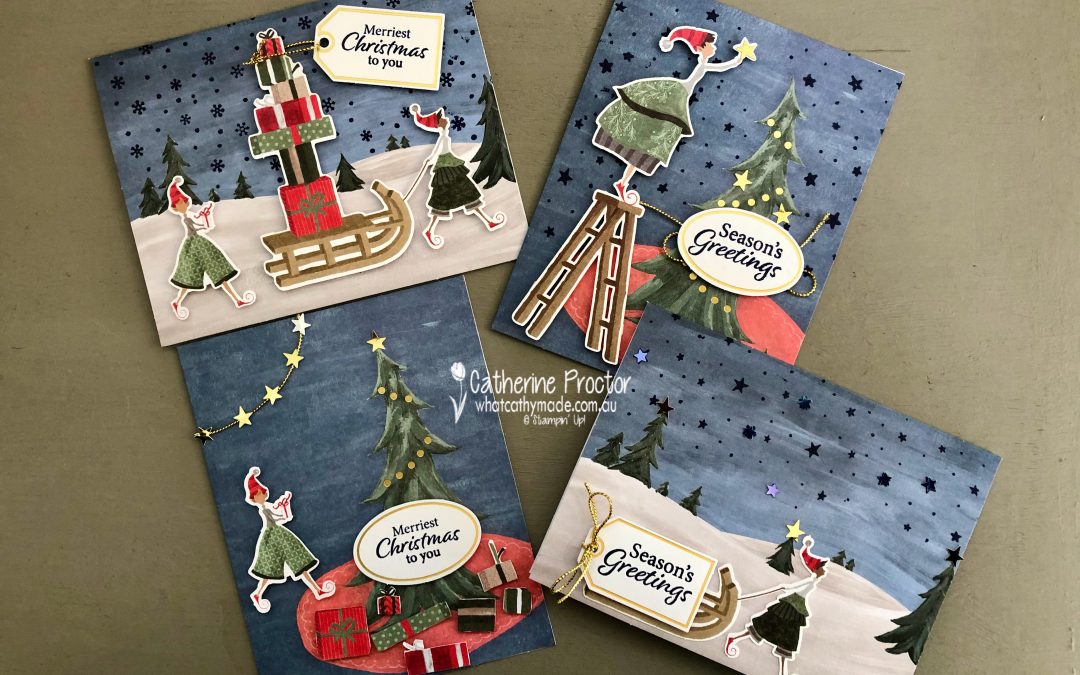
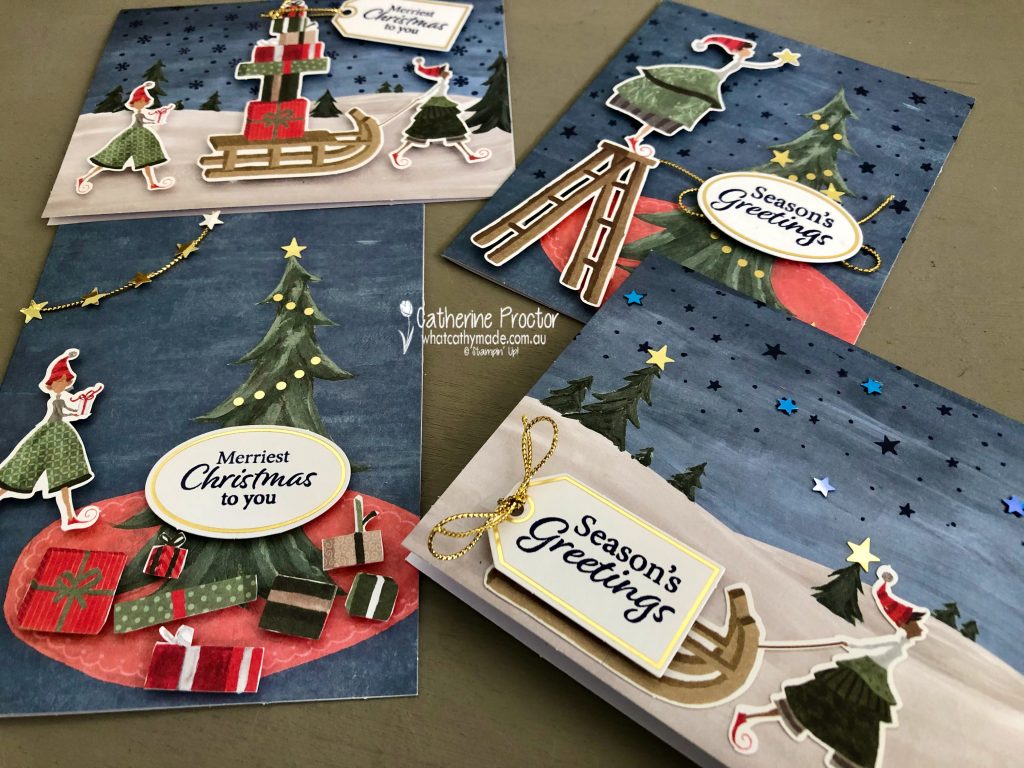
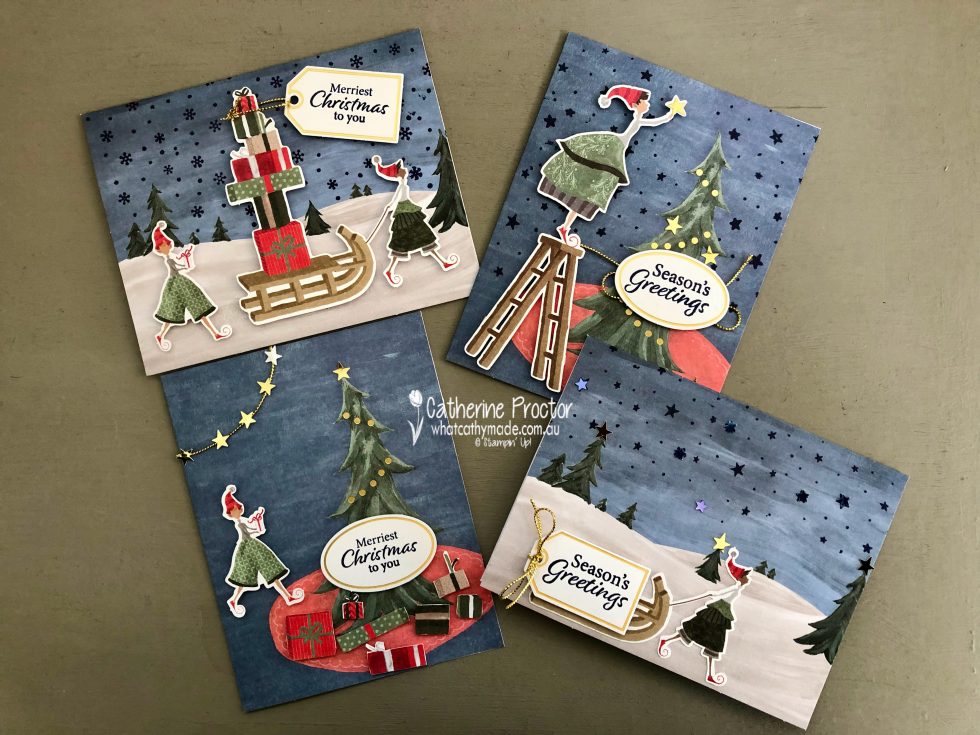
Here’s what I made during the zoom. Two of the cards are assembled as per the instructions and two are my own variations.
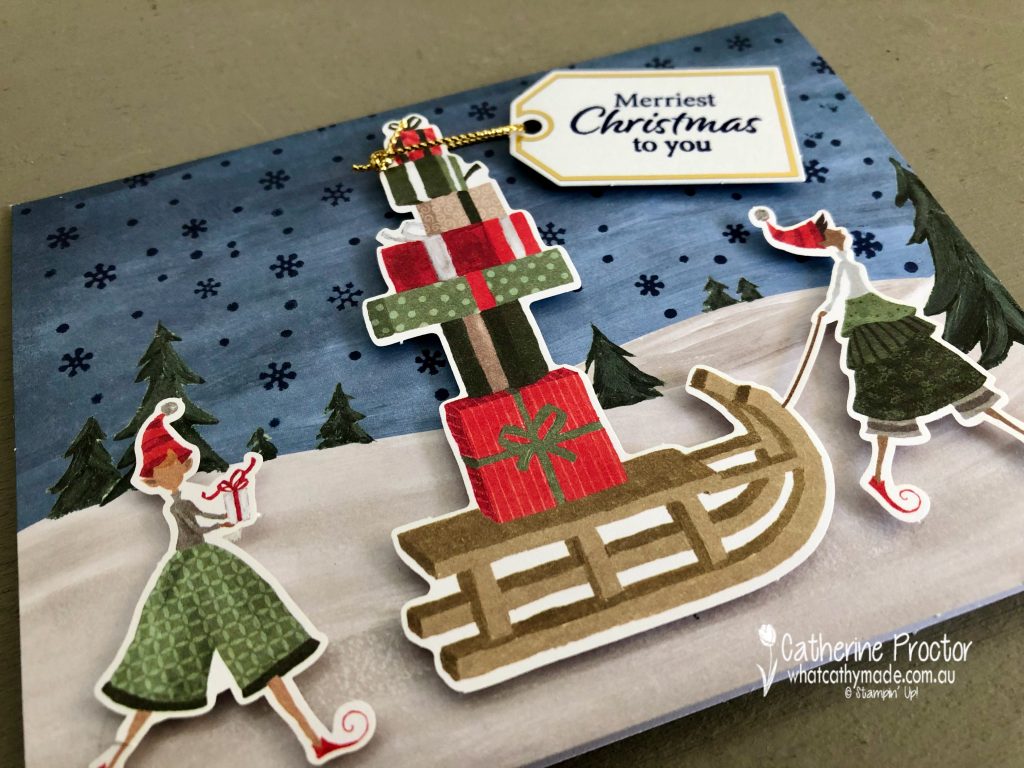
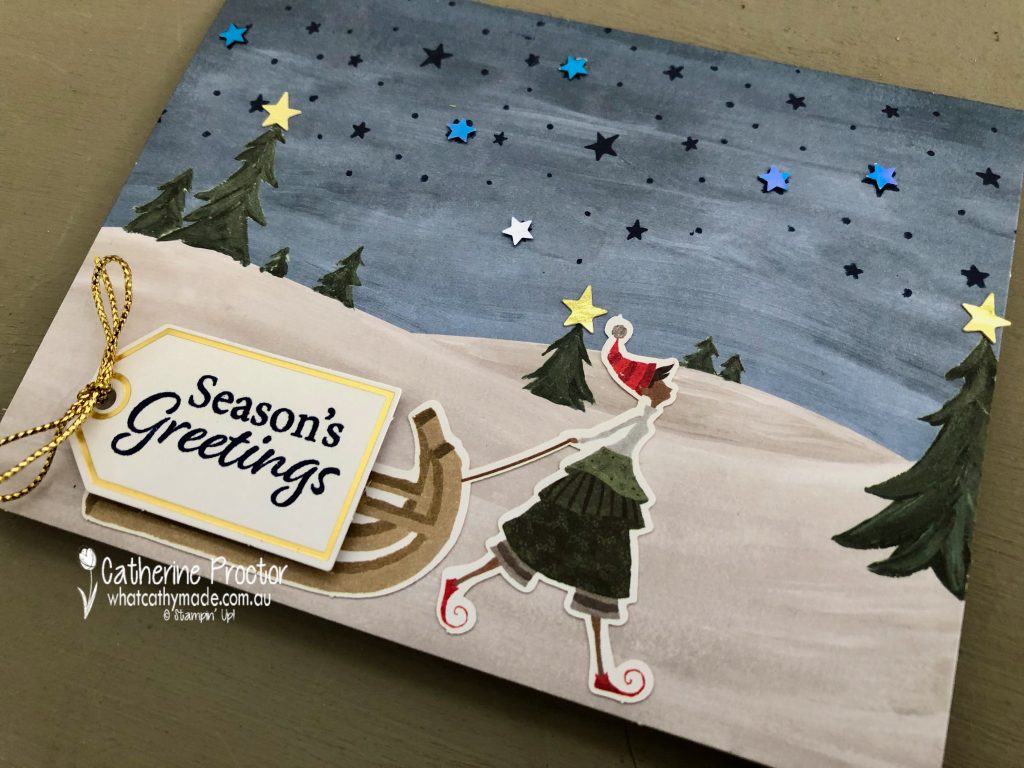
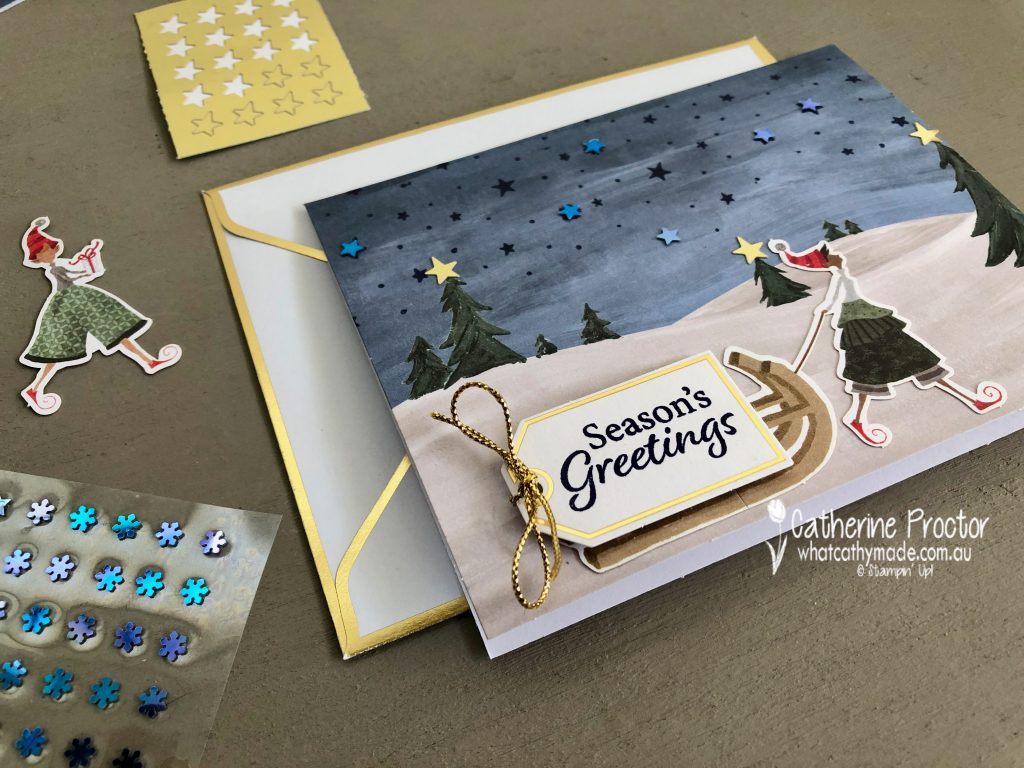
Card one is an outdoor sleigh card. The only stamping required is the snowflakes on the night sky, the “Merry Christmas to you” sentiment tag and the greeting inside the card.
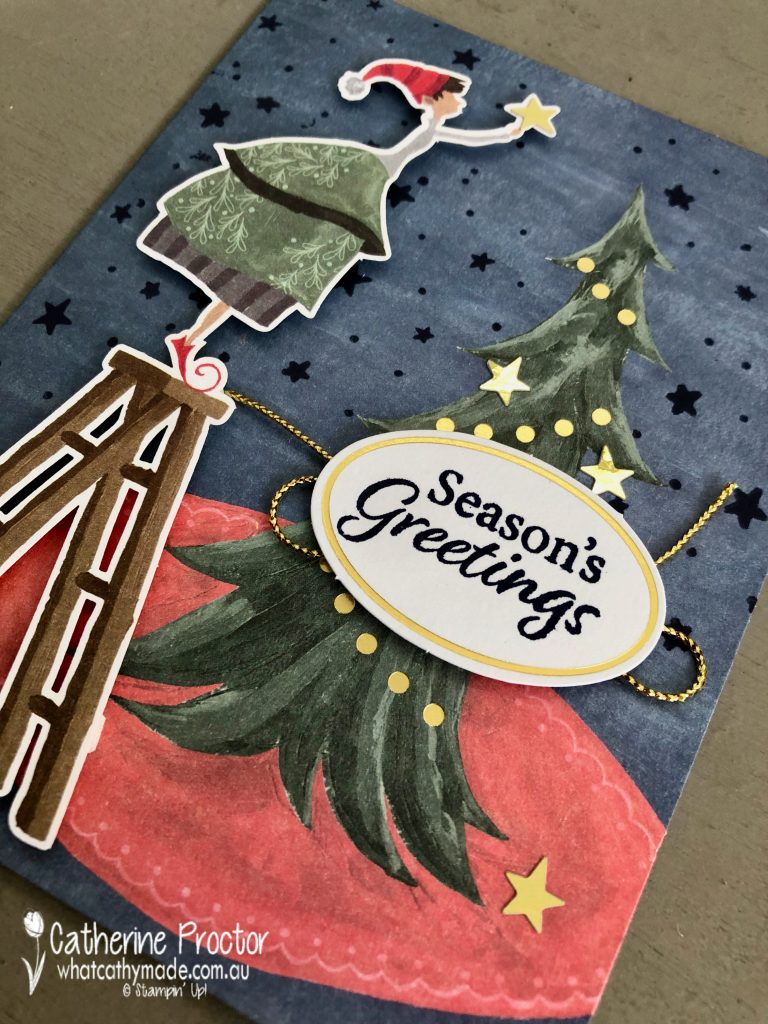
Card two depicts an indoor scene, with the girl reaching up to pop the star on top of the Christmas tree.
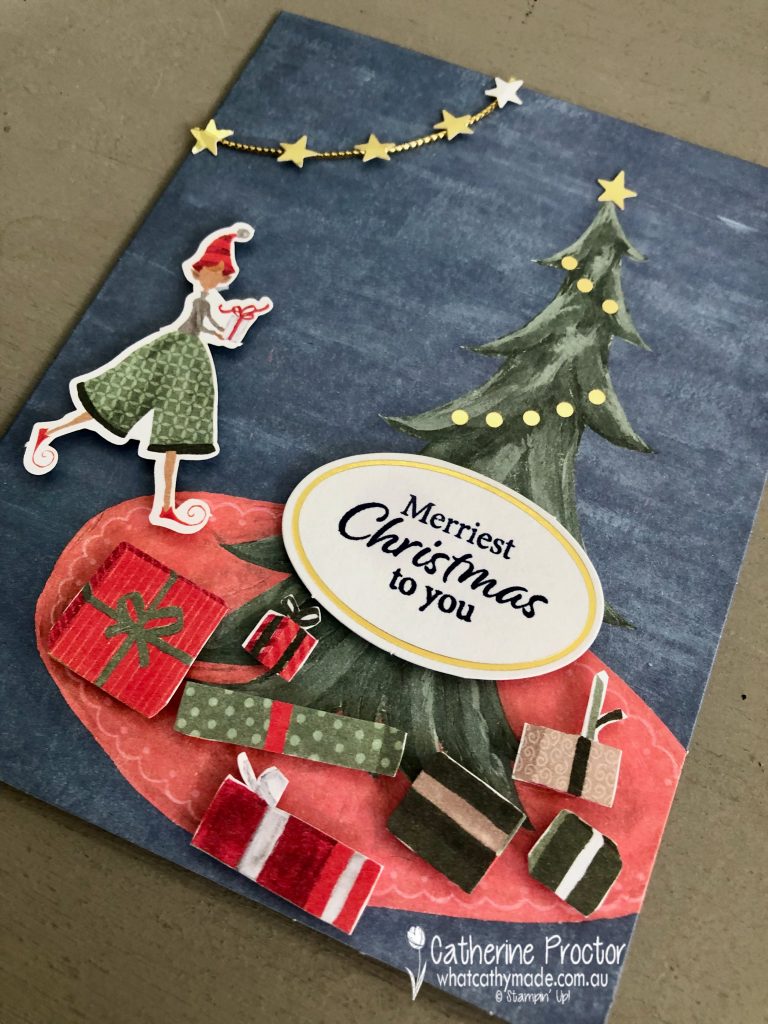
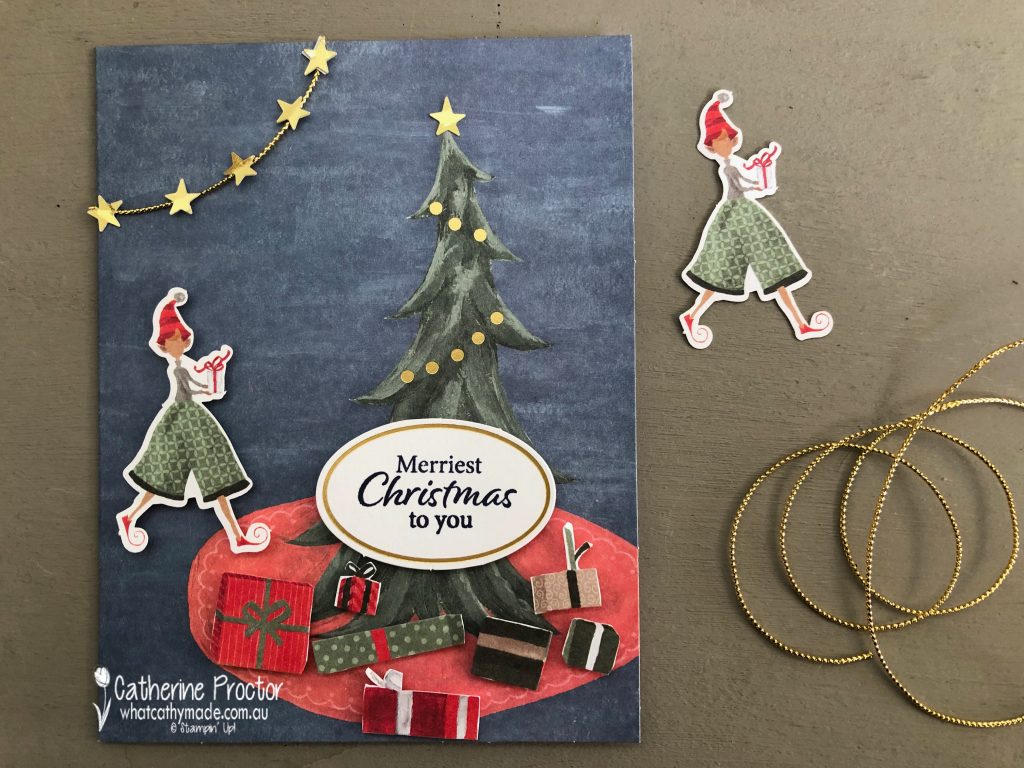
For card three I used my paper snips to chop up the presents from the sleigh and place them under the tree. I also added the boy from card two who is holding the present so it looks like he is about to add another present to the pile under the tree.
I had cut a length of the gold twine to attach the tag in card one but I had found the length suggested to be a bit too short, so I recut a longer piece of gold twine. So as to not waste this shorter piece of twine, I added it to this card to create a Christmas star garland, using some of the gold star stickers from the Christmas Whimsy Card Kit.
Card four uses the leftover sleigh that I had chopped the presents off. I thought it would look cute to have the girl pulling the sentiment across the front of the card.
A bow of the gold twine through the tag finishes this card. All of the cards come with a gorgeous gold edged envelope.
So, which version do you like the best? I love the whimsical feel of them all and the fact that this Christmas Whimsy Card Kit takes all of the hard work out of crafting! It was so relaxing connecting with friends and crafting this kit together on World Cardmaking Day.
Now it’s time to hop on over to our next participant, the lovely Kate Morgan. I can’t wait to see what Kate shares with us today!
If at any time you find a broken link please head to the blog of this week’s host of The Heart Of Christmas Blog Hop, Tina Gillespie and she will have the list of all those participating.
Thanks for visiting my site. I’ll be back with another card on Wednesday.
In the meantime, wherever you are in the world, stay safe, stay calm … and keep on crafting xxx


")

")