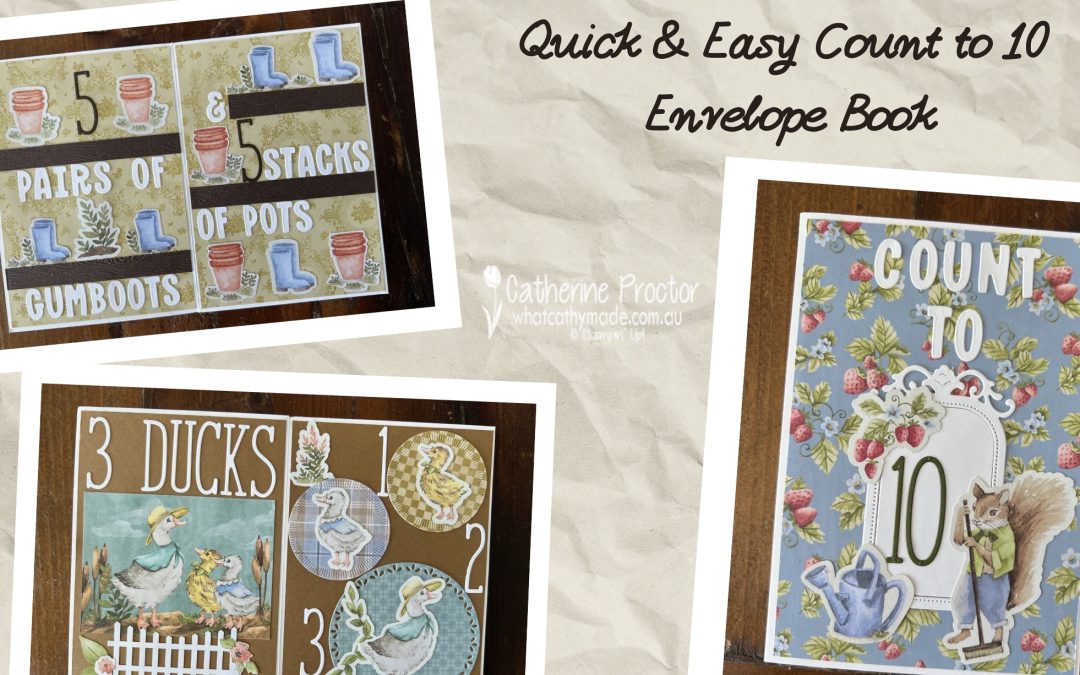
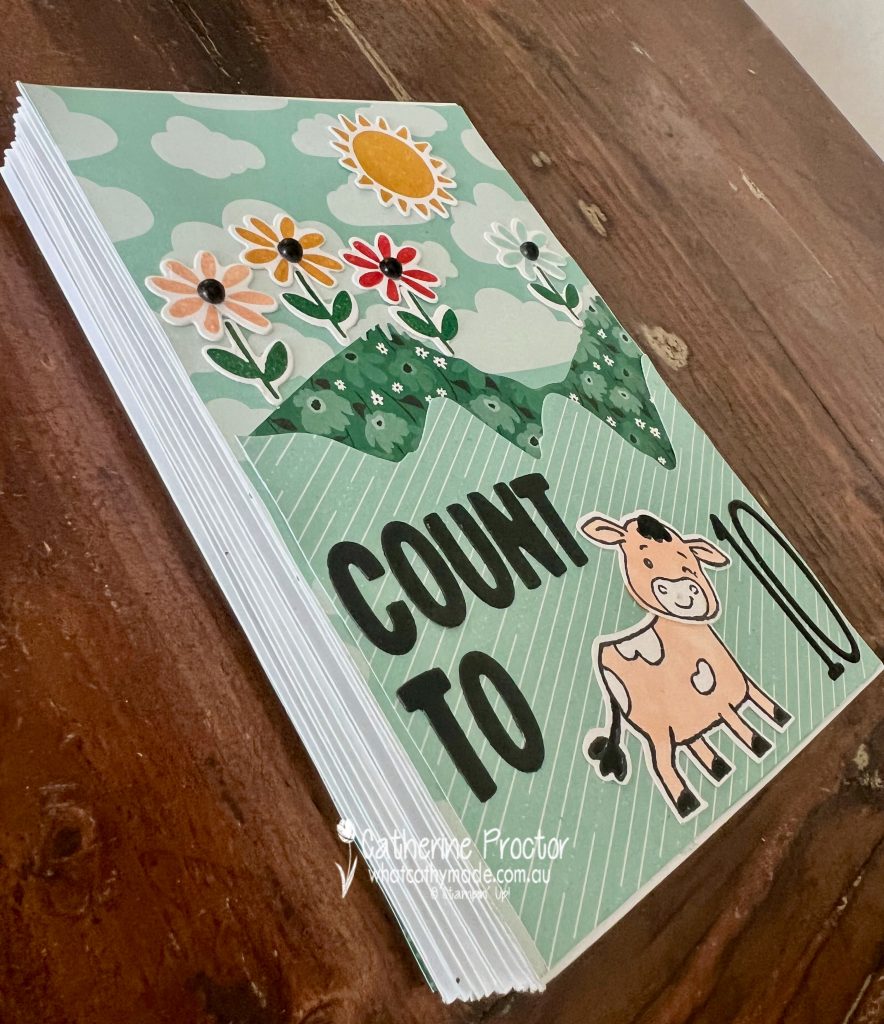
Hello crafty friends, I’m excited to be back with a brand new project for you, another of my envelope counting books!
Envelope books are quick and easy to make and they don’t require any measuring or cutting in the construction of the book pages.
Before we take a closer look at today’s project I just wanted to update you regarding my month long hiatus from crafting and posting and what has happened to the AWH Colour Creations Blog Hop.
To cut a long story short I was diagnosed with cancer just after Christmas, had surgery to remove the tumour and just this week received the all clear from my surgeon with no further treatment required at this stage. I’m so incredibly grateful and very happy to be finally back in my craft room again.
While I had treatment and I’m recovering, the AWH Colour Creations Blog Hop has been hosted by my friend Kate Morgan as an Instagram hop and I hope to rejoin it soon. I’m not sure ATM if it will remain as an Insta hop or not so for those of you not on Instagram I’ll also blog about my cards here. However, if you’d like to follow the AWH Colour Creations Blog Hop on Instagram, my Insta handle is whatcathymade and Kate’s Insta handle is craftwithkate.
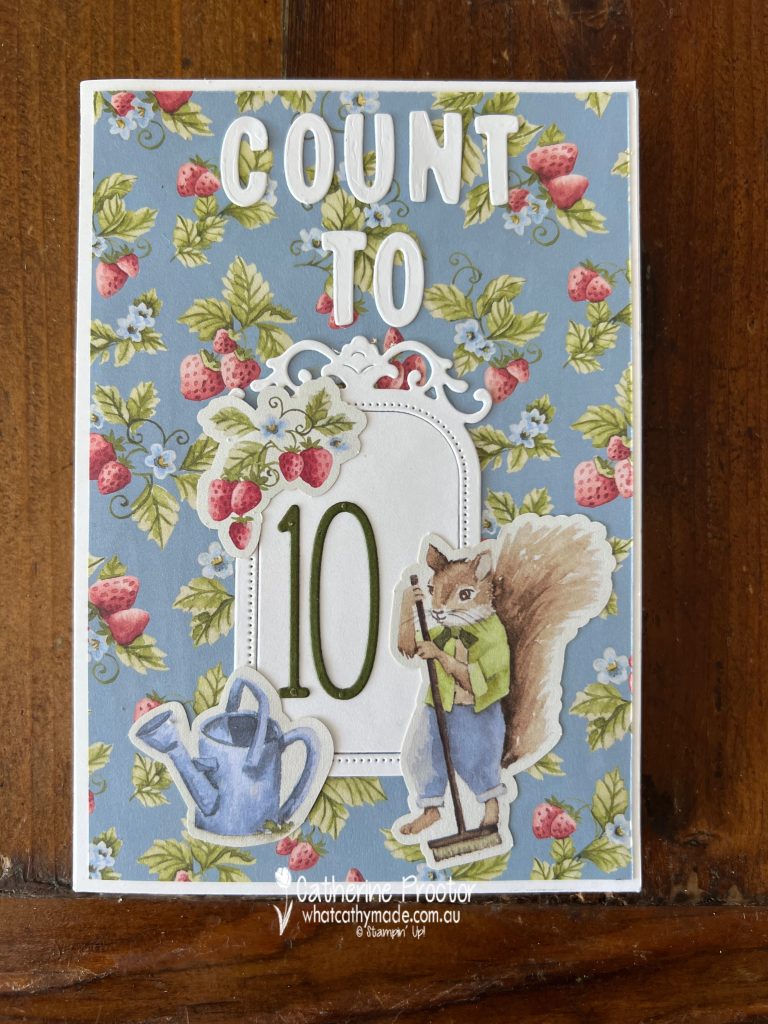
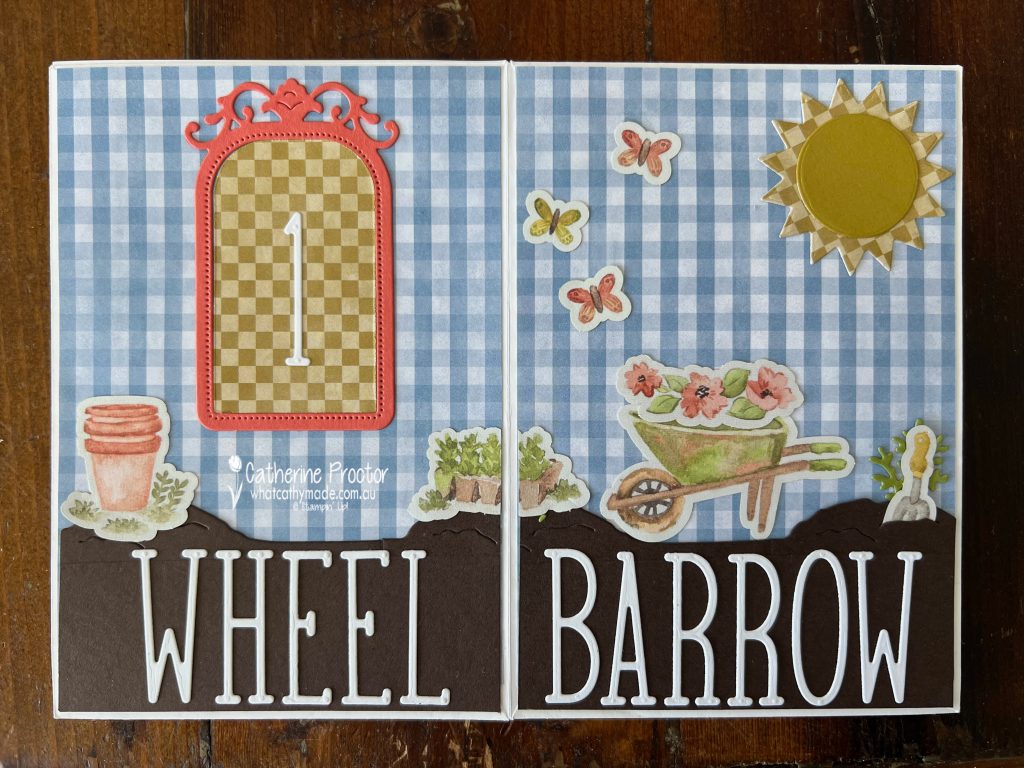
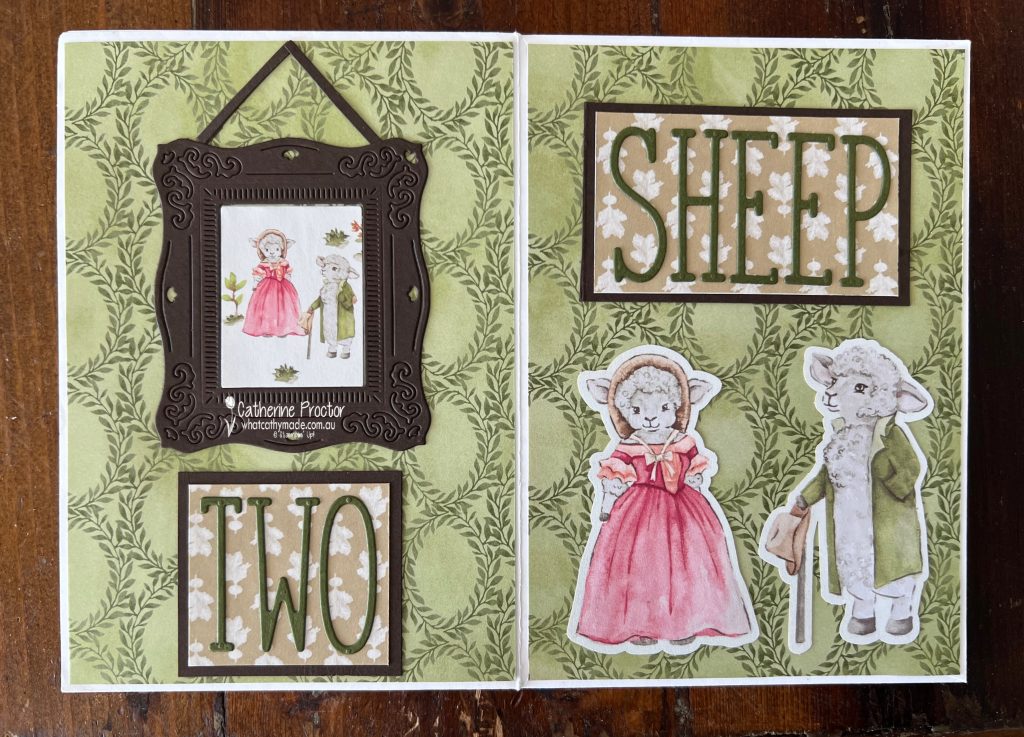
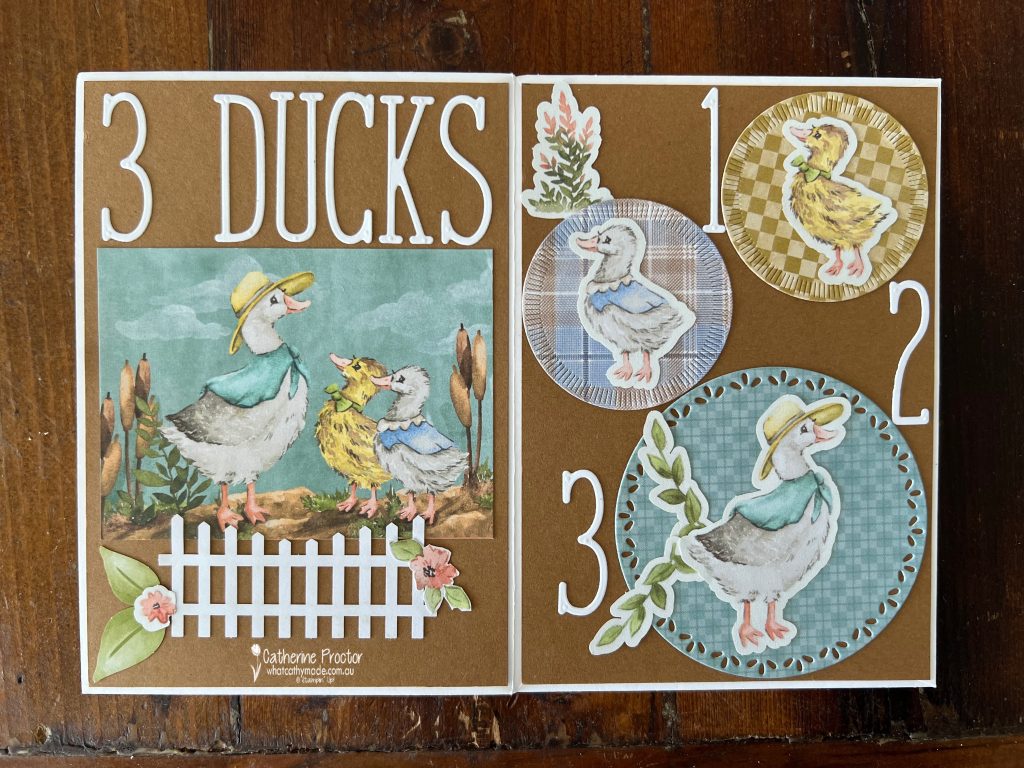
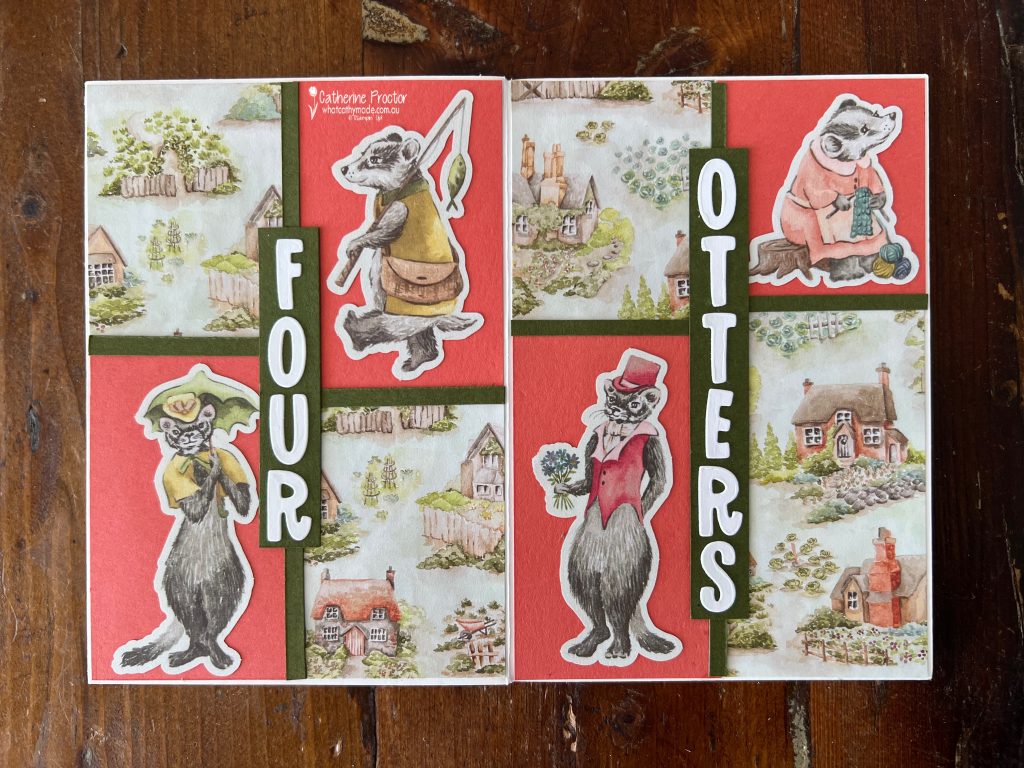
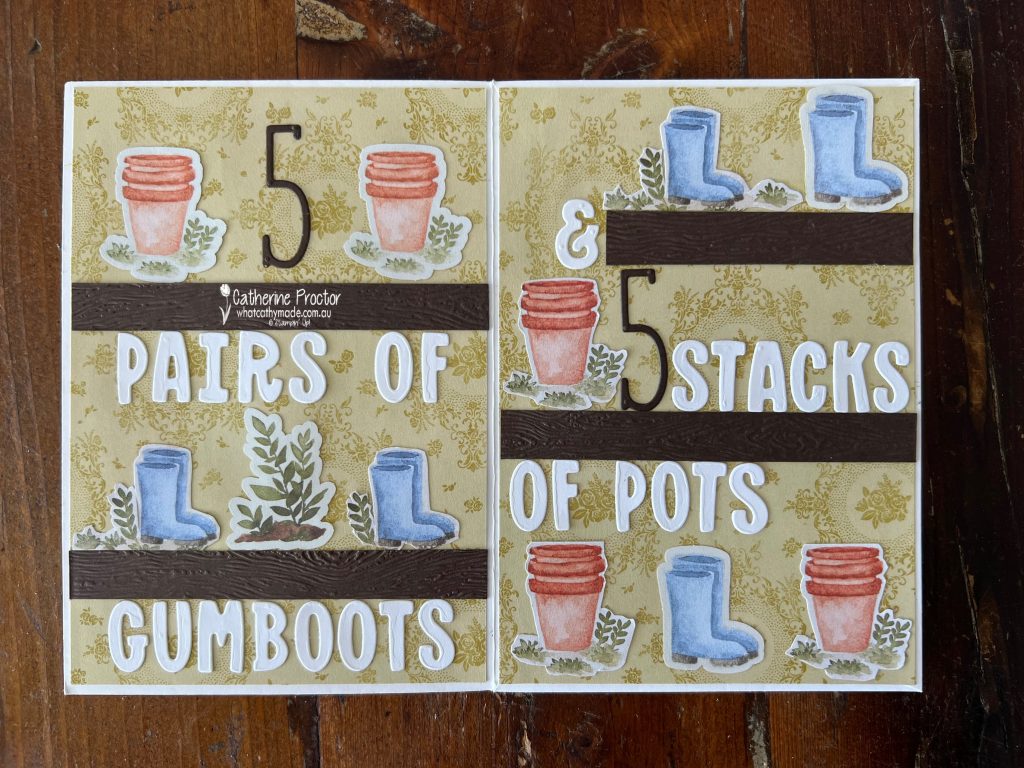
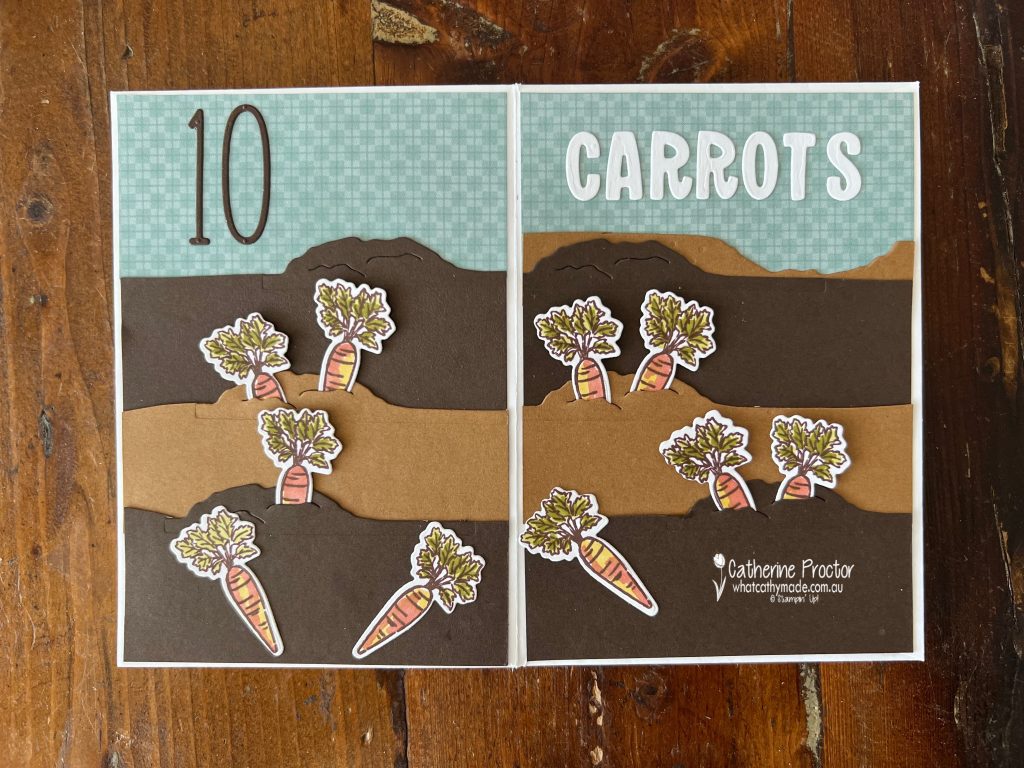
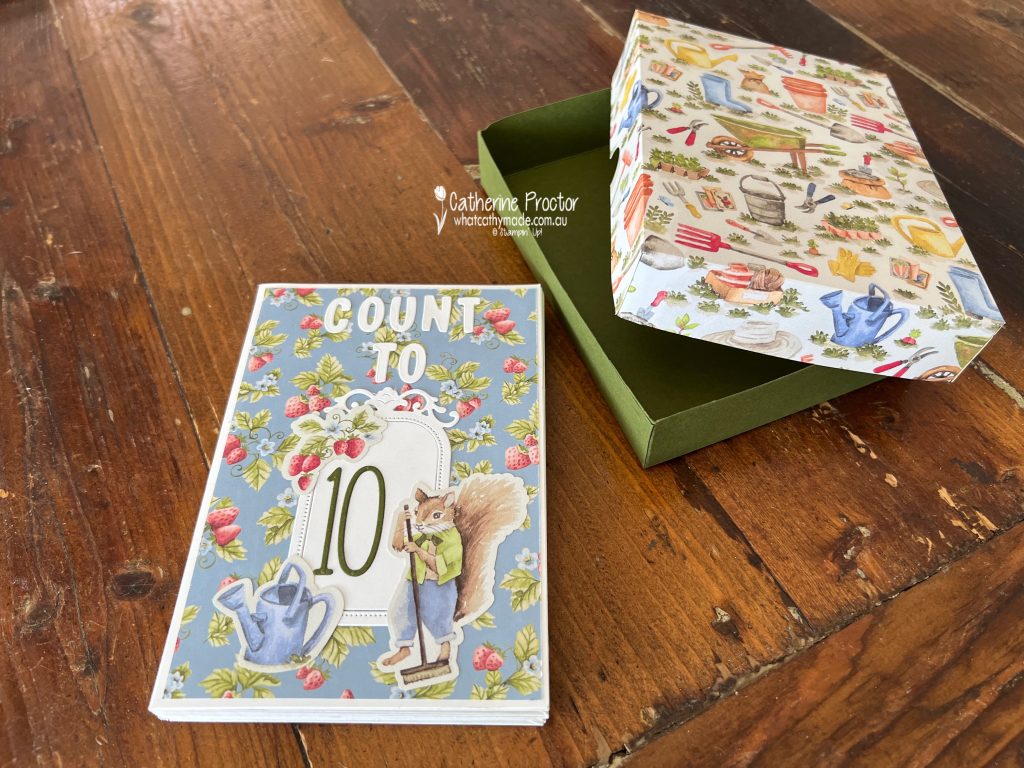
Storybook Moments Envelope Counting Book
While I was taking a little break, Stampin’ Up! added some of their existing products as SALE-a-Bration items you can redeem for FREE with any $100 purchase. You can take a look at all of the new SALE-a-Bration items here.
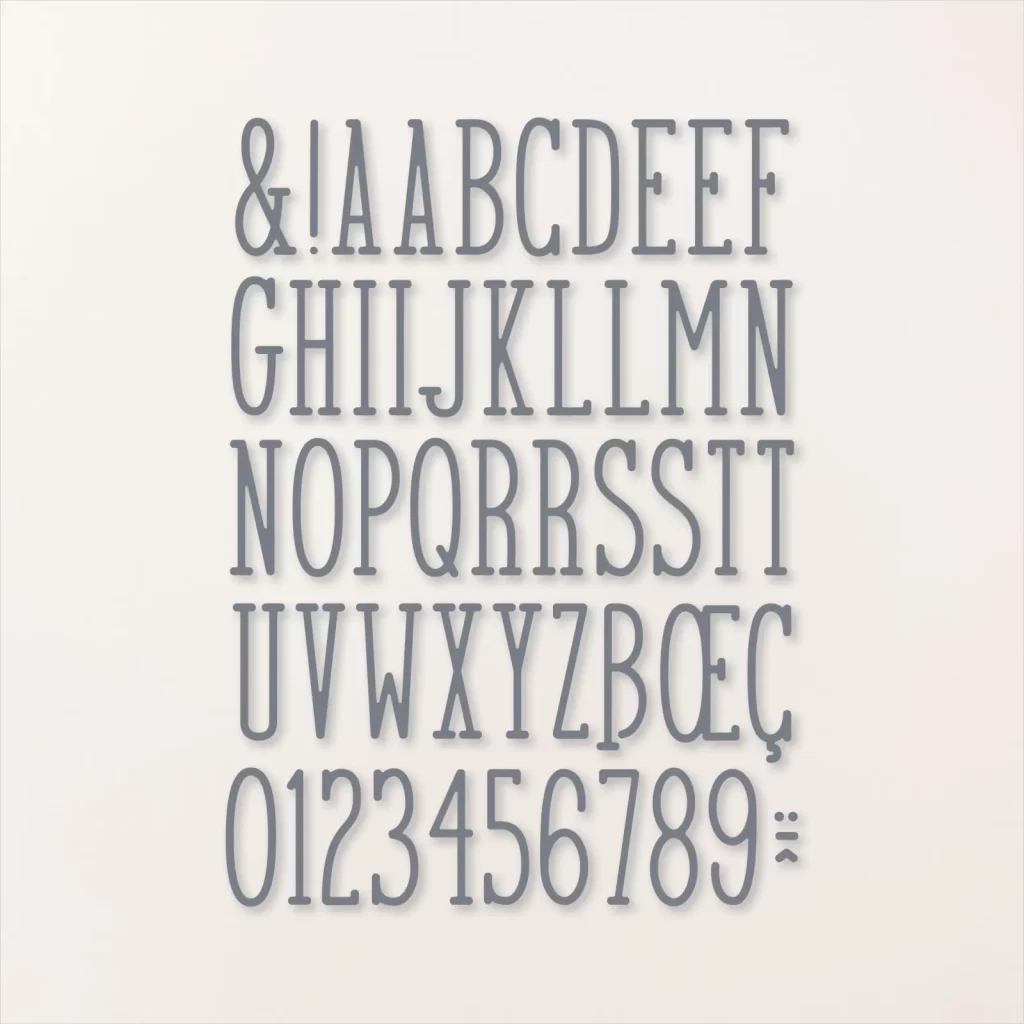
I’ve used one of these new products, the Alphabet A La Mode dies, in my counting book. NOTE: you need to use the new SALE-a-Bration item number (168074) when claiming these dies as your FREE SALE-a-Bration reward.
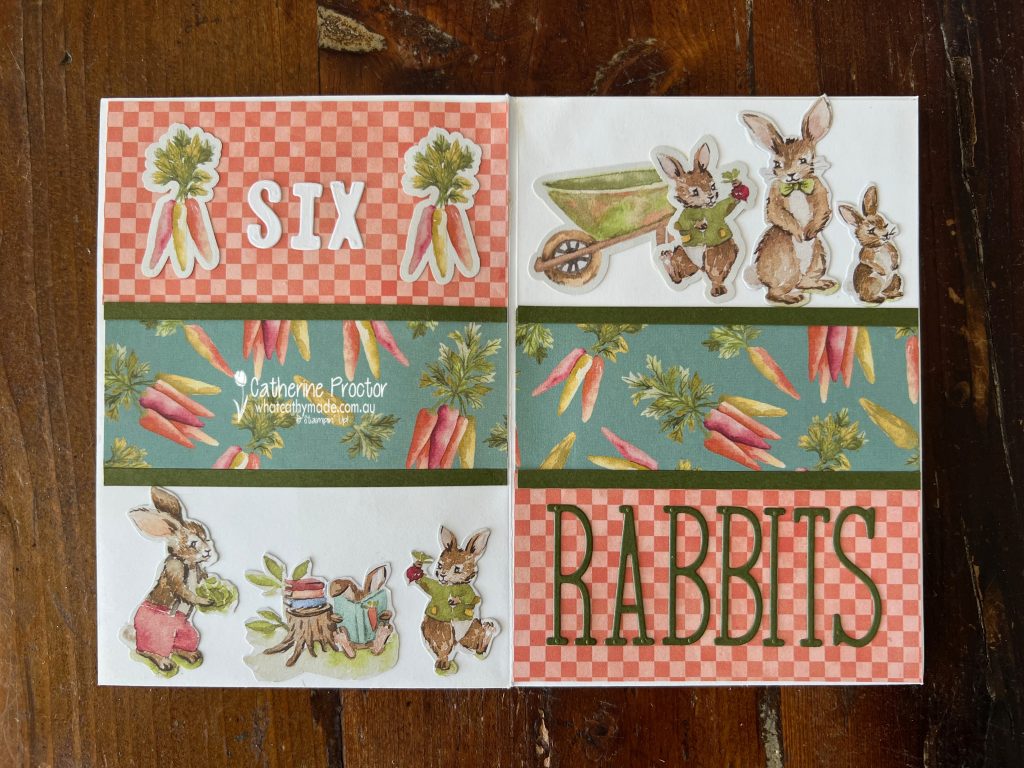
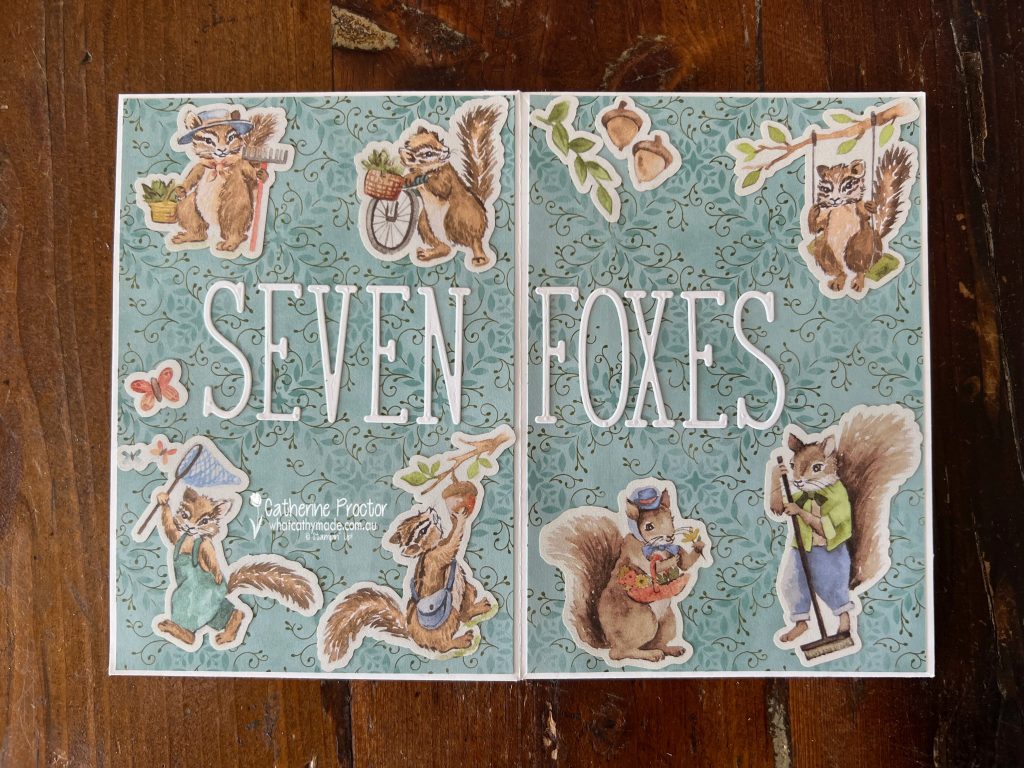
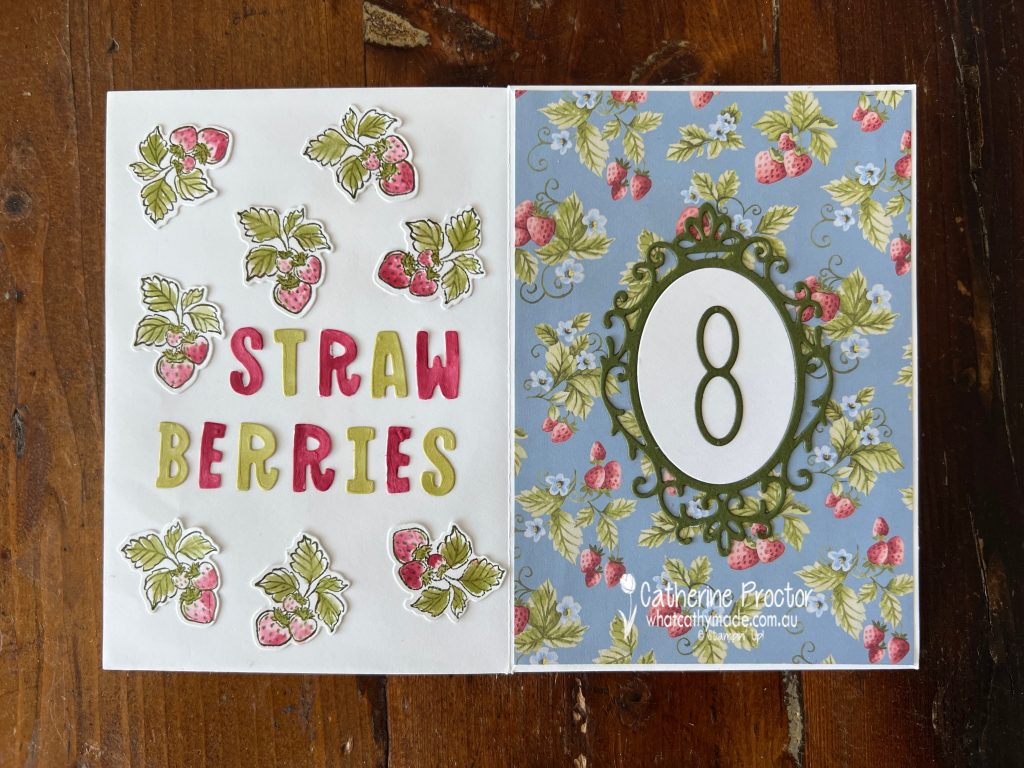
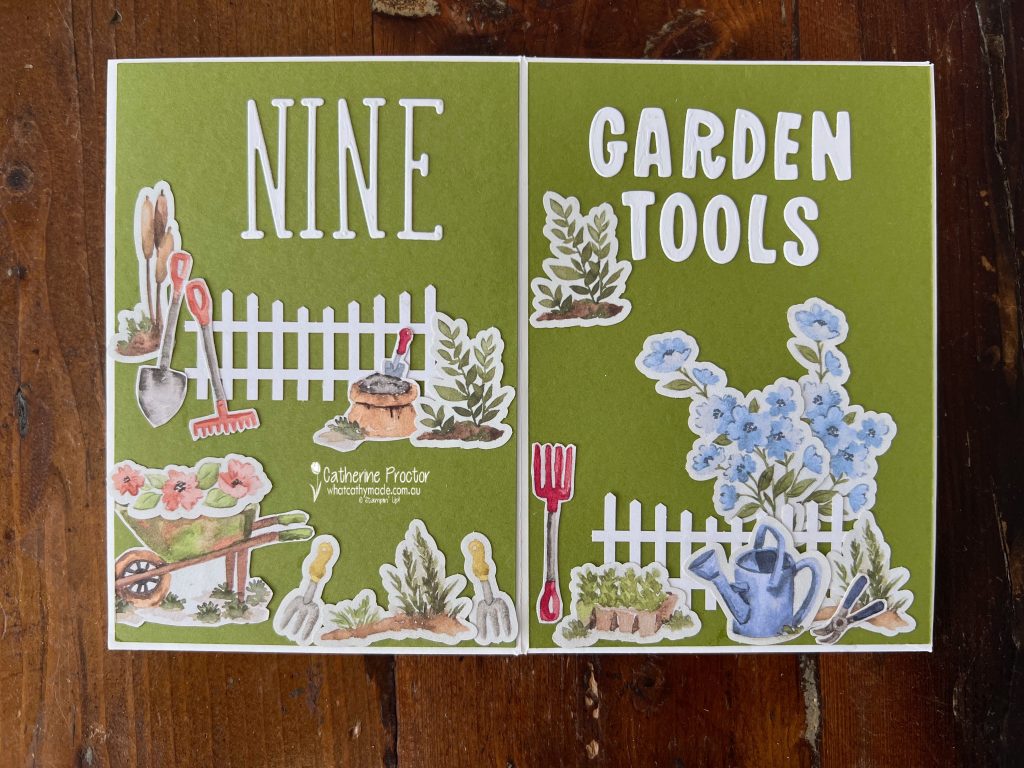
Here are some close up images of each of the pages in my book.
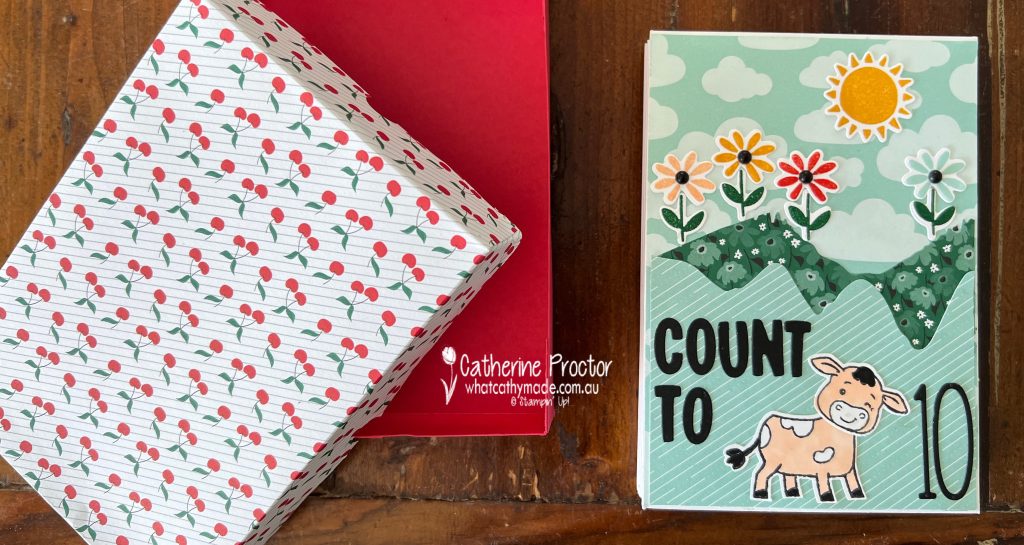
I always make a box to safely store my counting books too.
This 18 minute video shows how I’ve used different elements from the Storybook Moments Suite collection in the counting book and explains how I design and plan each layout and make a box to fit.
To see the construction method I used to create the envelope counting book, take a look at this video I made when I made another of my envelope books.
I’ll be back as soon as I can with some more crafty inspiration for you all!
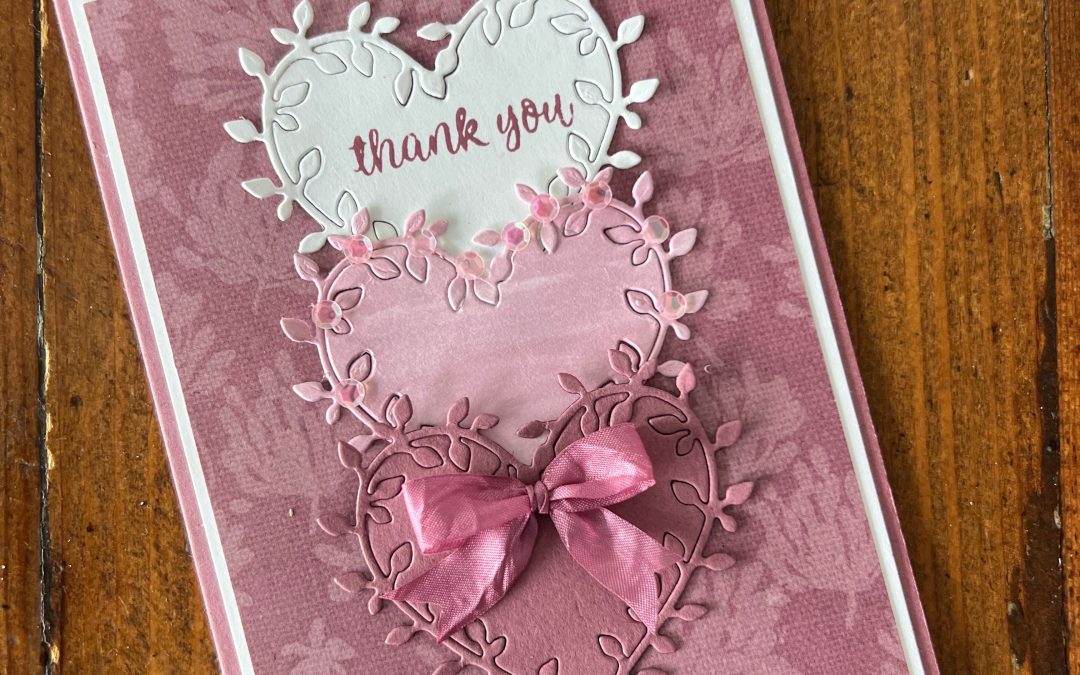
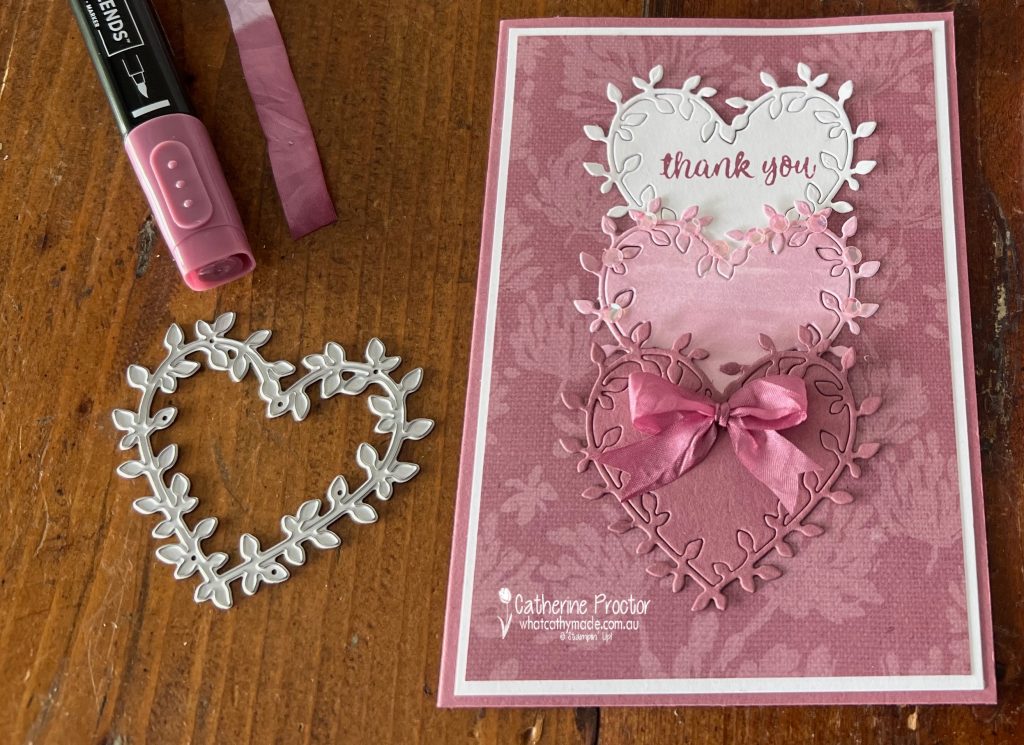
Welcome to week thirty-six of our Art With Heart 2024-25 Colour Creations blog hop!
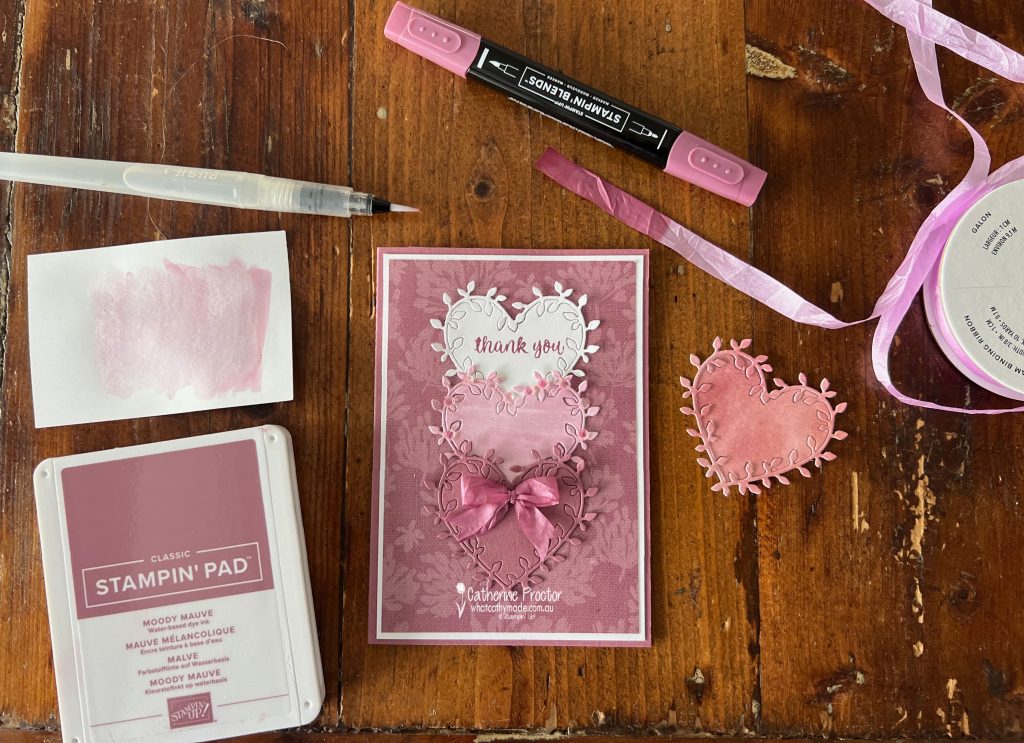
This week we’re featuring Moody Mauve, one of the 2023–2025 In Colors. This soft, sophisticated mauve colour has a touch of dusky warmth, throwing shades of muted pink and subtle purple.
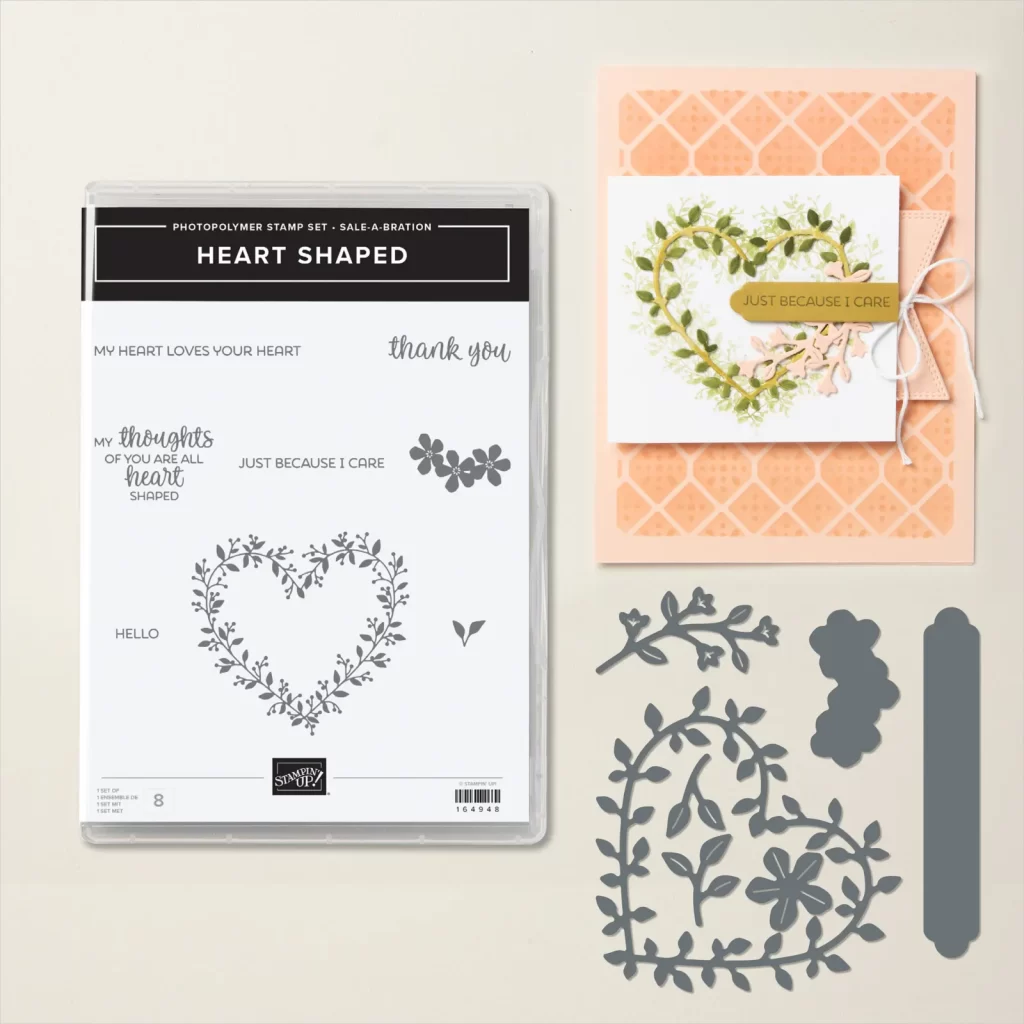
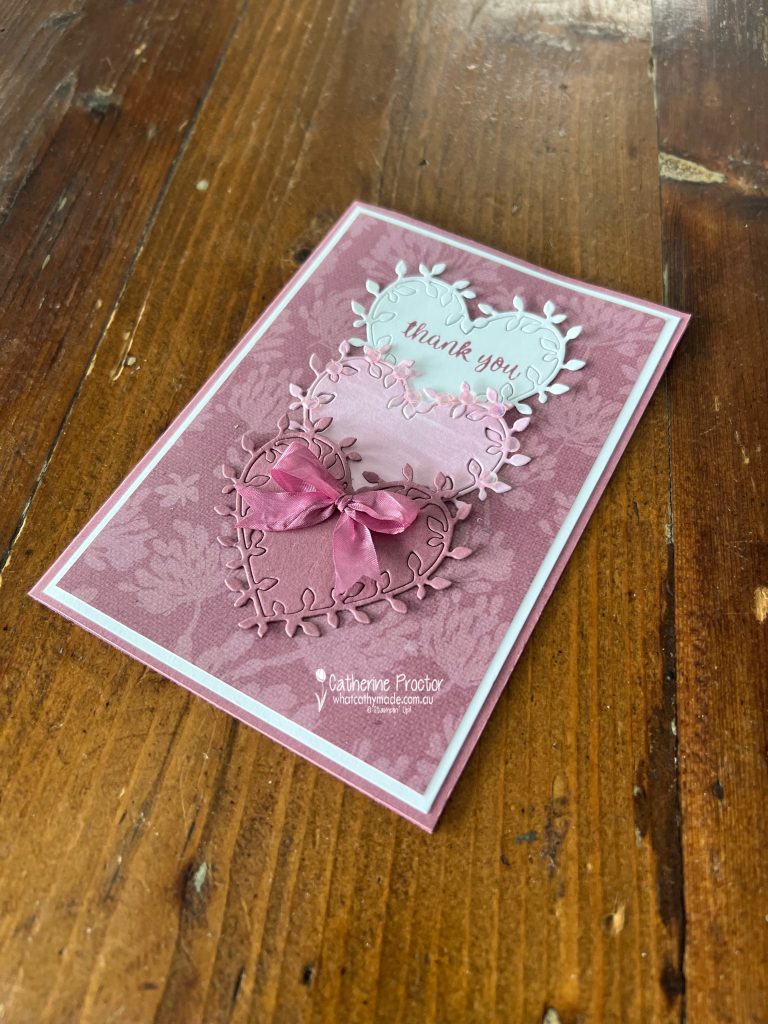
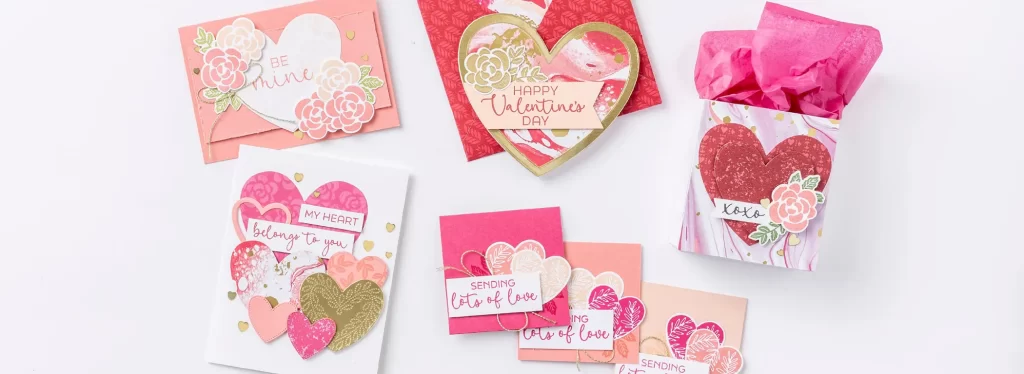
For this week’s card I’m using another Sale-a-bration, a stamp and die bundle called the Heart Shaped bundle which is a FREE Sale-a-bration item you can select with any $200 you spend during Sale-a-bration (7th January – 28th February).
I coloured two pieces of cardstock with Moody Mauve and was amazed at the difference in colour.
The darker heart on the left was coloured using a blending brush and ink from the ink pad. The paler heart on the right was water coloured using a water painter and ink from the same Moody Mauve ink pad!
I went with the paler heart to create my ombre Mood Mauve card.
This gorgeous DSP is from the Wildly flowering DSP. It has a wonderful vintage feel.
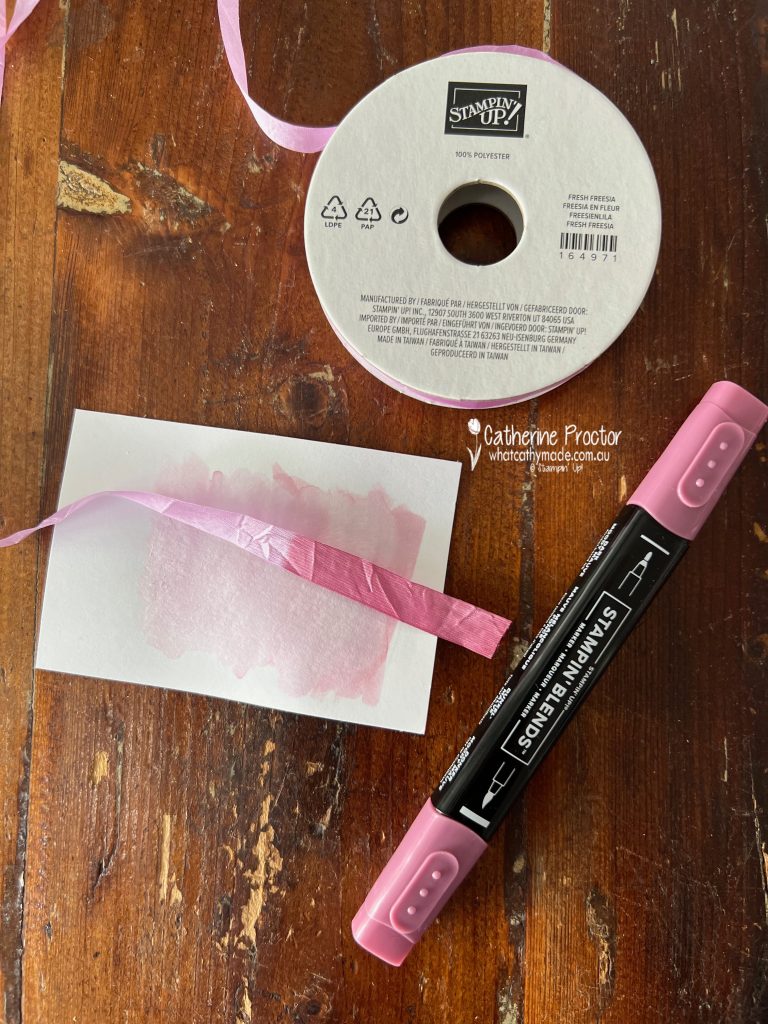
I’ve used two more Sale-a-bration products on my card. The ribbon is the Fresh Freesia 3/8″ (1 cm) Seam Binding Ribbon (you can select this for FREE with any $100 you spend during Sale-a-bration). I’ve used my light Moody Mauve Stampin’ Blend to colour it.
The other Sale-a-bration item is the Purple Adhesive-Backed Sequins (you can select this for FREE with any $100 you spend during Sale-a-bration).
I’ve used the Bubble Bath sequins around the edge of the middle water coloured heart but they are very hard to capture in a photograph!
The “thank you” sentiment is from the Heart Shaped stamp set that is part of the Heart Shaped bundle.
Now it’s time to hop in over to our next participant, the lovely Rachel Palmieri. I can’t wait to see what Rachel has made this week!
If at any time you find a broken link, you can find the complete list of all participants below.
The AWH Colour Creations team will be back next week on Wednesday 22nd January when we will be showcasing Mossy Meadow.
I hope you can join us then.
How to earn FREE products during SALE-A-BRATION
SALE-A-BRATION is on now until February 28th 2025 and during SALE-A-BRATION you can earn FREE products in three different ways.
Earn free product gifts when you place orders over $100 (before postage) in one transaction. The more you spend the more you earn!
Earn an extra $50 in Stampin’ Rewards (a total of $110) when you place an order over $500 before postage. You’ll also receive the free SALE-A-BRATION gifts too!
Get extra bonus products in your fully customisable starter kit when you join for just $169.
In your starter you get to choose up to $235 products of your choice PLUS during SALE-A-BRATION you can either choose:
* TWO colour group Stampin’ Write Marker sets and an exclusive stamp ($397 product overall and free postage), OR,
* You can add up to an additional $51 product of YOUR choice to the kit instead ($286 product overall and free postage).
You can download a digital copy of the SALE-A-BRATION brochure here and if you have any questions about SALE-A-BRATION please don’t hesitate to contact me.
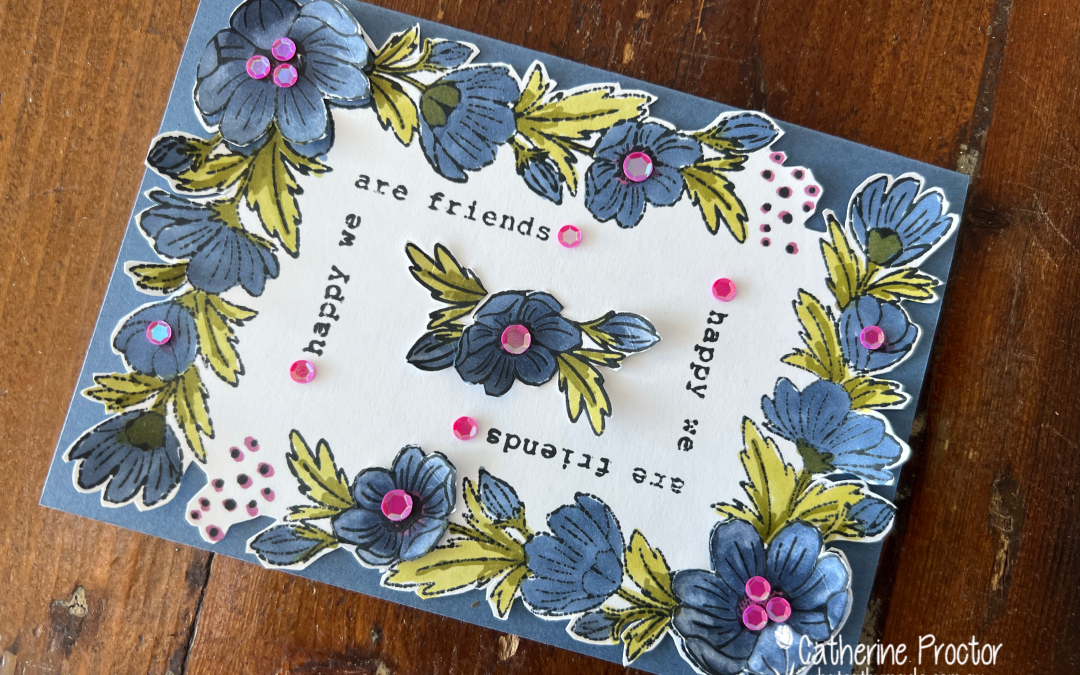
Welcome to week thirty-five of our Art With Heart 2024-25 Colour Creations blog hop and our very first blog hop for 2025!
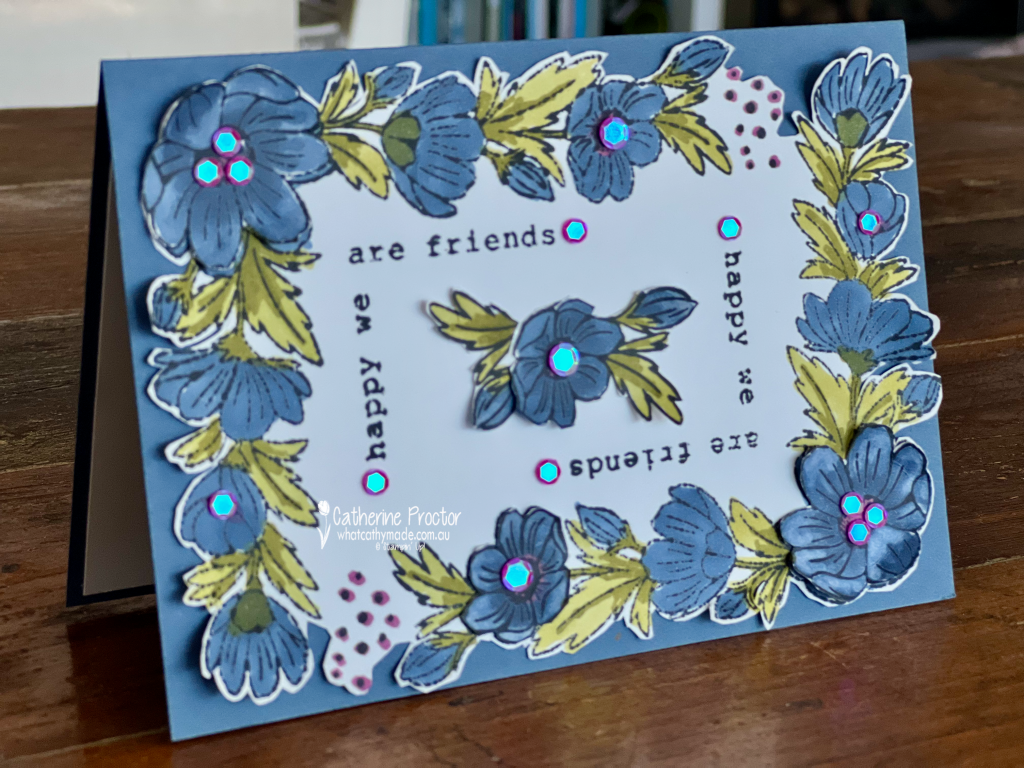
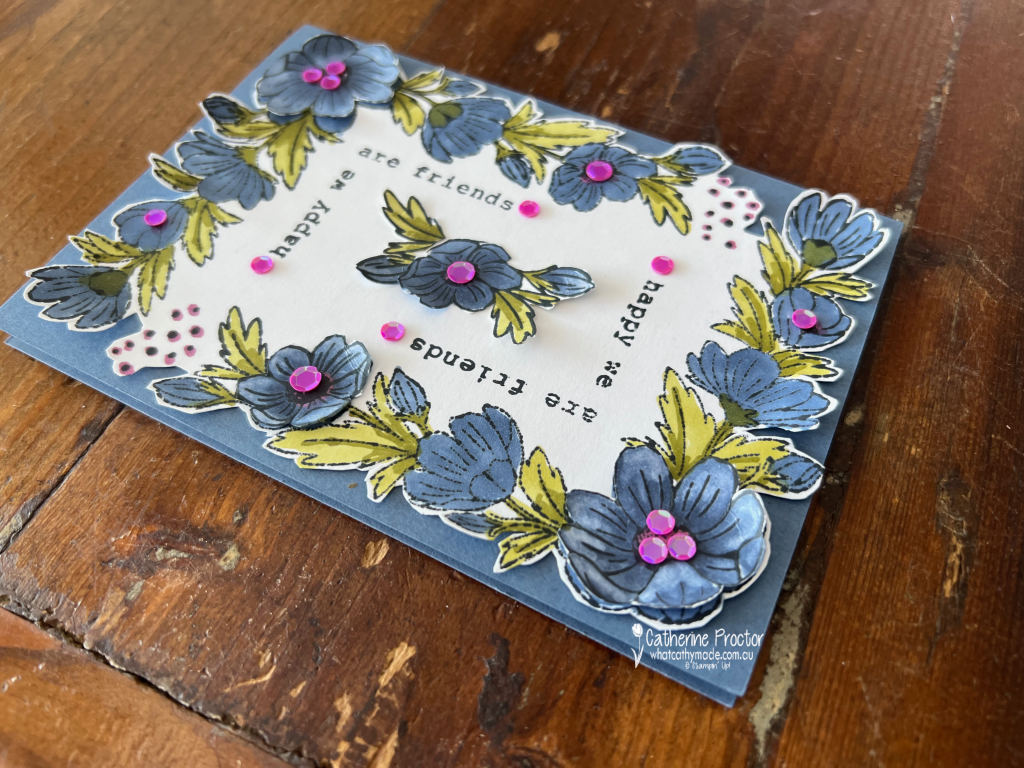
This week we’re featuring Misty Moonlight, a soft mid blue that was originally an In Colour but now belongs to the Neutral’s family. I’ve paired Misty Moonlight with Berry Burst, Old Olive and Basic White.
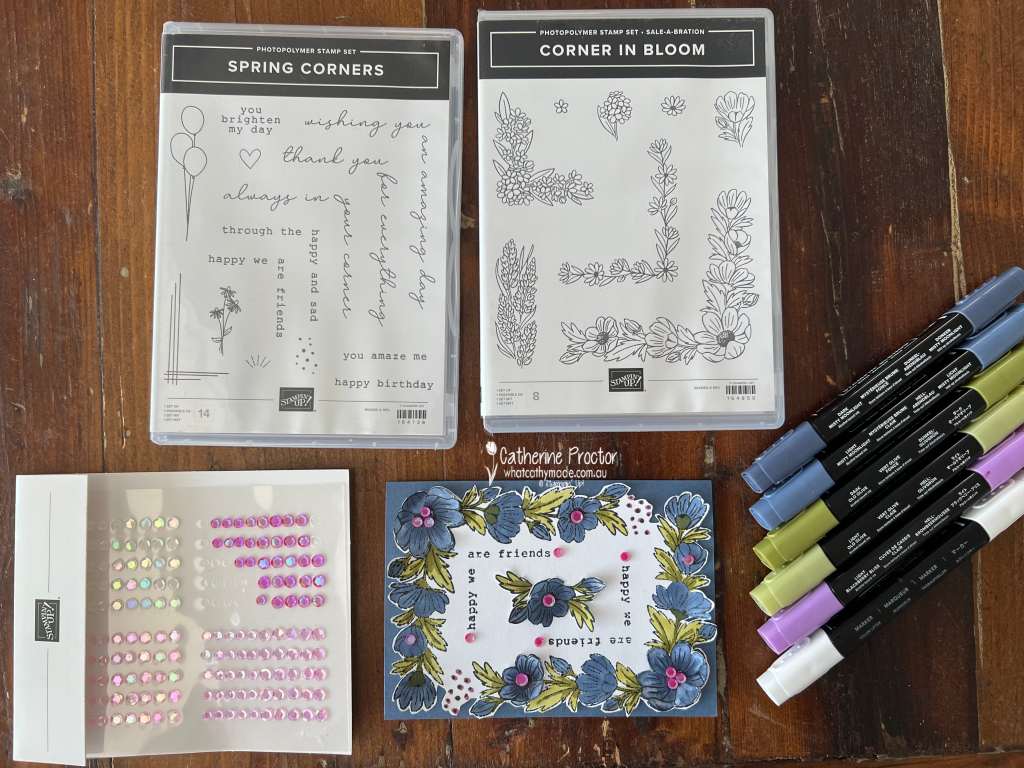
The floral stamp set is called Corner in Bloom and it’s a FREE Sale-a-bration stamp set you can select with any $200 you spend during Sale-a-bration (7th January – 28th February).
I’ve used my Misty Moonlight and Old Olive Stampin’ Blends (and colour lifter) to colour in the flowers before I fussy cut around the sides of the stamped images.
I’ve stamped and fussy cut a few extra flowers to add dimension.
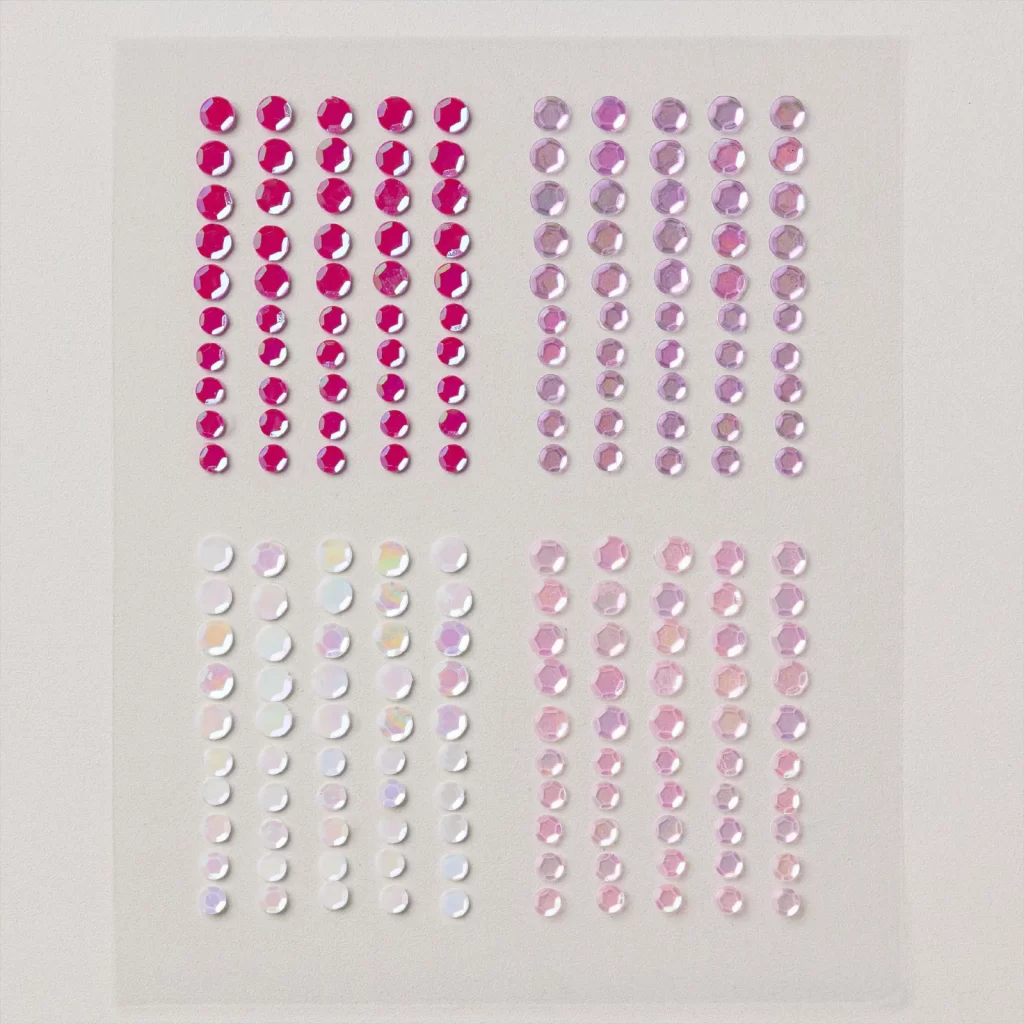
The iridescent embellishments are also a FREE Sale-a-bration item called Purple Adhesive Backed Sequins and you can select these with any $100 you spend during Sale-a-bration (7th January – 28th February).
This photo gives you a better idea of the true colour of the Berry Burst sequins I’ve used on this card.
The “happy we are friends” corner sentiment is from a new stamp set called Spring Corners in the January – April 2025 mini catalogue. It pairs so well with the Corner In Bloom stamp set!
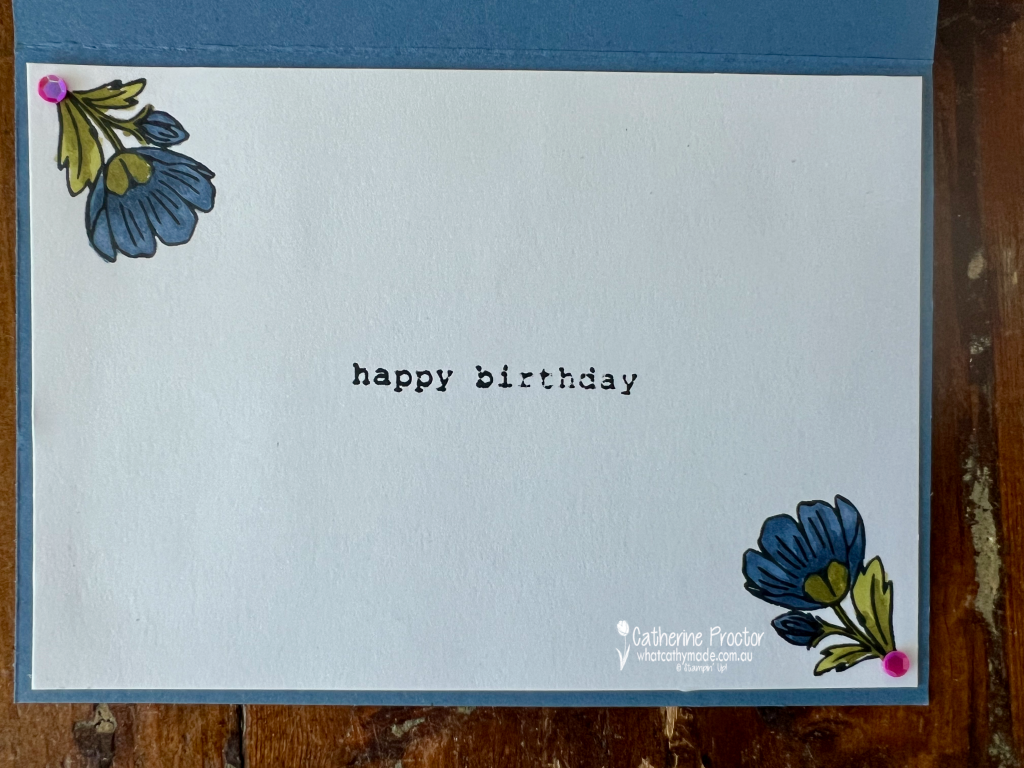
I’ve decorated the inside of the card too.
Now it’s time to hop in over to our next participant, the lovely Andrea Sargent. I can’t wait to see what Andrea has made this week!
If at any time you find a broken link, you can find the complete list of all participants below.
The AWH Colour Creations team will be back next week on Wednesday 15th January for our first blog hop of 2025, showcasing Moody Mauve.
I hope you can join us then.
How to earn FREE products during SALE-A-BRATION
SALE-A-BRATION is on now until February 28th 2025 and during SALE-A-BRATION you can earn FREE products in three different ways.
Earn free product gifts when you place orders over $100 (before postage) in one transaction. The more you spend the more you earn!
Earn an extra $50 in Stampin’ Rewards (a total of $110) when you place an order over $500 before postage. You’ll also receive the free SALE-A-BRATION gifts too!
Get extra bonus products in your fully customisable starter kit when you join for just $169.
In your starter you get to choose up to $235 products of your choice PLUS during SALE-A-BRATION you can either choose:
* TWO colour group Stampin’ Write Marker sets and an exclusive stamp ($397 product overall and free postage), OR,
* You can add up to an additional $51 product of YOUR choice to the kit instead ($286 product overall and free postage).
You can download a digital copy of the SALE-A-BRATION brochure here and if you have any questions about SALE-A-BRATION please don’t hesitate to contact me.
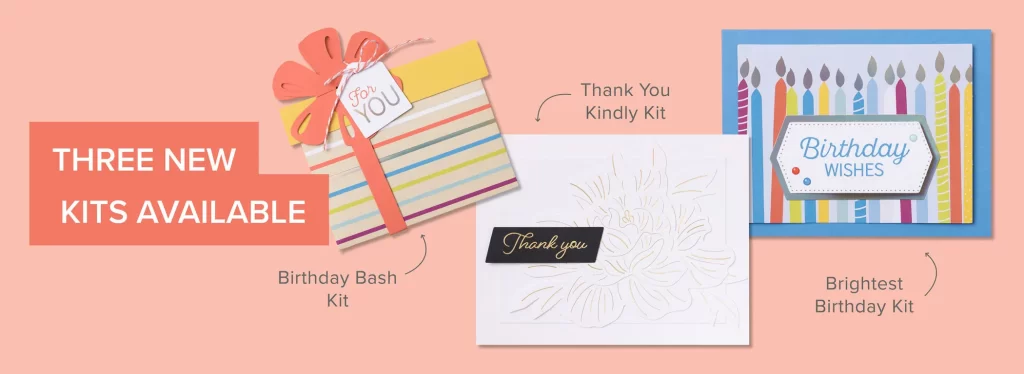
Today is an exciting day at Stampin’ Up! with TWO new catalogues, a digital SCRAPBOOKING brochure, THREE new kits & New Online Exclusives all launching today!!
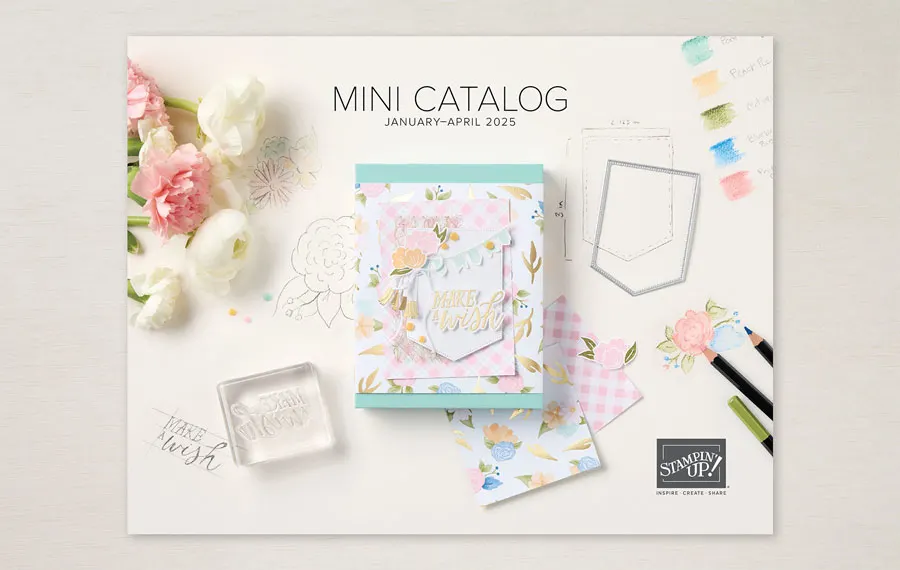
The brand new January – April 2025 Mini Catalogue
There are so many beautiful products in the brand new January – April 2025 mini catalogue and many of them coordinate with the SALE-A-BRATION offerings too. This catalogue begins today and it runs until April.
To download and read a digital copy of the January – April 2025 mini catalogue click here and shop the new products here.
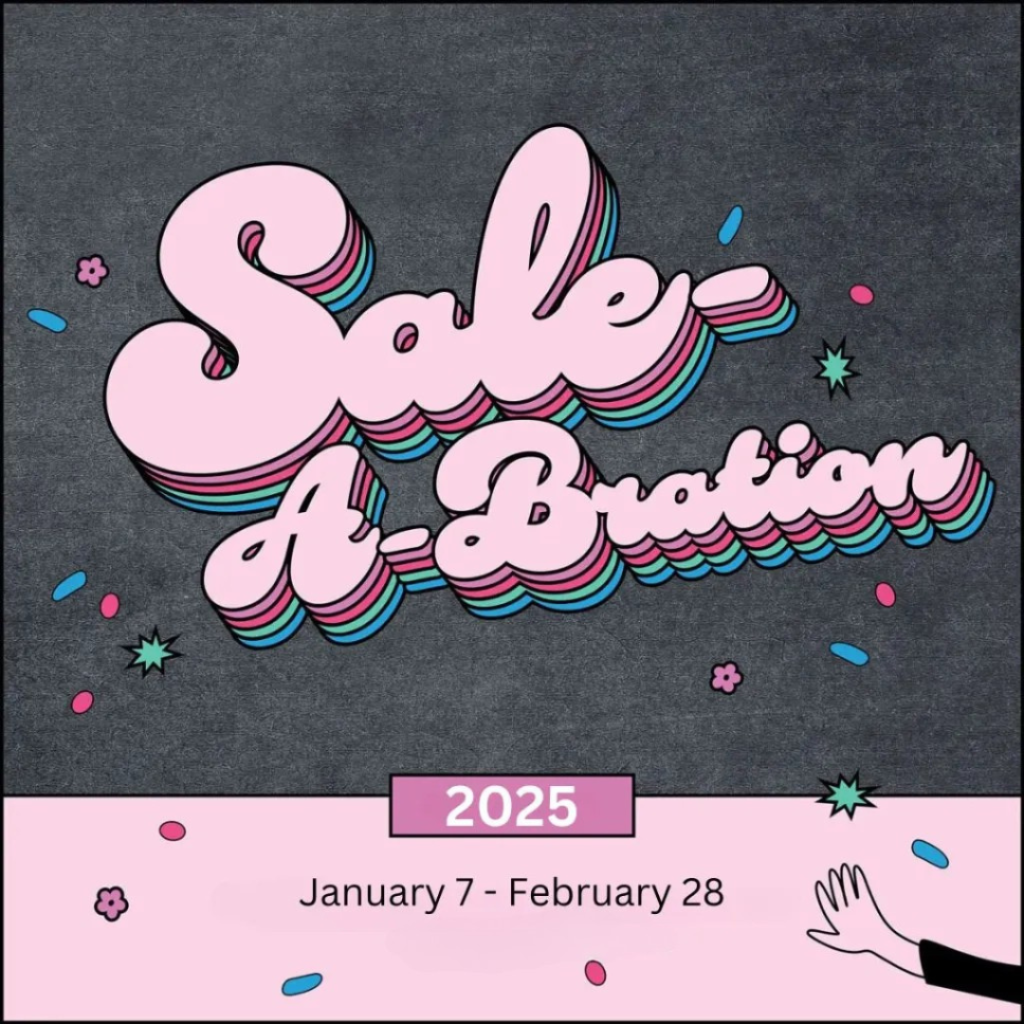
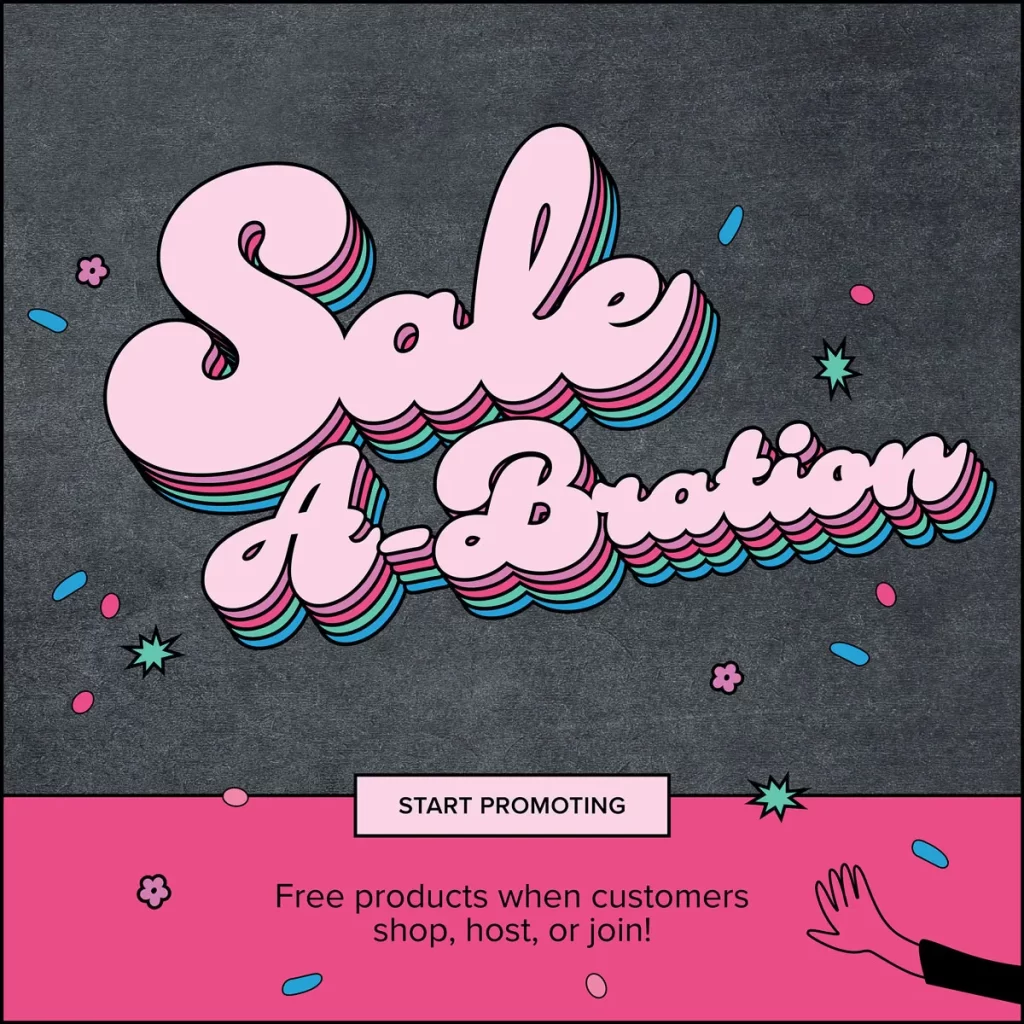
The 2025 Sale-A-Bration catalogue
Sale-A-Bration (6th January – 28 February) is the most exciting time of the year for crafters with something special for everyone!
You’ll earn free Sale-A-Bration products with every $100 purchase in my online store. The more you shop, the more you’ll earn!
If you decide to become a demonstrator during Sale-A-Bration you’ll get a choice of two different offers.
OPTION ONE: $235 worth of products PLUS a choice of two Stampin’ Write Marker Assortment packs AND the Handmade Designs Cling Stamp Set, an exclusive stamp set designed to work with the markers. That’s a $397 value all for just $169!
OPTION TWO: $235 AUD worth of product PLUS an additional $51 worth of product of your choice when you join for $169 AUD. That’s a $286 value!
To download and read a digital copy of the Sale-A-Bration catalogue click here and take a look at the new products here.
The January 2025 Scrapbooking brochure
The January 2025 Scrapbooking Brochure is full of inspiring new scrapbooking products made for memory keepers. Many of the products coordinate with the beautiful products in the brand new January – April 2025 mini catalogue.
NOTE: This brochure is available in digital format only. To download and read a digital copy of the January 2025 Scrapbooking Brochure click here and shop the new products here.
Three brand new kits
The three new kits added today to the Kits Collection are the Brightest Birthday Kit, the Birthday Bash Kit, and Thank You Kindly Kit.
To view these kits (and the others in the kits collection) visit my online store here.
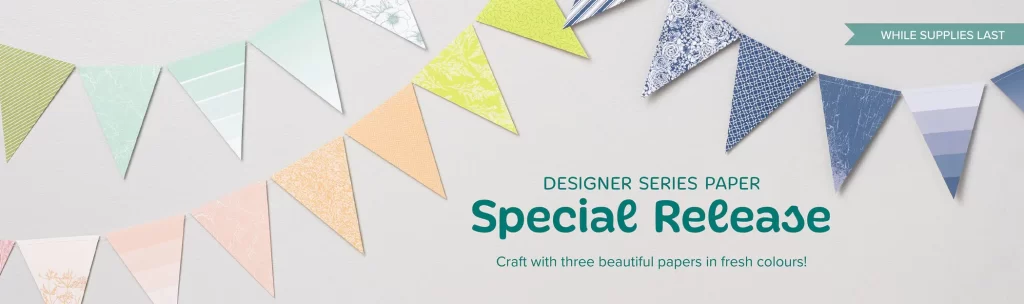
Brand new January online exclusives
The new online exclusives include refreshed previous Designer Series Papers using some of Stampin’ Up!’s best-selling colours!
From left to right:
Shades & Hues is recoloured from Color Theory.
Serene Love is recoloured from True Love.
Refreshed Beauty is recoloured from Blackberry Beauty.
To view these new online exclusives, new designer series papers (and the other products in the online exclusives collection) visit my online store here.
I’ll be back tomorrow with the first AWH Colour Creations blog hop for 2024 where we will be showcasing Misty Moonlight and I’ll be sharing with you some of these new products.
Welcome to week thirty-four of our Art With Heart 2024-25 Colour Creations blog hop, our final blog hop for 2024!
This week we’re featuring Melon Mambo, a lovely bright pink from the Brights family and I’m giving you a sneak peek of a FREE Sale-a-bration item coming very soon!.
As I was short of time I’ve reached for the FREE Rainbow Celebrations Kit that will be available on the 7th January. So how do you get this for free? With every $100 you spend during Sale-a-bration (7th January – 28th February) you can choose a FREE Sale-a-bration item from the brochure.
Here’s what you get in the FREE Rainbow Celebrations Kit. (OPPS! Not the Glossy Dots Assortment – I’ve added them to this photo because I used them in my card.)
I always like to modify my kits to get more bang for my buck! The kit makes 6 cards but I think I’ll make at least twice that using all the components.
I’ve adapted components from this kit to make my card, mounting just the front of the rainbow card base to a larger rectangle card base made from Summer Splash.
I don’t normally pair such bright colours together but this card makes me feel so happy with its bright retro vibes. Adding the Glossy Dots really ramps up the fun factor too!
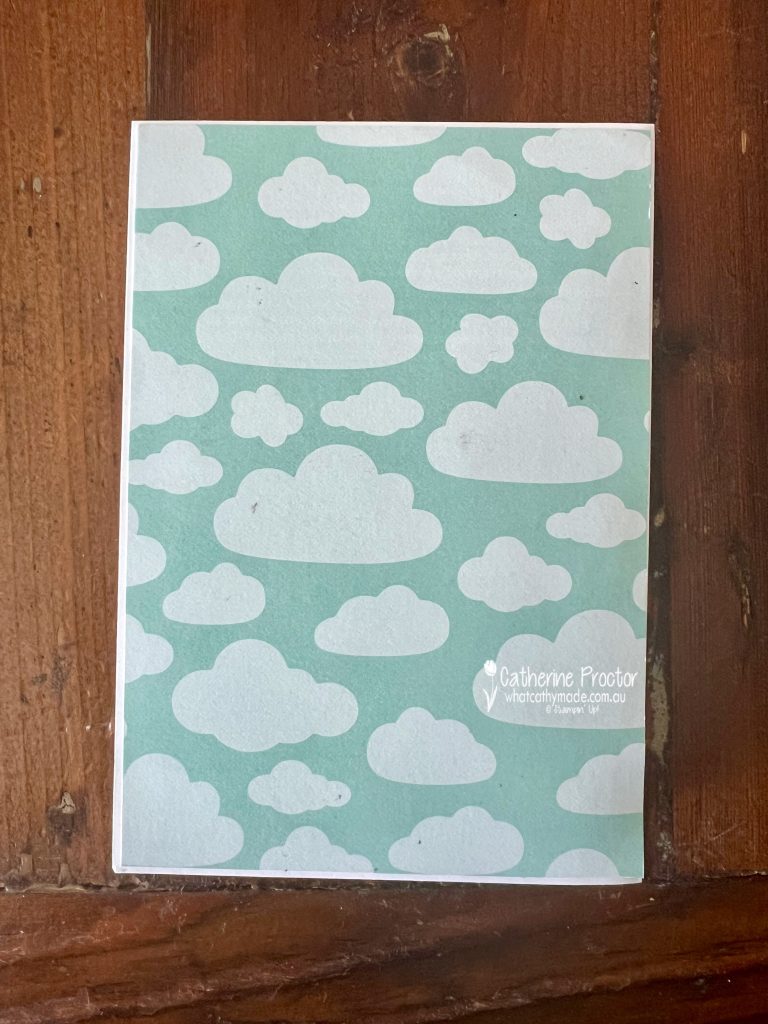
I’ve used one of the sentiments on the inside of my card and you can also see the cute cloud detail on the inside of the matching envelopes too in this photo below.
Now it’s time to hop in over to our next participant, the lovely Kate Morgan I can’t wait to see what Kate has made this week!
If at any time you find a broken link, you can find the complete list of all participants below.
Welcome to week forty-two of our Art With Heart 2023-24 Colour Creations blog hop!
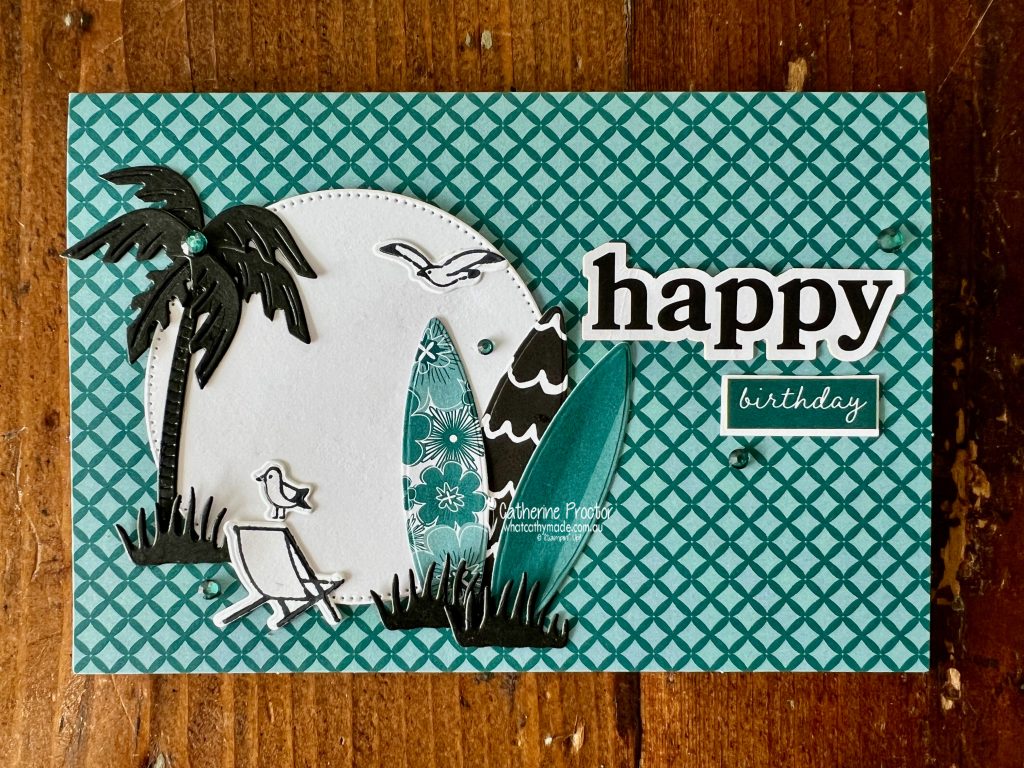
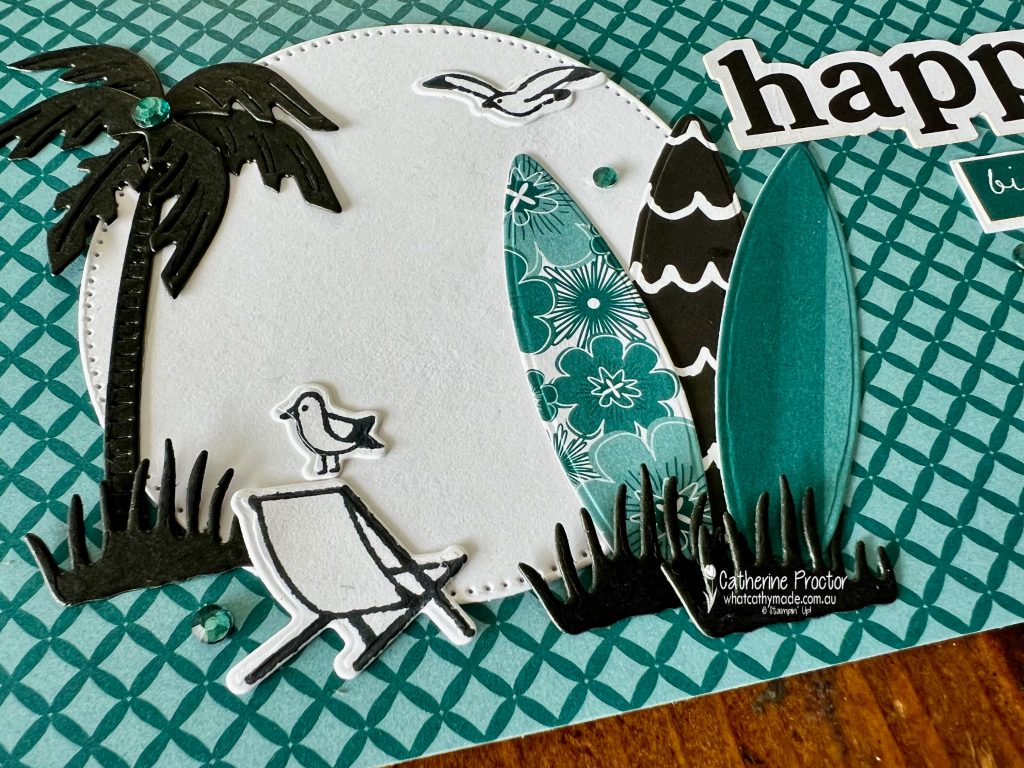
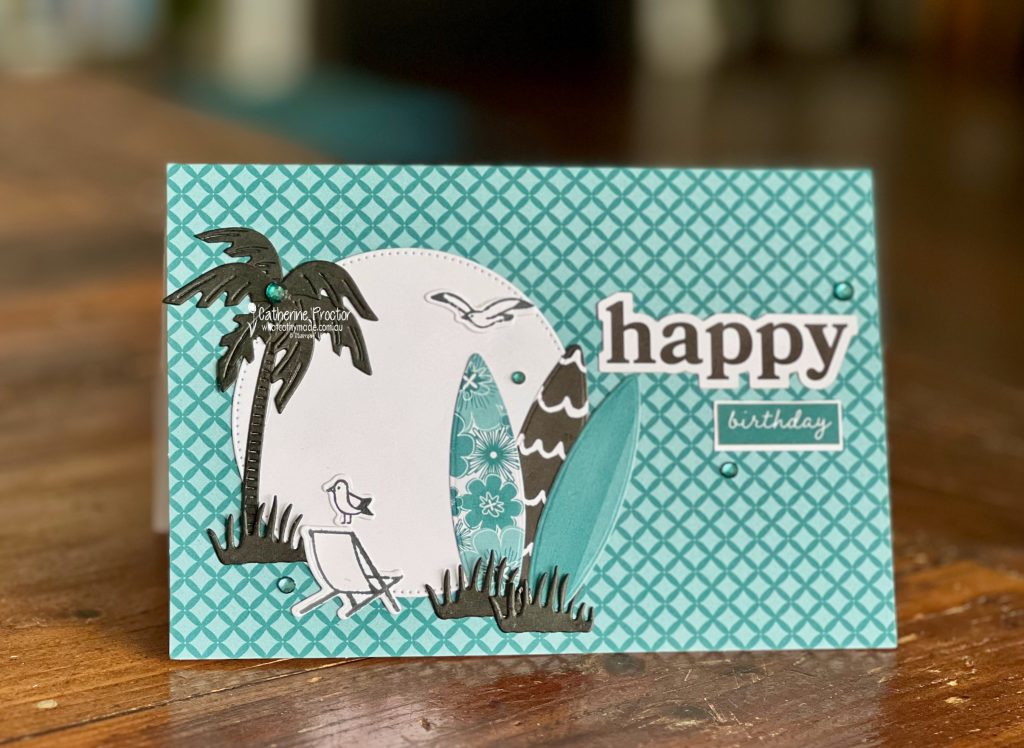
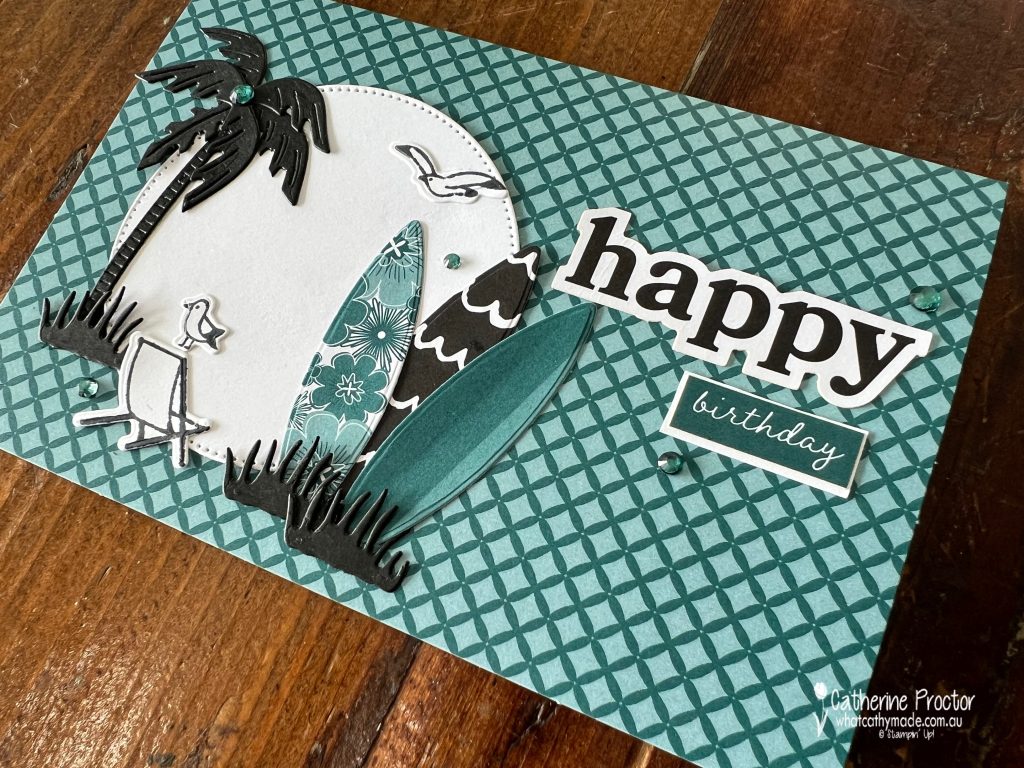
Our colour this week is Pretty Peacock, a deep teal colour that is an absolute favourite of mine.
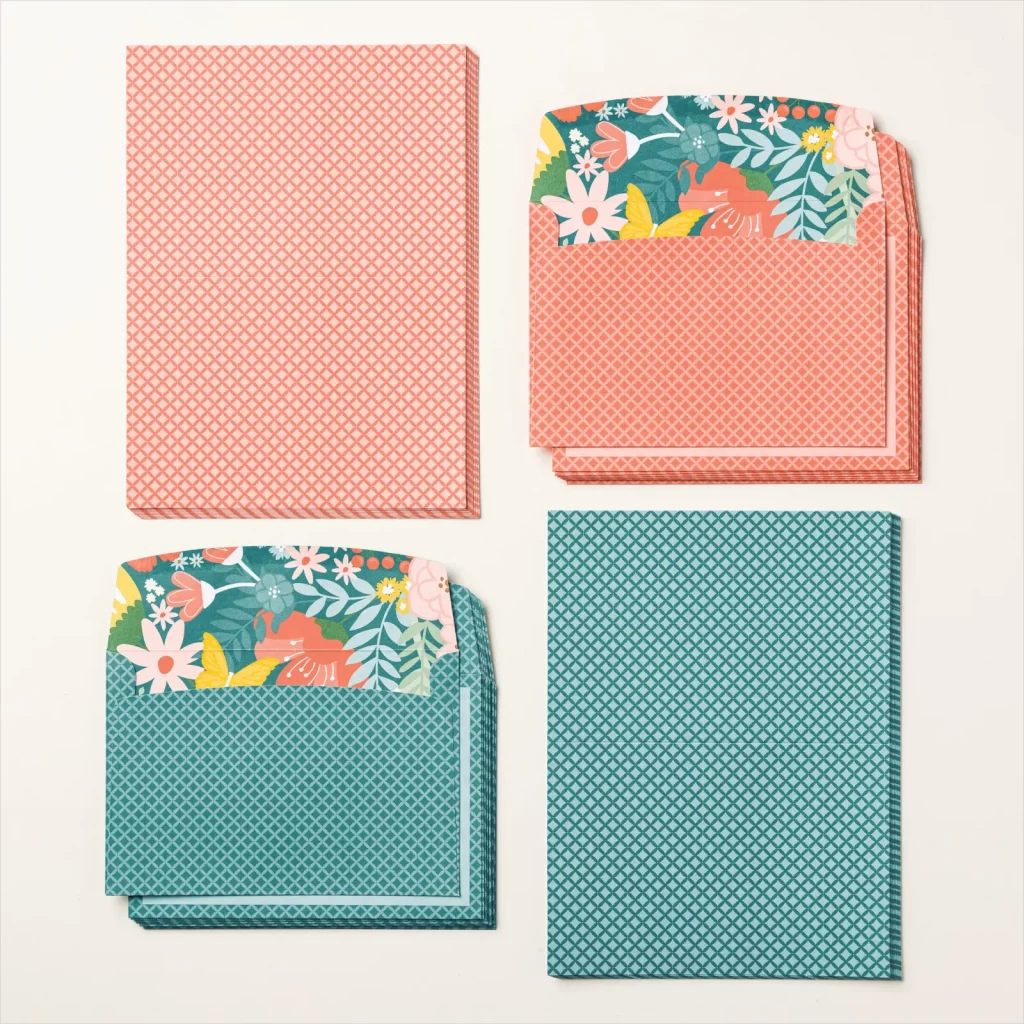
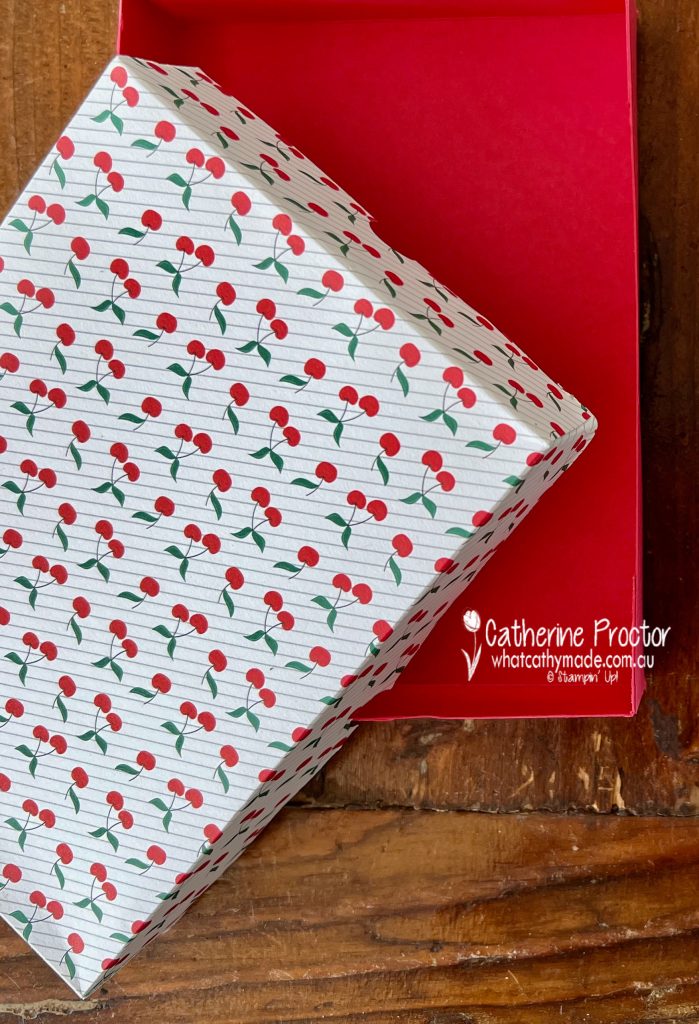
As there’s only one day left of Sale-a-bration, I’m sharing a card I’ve made using the Sweet Thoughts Memories & More Cards & Envelopes, one of the new items added as a Sale-a-bration reward in February.
This pack contains 20 cards and 20 envelopes. Having the card base and envelope ready cuts down on your prep time and helps you get to crafting much quicker.
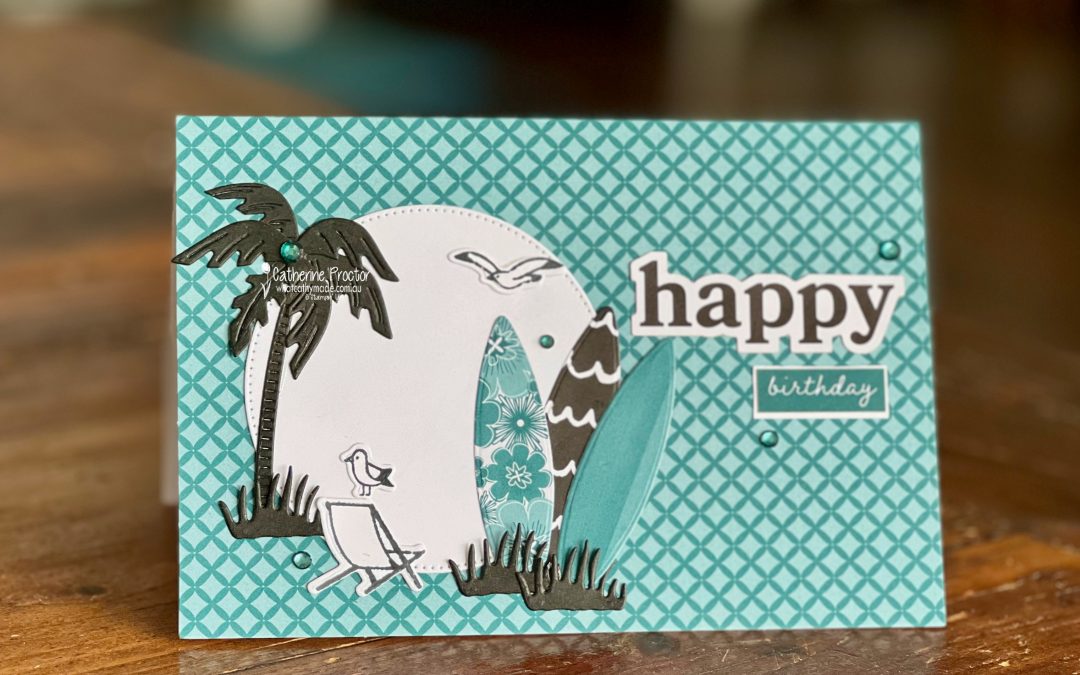
It’s my husband’s birthday this weekend and as he is a surfer it was a no-brainer to use the Beach Day bundle to make his birthday card.
I’ve used the surfboard die from the Beach Days dies and two of the Sweet Thoughts Memories & More cards from the card pack to make the floral and the striped Pretty Peacock surfboards, with the black and white surfboard die cut from the Zoo Crew 12″ x 12″ (30.5 x 30.5 cm) Designer Series Paper.
The rest of the stamped images and dies are from the Beach Day bundle.
The Happy birthday sentiment is created using stickers found in the Sweet Thoughts Memories & More Card Pack.
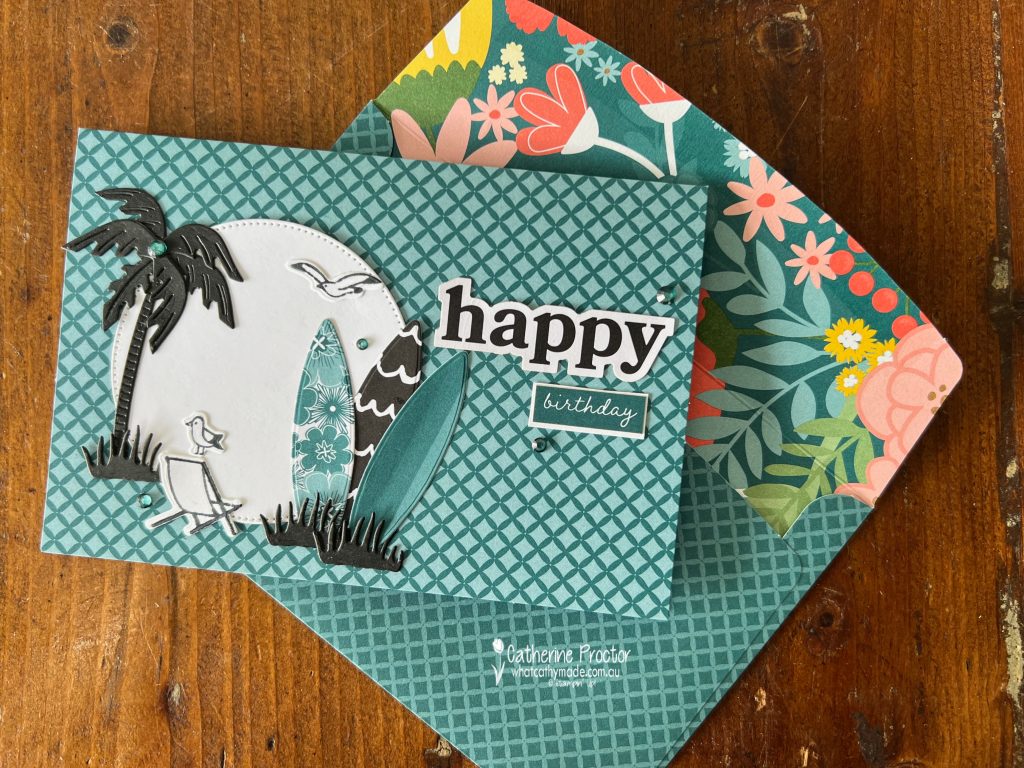
This gorgeous matching envelope is also included in the free Sale-a-bration Sweet Thoughts Memories & More cards and envelopes.
Now it’s time to hop on over to our next participant, the lovely Kate Morgan. I can’t wait to see what Kate has made this week!
If at any time you find a broken link, you can find the complete list of all participants below.
Welcome to week forty-one of our Art With Heart 2023-24 Colour Creations blog hop!
Our colour this week is Poppy Parade, a lovely bright red that certainly packs a punch!
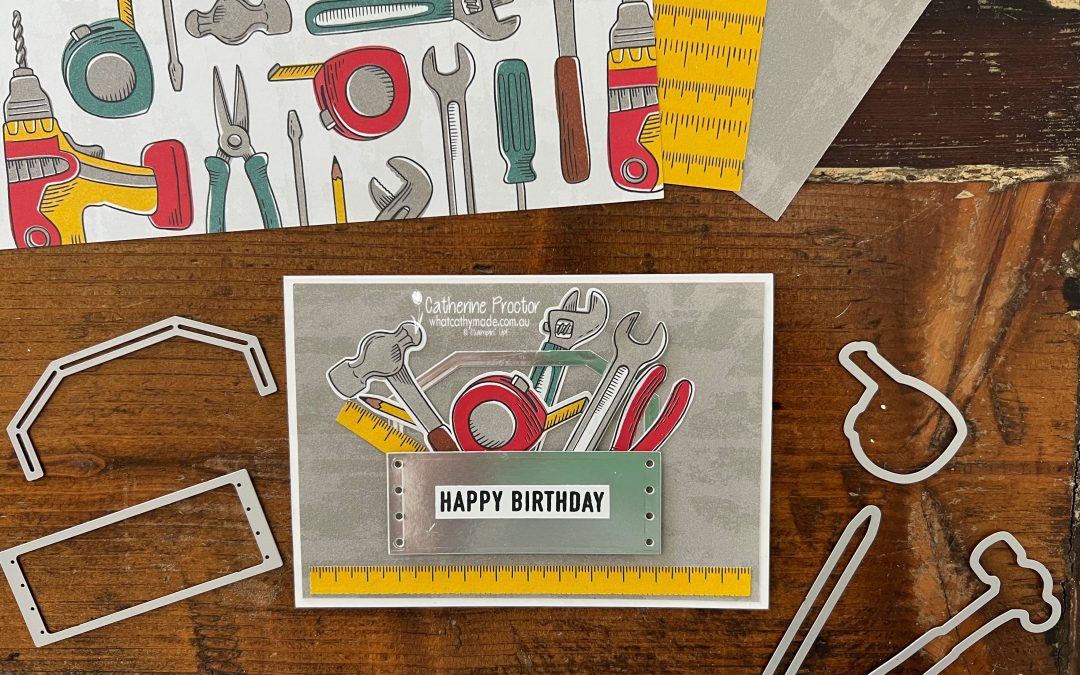
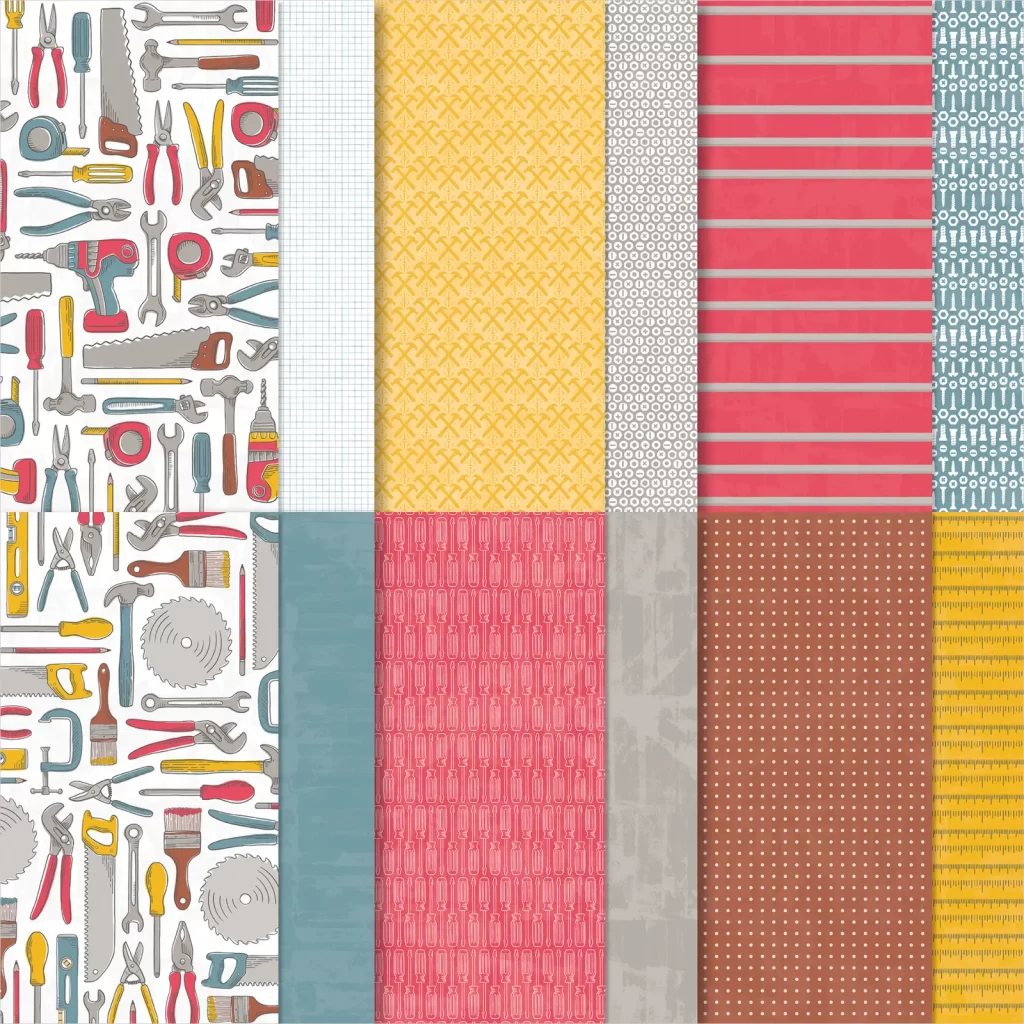
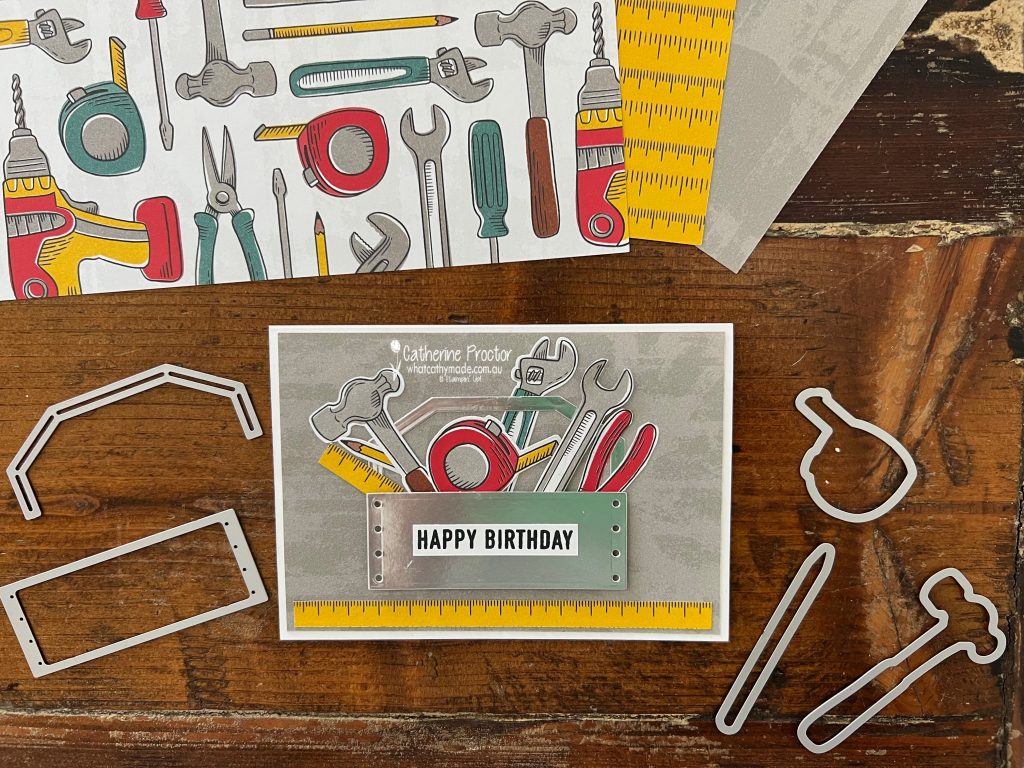
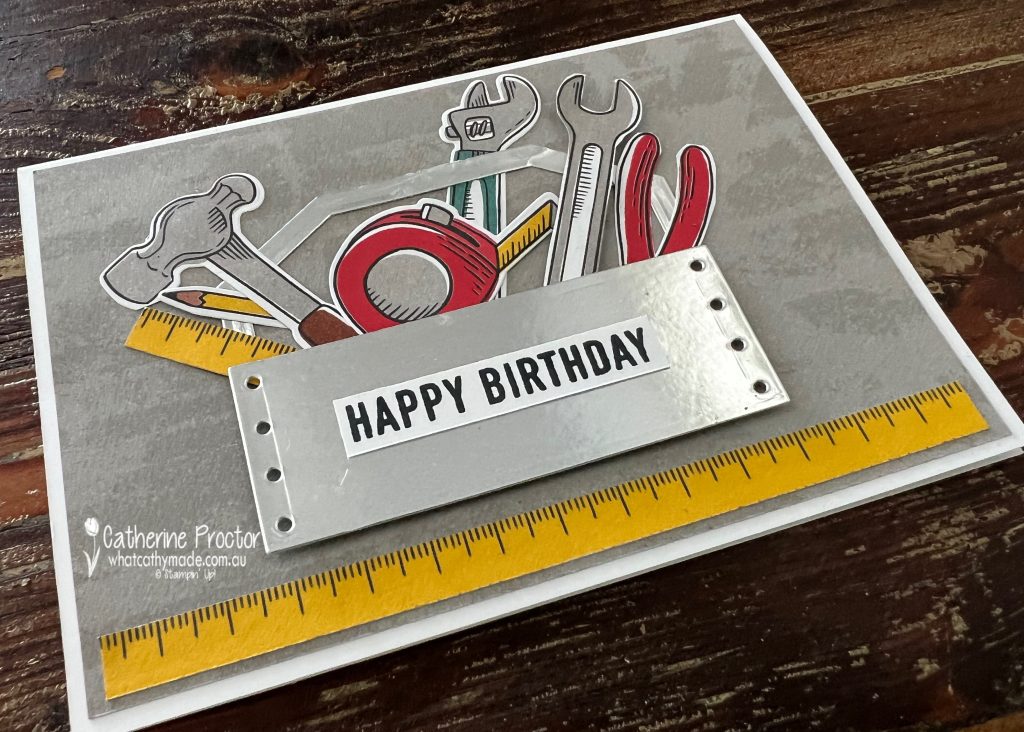
As there’s only just over a week left of Sale-a-bration, I’m sharing a birthday card I made in November for my youngest son who is halfway through his electrical apprenticeship. He loves his tools so the Sale-a-bration Trusty Toolbox DSP was simply perfect for him!
Apart from being a great DSP for masculine cards, what I particularly love about the Trusty Toolbox DSP is that the tool sheets have been designed to be die cut out using the Trusty Tools dies. This makes card making a breeze!
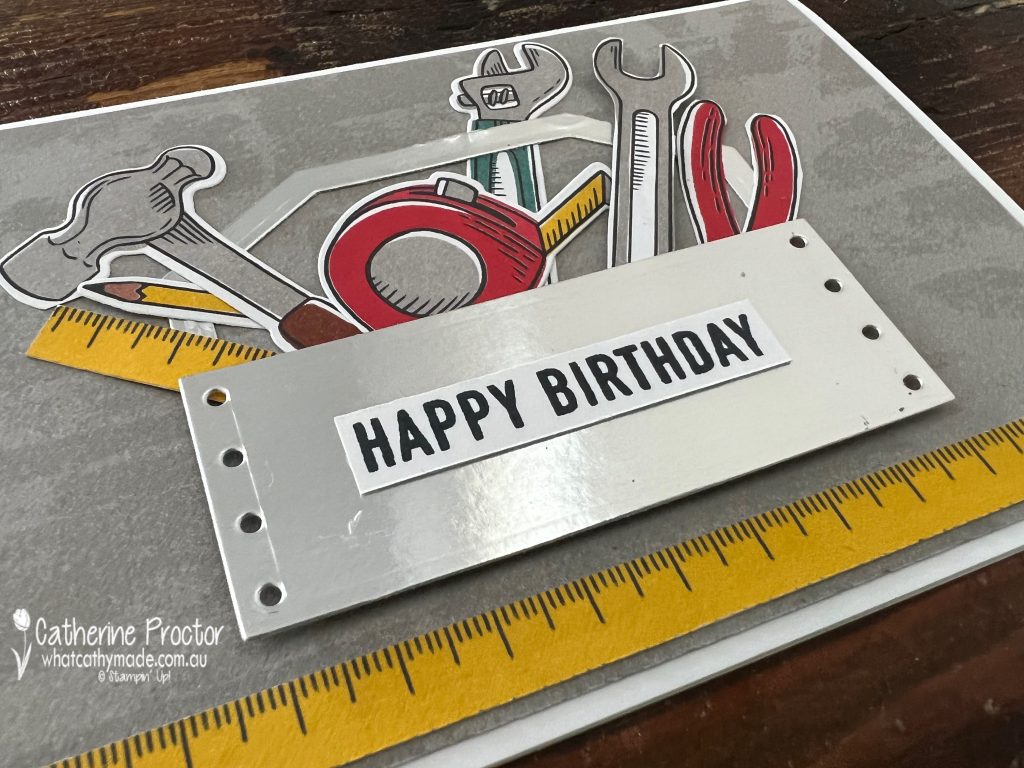
My simple silver tool box and handle were die cut from silver foil, mounted onto the card front using Dimensionals and then it was simply a matter of die cutting the tools from the DSP and arranging them into the tool box.
The tape measure is also a strip of Trusty Toolbox DSP. I love that there are both inches and centimetres on this particular design.
The “Happy birthday” sentiment is from the Hello Kiwi stamp set. I love the modern masculine font on this stamp set.
Die cut offcuts from the DSP that weren’t used on the card front decorate the inside of my card.
Now it’s time to hop on over to our next participant, the lovely Kate Morgan. I can’t wait to see what Kate has made this week!
If at any time you find a broken link, you can find the complete list of all participants below.
Welcome to week forty of our Art With Heart 2023-24 Colour Creations blog hop!
Our colour this week is Pool Party, a pale/green colour that is wonderful for skies and water. This is such a pretty and versatile colour!
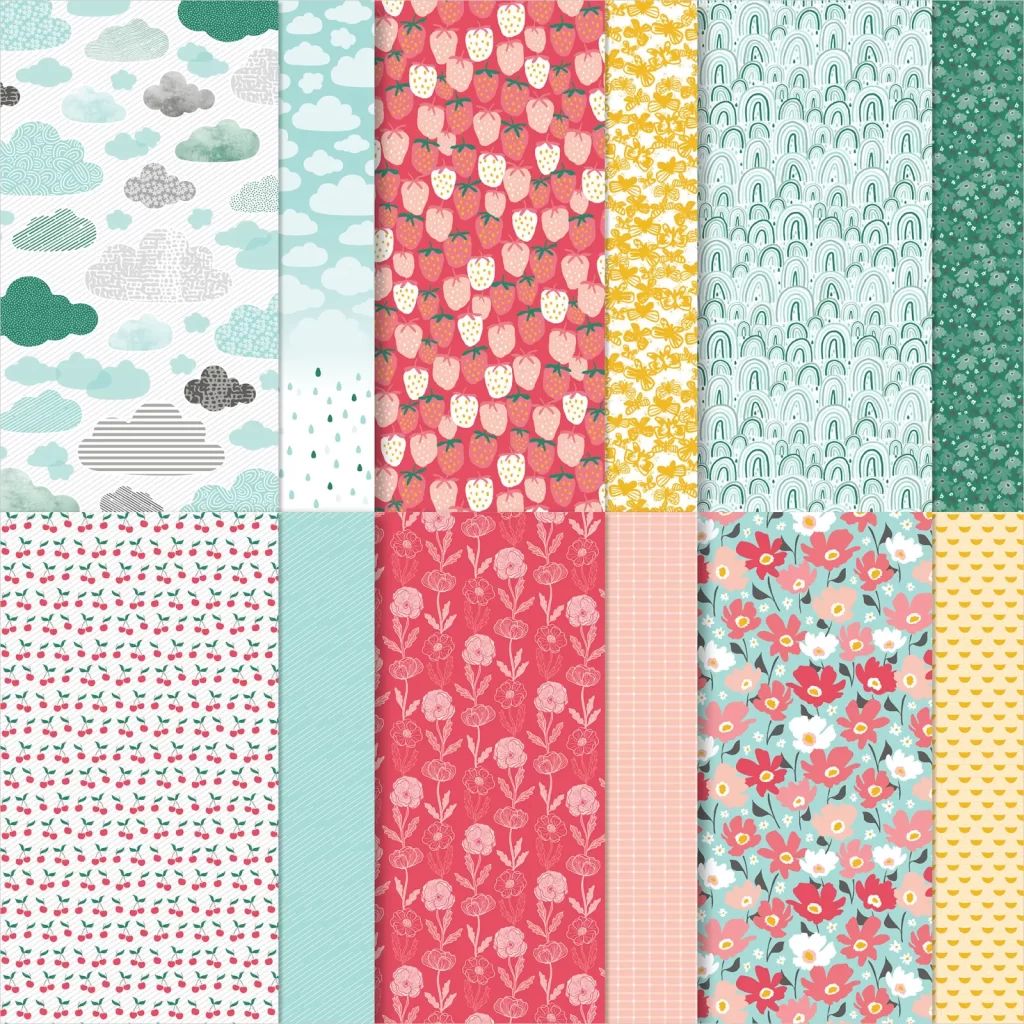
I have a very special project to share with you this week. I’ve made another envelope counting book, using the SALE-a-bration Sunny Days 12″ x 12″ (30.5 x 30.5 cm) Designer Series Paper.
If you didn’t see the counting book I made for SALE-a-bration last year and you’d like to know how to make an envelope album, I have included the instructions in this video.
Envelope albums are super easy to make as you only need envelopes and tear’n’tape. As you can see in the photo below, the envelopes form a spine as you adhere them together, making the counting book easy to open for little hands.
Throughout this counting book all of the letters and numbers are die cut using the Mini Alphabet dies and the Alphabet A La Mode dies.
The DSP for the box and the book is all from the Sunny Days DSP pack.
Here is a short 1 minute video that takes you through the pages of the Sunny Days DSP envelope counting book.
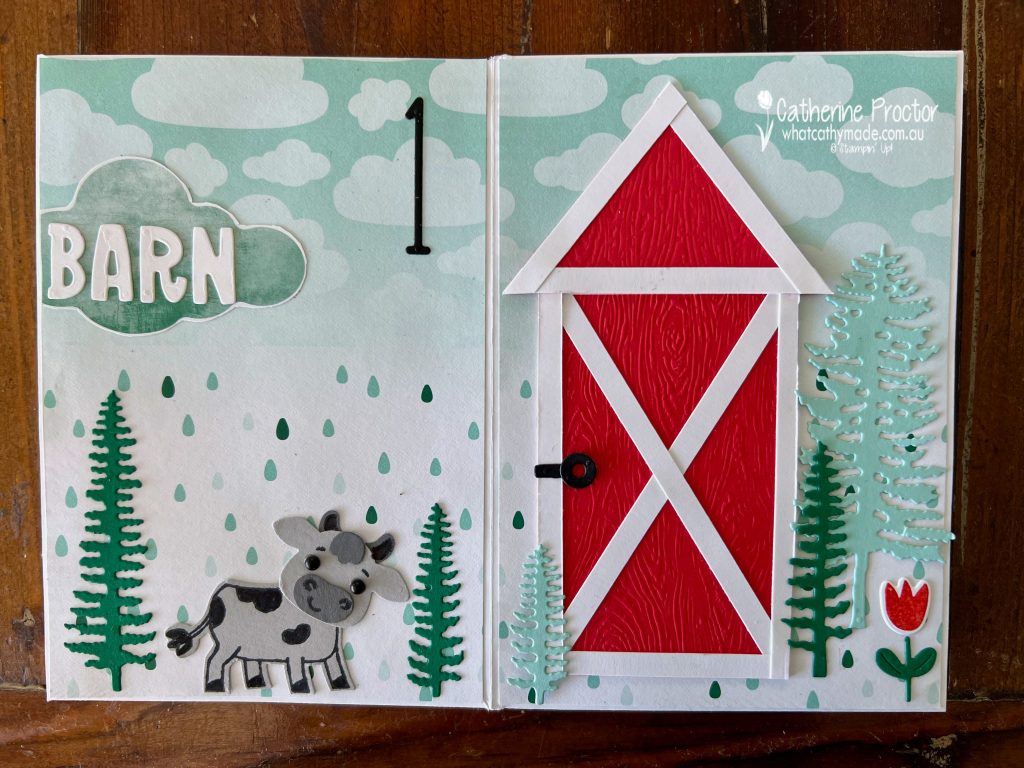
One Barn
The barn is made using Poppy Parade cardstock that has been embossed with the Timber embossing folder. The cow is stamped and punched out using the Cutest Cows bundle and the trees are die cut using the Forever Forest Dies.
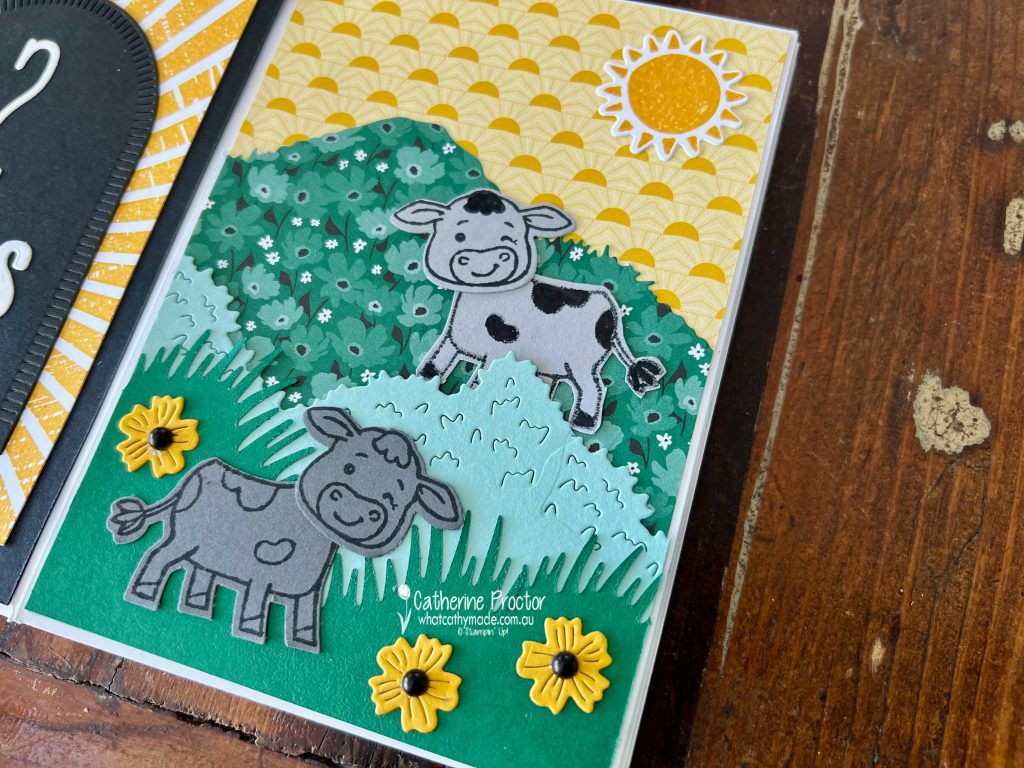
Two Cows
The Rays of Light stamp has been stamped in Crushed Curry. The black arch on the left and the grass and hills on the right are die cut using the Garden Meadows dies.
The Crushed Curry sun is stamped and die cut using the Bright Skies Bundle. The flowers are also die cut using the Bright Skies dies.
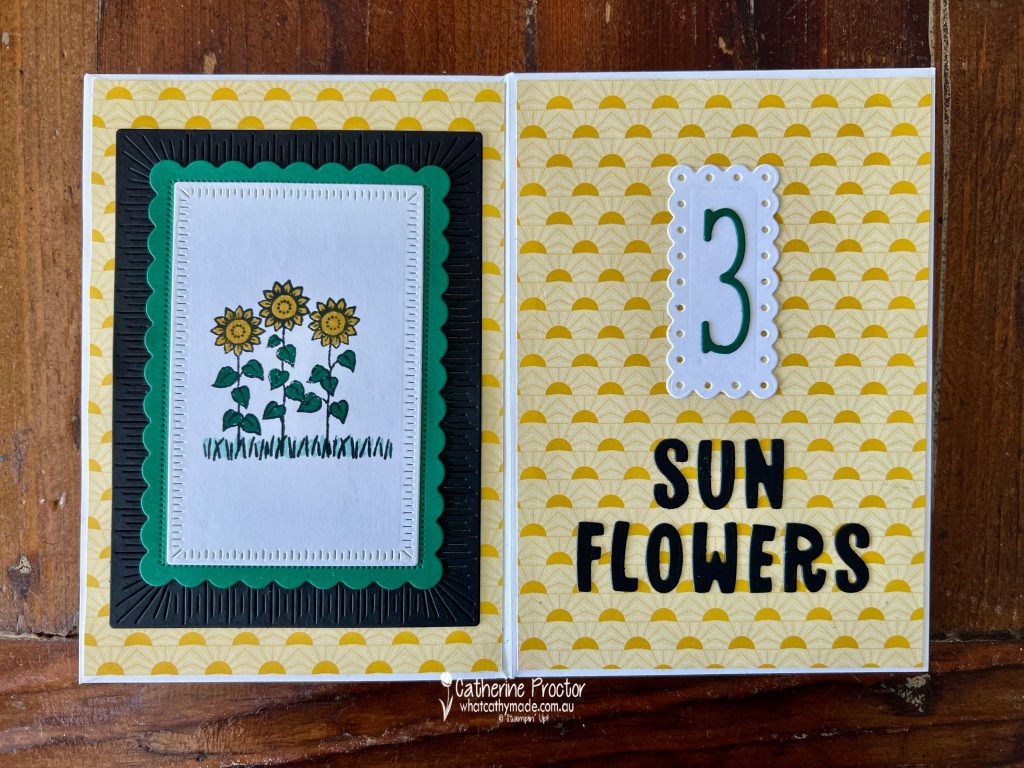
Three Sunflowers
The three sunflowers are from the cutest Cows stamp set and the cardstock layers are die cut using the Radiating Stitches Dies and the Scalloped Contours Dies.
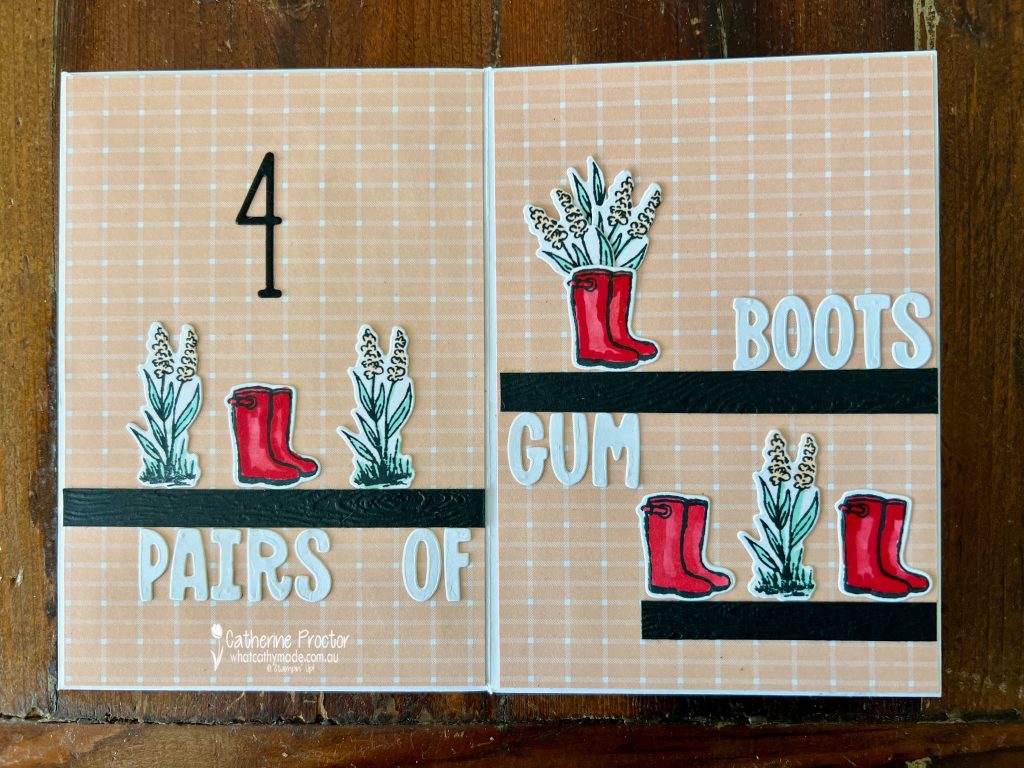
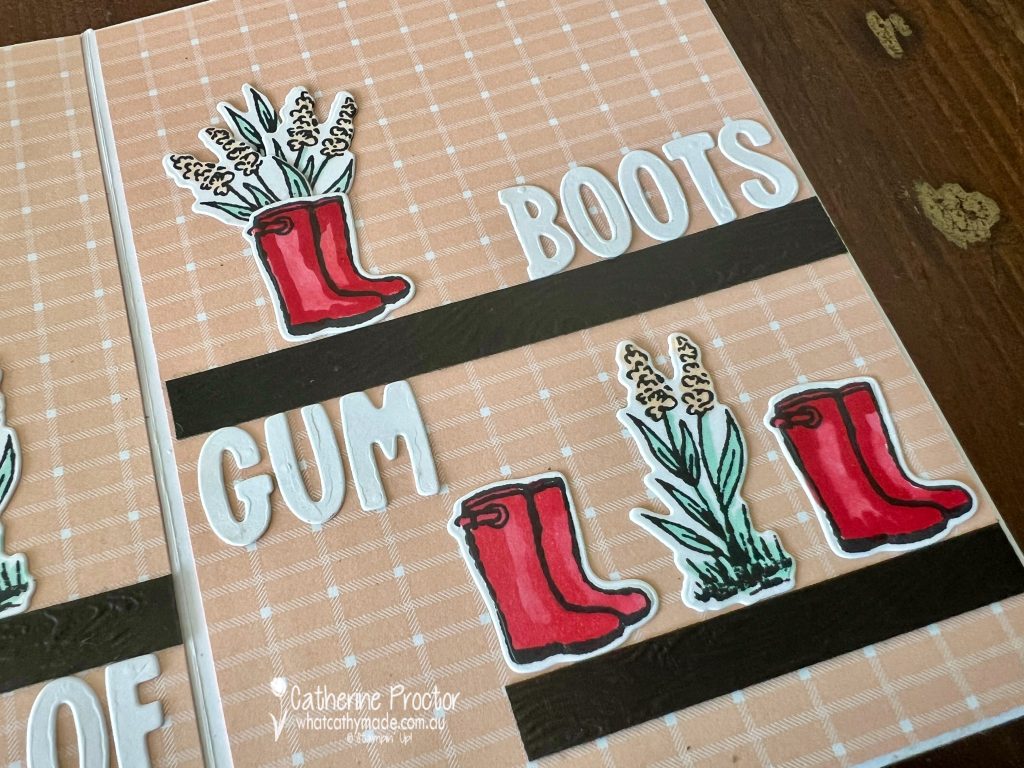
Four Gumboots
Both the gumboots and the flowers are stamped die cut using the Garden Meadow Bundle.
Poppy Parade Stampin’ Blends are an easy way to add colour, shine and dimension to the gumboots!
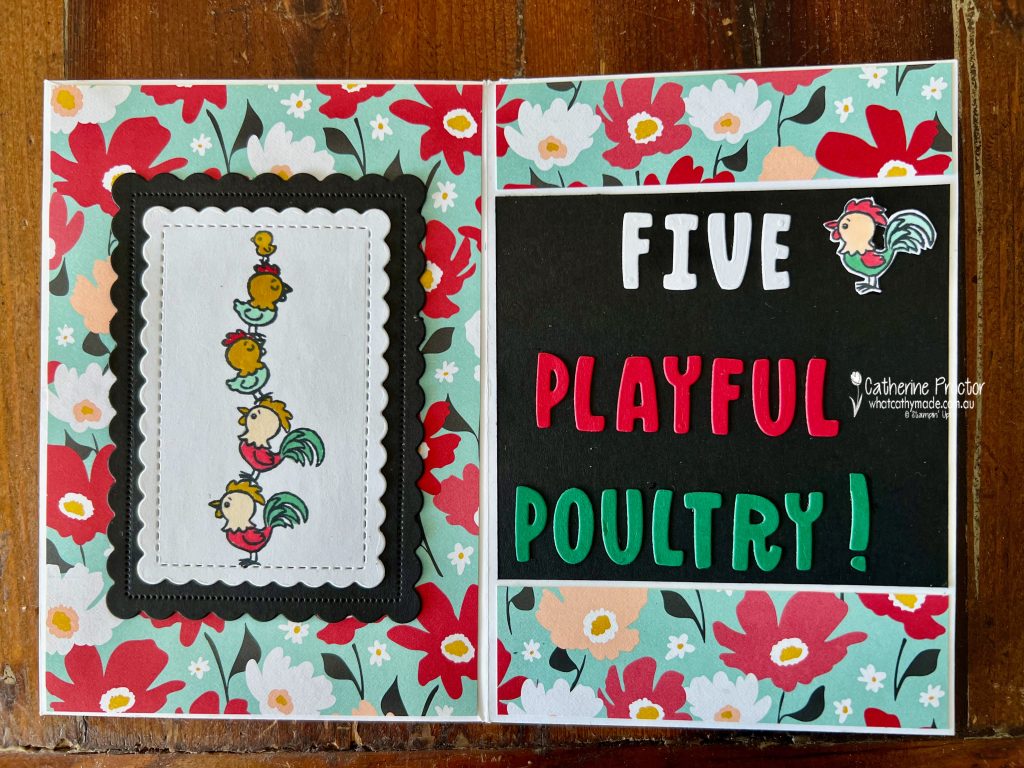
Five Playful Poultry
Two roosters, two chickens and a tiny chick are all stamped using the Cutest Cows Stamp Set.
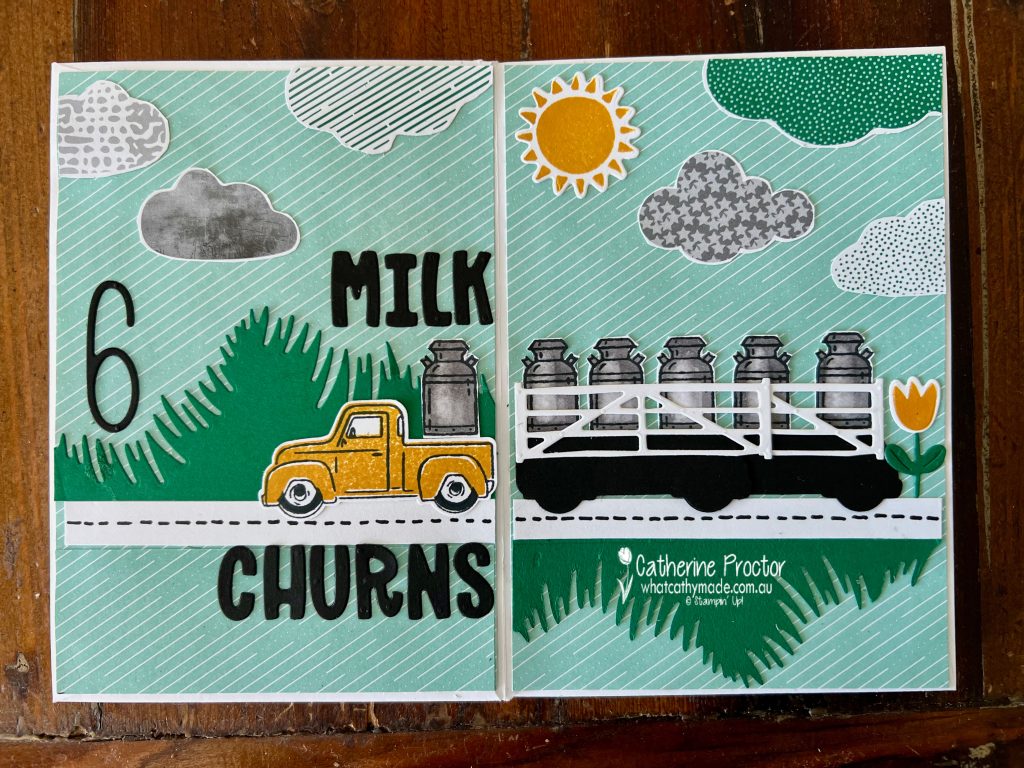
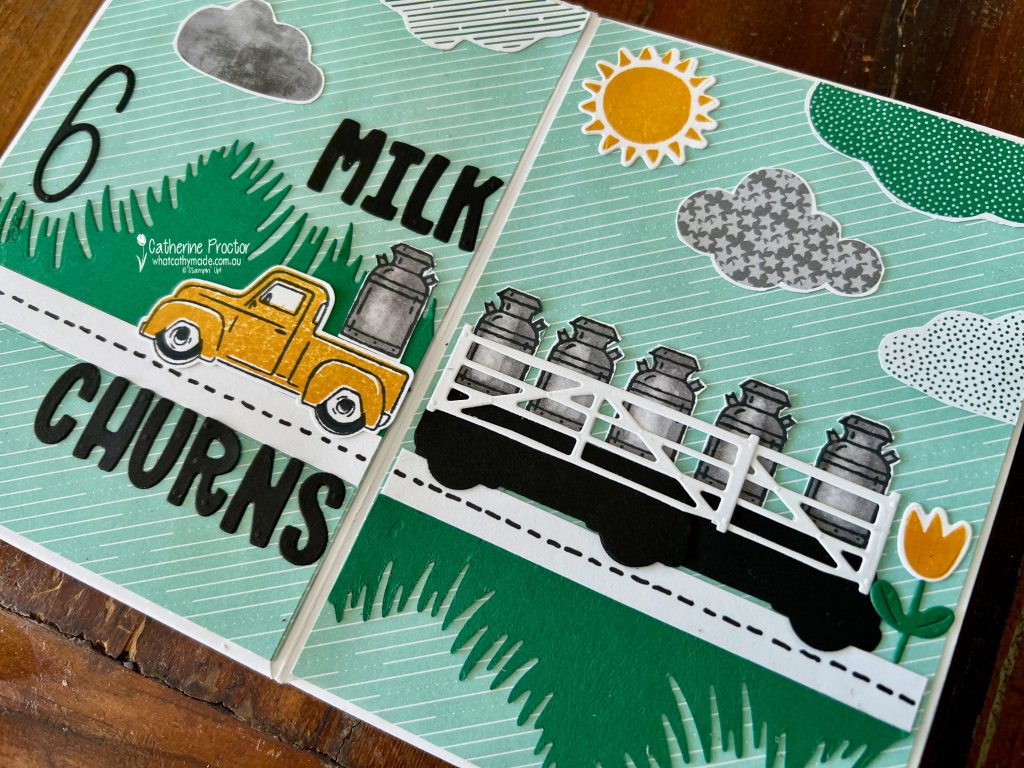
Six Milk Churns
There are a lot of different products used to create this scene, which might be my favourite page in the book!
The Trucking Along Bundle (Crushed Curry truck and black milk churn trailer), Garden Meadows Dies (holding the milk churns onto the trailer), Garden Meadow dies for Shaded Spruce grass, Crushed Curry sun and the yellow flower.
The clouds were fussy cut from the Sunny Days DSP.
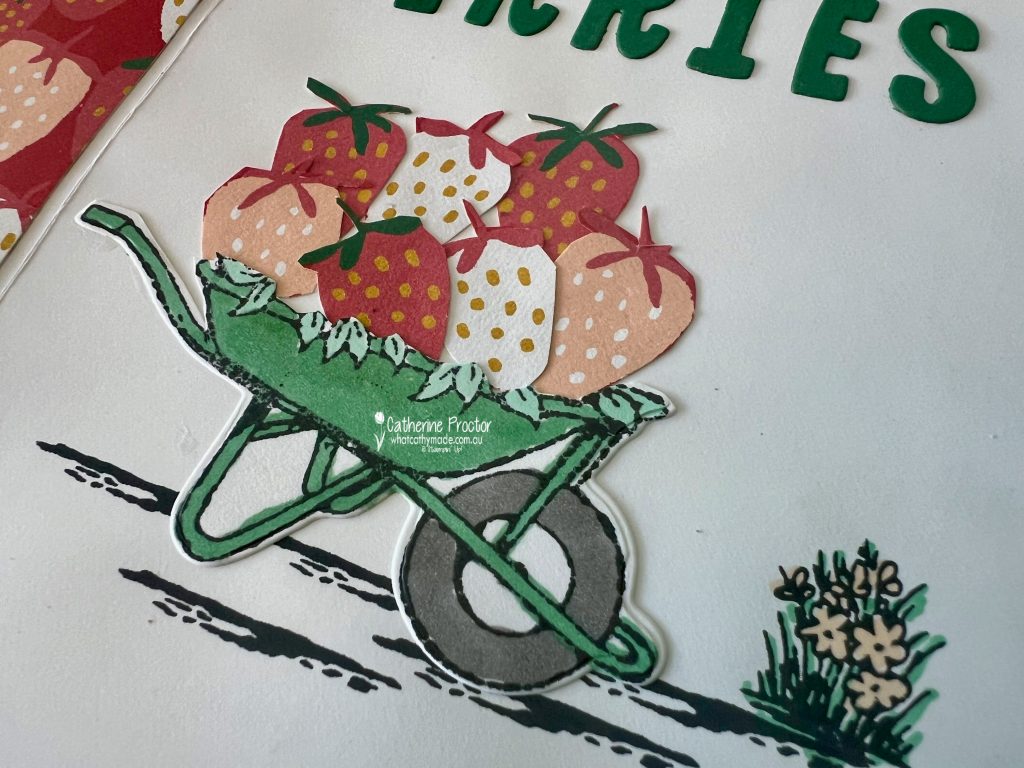
Seven Strawberries
The wheelbarrow has been stamped and die cut using the Garden Meadow bundle.
Fussy cut strawberries fill the wheelbarrow and the “shading” stamp from Garden Meadow stamp set grounds the scene.
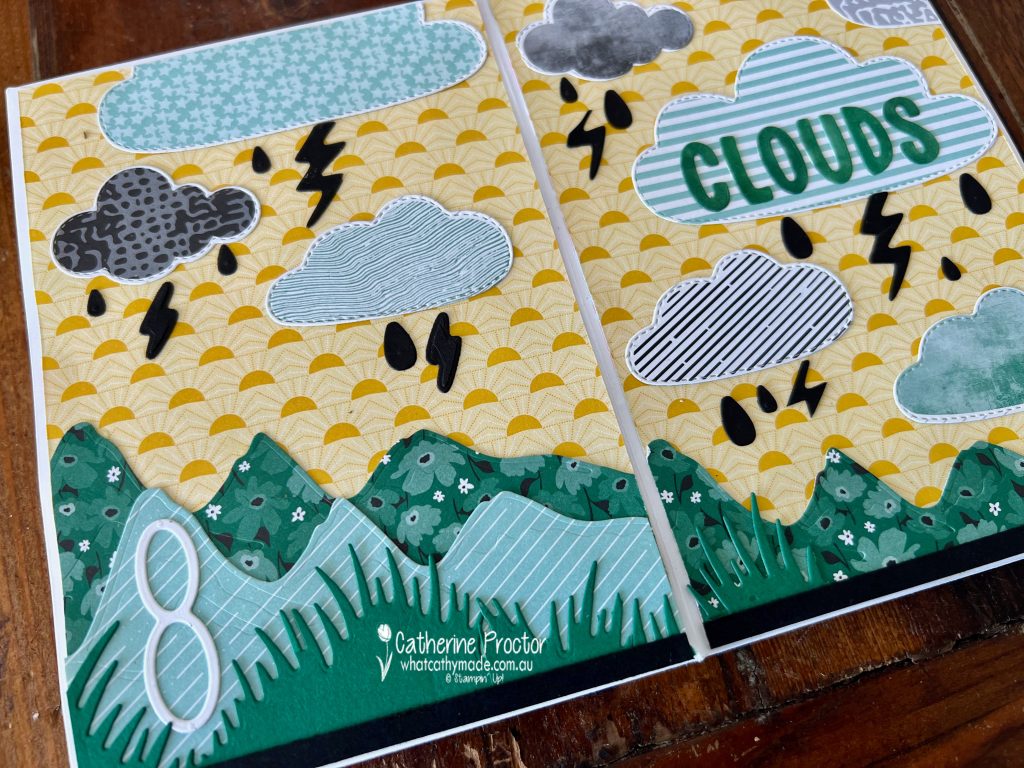
Eight Clouds
These clouds were die cut from the Sunny Days DSP using the Bright Skies dies. The lightening and raindrops are also die cut using the Bright Skies dies.
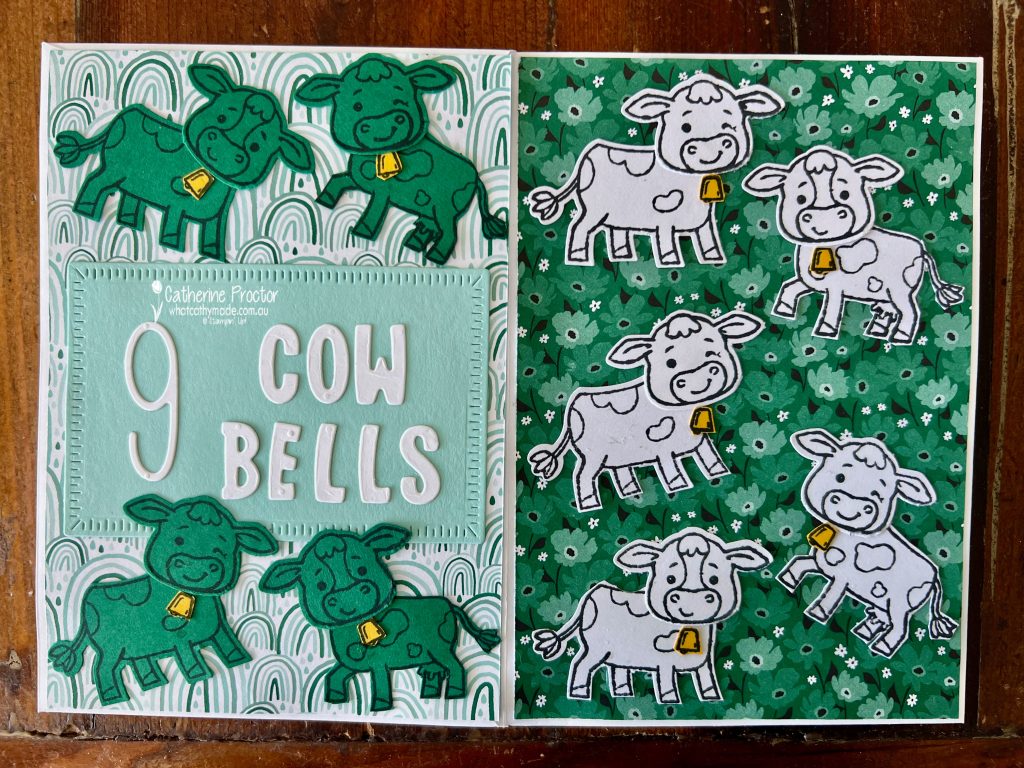
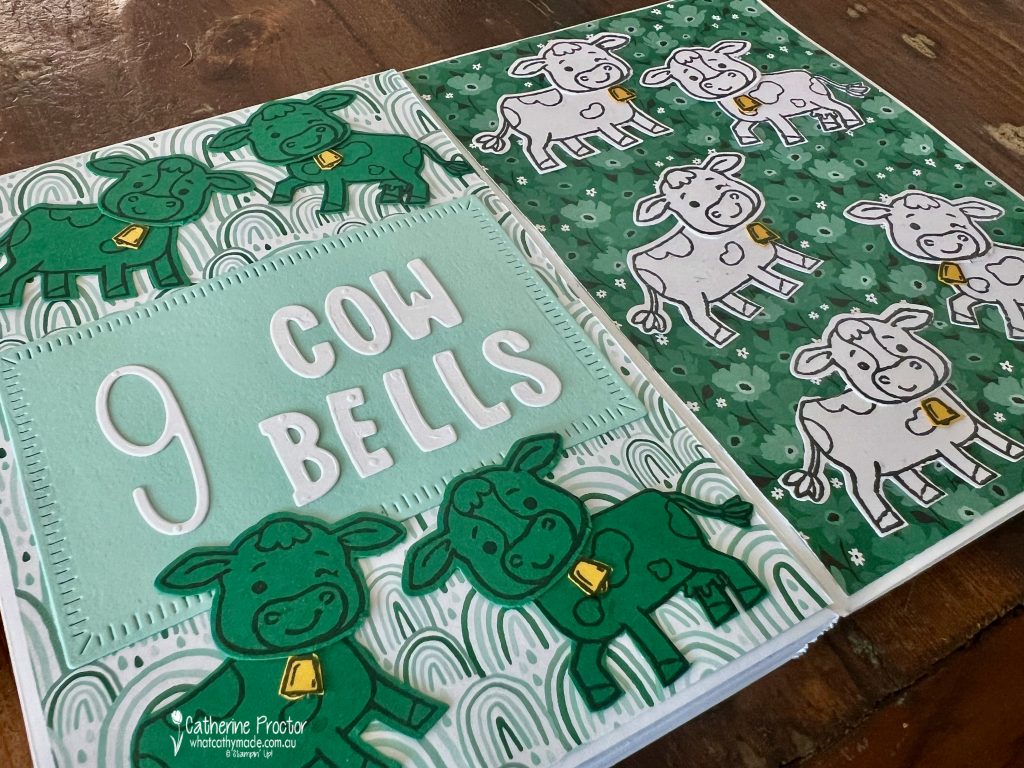
Nine Cow Bells
As these little cow bells from the Cutest Cows stamp set are so small I needed to find a a way to make them stand out on the page.
Stamping the cow bells onto Crushed Curry cardstock and popping each cowbell onto a contrasting monochromatic green and white background makes them stand out for ease of counting by children.
And the hopefully the cows being green makes the reader laugh too!
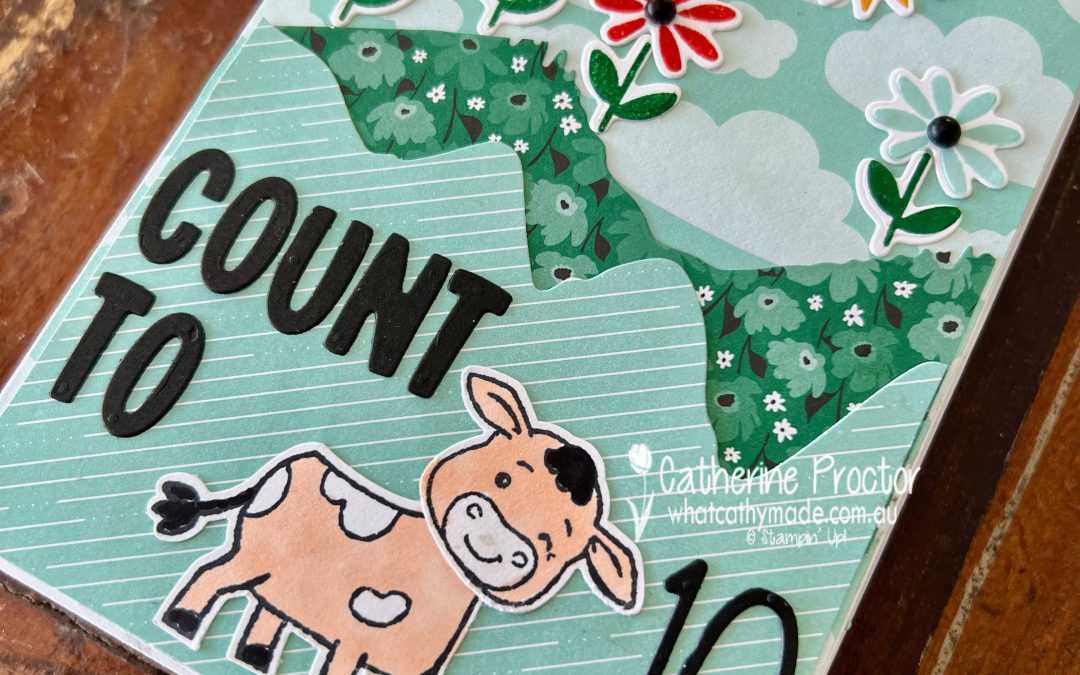
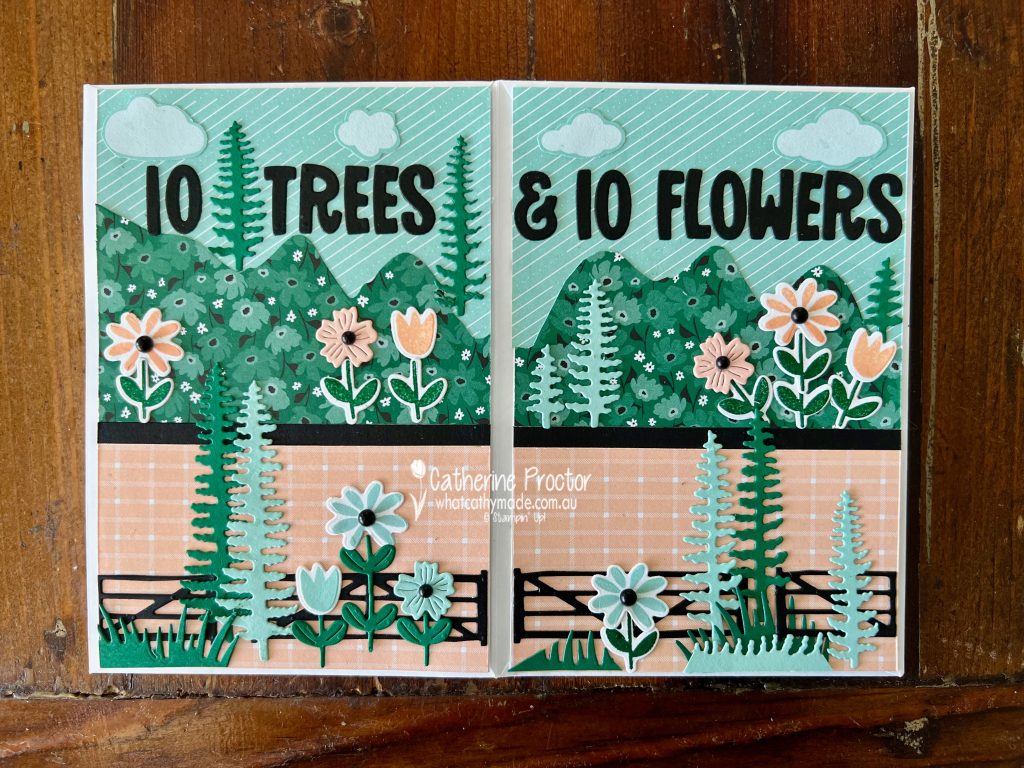
Ten Trees and Ten Flowers
Lika many of the scenes in this counting book, the proportions are totally out of whack, but that’s pasrt of the charm of children’s books. You get to play with colour and proportion in fun and exciting ways that really create visual interest for the child, sparking their imagination.
A strip of this gorgeous Pool Party DSP from the Sunny Skies DSP is adhered to the back flap of my envelope album.
I made a simple box using the Sunny Skies DSP for the lid and Poppy Parade cardstock for the base.
I hope you enjoyed my envelope album! I just love making projects for children.
Now it’s time to hop on over to our next participant, the lovely Rachel Palmieri – I can’t wait to see what has made this week!
If at any time you find a broken link, you can find the complete list of all participants below.
Welcome to week thirty-nine of our Art With Heart 2023-24 Colour Creations blog hop!
Our colour this week is Petal Pink, a soft and slightly orangey pink from the subtles family.
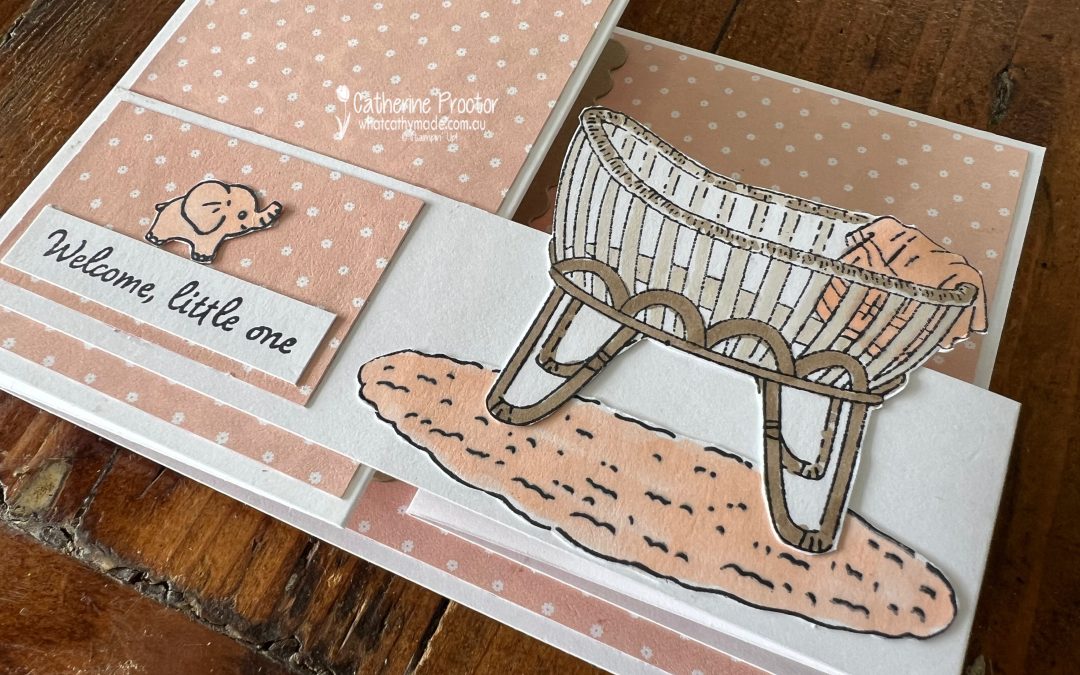
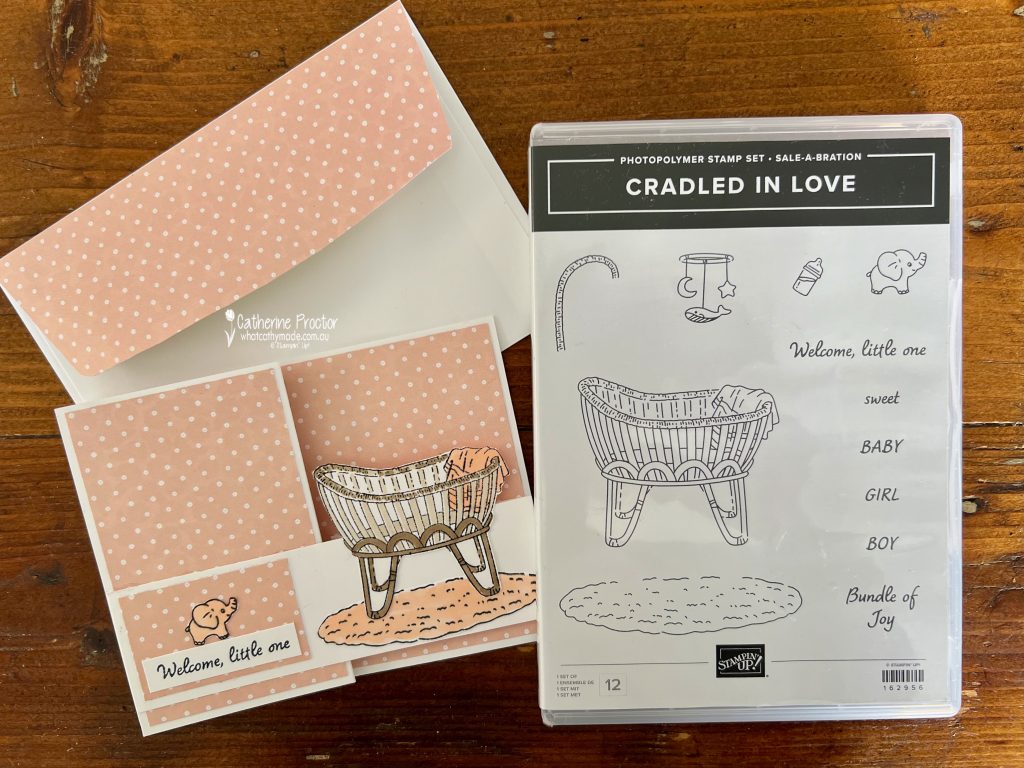
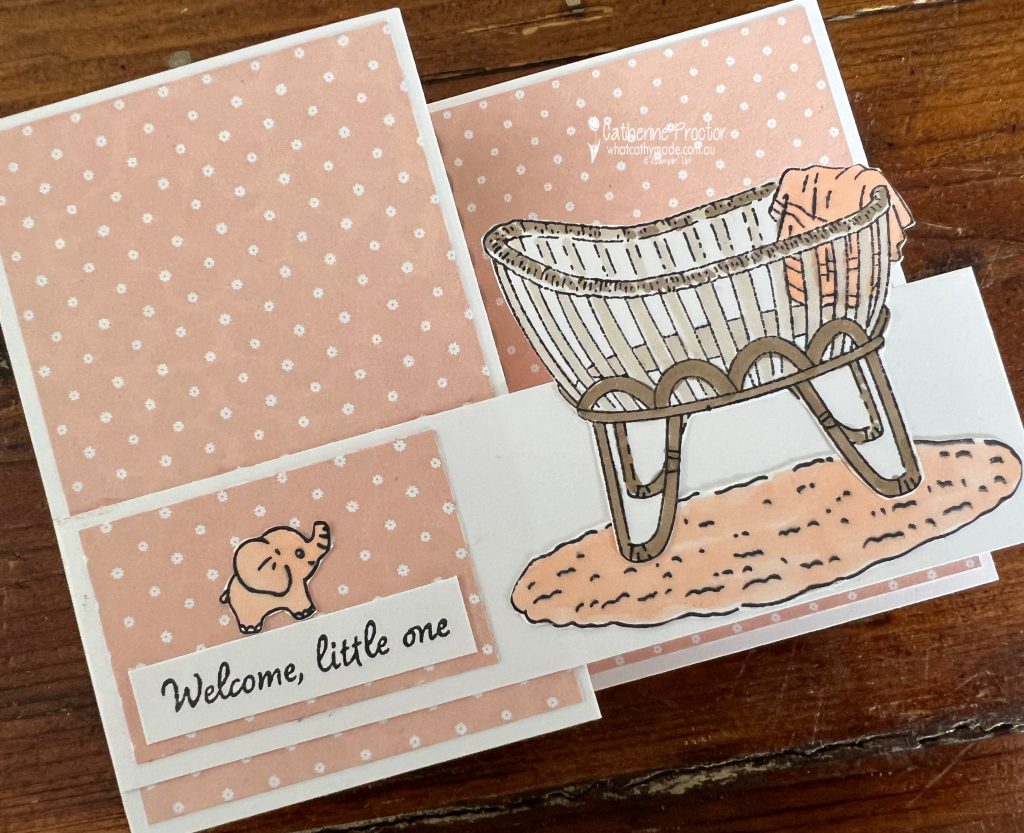
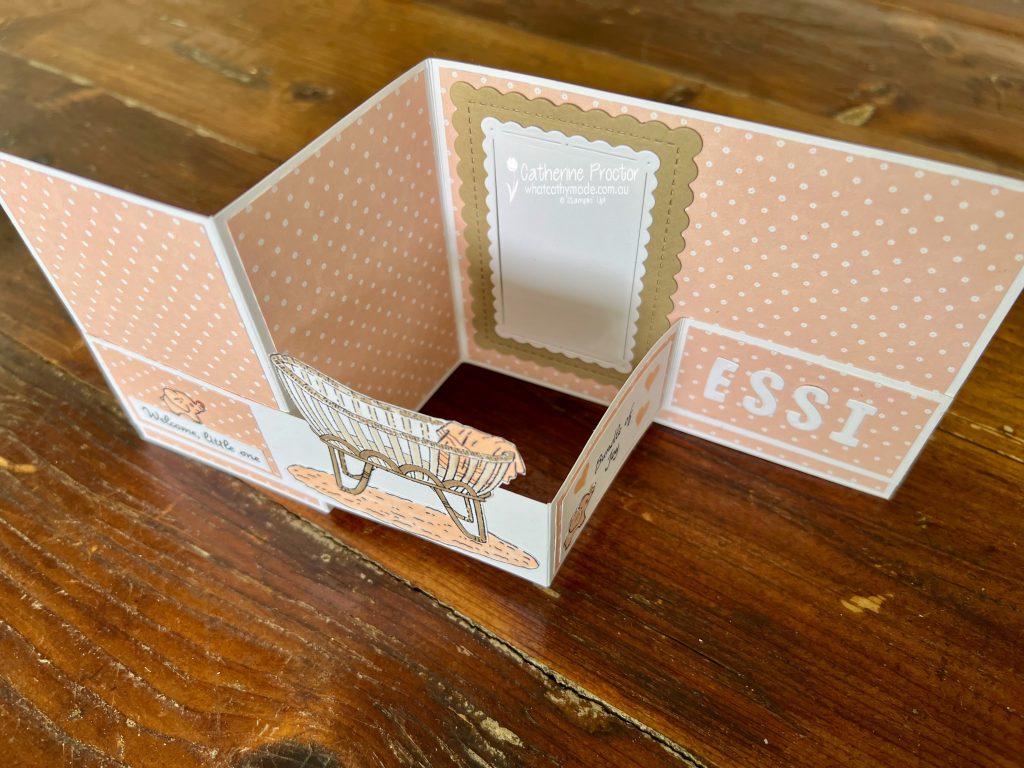
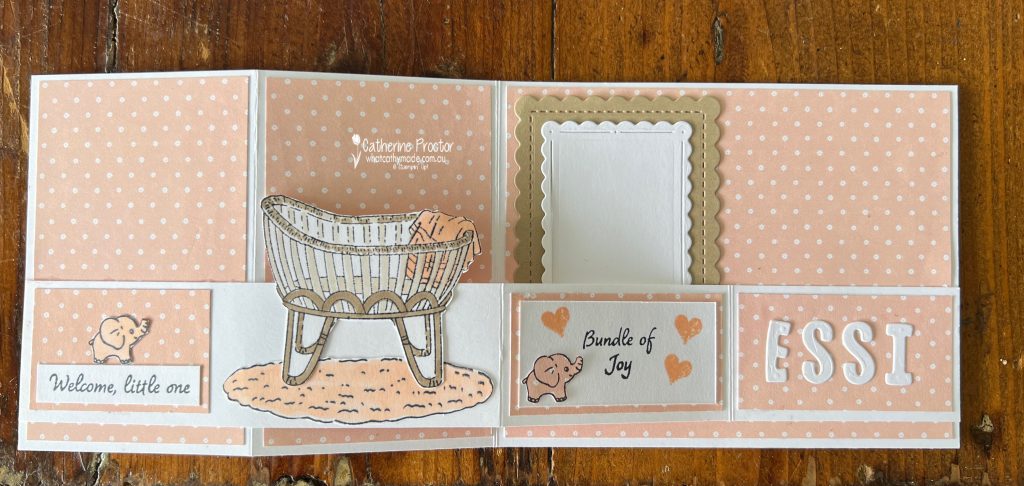
As I needed to make a new baby girl card for a friend of mine, it was the perfect opportunity to use the FREE (with any purchase over $90) “Cradled with Love” Saleabration stamp set.
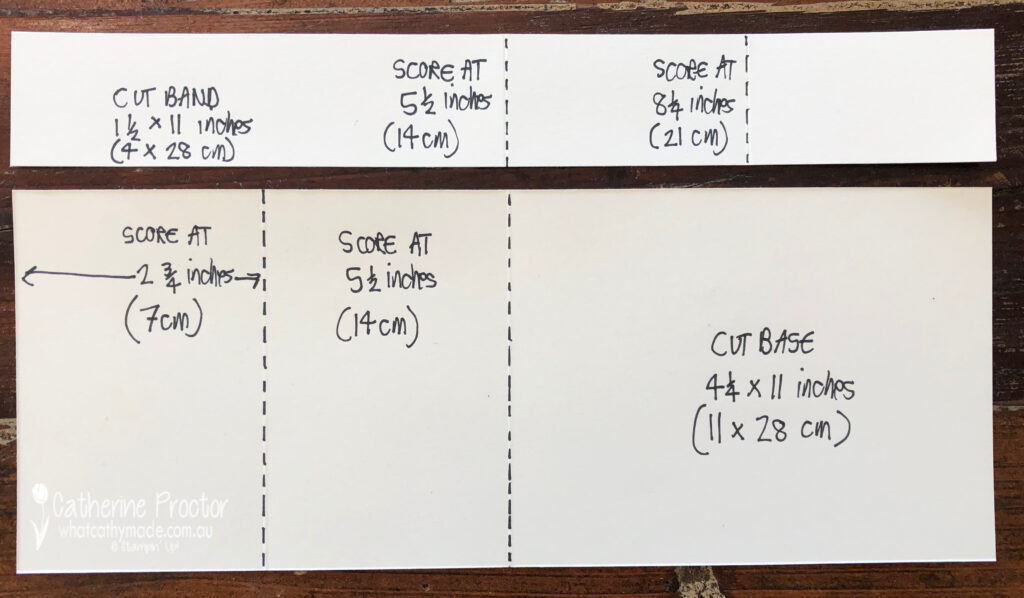
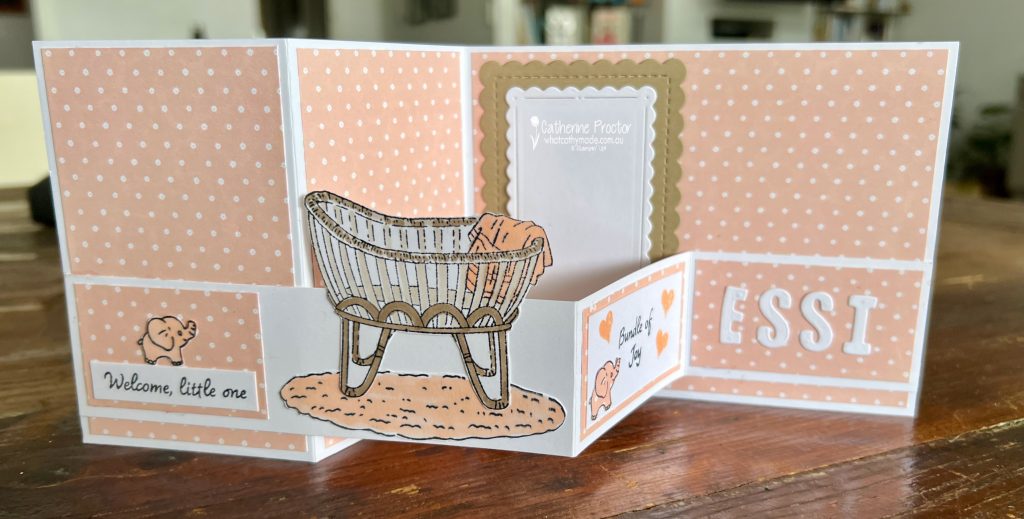
This is a pop-up fancy fold card called a Double Z card. Here is a metric template for this simple fancy fold.
After cutting, scoring and folding the card base I’ve added a DSP layer using this pretty spotted pink paper from a brand new online exclusives suite of products coming in March, called Flowering Zinnias.
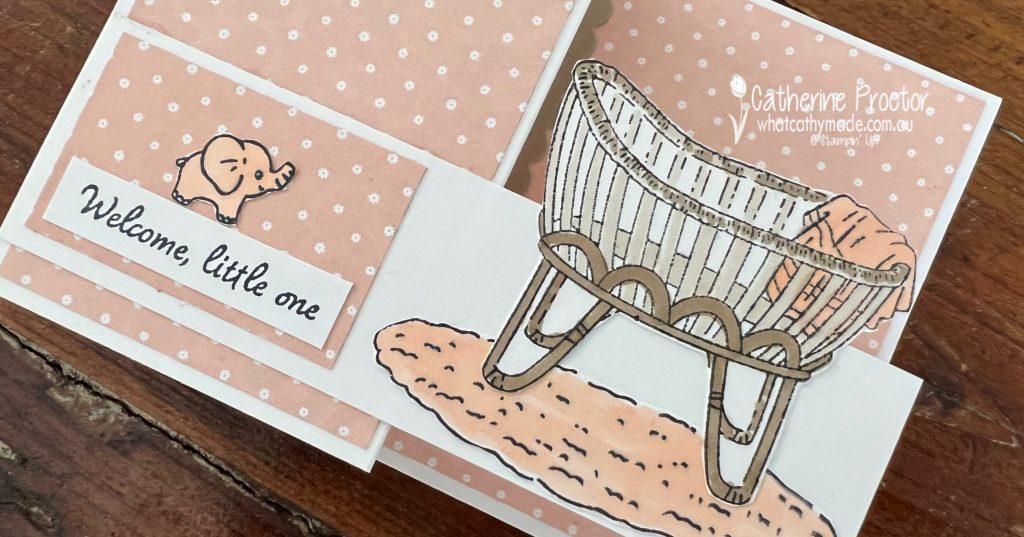
The cradle, rug and elephant were all stamped in Memento black ink and coloured using Petal Pink and Crumb Cake stampin’ blends.
I’ve used the new Mini alphabet dies to personalise this card for sweet baby Essi.
Scalloped rectangle die layers create a place to write a message inside.
Or you could also add the largest Scalloped rectangle die to the back of the card too.
In the inside fold I’ve stamped a little message and added another elephant, stamped onto the DSP and fussy cut out.
A strip of DSP adhered to the back flap of the envelope is the final touch.
Now it’s time to hop on over to our next participant, the lovely Andrea Sargent – I can’t wait to see what Andrea has made this week!
If at any time you find a broken link, you can find the complete list of all participants below.
Welcome to week thirty-six of our Art With Heart 2023-24 Colour Creations blog hop!
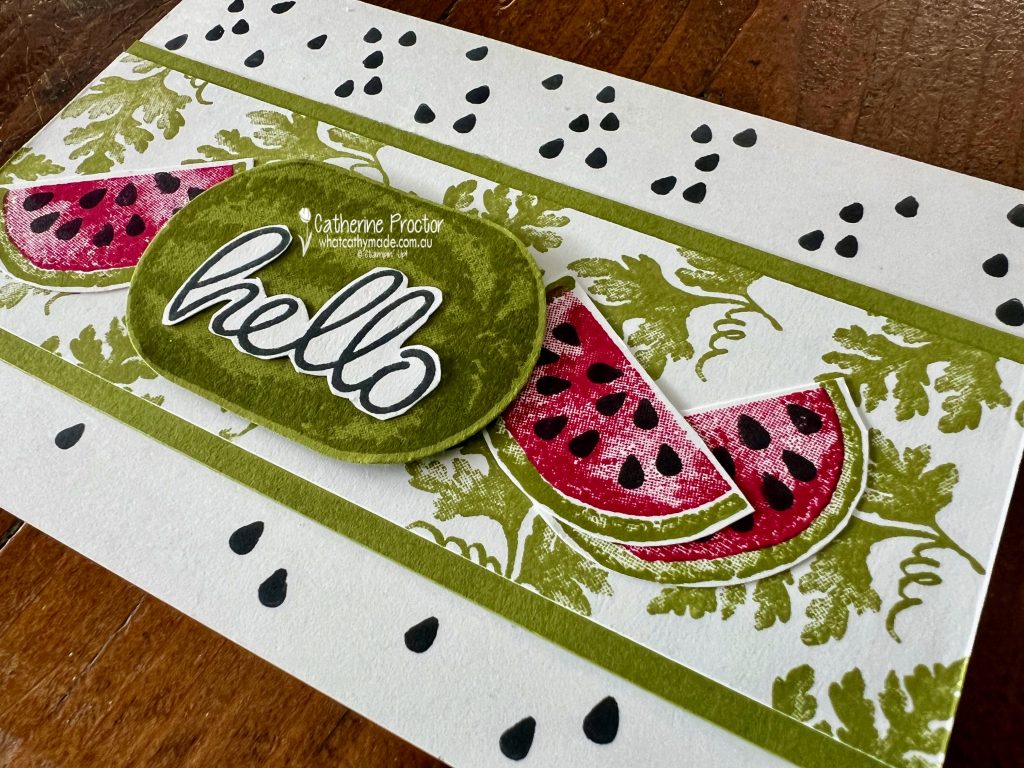
Our colour this week is Old Olive, from the Regals family. I always think of Old Olive as more of a neutral – it is my most used green as it really works well with so many other colours.
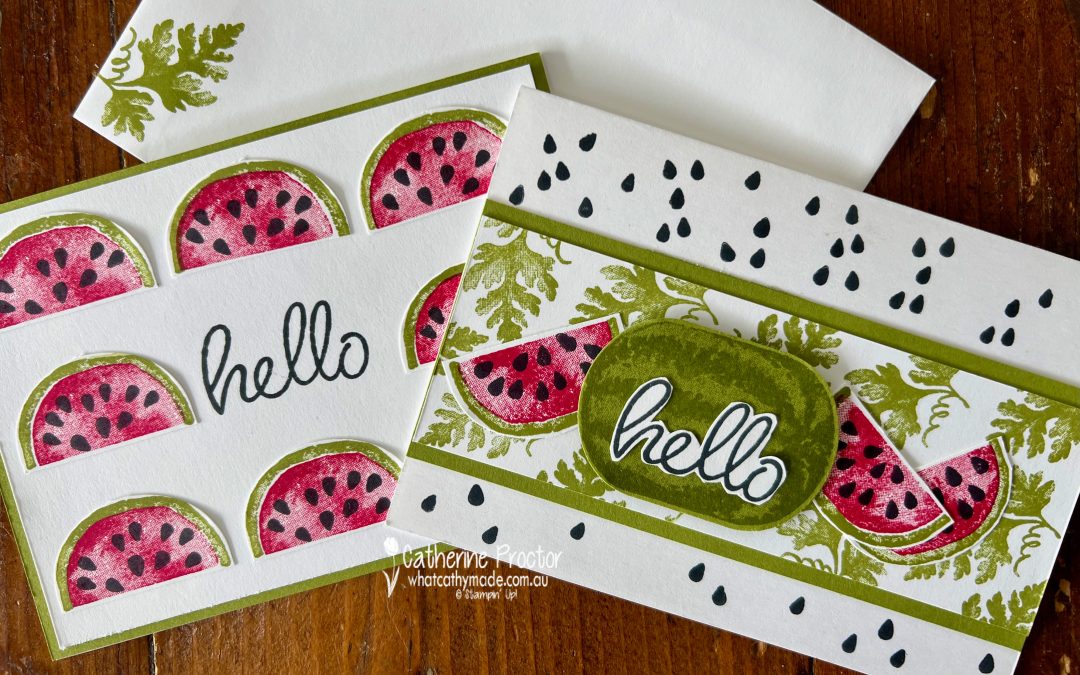
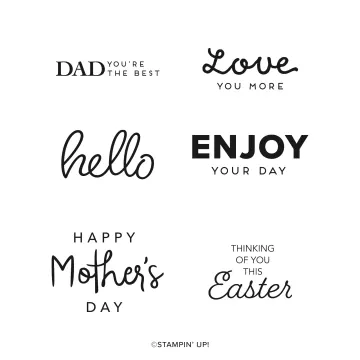
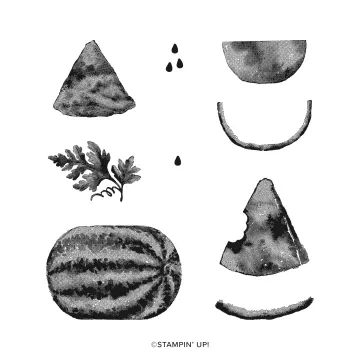
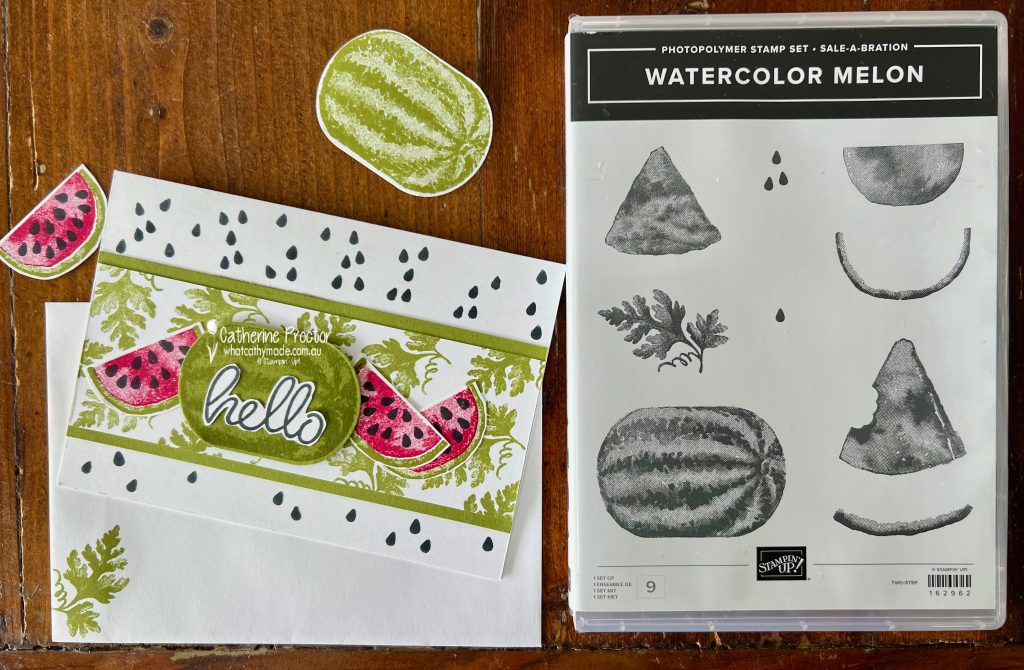
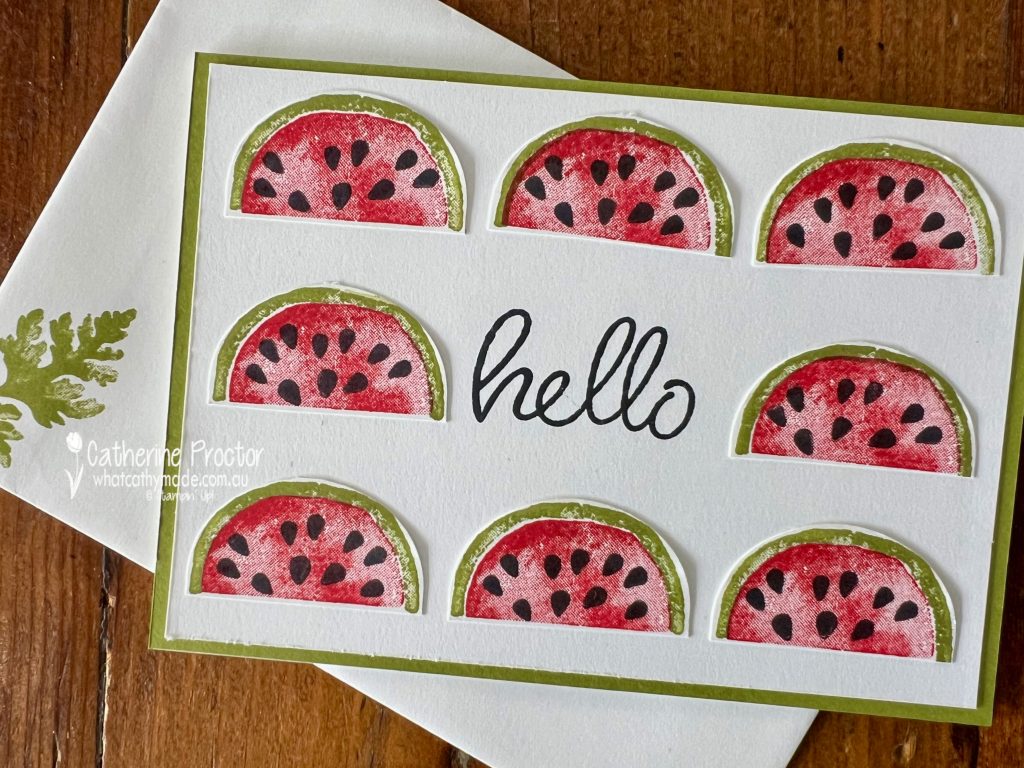
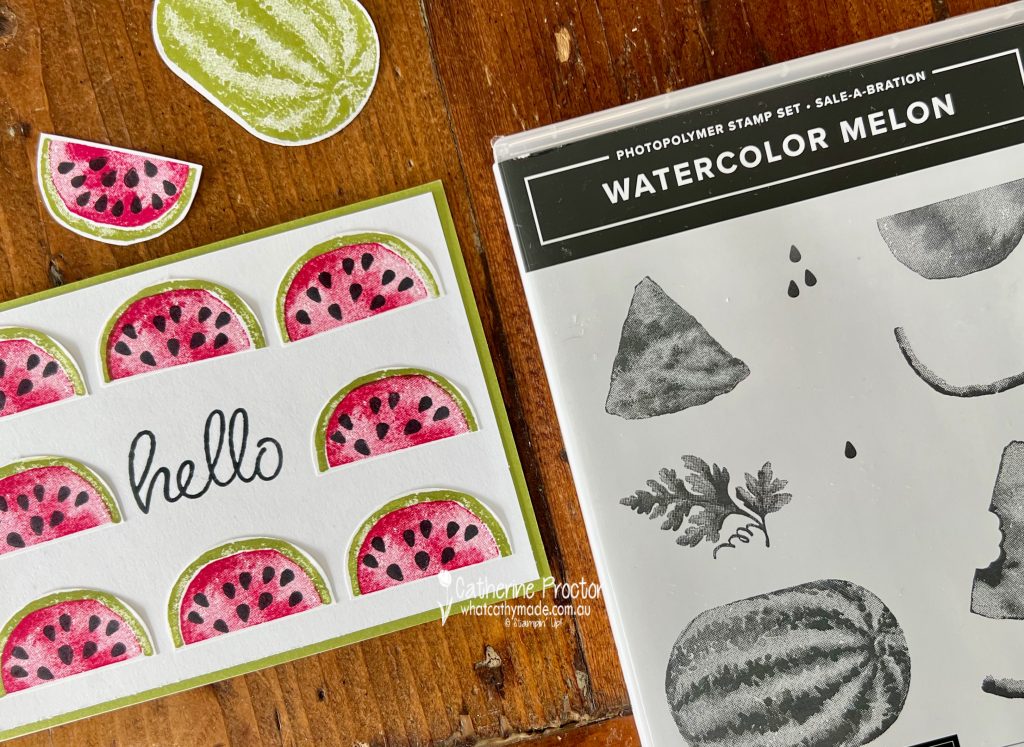
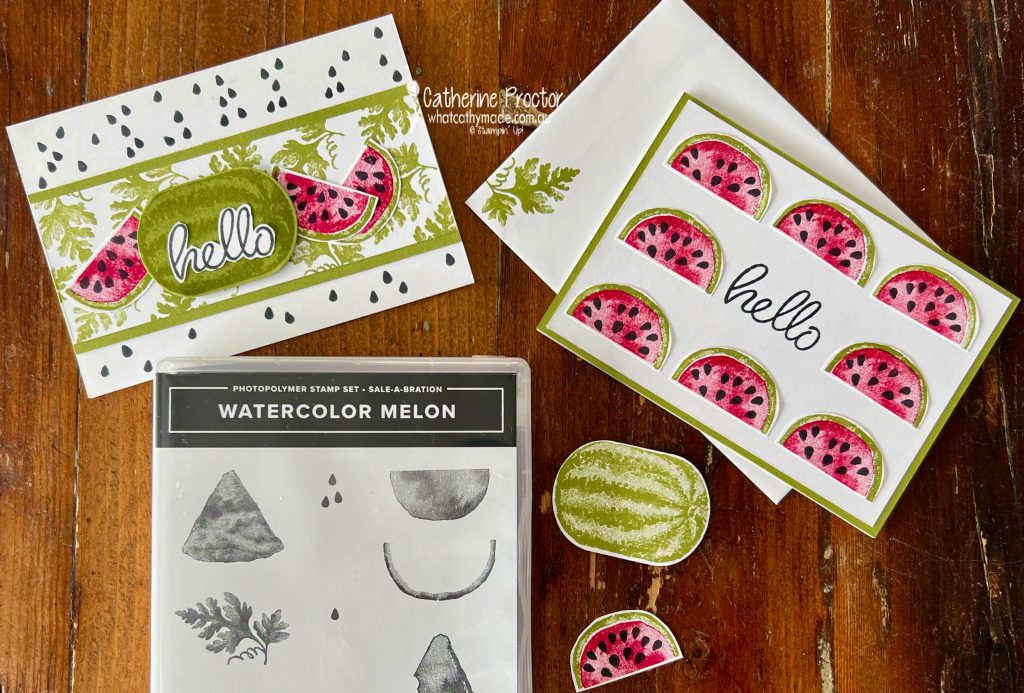
Both cards use two new stamp sets from the Sale-A-Bration catalogue which you can earn for FREE when you place any order over $90AUD: the Heartfelt Hello sentiment stamp set and the Watercolor Watermelon stamp set.
For Card one I’ve combined Old Olive with Melon Mambo, but you could use any combination of red/pink and green ink to create these sweet watermelons. This card was originally inspired by a slimline card that Peggy Noe of Pretty Paper Cards shared on Pinterest, however I’ve changed the colours, the layout, the card base shape and I’ve added a sentiment .
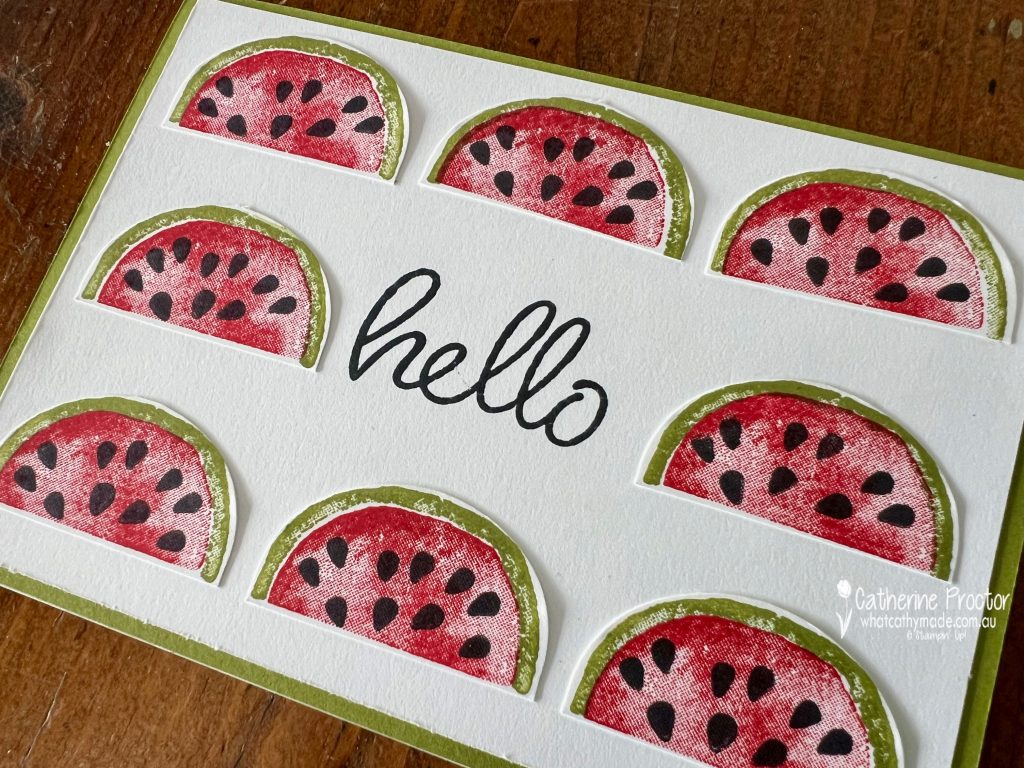
I originally stamped the whole watermelon onto Basic White card stock (see it above the card in the photo below) but it didn’t stand out enough against the Old Olive leaves on the layer behind so I stamped the watermelon in Old Olive onto Old Olive card stock instead.
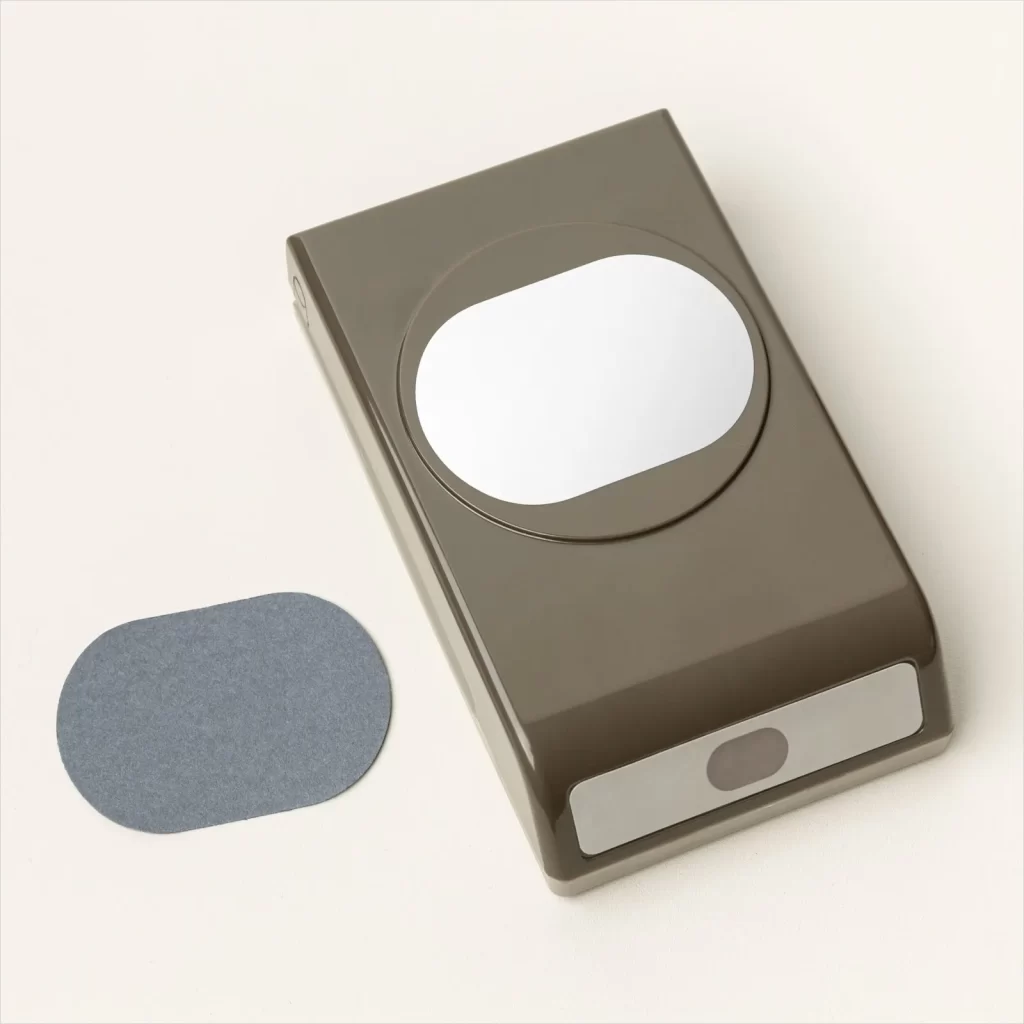
The whole watermelon and the watermelon wedges are designed to be punched out by the Modern Oval Punch – so clever!
Card two uses the simple but always so effective design trick of repetition. Eight watermelon slices have been stamped and punched out then glued to the card front around the stamped “hello” sentiment.
This “hello” sentiment on both cards is stamped in Memento Basic Black Ink.
A simple stamped Old Olive leaf dresses the envelope.
Now it’s time to hop on over to our next participant, the lovely Andrea Sargent – I can’t wait to see what Andrea has made this week!
If at any time you find a broken link, you can find the complete list of all participants below.