Is Calypso Coral a colour that makes your heart smile?
A group of the Art With Heart Team is hopping through the Stampin’ Up! colours in alphabetical order and week 14 is all about Calypso Coral.
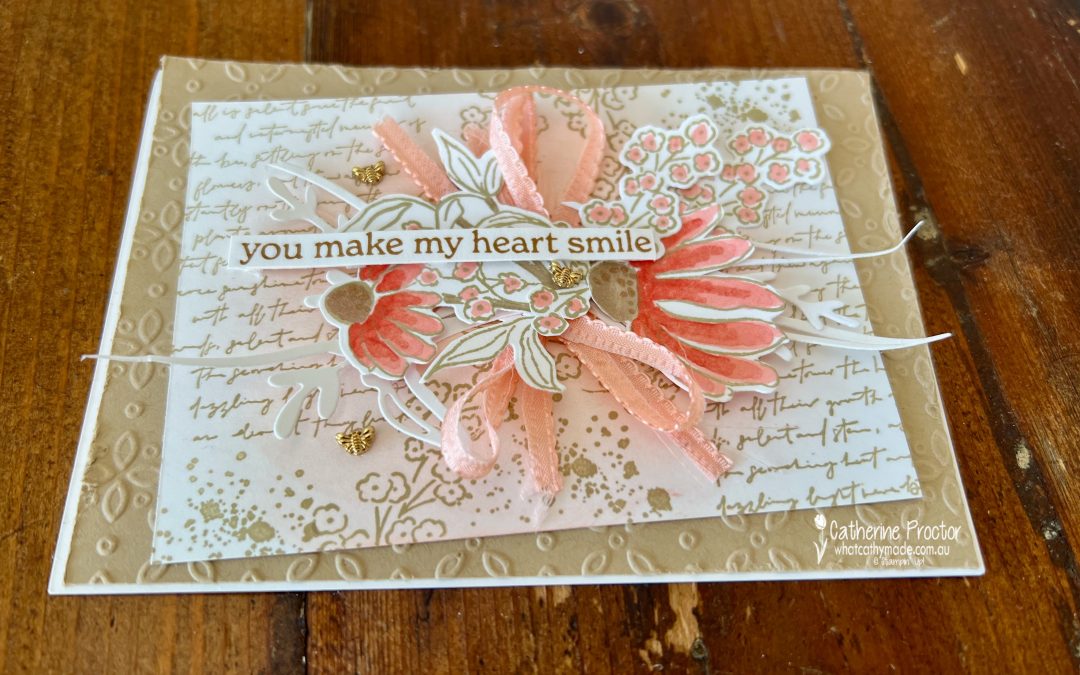
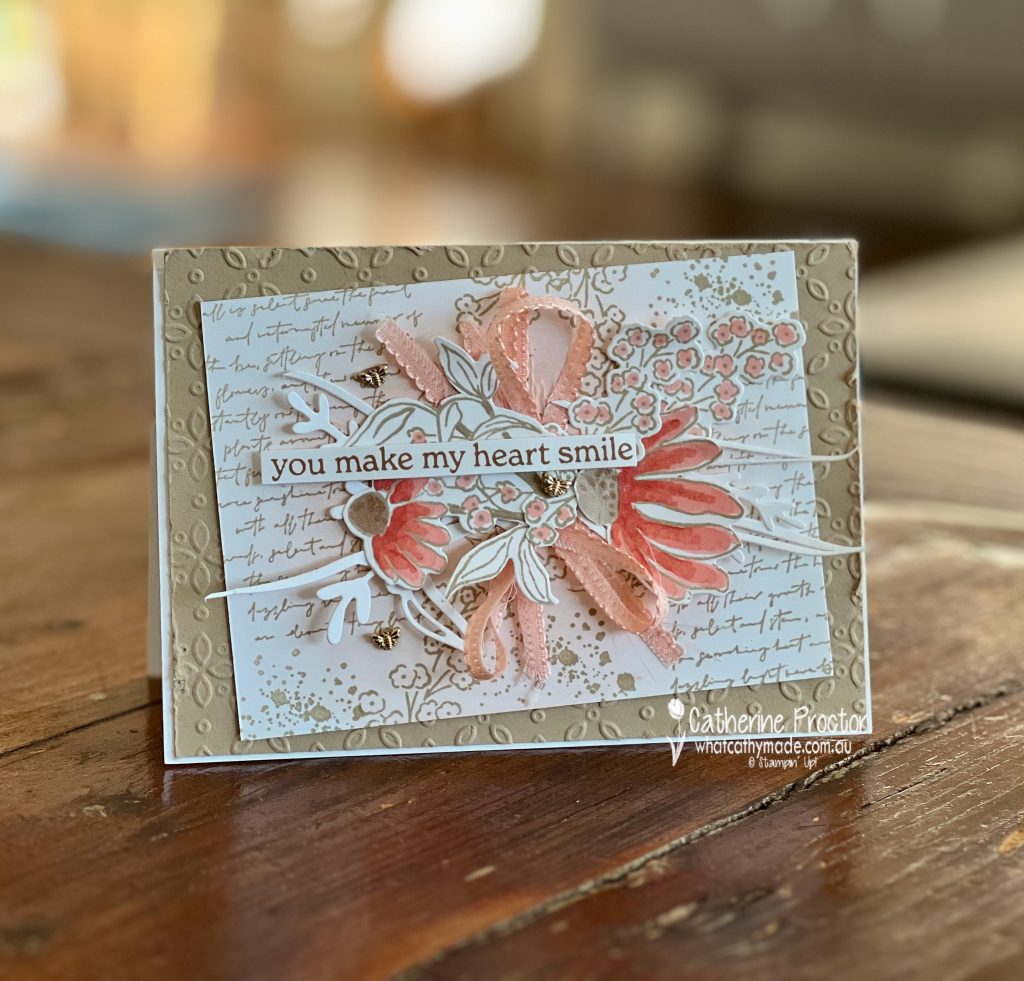
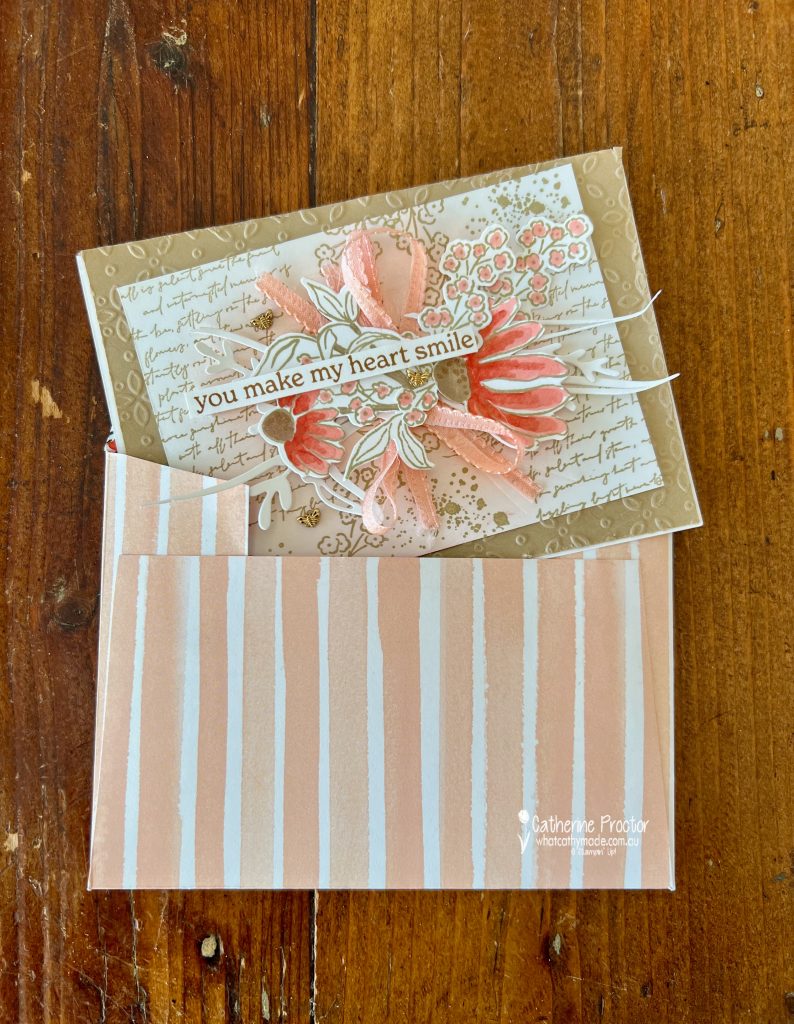
Here is my project, a shabby chic style birthday card (CASED from former Artisan team member, Tammy Wilson) that I specially created for my beautiful friend and longtime partner in crafting crime, Jenny Boffey @jenboff Boffey always makes me smile.
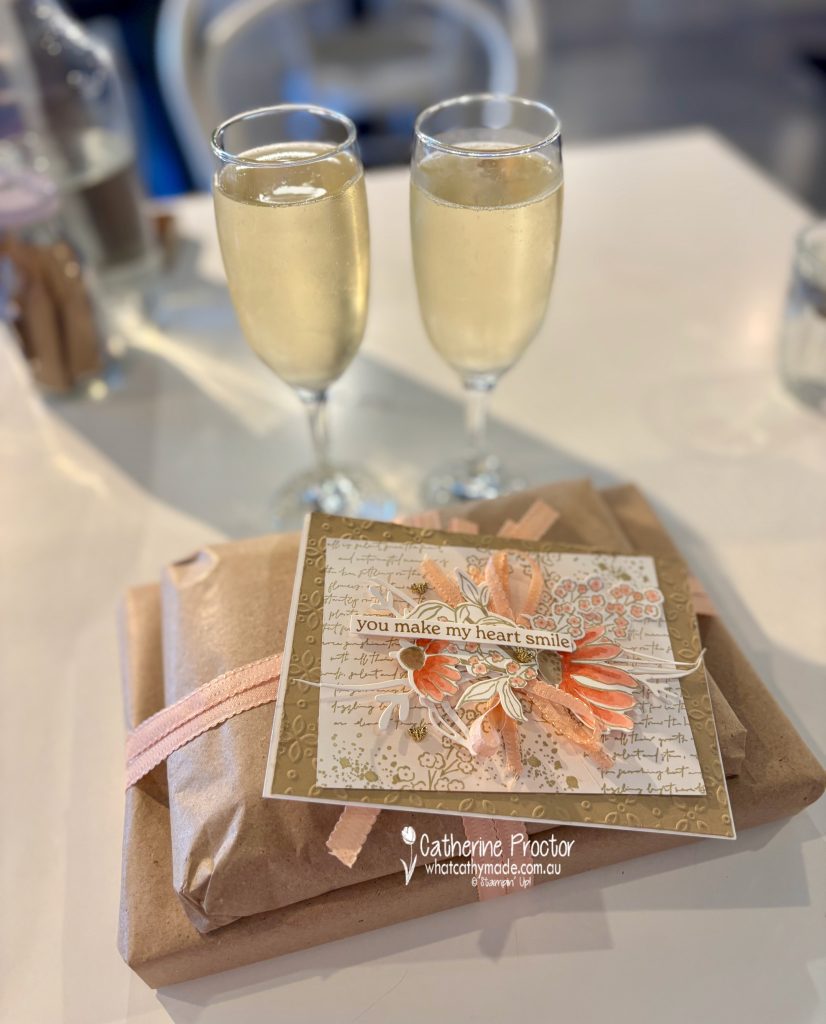
I had so much fun going out of my comfort zone to create this birthday card and I’m happy to say my Calypso Coral card definitely made Jenny smile.
We even managed to enjoy a sneaky lunchtime glass of bubbles together to toast her birthday!
How to make a shabby chic style birthday card
If you love the romantic, layered look of shabby chic cards, you can easily recreate this style using Stampin’ Up! products and a few mixed media techniques.
This card uses the Mixed Florals Bundle (Stamp Set and Dies), the Eyelet 3D Embossing Folder, the Elements of Text Stamp Set, the Scalloped Petal Pink Ribbon, Calypso Coral Ink, Blending Brush, Mixed Media Florals Dies, and Crumb Cake Cardstock and Ink to create a soft, vintage effect with plenty of texture.
Start by embossing Crumb Cake cardstock with the Eyelet 3D Embossing Folder to create a textured panel for your background. Layer this onto a Basic White card base for a clean edge.
Use various stamps from the the Elements of Text Stamp Set and the small floral stamp from the Mixed Florals Stamp Set stamped in Crumb Cake ink to add a script-style text pattern across the panel for a faded, old-paper feel. Use a blending brush
For the focal panel, stamp the largest floral image and the small floral stamp from the Mixed Florals Stamp Set in Crumb Cake and colour in with the Calypso Coral Stampin Blends. Die cut some Basic White cardstock using the large grass die.
Cut apart the large floral image and the grass die. Layer the flowers, foliage and ribbon together, to create a textured, “garden-style” arrangement.
Cut a piece of Petal Pink 3/8″ (1 cm) Scalloped Ribbon in half lengthway and add loops of Scalloped Petal Pink Ribbon between the flowers for extra softness and texture.
Finish the card by stamping the sentiment “you make my heart smile” (from the Layers of Beauty Stamp Set) in Pecan Pie ink and layering it across the floral cluster.
A few Tiny Bee Trinkets embellishments add a final touch of elegance.
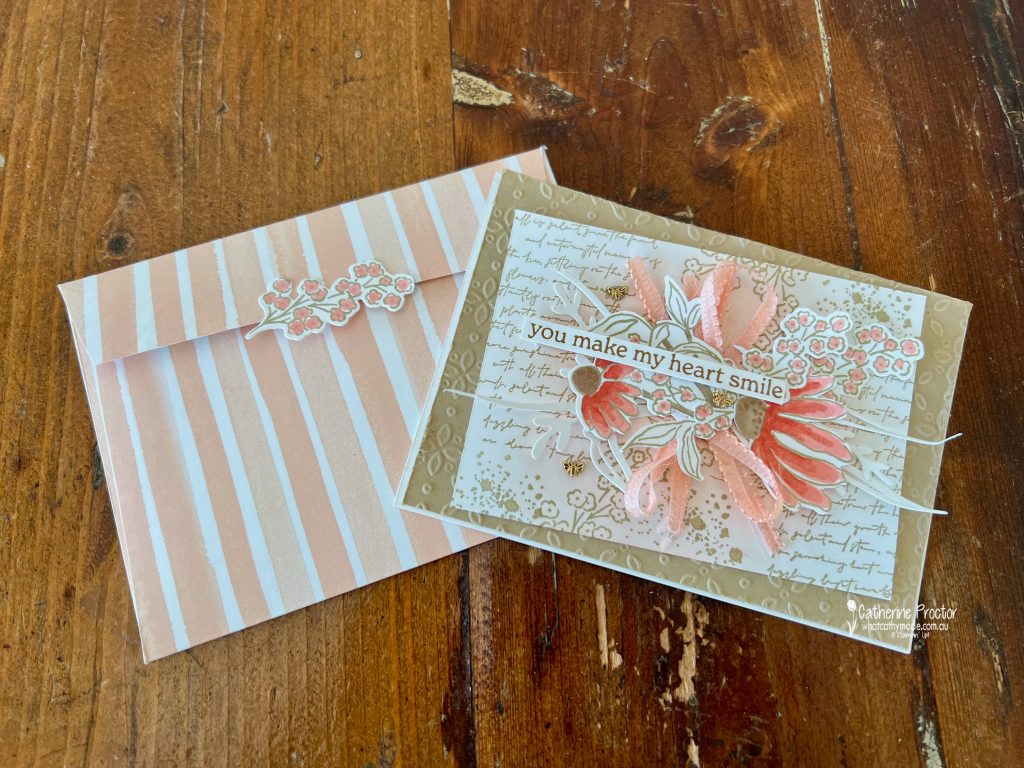
The handmade envelope was created using the Mixed Media Florals Designer Series Paper.
I used another small floral stamp from the Mixed Florals Stamp Set to create the closure on the back of the card. The “Happy Birthday” stamp is from the Birthday Celebration Stamp Set.
Take a look at some more Calypso Coral inspiration on our Insta Hop!
Our blog hop is now an Instagram hop but the good news is that you don’t need to have an Instagram account to view all of the other projects!
Simply copy any of the Insta handles below into a new search window to follow the Instagram hop at any point.
Next in our Hop is Andrea @andreaksargent. Be sure to check out her gorgeous project/s.
The full list of this week’s InstaHop is listed below:
Andrea @andreaksargent
Sharon @sharondaverncreates
Helen @apaperparadise
Rachel Woollard @handstamped_by_rachel
Rosa @hum.and.stamp
Kate @craftwithkate
Kirsty @crafty.littlemiss
Leanne @createwithleanne2
Theresa @teegeeinspirations
Vicki @vickiboucher
We’ll be back next Wednesday when we are showcasing Cherry Cobbler.I hope you can join us then!
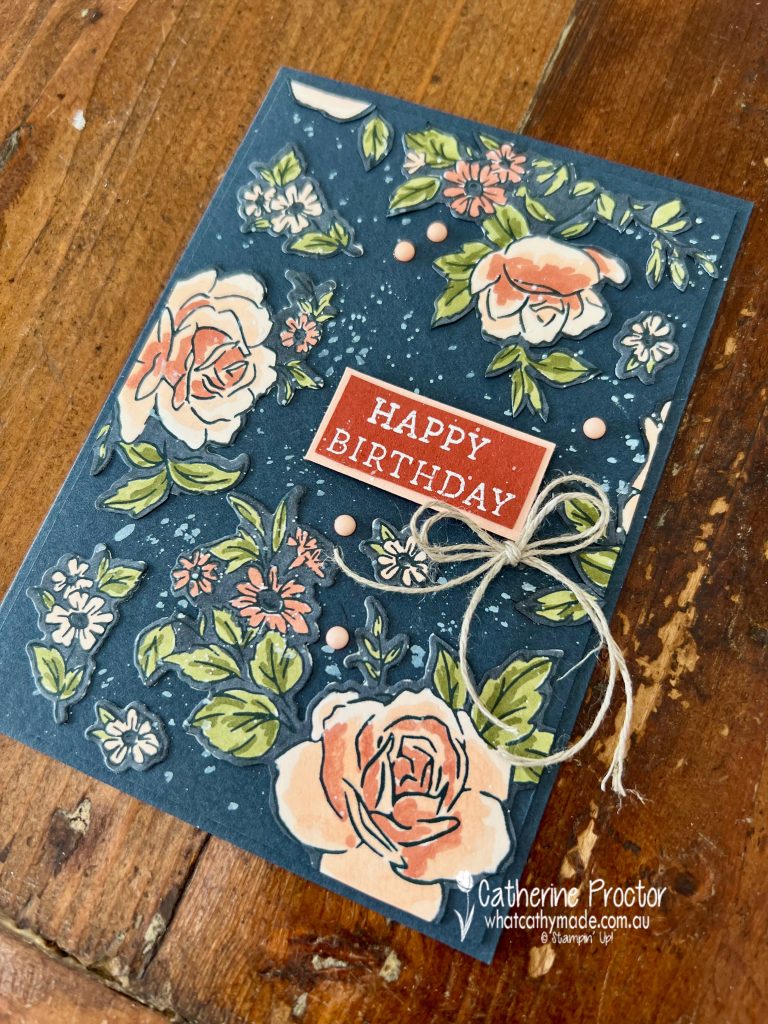
Welcome to Week 3 of the brand new 2025-26 AWH Colour Creations Insta Hop!
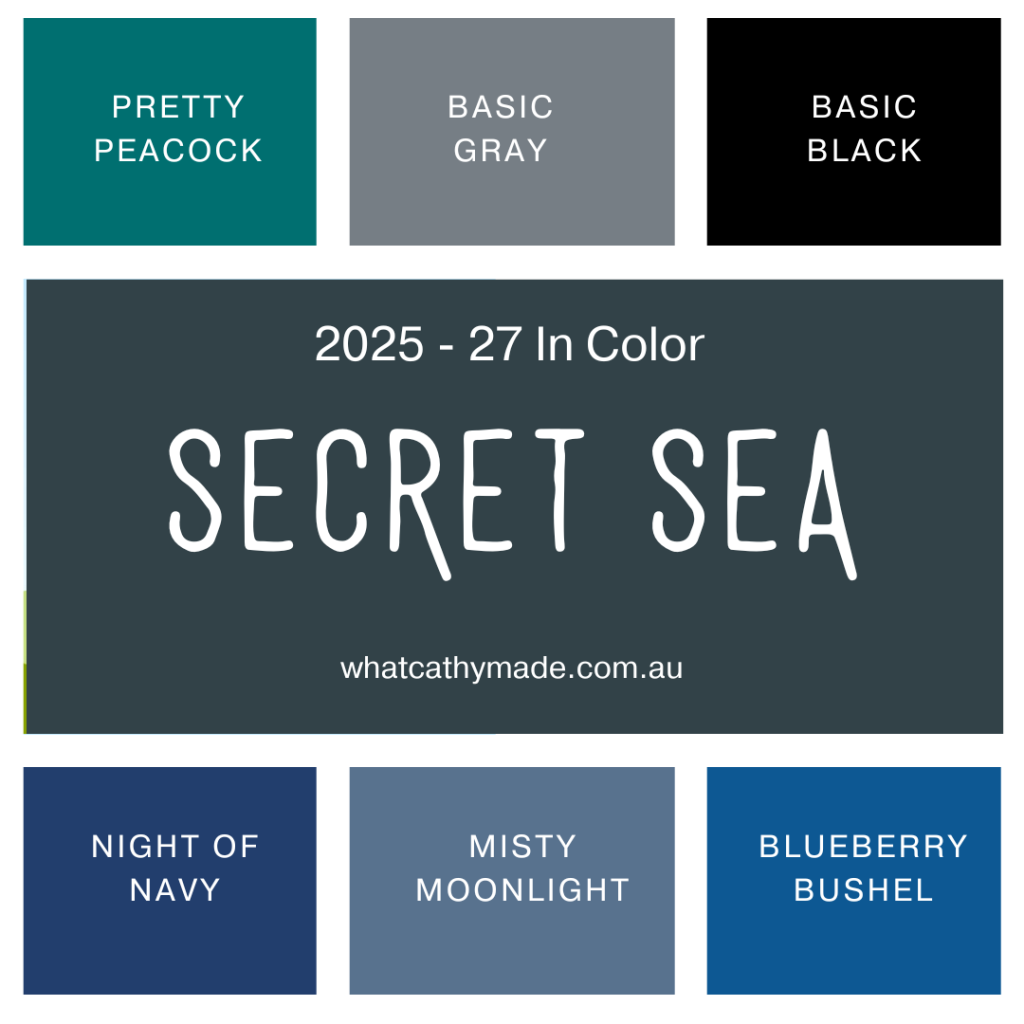
For the first five weeks of our AWH Colour Creations Insta Hop we are introducing the five new 2025-26 In Colors in alphabetical order and this week we are showcasing Secret Sea.
Secret Sea is a very dark blue-grey-green neutral colour that works beautifully with both warm and cool tones. Here’s a graphic I created to show how Secret Sea compares to the other dark blues and, grays and greens in the Stampin’ Up! range.
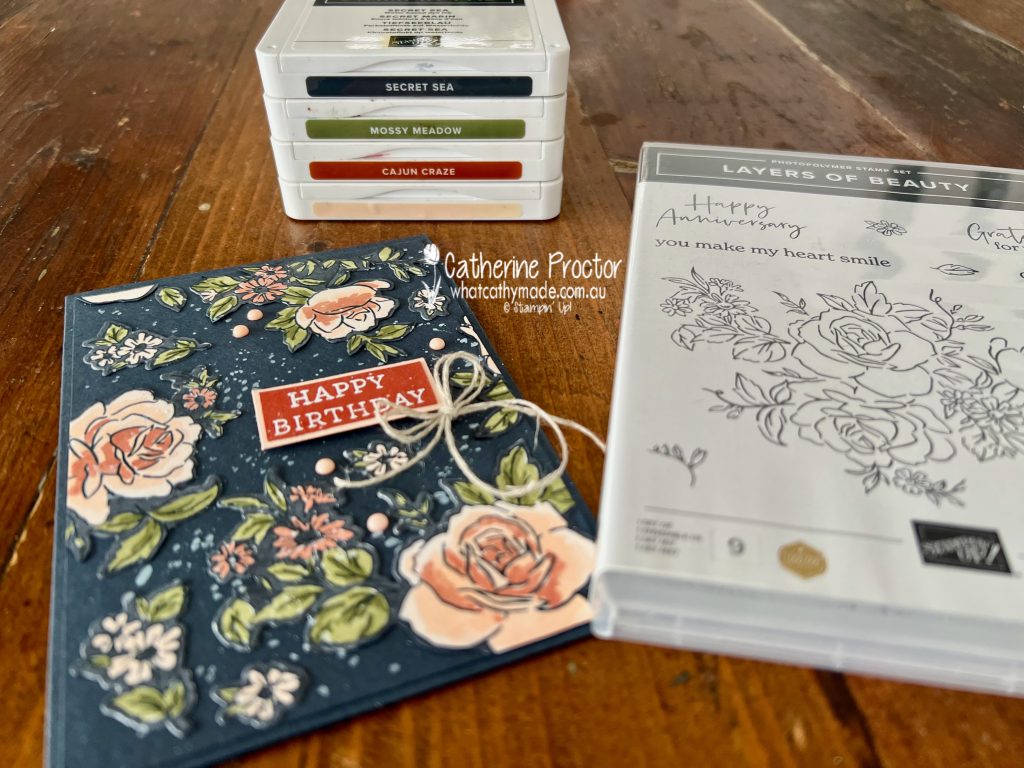
For this week’s project, I was inspired by the colour combination in the Boho Vibes DSP and so I’ve paired Secret Sea with Mossy Meadow, Petal Pink, and a pop of Cajun Craze for contrast.
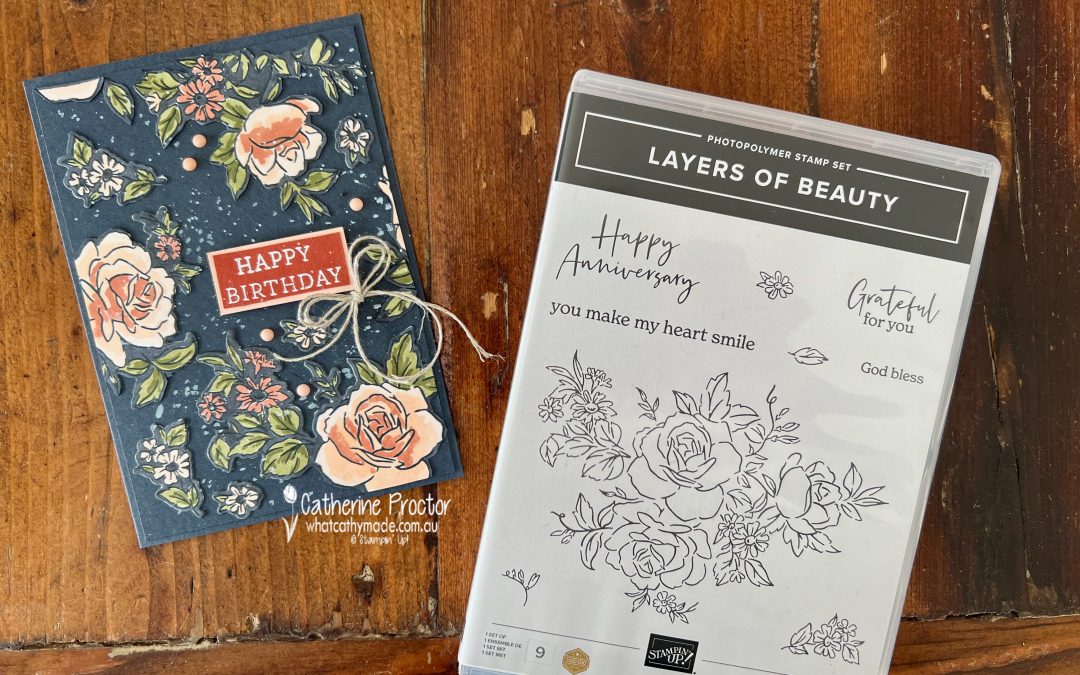
Secret Sea provided the perfect dark background to highlight the stunning floral imagery in the Layers of Beauty bundle.
For this card I didn’t use the masks included in the bundle. I stamped the floral and leaf images from the Layers of Beauty stamp set in Secret Sea and then coloured the images using Stampin’ Blends in:
Petal Pink (flowers)
Cajun Craze (floral centres and smaller flowers)
Mossy Meadow (leaves and foliage)
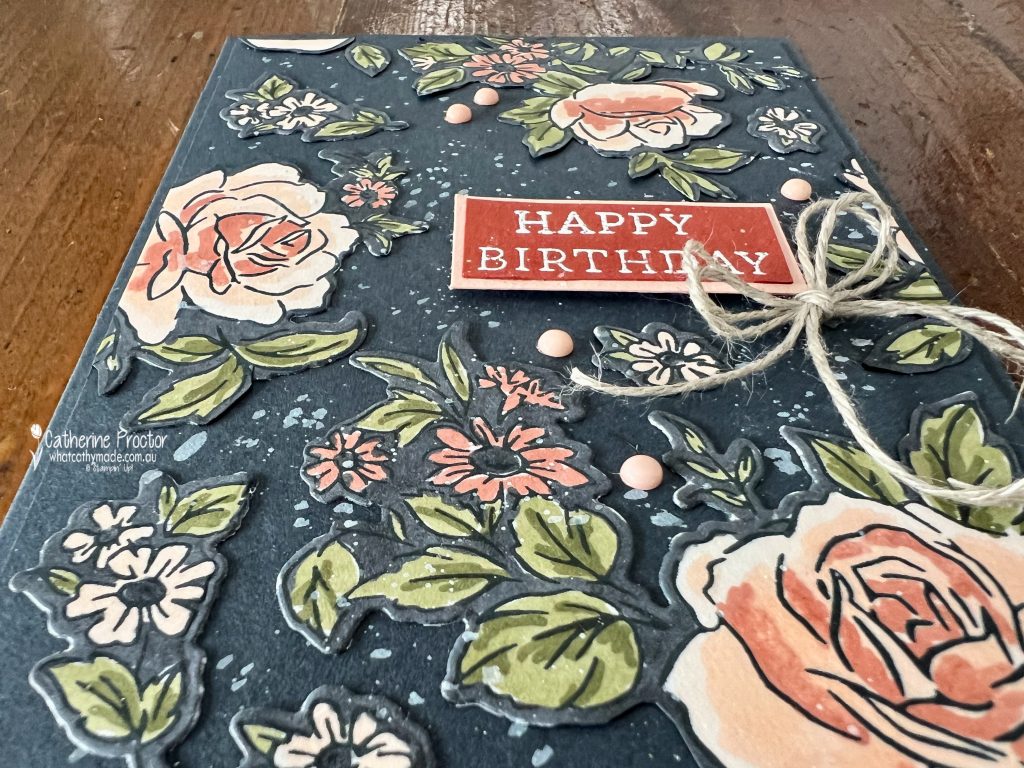
Once coloured, I die cut the entire panel using the coordinating Layers of Beauty dies and then cut the large floral image into three smaller pieces.
I layered the die cut pieces back onto a Secret Sea base to create a beautiful tone-on-tone effect with added dimension. You can really see the shadow and lift in the close-up photos!
TOP TIP – I used my Secret Sea Stampin’ Blend to colour the white cardstock edges of the die cut flowers and leaves.
To tie everything together, I used a splatter effect across the background – created by flicking watered-down Whisper White craft ink with a brush – for added texture.
The “Happy Birthday” sentiment comes from the Simply Said stamp set. I stamped it in Versamark Ink, heat embossed with WOW white embossing powder onto Cajun Craze card stock.
I backed the sentiment with Petal Pink cardstock to help it pop against the darker tones of the Secret Sea cardstock.
A bow of natural linen thread and a scattering of Petal Pink opaque dots adds softness and ties in with the colour palette.
The Petal Pink embellishments are from the Muted Palette Dots, which are part of the Boho Vibes Suite Collection.
Secret Sea is definitely a keeper in my craft stash. I love how it allows warmer tones like Cajun Craze and Petal Pink to shine.
Don’t forget to hop through the rest of the Art With Heart team to see more stunning Secret Sea projects!
Our blog hop is now an Instagram hop but the good news is that you don’t need to have an Instagram account to view all of the other projects!
Simply copy any of the Insta handles below into a new search window to follow the Instagram hop at any point.
Next in our Hop is Michele @taylormadedesigns58. Be sure to check out her gorgeous project/s.
The full list of this week’s InstaHop are listed below:
Michele @taylormadedesigns58
Kirsty @crafty.littlemiss
Andrea @andreaksargent
Vicki @vickiboucher
Leanne Mitchell @createwithleanne2
Theresa @teegeeinspirations
Kate @craftwithkate
Rachel W @handstamped_by_rachel
Rachel P @rachelpalmieristampin
Rosa @hum.and.stamp
Helen @apaperparadise
Cathy @whatcathymade – you are here!
If you live in Australia, you can find and purchase the products I’ve used for my card in my Stampin’ Up! Online Store.
I’ll be back next Wednesday night with Week 4 of our 2025 – 2026 AWH Colour Creations Insta hop when we will be showcasing Strawberry Slush, another of the 2025 – 27 InColours.
Welcome to week nine of our Art With Heart 2024-25 Colour Creations blog hop!
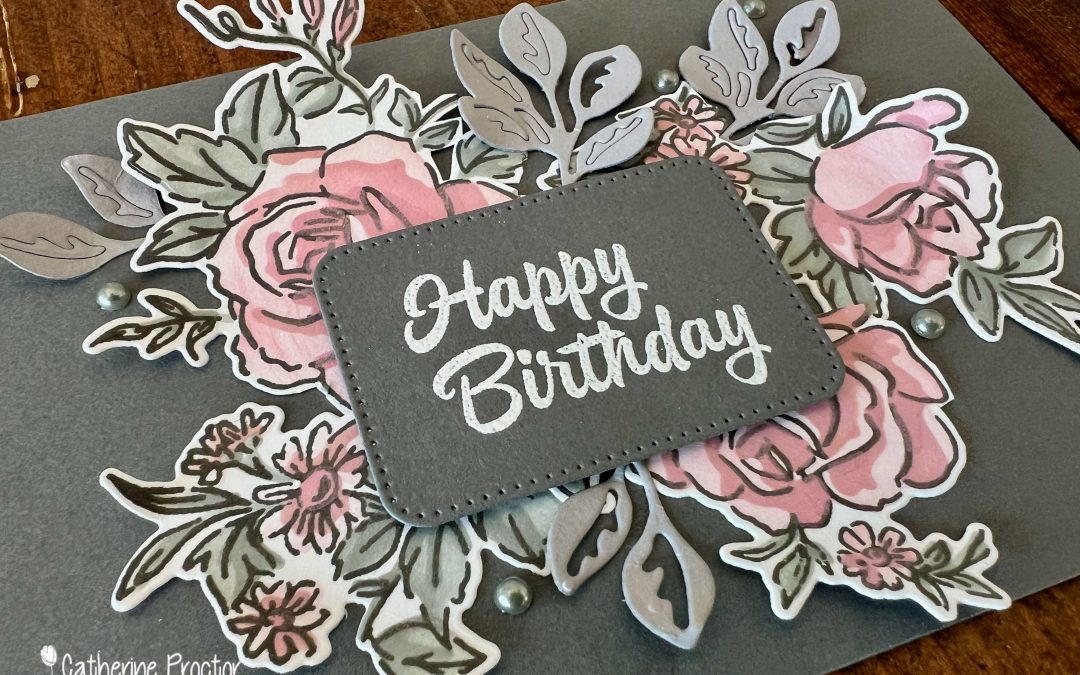
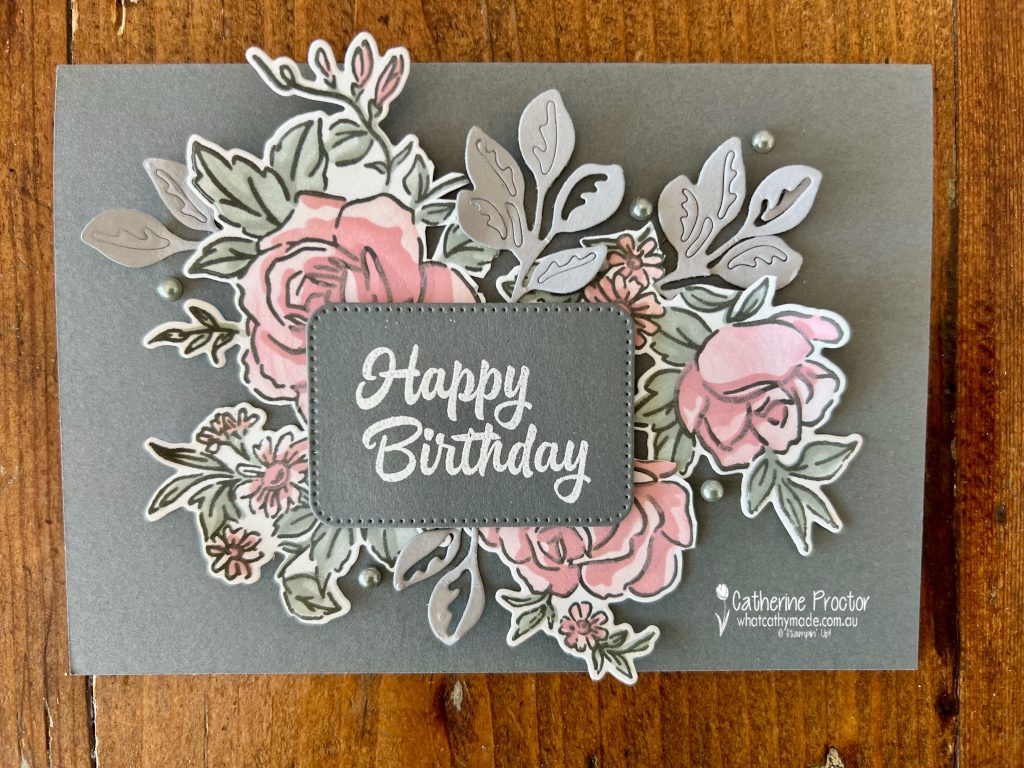
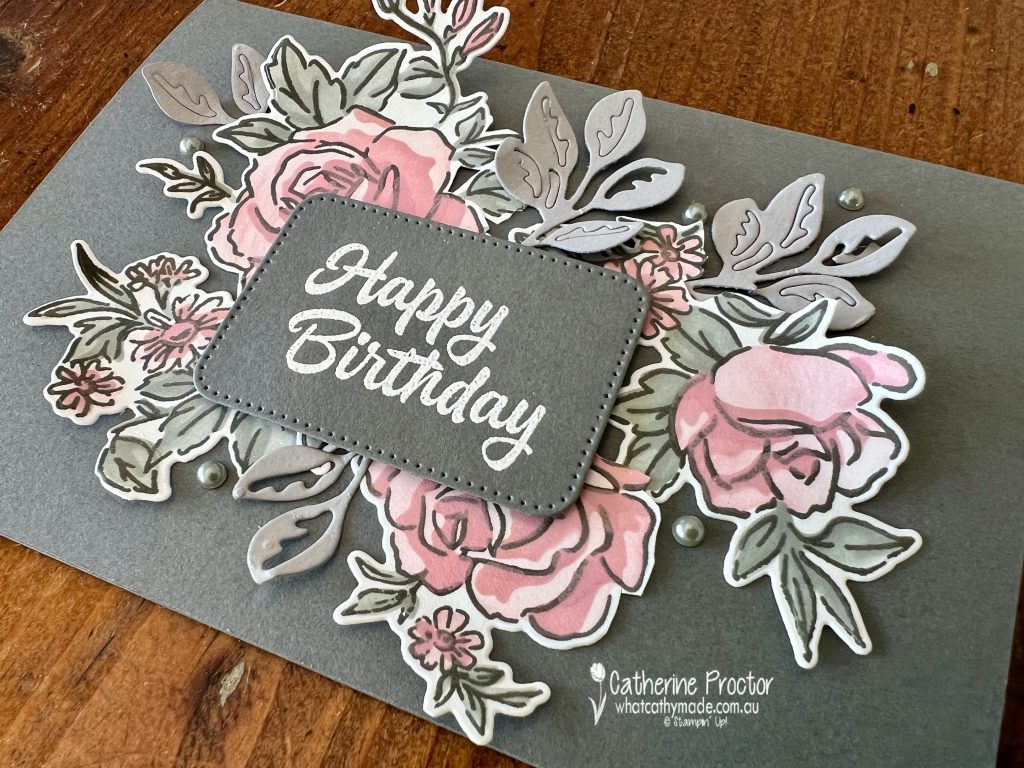
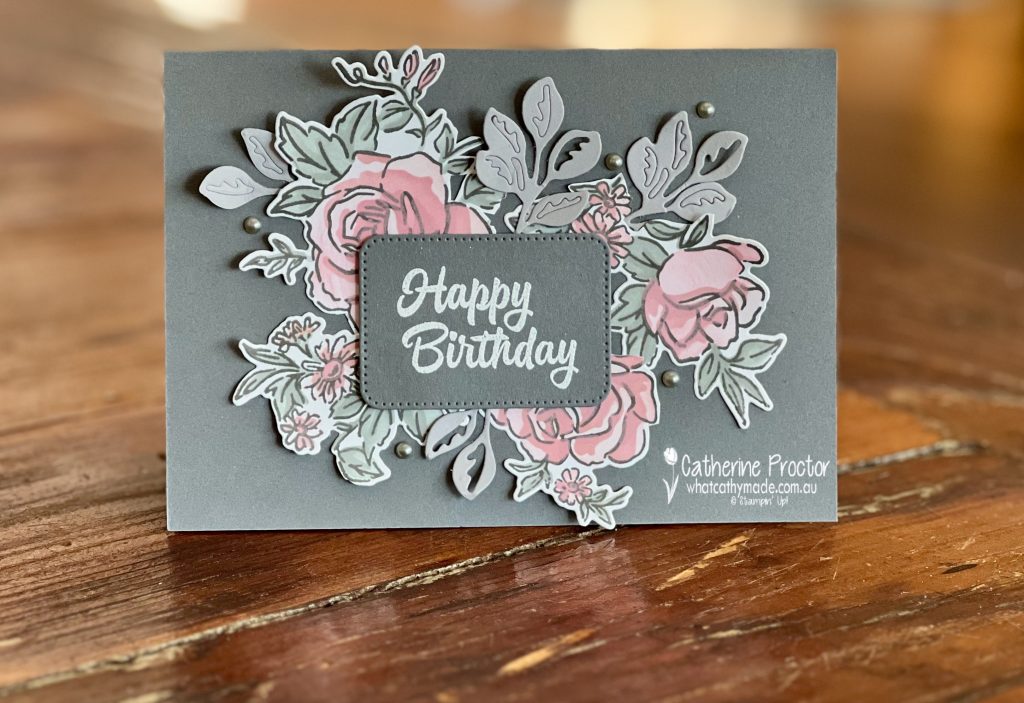
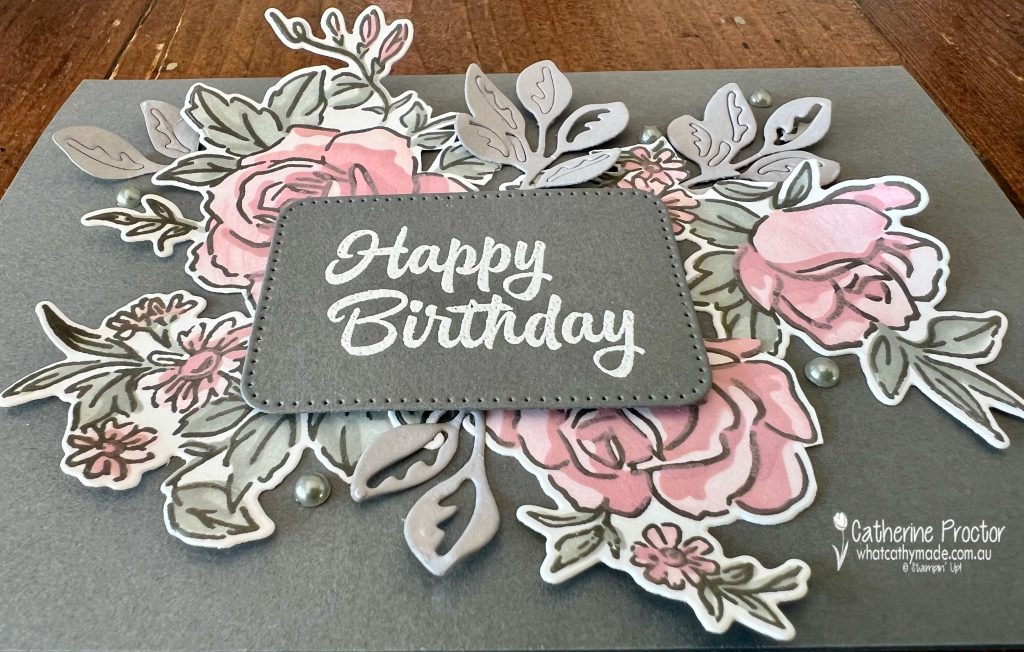
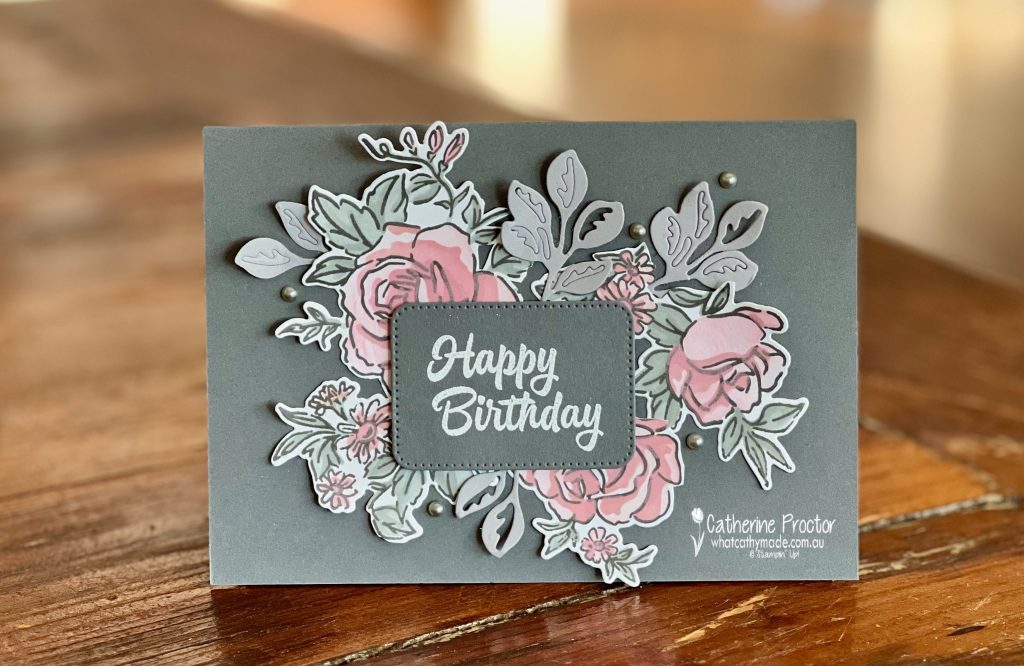
This week we’re featuring a dark gray neutral called Basic Gray. Although this is a great colour for landscape scenes and masculine cards, I decided to show how it can also work well for a feminine card.
This is the colour combination I’ve used for my card.
I can’t stop using this stunning Layers of Beauty bundle. For masks 1, 2 and 3 I’ve used Pretty in Pink. The colour gets darker every time I add another mask layer.
The leaves in the main stamped image are masked in Basic Gray.
After stamping and colouring the large floral image from the Layers of Beauty stamp set I cut it apart and arranged it on the card behind the white heat embossed “Happy Birthday” sentiment.
I’ve added some extra die cut Smoky Slate leaves using dies from the Layers of Beauty dies, finishing the card with Basic Gray Pearls.
Now it’s time to hop in over to our next participant, the lovely Ros Davidson – I can’t wait to see what Ros has made this week!
If at any time you find a broken link, you can find the complete list of all participants below.
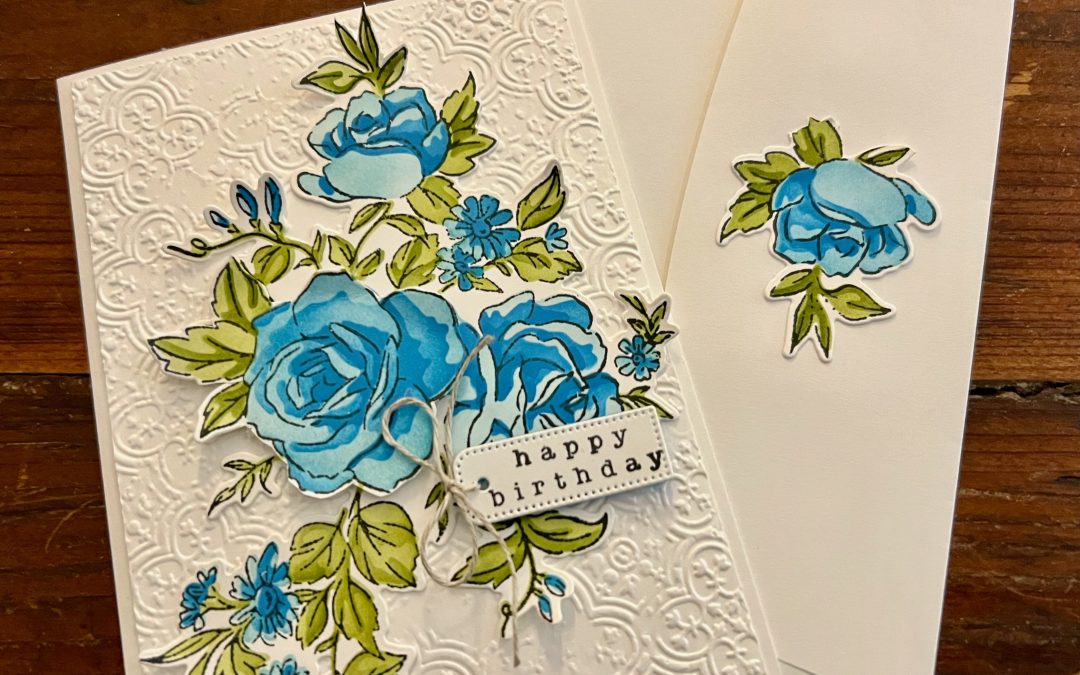
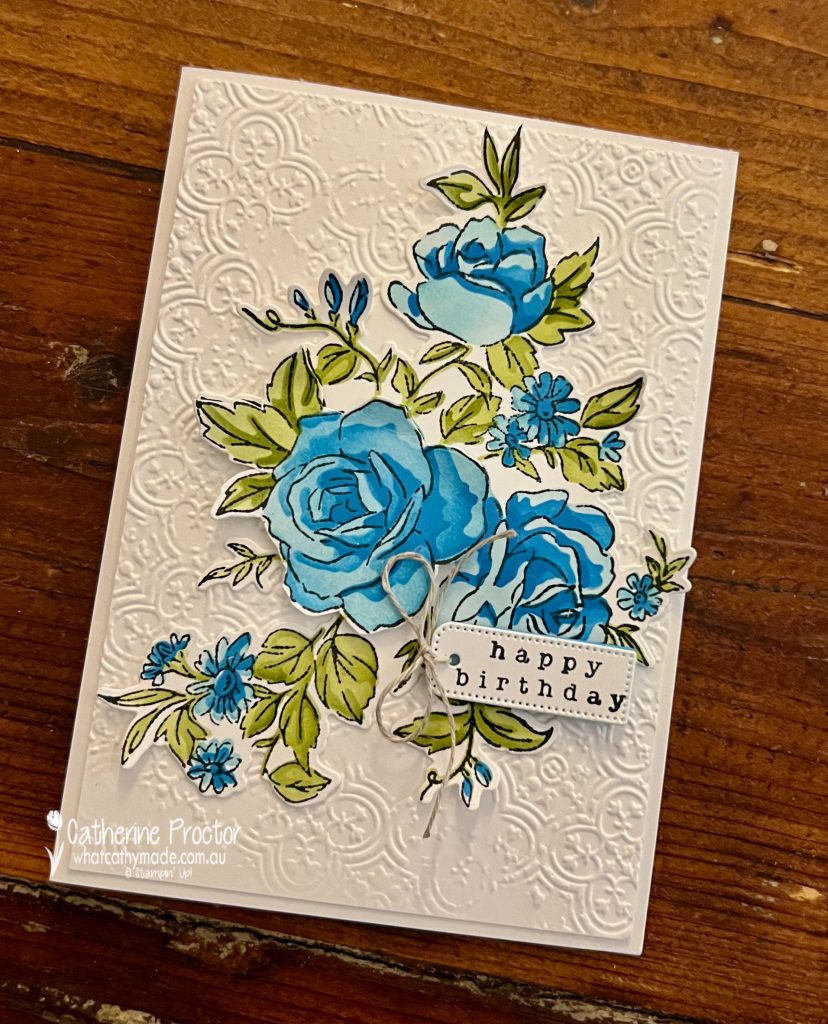
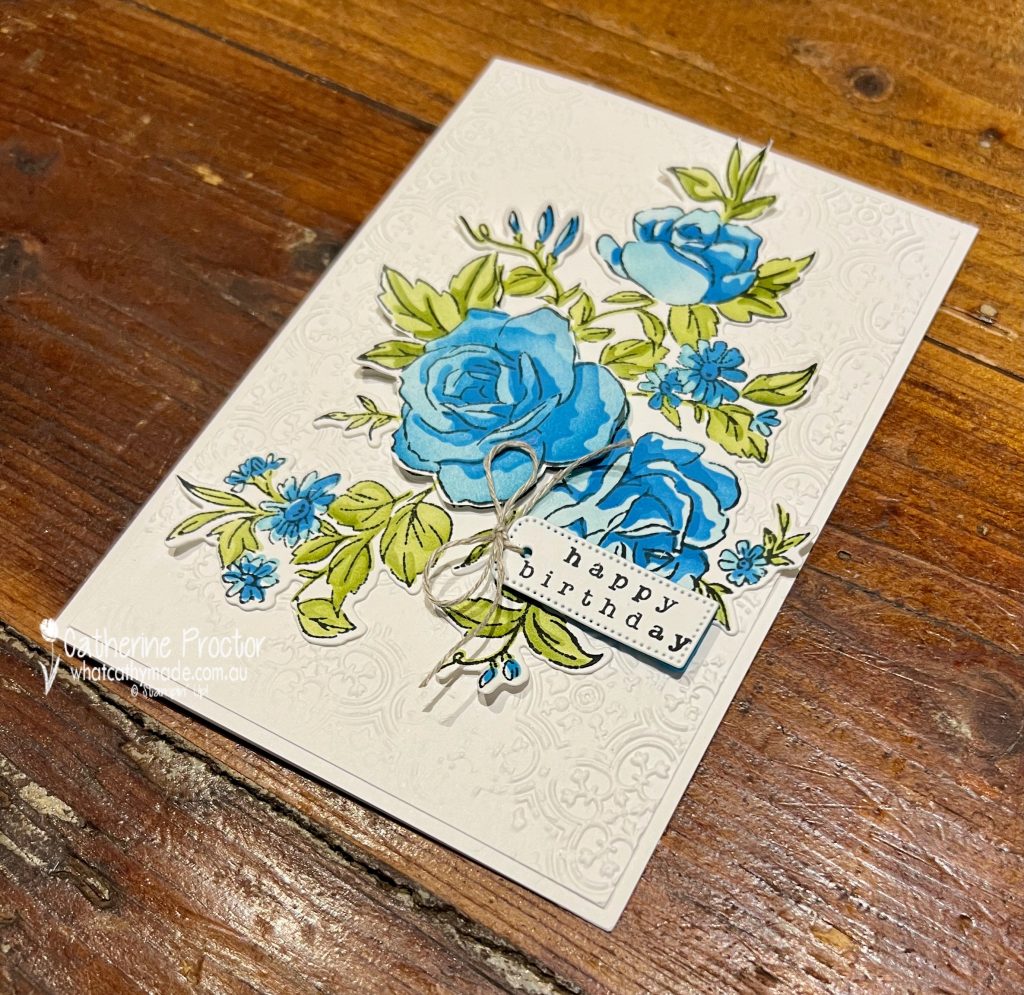
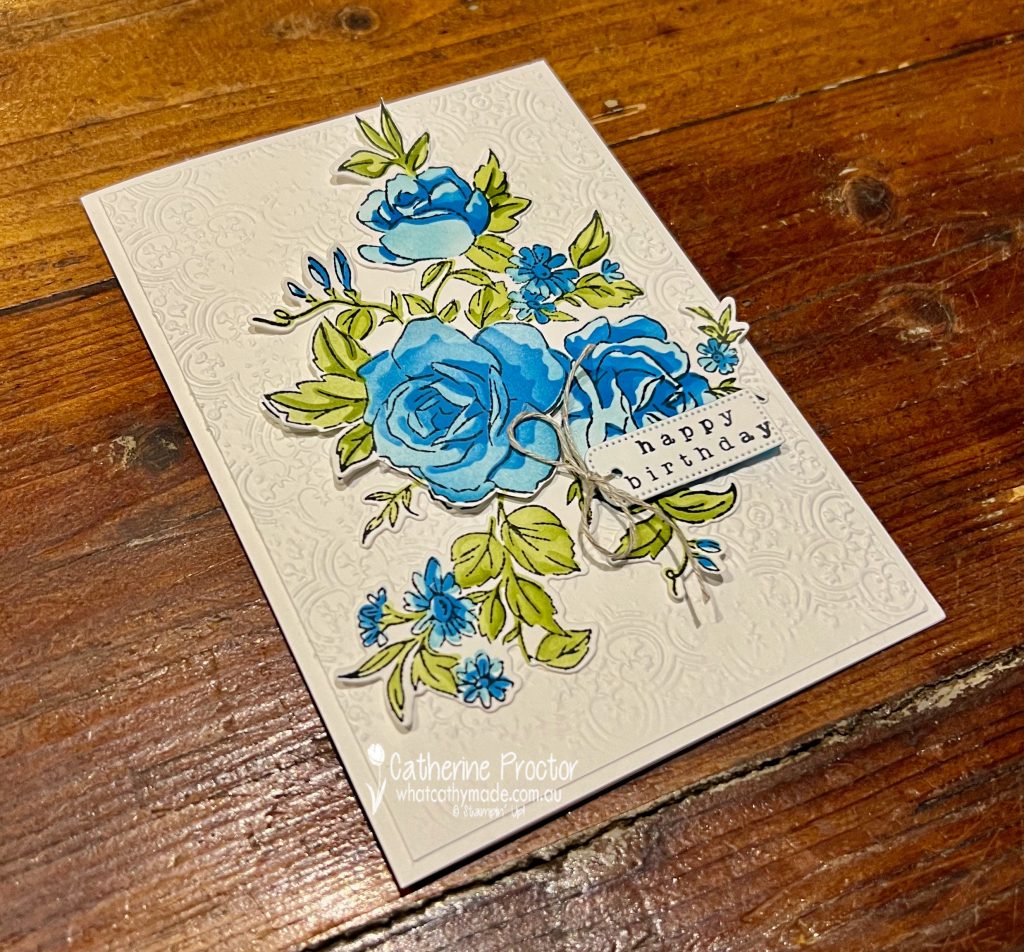
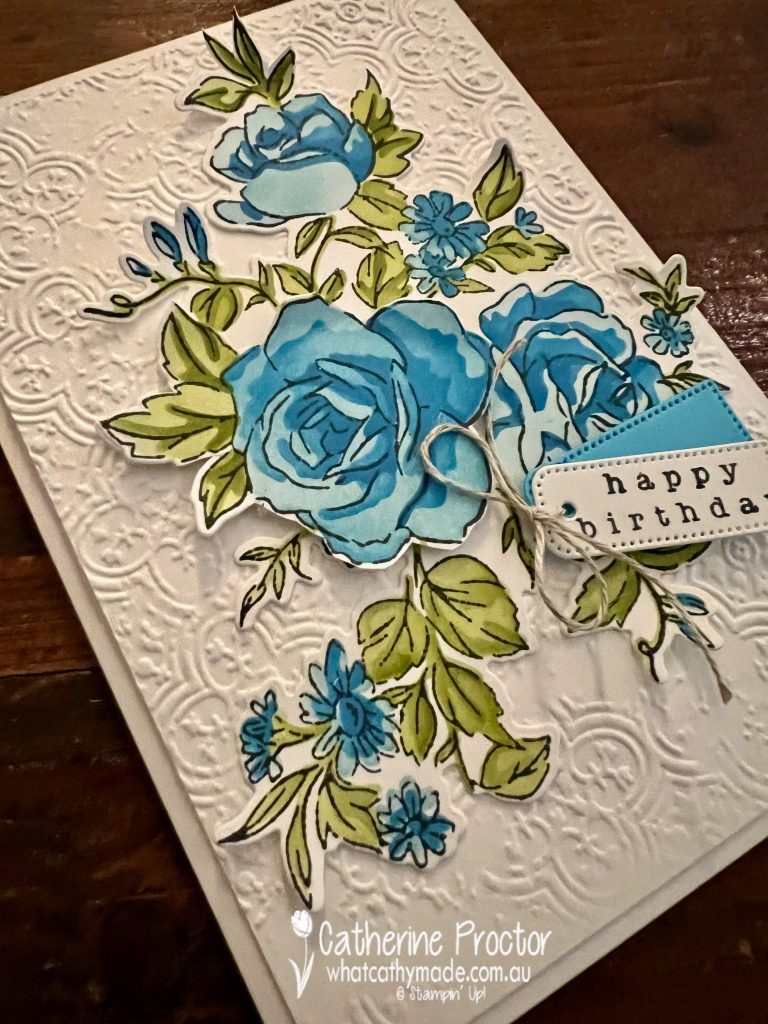
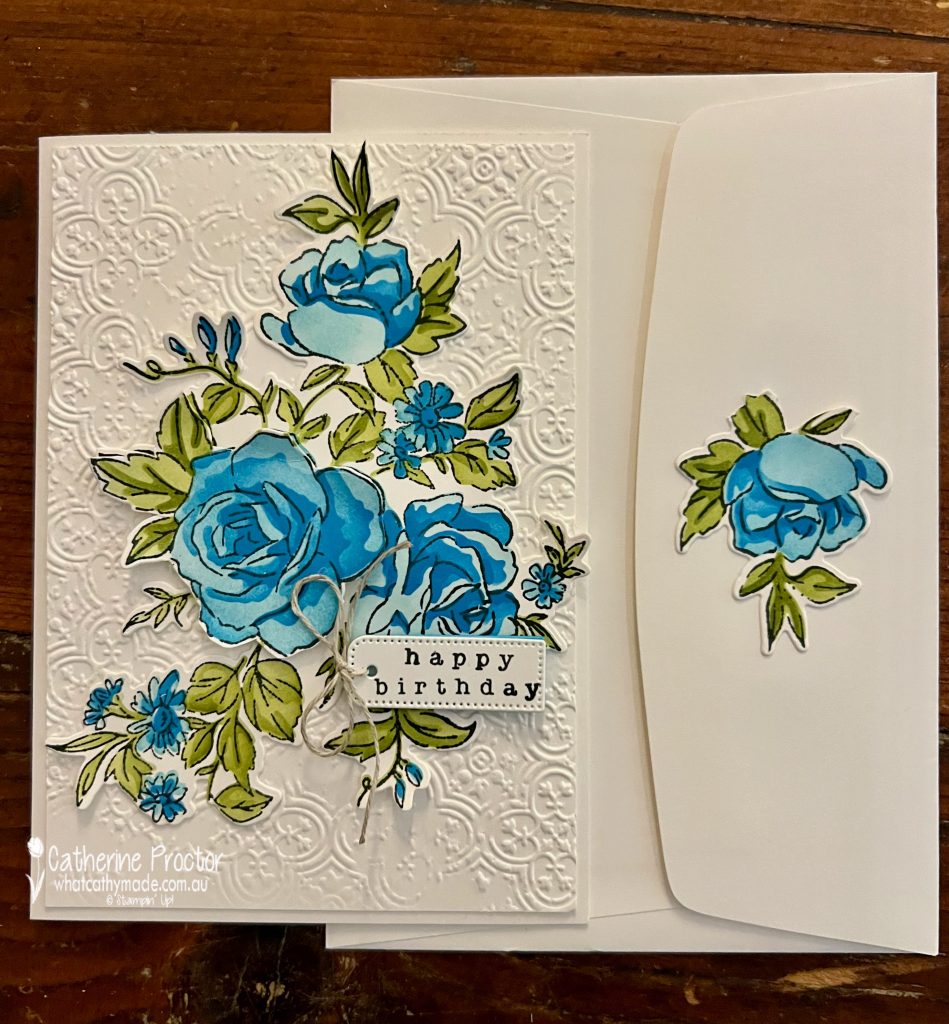
Welcome to week seven of our Art With Heart 2024-25 Colour Creations blog hop!
Now that we’ve featured the five new In Colors and the new neutral/core colour, Basic Beige, we are returning to our alphabetical showcasing of the Stampin’ Up! colour range, starting with Azure Afternoon.
Azure Afternoon is in the brights family and this bold aqua blue really makes me happy. For my card this week I’ve combined it with Balmy Blue, Mossy Meadow, Old Olive, Basic Black and Basic White, such a gorgeous colour combination.
Although Azure Afternoon reminds me of the sea and the sky, I decided to create a blue rose floral birthday card.
Apologies in advice – my photos this week are not the best as I make this card just before giving it to the recipient, so I had to photograph it using inside lights long after the sun had set.
The bundle I used for this card is a brand new favourite of mine, the Layers of Beauty bundle. In addition to a stamp set and matching dies it has a set of layering masks, fabulous for colouring techniques.
The masks are numbered 1–5 and there are notches in the masks to help with perfect alignment. After stamping the large floral spray stamp in Memento Ink, I used blending brushes to add the following colours to the numbered masks.
Balmy Blue – bottom floral mask
Azure Afternoon – middle floral mask
Azure Afternoon – top floral mask
Old Olive – bottom leaf mask
Mossy Meadow – top leaf mask
I stamped and coloured two identical floral sprays using these masks so I had extra flowers to decorate the envelope and add an extra layer to the front of the card.
Using one of the smaller dies, I cut out one of the roses from second floral spray and adhered with Stampin’ Dimensionals on the main floral spray.
The embossed layer of the card is created with the Distressed Tile embossing folder. I think its vintage vibe really suits this floral image.
A bow of linen thread attached the “Happy Birthday” sentiment from the Country Birdhouse stamp set is stamped over two lines so it fits into the cute little tag from the Layers of Beauty dies.
I also die cut an extra tag in Azure Afternoon to add interest and dimension to the card.
Not wanting to waste the rest of my second coloured floral spray I used the largest die and my paper snips to fussy cut a rose to decorate the back of my envelope.
Now it’s time to hop in over to our next participant, the lovely Kate Morgan – I can’t wait to see what Kate has made this week!
If at any time you find a broken link, you can find the complete list of all participants below.