Welcome to week 23 of our 2021-22 Colour Creations blog hop! Tonight we are showcasing Just Jade a mid teal green from the 2020-22 InColour collection.
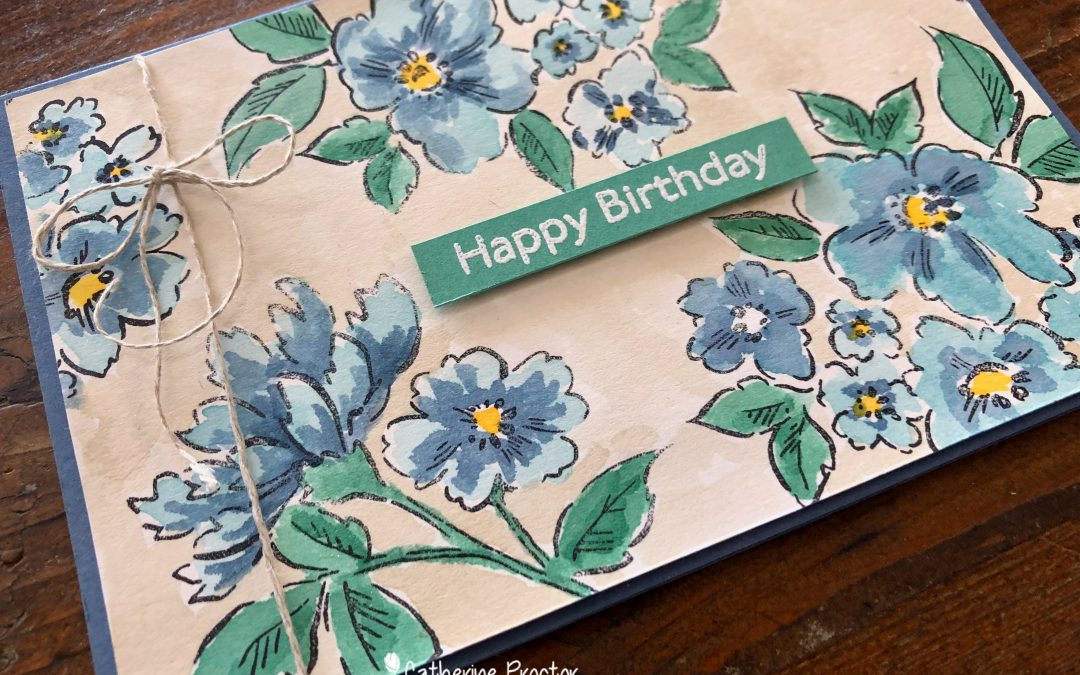
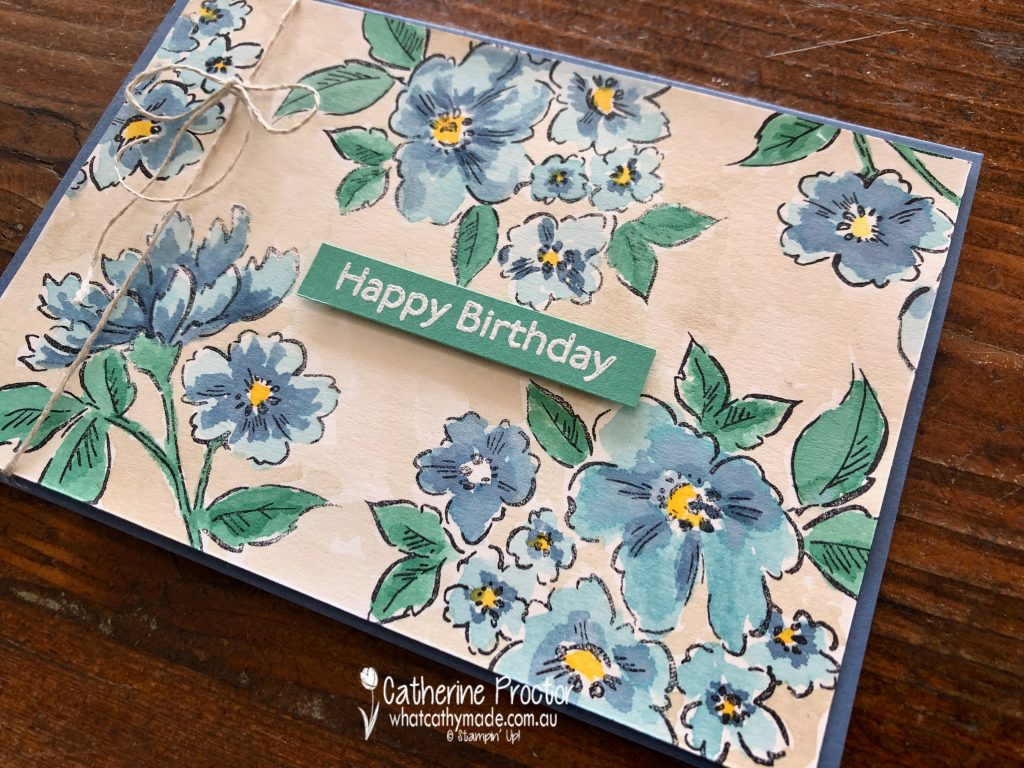
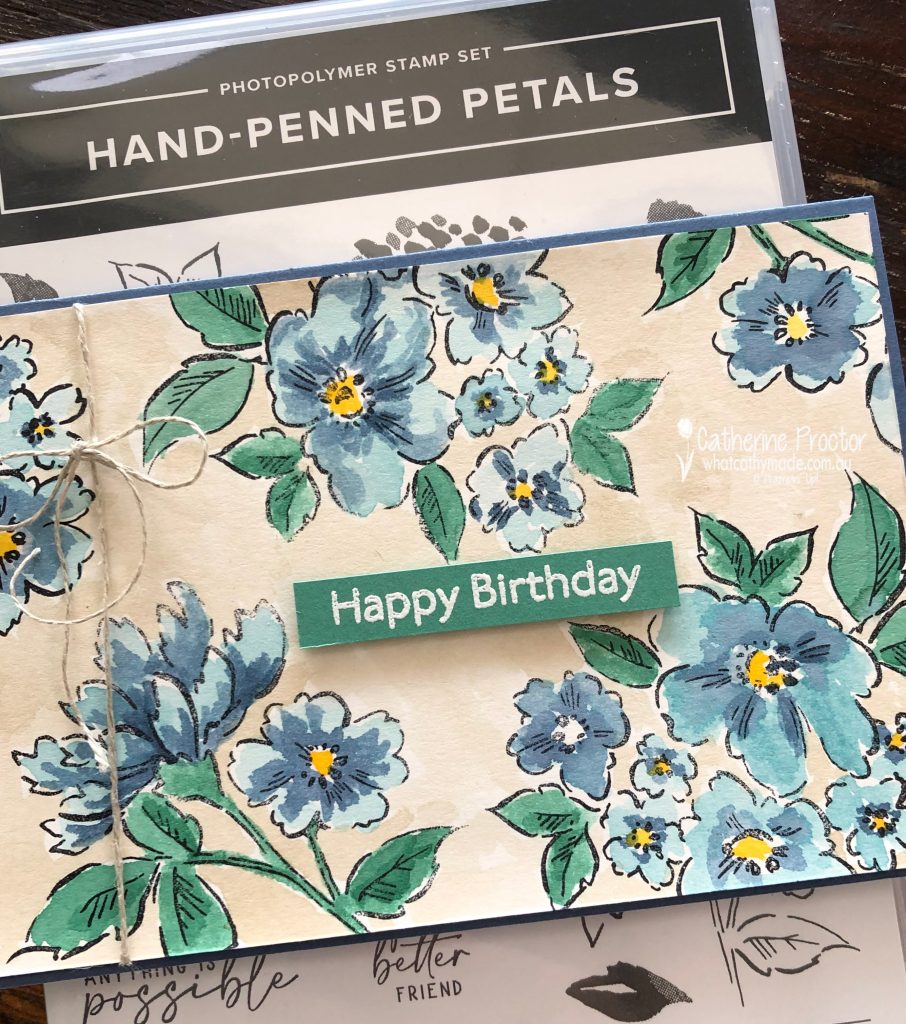
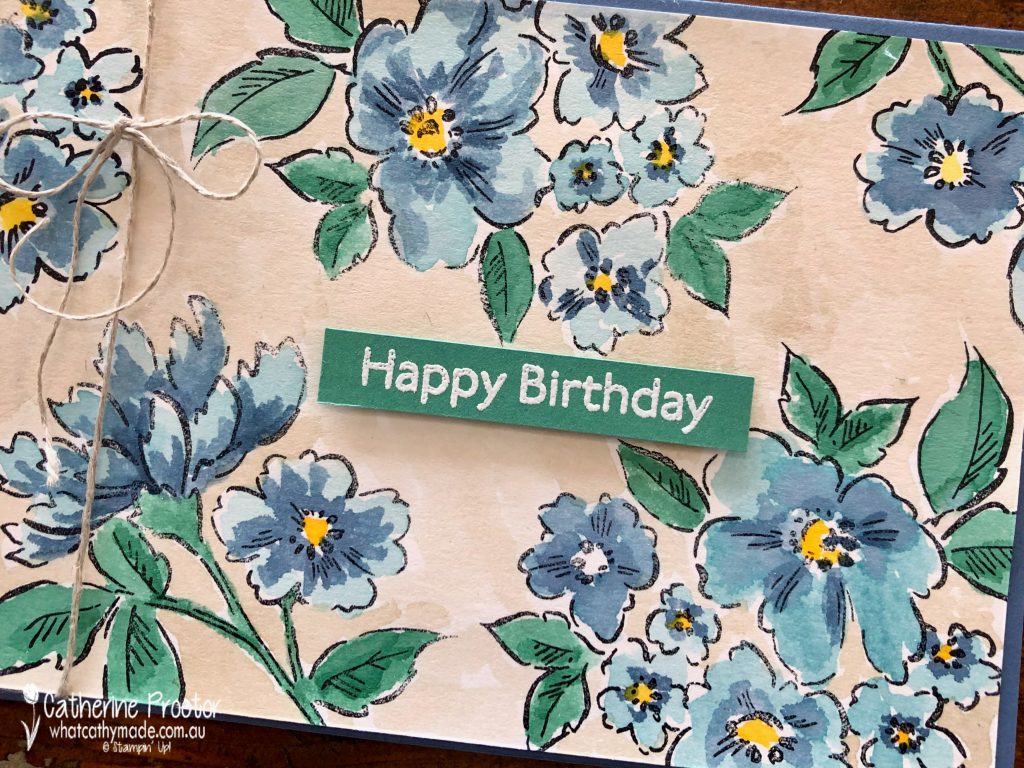
Do you enjoy watercolouring? I find it very relaxing and I love the way Stampin’ Up! products make me feel like an artist! If you feel nervous about watercolouring have a go at making this card – it’s actually very easy to do and I just love the way watercolour turns out different every single time.
To make this card I used Shimmery White Cardstock, which is excellent for watercolouring, however you can use the Fluid 100 Watercolour paper if you prefer. Remember to always stamp your images for watercolouring using the Jet Black StazOn Ink Pad NOT the Tuxedo Black Memento Ink Pad.
You’ll also need the Water Painters and I like to use the acrylic blocks as my ink palette or you can simply lift ink off the lid of the ink pads. These are the colours I used to watercolour my card.
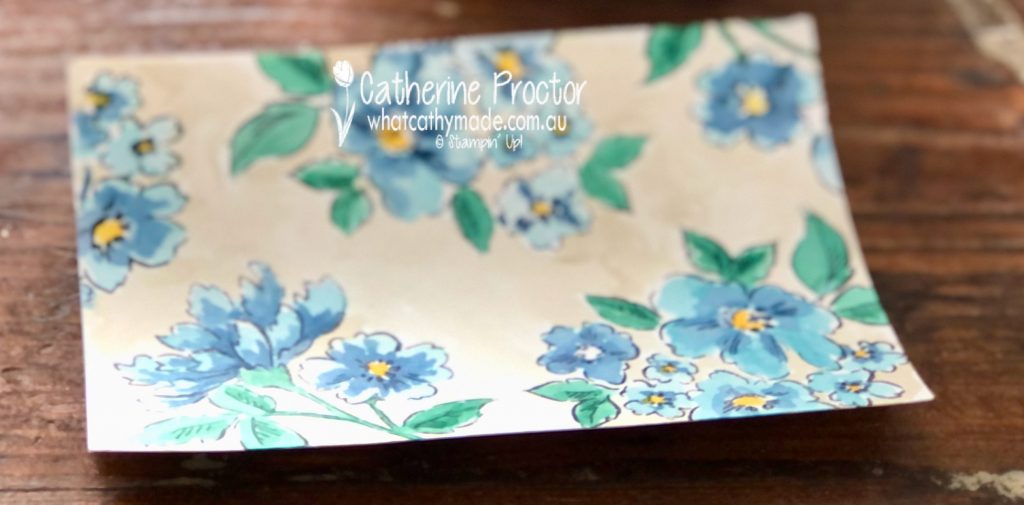
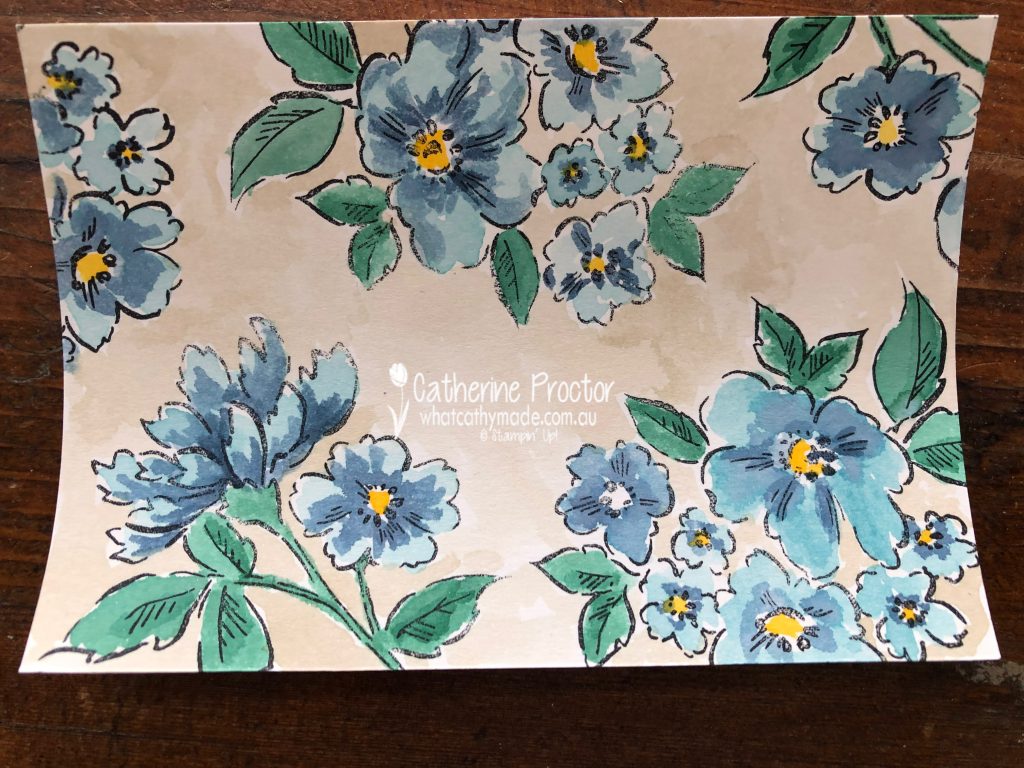
Using the two largest floral stamps from the Hand-Penned Petals Stamp Set I stamped around the edge of my Shimmery White Cardstock and then water coloured the flowers in Balmy Blue and Misty Moonlight, the leaves in Just Jade and the centre of the flowers in Mango Melody. I then used the Crumb Cake to watercolour the background space.
I didn’t want to cover up too much of my watercolour pattern so I kept the rest of the card quite simple, tying some linen thread around one side and into a bow and adding a small sentiment to the middle of the card. This sentiment is from the Art Gallery Stamp Set, stamped in Versamark Ink and heat embossed using white embossing powder.
It was only when writing this blog that I noticed my mistake – let’s just call it “artistic licence”! Can you see where I forgot to watercolour my card?
Now it’s time to hop on over to our next participant, the lovely Andrea Sargent – I can’t wait to see what Andrea has made this week!
If you find a broken link or have come to this blog hop from a different entry point, you can view the the full list of participants below:
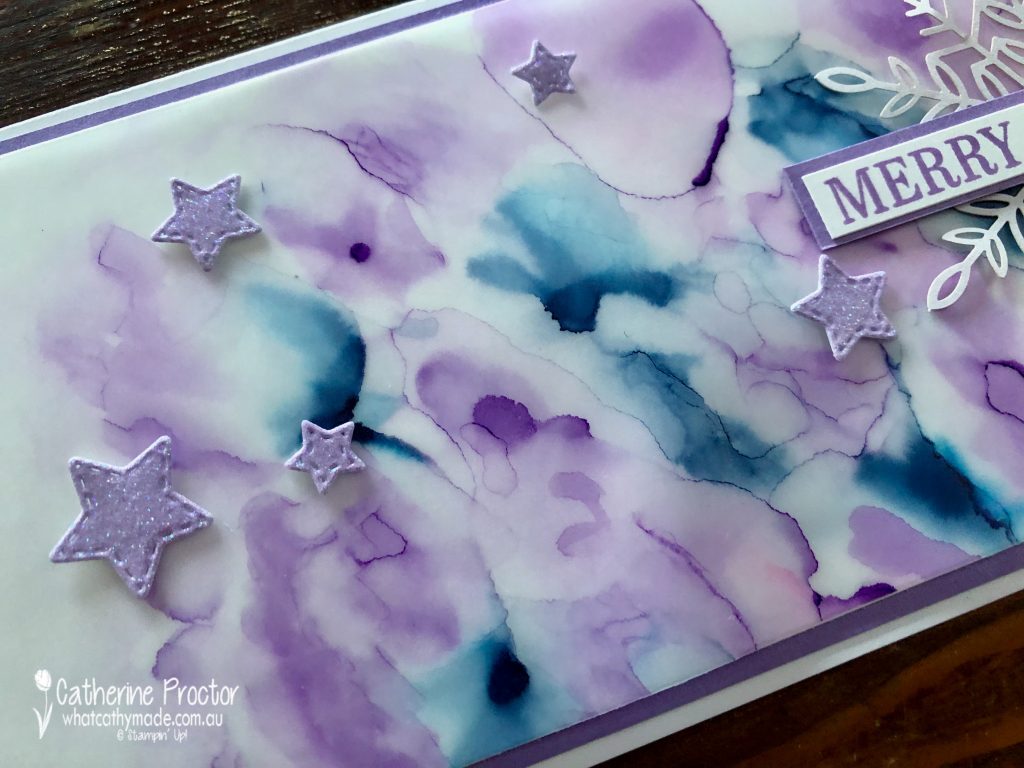
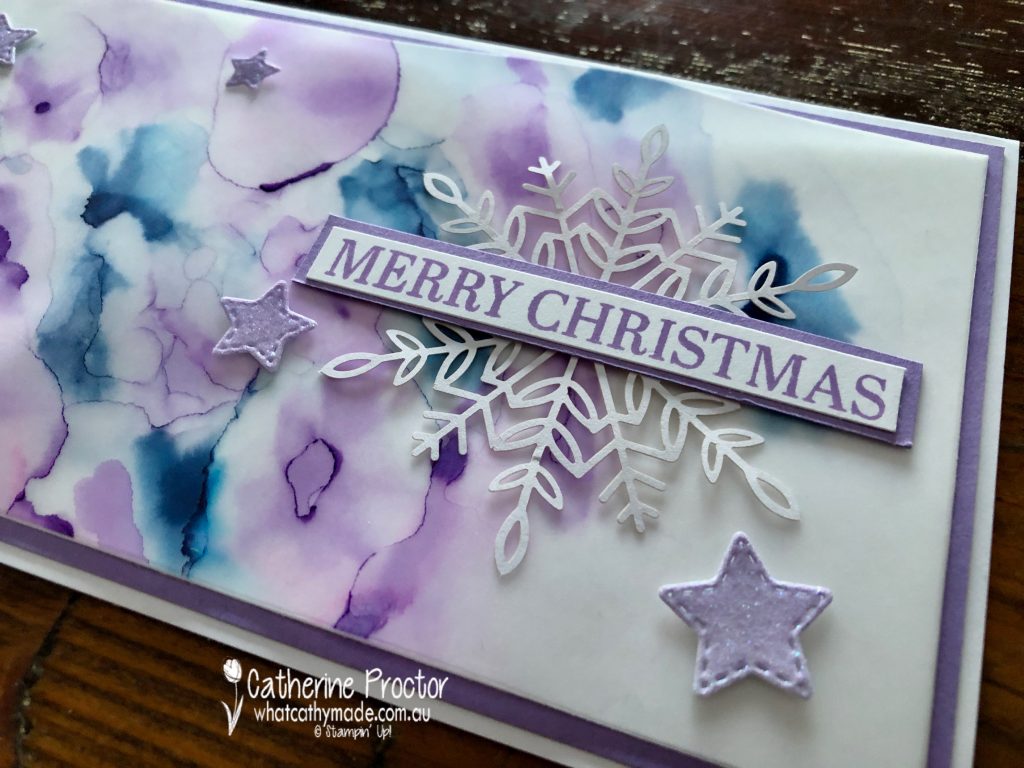
Welcome to week 22 of our 2021-22 Colour Creations blog hop! Tonight we are showcasing Highland Heather, a soft purple from the Subtles colour collection.
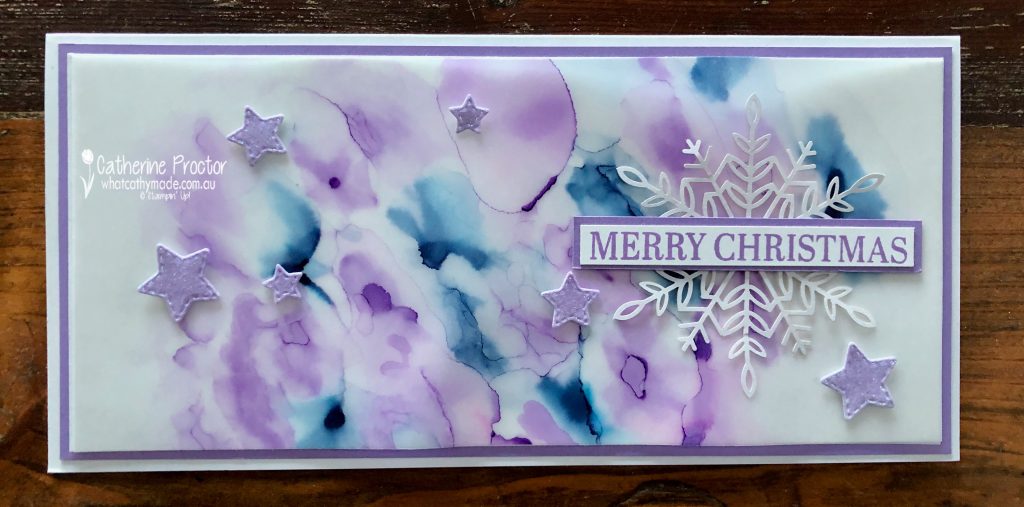
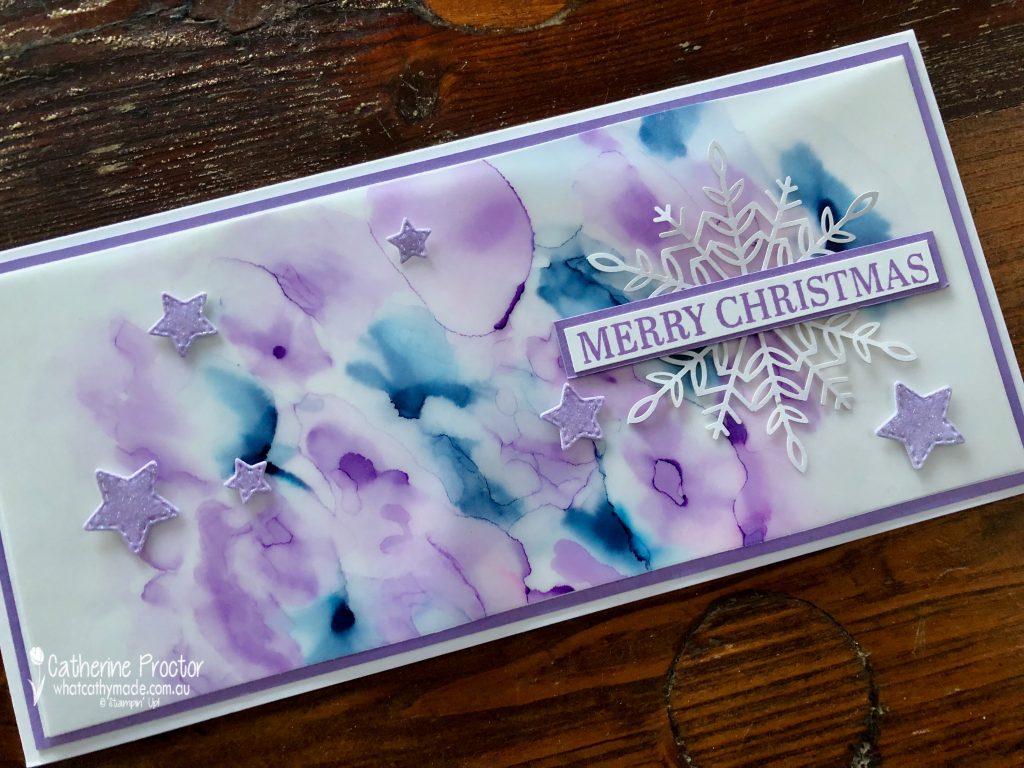
I know I’m a bit late to the party, but this week I finally tried the Stampin’ Blends alcohol technique. Oh my goodness, gracious me – what a fantastic technique this is! If you haven’t tried this technique yet, just give it a go. There is no right or wrong, it’s easy to do and you get a totally different effect every time. All you need are Stampin’ Blends, 100% Isopropyl Alcohol, vellum and a paintbrush.
For my slimline card (10 x 20 cm) I used my dark Highland Heather Stampin’ Blend and my dark Night of Navy Stampin’ Blend. I simply scribbled random “splotches” of each colour onto vellum and then used a paint brush to gently paint the edges of the splotches with 100% Isopropyl Alcohol.
If I felt the gaps between splotches were too big, I simply waited for the alcohol to dry, added more colour with the Stampin’ Blend and repeated the alcohol painting with my paintbrush.
The sparkly stars are die cut from the from one of the glittering glimmery ombre specialty papers using the star dies from the Give It a Whirl dies. I used the Gorgeous Grape glittering glimmery ombre specialty papers – the lighter end of this ombre paper looks more like Highland Heather than Gorgeous Grape.
TIP: Once the alcohol has dried, adhere your embellishments to the front side of the vellum FIRST and them turn the vellum over and strategically place adhesive BEHIND where the embellishments sit so you can’t see the adhesive behind the vellum layer.
A snowflake from the Wonderful Snowflakes embellishments and the Merry Christmas sentiment from the Sparkle of the Season stamp set complete my Christmas card.
Now it’s time to hop on over to our next participant, the lovely Michele Taylor – I can’t wait to see what she’s made this week!
If you find a broken link or have come to this blog hop from a different entry point, you can view the the full list of participants below:
Welcome to week 21 of our 2021-22 Colour Creations blog hop! Tonight we are showcasing Gray Granite, a really versatile gray from the Neutrals colour collection.
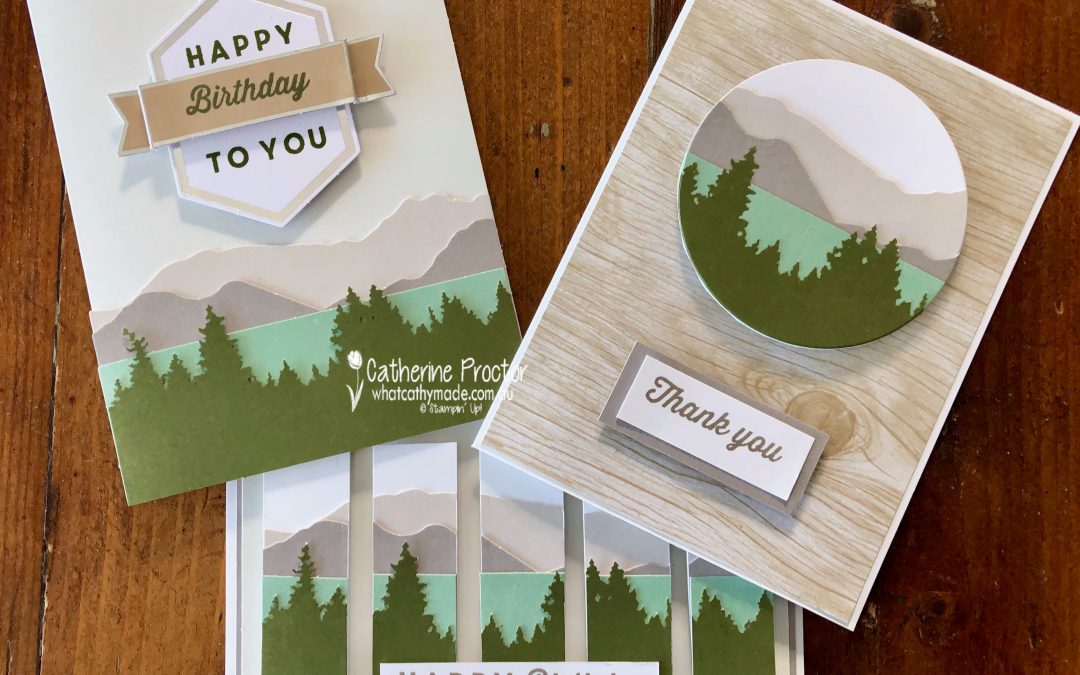
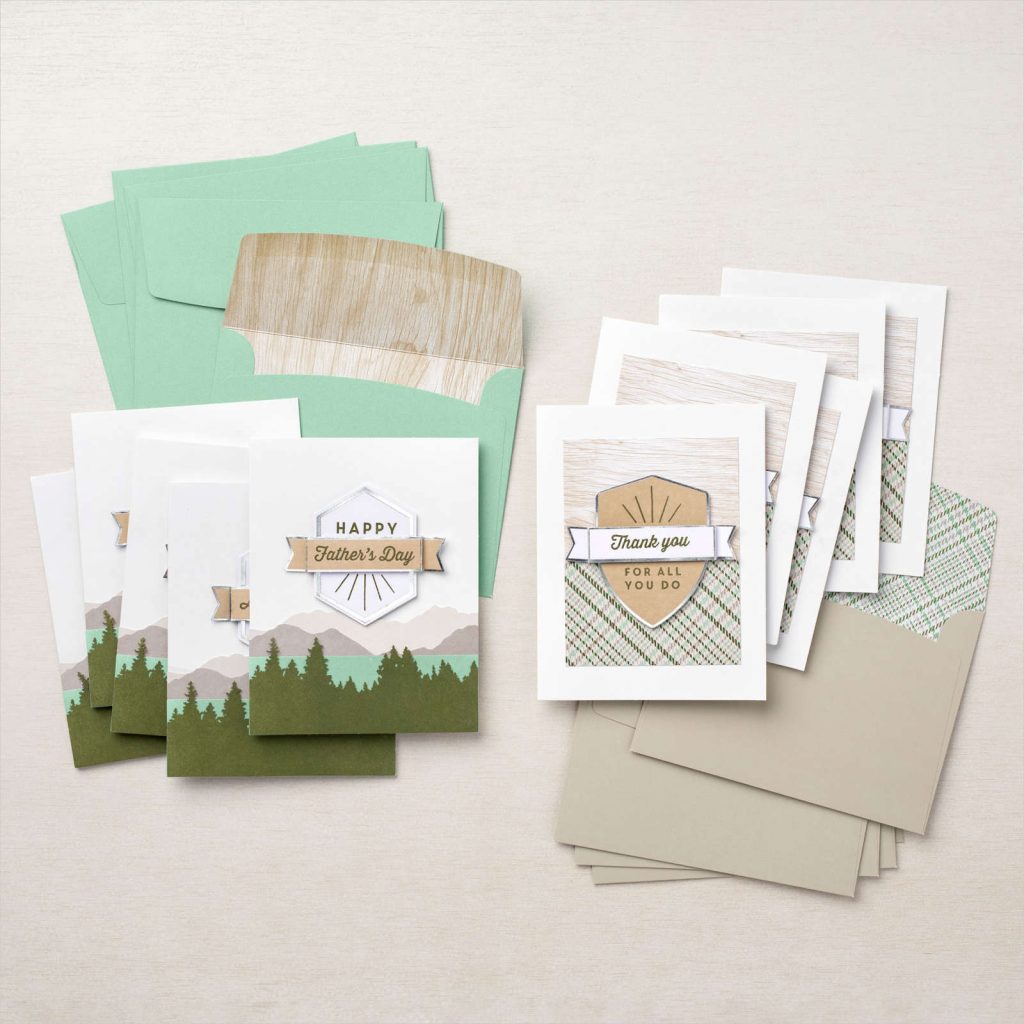
This week I didn’t have a lot of time to craft so I opened up one of my Stampin’ Up! kits: the For the Guys All-Inclusive Card Kit. For $33 this kit is incredible value as you get all the materials you need to make 10 cards with 10 matching envelopes.
After you’ve made your 10 cards you still have leftover adhesives as well as an acrylic block, a Mossy Meadow Stampin’ Spot and a fantastic stamp set full of stamps to suit virtually any man in your life!
You could simply make these cards up as instructed or make your own variations. These are how the cards look when they are made up per the enclosed instructions.
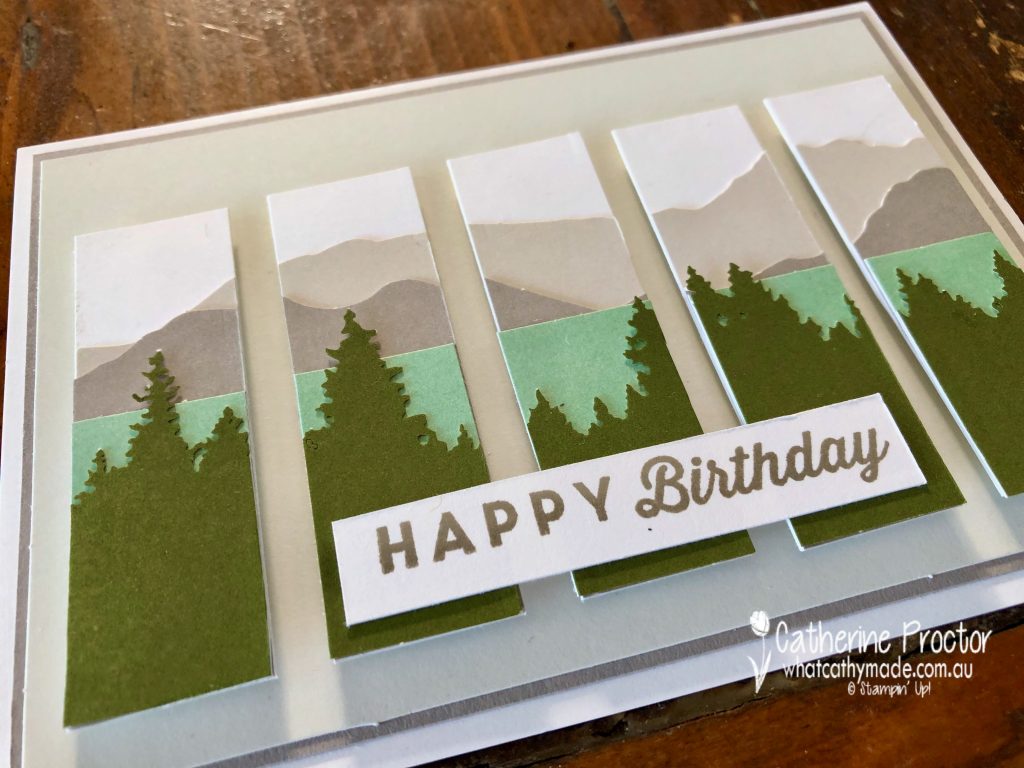
Here’s my first variation. I trimmed and mounted one of the card bases to a layer of Gray Granite cardstock onto a Basic White card base. The mountain scene was layered up as per the card design but It was adhered to the a layer of Basic White and cut into 5 strips before mounting onto the card base using dimensionals.
This card uses the lovely woodgrain pattern from one of the envelopes in this kit as the base layer on the Basic White card base – I’ll simply use another envelope instead for this card. The largest layering circle die cut this scene.
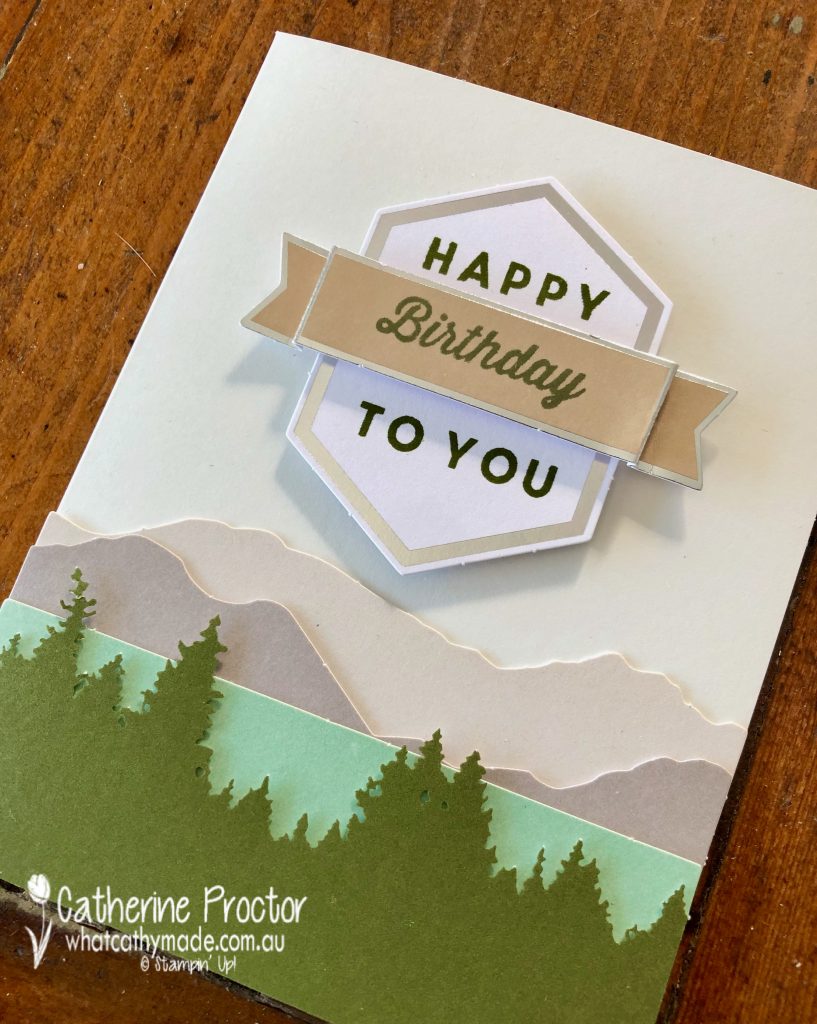
I did make up this card as per the kit instructions, but as I would not use this as a Father’s Day card (as suggested in the instructions) I substituted the Father’s Day sentiment for the birthday one instead.
I’m really happy with these masculine cards – the Gray Granite works so well these other soft neutral colours.
Now it’s time to hop on over to our next participant, the lovely Kate Morgan – I can’t wait to see what she’s made this week!
If you find a broken link or have come to this blog hop from a different entry point, you can view the the full list of participants below:
Welcome to week 20 of our 2021-22 Colour Creations blog hop! Tonight we are showcasing Granny Apple Green, a vivid green from the Brights colour collection.
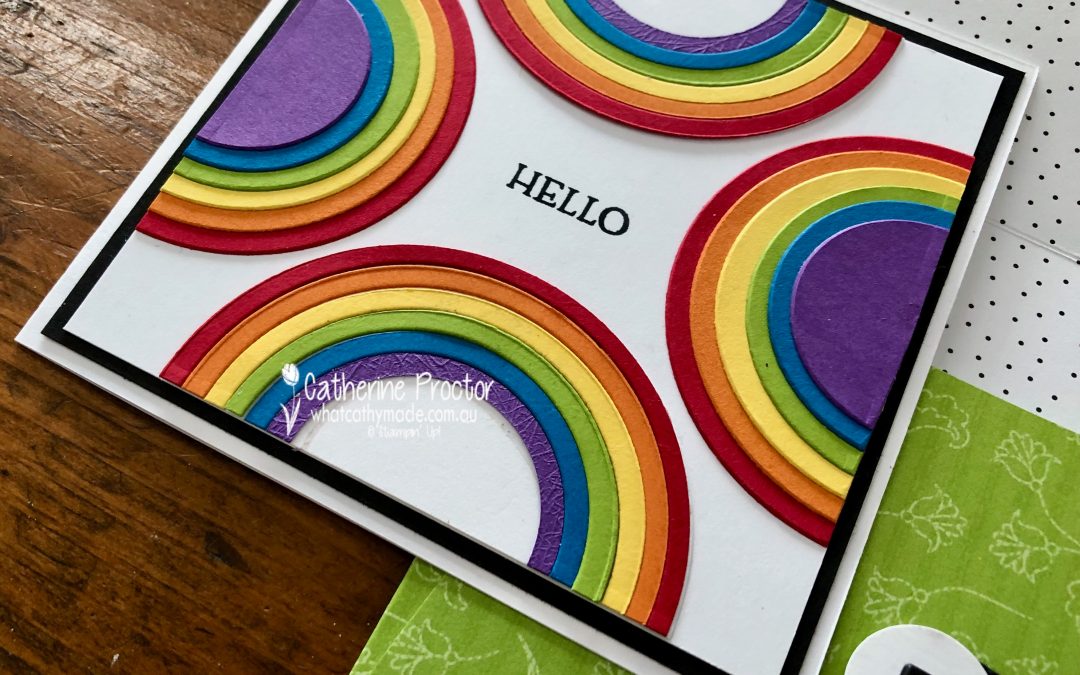
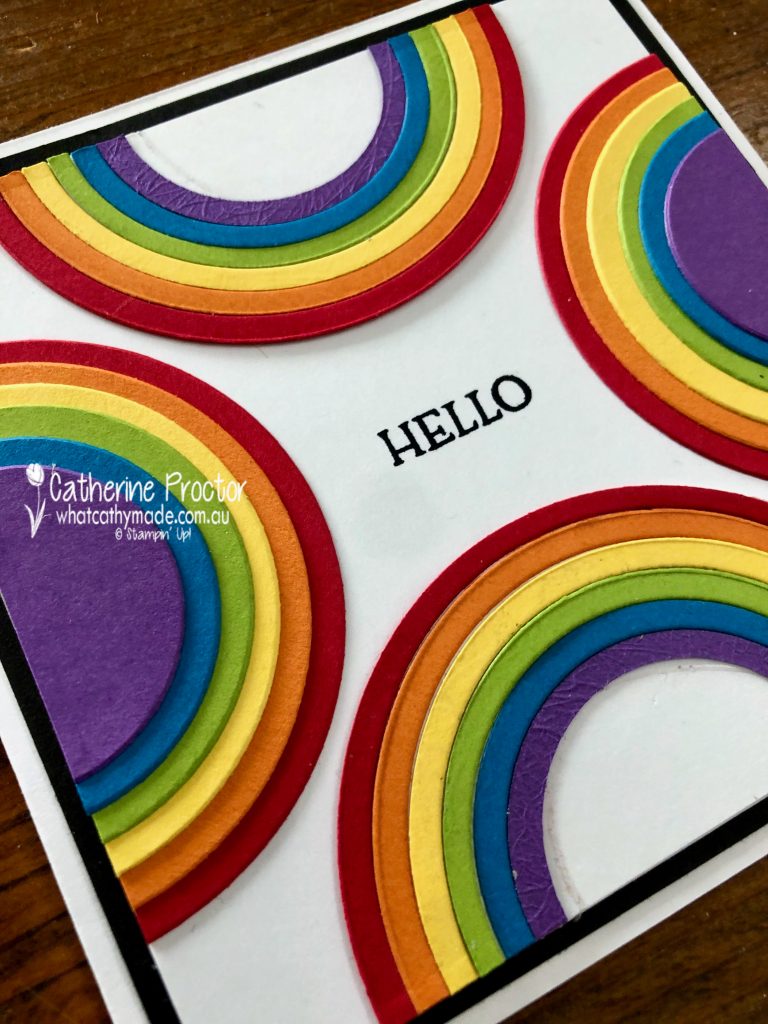
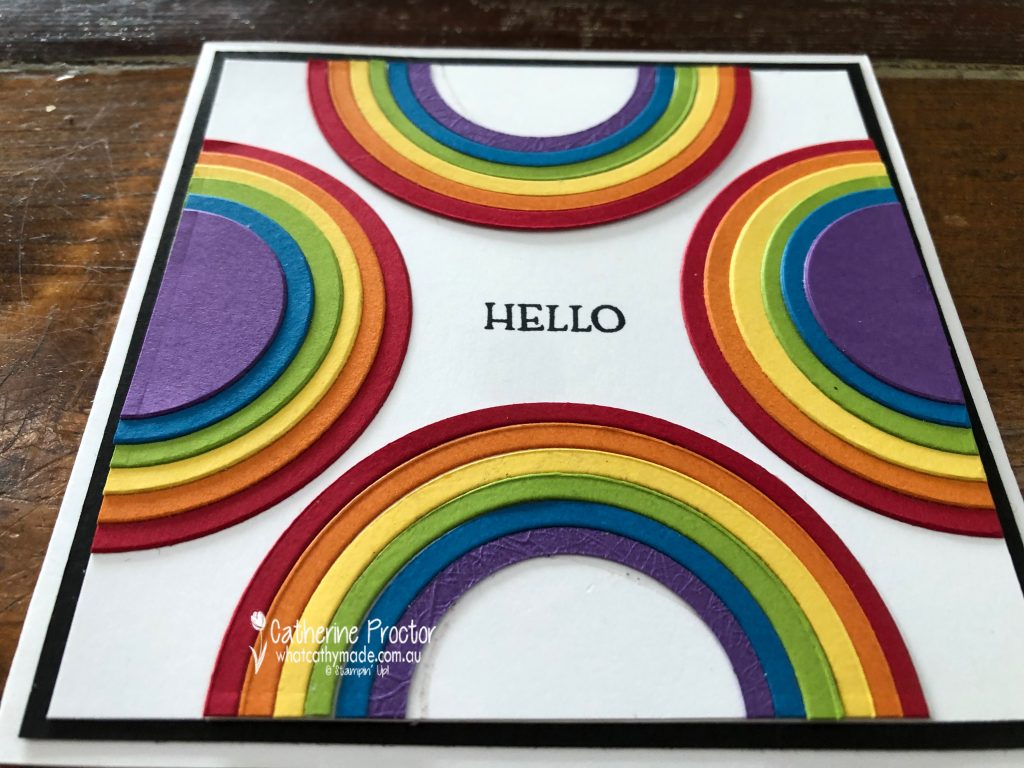
It’s such a cold, wet and windy day here in Sydney – the sort of weather that calls for a bright and happy rainbow card!
The rainbow colours on this card from top to bottom are:
Real Red
Pumpkin Pie
Daffodil Delight
Granny Apple Green
Pacific Point
Gorgeous Grape.
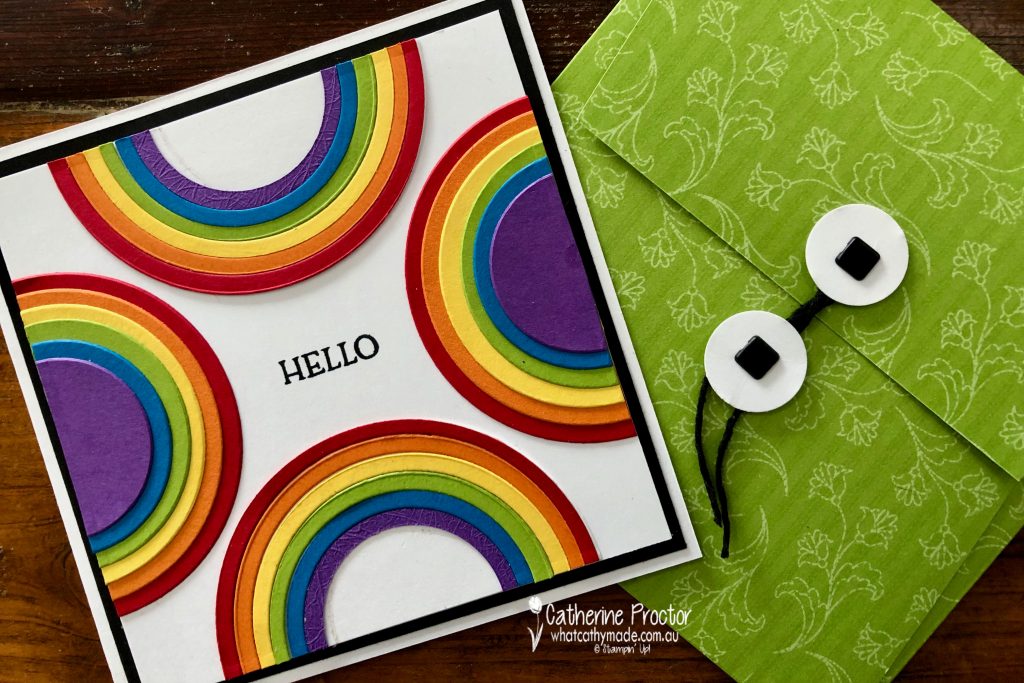
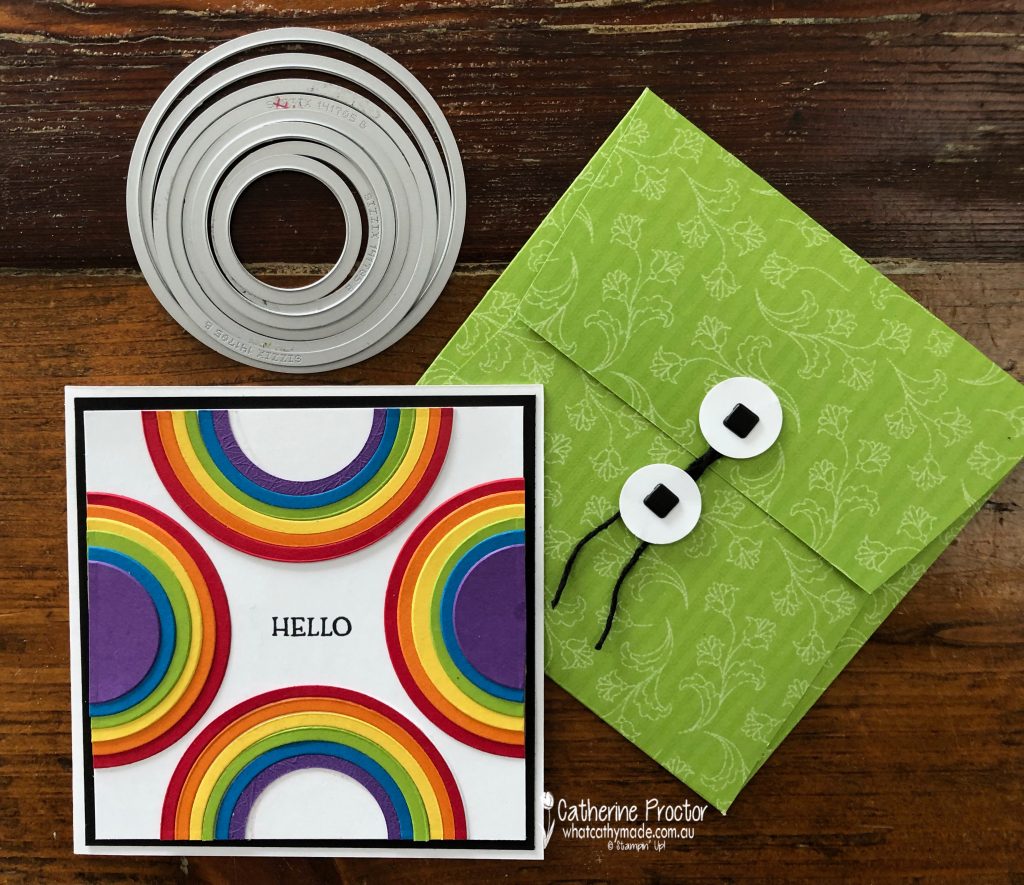
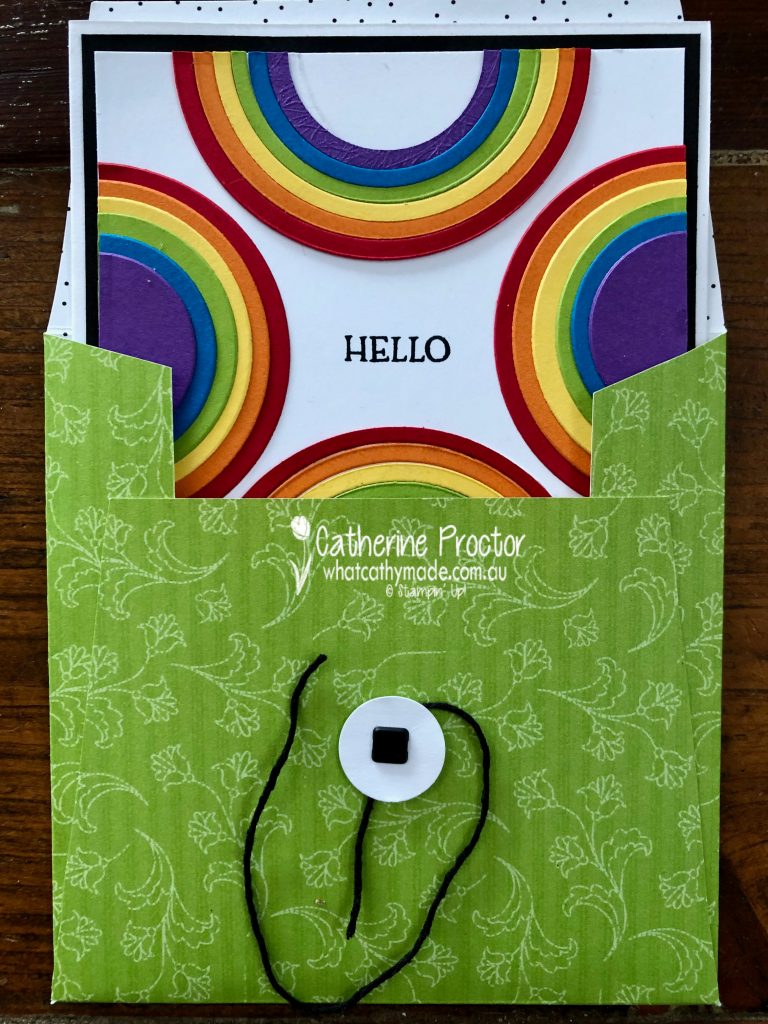
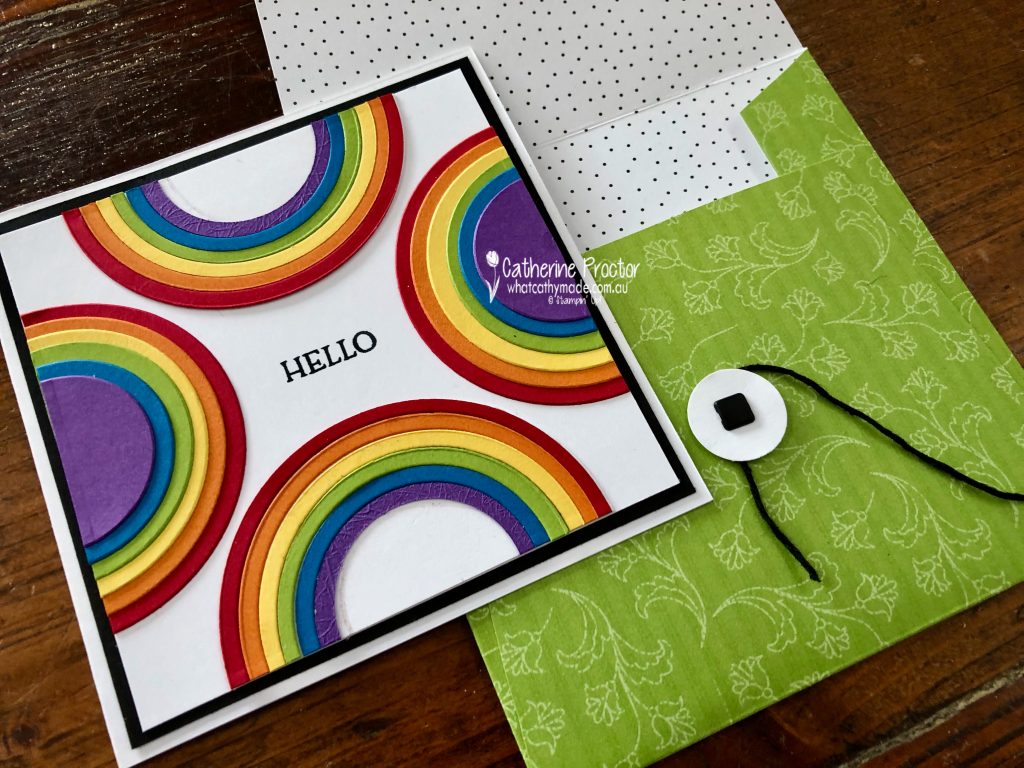
Because I didn’t feel there was enough Granny Apple Green in the card to justify using it for a Colour Creations Granny Apple Green blog hop, I made a matching envelope to showcase this vibrant green, using the Pattern Party DSP.
The layering circle dies make this card quick and easy to make. I created the top and bottom rainbows by die cutting a circle of Real Red with the largest circle die then die cutting it again with the next smallest sized circle and repeating that process with all the colours, using smaller and smaller circle dies. I carefully adhered the colours in rainbow order onto a circle of basic white and cutting it half. The rainbows on the sides of the card use the leftover circles, adhered in the same colour order.
TIP: adhere these circle in 2 sections of 3 layers each and cut them in half BEFORE adhering both sections together. These rainbows are 6 layers thick and too thick to be cut in half with paper trimmer all at once.
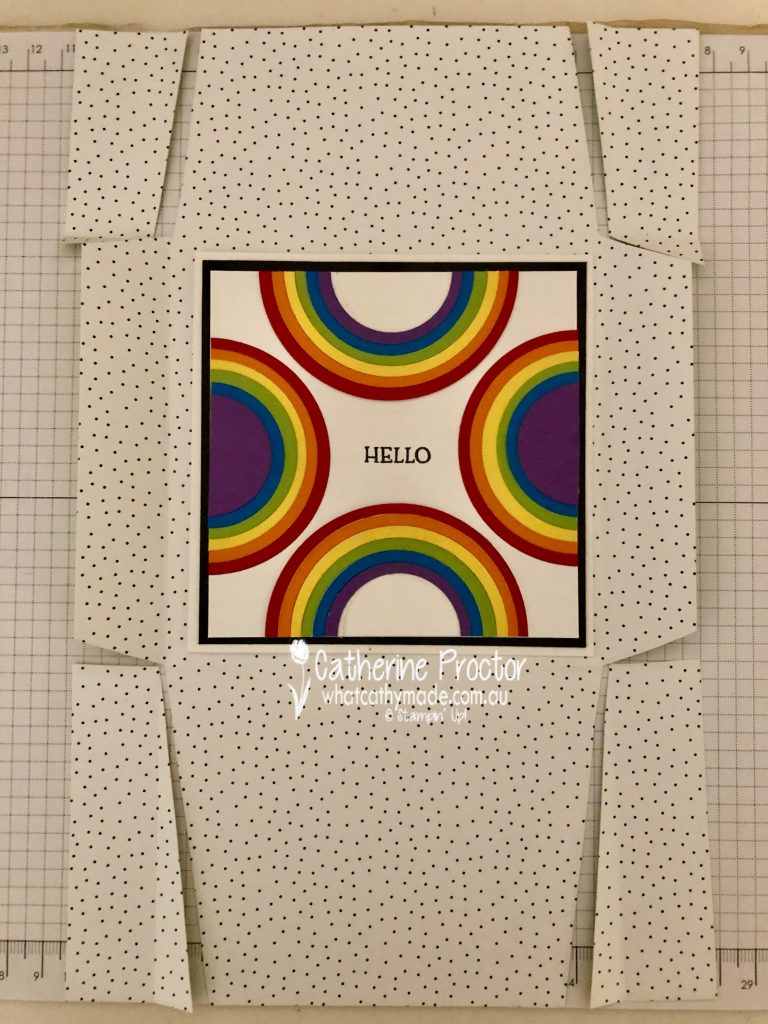
The scoring and cutting pattern for the envelope is shown in the photo below – whatever size your card is, make sure your finished envelope allows enough room for the card to slide in and out.
This card measures 11.5 x 11.5cm (4 1/2 x 4 1/2 inches) so I made my envelope 12.5 x 12.5 cm (5 x 5 inches). The flaps either side are scored at 2.5 cm (1 inch) wide and, the bottom flap is scored at 9.5 cm (3 3/4 inches) and the top flap is scored at 6cm (2 3/8 inches).
The back flap of the envelope closes with die cut Basic White circles secured to the card with square brads and a tie made using a short length of Basic Black Bakers Twine twisted around them. The “Hello” sentiment is from the Blossoms in Bloom stamp set.
Now it’s time to hop on over to our next participant, the lovely Rachel Woollard – I can’t wait to see what she’s made this week!
If you find a broken link or have come to this blog hop from a different entry point, you can view the the full list of participants below:
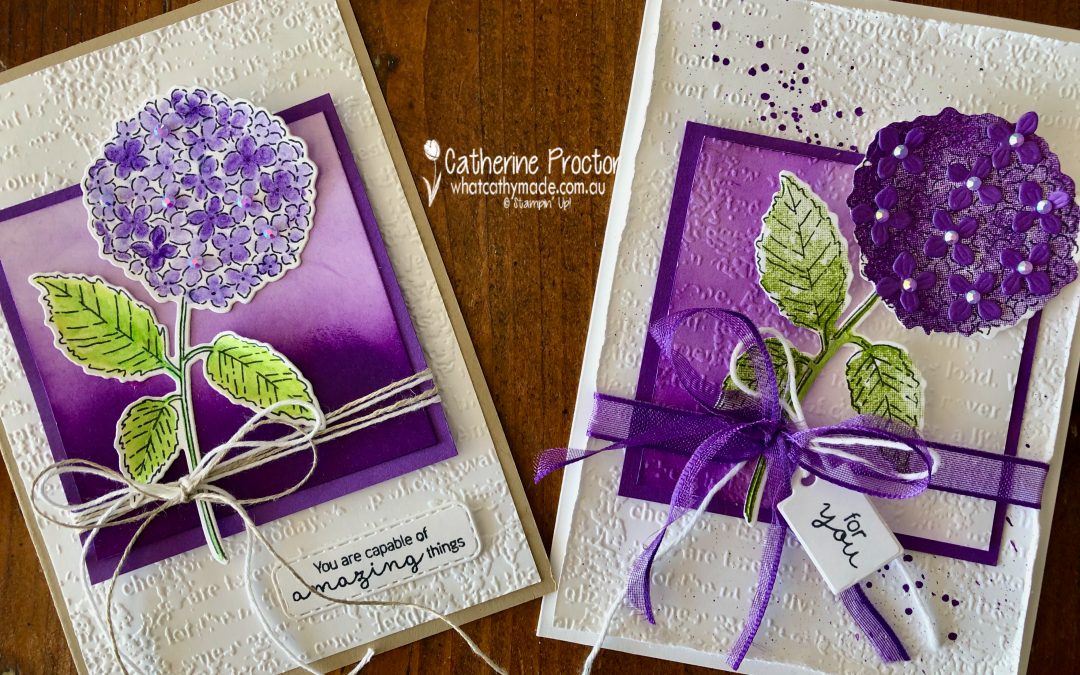
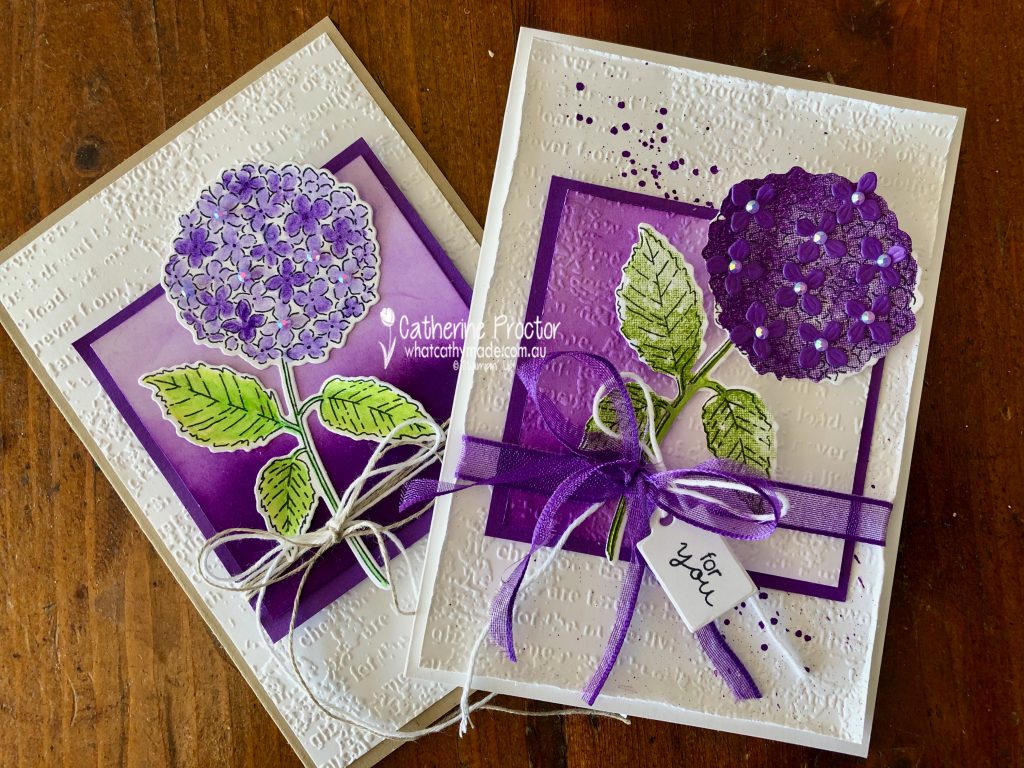
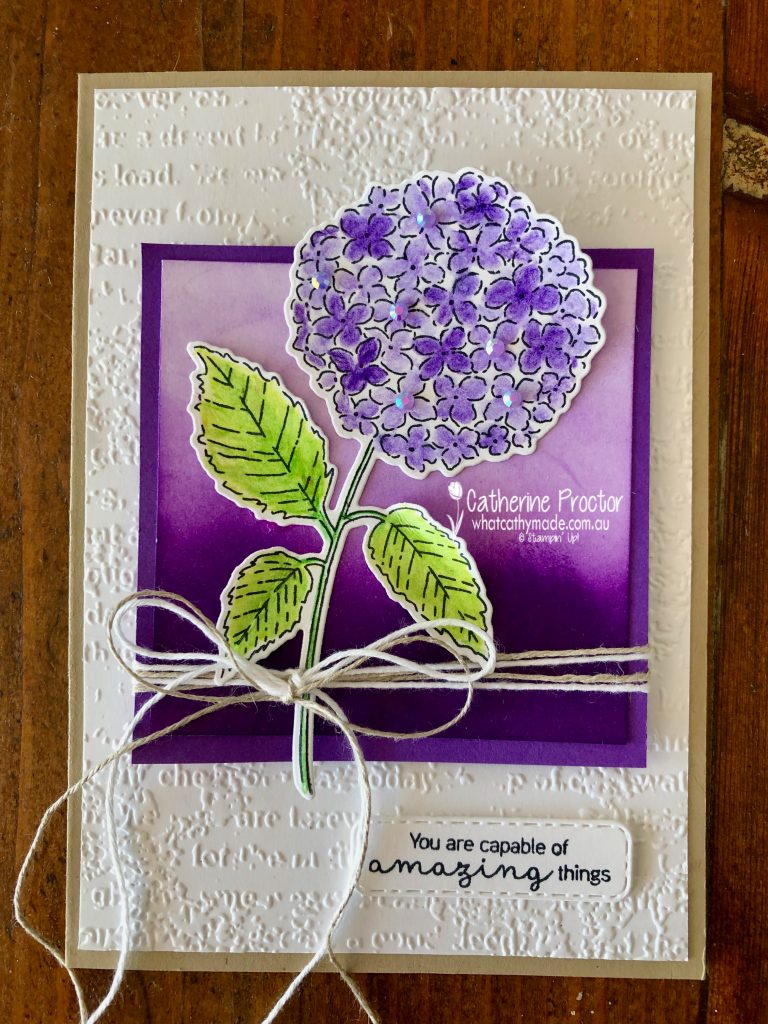
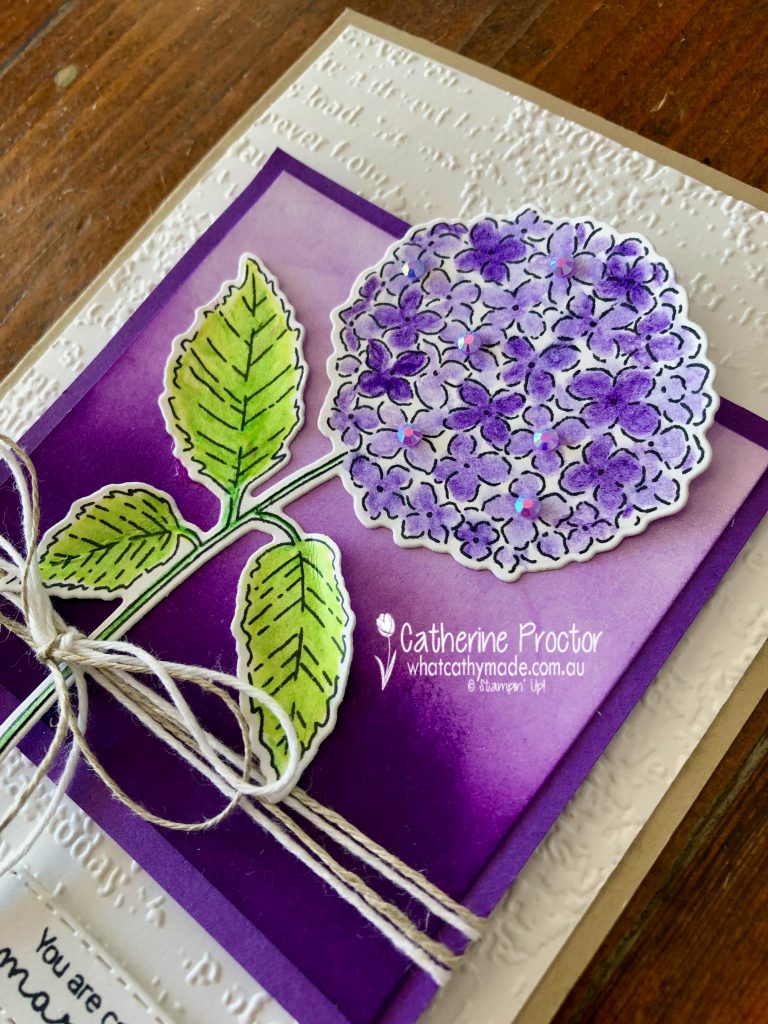
Welcome to week 19 of our 2021-22 Colour Creations blog hop! Tonight we are showcasing Gorgeous Grape, a bright purple from the Brights colour collection.
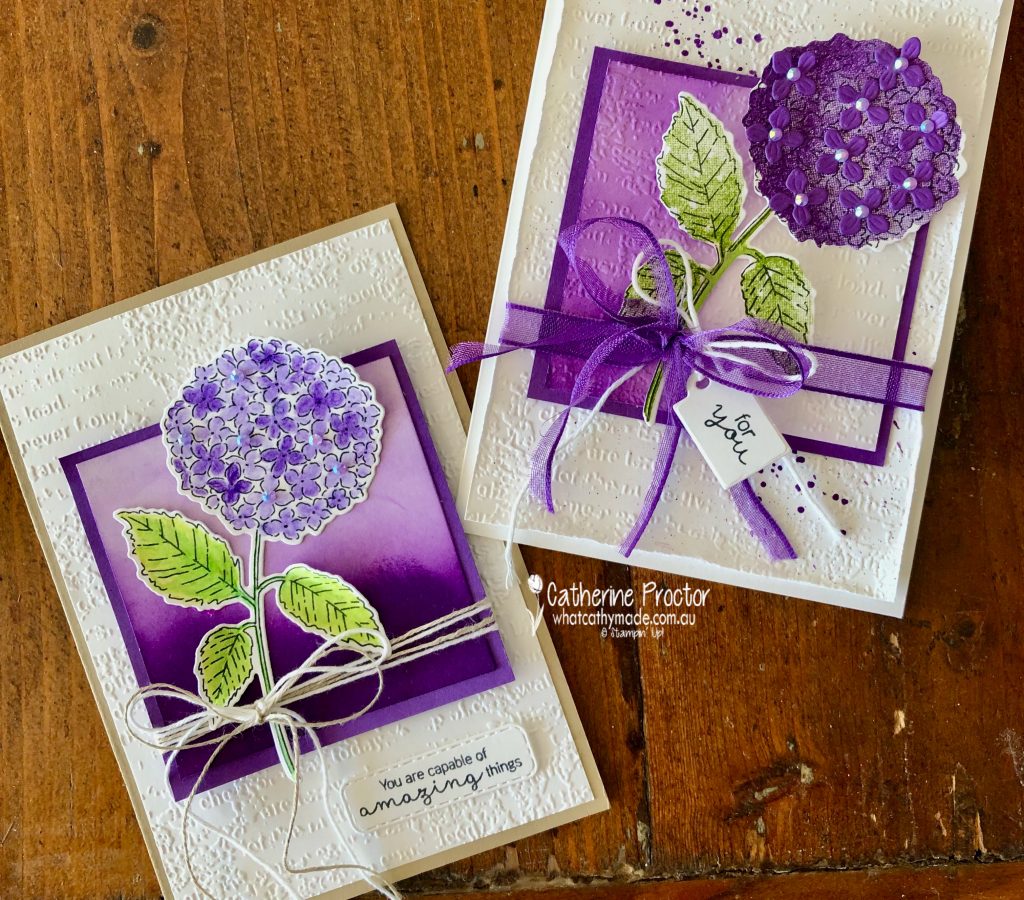
I made a card and I wasn’t sure it worked. So I made another card and I still couldn’t decide which one to post …
So, I present to you my “this or that?” Gorgeous Grape cards!
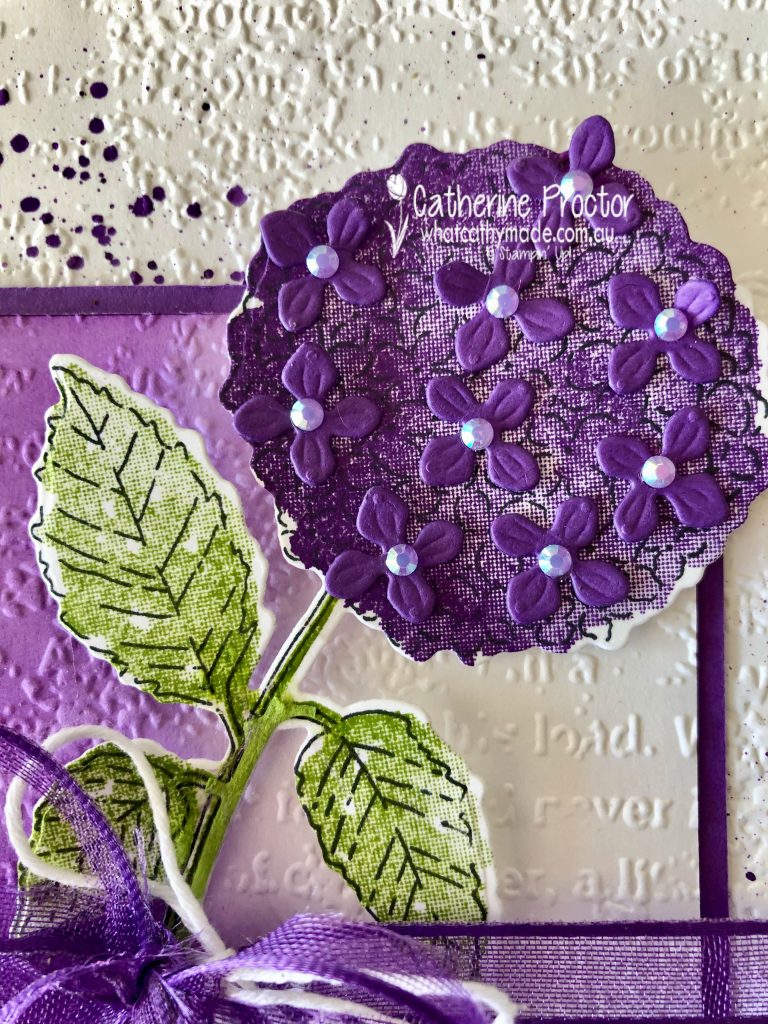
The Hydrangea Haven Bundle includes the Hydrangea Haven Stamp Set and the Hydrangea Dies. There are so many different ways to use this set.
This card has a Crumb Cake cardstock base and the hydrangea is coloured using the Gorgeous Grape and Granny Apple Green Watercolour Pencils, blending them with the Blender pens. Both my cards have a Basic White layer embossed with the Typeworn Type Embossing folder.
The smaller Basic White panel has been coloured in Gorgeous Grape using the blending brushes. Linen Thread and Basic White Bakers Twine are wrapped around the blended panel and Fresh Freesia embellishments from the 2021-2023 In Color Jewels in the hydrangea.
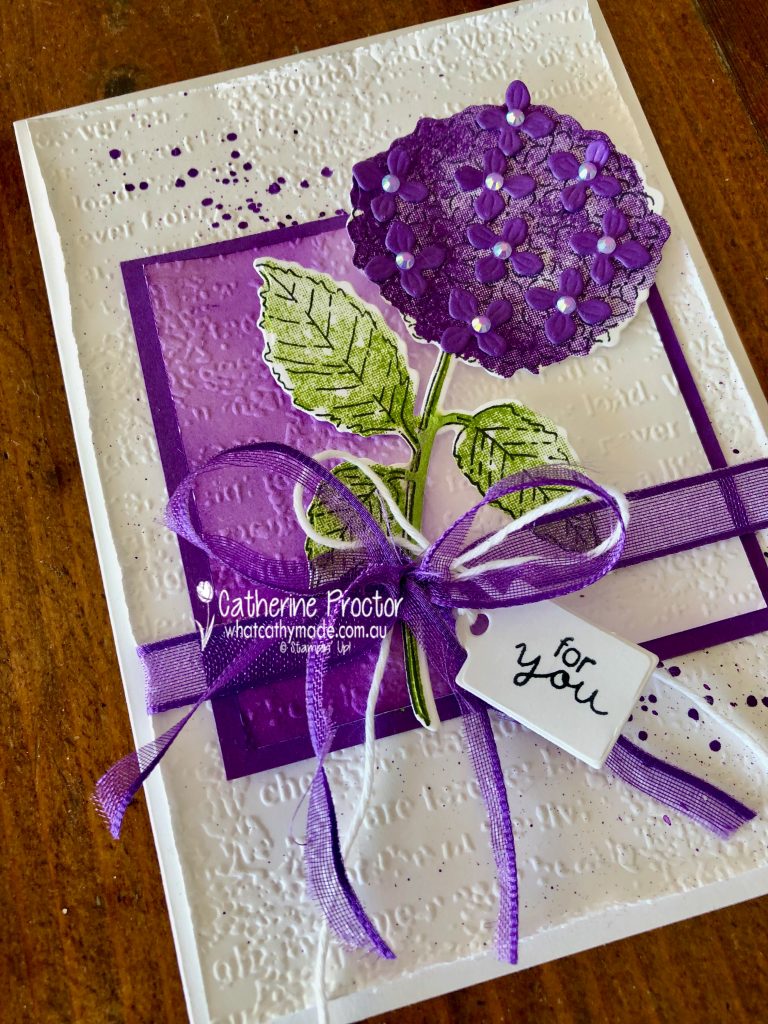
This card has a Basic White card base and the Hydrangea is stamped with Gorgeous Grape and Granny Apple Green. I used the long die from the Hydrangea Dies to cut the individual flowers from Gorgeous Grape cardstock.
I took this card up a notch by splattering and curling up the edges of the background embossed layer, also embossing the smaller front panel and using the Gorgeous Grape ribbon, cut in half for the bow. The stamped hydrangea is a lot darker than the hydrangea coloured in pencils in the other card.
I love the tiny tag that comes in this bundle!
This or that? I’m still not sure which card I prefer!
Now it’s time to hop on over to our next participant, the lovely Kate Morgan – I can’t wait to see what she’s made this week!
If you find a broken link or have come to this blog hop from a different entry point, you can view the the full list of participants below:
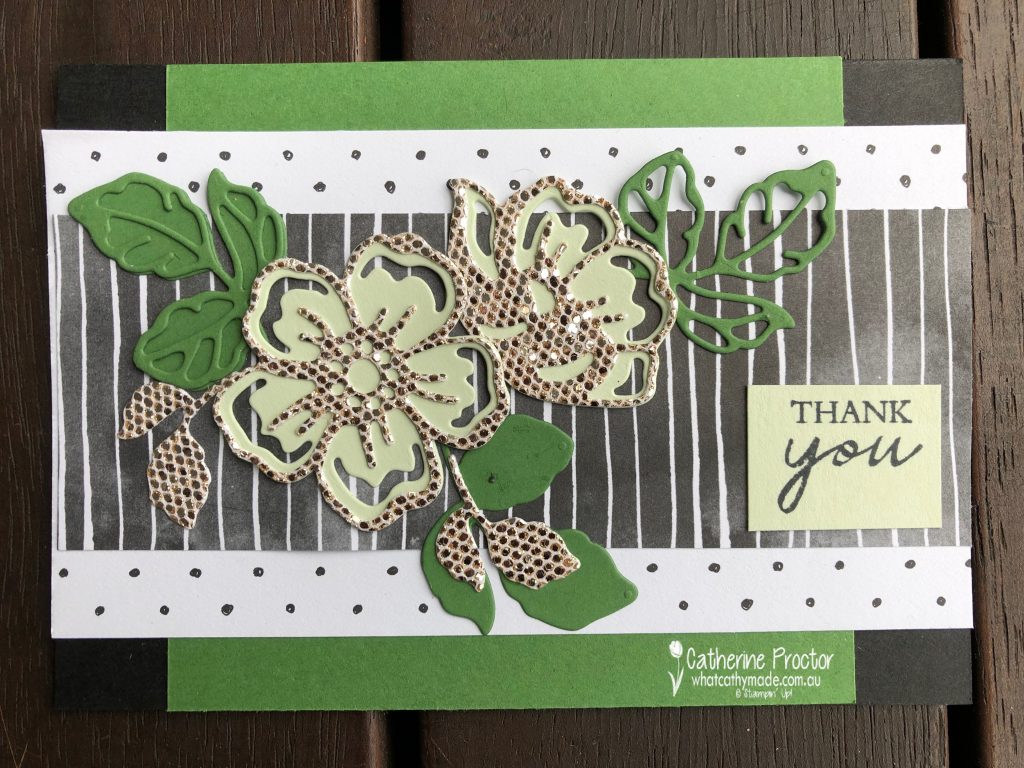
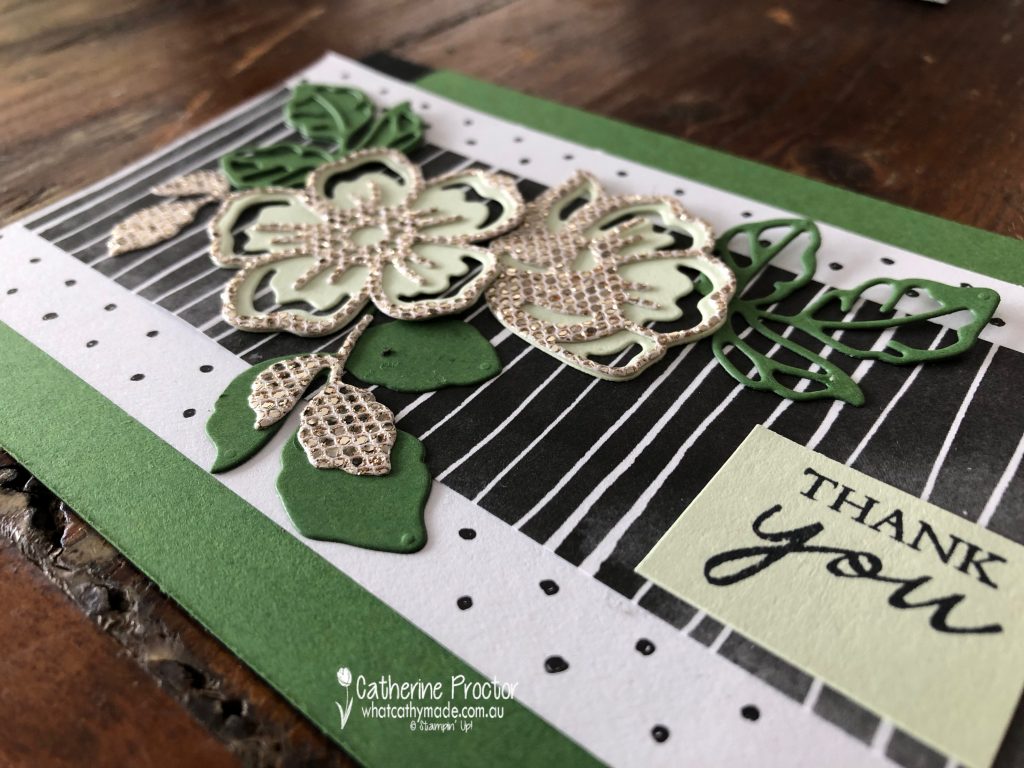
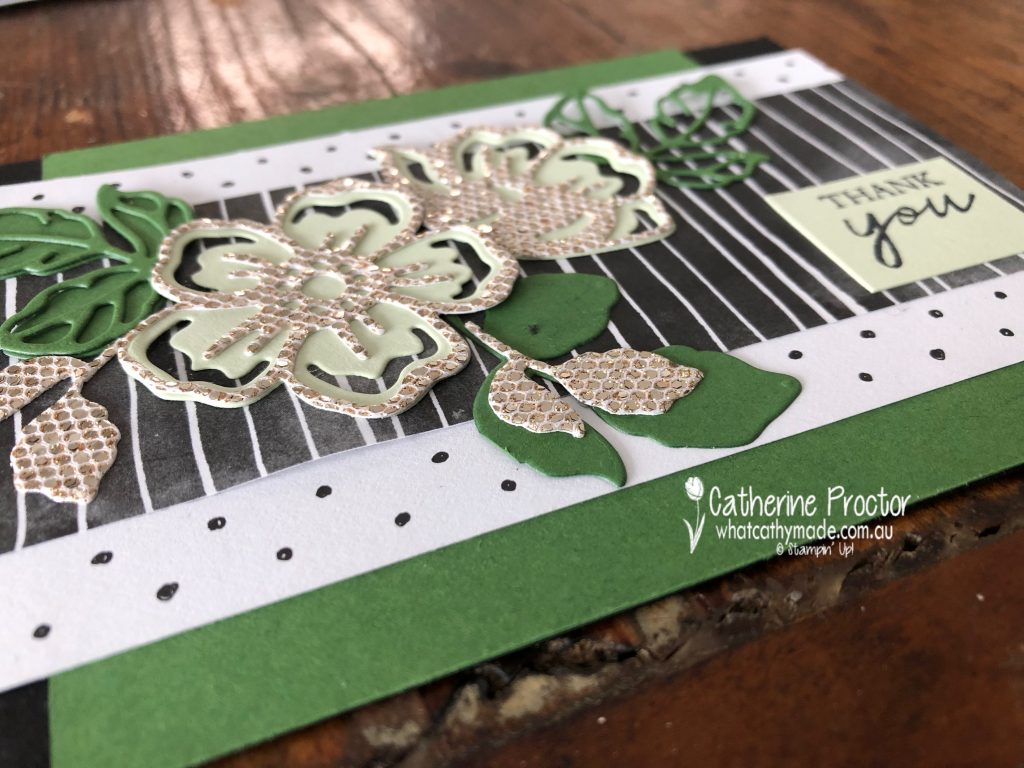
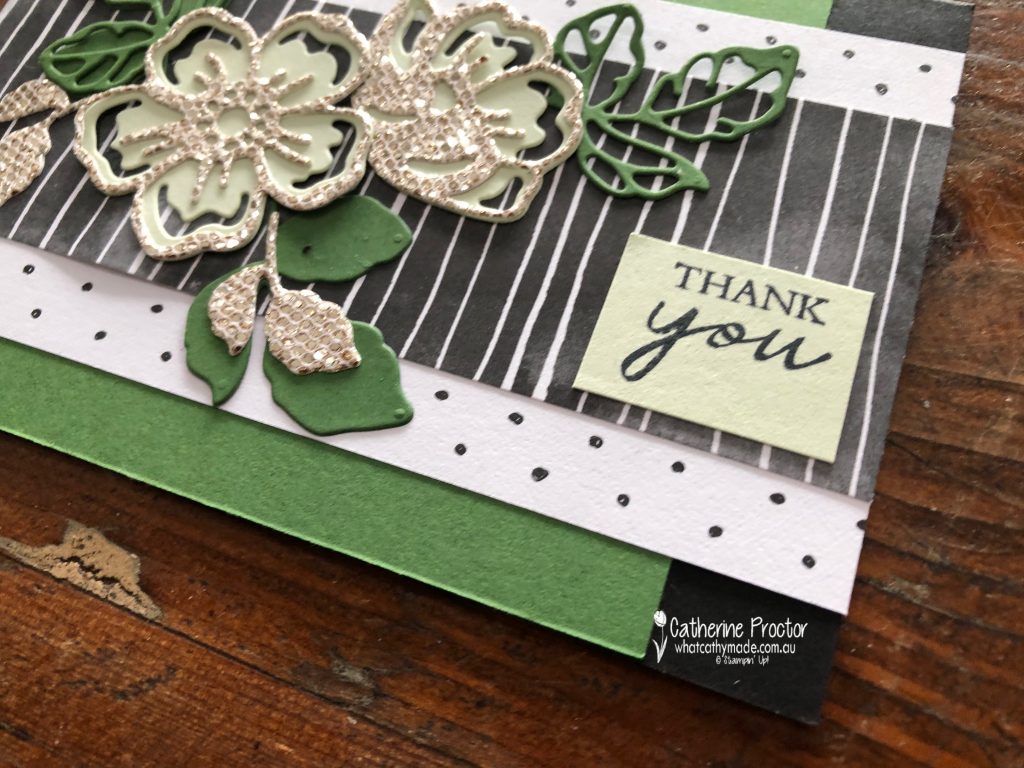
Welcome to week 17 of our 2021-22 Colour Creations blog hop! Tonight we are showcasing Garden Green, a mid green from the Regals colour collection.
As SALE-a-bration ends tomorrow night I decided to bring together three of my favourite products from SALE-a-bration for my card tonight: the Be Dazzling DSP, the Beautifully Penned Designer Series Paper and the Summer Shadow Dies.
Although Garden Green is not a green I use very often, I really like pairing it with Basic Black and Soft Seafoam.
These Summer Shadow Dies are a great die set because they work so well on their own or you can use them to cut out the stamped images from the Shaded Summer Stamp Set. You can use them as single layer dies or layer them – I’ve done both single and double layers on my card.
The black and white Beautifully Penned Designer Series Paper goes with any colour and you can use it just as it is or you can colour it in.
Now it’s time to hop on over to our next participant, the lovely Theresa Gerrard – I can’t wait to see what she’s made this week!
If you find a broken link or have come to this blog hop from a different entry point, you can view the the full list of participants below:
Don’t forget to use my monthly Host Code (if your order is between $50 – $250) and I will send you a thank you gift the following month. If your order is over $250 don’t use the host code because you will qualify for your own stamping rewards. My September Host Code is WVX3UYCR and it is valid until midnight September 30.
I’ll be back with another Christmas card next Monday. In the meantime, wherever you are in the world, stay safe, stay calm … and keep on crafting xxx
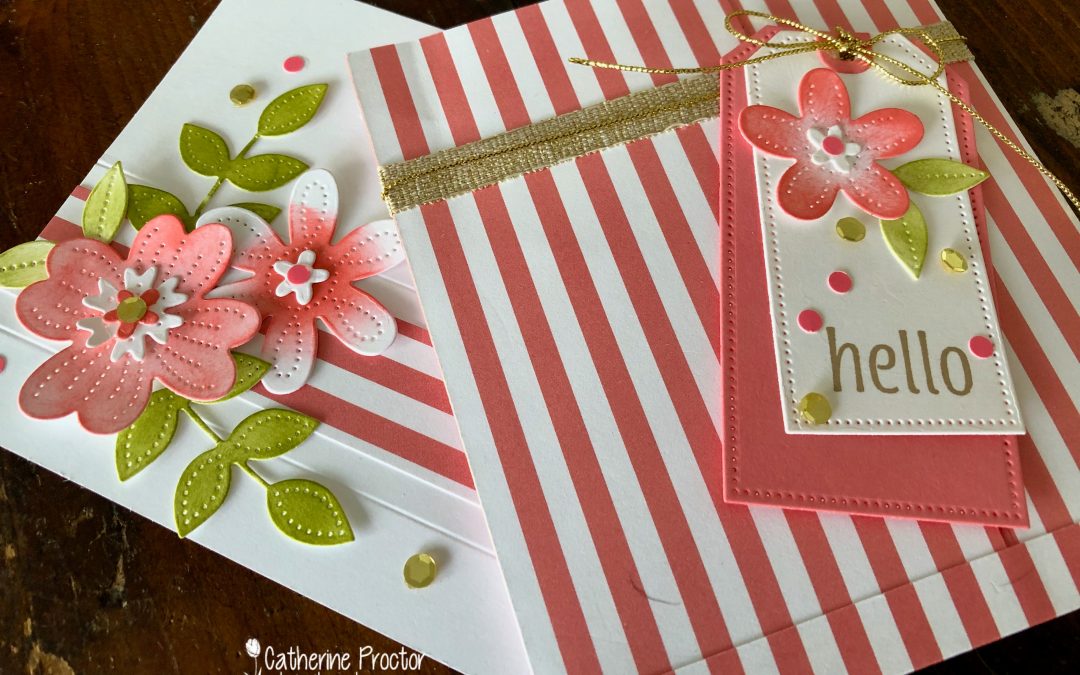
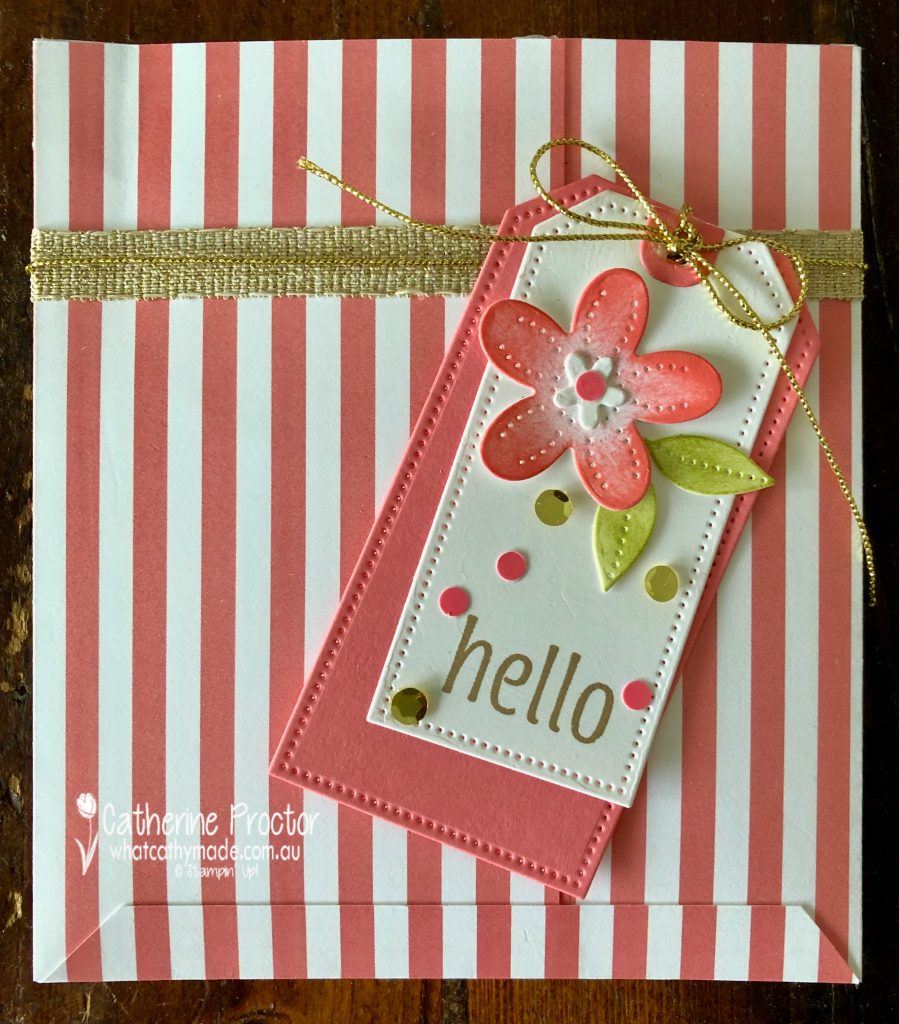
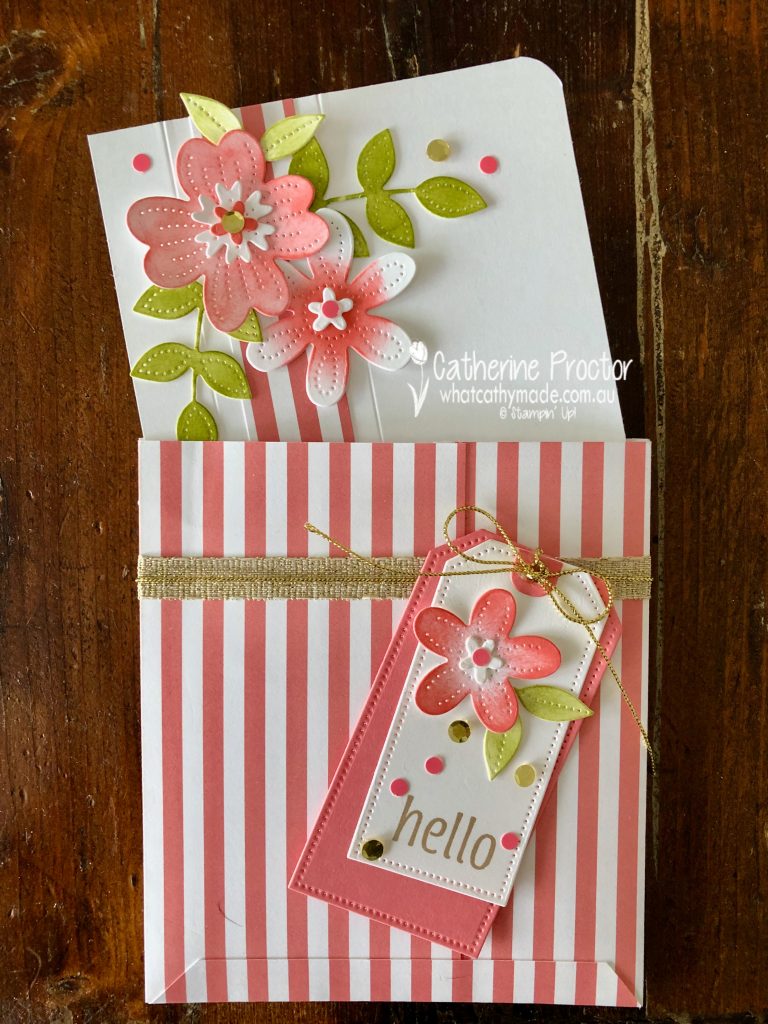
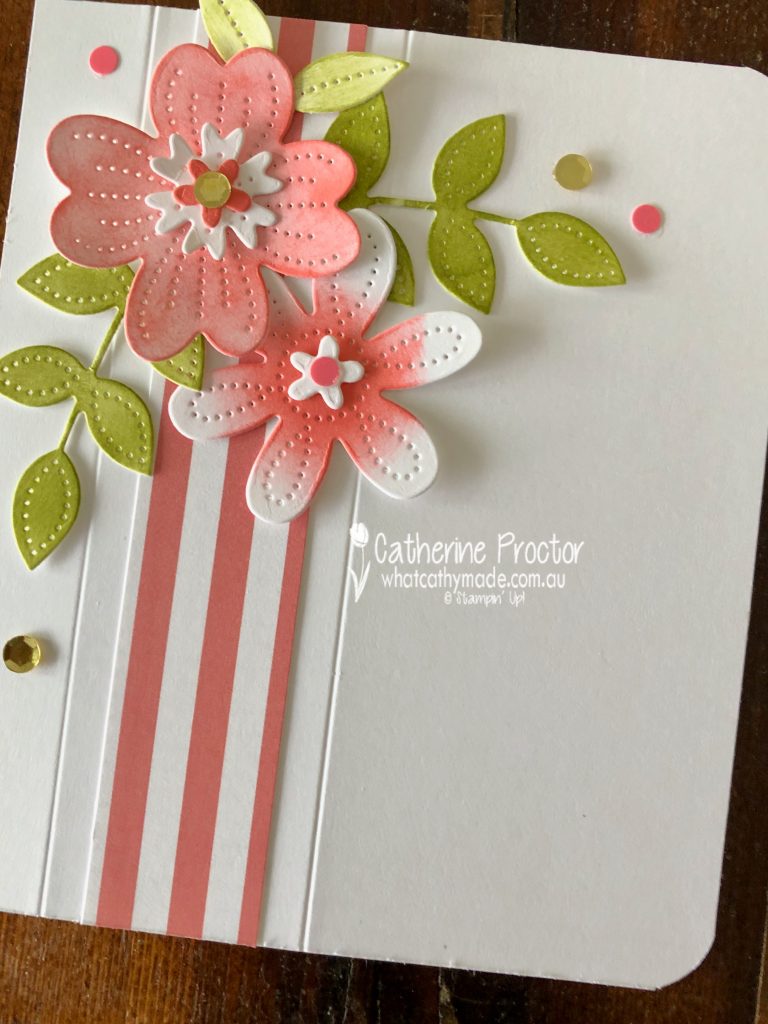
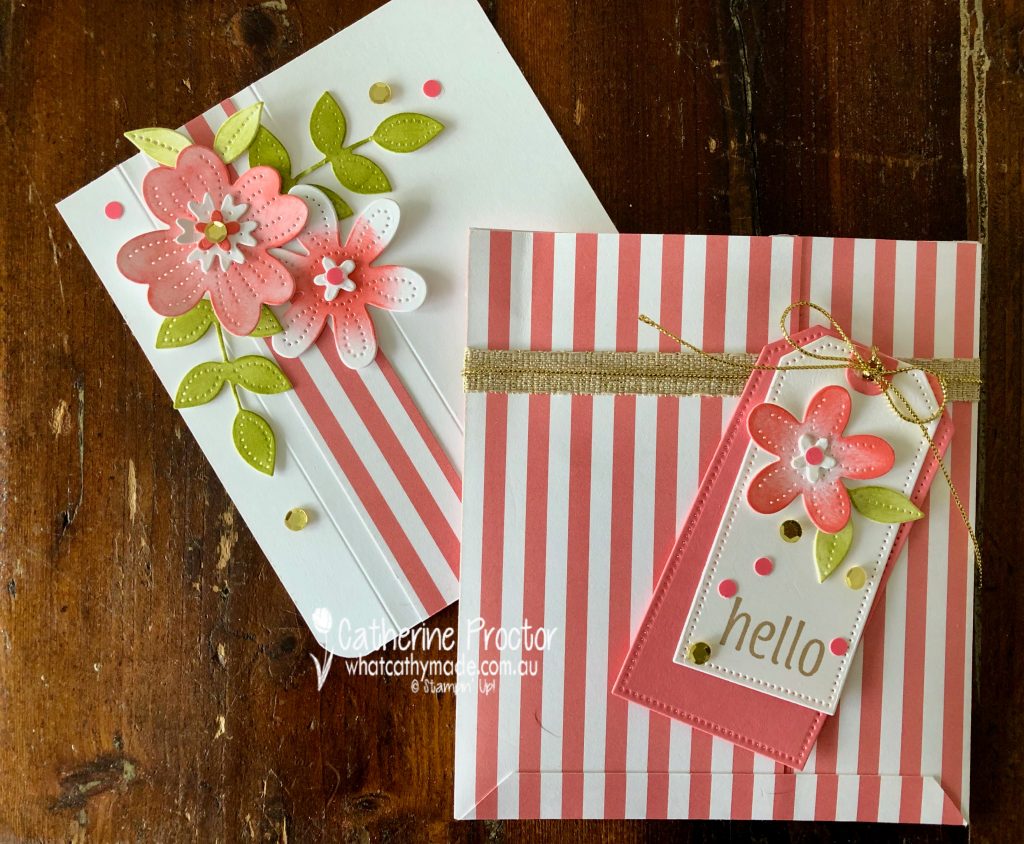
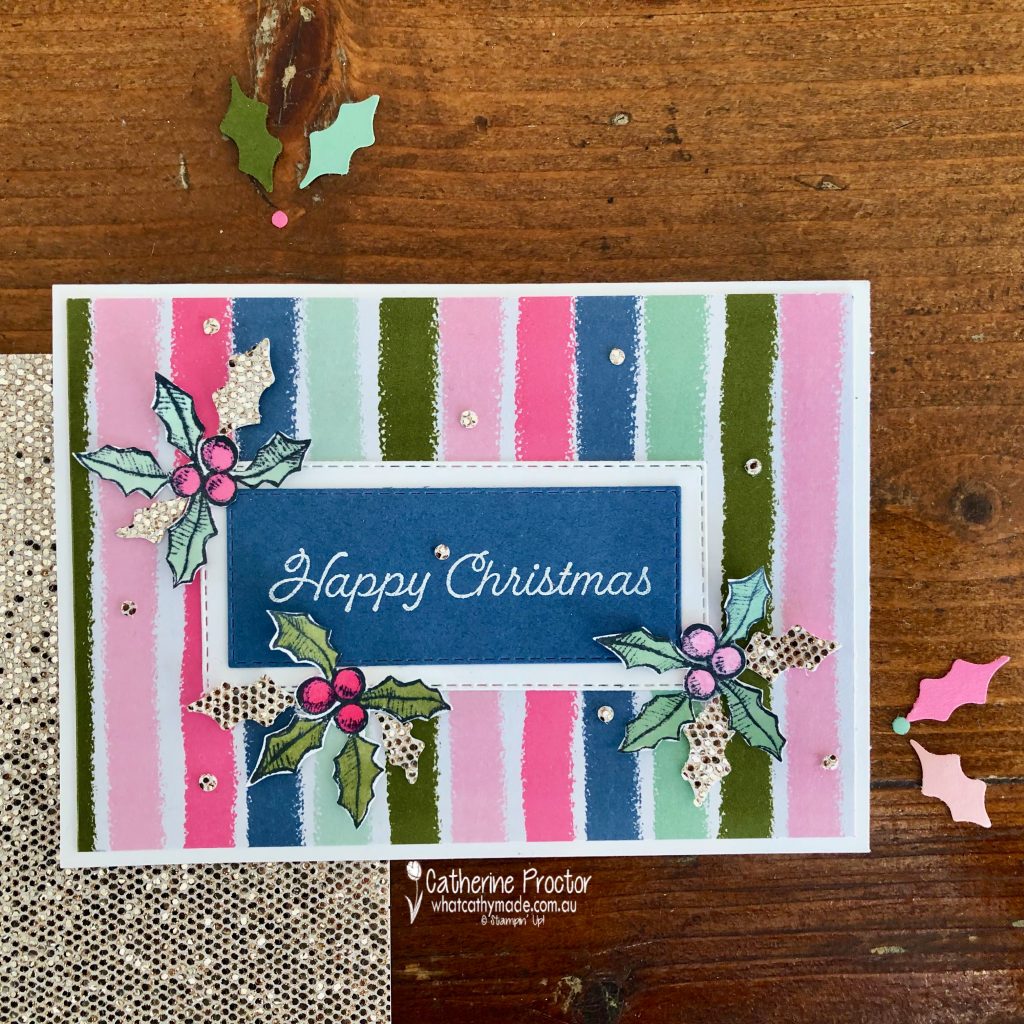
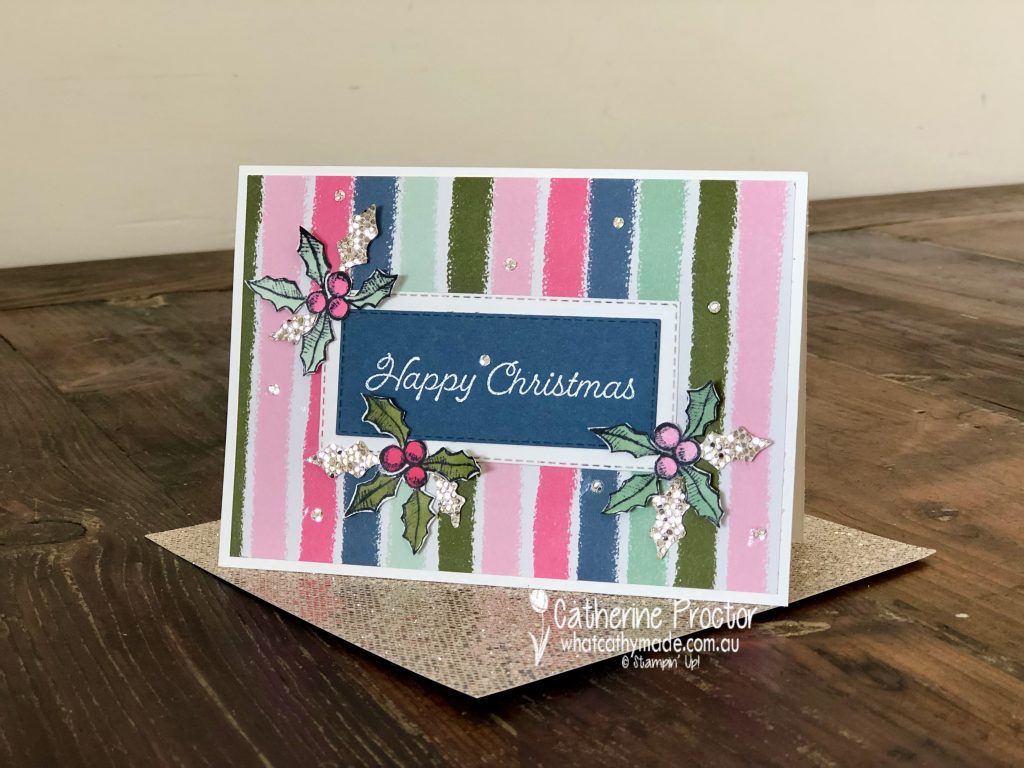
Welcome to week 17 of our 2021-22 Colour Creations blog hop! Tonight we are showcasing Flirty Flamingo, a vibrant pink from the Brights colour collection.
The starting point for my card today was the beautiful Flirty Flamingo striped paper from the Pattern Party Designer Series Paper. This is a host product, only available with Stampin’ Rewards, and it includes 48 sheets (4 each of 12 double-sided designs) in these gorgeous colours: Basic Black, Crushed Curry, Flirty Flamingo, Granny Apple Green, Misty Moonlight, Pale Papaya, Petal Pink, Pool Party and Poppy Parade.
I started my making an 5″ x 5 1/2″ bag, using these instructions for a 6×6 DSP, even though this DSP is 12 x 12″. The bag uses either one sheet of 12×12″ DSP cut into 6×6″ squares or 3 sheets of 6×6″ DSP.
Cut piece 1 at 5″ wide x 6″tall and score 1/2″ at the bottom.
Cut piece 2 to 3 1/2″wide x 5 1/2 ” tall and score 1/2″ along the left side of 5 1/2 ” edge.
Cut piece 3 to 3 1/2″wide x 5 1/2 ” tall and score 1/2″ along the right side of 5 1/2 ” edge.
Adhere the folded sides of pieces 2 and 3 to the left and right edges of piece 1.
Adhere together the overlapped section of pieces 2 and 3 together.
Fold up the bottom flap and adhere.
I wrapped the Fine Art 3/8″ (1 cm) Ribbon and gold metallic Simply Elegant Trim around the bag and tied a bow. The Simply Elegant Trim is slippery and hard to keep sitting in a nice bow shape so I always use a couple of glue dots.
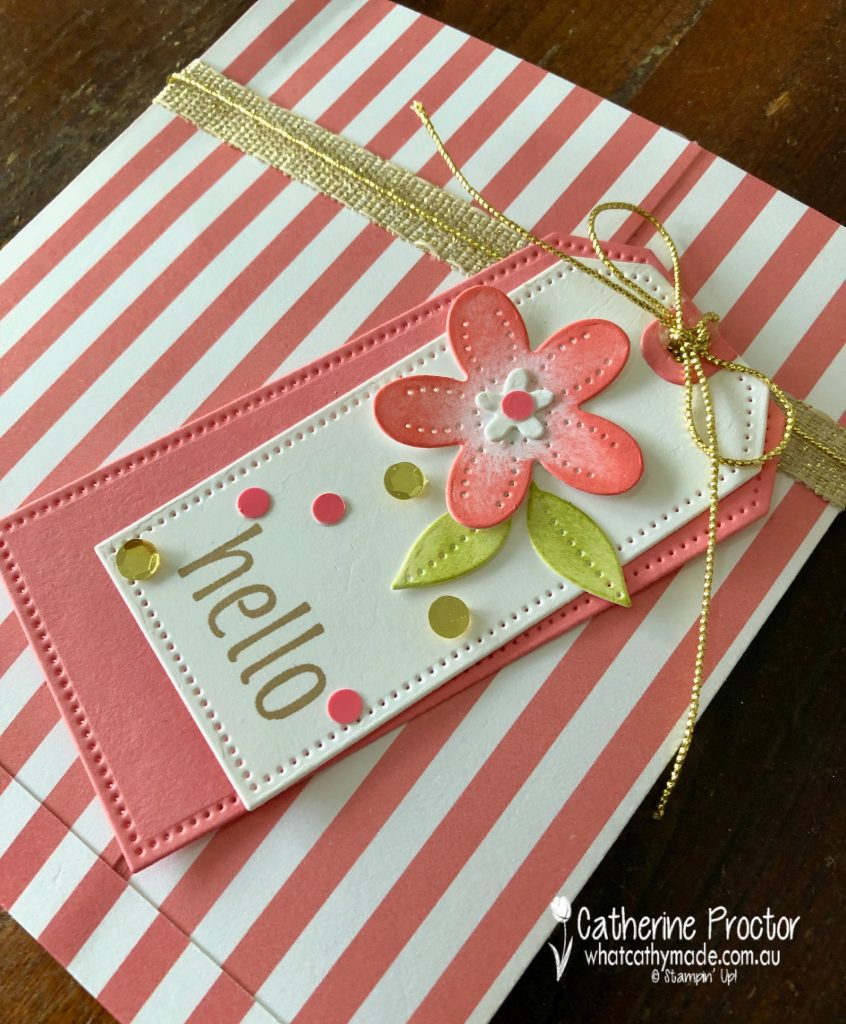
The layered tags are cut using the Tailor Made Tags Dies, Pierced Blooms Dies and Flirty Flamingo and gold sequins from the Sequins For Everything.
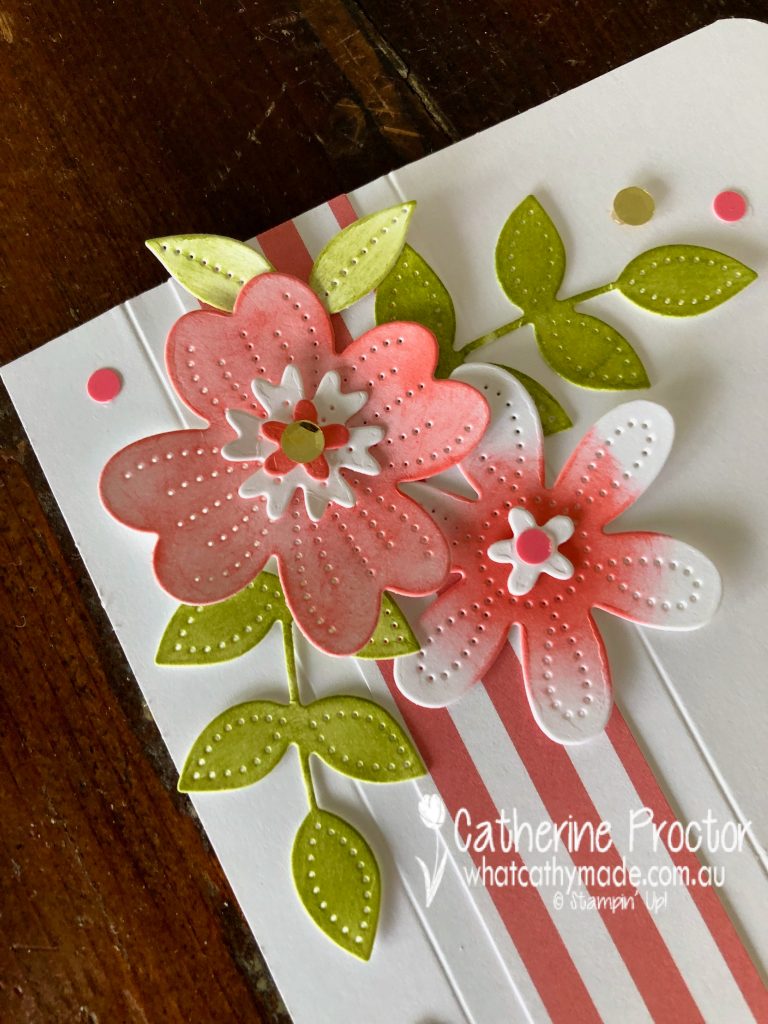
I cut the single layer card to fit inside the bag, decorating it with the same embellishments and a strip of the striped DSP I used for the bag. All of the flowers and leaves were die cut in Basic White using the Pierced Blooms Dies and then colored with Pear Pizzazz and Flirty Flamingo ink using sponge daubers.
I added a score line either side of the strip of DSP using the score blade on my paper trimmer.
I love how quick and easy it is to achieve different shades of colour and a variegated effect by adding colour with a sponge dauber.
I’m not sure if there is an official name for a single layer card in an bag that acts like an envelope? Whatever it is called, I think I will be making more of these as they have plenty of room to also enclose photos, a Christmas letter or even gift cards of any size.
I’ve left room to write on the front of the card, however you could simply use the reverse side if you wanted to write a longer message.
Now it’s time to hop on over to our next participant, my friend Kate Morgan – I can’t wait to see what she’s made this week!
If you find a broken link or have come to this blog hop from a different entry point, you can view the the full list of participants below:
Don’t forget to use my monthly Host Code (if your order is between $50 – $250) and I will send you a thank you gift the following month. If your order is over $250 don’t use the host code because you will qualify for your own stamping rewards. My September Host Code is WVX3UYCR and it is valid until midnight September 30.
I’ll be back with another Christmas card next Monday. In the meantime, wherever you are in the world, stay safe, stay calm … and keep on crafting xxx
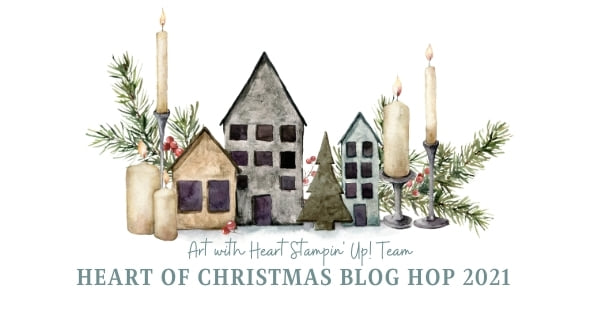
The new July-December 2021 Mini Catalogue and SALE-a-bration catalogues go live tomorrow so I’m sharing another card that uses some of these beautiful Christmas products.
I’m not really a sparkly girly girl at all but I just can’t stop using this FREE Be Dazzling specialty designer paper from the SALE-a-bration catalogue. I’ve taken a zillion photos of my card to show you just how gorgeous this Be Dazzling specialty designer paper is!
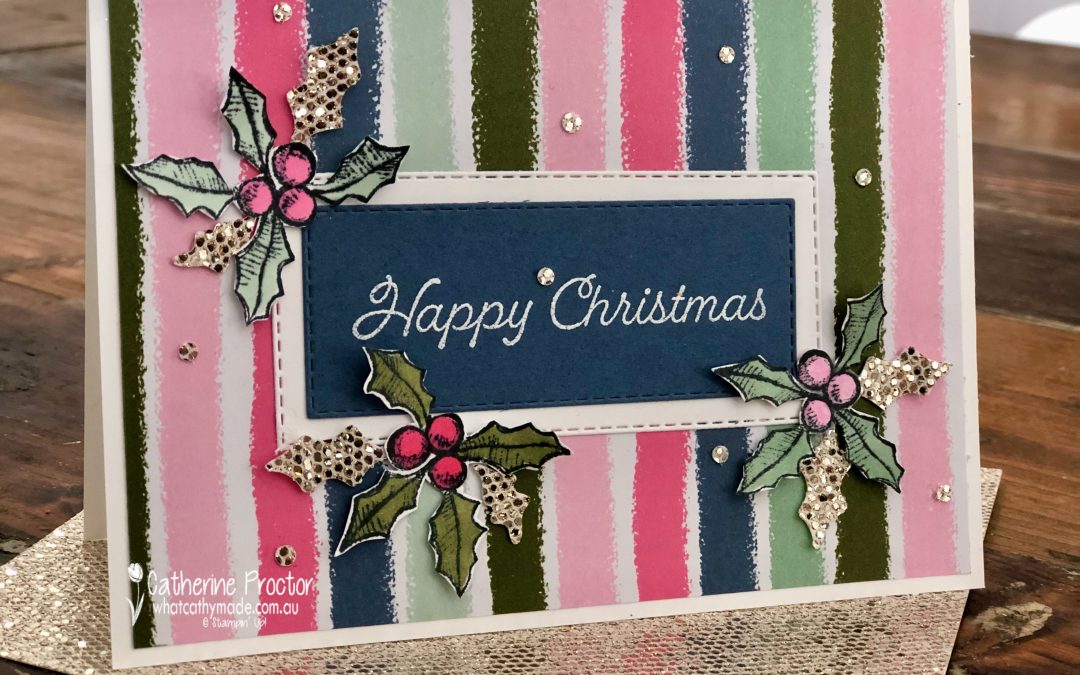
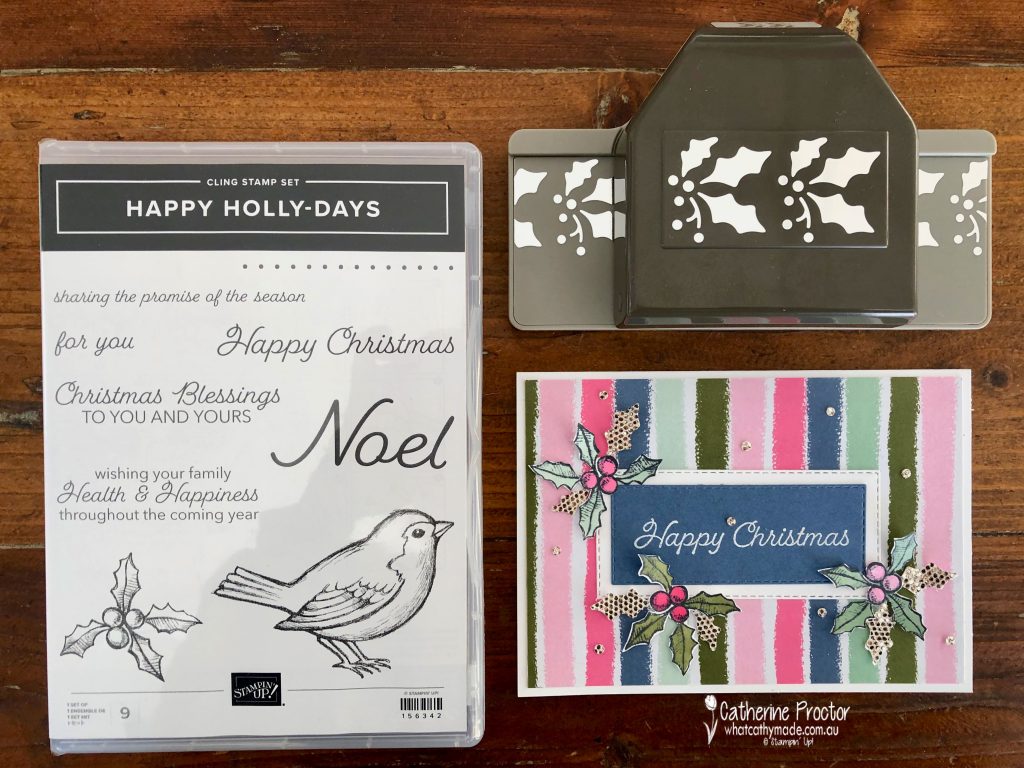
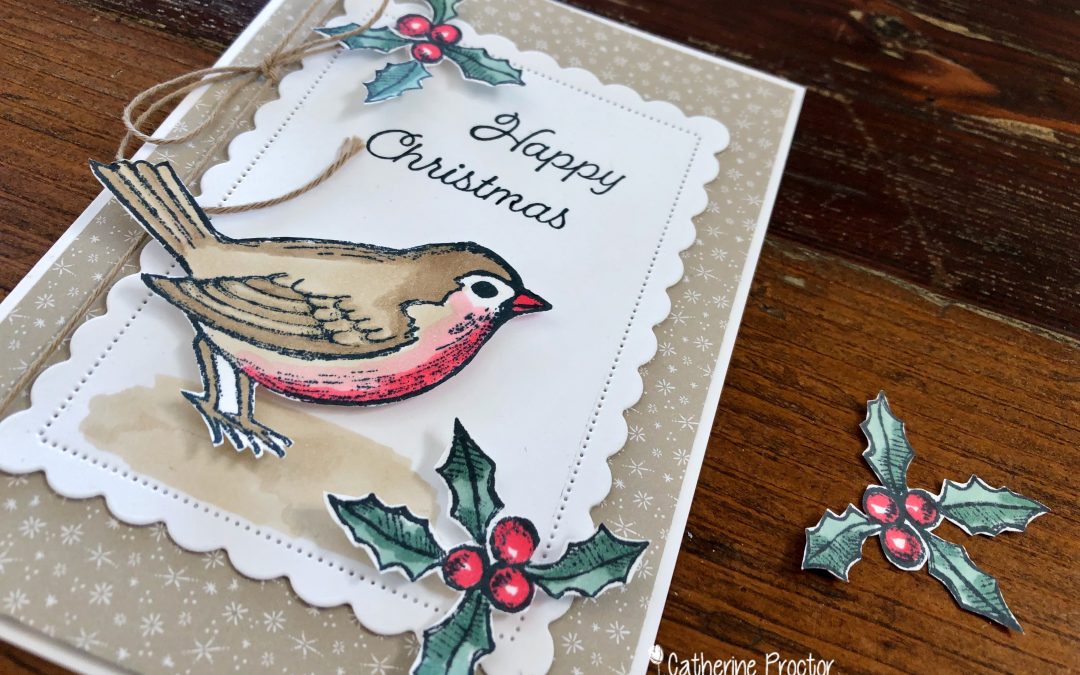
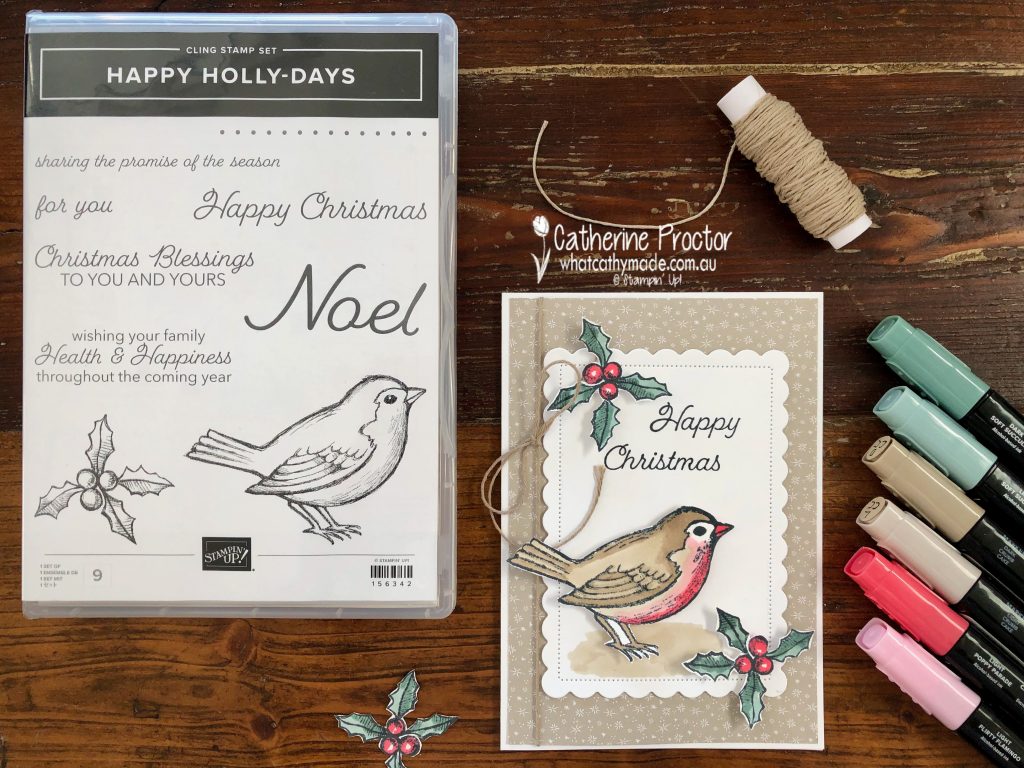
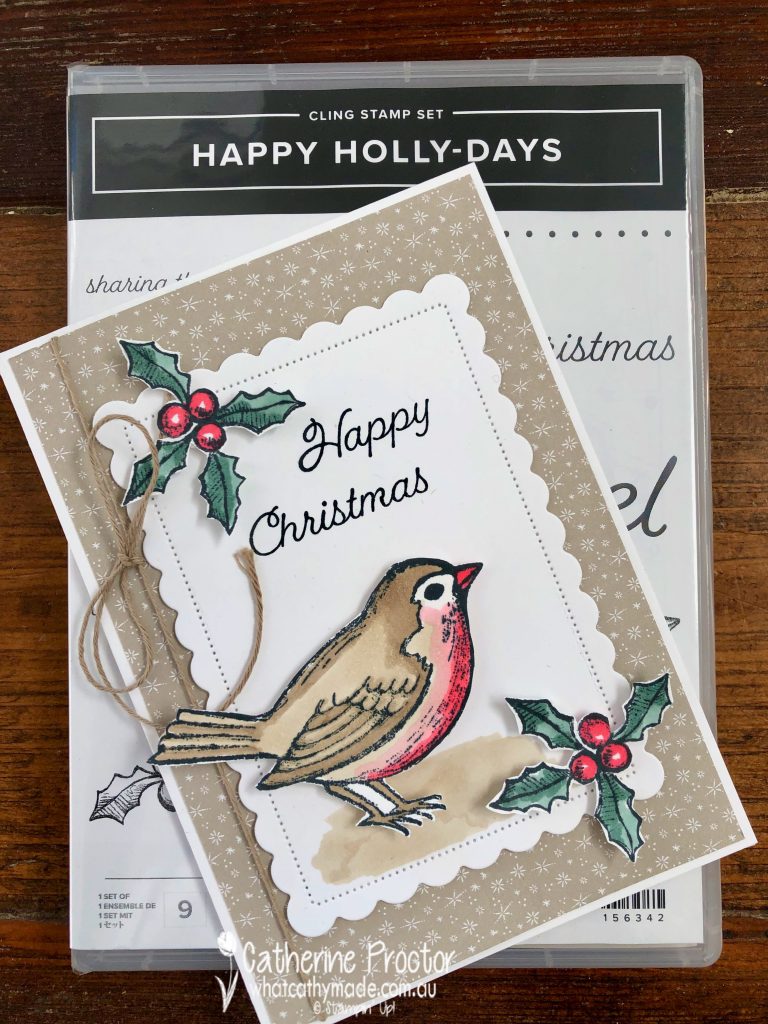
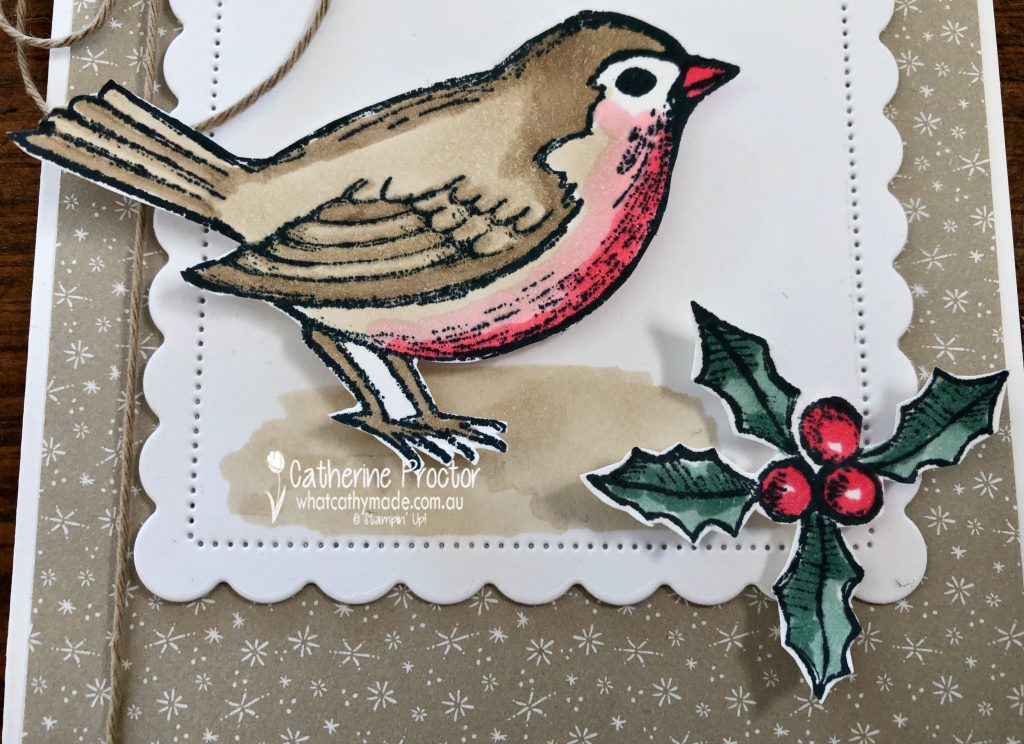
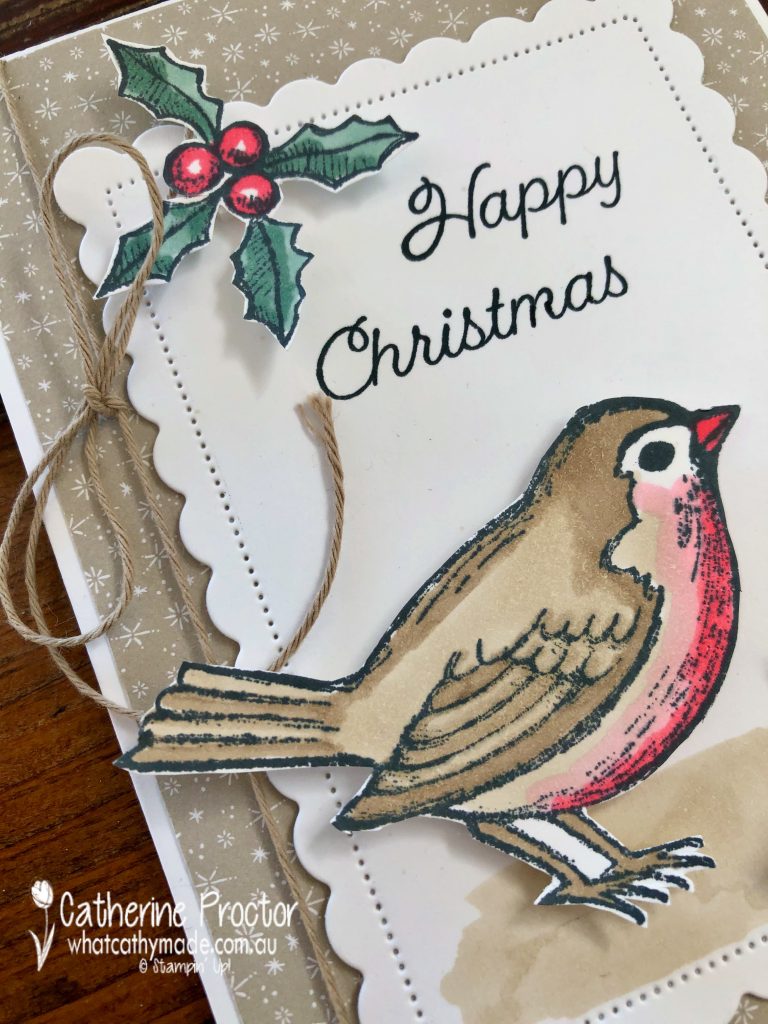
I’ve also used one of my favourite bundles from the July-December 2021 Mini Catalogue – the Happy Holly-Days Bundle. Last week I shared this card with you that featured the adorable bird coloured in – this week I’ve used the holly stamp and the Holly Border Punch from the Happy Holly-Days Bundle.
What’s that stunning striped Designer Series Paper I hear you cry? It’s my favourite DSP from the new July-December 2021 Mini Catalogue, called Whimsy & Wonder Designer Series Paper.
I cannot begin to tell you how stunning this DSP is. The colour combination is: Polished Pink, Blushing Bride, Mossy Meadow, Mint Macaron, Misty Moonlight and Iridescent. It is foiled on one side, with gorgeous background patterns (like the stripes I’ve used today) on the other side.
This card layout would work with any Designer Series Paper – just pick up the colours in the DSP for when you colour in the holly. I used light and dark Polished Pink, Mossy Meadow and Mint Macaron blends to colour the holly and then I fussy cut it out. If you don’t enjoy fussy cutting just use the holly punch to punch out cardstock in colours that co-ordinate with your DSP.
An added bonus of this punch is the little dots it punches out – don’t waste them! Just like I did with the Deer Builder punch on this card, I’ve used these dots as tiny embellishments.
These tiny dots can be tricky to adhere as they are so small. I find the easiest way to do this is to place a small amount of multipurpose glue onto the silicon mat and then insert the sharp tip of your “Take your Pick” tool into the glue. Use this tip with the glue to pick up the back of the embellishment, place it on your card and gently press down as you slide the “Take your Pick” tool out from under the embellishment.
Now it’s time to hop on over to our next participant, the incredible talented Theresa Gerrard. I wait to see what Theresa shares with us today!
If at any time you find a broken link please head to the blog of this week’s Host of the Heart of Christmas Blog Hop, Rachel Woollard, and she will have the list of all who are participating.
Thanks for visiting my site. I’ll be back with another card on Wednesday. If you’d like a copy of the forthcoming July-December mini catalogue and the Sale-a-bration catalogueplease get in touch.
I’m loving the challenge of creating a Christmas card each week and I hope you’re being inspired to create some too.
If you enjoy colouring techniques the Happy Holly-Days stamp set from the forthcoming July-December 2021 mini catalogue is a must!
Both this bird stamp and the holly stamp could be coloured using a variety of watercolour techniques or the Stampin’ Up! watercolour pencils, but for my card today I’ve quickly coloured the images in using our Stampin’ Blends.
The holly is coloured in using light and dark Soft Succulent and light Poppy Parade Stampin’ Blends, while the bird is coloured with Light and dark Crumb Cake, light Flirty Flamingo and light Poppy Parade Stampin’ Blends…love this colour combination!
Basic Black
Crumb Cake
Sahara Sand
Soft Succulent
Flirty Flamingo
Poppy Parade
The softly patterned Sahara Sand DSP is from the Tidings of Christmas 6″ x 6″ Designer Series Paper – on sale until August 2.
It was very easy to fussy cut both the bird and the holly. This Happy Holly-Days stamp set is actually part of a bundle with the holly border punch, but I only used the stamp set on this card.
To ‘anchor’ the bird onto the card I used the light Crumb Cake Stampin’ Blend on the Basic White cardstock layer that has been die cut using the second largest Scalloped Contour die.
I inked up the word ‘Happy’ from the “Happy Christmas’ sentiment and stamped it first and then inked and stamped the word ‘Christmas’ below it. Crumb Cake twine wrapped around the card and tied into a soft bow finishes off the card.
Now it’s time to hop on over to our next participant, the very talented Ros Davidson – I can’t wait to see what Ros shares with us today.
If at any time you find a broken link please head to the blog of this week’s Host of the Heart of Christmas Blog Hop, Tina Gillespie, and she will have the list of all who are participating.
Thanks for visiting my site. I’ll be back with another card on Wednesday. If you’d like a copy of the forthcoming July-December mini catalogue and the Sale-a-bration catalogueplease get in touch.
Are you ready for some more Christmas inspiration?
It’s pretty cold here in Sydney at the moment so I’ve made a very wintery card for you today using a new bundle from the forthcoming July-December Mini catalogue.
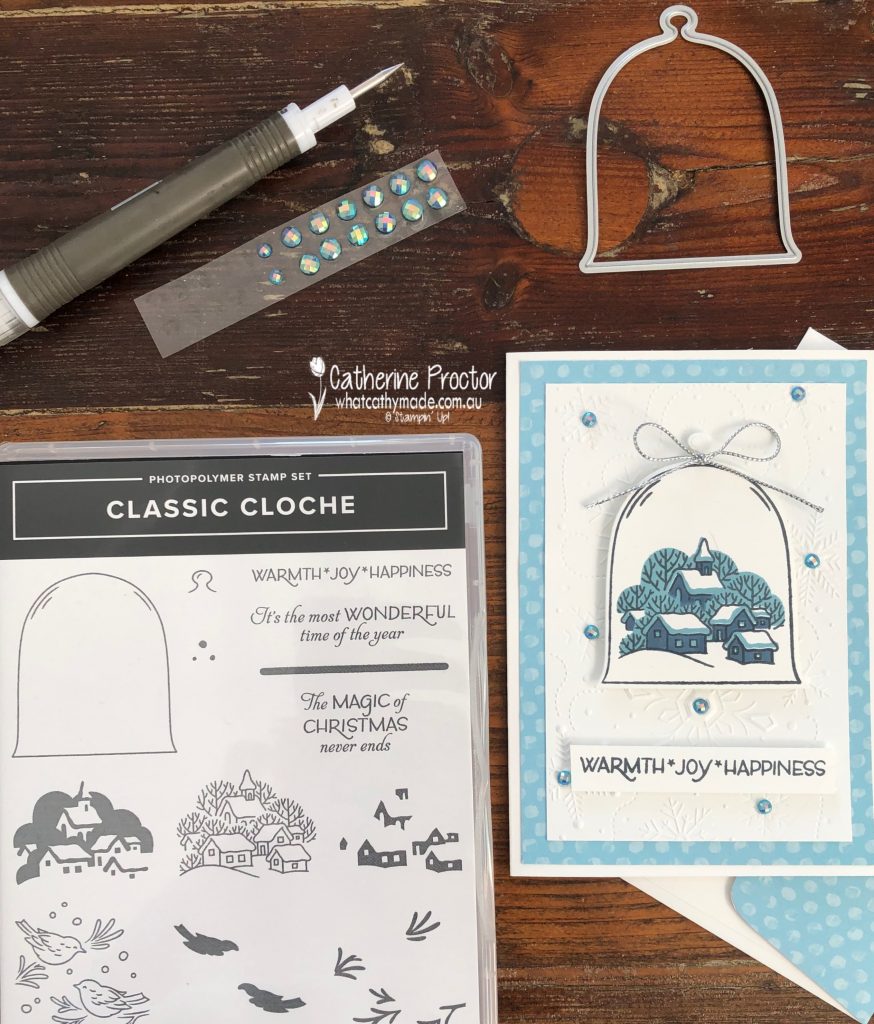
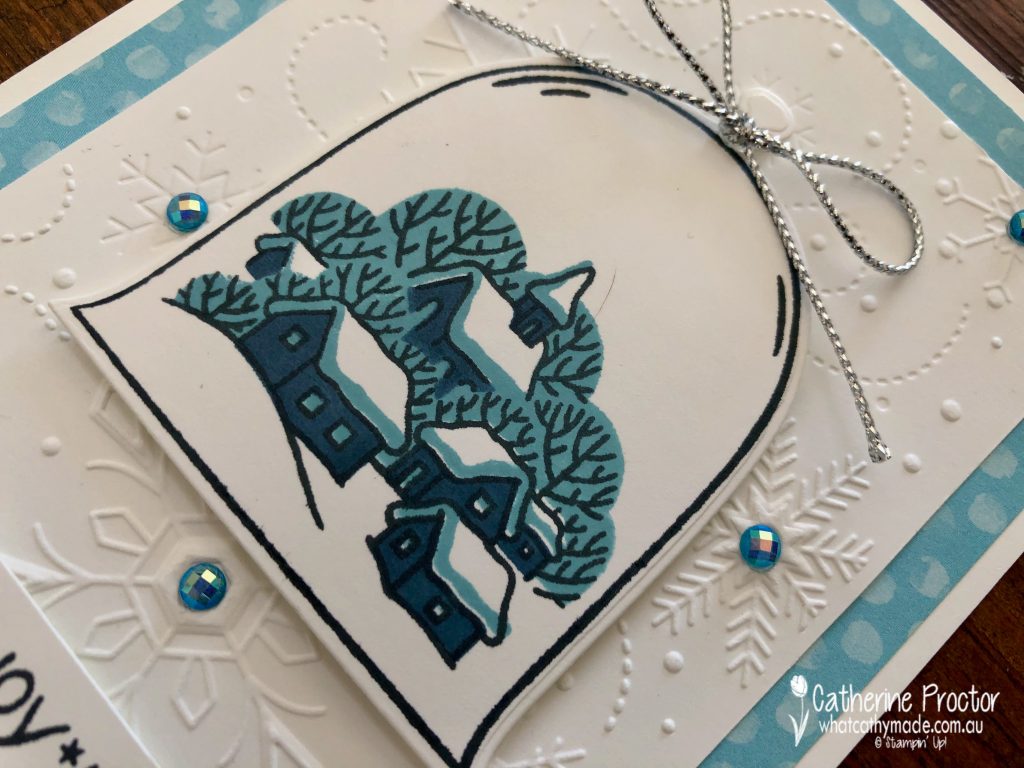
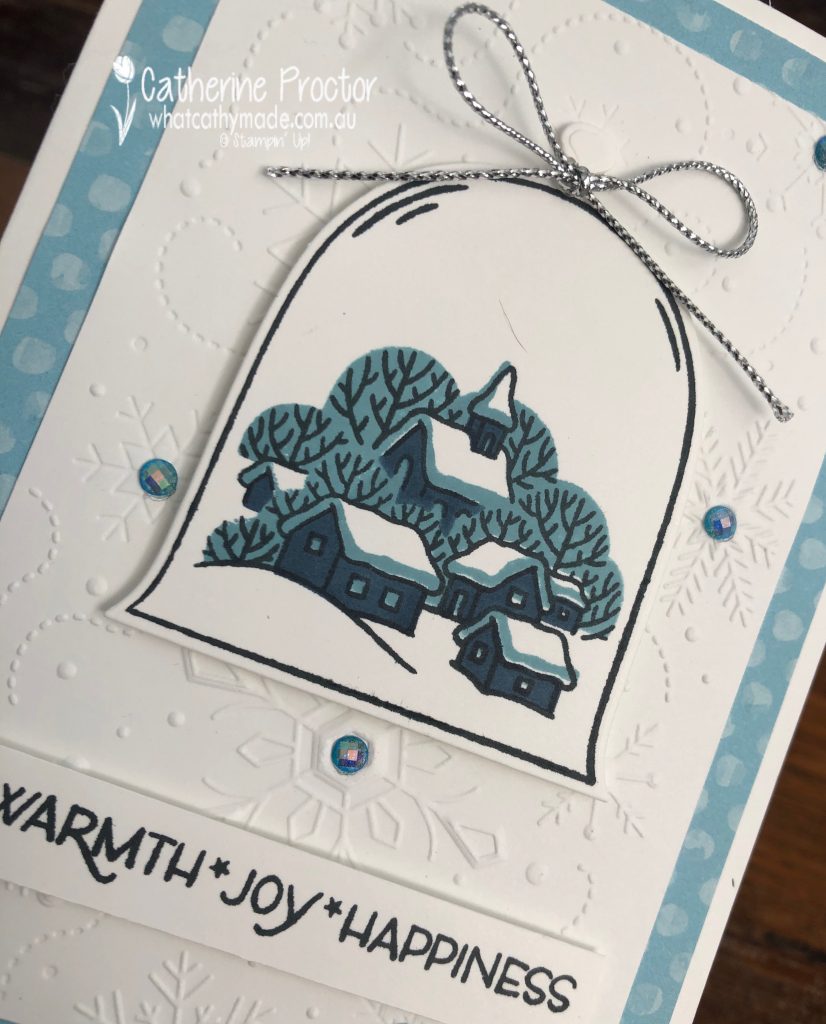
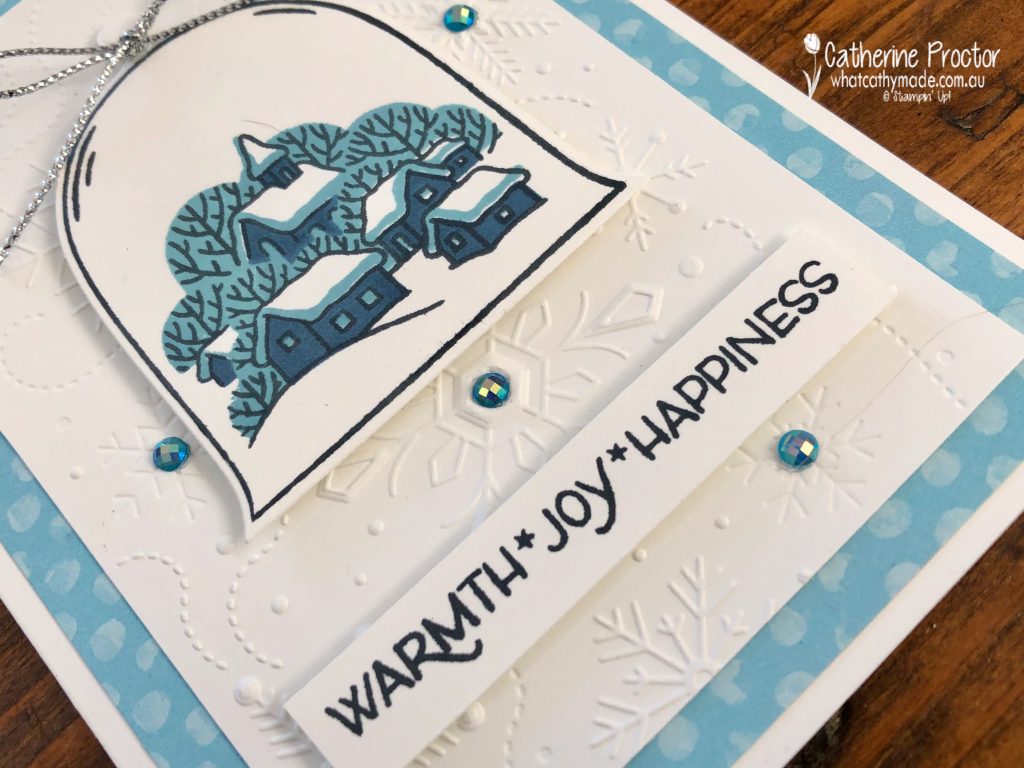
I have to confess this card wasn’t meant to be this simple – I had intended to make a shaker card using the new cloche shaker domes that match the Classic Cloche bundle but I forgot to order them! Luckily, this bundle really lends itself to both simple and more complex cards.
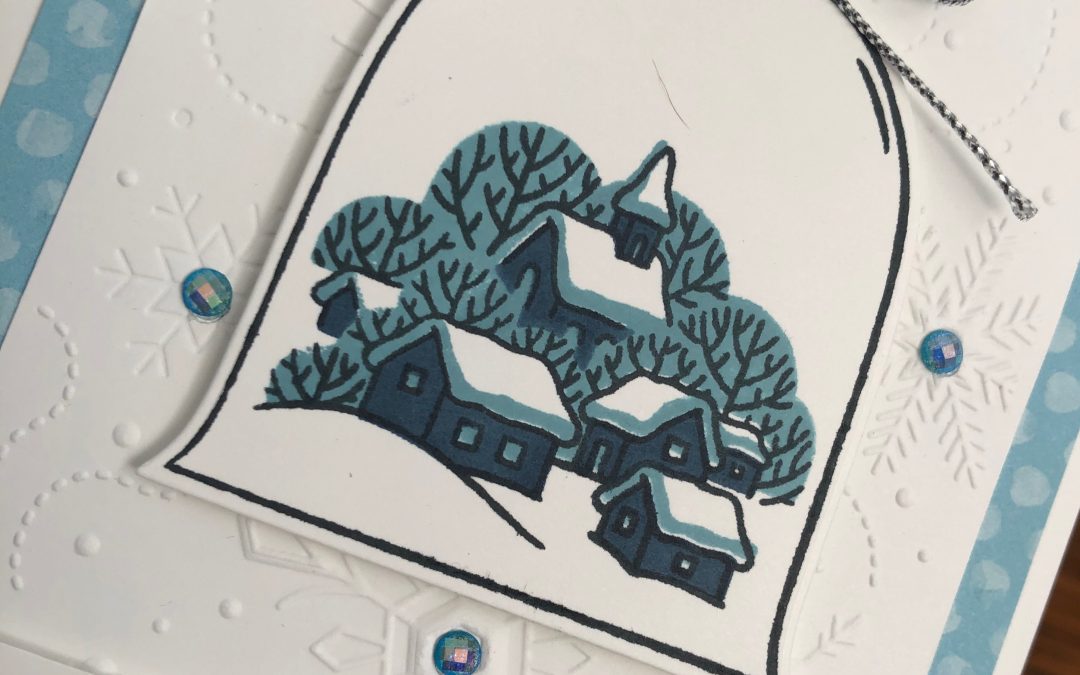
I fell in love with this little snowy town which is why this bundle made it to the very top of my wish list. There is also an adorable pair of birds sitting on branches in the stamp set and plenty of dies to create different scenes – I’ve only used the cloche die in this this card and I can’t wait to play with the other dies on some more Christmas cards soon.
The little village image can either be used on its own and hand coloured, or you can use the 3 layer stamps as it I’ve done in this card. I stamped the cloche outline stamp and the village line image stamp in Tuxedo Memento, the background stamp in Balmy Blue and the stamp that shades the houses in Misty Moonlight.
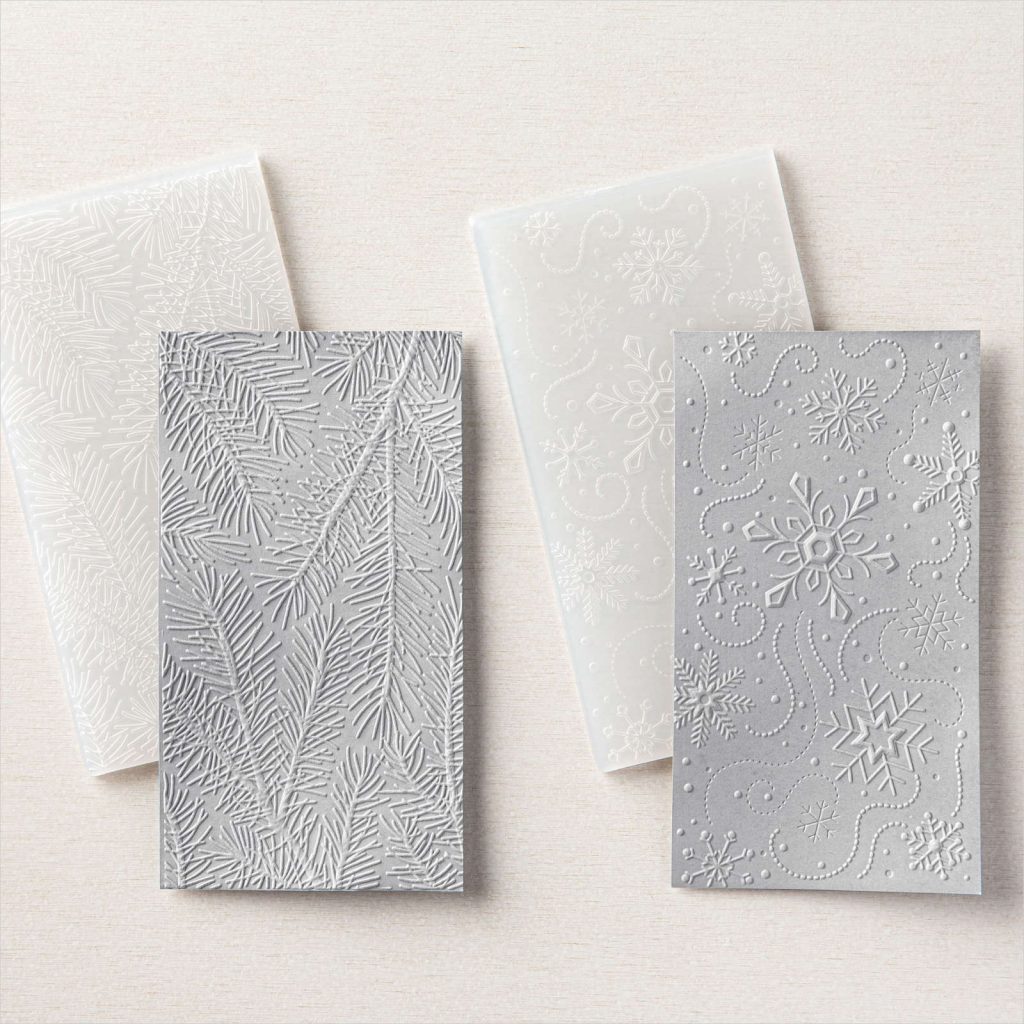
The Wintry embossing folder was the perfect background layer for my snowy village. This embossing folder is available now and it is one of a pack of two – they will be getting a lot of use on my Christmas cards this year.
The Balmy Blue Adhesive-Backed Gems were the perfect embellishment to highlight the middle of the snowflakes on the embossed layer.
You don’t always have to use Christmas paper to make a Christmas card – this spotted DSP is from the You’re a Peach Designer Series Paper (currently on sale) and it reminded me of snowflakes! I really love this sentiment from the Classic Cloche stamp set.
Now it’s time to hop on over to our next participant, our very talented Art With Heart team leader, Claire Daly. I can’t wait to see what Claire shares with us today.
If at any time you find a broken link please head to the blog of this week’s Host of the Heart of Christmas Blog Hop, Sharon Davern, and she will have the list of all who are participating.
Thanks for visiting my site. I’ll be back with another card on Wednesday. If you’d like a copy of the forthcoming July-December mini catalogue and the Sale-a-bration catalogueplease get in touch.


")


 Specialty Paper")