Welcome to week thirty-seven of our Art With Heart 2023-24 Colour Creations blog hop!
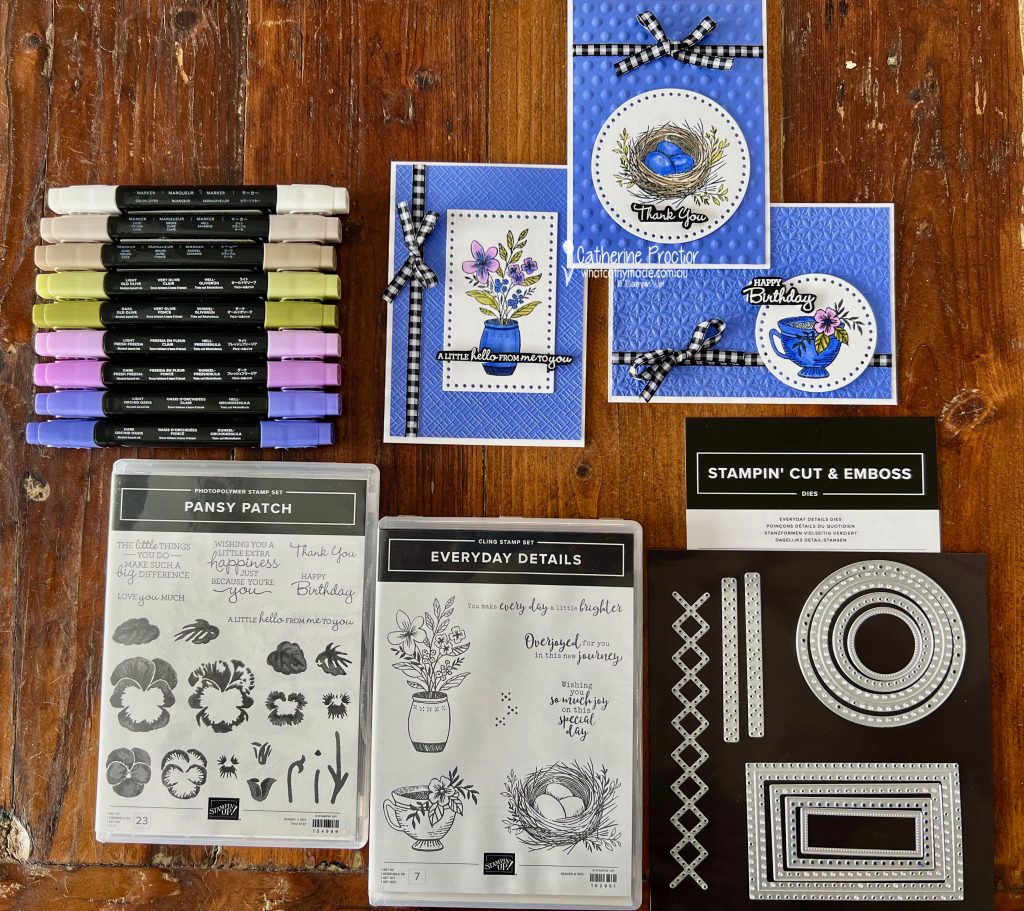
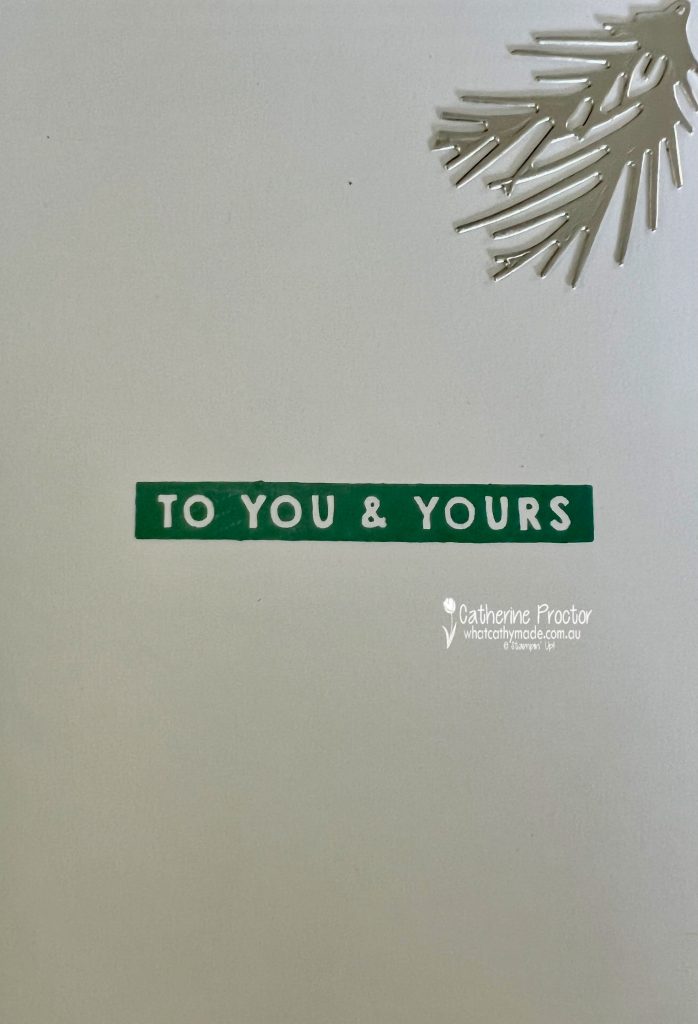
Our colour this week is Orchid Oasis, an 2022–2024 In Color. Whether this is a blue or a purple shade really depends on what colour you put it against. Either way, I think this is a gorgeous colour and it’s one I hope will join the core colour range one day.
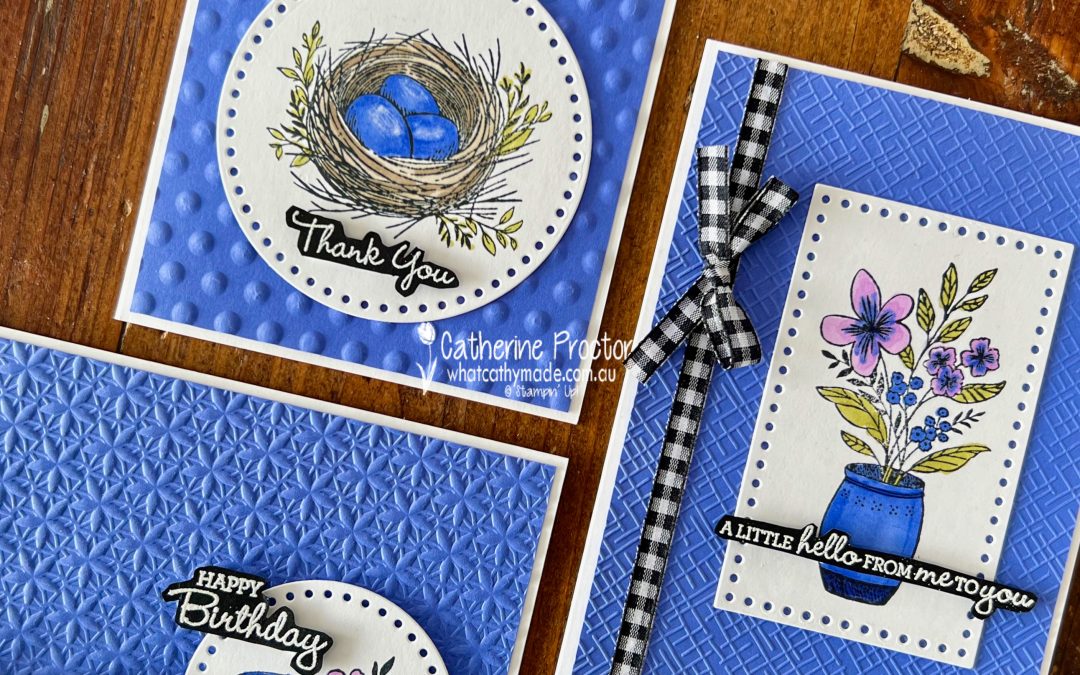
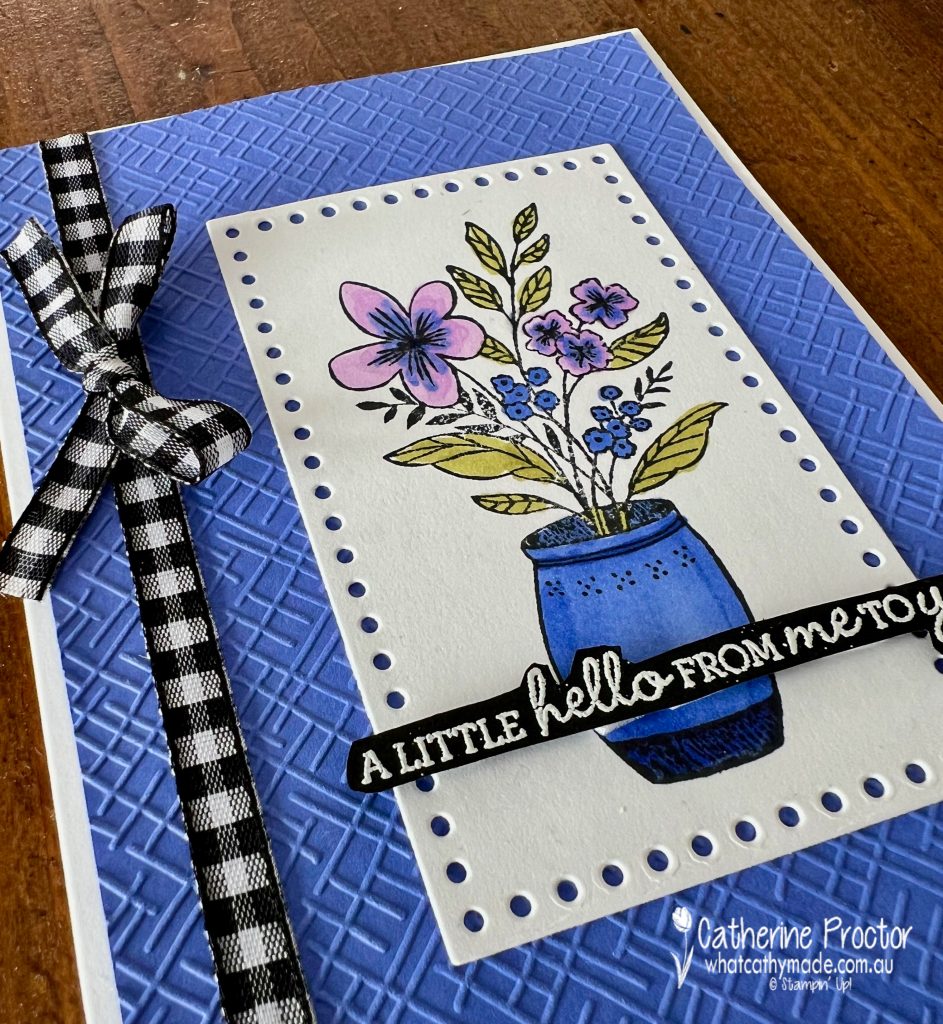
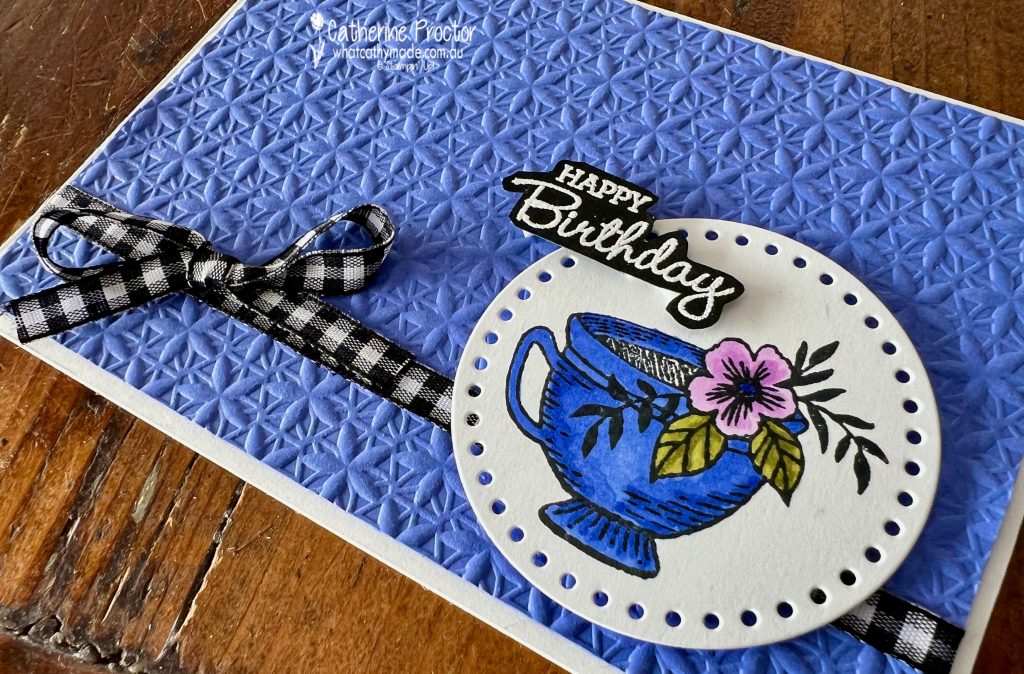
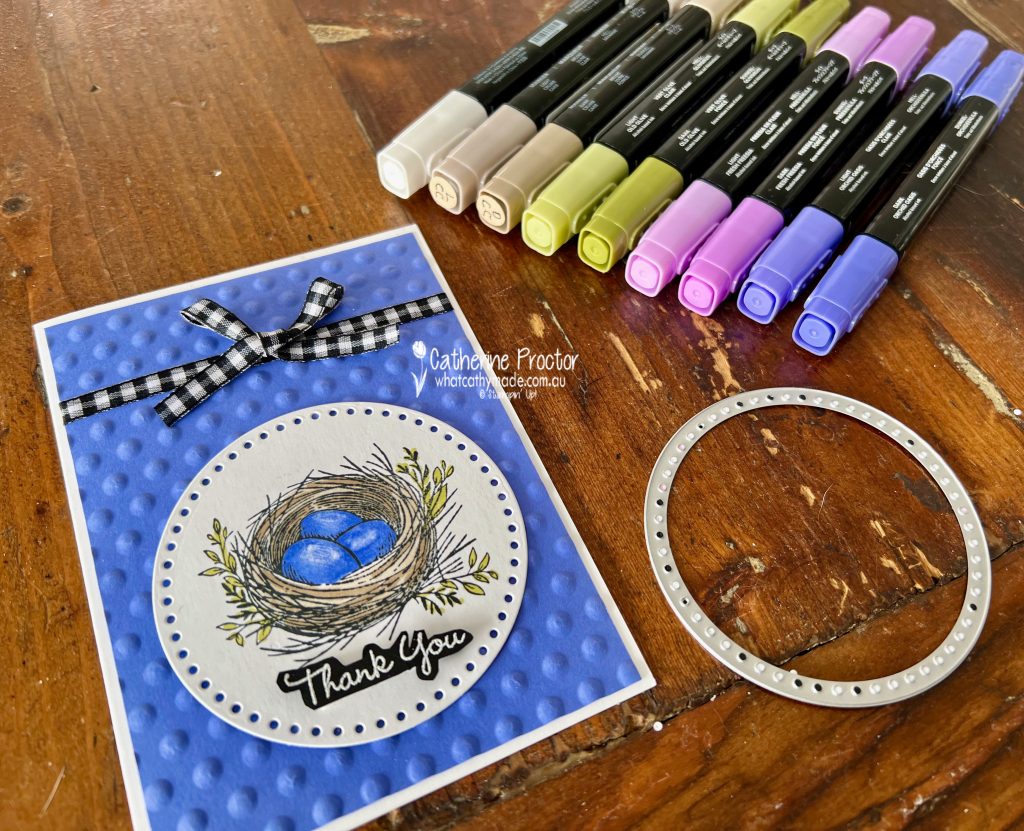
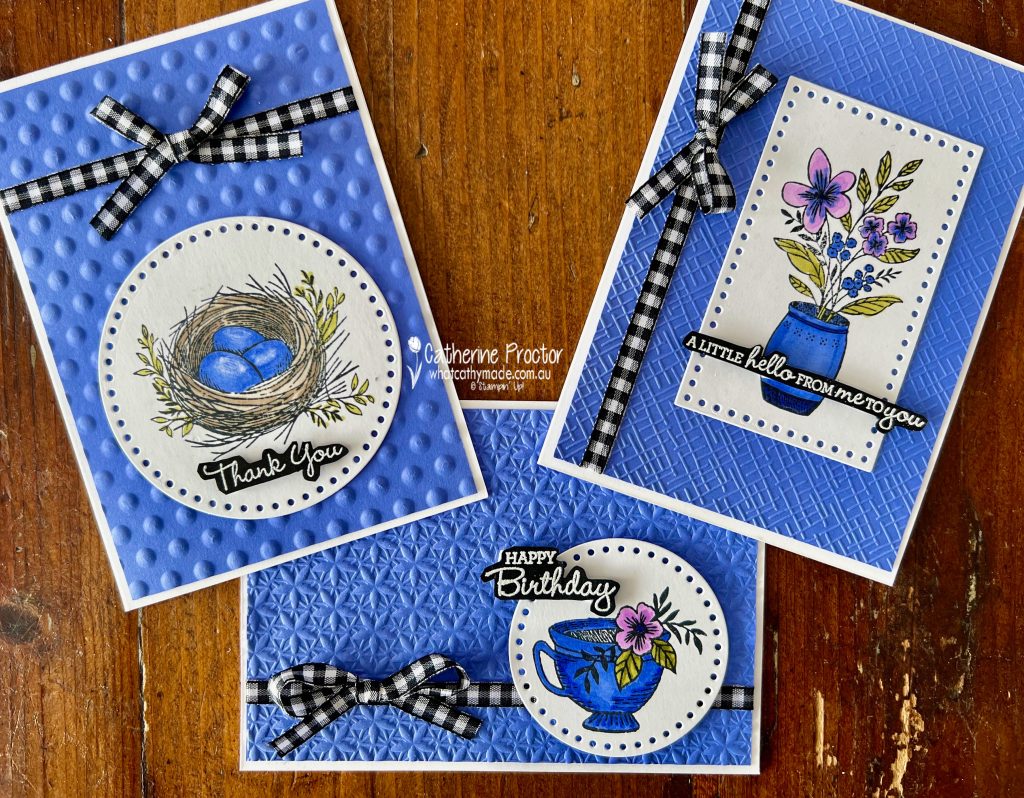
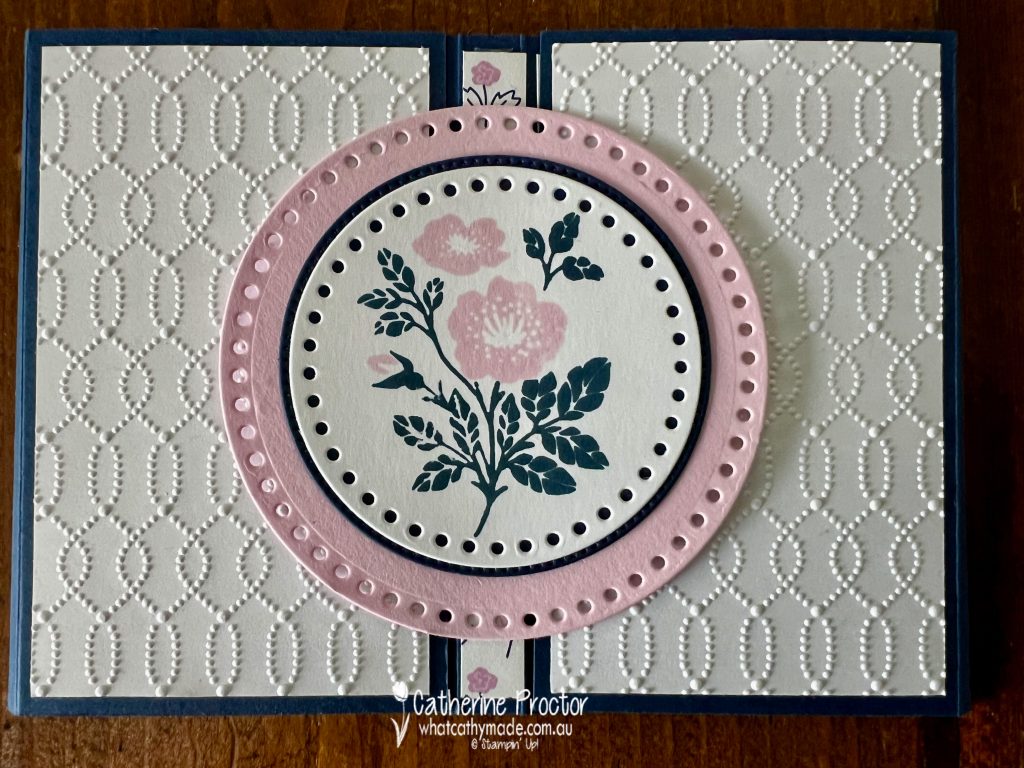
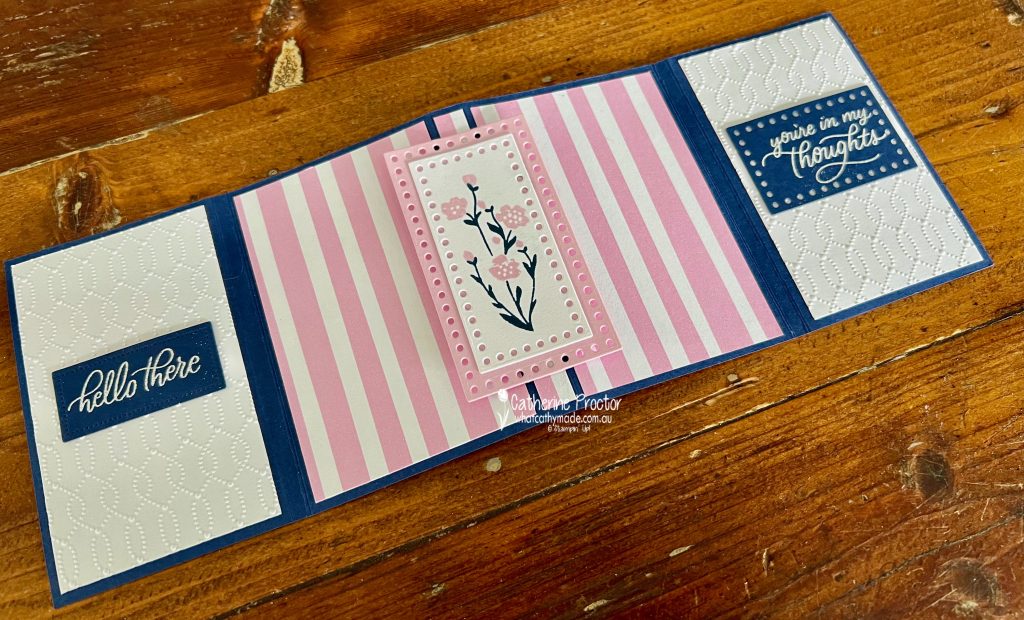
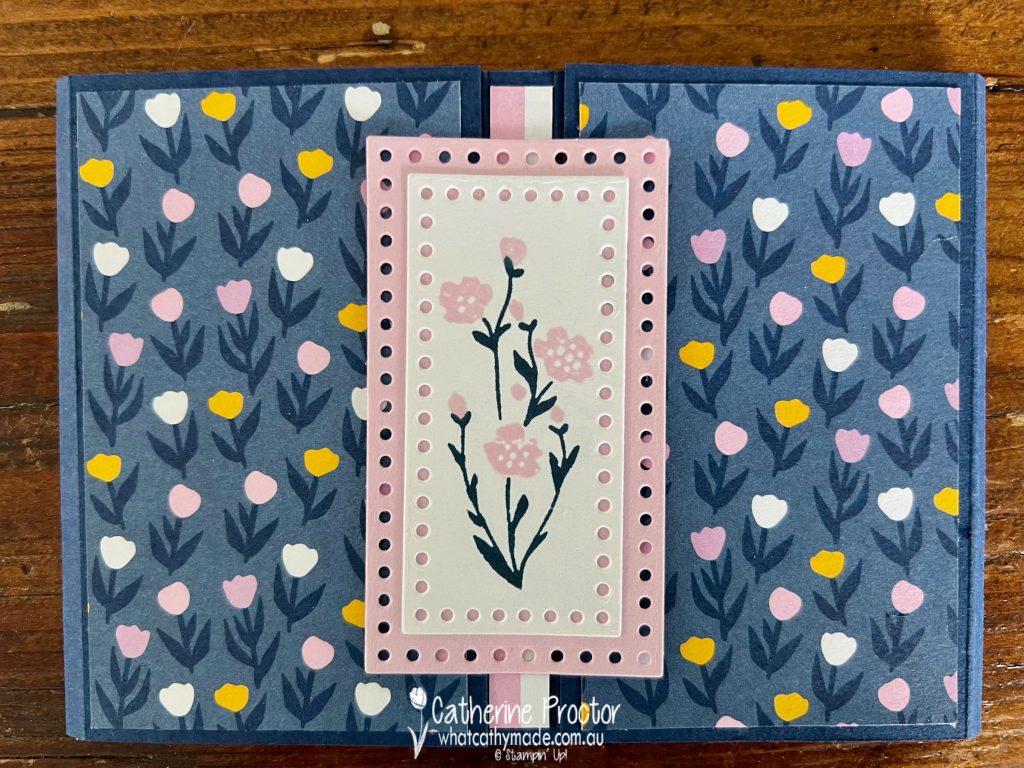
My three cards this week all use the brand new Everyday Details bundle from the January–April 2024 Mini Catalogue as well as the versatile Basics 3D Embossing folders from the online exclusives.
Card one uses the criss cross hatched embossing folder and the largest rectangle die from the Everyday Details dies.
Card two features the teacup image, die cut using the second largest circle die from the Everyday Details dies.
I think card three is my favourite as I love the three little blue eggs in the nest and the “bubble circle” embossing of Orchid Oasis card stock layer.
I don’t often use ribbon on my cards but I couldn’t resist adding a strip of black and white gingham ribbon adhered with Tear & Tape Adhesive with a bow attached with an adhesive dot.
Now it’s time to hop on over to our next participant, the lovely Andrea Sargent – I can’t wait to see what Andrea has made this week!
If at any time you find a broken link, you can find the complete list of all participants below.
Welcome to week thirty-six of our Art With Heart 2023-24 Colour Creations blog hop!
Our colour this week is Old Olive, from the Regals family. I always think of Old Olive as more of a neutral – it is my most used green as it really works well with so many other colours.
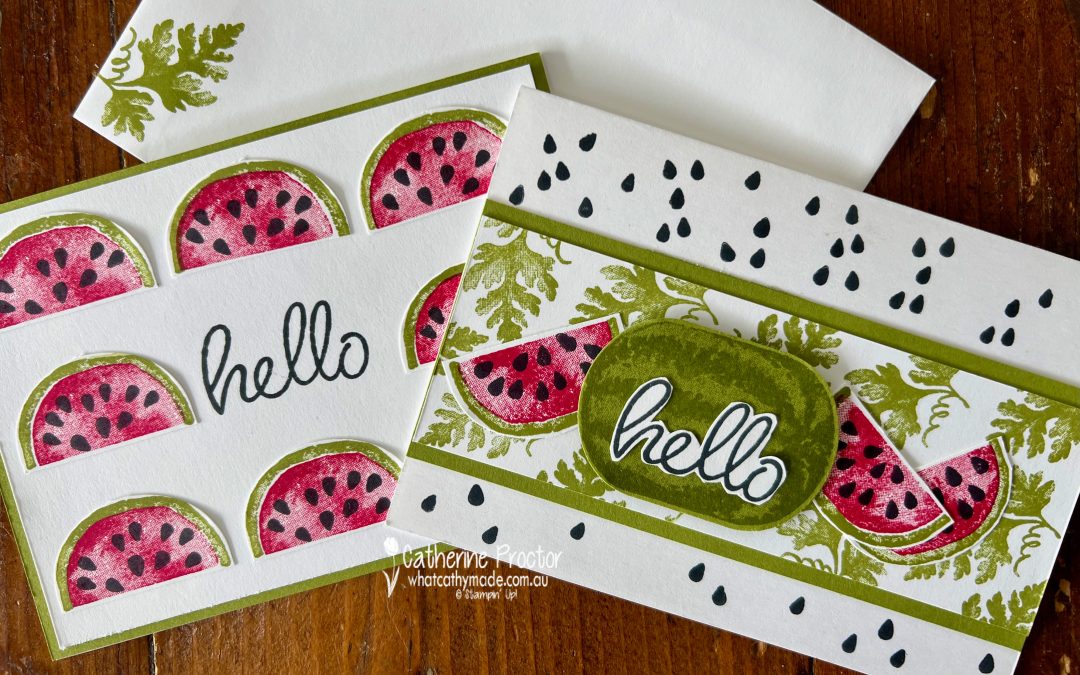
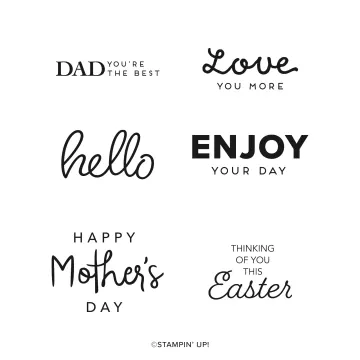
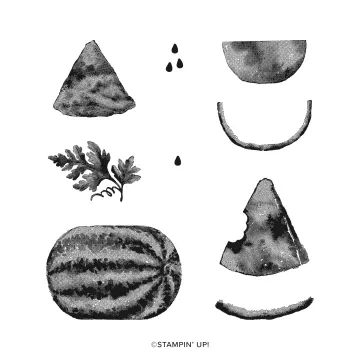
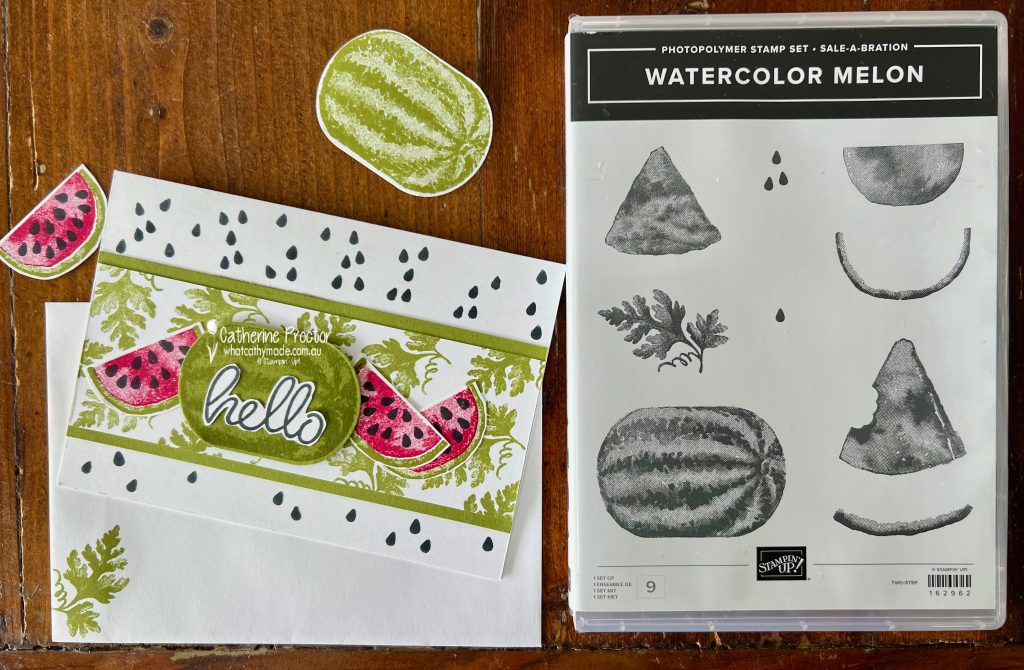
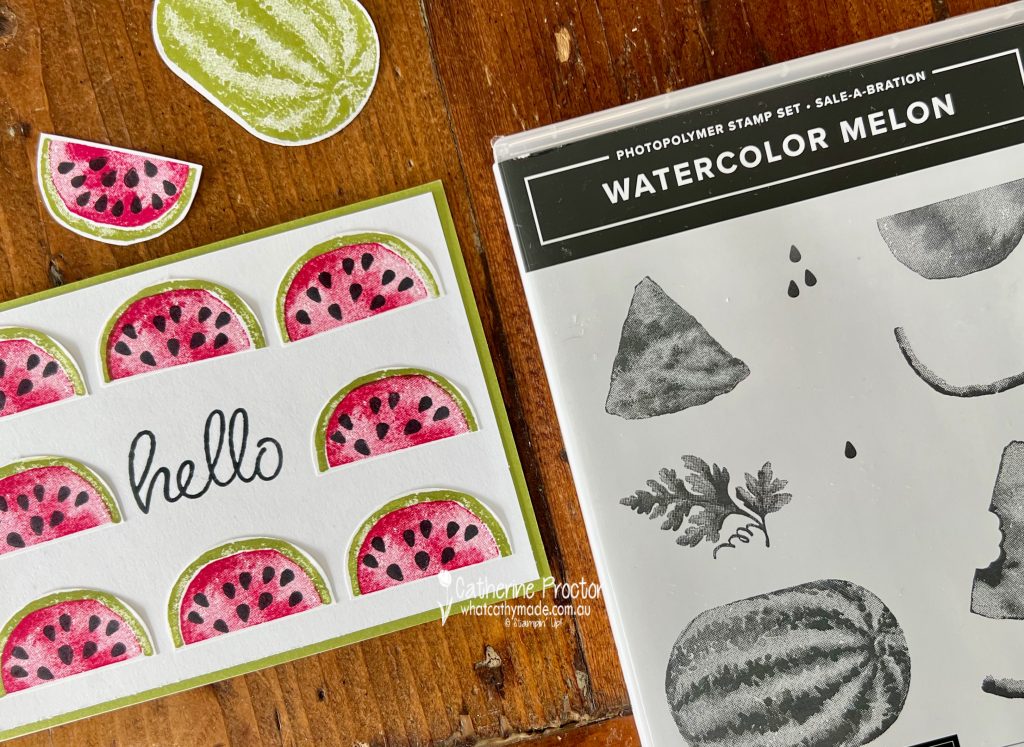
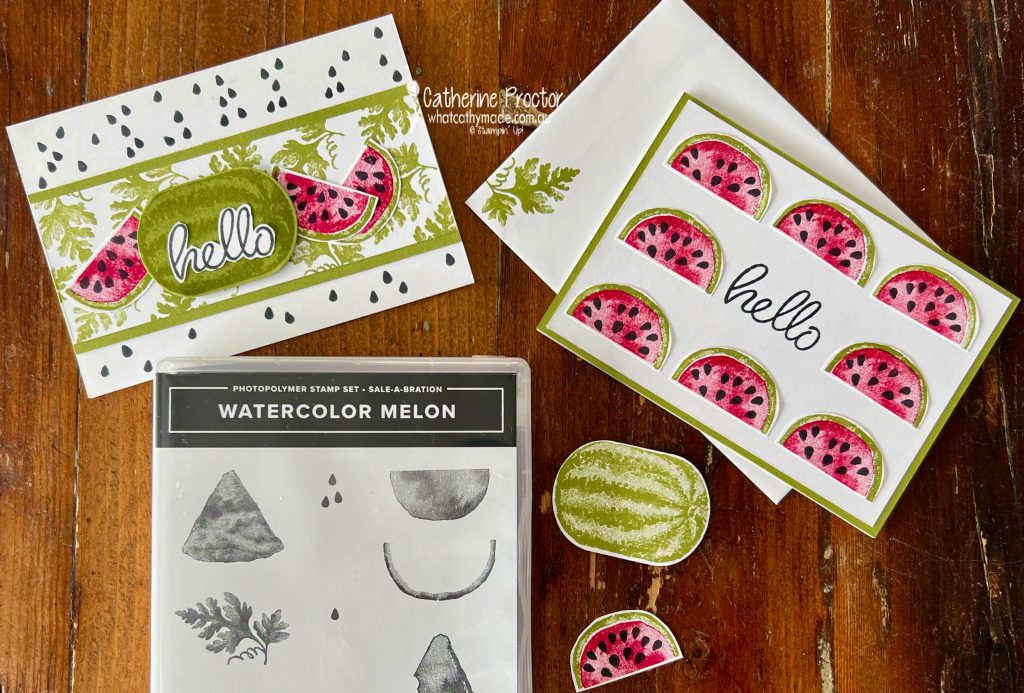
Both cards use two new stamp sets from the Sale-A-Bration catalogue which you can earn for FREE when you place any order over $90AUD: the Heartfelt Hello sentiment stamp set and the Watercolor Watermelon stamp set.
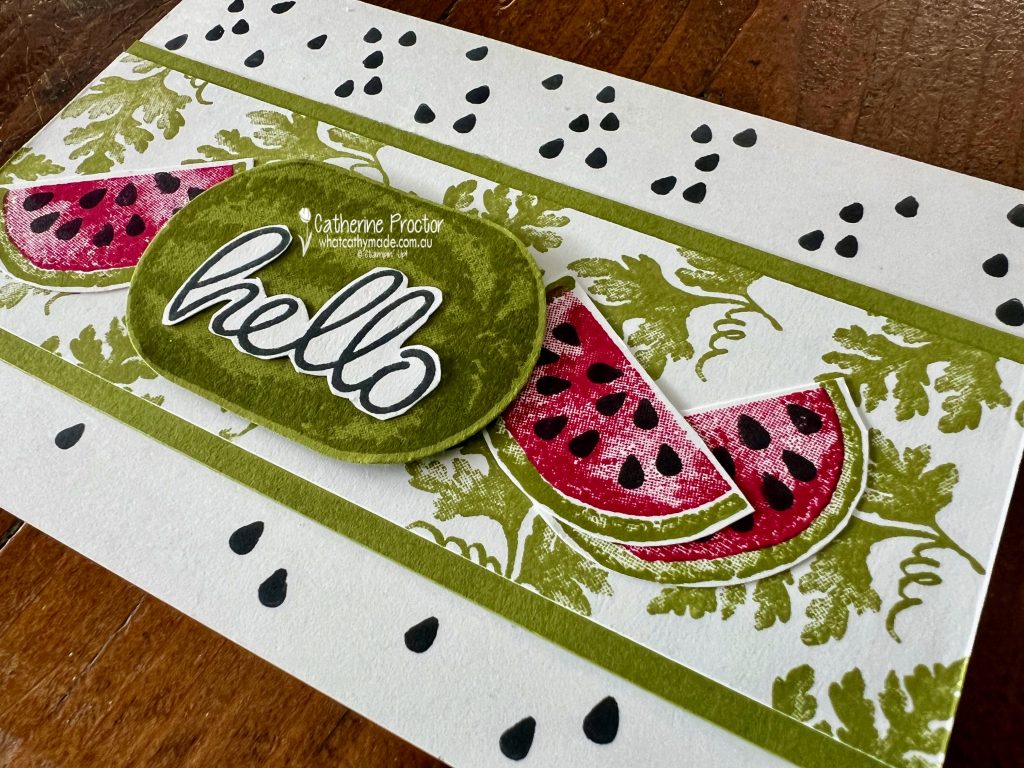
For Card one I’ve combined Old Olive with Melon Mambo, but you could use any combination of red/pink and green ink to create these sweet watermelons. This card was originally inspired by a slimline card that Peggy Noe of Pretty Paper Cards shared on Pinterest, however I’ve changed the colours, the layout, the card base shape and I’ve added a sentiment .
I originally stamped the whole watermelon onto Basic White card stock (see it above the card in the photo below) but it didn’t stand out enough against the Old Olive leaves on the layer behind so I stamped the watermelon in Old Olive onto Old Olive card stock instead.
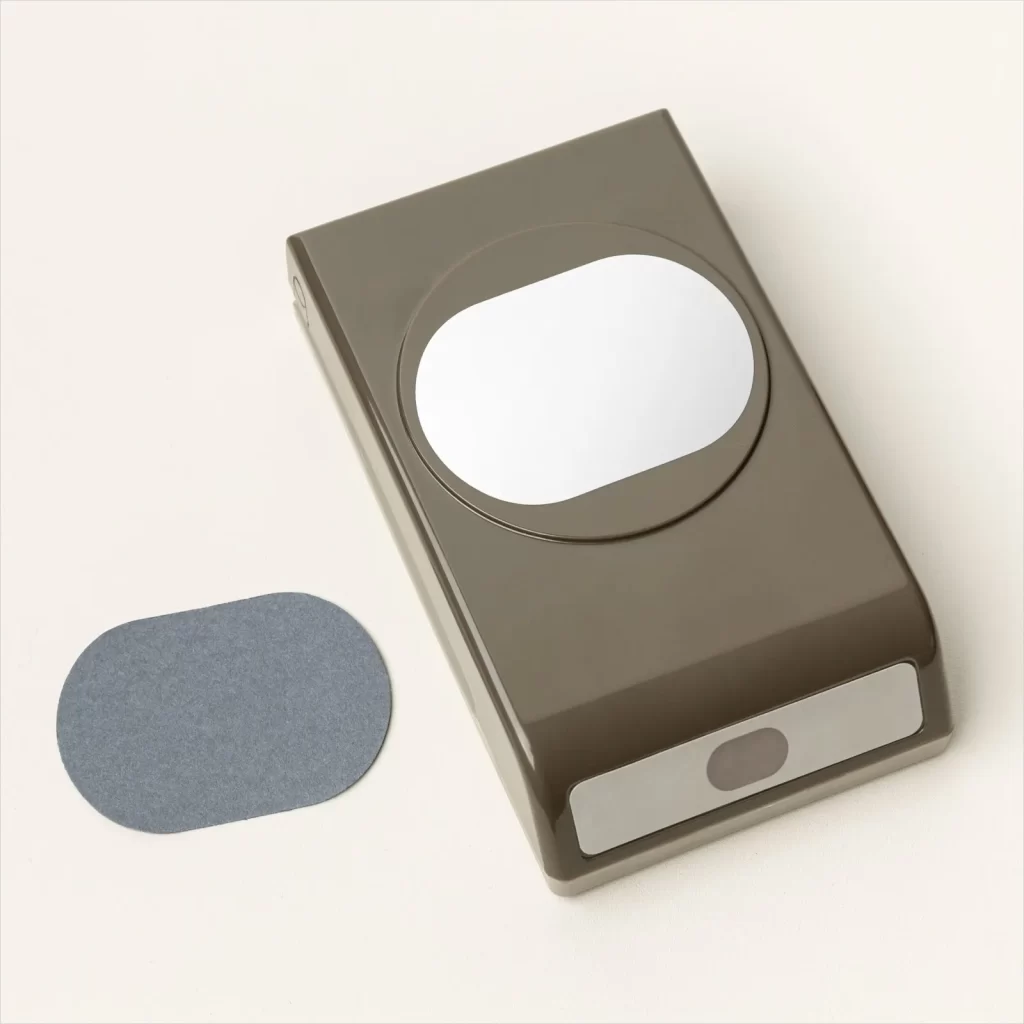
The whole watermelon and the watermelon wedges are designed to be punched out by the Modern Oval Punch – so clever!
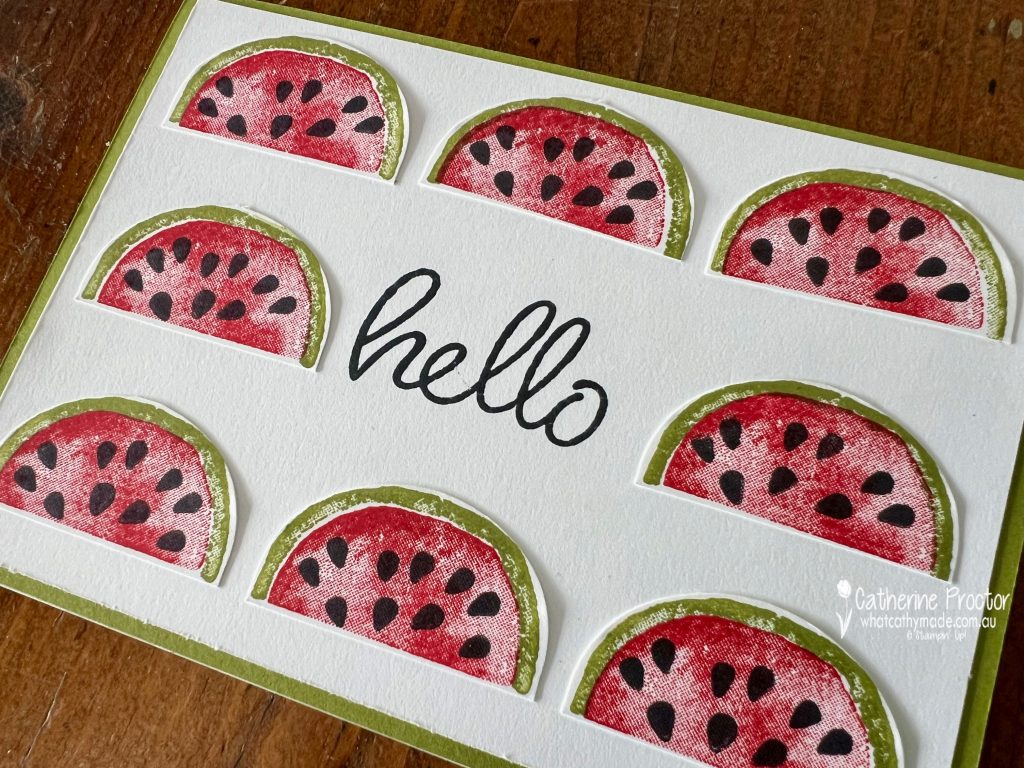
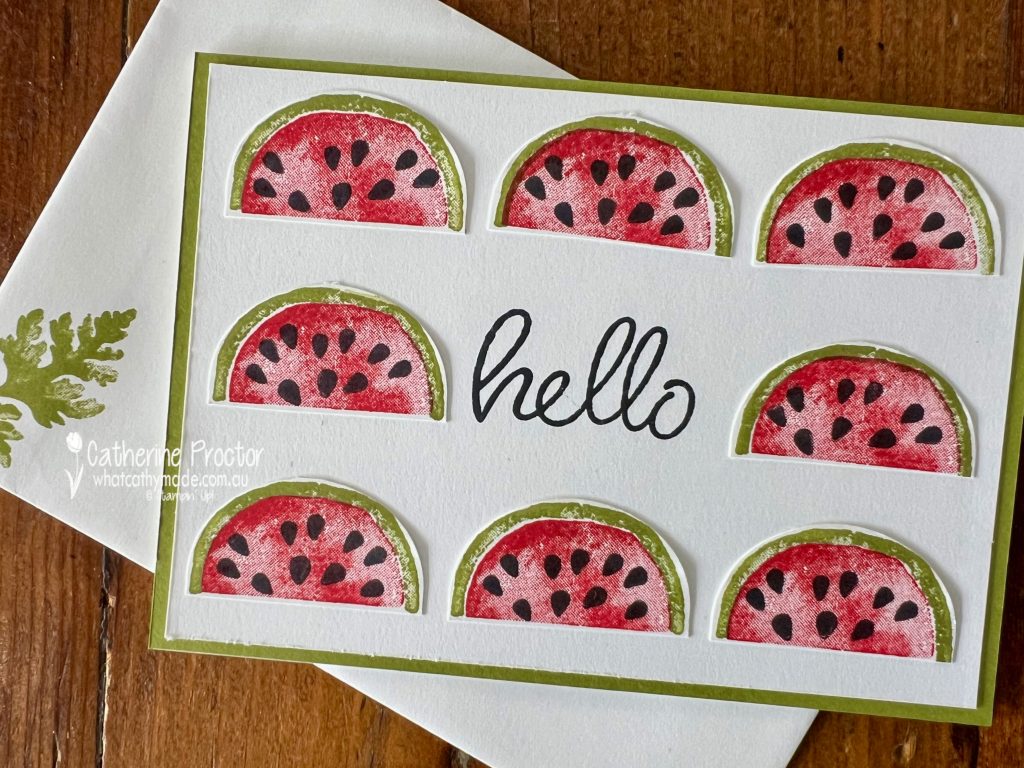
Card two uses the simple but always so effective design trick of repetition. Eight watermelon slices have been stamped and punched out then glued to the card front around the stamped “hello” sentiment.
This “hello” sentiment on both cards is stamped in Memento Basic Black Ink.
A simple stamped Old Olive leaf dresses the envelope.
Now it’s time to hop on over to our next participant, the lovely Andrea Sargent – I can’t wait to see what Andrea has made this week!
If at any time you find a broken link, you can find the complete list of all participants below.
Welcome to week thirty-five of our Art With Heart 2023-24 Colour Creations blog hop!
Our colour this week is Night of Navy, one of my favourite colours. This Neutral colour works with most other colours and tonight I’ve paired it with Bubble Bath, Basic White and Misty Moonlight, drawing colour inspiration from the colours in the the Delightfully Eclectic 12″ x 12″ (30.5 x 30.5 cm) Designer Series Paper.
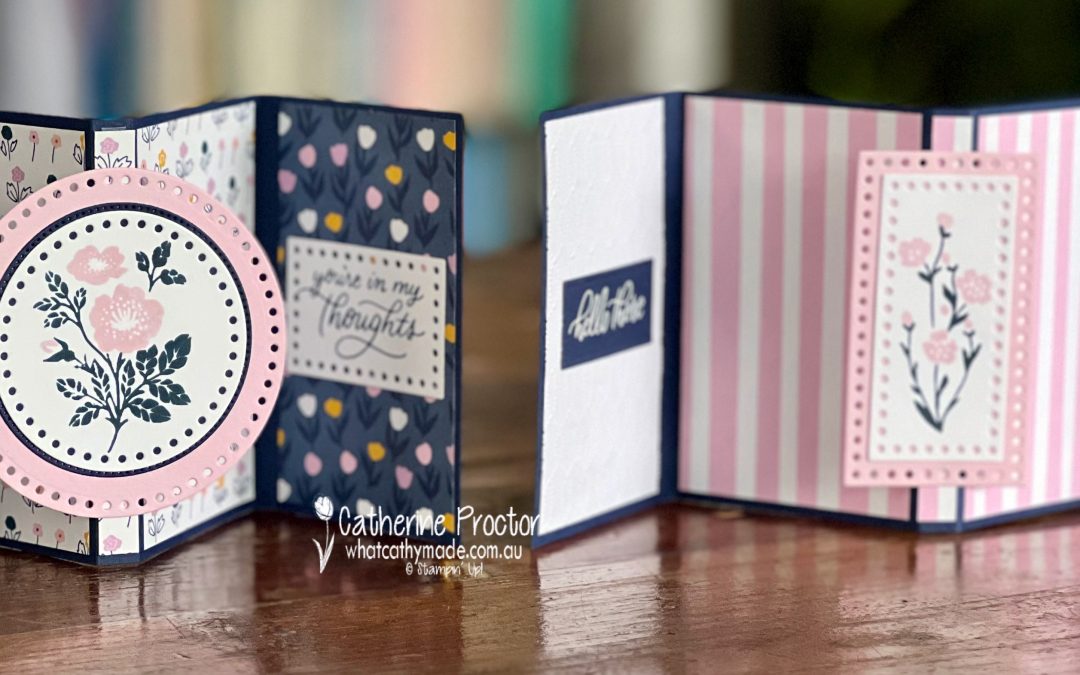
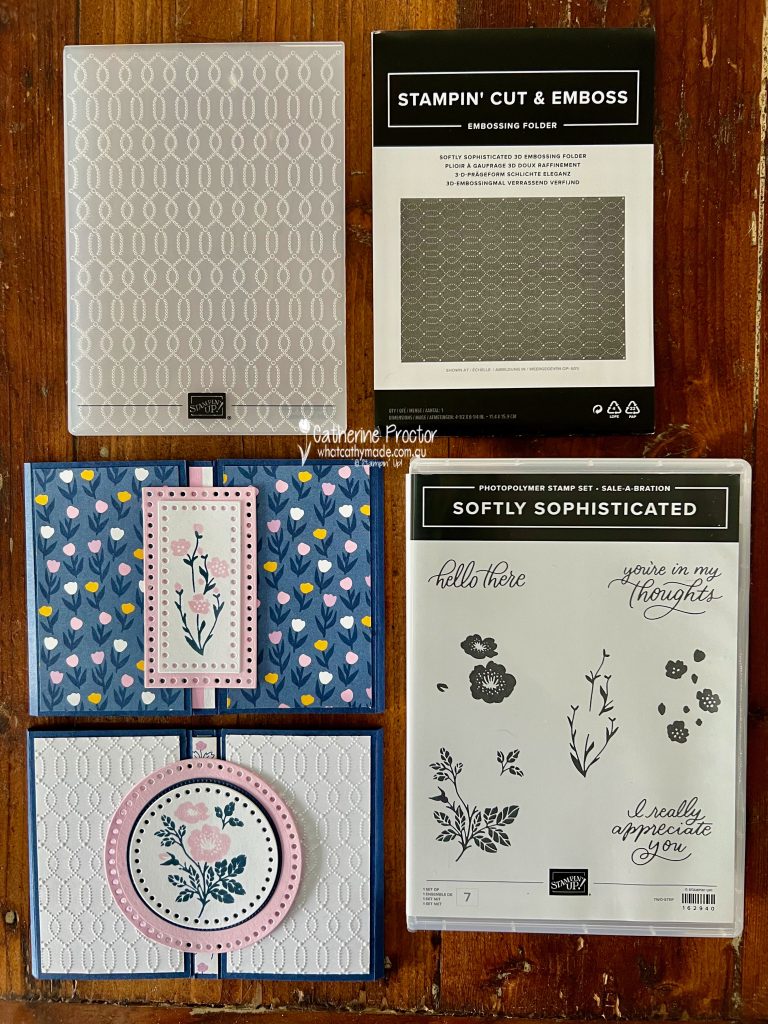
My two sympathy cards use products from the brand new January–April 2024 Mini Catalogue and the Sale-A-Bration catalogue: the Softly Sophisticated bundle (stamps and embossing folder) and the Everyday Details Dies.
The Softly Sophisticated bundle is a Sale-a-bration item that includes a stamp set and an embossing folder. You can earn it for FREE when you place any order over $180AUD.
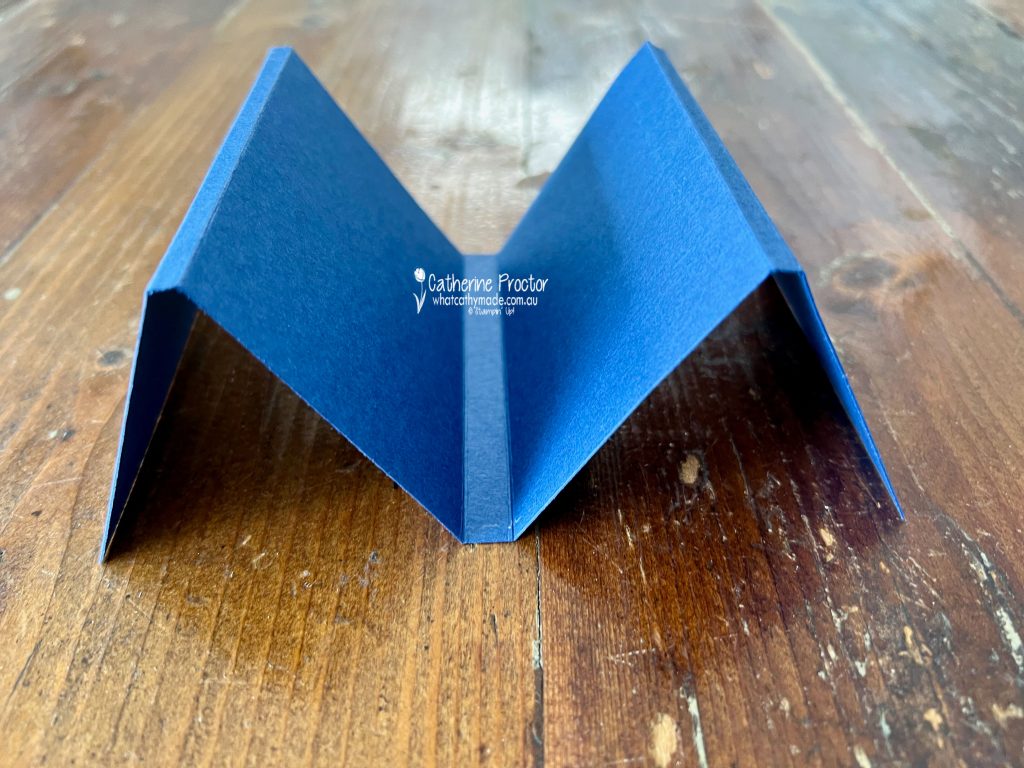
I’ve CASED my cards from a fancy fold created by Susan Campfield, a Stampin’ Up! demonstrator based in the USA. The fancy fold is called “The Marvelous Fun Fold Card”. You can watch her video on how to make the M fold here.
I’ve altered Susan’s measurements to create a slightly different metric template that allows two card bases to be cut from one sheet of A4 cardstock.
Cut the A4 cardstock in half lengthways at 10.5cm to create two card bases. For each card base, score along the long side of the card base at 6.5, 7, 14, 15, 22, 22.5 and then cut the excess off at 29 cm. Then you fold along these lines to form an M shape.
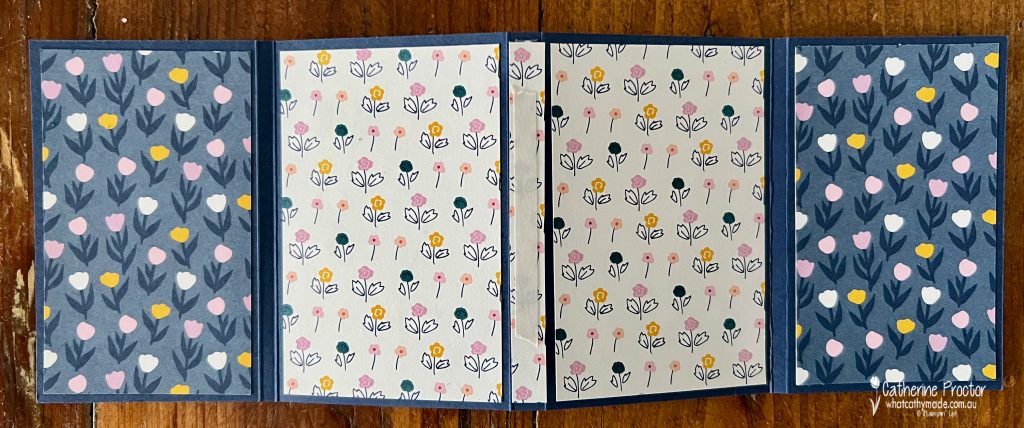
Decorate with Embossed cardstock panels and DSP panels before adhering a strip of Tear & Tape Adhesive to the middle 1cm wide panel – this is to adhere the centre image and make the fancy fold mechanism work.
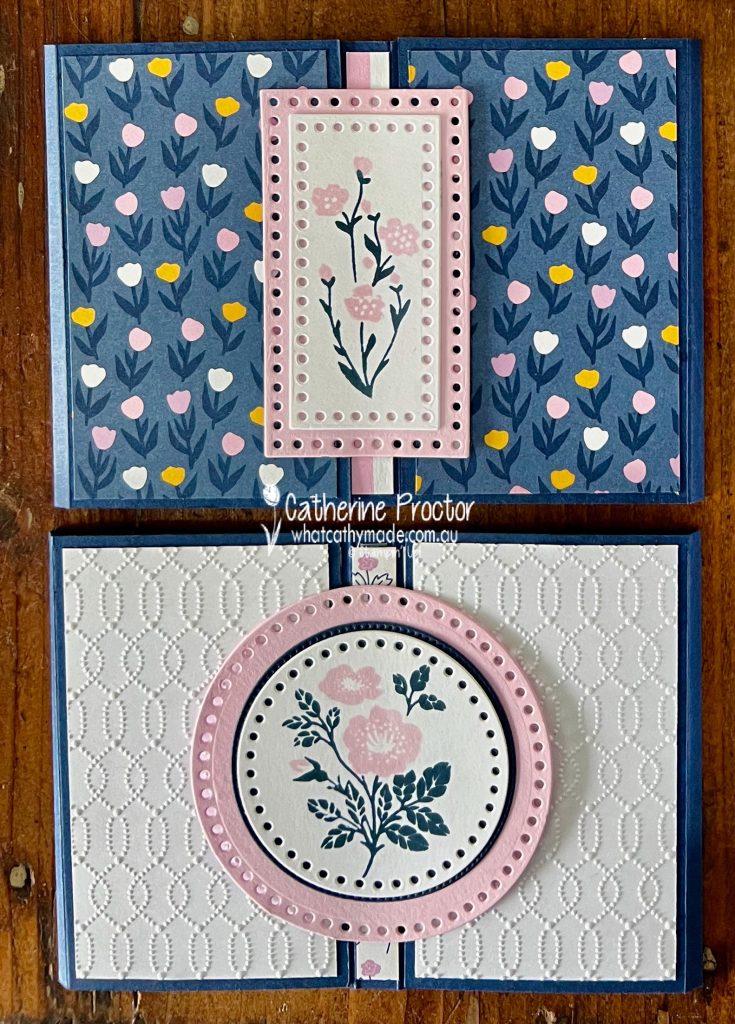
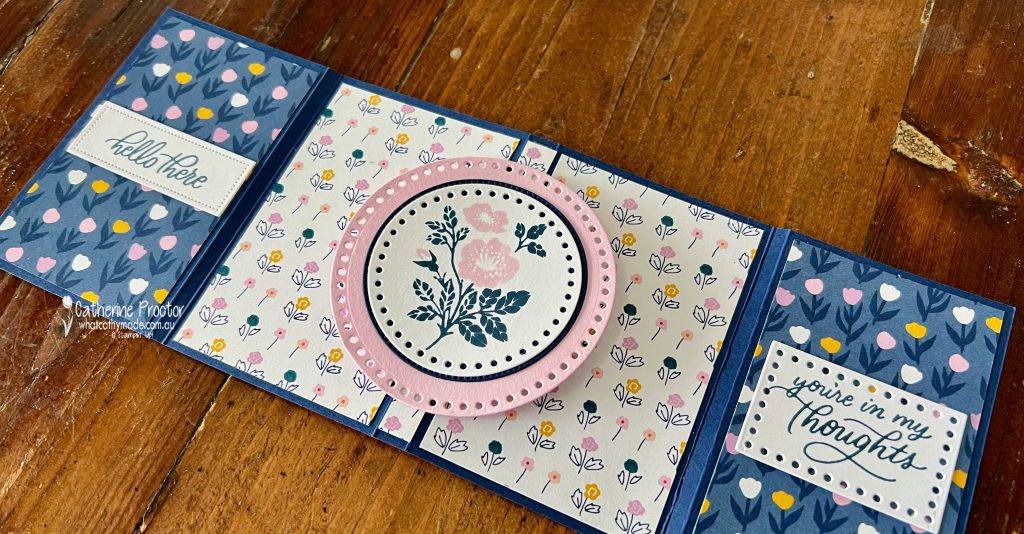
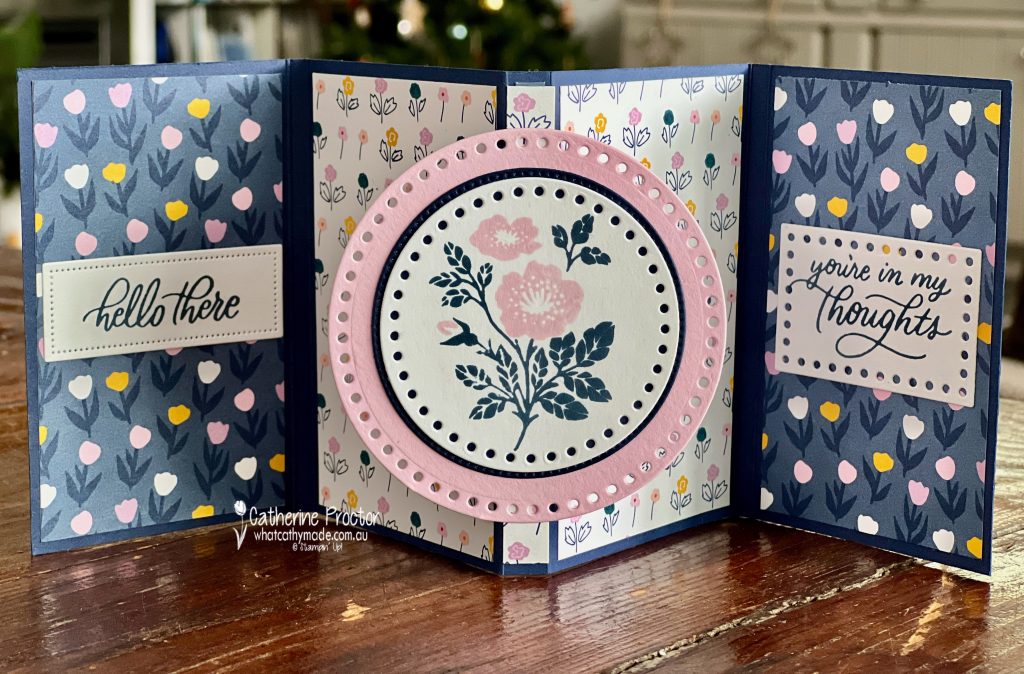
I’ve stamped the centre image in Misty Moonlight and Bubble Bath, using two stamps from the Softly Sophisticated bundle. The image is layered on circle dies from the new Everyday Details dies, as well as a middle circle cut from Night of Navy cardstock using the Stylish Shapes dies.
The sentiments on the inner side flaps are die cut using the Everyday Details dies, shortened where necessary.
The side flaps tuck in in behind this centre floral image to close the card. You can write your message on Basic White cardstock panels adhered to the back of the card.
For the second card, the embossed panels are placed inside the card, with the DSP on the front side flaps.
The centre image is stamped in Misty Moonlight and Bubble Bath, using two stamps from the Softly Sophisticated bundle, layered on rectangle dies from the new Everyday Details dies
This is such a cool fancy fold – here’s a short video to show how the card opens and closes.
Now it’s time to hop on over to our next participant, the lovely Kate Morgan – I can’t wait to see what Kate has made this week!
If at any time you find a broken link, you can find the complete list of all participants below.
Welcome to 2024 and to week thirty-four of our Art With Heart 2023-24 Colour Creations blog hop!
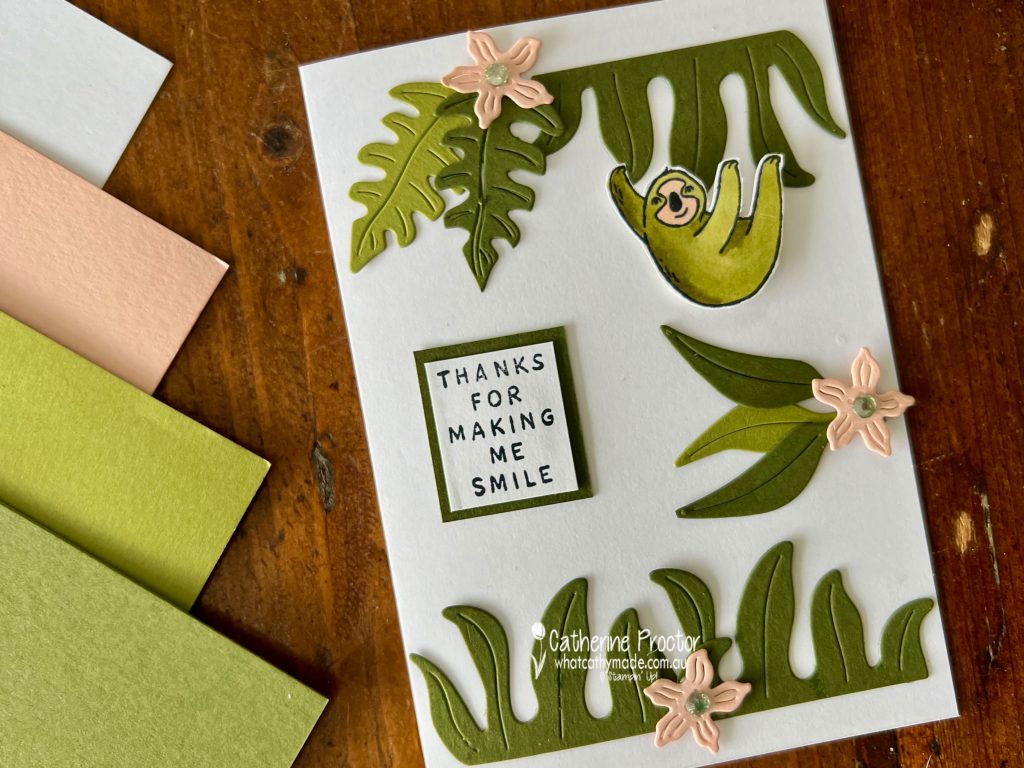
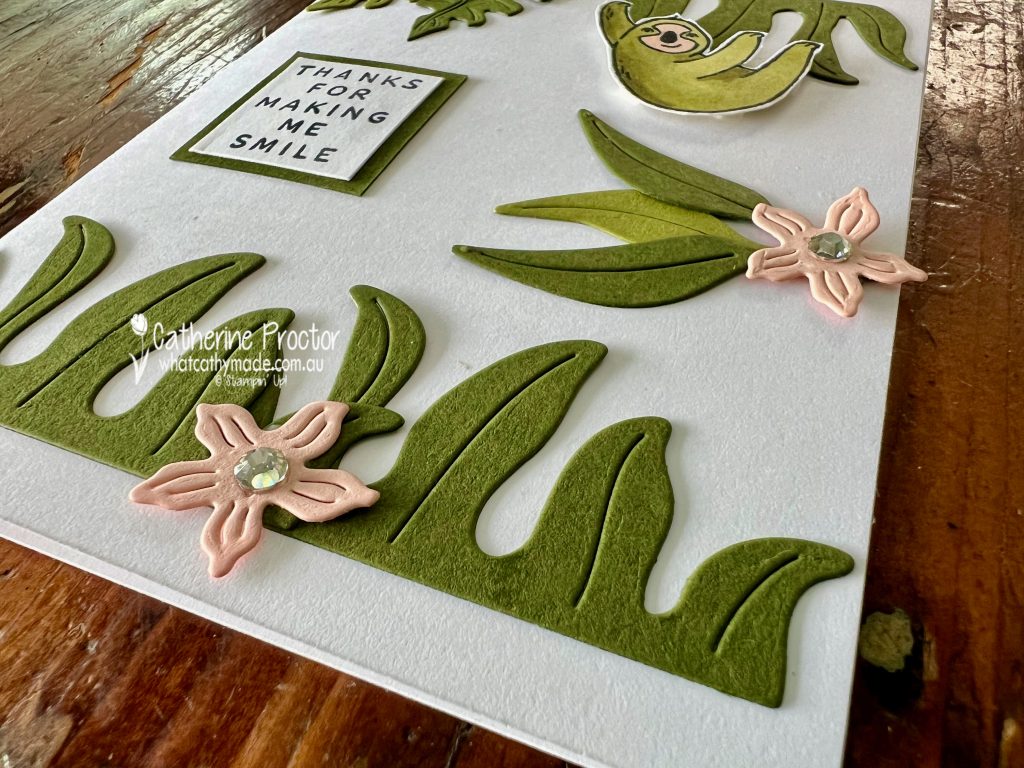
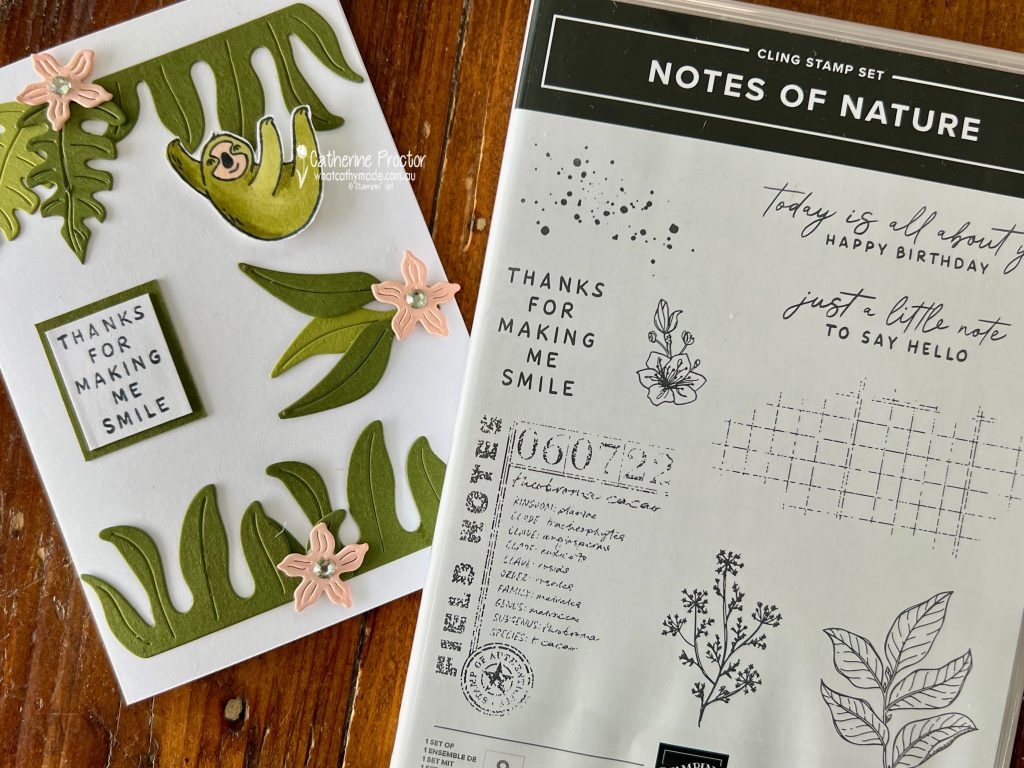
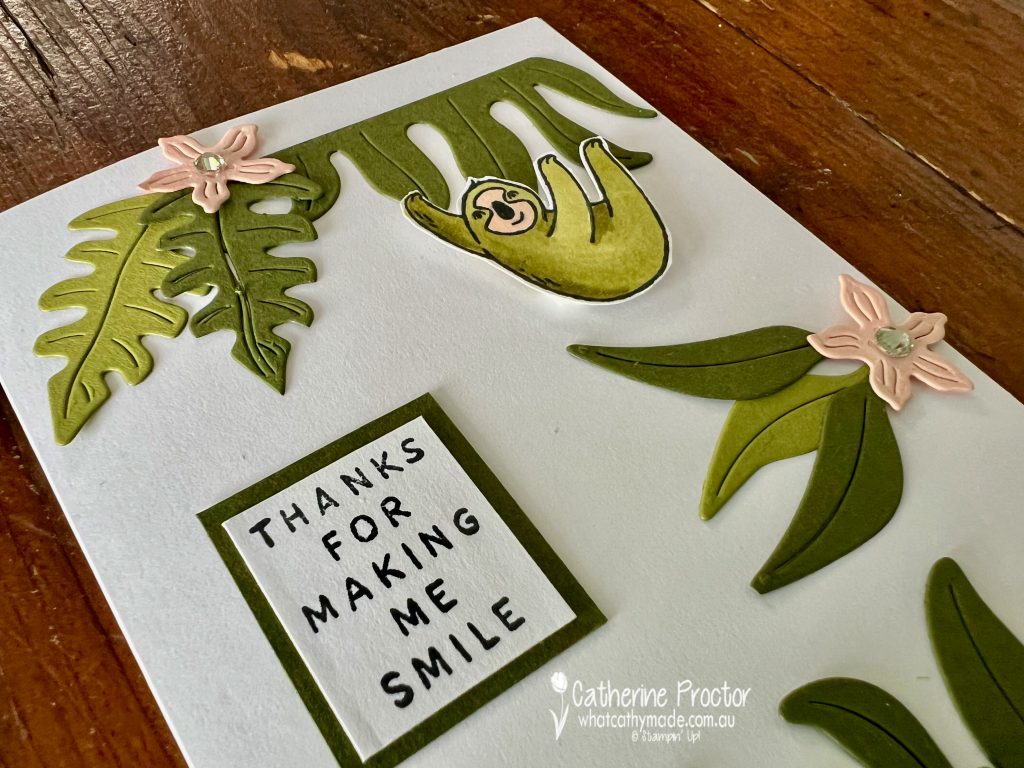
Tomorrow the January–April 2024 Mini Catalogue and the Sale-A-Bration catalogue both go live and I’ve used three new products from both catalogues in my card tonight: the Jungle Pals stamp set, the Jungle Pals Dies and the Notes of Nature cling stamp set.
Our colour this week, Mossy Meadow, is a deep green that I couldn’t resist pairing with Old Olive and Petal Pink to create my jungle scene.
During Sale-a-bration, for every, $90 or $180 that you spend on ANY Stampin’ Up! product you can earn Sale-a-bration products.
The Jungle Pals stamp set is free with purchases of $90 or more, while the Jungle Pals Dies are free with purchases of $180 or more.
I love the details in these Jungle Pals Dies!
As the Jungle Pals stamp set doesn’t have sentiments, I’ve used a sentiment from a new stamp set in the January–April 2024 Mini Catalogue, the Notes of Nature cling stamp set.
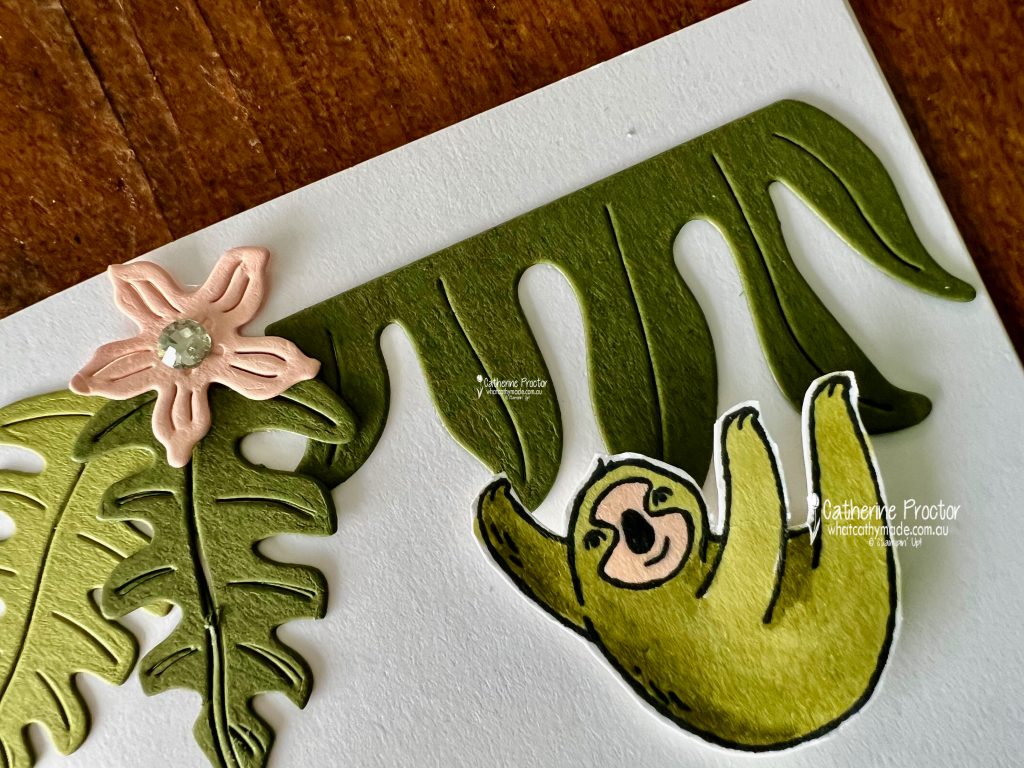
I thought this sentiment was perfect for the cheeky sloth swinging from the branches!
I coloured the sloth using Old Olive light and dark Stampin’ Blends! as well as Petal Pink Stampin’ Blends! before fussy cutting him out.
Now it’s time to hop on over to our next participant, the lovely Andrea Sargent – I can’t wait to see what Andrea has made this week!
If at any time you find a broken link, you can find the complete list of all participants below.
Welcome to week thirty-three of our Art With Heart 2023-24 Colour Creations blog hop!
Our colour this week, Misty Moonlight, is a beautiful blue that previously was an In Colour but has now joined the Neutrals family as a core colour. It’s one of my favourite all time colours!
As this week is our last AWH Colour Creations for 2023 and it is only 12 days until Christmas I thought I’d share some quick Christmas cards that are easy to whip up at the last minute.
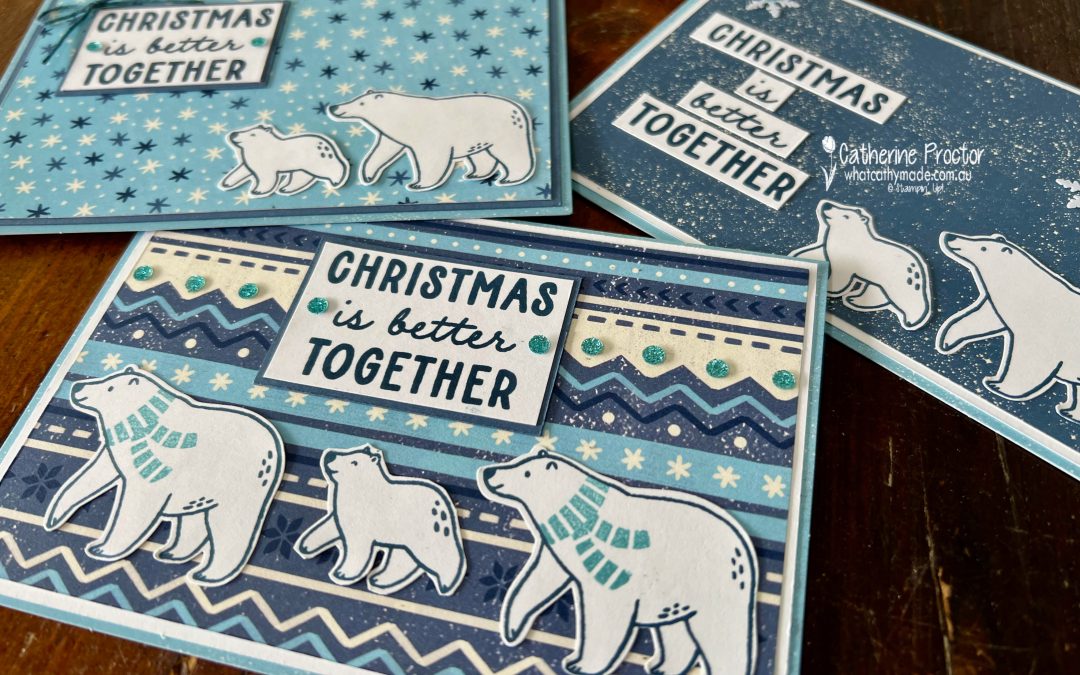
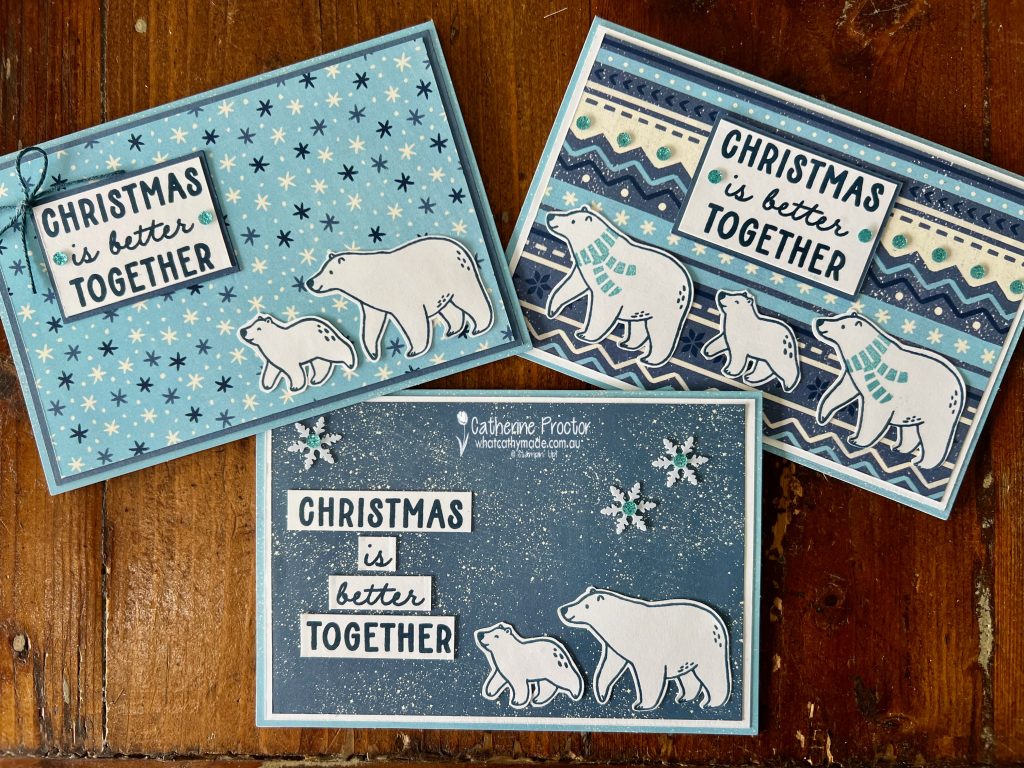
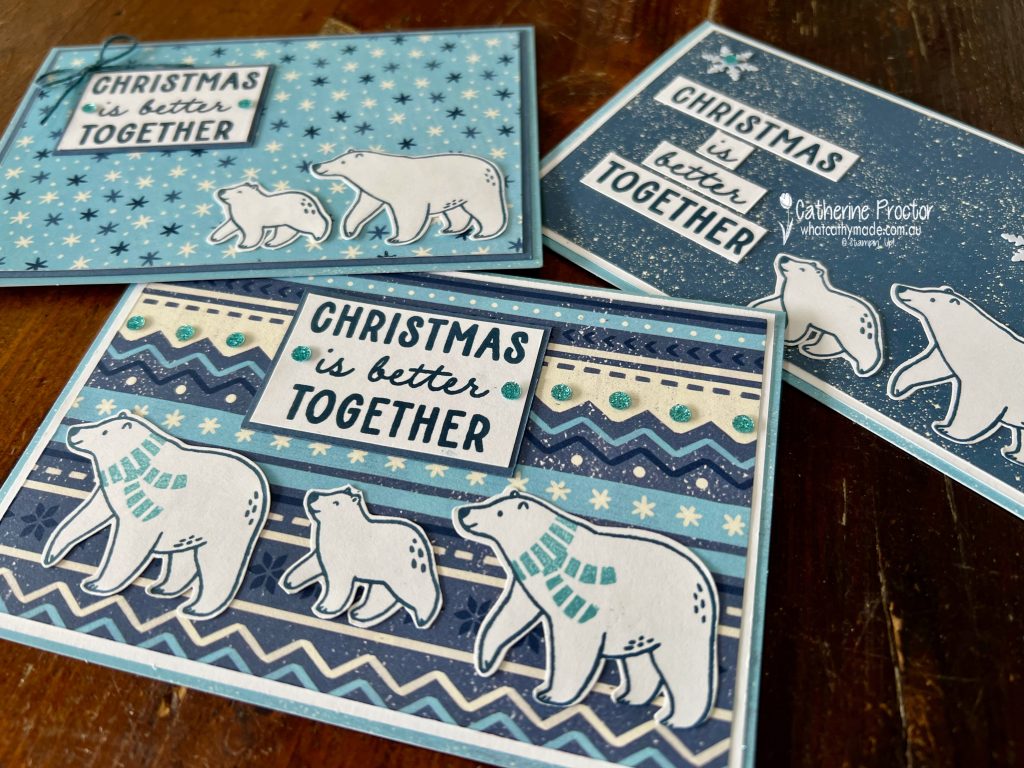
These three cards all use products from the Beary Christmas Suite Collection which is retiring soon, with many of the products on sale now.
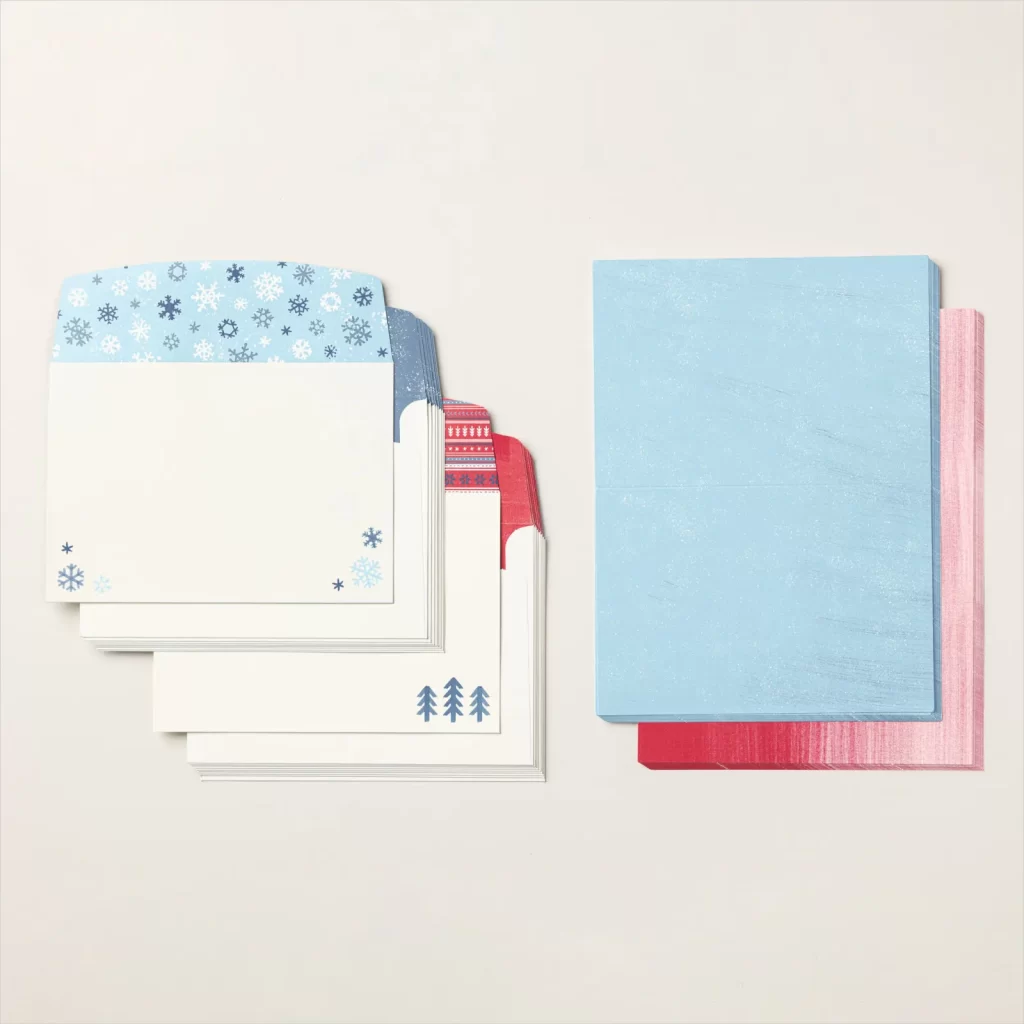
The card base and envelopes are from the Beary Christmas Memories & More Cards & Envelope packs. This pack includes 20 cards and envelopes and is currently reduced to $12.25 , which works out to be just 61 cents per card and envelope!
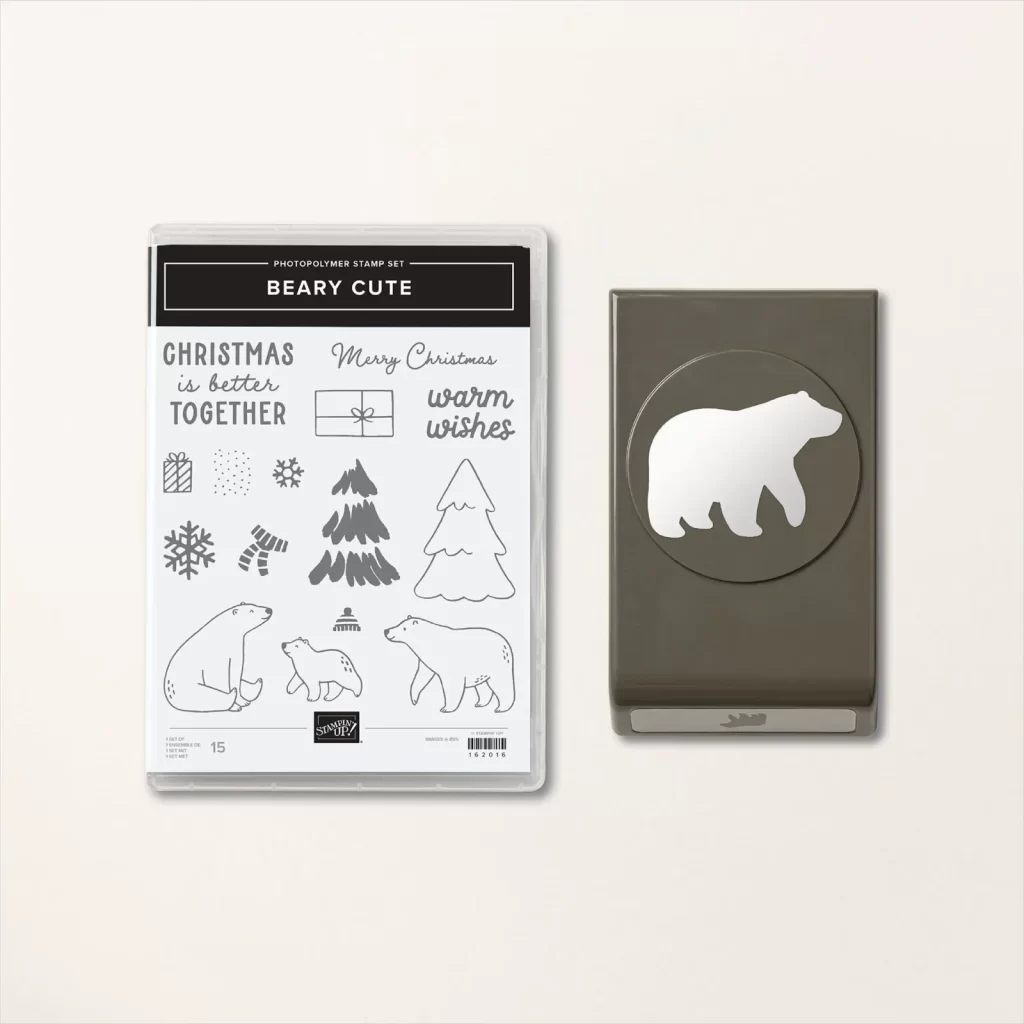
The cards also use the Beary Cute Bundle, which includes the Beary Cute Stamp Set and the Beary Cute Punch. I’ve stamped all the bears in Misty Moonlight, punching out the large bears with the Beary Cute Punch and fussy cutting the small bears with paper snips.
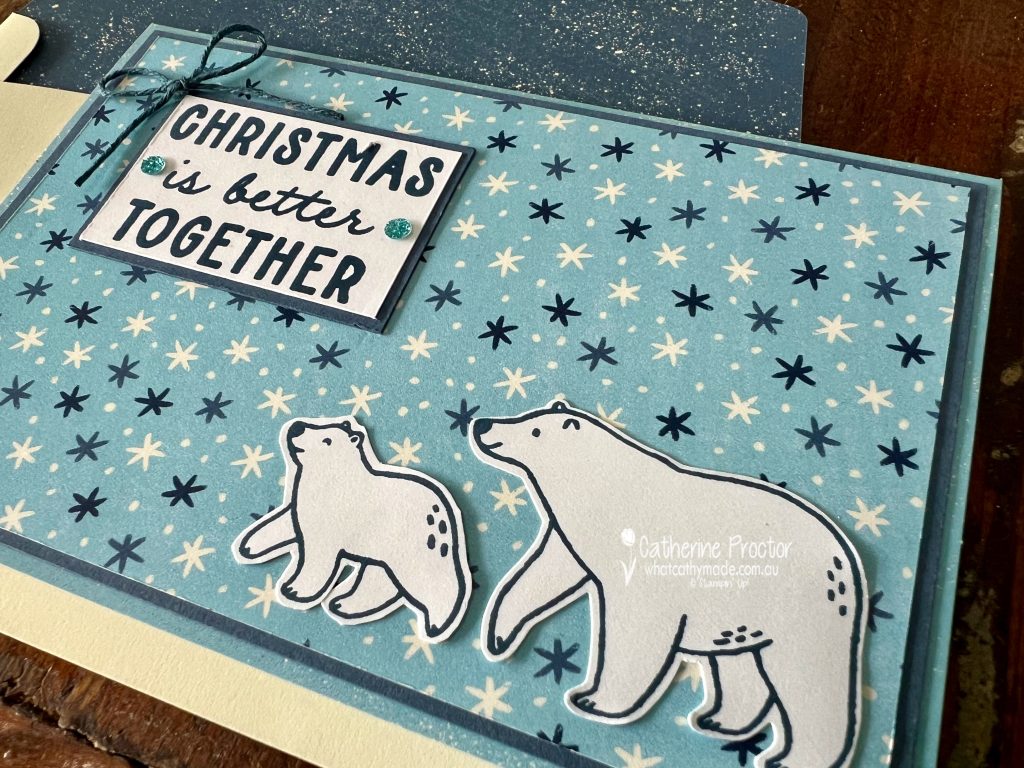
Card one features the Beary Christmas Designer Series Paper with a sentiment from the Beary Cute stamp set.
White bakers twine was coloured using my Misty Moonlight Stampin’ Blends before being tied into a bow.
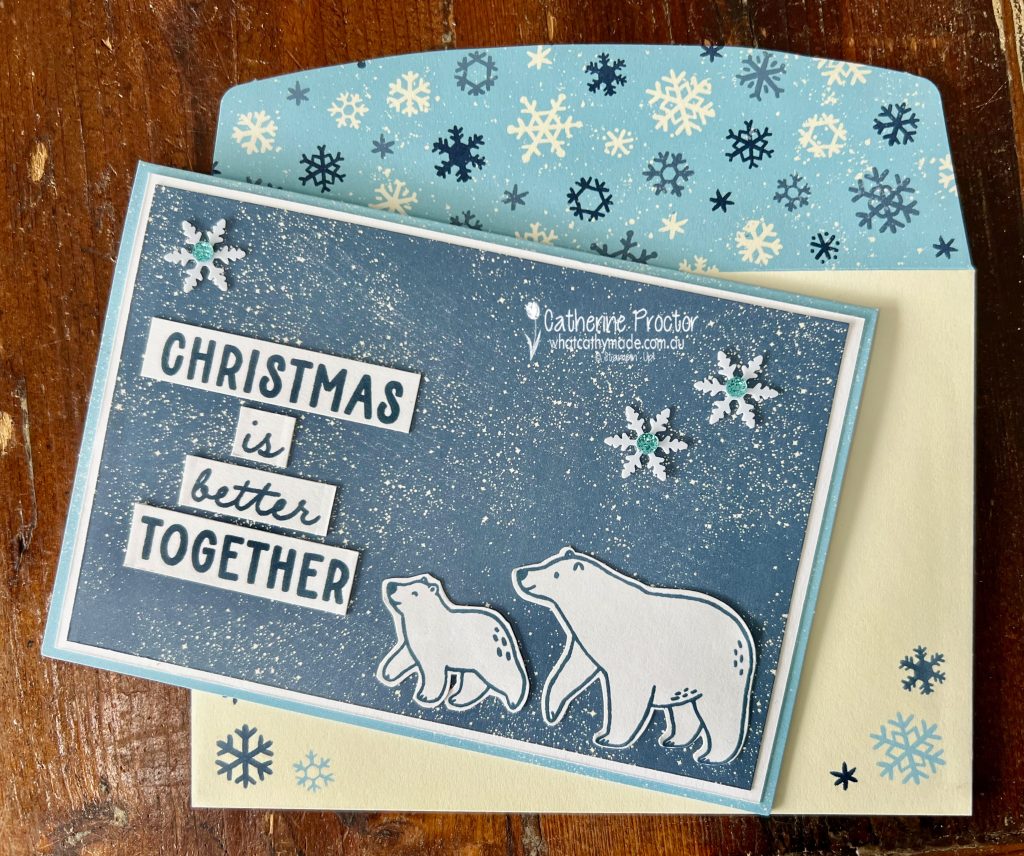
Card two uses the envelope lining as the top layer of the card with the sentiment cut into individual words and arranged on top of the envelope lining layer. Adhesive snowflakes topped with adhesive-backed glitter sequins complete the scene.
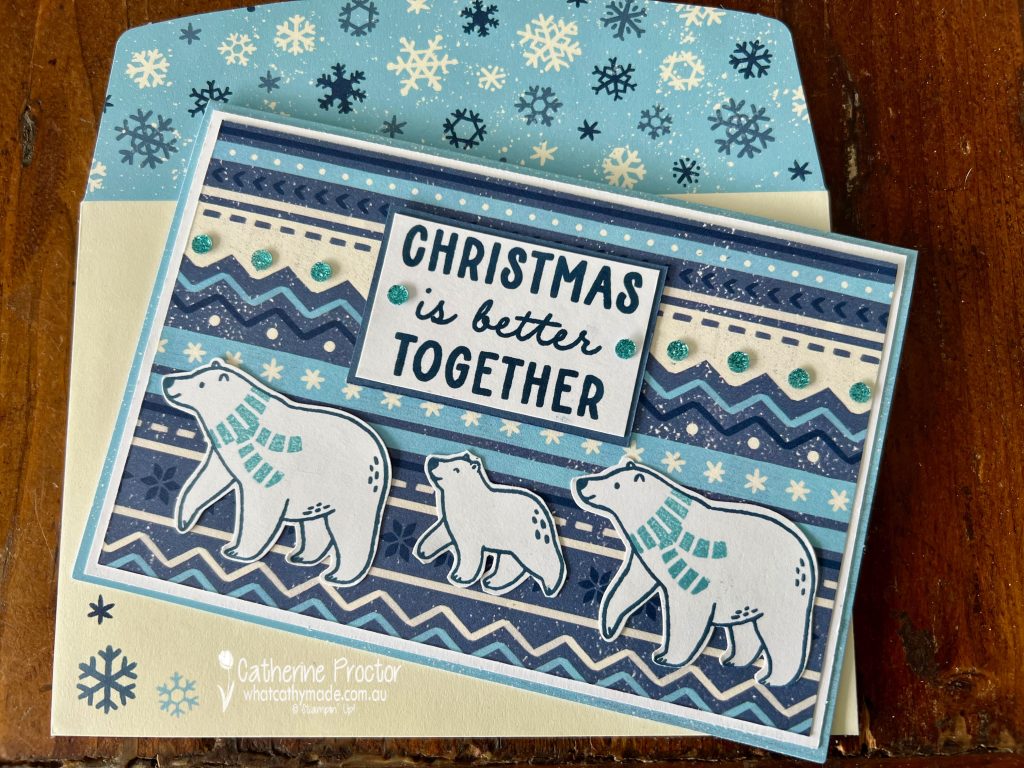
Card three has three bears in a row, stamped in Misty Moonlight with Balmy Blue scarves. Once again the adhesive-backed glitter sequins add a touch of festive sparkle to another DSP design from the Beary Christmas Designer Series Paper.
Which is your favourite card of the three?
Now it’s time to hop on over to our next participant, the lovely Rachel Woollard – I can’t wait to see what Rachel has made this week!
If at any time you find a broken link, you can find the complete list of all participants below.
We’re taking a two-week break over the Christmas and New Year period, but will return on Wednesday, 3rd January when we’ll be back showcasing Mossy Meadow. I hope you can join us then.
In the meantime, I hope you have a very Merry Christmas and a Happy New Year!
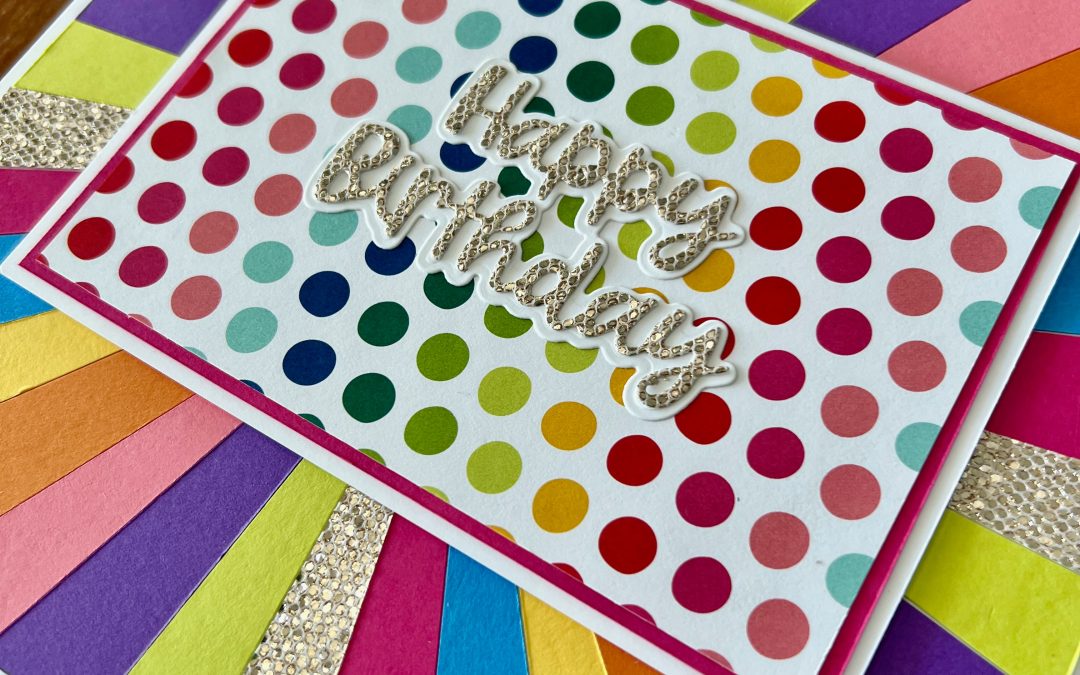
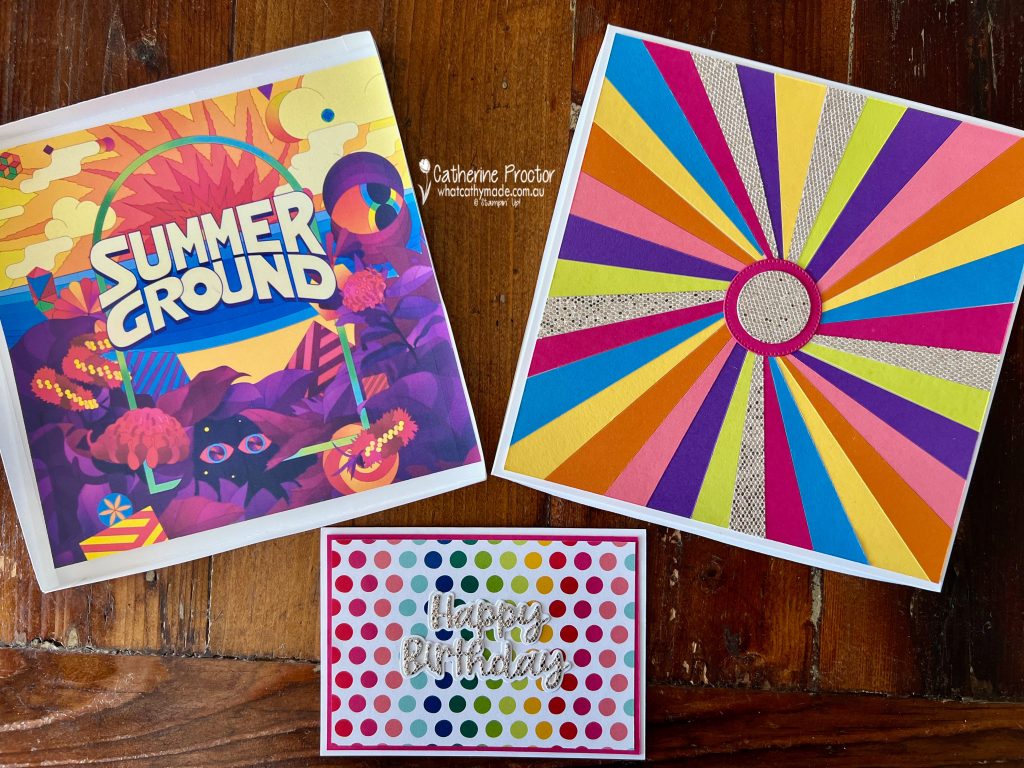
Welcome to week thirty-two of our Art With Heart 2023-24 Colour Creations blog hop!
This week we are showcasing Melon Mambo, a vibrant pink.
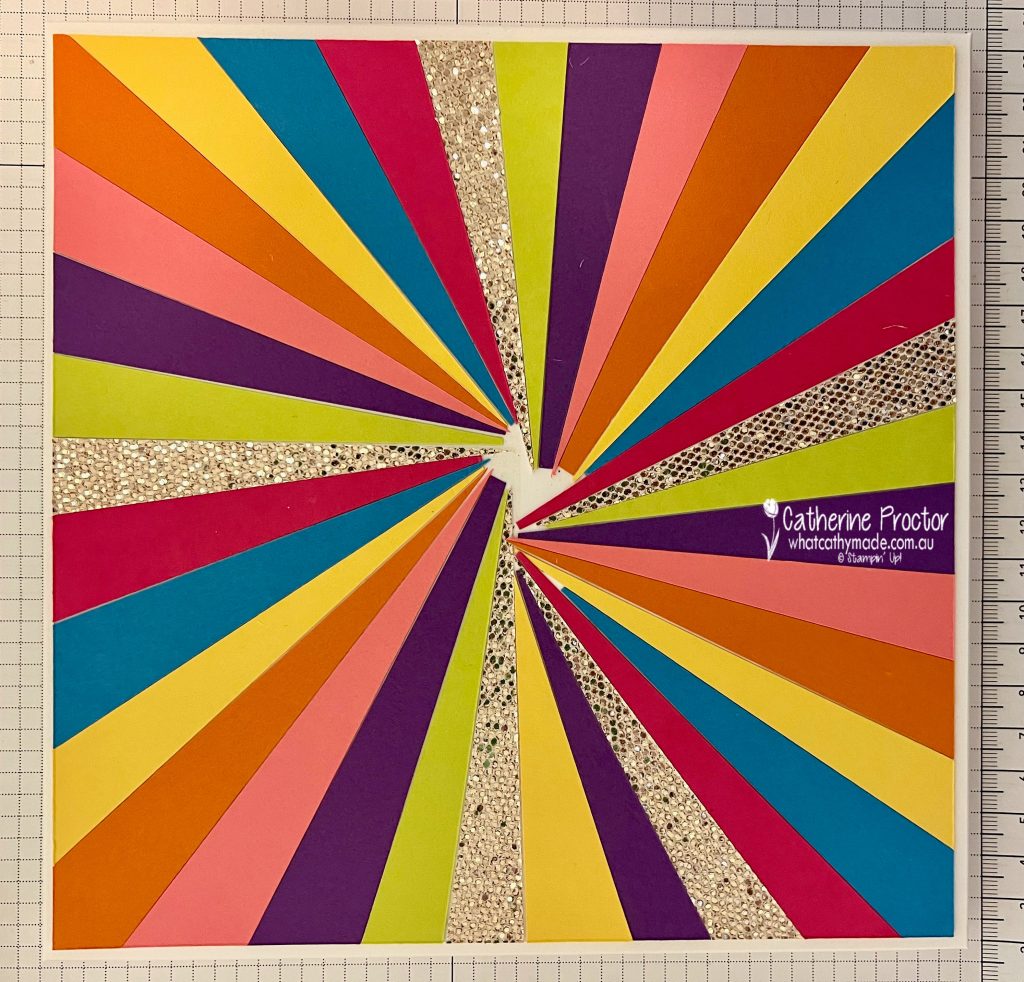
I gifted an ‘experience’ rather than a physical gift to my sister-in-law for her birthday so I printed out a voucher for the experience onto Basic White Cardstock.
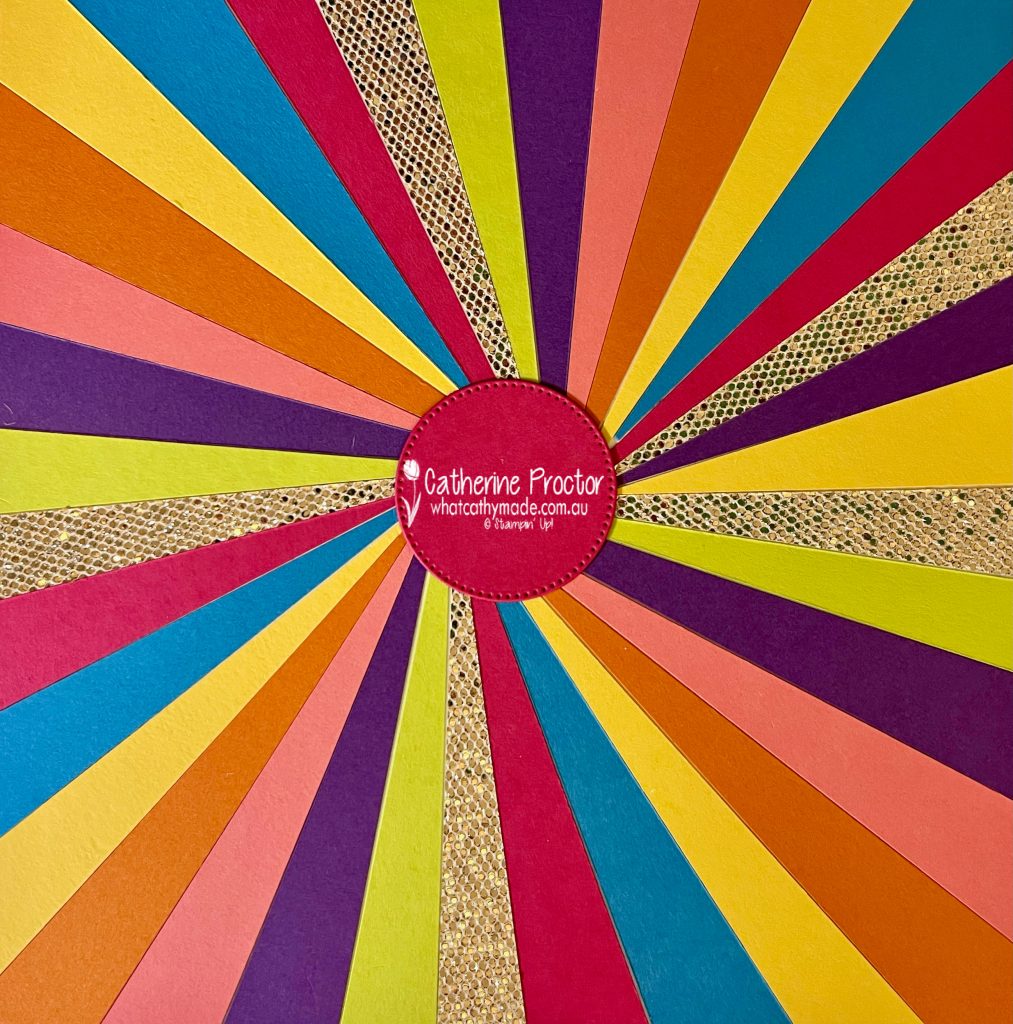
I custom made a box to fit the voucher and used strips of cardstock to make a top for the box as I did not have a large enough piece of DSP that matched the colours in the voucher to top the box.
The top of the gift box was created using a square of Basic White Cardstock slightly smaller than the top of the box lid. I covered this square in an adhesive sheet and measured and marked the middle point of the square.
Angled strips of Melon Mambo, Flirty Flamingo, Gorgeous Grape, Tahitian Tide, Pumpkin Pie, Granny Apple Green, Daffodil Delight and More Dazzle Specialty Paper were arranged in a pattern to cover the adhesive sheet.
A die cut circle of Melon Mambo cardstock covers the joins in the middle.
A smaller die cut circle of More Dazzle Specialty Paper added a final touch of bling.
A very quick birthday card was created to match, using the Merry Bold & Bright Designer Series Paper.
I’m so looking forward to attending this Festival of Sydney event with my sister-in-law!
Now it’s time to hop on over to our next participant, the lovely Andrea Sargent – I can’t wait to see what Andrea has made this week!
If at any time you find a broken link, you can find the complete list of all participants below.
Welcome to week thirty-one of our Art With Heart 2023-24 Colour Creations blog hop!
This week we are showcasing Lost Lagoon, a beautiful soft green that previously was an In Colour but has now joined the Subtles family as a core colour.
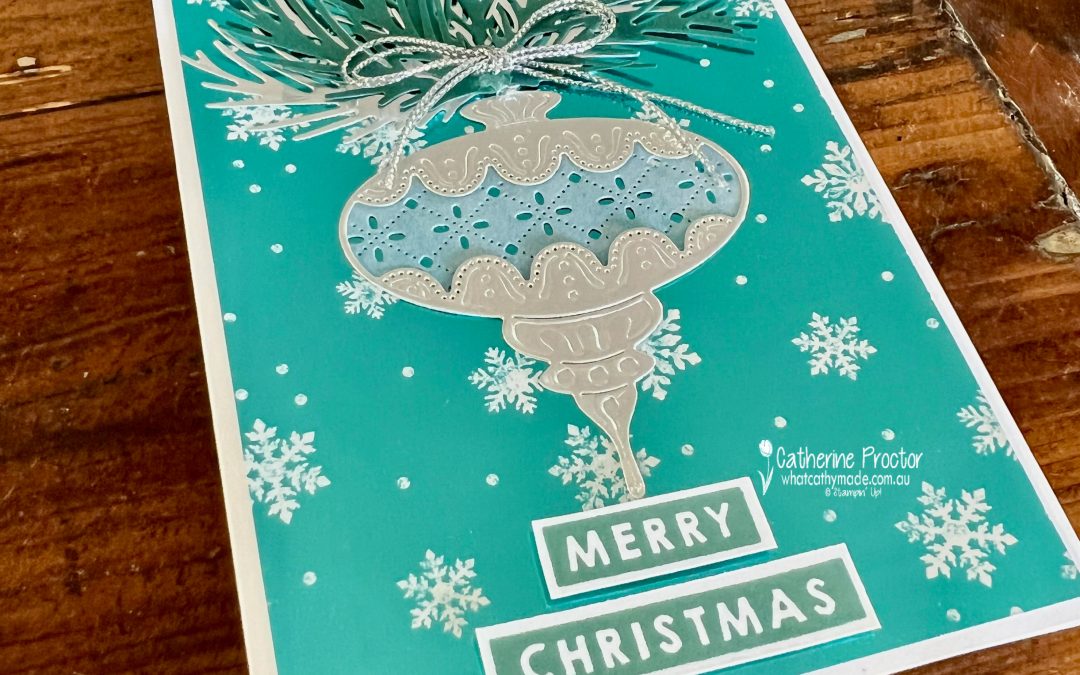
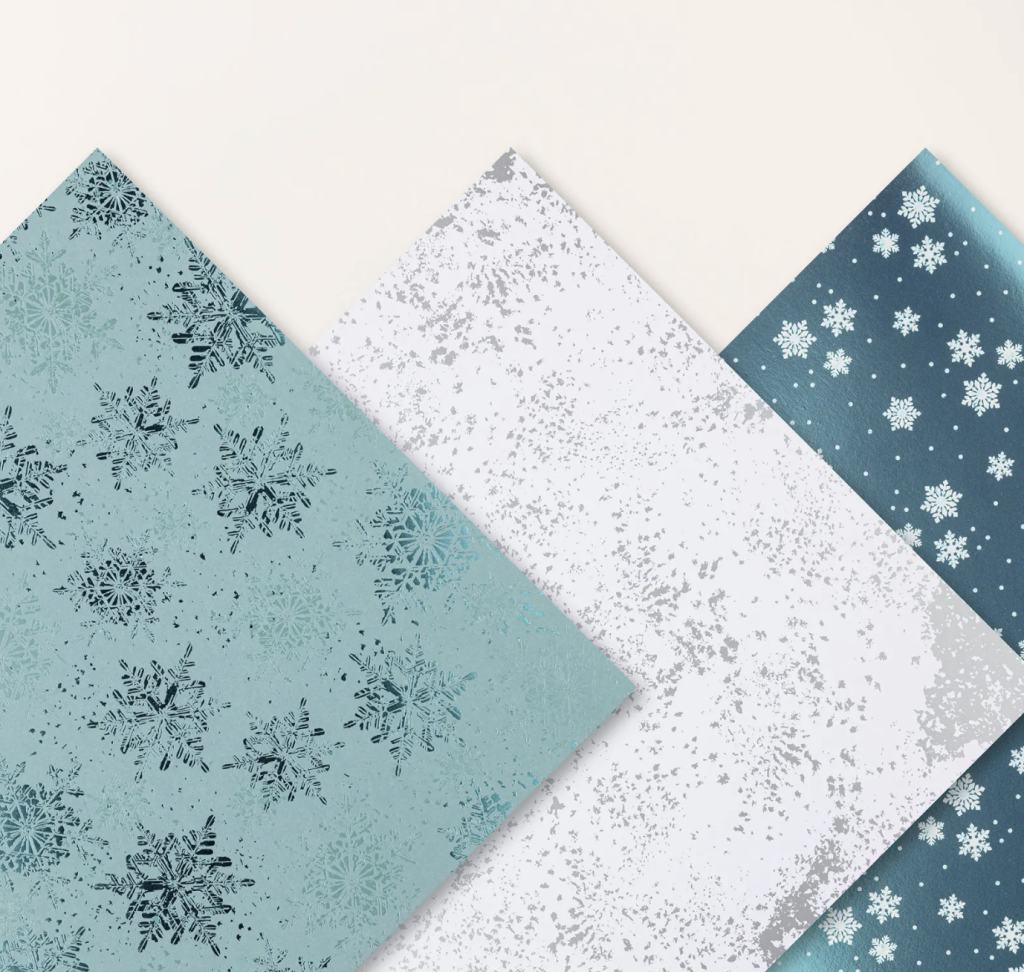
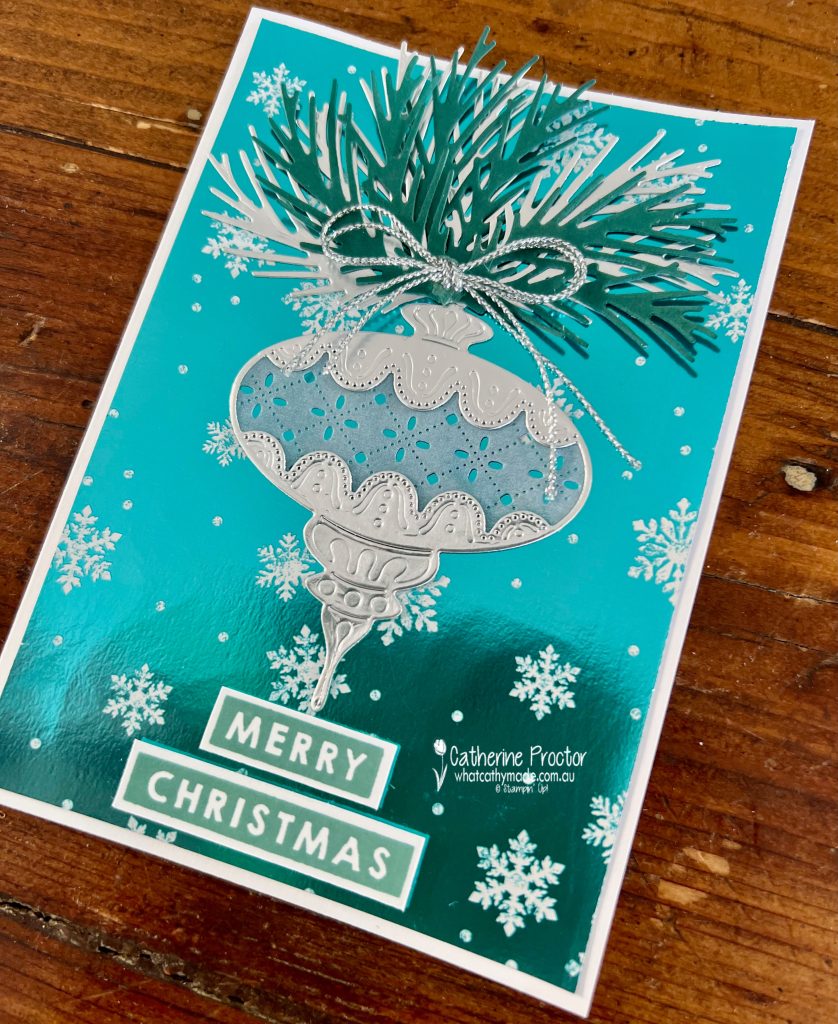
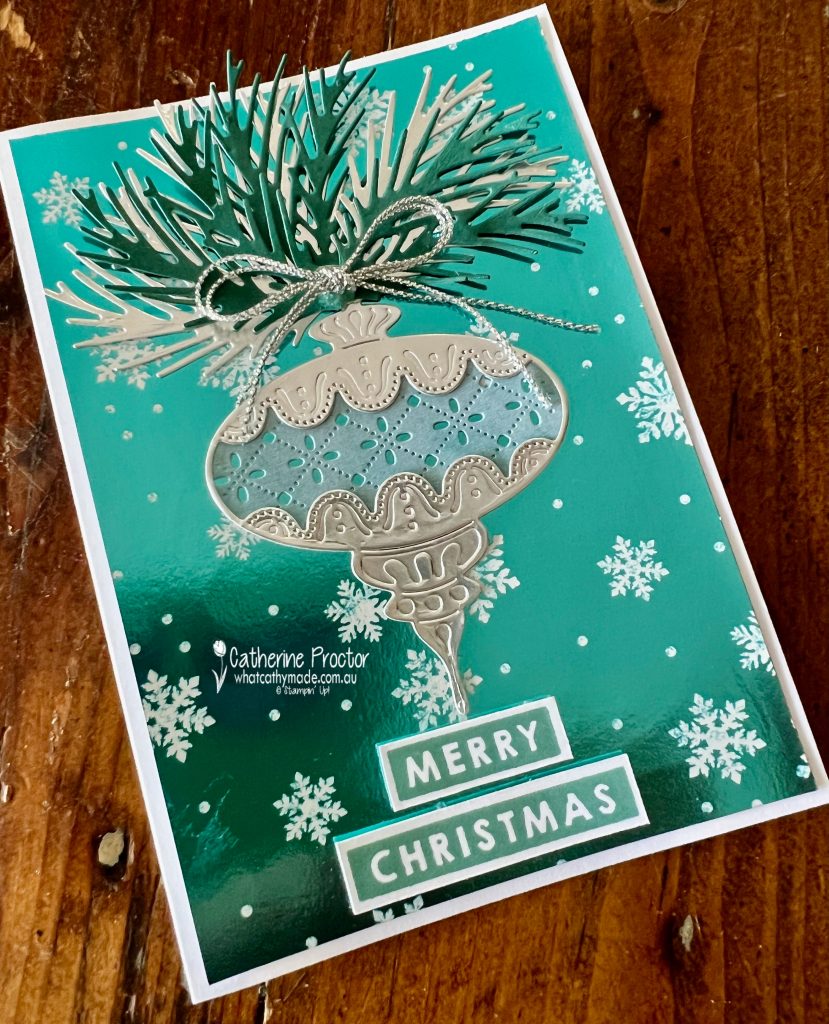
These is a stunning specialty paper in the Holiday Catalogue called the Snowflake Magic 12″ x 12″ (30.5 x 30.5 cm) Specialty Designer Series Paper. It is retiring soon so I really wanted to make a Christmas card with it for this week’s blog.
These Handmade Elements dies are also retiring and work so well with the Snowflake Magic DSP.
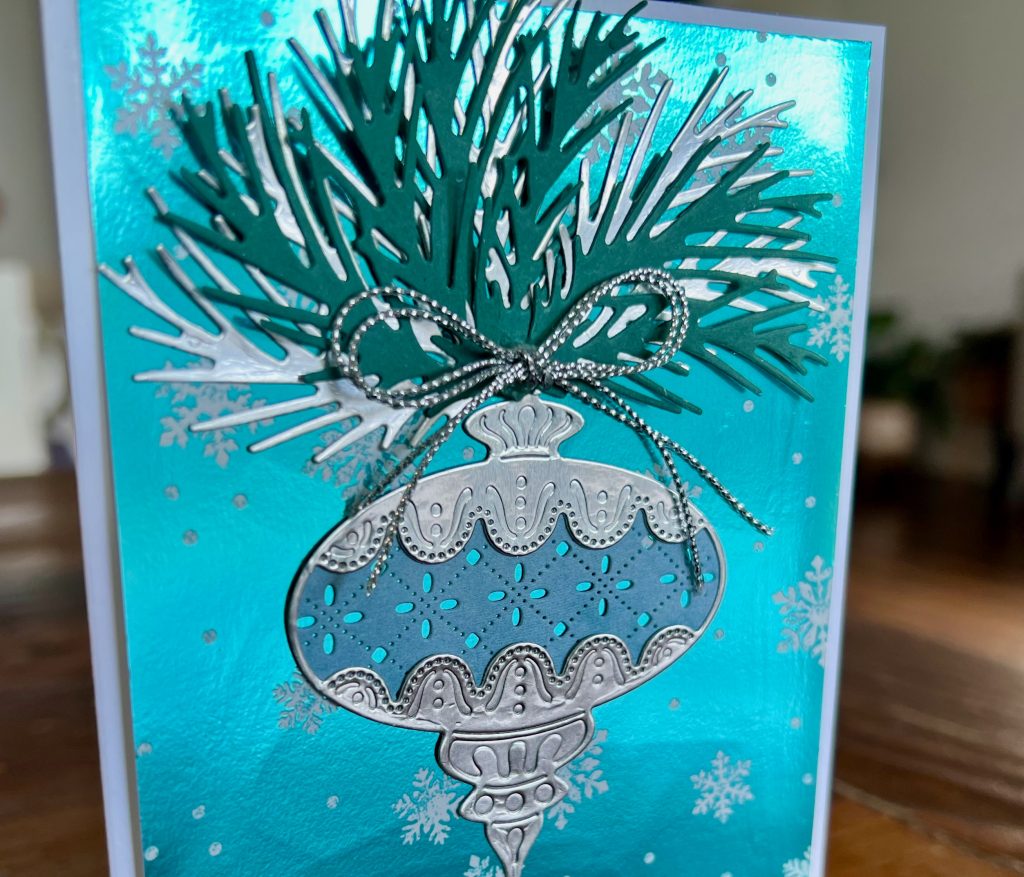
The foliage pieces are Lost Lagoon cardstock with Lost Lagoon ink blended over it and then die cut with the Joy of Noel Dies. I’ve also added some silver foil foliage pieces behind the Lost Lagoon.
The Christmas ornament is die cut from silver foil using the Handcrafted Elements dies.
The sentiment is from the Merry & Bright stamp set, stamped in Lost Lagoon.
And the inside of the card has some silver foil too!
Now it’s time to hop on over to our next participant, the lovely Andrea Sargent – I can’t wait to see what Andrea has made this week!
If at any time you find a broken link, you can find the complete list of all participants below.
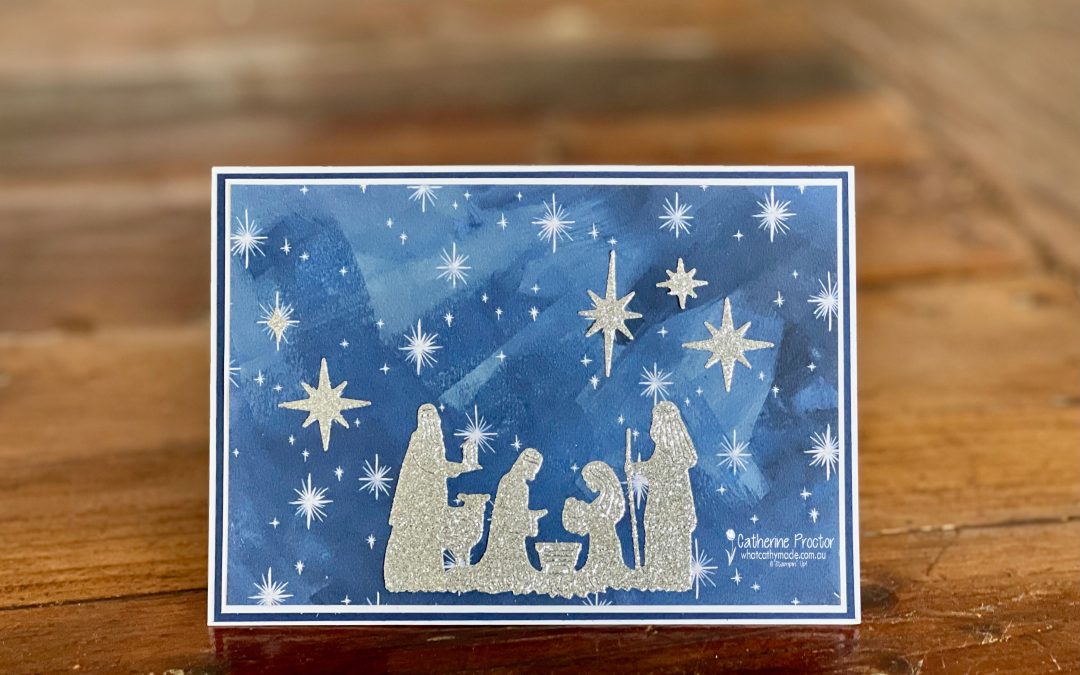
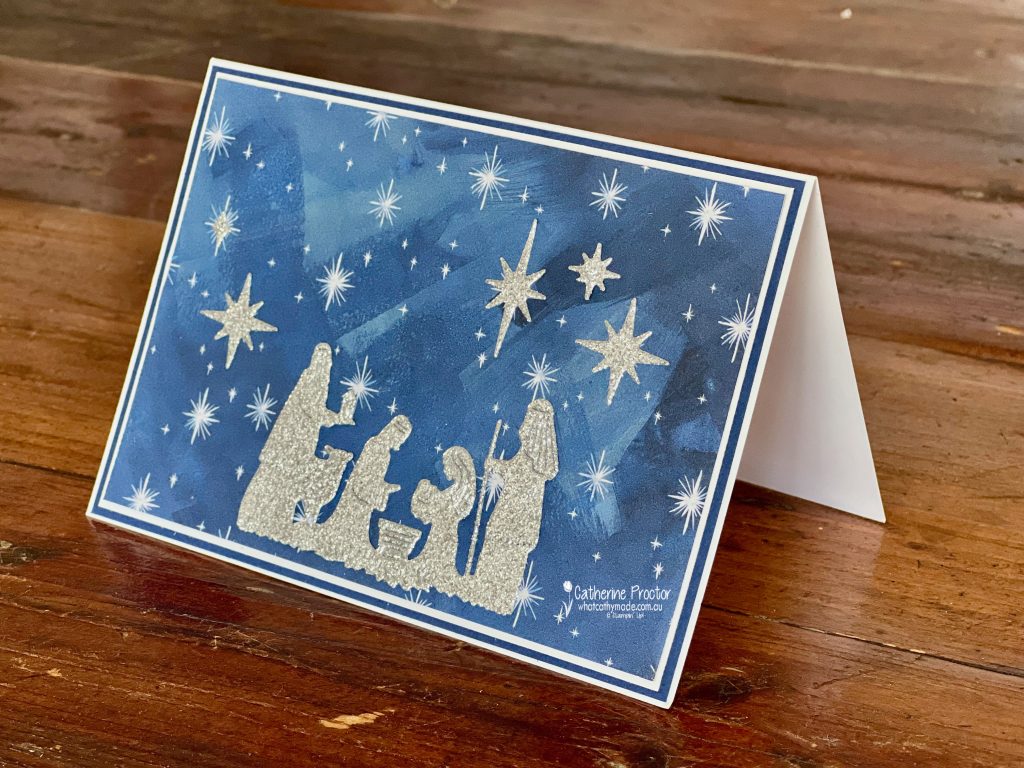
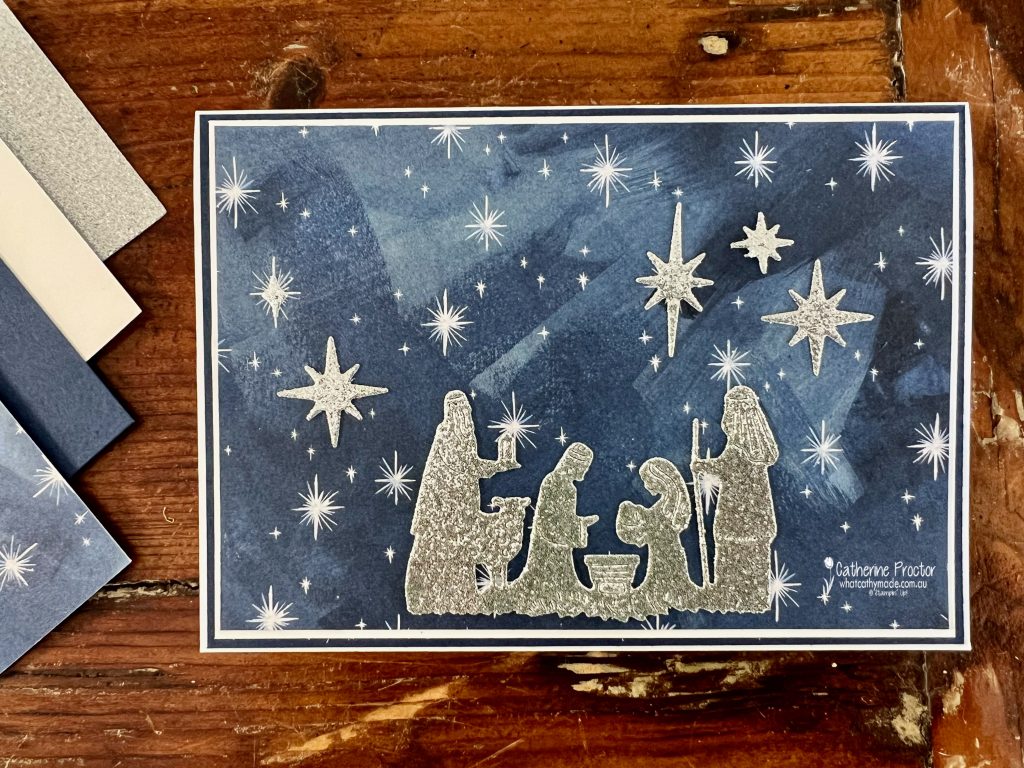
I’ve been missing in action the past month, but I was determined to join in the hop this week as it is the very last Heart of Christmas hop for the year. Sharon has done an amazing job hosting our Christmas blog. Thank you Sharon!
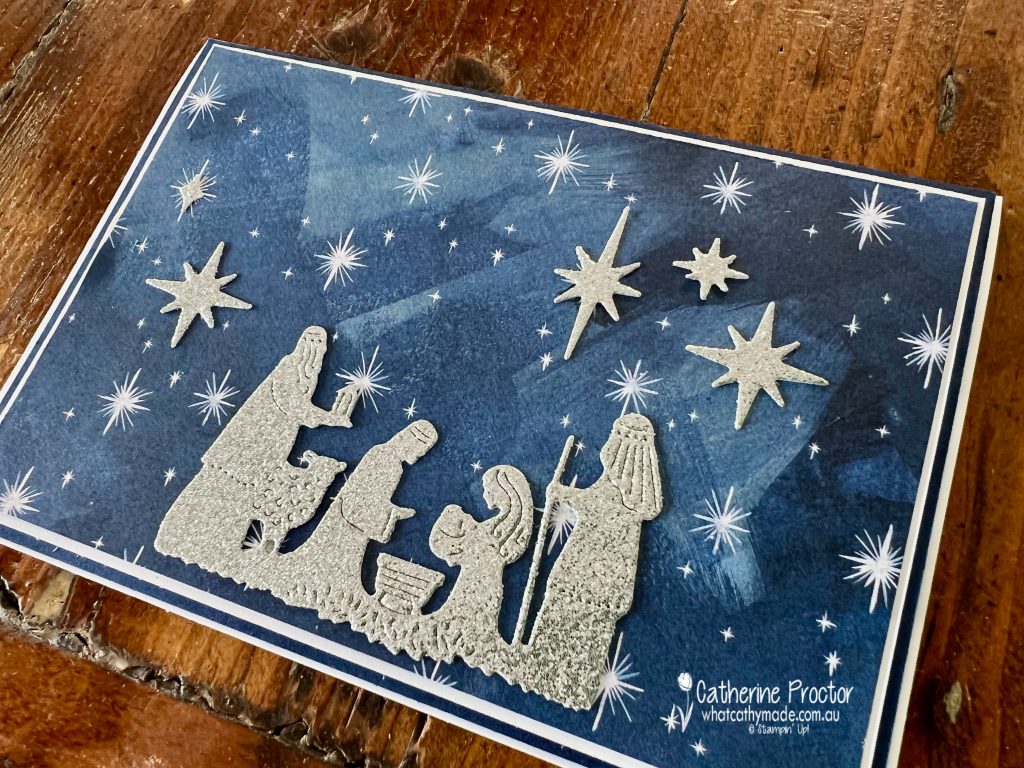
After attempting to make a fancy fold that did not work at all, here is super quick and easy Christmas card instead!
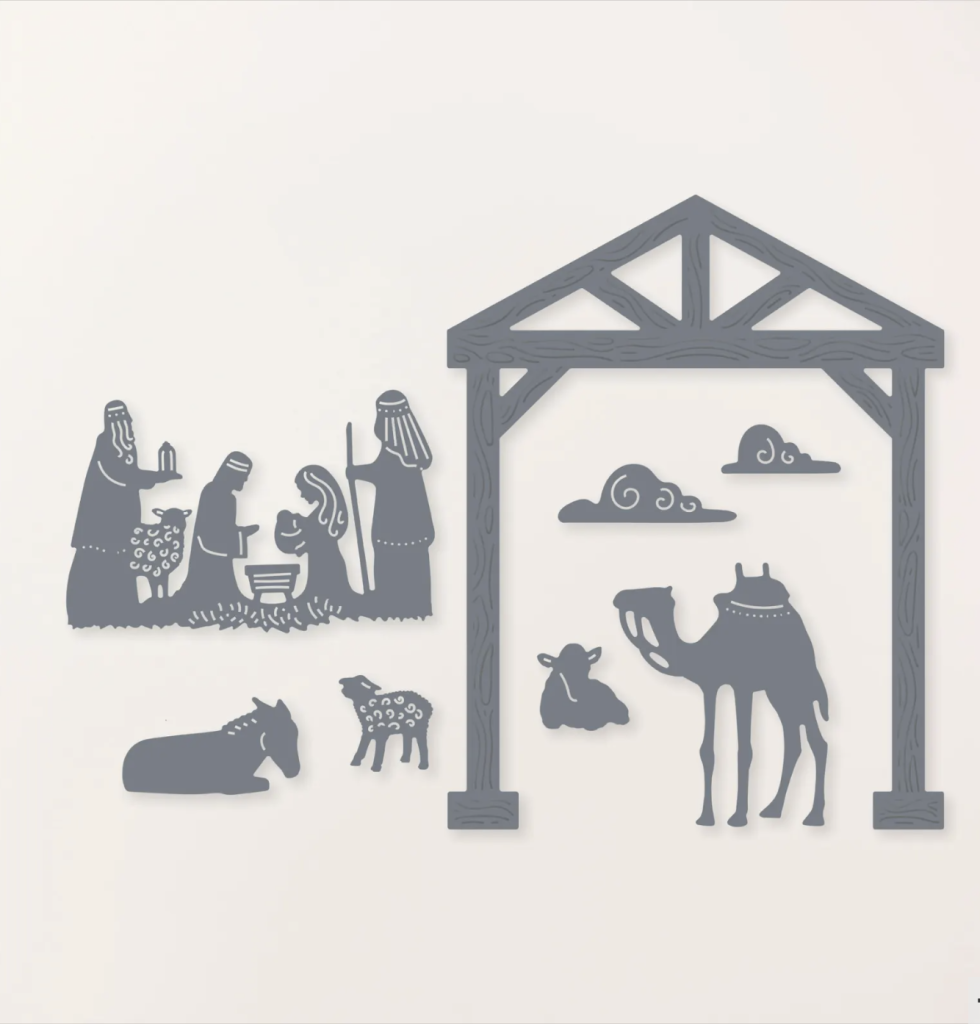
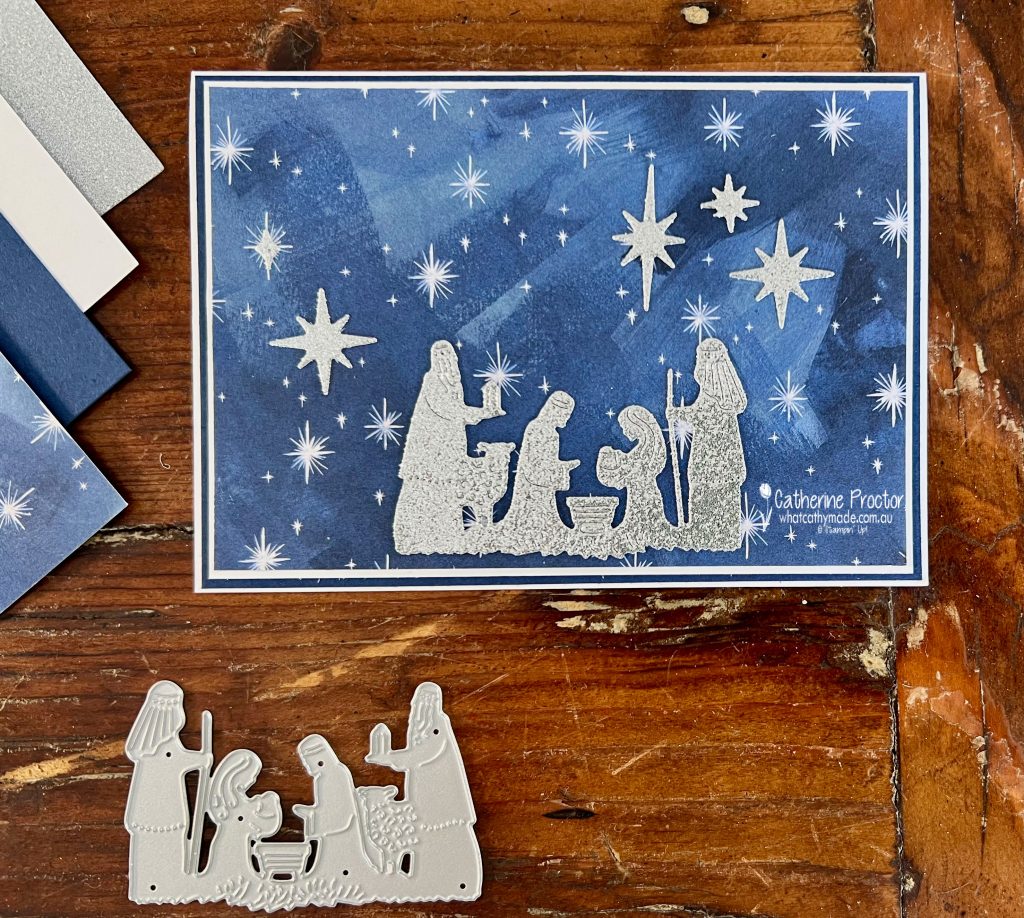
The O Holy Night Designer Series Paper forms the perfect background for this simple nativity scene. I’ve paired it with Silver Adhesive-backed Glimmer Paper, Night of Navy card stock and Basic White card stock.
I love the amount of detail in this nativity die from the Night Divine dies.
The Silver Adhesive-backed Glimmer Paper makes working with these detailed dies a breeze – there is no need to muck around with glue.
The glimmery stars in the sky are die cut using the dies from the Stars at Night Hybrid Embossing Folder set.
If you have a pack of the O Holy Night Designer Series Paper and a pack of the Silver Adhesive-backed Glimmer Paper (online only) this design would be ideal for mass production of Christmas cards.
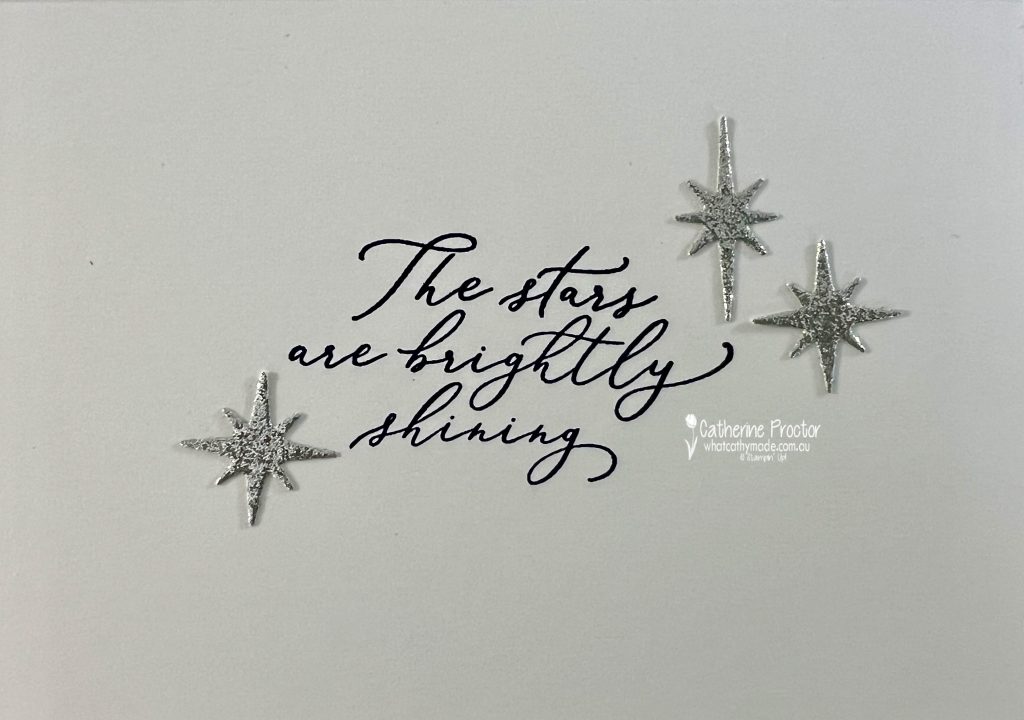
A few extra die cut stars complete the inside of the card.
Now it’s time to hop on over to our next participant, the lovely Judy May. I can’t wait to see what Judy has made this week.
If at any time you find a broken link, you can find the complete list of all participants on Sharon Davern’s blog.
Welcome to week thirty of our Art With Heart 2023-24 Colour Creations blog hop!
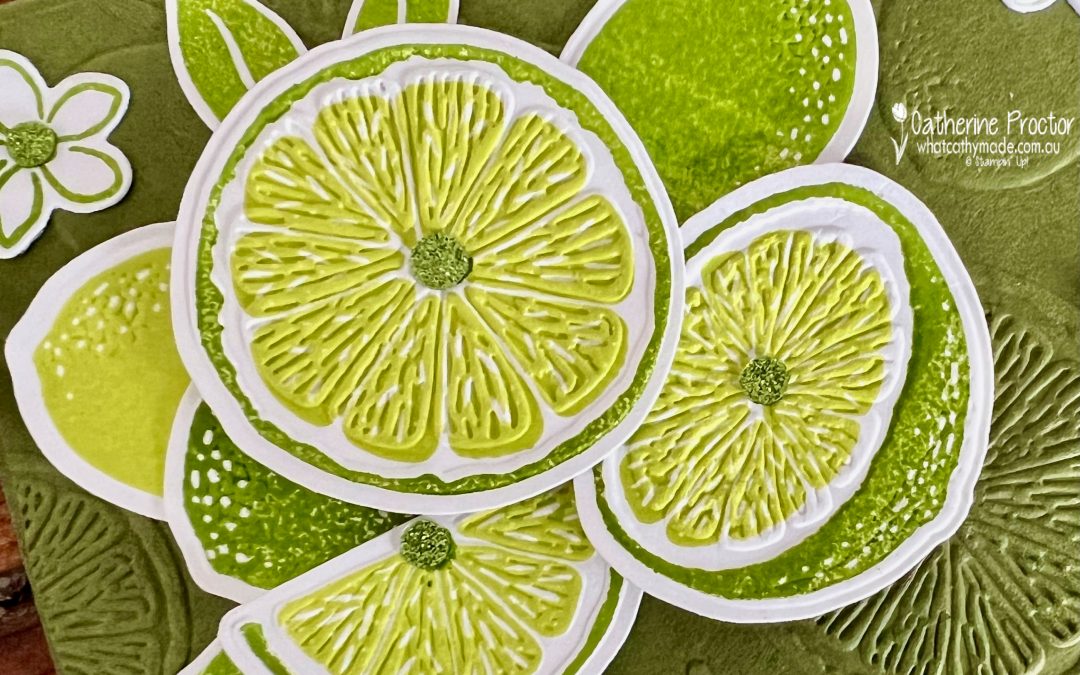
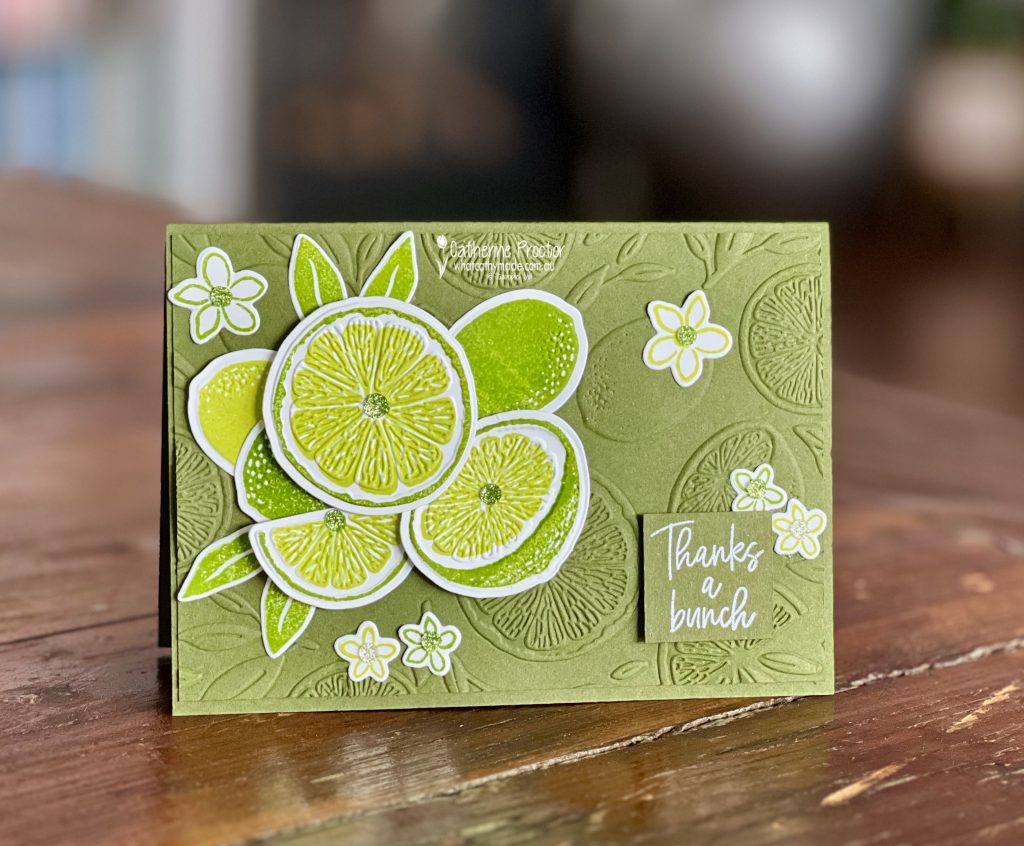
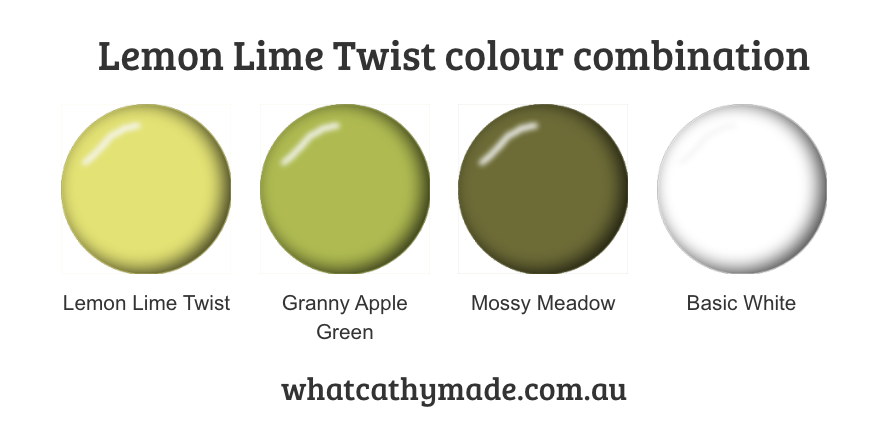
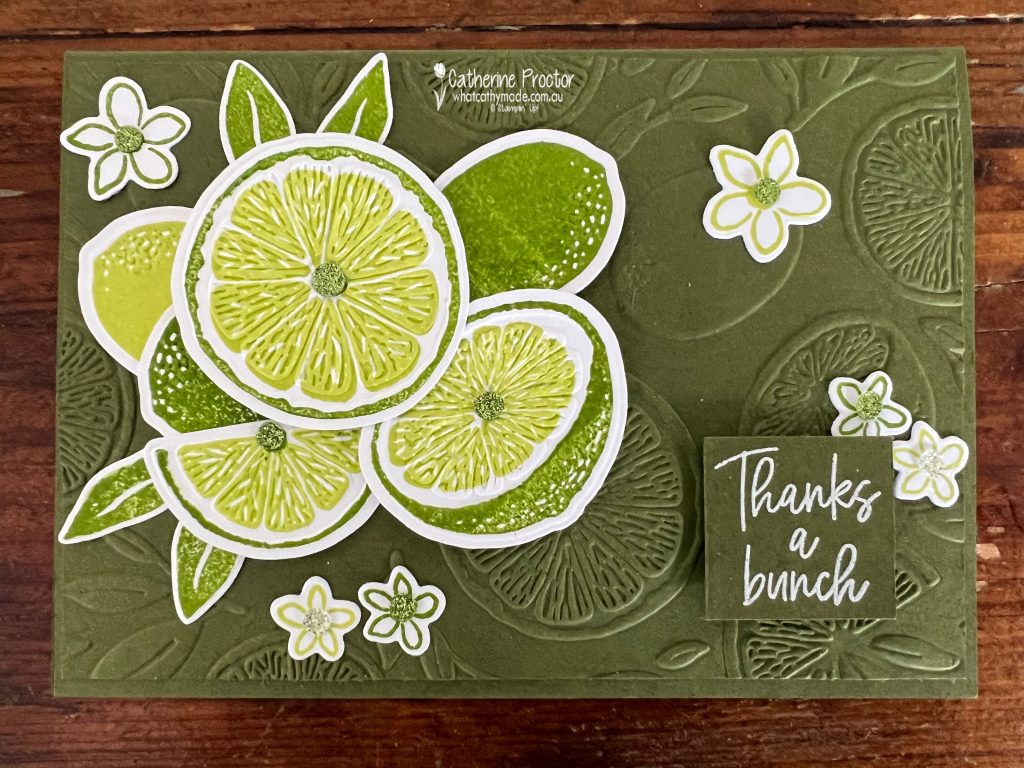
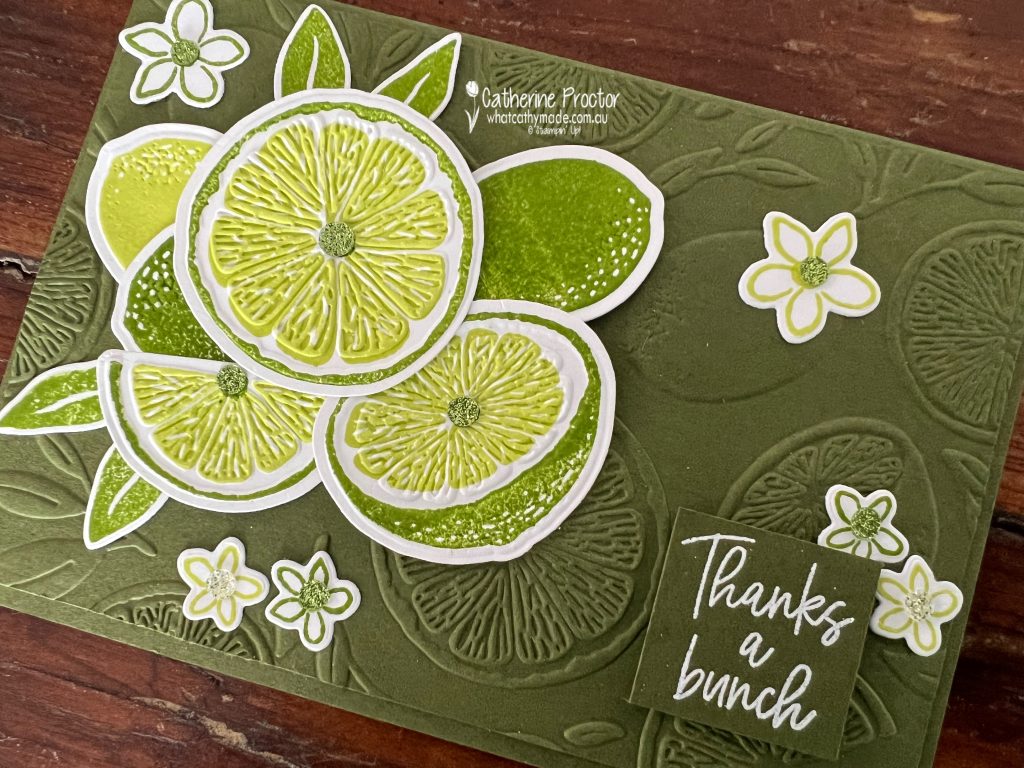
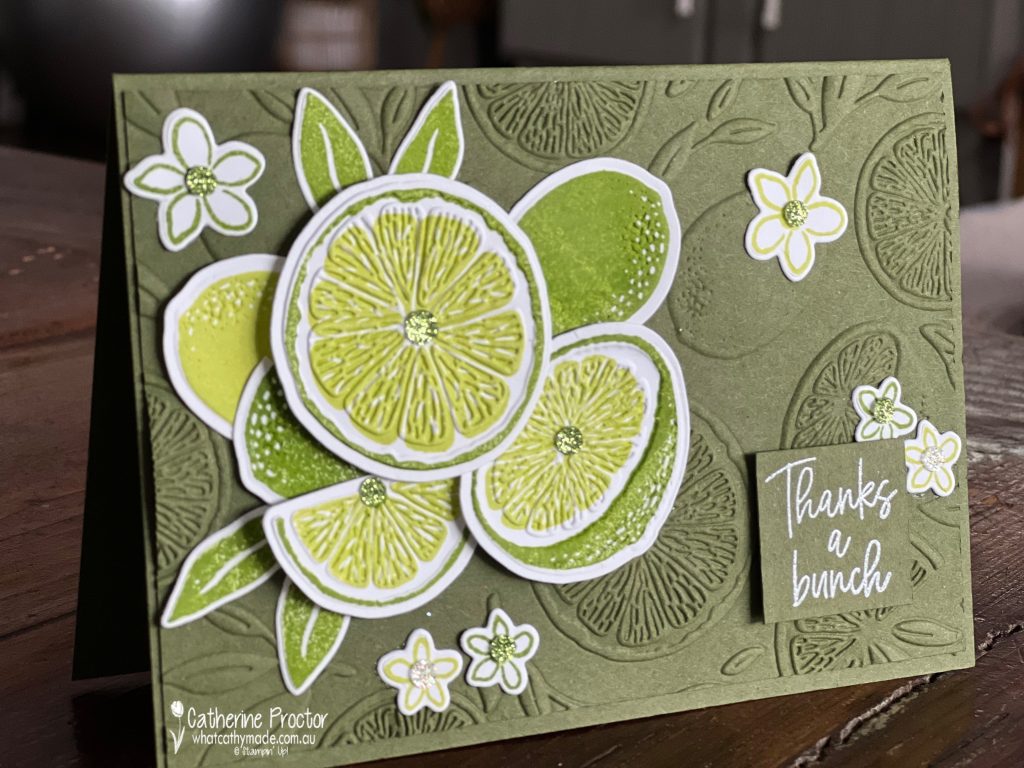
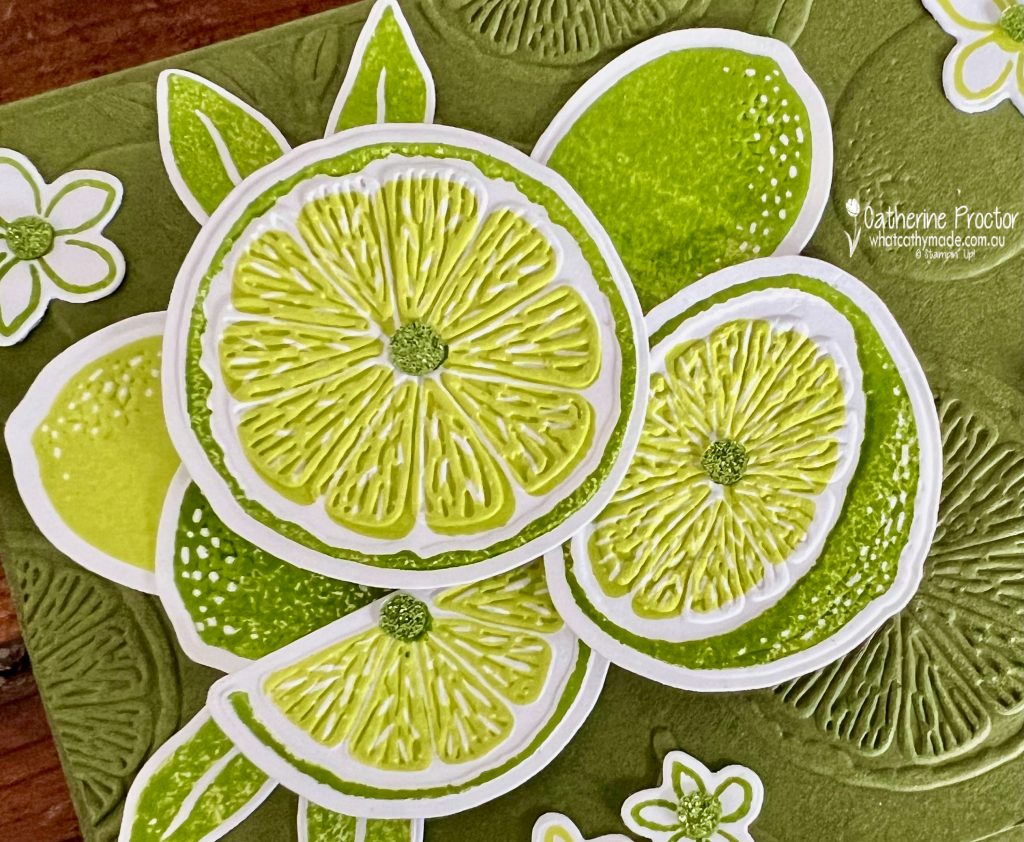
This week we are showcasing Lemon Lime Twist, a vibrant yellow green. I couldn’t resist using the Sweet Citrus bundle to showcase this colour in all its fluro glory!
I’ve combined Lemon Lime Twist with two other greens, Granny Apple Green and Mossy Meadow.
I love the way Lemon Lime Twist and Granny Apple Green look even more vibrant against the Mossy Meadow card base.
The Sweet Citrus hybrid embossing folder does all the heavy lifting on this card, creating an incredibly realistic 3D effect.
I can’t stop using the Adhesive-Backed Glitter Sequins on my cards. They are retiring soon and on special now, reduced from $14 to $9.80.
It’s hard to show all the texture on this card in a photo – it really is incredibly lifelike.
Now it’s time to hop on over to our next participant, the lovely Rachel Palmeri – I can’t wait to see what Rachel has made this week!
If at any time you find a broken link, you can find the complete list of all participants below.
The September–December 2023 Mini Catalogue is retiring soon!
From now until 3 January 2024, you can stock up on your favourite seasonal products and save up to 60% on essential craft supplies. But remember, these Last Chance Products will only be available while supplies last.
You can take a look at all of the Last Chance Products and order them online HERE
Don’t forget to use my November Host Code DHGMKS9Y if your order is between $50 and $250. If your order is over $250 don’t use the host code because you will receive your own hostess rewards to redeem for free product.
I’ll be back tonight at 8pm with a new card to share, when our Art With Heart Colour Creations team will be showcasing Lemon Lime Twist.