Welcome to week forty three of our Art With Heart 2022-23 Colour Creations blog hop.
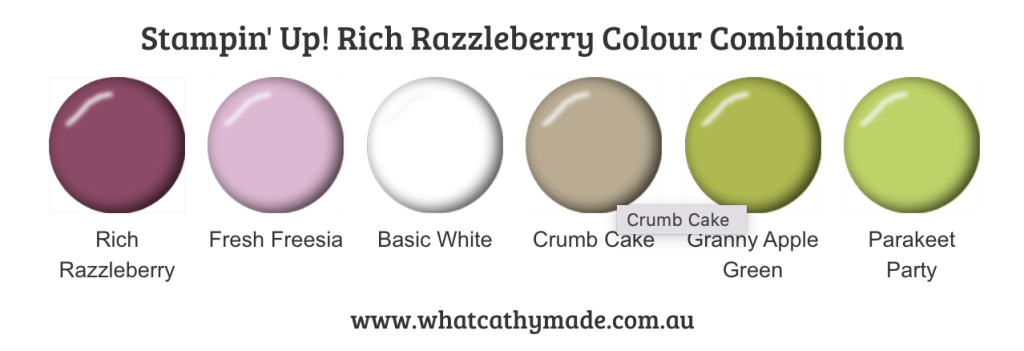
This is a weekly blog hop where we showcase the stunning range of Stampin’ Up! colours in alphabetical order over 12 months and this week we are featuring Rich Razzleberry from the Regals family.
Rich Razzleberry is a gorgeous colour that I simply forget to use! When I do remember to use it I wonder why I don’t use it more often!
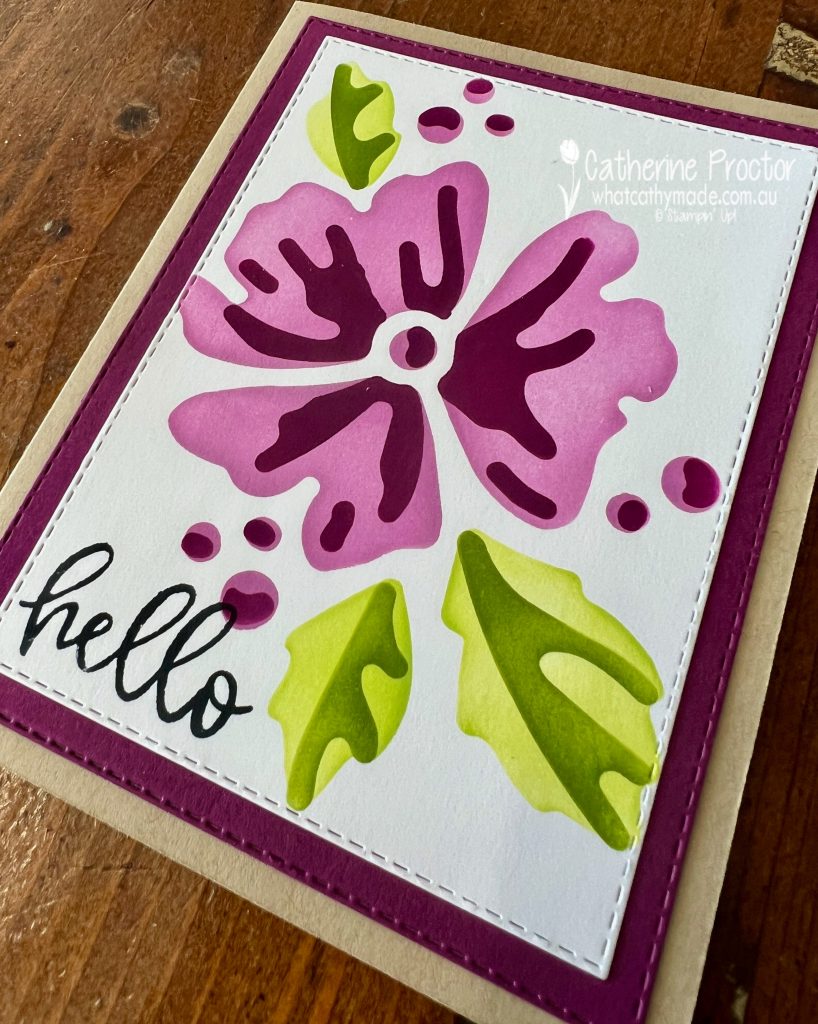
I love Fresh Freesia and Rich Razzleberry together so this is my colour combination for this week.
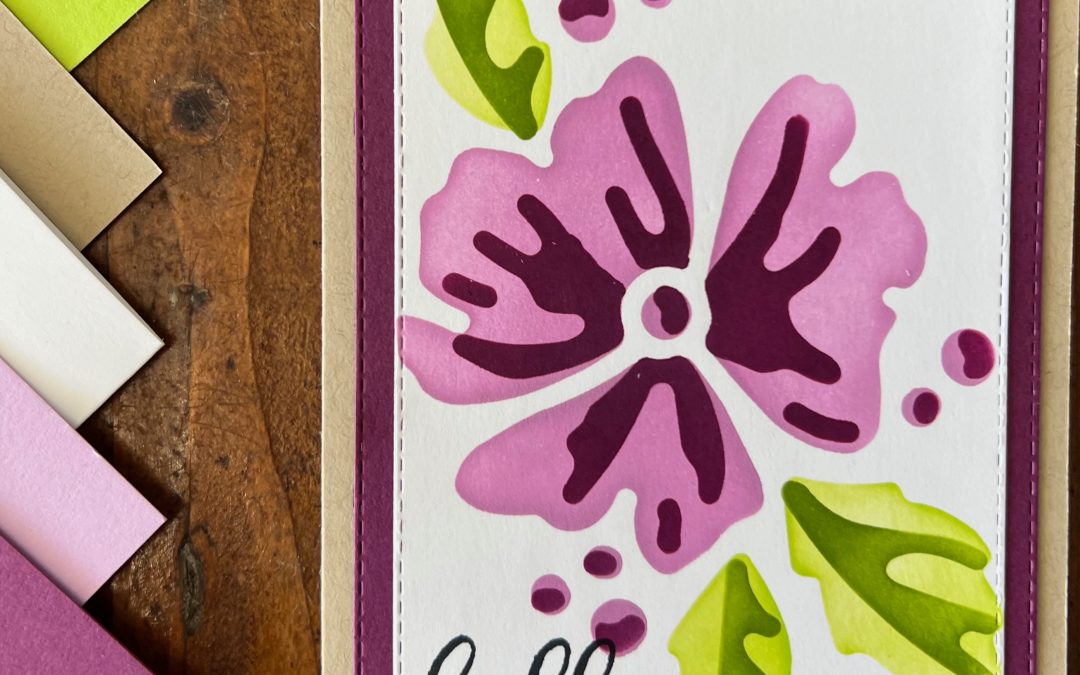
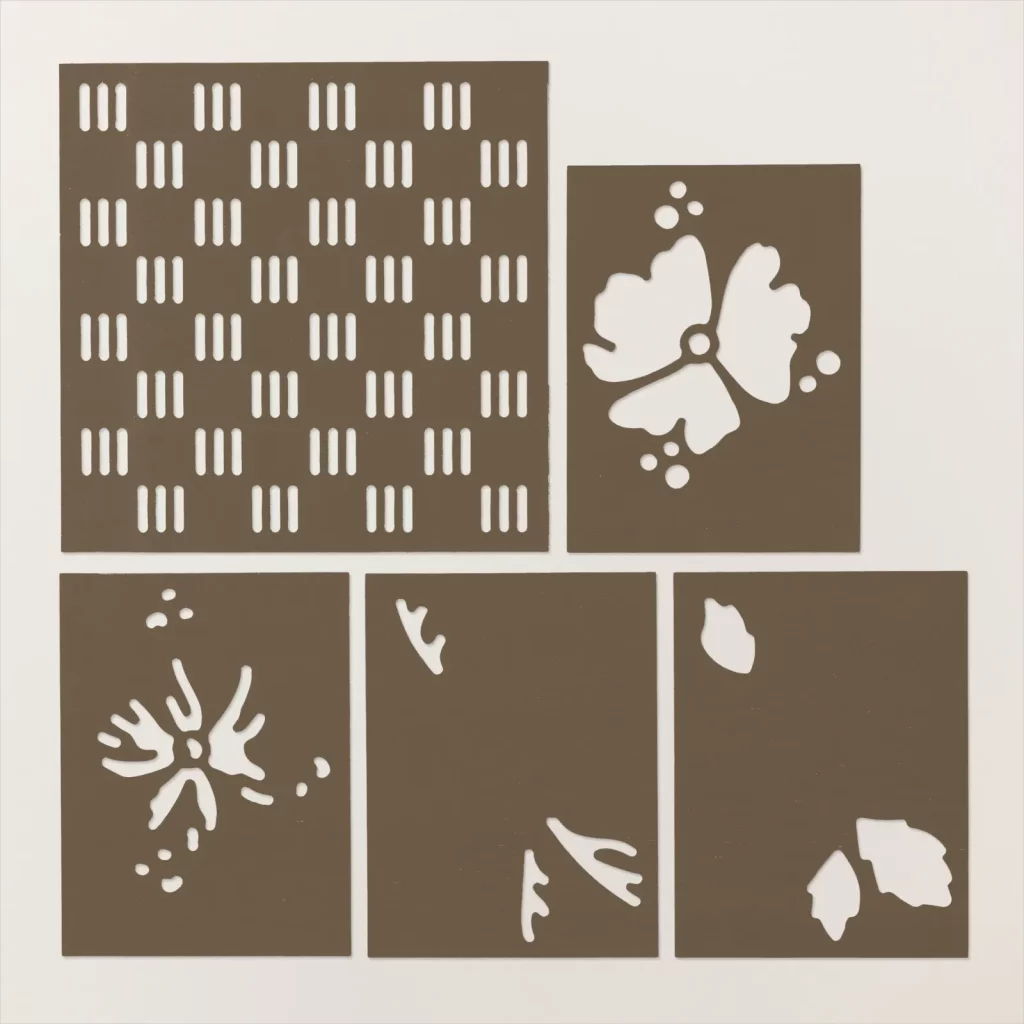
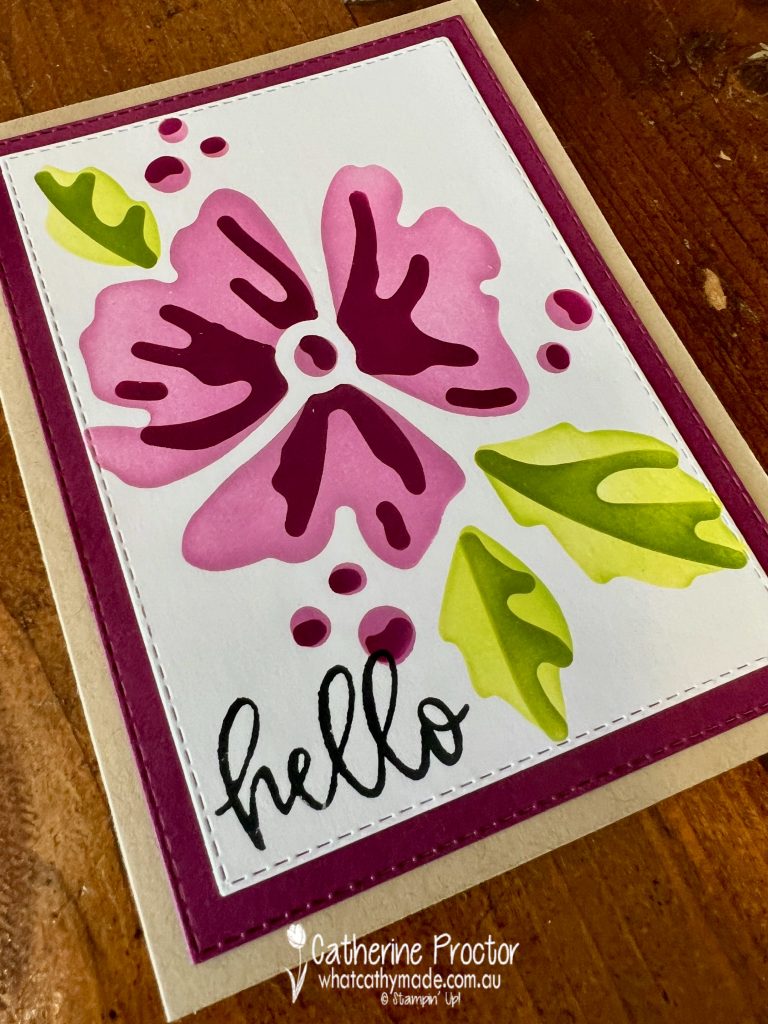
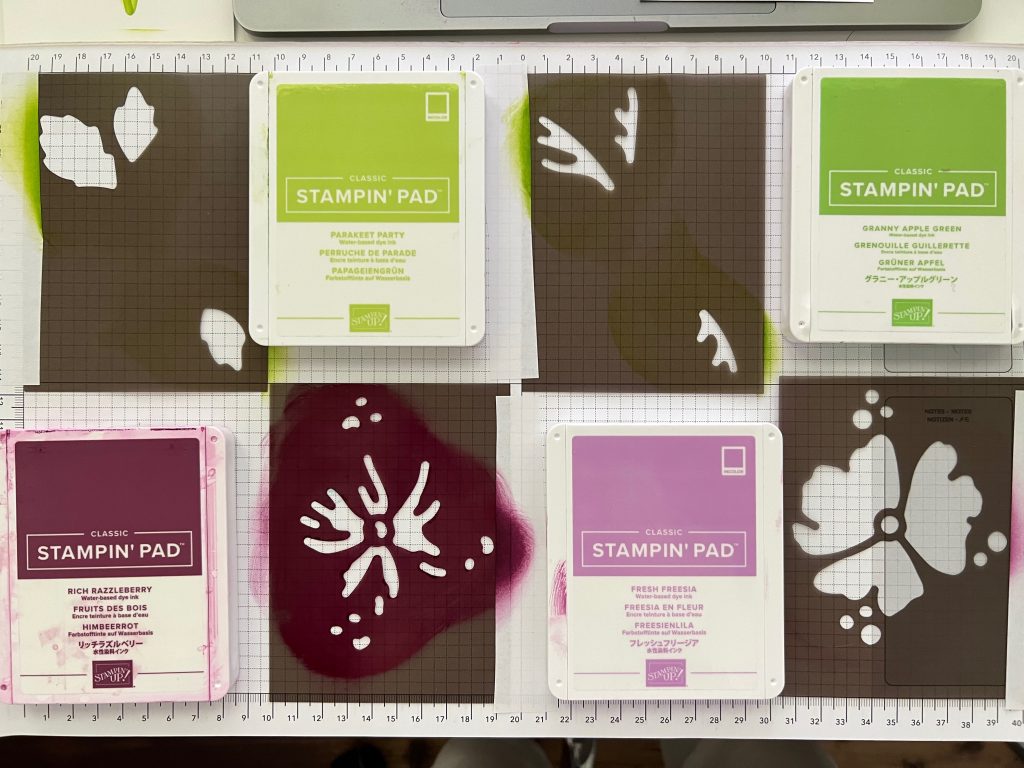
My layering mask card is a super fast and easy card that uses the Loveliest Layers Decorative Masks and blending brushes, inspired by cards shared recently by the Stampin’ Up! CEO, Sara Douglass on her Facebook live. You can watch her video and see her cards here.
The colour combination possibilities with these masks are really endless!
One way to line up the layering masks is to use a Stamparatus, placing the cardstock and the masks right into the top corner of the Stamparatus before inking up the layers – this aligns the images perfectly without having to tape them into place.
Once the mask is firmly in place, use a blending brush to lift ink off an ink pad (use a separate blending brush for each colour) and then gently blend the ink over the mask in a circular motion. You can make the level of colour intensity as light or as dark as you like.
The method Sara and I both used involved taping one side of the masks to your grid paper, using strips of Stampin’ up! Masking Tape or washi tape. This method works really well if you are making more than one card front.
The cardstock layers were die cut using the Stitched Rectangle Dies before adhering to a Crumb Cake Card base. The “Hello” sentiment is from the Biggest Wish Stamp Set stamped in Memento ink.
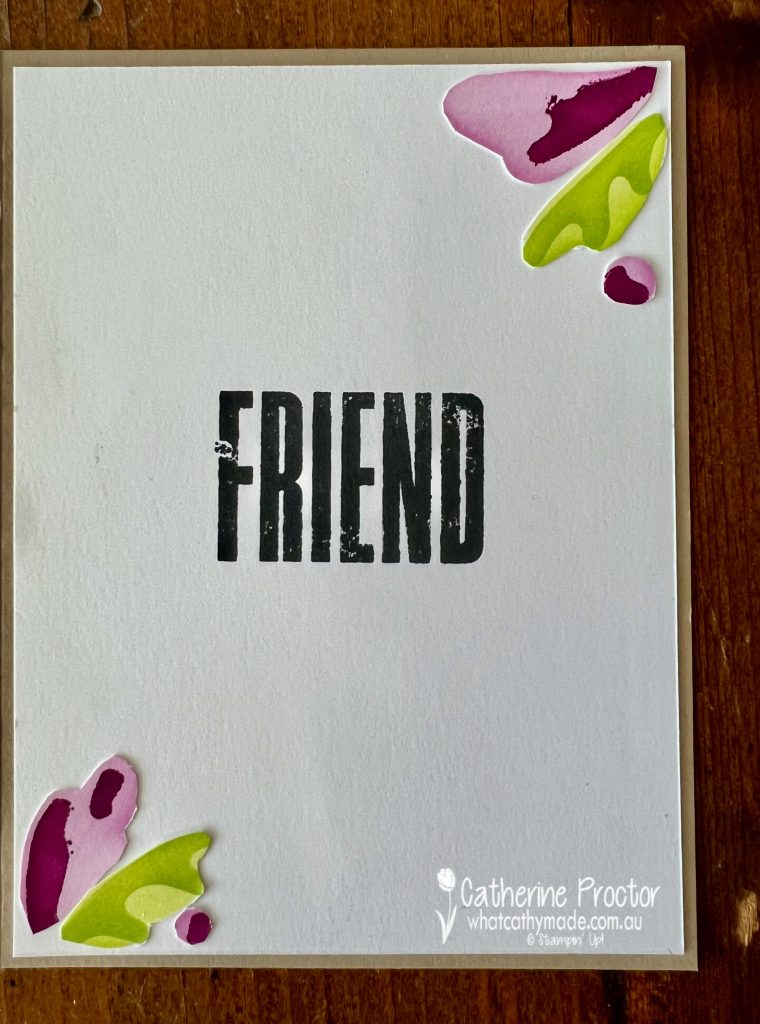
Inside the card I used the “friend” sentiment from the Biggest Wish Stamp Set and added some spare masked pieces I cut to fit.
Now it’s time to hop on over to our next participant, the lovely Rachel Palmieri – I can’t wait to see what Rachel has made this week!
If at any time you find a broken link, you can find the complete list of all participants below.
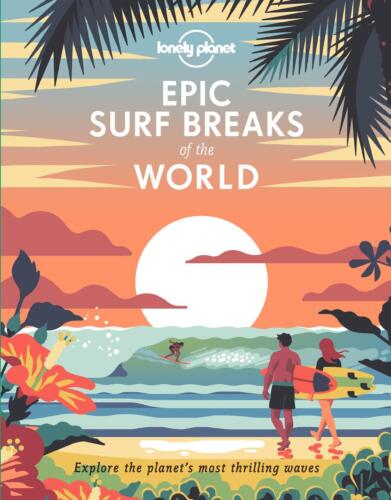
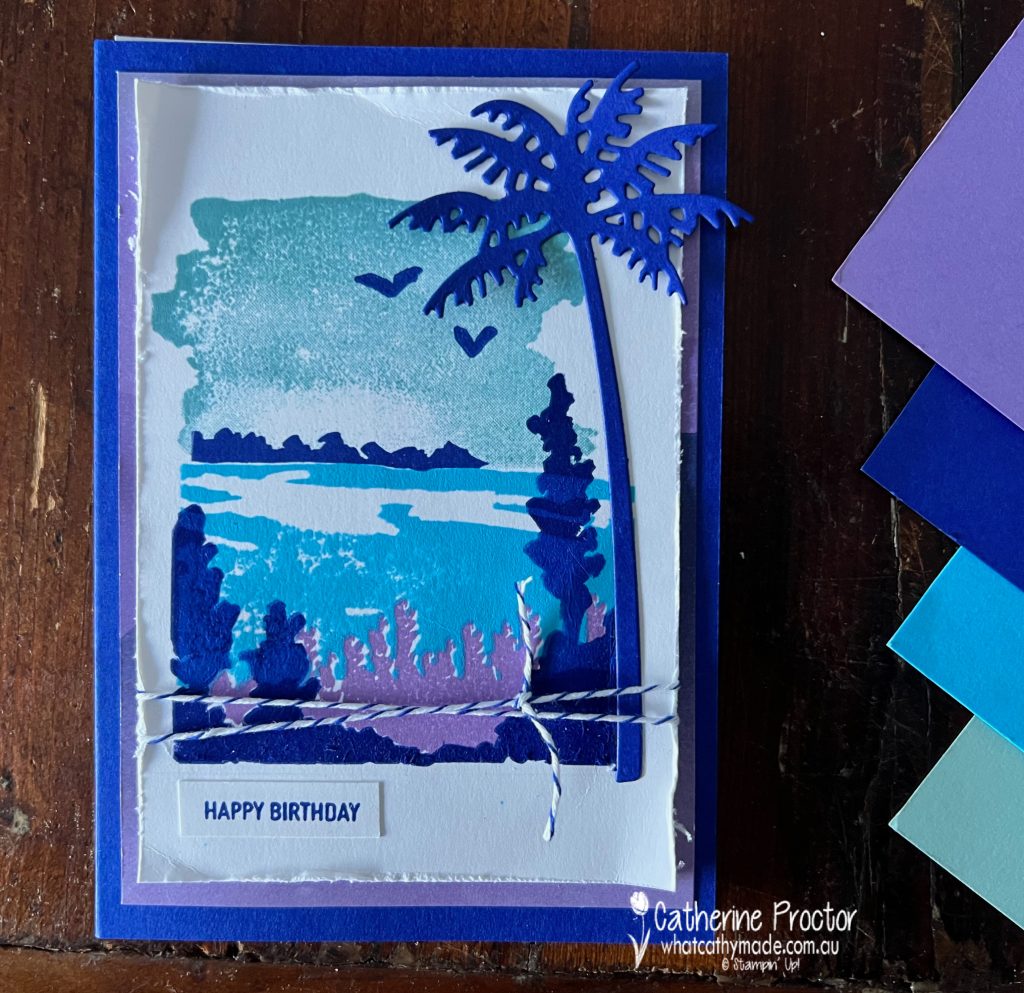
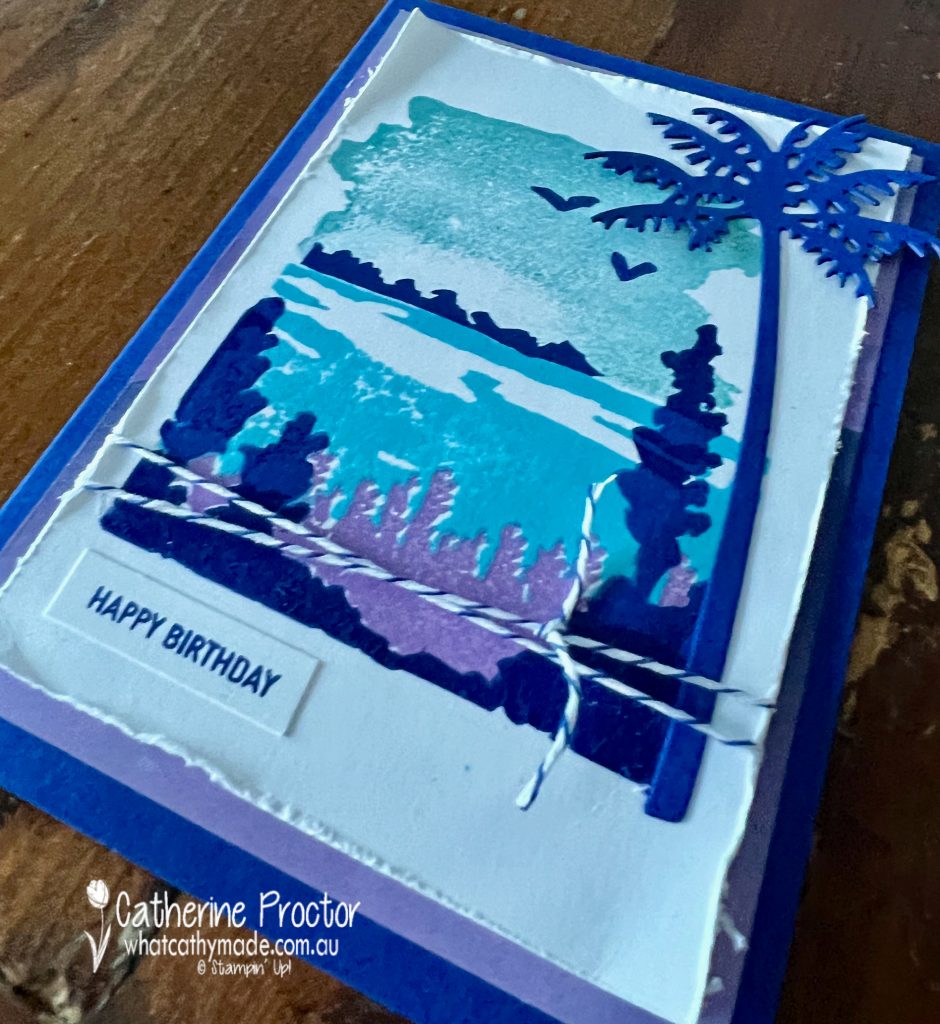
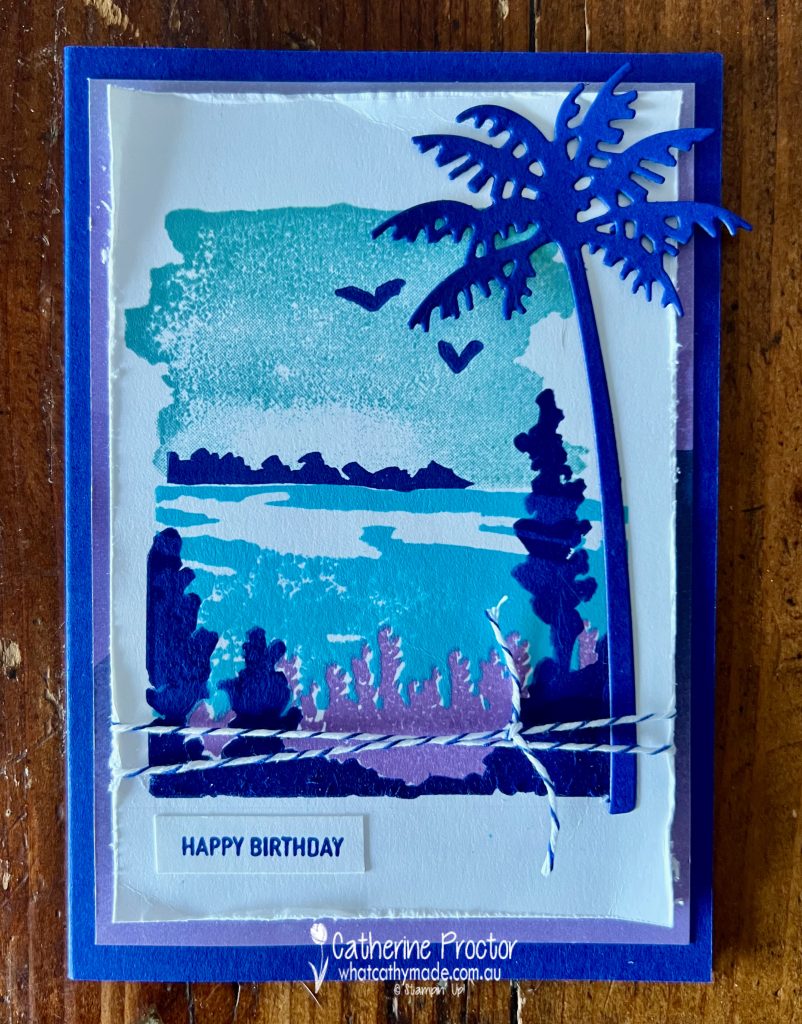
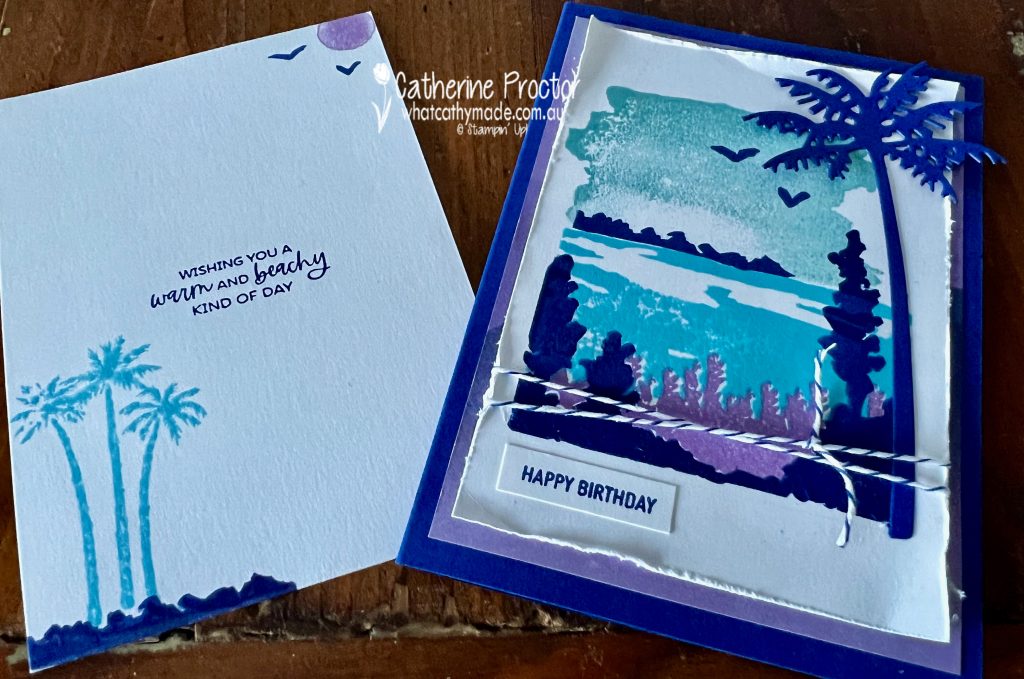
Last Friday my husband, Pete, celebrated his birthday and one of the books I gave him was the Lonely Planet Epic Surf Breaks of the World.
I knew Pete would love adding more surf breaks to his bucket list – as I type this blog he is surfing down the south coast – and I knew I’d love looking at the incredible illustrations by the illustrator, Ross Murray, like this one below.
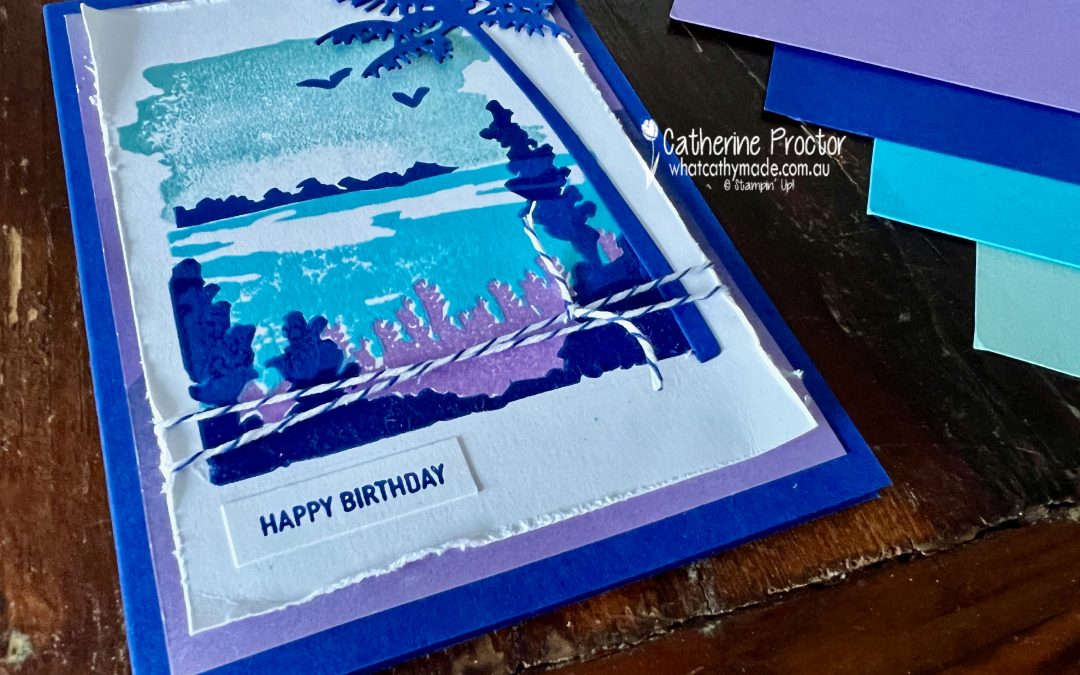
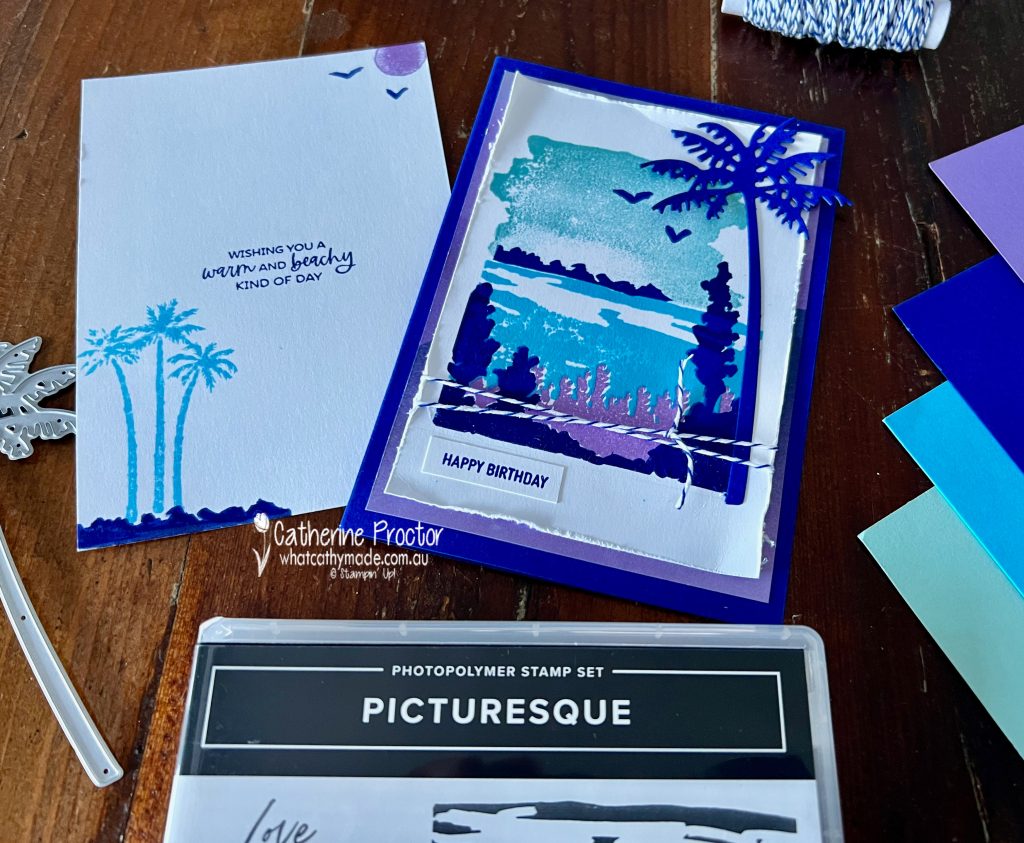
To make a matching card in a similar graphic style I used the Stampin’ Up! Picturesque stamp set, combined with one of the stamps from the Oceanfront stamp set. Thanks to Laurie Alexander, a USA Stampin’ Up! demonstrator who gave me the idea to combine the two sets.
I chose a vibrant palette of blues and purples, however you can really use any colours with this graphic stamp set.
The colours are so vibrant in this card it was hard to take a good photo that didn’t look overexposed!
This stamp set is photopolymer, which makes it super easy to line up the layers of colour, however, the bottom stamp that I’ve stamped in Starry Sky can easily bend, so I used my grid paper in the Stamparatus to line up the stamp before stamping.
The Stamparatus is a must have for creating this type of landscape as you often have to go back a restamp the larger stamps to ensure saturation of colour and coverage.
Other products used include the large palm die from the Palm Dies, the happy birthday stamp from the new On The Ocean stamp set and some In Colour Starry Sky twine.
The inside of the card has a a palm stamp from the Paradise Palms Stamp Set, with a Highland Heather sun – why not!
I’ll be back this Wednesday March 1, with the AWH Colour Creations team to showcase Rich Razzleberry. I hope you can join us then.
Welcome to week forty two of our Art With Heart 2022-23 Colour Creations blog hop.
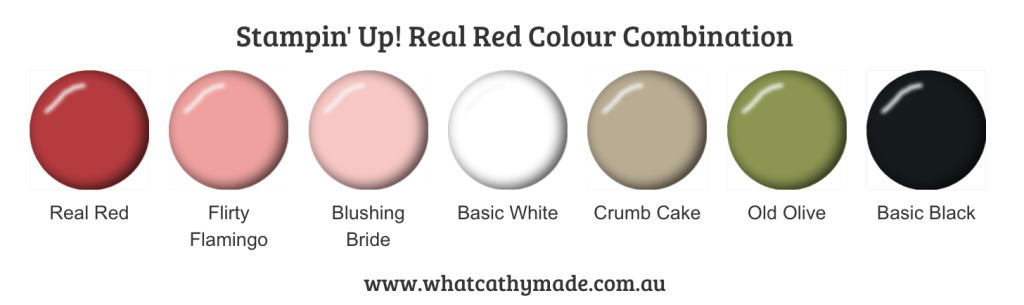
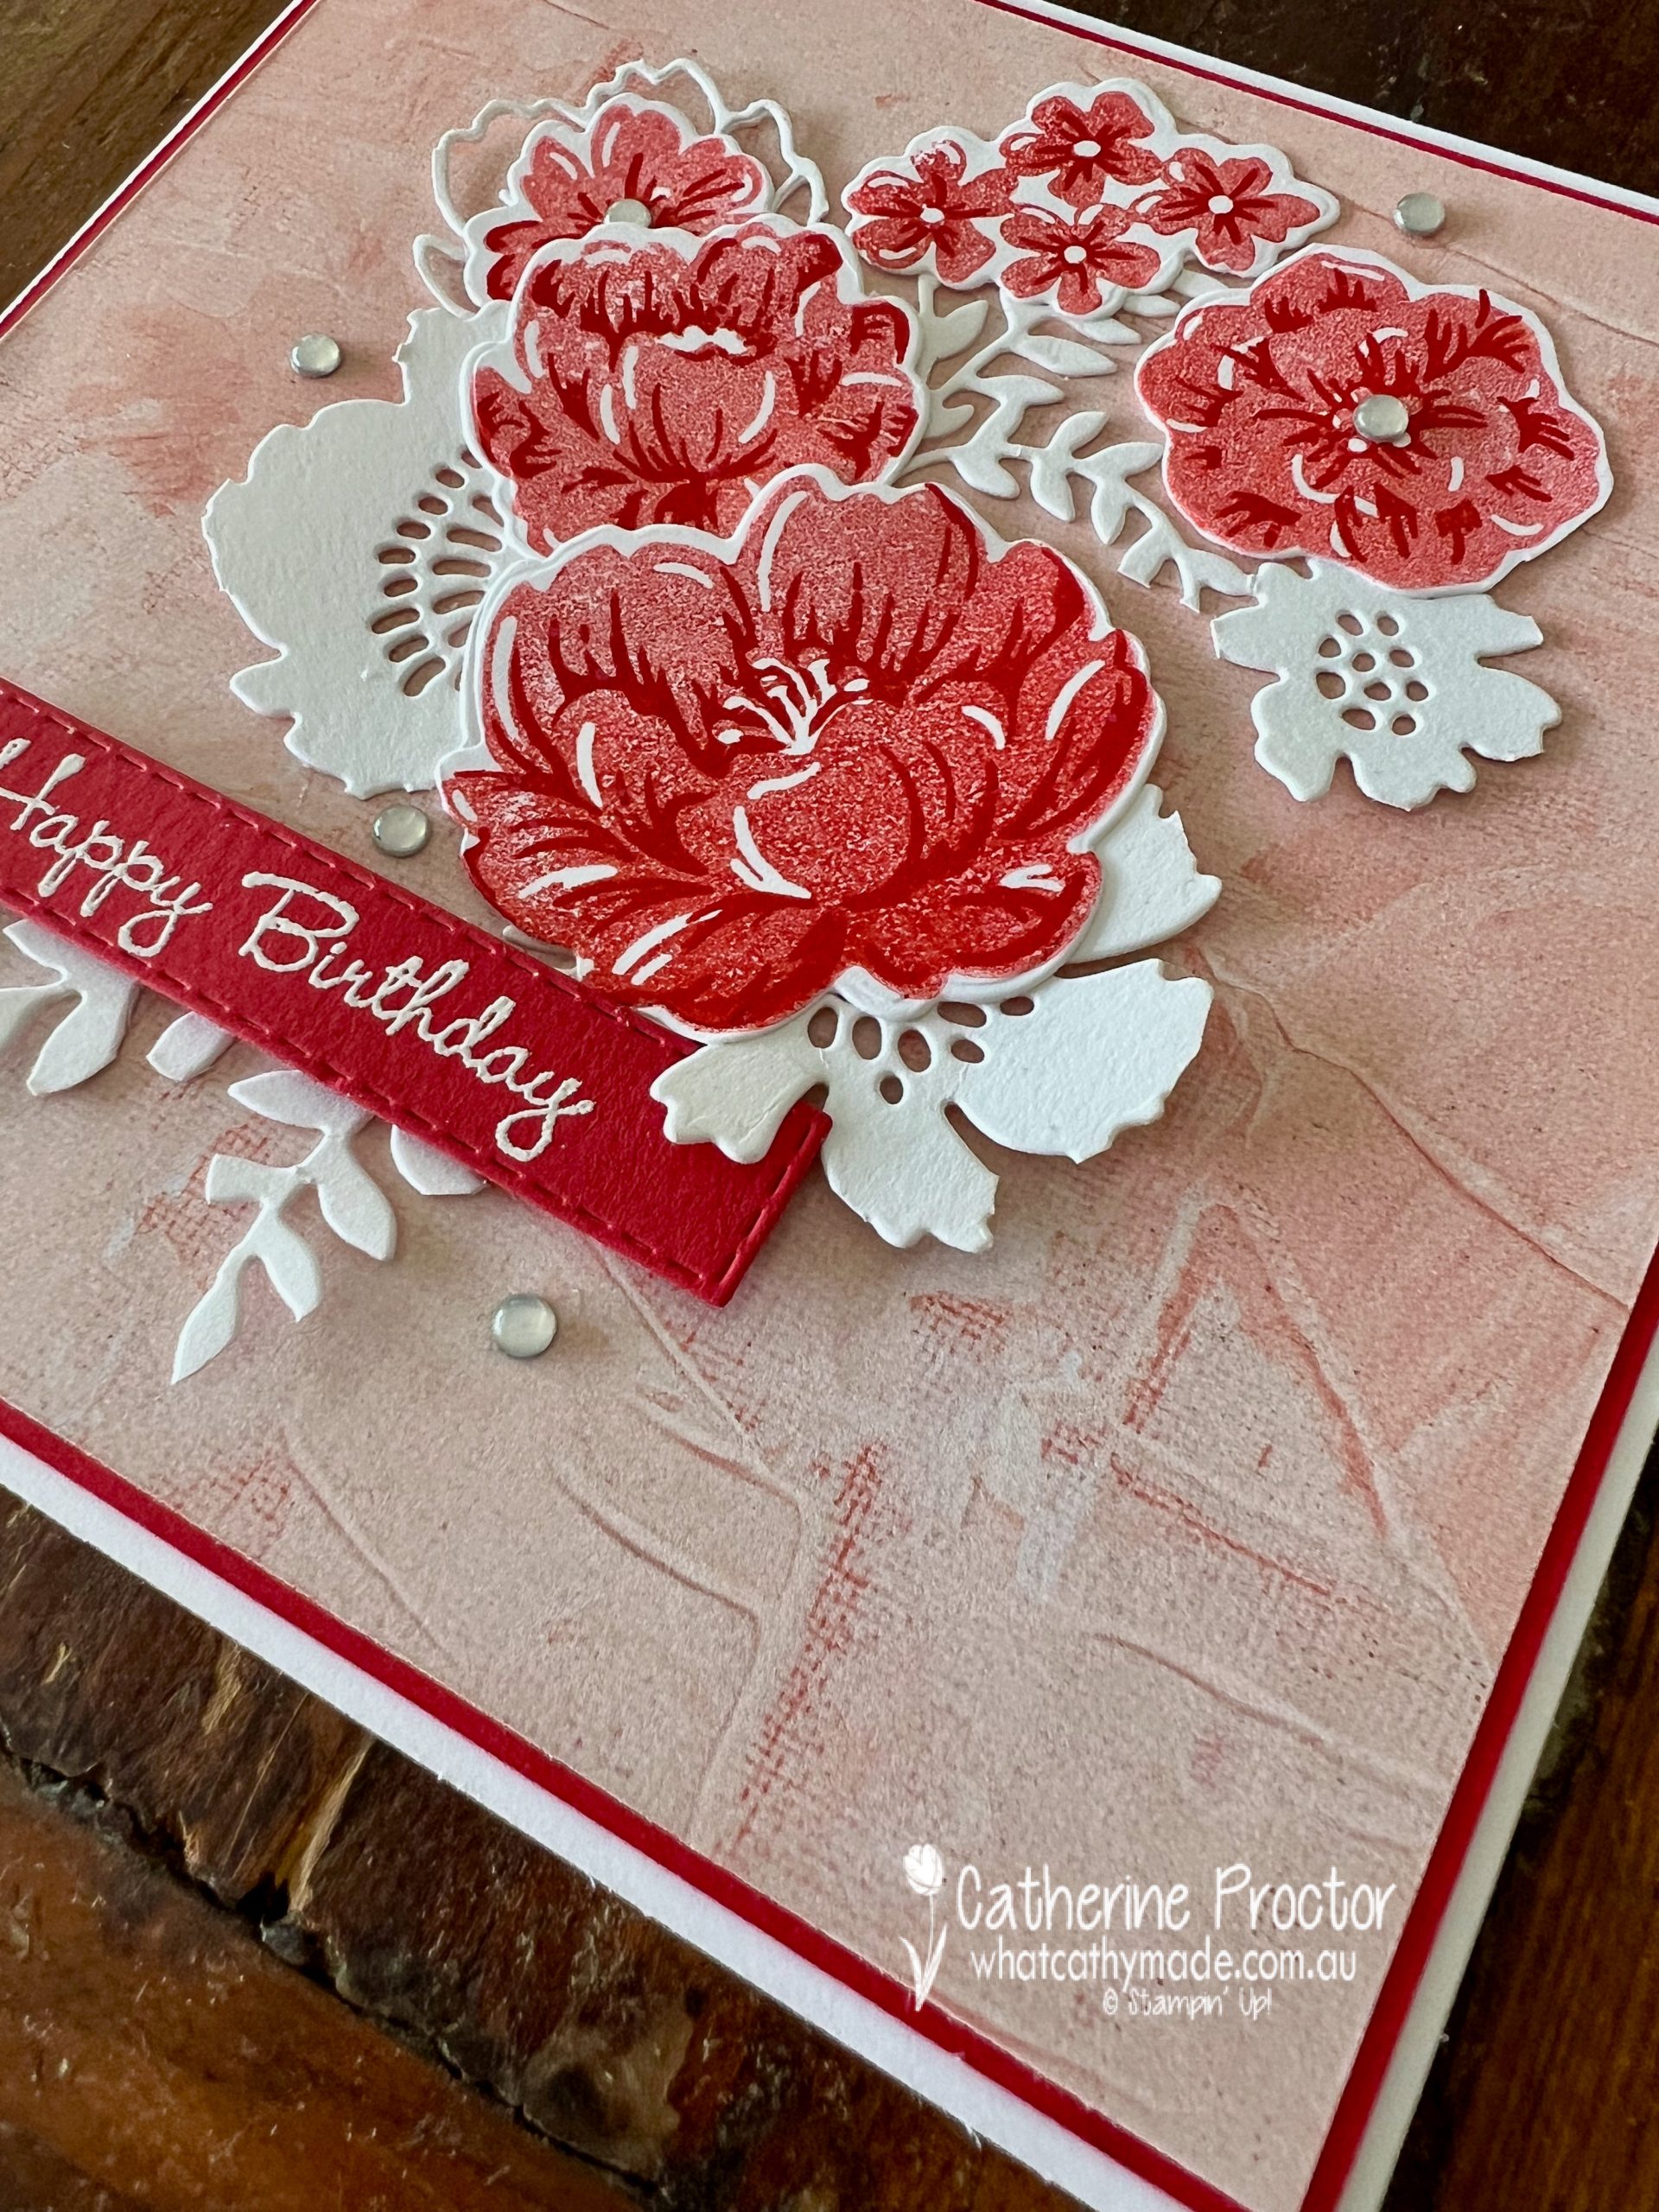
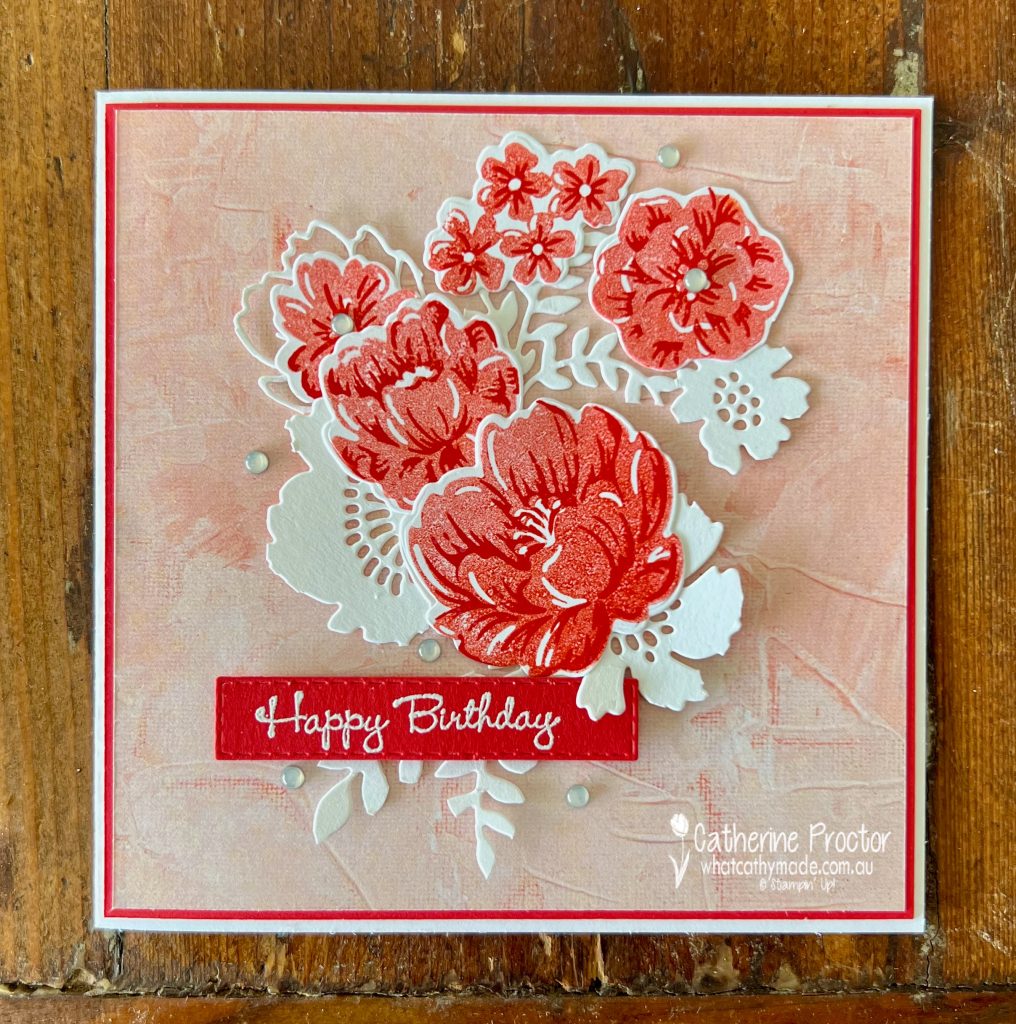
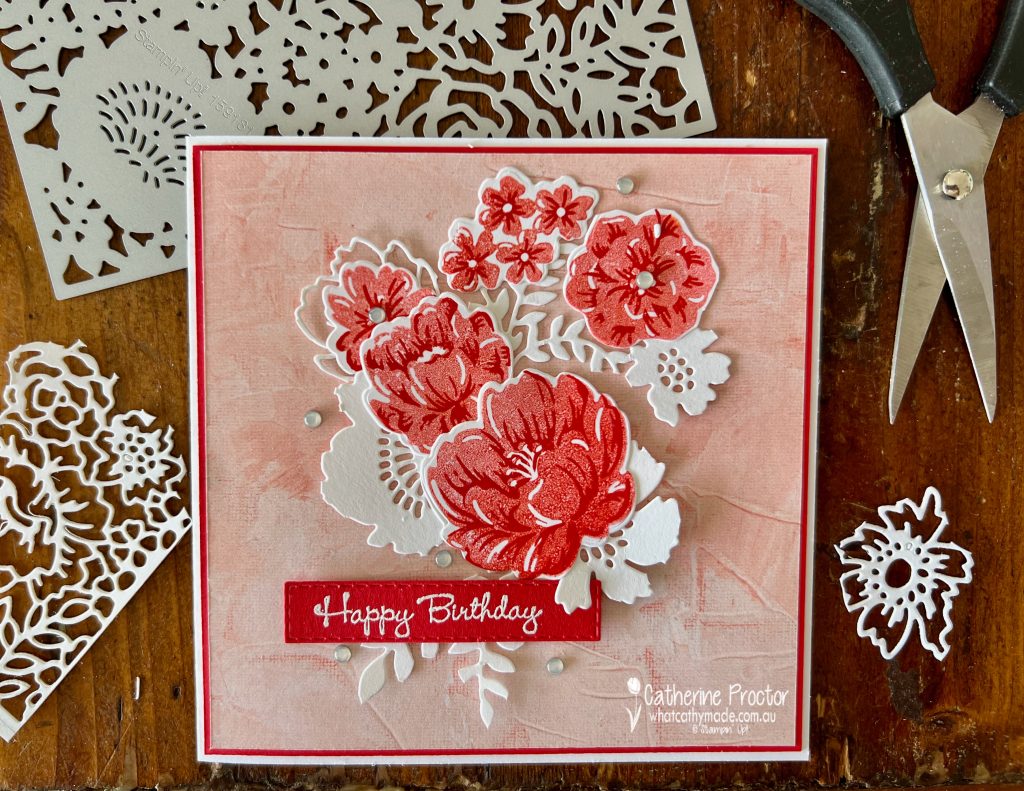
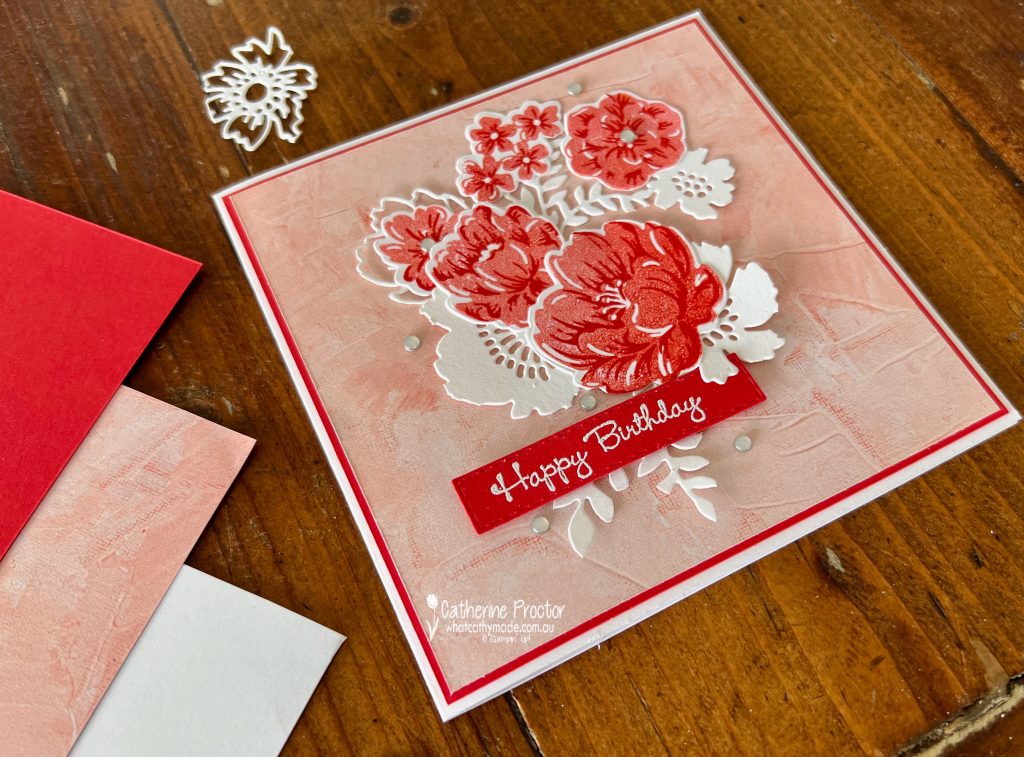
This is a weekly blog hop where we showcase the stunning range of Stampin’ Up! colours in alphabetical order over 12 months and this week we are featuring Real Red from the Regals family.
Sometimes you feel like stamping – sometimes you don’t!
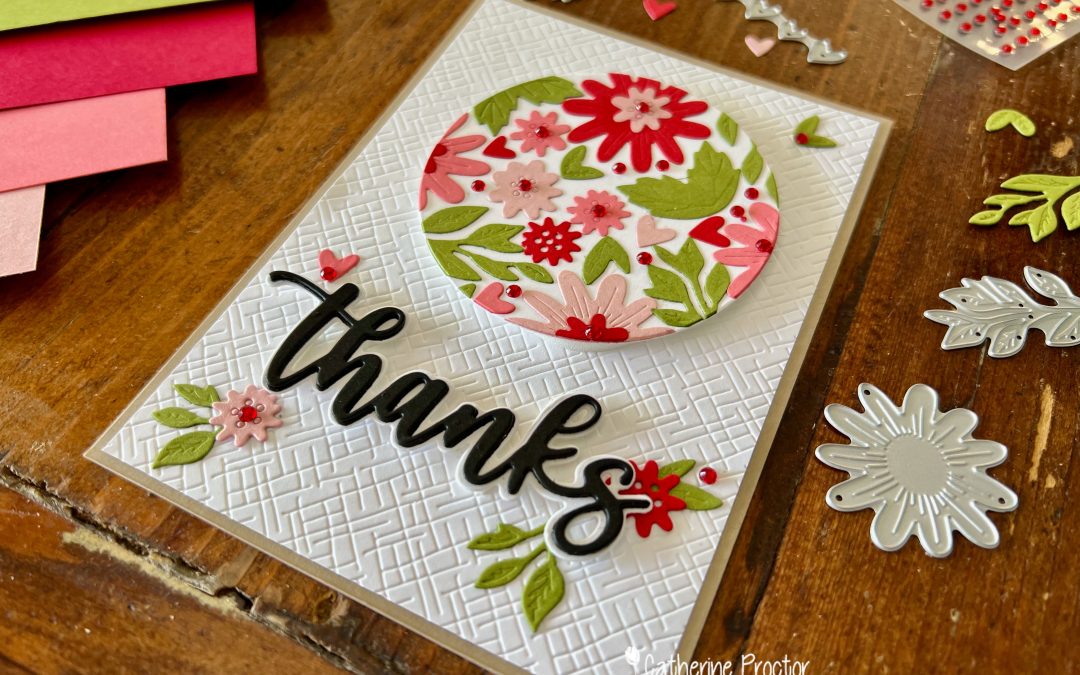
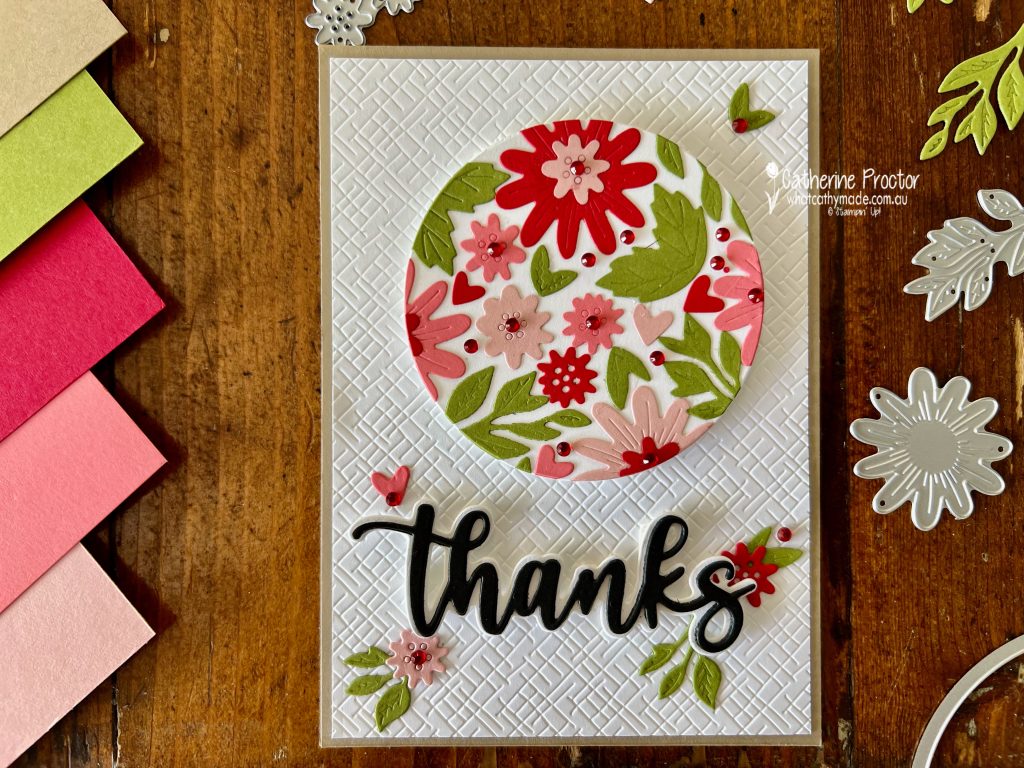
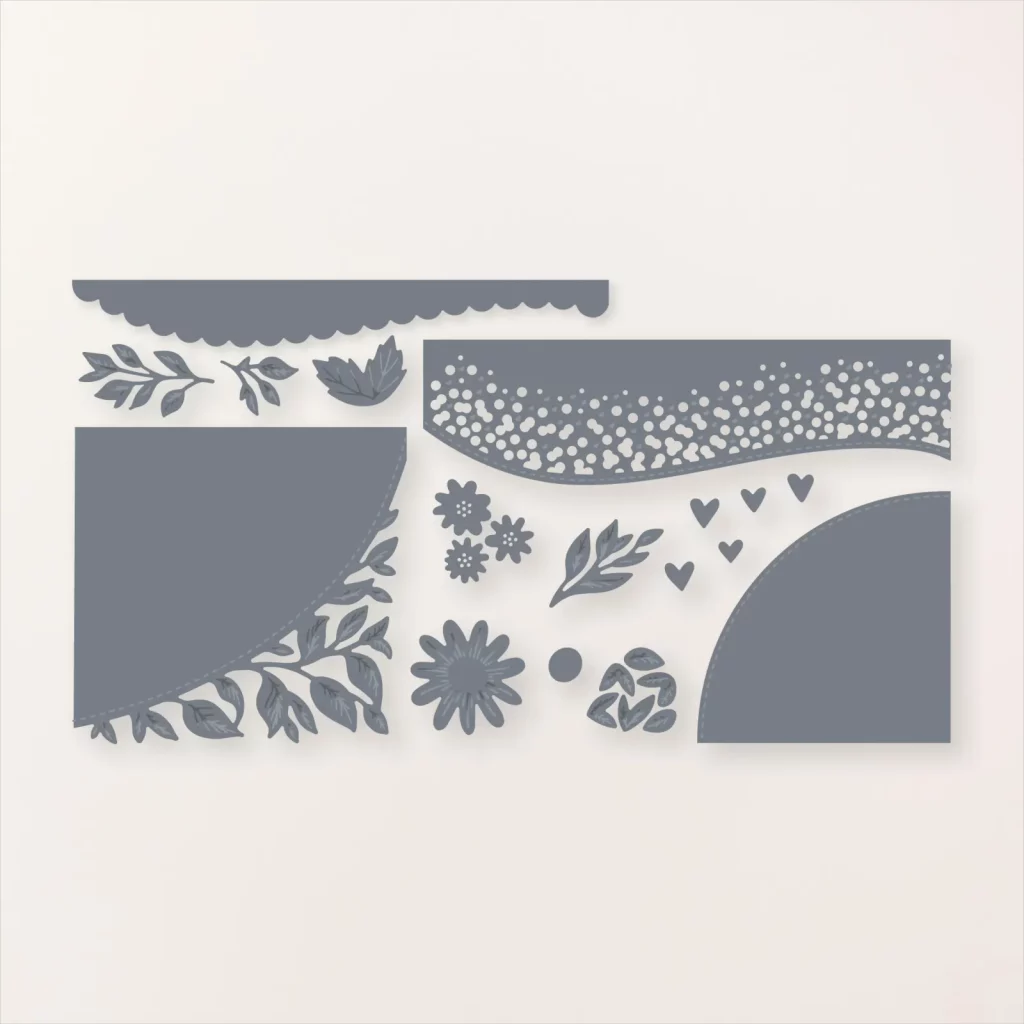
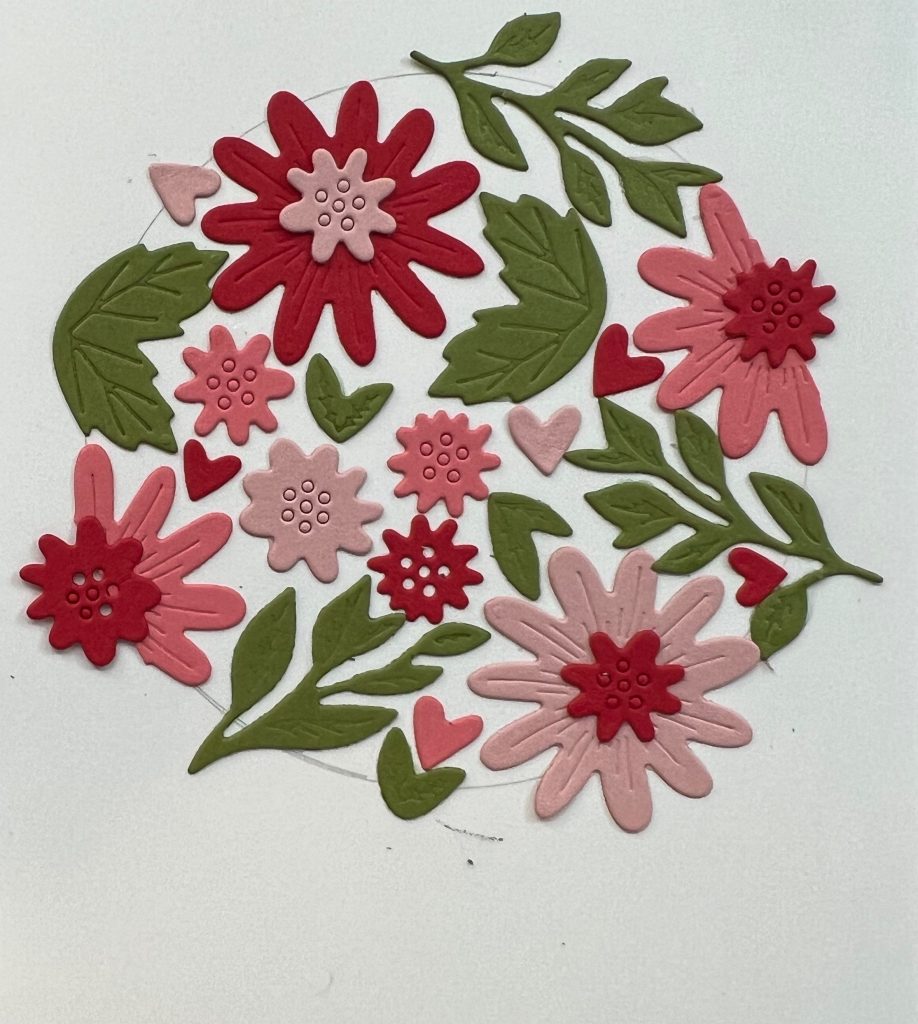
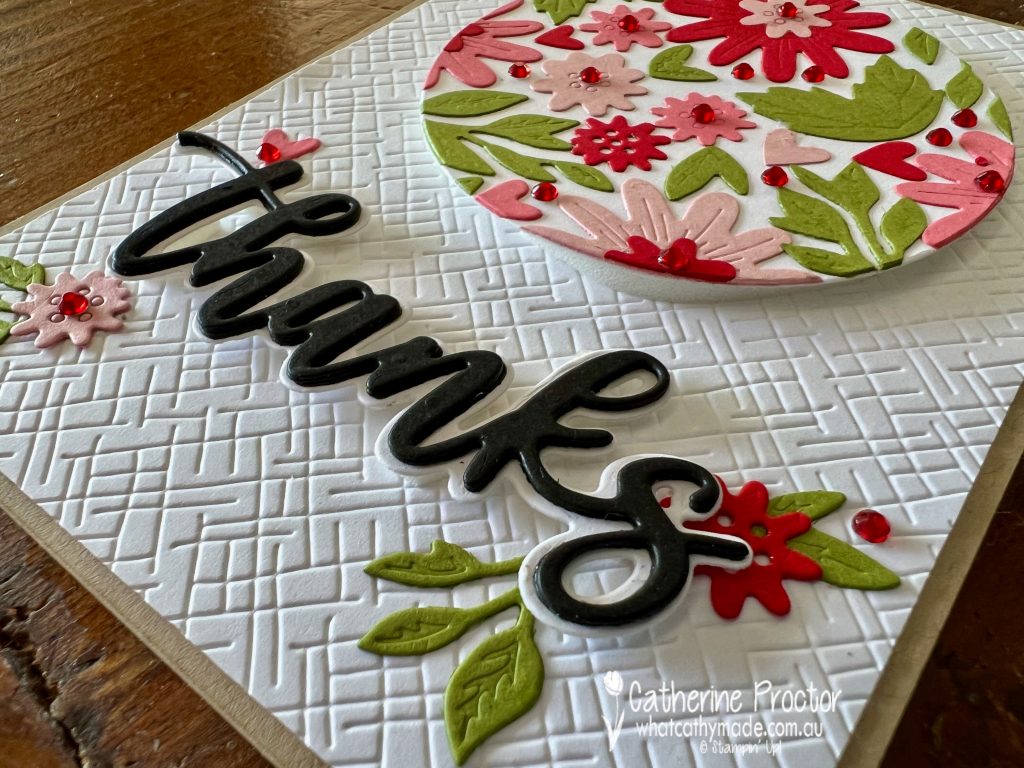
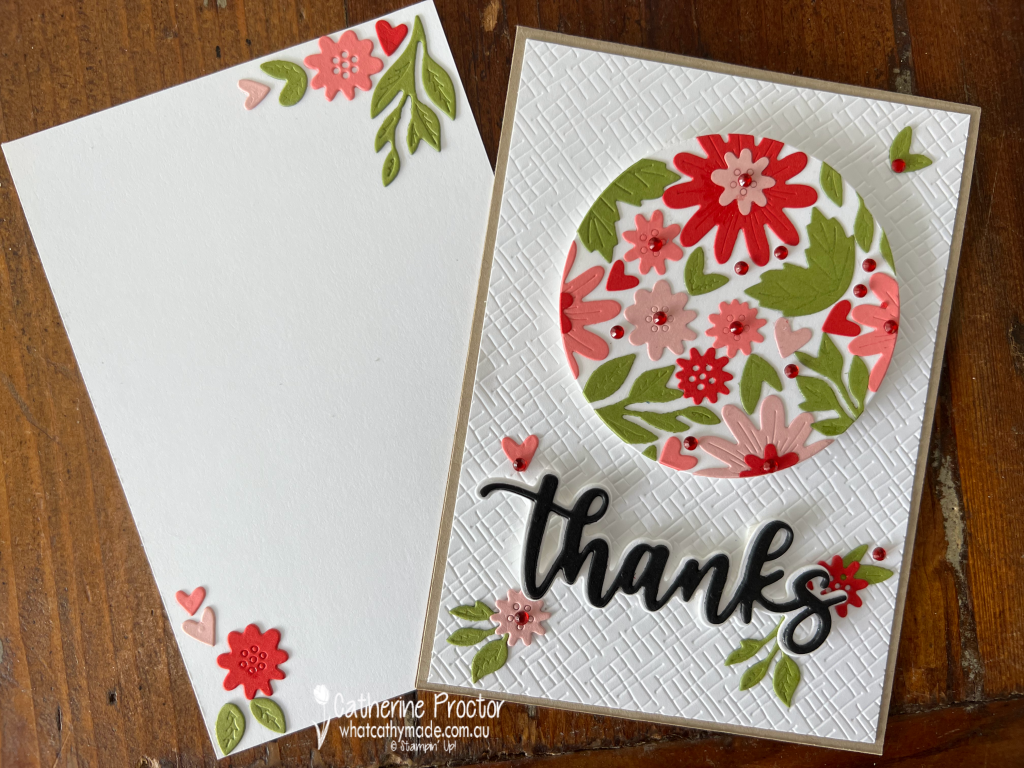
This Real Red card does not have any stamping thanks to the Amazing Thanks Dies and the Around The Bend Dies, which include multiple “stand alone” floral dies.
Stand alone floral dies do not die cut stamped images – they die cut and emboss flower and leaf pieces that you can layer or use on their own. The Around the Bend dies give you 20 floral pieces as well as four larger curved border dies.
I have to confess that I don’t use Real Red very often outside of Christmas cards, however, I do love using red and pink together, hence my colour combination today.
This style of card is so easy to make – you can use any large die or shape template. I used a pencil to trace around the outside of the largest of the layering stitched circle dies.
After die cutting an assortment of flowers and leaves I arranged them within the circle shape, making sure the die cut pieces fit together snugly and overlap the circle outline. I always take a photo at this stage to use as a reference before I remove all the die cuts and then glue them back into the circle shape.
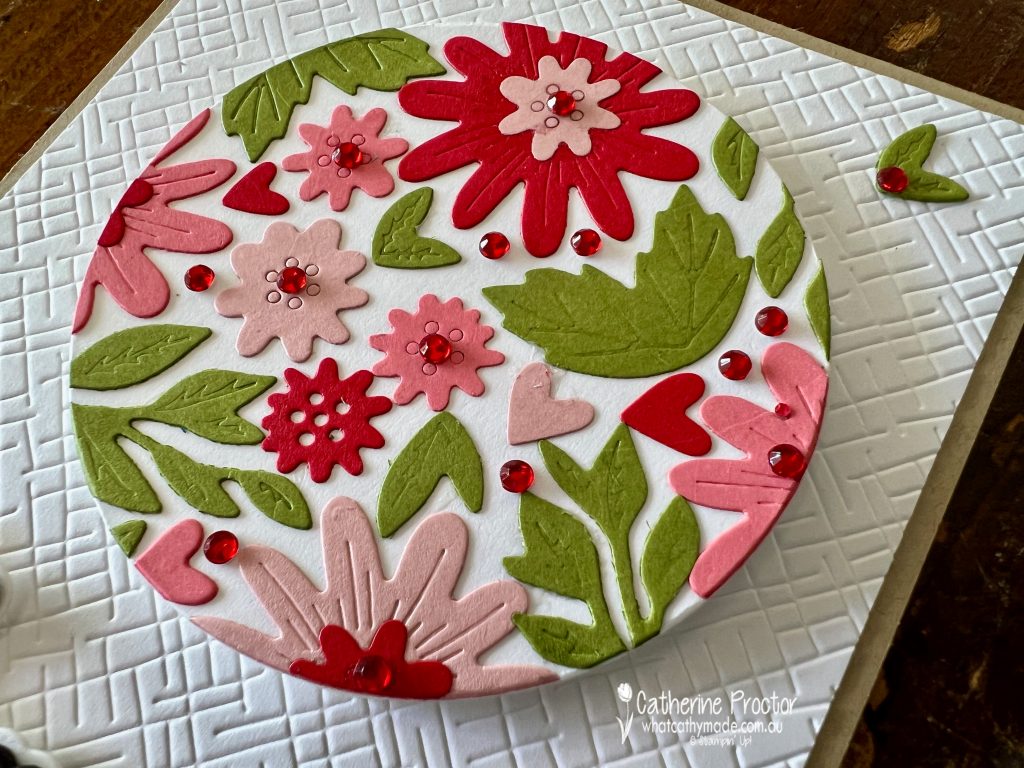
Once I’d adhered all of the die cut shapes I used the circle die to cut the floral circle out and adhere to my card base, adding red Rhinestone jewels. There’s no need to rub out the pencil marks as the layering circle die cuts the flowers INSIDE the pencil circle outline.
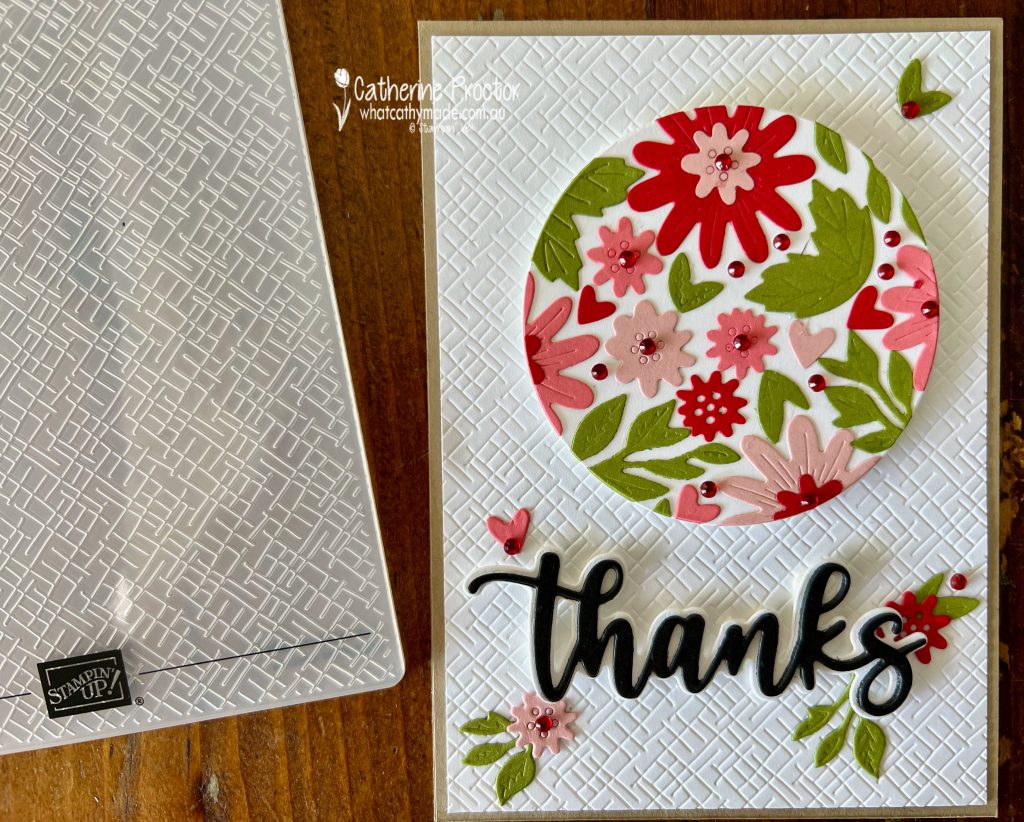
Did you notice the embossed background on this card? Today, Stampin ‘Up! has released online exclusive products and this embossing folder is part of a three pack called Basic 3D embossing folders.
I’ve die stacked the “Thanks” die by cutting it out three times in Basic Black cardstock, gluing the three layers together and then adhering it to the “Thanks” die layer die cut in Basic White. You can see the incredible dimension from the side of the card.
I decided to leave the inside of the card blank, just using up some spare die cuts to decorate it. This truly is a no stamping card!
Now it’s time to hop on over to our next participant, the lovely Rachel Palmieri – I can’t wait to see what Rachel has made this week!
If at any time you find a broken link, you can find the complete list of all participants below.
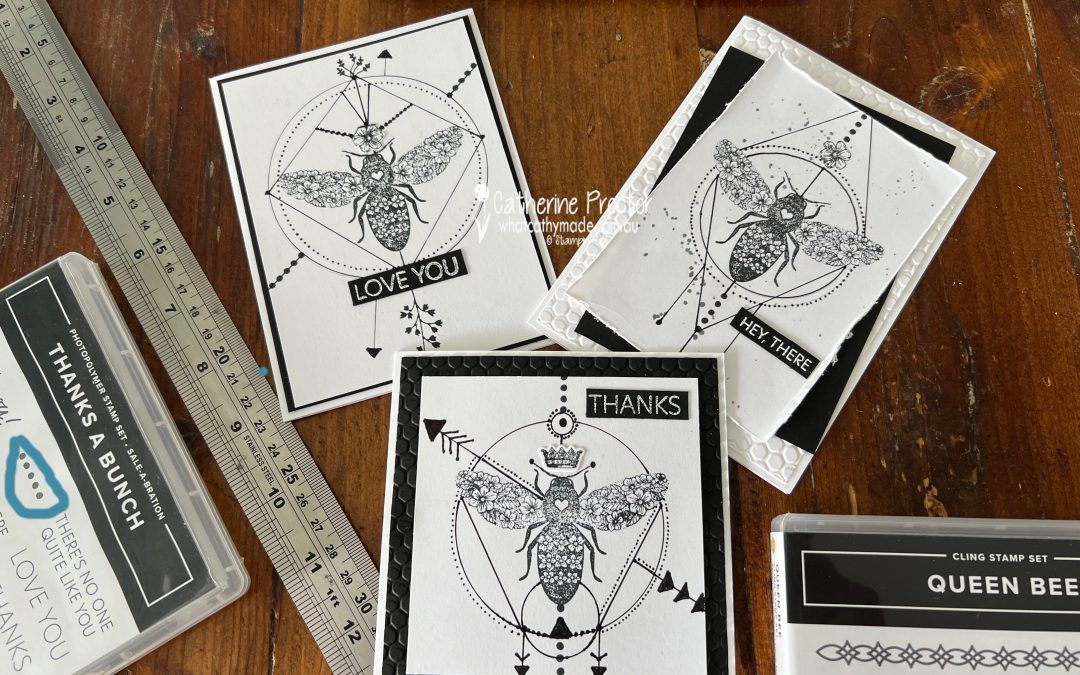
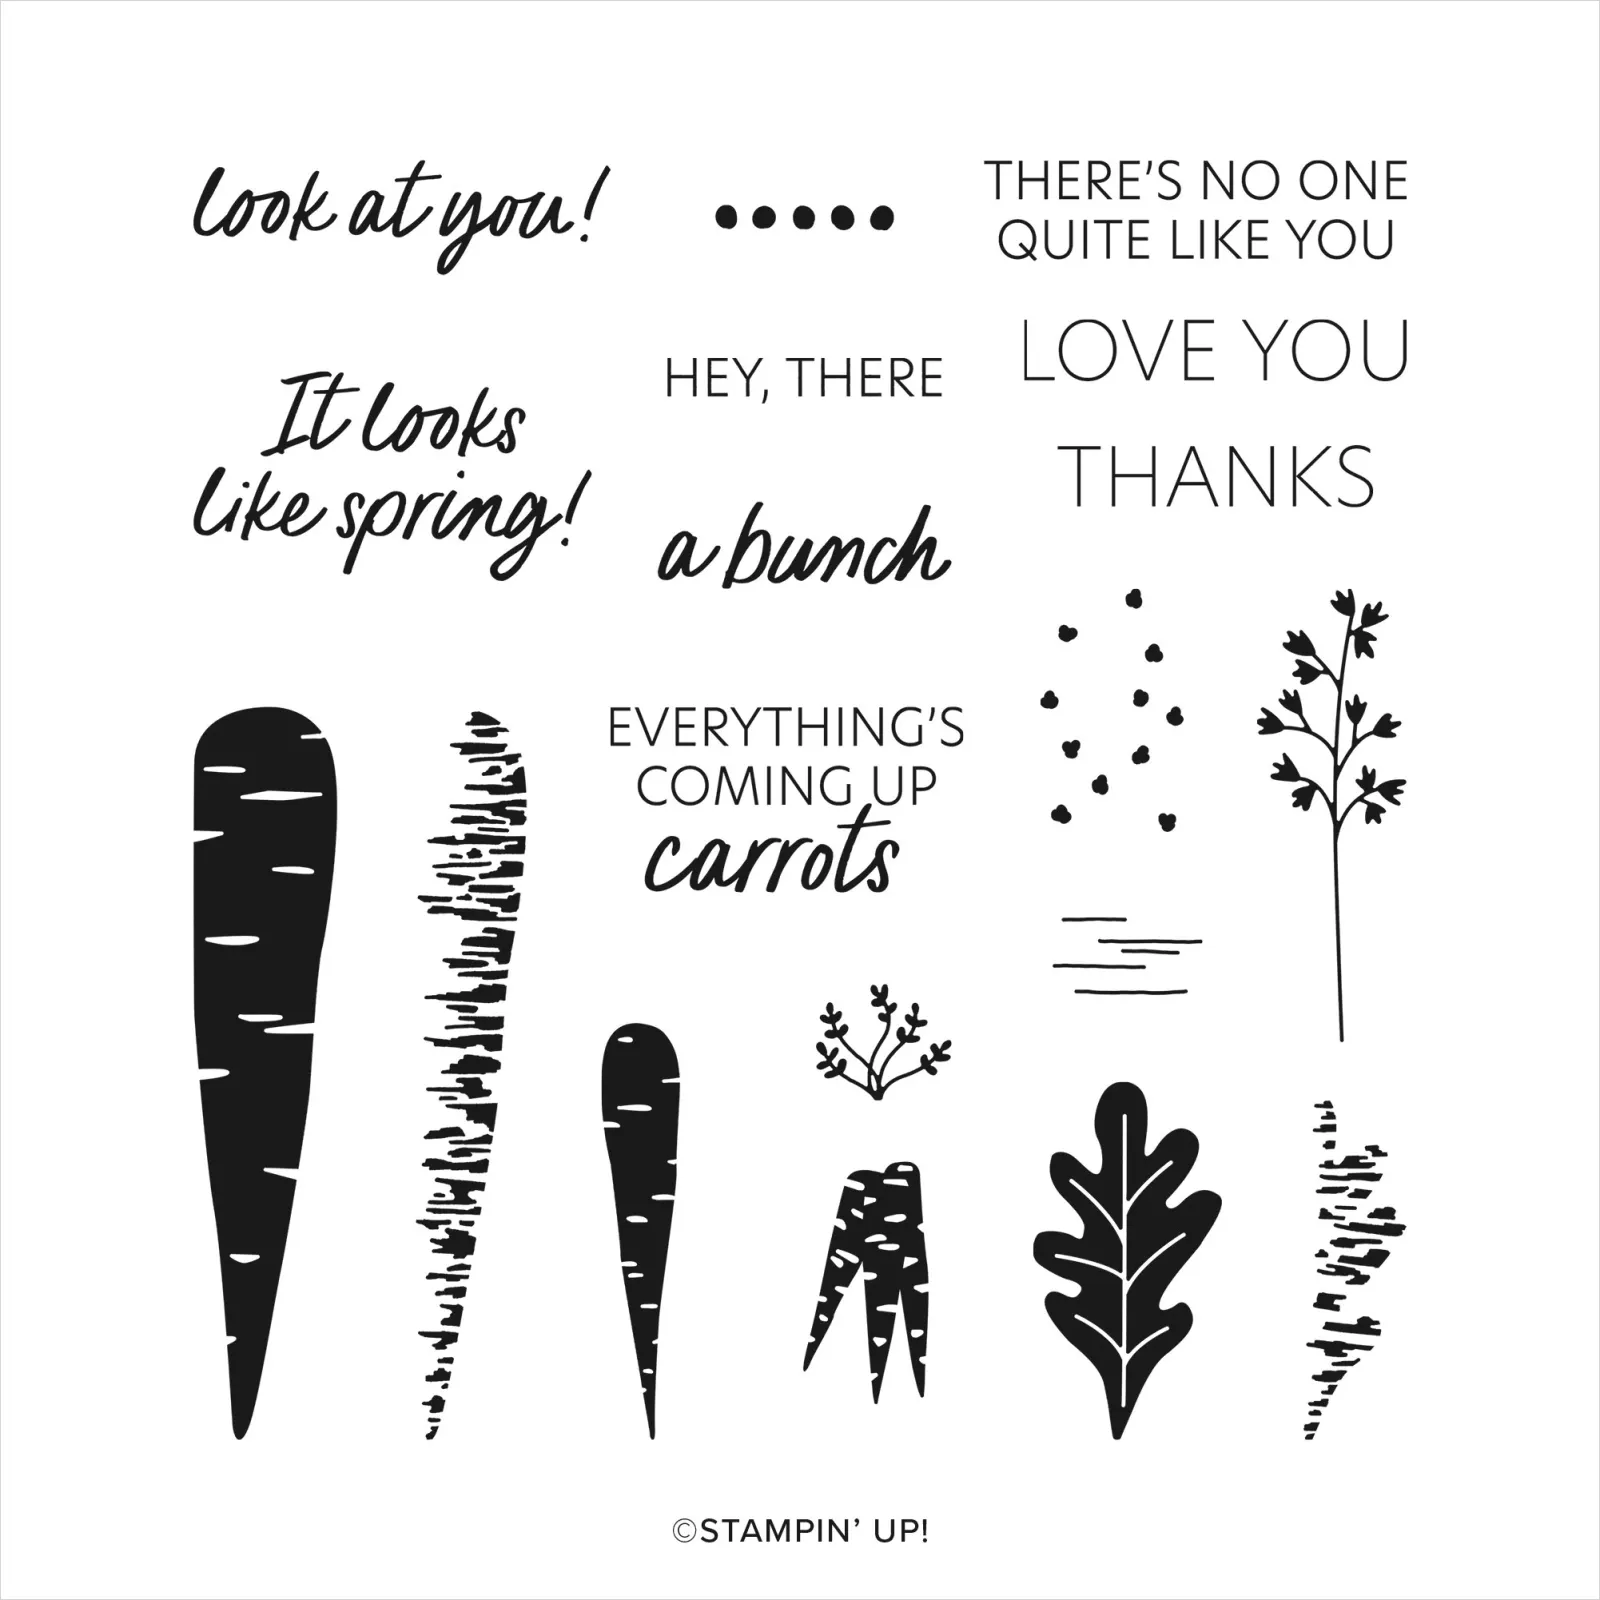
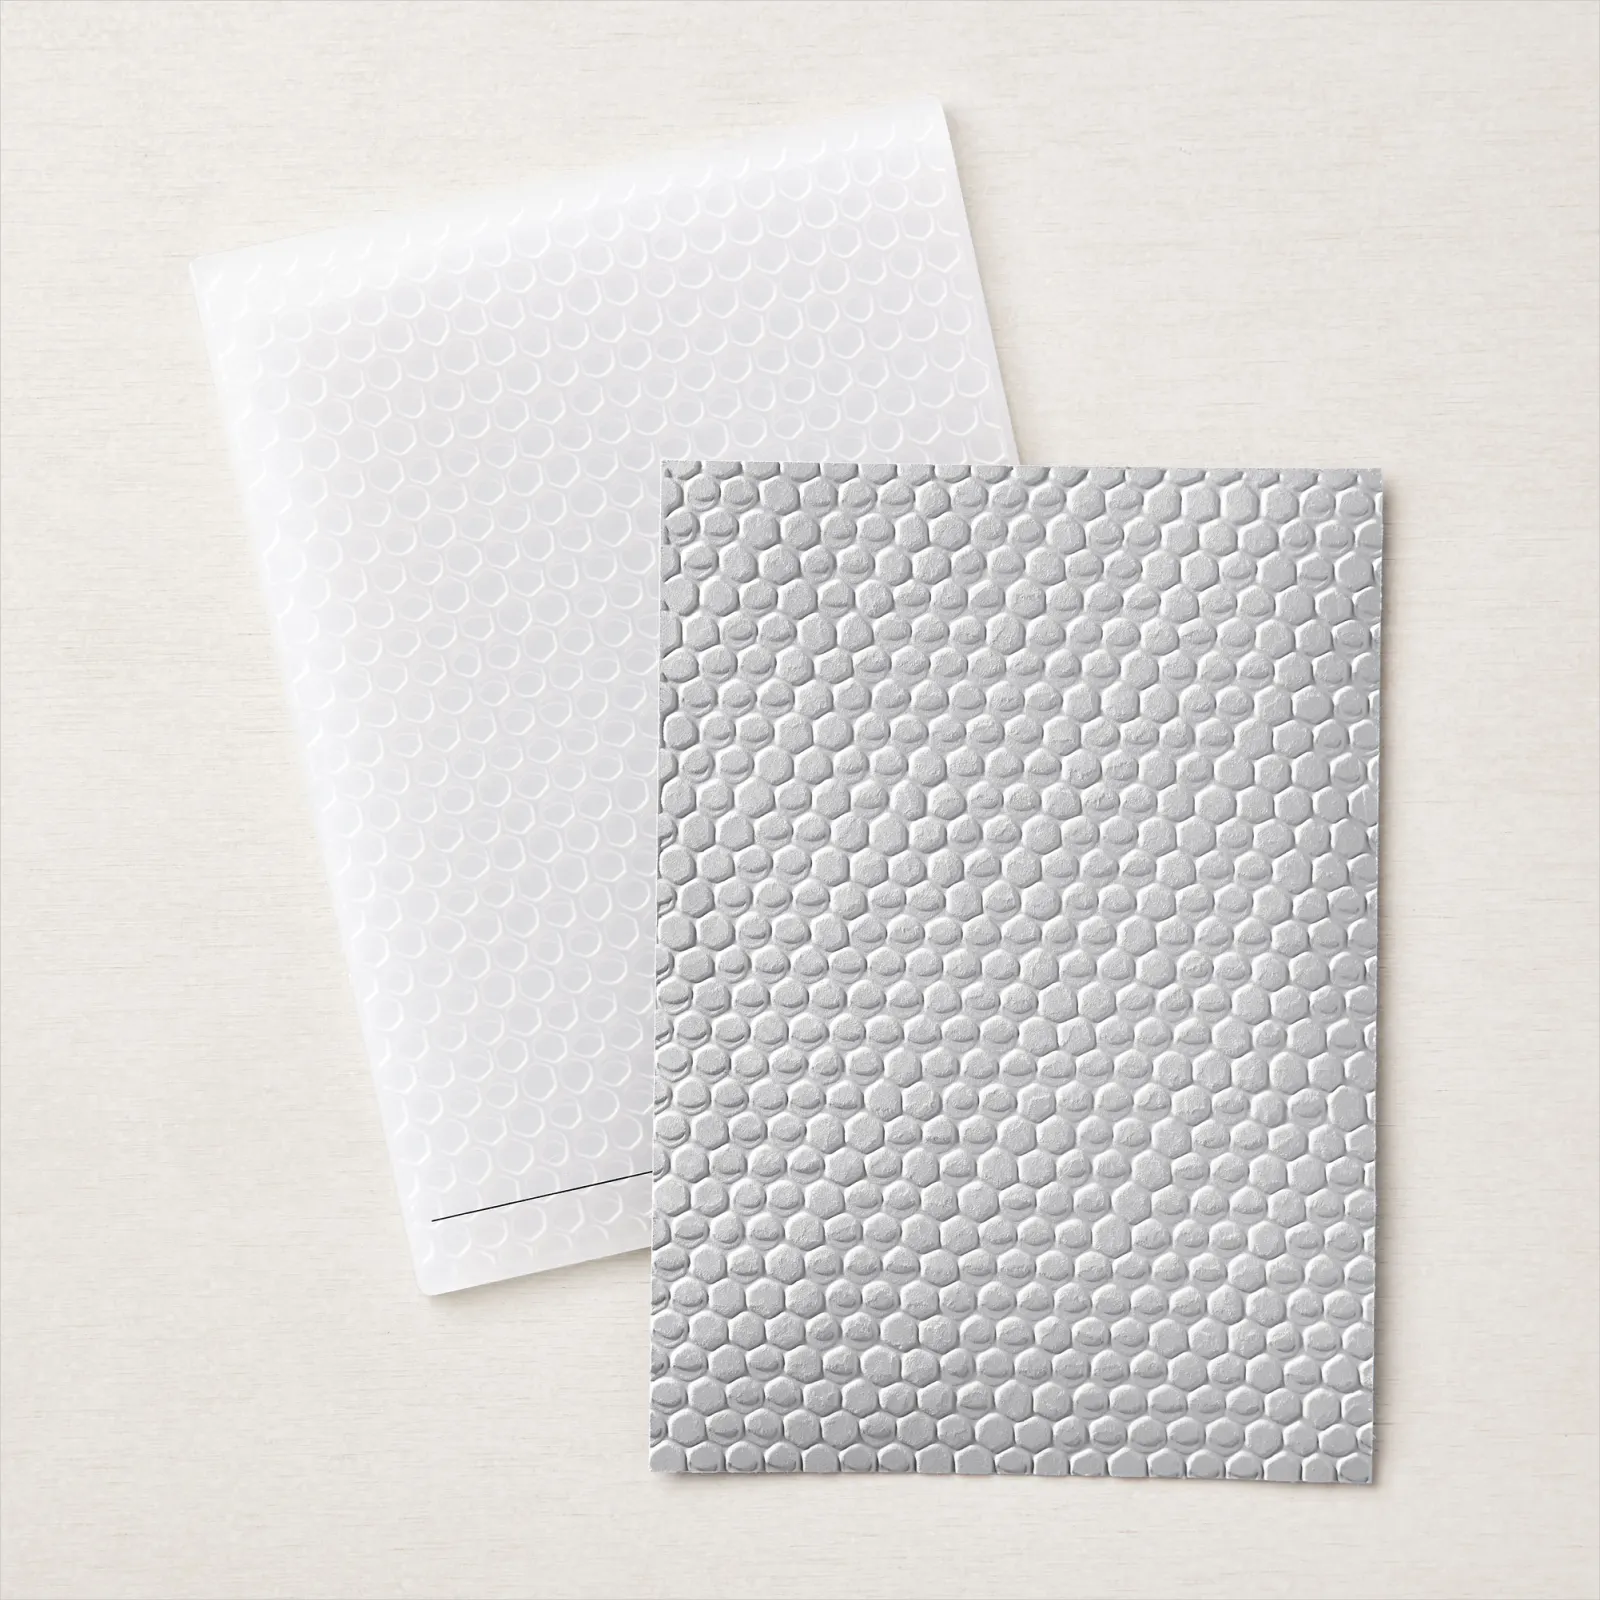
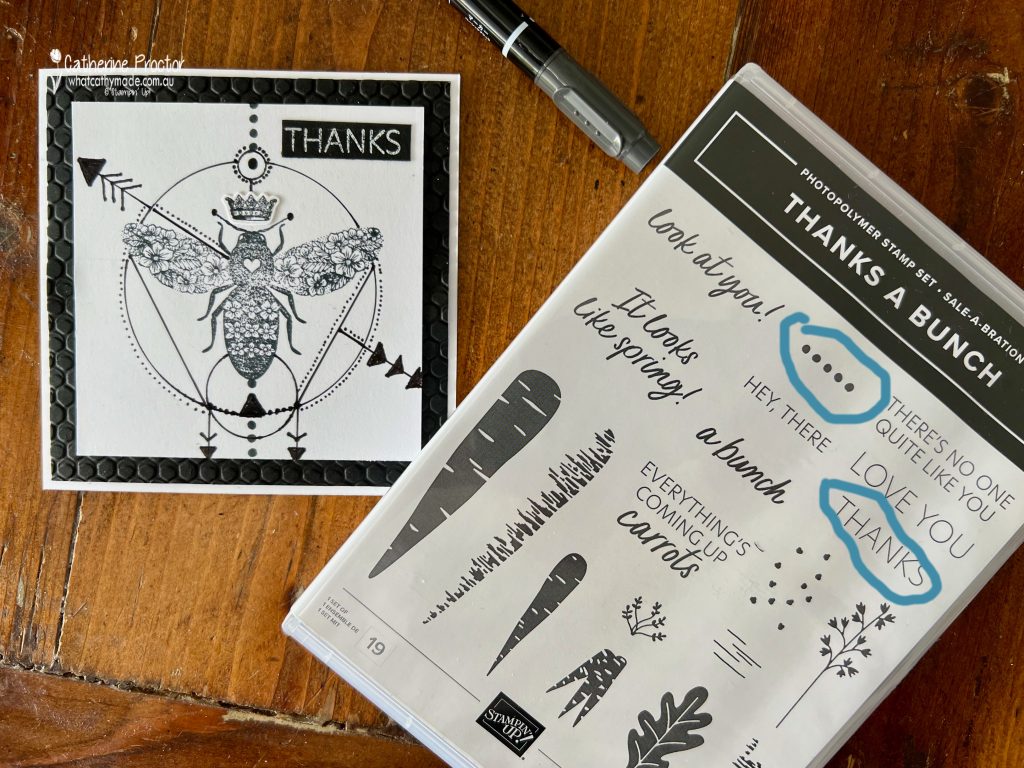
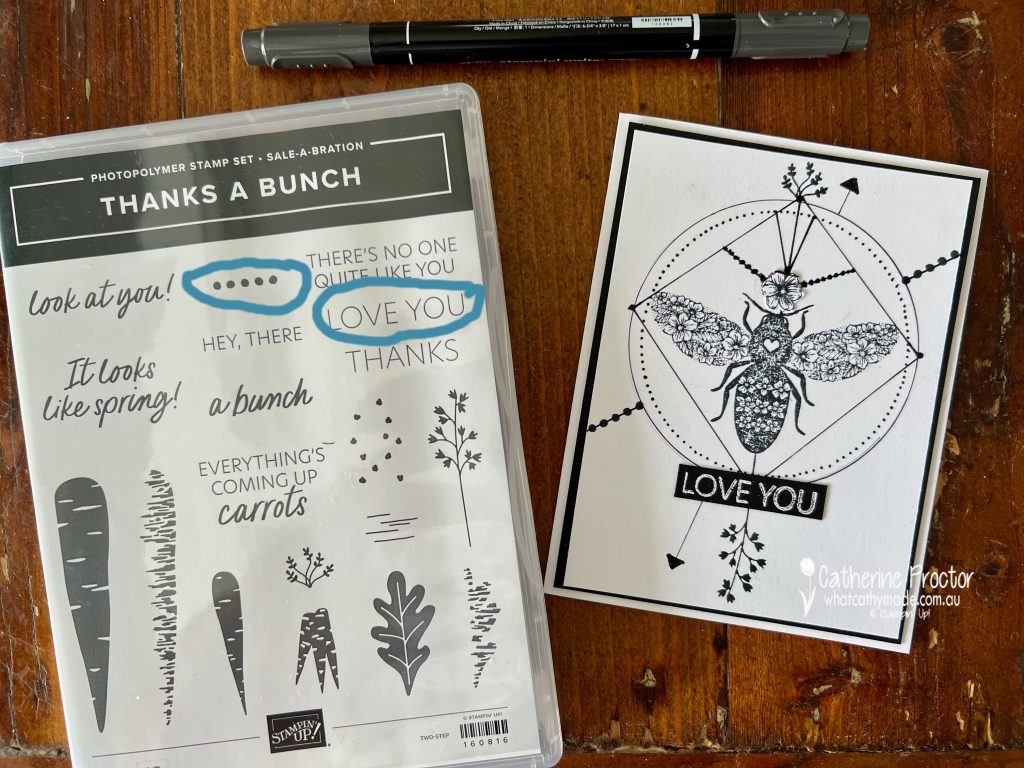
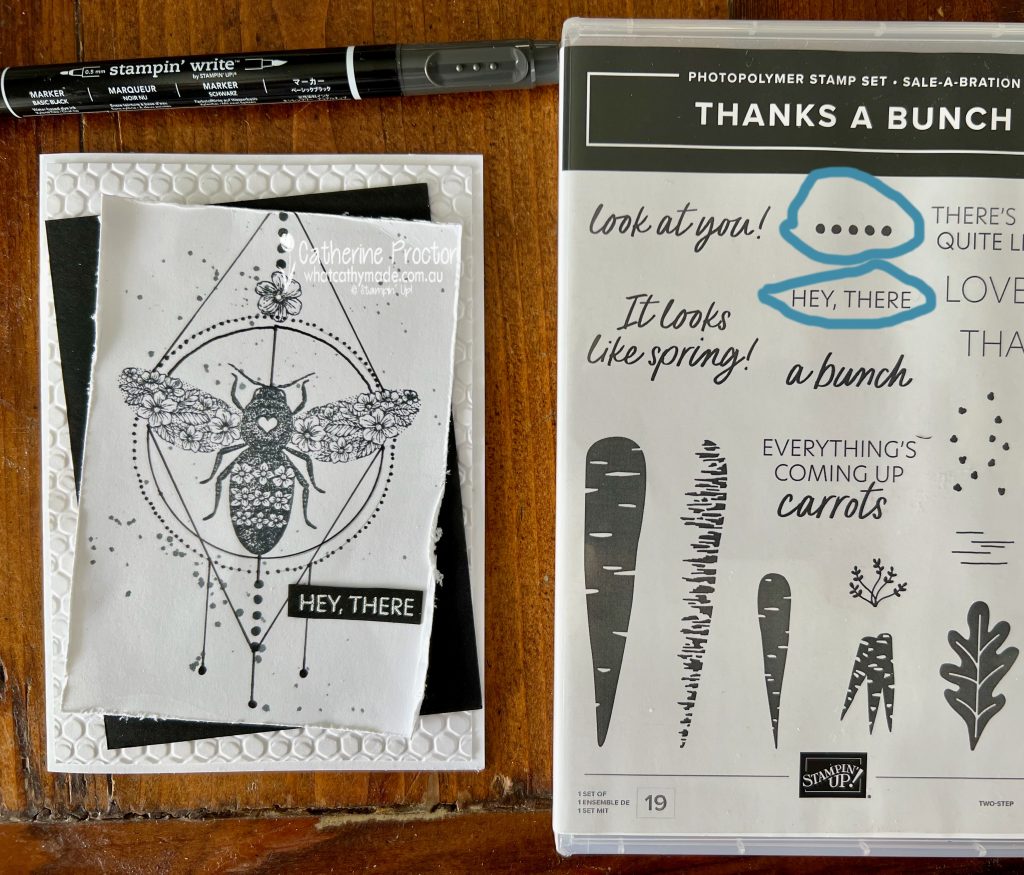
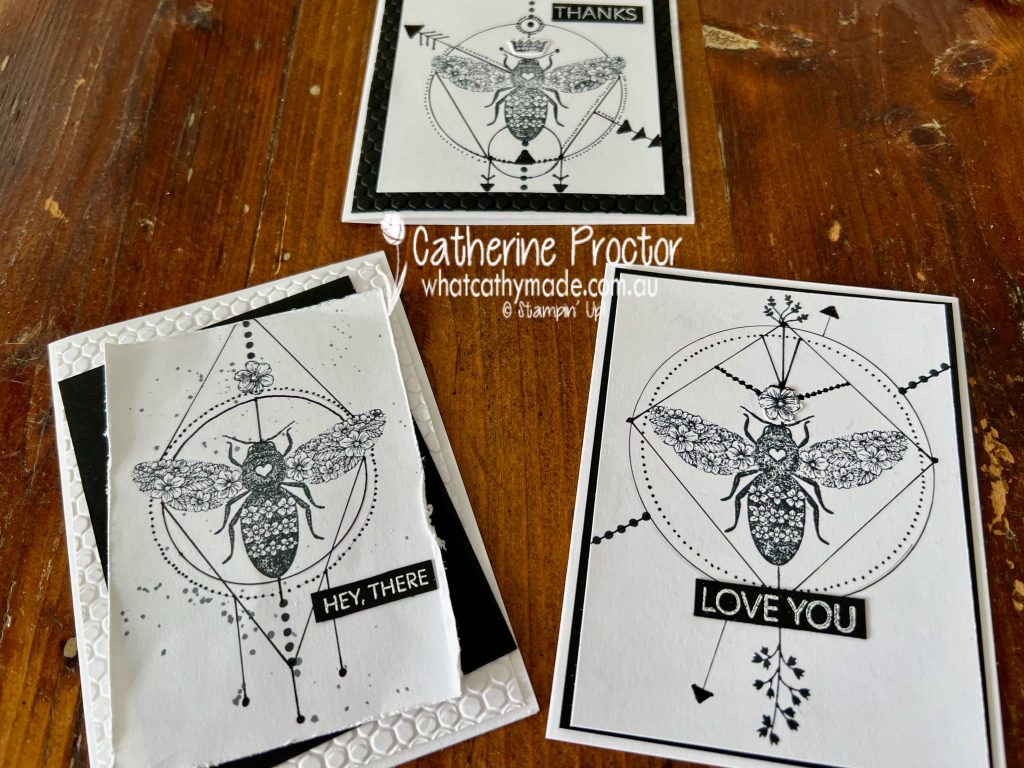
With only two days left until SALE-a-bration ends, I couldn’t resist sharing these three cards that bring together the Stunning Queen Bee stamp set with two of the FREE Sale-a-bration items: the Thanks a Bunch Stamp set and the Hive 3D embossing folder.
Thanks a Bunch Stamp SetHive 3D Embossing folder
There’s a tiny stamp in the Thanks a Bunch stamp set that works really well on this graphic, tattoo style of card – the 5 dots in a row. I’ve used this dot stamp on all three cards below, along with other stamps from both stamp sets and freehand drawn lines using a ruler and a Black Stampin’ Write marker.
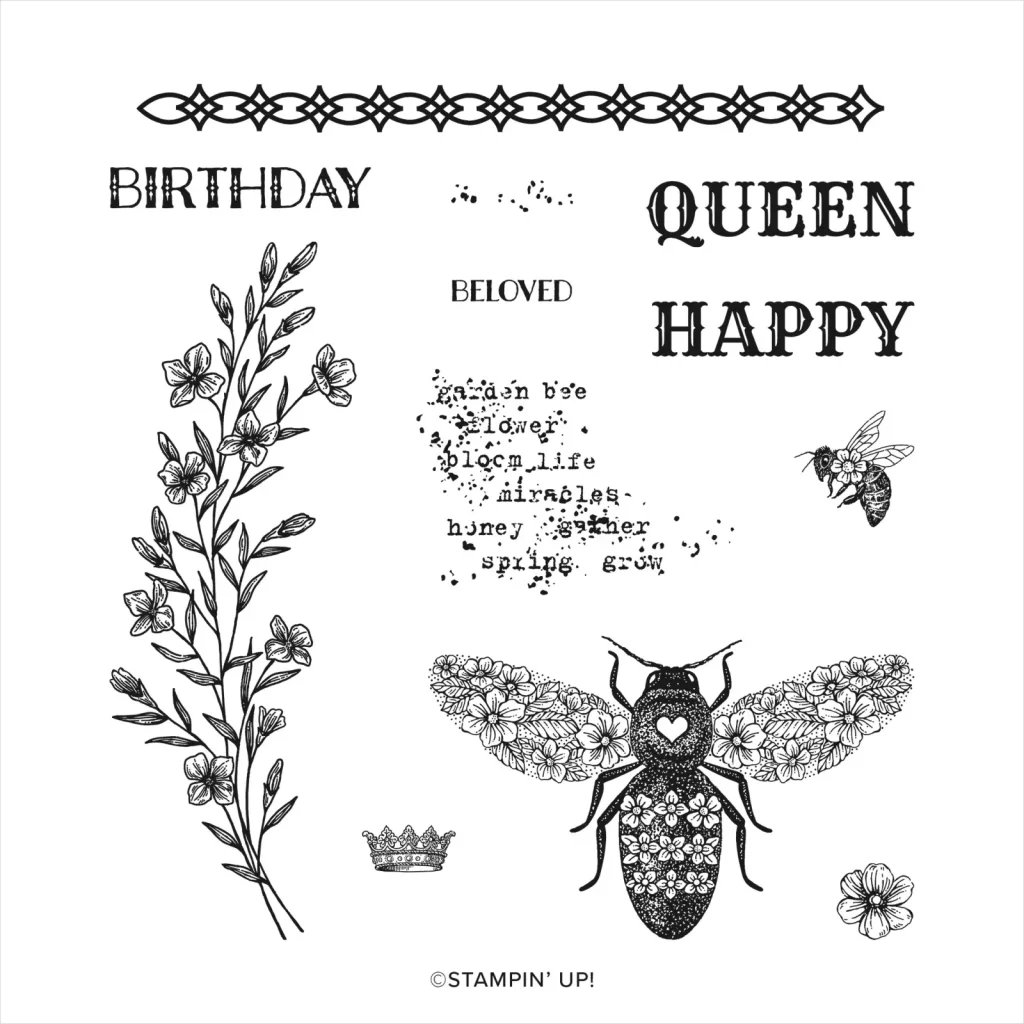
The square thanks card also uses the Hive 3D embossing folder as well as the large bee stamp, the crown stamp and the thanks sentiment from the Queen Bee stamp set.
The love you card also uses the two carrot tops from Thanks a Bunch.
The Hey, There card also uses the bee stamp and the flower stamp from the Queen Bee stamp set, as well as the Hive 3D embossing folder.
I love the freedom this style of cardmaking gives me to take stamped images and take them to the next level.
Don’t forget that SALE-a-bration ends midnight tomorrow so don’t miss out if you would like to add any of these gorgeous products to your craft collection.
I’ll be back this Wednesday March 1, with the AWH Colour Creations team to showcase Real Red. I hope you can join us then.
Welcome to week forty one of our Art With Heart 2022-23 Colour Creations blog hop.
This is a weekly blog hop where we showcase the stunning range of Stampin’ Up! colours in alphabetical order over 12 months and this week we are featuring Pumpkin Pie from the Regals family.
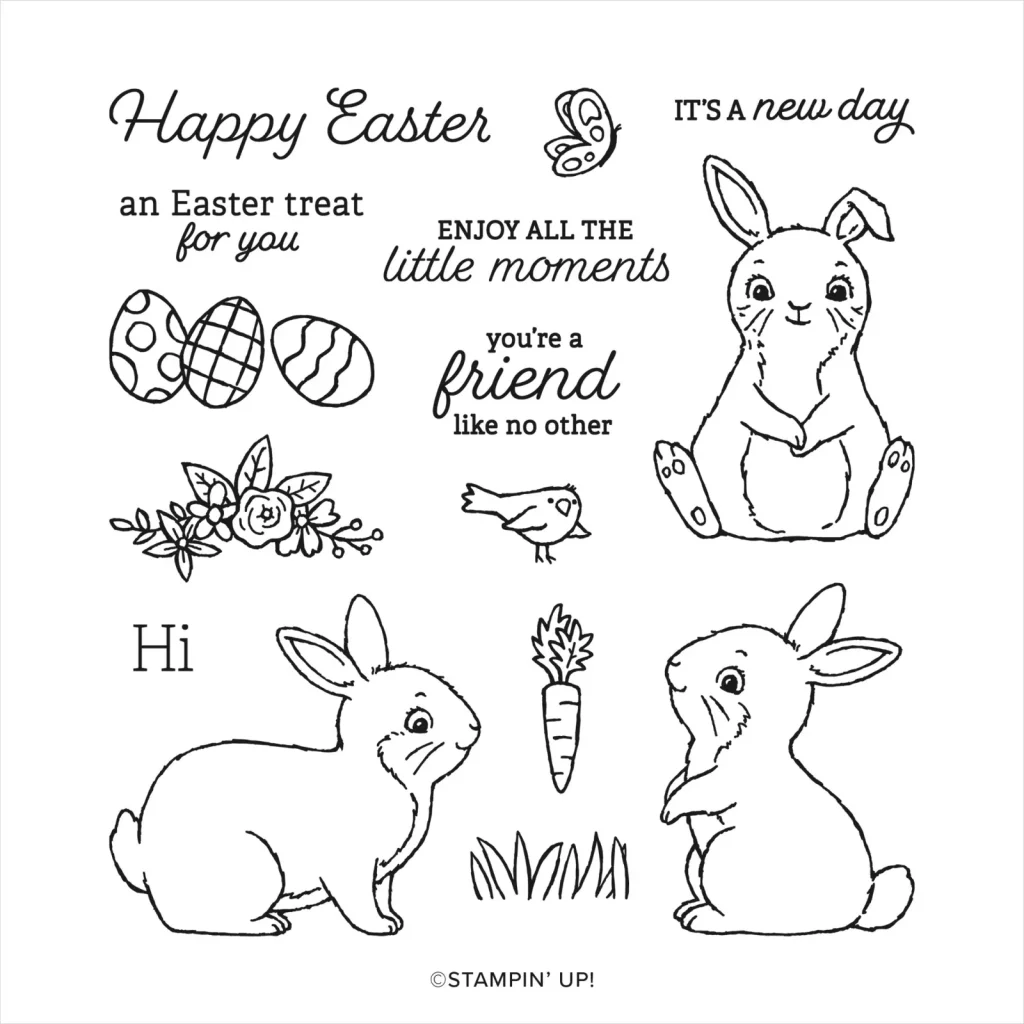
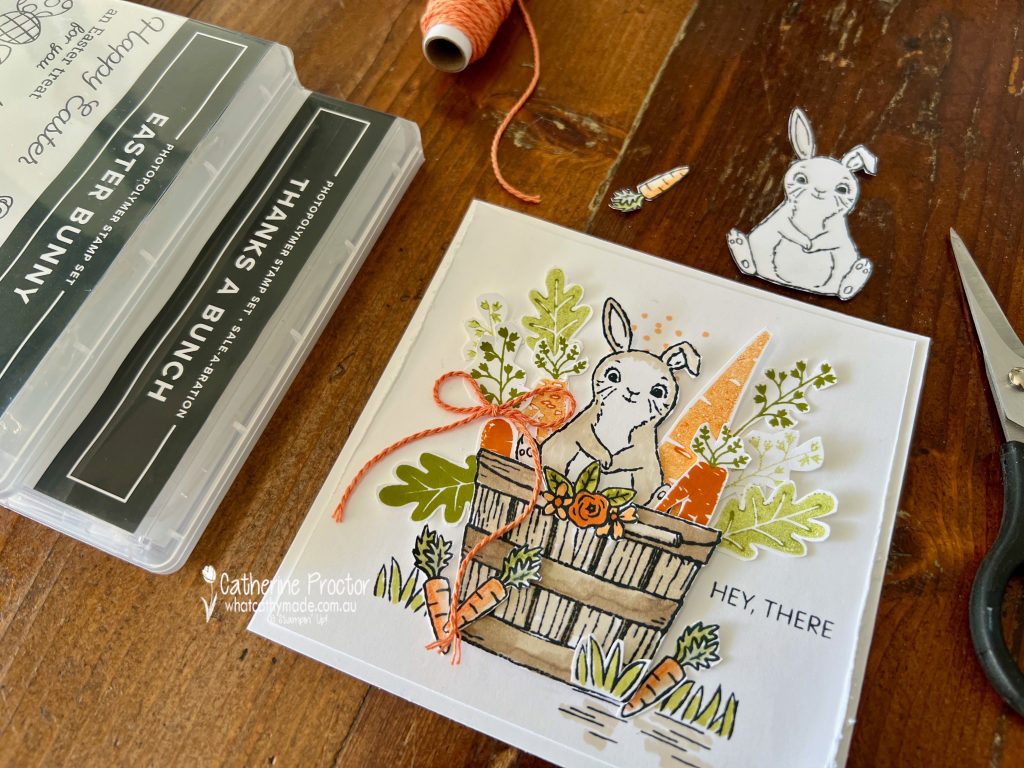
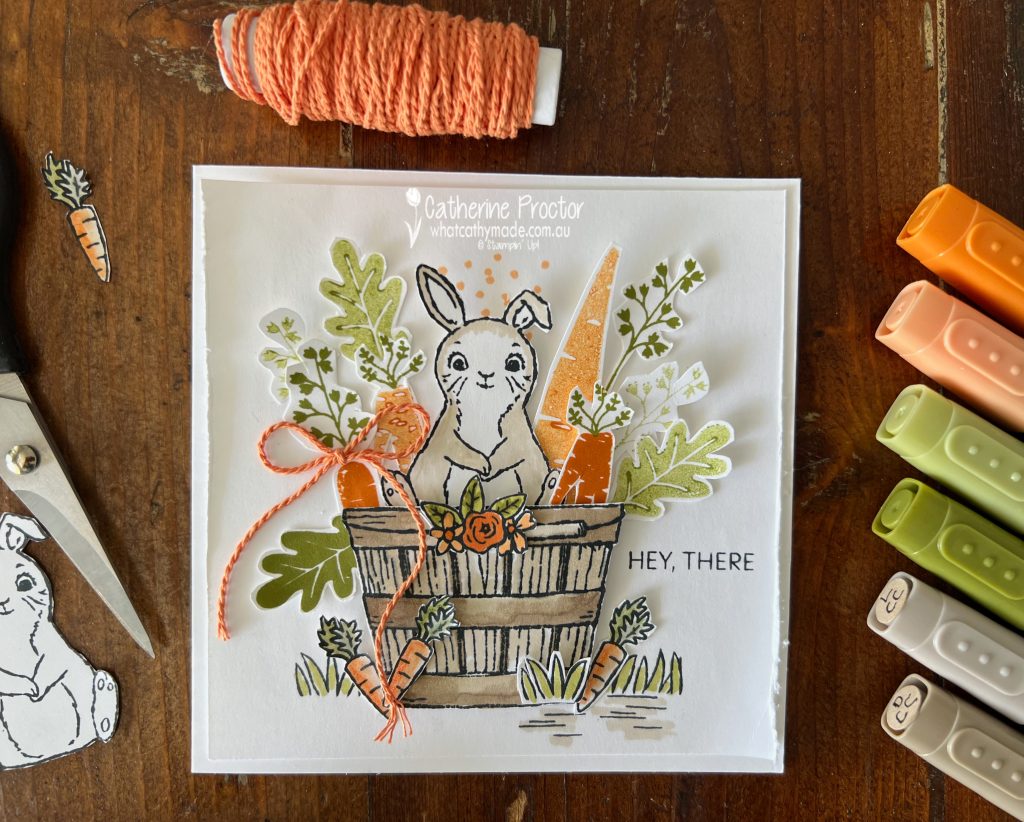
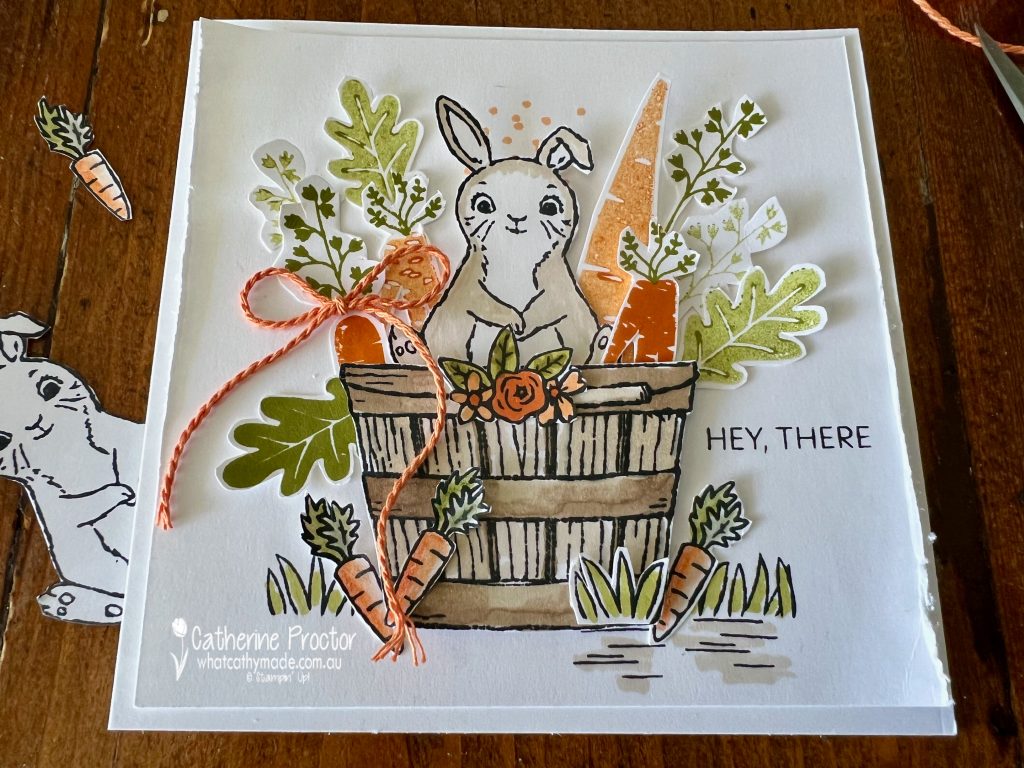
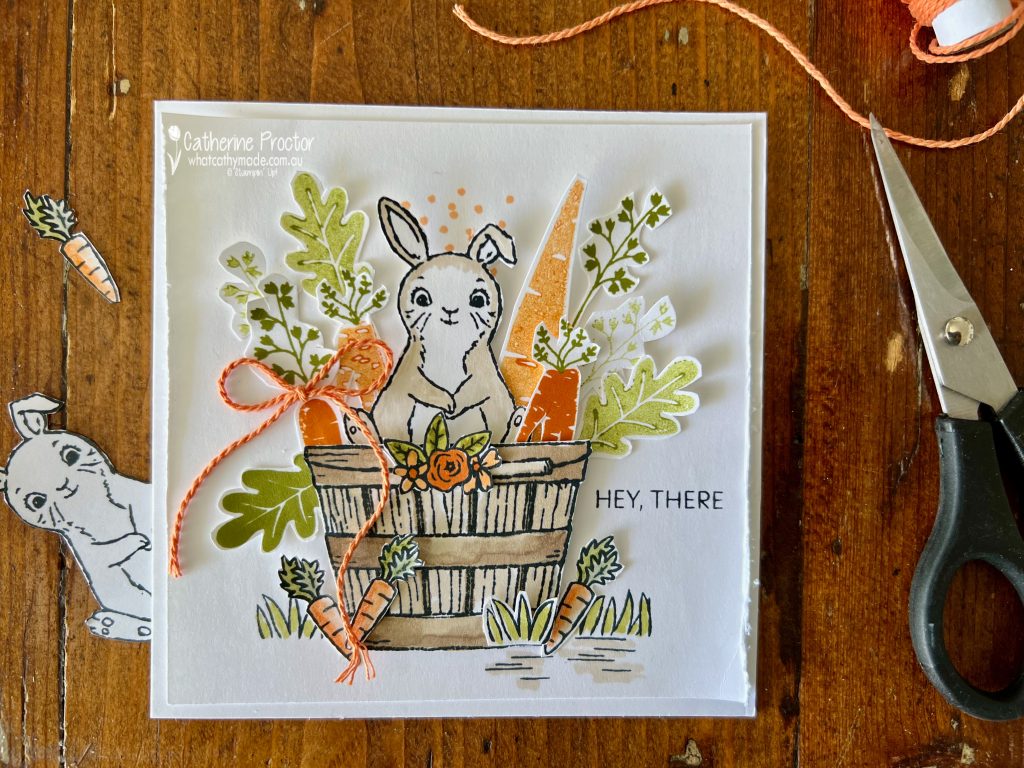
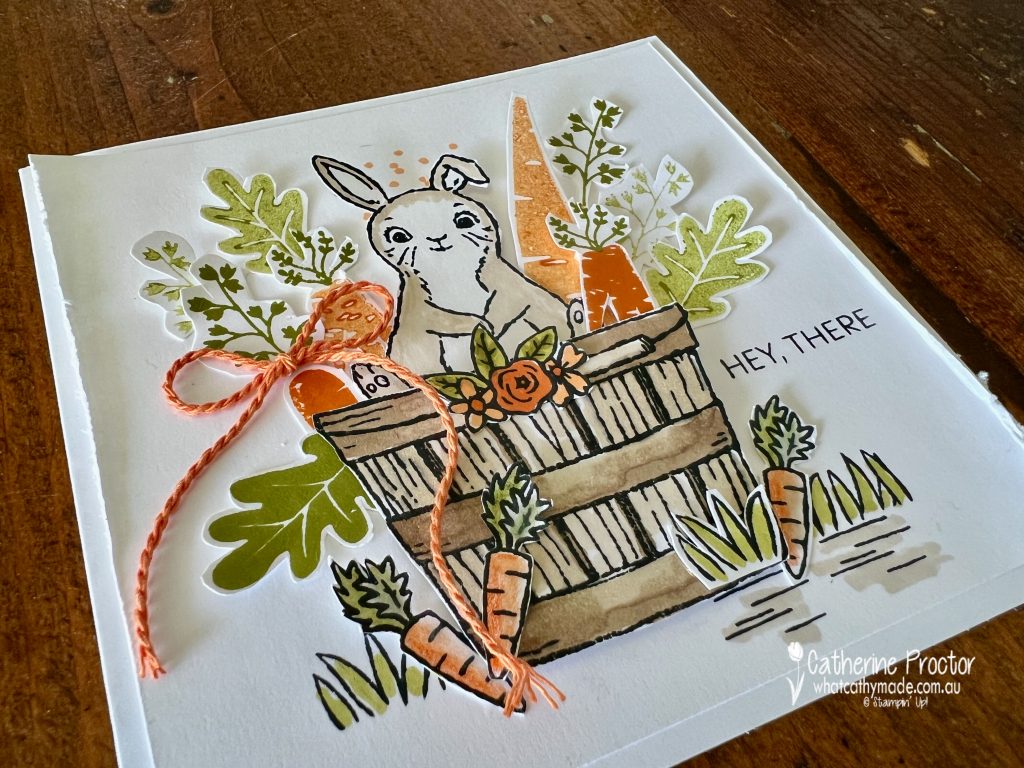
SALE-a-bration ends next Wednesday night so I decided to showcase the adorable SALE-a-bration Thanks a Bunch stamp set once again, this time combining it with the Easter Bunny stamp set.
My card was inspired by a gorgeous card made by a very talented German demonstrator called Mandy Pätzold, who combined these two stamp sets and popped her rabbit in a teacup – I’ve placed my rabbit in the wooden basket from the Cheerful Basket Stamp Set instead.
There are only three colours on this card: Pumpkin Pie, Old Olive and Crumb Cake. For all these colours I’ve used them at full strength as well as stamped off once for a lighter tone and I’ve used both the dark and the light Stampin’ Up! blends.
The larger carrots and carrot leaves and fernery from the Thanks A Bunch stamp set are stamped and fussy cut with paper snips. The smaller carrots and the bunny rabbit are from the Easter Bunny stamp set and the basket from the Cheerful Basket Stamp Set are stamped in Memento and coloured with Stampin’ blends.
I’m not going to lie, there is a bit of fuss cutting in this card, however I find it very relaxing. Do you enjoy fussy cutting? My top tip for curves and angles is to turn the paper, rather than your paper snips.
I’ve roughed up the side edges of the top Basic White layer using my paper snips and added a simple Pumpkin Pie bow from the Three Twine Combo Pack.
The “Hey, there” sentiment comes from the Thanks A Bunch stamp set – this is a great all purpose sentiment that allows me to use the card for a variety of reasons, depending on what I decide to stamp inside.
Now it’s time to hop on over to our next participant, the lovely Di Furniss – I can’t wait to see what Di has made this week!
If at any time you find a broken link, you can find the complete list of all participants below.
Welcome to week forty of our Art With Heart 2022-23 Colour Creations blog hop.
This is a weekly blog hop where we showcase the stunning range of Stampin’ Up! colours in alphabetical order over 12 months and this week we are featuring Poppy Parade from the Brights family.
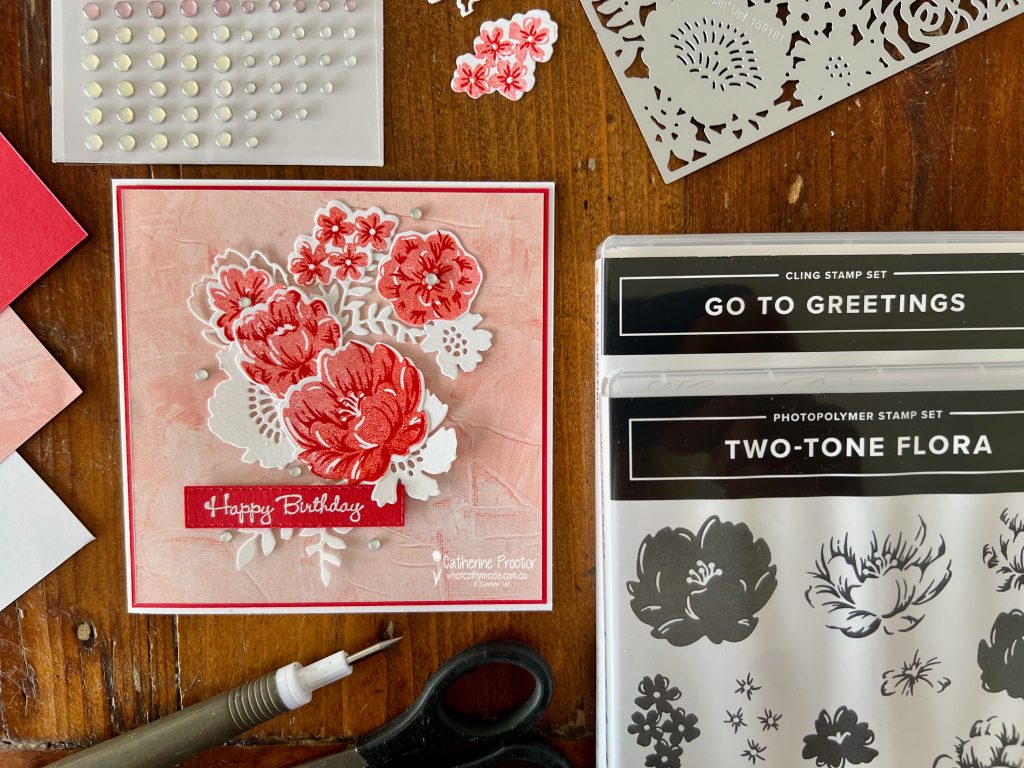
The Fancy Flora Suite includes the Two-Tone Flora Stamp Set and the Two-Tone Flora Dies. I’ve used the Two-Tone Flora Stamp Set, which is a two step stamp set, to stamp Poppy Parade at full strength stamping for the detailed sections of the flower and and stamped off once for the solid flower image.
Because these are photopolymer stamps they are easy to line up. I always stamp the solid flower first and then stamp the detailed image. Then I die cut the flowers using the Two-Tone Flora Dies.
The white die cut pieces are cut from the large background die in the Two-Tone Flora Dies die set which is completely filled with pretty flowers. I’ve used my paper snips to cut out flowers and sprigs and create a floral arrangement with the Poppy Parade stamped and die cut flowers.
Once I’d created a floral arrangement, I adhered it to a sheet Fancy Flora DSP. This pattern in the Fancy Flora DSP has a gorgeous textured painted effect that really softens Calypso Coral – I like this softer shade of Calypso Coral and how beautifully it pairs with Poppy Parade.
I couldn’t resist using the smallest “Happy Birthday” sentiment from the Go To Greetings stamp set, white heat embossed onto Poppy Parade cardstock. It’s such a feminine script.
The final touch for the front of my birthday card? A scattering of clear Adhesive-backed Milky Dots are the perfect embellishment.
Now it’s time to hop on over to our next participant, the lovely Di Furniss – I can’t wait to see what Di has made this week!
If at any time you find a broken link, you can find the complete list of all participants below.
If you live in Australia, you can find and purchase these products in my Stampin’ Up! Online Store once they are available to purchase tomorrow morning.
We’ll be back next Wednesday, February 22, with projects showcasing Pumpkin Pie.
Welcome to week thirty nine of our Art With Heart 2022-23 Colour Creations blog hop.
This is a weekly blog hop where we showcase the stunning range of Stampin’ Up! colours in alphabetical order over 12 months and this week we are featuring Pool Party from the Subtles family.
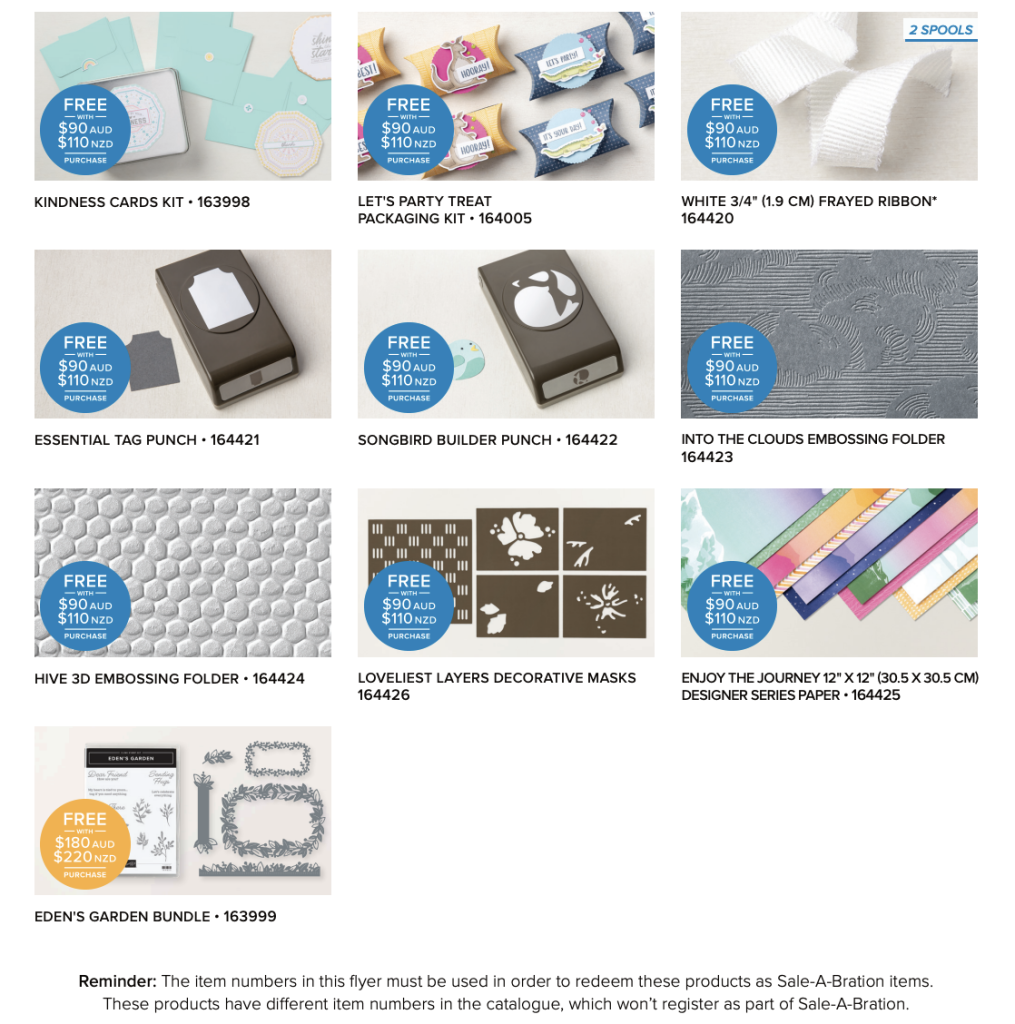
Did you know that Stampin’ Up! has now added 10 more products to their SALE-a-bration offerings? Until 28 February you can earn these products or the original SALE-a-bration items for FREE on any order over $90.
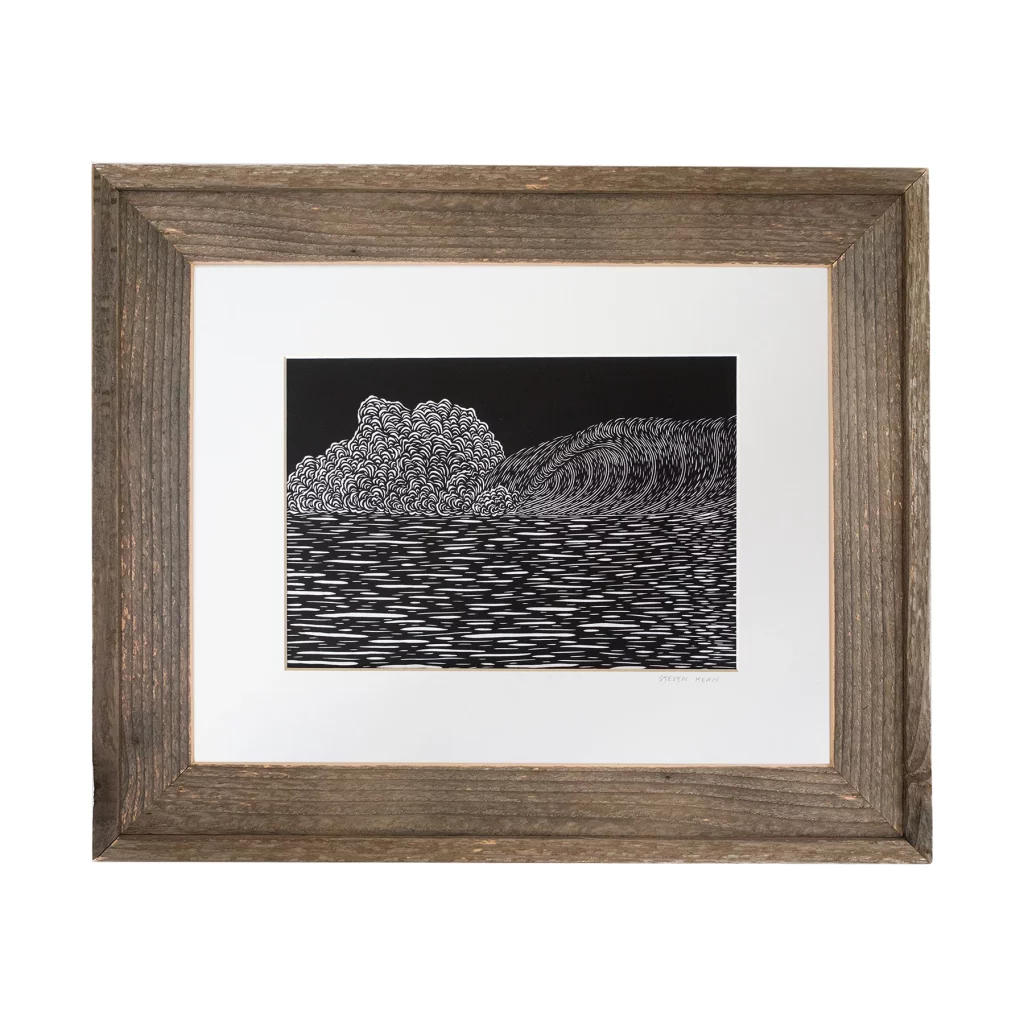
One of these new SALE-a-bration offerings is the Into The Clouds embossing folder which to me looks like a linocut or woodcut. I’ve always loved this graphic style of printmaking, especially in illustrations for children’s books.
Steven Kean, from the North shore of Hawaii is one artist, in particular, who our entire family loves because he specialises in this style of surf prints. This is the print we bought from him in on our holiday to Hawaii several years ago.
As I wanted to make Pool Party and the Into The Clouds embossing folder the main focus of my card, I’ve kept my color scheme very monochromatic, using just three colours as well as Basic White.
The Into The Clouds embossing folder is quite a thin embossing folder so the Stampin’ Up! Stampin’ Cut & Emboss Machine sandwich that worked for me was:
Base Plate – bottom layer
Into The Clouds embossing folder with Pool Party cardstock inside – middle layer
Embossing Plate – top layer
Always remember to run your embossing folders through Stampin’ Cut & Emboss Machine with the folded spine going through the machine first and the Stampin’ Up! logo facing upwards.
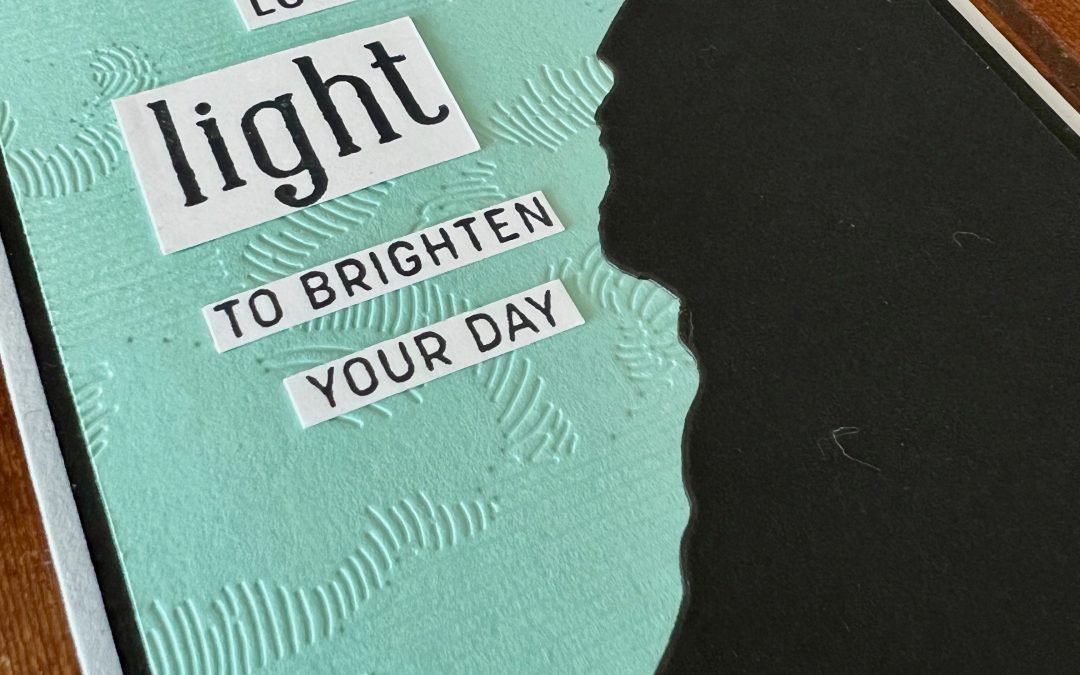
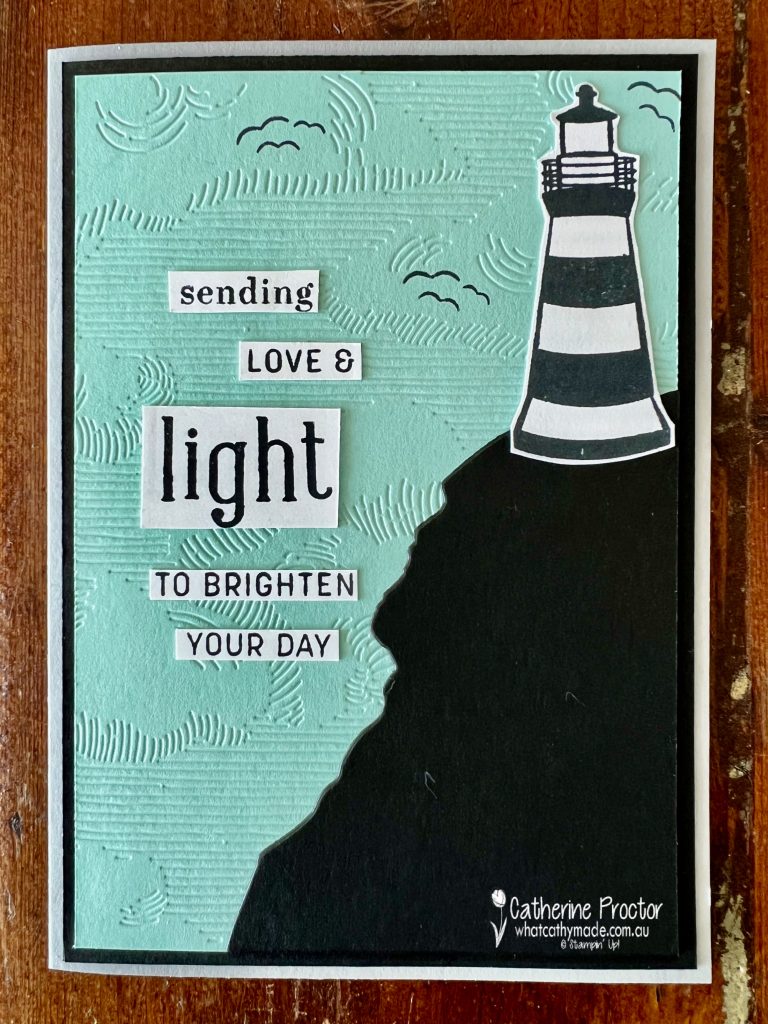
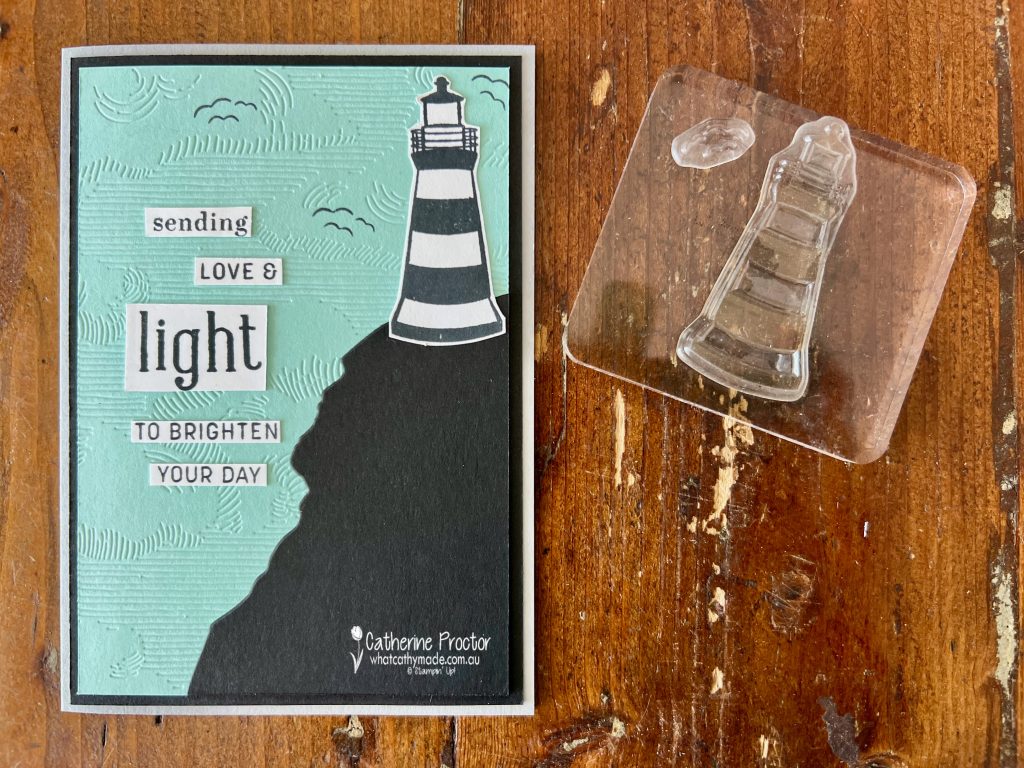
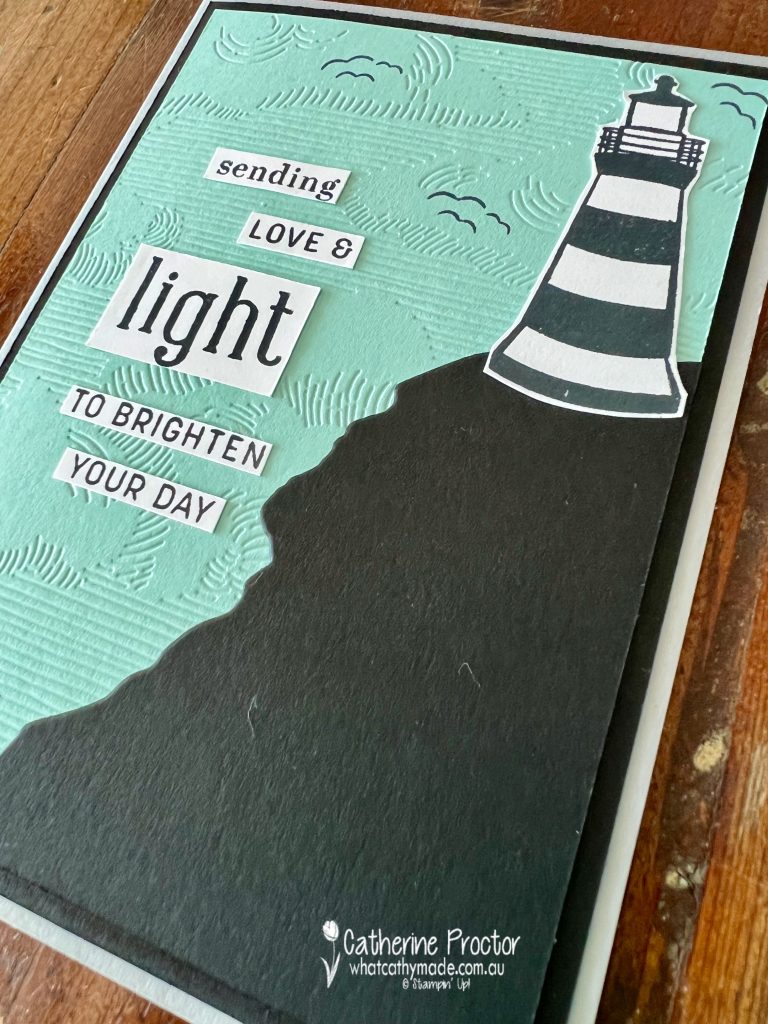
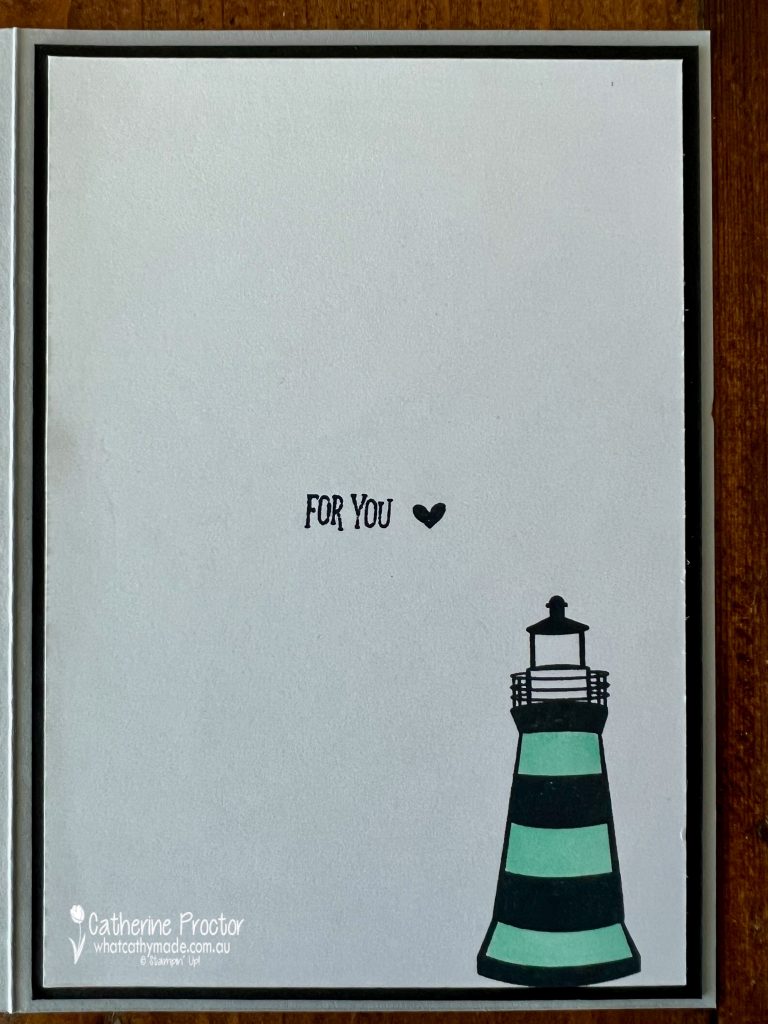
To create my lighthouse scene I used a landscape die from the new Greatest Journey dies, however you could easily freehand cut a cliff if you don’t own these dies.
Don’t forget to use the stamp sets that come in kits on your other cards. This lighthouse stamp is from the You Are My Anchor Photopolymer Stamp Set, part of a kit collection called the You Are My Anchor All-Inclusive Card Kit.
This kit really is fantastic value for money!
For $33 you receive everything you need to make make 10 mini cards, 10 mini printed envelopes and 4 boxes with bands, including: * You Are My Anchor Photopolymer Stamp Set * Pre-cut card bases and die cut pieces * Pacific Point Classic Stampin’™ Spot * Rope Twine * Adhesive to complete projects * Acrylic stamp block
The lighthouse was the perfect size and very easy to fussy cut out with Paper Snips. I also stamped seagulls using the tiny seagull stamp from the same stamp set to create this lighthouse scene.
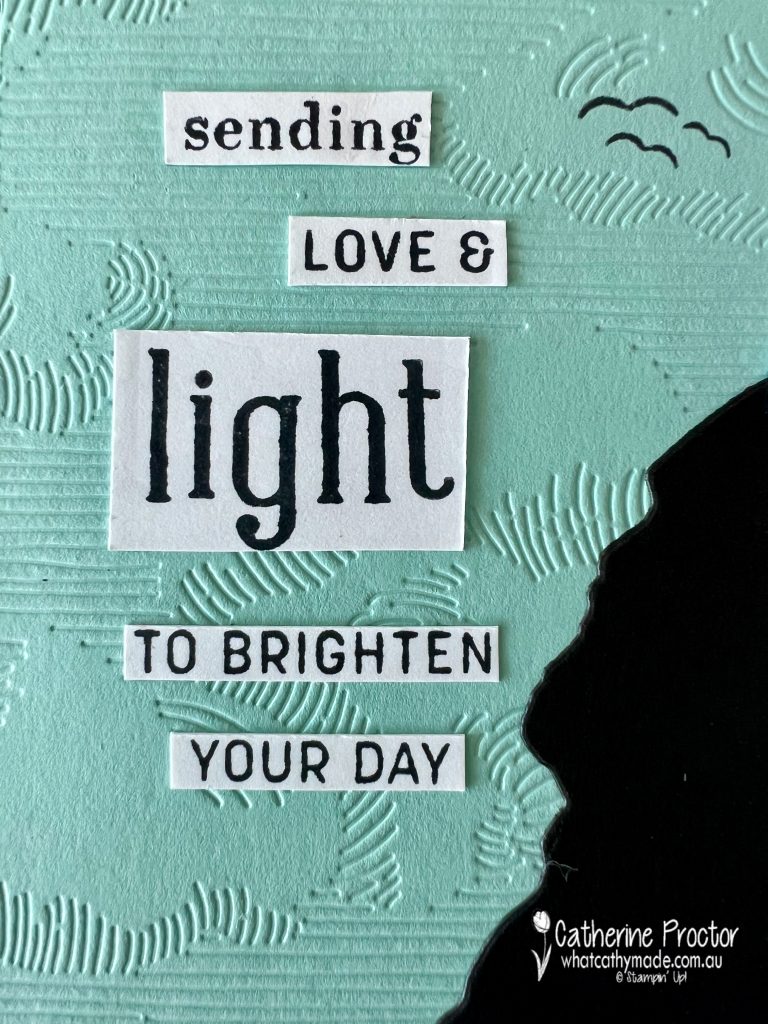
There are plenty of sentiments that would work really well with this card, however, I don’t own any of these stamp sets so I created my own using stamps I already have.
The word “sending” is from the Full of Love Stamp Set, “light” is stamped using the Alphabest stamp set and the rest of words are from the Sending Smiles stamp set.
I’ve stamped another lighthouse on the inside of my card, along with a sentiment and a heart, all stamps included in the You Are My Anchor Photopolymer Stamp Set.
Now it’s time to hop on over to our next participant, the lovely Tina Gillespie – I can’t wait to see what Tina has made this week!
If at any time you find a broken link, you can find the complete list of all participants below.
If you live in Australia, you can find and purchase these products in my Stampin’ Up! Online Store once they are available to purchase tomorrow morning.
We’ll be back next Wednesday, February 15, with projects showcasing Poppy Parade.
Welcome to week thirty eight of our Art With Heart 2022-23 Colour Creations blog hop.
This is a weekly blog hop where we showcase the stunning range of Stampin’ Up! colours in alphabetical order over 12 months and this week we are featuring Polished Pink from the 2021-23 family.
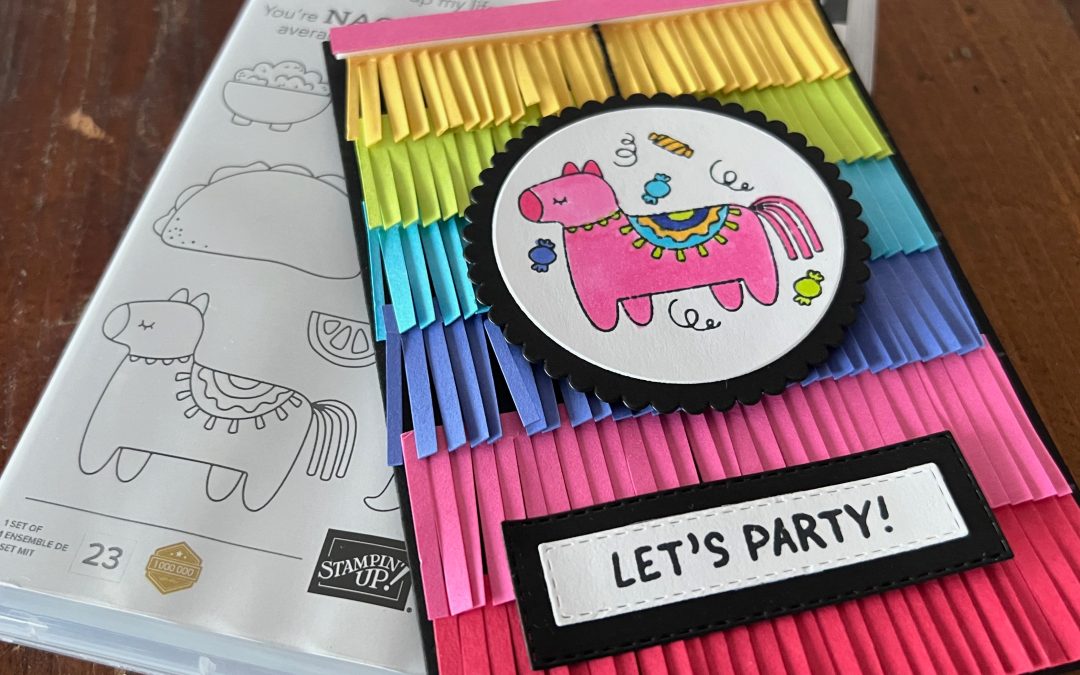
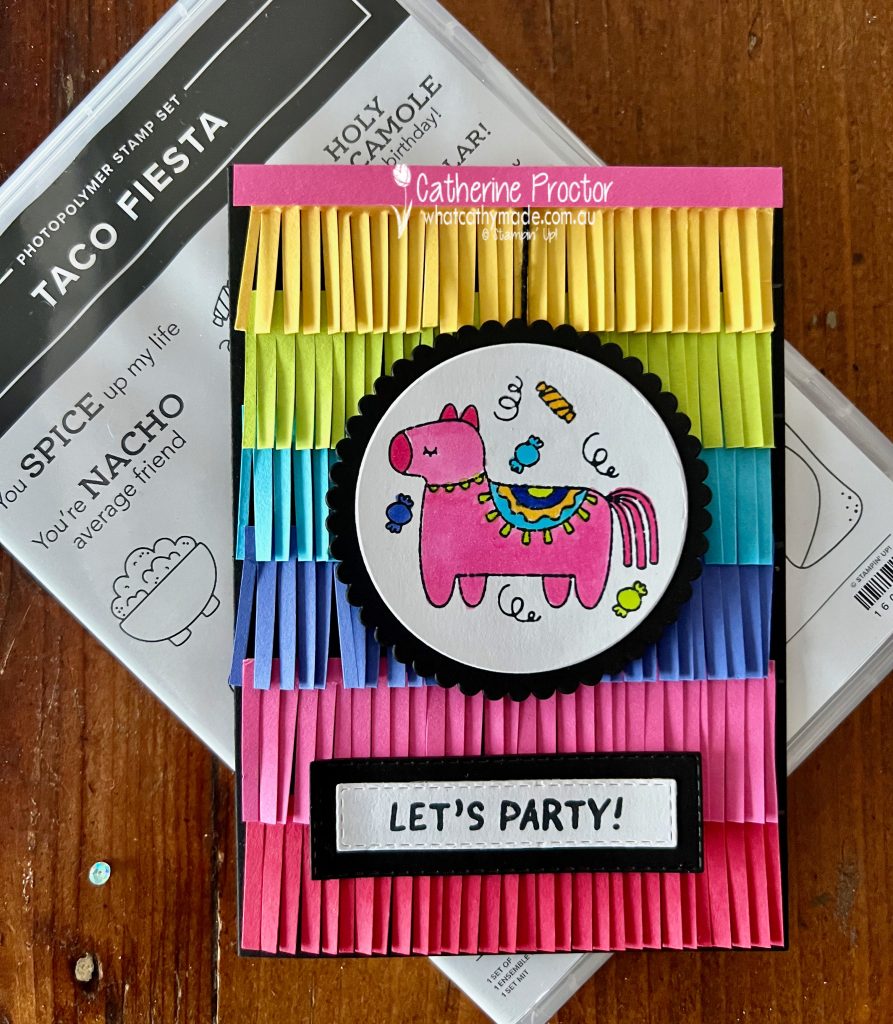
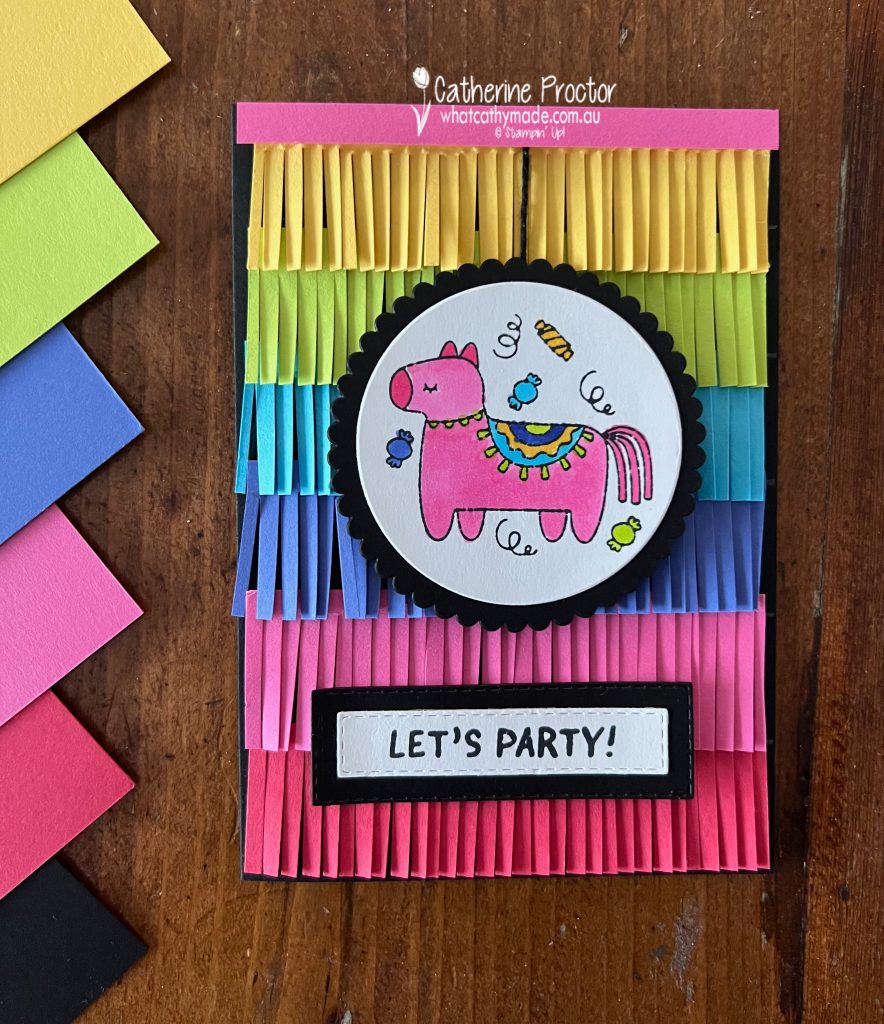
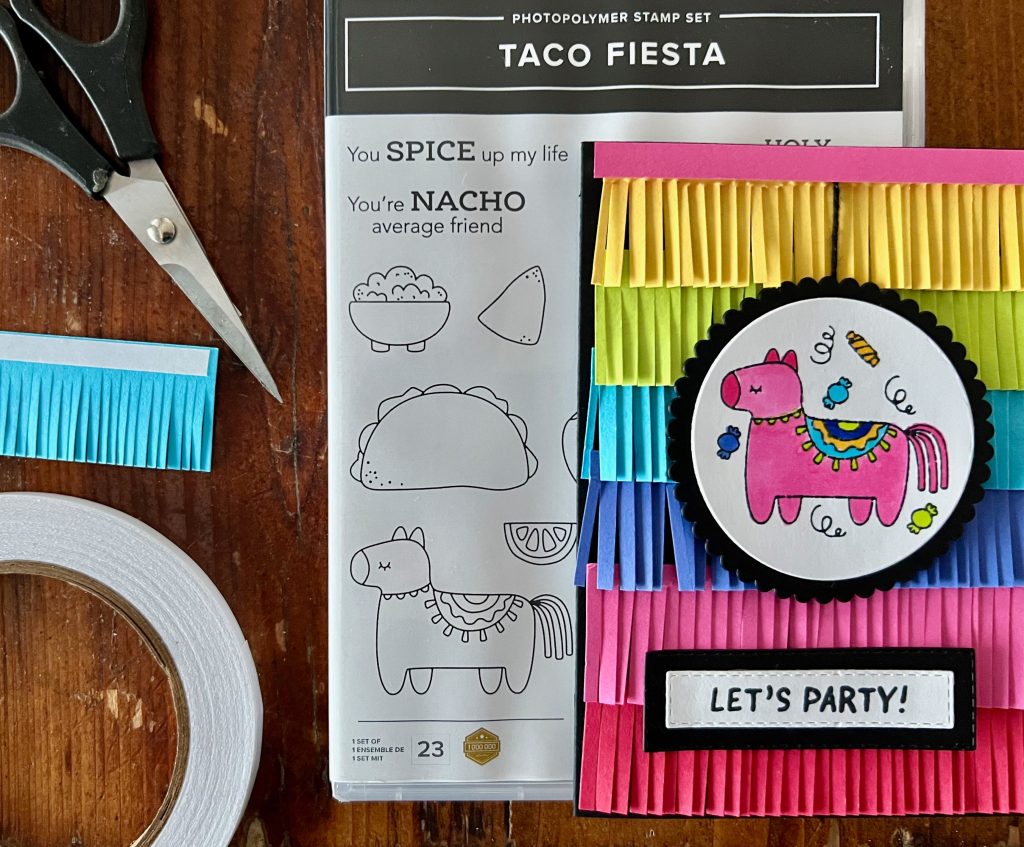
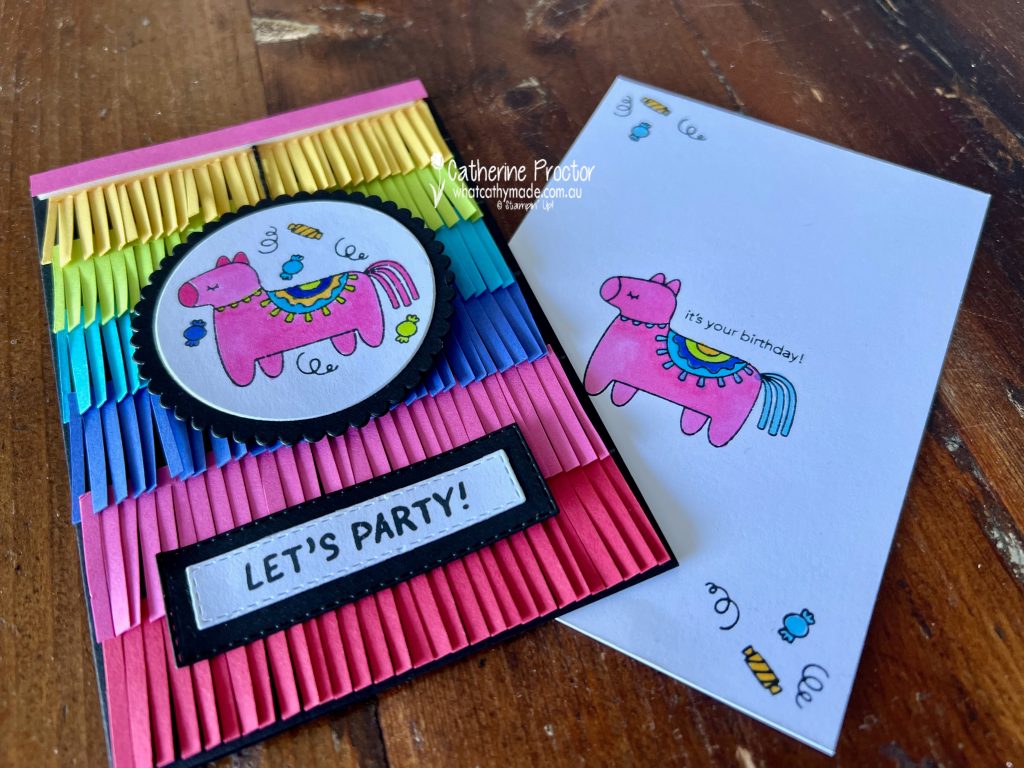
A fabulously fun colour like Polished Pink deserves to be paired with fabulously fun stamp set like Taco Fiesta!
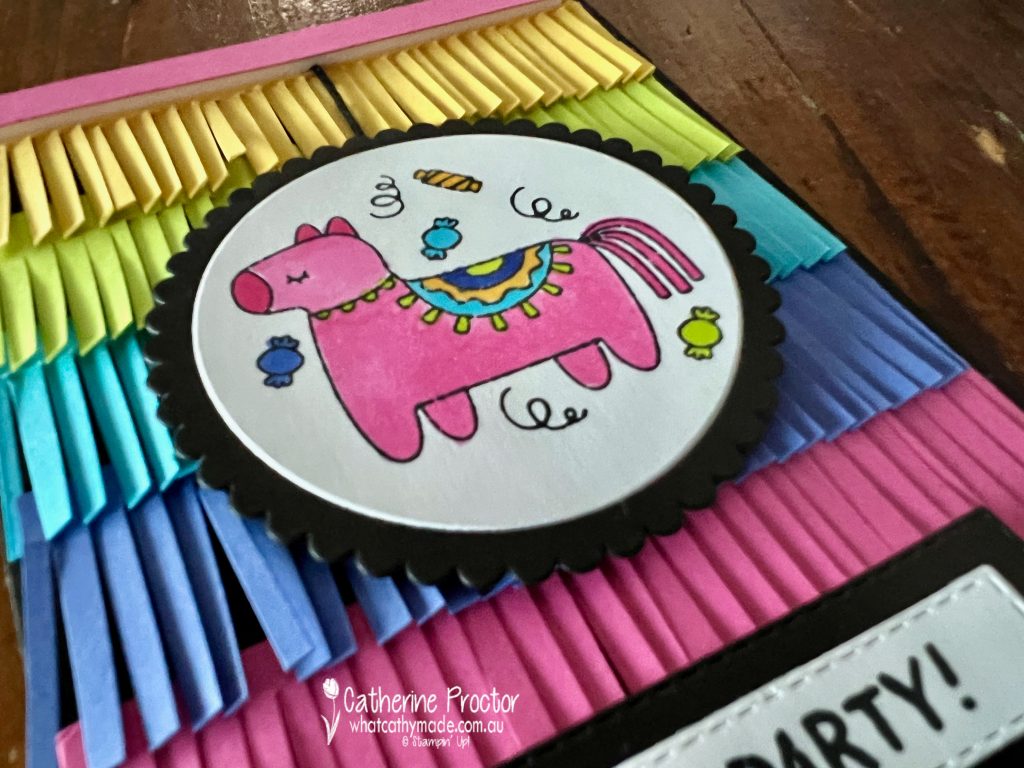
There are plenty of taco/guacamole/chilli related food images and sayings in this stamp set, however I just couldn’t resist using this adorable pinata image, coloured in with Stampin Blends in the colours of the cardstock used for the pinata fringing.
Polished Pink is gorgeous vibrant pink, so I paired it with other vibrant In Colours as well colours from the Brights family. From top to bottom in my card I’ve used Daffodil Delight, Parakeet Party, Orchid Oasis, Polished Pink and Sweet Sorbet, with a card base of Basic Black to make these colours pop even more.
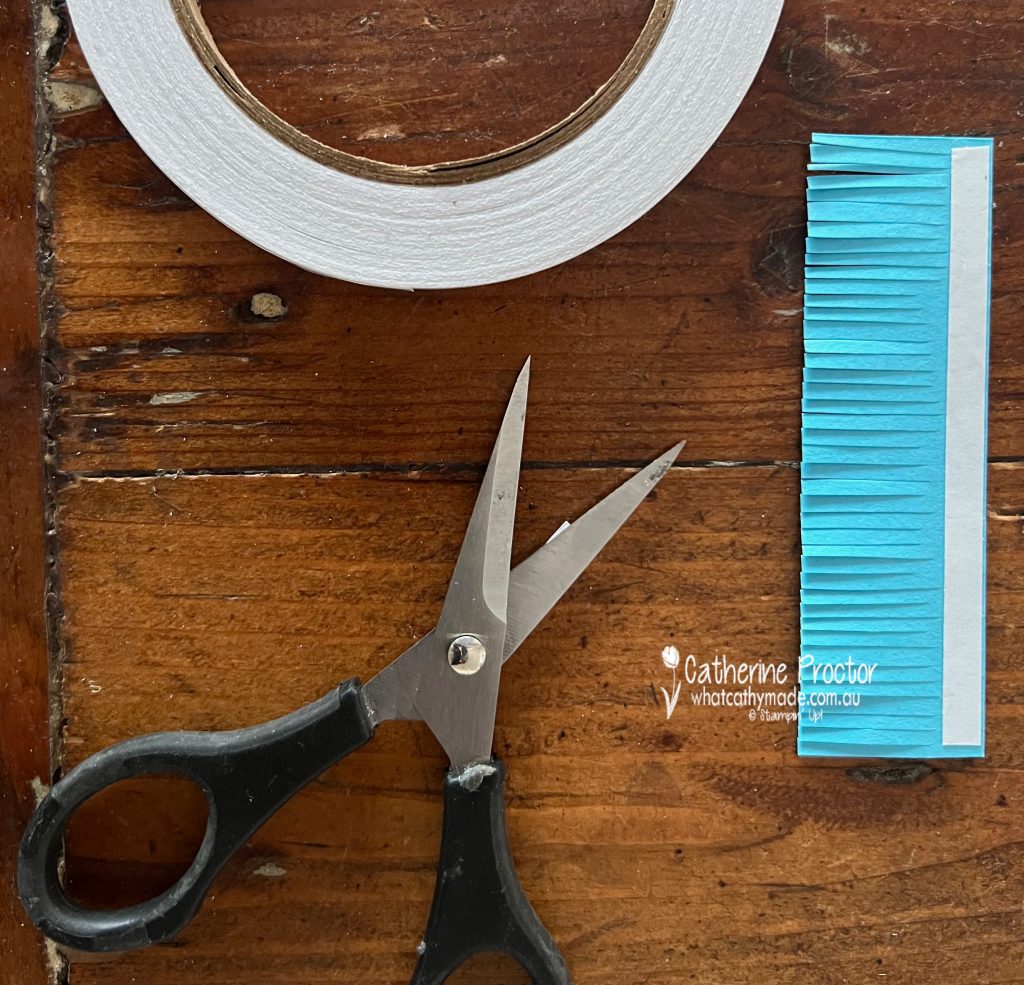
The pinata fringing on the card front is super easy to make, either with fringing scissors or using your paper snips.
Pinata Fringing Technique
My card base measures 14.8 x 10.5cm (half an A4 sheet of cardstock that has been scored and fold in half) and I wanted to use 6 colours, so I used my trimmer to cut 6 different cardstock colours, each at 3 x 10 cm – this allows the layers of fringing to overlap each other.
Use a pencil to mark 5 lines, each spaced 2.5 cm apart (this gives room for overlap of fringing) measuring up from the bottom of the card and going all the way up to the top.
Attach one strip of tear & tape along the longer 10 cm edge on one side of each colour of cardstock.
With the side that has the tear & tape facing up, use Paper Snips or fringing scissors to cut fringes at all the way along the length of the cardstock, cutting up to the bottom of the tear & tape.
Once all of your colours have all been fringed, remove the backing off the tear & tape and attach the fringing to the card front along your pencil lines, working from the bottom of the card up so you can overlap the fringing as you go.
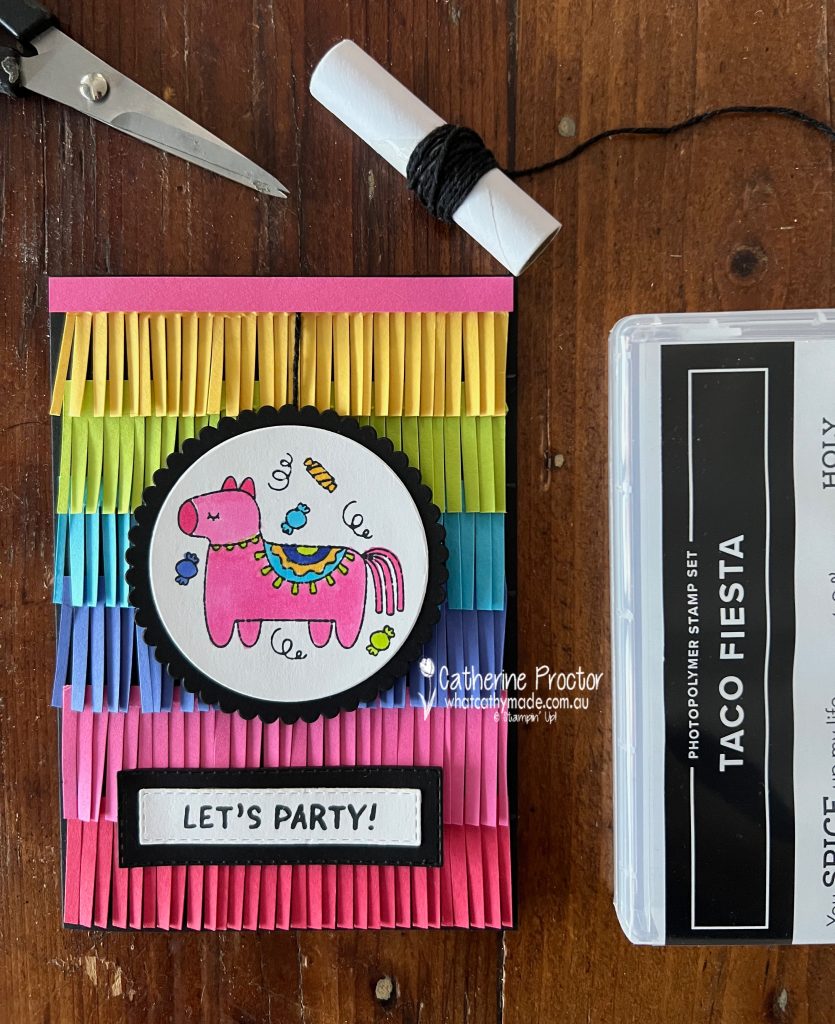
I’ve die cut the pinata image using a layering circle die and added a scalloped Basic Black layering circle behind it. The pinata is “hanging” from the strip of Polished Pink cardstock by a string of Basic Black Bakers twine.
The “Let’s Party” sentiment is part of a longer sentiment from the Breaking News stamp set. I bought this stamp set for my son’s university graduation, however I’ve used it on so many cards since.
Inside the card I’ve used part of a sentiment from the Taco Fiesta stamp set. To use just one a part of a sentiment simply place the sticky part of a post it note over the words you want covered. Ink up the stamp and then remove the post it note BEFORE stamping the sentiment onto the cardstock.
Now it’s time to hop on over to our next participant, the lovely Andrea Sargent – I can’t wait to see what Andrea has made this week!
If at any time you find a broken link, you can find the complete list of all participants below.
If you live in Australia, you can find and purchase these products in my Stampin’ Up! Online Store once they are available to purchase tomorrow morning.
We’ll be back next Wednesday, February 8, with projects showcasing a favourite colour for many people, Pool Party.
Welcome to week thirty seven of our Art With Heart 2022-23 Colour Creations blog hop.
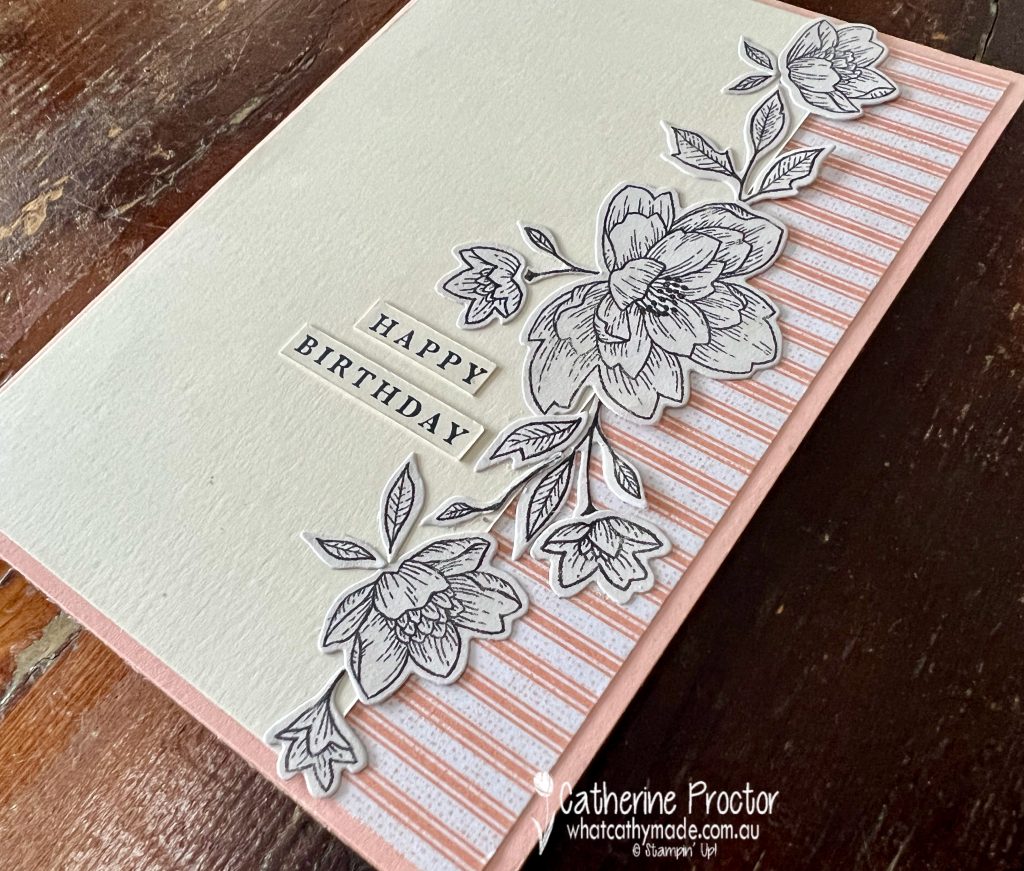
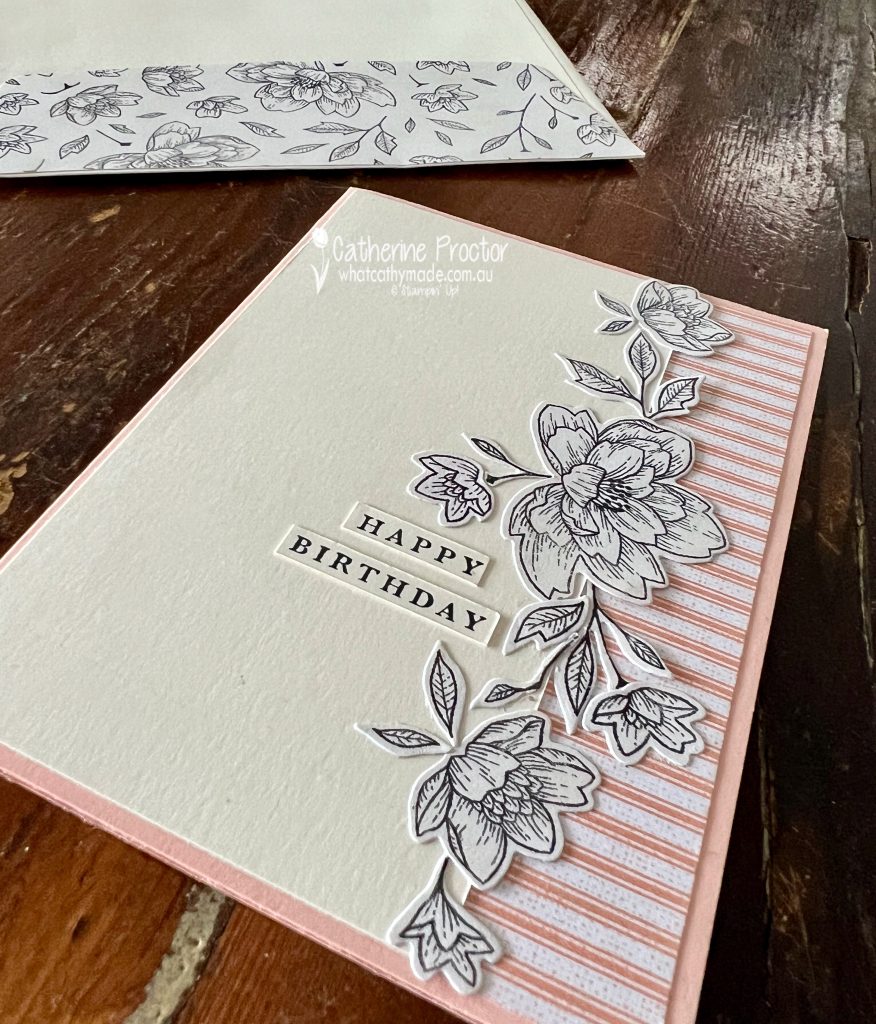
This is a weekly blog hop where we showcase the stunning range of Stampin’ Up! colours in alphabetical order over 12 months and this week we are featuring Petal Pink from the Subtles family.
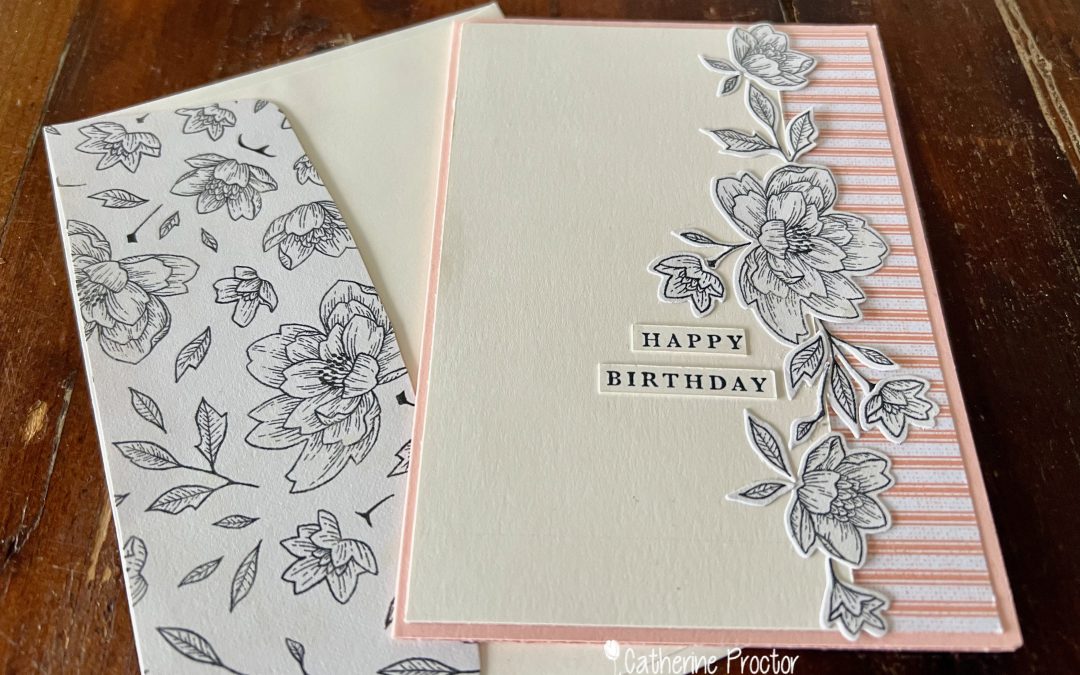
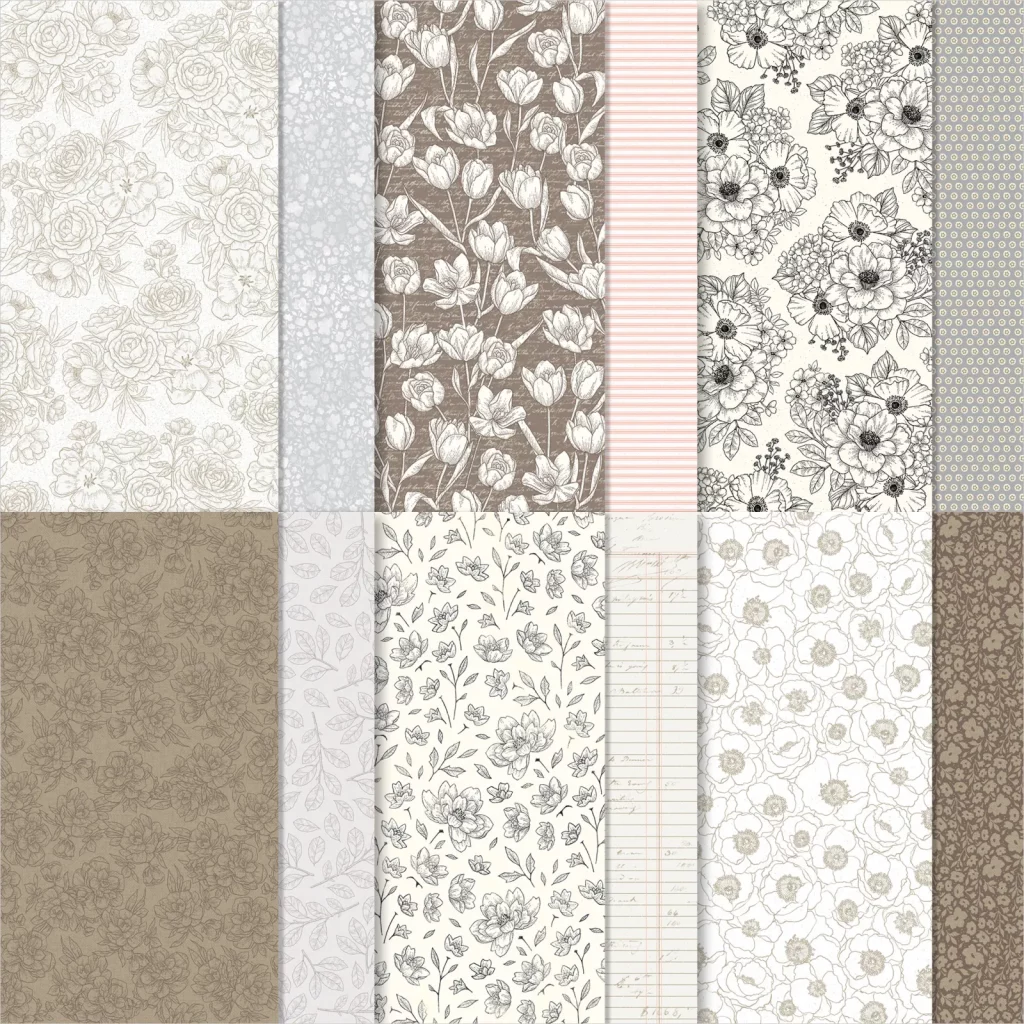
After using so many colours last week, I’ve kept my card deliberately monochrome this week, using just Petal Pink, Basic Black and Very Vanilla, three of the colours in the Abigail Rose 12″ x 12″ (30.5 x 30.5 cm) Designer Series Paper.
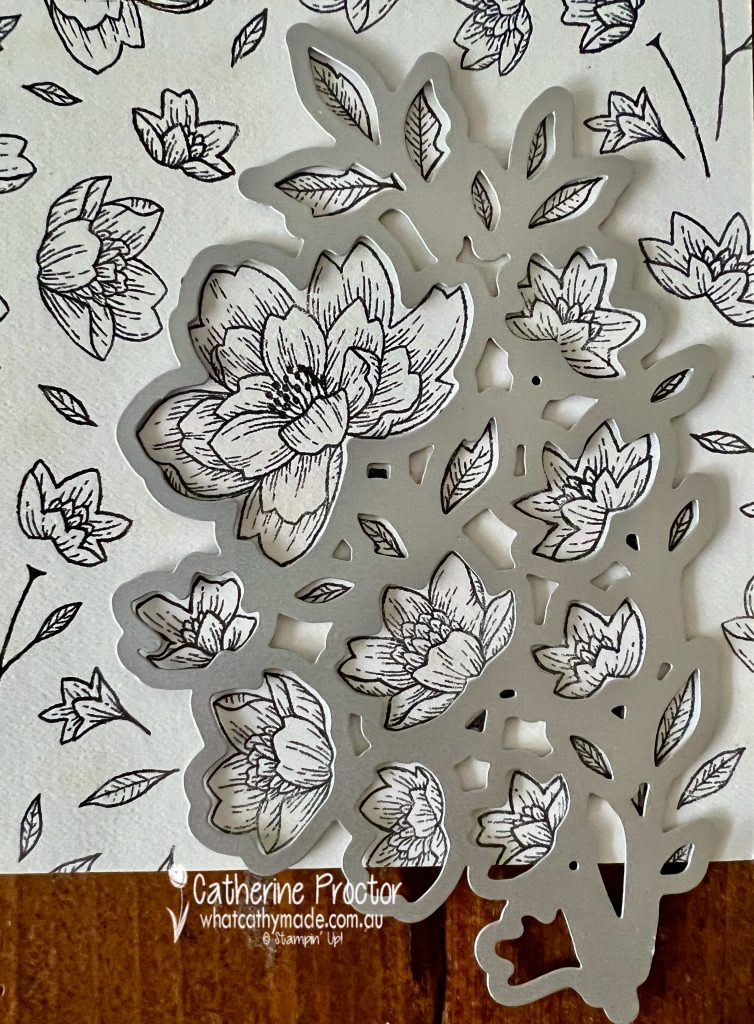
I love Designer Series Papers that have coordinating dies to cut out images – it saves so much stamping time. The Cottage Flower dies not only cut out images from the Cottage Rose stamp set, they also cut out flowers and leaves from this sheet of DSP.
I’ve simply arranged the die cut images in a row over the top of where the Very Vanilla cardstock and Abigail Rose striped DSP meet on my card front.
The “Happy Birthday” sentiment is stamped onto a scrap of Very Vanilla cardstock, trimmed with my paper trimmer before adhering to the card front.
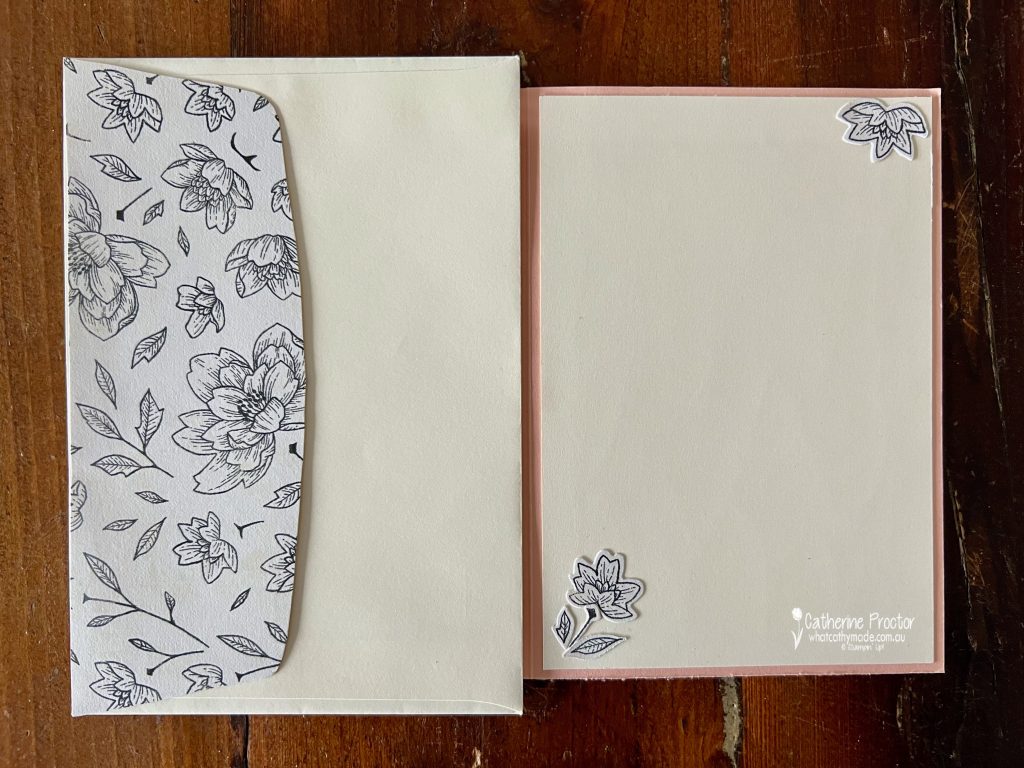
The inside of the card and the back of the envelope are decorated with leftover die cut pieces and DSP offcuts.
I was planning on colouring in the roses with my Petal Pink Stampin’ blends, but I really liked the simplicity of the card as it was, so I left the die cut pieces uncoloured.
Now it’s time to hop on over to our next participant, the lovely Rosa Leyden – I can’t wait to see what Rosa has made this week!
If at any time you find a broken link, you can find the complete list of all participants below.
If you live in Australia, you can find and purchase these products in my Stampin’ Up! Online Store once they are available to purchase tomorrow morning.
We’ll be back next Wednesday, February 1, with projects showcasing a much more vibrant pink, Polished Pink.
Welcome to week thirty six of our Art With Heart 2022-23 Colour Creations blog hop.
This is a weekly blog hop where we showcase the stunning range of Stampin’ Up! colours in alphabetical order over 12 months and this week we are featuring Pear Pizzazz from the Subtle family.
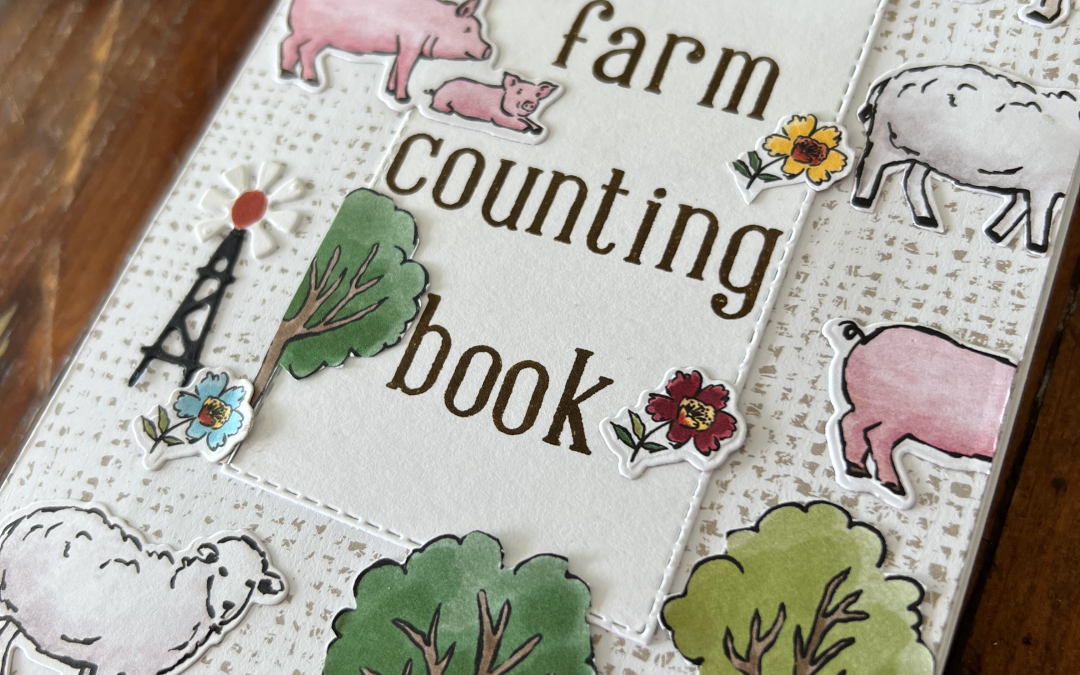
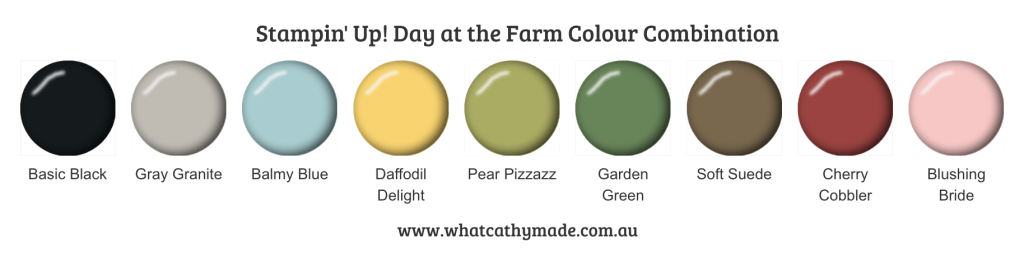
Today I’ve gone a bit rogue and created a project that uses not only Pear Pizzazz, but eight other colours too: Balmy Blue, Basic Black, Blushing Bride, Cherry Cobbler, Daffodil Delight, Garden Green, Gray Granite and Soft Suede!
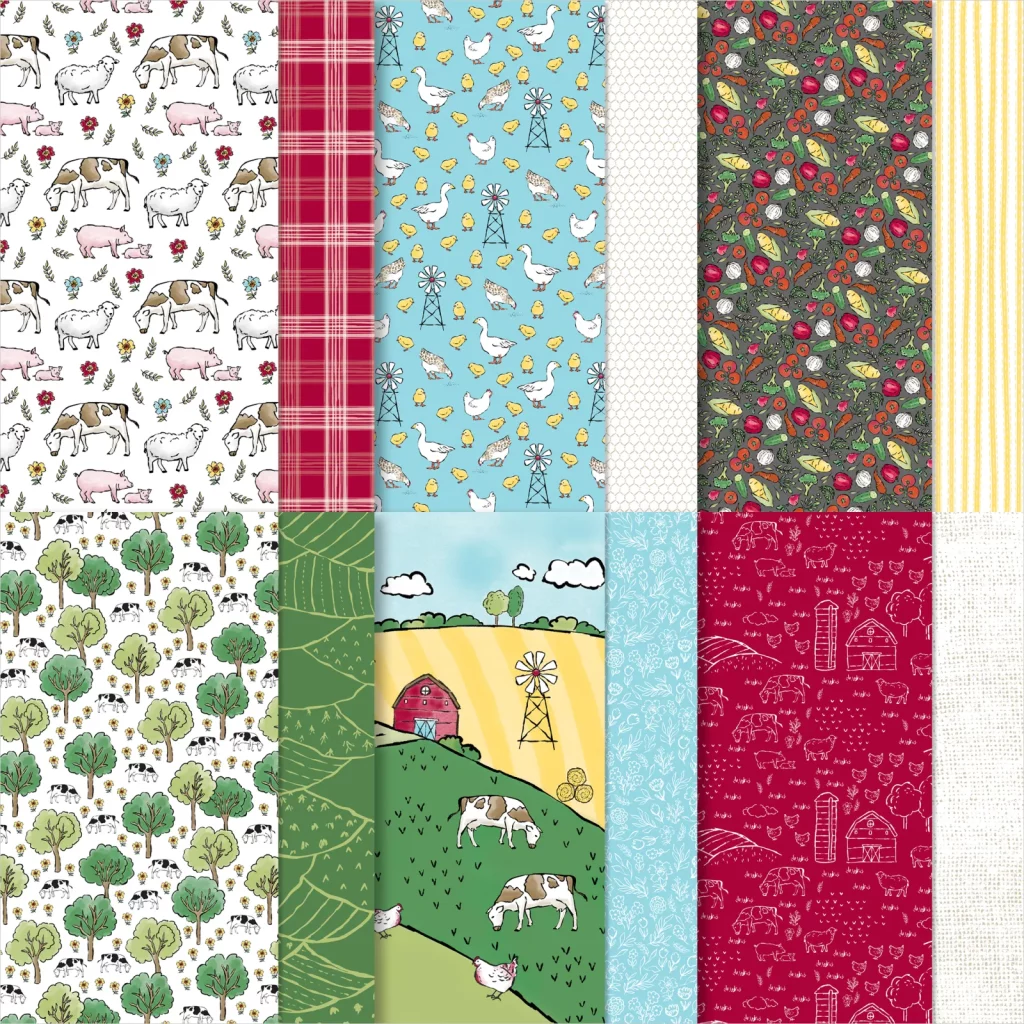
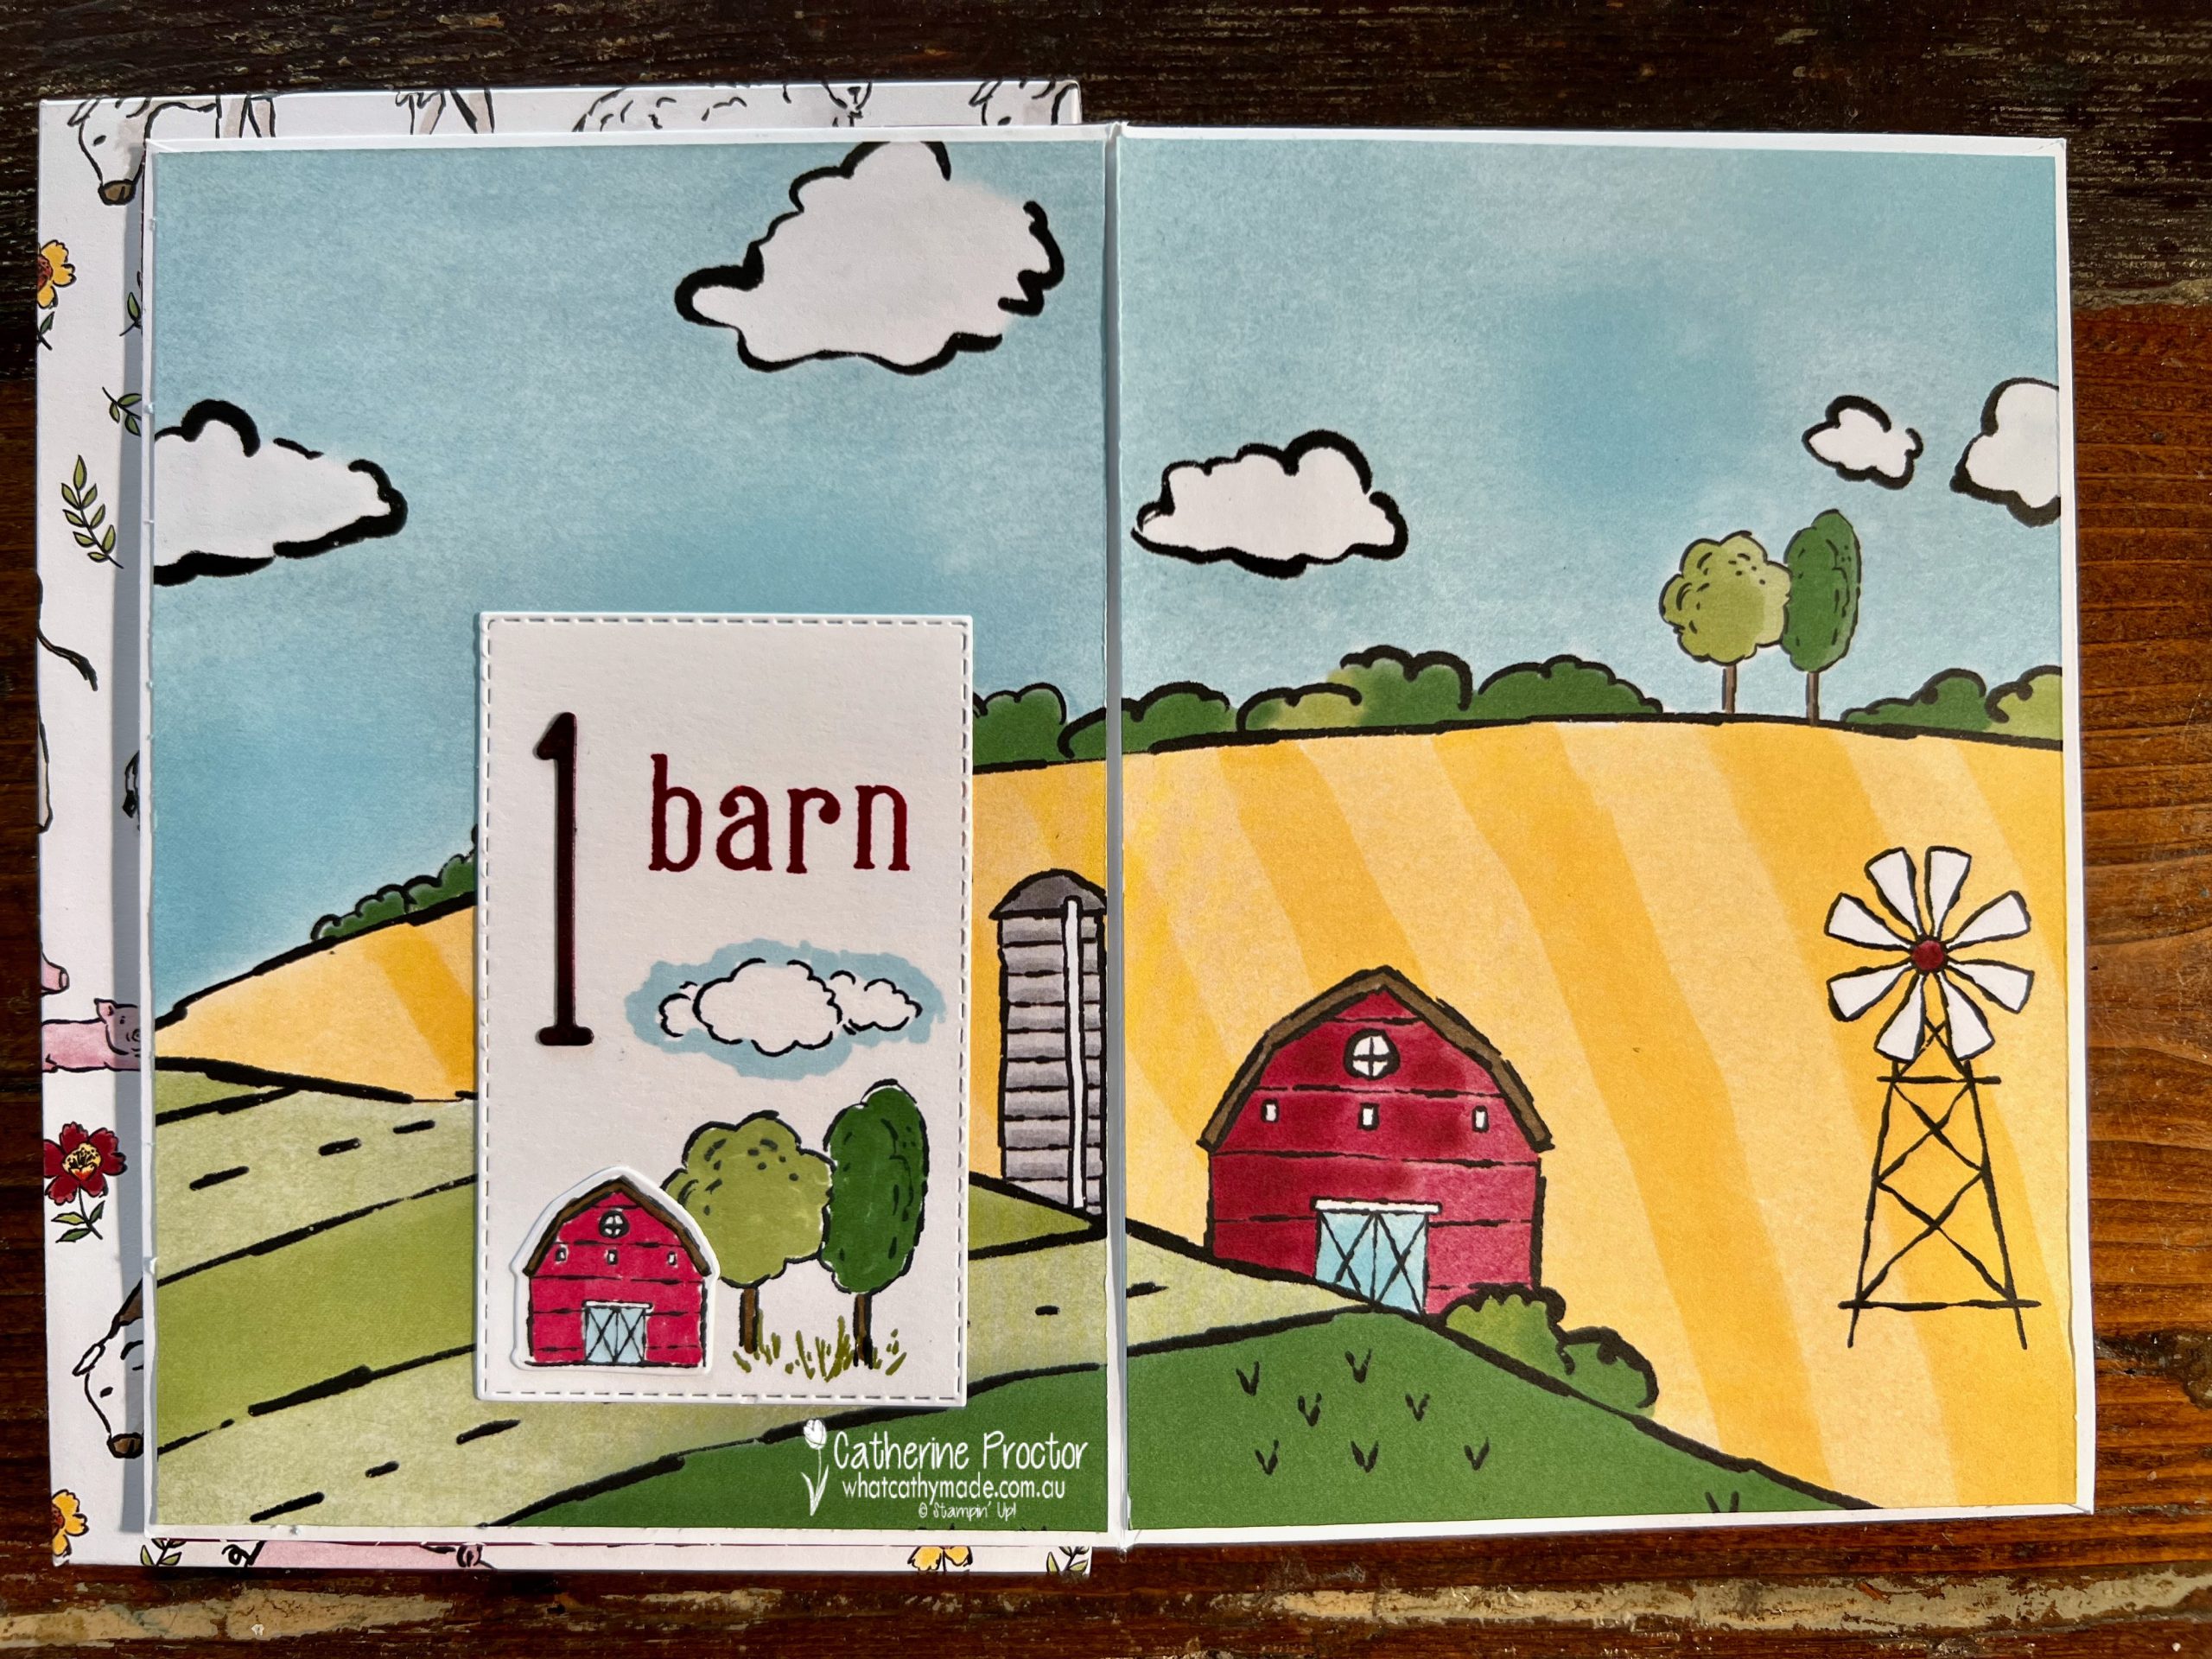
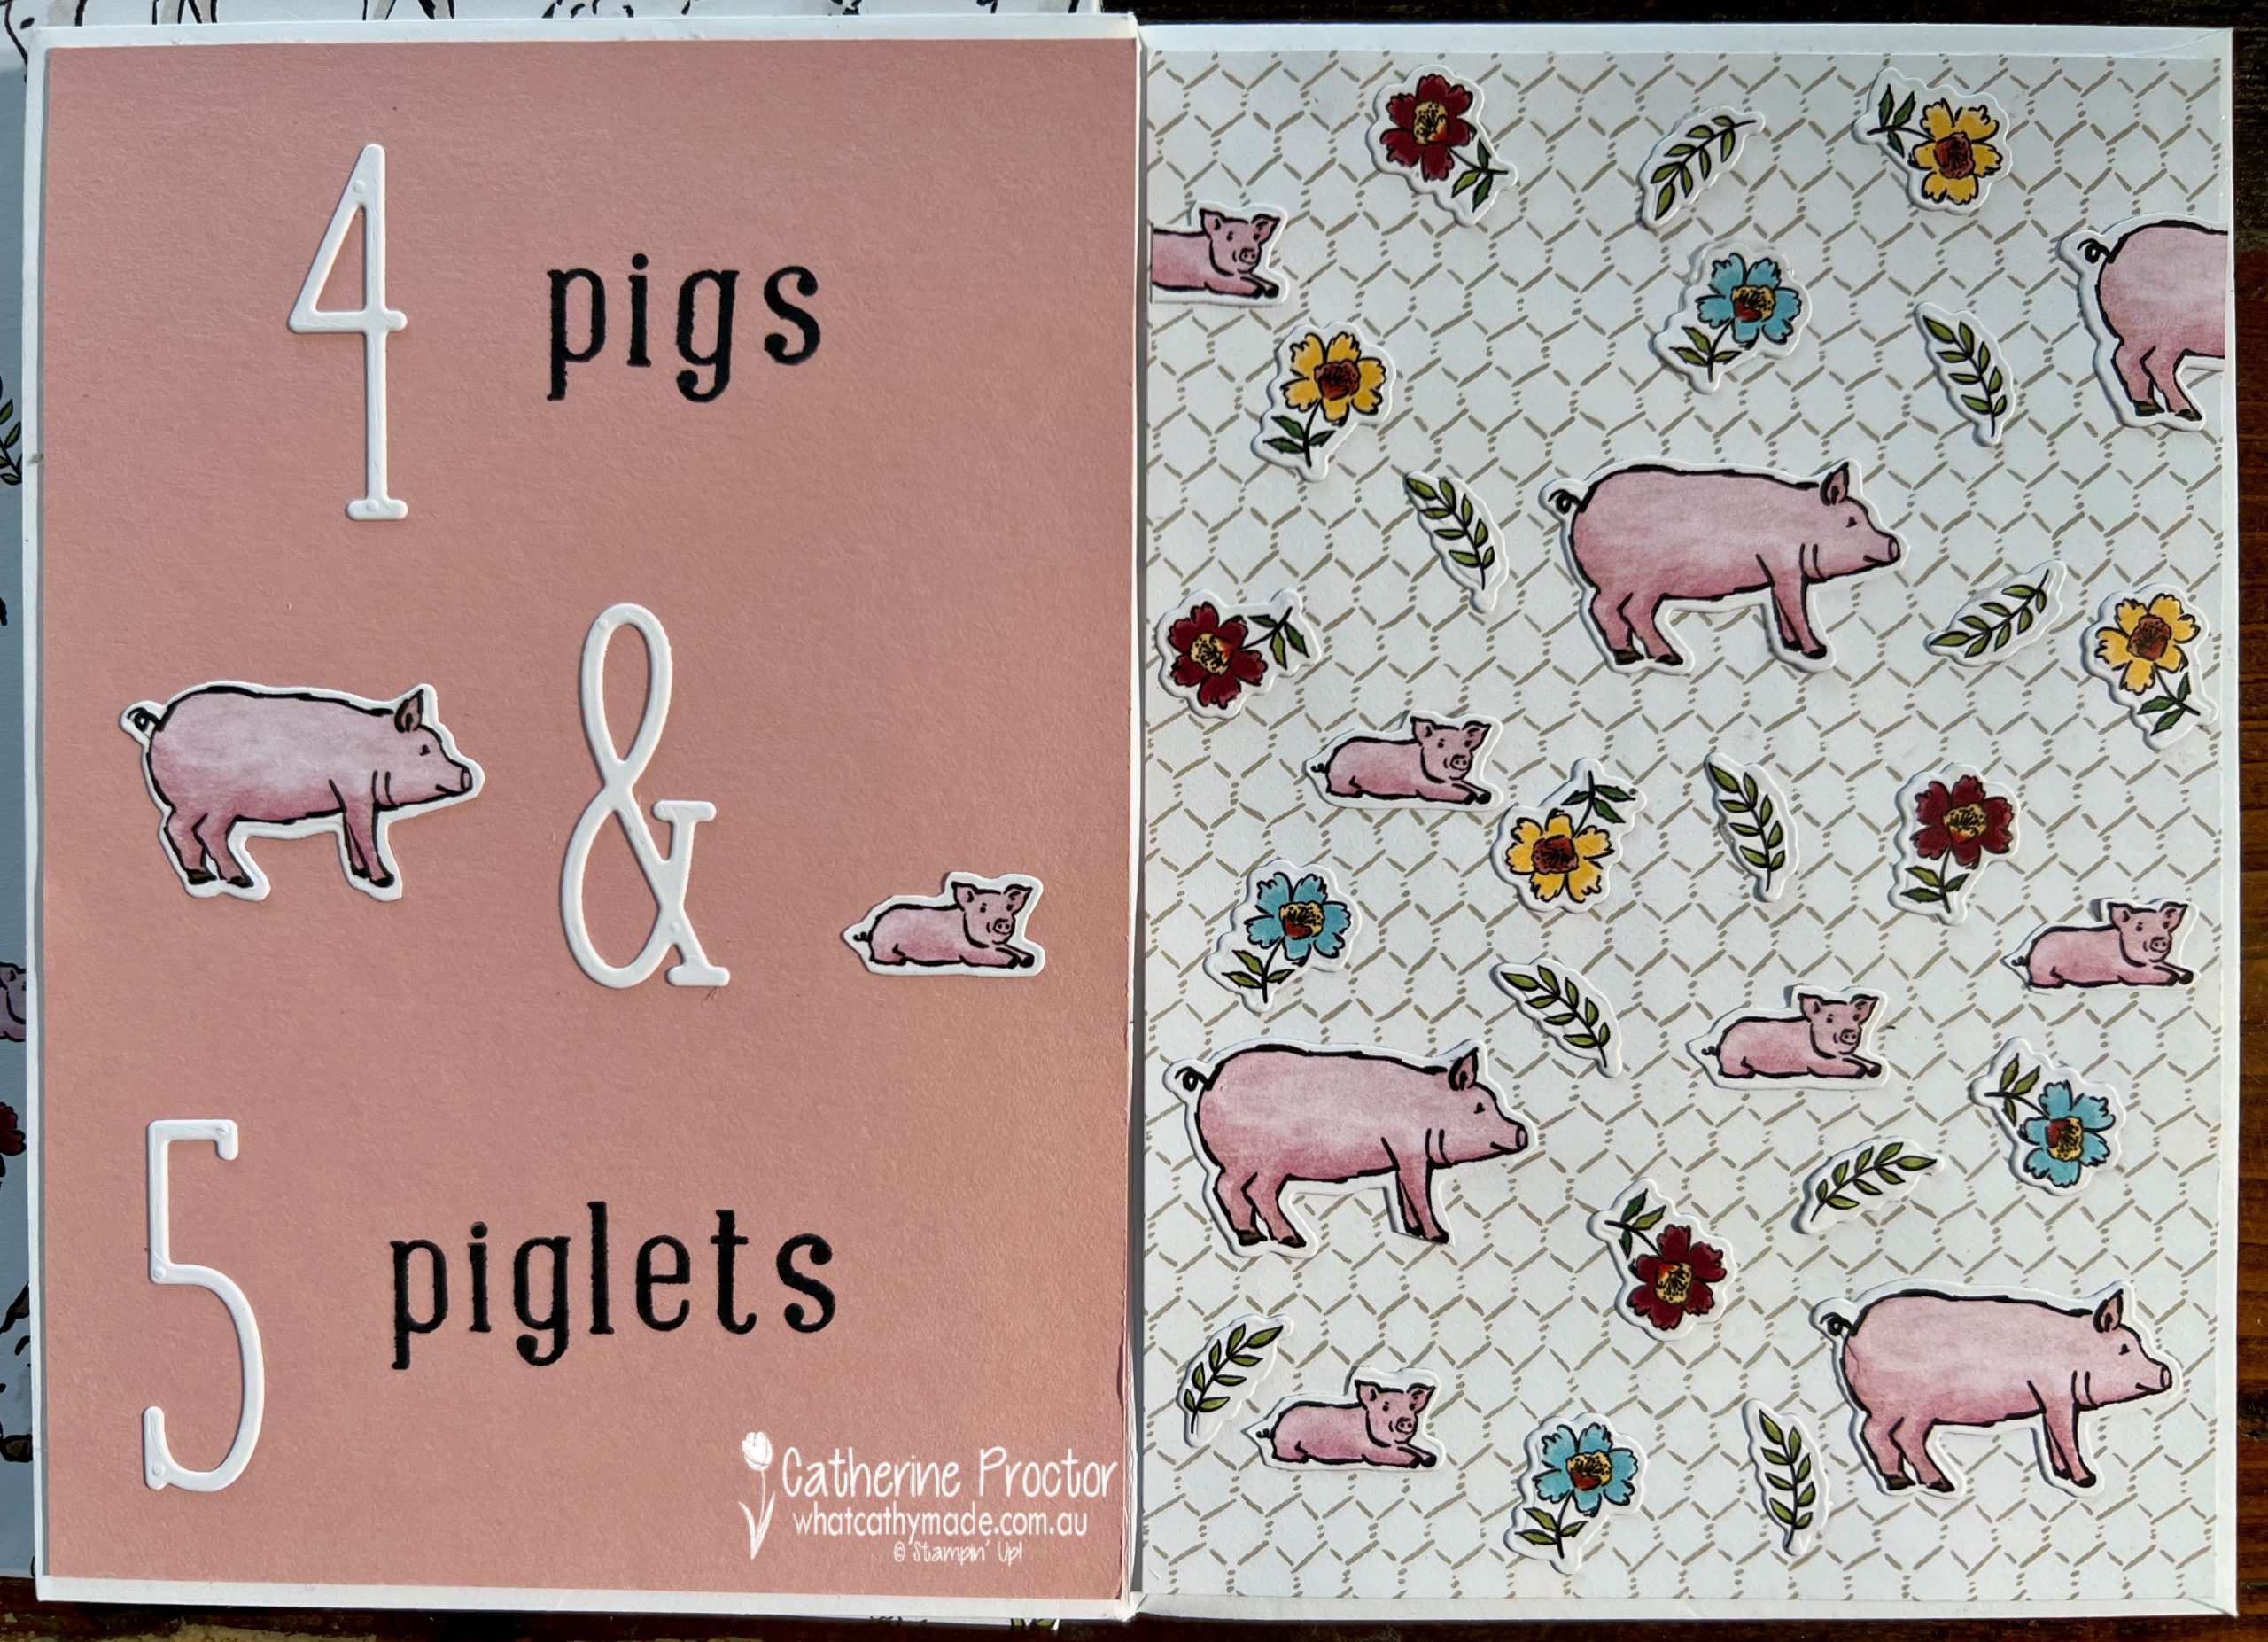
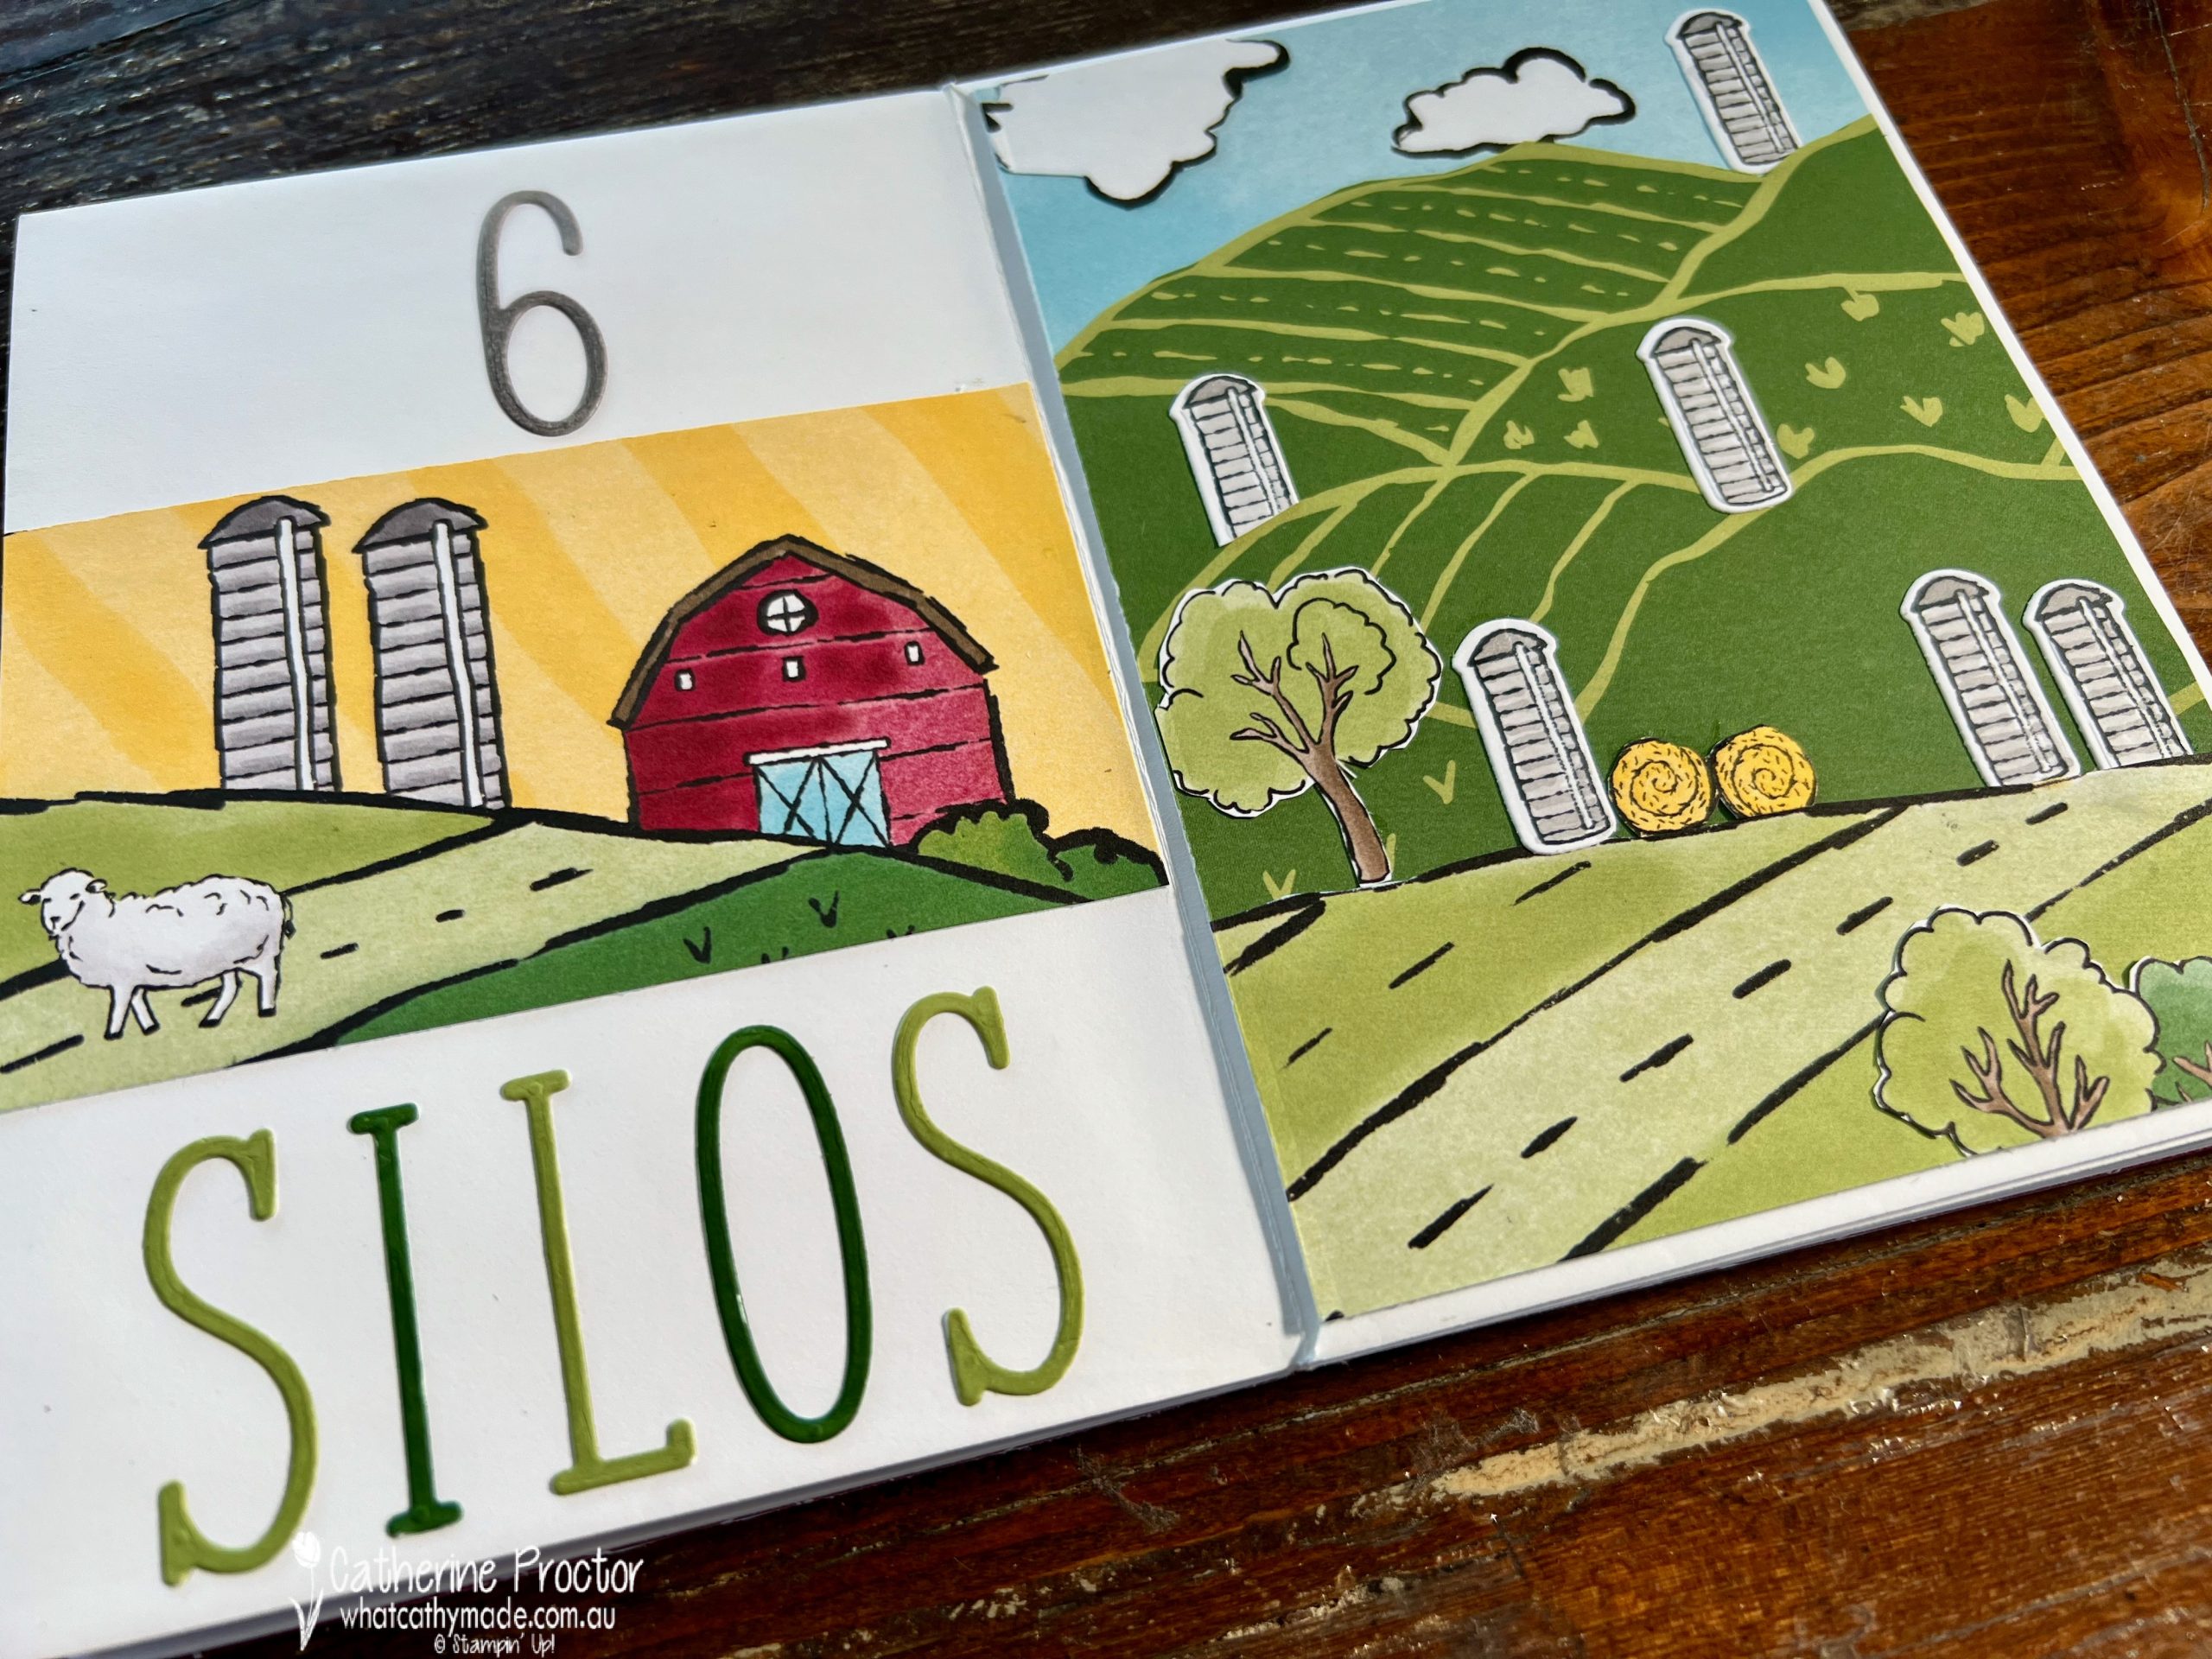
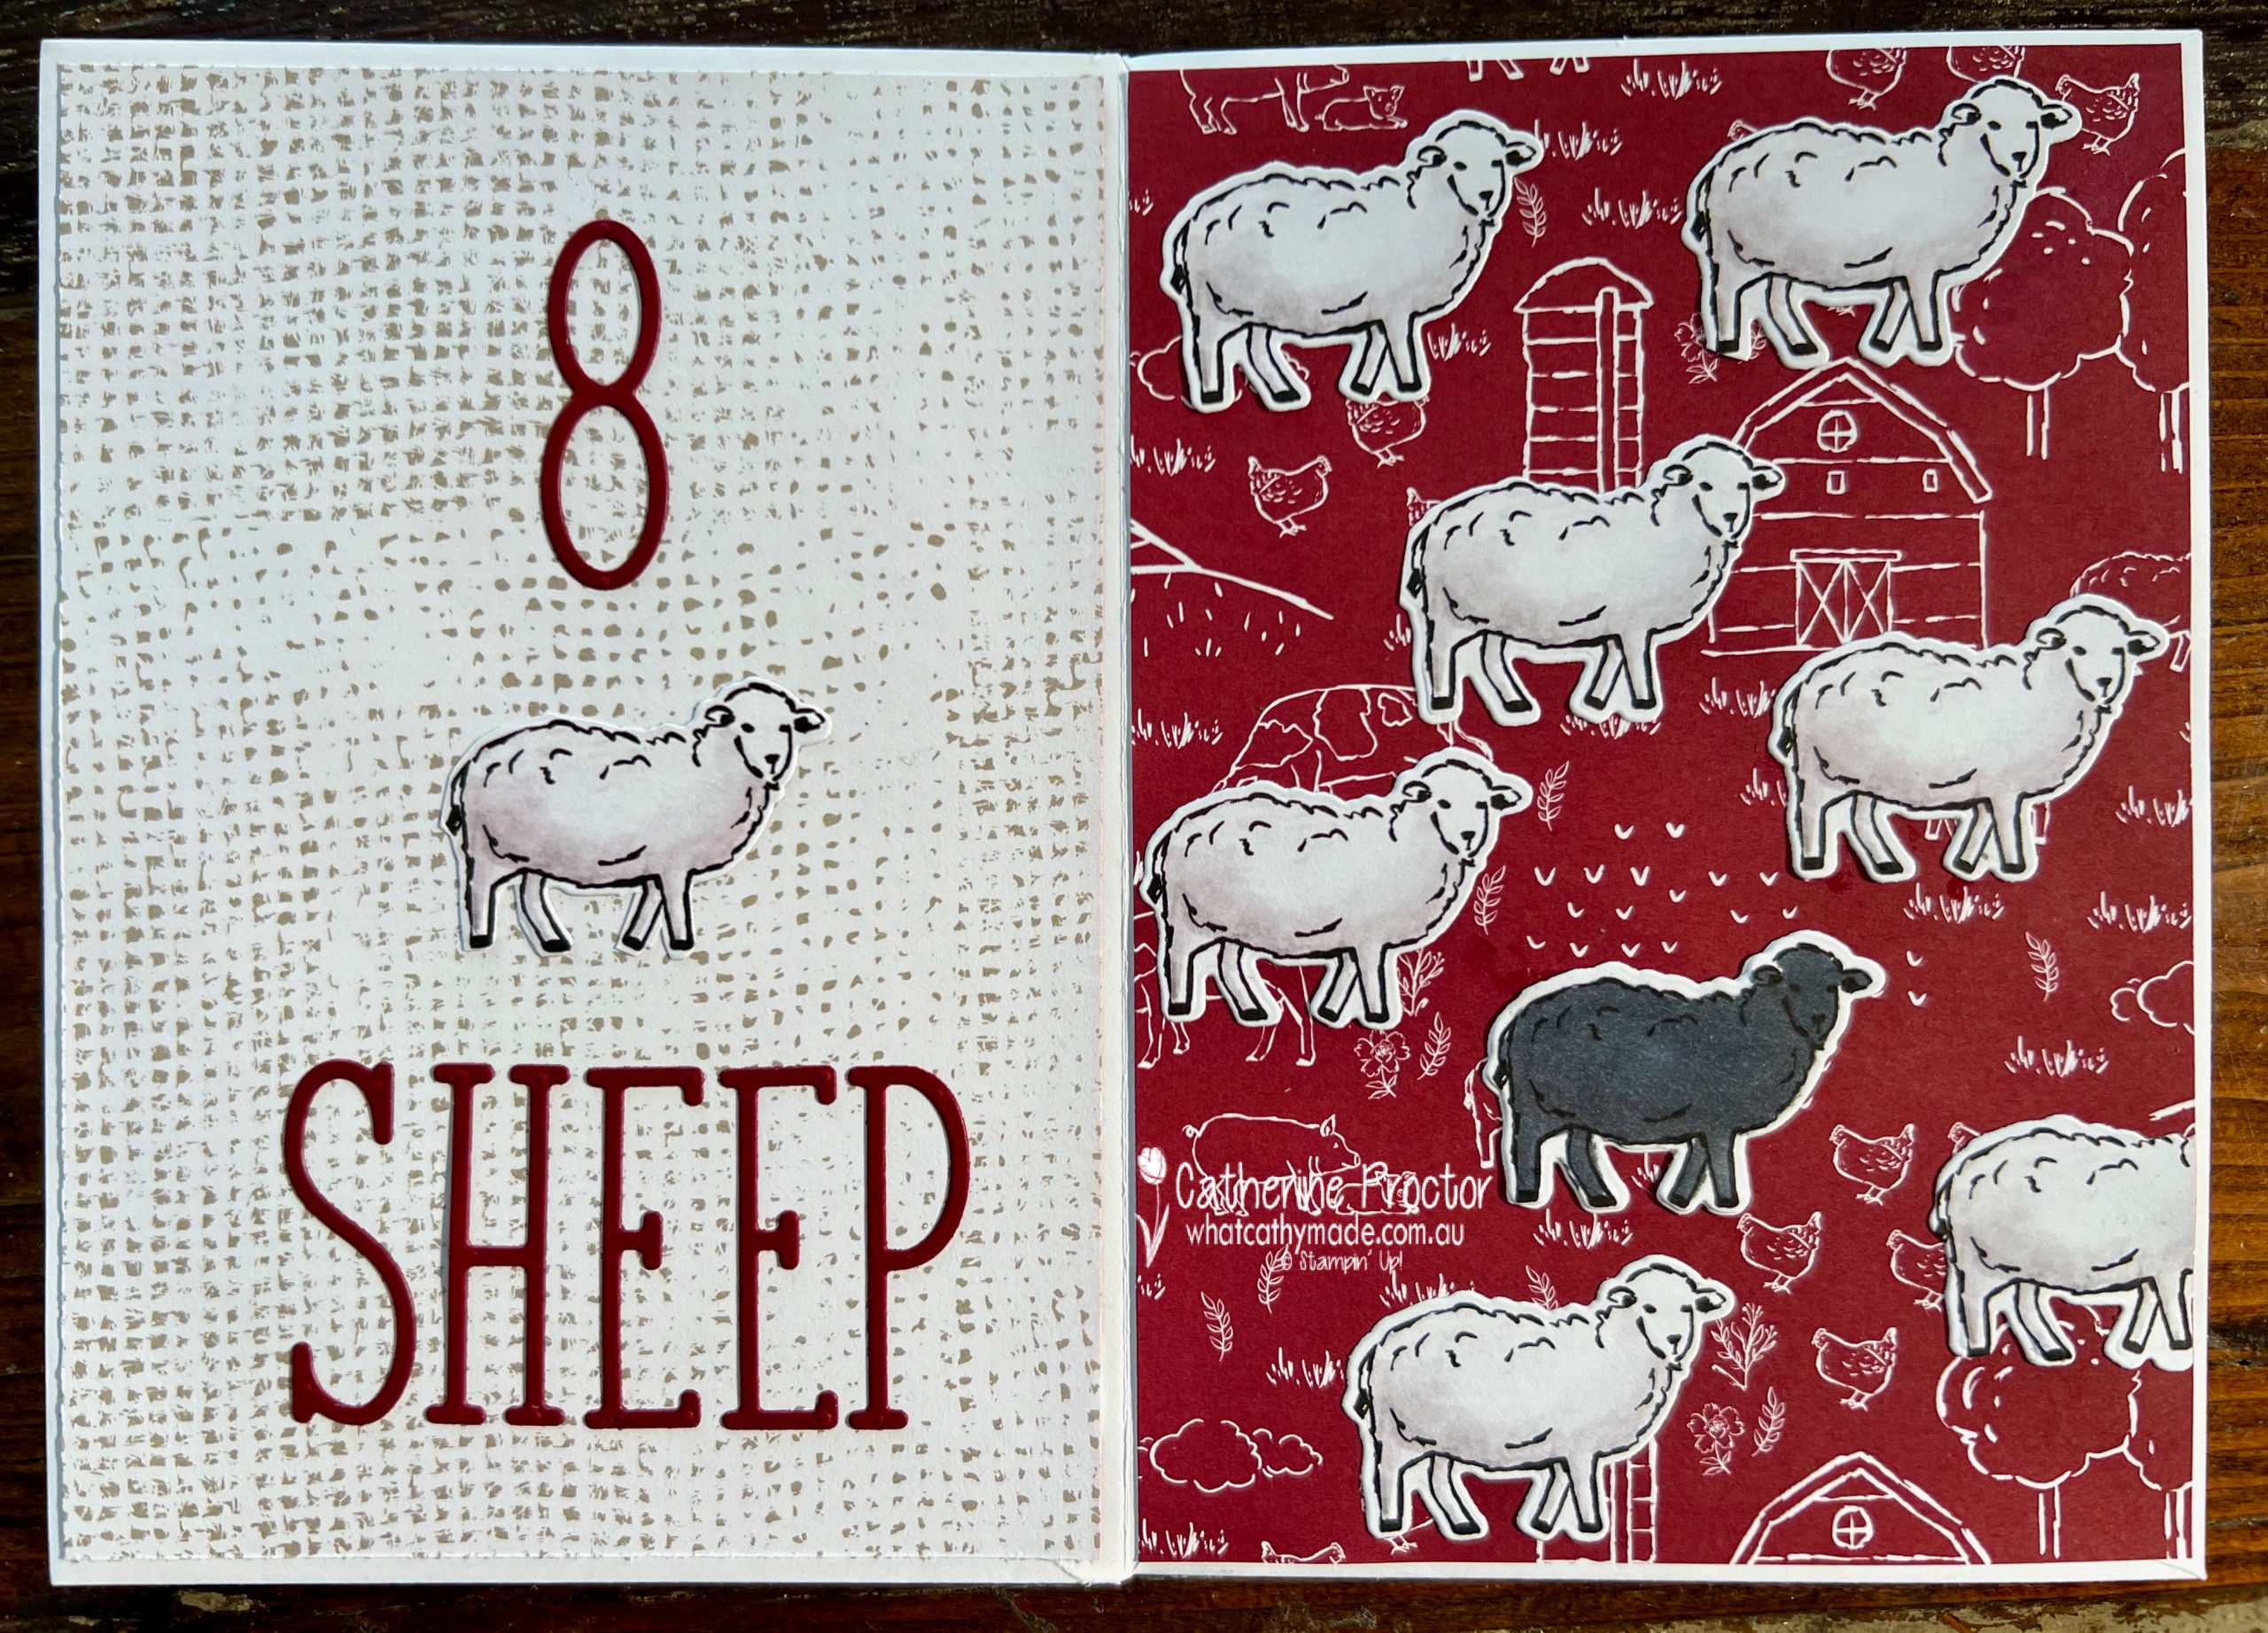
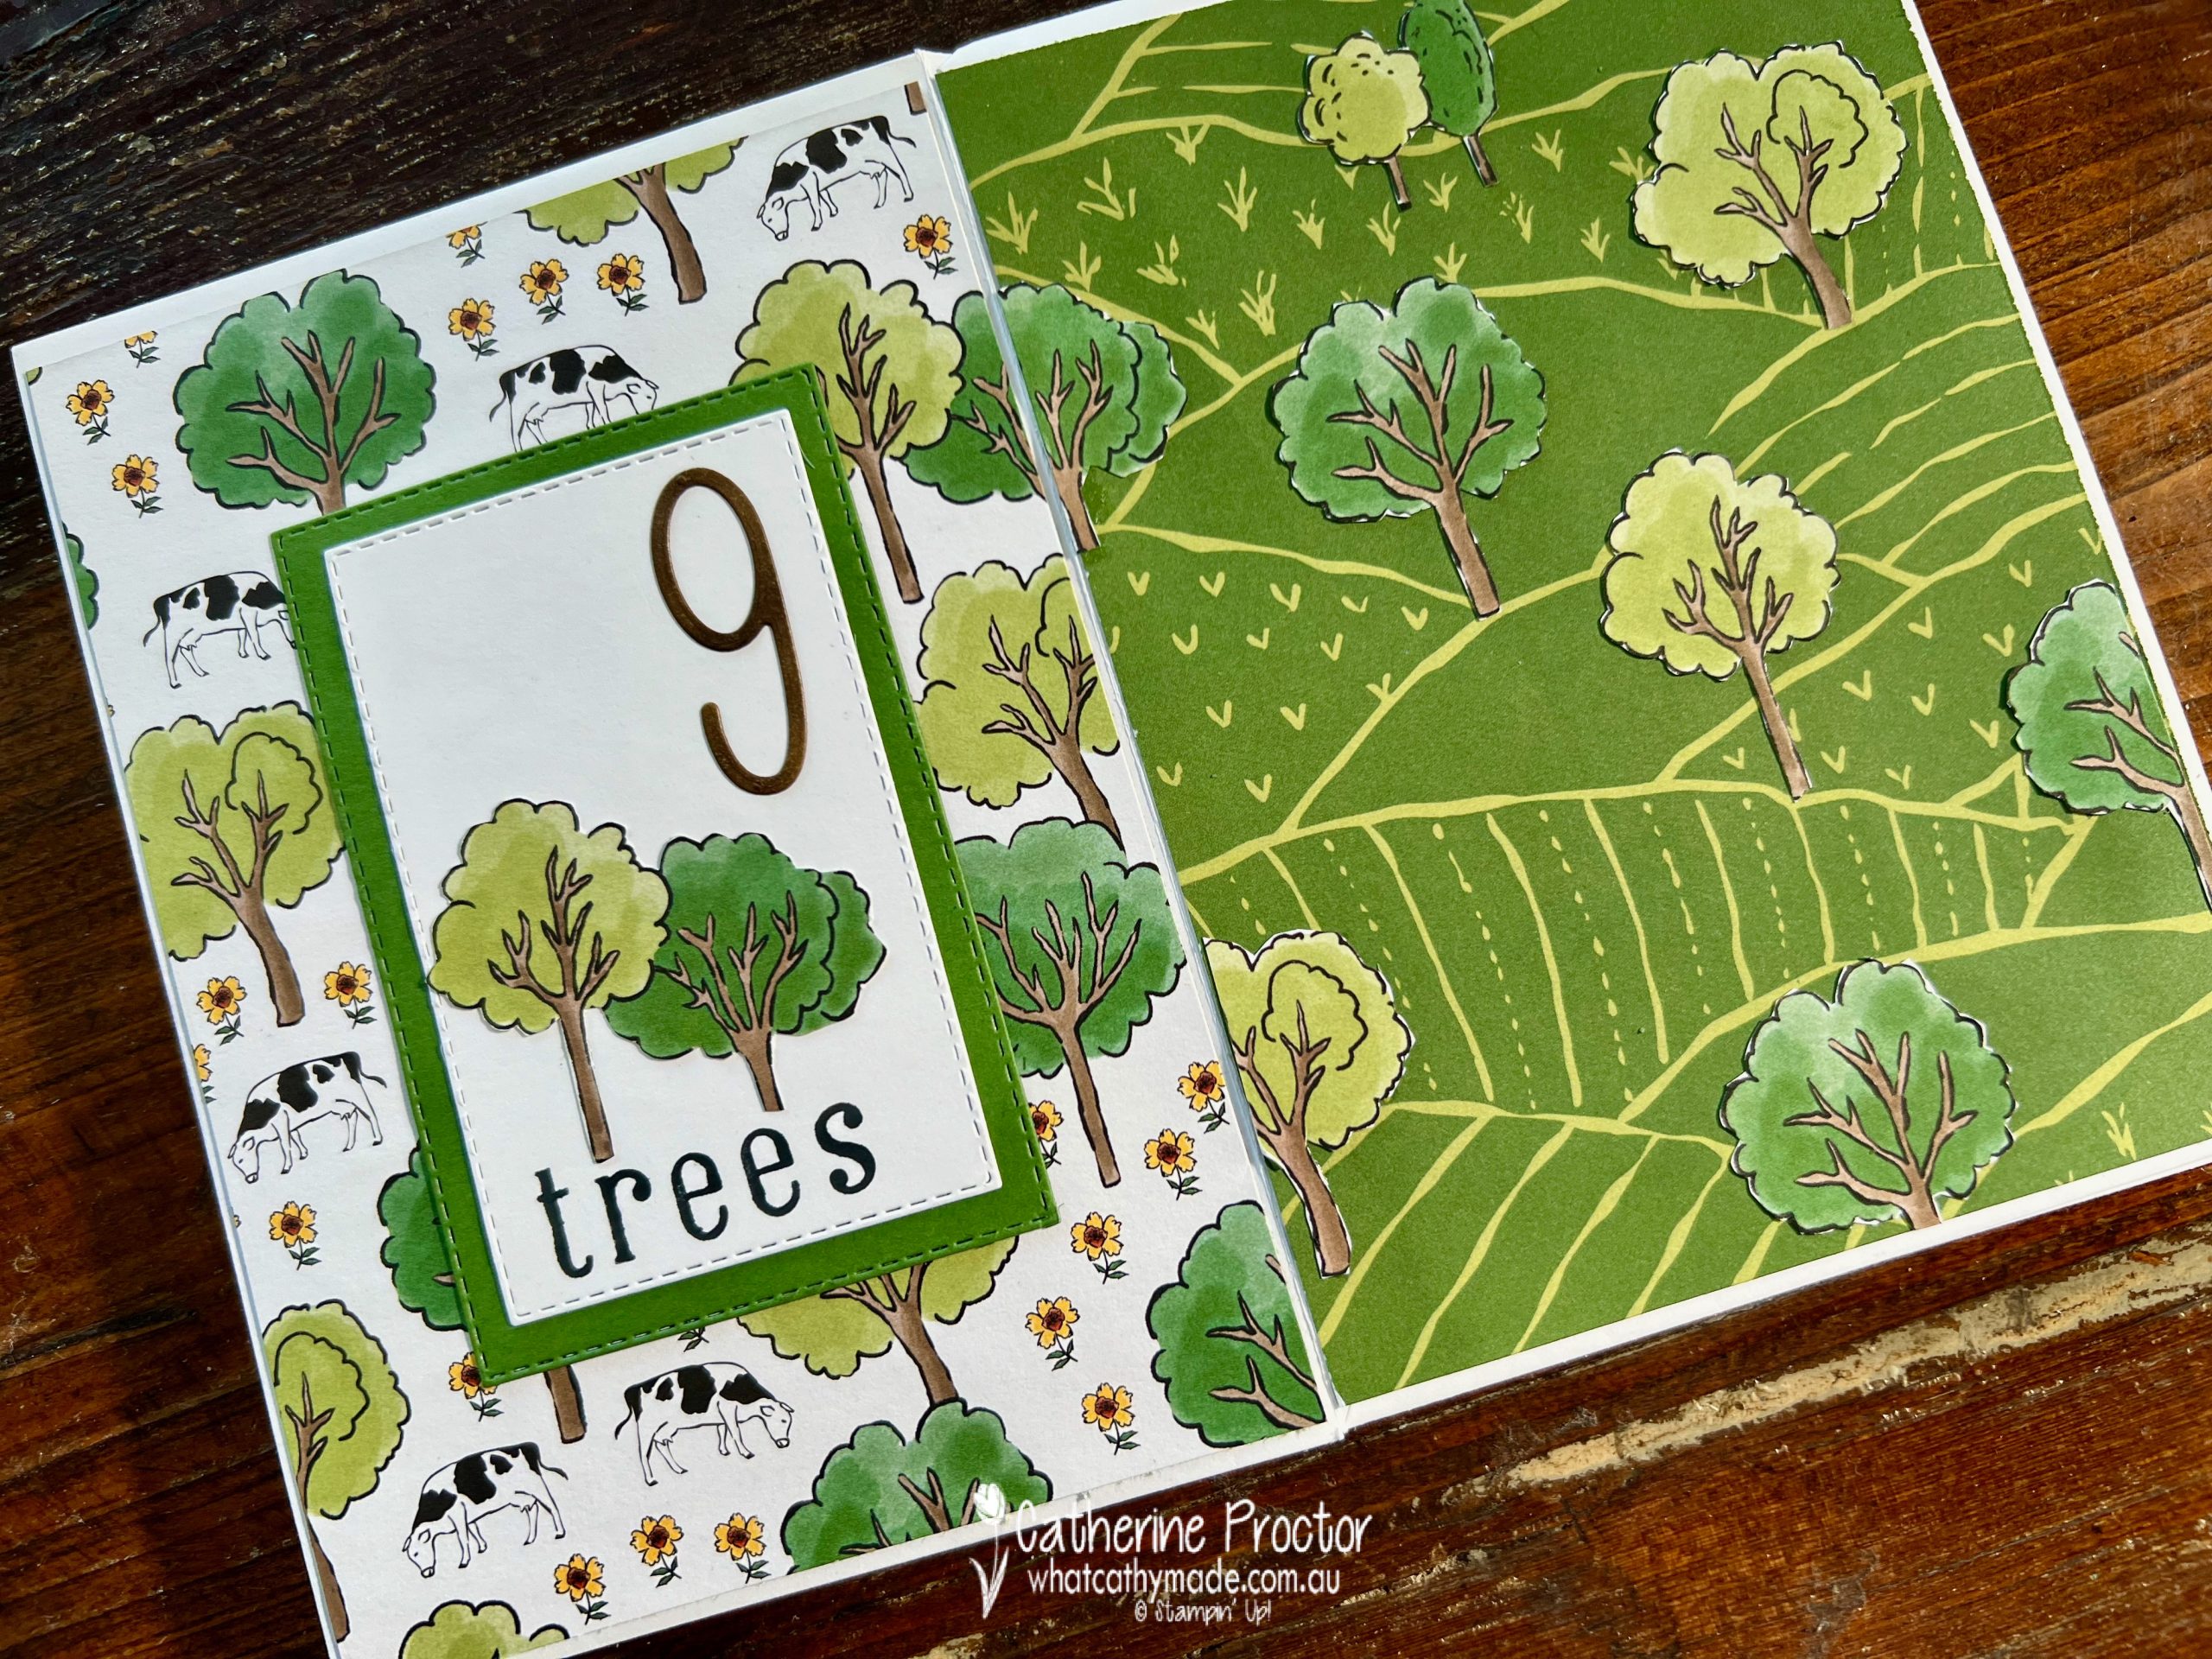
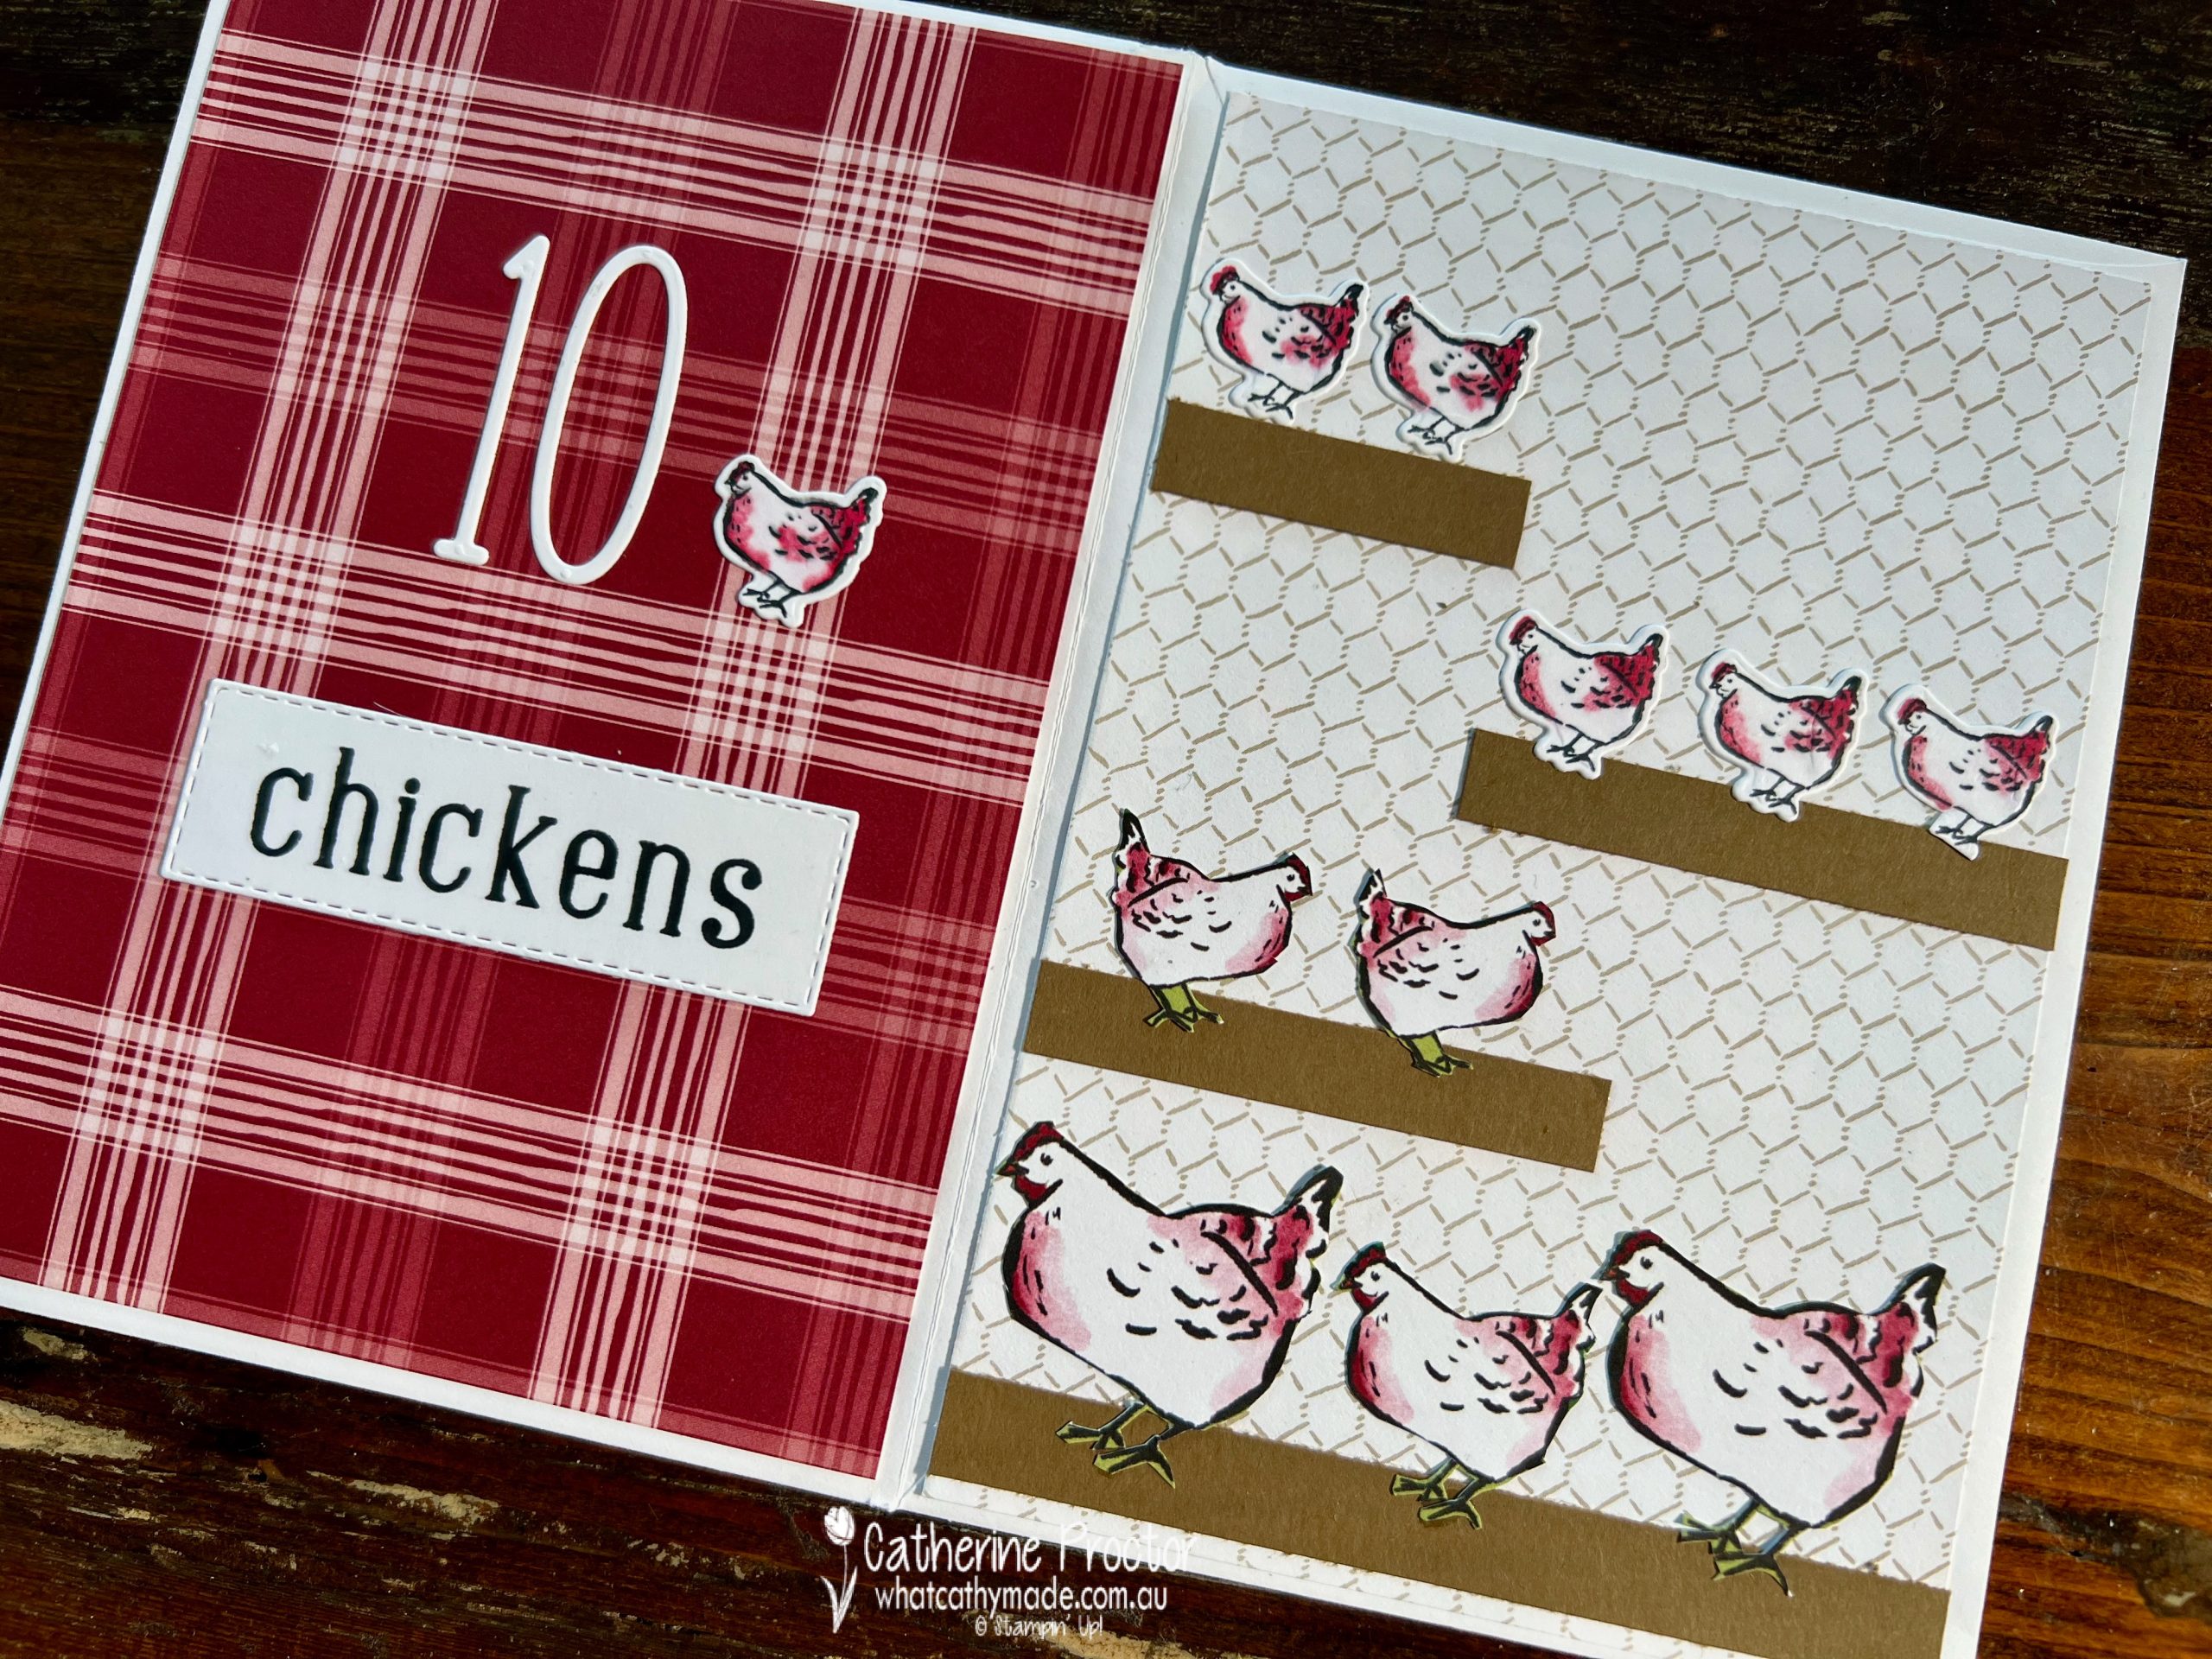
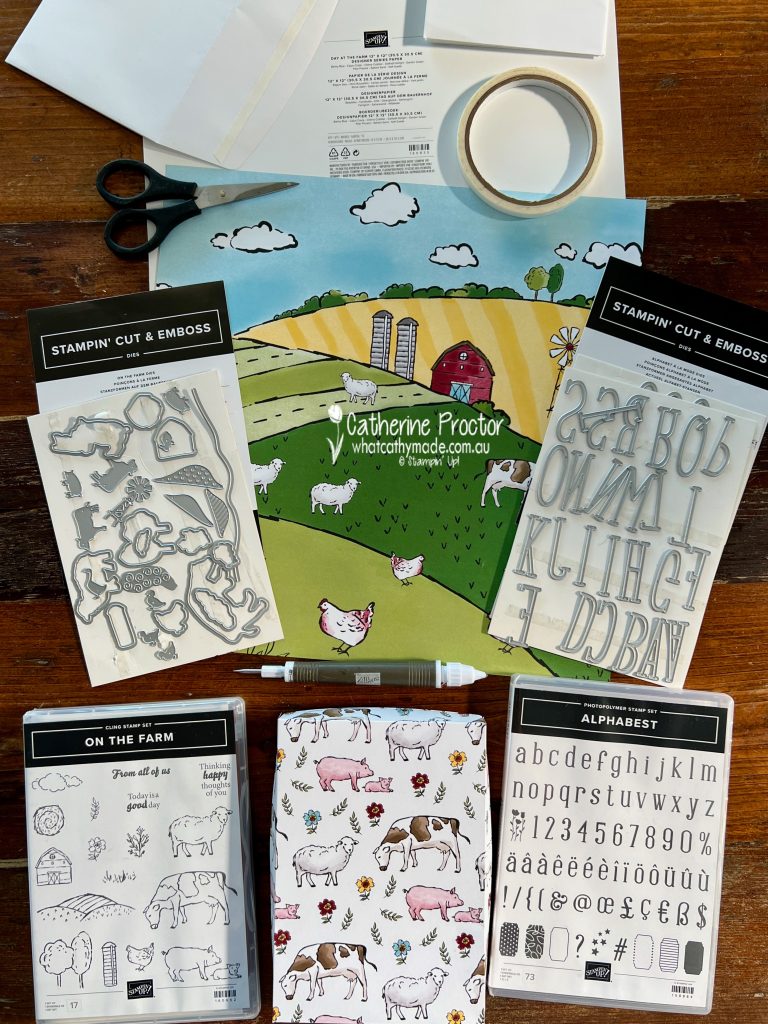
So why have I used so many colours for my project this week? One of the free SALE-a-bration items you can redeem for a $90 spend until 28th February 2023 is the Day at the Farm DSP and I’ve used this DSP to create a children’s counting book.
Here’s a short one-minute video to show you what the counting book looks like.
And here’s a closer look at each page.
In addition to the Day At The Farm DSP I’ve used the On the Farm Stamp and Dies (available as the On the Farm bundle), the Alphabest stamp set and the Alphabet a la Mode dies. The On the Farm Dies die cut out many of the images in the Day At The Farm DSP.
The counting book is made using envelopes – it’s a quick and easy alternative to making a chipboard album with a paper hinge and you don’t need a scoring board.
I’ve also created this 24 minute video on my YouTube channel that shows you how I made each page of this counting book and takes you through the process of making an envelope album, step by step.
Now it’s time to hop on over to our next participant, the lovely Andrea Sargent – I can’t wait to see what Andrea has made this week!
If at any time you find a broken link, you can find the complete list of all participants below.
If you live in Australia, you can find and purchase these products in my Stampin’ Up! Online Store once they are available to purchase tomorrow morning.
We’ll be back next Wednesday January 25 with projects showcasing another one of the Subtles, Petal Pink.