Are you ready for some more Christmas crafting inspiration?
It’s week three of the 2025 Heart of Christmas blog hop and our Art With Heart team have plenty more inspiration for your Christmas projects.
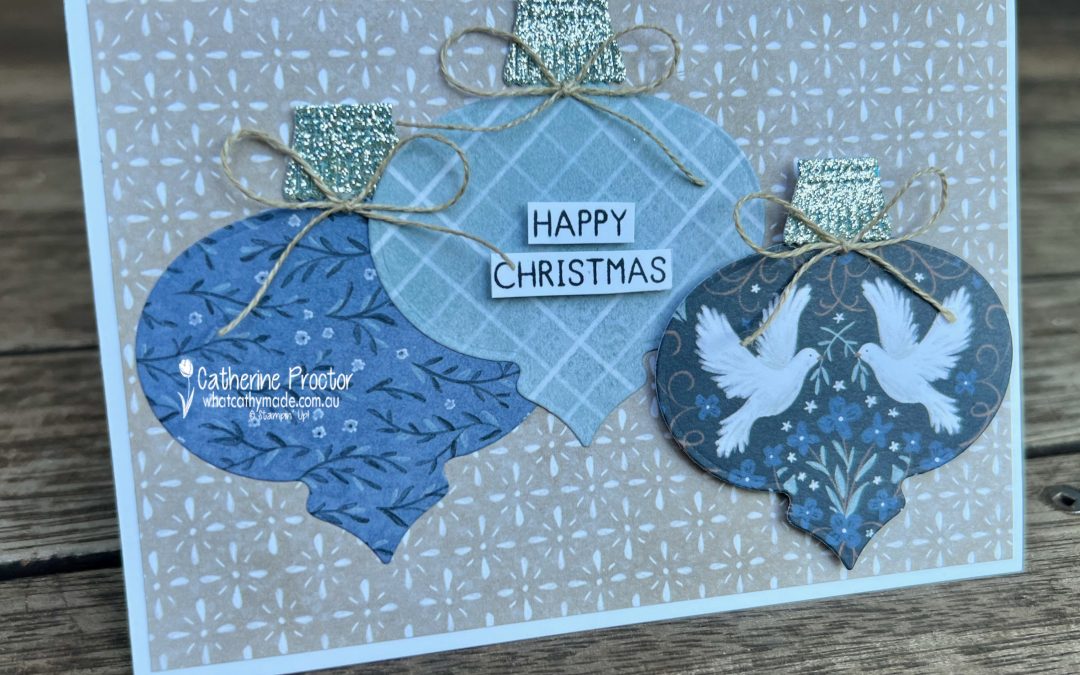
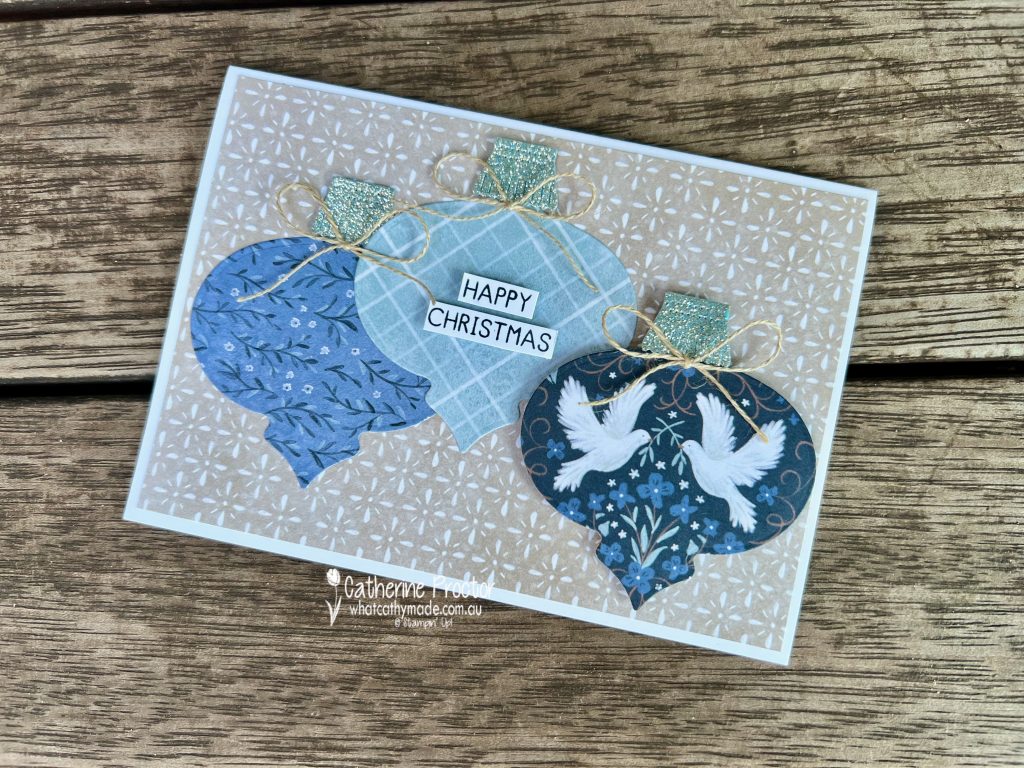
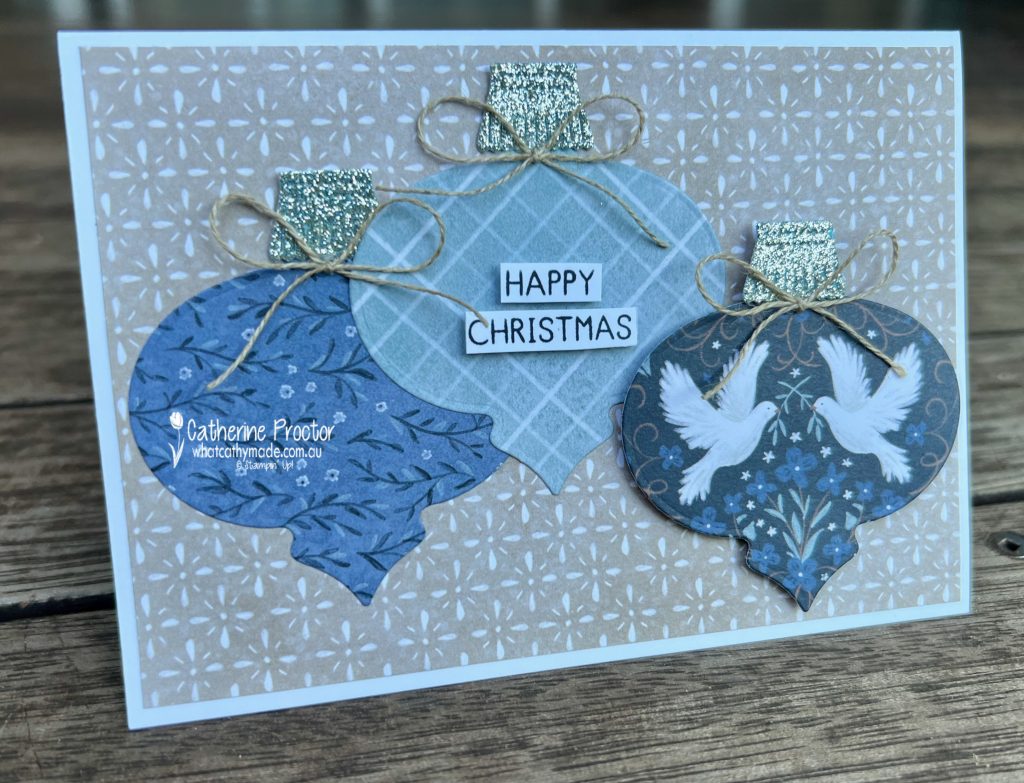
My Christmas card this week combines products from the Peaceful Garden Suite Collection and the Modern Christmas Suite. I love it when products from different suites work so well together!
The Ornamental Christmas dies are part of the Modern Christmas Suite and they include two large Christmas bauble dies with ornament cap dies, just perfect for showcasing beautiful patterns in DSP.
I’ve seen a few Christmas cards that have used the Bauble Blooms Dies with the Peaceful Garden 12″ x 12″ (30.5 x 30.5 cm) Designer Series Paper, so I thought I’d see if it also worked with the Ornamental Christmas dies and I’m really happy with the result!
I’ve used the ornament cap dies to die cut the Peaceful Garden 12″ x 12″ (30.5 x 30.5 cm) Glimmer Paper, adding a touch of shimmer to my Christmas card. I had to photograph my card outside this week to capture the glimmer – I think this photo shows it the best.
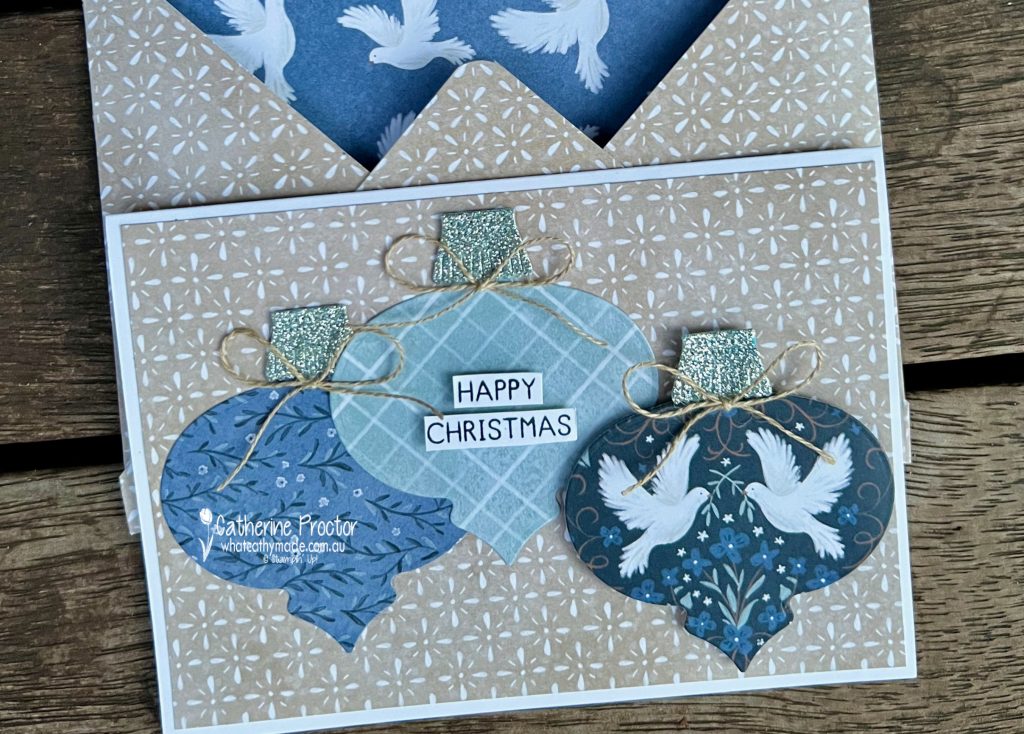
Such a pretty card deserves a handmade envelope, so I made one using the Peaceful Garden 12″ x 12″ (30.5 x 30.5 cm) Designer Series Paper .
The “Happy Christmas” sentiment is stamped in Secret Sea using a sentiment from a gorgeous stamp set called the Gift of Joy Stamp Set.
Take a look at some more Christmas Card inspiration on our Heart of Christmas blog hop!
Now it’s time to hop in over to our next participant, the lovely Sharon Davern. I can’t wait to see what Sharon has made this week!
If the next button link is not working or you’d like to see the entire list of participants go to Sharon Davern‘s blog. Sharon does an amazing job of hosting our Heart of Christmas blog every Monday.
Our AWH team will be back on Wednesday night, showcasing Early Espresso on our Insta Hop. I hope you can join us then!
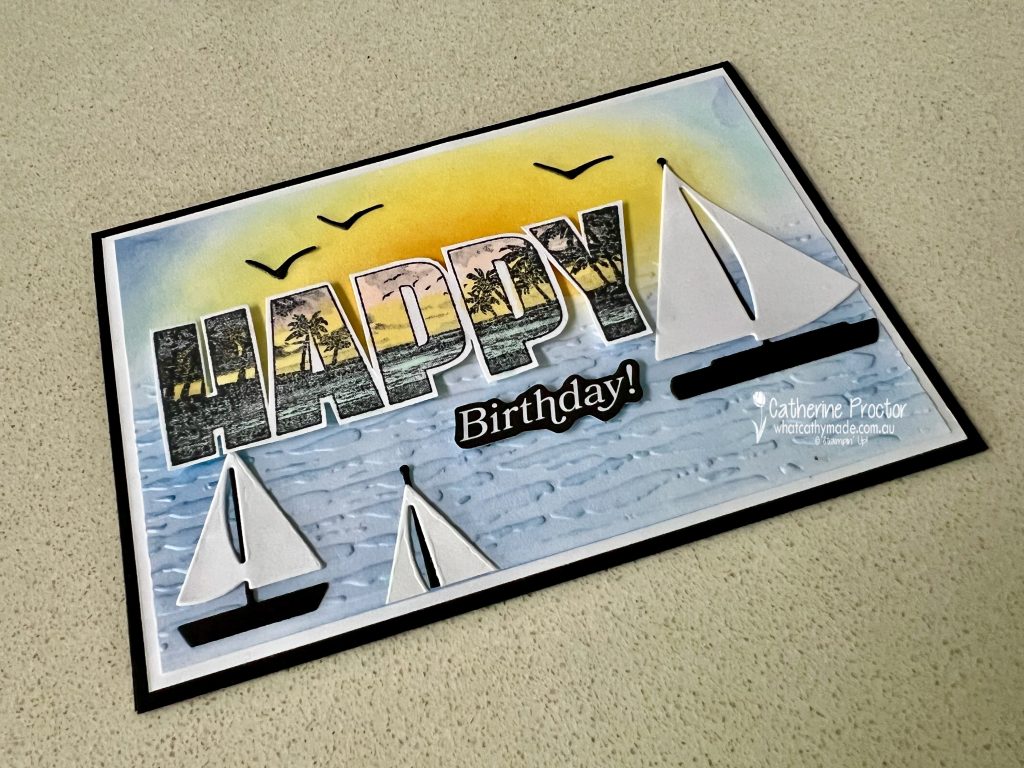
This week we’re showcasing Daffodil Delight, a sunny, happy yellow from the Brights family.
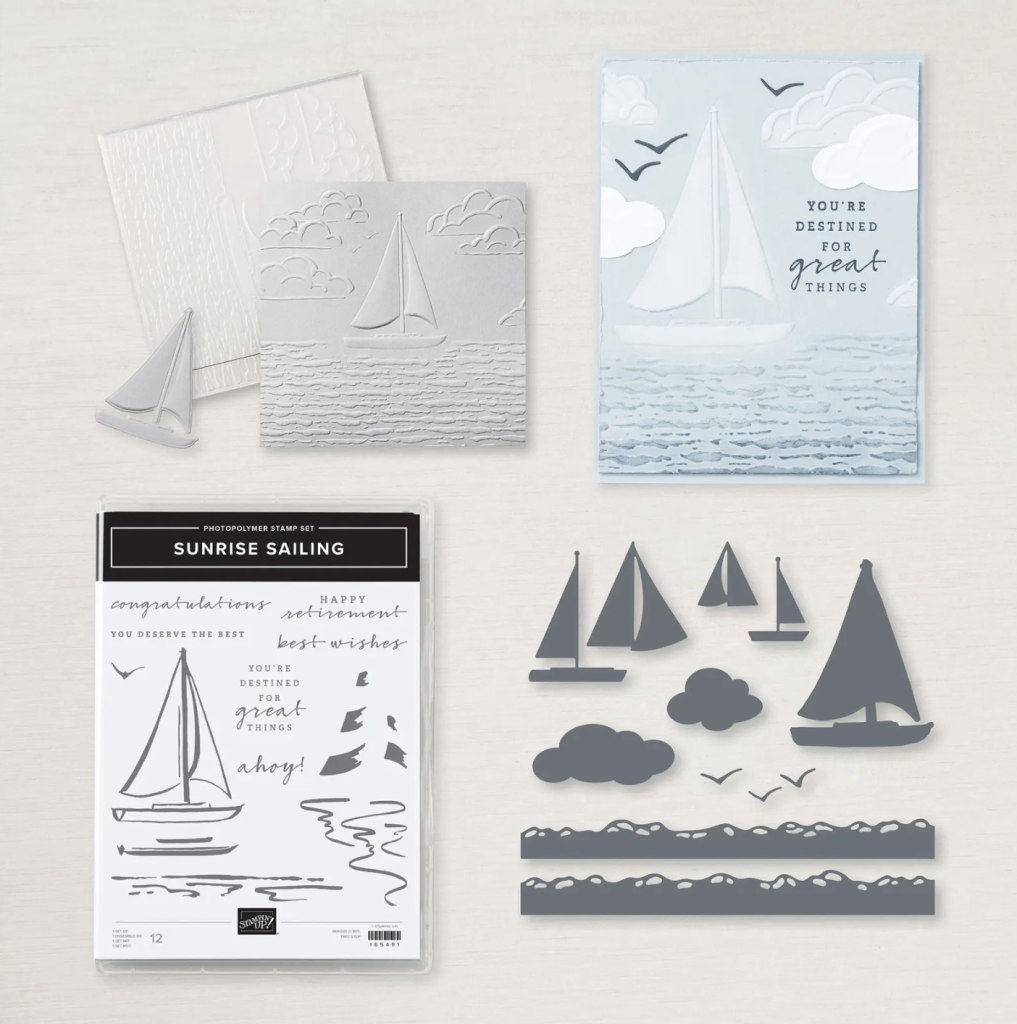
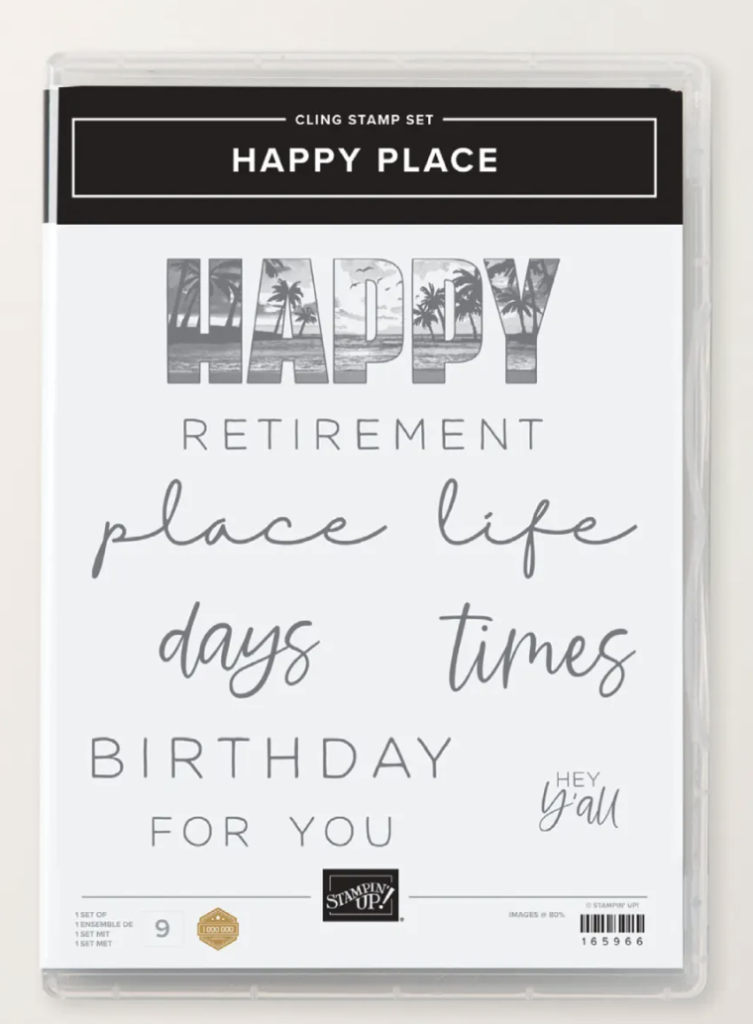
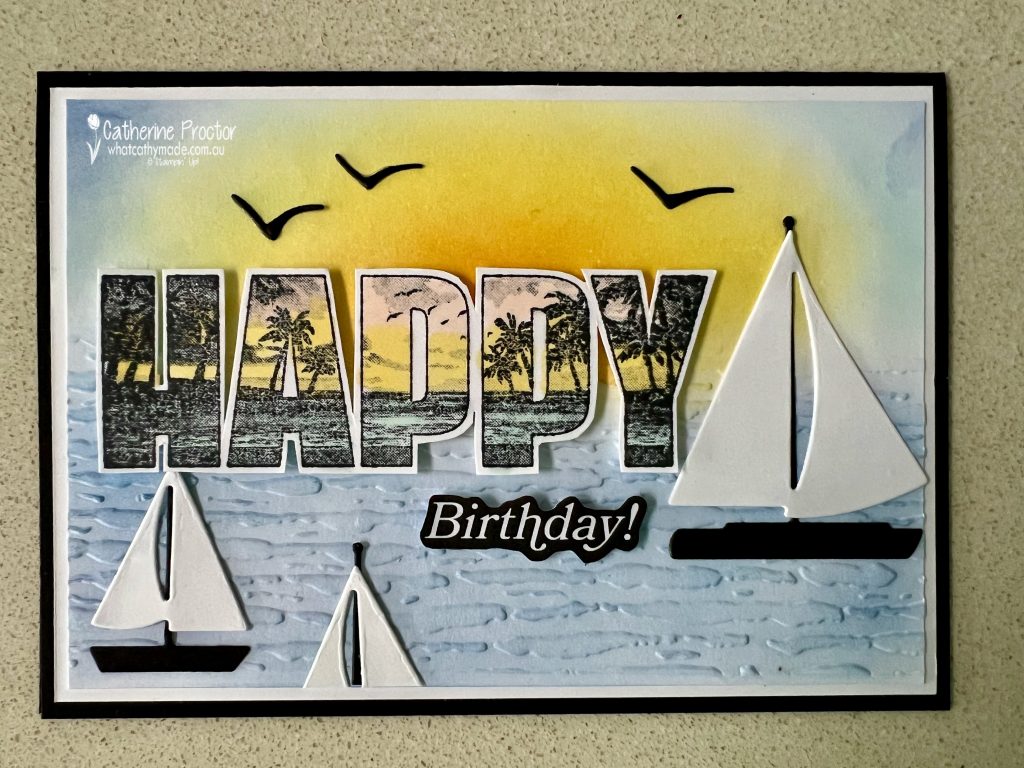
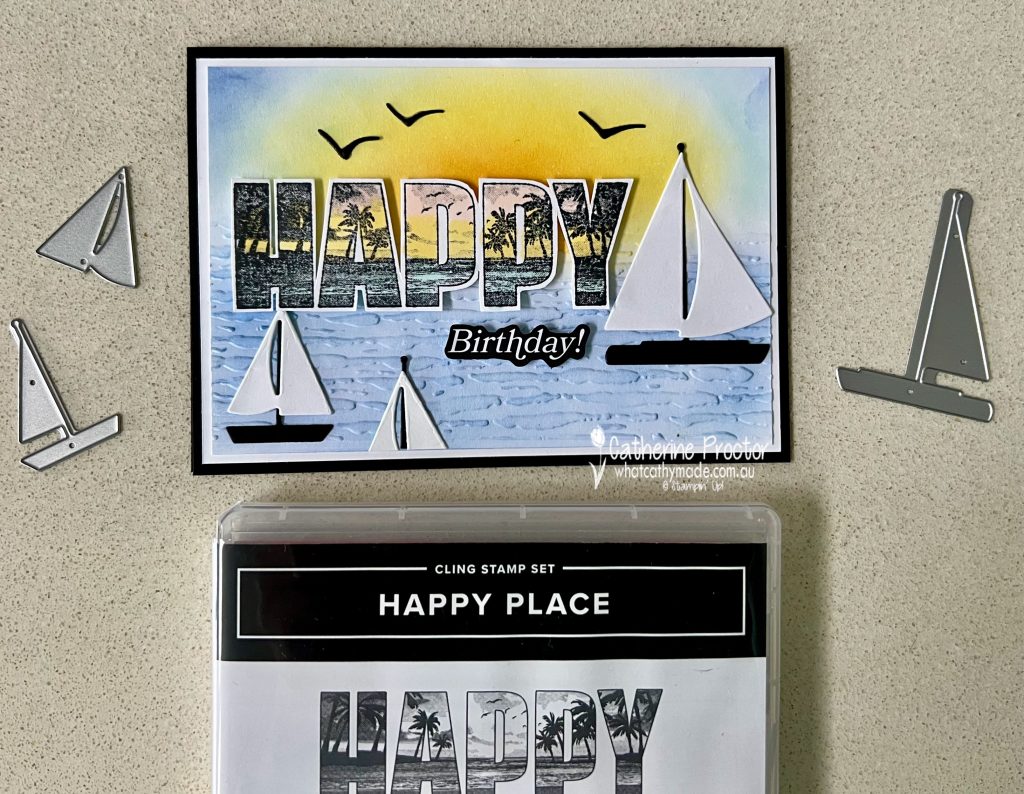
As soon as I saw the “Happy Place” stamp set in the new September – December catalogue I knew it would work perfectly with the Sunrise Sailing bundle!
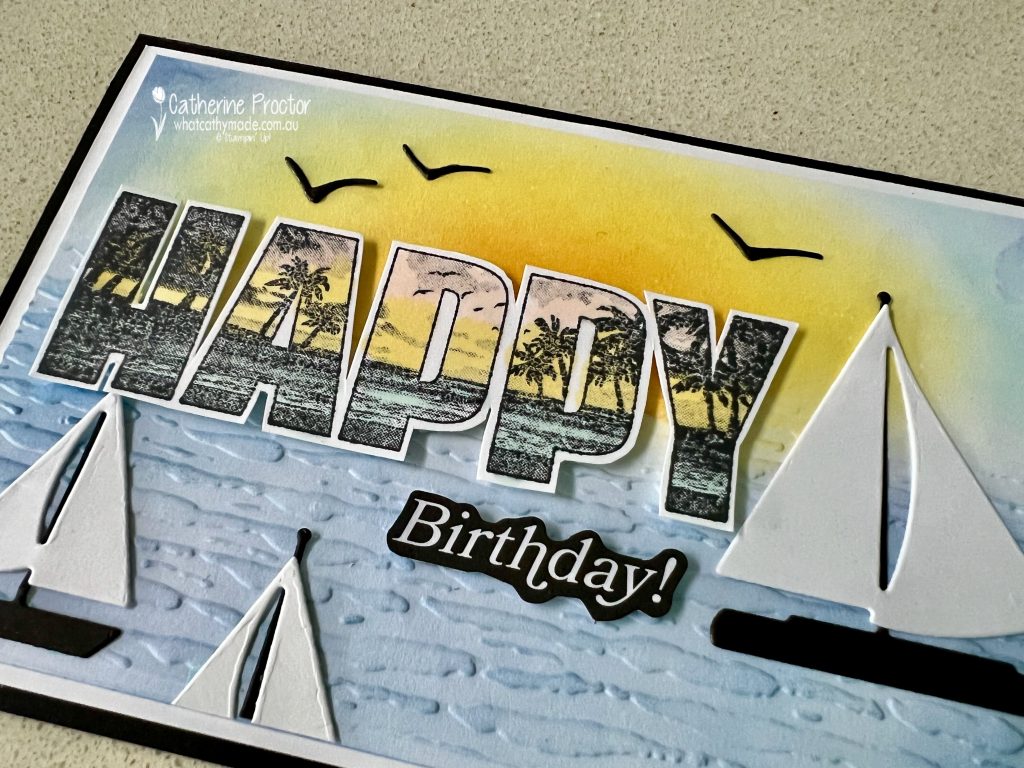
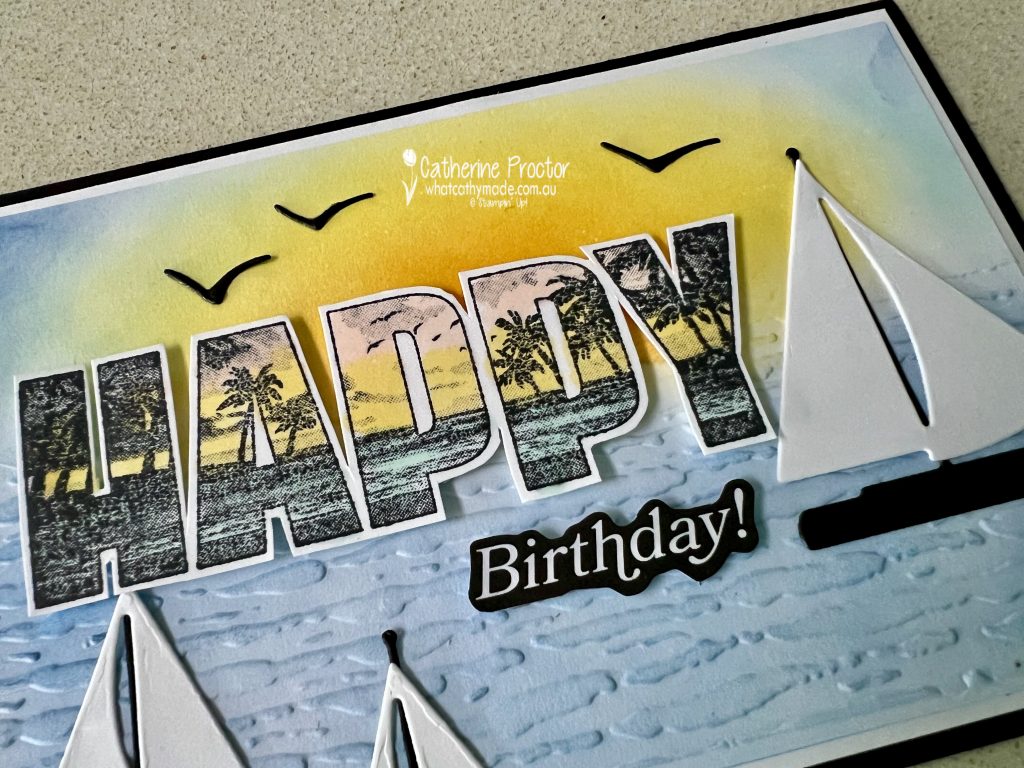
To create my sunrise scene I’ve used a mix of colours. The inks I’ve blended on the Basic White cardstock layer to create my sunrise are Daffodil Delight, Night of Navy, Peach Pie and Balmy Blue.
The Stampin’ Blend colours I used to colour in the “Happy” stamp are Daffodil Delight, Petal Pink and Pool Party. And the card base is Basic Black cardstock.
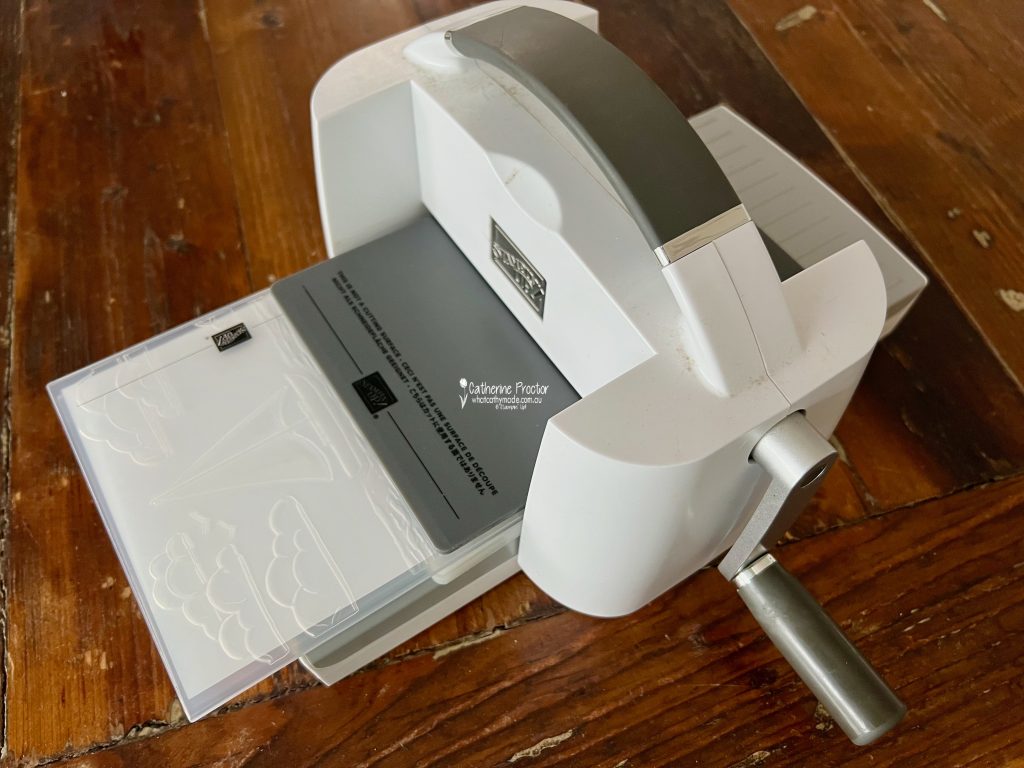
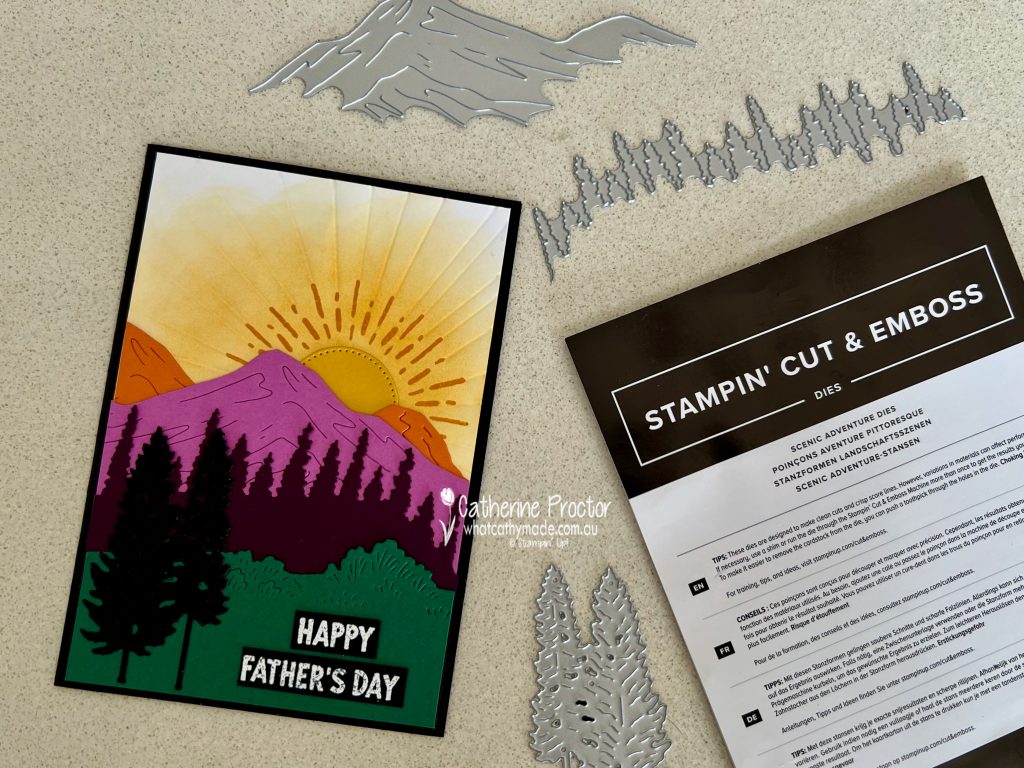
How to partially emboss a cardstock layer
For my sunrise layer I wanted the texture of the sea underneath my blended sunrise, without the embossed image of the sail boat. To achieve this effect I simply embossed the bottom section of the Sunrise Sailing EF by rotating it 90 degrees and only running the lower section through the Stampin’ Up! Stampin’ Cut & Emboss Machine.
This image shows how I’ve extended most of the embossing folder off the edge of the embossing platform. NOTE: the Specialty Plate (Plate 4) only covers the area of the cardstock I want to emboss.
Blending and shading to create a sunrise.
Blending brushes make it easy to create a sunrise/sunset scene. I started at the centre with the Daffodil Delight, adding a touch of Peach Pie to darken the centre of the Daffodil Delight, then I blended the Balmy Blue and Night of Navy for the rest of the sky. The ocean is also Night of Navy.
I used stampin blends to colour in the “Happy” stamp and then I cropped the “birthday” from a “Happy Birthday” greeting in the Greetings for All Mix & Match Ephemera Pack.
The cute little sail boats and seagulls are all from the Sunrise Sailing bundle, die cut in Basic Black and Basic White.
Take a look at some more Daffodil Delight inspiration on our Insta Hop!
Our blog hop is now an Instagram hop but the good news is that you don’t need to have an Instagram account to view all of the other projects!
Simply copy any of the Insta handles below into a new search engine window to follow the Instagram hop at any point.
Next in our Hop is Kate @craftwithkate. Be sure to check out her gorgeous project/s.
The full list of this week’s InstaHop is listed below:
Kate @craftwithkate
Helen @apaperparadise
Andrea @andreaksargent
Kirsty @crafty.littlemiss
Leanne @createwithleanne2
Sharon @sharondaverncreates
Cathy @whatcathymade – you are here!
We’ll be back next Wednesday when we are showcasing the darkest of the neutrals: Early Espresso.
Looking for some Christmas card inspiration?
Our Heart of Christmas blog hop is back for 2025 and we will go live at 8pm (EAST) every Monday night with Christmas card inspiration. This hop is a traditional blog hop (not an Instahop) so you can follow along by reading my blog.
It’s week two of the 2025 Heart of Christmas blog hop and hopefully our Art With Heart team will provide you with plenty more inspiration for your Christmas projects.
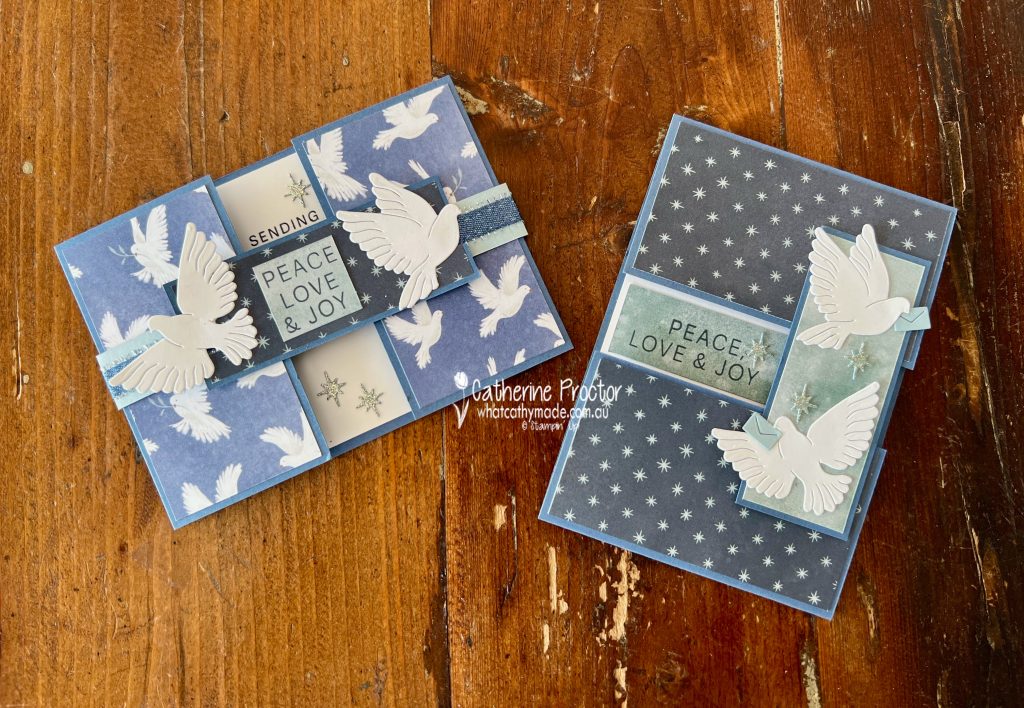
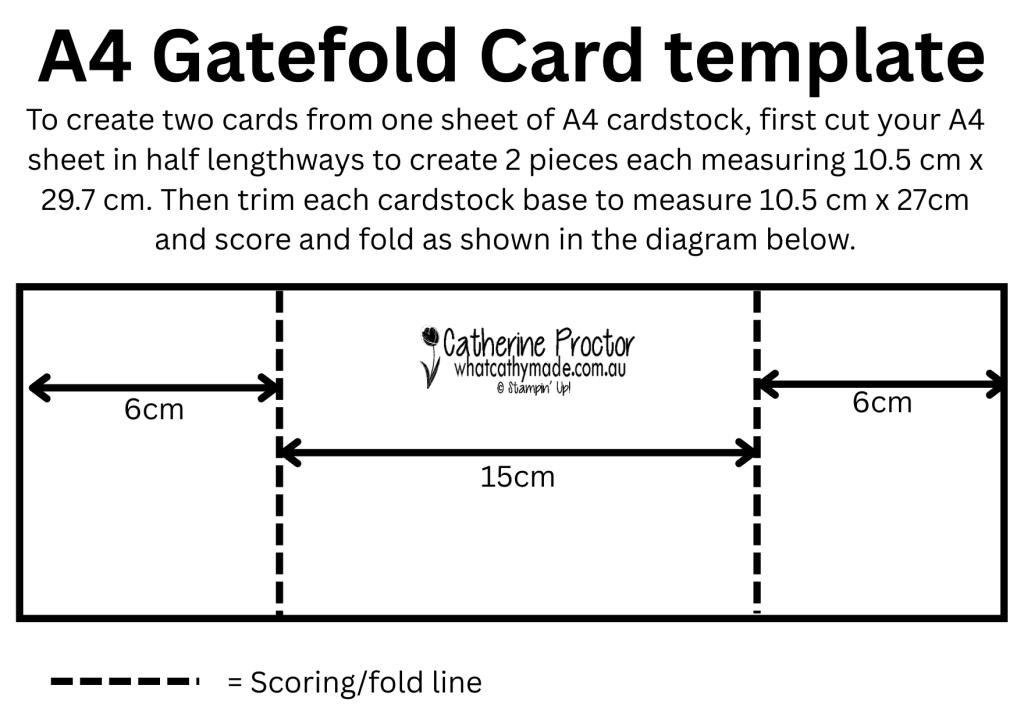
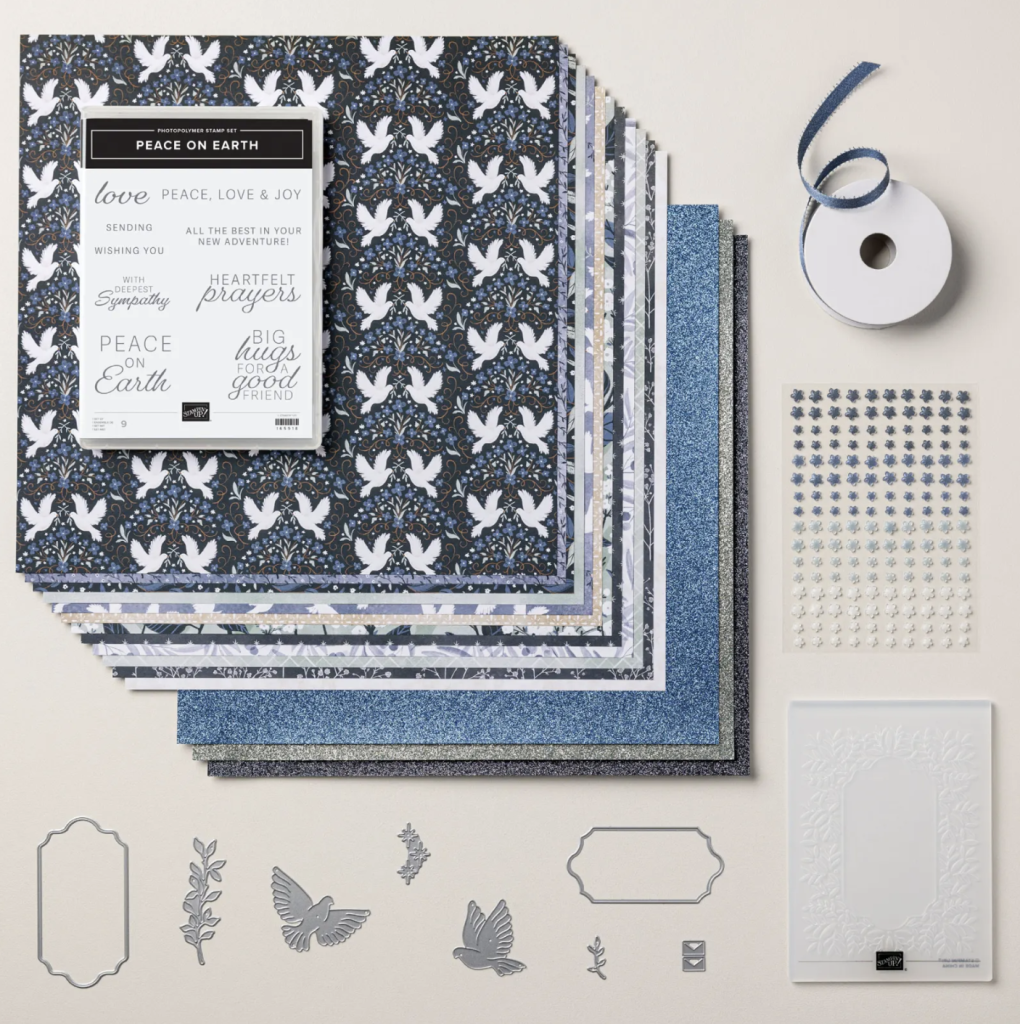
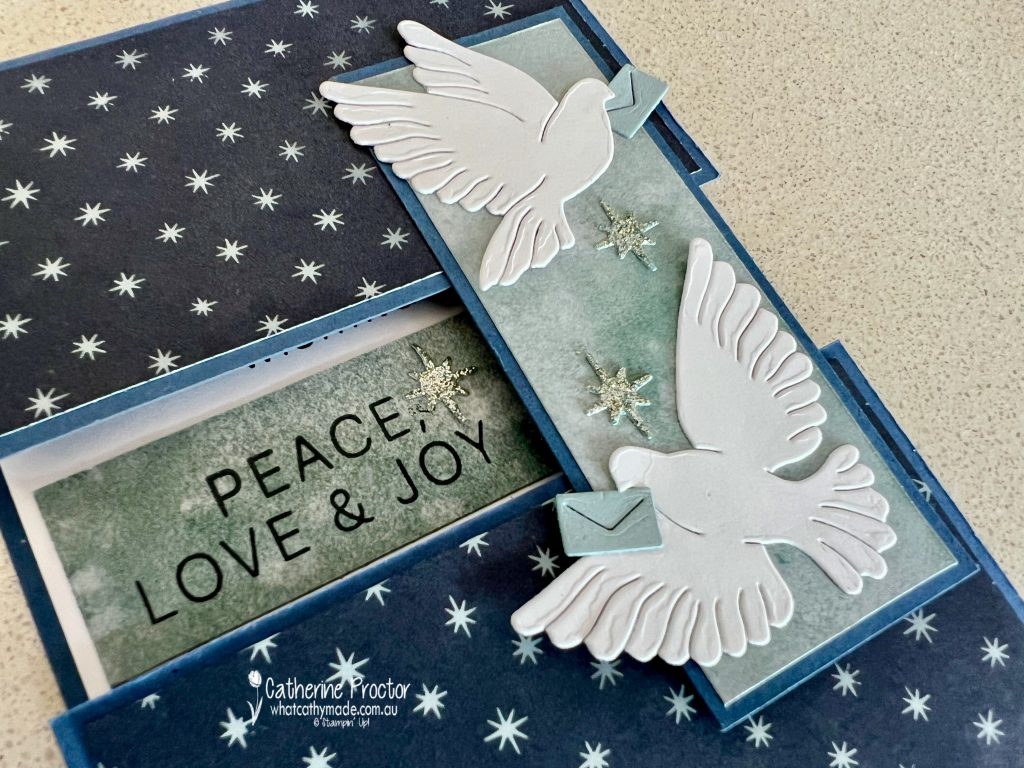
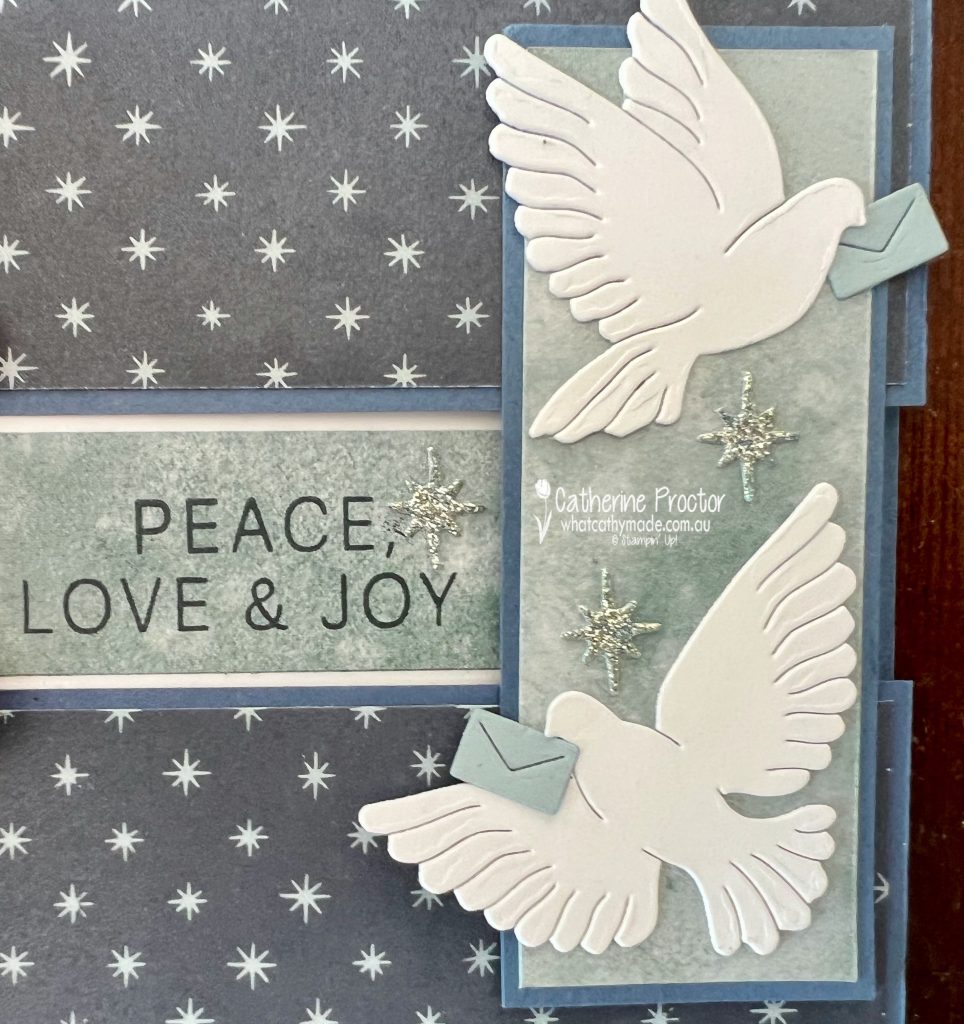
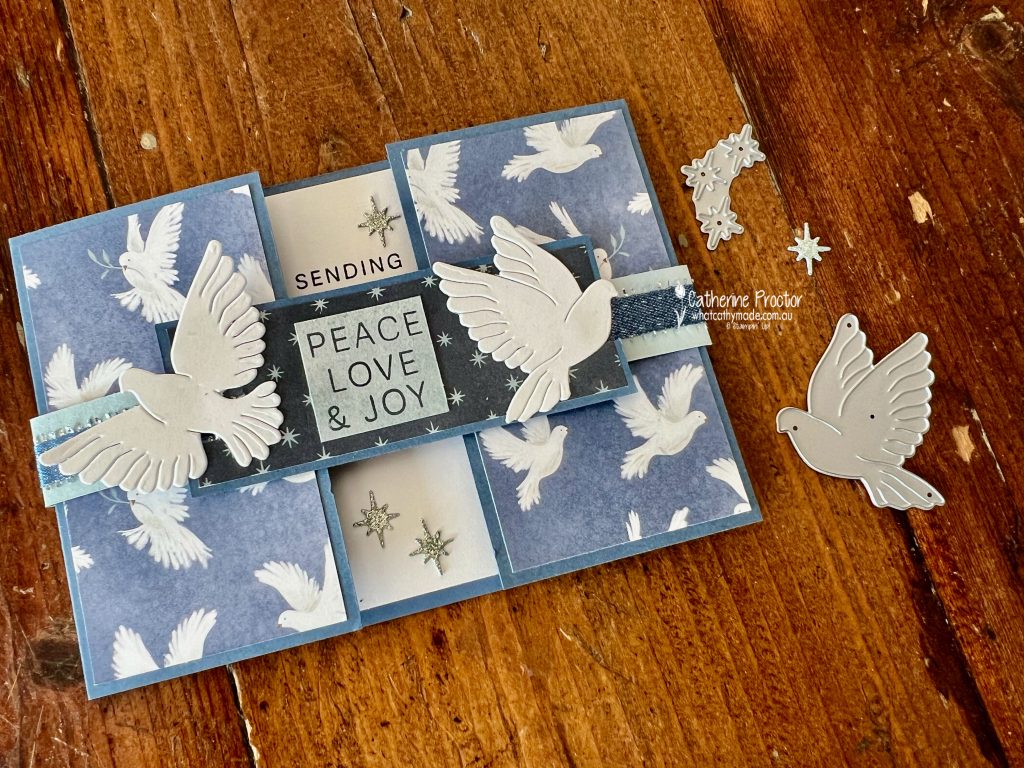
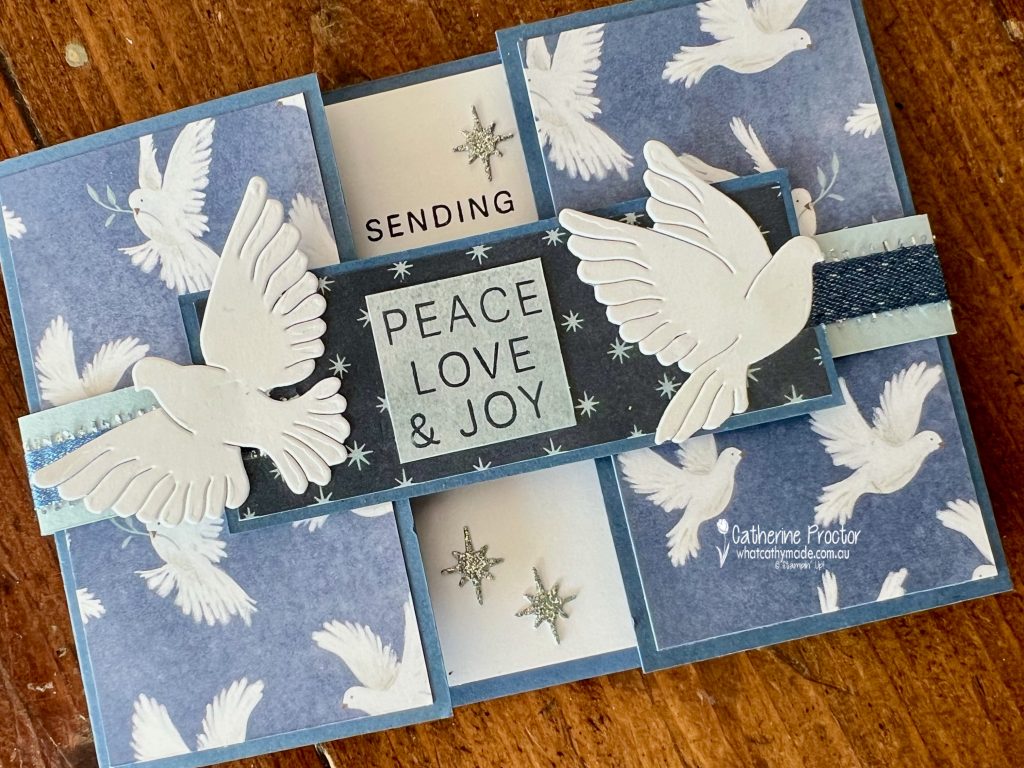
This week I’ve created two gatefold cards using products from the Peaceful Garden Suite Collection. One is a vertical gatefold card and the other is a horizontal gatefold card.
This is the template I’ve created to show you how I made two gatefold cards from one sheet of Misty Moonlight cardstock. For both cards I’ve designed the fold so it reveals the middle of the inside layer of the card, even when the card is closed.
All of the DSP, glimmer foil, embellishments, sentiments and ribbon used on both these cards comes from the Peaceful Garden Suite, which you’ll find in the September – December 2025 Catalogue.
Card 1 – Vertical Gatefold Card
This starry Secret Sea/Cloud Cover DSP is my favourite DSP design from the Peaceful Garden 12″ x 12″ (30.5 x 30.5 cm) Designer Series Paper and it pairs perfectly with the other Cloud Cover DSP I’ve used for the inside sentiment and the side layering piece with the doves.
I have to admit I had originally stamped the sentiment directly onto the inside Basic White cardstock panel, however I accidentally smudged some ink so I covered it up with a strip of DSP and I really like the effect!
For both cards I’ve die cut the Peaceful Garden 12″ x 12″ (30.5 x 30.5 cm) Glimmer Paper using the star dies from the Peace on Earth Bundle to create my embellishments.
The other die I love in this bundle is the tiny envelope die that fits in the doves’ mouths. I die cut it from Cloud cover cardstock for card one.
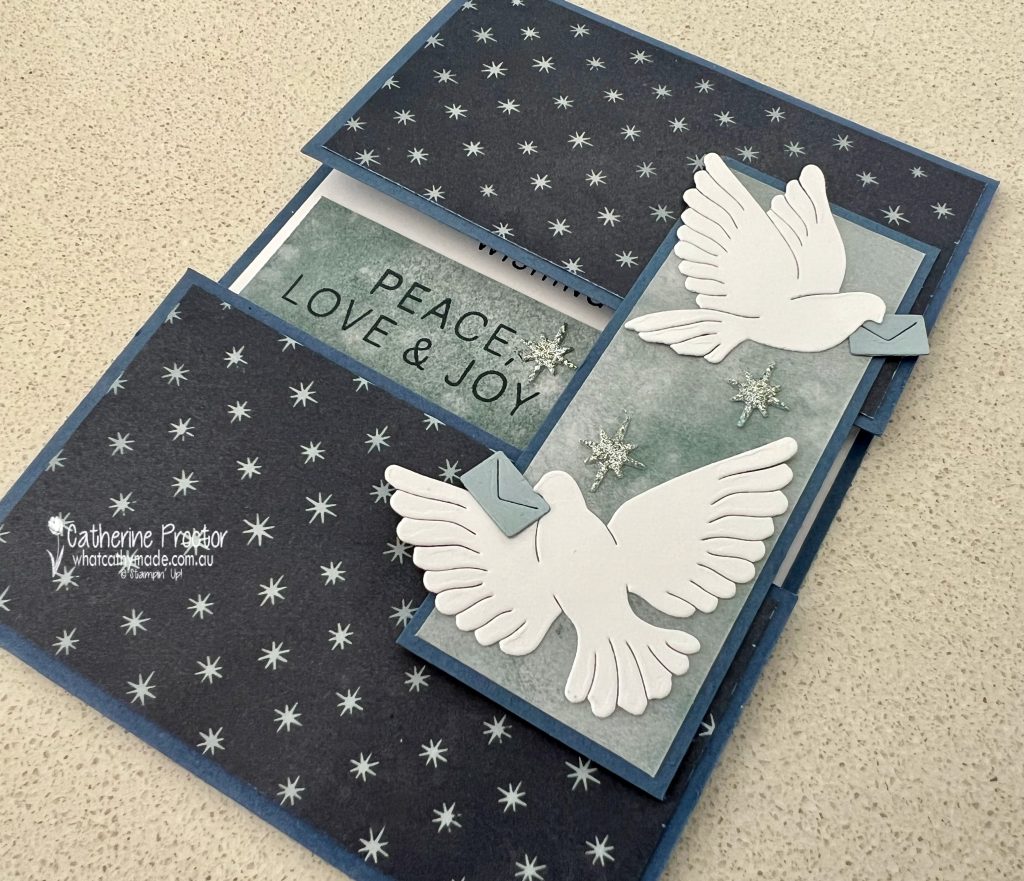
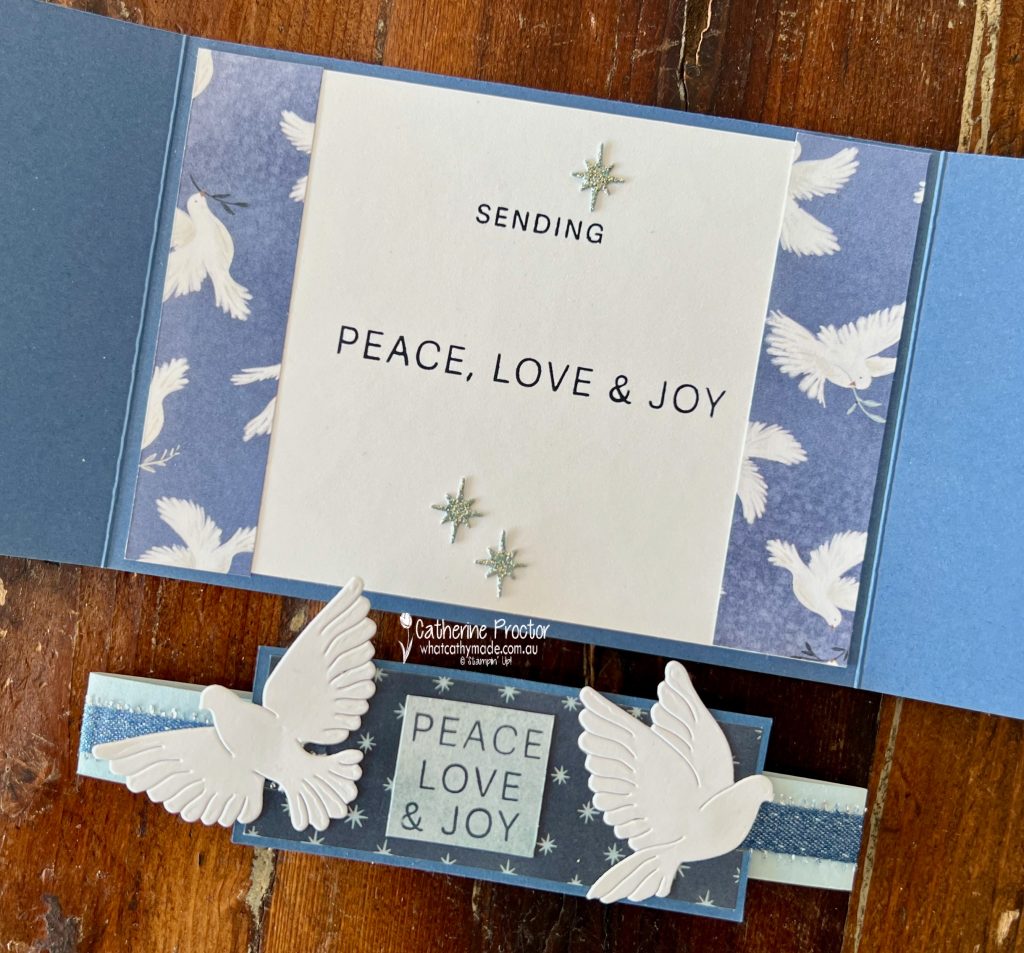
Here’s what the card looks like when you open it up. I simply used a single glue dot to hold closed the side layering piece with the doves.
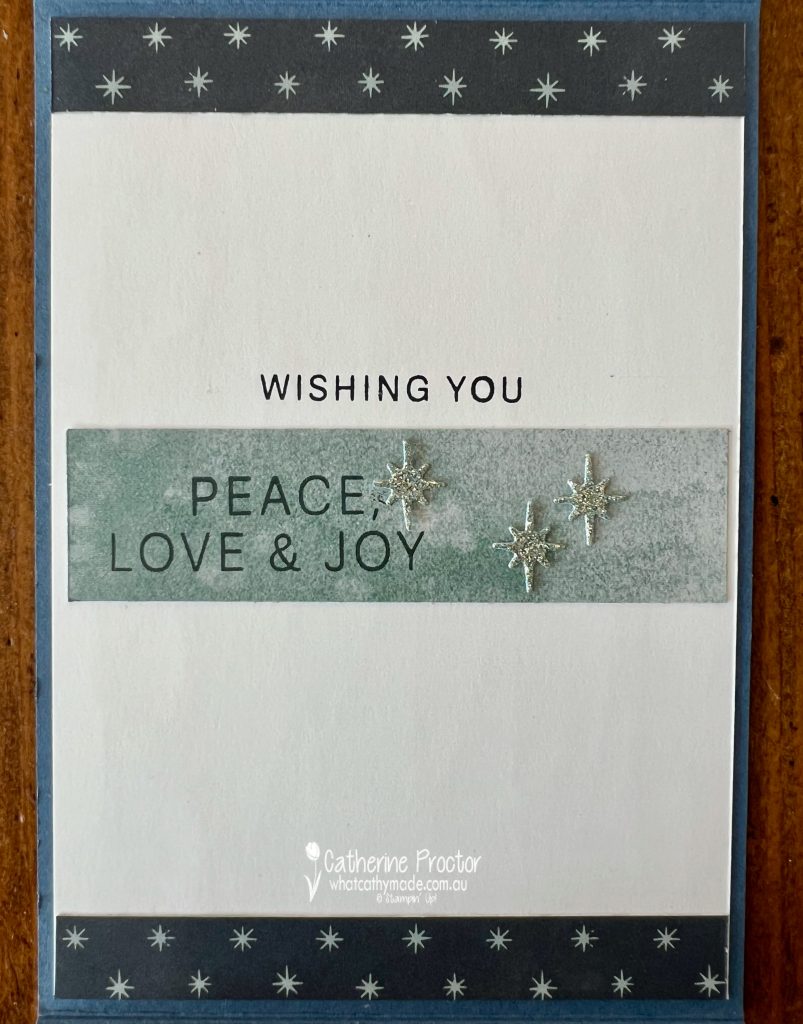
Card 2 – Horizontal Gatefold Card with a Belly Band
Card two has exactly the same measurements for the card base as card one, however it has been flipped vertically and a belly band has been added to secure it closed.
I created the belly band using a strip of cloud cover cardstock and a length of the Misty Moonlight & Silver Edged 1/2″ (1.3 cm) Ribbon from the Peaceful Garden Suite,
Here’s what the card looks like on the inside with the belly band removed.
For both cards I stamped the sentiments in Secret Sea, sometimes just partially stamping the “Peace, Love & Joy” sentiment to make it fit into my design.
Take a look at some more Christmas Card inspiration on our Heart of Christmas blog hop!
Now it’s time to hop in over to our next participant, the lovely Kate Morgan. I can’t wait to see what Kate has made this week!
If the next button link is not working or you’d like to see the entire list of participants go to Sharon Davern‘s blog. Sharon does an amazing job of hosting our Heart of Christmas blog every Monday.
Our AWH team will be back on Wednesday night, showcasing Daffodil Delight on our Insta Hop. I hope you can join us then!
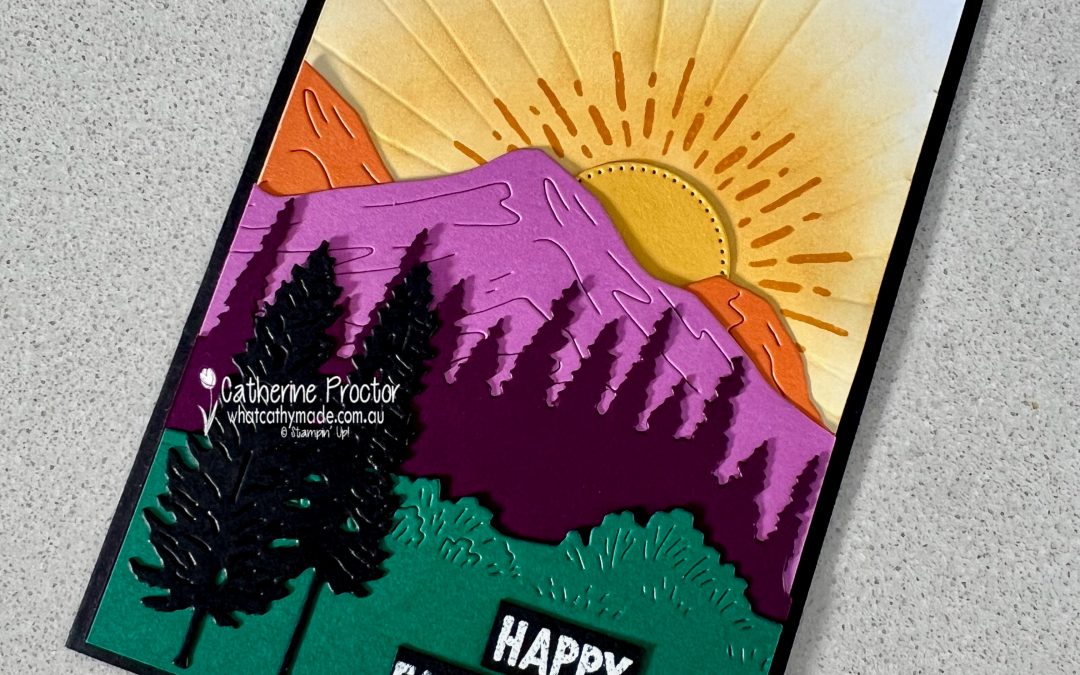
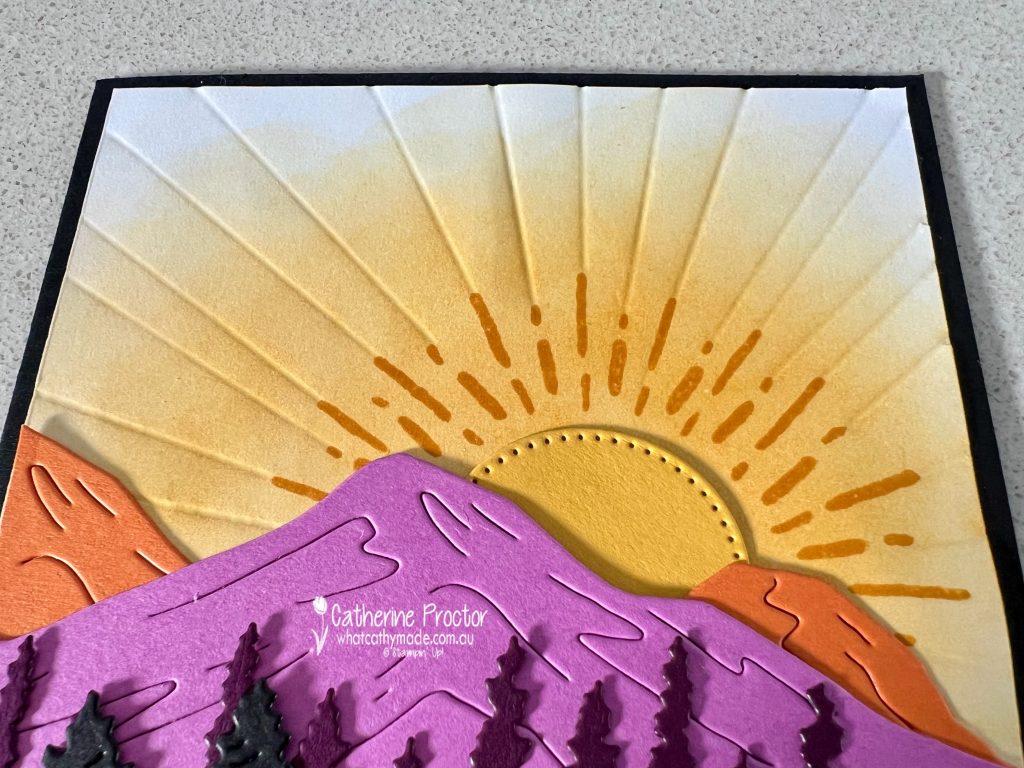
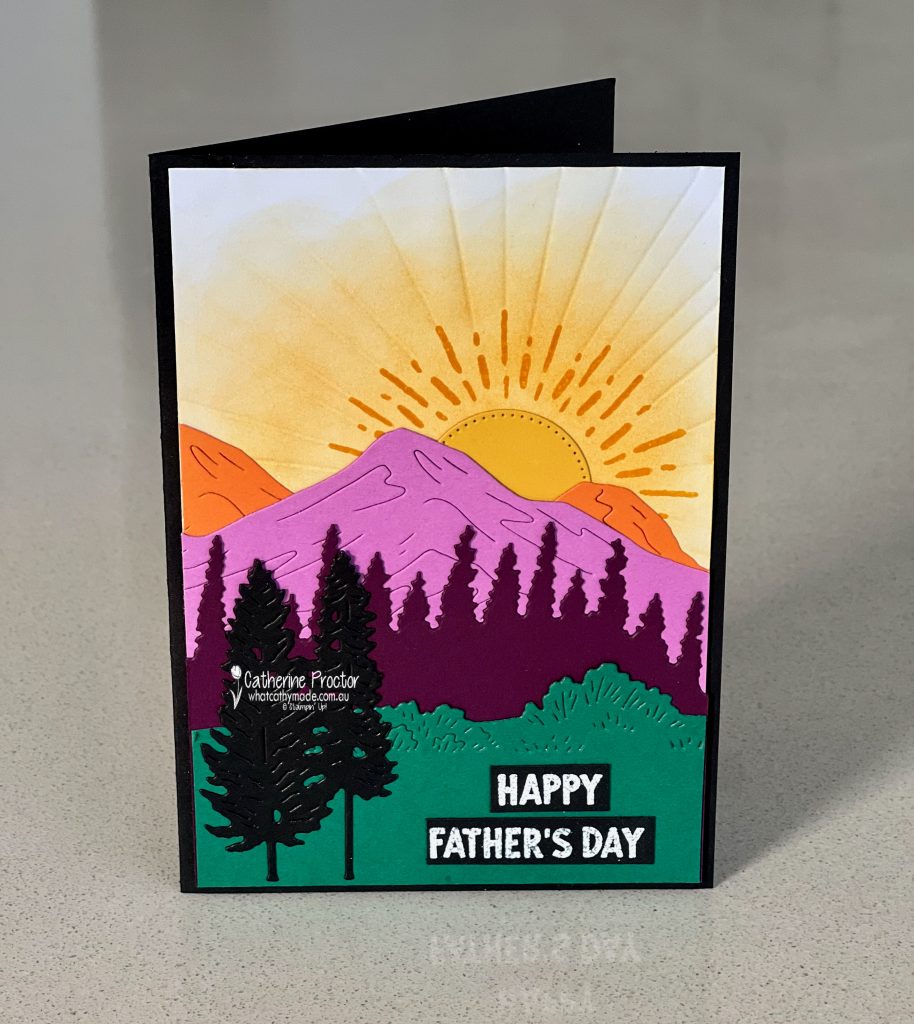
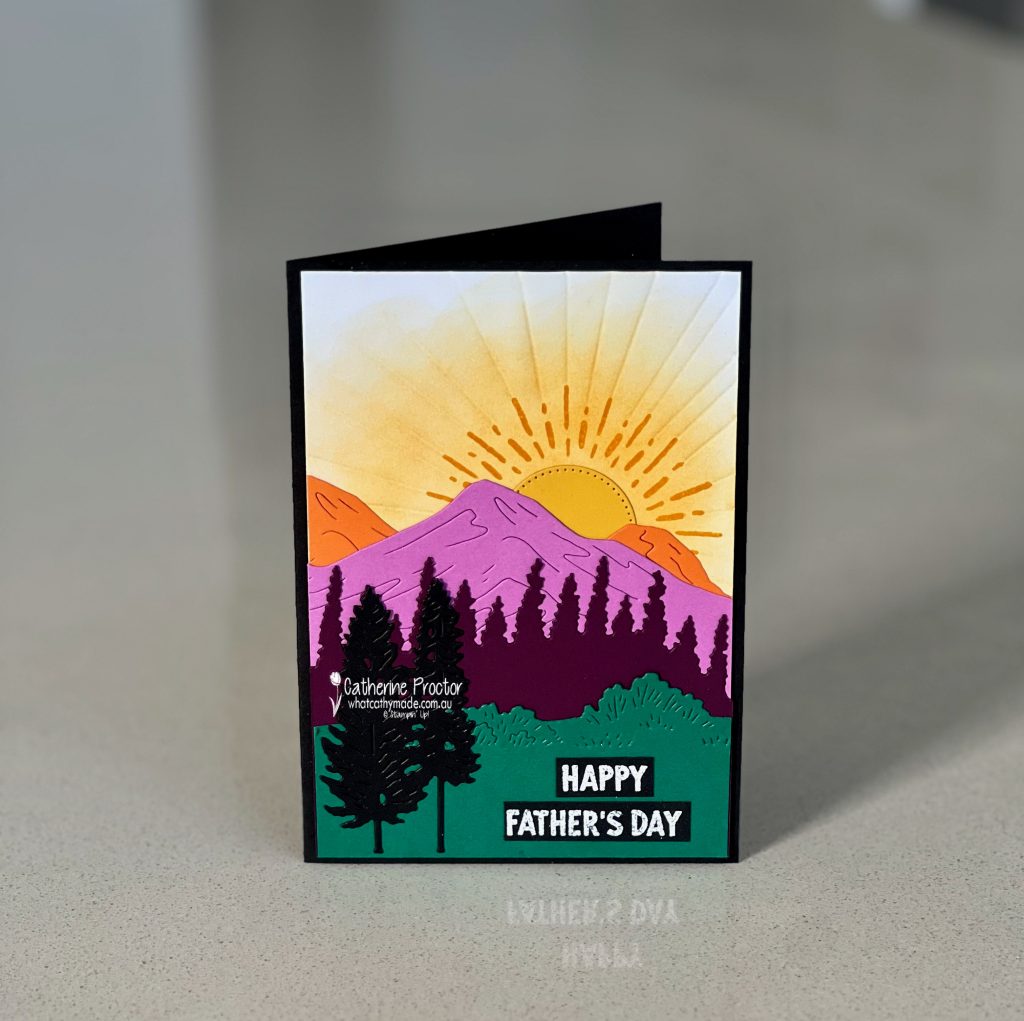
This week we’re showcasing Crushed Curry, a rich golden yellow from the Regals family, and I’ve used it with the amazing Scenic Adventure dies to create a sunrise Father’s Day card for my husband.
Although I usually gravitate towards more monochromatic colour palettes, for this card I took my inspiration from nature and used colours I would not normally pair together: Crushed Curry, Pumpkin Pie, Petunia Pop, Blackberry Bliss, Basic Black and Shaded Spruce.
The Scenic Adventure dies are part of a bundle with the Scenic Adventure stamp set, however on this card I’ve only used the Scenic Adventure dies, as well as a circle die from the Stylish Shapes dies to make the Crushed Curry sun. The only stamping is the sentiment.
Adding extra detail with hand embossing
To emphasise the Crushed Curry sun and add extra texture to this card I decided to add some hand embossing.
On a Basic White cardstock layer I stamped a sun in Crushed Curry using the semicircle stamp in the Sunshine Vibes stamp set and then I stamped the Sun rays in Crushed Curry all round the sun.
To add texture, I used the stylus from my Simply Scored Scoring Tool and a ruler to emboss lines that extend the sun rays. I then used a small blending brush and Crushed Curry Ink to add the glow of the sun in the sky as it rises above my mountain scene.
The white heat embossed “Father Day” sentiment is from the Trusty Tools stamp set, heat embossed onto Basic Black card stock.
I really love the vibrant, graphic quality this unusual colour combination gives to my sunrise scene and i hoipw my husband likes it too!
Take a look at some more Crushed Curry inspiration on our Insta Hop!
Our blog hop is now an Instagram hop but the good news is that you don’t need to have an Instagram account to view all of the other projects!
Simply copy any of the Insta handles below into a new search engine window to follow the Instagram hop at any point.
Next in our Hop is Kirsty @crafty.littlemiss . Be sure to check out her gorgeous project/s.
The full list of this week’s InstaHop is listed below:
Kirsty @crafty.littlemiss
Kate @craftwithkate
Helen @apaperparadise
Leanne @createwithleanne2
Sharon @sharondaverncreates
Andrea @andreaksargent
Vicki @vickiboucher
Cathy @whatcathymade
Cathy @whatcathymade – you are here!
We’ll be back next Wednesday when we are showcasing another yellow: Daffodil Delight!
Looking for some Christmas card inspiration?
Our Heart of Christmas blog hop is back for 2025 and we will go live at 8pm (EAST) every Monday night with Christmas card inspiration. This hop is a traditional blog hop (not an Instahop) so you can follow along by reading my blog.
You can also register NOW for the FREE World Cardmaking Day online Stampin’ Up! event.
If you haven’t received your copy of the new September – December Mini Catalogue, please get in touch with me and I’ll pop one in the post for you.
In the meantime, you can take a closer look at all the new products in the September – December Mini Catalogue and purchase them through my online store here
I’ll be back tonight with our Art With Heart Insta hop where we will be showcasing Crushed Curry. Hope you can join me tonight for some crafty inspiration.
Our Art With Heart, Heart of Christmas team are back for 2025 and hoping to provide plenty of inspiration for the next sixteen weeks with our Heart of Christmas blog hop!
In just two days time the new September – December 2025 Mini Catalogue (AKA the Christmas Catty), the September Online Exclusives and three new kits are being released.
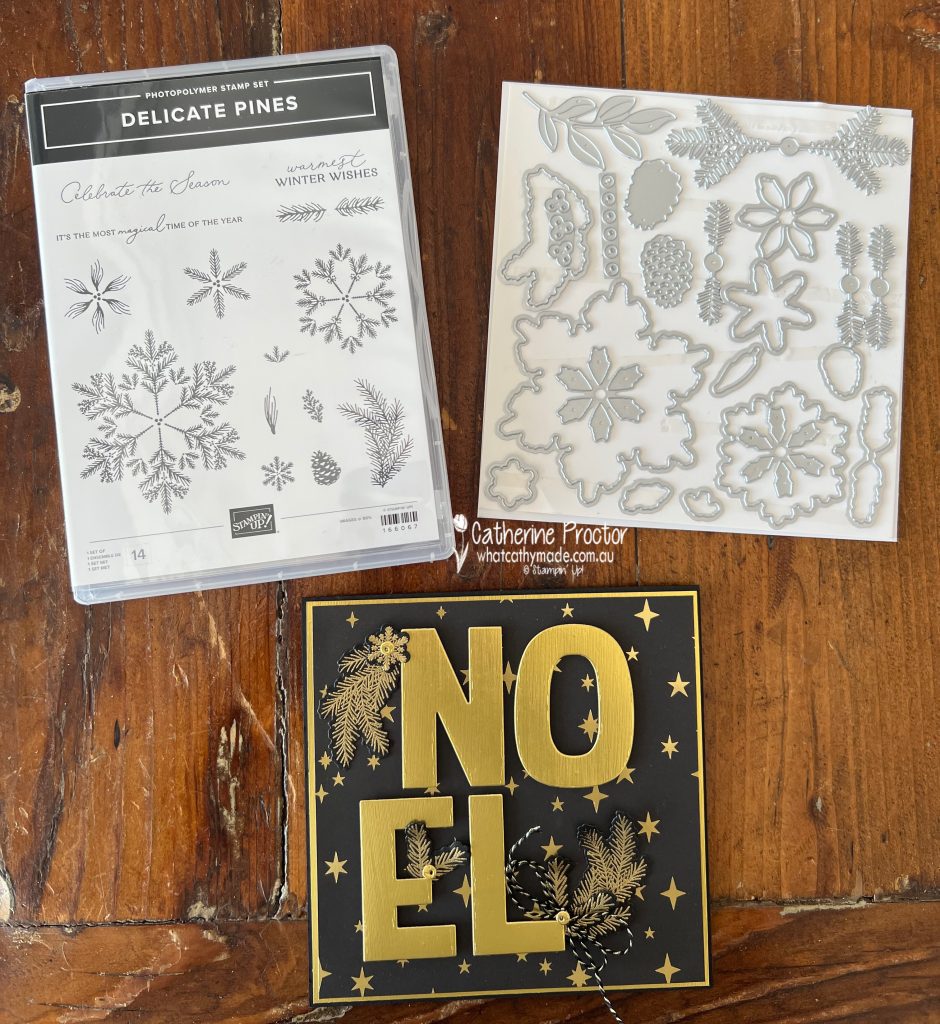
My two cards for week 1 use dies from the Annual Catalogue as well as products from the September Online Exclusives: the Modern Christmas Suite collection and the Elegant Pine Snowflake suite.
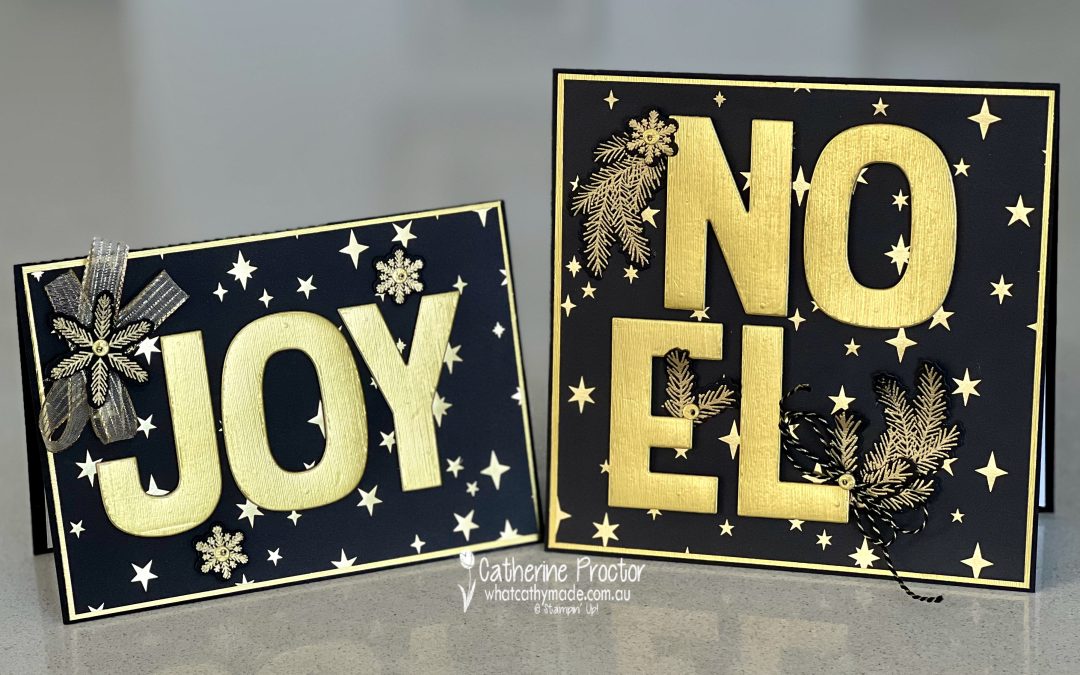
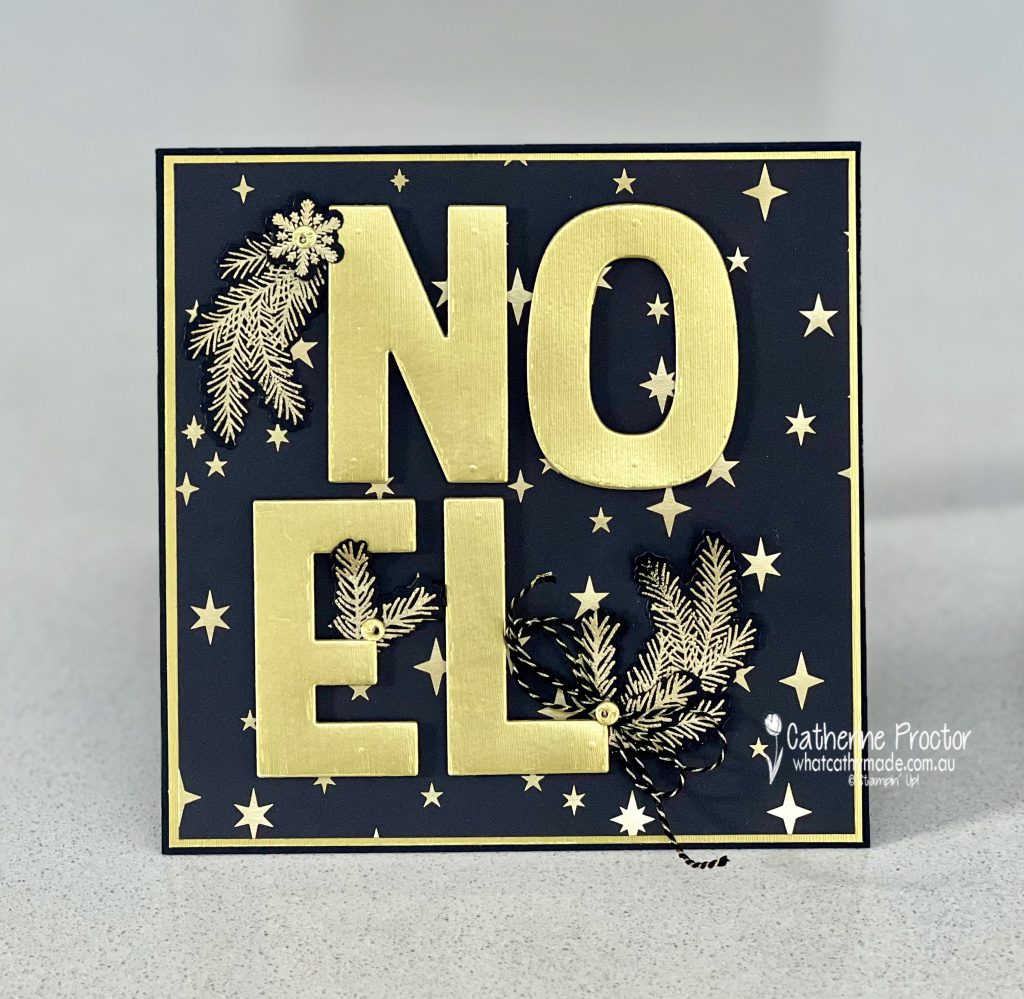
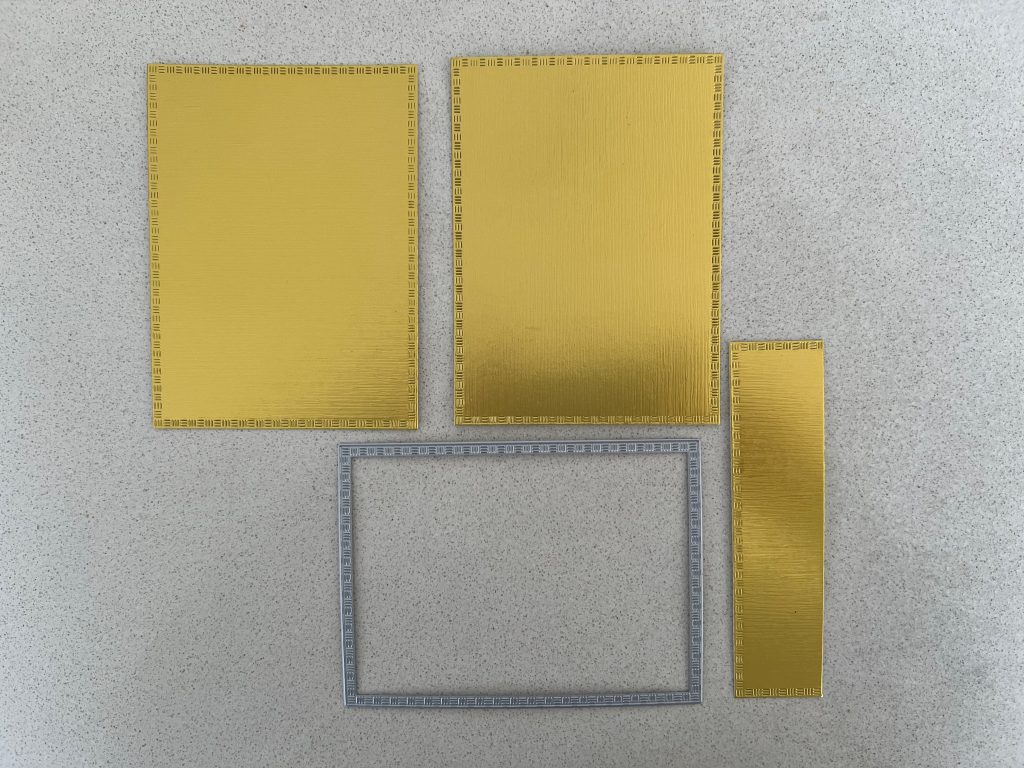
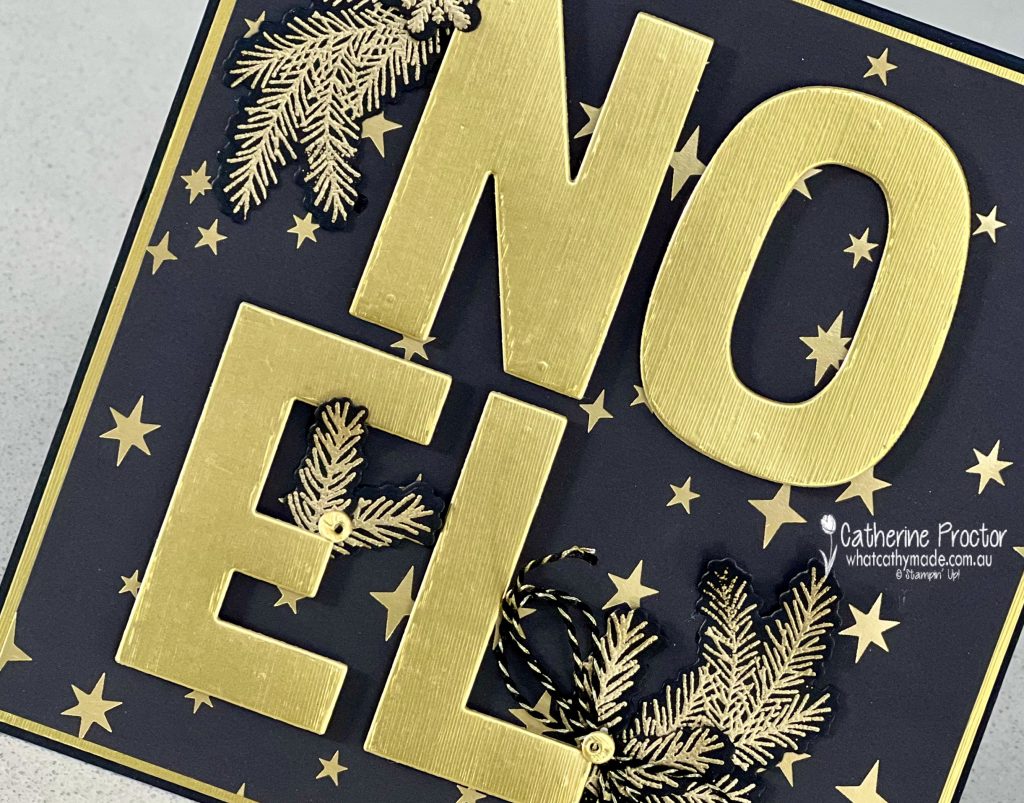
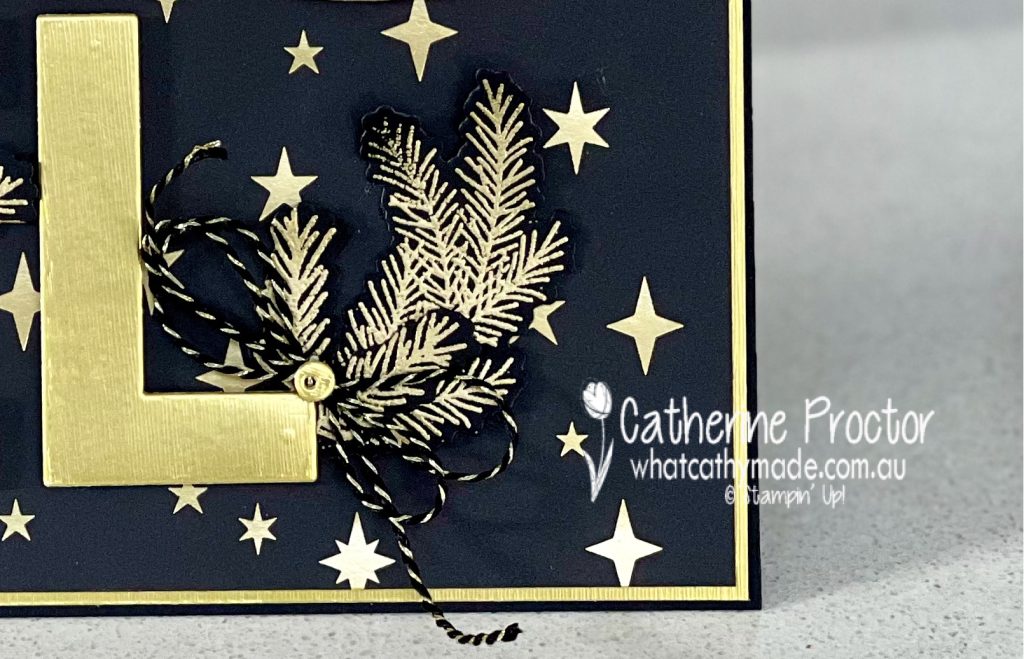
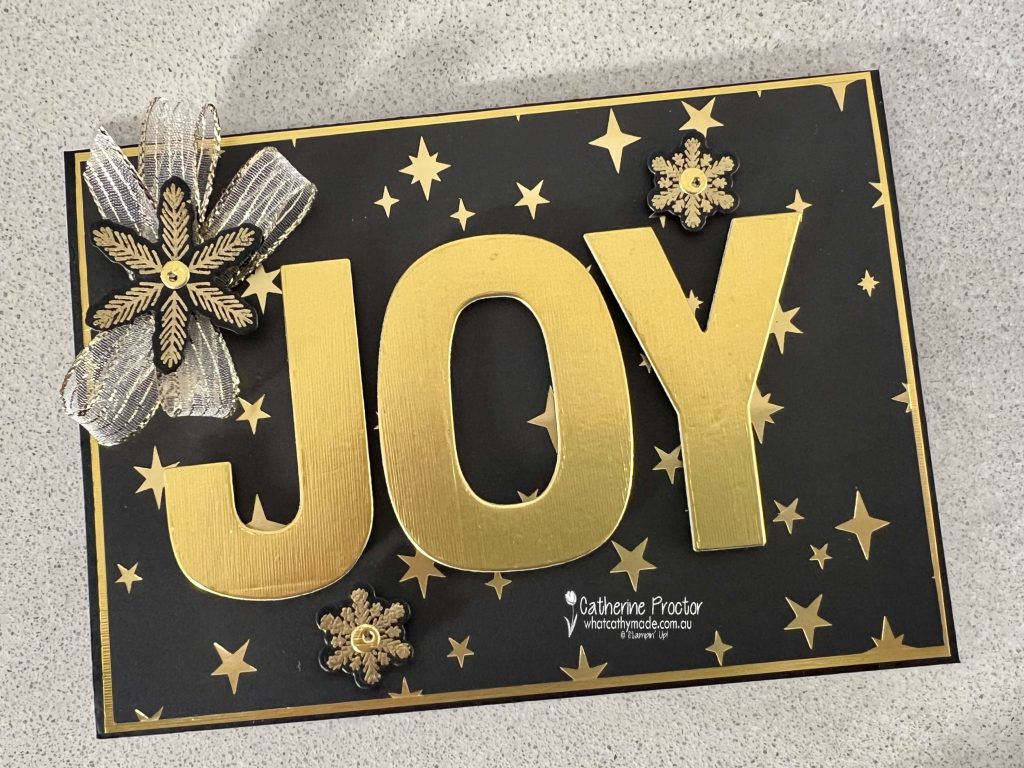
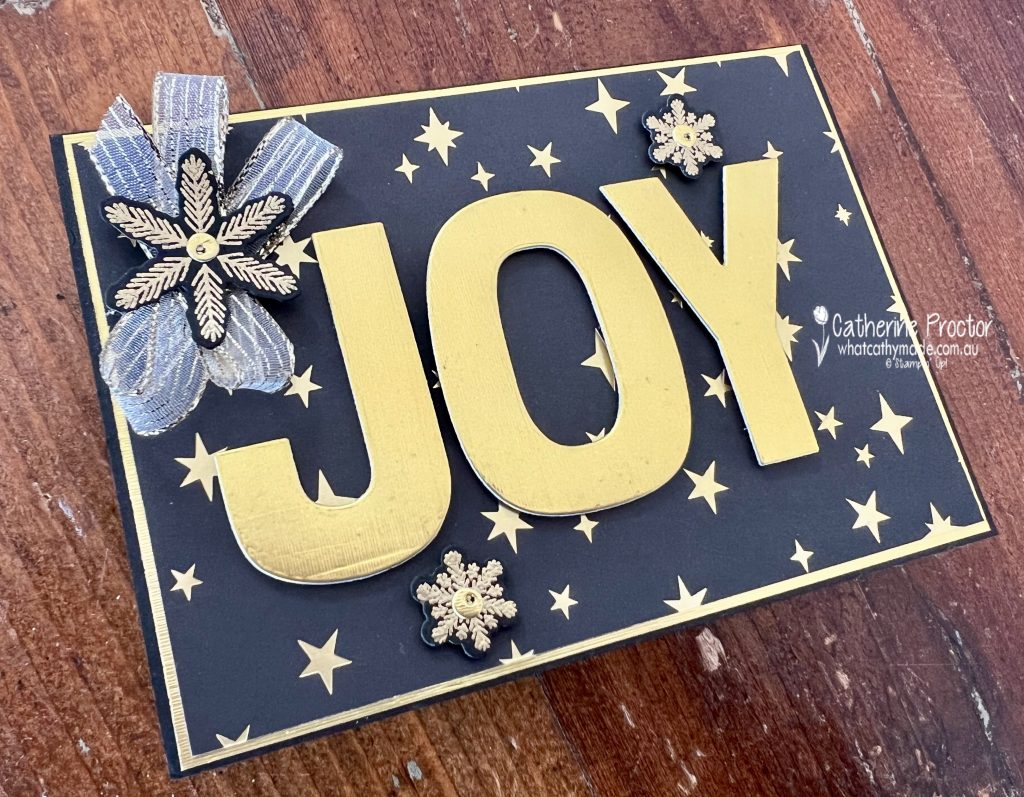
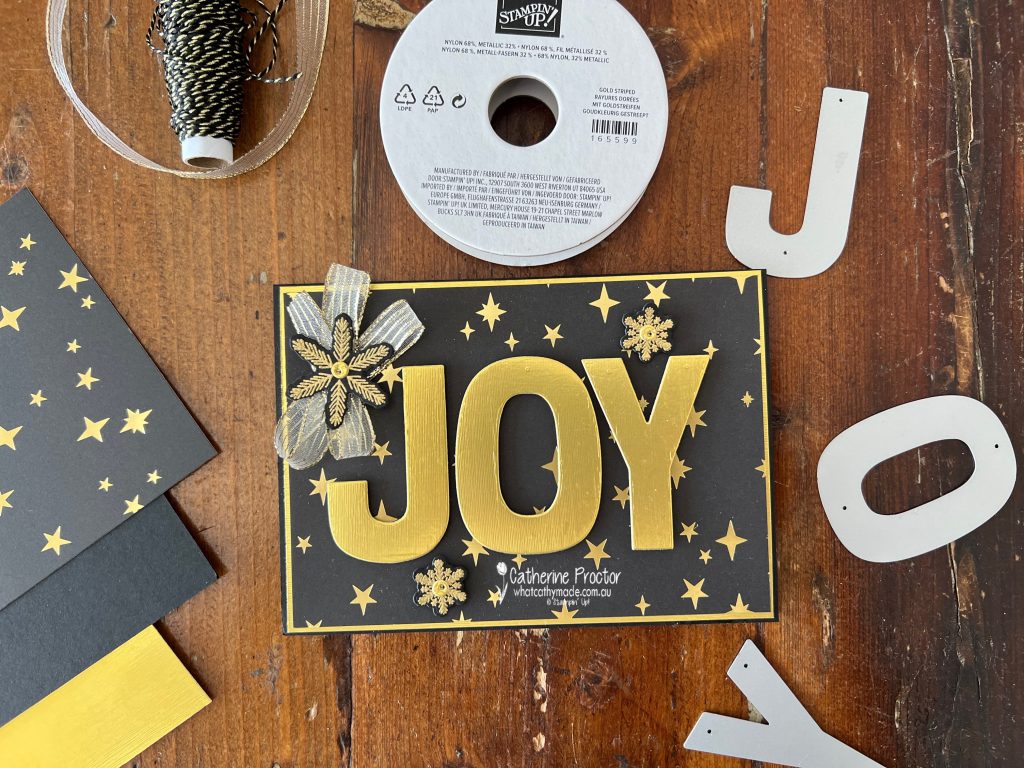
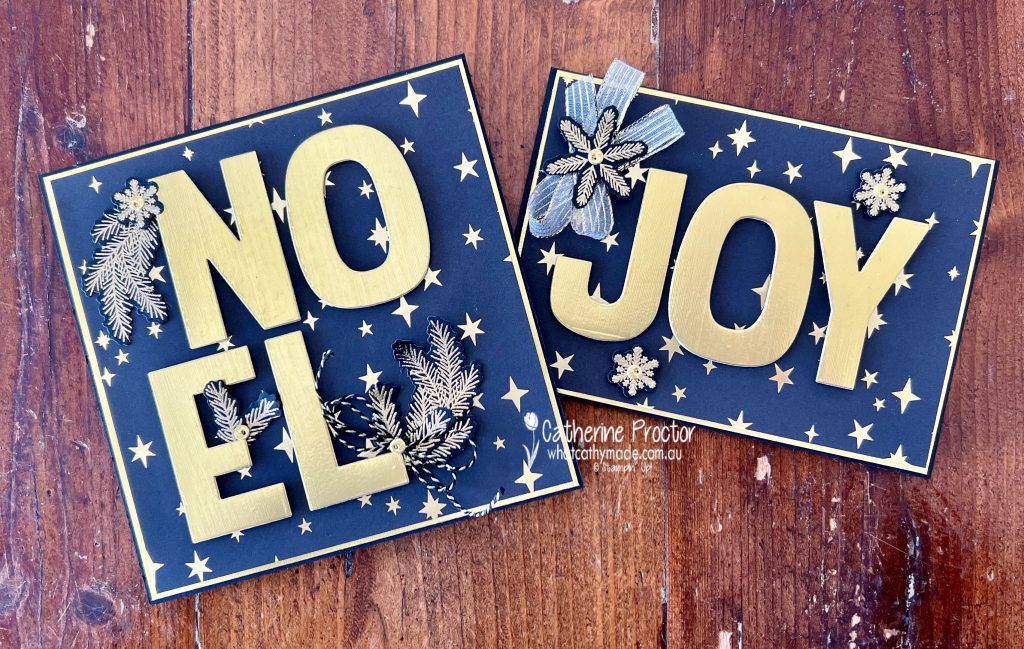
Both cards use the foiled gold star pattern from this gorgeous Modern Christmas 12” X 12” (30.5 X 30.5 Cm) Specialty Designer Series Paper and the Party Alphabet Dies to die cut gold foil letters.
Card 1 – Noel
When creating the square gold foil mat under the DSP layer I like to use large dies to cut our the inside of the foil layer so I don’t waste all that foil. Look at how much foil I have left over!
Both cards have foliage embellishments created using the Delicate Pines Bundle, another Online Exclusive being released on September 3.
If you take a close look at my cards you can see I’ve used the berry die (it cuts six tiny berries at once) to embellish the middle of the gold heat embossed foliage pieces.
The black and gold twine for the bow is from the Black & White & Gold Bakers Twine pack, part of the Modern Christmas Suite. It’s a bit hard to see in these photos, but it is just the perfect finishing touch in real life.
Card 2 – Joy
Card two uses all the same products as card one with th exception of the twine. Instead of the black & gold twine I’ve used the Gold Striped 3/8″ (1 cm) Mesh Ribbon.
While the Party Alphabet dies are perfect for banners, home decor pieces and scrapbooking, they are also fabulous for modern and graphic cards.
Words such as “Joy”, “Noel”, “Happy”, “Hi”, “Hugs” , “Love”, “Merry” and more can be cut using these dies to create hi impact cards.
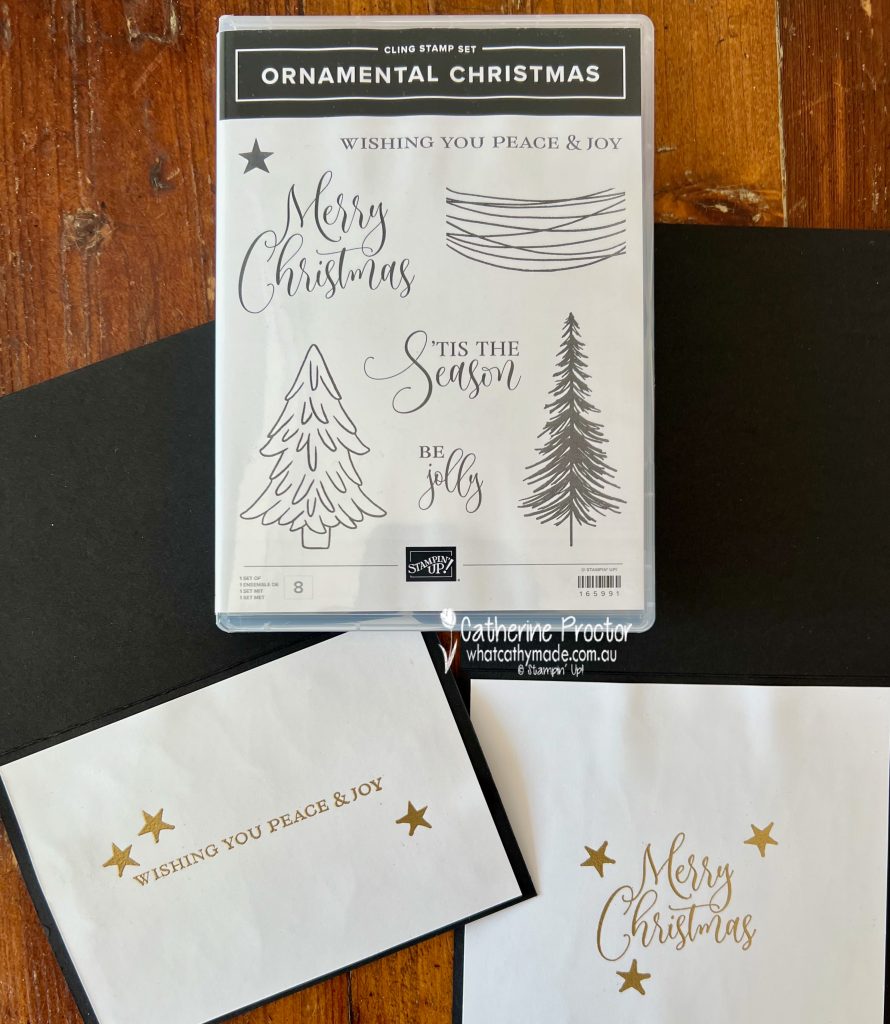
I haven’t forgotten the inside of the cards. I’ve gold heat embossed two of the sentiments from the Ornamental Christmas stamp set. The Ornamental Christmas stamp set is part of the Ornamental Christmas Bundle in the Modern Christmas Suite (online exclusive).
Take a look at some more Christmas Card inspiration on our Heart of Christmas blog hop!
Now it’s time to hop in over to our next participant, the lovely Kate Morgan. I can’t wait to see what Kate has made this week!
If the next button link is not working or you’d like to see the entire list of participants go to Sharon Davern‘s blog. Sharon does an amazing job of hosting our Heart of Christmas blog every Monday.
Our AWH team will be back on Wednesday night, showcasing Crushed Curry on our InstaHop. I hope you can join us then!
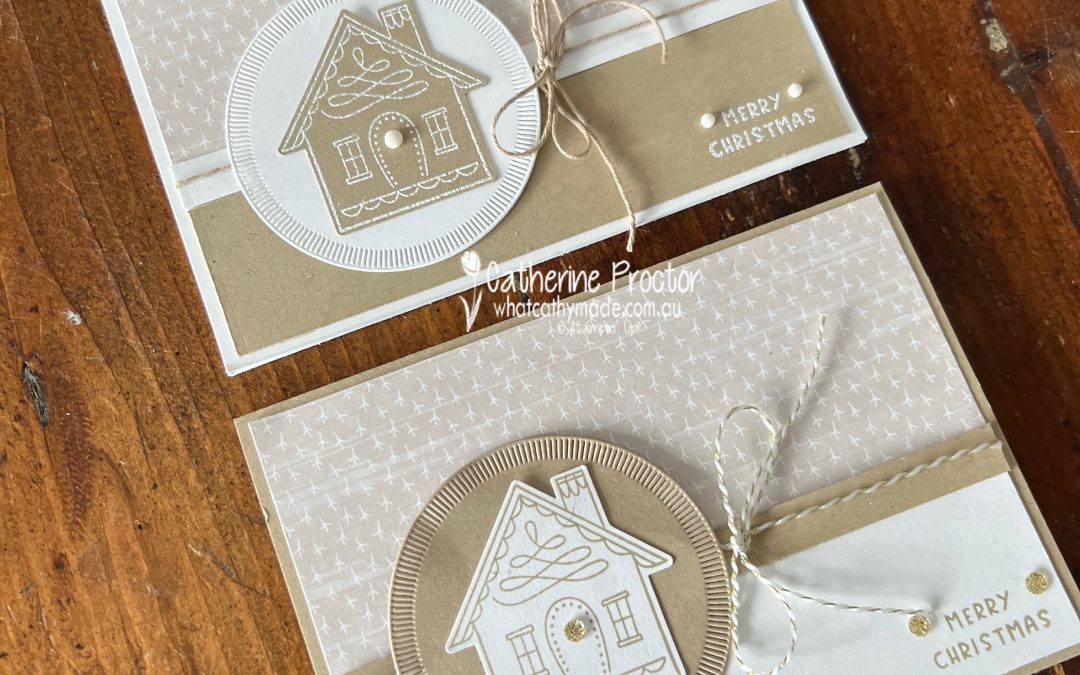
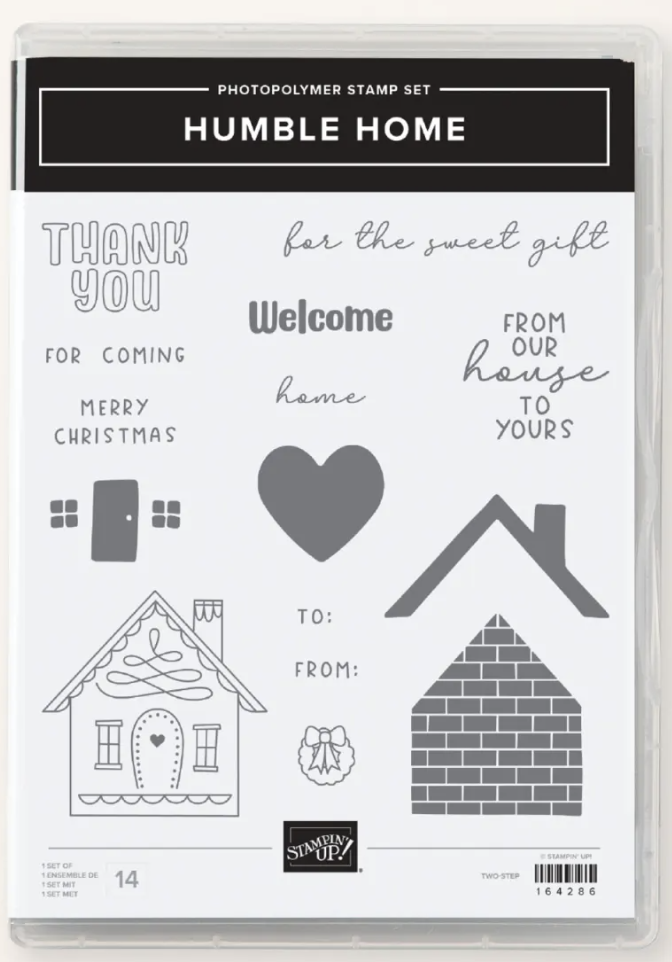
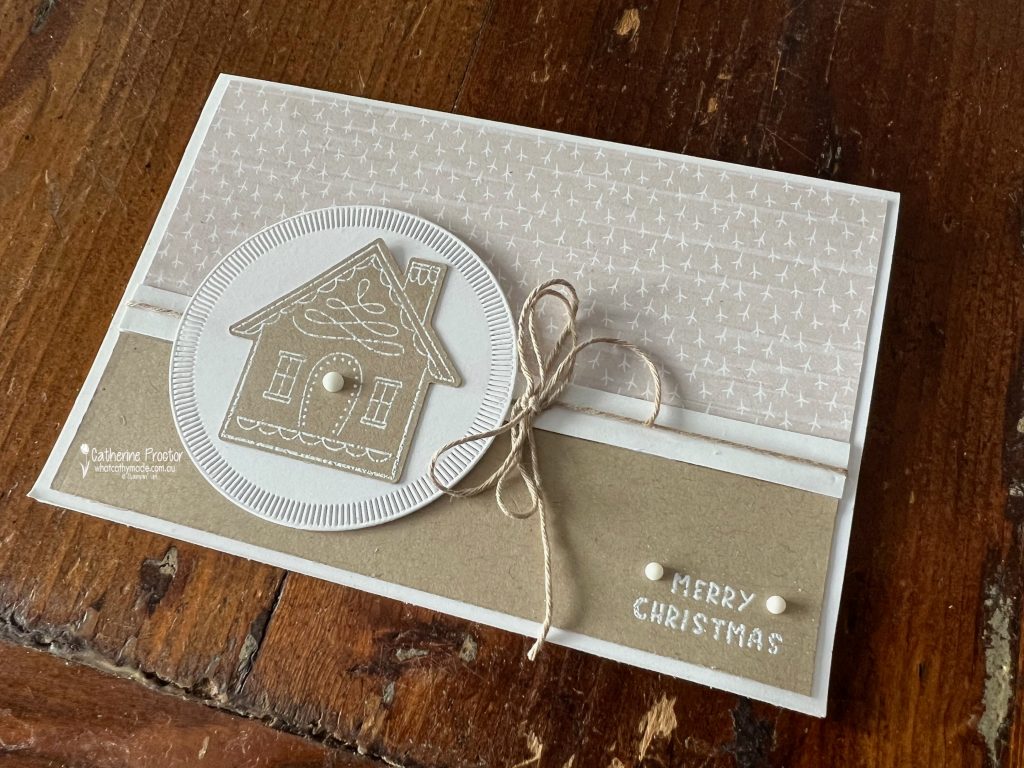
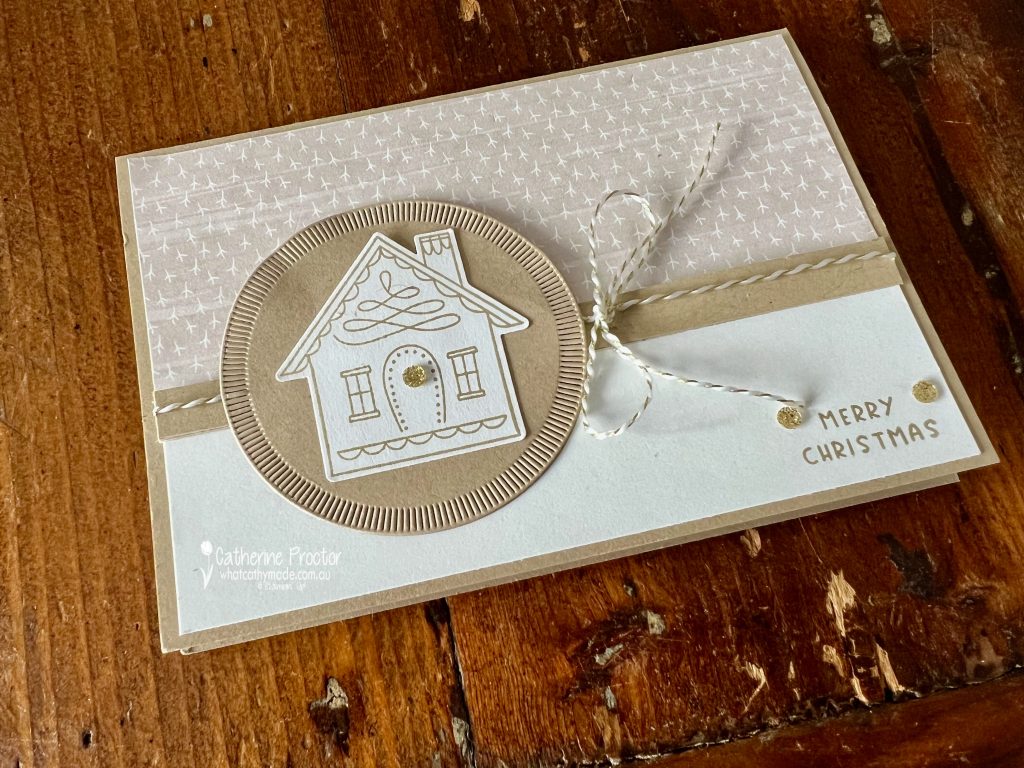
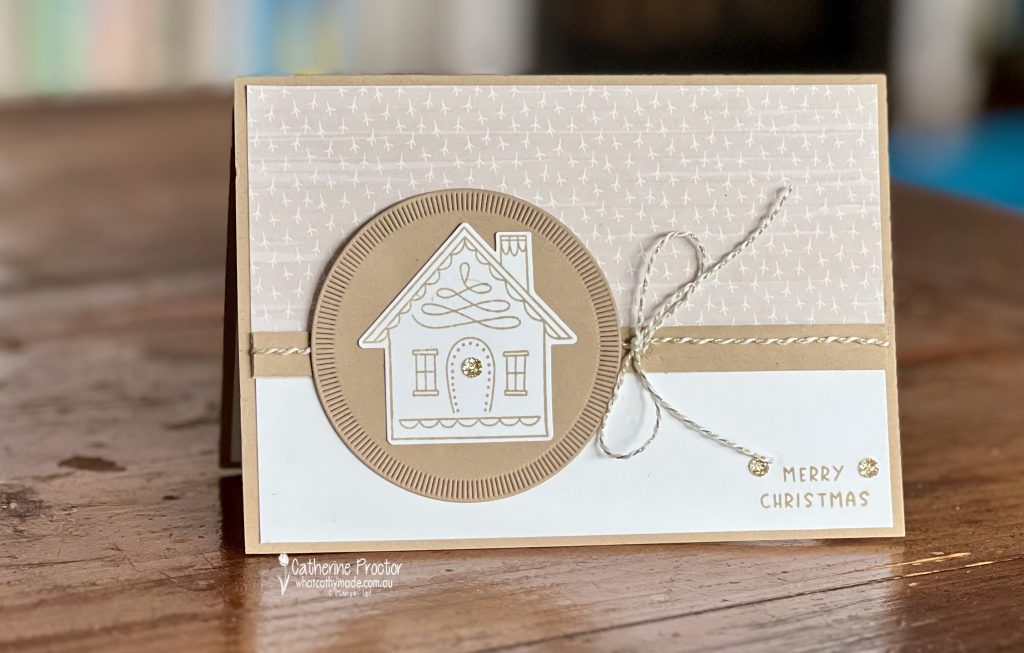
This week we’re showcasing my favourite Stampin’ Up! colours–Crumb Cake–and I’m also taking the opportunity to showcase one of my favorite stamp sets (now on the last chance list): Humble Home.
This versatile stamp set has been massively reduced to $10.50, so if it’s not already in your collection, now’s the time to add it to your next order before it is gone!
I deliberately kept my colour combination neutral this week because as Crumb Cake is so versatile and it works with every single colour it often plays second fiddle to other colours. By pairing it back to just two colours (with a touch of gold) Crumb Cake really shines.
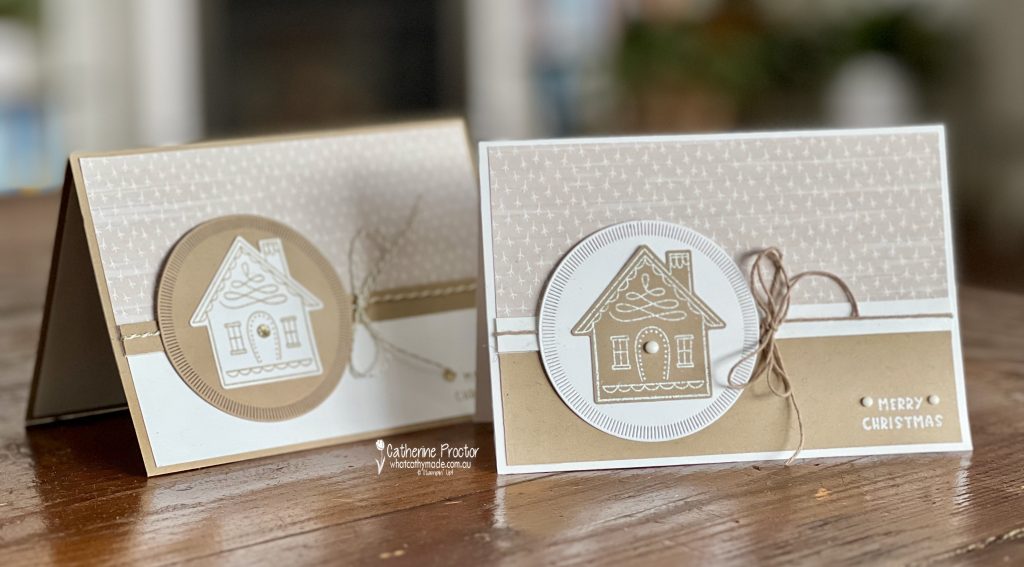
One Design – Two Cards
Just like my Coastal Cabana cards last week, I’ve used the one card sketch to create two different cards. Both cards use the stunning Nests of Winter DSP for the top panel of the card and one of the Spotlight on Nature dies has been used to die cut the circle behind the focal image.
This time I kept the layout and orientation the same, simply swapping out where I placed the Crumb Cake and the Basic White.
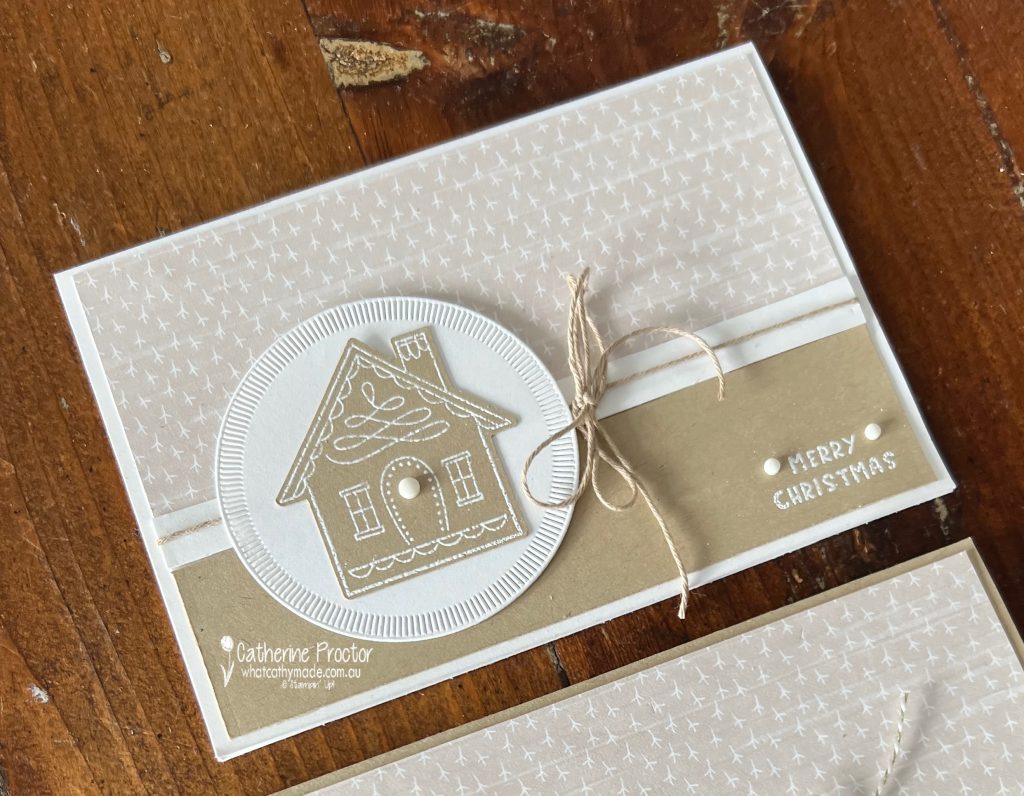
Card one has Basic White card base and I’ve heat embossed the focal home image and the sentiment in white onto Crumb Cake card stock.
The twine is the Crumb Cake twine from the The Baker’s Twine Essentials Pack and the white dots are from the Neutral Matte Dots.
Card two has a Crumb Cake card base and the sentiment and the focal home image are stamped in Crumb Cake.
The twine and embellishments are a sneak peek at new products from the September – December catalogue (Traditional Sparkling Sequins) and Online Exclusives (Black & White & Gold Bakers Twine), both available September 3.
Take a look at some more Crumb Cake inspiration on our Insta Hop!
Our blog hop is now an Instagram hop but the good news is that you don’t need to have an Instagram account to view all of the other projects!
Simply copy any of the Insta handles below into a new search window to follow the Instagram hop at any point.
Next in our Hop is Kirsty @crafty.littlemiss . Be sure to check out her gorgeous project/s.
The full list of this week’s InstaHop is listed below:
Kirsty @crafty.littlemiss
Andrea @andreaksargent
Kate @craftwithkate
Rosa @hum.and.stamp
Claire @clairedalycreates
Sharon @sharondaverncreates
Helen @apaperparadise
Vicki @vickiboucher
Leanne @createwithleanne2
Cathy @whatcathymade – you are here!
We’ll be back next Wednesday when we are showcasing Crushed Curry.
Want more Christmas card inspiration?
Starting Monday 1st September (that’s right, it’s next Monday night!) our Heart of Christmas blog hop will be returning for 2025. This hop is a traditional blog hop (not an Instahop) so you can follow along by reading my blog.
The blog hop will go live at 8pm (EAST) every Monday night for 16 weeks.
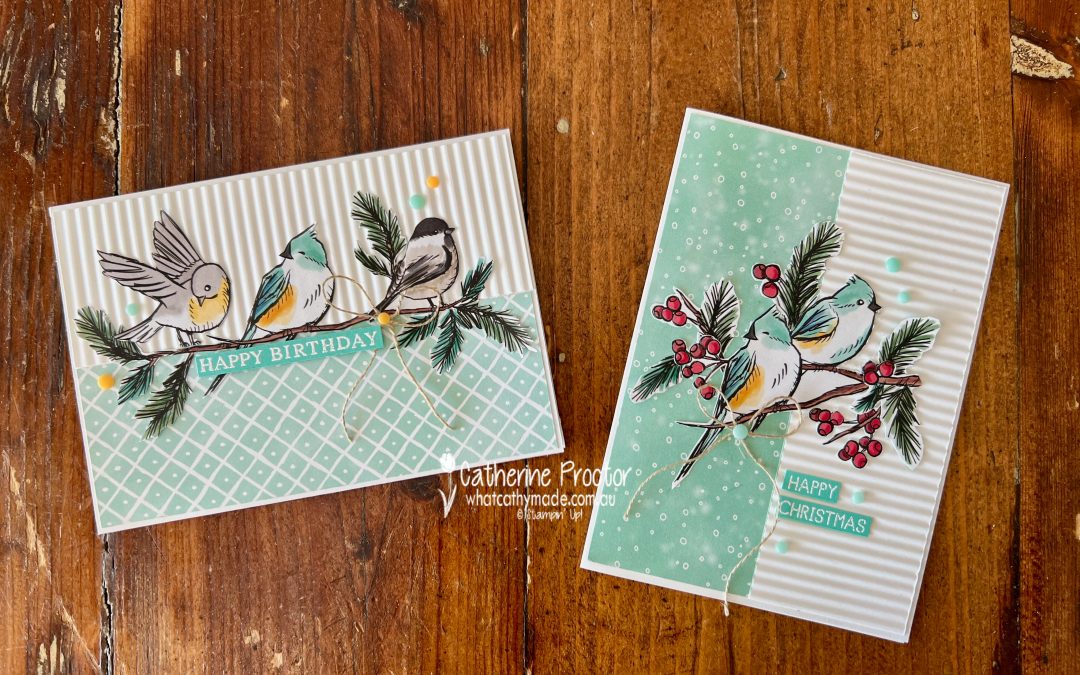
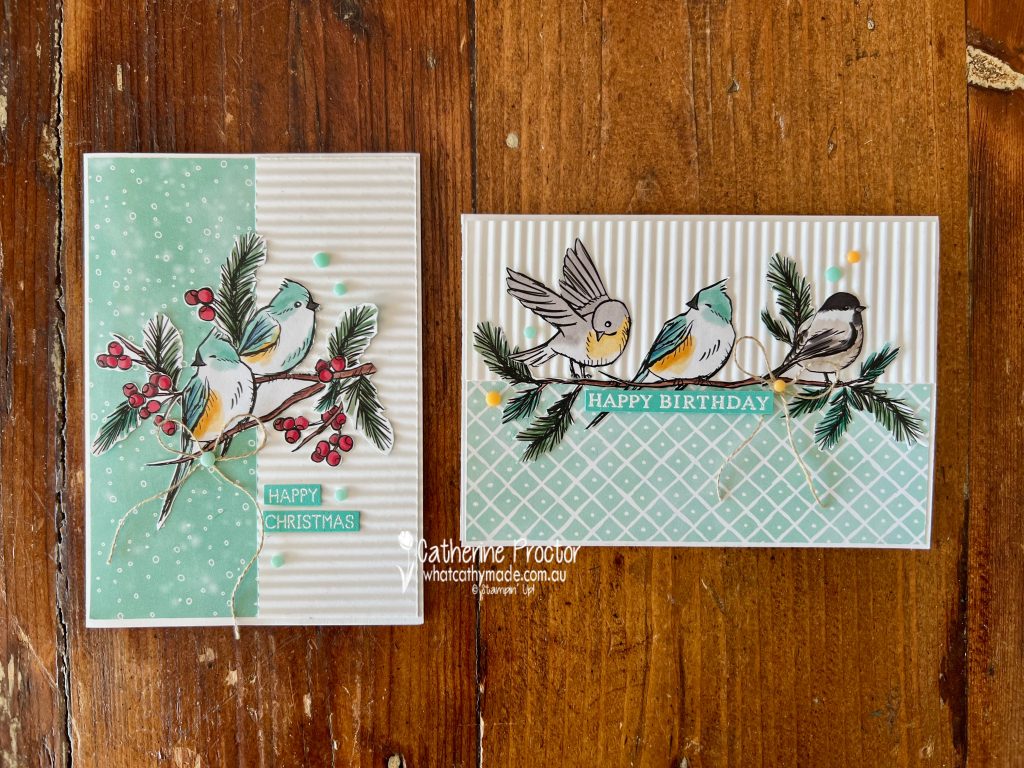
In our house, we try to “cook once, eat twice” during the week and I’ve decided to apply the same approach to my cardmaking this week.
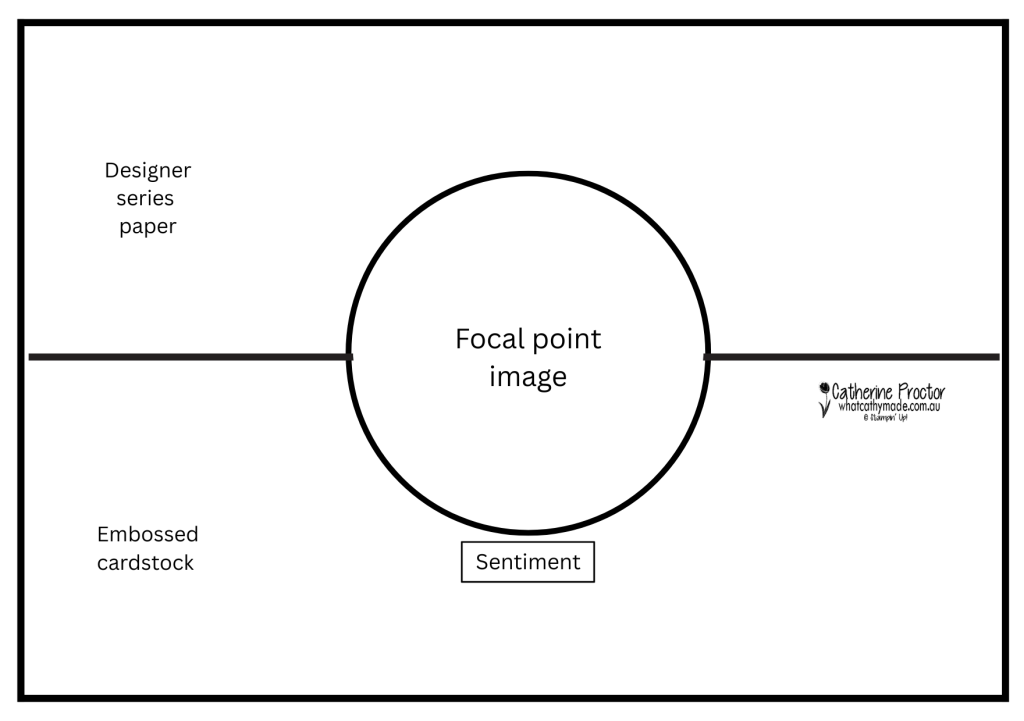
Using the one card sketch I’ve created two cards: a Christmas card and a birthday card. Here are the two versions of the card template I’ve used to make my cards.
Version #1 is a horizontal card design. I used to make my Christmas card
Version #2 is simply Version #1 turned horizontally with the sentiment moved to under the focal point image. I used this version to create a birthday card.
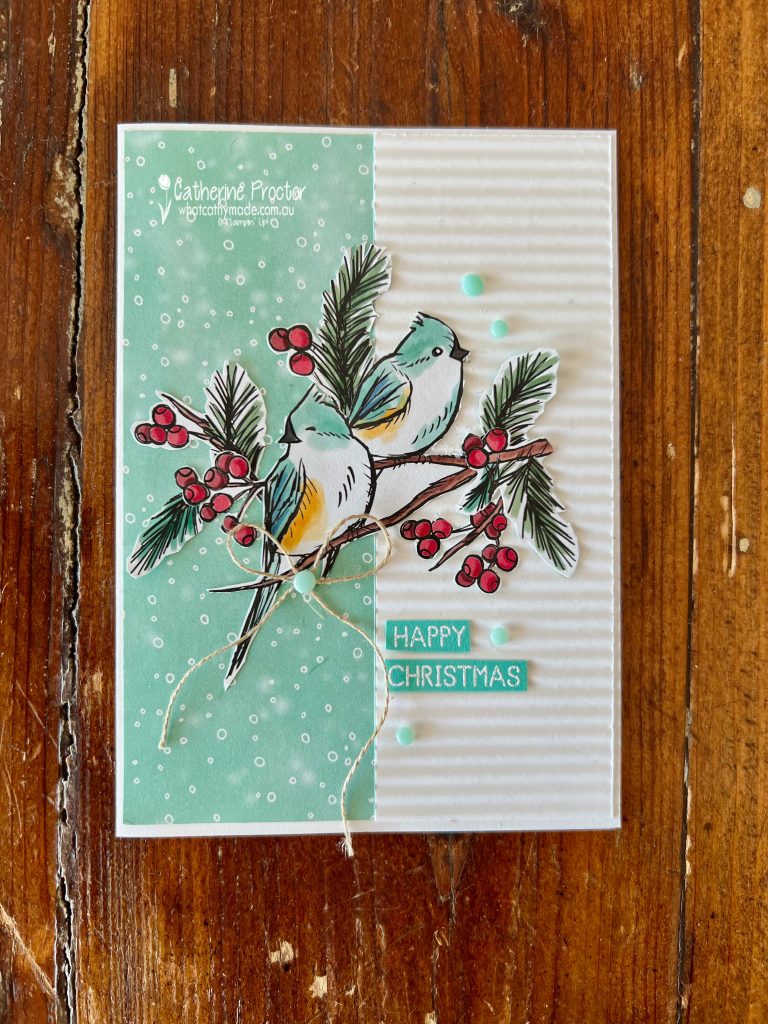
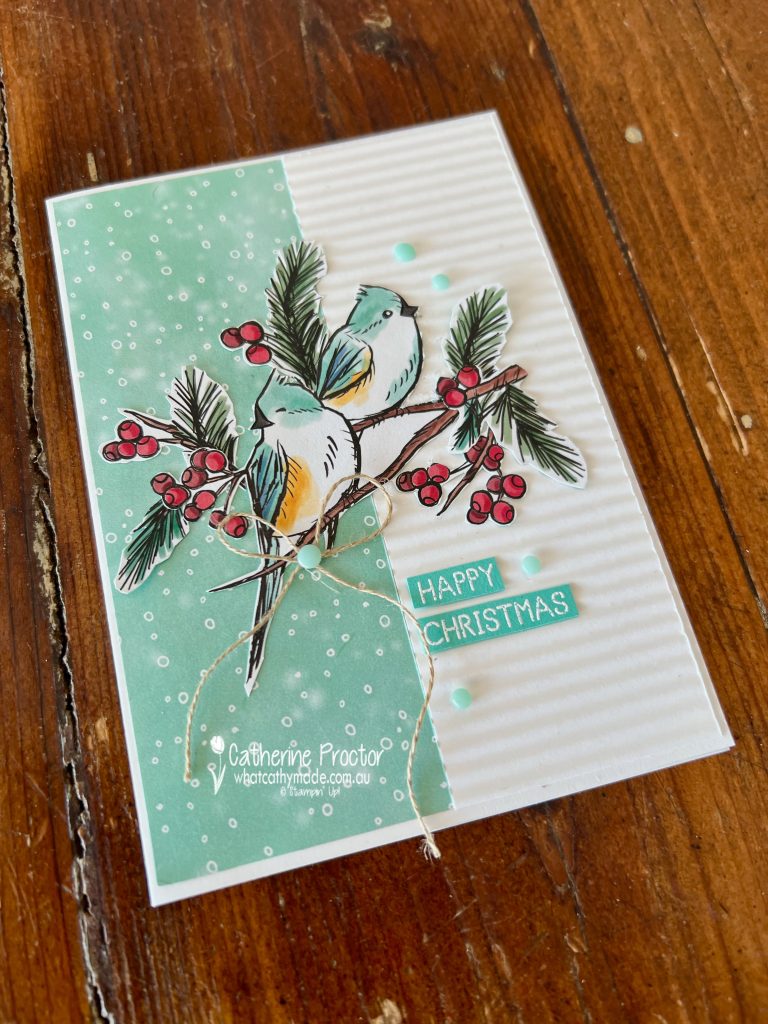
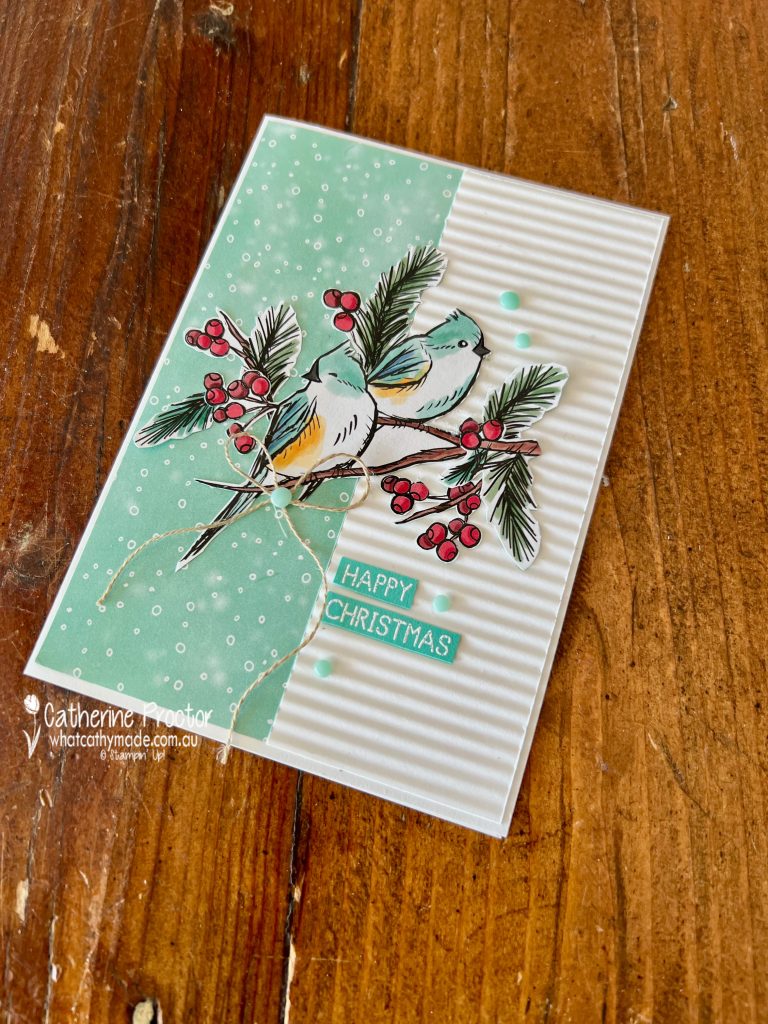
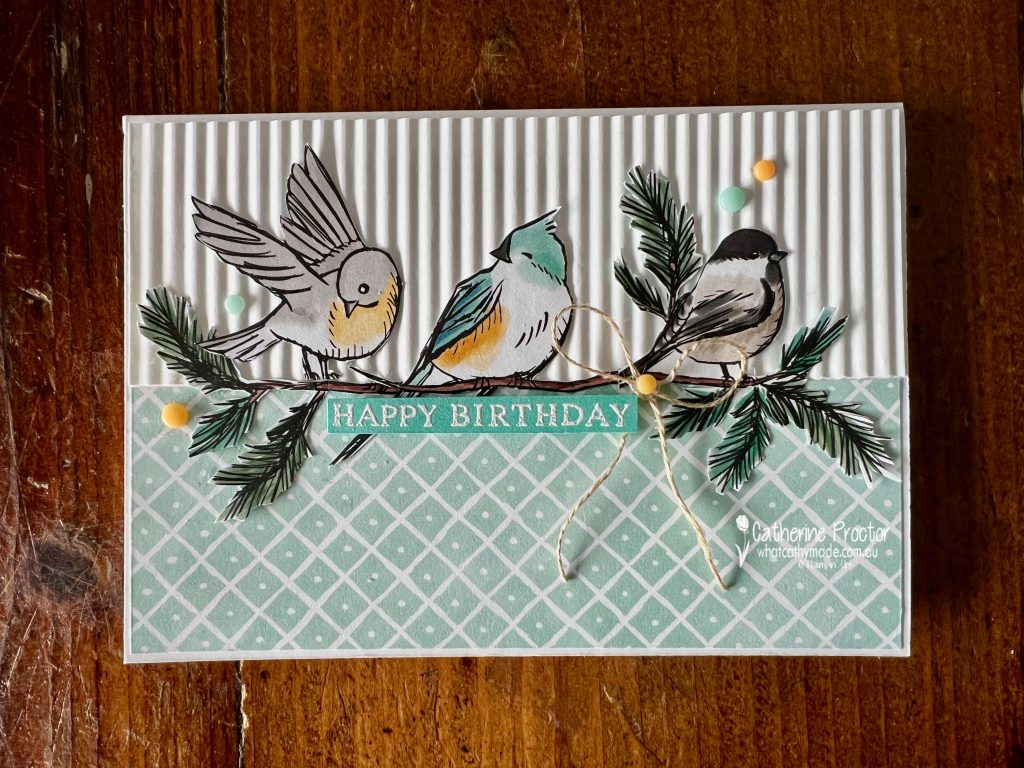
Nests of Winter Christmas Card
The inspiration for both my cards this week came from a beautiful card my friend (and Stampin’ Up! Artisan) Andrea Sargent made for our Insthop last week. It reminded me to fussy the birds and branches from the beautiful Nests of Winter DSP.
The Coastal Cabana DSP panel on the left is also from the Nests of Winter DSP. The embossed cardstock uses an embossing folder called the Mini Corrugated 3D Embossing Folder that is reduced and in the last chance section of the website. The Party Dots embellishments are also reduced and in the last chance section of the website so don’t miss out!
The “Merry Christmas” sentiment is from a stamp set coming in the new Christmas Catalogue called the “Gift of Joy Stamp Set”. I white heat embossed it onto Coastal Cabana cardstock.
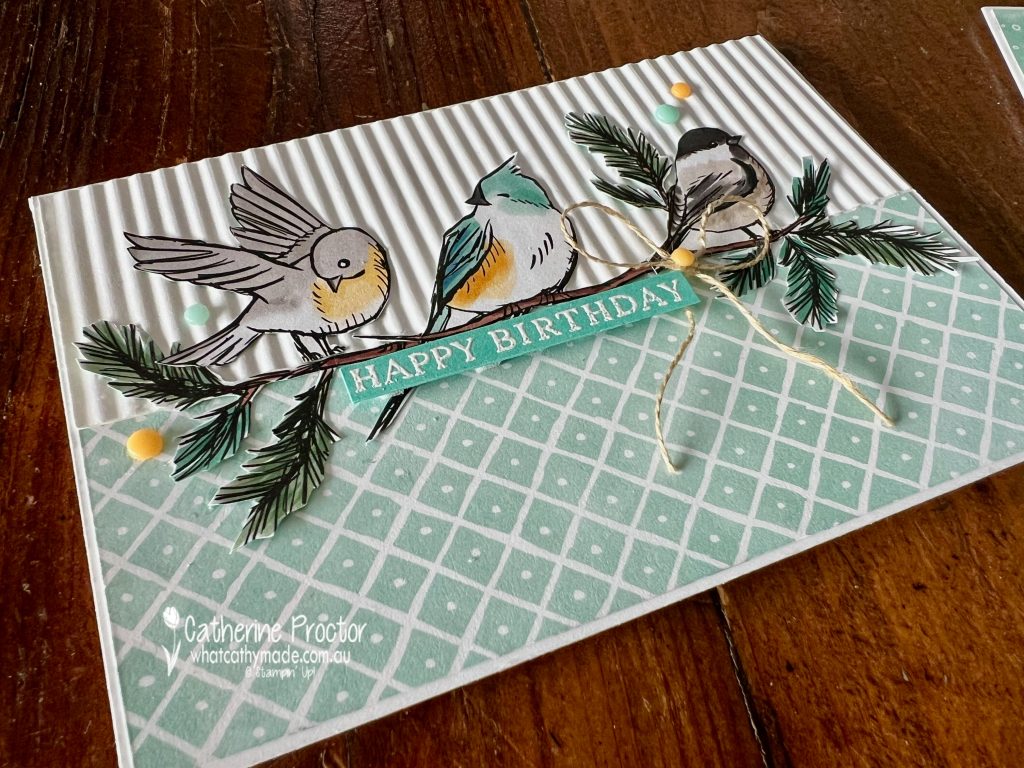
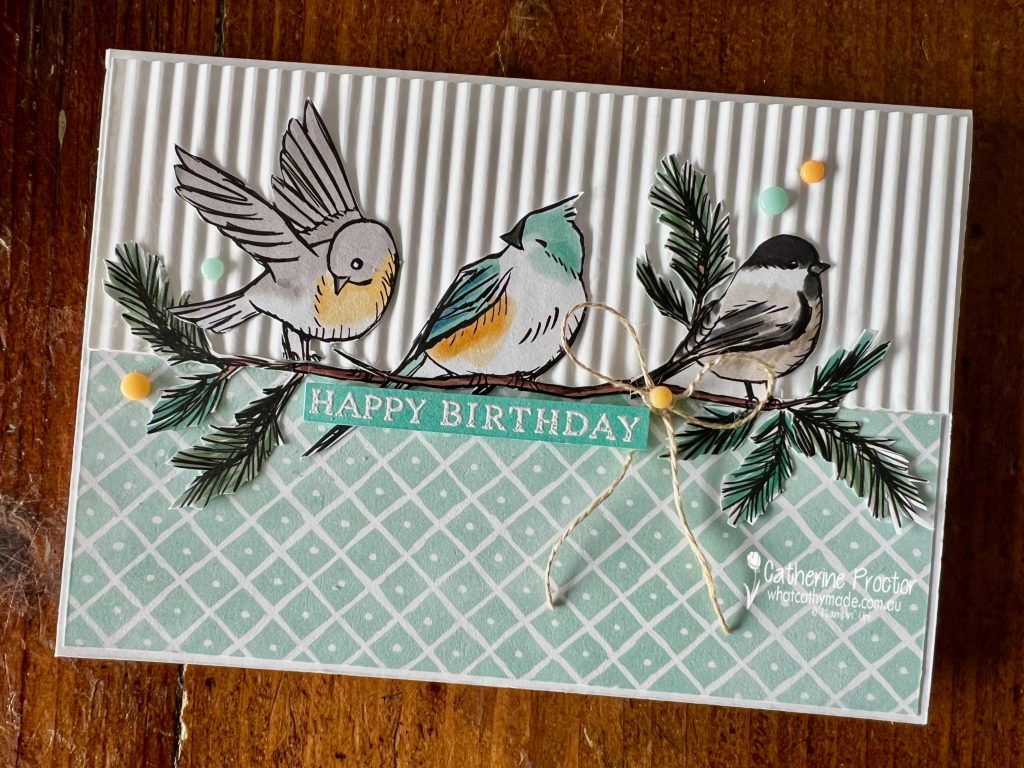
Nests of Winter Birthday Card
This card really showcases the versatility of this beautiful DSP. I rotated my sketch and layered my fussy cut bird, branch and foliage images together to create a sweet birthday card. I’ve used a different Coastal Cabana design from the Nests of Winter DSP on this card.
Like my Christmas card, this card uses the soon to be retired Mini Corrugated 3D Embossing Folder and Party Dots embellishments. Both cards are also finished with a bow of linen thread.
Take a look at some more Coastal Cabana inspiration on our Insta Hop!
Our blog hop is now an Instagram hop but the good news is that you don’t need to have an Instagram account to view all of the other projects!
Simply copy any of the Insta handles below into a new search window to follow the Instagram hop at any point.
Next in our Hop is Kirsty @crafty.littlemiss . Be sure to check out her gorgeous project/s.
The full list of this week’s InstaHop is listed below:
Kirsty @crafty.littlemiss
Helen @apaperparadise
Kate @craftwithkate
Leanne @createwithleanne2
Andrea @andreaksargent
Claire @clairedalycreates
Rosa @hum.and.stamp
Sharon @sharondaverncreates
Theresa @teegeeinspirations
Cathy @whatcathymade – you are here!
We’ll be back next Wednesday when we are showcasing Crumb Cake. I hope you can join us then!
Is August too early to start making Christmas cards?
I certainly hope not as I’ve made my very first Christmas card of the year for Week 14 of our Art With Heart Instashop, which is showcasing the gorgeous rich red colour, Cherry Cobbler.
Cherry Cobbler always makes me think of Christmas and as my Christmas catty preorder arrived this week it was the perfect opportunity to give you a sneak peek of some of these beautiful new Christmas products.
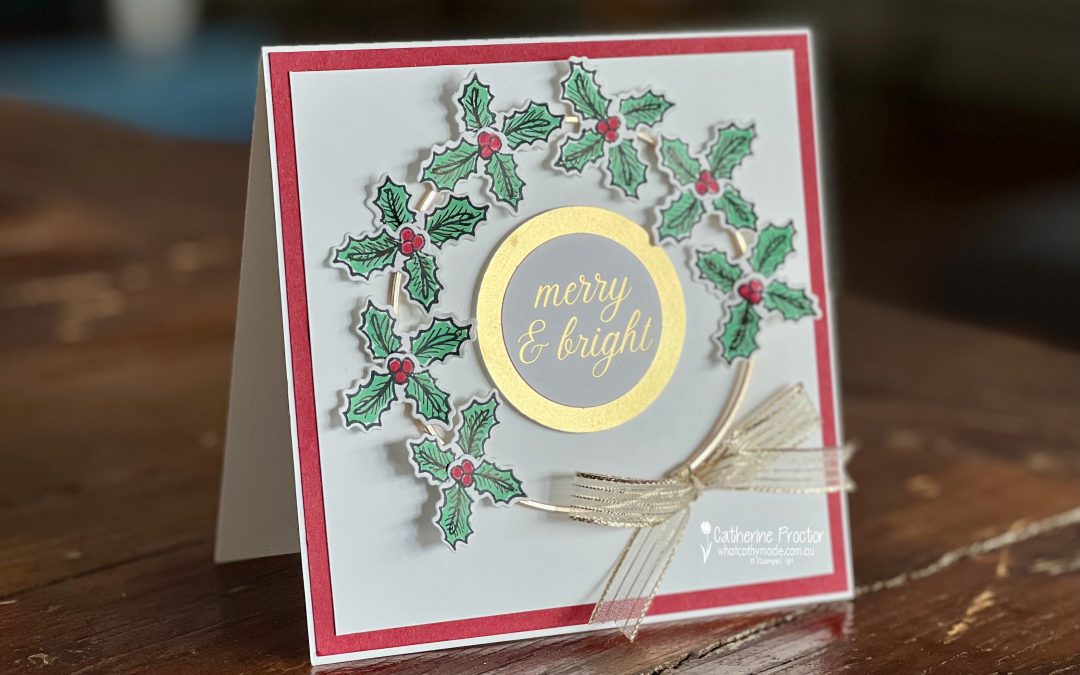
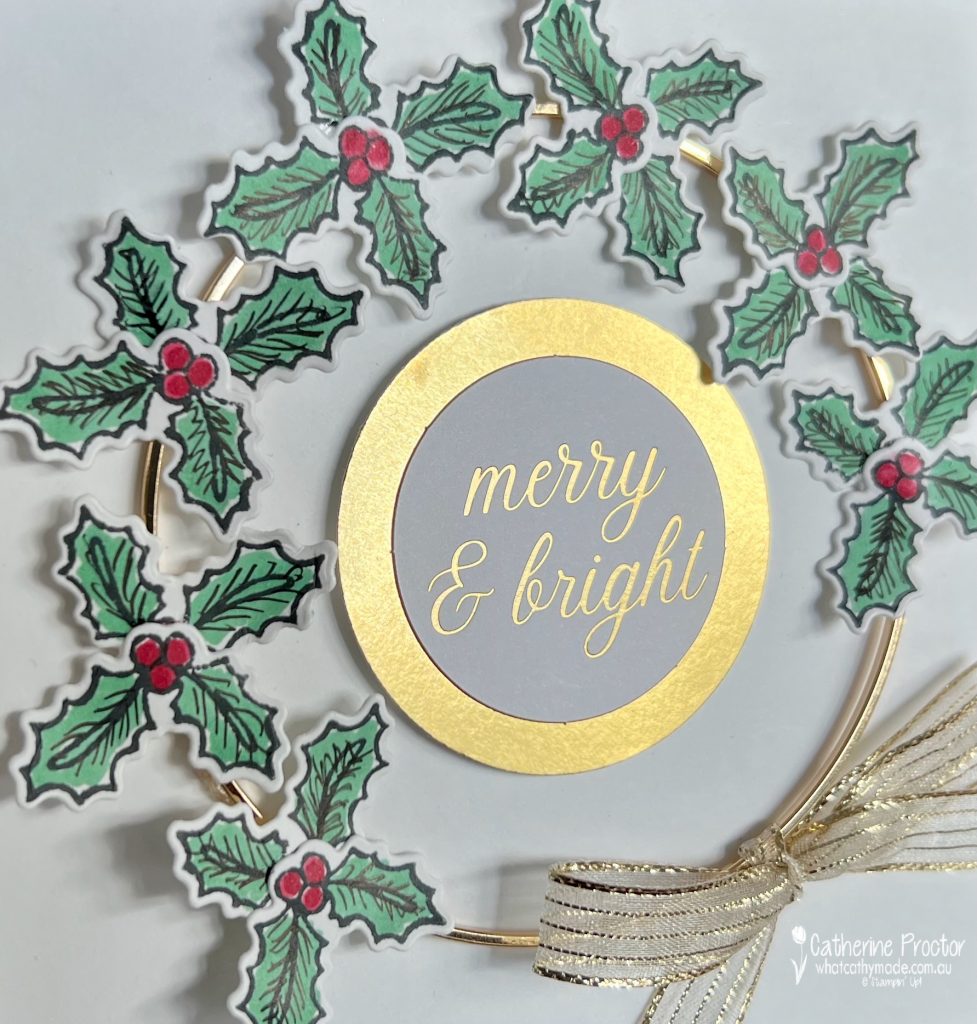
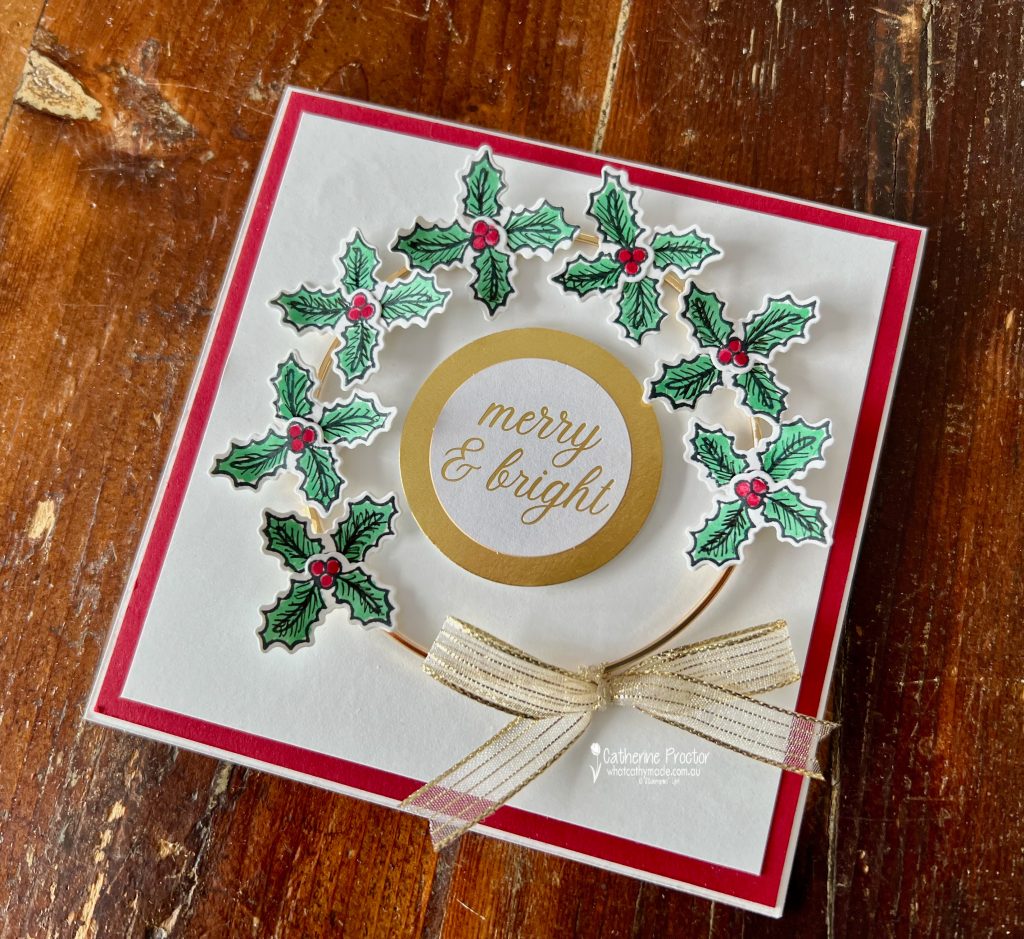
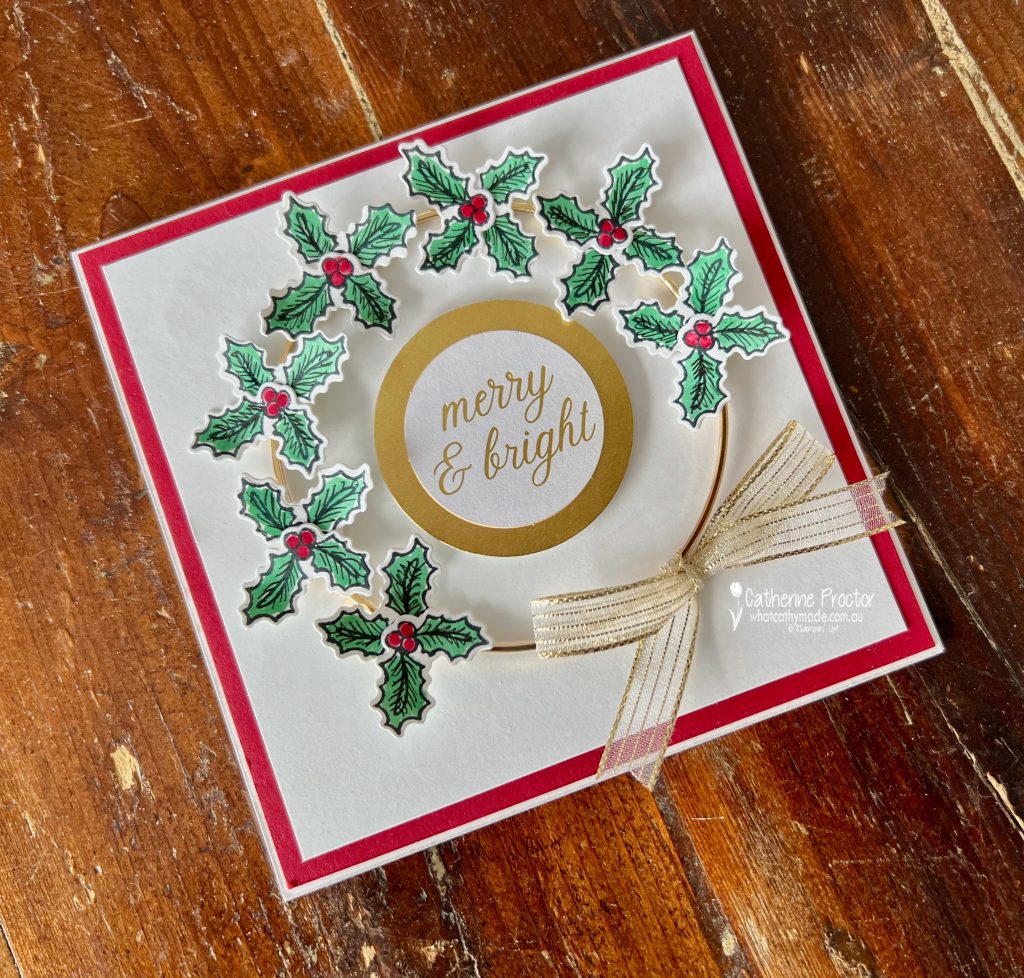
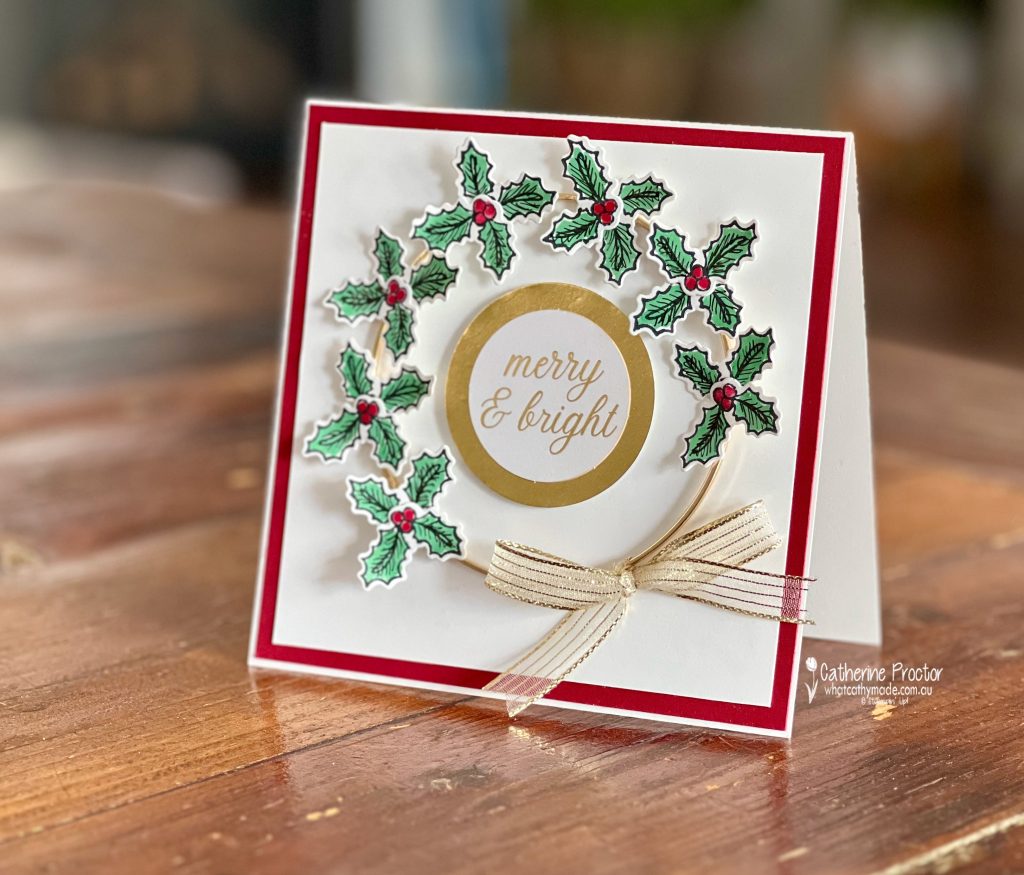
How to make a Jolly Holly Christmas Card using a Large Mellic Hoop
I’ve included a few tips and tricks this week to help you recreate the look of this card.
Tip #1– adding detail to stamps (or to your cardstock) using the 0.4mm Journaling Pens.
After stamping and die cutting holly leaves from the Jolly Holly bundle I coloured them using the Cherry Cobbler and Shaded Spruce Stampin/’ Blends. I then hand drew extra detail to the holly leaves using the journalling pens.
Here’s the first sneak peek of new products from the forthcoming Christmas catty. The Greetings for You Mix & Match Ephemera Pack are peel-and-stick!!!! How exciting is that! These elegant Christmas greetings are printed in gold foil and you get 6 sheets for $15. Such great value!
Tip # 2 The while cardstock used in the ephemera packs is slightly different to Basic White cardstock so if I’m layering white on white i like to add a layer so the difference is not noticeable. I’ve stuck my “Merry & Bright” ephemera sentiment onto a 2 inch punched circle of gold foil.
Sneak peek #2 and tip #3 – Large Gold Hoops. I love these Online Exclusive embellishments for adding dimension and a metallic element to a card. They’re also the prefect base to create a wreath. But what’s the best way to adhere them?
I used four glue dots and made sure they were positioned under the leaves and the metallic bow.
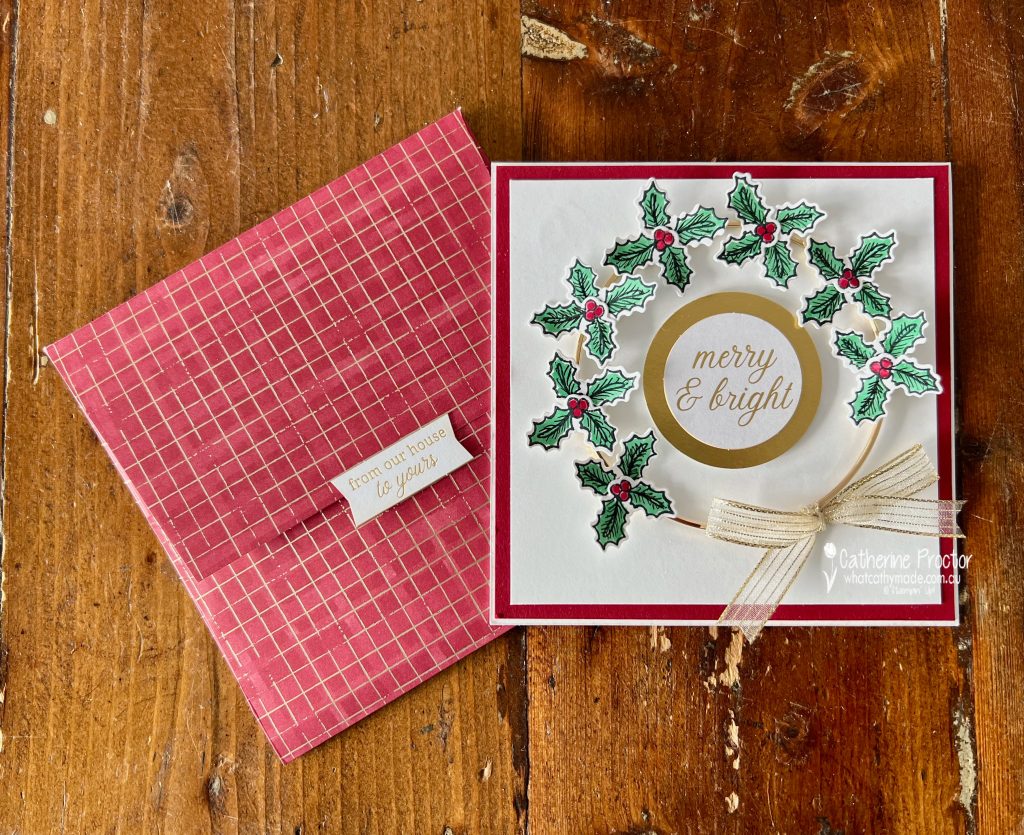
How to make a square envelope from a 6×12 inch sheet of DSP
Tip #4 making a square envelope from a 6×12 sheet of DSP. All I had left of the this stunning Cherry Cobbler DSP from the Regal Distressed Patterns 12″ x 12″ (30.5 x 30.5 cm) Specialty Designer Series Paper was a 6×12 inch strip. To create the square envelope for my 5 1/4 inch square card I score 1/4 inch along both 12 inch sides of the DSP and 3 1/2 inches from the top and bottom of the 6 inch side.
This gave me just enough room to adhere the 1/4 inch side flaps with tear n tape to make a squre envelope.
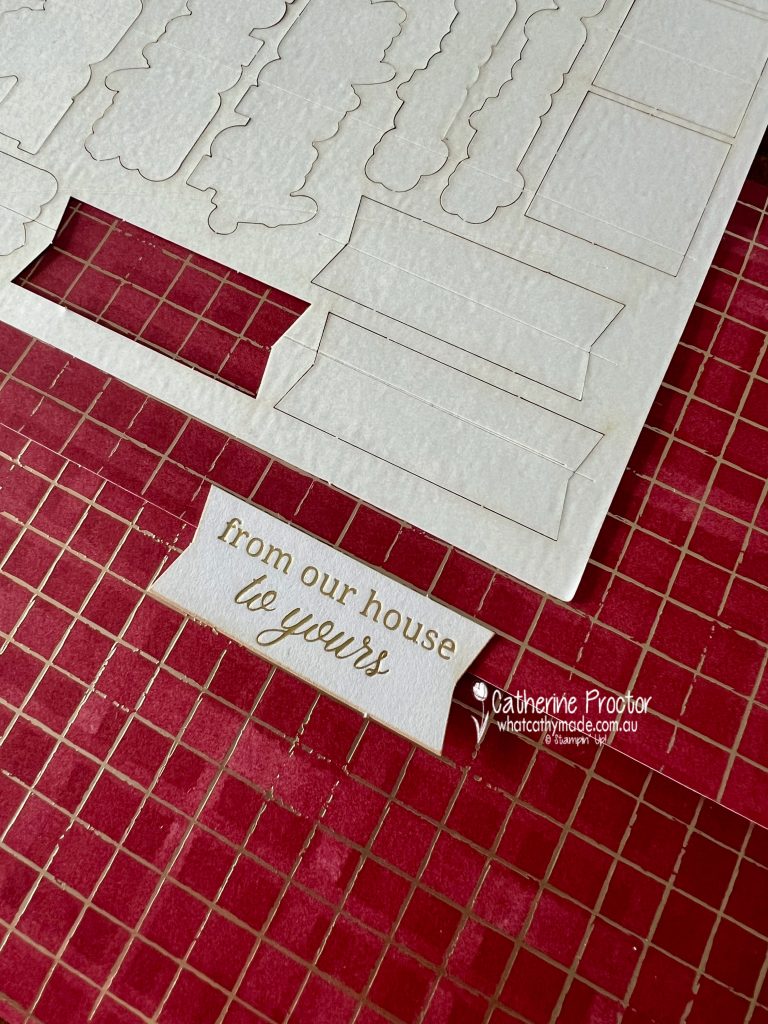
Tip #5 – creating an envelope seal couldn’t be easier using the new Greetings for You Mix & Match Ephemera Pack! I simply removed the top side of the adhesive cover to stick the sentiment to the envelope flap. Once the card is written in and signed and ready to post, remove the lower side of the adhesive cover and press to seal.
Take a look at some more Cherry Cobbler inspiration on our Insta Hop!
Our blog hop is now an Instagram hop but the good news is that you don’t need to have an Instagram account to view all of the other projects!
Simply copy any of the Insta handles below into a new search window to follow the Instagram hop at any point.
Next in our Hop is Helen @apaperparadise. Be sure to check out her gorgeous project/s.
The full list of this week’s InstaHop is listed below:
Is Calypso Coral a colour that makes your heart smile?
A group of the Art With Heart Team is hopping through the Stampin’ Up! colours in alphabetical order and week 14 is all about Calypso Coral.
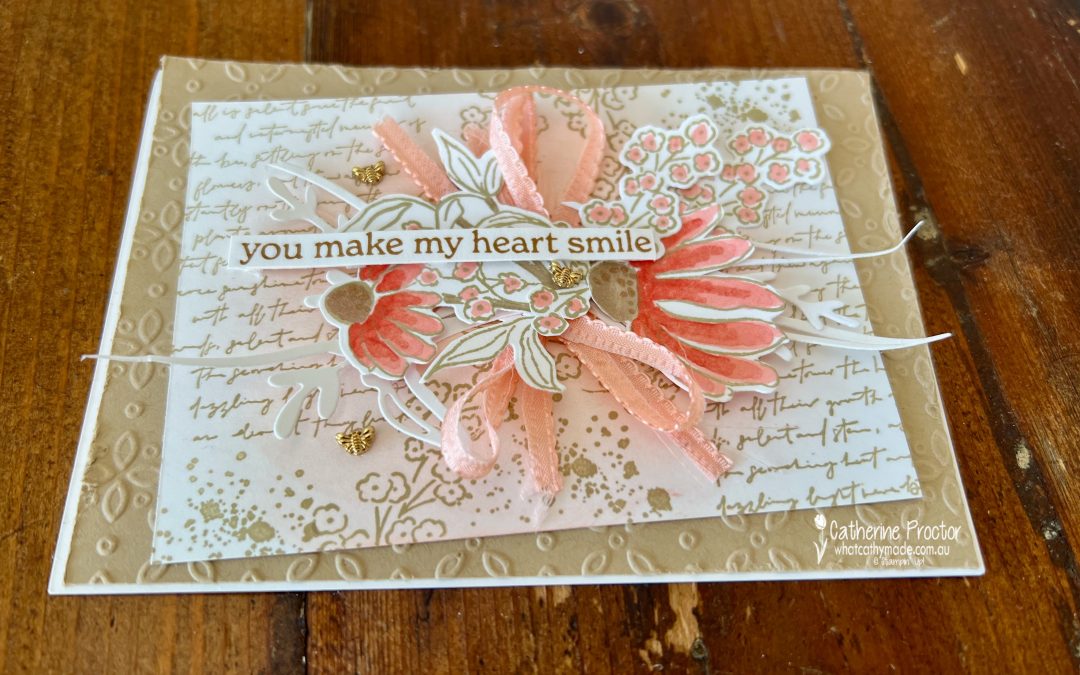
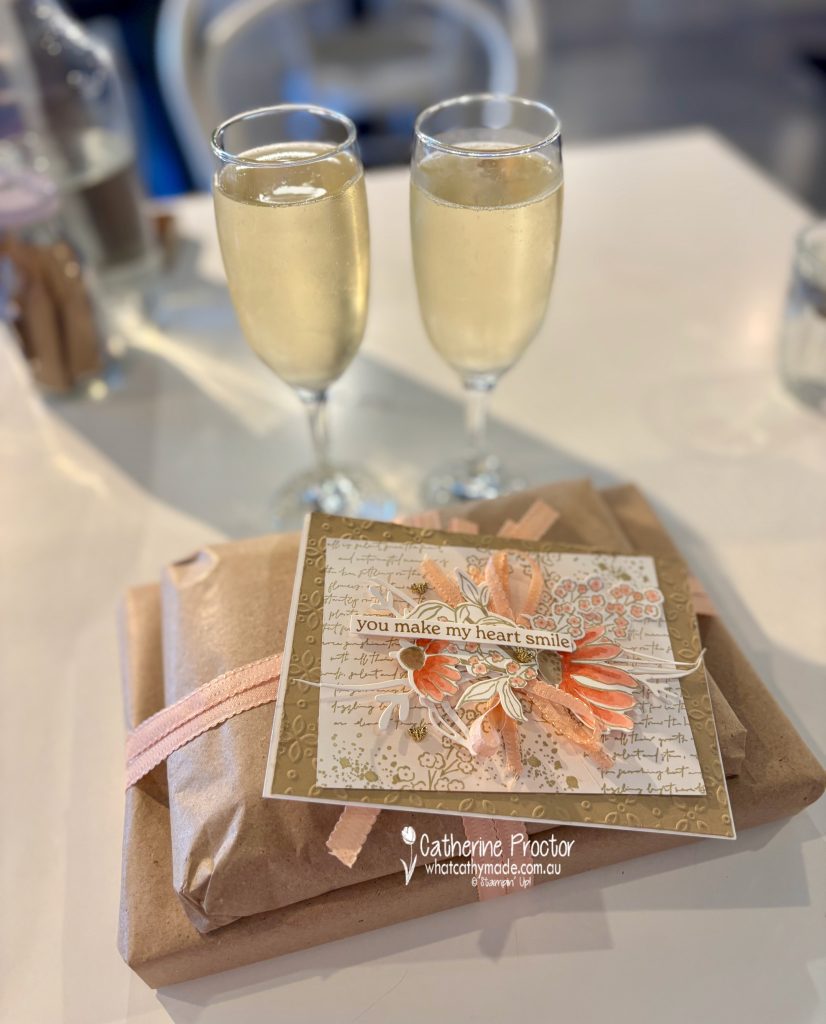
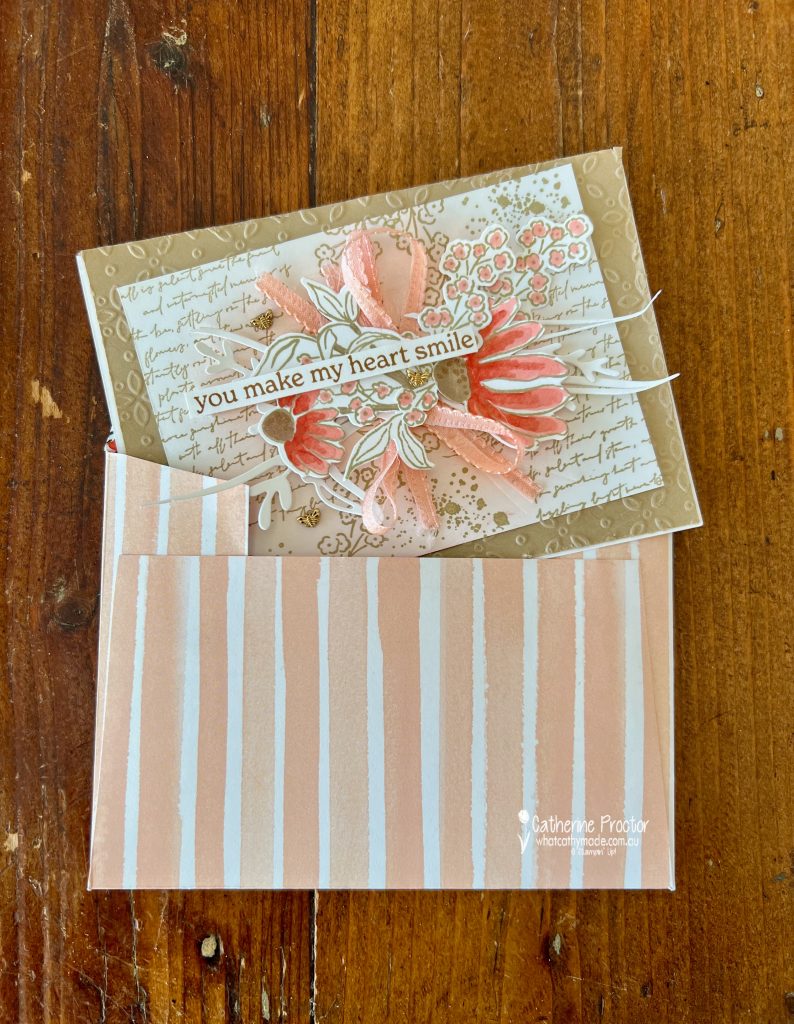
Here is my project, a shabby chic style birthday card (CASED from former Artisan team member, Tammy Wilson) that I specially created for my beautiful friend and longtime partner in crafting crime, Jenny Boffey @jenboff Boffey always makes me smile.
I had so much fun going out of my comfort zone to create this birthday card and I’m happy to say my Calypso Coral card definitely made Jenny smile.
We even managed to enjoy a sneaky lunchtime glass of bubbles together to toast her birthday!
How to make a shabby chic style birthday card
If you love the romantic, layered look of shabby chic cards, you can easily recreate this style using Stampin’ Up! products and a few mixed media techniques.
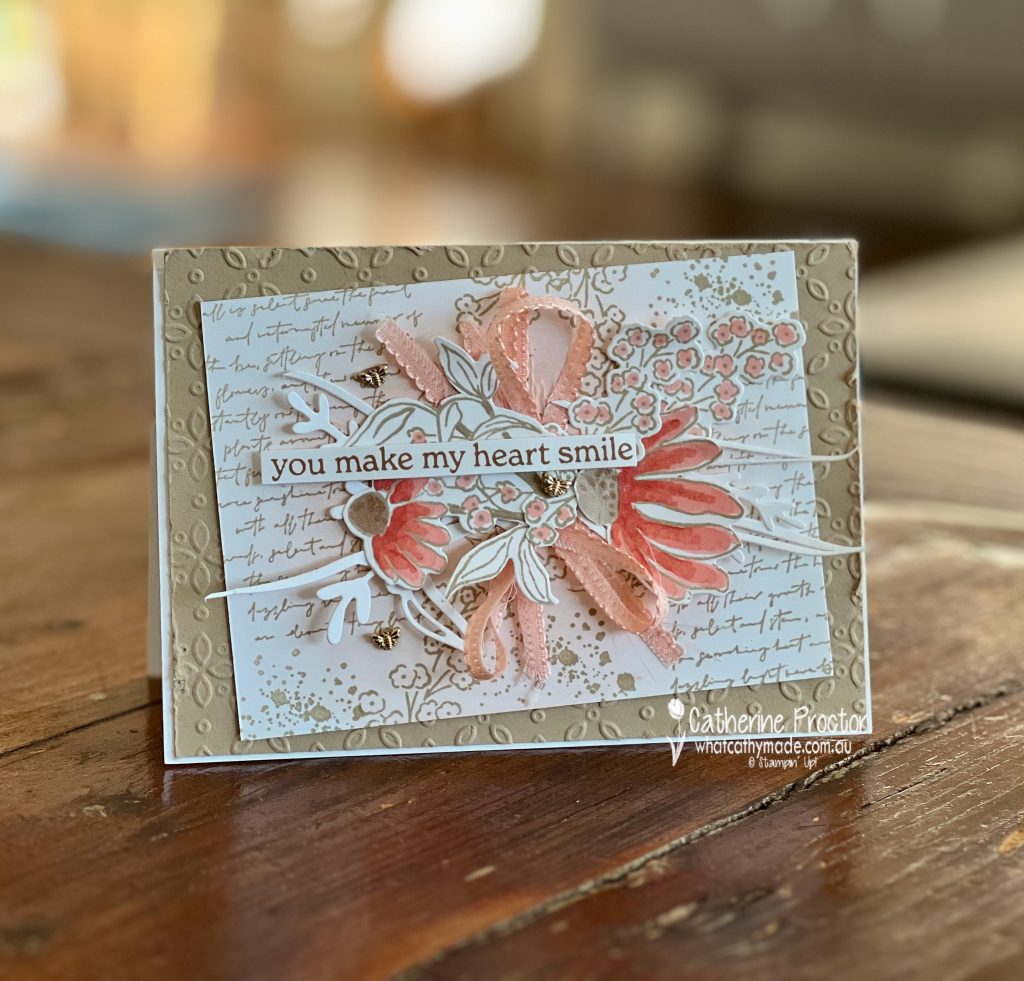
This card uses the Mixed Florals Bundle (Stamp Set and Dies), the Eyelet 3D Embossing Folder, the Elements of Text Stamp Set, the Scalloped Petal Pink Ribbon, Calypso Coral Ink, Blending Brush, Mixed Media Florals Dies, and Crumb Cake Cardstock and Ink to create a soft, vintage effect with plenty of texture.
Start by embossing Crumb Cake cardstock with the Eyelet 3D Embossing Folder to create a textured panel for your background. Layer this onto a Basic White card base for a clean edge.
Use various stamps from the the Elements of Text Stamp Set and the small floral stamp from the Mixed Florals Stamp Set stamped in Crumb Cake ink to add a script-style text pattern across the panel for a faded, old-paper feel. Use a blending brush
For the focal panel, stamp the largest floral image and the small floral stamp from the Mixed Florals Stamp Set in Crumb Cake and colour in with the Calypso Coral Stampin Blends. Die cut some Basic White cardstock using the large grass die.
Cut apart the large floral image and the grass die. Layer the flowers, foliage and ribbon together, to create a textured, “garden-style” arrangement.
Cut a piece of Petal Pink 3/8″ (1 cm) Scalloped Ribbon in half lengthway and add loops of Scalloped Petal Pink Ribbon between the flowers for extra softness and texture.
Finish the card by stamping the sentiment “you make my heart smile” (from the Layers of Beauty Stamp Set) in Pecan Pie ink and layering it across the floral cluster.
A few Tiny Bee Trinkets embellishments add a final touch of elegance.
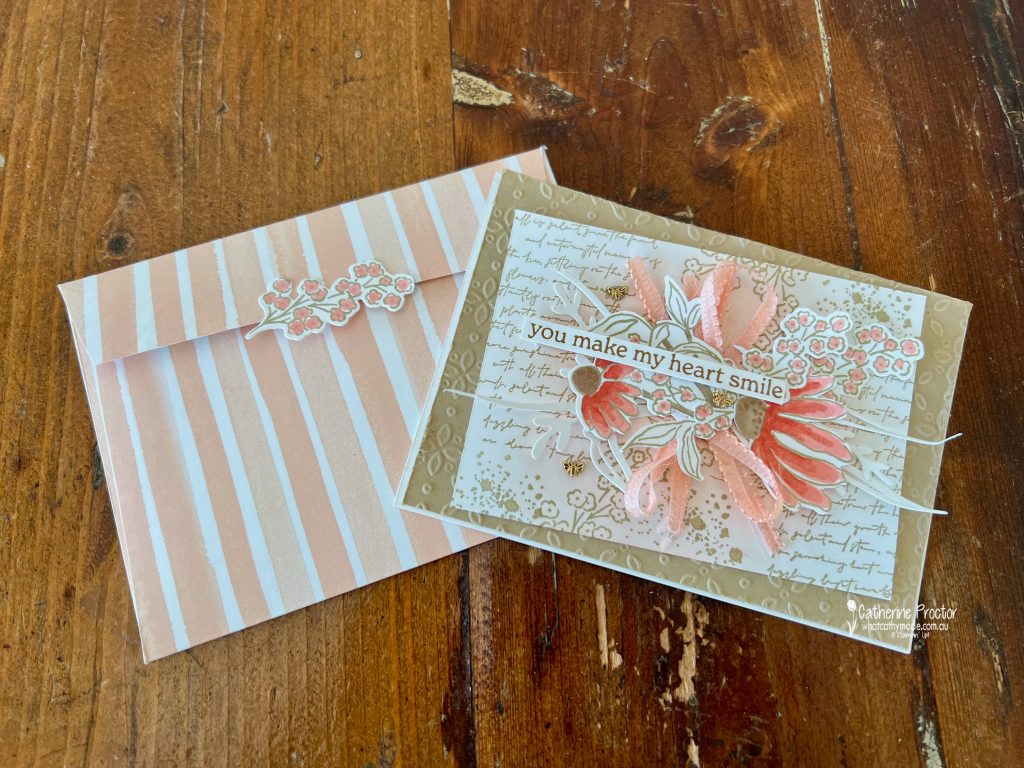
The handmade envelope was created using the Mixed Media Florals Designer Series Paper.
I used another small floral stamp from the Mixed Florals Stamp Set to create the closure on the back of the card. The “Happy Birthday” stamp is from the Birthday Celebration Stamp Set.
Take a look at some more Calypso Coral inspiration on our Insta Hop!
Our blog hop is now an Instagram hop but the good news is that you don’t need to have an Instagram account to view all of the other projects!
Simply copy any of the Insta handles below into a new search window to follow the Instagram hop at any point.
Next in our Hop is Andrea @andreaksargent. Be sure to check out her gorgeous project/s.
The full list of this week’s InstaHop is listed below:
Andrea @andreaksargent
Sharon @sharondaverncreates
Helen @apaperparadise
Rachel Woollard @handstamped_by_rachel
Rosa @hum.and.stamp
Kate @craftwithkate
Kirsty @crafty.littlemiss
Leanne @createwithleanne2
Theresa @teegeeinspirations
Vicki @vickiboucher
We’ll be back next Wednesday when we are showcasing Cherry Cobbler.I hope you can join us then!