Hello crafters – welcome to our last AWH Heart of Christmas blog hop for 2021! I’ve loved being inspired by the incredible creations in our Art with Heart Team.
With less than four weeks to Christmas have you got all your Christmas cards made yet? Have you even started yet?
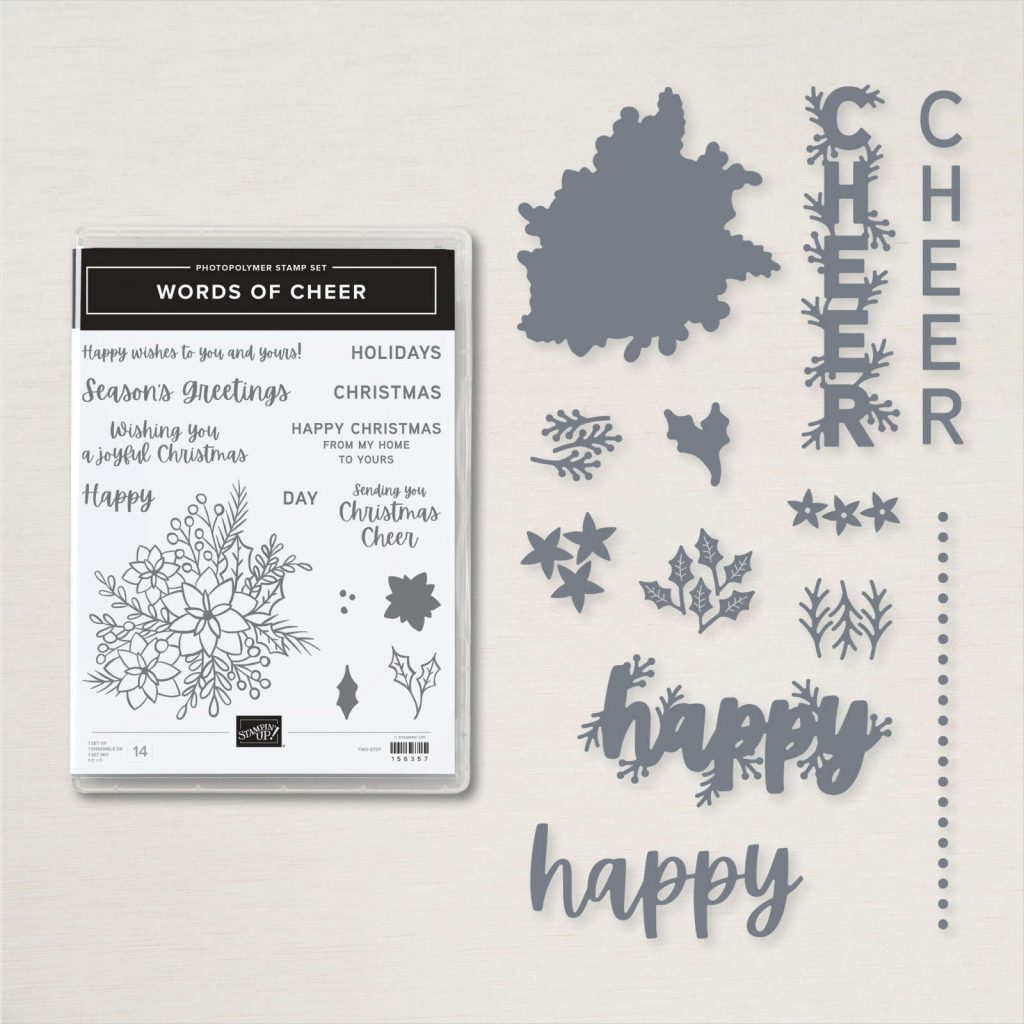
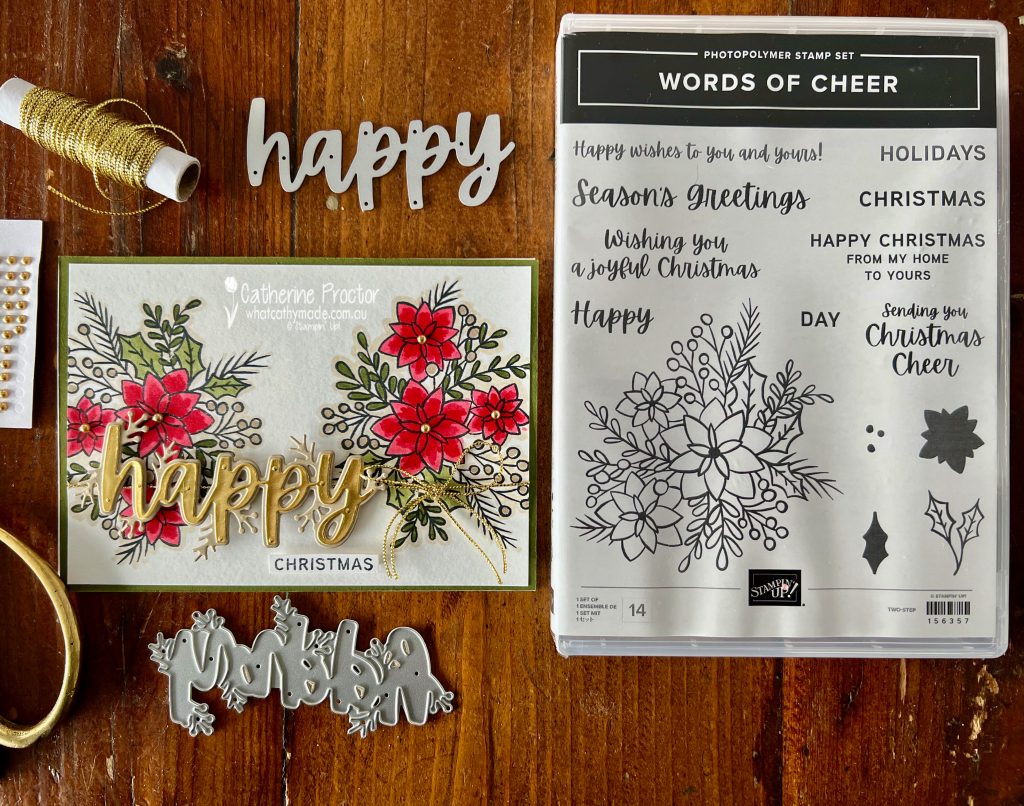
I finally caved in and purchased the Words of Cheer bundle after seeing so many amazing cards made with this bundle. I’ve enjoyed using this bundle so much I’ve also used it for my Merry Merlot card for our AWH Colour creations blog hop this week – come back and visit my blog on Wednesday night to see the other card I’ve made with the Words of Cheer bundle.
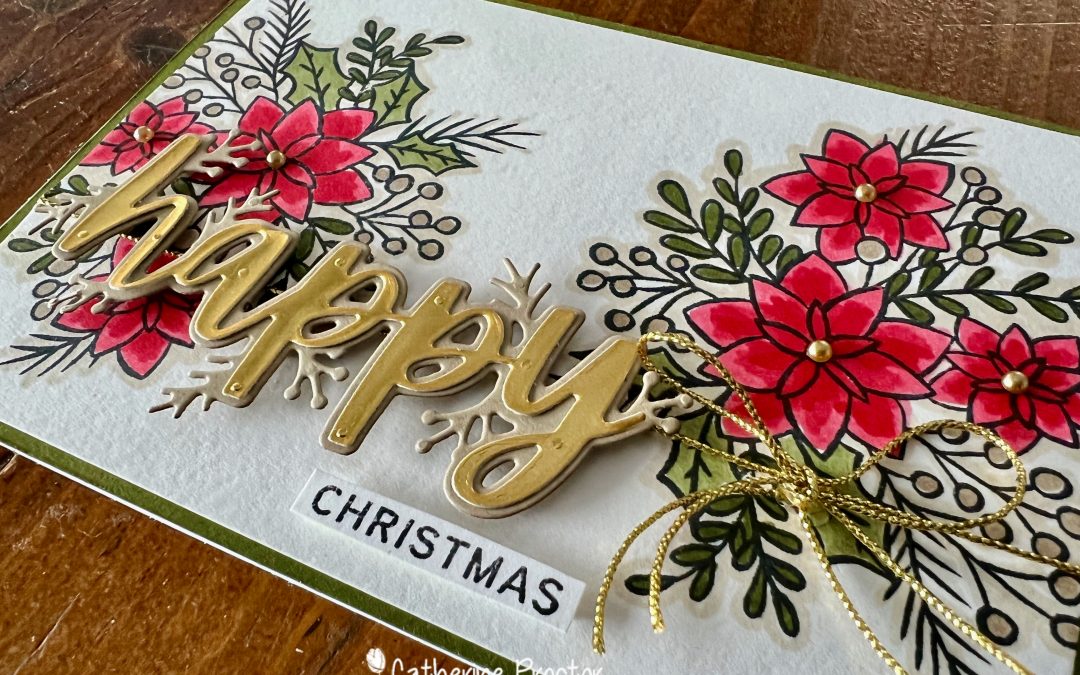
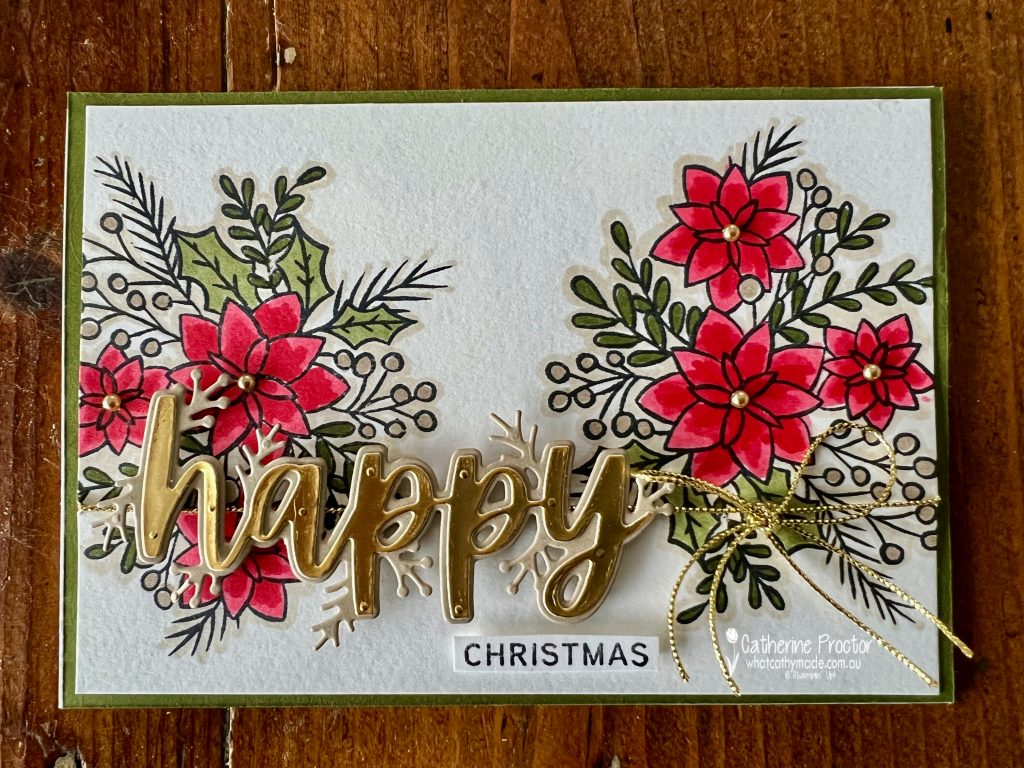
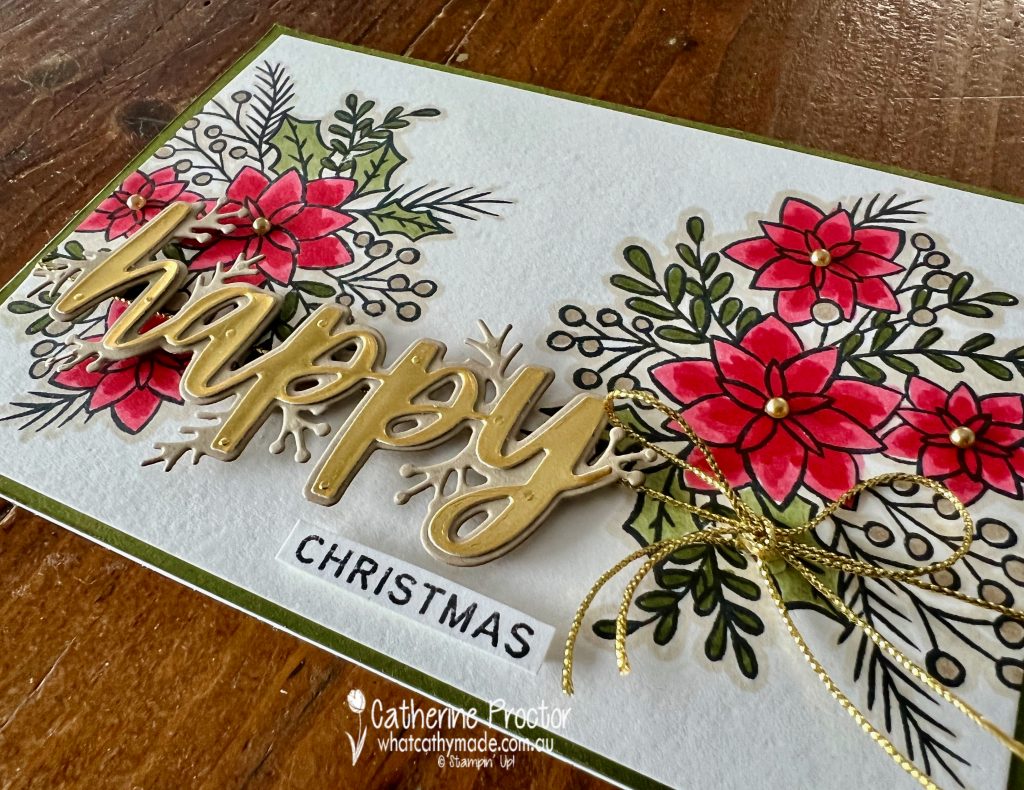
The large floral image gives you a lot of different options for adding colour to your card. I’ve used Poppy Parade, Mossy Meadow and Crumb Cake Stampin Blends, a Basic Black stamped sentiment and image outline, with gold accents in the die cut letters and the twine. I love how all these neutrals work together to make the Poppy Parade really pop!
The card design is super simple. Stamp the large floral image on each side of the Basic White card stock layer, colour it in and wrap with some twine or ribbon before adhering to your card base – I used Mossy Meadow.
When die cutting with foil I use use adhesive sheets to eliminate the risk of glue on the foil. The top layer of “happy” is gold foil on an adhesive sheet and the bottom layer is die cut in Crumb Cake card stock and then popped onto the card using Stampin Dimensionals.Not only do these large double layer dies look amazing, they are so easy to use!
To match the gold metallic Simply Elegant Trim tied around the base of the card I added Gold adhesive backed Metallic Pearls to the centre of the flowers. TIP – to get the Simply Elegant Trim to stay tied in a bow and sitting on the card I used a double knot and also adhered it to the card using glue dots.
Now it’s time to hop on over to our next participant, the lovely Christine Blain. I can’t wait to see what Christine shares with us today!
If at any time you find a broken link please head to the blog of this week’s host of The Heart Of Christmas Blog Hop, Tina Gillespie, and she will have the list of all those participating.
If you live in Australia, you can find and purchase all these products in my Stampin’ Up! Online Store or by clicking on the images below.
Hello crafters! Welcome to Week 21 of our AWH Heart of Christmas blog hop. It’s hard to believe that it’s less than five weeks until Christmas and after tonight’s blog hop we only have one more Heart of Christmas blog hop left this year!
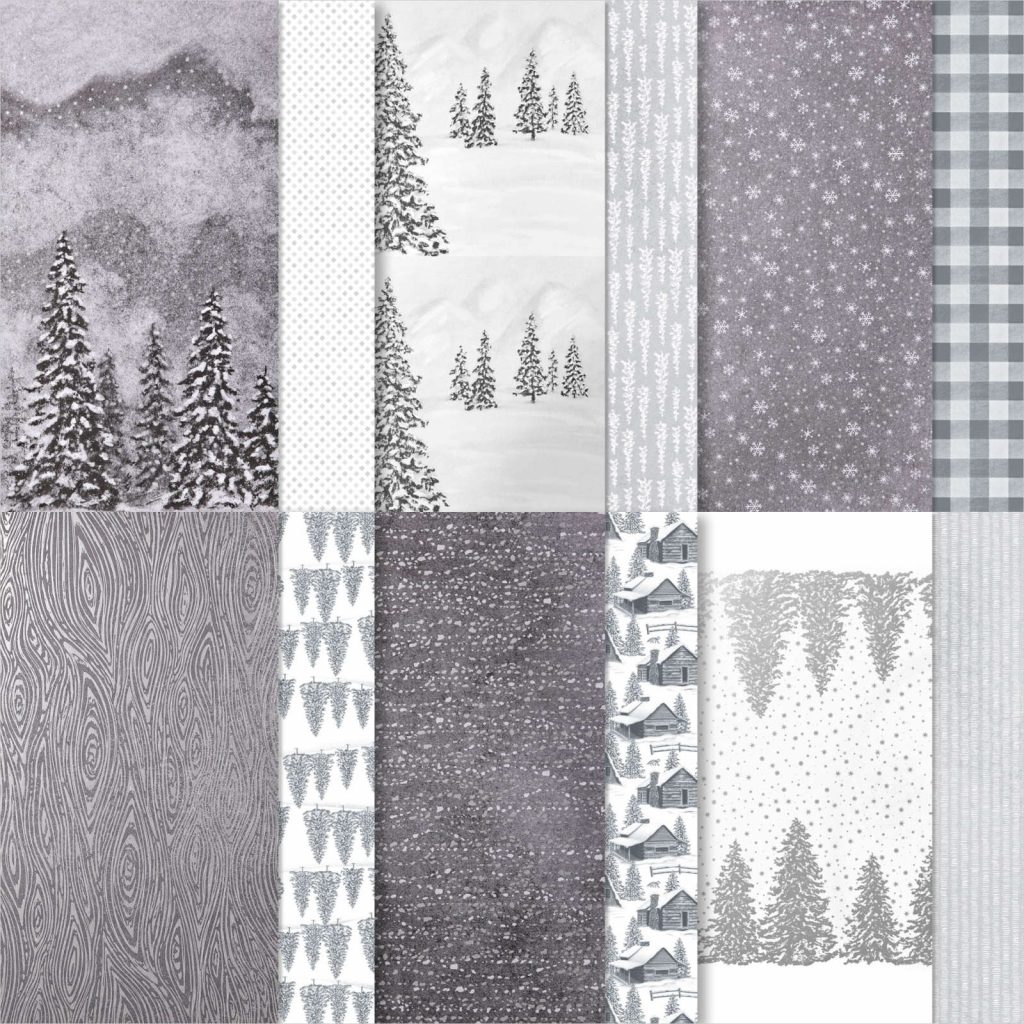
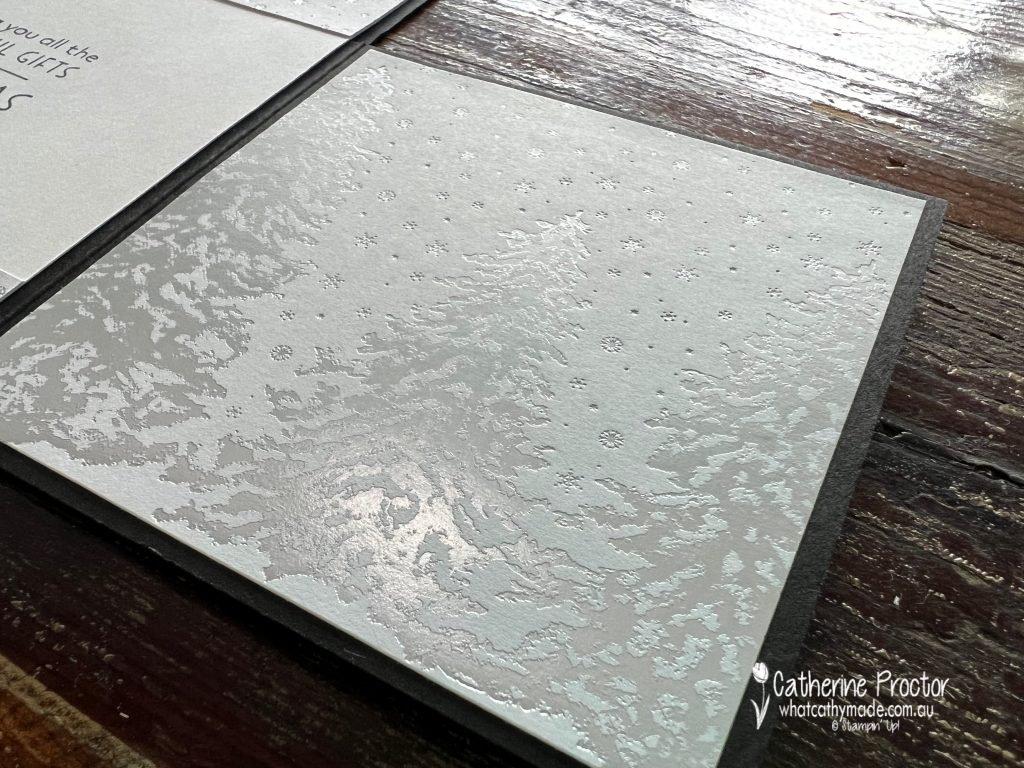
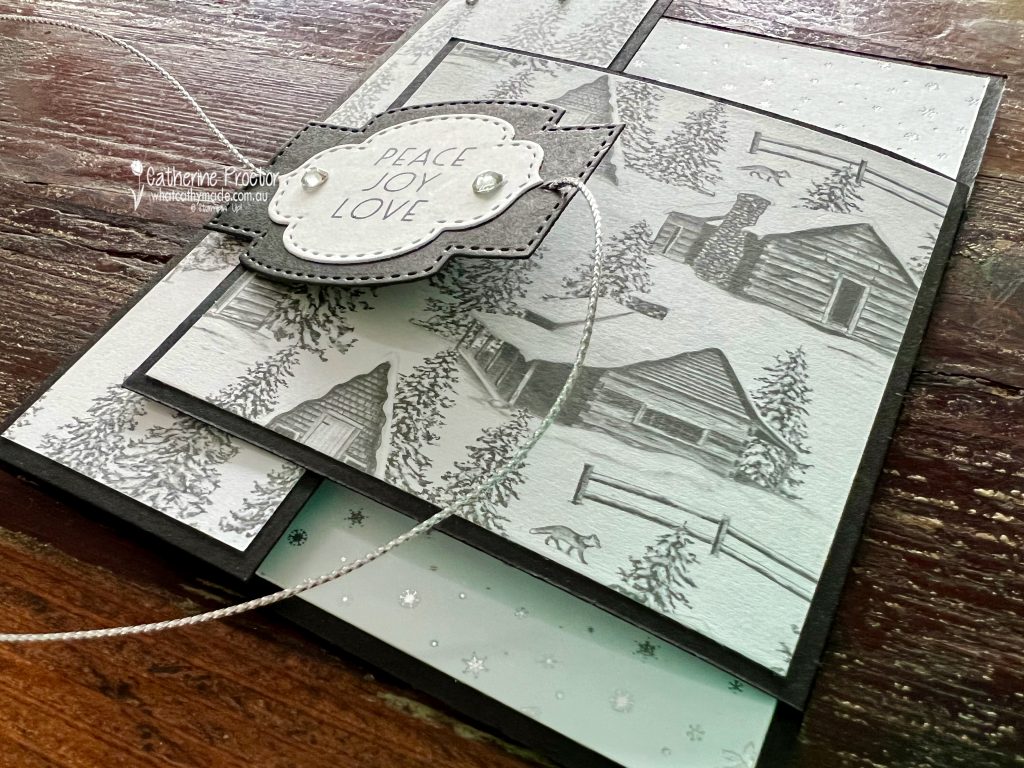
I don’t know about you, but sometimes I don’t use a particular Designer Series Paper because it’s just so beautiful and I don’t want to cut it or cover it. It’s really had to see all the foiling in this photo, but the Peaceful Place is simply stunning and I wasn’t sure exactly how to use it.
With Designer Series Paper as elegant as this, I think it’s best to keep the card quite simple and let the paper be the star of the show, which is why I decided to create a Christmas latch card.
This fancy fold looks pretty fancy, but it is easy peasy to make. The card base is created from two pieces of Basic Black cardstock. The first piece measures 16 x 14.8 cm, scored at 5 cm along the 16 cm side – this is the back of the card and the left flap. The second piece measures 10.5 x 9.5 cm, scored at 1 cm along the 10.5 cm side – this is the right flap and hinge.
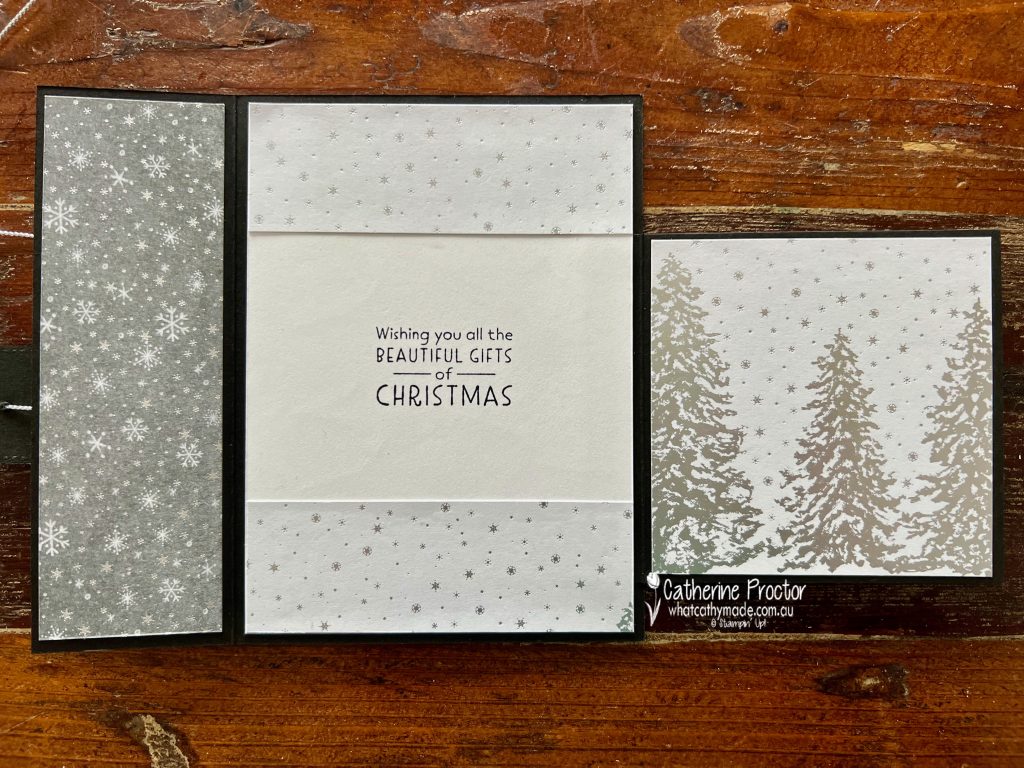
Once you adhere the right hinge to the right hand side of the card, you can then decorate the inside and the outside of the cardstock base and flaps with the DSP. I used this lovely foiled DSP for the inside right flap.
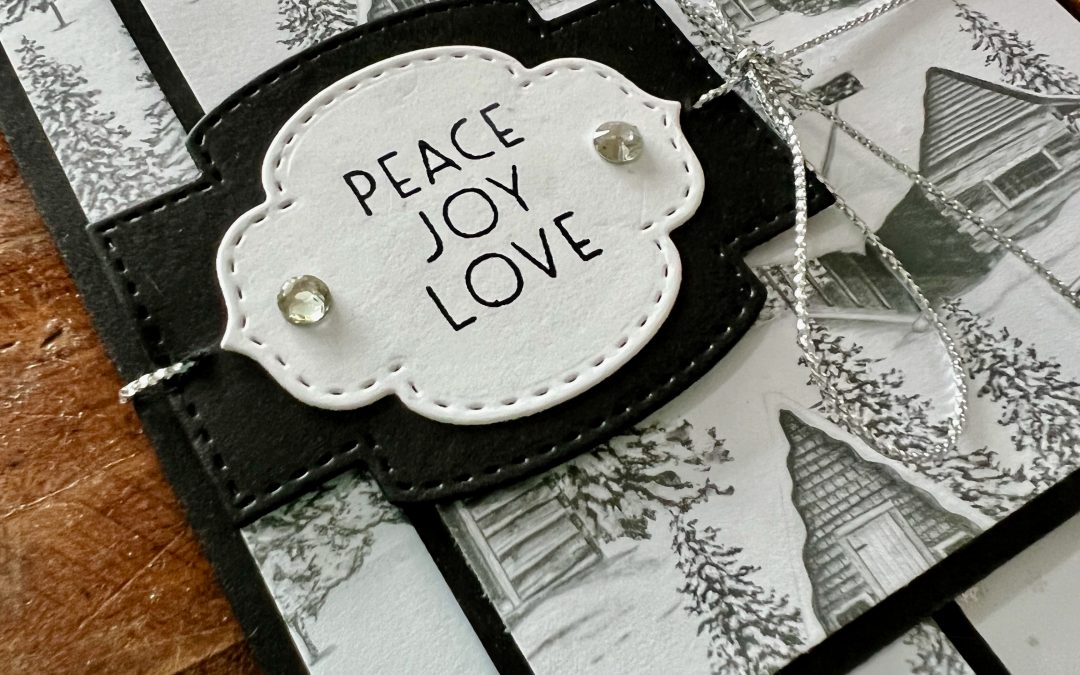
Here’s what all of the card looks like on the inside. Both this sentiment and the sentiment on the front of the card are from the Inspired Thoughts stamp set. Isn’t this a beautiful font?
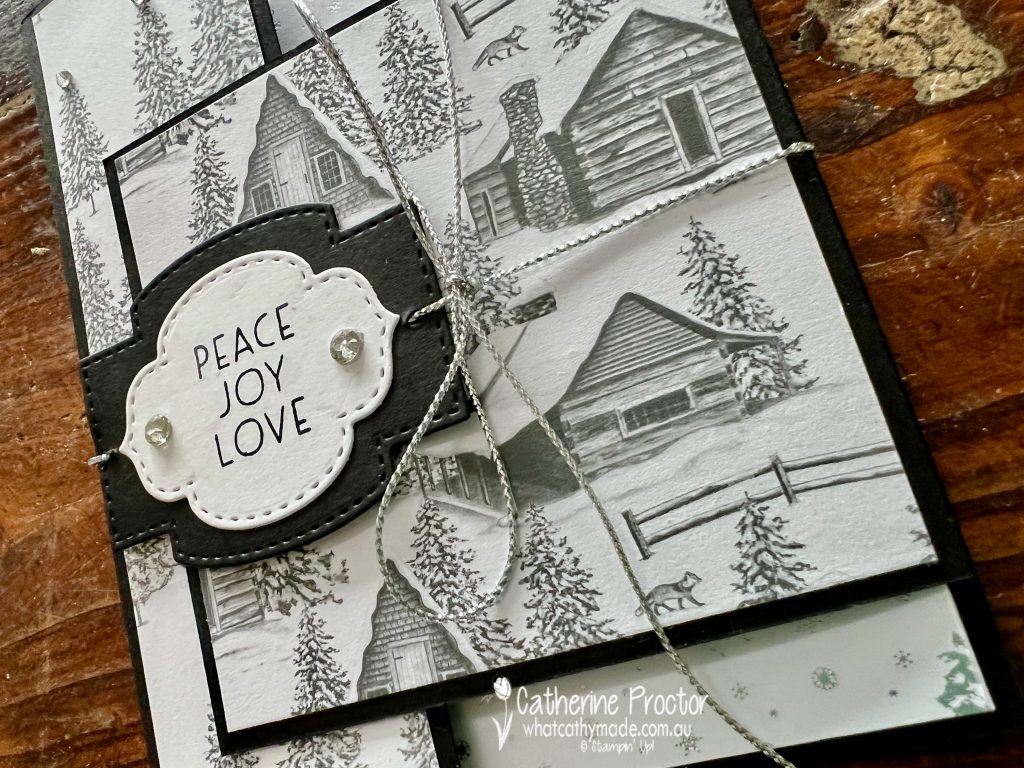
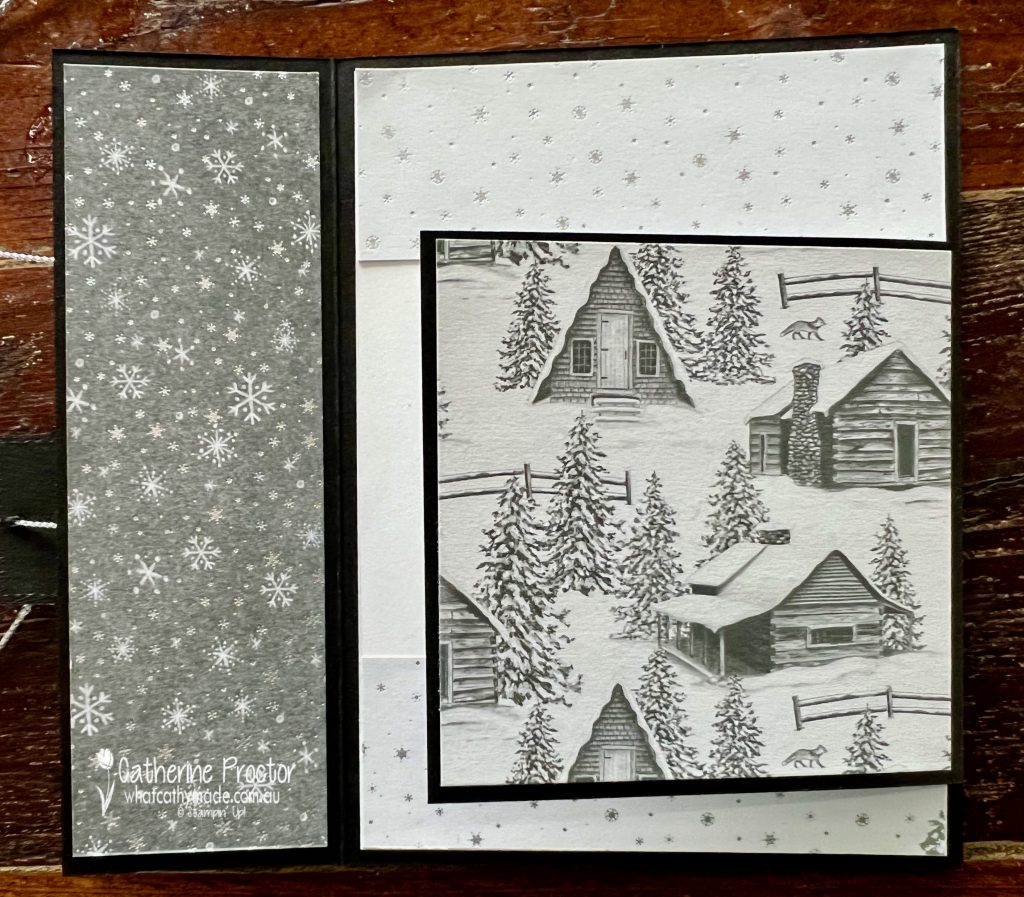
The photo below shows how the outside of the right flap uses the DSP with the cabin print. There is a coordinating Peaceful Cabin Bundle (it includes the Peaceful Cabin Stamp Set and the Cabin Dies), but I don’t own it. This type of fancy fold is ideal for when you want to showcase DSP but you don’t own the matching bundle – all you need is a sentiment from any stamp set that works with the DSP.
The “Peace, Joy, Love” sentiment has been die cut using the Stitched So Sweetly dies and it forms the latch mechanism. After threading a length of silver simply elegant trim through the sentiment, I used a couple of Stampin’ Dimensionals to attach the LEFT SIDE ONLY of the sentiment to the card – the right flap of the card slips over the left flap and under the right side of the sentiment to create a latch.
The final touch to my card was the addition of some rhinestone jewels and then tying the metallic silver thread into a bow to the right of the sentiment. This thread wrapped around the card is not only decorative … it also helps the card to sit flat.
Now it’s time to hop on over to our next participant, the lovely Ros Davidson. I can’t wait to see what she shares with us today!
If at any time you find a broken link please head to the blog of this week’s host of The Heart Of Christmas Blog Hop, Sharon Davern, and she will have the list of all those participating.
If you live in Australia, you can find and purchase all these products in my Stampin’ Up! Online Store or by clicking on the images below.
Hello crafters! Welcome to Week 20 of our AWH Heart of Christmas blog hop.
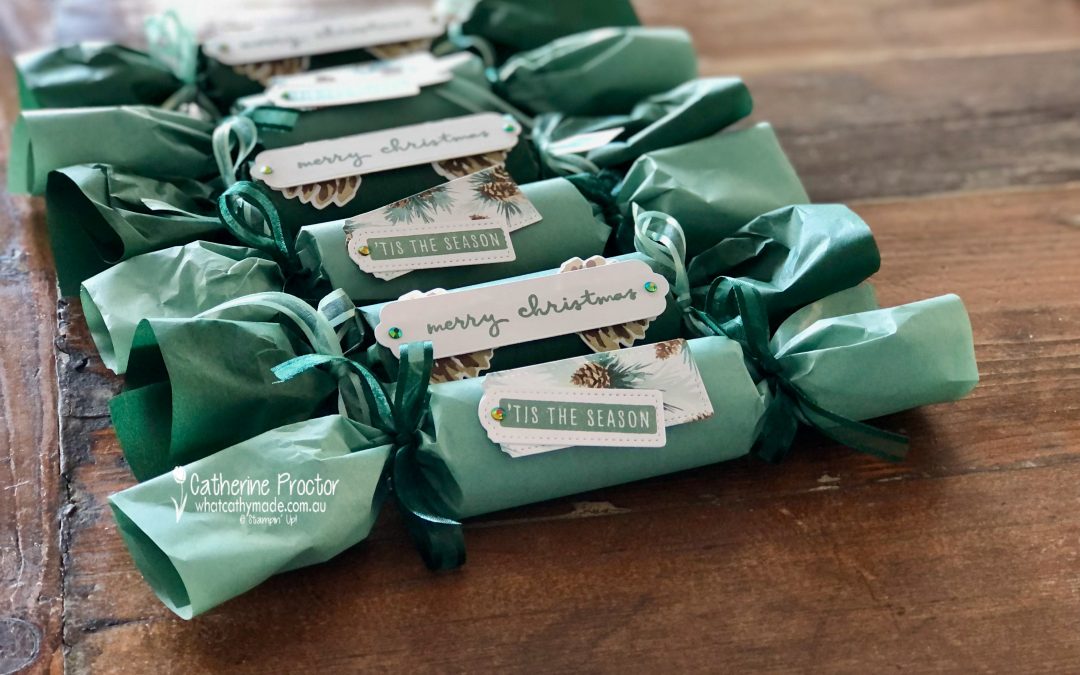
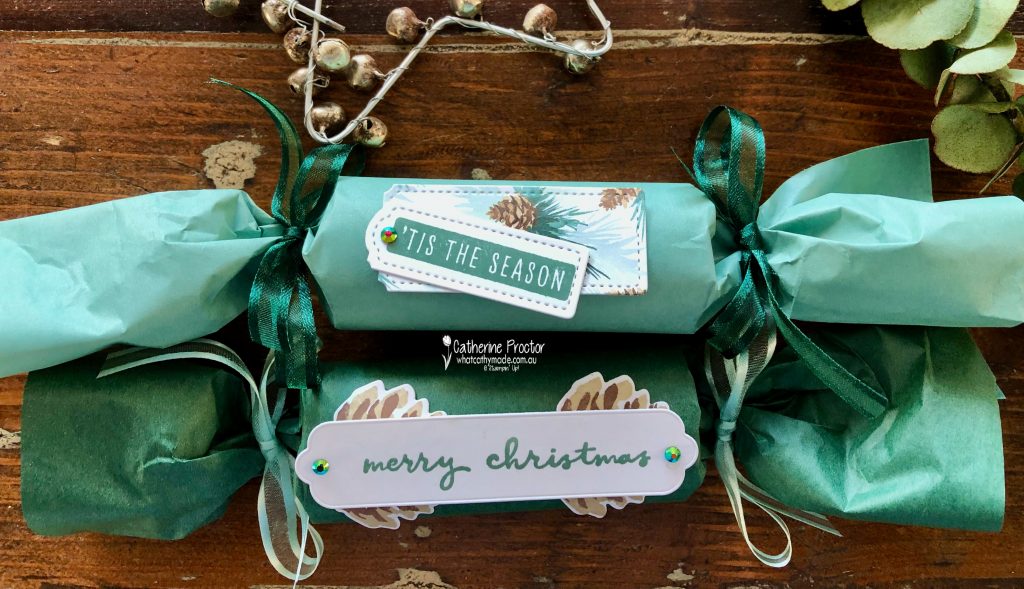
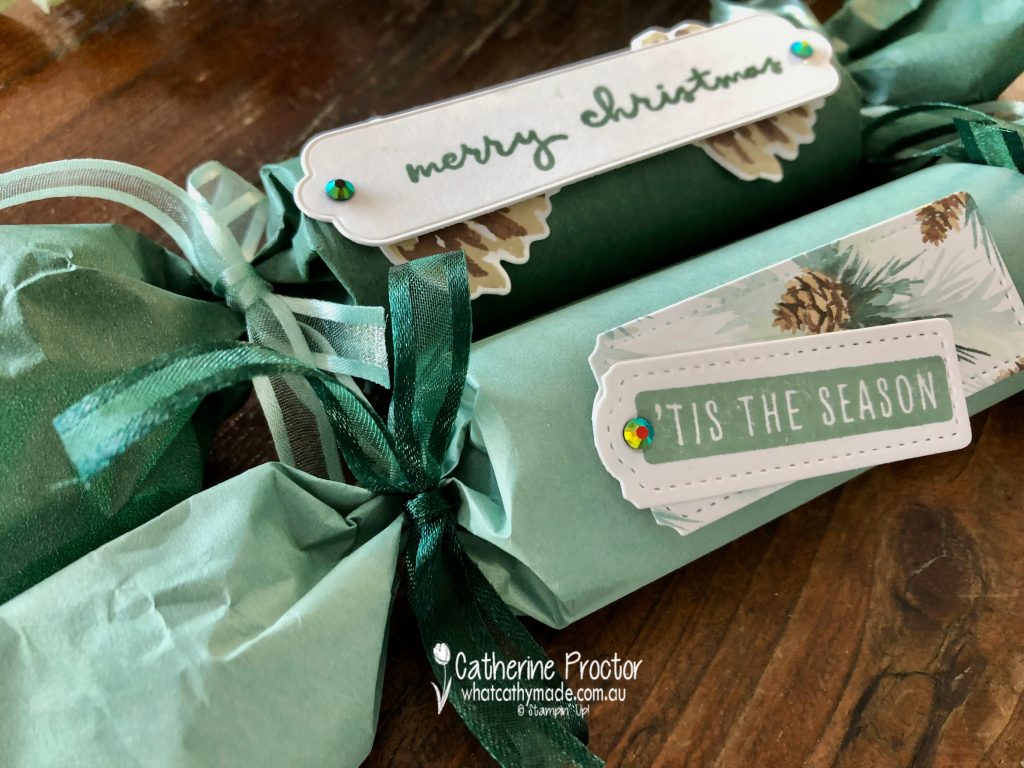
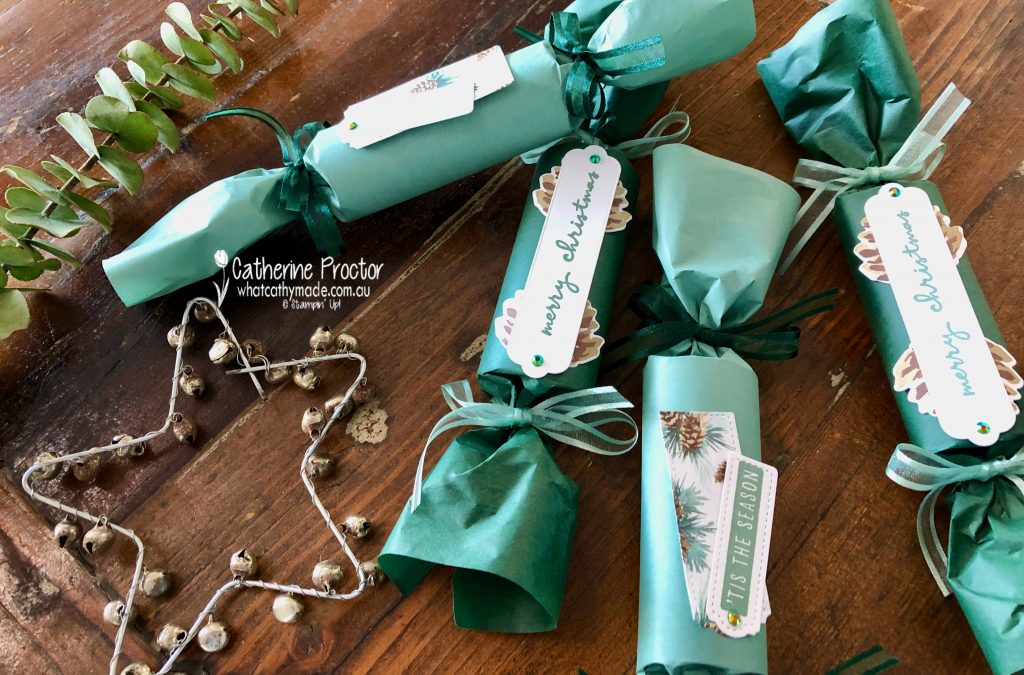
This week I’m using a stunning new product, the limited release Ever Eden Cotton Paper. This soft, delicate tissue-like paper offers a unique way to add dimension and visual interest to any paper project, can be used to wrap gifts, or it can be die cut, ripped, wrinkled or folded.
And it’s also the perfect thickness to create your own Christmas crackers!
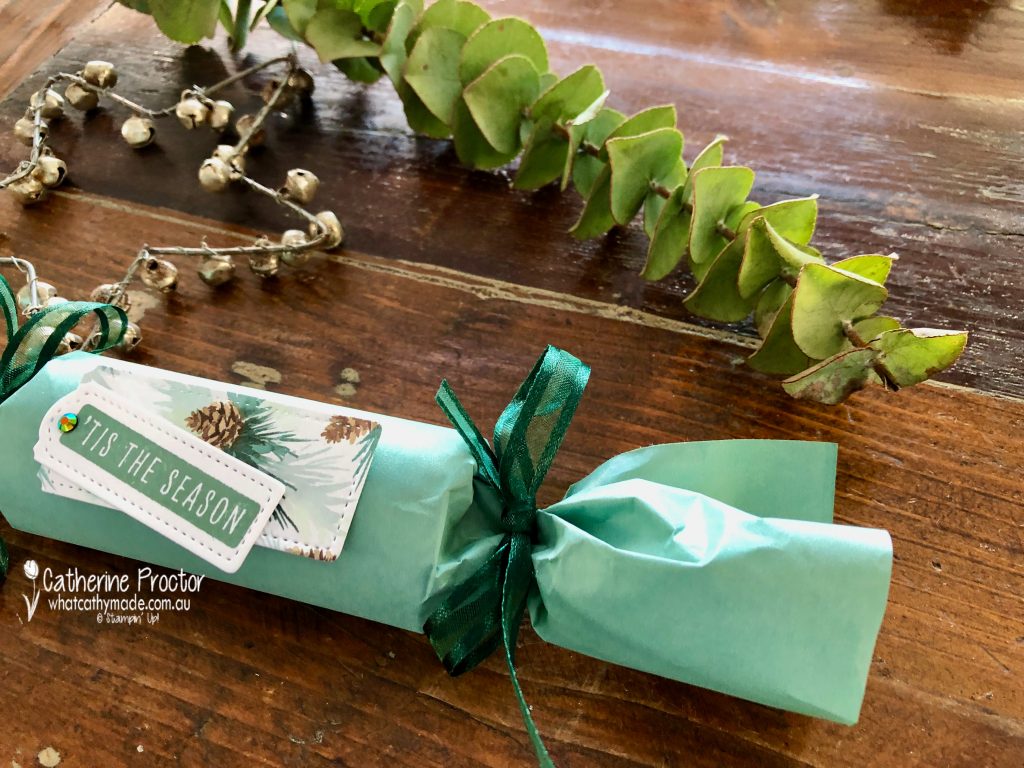
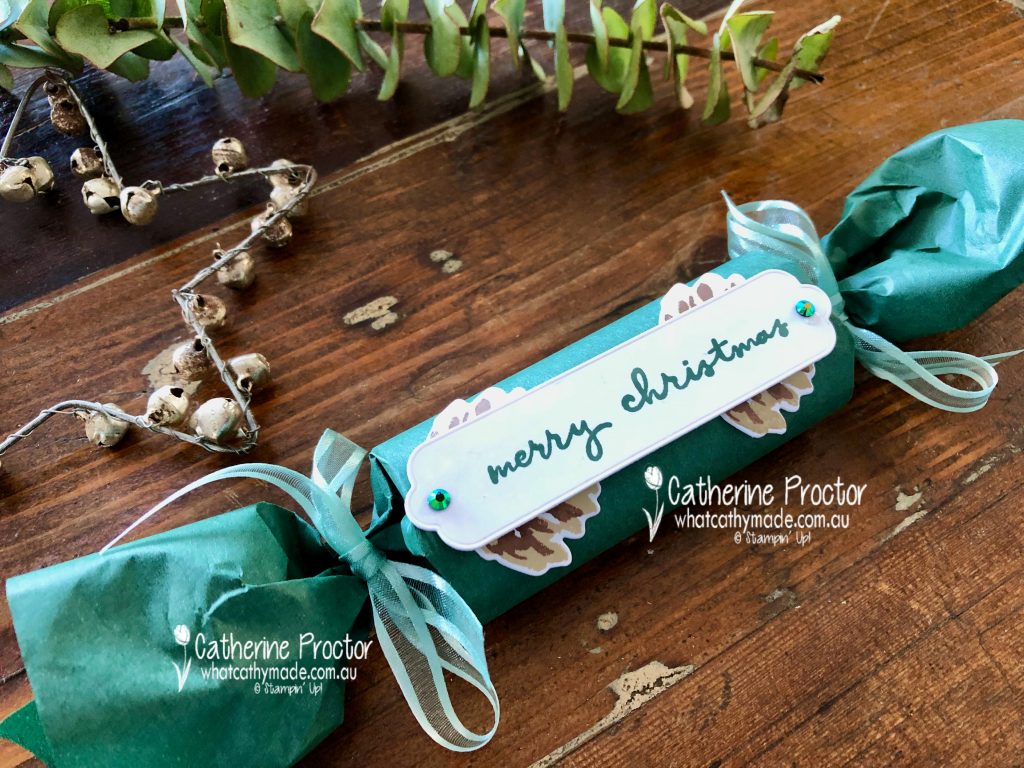
The Ever Eden Cotton Paper comes in two colours: Soft Succulent and Evening Evergreen. For my Evening Evergreen Christmas Crackers I tied each end with the Soft Succulent Open Weave Ribbon and for the Soft Succulent Christmas Crackers I used the Evening Evergreen Open Weave Ribbon.
These crackers are super easy to make. You can use the cardboard roll from wrapping paper, loo rolls or make your own inner tube from Crumb Cake or Basic White card stock. Each cracker is wrapped with half a sheet of Ever Eden Cotton Paper, attached to the inner tube with Tear and Tape.
Don’t forget to fill your cracker with a snap, a sweet, a joke or a treat before tying the ends with the ribbon. If you forget, you can gently untie one end and insert these things later.
The label on the Soft Succulent “Tis the season” cracker is die cut with the Tailor Made Tag dies and has a second tag cut from this gorgeous Painted Christmas DSP. The sparkly Ever Evergreen In Colour Jewels decorate both crackers.
After I made all my crackers I realised I could have used the Garden Gems from the Eden’s Garden Collection! The label on the Evening Evergreen cracker has the “Merry Christmas” sentiment from the Christmas to Remember stamp set, die cut using one of the label dies from the Seasonal Label dies – I though the shape of this long narrow die perfectly suited the shape of the cracker.
A pinecone stamped in Crumb Cake and Early Espresso was cut in half and adhered under the long die at each end of the cracker.
Now it’s time to hop on over to our next participant, the lovely Rachel Woollard. I can’t wait to see what she shares with us today!
If at any time you find a broken link please head to the blog of this week’s host of The Heart Of Christmas Blog Hop, Tina Gillespie, and she will have the list of all those participating.
If you live in Australia, you can find and purchase all these products in my Stampin’ Up! Online Store or by clicking on the images below.
Welcome back to Week 13 of our weekly Heart of Christmas blog.
Although I missed week 1, I’m determined to try to post a Christmas card or project every week until Christmas. I really love making Christmas cards and being part of this weekly blog with the Art with Heart Team is a great excuse to make Christmas cards year round. It also means I end up being super organised with my cards by the time December comes around… a win/win!
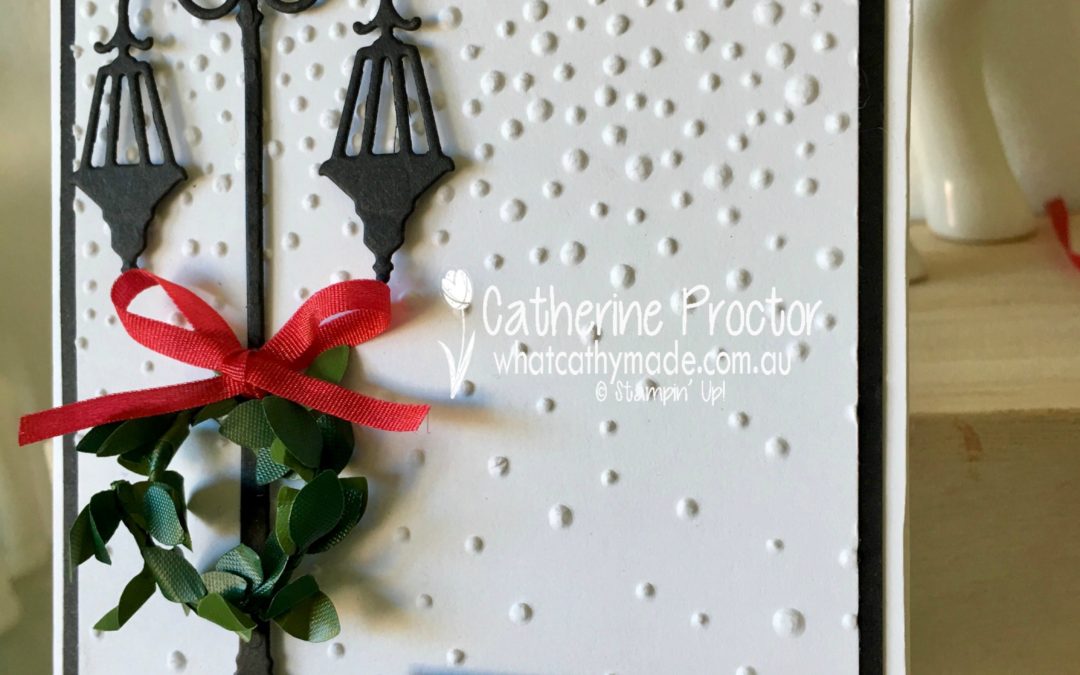
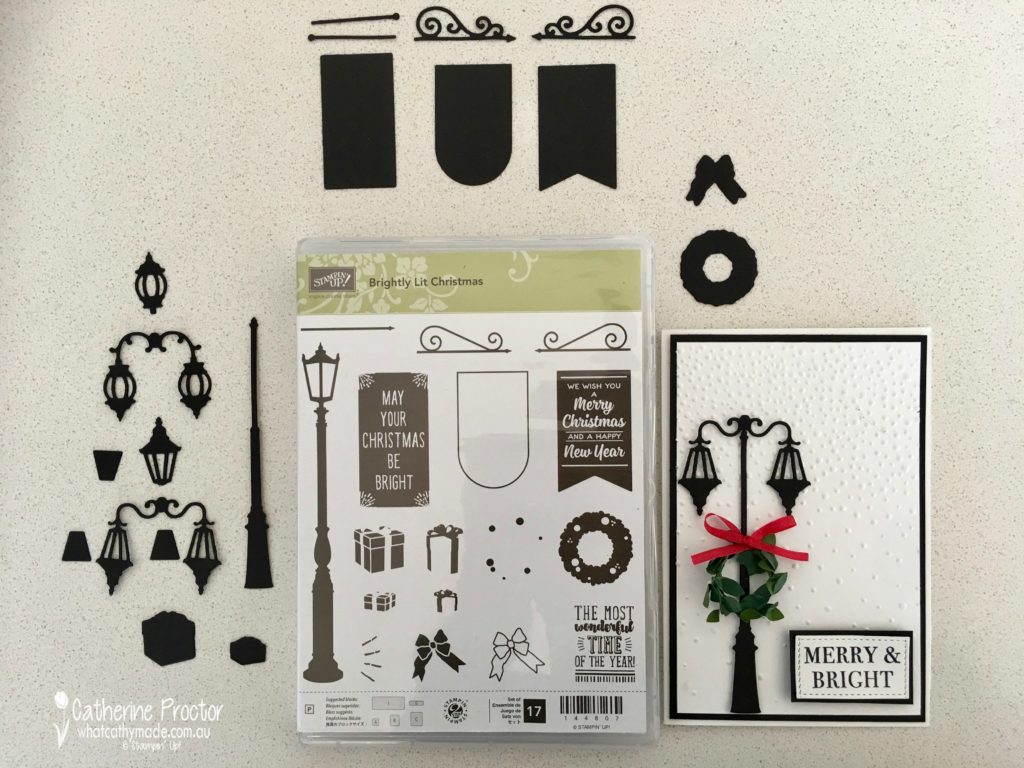
This week I wanted to make a simple card that would “hero” the gorgeous new lamppost die. This die reminds me of my one and only white Christmas in 1989, which I spend in Edinburgh (where my father’s family comes from) after a month’s holiday in the UK. It was such a special time and I loved having a white Christmas in that magical city.
The Brightly Lit Christmas bundle comes with a variety of lamps and they look great angled up or down, used singularly, or with 2 or 3 lampshades. There’s also the option of a hanging banner or sign that hangs off an arm off the lamppost (the matching stamp set has signs that fit perfectly into these banners). I’ve cut out all the dies below and photographed them beside the Brightly Lit Christmas stamp set so you can see just how many pieces you get in this bundle, how they co-ordinate together, and how versatile it is!
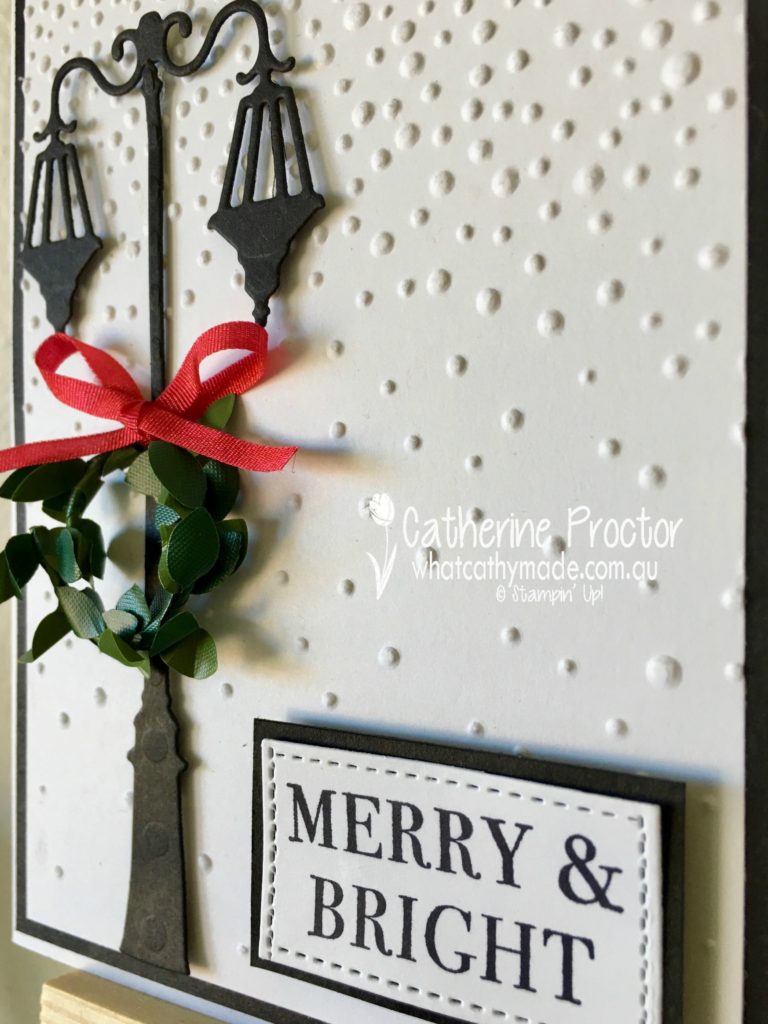
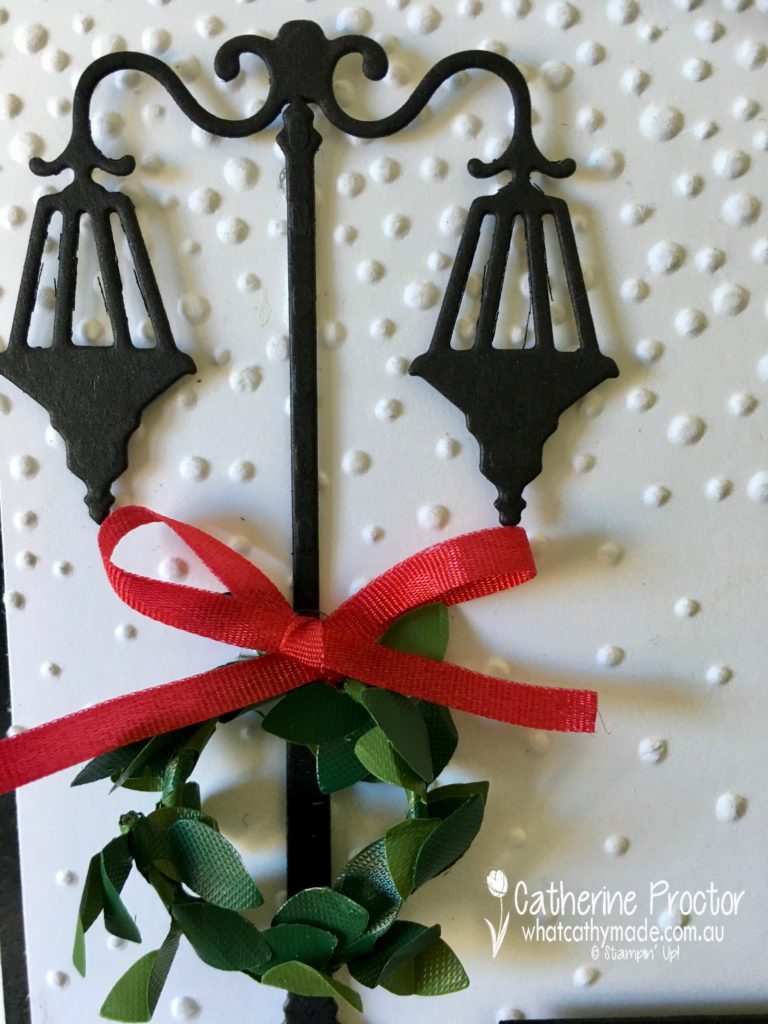
The perfect background for this lamppost is the softly falling embossing folder. I must admit I often forget to use my embossing folders but when I do remember to use them I just love the texture and dimension they add to my cards.
I’ve used some of the new beautiful 1/8 inch real red ribbon to attach one of the darling little boxwood wreaths to the lamppost. I actually cut the wreath in half with my scissors to make it the right dimension for this card.
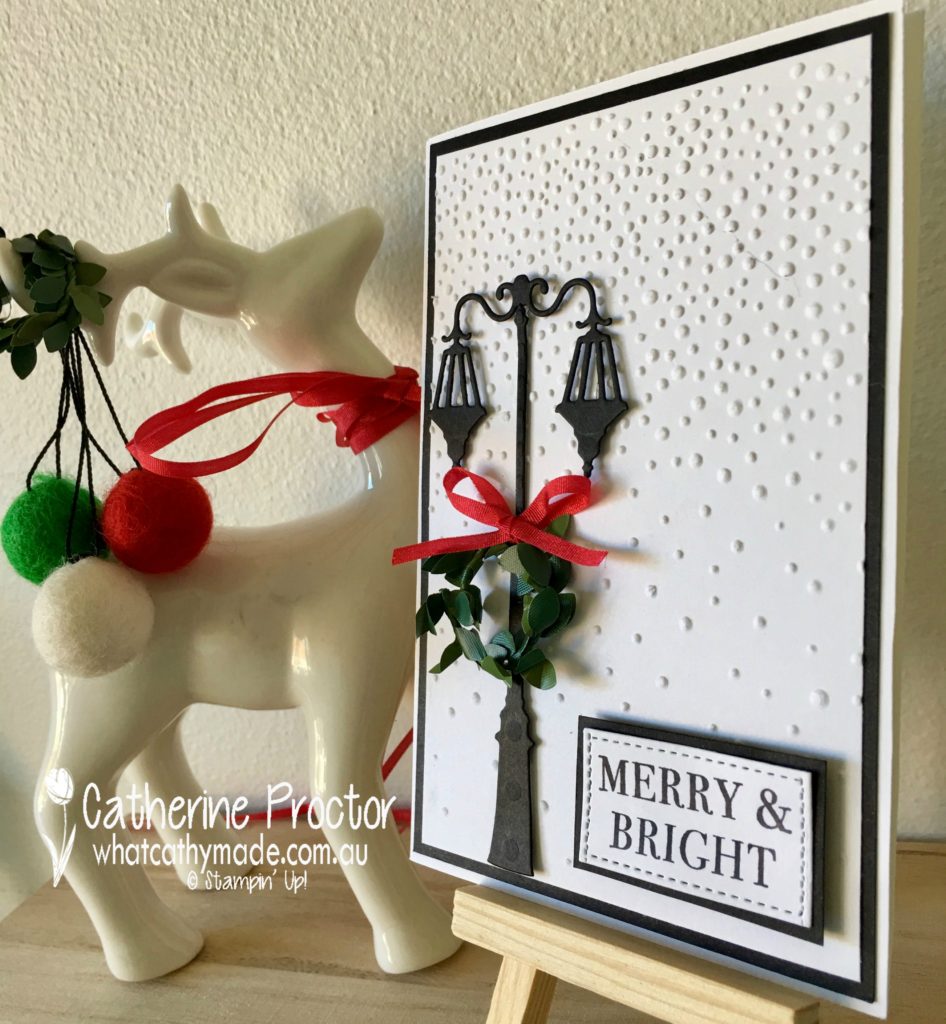
Finally, to finish the card off I thought the “Merry & Bright” sentiment from the new Hearts Come Home stamp set was just the perfect match for a lamppost. If you love the Hearts Come Home bundle as much as I do take a look at my blog tomorrow as I’ll be sharing another card that features this beautiful bundle.
I love this classic and neutral colour combination of black and white because I think it really makes the green wreath and red ribbon pop. And my little reindeer just loves his fancy pom pom decorations for this week’s blog!
To see what the rest of the team have made, visit Claire’s blog here. I’ll be back with more Christmas card inspiration next week.
Product List (I can’t include a link here to the Brightly Lit bundle, the real red ribbon or the Hearts Come Home stamp set because these are not available for purchase until September 1)
Welcome back to another week of “Heart of Christmas” inspiration from the Art With Heart team. I hope you’re enjoying reading our blog as much as we’re enjoying making these cards!
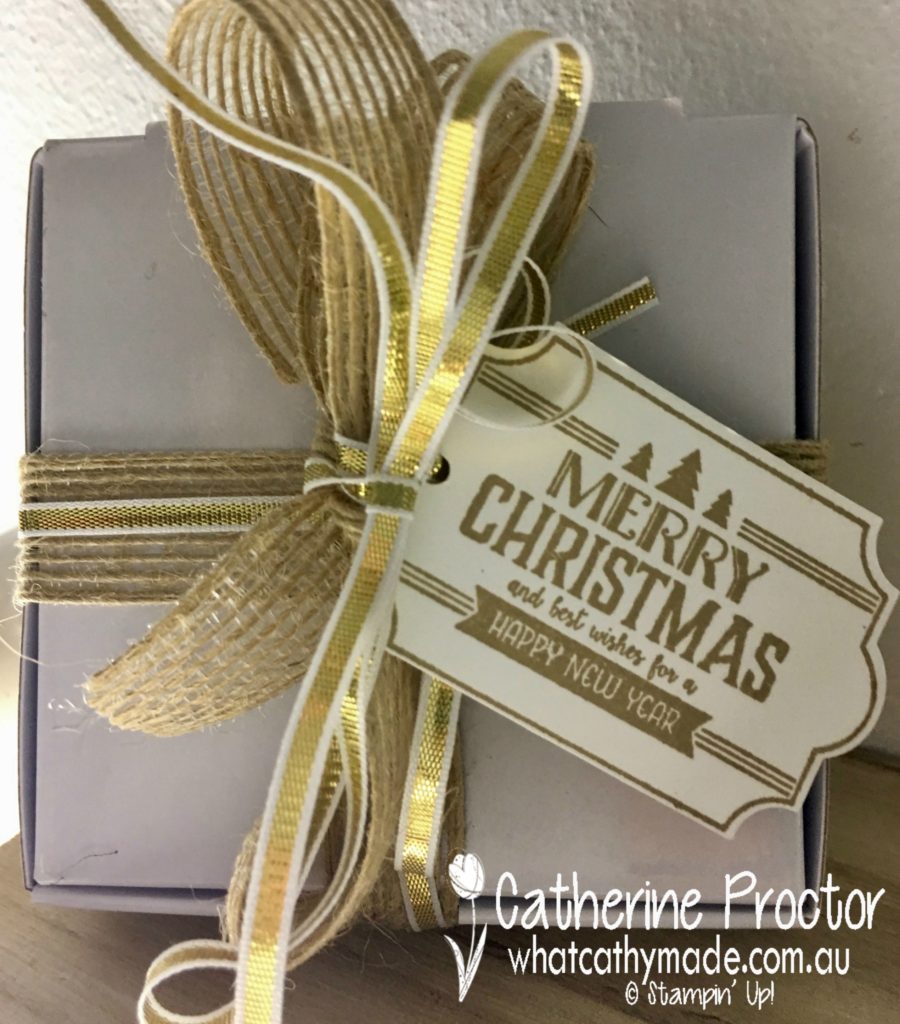
I’m just loving all the products from the new holiday catalogue (contact me if you’d like a copy and I’ll post one out to you) and this week I decided to mix up some old and new products to make a box of iced gingerbread Christmas ornaments.
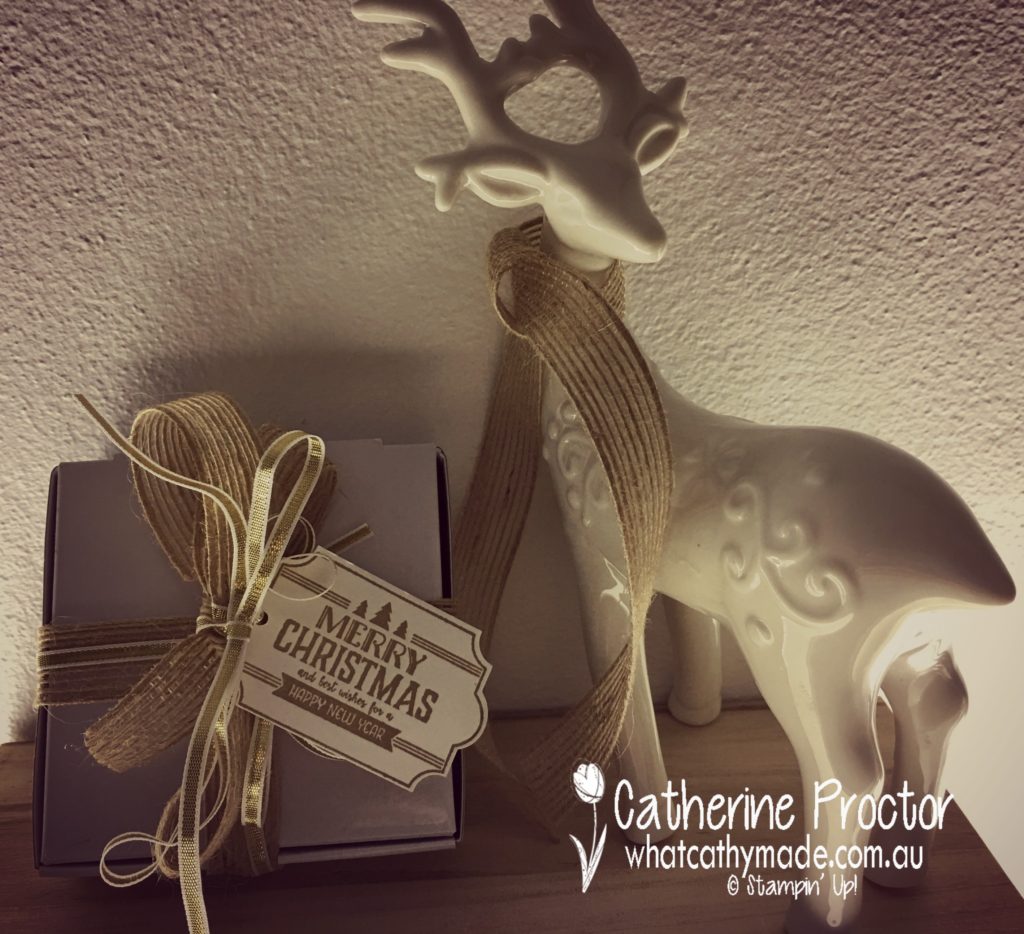
This packaging was so quick to make. I stamped the tag using crumb cake ink and the Merry Little Labels stamp set which I then punched out with its matching label punch. This new everyday label punch is so versatile and it has 2 new stamp sets that match it!
My ornaments are presented in a mini pizza box…so cute! They come in a pack of 8 and are food safe if you want to use them to package up edible gifts. You simply fold the precut and scored pizza box into shape and glue 2 of the bottom flaps. Then it’s all ready for you to pop your gifts inside. I wrapped mine up with burlap ribbon and 1/8 inch gold ribbon, then used some more of the ribbon to attach the gift tag.
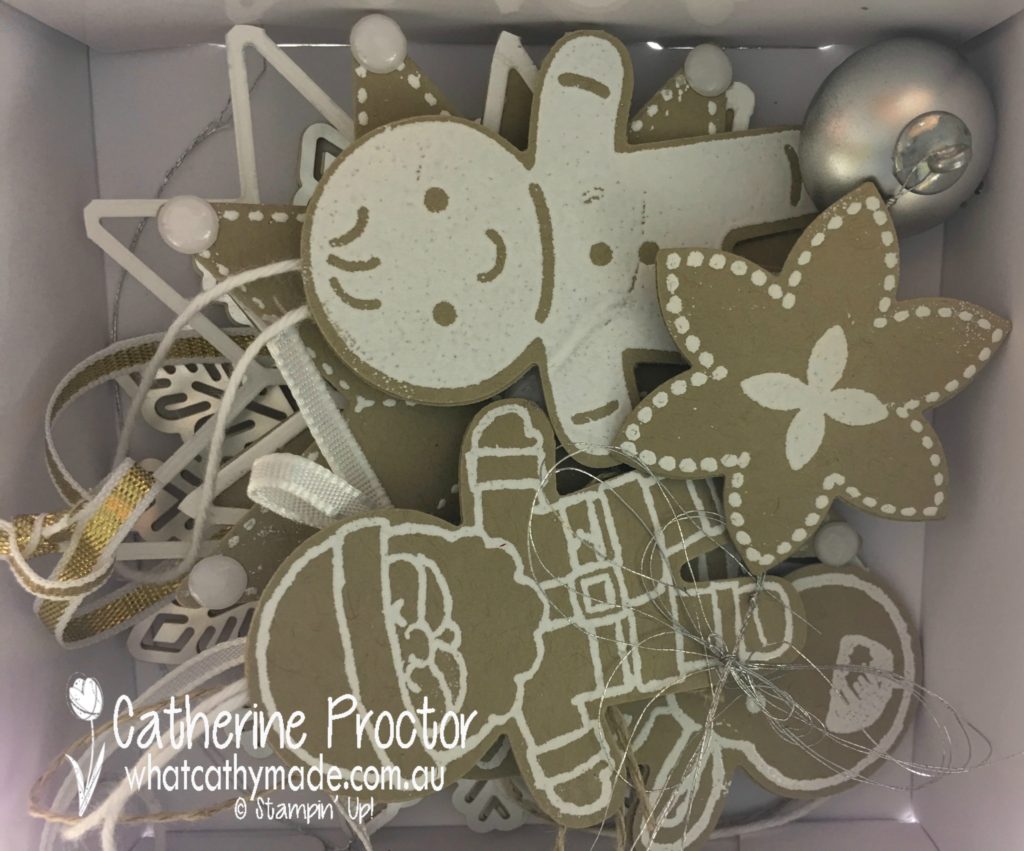
Want to take a peek inside the box?
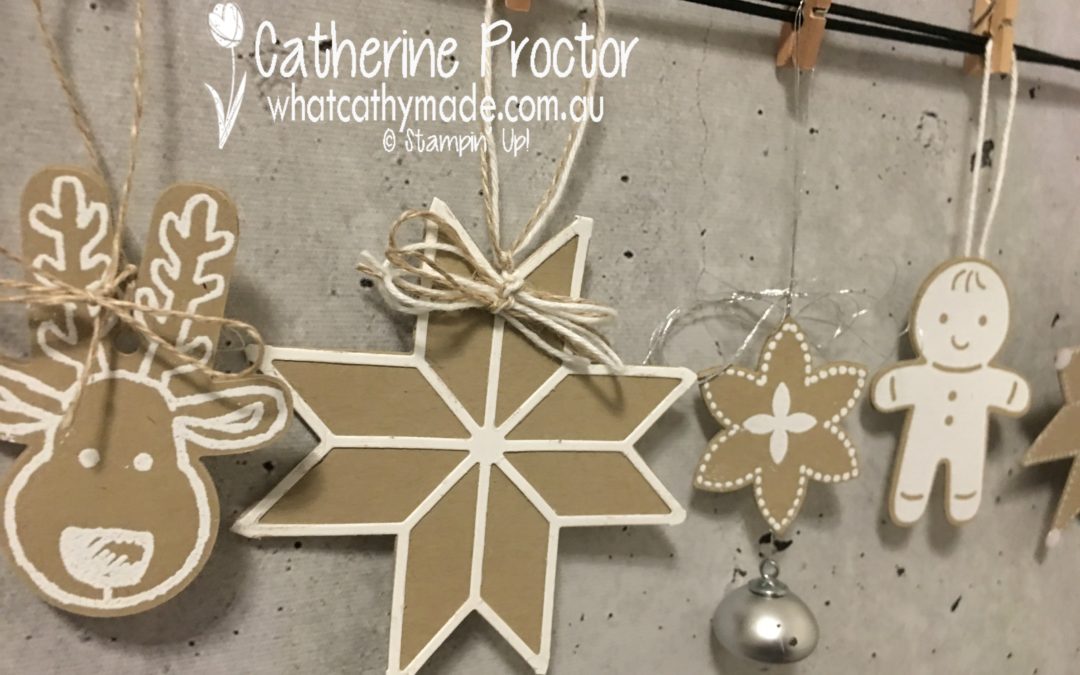
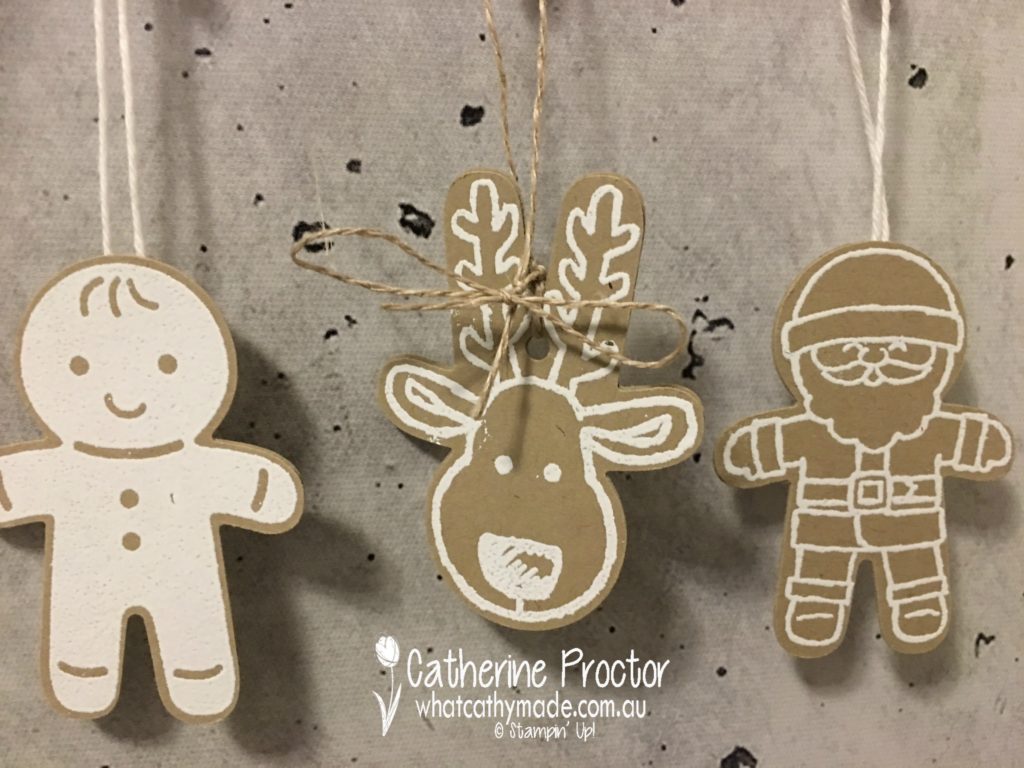
Using crumb cake paper, whisper white paper and ink, white embossing powder, my heat tool and various embellishments and ribbons I’ve made a set of Christmas tree ornaments that (hopefully) look like iced gingerbread ornaments for the tree.
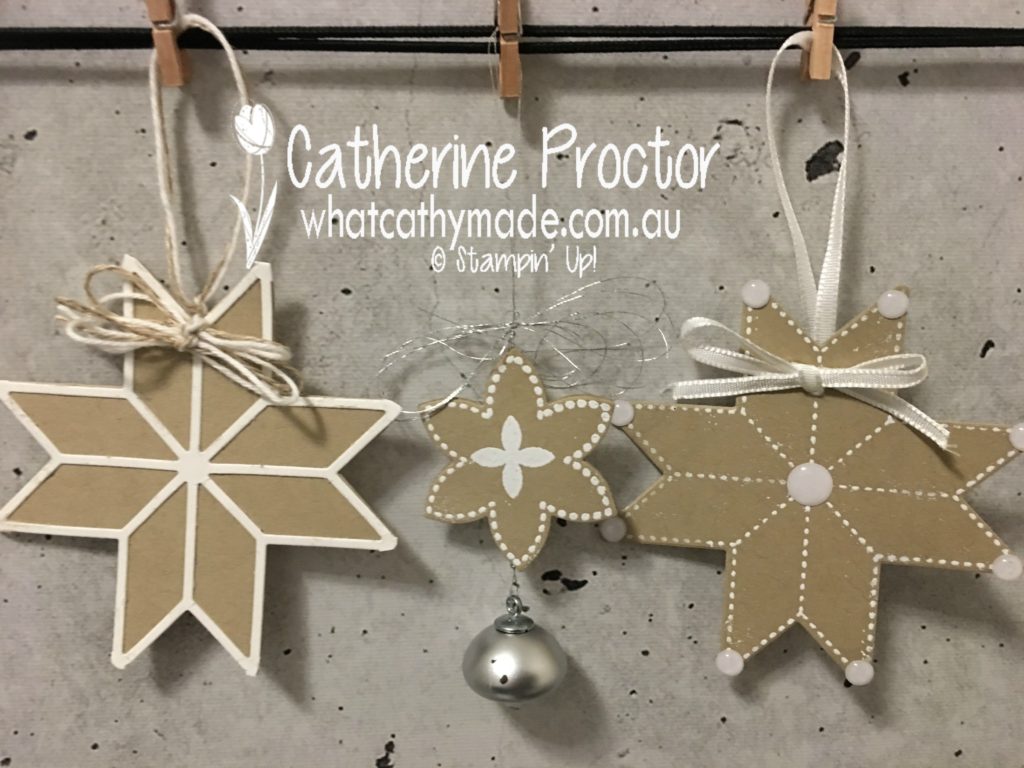
I started by using the new quilt builder framelits and merry little quilt stamps to make the first 3 ornaments. Did you notice the silver ornament hanging from the middle one? Thats a new embellishment called mini ornaments and they also come in a pack of 8.
And I just love how the white embellishments on the star on the far right look like little blobs of royal icing on the gingerbread biscuit!
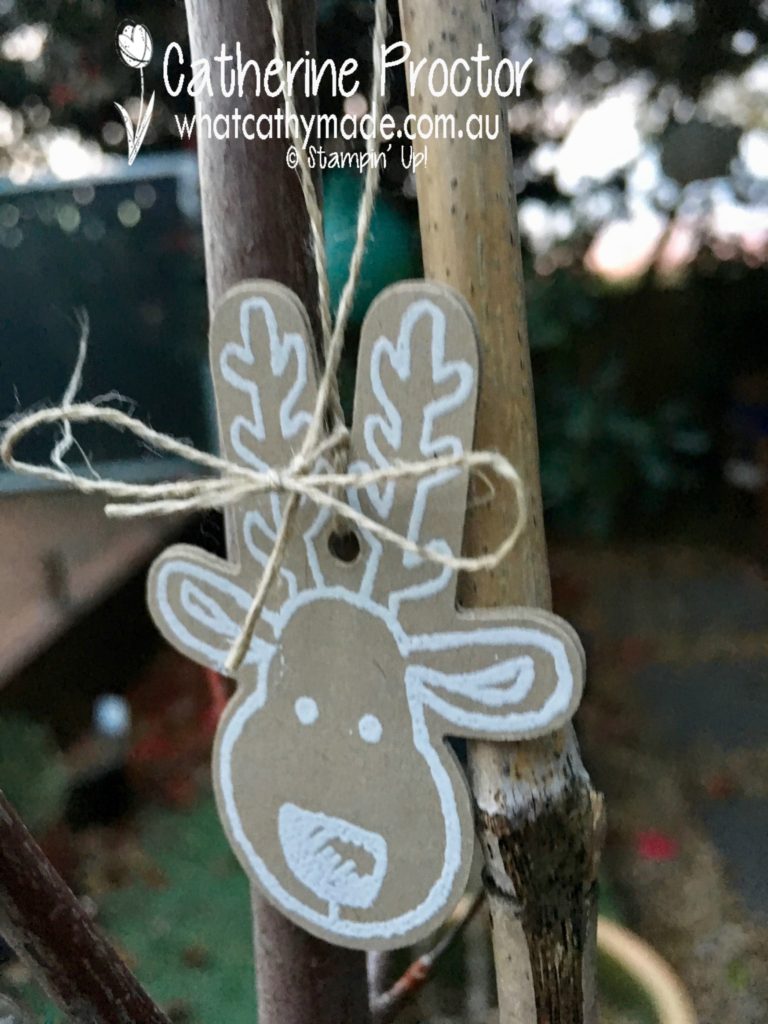
I then decided to use the cookie cutter punch and its matching stamp set to make another 3 iced gingerbread ornaments, this time using white bakers twine and linen thread to hang them from the tree.
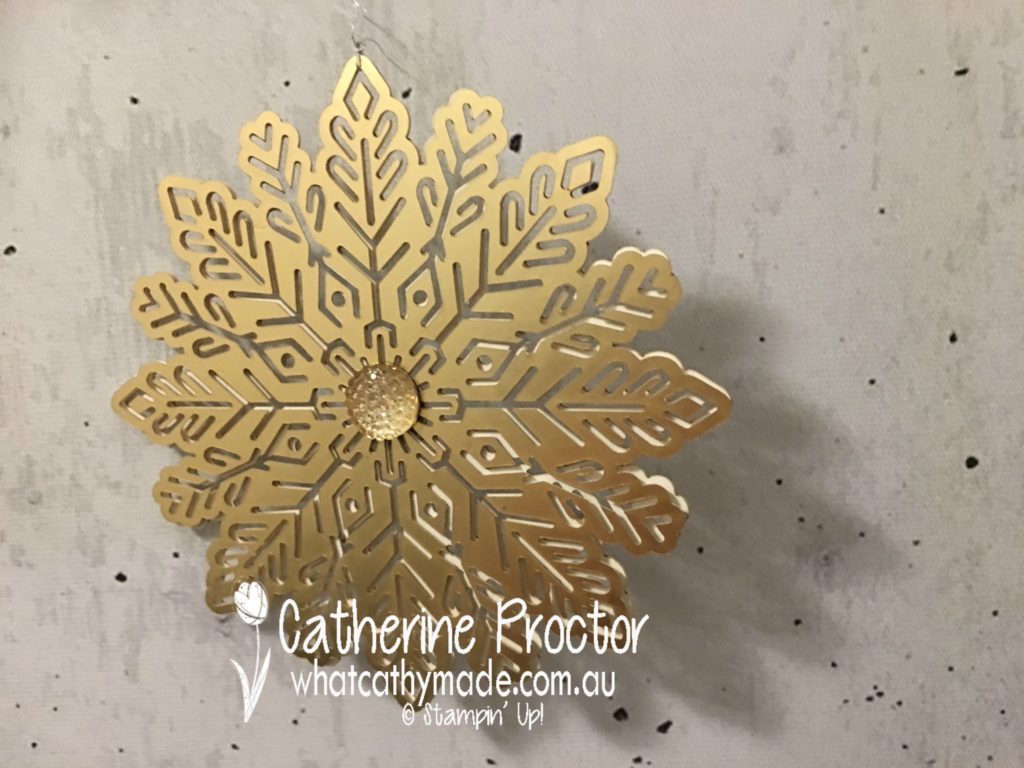
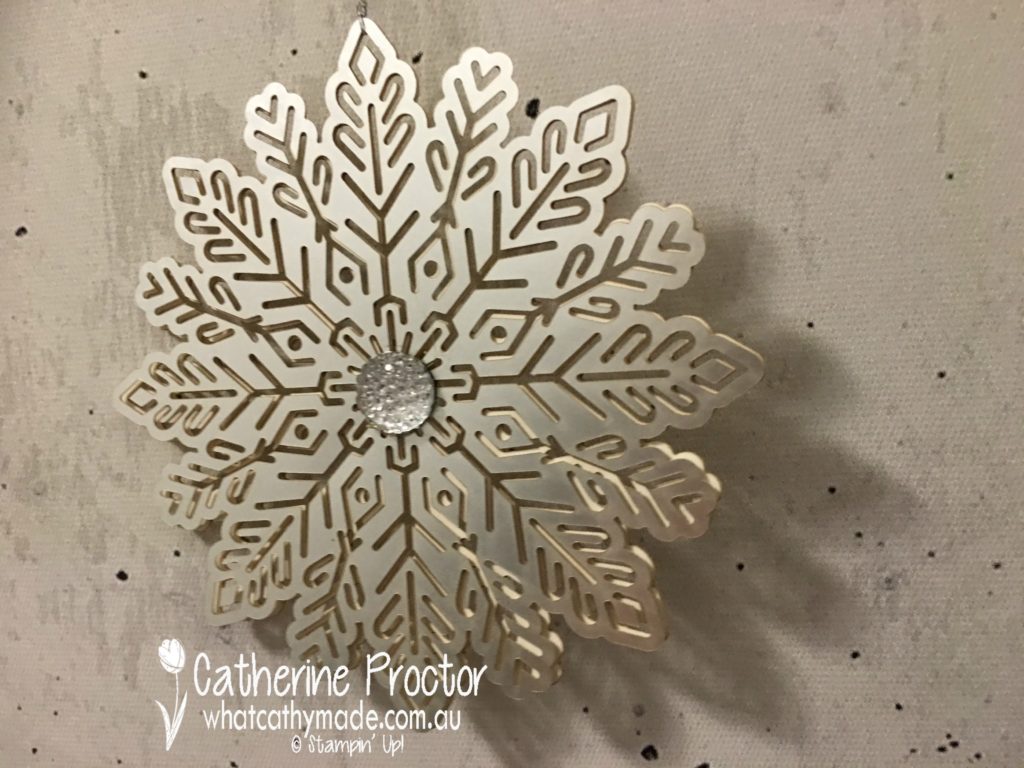
I was having so much fun I also made a very quick and easy snowflake ornament by simply adhering and gold and a silver snowflake together and placing a gold and a clear facetted gem in the middle of each side. This time I used silver thread as the hanger.
If you wanted a last minute present you could make up a set of these snowflake ornaments and present them in one of the little pizza boxes…no stamping or die cutting required, just glue dots and a quick tie of the silver or gold thread and you’re done! I think I might make a set of these for my tree this year…they are so sparkly and beautiful!
Okay, I really, really tried to say no…but one of the naughty reindeers carried on a treat until I relented and said yes, you can be in the blog. I mean he already had the burlap ribbon tied around his neck, so what could I do?
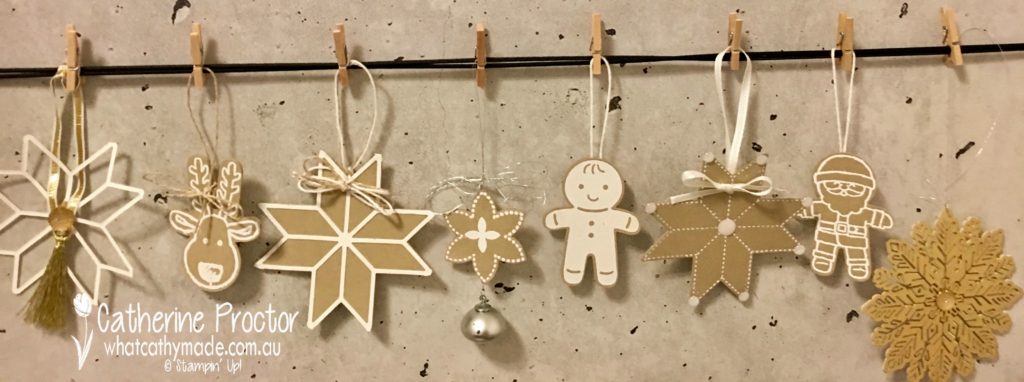
And finally, here are all my little iced gingerbread ornaments lined up in a row!
I did attempt to take a picture of them all hanging on a tree outside but it was already way too dark, so here’s a closeup of just one of them on my very bare maple tree (it’s winter here in Australia).
To see what the rest of the team have made this week, visit Claire’s blog here.
I’ll be back with more Christmas card inspiration next week.
Product List (unfortunately I can’t include the new products from the holiday catalogue in this list yet)


 Specialty Designer Series Paper")


")
 Cotton Paper")
 Designer Series Paper")


 Open Weave Ribbon")
 Open Weave Ribbon")


 Burlap Ribbon")


