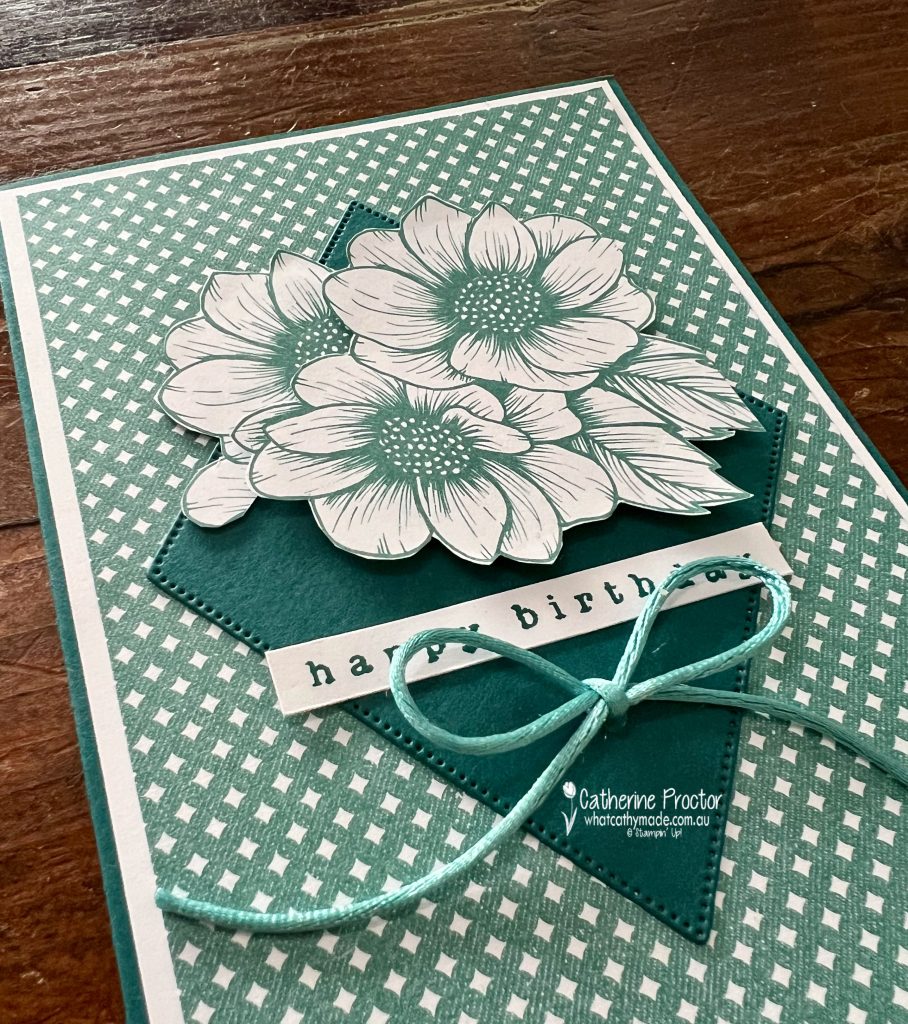
A group of the Art With Heart Team is hopping through the Stampin’ Up! colours in alphabetical order. Week 48 is all about Shaded Spruce and I’ve made a birthday card.
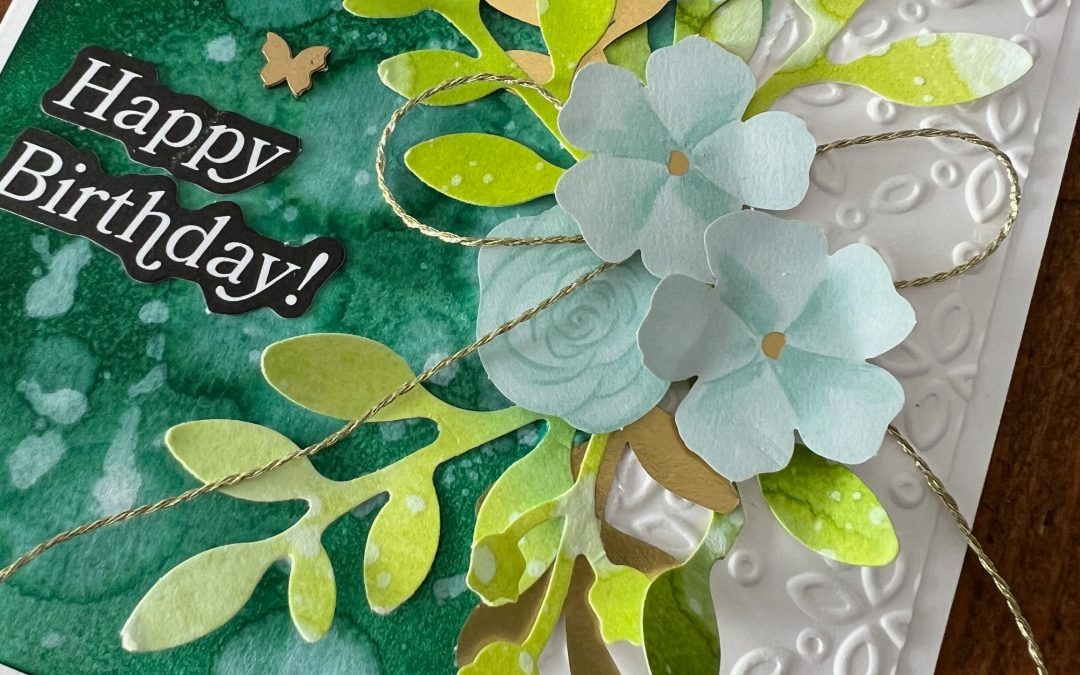
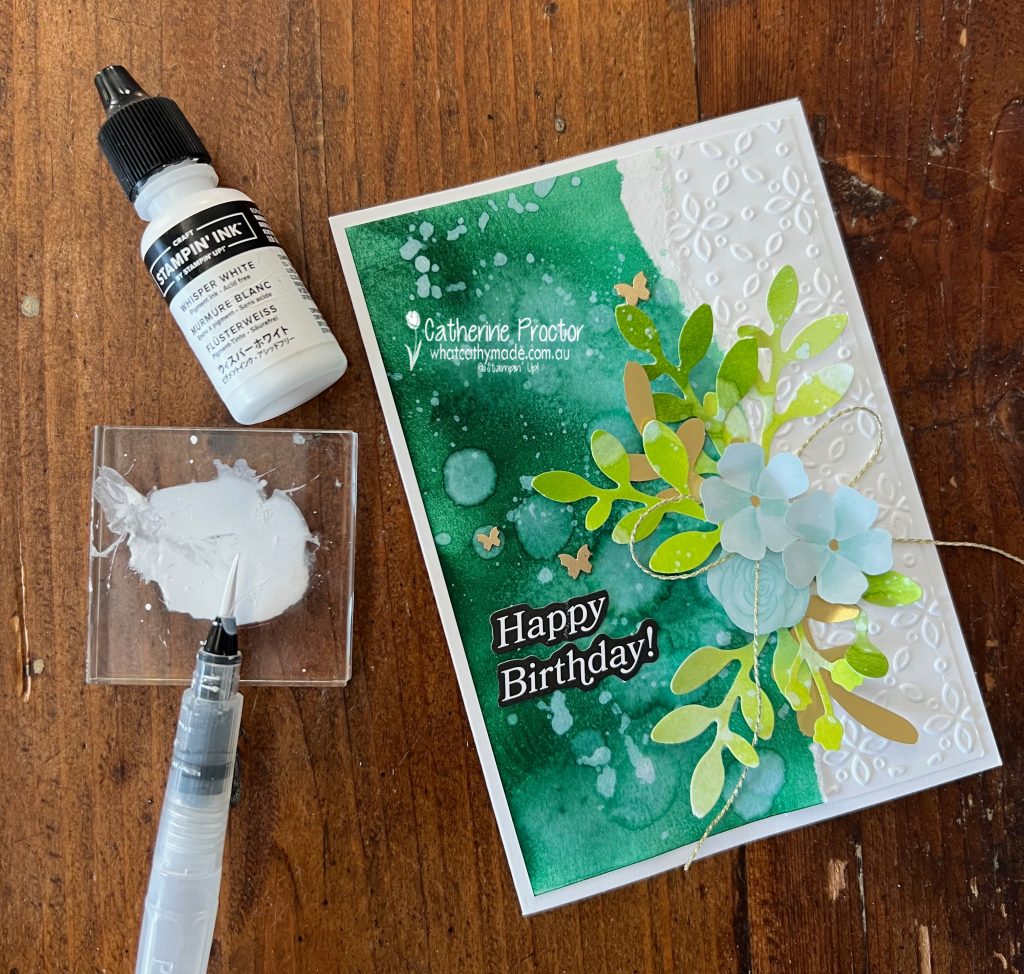
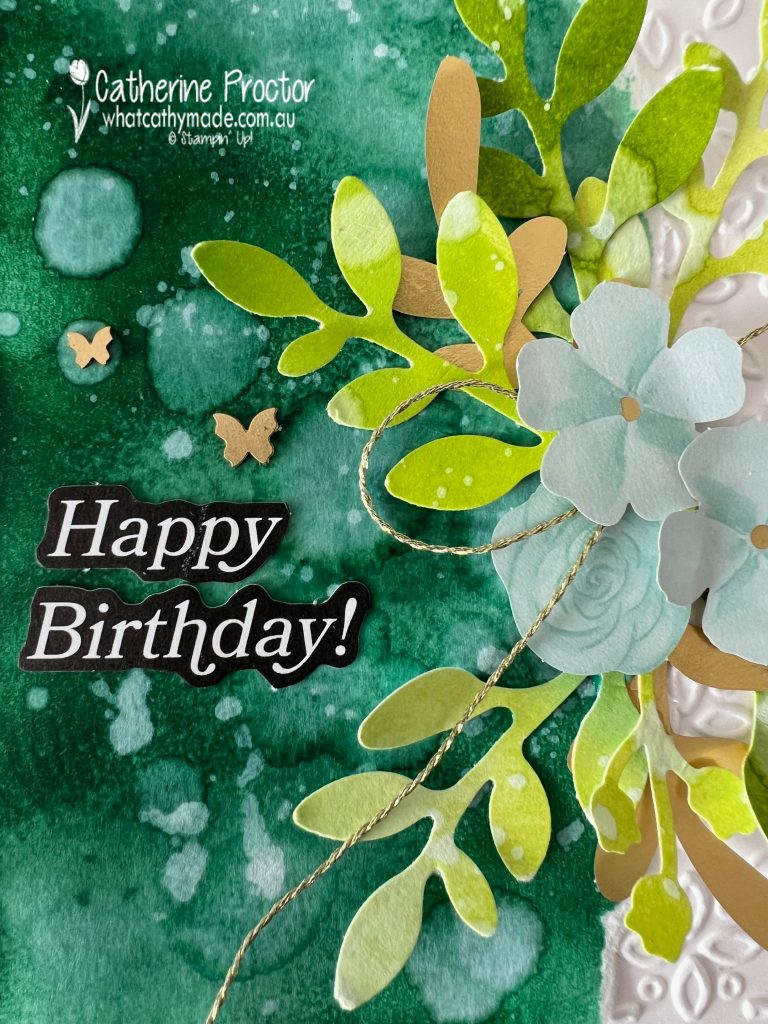
The Shaded Spruce background layer on the left was created using blending Brushes to apply Shaded Spruce, Lemon Lime Twist and Granny Apple Green ink to Basic White cardstock.
I then used a water painter to splatter water and white ink refill diluted with water over the coloured cardstock.
The right hand side of the card front is a layer of Basic White cardstock embossed with the Eyelet Embossing folder. The left hand side of the card is the Shaded Spruce section of the coloured cardstock, torn on the edge.
The leaves are punched from the rest of the coloured cardstock using the Leaf Punch which is in the Last Chance products section of the website (as is the Gold Twisted Thread). The flowers and gold leaves are from the Wildflower Birthday Specialty Designer Series Paper and the “Happy Birthday” sentiment is from the Greetings for All Mix & Match Ephemera Pack.
Our blog hop is now an Instagram hop but the good news is that you don’t need to have an Instagram account to view all of the other projects! Simply copy any of the Insta handles below into a new search window to follow the Instagram hop.
Next in our hop is Vicki @vickiboucher. Be sure to check out her gorgeous project/s.
The full list of this week’s Insta Hop are listed below:
A group of the Art With Heart Team is hopping through the Stampin’ Up! colours in alphabetical order. Week 47 is all about Real Red.
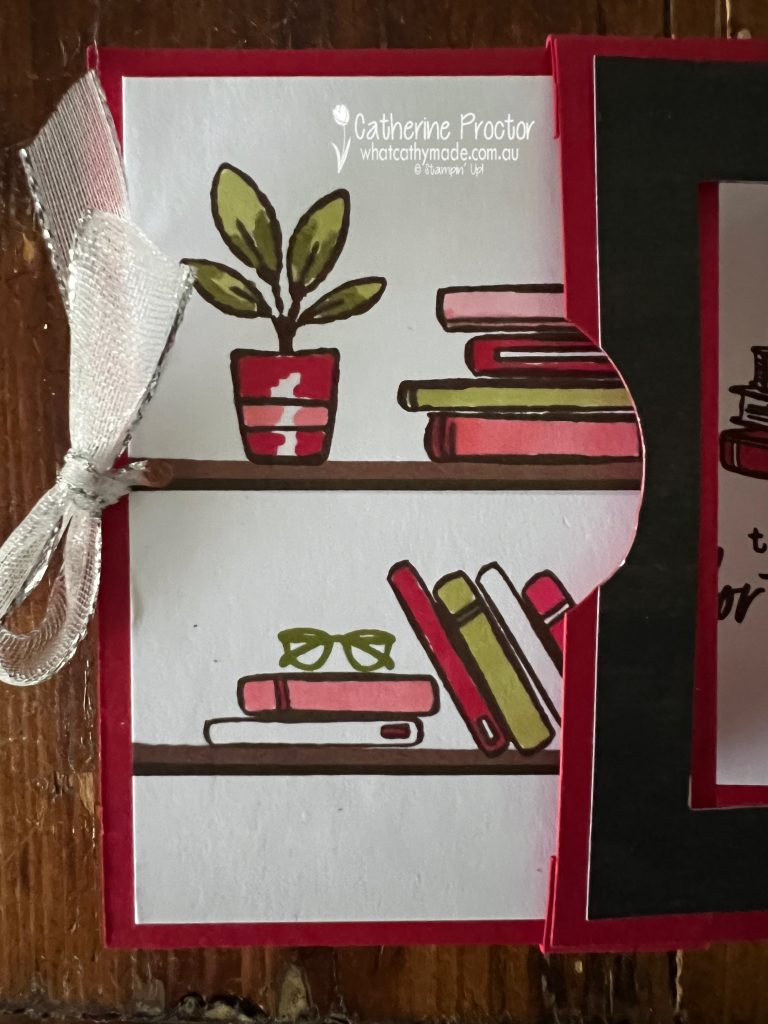
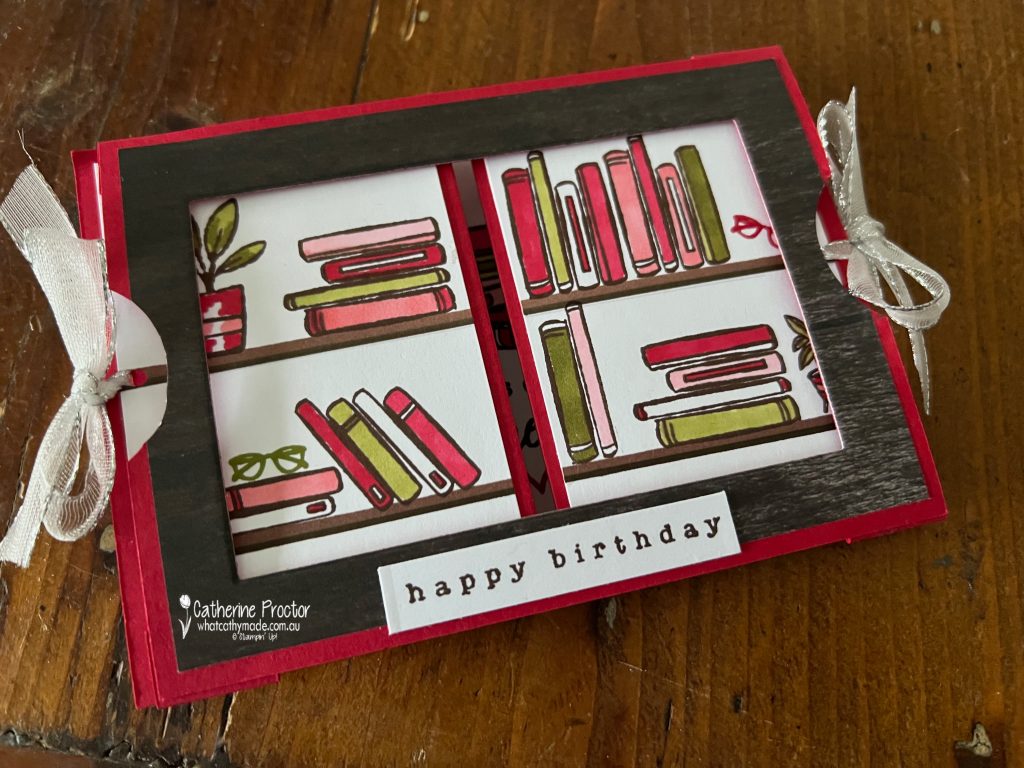
I must confess I usually only use Real Red for Christmas cards, so it was good to challenge myself to use it for a birthday card this week. This is my colour combination and I love it!
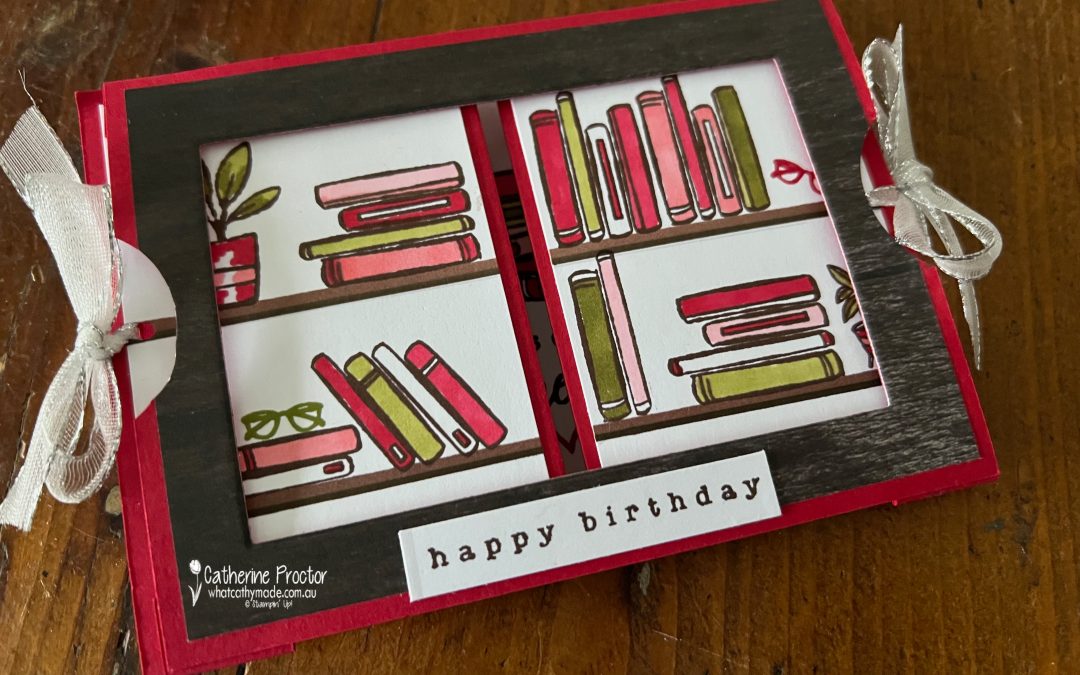
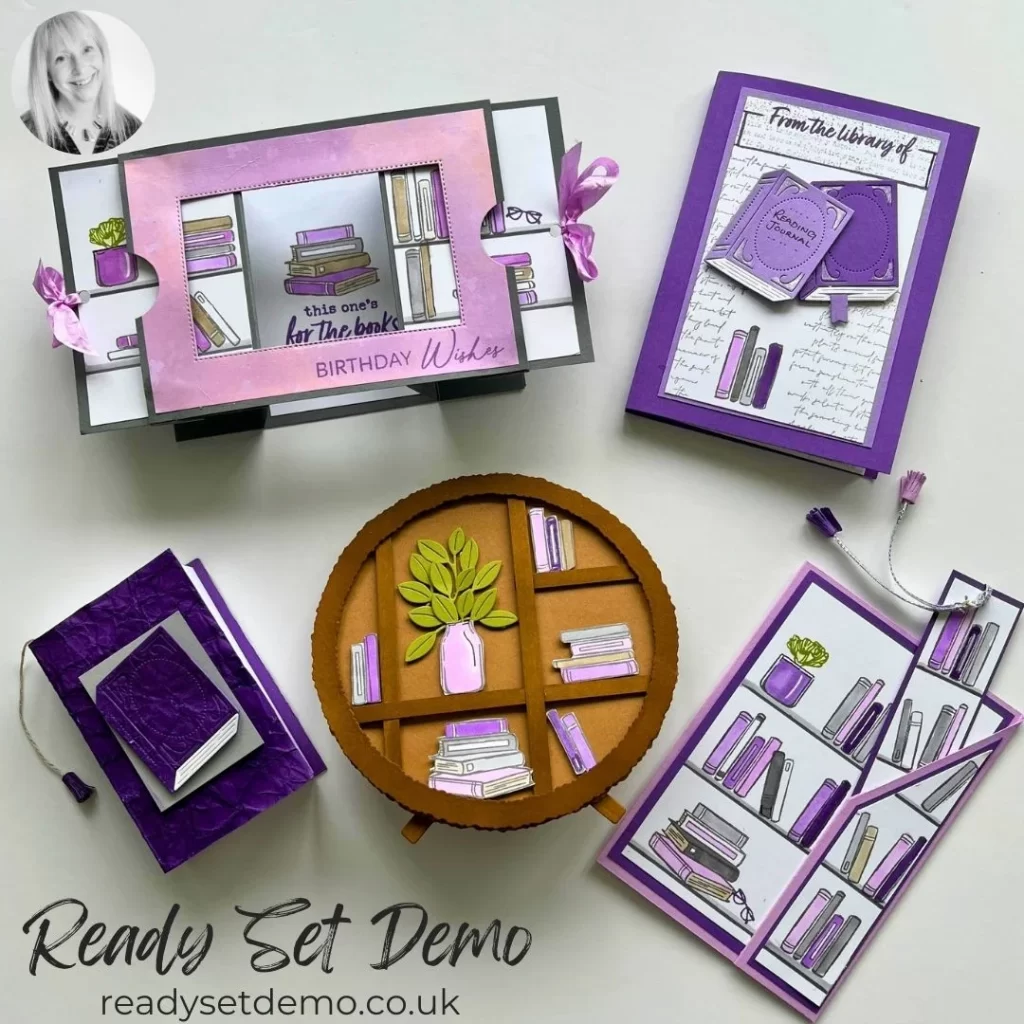
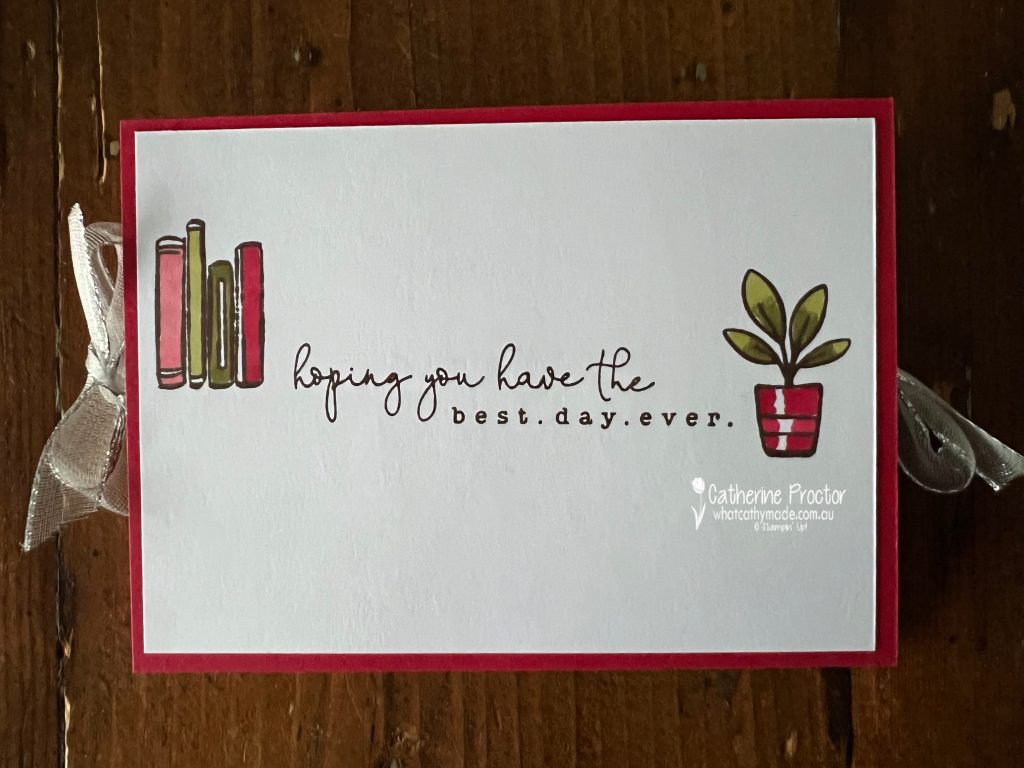
My card was made following an excellent template I purchased from an amazing UK Demonstrator called Liz Shannon. I bought this tutorial from her intending to make the adorable mid century bookcase but I ended up making the Secret Sliding card instead. I will make the other projects too.
Here is a picture of the projects included in her tutorial.
The alternative products I used in my card include the pot plant from the Attention Shoppers stamp set for the left hand panel.
Another pot plant from the new Online Exclusives stamp set, “She’s the Greatest” is stamped on the right hand panel.
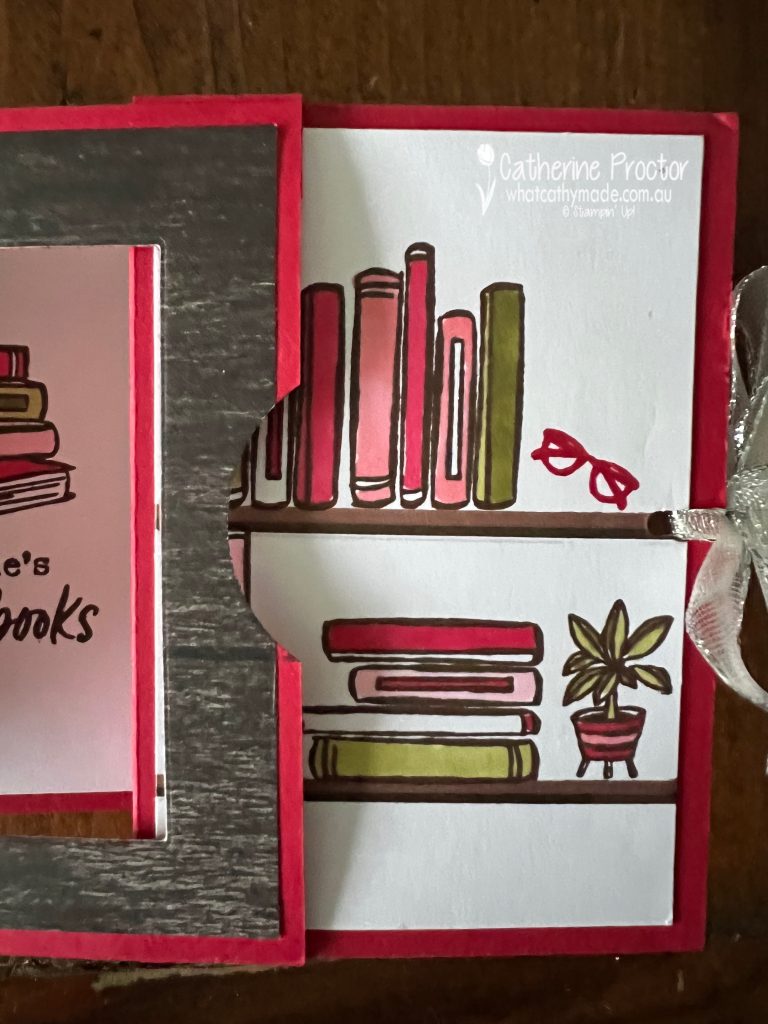
I’ve also used the “Happy Birthday” sentiment from the Country Birdhouse stamp set for the front of the card.
And another sentiment the Country Birdhouse stamp set on the writing panel on the back of the card too.
Here’s a short video to show you how this card opens and closes.
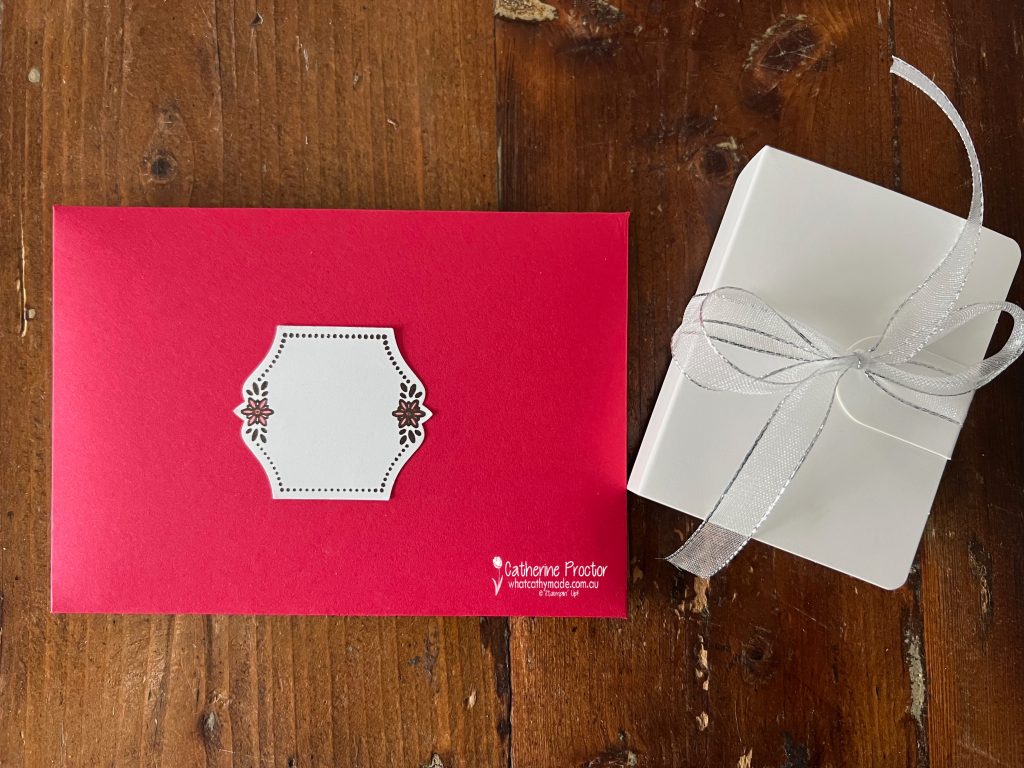
I made a custom made envelope out of Real Red cardstock to fit this special card and made a name label for the front of the card using the To the Point Label Punch and the coordinating Bright Borders Stamp Set.
Unfortunately, the book I’d ordered as the birthday gift did not arrive in time so I printed a copy of the book’s cover and popped it into one of the cute little Book Treat Boxes.
Our blog hop is now an Instagram hop but the good news is that you don’t need to have an Instagram account to view all of the other projects! Simply copy any of the Insta handles below into a new search window to follow the Instagram hop.
Next in our hop is Vicki @vickiboucher. Be sure to check out her gorgeous project/s.
The full list of this week’s Insta Hop are listed below:
Hello! This week I’m back from On Stage in Brisbane where I had a wonderful time catching up with many of my Stampin’ Up! friends and exploring the exciting new products from the forthcoming 2025 -2026 Annual Catalogue and Online Exclusives, both coming in May.
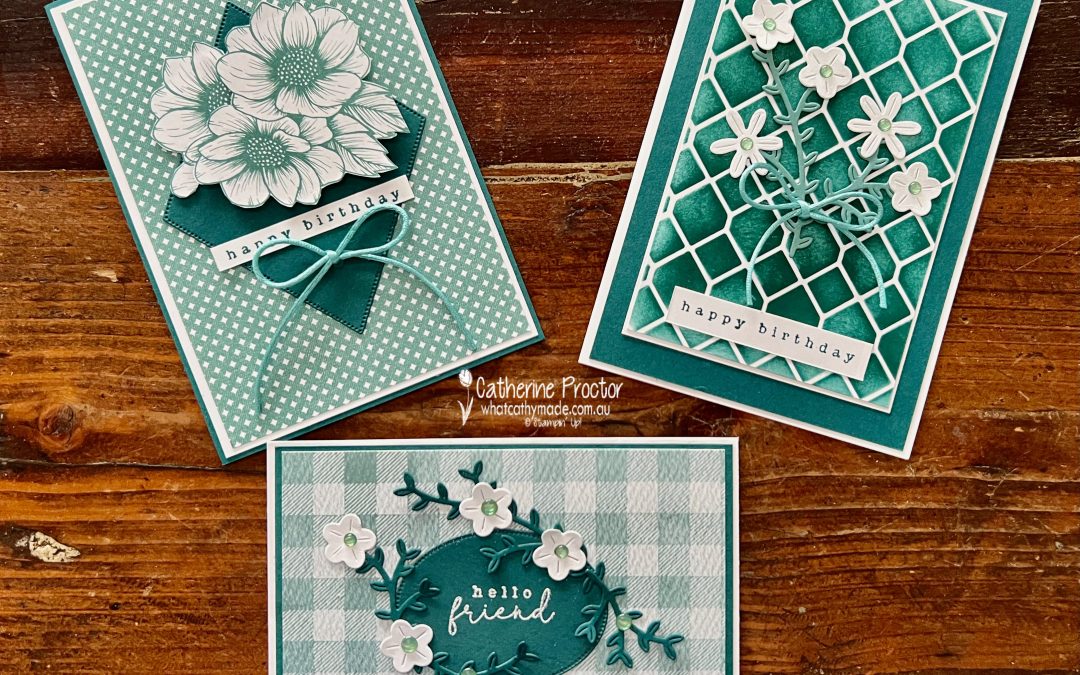
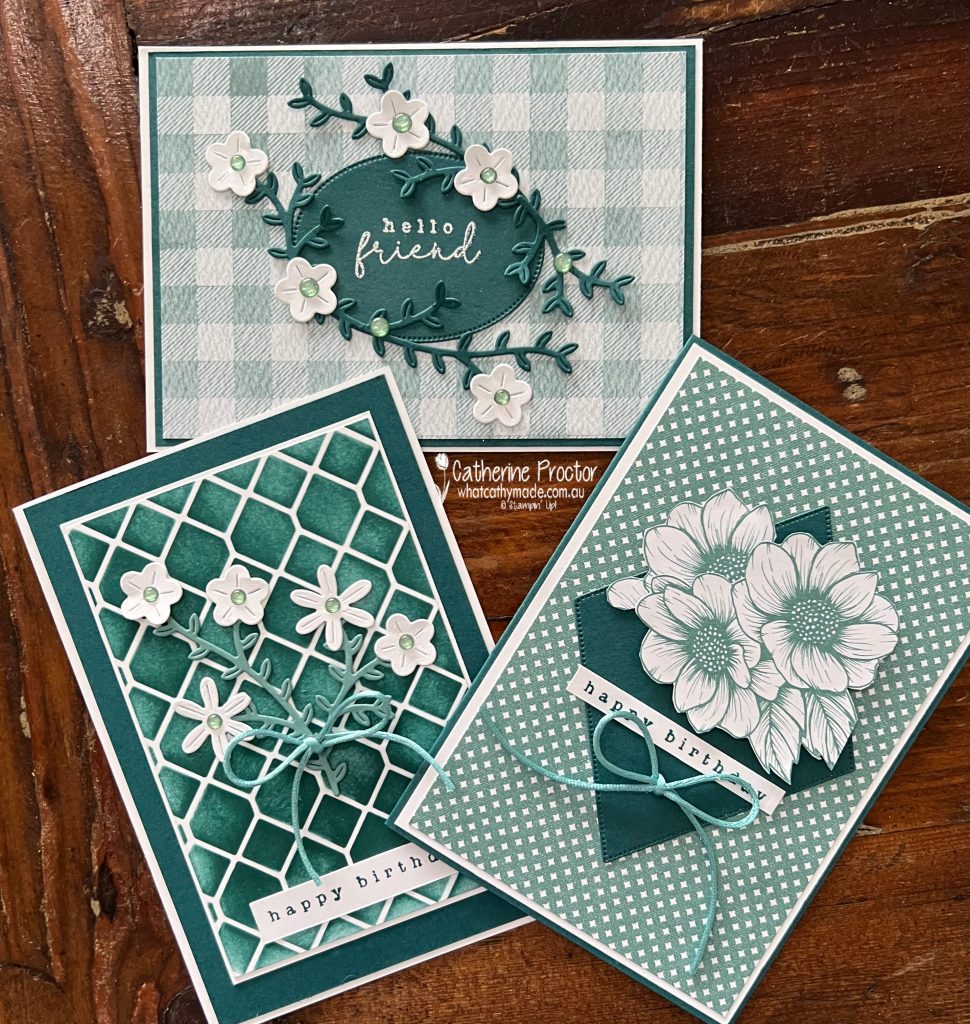
I’ll be sharing some sneak peeks of the new products with you very soon, but in the meantime here are my cards for Week 45, which is all about Pretty Peacock, a member of our Regals family.
For my monochromatic colour scheme I’ve teamed Pretty Peacock with Lost Lagoon and Basic White. I love this colour combination!
The gorgeous DSPs I’ve used for these cards are called Serene Love 12″ x 12″ (30.5 x 30.5 cm) Designer Series Paper (on sale in the Last Chance section of the website now).
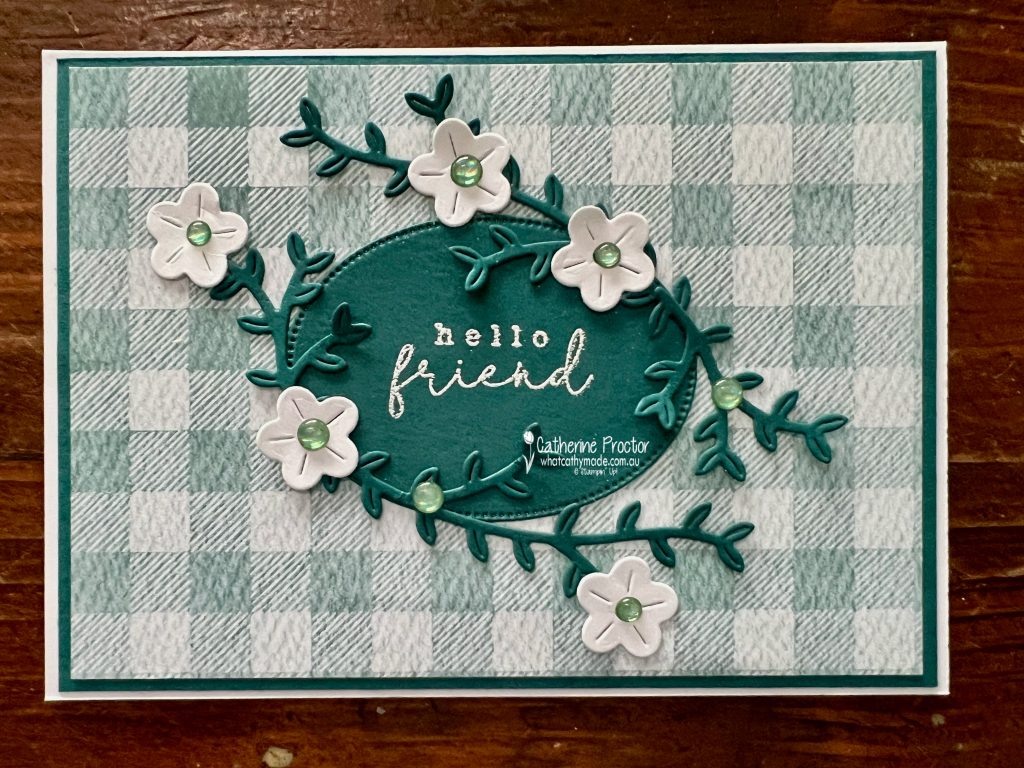
And this is the Everyday Happiness 12″ x 12″ (30.5 x 30.5 cm) Designer Series Paper, an Online Exclusive product.
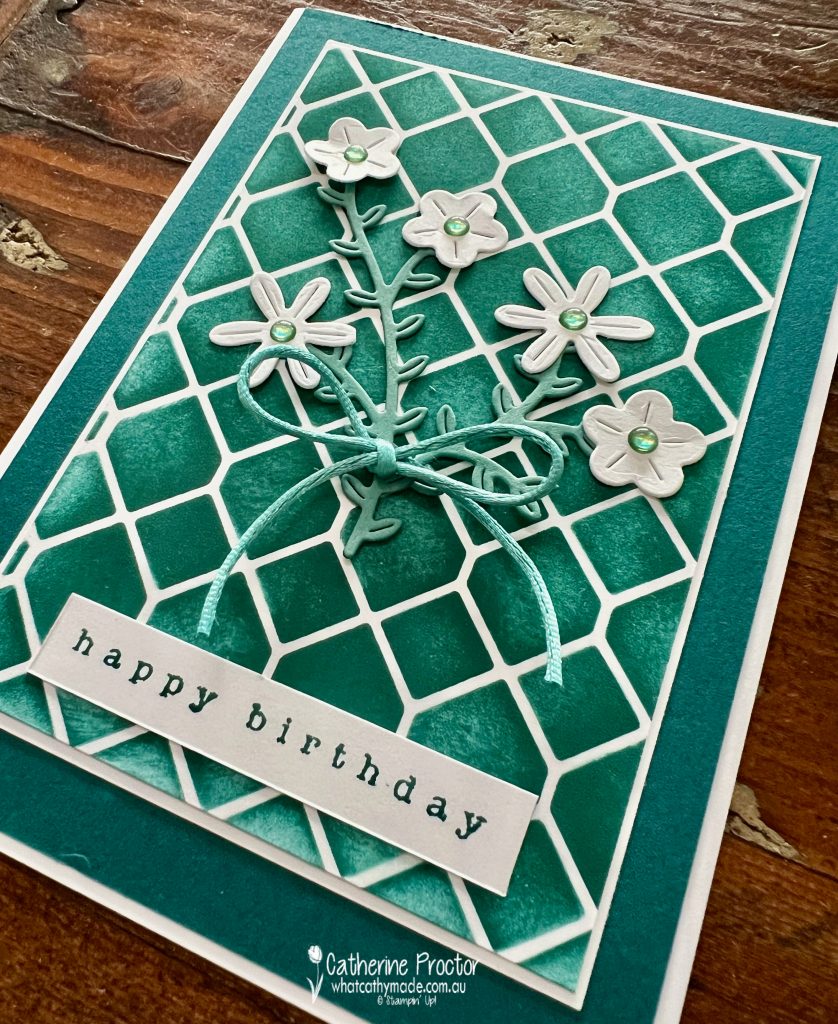
All three cards use the the Linked Together Dies and/or the Linked Together Decorative Masks.
Card one has a fussy cut flower from the Serene Love DSP. The sentiment is from the Country Birdhouse stamp set and the ribbon is Lost Lagoon cording. The Pretty Peacock layer is die cut with the Linked Together Dies.
Card two uses a gorgeous checked pattern from the Everyday Happiness DSP. The “hello friend” sentiment is also from the Country Birdhouse stamp set and the embellishments are Pool Party embellishments from the Glossy Dots Assortment.
For card three I used the Linked Together decorate masks with Pretty Peacock ink applied with a blending brush. I think the Lost Lagoon die cut stems would have shown up better if I’d used Lost Lagoon ink for the mask and Pretty Peacock cardstock for the die cuts.
I’ve only used one of the masks for my background – these masks are so affordable and a wonderful way to make your own DIY interesting backgrounds in any colour!
Our blog hop is now an Instagram hop but the good news is that you don’t need to have an Instagram account to view all of the other projects! Simply click on the links below.
Next in our hop is Claire @clairedalycreates. Be sure to check out her gorgeous project/s.
The full list of this week’s Insta Hop are listed below:
A group of the Art With Heart Team is hopping through the Stampin’ Up! colours in alphabetical order and Week 44 is all about Poppy Parade.
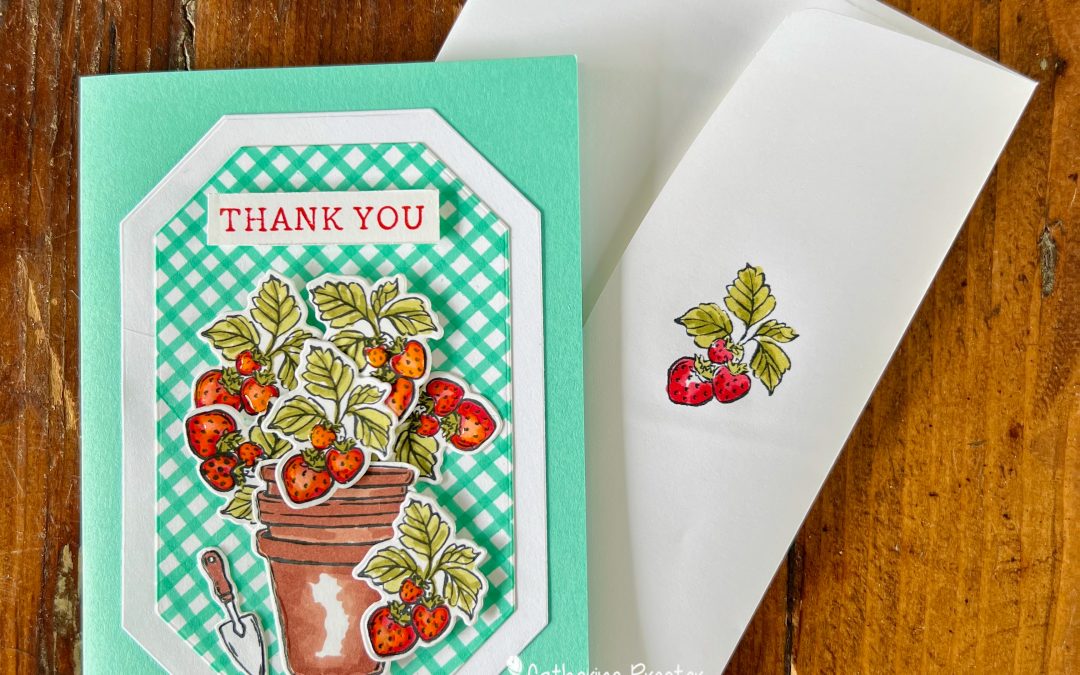
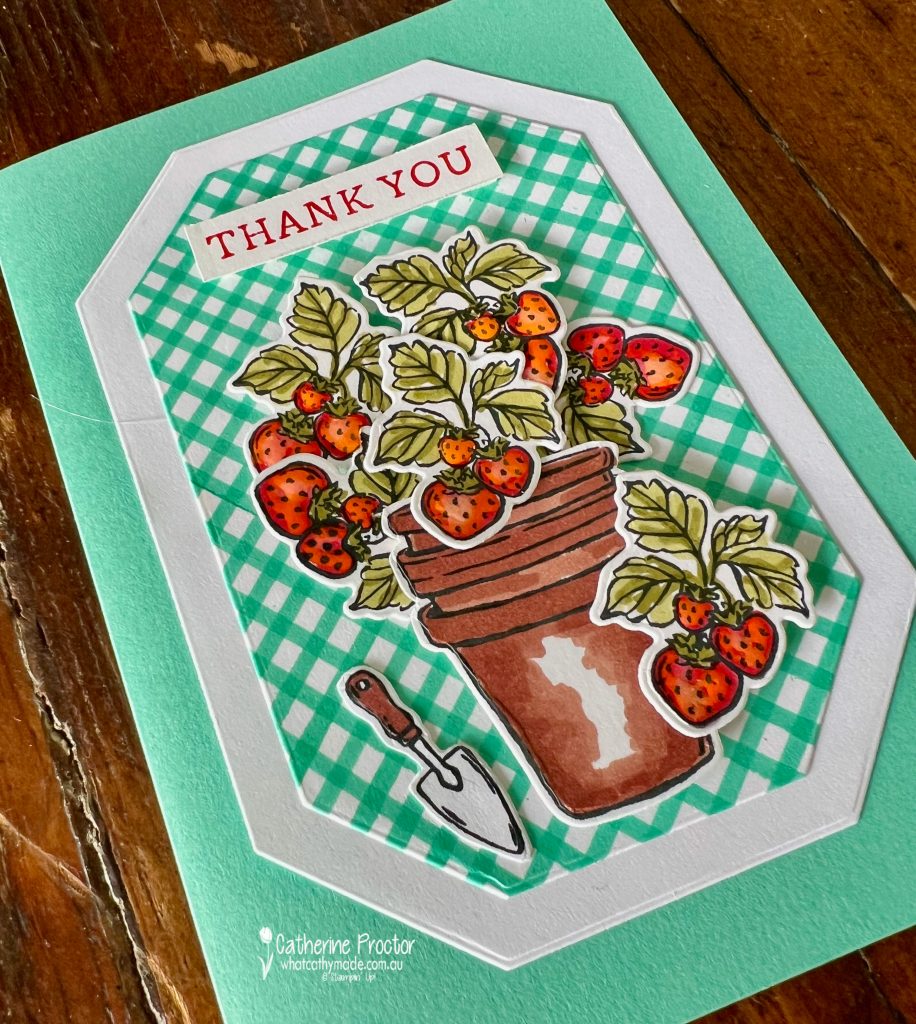
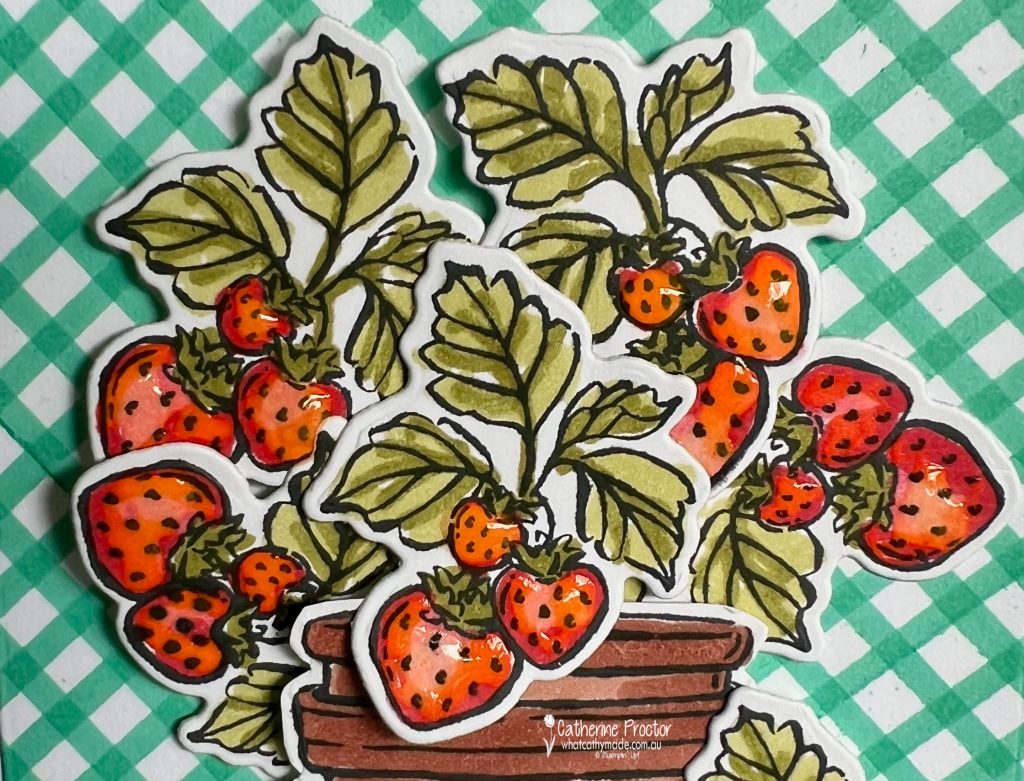
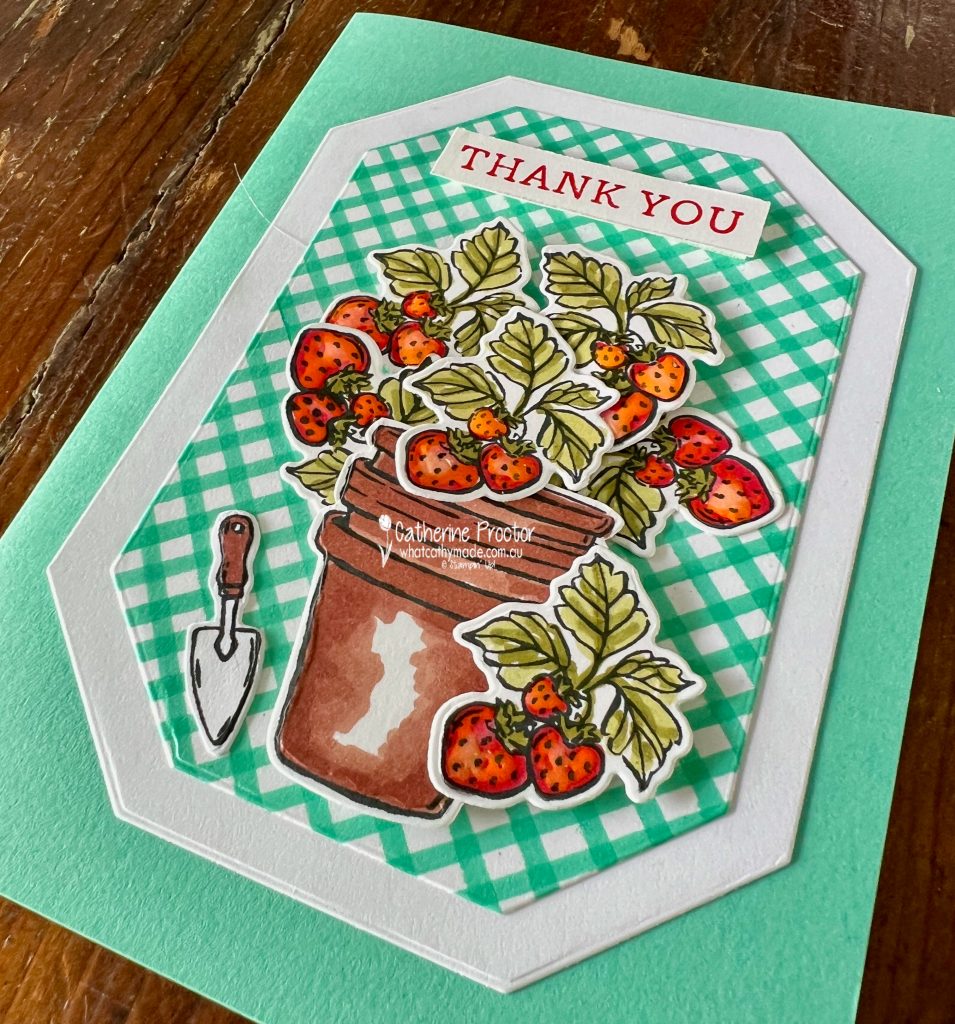
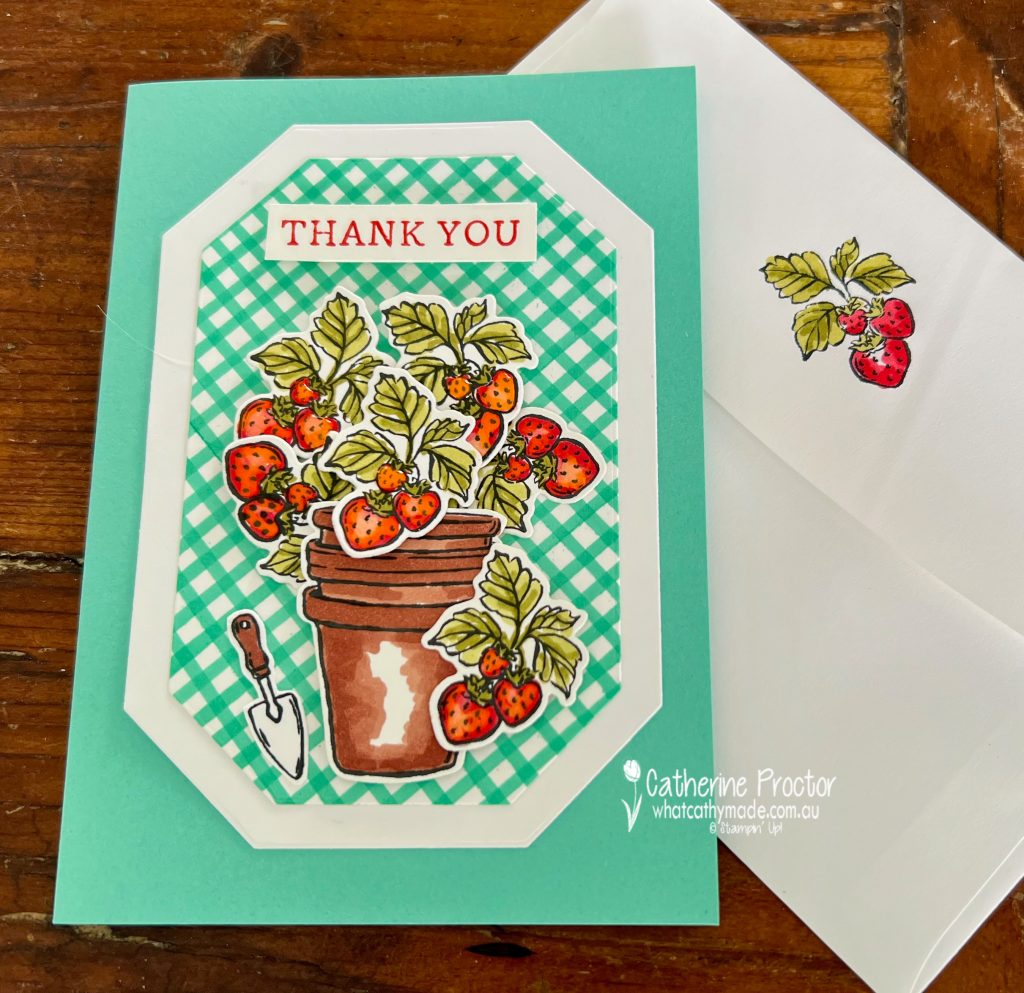
Here is my project, a rich red cluster of Poppy Parade cherries sitting in a stack of terracotta pots. Don’t they pop against my hand drawn Summer Splash gingham background (created with a ruler and the Stampin’ Blends)?
My card is CASED from an amazing card made by @hammondandpenny for a recent @stampinthroughthecatalog challenge. I loved Melodie’s hand drawn gingham and her retro colour combination! This is Melody’s card.
To create my juicy cherries I coloured them using the Poppy Parade Stampin’ Up! blends before covering the cherries with a thin layer of glue from the fine-tip glue pen. Let it dry before adhering to the card.
The leaves and the pot are also coloured using Stampin Blends. I’ve used Old Olive for the leaves and Copper Clay for the pots.
The layers are die cut using the Countryside Corners dies and I’ve stamped and coloured another cluster of strawberries on the envelope flap.
Next in our Hop is Kate @craftwithkate, the coordinator of our Insta hop. Be sure to check out her gorgeous project/s.
The full list of this week’s Insta Hop are listed below:
I’m off to On Stage in Brisbane first thing tomorrow morning to catch up with all my Stampin’ Up! friends and find out what’s in the new Annual Catalogue, which is so exciting!
Ill ‘be back next Wednesday night with our weekly AWH Colour Creations Insta hop when we will be showcasing Pretty Peacock.
I’m finally back with our Wednesday evening AWHT Colour Creations Hop and so glad you are here. In my absence we have made a change to how we are showcasing the full range of 50+ gorgeous Stampin’ Up! colours by moving from a blog hop to an Instagram hop.
I’ll continue to post my cards here as well, however if you want to follow along the blog hop you’ll need to visit my Instagram account 8pm on a Wednesday evening at @whatcathymade (https://www.instagram.com/whatcathymade/).
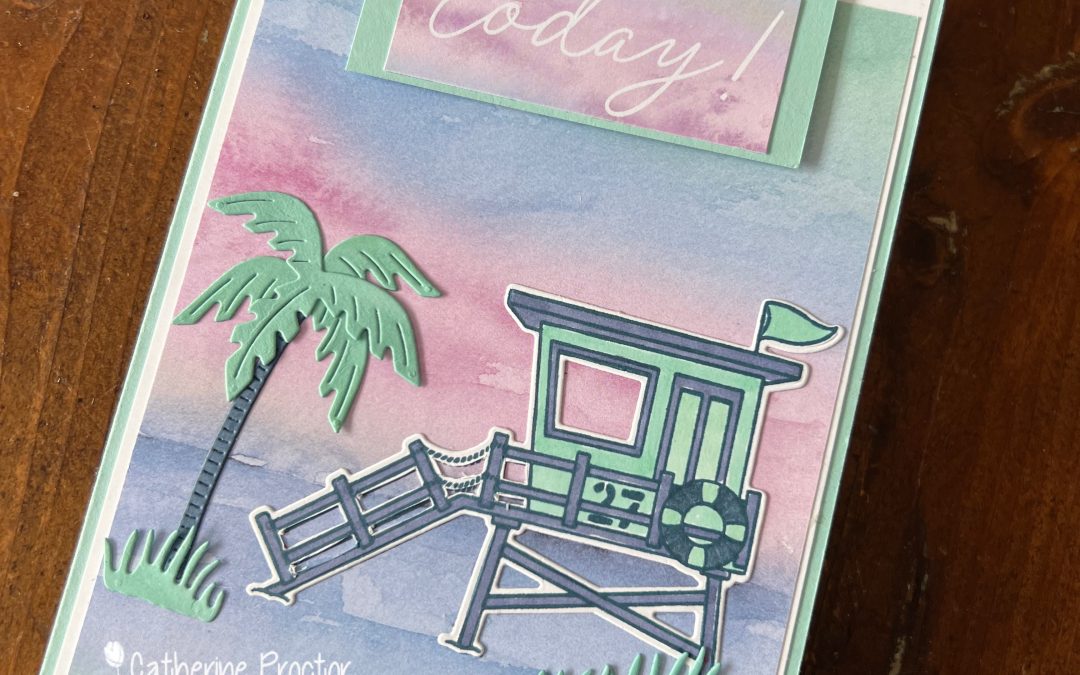
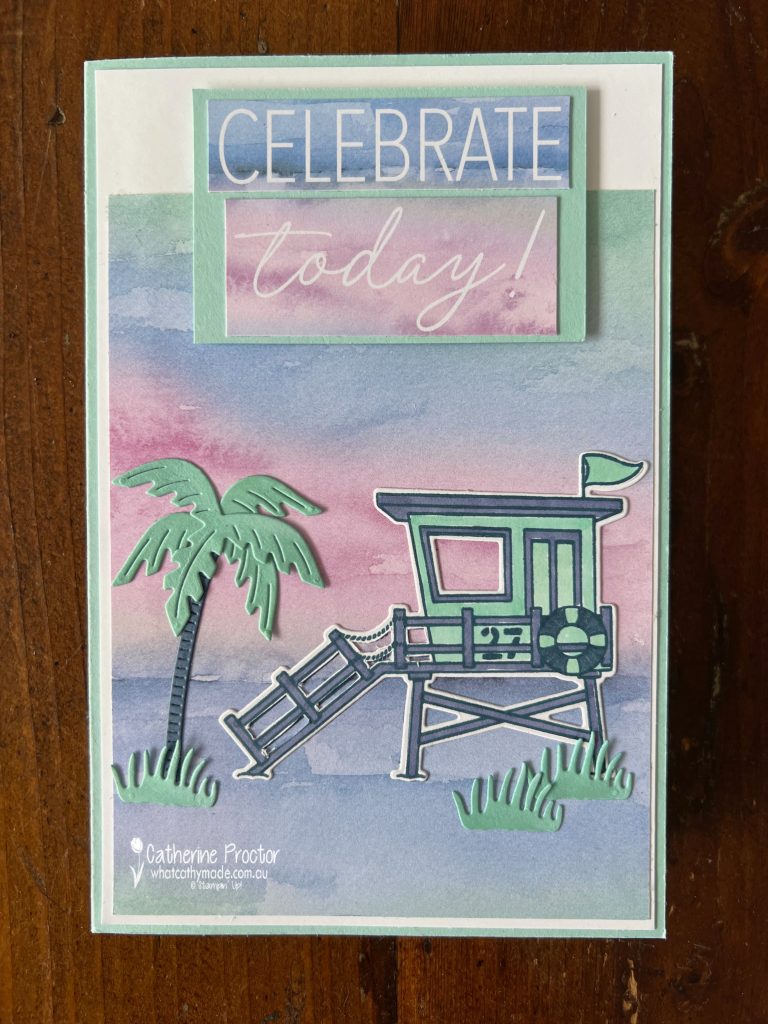
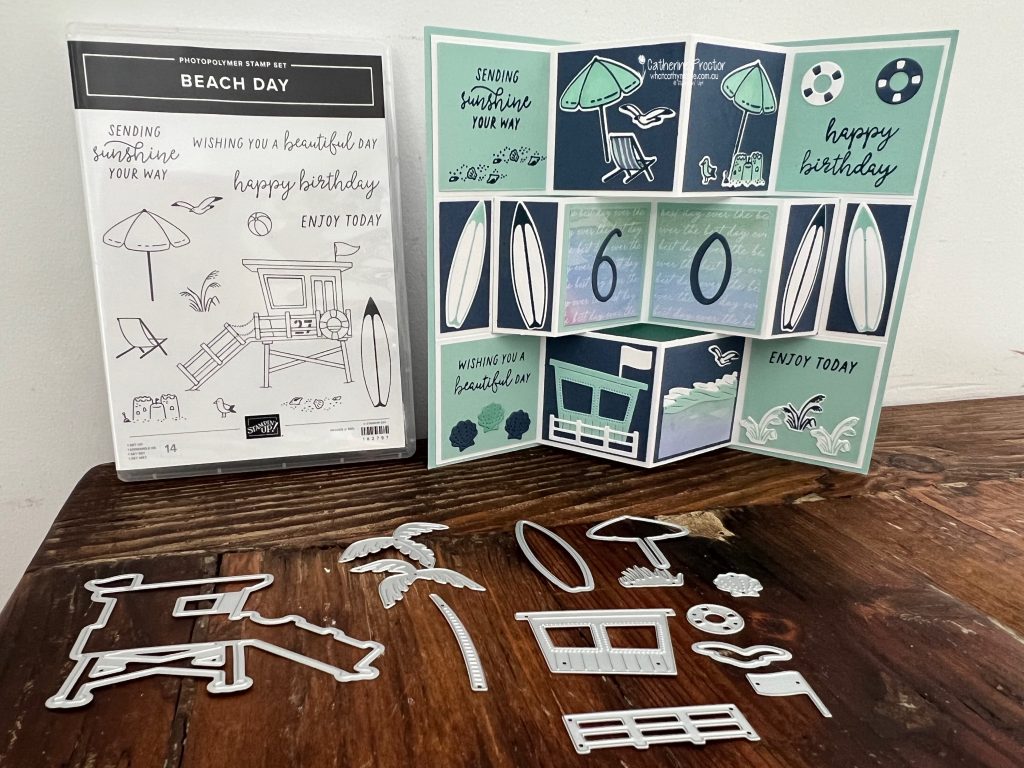
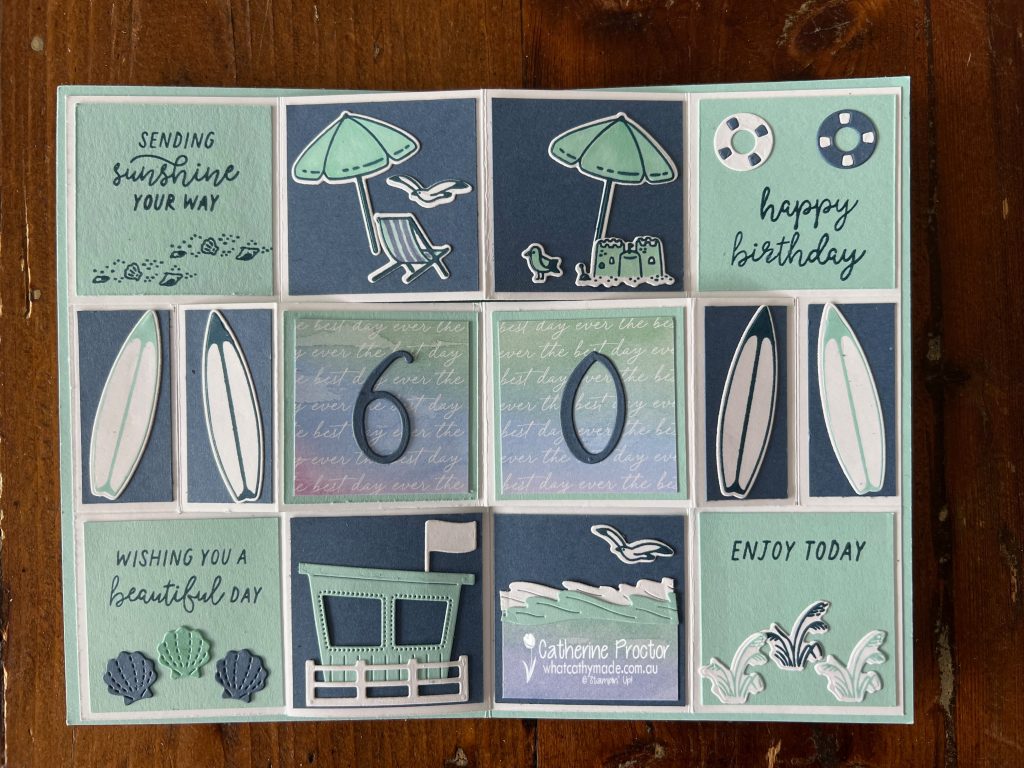
Our colour this week is Pool Party, a favourite colour of mine and just perfect for making a birthday card for my husband who turns 60 this week!
I’ve taken my colour combination from the sheet of gorgeous Thoughtful Journey 6″ x 6″ (15.2 x 15.2 cm) Designer Series Paper I’ve used for the front of the card, combining Pool Party with Misty Moonlight, Basic White and a touch of Petunia Pop.
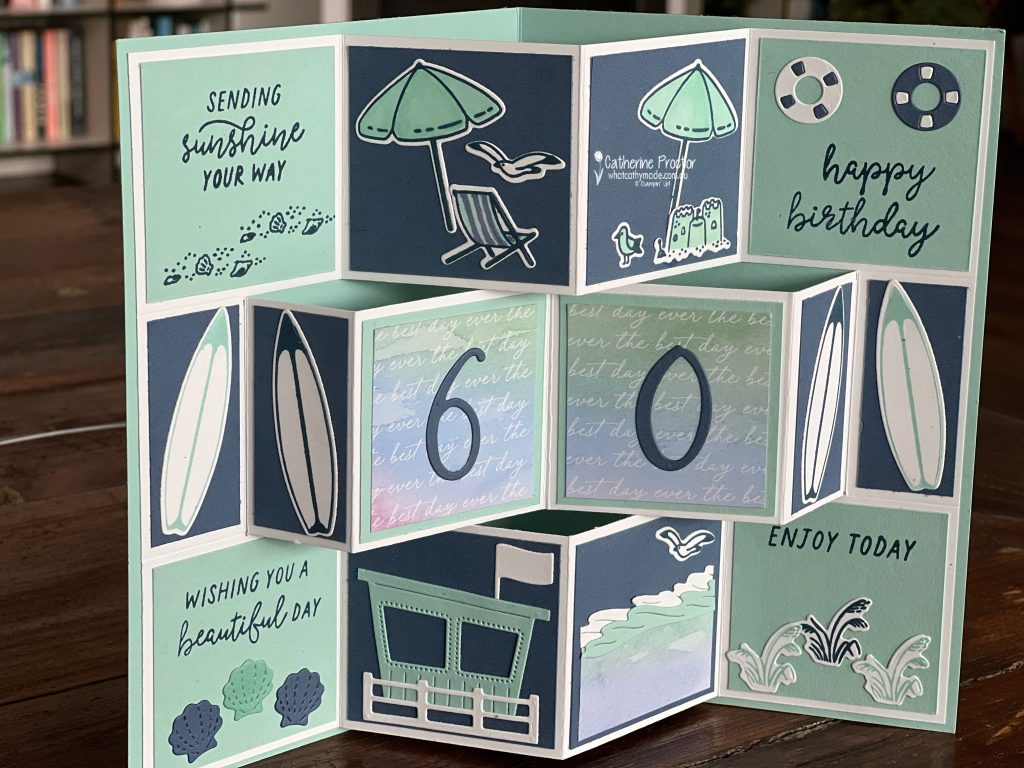
My husband loves to surf so the Beach Days bundle was just perfect for his birthday card. And as it is a special birthday that ends with a zero I decided to make a fancy fold.
This short video shows you the magic that happens when you open up the card!
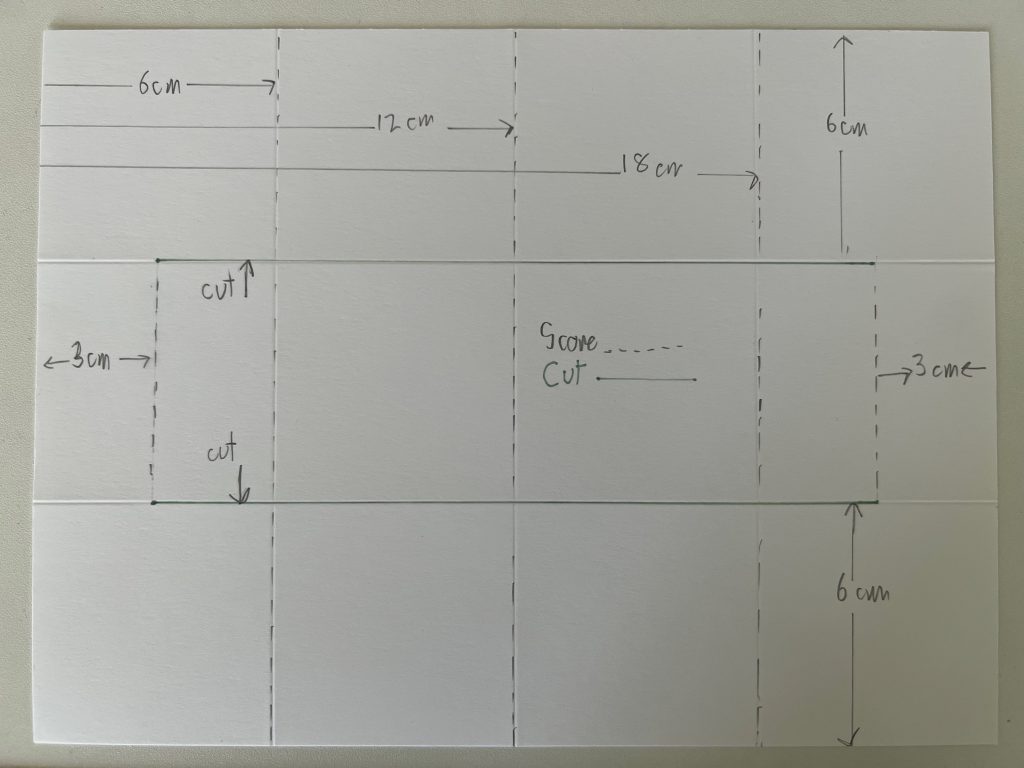
If you’ve never made a Trifold Shutter Card before, here’s a template I’ve created using metric measurements and A4 cardstock.
Trifold Shutter Card Template
Cut a piece of Pool Party cardstock (this is the outside card base) 24.5 cm wide x 18.5 cm high.
Score the outer card base at 12.25 cm along the 24.5 cm side and then fold in half along this score line.
Cut a Basic White inner card base (for the fancy fold) 24 cm wide x 18 cm high.
Score the inner card base at 12 cm and then fold in half along the score line.
Measure and draw with a pencil the cutting lines as per the template diagram below then carefully cut along these cutting lines.
Now measure and score all of the fold lines and then rub out any pencil marks.
Decorate each panel as desired.
This photo shows the direction to fold the score lines. I cut the larger Pool Party and Misty Moonlight cardstock layers for the panels at 5.5cm square. The smaller cardstock panels behind the surfboards measure 5.5 x 2.5 cm.
I’ve decorated the inside of the card using stamps and dies from the Beach Days bundle.
Using Post It notes to mask off sections of my stamps as I inked them up (you then remove the Post It note before stamping), allowed me to stamp the “happy birthday” sentiment inside the card to fit onto one of the panels.
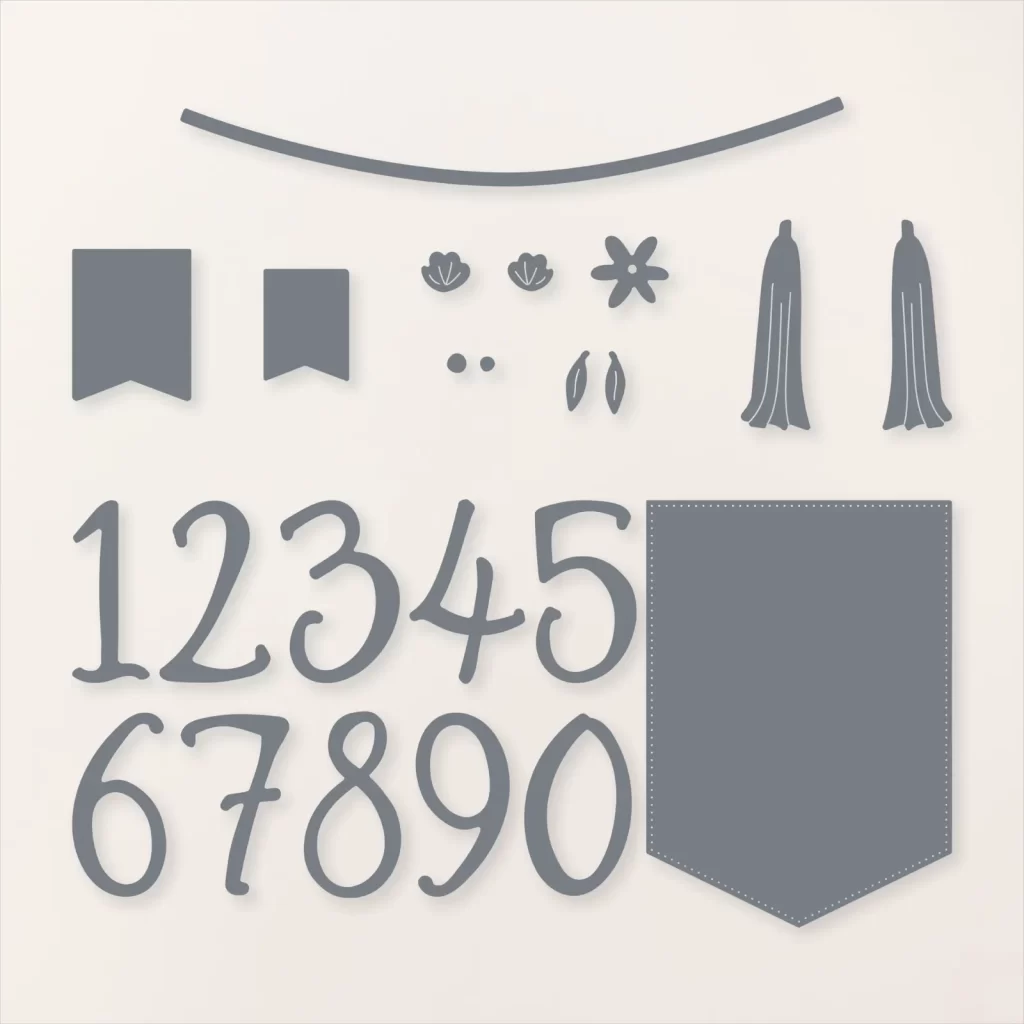
The 60 inside the card has been die cut using the brand new Birthday Celebration Dies.
After decorating the inside of your trifold shutter card, adhere it to the Pool Party card base. Make sure you only adhere the left and right sections of your fancy fold to the inside of your card base so the middle section of your trifold shutter card can open and close.
I’ve also used some of the Thoughtful Journey Memories & More Cards to decorate the front and the inside of the card and the handmade envelope.