Welcome to week fourteen of the Heart Of Christmas Blog Hop!
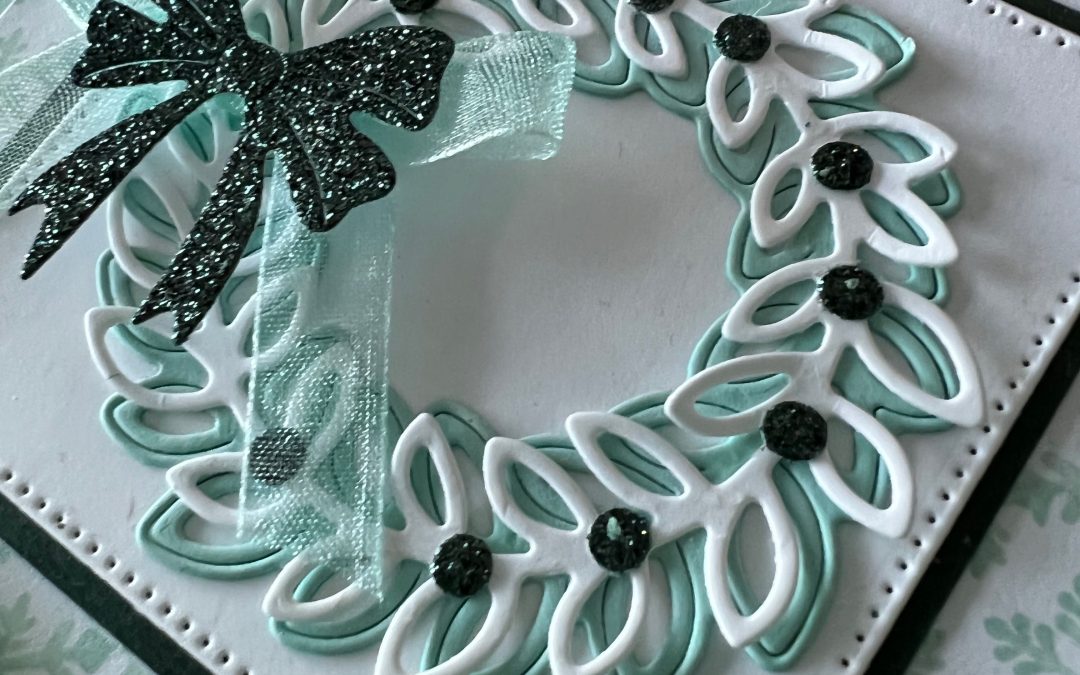
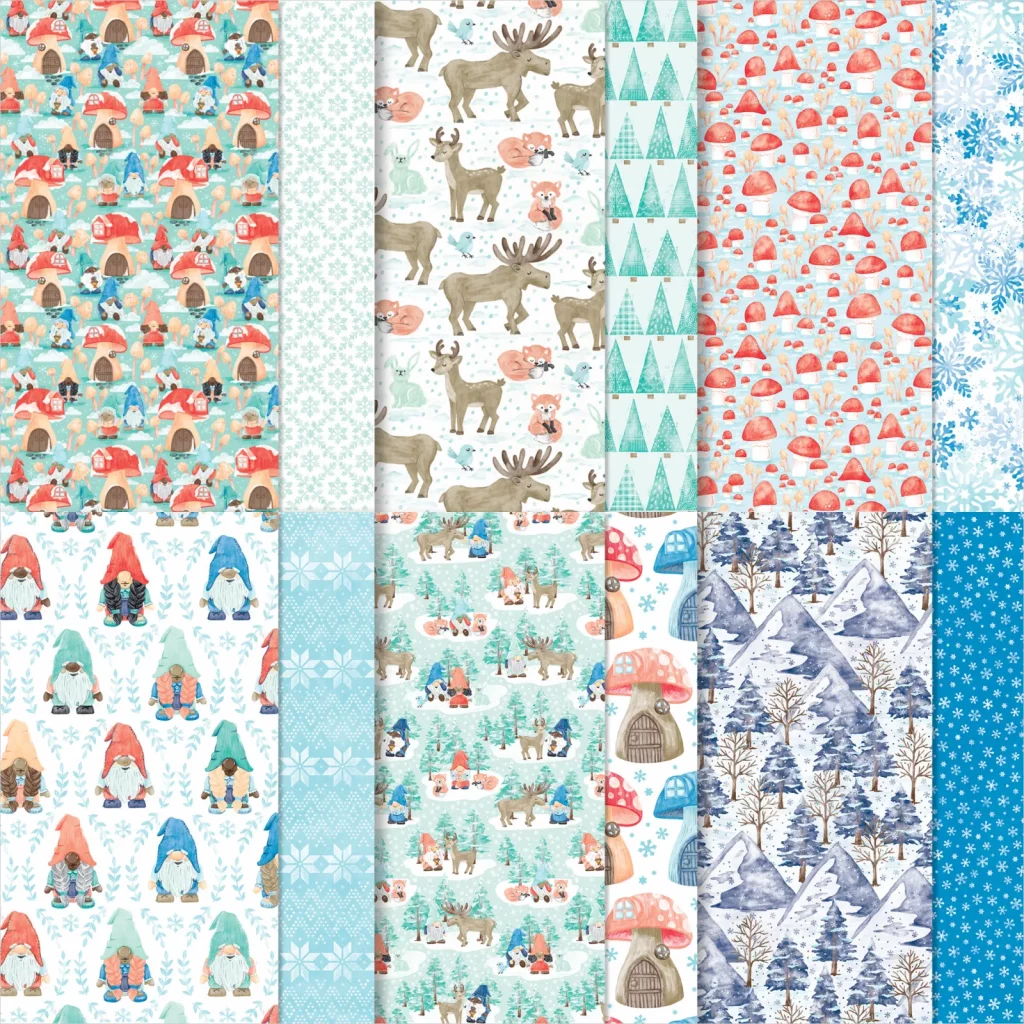
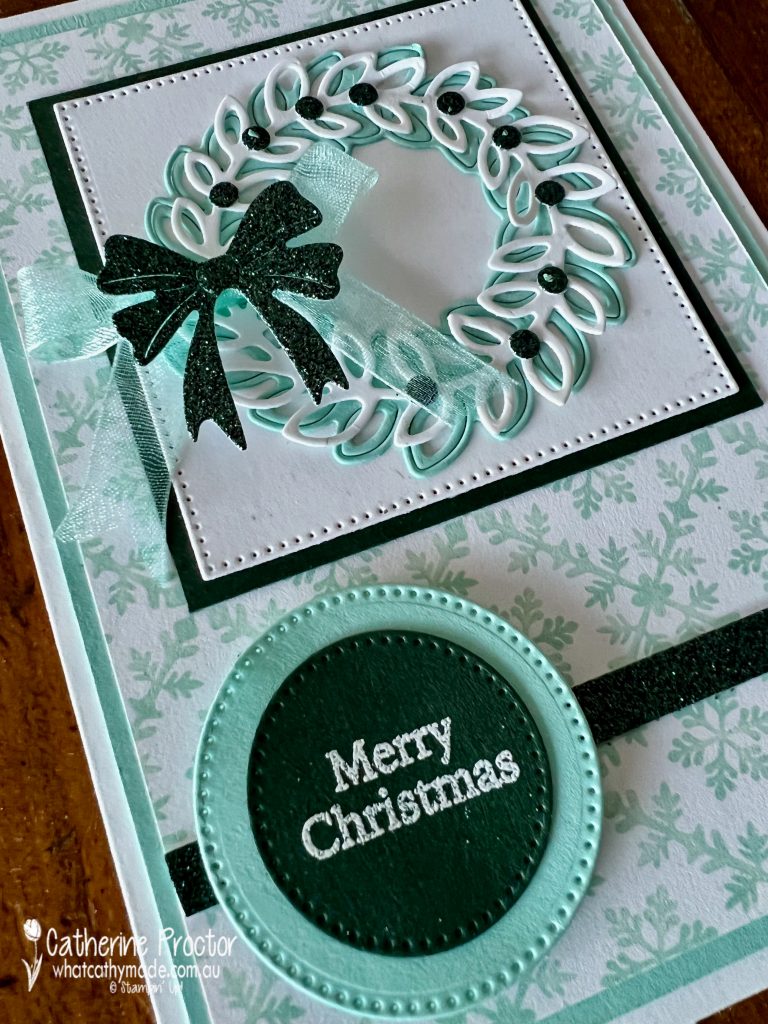
Do you ever love the “B side” patterns more than the “A side” patterns in a Designer Series Paper pack? I especially love the “B side” patterns of the Storybook Gnomes DSP – it is full of beautiful snowflake and tree patterns in soft blues, aquas and greens.
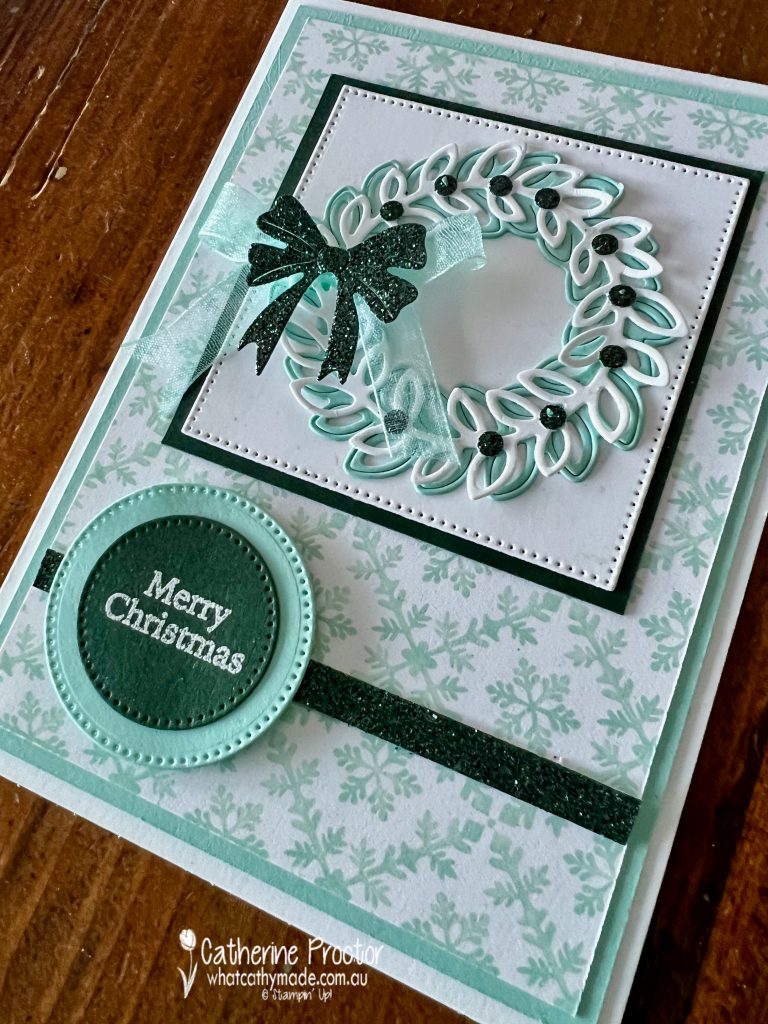
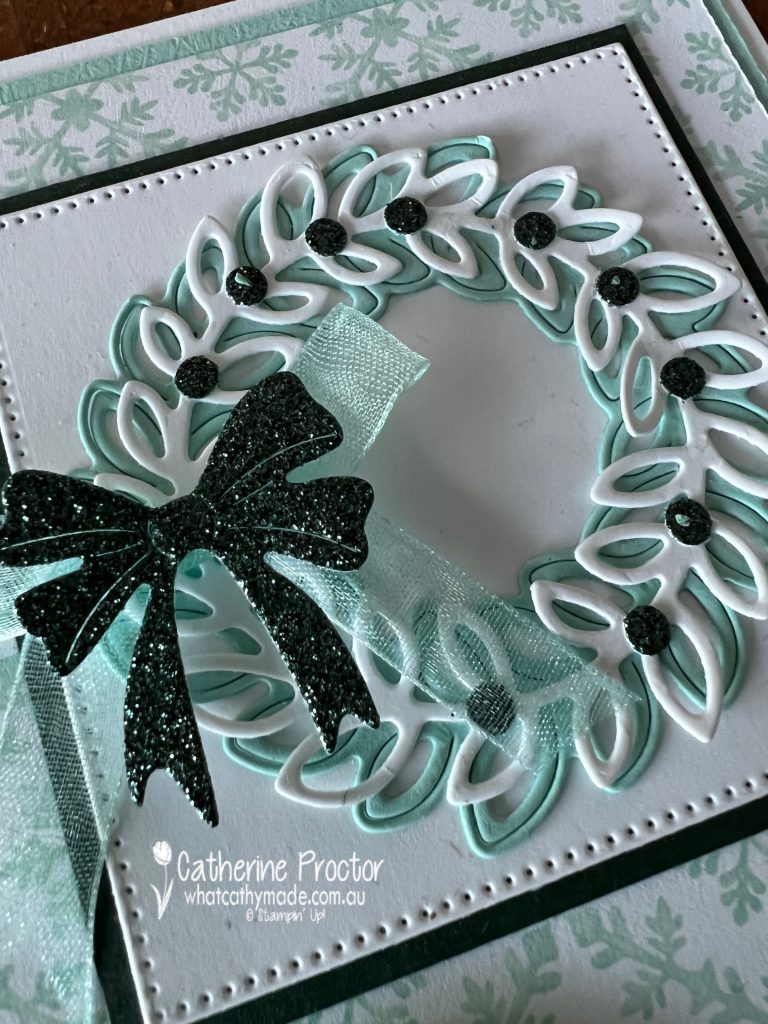
My card tonight was inspired by the Pool Party snowflake pattern in the Storybook Gnomes DSP so I decided to pair it with the Evening Evergreen Glimmer Specialty Paper to create a Christmas wreath card.
Pool Party and Evening Evergreen work so well together I decided not to add any more colours to this colour combination.
My favourite die in the Country Wreaths die is this elegant double bow die. I’ve layered it on top of a Pool Party Sheer ribbon bow for extra dimension and impact.
The Evening Evergreen “berries” on the wreath are created using the Dots & Spots Die to die cut out the Evening Evergreen Glimmer Specialty Paper. This die is great for creating your own embellishments using specialty papers.
I also added a strip of this gorgeous Evening Evergreen Glimmer Specialty Paper underneath the sentiment which is stamped in Versamark ink, white heat embossed and die cut out with the Stylish Shapes dies.
Now it’s time to hop on over to our next participant, the lovely Tina Gillespie – I can’t wait to see what Tina has created today!
If at any time you find a broken link, you can find the complete list of all participants on Sharon’s blog.
Welcome to week twenty two of our Art With Heart 2022-23 Colour Creations blog hop!
This is a weekly blog hop where we showcase the stunning range of Stampin’ Up! colours in alphabetical order over 12 months and this week we are featuring Garden Green, from the regal family.
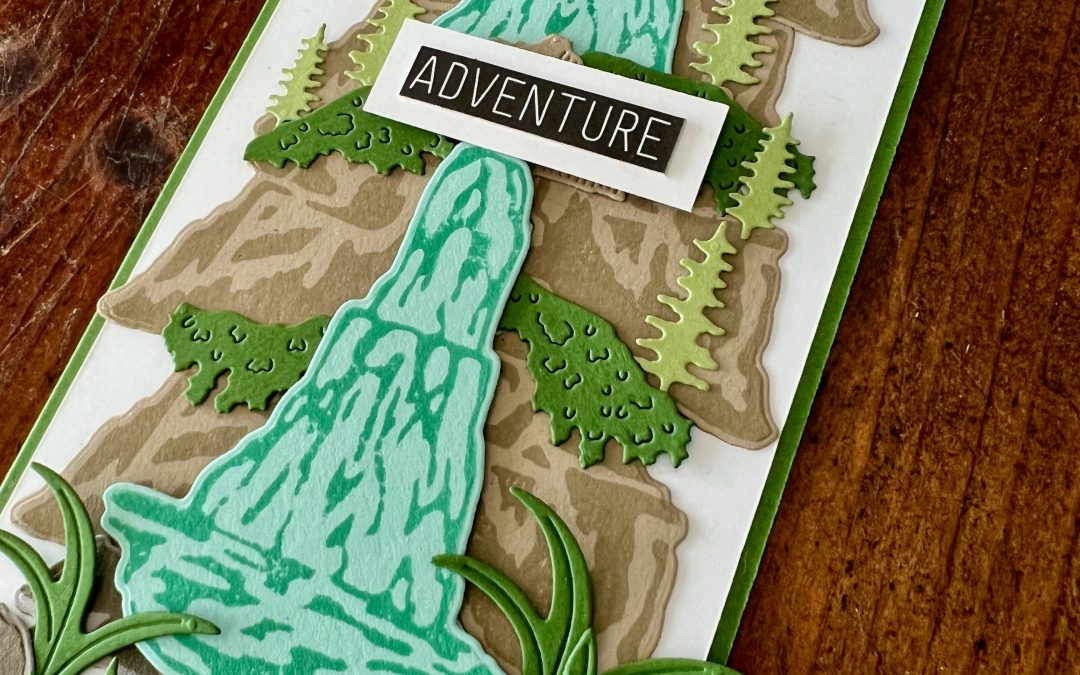
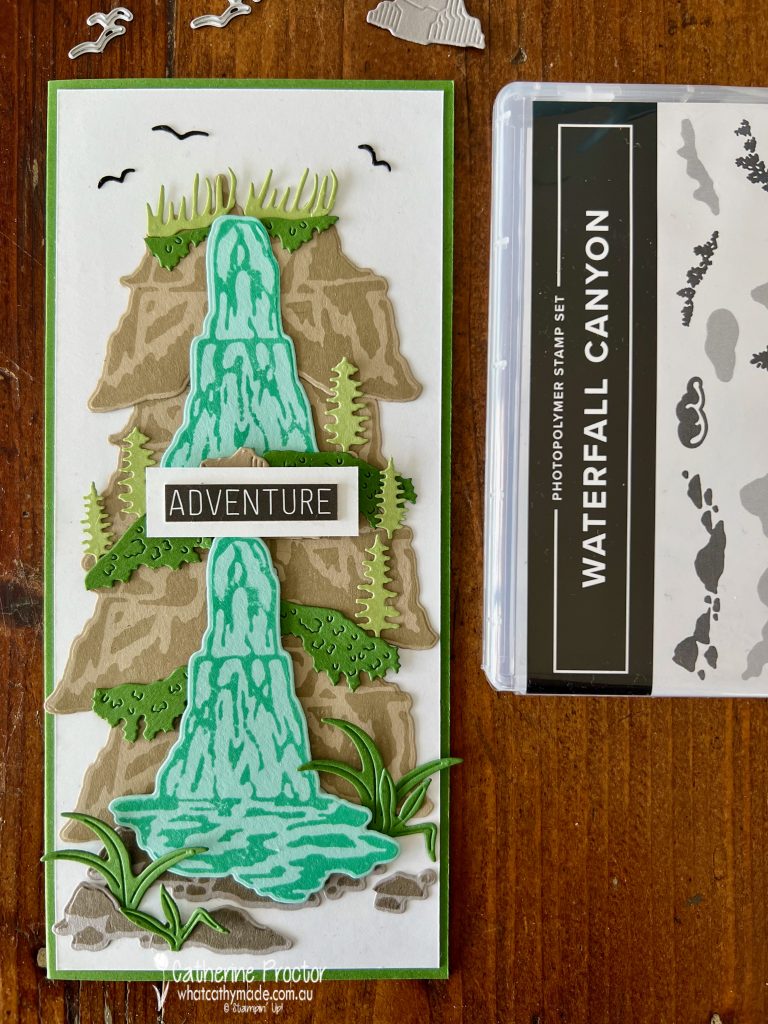
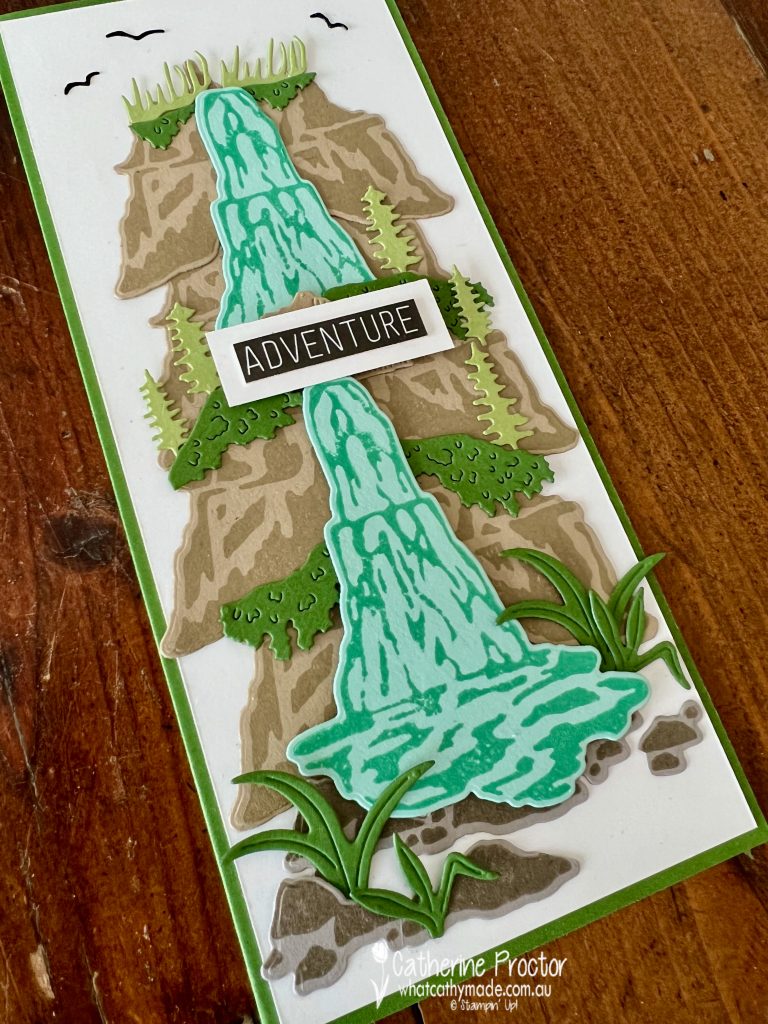
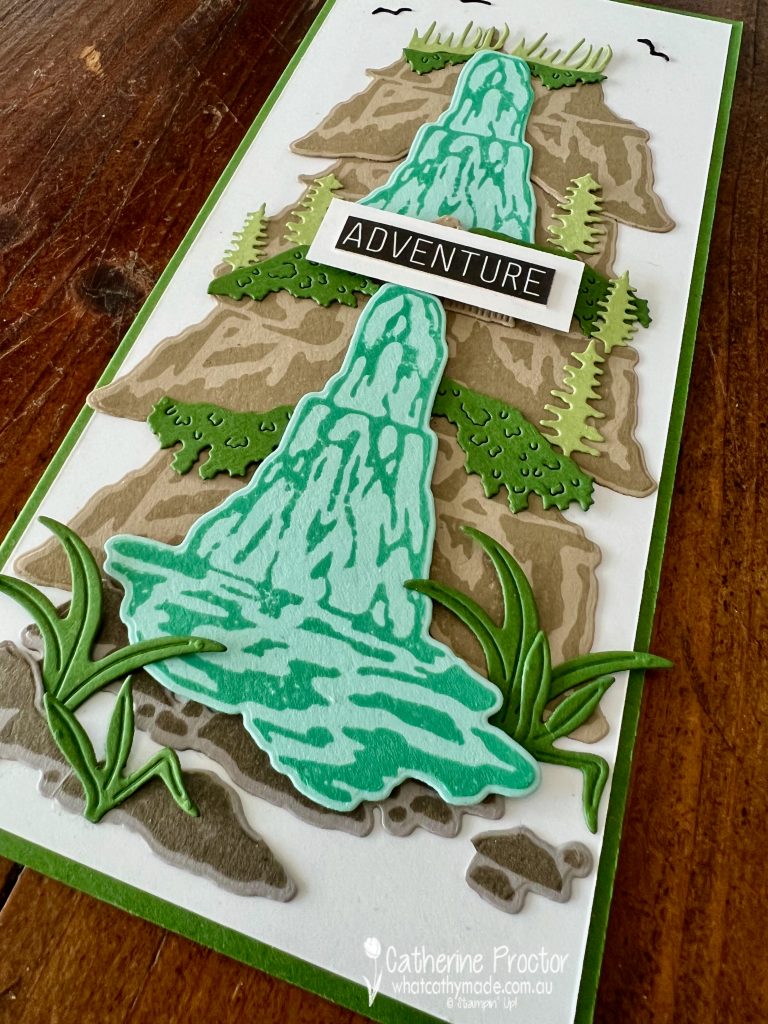
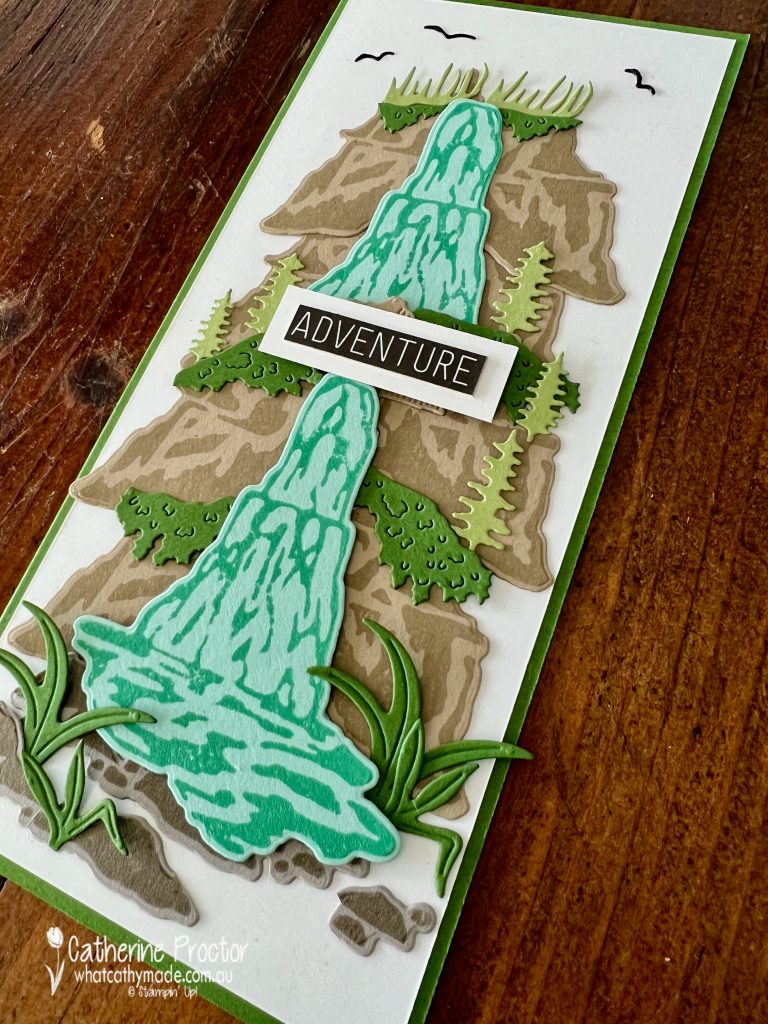
I love making scene cards, so I’ve had my eye on the Waterfall Canyon stamp set for a long time now. When the coordinating Waterfalls dies become available this month as part of the Perfect Partners Promotion, I just couldn’t resist this bundle.
I’ve made a slimline card so I could make an extra long waterfall. The card base base is Garden Green card stock measuring 21 x 28 cm.
Garden Green works very well with so many other colours – today I’ve paired it with colours that work for a nature scene: Crumb Cake, Pool Party, Coastal Cabana, Gray Granite, Pear Pizzazz, Basic Black and Basic White.
The “Adventure” sentiment is not a stamp – it is a sticker from the “Today is the Day” Memories & More card pack, adhered to a scrap of Basic White card stock.
The birds at the top of the card are not stamps either – they are tiny dies from the Waterfall dies.
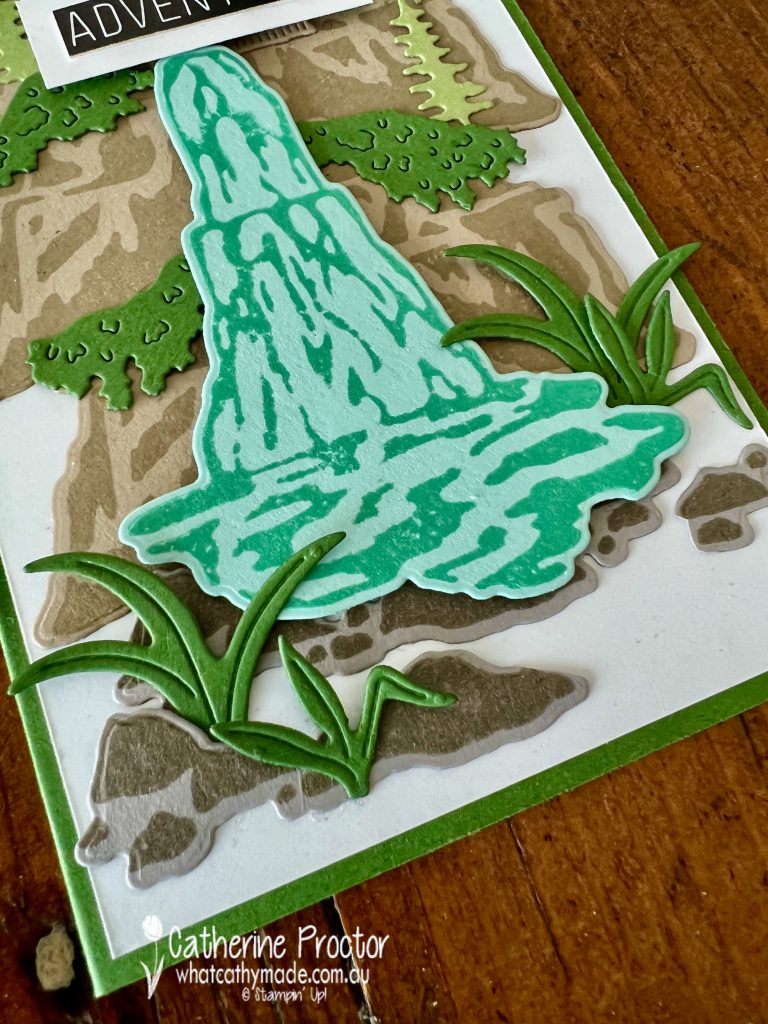
I love these Waterfall dies, especially the ones that I’ve used for the Gray Granite rocks, the Garden Green grass pieces at the bottom of the waterfall and the Garden Green foliage that sits on the rocks.
The size of the grass dies gives an instant sense of perspective with the Pear Pizzazz tree dies being so much smaller.
I only realised after photographing this that I’ve actually adhered the Crumb Cake rock pieces upside on my card front, LOL! Hopefully it still works?
Now it’s time to hop on over to our next participant, the lovely Tina Gillespie – I can’t wait to see what Tina has made this week!
If at any time you find a broken link, you can find the complete list of all participants below.
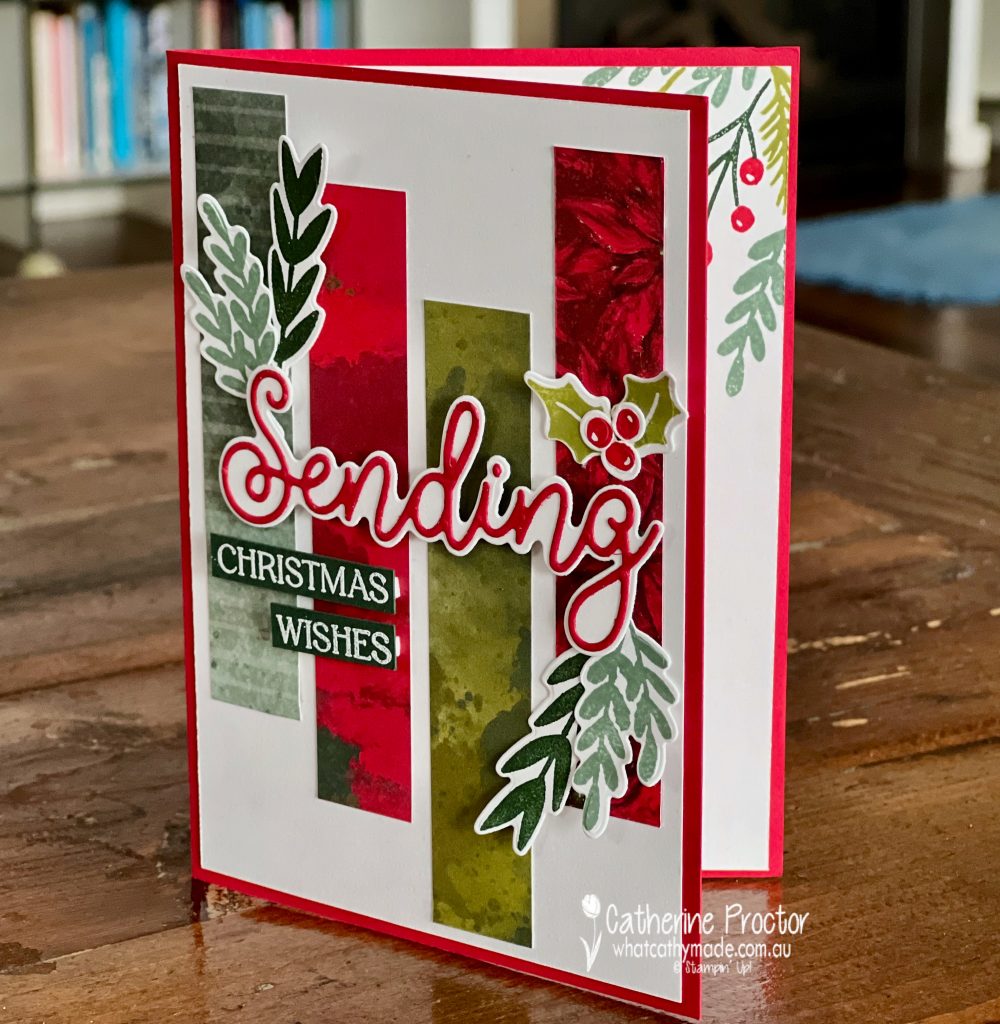
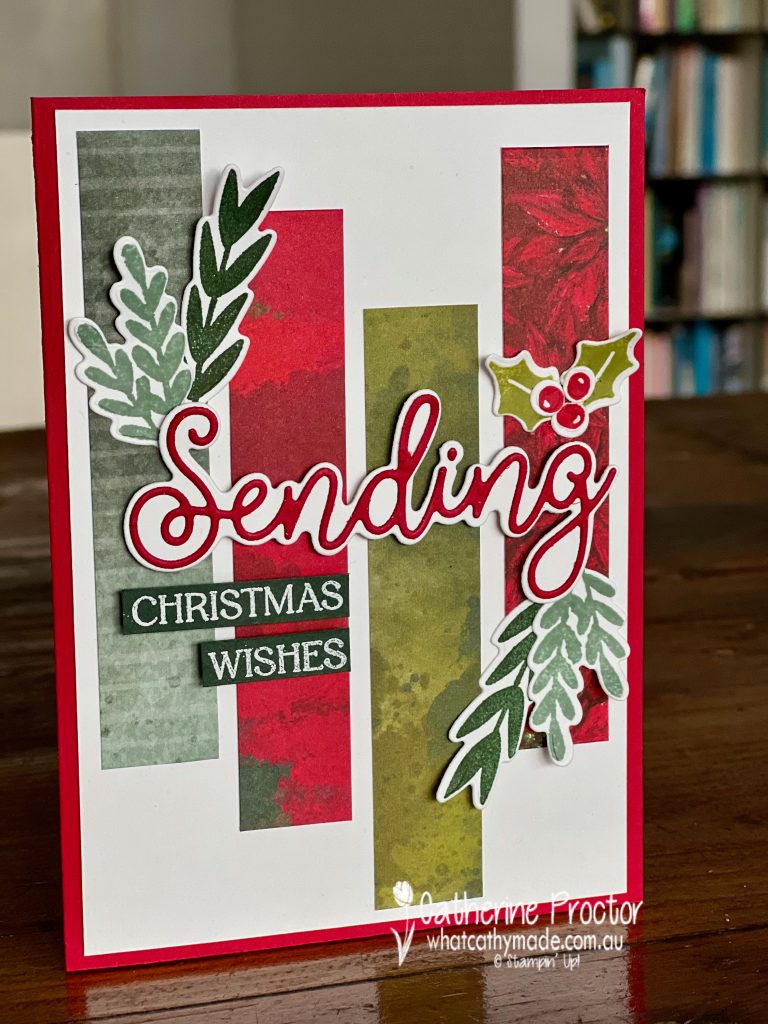
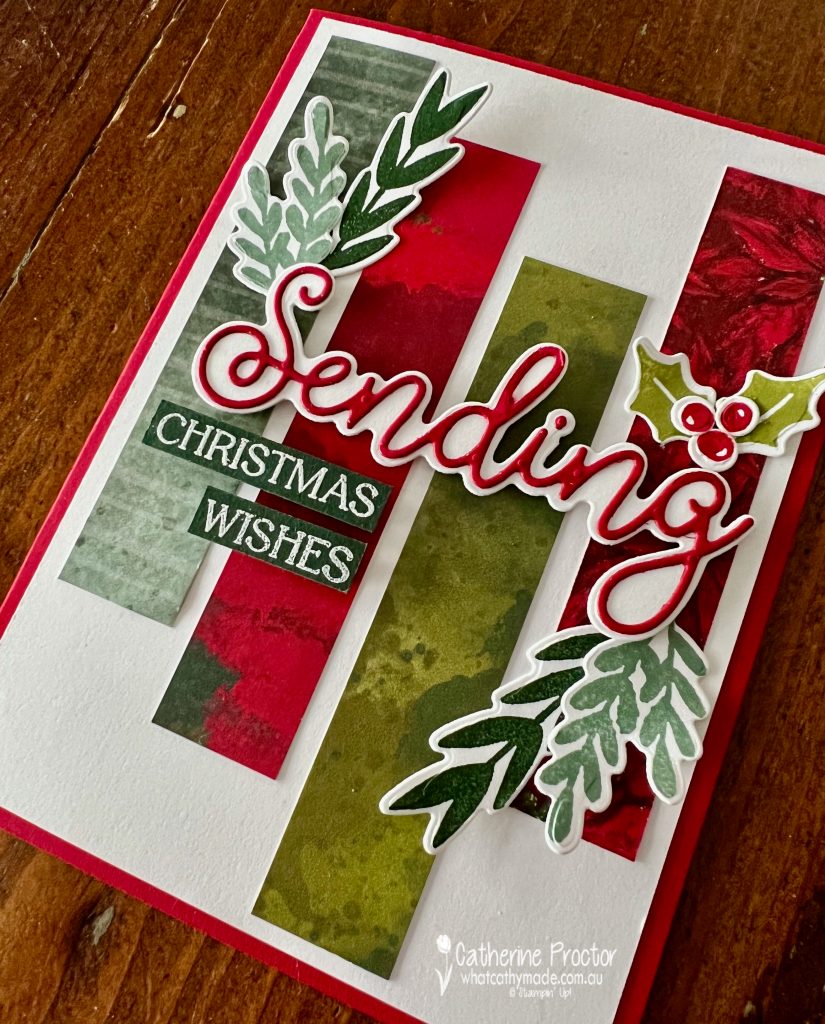
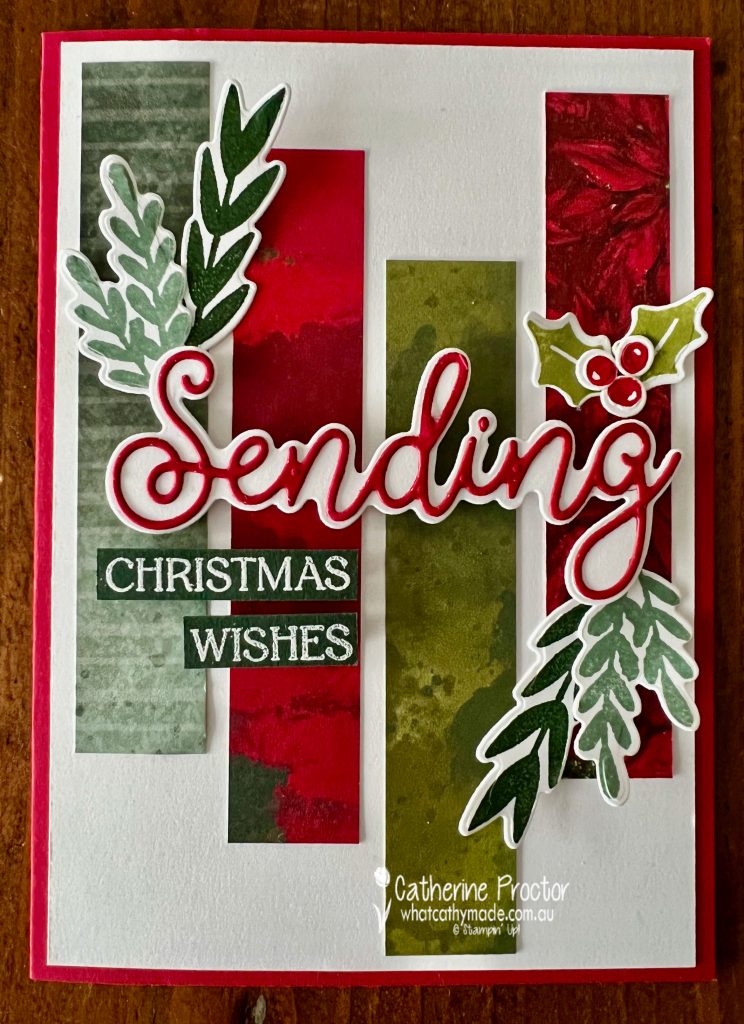
Welcome to week thirteen of the Heart Of Christmas Blog Hop!
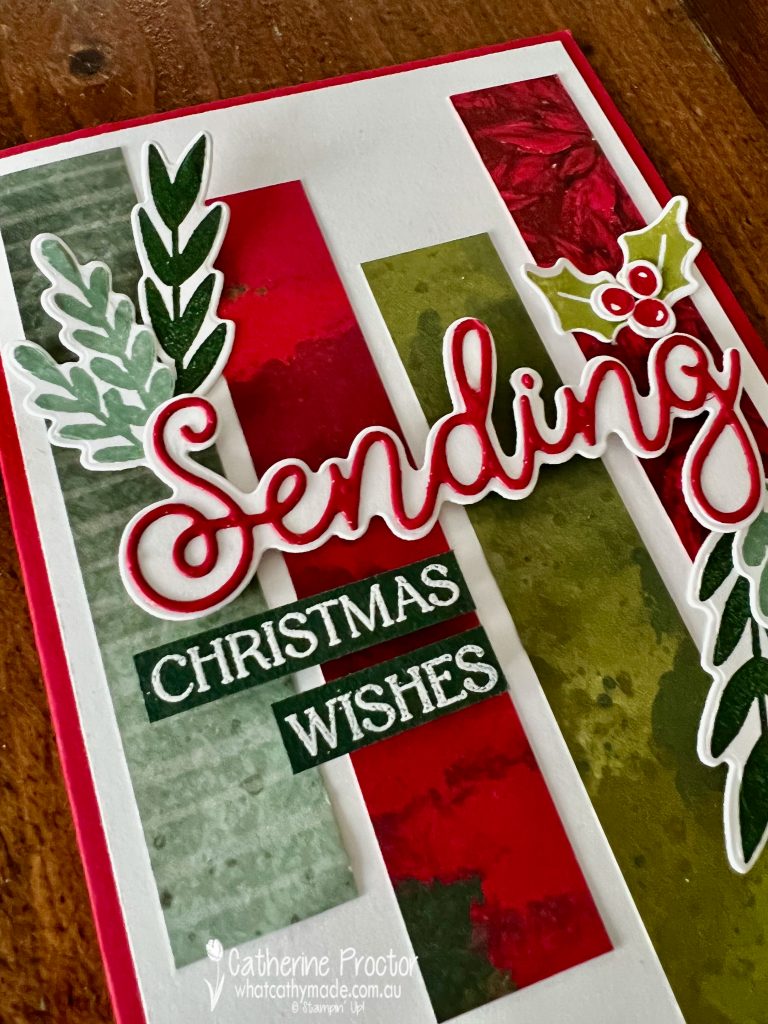
Wondering how to use up your leftover strips of designer series paper or how to incorporate more than one DSP pattern on your card front? This simple layout is very effective and it can be made with virtually any DSP.
The trick to stop the background DSP competing with the foreground elements is to use a DSP that has a smaller pattern or more solid colours.
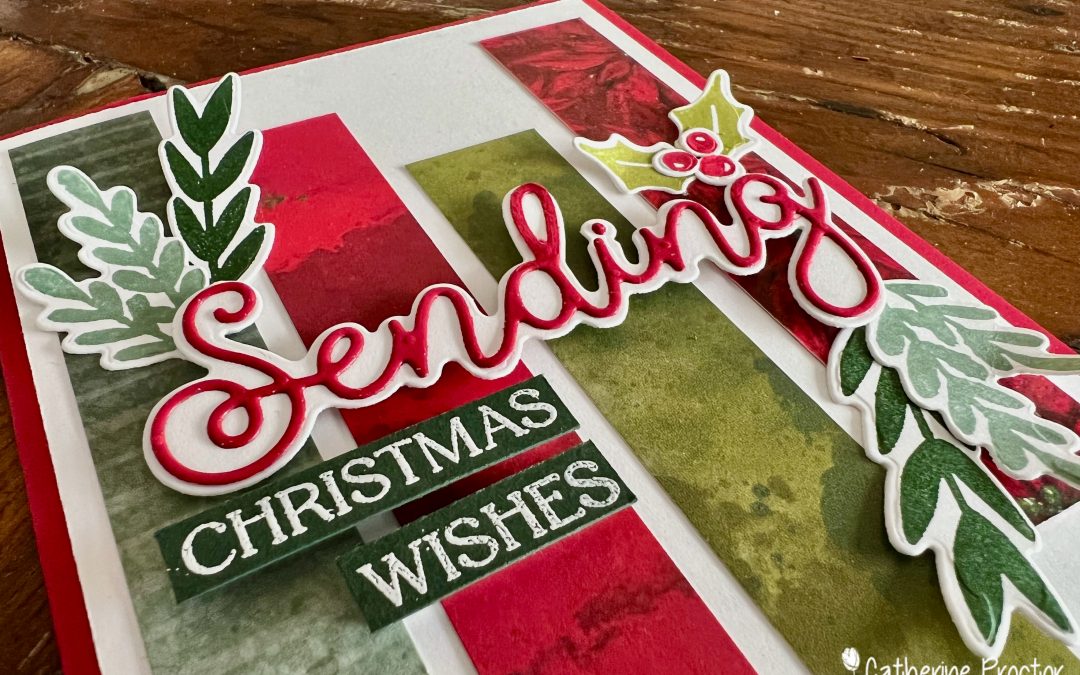
I originally intended to use the Painted Christmas DSP for this card, however I felt that the Boughs of Holly DSP was a better match as it really allowed the sentiment and foliage pieces to shine.
The foliage is stamped and die cut using the Christmas Banners Bundle in colours selected to match the Boughs of Holly DSP: Real Red, Evening Evergreen, Soft Succulent, Old Olive (stamped off) and Basic White.
Stampin' Up! Boughs of Holly DSP colour combination
I love the versatility and impact of word dies. This layered “sending” sentiment is from the Sending Smiles dies and I reach for a lot. Don’t forget to use an adhesive sheet for the top word layer – it turns the word into a repositionable sticker and prevents any adhesive mess.
There is no Christmas sentiment in the Sending Smiles bundle, so I used the “Christmas” and the “wishes” sentiment from the Christmas Banners Stamp Set, stamped in Versamark ink onto scraps of Evening Evergreen cardstock and then white heat embossed.
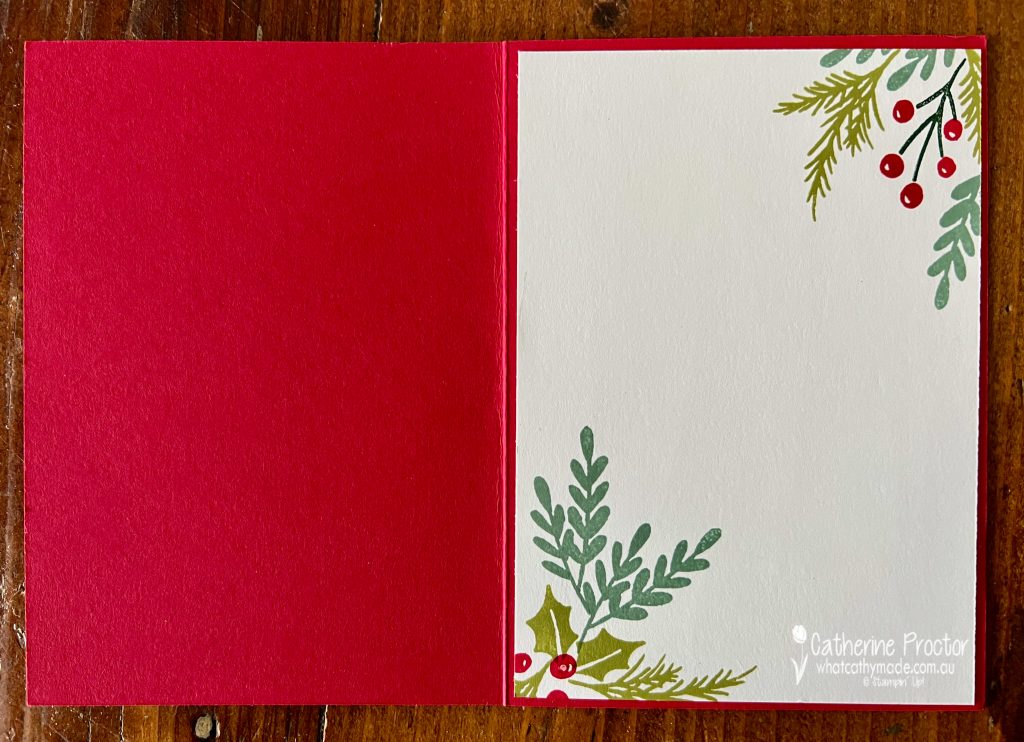
I’ve stamped some more of this gorgeous foliage from the Christmas Banners stamp set inside the card too.
Now it’s time to hop on over to our next participant, the lovely Rosa Leyden– I can’t wait to see what Rosa has created today!
If at any time you find a broken link, you can find the complete list of all participants on Sharon’s blog.
If you live in Australia, you can find and purchase these products in my Stampin’ Up! Online Store or by clicking on the links below.
Welcome to week twenty one of our Art With Heart 2022-23 Colour Creations blog hop!
This is a weekly blog hop where we showcase the stunning range of Stampin’ Up! colours in alphabetical order over 12 months and this week we are featuring Fresh Freesia, a 2021-23 In Colour.
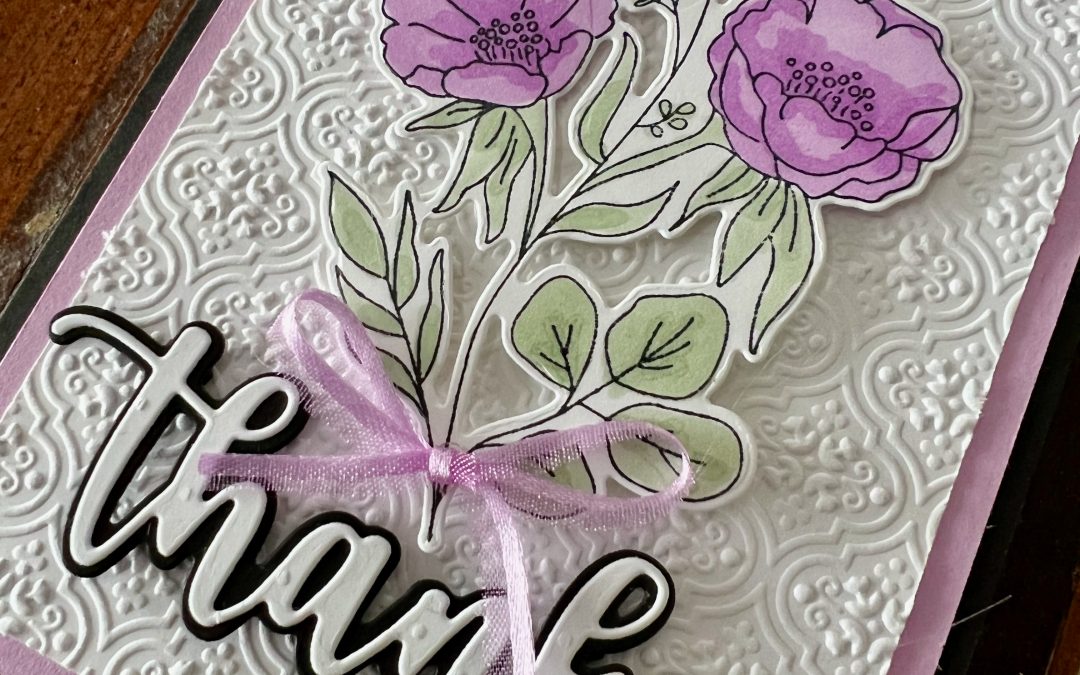
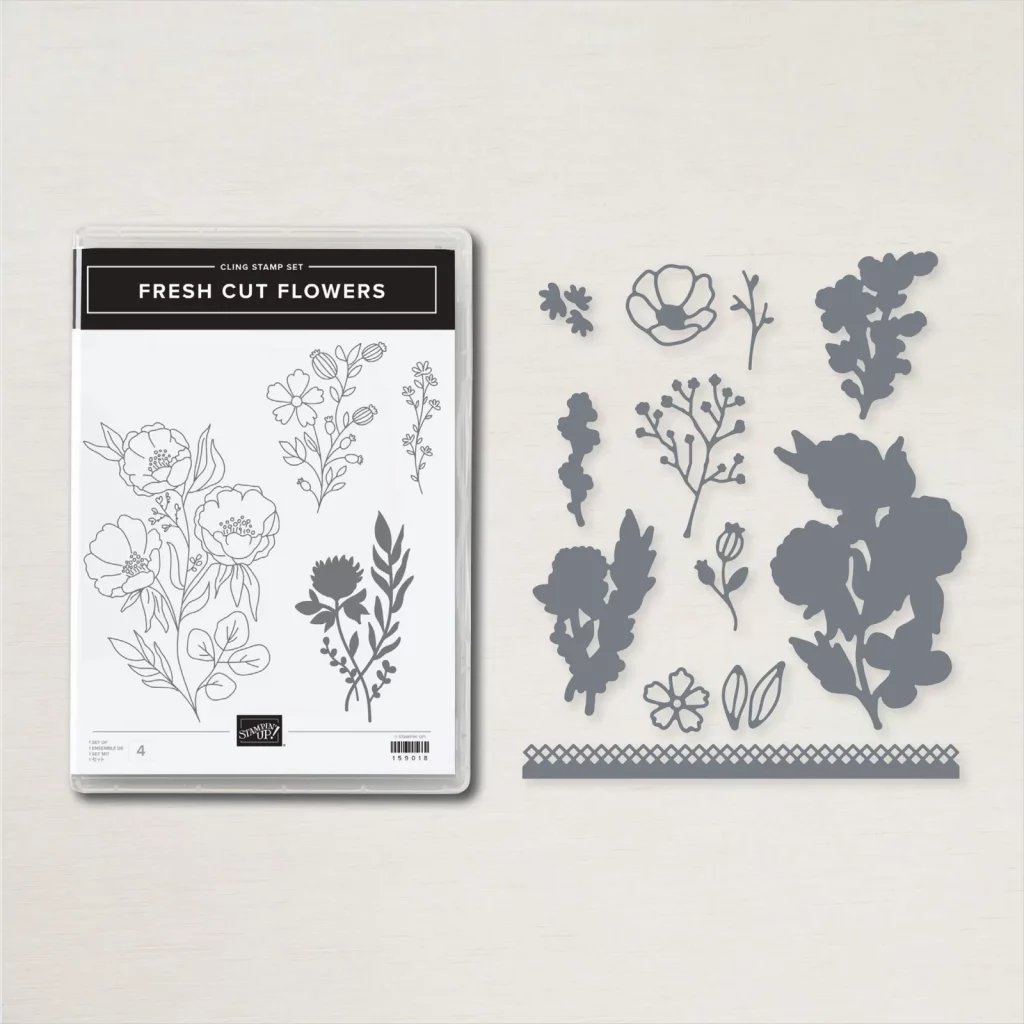
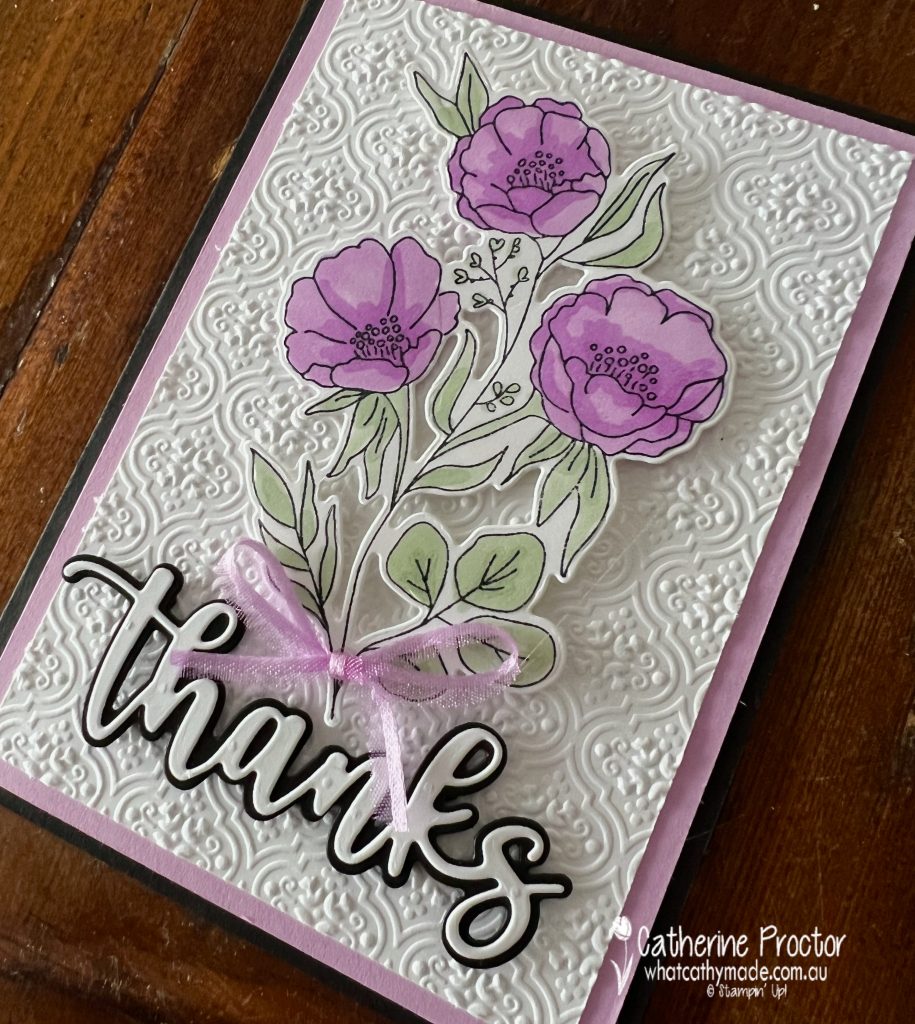
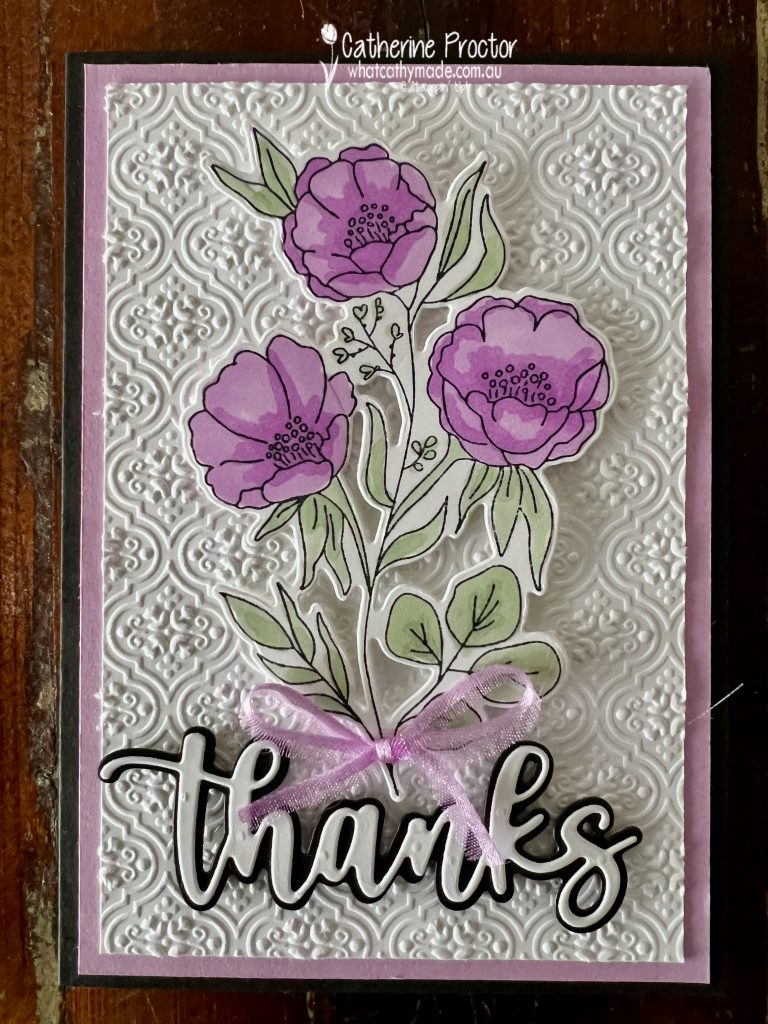
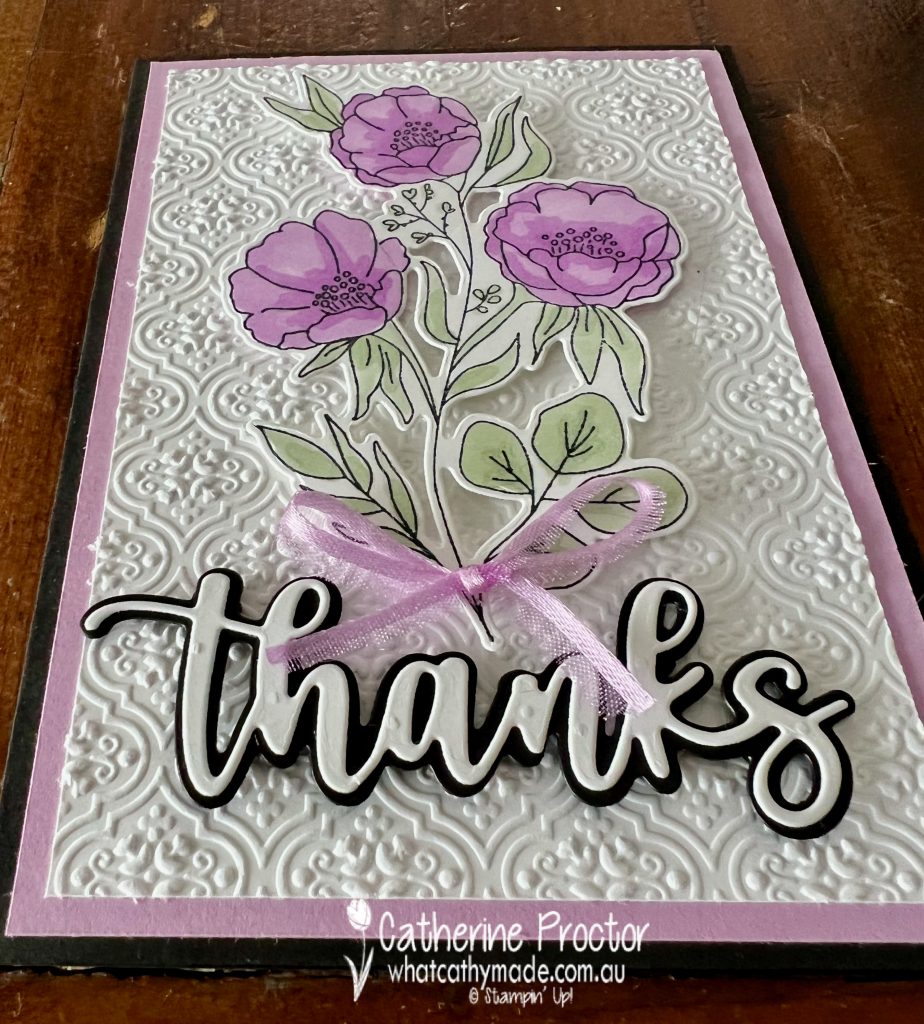
Tonight’s card features another new die set from the Perfect Partners Promotion – the Fresh Cut Stems dies that coordinate with the Fresh Cut Flowers stamp set.
There are so many gorgeous dies in the Fresh Cut Stems dies, however I decided to use just the ones that die cut the stamped images for my “thanks” card.
This largest image is simply perfect on its own to fill the front of a card.
Fresh Fressia works with any of the greens – for this card it has been paired with Soft Sea Foam, the lightest of the greens in the Stampin’ Up! colour range.
I’ve used Stampin’ Up! blends to colour the delicate line images in the Fresh Cut Flowers stamp set, however you could use any colouring method that you prefer.
The “Thanks” layered sentiment is from the Amazing Thanks dies. Don’t forget to use your adhesive sheet for the top layer before die cutting the top word.
Now it’s time to hop on over to our next participant, the lovely Andrea Sargent – I can’t wait to see what Andrea has made this week!
If at any time you find a broken link, you can find the complete list of all participants below.
Welcome to week twelve of the Heart Of Christmas Blog Hop!
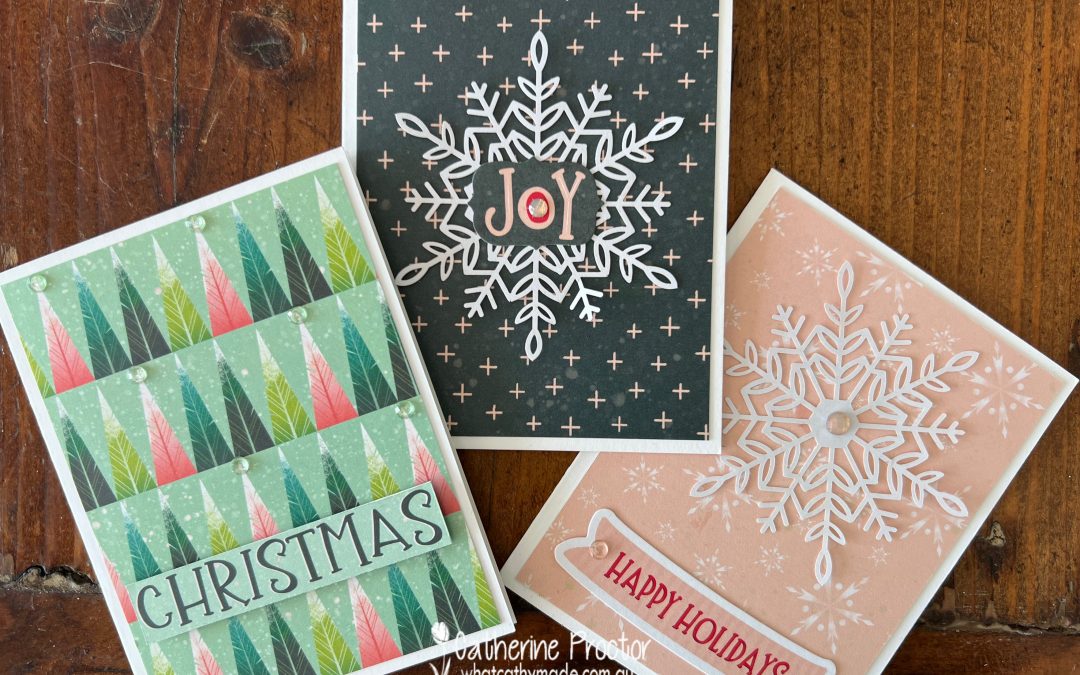
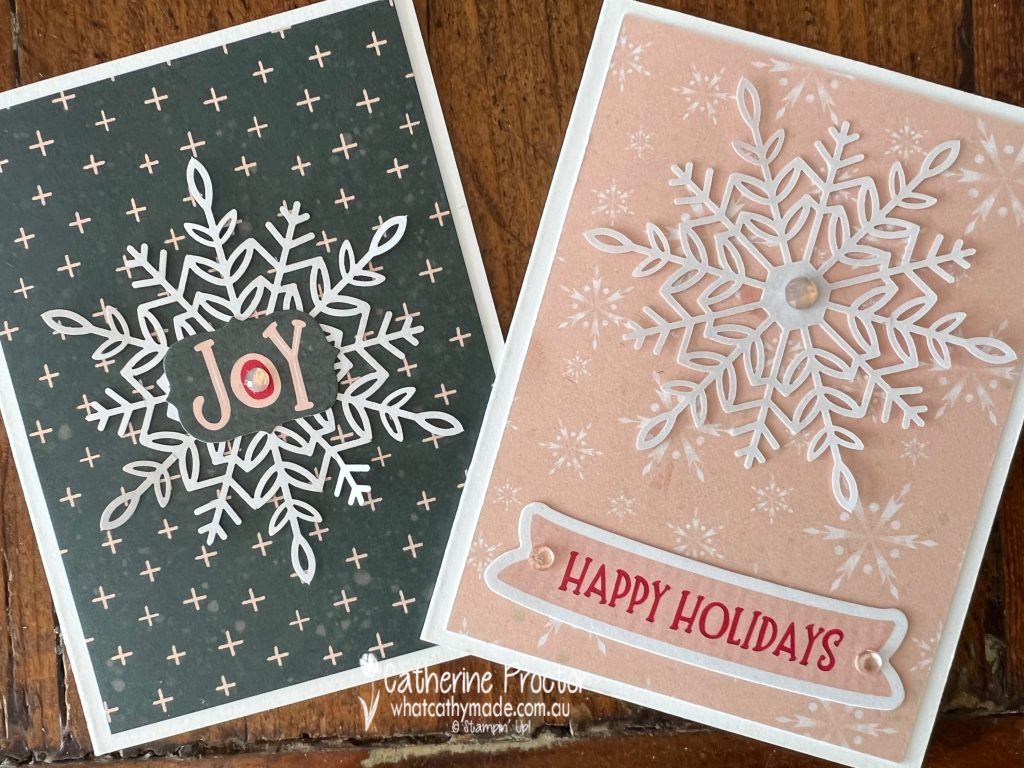
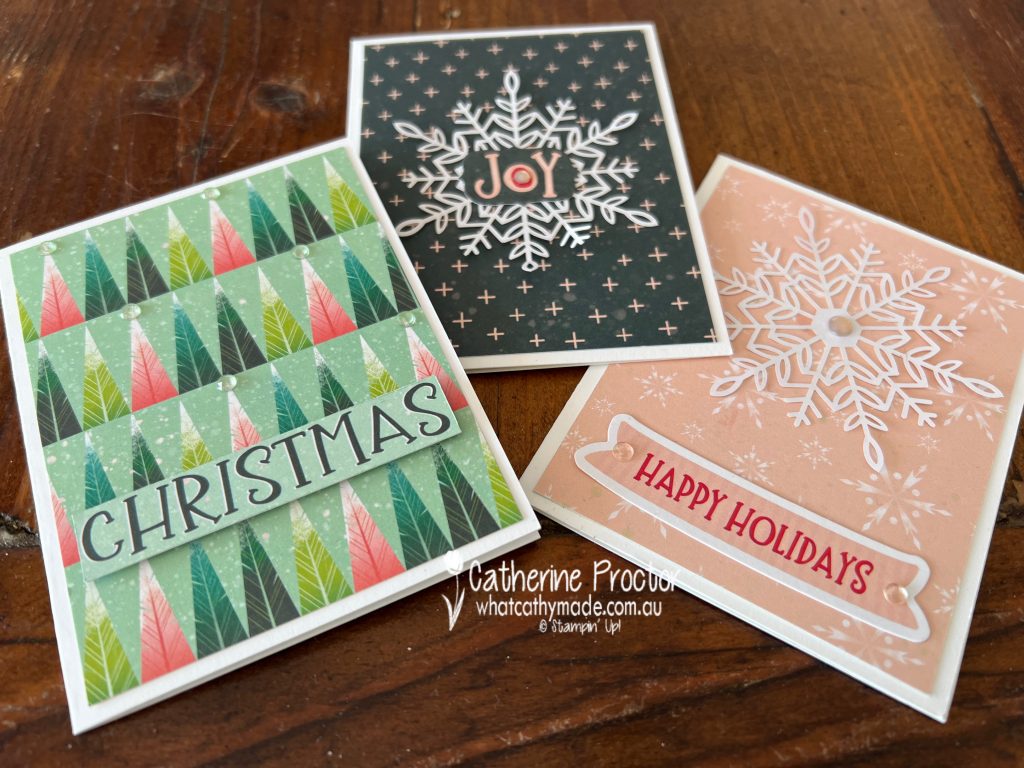
This week I’m sharing three cards that are perfect for a beginner cardmaker to make as they require no stamping or die cutting.
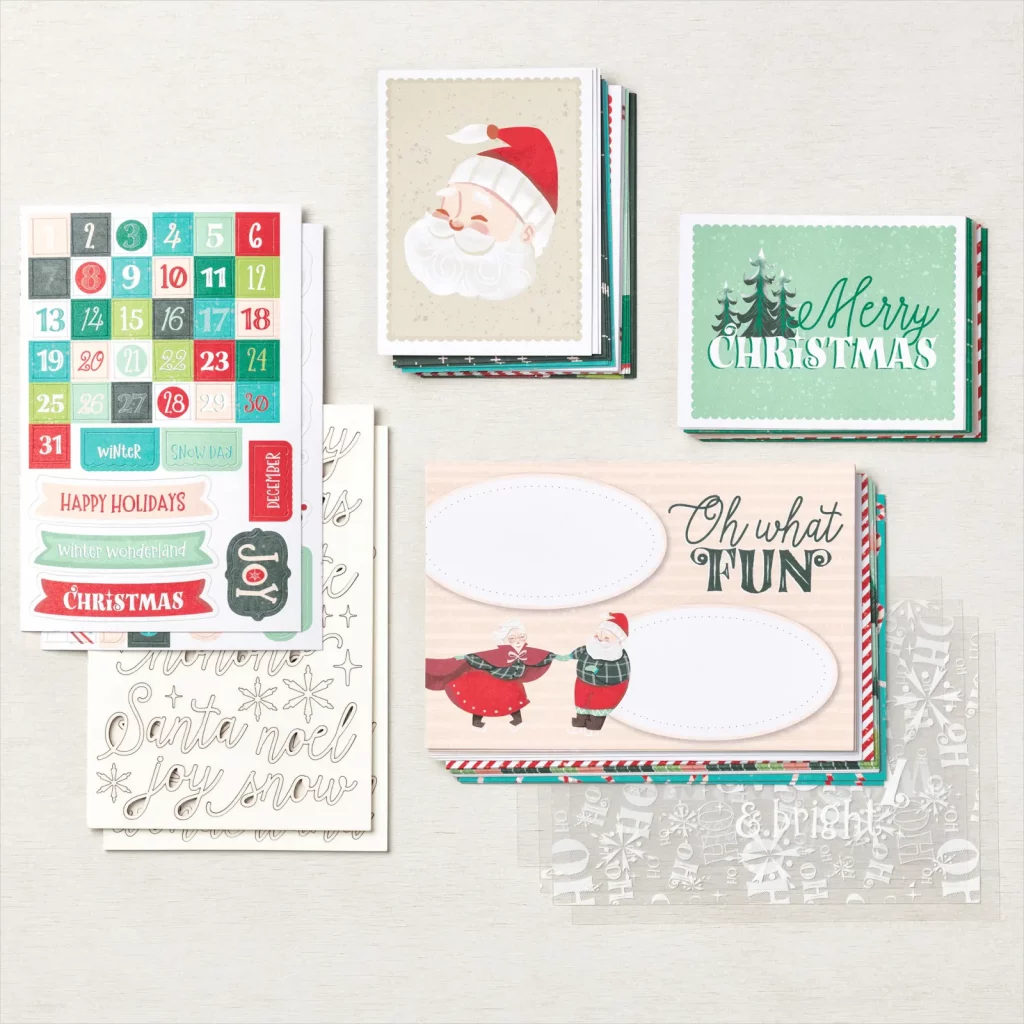
All I’ve used is a pack of the Santa Express Memories & More Card Pack, card bases from Memories & More Card Packs and a few embellishments.
The Santa Express Memories & More Card Pack includes:
54 double-sided, printed cards
2 sheets of stickers
4 acetate overlays
2 laser-cut sheets of words and embellishments
I love the colour combinations and the designs of the Memories & More cards in this pack.
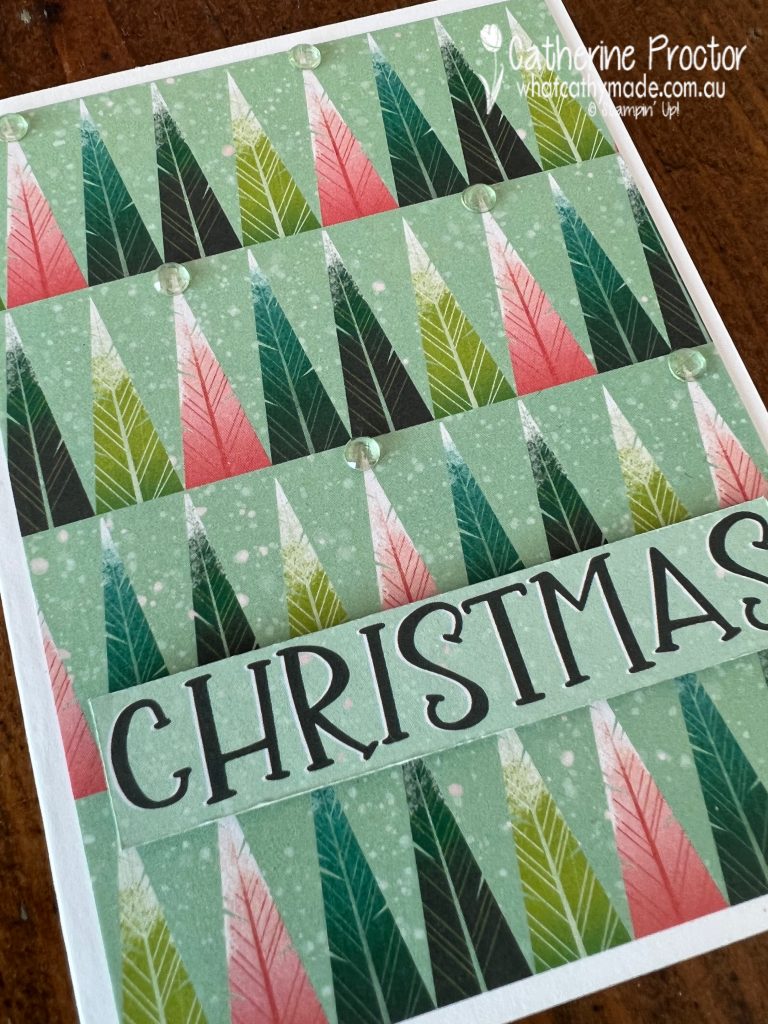
For card one I’ve used this graphic Christmas Tree design and a Christmas sentiment cut from another one of the Memories & More cards. Clear Elegant Faceted Gems embellish the tops of some of the trees.
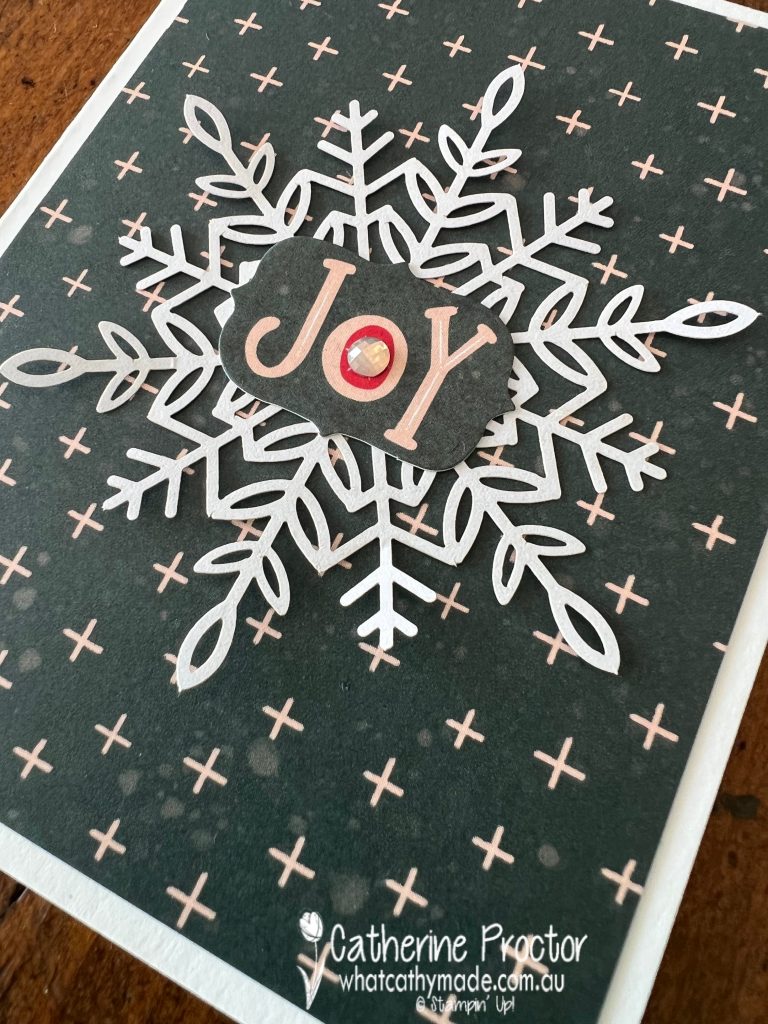
My “Joy” card uses one of the stickers from the pack, an Evening Evergreen Memories & More card, a Wonderful Snowflake and a pink Elegant Faceted Gem.
Card three also uses another one of the stickers from the pack – Happy Holidays –a Petal Pink Memories & More card and another Wonderful Snowflake with a Petal Pink Elegant Faceted Gem in it’s centre and clear Elegant Faceted Gems on the sentiment.
Wonderful Snowflakes are one of my favourite Christmas embellishments as they instantly add an elegant touch to any Christmas card.
Quick and easy but oh so effective – Memories & More cards and notecards and envelopes are great to have in your stash when you really don’t have the time or the inclination for stamping and die cutting.
Now it’s time to hop on over to our next participant, the lovely Christine Blain– I can’t wait to see what Christine has created today!
If at any time you find a broken link, you can find the complete list of all participants on Tina’s blog. Tina is running the hop for us tonight as Sharon is very busy running 21st celebrations. Thanks so much Tina!
If you live in Australia, you can find and purchase these products in my Stampin’ Up! Online Store or by clicking on the links below.


")


")
")


 Designer Series Paper")


")
")


 Open Weave Ribbon")