Welcome to our last Heart of Christmas blog hop for 2024!
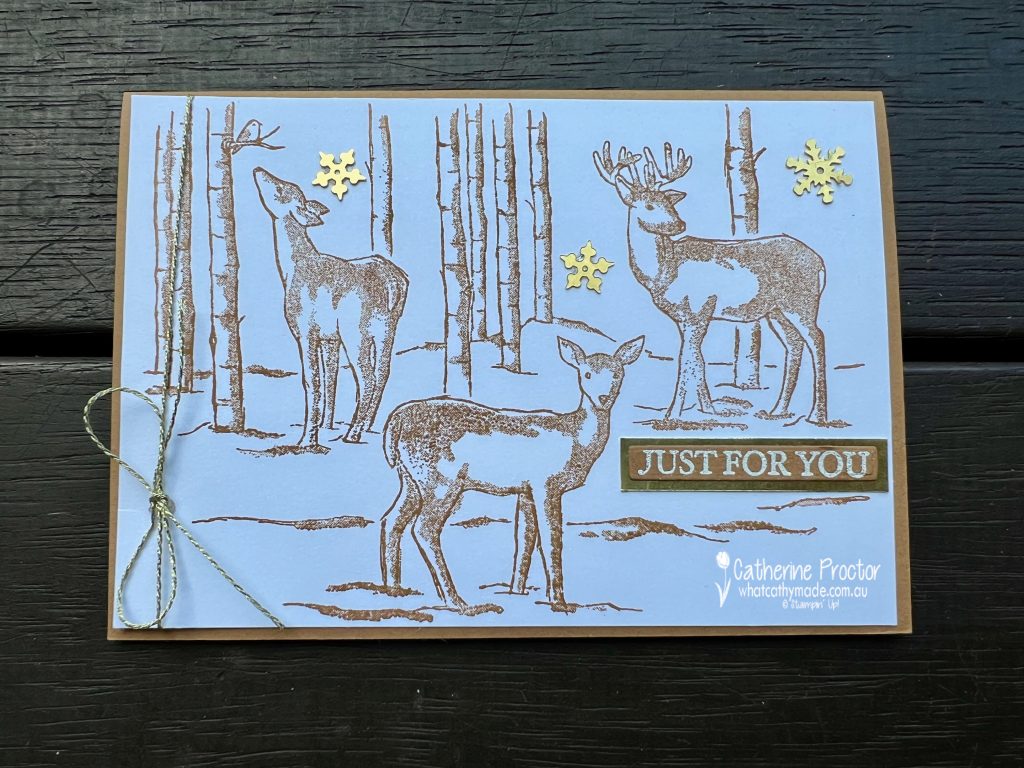
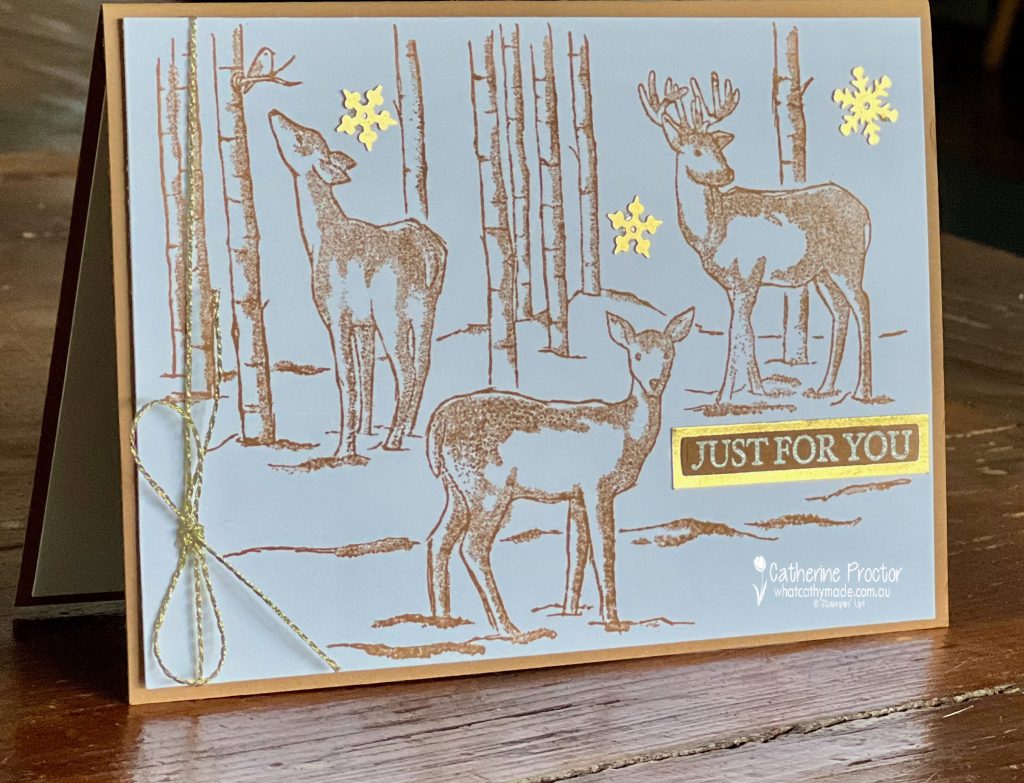
My simple stamping Christmas card was also made for the “Forest Friends” challenge for Day 25 of the 30 Days of Christmas card making challenge.
I’ve created a monochrome Christmas card that uses a large background stamp set, the Graceful Deer Stamp Set, which I’ve stamped in Pecan Pie.
Would you believe (apart from the sentiment) I’ve only used one stamp to create this forest scene?
A large background stamp like Graceful Deer Stamp Set is ideal for when you need a production line of Christmas cards.
Although I’ve added a few gold snowflake embellishments and some gold twisted thread I could also have simply stamped the image and left it at that!
The “Just for you” sentiment is from the Hang an Ornament Stamp Set, heat embossed in white.
Now it’s time to hop in over to our next participant, the lovely Christine Blain. I can’t wait to see the project Christine has created this week!
If the next button link is not working or you’d like to see the entire list of participants go to Sharon Davern‘s blog.
Sharon has done an amazing job of hosting our Heart of Christmas blog every Monday. Thank you so much Sharon for organising our Christmas blog hop once again xx
Our AWH team will be back on Wednesday night, showcasing Lemon lime Twist. I hope you can join us then!
Welcome to week 16 of the Art with Heart Team Stampin’ Up! Heart of Christmas blog hop for 2024. I hope you we are continuing to inspiring you each week with our Christmas card ideas.
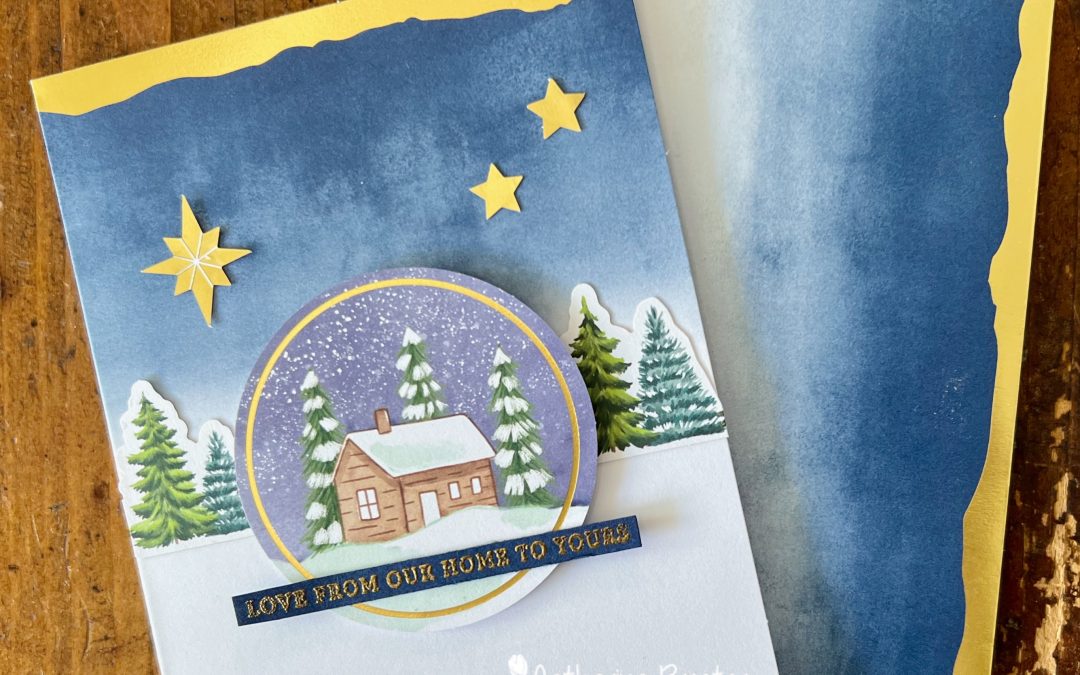
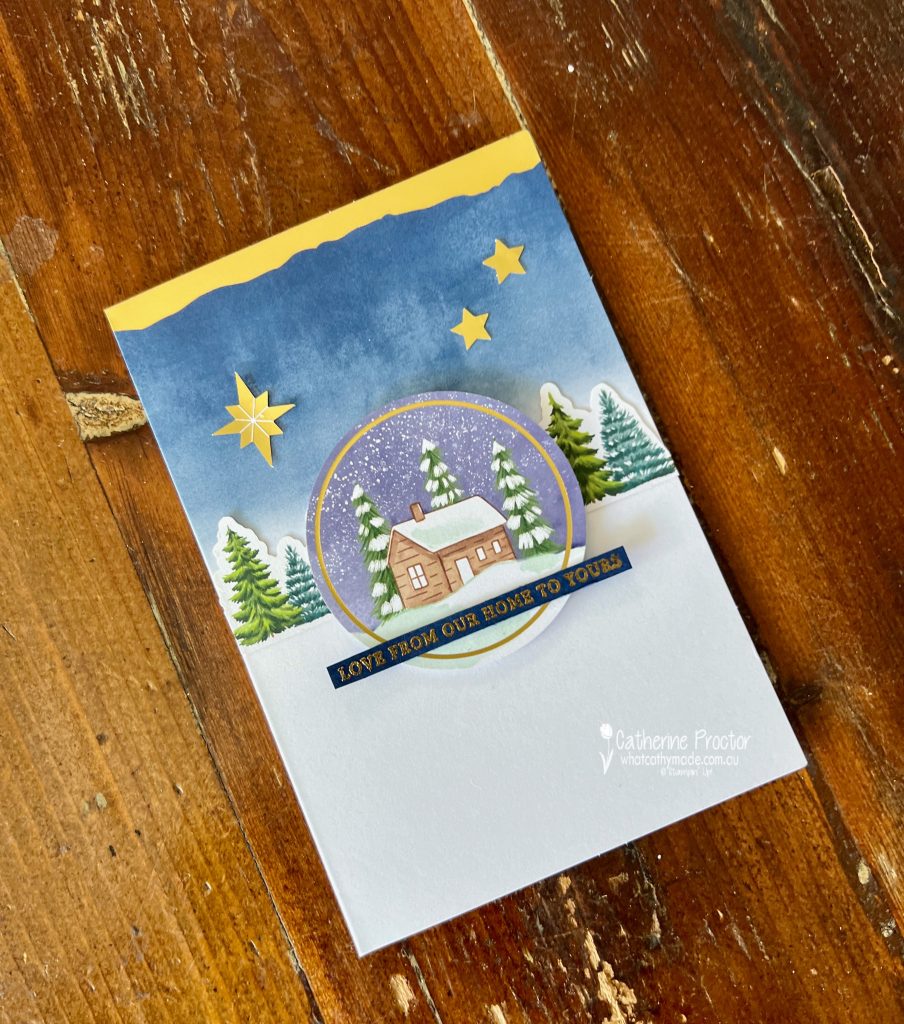
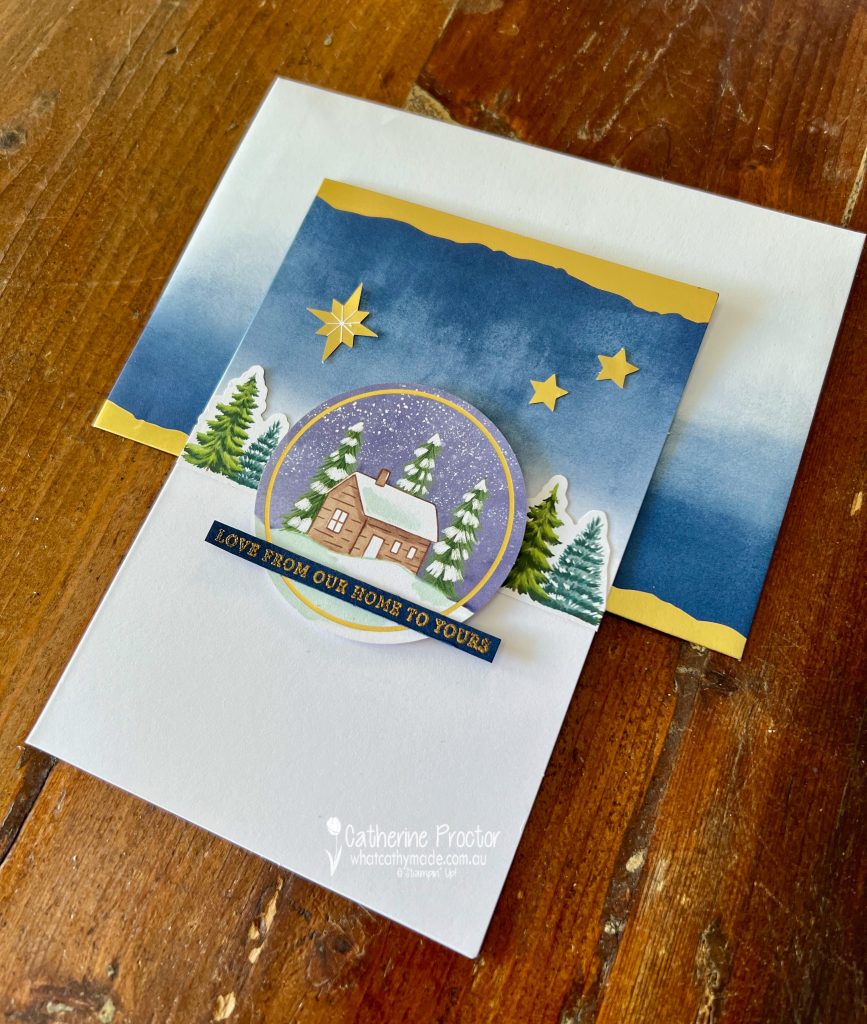
My quick and easy Christmas card was also made for a sketch challenge for Day 18 of the 30 Days of Christmas card making challenge. This is the sketch.
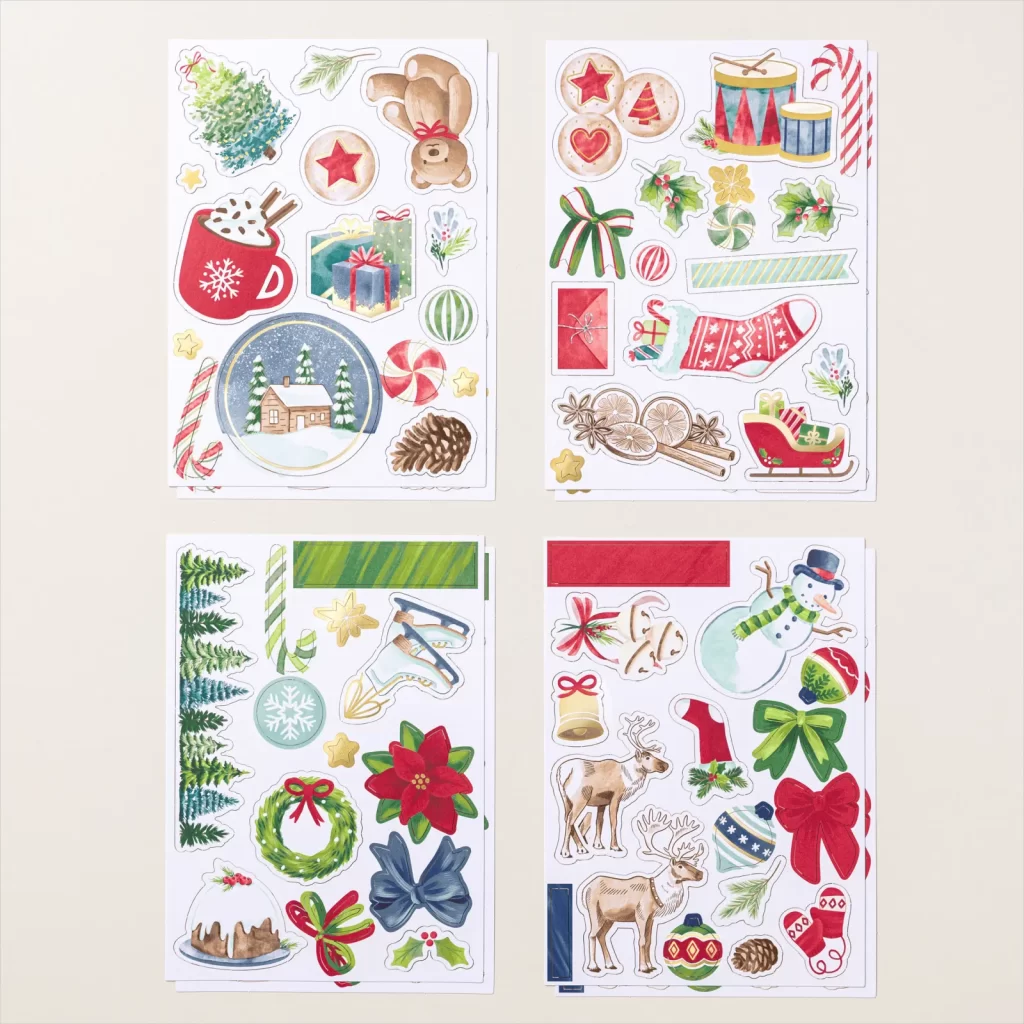
Stampin’ Up! have the most wonderful Mix & Match Ephemera Packs in the Christmas catalogue.
For this card I’ve used the pre-cut row of trees, the house scene and some gold stars from the Joyful Images Mix & Match Ephemera Pack.
These ephemera packs are designed to work well with the Gold Dipped Mix & Match Cards and Envelopes.
The gold heat embossed “Love from our home to yours” is from the Peaceful Season stamp set. I thought this was the perfect sentiment to go with the house.
These Mix & Match Ephemera Packs are my go to for when I need to make quick and easy cards. You get two sheets of each design for just $16.75!
Now it’s time to hop in over to our next participant, the lovely Claire Daly. I can’t wait to see the project Claire has created this week!
If the next button link is not working or you’d like to see the entire list of participants go to Sharon Davern‘s blog.
Sharon does an amazing job of hosting our Heart of Christmas blog every Monday.
Our AWH team will be back on Wednesday night, showcasing Highland Heather, or you can enjoy some more Heart of Christmas inspiration next Monday night.
Welcome to week 13 of the Art with Heart Team Stampin’ Up! Heart of Christmas blog hop for 2024. I hope you we are continuing to inspiring you each week with our Christmas card ideas.
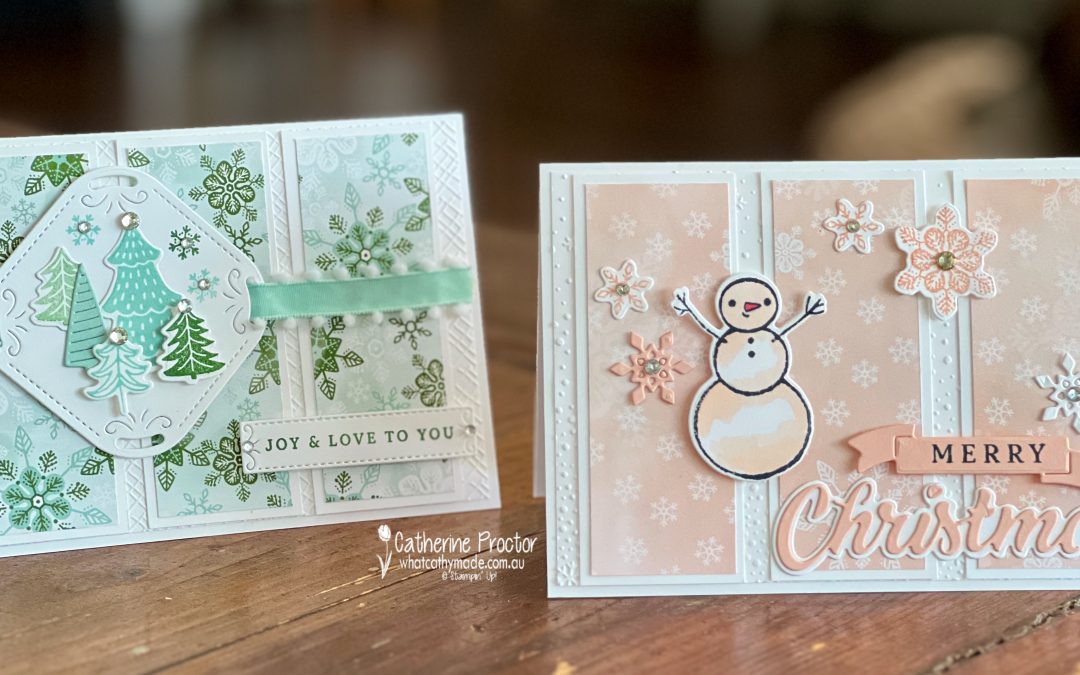
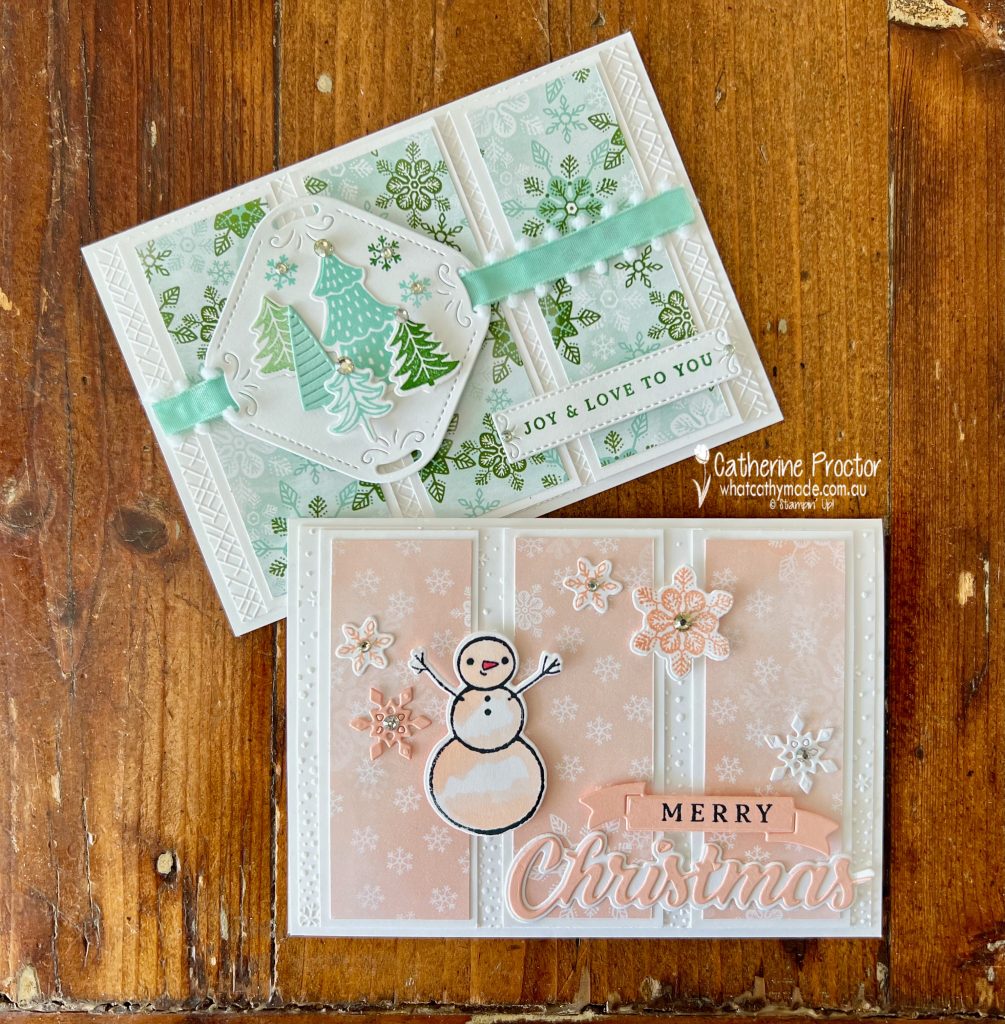
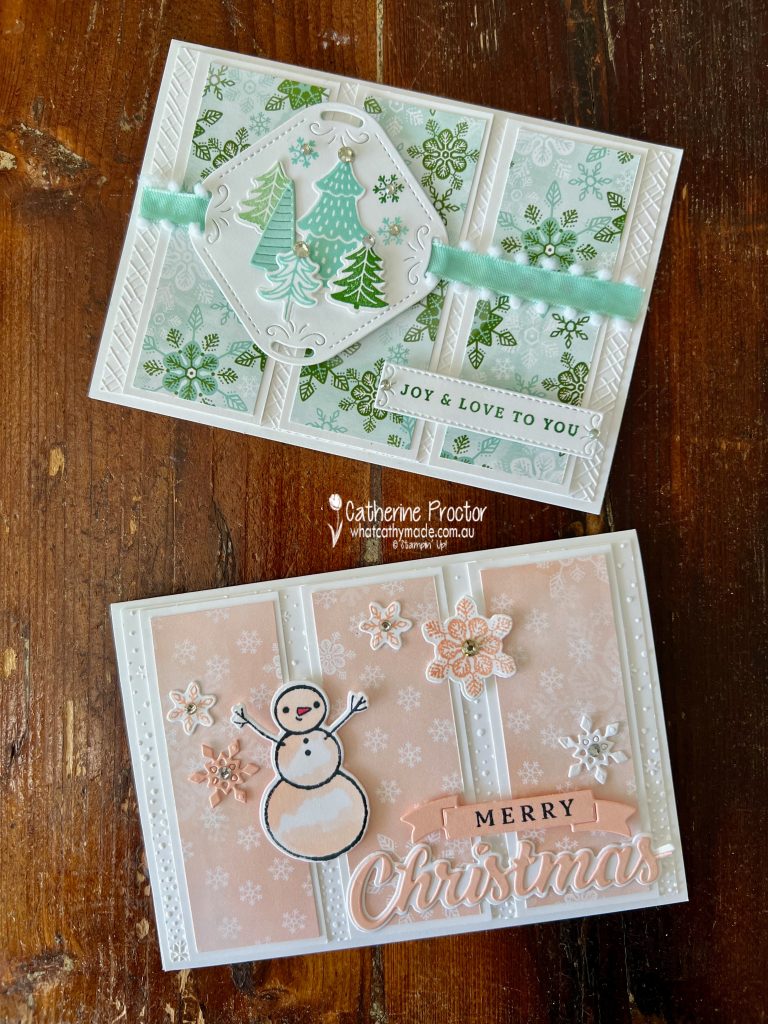
The Snowy Scenes Suite collection has so many different elements to play with I ended up creating two cards instead of one for tonight’s blog hop. Although they use the same layout, the colours are very different, drawn from the different DSP designs.
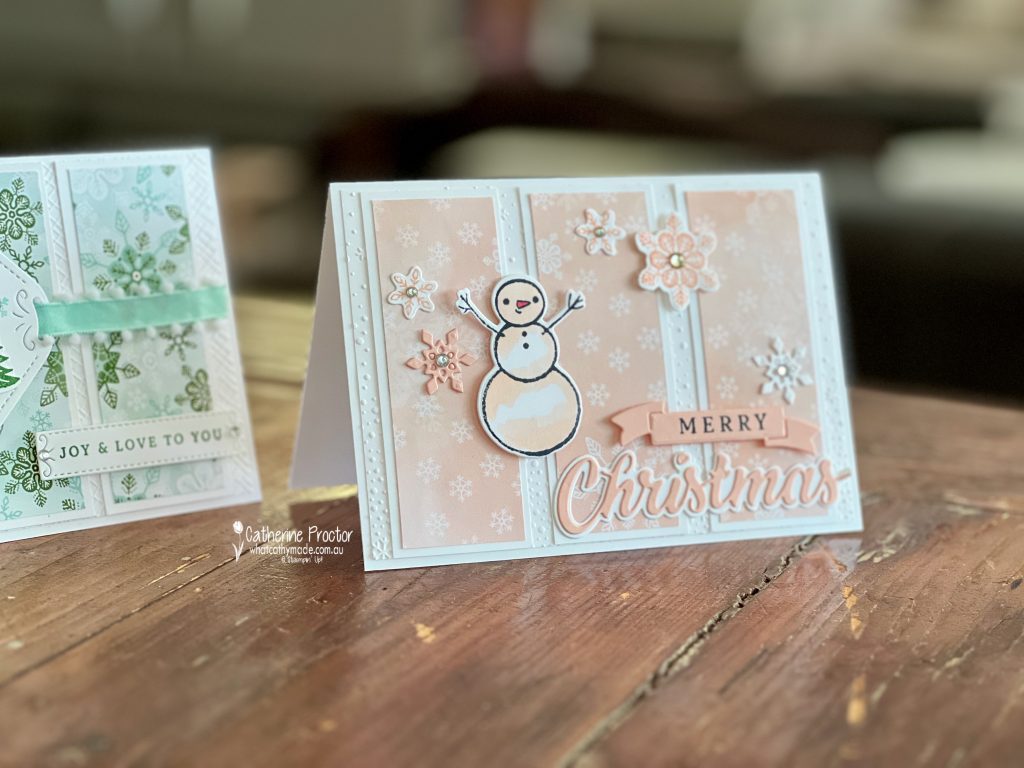
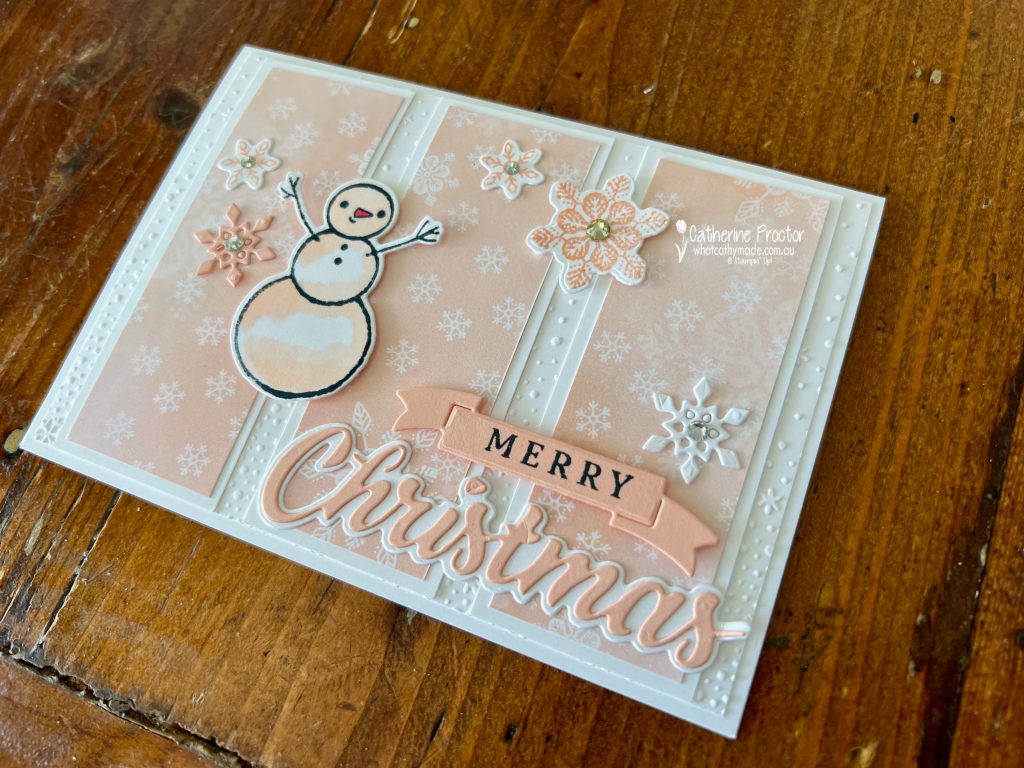
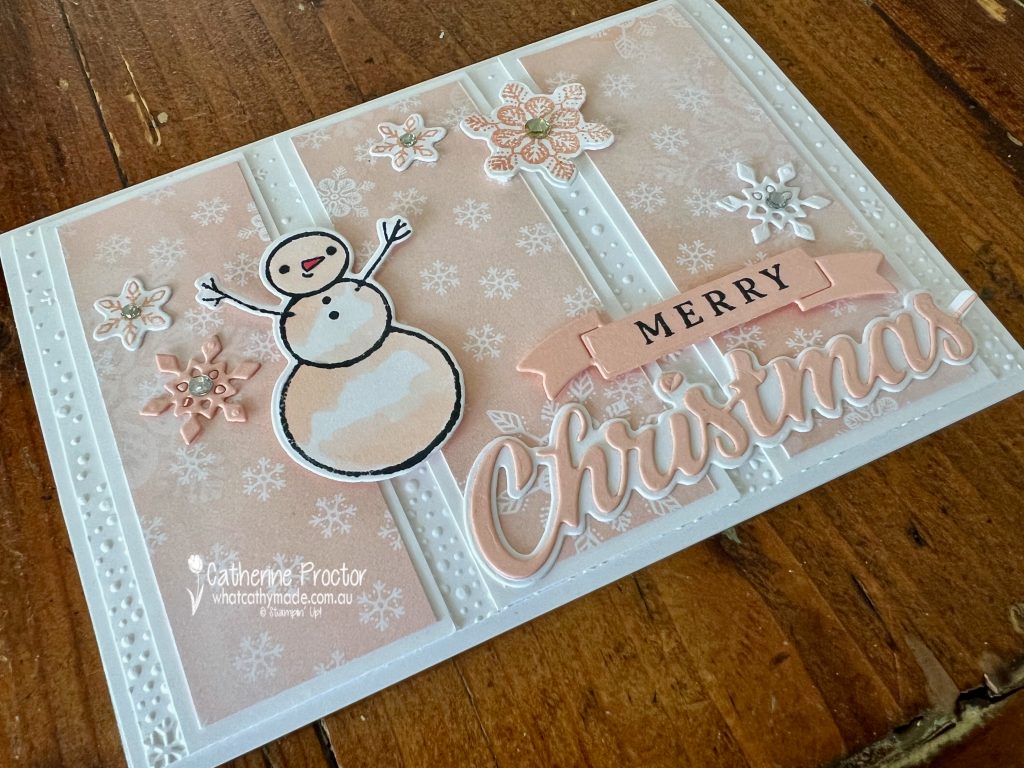
Card one features the soft Petal Pink paper from the Snowy Scenes DSP and the Snowflake Sky 3D Embossing Folder.
The Merry Christmas sentiment is created in Petal Pink, white and black, using stamps and dies from the Peaceful Season Bundle.
The snowman has been shaded using the light Petal Pink Stampin’ Blend with a tiny touch of Poppy Parade for the nose.
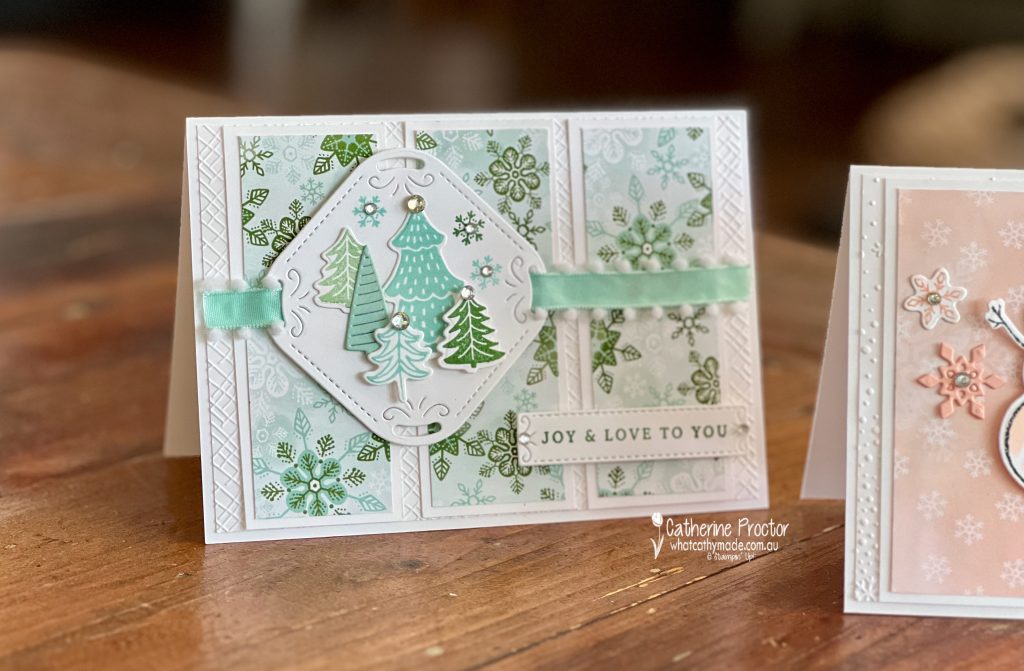
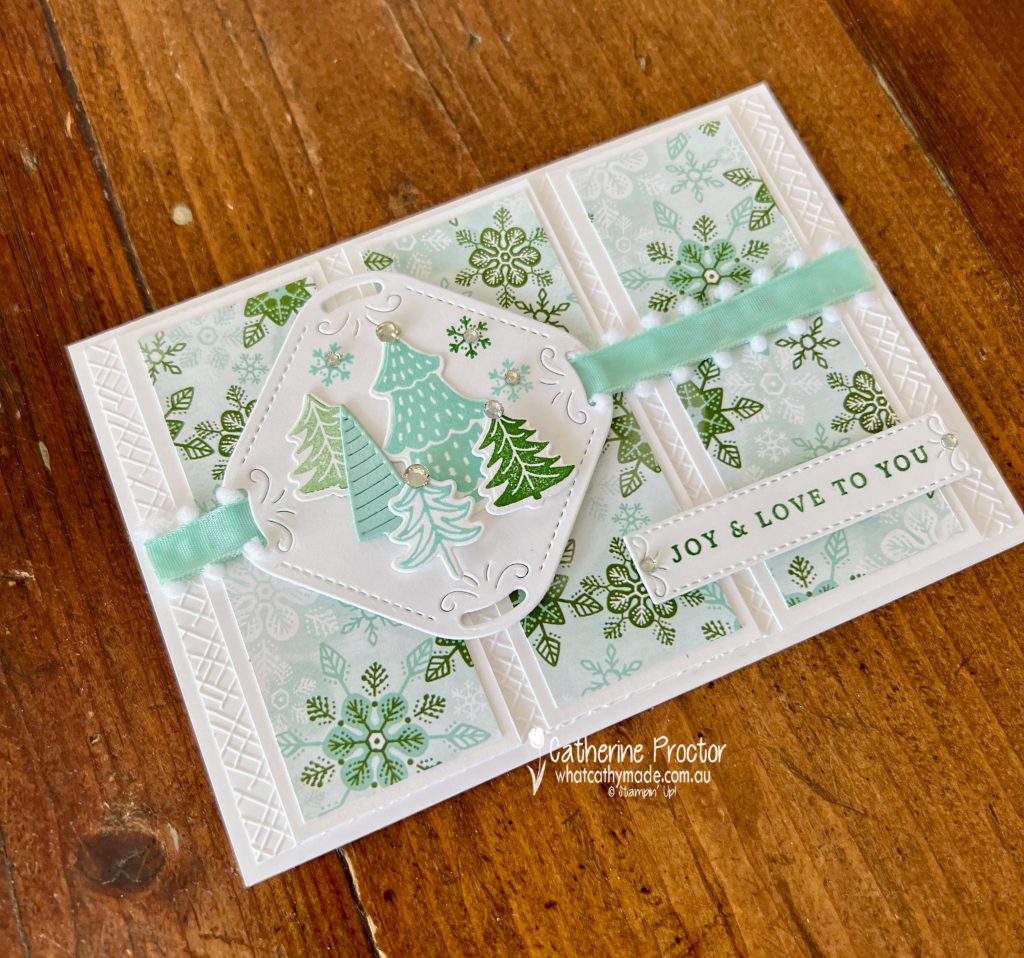
The colour scheme for card two is Pool Party and Garden Green, this time drawing inspiration from a different design in the Snowy Scenes DSP. The embossing folder is the crosshatch design from the Basics 3D Embossing Folders.
The large square label die from the Peaceful Season dies has slots that are designed for ribbon to be threaded through. I’ve cut a length of the Pool Party Pompom Ribbon to thread though the label. How cute is this ribbon!
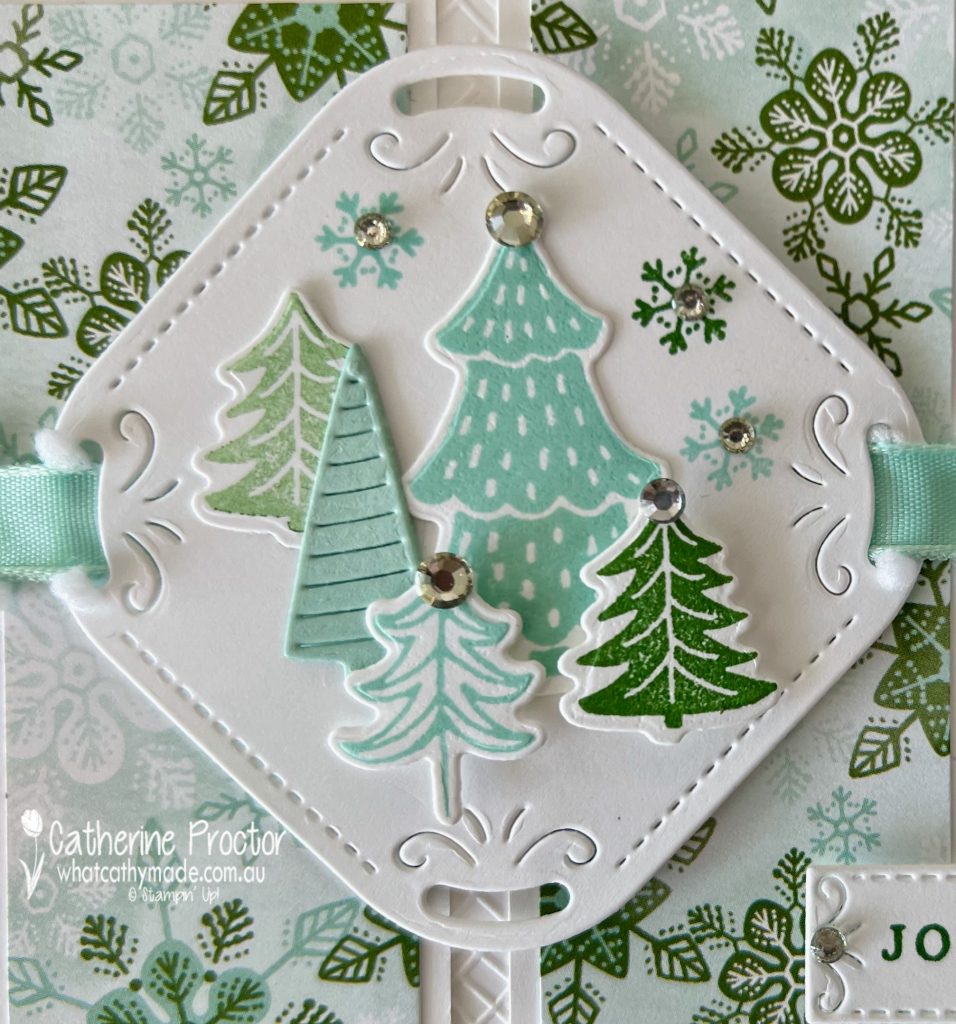
Instead of a snowman as the focal image, for this card I’ve stamped and die cut an assortment of trees in Pool Party and Garden Green, arranging them onto the Peaceful Season’s label. I’ve also stamped a few snowflakes and added Rhinestone Basic Jewels.
The “Joy & Love to You” sentiment and label are stamped and die cut using the Peaceful Season Bundle bundle.
So, which design do you prefer? Although I’m more of a blue and a green girl, I actually think the lighter and less dominant Petal Pink DSP works better to make the focal image and sentiment really pop.
Now it’s time to hop in over to our next participant, the lovely Judy May. I can’t wait to see the project Judy has created this week!
If the next button link is not working or you’d like to see the entire list of participants go to Sharon Davern‘s blog. Sharon does an amazing job of hosting our Heart of Christmas blog every Monday.
Our AWH team will be back on Wednesday night, showcasing Gorgeous Grape, or you can enjoy some more Heart of Christmas inspiration next Monday night.
Welcome to week 12 of the Art with Heart Team Stampin’ Up! Heart of Christmas blog hop for 2024. I hope you we are continuing to inspiring you each week with our Christmas card ideas.
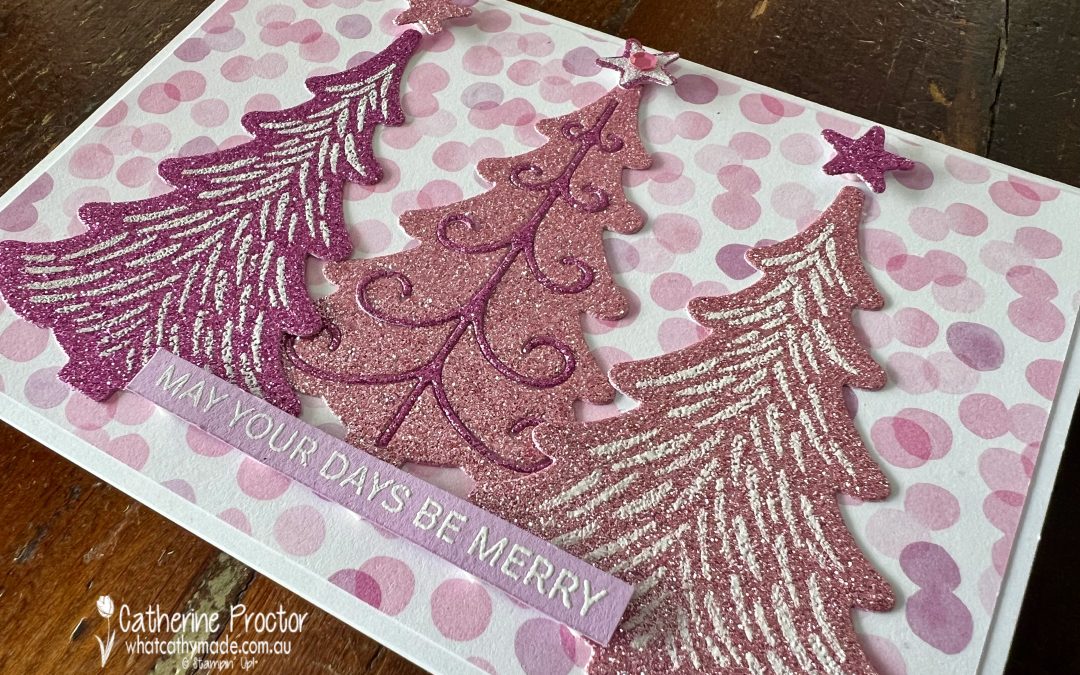
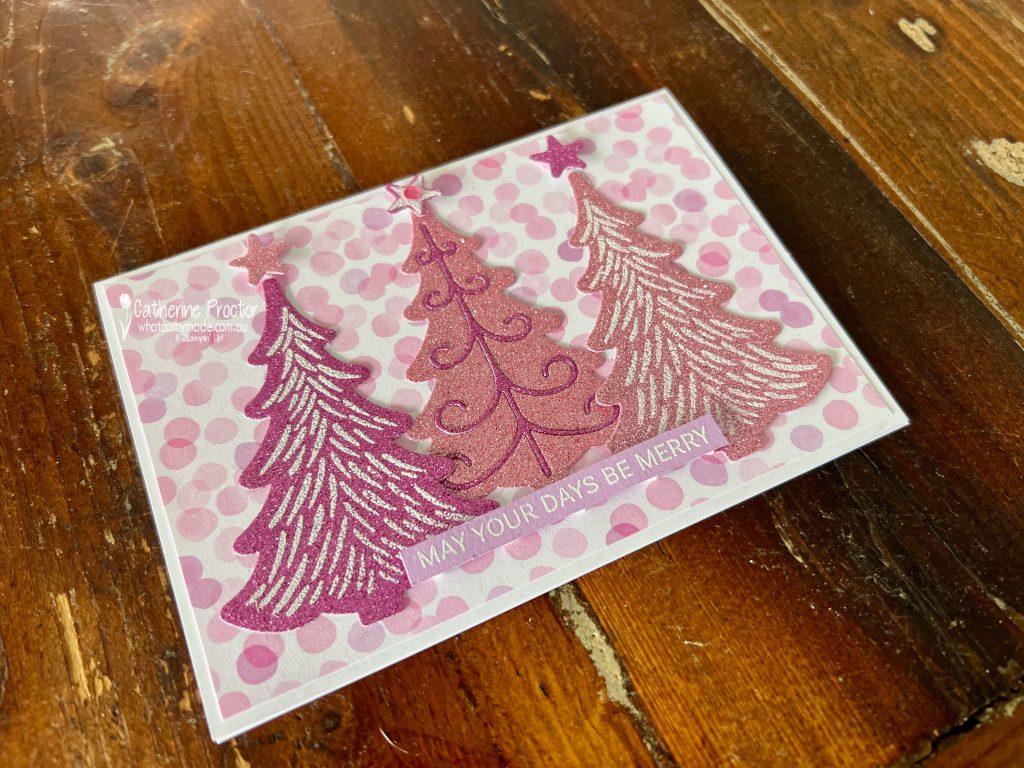
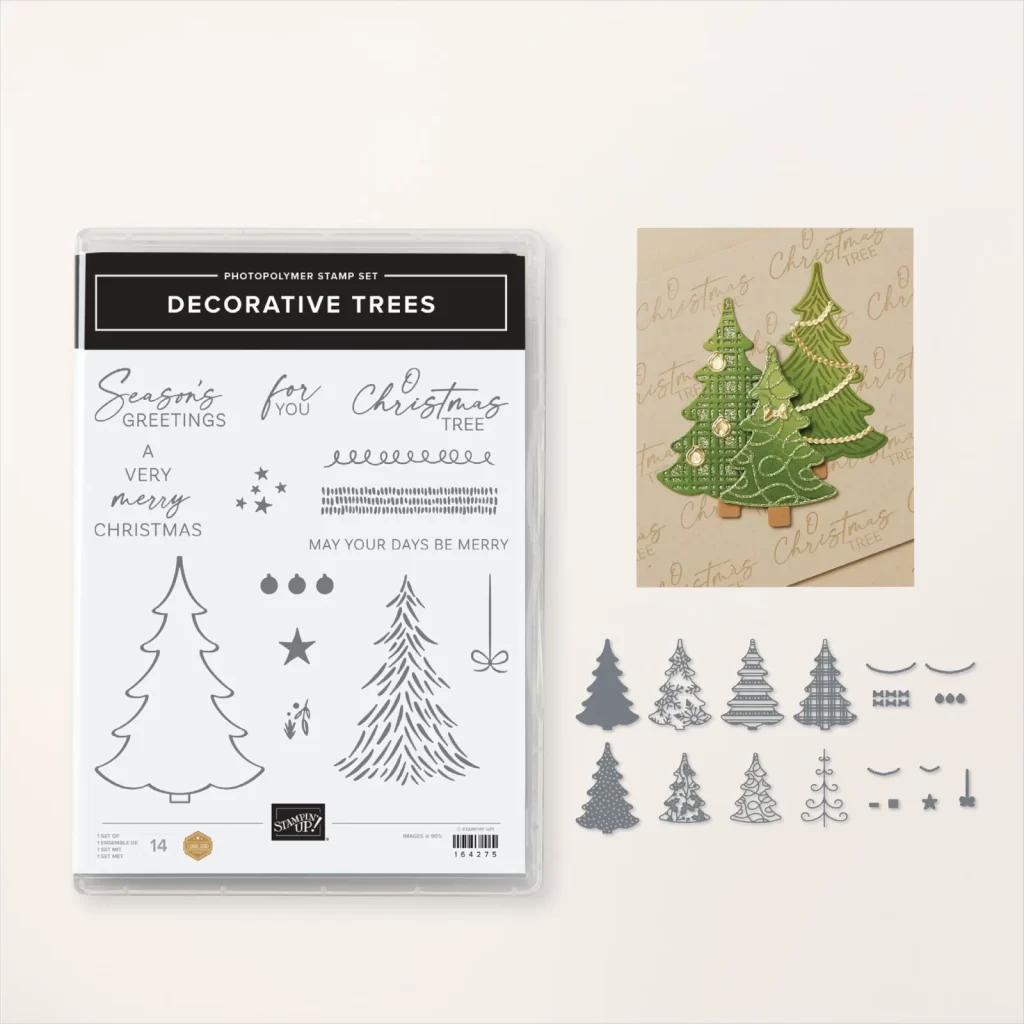
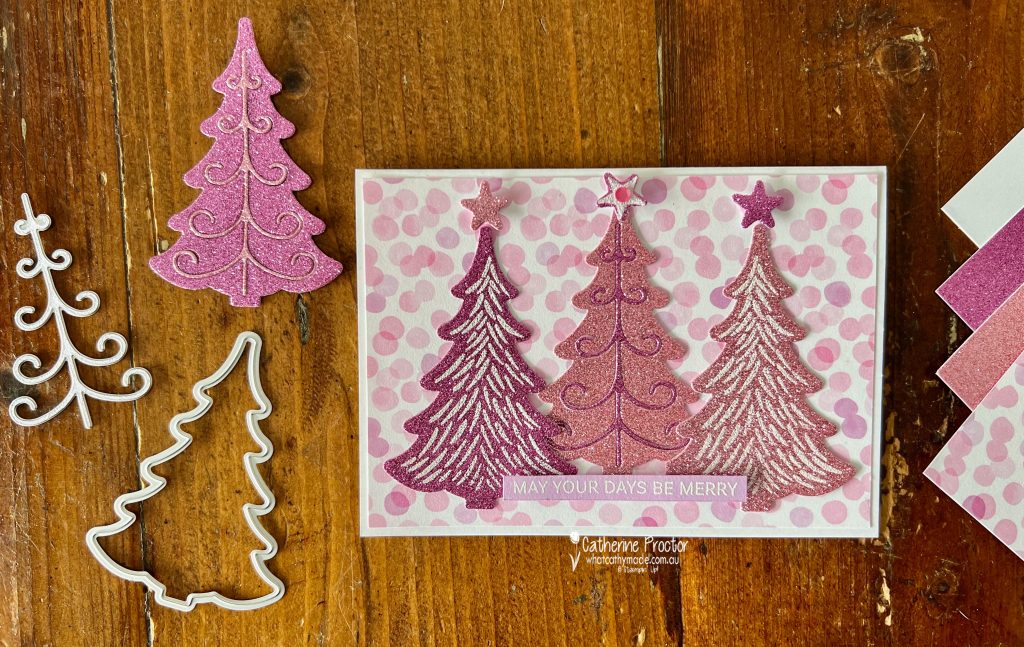
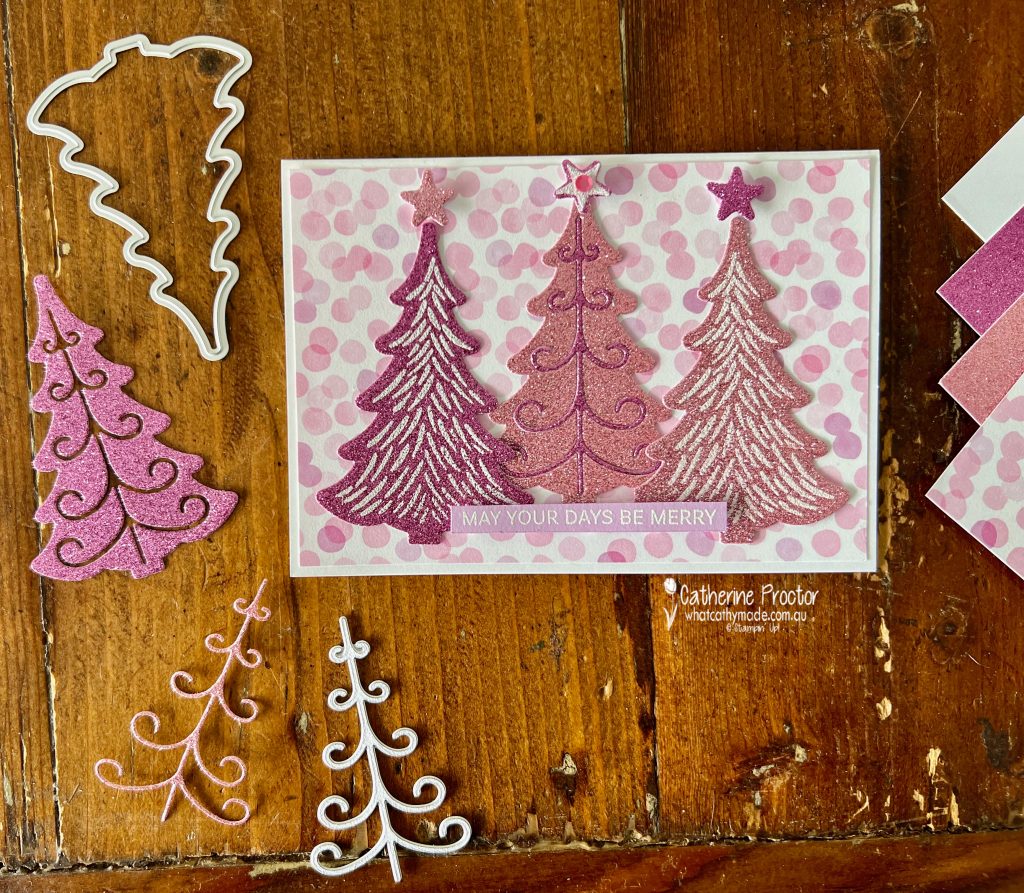
Warning – if you only like traditional Christmas cards in traditional colours, please turn away now! My card this week is very sparkly and definitely not traditional at all, but it features a super cool technique I had never heard of before and you might like to learn about too!
On a Facebook live last week, Stampin’ Up’s Sara Douglass demonstrated how to heat emboss glimmer paper. I had no idea glimmer paper could be heat embossed, but the technique is exactly the same as heat embossing any other type of paper.
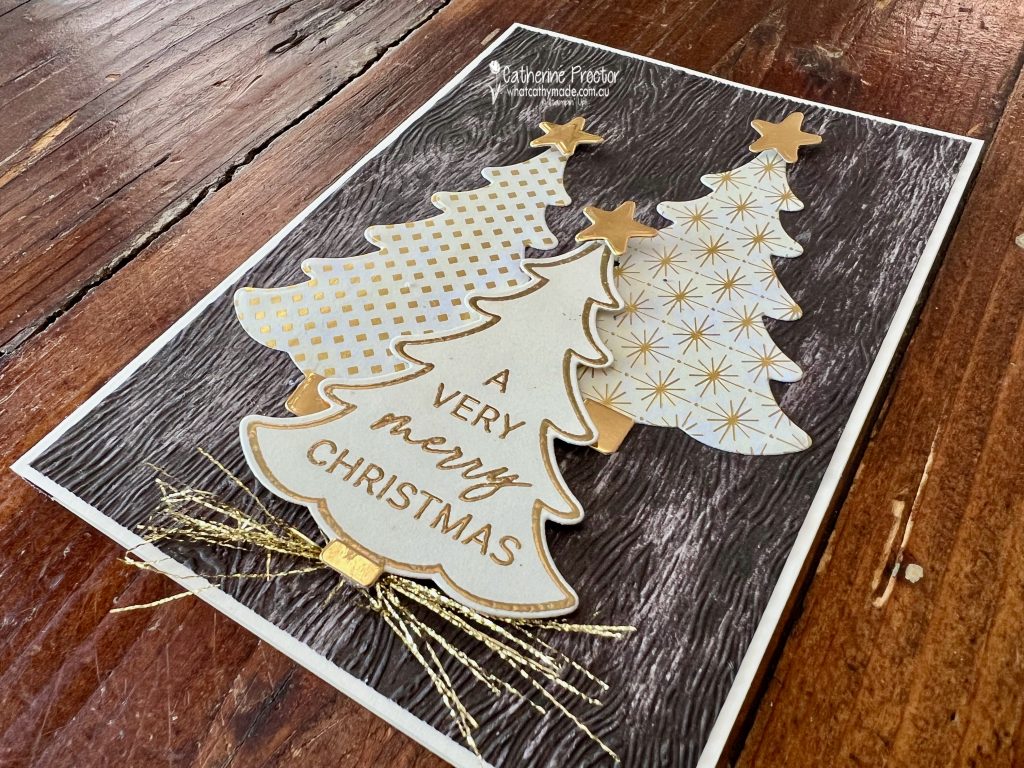
Both Sara and I used the Decorative Trees bundle for our projects.
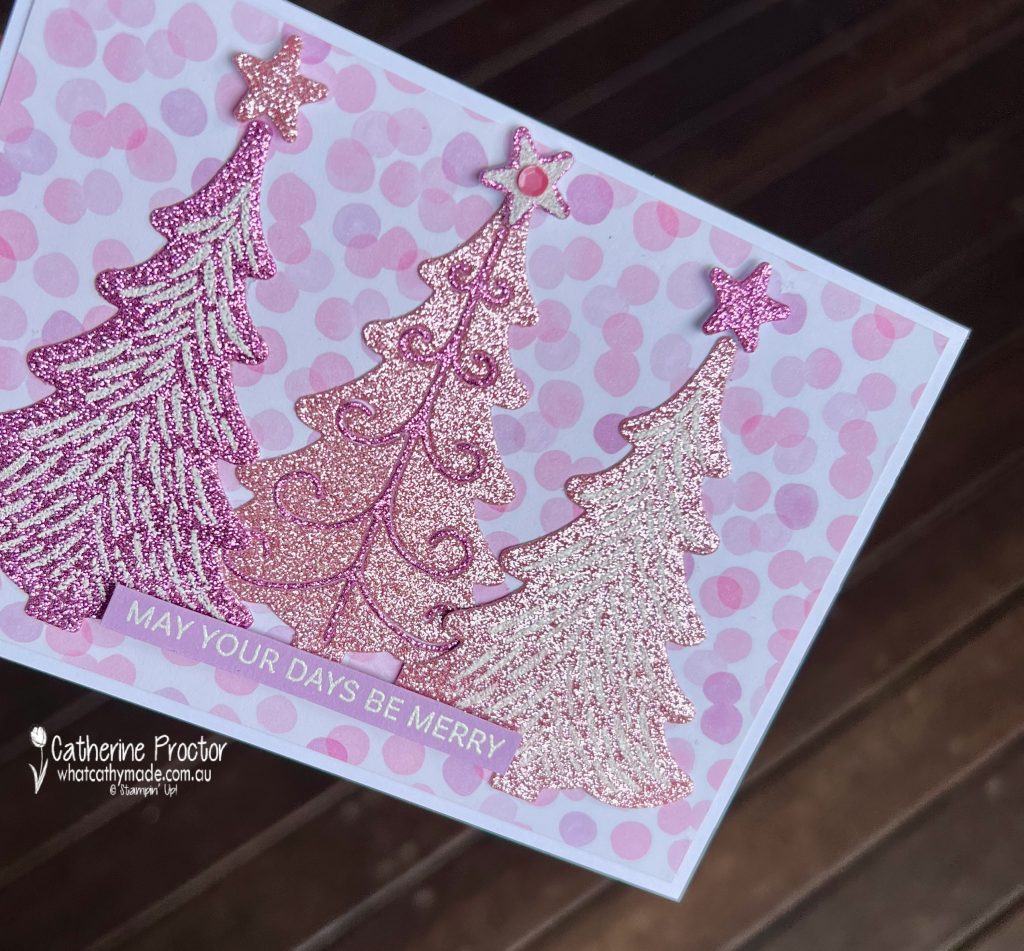
I decided to use the Petunia Pop and Pretty in Pink glimmer papers from the 2024–2026 In Color Glimmer Specialty Paper pack, heat embossed with white embossing powder. I layered my three trees over this delightful “bokeh effect” DSP pattern from the Bright & Beautiful 6″ x 6″ (15.2 x 15.2 cm) Designer Series Paper.
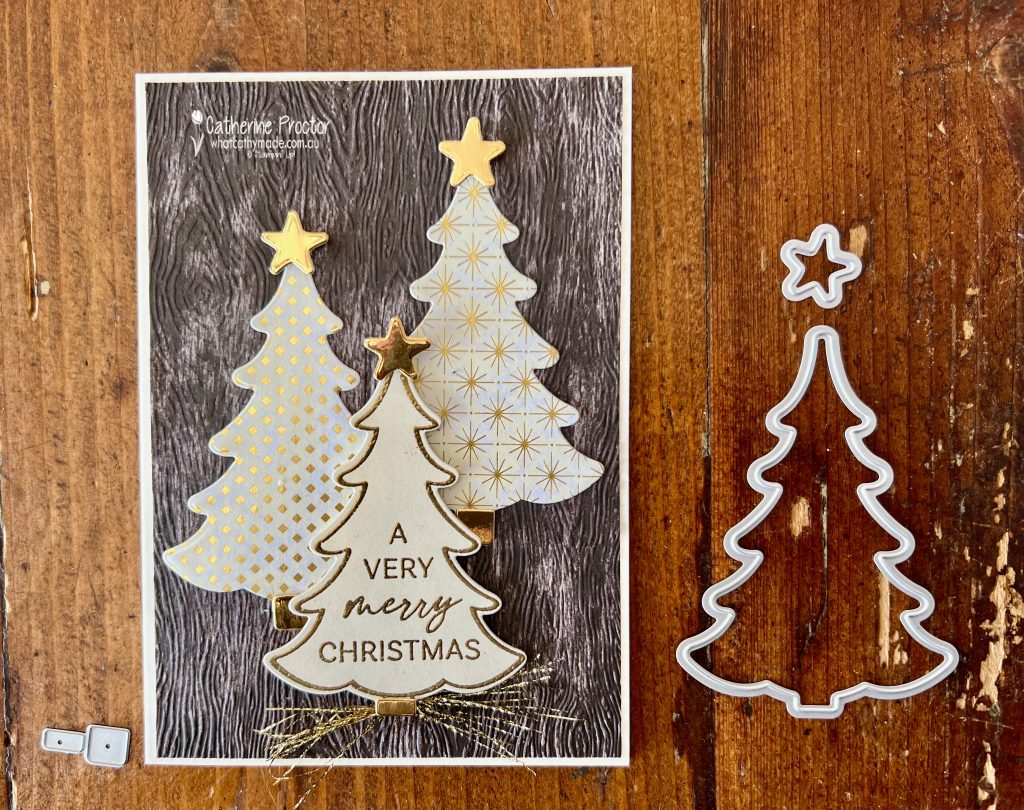
In addition to heat embossing I used the die inlay technique for the middle tree. This is where you die cut twice, laying the negative image from one colour inside the postive die cut image in a different colour.
As you can see in the photos above and below, the negative pieces create another die inlay tree I can use on another card.
The white heat embossed sentiment also comes from the Decorative Tree stamp set, stamped onto a strip of Petunia Pop card stock. Can you see the delightful sparkle this glimmer paper has?
The outside photo gives you a better idea of just how sparkly these glimmer papers are!
Now it’s time to hop in over to our next participant, the lovely Kate Morgan. I can’t wait to see the project Kate has created this week!
If the next button link is not working or you’d like to see the entire list of participants go to Sharon Davern‘s blog. Sharon does an amazing job of hosting our Heart of Christmas blog every Monday.
Our AWH team will be back on Wednesday night, showcasing Garden Green, or you can enjoy some more Heart of Christmas inspiration next Monday night.
Welcome to week 11 of the Art with Heart Team Stampin’ Up! Heart of Christmas blog hop for 2024. I hope you we are continuing to inspiring you each week with our Christmas card ideas.
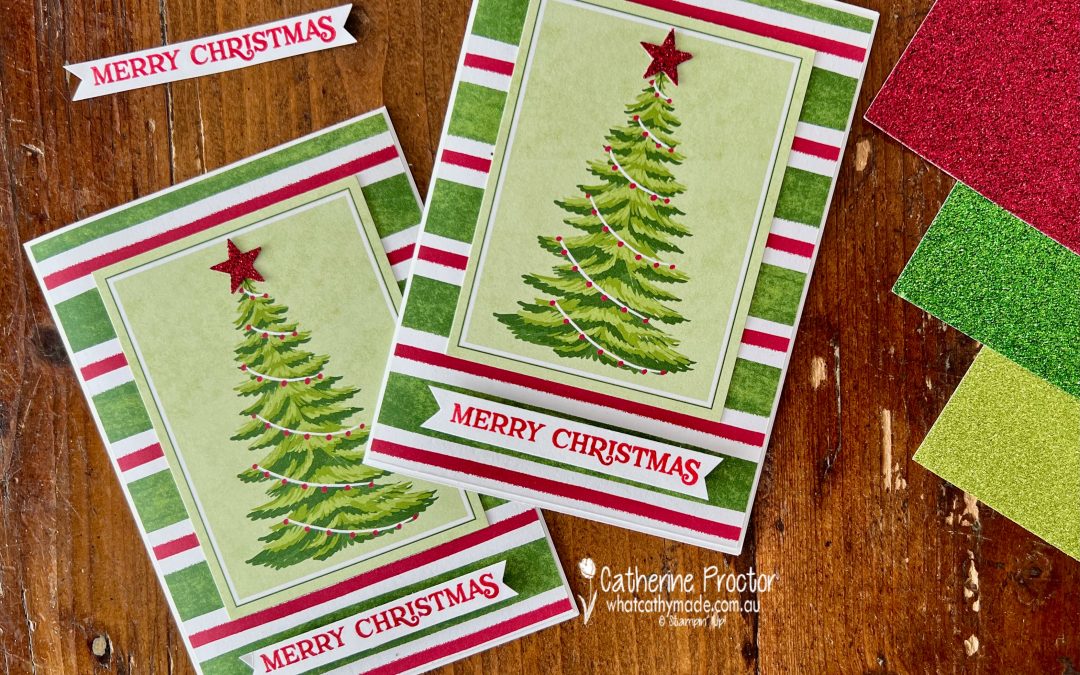
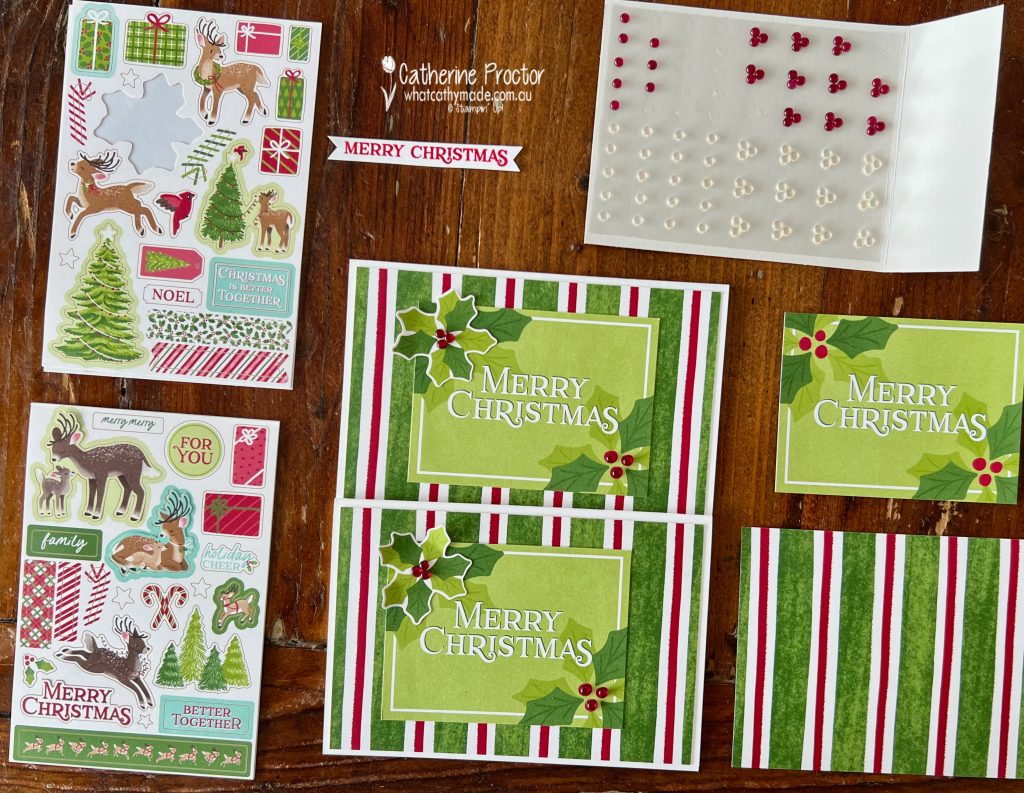
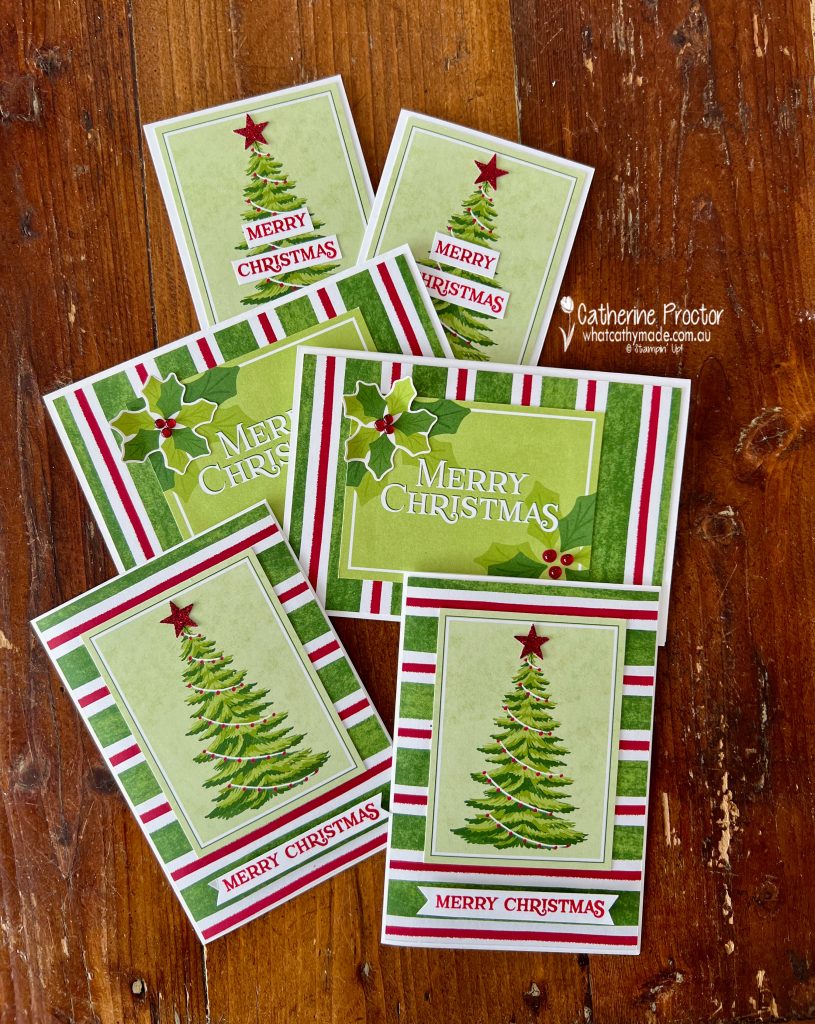
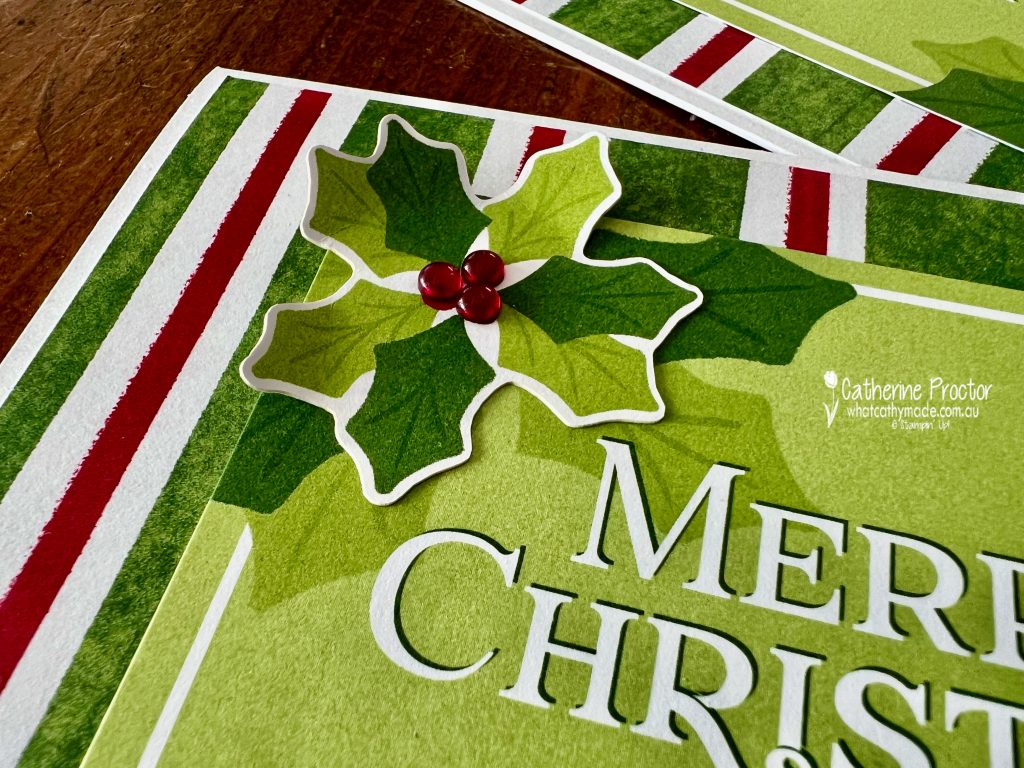
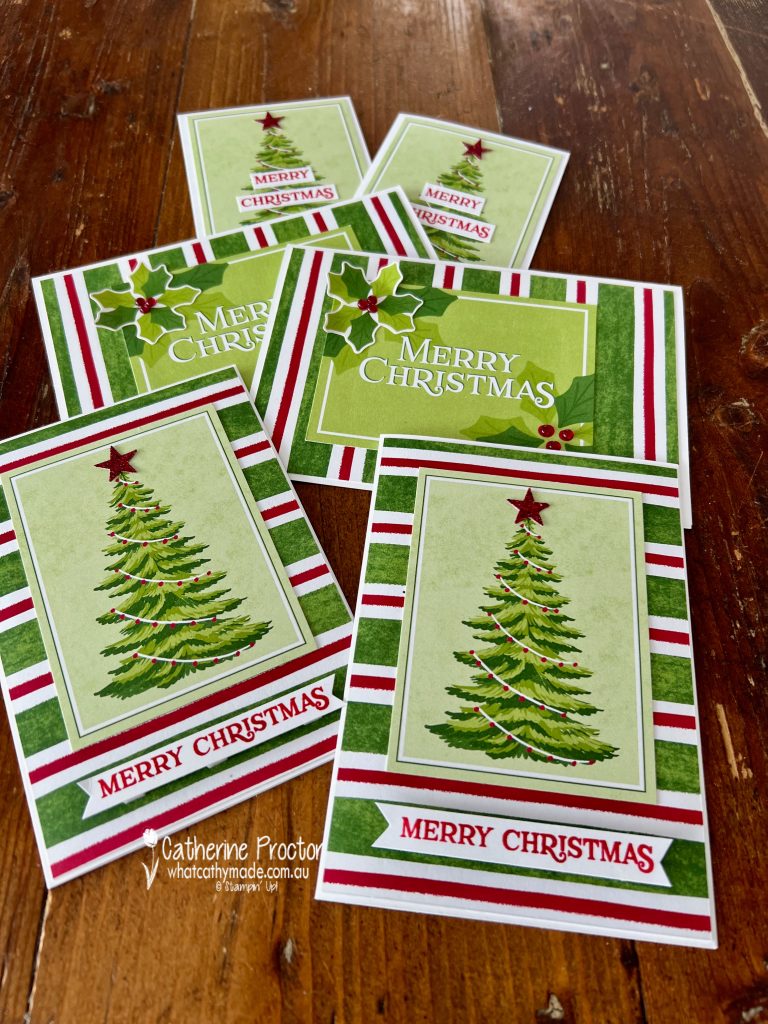
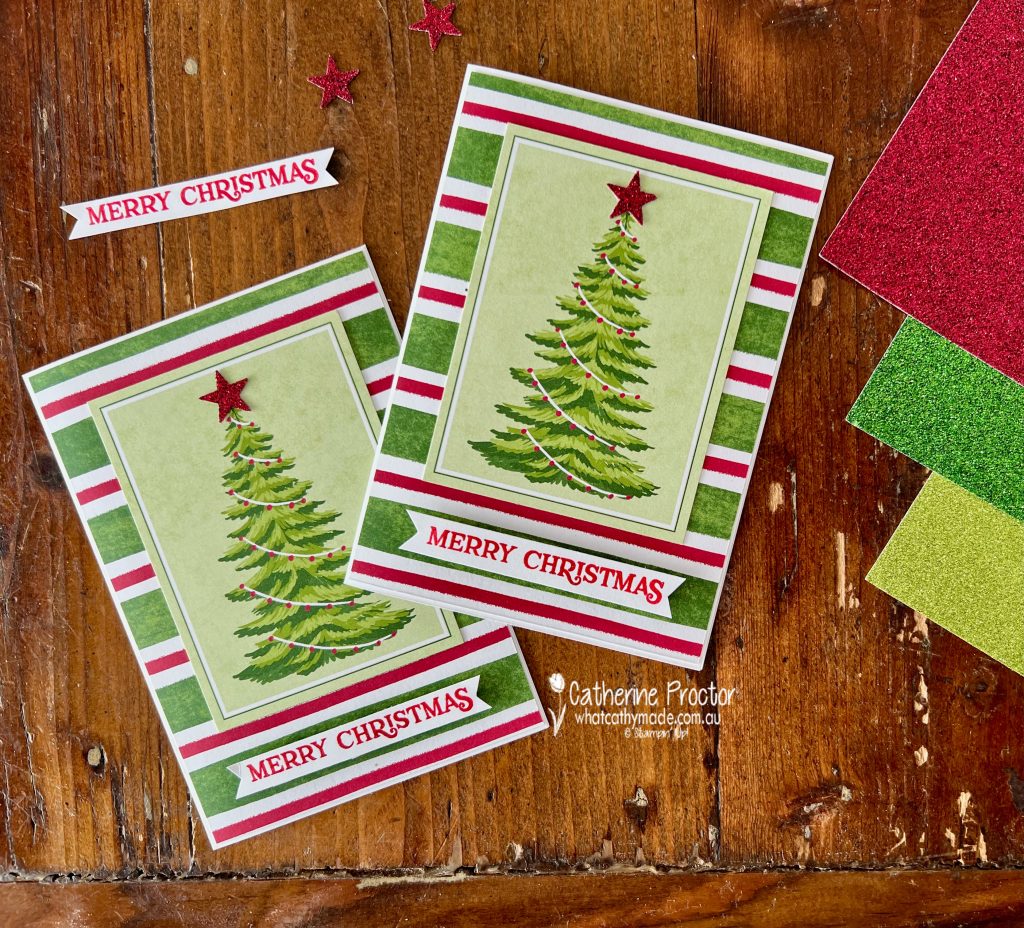
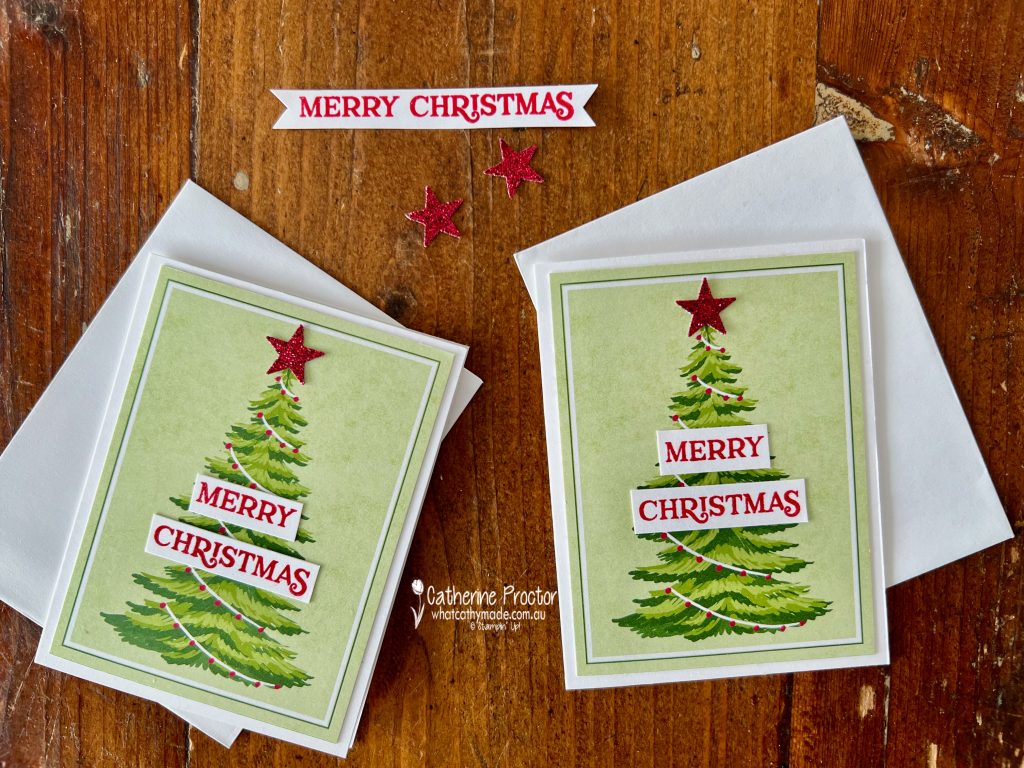
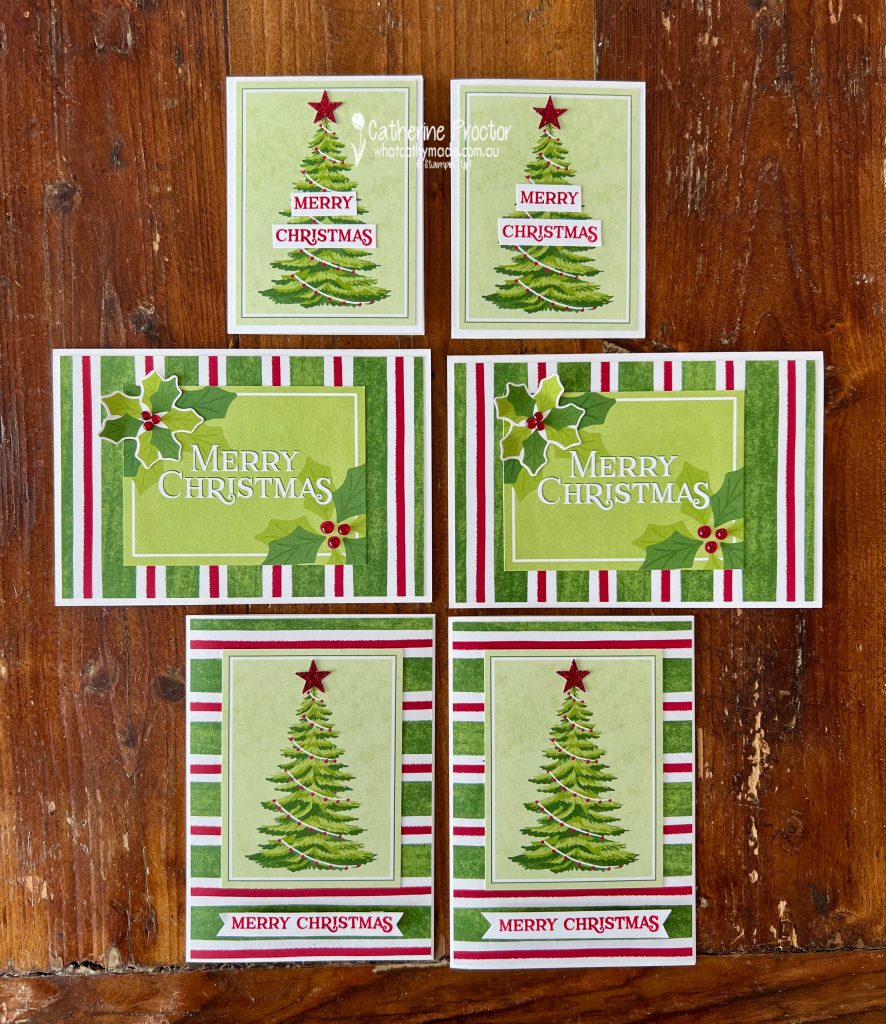
This week’s Christmas cards were quick and easy to make with the Reindeer Fun Memories & More pack that contains contains 54 double-sided printed cards and 4 sticker sheets.
I had intended to make just one card but went on to make six cards, ideal for building up my Christmas stash!
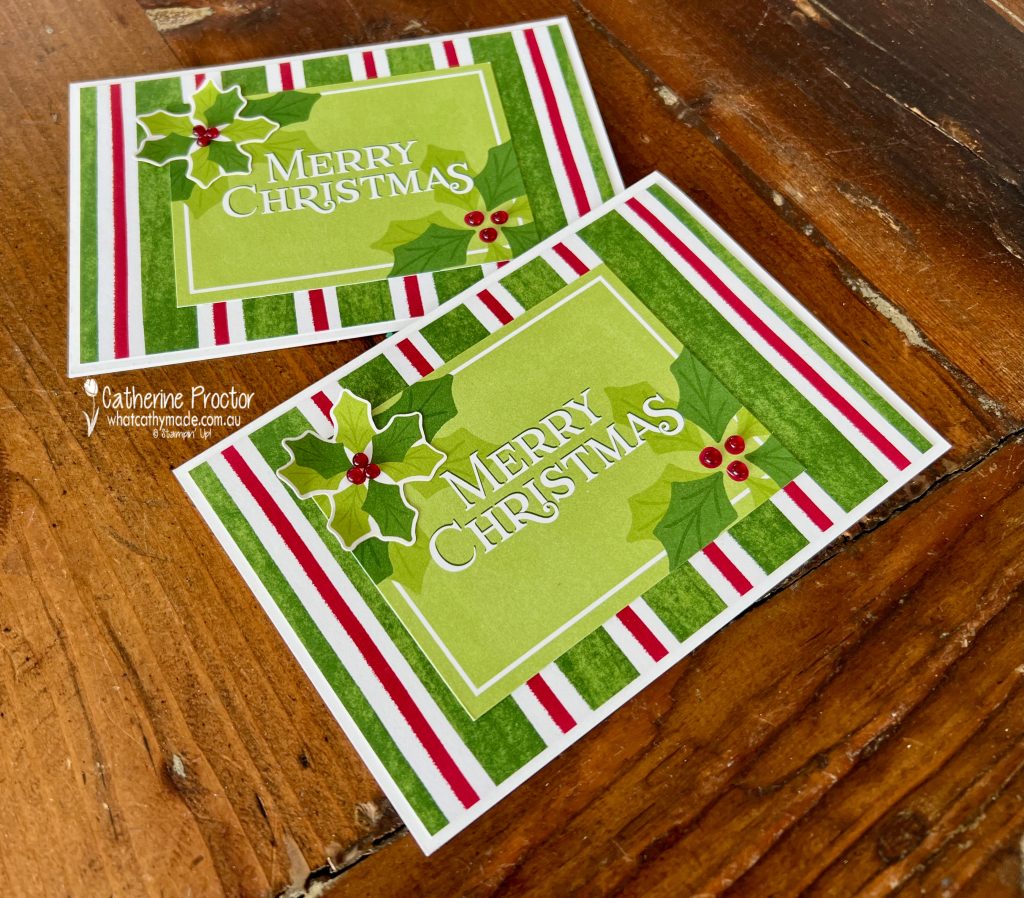
These first two “no-stamping” horizontal cards use the large Memories & More card bases that come in an envelope with smaller card bases and matching envelopes.
I’ve layered the 3″ x 4″ (7.6 x 10.2 cm) Merry Christmas cards over the striped 4″ x 6″ (10.2 x 15.2 cm) 18 cards.
I’ve simply added a holly sticker and an assortment of Cherry Cobbler berries from the Cherry Cobbler & Pearl Adhesive-Backed Berries pack for extra dimension.
I’d run out of Memories & More large card bases to use for the next cards so I used our Australian half a sheet of A4 card bases instead.
It’s easy to make the Memories & More cards fit our Australian card bases. Simply trim a 5 mm section off the bottom of the striped Memories & More card. I’ve then adhered the small Christmas tree Memories & More card over the top of the striped large Memories & More card.
The Peaceful Evergreens Dies were used to die cut red stars from the Festive 12″ x 12″ (30.5 x 30.5 cm) Glimmer Paper to top the trees.
The “Merry Christmas” sentiment was stamped firstly onto the Versamark ink pad and secondly onto the Real Red ink pad BEFORE stamping onto Basic White card stock and being heat embossed using clear embossing powder.
This technique allows you to heat emboss in any colour without using a stamp positioning tool! Just remember to clean your stamp thoroughly every time AFTER you stamp onto the card stock if you are making multiple sentiments like I have done today.
My final two cards use the small Memories & More card bases and the same small Christmas tree Memories & More cards from my second card design.
Once again they are topped with the red glimmer stars and have the red heat embossed sentiment from the Reindeer fun stamp set. I chopped the sentiment in half so it fitted across the Christmas trees.
I love how quick and easy it is to mass produce Christmas cards using the Memories & More card packs as well as the Memories & More card bases & envelopes!
Now it’s time to hop in over to our next participant, the lovely Sharon Davern. I can’t wait to see the project Sharon has created this week!
If the next button link is not working or you’d like to see the entire list of participants go to Sharon Davern‘s blog. Sharon does an amazing job of hosting our Heart of Christmas blog every Monday.
Our AWH team will be back on Wednesday night, showcasing Fresh Freesia, or you can enjoy some more Heart of Christmas inspiration next Monday night.
Welcome to week 10 of the Art with Heart Team Stampin’ Up! Heart of Christmas blog hop for 2024. I hope you we are continuing to inspiring you each week with our Christmas card ideas.
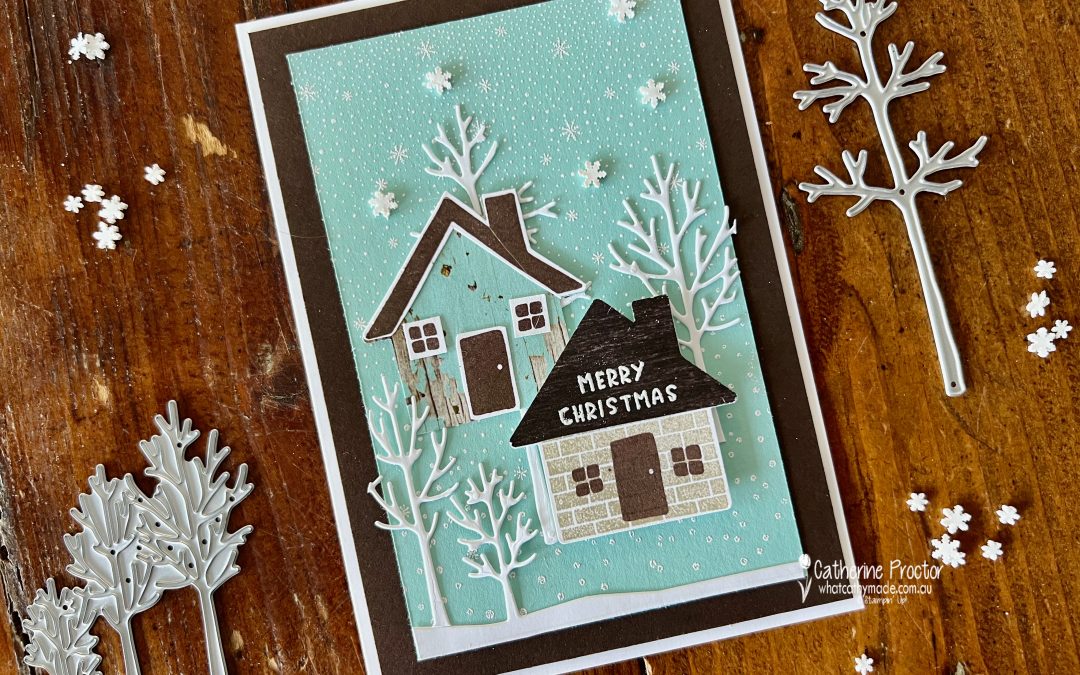
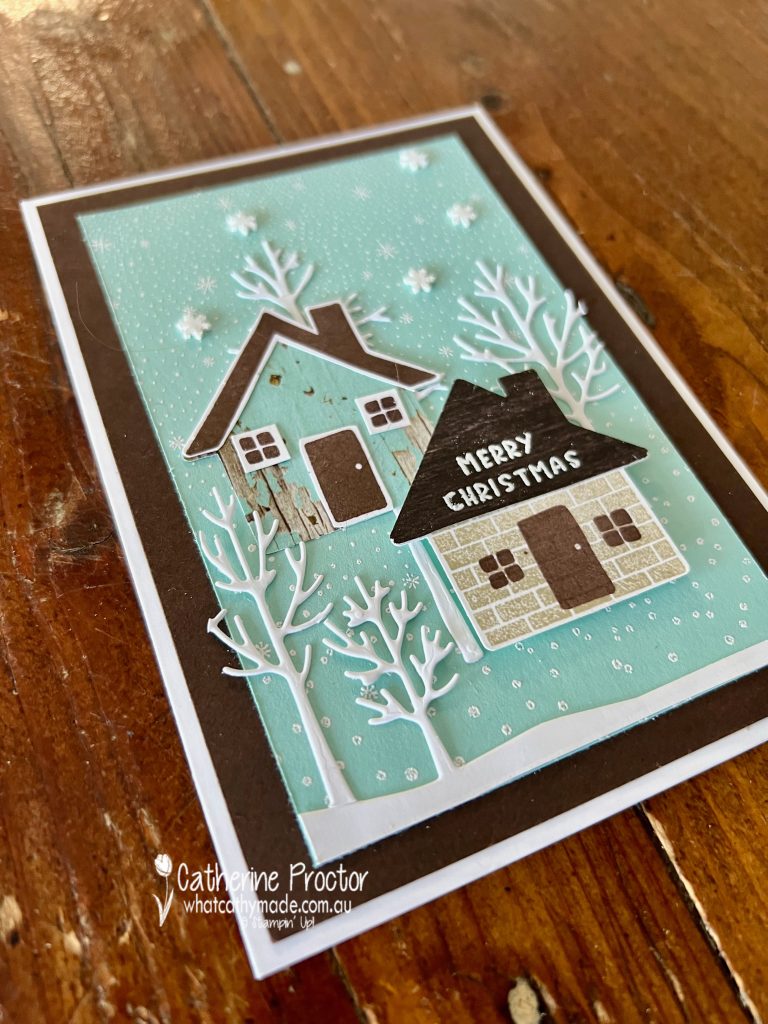
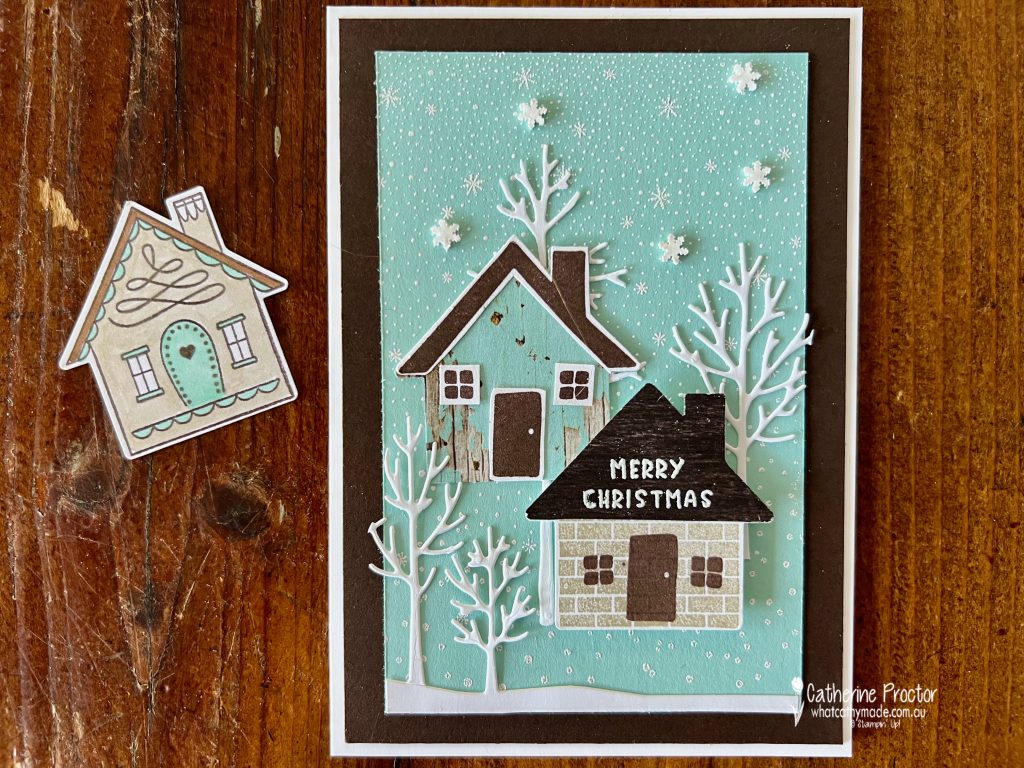
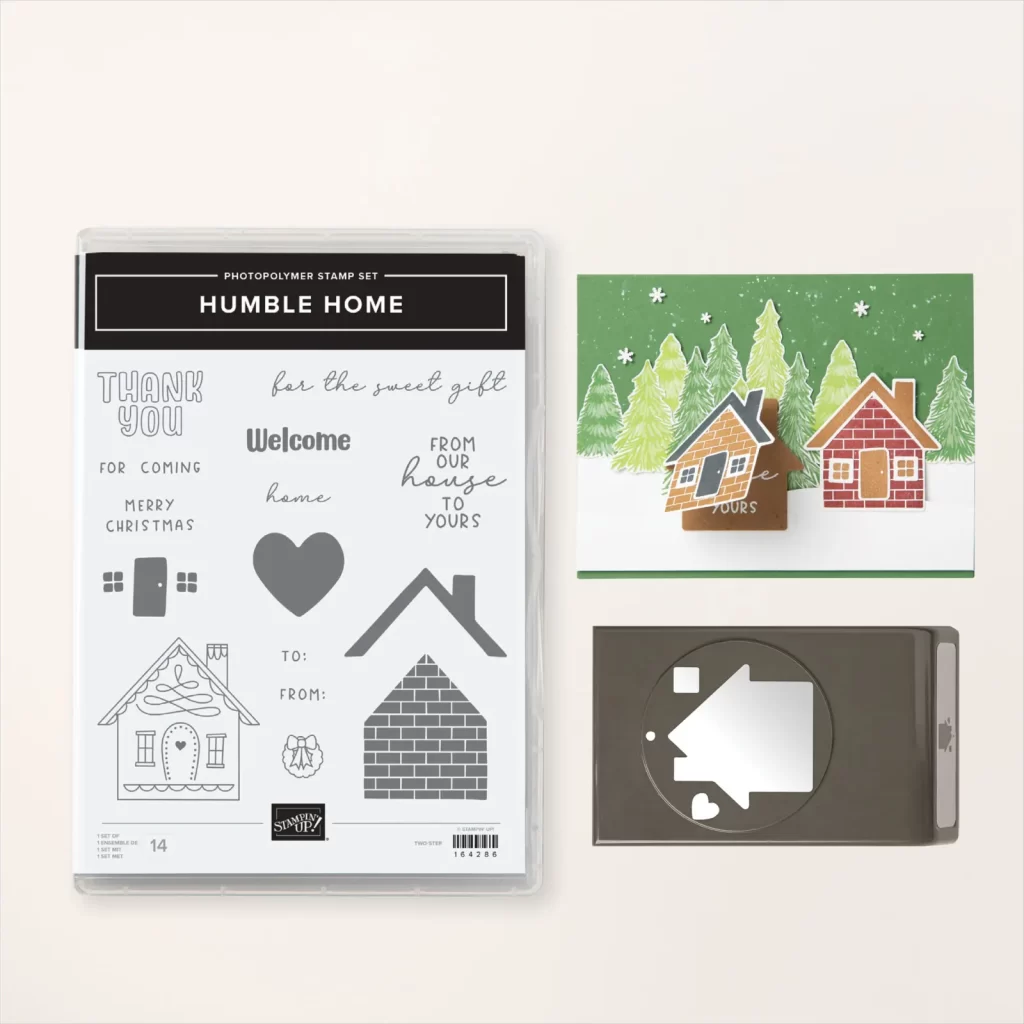
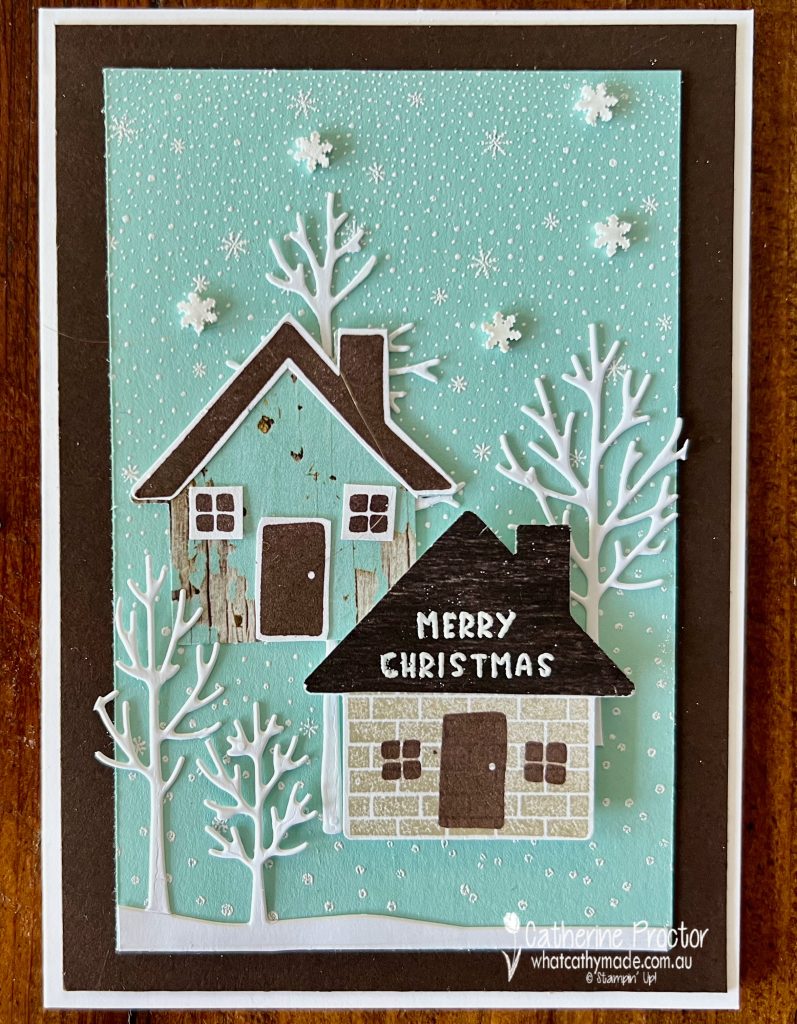
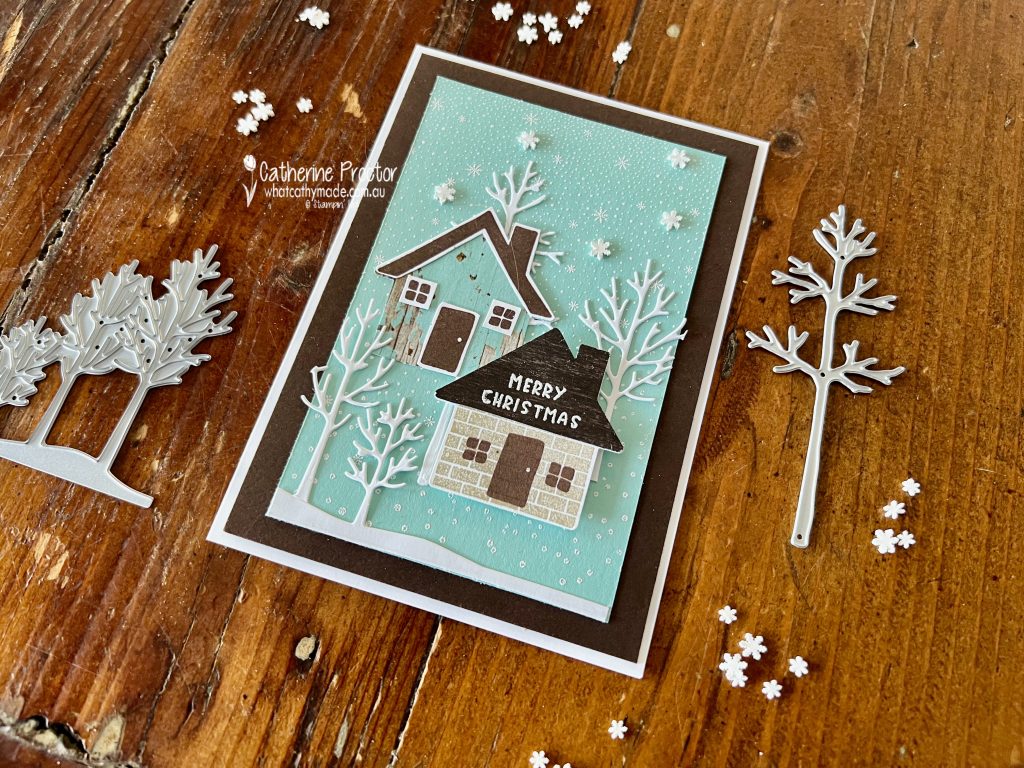
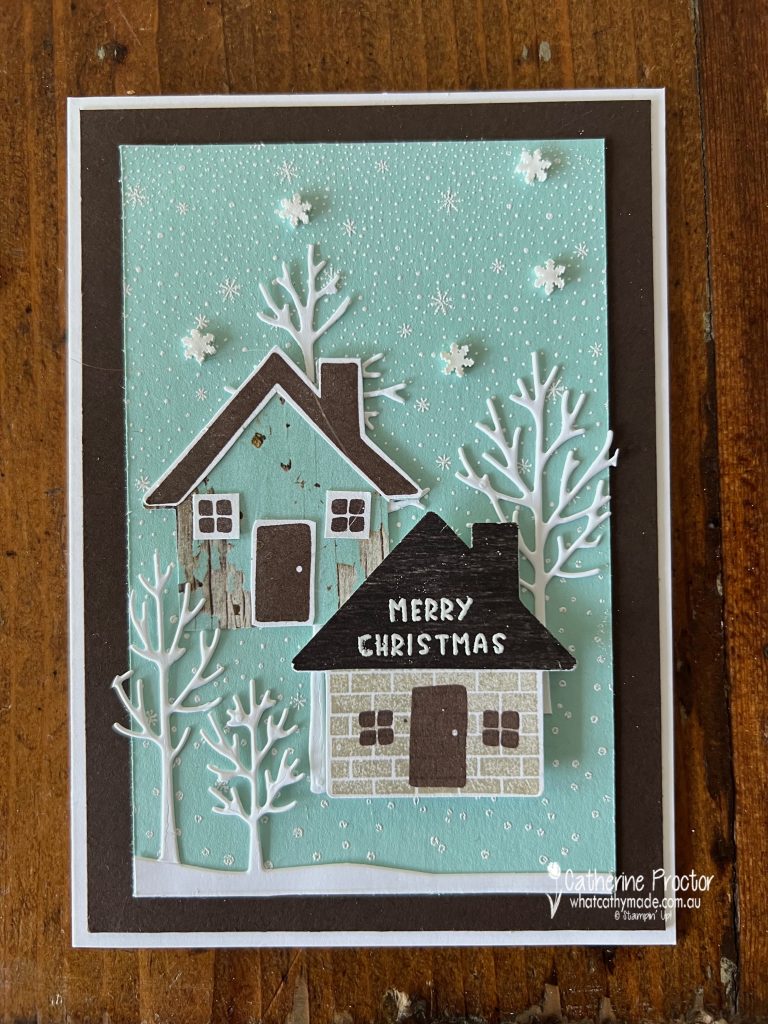
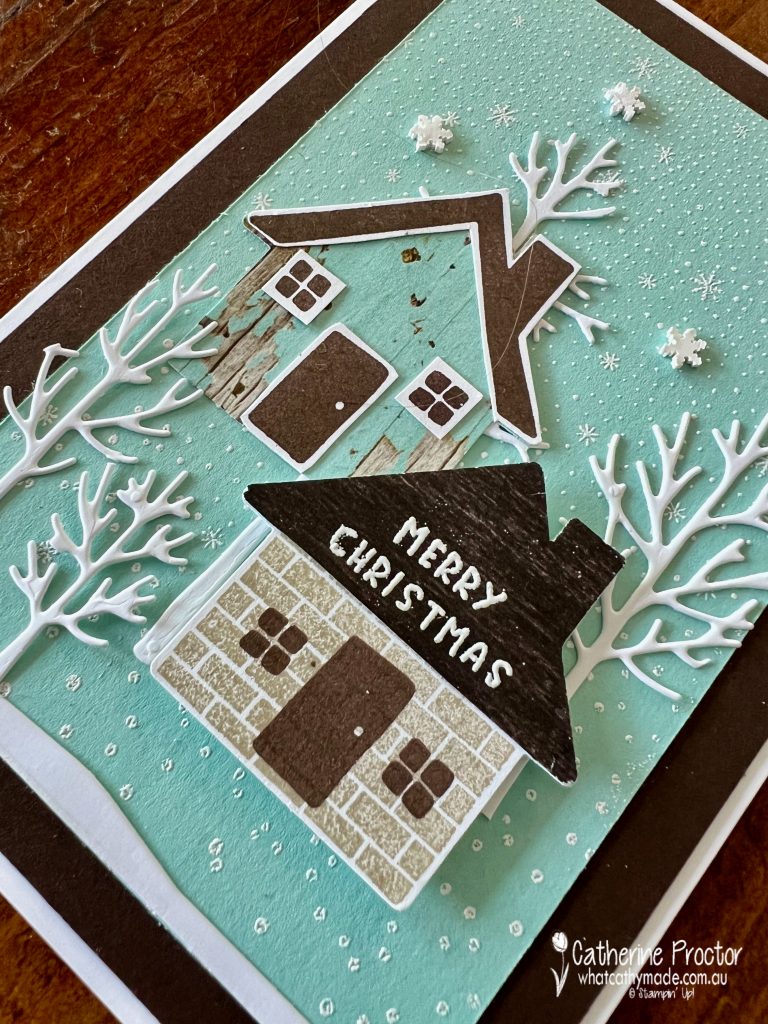
This week’s Christmas card is all about breaking the rules for me. Can you guess which design rule I’ve broken with my Humble Home bundle Christmas card?
The rule of 3 in design (also known as the rule of thirds) is a principle that suggests things arranged in odd numbers, especially in groups of three, are more appealing, effective, and memorable than even-numbered groupings.
Odd numbers, particularly three, create a sense of balance and asymmetry that keeps the eye engaged and creates a clear focus point. Apparently, the human brain tends to remember things more easily in sets of three!
This is why I originally stamped and punched three different houses to decorate my card front, however I just couldn’t make the design work with three houses so this little extra Crumb Cake, Pecan Pie and Pool Party house will be kept for another card.
The two houses that made the cut are created using the Humble Home bundle–this is the bundle on the cover of the Holiday Catalogue.
The Pool Party house on the left has been punched from the Country Woods Designer Series Paper and the house on the right is stamped in Crumb Cake and Early Espresso.
The white trees are die cut using some of the Frosted Forest Dies.
I white heat embossed the Falling Snow Stamp onto Pool Party cardstock, layered onto an Early Espresso layer and a Basic White card base, adding a few White Loose Snowflake embellishments for extra dimension.
The roof of the house on the right of the card is actually another piece of Country Woods DSP, punched out using the Humble Home punch and trimmed down to roof size.
I’ve white heat embossed the “Merry Christmas” sentiment from the Humble Home stamp set onto the roof.
Now it’s time to hop in over to our next participant, the lovely Sharon Davern. I can’t wait to see what Sharon has made this week!
If the next button link is not working or you’d like to see the entire list of participants go to Sharon Davern’s blog. Sharon does an amazing job of hosting our Heart of Christmas blog every Monday.
Don’t forget that if you have been eyeing a stamp set (or two, or three) from the 2024–2025 Annual Catalogue the annual Stampin’ Up! Three-Day Stamp Sale is on now! The sale will run for three days ONLY from 7 October 2024, at 12:00 a.m. to 9 October 2024, at 11:59 p.m. (AEDT)
From 7 to 9 October, you can order those stamp sets you’ve been wanting at a 15% discount. The 15% off discount apply to all stamp sets (photopolymer and cling) from the 2024–2025 Annual Catalogue.
You can view all of the stamp sets on sale and purchase them here!
This stamp sale only happens once a year so don’t miss out!
The AWH team will be back on Wednesday night, showcasing Flirty Flamingo, or you can enjoy some more Heart of Christmas inspiration next Monday night.
Welcome to week 8 of the Art with Heart Team Stampin’ Up! Heart of Christmas blog hop for 2024. I hope you we are continuing to inspiring you each week with our Christmas card ideas.
For this week’s Christmas card I’m featuring the beautiful vintage style Sentimental Christmas DSP. This DSP raises money for children’s literacy with $4.25 for every pack sold given to local charities around the world.
I don’t know the name of this easy fun fold, however it is a fabulous fun fold to use when you want to showcase both sides of a designer series paper. I’ve used this adorable reindeer pattern with a Pecan Pie snowflake pattern on the reverse side.
The card is basically two cards that overlap. The second card is smaller and its flap overlaps the DSP flap of the base card.
The card base is one quarter of a sheet of A4 cardstock. The DSP is adhered to the card base and has a flap on the right side that opens up. This shows the reverse side of the DSP.
Here’s what the card looks like when closed. I used a single glue dot to keep the card closed and it doesn’t tear the DSP or the cardstock when opened and closed multiple times.
Two of the Stitched Shapes circles cut out the feature piece of DSP on the front of the card. I’ve stamped a sentiment from the Peaceful Season Stamp Set in Pecan Pie along with holly from the Reindeer Fun stamp set.
Inside the card I’ve stamped another sentiment from the a sentiment from the Peaceful Season Stamp Set and some more holly.
To enable the card to stand up for display I added a piece of cardstock on the back.
This is a great design to mass produce a batch of Christmas cards. It can be made with 12″ x 12″ DSP or 6″ x 6″ DSP.
Now it’s time to hop in over to our next participant, the lovely Rachel Woollard. It’s Rachel’s birthday today and I can’t wait to see what the birthday girl has made this week!
If the next button link is not working or you’d like to see the entire list of participants go to Sharon Davern‘s blog. Sharon does an amazing job of hosting our Heart of Christmas blog every Monday.
The AWH team will be back on Wednesday night, showcasing Daffodil Delight, or you can enjoy some more Heart of Christmas inspiration next Monday night.
Welcome to week 7 of the Art with Heart Team Stampin’ Up! Heart of Christmas blog hop for 2024. I hope you we are continuing to inspiring you each week with our Christmas card ideas.
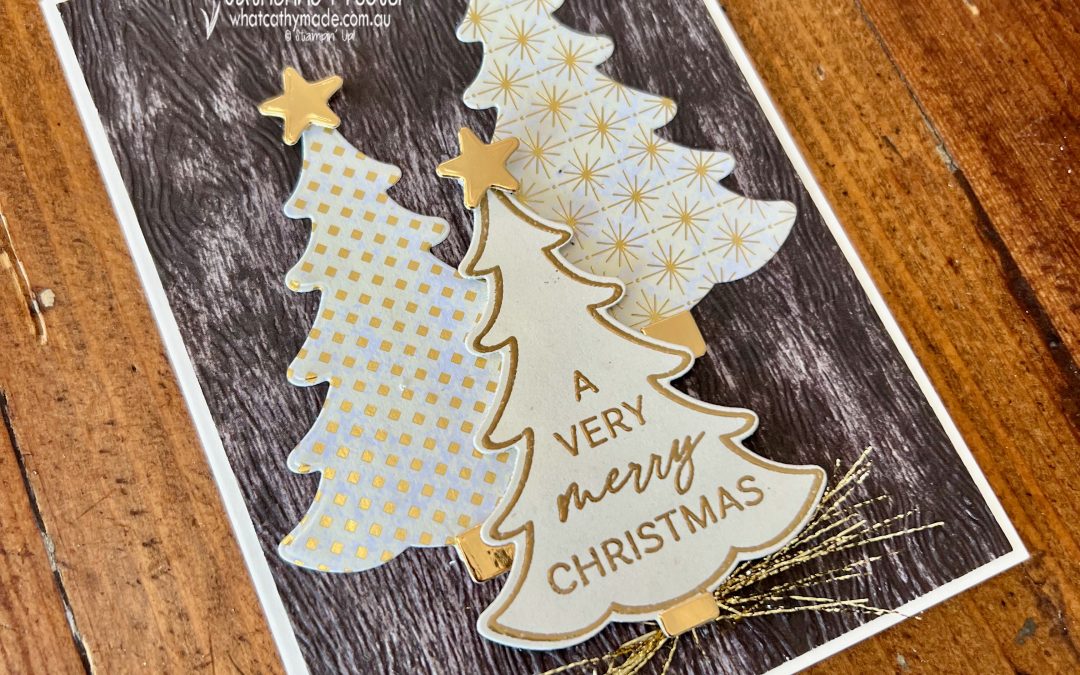
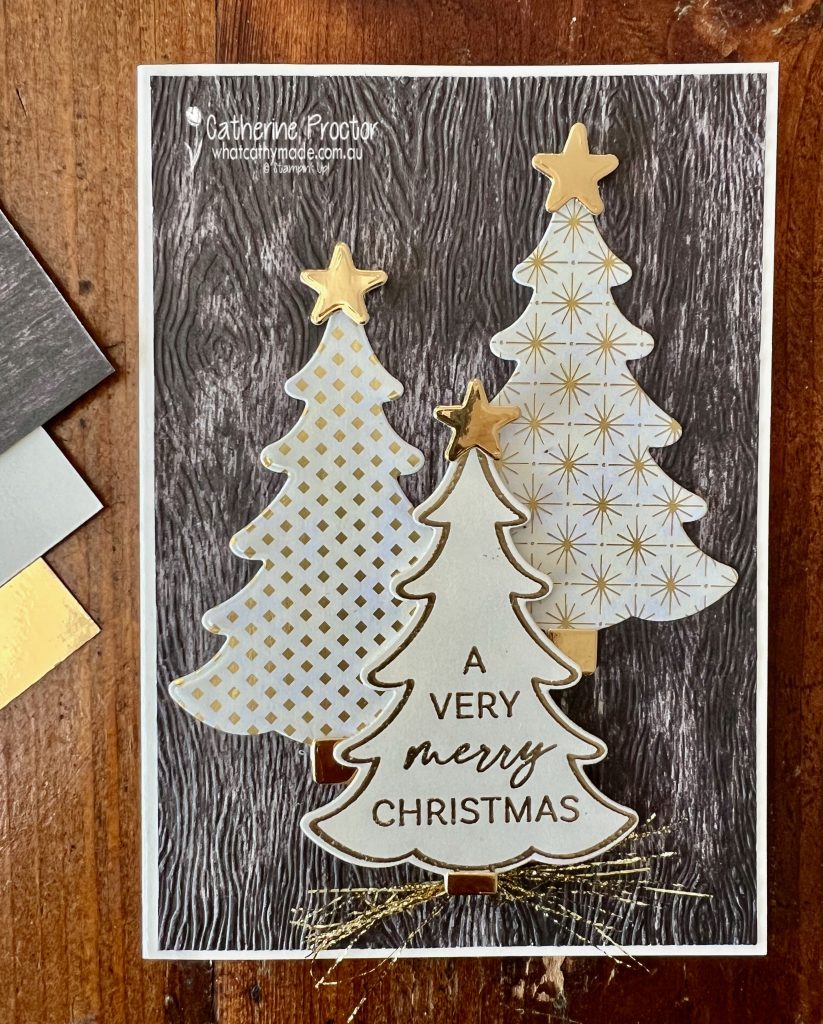
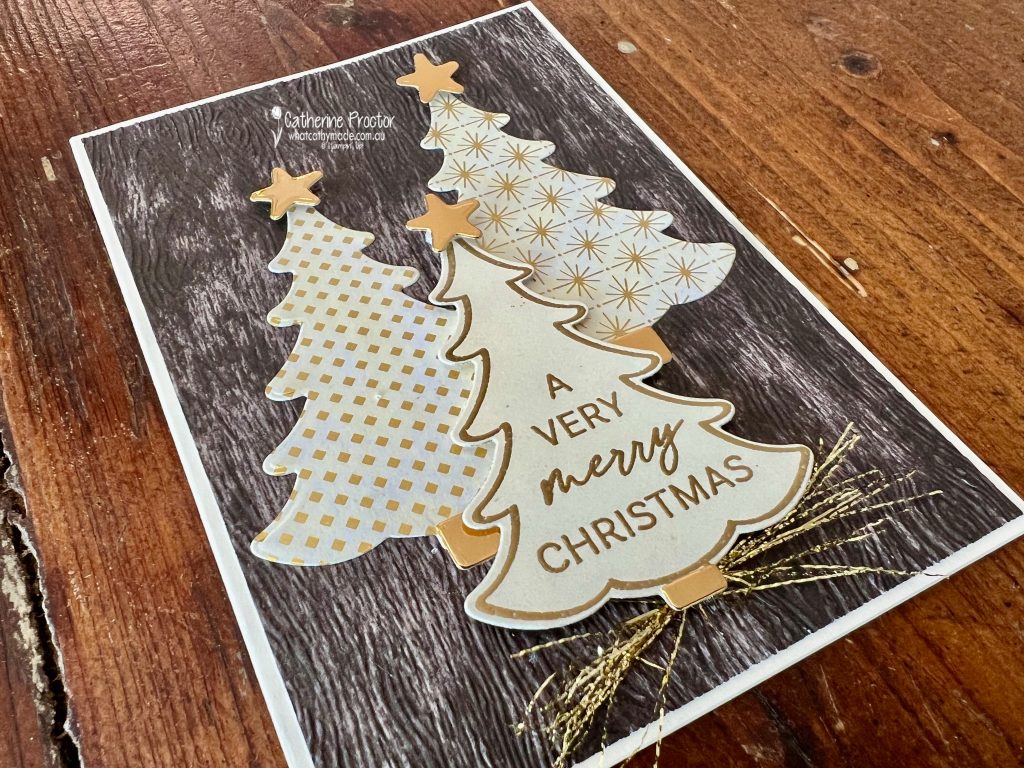
For this week’s Christmas card I’ve used the brand new Decorative Trees bundle (Decorative Trees stamp set and Decorative Trees dies). The number of stunning dies in this bundle provides opportunities for so many different colour combinations and designs of cards.
I decided to use the tree outline die to die cut some of the beautiful DSP designs in Very Vanilla and gold from the Season of Green & Gold 12″ x 12″ (30.5 x 30.5 cm) Specialty Designer Series Paper.
The middle tree has been heat embossed in gold using stamps from the Decorative Tree stamp set.
The Early Espresso layer is from the Country Woods 12″ x 12″ (30.5 x 30.5 cm) Designer Series Paper embossed using the Timber 3D Embossing Folder.
The stars on the top of the tree and the tree bases have all been die cut from gold foil.
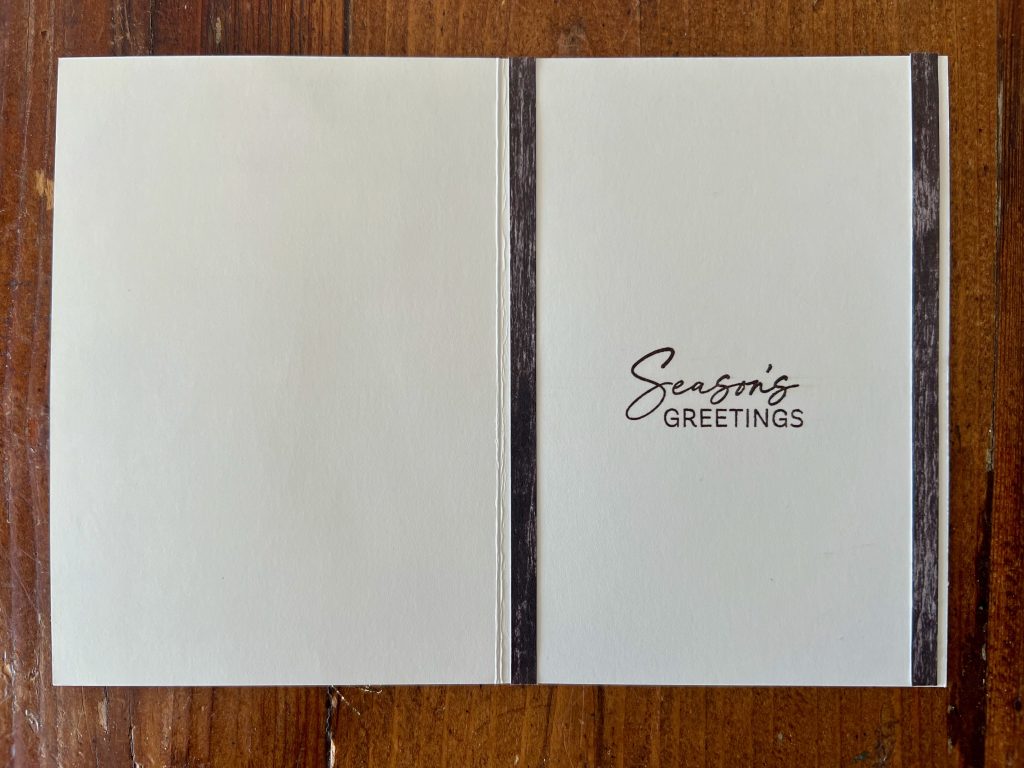
As there is a lot of gold on the front of the card I’ve kept the inside very neutral in Early Espresso and Very Vanilla.
Now it’s time to hop in over to our next participant, the lovely Kate Morgan – I can’t wait to see what Kate has made this week!
If the next button link is not working or you’d like to see the entire list of participants go to Sharon Davern‘s blog. Sharon does an amazing job of hosting our Heart of Christmas blog every Monday.
The AWH team will be back on Wednesday night, showcasing Crushed Curry, or you can enjoy some more Heart of Christmas inspiration next Monday night.
Welcome to week 6 of the Art with Heart Team Stampin’ Up! Heart of Christmas blog hop for 2024. I hope you we are continuing to inspiring you each week with our Christmas card ideas.
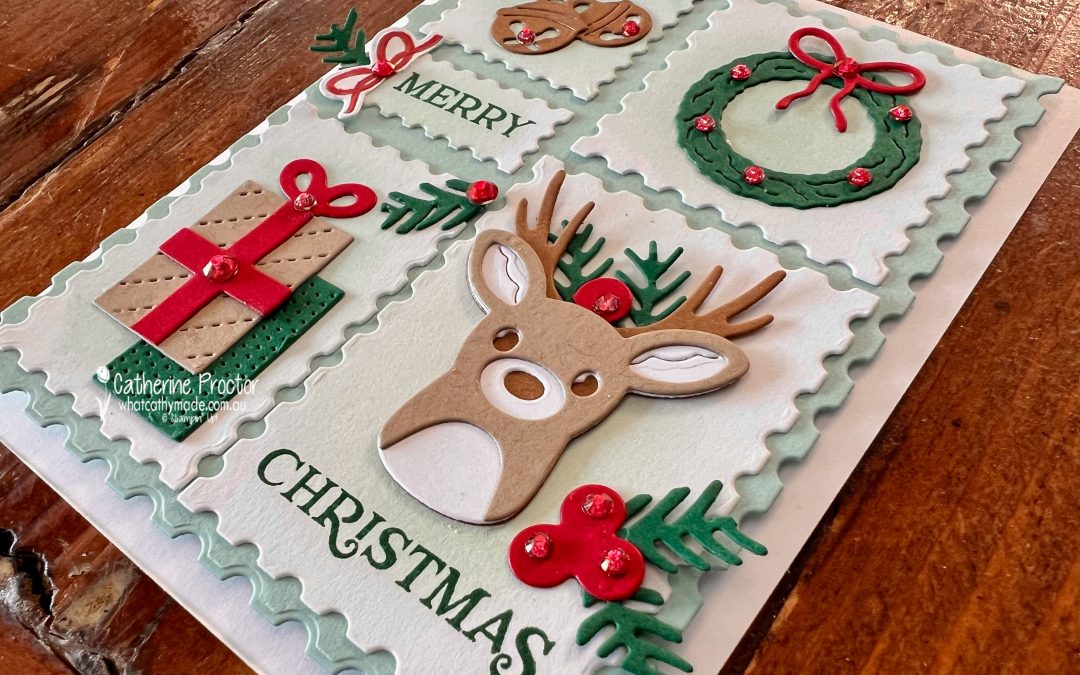
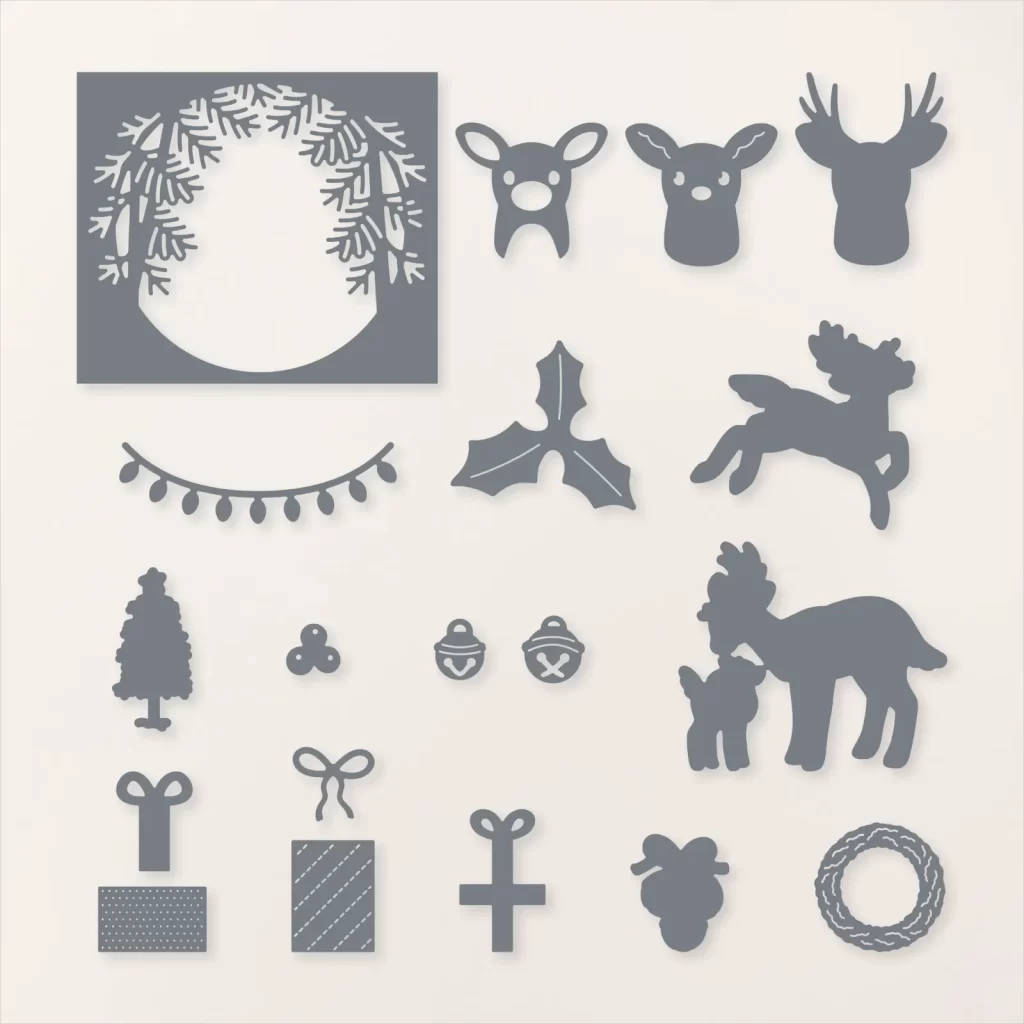
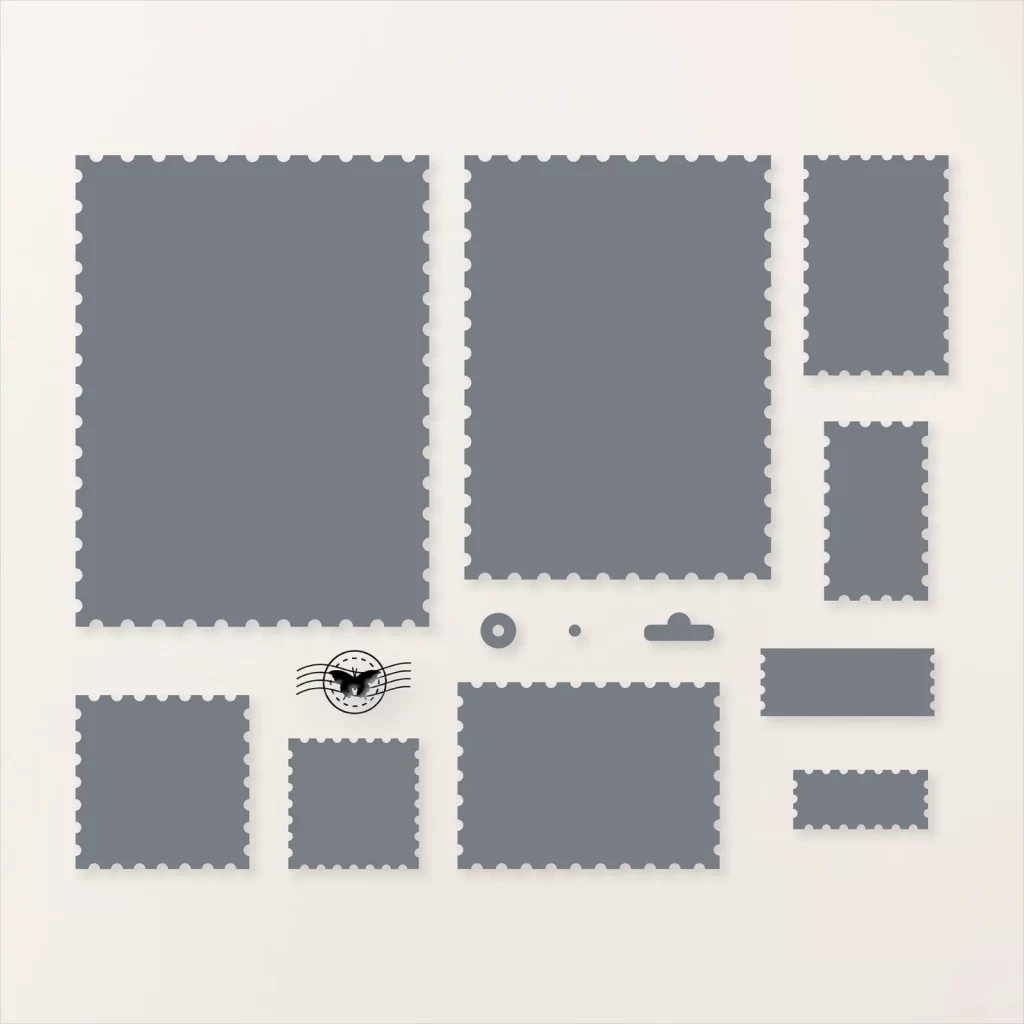
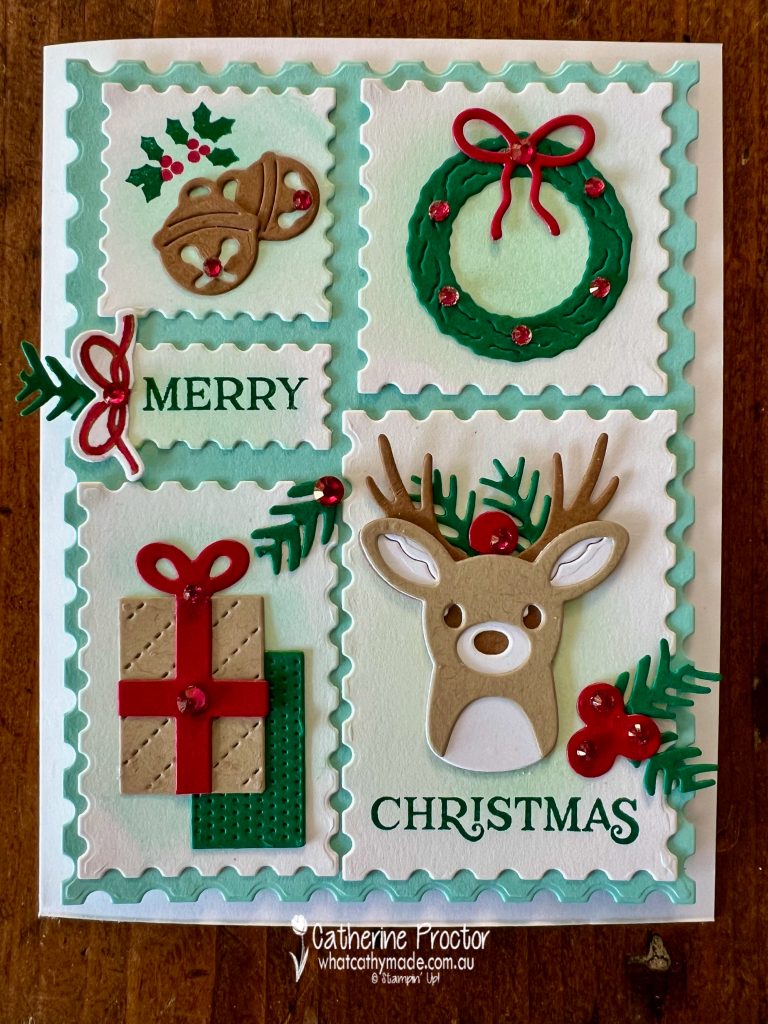
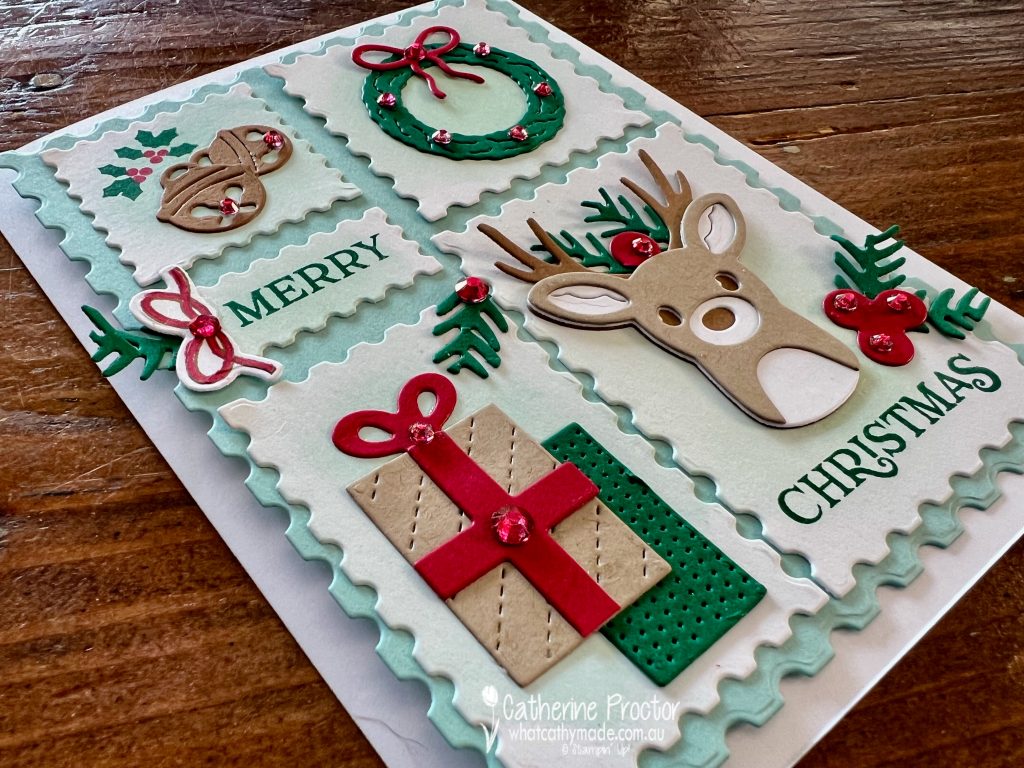
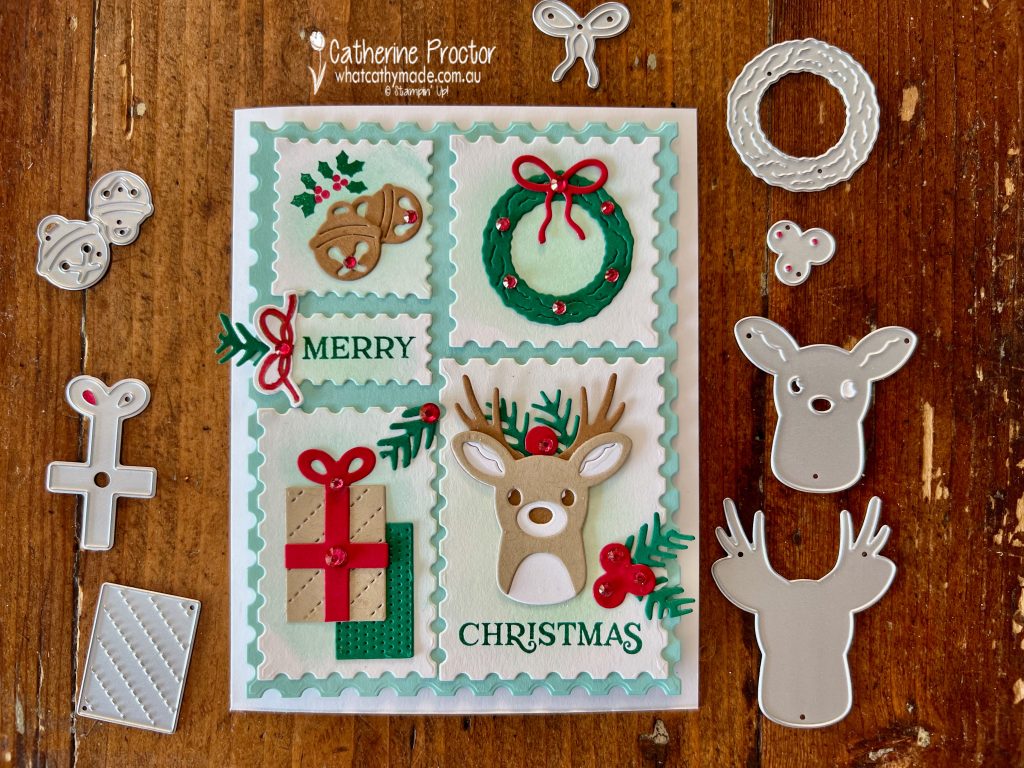
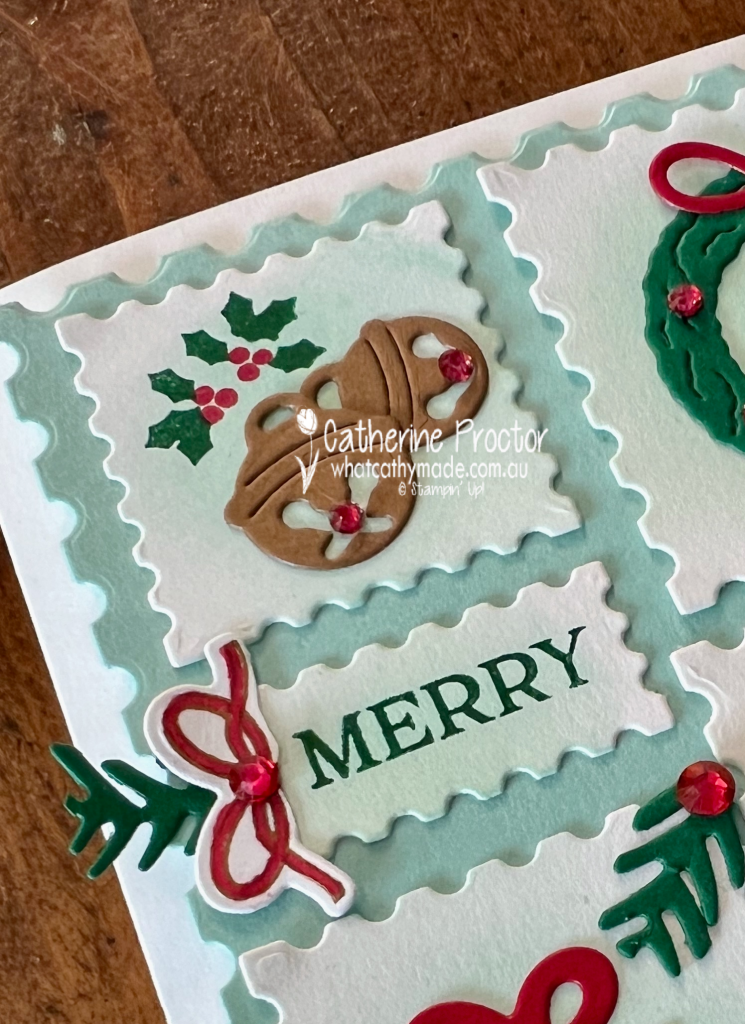
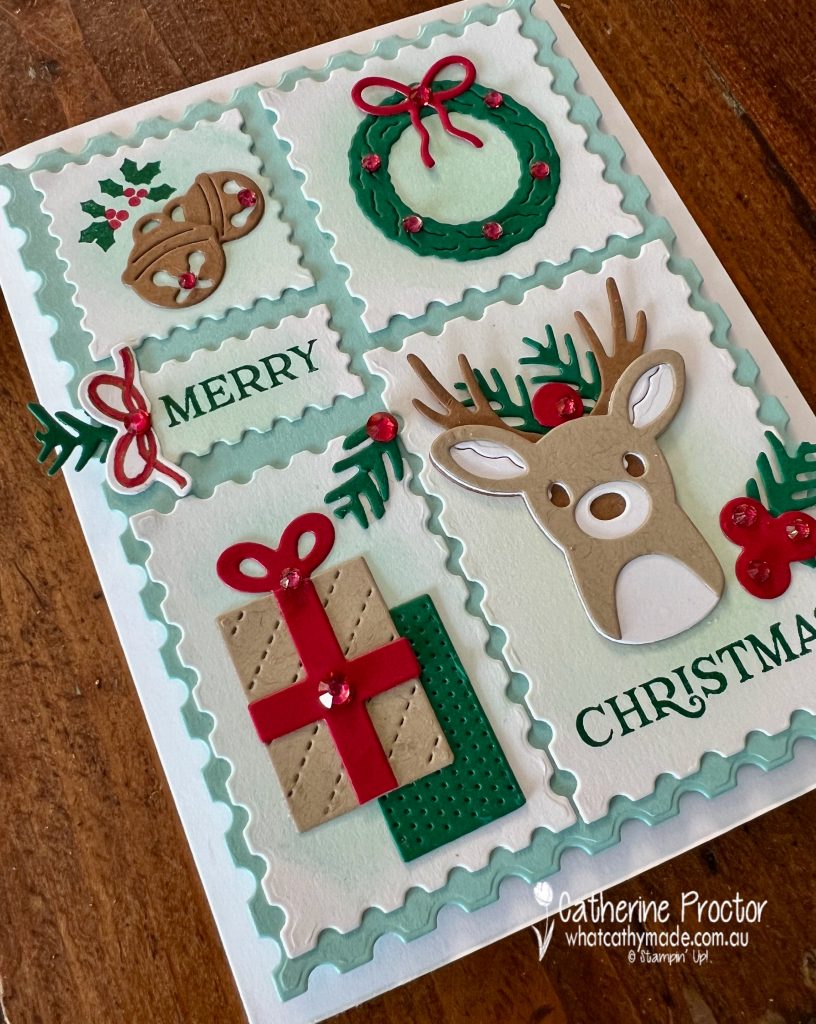
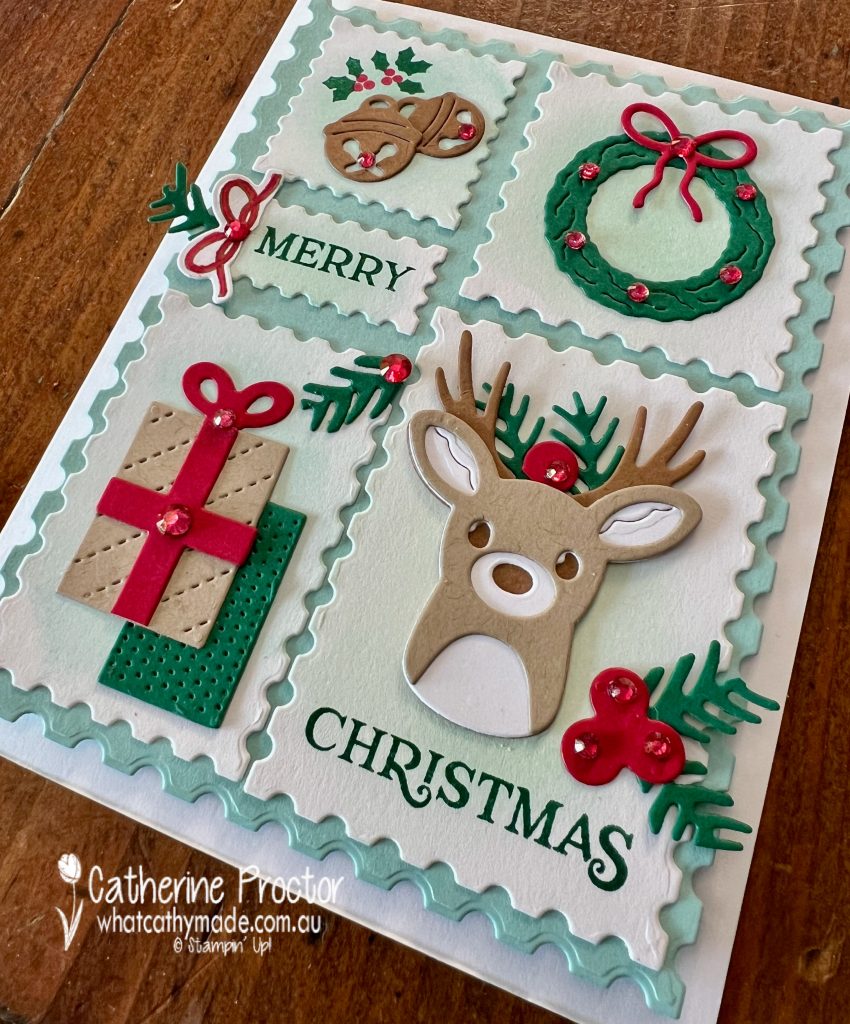
For this week’s Christmas card I’ve used the brand new Reindeer Fun bundle (Reindeer Fun stamp set and Reindeer Fun dies) and the Perennial Postage Dies to create a postage collage card.
I’ve used one of my favourite Christmas colour combinations for this card: Real Red, Crumb Cake, Pecan Pie, Pool Party, Shaded Spruce and Basic White.
My card base began with half a sheet of A4 cardstock folded in half, which I then trimmed down by approximately 1 cm.
TOP TIP: Trimming 1 cm off the bottom of the card is an easy hack I use when I want to use the large Stampin’ Up! dies on my card bases as the large Stampin’ Up! dies are designed to fit US card bases, which are shorter and wider than our A6 size card bases.
Five smaller Perennial Postage dies of assorted sizes were die cut from Basic White cardstock and then lightly shaded with Pool Party ink using a small blending brush.
Using the Reindeer Fun dies I die cut an assortment of cardstock pieces to decorate each panel. The foliage has been fussy cut from the large Reindeer Fun foliage frame die.
I’ve also stamped the holly leaves and holly berry stamps from the Reindeer Fun stamp set on the top left panel.
The “Merry Christmas” sentiment from the Reindeer Fun stamp set was stamped over two different panel pieces to make it fit. I really like splitting the sentiment as it also draws your eye around the different elements on the card.
I used my dark Real Red Stampin’ Blend to colour some Rhinestone Basic Jewels. They add a very festive touch of bling to my card. Perhaps I have gone slightly overboard with them?
Now it’s time to hop in over to our next participant, the our lovely host, Sharon Davern – I can’t wait to see what Sharon has made this week!
If the next button link is not working or you’d like to see the entire list of participants go to Sharon Davern‘s blog. Sharon does an amazing job of hosting our Heart of Christmas blog every Monday.
The AWH team will be back on Wednesday night, showcasing Crumb Cake, or you can enjoy some more Heart of Christmas inspiration next Monday night.
Welcome to week 4 of the Art with Heart Team Stampin’ Up! Heart of Christmas blog hop for 2024. I hope you we are inspiring you with our Christmas card ideas.
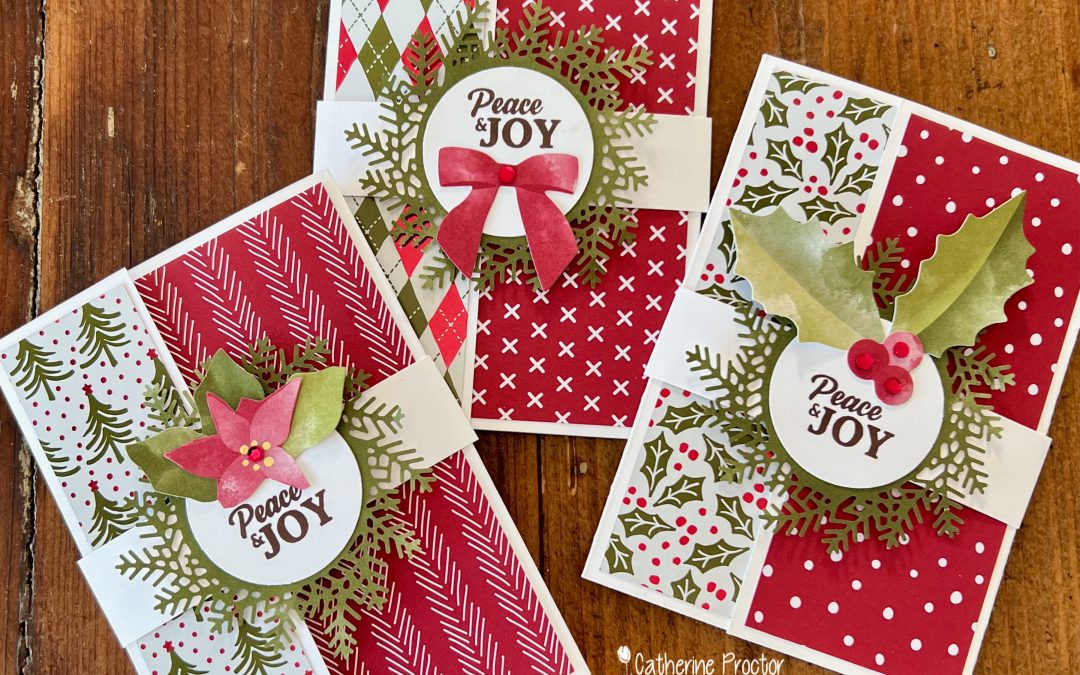
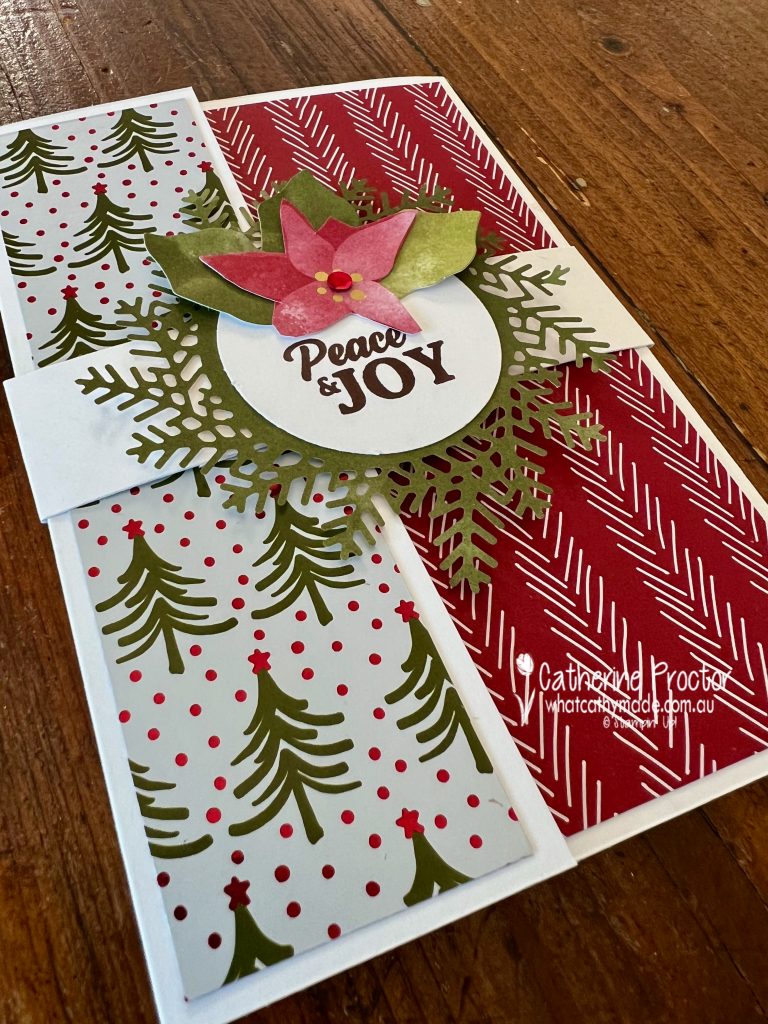
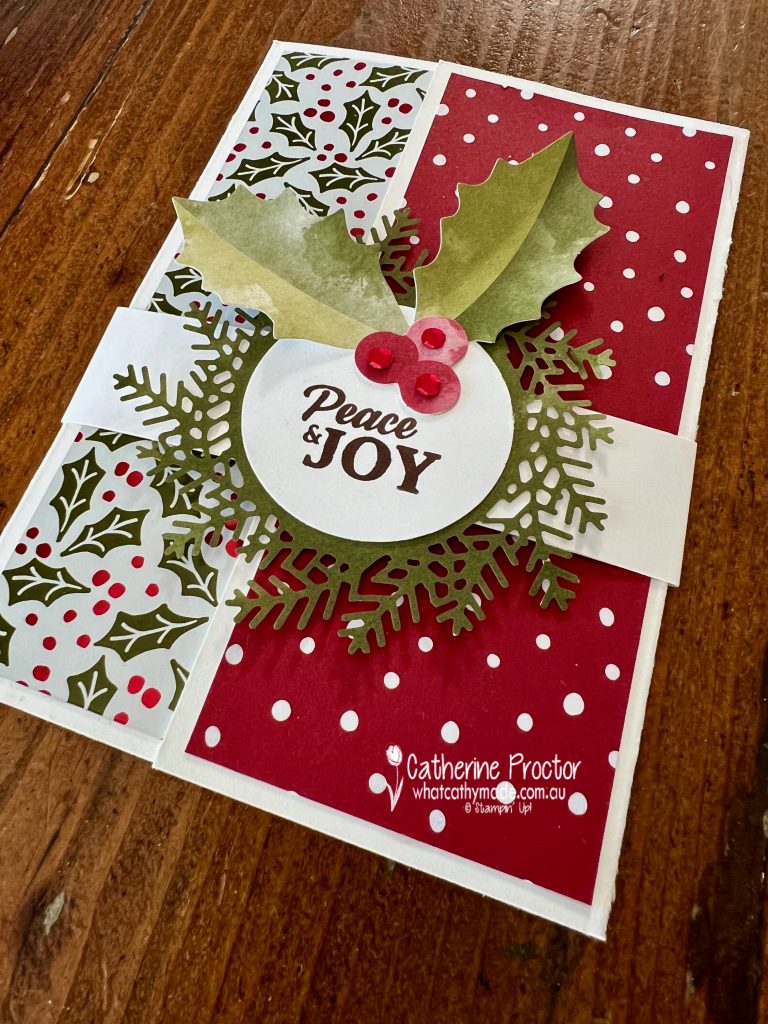
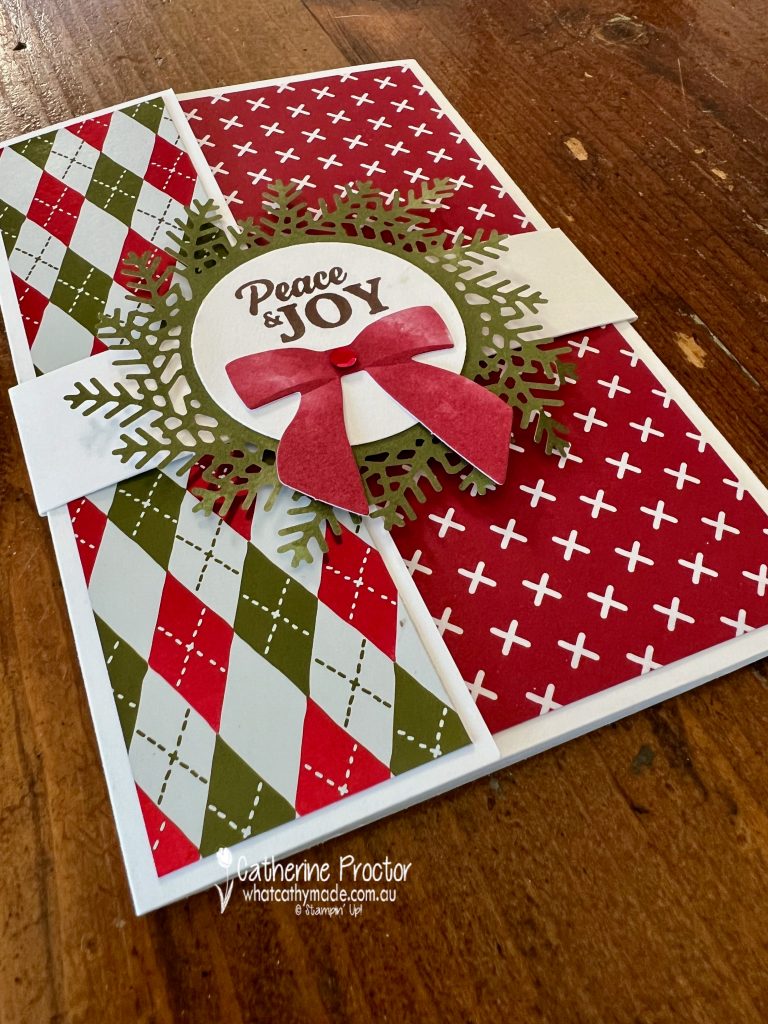
My Christmas cards for week 4 of our Heart of Christmas blog hop use the stunning Shining Christmas 12″ x 12″ (30.5 x 30.5 cm) Specialty Designer Series Paper as well as elements from the Rustic Christmas Countdown Kit.
Between making these cards and my blog going live the Shining Christmas DSP is unfortunately now unavailable, however you can use any DSP patterns in this very simple fancy fold.
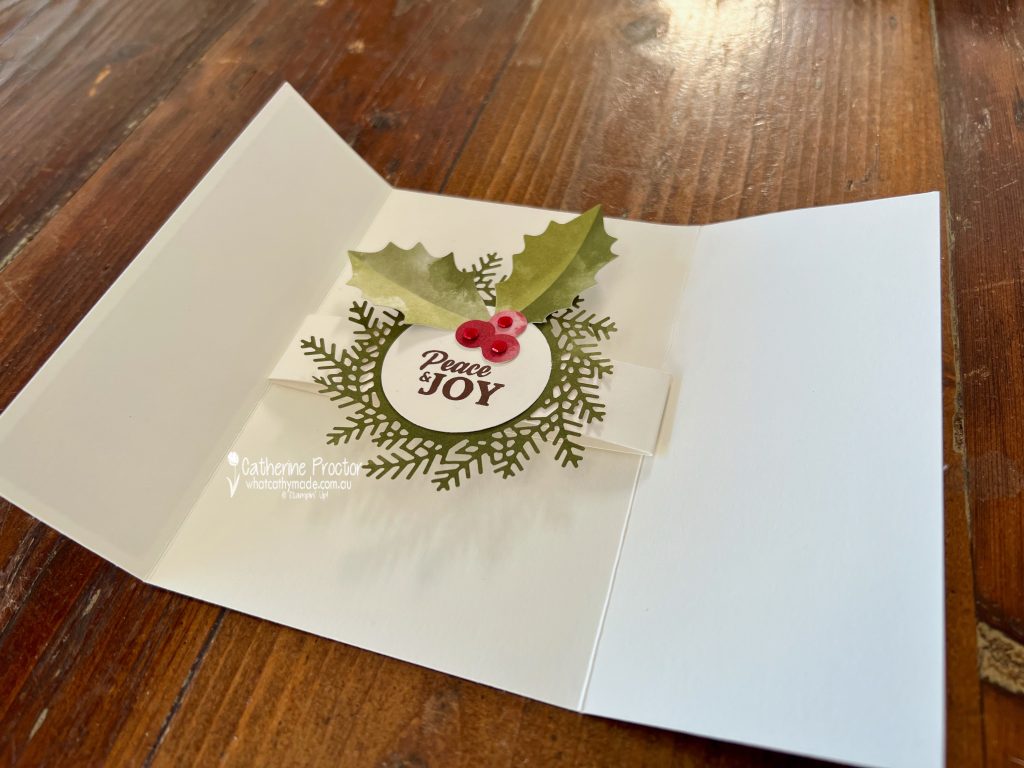
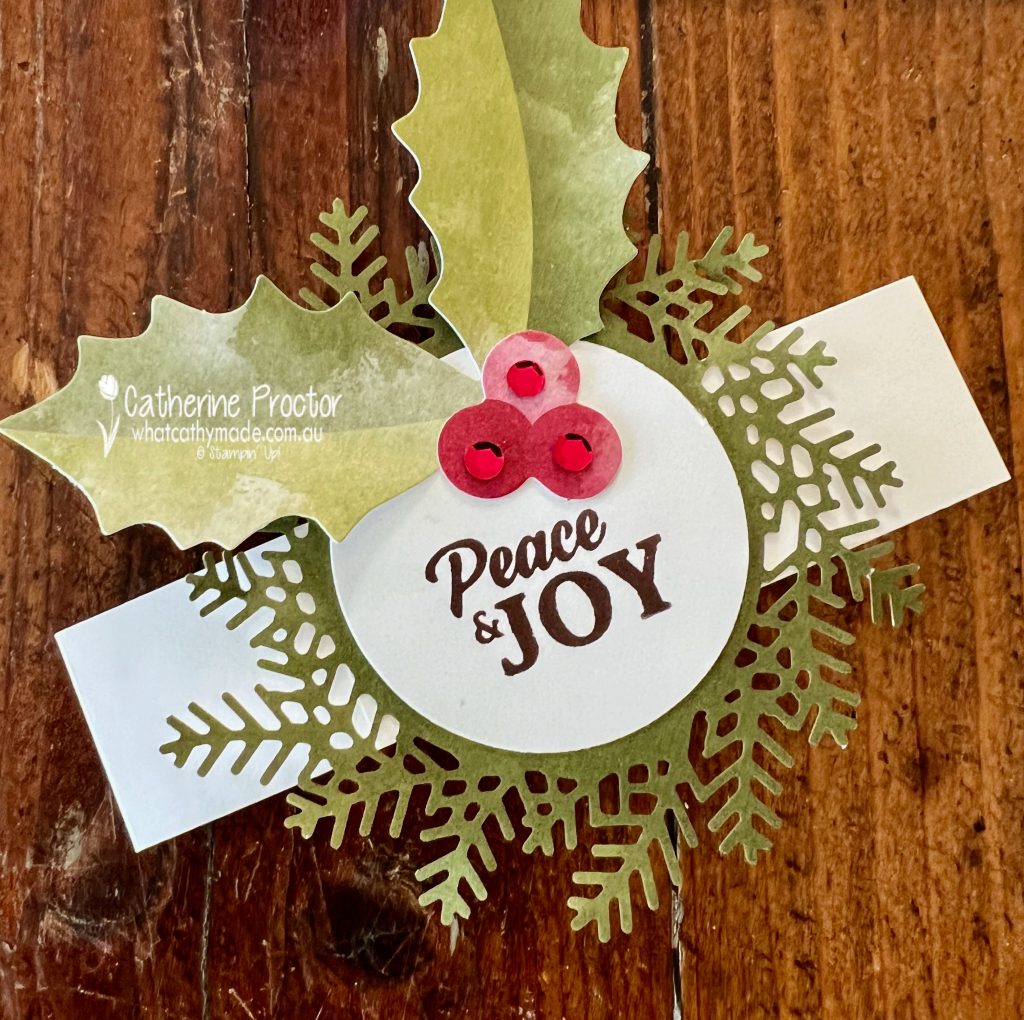
Using half a sheet of A4 cardstock I’ve scored it on the landscape side at 2½ and 6½ inches and decorated the side flaps with DSP. These flaps slightly overlap at the front.
For each of the three cards I’ve made a one inch belly band, decorated with different elements from the Rustic Christmas Countdown Kit.
The “Peace and Joy” sentiment is stamped in Early Espresso and it comes from a stamp set called the Peaceful Season Stamp Set, available from September 4.
Cherry Cobbler embellishments from the Rustic Christmas Countdown Kit add a final touch of bling.
With a simple fancy fold like this I decided to make three cards so I could showcase the different patterns in this DSP. It’s also a wonderful way to build up my Christmas Card collection!
Now it’s time to hop in over to our next participant, the lovely Theresa Gerrard – I can’t wait to see what Theresa has made this week!
If the next button link is not working or you’d like to see the entire list of participants go to Sharon Davern‘s blog. Sharon does a great job of hosting our Heart of Christmas blog every Monday.
The AWH team will be back on Wednesday night, showcasing Coastal Cabana, or you can enjoy some more Heart of Christmas inspiration next Monday night.