Welcome to week nine of our 2020-2021 Art With Heart Colour Creations Showcase. This week we are bringing you some Cherry Cobbler colour inspiration.
Each week various members of our Art With Heart Colour Creations team will be bringing you weekly colour inspiration as we showcase our range of over 50 beautiful Stampin’ Up! colours in alphabetical order.
Week 9 – Cherry Cobbler
Cherry Cobbler is a deep rich red colour that always makes me think of Christmas and there are plenty of lovely new Cherry Cobbler products in the August-December catalogue (AKA the holiday catalogue), available to purchase from August 4, which is just next week.
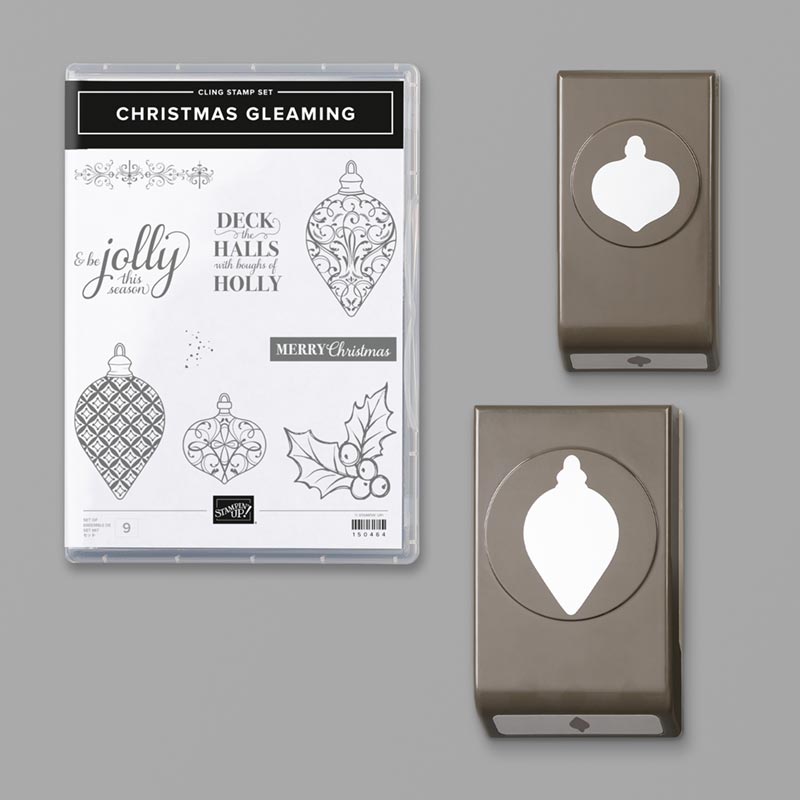
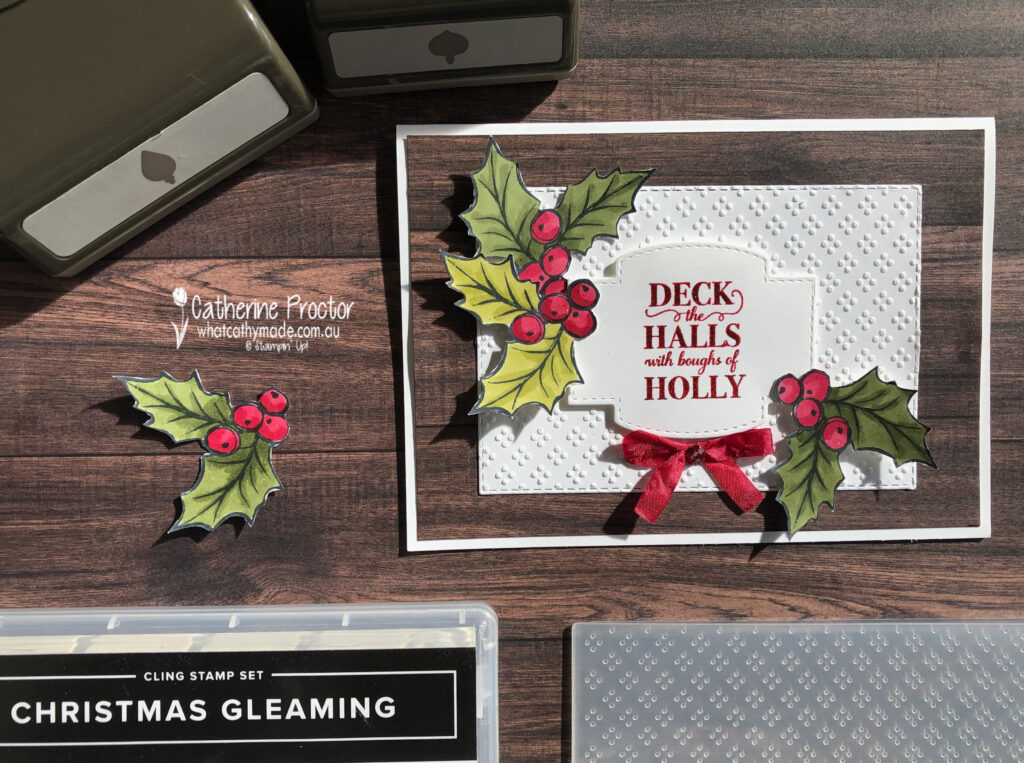
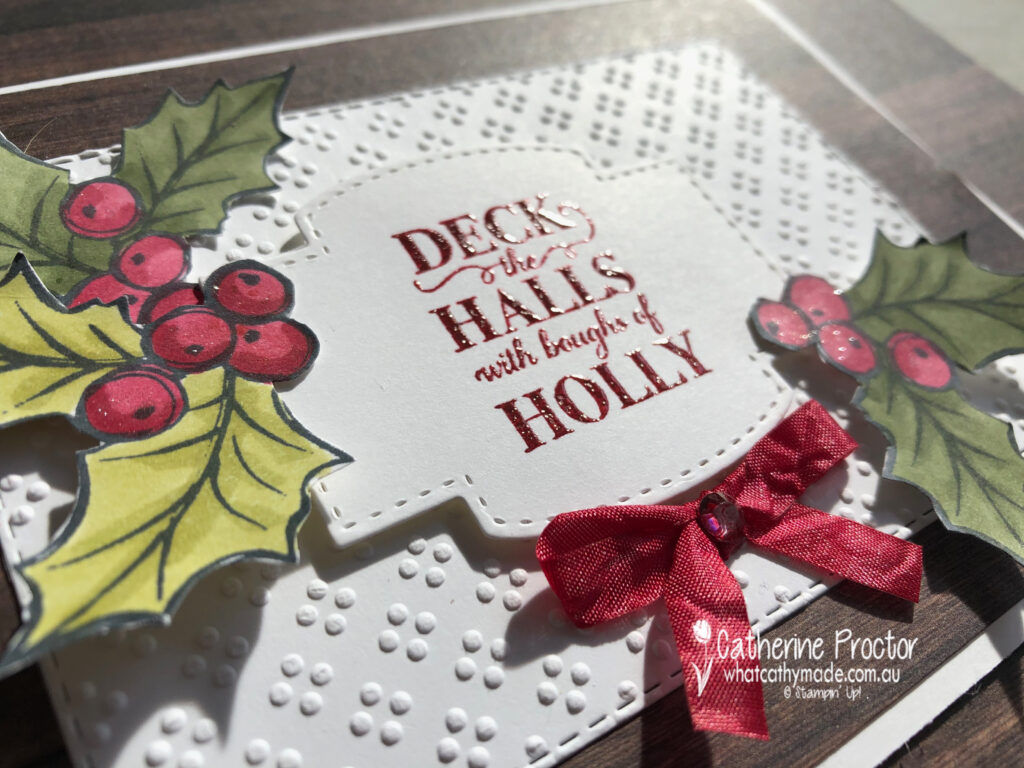
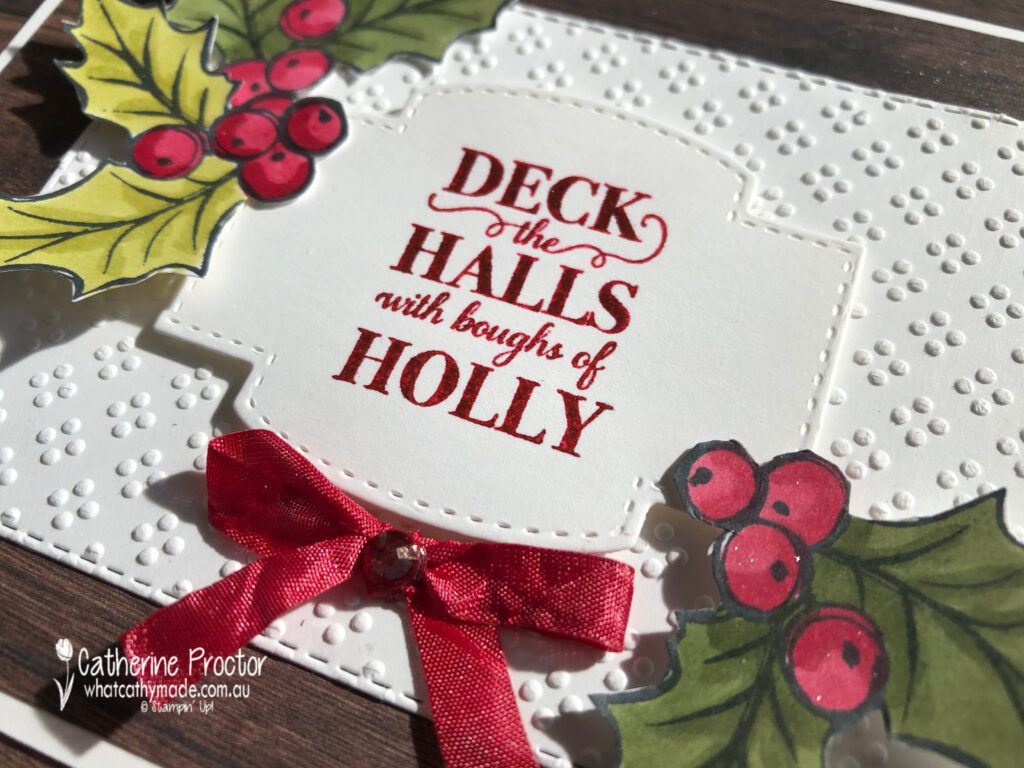
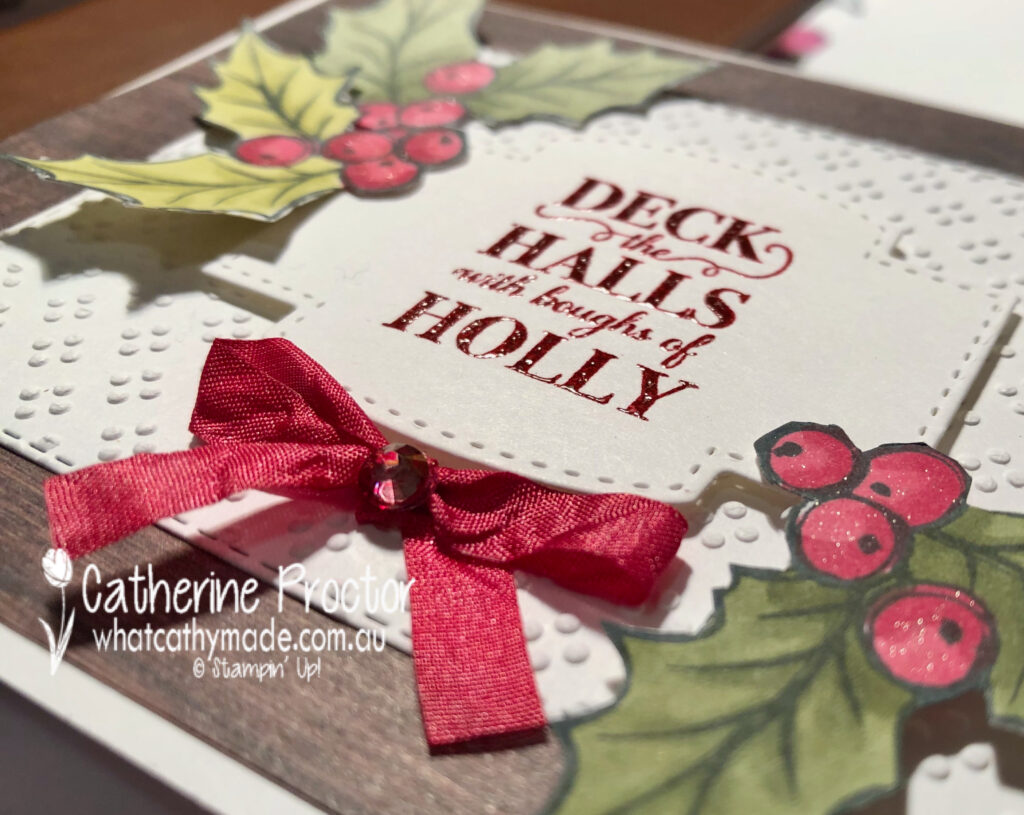
Today I’ve used a stamp set that is part of a punch bundle called Christmas Gleaming. You might already have because it was in last year’s holiday catalogue and it is returning this year.
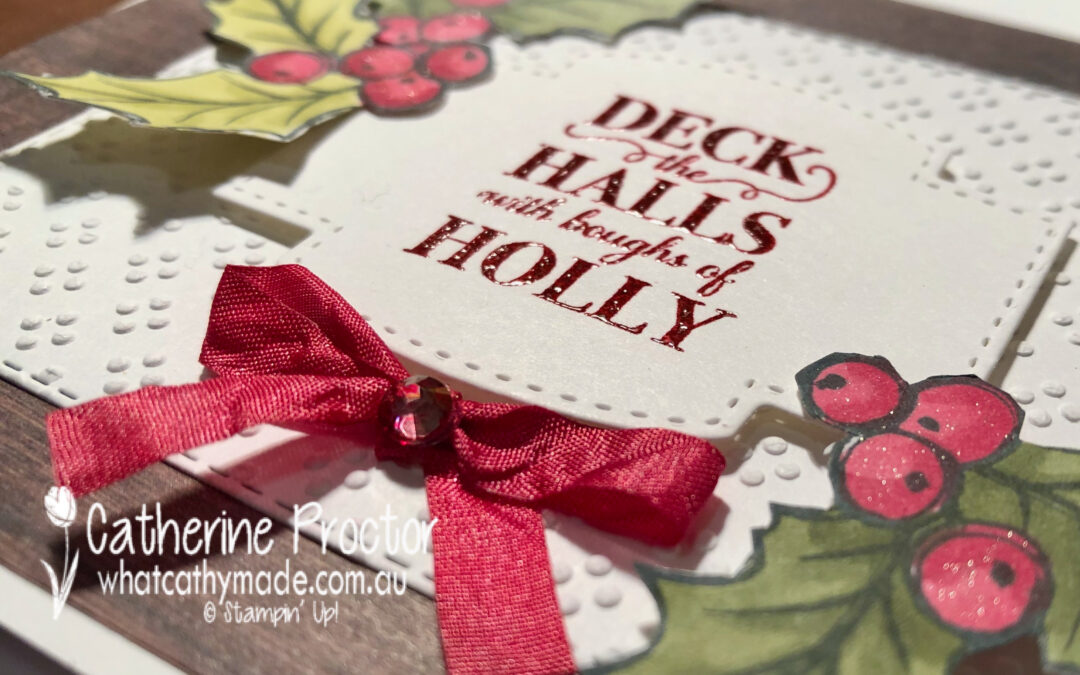
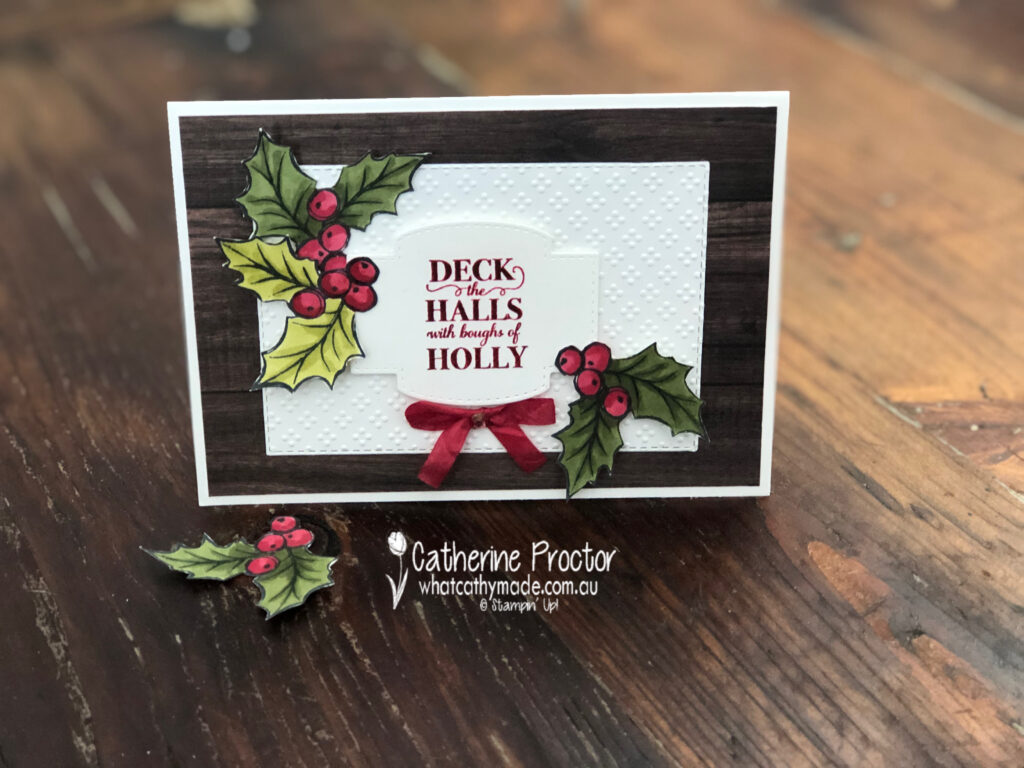
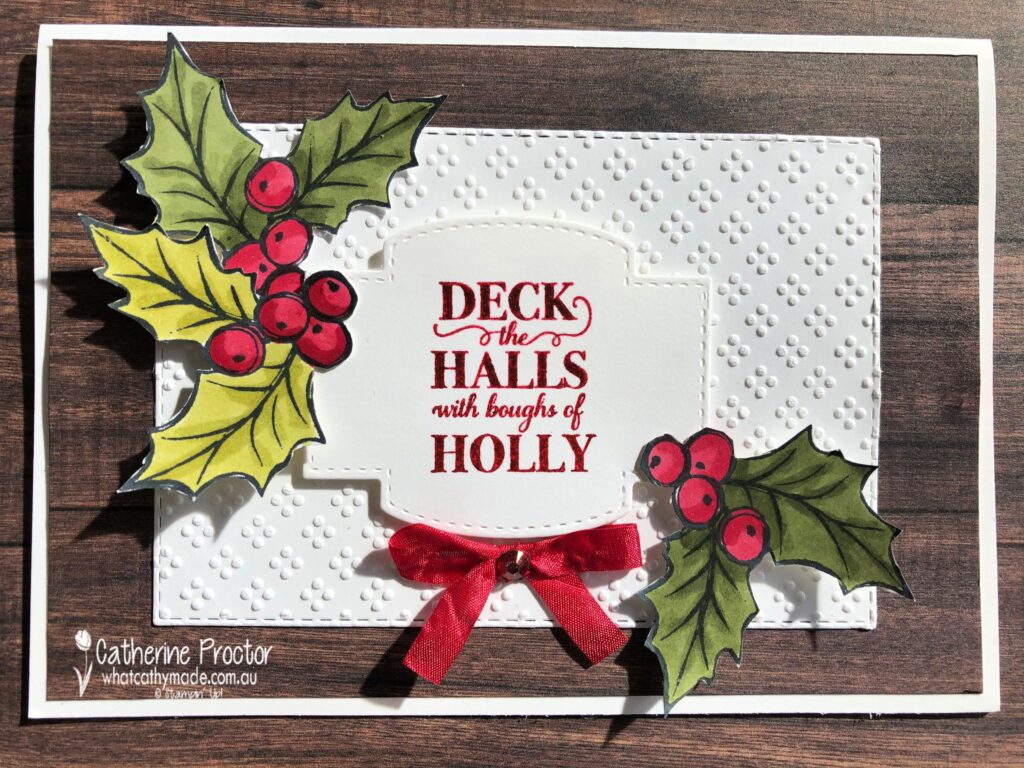
My “Deck the Halls with Boughs of Holly” card doesn’t use the Gleaming Ornaments punch pack – instead I’ve just used the Christmas Gleaming stamp set and simply fussy cut my holly leaves, which was super easy to do using my paper snips.
The holly leaves were stamped with Memento ink onto Whisper White card stock and then coloured them in with light and dark Cherry Cobbler, Old Olive and Mossy Meadow blends. I like the contrast between the lighter and the darker leaves.
The Whisper White panel has been embossed with one of the new “Wrapped in Texture” embossing folders – these raised dots reminded me of the holly berries and I think they work well with the holly sprigs. The sentiment was die cut using one of the Stitched So Sweetly dies.
The Wink of Stella pen adds some sparkle and shine to the holly berries. I also heat embossed my sentiment with clear emboss power after I stamped it firstly in Versamark and then in Cherry Cobbler. This is a great technique to remember if you want to emboss in any colour.
Can you see the sparkle and shine? It’s so pretty in real life.
It’s super easy to make your own Cherry Cobbler ribbon and Cherry Cobbler rhinestone jewel. Simply use your dark Cherry Cobbler blend to colour in the Whisper White crinkled seam binding ribbon and the large rhinestone basic jewel and wait a few minutes for the colour to set before adhering to your card.
Hopefully this super close up gives you a better view of my home made Cherry Cobbler ribbon and Cherry Cobbler rhinestone jewel.
I’ll share some other cards I’ve made with this bundle (using the punches as well) later this week.
In the meantime I can’t wait to see what the rest of the Art With Heart team have created with Cherry Cobbler today. Click on the links below to see what they’ve made.
Next Tuesday we’ll be showcasing one of the 2020-22 In Colours: Cinnamon Cider. We hope you can join us all then.
To purchase any of the products featured in today’s post, simply contact your Stampin’ Up! demonstrator, any of the ladies in the AWH Colour Creations Showcase or click on the product links below.
Bonus Days are happening now! From July 1st to August 3rd you will earn a $9 bonus days coupon for every $90 you spend in one transaction (before post). Stampin’ Up! will email you your Bonus Days vouchers which you redeem for shopping in August.
If you’d like me to post you your very own copy of the 2020-21 Stampin Up! Annual Catalogue, the 2020-21 Beginners Brochure, the August – December Mini Catalogue (this is the Holiday/Christmas Catalogue) or to simply find out about more about Stampin’ Up! contact me.
In the meantime, wherever you are in the world, stay safe, stay calm…and keep on crafting xxx
Welcome to the Heart of Christmas 2020 where the Art with Heart team share their Christmas inspiration with you on the third Monday of each month.
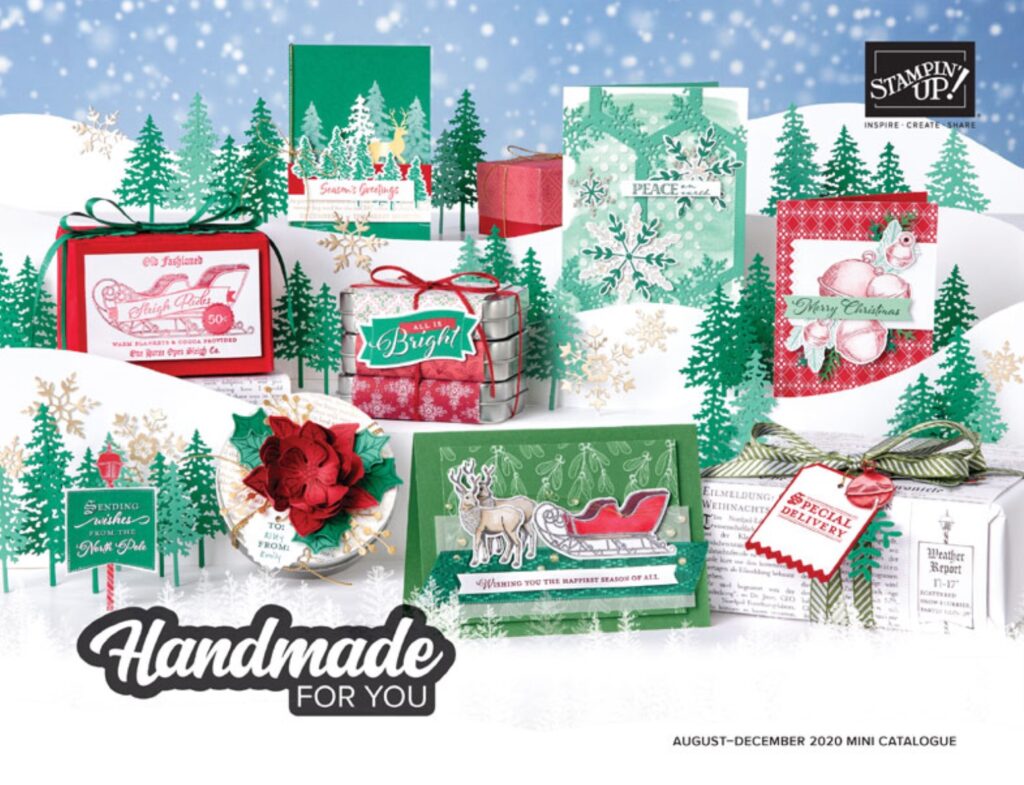
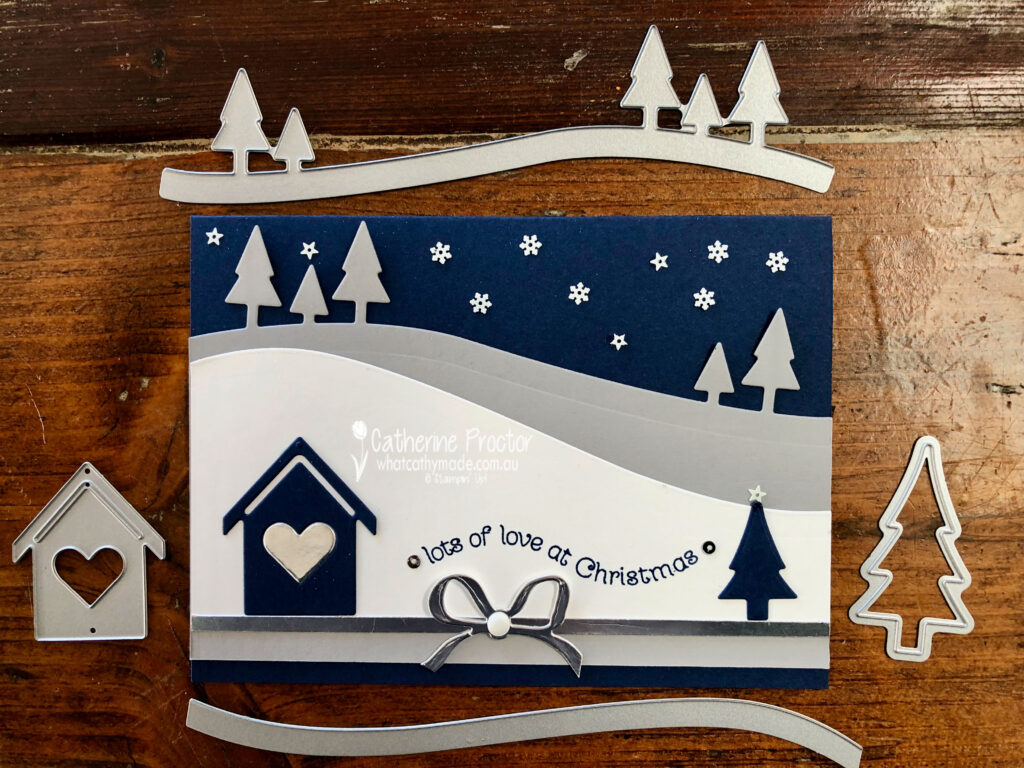
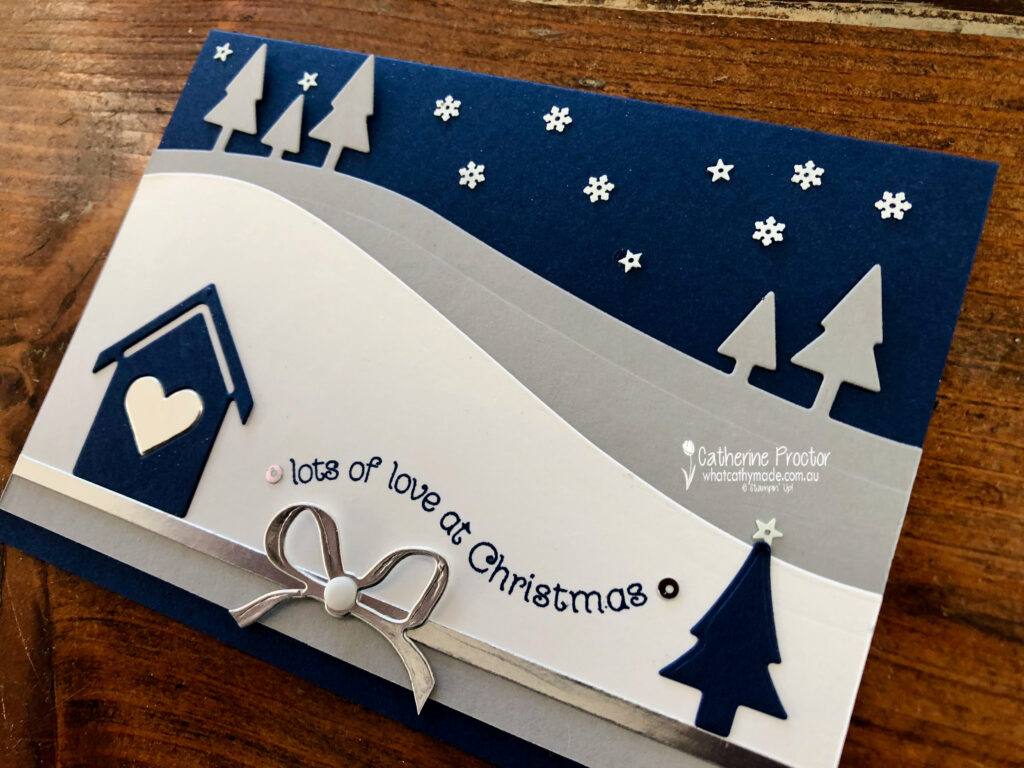
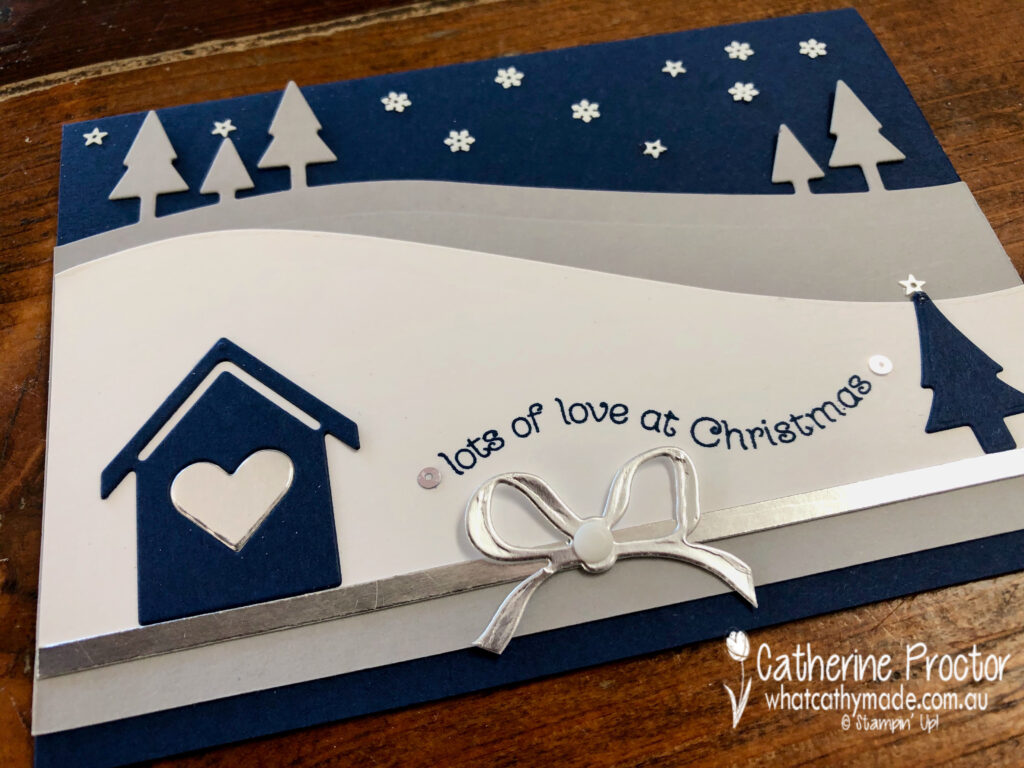
Today I’m sharing with you a card that features some exciting new products from the upcoming Stampin’ Up! August – December mini catalogue. These products will be able to be purchased from August 4th 2020.
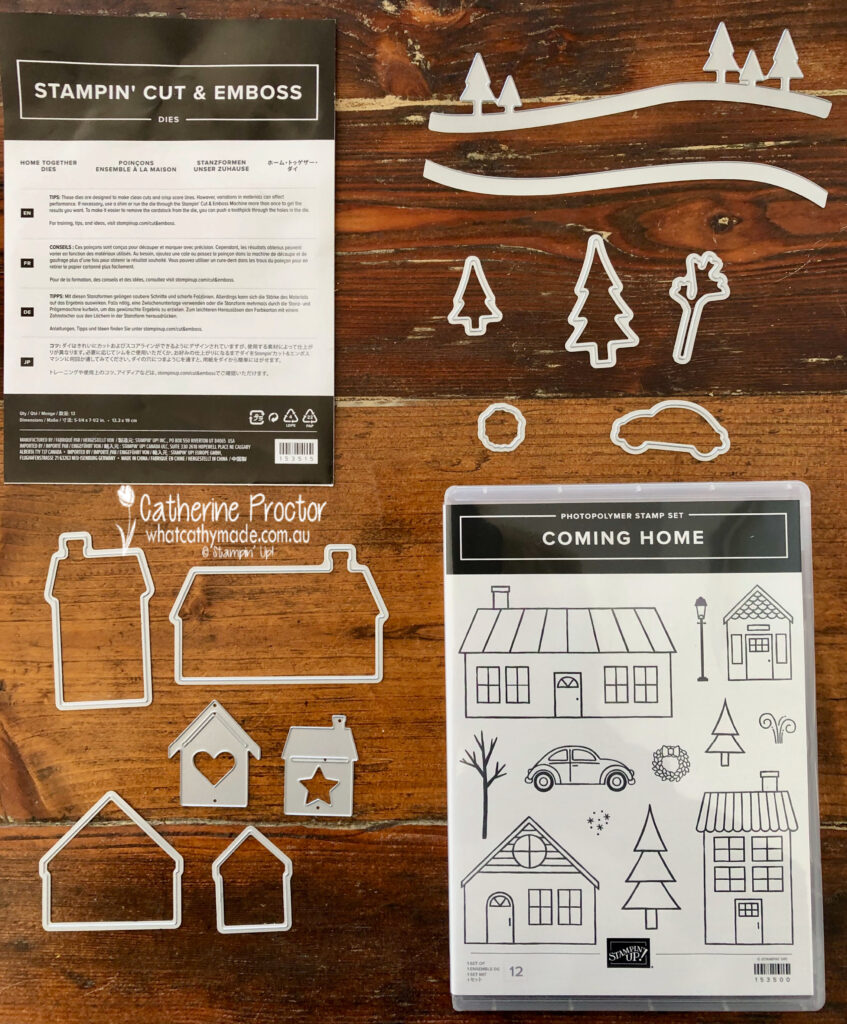
The Coming Home Bundle is part of the Trimming the Town Suite, perfect for Christmas Cards, Welcome to Your New Home Cards, male cards, teenage cards…and even congratulations on getting your licence/buying your first car cards with that adorable little car and its matching die cut. Here’s what you get in this bundle.
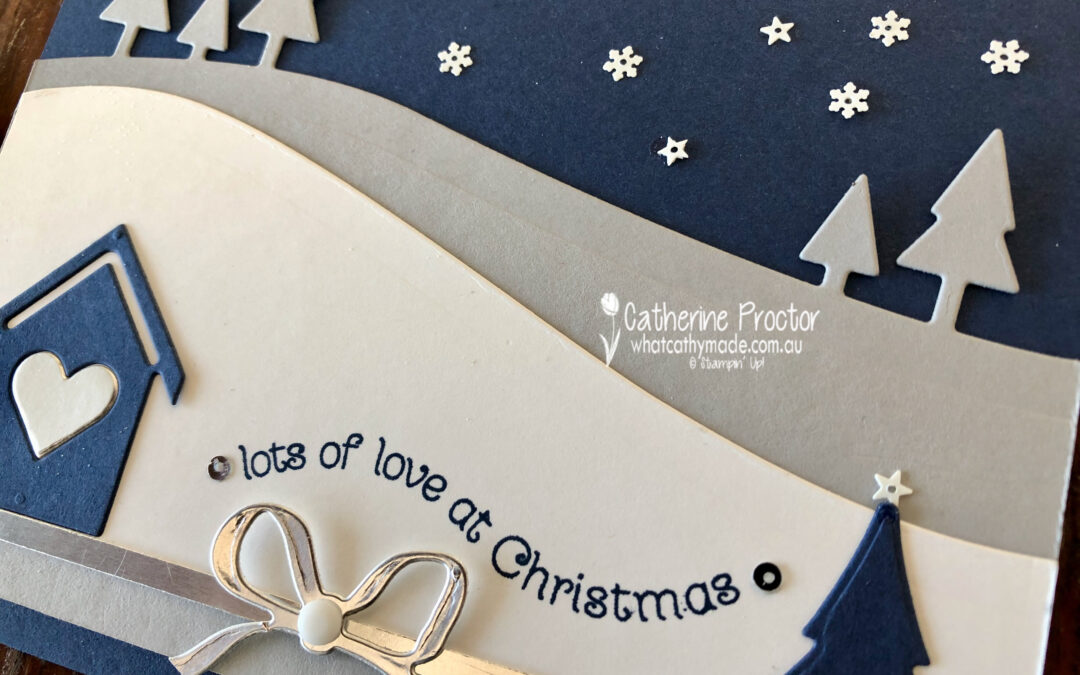
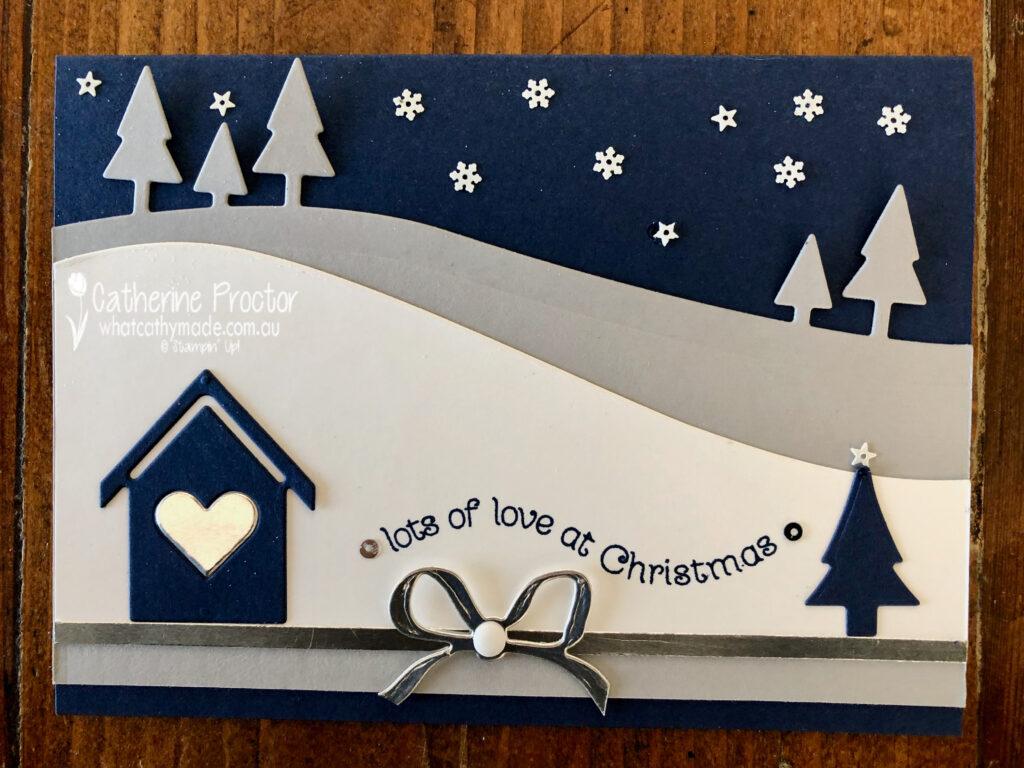
For my card today I’ve just used the Home Together dies, along with the gorgeous “Lots of love at Christmas” stamp from the Itty Bitty Christmas stamp set.
I thought this sentiment really suited the card design for two reasons: the curvy shape of the sentiment mirrors the curves of the long horizontal die cuts and the “love at Christmas” references the little Night of Navy house with its silver heart.
I love silver with Night of Navy but Stampin’ Up! doesn’t have a narrow silver ribbon in this current catalogue so I had to get creative! To make my ribbon I cut a narrow strip of silver foil and used the bow die from the “Wreath Builder” dies to cut a bow from silver foil.
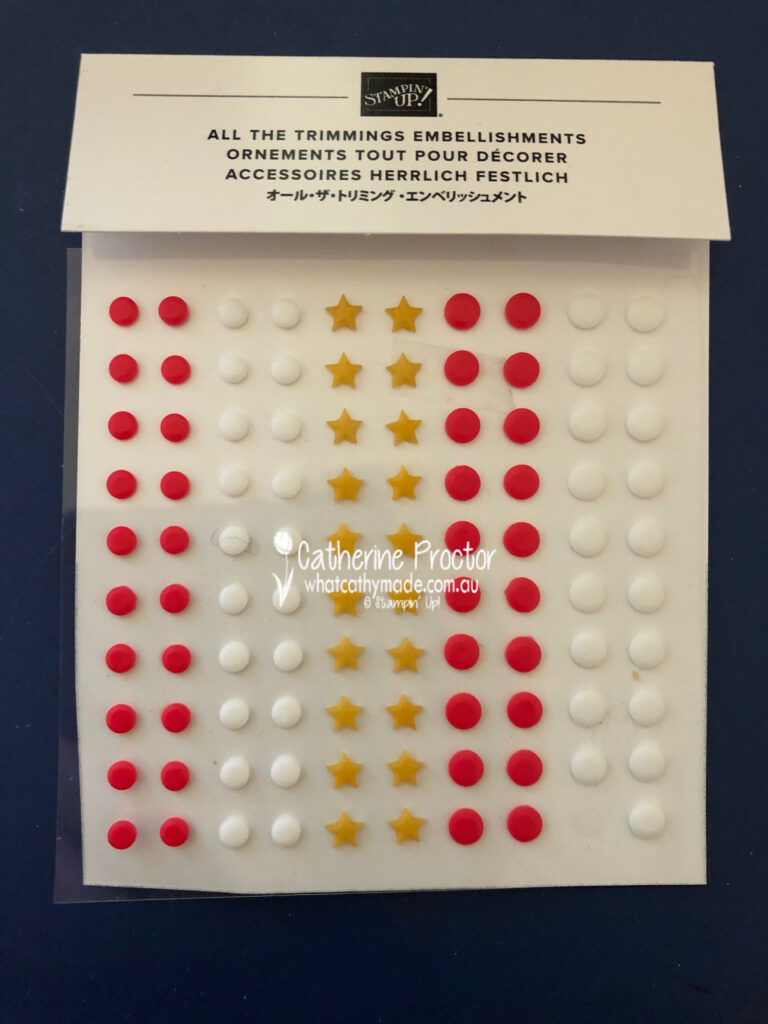
The White dot in the centre of my bow is a new embellishment from the Trimming the Town suite – All the Trimmings Embellishments.
Do you recognise the tiny stars, snowflakes and silver circles that embellish my card? They are the Snowflakes Sequins embellishments from last year’s August – December mini and they we be coming back from August 4 in this year’s catalogue too.
My colour combination for this card is very simple but timeless and a real favourite of mine. You can never go wrong with Night of Navy, Smoky Slate, Whisper White and Silver foil.
The lovely Judy May is hosting our Heart of Christmas showcase this year. To see the other Christmas creations go back to Judy’s post.
To purchase any of the products featured in today’s post, simply contact your Stampin’ Up! demonstrator, any of the ladies in the AWH Colour Creations Showcase or click on the product links below.
If you’d like me to post you your very own copy of the 2020-21 Stampin Up! Annual Catalogue, the 2020-21 Beginners Brochure, or to simply find out about more about Stampin’ Up! contact me.
In the meantime, wherever you are in the world, stay safe, stay calm…and keep on crafting xxx
Welcome to week 5 of the Art With Heart “Heart Of Christmas” blog hop.
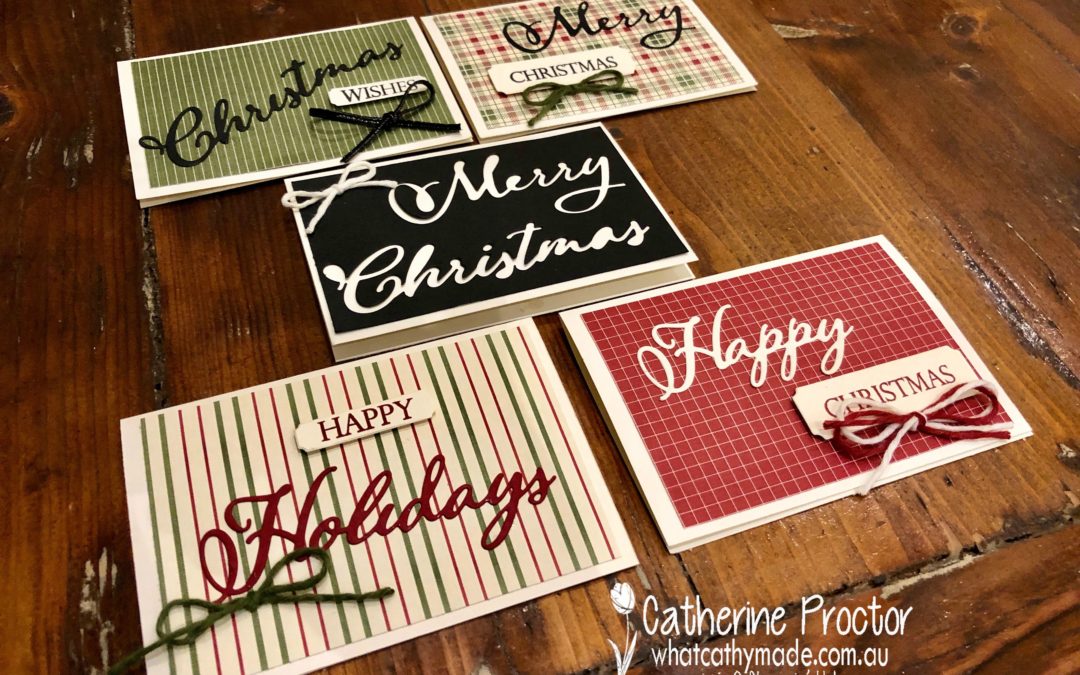
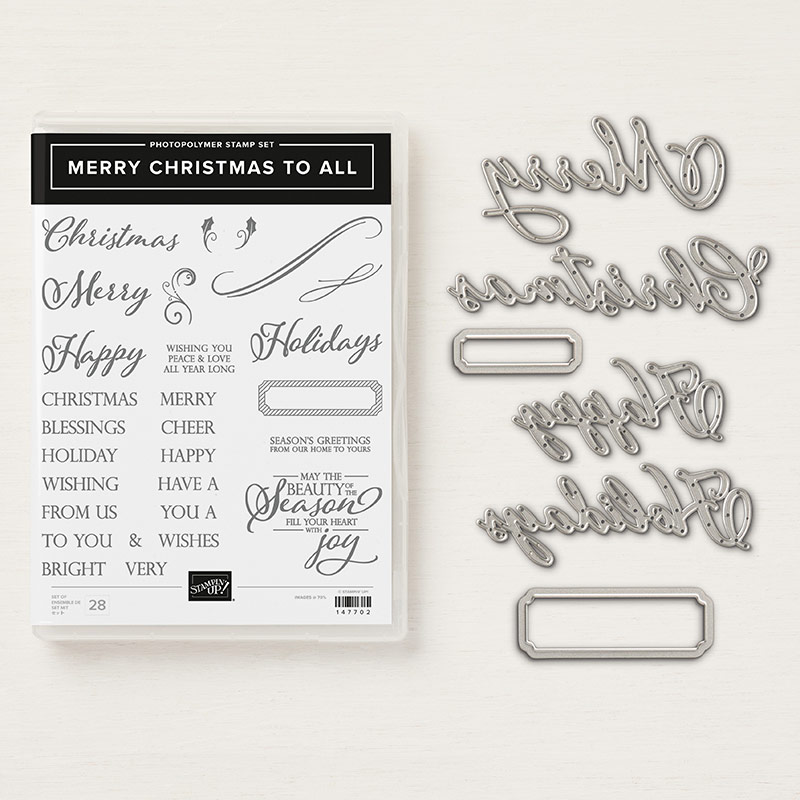
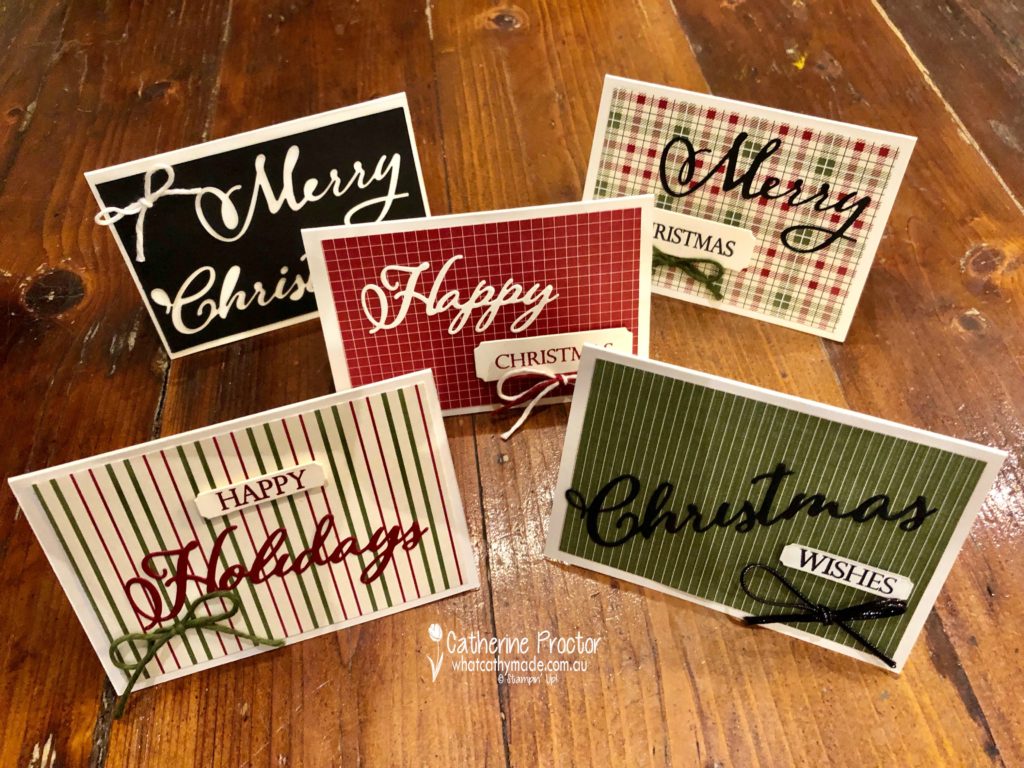
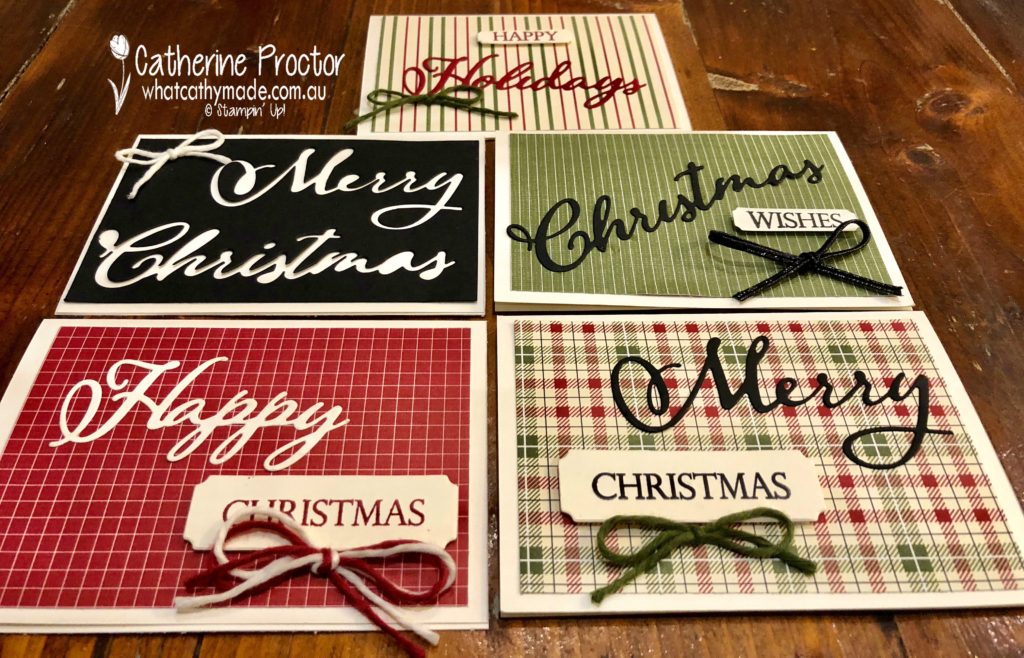
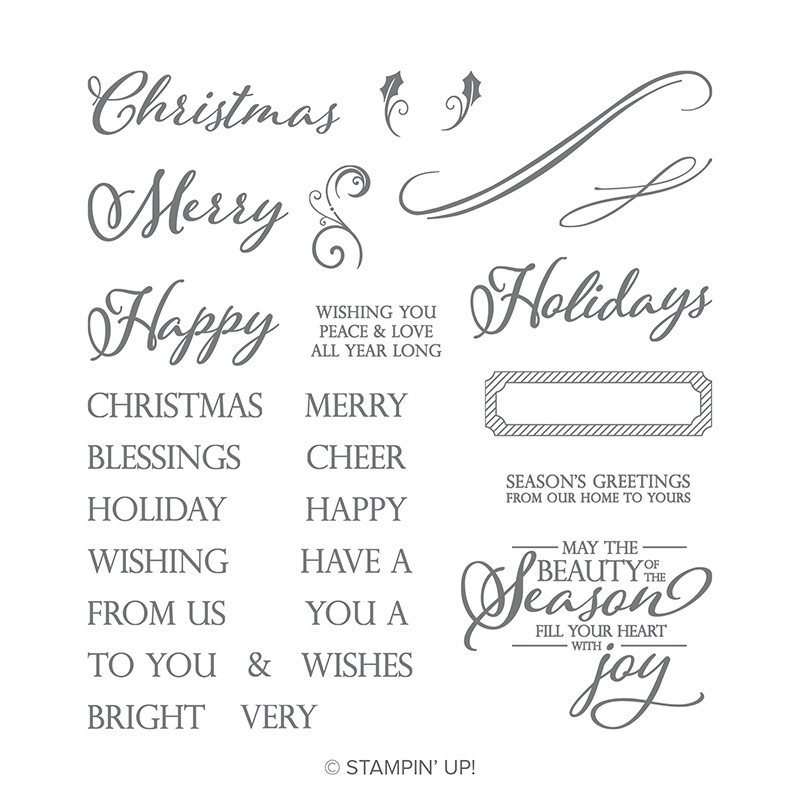
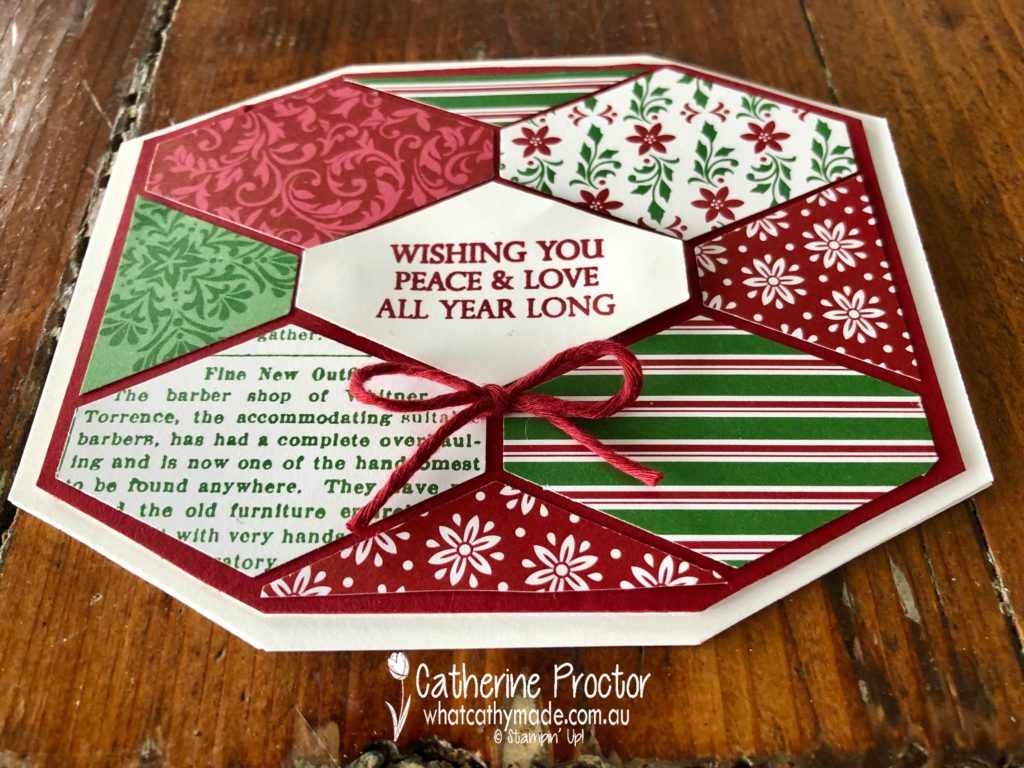
Tonight I’ve used a bundle from the new Holiday Catalogue called “Merry Christmas to All”. This is a great text-heavy set that works really well to feature DSP or can even be used on its own. There are so many possible word combinations with the dies and the stamps in this bundle.
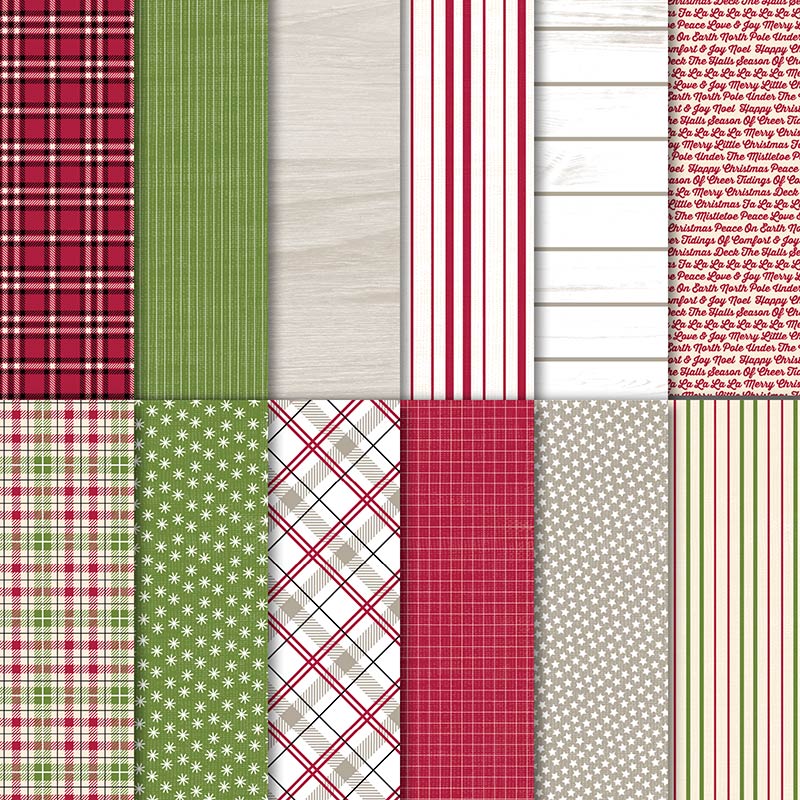
I’ve used this set with the gorgeous Festive Farmhouse DSP to make a set of classic masculine Christmas cards that show just some of the many combinations of words you can make by mixing up these dies and stamps.
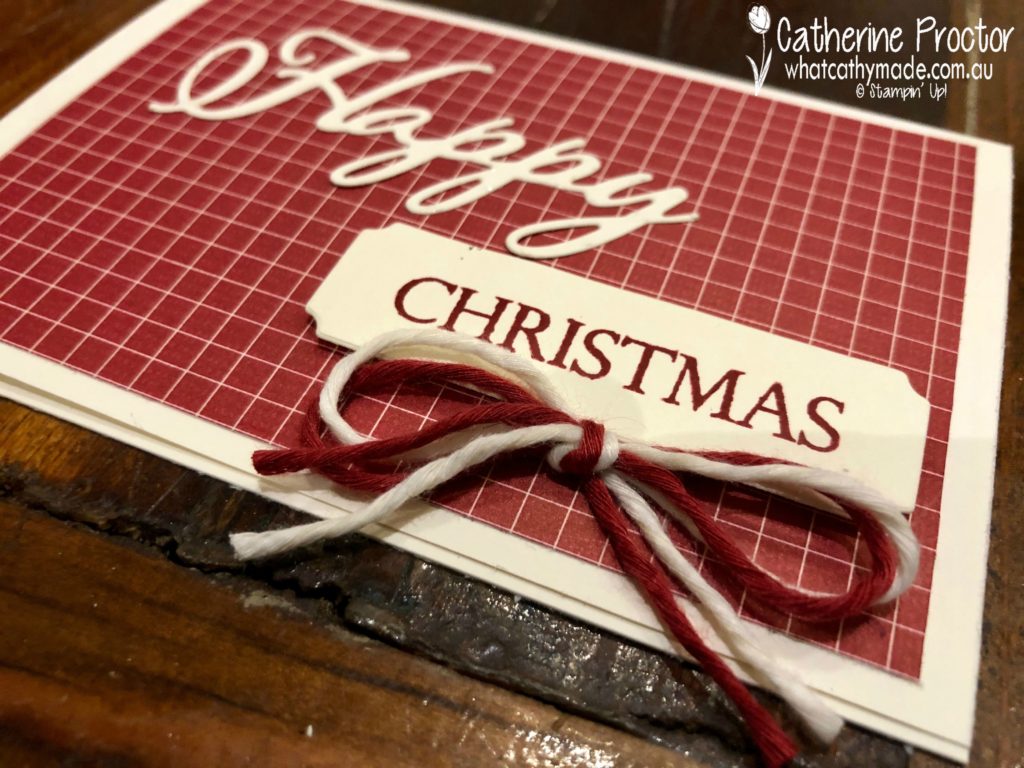
Card one features the gorgeous Cherry Cobbler and Very Vanilla together. I love this colour combo.
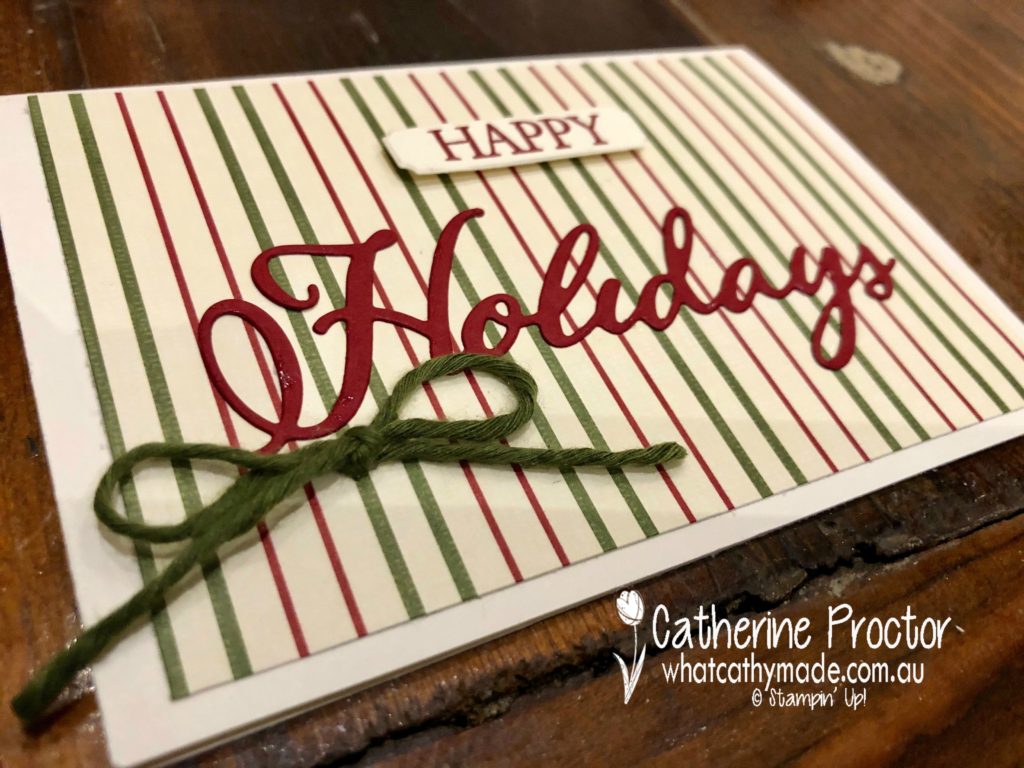
Card two “Happy Holidays” is a lovely striped DSP that also has Mossy Meadow in the colour mix.
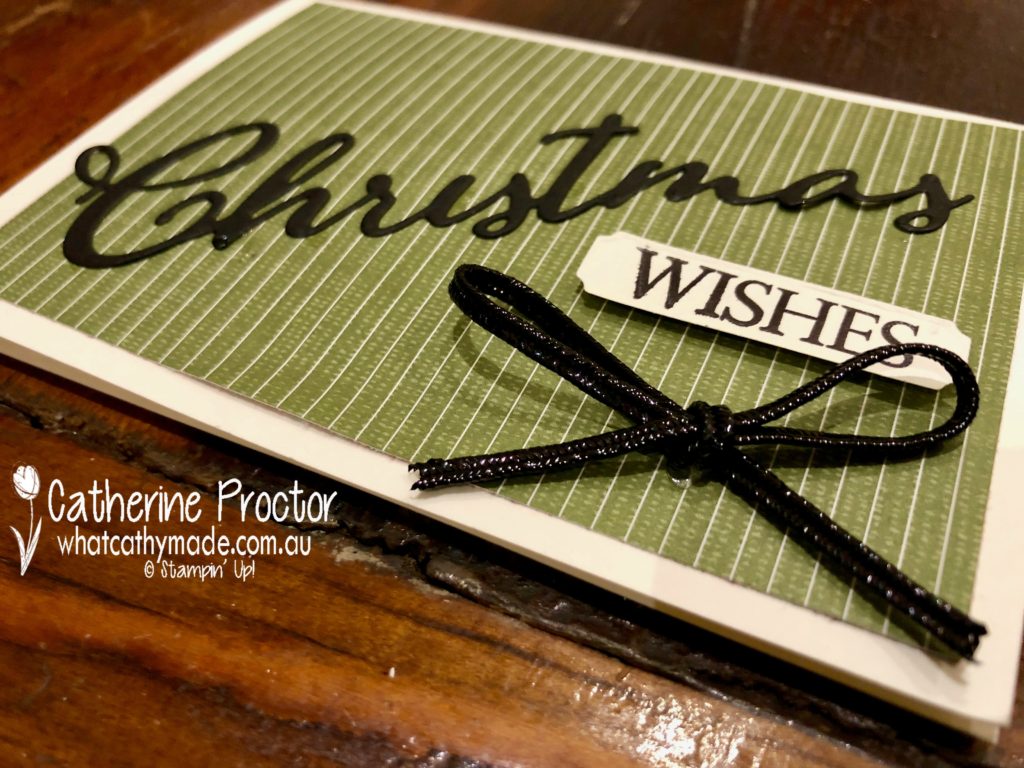
Card three “Christmas Wishes” is another stripe, this time in Mossy Meadow and Whisper White, with black text and a black bow.
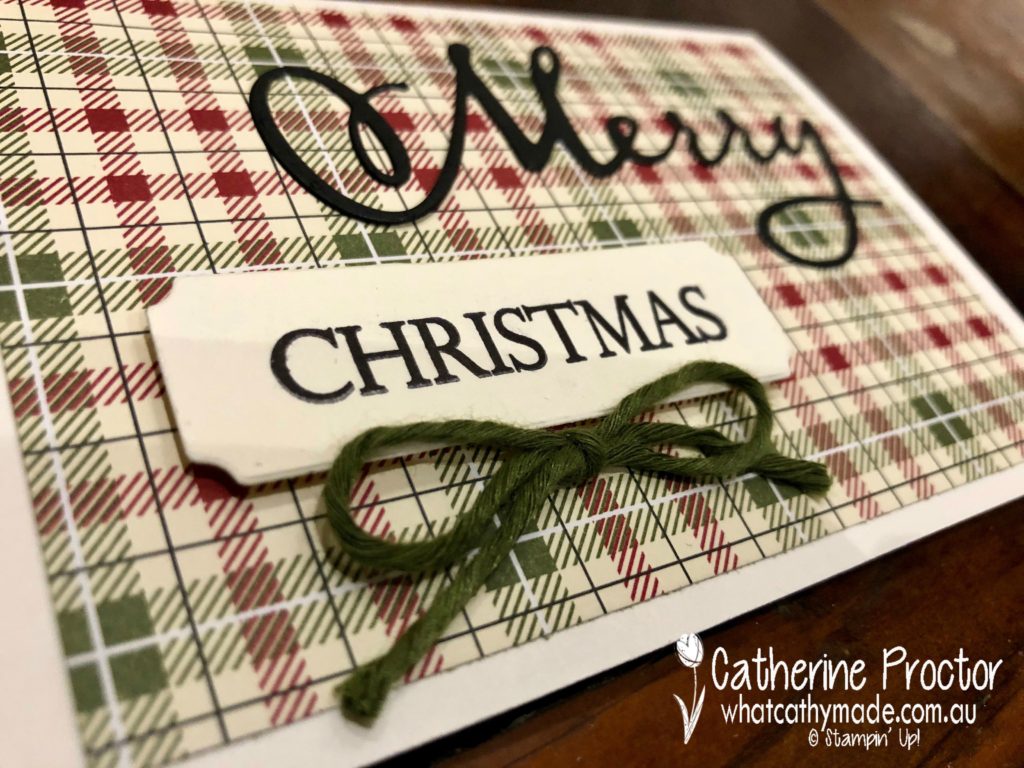
Card four “Mery Christmas” is a lovely traditional Christmas check, topped with a Mossy Meadow bow.
And finally, card five is made from the negative cardstock after I die cut the Basic black cardstock…a very happy accident that reminds me how well Very Vanilla and Basic Black go together.
There are so many more lovely patterns in this DSP pack, I could have made a lot more of these cards, but I decided to just use the DSP patterns that worked better with a Very Vanilla base.
These cards were ridiculously easy to make and I really love their classic, farmhouse feel.
The final touch for my cards were simple bows made from the Cherry Cobbler, Mossy Meadow and Very Vanilla Twine in the Festive Farmhouse Cotton Twine pack. I also used some of the Black 1/8″ (3.2 Mm) Cord.
To see what the rest of the AWH team have made head back to the lovely Claire Daly’s blog.
To purchase any of the products I used in this project you can shop with me here.
You can order the new products from the holiday catalogue NOW!
Contact me if you’d like to receive a free copy of the holiday catalogue.
Welcome to week 4 of the Art With Heart “Heart Of Christmas” blog hop.
Today’s a very exciting day because the Stampin’ Up Holiday Catalogue is released today!
There are some stunning papers in this catalogue but for my project today I’m featuring a new Christmas Designer Series Paper that you might otherwise overlook because it is not in the Holiday Catalogue.
This paper is called the Dashing Along DSP, and it’s a free paper that you can earn when you host a party. Here are the details.
And here’s my card featuring all of the lovely Dashing Along DSP.
Punches are a quick and easy way to create cards, and today I’ve used the Tailored Tag punch to make a card that shows you all of the patterns in the Dashing Along DSP.
The colours in the DSP are Cherry Cobbler, Garden Green and Whisper White, so I mounted my punched out DSP onto some Cherry Cobbler cardstock, and them onto a Whisper White card base.
The sentiment in the middle of the card is stamped in Cherry Cobbler from a fabulous new stamp set called Merry Christmas to all. It even comes with a matching set of dies.
The final touch for my card is a simple bow made from the Cherry Cobbler Festive Farmhouse Cotton Twine. You also get a roll of Mossy Meadow and Very Vanilla Twine in this pack.
To see what the rest of the AWH team have made head back to the lovely Claire Daly’s blog.
To purchase any of the products I used in this project from the annual catalogue you can shop with me here.
You can order the new products from the holiday catalogue NOW!
Contact me if you’d like to receive a free copy of the holiday catalogue.
Welcome to week 3 of the Art With Heart “Heart Of Christmas” blog hop.
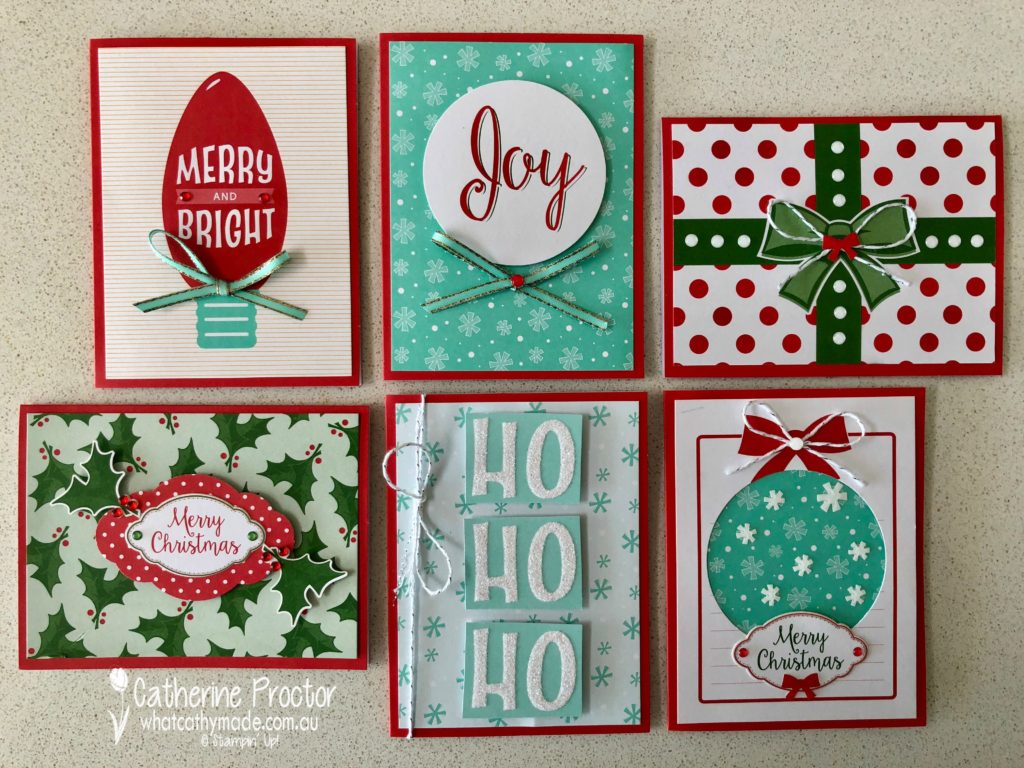
Stampin’ Up!’s Santa’s Workshop Memories & More Card Pack make it so quick and easy to create professional-looking Christmas cards…in fact, it is so easy I’m almost embarrassed to claim creative credit for these cards.
Luckily, I did a little creative cutting and embellishing to make these cards my own design, but even so, I still managed to make 6 cards in less than 30 minutes!
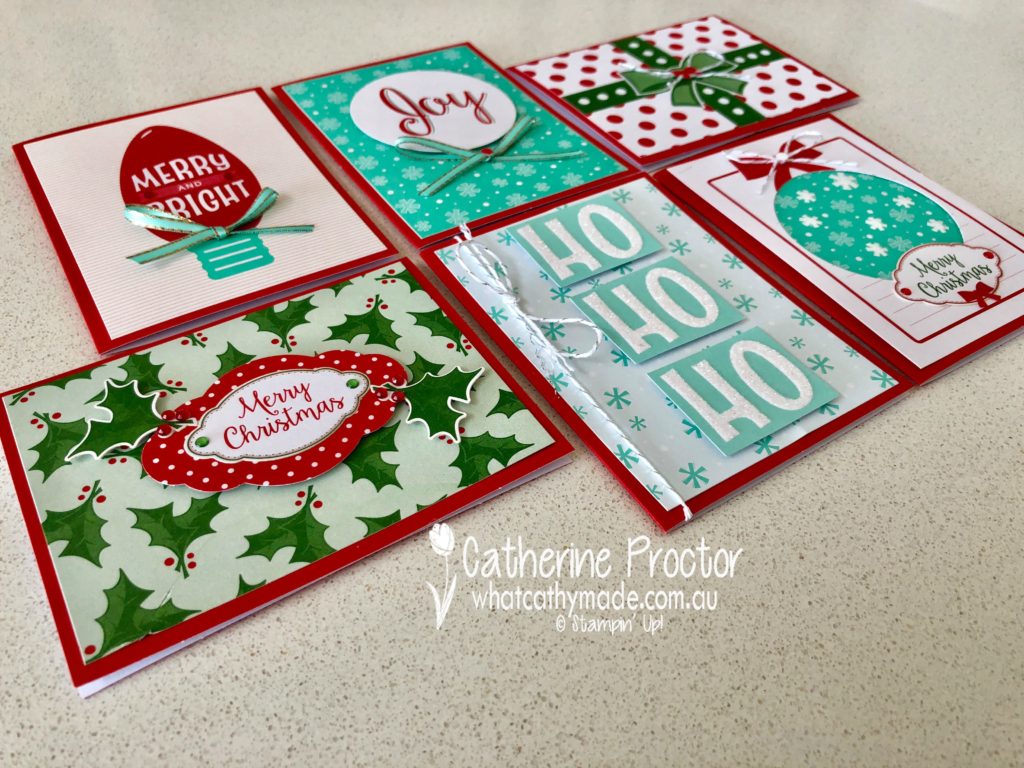
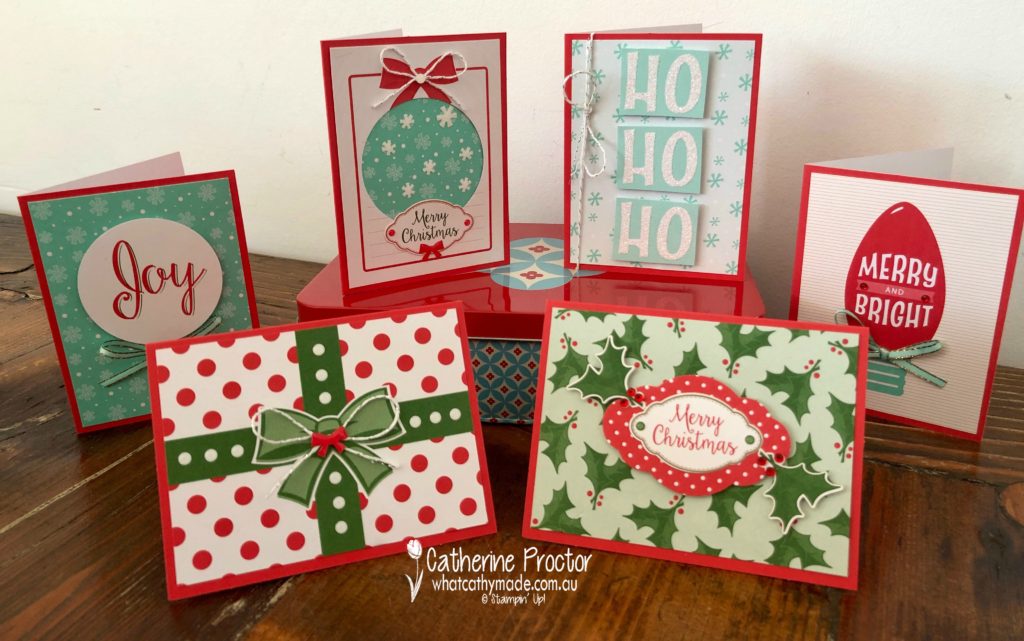
And as if Stampin’ Up haven’t made it easy enough already with 50 pre-printed cards suitable for both scrapbooking and card making, this year they’ve also released the co-ordinating Santa’s Workshop Memories & More 20 cards in two sizes (with matching envelopes) in Poppy Parade, which I’ve used to make my cards this week.
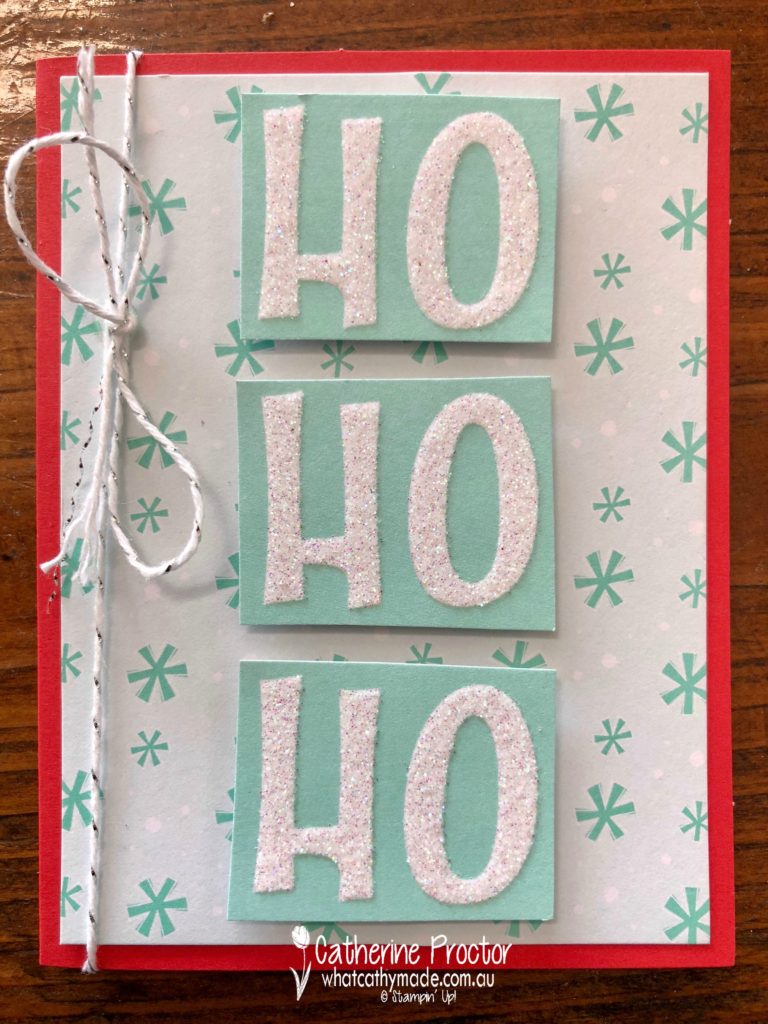
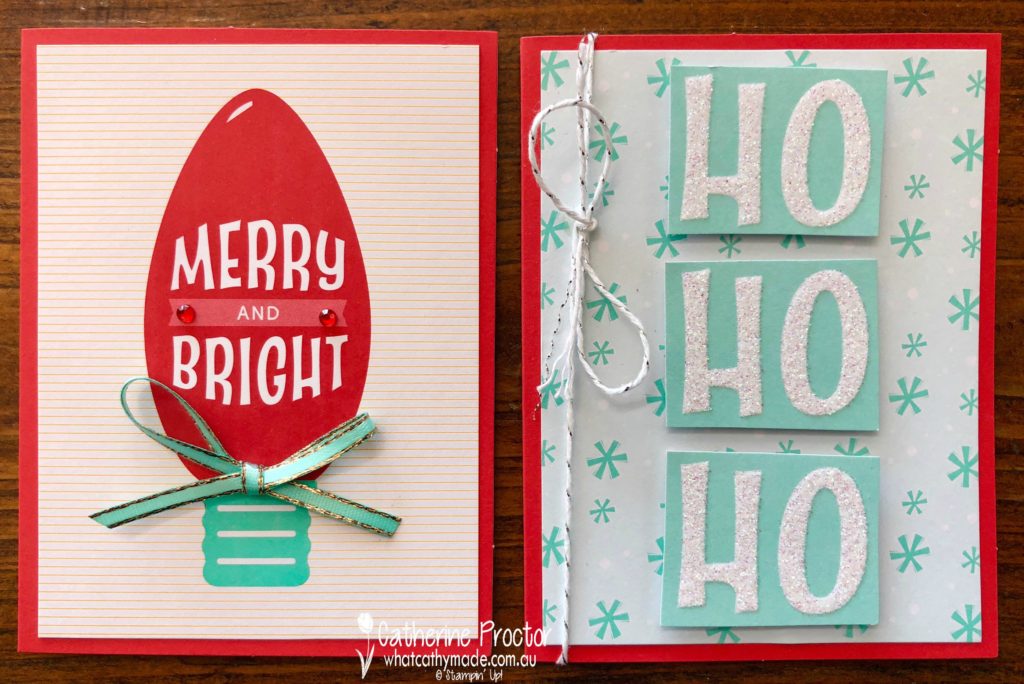
How gorgeous do the colours Poppy Parade and Coastal Cabana look together? For my first card below, I used one of the smaller Memories & More cards as the background and then chopped up the frosted glittery “ho ho ho” from one of the larger Memories & More cards to mount on top. Silver and white bakers twine complete the card.
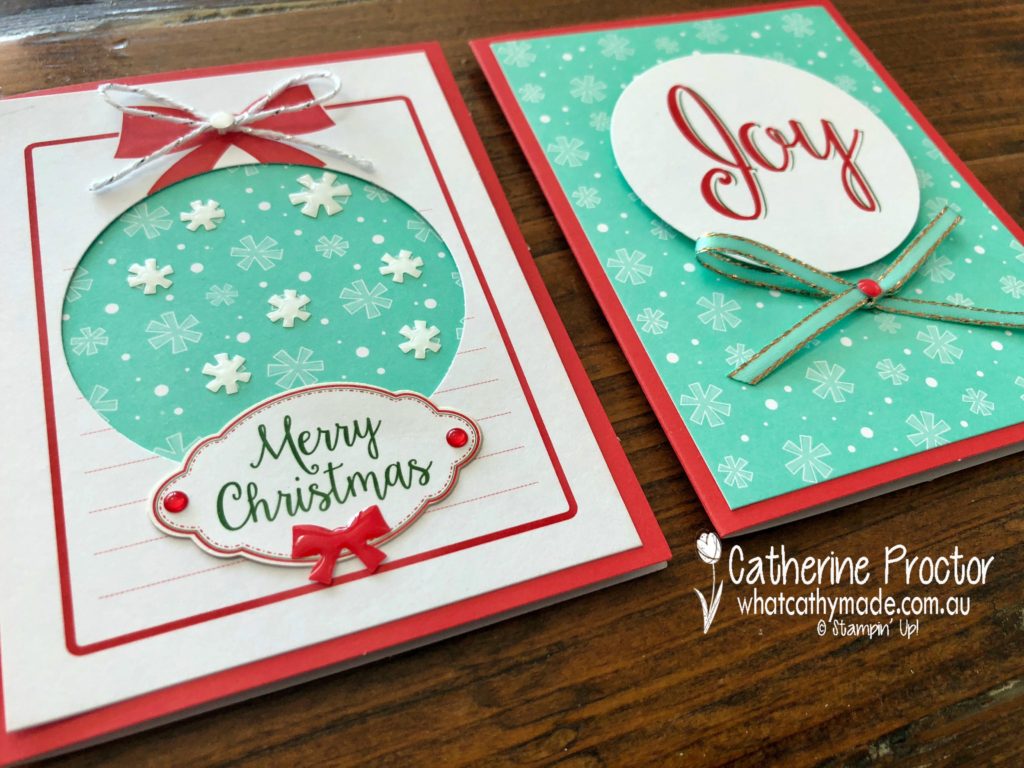
My next 2 cards use a Coastal Cabana background card and the same card on top. I used my largest Stampin’ Up! punch to punch the word joy out of the Memories & More card and mounted it onto the card on the right, then flipped over the card and used the reverse side and negative image for the card on the left, embellished with some Santa’s Workshop enamel shapes and stickers from the Memories & More card pack.
For my “Merry Christmas” card below I used my Pretty Label punch to punch out a red and white spotted memories & more card as an extra layer under the “Merry Christmas” sticker, then I added two holly stickers and some red rhinestone jewels. The top card also features a dotty card to which I added further dots, using white Santa’s Workshop enamel shapes to embellish the green bow.
And finally, how cute is this “Merry and Bright” Memories & More card? All it needed was a couple of red rhinestone jewels and a bow of Coastal Cabana ribbon to add a little extra bling.
To see what the rest of the AWH team have made head back to the lovely Claire Daly’s blog.
To purchase any of the products I used in this project from the annual catalogue you can shop with me here.
You can order the new products from the holiday catalogue from September 5, or if you join as a demonstrator you can order them now…contact me if you’d like to find out more or receive a free copy of the holiday catalogue.
Welcome to week 2 of the Art With Heart “Heart Of Christmas” blog hop.
Claire Daly began this weekly Christmas blog hop for the first time last year, and it was so inspiring for everyone involved she’s decided to do it again this year. Thank you, Claire!
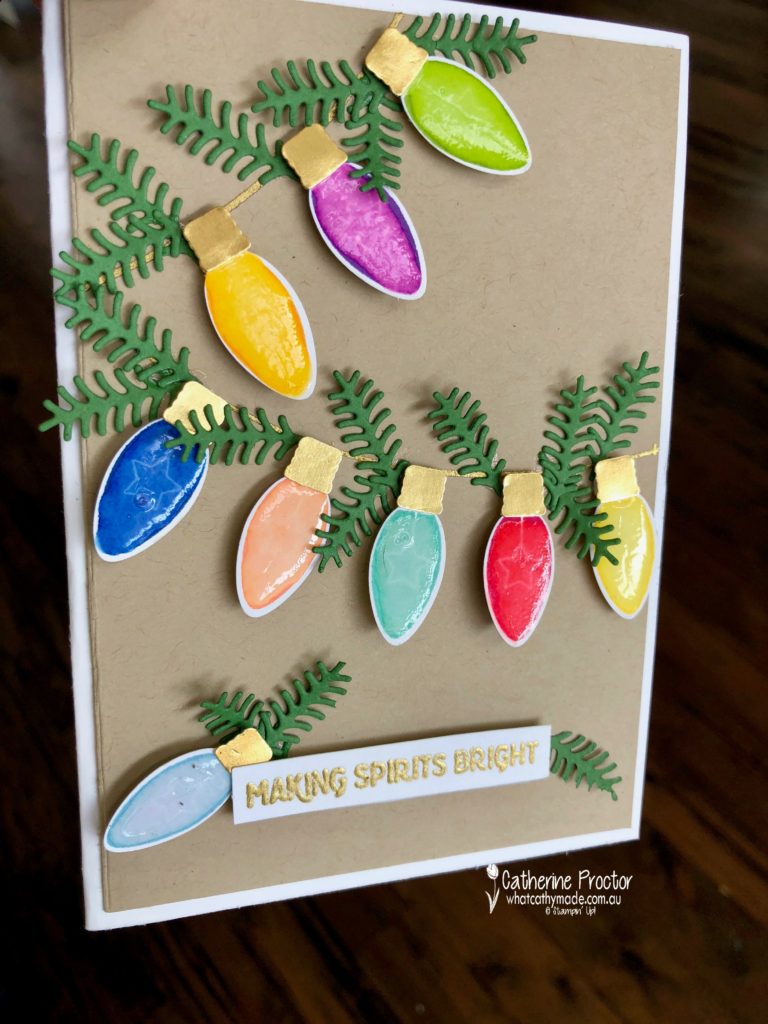
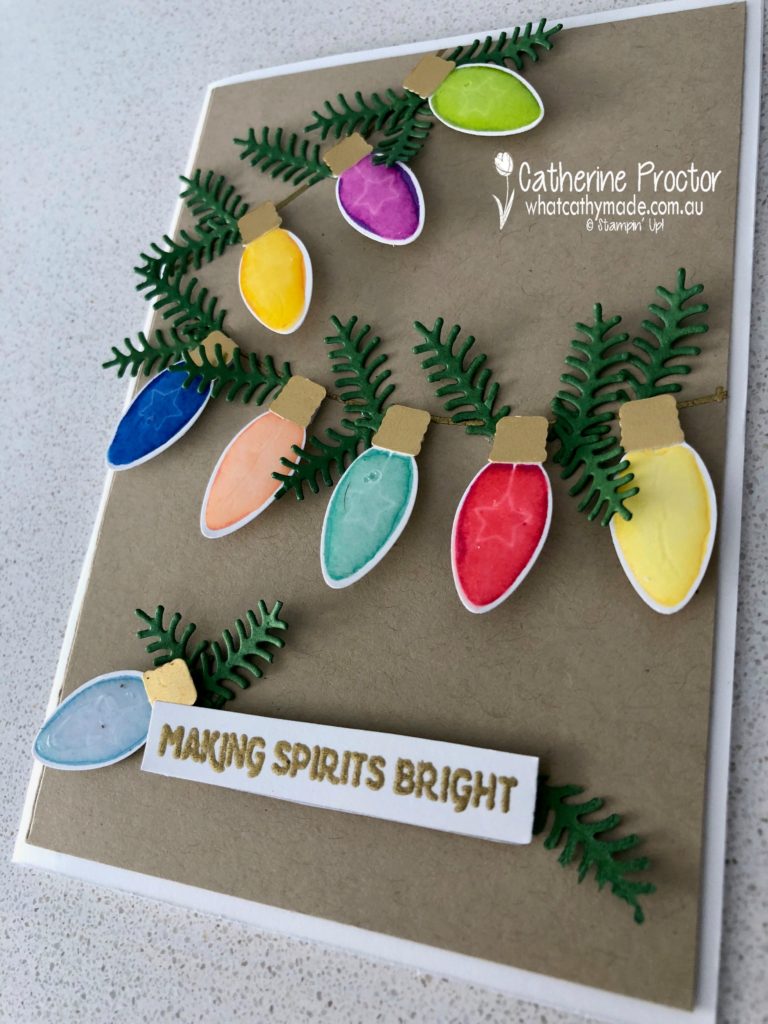
Boy oh boy, I love twinkling lights and lanterns at any time of the year, but especially at Christmas time.
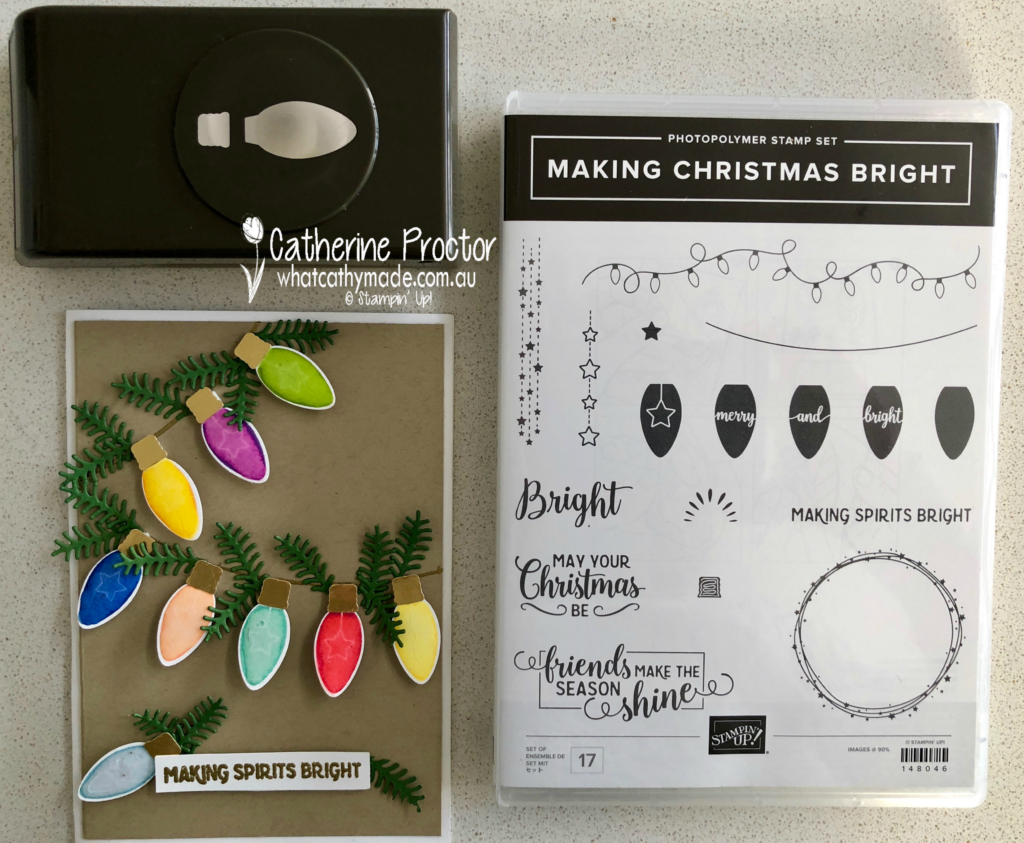
So when I saw this new punch bundle in the upcoming the Holiday Catalogue it went straight to the top of my wishlist!
The Making Christmas Bright bundle has so much possibility and versatility…I just know I’ll be making a lot of cards with this set.
I’m particularly excited about the card I’ve made today because it uses a technique I’ve been wanting to try for a long time, but I have to confess i don’t actually know the name of this technique, LOL!
So, I’ll just call it the fine tip glue technique for want of a better term.
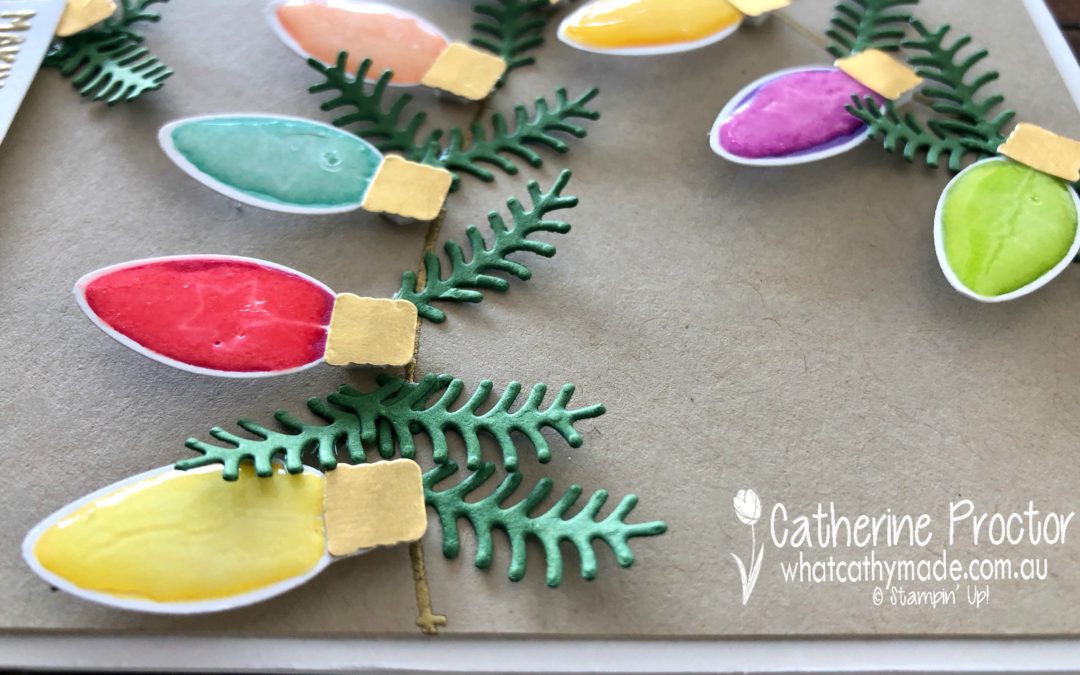
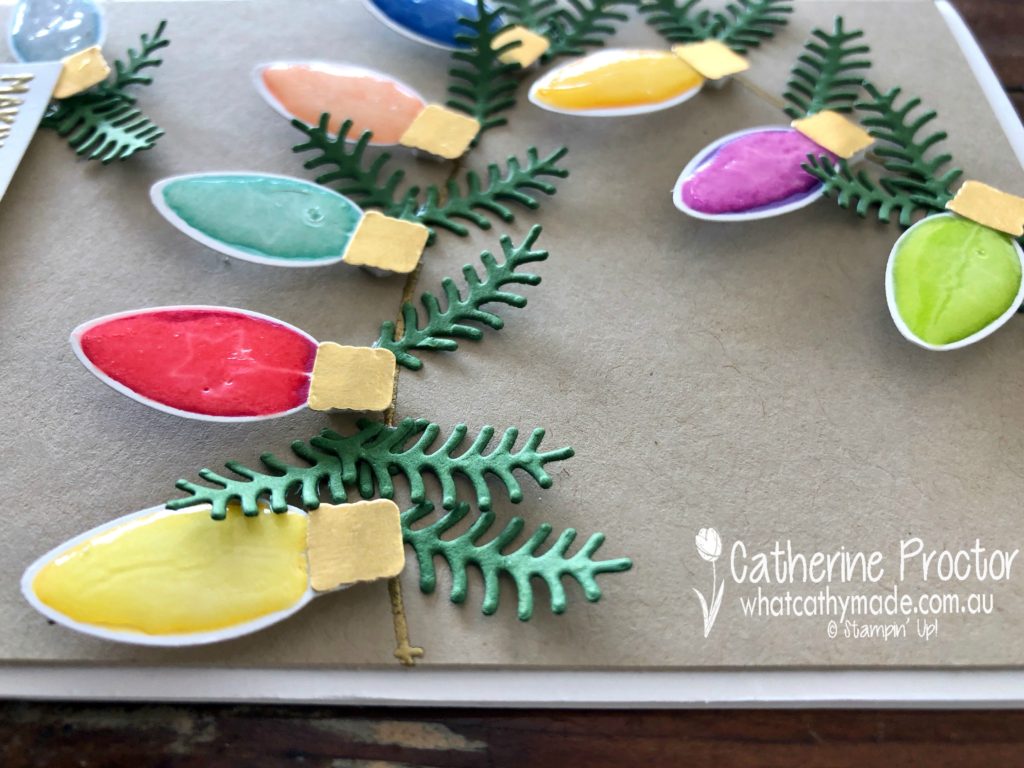
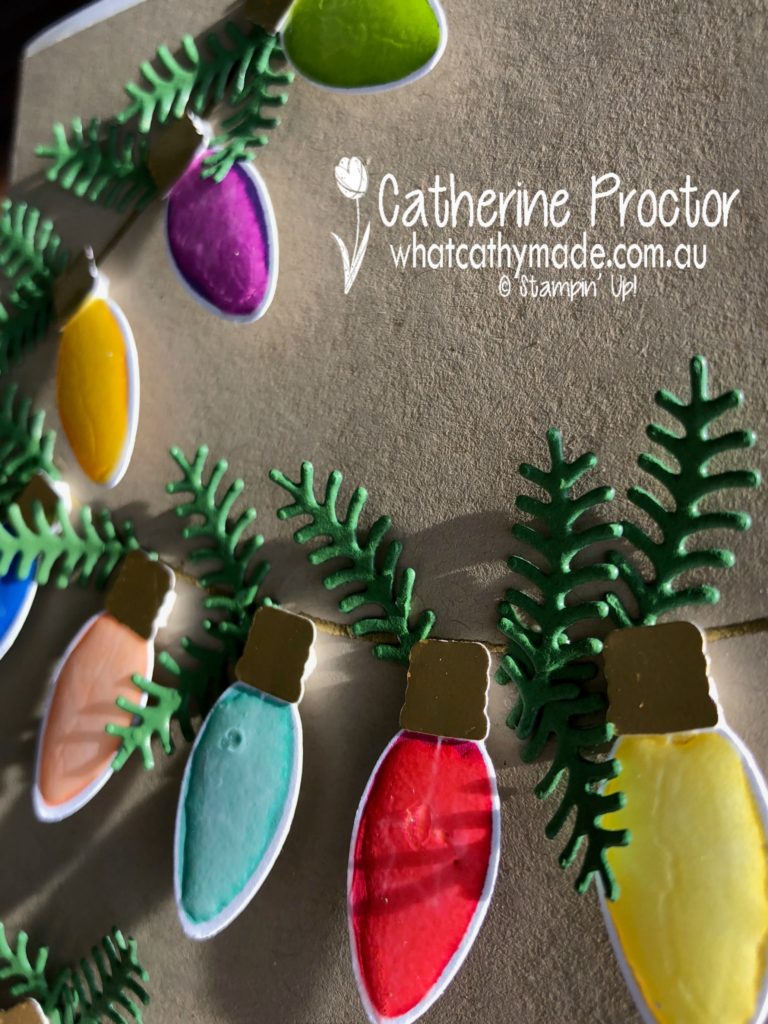
This is such an easy technique and so perfect for this bundle because it really makes the Christmas lights look shiny like glass. Here’s a close-up side angle to give you a better look.
After stamping the light bulbs in assorted colours and punching them out with the Christmas Bulb builder punch I simply covered the images with a thin layer of Stampin’ Up! fine-tipped glue and left them to dry.
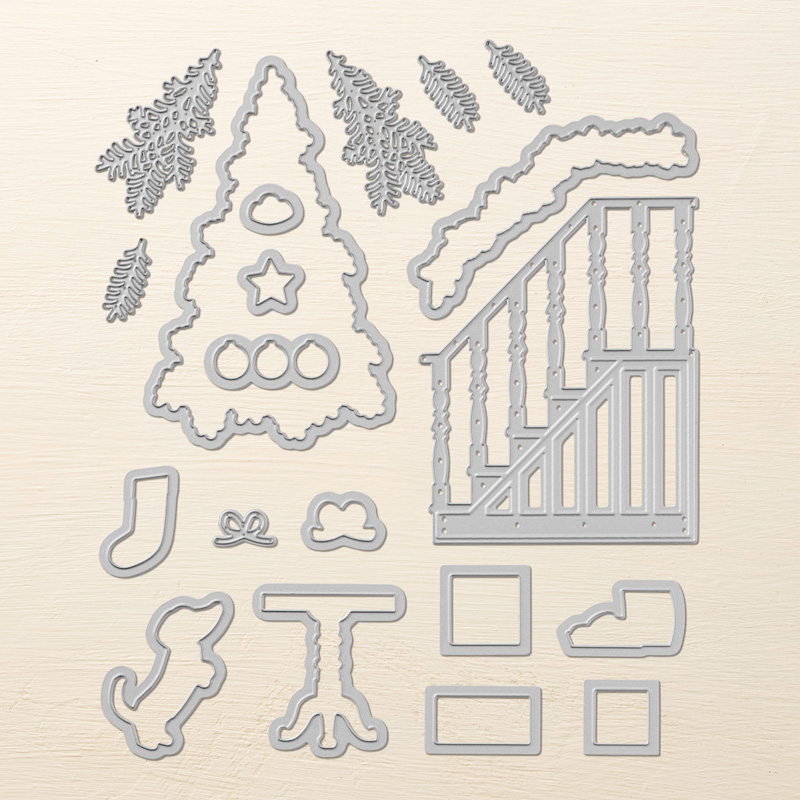
The base of the light bulbs were punched out of gold foil, and the pine needles were die cut from Garden Green cardstock using the Christmas Staircase dies. There are three of these pine needle branches in the set, which makes die cutting them out so quick and easy.
Crumb Cake cardstock was the ideal neutral card base to make all of these colours pop, and I heat embossed the gold strand the lights are hanging from (there’s a stamp for this in the Making Christmas Bright stamp set but it’s hard to see on my card under the pine needles and bulbs) as well as the “Making Spirits Bright” sentiment.
The final touch was to use mini dimensionals to adhere my light bulbs and make them really pop.
To see what the rest of the AWH team have made head back to the lovely Claire Daly’s blog.
To purchase any of the products I used in this project from the annual catalogue you can shop with me here.
You can order the new products from the holiday catalogue from September 5, or if you join as a demonstrator you can order them now…contact me if you’d like to find out more or receive a free copy of the holiday catalogue.

")


 Crinkled Seam Binding Ribbon")