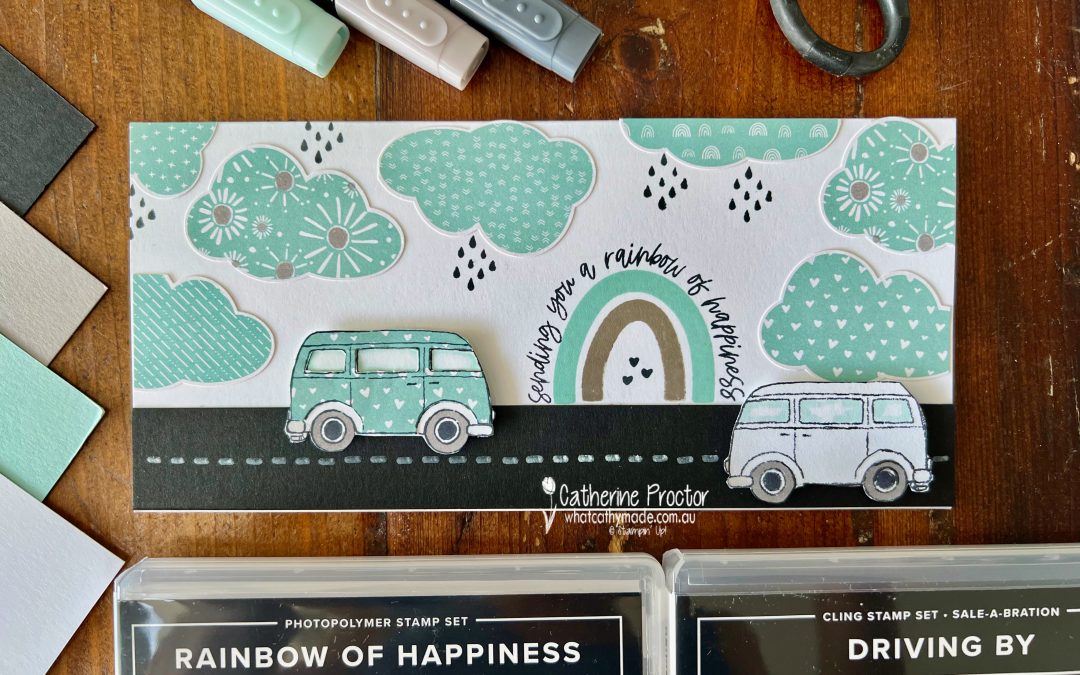
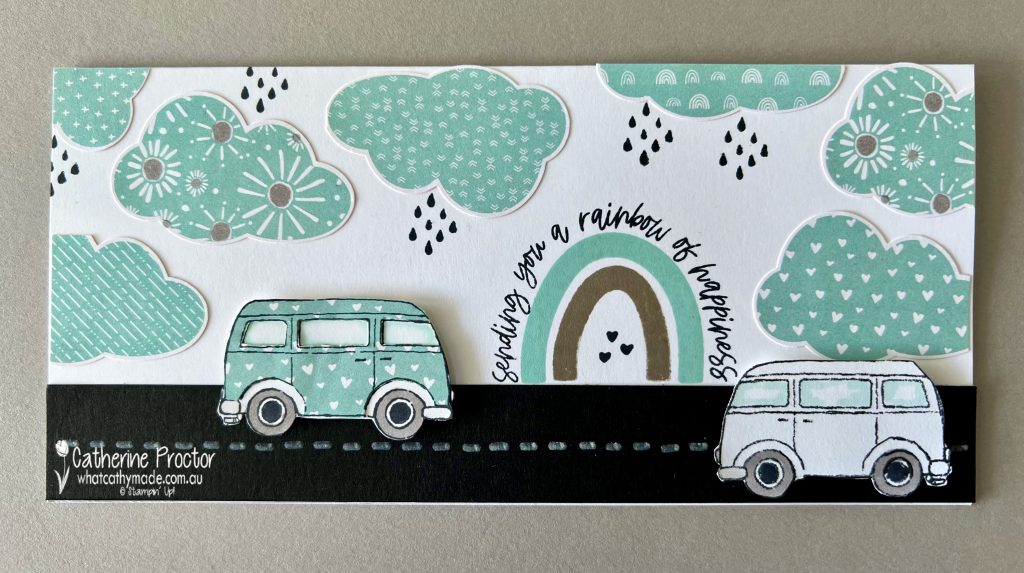
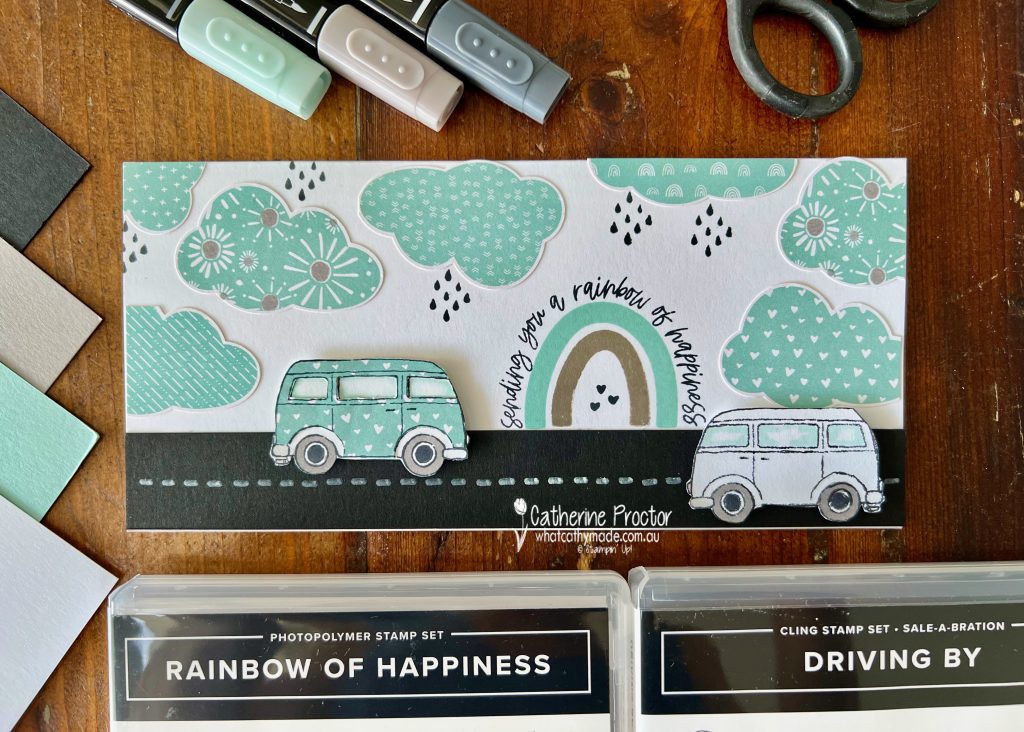
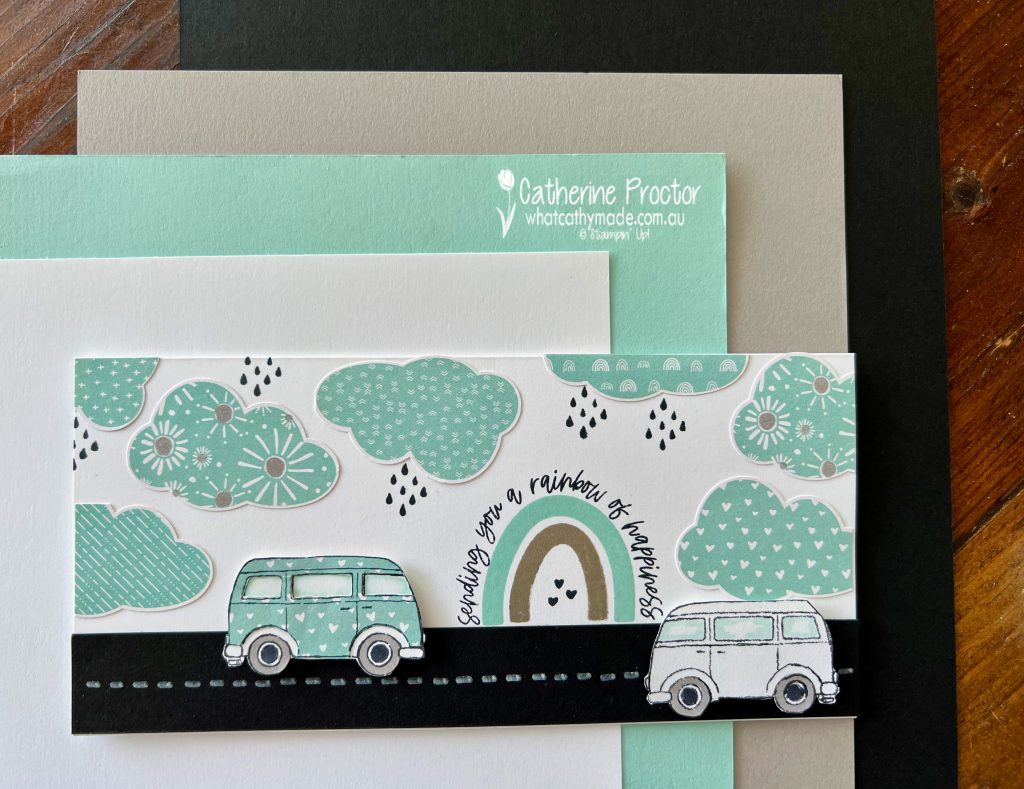
Today I’m joining in the #CTC353 challenge, which is to CASE (Copy And Share Everything) the 2022 Sale-a-bration Catalogue. I decided to CASE this card on page 2 of the 2022 Sale-a-bration Catalogue.
Although I CASED the slimline format, the rainbows and the Pool Party/Basic Black/Basic White colour combination, my card ended up looking very different to the card I CASED!
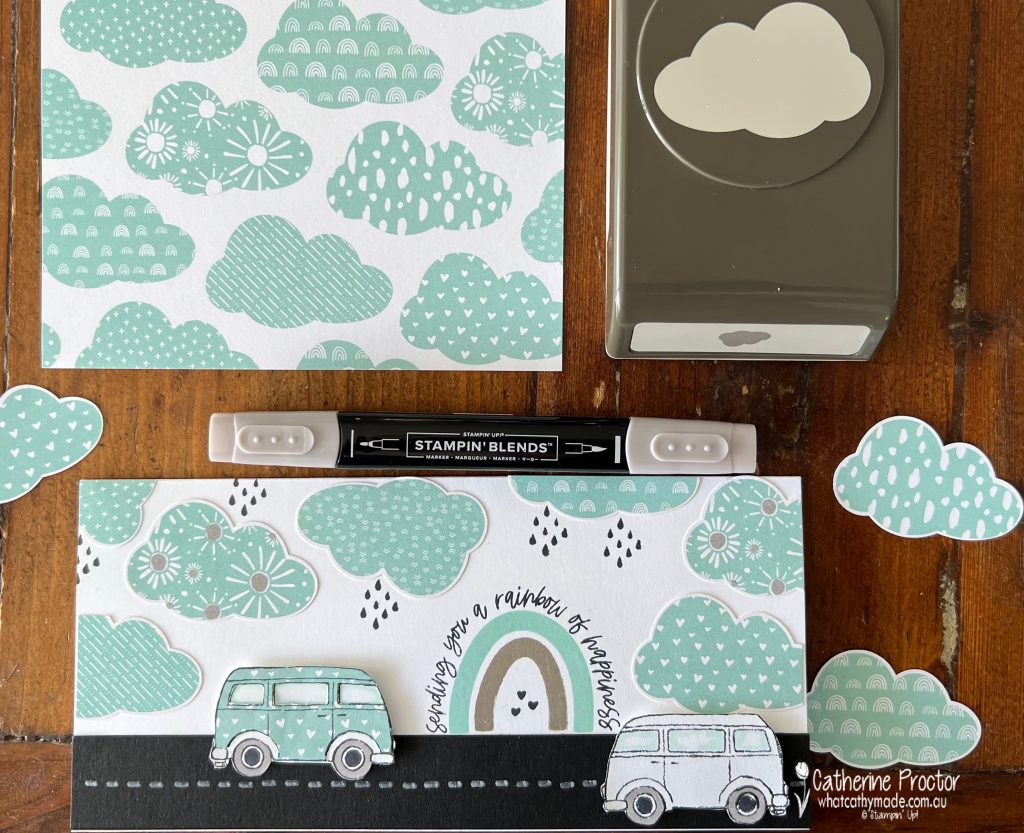
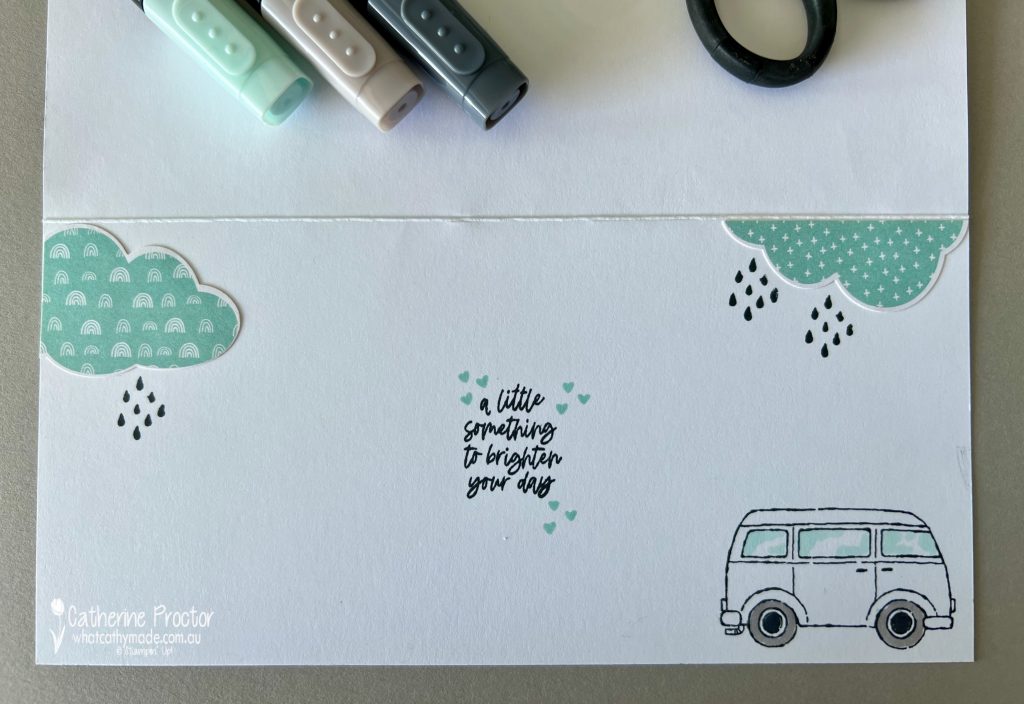
When my order arrived this week I realised that this FREE Sunshine and Rainbows SALE-a-bration DSP has a DSP design that co-ordinates with the new Cloud punch – how cool is that!
I wanted to use as many of these gorgeous clouds as possible on my card so I didn’t waste the partial clouds on the edges of the DSP. I punched these clouds out too and used them on the sides and the top of my card. I also used my Gray Granite Stampin’ Blend! to colour in some of the clouds.
As well as the FREE Sunshine and Rainbows SALE-a-bration DSP I used another SALE-a-bration product on this card – the adorable “Driving By” Stamp set.
This FREE stamp set is the perfect set to try two awesome stampin’ techniques: reverse stamping and paper piecing. I’ve paper pieced the combi van on the left using a different Pool Party DSP from the Sunshine and Rainbows DSP and then I used my silicone mat to the reverse the combi image so I could have the other combi travelling in the other direction on the other side of the road.
The road is a 1″ strip of Basic Black cardstock – the road lines are hand drawn using the Chalk Marker.
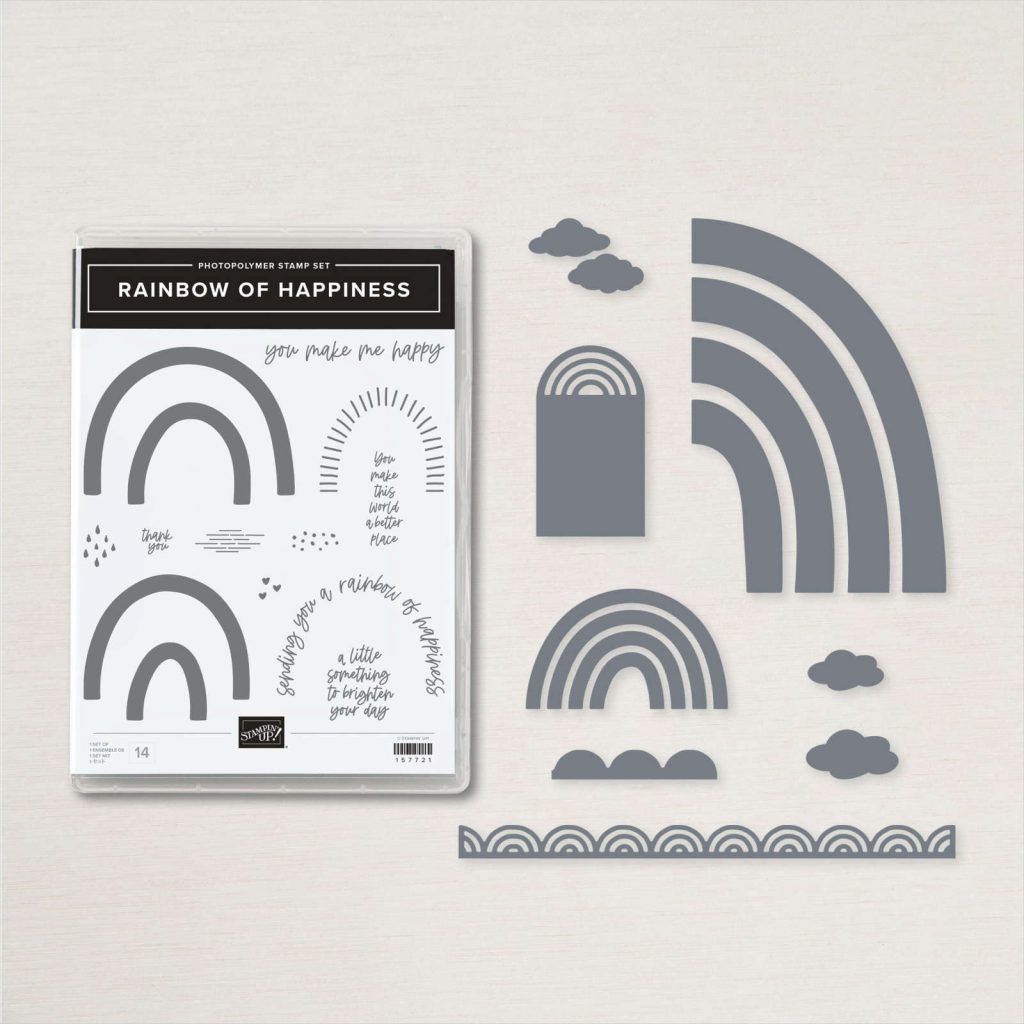
The Sunshine and Rainbows DSP coordinates with the Rainbow of Happiness bundle.
I’ve used the “Rainbow of Happiness” stamp set from this bundle to stamp my rainbow in non-traditional colours to match the DSP clouds and the road: Basic Black, Pool Party and Gray Granite.
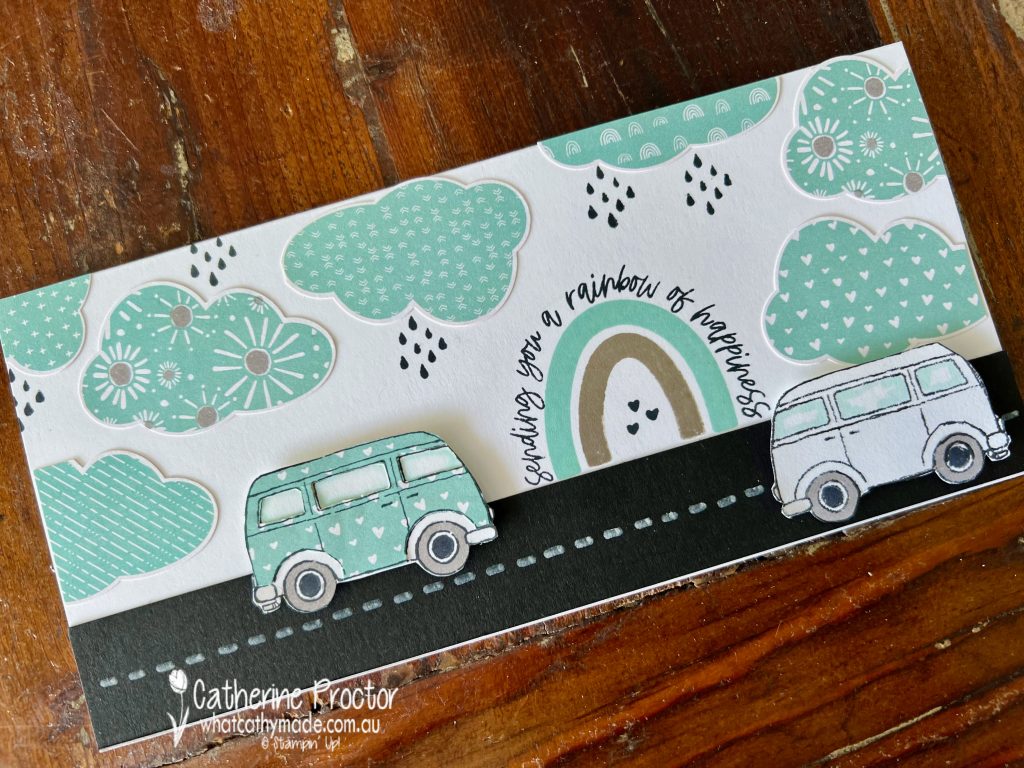
I used some more of the partial clouds to decorate the inside of the card and couldn’t resist adding another little combi van, this time stamped directly onto my card.
To purchase any of the products featured in today’s post, click on the links below or go to my Stampin’ Up! Online Store
If you’d like me to post you your very own copy of the 2022 Sale-a-bration Catalogue, the January – June 2022 Mini Catalogue, the 2021-22 Stampin Up! Annual Catalogue or to simply find out about more about Stampin’ Up! contact me.
I’ll be back on Wednesday night with the AWH Colour Creations team and we will be showcasing Pear Pizzazz.
In the meantime, wherever you are in the world, stay safe, stay calm…and keep on crafting xxx
It’s been a very long time since I joined the CASEing the Catty challenge so I’m excited to play along again this week. The #CTC351 challenge is to case the 2022 Sale-a-bration Catalogue.
I decided to CASE this card on page 7 of the 2022 Sale-a-bration Catalogue.
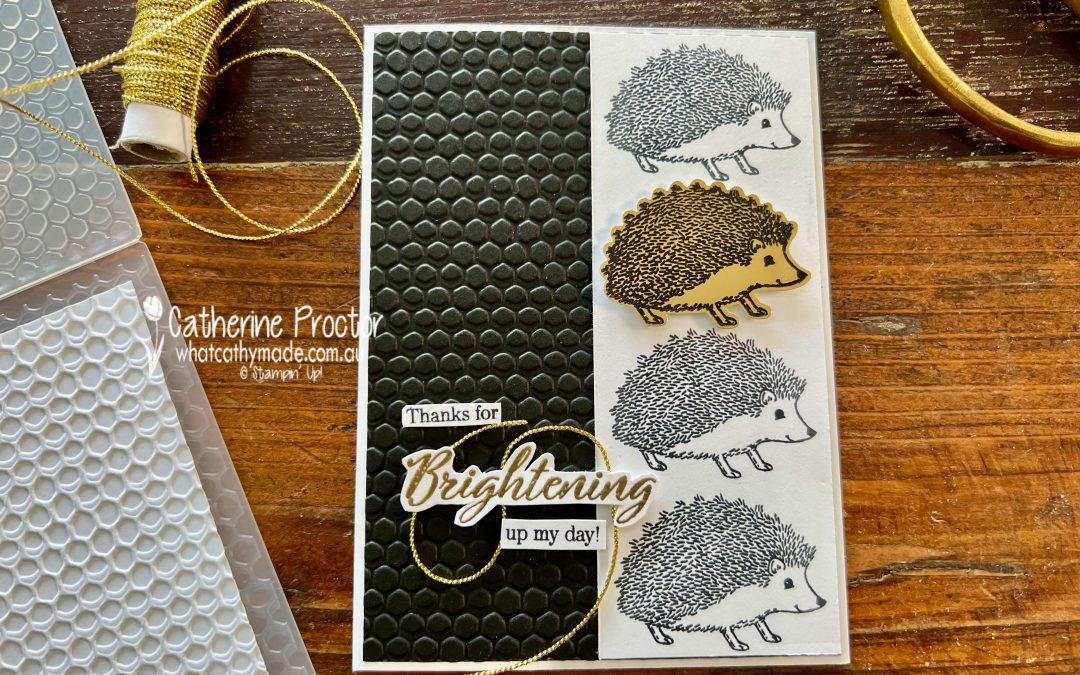
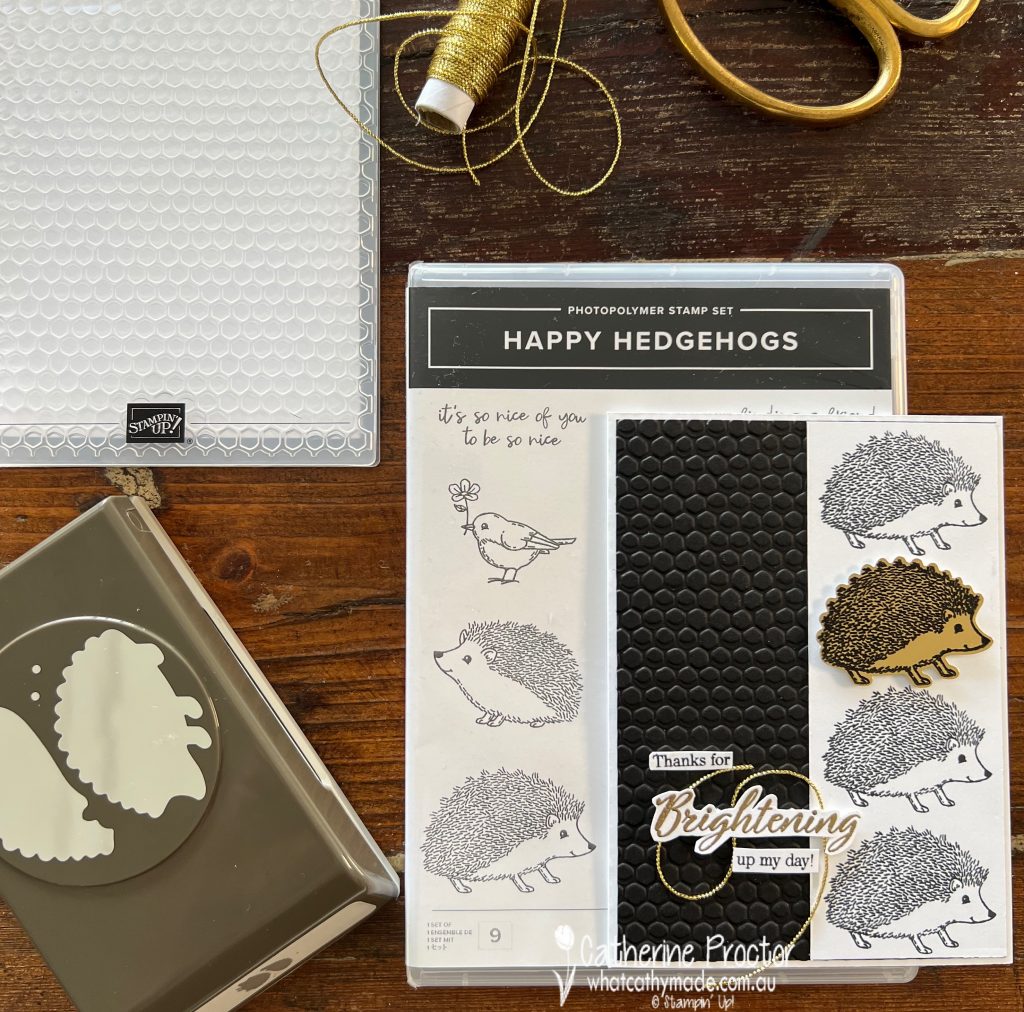
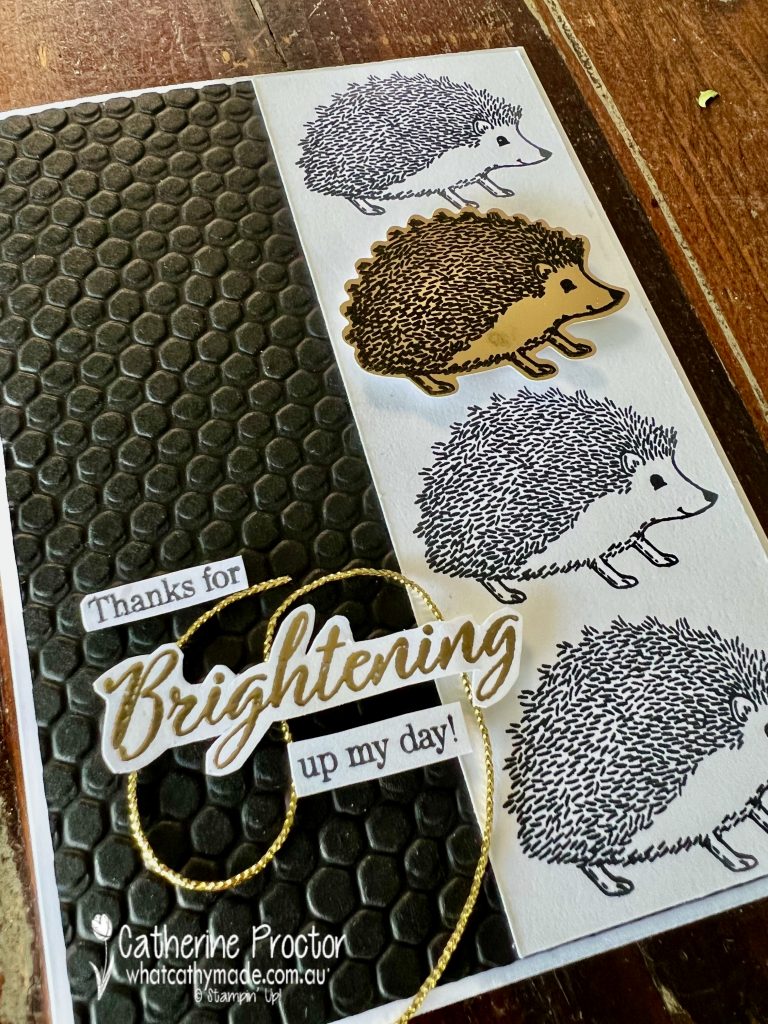
I’ve used two new products from the January – June Mini Catalogue for my CASE: the Happy Hedgehogs punch bundle and the Hive Embossing folder. I’ve also used a FREE SALE-a-bration product, the Special Moment stamp set.
I kept the layout and design very similar to the card I’m CASEing in the catalogue, basically changing the colours and the stamp set used.
The “Thanks for brightening up my day” sentiment from the Special Moments stamp set is the perfect sentiment for my bright and shiny gold hedgehog. He certainly brightens up what is otherwise a deliberately monochromatic card!
I used Black Stazon ink to stamp the hedgehog onto the gold foil and then punched the hedgehog out using the hedgehog builder punch.
The sentiment was stamped twice, once in Memento Black and one in Versamark ink that I then gold embossed to match the hedgehog. I fussy cut both sentiments using paper snips and adhered to the card with dimensionals.
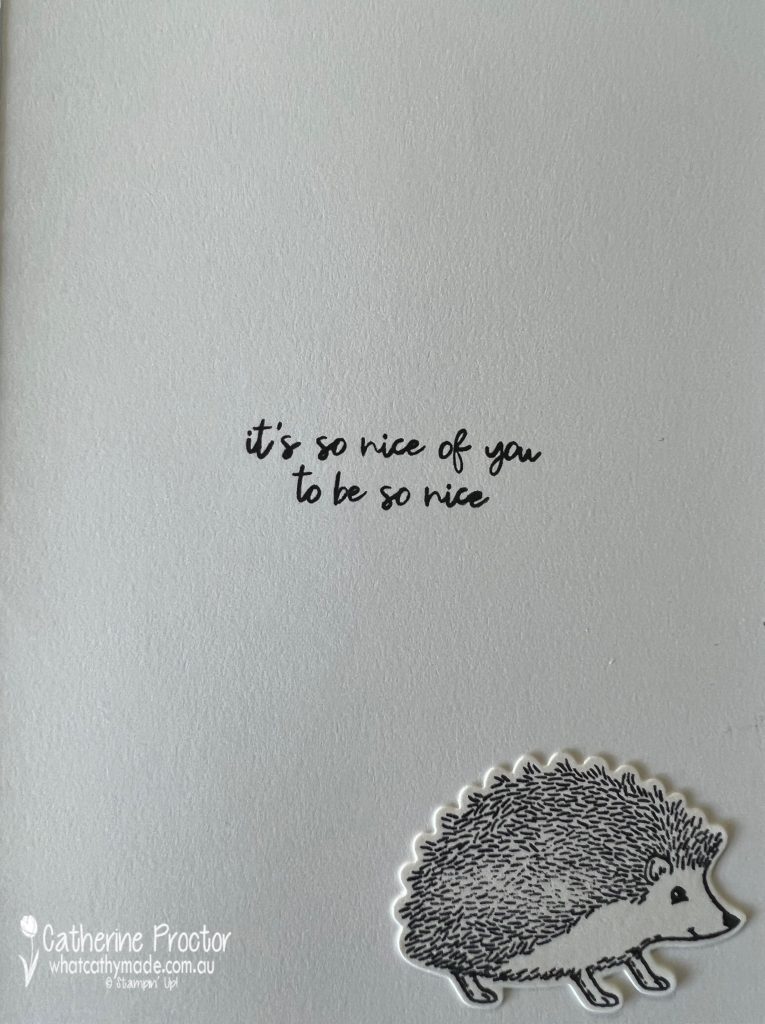
I didn’t forget the inside of the card either, using one of the sentiments from the Happy Hedgehogs stamp set. I think it works really well with the sentiment on the front of the card.
If you’d like me to post you your very own copy of the 2022 Sale-a-bration Catalogue, the January – June 2022 Mini Catalogue, the 2021-22 Stampin Up! Annual Catalogue or to simply find out about more about Stampin’ Up! contact me.
I’ll be back on Wednesday night with the AWH Colour Creations team and we will be showcasing Old Olive.
In the meantime, wherever you are in the world, stay safe, stay calm…and keep on crafting xxx
Hello crafters – welcome to our last AWH Heart of Christmas blog hop for 2021! I’ve loved being inspired by the incredible creations in our Art with Heart Team.
With less than four weeks to Christmas have you got all your Christmas cards made yet? Have you even started yet?
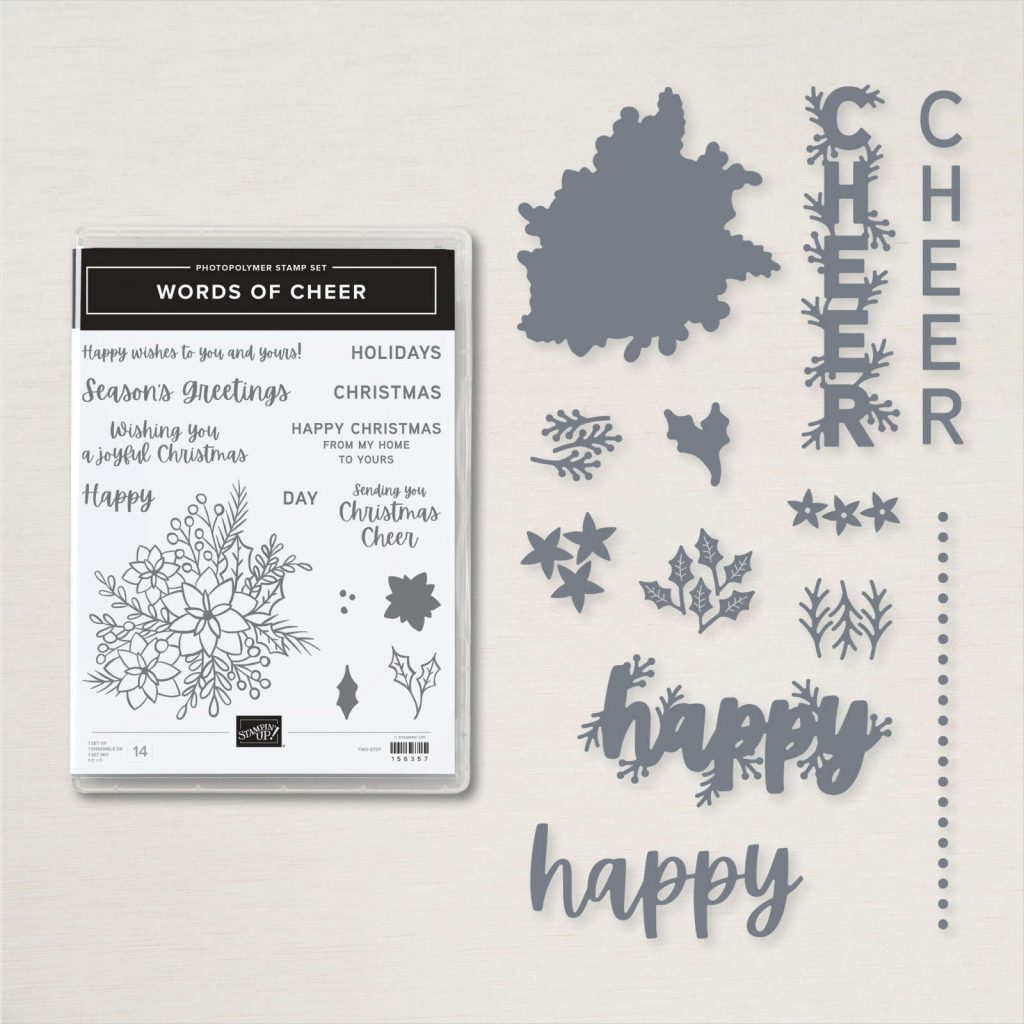
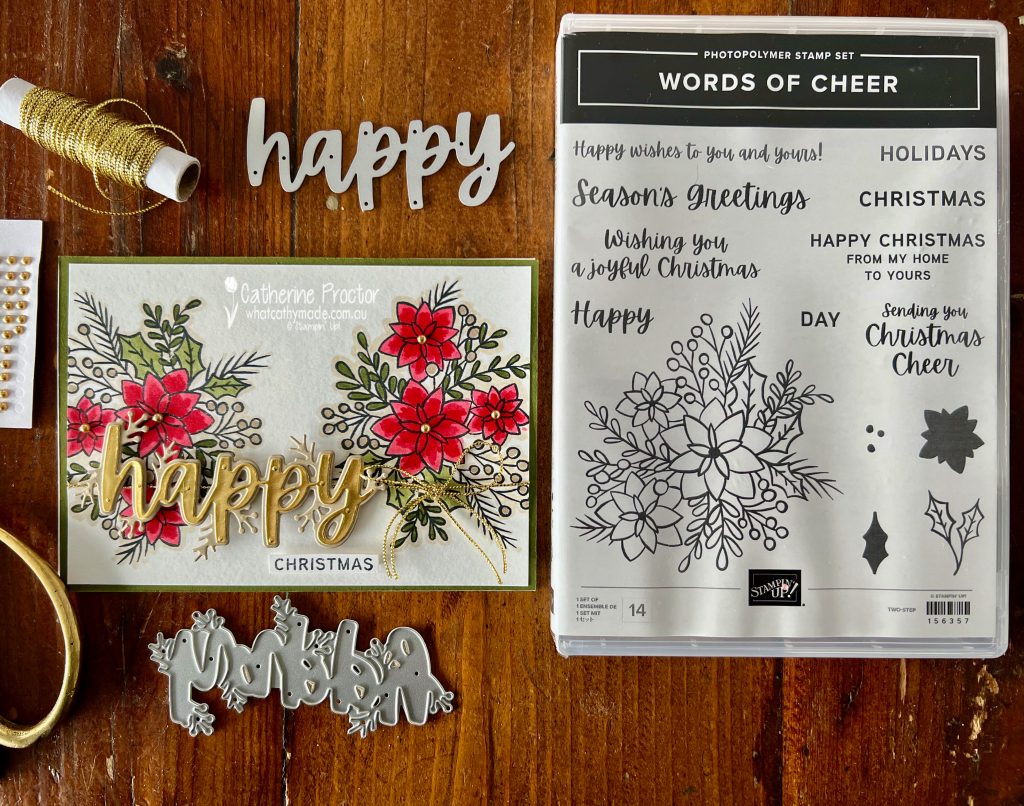
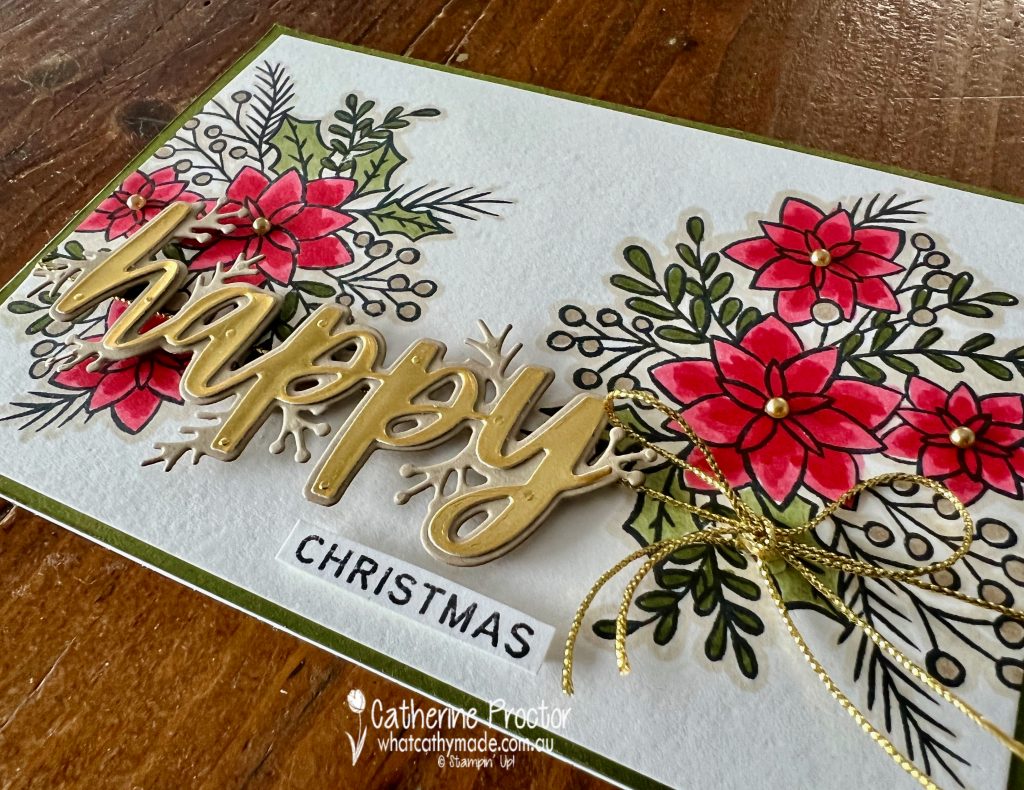
I finally caved in and purchased the Words of Cheer bundle after seeing so many amazing cards made with this bundle. I’ve enjoyed using this bundle so much I’ve also used it for my Merry Merlot card for our AWH Colour creations blog hop this week – come back and visit my blog on Wednesday night to see the other card I’ve made with the Words of Cheer bundle.
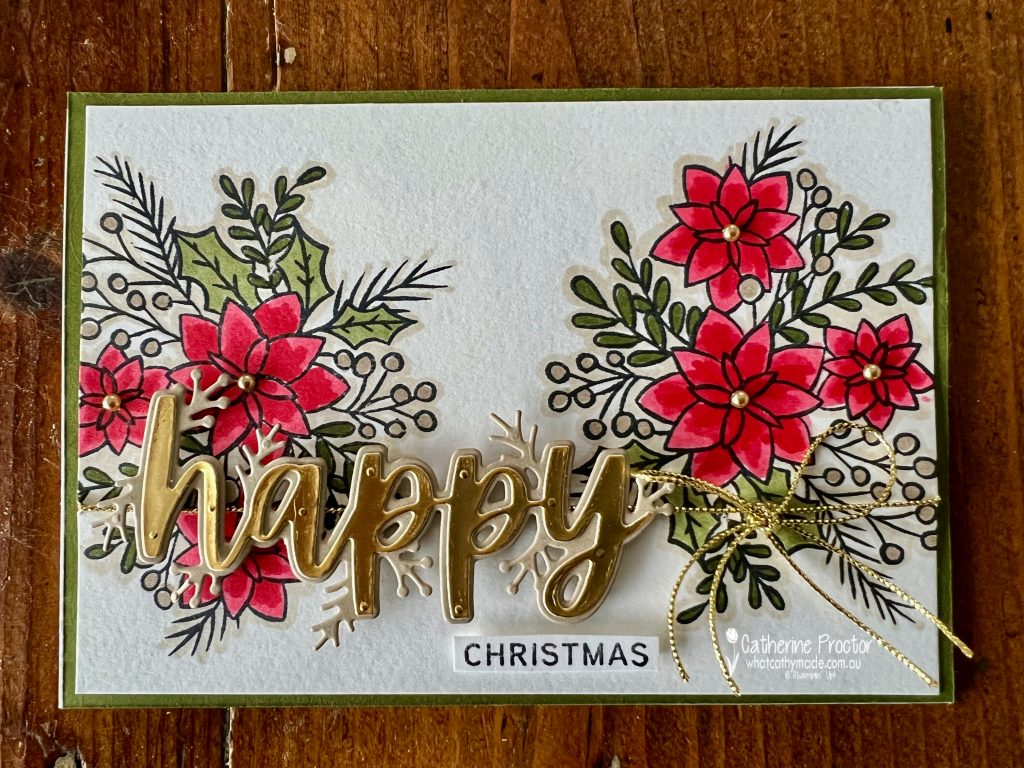
The large floral image gives you a lot of different options for adding colour to your card. I’ve used Poppy Parade, Mossy Meadow and Crumb Cake Stampin Blends, a Basic Black stamped sentiment and image outline, with gold accents in the die cut letters and the twine. I love how all these neutrals work together to make the Poppy Parade really pop!
The card design is super simple. Stamp the large floral image on each side of the Basic White card stock layer, colour it in and wrap with some twine or ribbon before adhering to your card base – I used Mossy Meadow.
When die cutting with foil I use use adhesive sheets to eliminate the risk of glue on the foil. The top layer of “happy” is gold foil on an adhesive sheet and the bottom layer is die cut in Crumb Cake card stock and then popped onto the card using Stampin Dimensionals.Not only do these large double layer dies look amazing, they are so easy to use!
To match the gold metallic Simply Elegant Trim tied around the base of the card I added Gold adhesive backed Metallic Pearls to the centre of the flowers. TIP – to get the Simply Elegant Trim to stay tied in a bow and sitting on the card I used a double knot and also adhered it to the card using glue dots.
Now it’s time to hop on over to our next participant, the lovely Christine Blain. I can’t wait to see what Christine shares with us today!
If at any time you find a broken link please head to the blog of this week’s host of The Heart Of Christmas Blog Hop, Tina Gillespie, and she will have the list of all those participating.
If you live in Australia, you can find and purchase all these products in my Stampin’ Up! Online Store or by clicking on the images below.
Hello crafters! Welcome to Week 21 of our AWH Heart of Christmas blog hop. It’s hard to believe that it’s less than five weeks until Christmas and after tonight’s blog hop we only have one more Heart of Christmas blog hop left this year!
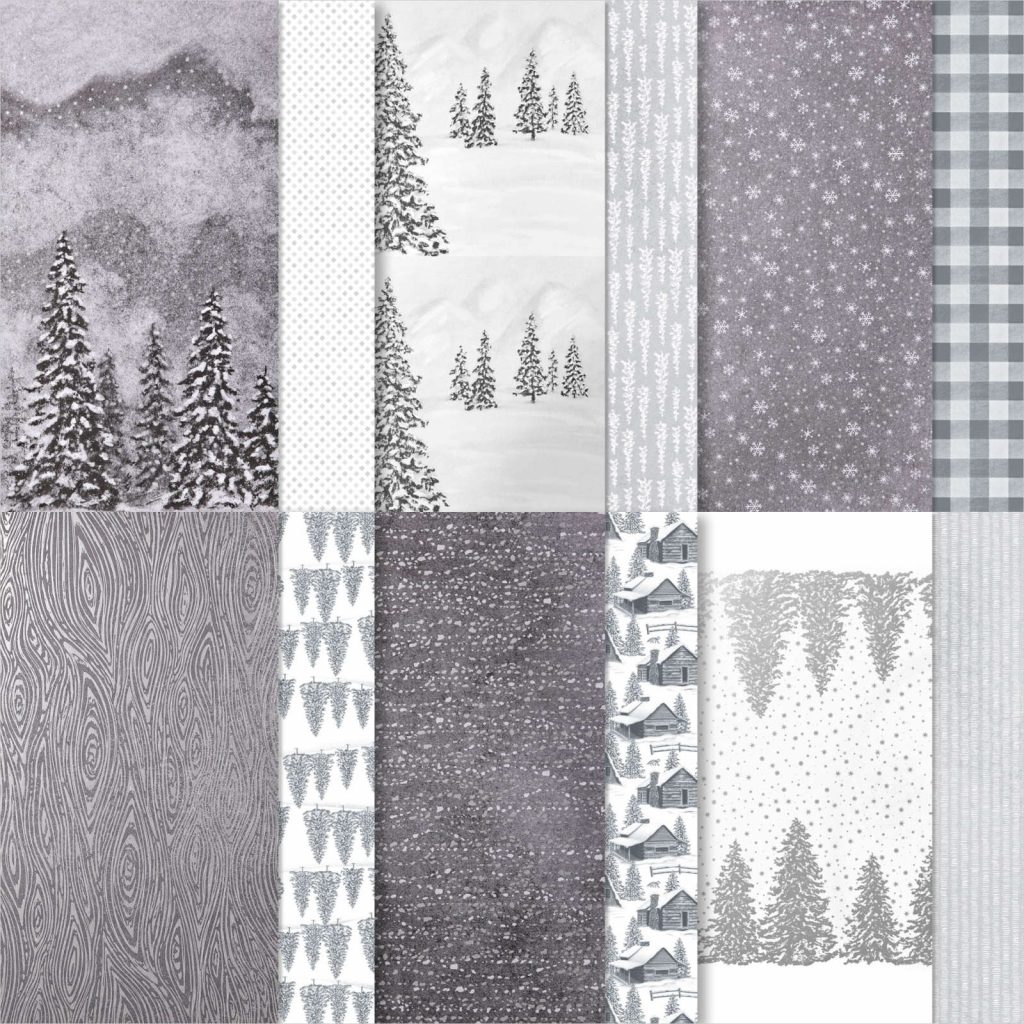
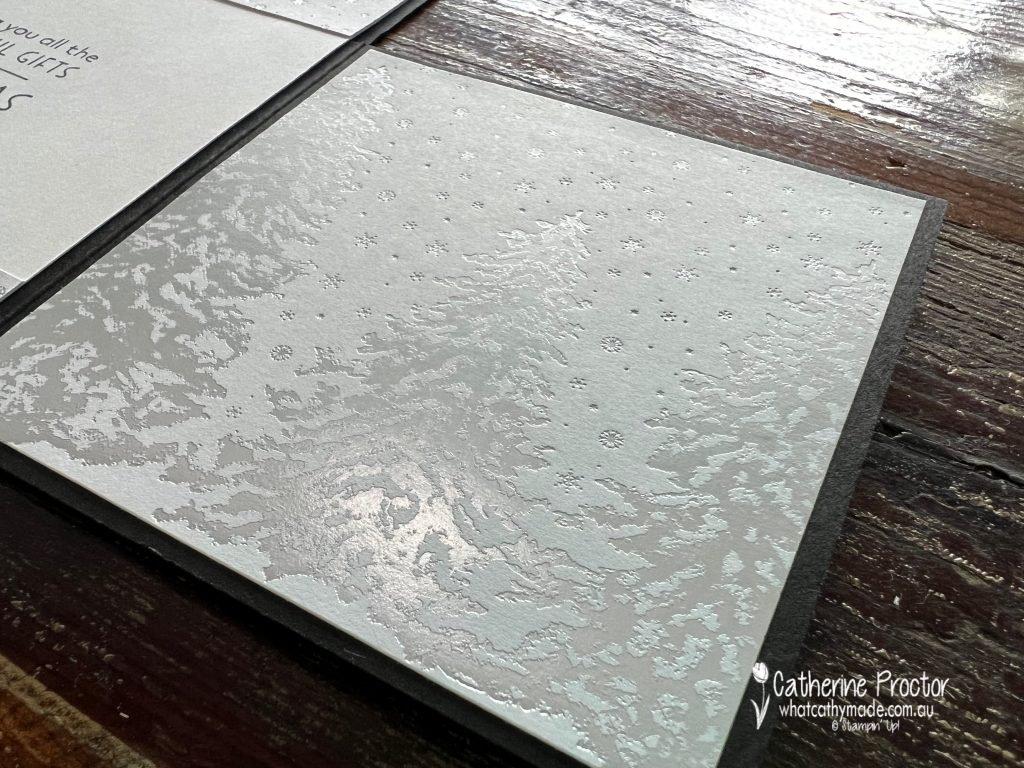
I don’t know about you, but sometimes I don’t use a particular Designer Series Paper because it’s just so beautiful and I don’t want to cut it or cover it. It’s really had to see all the foiling in this photo, but the Peaceful Place is simply stunning and I wasn’t sure exactly how to use it.
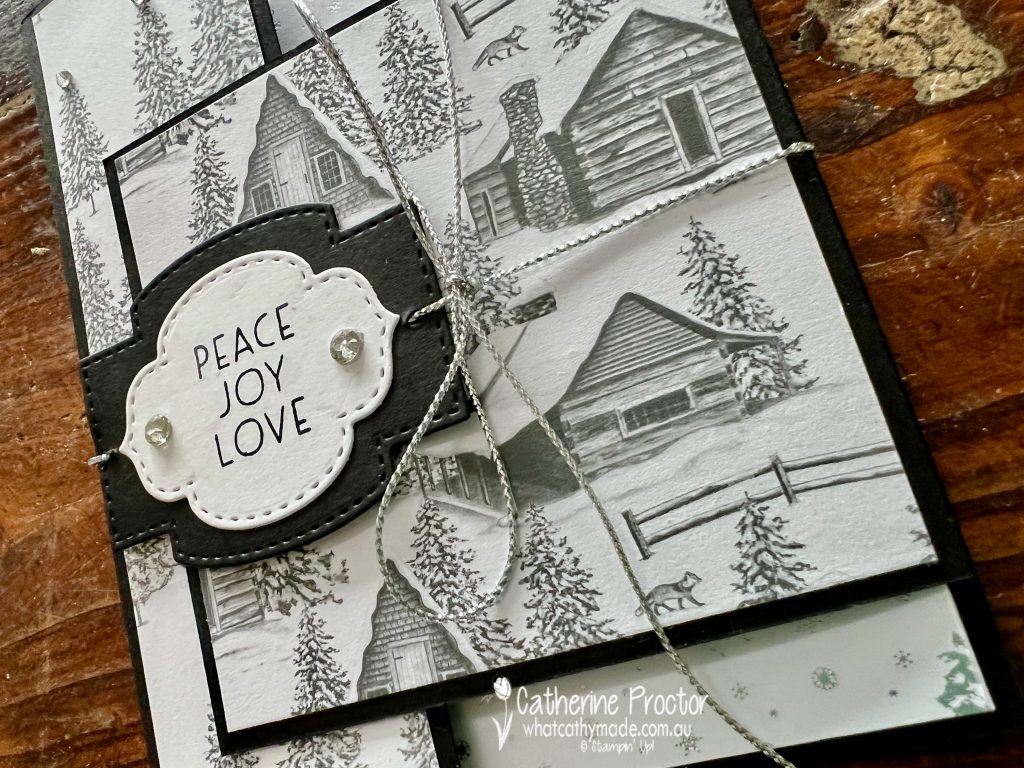
With Designer Series Paper as elegant as this, I think it’s best to keep the card quite simple and let the paper be the star of the show, which is why I decided to create a Christmas latch card.
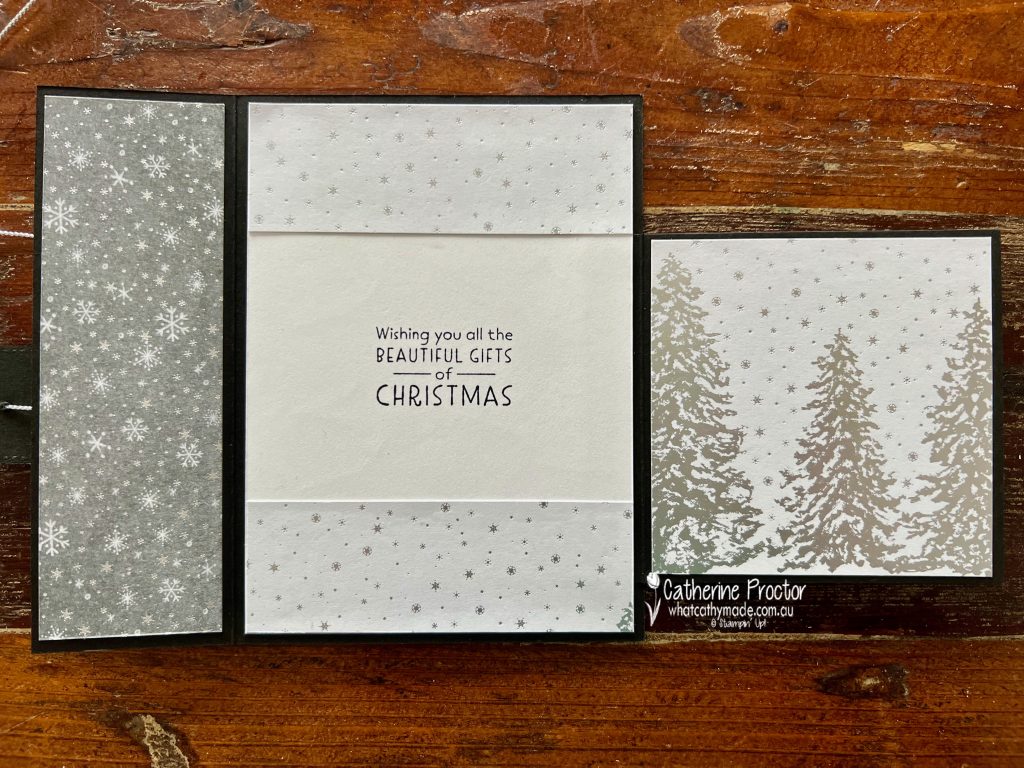
This fancy fold looks pretty fancy, but it is easy peasy to make. The card base is created from two pieces of Basic Black cardstock. The first piece measures 16 x 14.8 cm, scored at 5 cm along the 16 cm side – this is the back of the card and the left flap. The second piece measures 10.5 x 9.5 cm, scored at 1 cm along the 10.5 cm side – this is the right flap and hinge.
Once you adhere the right hinge to the right hand side of the card, you can then decorate the inside and the outside of the cardstock base and flaps with the DSP. I used this lovely foiled DSP for the inside right flap.
Here’s what all of the card looks like on the inside. Both this sentiment and the sentiment on the front of the card are from the Inspired Thoughts stamp set. Isn’t this a beautiful font?
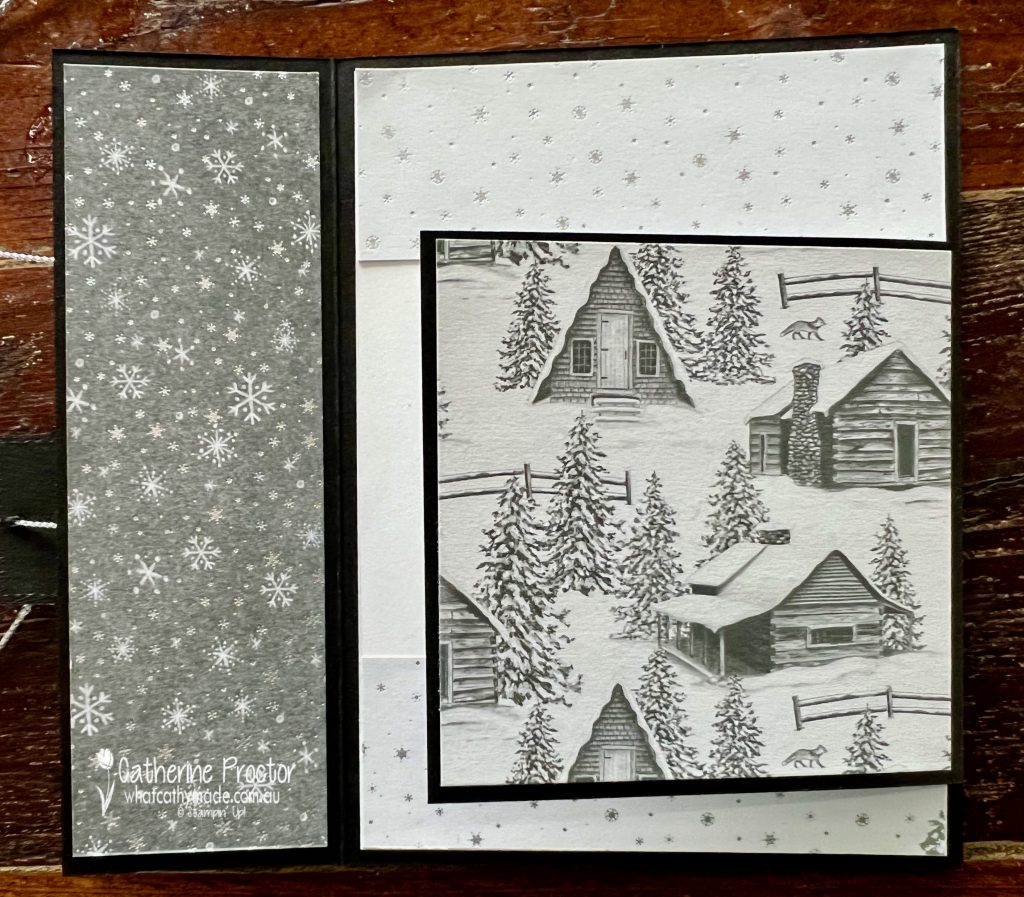
The photo below shows how the outside of the right flap uses the DSP with the cabin print. There is a coordinating Peaceful Cabin Bundle (it includes the Peaceful Cabin Stamp Set and the Cabin Dies), but I don’t own it. This type of fancy fold is ideal for when you want to showcase DSP but you don’t own the matching bundle – all you need is a sentiment from any stamp set that works with the DSP.
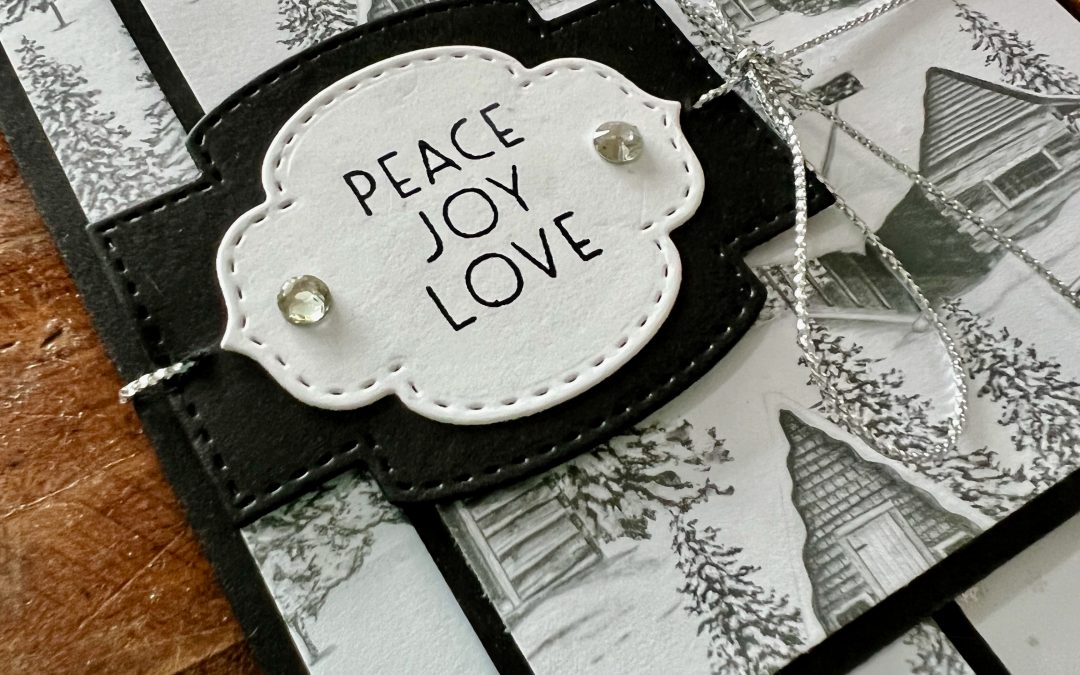
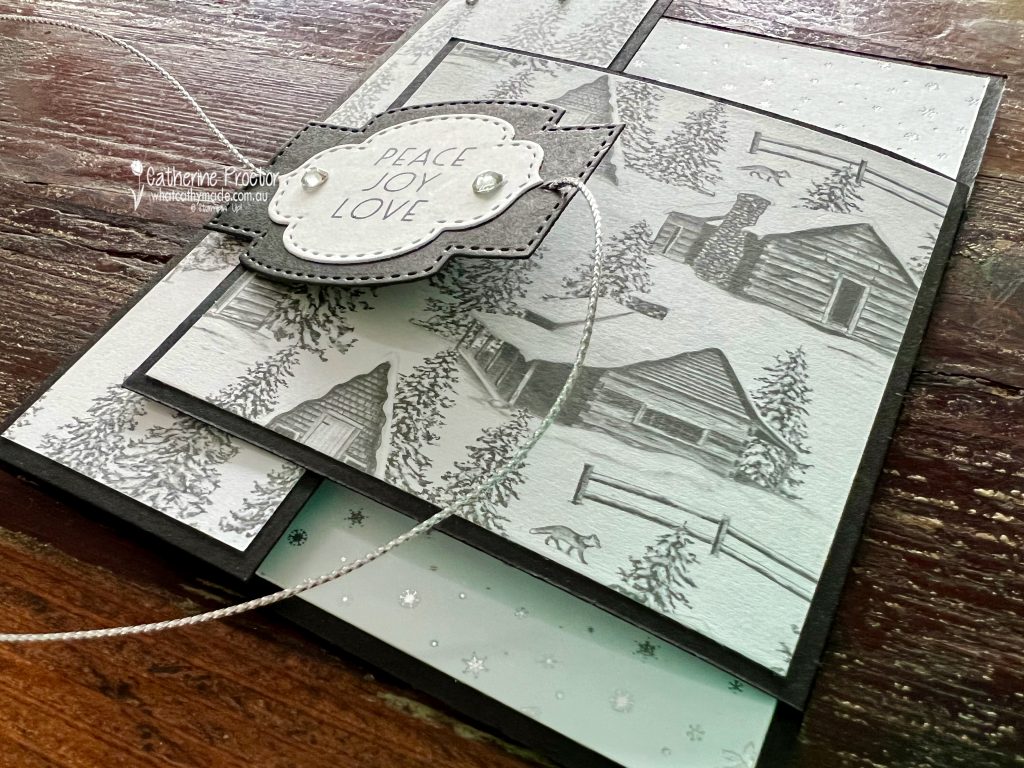
The “Peace, Joy, Love” sentiment has been die cut using the Stitched So Sweetly dies and it forms the latch mechanism. After threading a length of silver simply elegant trim through the sentiment, I used a couple of Stampin’ Dimensionals to attach the LEFT SIDE ONLY of the sentiment to the card – the right flap of the card slips over the left flap and under the right side of the sentiment to create a latch.
The final touch to my card was the addition of some rhinestone jewels and then tying the metallic silver thread into a bow to the right of the sentiment. This thread wrapped around the card is not only decorative … it also helps the card to sit flat.
Now it’s time to hop on over to our next participant, the lovely Ros Davidson. I can’t wait to see what she shares with us today!
If at any time you find a broken link please head to the blog of this week’s host of The Heart Of Christmas Blog Hop, Sharon Davern, and she will have the list of all those participating.
If you live in Australia, you can find and purchase all these products in my Stampin’ Up! Online Store or by clicking on the images below.
Hello crafters! Welcome to Week 20 of our AWH Heart of Christmas blog hop.
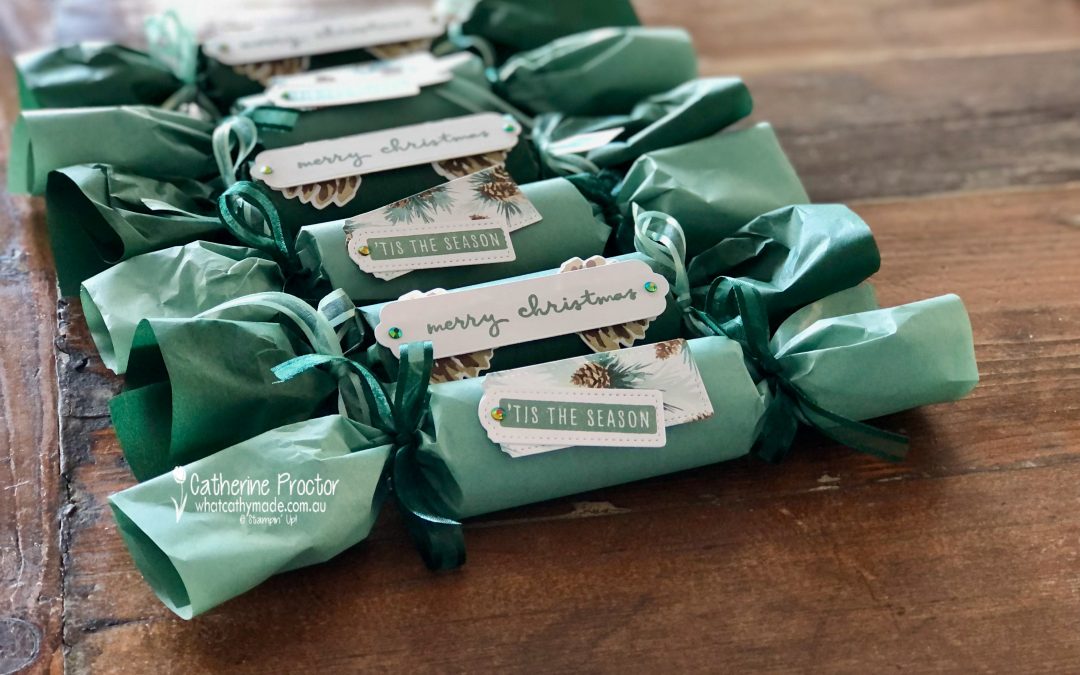
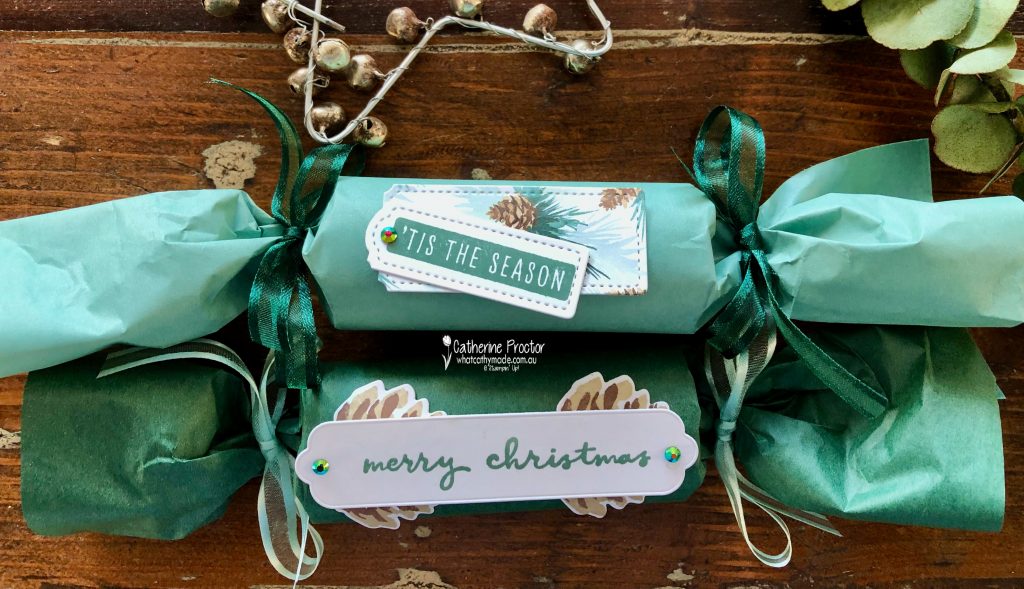
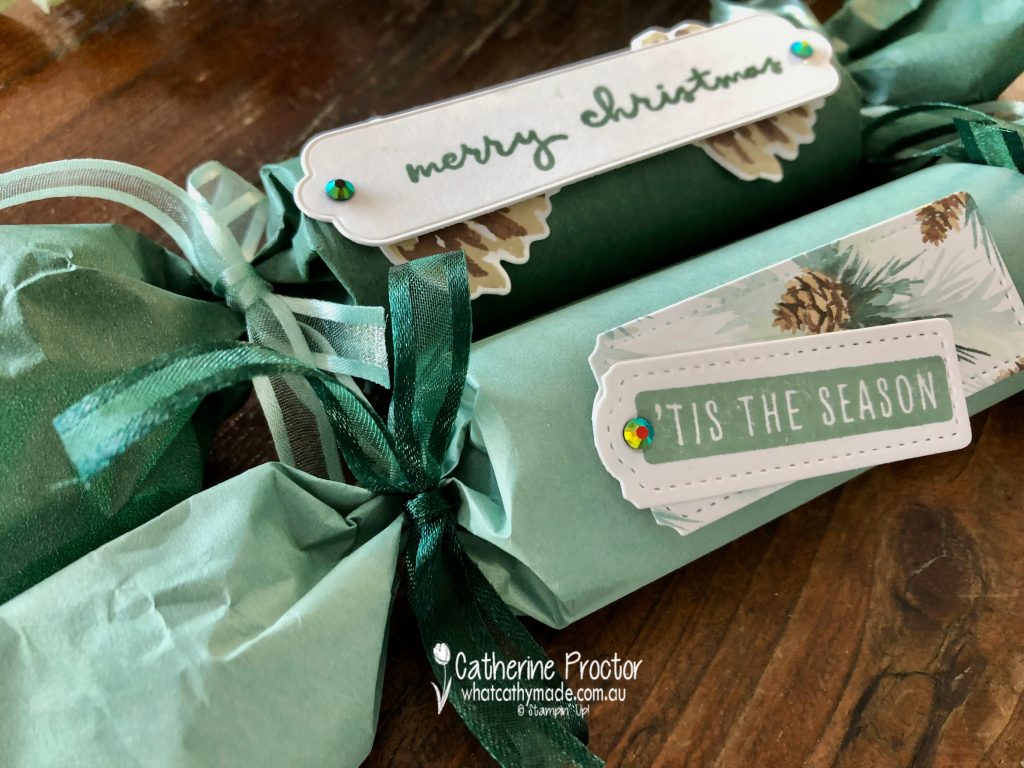
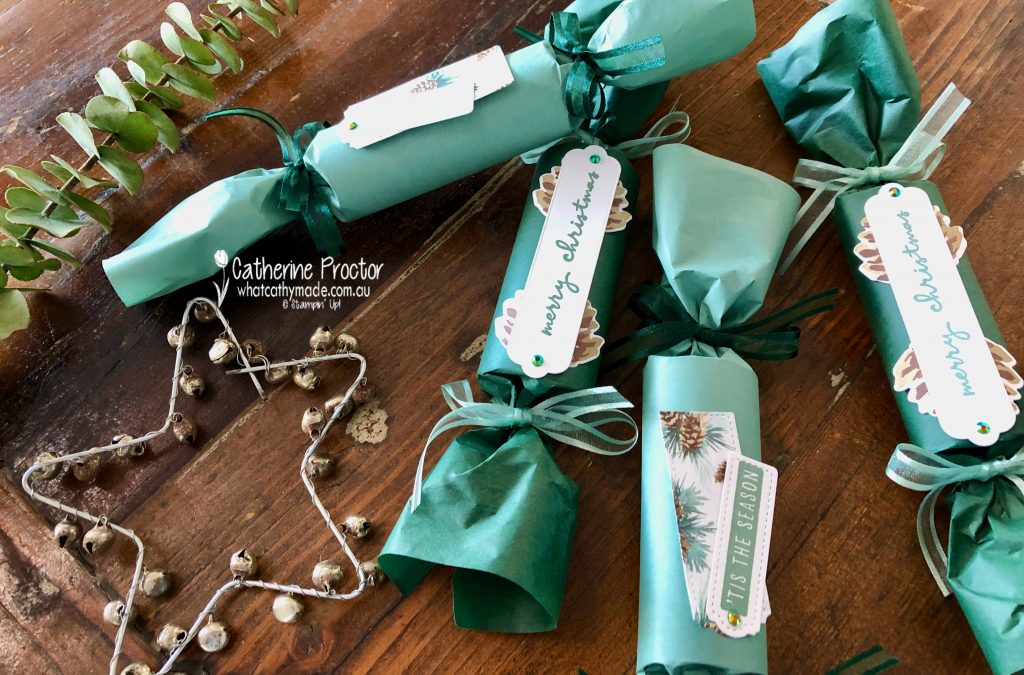
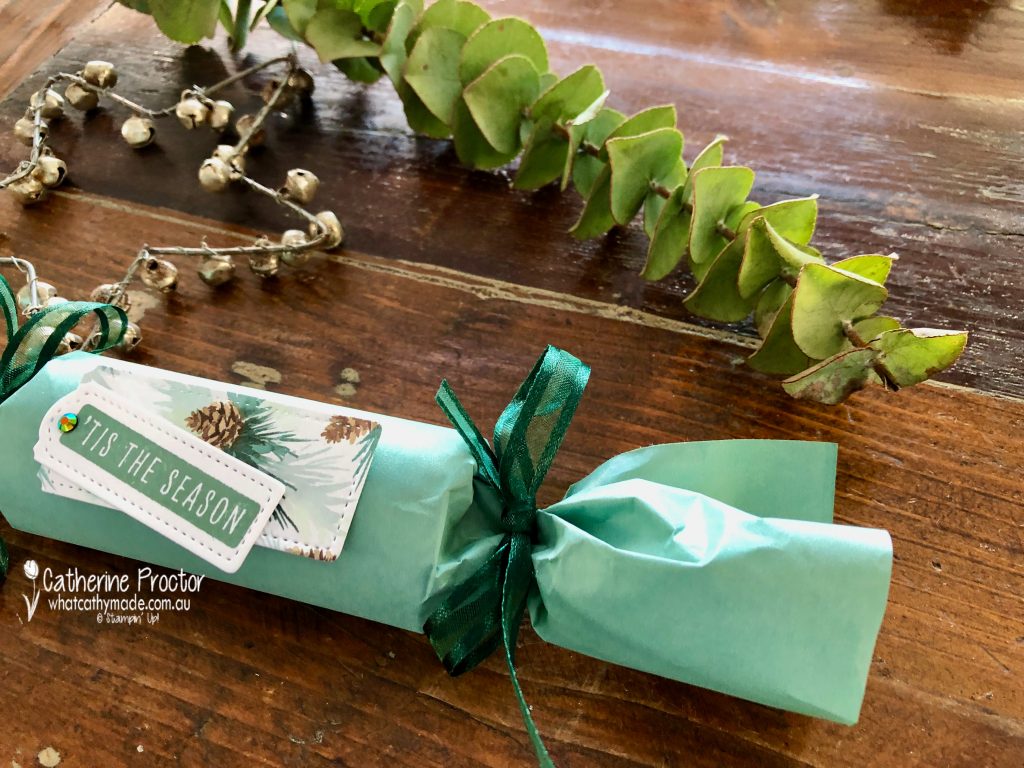
This week I’m using a stunning new product, the limited release Ever Eden Cotton Paper. This soft, delicate tissue-like paper offers a unique way to add dimension and visual interest to any paper project, can be used to wrap gifts, or it can be die cut, ripped, wrinkled or folded.
And it’s also the perfect thickness to create your own Christmas crackers!
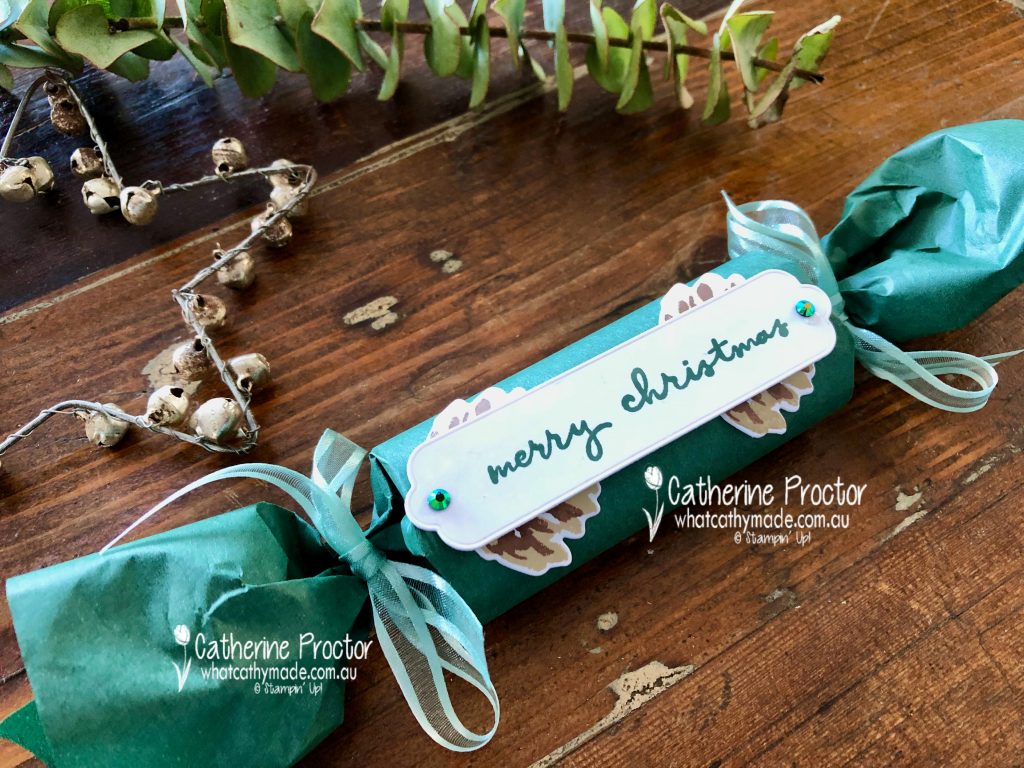
The Ever Eden Cotton Paper comes in two colours: Soft Succulent and Evening Evergreen. For my Evening Evergreen Christmas Crackers I tied each end with the Soft Succulent Open Weave Ribbon and for the Soft Succulent Christmas Crackers I used the Evening Evergreen Open Weave Ribbon.
These crackers are super easy to make. You can use the cardboard roll from wrapping paper, loo rolls or make your own inner tube from Crumb Cake or Basic White card stock. Each cracker is wrapped with half a sheet of Ever Eden Cotton Paper, attached to the inner tube with Tear and Tape.
Don’t forget to fill your cracker with a snap, a sweet, a joke or a treat before tying the ends with the ribbon. If you forget, you can gently untie one end and insert these things later.
The label on the Soft Succulent “Tis the season” cracker is die cut with the Tailor Made Tag dies and has a second tag cut from this gorgeous Painted Christmas DSP. The sparkly Ever Evergreen In Colour Jewels decorate both crackers.
After I made all my crackers I realised I could have used the Garden Gems from the Eden’s Garden Collection! The label on the Evening Evergreen cracker has the “Merry Christmas” sentiment from the Christmas to Remember stamp set, die cut using one of the label dies from the Seasonal Label dies – I though the shape of this long narrow die perfectly suited the shape of the cracker.
A pinecone stamped in Crumb Cake and Early Espresso was cut in half and adhered under the long die at each end of the cracker.
Now it’s time to hop on over to our next participant, the lovely Rachel Woollard. I can’t wait to see what she shares with us today!
If at any time you find a broken link please head to the blog of this week’s host of The Heart Of Christmas Blog Hop, Tina Gillespie, and she will have the list of all those participating.
If you live in Australia, you can find and purchase all these products in my Stampin’ Up! Online Store or by clicking on the images below.
Hello crafters! Welcome to Week 19 of our AWH Heart of Christmas blog hop.
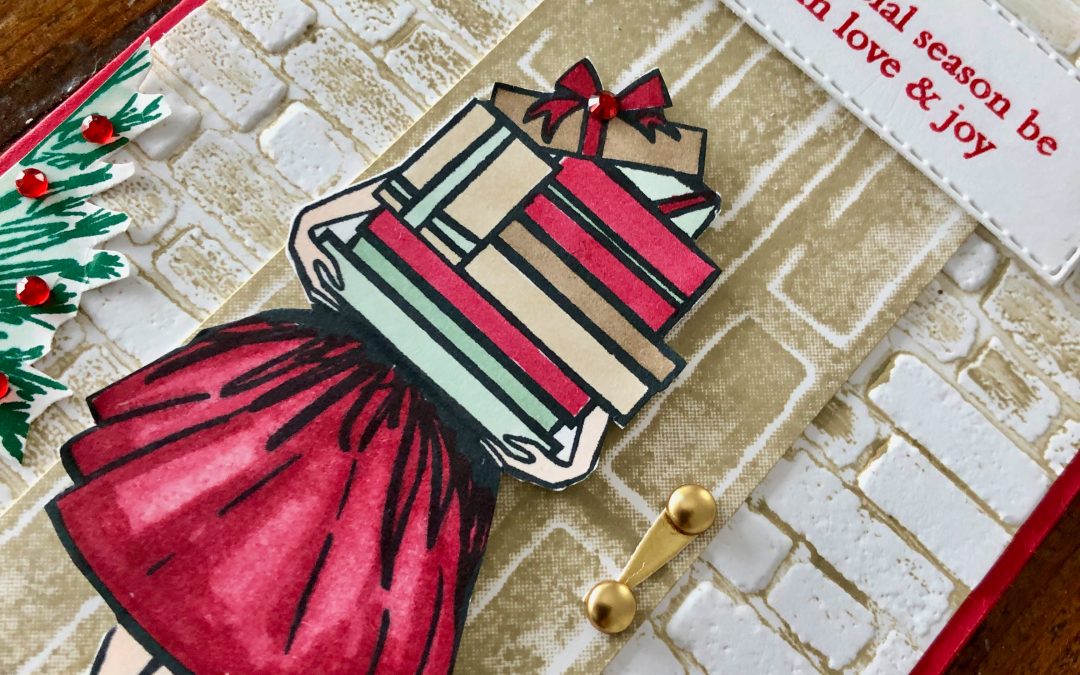
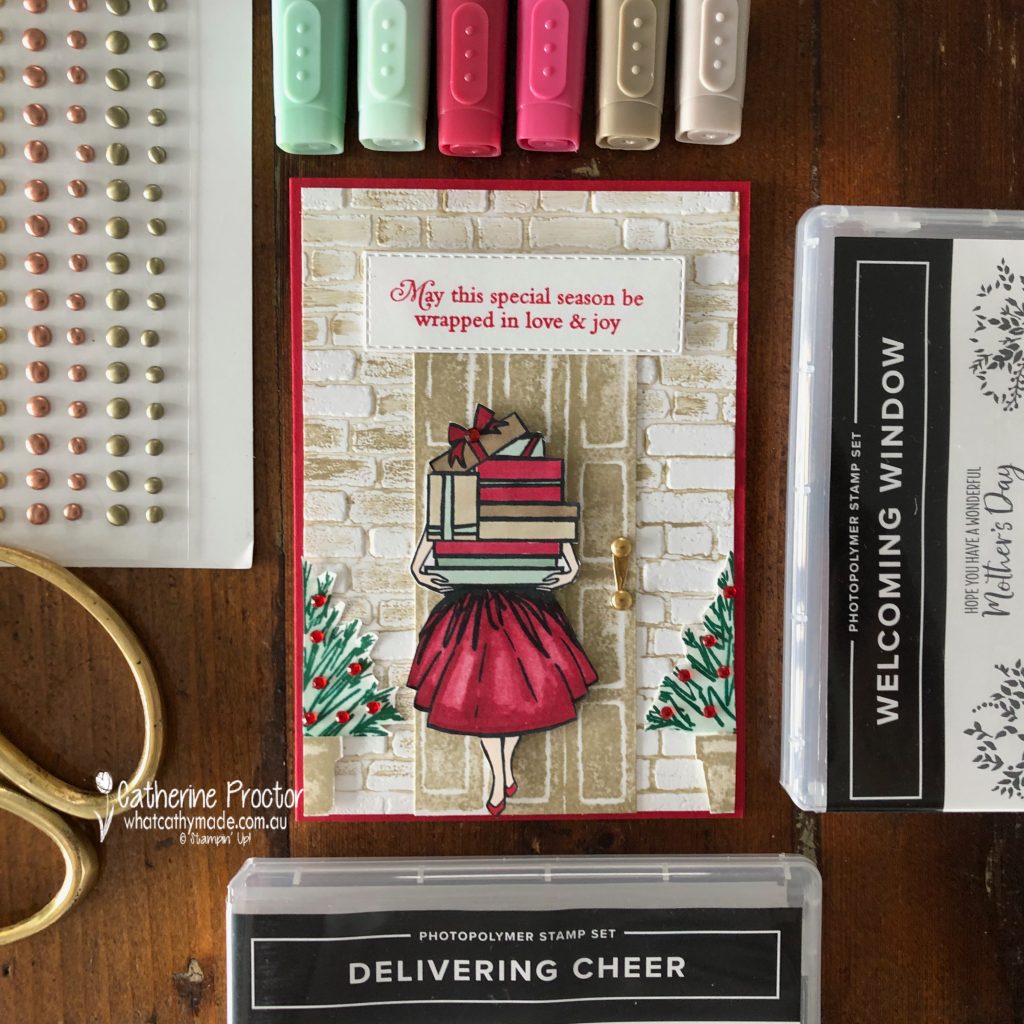
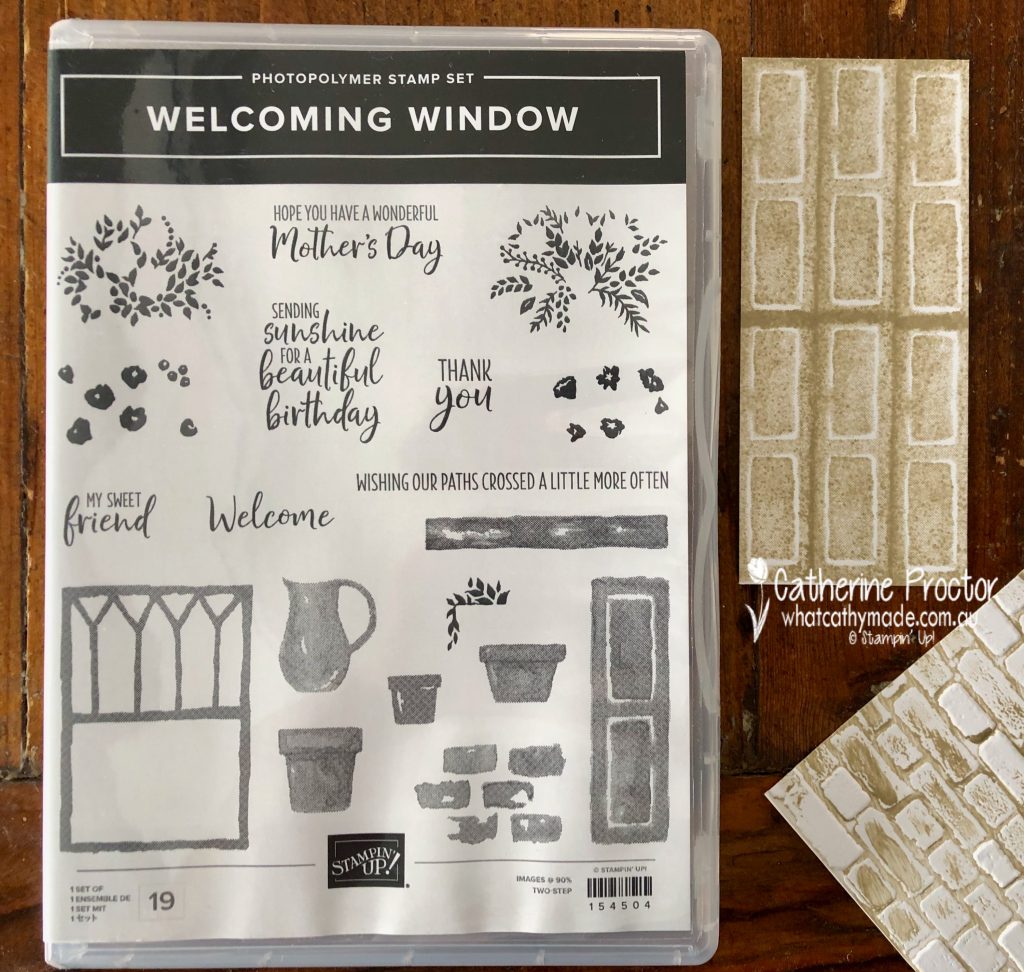
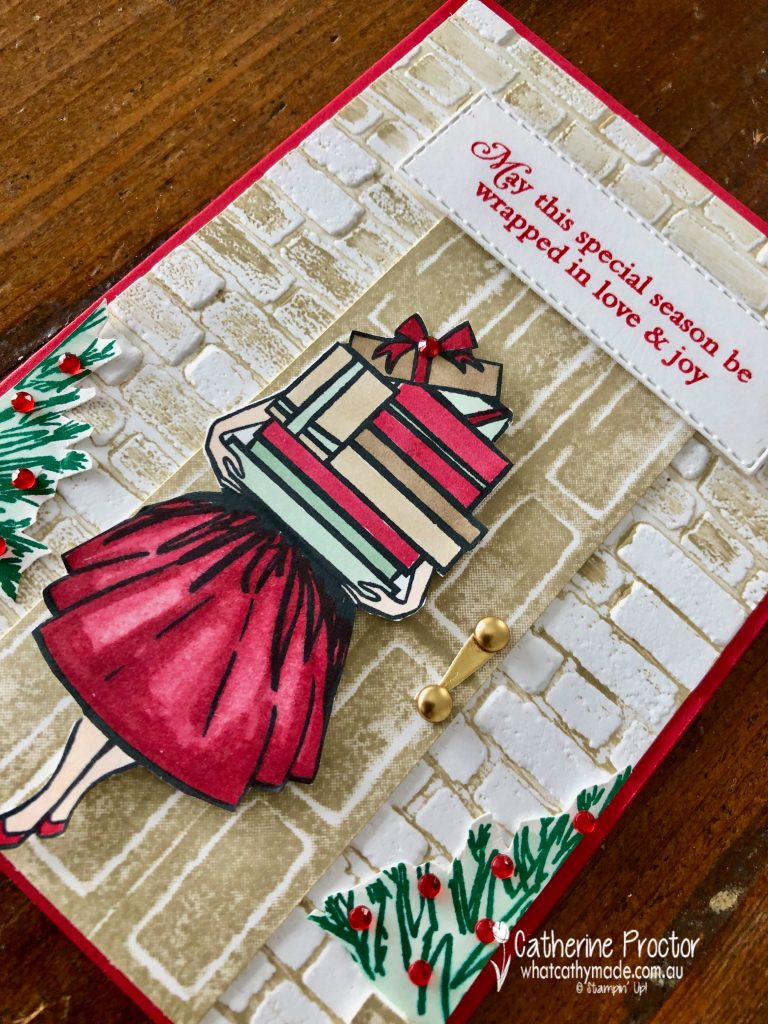
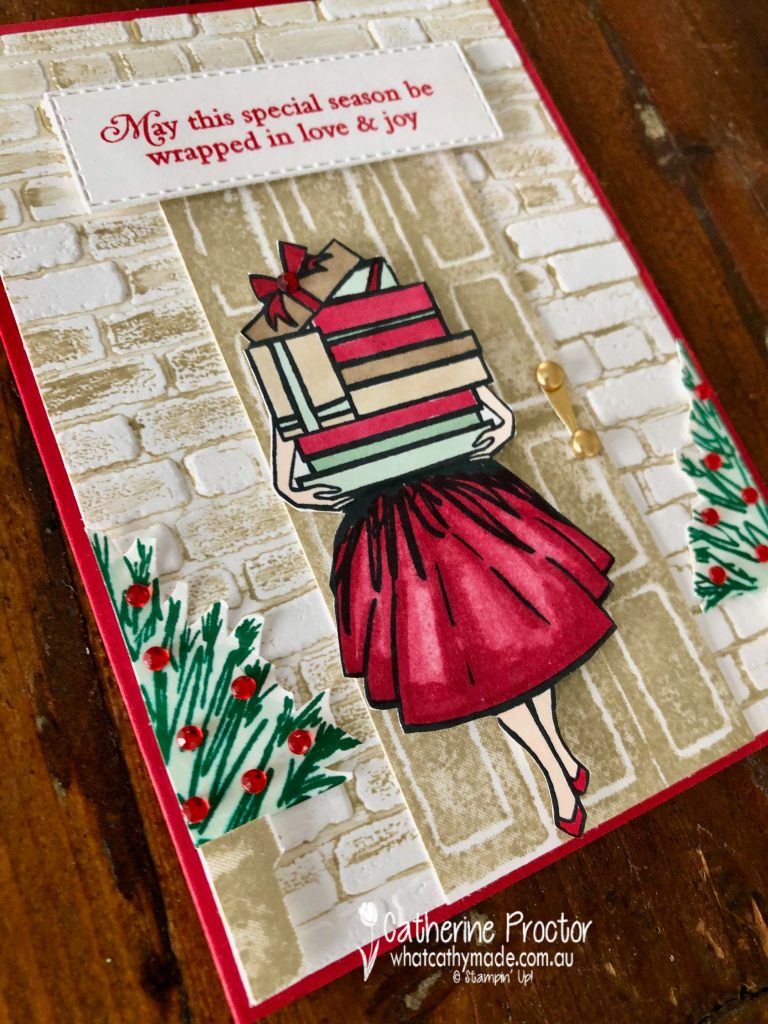
This week I’m combing a new stamp set and bundle that both work so perfectly together to create a Christmas scene card: the Welcoming Window bundle and the Delivering Cheer stamp set. I love the idea of this girl turning up to the front door with so many presents in her arms you can’t even see her face!
There is no door image in the Welcoming Window bundle, however the shutter stamped side-by-side six times creates a door that is the correct scale for the girl with the presents. I love a big solid front door like this!
The brickwork for the outside of the house is simply the Bricks and Mortar EF that has been swiped with the Crumb Cake ink pad (on the inside top side) before embossing a piece of Basic White cardstock.
This isn’t a quick card to make but it is relaxing (well, I think so!) to colour it all in and fussy cut the elements in this card using my Stampin’ Blends.
The shutter “hinge” dies from the Window Flower Box Dies were used with the Brushed Metallic adhesive-backed dots to create a door handle.
Red Rhinestone jewels decorate the Christmas trees in pots that sit either side of the front door. The pots are from the Welcoming Windows stampset but the Christmas Trees are the top section of another stamp in the Delivering Cheer stamp set.
The sentiment is from an older Christmas stamp set, the Perfectly Plaid Stamp Set. I just had to use this sentiment as it perfectly describes my Christmas scene!
Now it’s time to hop on over to our next participant, the lovely Ros Davidson. I can’t wait to see what she shares with us today!
If at any time you find a broken link please head to the blog of this week’s host of The Heart Of Christmas Blog Hop, Sharon Davern, and she will have the list of all those participating.
If you live in Australia, you can find and purchase all these products in my Stampin’ Up! Online Store or by clicking on the images below.
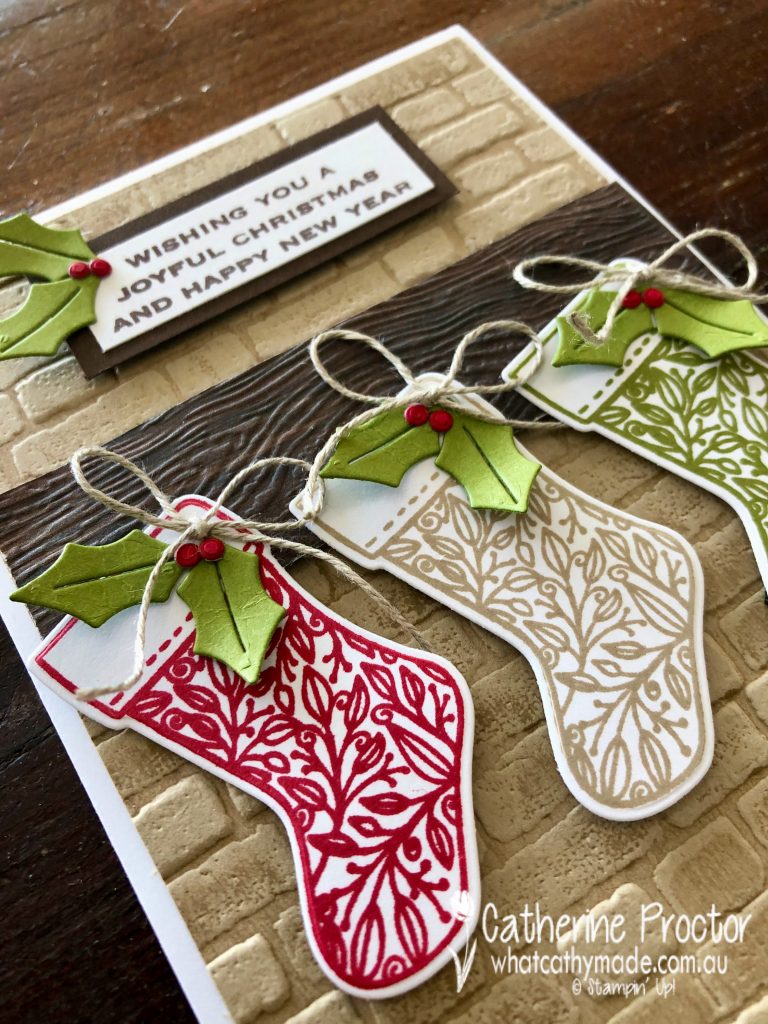
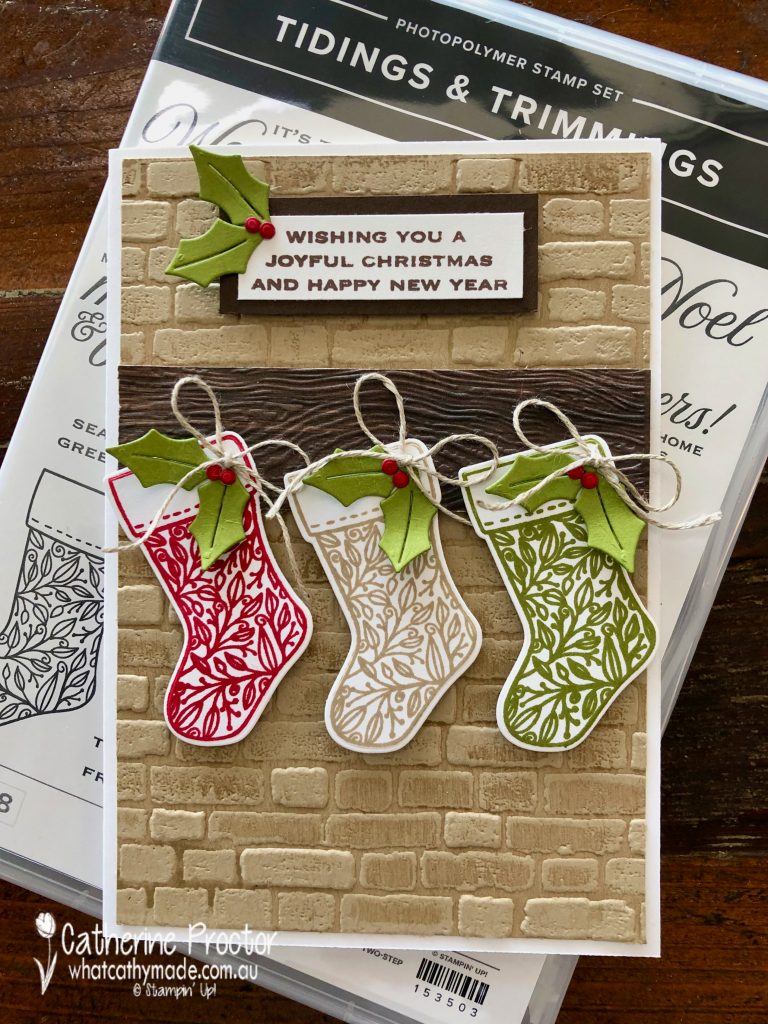
Hello crafters! Welcome to Week 18 of our AWH Heart of Christmas blog hop.
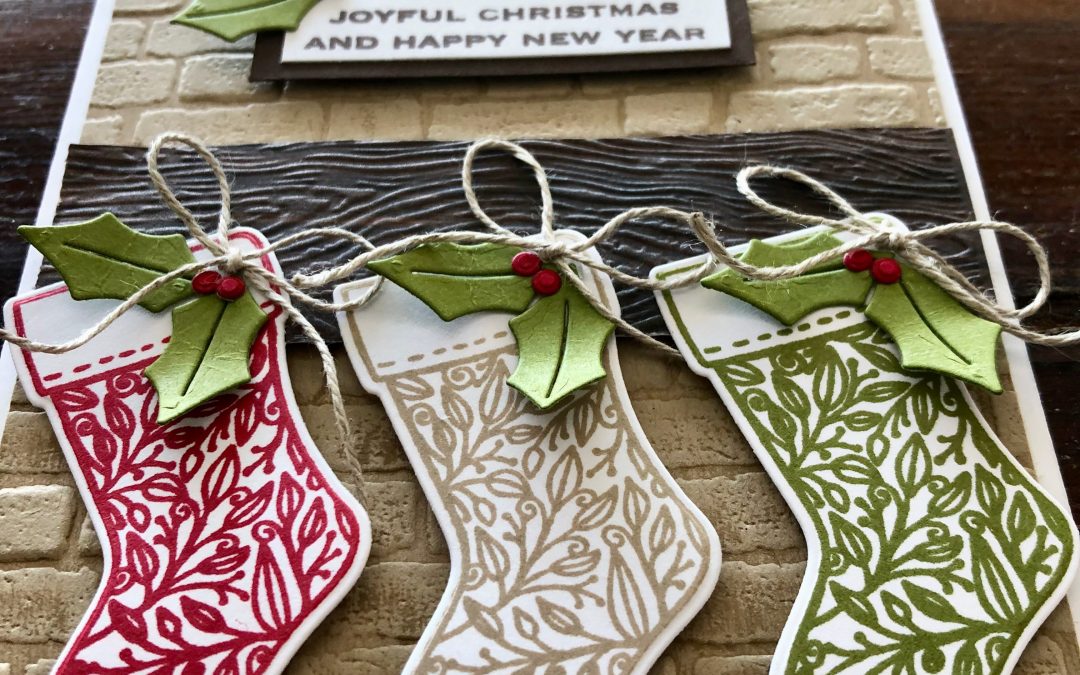
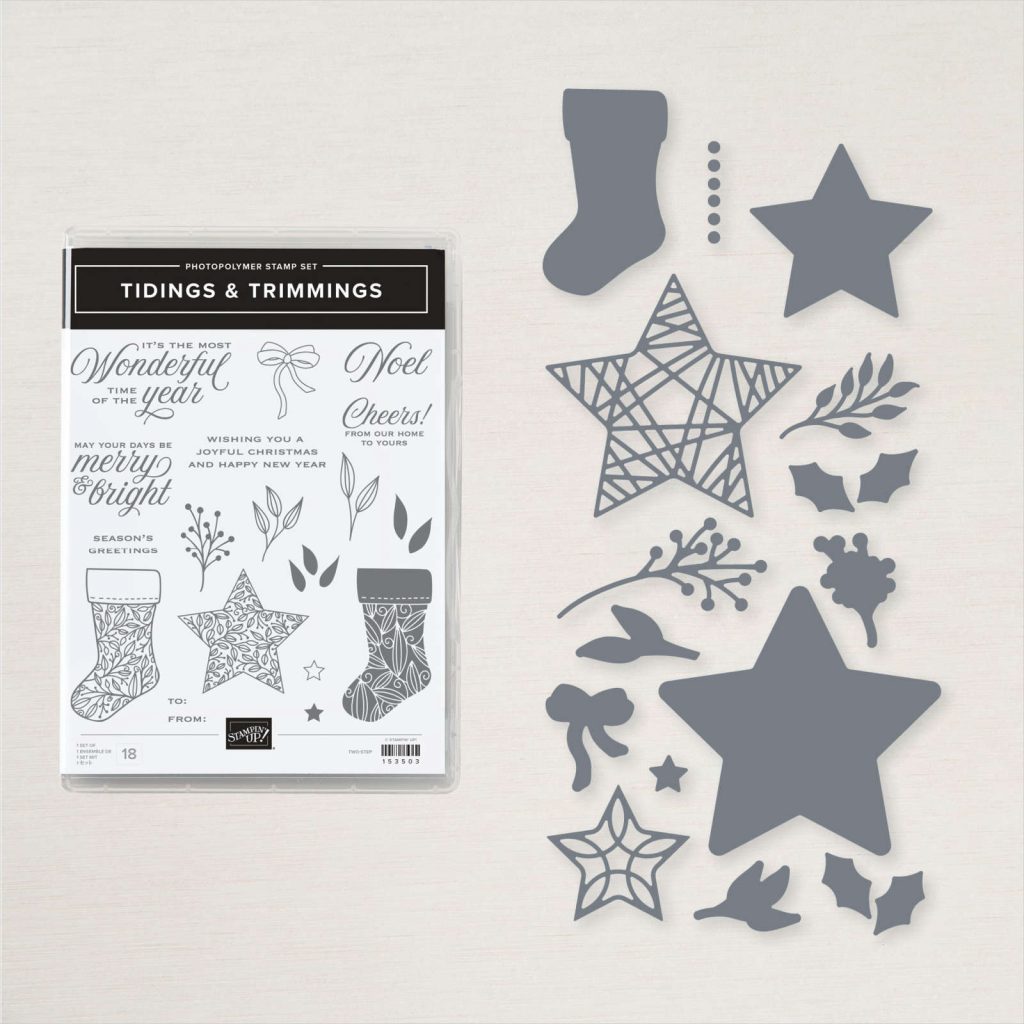
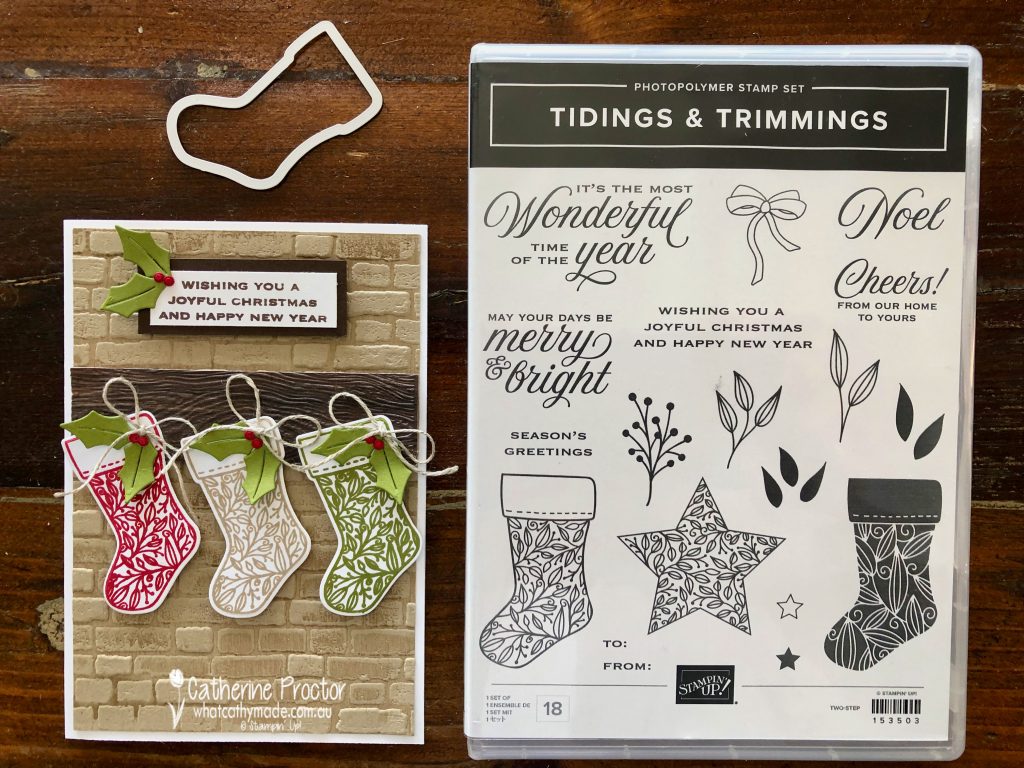
This week I finally used a bundle I’ve had for ages – I don’t know why it took me so long to open it up! The Tidings & Trimmings Bundle includes the Tidings & Trimmings Stamp Set and the Christmas Trimmings Dies. It’s on page 88 of the 2021-22 Annual Catalogue.
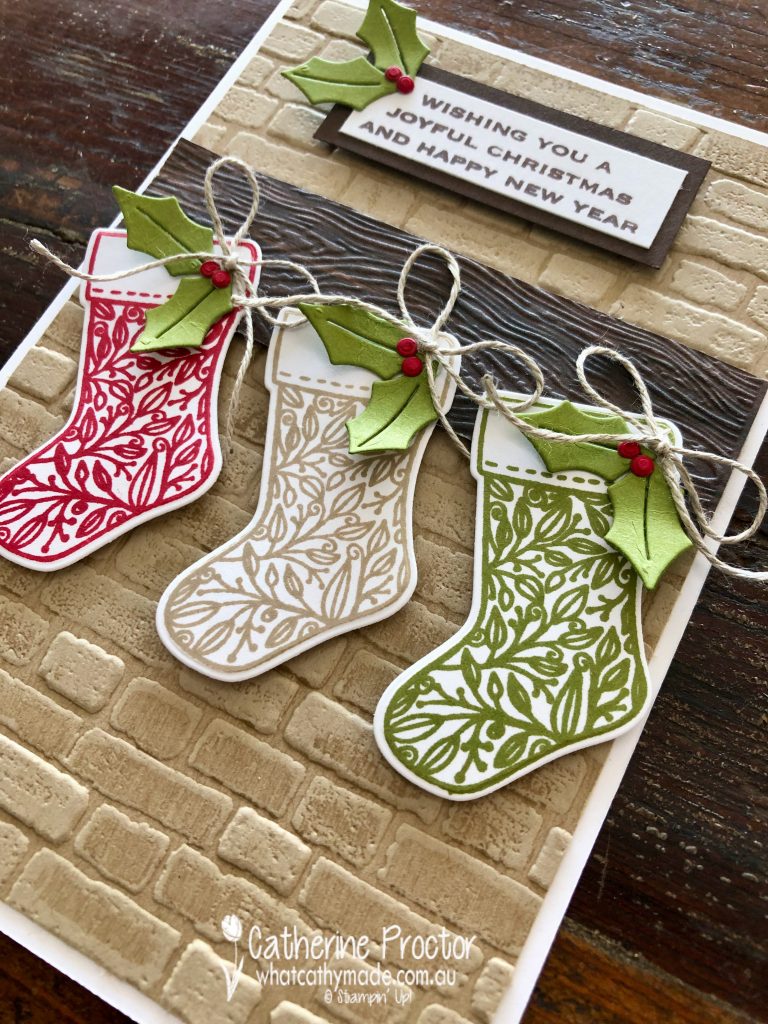
I love creating miniature scenes on cards and the lovely brick background you see on this card is actually a reject from the Christmas card I made for next Monday. I didn’t want to waste this embossed Crumb Cake background so I designed this entire card around it.
TIP: For a more realistic effect I swiped the inside of the Bricks & Mortar EF with my Crumb Cake ink pad BEFORE inserting the Crumb Cake card stock into the EF and running it through the cut’n’emboss machine.
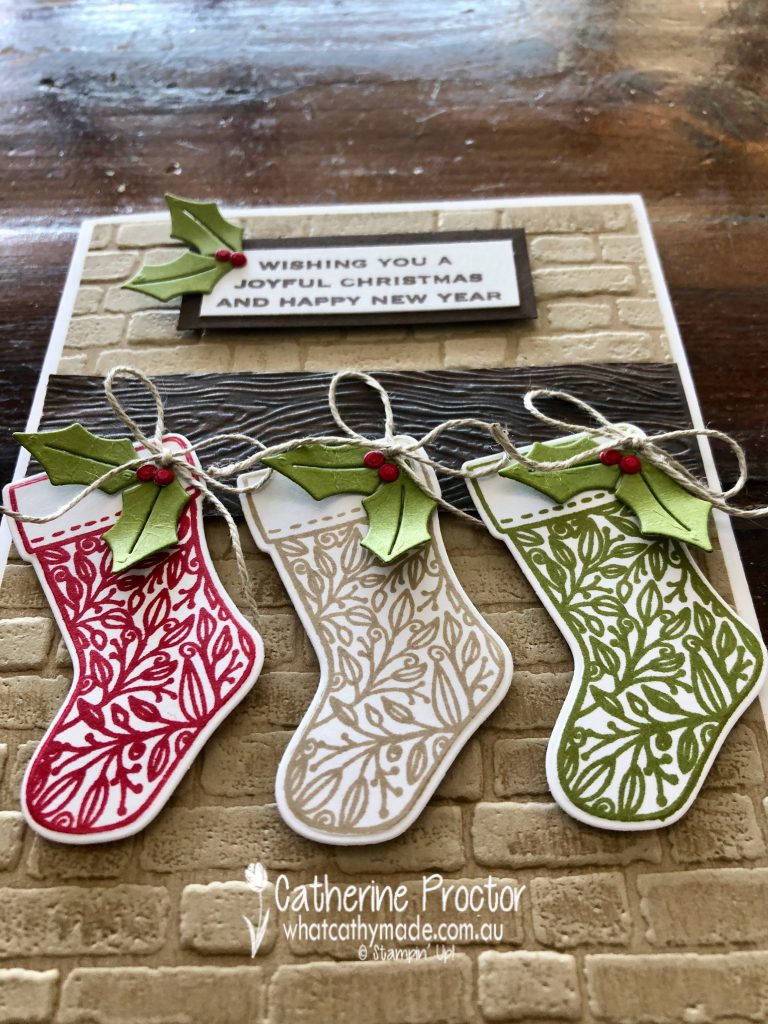
The mantlepiece is simply a strip of In Good Taste DSP that I embossed using the Timber 3D embossing folder. I attached the mantelpiece to the brick chimney using Stampin’ dimensionals so it sits out like a real mantelpiece would.
The three stockings are stamped in Real Red, Crumb Cake and Old Olive (one of my favourite Christmas colour combinations), then die cut out with the stocking die from the Christmas Trimmings Dies.
The little holly leaves and berries decorating the stockings and the sentiment are also cut using the Christmas Trimmings Dies – I used Old Olive for the holly leaves and Real Red for the holly berries.
I couldn’t resist adding a tiny bow of linen thread to each of the stockings – linen thread is hands down my all time favourite Stampin’ Up! product!I love the tiny upper case font on this sentiment. I’ve stamped it in Early Espresso to contrast with the Crumb Cake embossed background and to tie in with the colour of the mantlepiece.
Now it’s time to hop on over to our next participant, the lovely Sharon Davern. I can’t wait to see what she shares with us today!
If at any time you find a broken link please head to the blog of this week’s host of The Heart Of Christmas Blog Hop, Tina Gillespie, and she will have the list of all those participating.
Thanks for visiting my site. I’ll be back with another card on Wednesday.
In the meantime, wherever you are in the world, stay safe, stay calm … and keep on crafting xxx
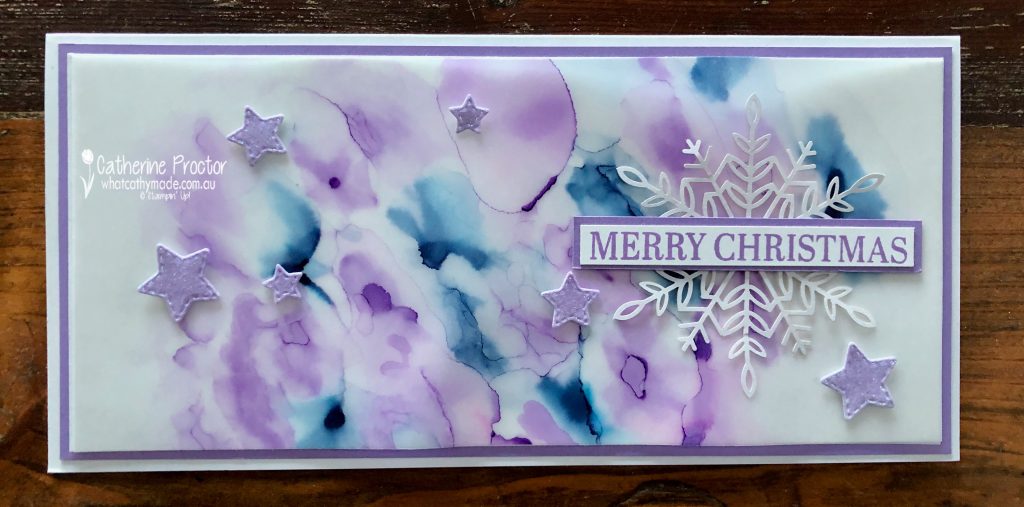
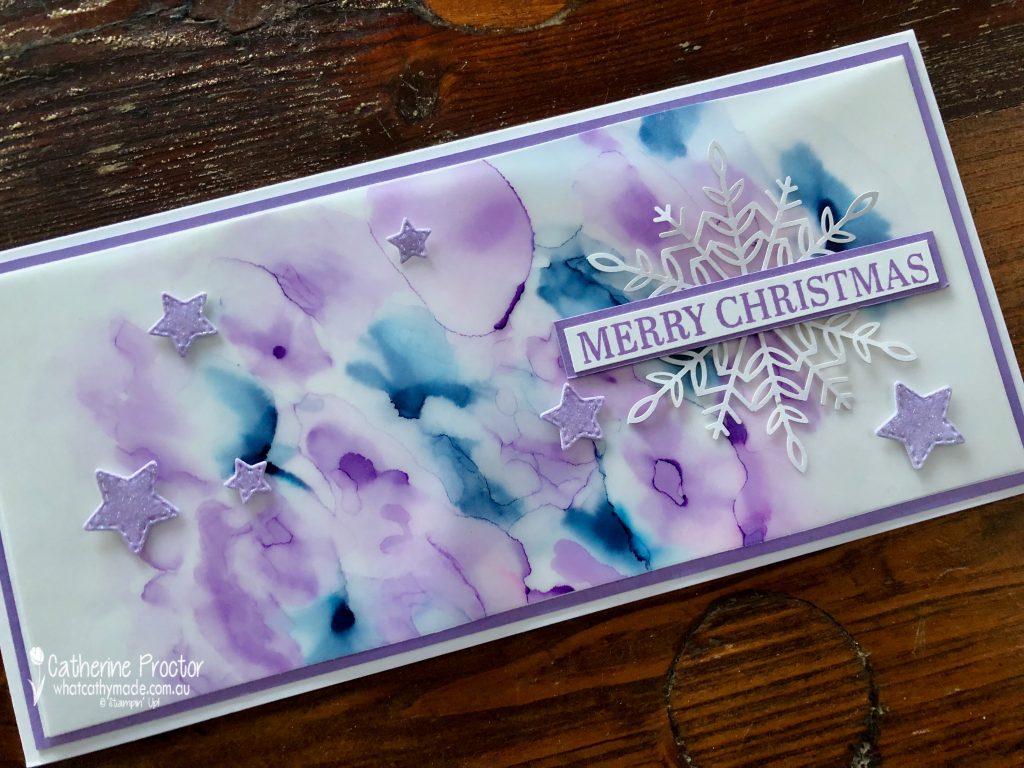
Welcome to week 22 of our 2021-22 Colour Creations blog hop! Tonight we are showcasing Highland Heather, a soft purple from the Subtles colour collection.
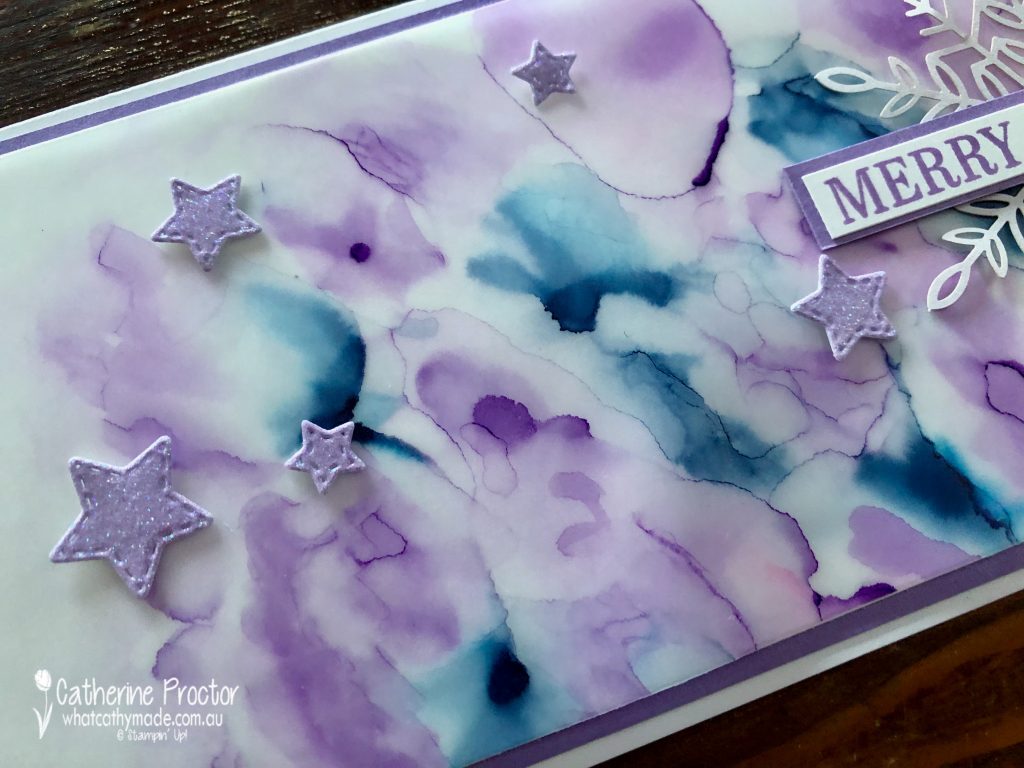
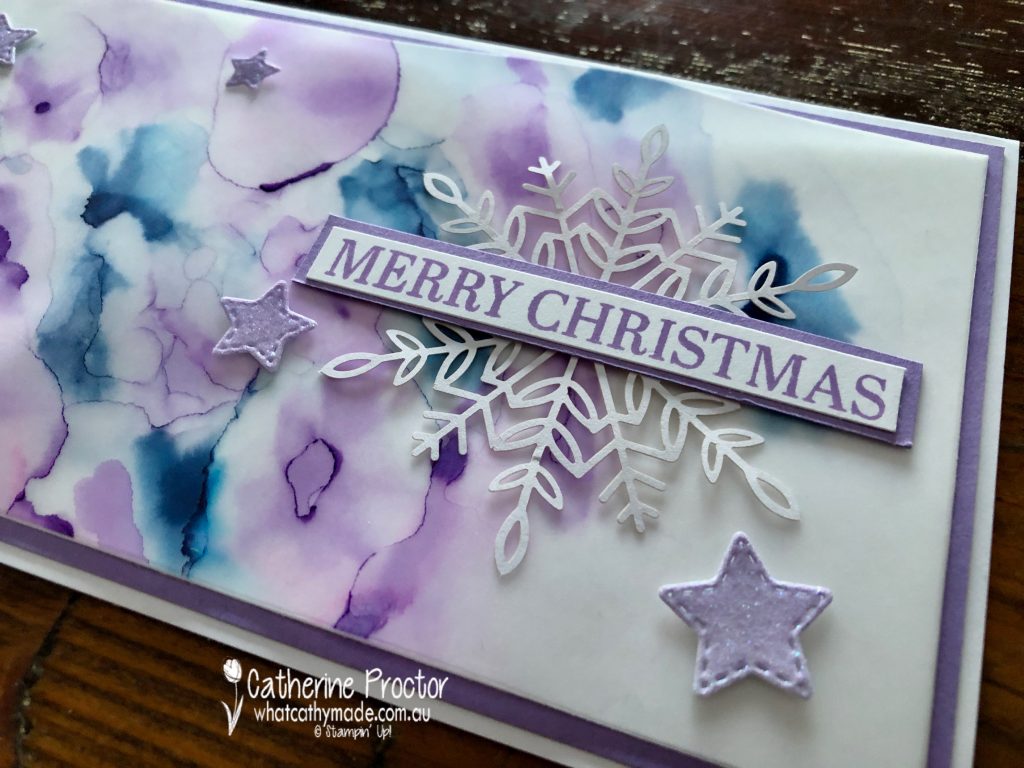
I know I’m a bit late to the party, but this week I finally tried the Stampin’ Blends alcohol technique. Oh my goodness, gracious me – what a fantastic technique this is! If you haven’t tried this technique yet, just give it a go. There is no right or wrong, it’s easy to do and you get a totally different effect every time. All you need are Stampin’ Blends, 100% Isopropyl Alcohol, vellum and a paintbrush.
For my slimline card (10 x 20 cm) I used my dark Highland Heather Stampin’ Blend and my dark Night of Navy Stampin’ Blend. I simply scribbled random “splotches” of each colour onto vellum and then used a paint brush to gently paint the edges of the splotches with 100% Isopropyl Alcohol.
If I felt the gaps between splotches were too big, I simply waited for the alcohol to dry, added more colour with the Stampin’ Blend and repeated the alcohol painting with my paintbrush.
The sparkly stars are die cut from the from one of the glittering glimmery ombre specialty papers using the star dies from the Give It a Whirl dies. I used the Gorgeous Grape glittering glimmery ombre specialty papers – the lighter end of this ombre paper looks more like Highland Heather than Gorgeous Grape.
TIP: Once the alcohol has dried, adhere your embellishments to the front side of the vellum FIRST and them turn the vellum over and strategically place adhesive BEHIND where the embellishments sit so you can’t see the adhesive behind the vellum layer.
A snowflake from the Wonderful Snowflakes embellishments and the Merry Christmas sentiment from the Sparkle of the Season stamp set complete my Christmas card.
Now it’s time to hop on over to our next participant, the lovely Michele Taylor – I can’t wait to see what she’s made this week!
If you find a broken link or have come to this blog hop from a different entry point, you can view the the full list of participants below:
Hello crafters! Welcome to Week 17 of our AWH Heart of Christmas blog hop.
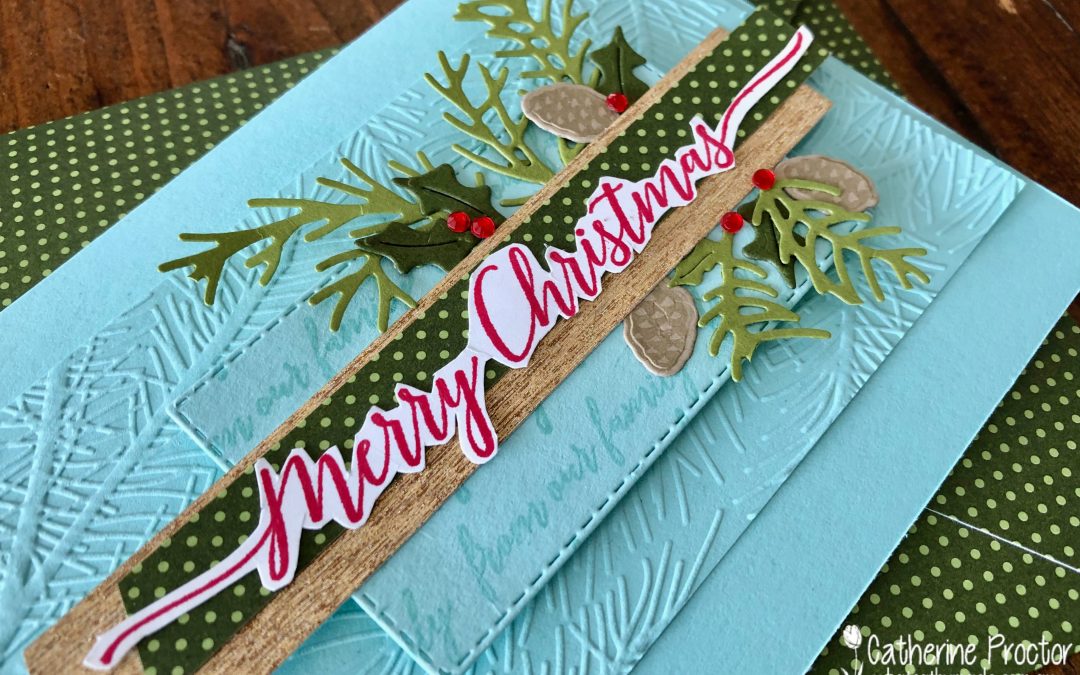
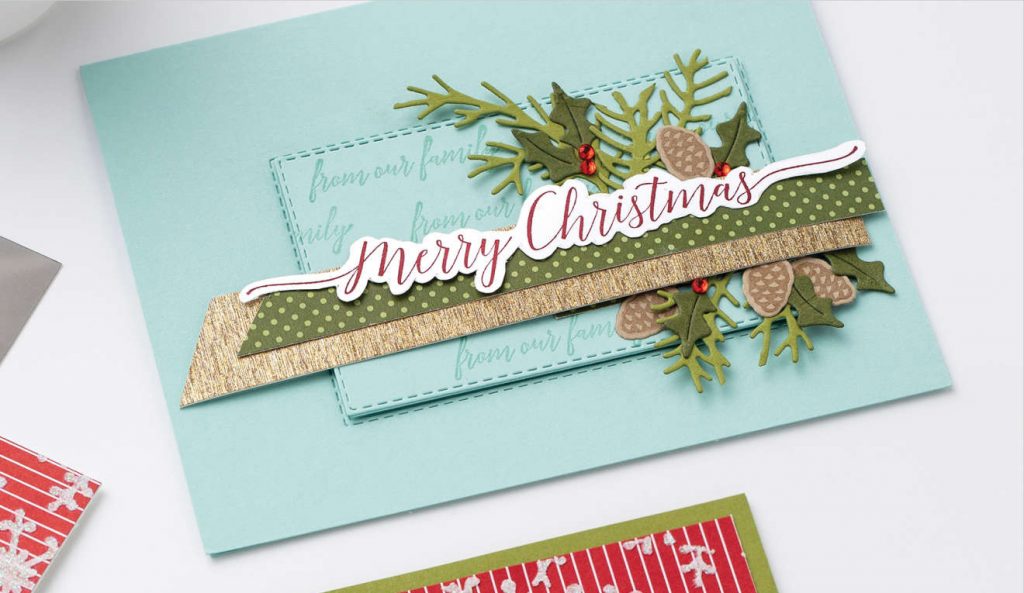
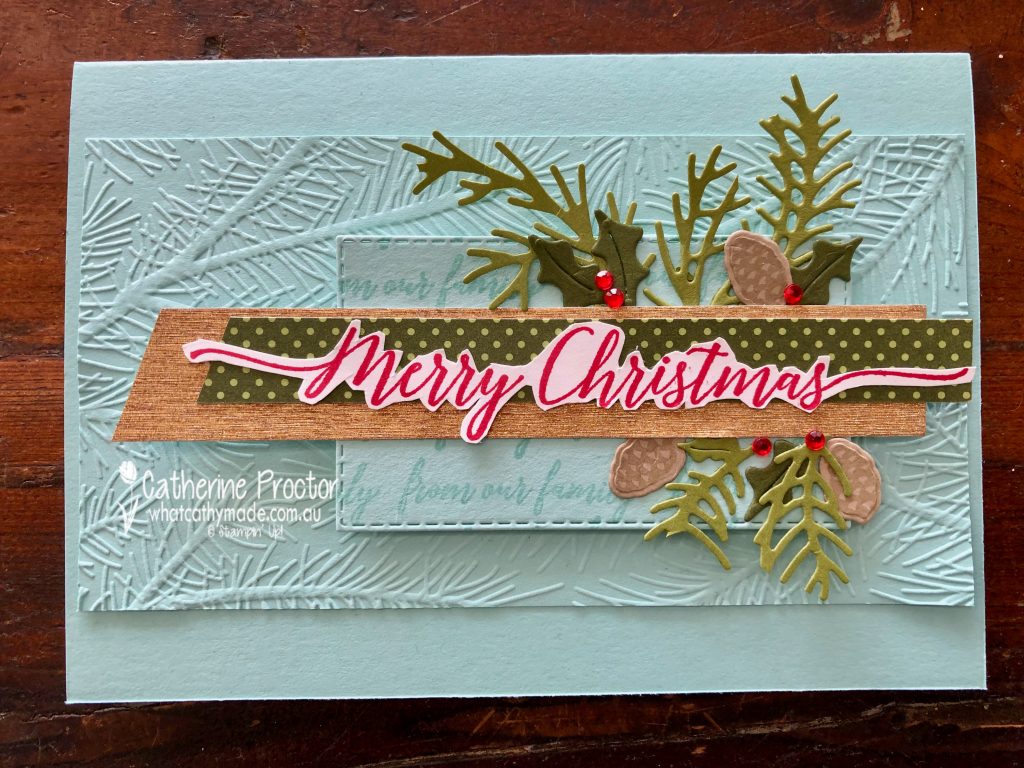
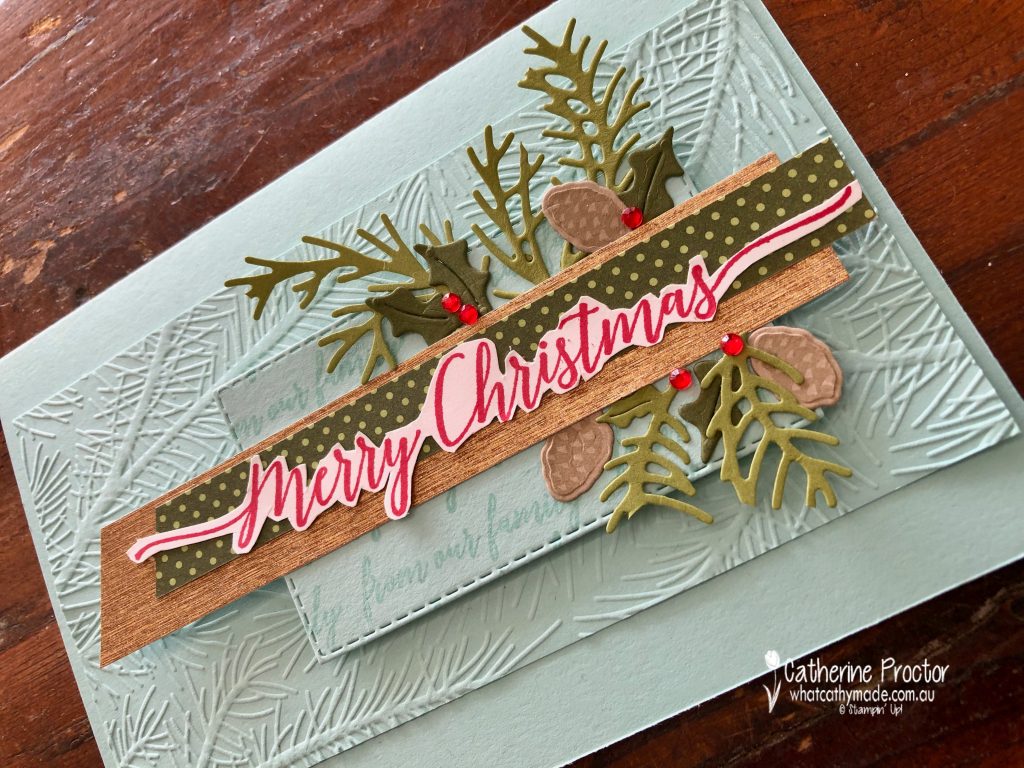
This week I decided to CASE the Stampin’ up! July-December 2021 Mini Catalogue. If you don’t know what CASE stands for, it means to Copy And Share Everything. The Stampin’ Up! catalogues are a great source of inspiration for design ideas, which is why I always hold onto old copies of the Stampin’ Up! catalogues.
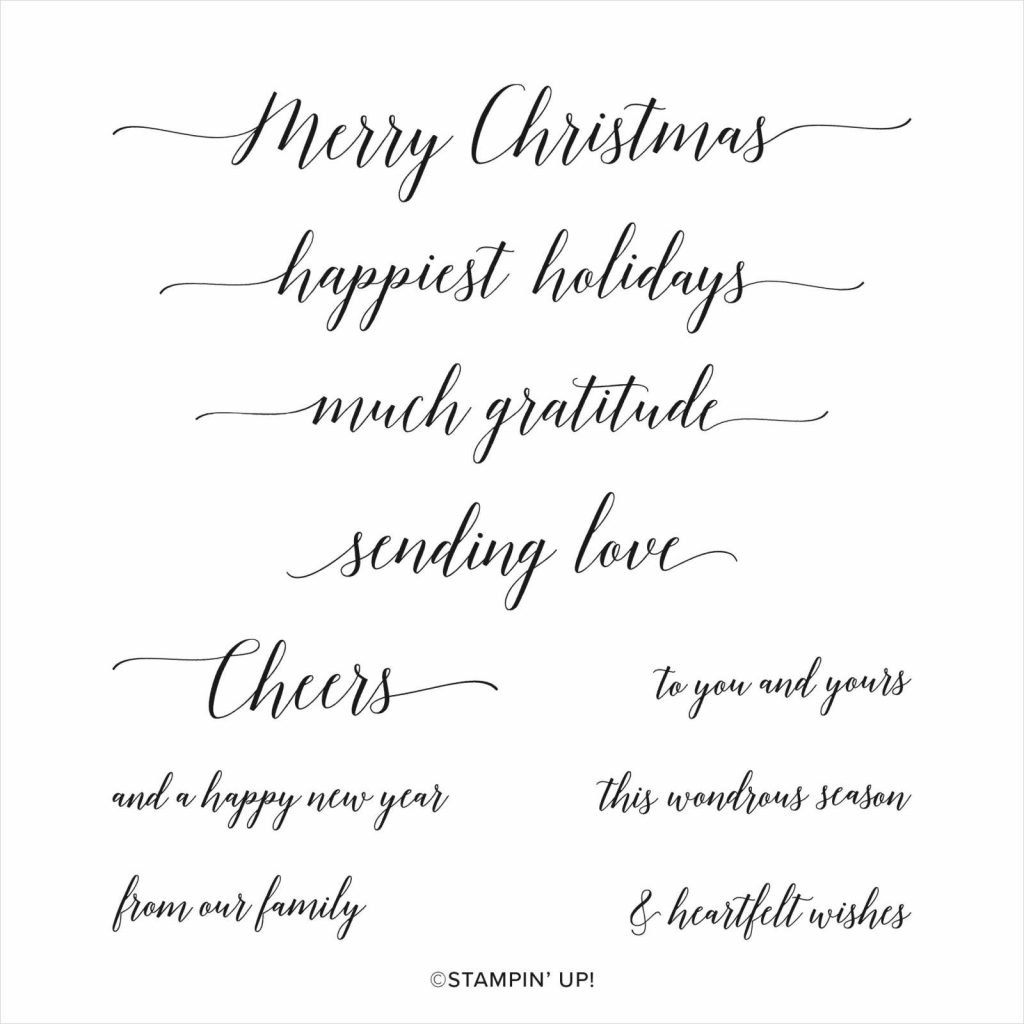
The card I cased is on page 57 of the July-December 2021 Mini Catalogue and I loved this card so much I bought the Heartfelt Wishes stamp used on this card.
Although I kept the colours and the layout pretty much the same as the original, I also added in an an embossed layer using one of the wintry embossing folders. Such a simple step, but doesn’t it give a wonderful dimension to the card?
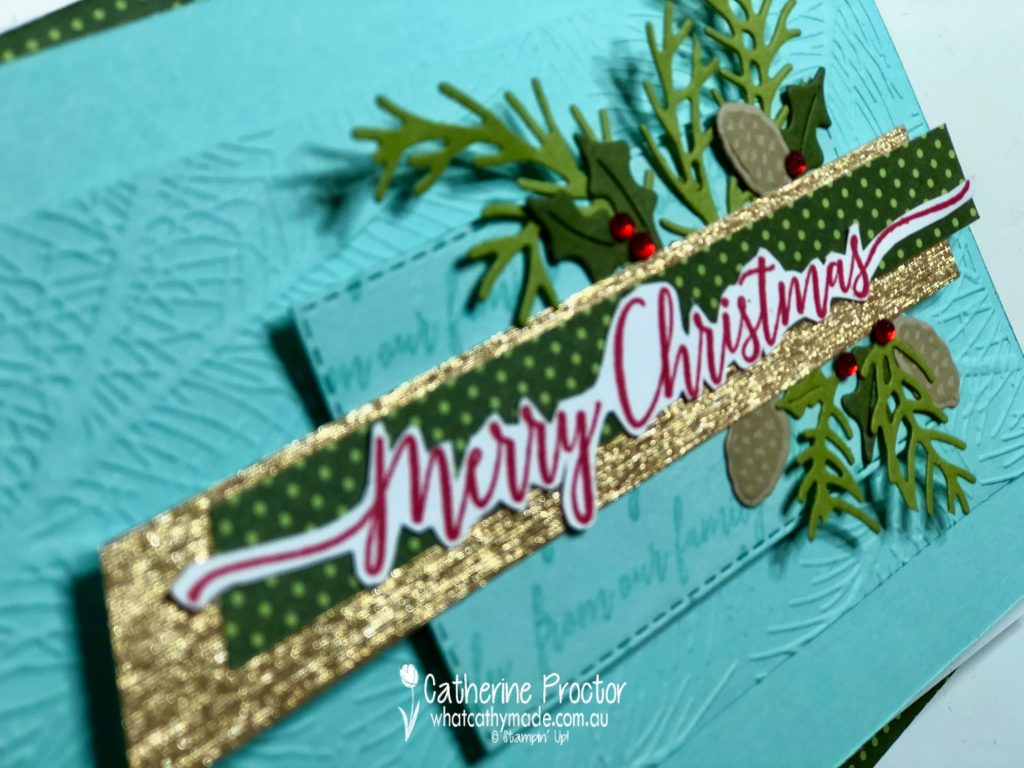
Once again I’ve used the incredibly versatile Seasonal Swirl dies and matching Sparkle of the Season stamp set for the foliage the holly leaves and the pine cones. The holly berries are Red Rhinestones.
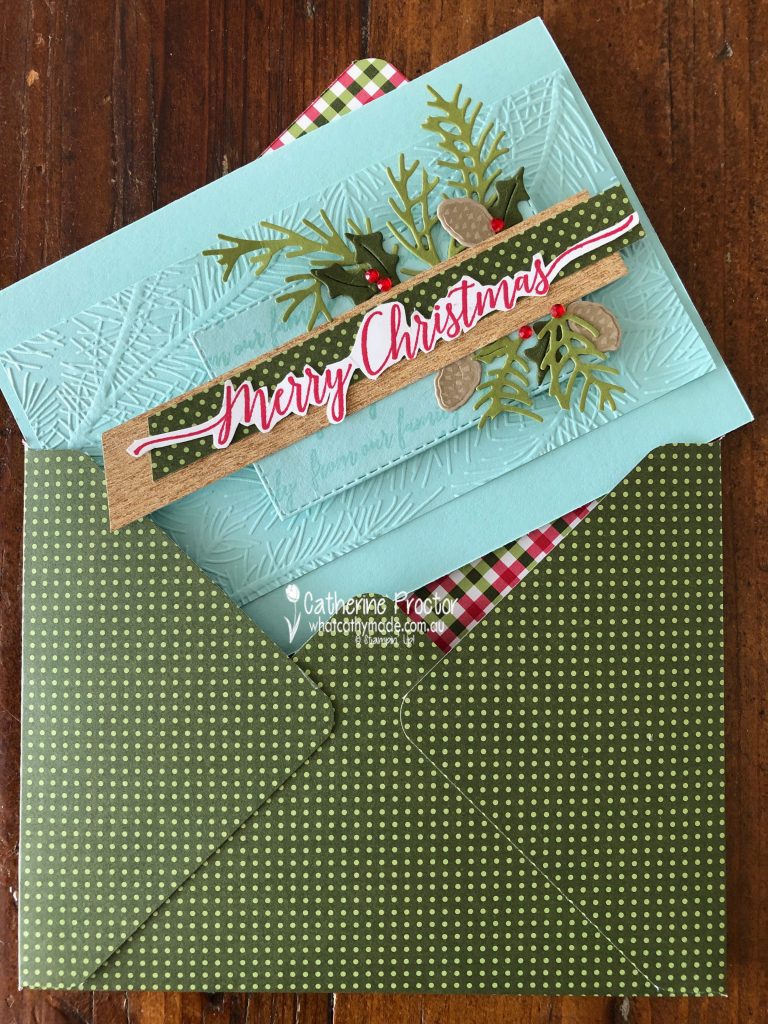
The lovely spotted Mossy Meadow strip of DSP is from Heartwarming Hugs DSP – I’ve made a co-ordinating envelope with this DSP too.
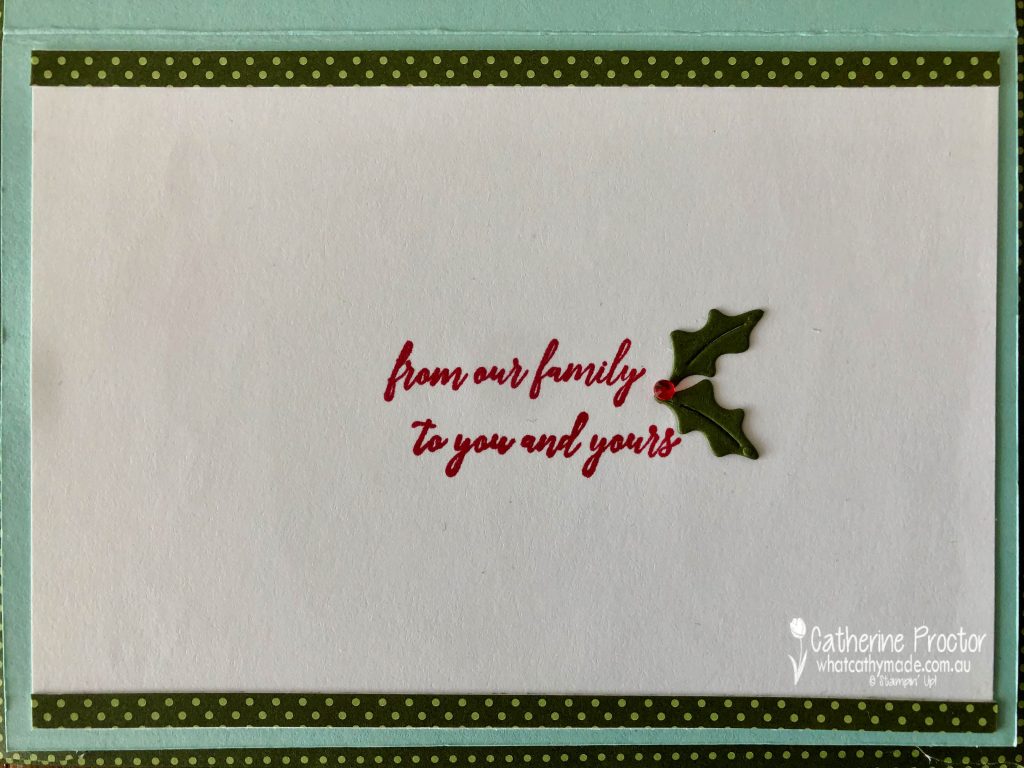
The inside of the card uses the “from our family to yours” stamp that I also used on the front of the card, more holly and strips of the Heartwarming Hugs DSP.
This strip of Gold Brushed Metallic 12″ x 12″ (30.5 x 30.5 cm) Cardstock really adds so much interest to the card – this close up shows you just how sparkly it is!
Now it’s time to hop on over to our next participant, the lovely Claire Daly. I can’t wait to see what Claire shares with us today!
If at any time you find a broken link please head to the blog of this week’s host of The Heart Of Christmas Blog Hop, Sharon Davern, and she will have the list of all those participating.
Thanks for visiting my site. I’ll be back with another card on Wednesday.
In the meantime, wherever you are in the world, stay safe, stay calm … and keep on crafting xxx
Welcome to week 21 of our 2021-22 Colour Creations blog hop! Tonight we are showcasing Gray Granite, a really versatile gray from the Neutrals colour collection.
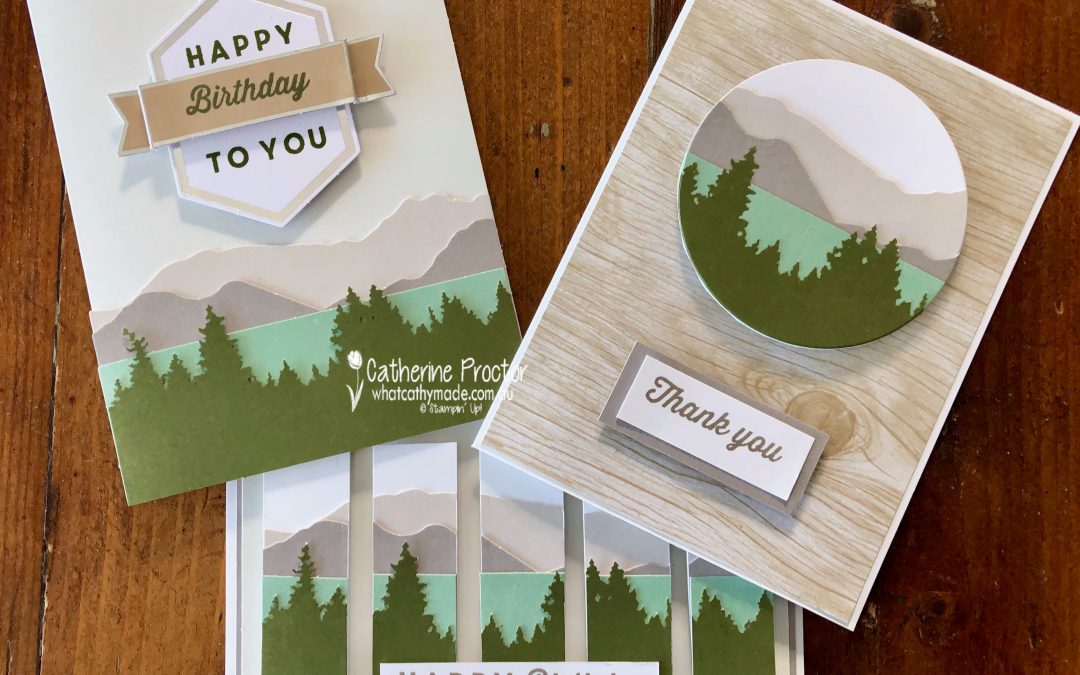
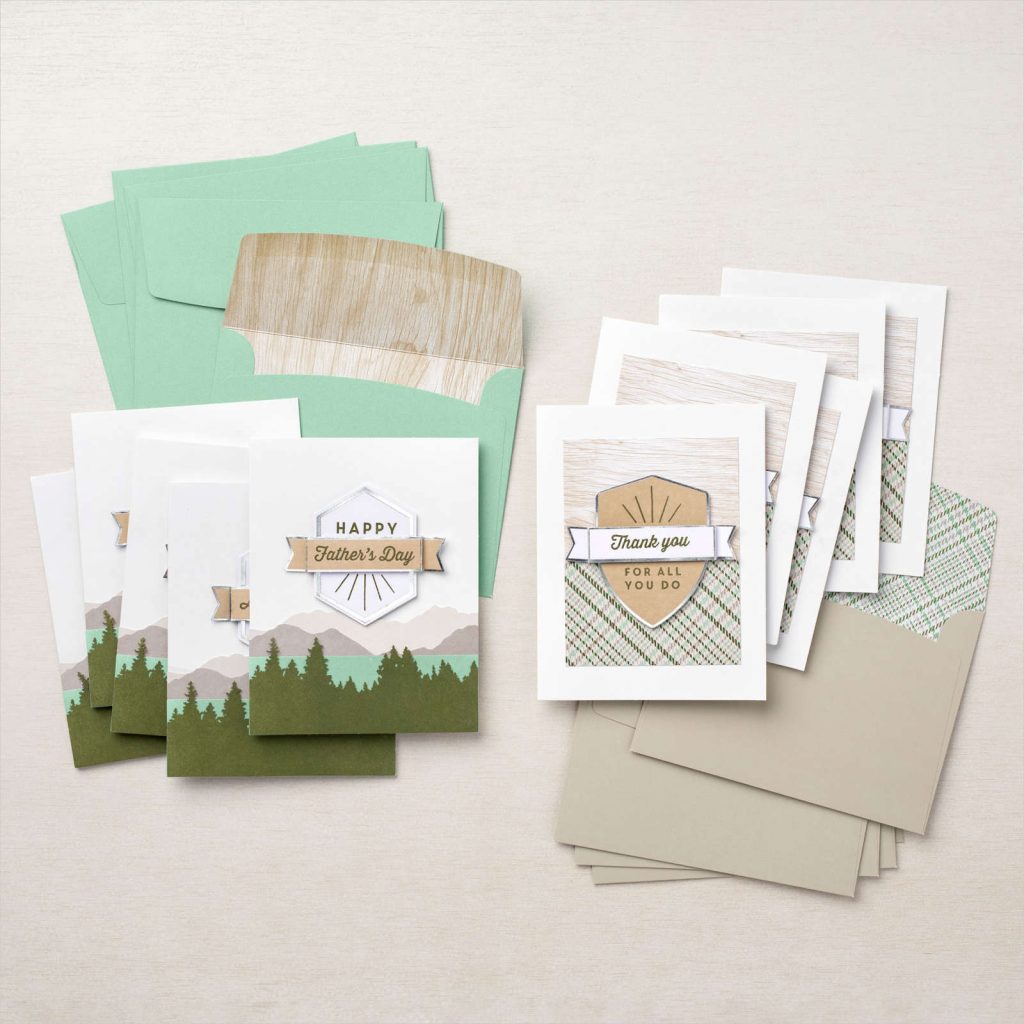
This week I didn’t have a lot of time to craft so I opened up one of my Stampin’ Up! kits: the For the Guys All-Inclusive Card Kit. For $33 this kit is incredible value as you get all the materials you need to make 10 cards with 10 matching envelopes.
After you’ve made your 10 cards you still have leftover adhesives as well as an acrylic block, a Mossy Meadow Stampin’ Spot and a fantastic stamp set full of stamps to suit virtually any man in your life!
You could simply make these cards up as instructed or make your own variations. These are how the cards look when they are made up per the enclosed instructions.
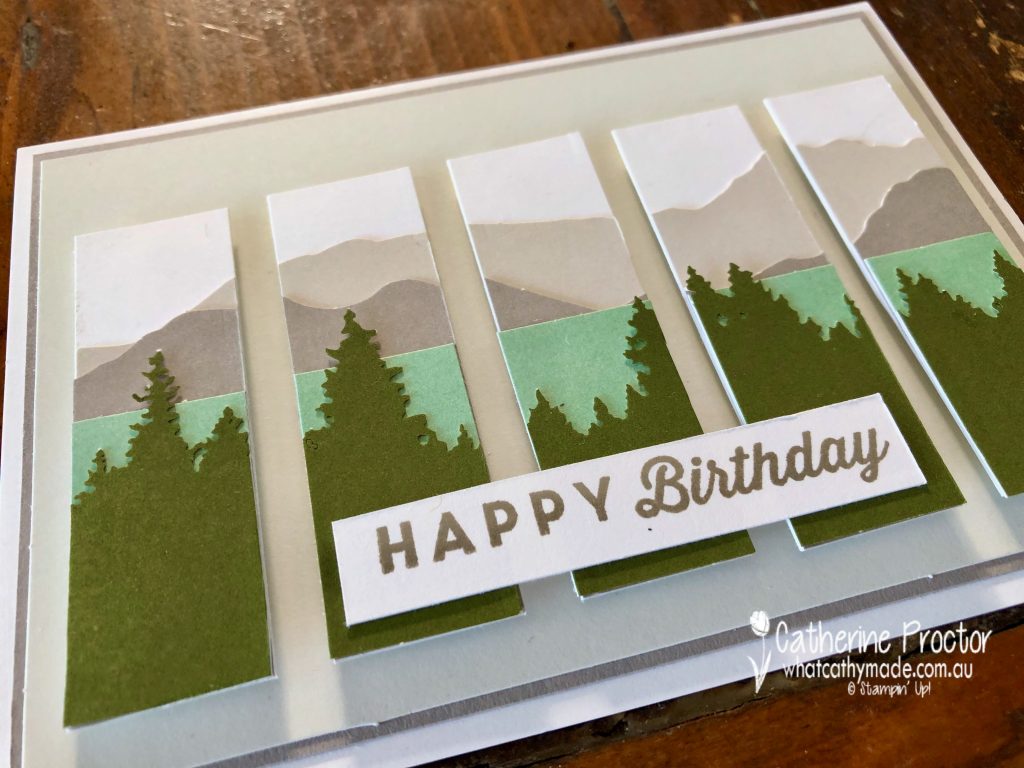
Here’s my first variation. I trimmed and mounted one of the card bases to a layer of Gray Granite cardstock onto a Basic White card base. The mountain scene was layered up as per the card design but It was adhered to the a layer of Basic White and cut into 5 strips before mounting onto the card base using dimensionals.
This card uses the lovely woodgrain pattern from one of the envelopes in this kit as the base layer on the Basic White card base – I’ll simply use another envelope instead for this card. The largest layering circle die cut this scene.
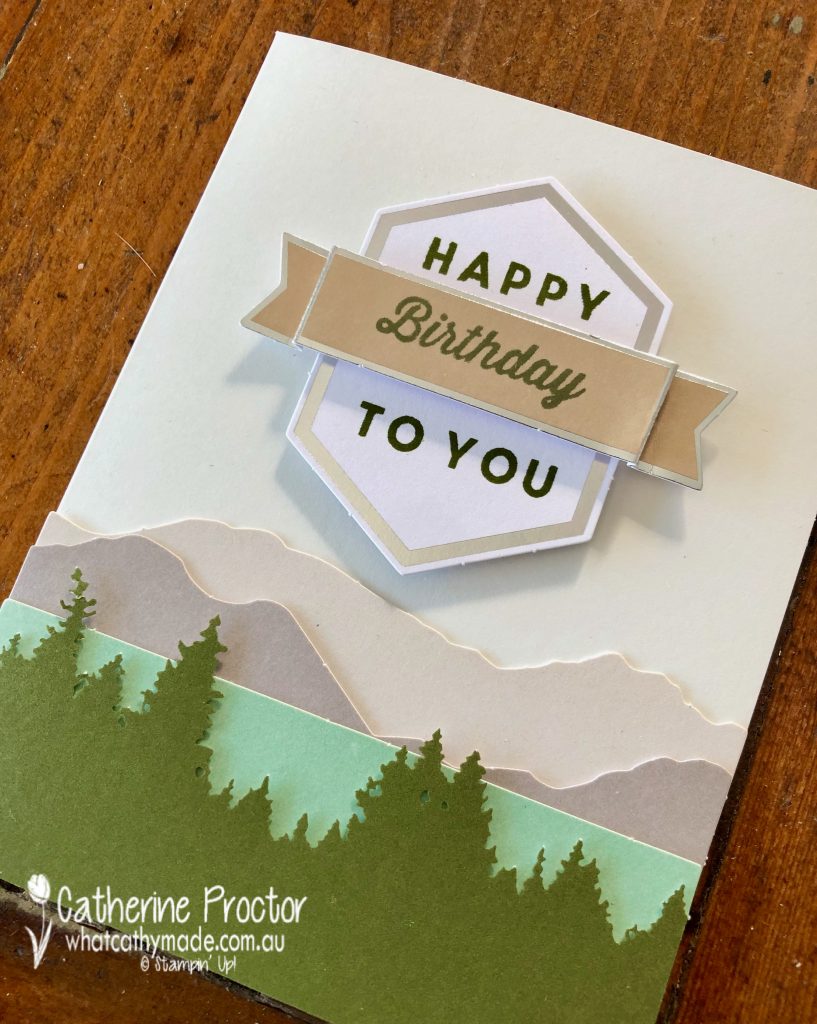
I did make up this card as per the kit instructions, but as I would not use this as a Father’s Day card (as suggested in the instructions) I substituted the Father’s Day sentiment for the birthday one instead.
I’m really happy with these masculine cards – the Gray Granite works so well these other soft neutral colours.
Now it’s time to hop on over to our next participant, the lovely Kate Morgan – I can’t wait to see what she’s made this week!
If you find a broken link or have come to this blog hop from a different entry point, you can view the the full list of participants below:


")
")
 Designer Series Paper")


 Specialty Designer Series Paper")


")
 Cotton Paper")
 Designer Series Paper")


 Open Weave Ribbon")
 Open Weave Ribbon")


")


")


 Specialty Paper")