Welcome to week twenty four of our Art With Heart 2023-24 Colour Creations blog hop! This week we are showcasing Fresh Freesia, one of my favourite Stampin’ Up! colours. Fresh Freesia was originally an In Colour, however this year it was added to the subtles family in the core colour range.
Did you take part in the World Card Making Day last Saturday? I was away for the weekend so I took some basic supplies with me so I could craft along at the event, adapting the card designs Stampin’ Up! supplied to make Fresh Freesia cards instead.
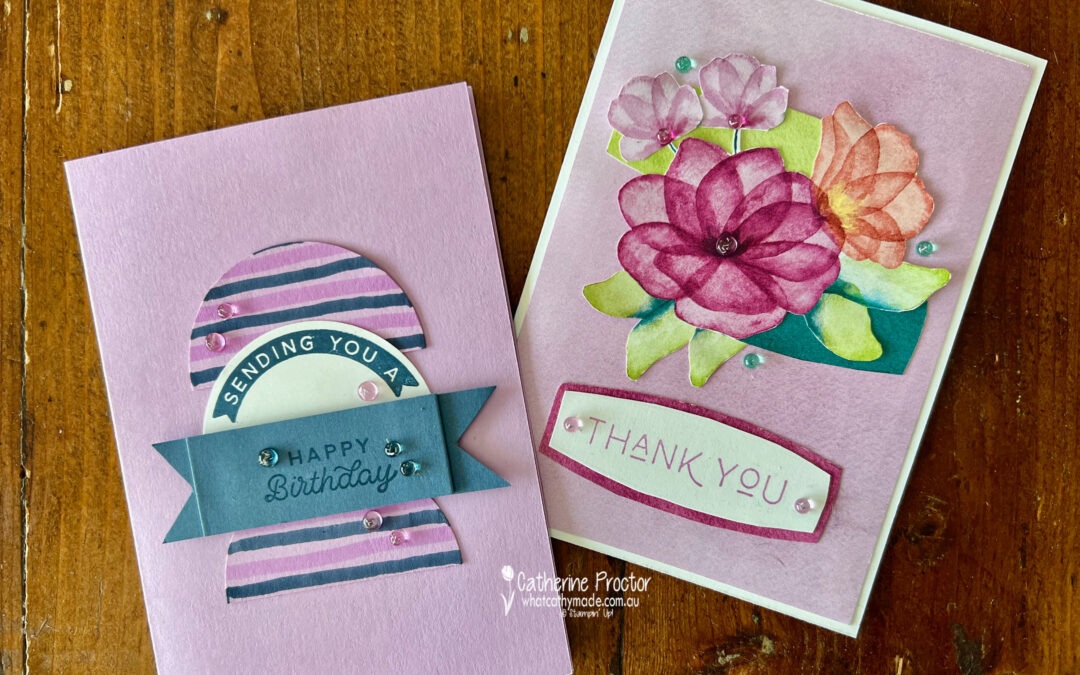
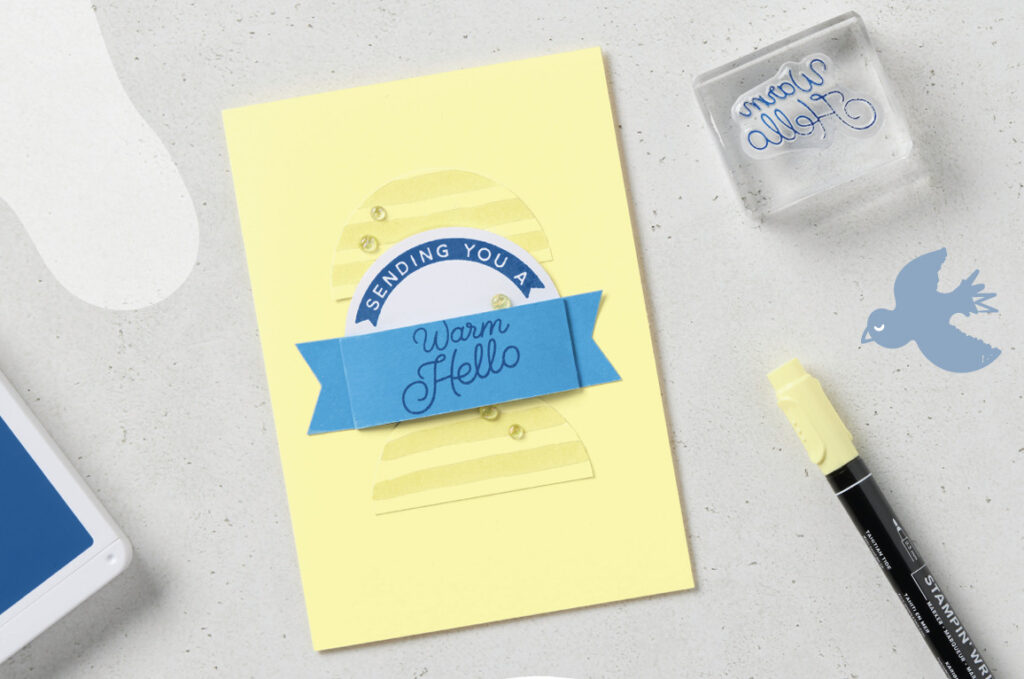
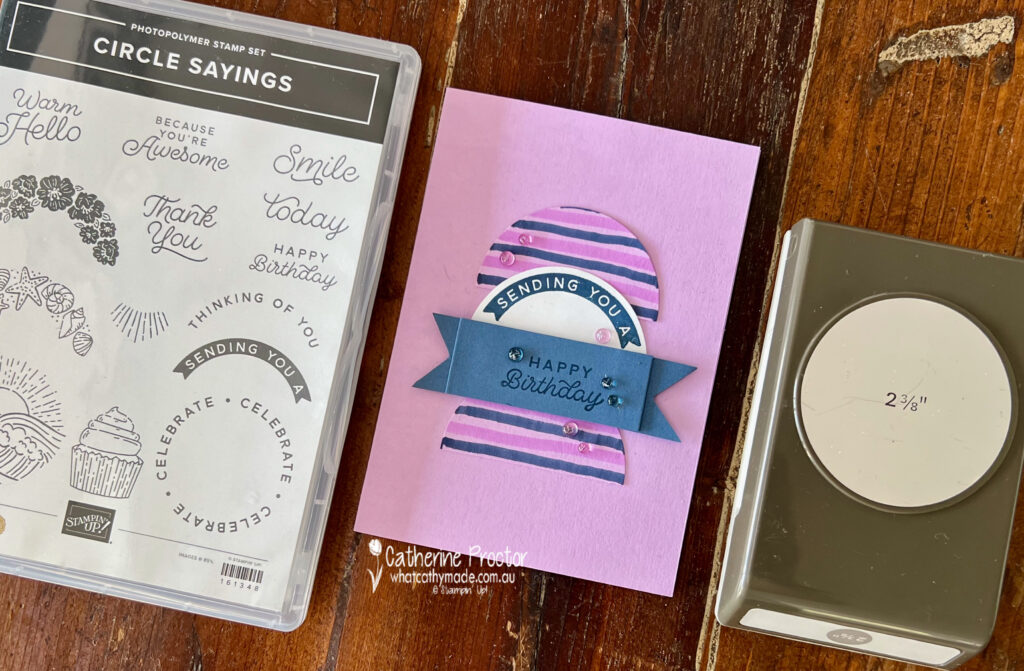
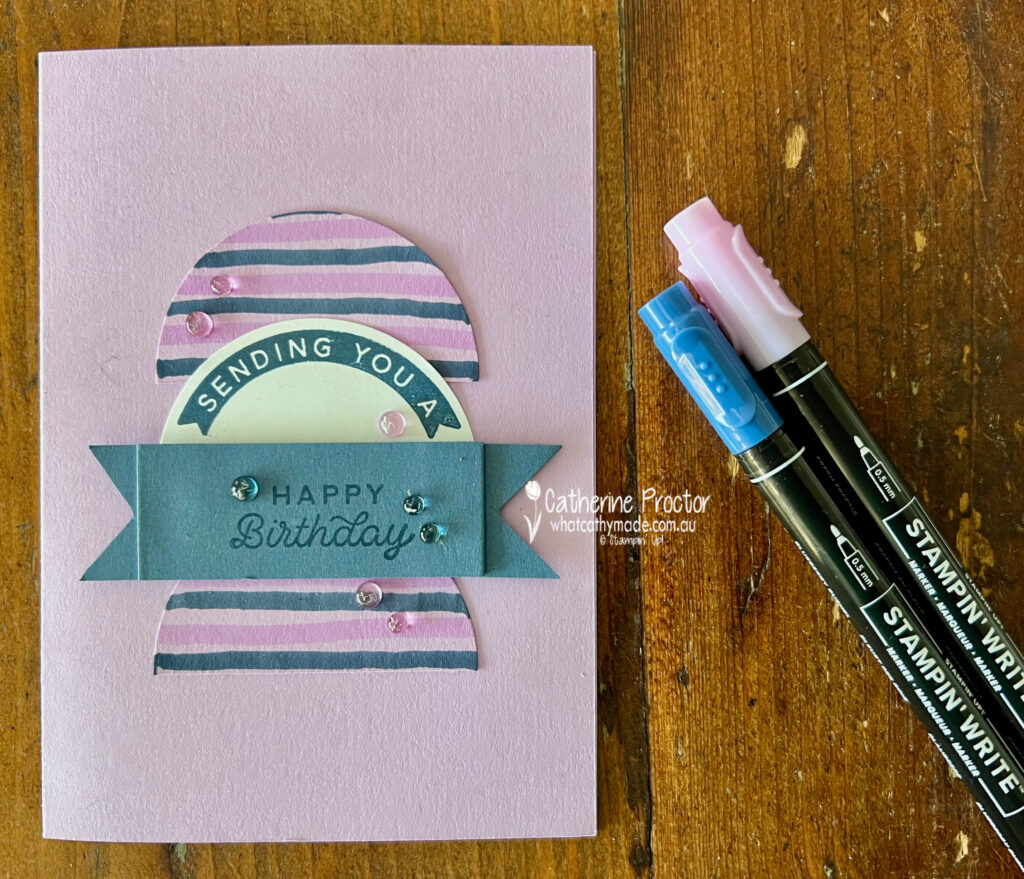
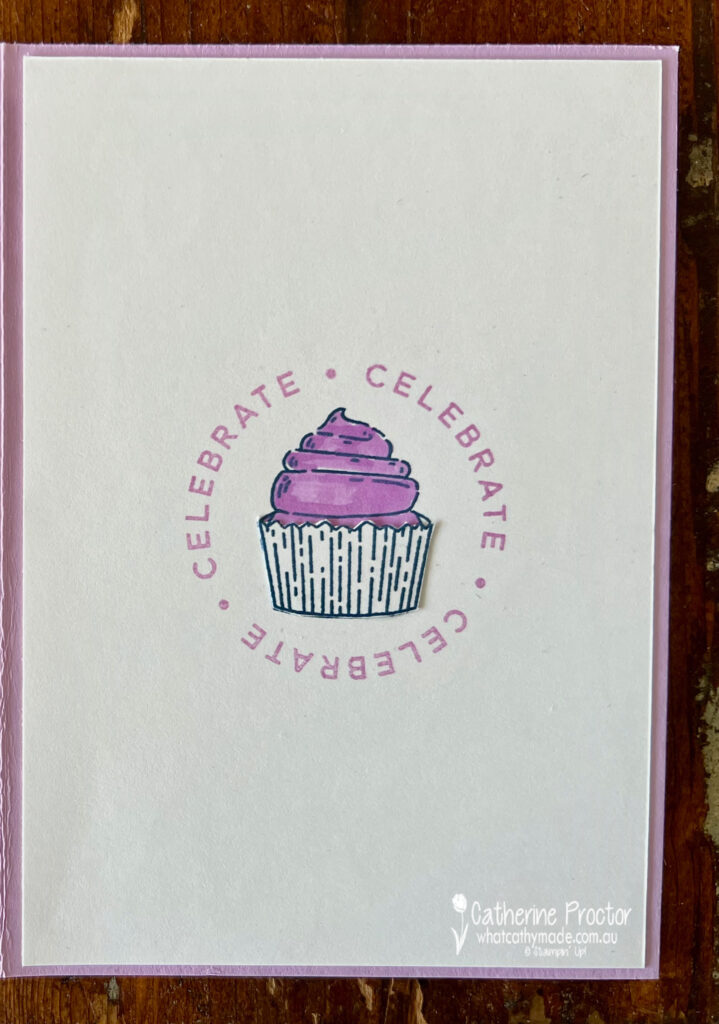
This is the first card design for the event, supplied by Stampin’ Up! It uses the brush tip end of the new Stampin’ Write Markers to create a striped background, and the Circle Sayings bundle with circle punch.
I stuck fairly close to the design of this card, swapping out the original colours for Fresh Freesia and Misty Moonlight instead.
My two-tone striped background was created using Fresh Freesia and Misty Moonlight Stampin’ Write Markers.
I also added a hand stamped and hand coloured inside layer to my card.
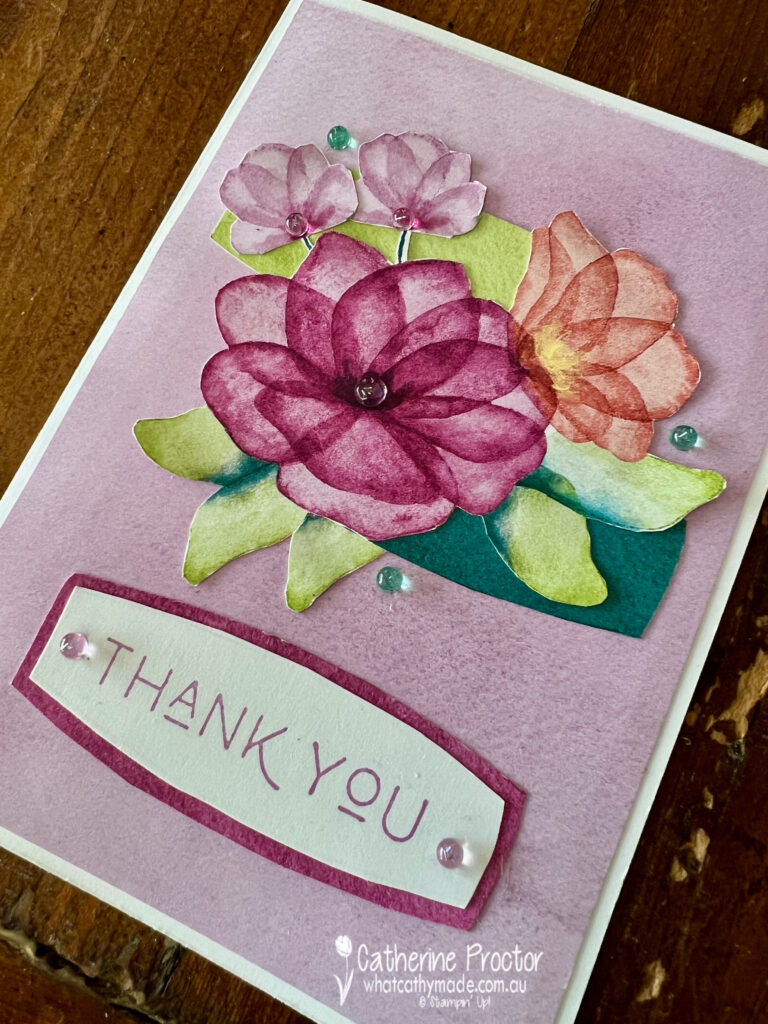
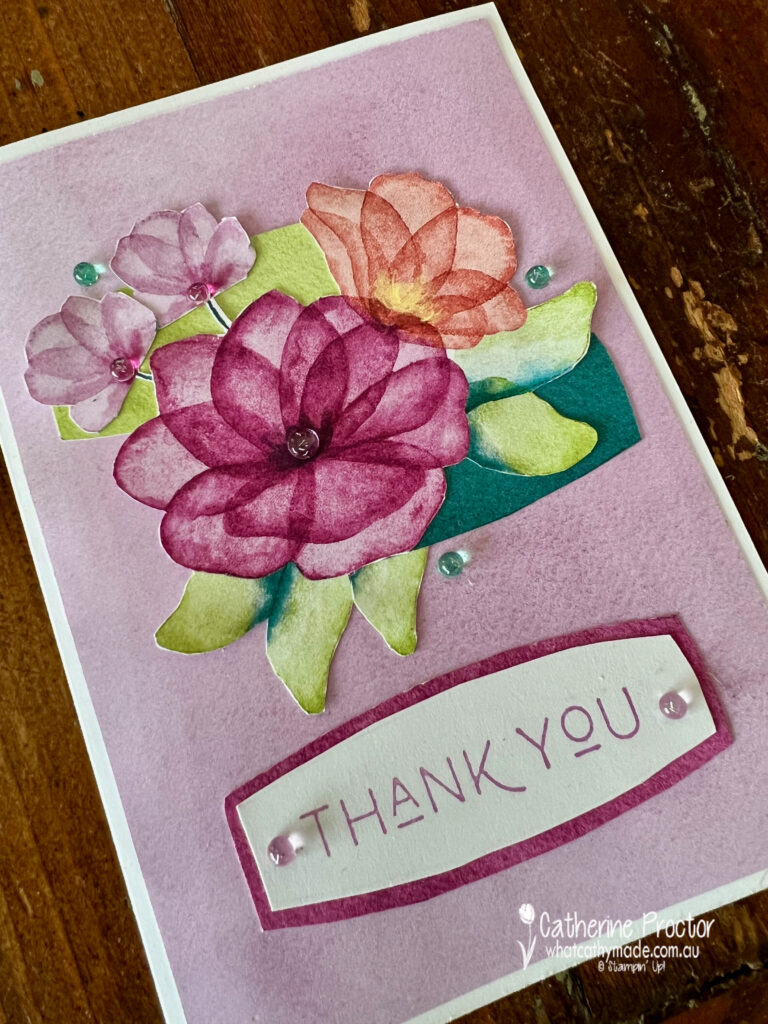
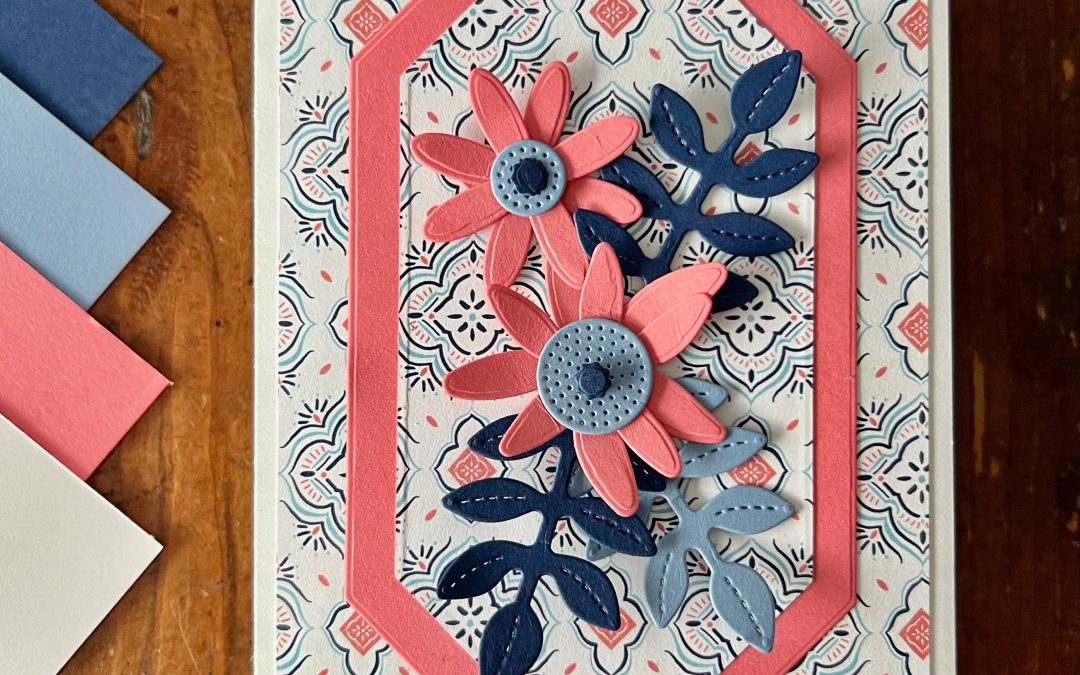
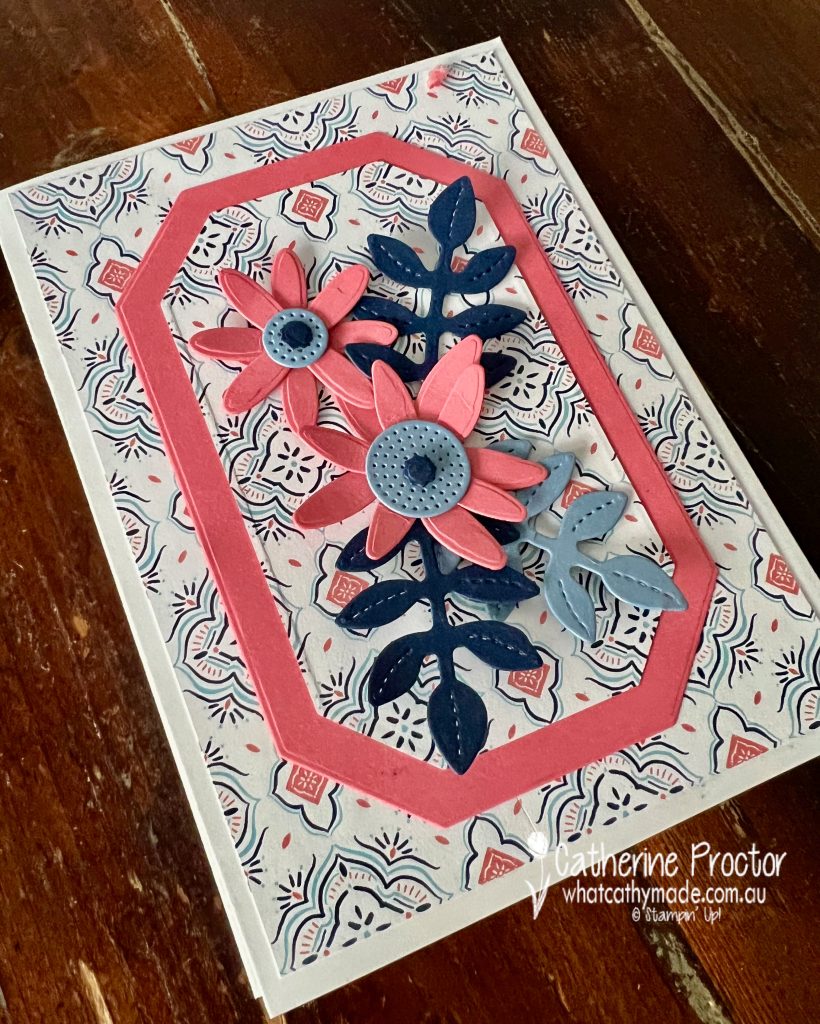
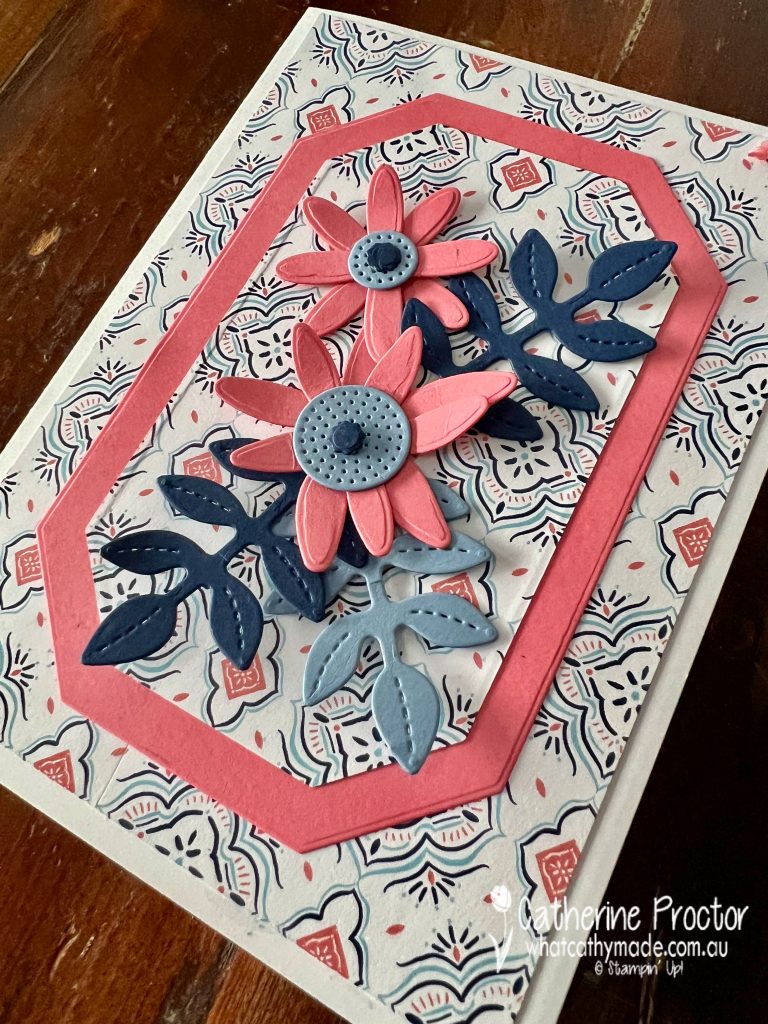
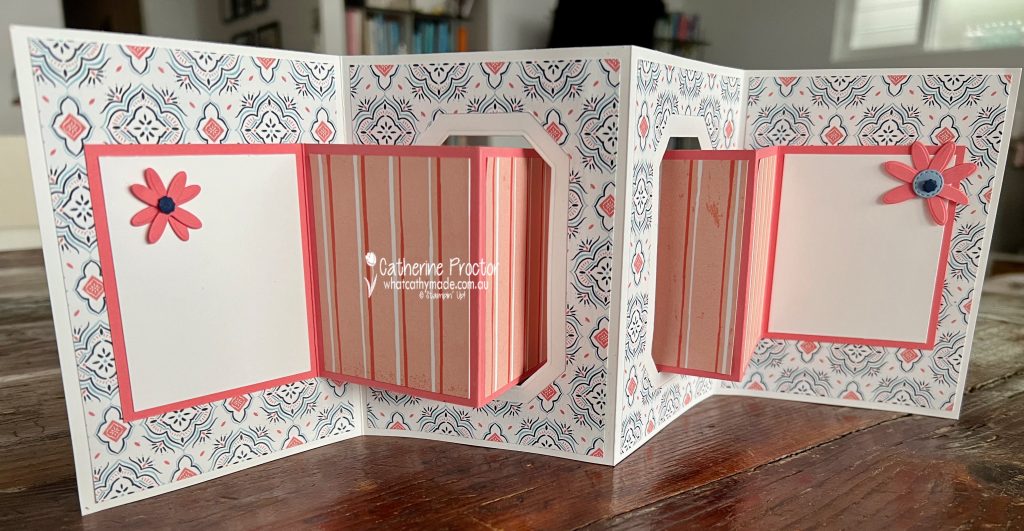
The second card created by Stampin’ up! uses the Earthen Elegance bundle, with elements of the card that needed to be die cut with a Cut & Emboss Machine.
Guess what? Although I packed my Mini Stampin’ Cut & Emboss Machine, I actually hadn’t packed the clear die cutting plates. What I thought was a new set of die cutting plates turned out to only be the base plate and the embossing plates!
Luckily, I had packed the new Delightful Floral 12″ x 12″ (30.5 x 30.5 cm) Designer Series Paper, so I fussy cut flowers from the DSP to make my own version of the card.
For the long oval shaped sentiment and the two panels behind the flowers I traced around the large vase die with a pencil and then fussy cut it out to create the same layout as the original card.
The gorgoeus embellishments on both these cards are the Fresh Freesia and Misty Moonlight gems from the Tinsel Gems Three-Pack.
Now it’s time to hop on over to our next participant, the lovely Kate Morgan – I can’t wait to see what Kate has made this week!
If at any time you find a broken link, you can find the complete list of all participants below.
Welcome to week twenty three of our Art With Heart 2023-24 Colour Creations blog hop! This week we are showcasing Flirty Flamingo, a bright pink colour from the brights family.
I’ve taken my colour combination inspiration this week from this gorgeous sheet of Les Shoppes Designer Series Paper. The colours in this sheet of DSP are Balmy Blue, Flirty Flamingo, Night of Navy and Basic White.
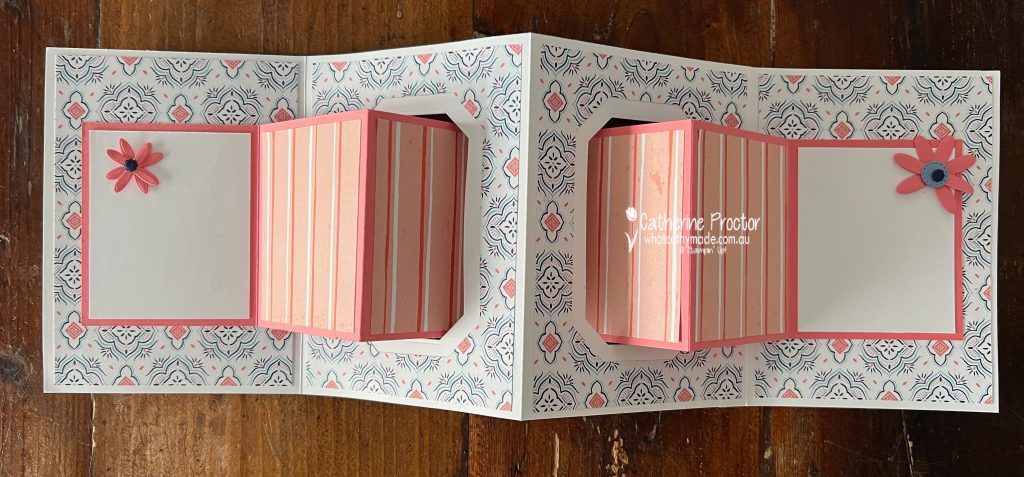
A fancy fold is often a wonderful way to use Designer Series Paper so I’ve created an Interlocking Accordion Card, following a template created by Lisa Curico from the USA.
You can find the instructions on how to make this card on Lisa’s YouTube channel and she also has a template with all the measurements here. I’ve used Lisa’s measurements, but made a totally different looking card by using a different DSP, different colours, different dies and not having any stamping on my card.
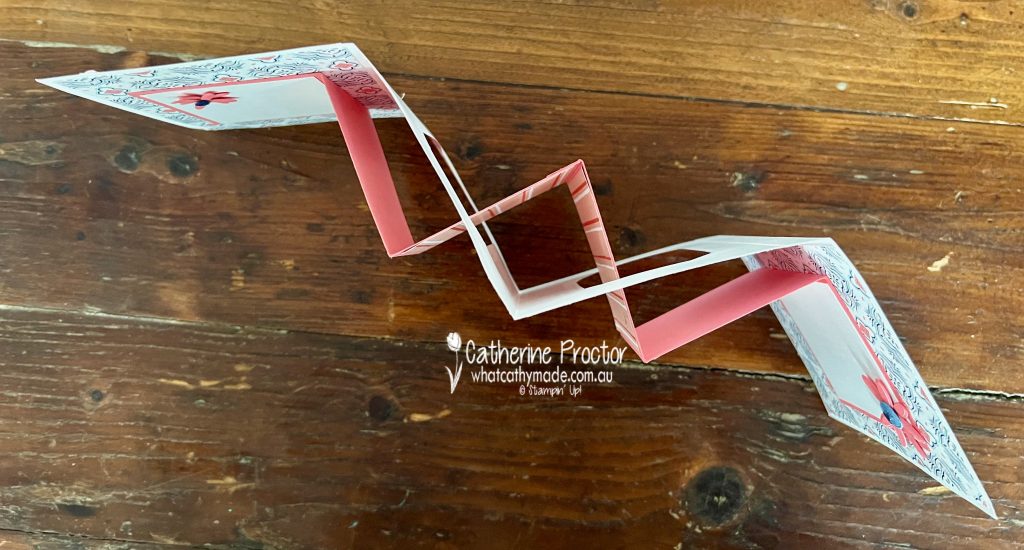
Here’s a short video to show you how this fancy fold opens up – for some reason the video is upside down and it won’t flip around for me tonight no matter how hard I try, however as there is no stamping on this card it’s not really a big deal.
This card also stands up for display really well – here’s what it looks like opened up for display.
Apart from adding a couple of leftover Paper Florist die cuts, I’ve left the first and last inside panels blank to allow room to stamp a sentiment on the first one and write a message to the recipient on the last panel.
Here’s what it looks like from above so you can see the way the inner card folds into and interlocks with the outer card.
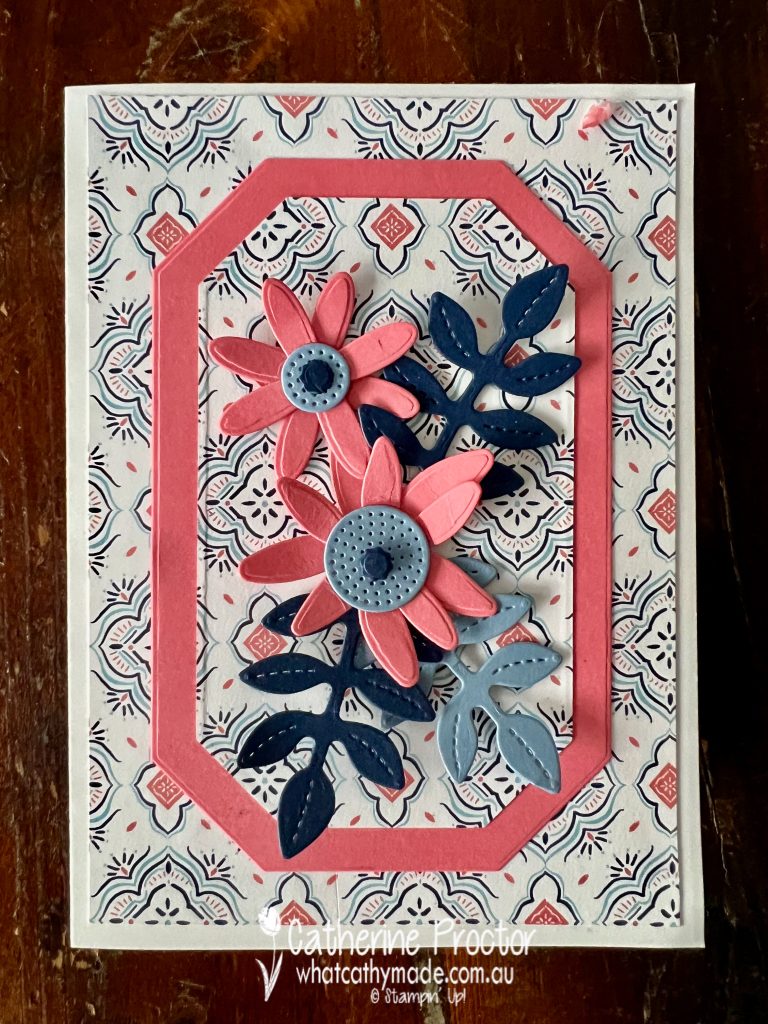
The Countryside Corners dies were used to decorate the front of the card as well as to cut out the holes in the outside card so that the smaller inside card can thread through.
To match the colours in the DSP, I’ve used both the Countryside Corners Dies and the Paper Florist dies to die cut Balmy Blue, Flirty Flamingo and Night of Navy cardstock and decorate the front of the card.
Now it’s time to hop on over to our next participant, the lovely Tina Gillespie – I can’t wait to see what Tina has made this week!
If at any time you find a broken link, you can find the complete list of all participants below.
Welcome to week twenty two of our Art With Heart 2023-24 Colour Creations blog hop! This week we are showcasing Early Espresso, a a rich dark brown from the neutrals family.
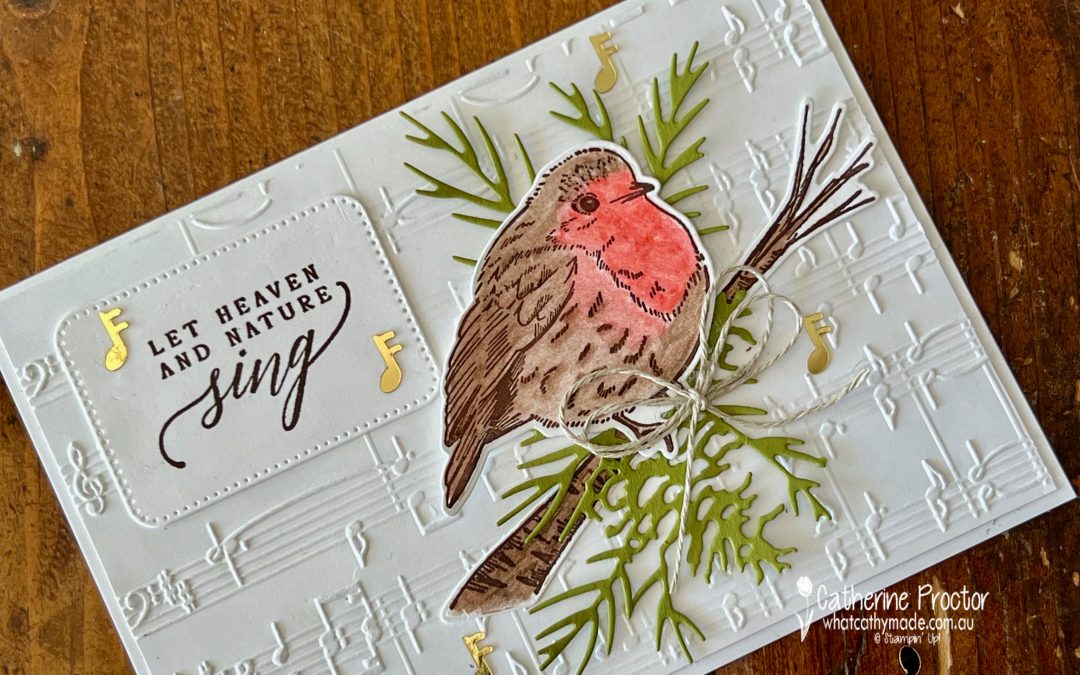
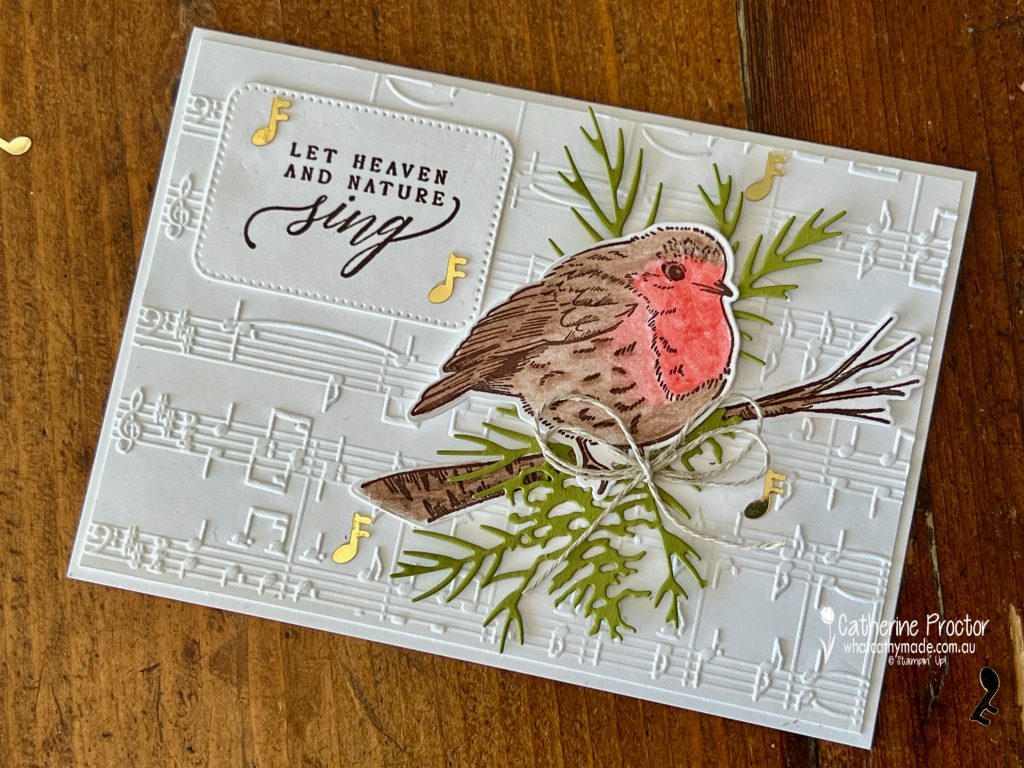
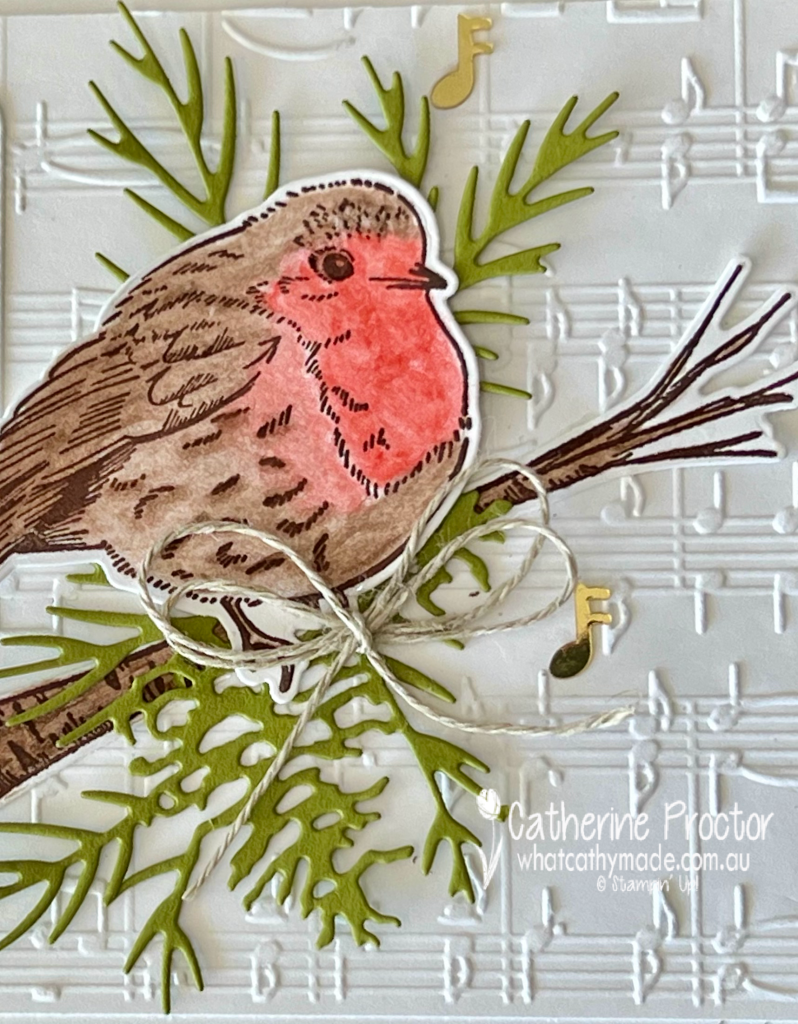
Early Espresso is a wonderful neutral that really makes other colours pop. It’s also fabulous for wood and nature themed cards, like the Christmas card I’ve made for this week’s hop.
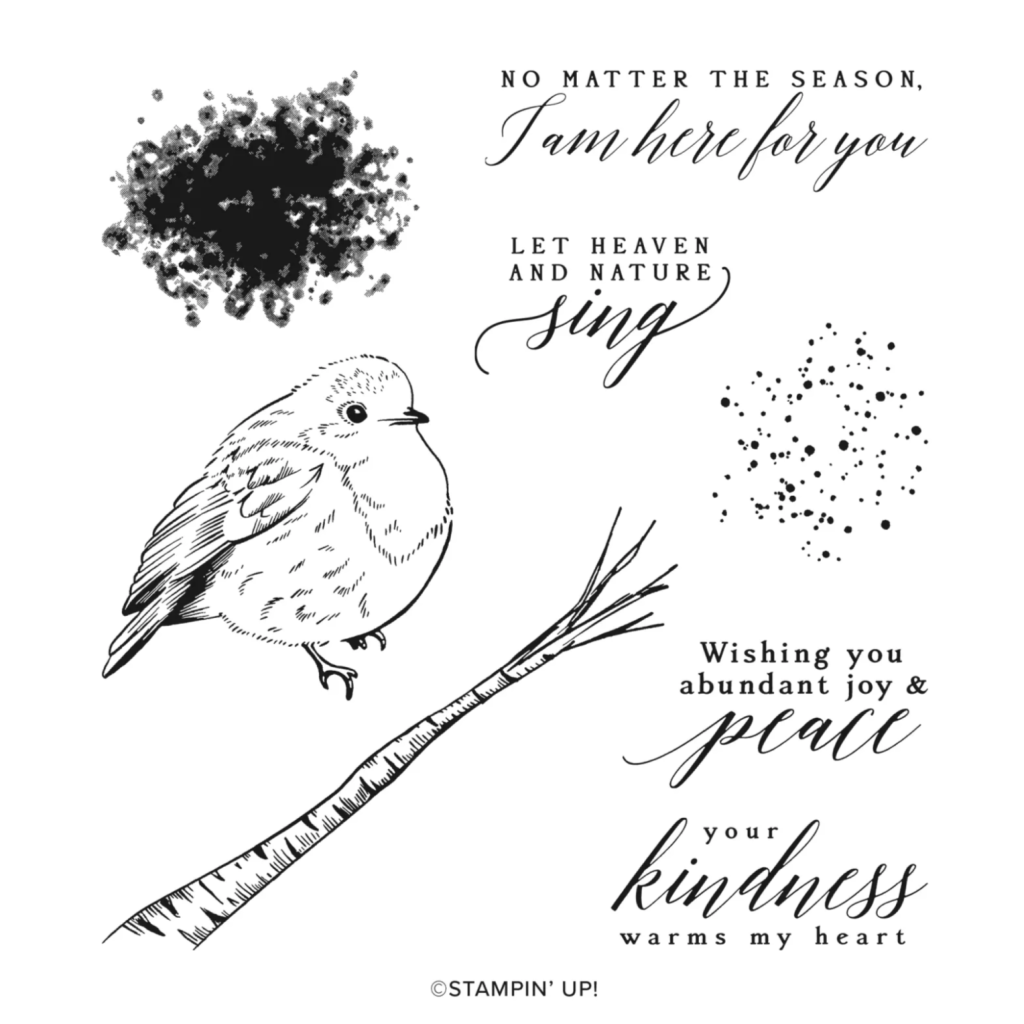
The bird and the branch stamp are from the “Perched in a Tree” stamp set, stamped in Early Espresso ink as is the “Let Heaven and Nature Sing ” sentiment. With this sentiment I just had to use the Merry Melody embossing folder too!
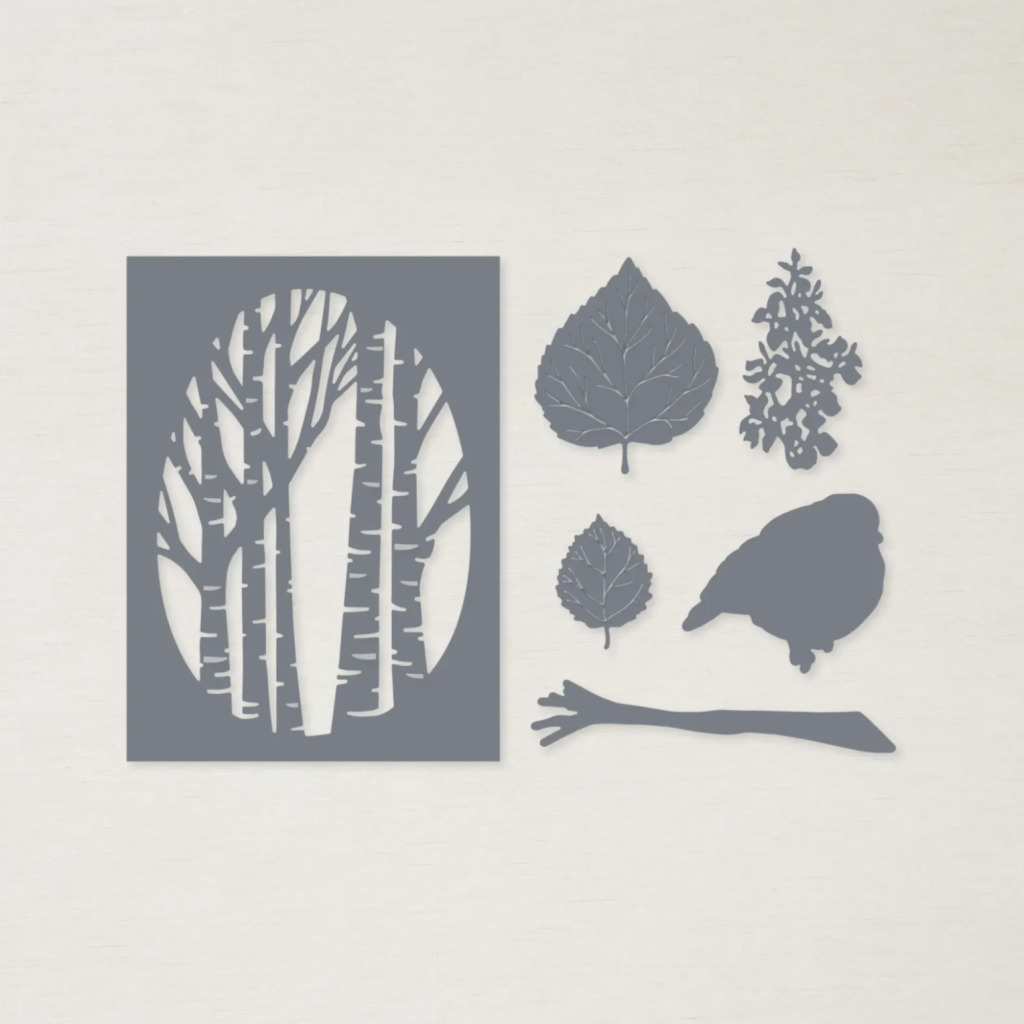
The bird and tree trunk were then die cut using the coordinating Aspen Tree Dies.
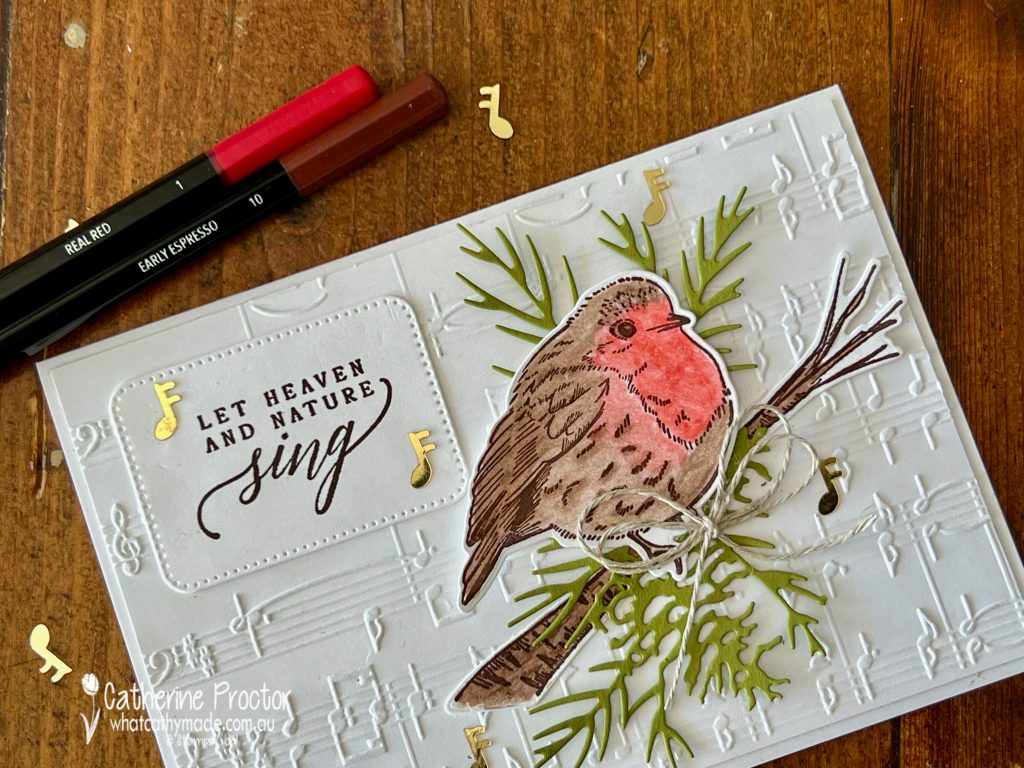
I coloured the bird and the tree branch using watercolour pencils, then blended the colouring in with a blender pen to make the colours smooth.
The Old Olive cardstock foliage is created using one section of the Christmas Pinecone Dies and the final touches are a bow of linen thread and a few music notes from the Loose Holly Gems & Sequins.
Now it’s time to hop on over to our next participant, the lovely Kate Morgan – I can’t wait to see what Kate has made this week!
If at any time you find a broken link, you can find the complete list of all participants below.
Your Christmas countdown continues – it’s exactly three months or 13 weeks today until Christmas Day!
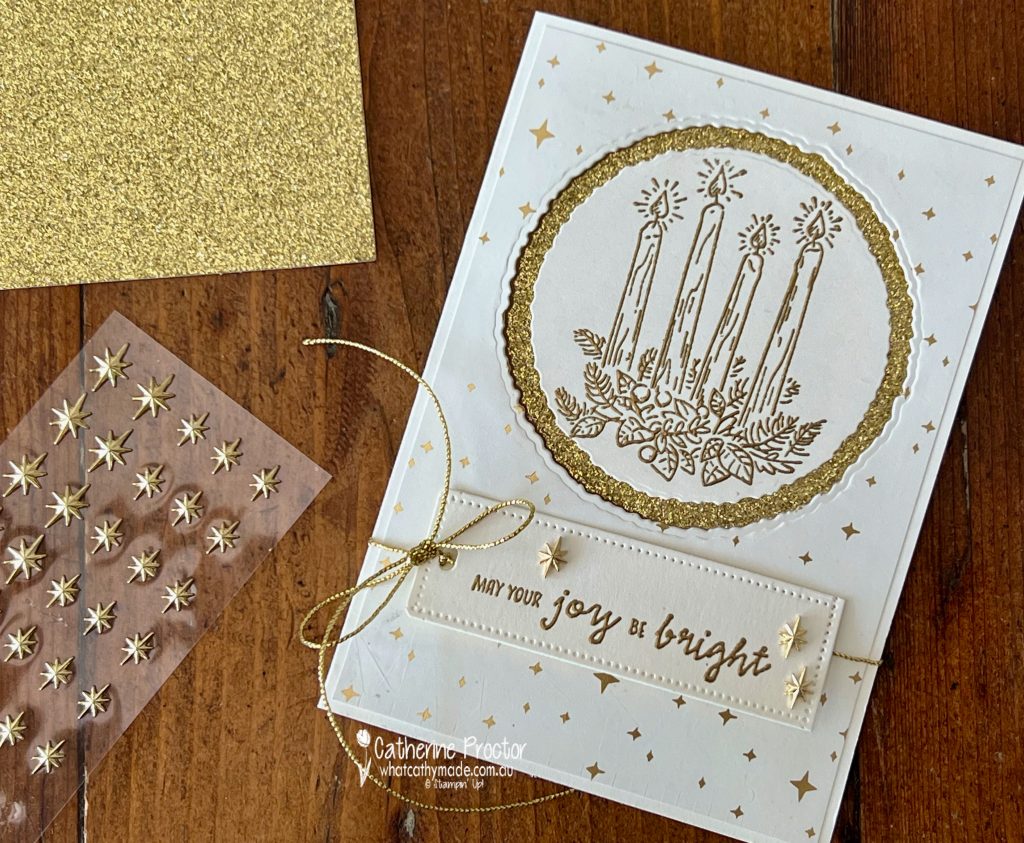
This week’s Christmas card is a fancy fold card – I’m not 100% sure of the name, however think it could be called a peek a boo flap card? Here’s a short video to show you how it works.
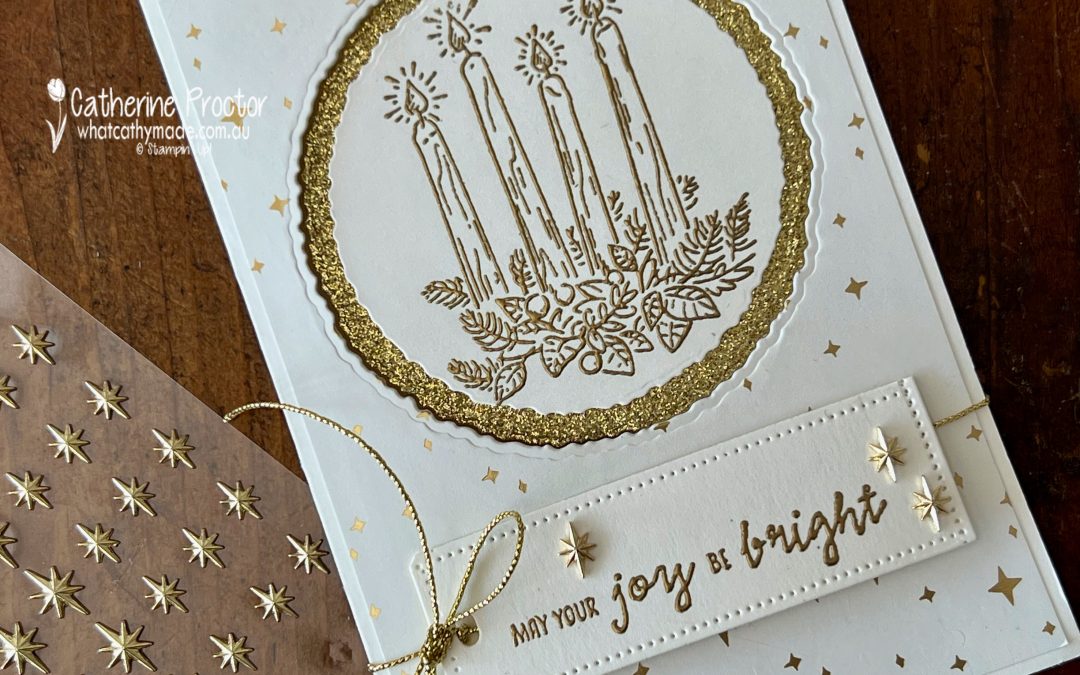
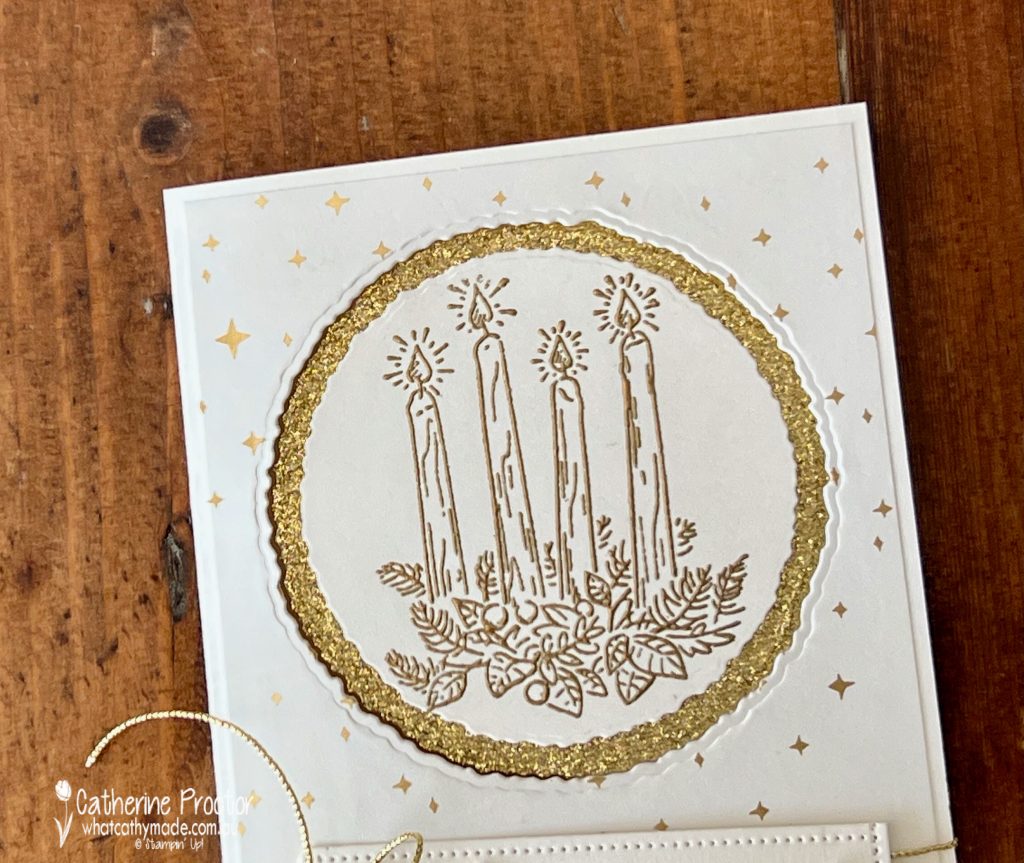
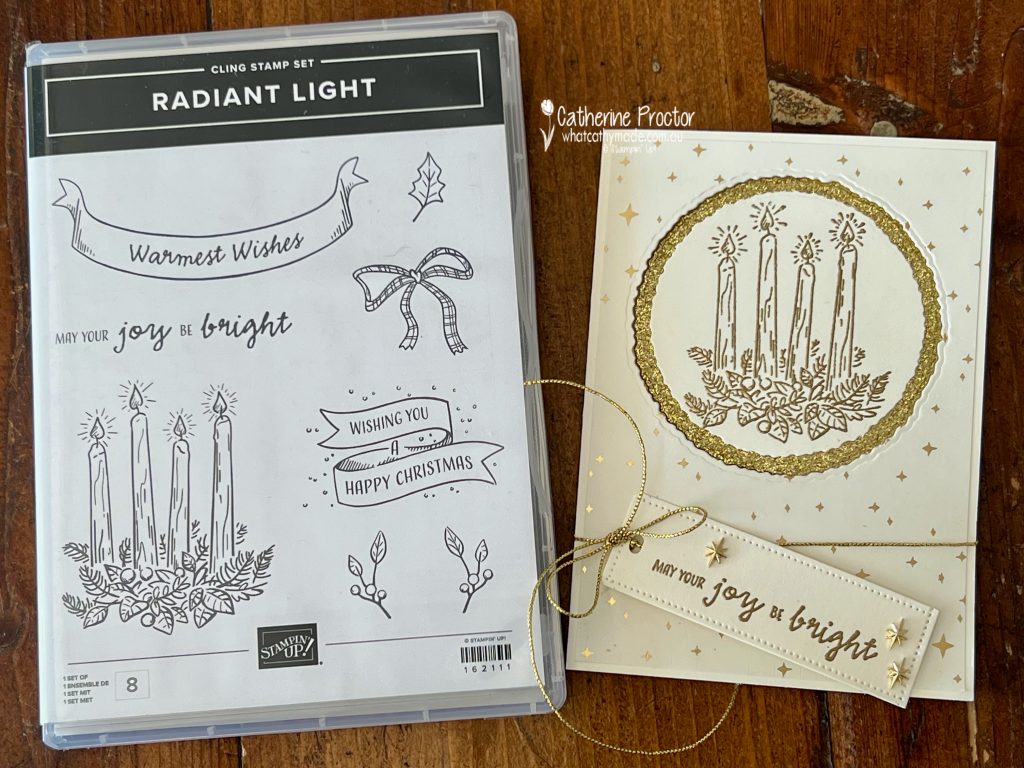
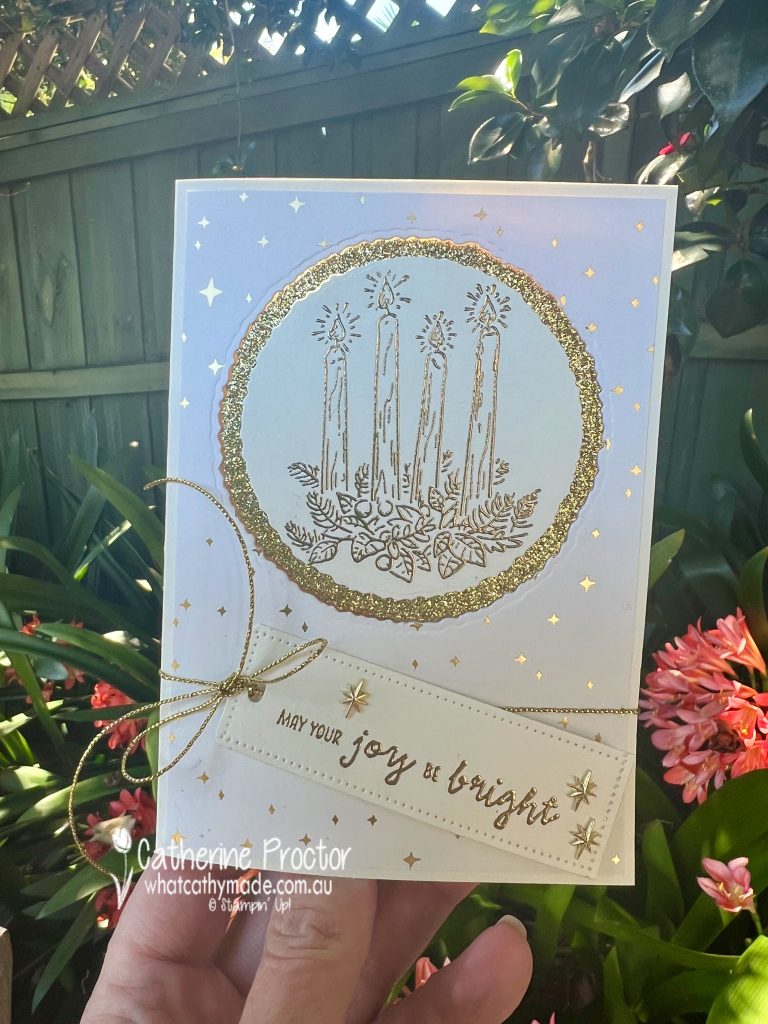
As you probably know, I love monochromatic cards. I’ve taken the colour scheme for my card from the stunning gold and Very Vanilla Shining Brightly 12″ x 12″ (30.5 x 30.5 cm) Specialty Designer Series Paper I’ve used on the front of the card and also inside it too.
The gorgeous candle image and both sentiments are all from the Radiant Light stampset.
The gold heat embossed candle image and the gold glimmer circle layer behind it are both die cut using the new Decked Circle Dies.
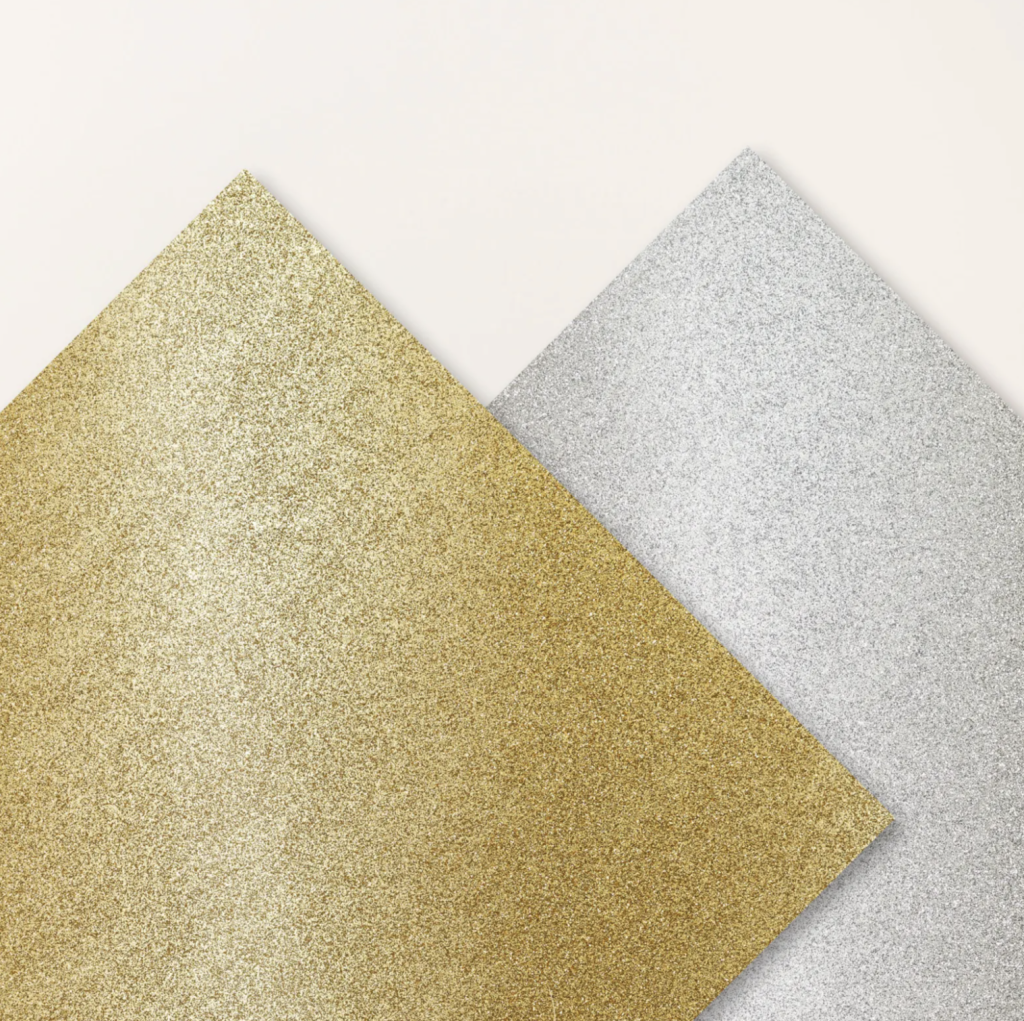
The Silver & Gold 12″ x 12″ (30.5 x 30.5 cm) Adhesive-backed Glimmer Paper is self adhesive and it is a brand new online only release.
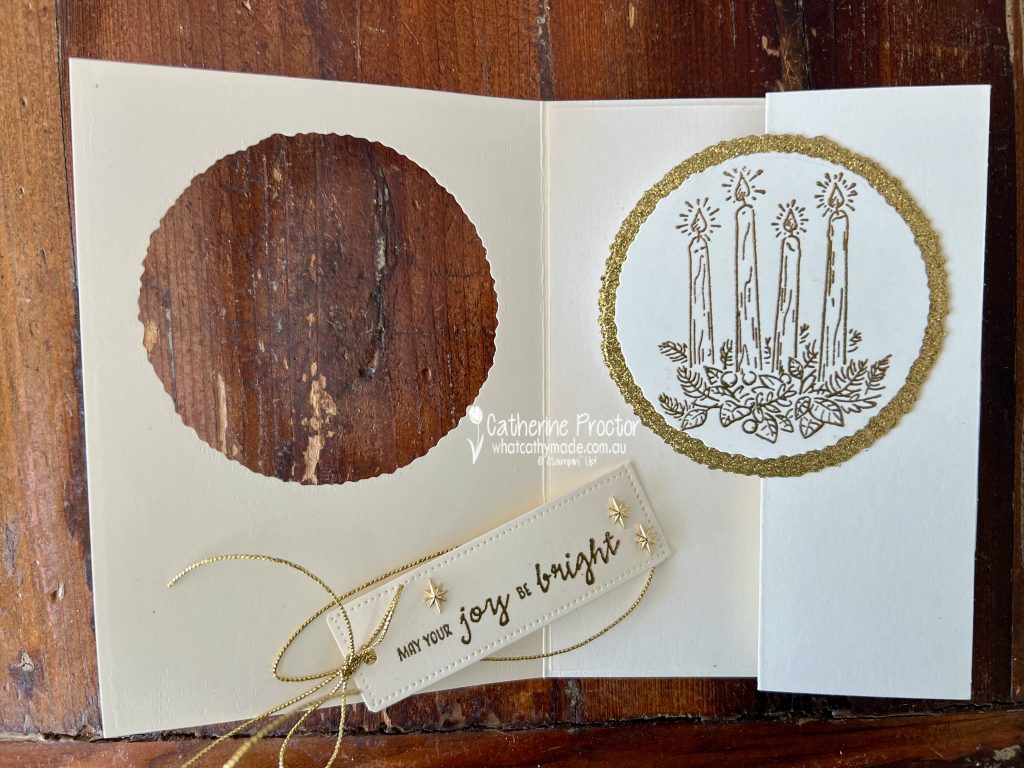
Here’s what the card looks like partially opened…
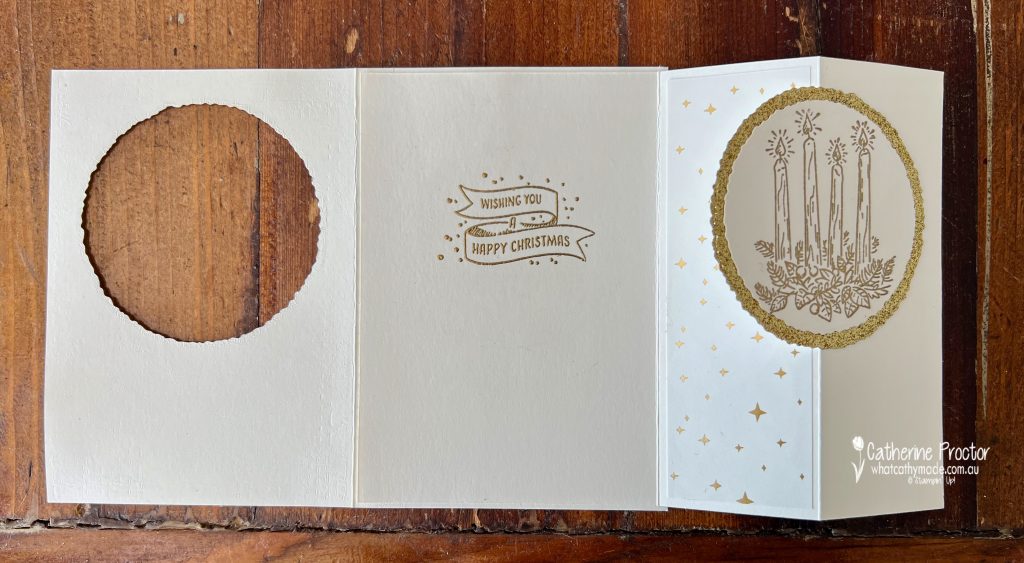
Here’s what the card looks like fully opened…
The Adhesive-Backed Star Trinkets on the front tag sentiment pick up the stars in the DSP – the perfect embellishment!
It’s so hard to photograph the glorious sparkly gold elements in my card so I also took a photograph outside in my garden.
Now it’s time to hop on over to our next participant, the lovely Caroline Manwaring. I can’t wait to see what Caroline has made this week.
If at any time you find a broken link, you can find the complete list of all participants on Sharon’s blog.
I’ll be back on Wednesday with the AWH Colour Creations blog where we will be showcasing Early Espresso – I’ve made another Christmas card for Wednesday night’s blog!
Welcome to week twenty one of our Art With Heart 2023-24 Colour Creations blog hop! This week we are showcasing Daffodil Delight, a sunny yellow from the Brights family.
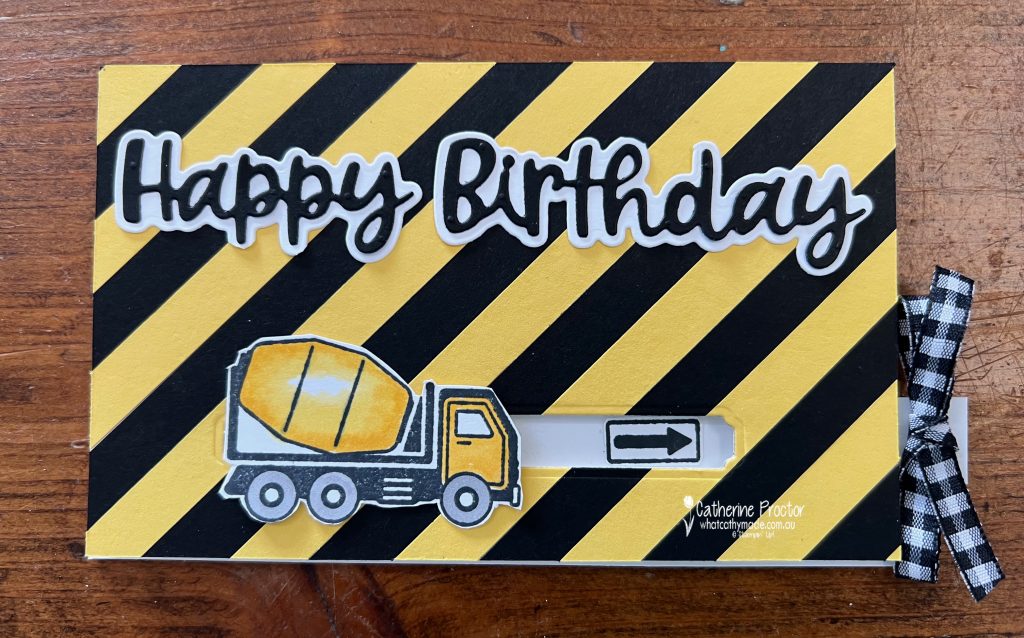
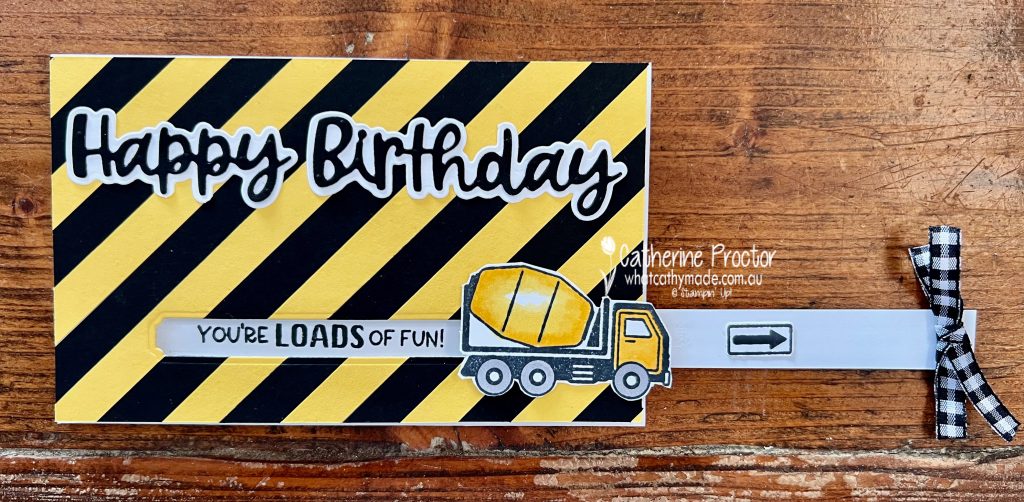
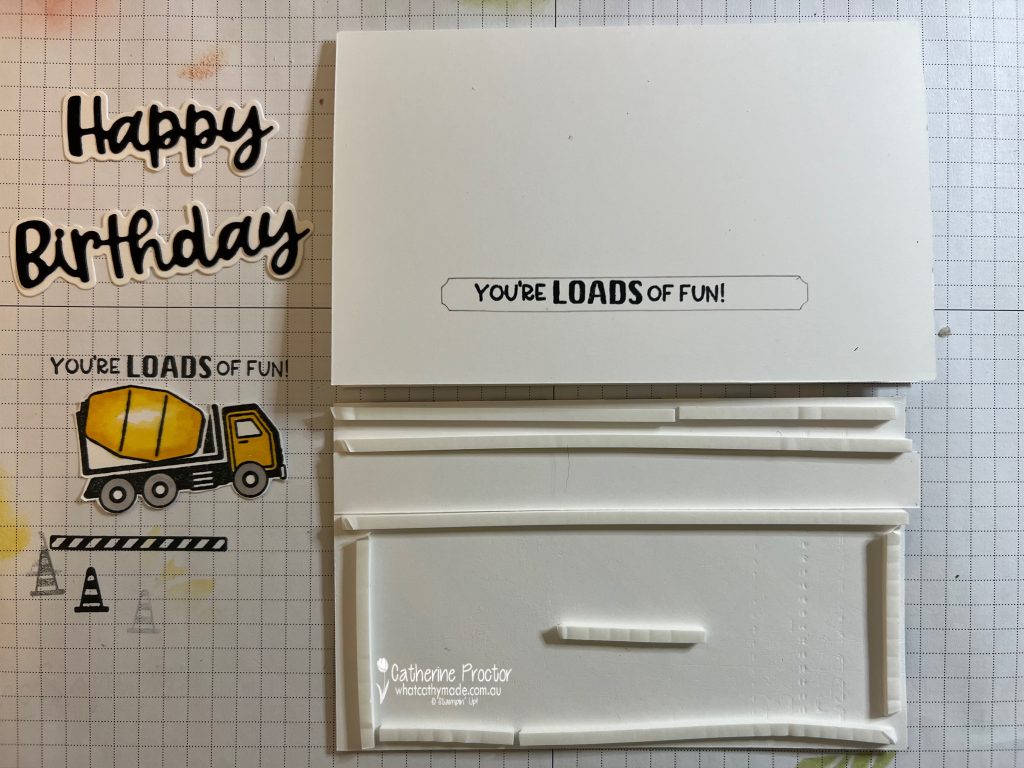
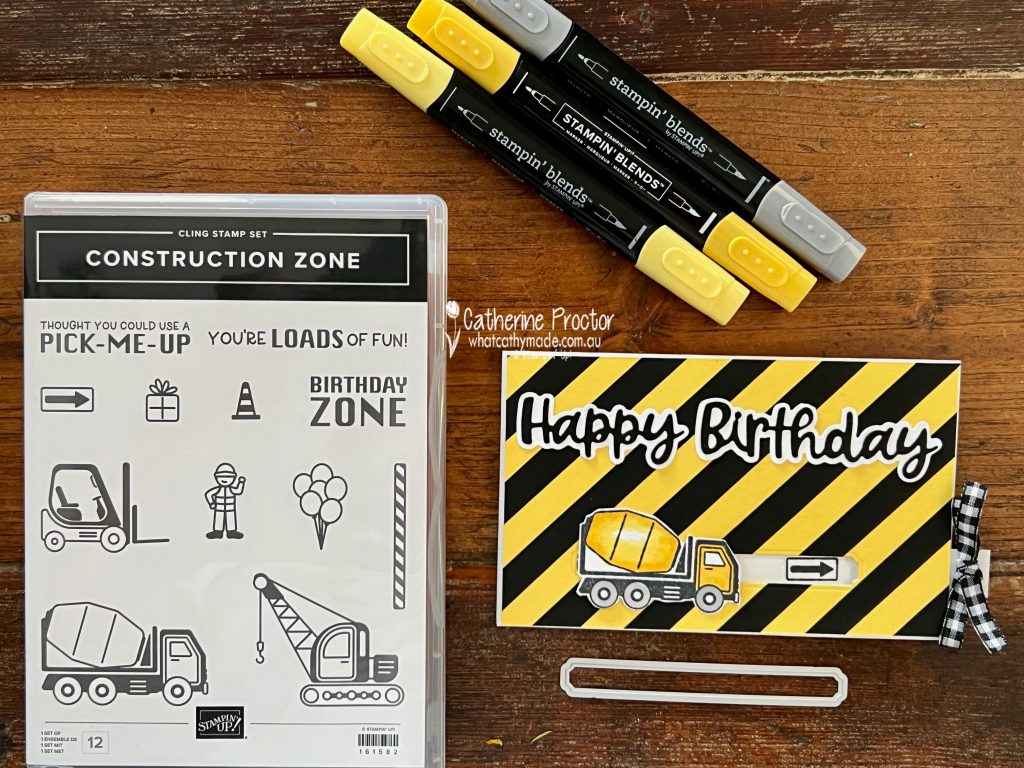
Have you seen any of the cards that use the Construction Zone stamp set, creating a “high vis” vibe by using strips of Daffodil Delight and Basic Black cardstock? Today I’ve stepped it up by creating a “high vis” card that is also a slider card.
Here is what the slider card looks like with the slider mechanism sitting inside the card…
And here it is with the slider pulled open…
The “You’re loads of fun” sentiment from the Construction Zone stamp set was the perfect size and shape to use as the sentiment for the slider reveal. The “Happy Birthday” sentiment is from the Wanted to Say dies, cut in half to create a horizontal sentiment.
To create the “high vis” vibe is relatively simple. I adhered adhesive sheets to Daffodil Delight and Basic Black cardstock before cutting the cardstock into 1cm wide strips.
These strips were then attached on a 45 degree angle to a piece of Basic White card stock to create the front layer.
The channel for the slider mechanism was then cut out of this front layer using the longest die from the Sending Dies.
Here’s a peek at the construction process – I made up the design of this card and the mechanism as I went along so I only took one (very messy) photo of the construction stage.
One important aspect of creating a slider card is to place the top layer over the front of the card (BEFORE adhering the top layer to the card front with foam strips) and trace the die-cut channel area onto the card. This shows you exactly where to stamp the slider reveal sentiment.
This photo also shows the reverse side of the slider strip sitting between the strips of foam that line the slider channel – line the slider strip up between theses foam strips to ensure it slides smoothly but is still snug BEFORE you attach the cement truck to the front slider strip using either foam strips or dimensionals.
This short video shows the slider card in action, as well as the back of the slider strip pull mechanism.
I’ve used the arrow stamp from the Construction Zone stamp set to indicate where to pull, using a bow of Black & White 1/4″ (6.4 mm) Gingham Ribbon adhered with a black Square Brad to the slider strip, which is 1.5cm wide.
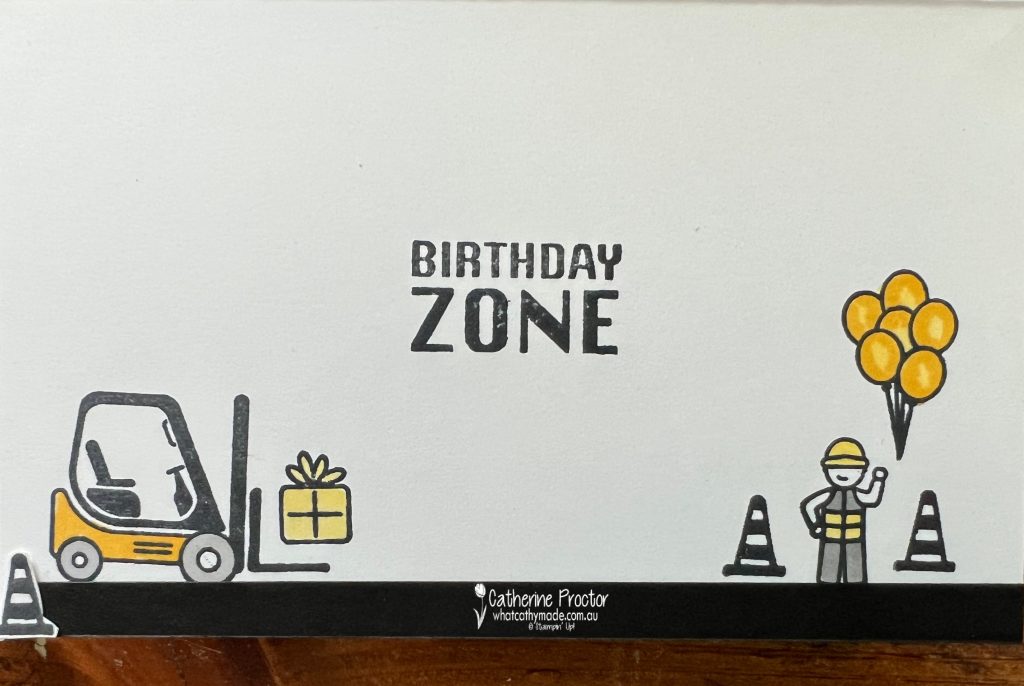
On the inside of the card I had fun playing with the other stamps from the construction Zone stamp set.
I’ve coloured the inside images and the cement mixer on the front of the card with Daffodil Delight and Smoky Slate stampin blends.
Now it’s time to hop on over to our next participant, the lovely Andrea Sargent – I can’t wait to see what Andrea has made this week!
If at any time you find a broken link, you can find the complete list of all participants below.
Welcome to week twenty of our Art With Heart 2023-24 Colour Creations blog hop!
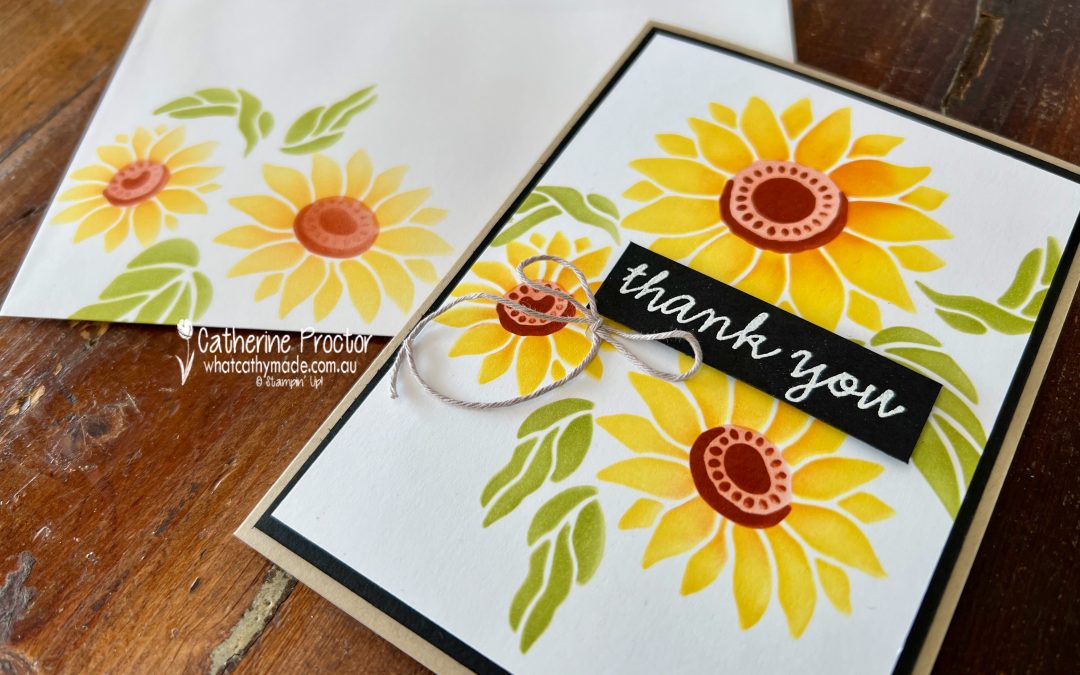
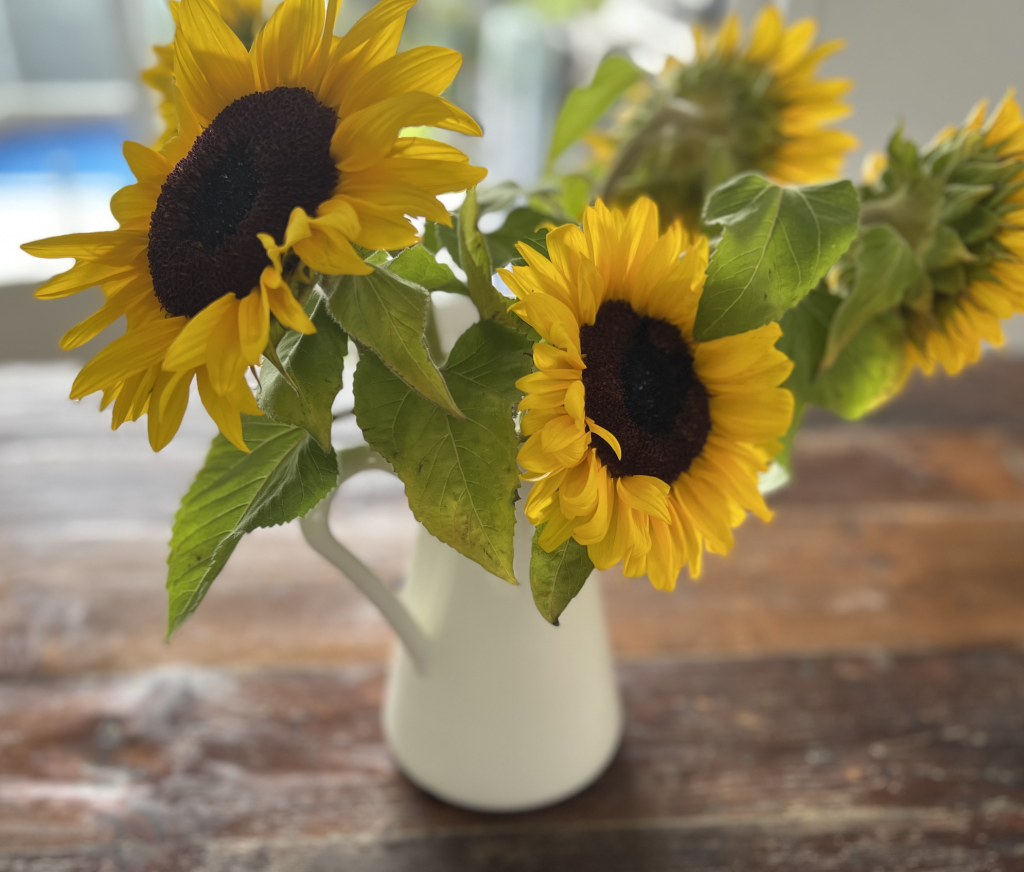
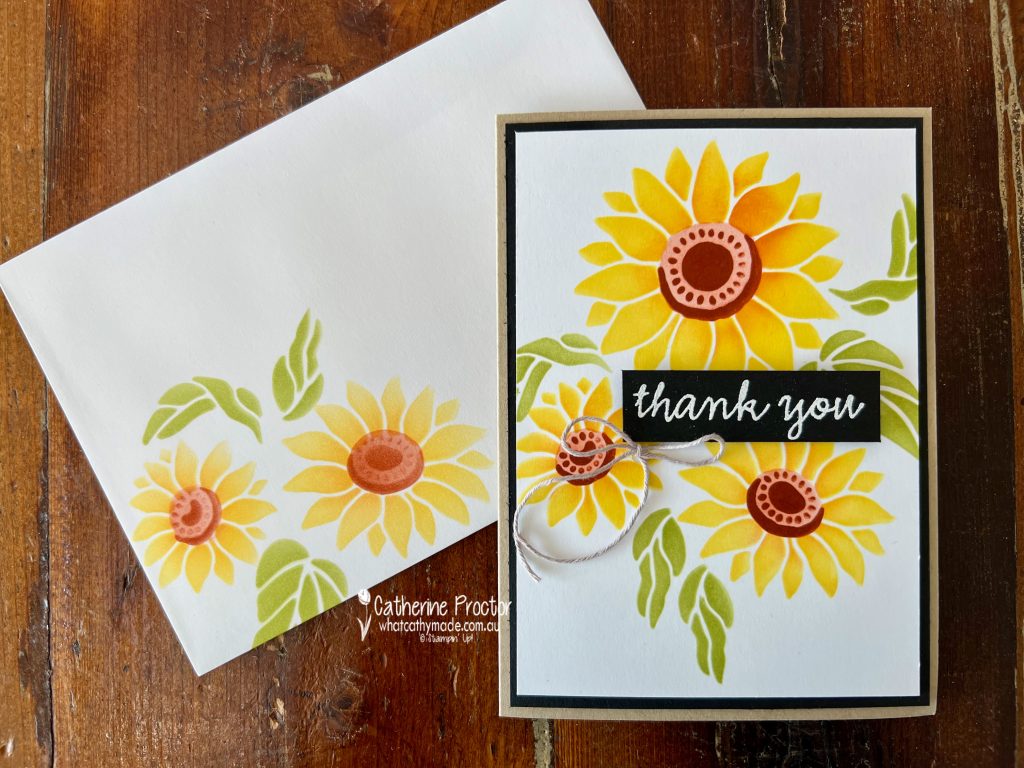
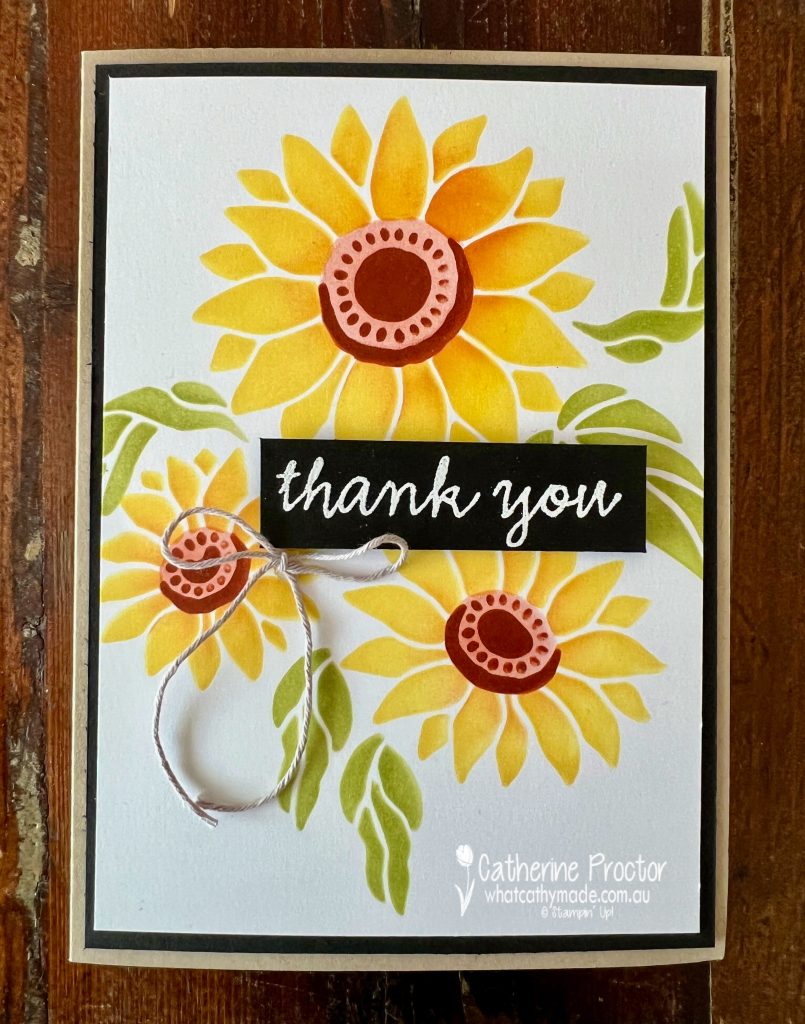
Crushed Curry is such a rich golden yellow, the ideal shade of yellow to use for sunflowers! I bought a bunch of glorious sunflowers this morning to give to my friend Rachel for her birthday.
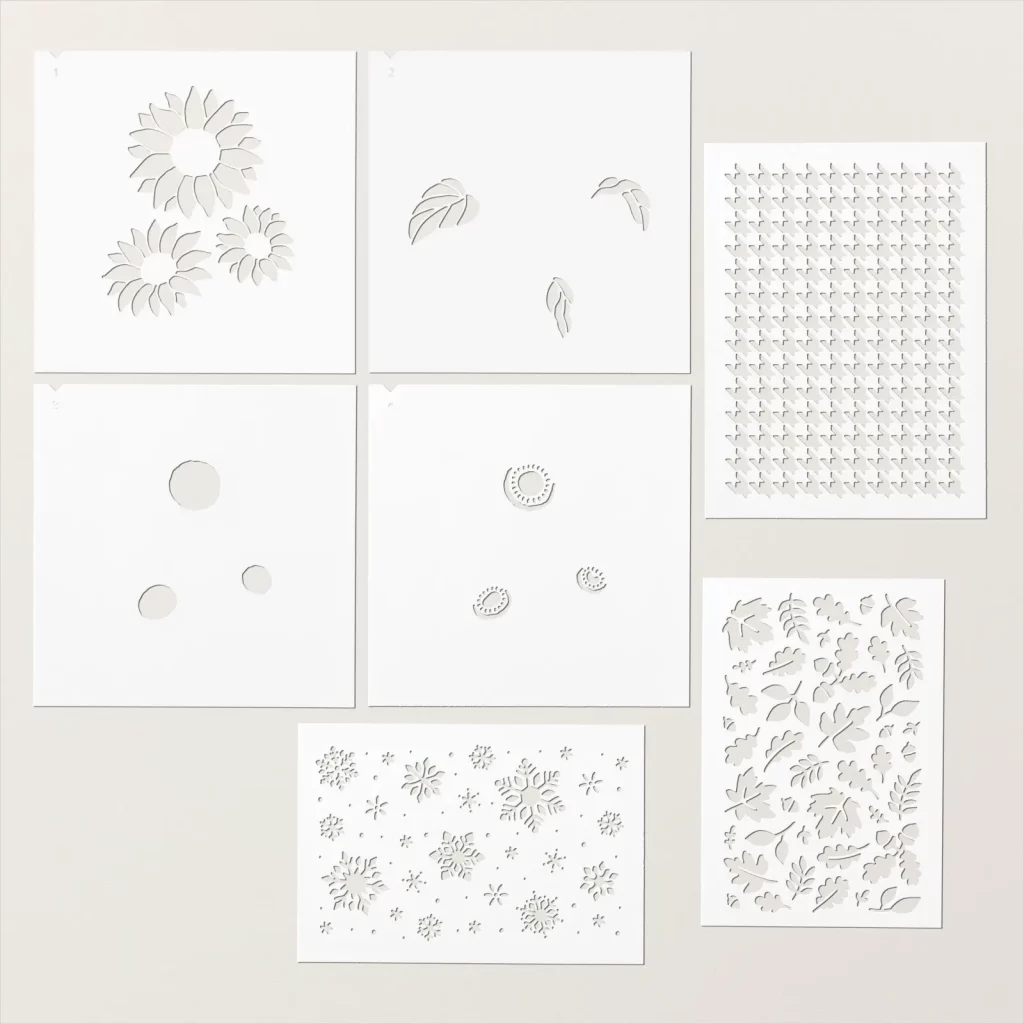
This week was the perfect opportunity to make a sunflower card using the Abundant Beauty Decorative masks. I had overlooked these masks until I started seeing so many gorgeous cards made with them!
You get seven masks in this pack – four masks to create the sunflowers, one snowflake mask, an autumn leaves mask and a “David Jones” argyle patterned mask. At only $18.50, this really has to be the best value product in the entire catalogue!
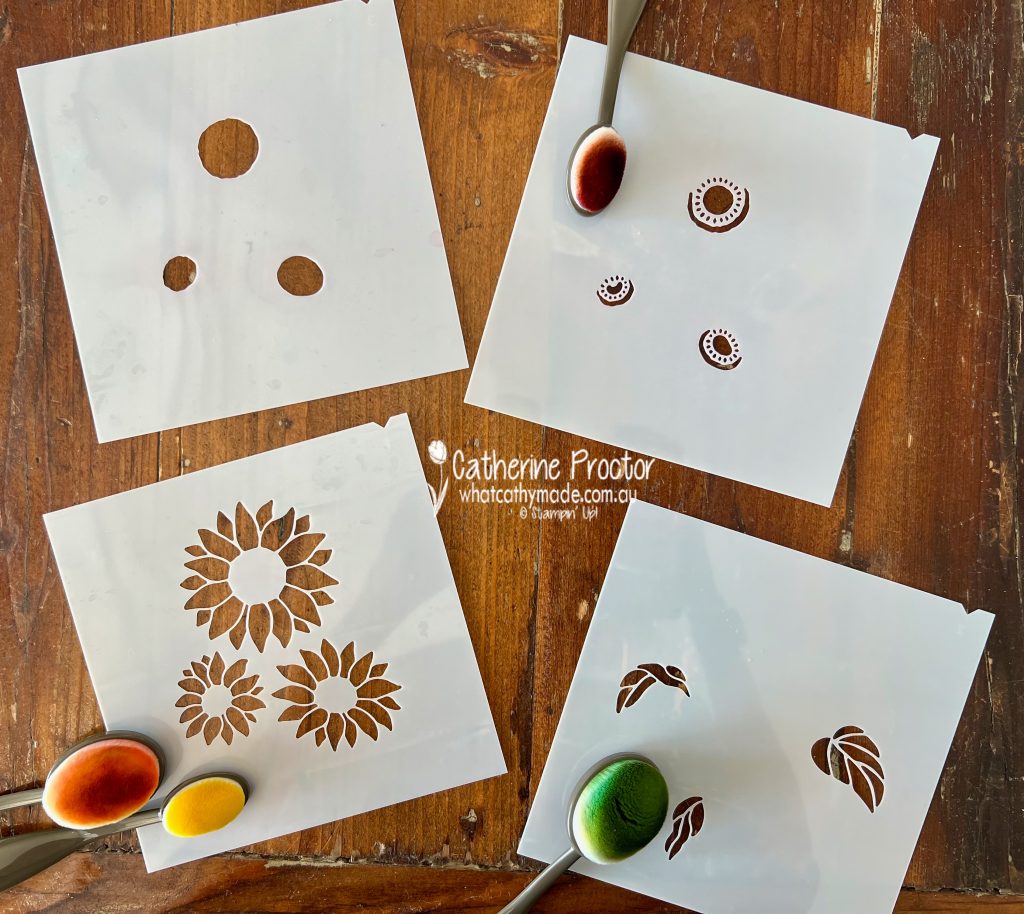
The beauty of masks is that they are so simple and versatile to use.
You can add colour and texture with Embossing Paste and Palette Knives, Classic Stampin’ Ink, Blending Brushes, Sponge Daubers or trace within the mask outlines with Stampin’ Write Markers or even Watercolour Pencils.
I’ve used large and small blending brushes to add colour from my Crushed Curry, Pumpkin Pie, Cajun Craze and Old Olive ink pads. Notches at the top of the masks make for easy alighnment.
Using the ink already on my blending brushes, I also added a couple of sunflowers to the envelope and to the inside of the card.
The “Thank you” sentiment on the front of the card was heat embossed in white onto Basic Black cardstock.
Now it’s time to hop on over to our next participant, the lovely Di Furniss – I can’t wait to see what Di has made this week!
If at any time you find a broken link, you can find the complete list of all participants below.
Your Christmas countdown continues – it’s 15 weeks today until Christmas Day!
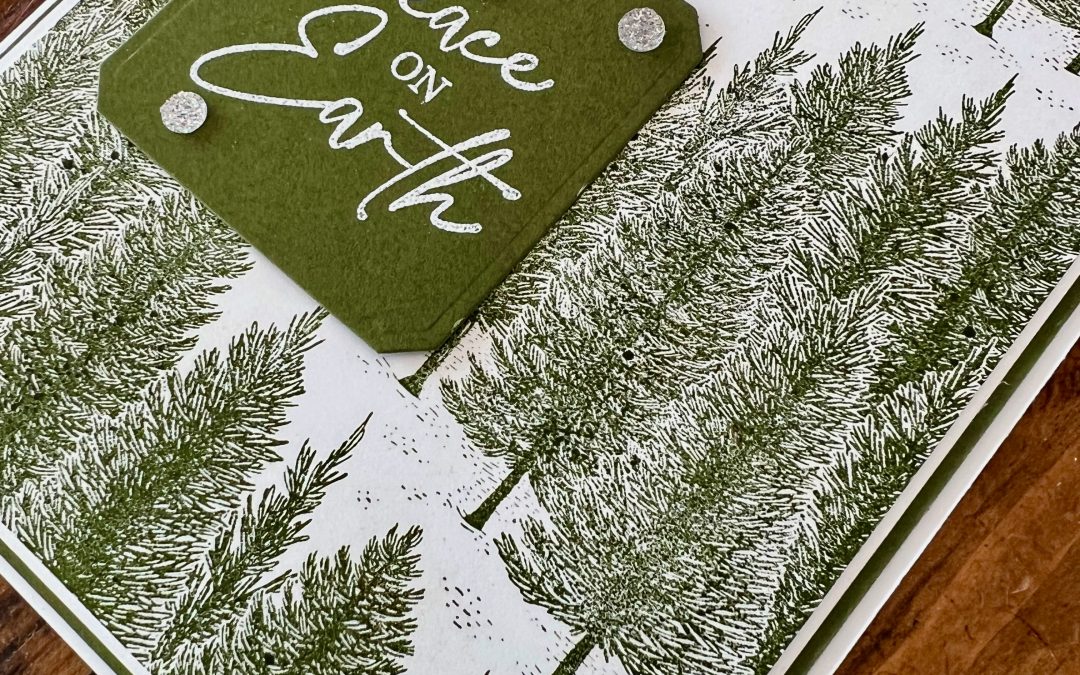
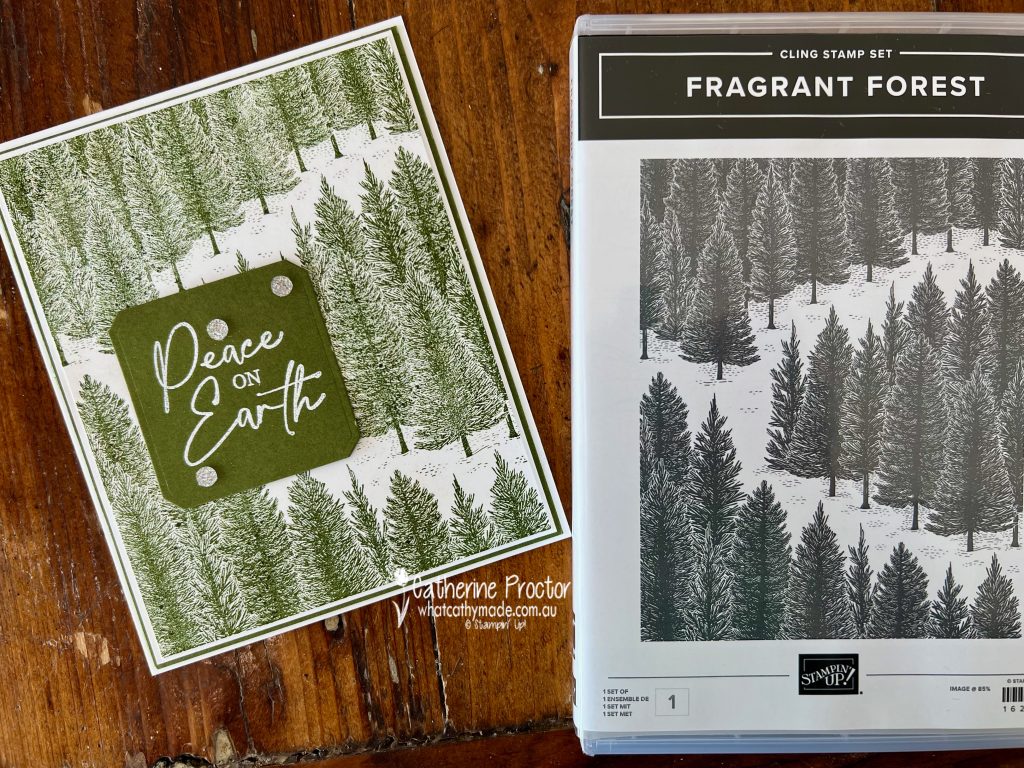
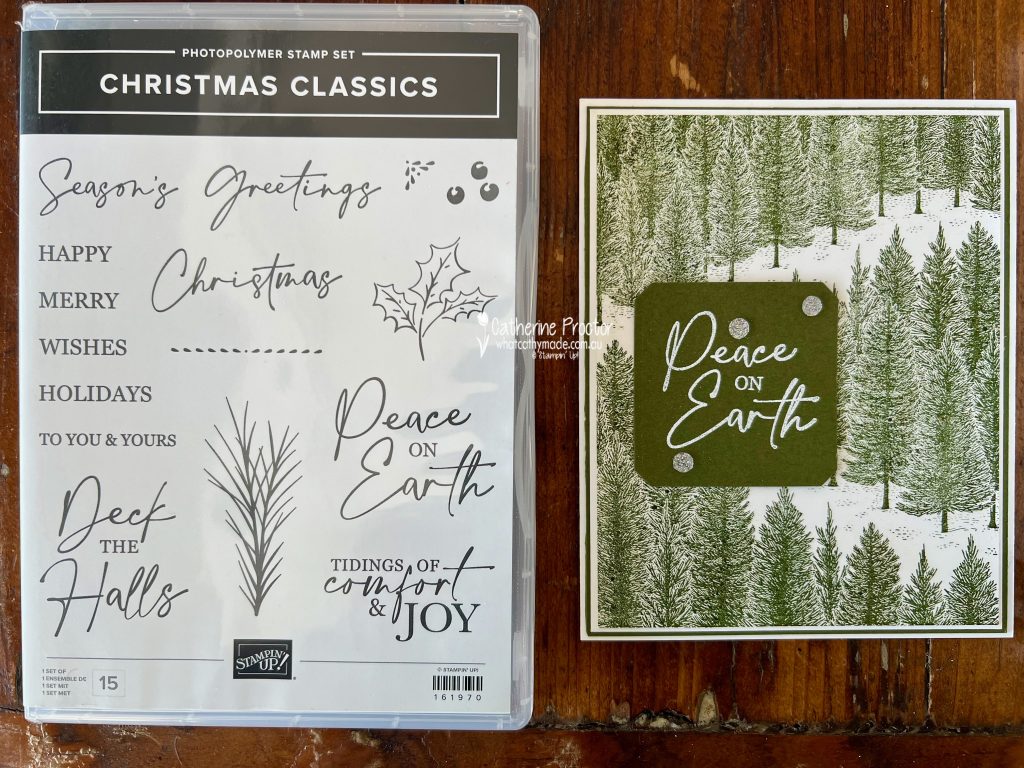
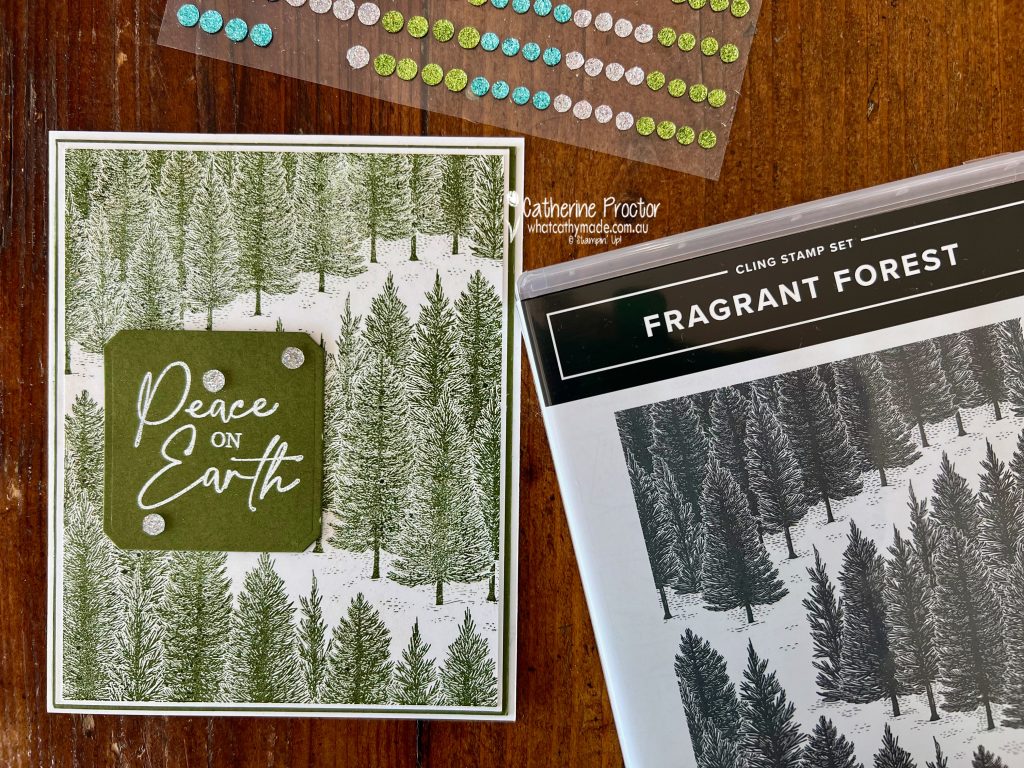
This week’s Christmas card couldn’t be simpler. I’ve used the new Fragrant Forest stamp – a background stamp that’s quite frankly just too gorgeous to cover up!
I’ve stamped this stamp in Mossy Meadow onto Basic White cardstock adding a Mossy Meadow Sentiment label as I love monochromatic cards.
The Fragrant Forest background stamp works with any Christmas sentiment. I’ve stamped and embossed two different sentiments from the Christmas Classics stamp set, however, I can’t decide which one I prefer.
Card one is a smaller sentiment I’ve fussy cut around – I like that this smaller sentiment shows more of the background imagery.
Card two has a larger sentiment, die cut using the rounded square die from the Christmas Classics Dies. I like that the larger sentiment allows room for a bit of bling.
The Adhesive-Backed Glitter Sequins are my favourite embellishment from this catalogue!!!
Which sentiment do you think works best?
Now it’s time to hop on over to our next participant, the lovely Sharon Davern. I can’t wait to see what Sharon has made this week.
If at any time you find a broken link, you can find the complete list of all participants onSharon‘s blog.
Welcome to week nineteen of our Art With Heart 2023-24 Colour Creations blog hop! This week we are using one of my most used and absolute favourite colours: Crumb Cake!
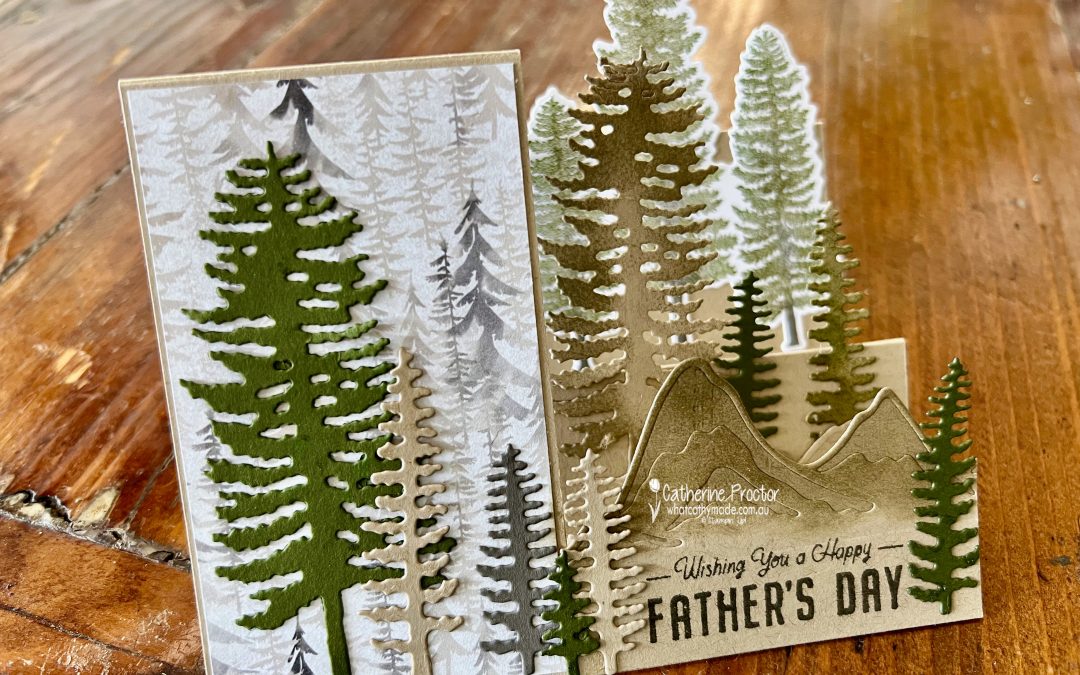
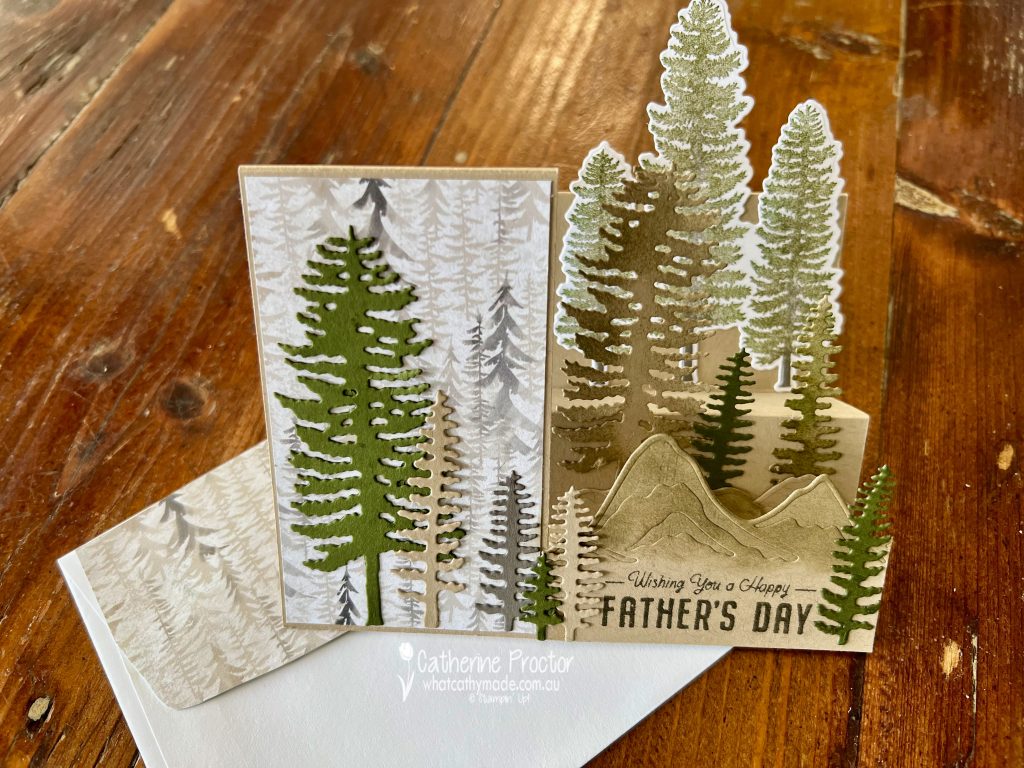
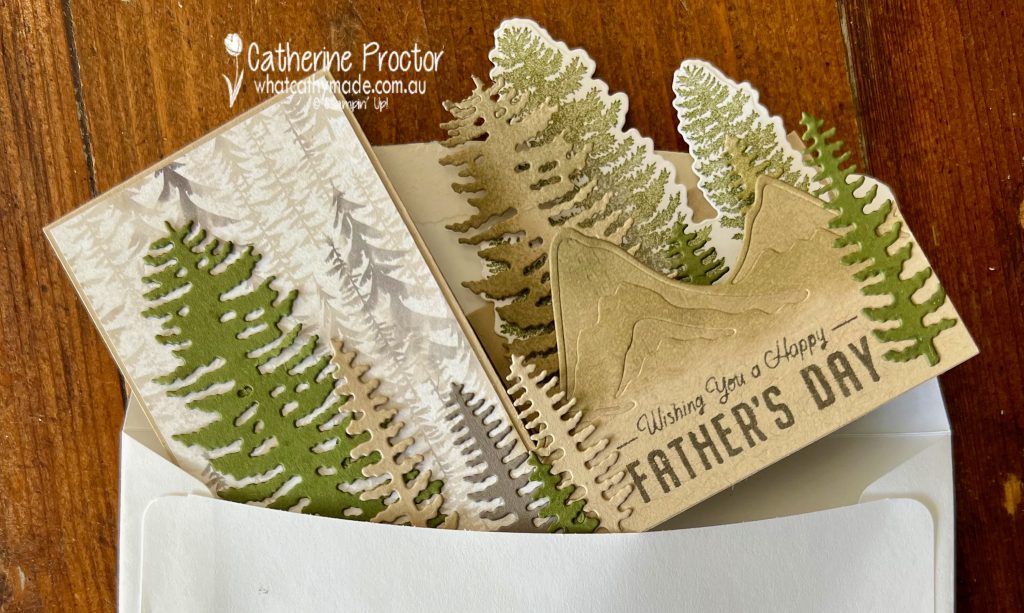
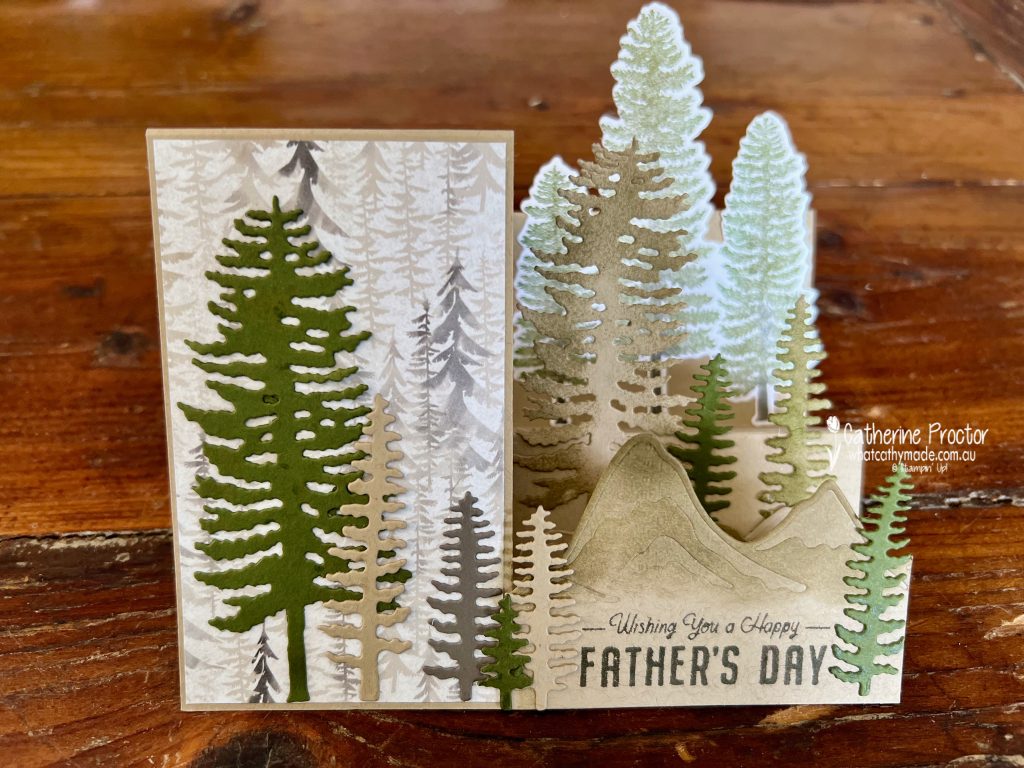
Unfortunately, I just didn’t have the time to really do this colour justice. I had so many ideas in my head and wanted to make several cards, however I only had time to make a Father’s Day card for my dad…and I had to make it in record time!
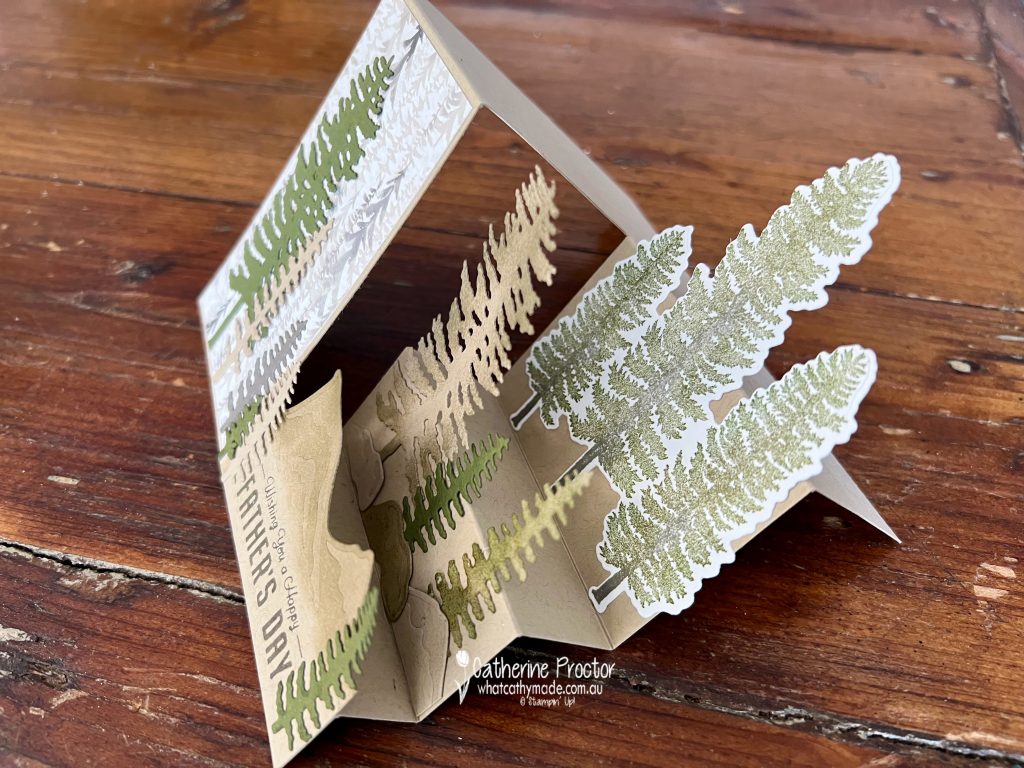
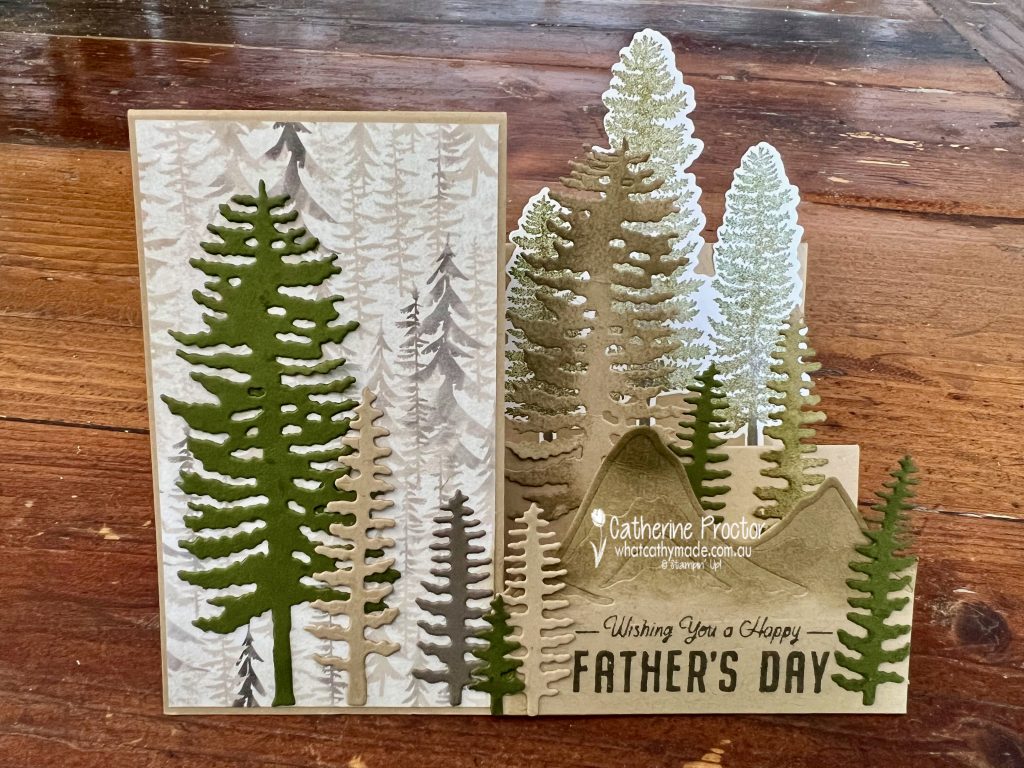
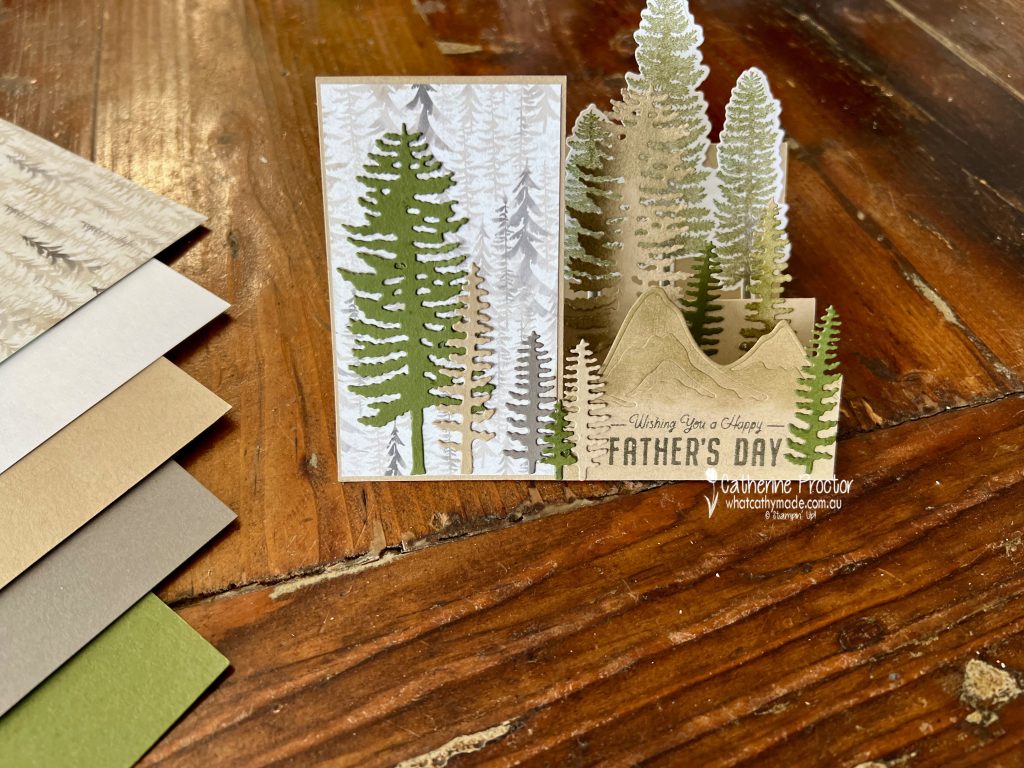
This style of card is called a side step card and I’ve used a brand new bundle from the September – December Mini Catalogue.
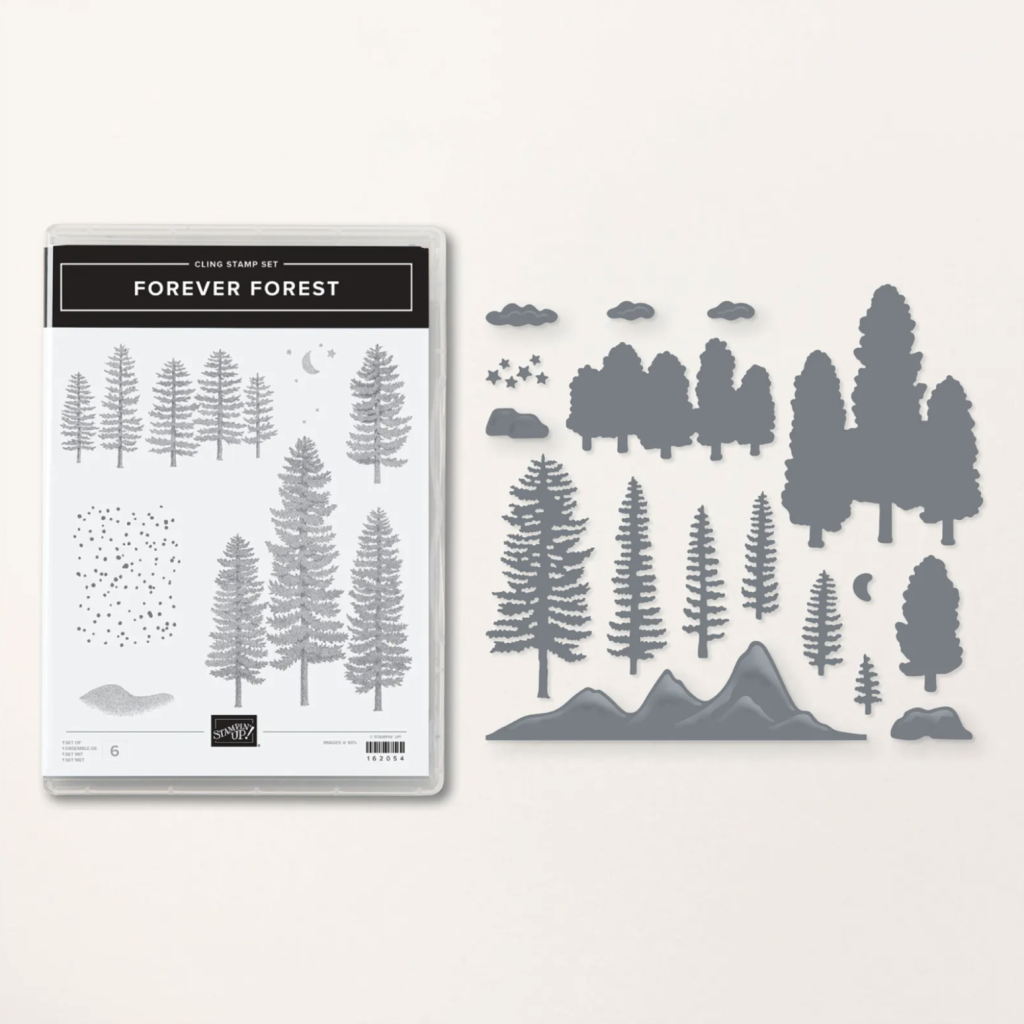
The Forever Forest bundle is just perfect for masculine cards, sympathy card, nature cards and Christmas cards.
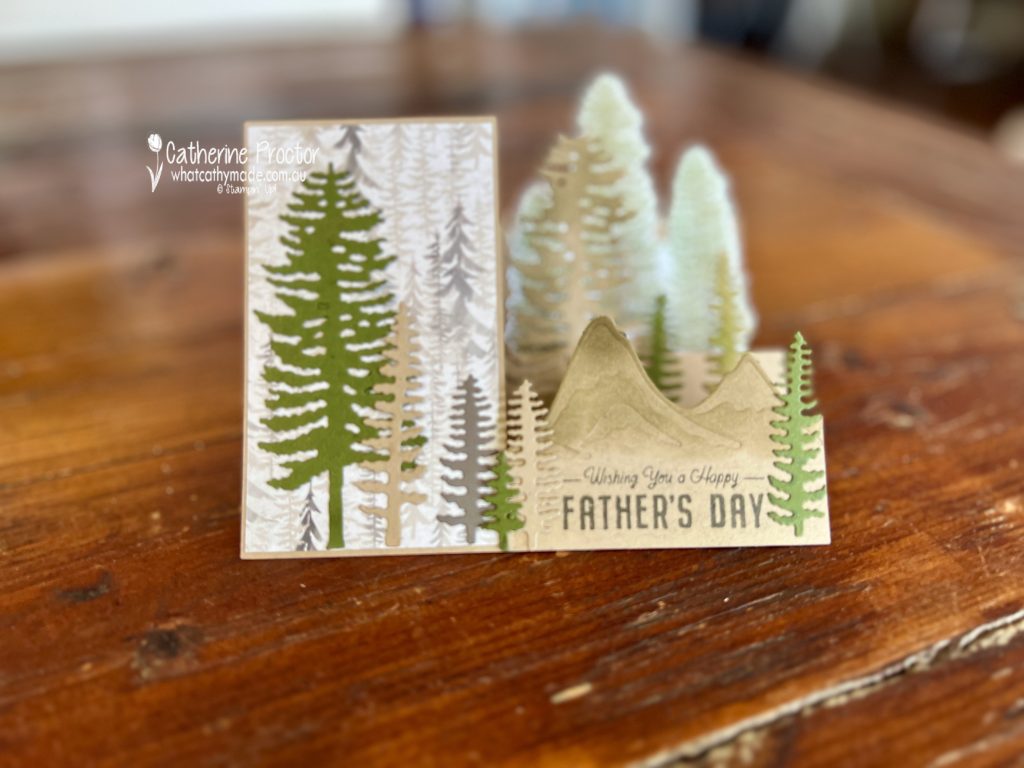
A side step card is a great card for scenes, as the side steps add instant dimension and depth to the scene.
Normally, the mountains would be in the background, however I needed to have the trio of stamped and die cut trees at the back so they didn’t cover the other elements. I’ve used a mixture of stampining, sponging and die cutting to create all the trees, boulders and mountains
The colour combination for this card is drawn from the colours in this sheet of One Horse Open Sleigh 6″ x 6″ (15.2 x 15.2 cm) Designer Series Paper. Crumb Cake, Pebbled Path, Basic White and Mossy Meadow also thrown into the mix.
The same sheet of One Horse Open Sleigh 6″ x 6″ (15.2 x 15.2 cm) Designer Series Paper also dresses up the envelope flap.
And, yes, the card folds flat to fit into a standard C6 envelope.
The Father’s Day sentiment is from the He’s All That Stamp Set.
Now it’s time to hop on over to our next participant, the lovely Kate Morgan – I can’t wait to see what Kate has made this week!
If at any time you find a broken link, you can find the complete list of all participants below.
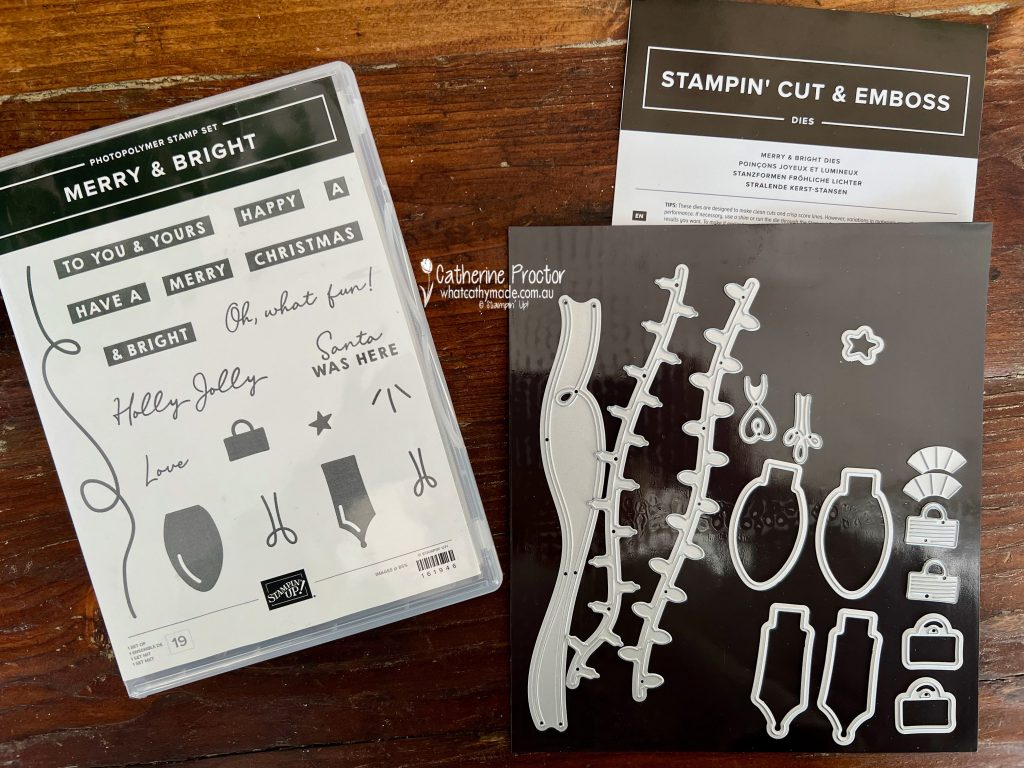
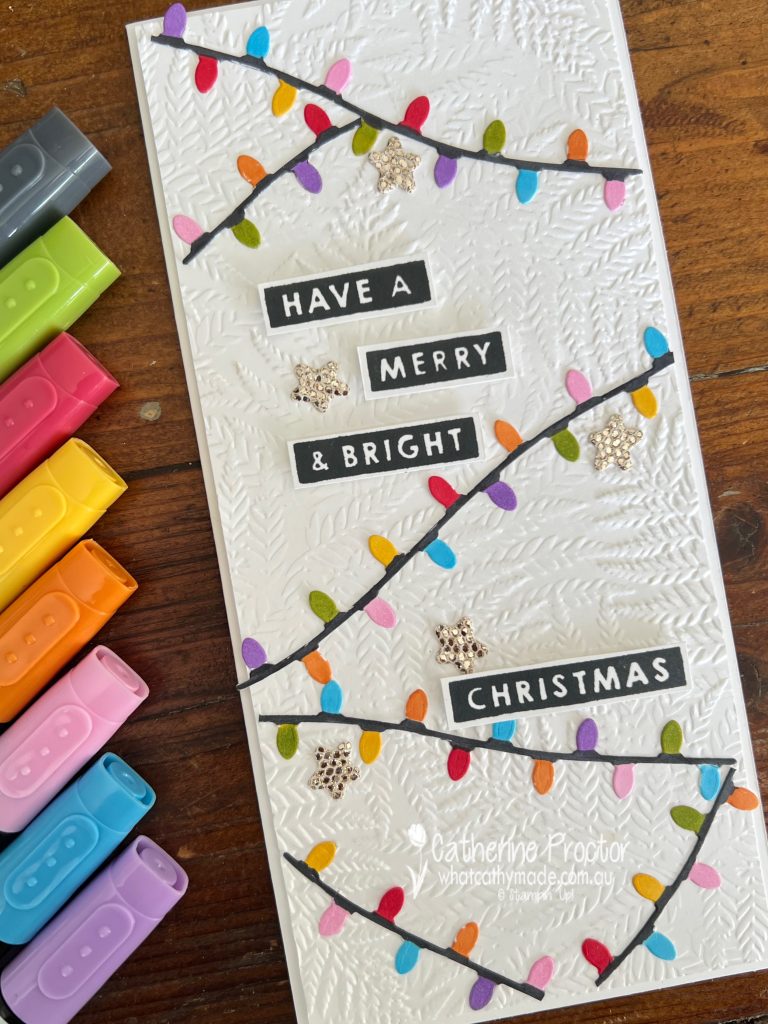
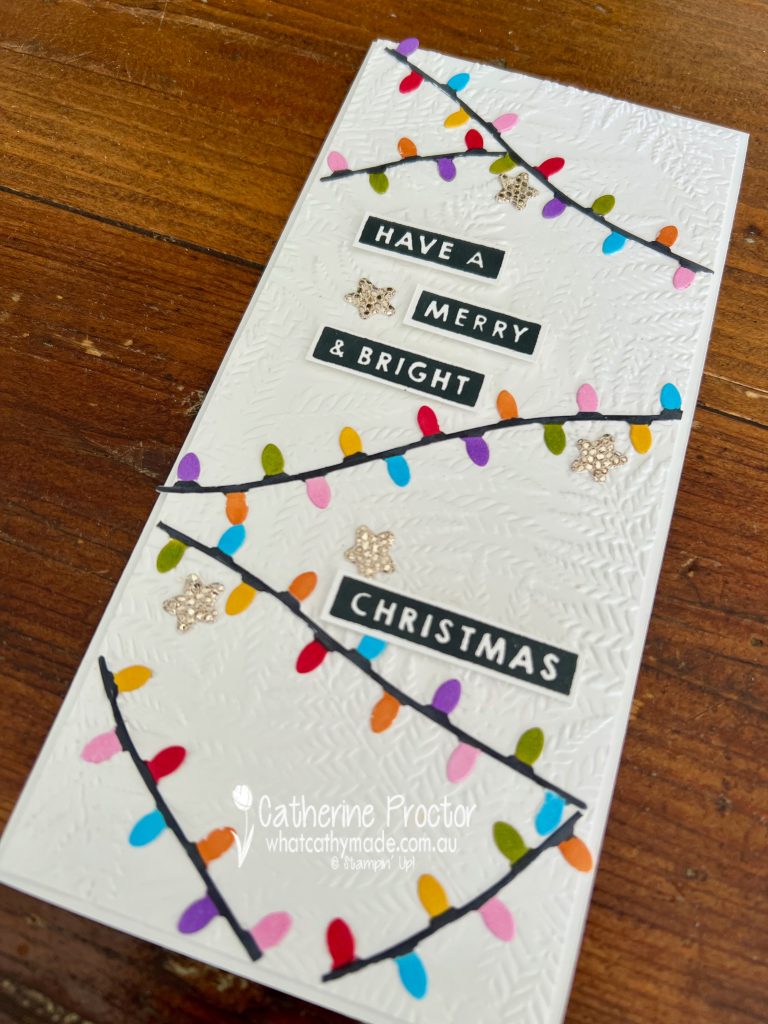
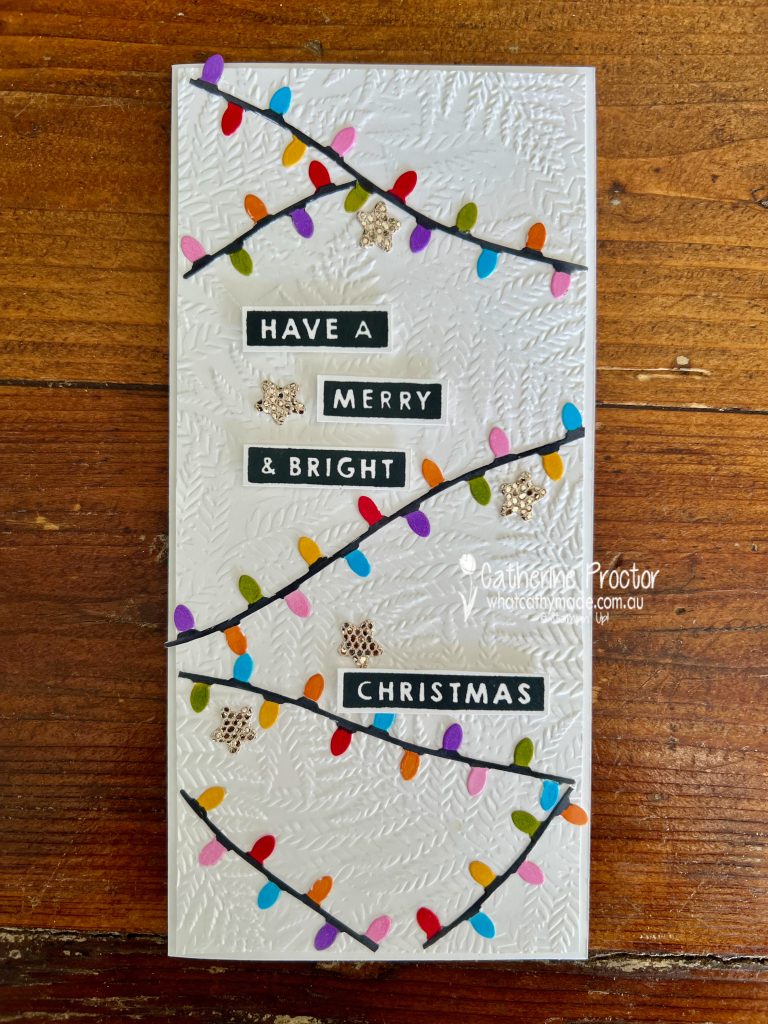
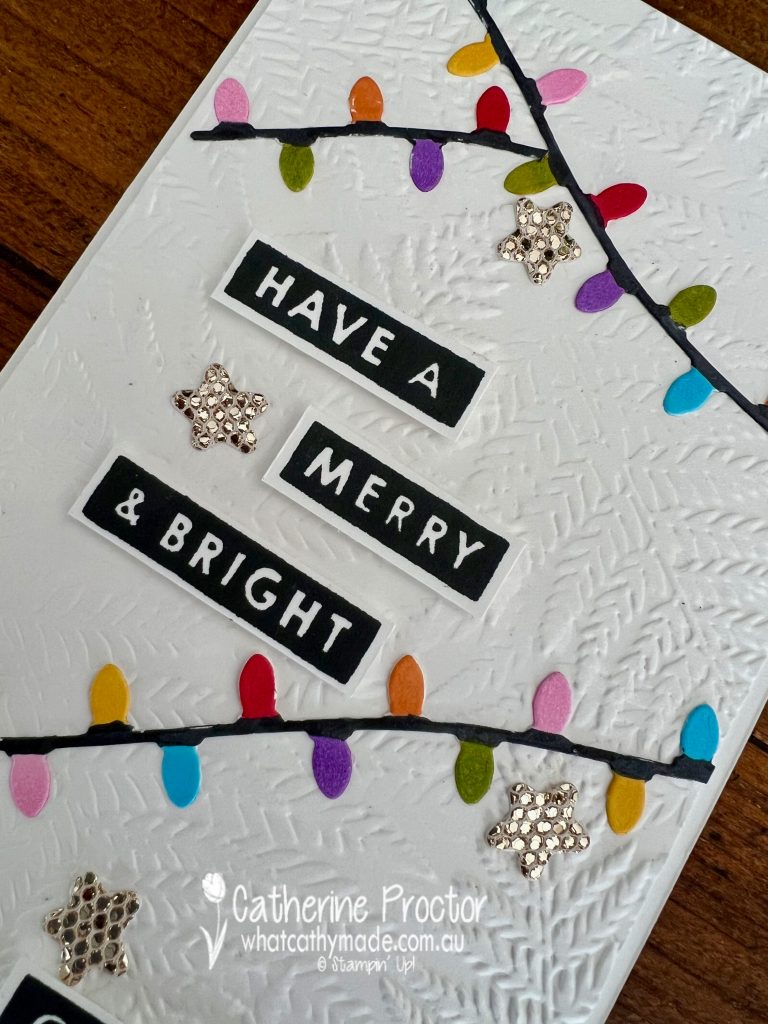
Your Christmas countdown continues – it’s 16 weeks today until Christmas Day! And in even more exciting news, it’s only two days until the Stampin’ Up! September December Mini Catalogue goes live and you can purchase the Merry & Bright bundle.
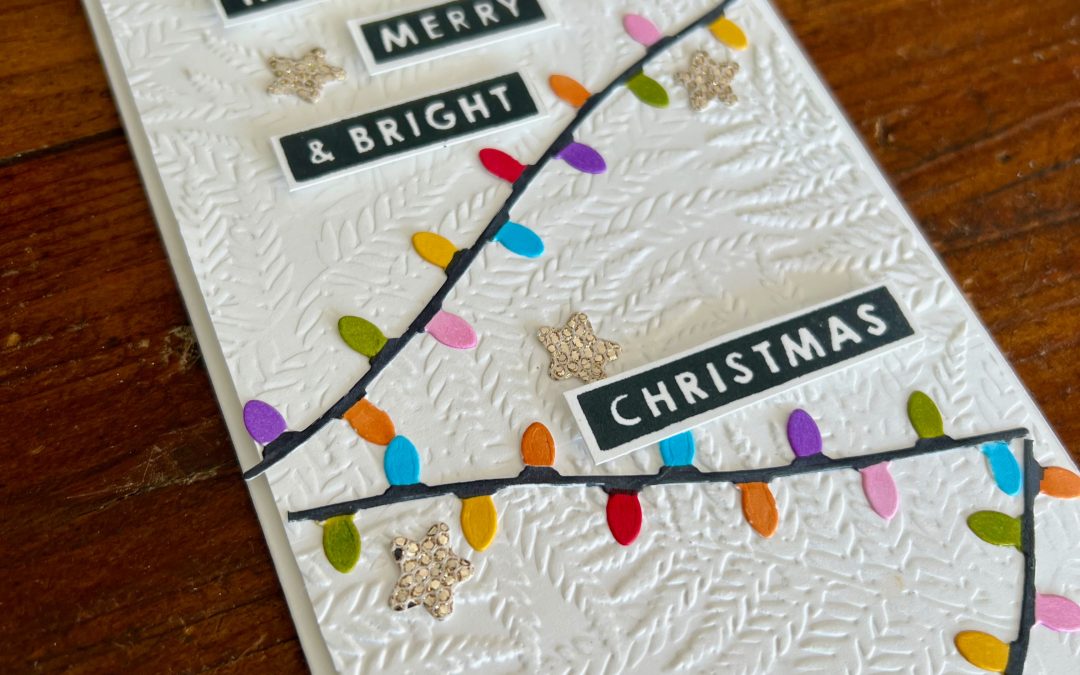
Sometimes the dies in a bundle can be overlooked if they don’t have a matching stamp set, and to honest, I don’t think I realised the Merry & Bright bundle included these two strings of Christmas lights until my delivery arrived!
I’ve used the die with the more rounded light bulb to create this slimline card. Four “string of Christmas lights” dies were die cut from Basic White cardstock and then coloured in with a variety of Stampin’ Blends.
The top layer of the card was embossed using the Fern 3D embossing folder to mimic the branches of a Christmas tree.
Using the star die in the Merry & Bright bundle, I die cut a few stars from the More Dazzle Specialty paper.
The sentiment is from the Merry & Bright stamp set, stamped in Memento Tuxedo black for contrast against the white card base and card front layer and and the bright colours of the Christmas lights.
Now it’s time to hop on over to our next participant, the lovely Rosa Leyden. I can’t wait to see what Rosa has made this week.
If at any time you find a broken link, you can find the complete list of all participants on Sharon’s blog.
Welcome to week eighteen of our Art With Heart 2023-24 Colour Creations blog hop!
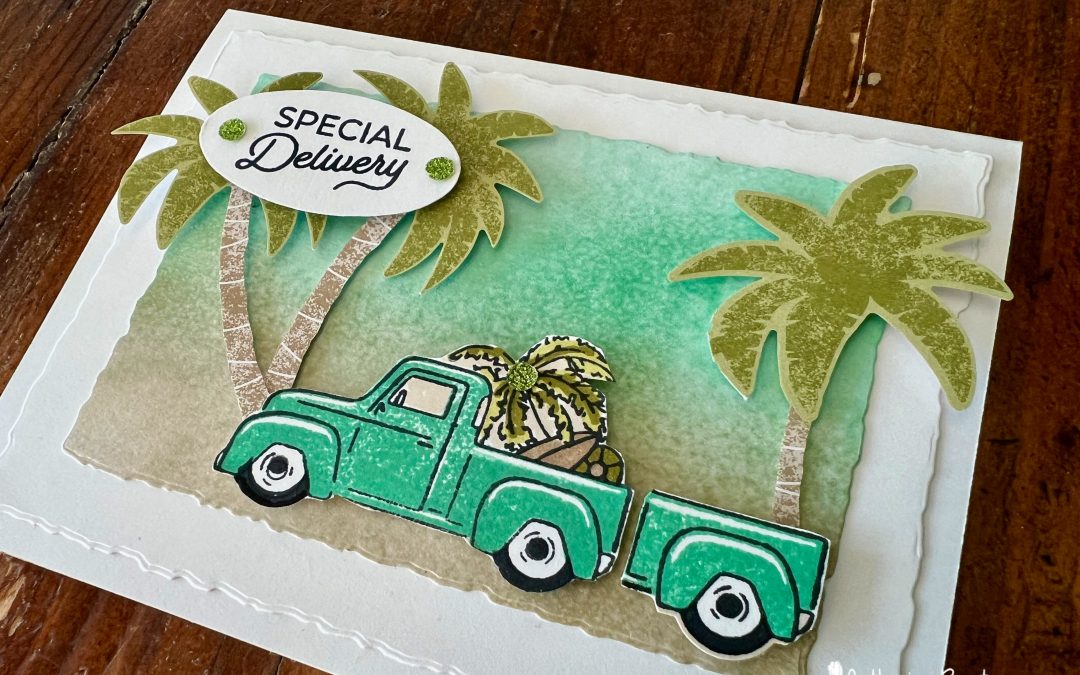
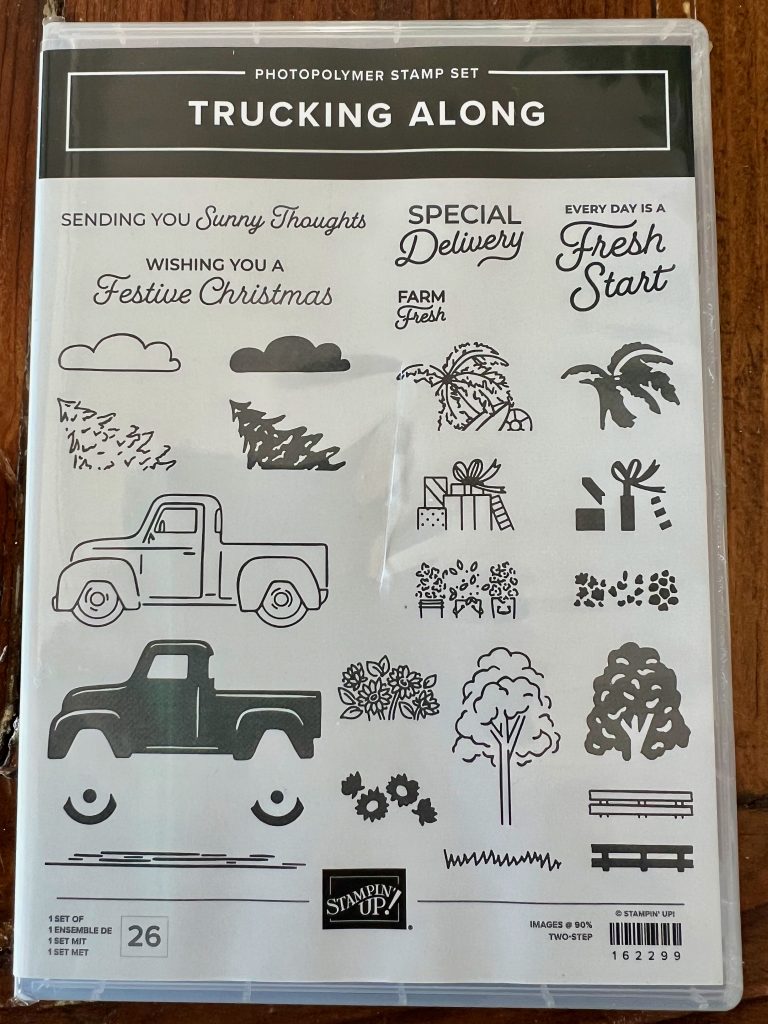
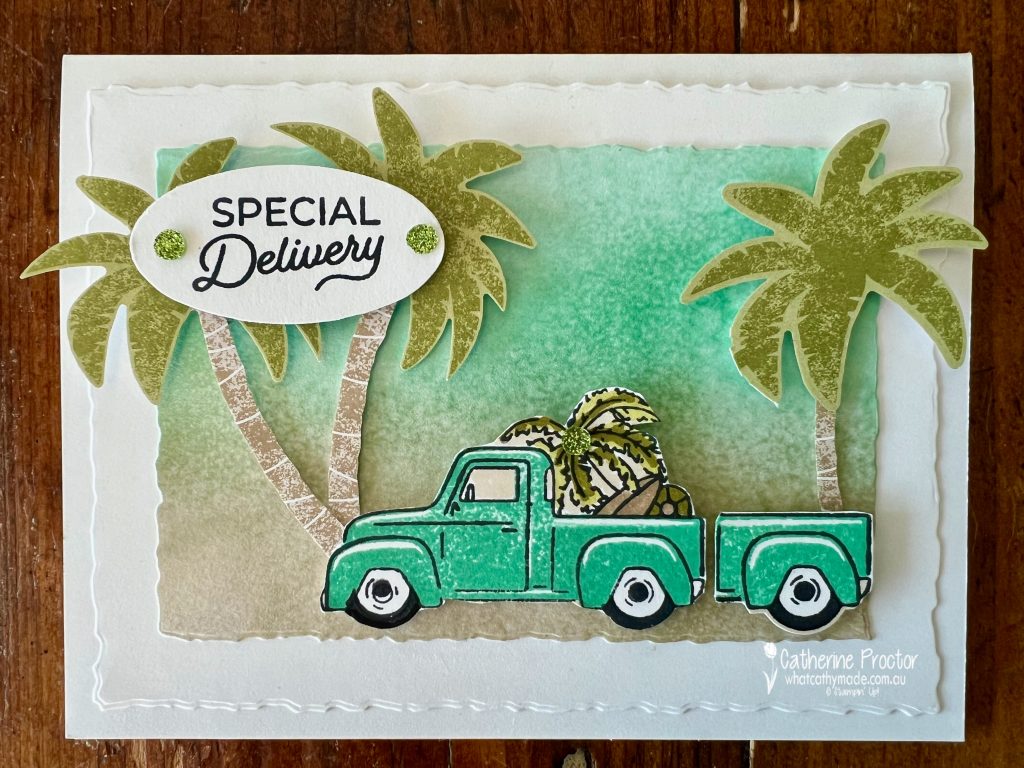
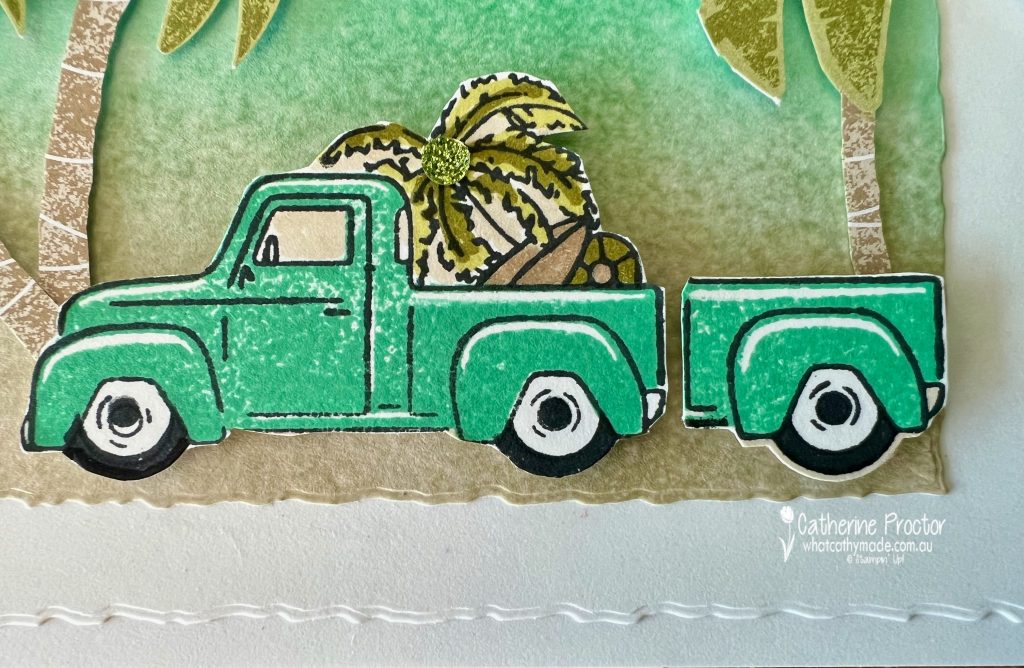
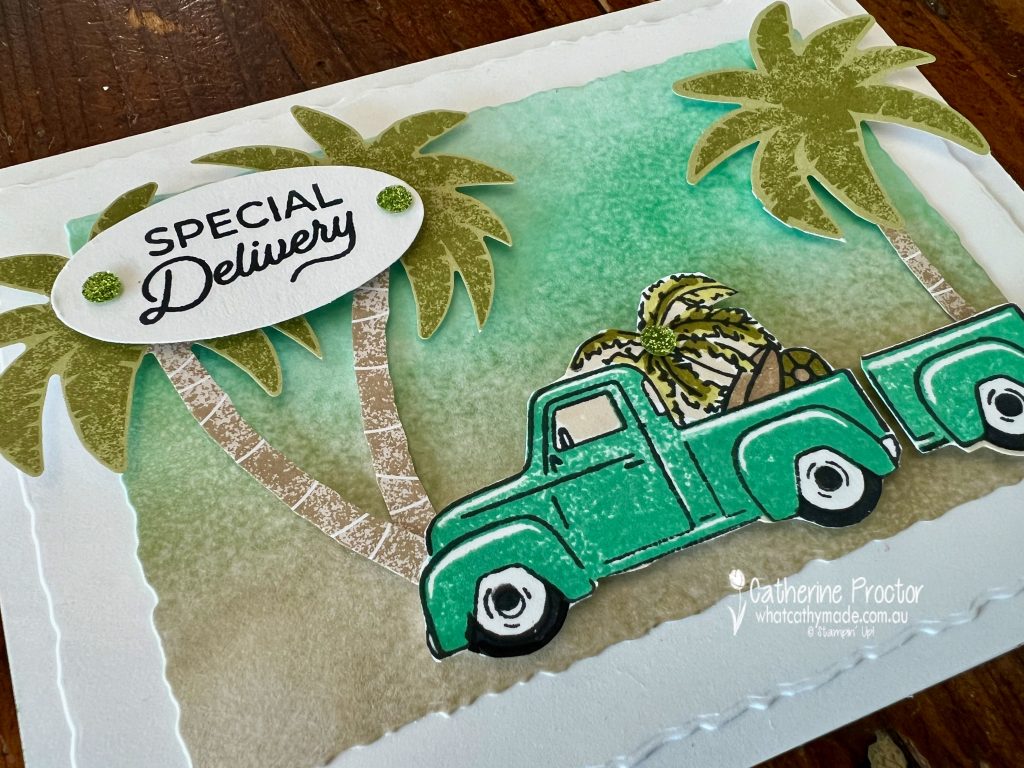
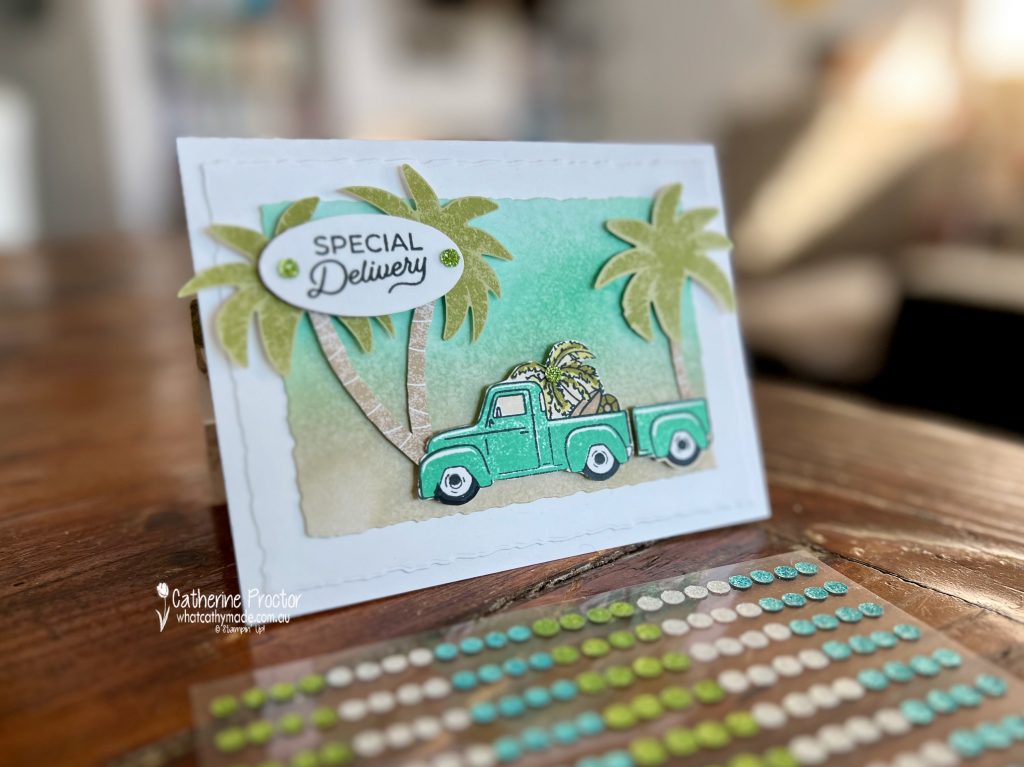
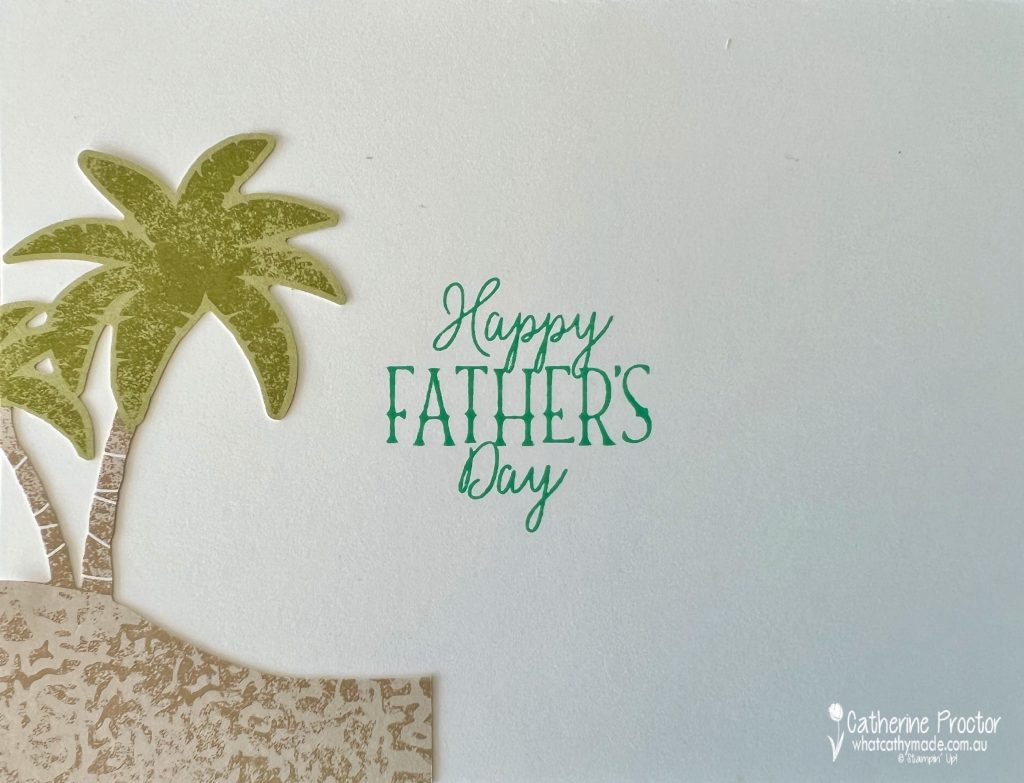
It’s Father’s day this coming Sunday and as my husband loves to surf (am I allowed to say “lives” to surf?) I was super excited to see that the new Trucking Along stamp set includes a stamp with a surfboard and a palm tree.
Pete also drives a ute so this was the perfect stamp set to use for his Father’s Day card!
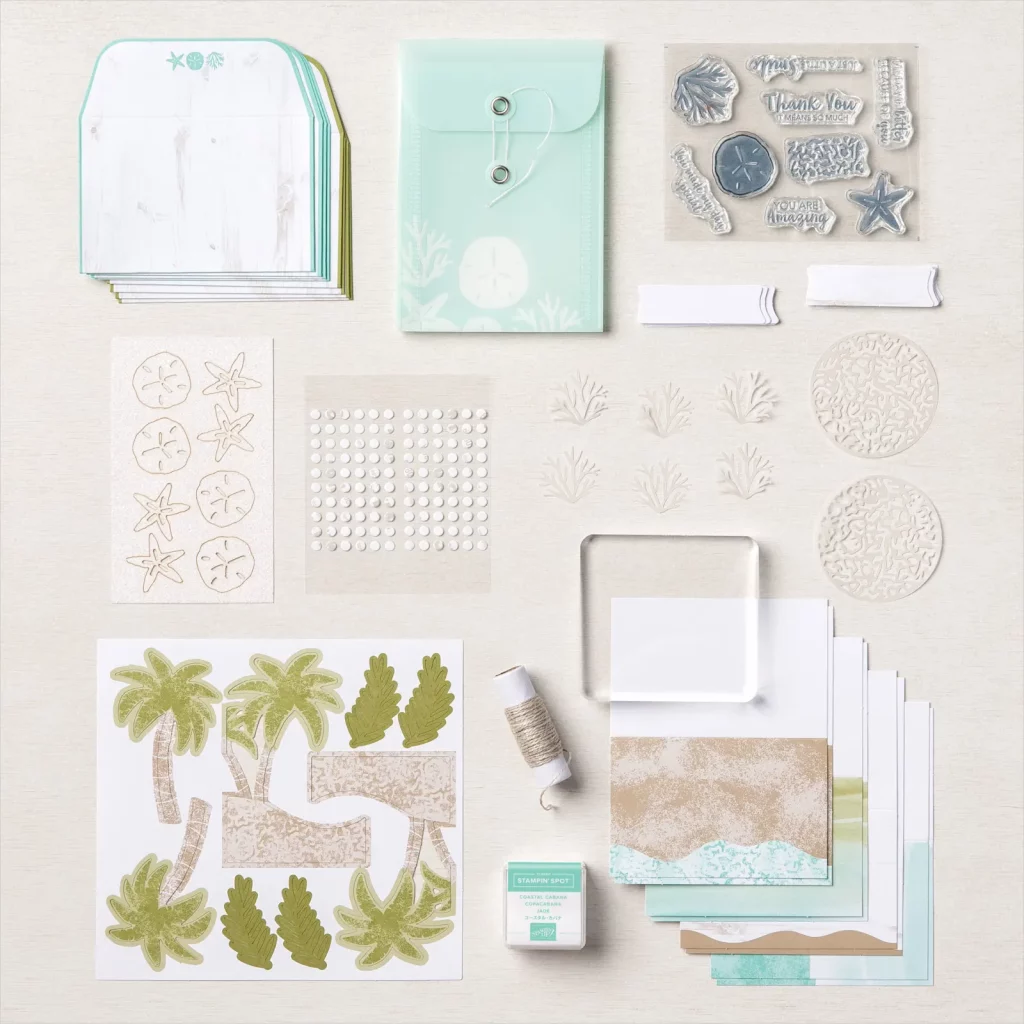
Tomorrow is also the last day of Stampin’ Up!’s kit sale, so I’ve used some of the pre-cut palm tree pieces from the A Little Smile All-Inclusive Card Kit on my card.
They work so well with the surfboard/palm stamp from the Trucking Along stamp set and the A Little Smile All-Inclusive Card Kit is on sale for $25.90 until midnight tomorrow night!
This kit also gave me inspiration for the the colour combination and background of my Father’s Day card. I used blending brushes to create layers of Crumb Cake and Coastal Cabana and die cut it out with the third largest Deckled Rectangle die.
I also added an additional white cardstock layer behind the top layer, die cut with the largest Deckled Rectangle die. To make our metric half A4 card base fit imperial American sized dies such as the Deckled Rectangle dies I simply trim about 1cm off one side of the card base before I adhere all the layers together.
Two utes were stamped in Coastal Cabana, with the second ute cut in half to add a trailer to the back of the first ute. Although there is a matching punch, I fussy cut both utes so I could add the surfboard stamp in the back of the first ute and create the trailer from the second ute.
The “Special Delivery” sentiment was going to sit in the ute trailer, however I decided at the last minute to pop it on the palm trees. It’s been punched out with the Double Oval Punch.
These new Adhesive-Backed Glitter Sequins are from the forthcoming September – December catalogue and they’re stunning! I’ve used the Old Olive sequins to match the palm trees and add a touch of bling to complete the card front.
The Father’s Day sentiment inside the card is from the Gone Fishing stamp set, stamped in Coastal Cabana. I added another pre-cut palm tree from the kit to finish off the inside.
Now it’s time to hop on over to our next participant, the lovely Andrea Sargent – I can’t wait to see what Andrea has made this week!
If at any time you find a broken link, you can find the complete list of all participants below.