Welcome to week twenty six of our Art With Heart 2022-23 Colour Creations blog hop!
This is a weekly blog hop where we showcase the stunning range of Stampin’ Up! colours in alphabetical order over 12 months and this week we are featuring Highland Heather from the subtles family.
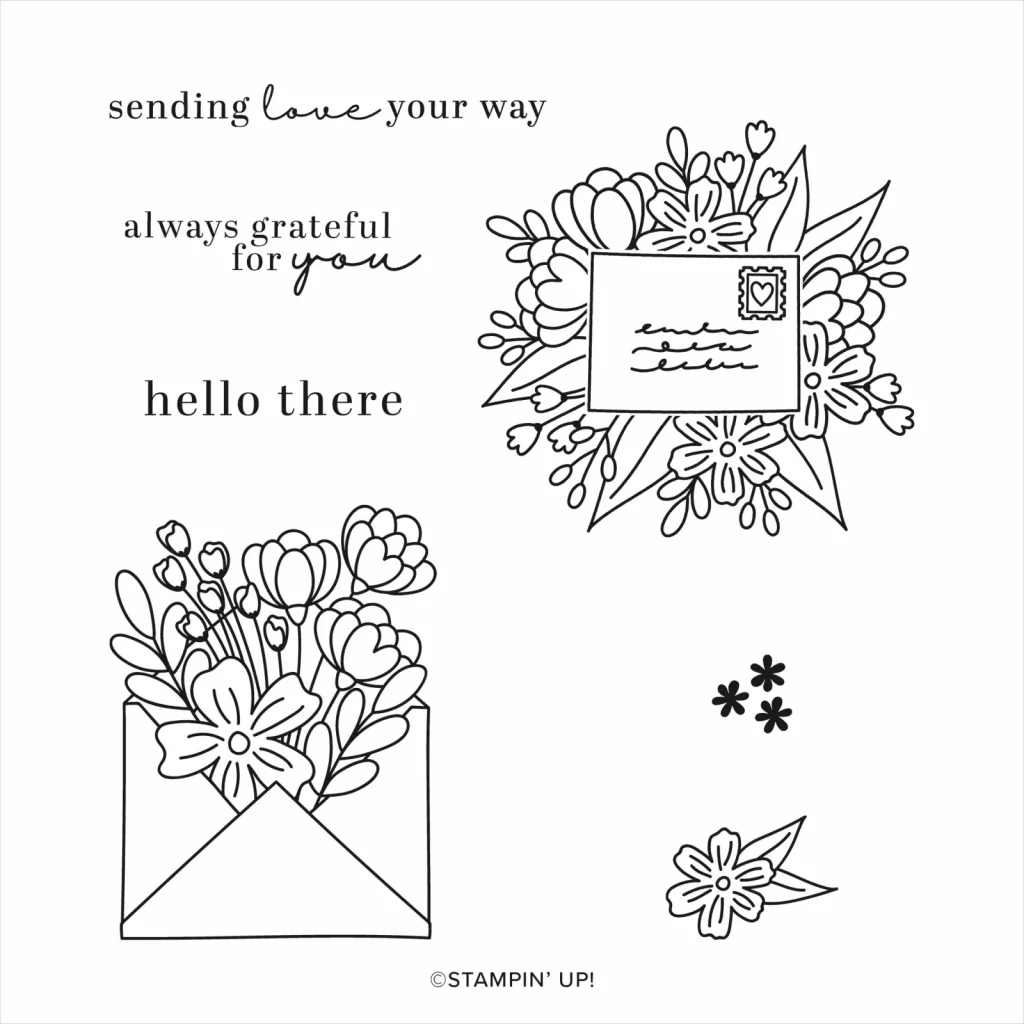
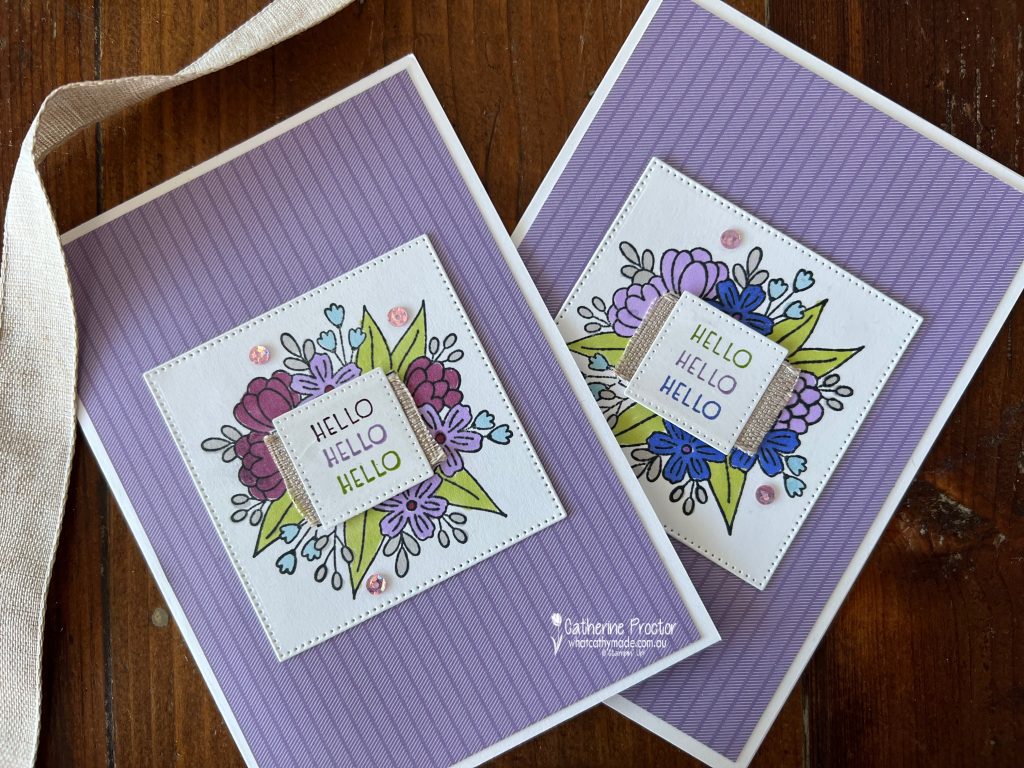
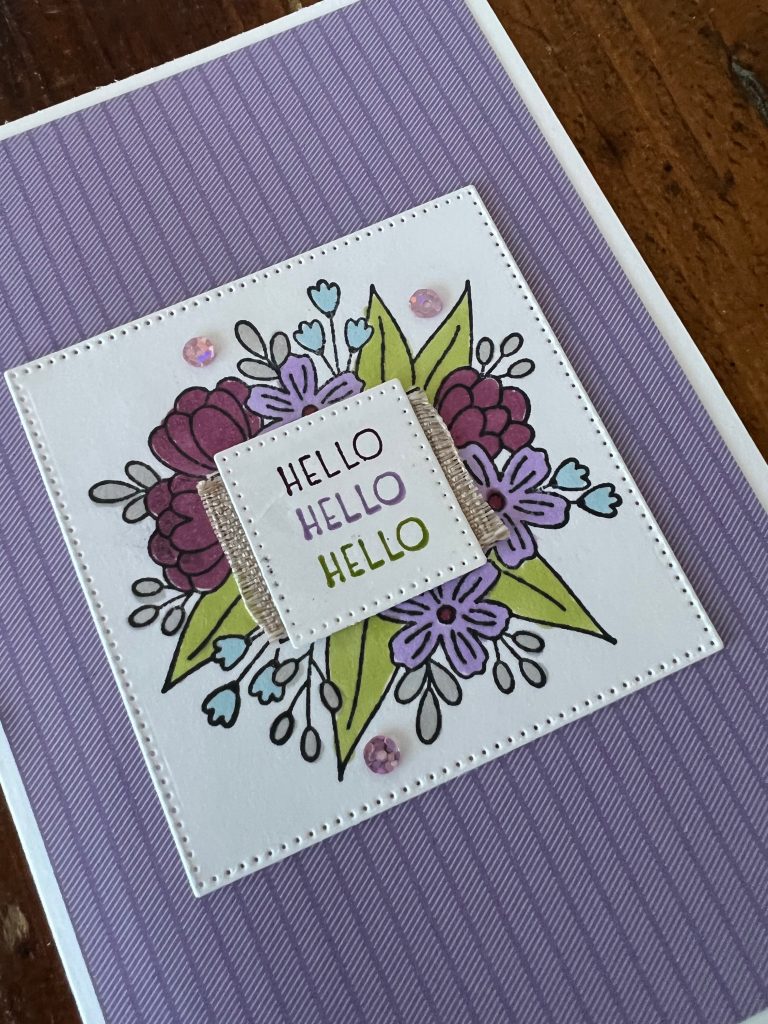
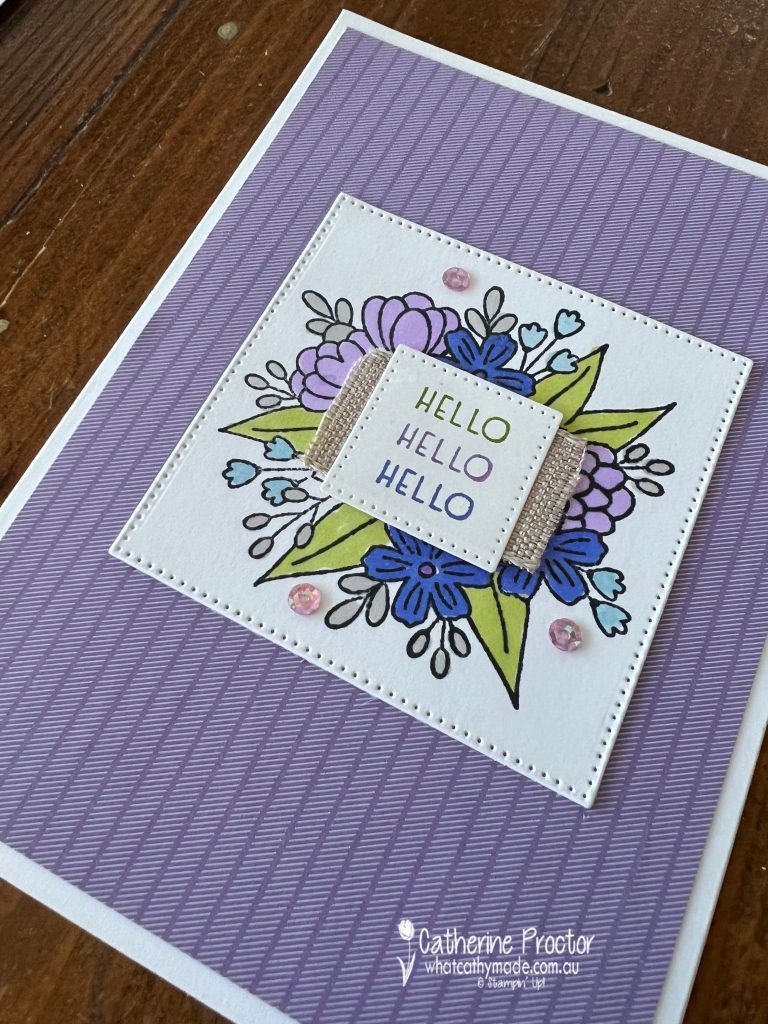
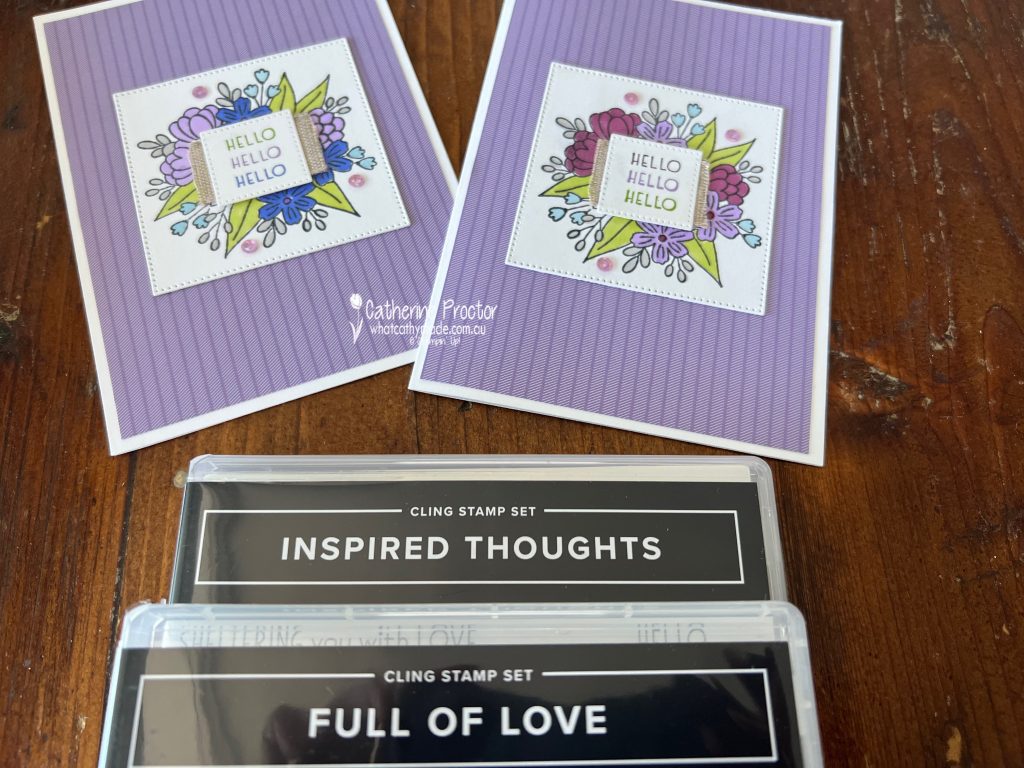
This week I’m using a stamp set that is great for any kind of colouring: the Full of Love Stamp Set.
This is also great stamp set for stampers who are starting their stamp collection as it contains a variety of sentiments and images.
I’ve actually used a sentiment from another stamp set – Inspired Thoughts – but that is only because I am CASEing the “Hello, hello, hello” card from page 76 of the Annual Catalogue.
The Stampin’ Up! designers layered the die cut sentiment over a strip of the Natural Finish Ribbon to cover the stamped envelope, revealing just the flowers that surround the envelope. I’ve also done this for my two cards below.
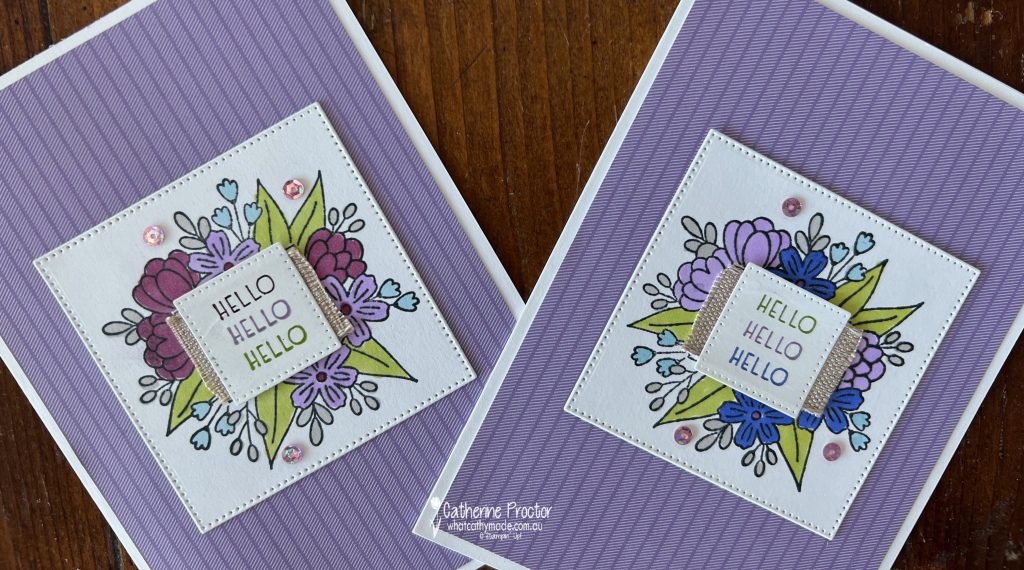
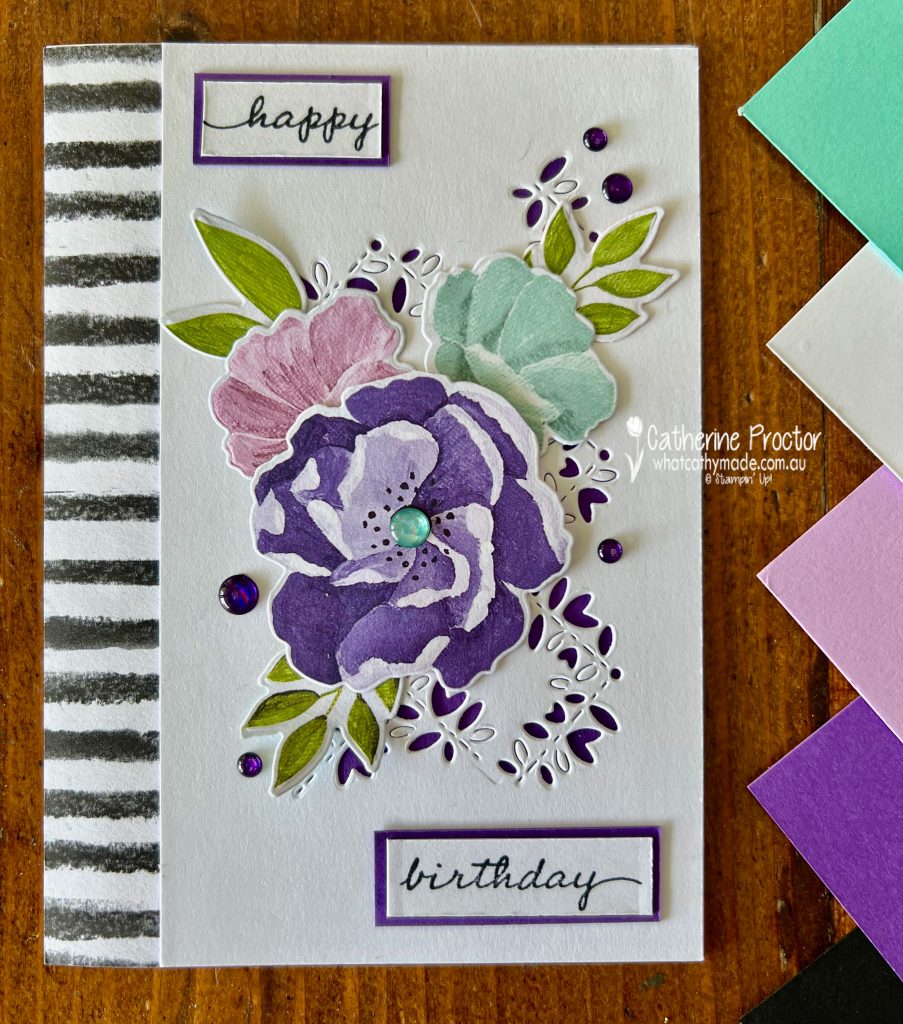
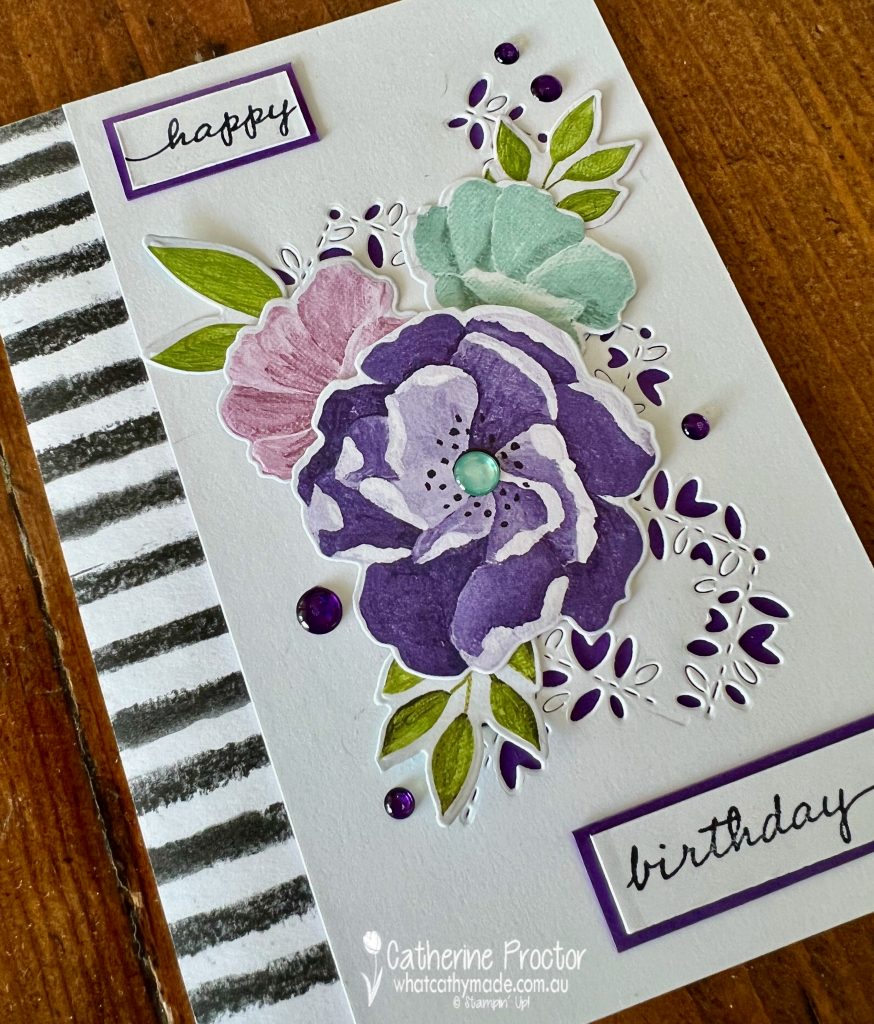
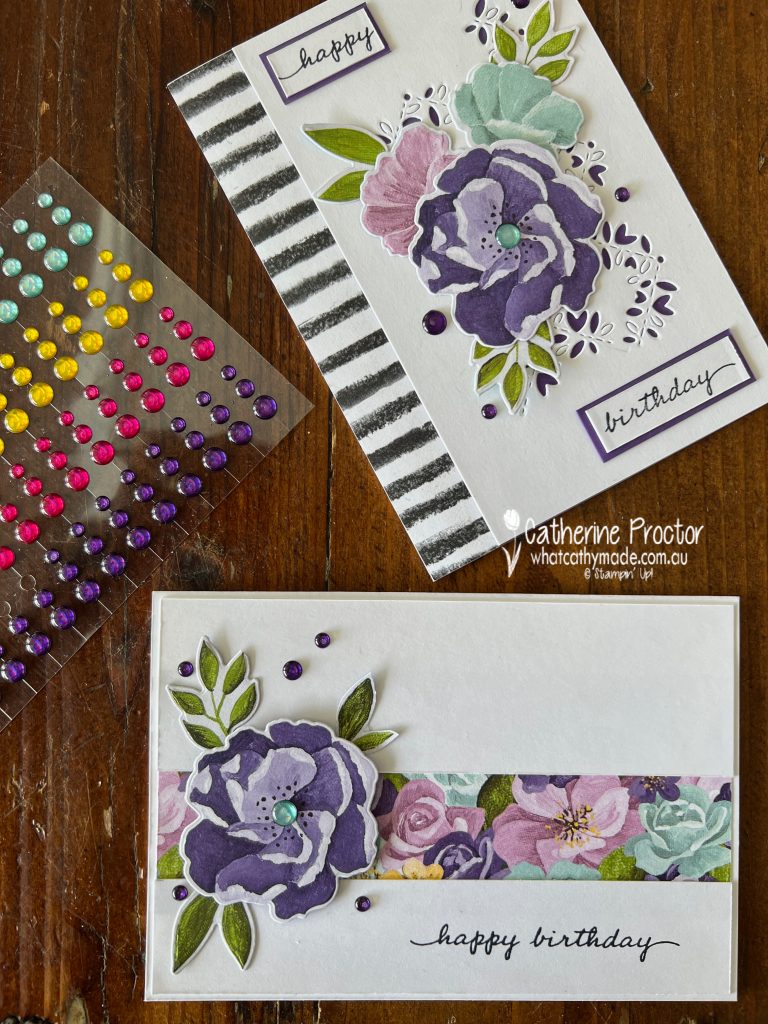
I’ve taken a risk with my colour choice for both cards, combining Highland Heather, which is a soft subtle colour, with two very intense colours: Blackberry Bliss and Orchid Oasis.
Card one combines Highland Heather with Blackberry Bliss, Balmy Blue, Gray Granite and Granny Apple Green.
Card one combines Highland Heather with Orchid Oasis, Balmy Blue, Gray Granite and Granny Apple Green.
Both cards use the smallest square in the Stylish Shapes Dies to die cut the coloured image, Highland Heather Subtles 6″ x 6″ Designer Series Paper and Stampin’ Blends to colour the images.
The finishing touch is three Fresh Freesia Adhesive-Backed Sequins.
Now it’s time to hop on over to our next participant, the lovely Kate Morgan – I can’t wait to see what Kate has made this week!
If at any time you find a broken link, you can find the complete list of all participants below.
Welcome to week twenty five of our Art With Heart 2022-23 Colour Creations blog hop!
This is a weekly blog hop where we showcase the stunning range of Stampin’ Up! colours in alphabetical order over 12 months and this week we are featuring Gray Granite from the neutrals family.
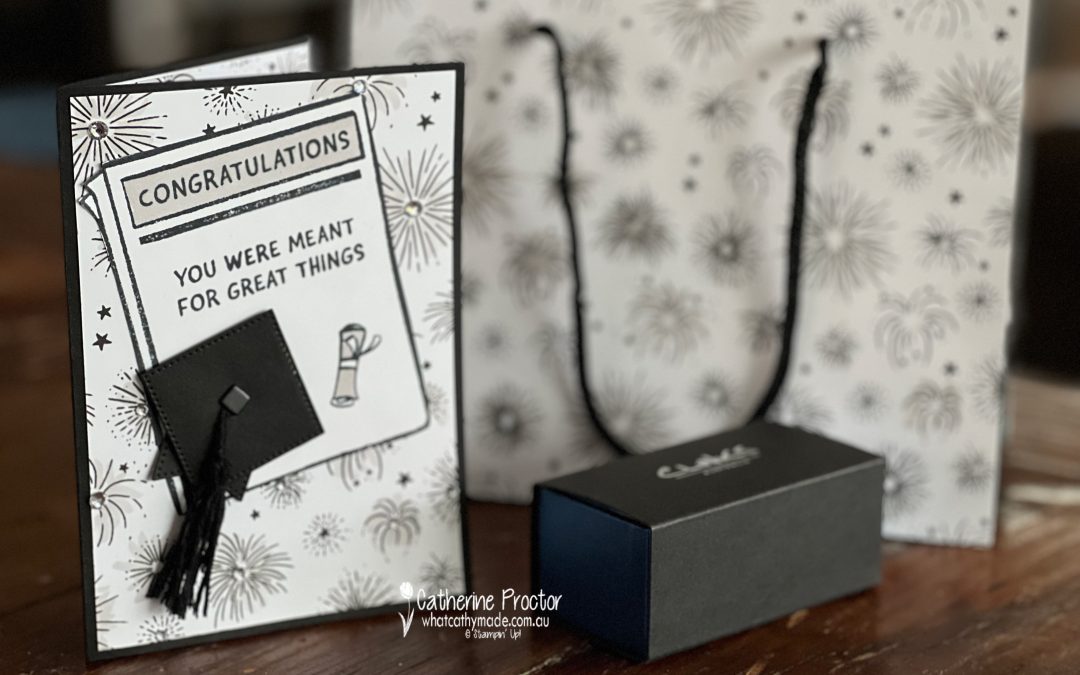
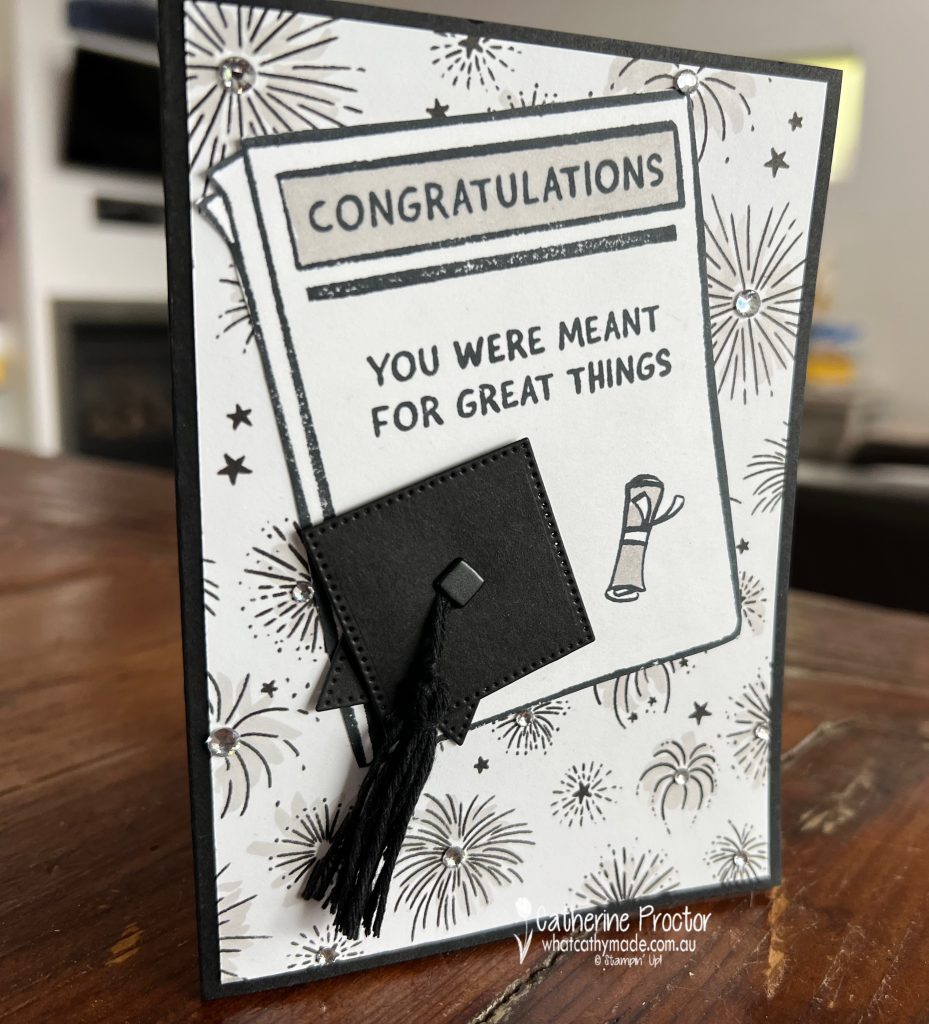
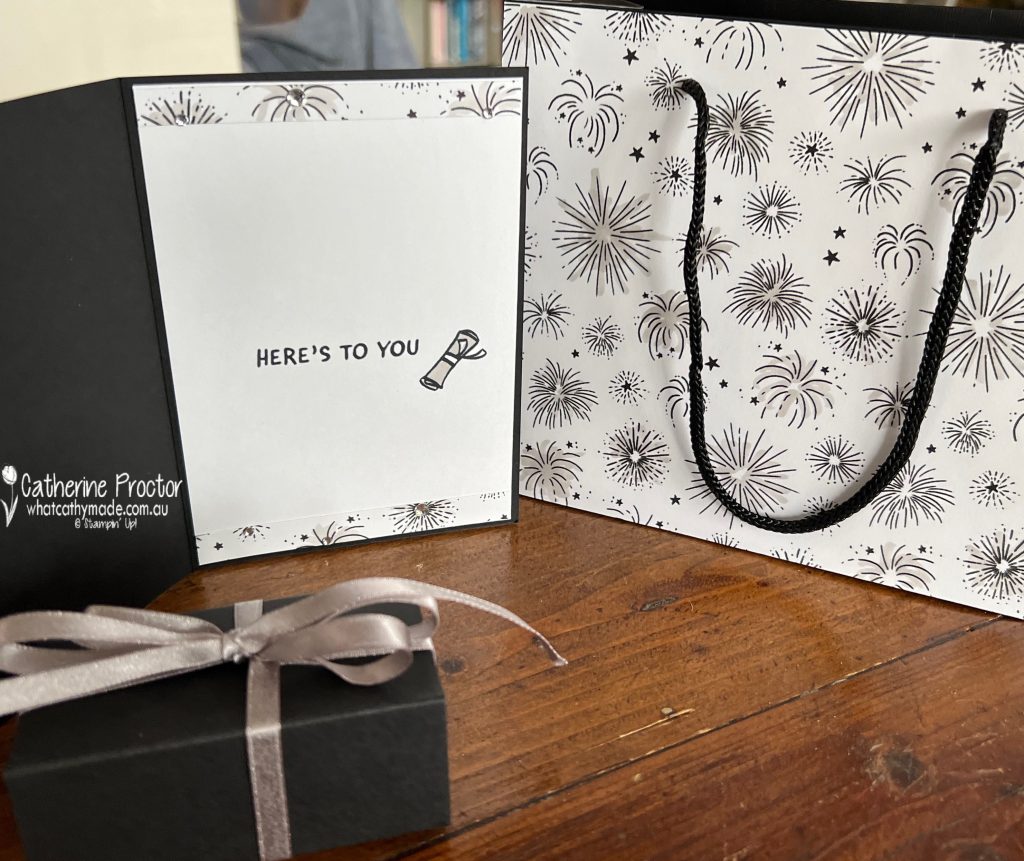
I made this card for a very special ocassion – my eldest son’s university graduation last week! He actually finished uni not last year, but the year before, but thanks to Covid they are running a bit behind with the graduation ceremonies.
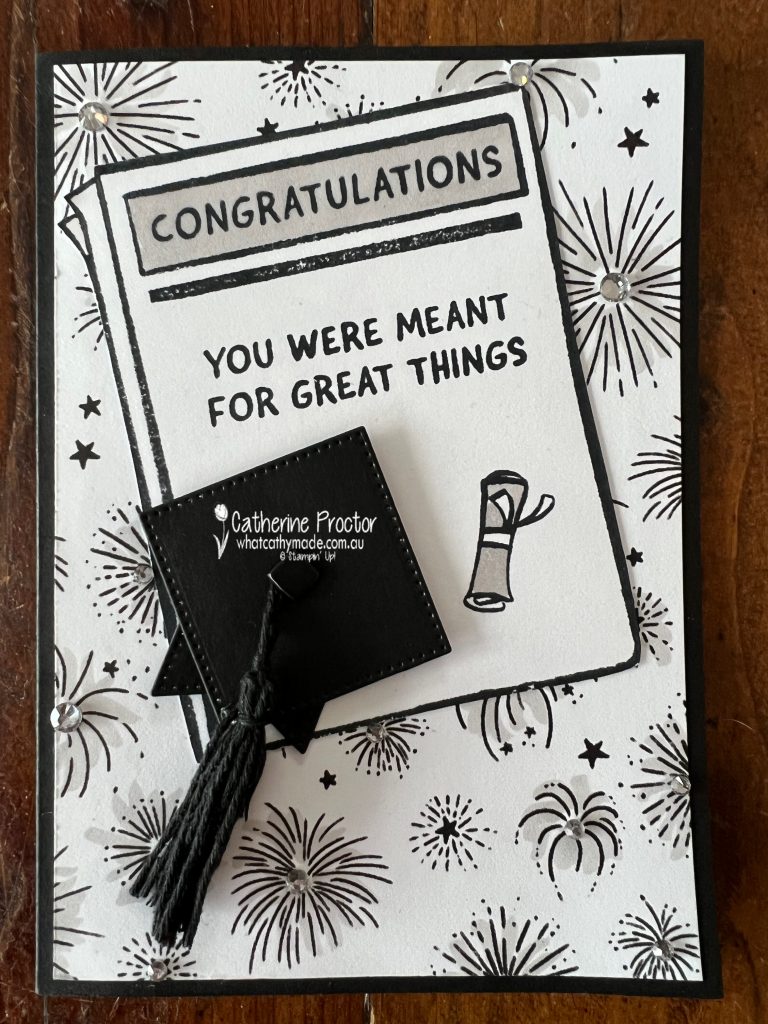
I specifically bought the Breaking News Stamp Set to make Samuel’s graduation card, however I think it’s going to be great for all kinds of cards. Working in publishing all my life, I love having a newspaper stamp set in my collection!
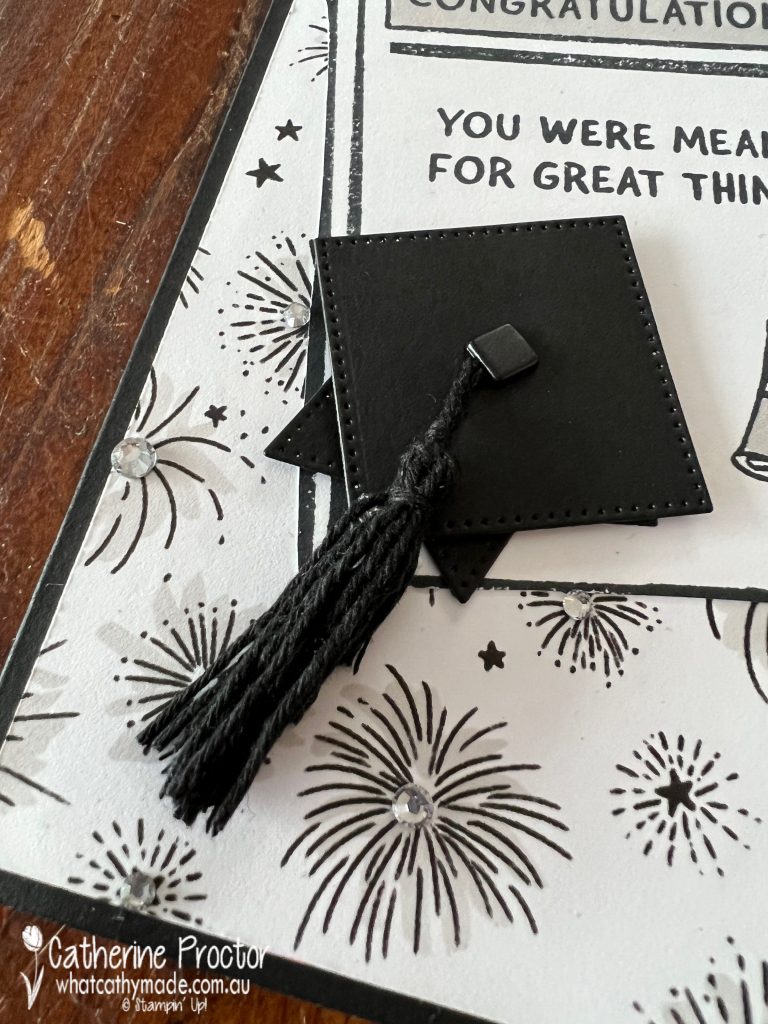
I also wanted to also incorporate a Mortar Board on my card and so I used a couple of the Stylish Shapes Dies to make a mini Mortar Board with a Black Brad from the Round & Square Brads and some Black Baker’s Twine from the Baker’s Twine Essentials Pack to make the tassel.
I jazzed up the Celebrate Everything 12″ x 12″ Designer Series Paper using my Gray Granite Stampin’ Blends and some Rhinestone Basic Jewels.
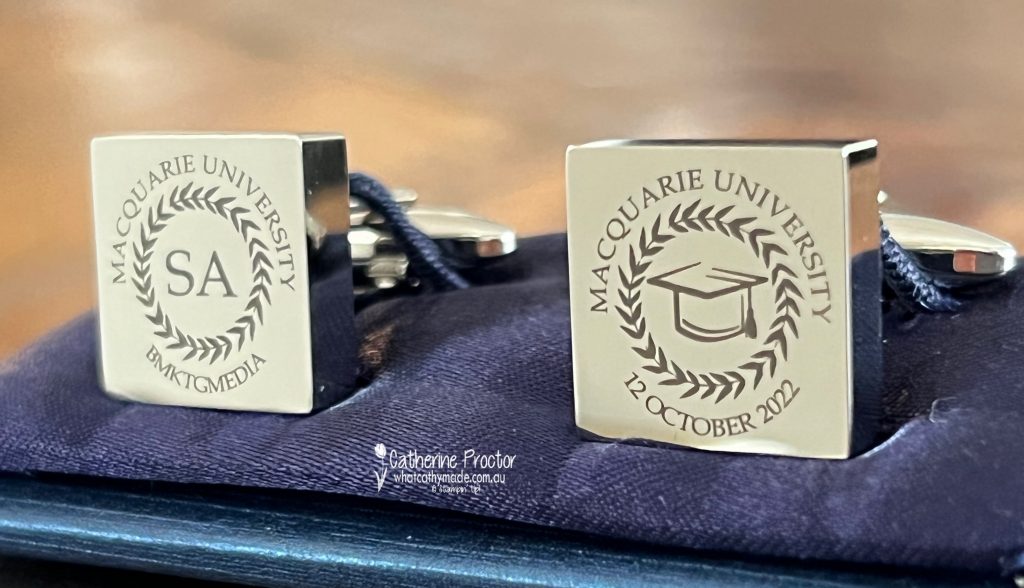
We gave Samuel some cufflinks engraved with his initials, the abbreviation of his degree, the date of his graduation and the name of the university he graduated from – Macquarie University.
The cufflinks arrived in a lovely box and gift bag so there was no need for me to “reinvent the wheel” with the packaging. I simply adhered the Celebrate Everything 12″ x 12″ Designer Series Paper to the black gift bag and tied some Gray Granite Shimmer Ribbon around the cufflinks box.
This fireworks DSP pattern just screams celebration to me and it could be easily customised with any colour.
Here’s the inside of the card – how cute is that little diploma/degree scroll stamp! Once again, it was coloured with Gray Granite Stampin’ Blends.
Now it’s time to hop on over to our next participant, the lovely Andrea Sargent – I can’t wait to see what Andrea has made this week!
If at any time you find a broken link, you can find the complete list of all participants below.
Welcome to week sixteen of the Heart Of Christmas Blog Hop!
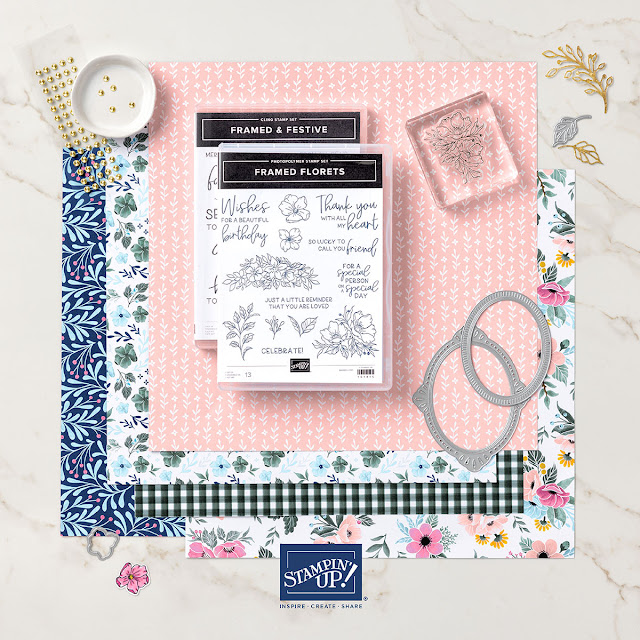
New product alert! Checkout the gorgeous Fitting Florets Collection!
It includes products that will be in the upcoming January-June Mini Catalogue, as well as three products of which will only be available from November 1 for a limited period of time.
The limited time products from this collection include:
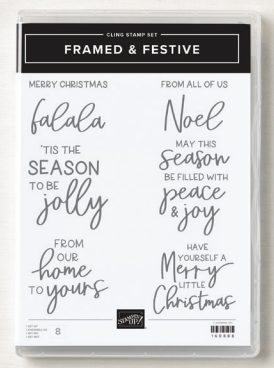
The Framed & Festive Stamp Set – a Christmas sentiment set
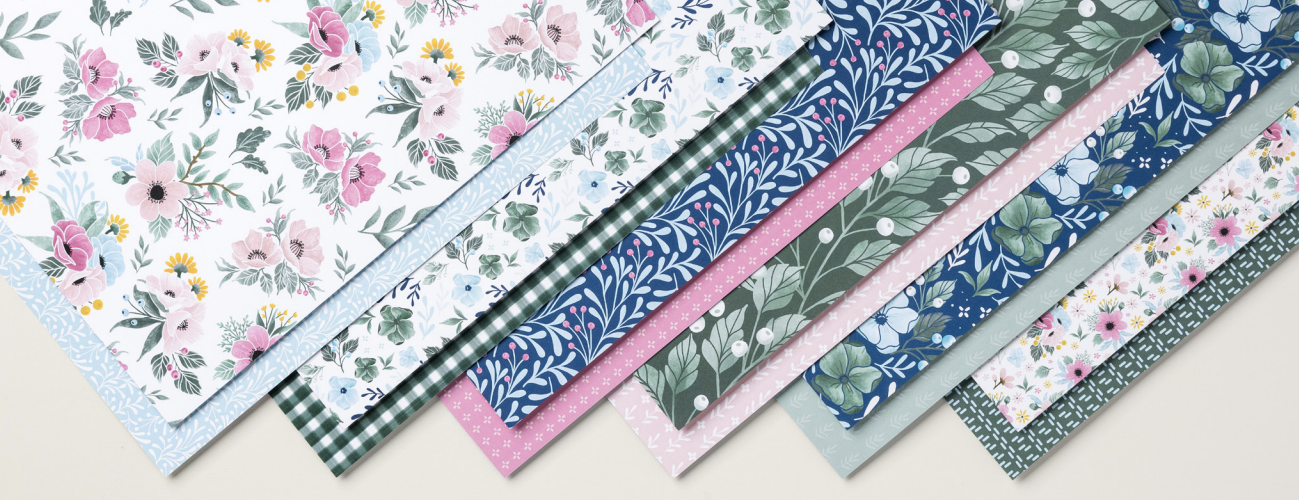
The Fitting Florets DSP – both floral and patterned designs in Balmy Blue, Blushing Bride, Crushed Curry, Evening Evergreen, Night of Navy, Polished Pink, Soft Succulent.
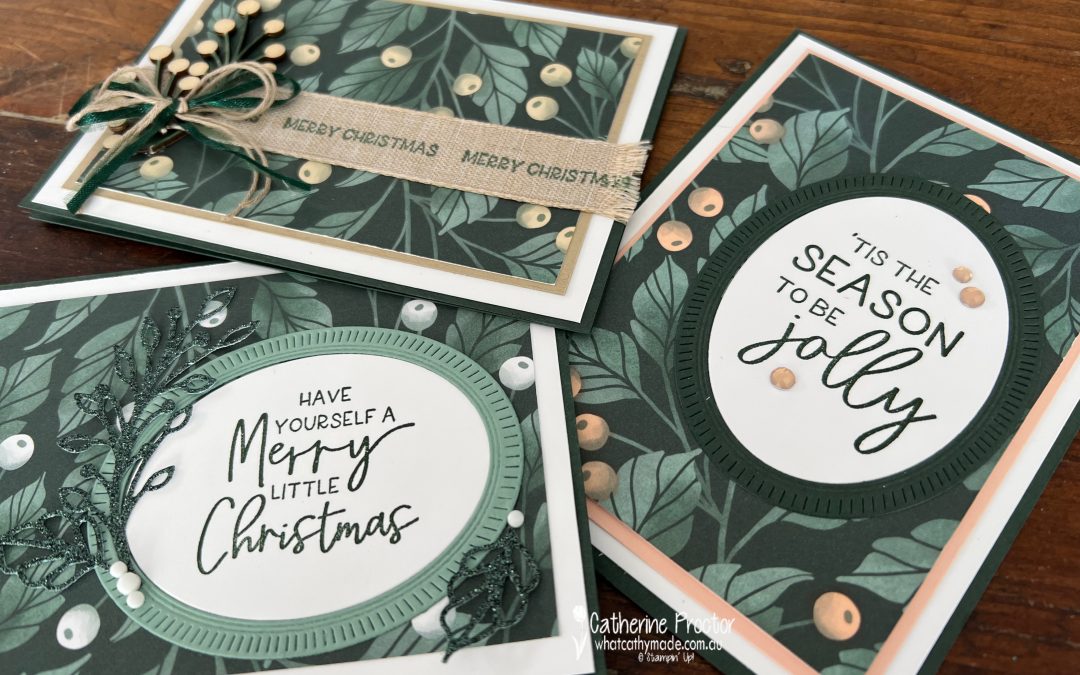
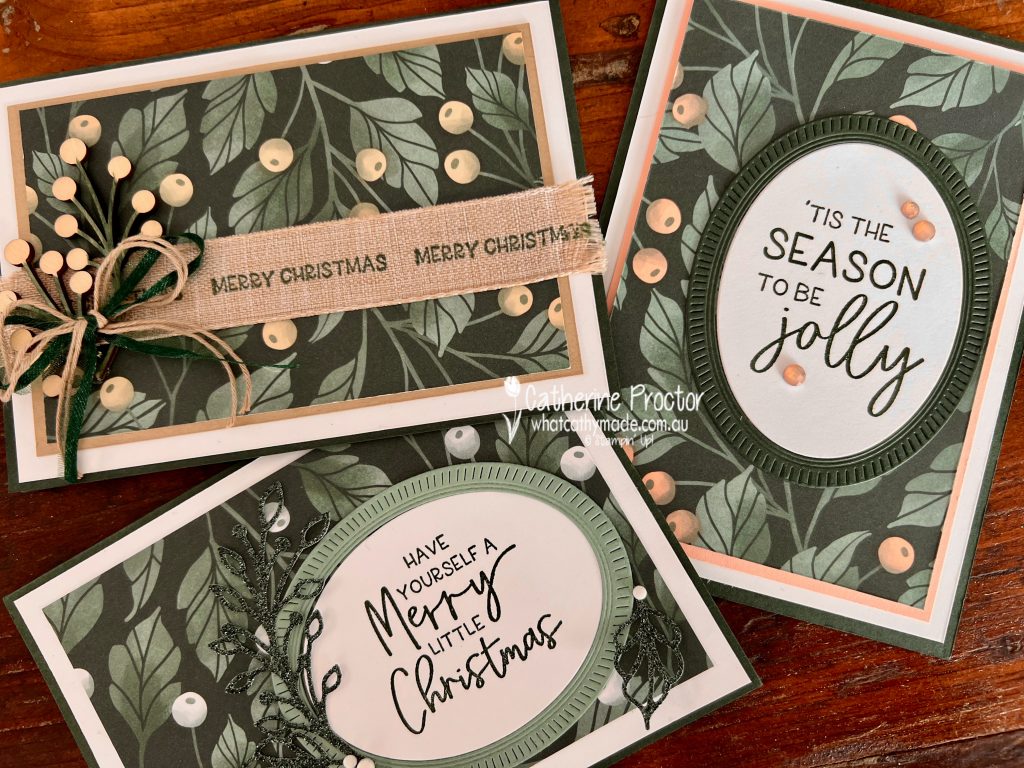
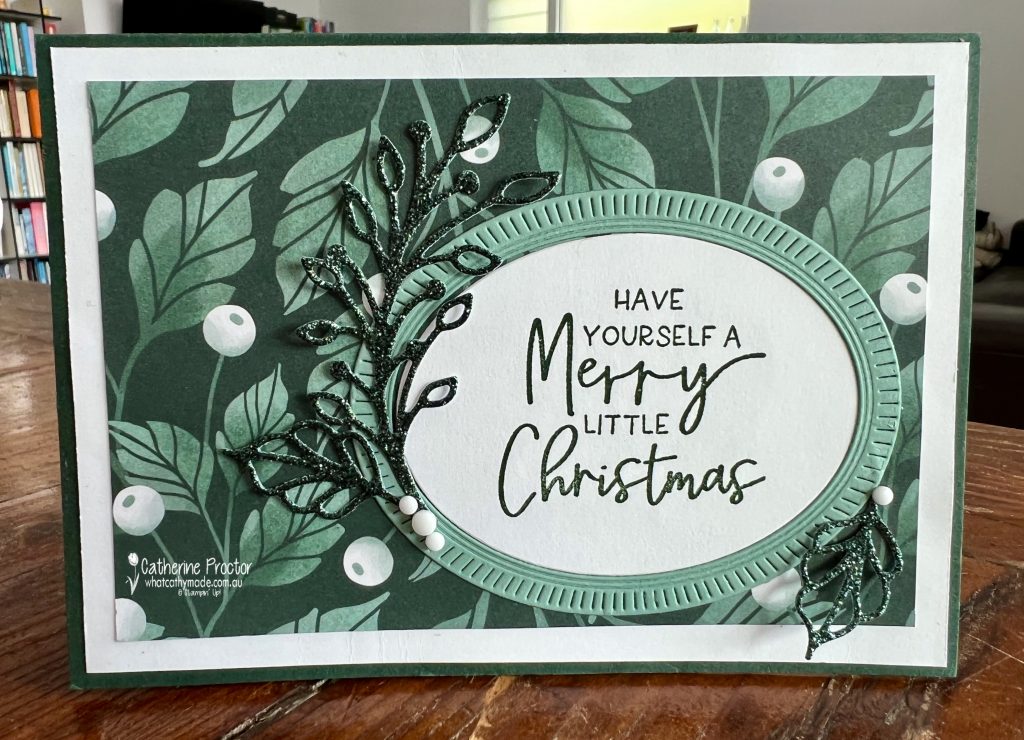
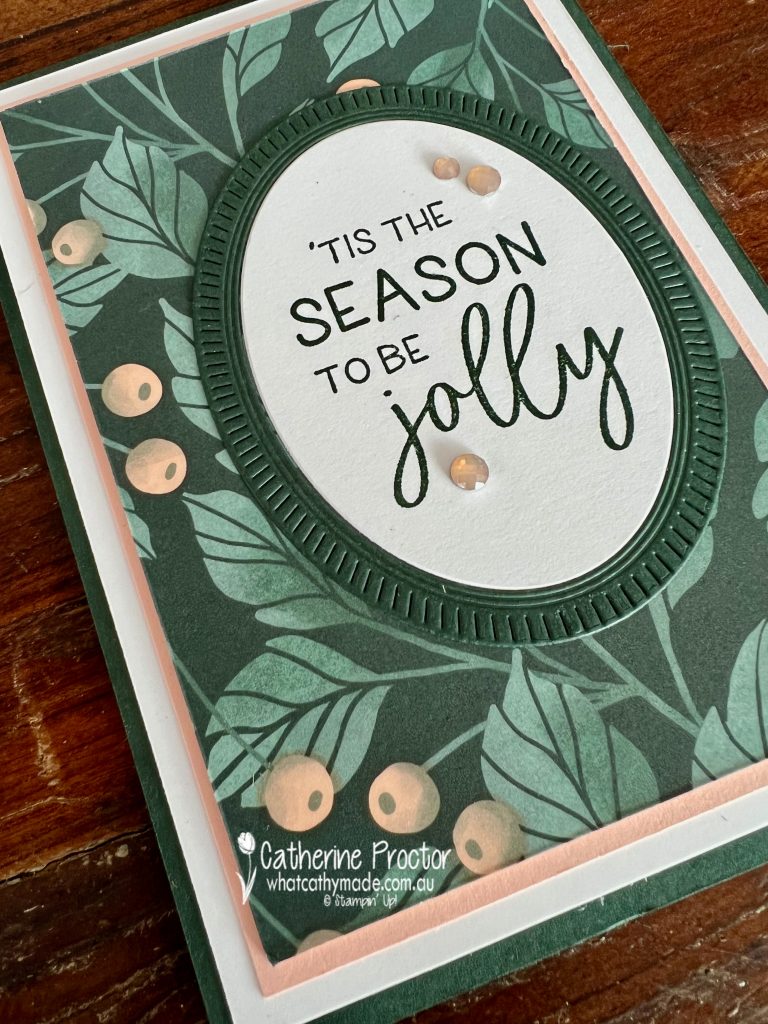
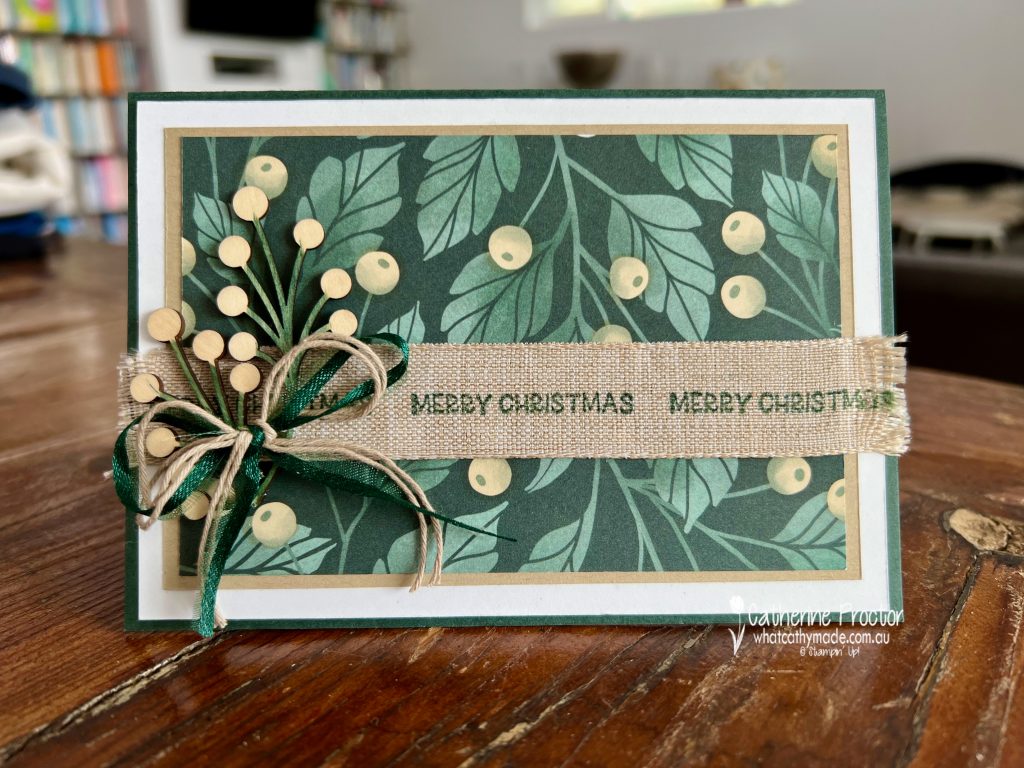
For all my cards I’ve used the Evening Evergreen/Soft Succulent/Basic White leaves and berries patterned paper from the Fitting Florets DSP to make three Christmas Cards, changing the colours slightly for each card.
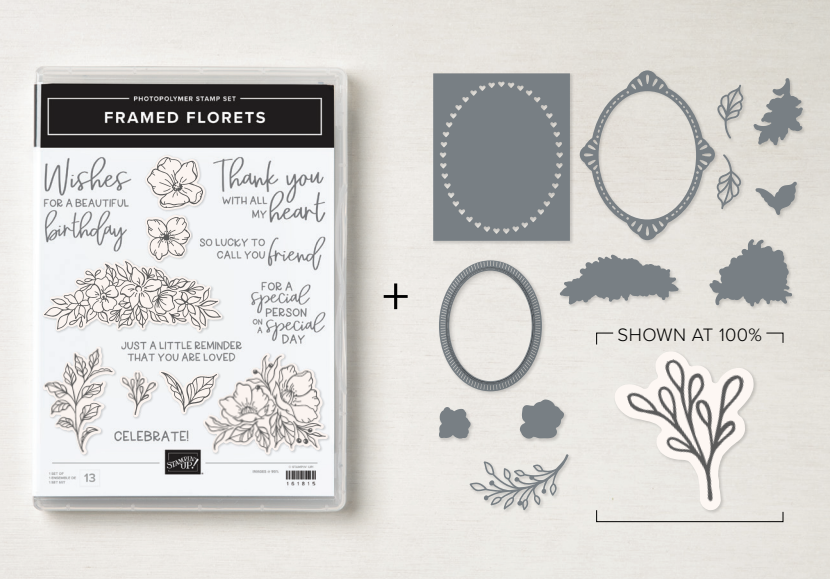
All three cards also use sentiments that are stamped and framed using the Framed Florets Bundle, available from November 1 until the end of June 2023.
Card one is a monochrome card that uses just the colours in this DSP pattern, along with die cut embellishments in Evening Evergreen Glimmer Specialty Paper, die cut using the Framed Florets dies.
White Classic Matte Dots coordinate with the white berries on the DSP.
Card two adds a touch of Petal Pink, with a layer of Petal Pink card stock and berries on the DSP coloured in with Petal Pink Stampin’ Blends!
Three Petal Pink Elegant Faceted Gems are the perfect embellishment to match the Petal Pink berries.
Card three adds Crumb Cake to the colour mix.
The stems of the Textural Elements are coloured with the Soft Succulent Stampin’ Blends and the Natural Finish Ribbon has been stamped in Evening Evergreen using the “Merry Christmas” sentiment from the Framed & Festive Stamp Set.
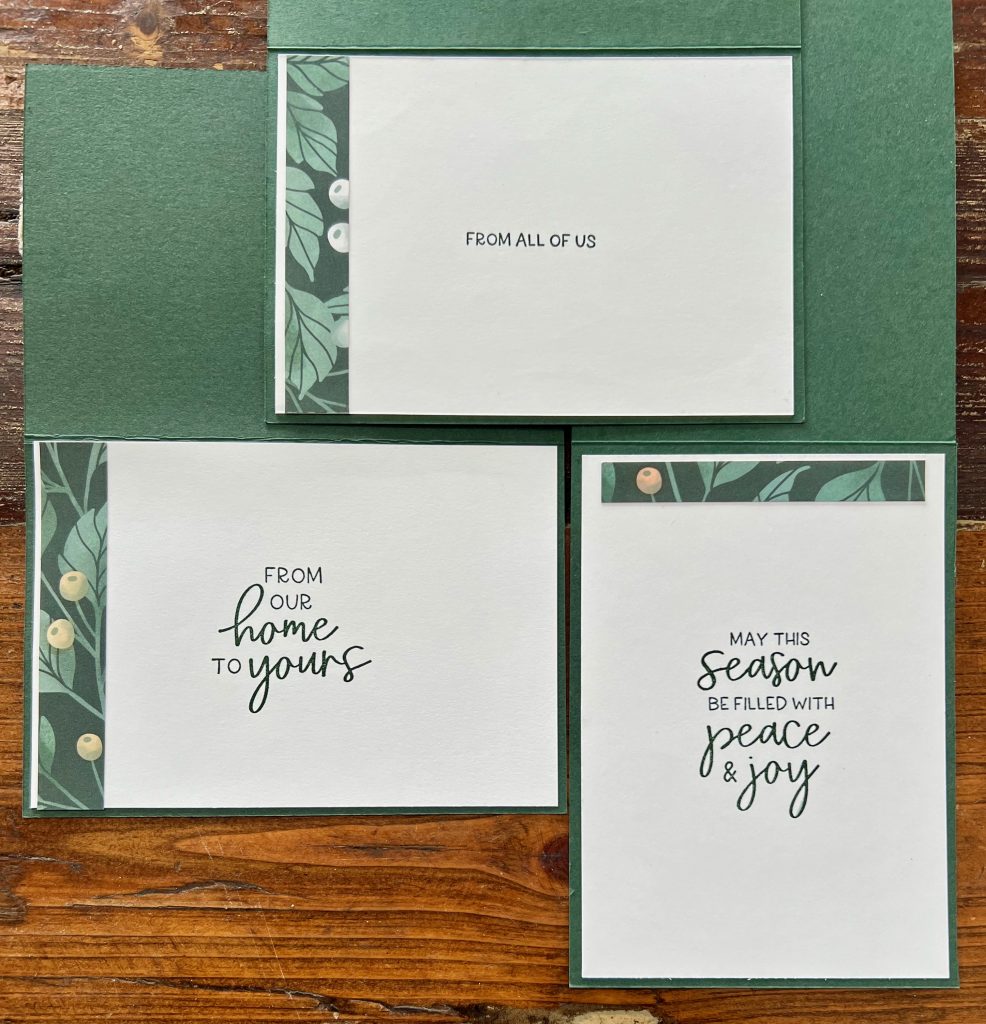
Strips of leftover DSP and additional sentiments decorate the inside of all three cards.
Now it’s time to hop on over to our next participant, the lovely Kathryn Ruddick – I can’t wait to see what Kathryn has created today!
If at any time you find a broken link, you can find the complete list of all participants on Sharon‘s blog.
Welcome to week twenty four of our Art With Heart 2022-23 Colour Creations blog hop!
This is a weekly blog hop where we showcase the stunning range of Stampin’ Up! colours in alphabetical order over 12 months and this week we are featuring Granny Apple Green from the brights family.
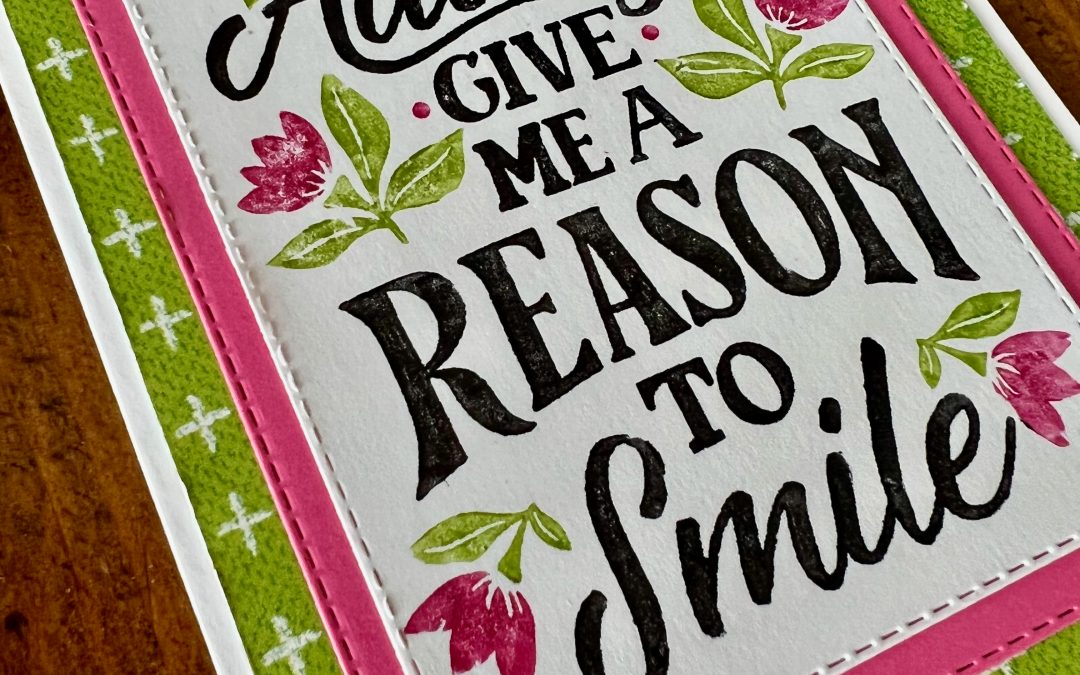
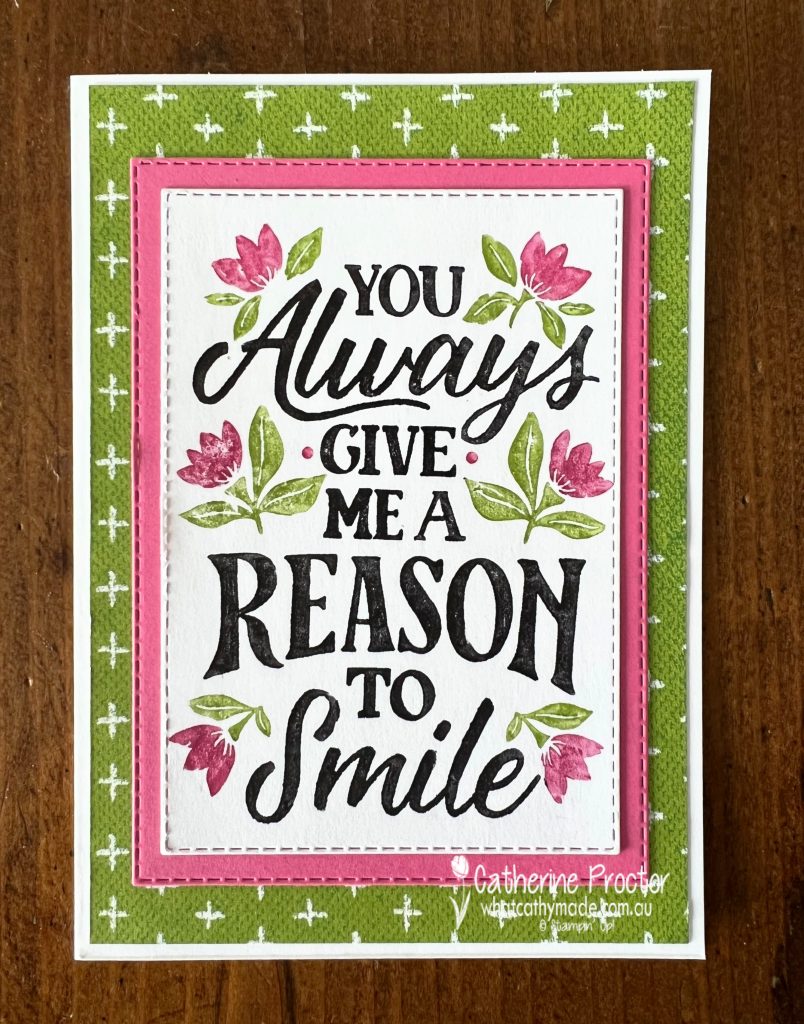
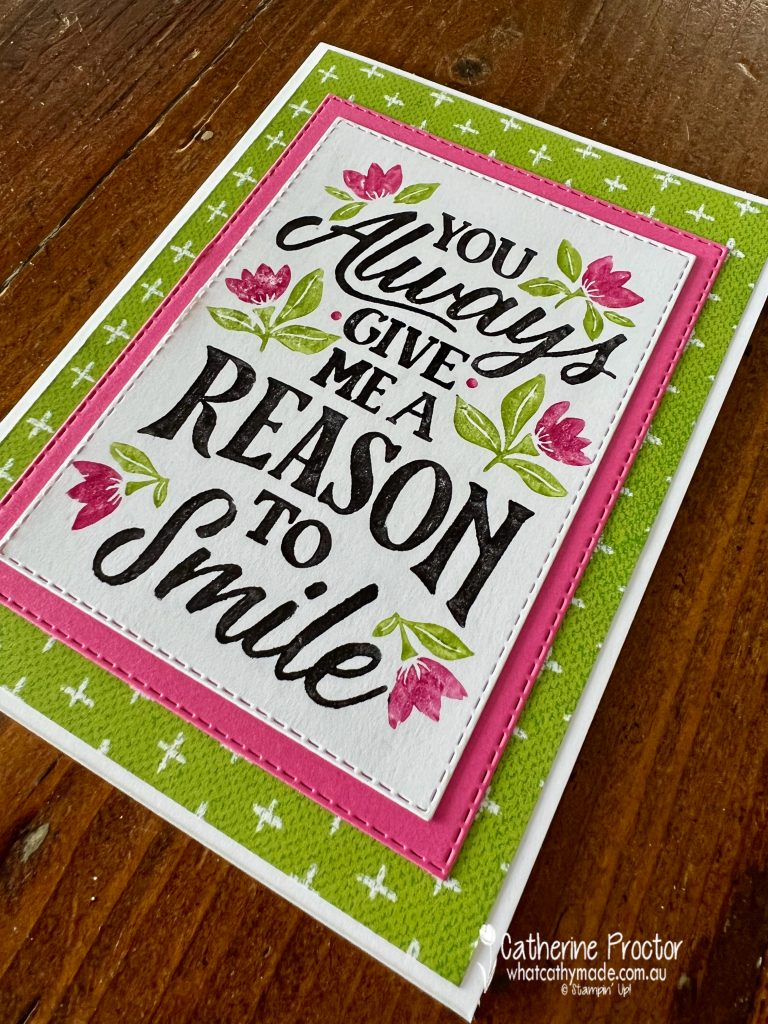
The Reasons to Smile Stamp Set is a wonderful stamp set, ideal for all ages, genders and occasions.
These stamps are great for fast card making as they give you both a sentiment and an image in one and can be stamped in any colour. They quickly fill the space on your card, work with a simple layer of DSP or cardstock and the mix of fonts is gorgeous!
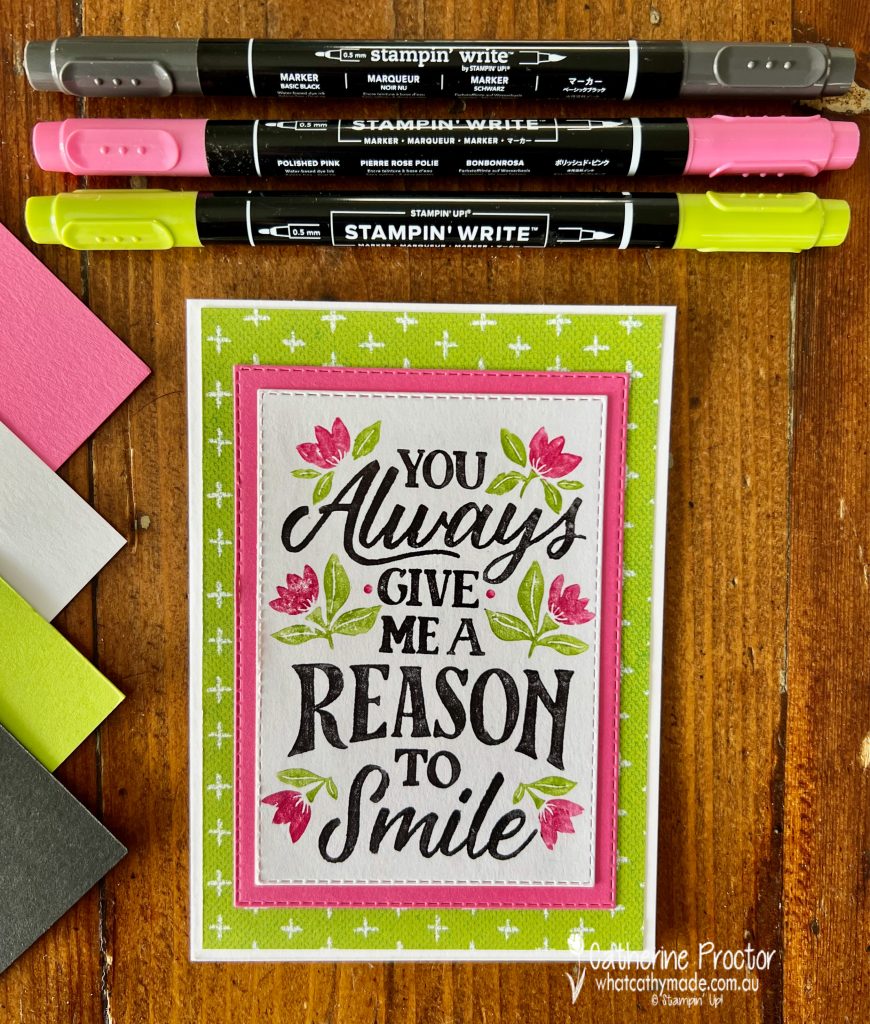
My card for this week uses a technique I have not used in a long time – the marker to stamp technique. You do not need ink pads for this technique as you actually apply colour directly to the stamp set using markers.
This technique is wonderful for stamping in multiple colours using just one stamp. I’ve paired Granny Apple Green with Polished Pink, Basic Black and Basic White, colouring the stamp with my Stampin Write Markers to create a vibrant happy card.
Stampin' Up! Granny Apple Green Colour Combination
Use a stamparatus so you can repeatedly stamp as you add different colours and ensure it lines up perfectly.
Add one colour at a time, colouring the stamp surface with the marker.
Huff on your stamps after colouring them in with the marker and before stamping.
You can recolour any area of the stamp if you have missed a section or if you would like a heavier coverage.
The gorgeous Granny Apple Green DSP background layer is from the Celebrate Everything 12″ x 12″ (30.5 x 30.5 cm) Designer Series Paper.
Speaking of celebrations, I won’t be hosting this hop tonight as my eldest son, Samuel, graduates from university today and we are taking him out after his graduation.
I can’t show you the card I made for Samuel yet because I made it for the Gray Granite blog hop next Wednesday night. The graduation card uses another DSP pattern from the very versatile Celebrate Everything 12″ x 12″ (30.5 x 30.5 cm) Designer Series Paper. Can you guess which pattern it is?
Now it’s time to hop on over to our next participant, the lovely Kate Morgan – I can’t wait to see what Kate has made this week!
If at any time you find a broken link, you can find the complete list of all participants on Tina’s Gillespie‘s website. Tina is hosting the blog tonight for me – thank you so much Tina!
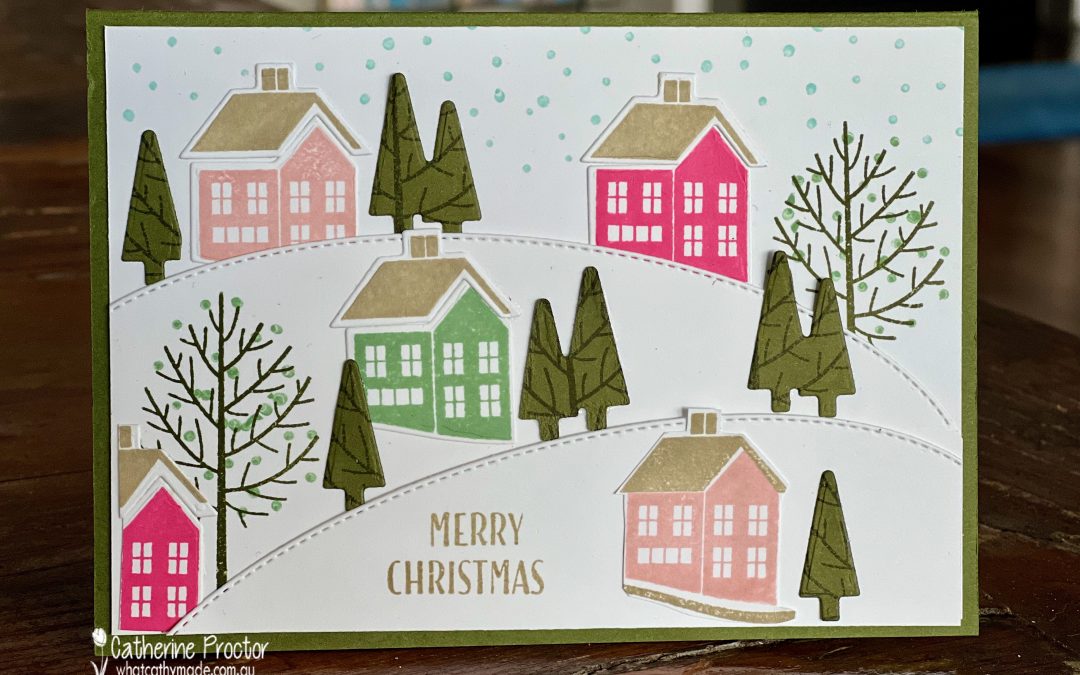
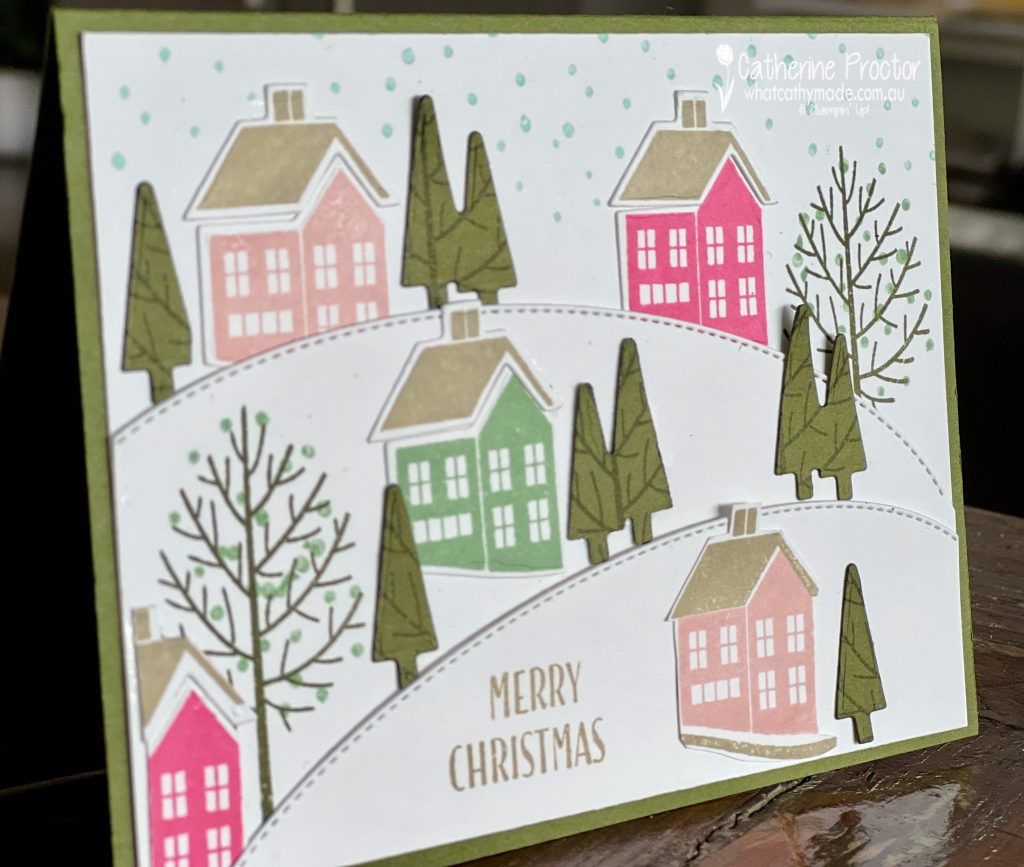
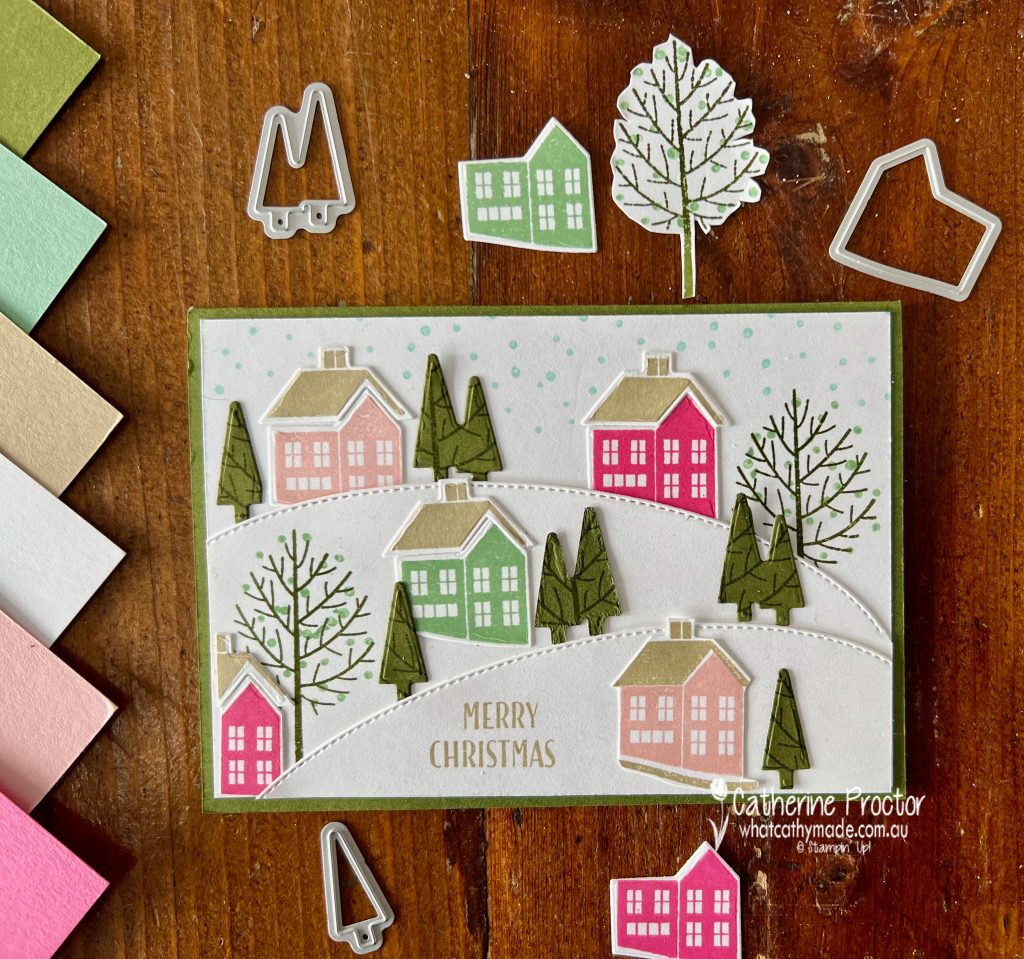
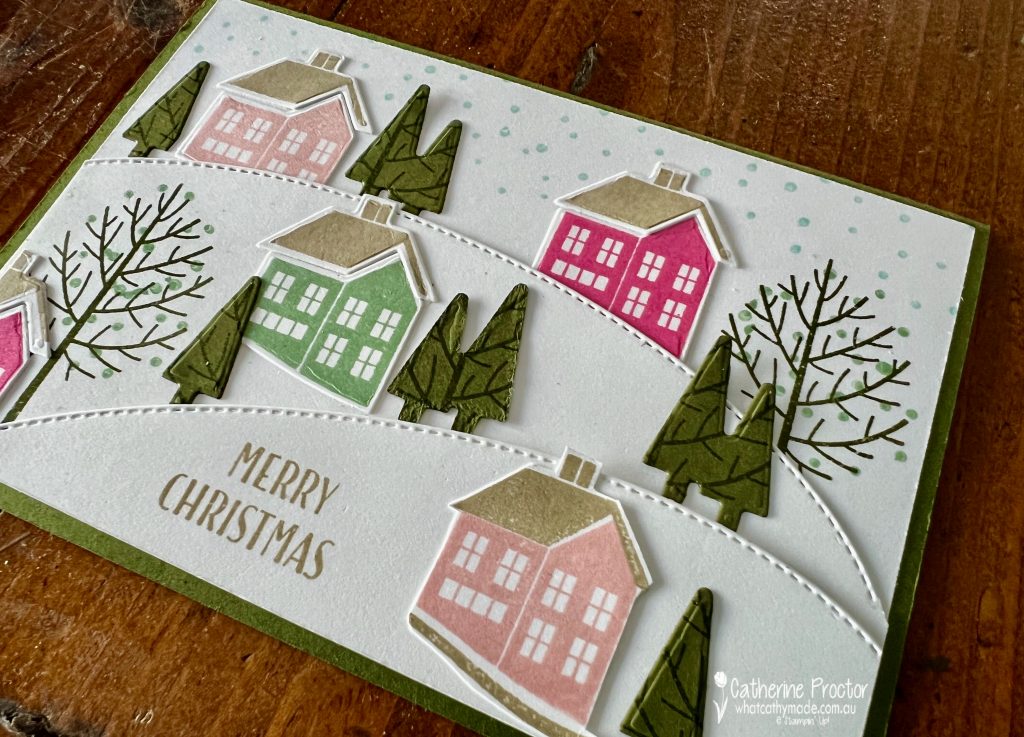
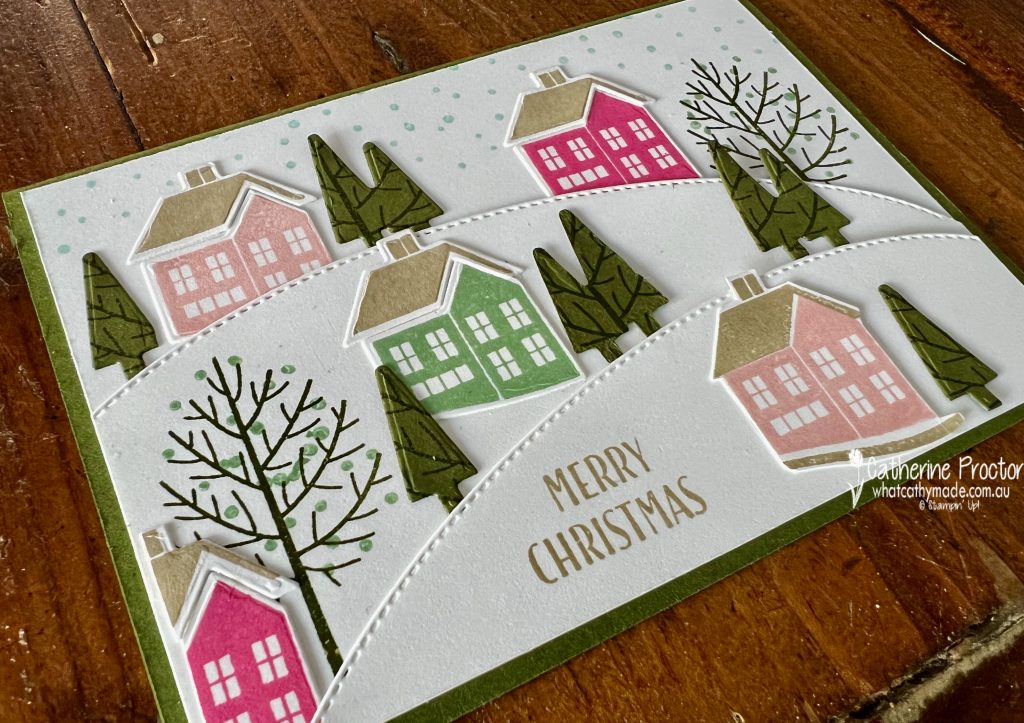
Welcome to week fifteen of the Heart Of Christmas Blog Hop!
I love taking inspiration for card making from our Stampin’ Up! catalogues – they are full of amazing ideas! One card that caught my eye was this card on page 36 of the July-December Mini Catalogue.
The clever detail in this card is the way they stamped the large tree stamp from the Window Wishes stamp set onto cardstock before using the smaller solid tree dies to die cut the trees for this scene.
My version of this card uses some of the colours in the gorgeous Whimsy and Wonder DSP that was in last year’s Holiday catalogue: Blushing Bride, Polished Pink, Crumb Cake, Mint Macaron and Mossy Meadow.
Stampin' Up! Window Wishes Scene Card Colour Combination
I decided to use the curved Basic Border die to create my snowscape. Two pieces of Basic White cardstock were cut with this die and positioned over a front layer of Basic White cardstock on a Mossy Meadow Card base.
I then stamped a large tree on two of the layers and stamped assorted trees and houses on scraps of Whisper White, die cutting with the Window dies and then building my scene as I went along.
Once I was happy with the arrangement I took a photo as a guide to remind myself where everything went and glued everything down, starting with the base layer.
The “Merry Christmas” greeting was stamped using two of the sentiment stamps in the Window Wishes stamp set. I simply inked up “Merry” and the “Christmas” but not the rest of the sentiments.
You could make this little scene in any colour you want and instead of using the Basic Border dies to create the landscape, you could simply freehand cut or trace around the edge of a plate.
Now it’s time to hop on over to our next participant, the lovely Rosa Leyden – I can’t wait to see what Rosa has created today!
If at any time you find a broken link, you can find the complete list of all participants on Sharon’s blog.
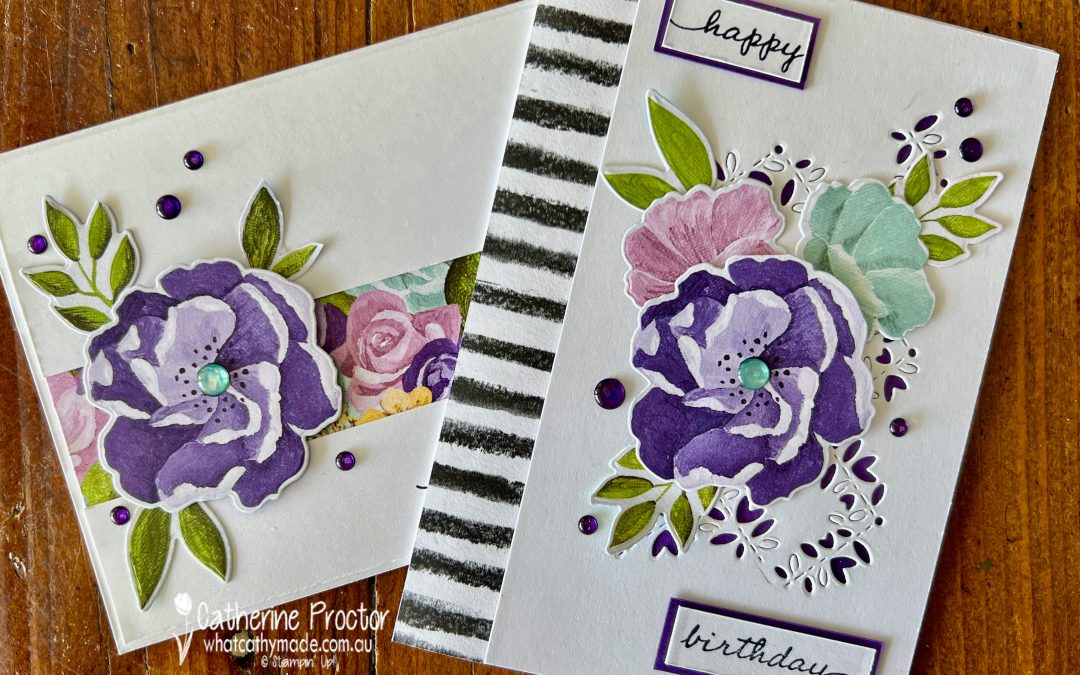
Welcome to week twenty three of our Art With Heart 2022-23 Colour Creations blog hop!
This is a weekly blog hop where we showcase the stunning range of Stampin’ Up! colours in alphabetical order over 12 months and this week we are featuring Gorgeous Grape from the brights family.
The Hues of Happiness DSP has a rainbow of colours, including Gorgeous Grape. For my cards today my colour scheme includes some of the colours in this DSP.
One of my favourite things about the Hues of Happiness DSP is that many of the images can be die cut out using the Happiness Abounds dies. For both my cards, the only stamping is the sentiment – the DSP really does all the hard work for me!
Card one is a horizontal card that has a strip of one of the Hues of Happiness DSP patterns as well as a Gorgeous Grape flower cut from another sheet of the DSP.
Gorgeous Grape and Pool Party dots from the Glossy Dots Assortment are the only embellishments needed with this stunning Designer Series Paper.
Card two has a layer of Gorgeous Grape DSP peeking through the die cut Basic White layer, die cut with the largest Happiness Abounds Die.
I’ve layered die cut flowers from the DSP in Gorgeous Grape, Pool Party/Coastal Cabana and Fresh Freesia, along with Granny Apple Green leaves.
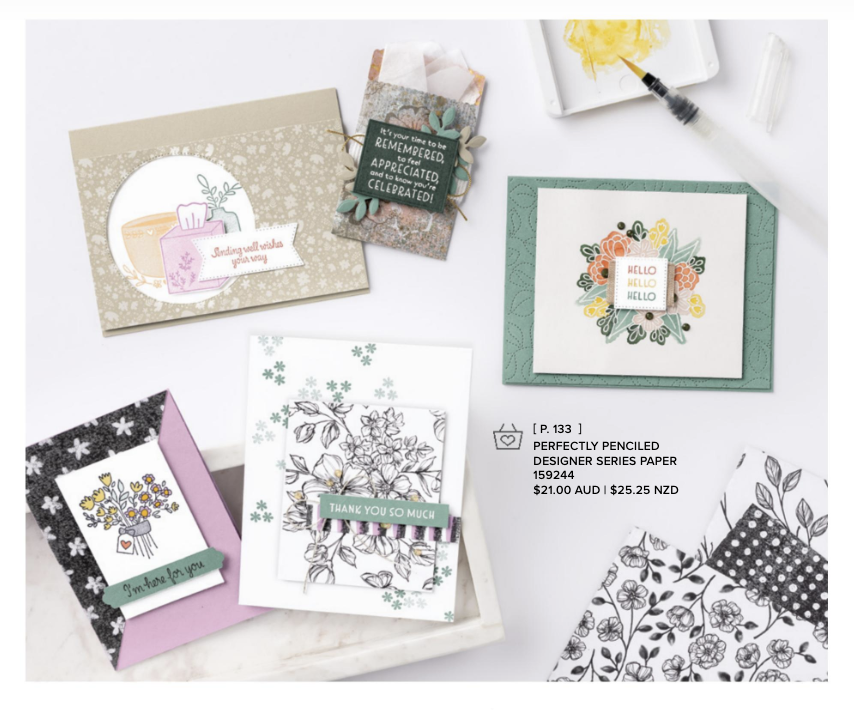
The strip of black and white striped DSP is from the the Perfectly Pencilled DSP.
For both cards I’ve used the “happy birthday” sentiment from the Happiness Abounds Stamp Set.
Now it’s time to hop on over to our next participant, the lovely Tina Gillespie – I can’t wait to see what Tina has made this week!
If at any time you find a broken link, you can find the complete list of all participants below.
Welcome to week fourteen of the Heart Of Christmas Blog Hop!
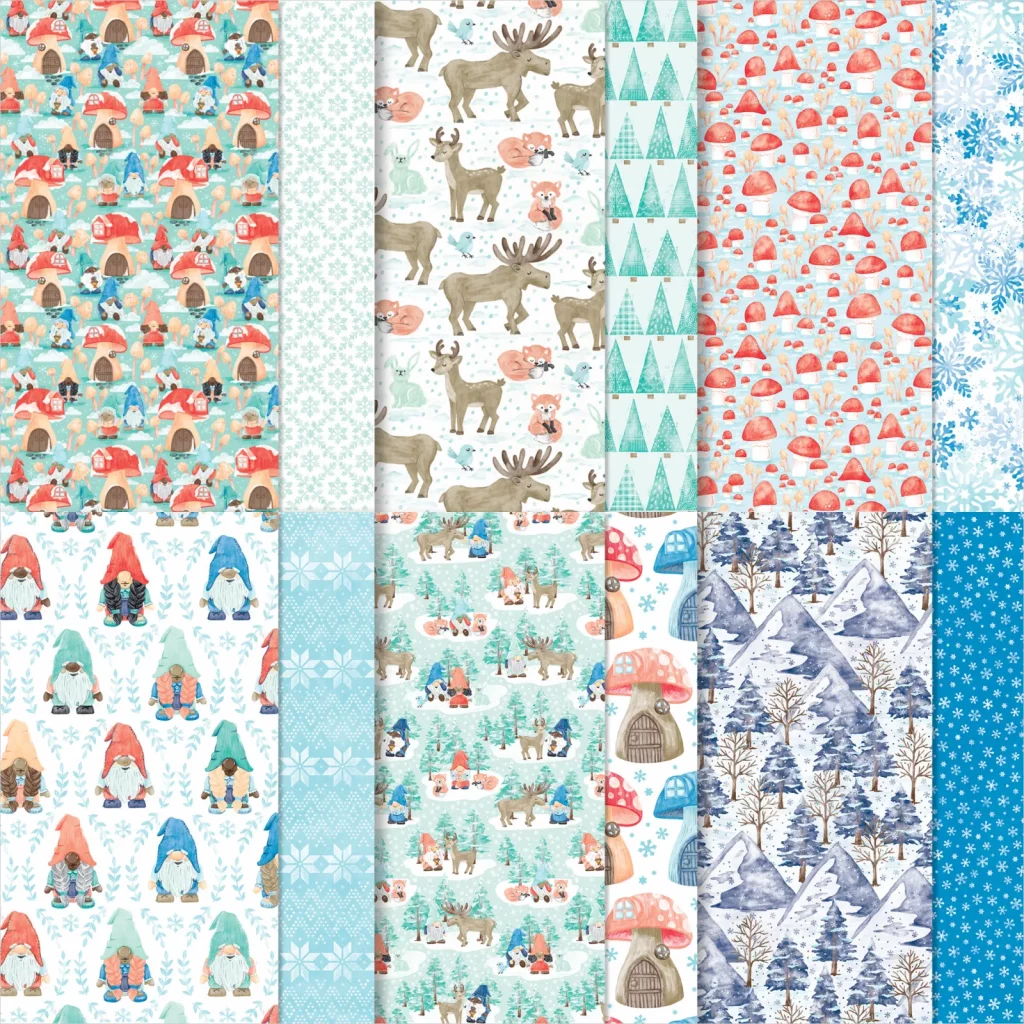
Do you ever love the “B side” patterns more than the “A side” patterns in a Designer Series Paper pack? I especially love the “B side” patterns of the Storybook Gnomes DSP – it is full of beautiful snowflake and tree patterns in soft blues, aquas and greens.
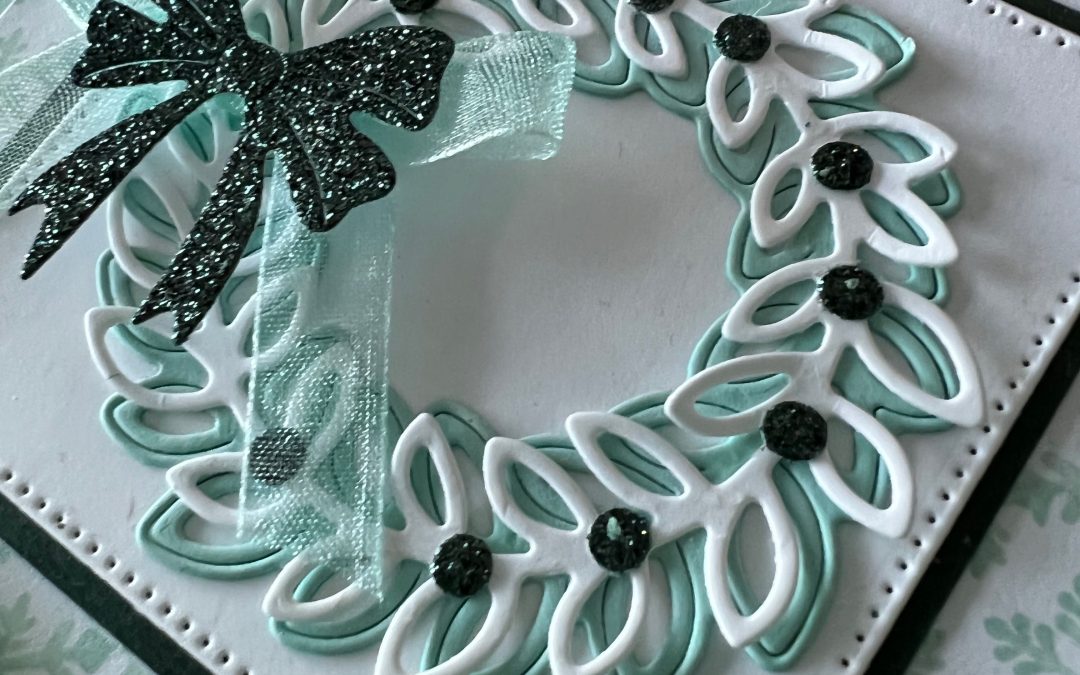
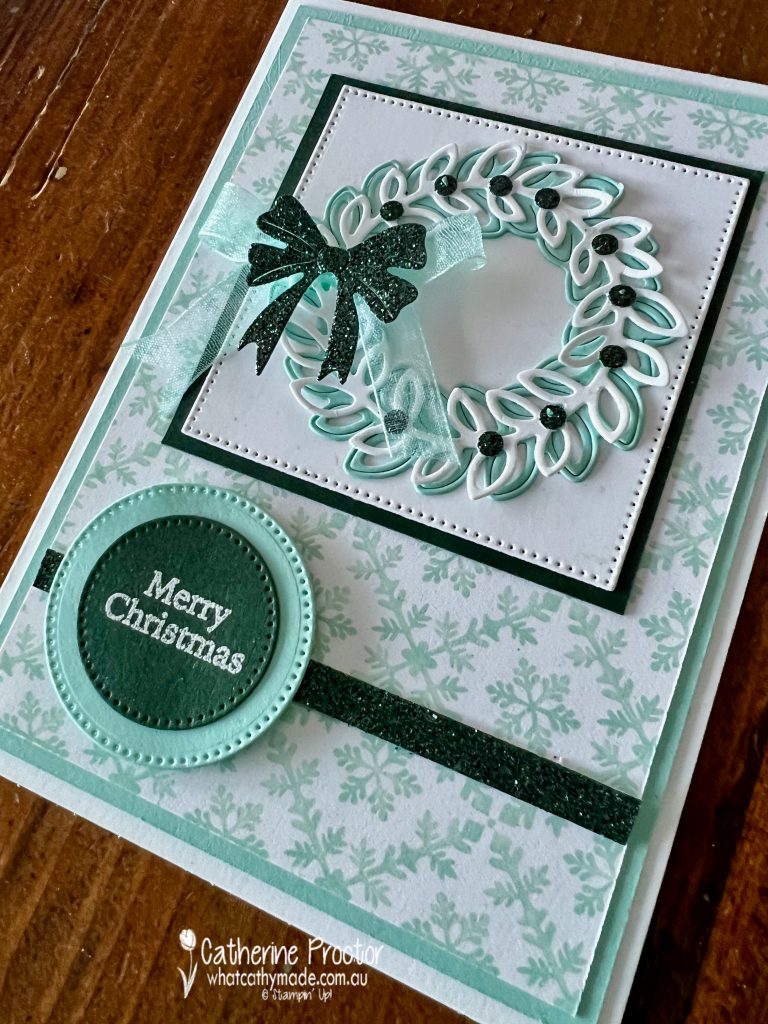
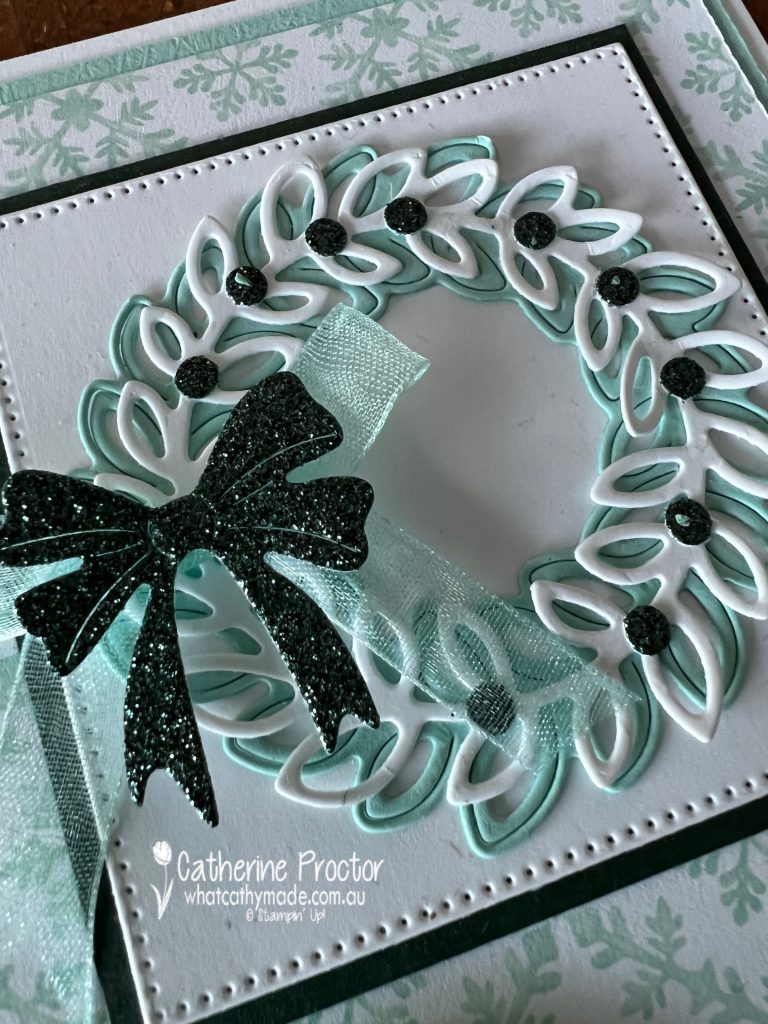
My card tonight was inspired by the Pool Party snowflake pattern in the Storybook Gnomes DSP so I decided to pair it with the Evening Evergreen Glimmer Specialty Paper to create a Christmas wreath card.
Pool Party and Evening Evergreen work so well together I decided not to add any more colours to this colour combination.
My favourite die in the Country Wreaths die is this elegant double bow die. I’ve layered it on top of a Pool Party Sheer ribbon bow for extra dimension and impact.
The Evening Evergreen “berries” on the wreath are created using the Dots & Spots Die to die cut out the Evening Evergreen Glimmer Specialty Paper. This die is great for creating your own embellishments using specialty papers.
I also added a strip of this gorgeous Evening Evergreen Glimmer Specialty Paper underneath the sentiment which is stamped in Versamark ink, white heat embossed and die cut out with the Stylish Shapes dies.
Now it’s time to hop on over to our next participant, the lovely Tina Gillespie – I can’t wait to see what Tina has created today!
If at any time you find a broken link, you can find the complete list of all participants on Sharon’s blog.
Welcome to week twenty two of our Art With Heart 2022-23 Colour Creations blog hop!
This is a weekly blog hop where we showcase the stunning range of Stampin’ Up! colours in alphabetical order over 12 months and this week we are featuring Garden Green, from the regal family.
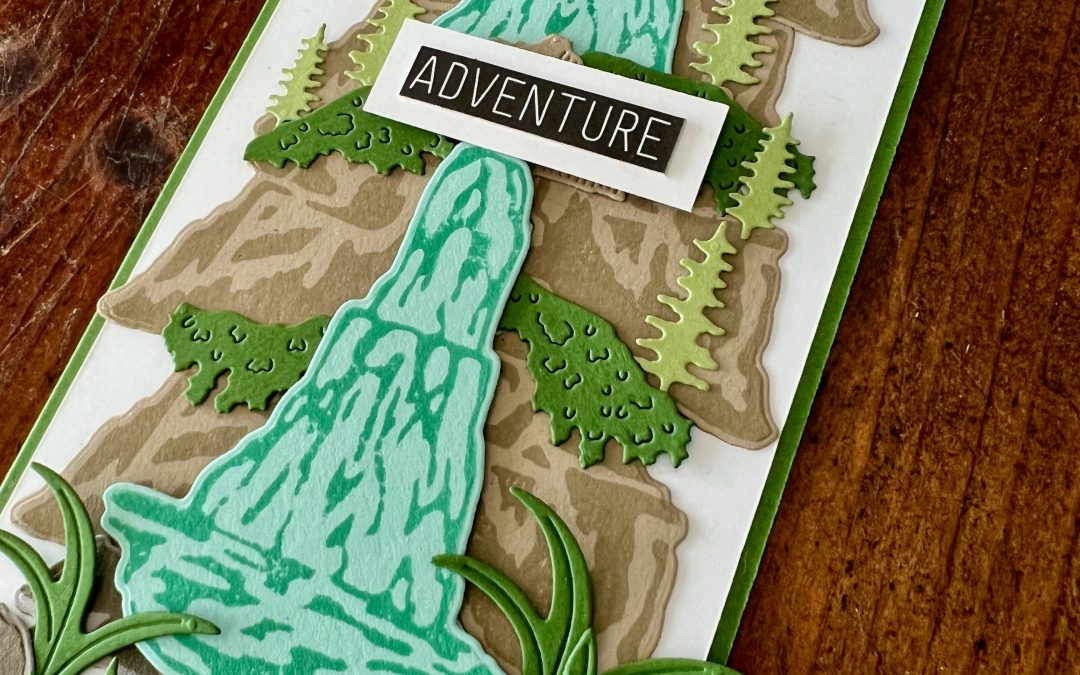
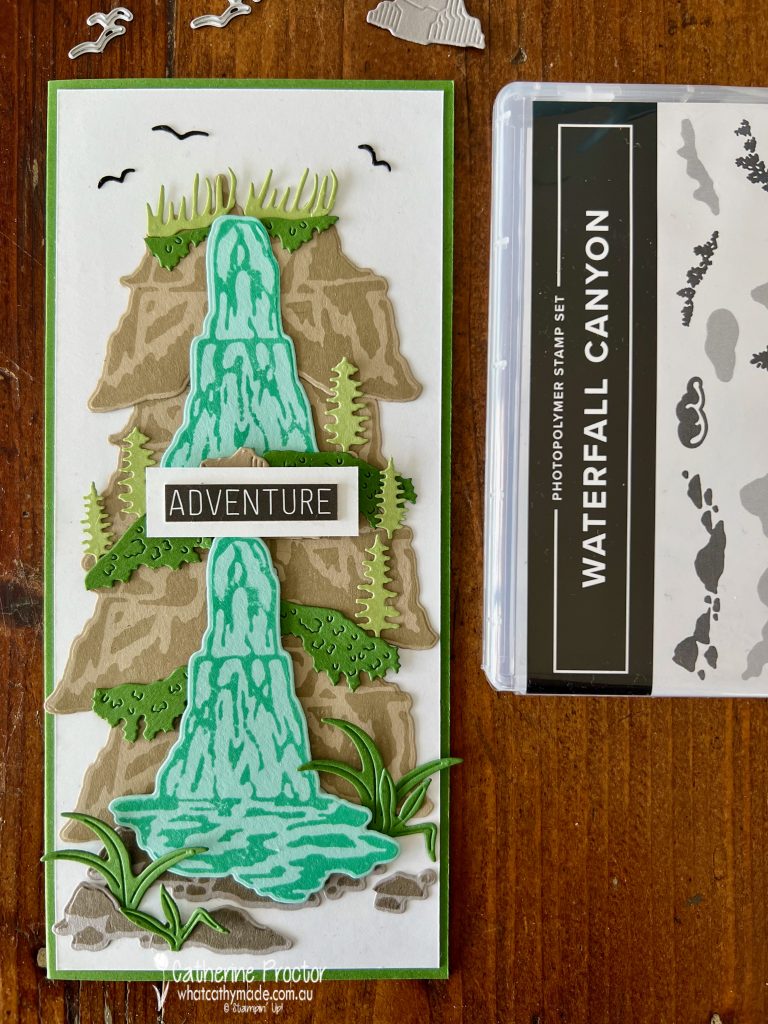
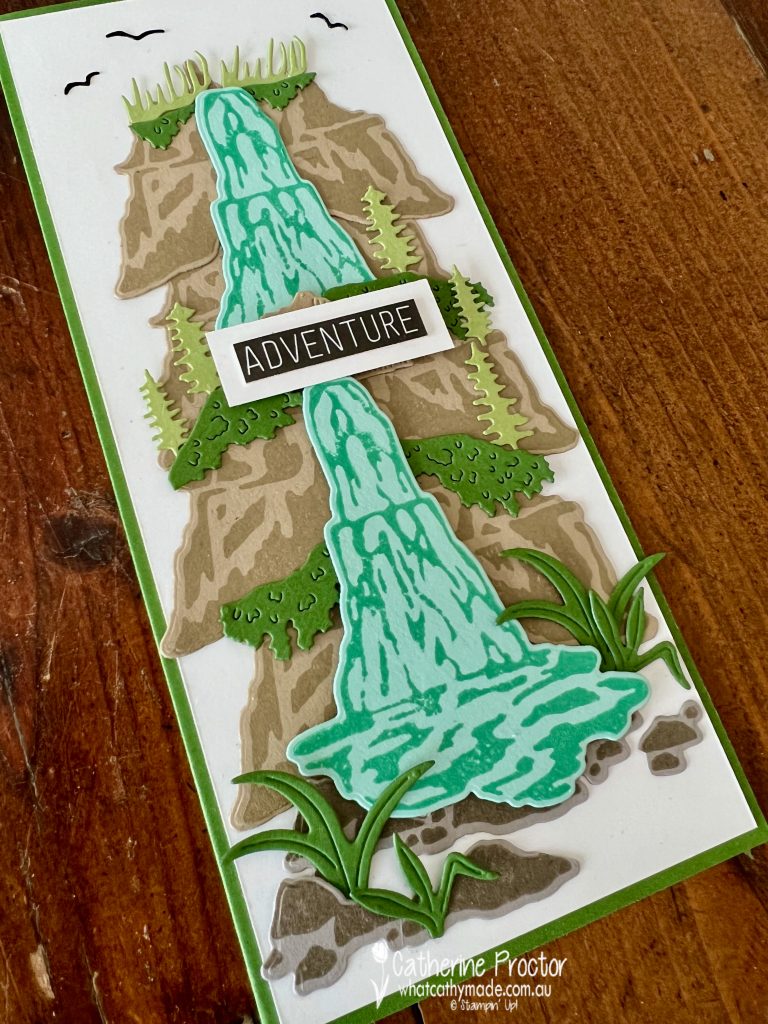
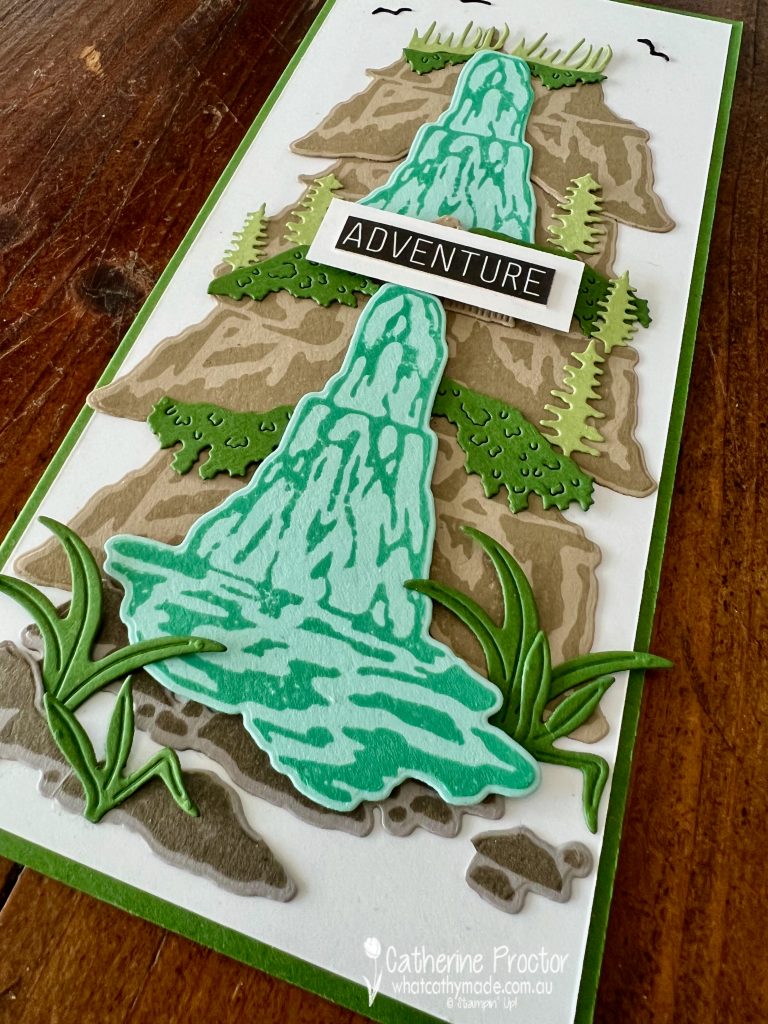
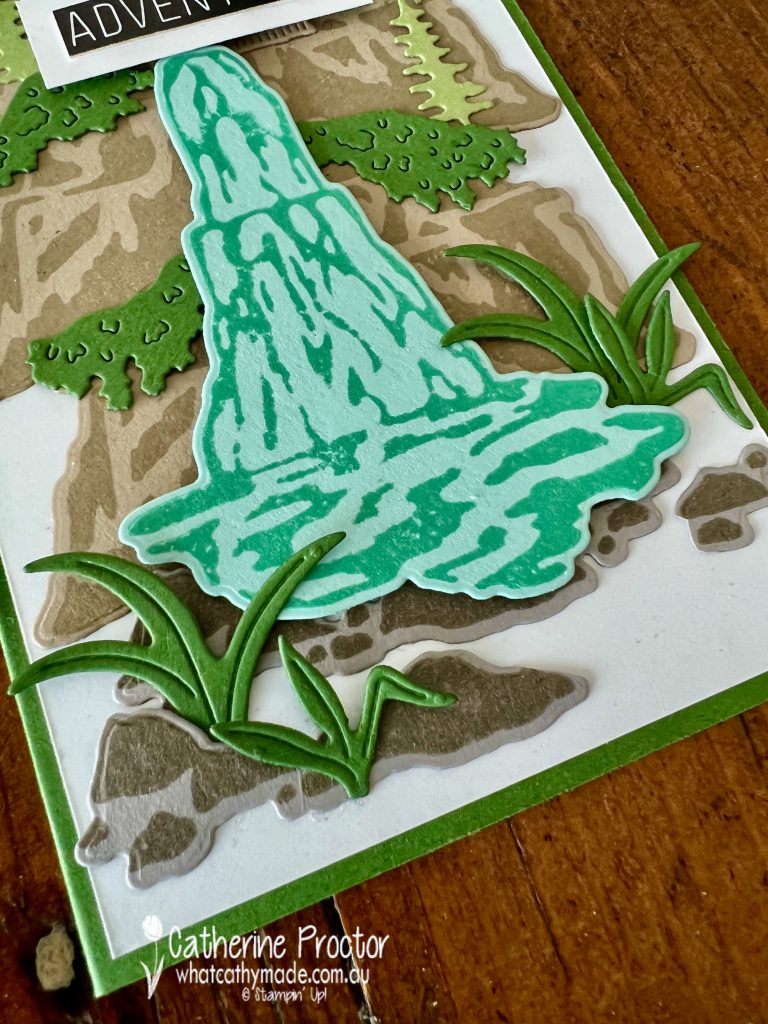
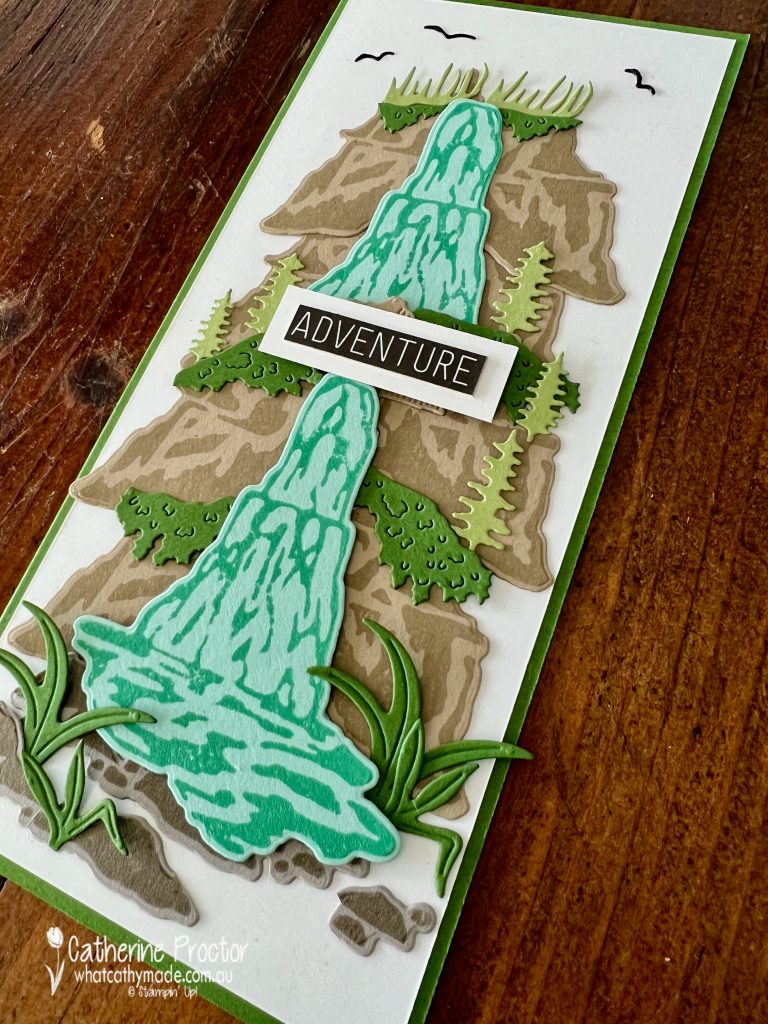
I love making scene cards, so I’ve had my eye on the Waterfall Canyon stamp set for a long time now. When the coordinating Waterfalls dies become available this month as part of the Perfect Partners Promotion, I just couldn’t resist this bundle.
I’ve made a slimline card so I could make an extra long waterfall. The card base base is Garden Green card stock measuring 21 x 28 cm.
Garden Green works very well with so many other colours – today I’ve paired it with colours that work for a nature scene: Crumb Cake, Pool Party, Coastal Cabana, Gray Granite, Pear Pizzazz, Basic Black and Basic White.
The “Adventure” sentiment is not a stamp – it is a sticker from the “Today is the Day” Memories & More card pack, adhered to a scrap of Basic White card stock.
The birds at the top of the card are not stamps either – they are tiny dies from the Waterfall dies.
I love these Waterfall dies, especially the ones that I’ve used for the Gray Granite rocks, the Garden Green grass pieces at the bottom of the waterfall and the Garden Green foliage that sits on the rocks.
The size of the grass dies gives an instant sense of perspective with the Pear Pizzazz tree dies being so much smaller.
I only realised after photographing this that I’ve actually adhered the Crumb Cake rock pieces upside on my card front, LOL! Hopefully it still works?
Now it’s time to hop on over to our next participant, the lovely Tina Gillespie – I can’t wait to see what Tina has made this week!
If at any time you find a broken link, you can find the complete list of all participants below.
Welcome to week thirteen of the Heart Of Christmas Blog Hop!
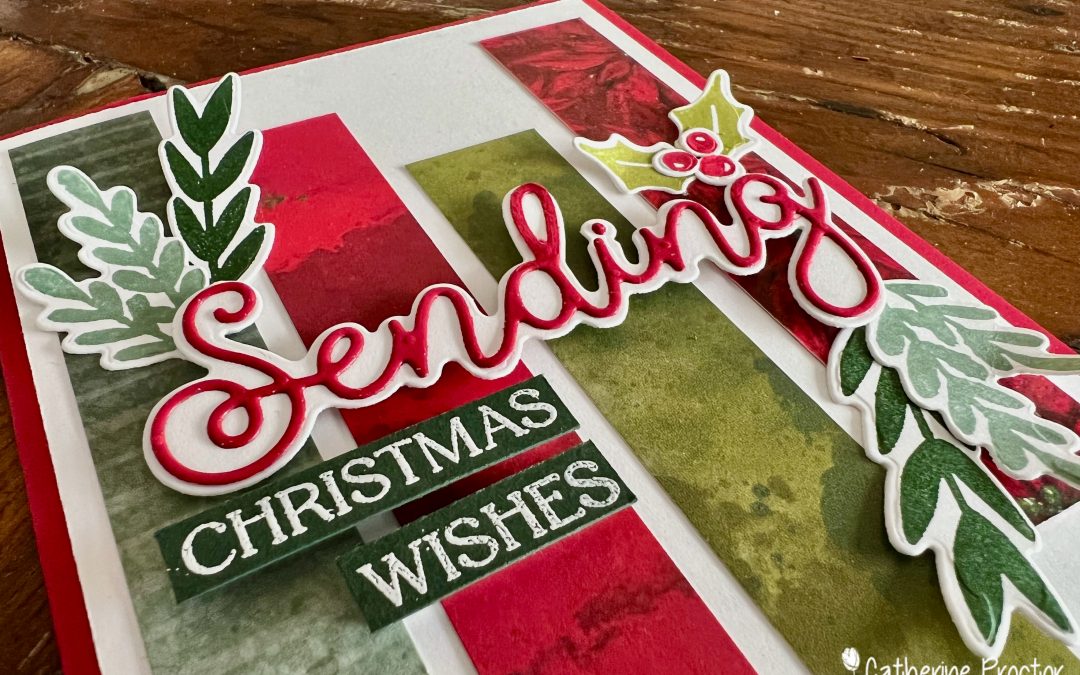
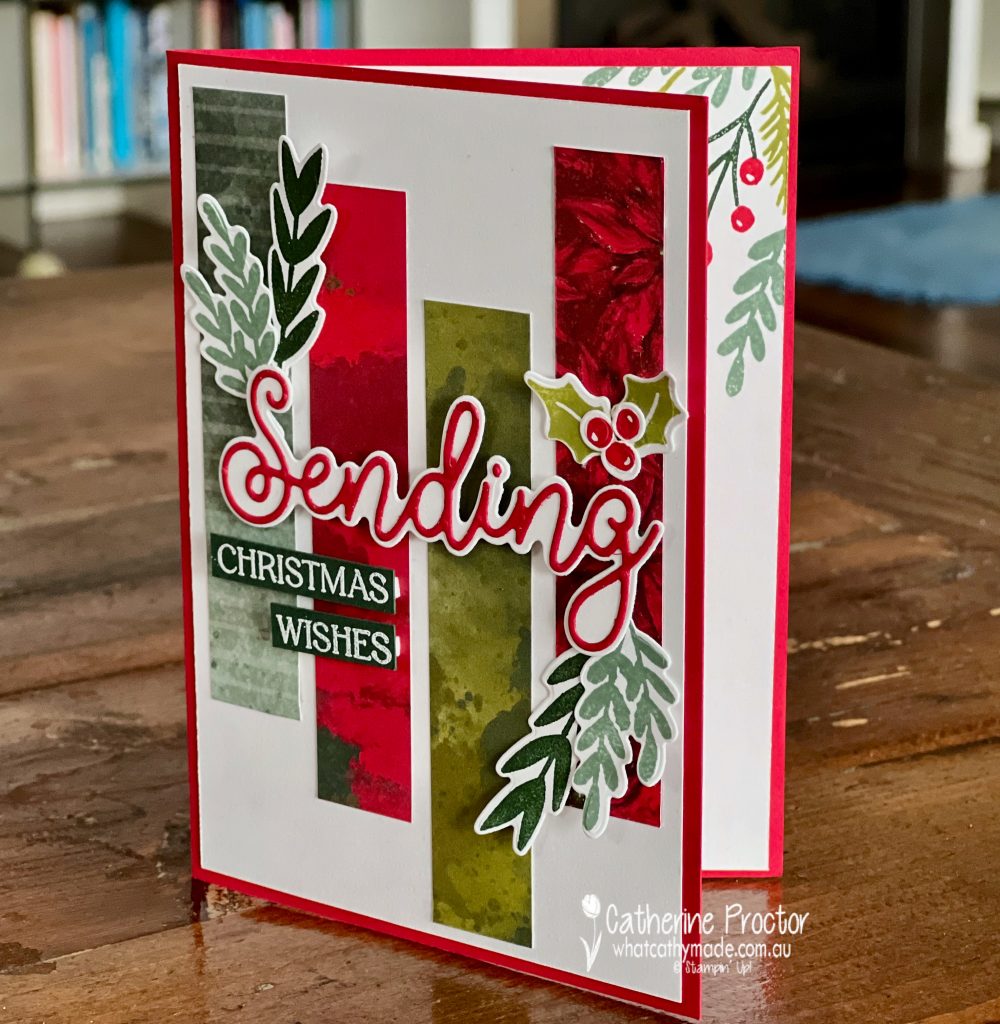
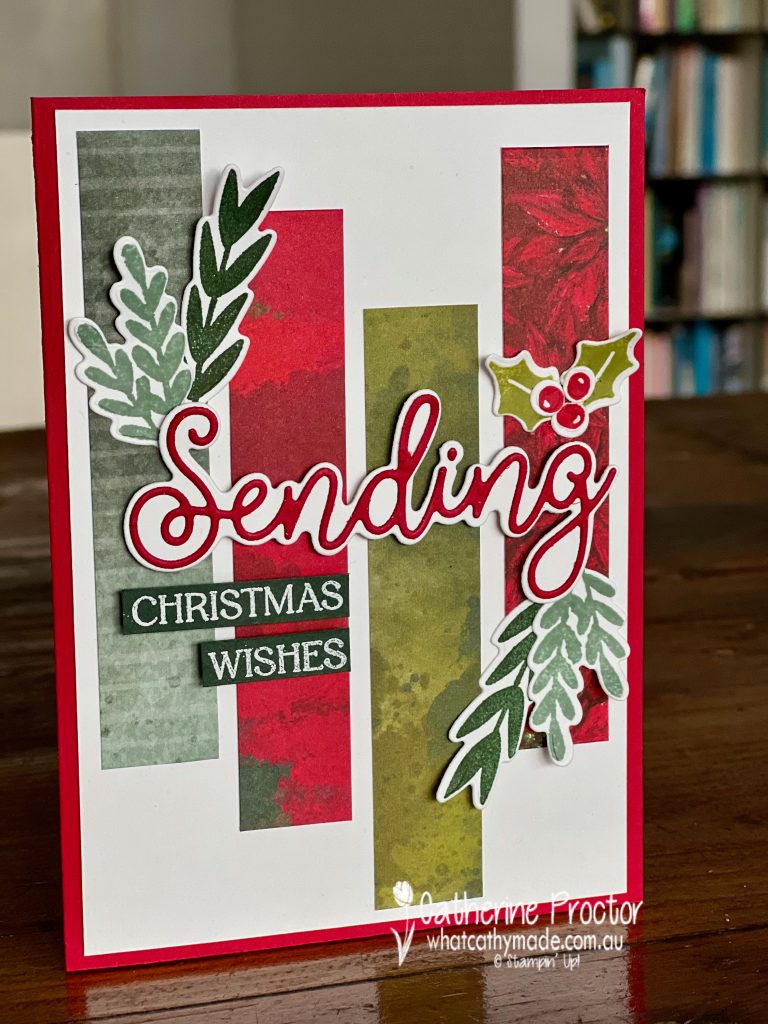
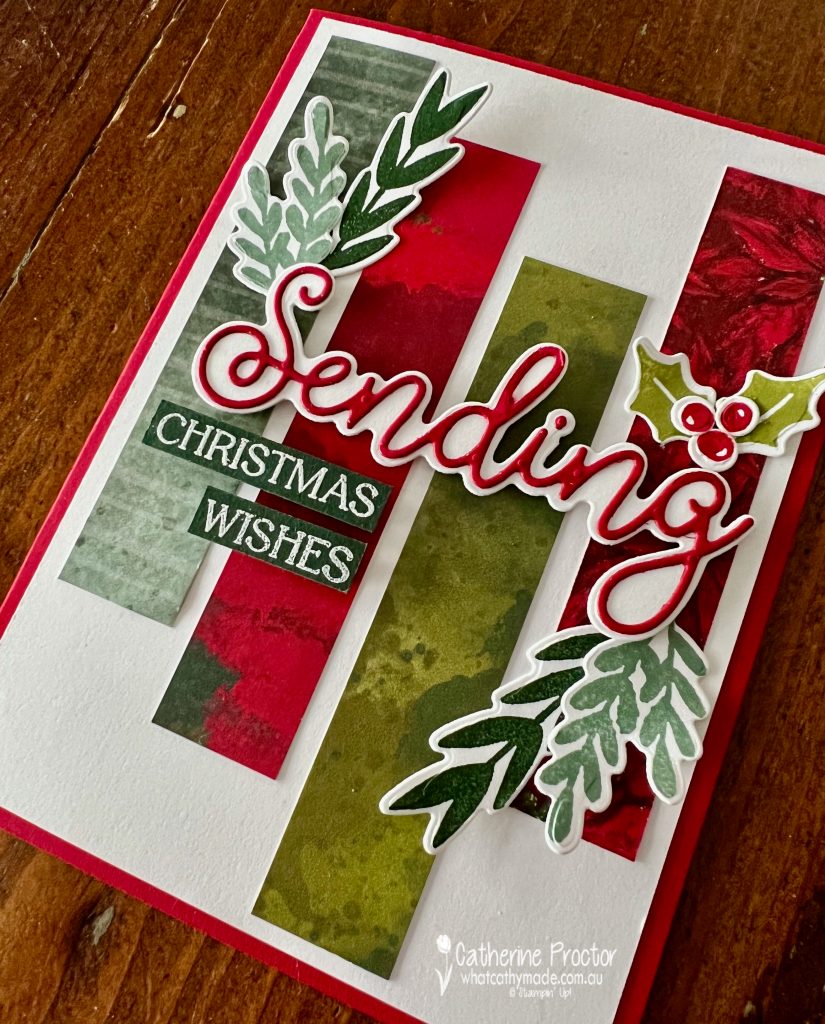
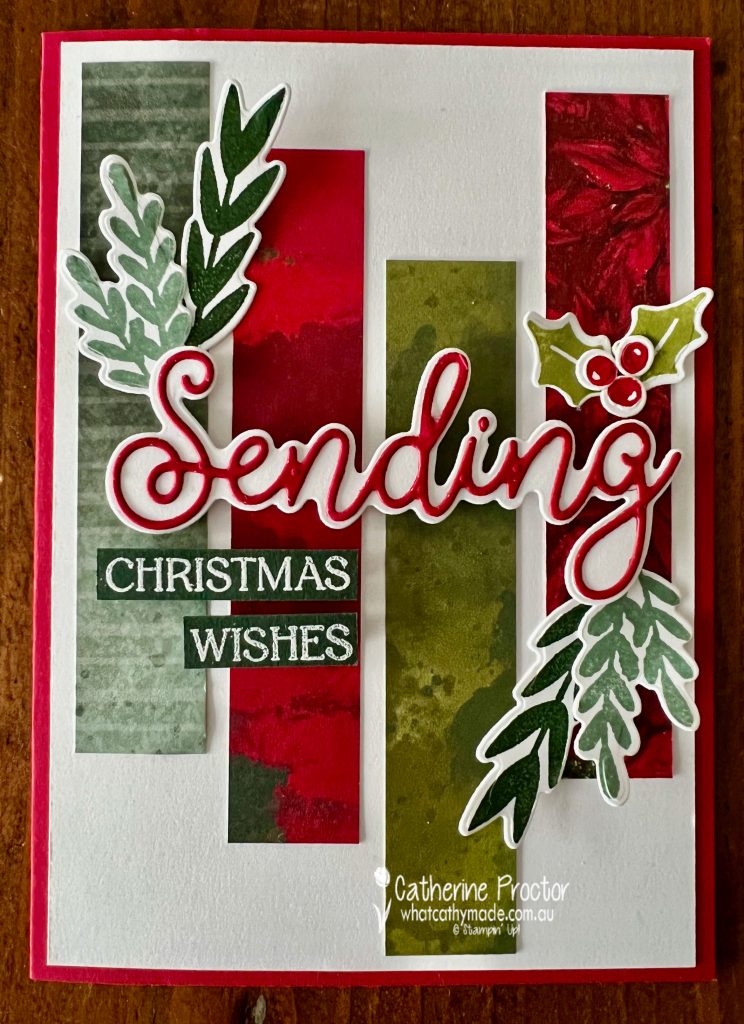
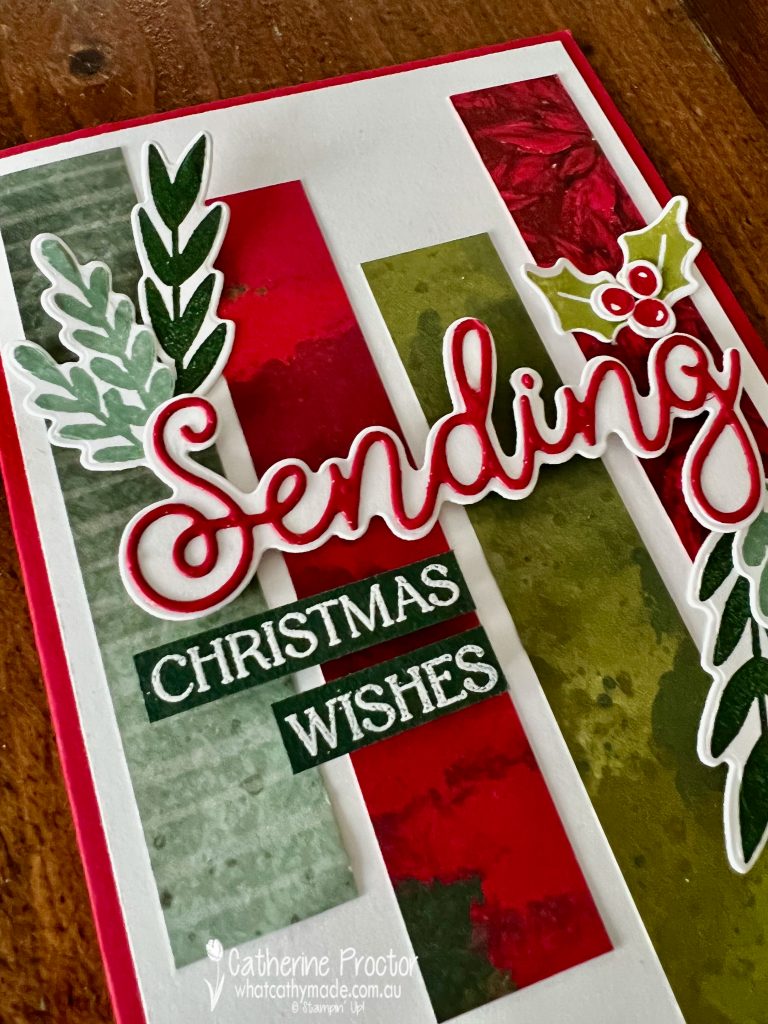
Wondering how to use up your leftover strips of designer series paper or how to incorporate more than one DSP pattern on your card front? This simple layout is very effective and it can be made with virtually any DSP.
The trick to stop the background DSP competing with the foreground elements is to use a DSP that has a smaller pattern or more solid colours.
I originally intended to use the Painted Christmas DSP for this card, however I felt that the Boughs of Holly DSP was a better match as it really allowed the sentiment and foliage pieces to shine.
The foliage is stamped and die cut using the Christmas Banners Bundle in colours selected to match the Boughs of Holly DSP: Real Red, Evening Evergreen, Soft Succulent, Old Olive (stamped off) and Basic White.
Stampin' Up! Boughs of Holly DSP colour combination
I love the versatility and impact of word dies. This layered “sending” sentiment is from the Sending Smiles dies and I reach for a lot. Don’t forget to use an adhesive sheet for the top word layer – it turns the word into a repositionable sticker and prevents any adhesive mess.
There is no Christmas sentiment in the Sending Smiles bundle, so I used the “Christmas” and the “wishes” sentiment from the Christmas Banners Stamp Set, stamped in Versamark ink onto scraps of Evening Evergreen cardstock and then white heat embossed.
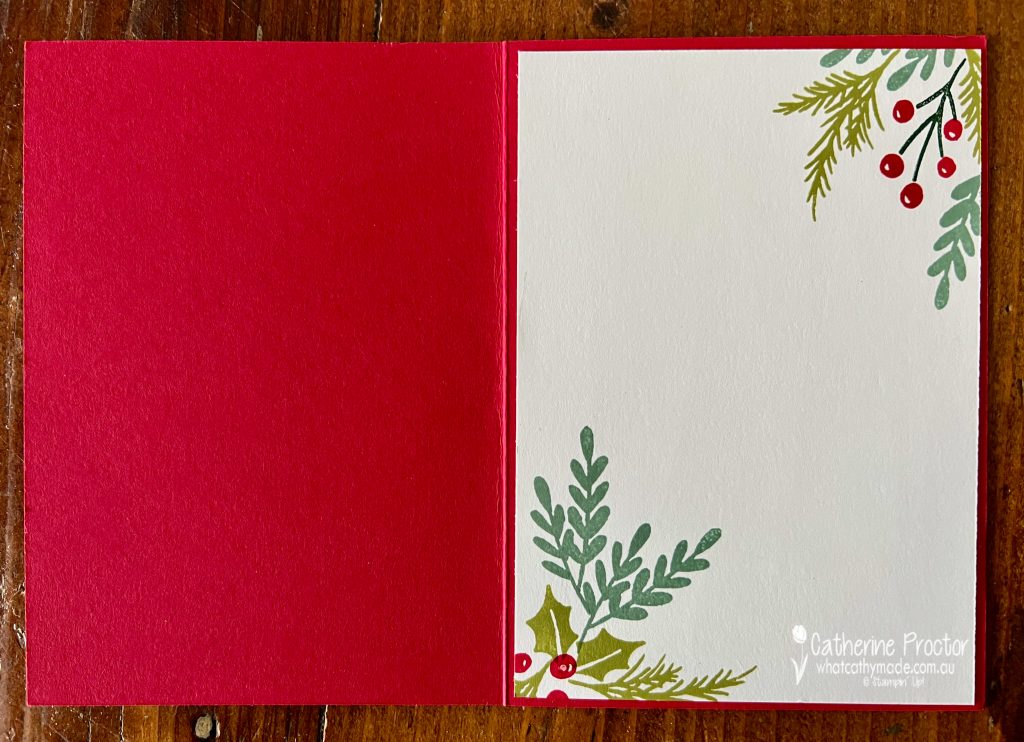
I’ve stamped some more of this gorgeous foliage from the Christmas Banners stamp set inside the card too.
Now it’s time to hop on over to our next participant, the lovely Rosa Leyden– I can’t wait to see what Rosa has created today!
If at any time you find a broken link, you can find the complete list of all participants on Sharon’s blog.
If you live in Australia, you can find and purchase these products in my Stampin’ Up! Online Store or by clicking on the links below.
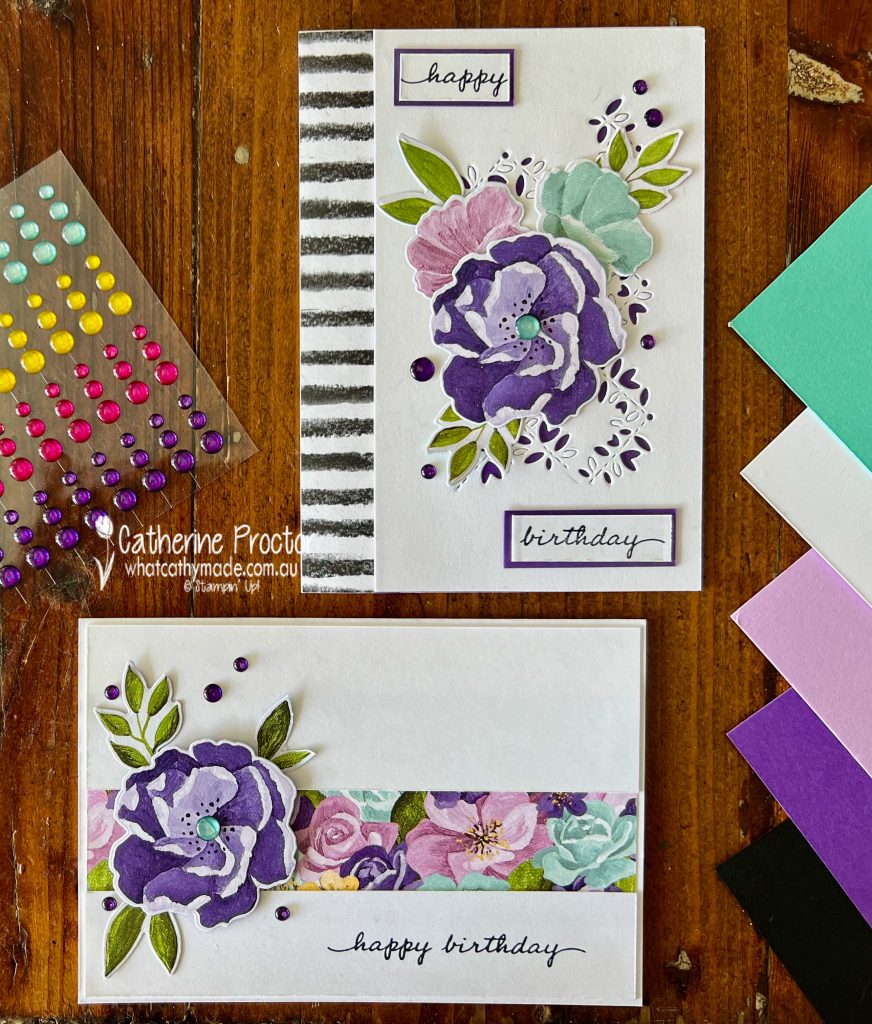
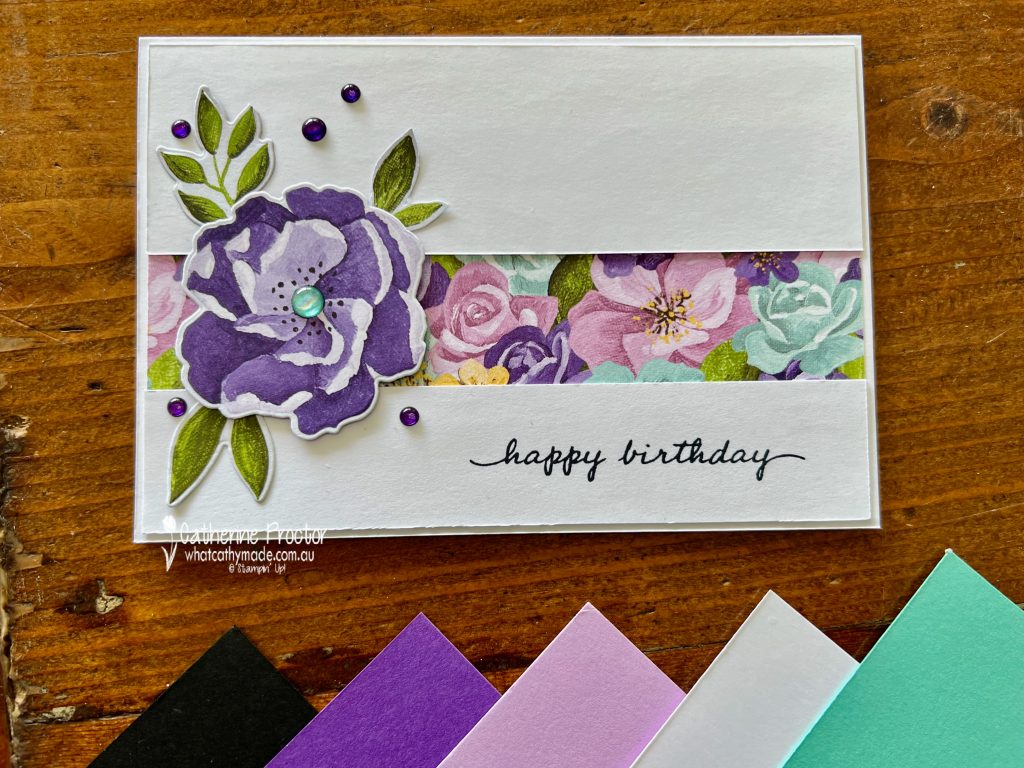
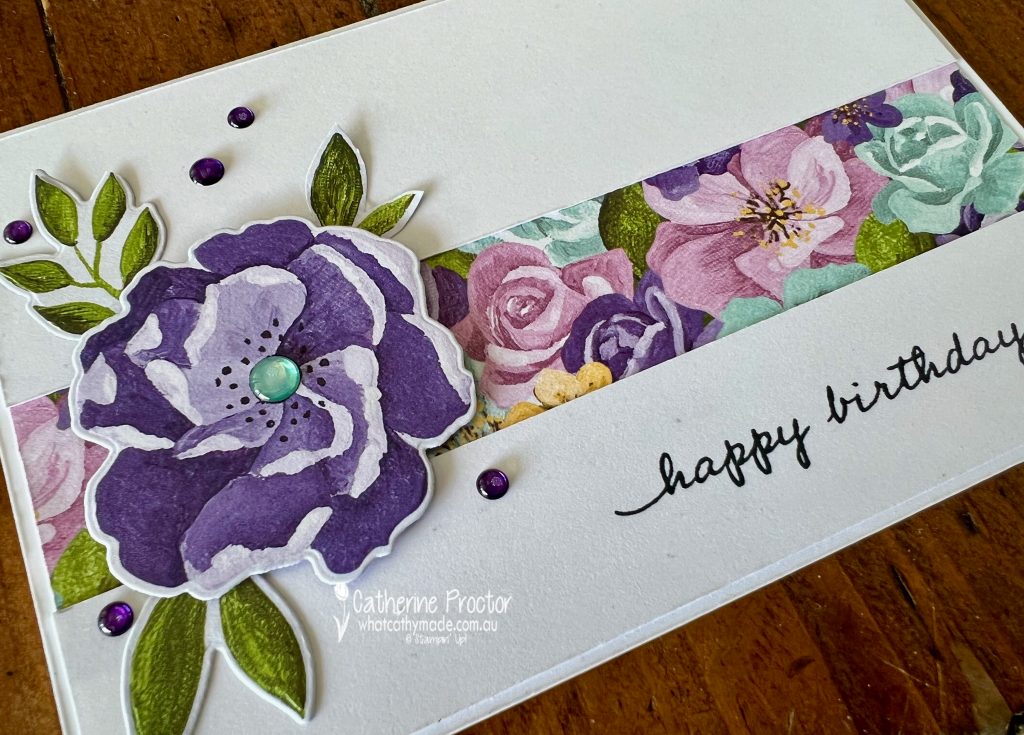
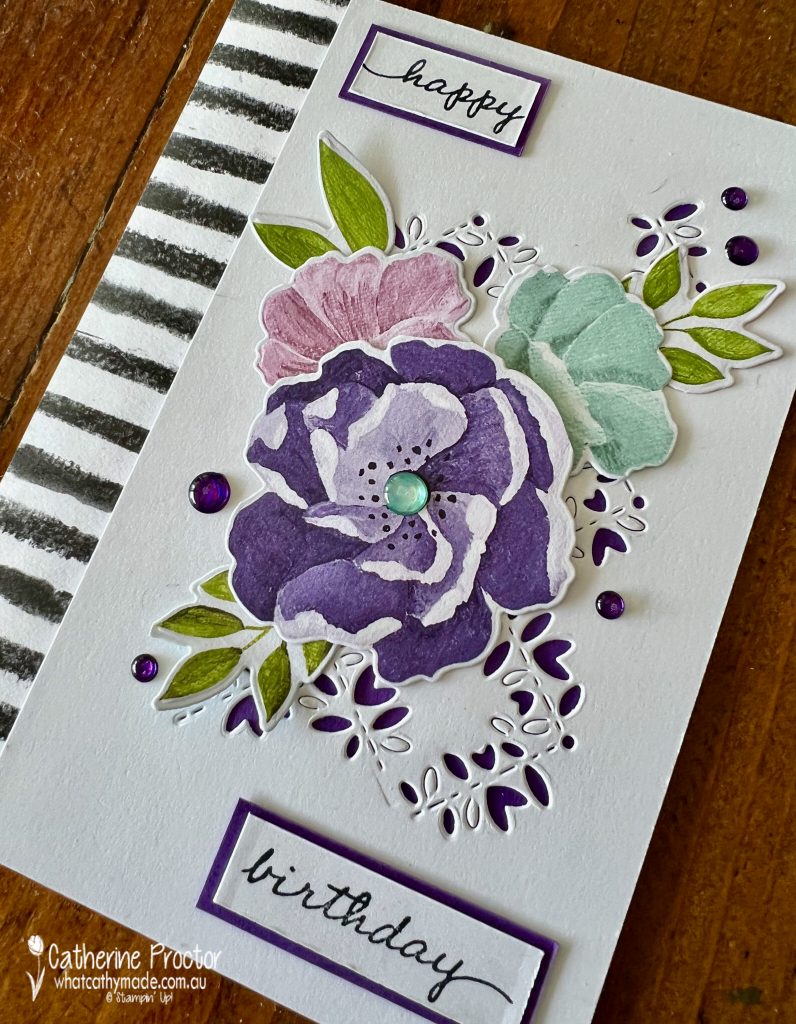
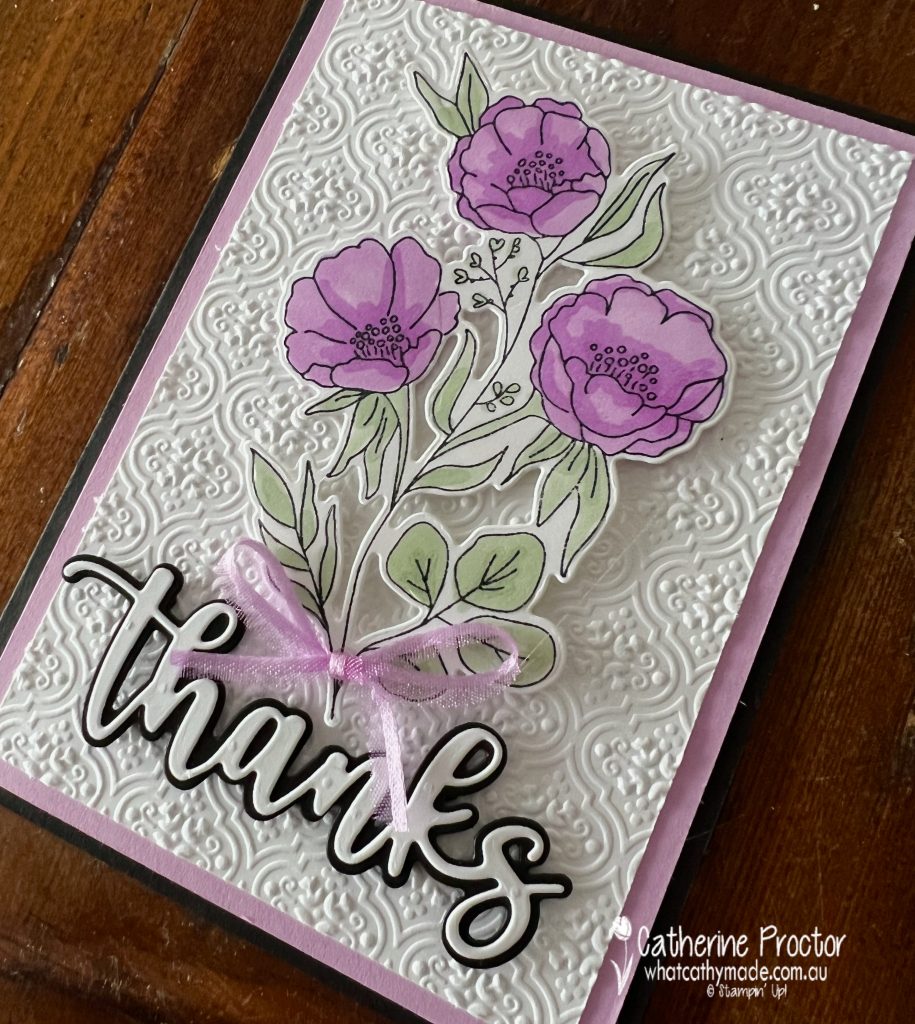
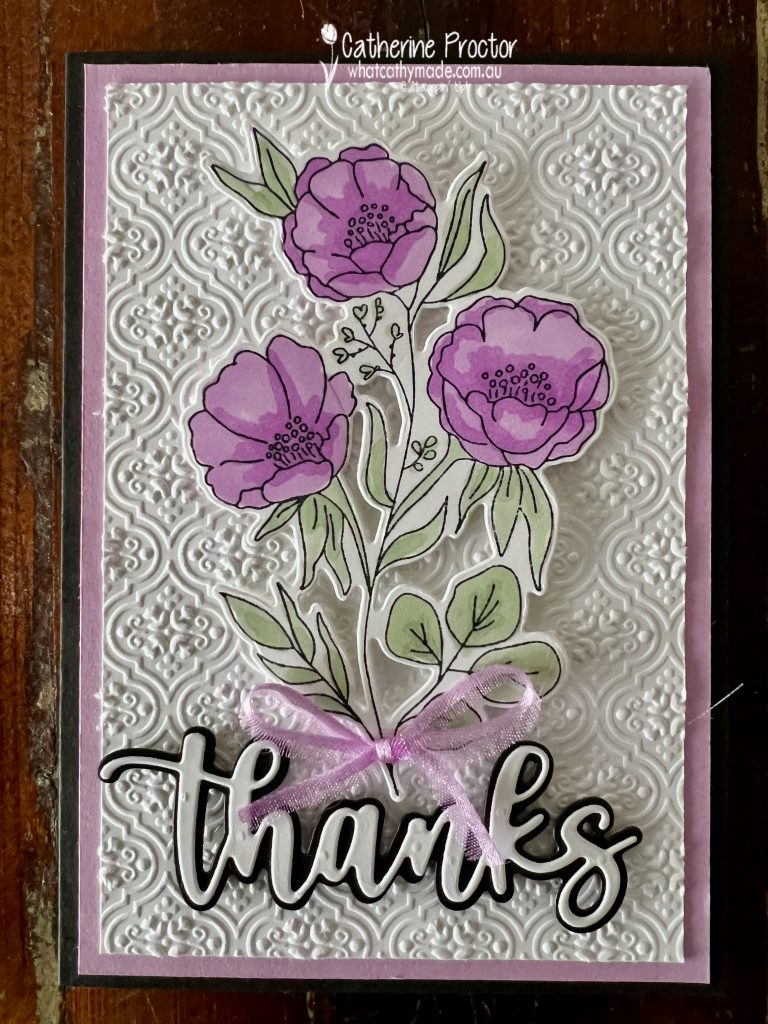
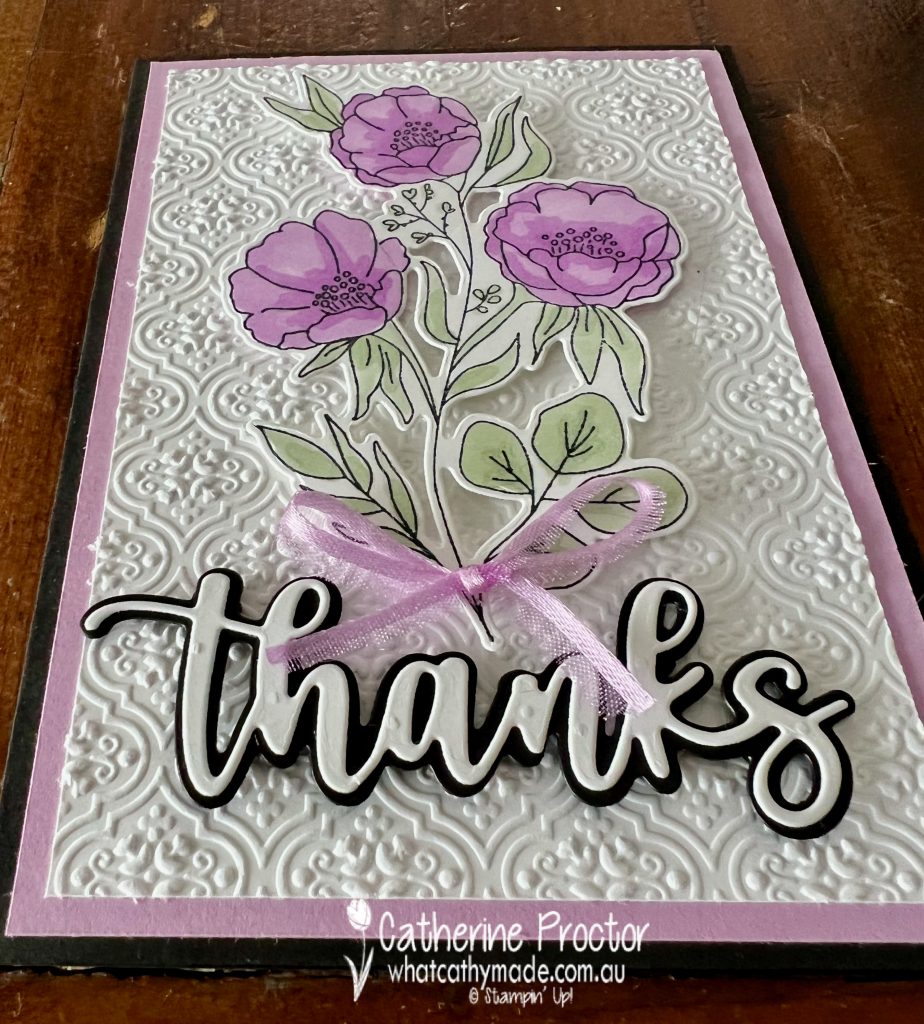
Welcome to week twenty one of our Art With Heart 2022-23 Colour Creations blog hop!
This is a weekly blog hop where we showcase the stunning range of Stampin’ Up! colours in alphabetical order over 12 months and this week we are featuring Fresh Freesia, a 2021-23 In Colour.
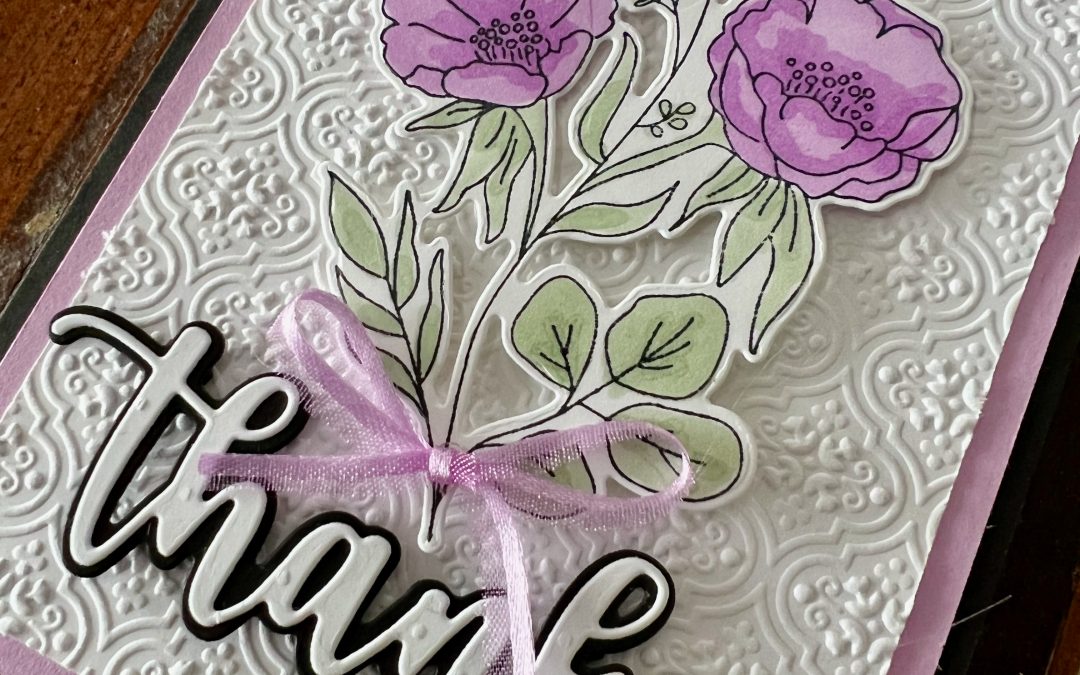
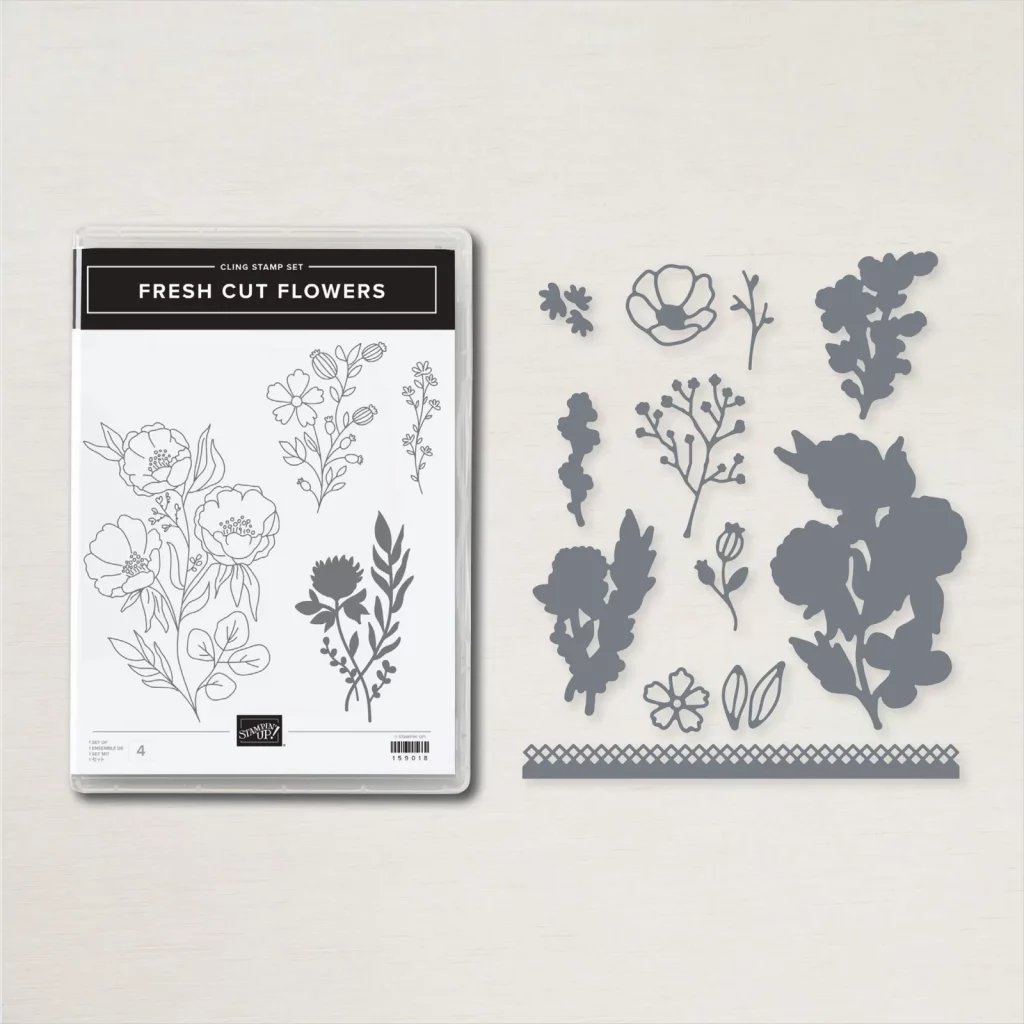
Tonight’s card features another new die set from the Perfect Partners Promotion – the Fresh Cut Stems dies that coordinate with the Fresh Cut Flowers stamp set.
There are so many gorgeous dies in the Fresh Cut Stems dies, however I decided to use just the ones that die cut the stamped images for my “thanks” card.
This largest image is simply perfect on its own to fill the front of a card.
Fresh Fressia works with any of the greens – for this card it has been paired with Soft Sea Foam, the lightest of the greens in the Stampin’ Up! colour range.
I’ve used Stampin’ Up! blends to colour the delicate line images in the Fresh Cut Flowers stamp set, however you could use any colouring method that you prefer.
The “Thanks” layered sentiment is from the Amazing Thanks dies. Don’t forget to use your adhesive sheet for the top layer before die cutting the top word.
Now it’s time to hop on over to our next participant, the lovely Andrea Sargent – I can’t wait to see what Andrea has made this week!
If at any time you find a broken link, you can find the complete list of all participants below.


")


")
")


 Designer Series Paper")


")
")


 Open Weave Ribbon")


