Welcome to week six of our Art With Heart 2022-23 Colour Creations blog hop! This is a weekly blog hop where we showcase the stunning range of Stampin’ Up! colours in alphabetical order over 12 months.
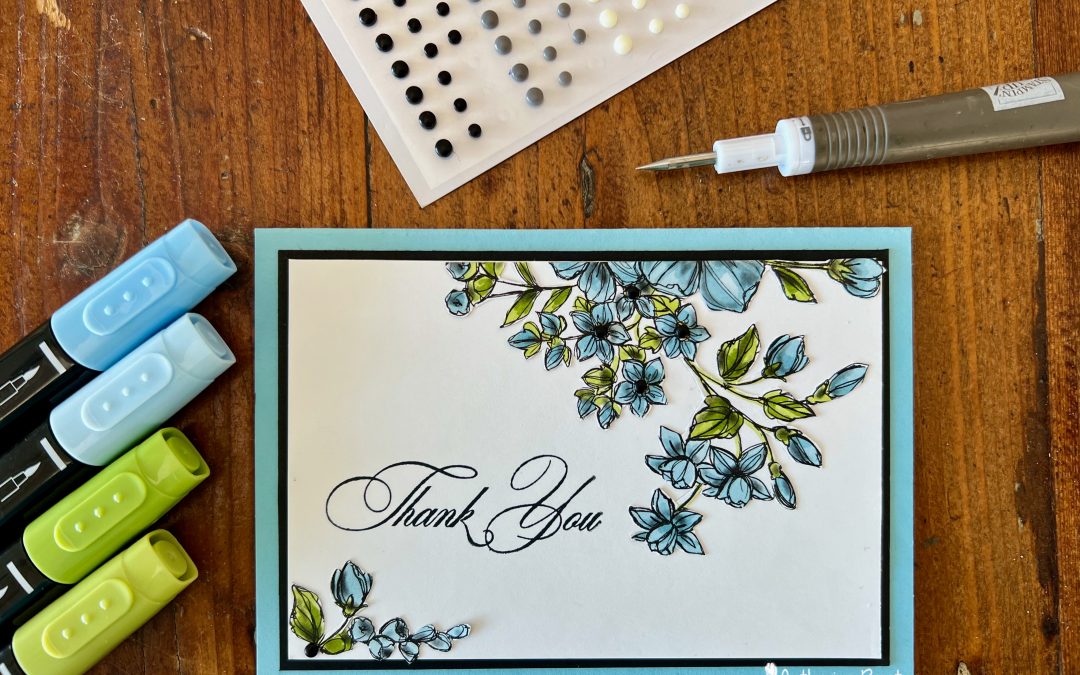
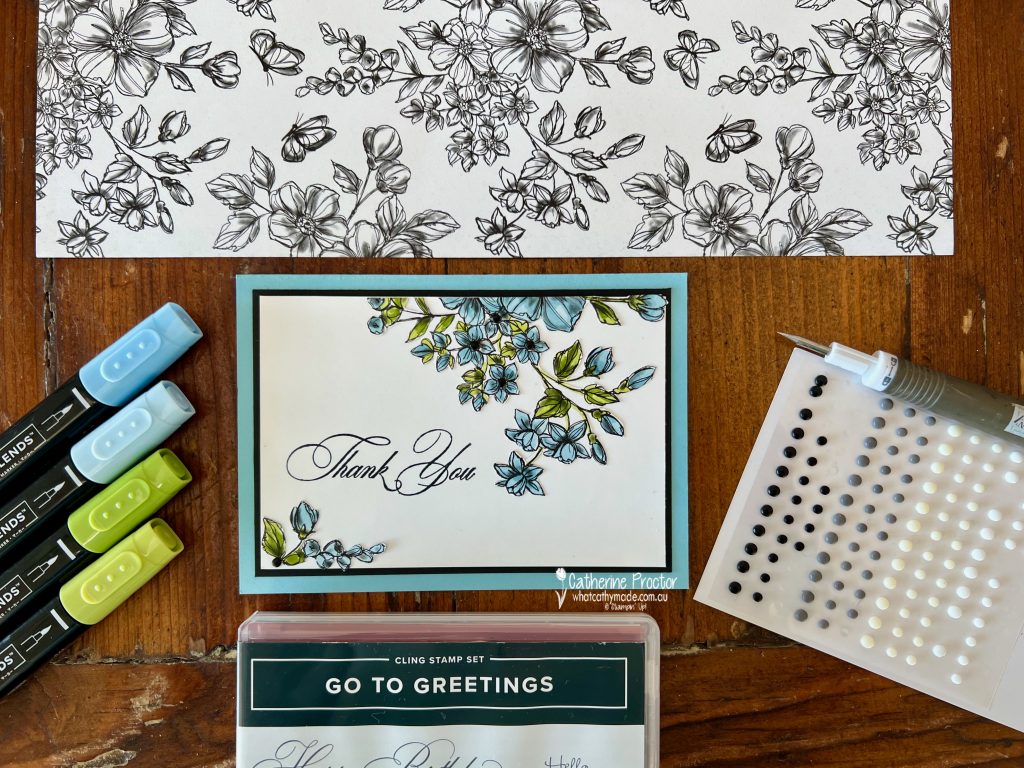
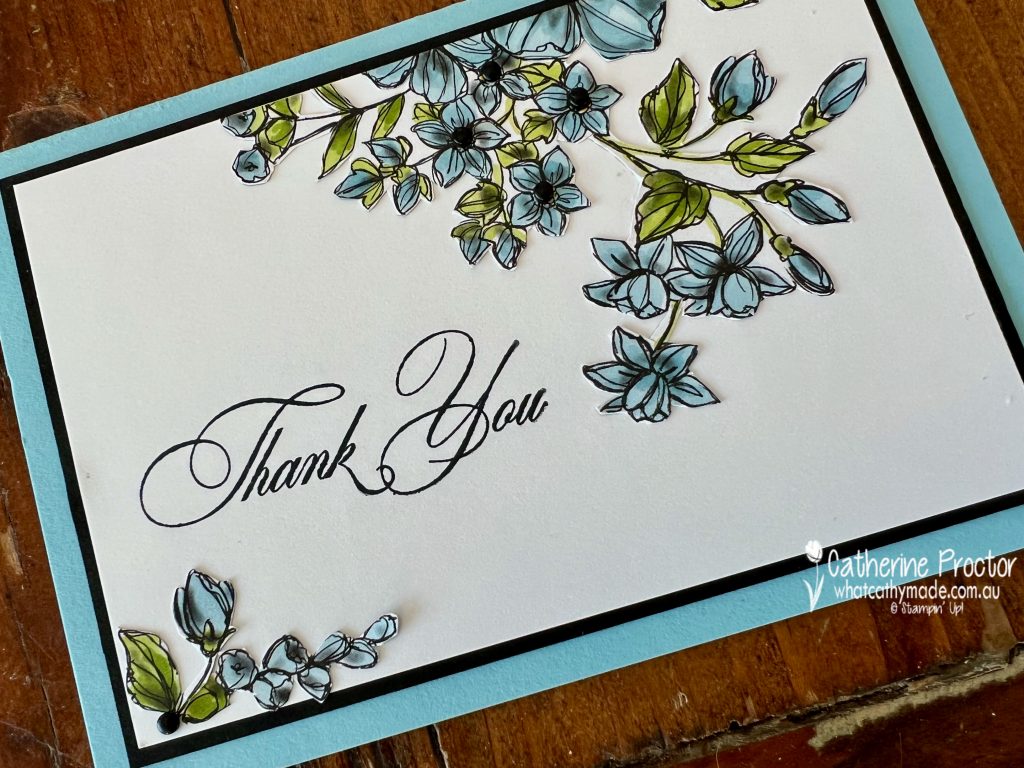
My card today has very little stamping as the beautiful flowers are actually a new black and white Designer Series Paper called Perfectly Penciled.
After colouring one of the floral sprays on the edge of the DSP using Balmy Blue and Granny Apple Green Stampin’ Blends, I fussy cut the flowers out with my paper snips and adhered them to a layer of Basic White cardstock using multipurpose glue.
The “Thank You” sentiment is from a lovely new sentiment stamp set called Go-To Greetings. I felt that the ornate, slightly old fashioned script looked like handwriting and matched the pretty blue floral sprays.
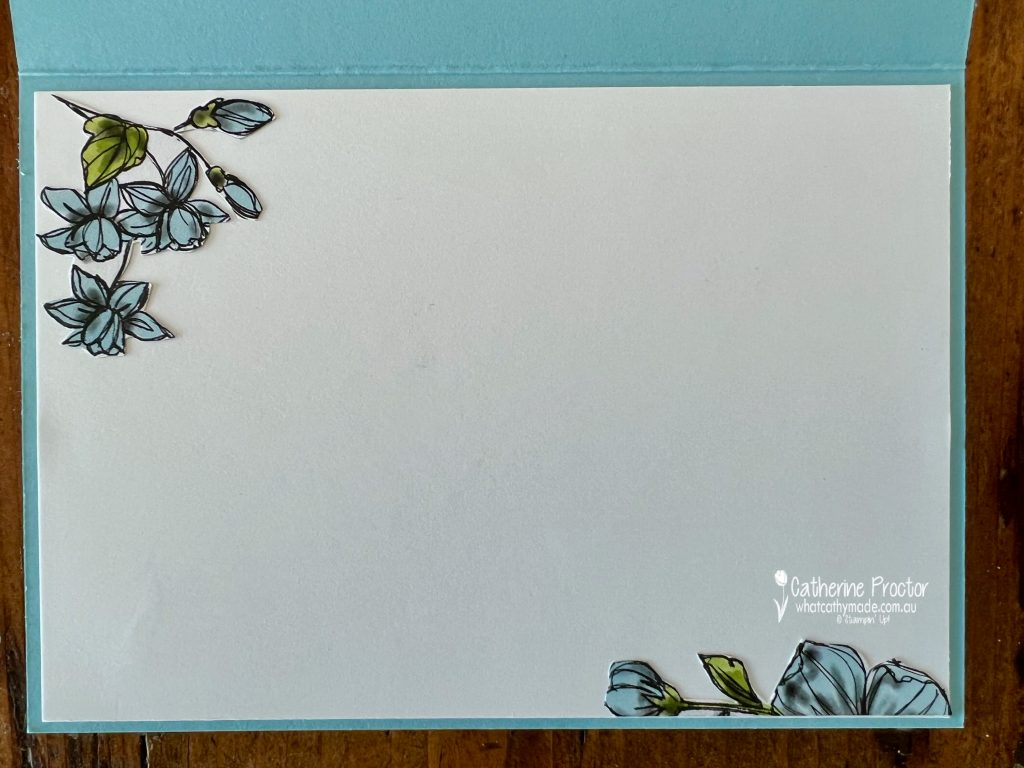
A couple of excess pieces of DSP adorn the inside of my card.
Now it’s time to hop on over to our next participant, the lovely Kate Morgan – I can’t wait to see what Kate has made this week!
If at any time you find a broken link, you can find the complete list of all participants below.
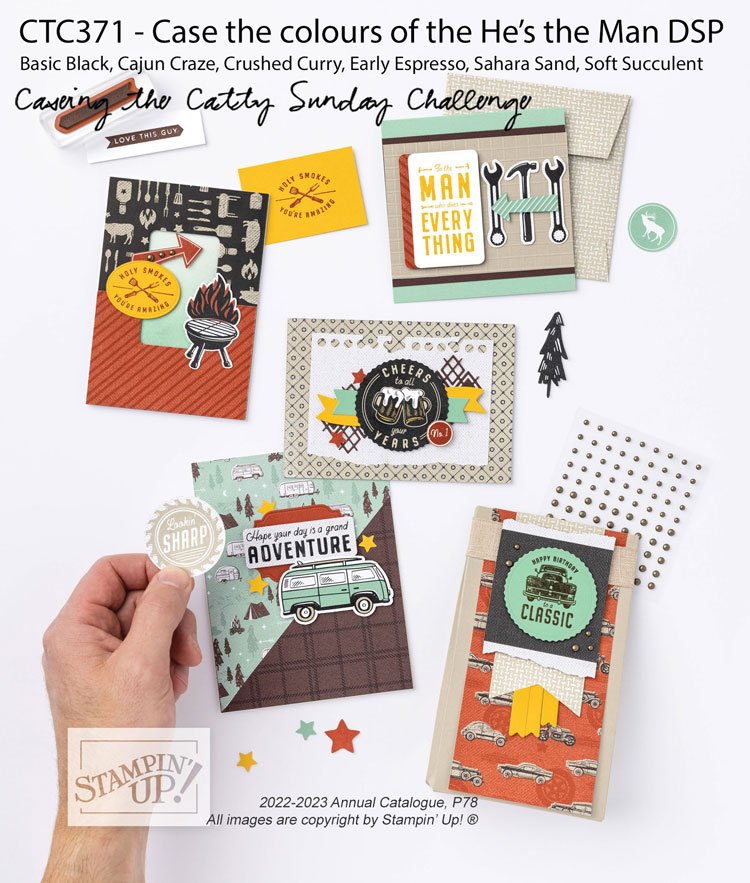
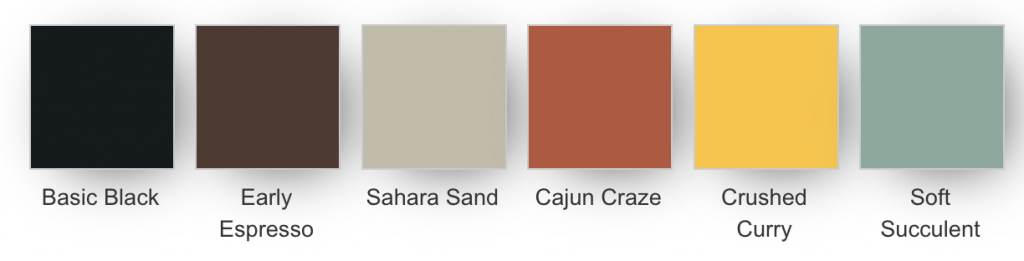
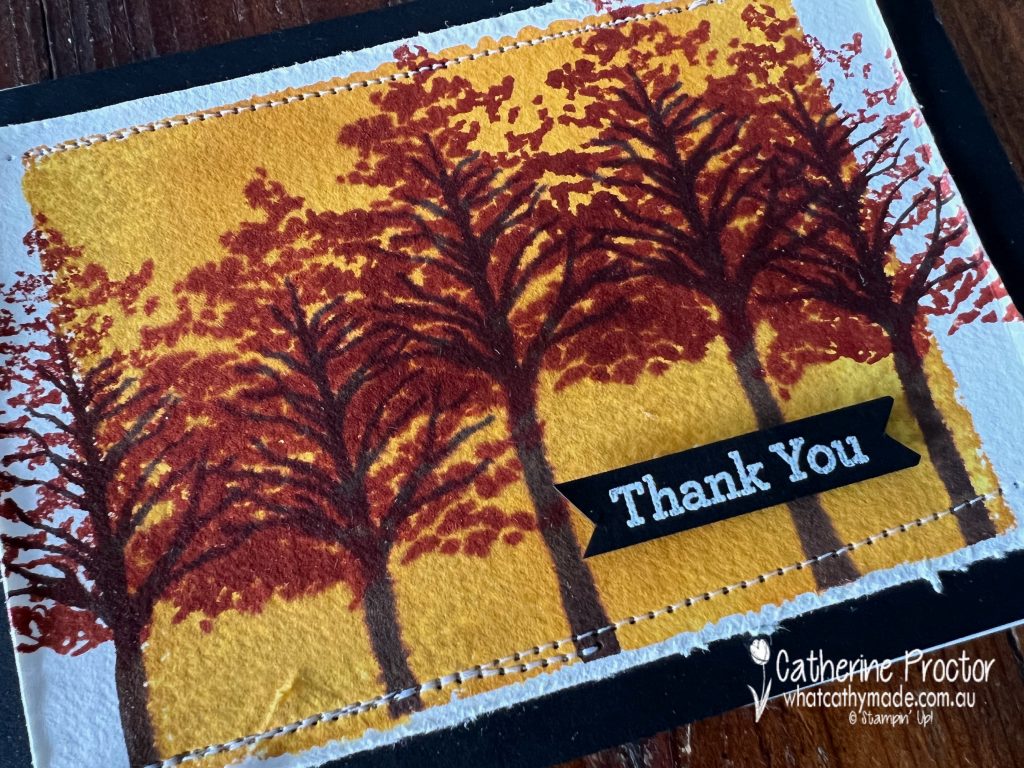
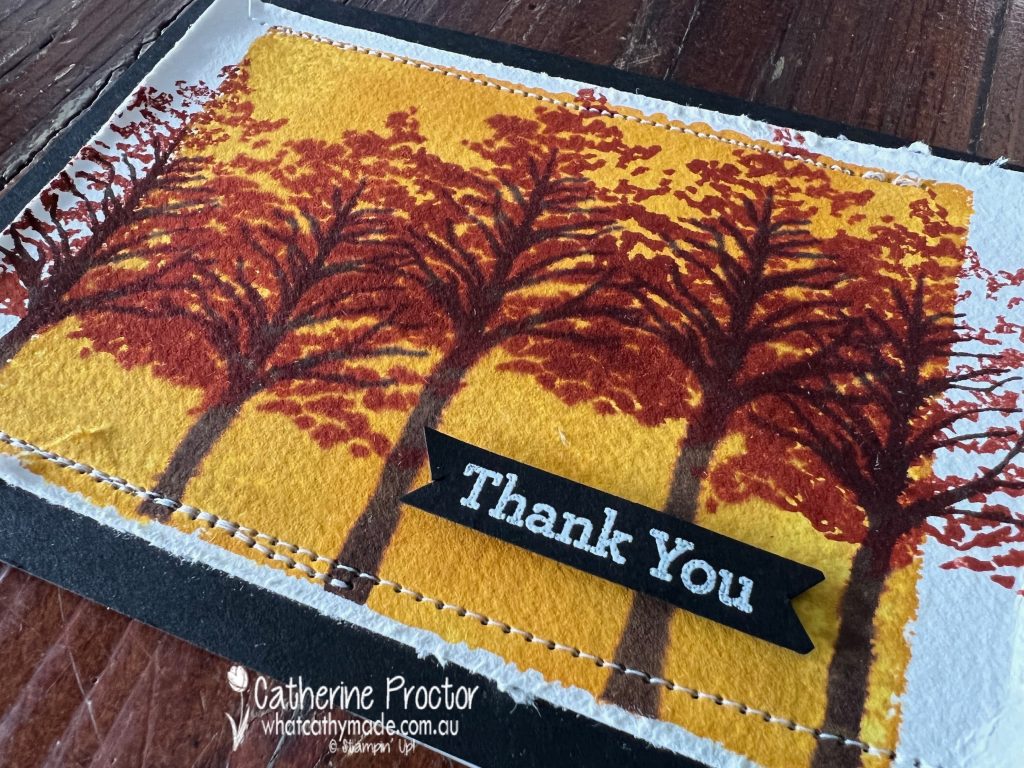
Today I’m joining in the #CTC371 challenge, which is to CASE (Copy And Share Everything) the colours of the He’s the Man DSP – Basic Black, Cajun Craze, Crushed Curry, Early Espresso, Sahara Sand and Soft Succulent from the 2022-2023 Annual Catalogue.
These are the colours from the He’s the Man DSP – I used four of these colours on my card today.
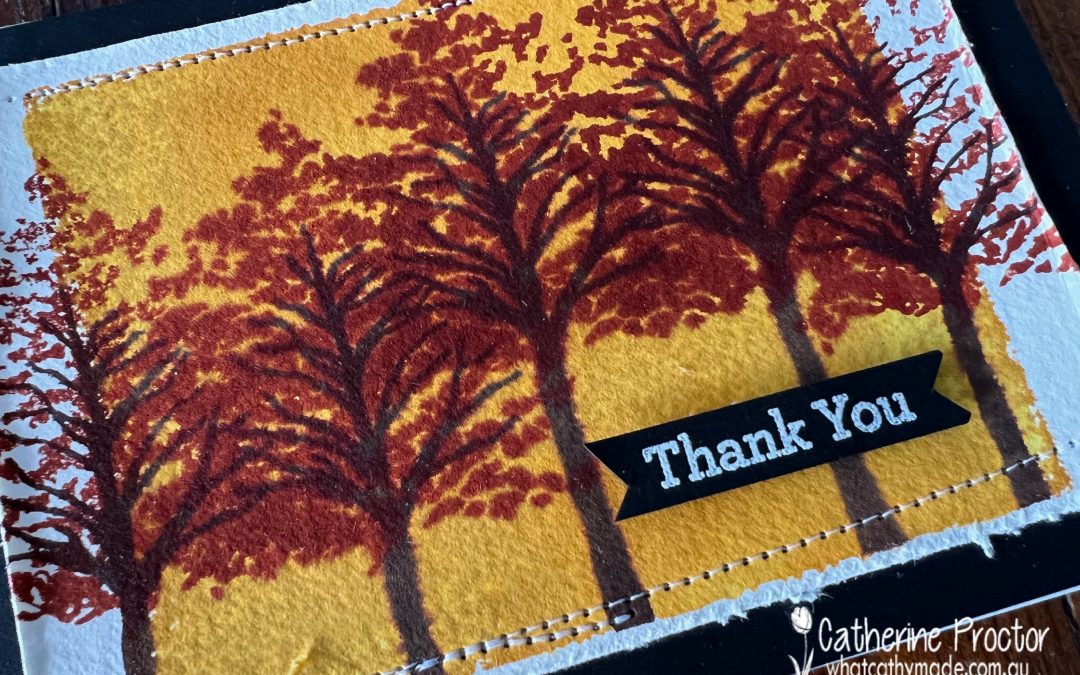
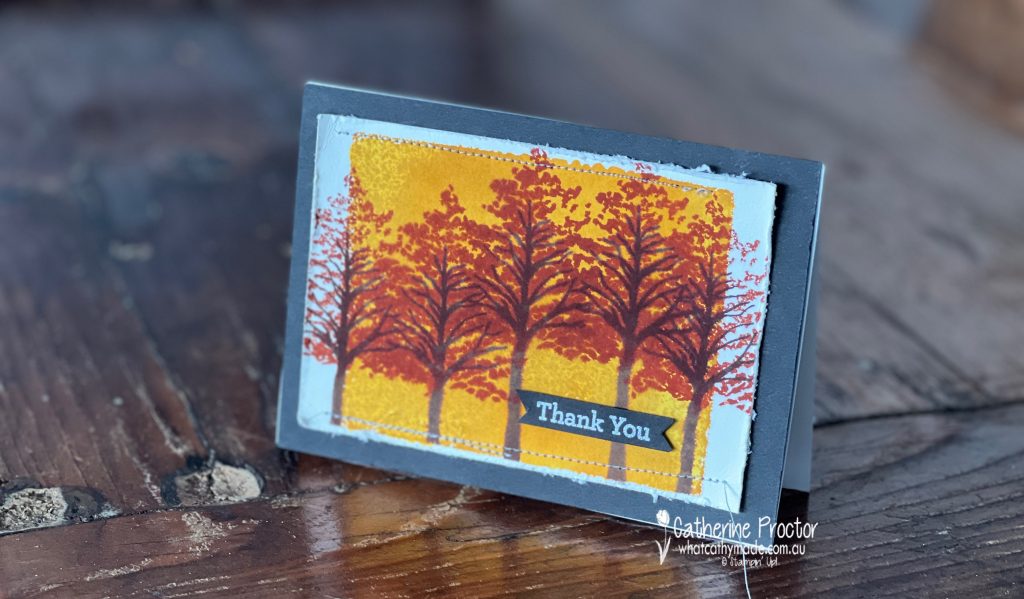
These colours remind me of autumn, so I decided to use the acrylic block stamping technique to create an autumn scene.
You can use Basic White cardstock for this technique, but I wanted the texture that watercolour paper gives to the image. I inked up an acrylic block (I used size E) by tapping my Crushed Curry stamp pad directly onto it, spritzed it with water using a Stampin’ Spritzer and then I stamped the acrylic block directly onto the watercolour paper.
The tree stamp from the Beauty in Friendship stamp set is stamped in Early Espresso ink, with the leaf stamp in Cajun Craze, and then I roughed up the edges of the watercolour paper using my paper snips.
Since I had my sewing machine out, I decided to sew the watercolour paper to a mat of Basic Black cardstock. I love sewing on paper, it gives a really cool texture to cards.
The “Thank You” sentiment is also from the Beauty of Friendship set, heat embossed in white onto Basic Black cardstock.
To purchase any of the products featured in today’s post, click on the links below or go to my Stampin’ Up! Online Store
If you’d like me to post you your very own copy of the 2022 Sale-a-bration Catalogue, the July-December 2022 Mini Catalogue, the 22-23 Stampin Up! Annual Catalogue or to simply find out about more about Stampin’ Up! contact me.
I’ll be back on Wednesday night with the AWH Colour Creations team and we will be showcasing Balmy Blue.
In the meantime, wherever you are in the world, stay safe, stay calm…and keep on crafting xxx
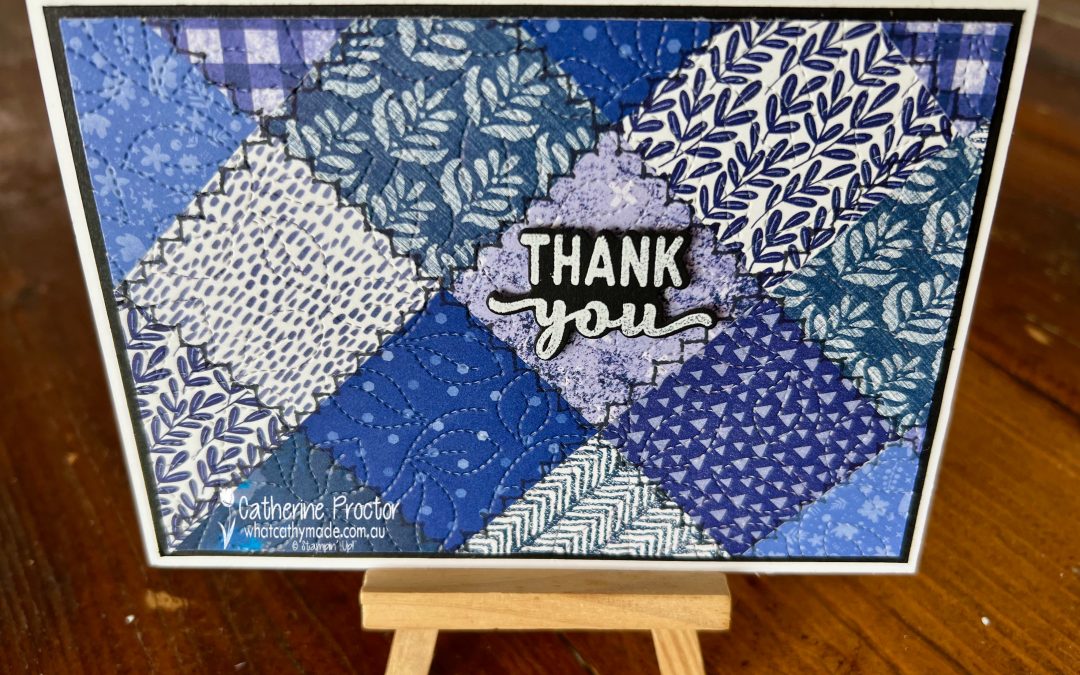
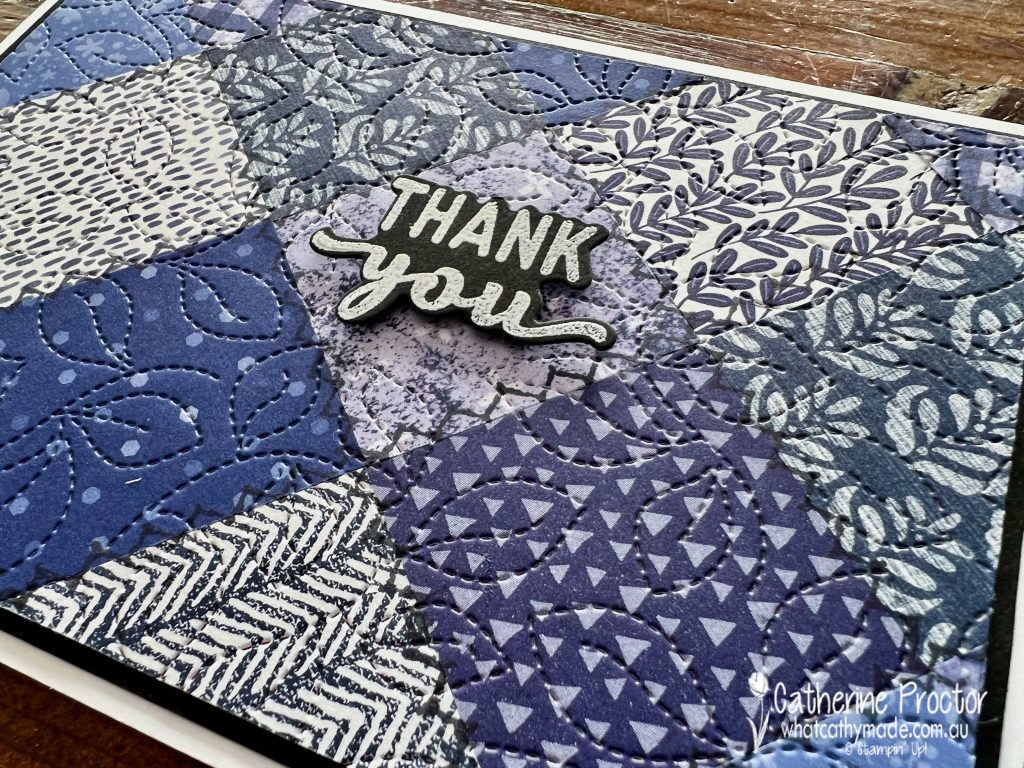
We’re a group of stamping friends who are celebrating Bron’s 60th Birthday in 2022 with six blog hops, over six months, with six fun themes! This is our inspiration pic for tonight’s hop – the current Stampin’ Up! range of blues.
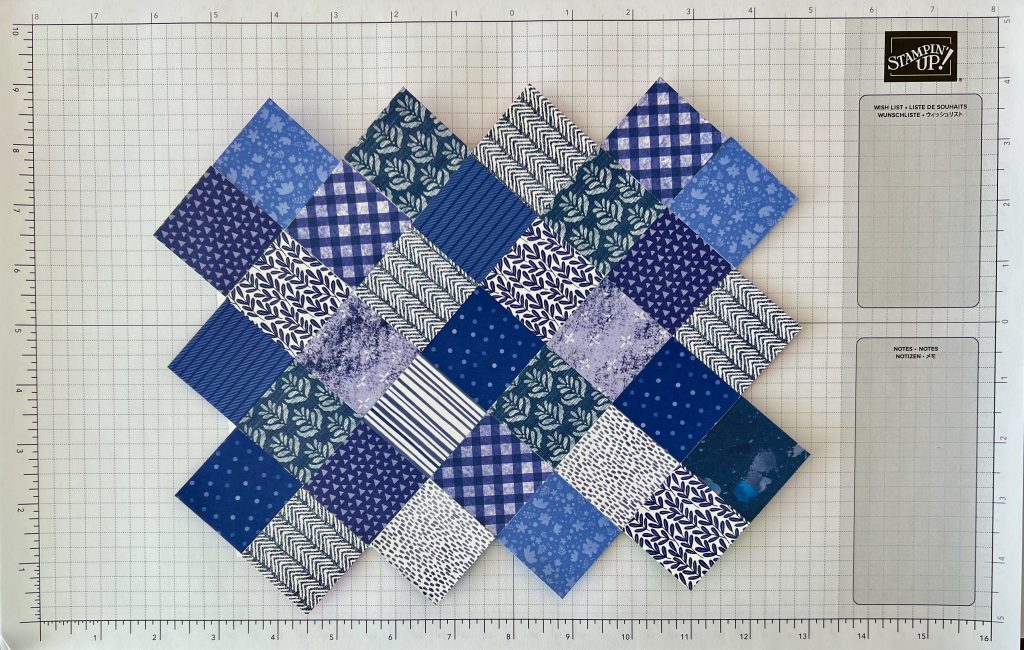
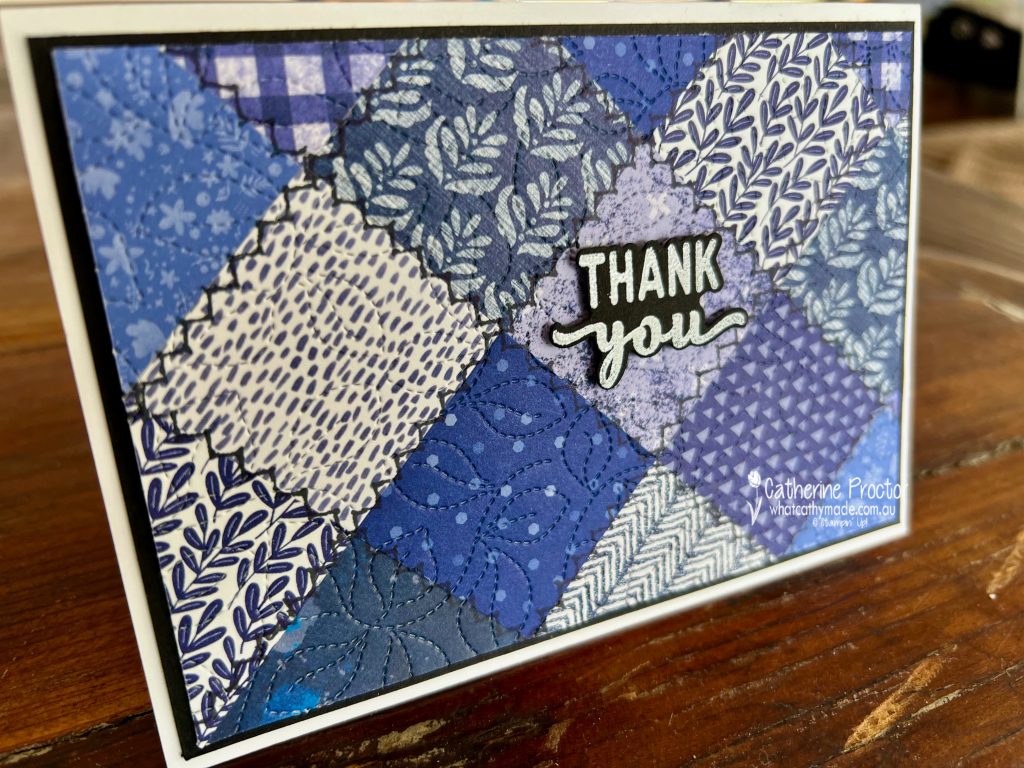
I love all these blues and wanted to use as many of them as possible on my card so I decided to make a paper quilt card using some of the paper patterns from Stampin’ Up!’s Butterfly Kisses, Lovely Linen, Tea Boutique, Sun Prints and 2022-24 In Colour Designer Series Papers.
Creating a paper quilt card is very easy and – you just need a paper trimmer to cut your DSP into precise squares. I cut one and a half inch squares and then arranged the DSP at an angle onto half a sheet of A4 cardstock (A5)– this size makes two paper card quilts.
Once I’d adhered the squares using multipurpose glue, I turned it over and trimmed the overhang DSP back to the A5 cardstock base.
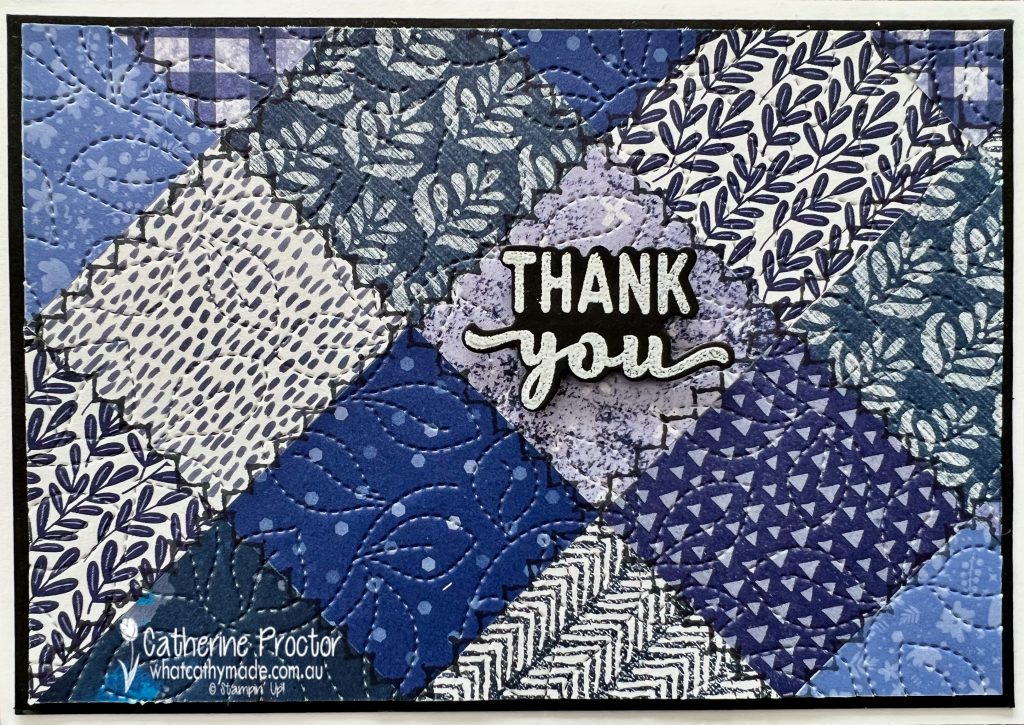
I then cut my patchwork layer in half, trimmed it and layered it to onto my card base using the following measurements.
Card base – Basic White cardstock 14.9 x 10.5cm (half a sheet of A4, folded in half)
Basic Back layer – 14.4 x 10 cm
Quilted paper layer – 13.9 x 9.5cm
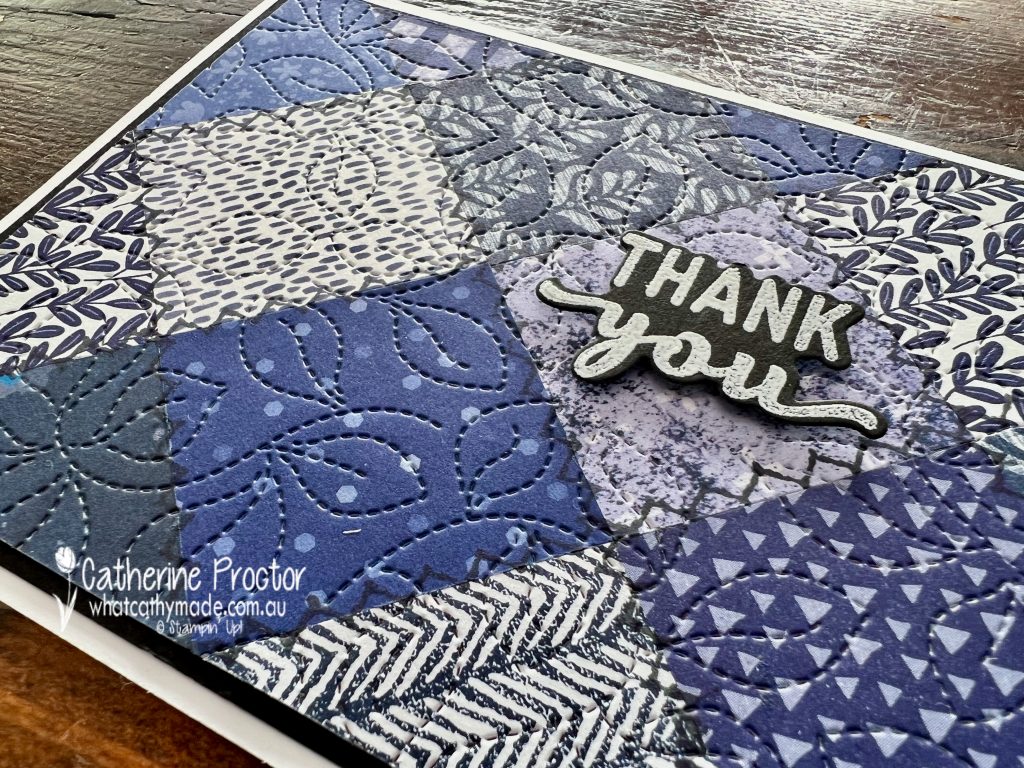
I then used a stamp from the the Stitchery Stamp Set to add “stitches” to my quilt in Memento Tuxedo black ink.
The final touch was embossing with the stitched greenery die – it really makes the patchwork card look like it is quilted!
The “Thank you” sentiment and matching die is from the new Charming Sentiments Bundle, which includes the Charming Sentiments Stamp Set and the Sentiment Silhouettes Dies.
I stamped the “Thank You” stamp in Versamark ink onto Basic Black cardstock and heat embossed it using white embossing powder.
Next up on Bronwyn’s Birthday Blog hop is the birthday girl herself, Bronwyn Easterly. I can’t wait to see what Bronwyn has created today!
If you live in Australia, you can find and purchase these products in my Stampin’ Up! Online Store or by clicking on the images below.
Welcome to week five of our Art With Heart 2022-23 Colour Creations blog hop! We are showcasing each of the 5 new In Colours for the first 5 weeks before we then feature our core colours in alphabetical order.
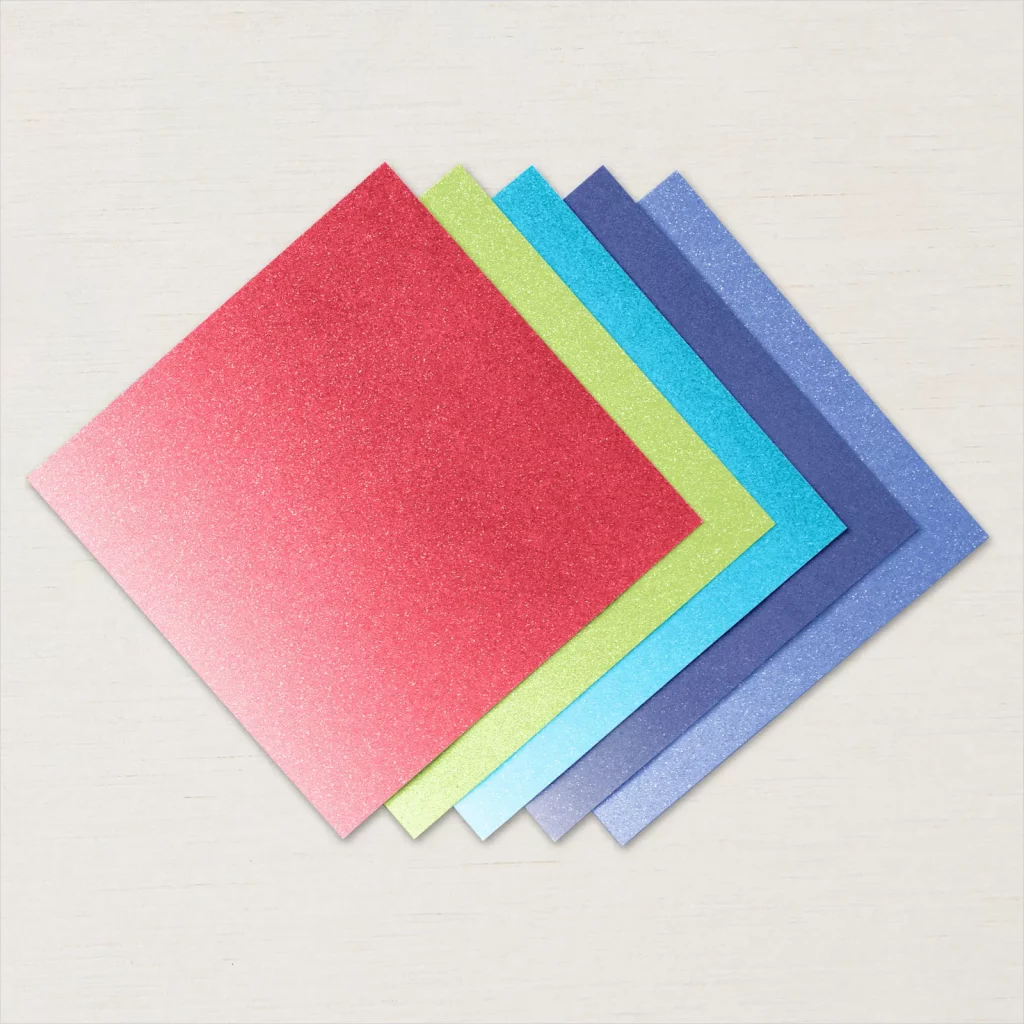
Our fifth new In Colour is Tahitian Tide, a turquoise colour that has been missing from the Stampin’ Up! colour range. Here’s what Tahitian Tide looks like in comparison to the other current Stampin’ Up! blue, aqua and teal colours.
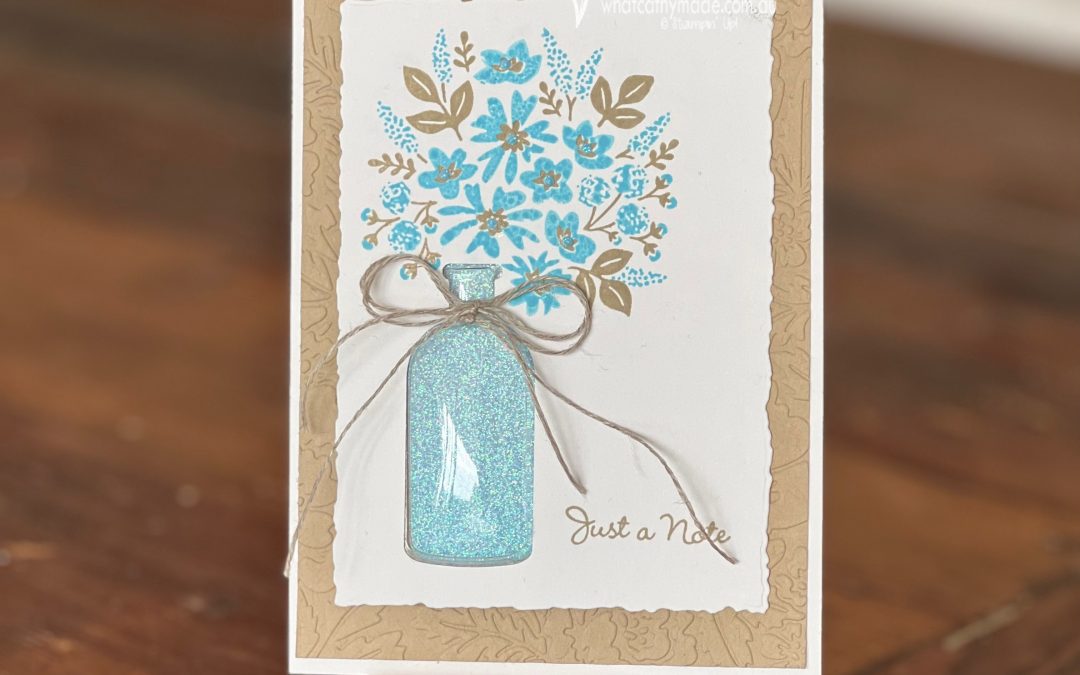
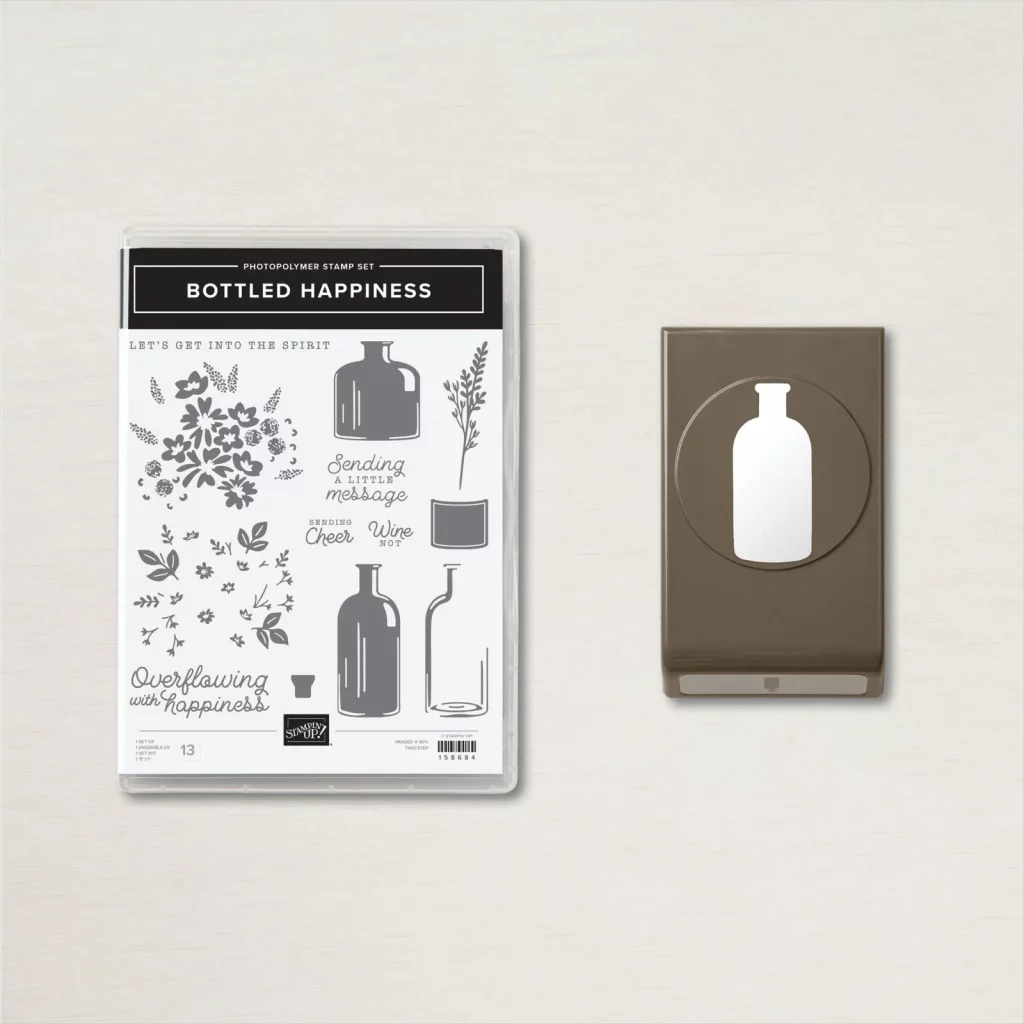
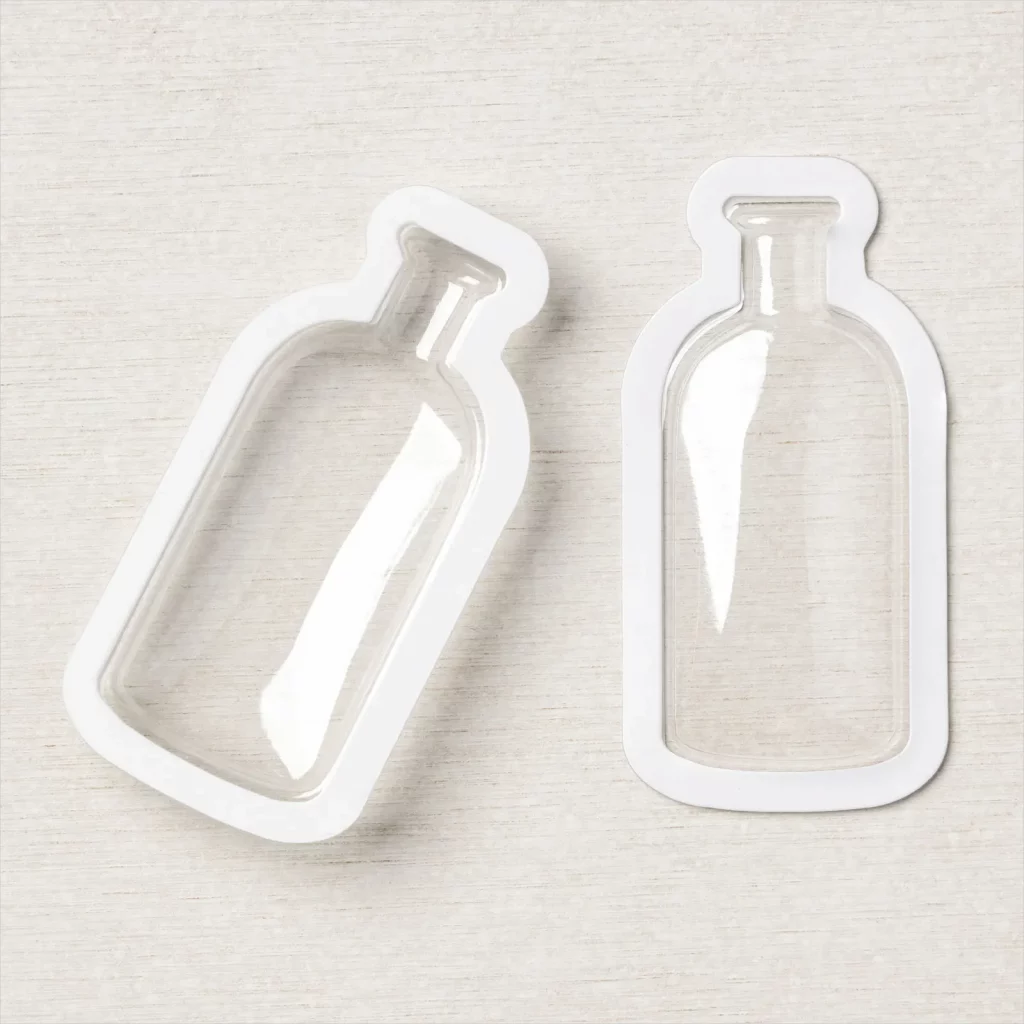
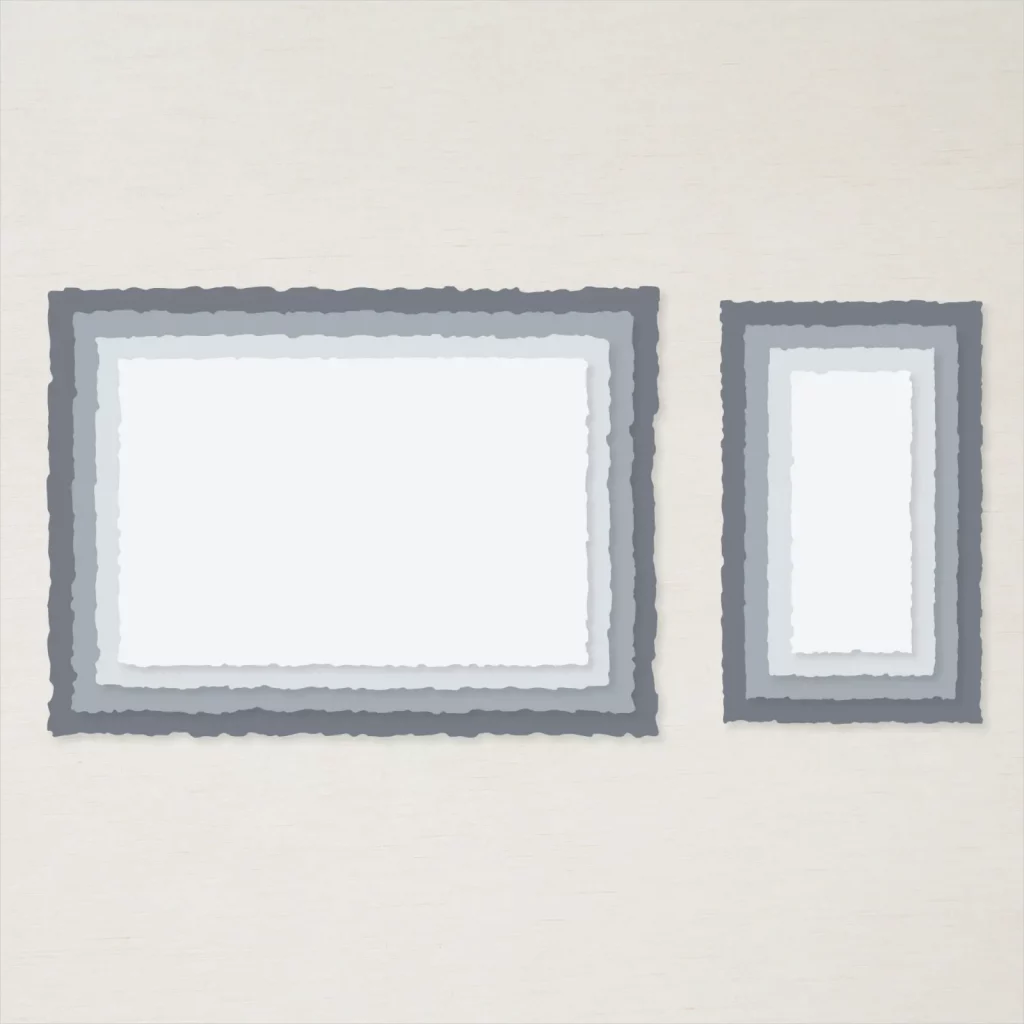
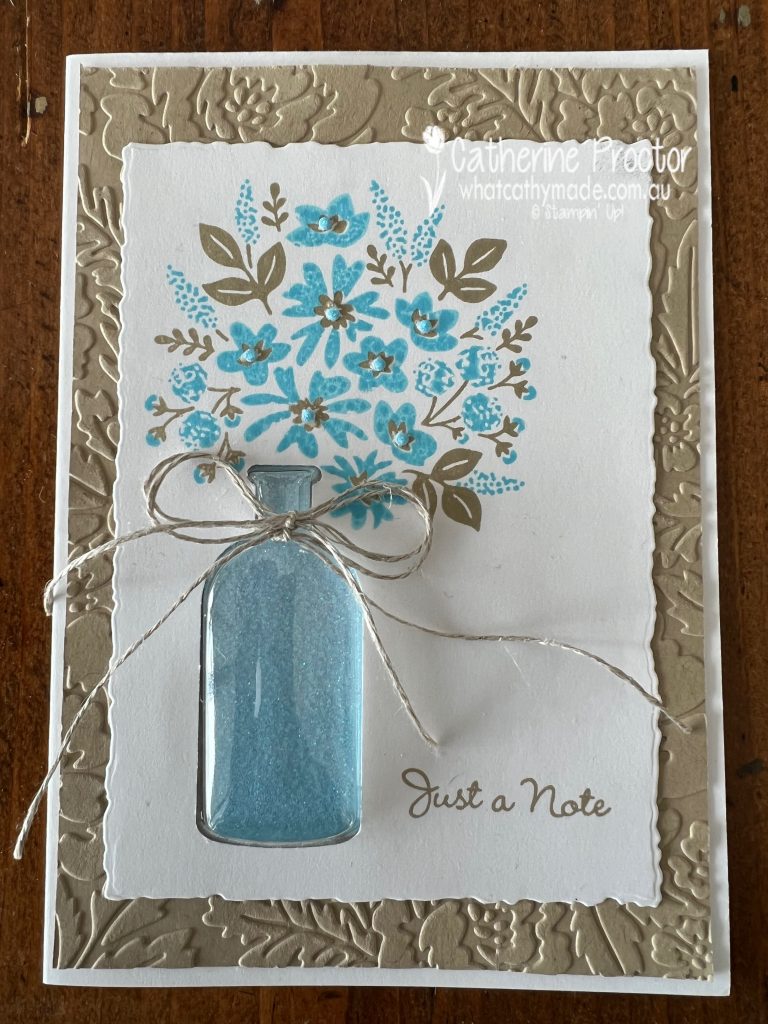
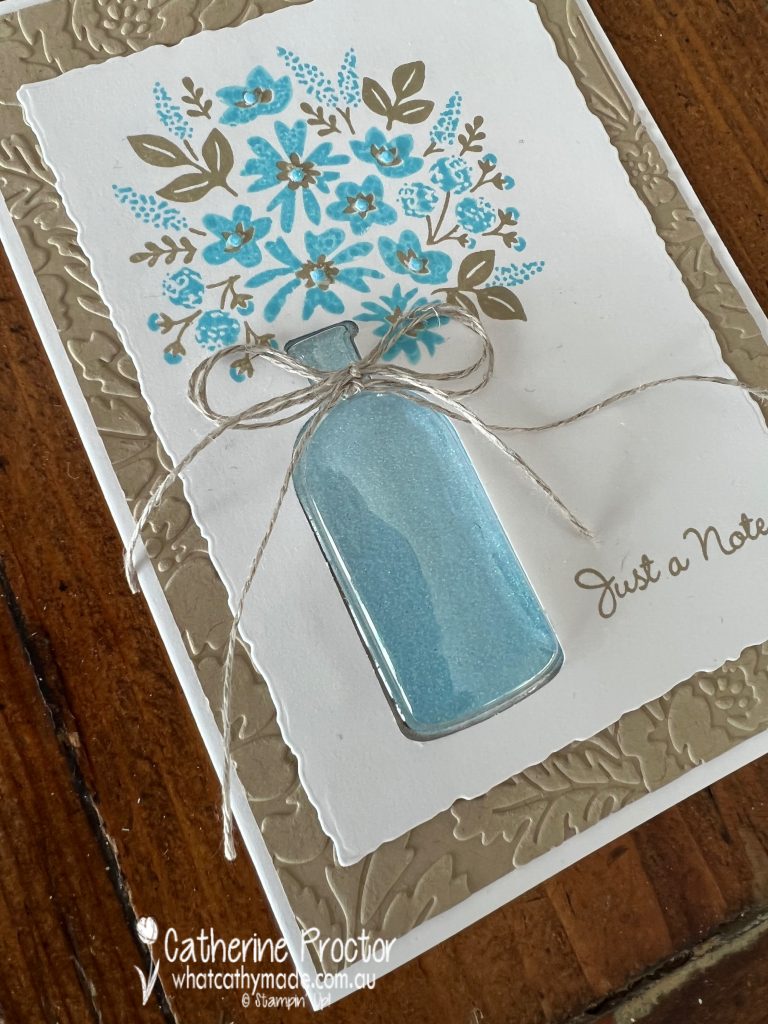
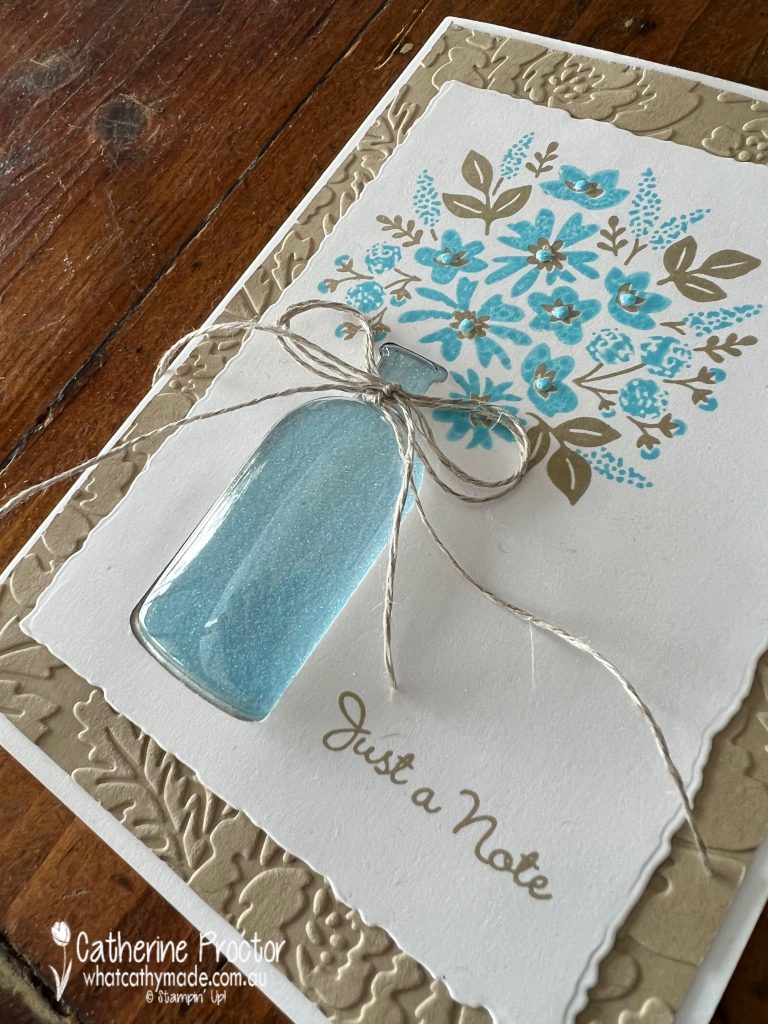
I’ve paired Tahitian Tide with my favourite neutral, Crumb Cake, for my 3D “Just a note” card. This card features lots of exciting new products, including the Bottled Happiness punch bundle, the Vintage bottle shaker domes, Deckled Rectangle Dies and 2022-2024 In Colour Glimmer Paper.
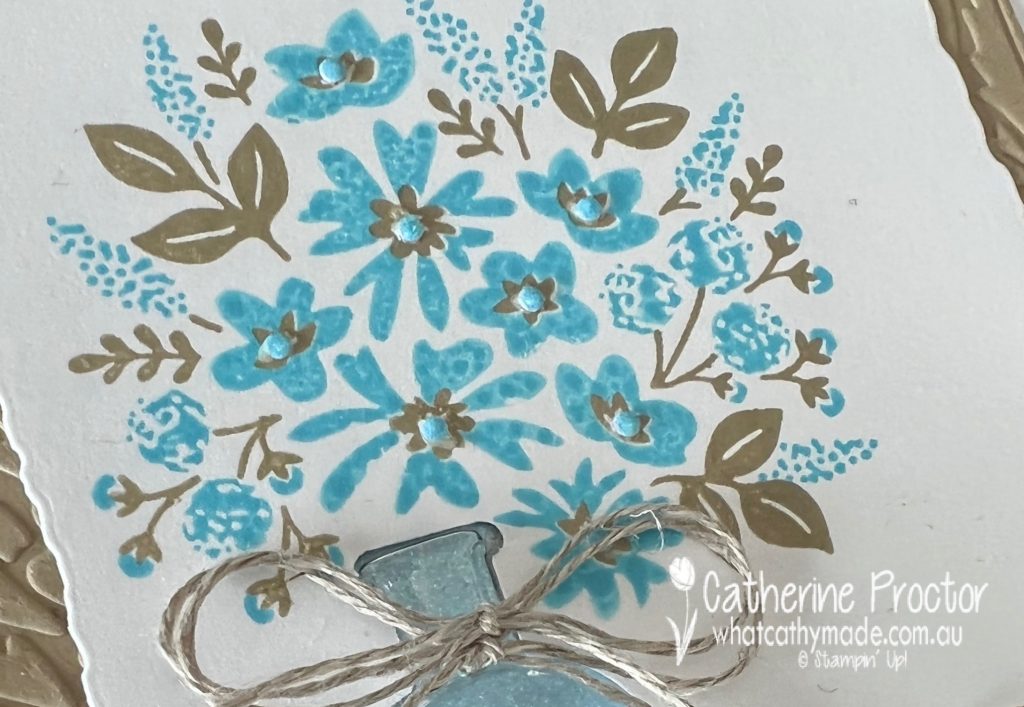
After I stamped the flowers I realised they were stamped on an angle that wouldn’t allow enough room for me to punch out the bottle shape underneath, so I punched my bottle out on an angle too. I often arrange flowers like this so I think it looks quite realistic!
I also used the Vintage bottle punch to punch out a bottle from the Tahitian Tide glimmer paper to look like the sparkle of water in the bottle. As the glimmer paper is an ombre paper, I chose the lighter section of the paper for the water. The glimmer bottle shape was popped inside a Vintage bottle shaker dome.
I added a tiny touch of sparkle to the centre of my flowers using a long die of circles from the Sentiment Silhouettes Dies to cut tiny circles from the glimmer paper. I have now mislaid this die after just one use! I do hope it turns up soon.
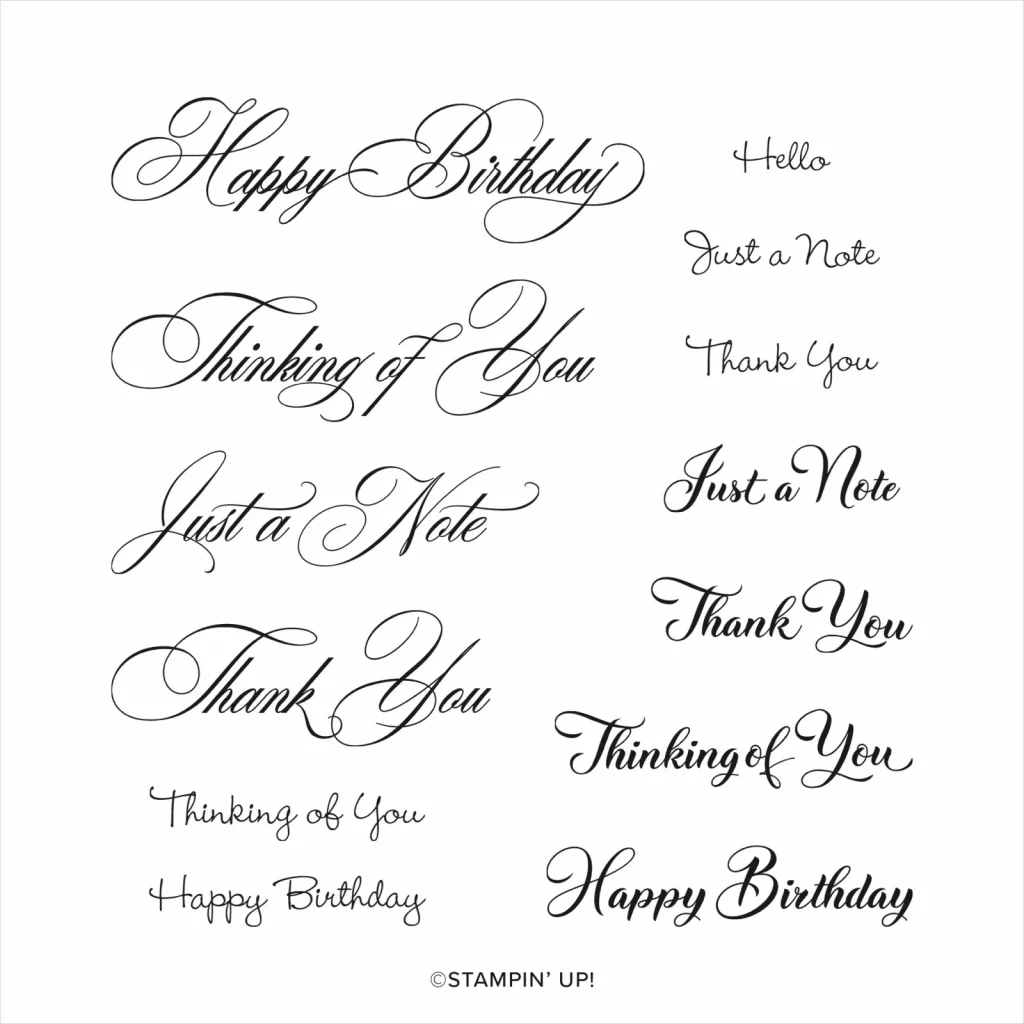
The “Just a Note” sentiment has the most gorgeous font. It comes from a new sentiment stamp set called Go-To Greetings Stamp Set, designed by Sandi Hartka, one of the Million Dollar achievers.
This versatile sentiment set includes three different sizes and fonts of your most stamped greetings — Thinking of You, Just a Note, Thank You, and Happy Birthday – as well as a small Hello. I already know I’m going to use this must-have set so much!
Now it’s time to hop on over to our next participant, the lovely Rachel Palmieri – I can’t wait to see what has made this week!
If at any time you find a broken link, you can find the complete list of all participants below.
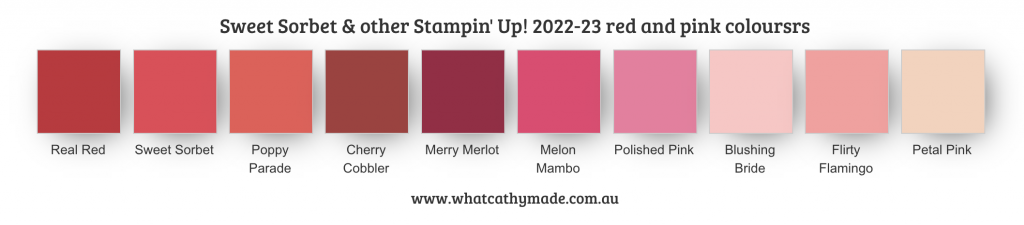
Welcome to week four of our Art With Heart 2022-23 Colour Creations blog hop! We are showcasing each of the 5 new In Colours for the first 5 weeks before we then feature our core colours in alphabetical order for the rest of the year.
Our fourth new In Colour is Sweet Sorbet, a vibrant red that sits neatly between Real Red and Poppy Parade. Here’s what Sweet Sorbet looks like in comparison to the other current Stampin’ Up! reds and pinks.
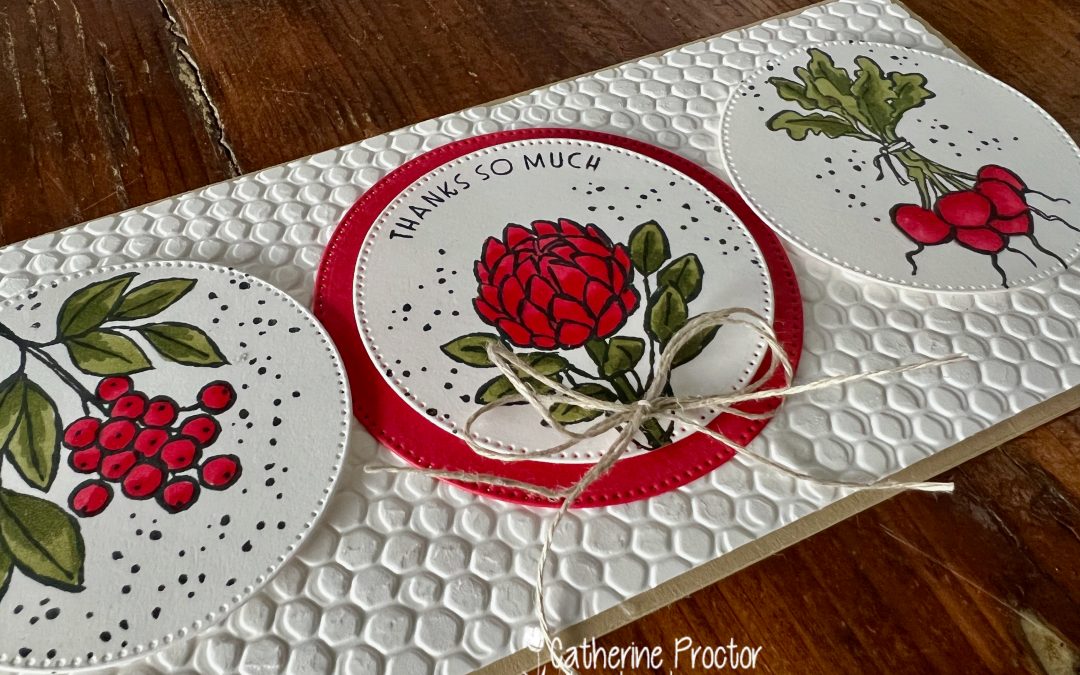
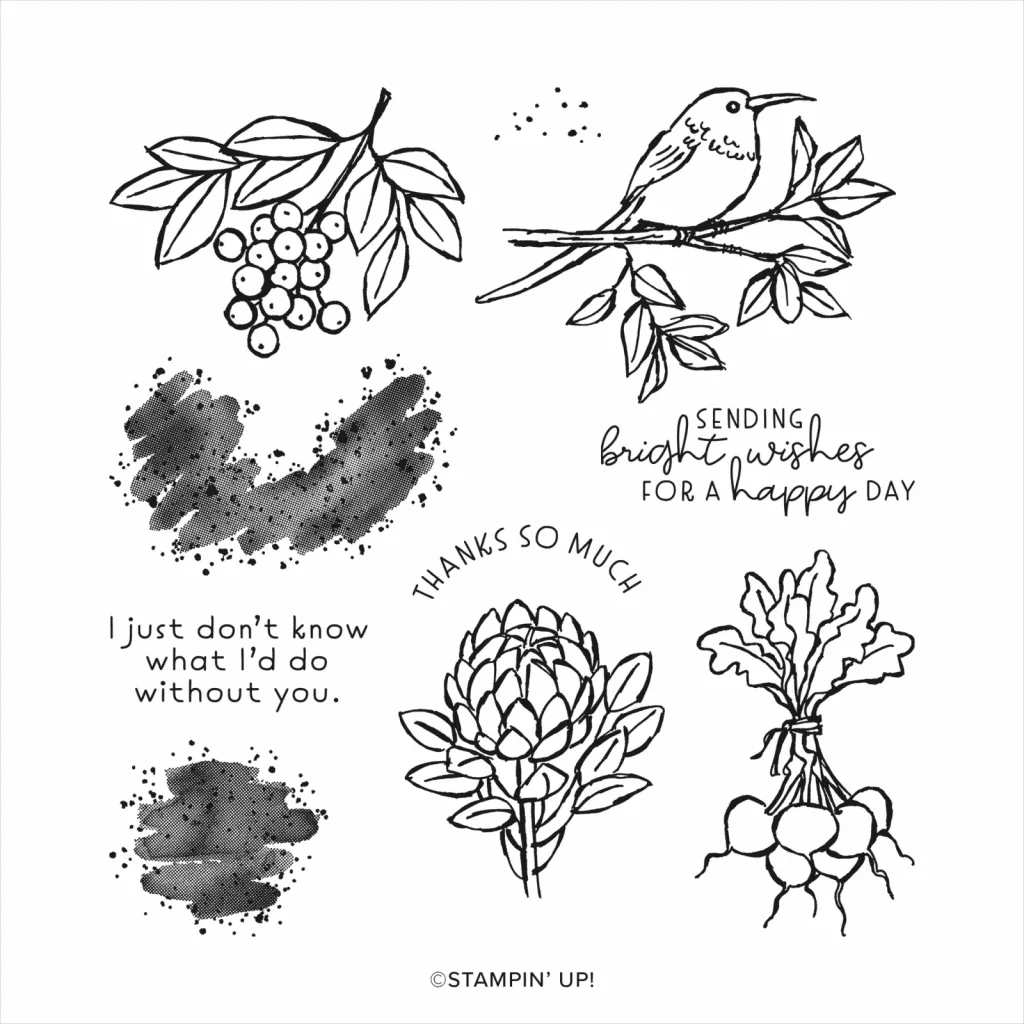
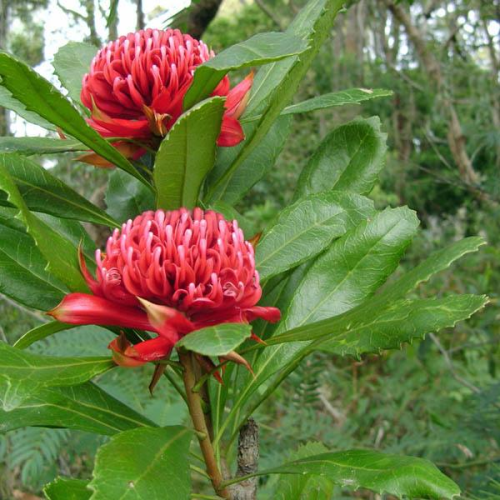
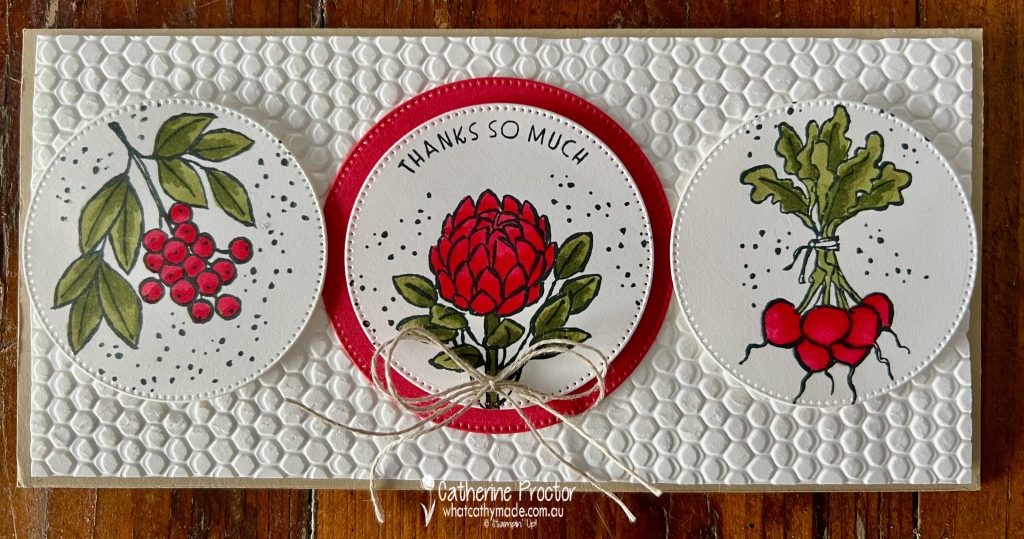
I decided to use the Eclectic Garden stamp set for my card because the flower stamp reminds me of a Waratah, the native flower of my home state of New South Wales, Australia.
Waratahs are a vibrant red, the ideal flower to be coloured in with Sweet Sorbet.
In the end I decided to create a slimline card also using two of the other images from Eclectic Garden because they are all so cute. After all, radishes can be red and the berries could be lingonberries!
The splatters are stamped with another stamp included in the Eclectic Garden stamp set, as is the cute “Thanks So Much” curved sentiment. The embossing folder is the the 3D Hive Embossing folder.
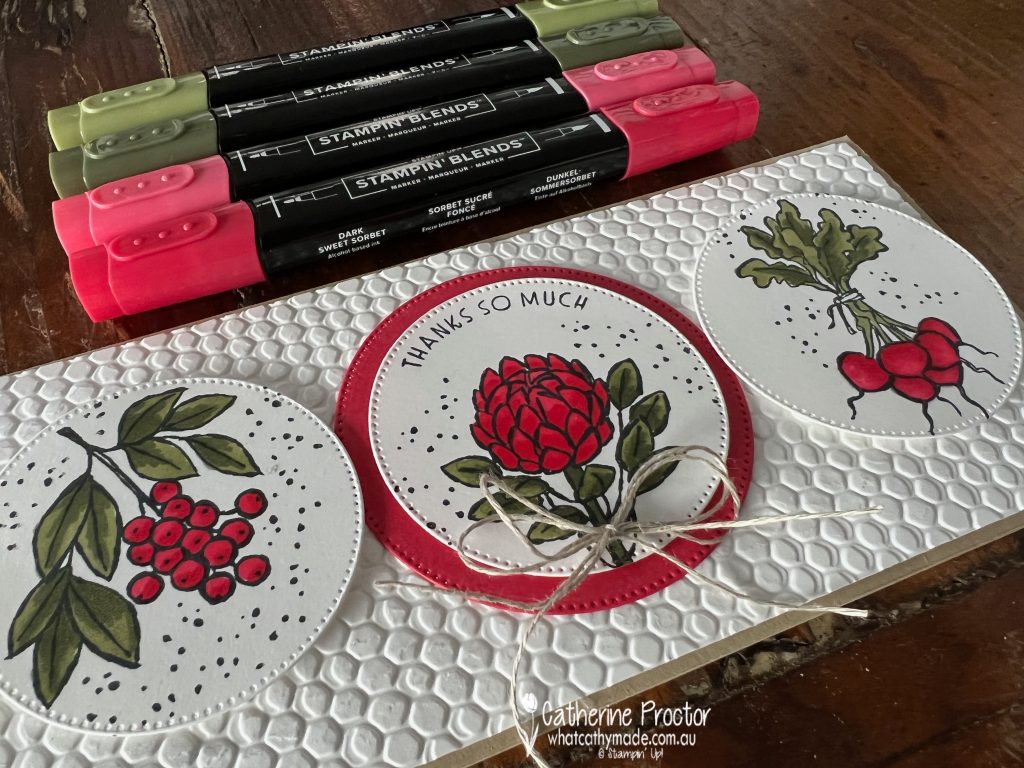
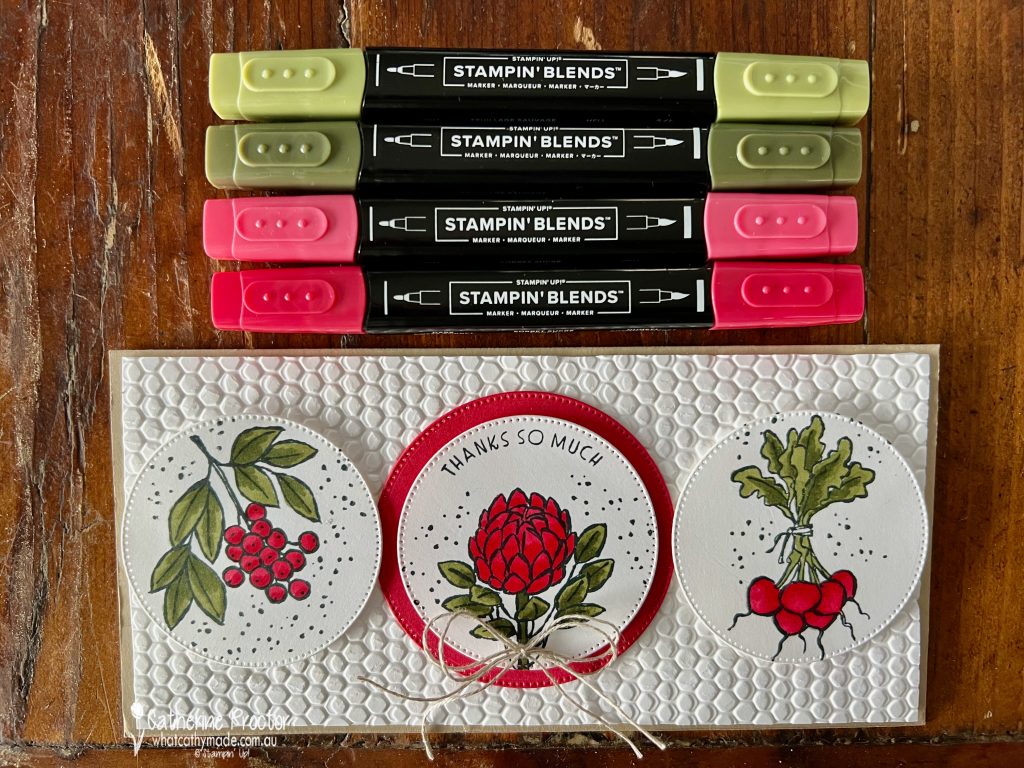
I used my light and dark Mossy Meadow and Sweet Sorbet Stampin’ Blends to colour the images in and the 2 largest circles from the new Stylish Shapes Dies to die cut the images out.
Now it’s time to hop on over to our next participant, the lovely Rachel Woollard – I can’t wait to see what has made this week!
If at any time you find a broken link, you can find the complete list of all participants below.


 Designer Series Paper")


")
 Designer Series Paper")
 Designer Series Paper")
 Designer Series Paper")
 Designer Series Paper")
 Designer Series Paper")


")

")


 Glimmer Paper")

")