Welcome to week eleven of our Art With Heart 2022-23 Colour Creations blog hop! This is a weekly blog hop where we showcase the stunning range of Stampin’ Up! colours in alphabetical order over 12 months and this week we are featuring Cajun Craze.
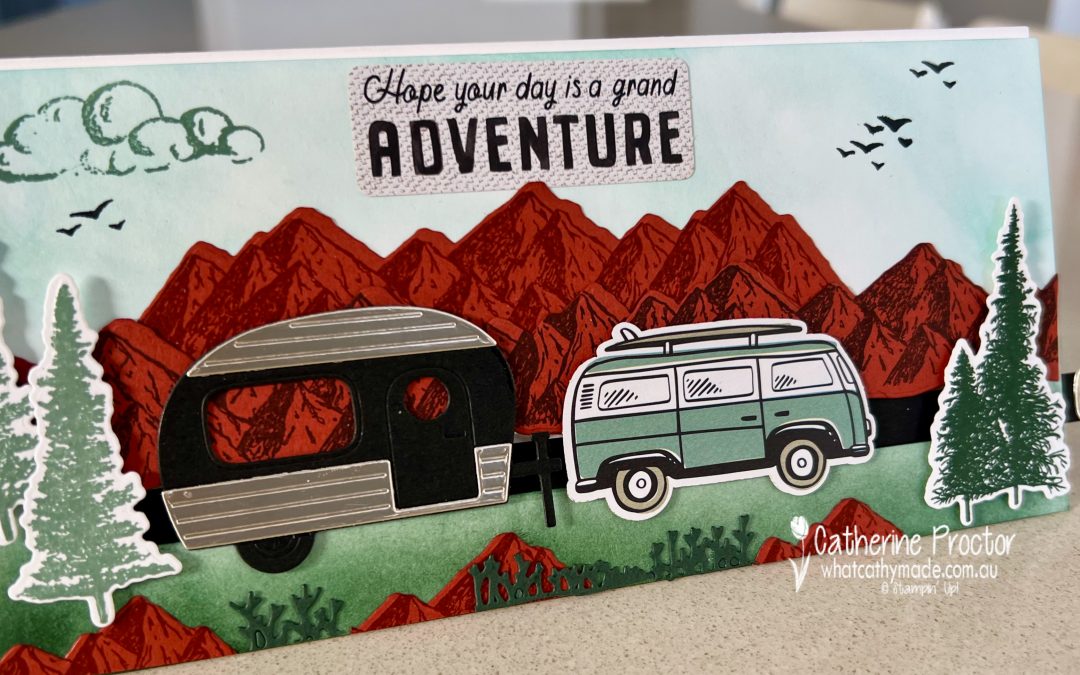
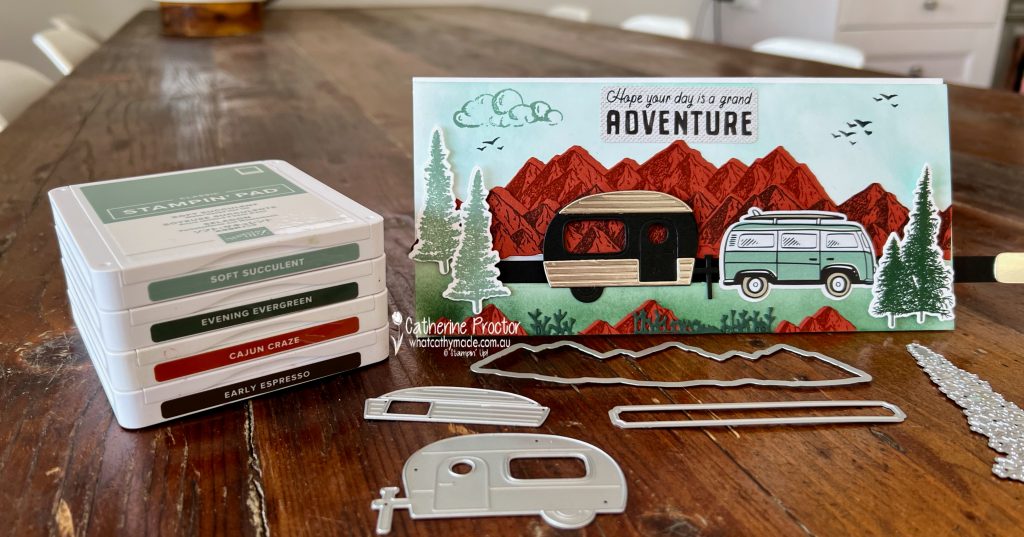
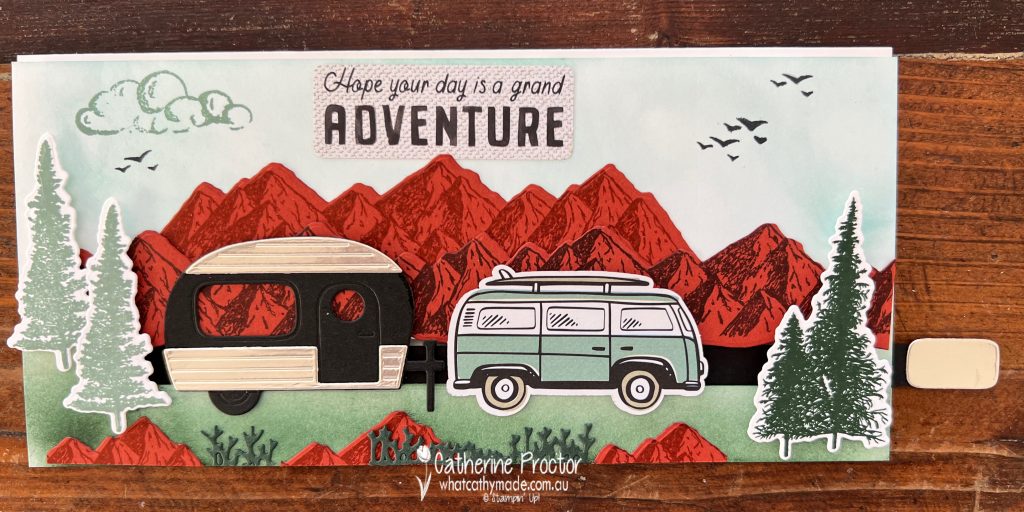
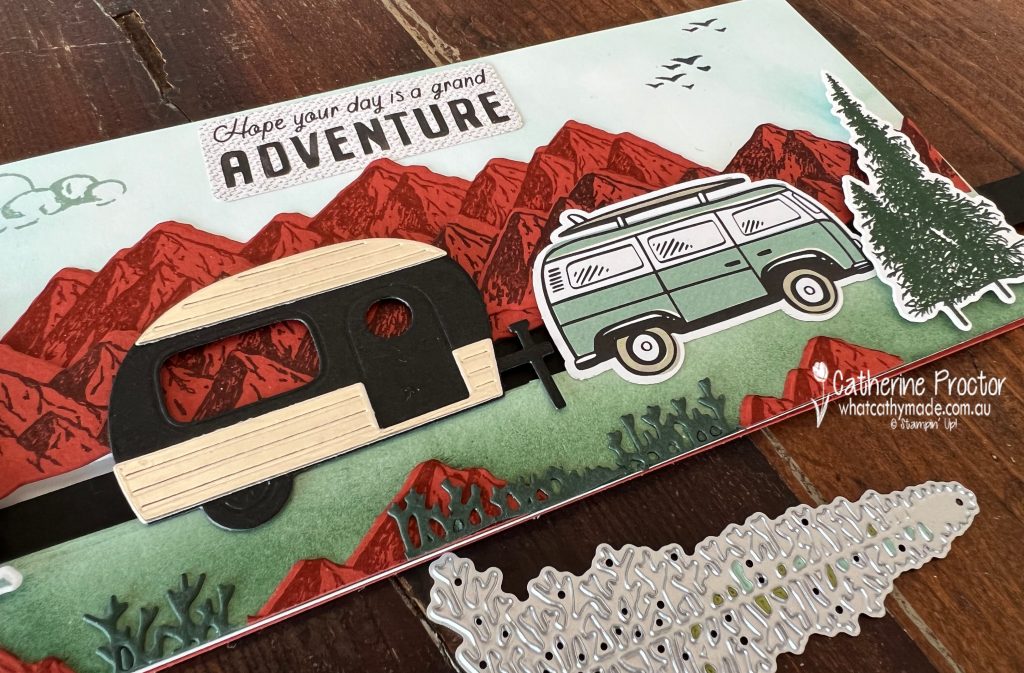
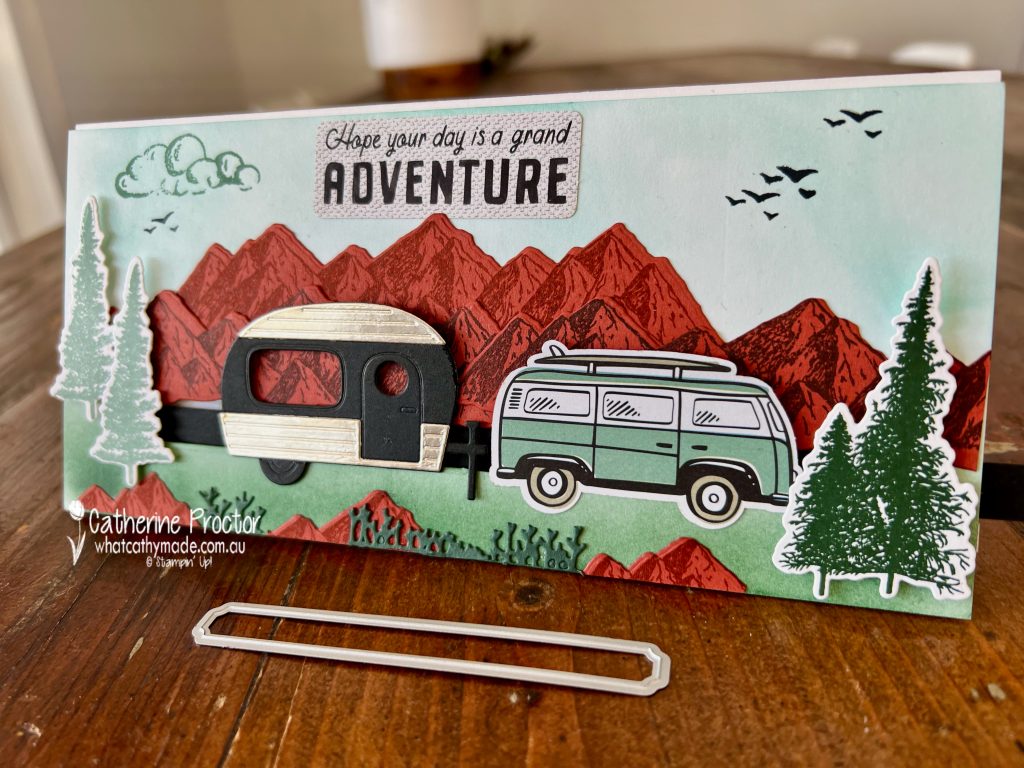
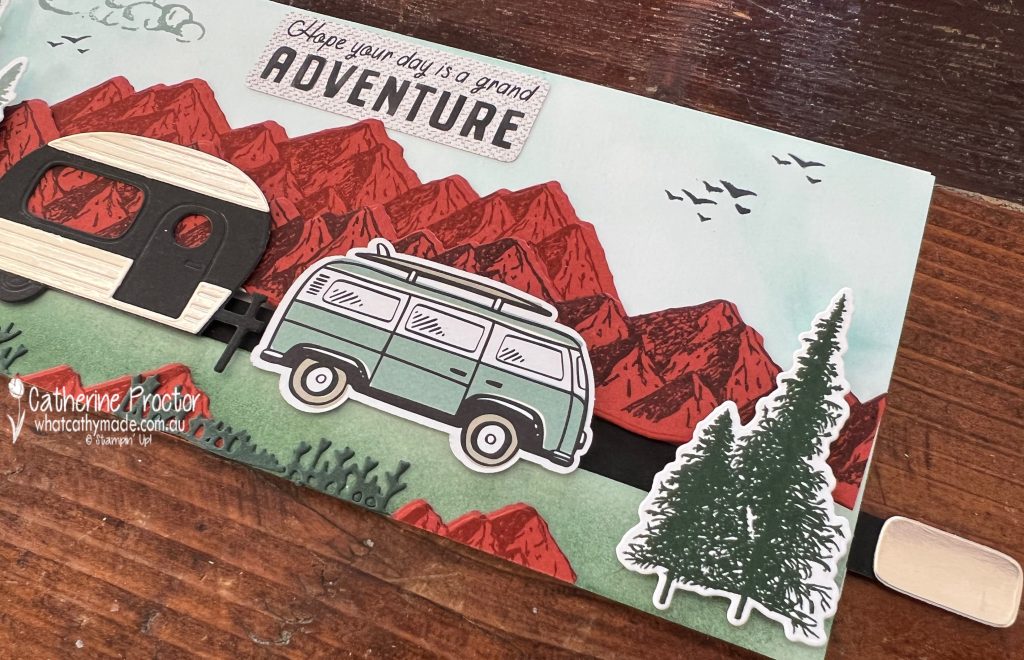
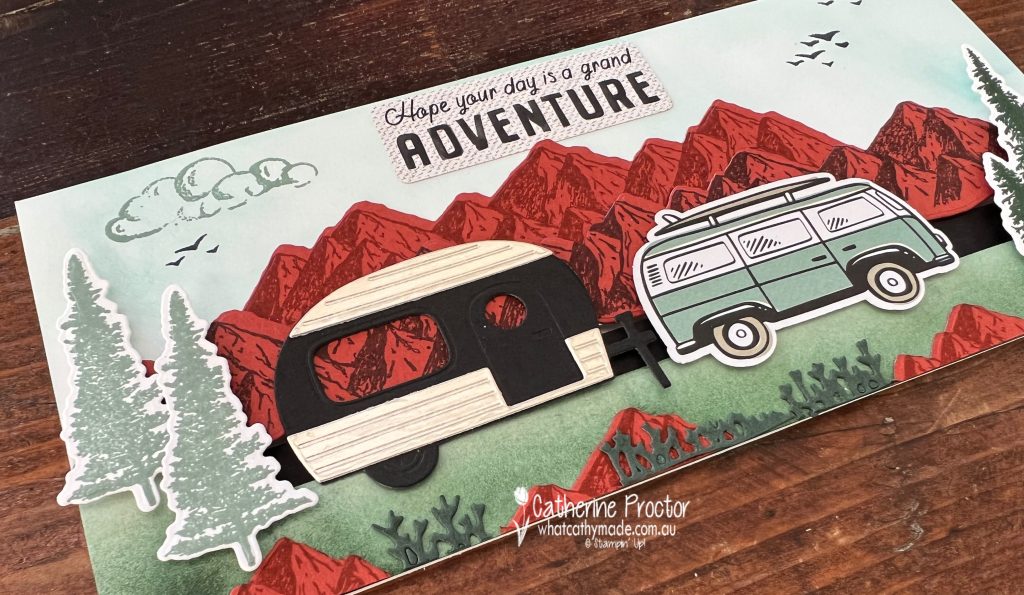
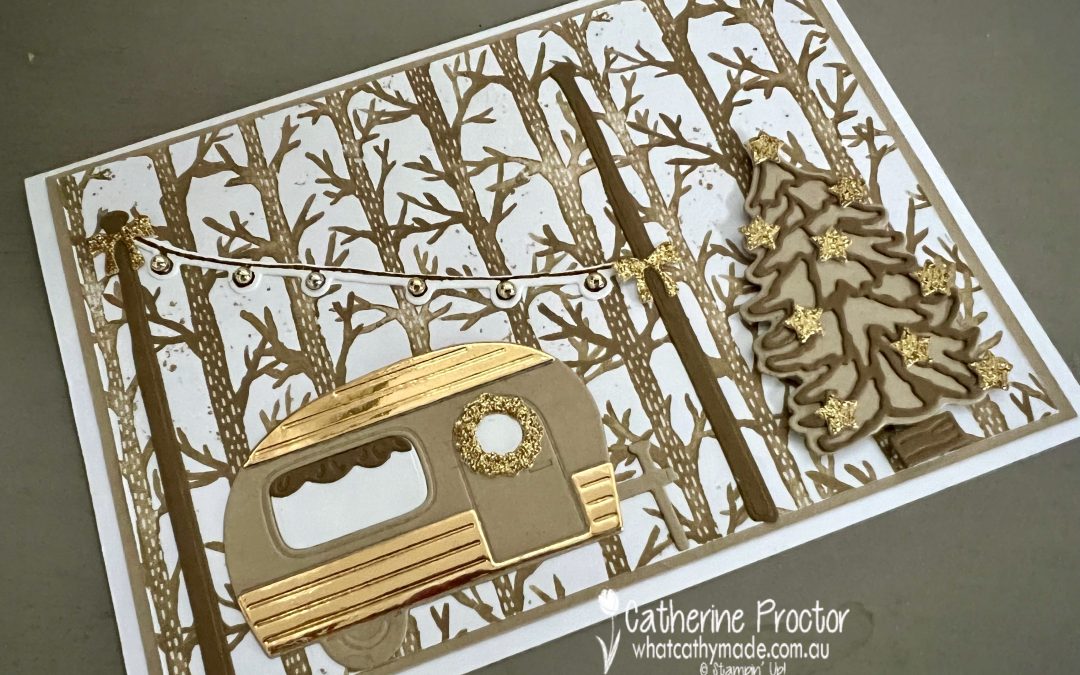
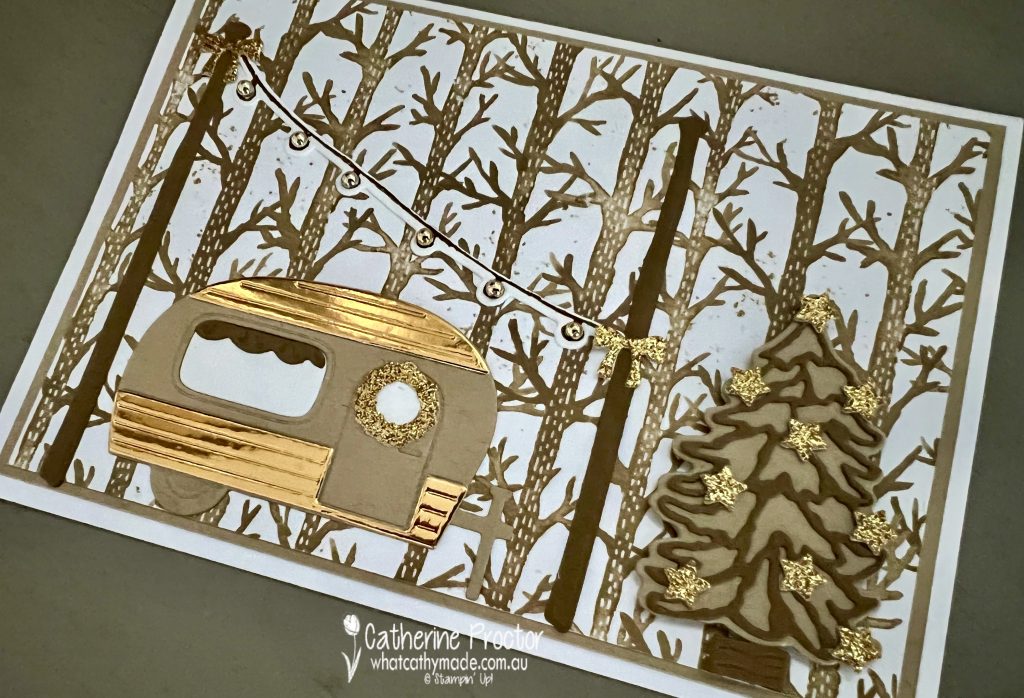
As soon as I saw this vintage Combi die cut in the “He’s the Man” designer series paper I knew exactly how I would use it – to tow the caravan from the free SALE-a-bration Tree Lot dies in a slimline slider card!
The colour combination for my Cajun Craze slimline slider card was also inspired by the retro colour combination in the “He’s the Man” designer series paper: Basic Black, Cajun Craze, Crushed Curry, Early Espresso, Sahara Sand, Soft Succulent, with the addition of some Evening Evergreen.
The Cajun Craze element of the card is the mountains and the rocks, stamped in both Early Espresso and Cajun Craze onto Cajun Craze card stock. Using the darker mountains stamped in Early Espresso at the front and the lighter mountains at the back gives instant dimension to the card.
The “grass” is made using the tallest Mountain Air tree die, used to die cut Evening Evergreen card stock with branches trimmed from the tree and adhered sideways to become grass. The “rocks” are trimmed tops of the mountains.
Here’s a quick 25 second video that shows you how my slimline slider card works, as well as the inside of my card.
The slot for the slider mechanism is created using the long thin die from Sending Dies. I die cut it twice to make one long channel.
There’s a great arrow die cut in the “He’s the Man” designer series paper that would work well for the end of the pull mechanism, however the negative window piece from the silver die cut caravan inside my card was sturdier and looked very smart, so I used that instead.
The blended background for the card is created with Evening Evergreen and Pool Party ink, applied with blending brushes.
The sentiment is another die cut from the “He’s the Man” designer series paper and the cloud and the little birds are both stamps from the Mountain Air stamp set.
Now it’s time to hop on over to our next participant, the lovely Amie McIlroy – I can’t wait to see what Amie has made this week!
If at any time you find a broken link, you can find the complete list of all participants below.
Welcome to week two of the Heart Of Christmas Blog Hop!
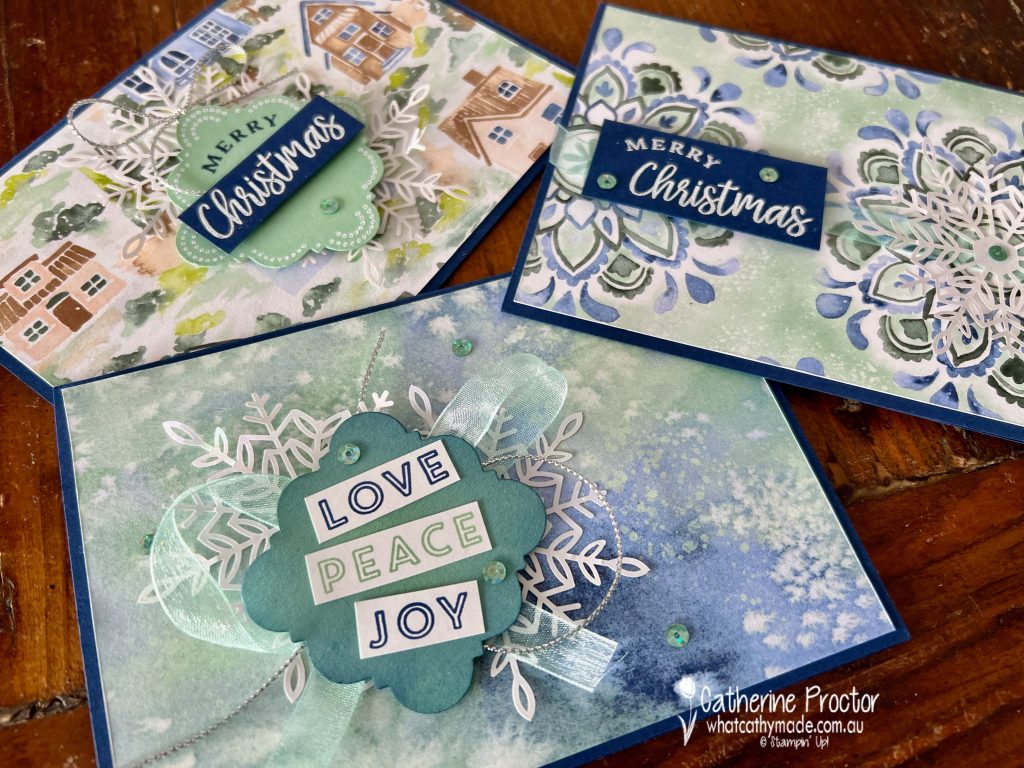
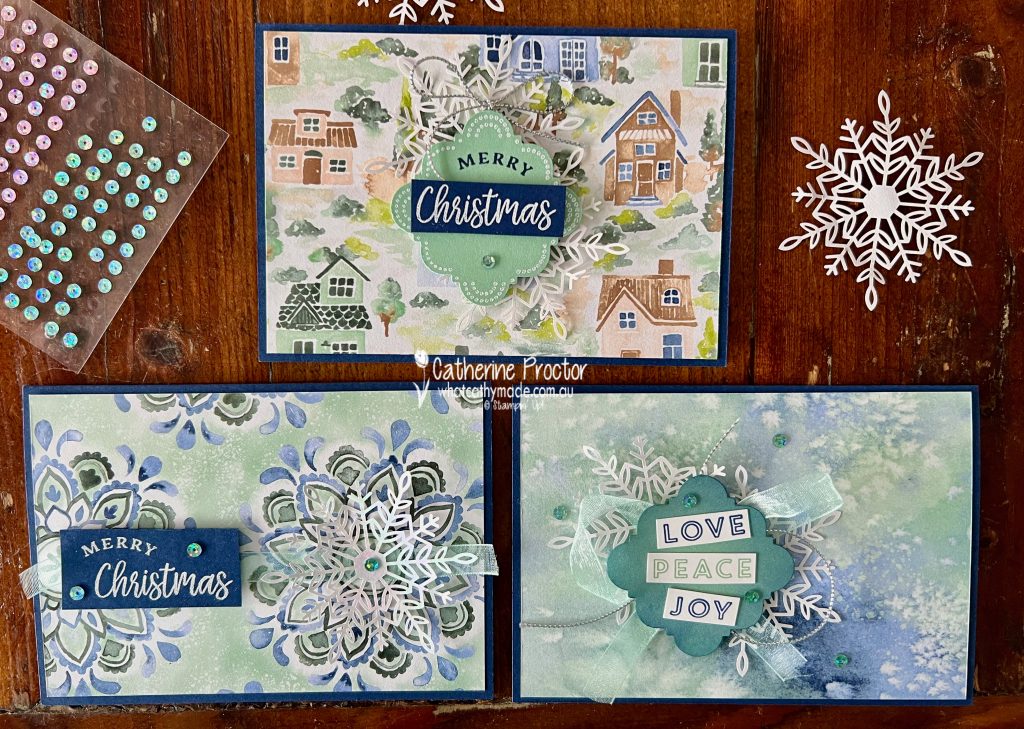
Tonight I have three more cards to share with you that use the FREE (with any order over $90) SALE-a-bration Rings Of Love designer series paper that I also used last week to make a Crumb Cake Caravan card.
Tonight’s cards use different patterns from the Rings Of Love DSP that feature mainly Night of Navy and Mint Macaroon. I love this combination of moody blues and aquas!
As well as the Rings Of Love designer series paper, these three cards all use a new punch bundle that I love for its versatility, affordability and ease of use: the Handmade Wishes Bundle.
The Handmade Wishes Bundle includes the Handmade Wishes Stamp Set and the Handmade Tag Punch and it’s ideal for making both tags and cards for Christmas as well as for other occasions too.
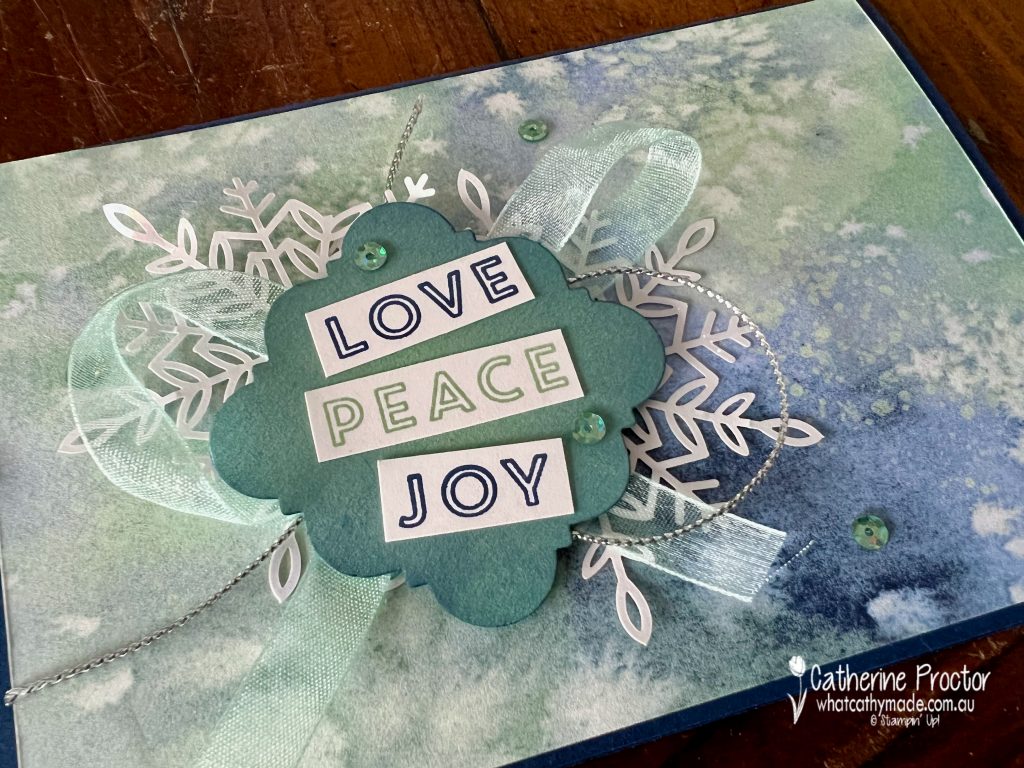
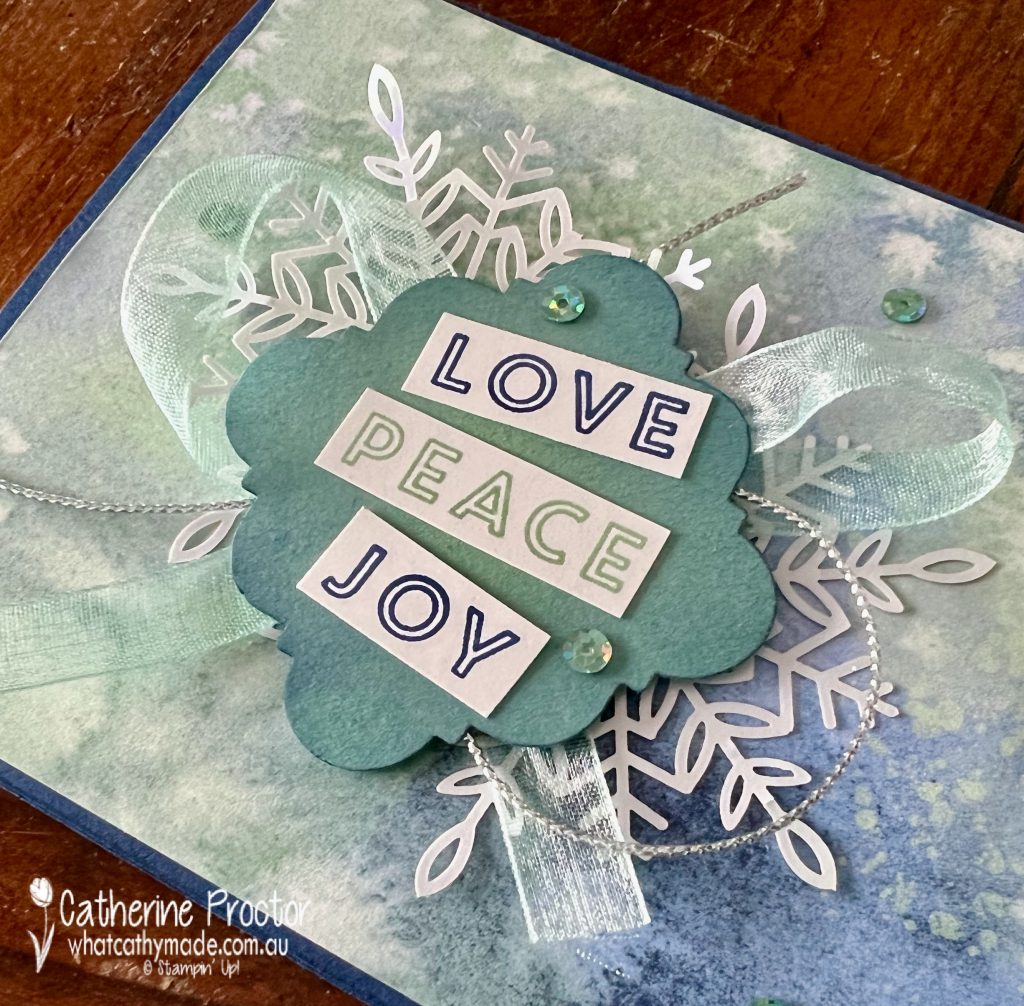
The inspiration for card one came from the bottom left card sample (image above) on page 21 of the July -December mini catalogue.
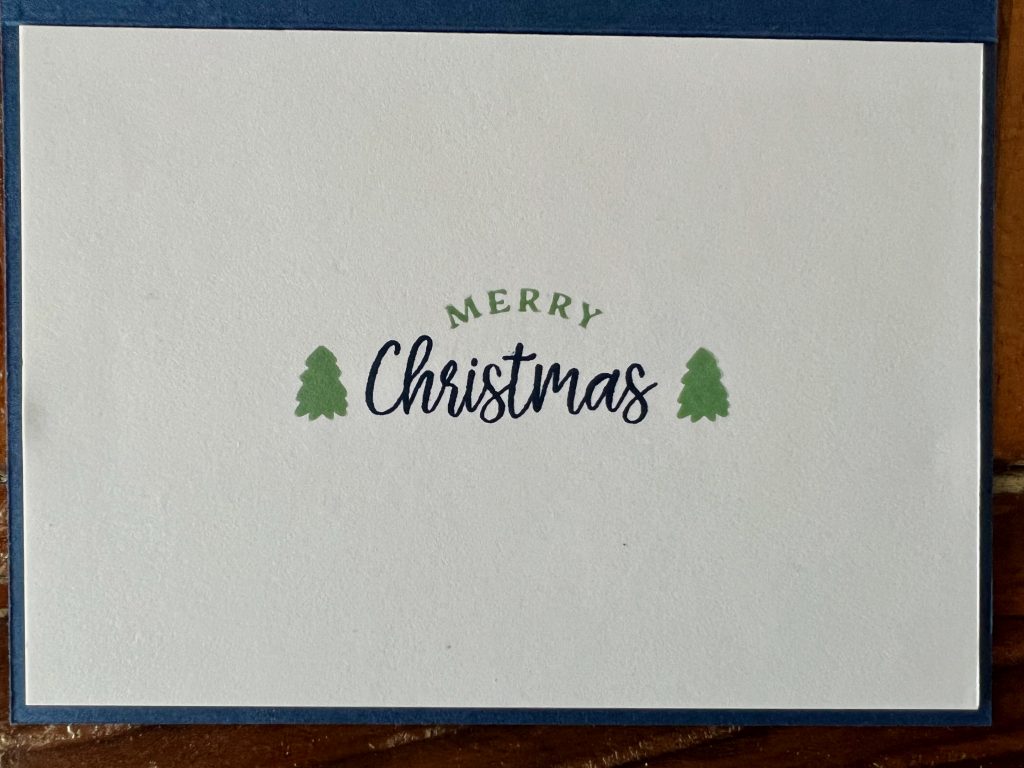
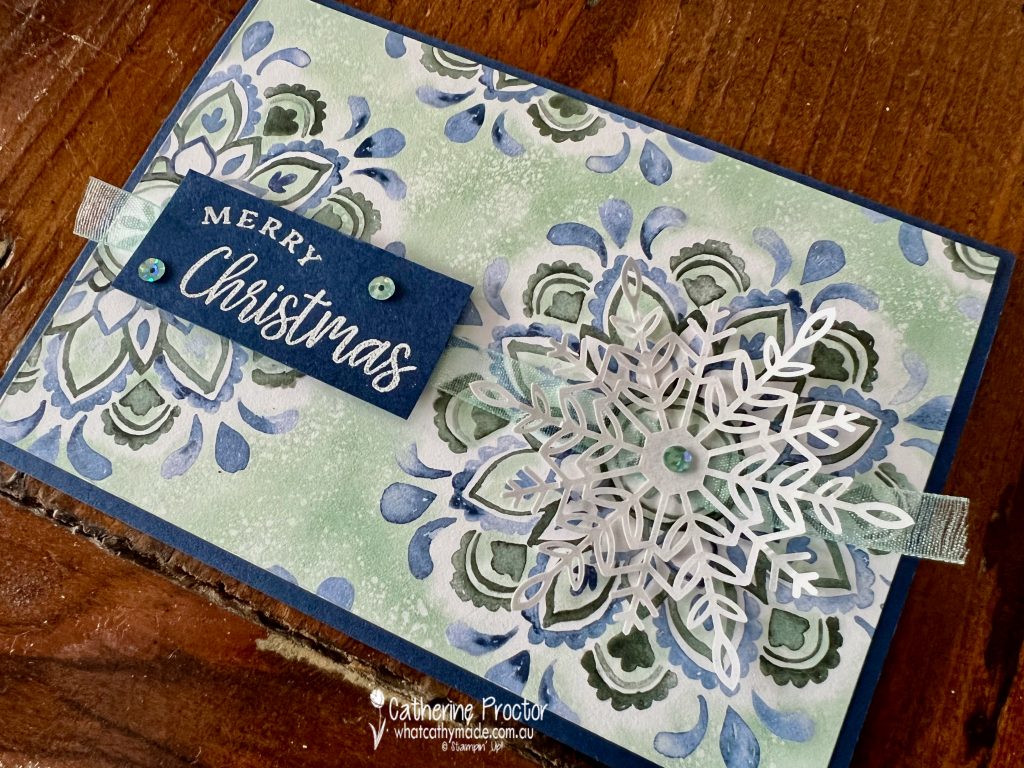
I loved the look of the Wonderful Snowflakes sitting behind the punched homemade tag shape with the words “love, peace & joy” on top.
I used the handmade tag punch to punch out a tag from Mint Macaron card stock and then used a blending brush to add Night of Navy ink around the edges.
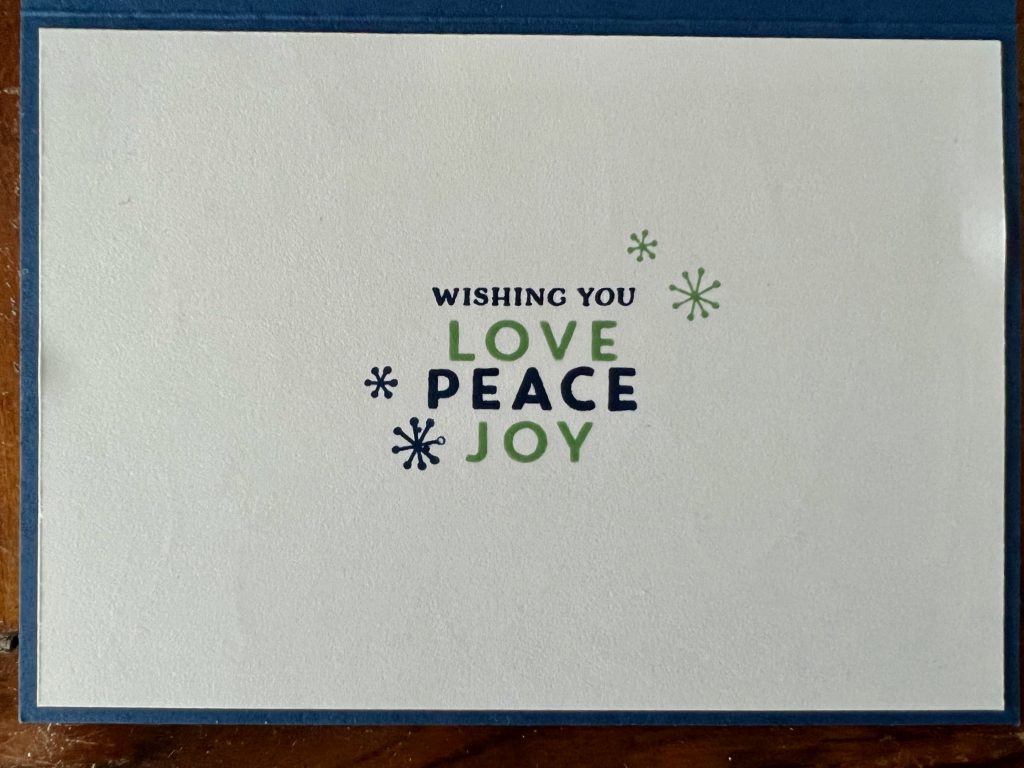
The inside uses more stamps from the Handmade Wishes Stamp Set, stamped in Night of Navy and Mint Macaron.
Card two uses a stunning medallion pattern from the “Rings Of Love” designer series paper, made to look more “Christmasy” with the white heat embossed “Merry Christmas” sentiment that pairs together two of the sentiments from the Handmade Wishes stamp set.
I’ve used some of the smaller stamps for the inside of this card.
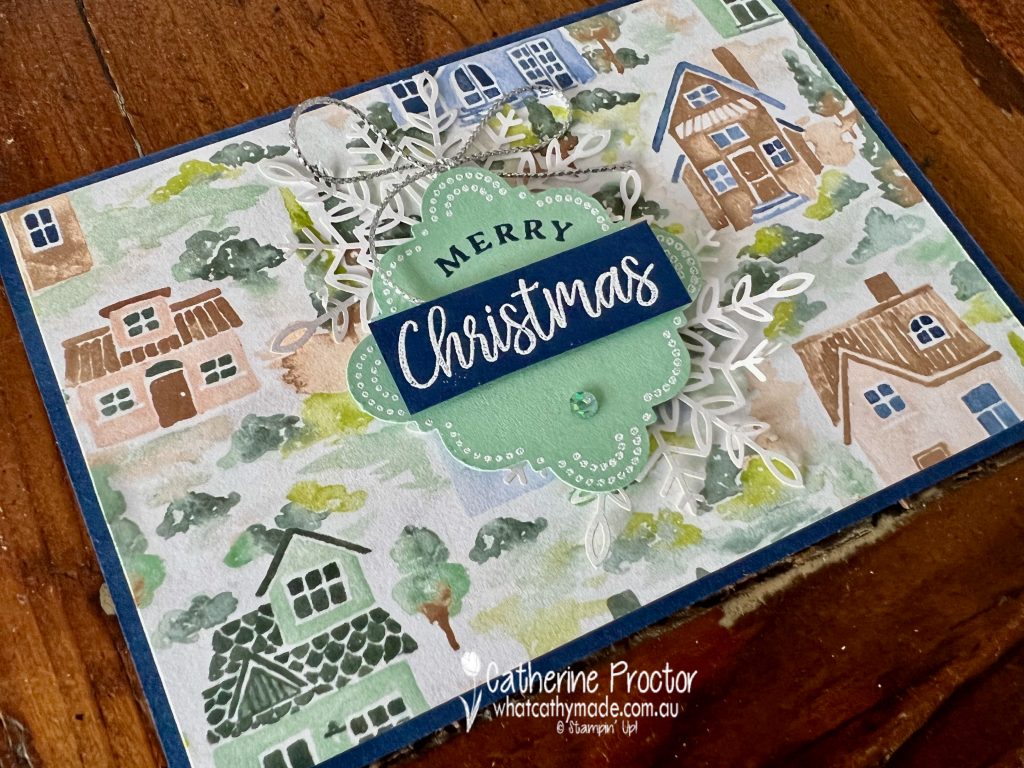
Card three uses the DSP with the little houses. This time I white heat embossed the punched out tag as well as the Christmas sentiment.
My cards also feature the new Adhesive-Backed Sequins & Gems! (I used the Coastal Cabana coloured gem), Pool Party Sheer Ribbon, silver Simply Elegant Trim and the Wonderful Snowflakes.
Now it’s time to hop on over to our next participant, the lovely Amie McIlroy – I can’t wait to see what Amie has made this week!
If at any time you find a broken link, you can find the complete list of all participants on Sharon‘s blog. Sharon Davern is the host of our Heart of Christmas blog hop this year – thank you so much Sharon!!!
If you live in Australia, you can find and purchase these products in my Stampin’ Up! Online Store or by clicking on the images below.
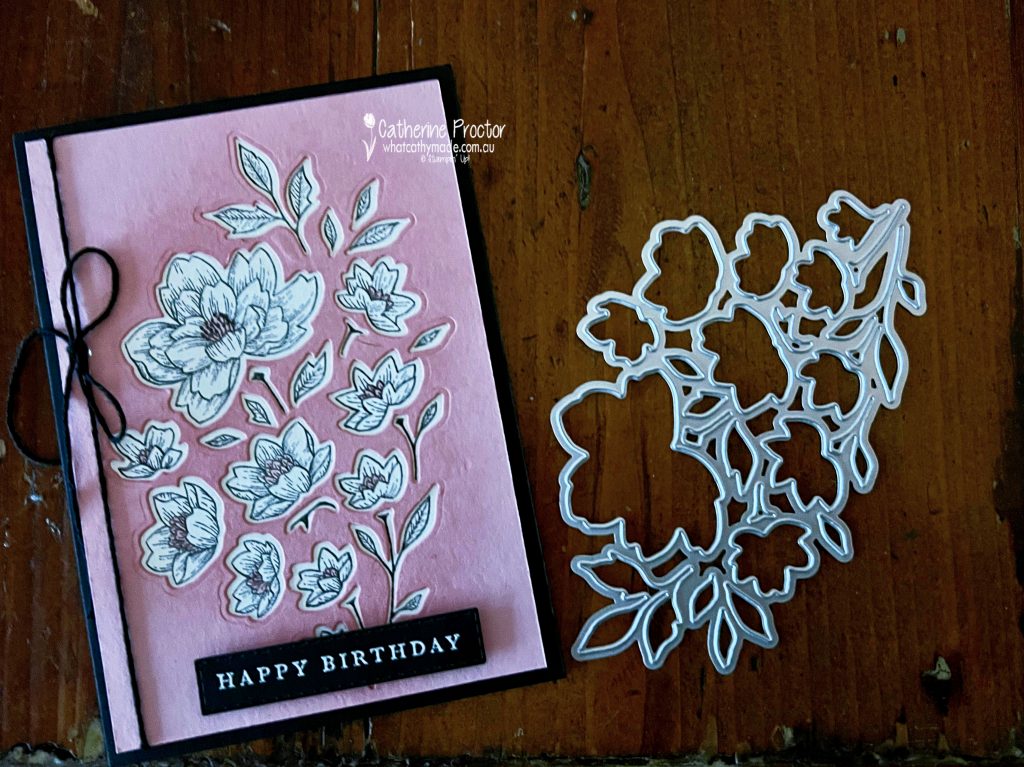
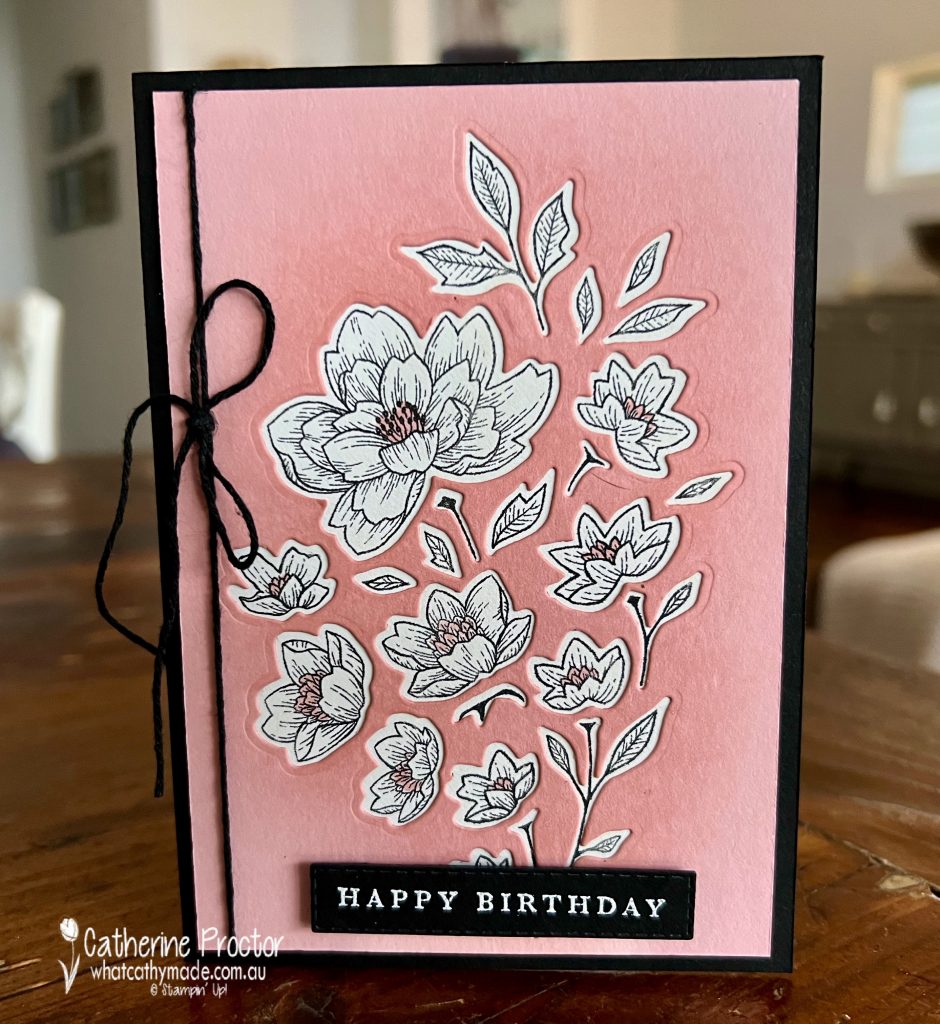
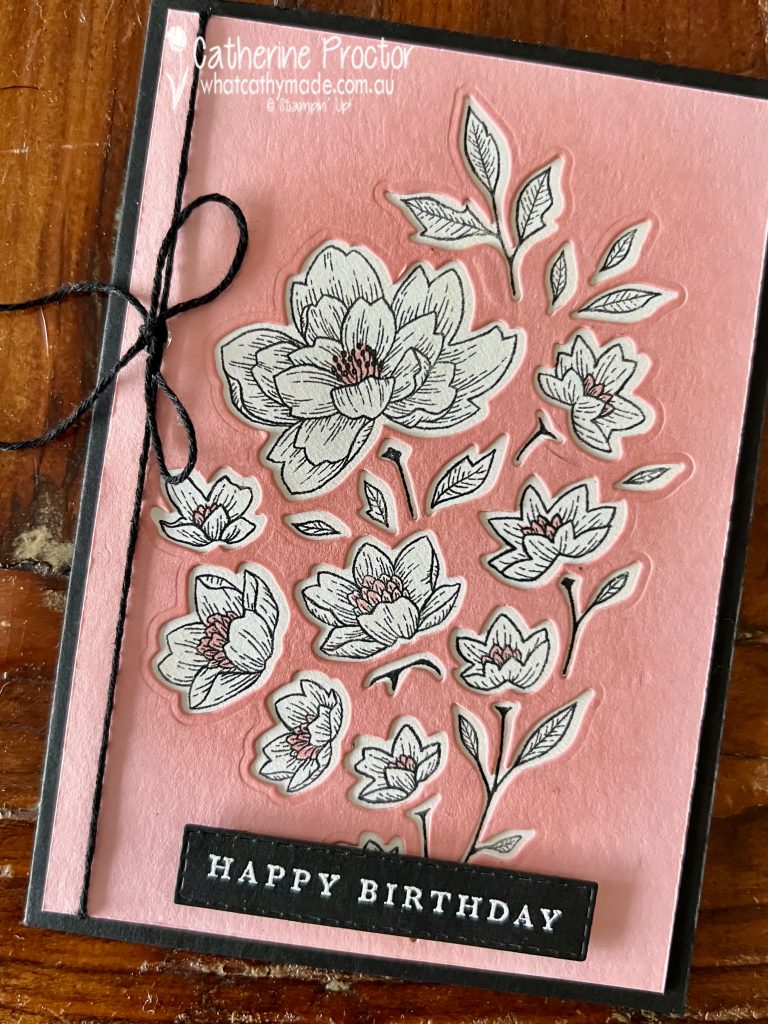
Welcome to week ten of our Art With Heart 2022-23 Colour Creations blog hop! This is a weekly blog hop where we showcase the stunning range of Stampin’ Up! colours in alphabetical order over 12 months and this week we are featuring Blushing Bride.
Do you love letterpress as much as I do? Tonight I’m sharing how to create a “faux letterpress” card using a technique that’s super easy to do!
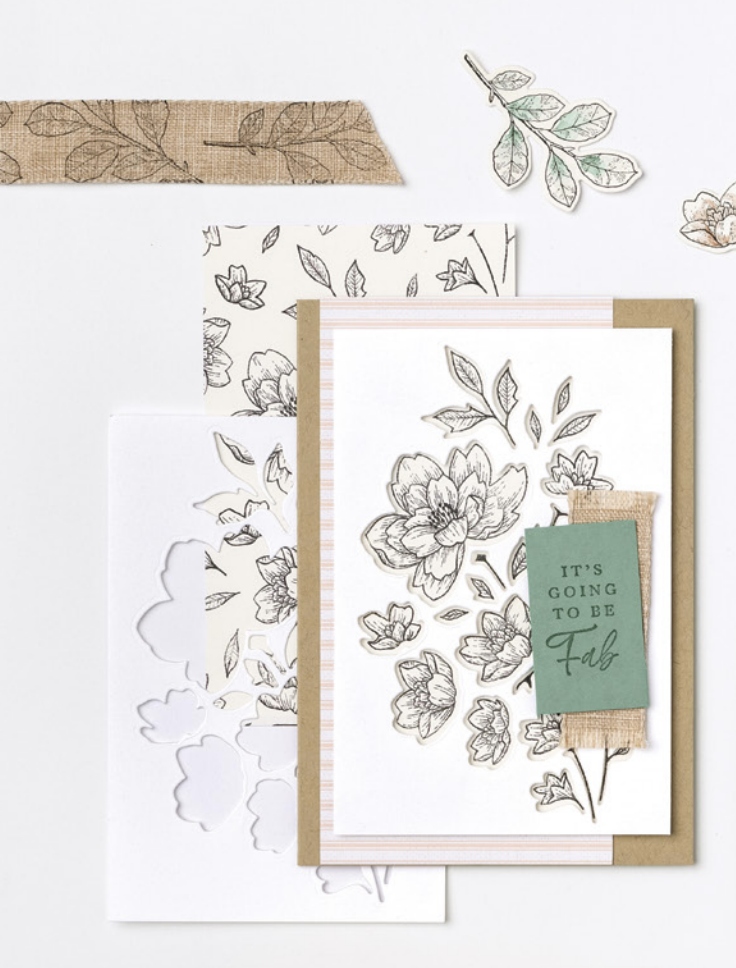
This card on page 56 of the Annual catalogue shows the faux letterpress technique that has inspired my Blushing Bride card.
So how does the faux letterpress technique work?
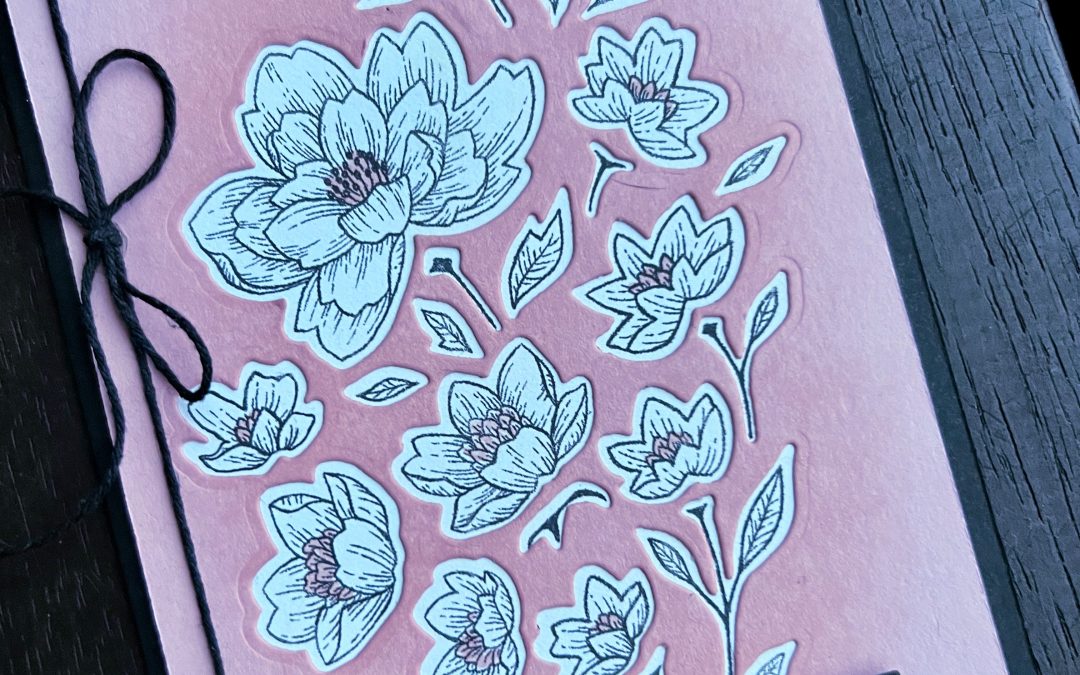
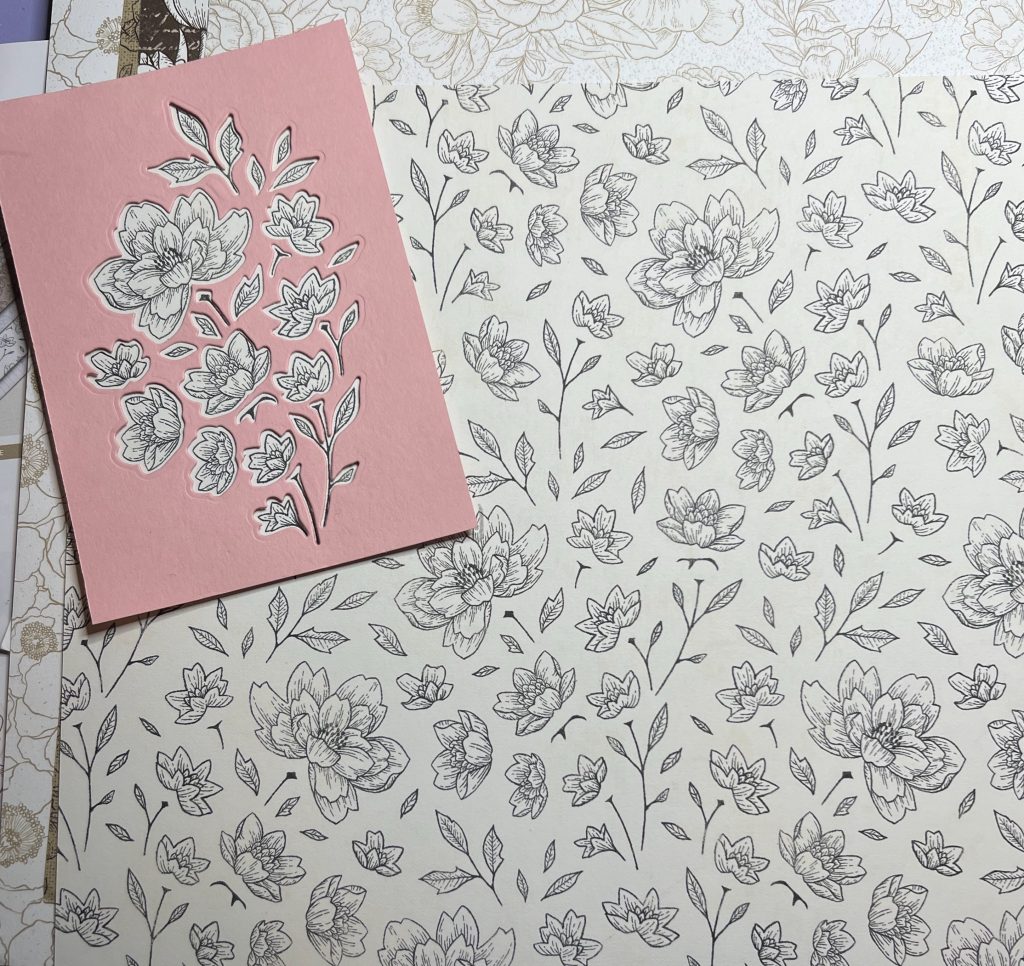
You’ll need to use a DSP that has a coordinating die that cuts out images from the DSP. I’ve used the largest die in the Cottage Flowers Dies that cuts out floral images on one of the Abigail Rose DSP patterns. How cute does it look already!
Faux Letterpress Technique
With the faux letterpress technique you effectively swap around the normal card “sandwich” of card stock base/card stock middle layer/DSP top layer to this sandwich instead: card stock base/DSP middle layer/card stock top layer.
Instead of using a die to cut images from the coordinating DSP, leave the DSP whole and use it as the middle layer of your card.
Die cut the card stock layer – this will become the top layer of your card.
Carefully line up the die cut openings in the card stock over the top of the corresponding DSP images and adhere the card stock over the DSP.
The die cut openings then reveal the flower pattern on the DSP underneath, creating a “faux letterpress” effect – simply genius!
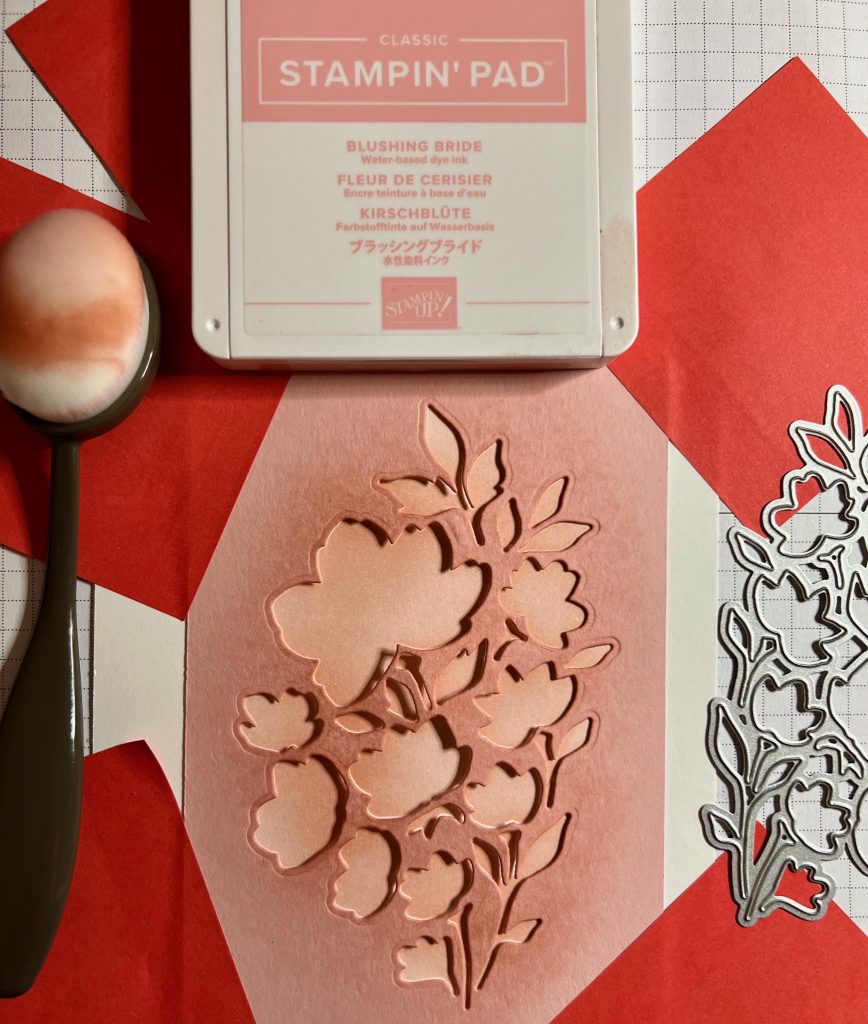
I die cut Blushing Bride card stock with the largest Cottage Flowers die and carefully positioned it over the top left hand side of the DSP, before trimming the DSP to size.
Before I adhered the die cut cardstock to the DSP I added some extra colour by blending Blushing Bride ink around the die cut area with a blending brush.
Of course, I couldn’t find where I had put my new masking paper – where is that masking paper when you want to use it! – so a few Post It notes did the trick instead.
I then carefully lined up the die cut layer with the DSP and adhered them together. Before I adhered the card front to the Basic Black card base I tied some Basic Black Bakers Twine around the left of the flowers with a single bow.
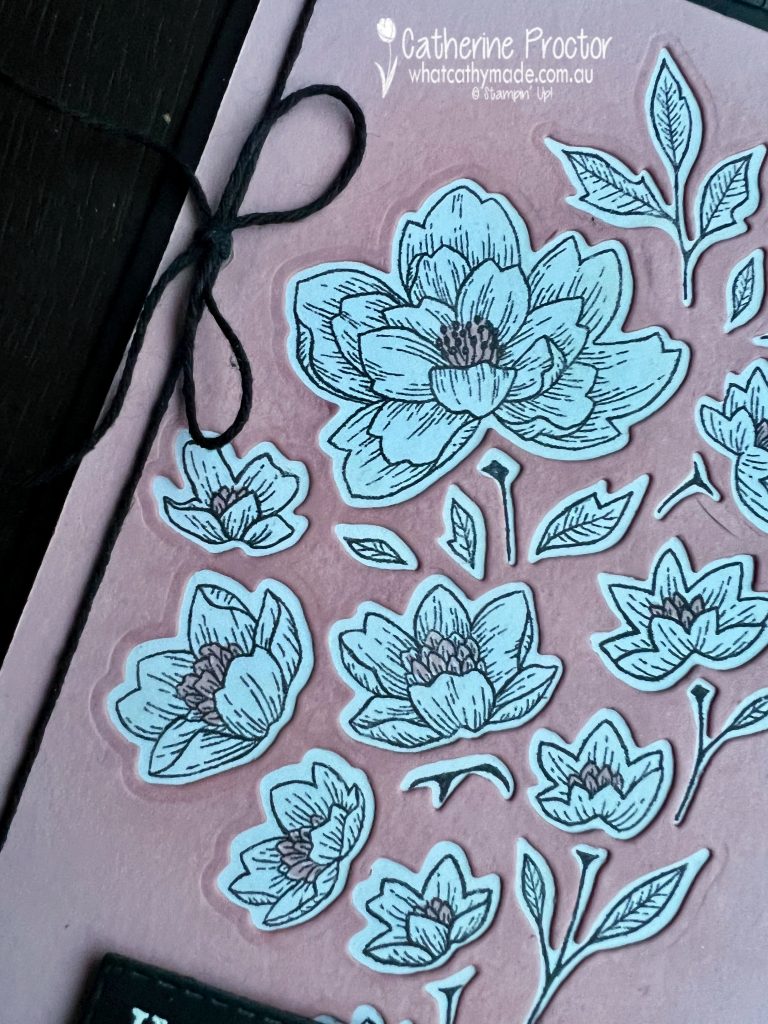
An extra touch of Blushing Bride was added to the centre of the flowers with a Blushing Bride Stampin’ Write marker.
The “Happy Birthday” sentiment is also from the Cottage Rose Bundle, which includes the Cottage Rose Stamp Set and the Cottage Flowers Dies, stamped in Versamark ink, and white heat embossed.
I stamped a few extra flowers on the inside of the card too and coloured them in with the Blushing Bride Stampin’ Write marker.
Now it’s time to hop on over to our next participant, the lovely Andrea Sargent – I can’t wait to see what Andrea has made this week!
If at any time you find a broken link, you can find the complete list of all participants below.
Welcome to week one of the Heart Of Christmas Blog Hop!
That’s right, our Heart Of Christmas Blog Hop is back for another exciting year of Christmas fun and creativity. We will continue to share weekly Christmas creations every Monday at 8pm, finishing up on November 28th.
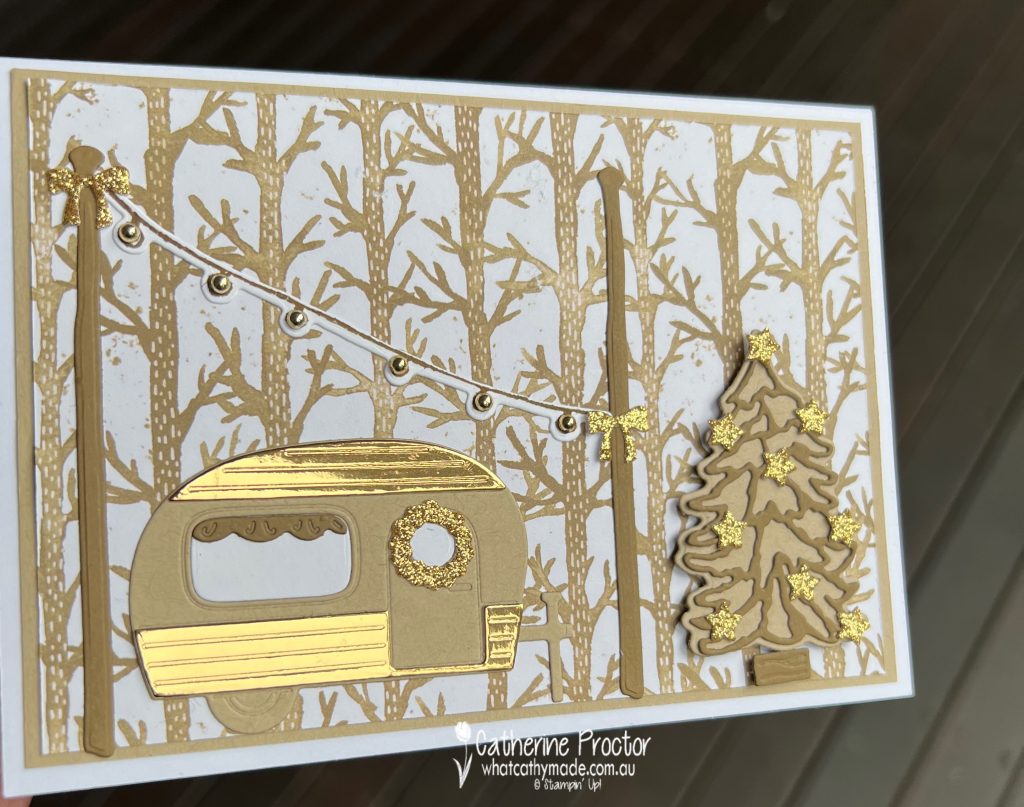
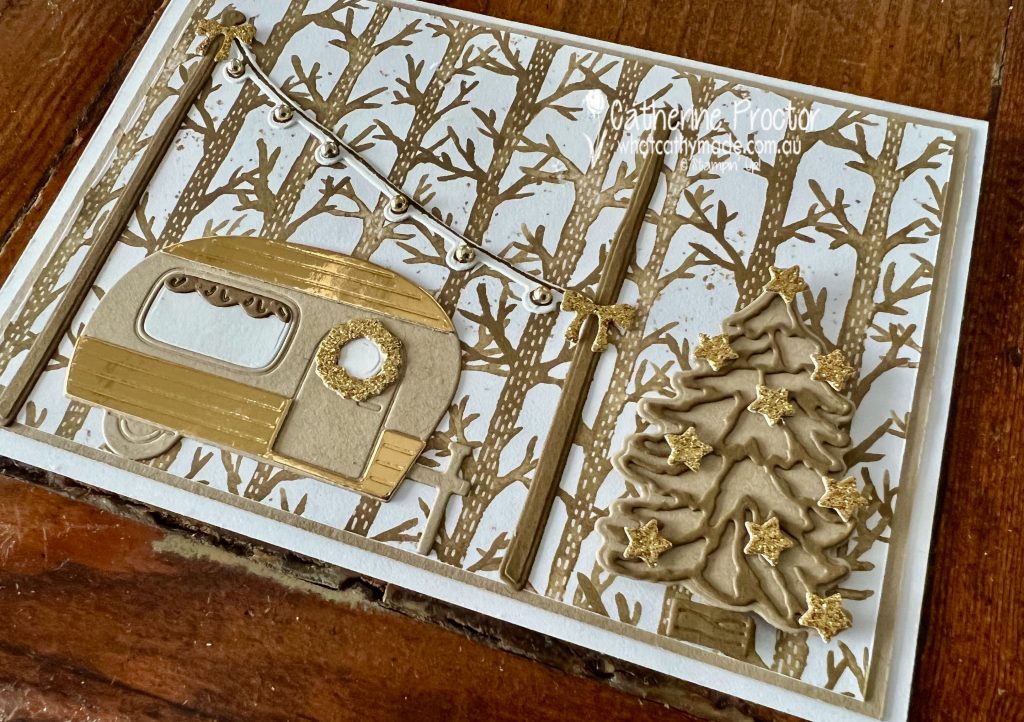
SALE-a-bration only runs from 1 July – 31 August, so I’m sharing a card tonight that features my absolute favourite SALE-a-bration item, the adorable Tree Lot dies. These dies are free when you purchase $180 or more in a single order and you get 24 dies in the set.
There are so many scenes you can make with the Tree Lot Dies and they also coordinate with a gorgeous new stamp set from the July-December 2022 catalogue, the Trees For Sale Stamp Set.
The colour scheme for my card is quite unusual for a Christmas card, however it was inspired by the tree pattern in the Rings Of Love designer series paper – this is my second favourite SALE-a-bration item!
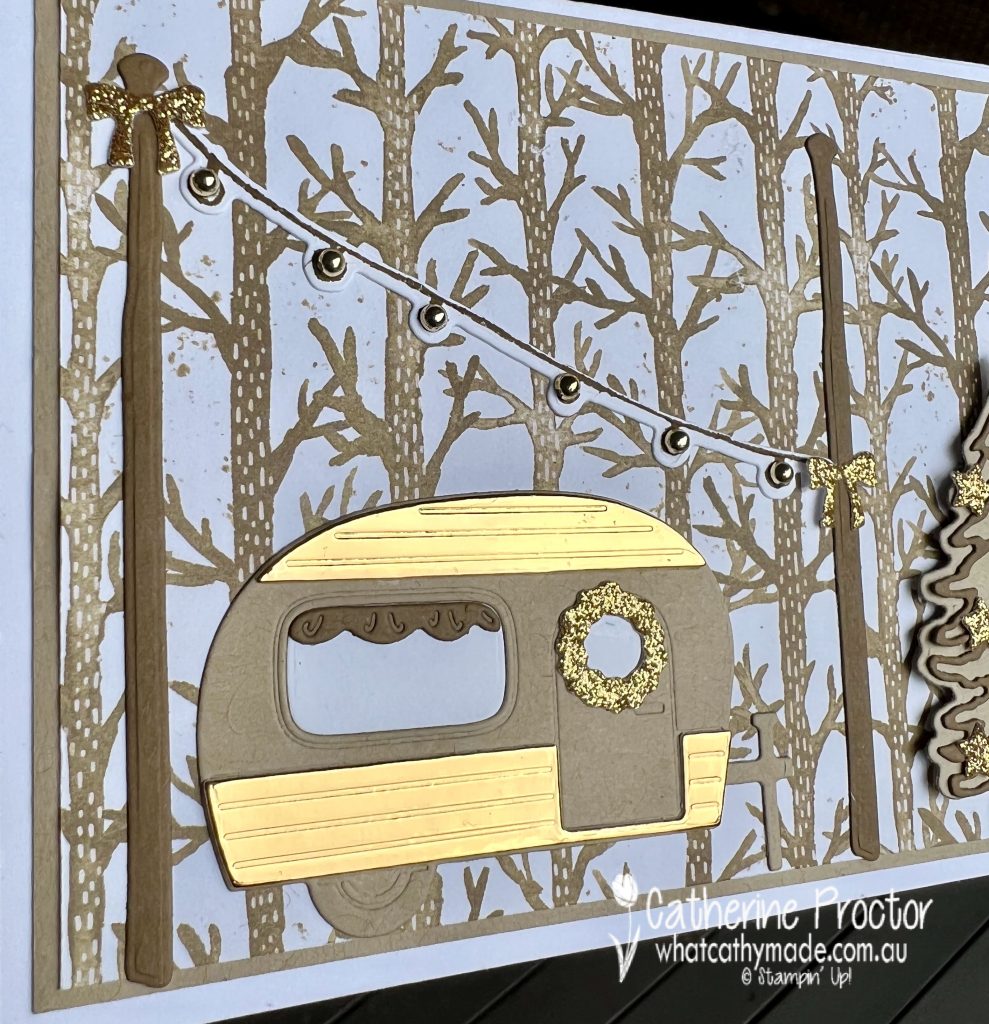
I loved the idea of a little caravan, parked in the middle of nowhere, celebrating Christmas by stringing up some fairy lights in the forest and adding some sparkly gold stars to one of the trees.
I’ve used the tiny star dies, the wreath die and the bow dies to die cut the sparkly stars in the tree, the wreath on the caravan door and the bows on the poles from the new Glimmer 12″ x 12″ (30.5 x 30.5 cm) Specialty Paper.
Metallics, glimmer paper and foils can be really hard to photograph inside so I took this photo outside to try to better capture all of the the shimmer and sparkle on my card!
The string of lights is stamped in Soft Suede with little gold lights created with the new Festive Pearls (they come in Cherry Cobbler, gold, silver and Soft Succulent).
The caravan base is Crumb Cake card stock with the ribbed metal section of the caravan die cut from gold foil. The curtain is Soft Suede card stock. I just love all these tiny detailed dies!
A couple of extra gold stars decorate the trees I stamped on the inside of my card.
I felt there was more than enough happening on the front of this card, so I didn’t add a sentiment to the front, but I may well change my mind and add one before I post it.
Now it’s time to hop on over to our next participant, the lovely Amie McIlroy – I can’t wait to see what Amie has made this week!
If at any time you find a broken link, you can find the complete list of all participants on Sharon‘s blog. The incredible Sharon Davern will be hosting our Heart of Christmas blog hop this year – thank you so much Sharon!!!
If you live in Australia, you can find and purchase these products in my Stampin’ Up! Online Store or by clicking on the images below.
Welcome to Bronwyn’s fourth Birthday Blog hop! You should have come to me from Chantell Randall.
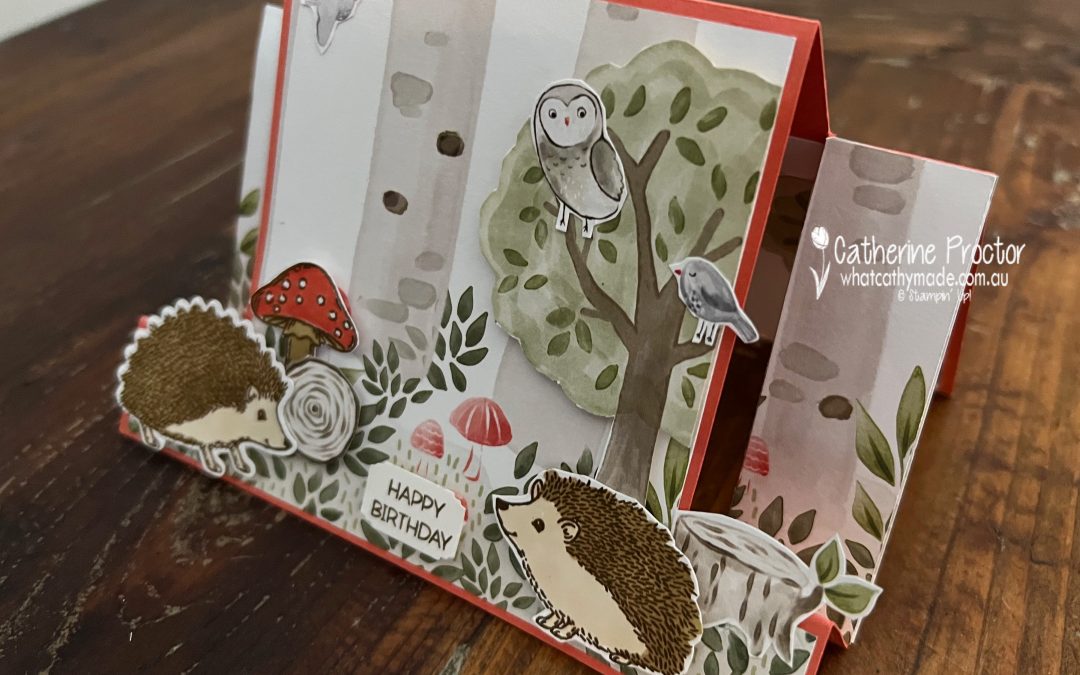
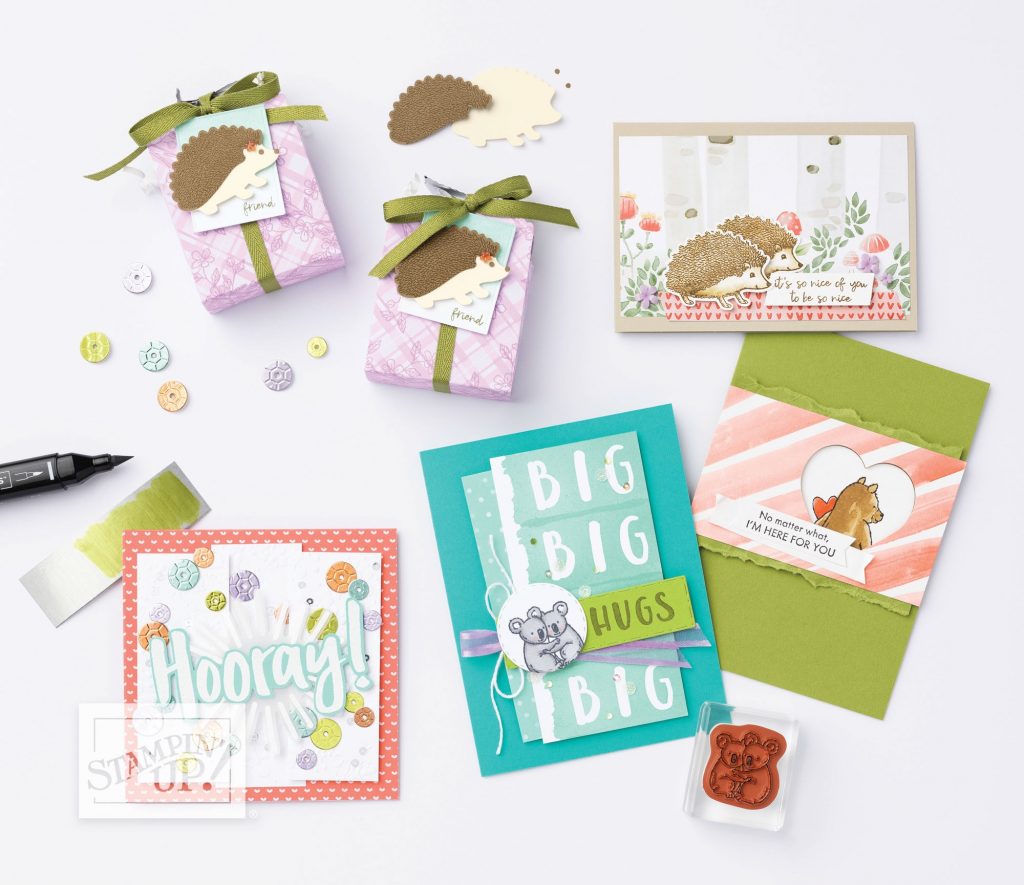
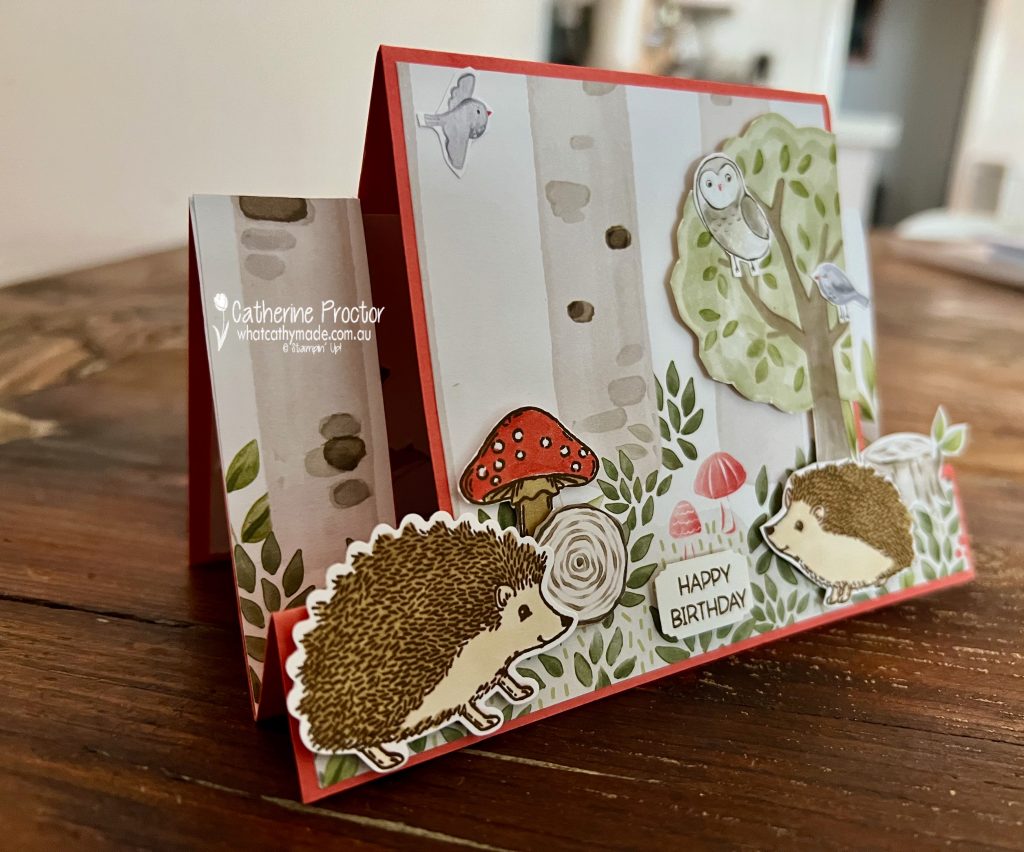
We’re a group of stamping friends who are celebrating Bron’s 60th Birthday in 2022 with six blog hops, over six months, with six fun themes! Tonight we are CASEing the Catty from a page in the sixties (i.e. any card from pages 60-69 in the Stampin’ Up! Annual Catalogue 2022-23). I’ve decided to CASE the hedgehog card on page 61 – top right in the photo below.
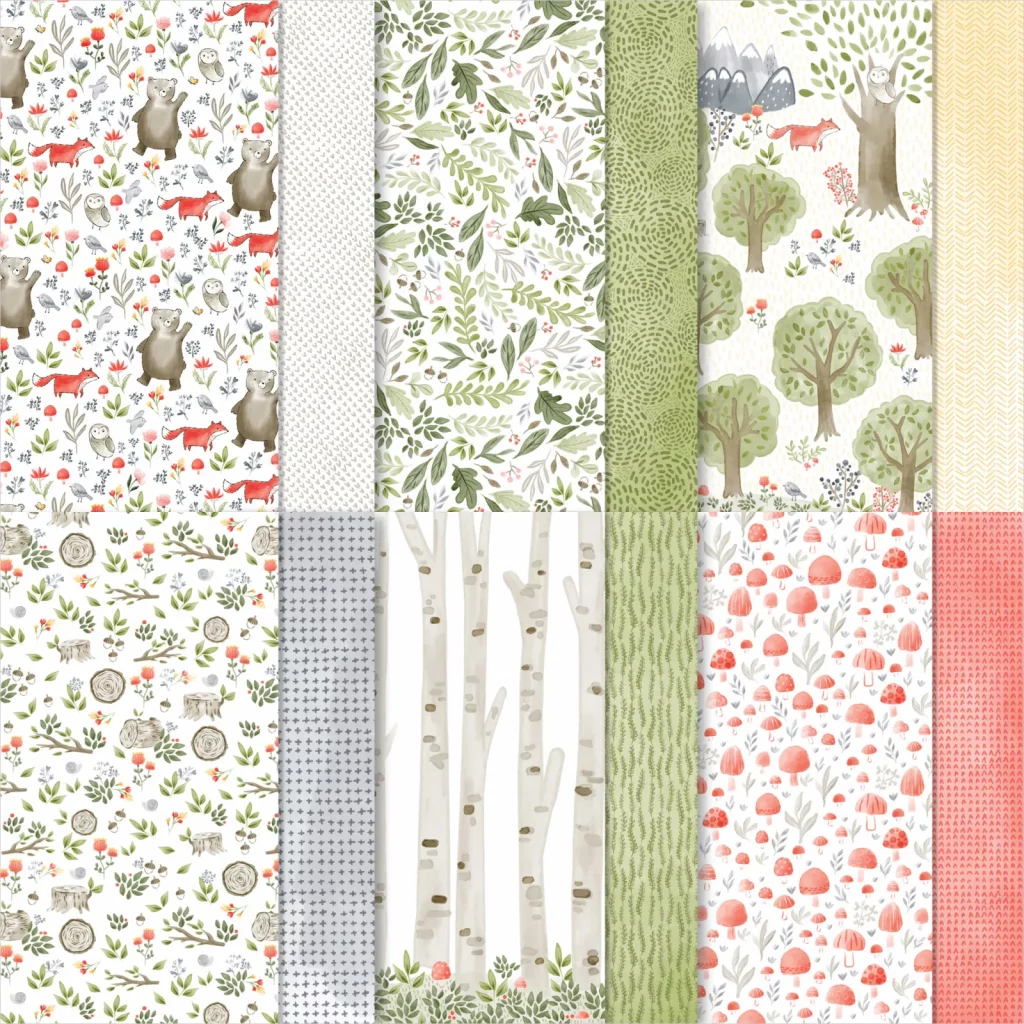
I loved the way this card combined the Happy Forest Friends DSP with the gorgeous Happy Hedgehogs stamp set. The tree DSP works really well with the hedgehogs and makes them look like they are in the woods.
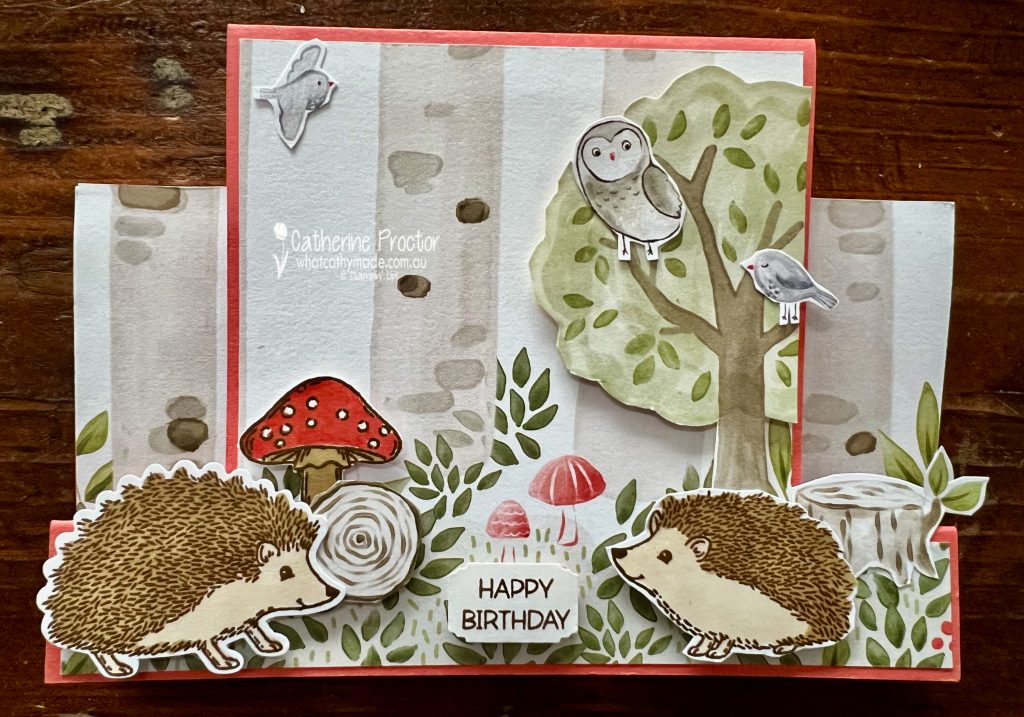
I’ve made my card 3D by making a fancy fold that I found on YouTube created by an overseas Stampin’ Up! demonstrator, but I’m not sure what this fancy fold is called? It was really fun to make and I altered the measurements to fit our Australian A4 cardstock.
Here’s what it looks like laying flat.
A lot of the elements on this card are images fussy cut from various DSP designs in the Happy Forest Friends DSP. The colour scheme of Calypso Coral and Soft Suede that I used to stamp and colour the hedgehogs and the large mushroom are inspired by the DSP.
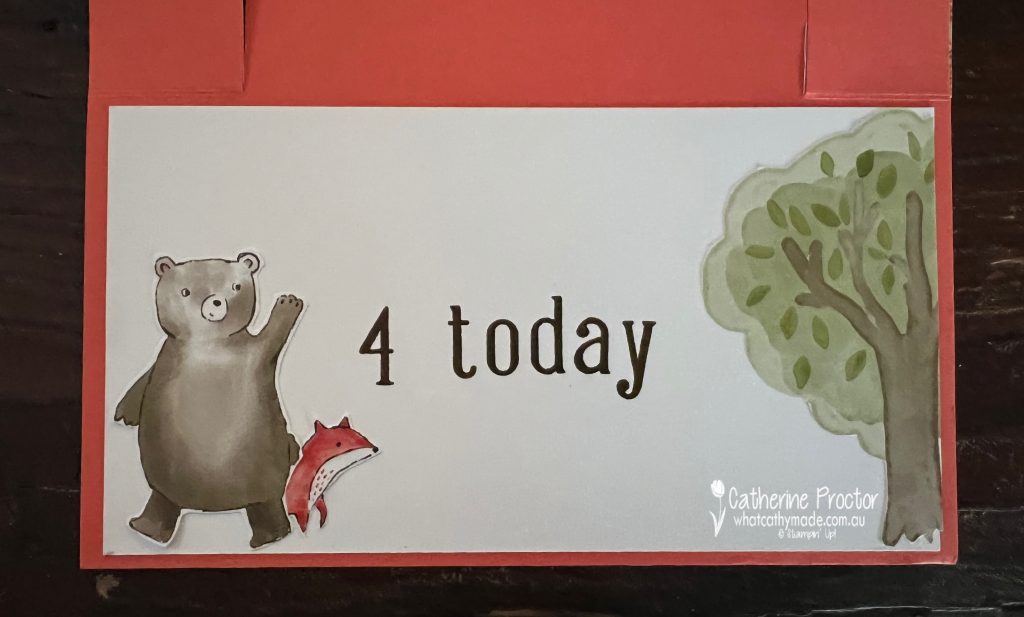
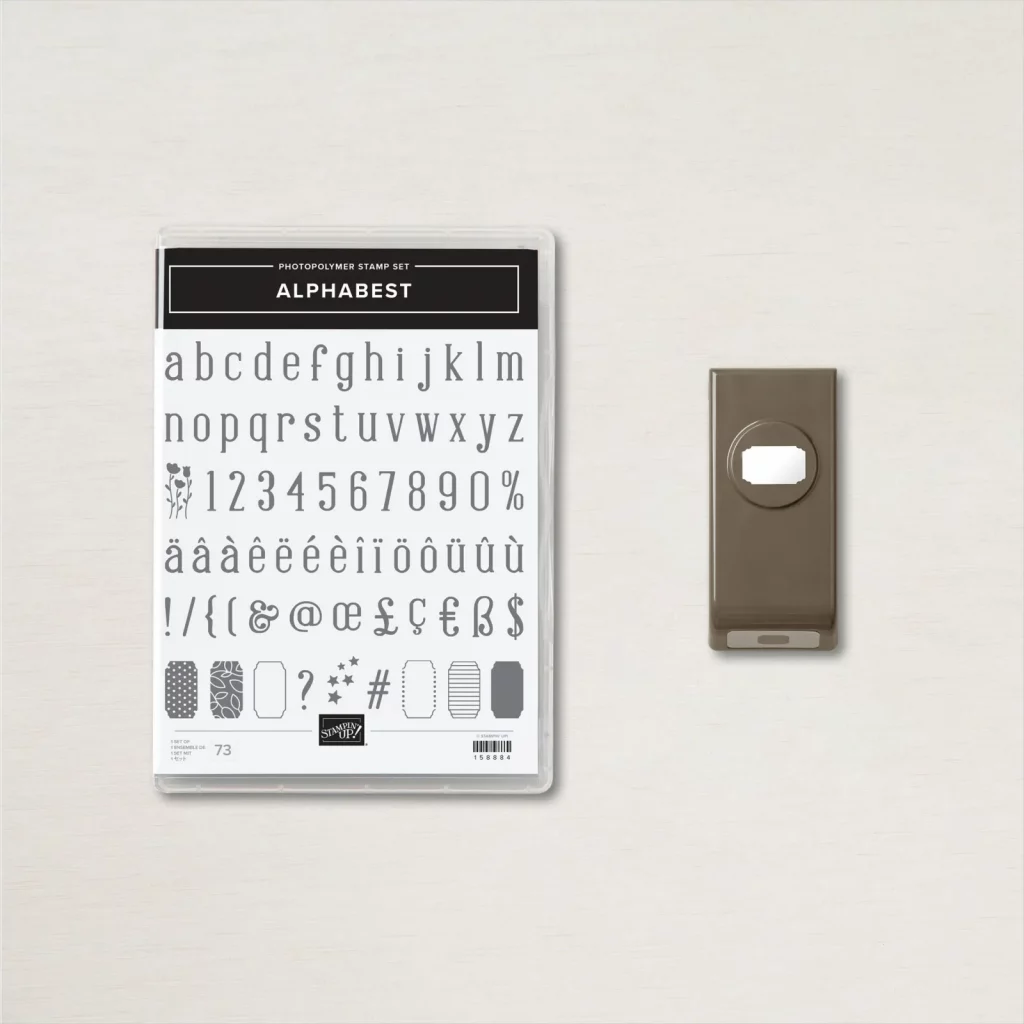
My youngest niece just turned 4 last week so I made this card for her birthday, using the Alphabest stamp set and more fussy cut images to personalise the inside of the card.
The Best Label punch (part of the Alphabest bundle) was the perfect size to punch out the “Happy Birthday” sentiment on the front of the card from the Penguin Place stamp set.
Next up on Bronwyn’s Birthday Blog hop is Vicki Arrowsmith. I can’t wait to see what Vicki has created today!
I’ll be back tomorrow with the Heart of Christmas blog hop and then again on Wednesday with the AWH Colour Creations blog hop, where we will be showcasing Blushing Bride.
Until then, wherever you are in the world, stay safe, stay calm … and keep on crafting xxx


")


 Specialty Designer Series Paper")
 Specialty Pack")


 Designer Series Paper")
")
")


 Sheer Ribbon")


")
 Designer Series Paper")


")


 Specialty Paper")