Are you ready for some more Christmas card inspiration?
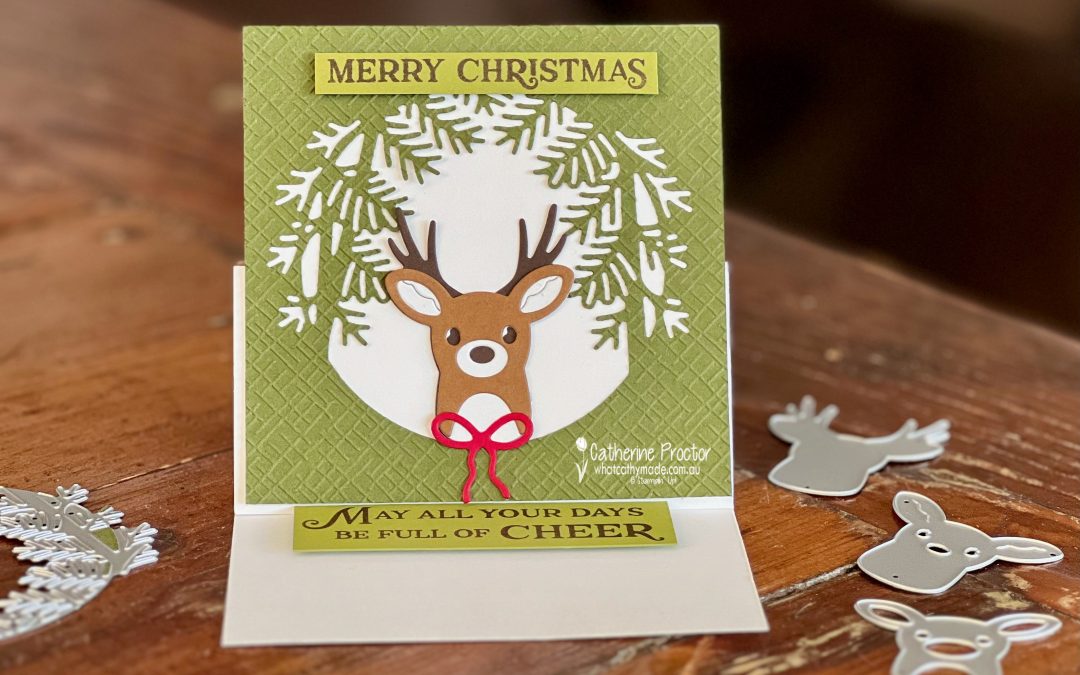
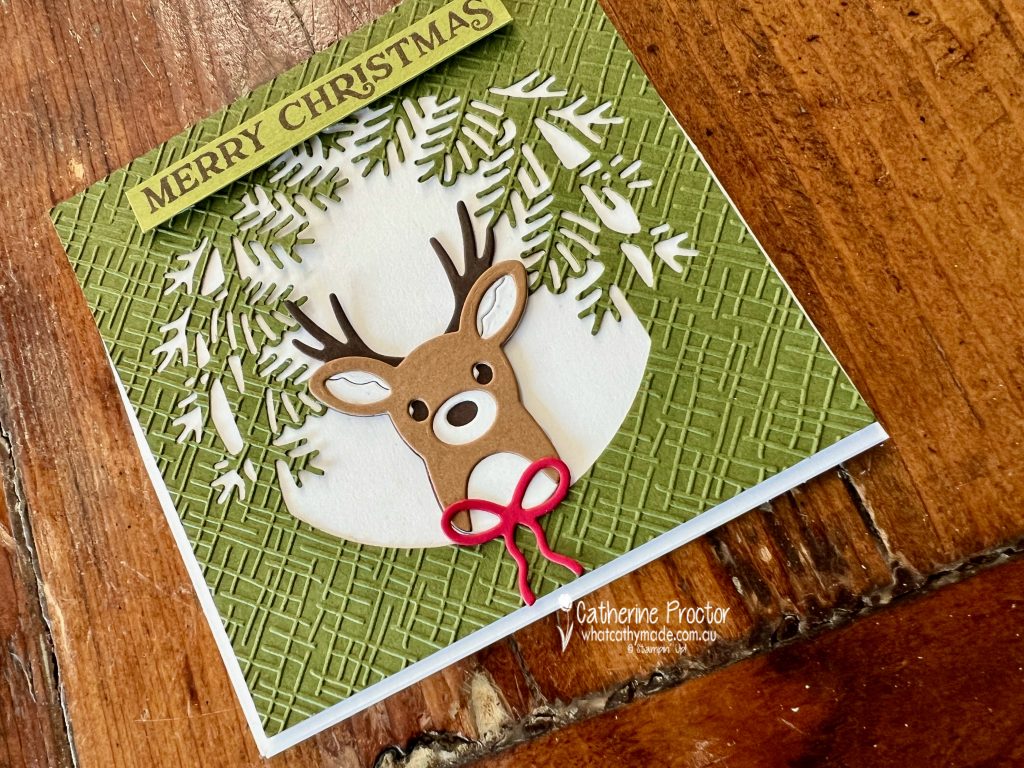
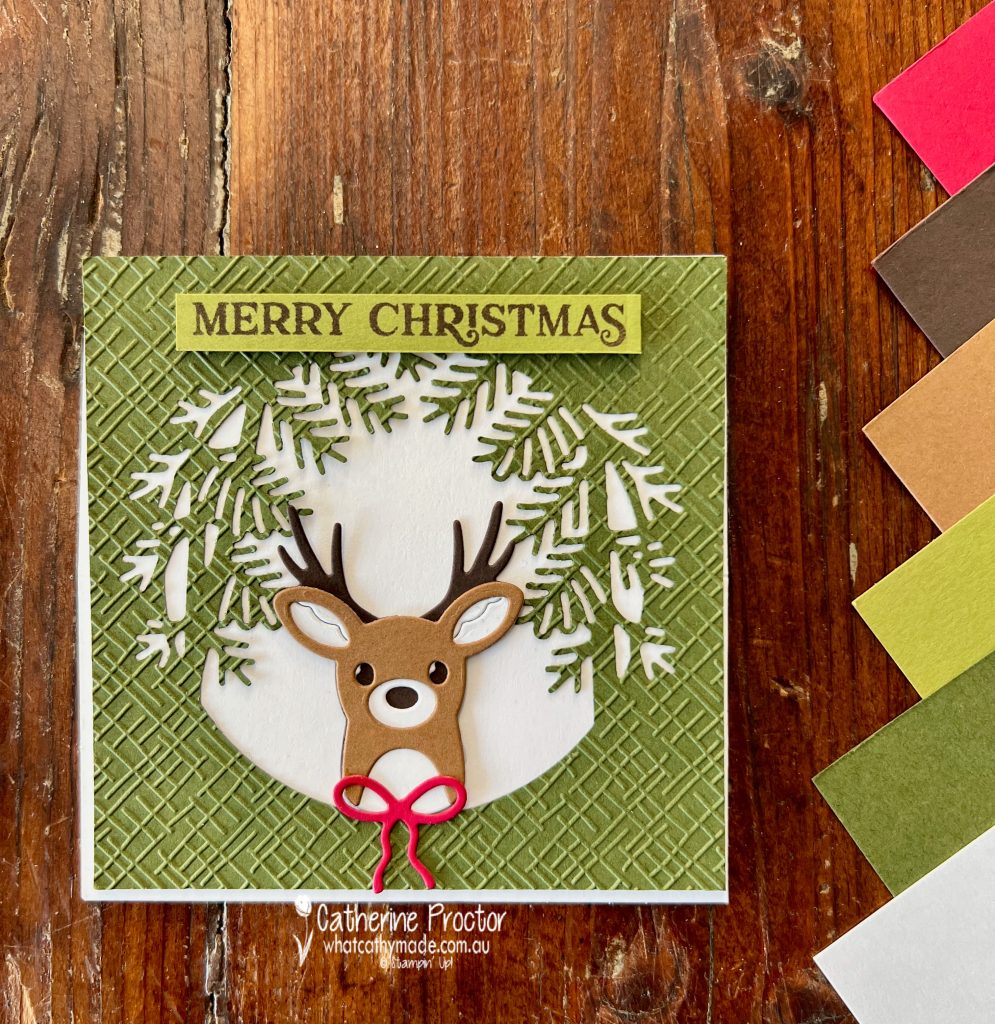
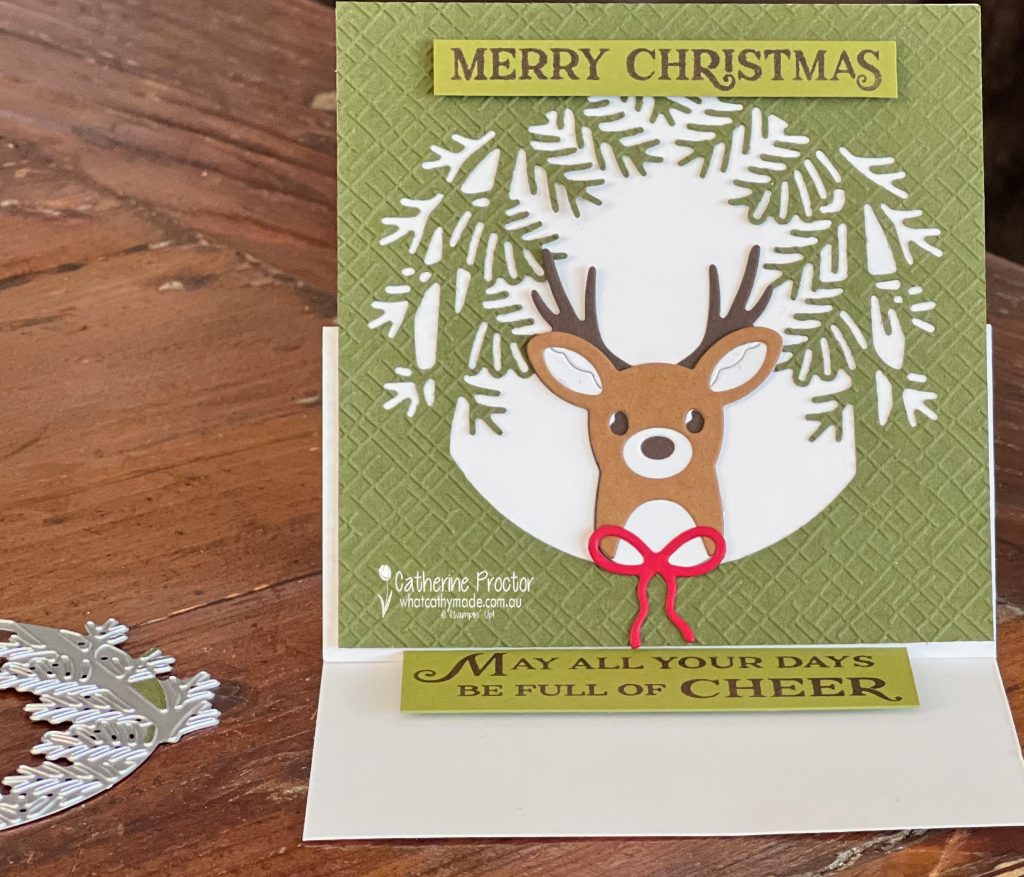
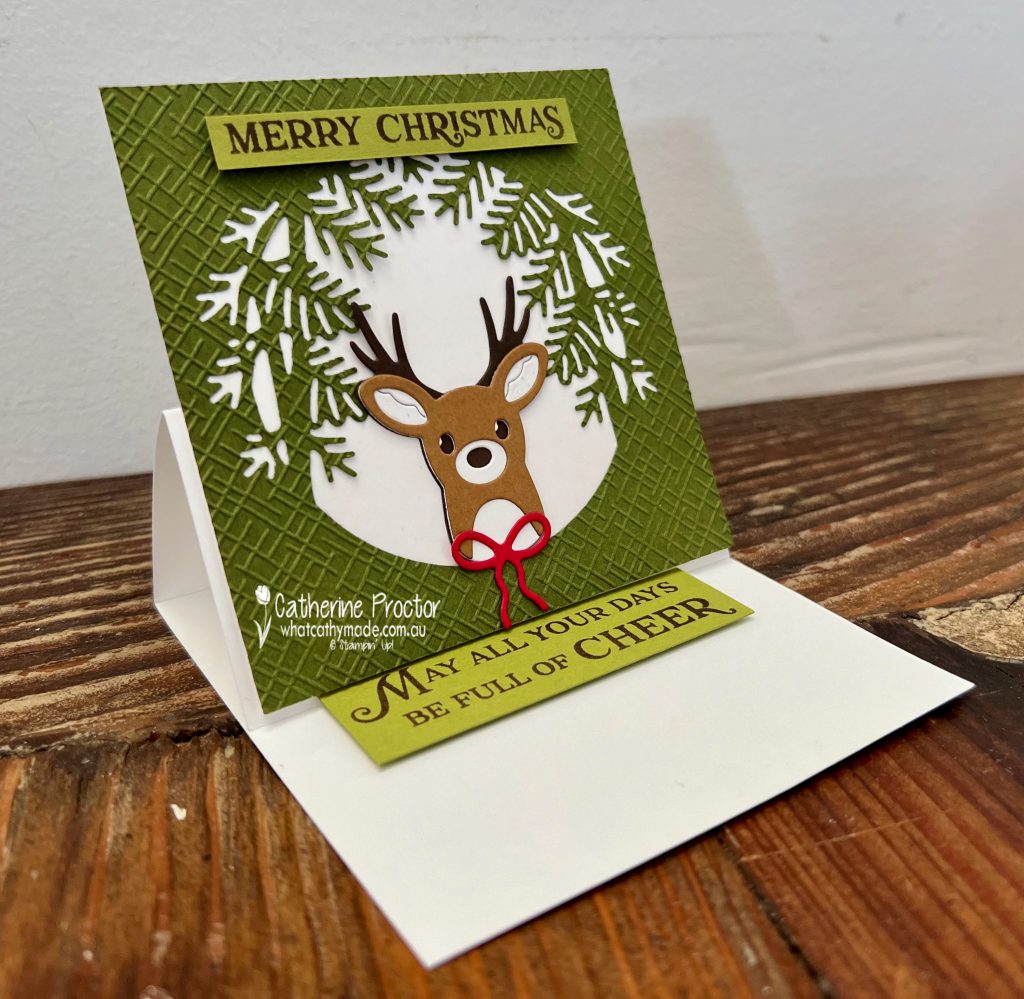
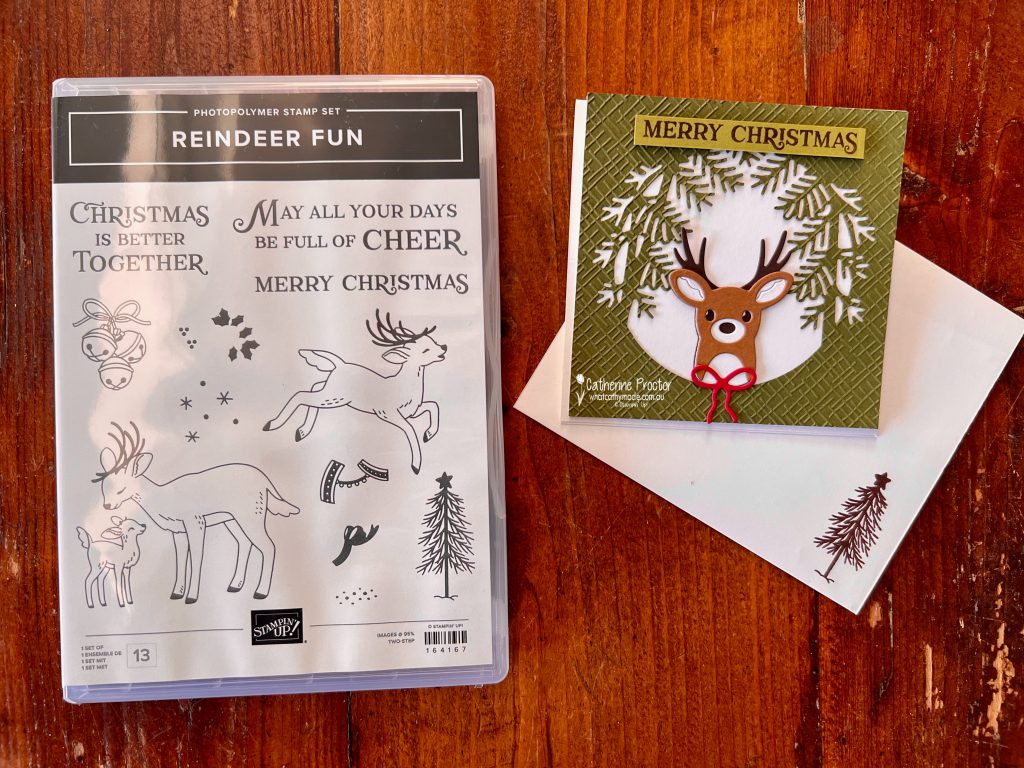
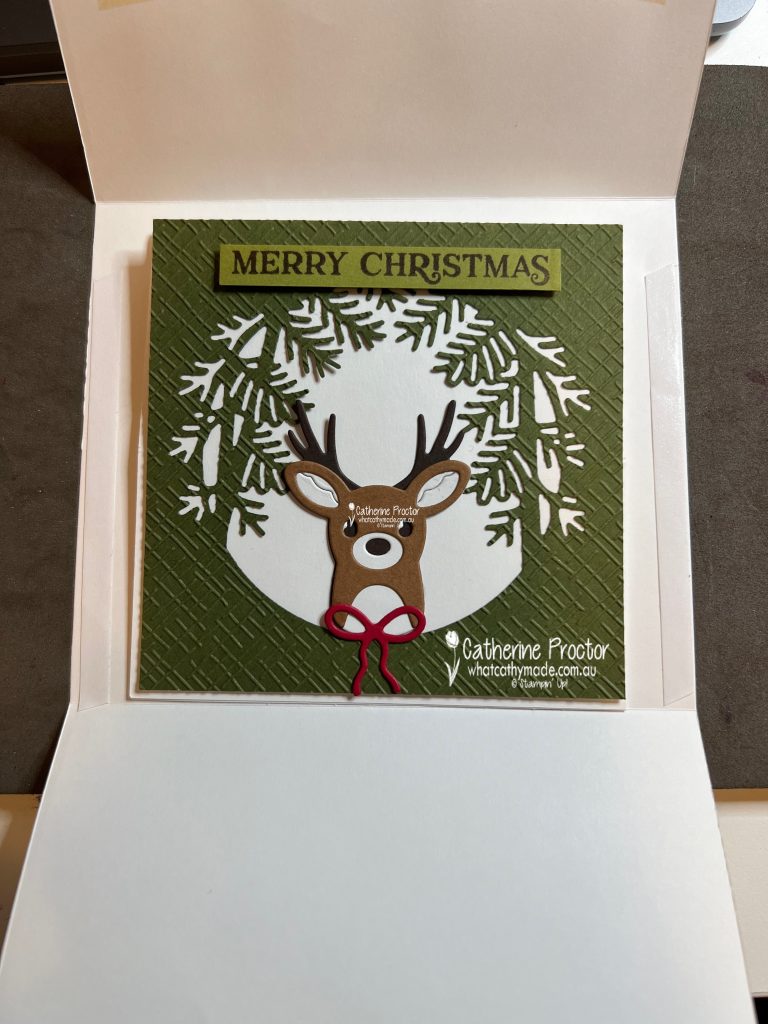
My Christmas card for week 3 of our Heart of Christmas blog hop uses products from a brand new suite in this year’s forthcoming September-December catalogue, the Reindeer Days Suite Collection.
I’m in love with this little die cut layered reindeer!
My classic Christmas colour combination includes Mossy Meadow, Old Olive, Real Red, Early Espresso, Pecan Pie and Basic White.
The Mossy Meadow layer had been embossed with one of the Basics Dies before being die cut out using the foliage frame from the Reindeer Fun dies.
The reindeer is made from three layers of dies.
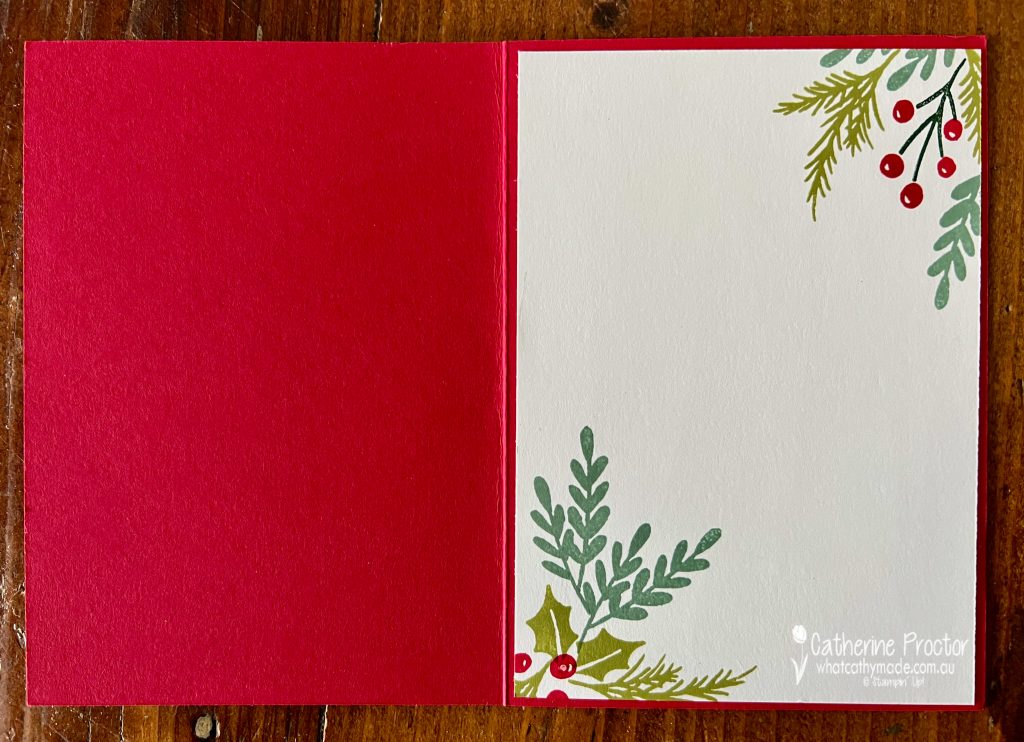
I’ve stamped the sentiments on the front and the inside in Early Espresso ink.
Both sentiments and the little tree on the envelope are from the Reindeer Fun stamp set.
To make an envelope that fits a square card I simply trimmed 1.5 cm off each side of a C6 envelope and used tear-n-tape to reseal the sides.
Now it’s time to hop in over to our next participant, the lovely Rachel Woollard – I can’t wait to see what Rachel has made this week!
If the next button link is not working or you’d like to see the entire list of participants go to Sharon Davern’s blog.
The AWH team will be back on Wednesday night, showcasing Cherry Cobbler, or you can enjoy some more Heart of Christmas inspiration next Monday night.
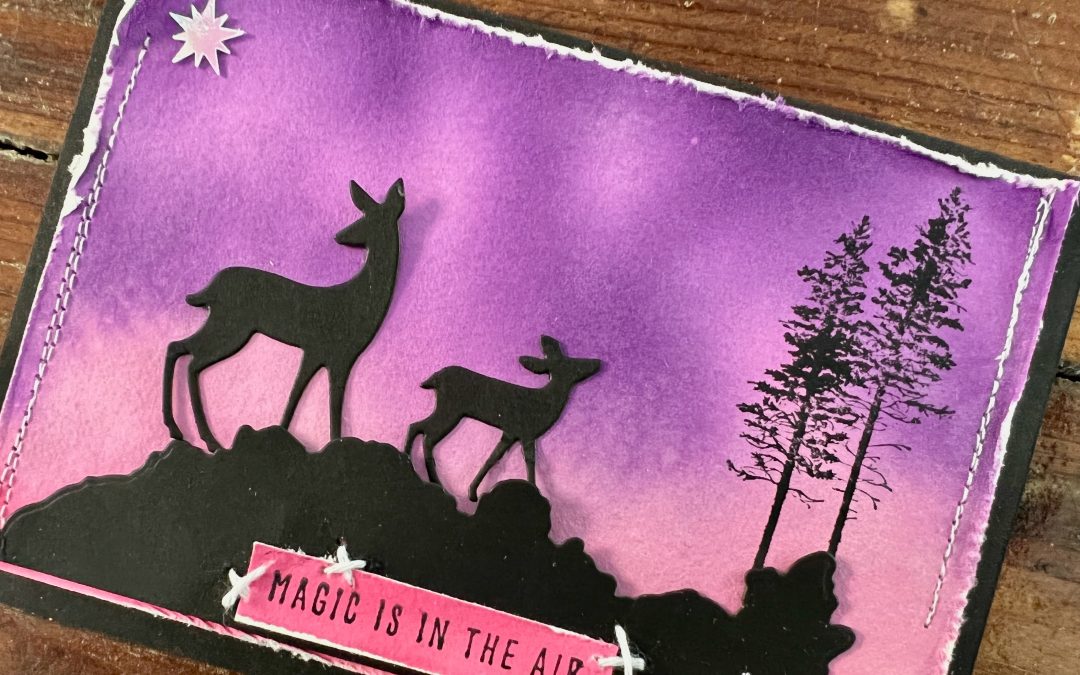
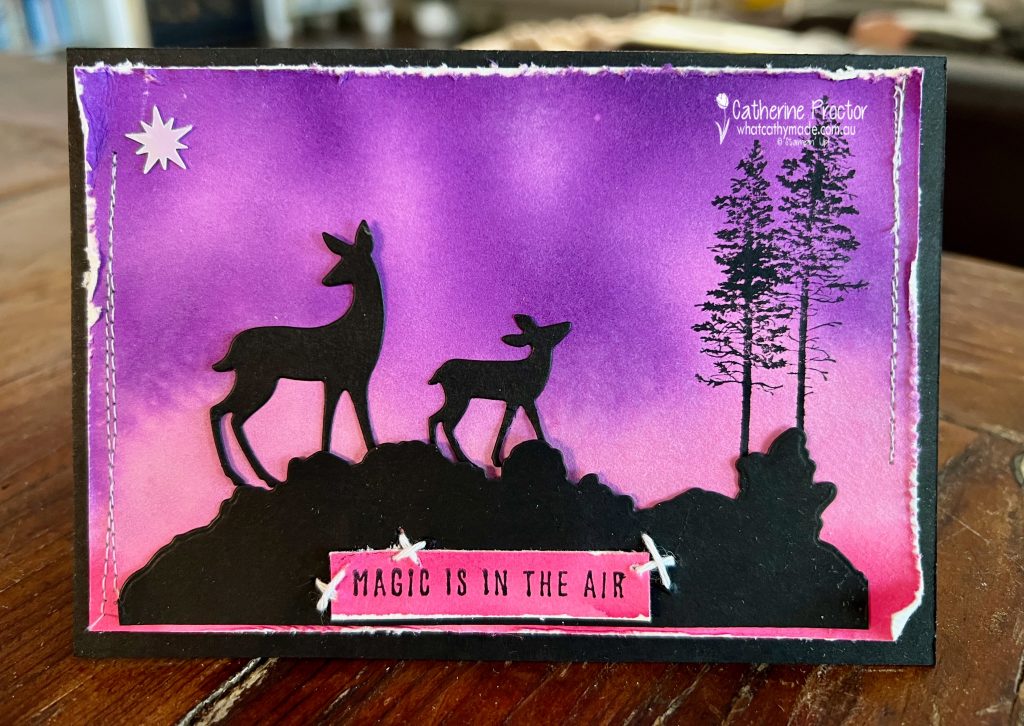
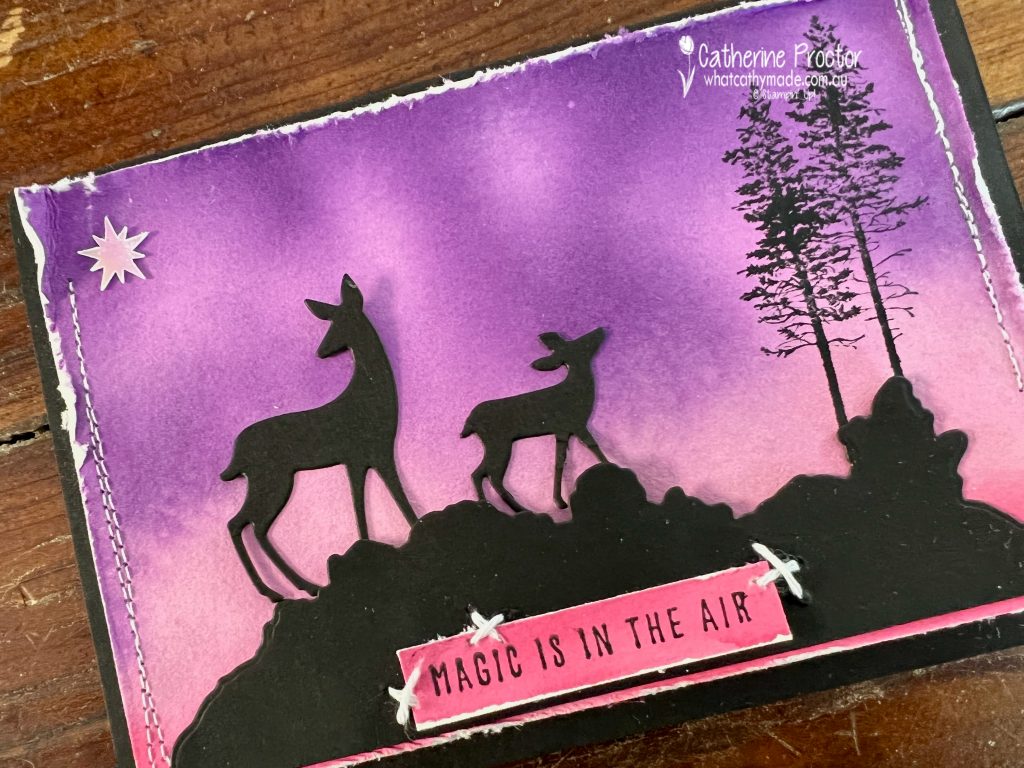
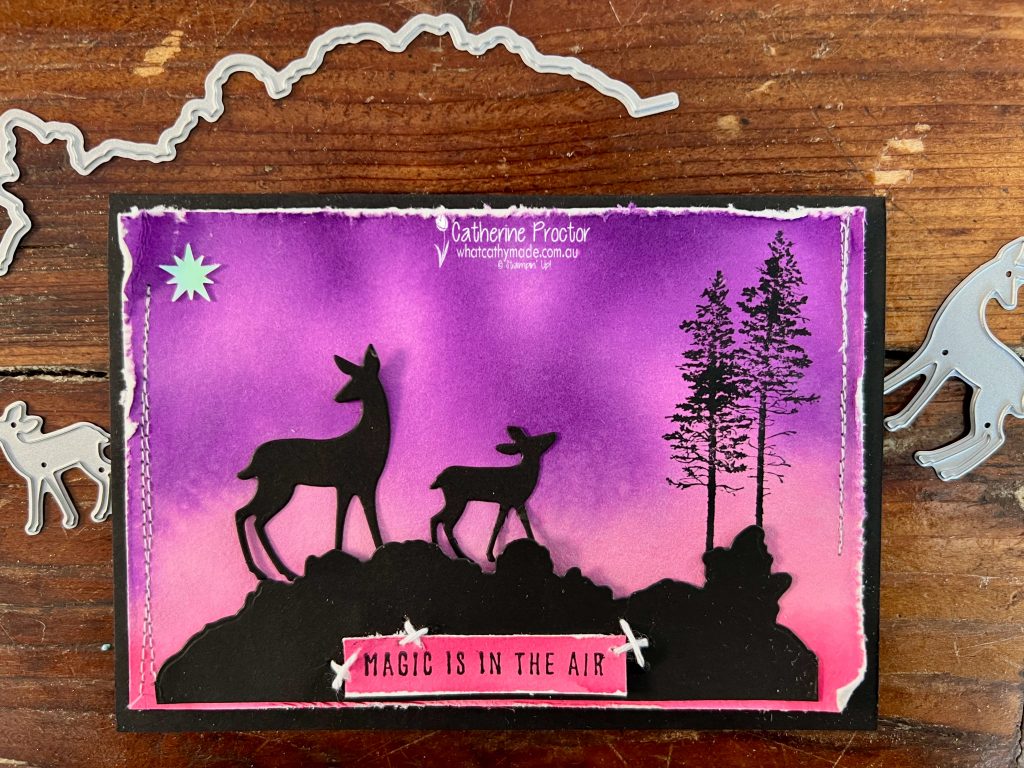
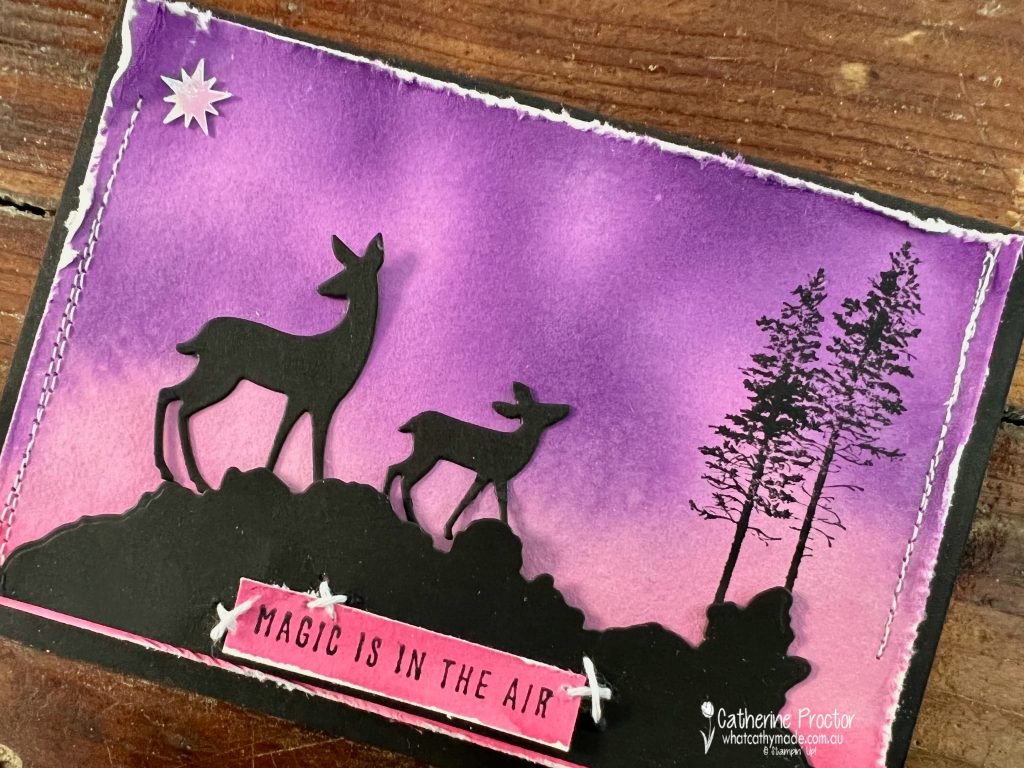
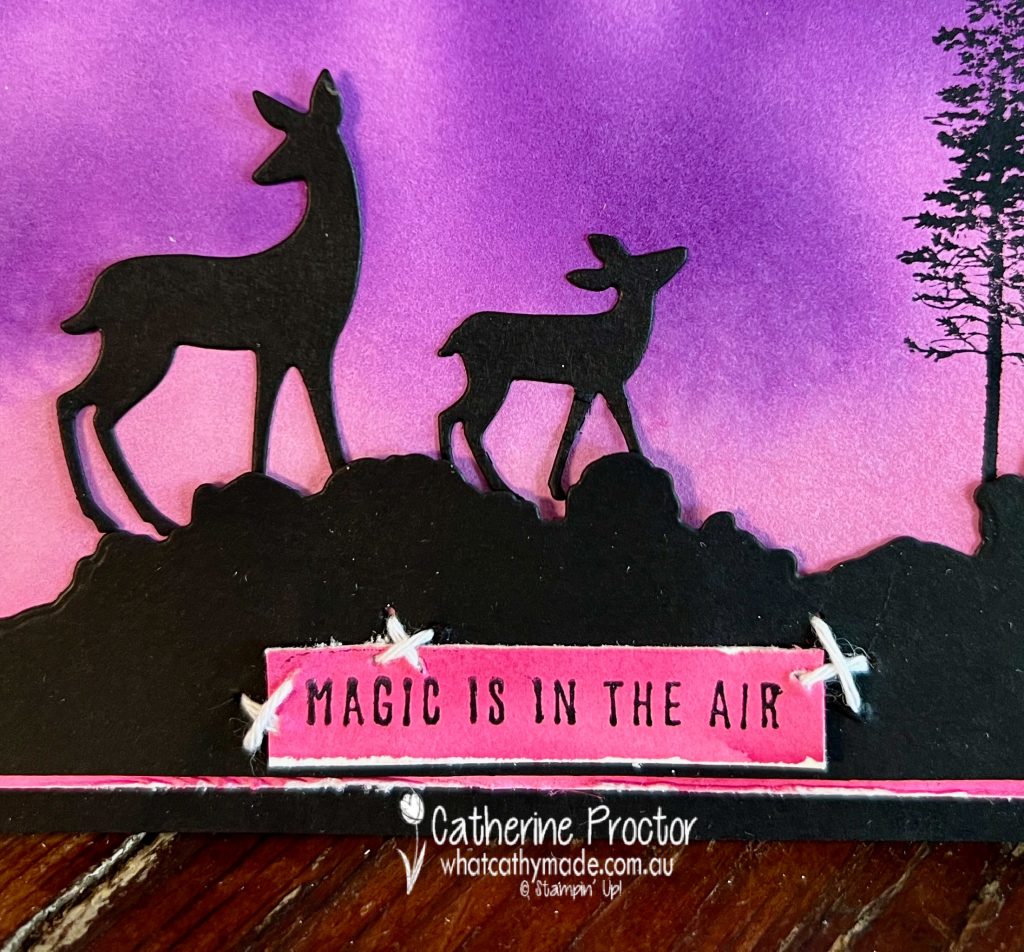
Day 7 of the #30DayChristmasCardMakingChallenge is a “Winter Sunset” card. This card certainly was a challenge for me!
I have to confess that living in Australia I have never seen a winter sunset in the Northern Hemisphere, so perhaps this scene looks more like the Northern Lights?
It was fun to get inky fingers for this challenge using the acrylic block technique with my Gorgeous Grape, Fresh Freesia and Polished Pink ink pads, stamping onto watercolour paper.
I use the largest acrylic block F, swiping it in order from top to bottom with Gorgeous Grape, Fresh Freesia and Polished Pink ink before squirting it with water using my Stampin’ Spritzer. I then gently placed a sheet of watercolour paper over the wet inky block and pressed down.
Once the background had dried, I stamped the trees from the Grassy Grove stamp set and then added my foreground elements, die cut from Basic Black Cardstock using the Grove dies.
A solitary Adhesive Backed star adds a tiny touch of bling and because my sewing machine is out at the moment, I just couldn’t resist adding some machine stitching and hand stitching to my card as well!
The “Magic is in the air” sentiment from the Peaceful deer stamp set was stamped into an offcut of my water coloured background and hand stitched to my card.
I’ll be back tonight with some Heart of Christmas card inspiration, as well as some more cards I’ve created for the 30 Day Christmas Card Making Challenge.
Wherever you are in the world, stay safe, stay calm … and keep on crafting xxx
Welcome to week eighteen of the Heart Of Christmas Blog Hop!
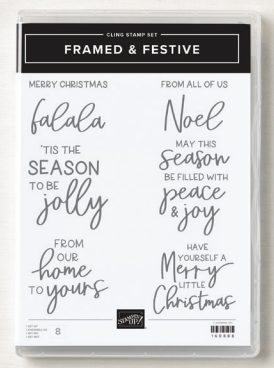
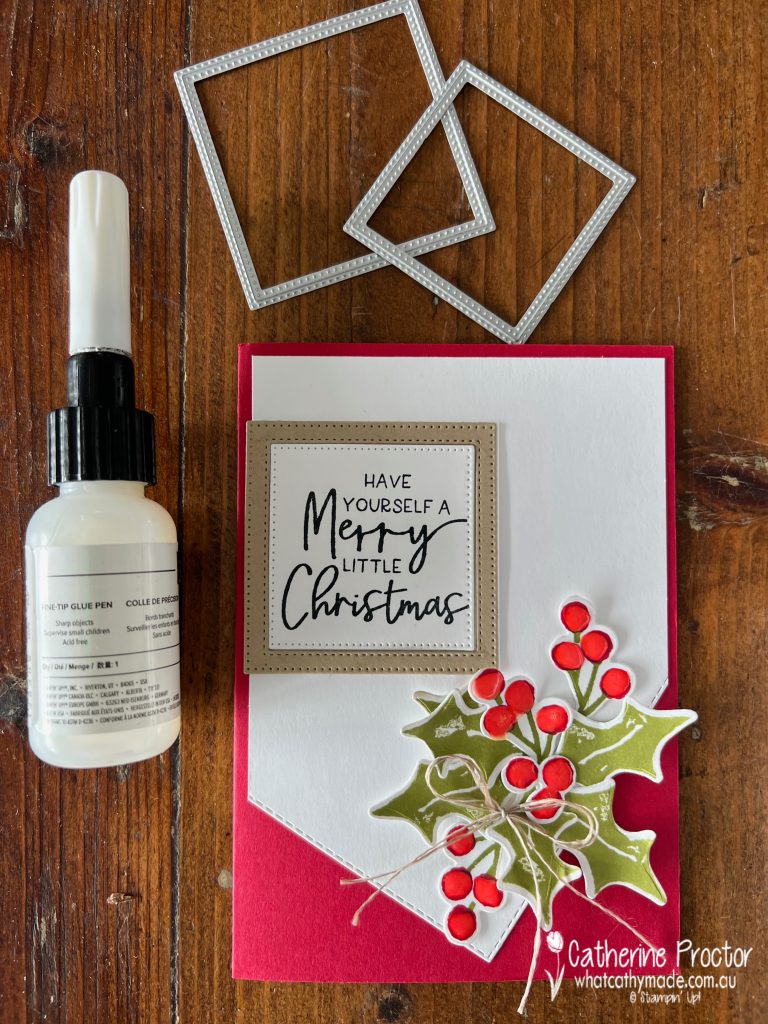
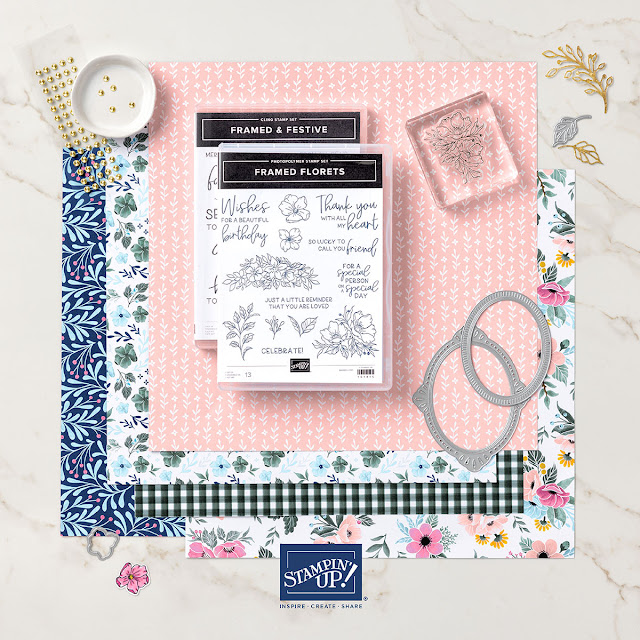
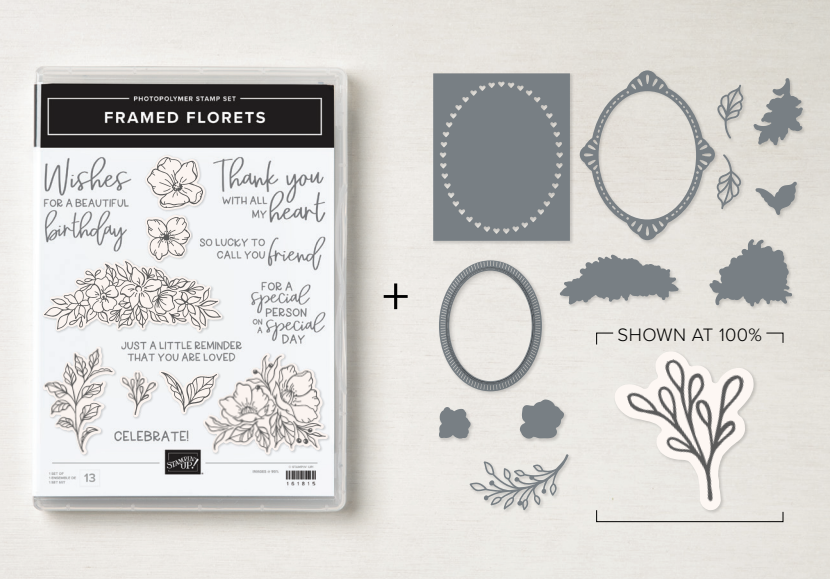
From tomorrow, November 1, the Fitting Florets Collection from the upcoming January – June Mini Catalogue will be available to order and it includes two products only available for limited time: the Framed & Festive Stamp Set and the Fitting Florets DSP.
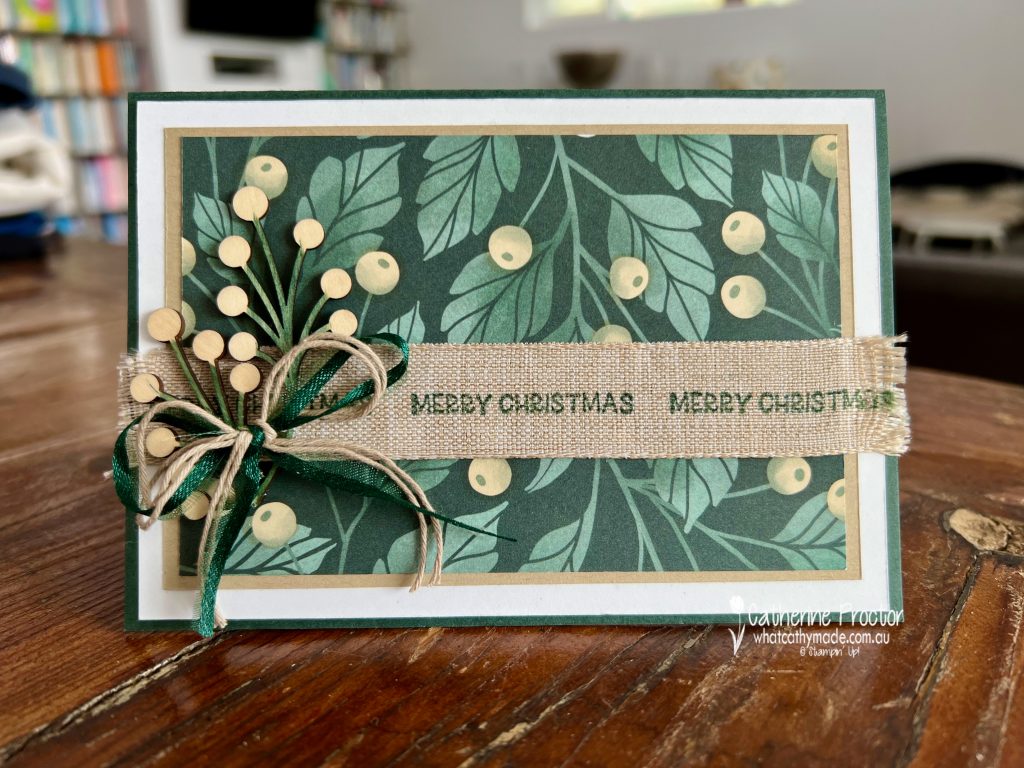
The Framed & Festive stamp set is a really versatile Christmas sentiment stamp set that works with any Christmas products. I’ve paired it with the Christmas Season stamp set and the coordinating Seasonal Labels dies for this week’s Heart of Christmas card.
The Basic White layer has been die cut an angle using the largest of the stitched rectangle dies. This adds visual interest and draws your attention to the bunch of holly berries and leaves.
My traditional red and green colour combination uses Real Red, Pear Pizzazz, Crumb Cake and Basic White. Fine tipped glue has been added to the holly berries to make them shine.
The sentiment has been die cut and framed using the middle two square Stylish Shapes dies. I really like the mix of fonts in the Christmas sentiments in the Framed & Festive stamp set.
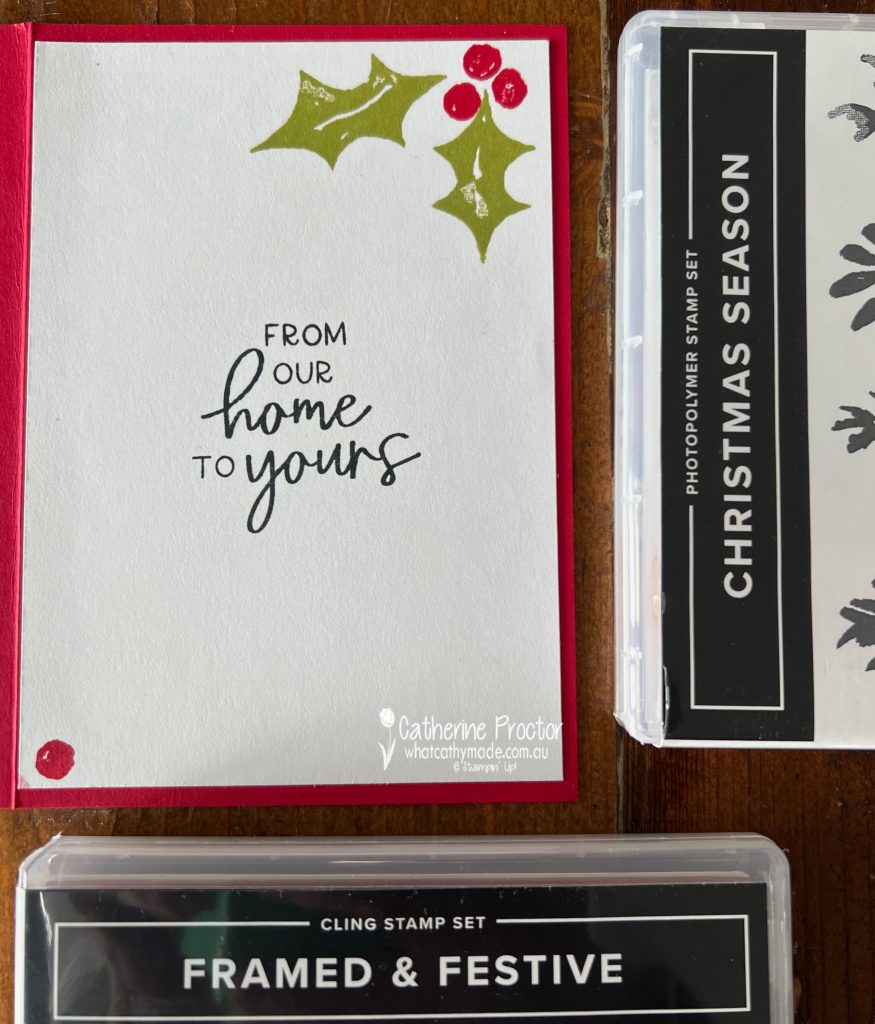
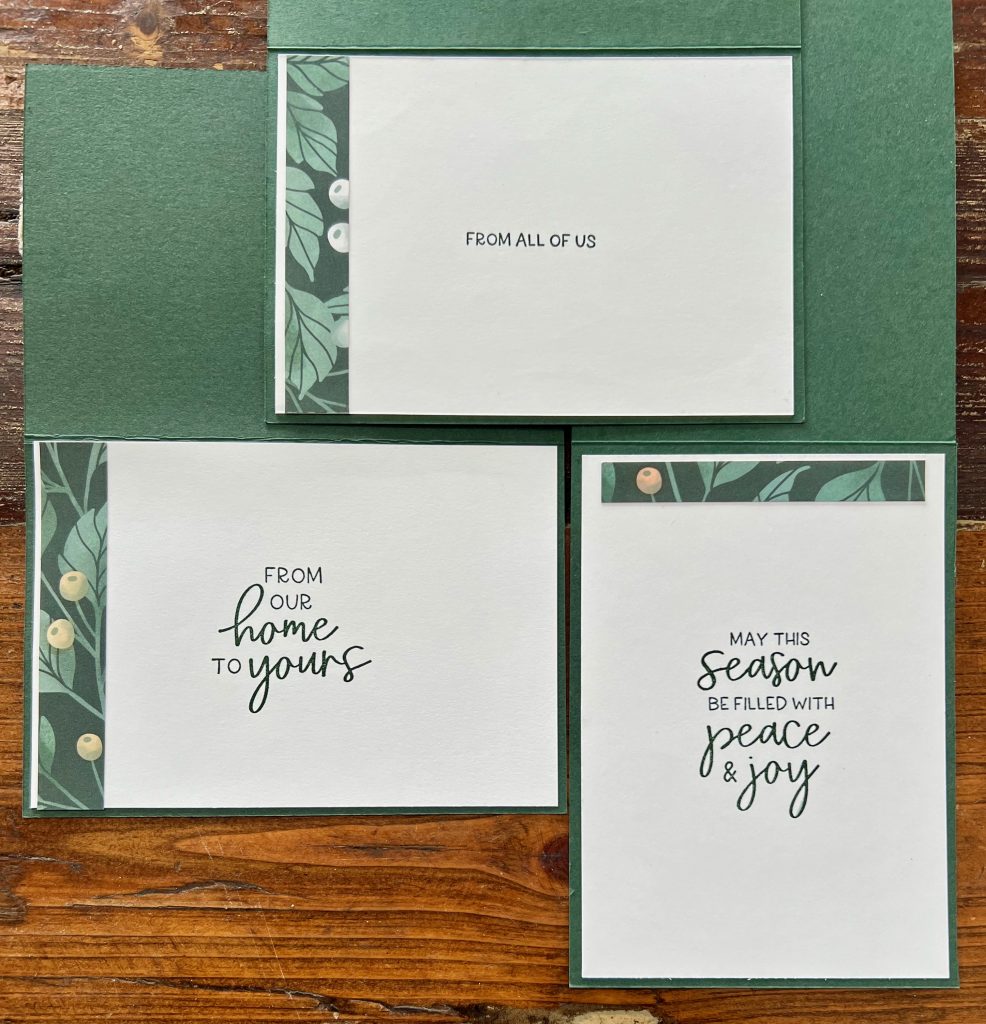
Another sentiment from the Framed & Festive stamp set has been used for the inside of the card – I think I will be using this sentiment a lot for my Christmas cards this year.
Now it’s time to hop on over to our next participant, the lovely Rachel Woollard – I can’t wait to see what Rachel has created today!
If at any time you find a broken link, you can find the complete list of all participants on Sharon‘s blog.
Welcome to week sixteen of the Heart Of Christmas Blog Hop!
New product alert! Checkout the gorgeous Fitting Florets Collection!
It includes products that will be in the upcoming January-June Mini Catalogue, as well as three products of which will only be available from November 1 for a limited period of time.
The limited time products from this collection include:
The Framed & Festive Stamp Set – a Christmas sentiment set
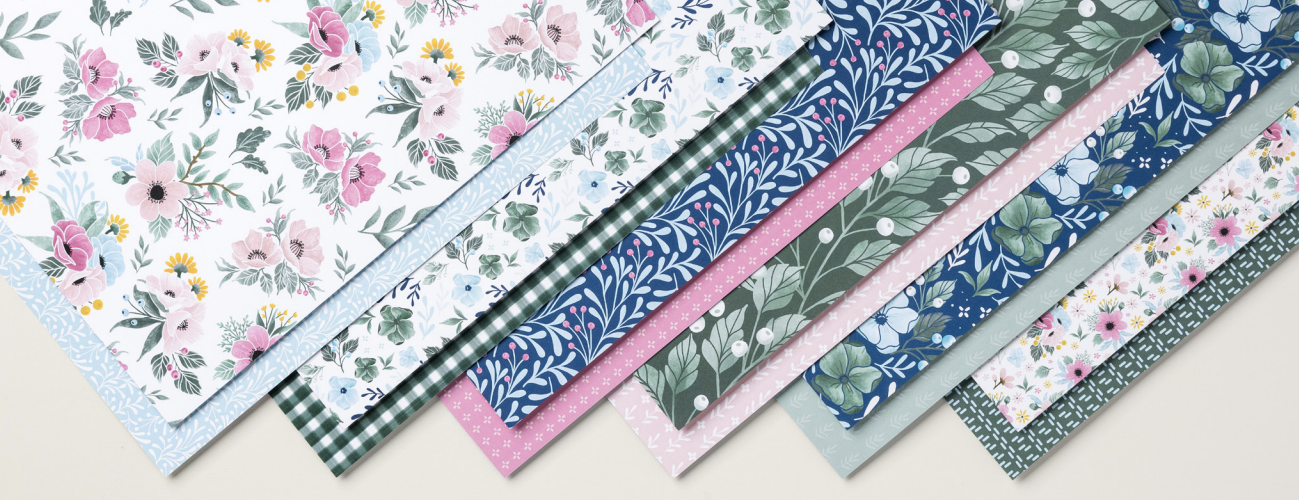
The Fitting Florets DSP – both floral and patterned designs in Balmy Blue, Blushing Bride, Crushed Curry, Evening Evergreen, Night of Navy, Polished Pink, Soft Succulent.
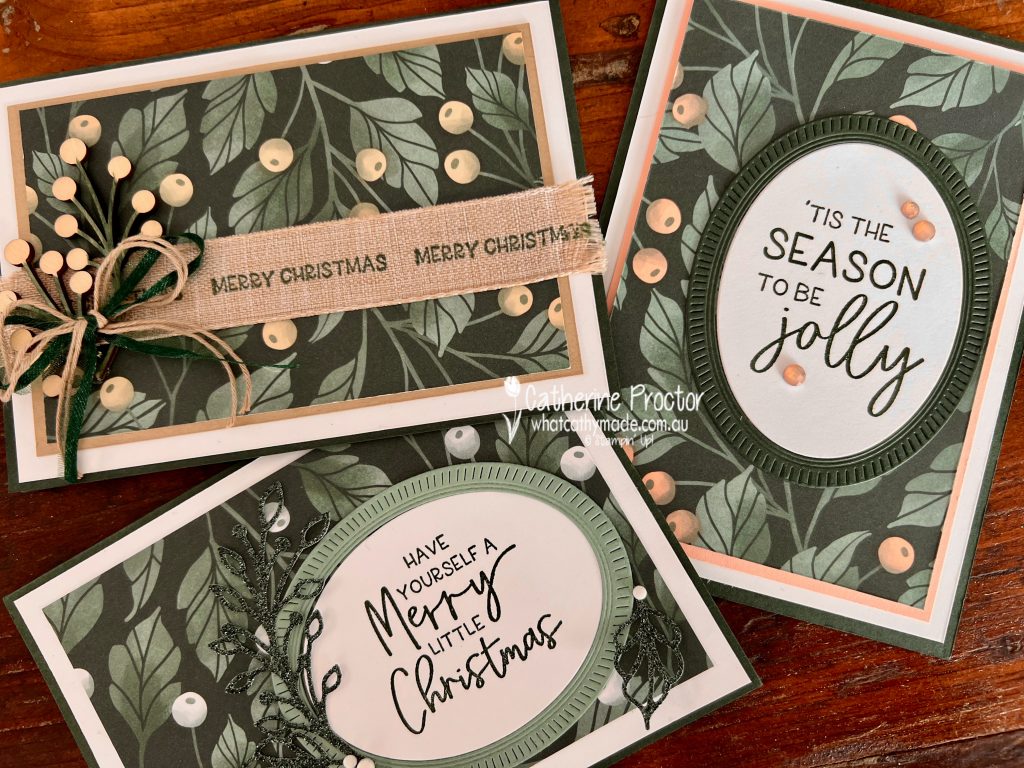
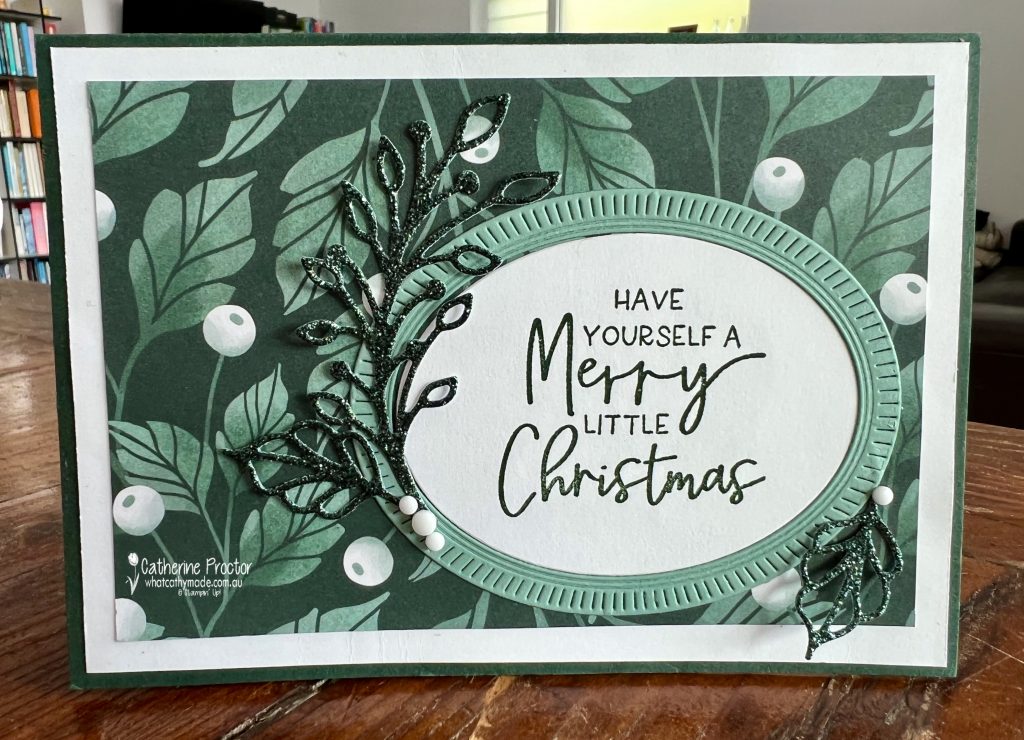
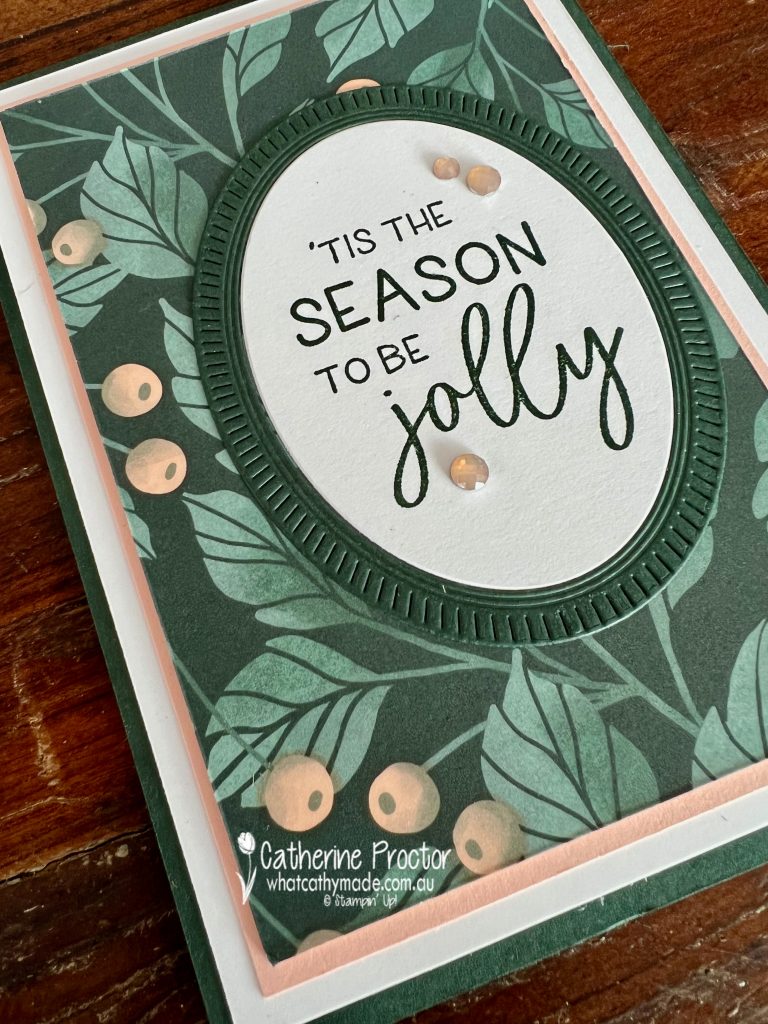
For all my cards I’ve used the Evening Evergreen/Soft Succulent/Basic White leaves and berries patterned paper from the Fitting Florets DSP to make three Christmas Cards, changing the colours slightly for each card.
All three cards also use sentiments that are stamped and framed using the Framed Florets Bundle, available from November 1 until the end of June 2023.
Card one is a monochrome card that uses just the colours in this DSP pattern, along with die cut embellishments in Evening Evergreen Glimmer Specialty Paper, die cut using the Framed Florets dies.
White Classic Matte Dots coordinate with the white berries on the DSP.
Card two adds a touch of Petal Pink, with a layer of Petal Pink card stock and berries on the DSP coloured in with Petal Pink Stampin’ Blends!
Three Petal Pink Elegant Faceted Gems are the perfect embellishment to match the Petal Pink berries.
Card three adds Crumb Cake to the colour mix.
The stems of the Textural Elements are coloured with the Soft Succulent Stampin’ Blends and the Natural Finish Ribbon has been stamped in Evening Evergreen using the “Merry Christmas” sentiment from the Framed & Festive Stamp Set.
Strips of leftover DSP and additional sentiments decorate the inside of all three cards.
Now it’s time to hop on over to our next participant, the lovely Kathryn Ruddick – I can’t wait to see what Kathryn has created today!
If at any time you find a broken link, you can find the complete list of all participants on Sharon‘s blog.
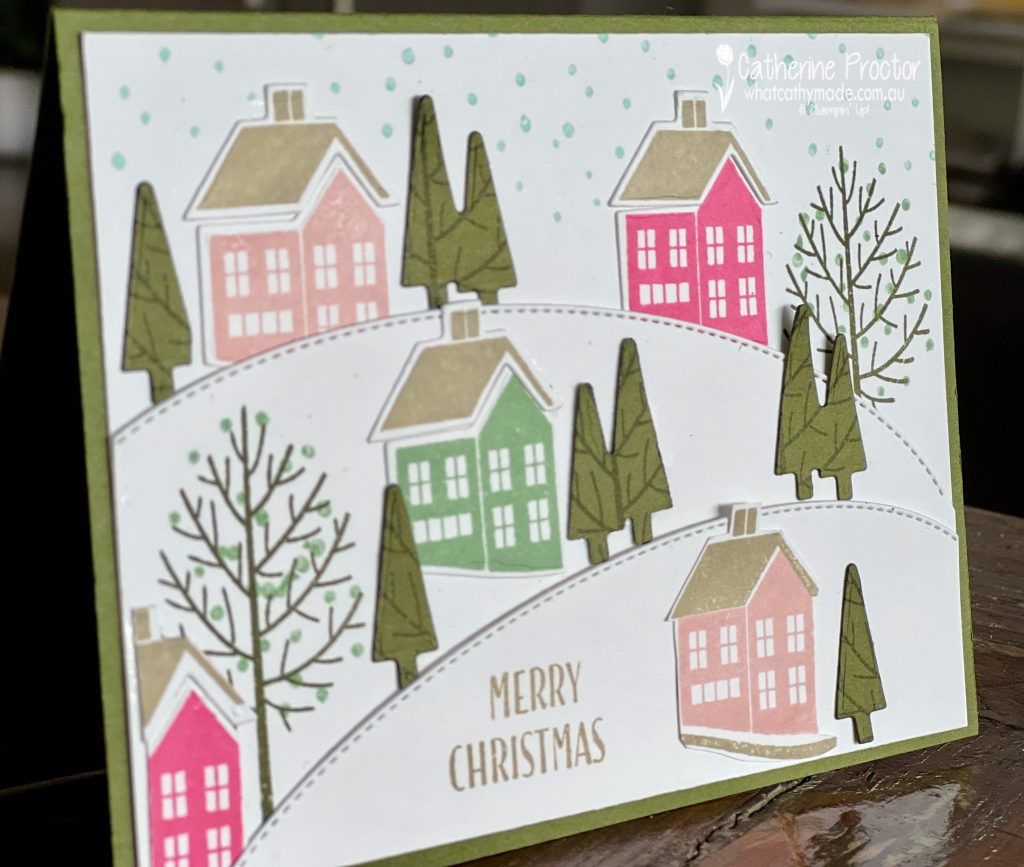
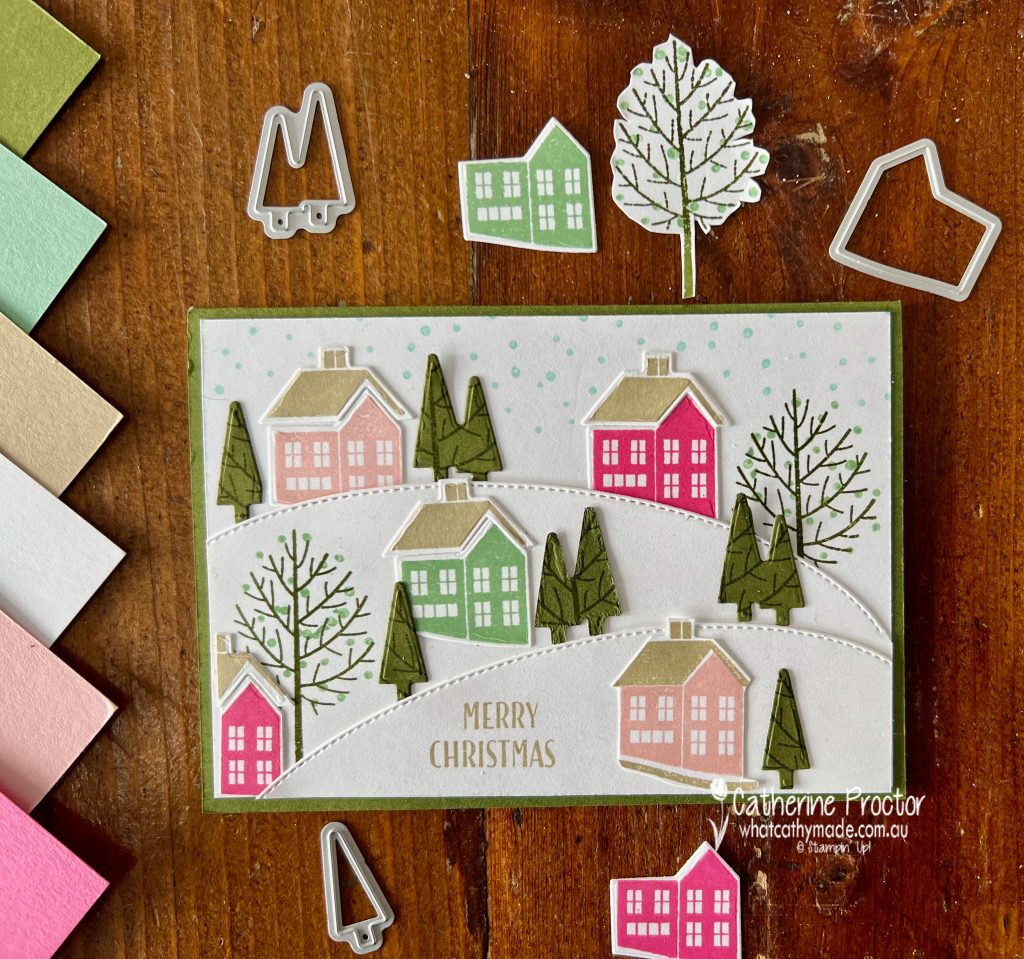
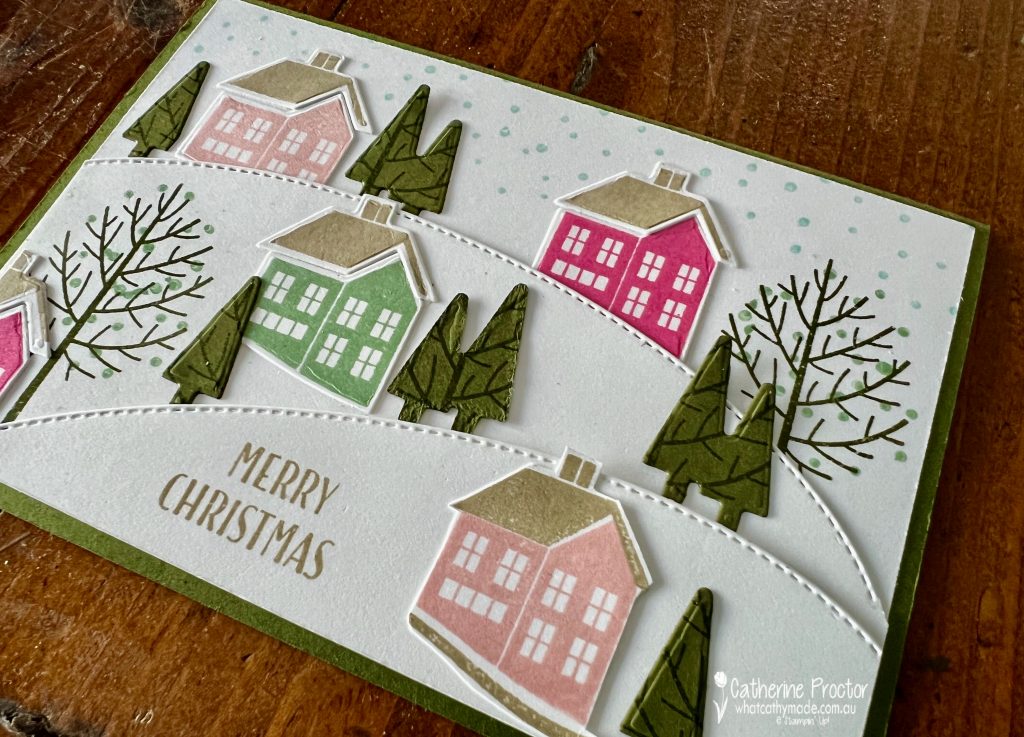
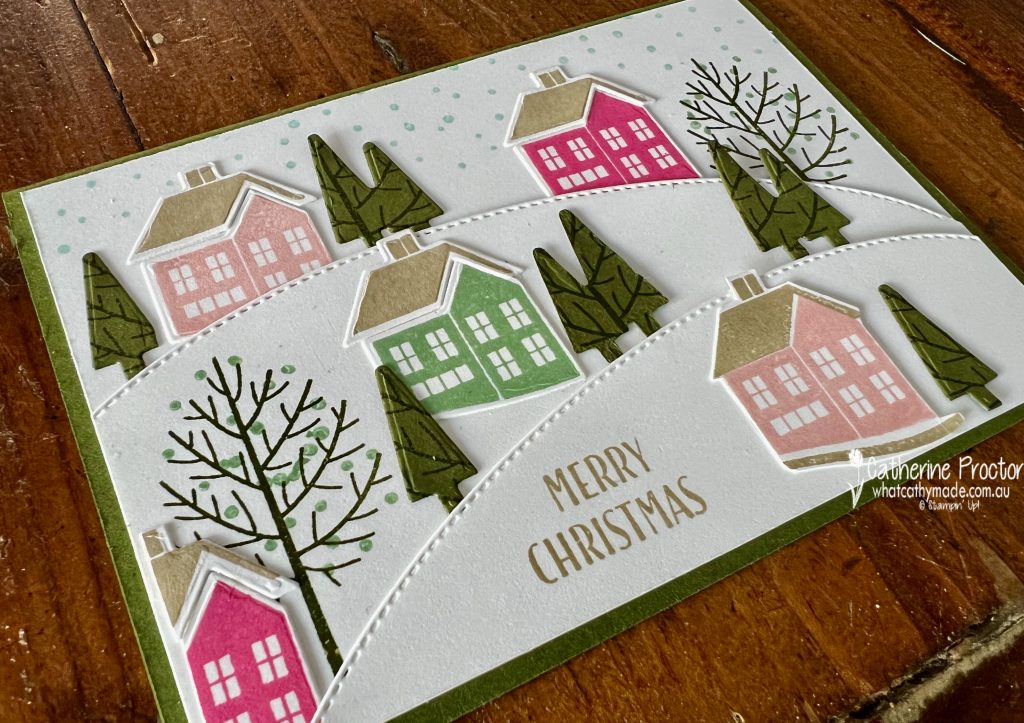
Welcome to week fifteen of the Heart Of Christmas Blog Hop!
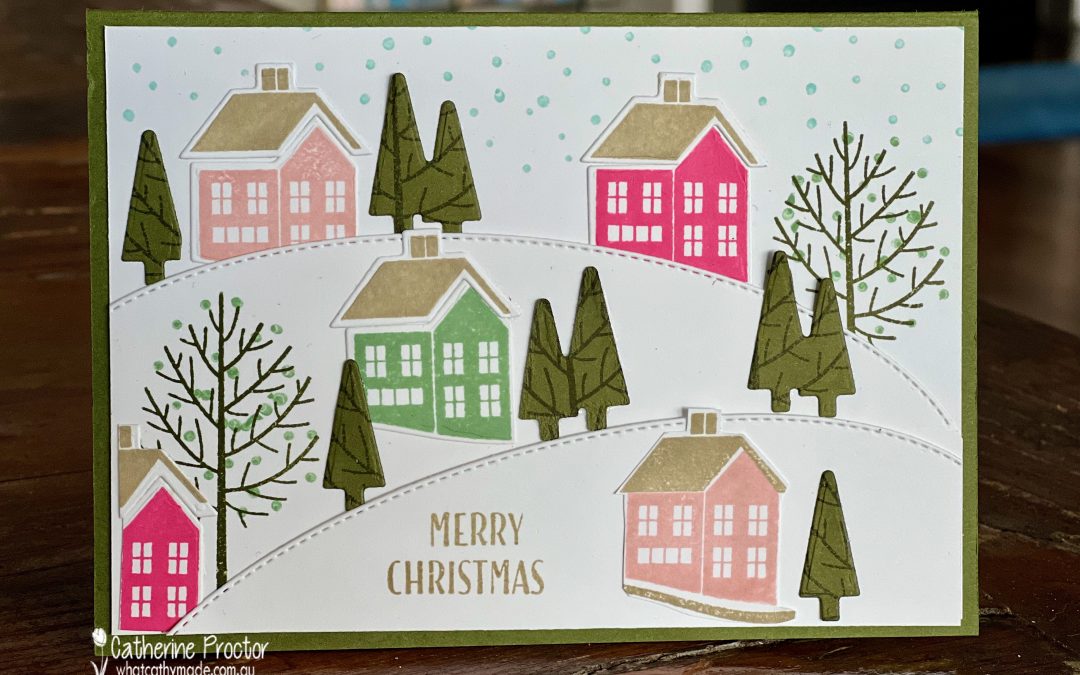
I love taking inspiration for card making from our Stampin’ Up! catalogues – they are full of amazing ideas! One card that caught my eye was this card on page 36 of the July-December Mini Catalogue.
The clever detail in this card is the way they stamped the large tree stamp from the Window Wishes stamp set onto cardstock before using the smaller solid tree dies to die cut the trees for this scene.
My version of this card uses some of the colours in the gorgeous Whimsy and Wonder DSP that was in last year’s Holiday catalogue: Blushing Bride, Polished Pink, Crumb Cake, Mint Macaron and Mossy Meadow.
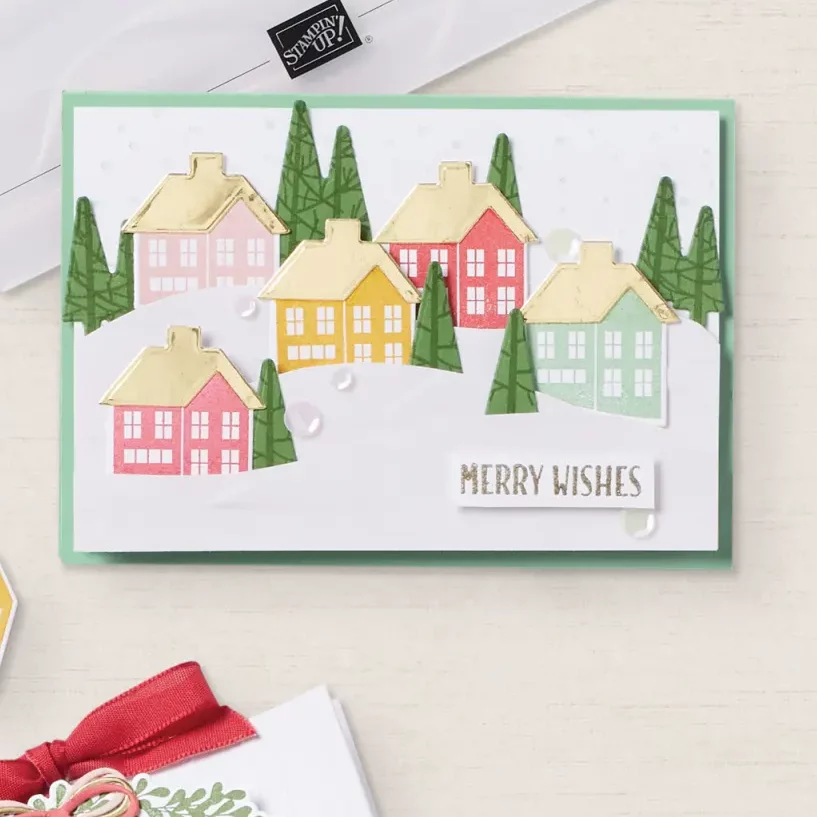
Stampin' Up! Window Wishes Scene Card Colour Combination
I decided to use the curved Basic Border die to create my snowscape. Two pieces of Basic White cardstock were cut with this die and positioned over a front layer of Basic White cardstock on a Mossy Meadow Card base.
I then stamped a large tree on two of the layers and stamped assorted trees and houses on scraps of Whisper White, die cutting with the Window dies and then building my scene as I went along.
Once I was happy with the arrangement I took a photo as a guide to remind myself where everything went and glued everything down, starting with the base layer.
The “Merry Christmas” greeting was stamped using two of the sentiment stamps in the Window Wishes stamp set. I simply inked up “Merry” and the “Christmas” but not the rest of the sentiments.
You could make this little scene in any colour you want and instead of using the Basic Border dies to create the landscape, you could simply freehand cut or trace around the edge of a plate.
Now it’s time to hop on over to our next participant, the lovely Rosa Leyden – I can’t wait to see what Rosa has created today!
If at any time you find a broken link, you can find the complete list of all participants on Sharon’s blog.
Welcome to week fourteen of the Heart Of Christmas Blog Hop!
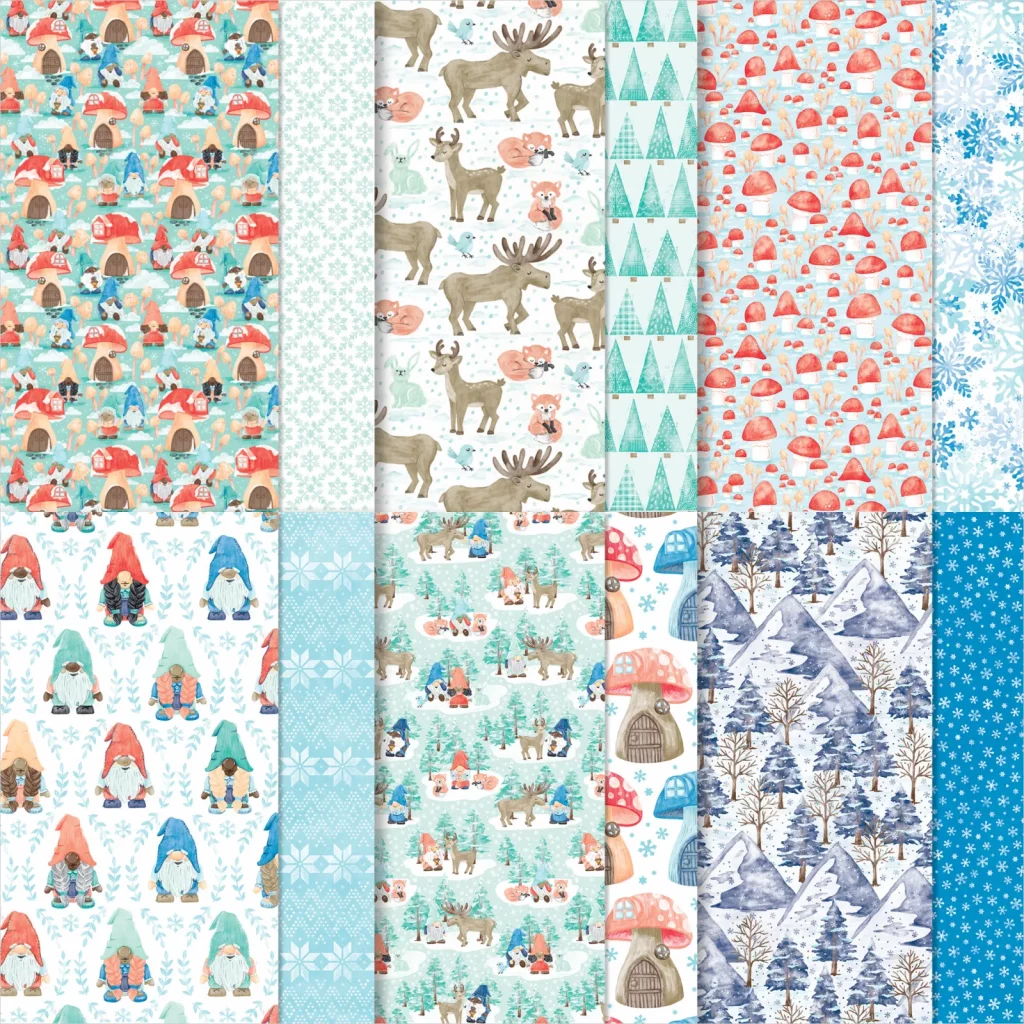
Do you ever love the “B side” patterns more than the “A side” patterns in a Designer Series Paper pack? I especially love the “B side” patterns of the Storybook Gnomes DSP – it is full of beautiful snowflake and tree patterns in soft blues, aquas and greens.
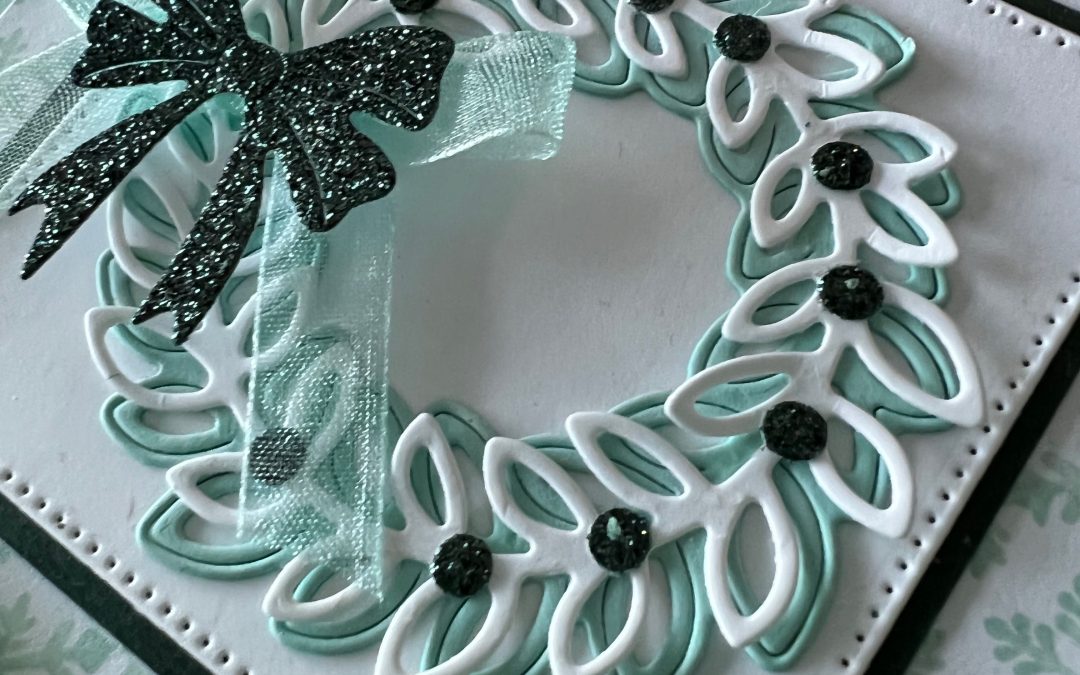
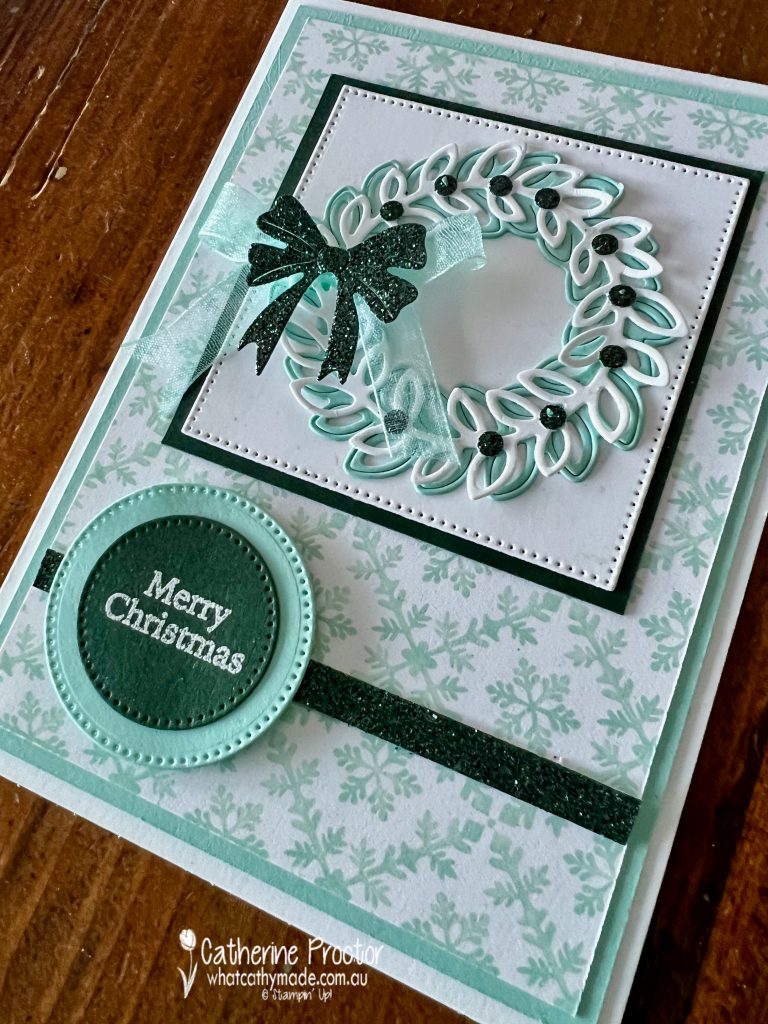
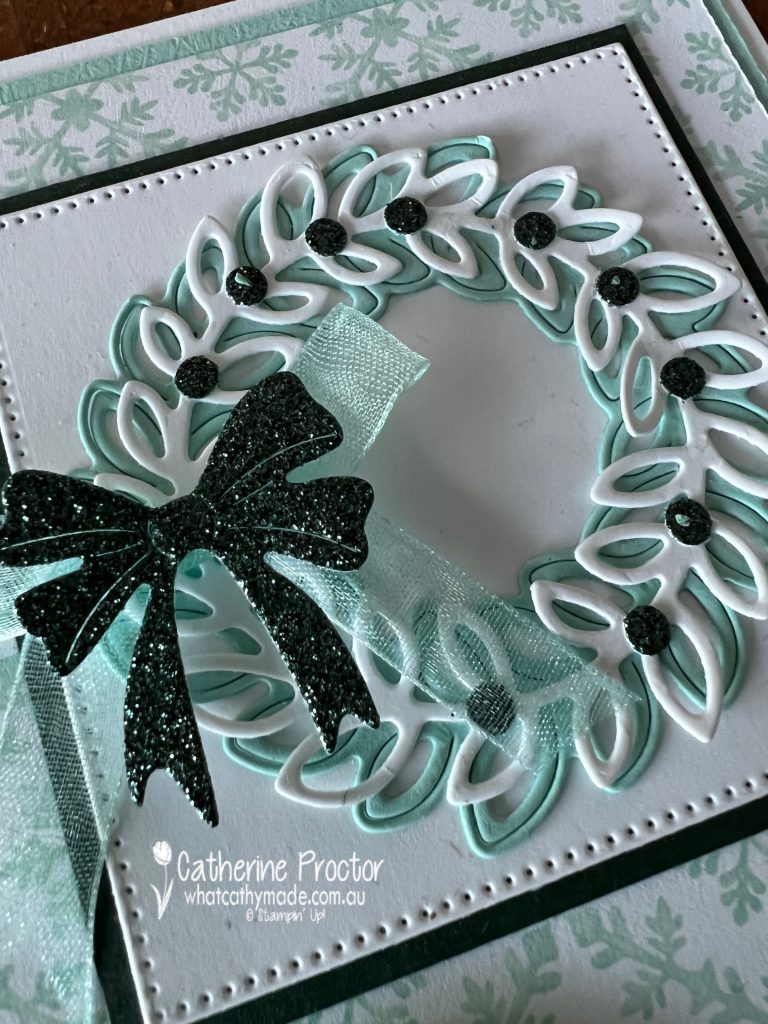
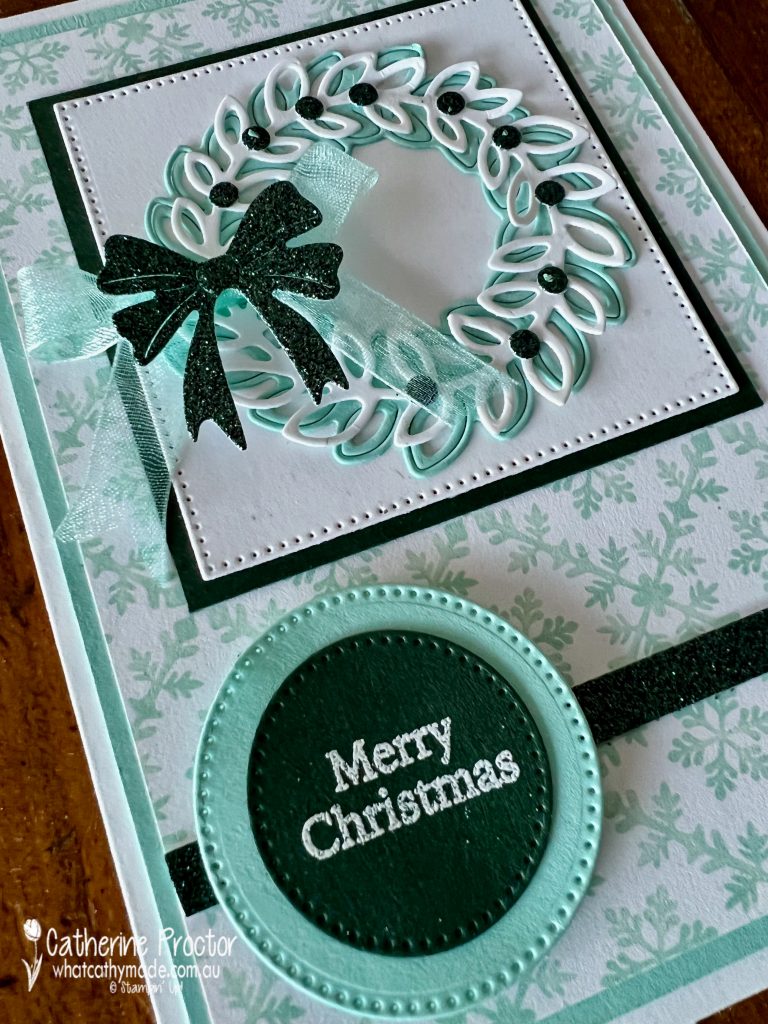
My card tonight was inspired by the Pool Party snowflake pattern in the Storybook Gnomes DSP so I decided to pair it with the Evening Evergreen Glimmer Specialty Paper to create a Christmas wreath card.
Pool Party and Evening Evergreen work so well together I decided not to add any more colours to this colour combination.
My favourite die in the Country Wreaths die is this elegant double bow die. I’ve layered it on top of a Pool Party Sheer ribbon bow for extra dimension and impact.
The Evening Evergreen “berries” on the wreath are created using the Dots & Spots Die to die cut out the Evening Evergreen Glimmer Specialty Paper. This die is great for creating your own embellishments using specialty papers.
I also added a strip of this gorgeous Evening Evergreen Glimmer Specialty Paper underneath the sentiment which is stamped in Versamark ink, white heat embossed and die cut out with the Stylish Shapes dies.
Now it’s time to hop on over to our next participant, the lovely Tina Gillespie – I can’t wait to see what Tina has created today!
If at any time you find a broken link, you can find the complete list of all participants on Sharon’s blog.
Welcome to week thirteen of the Heart Of Christmas Blog Hop!
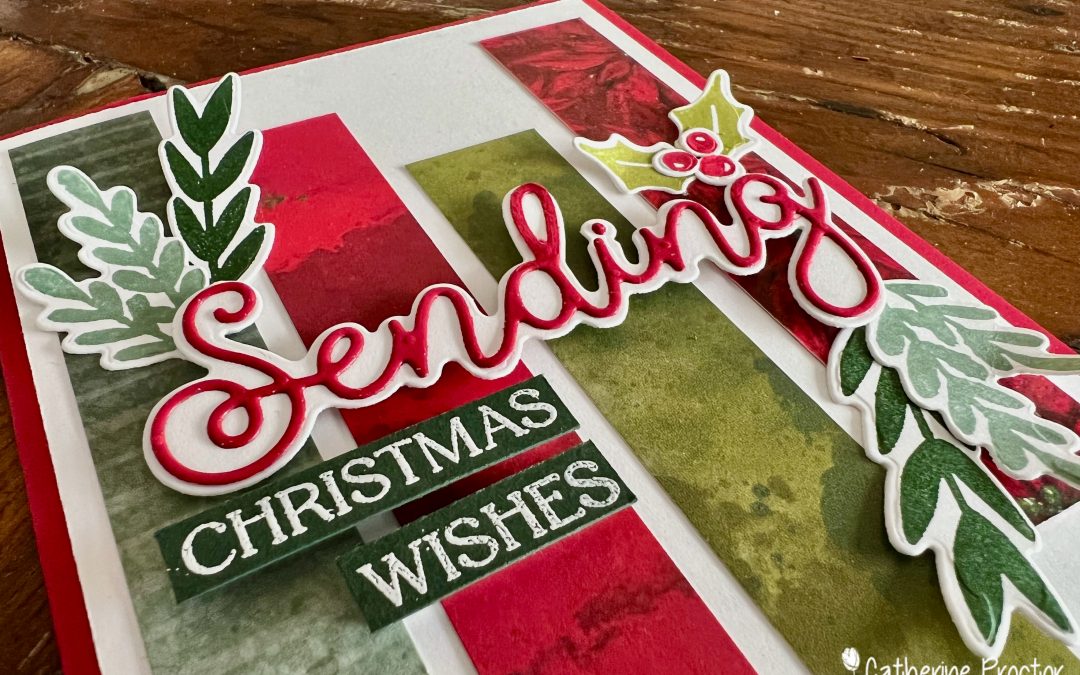
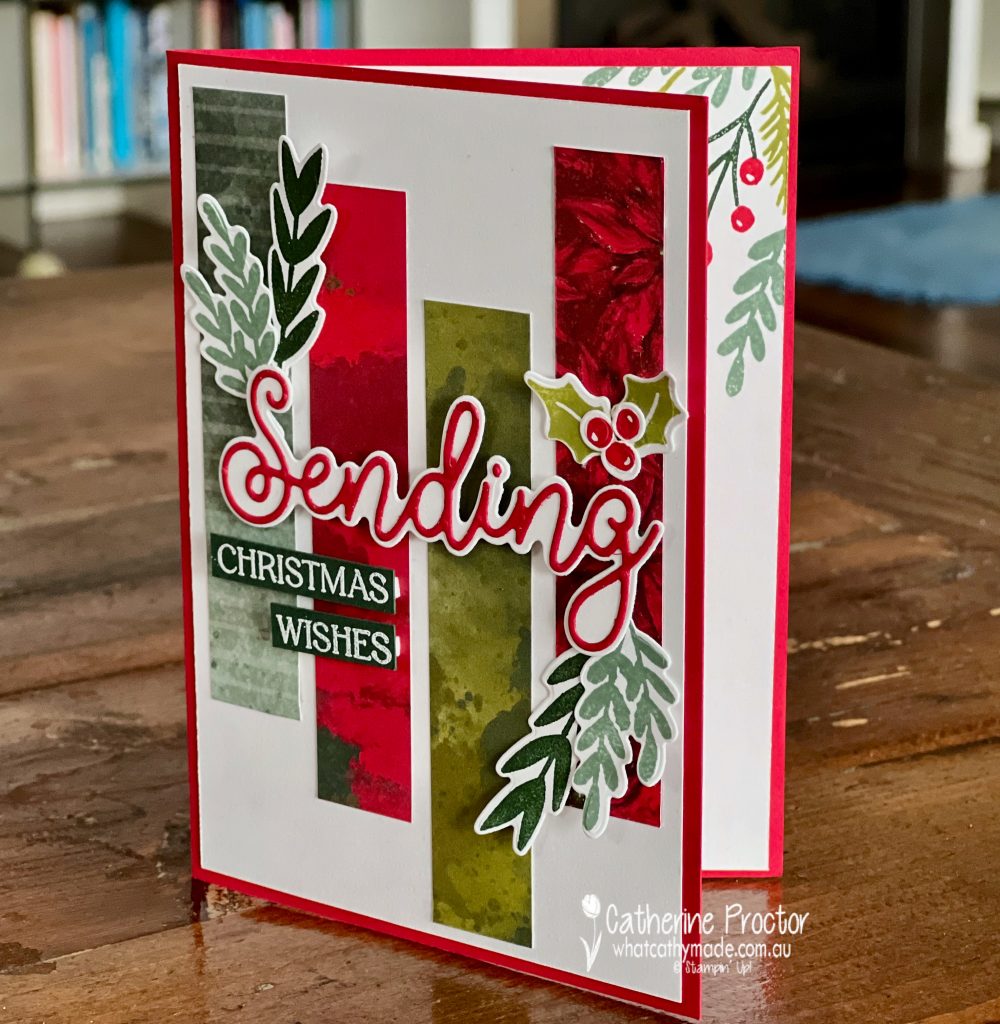
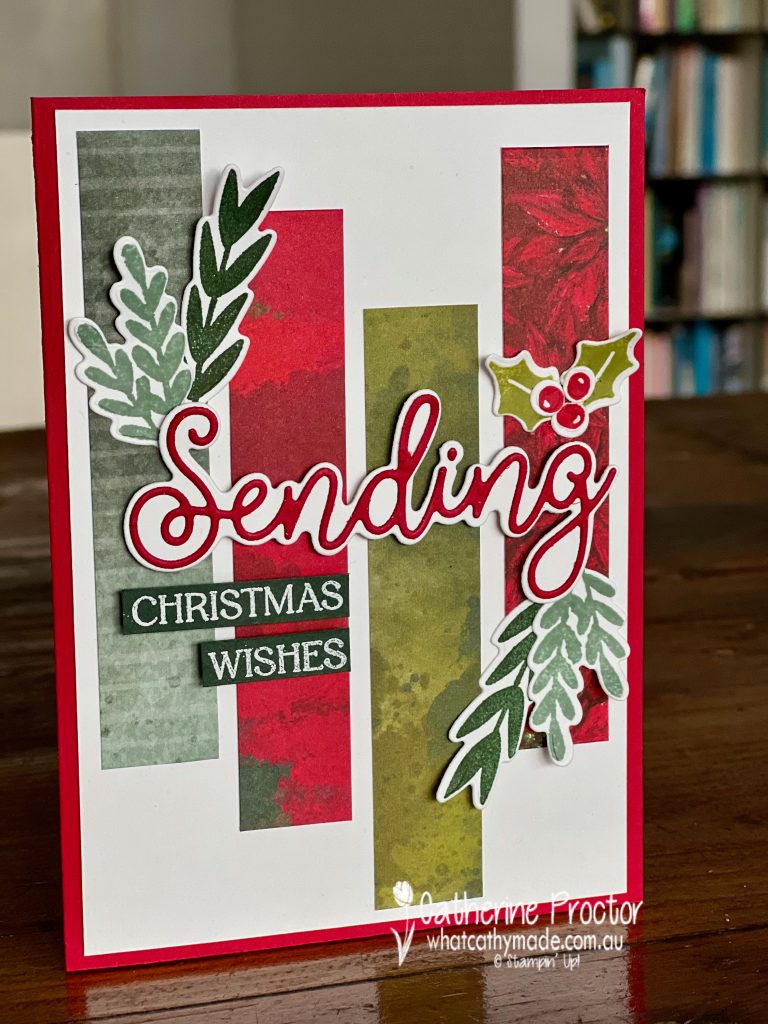
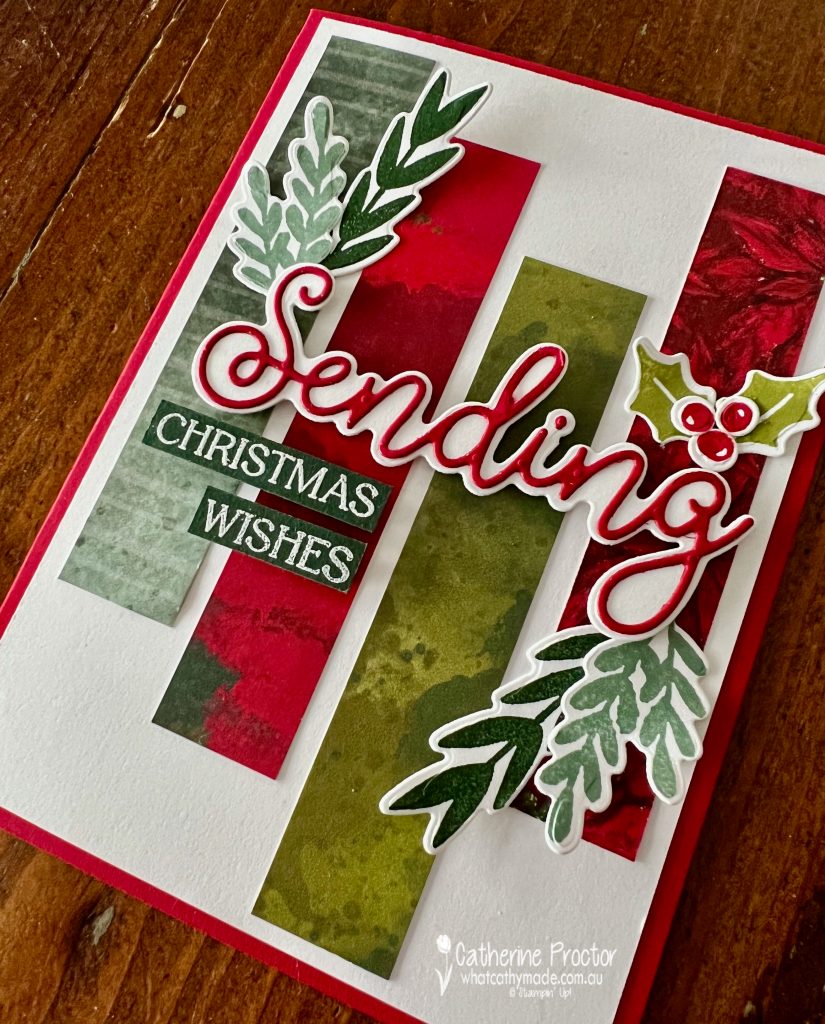
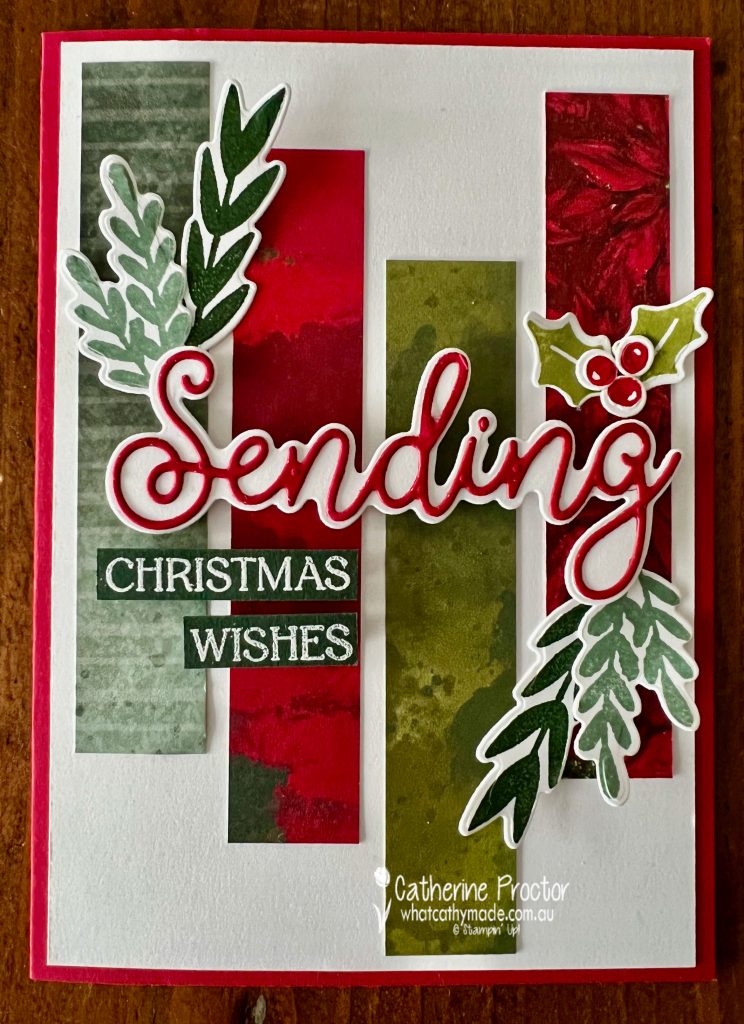
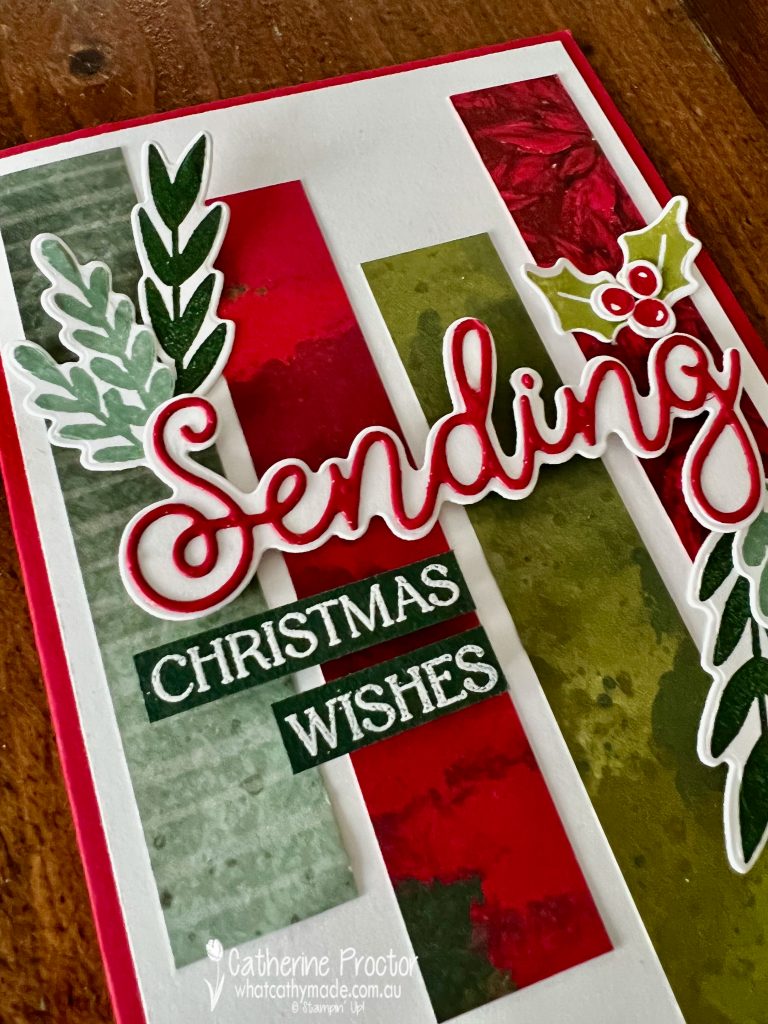
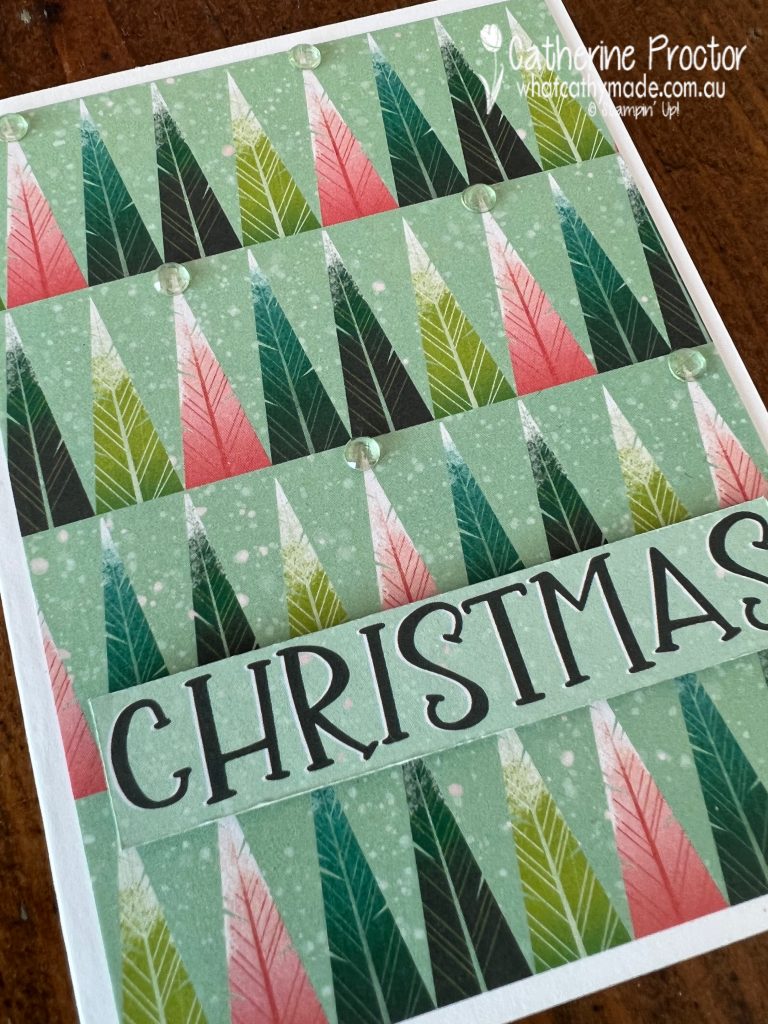
Wondering how to use up your leftover strips of designer series paper or how to incorporate more than one DSP pattern on your card front? This simple layout is very effective and it can be made with virtually any DSP.
The trick to stop the background DSP competing with the foreground elements is to use a DSP that has a smaller pattern or more solid colours.
I originally intended to use the Painted Christmas DSP for this card, however I felt that the Boughs of Holly DSP was a better match as it really allowed the sentiment and foliage pieces to shine.
The foliage is stamped and die cut using the Christmas Banners Bundle in colours selected to match the Boughs of Holly DSP: Real Red, Evening Evergreen, Soft Succulent, Old Olive (stamped off) and Basic White.
Stampin' Up! Boughs of Holly DSP colour combination
I love the versatility and impact of word dies. This layered “sending” sentiment is from the Sending Smiles dies and I reach for a lot. Don’t forget to use an adhesive sheet for the top word layer – it turns the word into a repositionable sticker and prevents any adhesive mess.
There is no Christmas sentiment in the Sending Smiles bundle, so I used the “Christmas” and the “wishes” sentiment from the Christmas Banners Stamp Set, stamped in Versamark ink onto scraps of Evening Evergreen cardstock and then white heat embossed.
I’ve stamped some more of this gorgeous foliage from the Christmas Banners stamp set inside the card too.
Now it’s time to hop on over to our next participant, the lovely Rosa Leyden– I can’t wait to see what Rosa has created today!
If at any time you find a broken link, you can find the complete list of all participants on Sharon’s blog.
If you live in Australia, you can find and purchase these products in my Stampin’ Up! Online Store or by clicking on the links below.
Welcome to week twelve of the Heart Of Christmas Blog Hop!
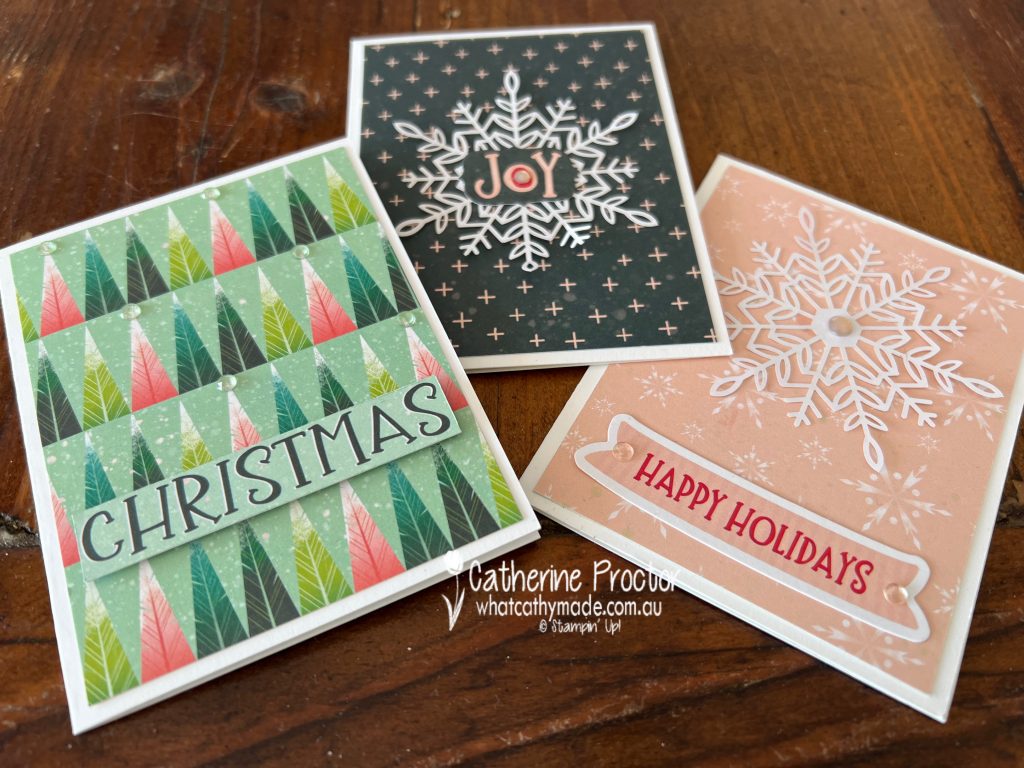
This week I’m sharing three cards that are perfect for a beginner cardmaker to make as they require no stamping or die cutting.
All I’ve used is a pack of the Santa Express Memories & More Card Pack, card bases from Memories & More Card Packs and a few embellishments.
The Santa Express Memories & More Card Pack includes:
54 double-sided, printed cards
2 sheets of stickers
4 acetate overlays
2 laser-cut sheets of words and embellishments
I love the colour combinations and the designs of the Memories & More cards in this pack.
For card one I’ve used this graphic Christmas Tree design and a Christmas sentiment cut from another one of the Memories & More cards. Clear Elegant Faceted Gems embellish the tops of some of the trees.
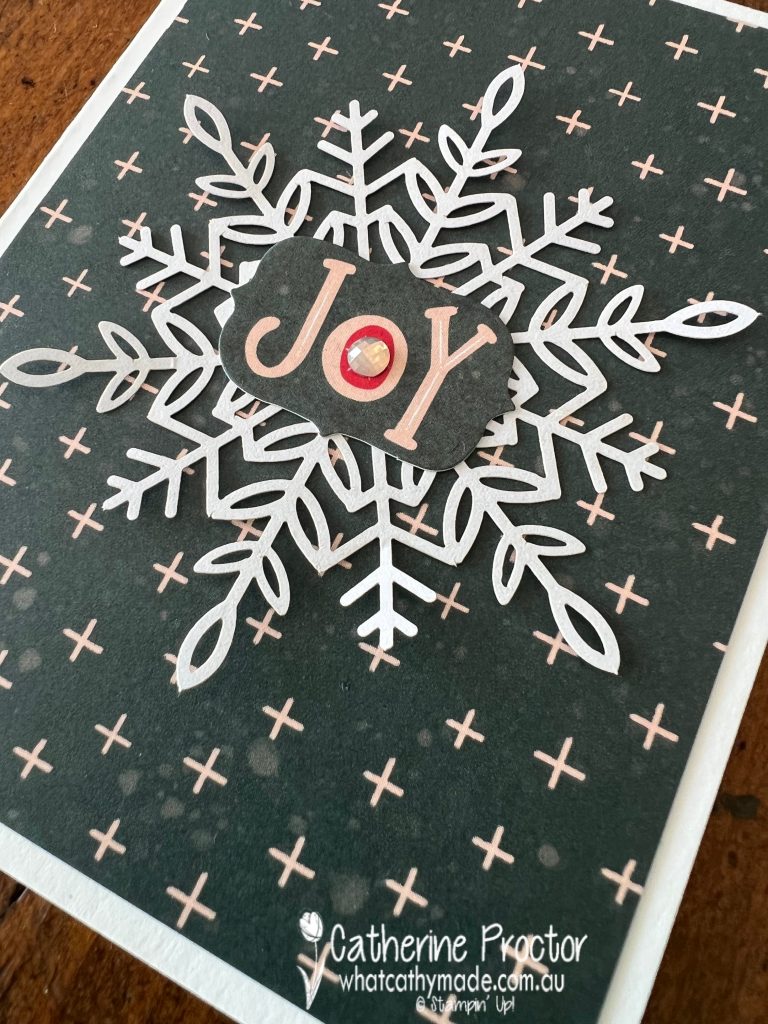
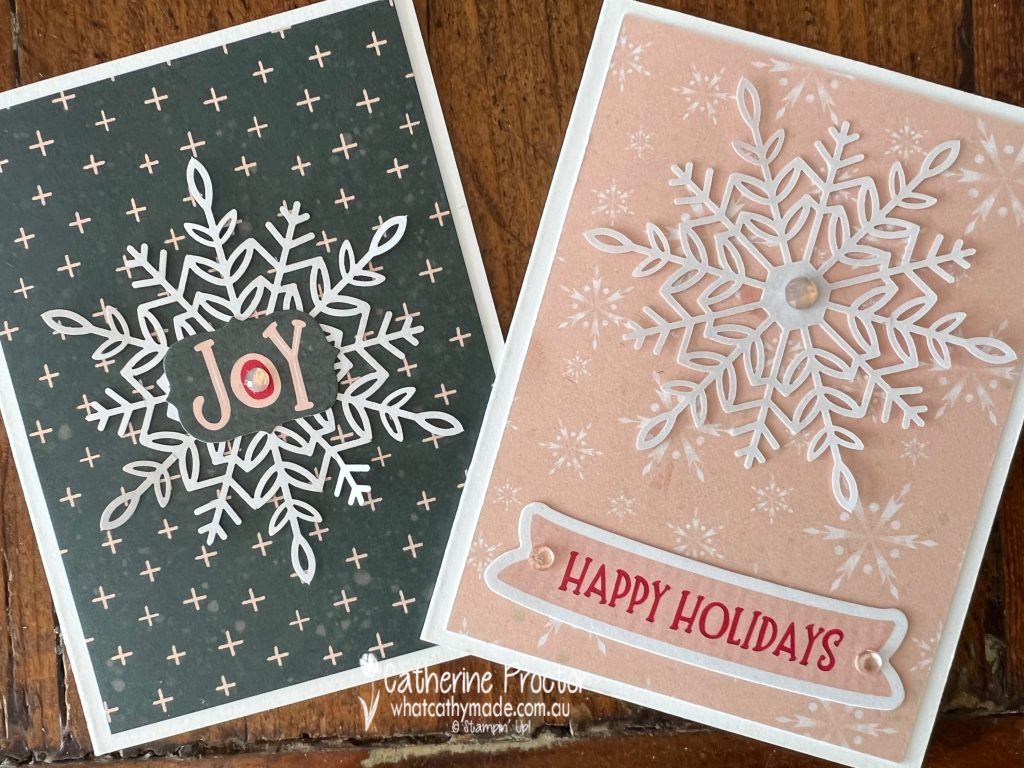
My “Joy” card uses one of the stickers from the pack, an Evening Evergreen Memories & More card, a Wonderful Snowflake and a pink Elegant Faceted Gem.
Card three also uses another one of the stickers from the pack – Happy Holidays –a Petal Pink Memories & More card and another Wonderful Snowflake with a Petal Pink Elegant Faceted Gem in it’s centre and clear Elegant Faceted Gems on the sentiment.
Wonderful Snowflakes are one of my favourite Christmas embellishments as they instantly add an elegant touch to any Christmas card.
Quick and easy but oh so effective – Memories & More cards and notecards and envelopes are great to have in your stash when you really don’t have the time or the inclination for stamping and die cutting.
Now it’s time to hop on over to our next participant, the lovely Christine Blain– I can’t wait to see what Christine has created today!
If at any time you find a broken link, you can find the complete list of all participants on Tina’s blog. Tina is running the hop for us tonight as Sharon is very busy running 21st celebrations. Thanks so much Tina!
If you live in Australia, you can find and purchase these products in my Stampin’ Up! Online Store or by clicking on the links below.
Welcome to week eleven of the Heart Of Christmas Blog Hop!
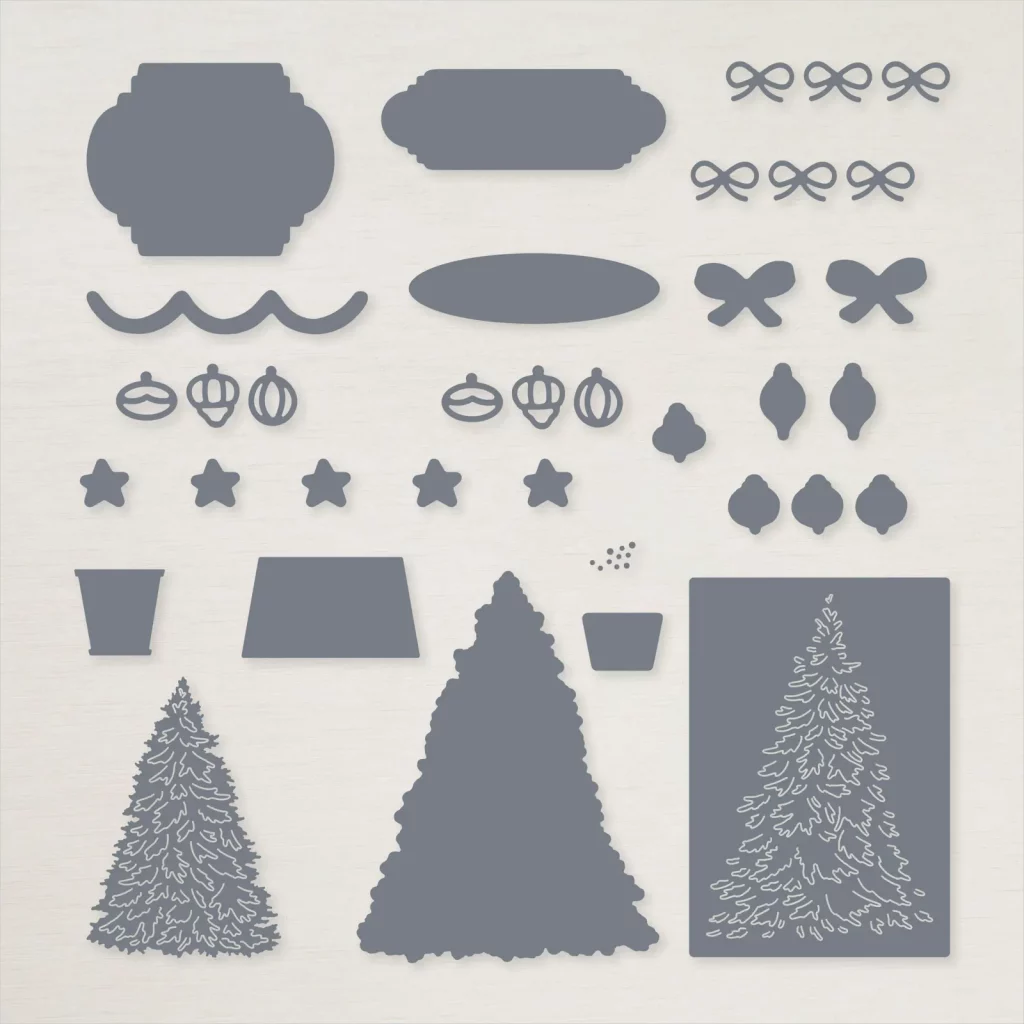
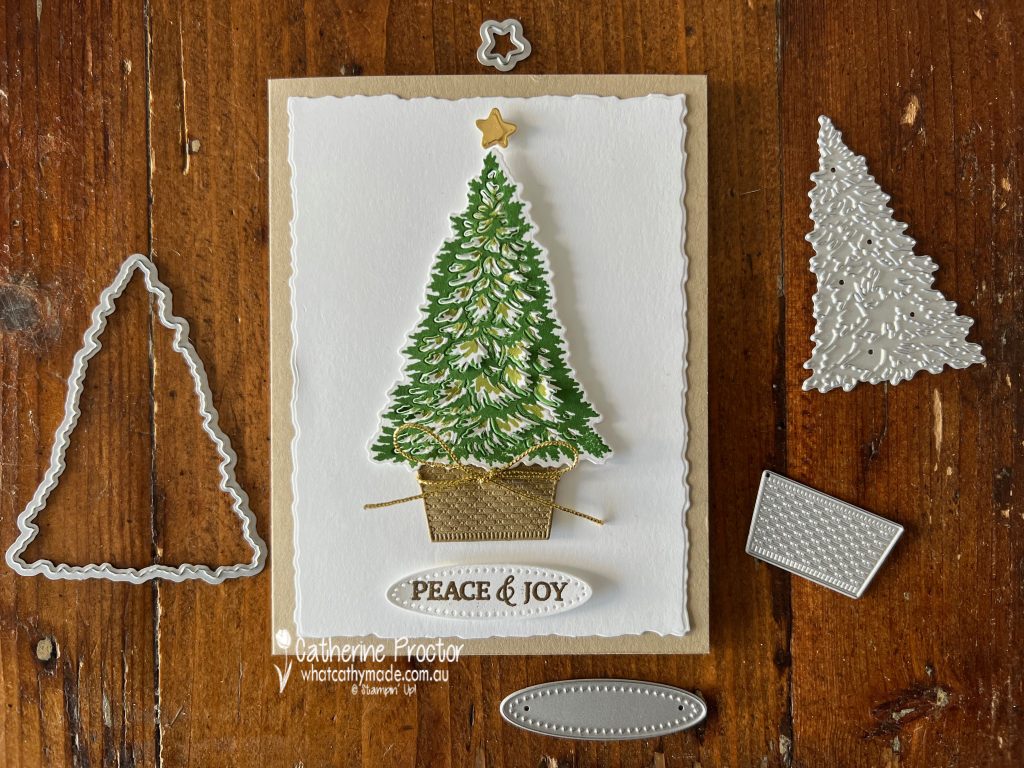
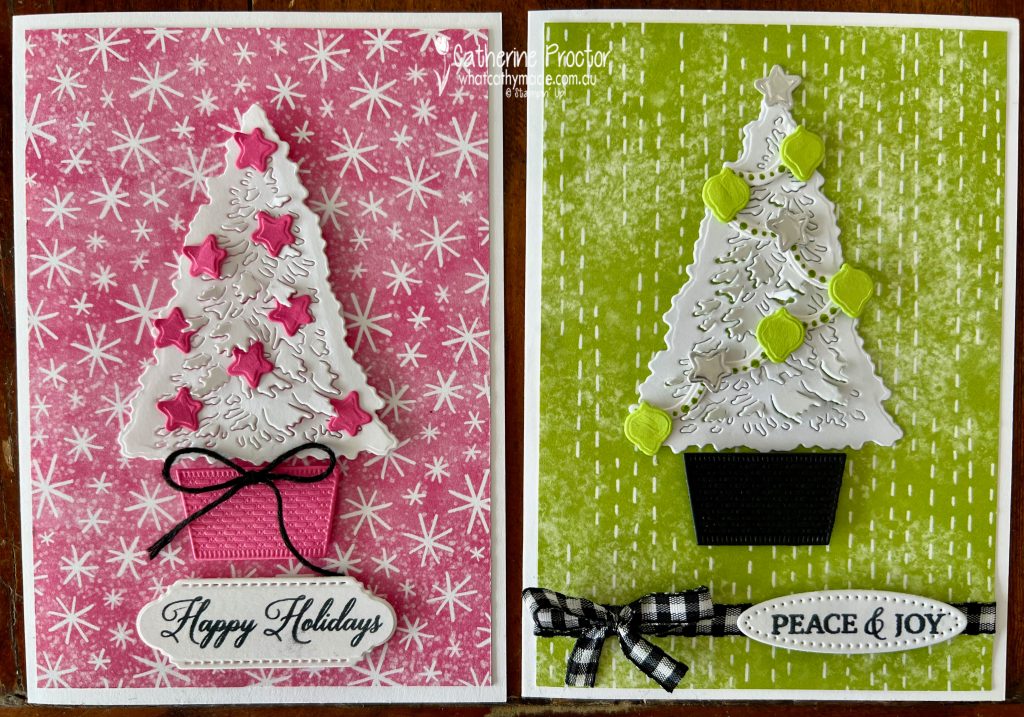
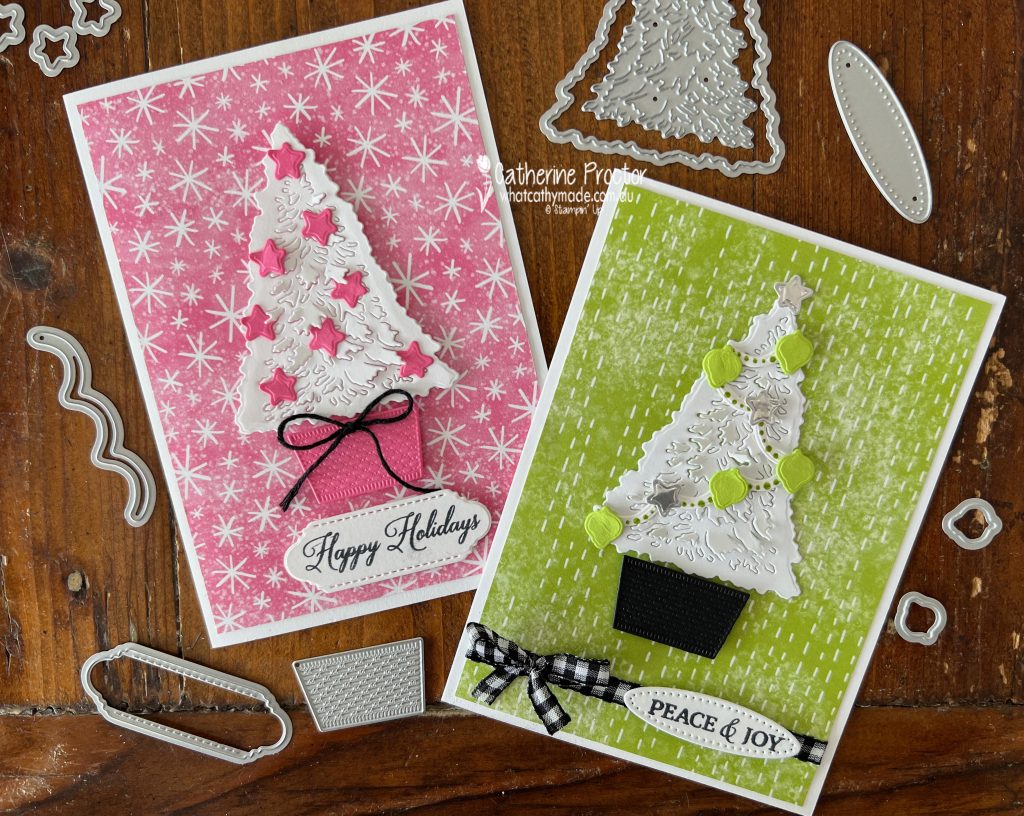
Stampin’ Up! have recently released six new dies that coordinate with existing stamp sets, so tonight my cards features the new Tree Trimming dies that coordinate with the Trimming the Trees stamp set.
You can purchase these dies during September, either as stand alone dies or as a bundle (10% off) with the Trimming the Trees stamp set.
I recently shared a more classical style of Christmas card that uses these Tree Trimming dies and the Trimming the Trees stamp set – here’s a photo of that card in case you missed it.
This week I’ve used the vibrant colours in the Celebrate Everything DSP to create two Christmas cards with a more modern style.
These cards show you just how versatile the Tree Trimming dies are – they are one of the few die sets that work equally as well with or without the coordinating stamp set.
I deliberately left the Christmas trees on both of my cards unstamped because the Basic White card stock showcases the the intricate die cut detail of the Tree Trimmings dies a lot better than a stamped image does.
The Granny Apple Green card features the bauble dies and the star dies, as well as the bead garland die. It’s really hard to photograph the stars are they are die cut in silver foil, whereas the baubles are die cut from Granny Apple Green cardstock.
My Polished Pink card uses the star dies as well as the tree basket die that is featured on both cards.
I love the sentiment dies included in the Tree Trimmings dies. I’ve used a different sentiment from the Trimming the Tree stamp set and a different sentiment die for each of my cards, however there are more sentiment dies and sentiments to choose from.
Now it’s time to hop on over to our next participant, the lovely Caroline Manwaring – I can’t wait to see what Caroline has created today!
If at any time you find a broken link, you can find the complete list of all participants on Sharon’s blog.
If you live in Australia, you can find and purchase these products in my Stampin’ Up! Online Store or by clicking on the links below.
Welcome to week ten of the Heart Of Christmas Blog Hop!
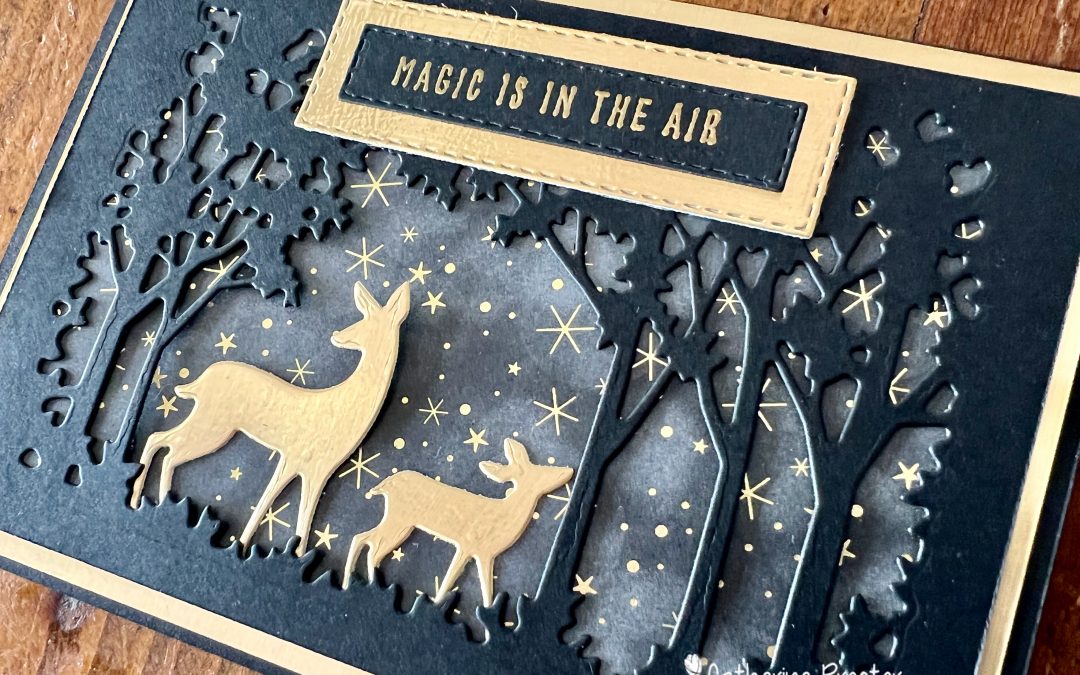
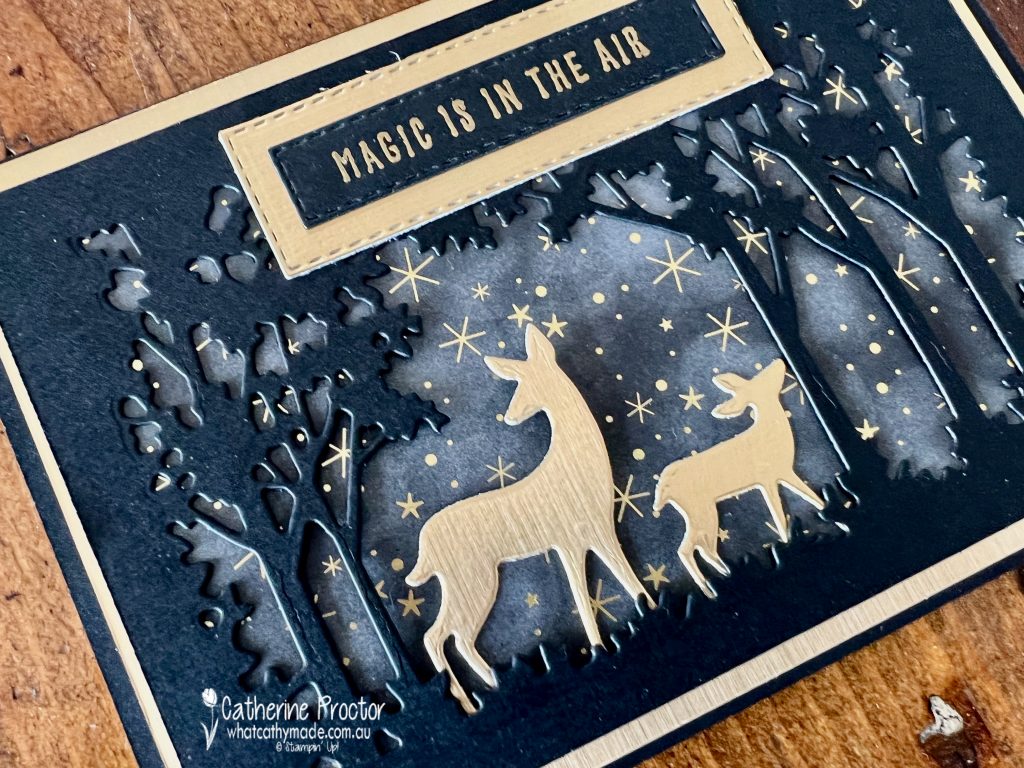
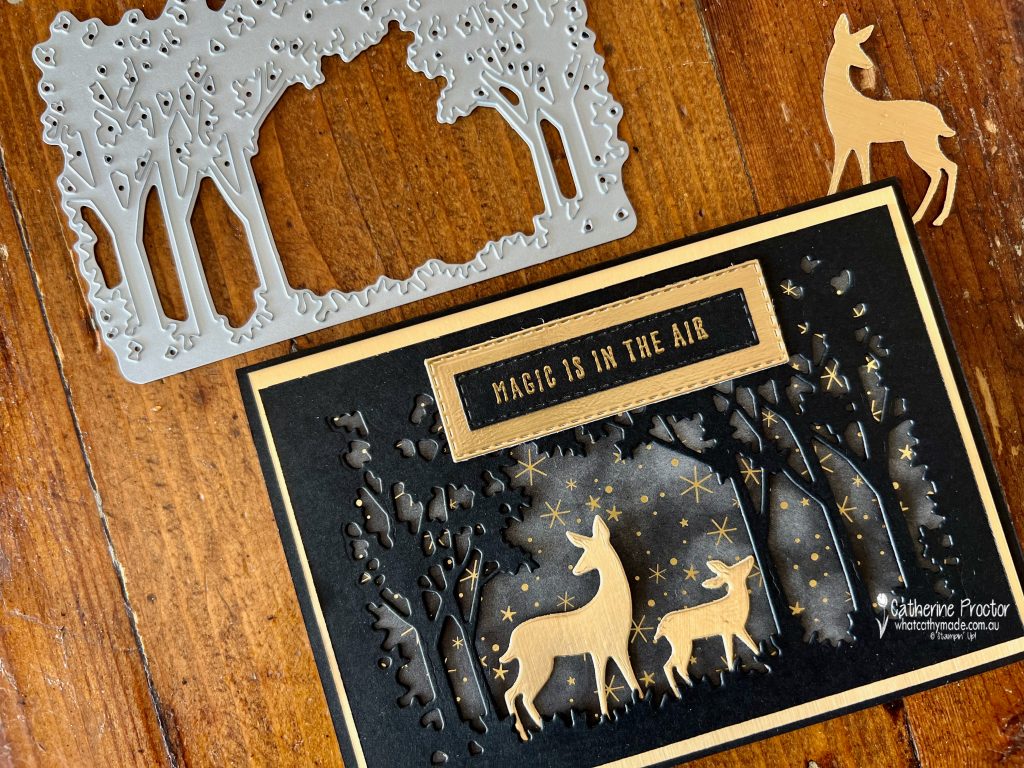
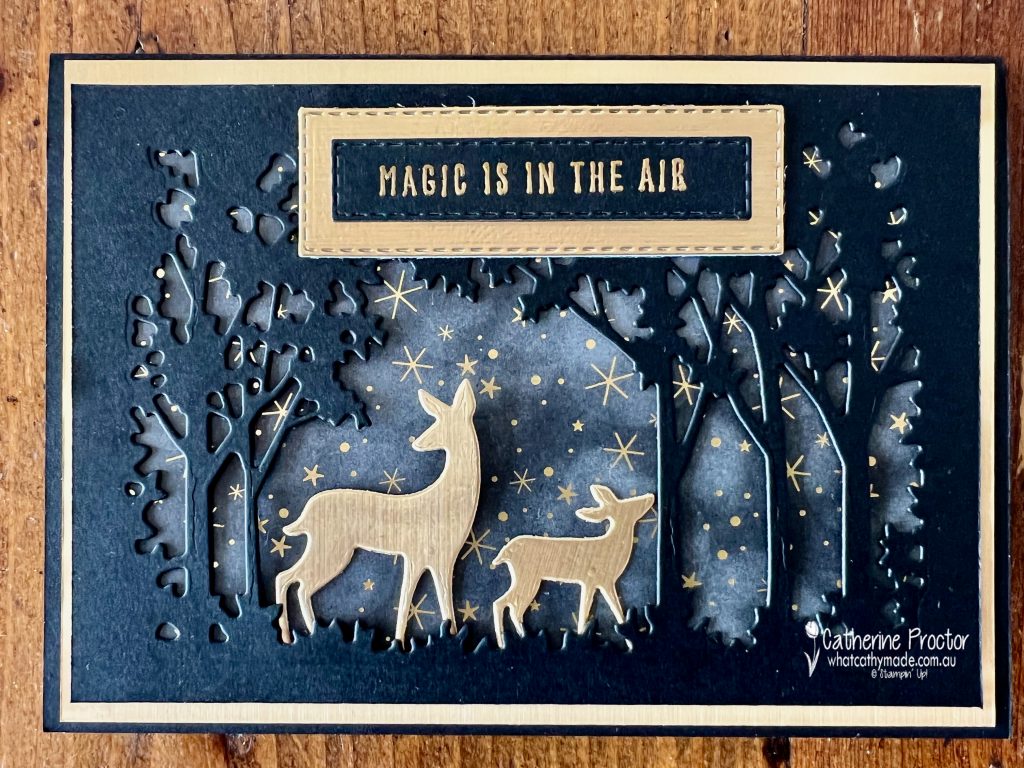
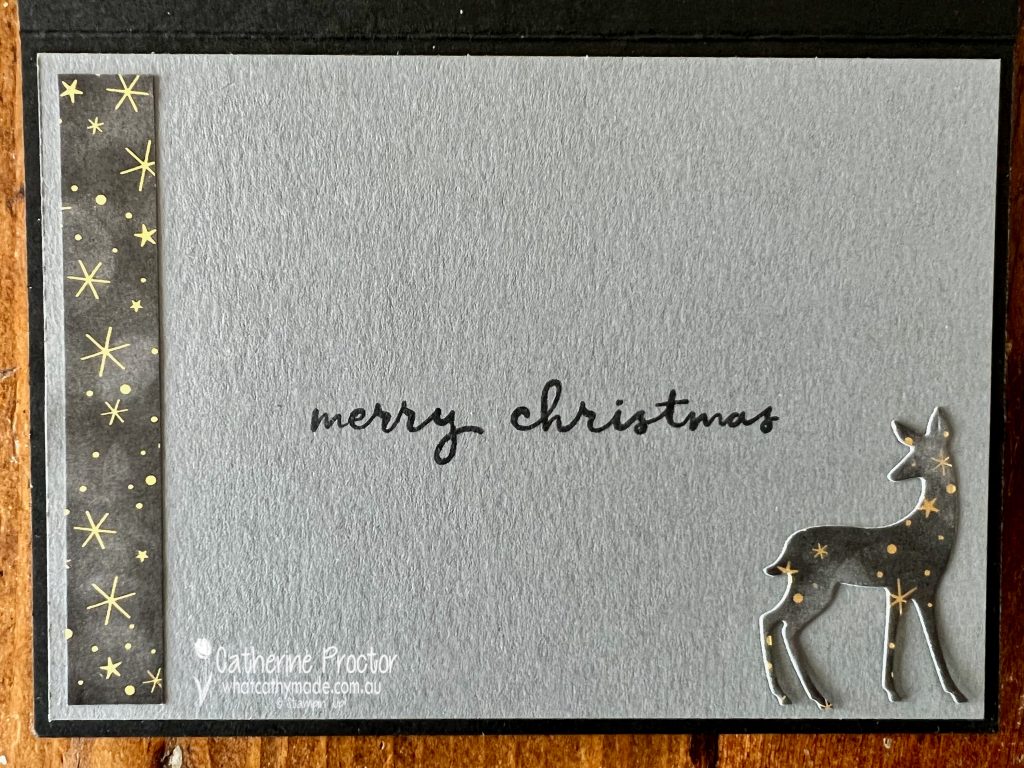
How dark is too dark when it comes to Christmas cards? I’ve gone super dark this week – I actually intended to make a white and blue card so I’m not quite sure how I ended up with a card this dark!
My mum kindly lent me the Grassy Grove bundle last week and I’ve had so much fun playing with it, combining it with the gorgeous Lights Aglow DSP and gold foil for this elegant Christmas card.
The deer are die cut in gold foil to pick up the gorgeous gold starry night in the Lights Aglow DSP.
I’ve used the “Magic is in the Air” sentiment from the Christmas to Remember stamp set because this forest scene looks quite magical to me with the gold stars glimmering in the dark night sky.
Inside the card I’ve used left over Lights Aglow DSP to decorate the insert. Normally I would use white, however white felt too stark against the black as there is no white on the front of the card, so I used Smoky Slate cardstock instead as there is some dark grey in the Lights Aglow DSP.
Now it’s time to hop on over to our next participant, the lovely Andrea Sargent – I can’t wait to see what Andrea has created today!
If at any time you find a broken link, you can find the complete list of all participants on Sharon’s blog.
If you live in Australia, you can find and purchase these products in my Stampin’ Up! Online Store or by clicking on the links below.


")
")


 Designer Series Paper")


")
")

 Designer Series Paper")


 Gingham Ribbon")


")

")
")
 Specialty Designer Series Paper")


