Welcome to week forty six of our Art With Heart 2022-23 Colour Creations blog hop – only four more weeks to go!
This is a weekly blog hop where we showcase the stunning range of Stampin’ Up! colours in alphabetical order over 12 months and this week we are featuring Smoky Slate from the Neutrals family.
Stampin’ Up! have a colour refresh happening and all the demonstrators get to find out the new colours and the retiring this Thursday morning – so exciting. Smoky Slate is part of the neutrals family – I love the versatility of all these neutrals and I don’t want any of them to retire!
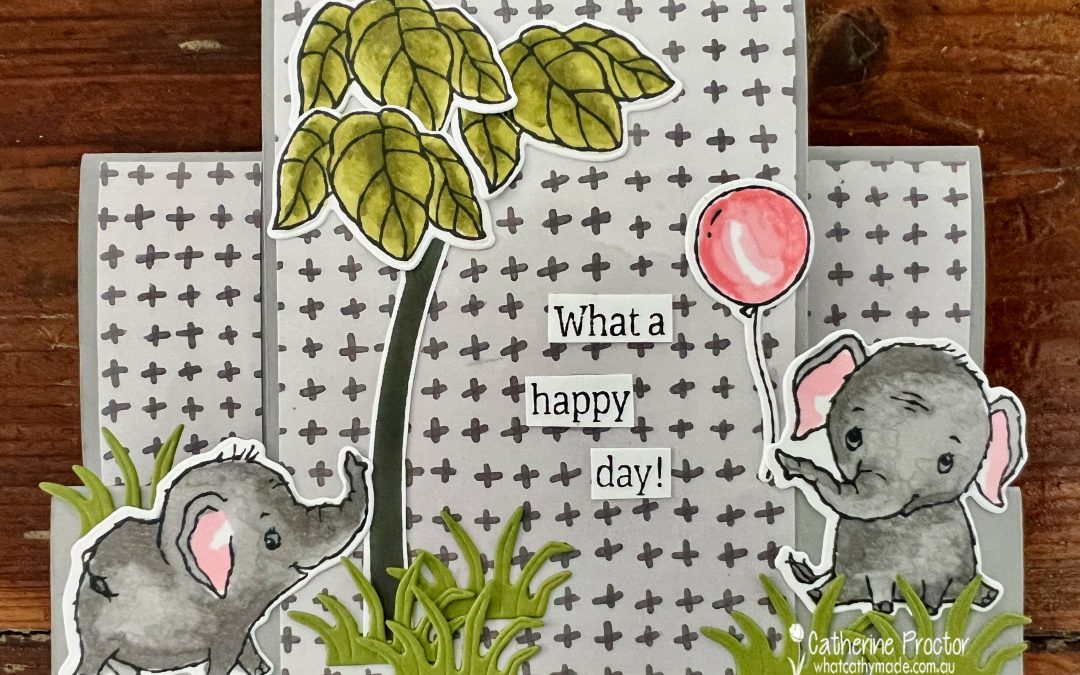
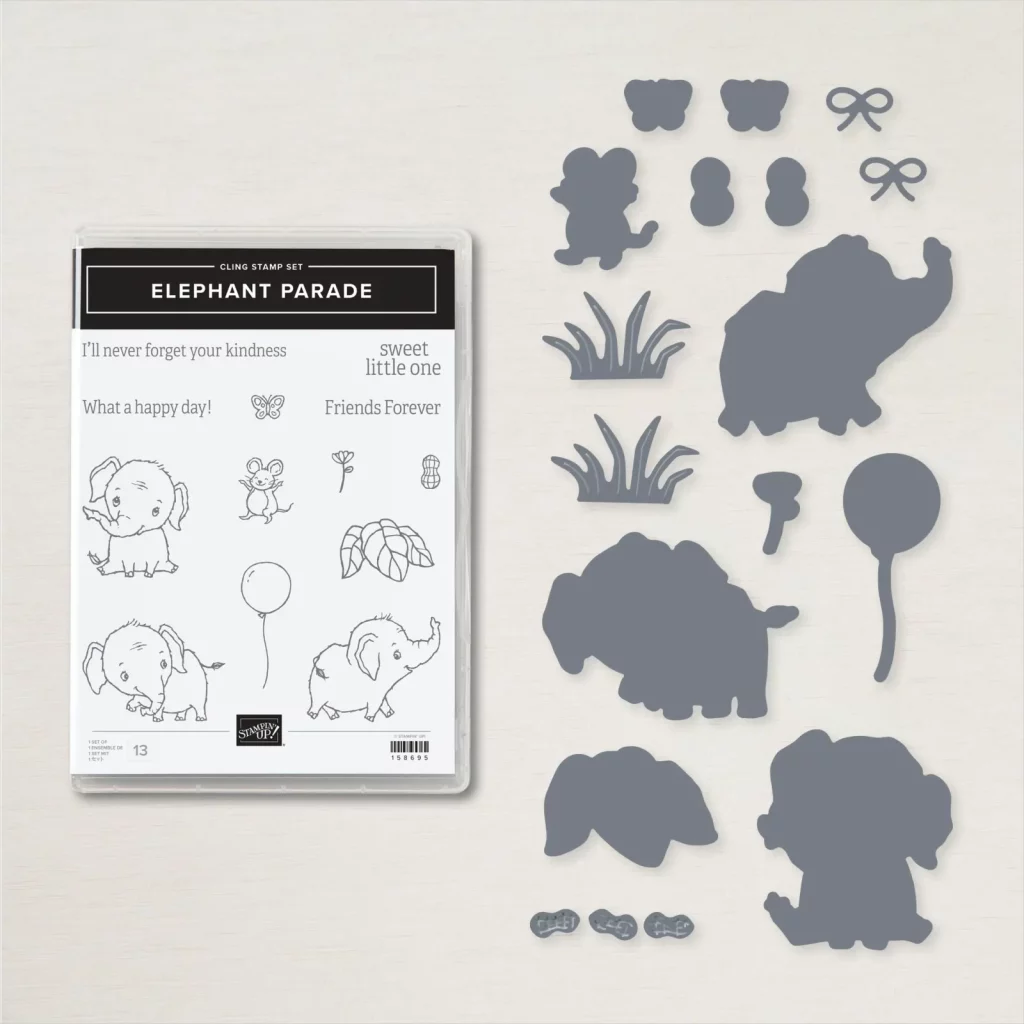
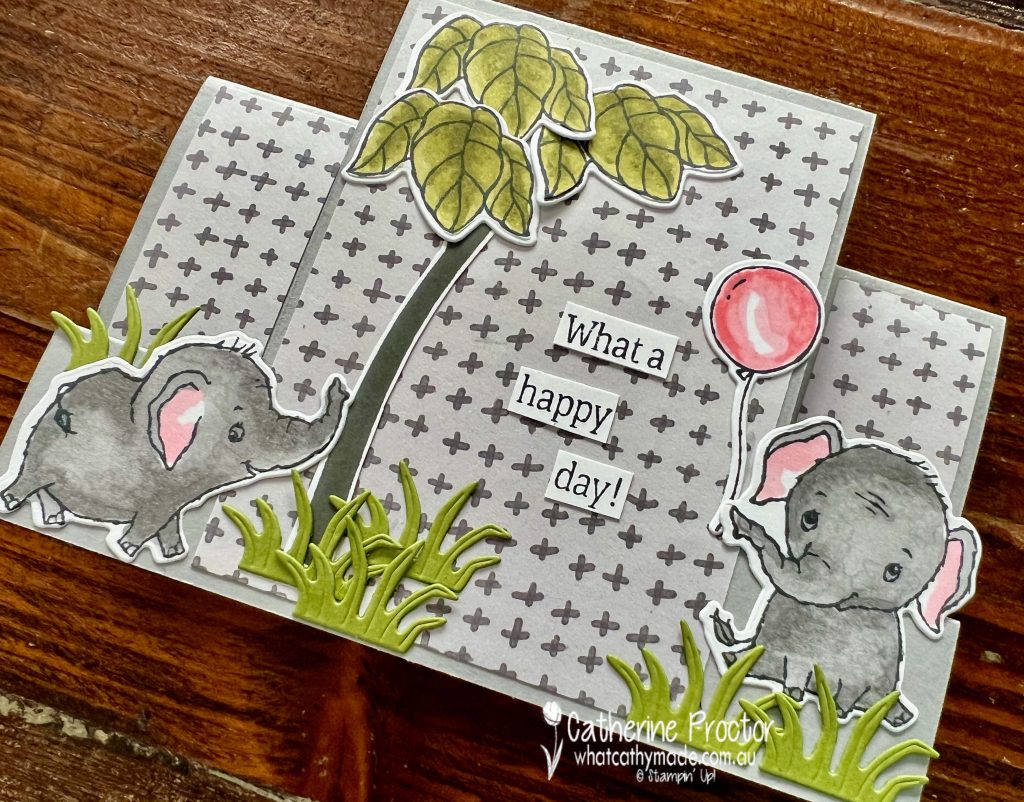
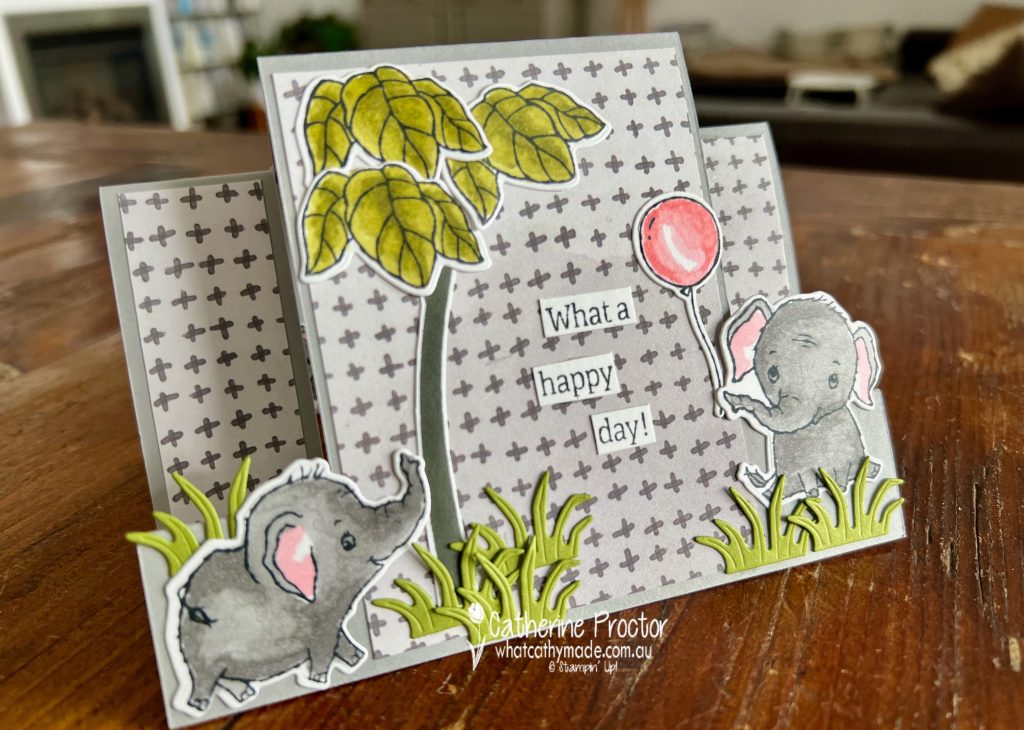
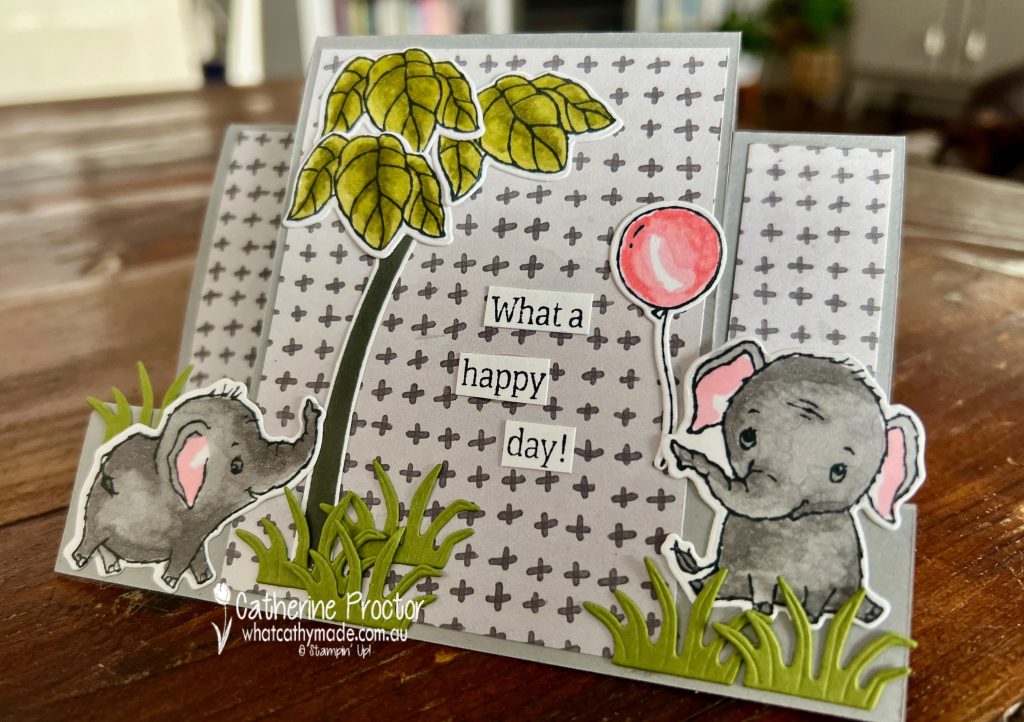
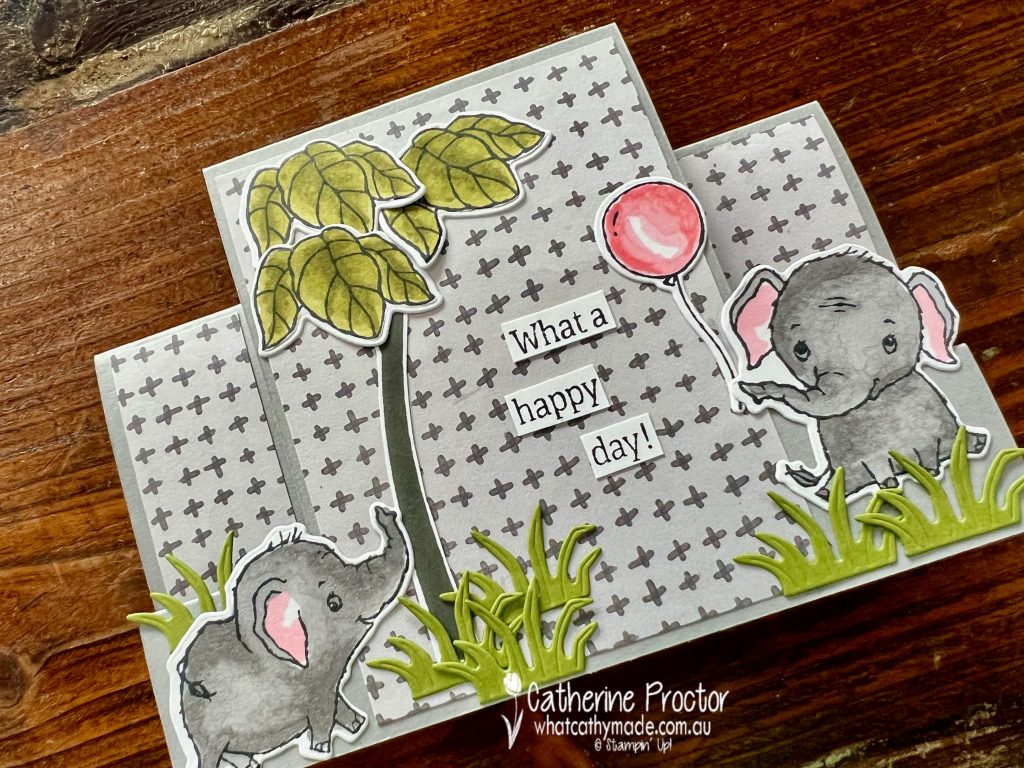
I know it’s an obvious choice, however I couldn’t resist using the Elephant Parade bundle for my centre step card tonight. The cuteness factor in these elephants is simply wow!
The cardbase is Smoky Slate cardstock and the gorgeous background DSP on my centre step card is from the Happy Forest Friends Designer Series Paper.
I stamped the three elephants with Memento ink and then coloured them in using Smoky Slate and Flirty Flamingo Stampin Blends. The balloon is coloured in Flirty Flamingo Stampin Blends, the Monstera leaves in Old Olive Stampin Blends and the tree trunk is a stamp from the Sweet Songbirds stamp set, stamped in Basic Gray.
The sentiment is from the Elephant Parade Stamp set, cut using my paper snips.
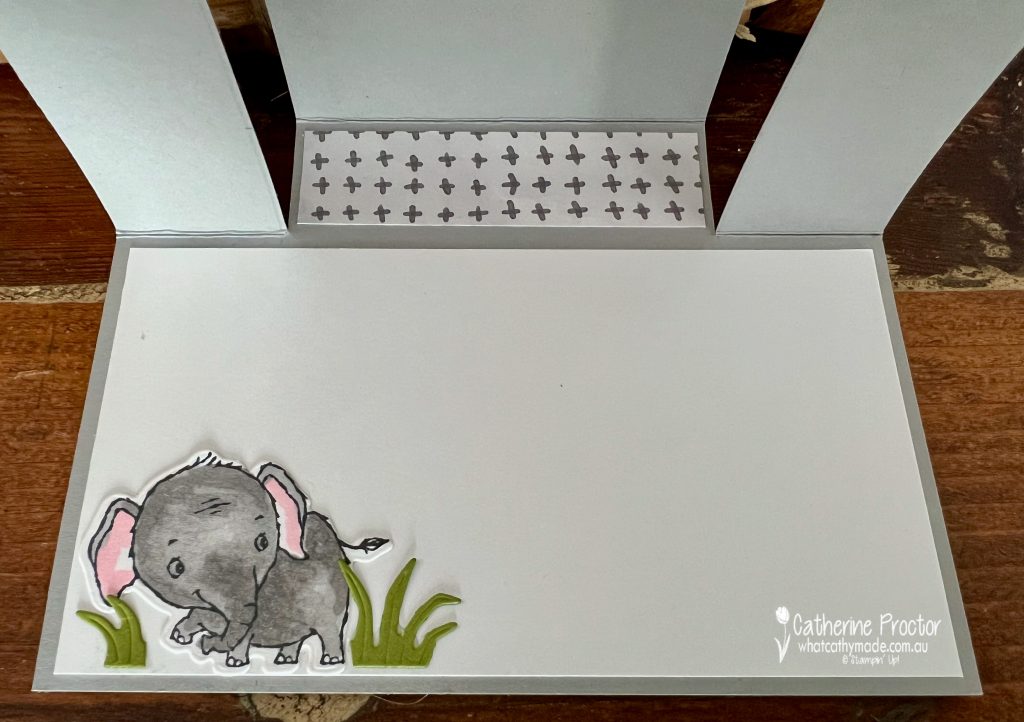
Where’s the third elephant, I hear you ask? Well, why don’t you take a peek inside the card!
The grass on both the front and the inside of the card is die cut from Old Olive cardstock, using a die in the Elephant Parade dies.
Now it’s time to hop on over to our next participant, the lovely Fiona Ryan – I can’t wait to see what Fiona has made this week!
If at any time you find a broken link, you can find the complete list of all participants below.
Welcome to week forty five of our Art With Heart 2022-23 Colour Creations blog hop.
This is a weekly blog hop where we showcase the stunning range of Stampin’ Up! colours in alphabetical order over 12 months and this week we are featuring Shaded Spruce from the Regals family.
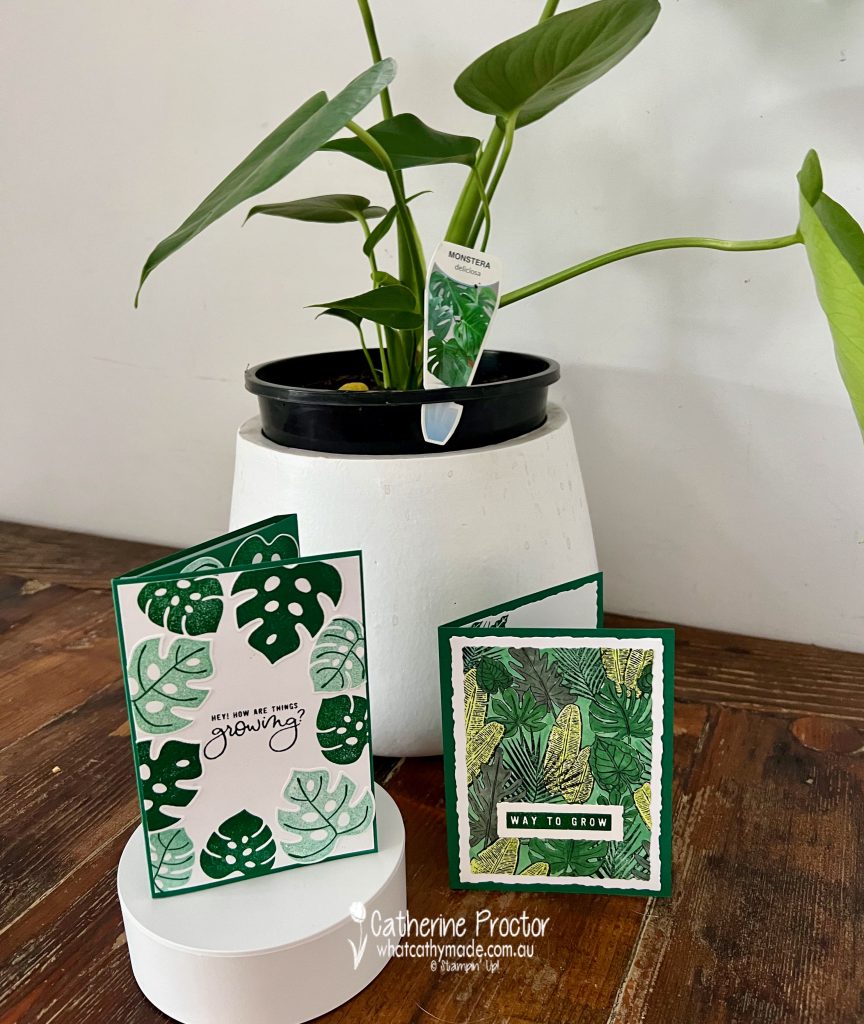
Do you love indoor plants? Personally, I would love to have a house filled with indoor plants, however my budget, available time and gardening skills keep my indoor plant collection to a minimum.
Luckily, with Stampin’ Up! l can create paper indoor plants that need no watering!
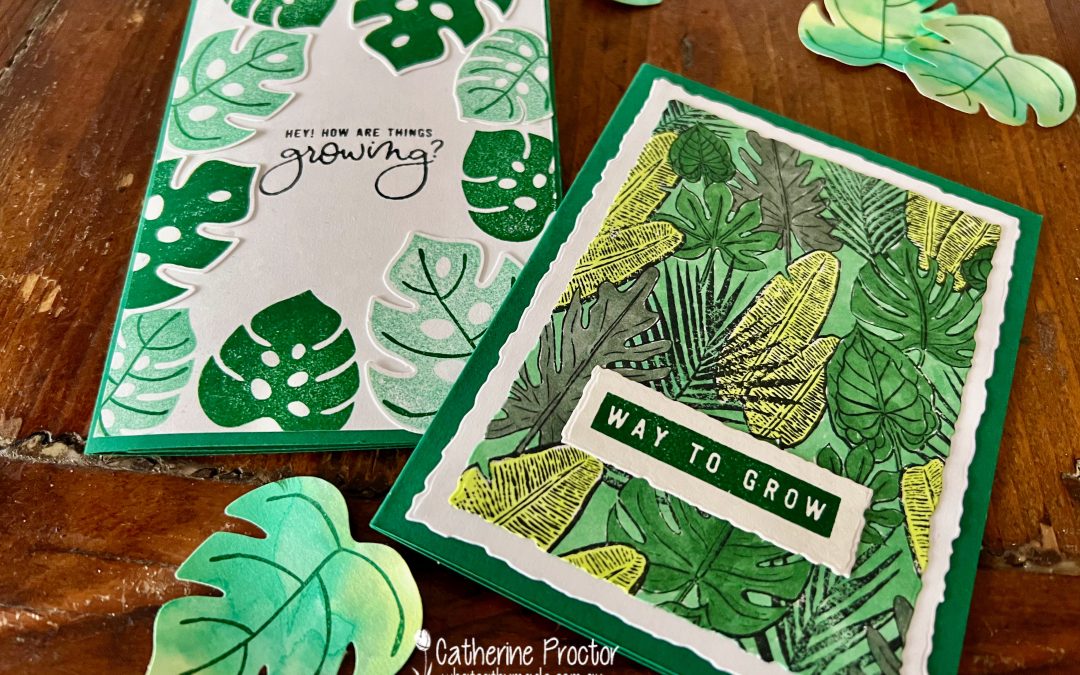
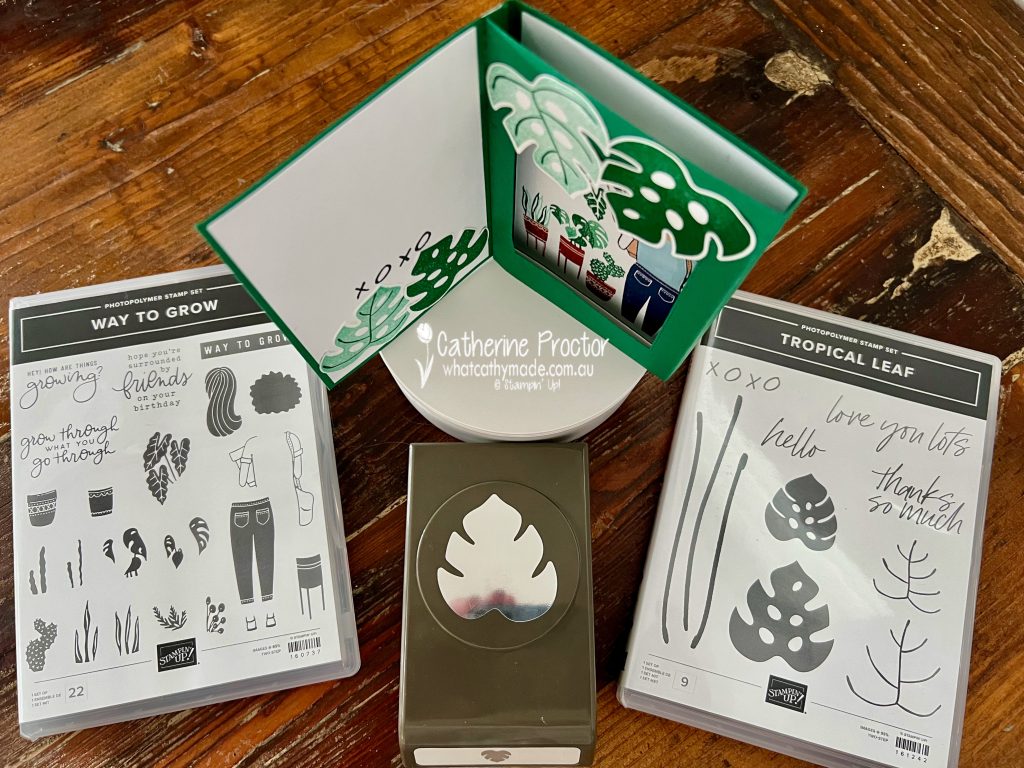
Would you believe, Stampin’ Up! actually have 5 different products with Monstera plants at the moment? Three online exclusive products – Rhino Ready Dies, Tropical Leaf stamp set and the Tropical Leaf punch – and two catalogue products – the Tropical Hideaway stamp and the Way to Grow Stamp set.
I’ve made two cards today that bring together the three stamp sets with Monstera plants as well as the Tropical Leaf punch.
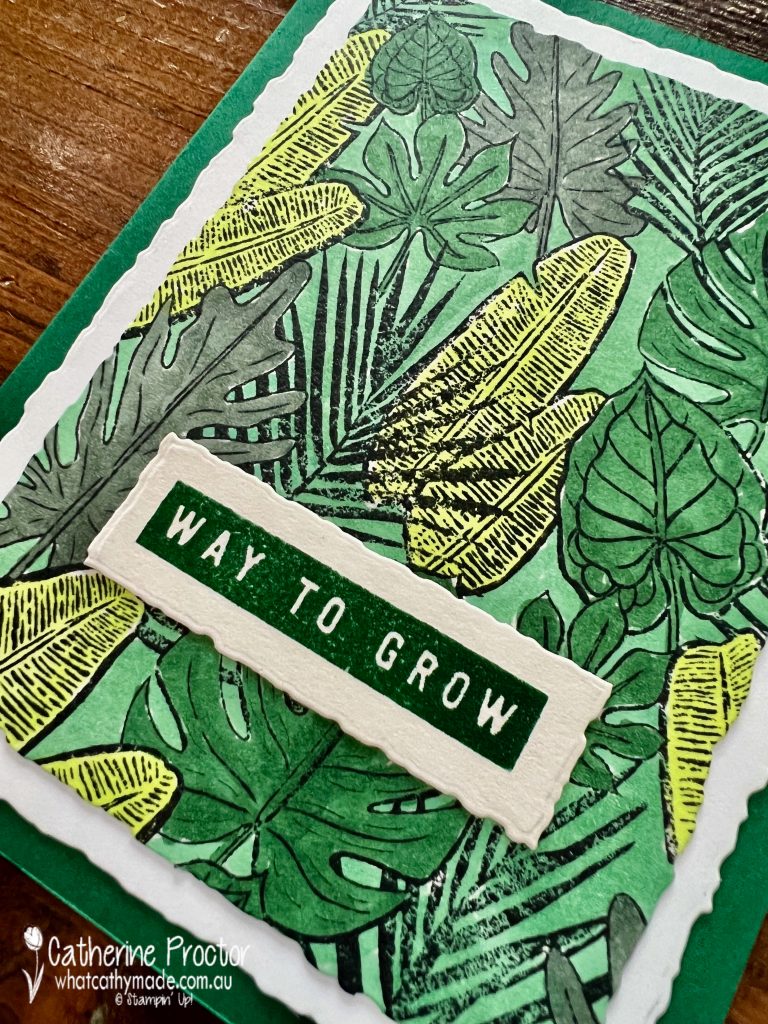
Shaded Spruce is what I would describe as a rich emerald green colour – with these rich deep colours from the Regals family I like to use them stamped off as well as at full strength.
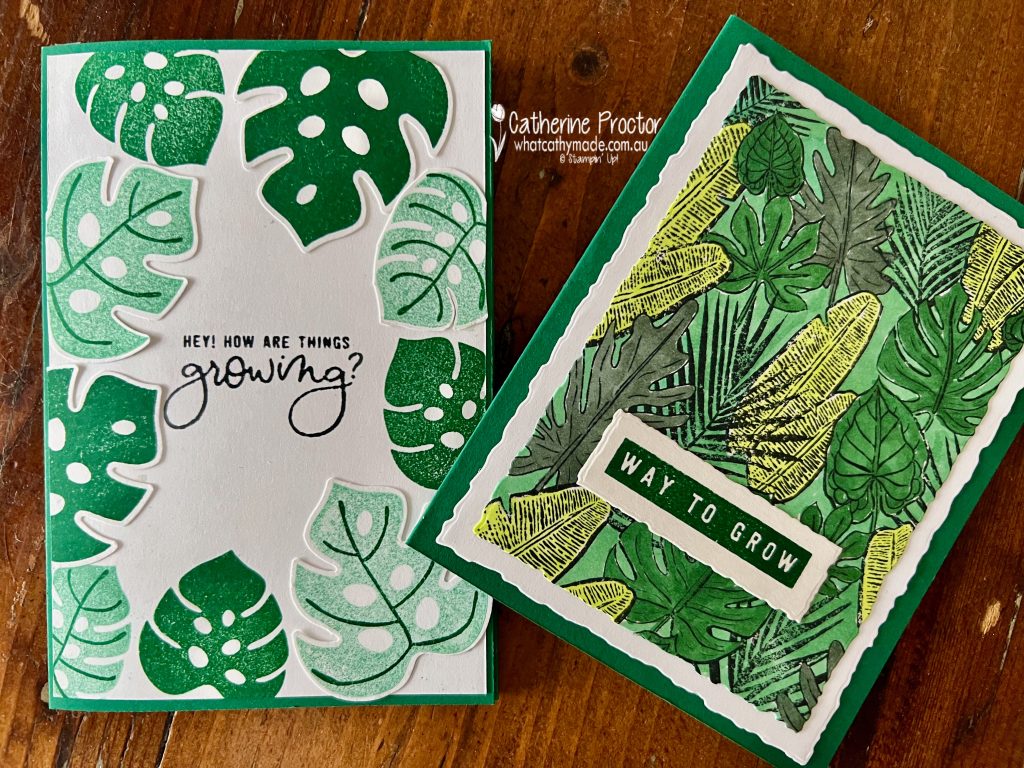
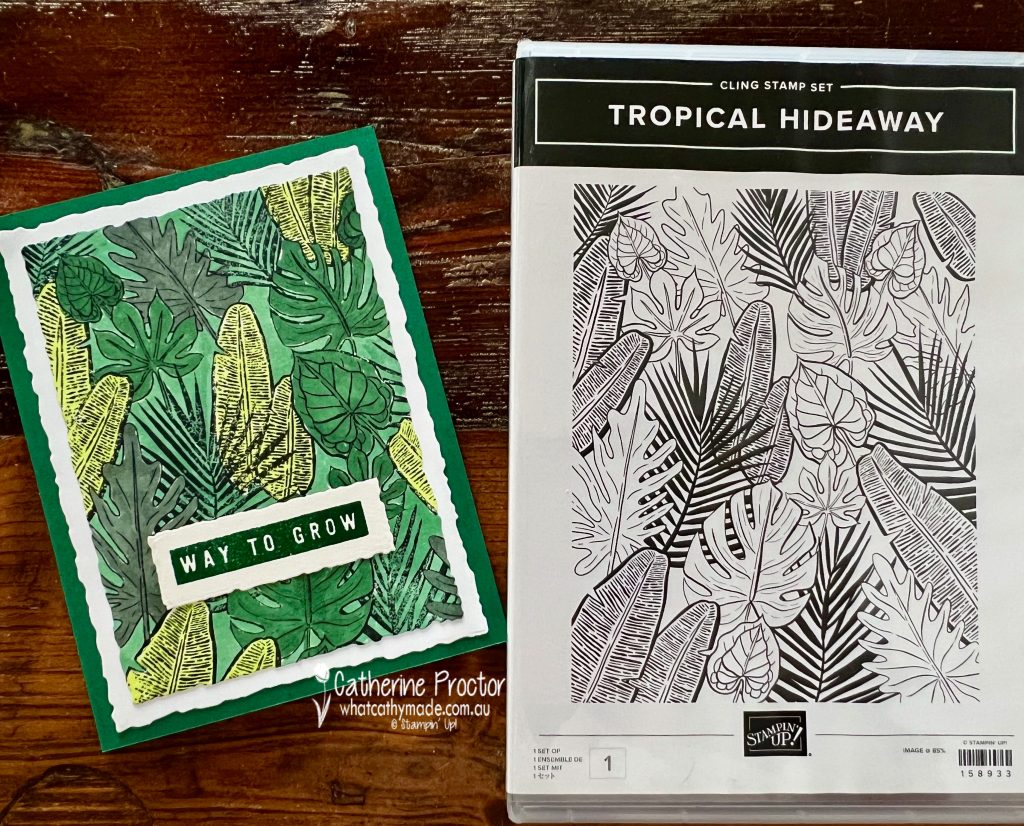
Card one uses the large background stamp set, Tropical Hideaway, coloured in with Shaded Spruce, Evening Evergreen and Parakeet Party Stampin’ Blends.
The card layers are die cut using the Deckled Rectangles Dies, with the “Way to Grow” sentiment from the Way to Grow Stamp set stamped in Shaded Spruce.
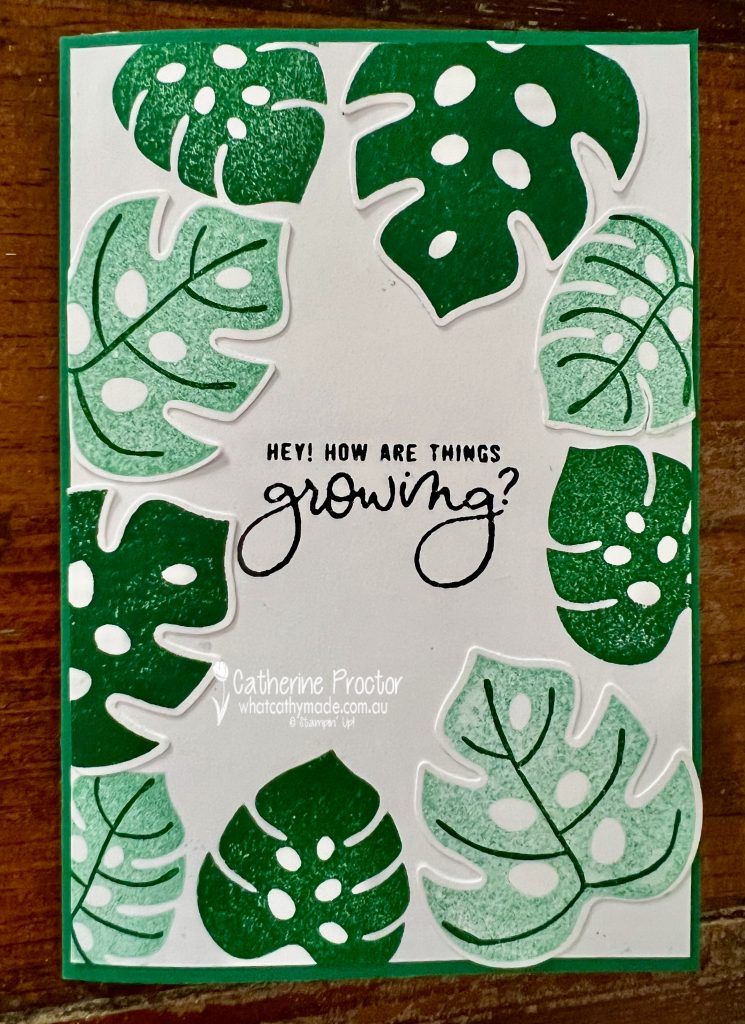
Card two uses Shaded Spruce at full strength and stamped off for my Tropical Leaf monstera leaves – some were punched out with the Tropical leaf punch for added dimension on the front of the card.
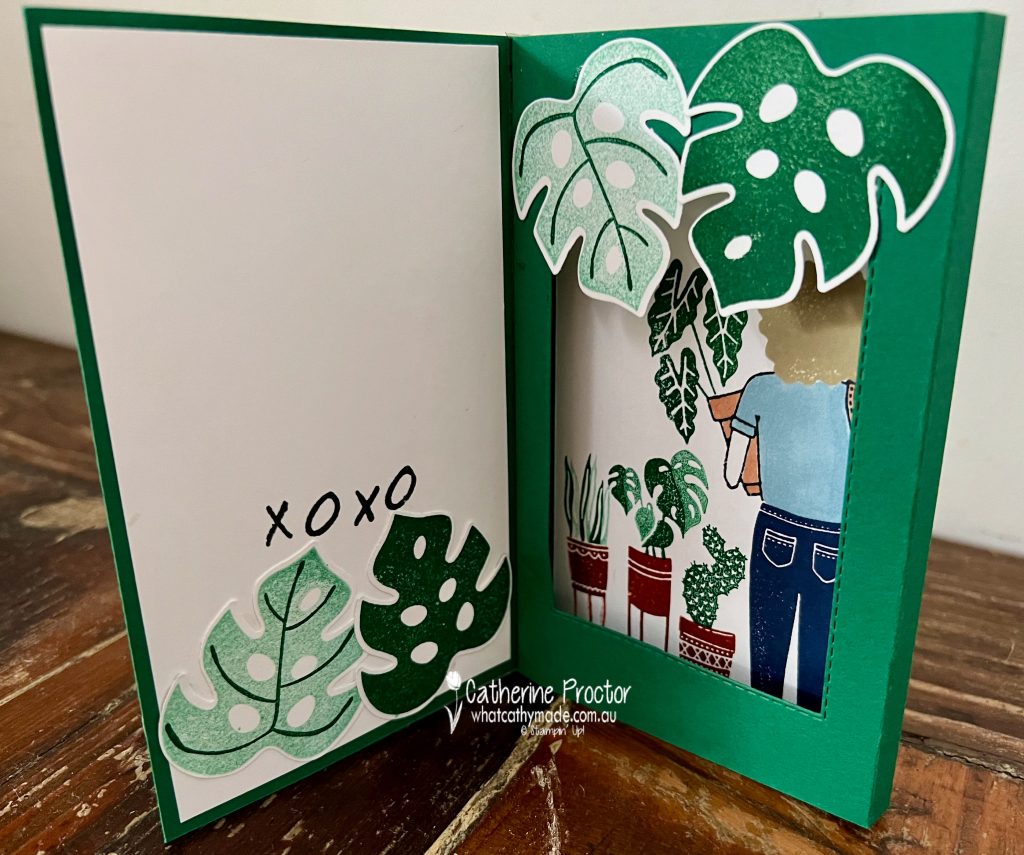
This is a shadow box card – so easy to make with a few simple folds, but so effective! It folds flat for postage, but it is designed to pop up and stand alone when opened.
This seven second video shows you the inside and how it stands up for display.
Spare monstera leaves frame the shadow box that reveals a garden centre scene created with stamps from the the Way to Grow stamp set and coloured with Stampin’ Blends.
Now it’s time to hop on over to our next participant, the lovely Rachel Palmieri – I can’t wait to see what Rachel has made this week!
If at any time you find a broken link, you can find the complete list of all participants below.
Welcome to week forty four of our Art With Heart 2022-23 Colour Creations blog hop.
This is a weekly blog hop where we showcase the stunning range of Stampin’ Up! colours in alphabetical order over 12 months and this week we are featuring Sahara Sand from the Neutrals family.
Sahara Sand is an extremely versatile neutral that I use all the time, however it is a colour I rarely choose it as the feature colour on a card.
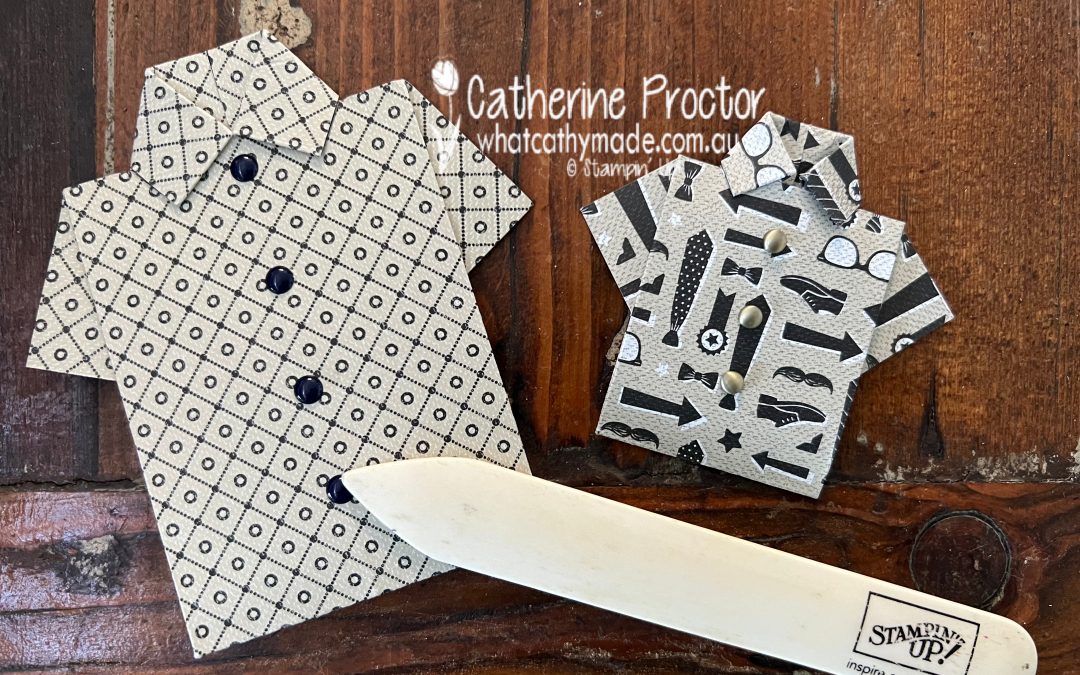
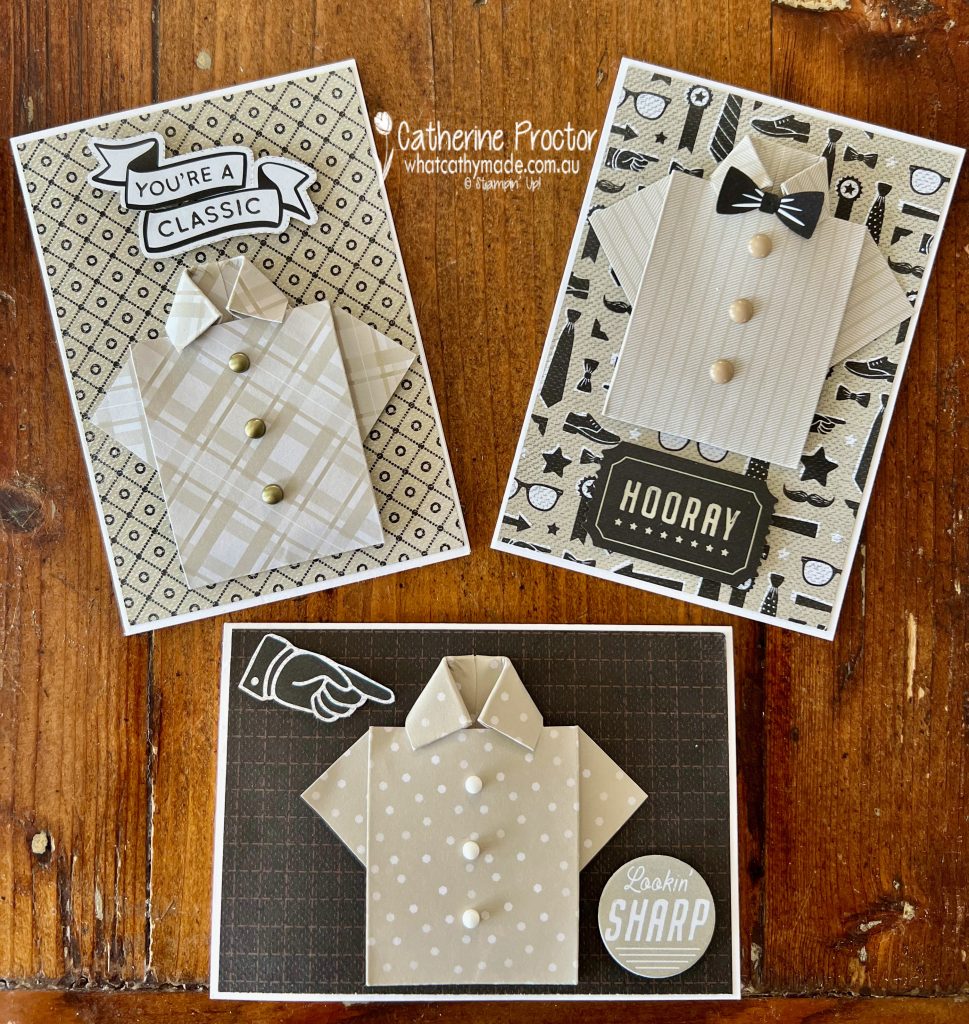
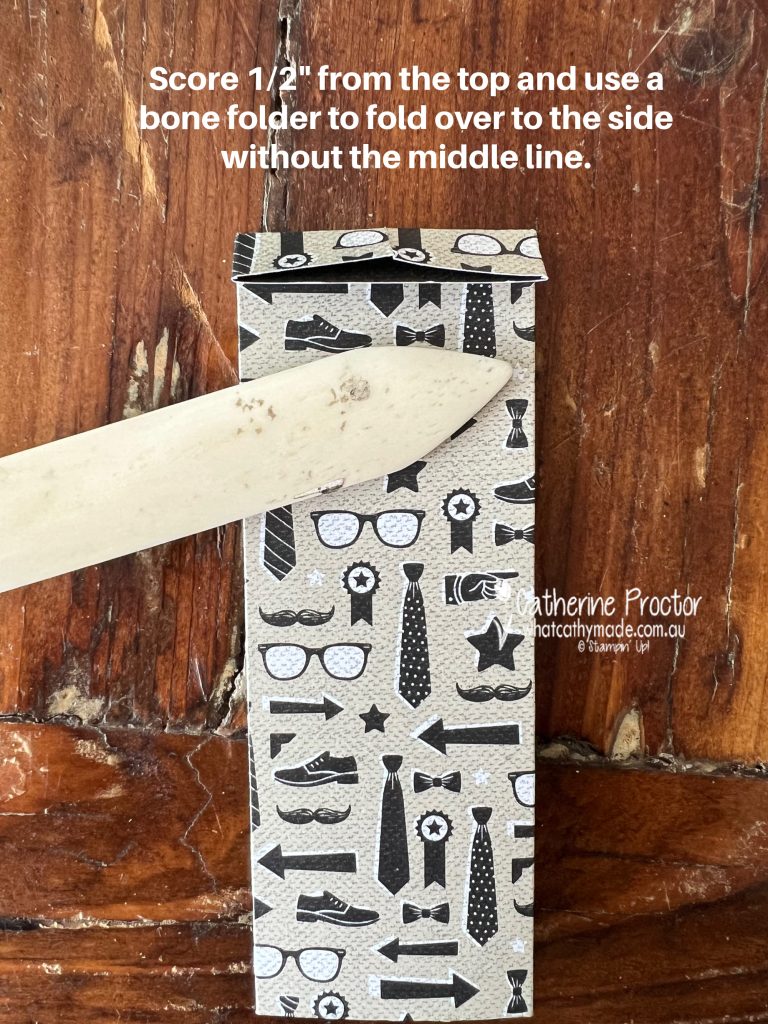
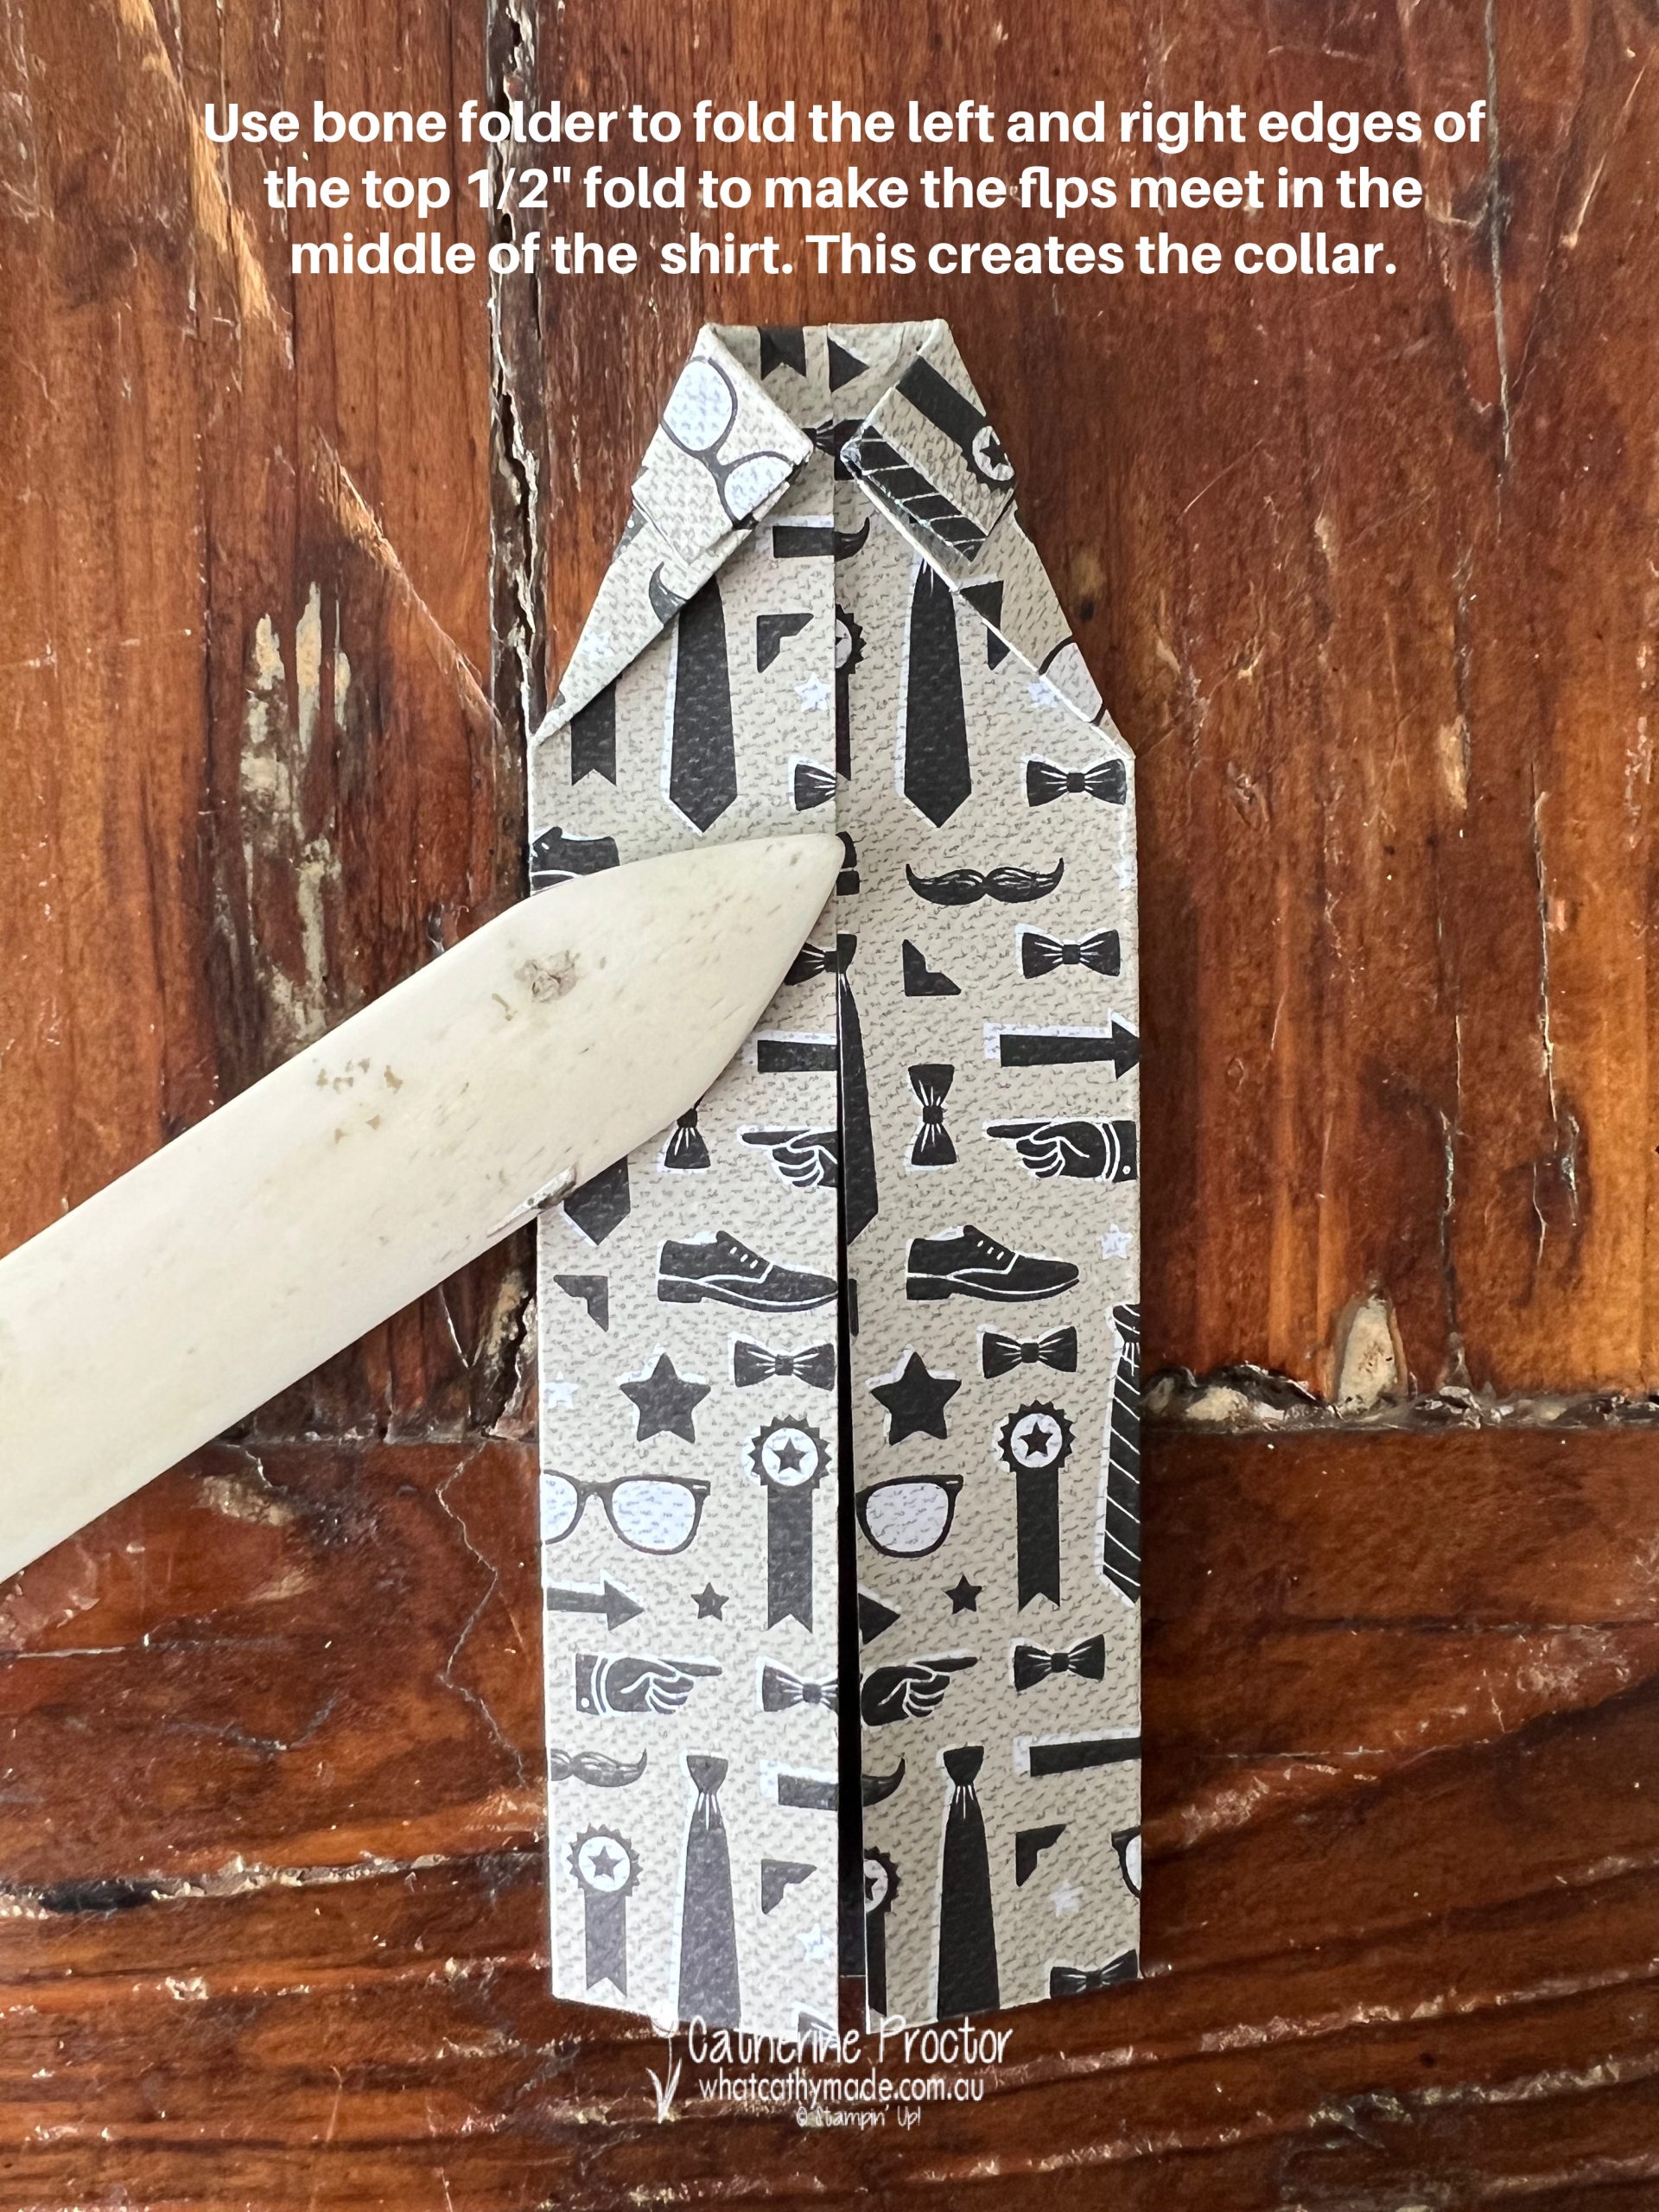
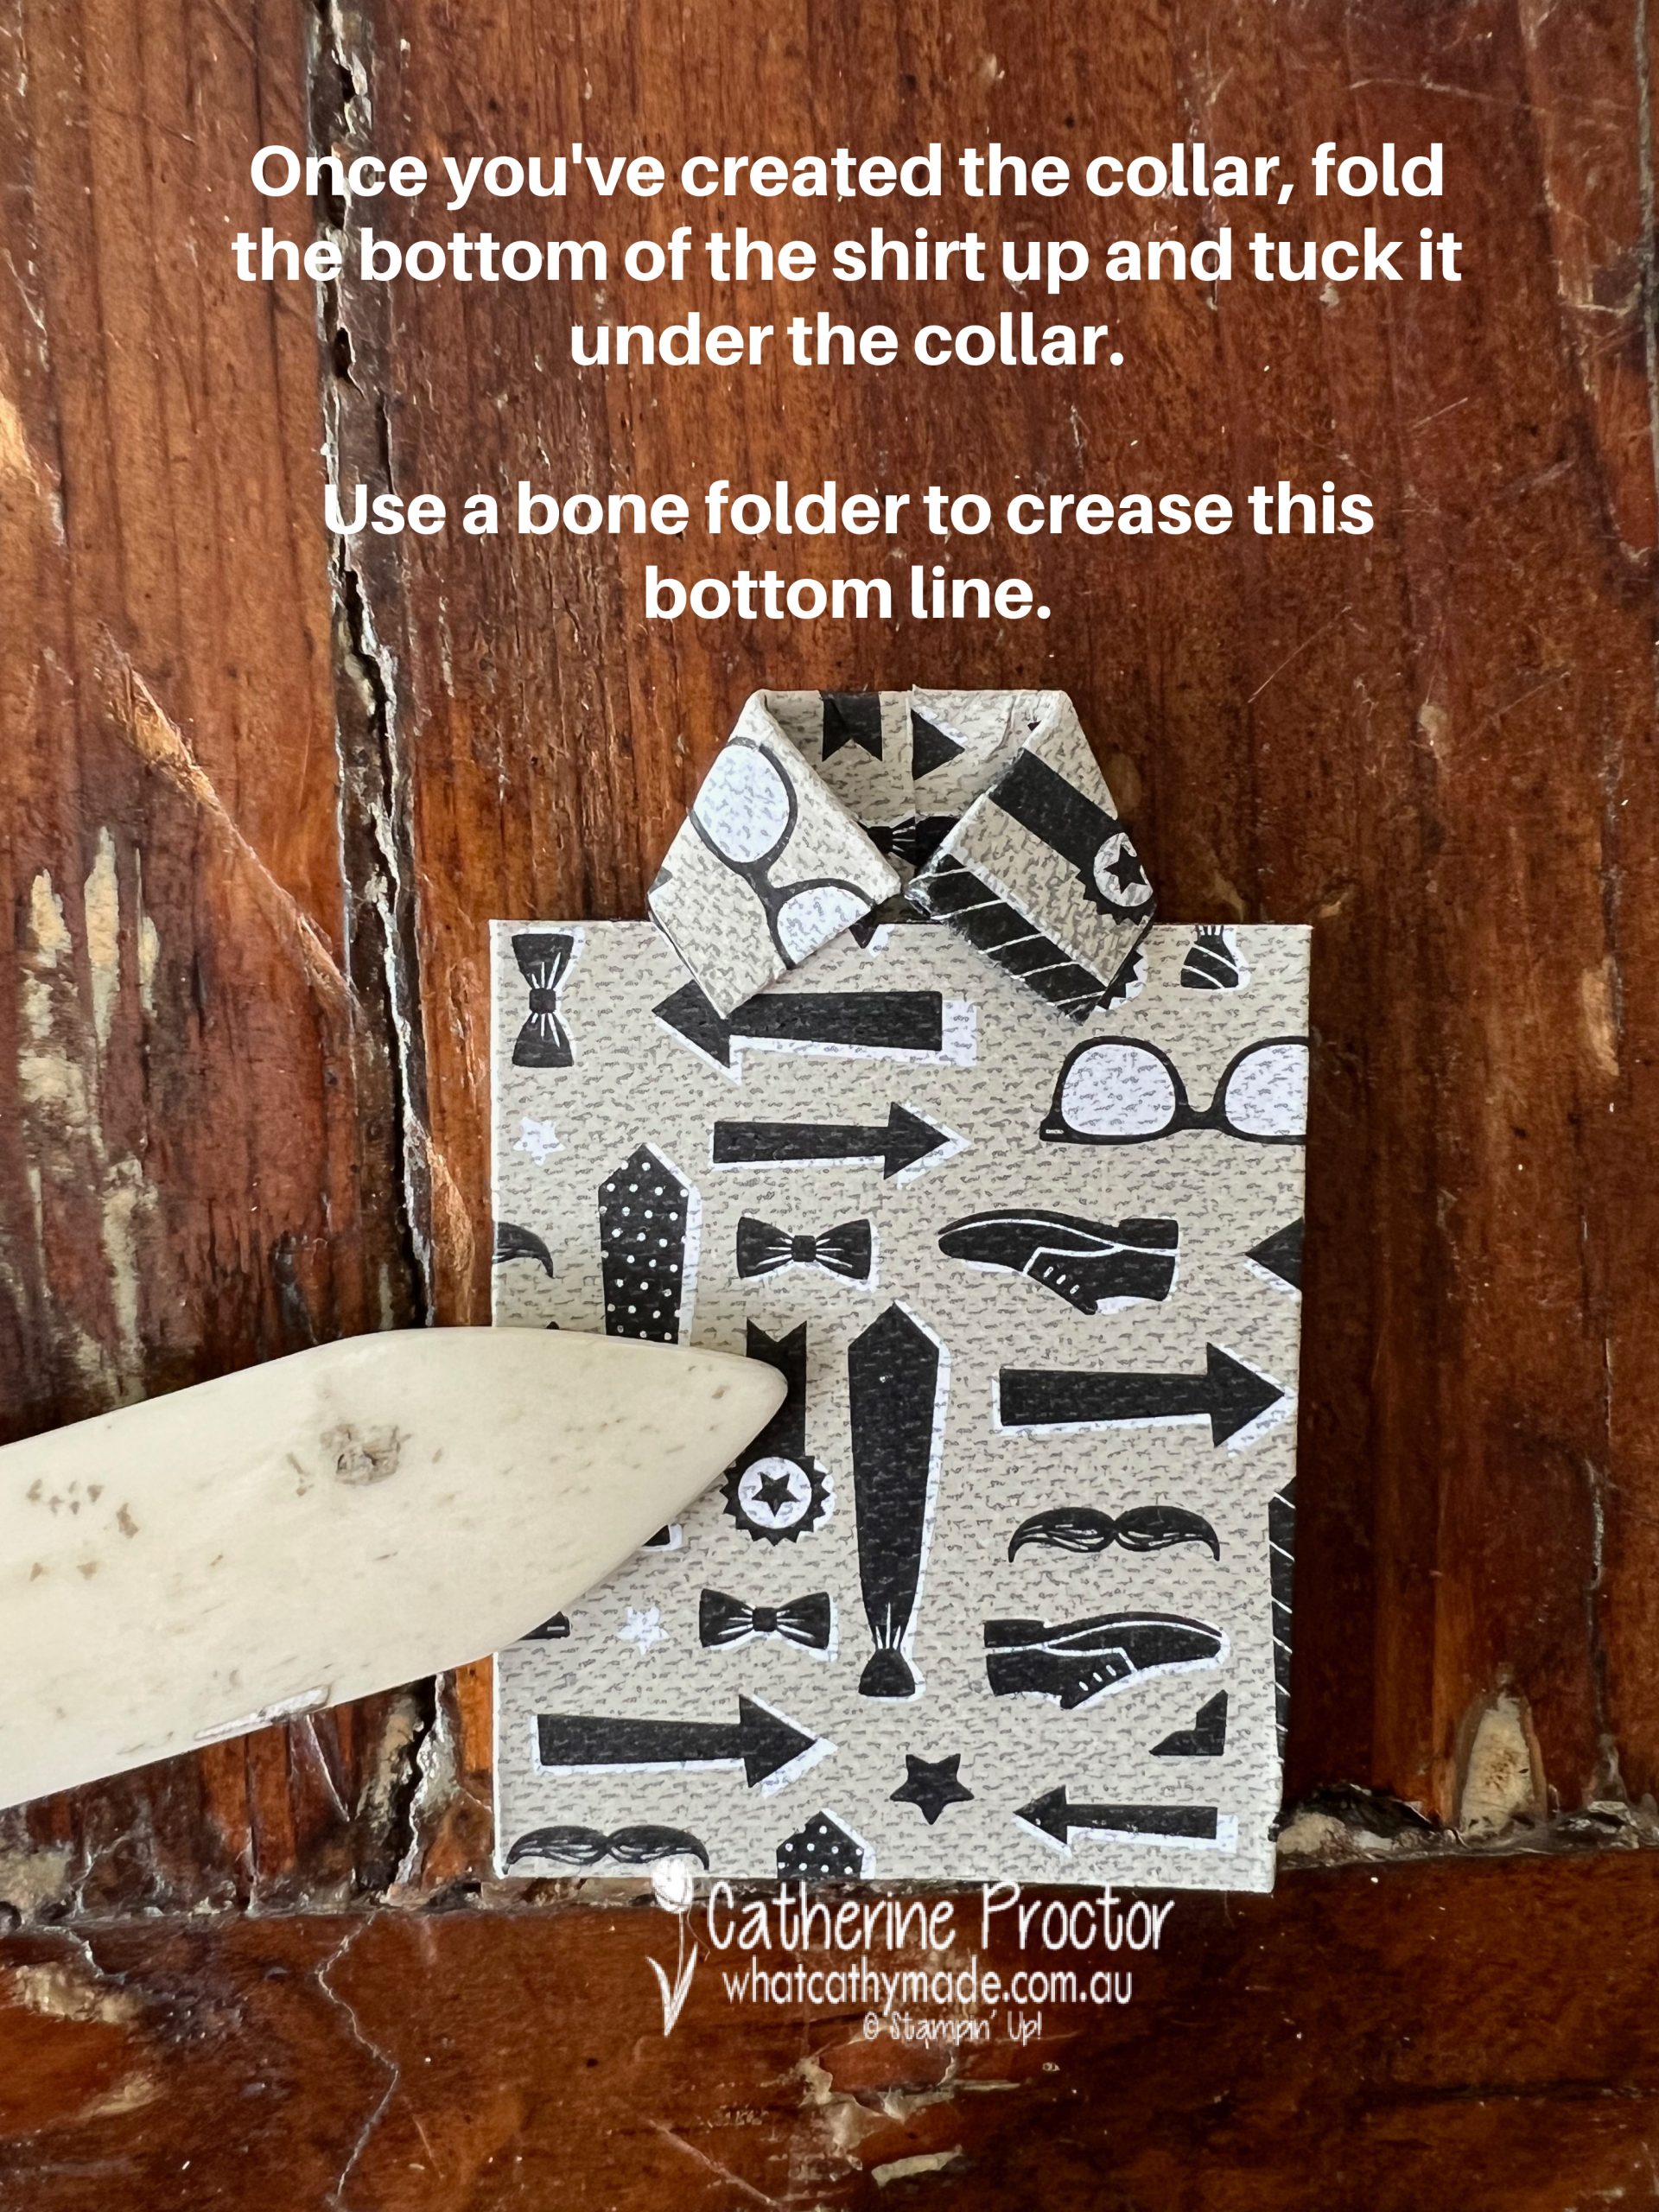
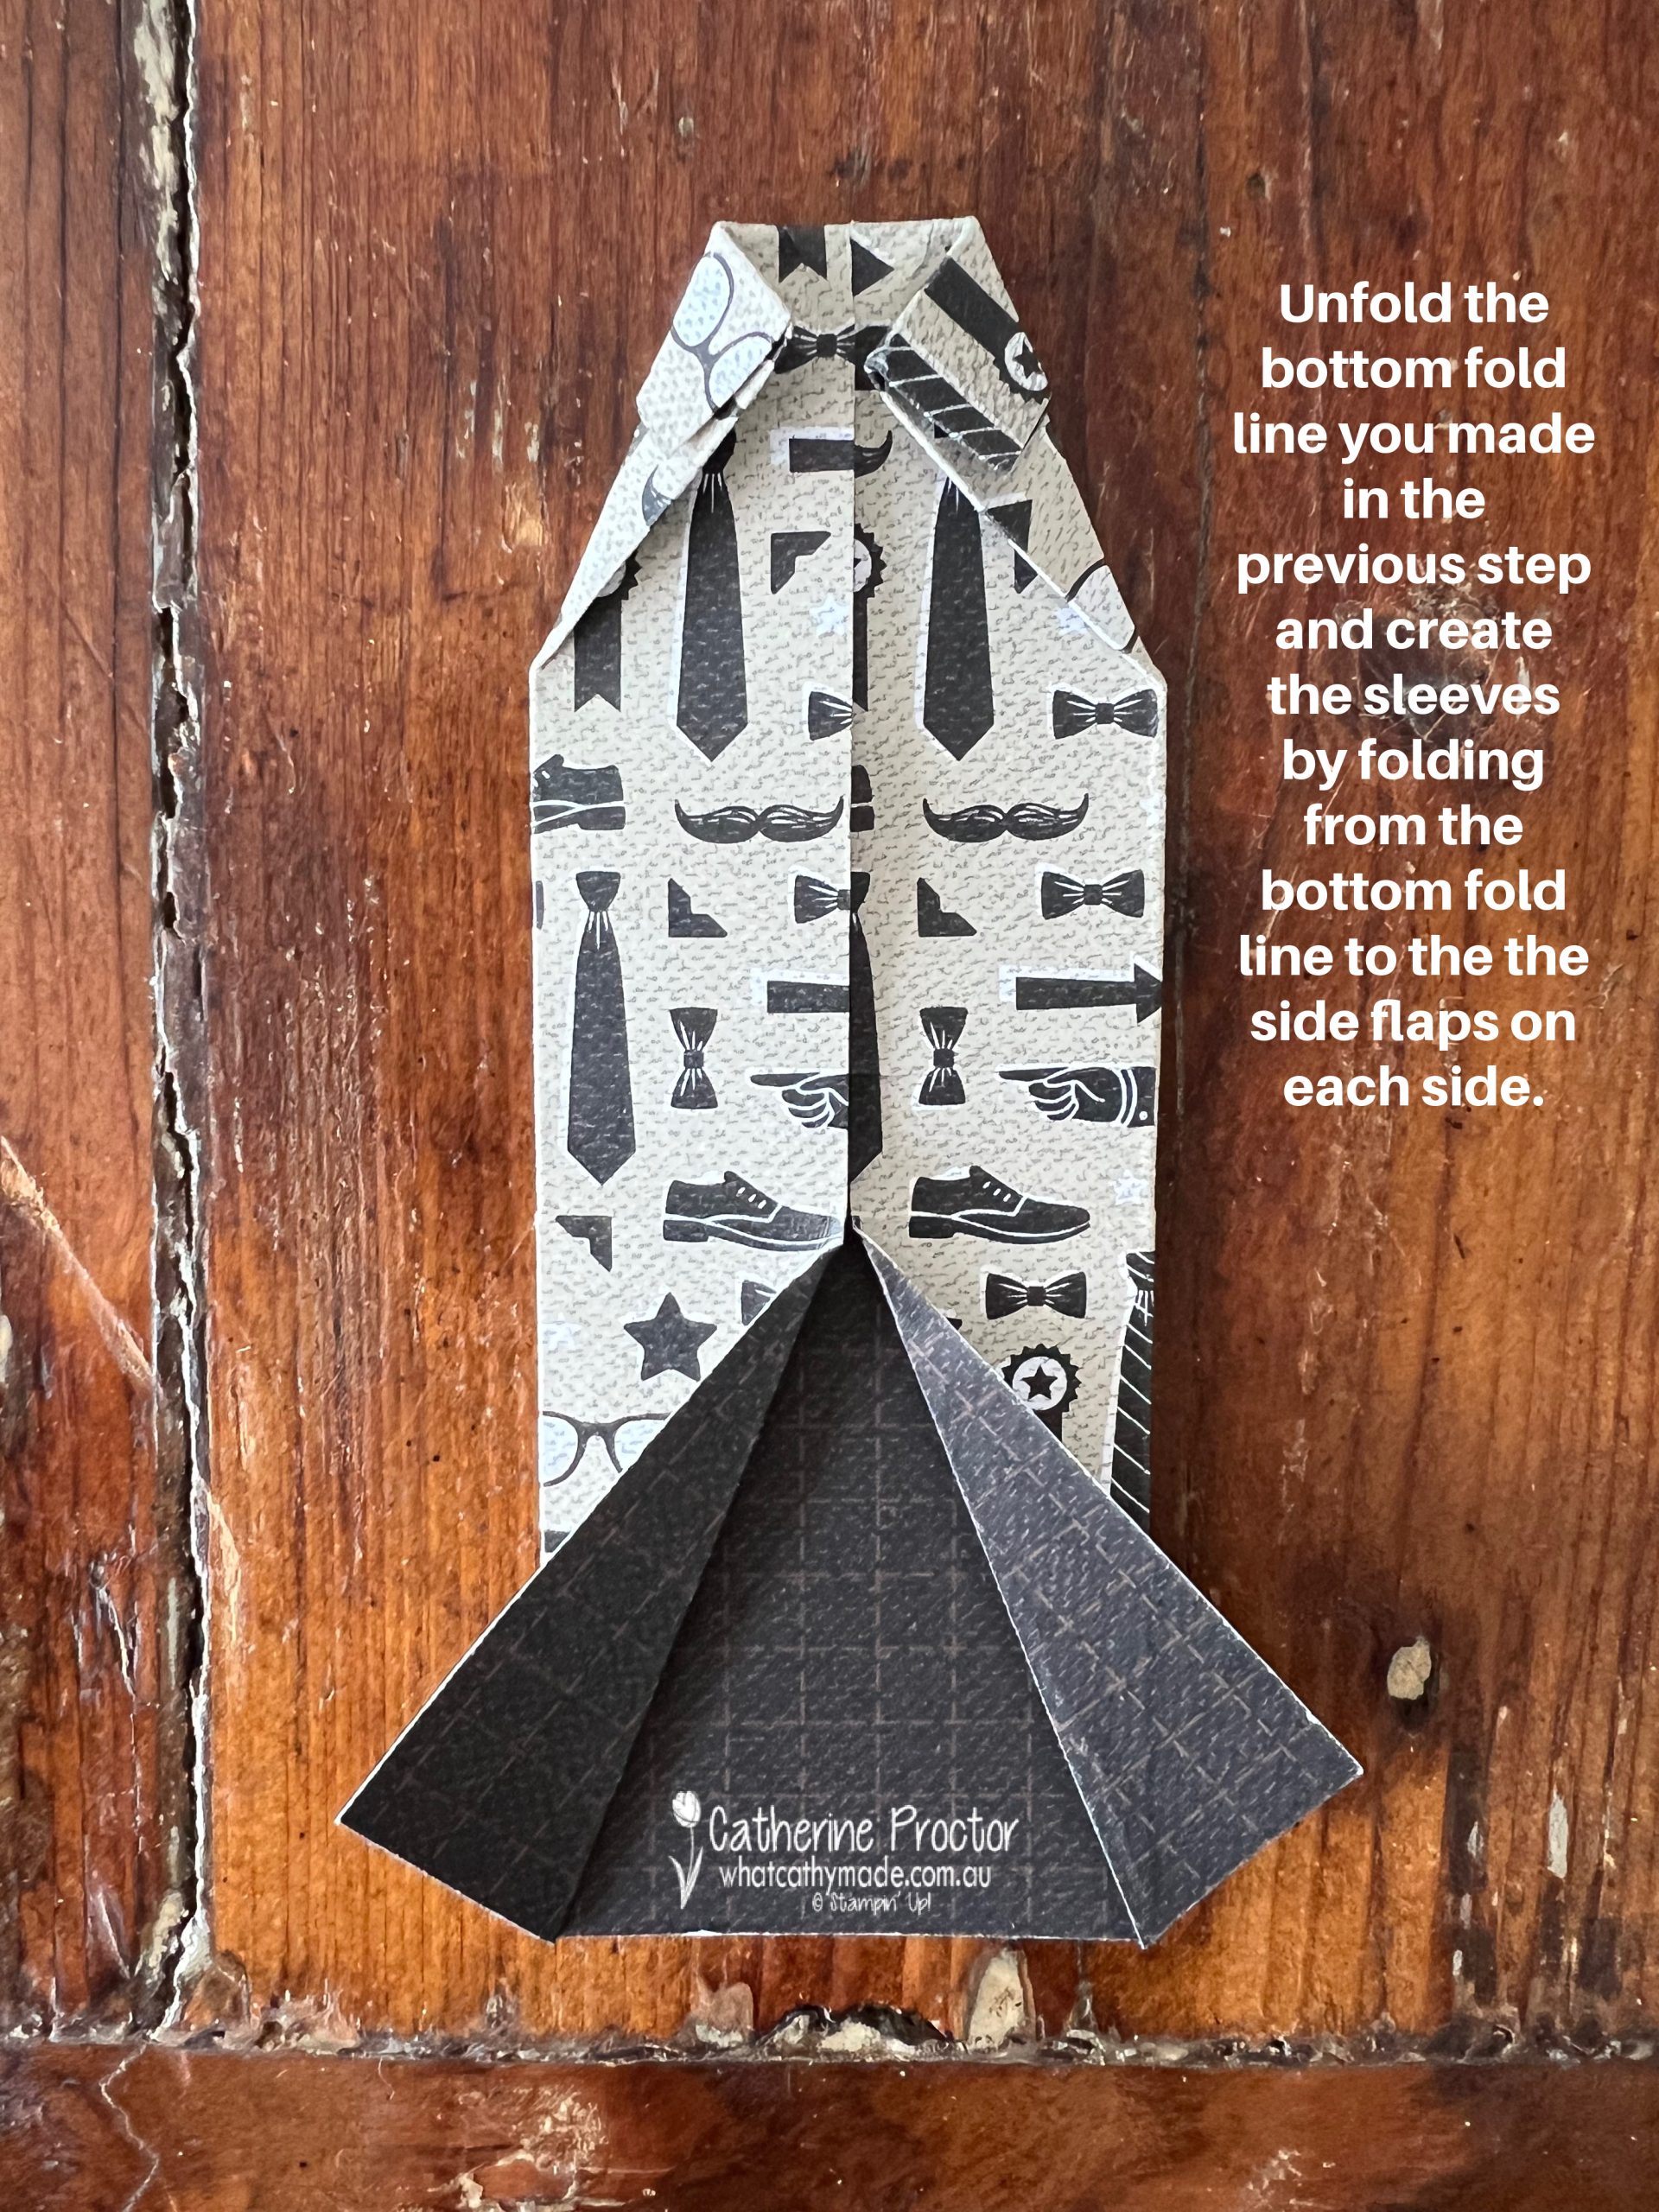
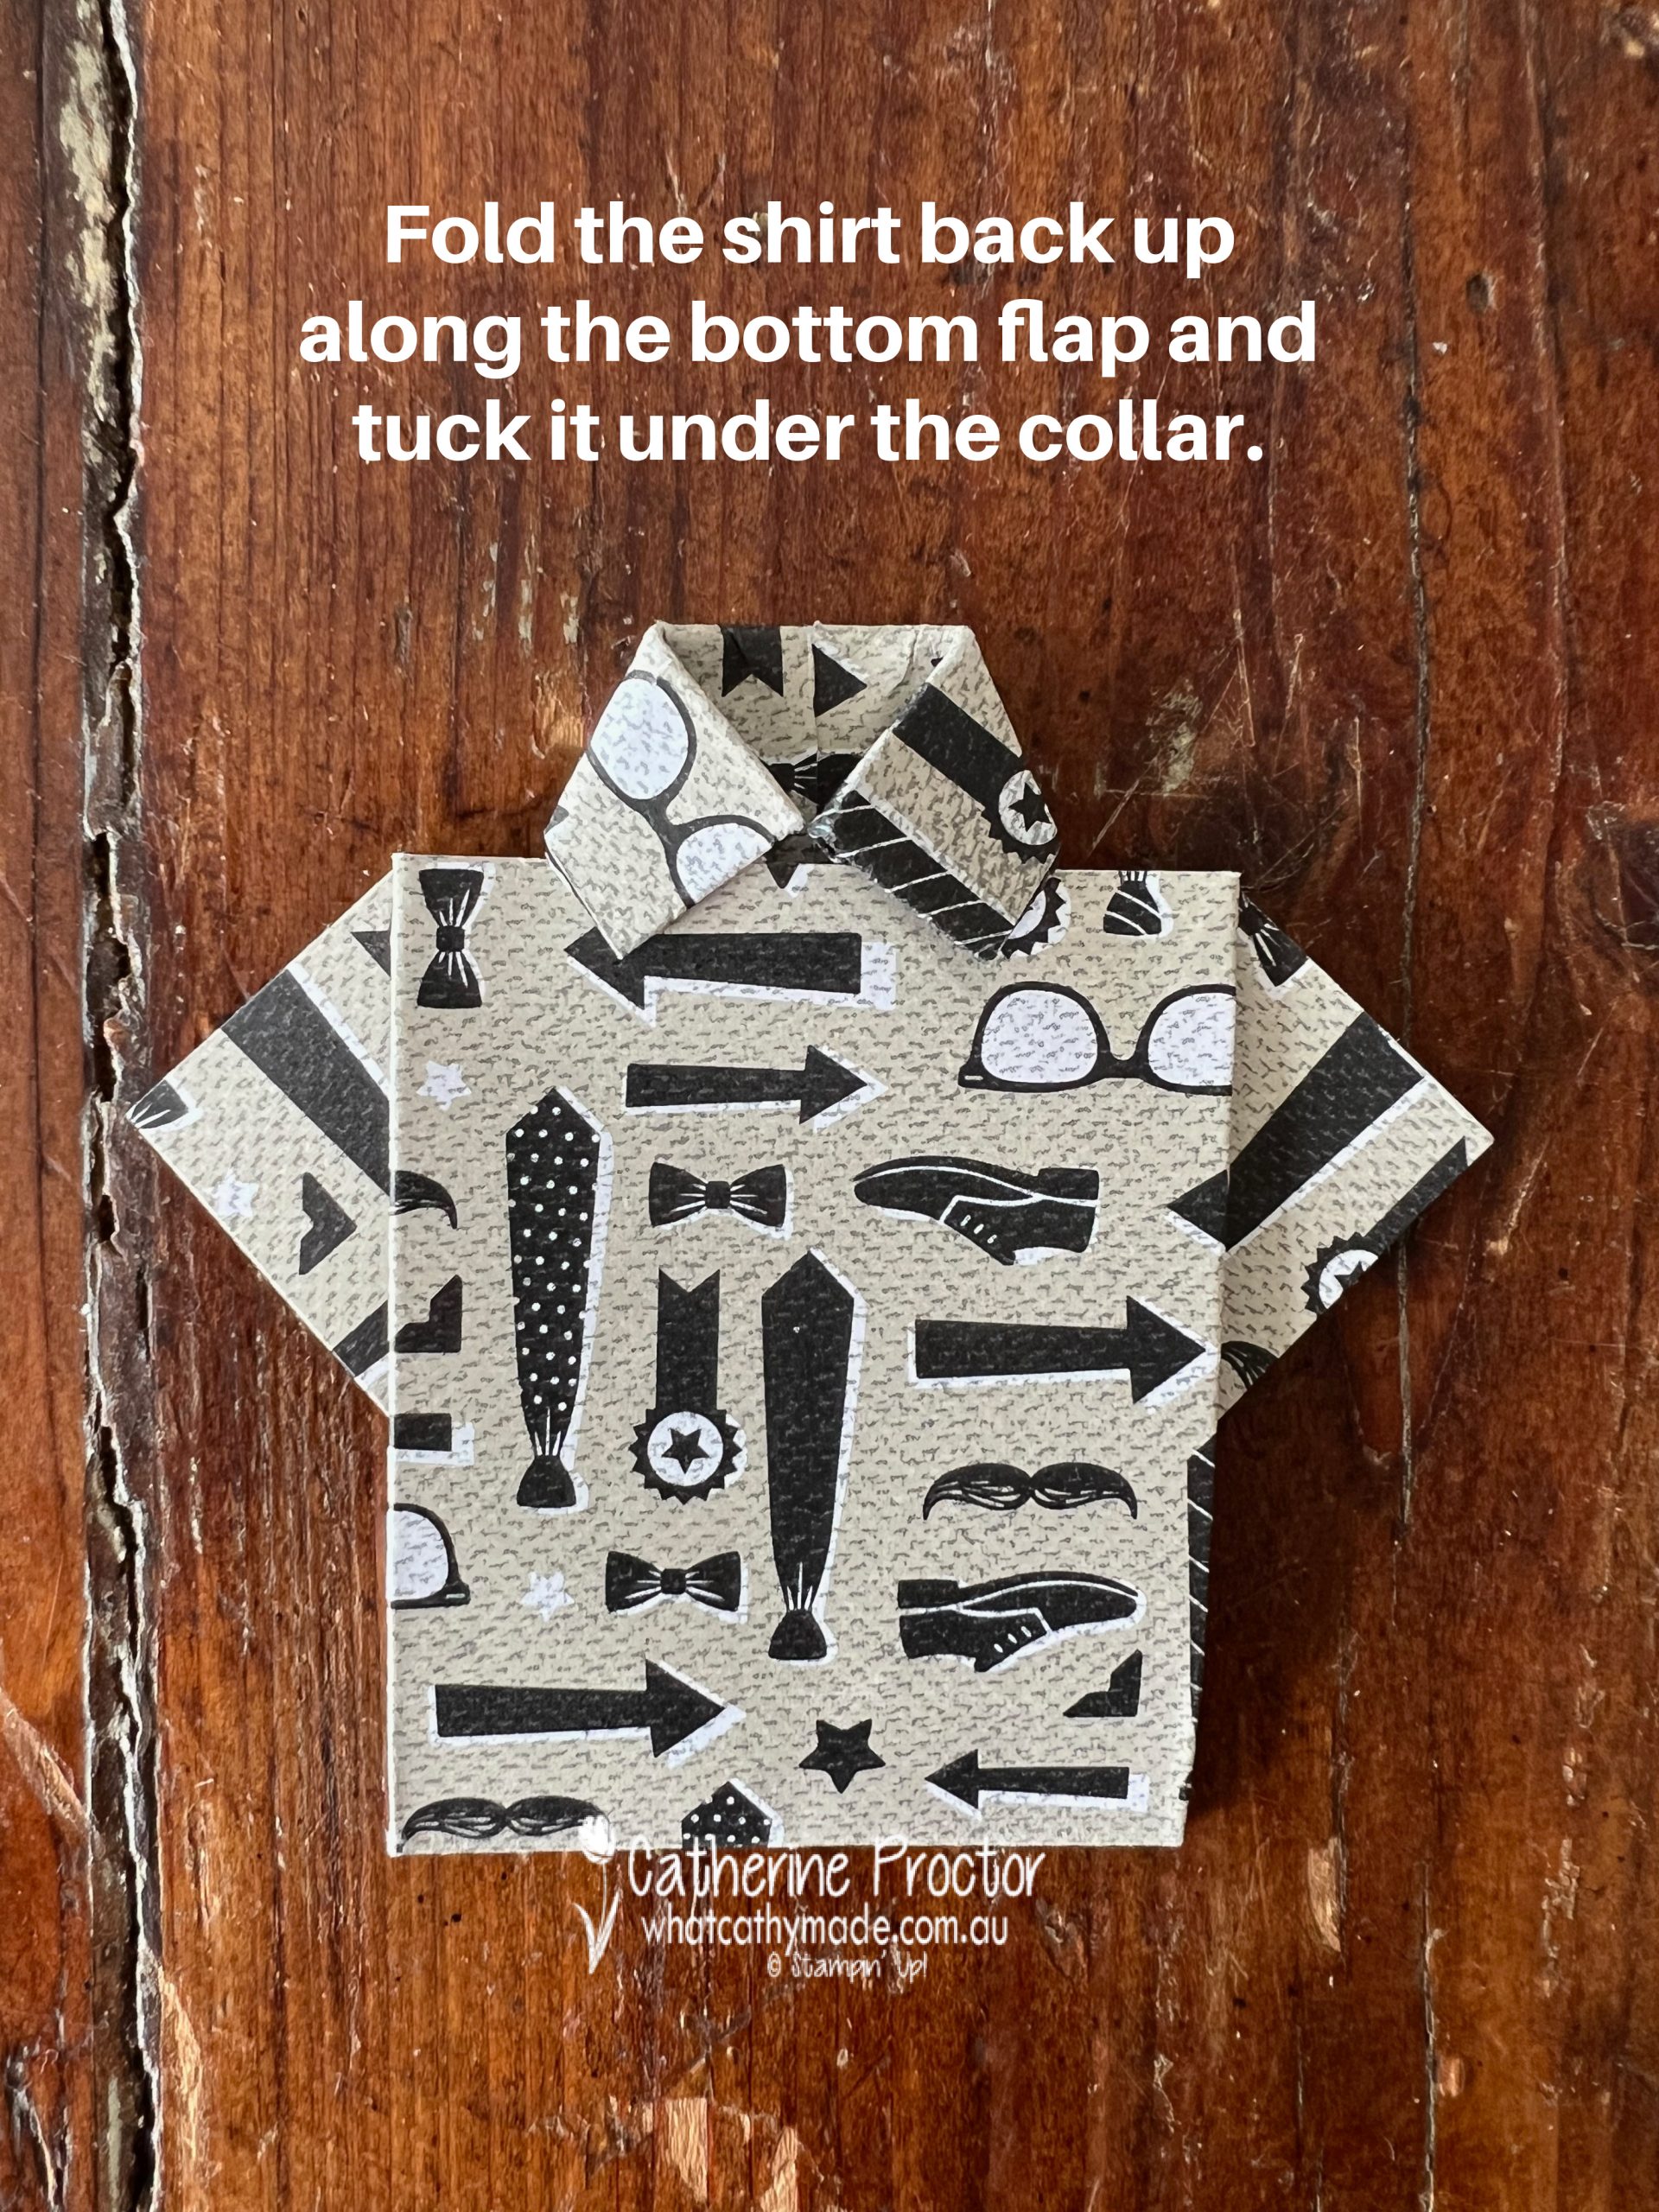
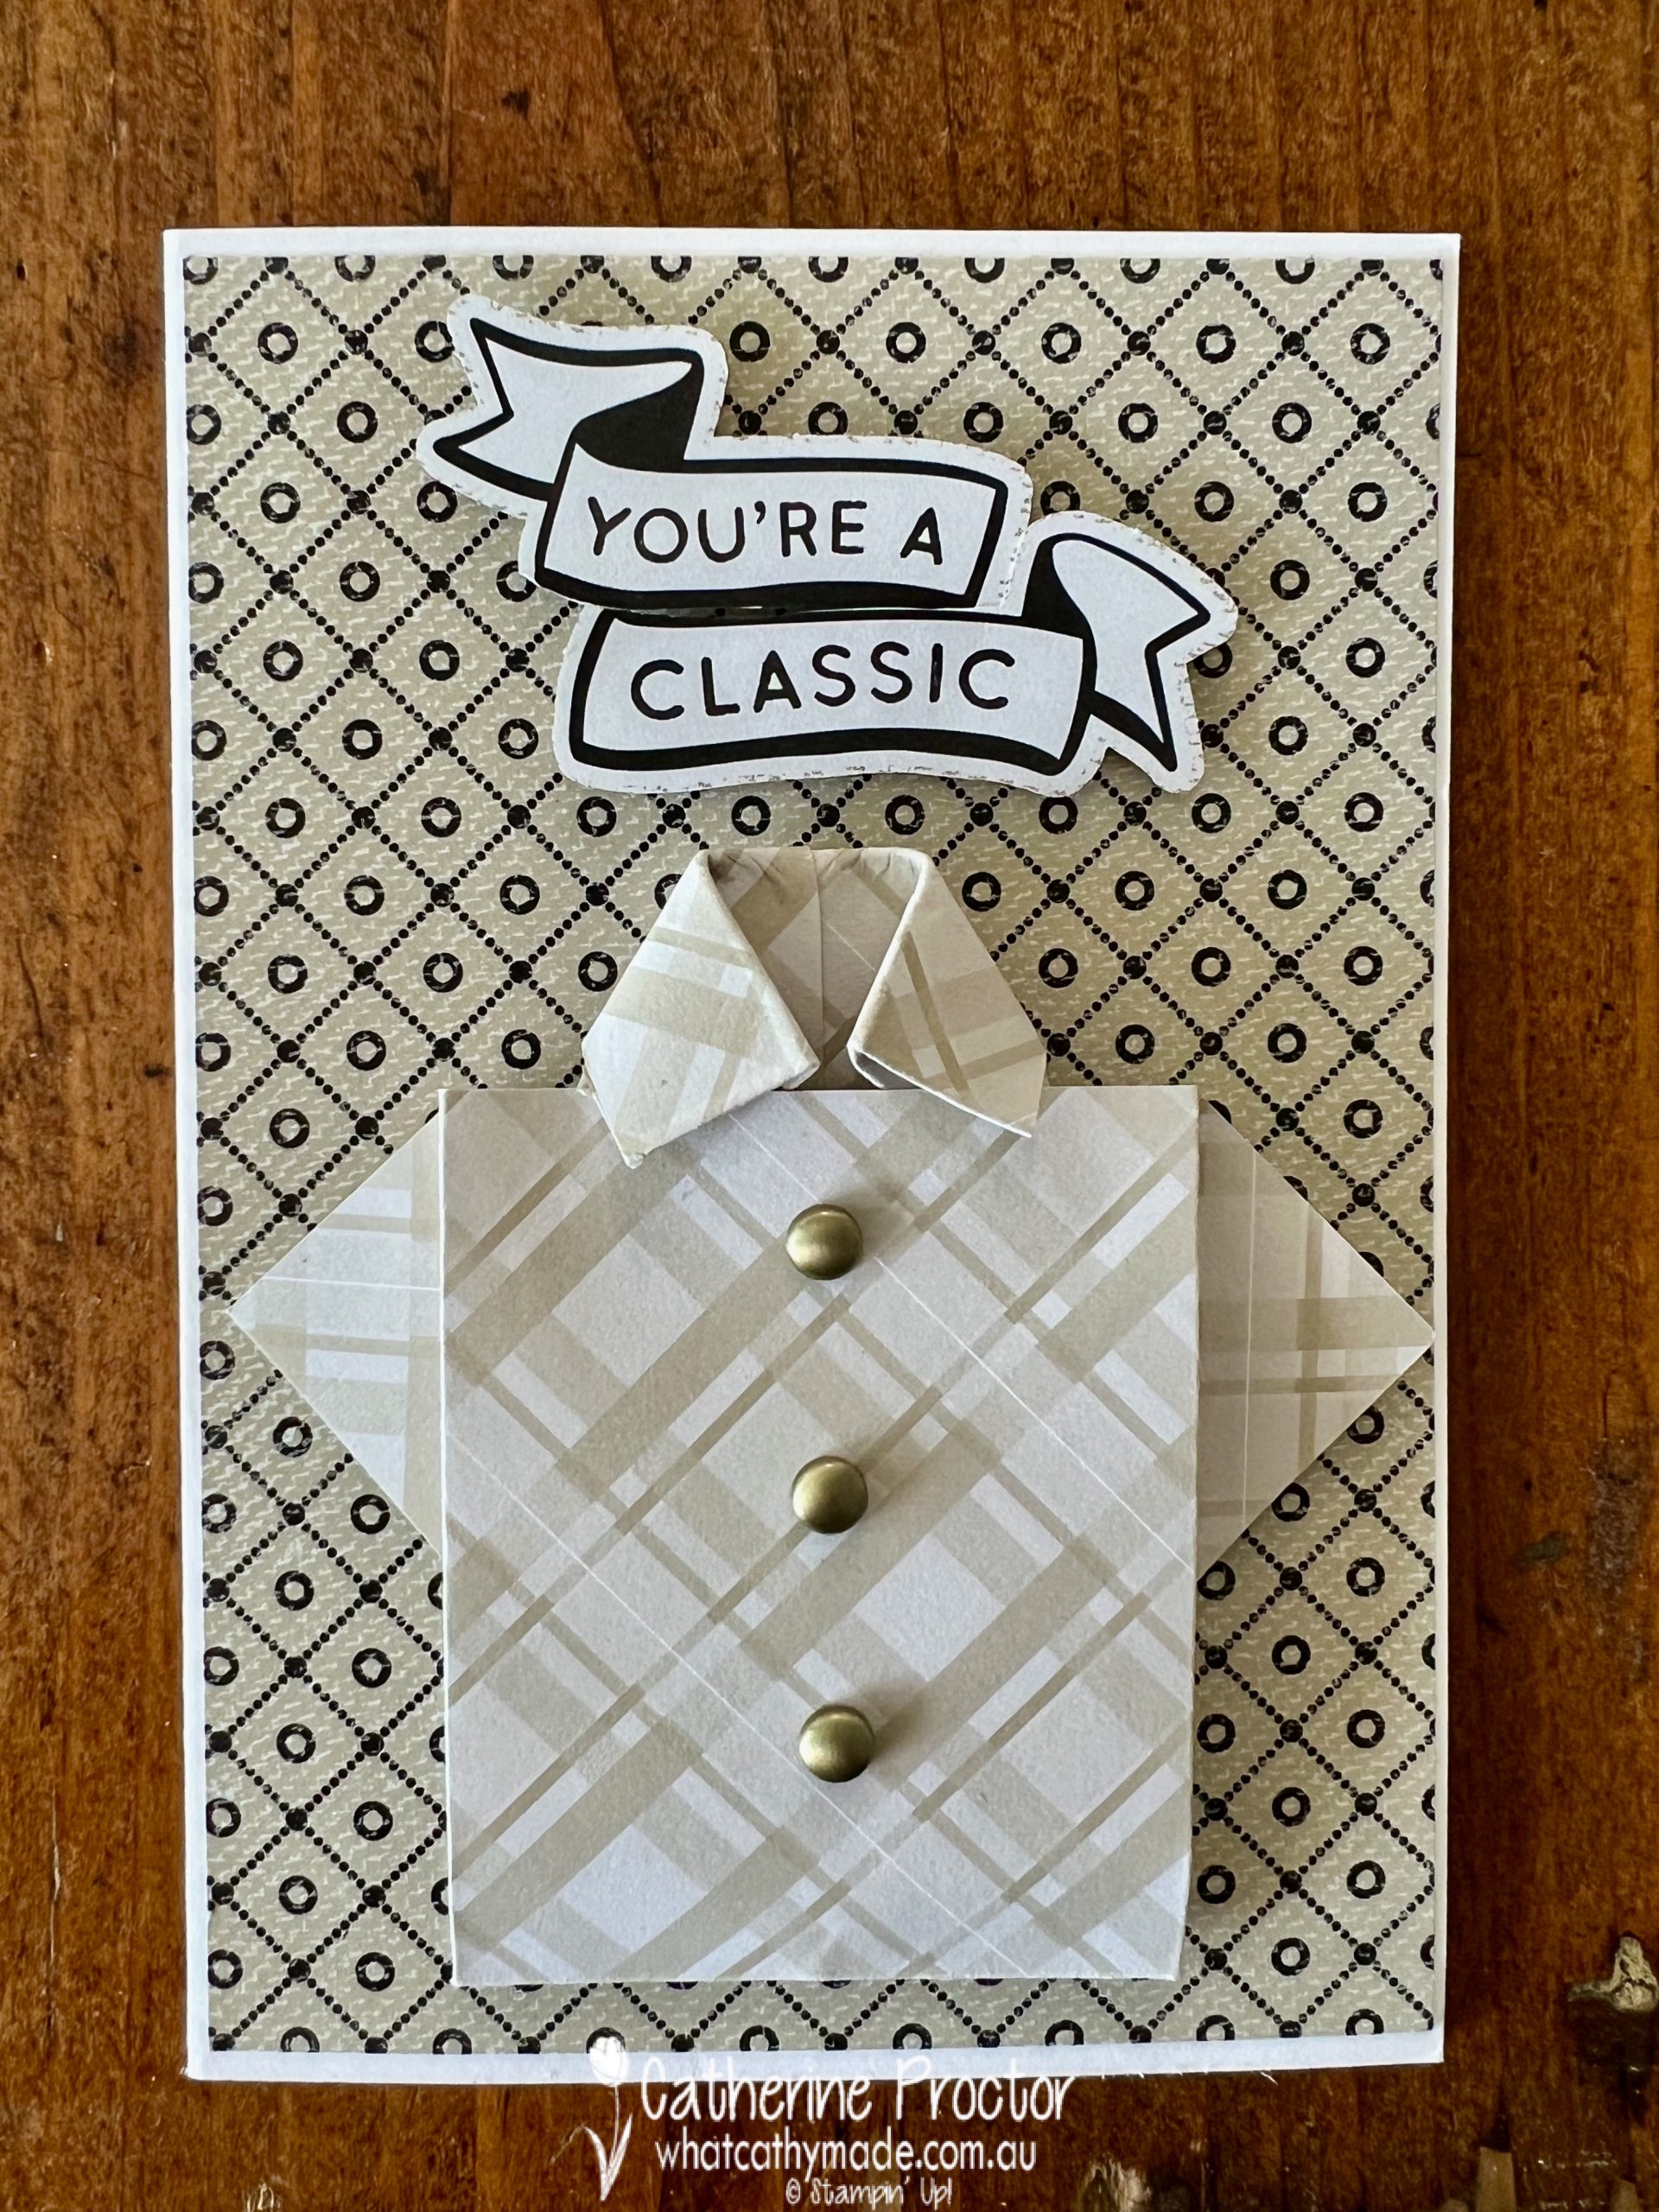
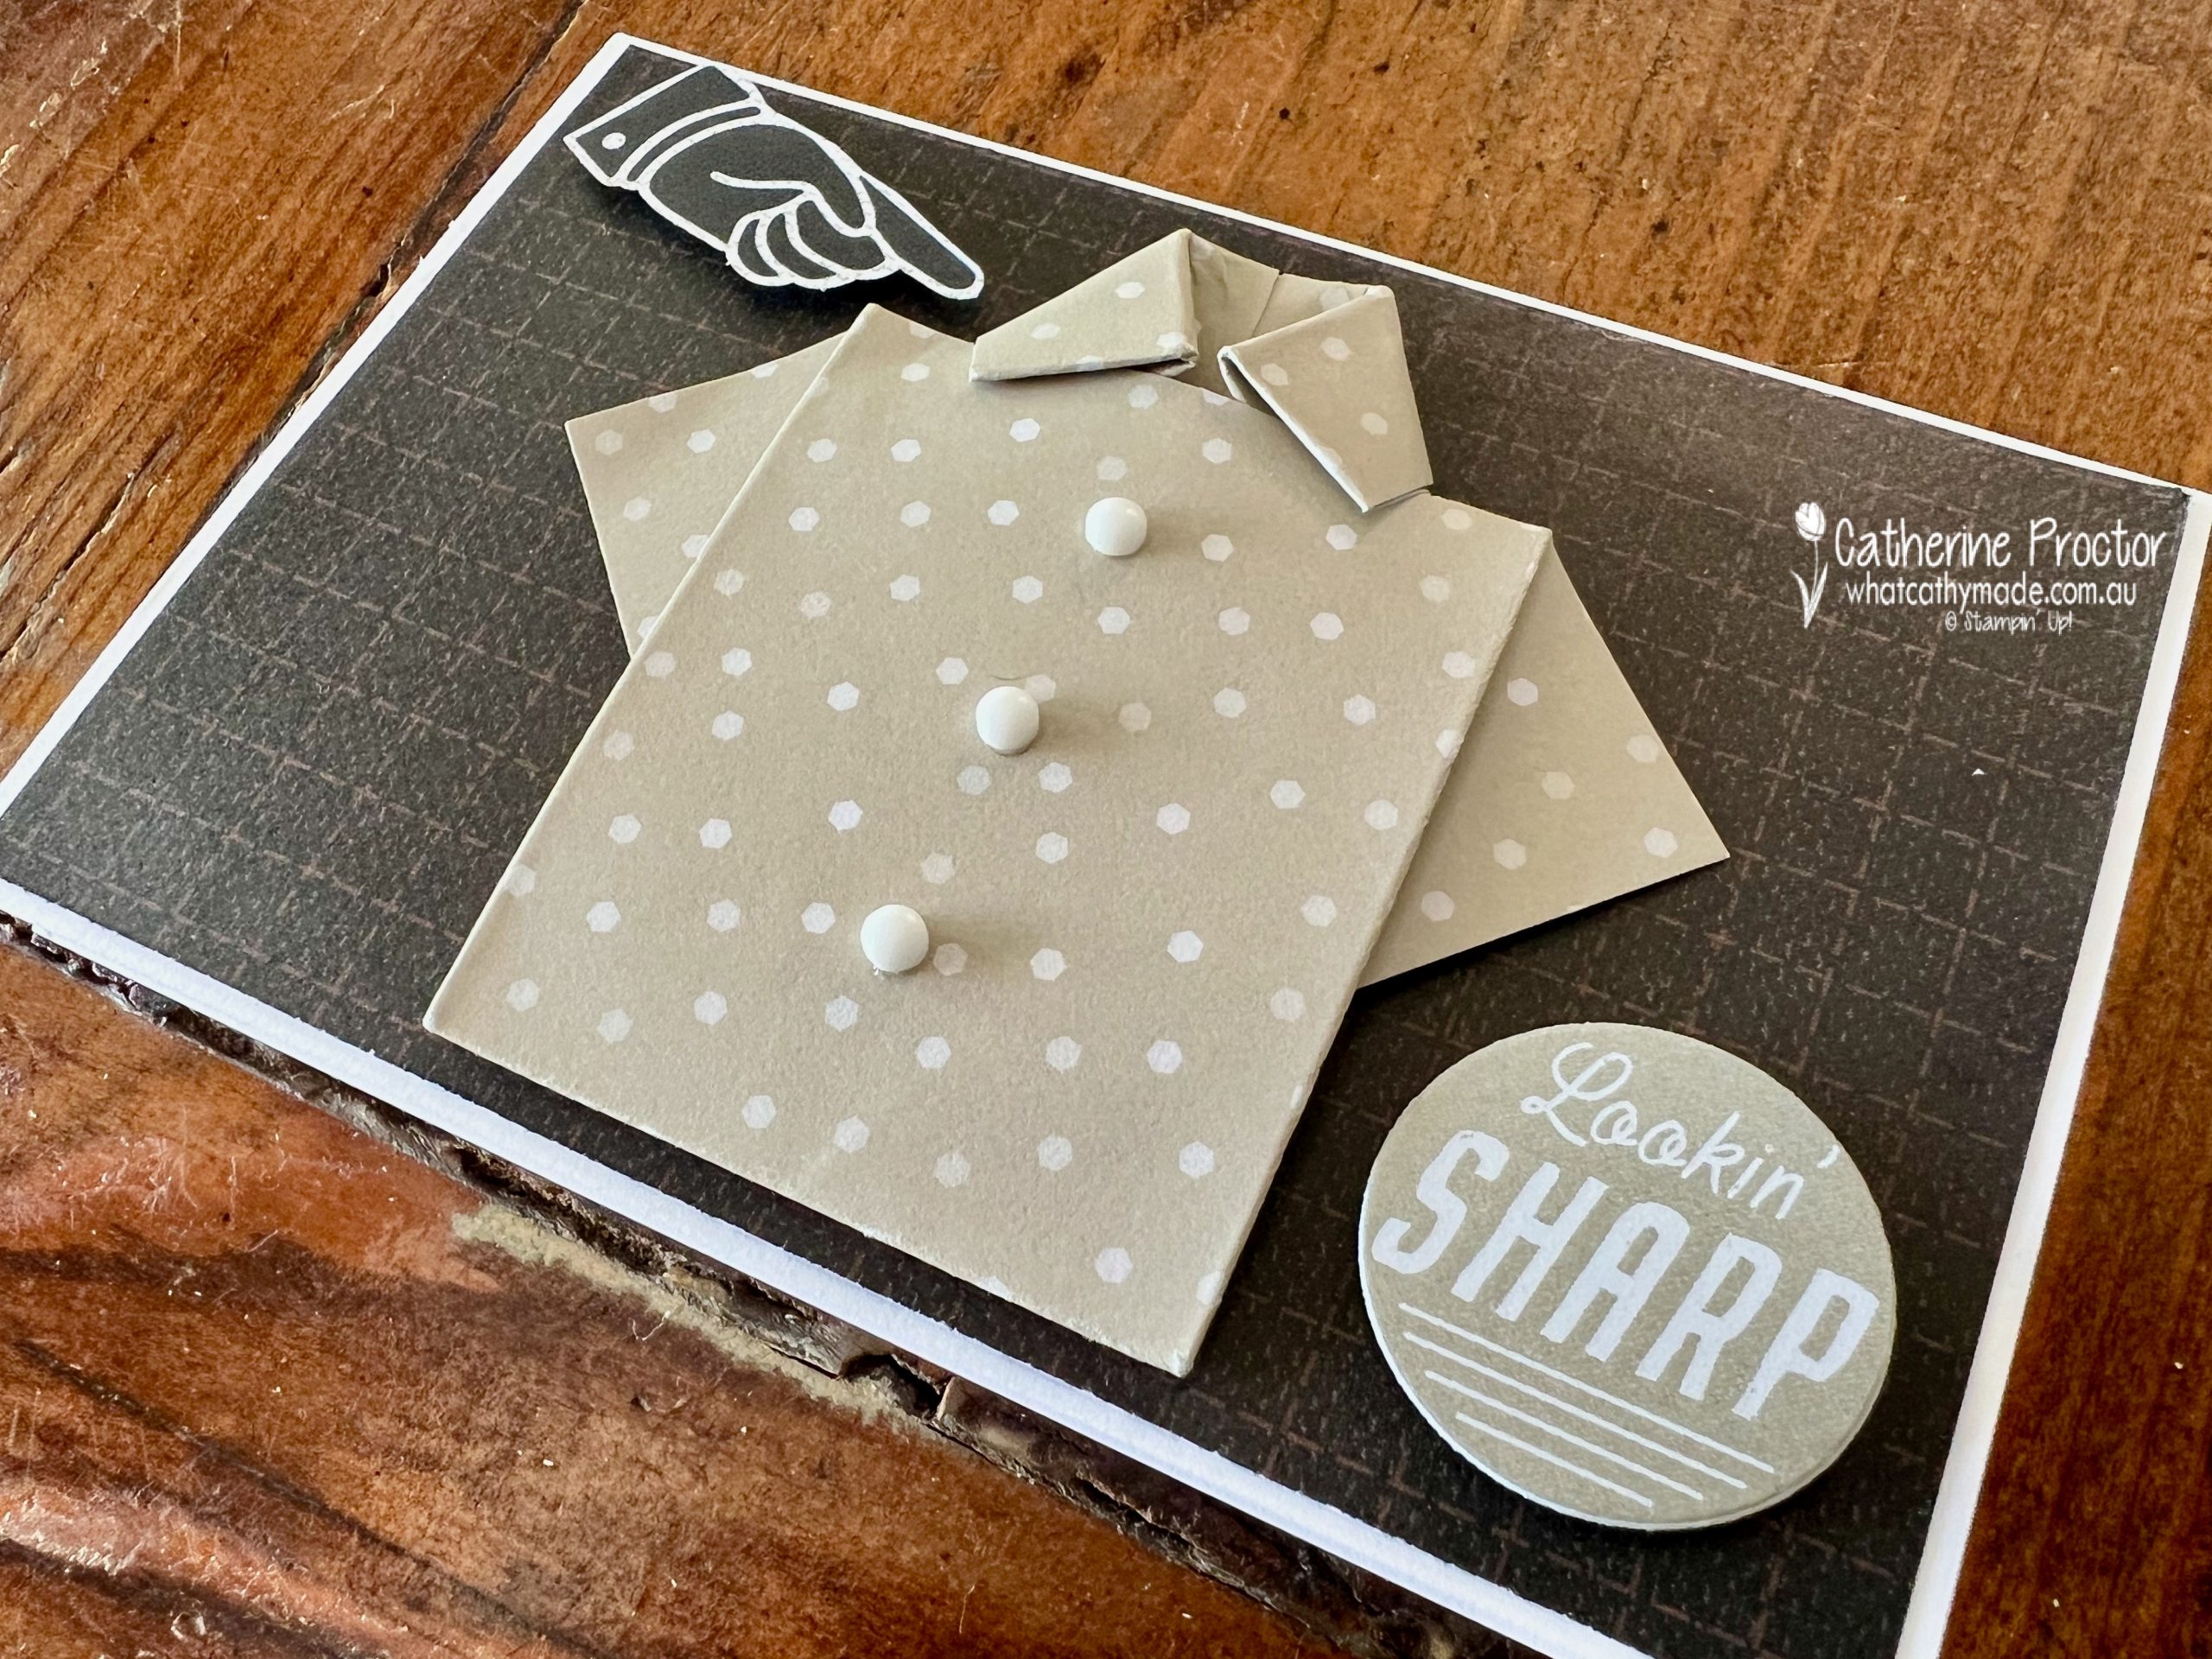
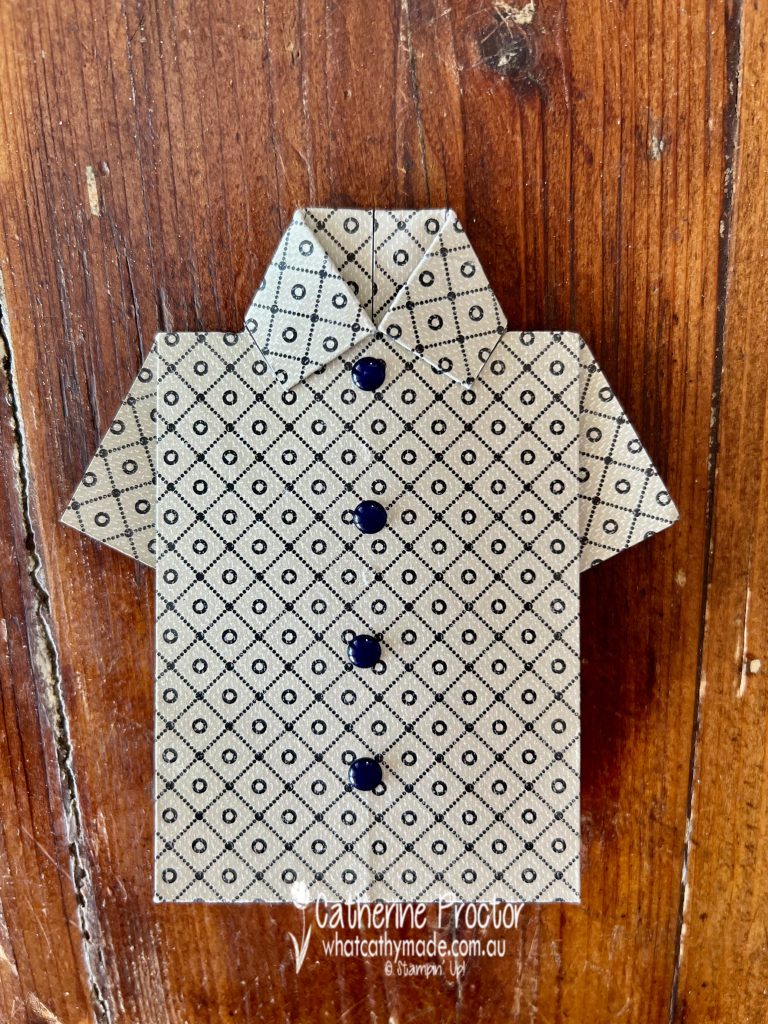
I knew using Designer Series Paper that features Sahara Sand would be a great way to showcase this colour, so I’ve made some origami shirts in two different sizes. These are the three cards I made using the smaller origami shirt.
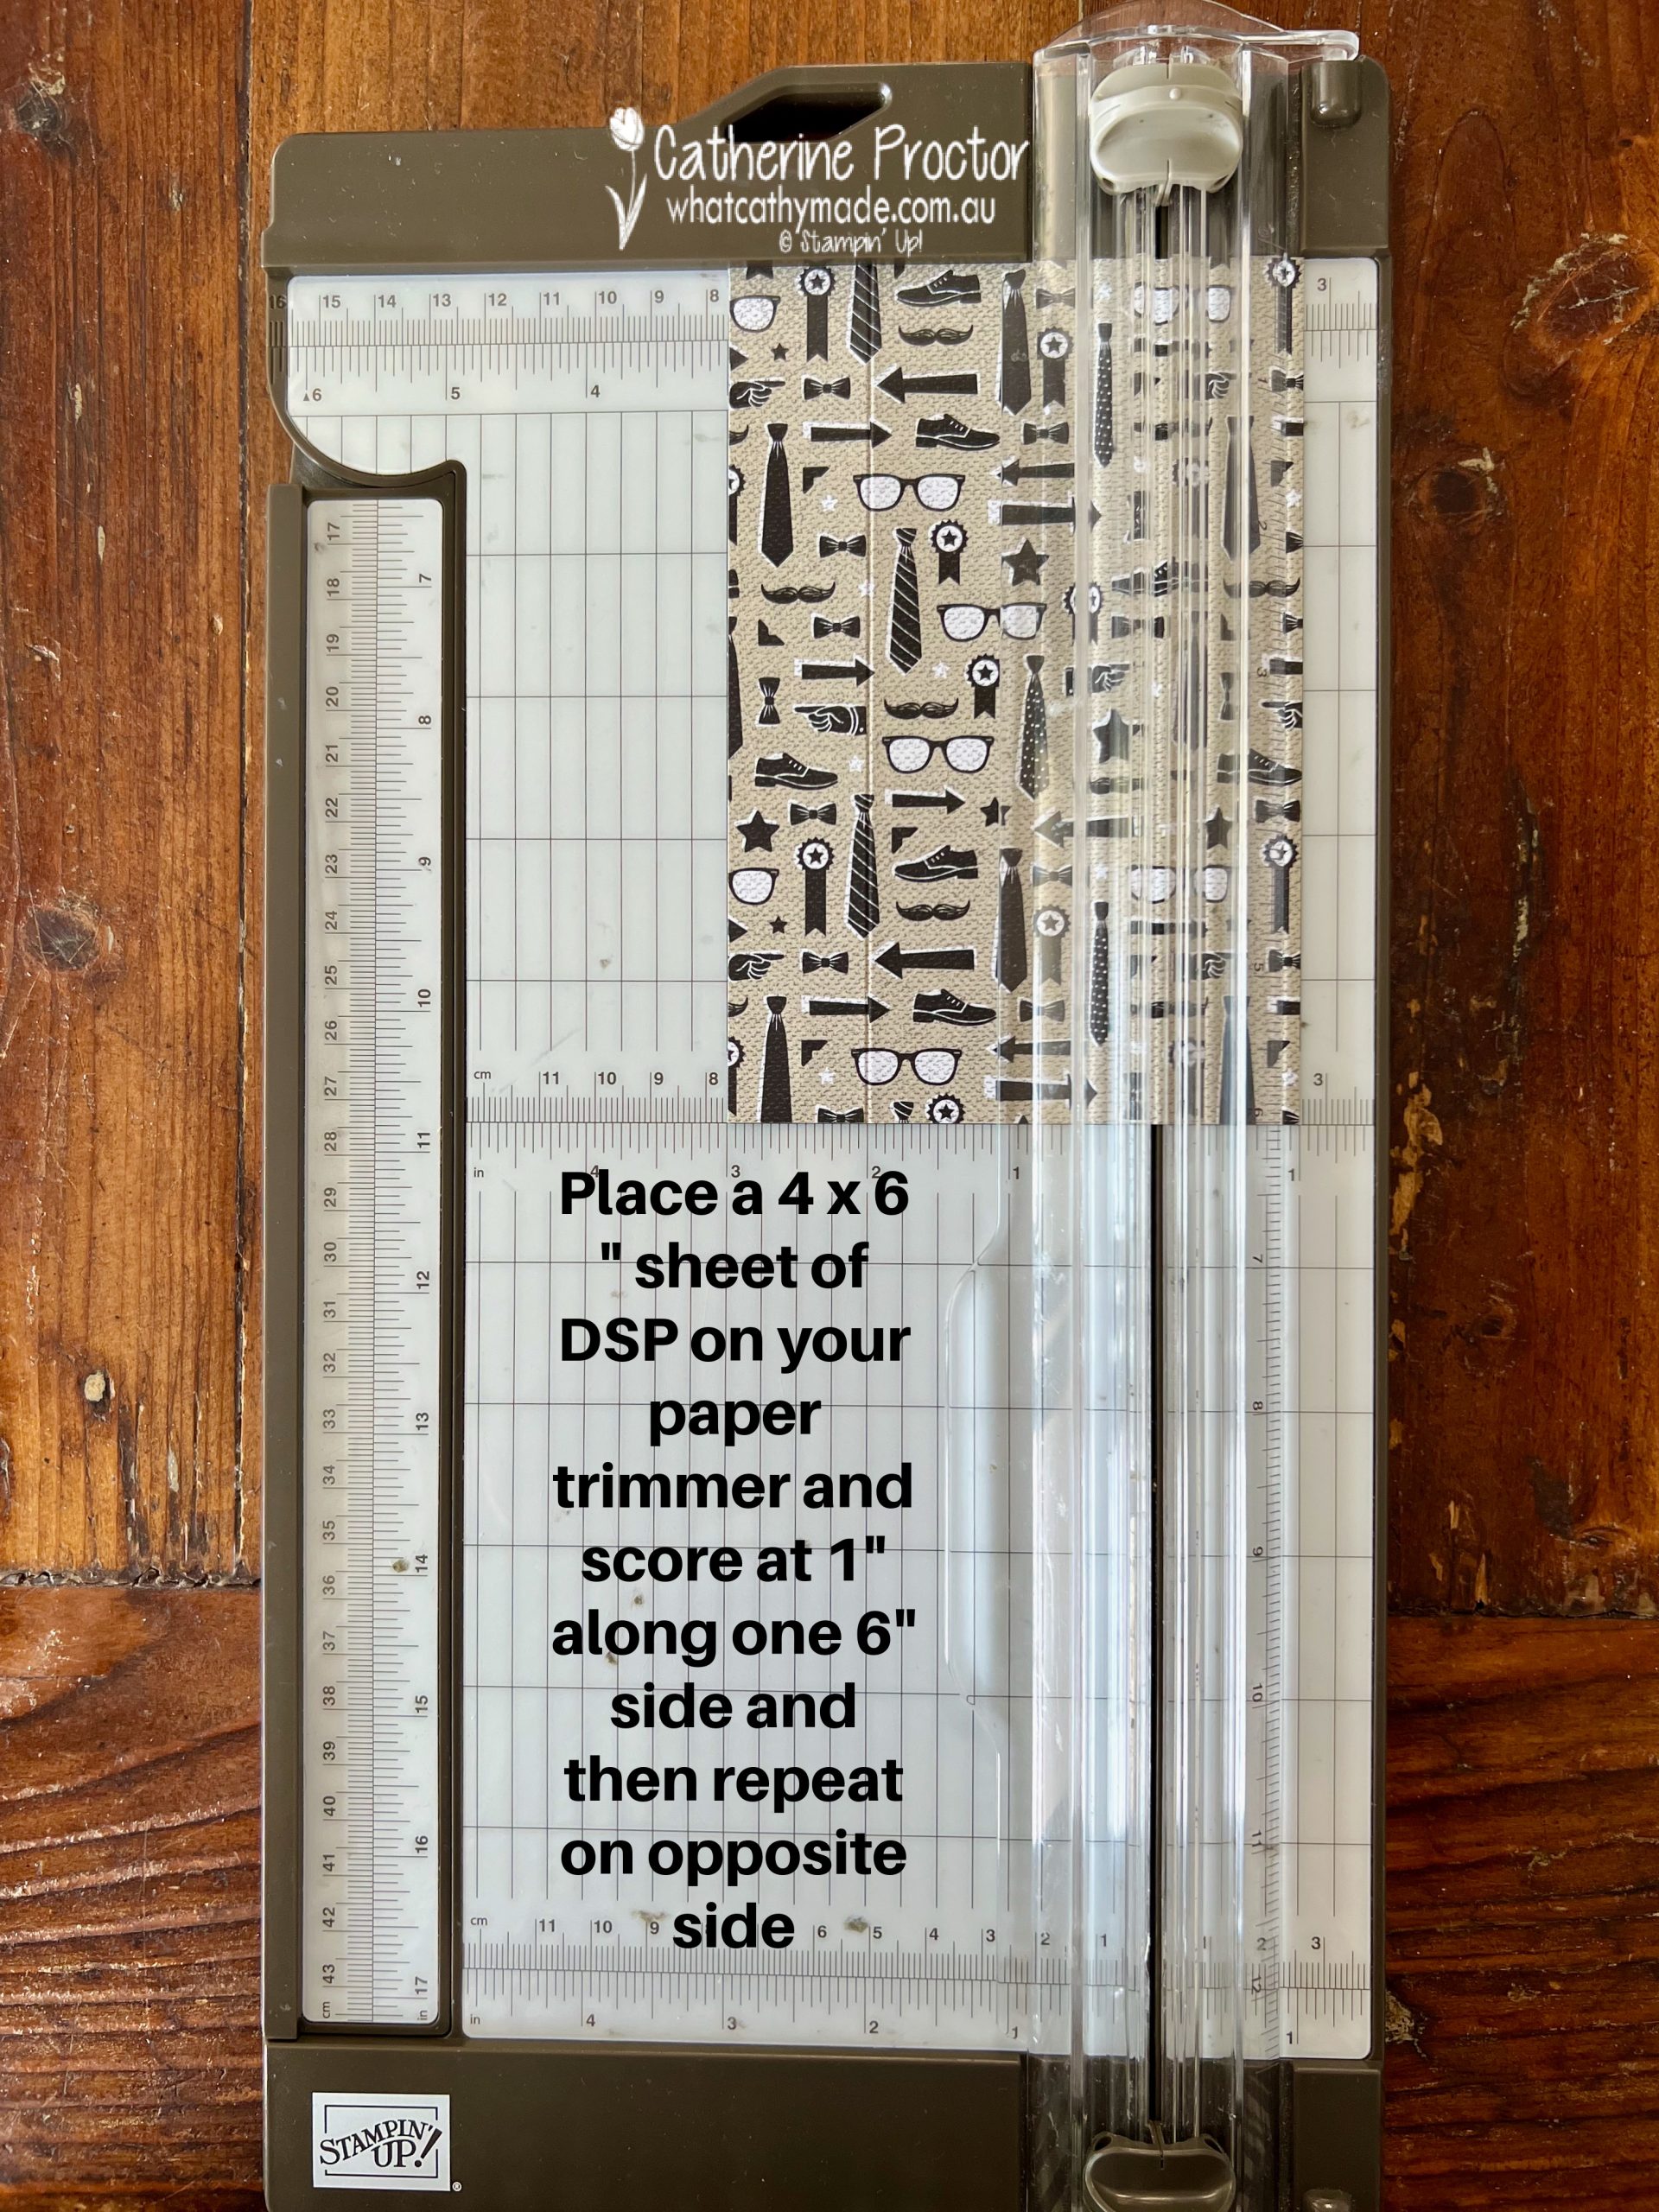
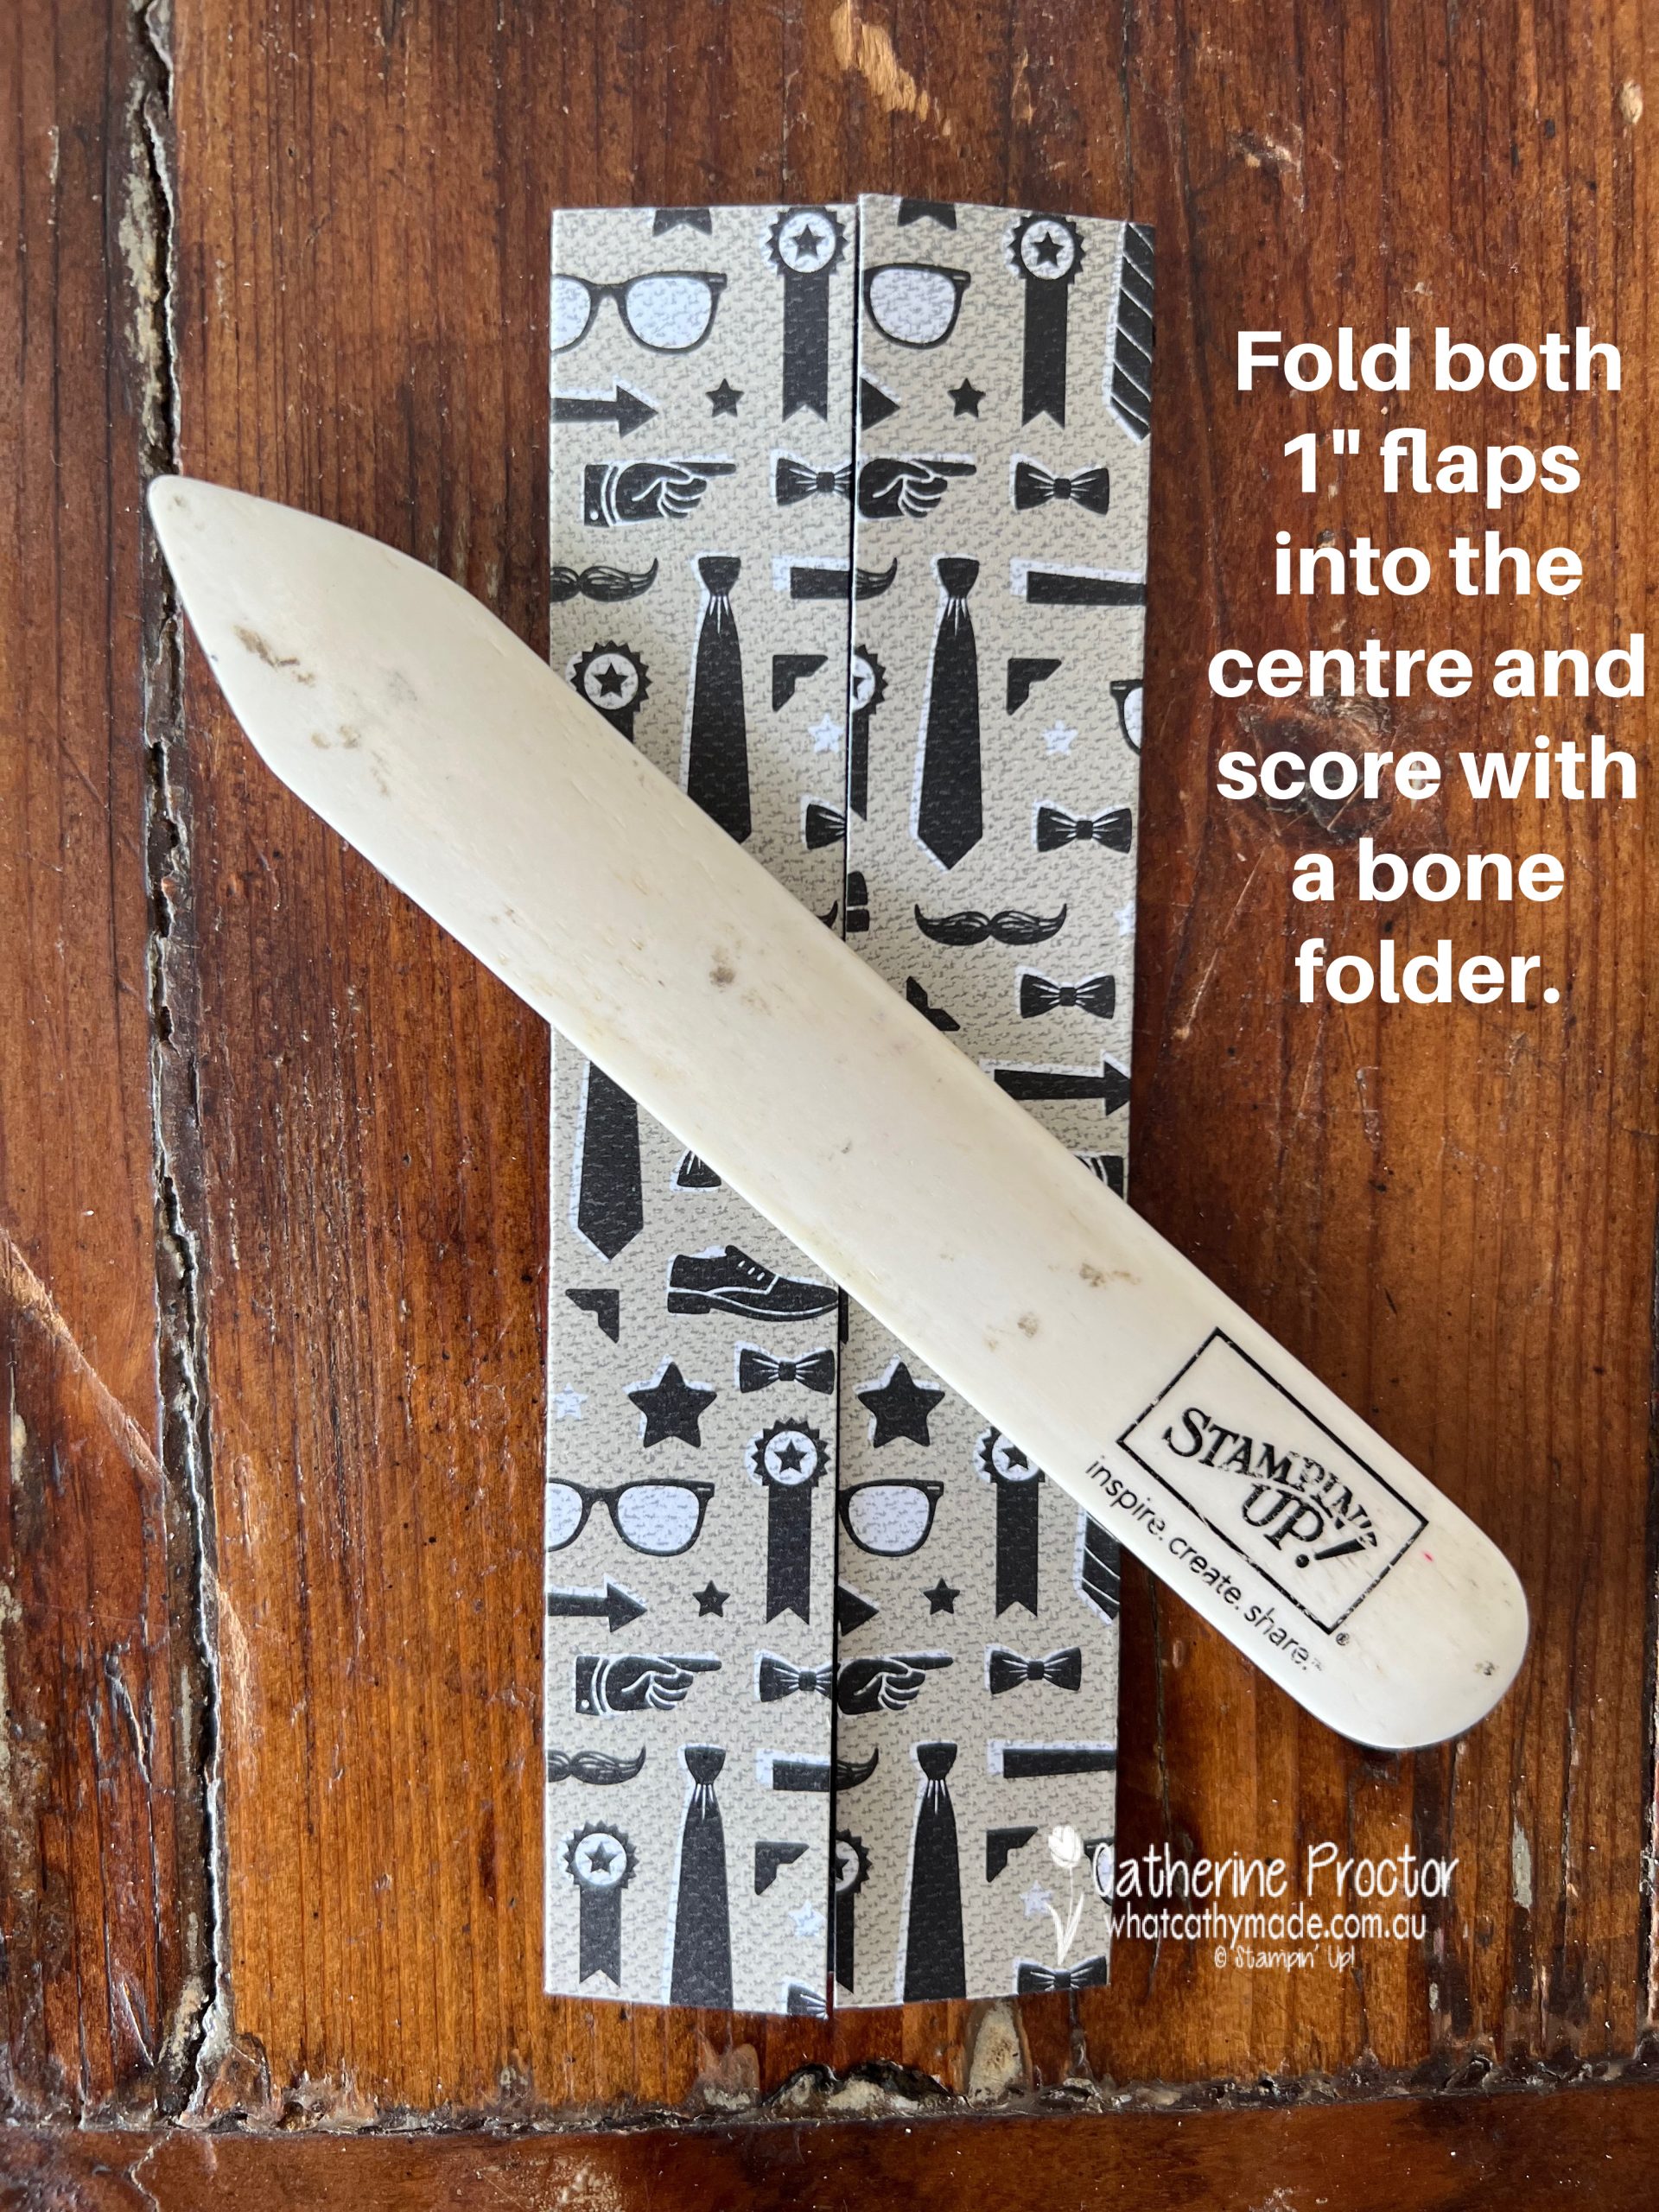
If you’ve never made these shirts before I urge you to give it a go. Once you have cut your rectangle of DSP to size, here is no die cutting involved – both sizes of origami shirt are made by simply folding the DSP.
I’ve used a combination of the He’s The Man DSP and the Neutrals 6″ x 6″ (15.2 x 15.2 cm) DSP.
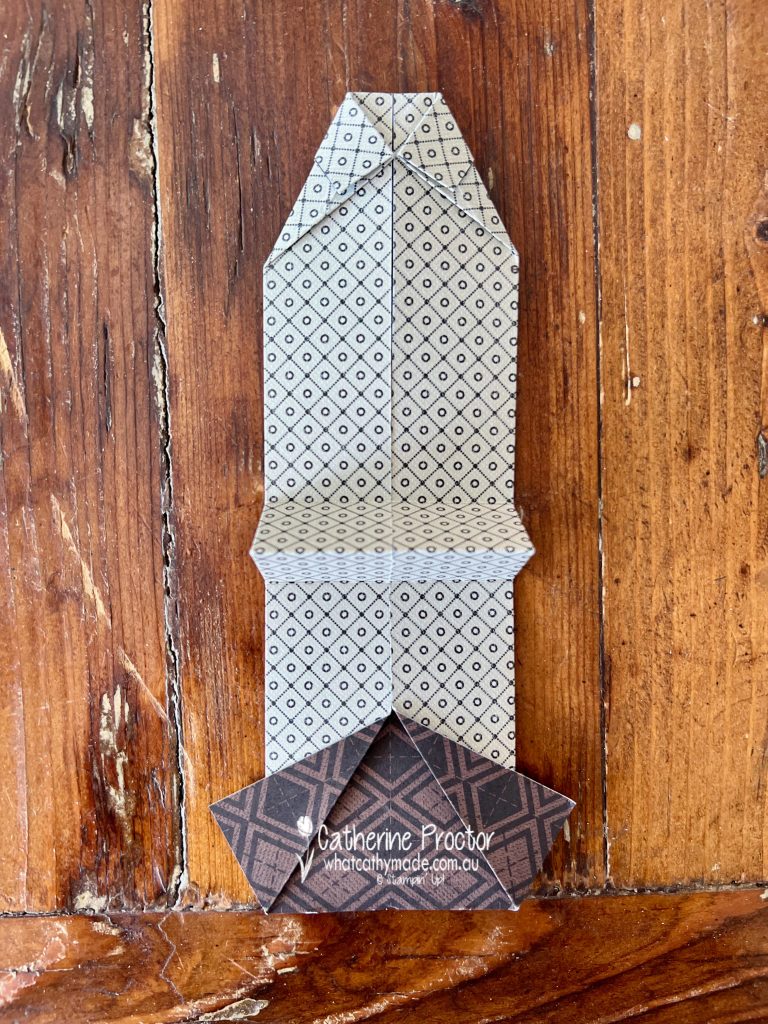
Origami DSP Shirt Card Instructions
Start with a rectangle of DSP measuring 4×6 inches for your origami shirt. Make sure you DON’T do what I did in the images below. Your DSP pattern has to be upside down while you’re scoring and folding the shirt, not the right way up, as you flip the front of the origami shirt up at the end.
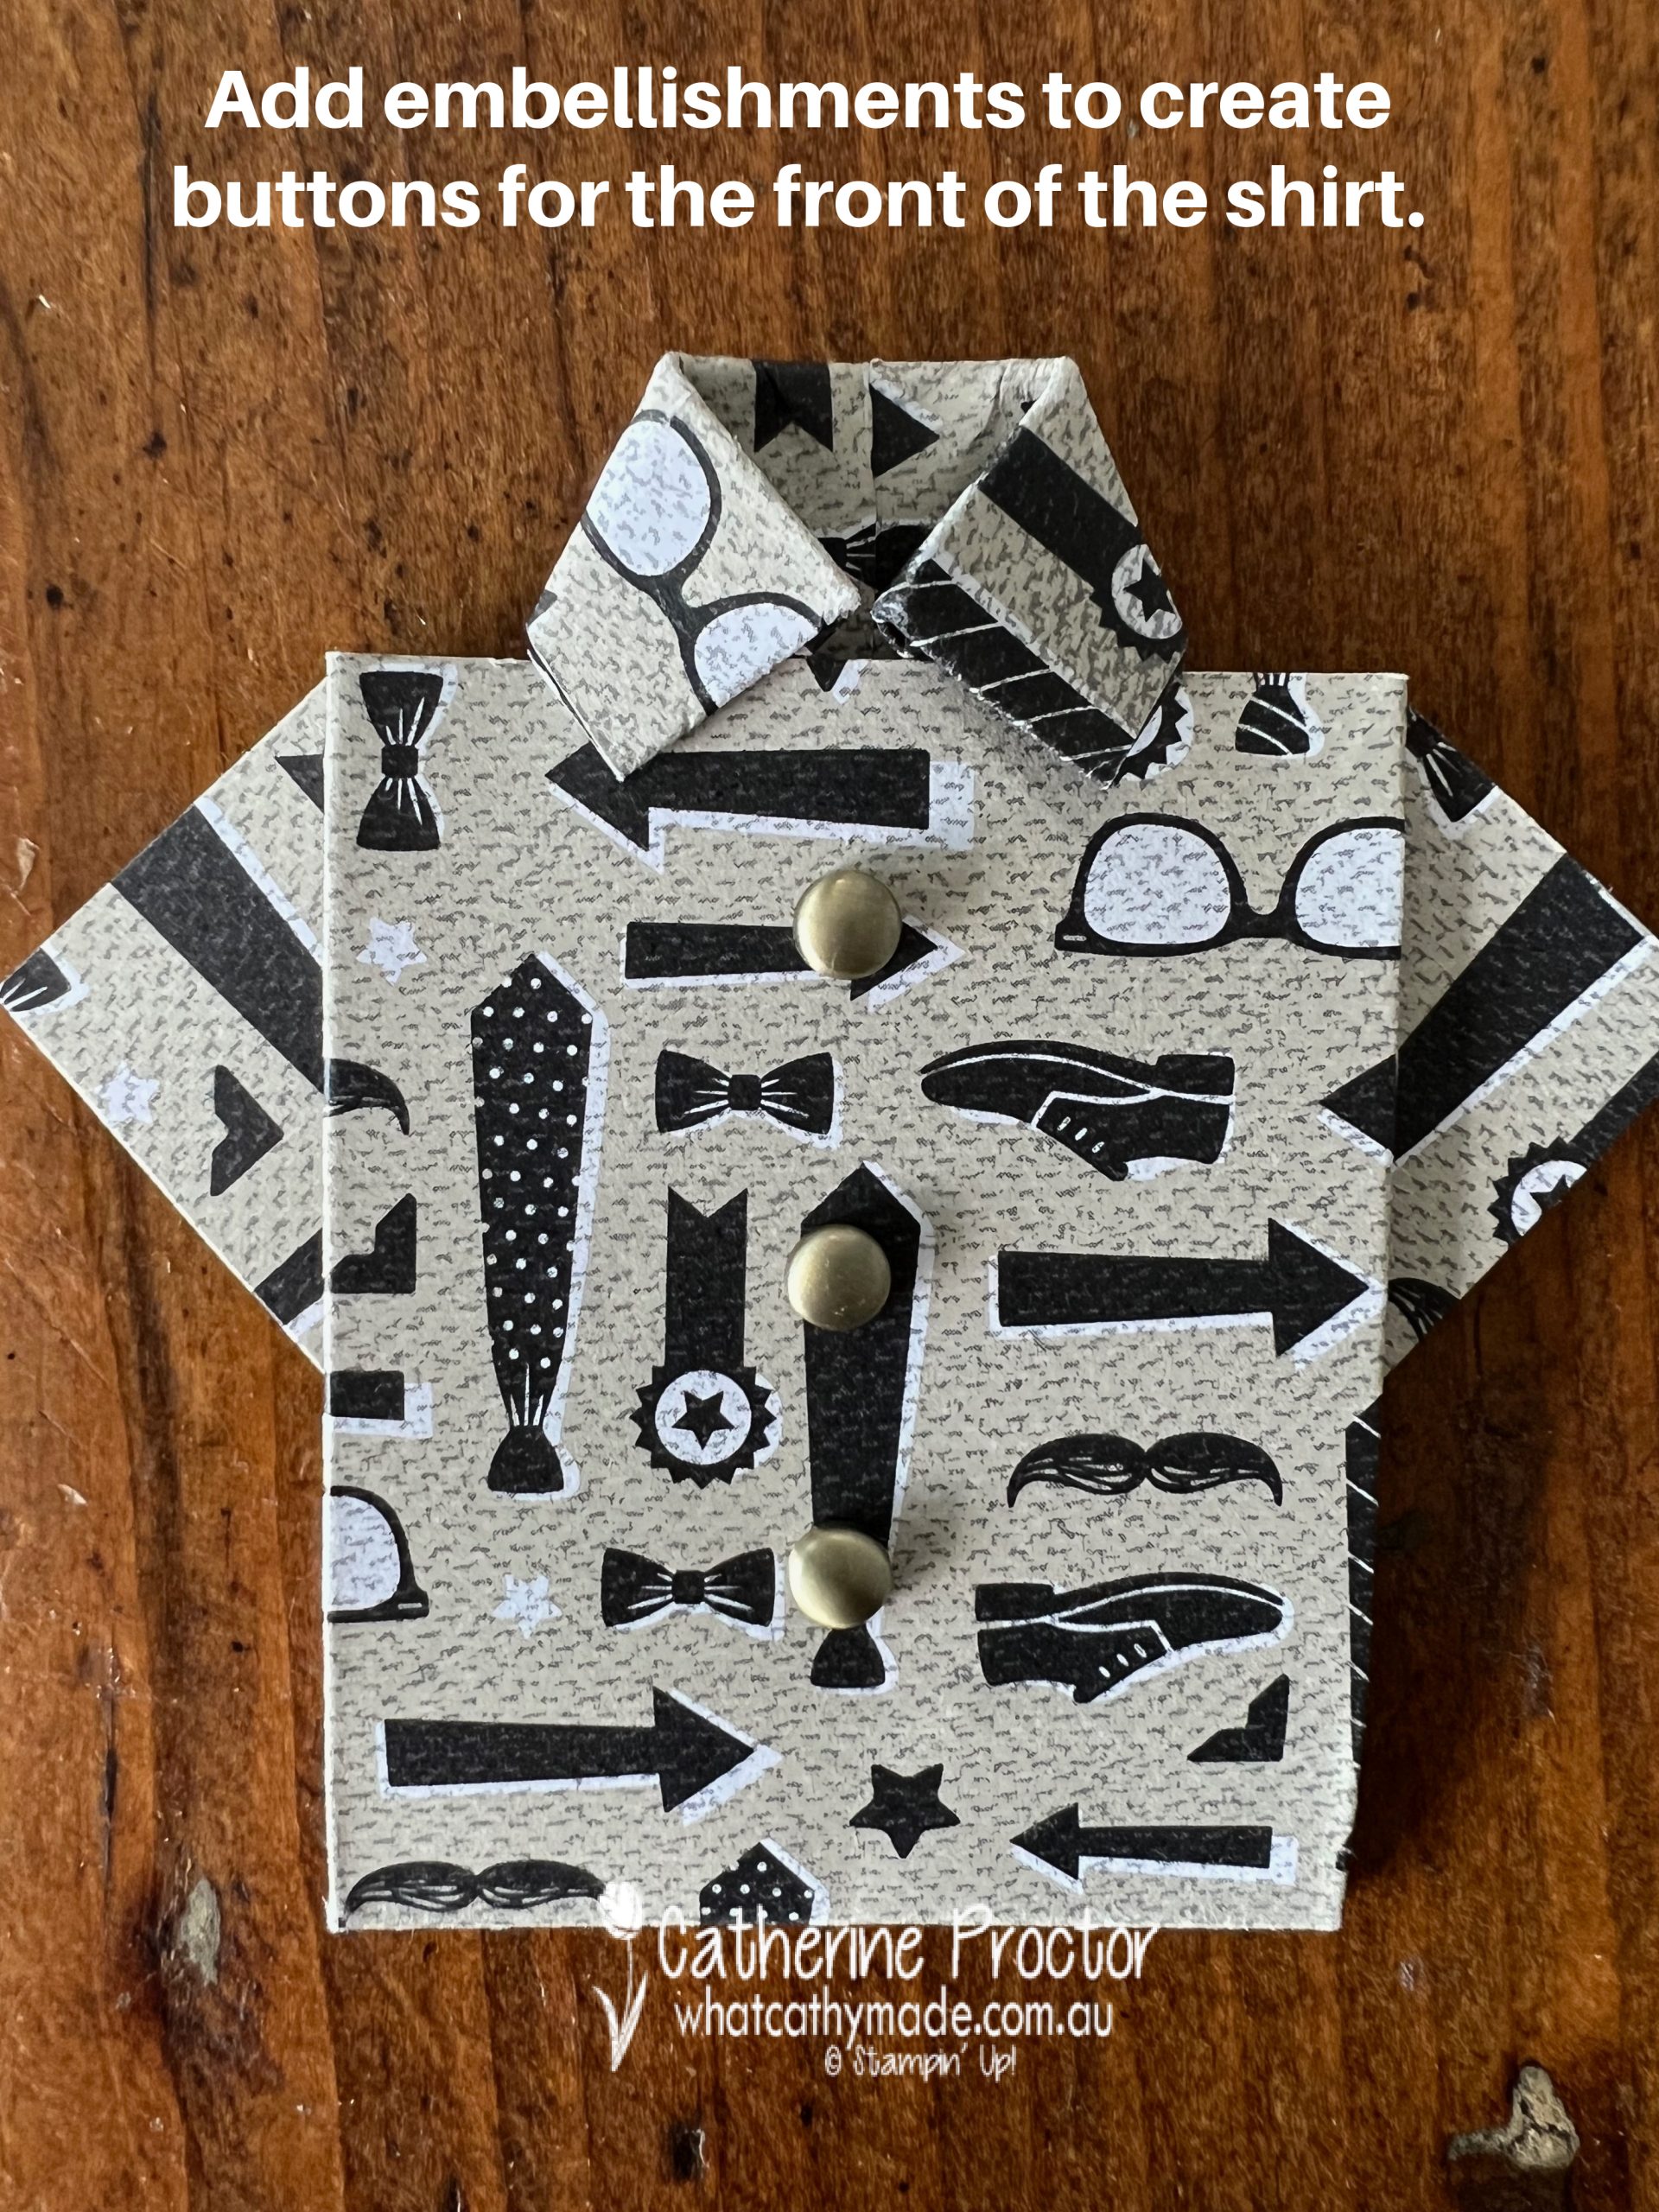
I made three different origami shirts using the Neutrals 6″ x 6″ (15.2 x 15.2 cm) DSP as the patterns looked liked mens shirts. They were then attached to Stampin’ Up! Notecards with a layer of the He’s The Man DSP.
Coordinating die-cut images from the He’s The Man DSP were used for the sentiments on each card. Brushed Metallic Adhesive-Backed Dots and Enamel Dot Essentials were perfect to use a buttons. The little bow tie is also one of the Coordinating die-cut images from the He’s The Man DSP.
I also made this larger origami shirt that is actually a card and gift holder in one. It uses a 6 x 12 ” piece of DSP and I CASED it from Stampin Savvy, Tammy Beard, following her instructions in a blog and video on her website.
The steps to make the larger origami shirt are basically the same as the smaller origami shirt, however she adds two extra folds at the bottom of the card, allowing it to stand up for display and providing enough room inside the card for a gift card and a handwritten message.
Now it’s time to hop on over to our next participant, the lovely Andrea Sargent – I can’t wait to see what has made this week!
If at any time you find a broken link, you can find the complete list of all participants below.
Welcome to week forty three of our Art With Heart 2022-23 Colour Creations blog hop.
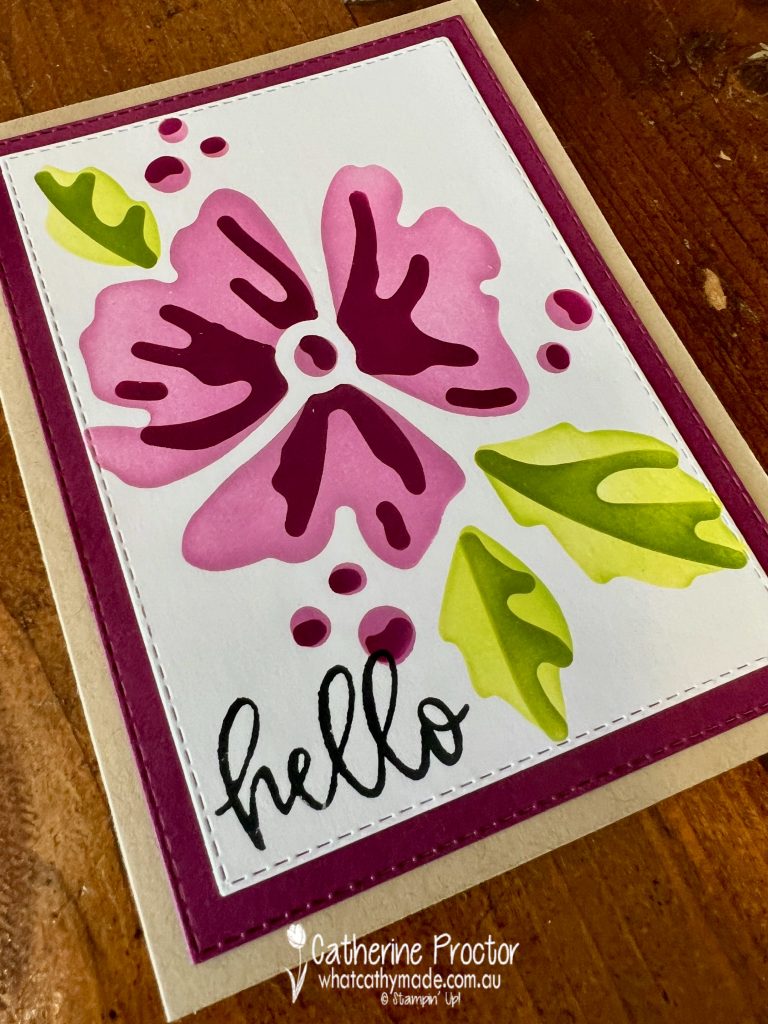
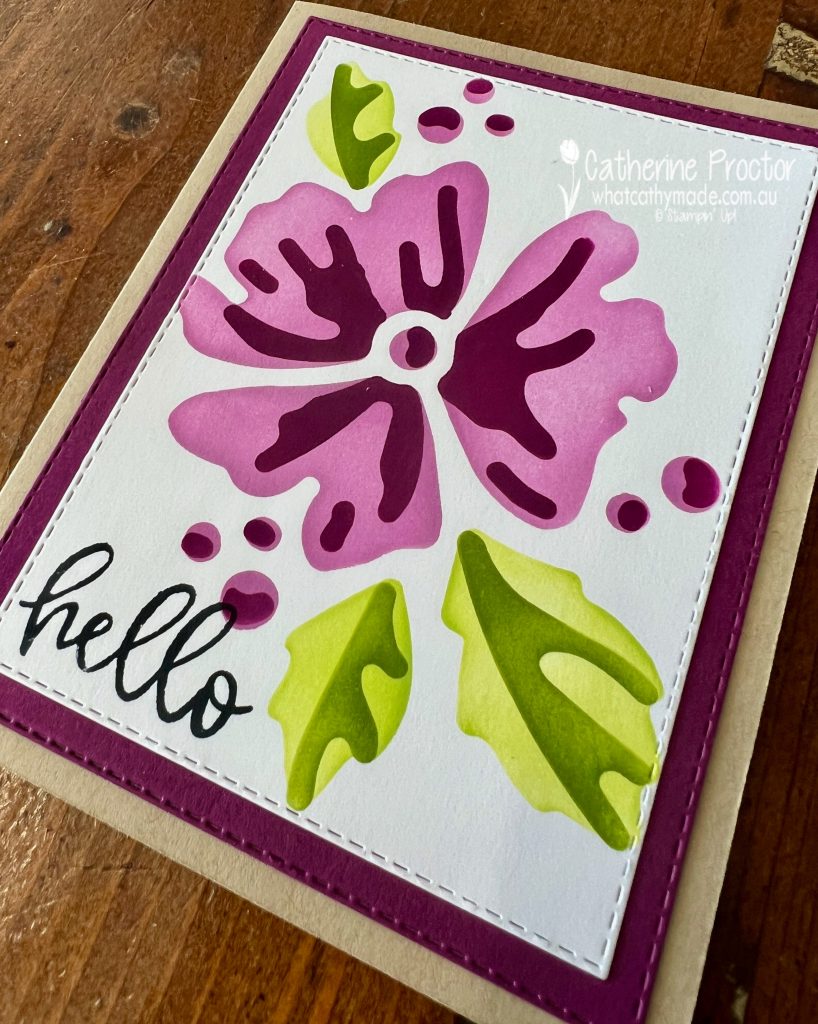
This is a weekly blog hop where we showcase the stunning range of Stampin’ Up! colours in alphabetical order over 12 months and this week we are featuring Rich Razzleberry from the Regals family.
Rich Razzleberry is a gorgeous colour that I simply forget to use! When I do remember to use it I wonder why I don’t use it more often!
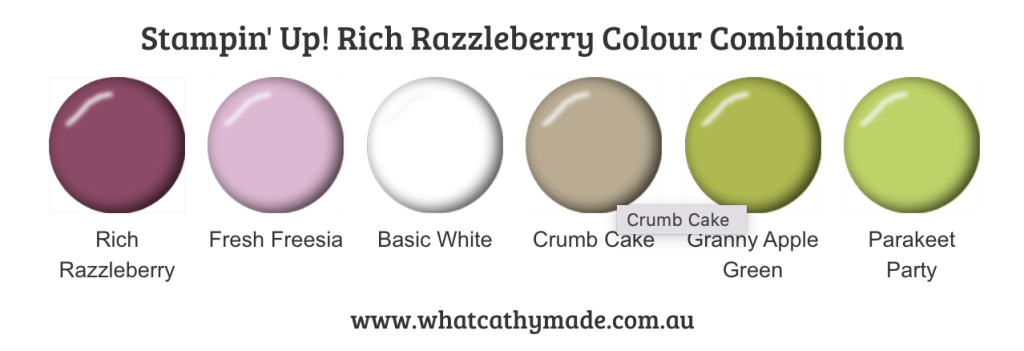
I love Fresh Freesia and Rich Razzleberry together so this is my colour combination for this week.
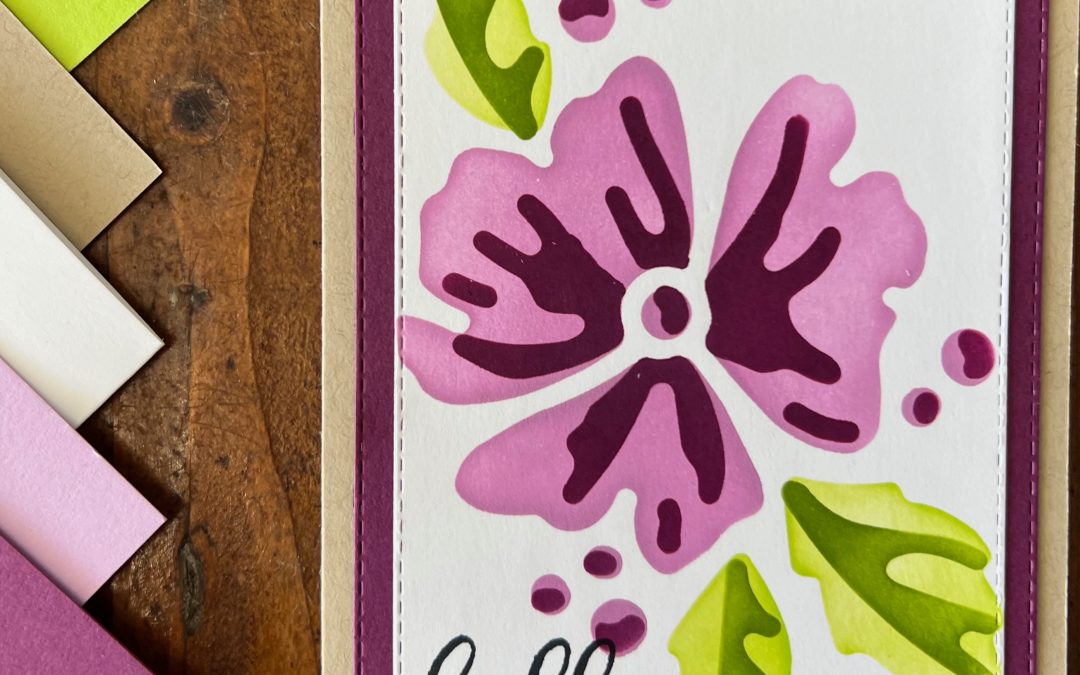
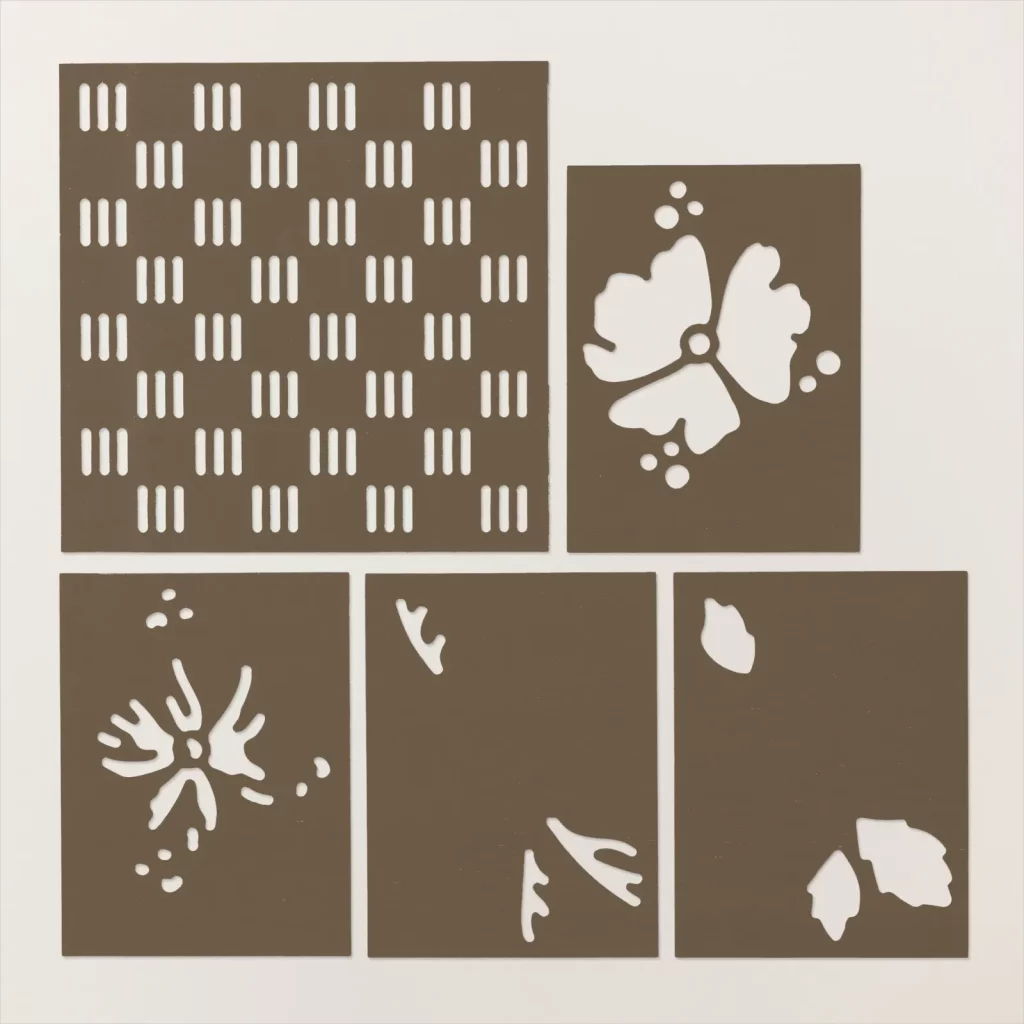
My layering mask card is a super fast and easy card that uses the Loveliest Layers Decorative Masks and blending brushes, inspired by cards shared recently by the Stampin’ Up! CEO, Sara Douglass on her Facebook live. You can watch her video and see her cards here.
The colour combination possibilities with these masks are really endless!
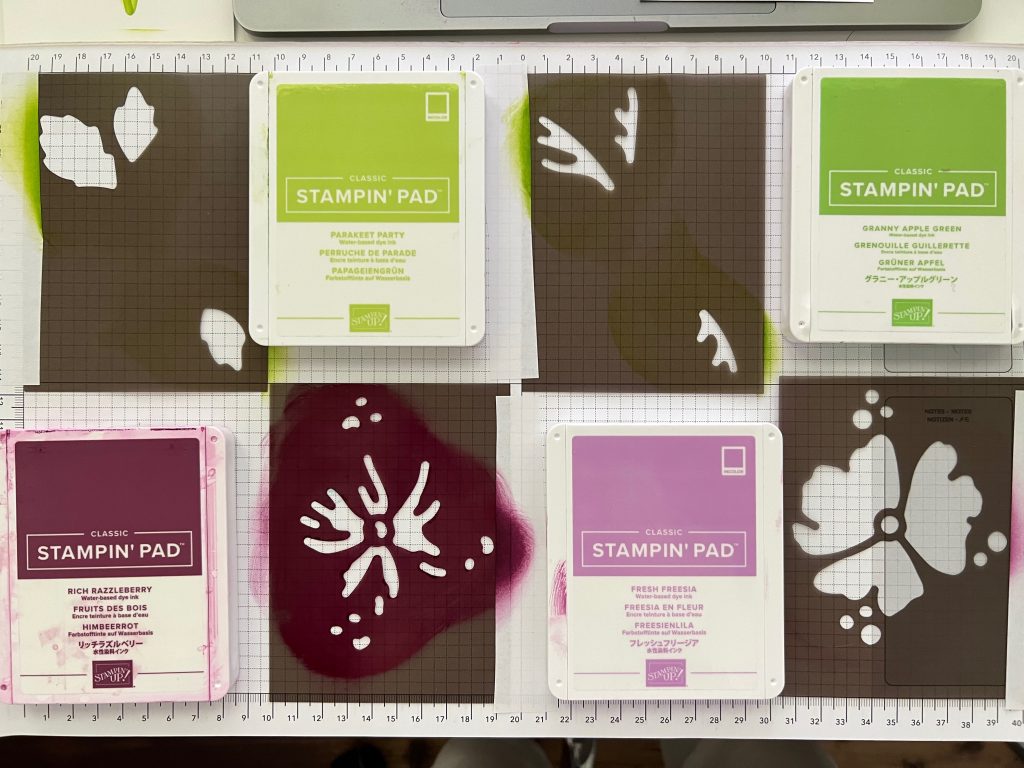
One way to line up the layering masks is to use a Stamparatus, placing the cardstock and the masks right into the top corner of the Stamparatus before inking up the layers – this aligns the images perfectly without having to tape them into place.
Once the mask is firmly in place, use a blending brush to lift ink off an ink pad (use a separate blending brush for each colour) and then gently blend the ink over the mask in a circular motion. You can make the level of colour intensity as light or as dark as you like.
The method Sara and I both used involved taping one side of the masks to your grid paper, using strips of Stampin’ up! Masking Tape or washi tape. This method works really well if you are making more than one card front.
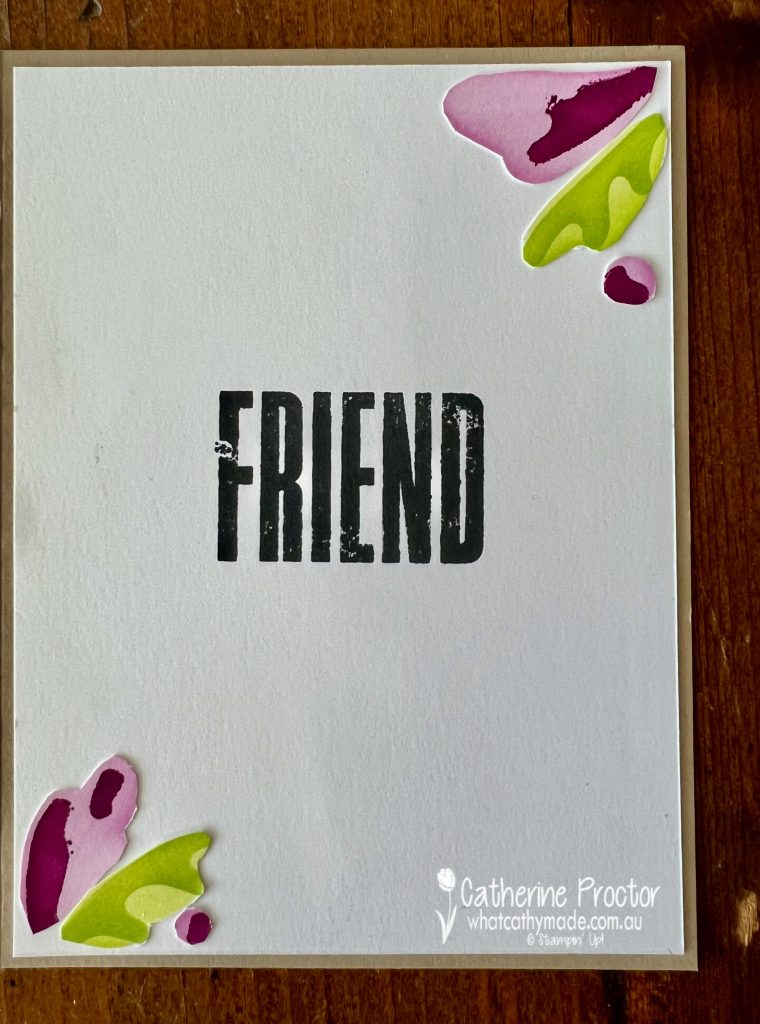
The cardstock layers were die cut using the Stitched Rectangle Dies before adhering to a Crumb Cake Card base. The “Hello” sentiment is from the Biggest Wish Stamp Set stamped in Memento ink.
Inside the card I used the “friend” sentiment from the Biggest Wish Stamp Set and added some spare masked pieces I cut to fit.
Now it’s time to hop on over to our next participant, the lovely Rachel Palmieri – I can’t wait to see what Rachel has made this week!
If at any time you find a broken link, you can find the complete list of all participants below.
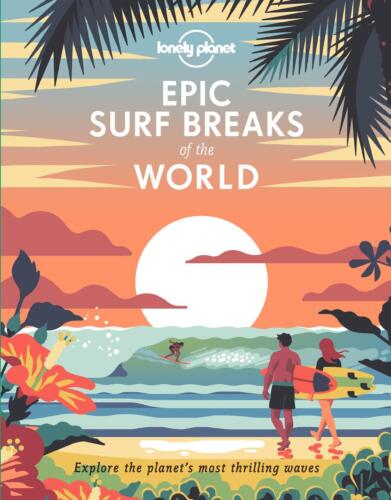
Last Friday my husband, Pete, celebrated his birthday and one of the books I gave him was the Lonely Planet Epic Surf Breaks of the World.
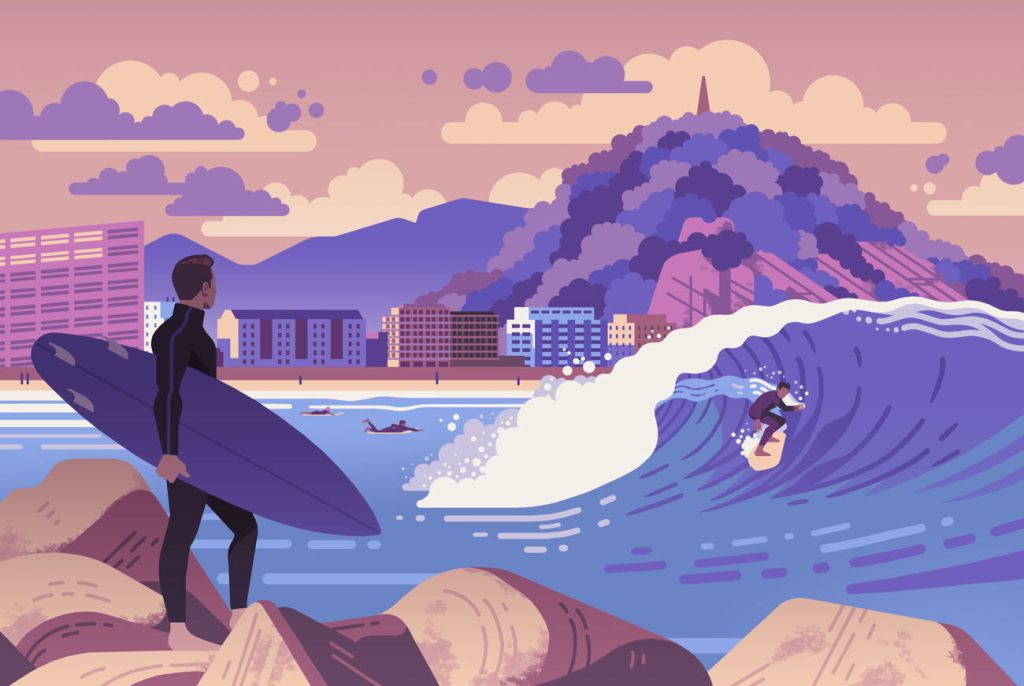
I knew Pete would love adding more surf breaks to his bucket list – as I type this blog he is surfing down the south coast – and I knew I’d love looking at the incredible illustrations by the illustrator, Ross Murray, like this one below.
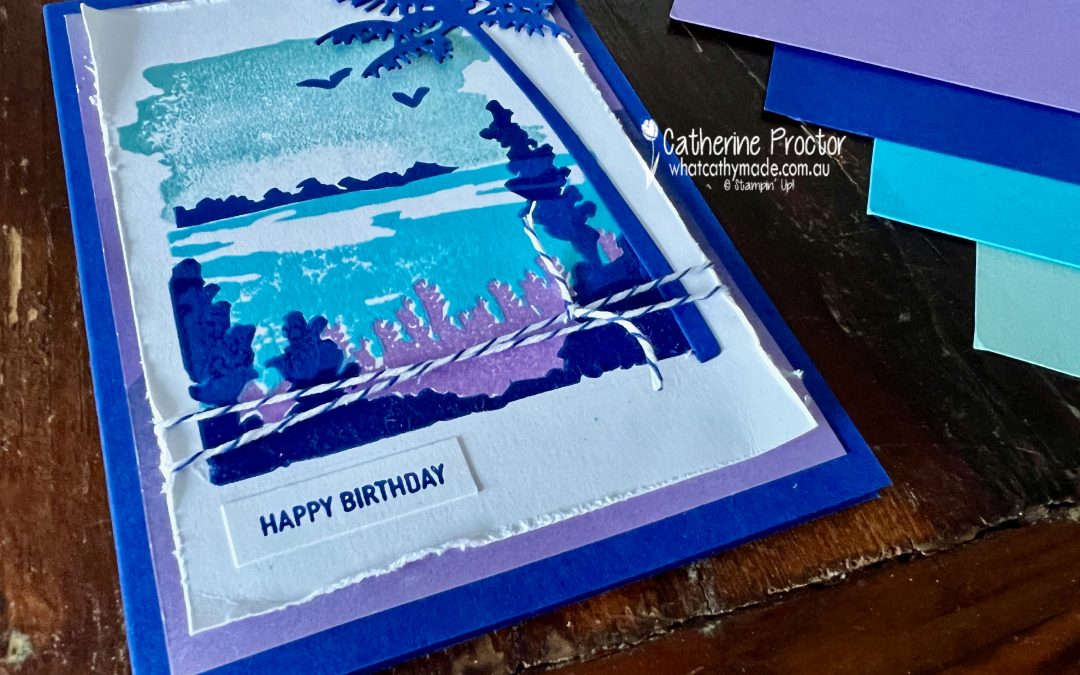
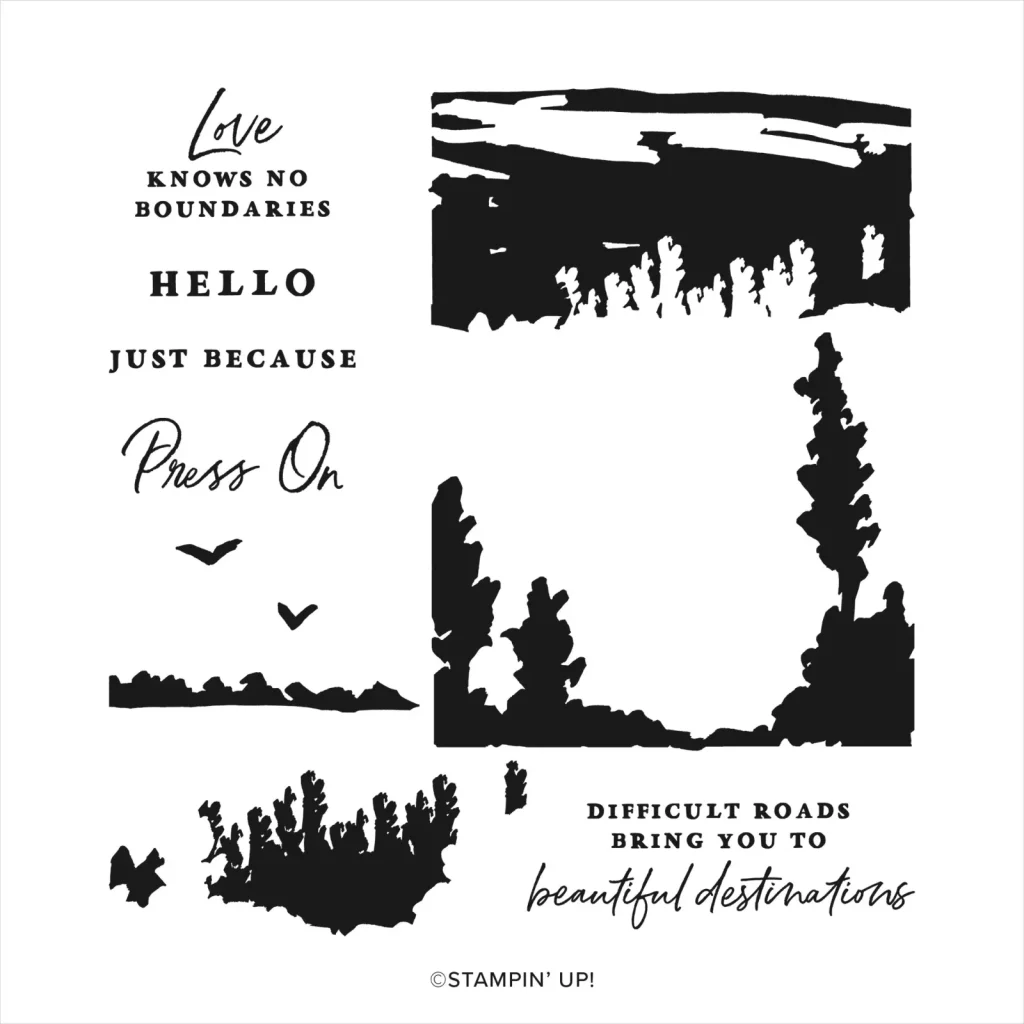
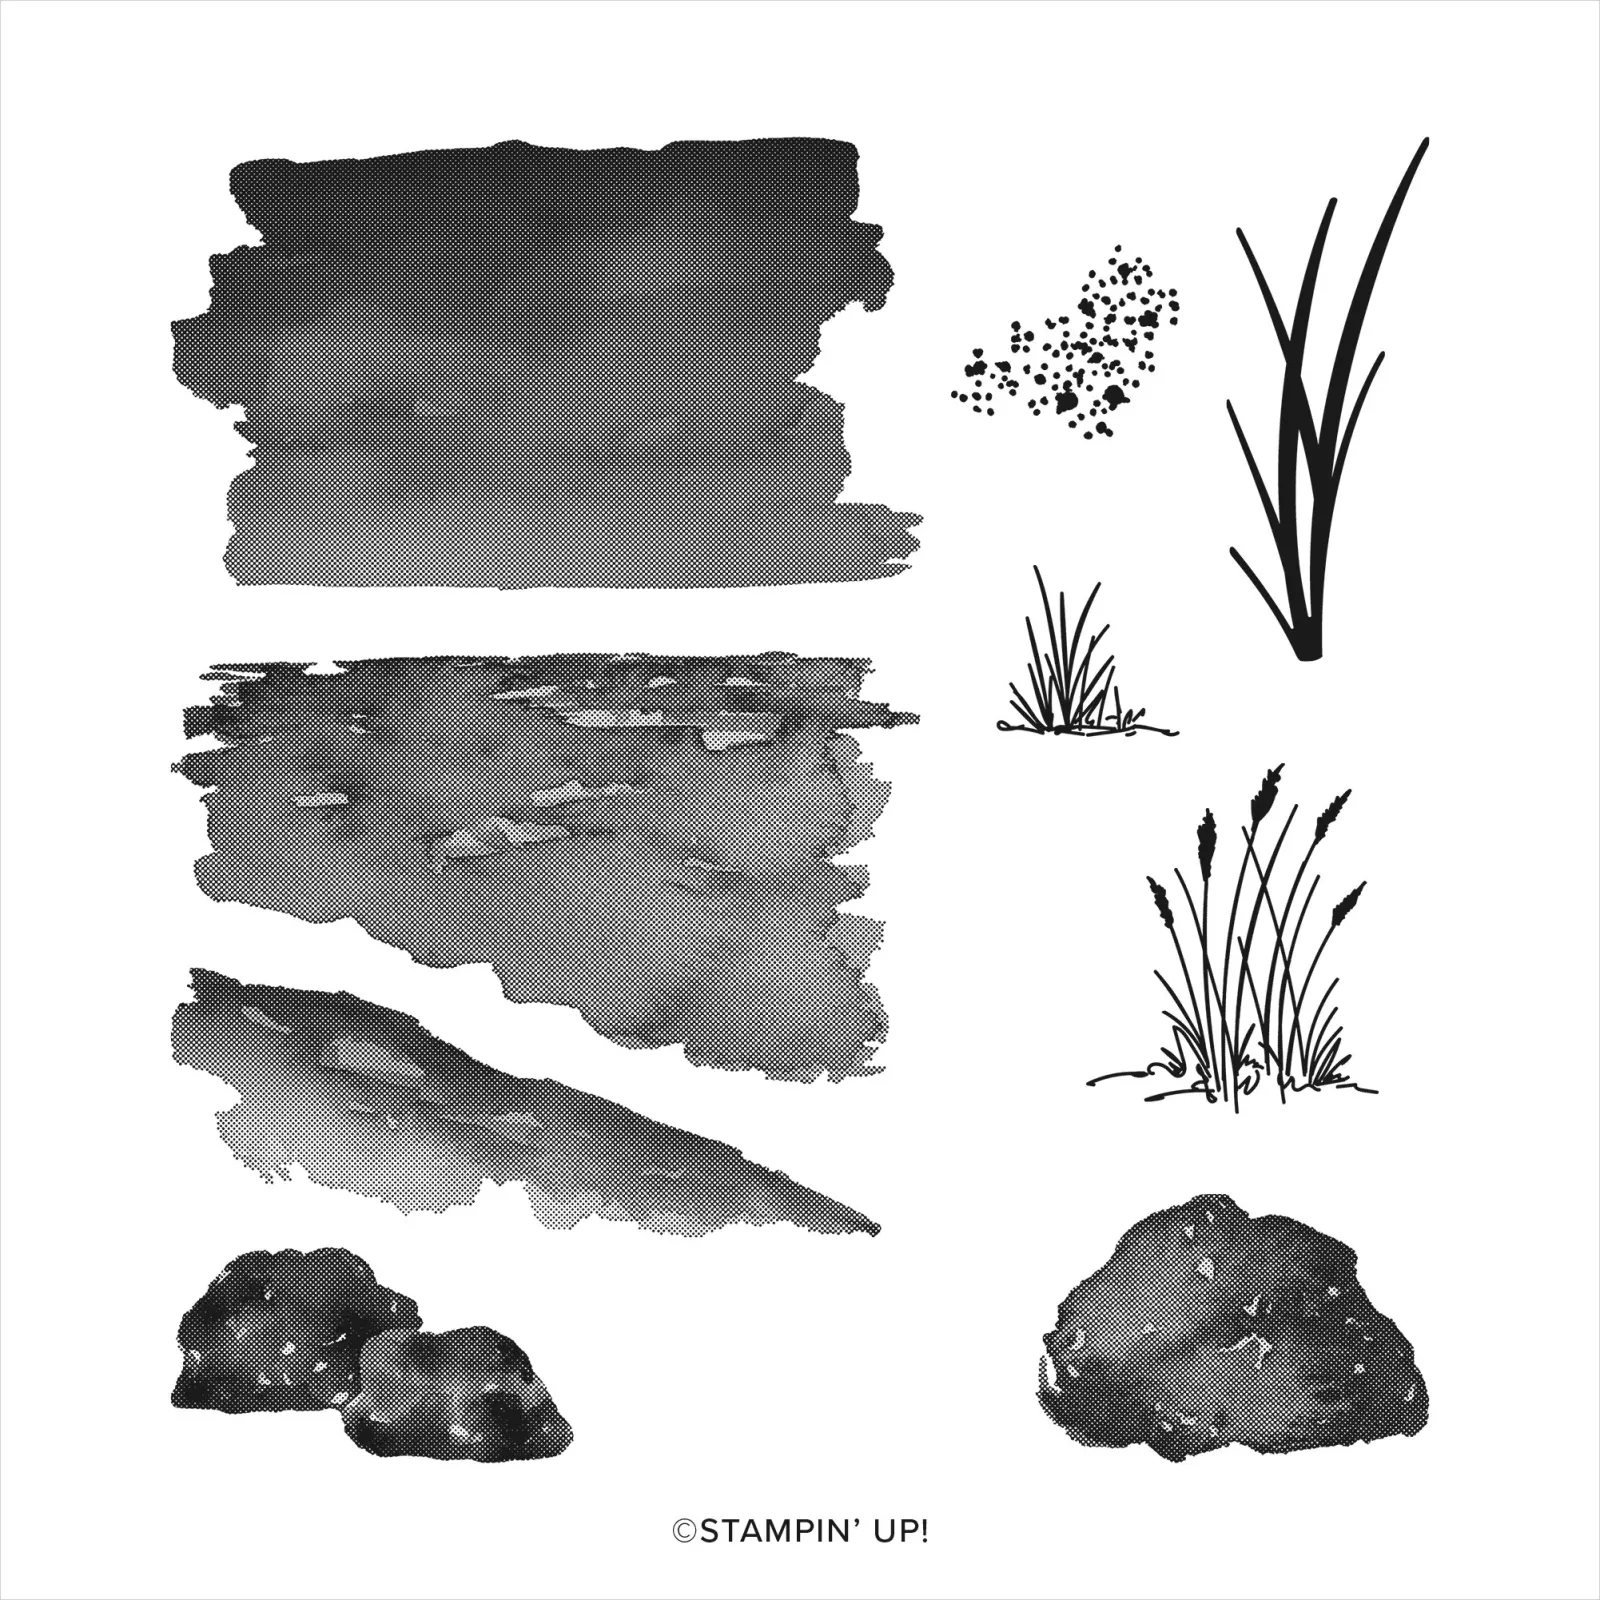
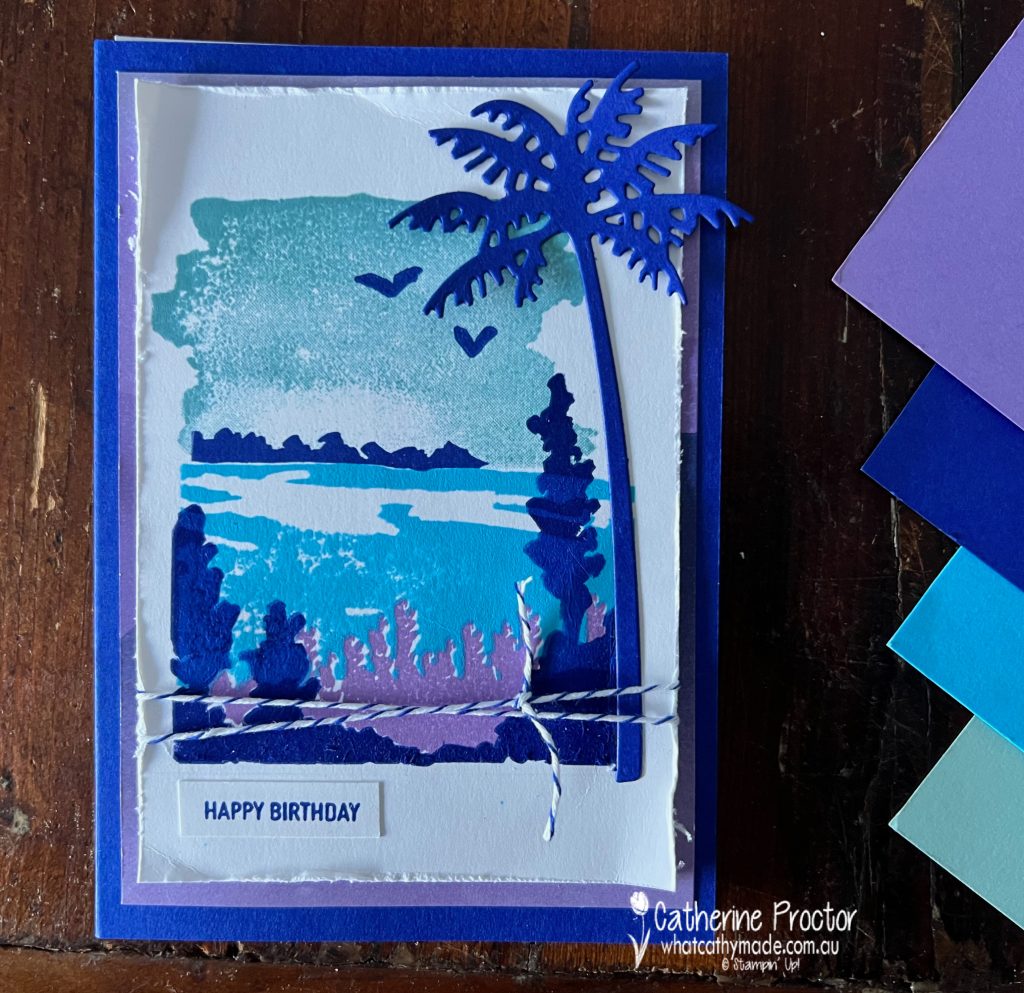
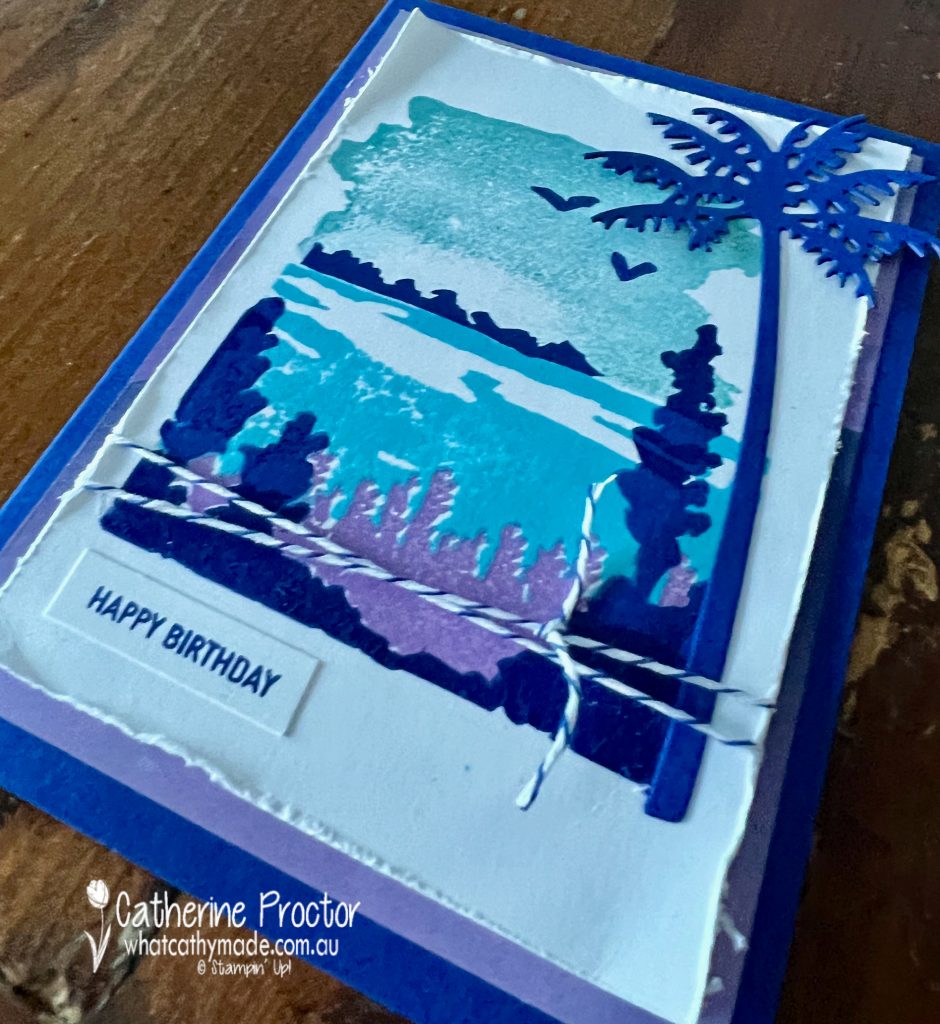
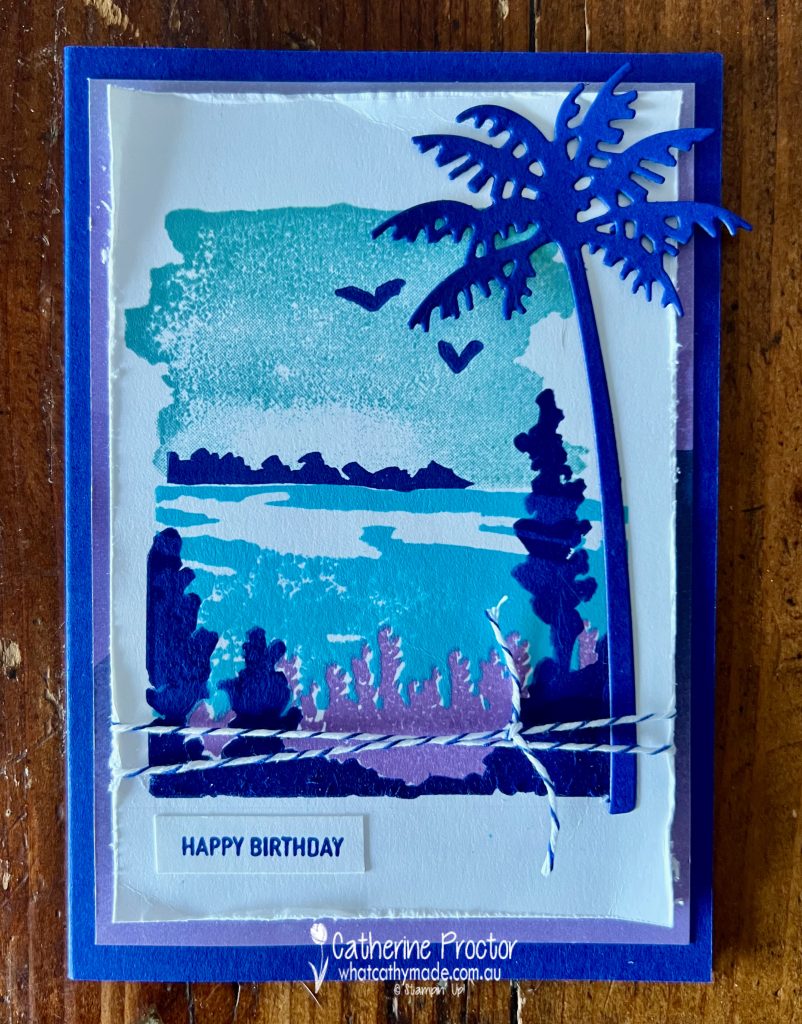
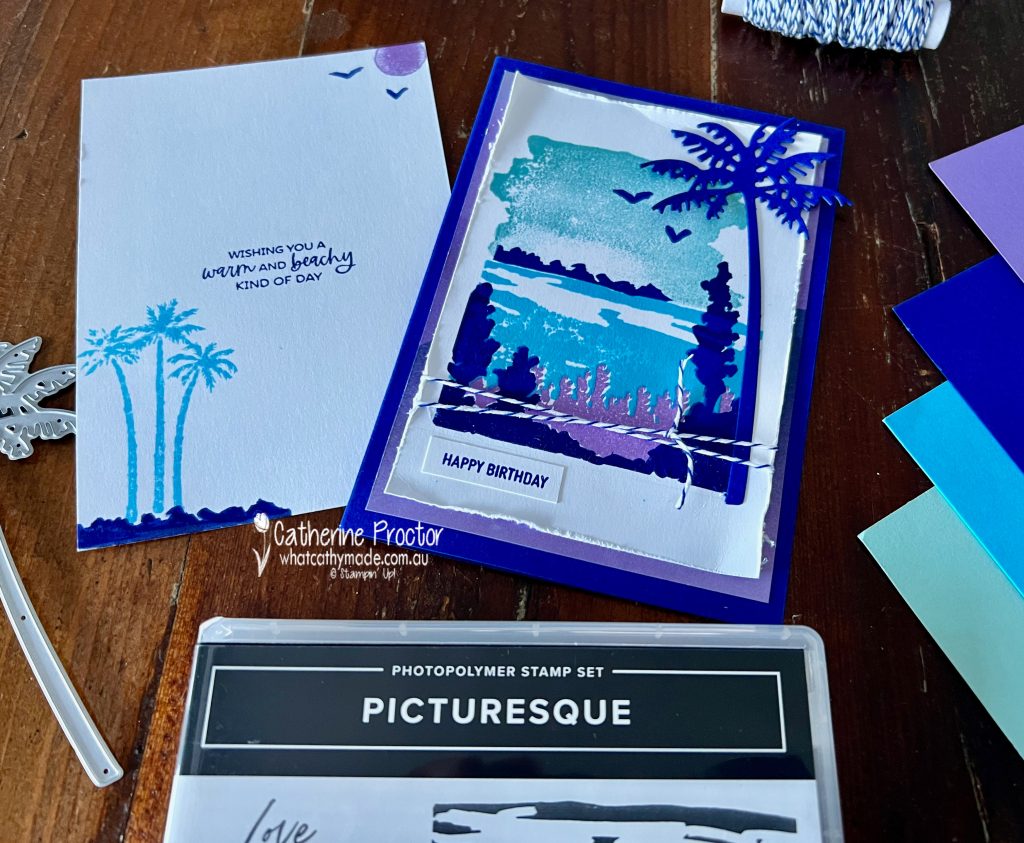
To make a matching card in a similar graphic style I used the Stampin’ Up! Picturesque stamp set, combined with one of the stamps from the Oceanfront stamp set. Thanks to Laurie Alexander, a USA Stampin’ Up! demonstrator who gave me the idea to combine the two sets.
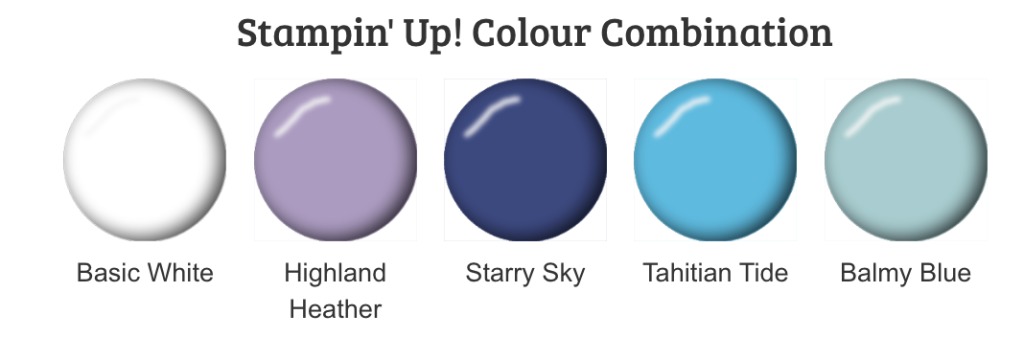
I chose a vibrant palette of blues and purples, however you can really use any colours with this graphic stamp set.
The colours are so vibrant in this card it was hard to take a good photo that didn’t look overexposed!
This stamp set is photopolymer, which makes it super easy to line up the layers of colour, however, the bottom stamp that I’ve stamped in Starry Sky can easily bend, so I used my grid paper in the Stamparatus to line up the stamp before stamping.
The Stamparatus is a must have for creating this type of landscape as you often have to go back a restamp the larger stamps to ensure saturation of colour and coverage.
Other products used include the large palm die from the Palm Dies, the happy birthday stamp from the new On The Ocean stamp set and some In Colour Starry Sky twine.
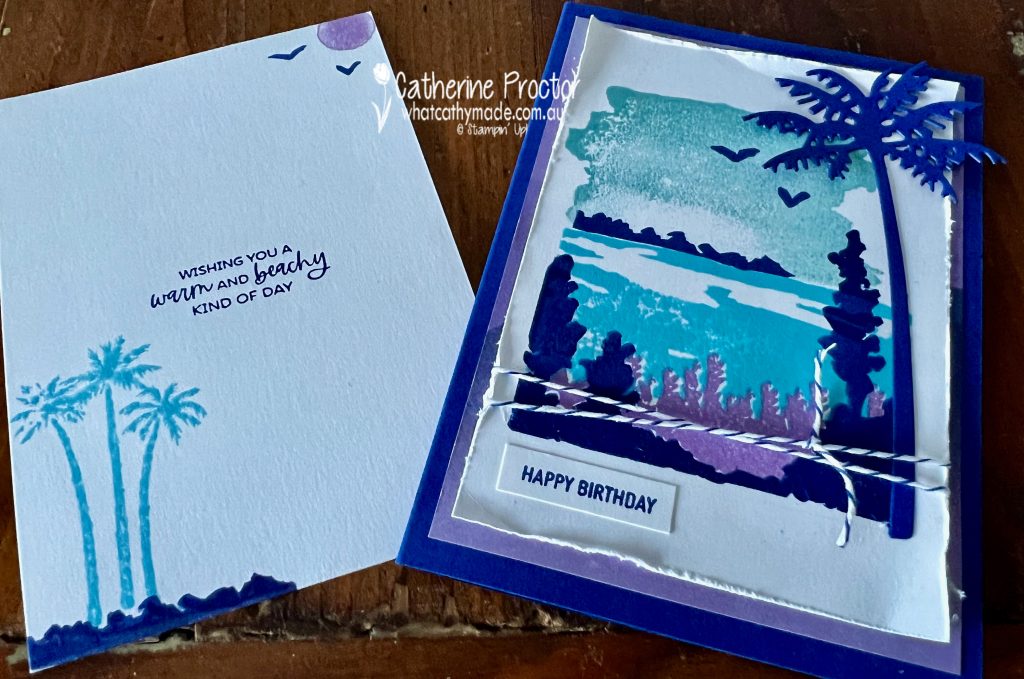
The inside of the card has a a palm stamp from the Paradise Palms Stamp Set, with a Highland Heather sun – why not!
I’ll be back this Wednesday March 1, with the AWH Colour Creations team to showcase Rich Razzleberry. I hope you can join us then.