Welcome back to the Heart of Christmas weekly blog.
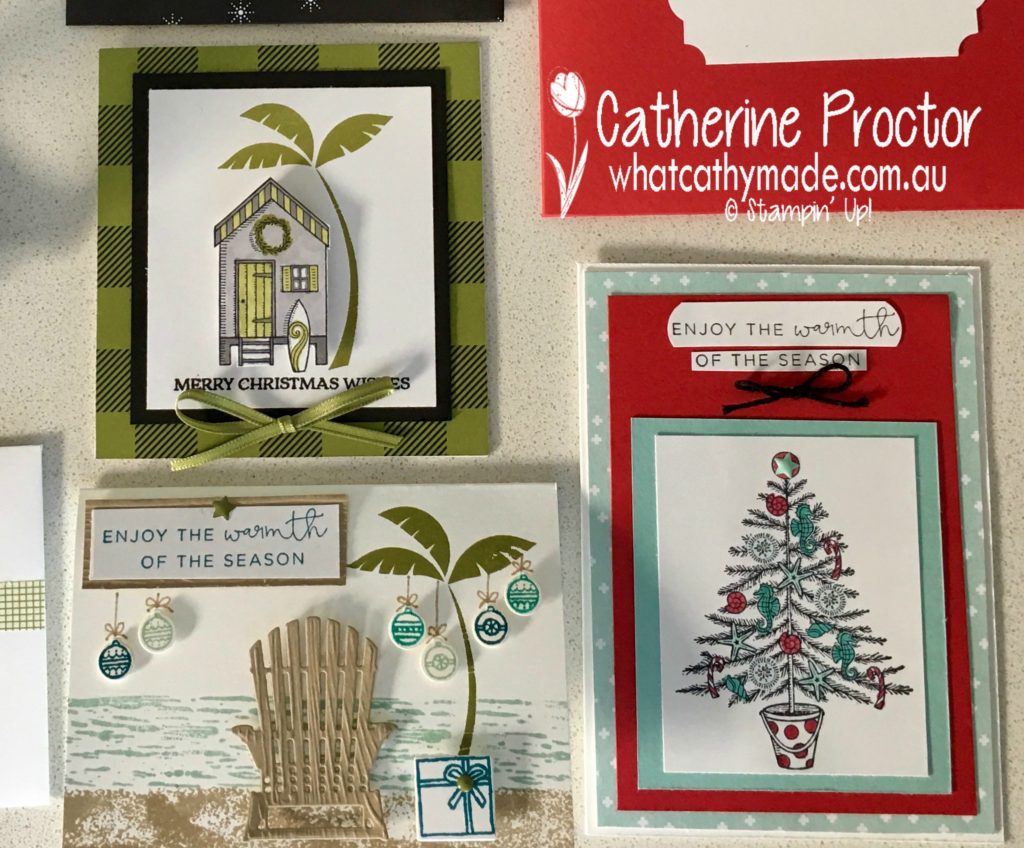
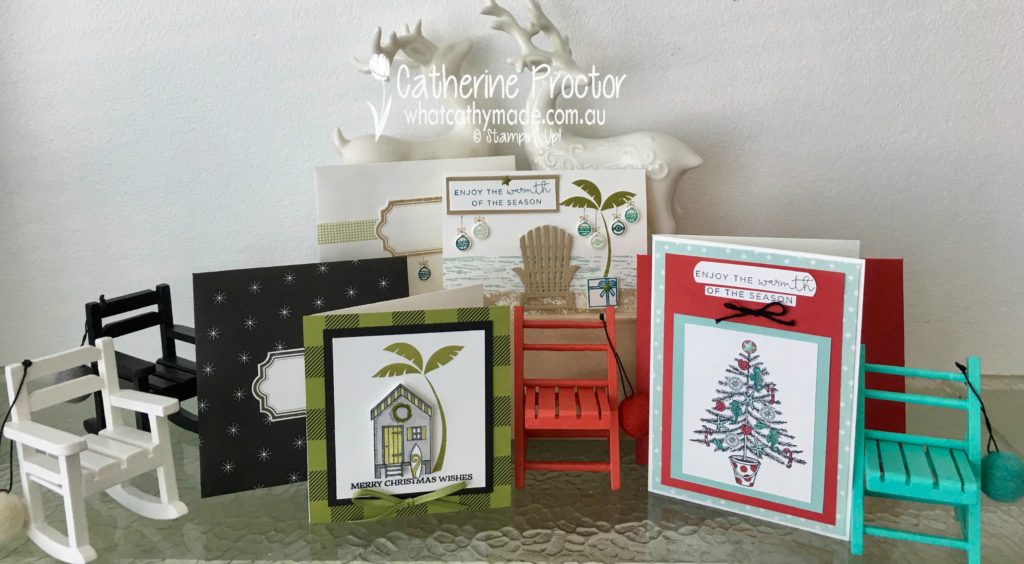
This week I was lucky enough to borrow and have a play with 2 sets I don’t own from the Holiday catalogue: Beachy Little Christmas and Wise Men from Afar. I was inspired by the graphic palm tree in the Wide Men from Afar set to make some Aussie Christmas cards, but I actually ended up using a a whole lot of stamp sets to make 3 quite different cards.
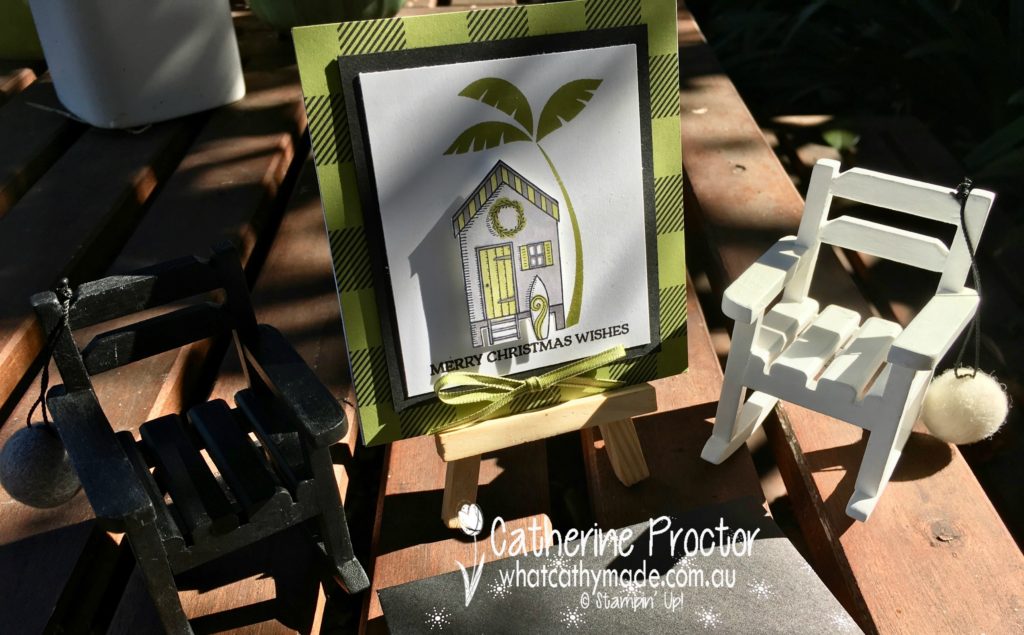
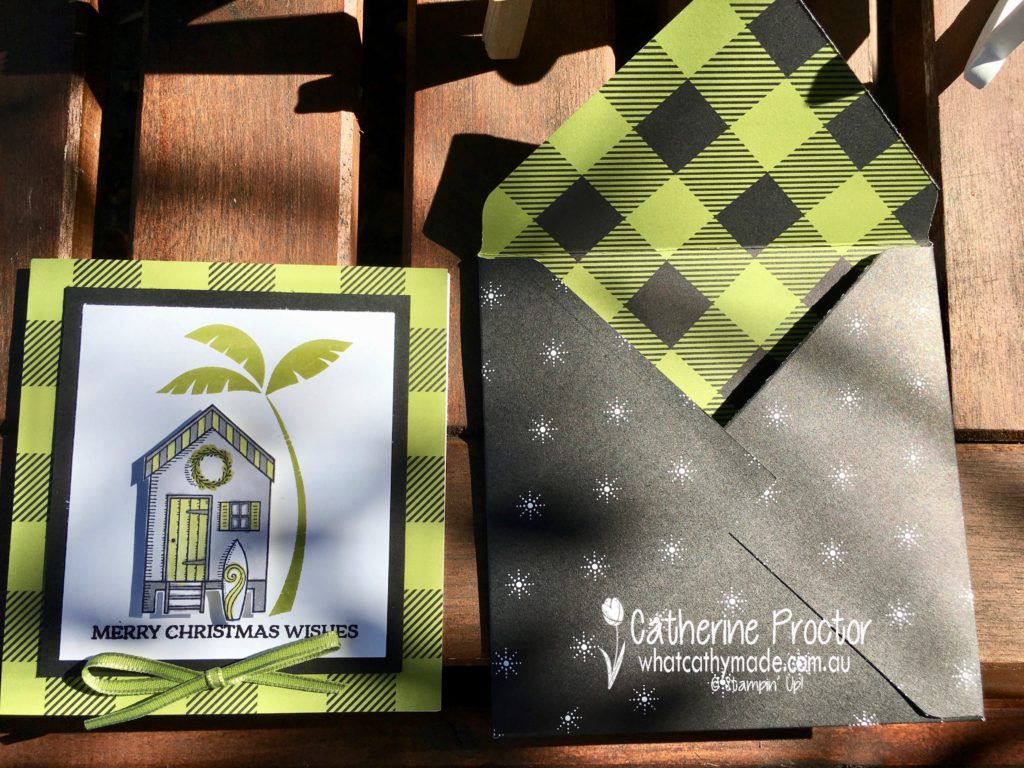
My first card uses the beach hut from Beachy Little Christmas…a perfect card for my family as we live at the beach and all my boys surf. I mounted it to the card with some Stampin’ Dimensionals.
I paired my fussy cut beach hut (coloured in with the new Stampin Blends pens which are available in November) with the palm tree from Wise Men from Afar, and used my envelope punch board to make a matching envelope out of the Merry Little Christmas DSP.
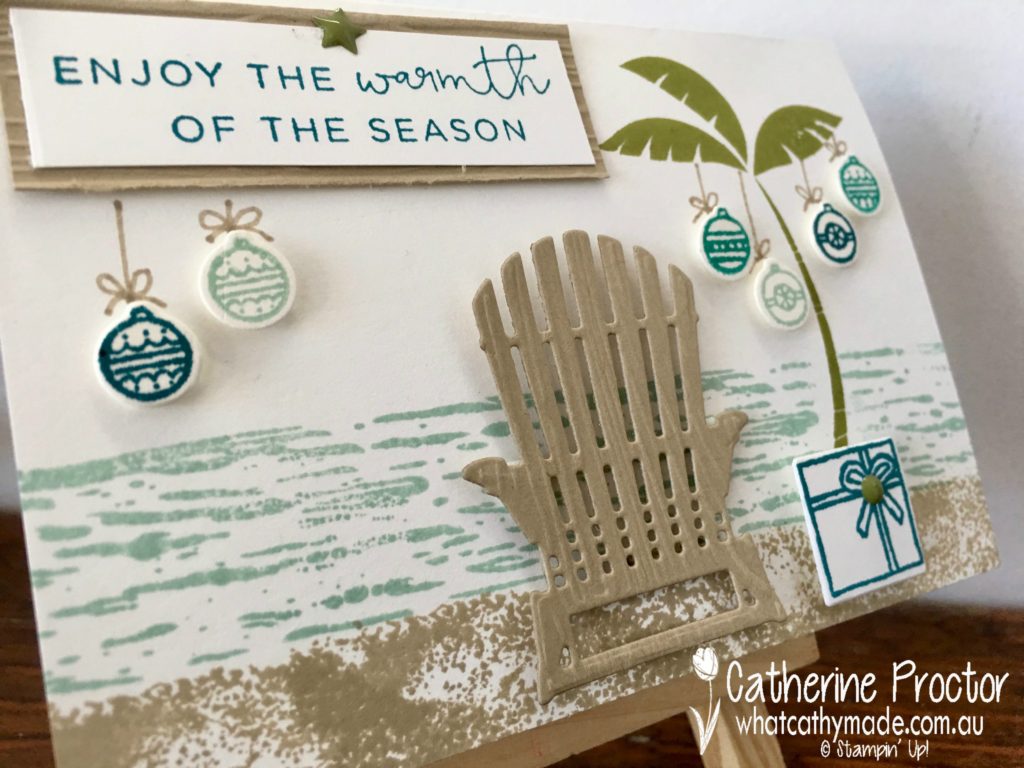
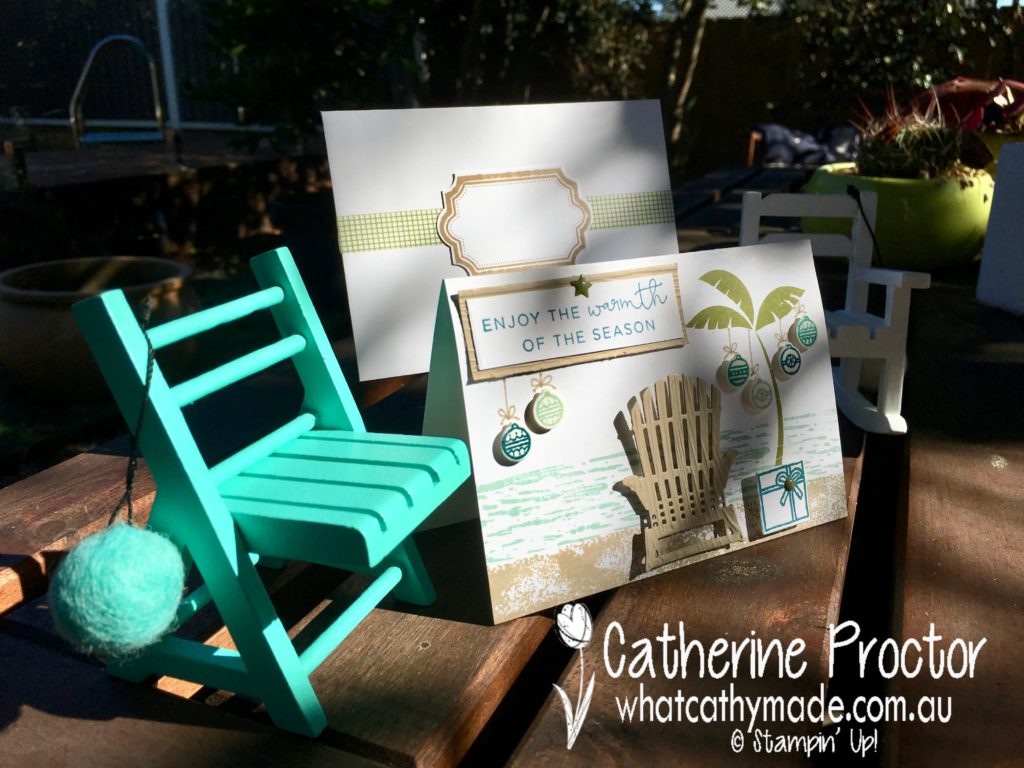
My second card features the palm tree again, this time stamped with the High Tide set to create a beach scene.
The Adirondack chair is a super cute die from the seasonal layer thinlets and the little ornaments and present are cut using the Christmas Staircase thinlets.
The beautiful “enjoy the warmth of the season” sentiment is from the Hearts Come Home stamp set…just perfect for a summer Christmas!
Because I used a whisper white notecard to make this card the matching envelope was already made, so I simply decorated it with Washi tape and a label made using the Labels to Love stamp set and Everyday label punch.
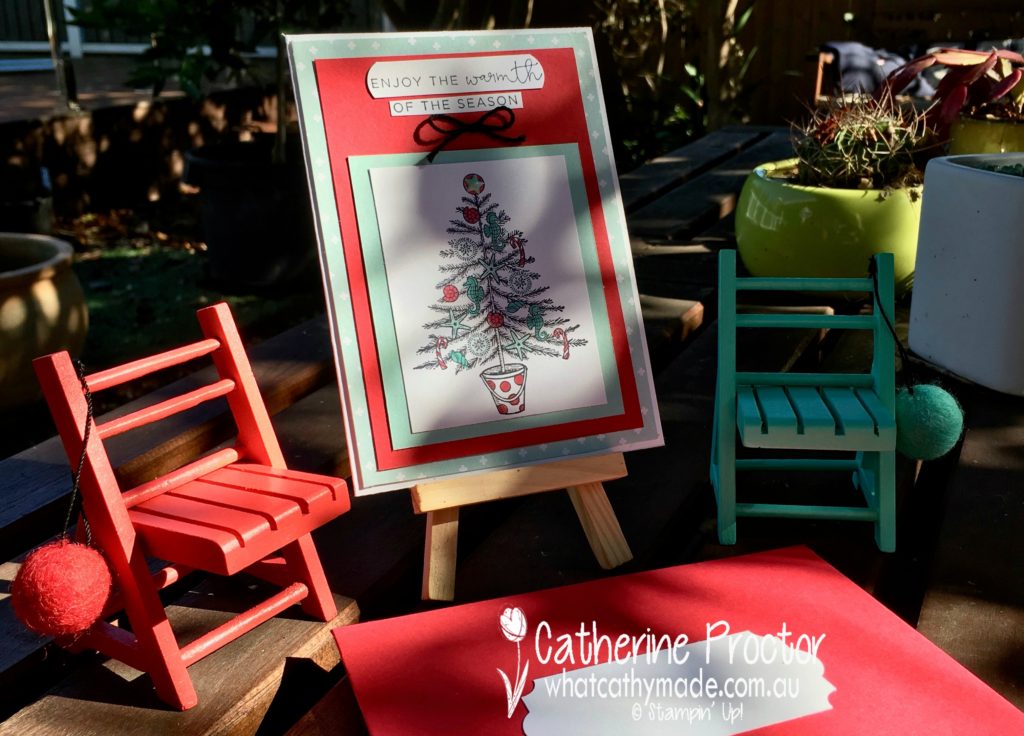
My final card uses the tree stamp from “Beach Little Christmas” coloured in with my blender pens and the “enjoy the warmth of the season” sentiment from the Hearts Come Home stamp set. I love the colours of pool party and real red together so I’ve mounted my tree onto both pool party and real red card stock, with the final layer some of the gorgeous Naturally Eclectic DSP.
I took most of these photos in my garden as it seemed only right for these cards…so many of our Christmas celebrations occur outdoors in the glorious Sydney summer.
But my reindeers insisted on an indoor photo as well, although I think they might just be upstaged by my darling little chairs…such a bargain at 10 cents each at my local op shop!
You can go back to Claire’s blog to see what the rest of our team have made this week.
And I’ll be back next week with some more Heart of Christmas inspiration.
Product List (NOTE: stampin blends not available until November 1)
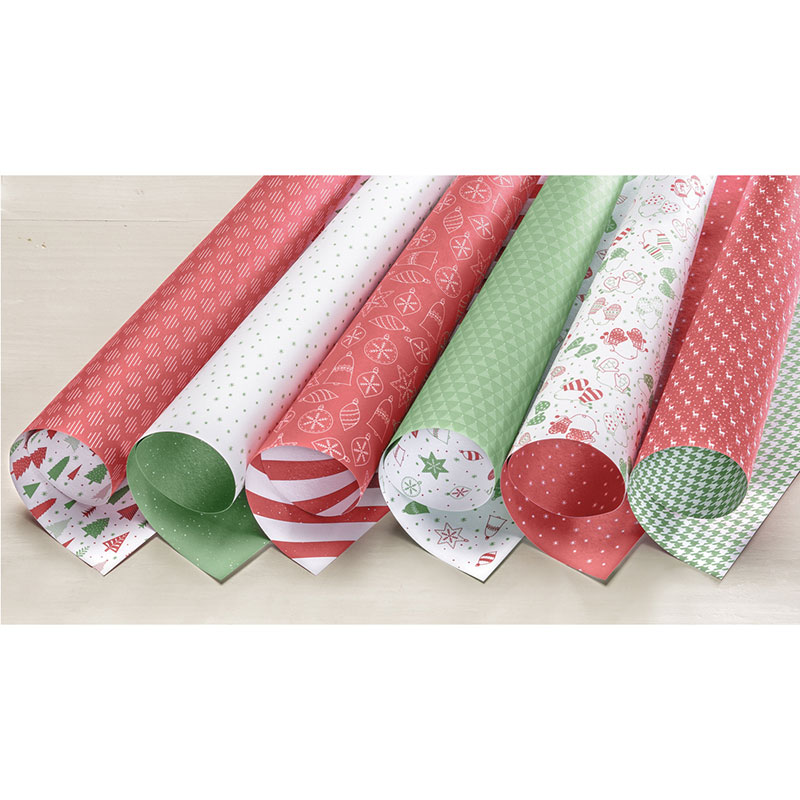
Tonight the Art with Heart team girls are sharing some wonderful ideas to inspire you with our Designer Series Papers. This month is the start of the new Stampin’ Up! year and we have a special promotion on our Designer Series Paper, buy 3 get 1 FREE for the month of October and there is no limit! I’m using one of the gorgeous papers available in this sale: “Be Merry Designer Series Paper”.
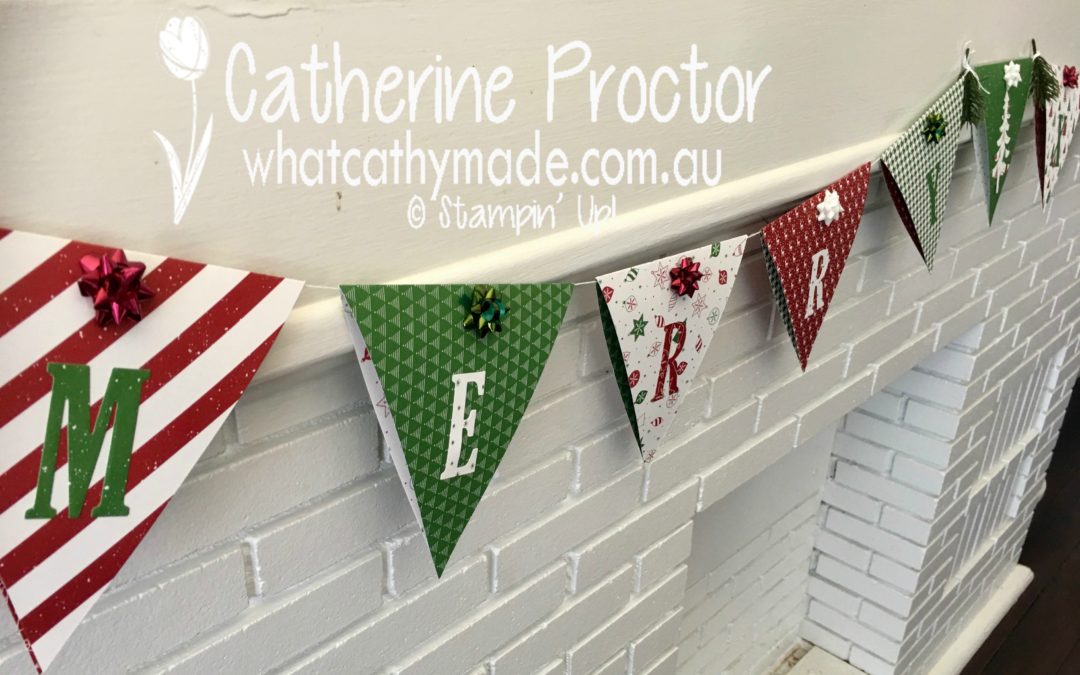
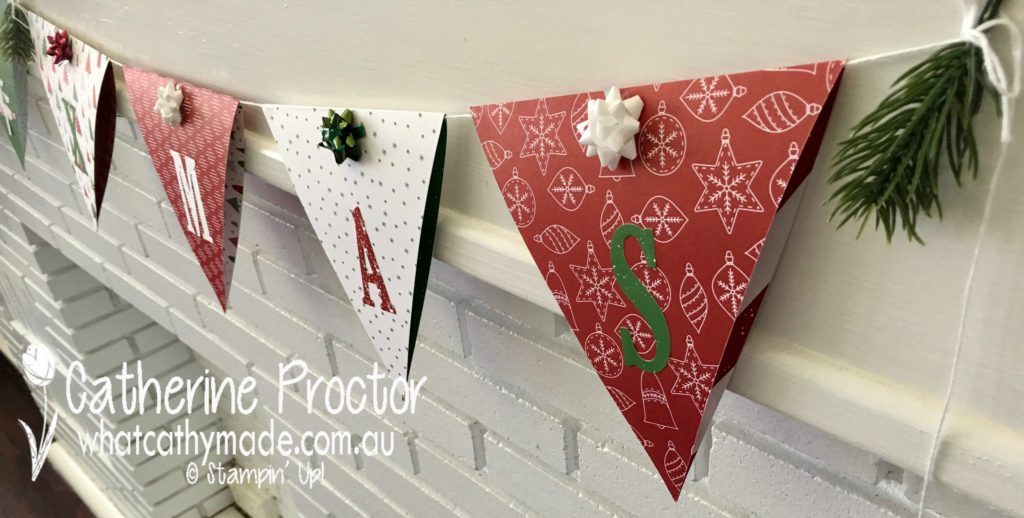
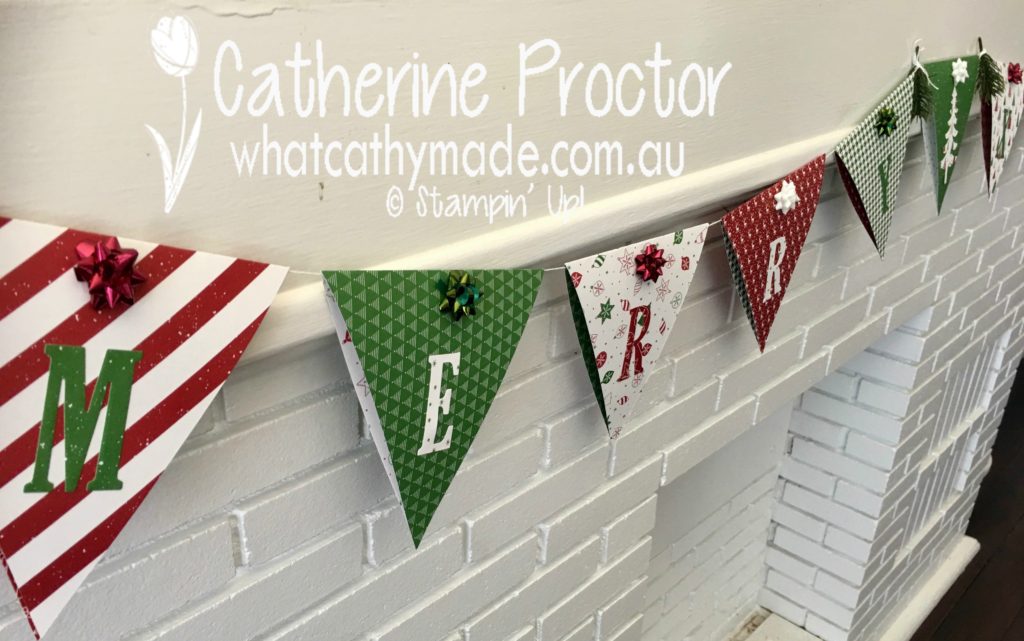
Have you ever made your own bunting? If you haven’t now’s the time to give it a go while the paper is on sale. I decided to make some Christmas bunting using the beautiful “Be Merry Designer Series Paper” and here it is hanging on my mantelpiece.
This is such a quick and easy project to make and you can use any of the gorgeous DSPs for this project. For my bunting I used less than half a packet of DSP…and that still left me with 7 full 12 x 12 inch sheets (one of each design and one spare sheet) and plenty of scraps to use for card making or other projects.
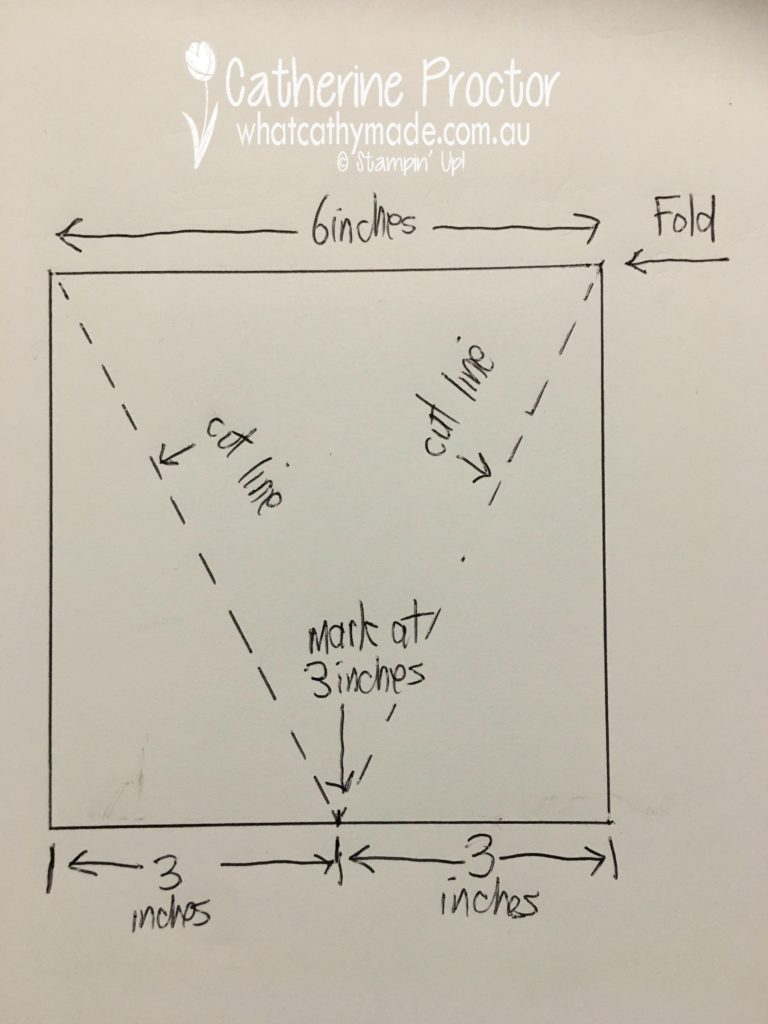
To make your bunting you simply use your paper trimmer to cut your paper in half lengthways (from top to bottom, ensuring any pattern is facing the right way up). Once you’ve cut your paper in half, take one piece and fold it in half so you now have a folded square that measures 6 x 6 inches. Mark the middle point (3 inches from either side) on the side opposite the fold, and then cut on the diagonal from your middle mark to the edges of the folded side, as shown in the diagram below.
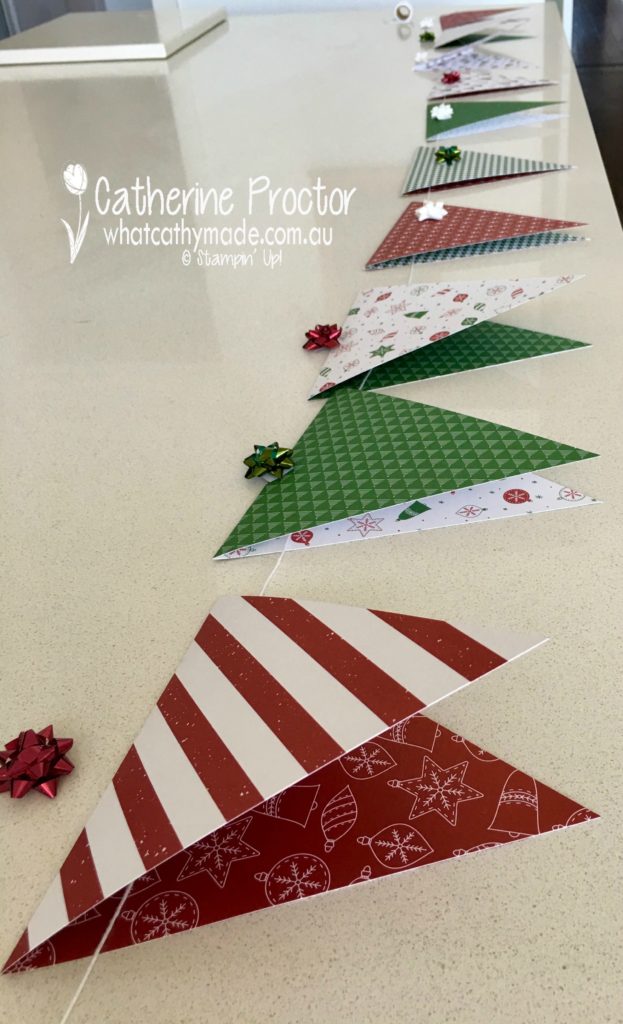
Save the offcuts to cut out your letters and repeat with the other half of your paper, this time folding it in the opposite direction so the other side of the patterned paper is used. I used 5 sheets of DSP for this project, making 10 bunting flags in total. To work out the order of bunting and space it apart I laid it all out on my kitchen bench so I could see how it looked.
I threaded whisper white bakers twine through the folded side of the flags and used a glue dot at either end of the fold to adhere the flag to the twine and close up the flag. I also used a glue dot at the bottom point of the flag. You can see in the picture below how nicely they hang…I left about 1 inch gap between the flags.
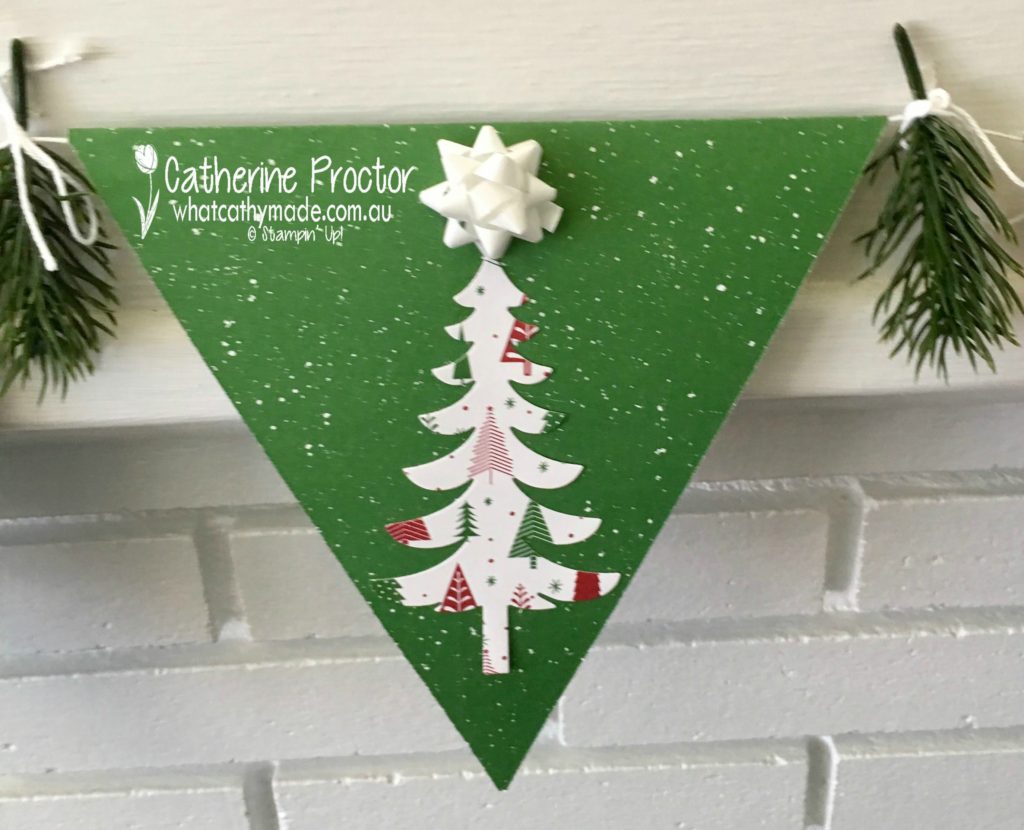
The finishing touch was to decorate the bunting with letters made from the DSP offcuts using the large letters framelits and a Christmas tree using a die from the Santa’s Sleigh die to break up the words “Merry” and “Xmas”.
The season of glitz mini gift bows are just the perfect size to add a little dimension (they come with their own adhesive backing), coupled with the green sprigs that I attached to the bunting with a bow of whisper white bakers twine.
You could make this bunting any length you wanted…I made mine to fit my mantelpiece…and you could leave your paper flags plain or decorate them with other punched or die cut shapes or words, such as “Peace, joy, love” or “ho, ho, ho”…it’s really up to you how you want to personalise your bunting.
Now it’s time to hop on over to our next participant, the very talented,Caroline Manwaring
If you find a broken link or have come to this blog hop from a different entry point, you can view the participants below:
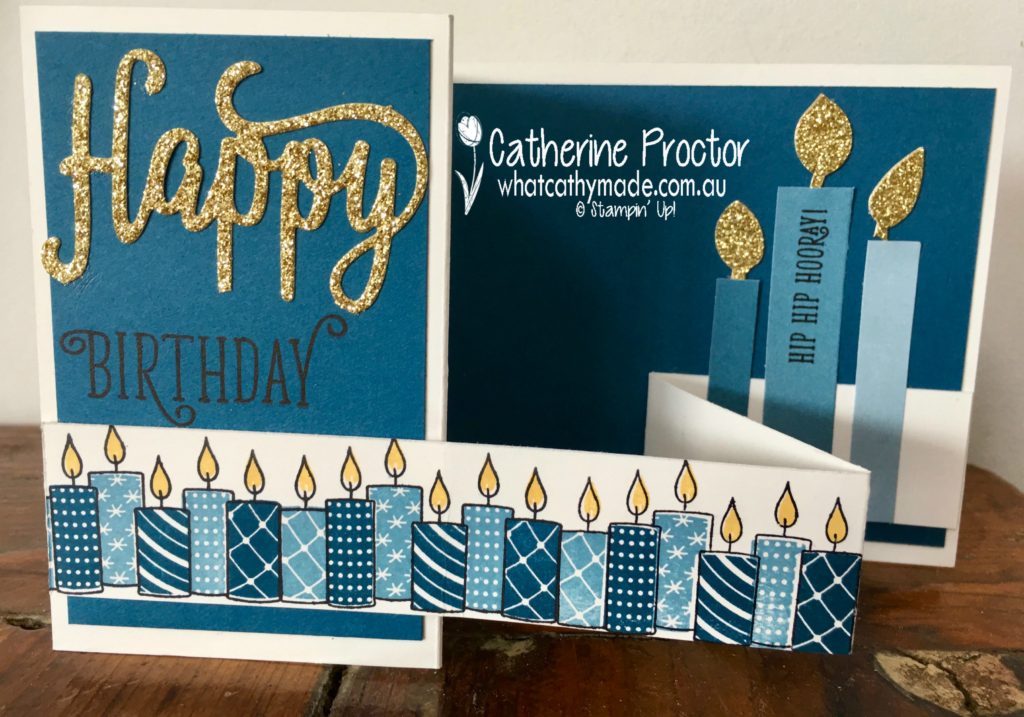
I really love getting multiple uses from all of my craft equipment which is why I’m super excited to share with you a birthday card I made this week.
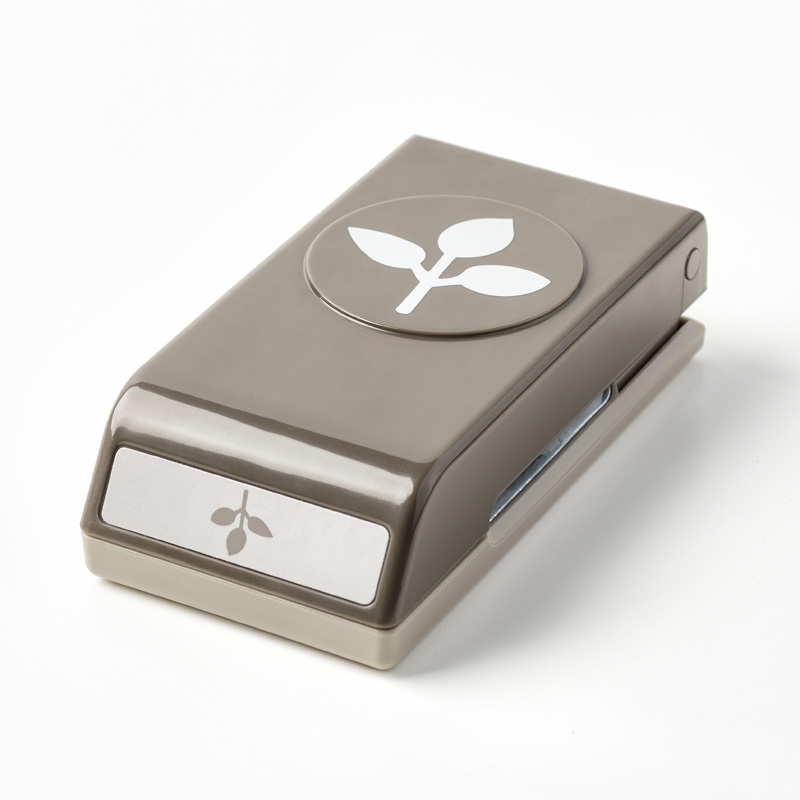
To create my birthday card I used 2 products from the holiday catalogue: a Christmas stamp set and a Fall/Autumn/Thanksgiving punch. Can you guess which products I used?
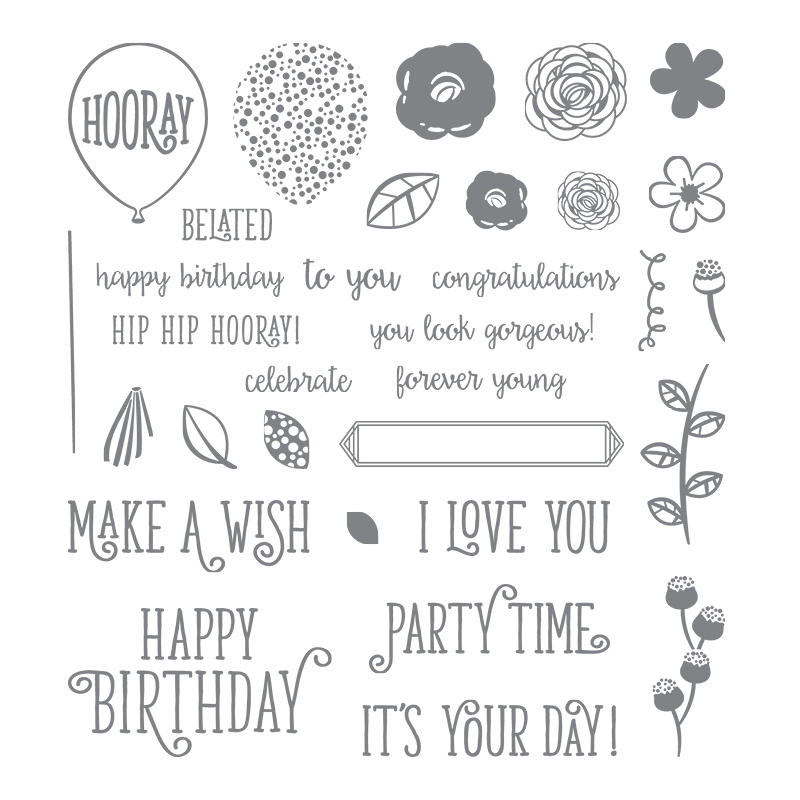
The stamp set is called Merry Patterns. This is a beautiful Christmas stamp set that features so many great stamps: a lovely large sentiment, beautiful candles, a fir branch and the cutest reindeers! Here’s a couple of the cards I’ve already made from this set.
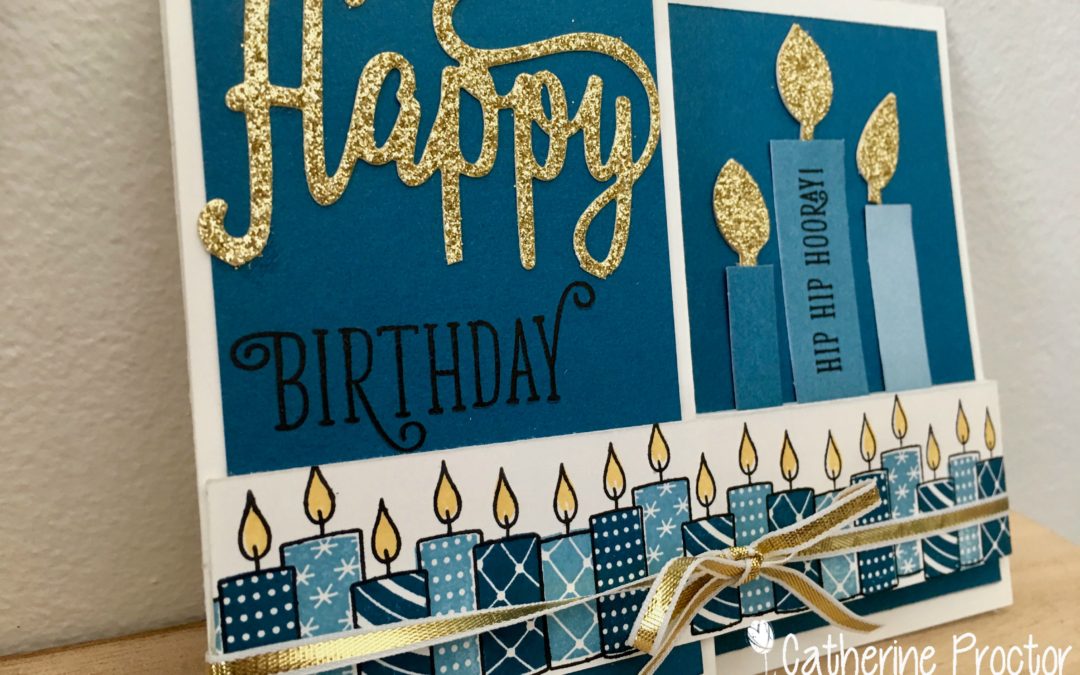
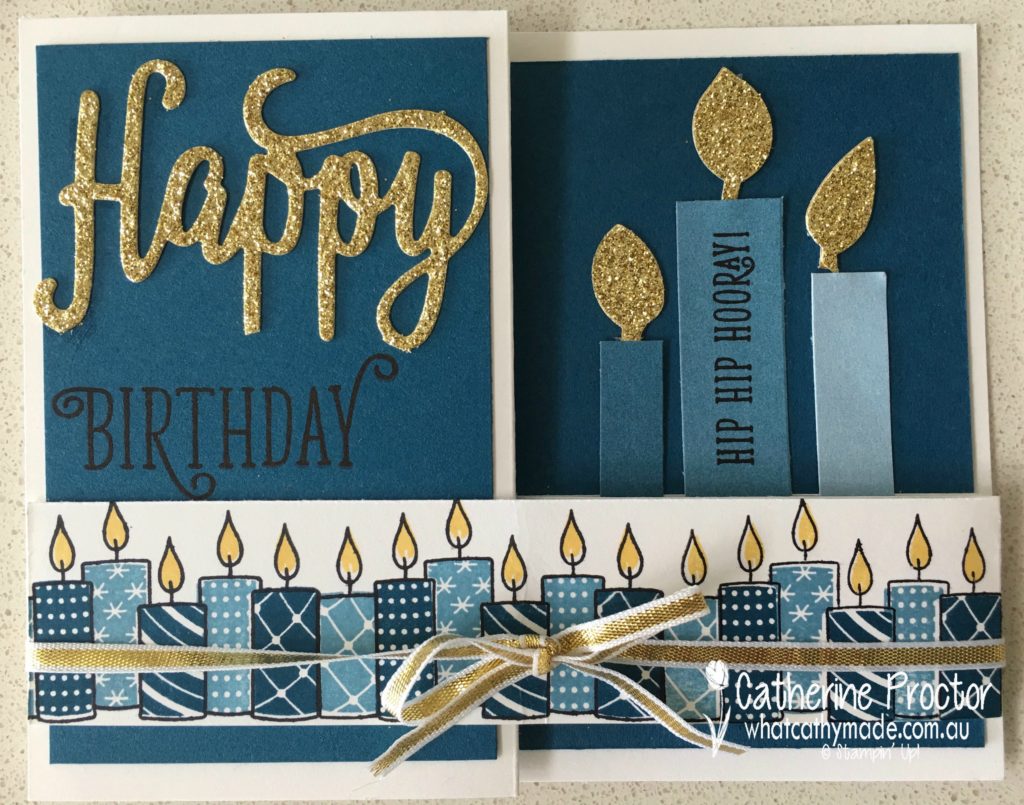
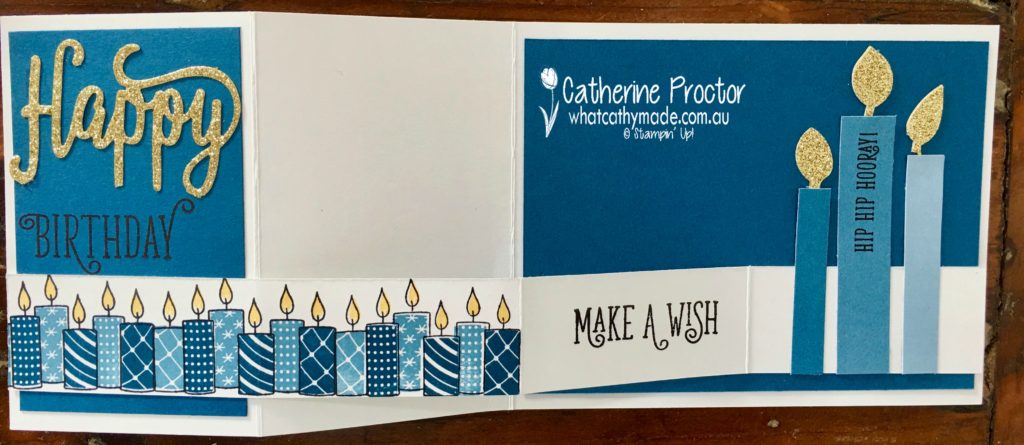
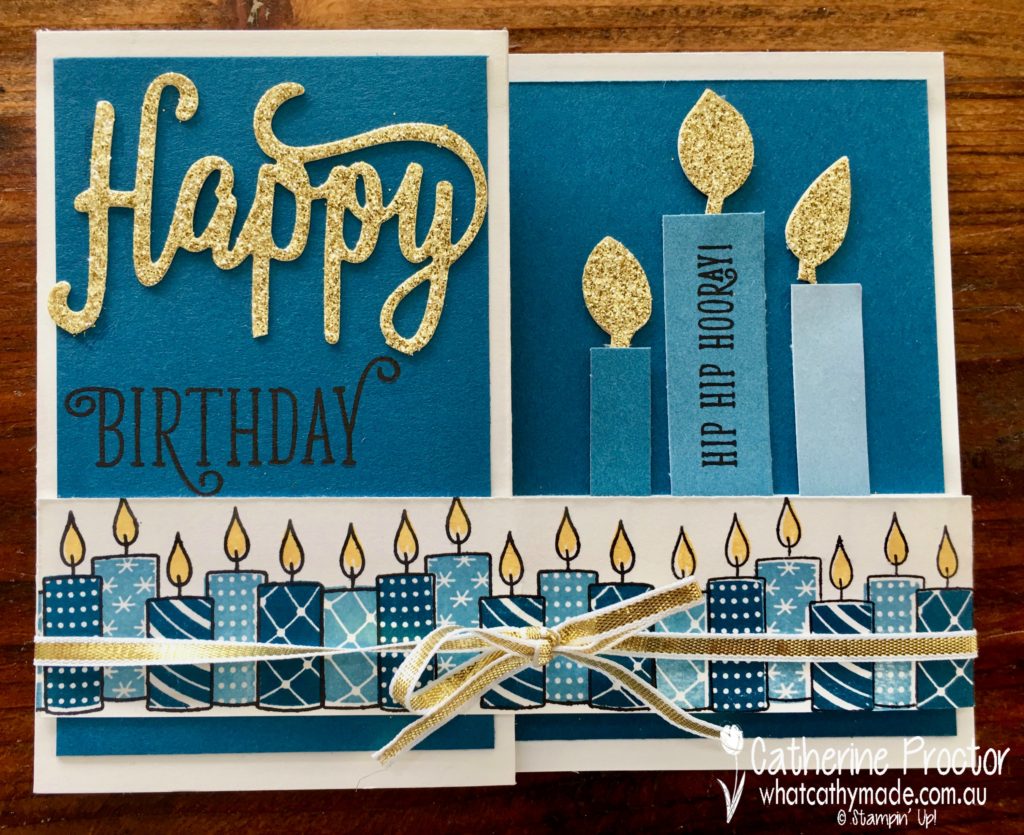
When I went to make another card with this set I wanted to try out the candle stamp this time…and I suddenly realised the candles would also work really well on a birthday card. So I made my first ever double Z fold card using the Merry Patterns stamp set.
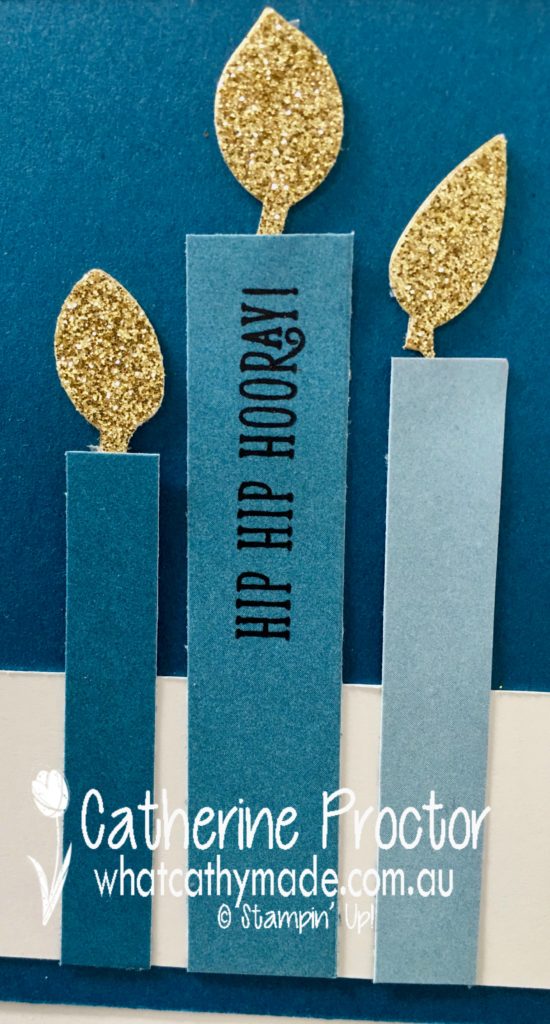
I used dapper denim and marina mist ink to stamp my candle stamp and then I decided the card needed something above the candles. I die cut the happy birthday die in gold glimmer paper for one side of the card but I only used the “happy”…the birthday was stamped from the matching Happy Birthday Gorgeous stamp set…I really love the font on this set.
I made some large candles for the other side of the card using the Colour Theory Designer Series Paper Stack, but my hand-cut candles really needed a flame. Can you guess what I used?
That’s right, I used the new leaf punch! I simply stamped it out of gold glimmer paper as well and cut it in three. I love how the shape of the leaves makes the candle flames look like they are moving in the wind (and close up you can see that I didn’t quite position the 3rd flame correctly, whoops!).
The final touches to this card were stamping the “make a wish’ sentiment on the inside of the double Z fold. You can see on the photo below how when the card is fully opened there’s also a blank section of whisper white to write your own message on.
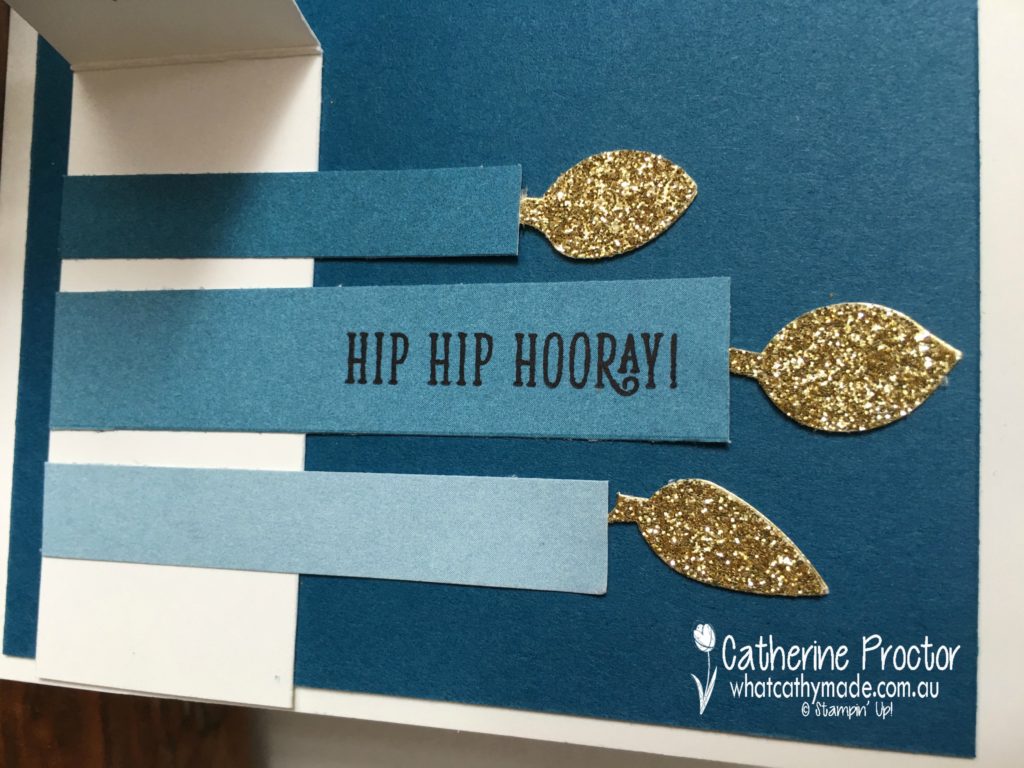
The big candles were looking a little plain so I decided to stamp the “hip hip hooray” sentiment sideways onto the middle candle…I really like the look of stamps stamped vertically instead of horizontally.
And to keep the card folded flat so it can easily pop into en envelope I attached a length of gold 1/8 ribbon to the back of the card and then used it to tie around the front and make a decorative bow.
I deliberately made this card in blue so it could be used for male or fame, young or old. I think this is a really versatile card for a wide range of ages.
Are you getting the most out of your craft supplies? I’ve got another versatile idea for you, this time using the offcuts of the Happy Birthday Die. I explain it all in my blog last week.
To purchase any others supplies I’ve used you can click on the links below, and I’ll be back with 2 more blogs later this week.
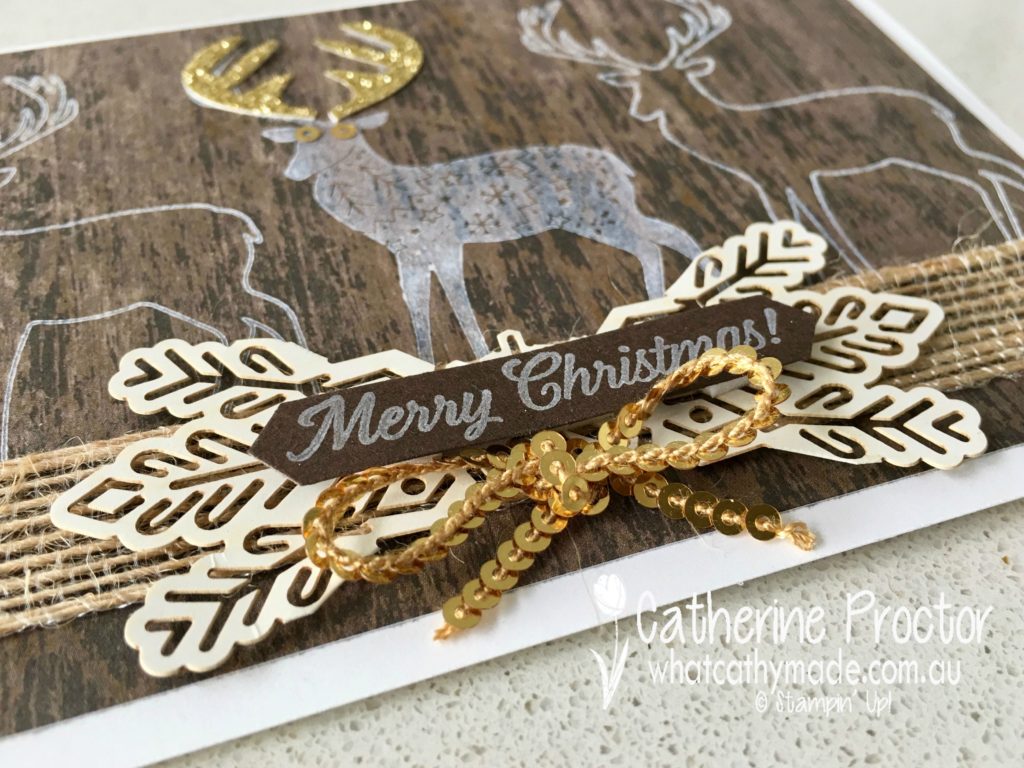
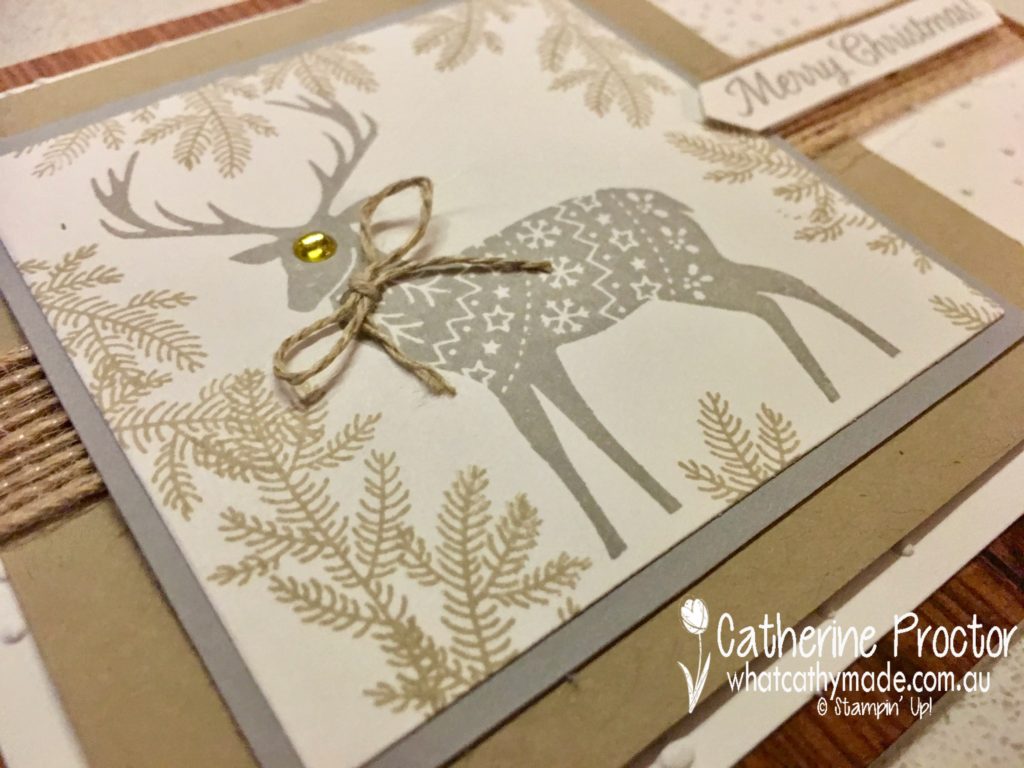
Welcome back to the Heart of Christmas weekly blog.
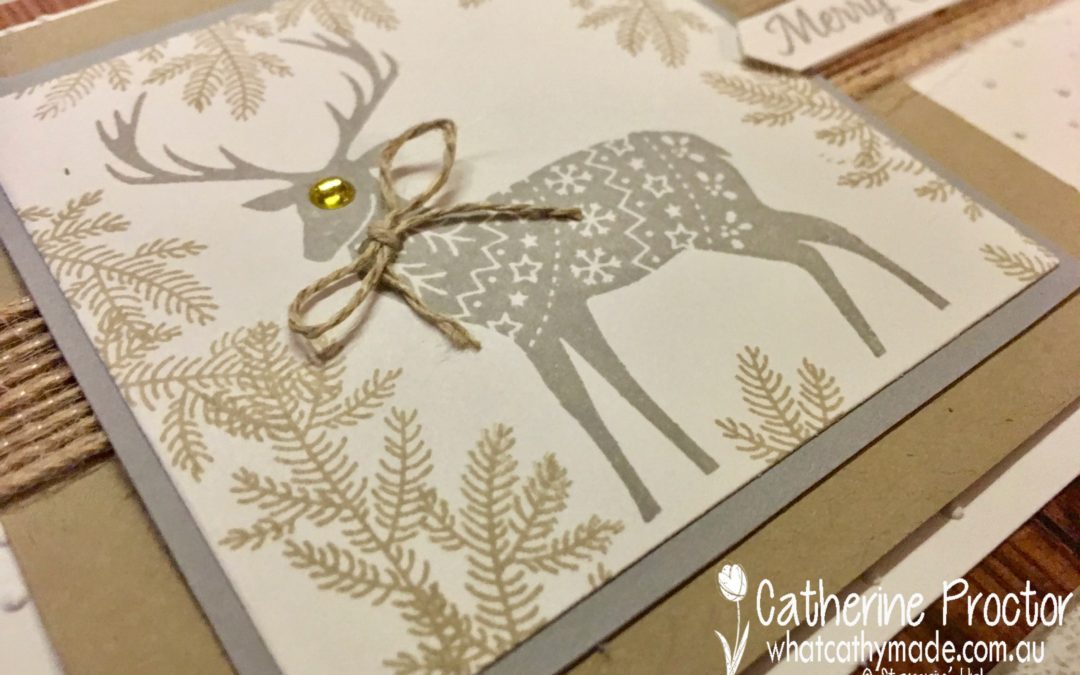
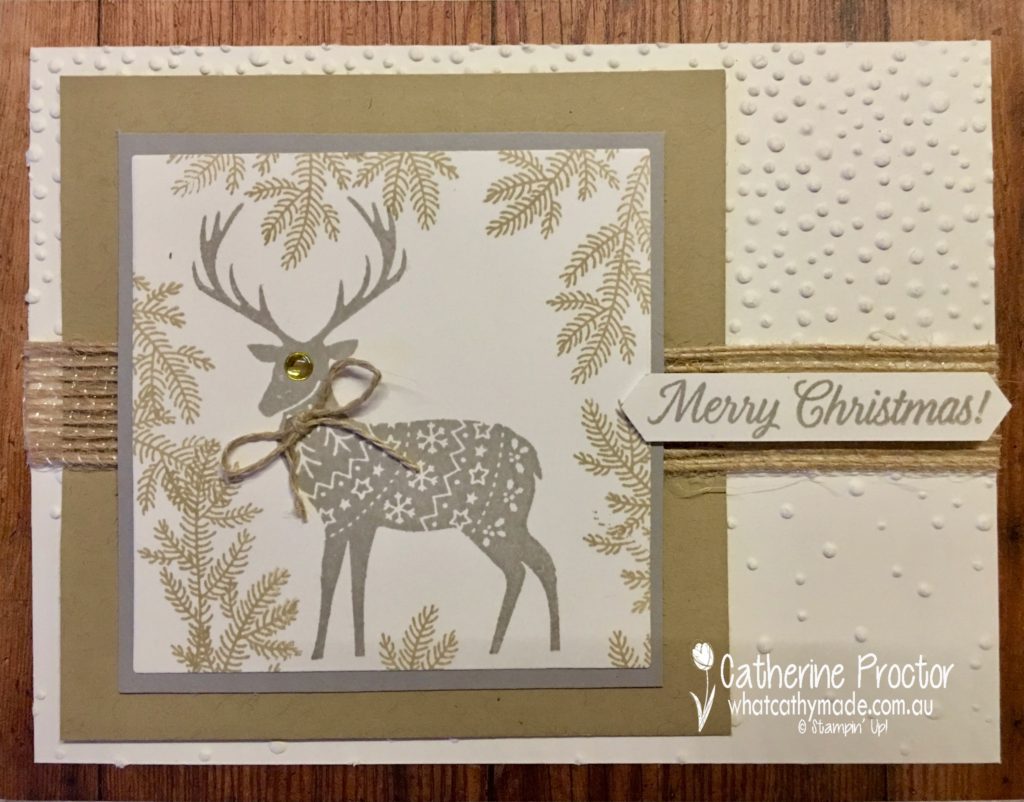
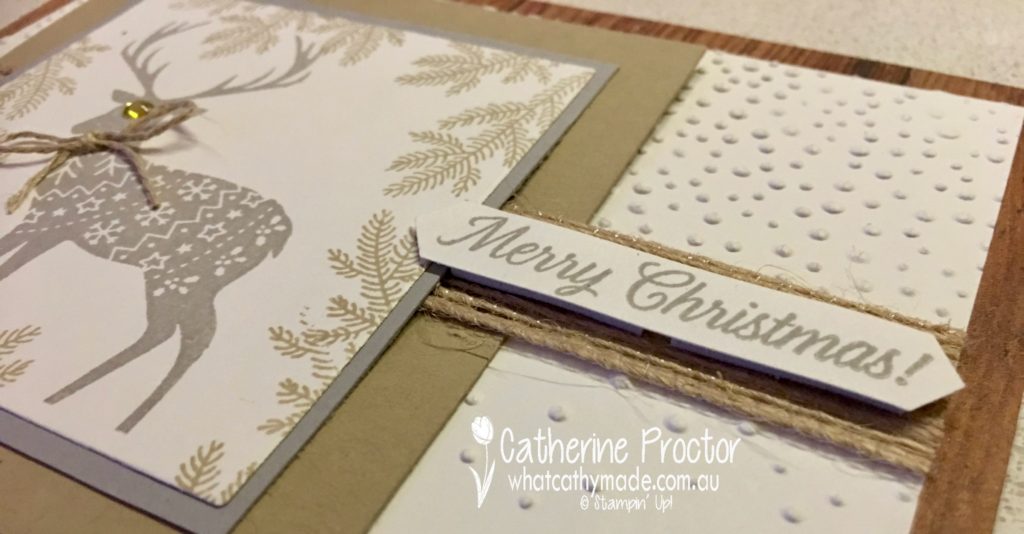
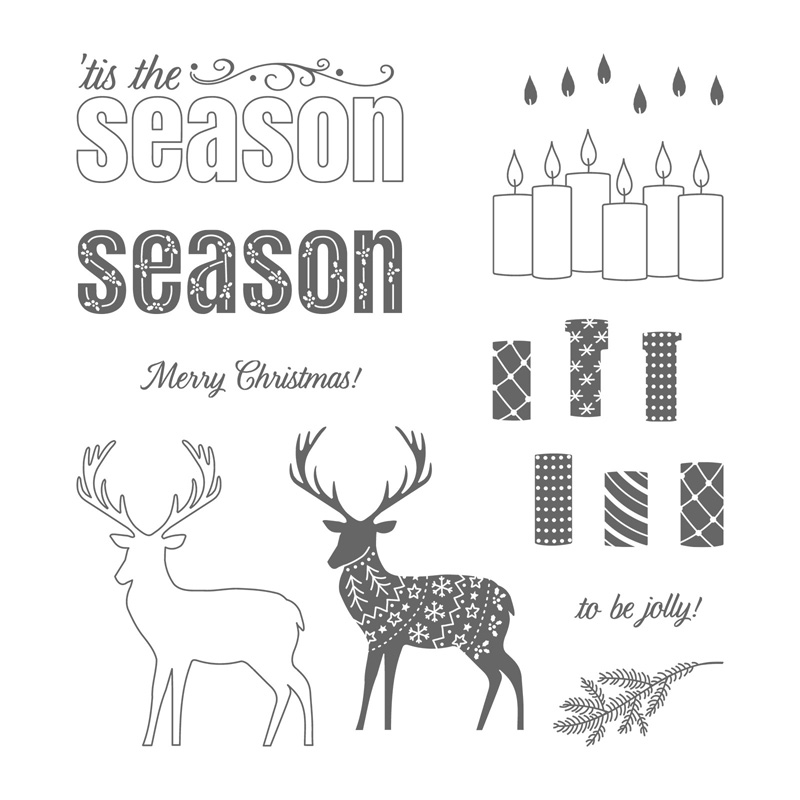
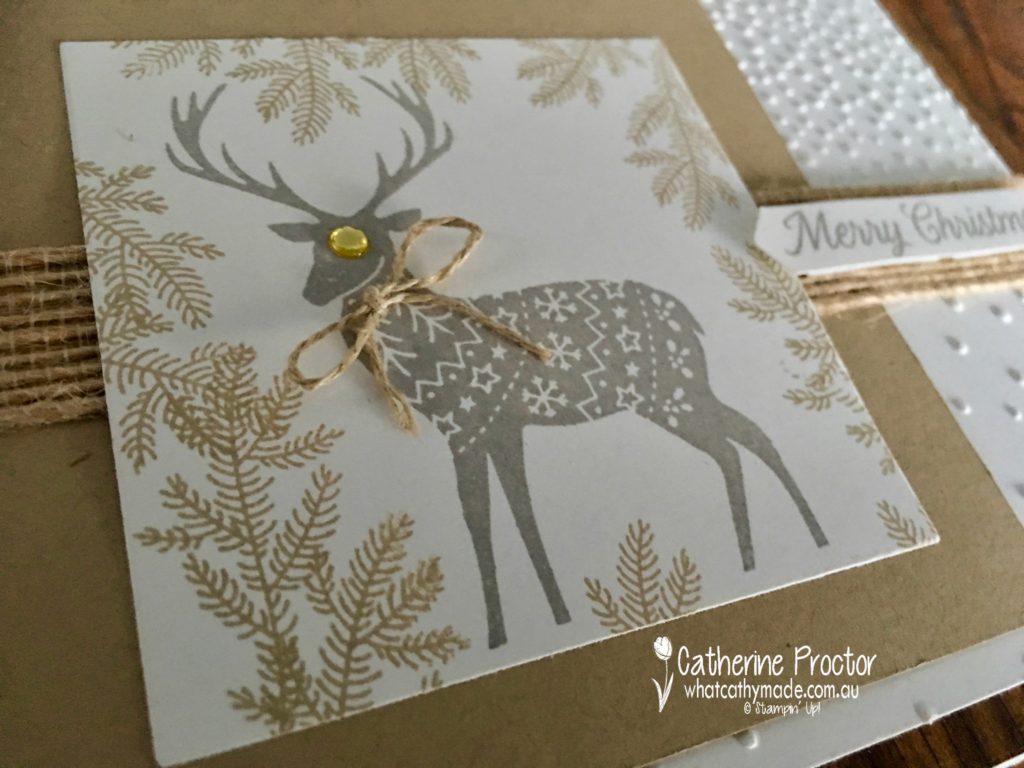
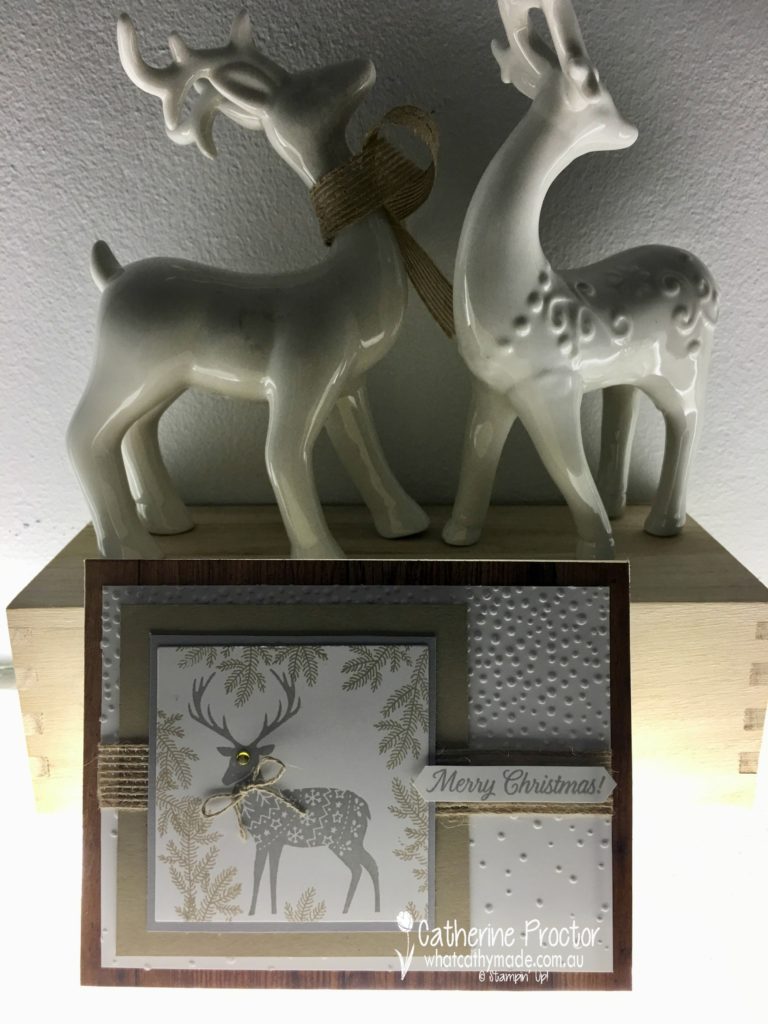
This week I had a play with a gorgeous new free Stampin’ Up! hostess set called Merry Patterns. Merry Patterns features the cutest reindeer in its very own knitted jacket. It’s no secret that I adore reindeer and just take a look at this beauty!
There are so many cute stamps in this stamp set but I only used 3 of them here…the pine branch is so lovely and the Merry Christmas sentiment is the perfect size for the modern label punch.
.
I’m going to make some more cards with this set to share with you in the coming weeks because this is such a versatile set. Here are all the stamps you get in this set:
What I love about this set is that you don’t need a big shot to make stunning cards…the images are just lovely on their own, which makes for quick, easy and inexpensive cards. My kind of cards.
I also think I’ve found a new favourite colour combination while making this card: crumb cake and smoky slate. Don’t you just love this combo?
Originally I mounted the stamped image straight onto the crumb cake layer (see the pic below) but them I went back and added a layer of smoky slate between. I really like both versions.
I hope you’ve enjoyed my Merry Patterns card today and I’ll be back soon with some more cards made from this lovely set.
My last photo is a bit dark but I had to include this shot with my reindeer because I made a reindeer card this week and they haven’t appeared on my blog for a couple of weeks!
To see what the other members of the Art with Heart team have made for you today, please go back to the very talented Claire Daly’s blog.
And to purchase any of the products I’ve used you can click on the links below.
PLEASE NOTE: Merry Patterns cannot be purchased…it is a free hostess stamp set you can earn simply by hosting a qualifying party…contact me to find out more.
Welcome back to the Heart of Christmas weekly blog.
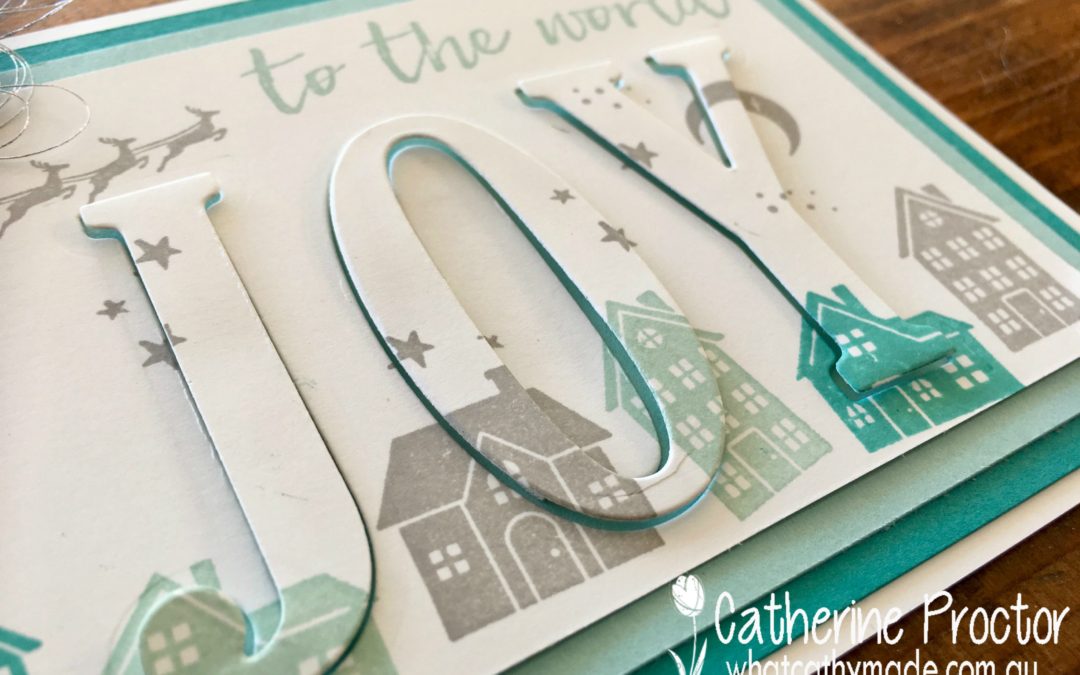
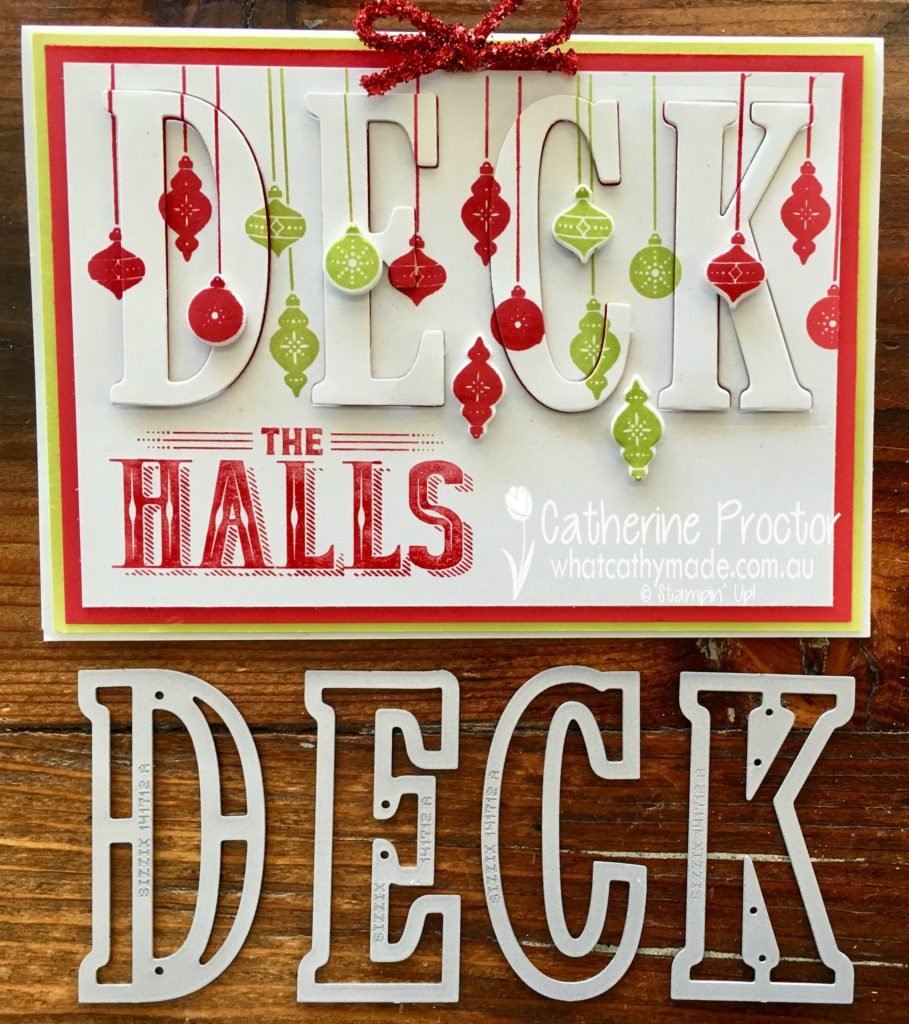
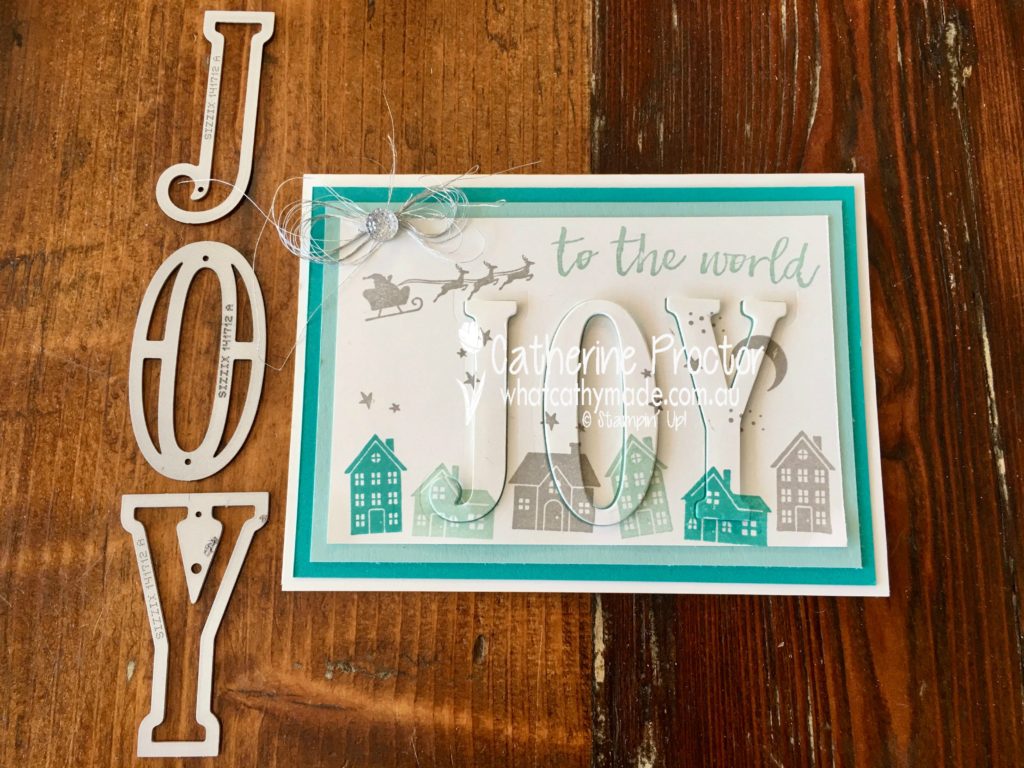
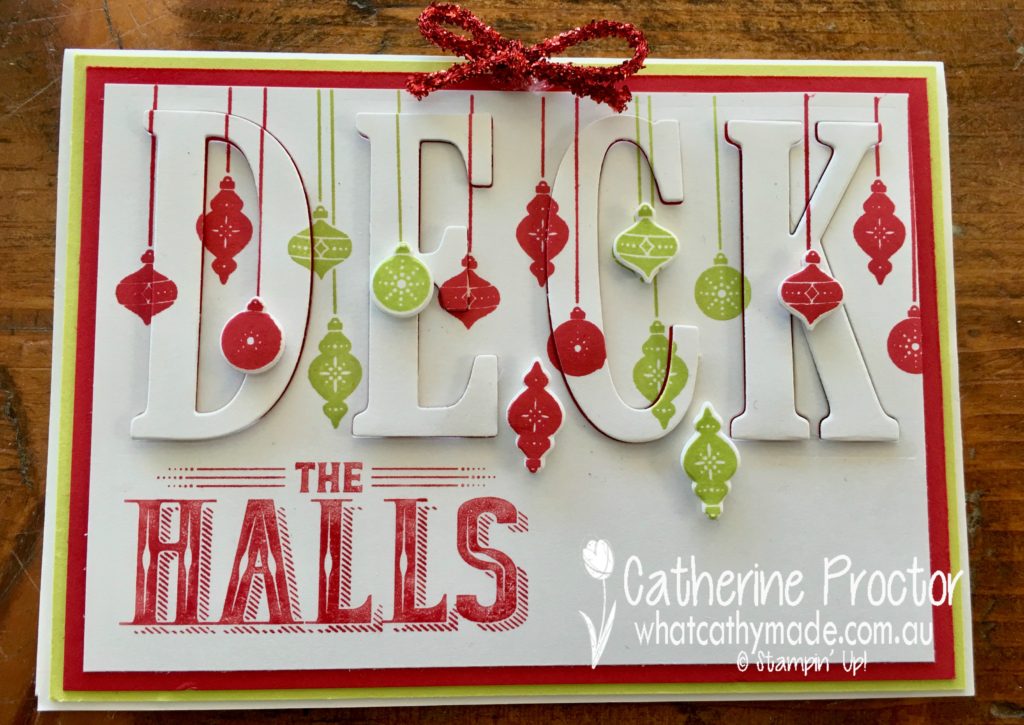
After seeing so many beautiful eclipse cards posted on social media I decided to hop on the bandwagon as well. My “deck the halls eclipse card” was CASED from one I saw on Pinterest, however the card that inspired me wasn’t watermarked and it didn’t link to a blog so I have no idea who to attribute the original idea to!
What I loved about the eclipse card I CASED was that it took one word from a Christmas sentiment and used the eclipse technique to create that word, then the rest of the sentiment was stamped. To do this on this first card I used my real red marker to only mark up the section of the Deck the Halls stamp I wanted to use, stamping with lemon lime twist and real red for the rest of the card.
Anyway, here are the two cards I made, inspired by an anonymous stranger on Pinterest!
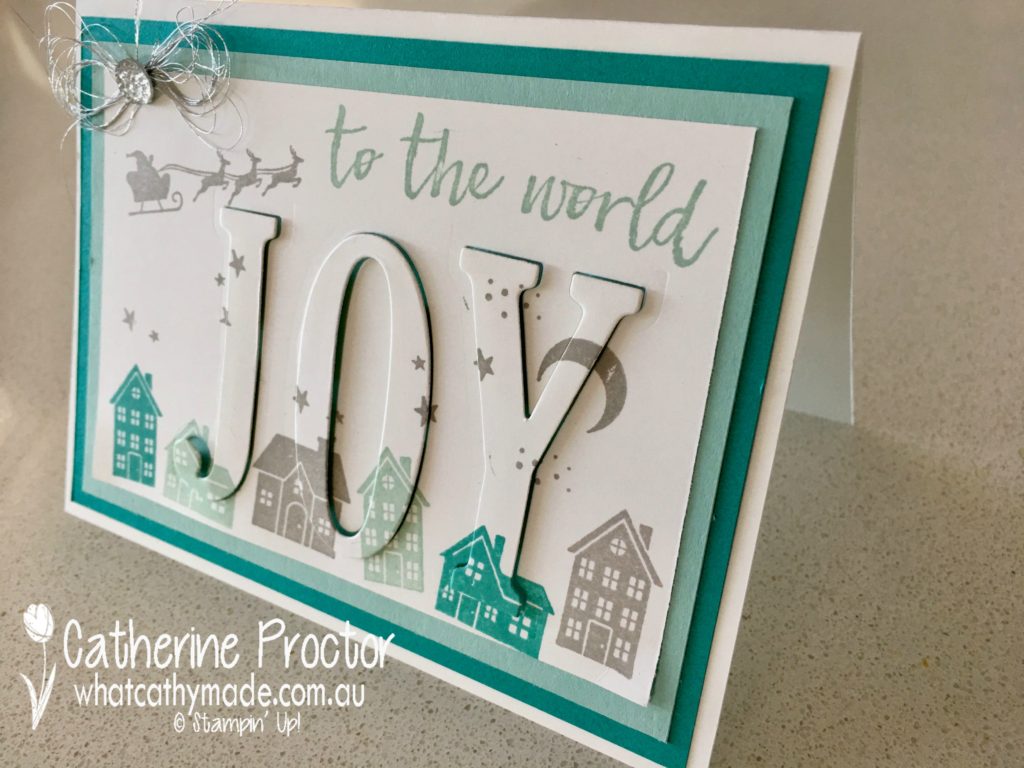
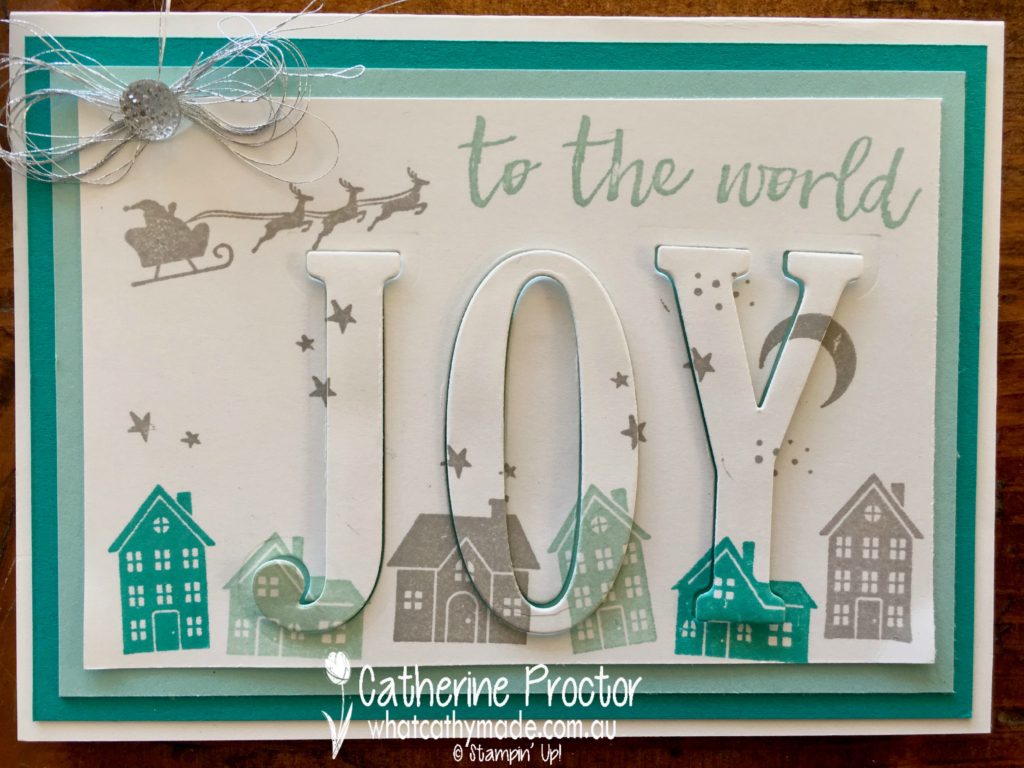
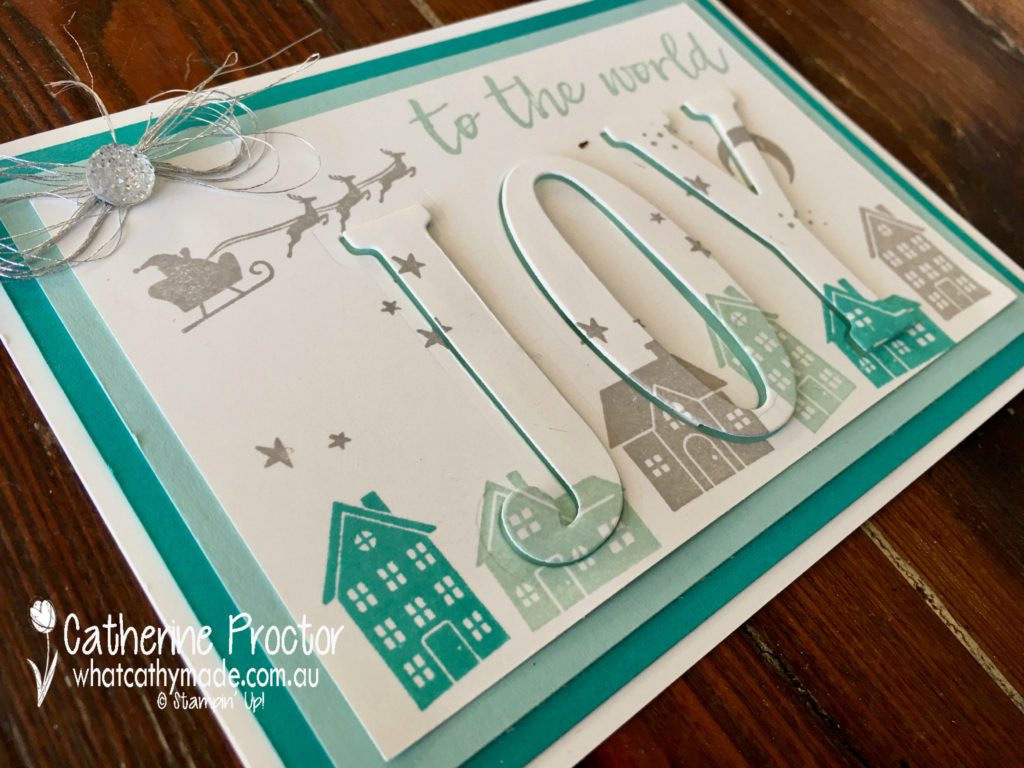
If you’ve never made an eclipse card before, you simply die cut your word with the large letter dies, but before you remove your die cut letters you stamp over them. When you’re done you lift up the letters and then adhere them with dimensionals so you can see the shadow of the coloured card stock below. I just love the dimension this technique adds to the card.
On my first card I stamped and die cut some extra baubles from the Carols of Christmas Stamp set and adhered them on top of the eclipse letters for added dimension. A tiny bow made out of the red tinsel trim completes the card.
For my second card I went for a cooler palette, using pool party, Bermuda bay and smoky slate ink. I used the same technique I described for the first card, this time making the word joy with the large letter dies and using the Hearts Come Home stamp set.
To complete my second card I made a bow with the silver thread and adhered it to my card with a clear facetted gem.
I hope you’ve enjoyed my eclipse cards today and I’ll be back tomorrow with a fancy fold card for you.
To see what the other members of the Art with Heart team have made for you today, please go back to the very talented Claire Daly’s blog.
And to purchase any of the products I’ve used you can click on the links below.
Hello fellow crafters, it’s time for some weekly “Heart of Christmas” Christmas card inspiration with the Art with Heart Team.
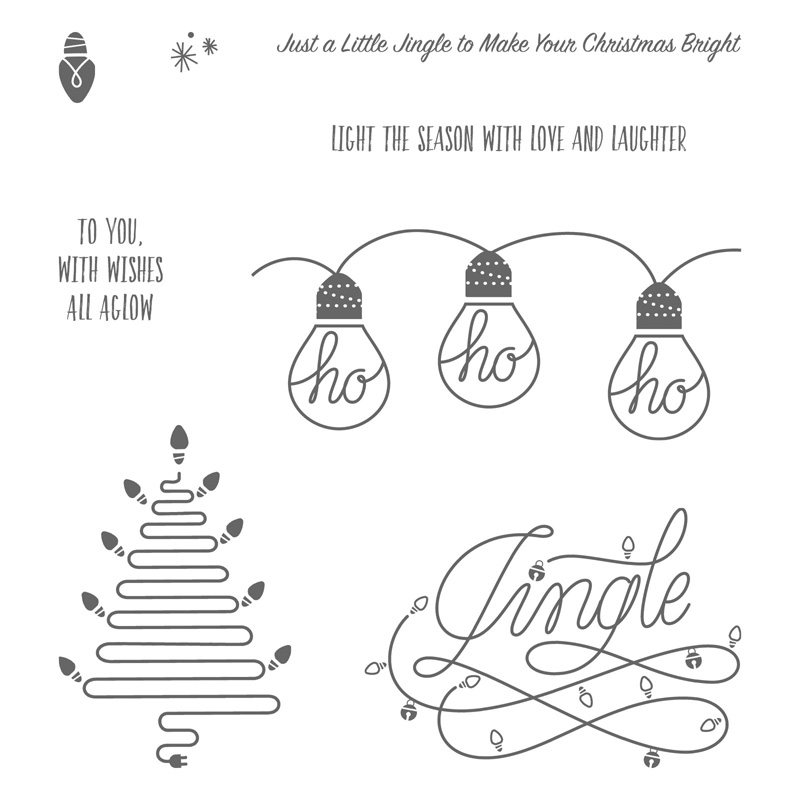
This week I decided to ink up a set from the new holiday catalogue called Wishes All Aglow.
I really love this stamp set because it’s playful and fun and I love stamps with images of Christmas lights and really any stamps with lights in general.
I took my inspiration from the holiday catalogue and here’s what they did with this set.
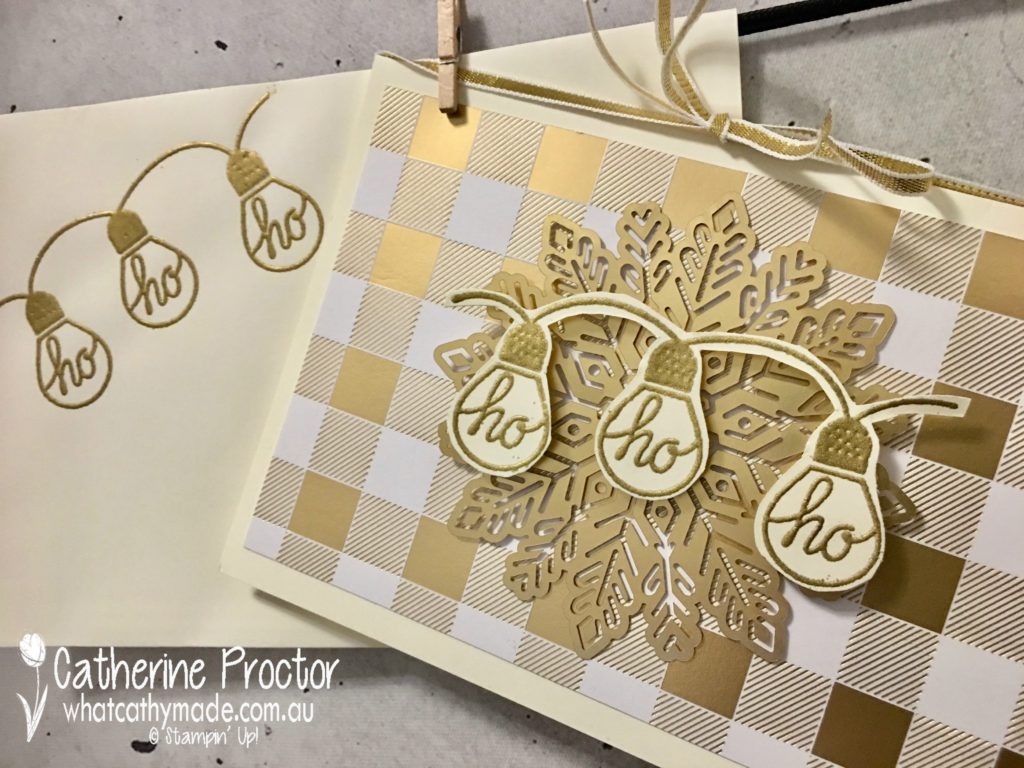
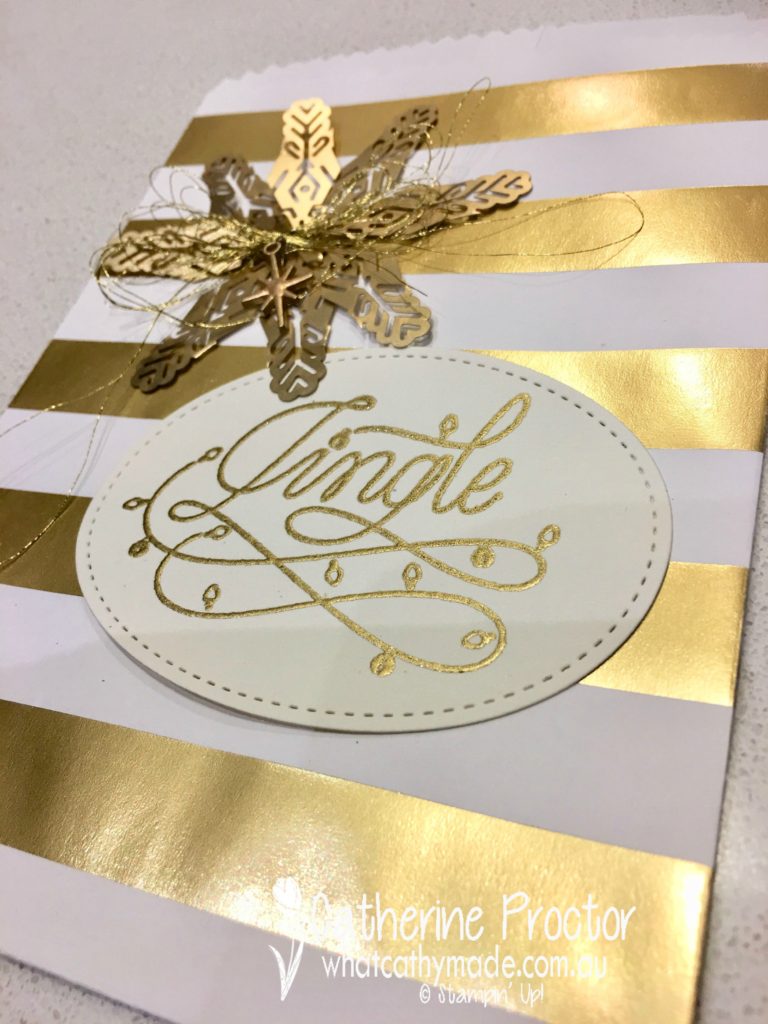
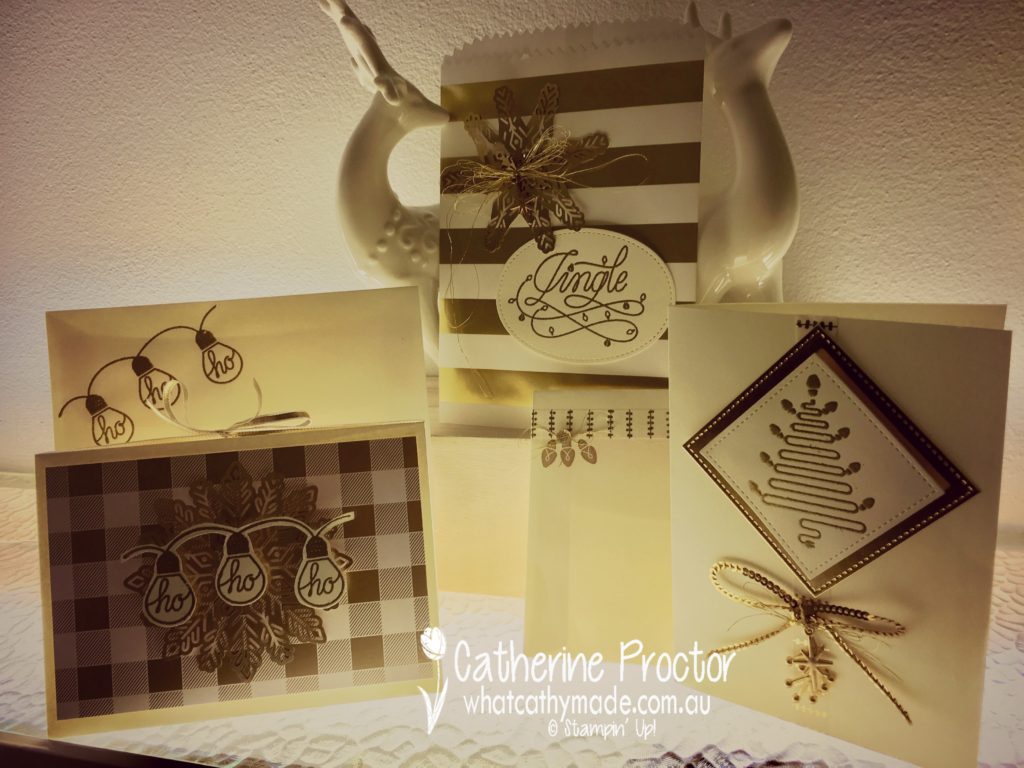
For my first card I decided to CASE the fussy cut “ho ho ho” but keep my card to a tighter colour scheme of very vanilla, white and gold. I also decorated a matching envelope to go with the card. The fussy cut stamp is mounted on a gold foil snowflake, which in turn is mounted on some of the Year of Cheer DSP.
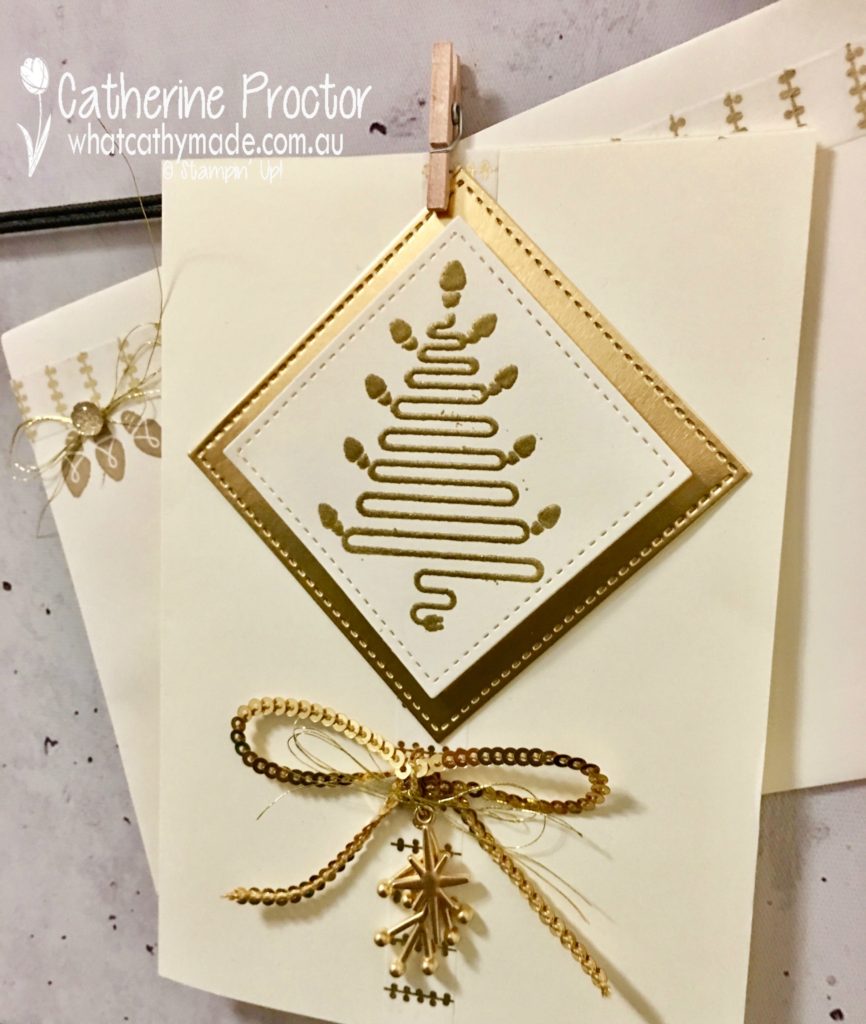
For my second card I kept to the gold vanilla and white theme but inked up different stamps from this set. I also used some of the Year of cheer washi tape and again decorated a matching envelope.
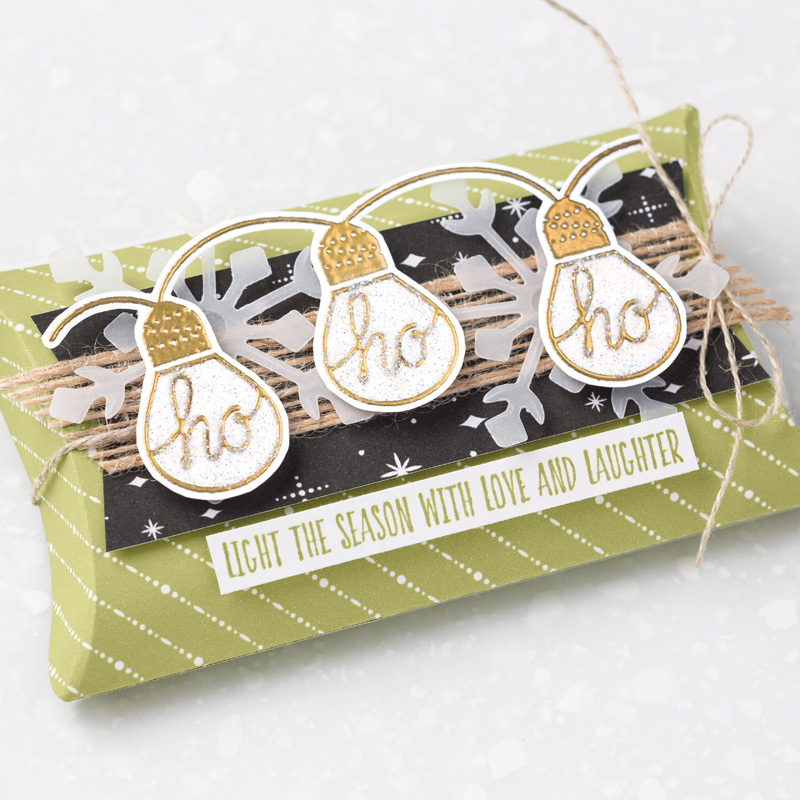
Finally I inked up the jingle stamp from the set and instead of making another card I decided to make a quick and easy treat bag to go with the cards, using the gold striped treat bags. I also used the leftover part of my foil snowflake from the card I made last week to decorate the bag. These foil snowflakes are so easy to cut up to use in different ways.
I used versamark ink, gold embossing power and my heat tool to achieve the gold stamped images and I love how the gold ties in the Wishes All Aglow Set with the beautiful products from the Year of Cheer suite.
To see the lovely projects the other members of the team have made this week hop back to Tina Gillespie’s blog.
To get your free copy of the new holiday catalogue, contact me here.
Or to purchase any of the products I’ve used in my cards, click on the links below.
Thanks for stopping by and I’ll be back with more holiday inspiration next week.
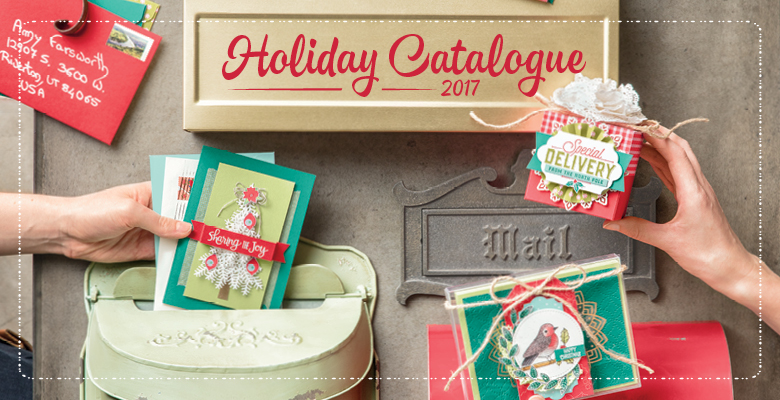
The Holiday catalogue is finally here and it’s full of absolutely stunning products!
You can look inside the catalogue right now by going to the Catalogue page of the Stampin’ Up! website and download this pdf version for free! Or you can contact me and I’ll send you out your very own print copy. If you’d like to purchase any of the products in the catalogue you can do so by visiting my online shop here.
I’ll be back tomorrow morning with some cards made from the new catalogue or checkout my blog page or some sneak peeks of cards I’ve already made using some of the new product.
Hello fellow crafters, it’s time for some weekly “Heart of Christmas” Christmas card inspiration with the Art with Heart Team.
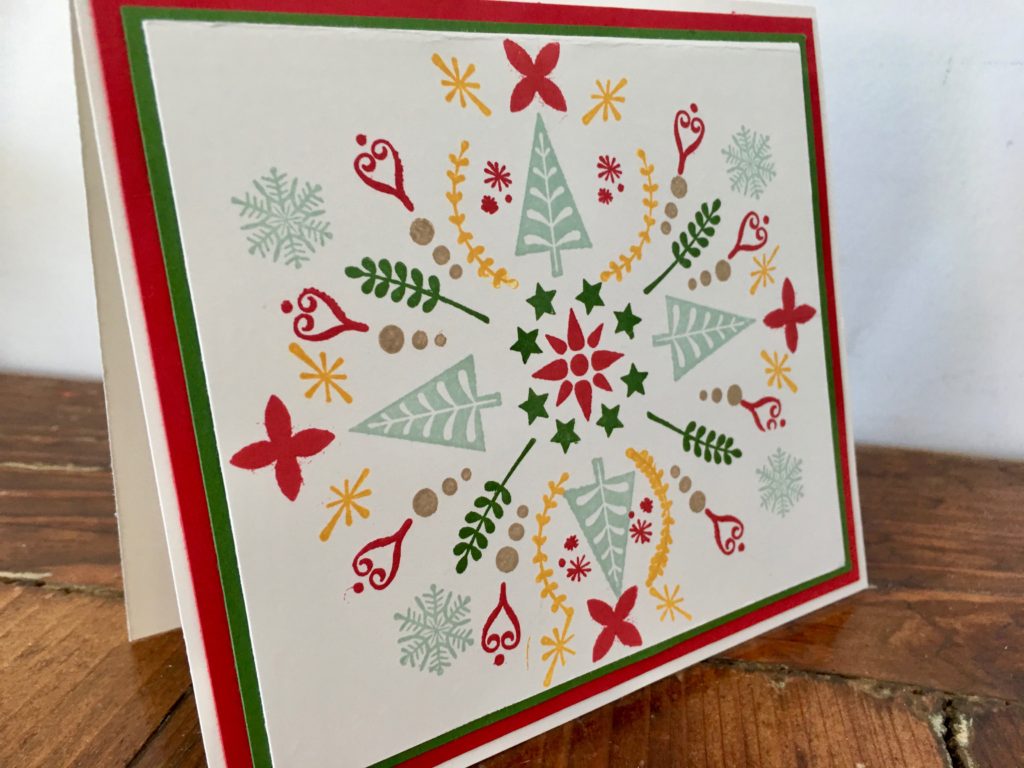
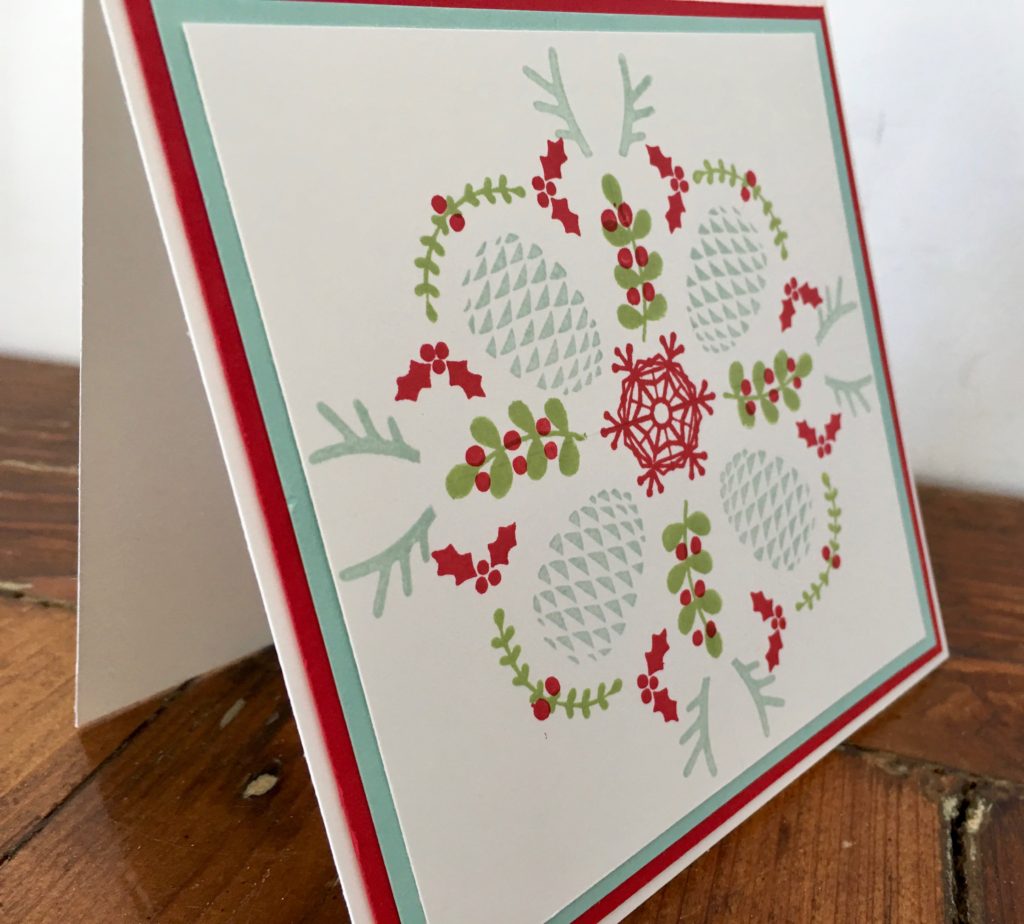
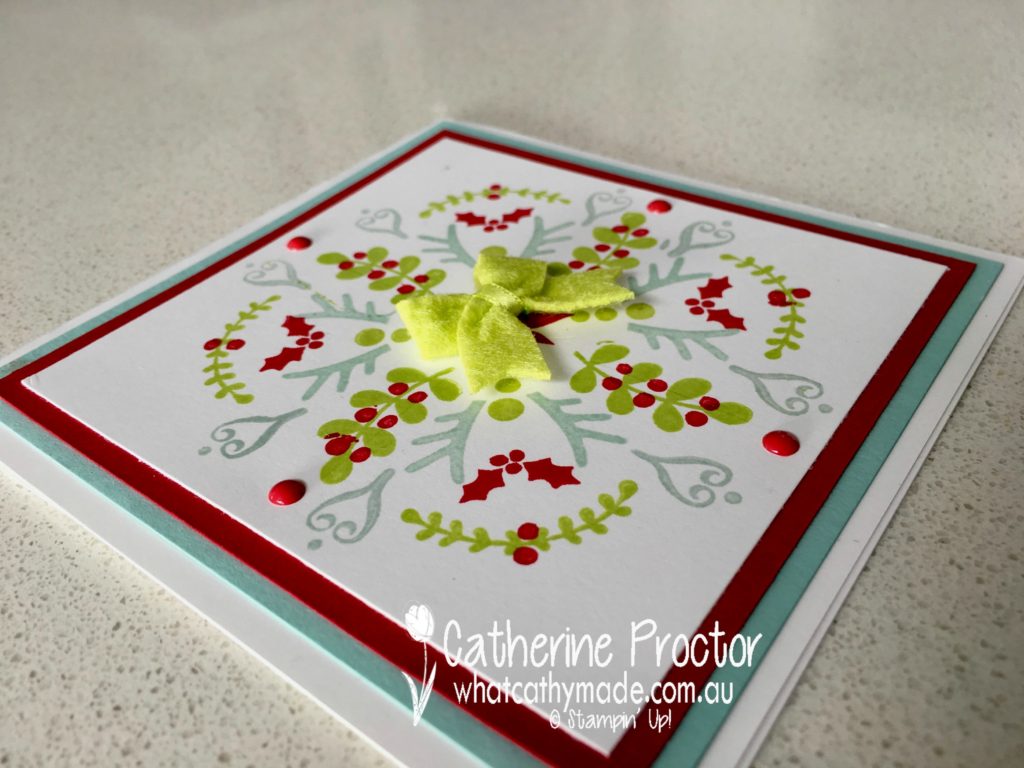
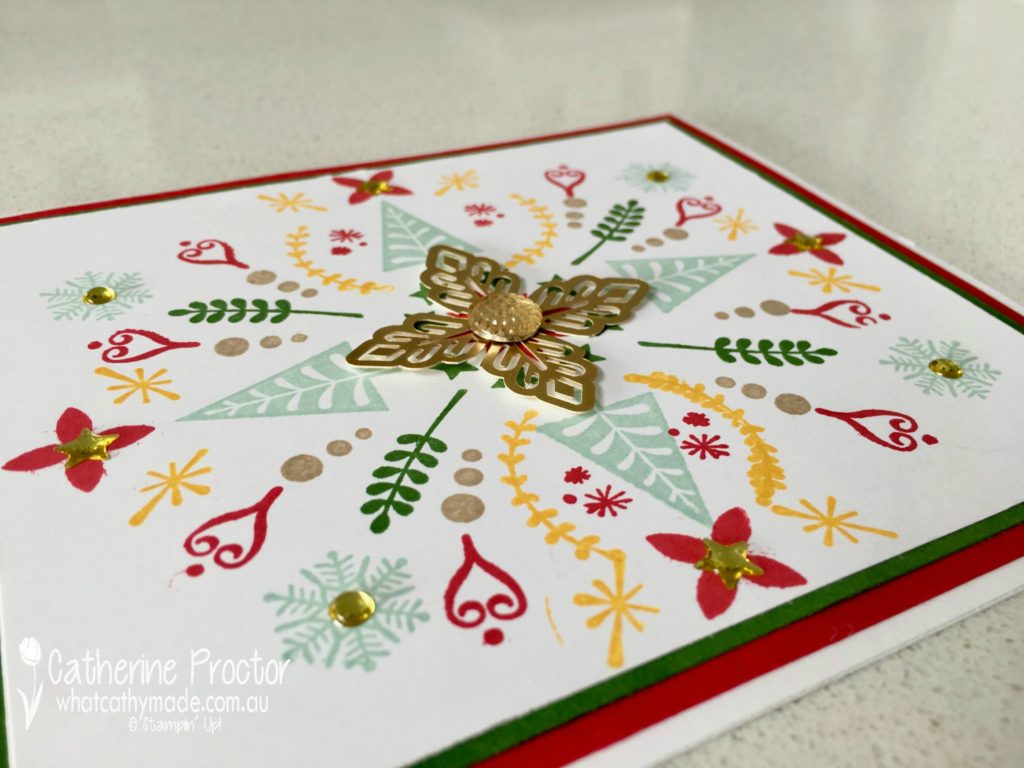
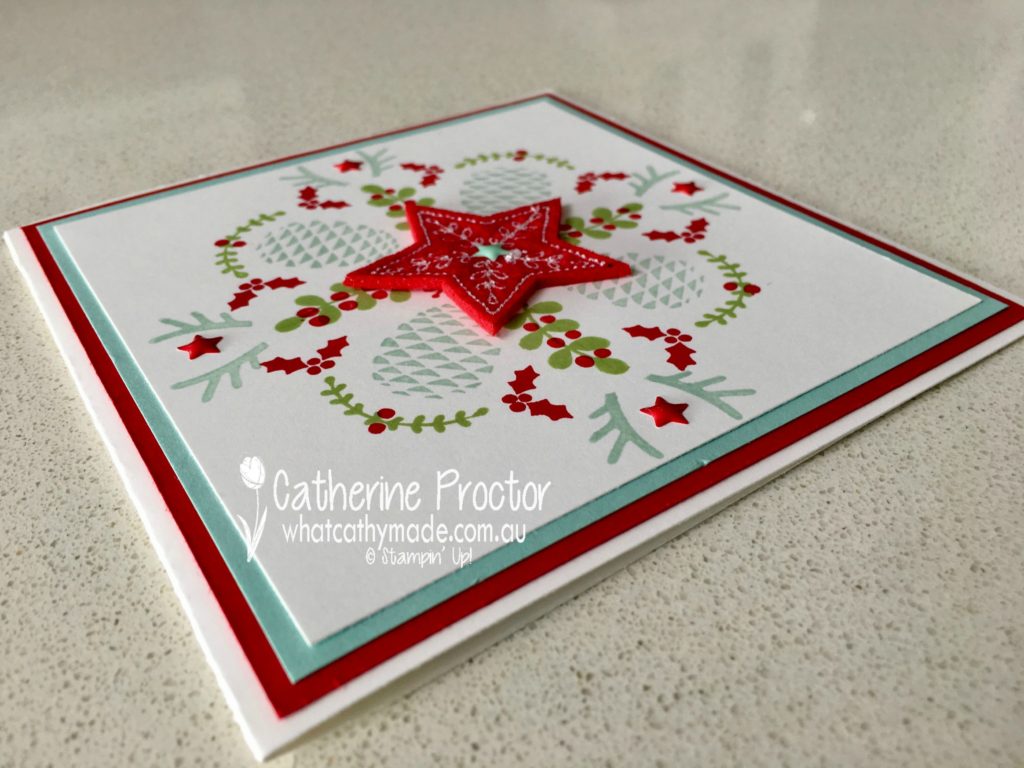
This week I nearly threw my cards in the bin.
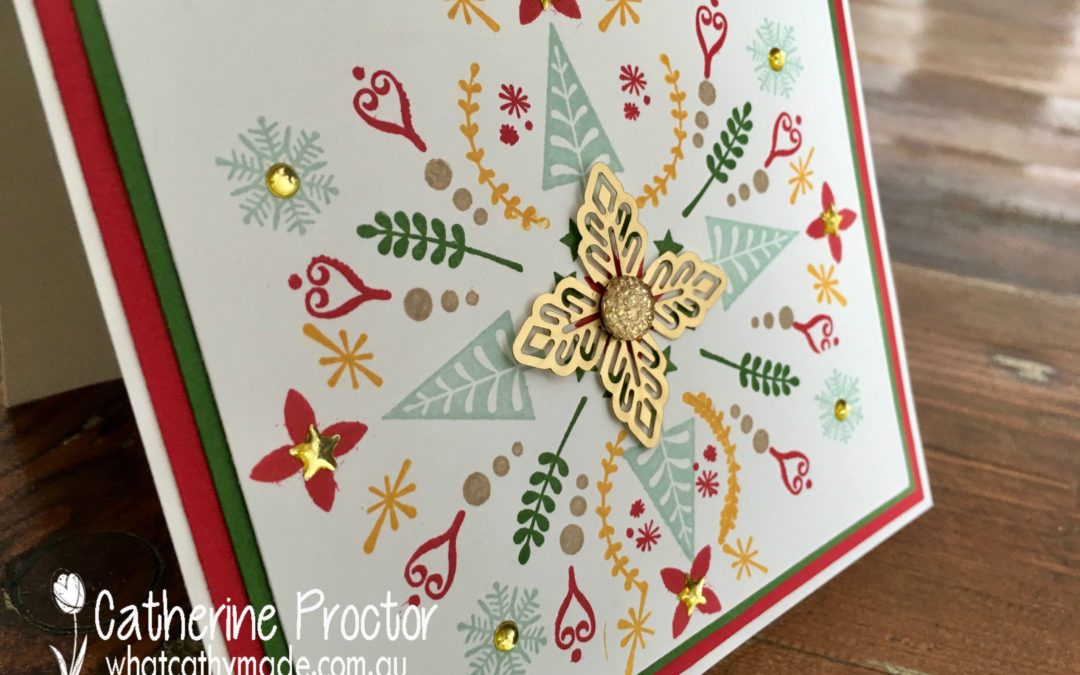
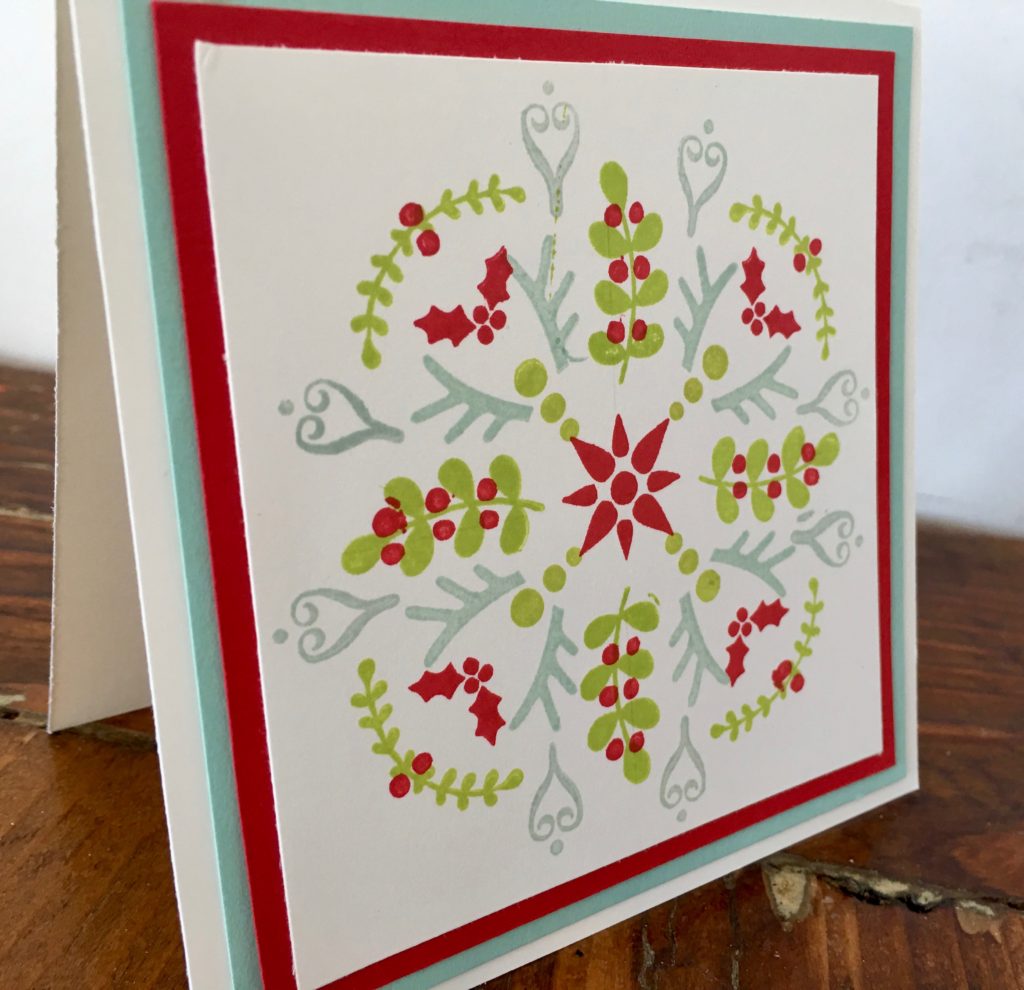
You see I was trying to make a style of card called scandi style or motif, a style I absolutely love but have never made before. A style I thought I needed to get my stamping 100% accurate for it to work.
To make a scandi/motif card you begin by marking the centre point of your card with a pencil and drawing intersecting lines out from this point. After that, it’s very simple. You stamp an image in the centre of the card and then stamp outwards using a variety of stamps and colours, following the lines you’ve drawn and trying to keep everything geometrical and balanced. And when you’re done you rub out your pencil guidelines.
Can you guess which stamp sets I used to make the designs below?
I really love this mix of colours and stamps but if you look closely at the images above you’ll see my designs are not 100% lined up. In fact, some of them are way out! This is a close up of all of my cards with all their imperfections!
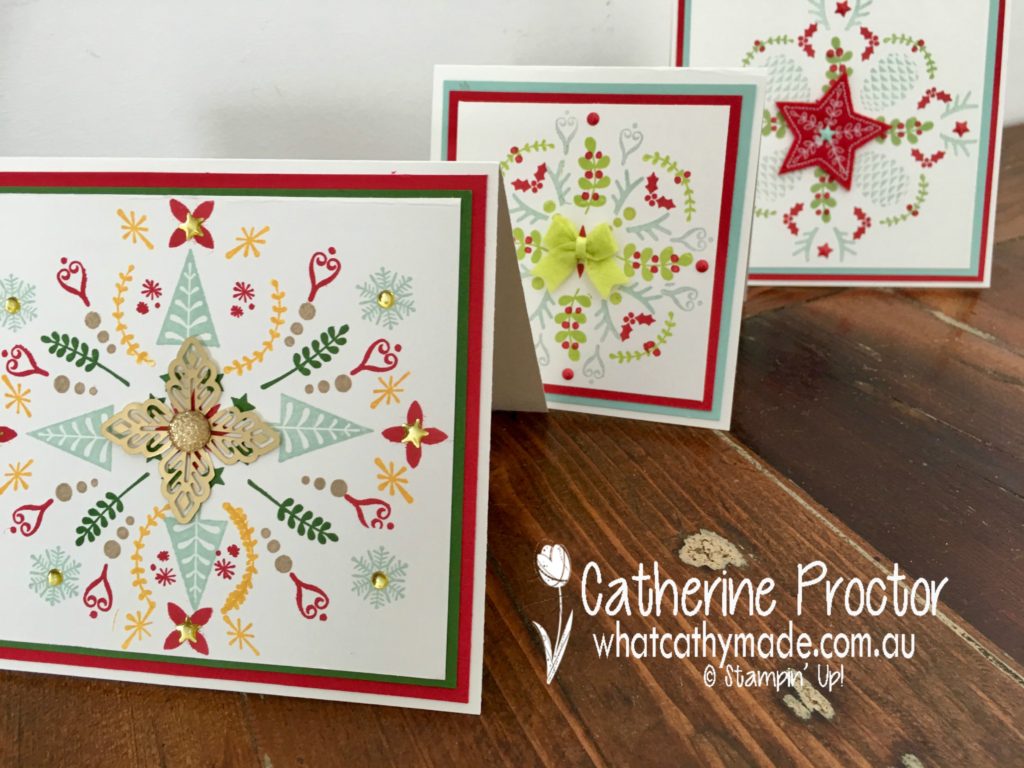
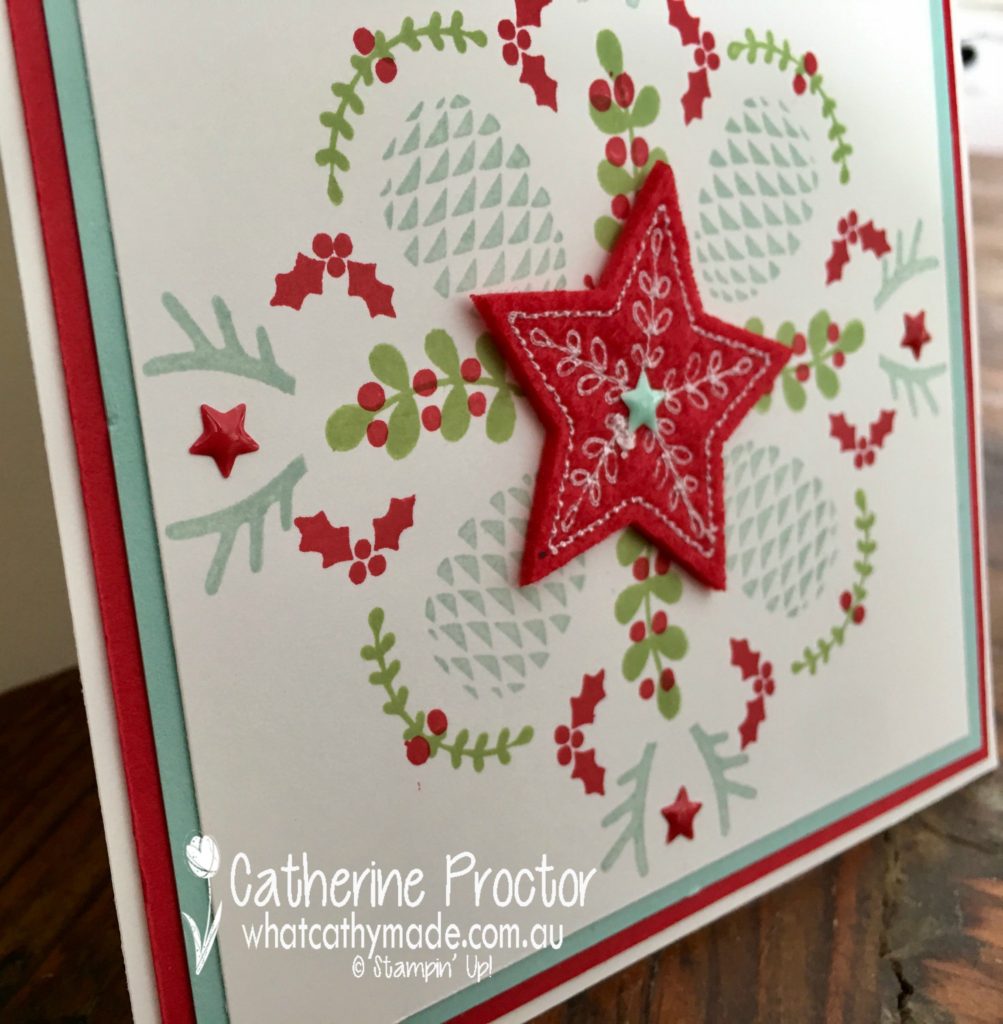
I was quite upset about this but when I showed my mum she begged me not to throw my attempts in the bin, reassuring me they still worked. So yesterday I decided to take her advice. I trimmed down around my stamping, mounted the designs onto matching card stock and added some embellishments.
Adding some dimension really helped lift the cards and distract from their imperfections, and his is how they look now.
For my first card I added one of the new stitched felt embellishments in the centre, as well as enamel shapes stars in pool party and real red.
On my second card I added an itty bitty bow in lemon lime twist and real red enamel dots.
Finally, for my third card I went a little crazy with the bling. I cut pieces of one of the new foil snowflakes and adhered these to the card with a facetted gem. Metallic gold shapes completed the card.
I’m really glad I listened to my mum and didn’t throw my stamping in the bin. But most importantly I decided to share these cards here to show you that even with a geometric pattern your stamping doesn’t always have to be perfect to make a lovely card.
This style of stamping really lets you get a lot of bang for your buck with your stamp sets. You can mix old and new, big and small, and I reckon this would look lovely in just 2 colours as well.
So I’m going to head back to the drawing board now and practice getting neater with this style of cardmaking…and of course, always remember to listen to my mum!
Thank’s for stopping by today. If you go to Claire Daly’s blog you’ll be able to hop to all of the other Art With Heart team members and see the beautiful Christmas creations they’ve shared with you this week.
Okay, so I’m technically a few days early (we celebrate Father’s Day on the the first Sunday in September here in Australia) but I wanted to share an idea for a quick and easy Father’s Day card in case you’re also struggling with ideas for a card for your dad.
When I go to design a card I often begin by thinking of a stamped image that I’d like to use and if you’re anything like me you probably find male cards harder to make than female cards. Unfortunately, most of my stamp sets tend to be feminine in nature and male stamp sets are often sport focused, but my dad is just not a sporty dad…apart from cricket and the Tour de France, which he stays up all night to watch!
So instead of designing my card by beginning with a stamp image in mind, I found it really helped to stop and think about:
what are my dad’s hobbies/interest/passions?
what colours does he like?
what did I really want to say to him?
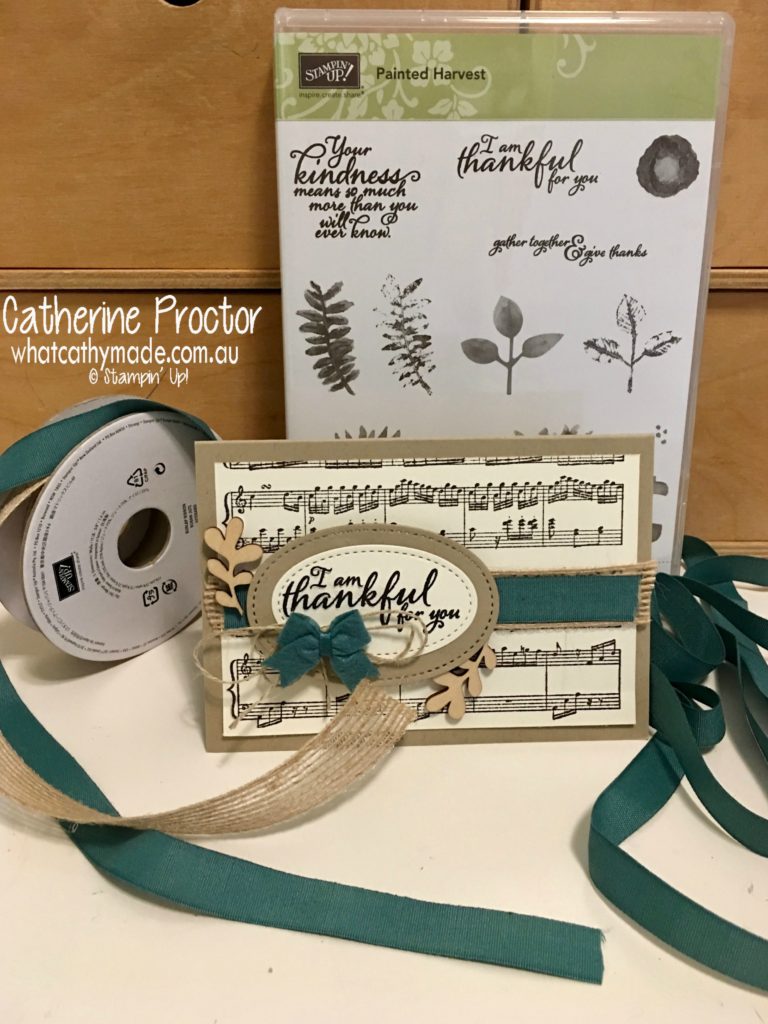
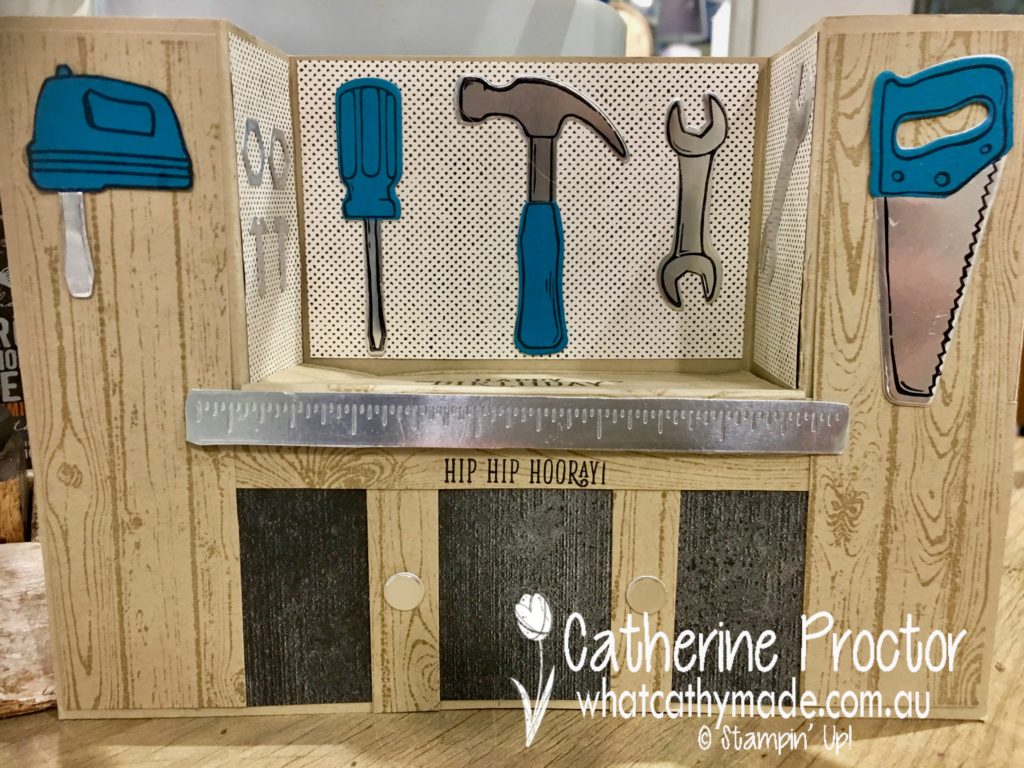
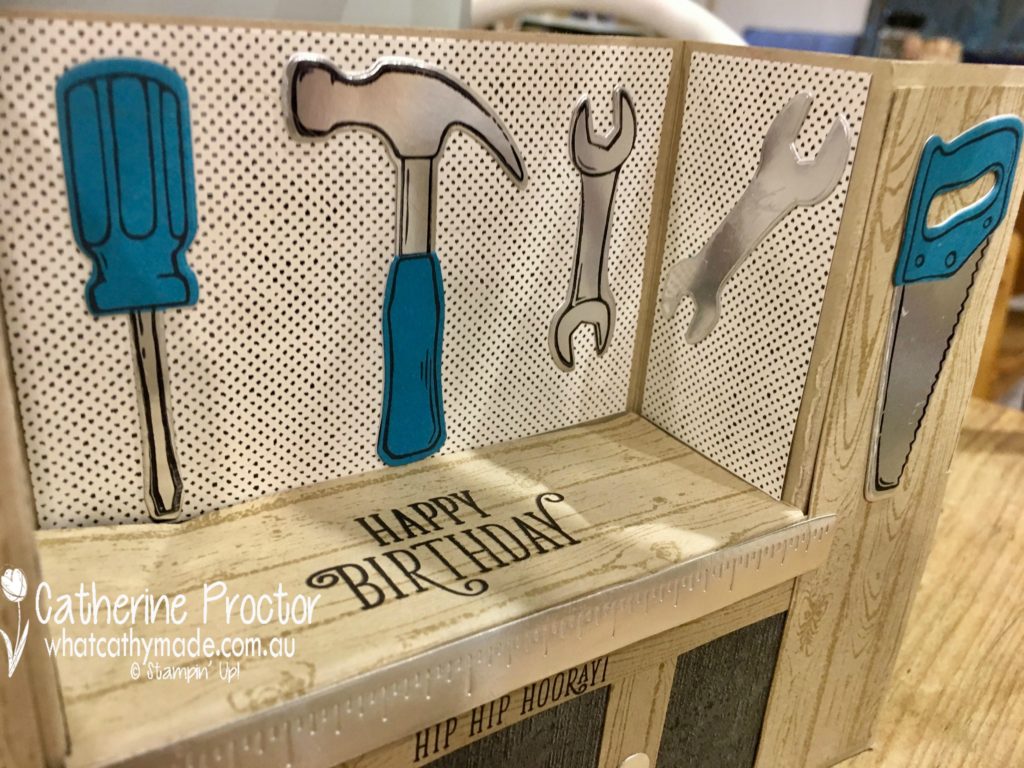
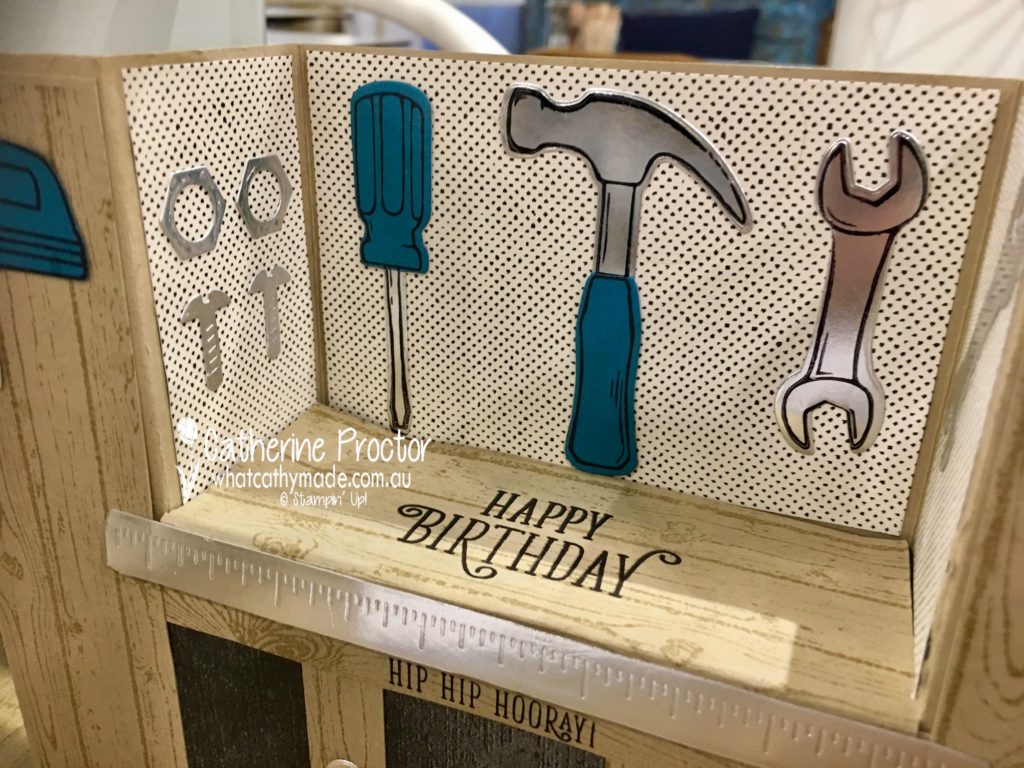
My dad’s hobbies include gardening, woodworking, astronomy, music and reading so I wanted to design a card that reflected one of these hobbies. I’d already used the awesome Nailed It bundle to make him a birthday card and he really loved this card. I followed a tutorial I purchased from a UK demo, Amanda Bates at The Craft Spa …and here’s the card that I adapted for Dad’s birthday from her tutorial.
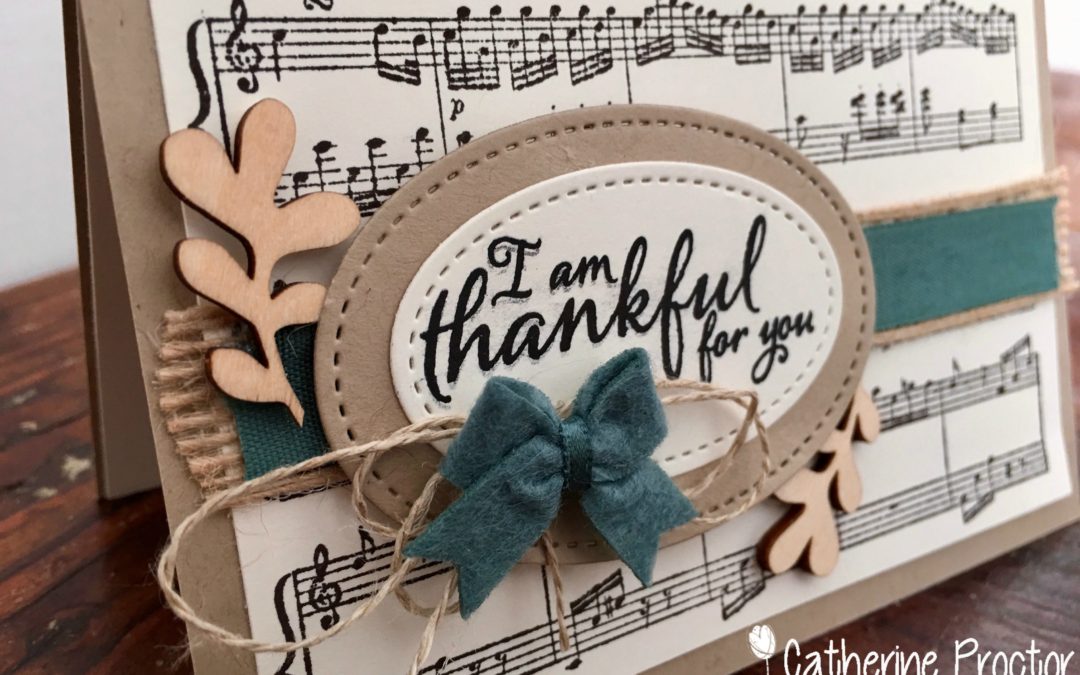
For Father’s Day I decided to instead focus on my dad’s love of music, so I stamped some very vanilla card stock using the sheet music background stamp. Because this is quite a busy background (and I wanted music to remain the focus) I knew all I needed was some ribbon and a sentiment to finish this card off.
I wanted to add a little bit of colour so I added some burlap ribbon, tranquil tide ribbon and a matching bow because I know that these earth tones are some of his favourite colours. The touches of nature elements are a nod to his love of gardening and nature.
Finally, I thought about what I really wanted to say to my dad and this is where the sentiment from the new Painted Harvest stamp set was just perfect: “I am thankful for you”. I’m so incredibly thankful to have my loving, generous, kind-hearted and super supportive dad in my life.
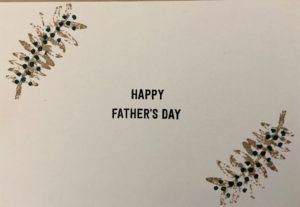
I finished the card off with a Happy Father’s Day sentiment inside from the Thoughtful Banners stamp set, because after all, it is a Father’s Day card…I just decided to have the more personal sentiment on the front of the card, but I could also have designed the card with the Father’s Day sentiment on the front and the other sentiment inside. I also used some of the stamps from the painted harvest set to decorate the inside of the card.
Now that I’ve sorted the card…the next tricky question is what do you give your dad for Father’s Day?
This year I’ve decided to give him something I know he really wants and something he’s actually asked for but we’ve never done before. I’m organising a photographer to take a family portrait for us, as all his grandchildren just keep growing and changing. And the rest of us are certainly not getting any younger!
If you’re stuck for an idea for your dad this year I reckon most dads would love the idea of a family portrait, because at the end of the day, that’s what Father’s Day is really about…our dads being with the ones they love the most, their family.
Live in Australia? You can purchase all the supplies I used for this card by clicking on the links below.


 Have you ever made your own bunting? If you haven’t now’s the time to give it a go while the paper is on sale. I decided to make some Christmas bunting using the beautiful “Be Merry Designer Series Paper” and here it is hanging on my mantelpiece.
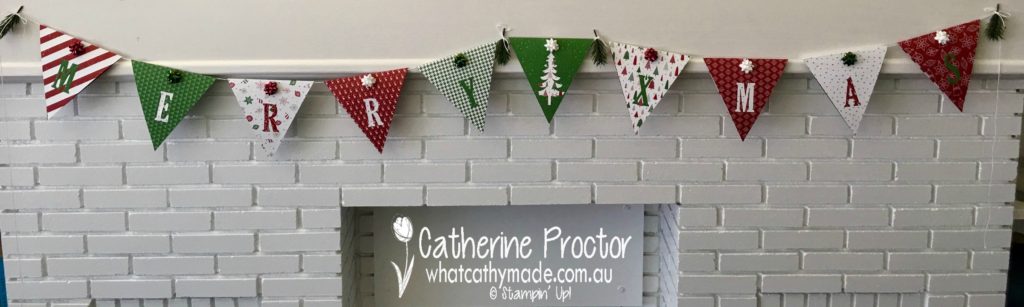 This is such a quick and easy project to make and you can use any of the gorgeous DSPs for this project. For my bunting I used less than half a packet of DSP…and that still left me with 7 full 12 x 12 inch sheets (one of each design and one spare sheet) and plenty of scraps to use for card making or other projects.
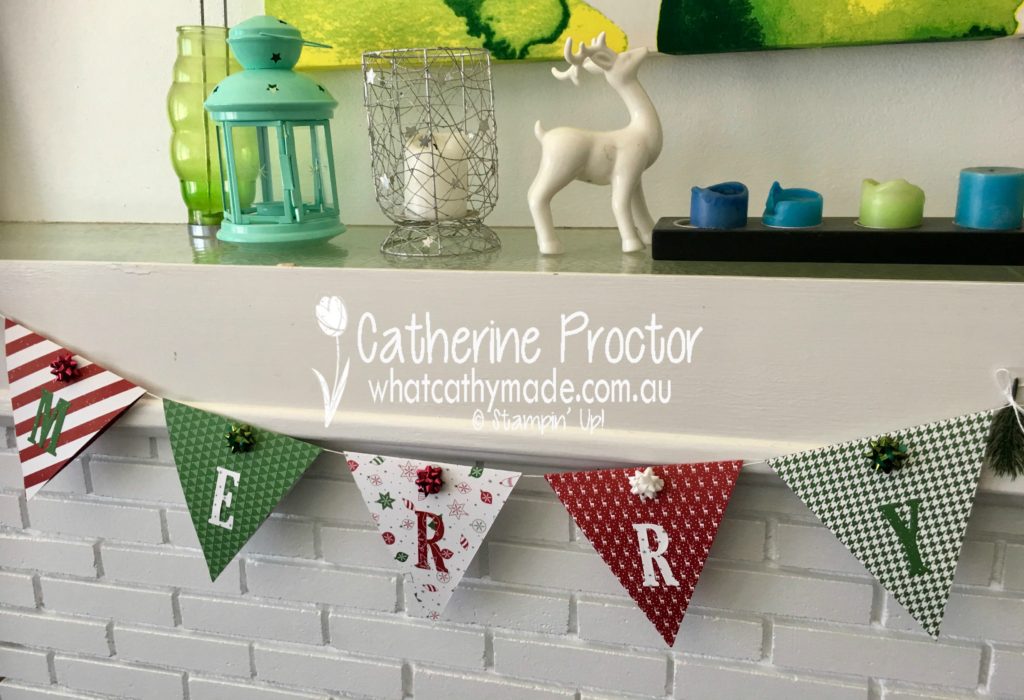


 .
.


 Burlap Ribbon")


 If you’ve never made an eclipse card before, you simply die cut your word with the large letter dies, but before you remove your die cut letters you stamp over them. When you’re done you lift up the letters and then adhere them with dimensionals so you can see the shadow of the coloured card stock below. I just love the dimension this technique adds to the card.
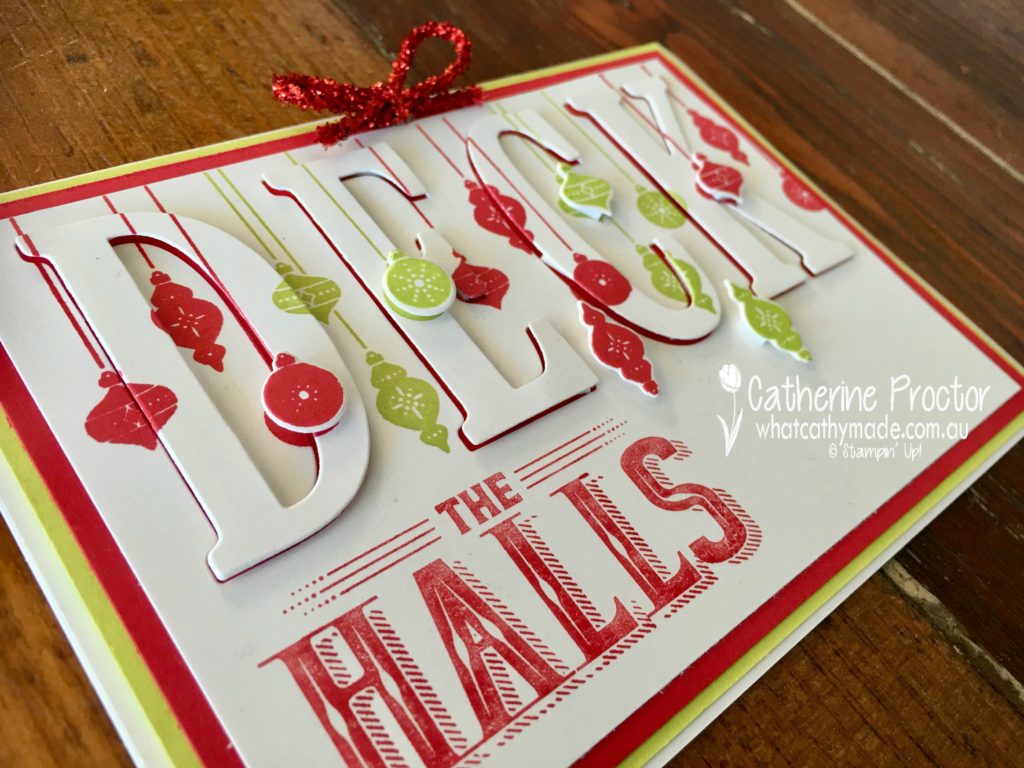


 Now that I’ve sorted the card…the next tricky question is what do you give your dad for Father’s Day?


