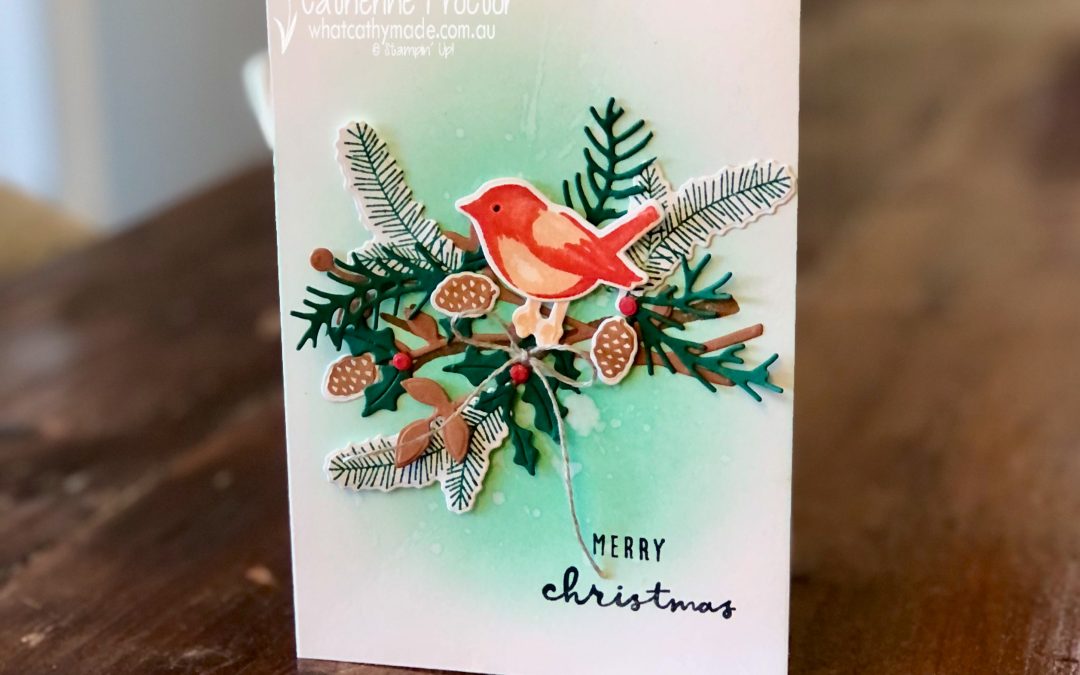
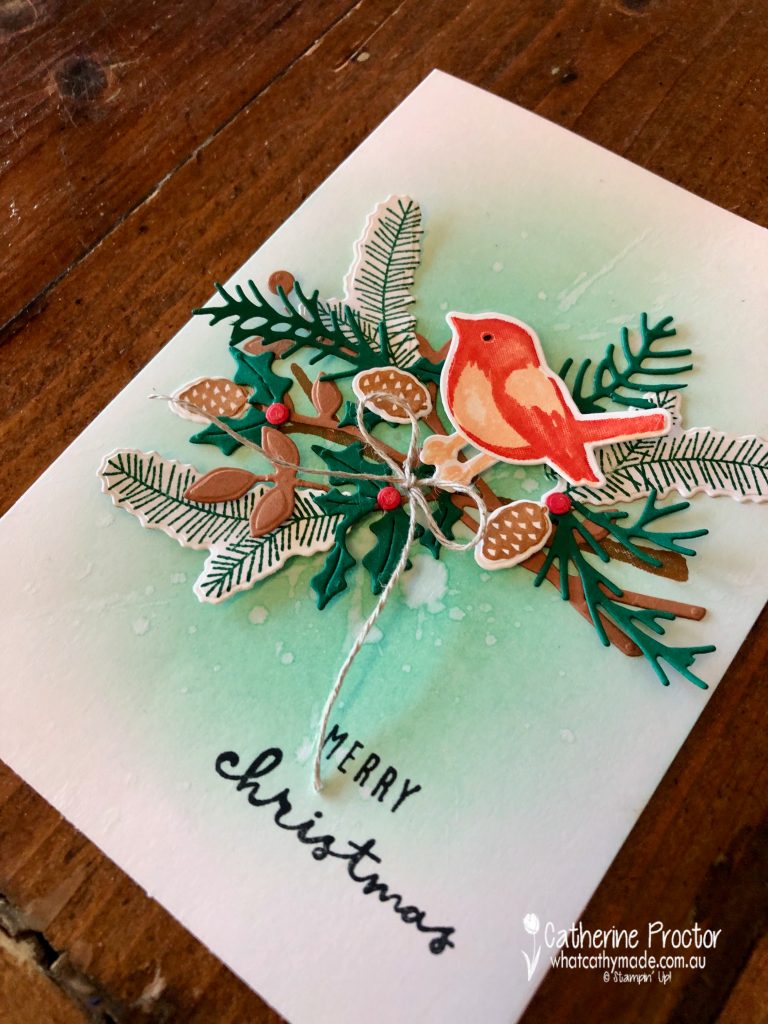
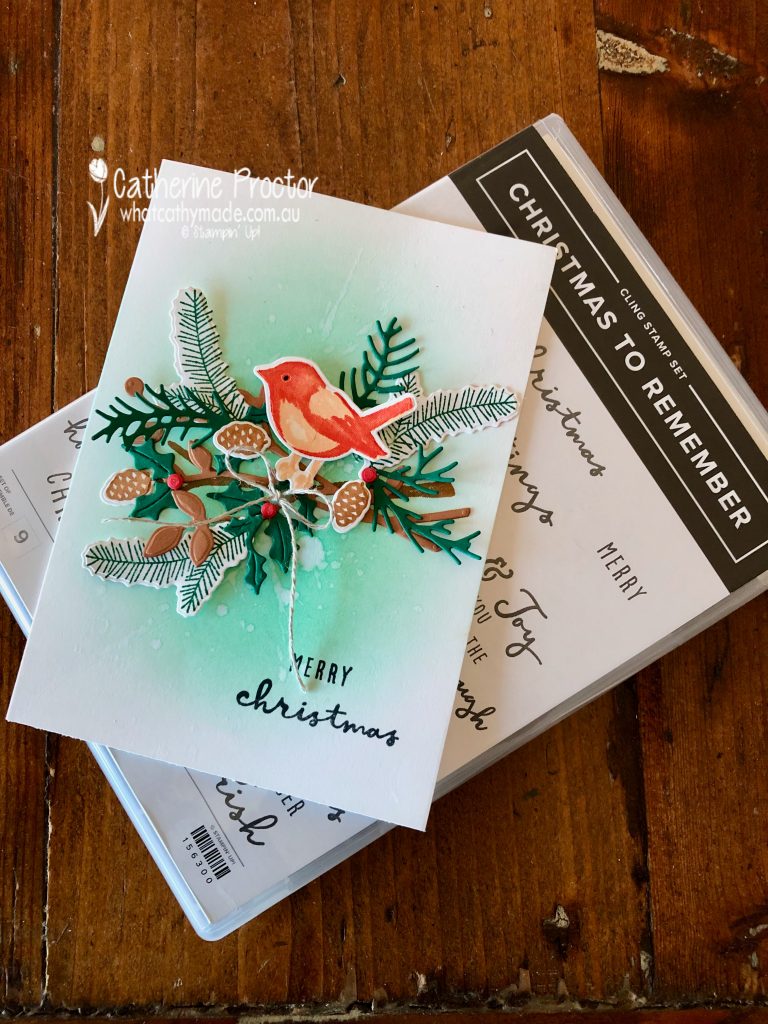
When I was a child my mum had a box of vintage Christmas cards that I used to love looking at and tonight I’ve combined a few different stamp and die sets to try to recreate this vintage vibe.
This style of card making is a lot of fun but also a little bit risky as I really have no idea what my final card will look like. I gradually add and remove different elements to build up the scene as I go.
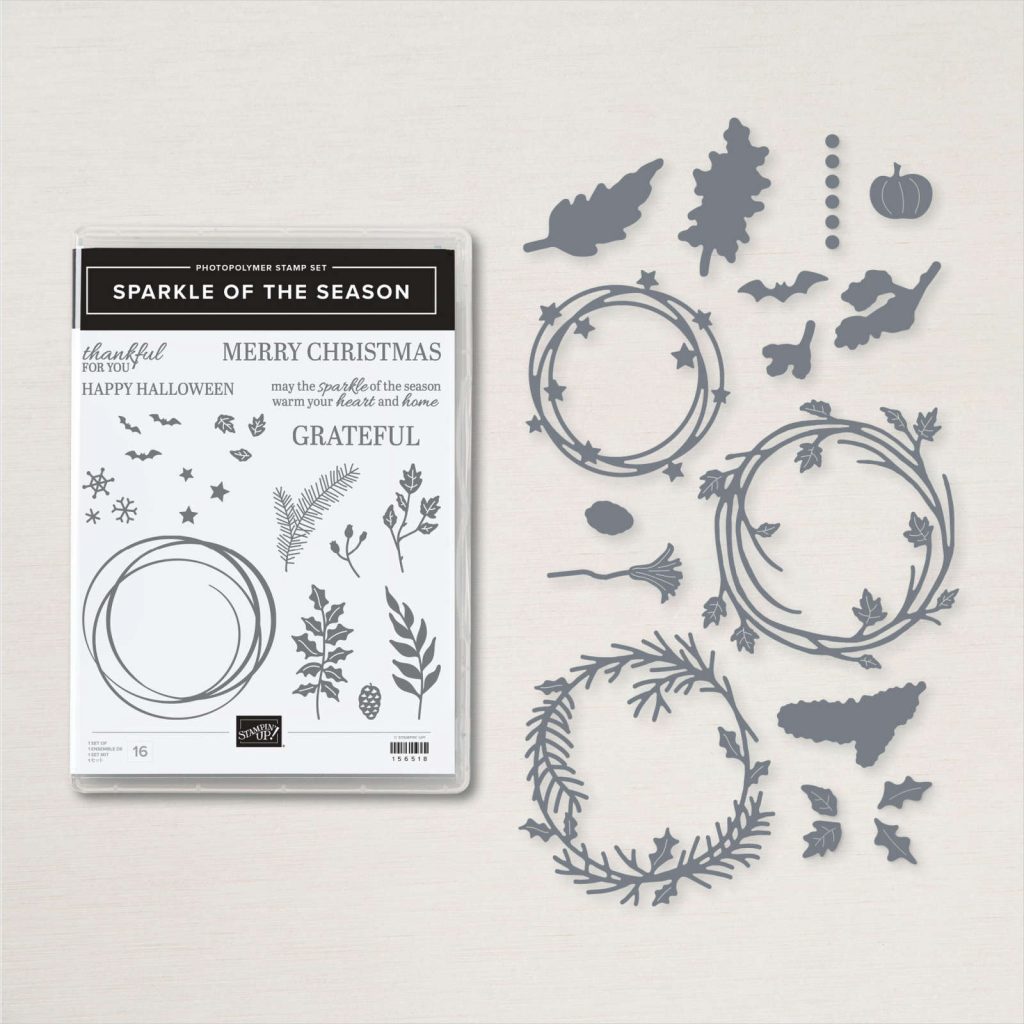
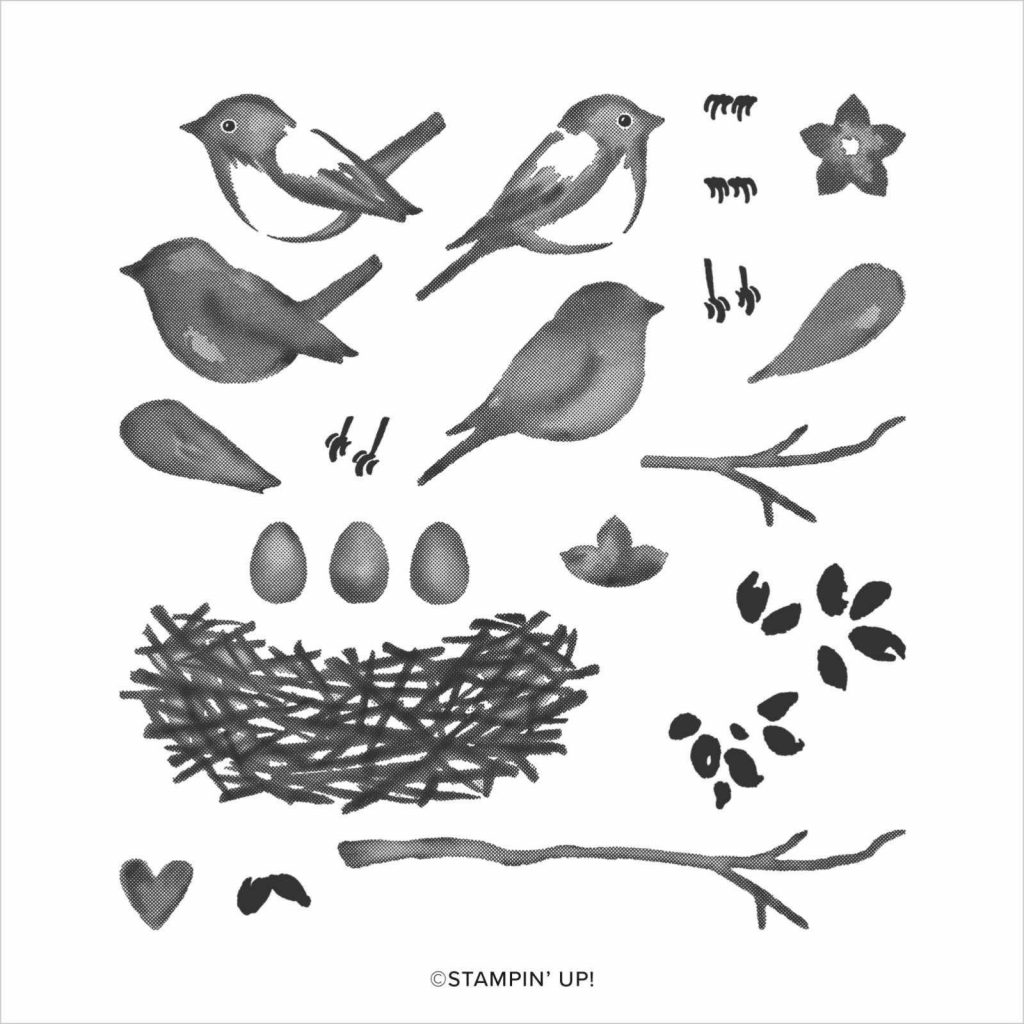
I originally intended to use the Christmas Season bundle but the scale just didn’t work with the little bird from the Birds & Branches stamps. So these are the stamp and die sets I’ve used instead.
Sparkle of the Season bundle
Birds & Branches stamp set
Christmas to Remember
Birds & More dies
The shading on the card base is created with a blending brush and Bermuda Bay ink pad. Add ink to your blending brush and then start in the middle of the card and swirl outwards, gradually building up the colour.
The speckled effect is easy to create. Once you’ve finished blending your background use the inner tube of a Stampin’ Spritzer to gently tap to drop water onto the blended background.
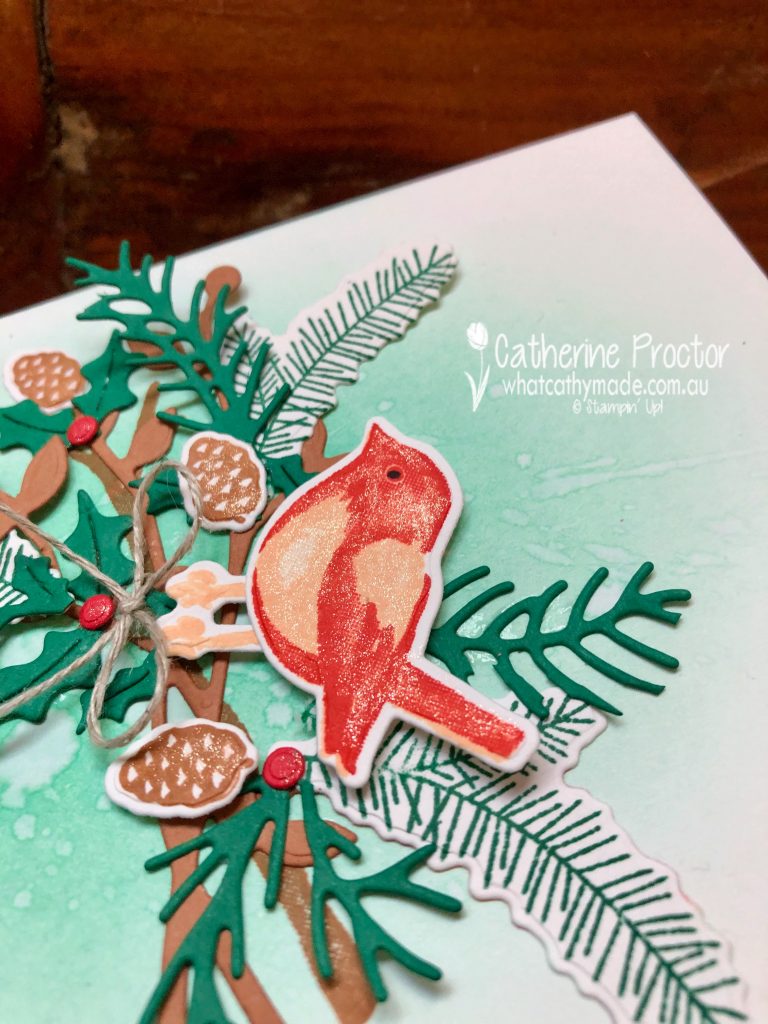
The bird was stamped in Pale Papaya and Poppy Parade, the pine needles in Just Jade and the pinecones in Cinnamon Cider. The branch was stamped in Cinnamon Cider and also die cut from Cinnamon Cider cardstock, trimmed to fit my card.
I die cut a wreath and holly leaves in Just Jade cardstock and then cut them up randomly to add texture and dimension to the card. The holly berries are die cut in Poppy Parade cardstock.
A touch of Wink of Stella adds subtle sparkle and shimmer to the little bird.
The Christmas to Remember sentiment stamp set has a lovely mix of fonts. I used two different stamps to mix up the fonts for my Merry Christmas Sentiment.
A bow of linen thread was the final touch.
Now it’s time to hop on over to our next participant, the incredible talented Tina Gillespie. I wait to see what Tina shares with us today!
If at any time you find a broken link, please head to the blog of this week’s Host of the Heart of Christmas Blog Hop, Tina Gillespie, and she will have the list of all who are participating.
You can purchase any of the products I’ve used tonight here.
Thanks for visiting my site. I’ll be back with another card on Wednesday.
In the meantime, wherever you are in the world, stay safe, stay calm … and keep on crafting xxx
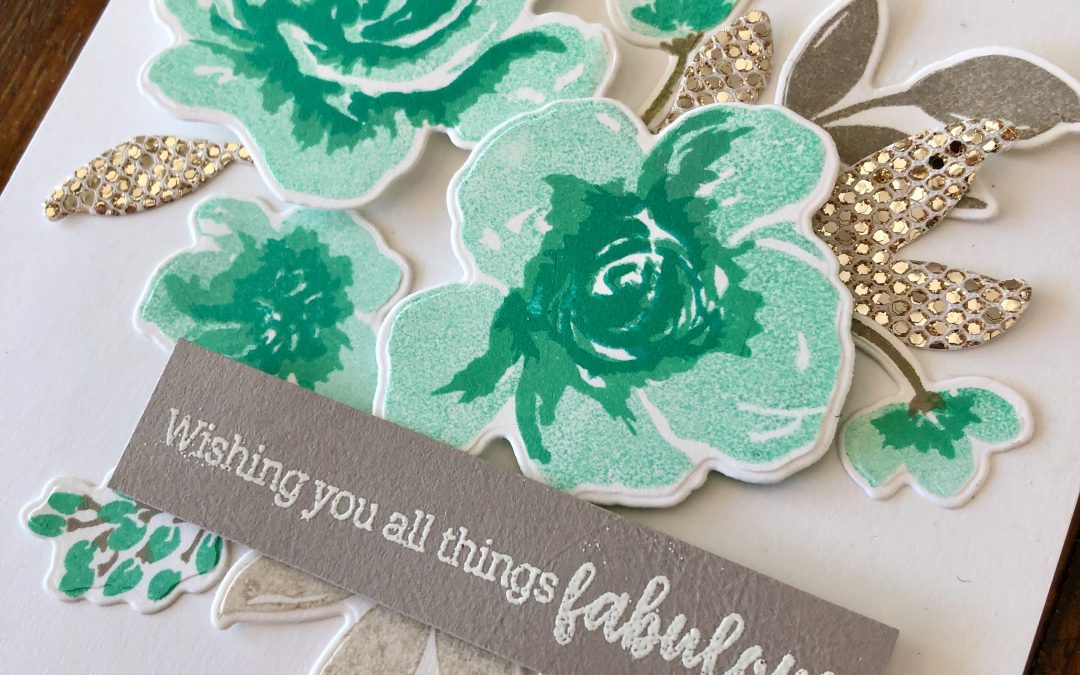
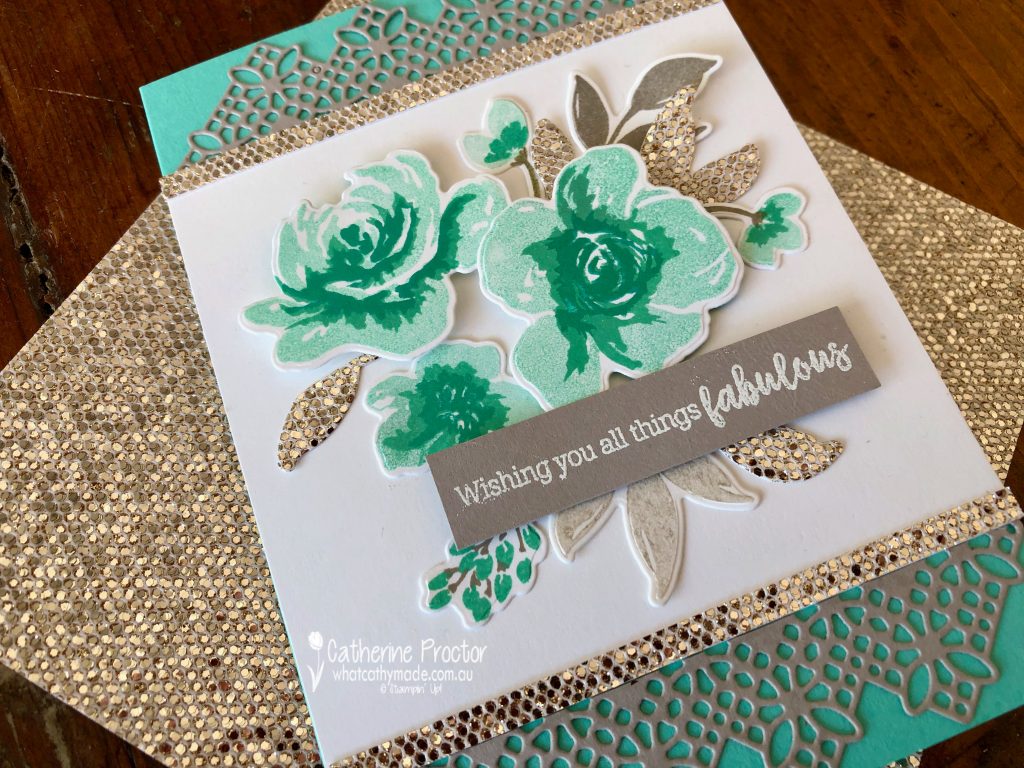
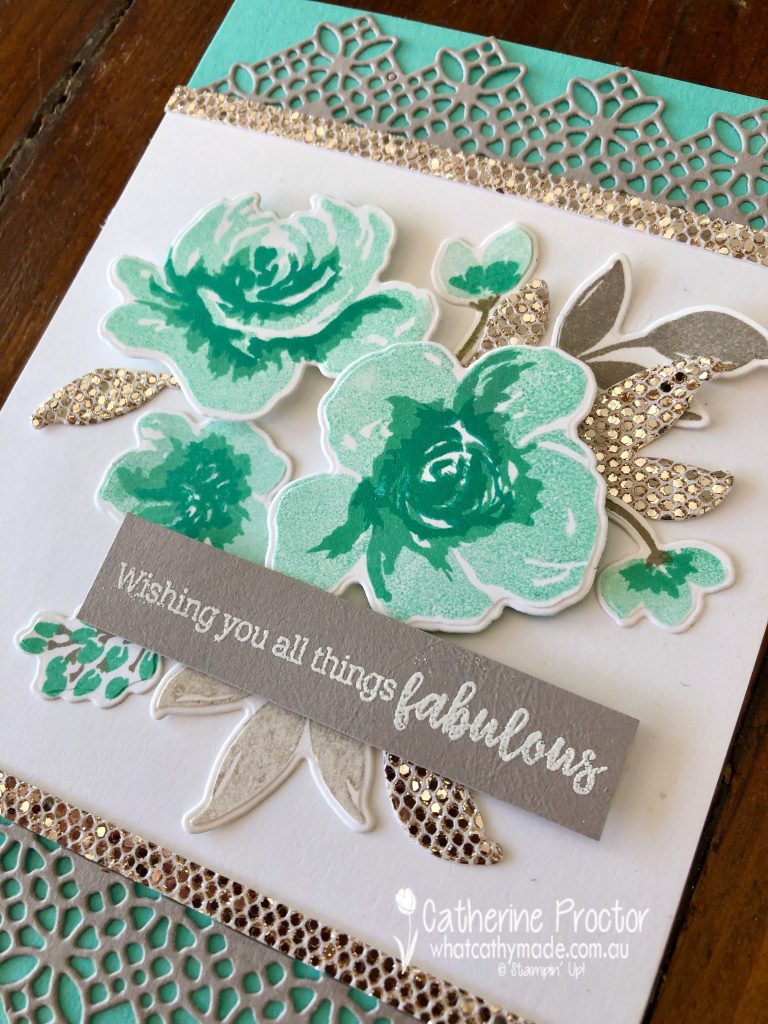
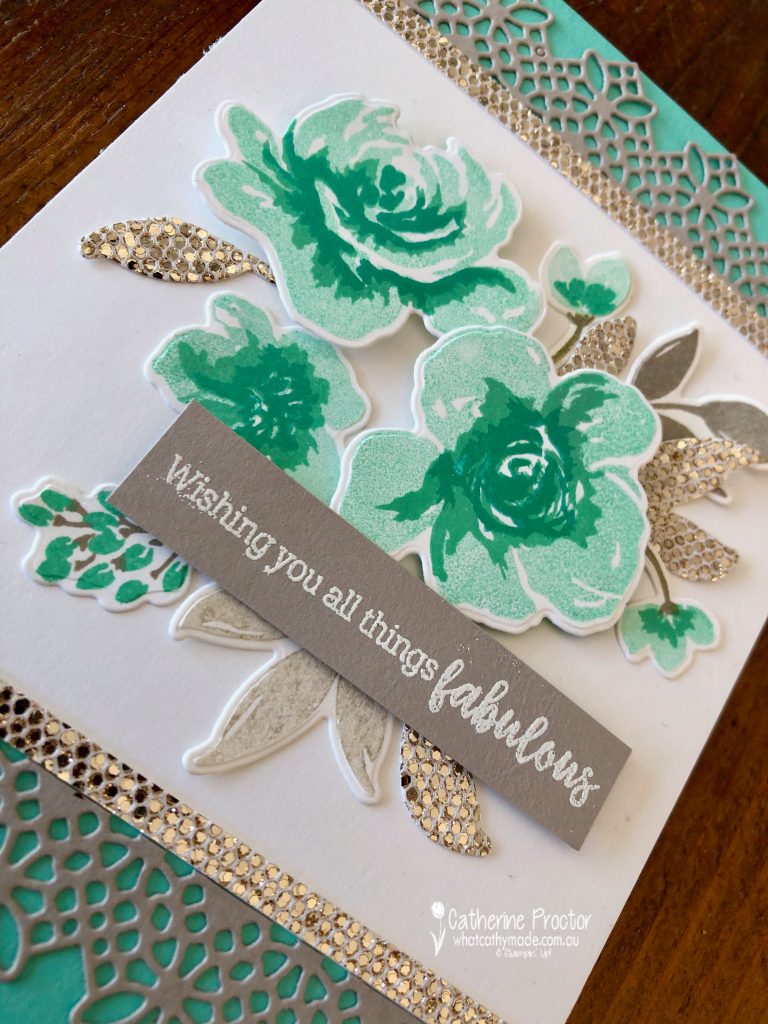
Welcome to week 12 of our 2021-22 Colour Creations blog hop! Tonight we are showcasing Coastal Cabana, a colour from the Brights family.
Did I hear you say “step away from the Be Dazzling DSP, Catherine”? Well, sorry, not sorry, I just can’t seem to stop using this SALE-a-bration specialty DSP!
Tonight’s Coastal Cabana card pairs something old (the All Things Fabulous stamp set and the Fabulous Floral dies) with something new (the FREE Be Dazzling DSP). The colour combination I’ve used is one I’m always drawn to for summer dresses, scarves and earrings: Coastal Cabana, Bermuda Bay, Gray Granite, Basic White and of course, the gorgeous champagne gold sparkle of the Be Dazzling DSP.
The largest flowers on my card are stamped using 3-step stamps that gradually layer up the colour of the flower – each level of stamp is numbered inside the stamp case. There are so many different colour combinations you can create with this type of stamp. Here’s how I inked up my flowers for this card.
Stamp the largest flower stamps (1A, 2A and 3A) in Coastal Cabana, stamped off once
Stamp the middle stamps (1B, 2B and 3B) in full strength Coastal Cabana
Stamp the smallest, top stamp (1C, 2C and 3C) in full strength Bermuda Bay
The leaves were stamped in Gray Granite, both at full strength and stamped off. I also die cut a few leaves from the Be Dazzling DSP and added 5mm strips of the Be Dazzling DSP at the top and bottom of my card, sitting beside the largest, intricate lacy die (from the Fabulous Floral dies) that has been cut in half and placed either side of the main front panel.
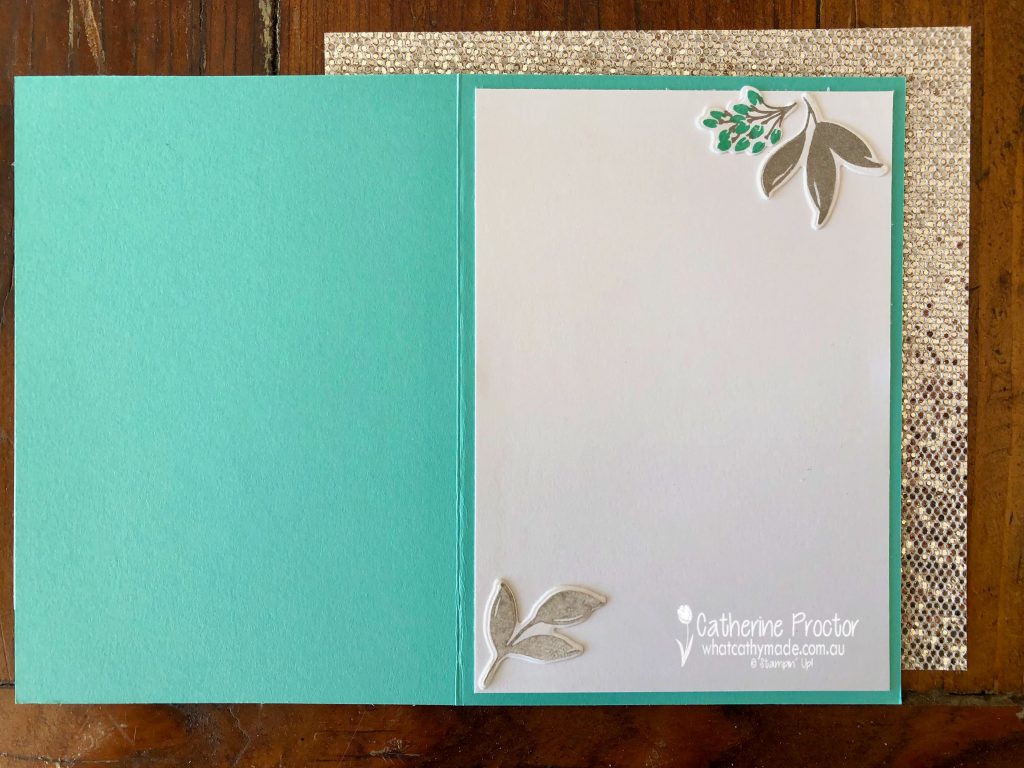
I used some left over stamped and die cut sprigs and leaves to decorate the inside of my card.
Now it’s time to hop on over to our next participant, the very talented Caroline Manwaring. I can’t wait to see what she’s made this week!
If you find a broken link or have come to this blog hop from a different entry point, you can view the the full list of participants below:
Do you use your Stampin’ Up! catalogues for inspiration? I find them such a wonderful source of ideas and this week I’ve taken my inspiration from the 2019 Stampin’ Up! Holiday catalogue.
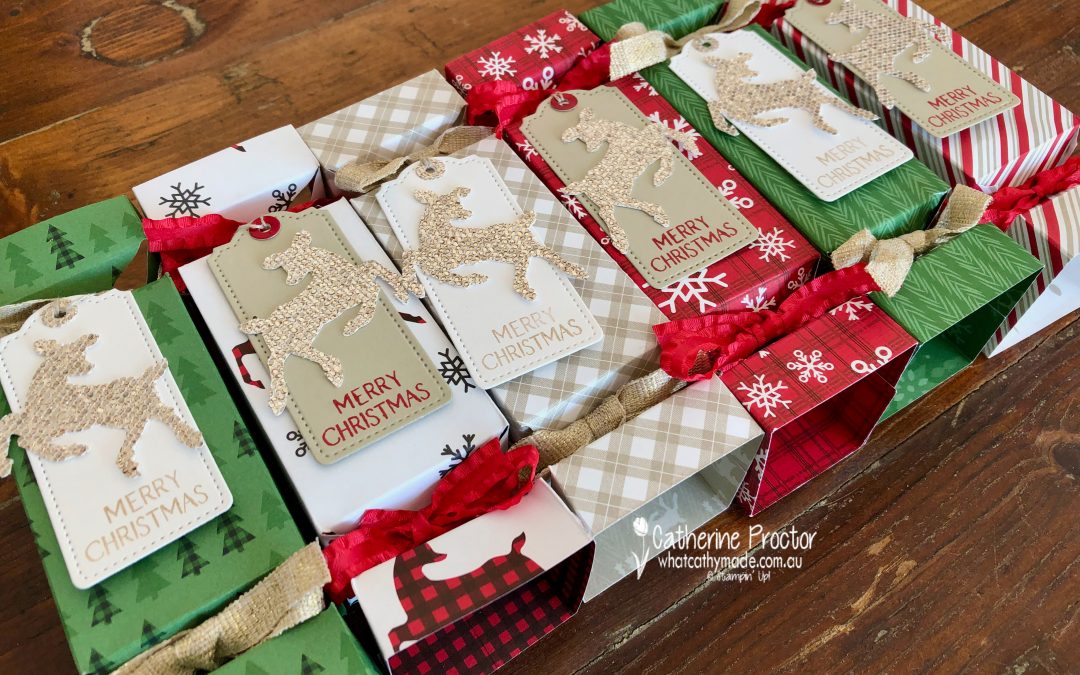
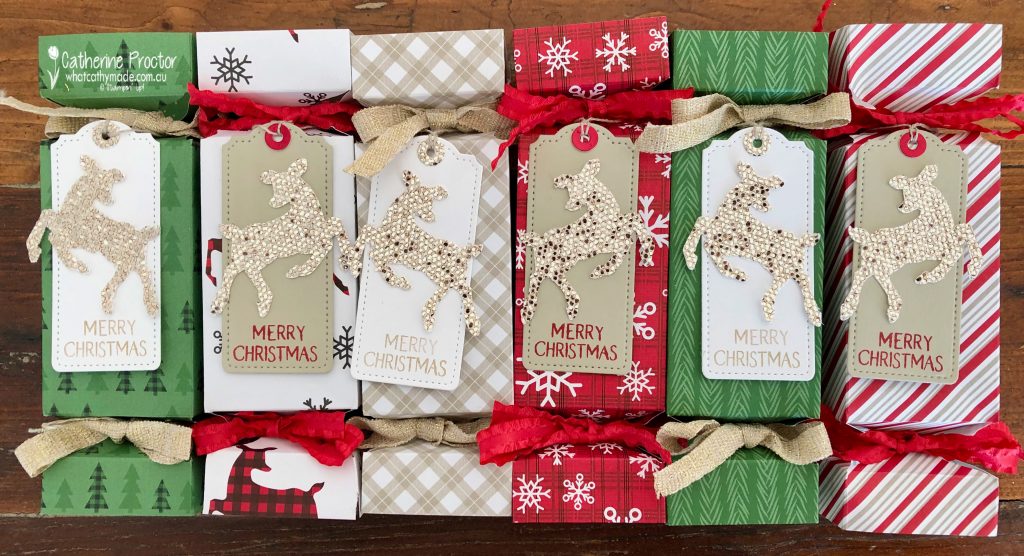
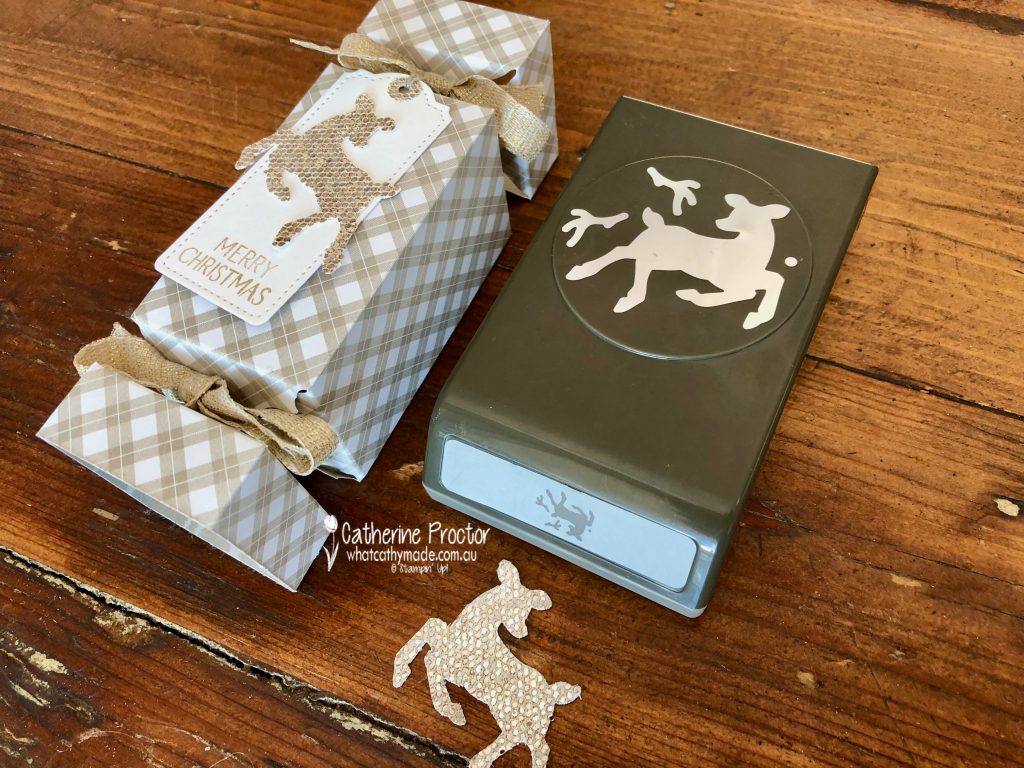
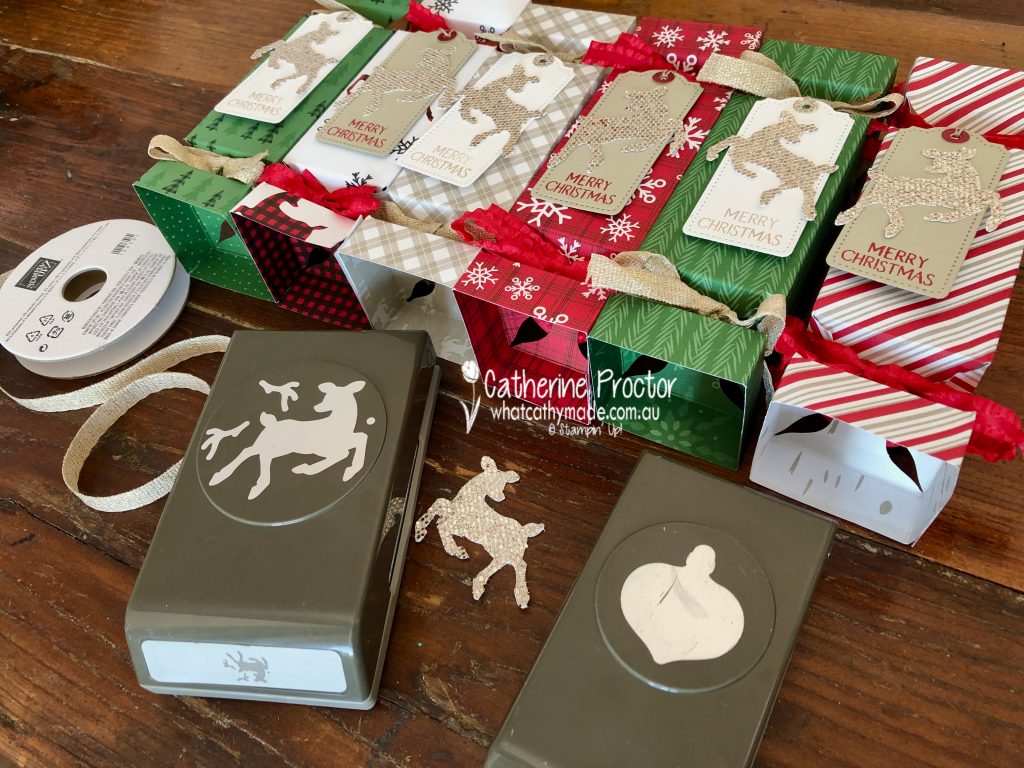
The 2019 Stampin’ Up! Holiday catalogue had very clever instructions on how to use your paper trimmer and the small Gleaming Ornaments Punch to make quick and easy Christmas crackers. As these ornament punches are currently available to purchase in the clearance rack (on sale for $35.40) I thought I would adapt this design and make a set of Christmas Crackers using the FREE SALE-a-bration Peaceful Prints DSP.
I’ve used 6 of the patterns from the Peaceful Prints DSP to make 6 crackers – I will make another 6 crackers using the reverse sides of this DSP before Christmas.
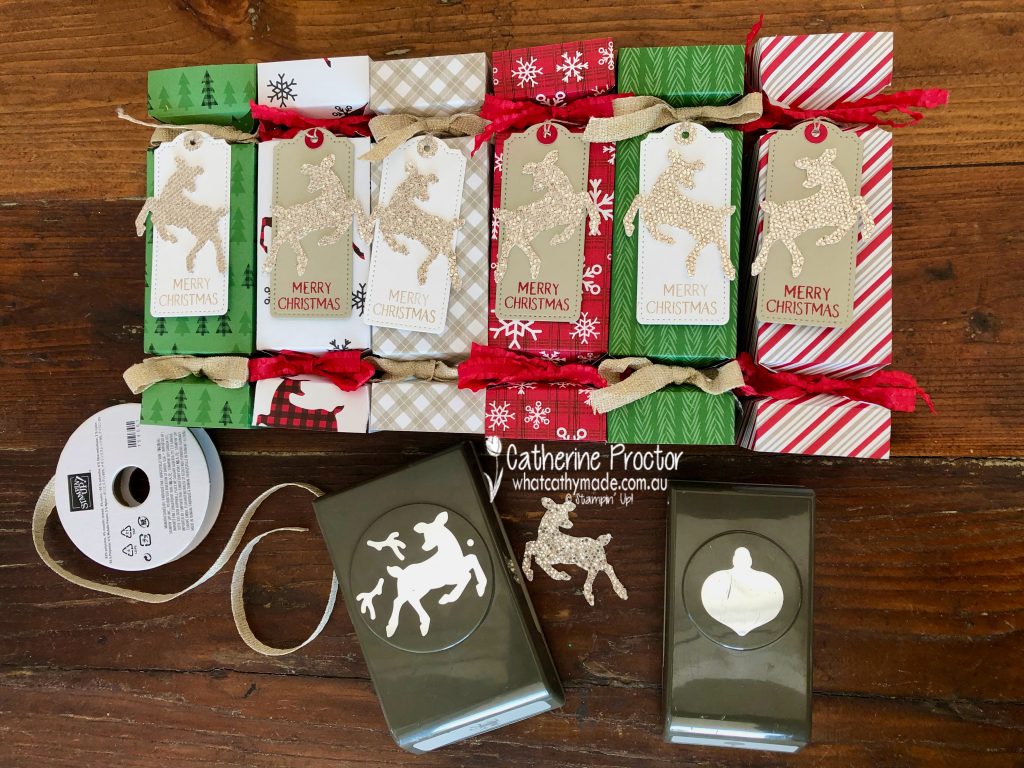
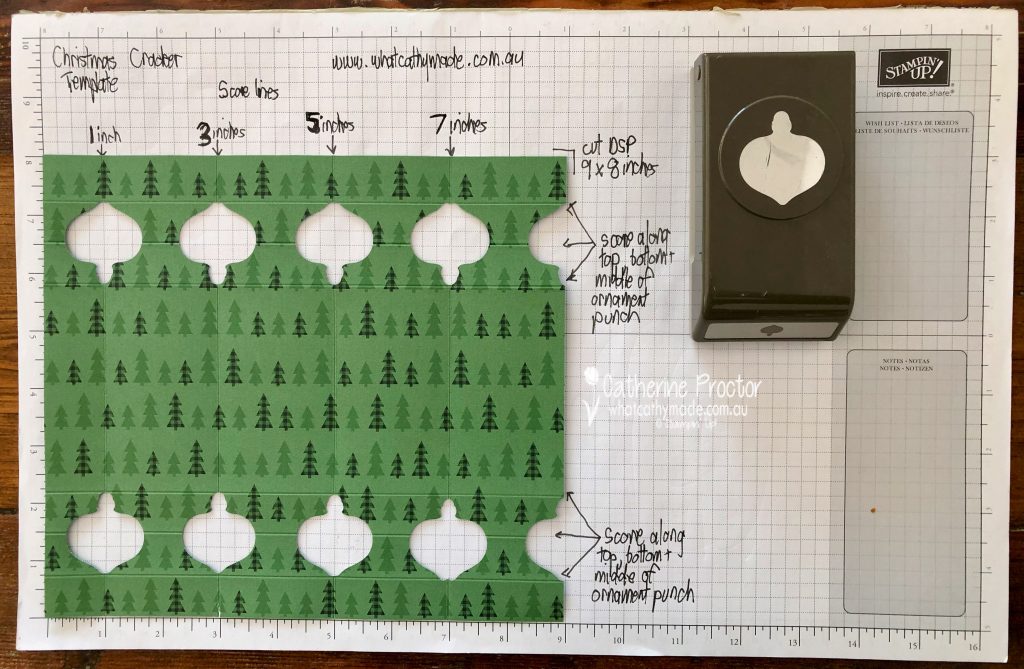
Here’s my template to make the crackers using the small ornament punch.
Trim a sheet of DSP to 9 x 8 inches
Score along the 8 inch side at 1 inch (this creates the flap for adhering the sides of the cracker together) and score again at 3, 5 and 7 inches
Fold along all these score lines
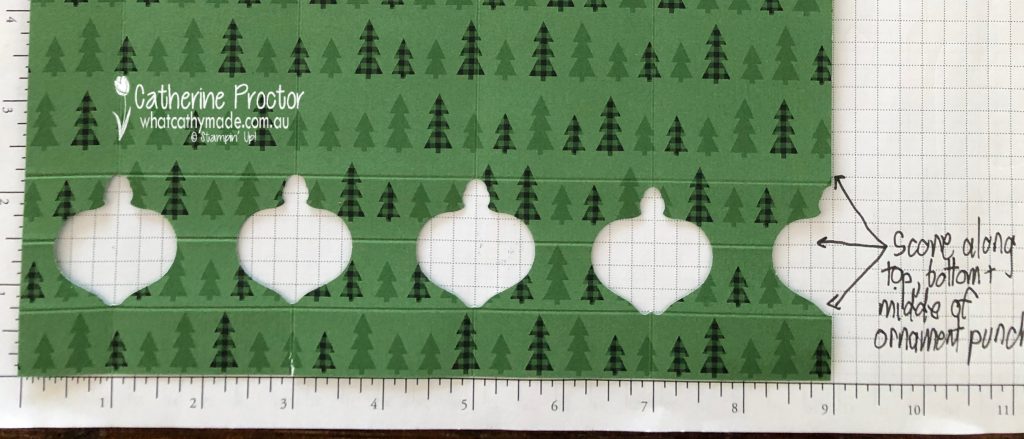
Fully insert small ornament punch to the edge of the DSP, ensuring the score line is in the centre of the ornament
Punch every score line at both ends of the DSP
Also punch at the 9 inch edge, lining up the centre of the punch with the edge of the DSP
Now score in the opposite direction, along the width of the cracker at the top, bottom and the centre of the punched out areas (see photo above) and then fold these score lines as per the photo below.
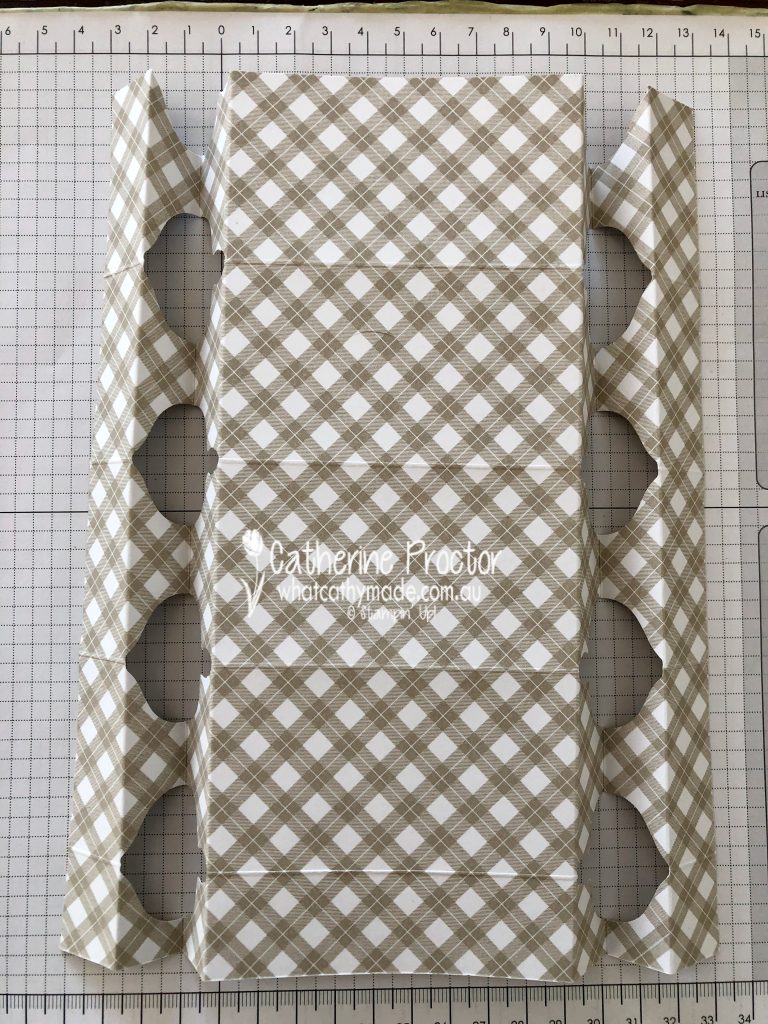
To assemble the cracker, fold up the 1 inch fold flap so that the DSP side that will be on the outside of the cracker is facing up.
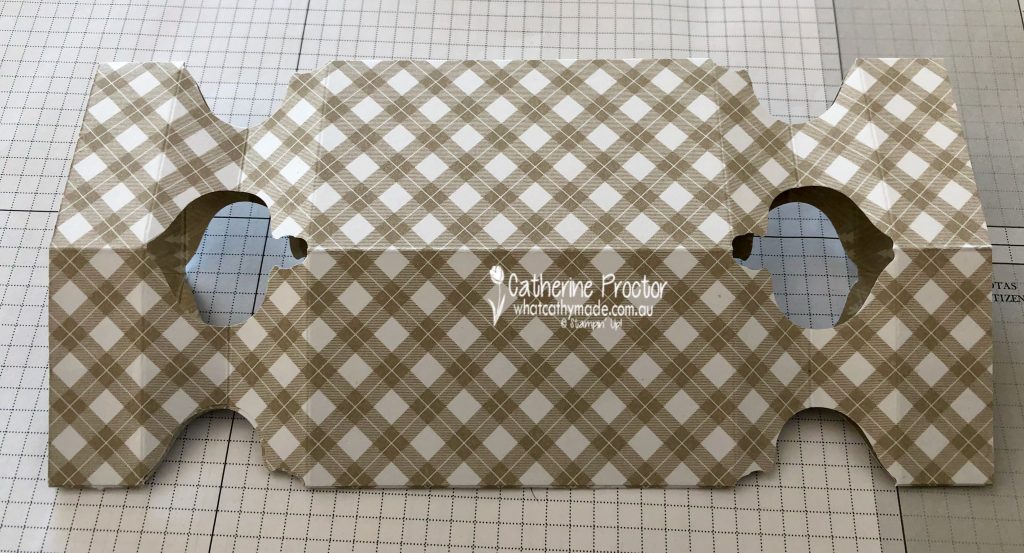
Place Multipurpose Liquid Glue on this flap and fold over the cracker at the 5 inch fold, lining up the punched out areas. Press together to adhere.
Cut ribbon of choice into 14 inch (36 cm) lengths and tie into a bow at each end.
You can decorate the crackers any way you want. I used the Peaceful Deer bundle, the FREE SALE-a-bration Be Dazzling DSP and the Tailored Made Tags Dies to create coordinating deer tags for my crackers. I used some Sahara Sand twine to attach them to one end of the cracker, but you could also simply adhere them to the top of the cracker.
These crackers are empty right now because I am going to fill them with yummy treats closer to Christmas, such a Ferrero Rocher chocolate, Lindt Balls and little jokes. To fill them at a later time, simply untie the bow at one end, pop the treats inside and retie the bow.
You can make these Christmas crackers out of any DSP to match your Christmas table decoration.
Now it’s time to hop on over to our next participant, the incredible talented Michele Taylor. I wait to see what Michele shares with us today!
If at any time you find a broken link please head to the blog of this week’s Host of the Heart of Christmas Blog Hop, Sharon Davern, as she has the full list of links for everyone who is participating.
You can purchase any of the products I’ve used tonight here.
Thanks for visiting my site. I’ll be back with another card on Wednesday.
In the meantime, wherever you are in the world, stay safe, stay calm … and keep on crafting xxx
Hello to all my crafting friends! Have you ever tried to use Christmas paper to make a birthday card?
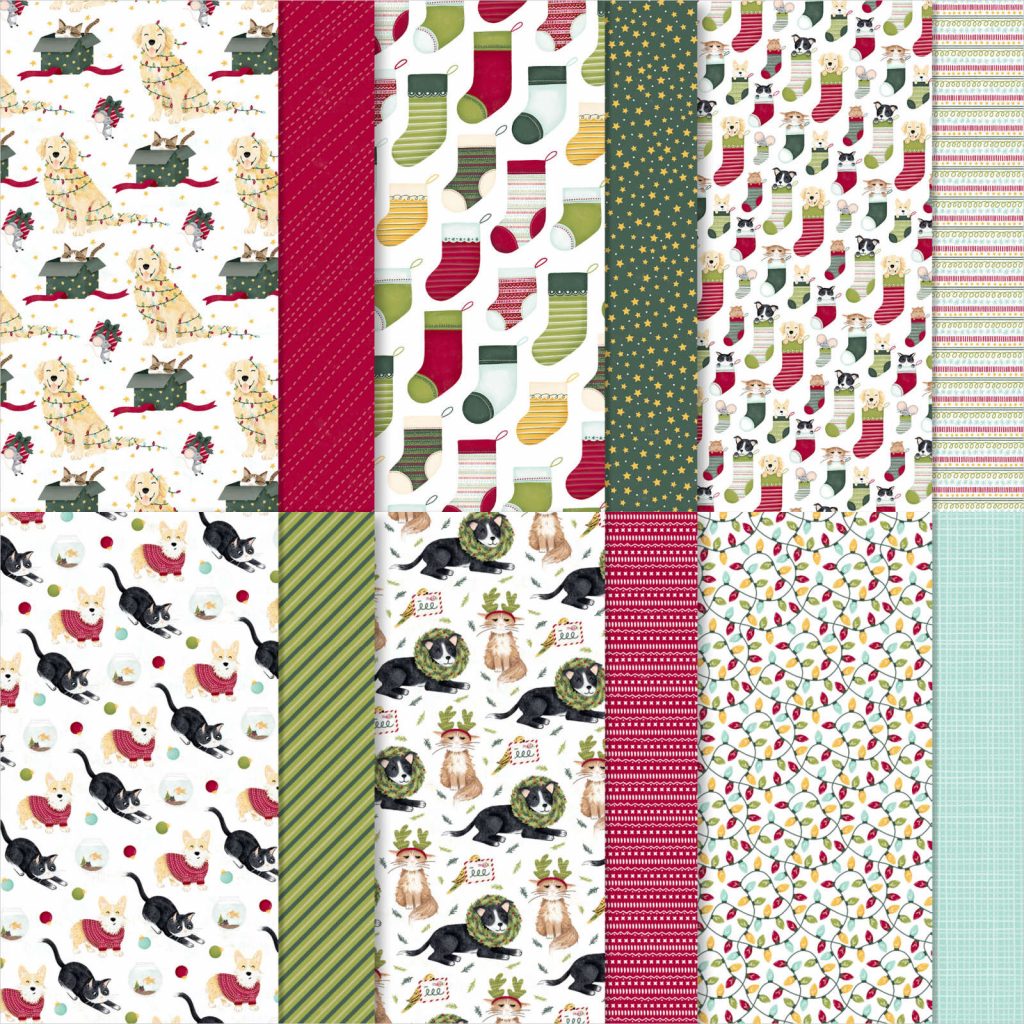
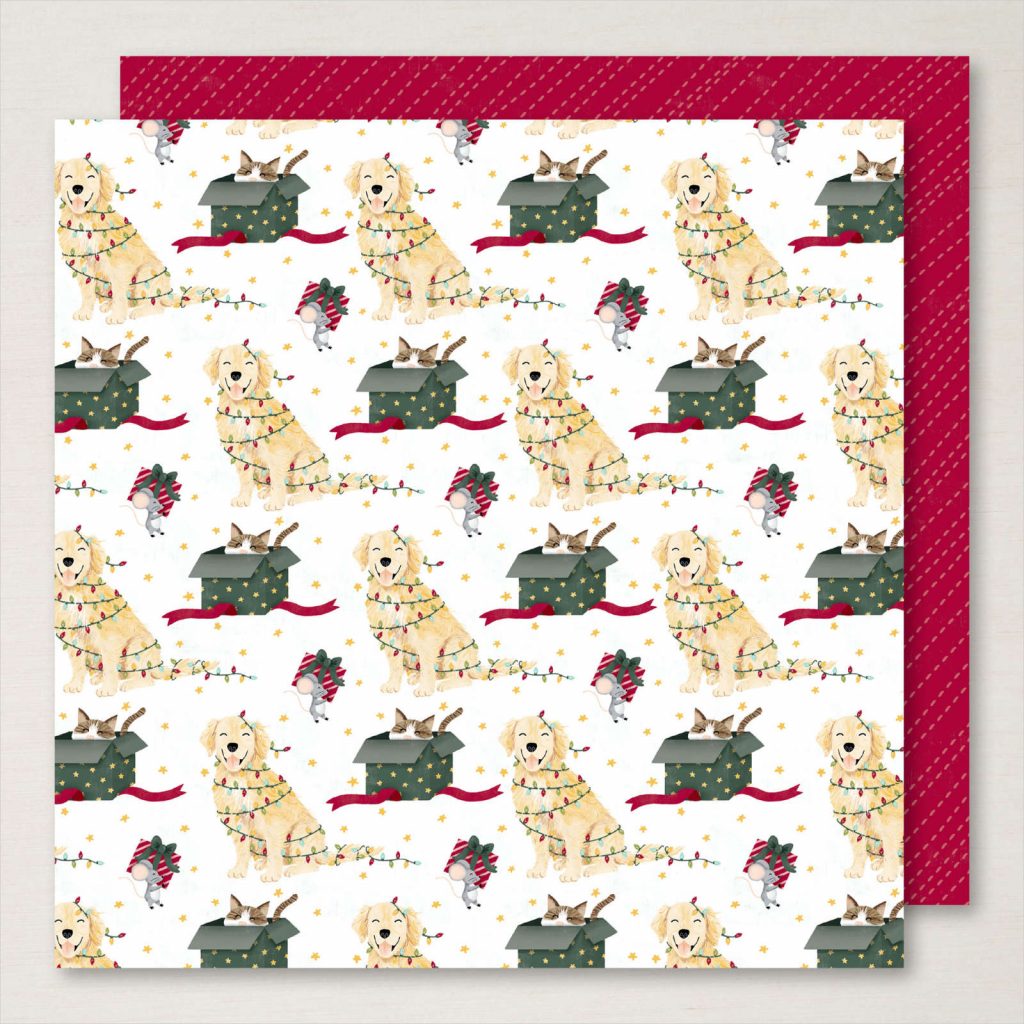
Today I’m sharing a custom birthday card I made using Stampin’ Up!’s new Christmas Designer Series Paper called Sweet Stockings. It might seem strange at first to use Christmas paper for a birthday card, but if you read on you’ll understand exactly why I used this DSP.
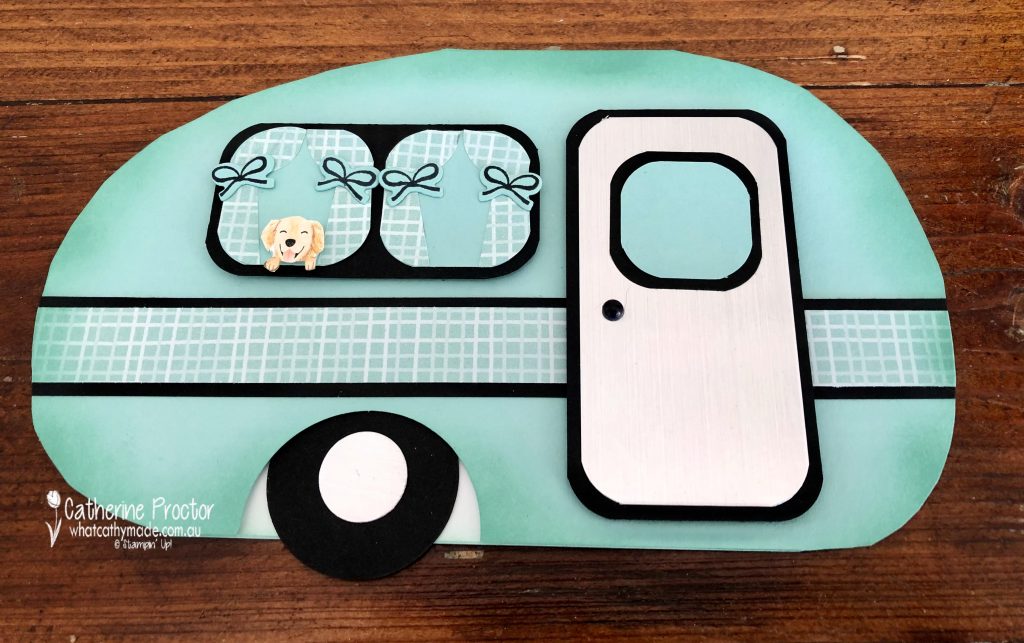
I made this birthday card for my very special friend and “crafting partner in crime”, Jenny, who has has an utterly adorable labrador/golden retriever called Nigel. As soon as I saw this labrador/golden retriever paper in the Sweet Stockings DSP from the July – December 2021 Mini catalogues I knew I had to use it for Jen’s birthday card, even though it is Christmas paper. This labrador/golden retriever looks so much like Nige!
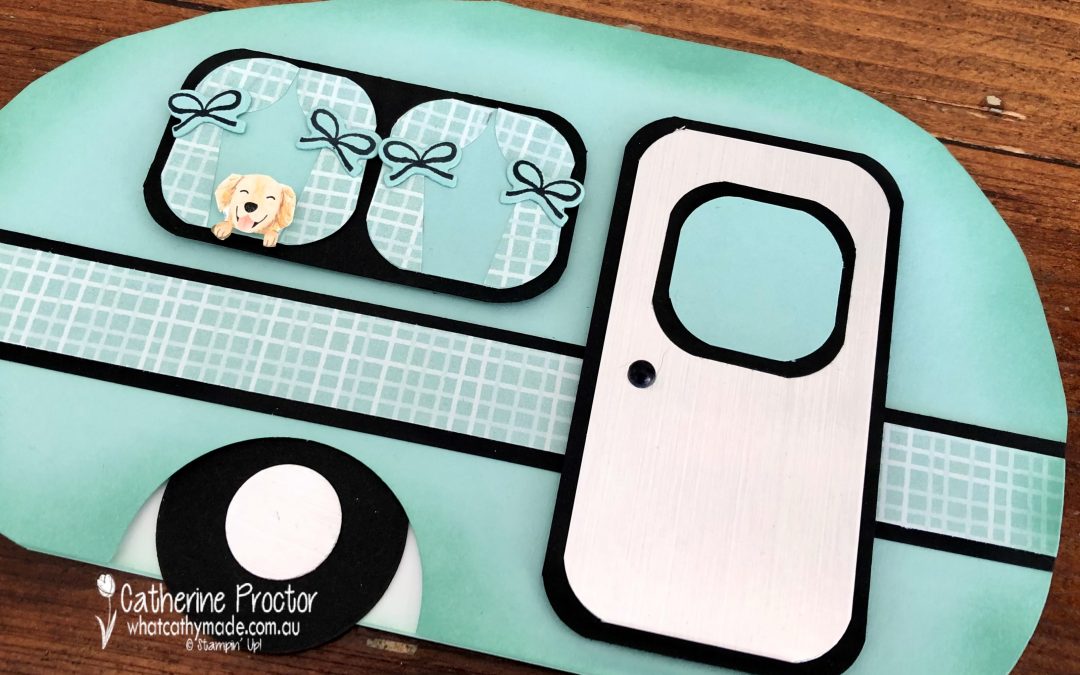
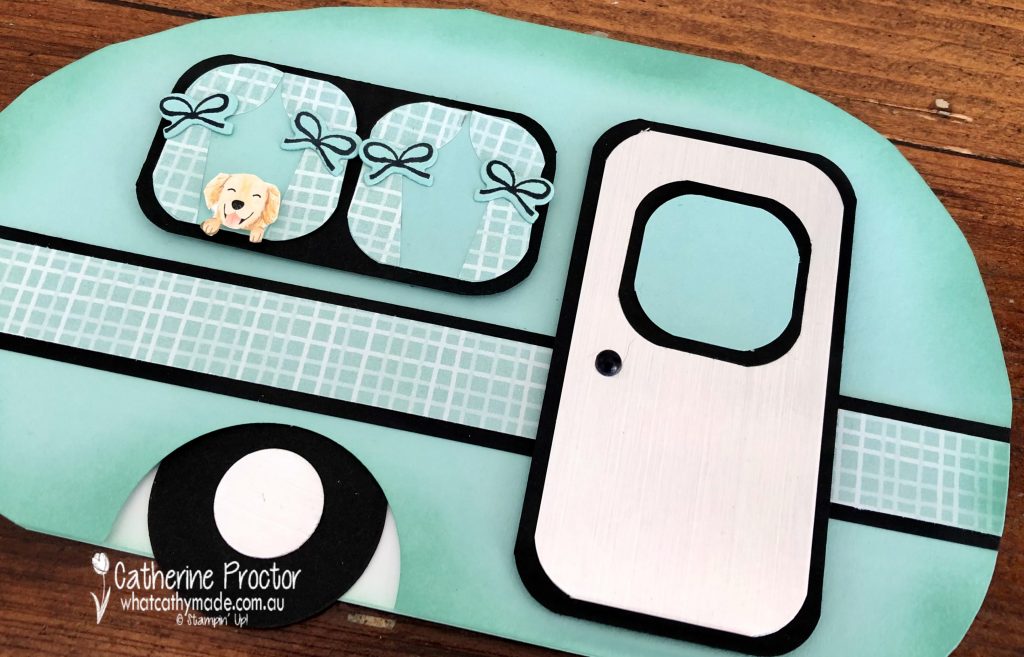
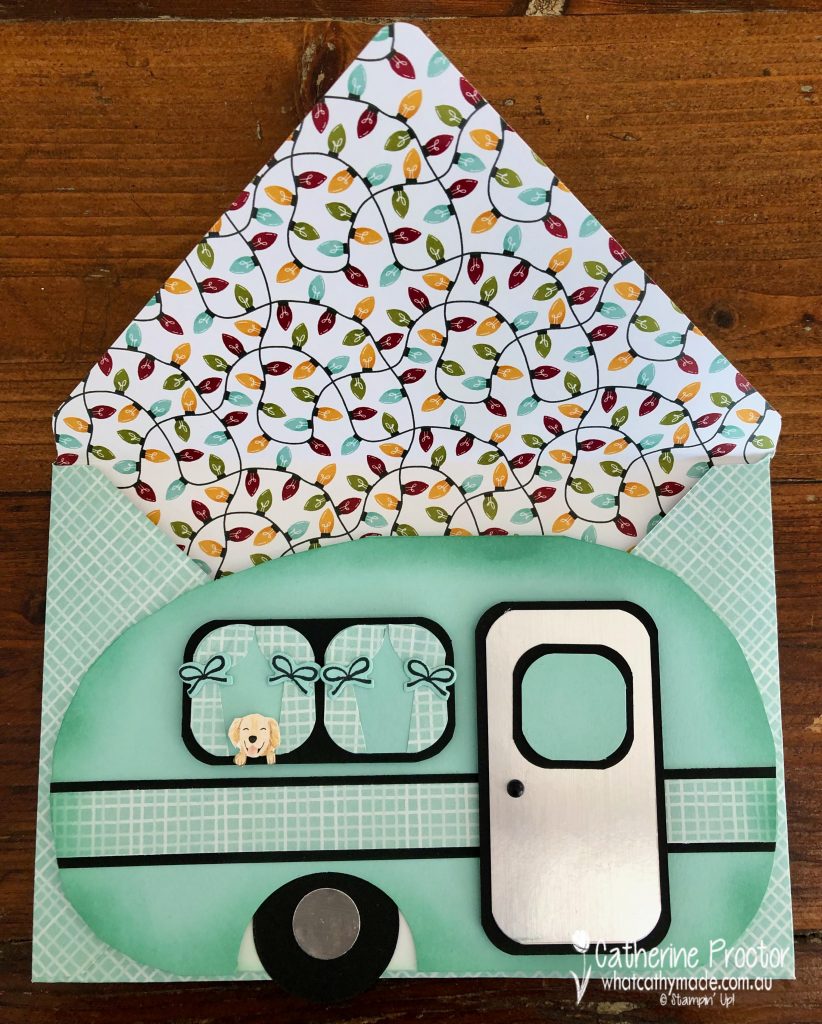
Jen has the most beautiful vintage caravan called Sylvia that we craft in together, so I wanted to make a caravan birthday card for her. I searched for caravan templates on Pinterest, printed one out and used it to make cut a card in the shape of a caravan. Of course, this caravan had to have a labrador/golden retriever looking out the window!
The card fold is at the top of the card – I adjusted the size of the caravan template on my computer to fit the width of a piece of A4 Pool Party cardstock, traced the outline of the van onto the card stock and scored across the the card stock at the top of the caravan. I folded at the scoreline and then cut out the caravan shape through both layers of card stock, making sure to leave a fold at the top.
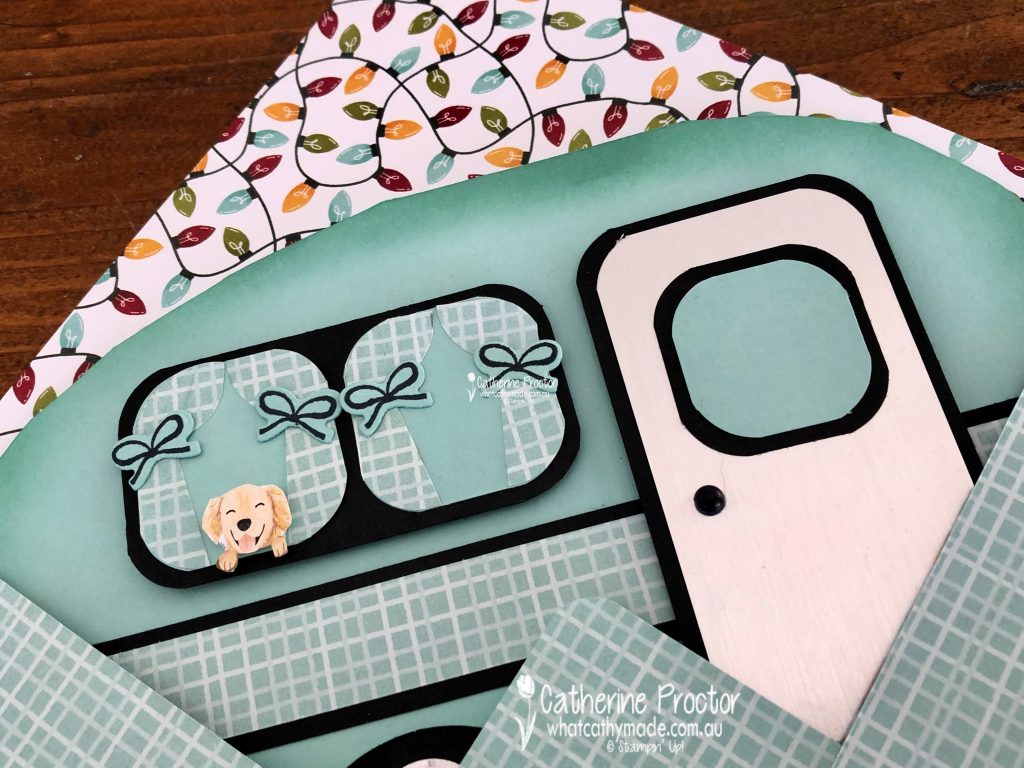
The door, windows and wheel are hand cut and die cut from silver foil and Basic Black cardstock, with the curtains and the stripe down the side of the caravan made using another pattern from the Sweet Stockings DSP.
The curtain tie back bows are a stamp and die from the All For Baby bundle. I used a blending brush to add dimension around the edge of the caravan and a Matte Black dot made the perfect door handle!
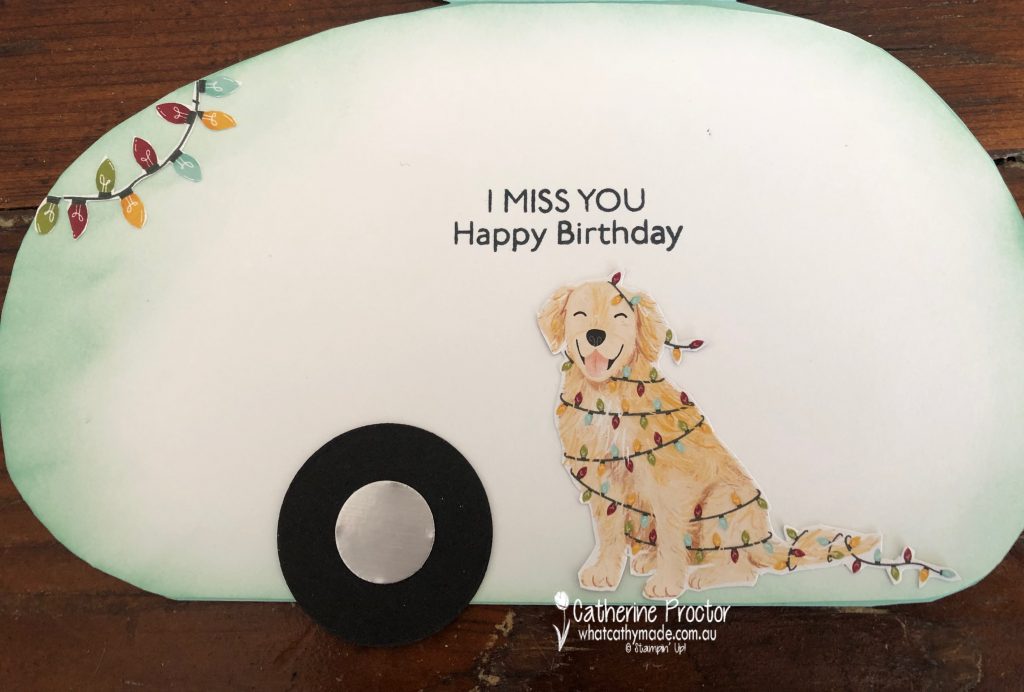
I hand cut the inside card layer in Basic White and shaded some more Pool Party Ink around the edge. Both the dog in the window on the front of the card and the dog inside the card were fussy cut from the Sweet Stockings DSP, as were the fairy lights for the inside of the caravan. The sentiments are both from the Art Gallery stamp set.
I also handmade a matching envelope using the same Sweet Stockings DSP I used for the curtains on the front of the card.
Even though I can’t see Jenny in person ATM, being able to post a special handmade card to her was a great way of letting her know that I was thinking of her on her special day and missing her so much!
Thanks for visiting my blog today. I’ll be back next tomorrow with some more Heart of Christmas inspiration and our weekly AWH Colour Creations Showcase on Wednesday, when we will be sharing projects made using Coastal Cabana.
When you shop online in my Stampin’ Up! Online Store don’t forget to use my monthly Host Code (if your order is between $50 – $250) and I will send you a thank you gift the following month. If your order is over $250 don’t use the host code because you will qualify for your own stamping rewards.
My August Host Code is AHQUWNVQ and it is valid until midnight August 31.
In the meantime, wherever you are in the world, stay safe, stay calm … and keep on crafting xxx
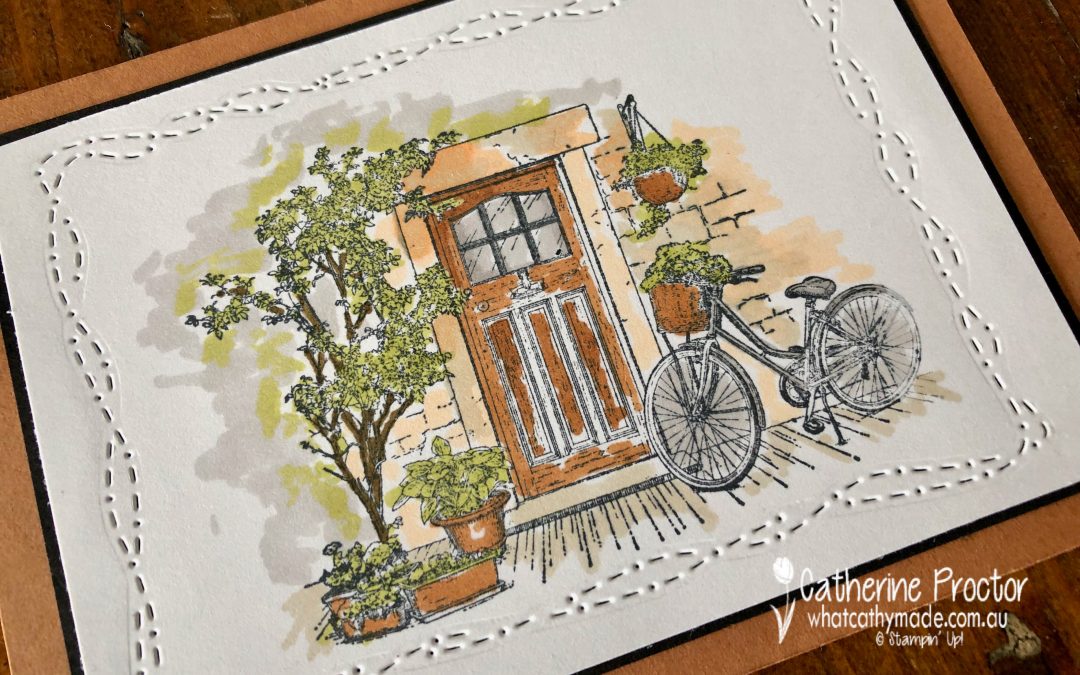
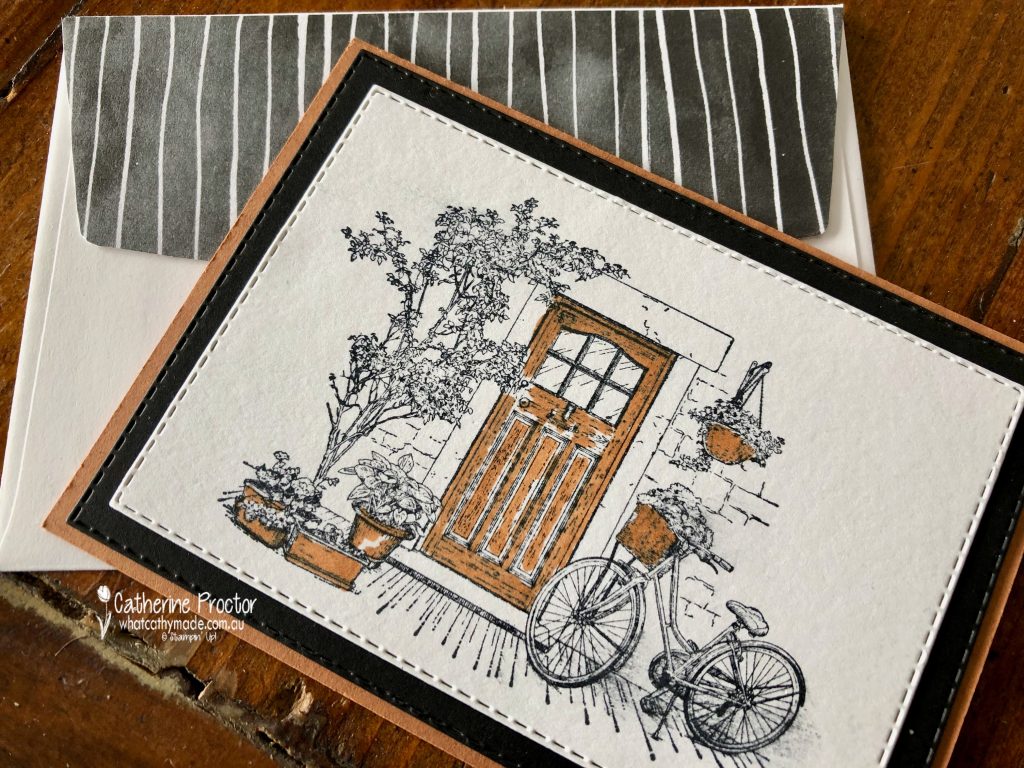
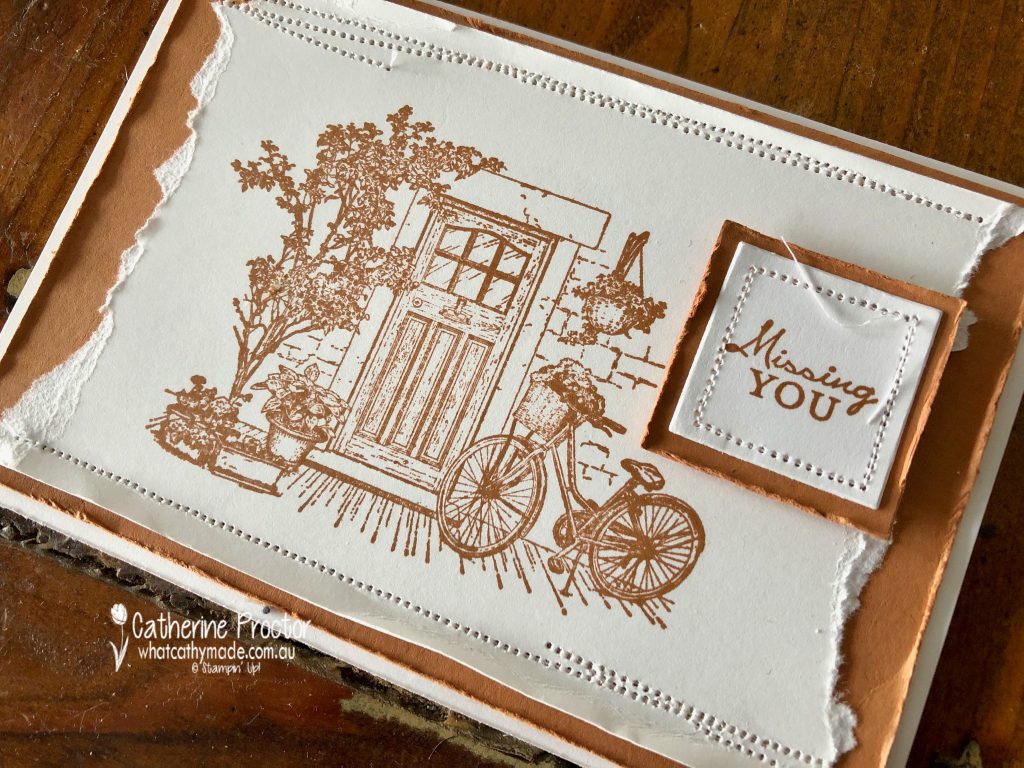
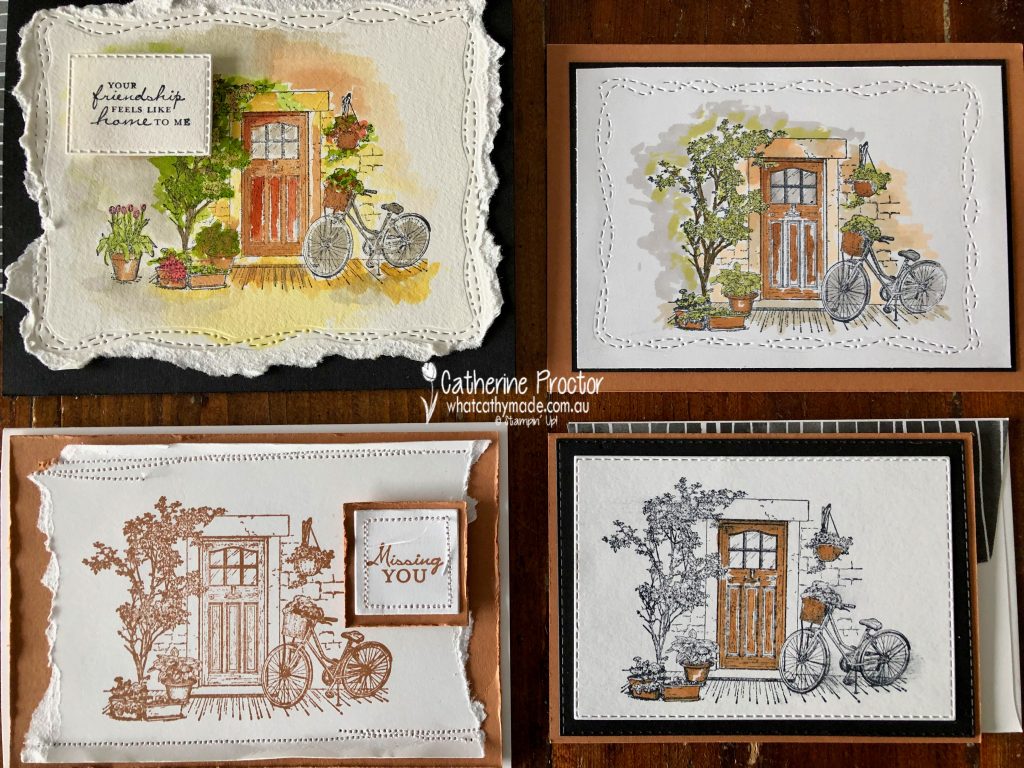
Welcome to week 11 of our 2021-22 Colour Creations blog hop! Tonight we are showcasing Cinnamon Cider, one of 2020-22 In Colours.
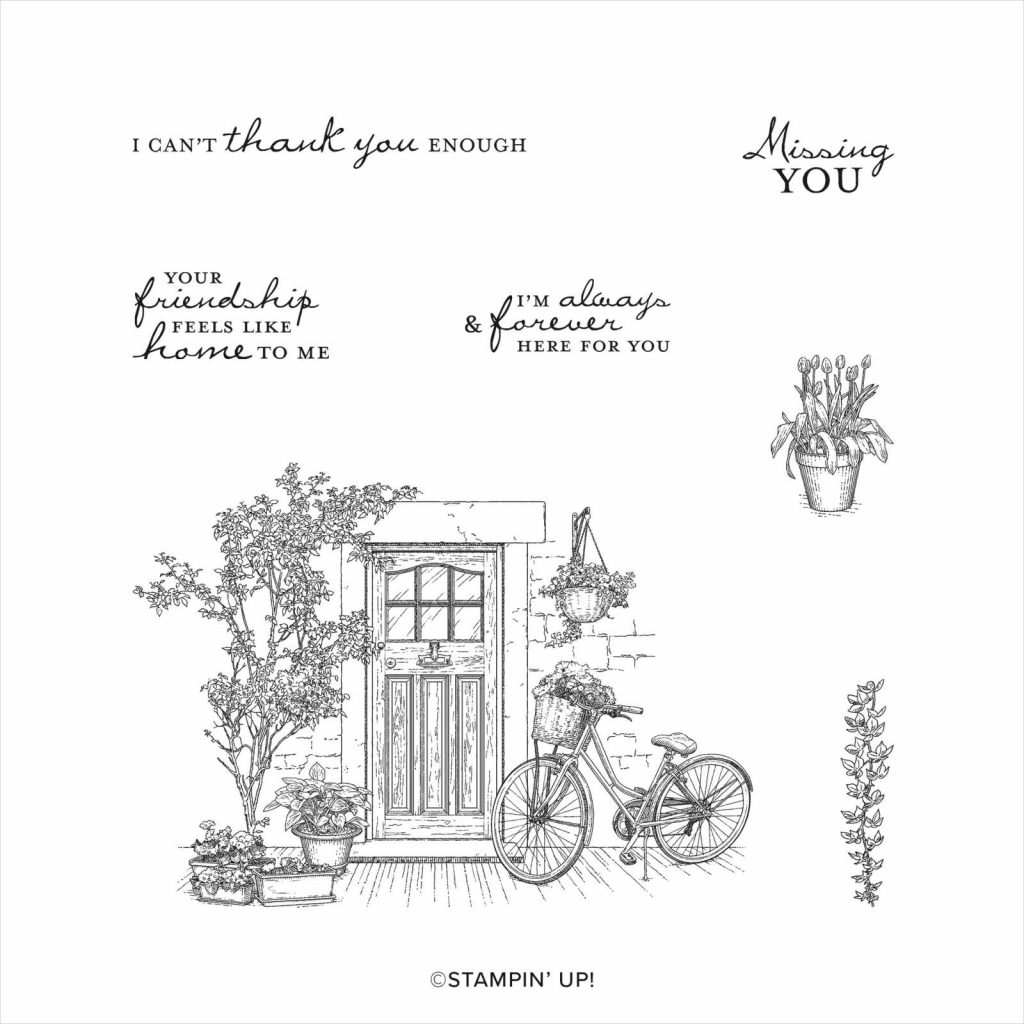
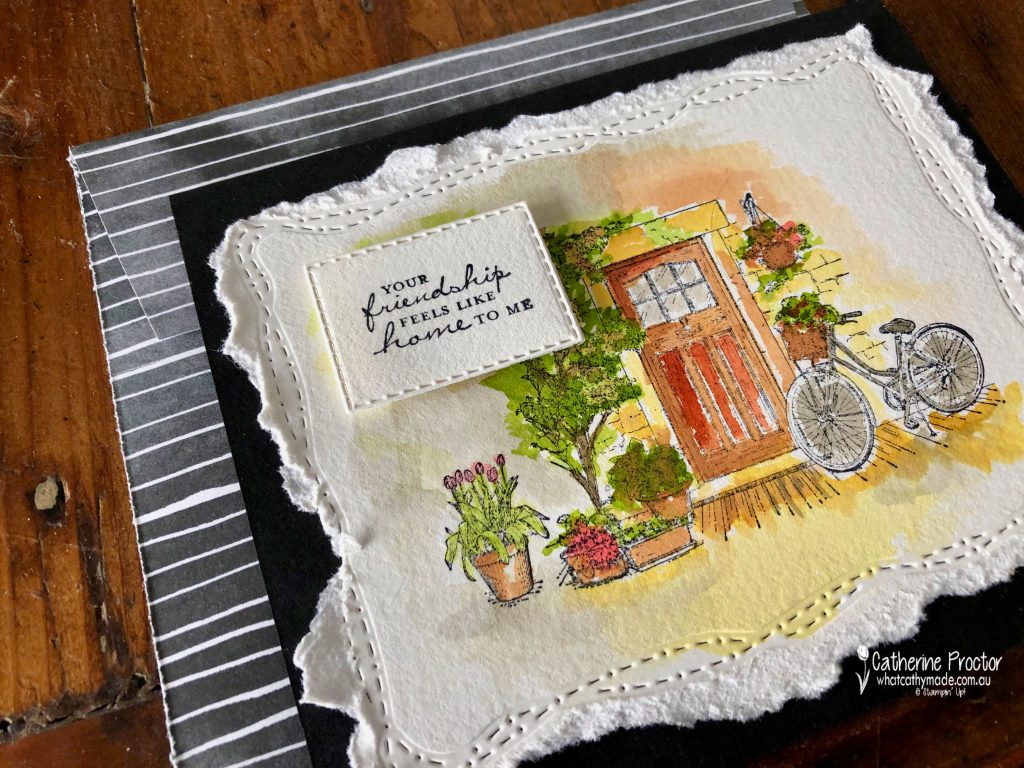
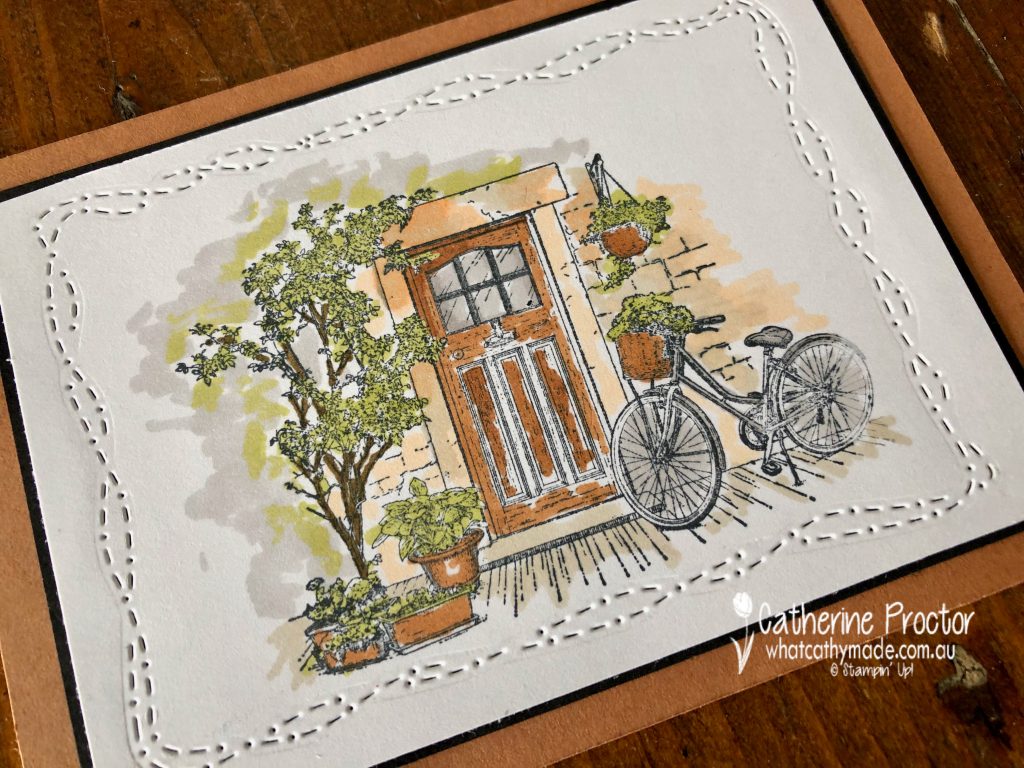
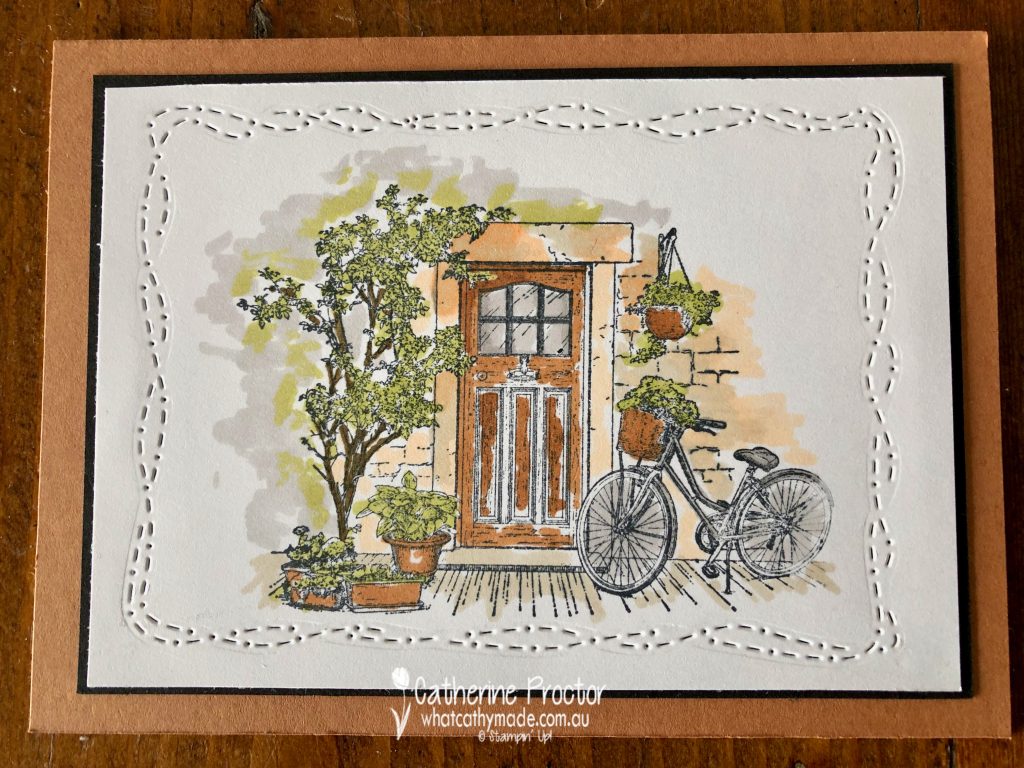
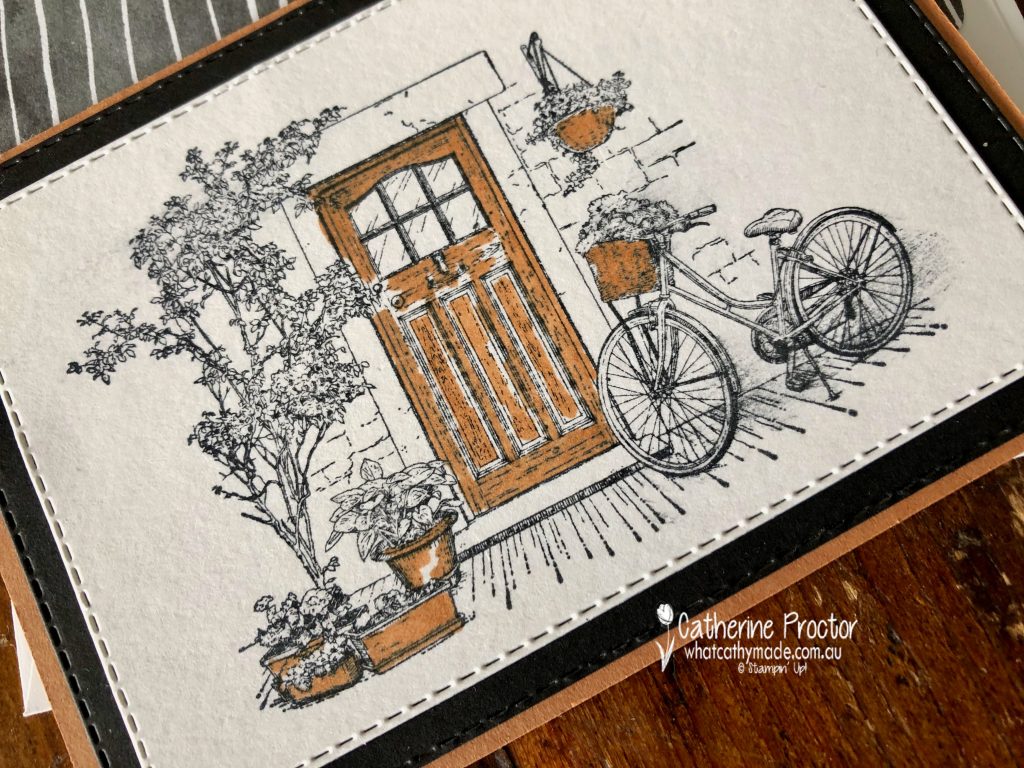
I’ve gone a bit berserk with the “Feels Like Home” stamp set today, making not one but four different cards. This stamp set is a free SALE-a-bration stamp set and I wanted to show four different ways of using it, including a “non colouring” option for crafters who don’t feel confident or don’t enjoy colouring.
This beautiful stamp set does all the hard work for you, making you look like an artist. Let me show you how.
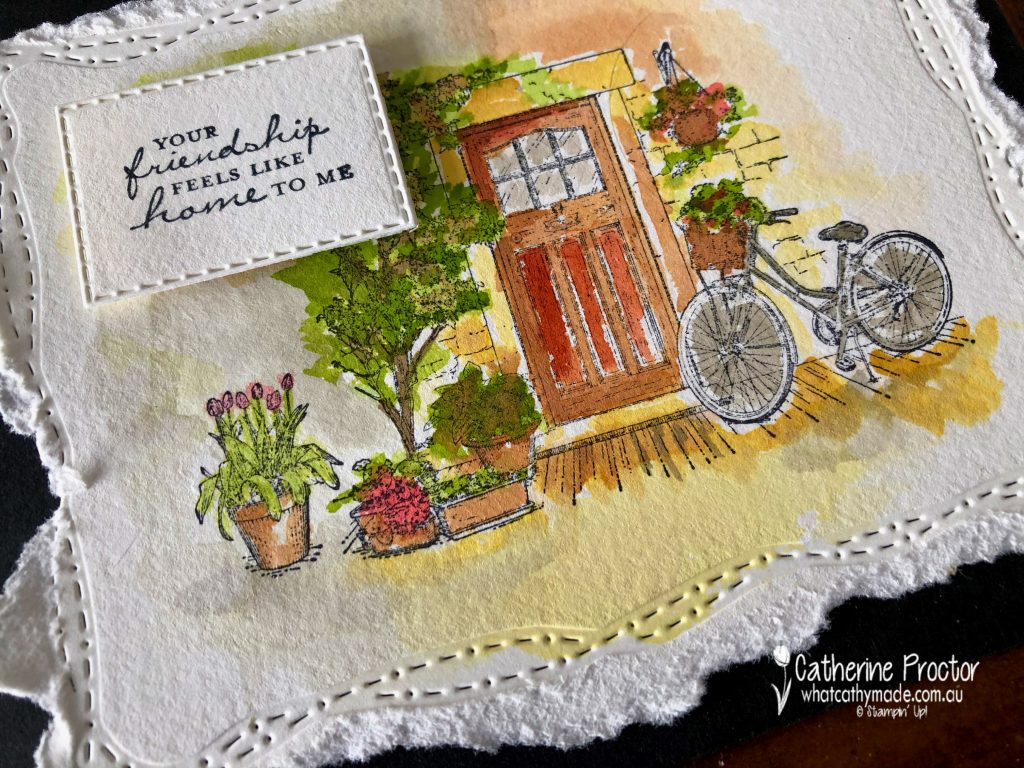
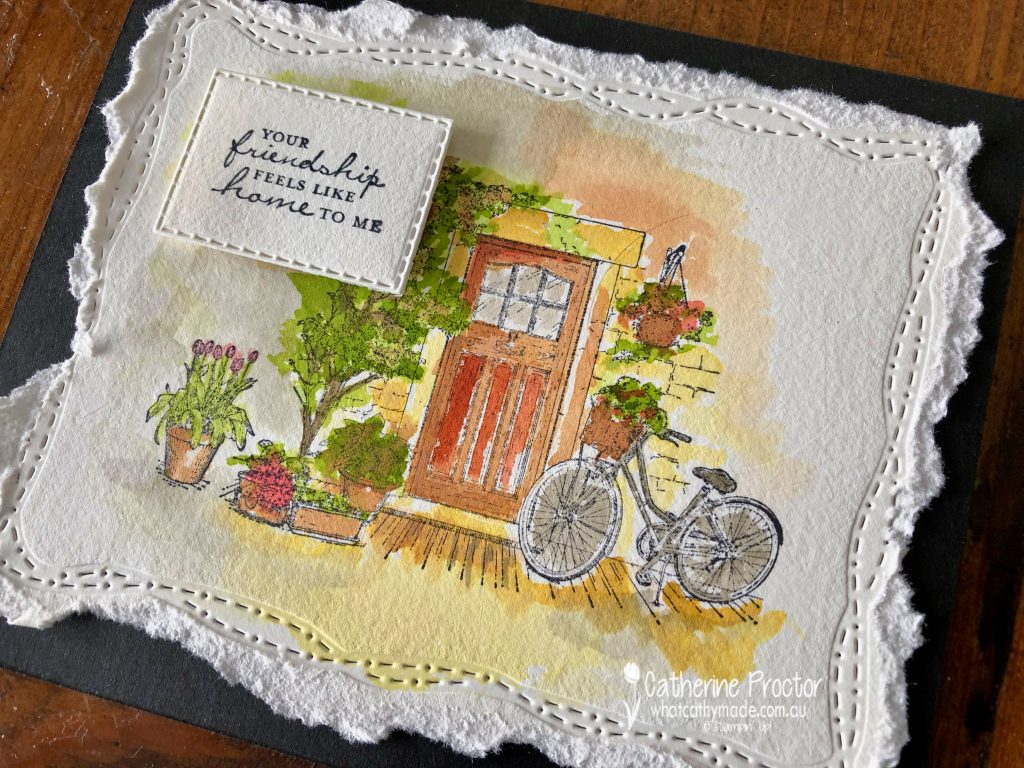
Card 1 Watercolor Card
Water colouring is easy with the right tools. Stamp with Stayzon Ink onto either watercolor paper or Shimmery white paper. Either use your inkpad lids or acrylic blocks to pick up ink from the ink pad and then paint the ink onto the image with the finest tipped Water Painter.
I still need a lot of practice with water colouring, but the great thing about water colouring is that there really are no mistakes – at least that’s what I tell myself, ha ha!
The Stitched With Whimsy dies show up really well on this watercolour paper and after embossing the paper with the largest die in this set, I held the die down on the paper and tore the paper around the edge of the metal die to add a lot of texture to the card.
The free SALE-a-bration Beautifully Penned DSP is a lovely neutral black and white, so it is perfect for making a handmade envelope to match a colourful card front like this one.
Card 2 Stampin’ Blends
I’m a lot more confident colouring an image with the Stampin’ Blends – don’t forget to stamp in Tuxedo Black Memento ink when using any alcohol marker, such as Stampin’ Blends. I also experimented a bit more with my colour combinations on this card, using light Gray Granite and Pale Papaya for the brick wall around the Cinnamon Cider door. I quite like this colour combination!
The second largest Stitched With Whimsy die perfectly framed the image and I deliberately didn’t add a sentiment so I could use this card for a variety of purposes.
Card 3 Monochromatic note card
Only colouring in with one colour (the light Cinnamon Cider Stampin’ Blend) on the image stamped in Tuxedo Black Memento Ink really showcases Cinnamon Cider and makes for a fast, easy and effective colouring technique.
Cardstock layers die cut with the stitched rectangle dies in Basic Black and Cinnamon Cider keep a restrained monochromatic colour scheme. I’ve adhered another strip of the free SALE-a-bration Beautifully Penned DSP to the back flap of a notecard envelope to coordinate.
Card 4 Simple Stamping
Okay, yes I did quickly run this card through the sewing machine, but apart from that, it is just Cinnamon Cider stamped onto Basic White cardstock – this image is so lovely I don’t think it really needs anything else. I love the sepia effect Cinnamon Cider gives to this card! I had a bit of fun tearing the Basic White paper and curling the edges with my paper snips – such a simple way to instantly add texture and interest.
I hope my cards have inspired you to give this stamp set a go, even if you don’t feel confident with colouring! Which one do you prefer?
Now it’s time to hop on over to our next participant, Claire Daly. I can’t wait to see what she’s made this week!
If you find a broken link or have come to this blog hop from a different entry point, you can view the the full list of participants below:
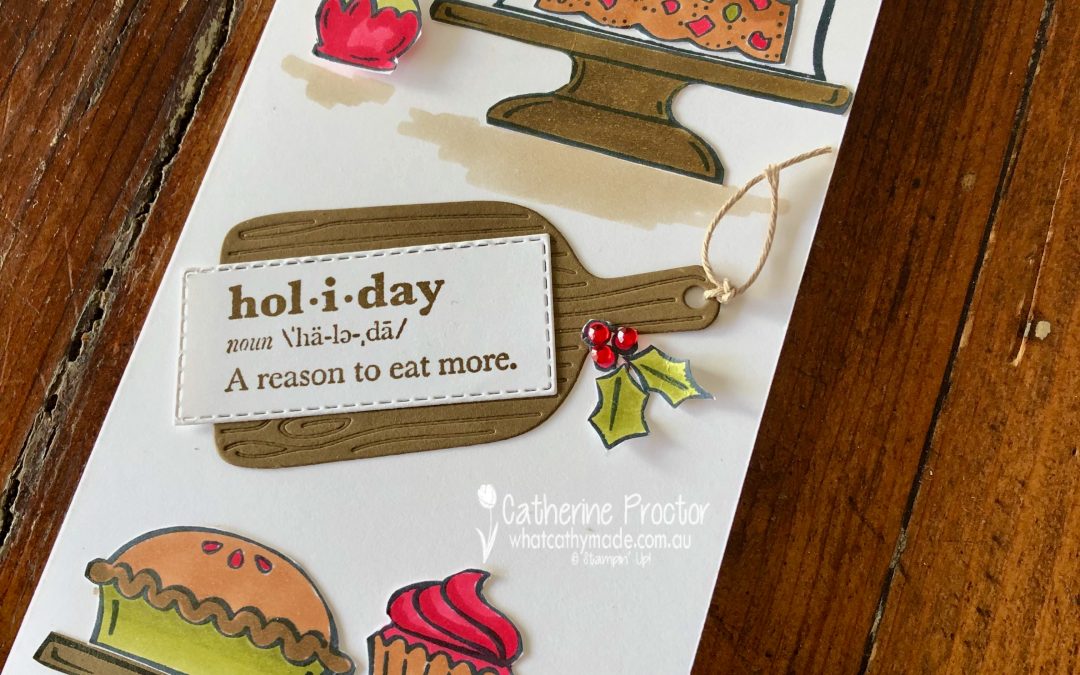
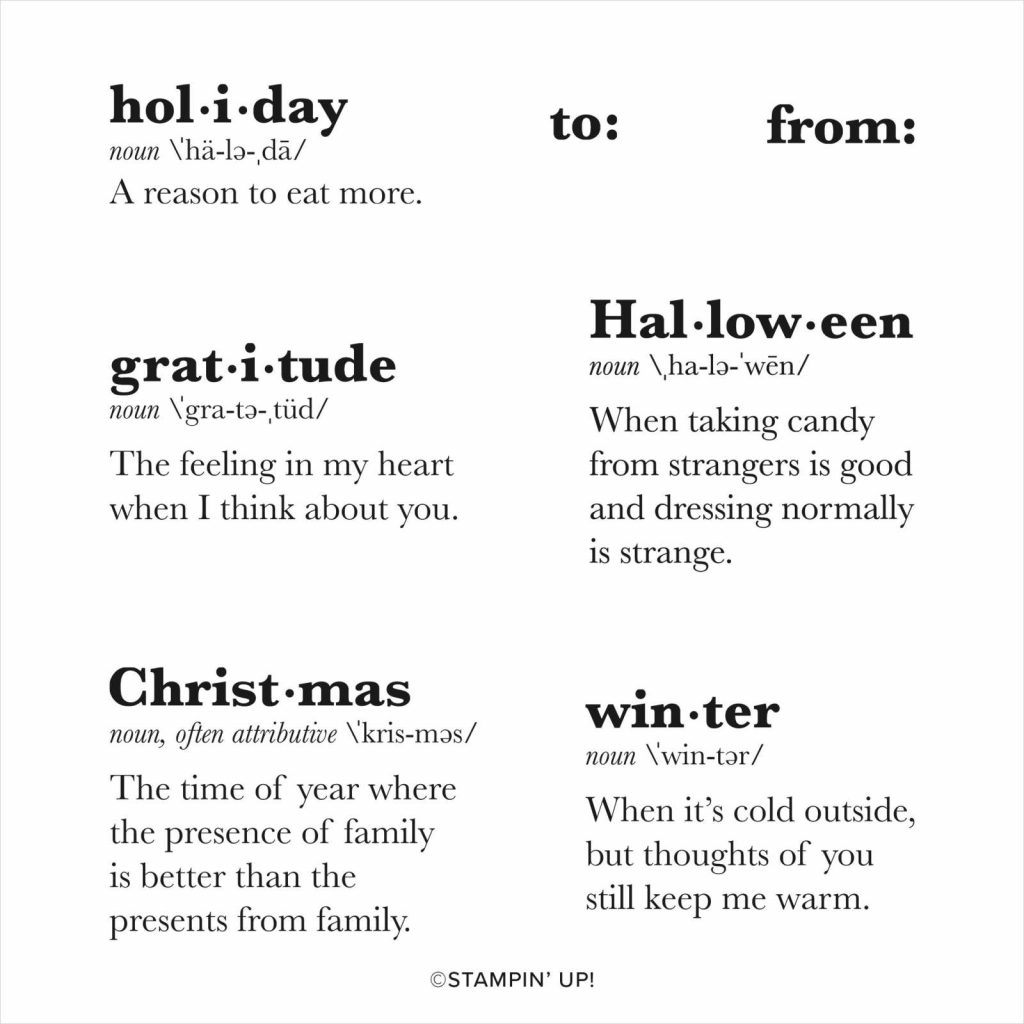
This week I’ve used a sentiment stamp set from the new July-December 2021 Mini Catalogue that could be easily overlooked, but I was lucky enough to win from my upline Claire, the Well Defined stamp set.
I’m not sure why I hadn’t used this stamp set before as I love dictionary definitions. In fact, I’ve just finished reading an amazing novel called “The Dictionary of Lost Words”, based on the true story of the women who were involved in the making of the Oxford English Dictionary. It’s a part of history I had never heard of before, beautifully told in one of the best books I’ve read this year.
Although these stamps have been created to look like an official dictionary entry, I’m not sure they would have been included in either the official Oxford Dictionary or even in the Dictionary of Lost Words!
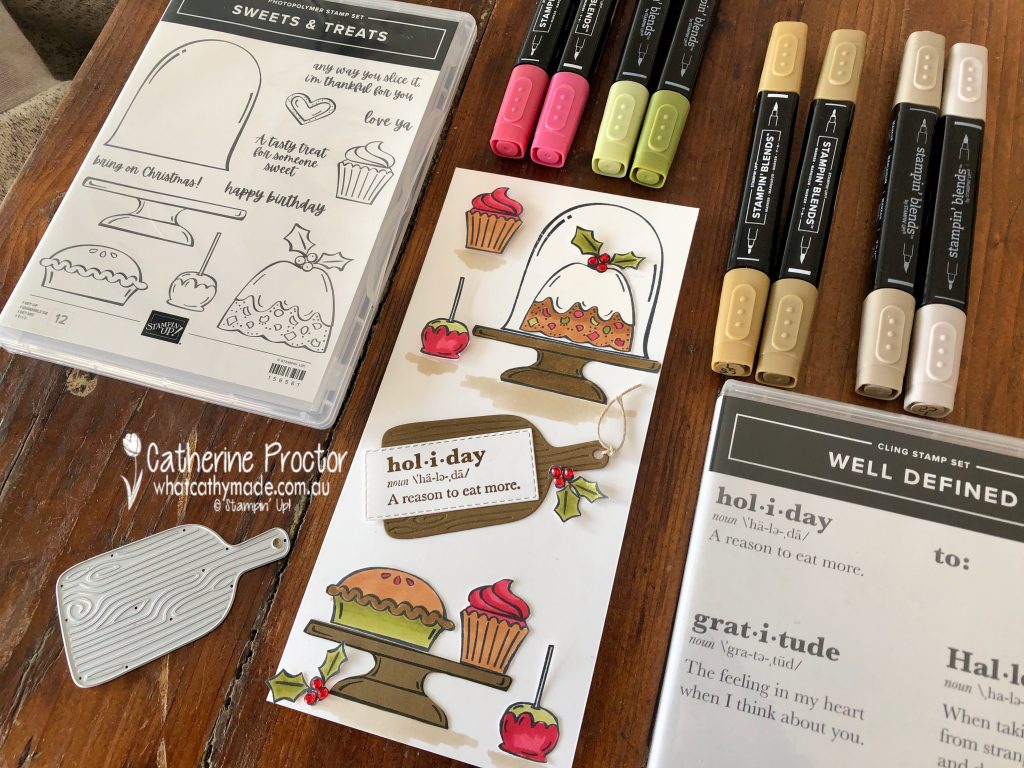
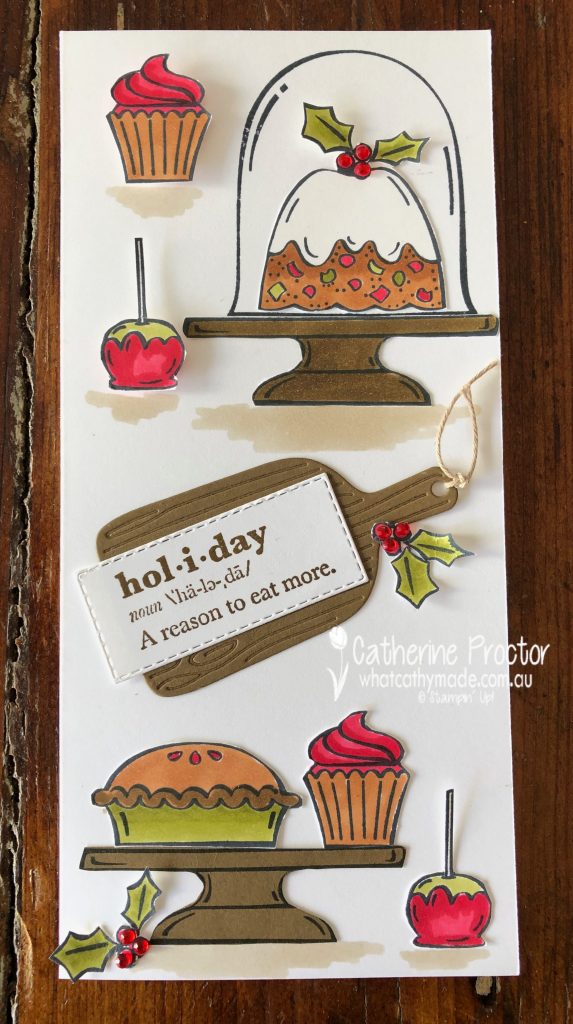
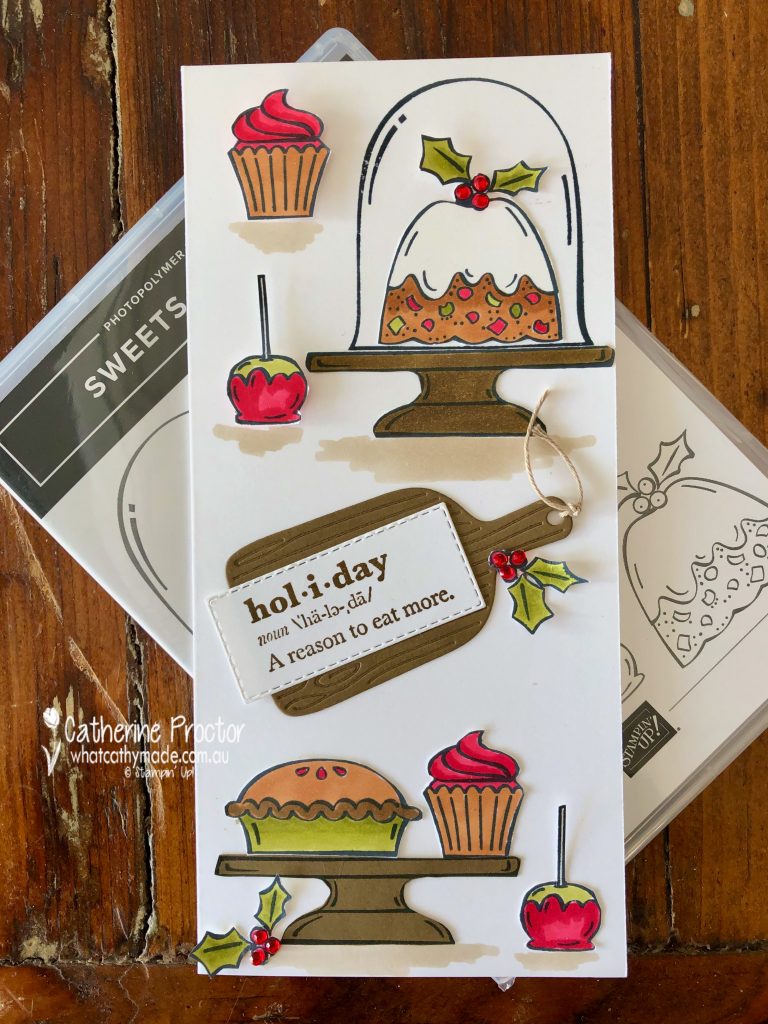
I’ve got plenty of ideas for cards to make with each of the dictionary definitions, however I’ve just used the “holiday” definition stamp today because I wanted to pair it with the Sweets & Treats stamp set for a fun, festive and food-themed card.
Stampin’ Blends in light and dark Old Olive, Real Red and Soft Suede give my card a traditional Christmas colour scheme, with scribbles of the light Crumb Cake Stampin’ Blend to anchor the images.
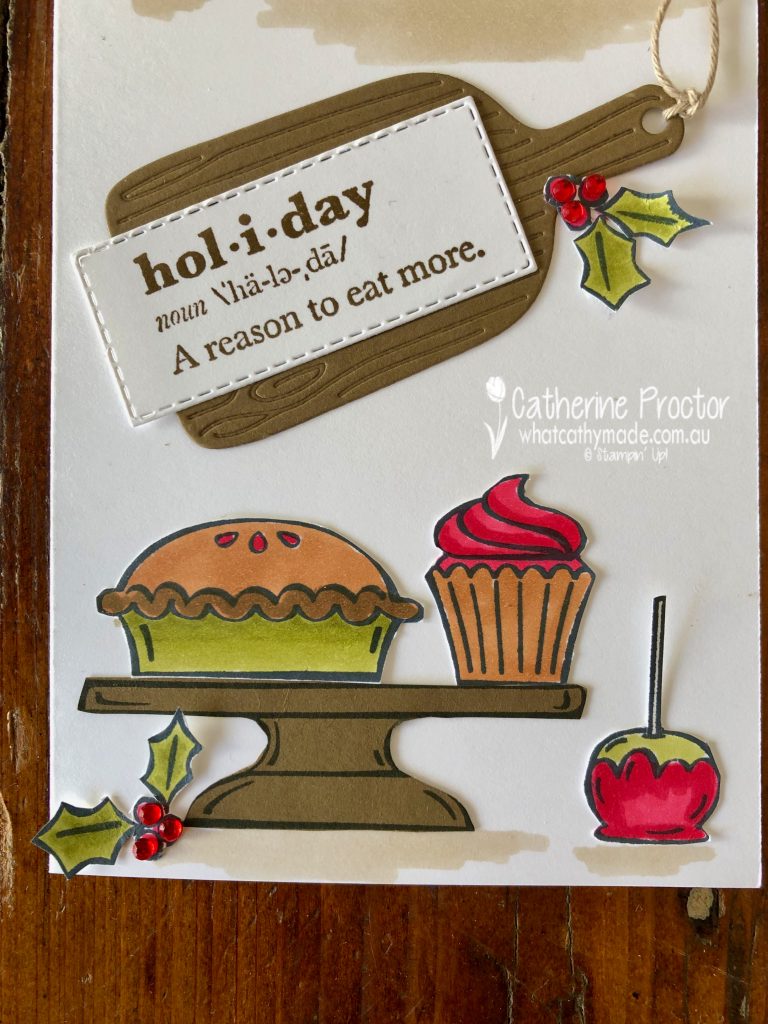
The sentiment is stamped in Soft Suede before being mounted onto the chopping board die from the Cookin’ Dies. I love how this little die embosses the card stock at the same time as it cuts out the shape of the chopping board.
I stamped two extra the holly sprigs from the plum pudding image and fussy cut them out to add a little more festive cheer. Red Rhinestone jewels are the perfect fit for the little holly berries and add a touch of bling to the card.
I must admit, although I adore the plum pudding stamp, I actually hate plum pudding, Christmas cake or any desserts that include dried fruit. I would, however, happily eat the cupcakes, toffee apples and definitely the cherry pie!
I had a lot of fun making this card – I hope it puts a smile on your face too!
Now it’s time to hop on over to our next participant, the incredible talented Michele Taylor. I wait to see what Michele shares with us today!
If at any time you find a broken link please head to the blog of this week’s Host of the Heart of Christmas Blog Hop, Tina Gillespie, as she has the full list of links for everyone who is participating.
You can purchase any of the products I’ve used tonight here.
Thanks for visiting my site. I’ll be back with another card on Wednesday.
In the meantime, wherever you are in the world, stay safe, stay calm … and keep on crafting xxx
Hello to all my crafting friends! Do you enjoy being challenged with your crafting? I certainly do!
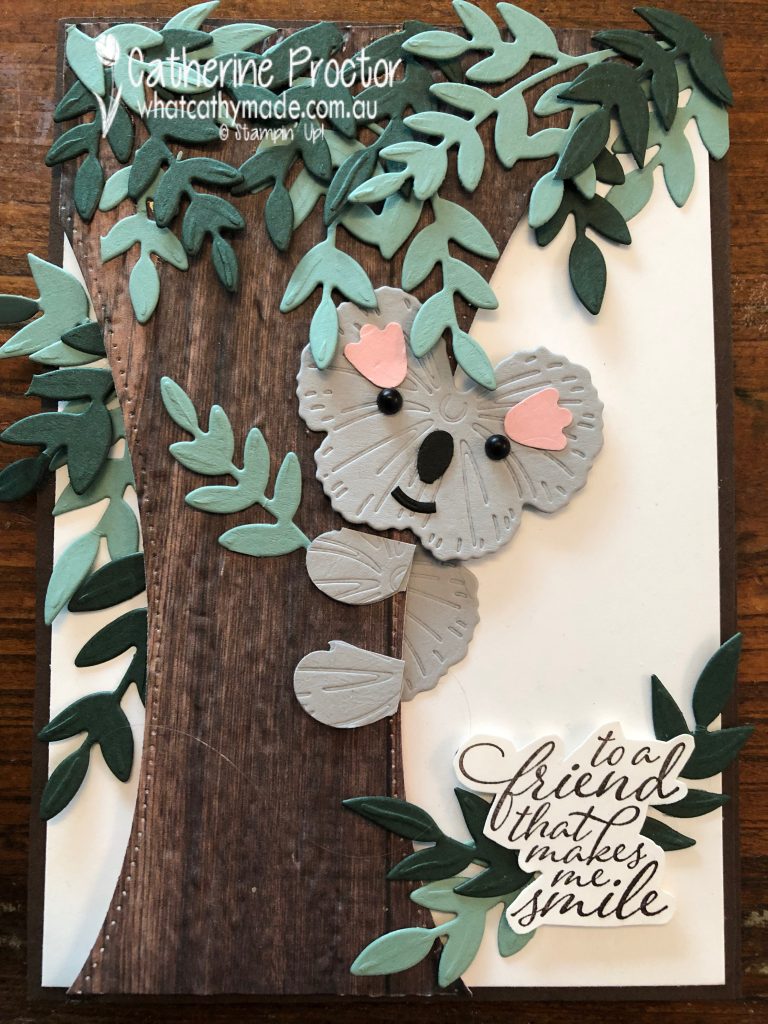
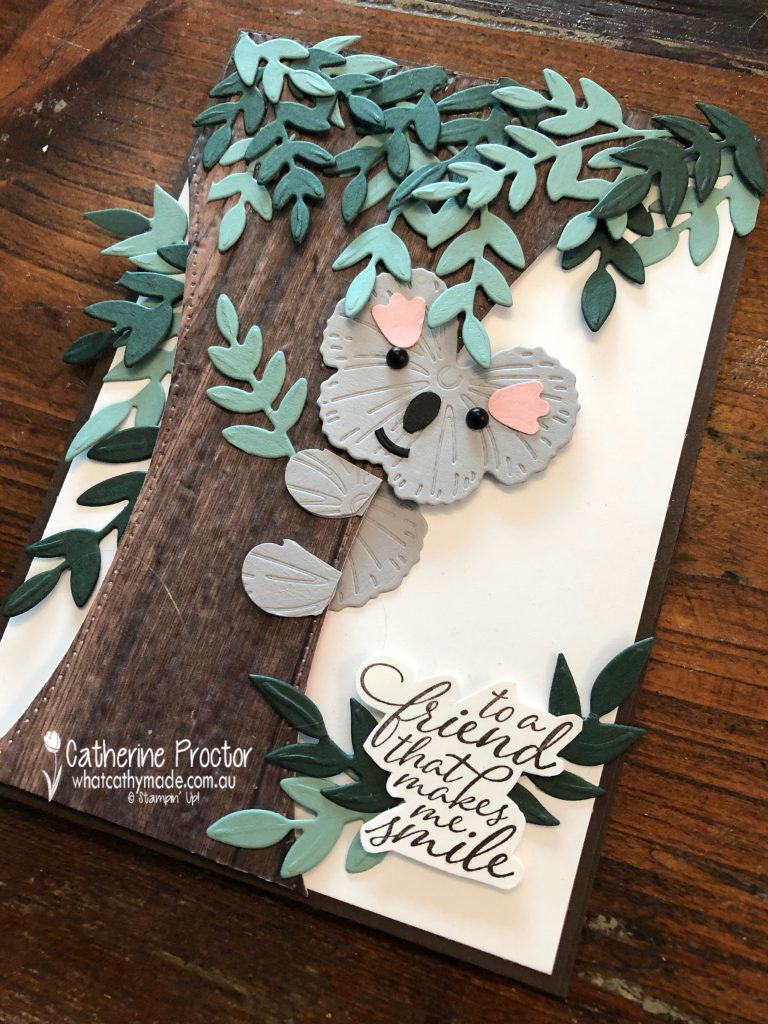
Today I’m sharing my entry for the inaugural “G’day Fri’yay’ Card Making Challenges” group, who are hosting fortnightly Card Making Challenge with Aussie Themes.
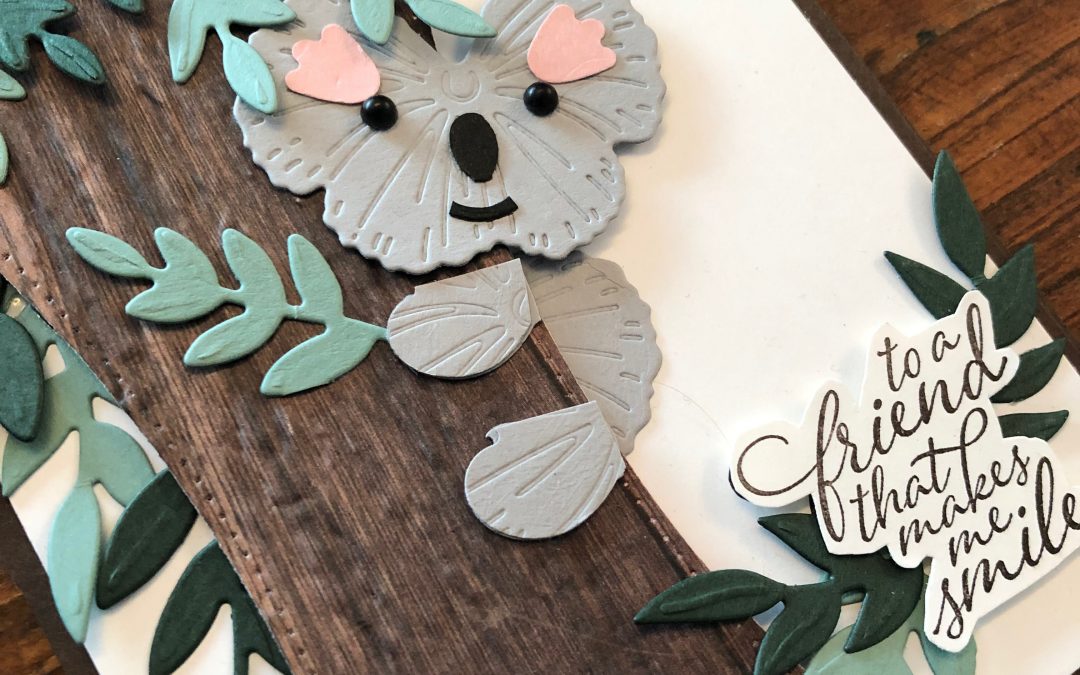
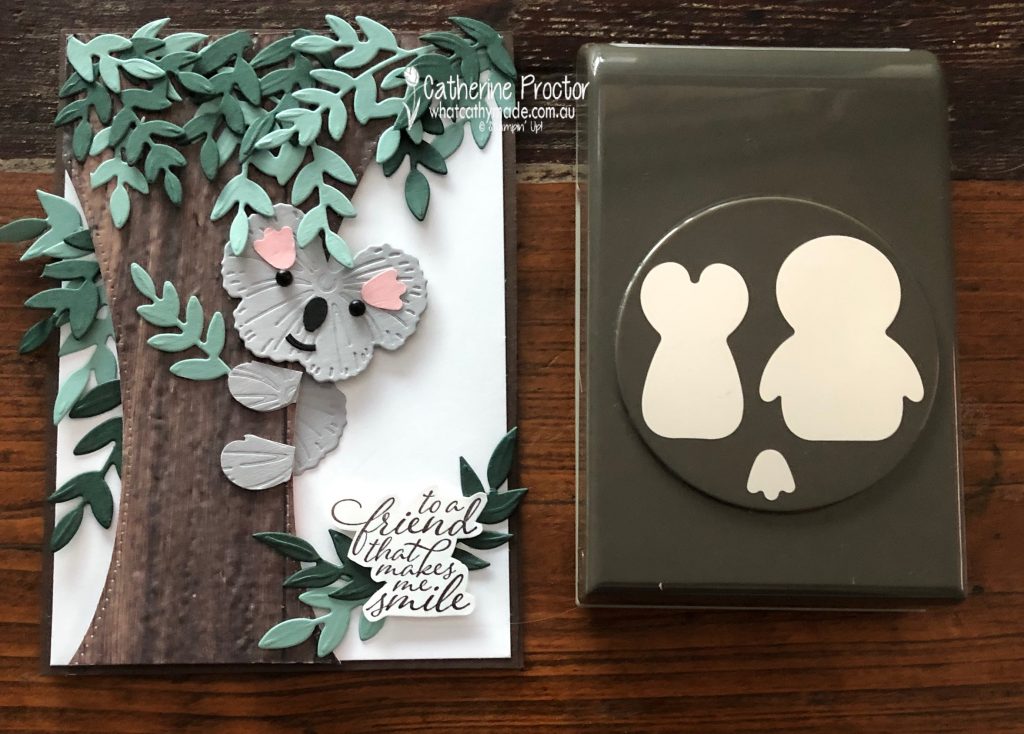
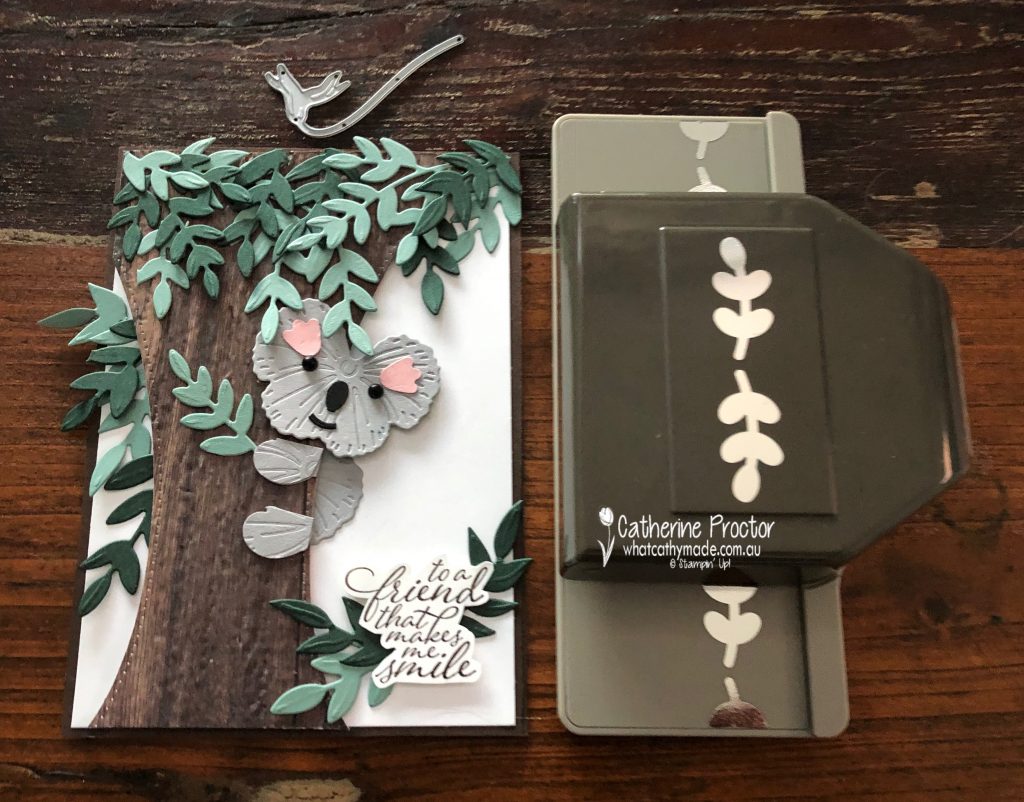
The theme for this challenge is koalas, however, although I don’t have a current Stampin’ Up! set with a koala imageI wasn’t going to let that stop me from entering.
So how did I create my koala? It was a combination of dies, punches and an embossing folder. Let’s just call it “die and punch art” and be done with it!
To make the tree I embossed some of the In Good Taste DSP with the Bark 3D embossing folder and used the long, curved Basic Border dies to create the shape of the trunk.
Evening Evergreen and Soft Succulent cardstock die cut with Forever Flourishing dies make for pretty realistic eucalypt leaves, don’t you agree? I hope the koala agrees because he doesn’t eat anything else!
I cannot believe how easy it was to make the little koala from Smoky Slate cardstock with the Pansy Dies! These Pansy dies emboss and cut at the same time, making my little koala even more realistic!
The feet of the new Penguin Builder Punch were punched in Blushing Bride for the inside of the ears.
The curve in the stem of one of the Pansy dies was die cut in Basic Black cardstock for the mouth and the nose was made by trimming a punched piece of Basic Black cardstock with the Symmetrical Stems Border Punch.
Two Matte Black Dots worked perfectly for the eyes!
I hope my “die and punch art” koala inspires you too to take a fresh look at your crafting supplies too and find new and creative ways of using them!
Thanks for visiting my blog today. I’ll be back next Monday with Heart of christmas inspiration and our weekly AWH Colour Creations Showcase – we are creating projects with Cinnamon Cider this week.
When you shop online in my Stampin’ Up! Online Store don’t forget to use my monthly Host Code (if your order is between $50 – $250) and I will send you a thank you gift the following month. If your order is over $250 don’t use the host code because you will qualify for your own stamping rewards.
My August Host Code is AHQUWNVQ and it is valid until midnight August 31.
In the meantime, wherever you are in the world, stay safe, stay calm … and keep on crafting xxx
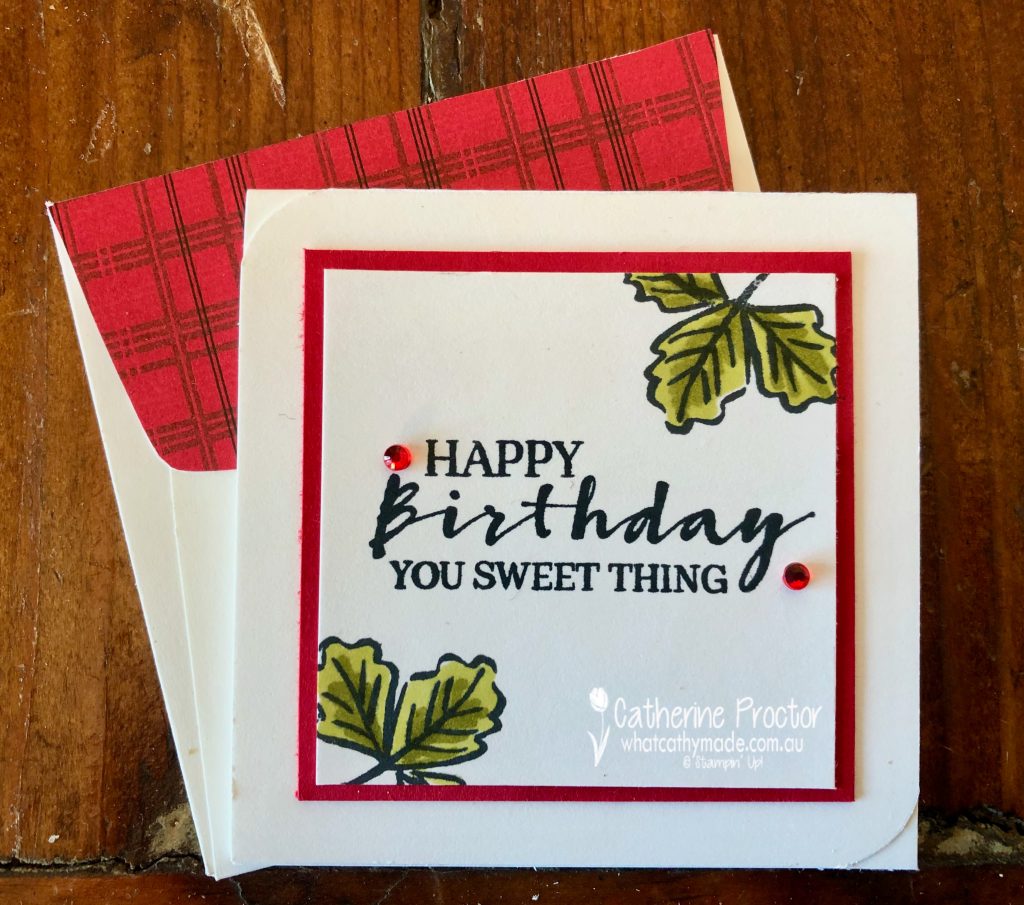
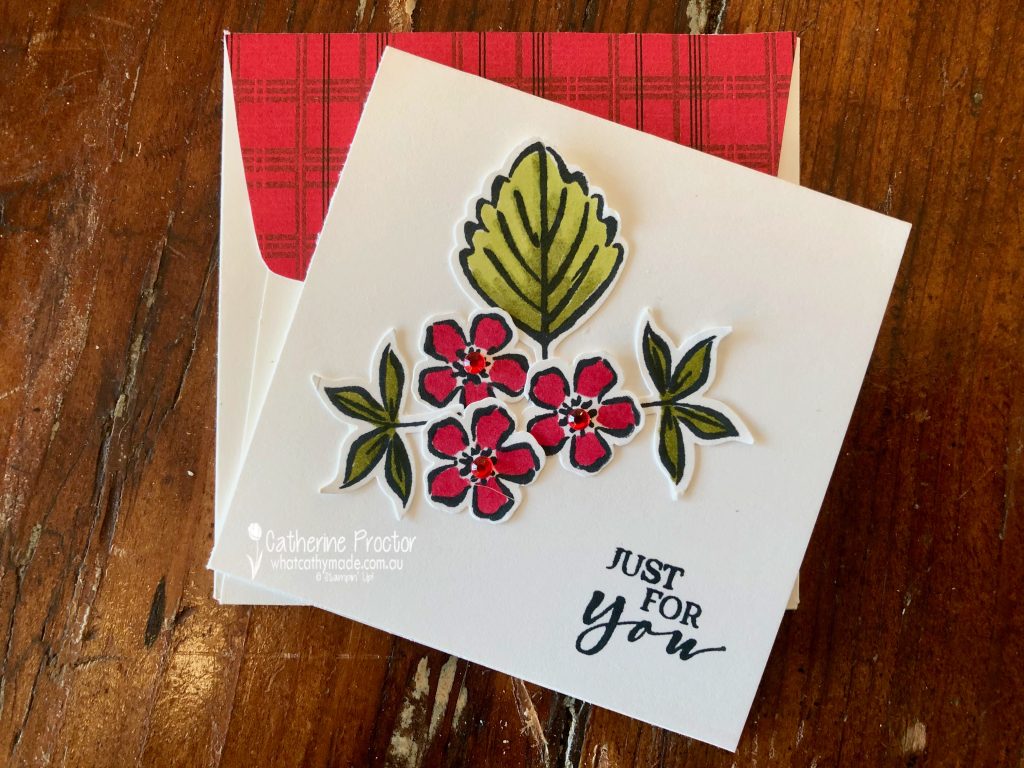
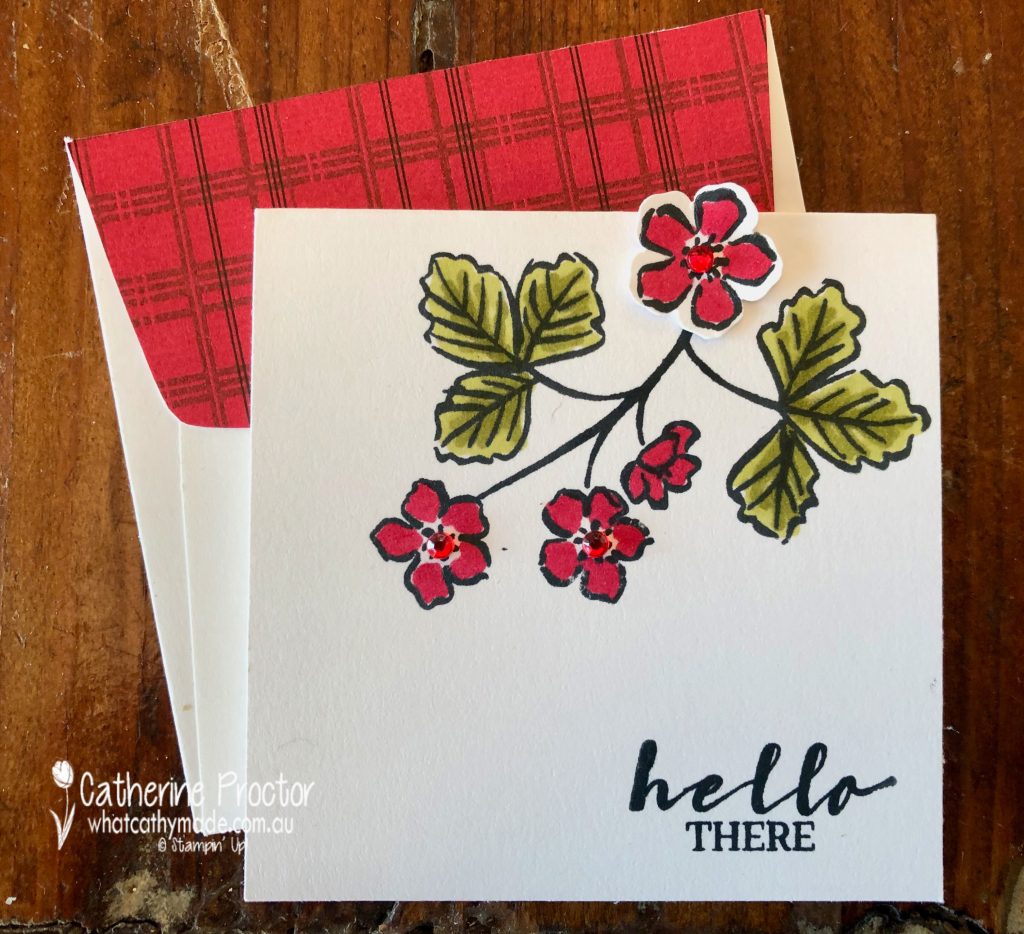
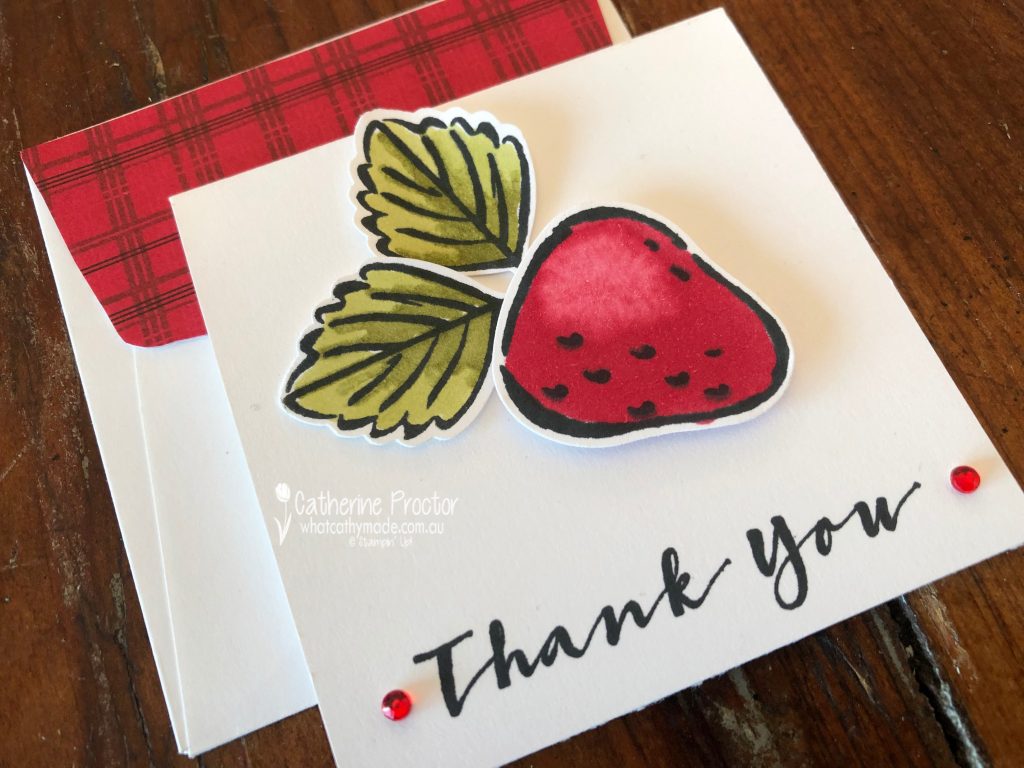
Welcome to week 10 of our 2021-22 Colour Creations blog hop! Tonight we are showcasing Cherry Cobbler, from the regals collection.
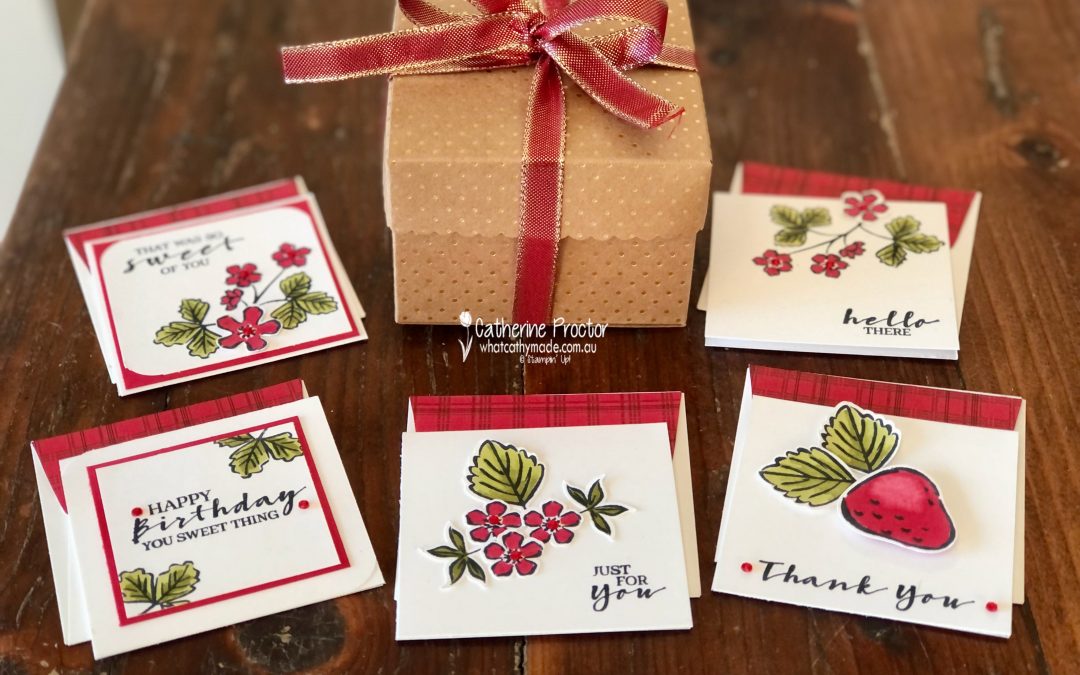
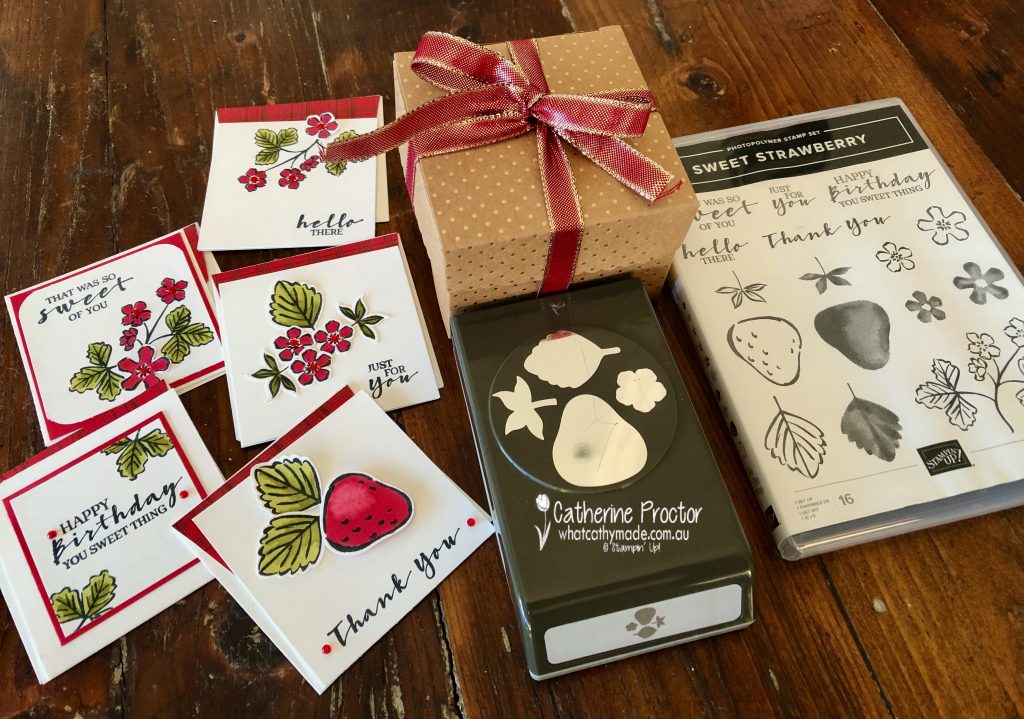
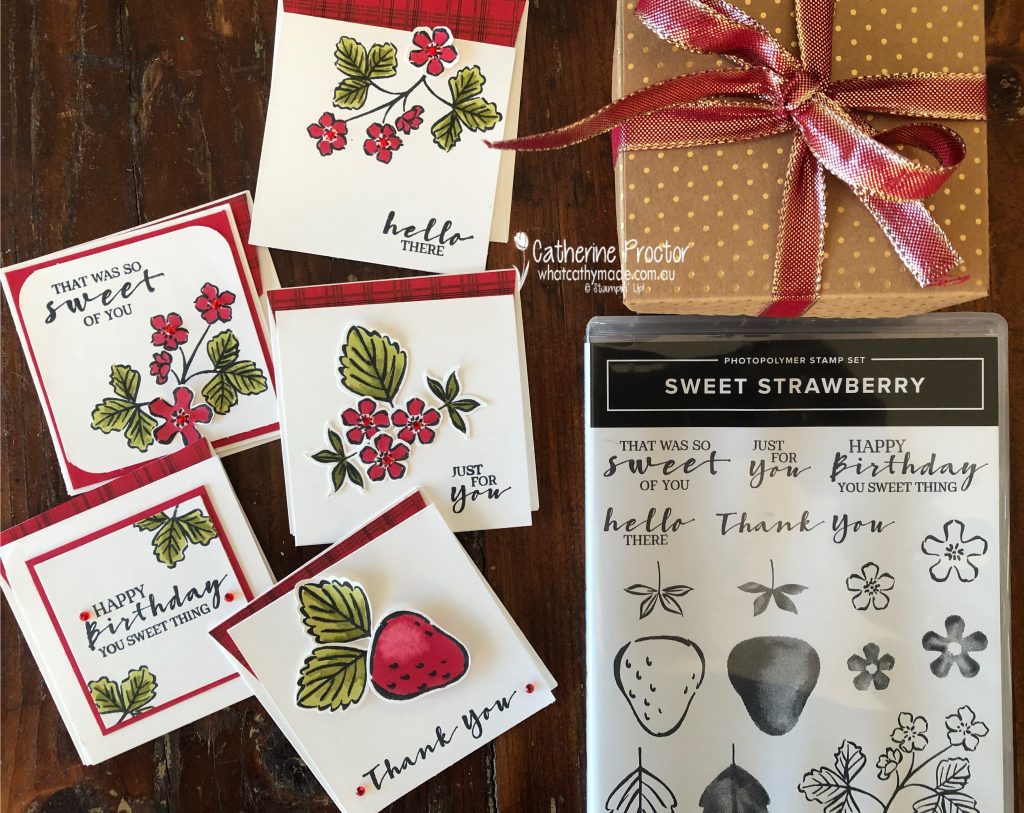
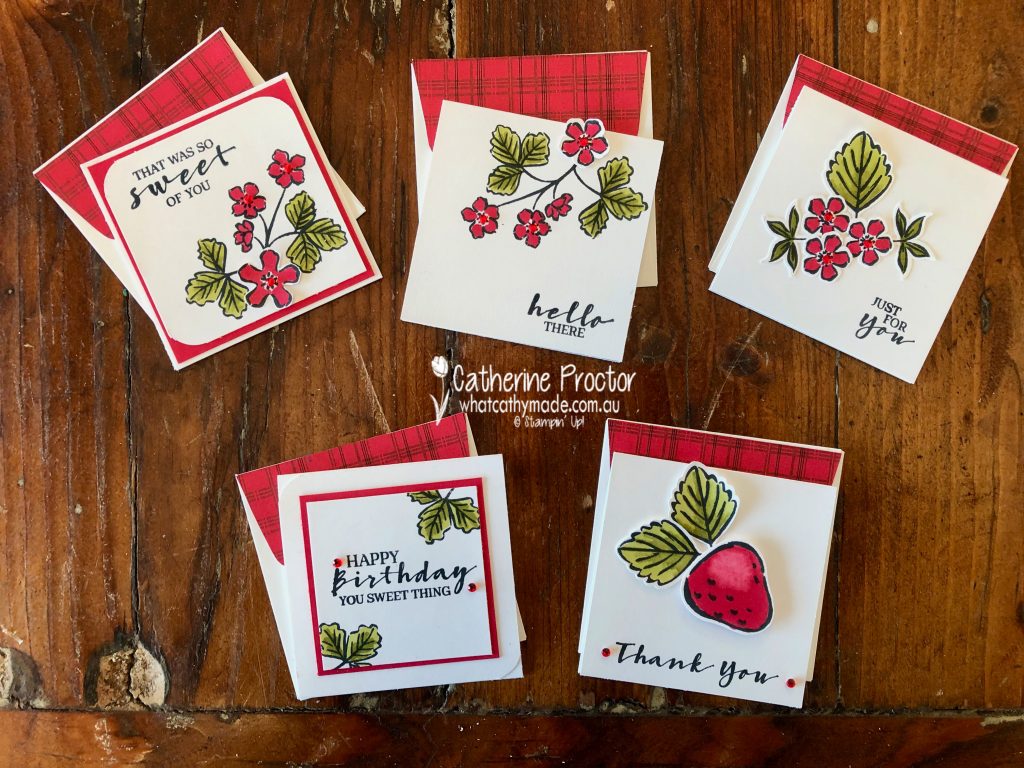
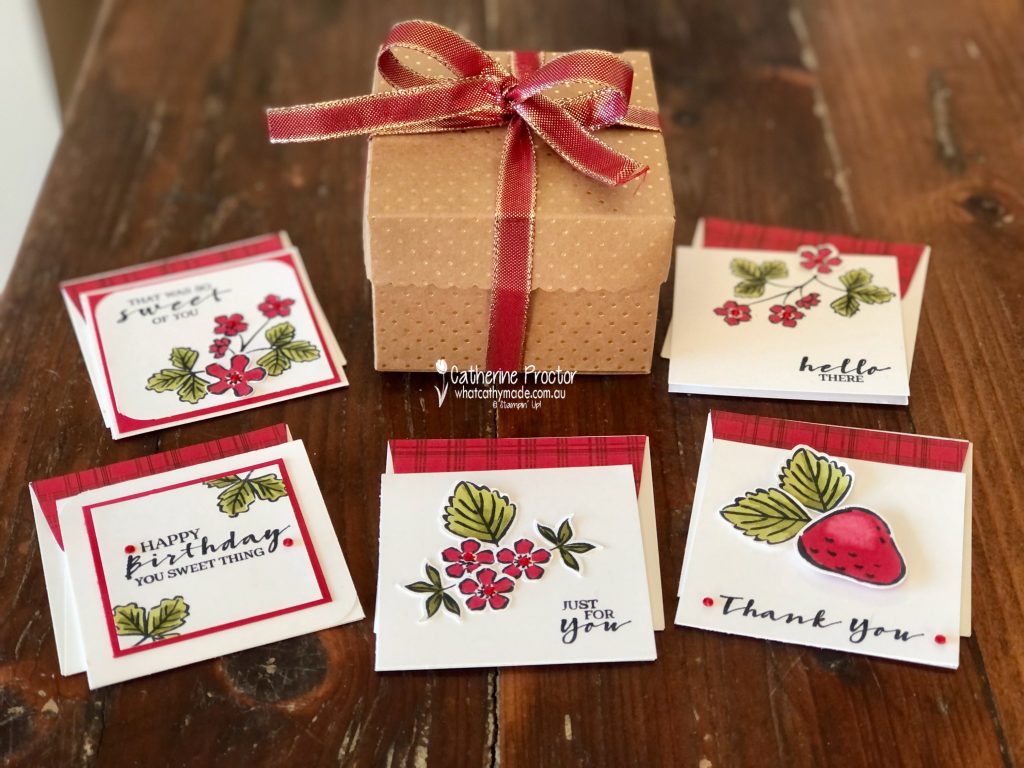
I normally use Cherry Cobbler to make Christmas cards, however, as I’m already making a Christmas card every Monday for our Heart of Christmas blog hop I decided to make a non-Christmas project instead that uses the Sweet Strawberry bundle and the stunning Cherry Cobbler & Gold 1/2″ (1.3 cm) Ribbon.
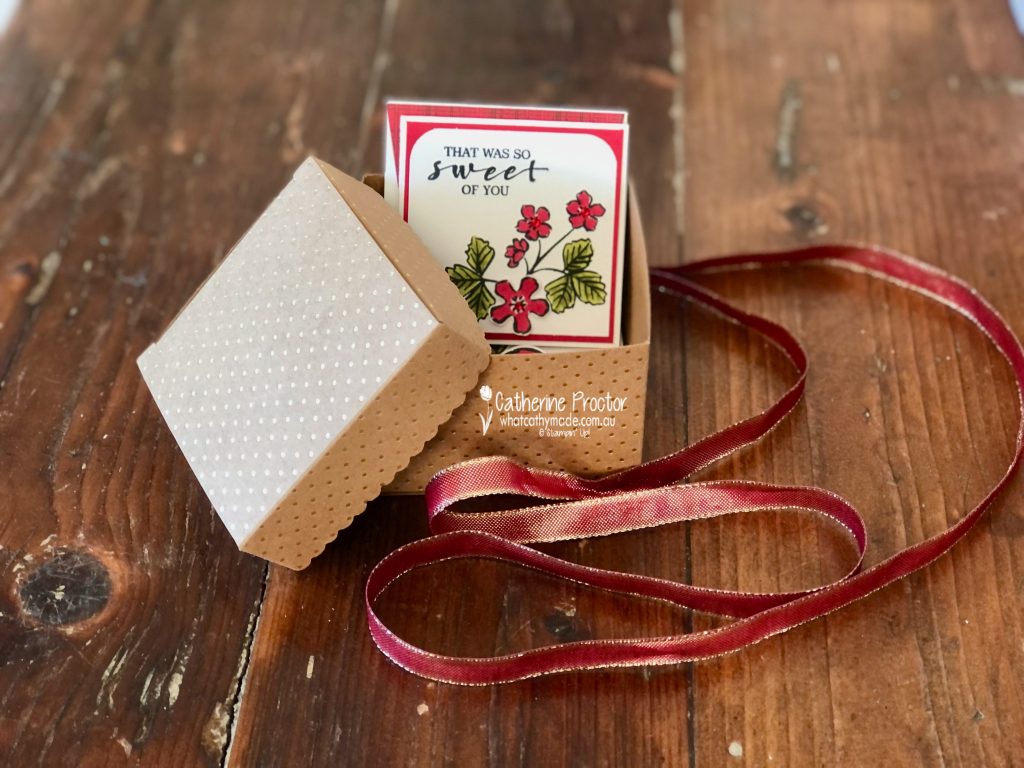
Have you seen the the Scalloped Kraft Treat Boxes in the Annual Catalogue? They are covered in tiny gold foil dots and they are perfect size for packaging up a selection of 3×3 inch notecards. They also coordinate so well with the Cherry Cobbler & Gold 1/2″ (1.3 cm) Ribbon.
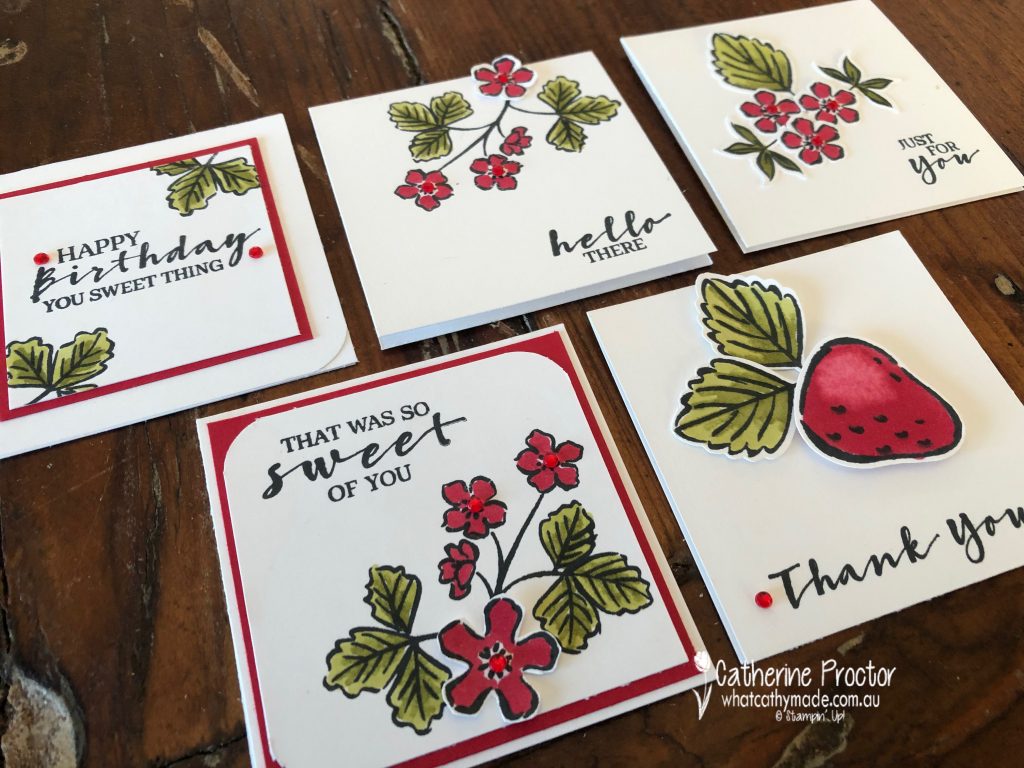
The Sweet Strawberry stamp set was the perfect stamp set to be coloured in with my light and dark Cherry Cobbler Stampin’ Blends. I’ve also used light and dark Old Olive Stampin’ Blends for the leaves.
There’s a lovely selection of sentiments in this stamp set and I’ve used a different one on each notecard.
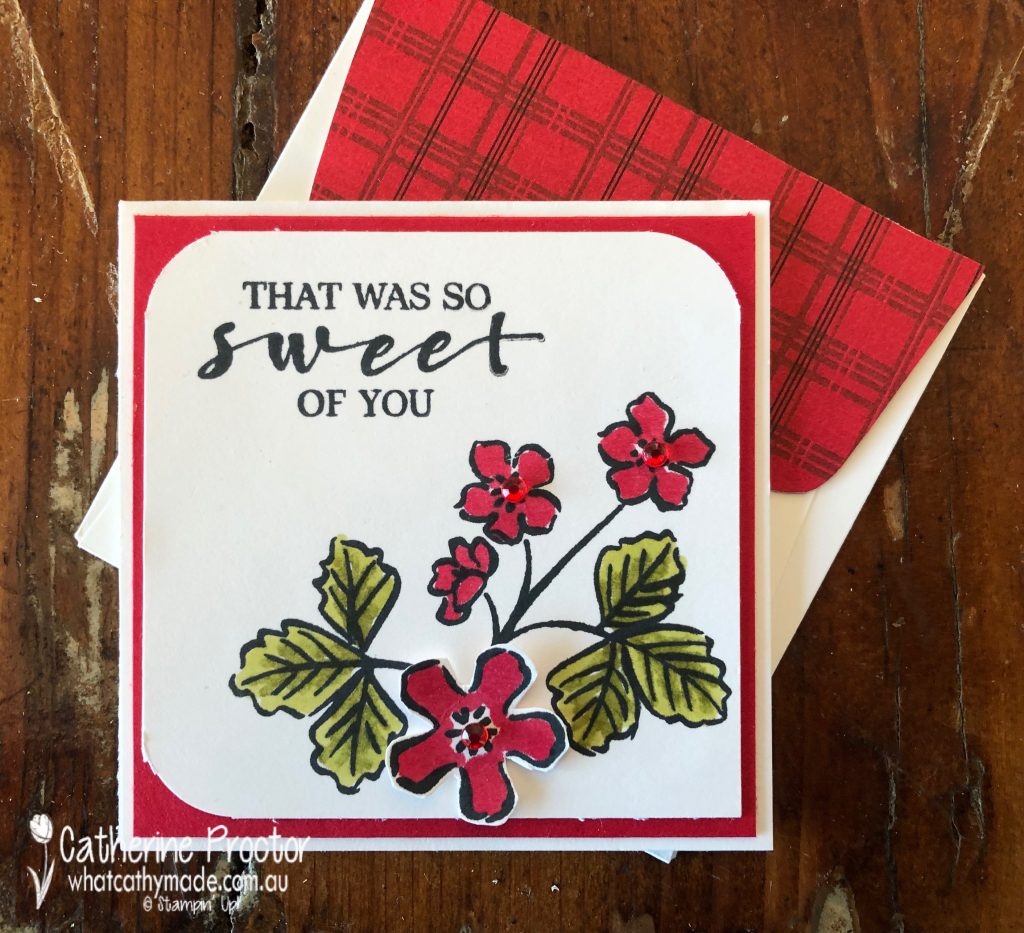
Here’s a closer look at each note card. For the first two notecards I added a layer of Cherry Cobbler Cardstock behind the stamped layer and I stamped directly onto the top card stock layer.
The coordinating Strawberry Builder punch punched out the strawberry, the large and small leaf and the strawberry flower that I’ve used for these notecards below – the large flower I fussy cut with my paper snips. Red Rhinestone Basic Jewels add a tiny touch of bling.
These Stampin’ Up! square envelopes come in a pack of 40 and are designed to fit 3″ x 3″ (7.6 x 7.6 cm) notecards. To coordinate with envelopes with my Cherry Cobbler notecards I’ve simply glued a strip of the Peaceful Prints FREE Sale-a-bration Designer Series Paper to the envelope flaps and trimmed the DSP with paper snips to fit the curve of the envelope flaps.
Although this DSP has Christmas designs on one side, the other sides are all background patterns you can also use on non-Christmas cards, like I have done here, using the Cherry Cobbler and Basic Black check pattern to decorate the envelope flaps.
The final touch for my gift box of Cherry Cobbler notecards is to tie it up with the new Cherry Cobbler & Gold 1/2″ (1.3 cm) Ribbon.
Now it’s time to hop on over to our next participant, Rachel Palmieri. I can’t wait to see what she’s made this week!
If you find a broken link or have come to this blog hop from a different entry point, you can view the the full list of participants below:
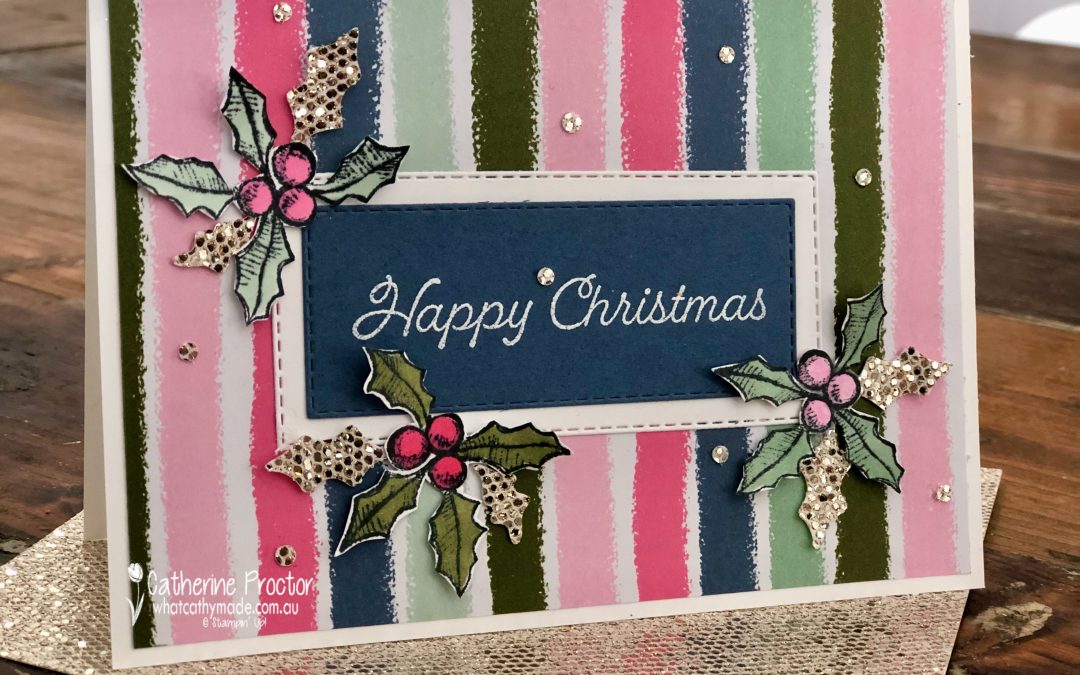
The new July-December 2021 Mini Catalogue and SALE-a-bration catalogues go live tomorrow so I’m sharing another card that uses some of these beautiful Christmas products.
I’m not really a sparkly girly girl at all but I just can’t stop using this FREE Be Dazzling specialty designer paper from the SALE-a-bration catalogue. I’ve taken a zillion photos of my card to show you just how gorgeous this Be Dazzling specialty designer paper is!
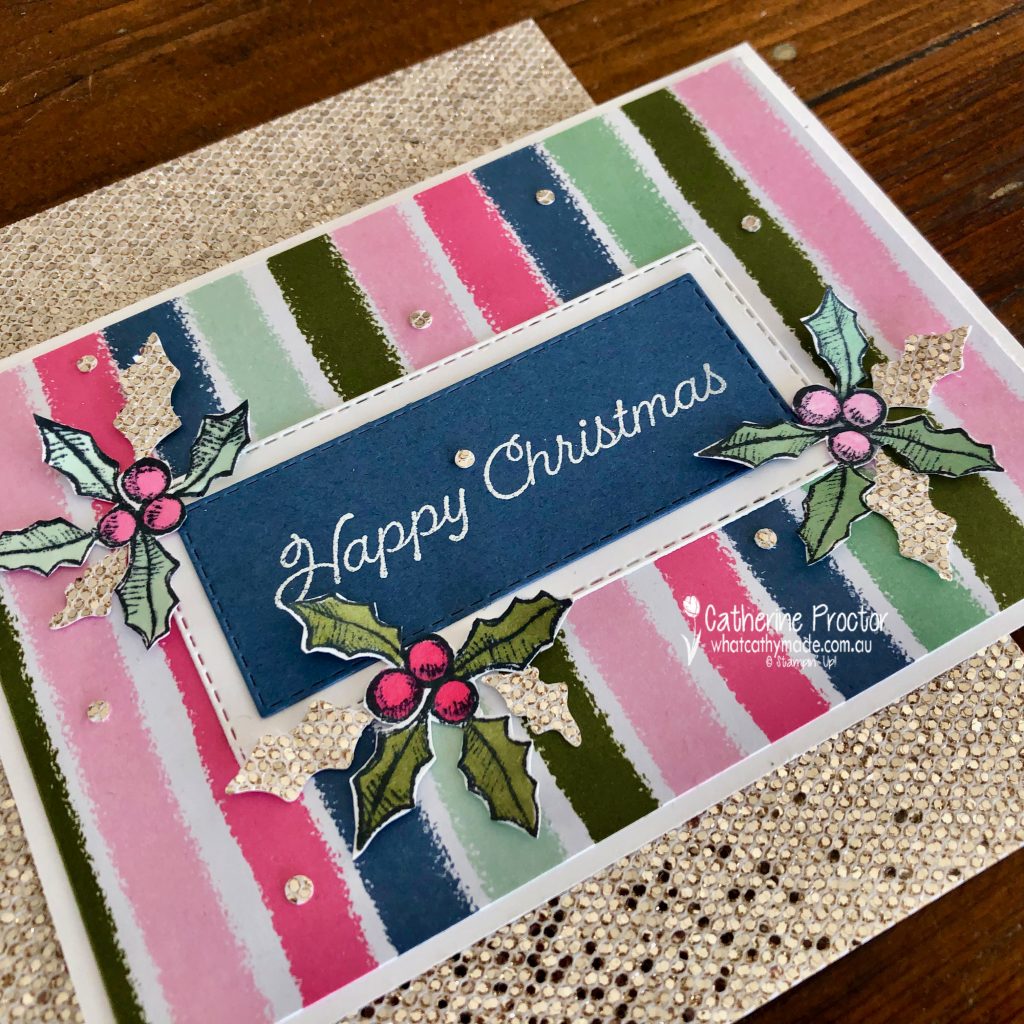
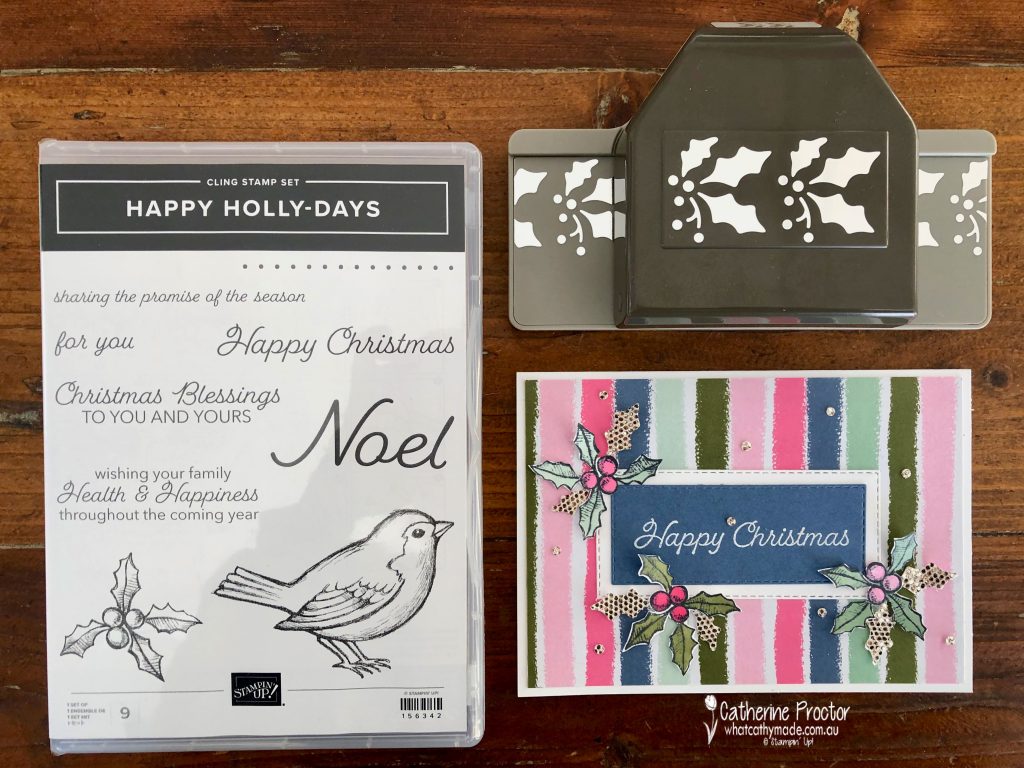
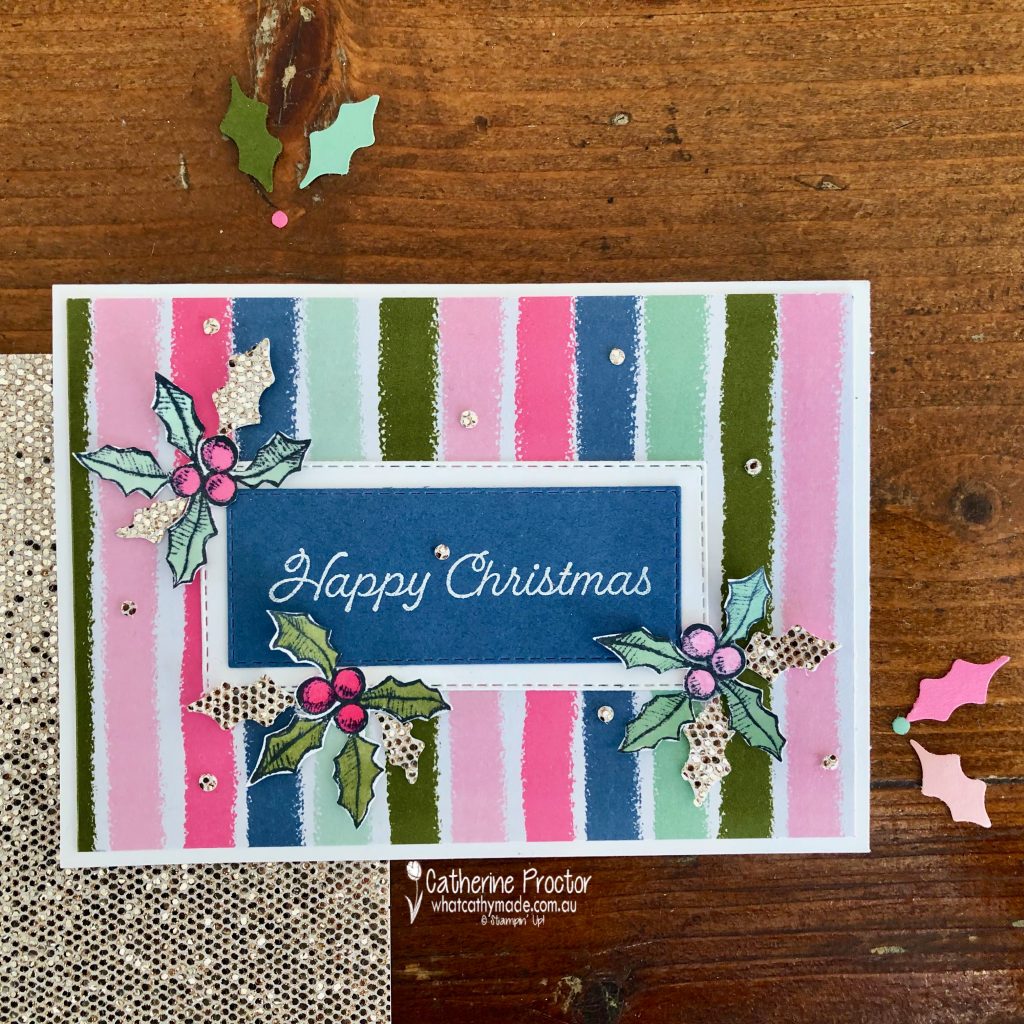
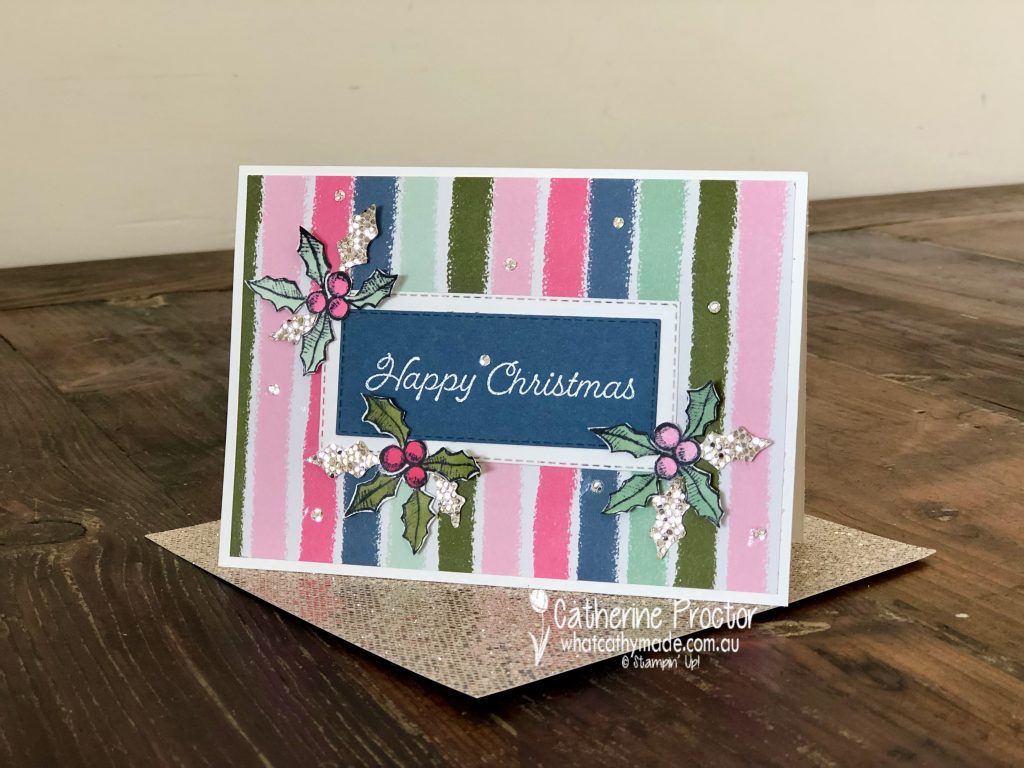
I’ve also used one of my favourite bundles from the July-December 2021 Mini Catalogue – the Happy Holly-Days Bundle. Last week I shared this card with you that featured the adorable bird coloured in – this week I’ve used the holly stamp and the Holly Border Punch from the Happy Holly-Days Bundle.
What’s that stunning striped Designer Series Paper I hear you cry? It’s my favourite DSP from the new July-December 2021 Mini Catalogue, called Whimsy & Wonder Designer Series Paper.
I cannot begin to tell you how stunning this DSP is. The colour combination is: Polished Pink, Blushing Bride, Mossy Meadow, Mint Macaron, Misty Moonlight and Iridescent. It is foiled on one side, with gorgeous background patterns (like the stripes I’ve used today) on the other side.
This card layout would work with any Designer Series Paper – just pick up the colours in the DSP for when you colour in the holly. I used light and dark Polished Pink, Mossy Meadow and Mint Macaron blends to colour the holly and then I fussy cut it out. If you don’t enjoy fussy cutting just use the holly punch to punch out cardstock in colours that co-ordinate with your DSP.
An added bonus of this punch is the little dots it punches out – don’t waste them! Just like I did with the Deer Builder punch on this card, I’ve used these dots as tiny embellishments.
These tiny dots can be tricky to adhere as they are so small. I find the easiest way to do this is to place a small amount of multipurpose glue onto the silicon mat and then insert the sharp tip of your “Take your Pick” tool into the glue. Use this tip with the glue to pick up the back of the embellishment, place it on your card and gently press down as you slide the “Take your Pick” tool out from under the embellishment.
Now it’s time to hop on over to our next participant, the incredible talented Theresa Gerrard. I wait to see what Theresa shares with us today!
If at any time you find a broken link please head to the blog of this week’s Host of the Heart of Christmas Blog Hop, Rachel Woollard, and she will have the list of all who are participating.
Thanks for visiting my site. I’ll be back with another card on Wednesday. If you’d like a copy of the forthcoming July-December mini catalogue and the Sale-a-bration catalogueplease get in touch.
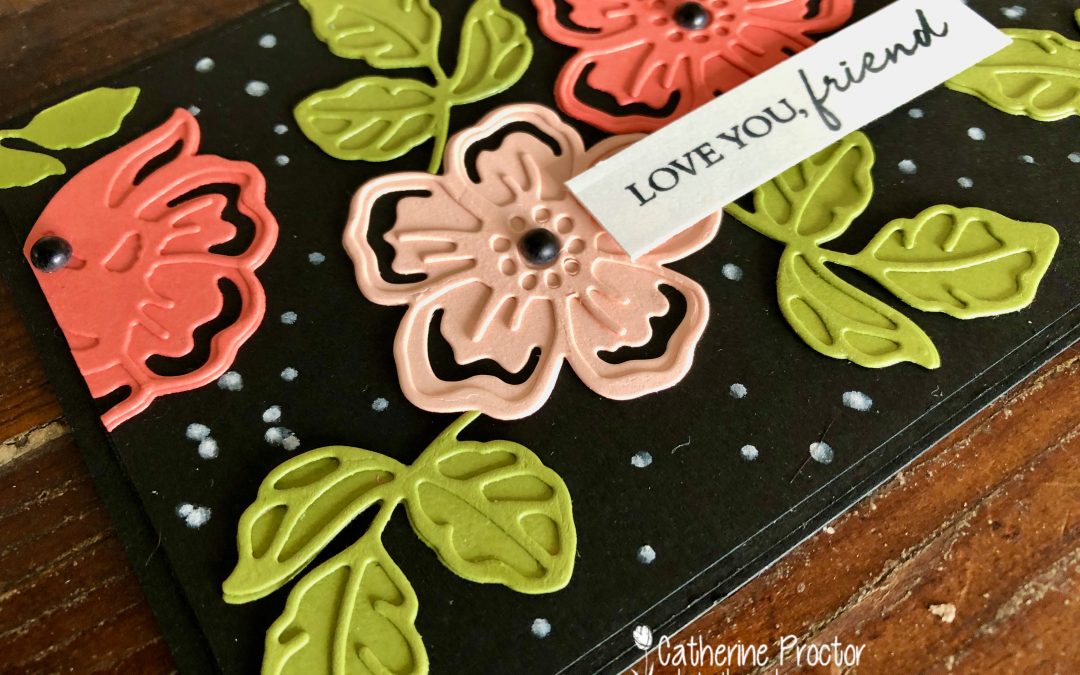
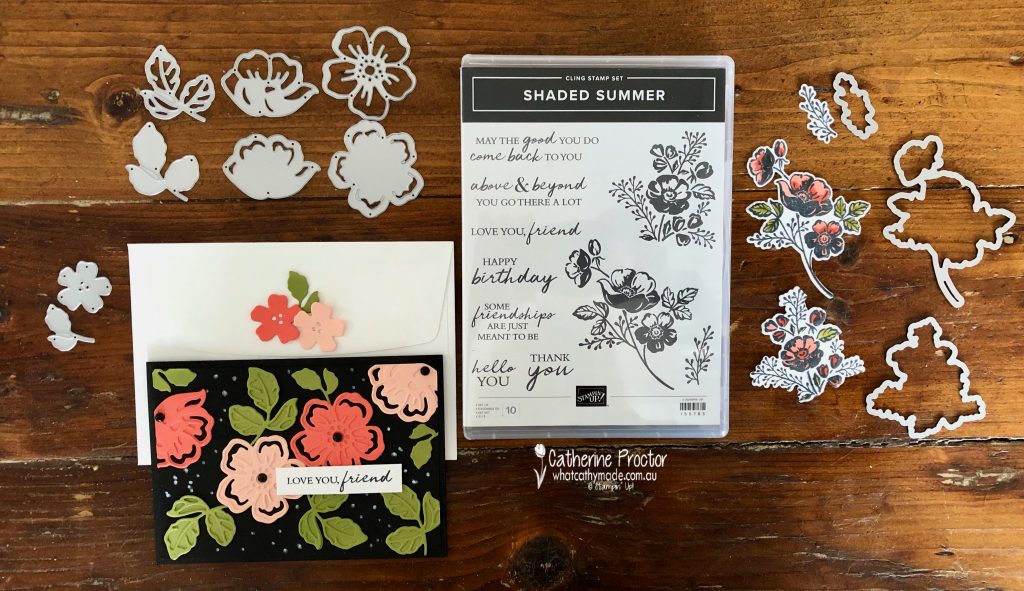
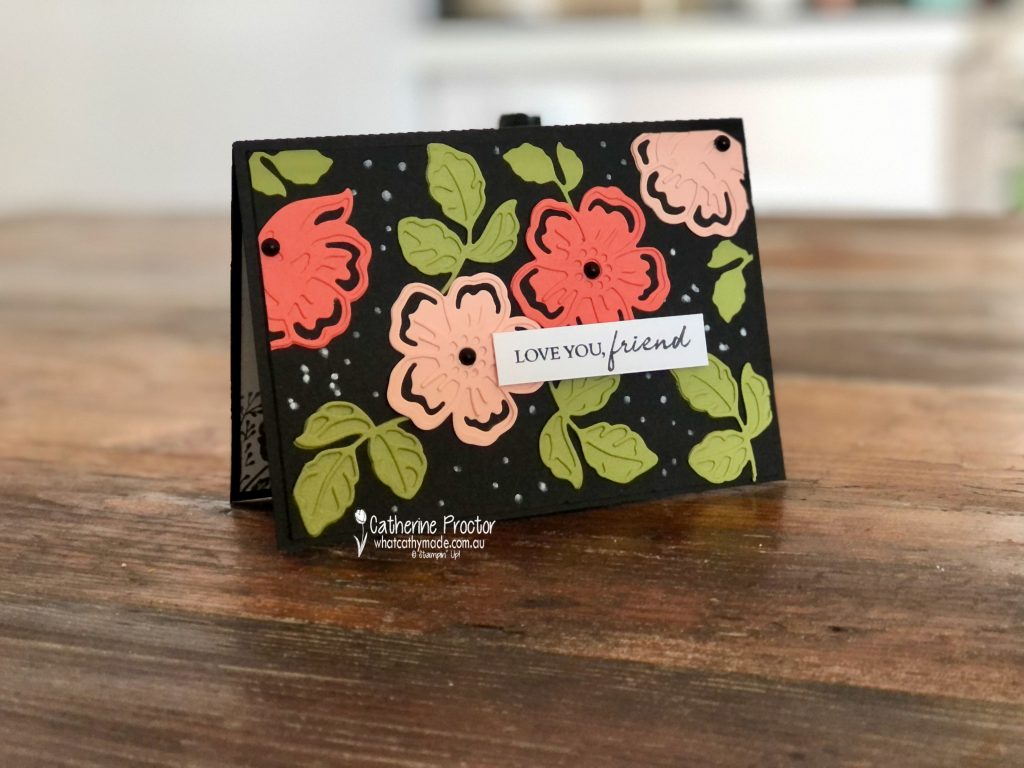
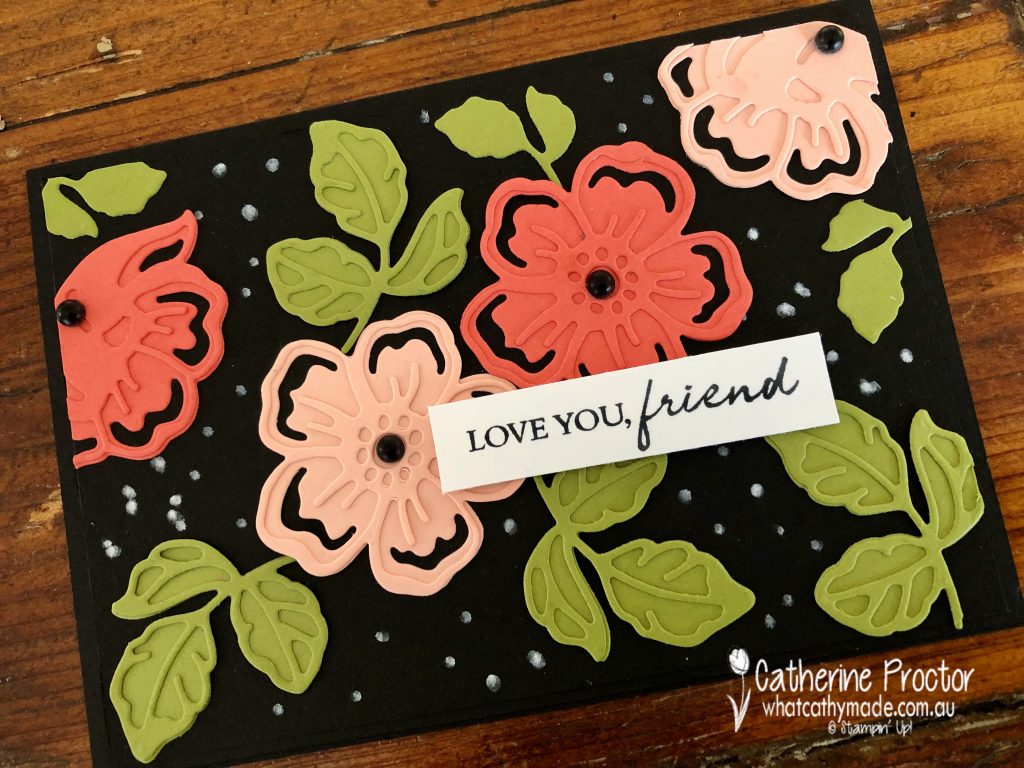
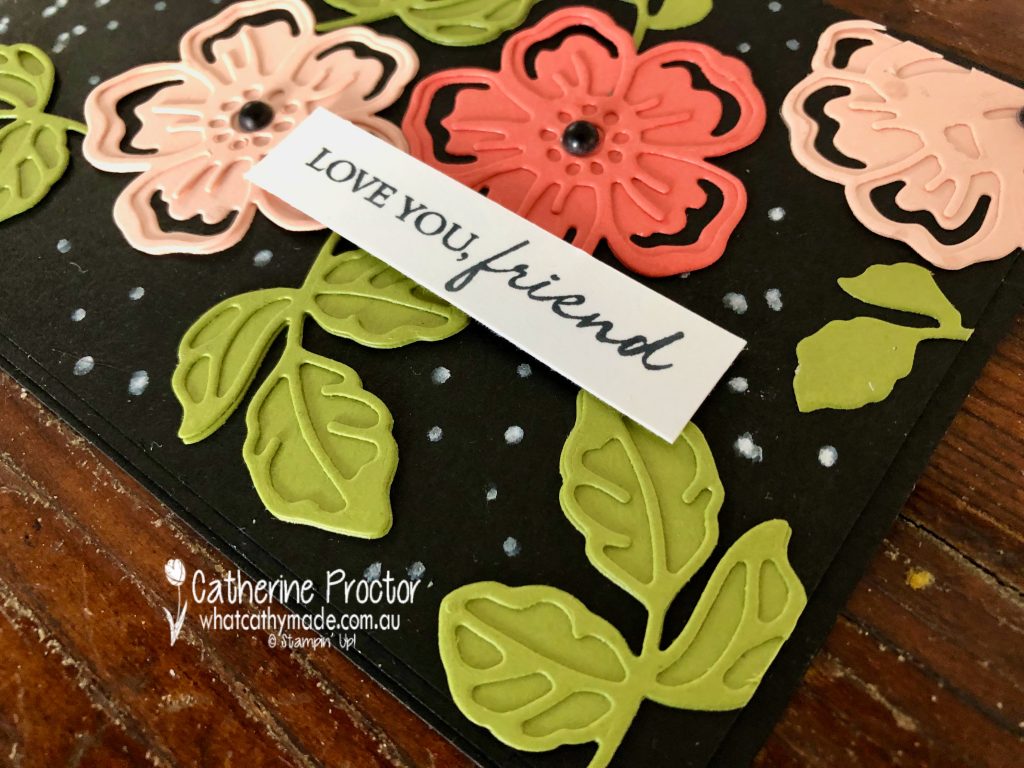
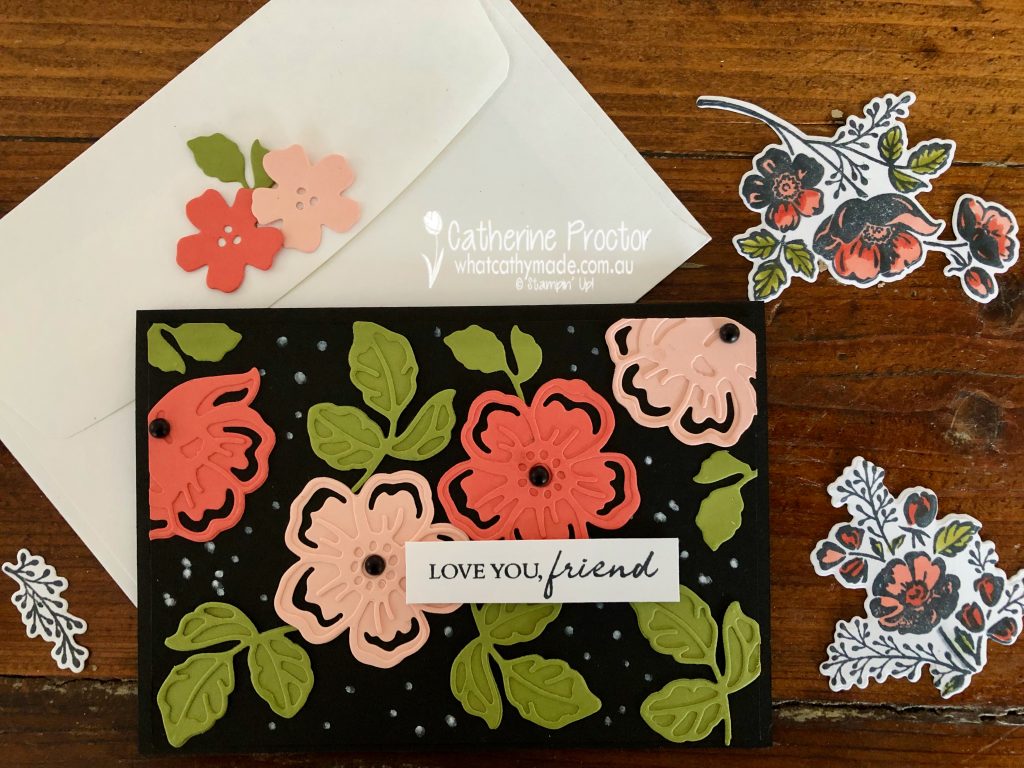
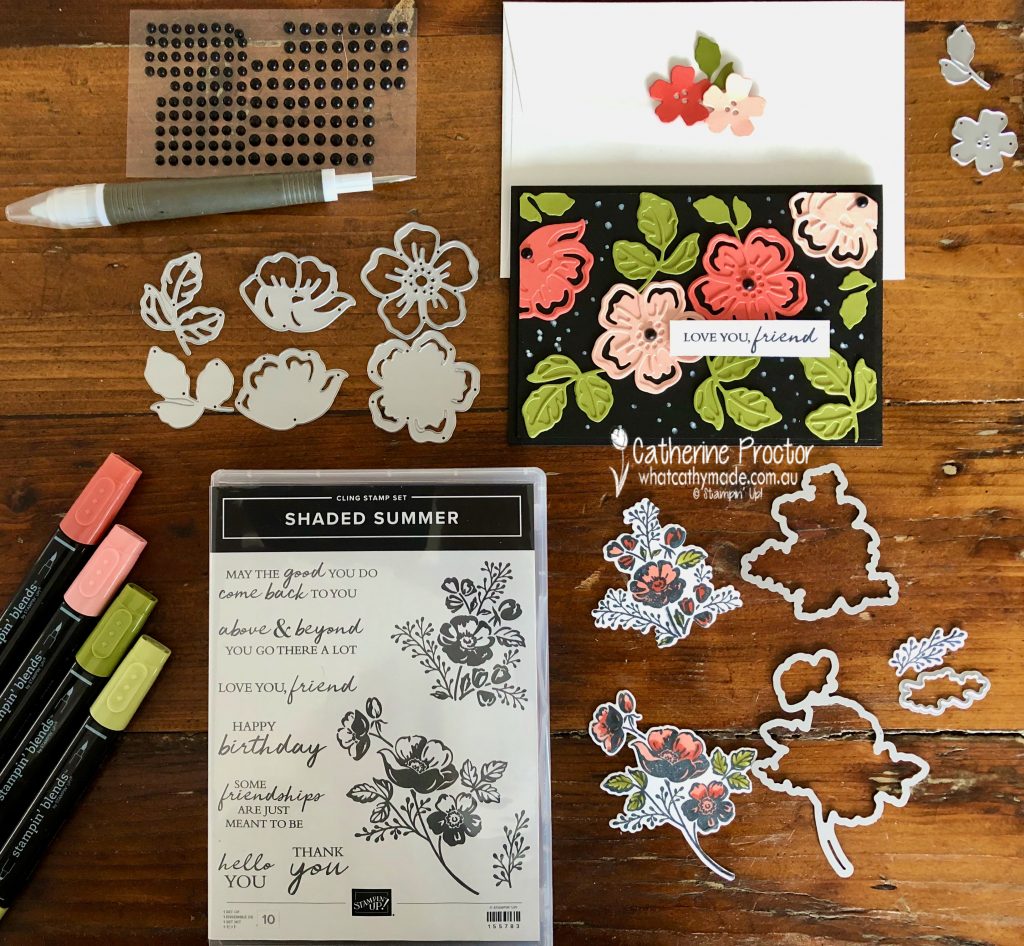
Welcome to week 9 of our 2021-22 Colour Creations blog hop! We are showcasing Calypso Coral, from the subtles collection.
My Calypso Coral card showcases a FREE product from the upcoming SALE-a-bration catalogue, available from 3rd August. The Summer Shadow dies are free with any purchase of $180 and there are 11 dies in the pack.
Although 3 of the 11 Summer Shadow dies die cut the flower and sprig images from the Shaded Summer stamp set (p75 of the annual Catalogue) I’ve deliberately made a card that uses the other 9 dies to show why these dies are still worth getting even if you don’t own the Shaded Summer stamp set.
My card design was inspired by a gorgeous card that Artisan Design team member, Martin Stone, made using the now retired Brushed Blooms bundle. As well as using different dies for my card, I’ve changed his Night of Navy card base to Basic Black and used different colours for my flowers and leaves: Calypso Coral, Petal Pink and Old Olive.
The white dots on the Basic Black layer were made with the Chalk Pen and the sentiment is from the Shaded Summer stamp set.
These Summer Shadow dies would also be perfect for the die inlay technique or they could also be used in a single layer, instead of layered as I’ve done on this card. I’ve used the smaller flower and leaf dies to adorn the back of my envelope.
When I made this card I just wasn’t happy with it but I couldn’t work out what I needed to fix. After I slept on it I realised the middle of the flowers needed another colour and the Matte Black dots were the perfect embellishment to finish my card. Embellishments really can make or break a card!
Now it’s time to hop on over to our next participant, Rachel Palmieri . I can’t wait to see what she’s made this week!
If you find a broken link or have come to this blog hop from a different entry point, you can view the the full list of participants below: