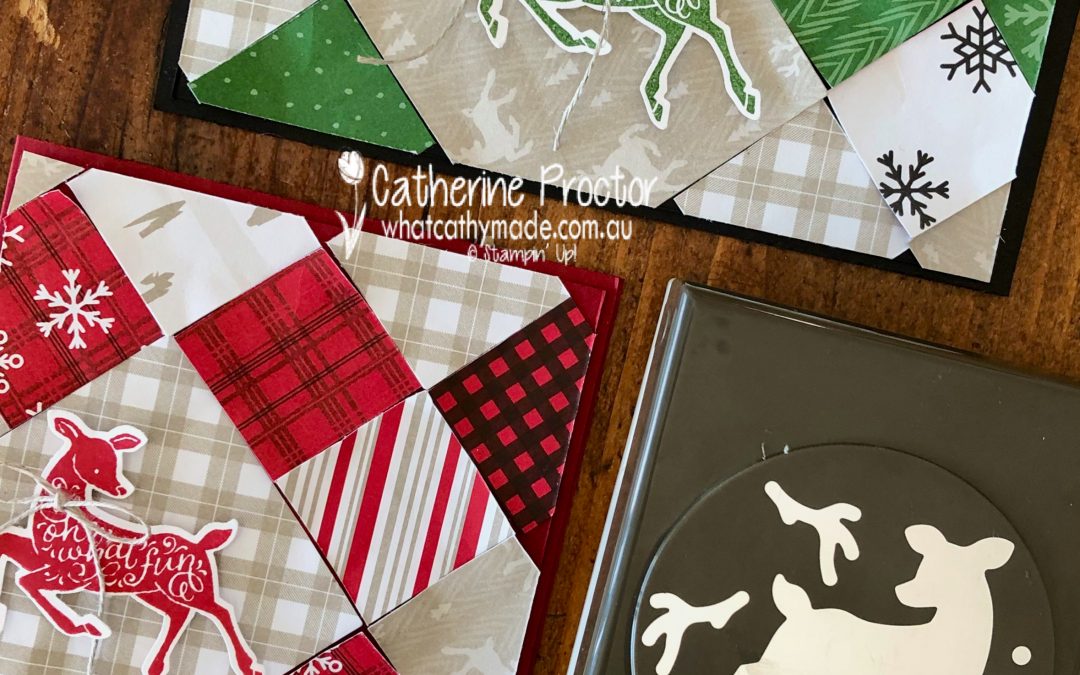
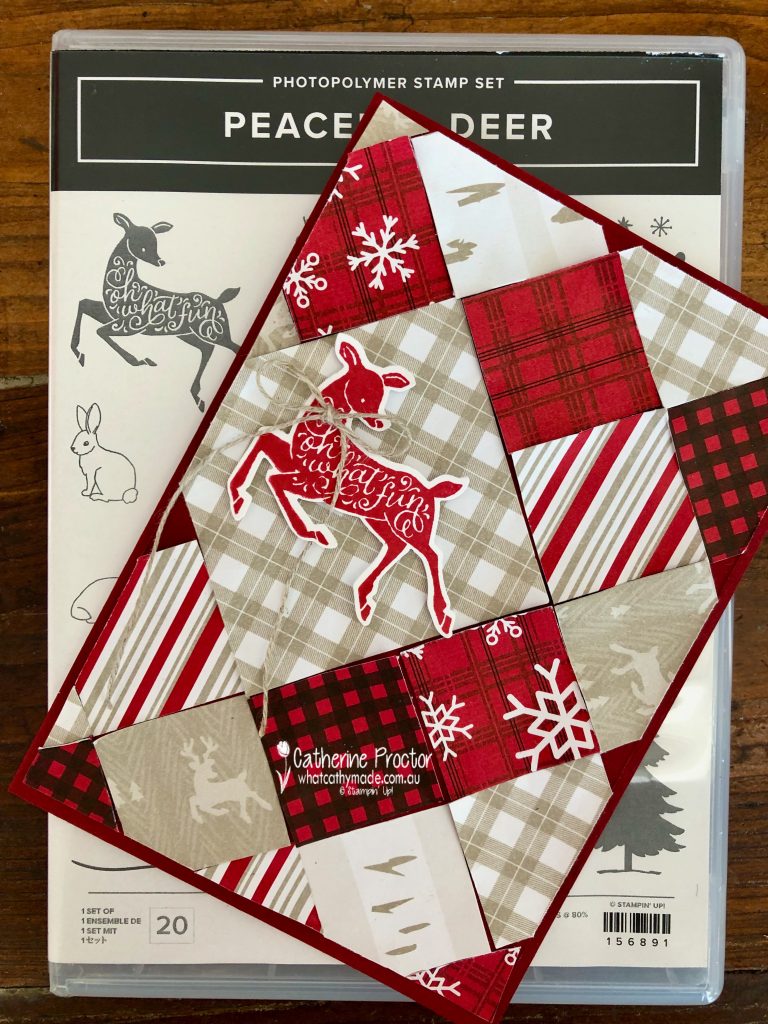
Hello crafters! I’ve got two cards for you this week that use a great technique for crafting with scraps of DSP. I was inspired to revisit this “paper patchwork” technique after seeing a Sweet Symmetry DSP paper patchwork card made by Martin Stone, one of the very talented Artisan Design members.
Although these cards use the FREE SALE-a-bration Peaceful Prints DSP, you can use this design/layout with any DSP. The secret to getting great texture is to scrunch up each square of DSP before adhering it to the card base. When you adhere, use Multipurpose glue and don’t adhere right to the edge of each square – let the edges stick up.
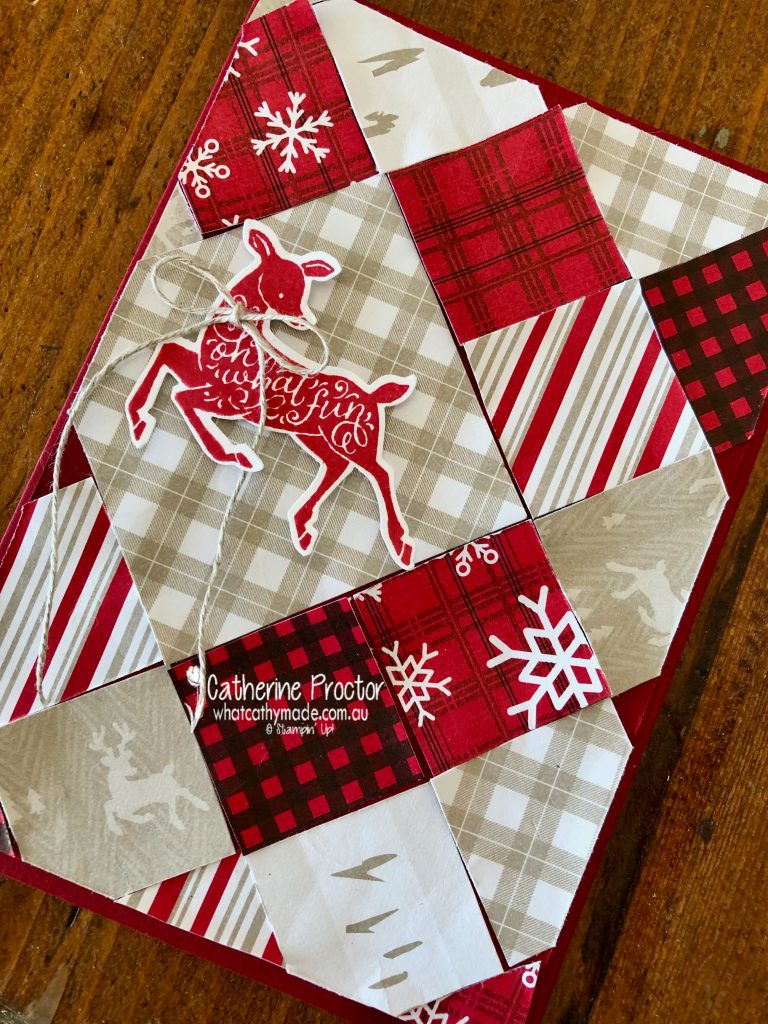
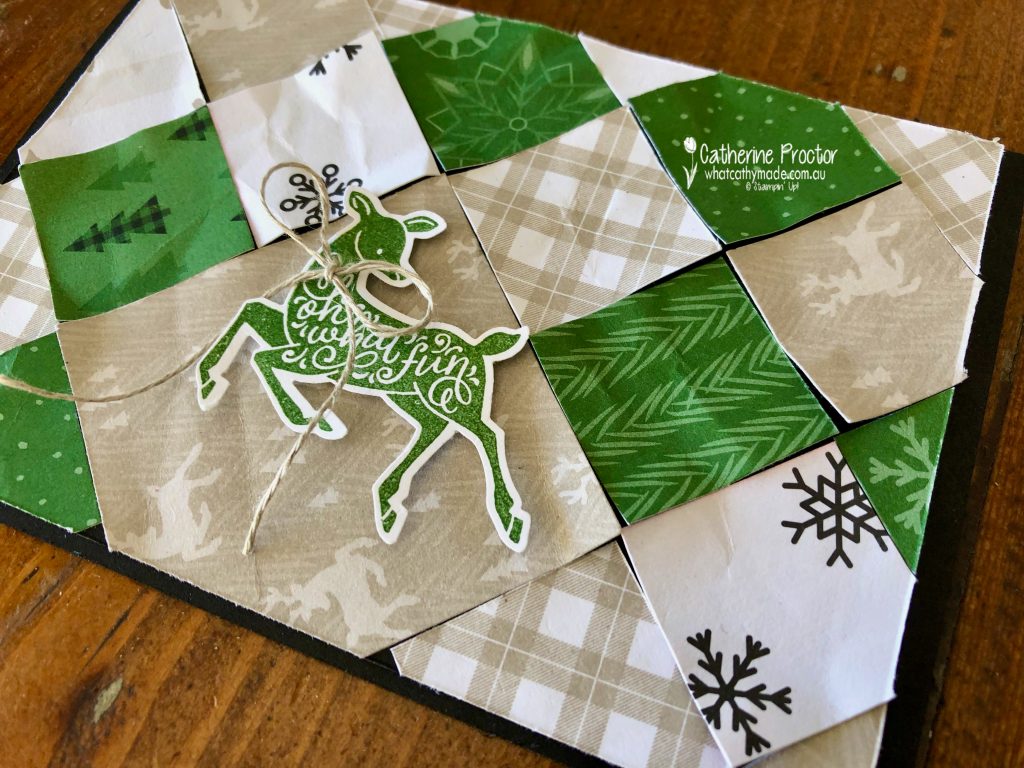
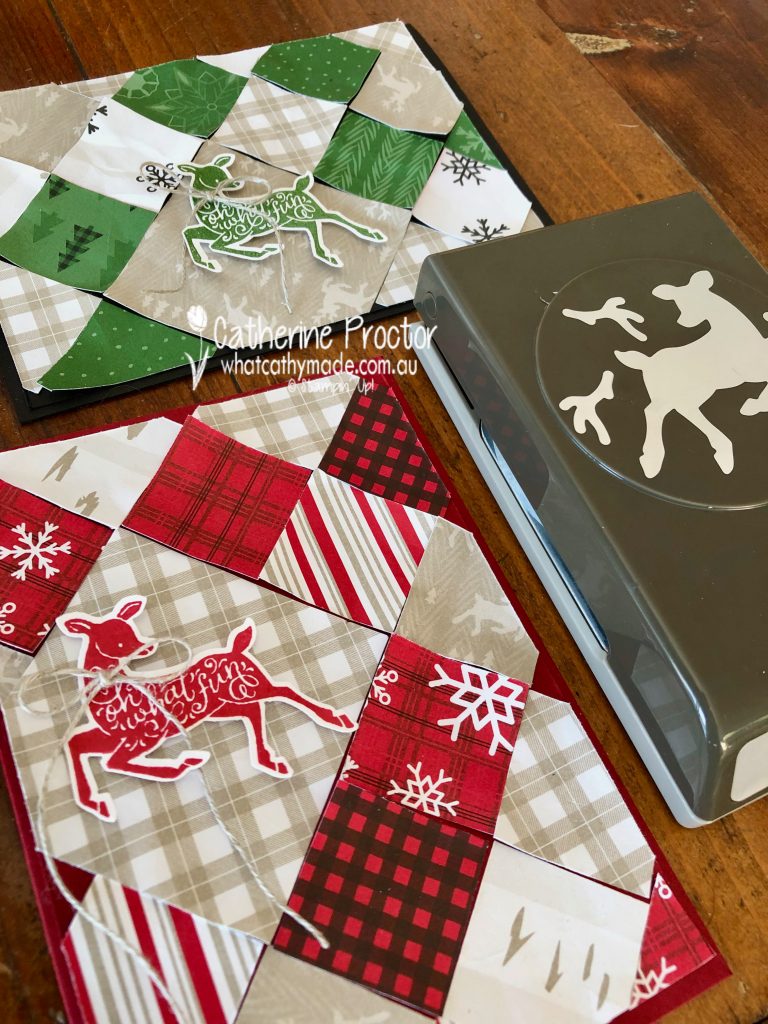
I split the Peaceful Prints DSP into the reds and greens and cut 3x3cm squares using my paper trimmer. Each card also has one larger 6x6cm square of DSP which I stuck down first and then added the other squares around it.
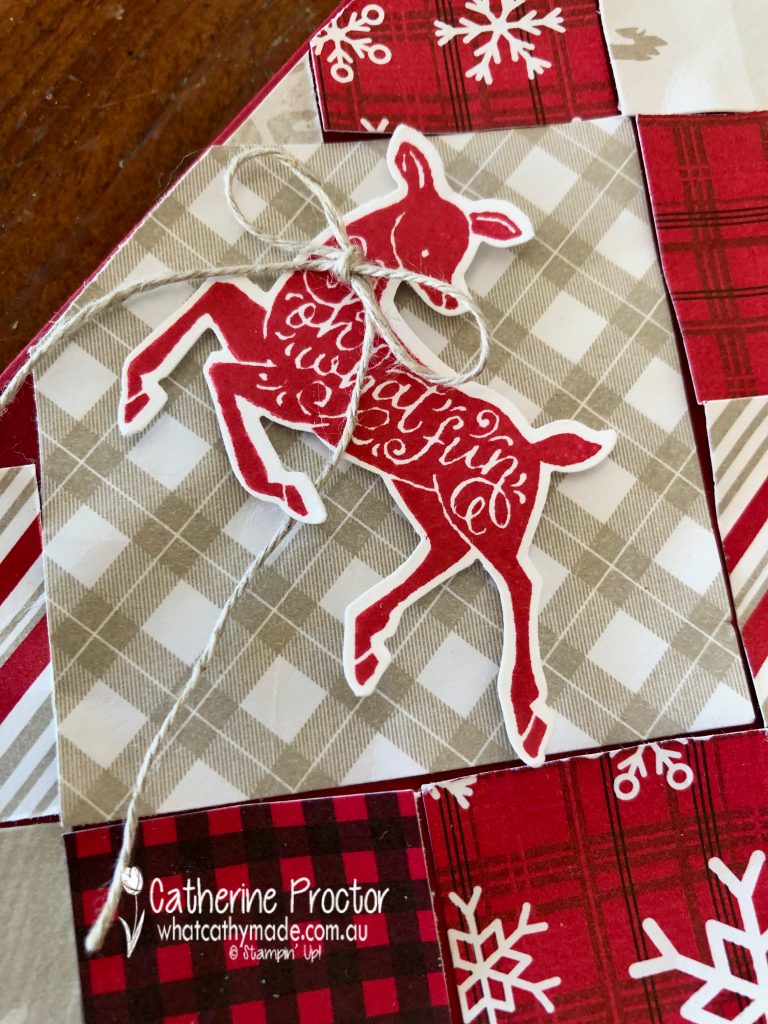
This red card uses the DSP in Real Red, Cherry Cobbler, Basic Black, Sahara Sand and Basic White. The card base is half an A4 sheet of Cherry Cobbler and the deer from Peaceful Deer is stamped in Real Red.
I added a bow of linen thread to the deer.
The green card has exactly the same size and layout – I just flipped the card over to landscape before attaching my Garden Green Deer and bow of linen thread. The card base is Basic Black and the DSP is Garden Green, Sahara Sand, Basic Black and Basic White.
After photographing my cards and uploading them to my website I suddenly realised the deer and the trees on the DSP are adhered upside down on my card, whoops! Hopefully the elegance of the stamped and punched deer draws your eye away from noticing my mistakes!
Red or green? Which card is your favourite?
Now it’s time to hop on over to our next participant, the lovely Christine Blain. I can’t wait to see what Christine shares with us today!
If at any time you find a broken link please head to the blog of this week’s Host of the Heart of Christmas Blog Hop, Tina Gillespie, as she has the full list of links for everyone who is participating.
You can purchase any of the products I’ve used tonight, here.
Thanks for visiting my site. I’ll be back with another card on Wednesday.
In the meantime, wherever you are in the world, stay safe, stay calm … and keep on crafting xxx
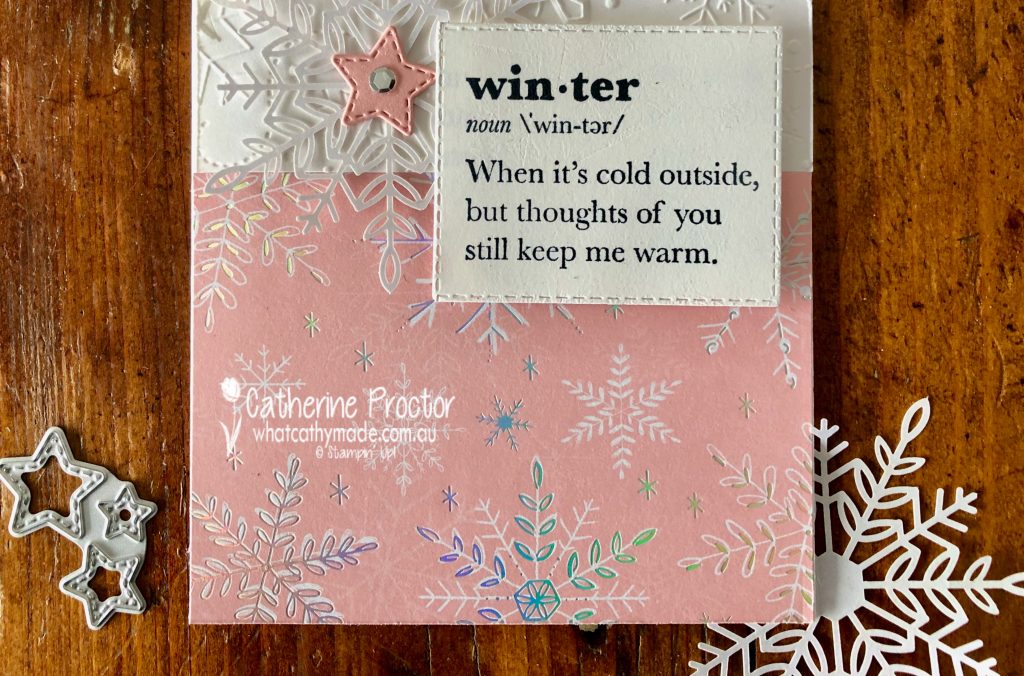
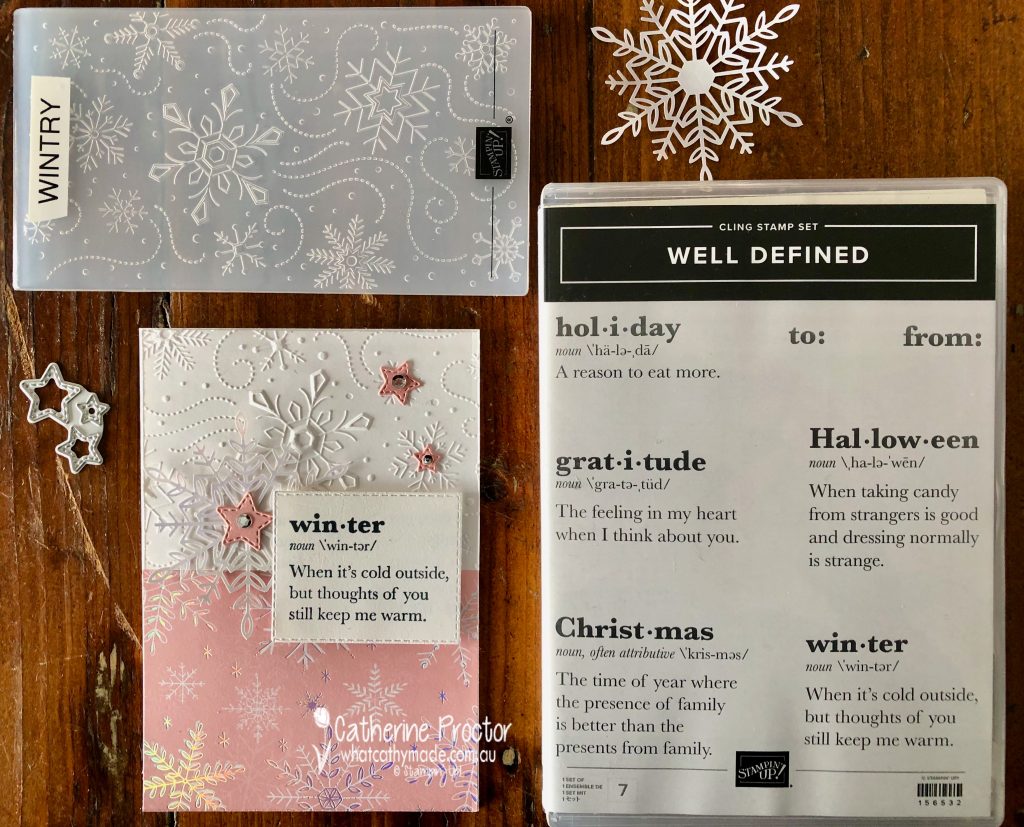
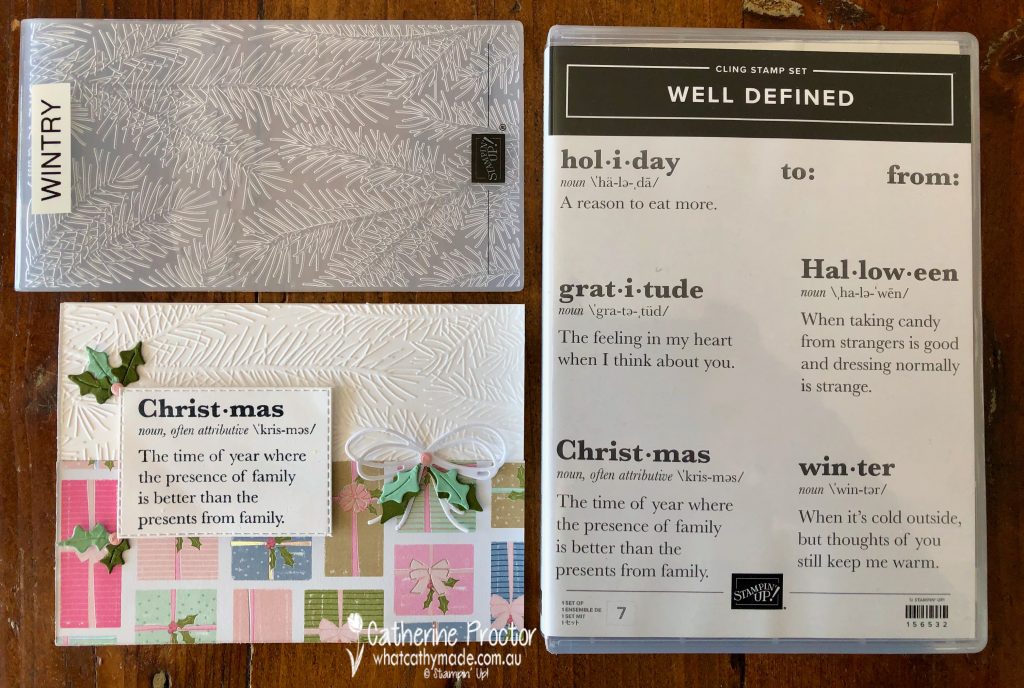
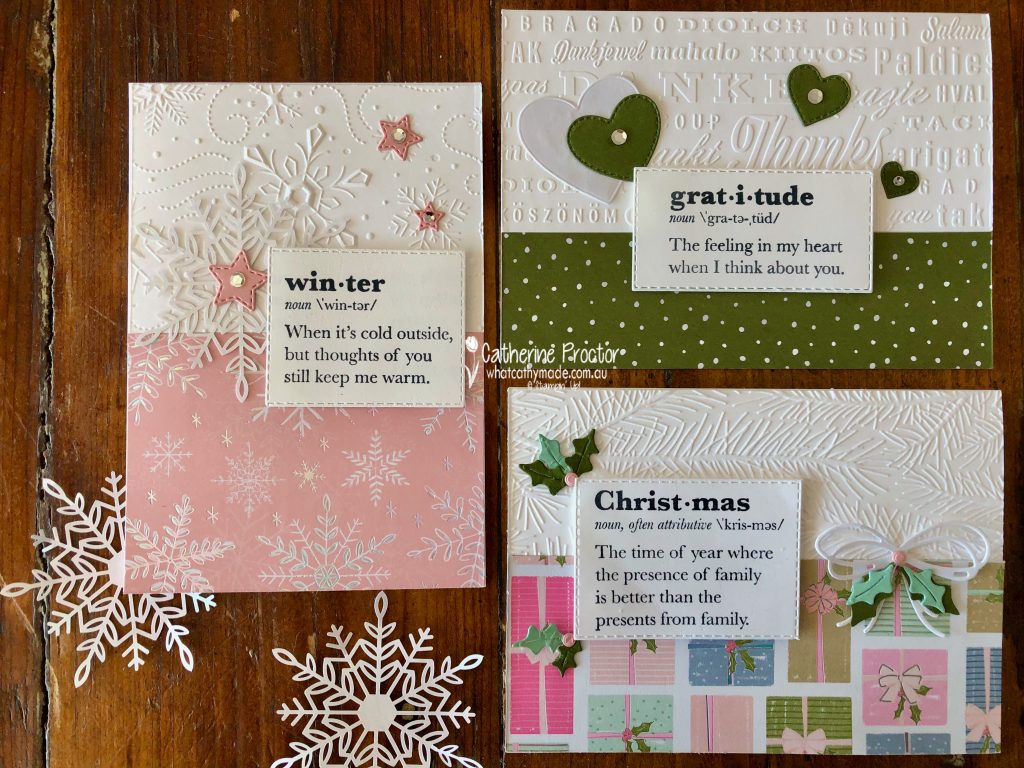
Hello crafters! For my cards this week I’m using the Whimsy & Wonder DSP and the Seasonal Swirl dies again, this time pairing them with the Well Defined stamp set and matching embossing folders.
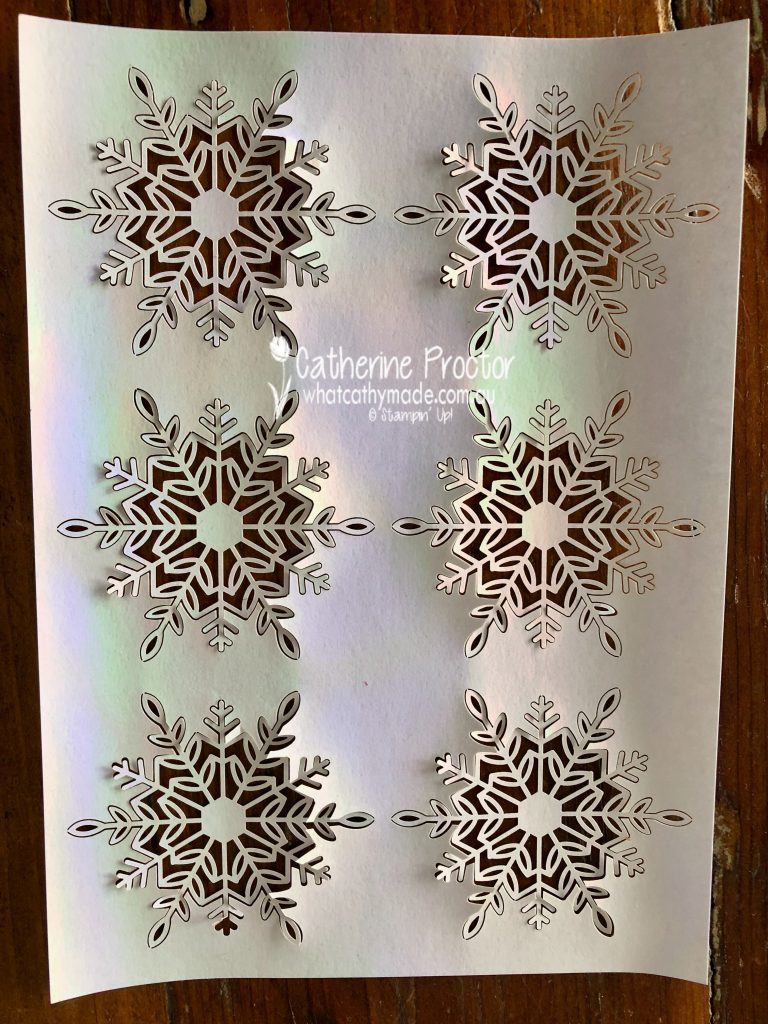
I’ve also created my own matching embellishments using the leftover iridescent foil that surrounds the Wonderful Snowflakes embellishments. There is plenty of spare foil here – don’t waste it! Use your dies and punches to create homemade embellishments to match your cards.
The different elements I used for each card were inspired my the particular definition I chose from the Well Defined stamp set. I think this first card is my favourite.
I’ve used the stamp that has “Winter” as the definition word, so I used the snowflake patterned DSP, the snowflake Wintry Embossing folder, one of the Wonderful Snowflakes embellishments and tiny stitched stars from the Seasonal Swirl dies. Subtle Shimmer Sequins add a final touch of bling.
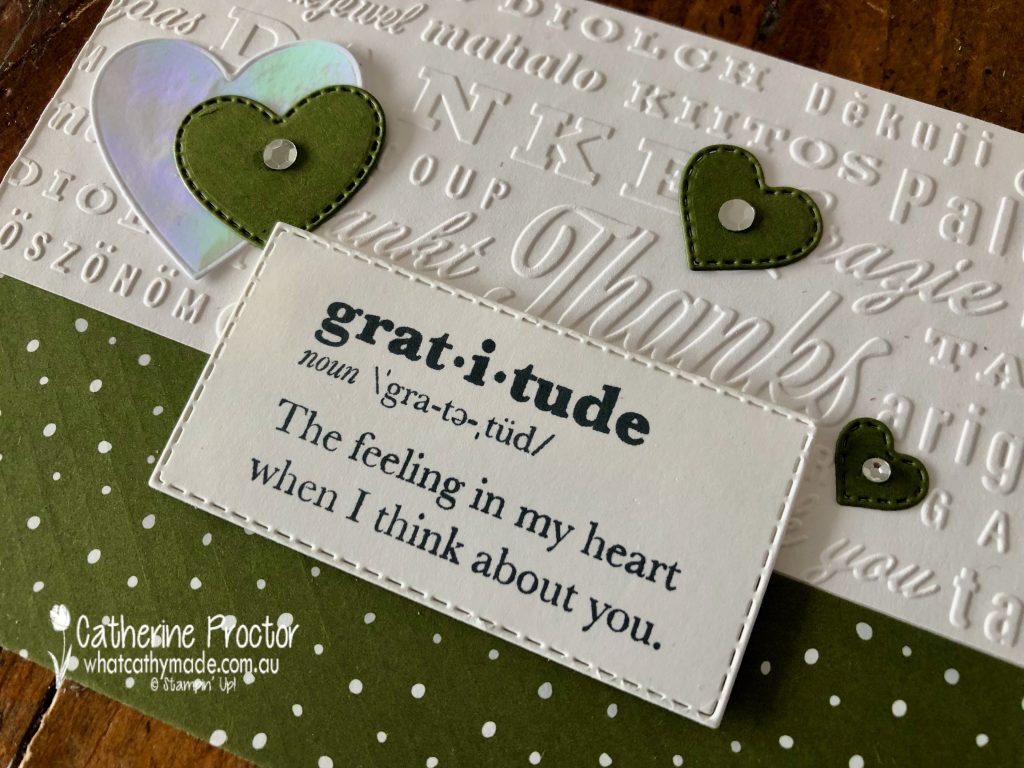
Card two uses the gratitude definition stamp, so the Thanks embossing folder from the Hello and Thanks embossing folders and stitched hearts were the obvious embellishments choice. The iridescent heart is die cut from leftover iridescent foil using the largest heart die in the Seasonal Swirl dies.
I like that this card uses mainly Christmas products to make a thank you card.
Card three is features the “Christmas” dictionary definition that references presents, so I used the Whimsy & Wonder DSP pattern with presents and holly on it. The holly embellishments are die cut using the Seasonal Swirl dies and the iridescent foil bow is die cut using the bow die from Pierced Blooms dies.
Which card is your favourite?
Now it’s time to hop on over to our next participant, the lovely Michele Taylor … I can’t wait to see what Michele shares with us today!
If at any time you find a broken link please head to the blog of this week’s Host of the Heart of Christmas Blog Hop, Tina Gillespie, as she has the full list of links for everyone who is participating.
You can purchase any of the products I’ve used tonight.
Thanks for visiting my site. I’ll be back with another card on Wednesday.
In the meantime, wherever you are in the world, stay safe, stay calm … and keep on crafting xxx
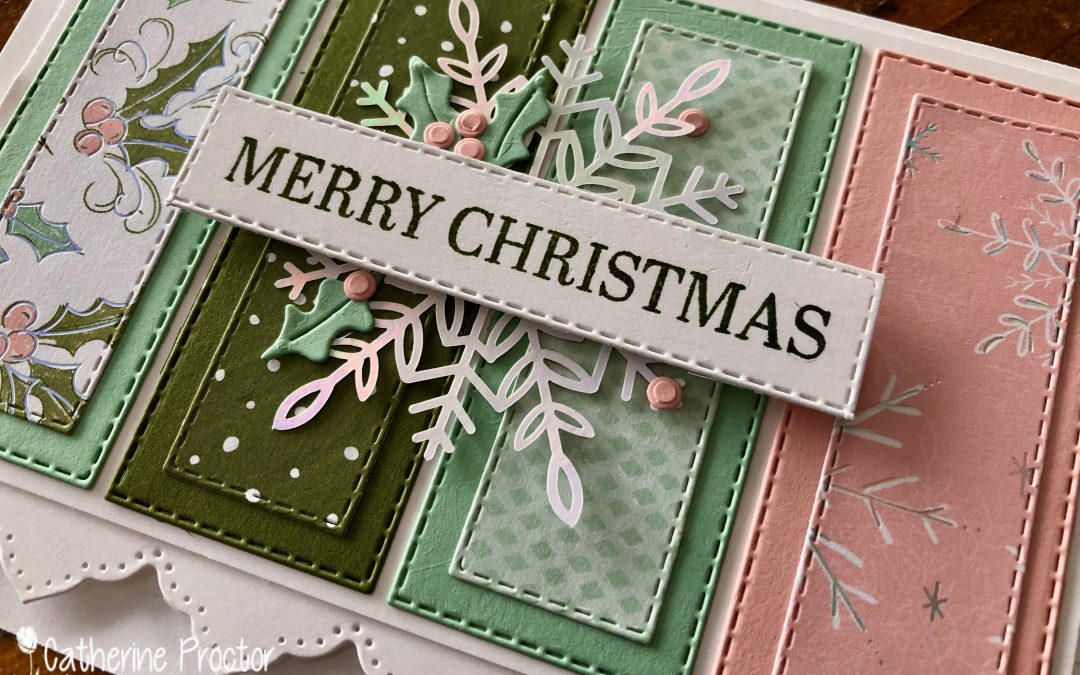
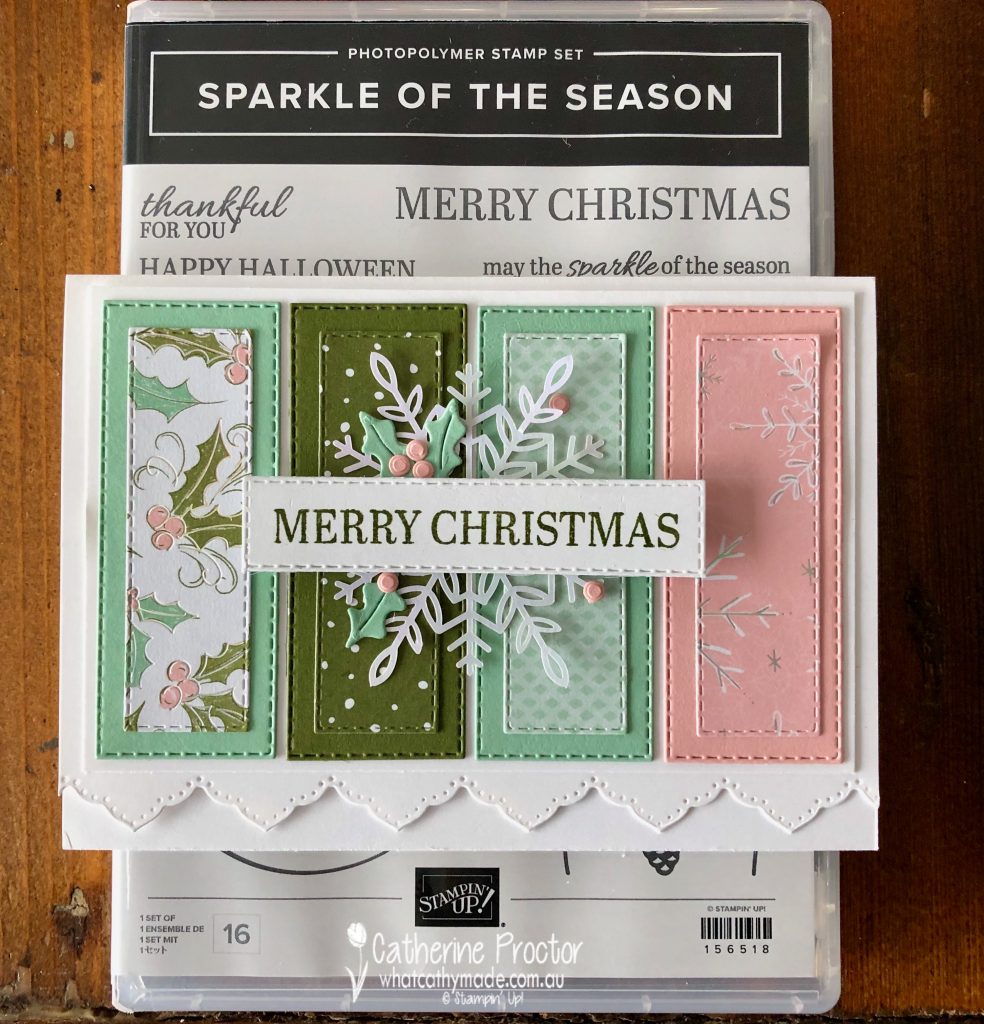
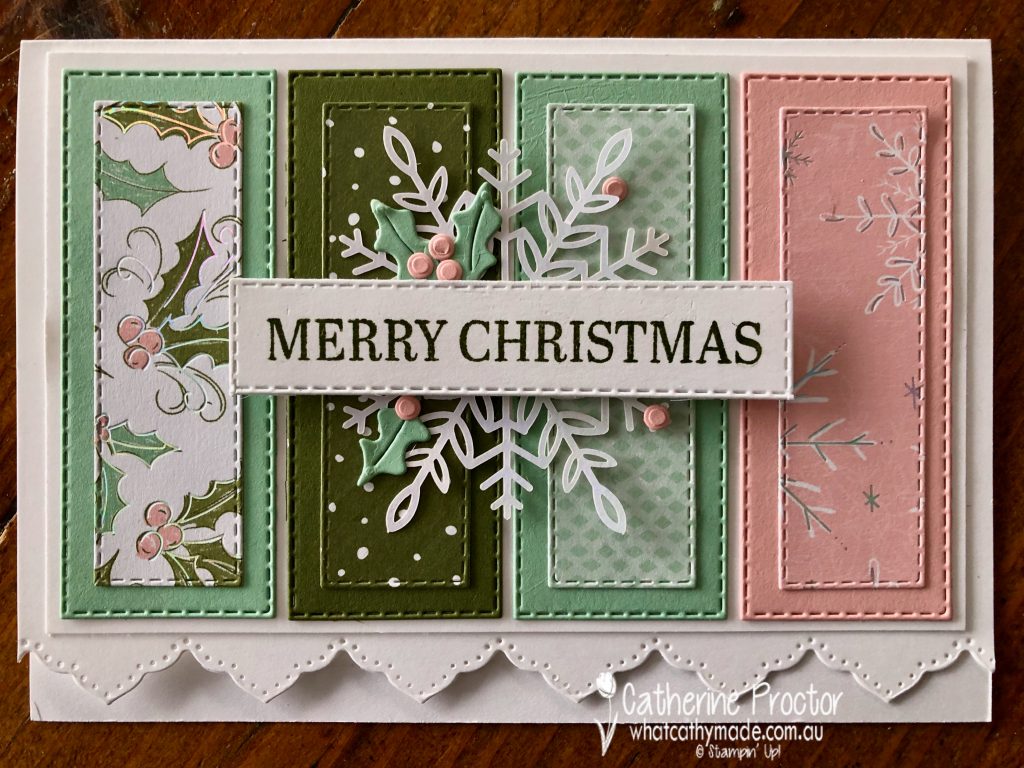
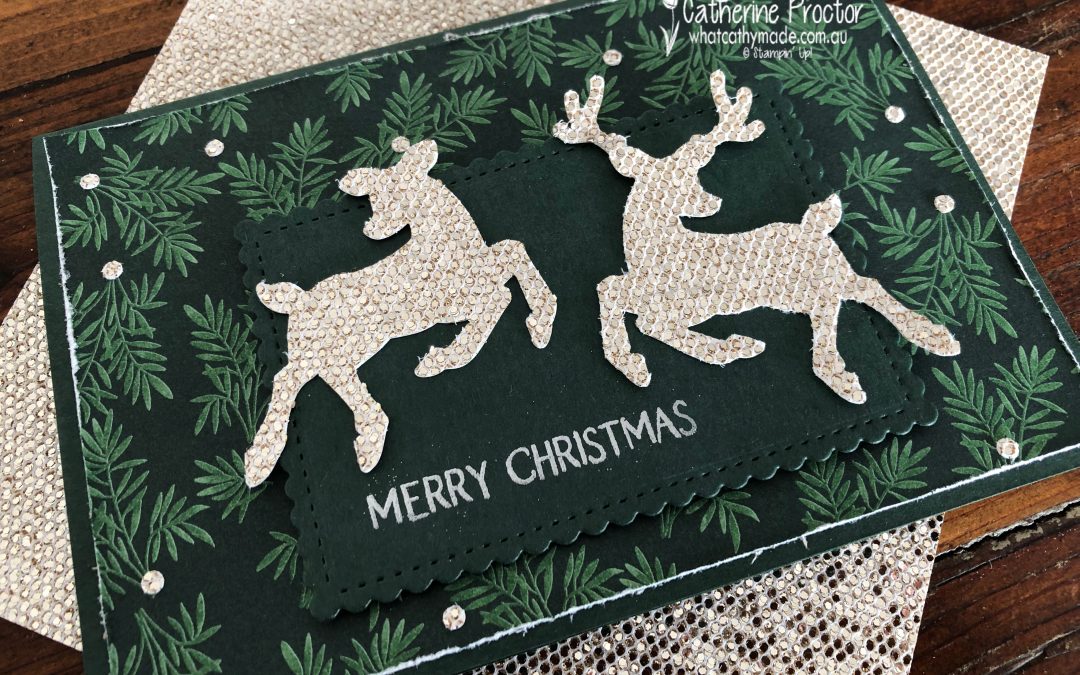
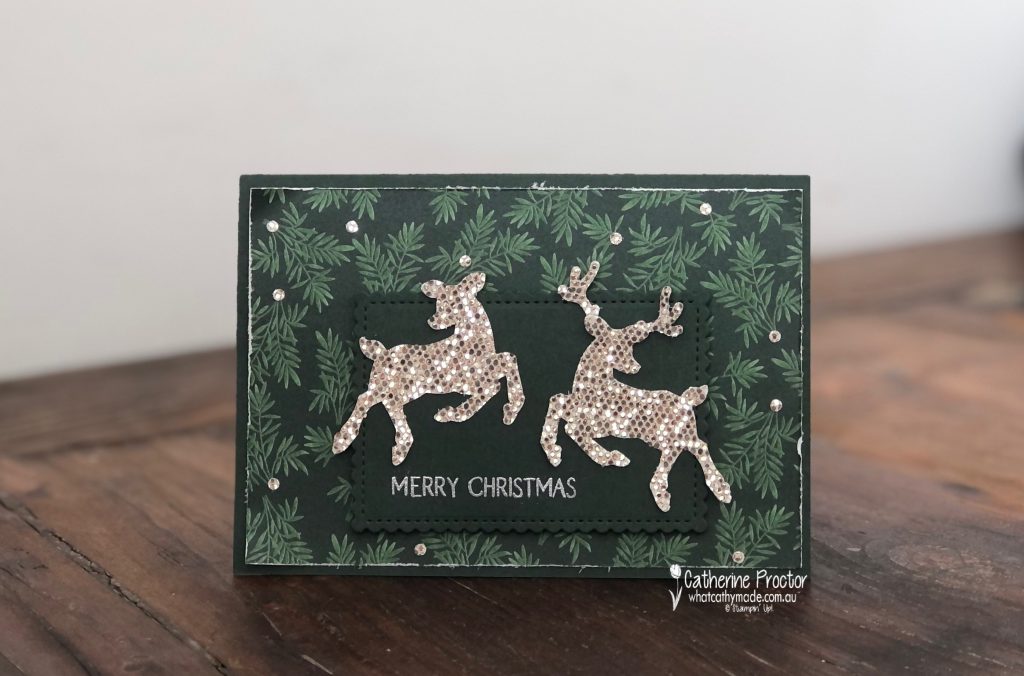
This week I was inspired by a beautiful card made by a Dutch Stampin’ Up! demonstrator called Berdien Weideveld. I loved the way her square card featured the Whimsy & Wonder DSP.
Berdien’s card also used a variety of retired products as well as several products I don’t own, so I’ve loosely CASED her card by changing my card to a rectangular design and only using current Stampin’ Up! products I already own.
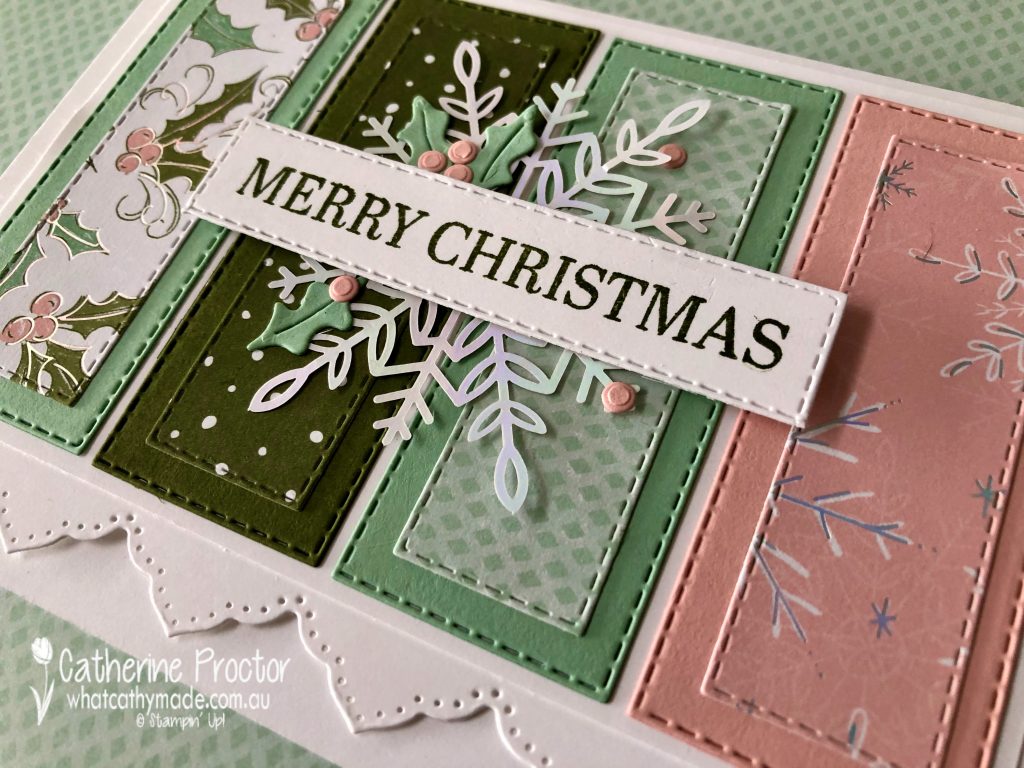
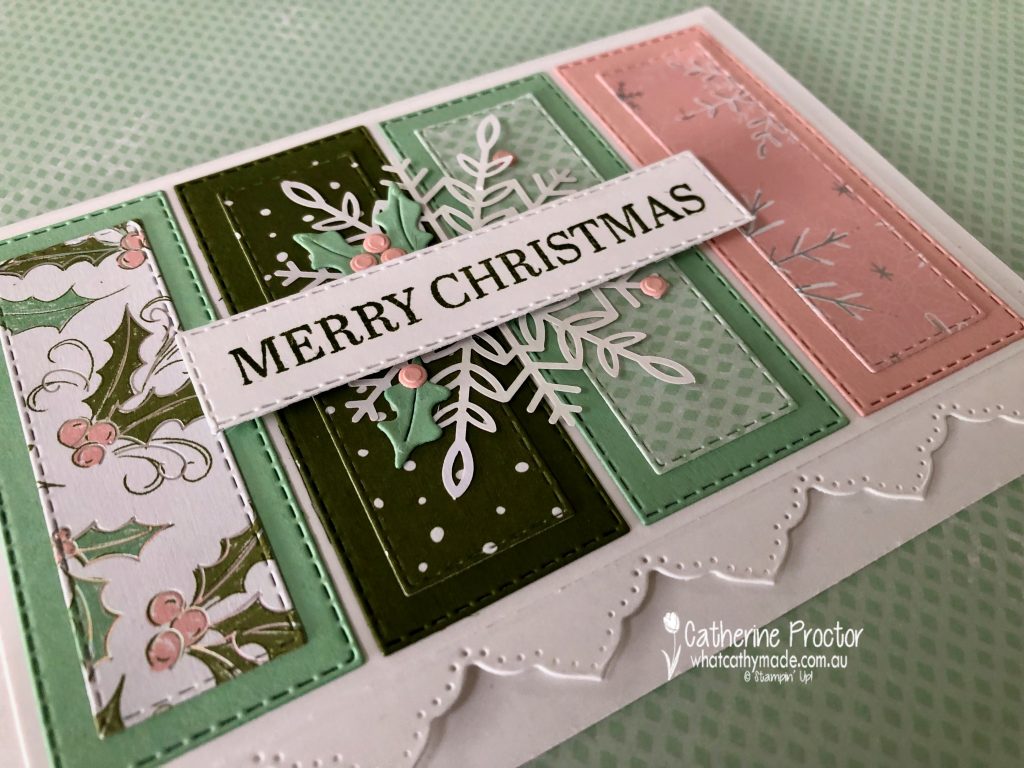
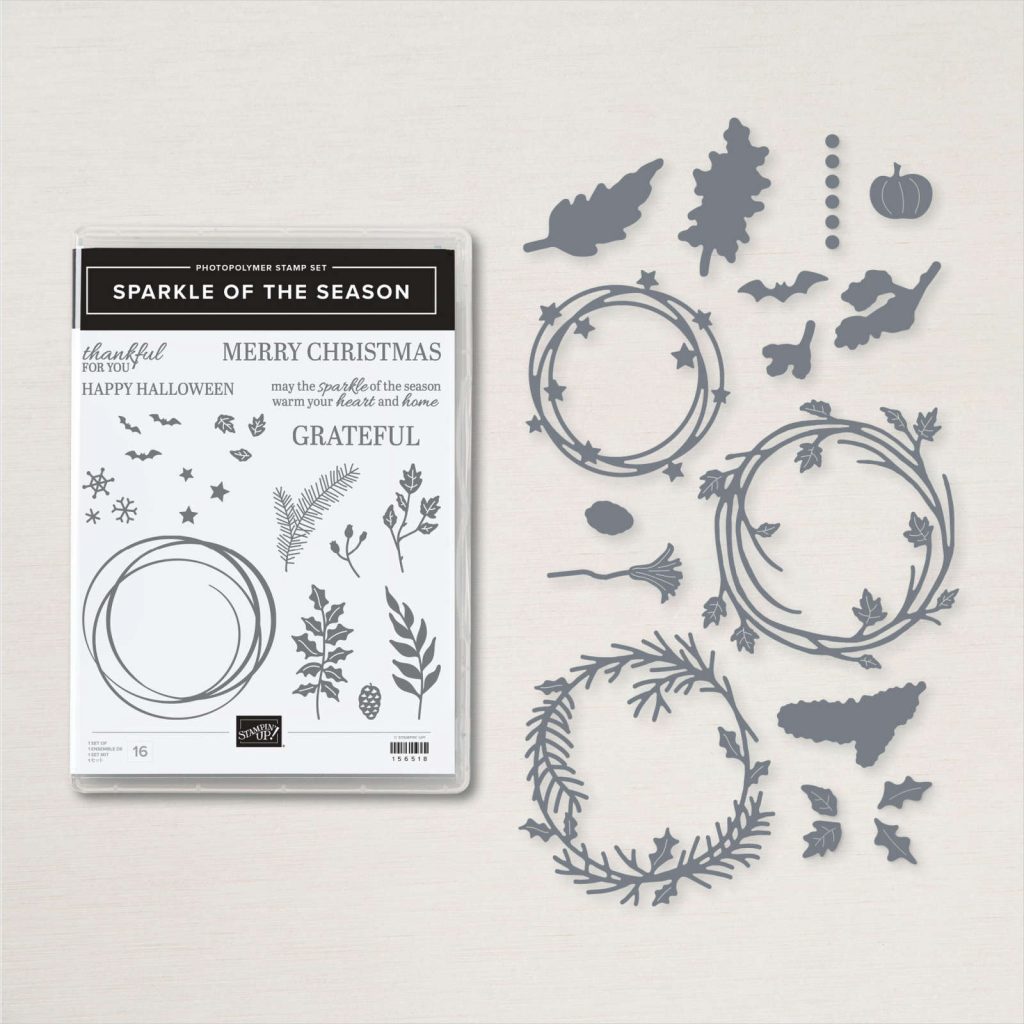
I originally bought the Sparkle of the Season bundle with the intent to make wreath wards, but I still haven’t made one yet! I am, however, getting a lot of use out of some of the other elements in this bundle, such as the holly berry and holly leaves dies and the “Merry Christmas” sentiment on my card today.
These stitched rectangles would definitely have to be my most used dies, despite the fact that they are designed to fit American sized cards, not our Aussie card bases, which are made from half an A4 sheet of cardstock.
When I lined up four of the stitched rectangles across the card front, there was a much wider border of Basic White at the base of the card compared to the top and the sides. So I used one of the Basic Border dies to turn this problem into a feature instead.
The Wonderful Snowflakes are white cardstock on one side with an iridescent foil on the other side and you get 24 in a pack. They are such a great embellishment and an easy way to quickly add texture, dimension and visual interest to a card.
This card design could be made out of any of our beautiful designer series papers (BONUS: it only uses a small amount of DSP) and the stitched rectangle dies make it so easy to line everything up!
I was soooooo tempted to add a touch of the FREE Be Dazzling DSP to my card but I resisted! I actually made 6 cards over the weekend and I didn’t add the Be Dazzling DSP to a single one. I think I might be having withdrawal symptoms though, so prepared to be dazzled again next week!
Now it’s time to hop on over to our next participant, the incredible talented Kate Morgan. It’s her birthday today. Happy birthday my friend! I can’t wait to see what Kate shares with us today!
If at any time you find a broken link please head to the blog of this week’s Host of the Heart of Christmas Blog Hop, Sharon Davern, as she has the full list of links for everyone who is participating.
You can purchase any of the products I’ve used tonight here.
Thanks for visiting my site. I’ll be back with another card on Wednesday.
In the meantime, wherever you are in the world, stay safe, stay calm … and keep on crafting xxx
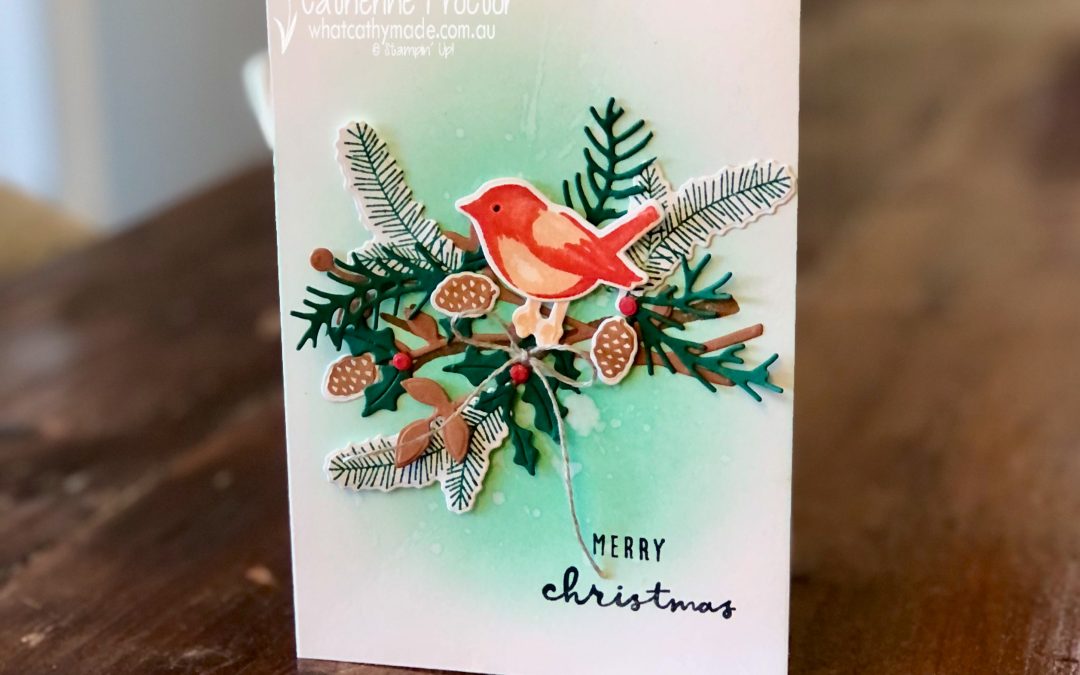
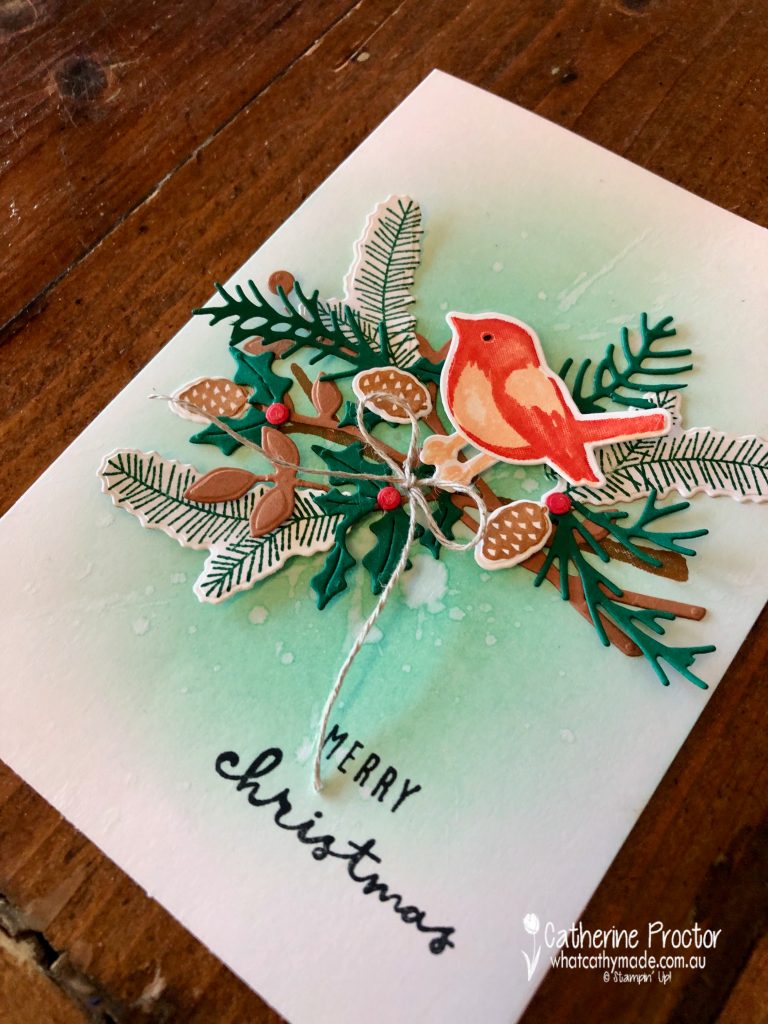
When I was a child my mum had a box of vintage Christmas cards that I used to love looking at and tonight I’ve combined a few different stamp and die sets to try to recreate this vintage vibe.
This style of card making is a lot of fun but also a little bit risky as I really have no idea what my final card will look like. I gradually add and remove different elements to build up the scene as I go.
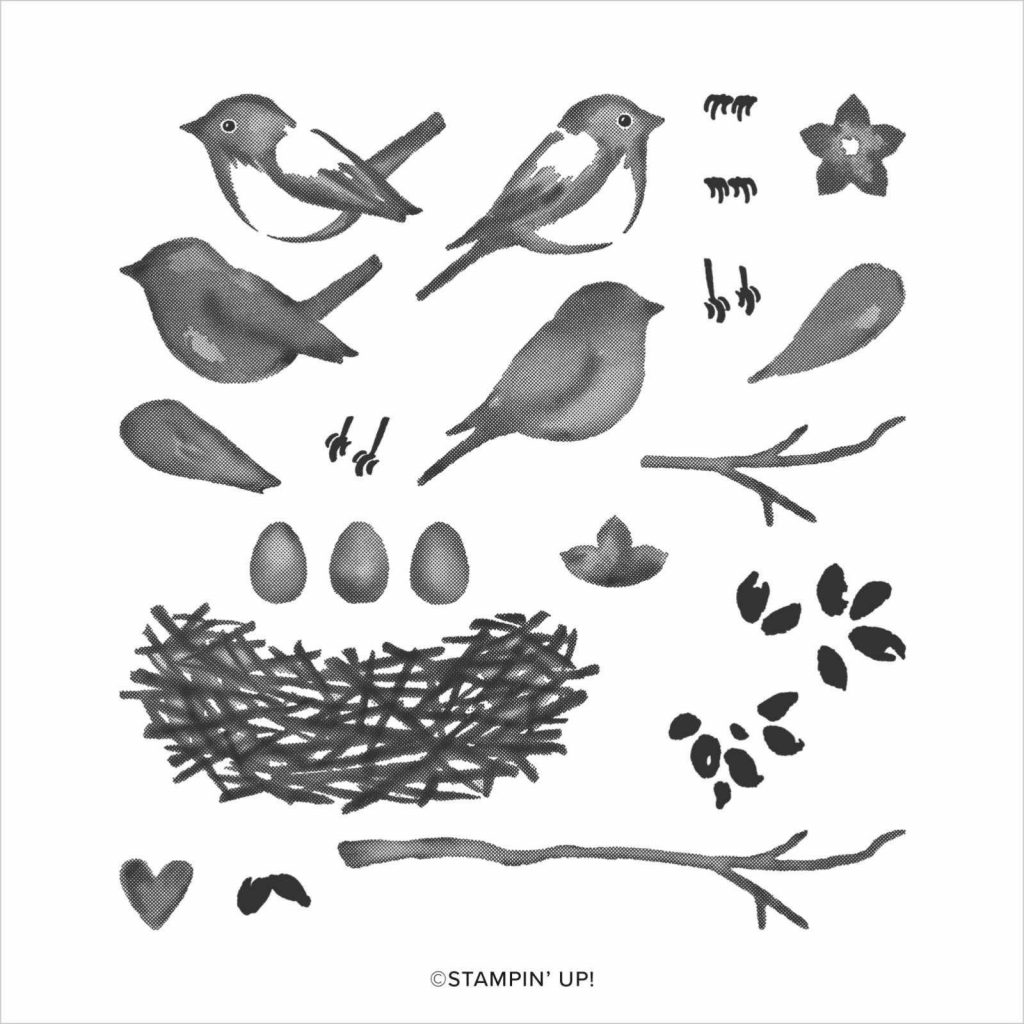
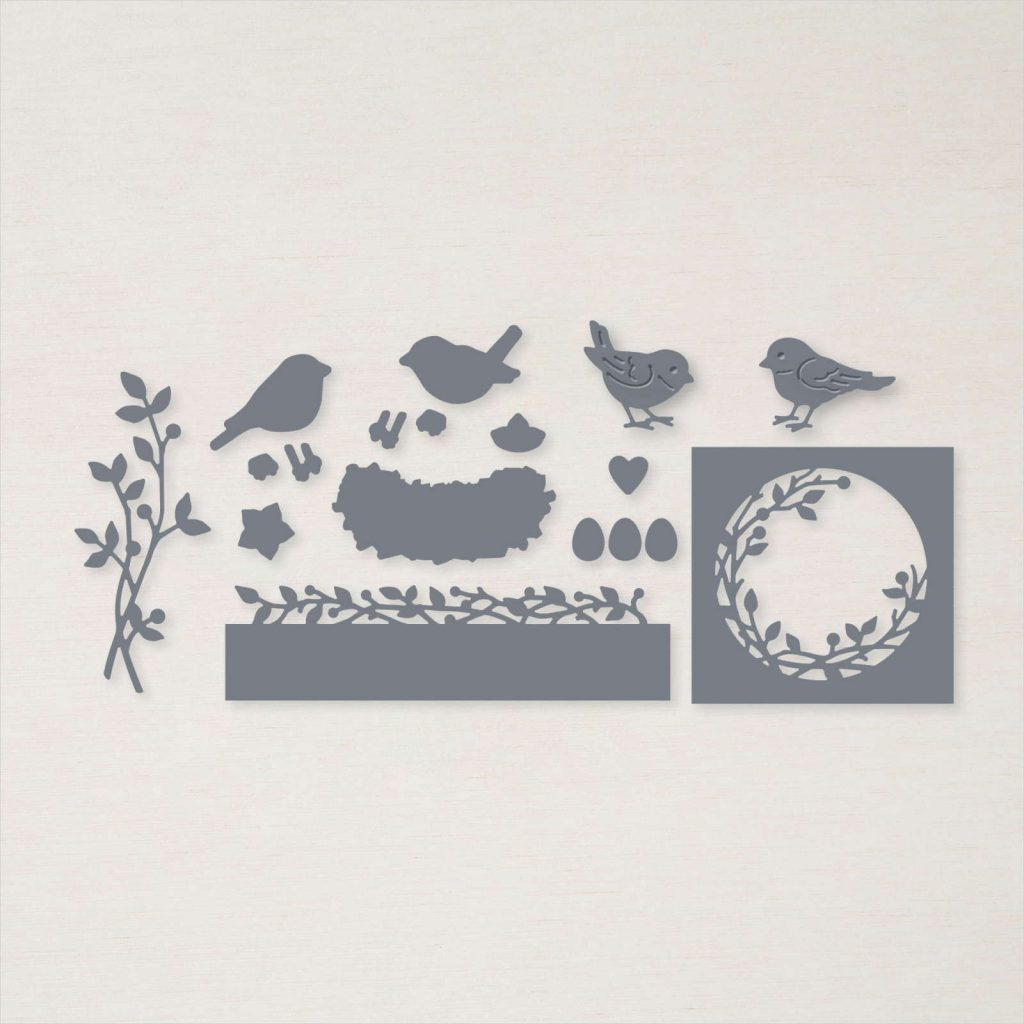
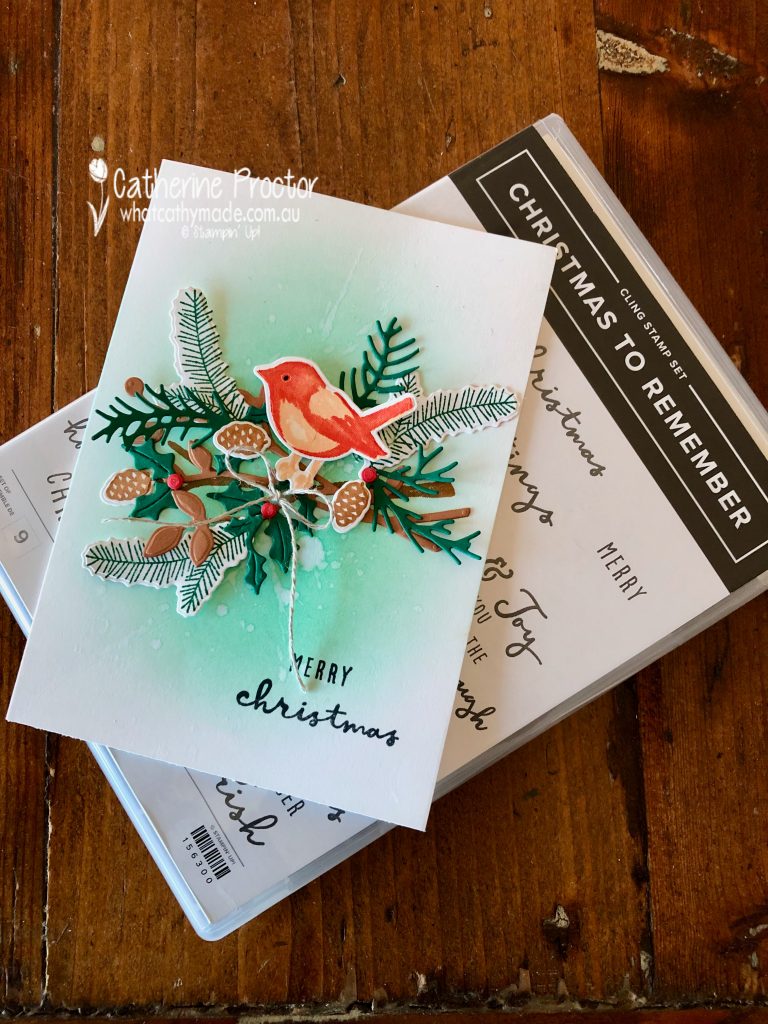
I originally intended to use the Christmas Season bundle but the scale just didn’t work with the little bird from the Birds & Branches stamps. So these are the stamp and die sets I’ve used instead.
Sparkle of the Season bundle
Birds & Branches stamp set
Christmas to Remember
Birds & More dies
The shading on the card base is created with a blending brush and Bermuda Bay ink pad. Add ink to your blending brush and then start in the middle of the card and swirl outwards, gradually building up the colour.
The speckled effect is easy to create. Once you’ve finished blending your background use the inner tube of a Stampin’ Spritzer to gently tap to drop water onto the blended background.
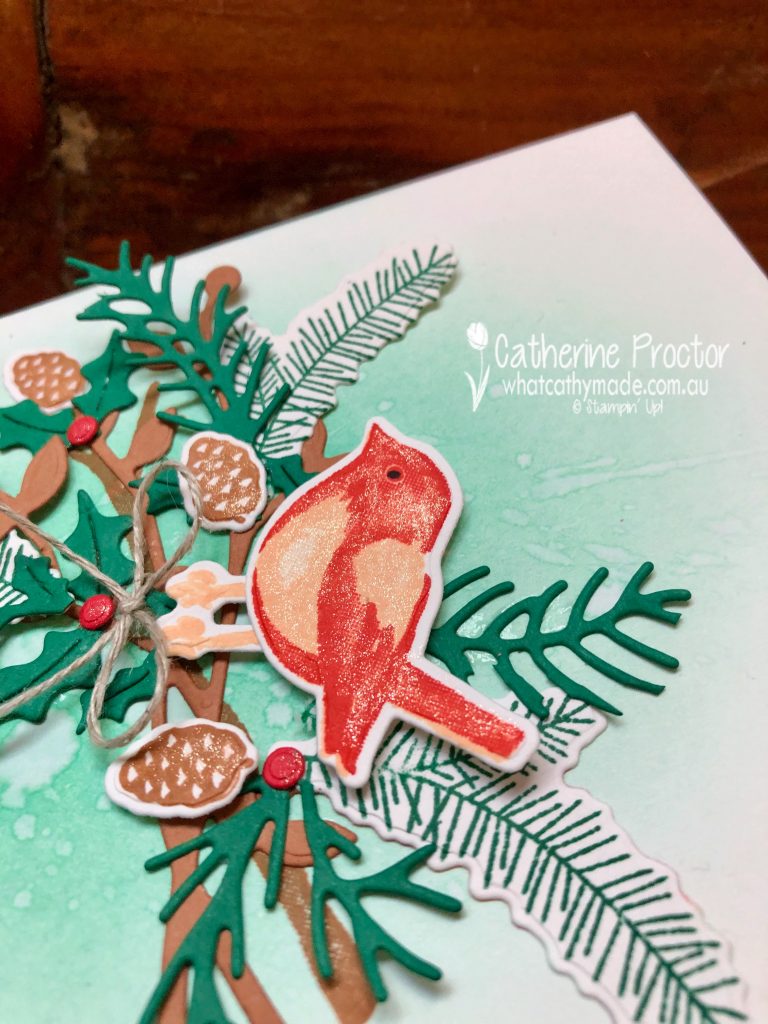
The bird was stamped in Pale Papaya and Poppy Parade, the pine needles in Just Jade and the pinecones in Cinnamon Cider. The branch was stamped in Cinnamon Cider and also die cut from Cinnamon Cider cardstock, trimmed to fit my card.
I die cut a wreath and holly leaves in Just Jade cardstock and then cut them up randomly to add texture and dimension to the card. The holly berries are die cut in Poppy Parade cardstock.
A touch of Wink of Stella adds subtle sparkle and shimmer to the little bird.
The Christmas to Remember sentiment stamp set has a lovely mix of fonts. I used two different stamps to mix up the fonts for my Merry Christmas Sentiment.
A bow of linen thread was the final touch.
Now it’s time to hop on over to our next participant, the incredible talented Tina Gillespie. I wait to see what Tina shares with us today!
If at any time you find a broken link, please head to the blog of this week’s Host of the Heart of Christmas Blog Hop, Tina Gillespie, and she will have the list of all who are participating.
You can purchase any of the products I’ve used tonight here.
Thanks for visiting my site. I’ll be back with another card on Wednesday.
In the meantime, wherever you are in the world, stay safe, stay calm … and keep on crafting xxx
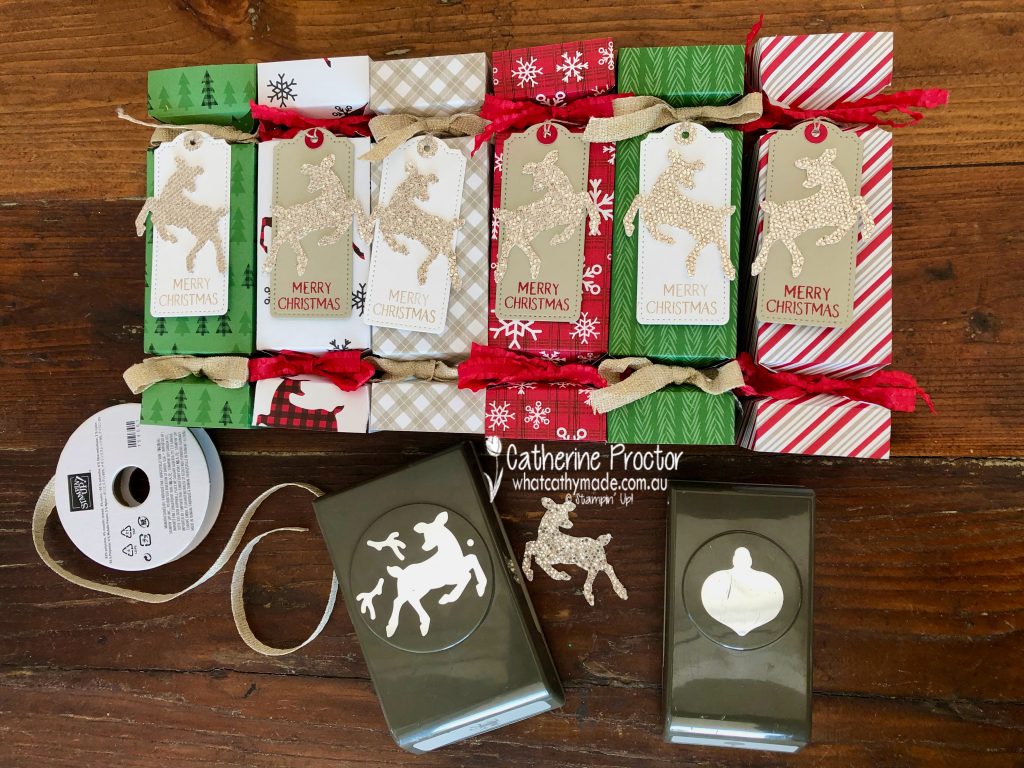
Do you use your Stampin’ Up! catalogues for inspiration? I find them such a wonderful source of ideas and this week I’ve taken my inspiration from the 2019 Stampin’ Up! Holiday catalogue.
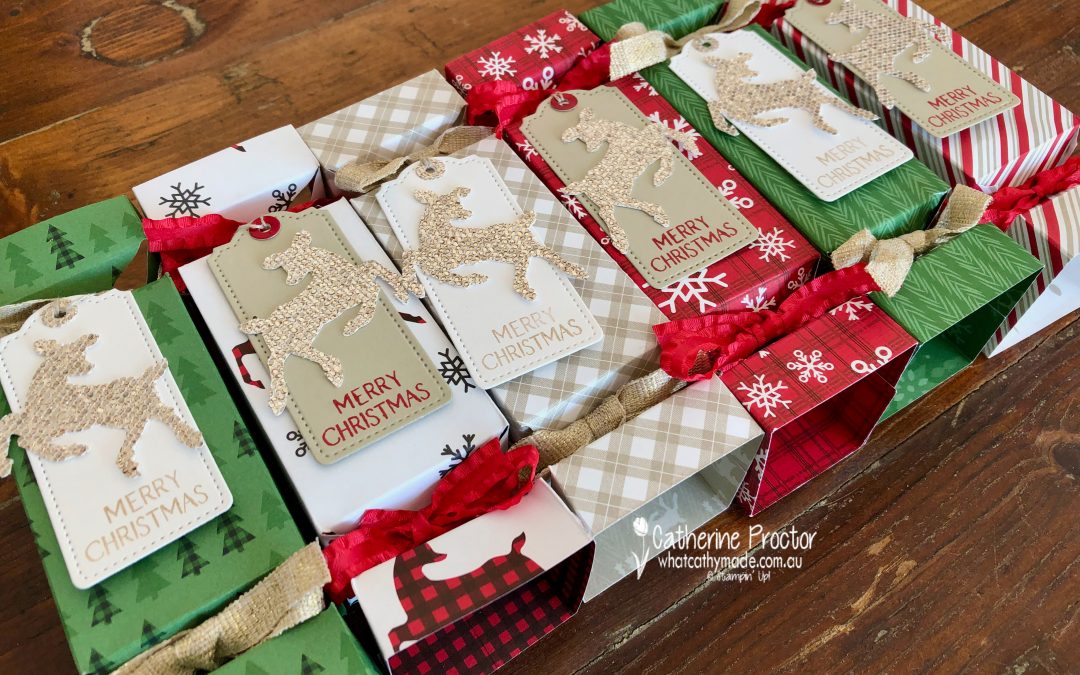
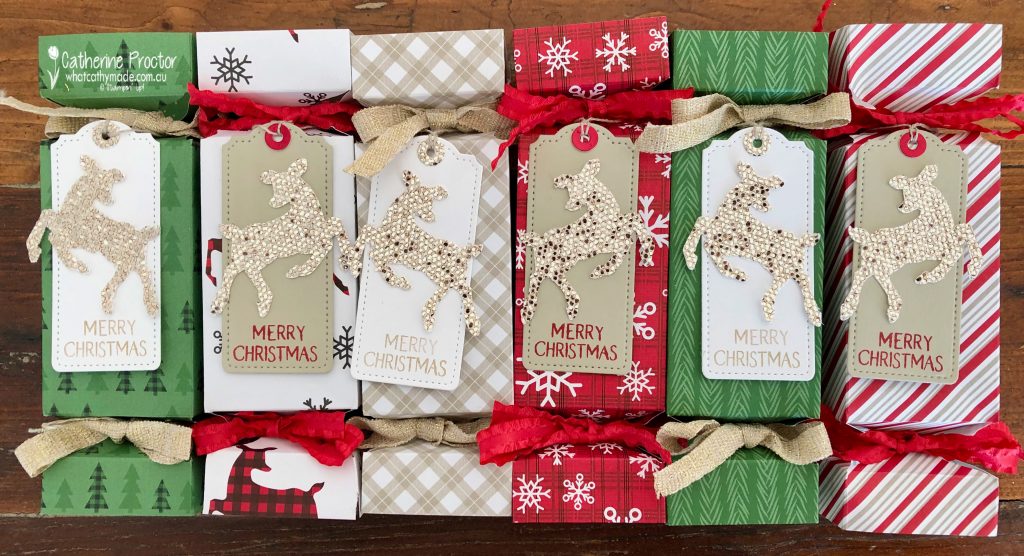
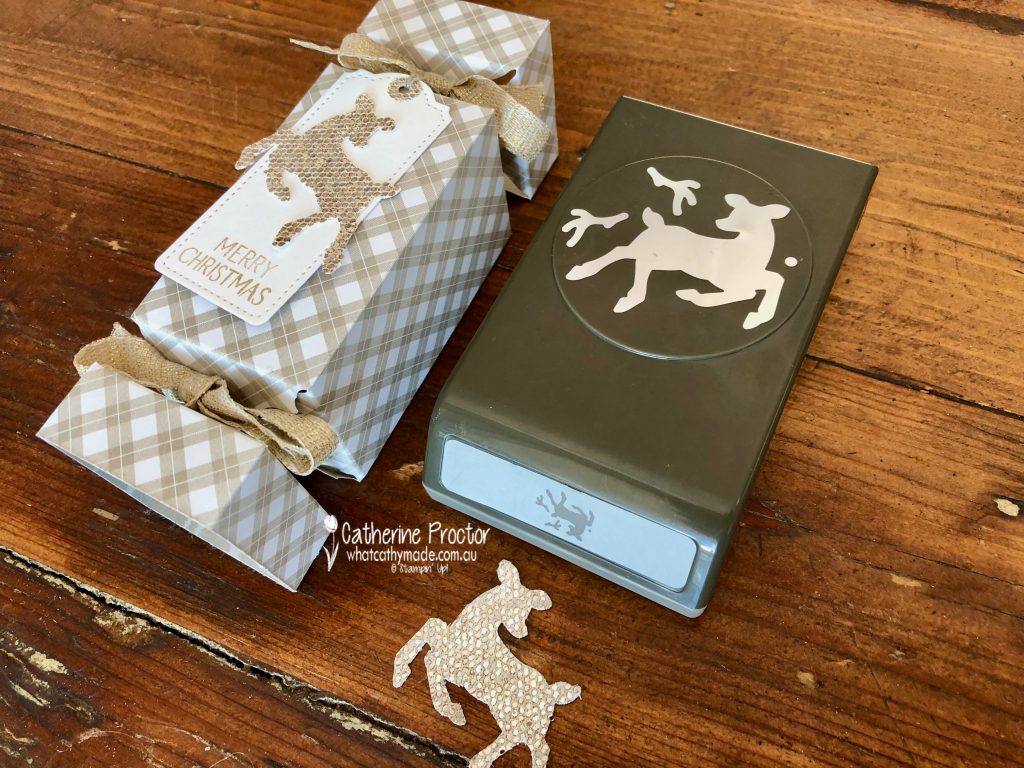
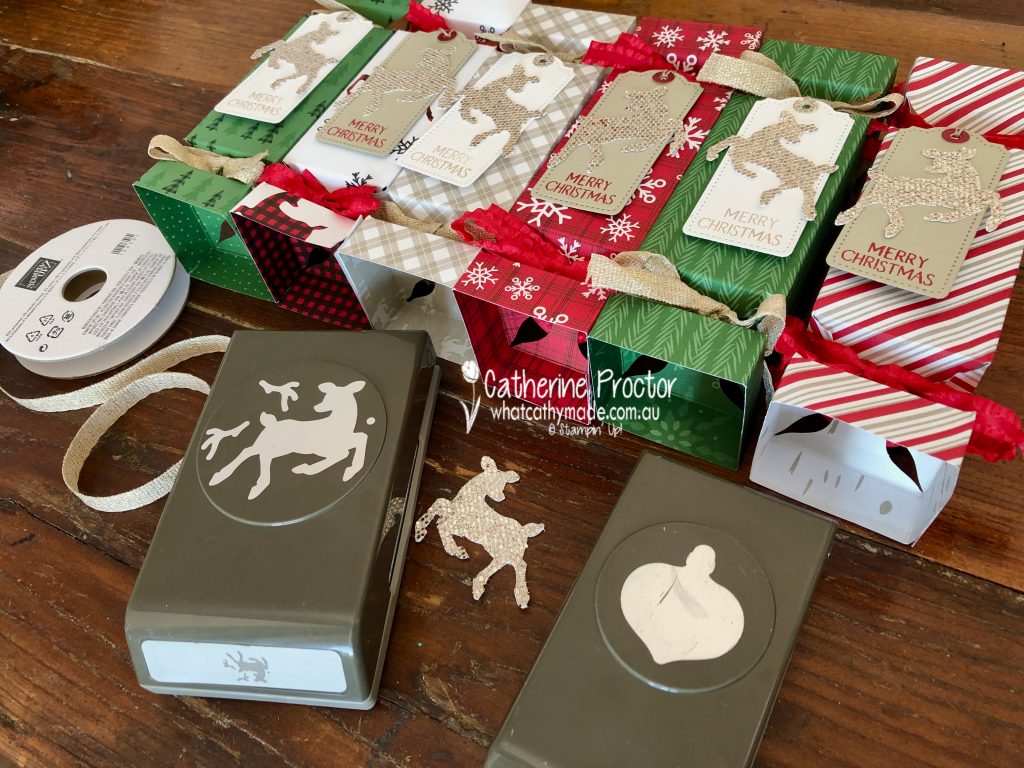
The 2019 Stampin’ Up! Holiday catalogue had very clever instructions on how to use your paper trimmer and the small Gleaming Ornaments Punch to make quick and easy Christmas crackers. As these ornament punches are currently available to purchase in the clearance rack (on sale for $35.40) I thought I would adapt this design and make a set of Christmas Crackers using the FREE SALE-a-bration Peaceful Prints DSP.
I’ve used 6 of the patterns from the Peaceful Prints DSP to make 6 crackers – I will make another 6 crackers using the reverse sides of this DSP before Christmas.
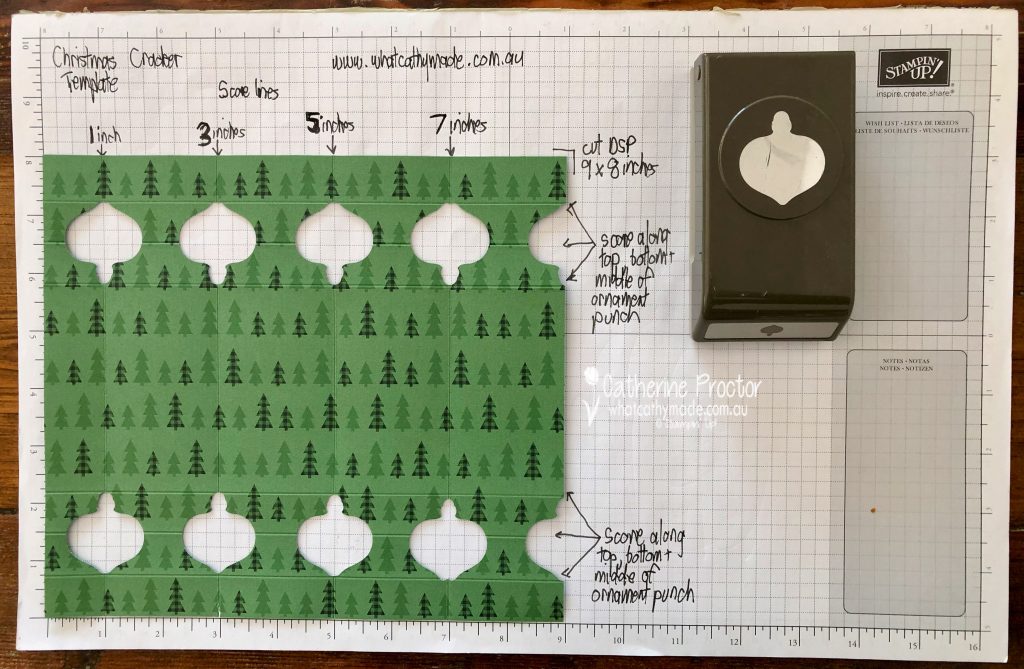
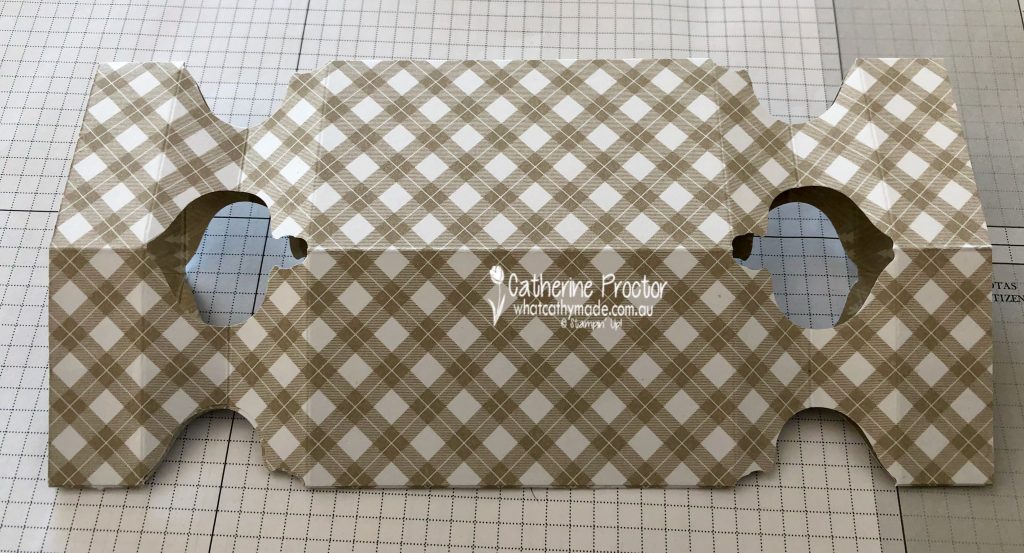
Here’s my template to make the crackers using the small ornament punch.
Trim a sheet of DSP to 9 x 8 inches
Score along the 8 inch side at 1 inch (this creates the flap for adhering the sides of the cracker together) and score again at 3, 5 and 7 inches
Fold along all these score lines
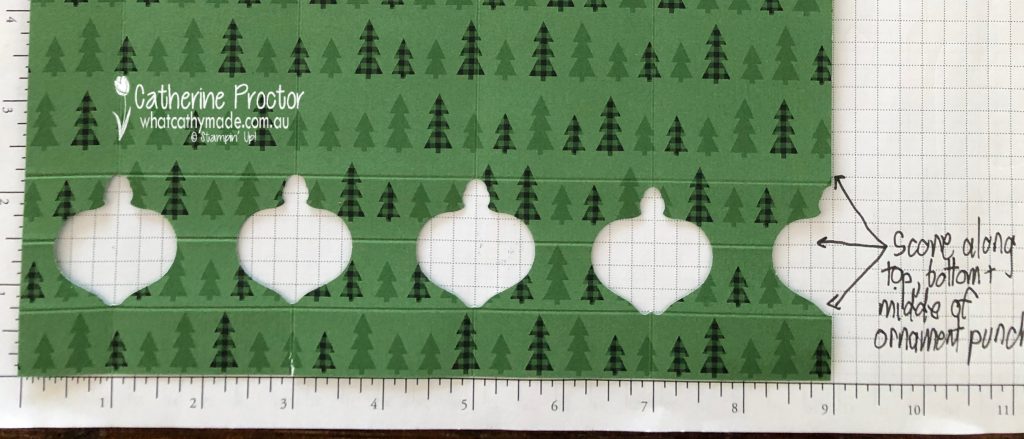
Fully insert small ornament punch to the edge of the DSP, ensuring the score line is in the centre of the ornament
Punch every score line at both ends of the DSP
Also punch at the 9 inch edge, lining up the centre of the punch with the edge of the DSP
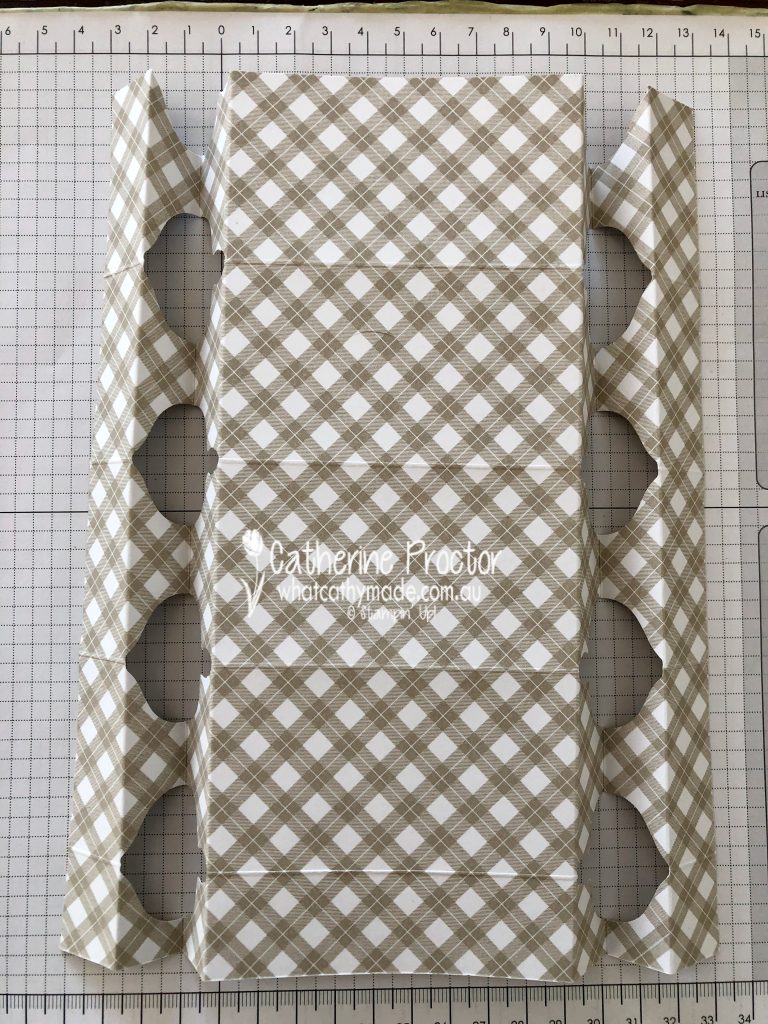
Now score in the opposite direction, along the width of the cracker at the top, bottom and the centre of the punched out areas (see photo above) and then fold these score lines as per the photo below.
To assemble the cracker, fold up the 1 inch fold flap so that the DSP side that will be on the outside of the cracker is facing up.
Place Multipurpose Liquid Glue on this flap and fold over the cracker at the 5 inch fold, lining up the punched out areas. Press together to adhere.
Cut ribbon of choice into 14 inch (36 cm) lengths and tie into a bow at each end.
You can decorate the crackers any way you want. I used the Peaceful Deer bundle, the FREE SALE-a-bration Be Dazzling DSP and the Tailored Made Tags Dies to create coordinating deer tags for my crackers. I used some Sahara Sand twine to attach them to one end of the cracker, but you could also simply adhere them to the top of the cracker.
These crackers are empty right now because I am going to fill them with yummy treats closer to Christmas, such a Ferrero Rocher chocolate, Lindt Balls and little jokes. To fill them at a later time, simply untie the bow at one end, pop the treats inside and retie the bow.
You can make these Christmas crackers out of any DSP to match your Christmas table decoration.
Now it’s time to hop on over to our next participant, the incredible talented Michele Taylor. I wait to see what Michele shares with us today!
If at any time you find a broken link please head to the blog of this week’s Host of the Heart of Christmas Blog Hop, Sharon Davern, as she has the full list of links for everyone who is participating.
You can purchase any of the products I’ve used tonight here.
Thanks for visiting my site. I’ll be back with another card on Wednesday.
In the meantime, wherever you are in the world, stay safe, stay calm … and keep on crafting xxx
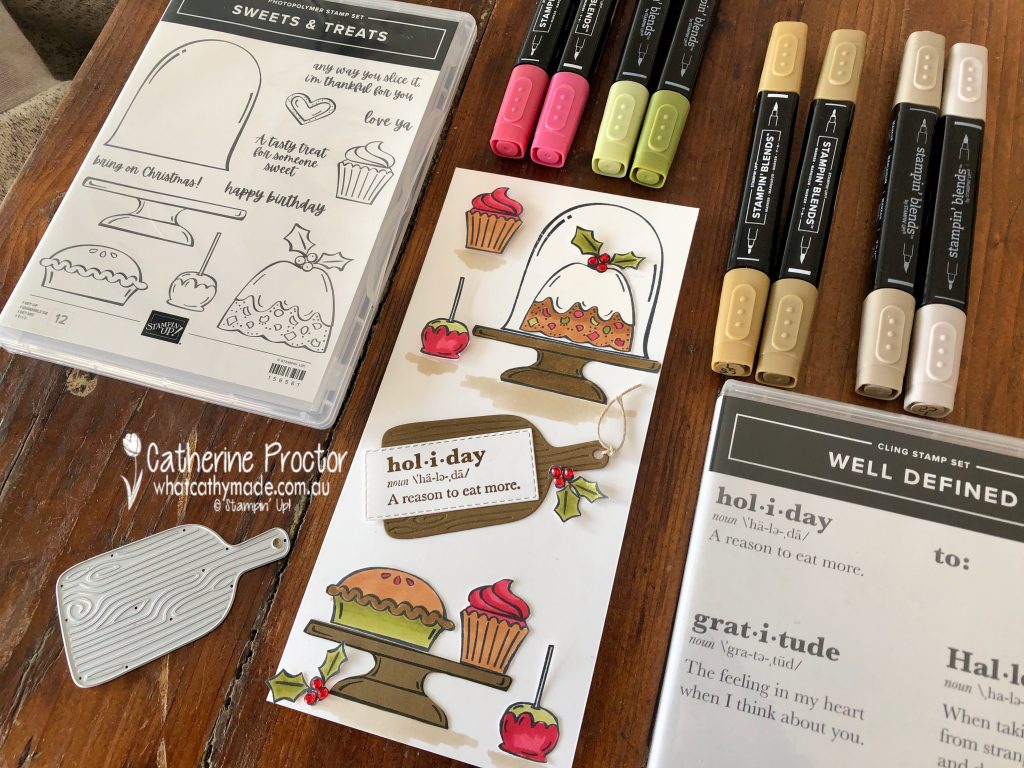
This week I’ve used a sentiment stamp set from the new July-December 2021 Mini Catalogue that could be easily overlooked, but I was lucky enough to win from my upline Claire, the Well Defined stamp set.
I’m not sure why I hadn’t used this stamp set before as I love dictionary definitions. In fact, I’ve just finished reading an amazing novel called “The Dictionary of Lost Words”, based on the true story of the women who were involved in the making of the Oxford English Dictionary. It’s a part of history I had never heard of before, beautifully told in one of the best books I’ve read this year.
Although these stamps have been created to look like an official dictionary entry, I’m not sure they would have been included in either the official Oxford Dictionary or even in the Dictionary of Lost Words!
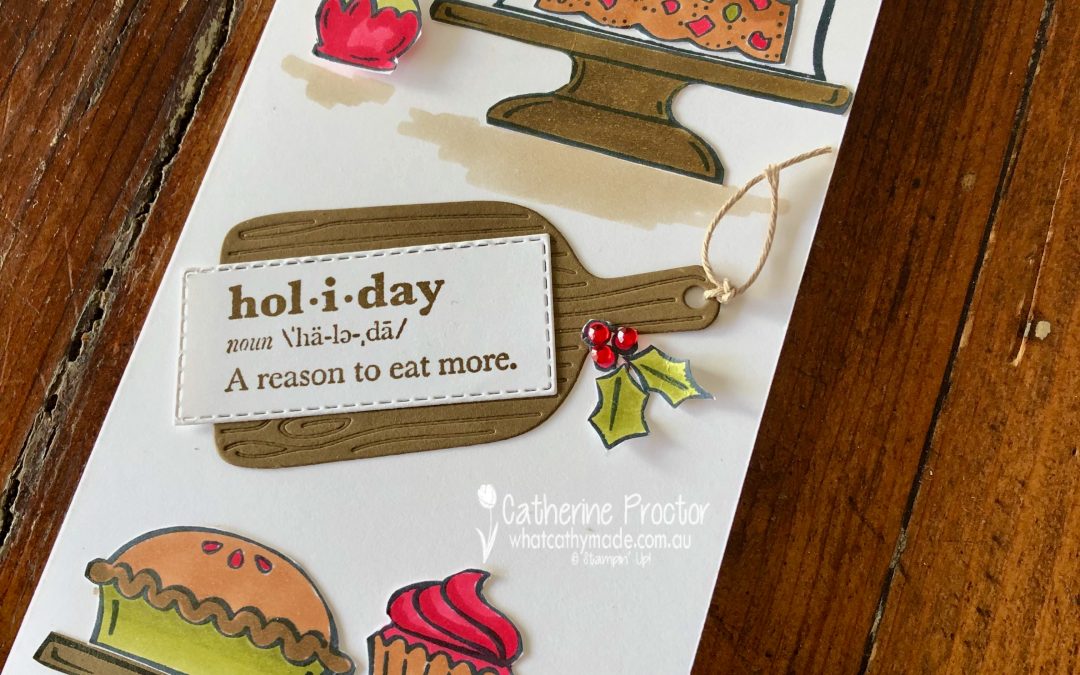
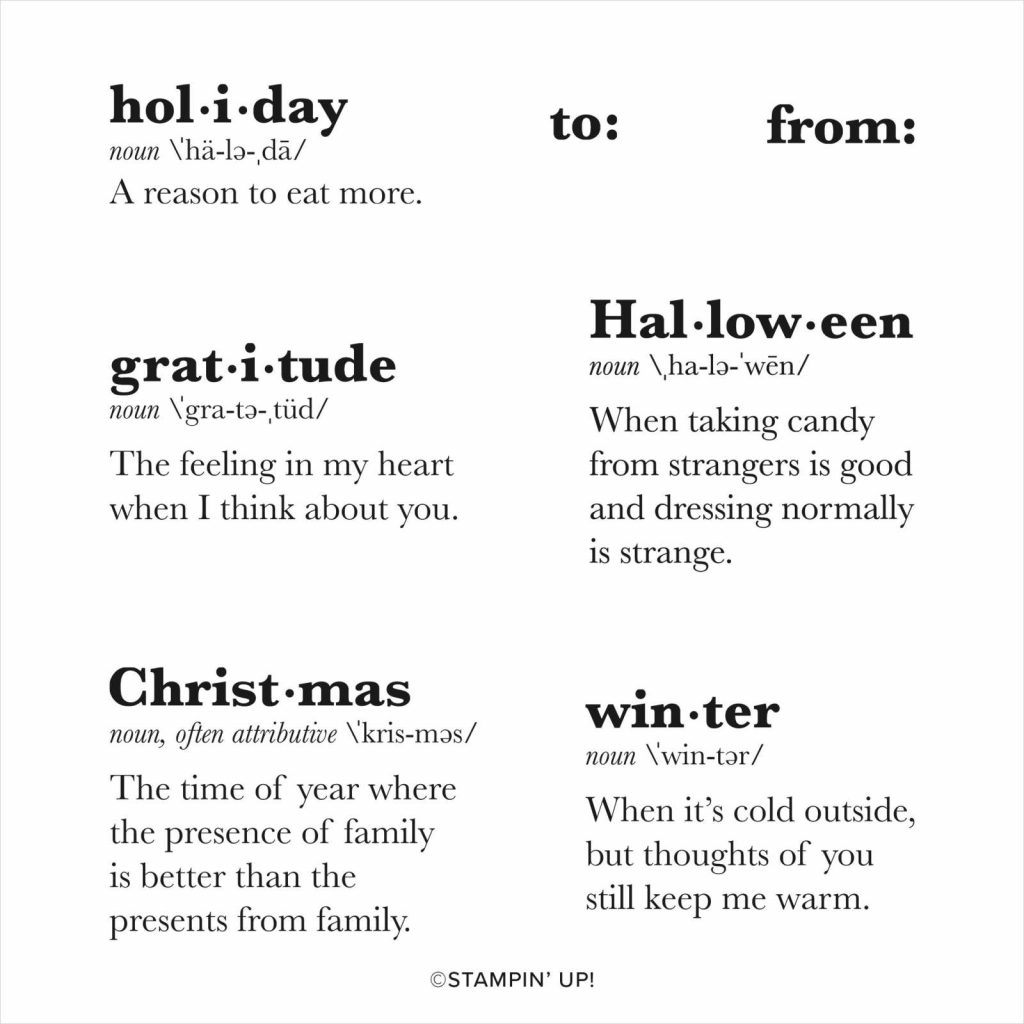
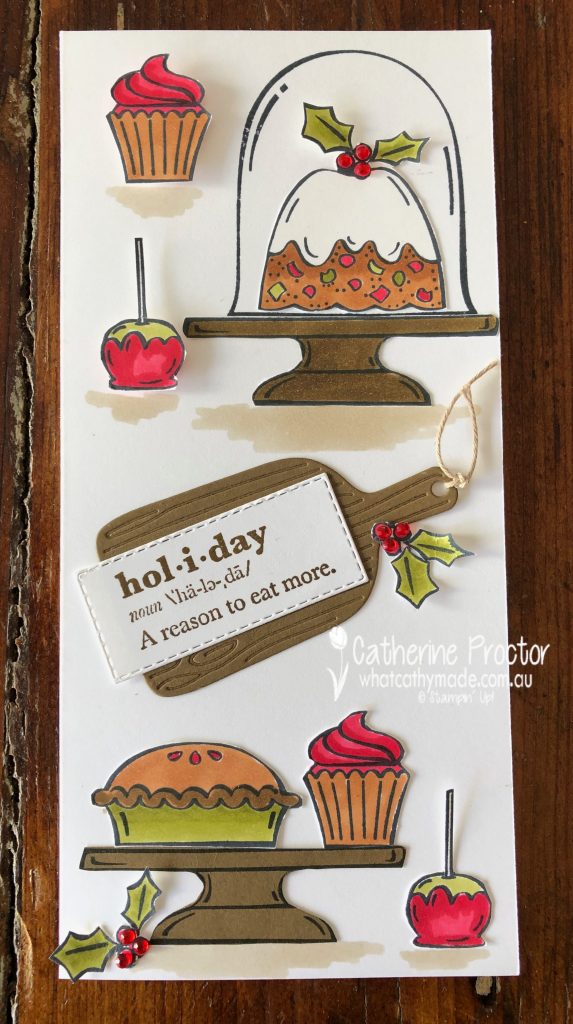
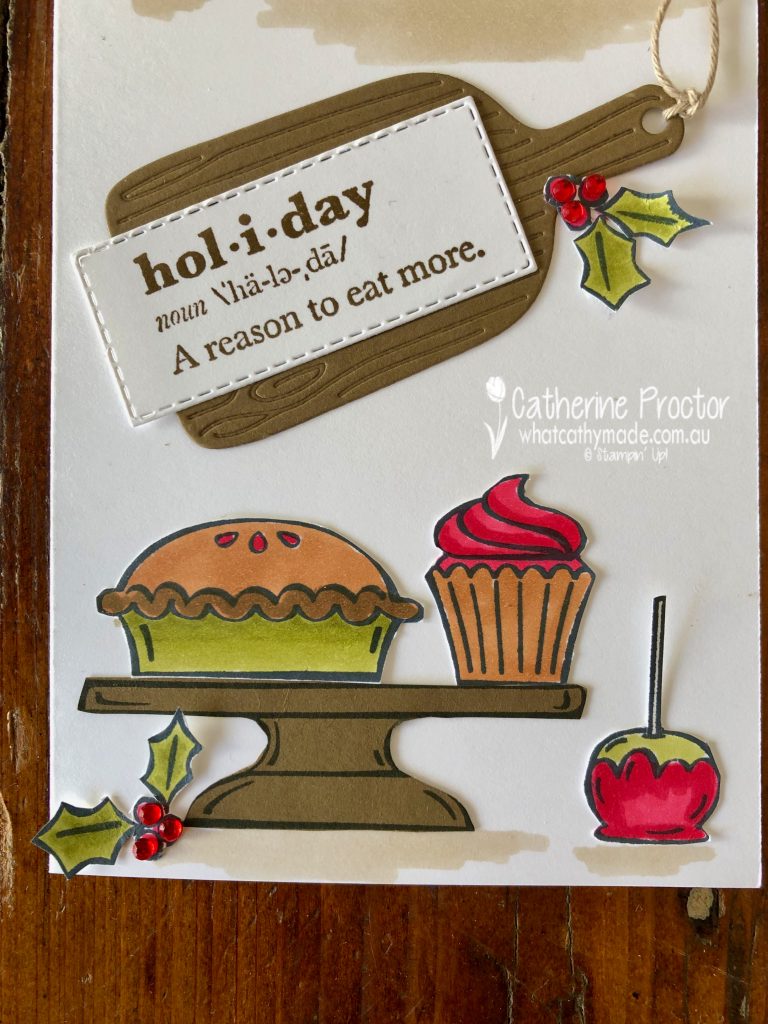
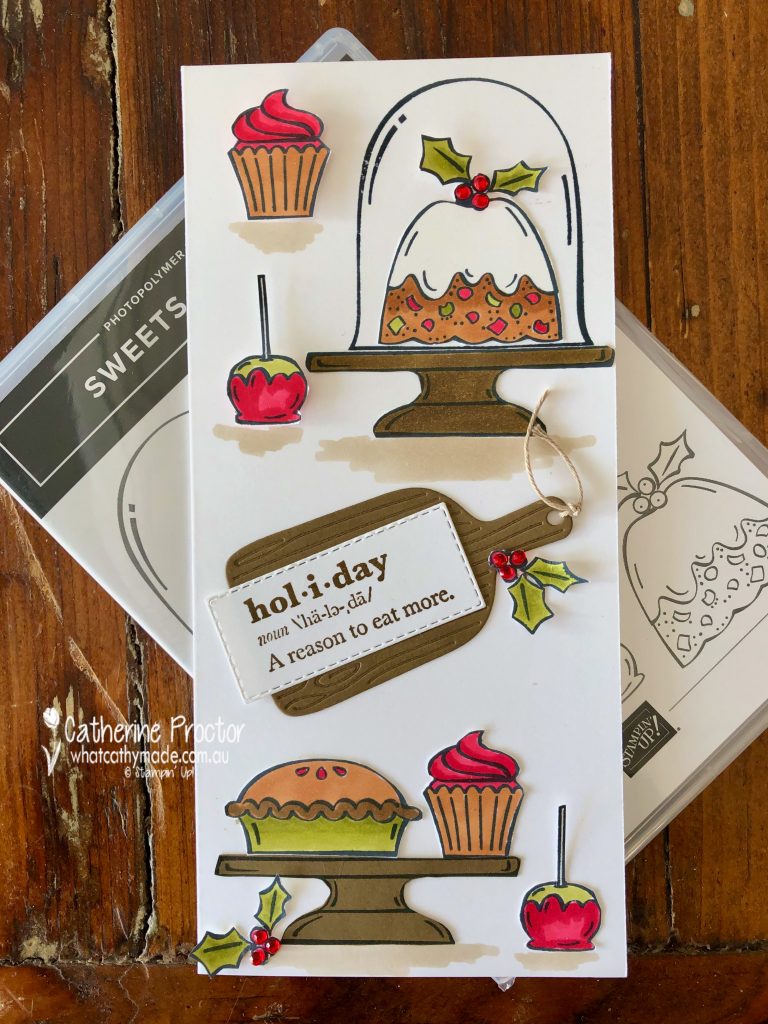
I’ve got plenty of ideas for cards to make with each of the dictionary definitions, however I’ve just used the “holiday” definition stamp today because I wanted to pair it with the Sweets & Treats stamp set for a fun, festive and food-themed card.
Stampin’ Blends in light and dark Old Olive, Real Red and Soft Suede give my card a traditional Christmas colour scheme, with scribbles of the light Crumb Cake Stampin’ Blend to anchor the images.
The sentiment is stamped in Soft Suede before being mounted onto the chopping board die from the Cookin’ Dies. I love how this little die embosses the card stock at the same time as it cuts out the shape of the chopping board.
I stamped two extra the holly sprigs from the plum pudding image and fussy cut them out to add a little more festive cheer. Red Rhinestone jewels are the perfect fit for the little holly berries and add a touch of bling to the card.
I must admit, although I adore the plum pudding stamp, I actually hate plum pudding, Christmas cake or any desserts that include dried fruit. I would, however, happily eat the cupcakes, toffee apples and definitely the cherry pie!
I had a lot of fun making this card – I hope it puts a smile on your face too!
Now it’s time to hop on over to our next participant, the incredible talented Michele Taylor. I wait to see what Michele shares with us today!
If at any time you find a broken link please head to the blog of this week’s Host of the Heart of Christmas Blog Hop, Tina Gillespie, as she has the full list of links for everyone who is participating.
You can purchase any of the products I’ve used tonight here.
Thanks for visiting my site. I’ll be back with another card on Wednesday.
In the meantime, wherever you are in the world, stay safe, stay calm … and keep on crafting xxx
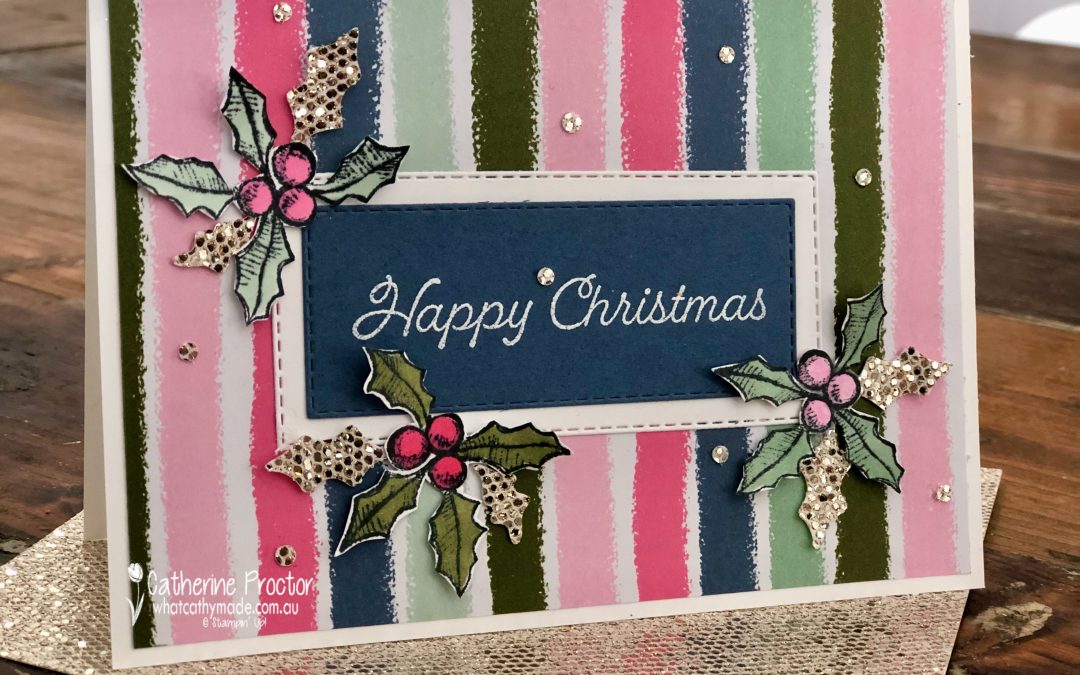
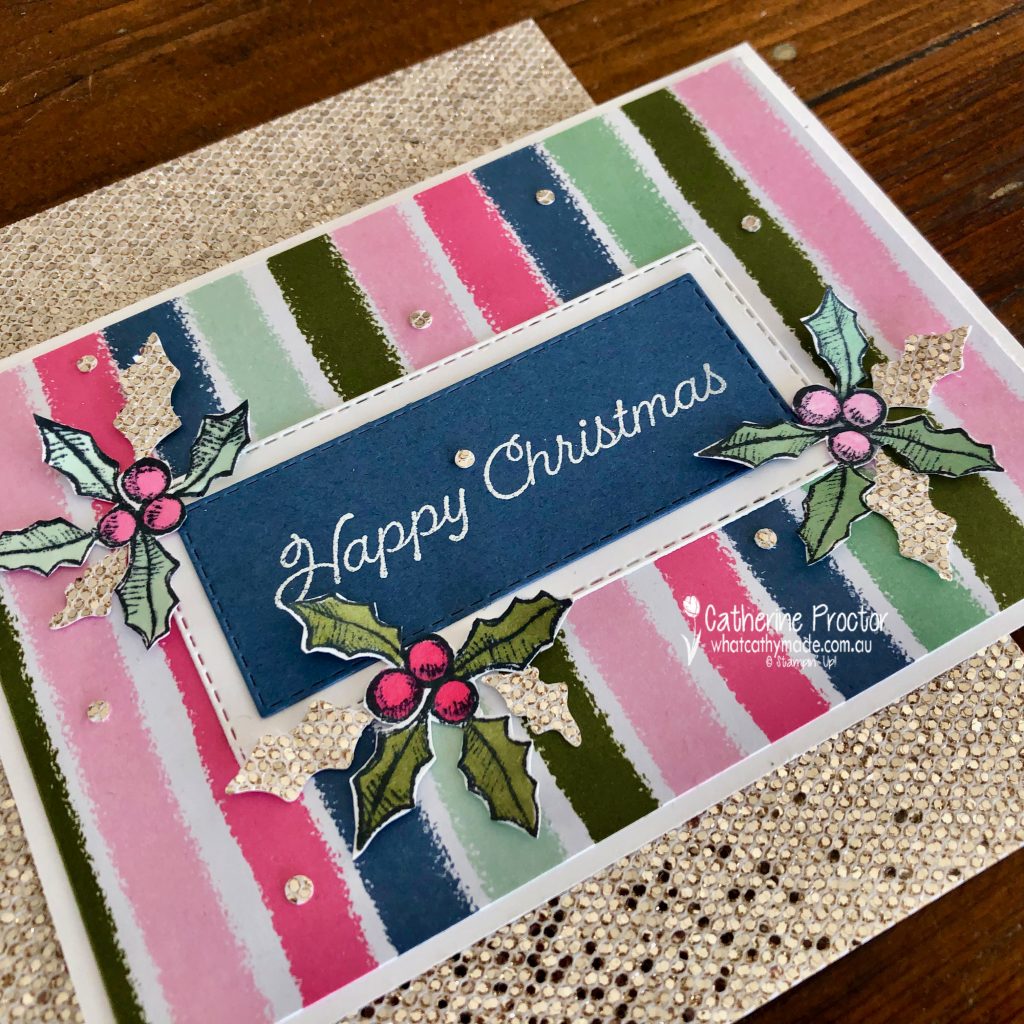
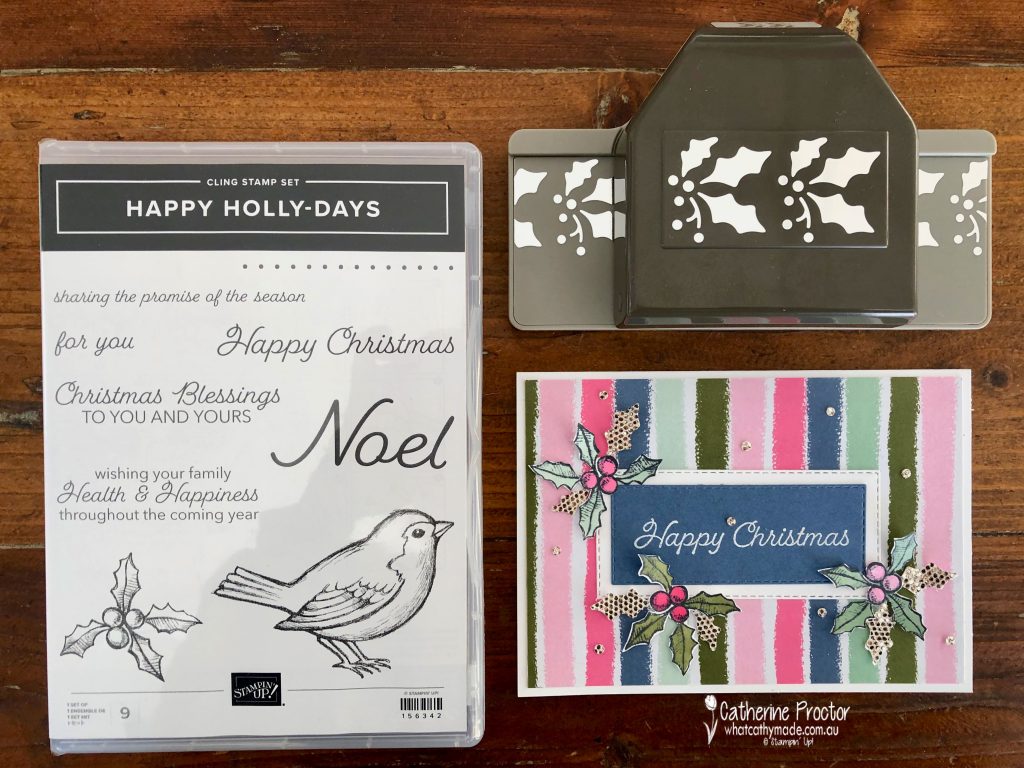
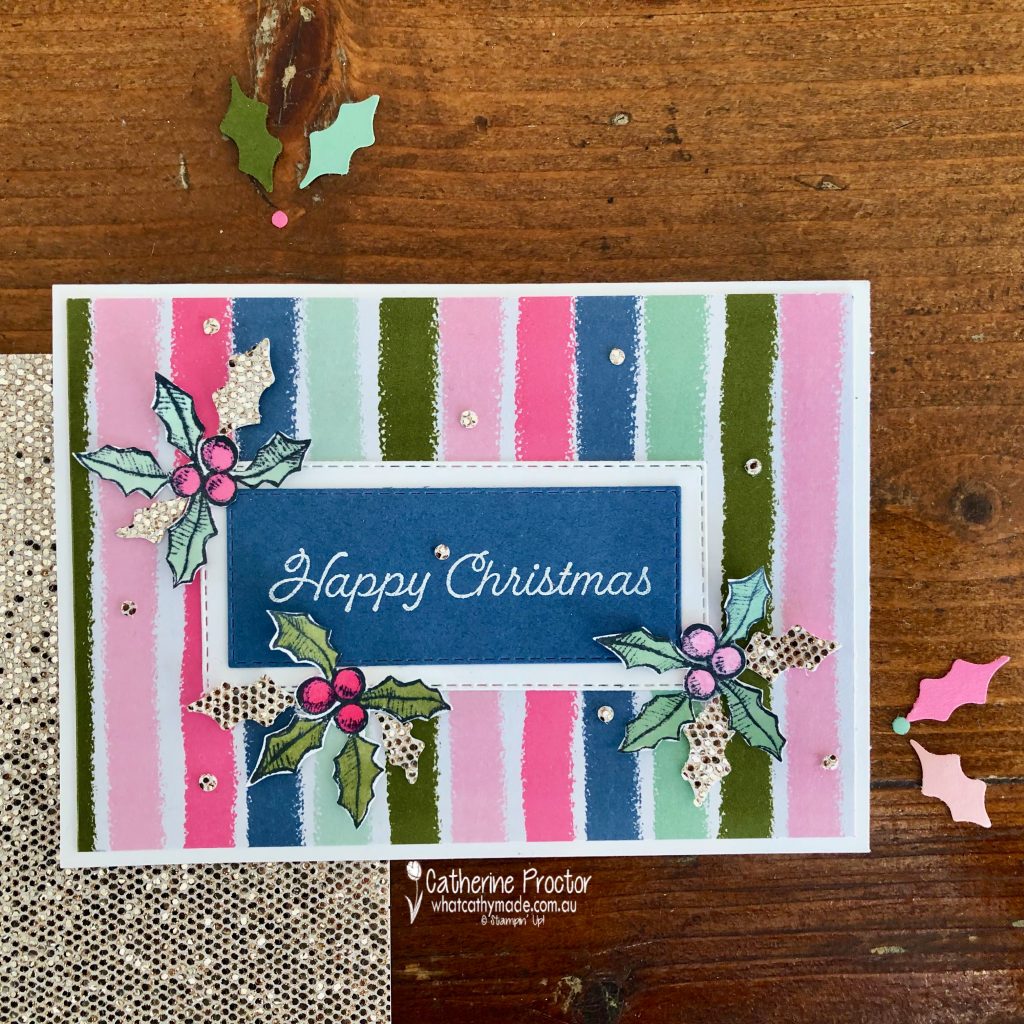
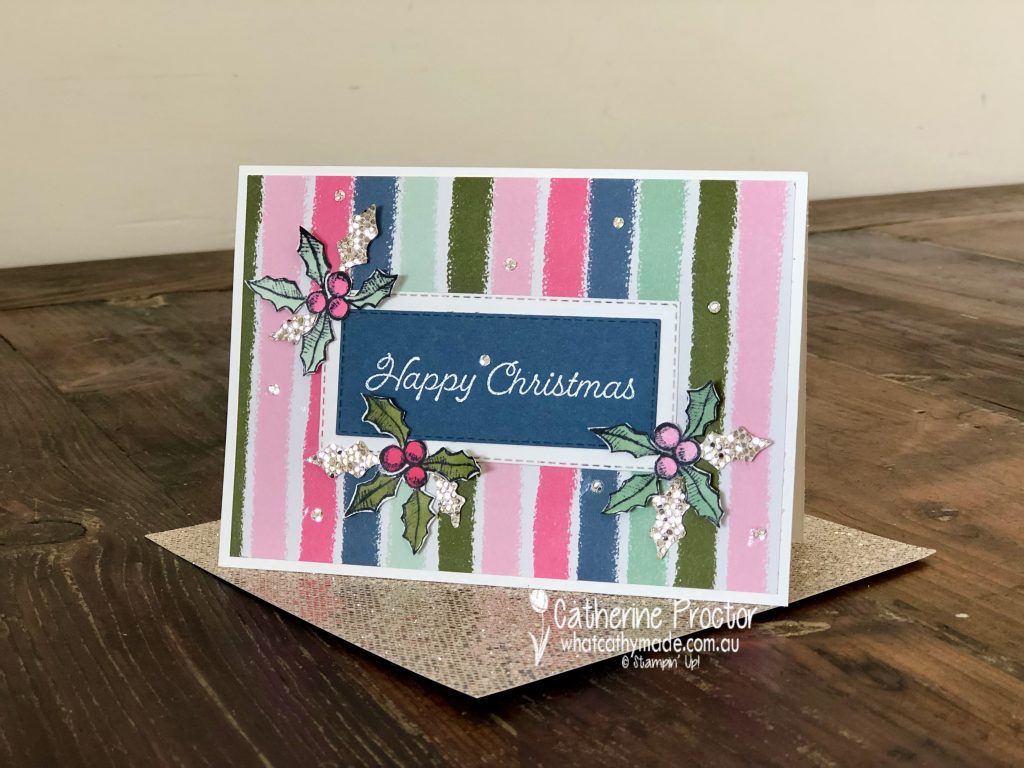
The new July-December 2021 Mini Catalogue and SALE-a-bration catalogues go live tomorrow so I’m sharing another card that uses some of these beautiful Christmas products.
I’m not really a sparkly girly girl at all but I just can’t stop using this FREE Be Dazzling specialty designer paper from the SALE-a-bration catalogue. I’ve taken a zillion photos of my card to show you just how gorgeous this Be Dazzling specialty designer paper is!
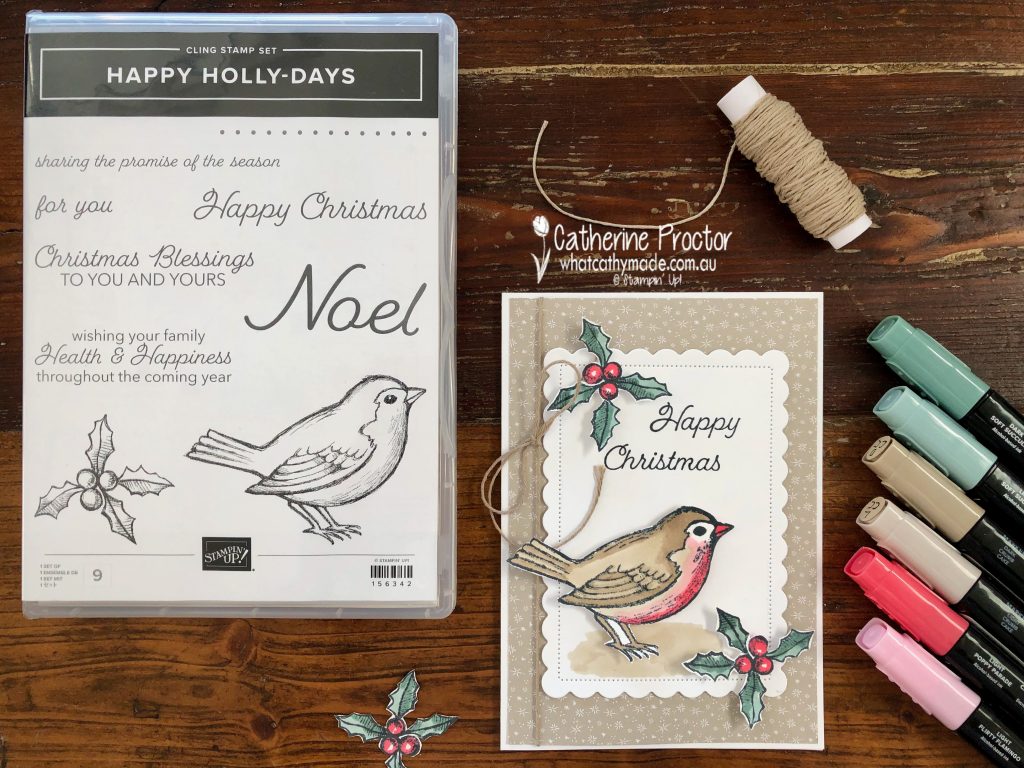
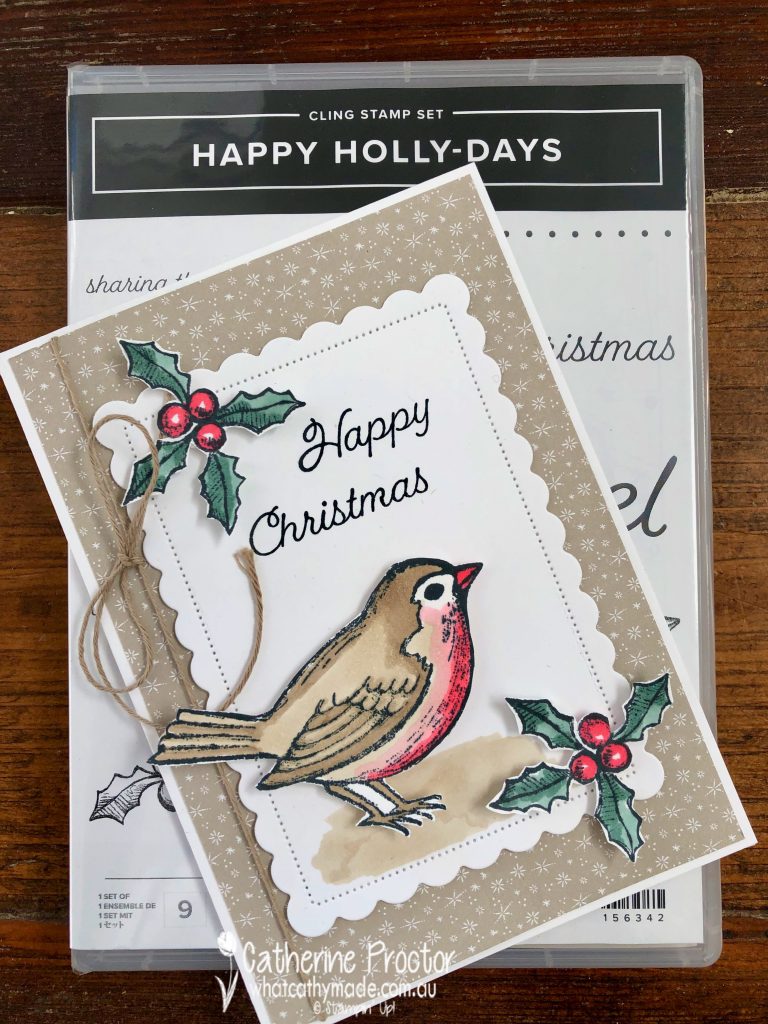
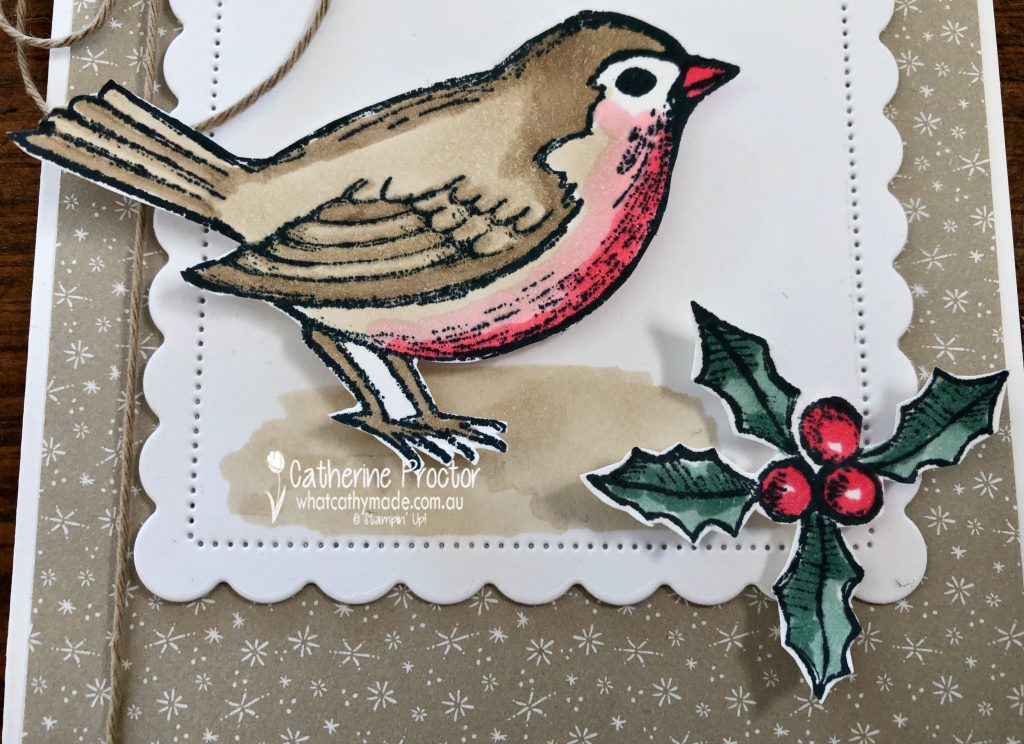
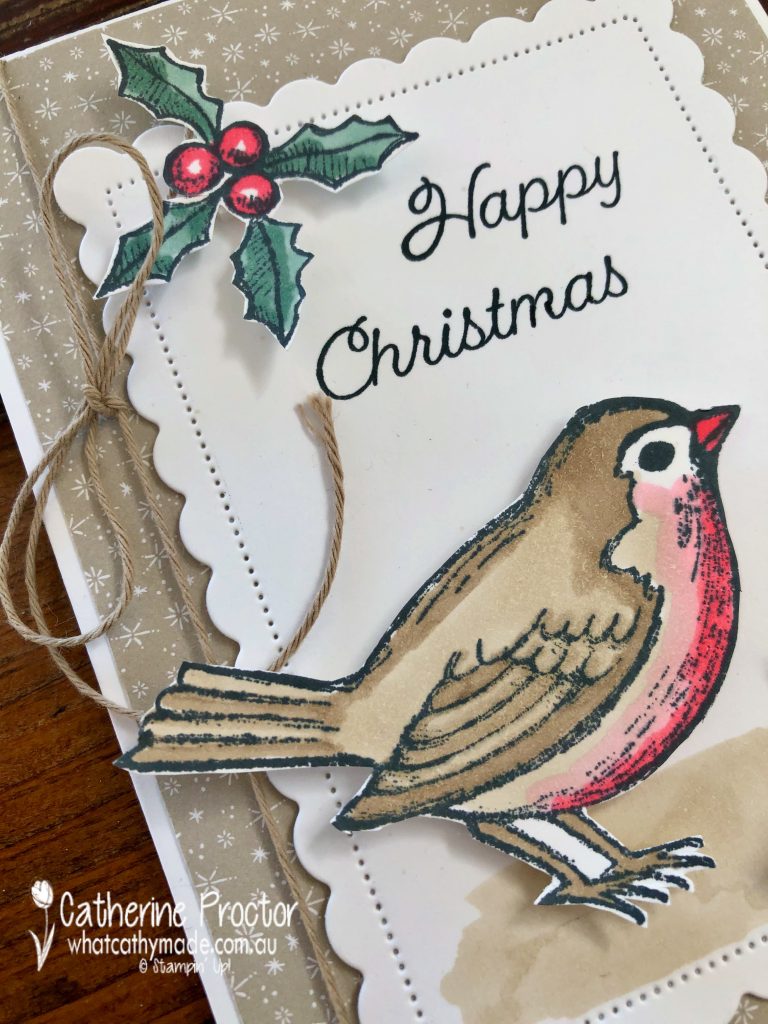
I’ve also used one of my favourite bundles from the July-December 2021 Mini Catalogue – the Happy Holly-Days Bundle. Last week I shared this card with you that featured the adorable bird coloured in – this week I’ve used the holly stamp and the Holly Border Punch from the Happy Holly-Days Bundle.
What’s that stunning striped Designer Series Paper I hear you cry? It’s my favourite DSP from the new July-December 2021 Mini Catalogue, called Whimsy & Wonder Designer Series Paper.
I cannot begin to tell you how stunning this DSP is. The colour combination is: Polished Pink, Blushing Bride, Mossy Meadow, Mint Macaron, Misty Moonlight and Iridescent. It is foiled on one side, with gorgeous background patterns (like the stripes I’ve used today) on the other side.
This card layout would work with any Designer Series Paper – just pick up the colours in the DSP for when you colour in the holly. I used light and dark Polished Pink, Mossy Meadow and Mint Macaron blends to colour the holly and then I fussy cut it out. If you don’t enjoy fussy cutting just use the holly punch to punch out cardstock in colours that co-ordinate with your DSP.
An added bonus of this punch is the little dots it punches out – don’t waste them! Just like I did with the Deer Builder punch on this card, I’ve used these dots as tiny embellishments.
These tiny dots can be tricky to adhere as they are so small. I find the easiest way to do this is to place a small amount of multipurpose glue onto the silicon mat and then insert the sharp tip of your “Take your Pick” tool into the glue. Use this tip with the glue to pick up the back of the embellishment, place it on your card and gently press down as you slide the “Take your Pick” tool out from under the embellishment.
Now it’s time to hop on over to our next participant, the incredible talented Theresa Gerrard. I wait to see what Theresa shares with us today!
If at any time you find a broken link please head to the blog of this week’s Host of the Heart of Christmas Blog Hop, Rachel Woollard, and she will have the list of all who are participating.
Thanks for visiting my site. I’ll be back with another card on Wednesday. If you’d like a copy of the forthcoming July-December mini catalogue and the Sale-a-bration catalogueplease get in touch.
I’m loving the challenge of creating a Christmas card each week and I hope you’re being inspired to create some too.
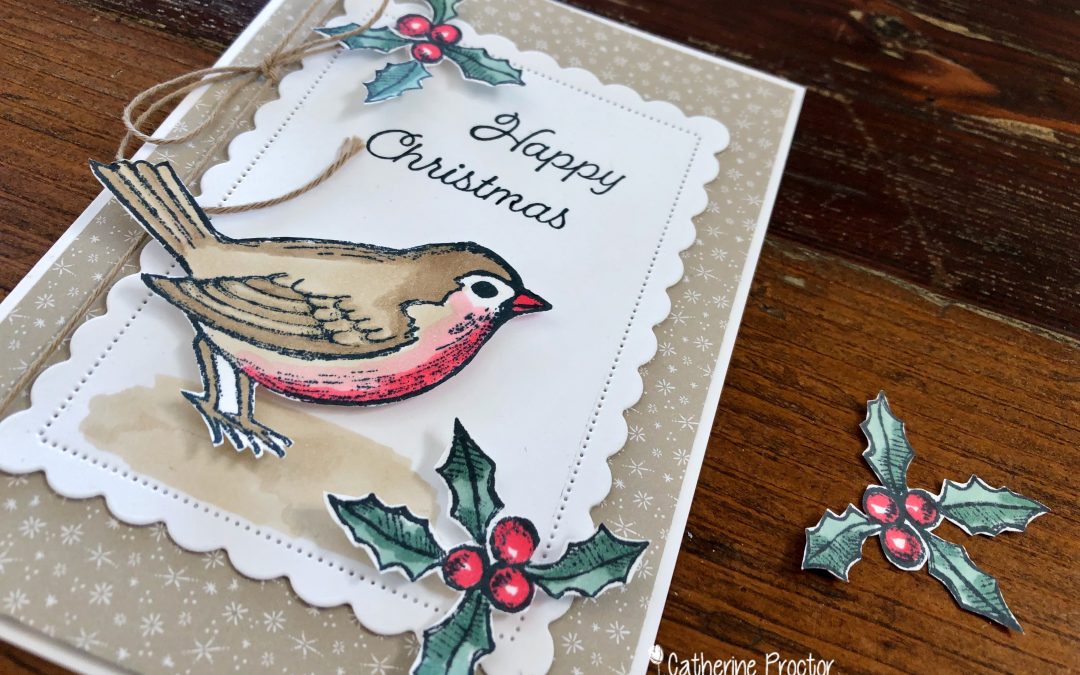
If you enjoy colouring techniques the Happy Holly-Days stamp set from the forthcoming July-December 2021 mini catalogue is a must!
Both this bird stamp and the holly stamp could be coloured using a variety of watercolour techniques or the Stampin’ Up! watercolour pencils, but for my card today I’ve quickly coloured the images in using our Stampin’ Blends.
The holly is coloured in using light and dark Soft Succulent and light Poppy Parade Stampin’ Blends, while the bird is coloured with Light and dark Crumb Cake, light Flirty Flamingo and light Poppy Parade Stampin’ Blends…love this colour combination!
Basic Black
Crumb Cake
Sahara Sand
Soft Succulent
Flirty Flamingo
Poppy Parade
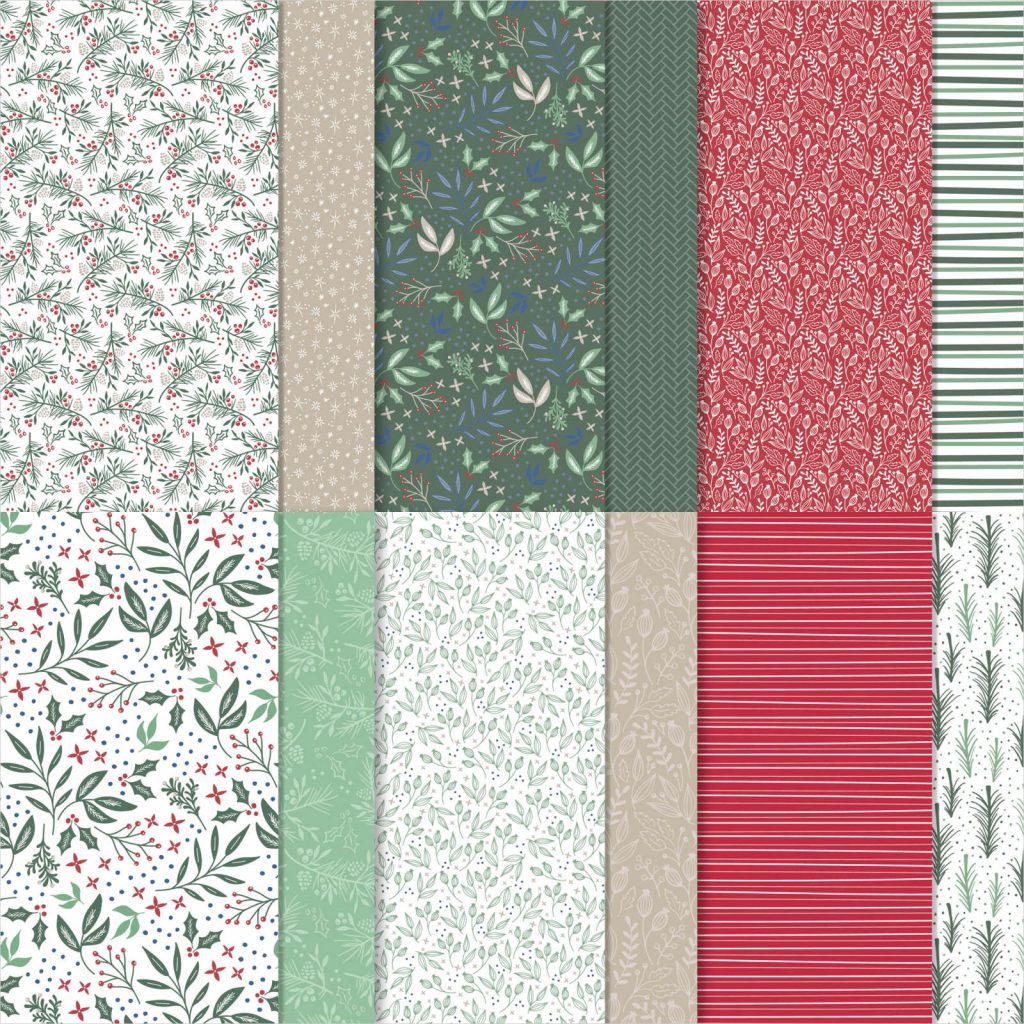
The softly patterned Sahara Sand DSP is from the Tidings of Christmas 6″ x 6″ Designer Series Paper – on sale until August 2.
It was very easy to fussy cut both the bird and the holly. This Happy Holly-Days stamp set is actually part of a bundle with the holly border punch, but I only used the stamp set on this card.
To ‘anchor’ the bird onto the card I used the light Crumb Cake Stampin’ Blend on the Basic White cardstock layer that has been die cut using the second largest Scalloped Contour die.
I inked up the word ‘Happy’ from the “Happy Christmas’ sentiment and stamped it first and then inked and stamped the word ‘Christmas’ below it. Crumb Cake twine wrapped around the card and tied into a soft bow finishes off the card.
Now it’s time to hop on over to our next participant, the very talented Ros Davidson – I can’t wait to see what Ros shares with us today.
If at any time you find a broken link please head to the blog of this week’s Host of the Heart of Christmas Blog Hop, Tina Gillespie, and she will have the list of all who are participating.
Thanks for visiting my site. I’ll be back with another card on Wednesday. If you’d like a copy of the forthcoming July-December mini catalogue and the Sale-a-bration catalogueplease get in touch.
Are you ready for some more Christmas inspiration?
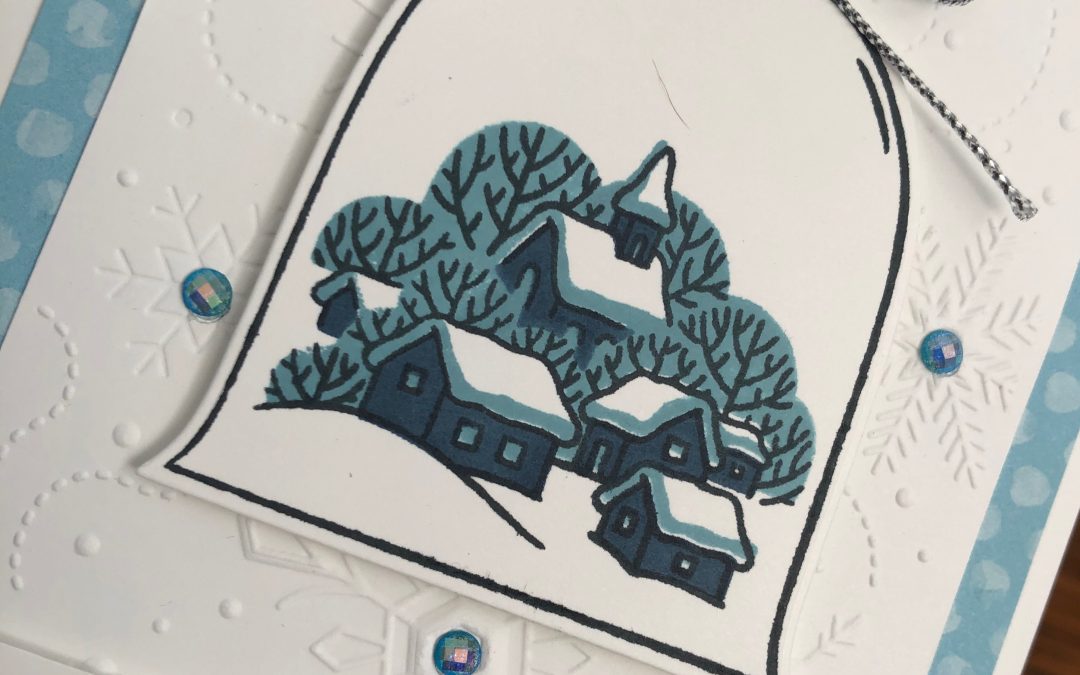
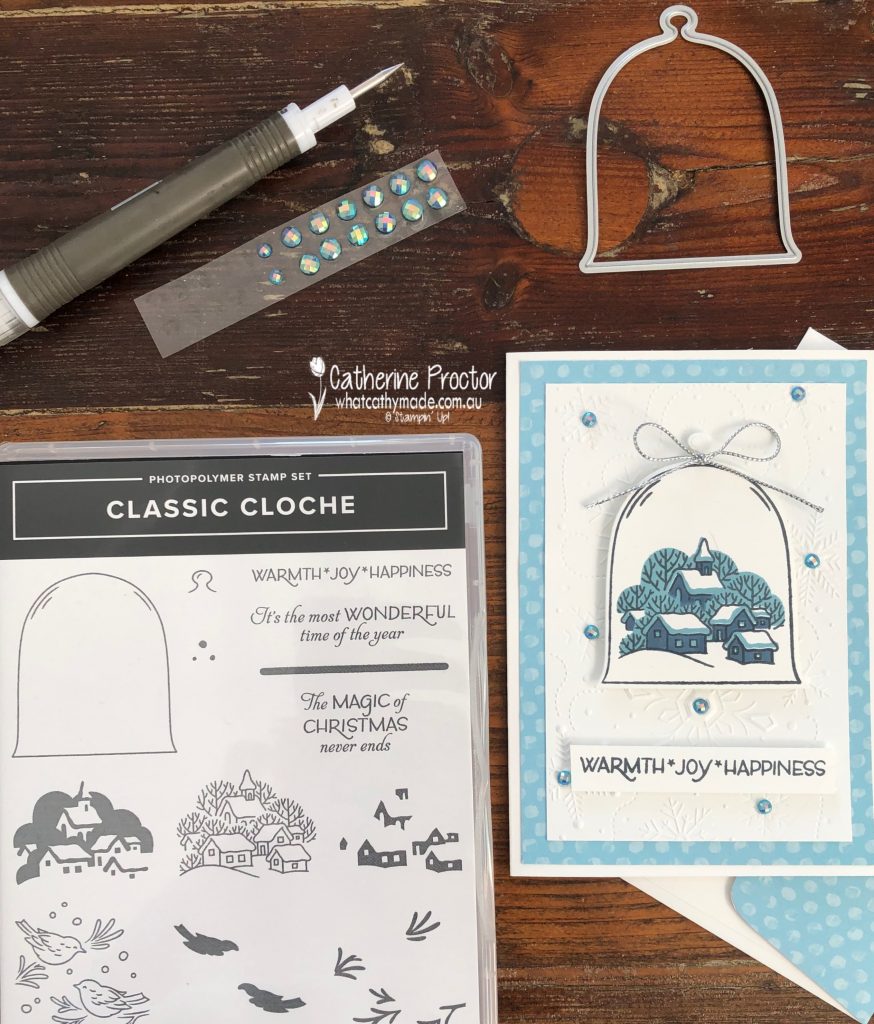
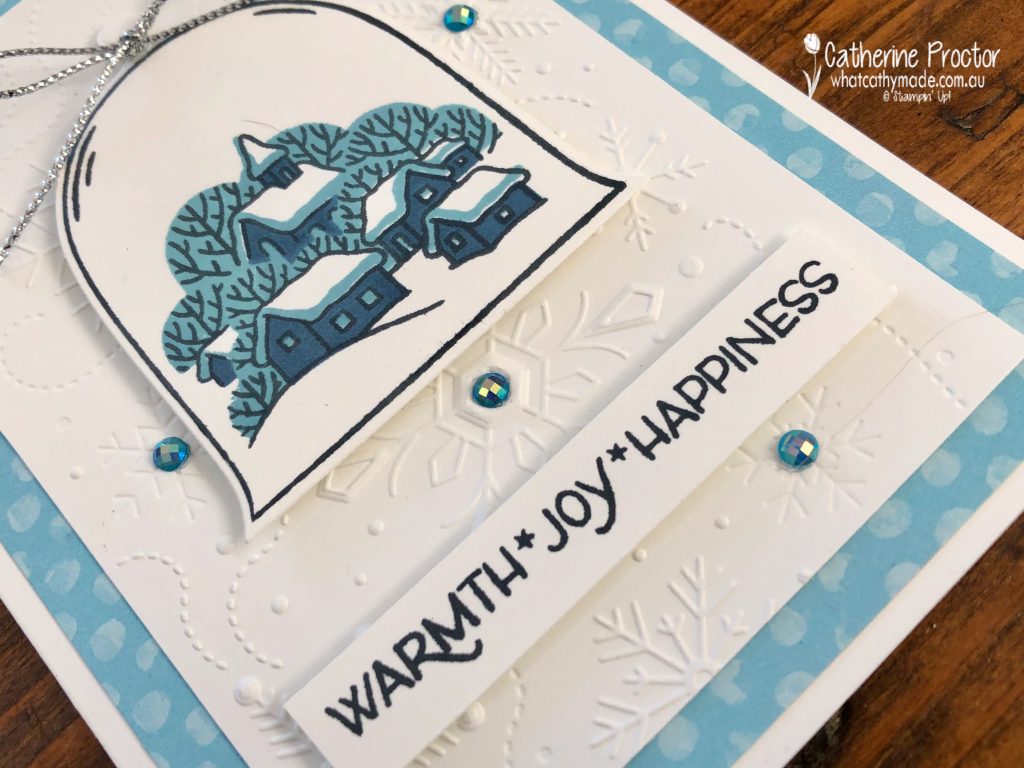
It’s pretty cold here in Sydney at the moment so I’ve made a very wintery card for you today using a new bundle from the forthcoming July-December Mini catalogue.
I have to confess this card wasn’t meant to be this simple – I had intended to make a shaker card using the new cloche shaker domes that match the Classic Cloche bundle but I forgot to order them! Luckily, this bundle really lends itself to both simple and more complex cards.
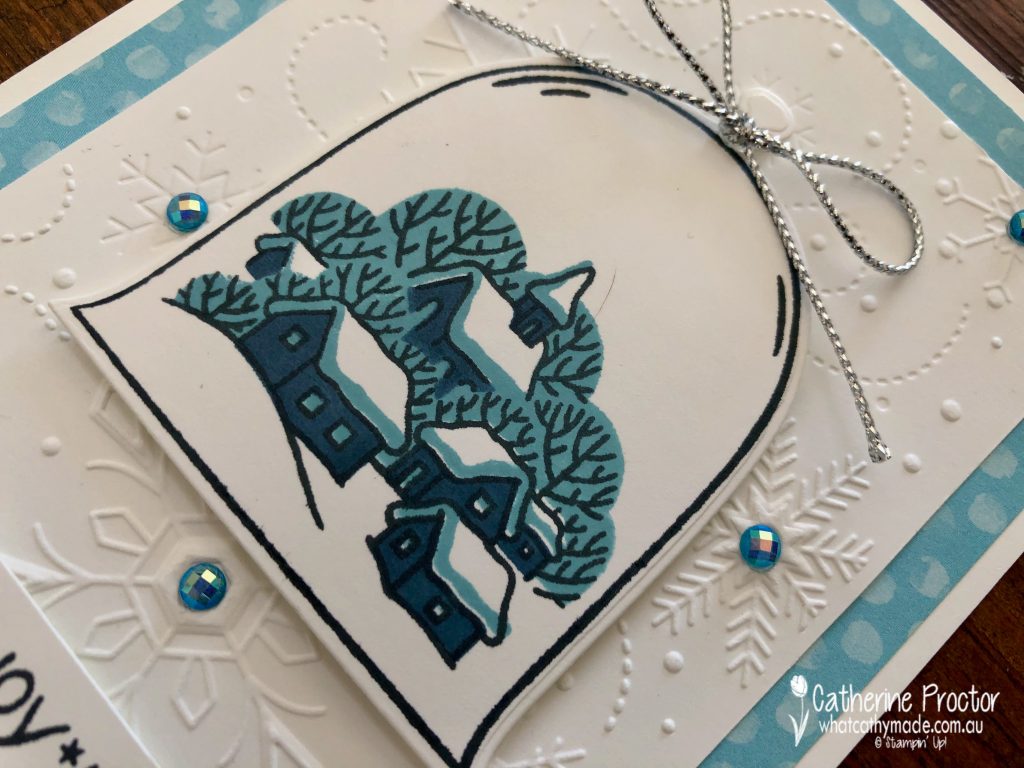
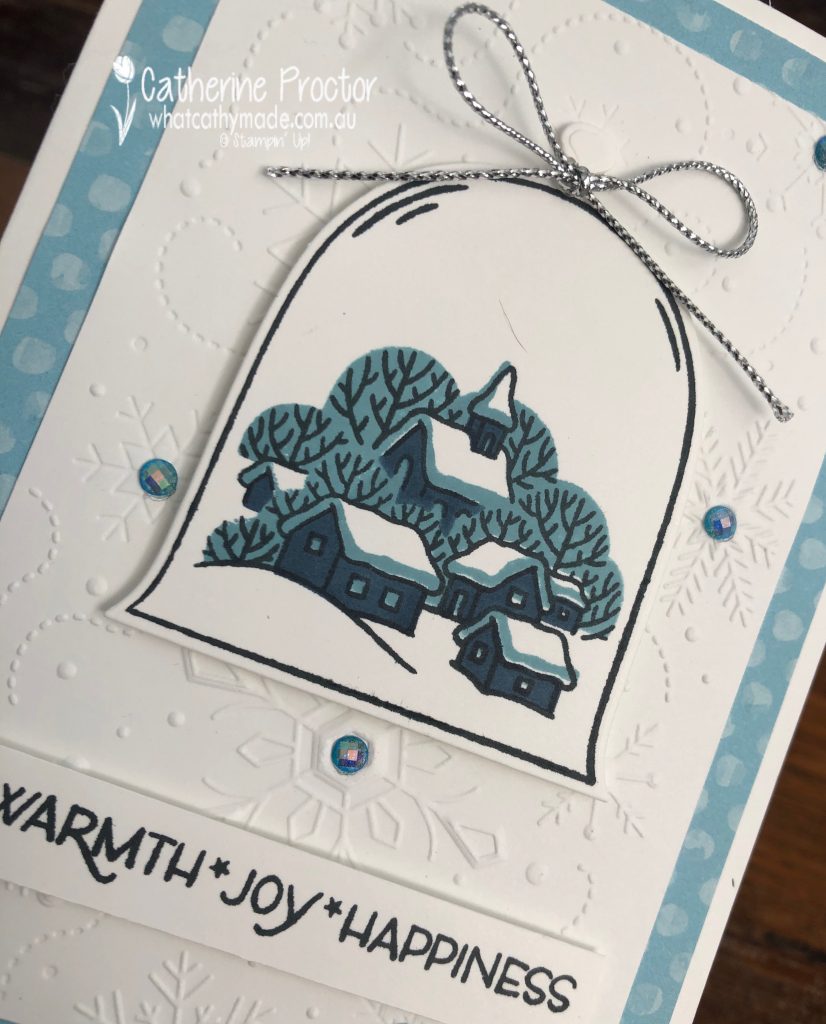
I fell in love with this little snowy town which is why this bundle made it to the very top of my wish list. There is also an adorable pair of birds sitting on branches in the stamp set and plenty of dies to create different scenes – I’ve only used the cloche die in this this card and I can’t wait to play with the other dies on some more Christmas cards soon.
The little village image can either be used on its own and hand coloured, or you can use the 3 layer stamps as it I’ve done in this card. I stamped the cloche outline stamp and the village line image stamp in Tuxedo Memento, the background stamp in Balmy Blue and the stamp that shades the houses in Misty Moonlight.
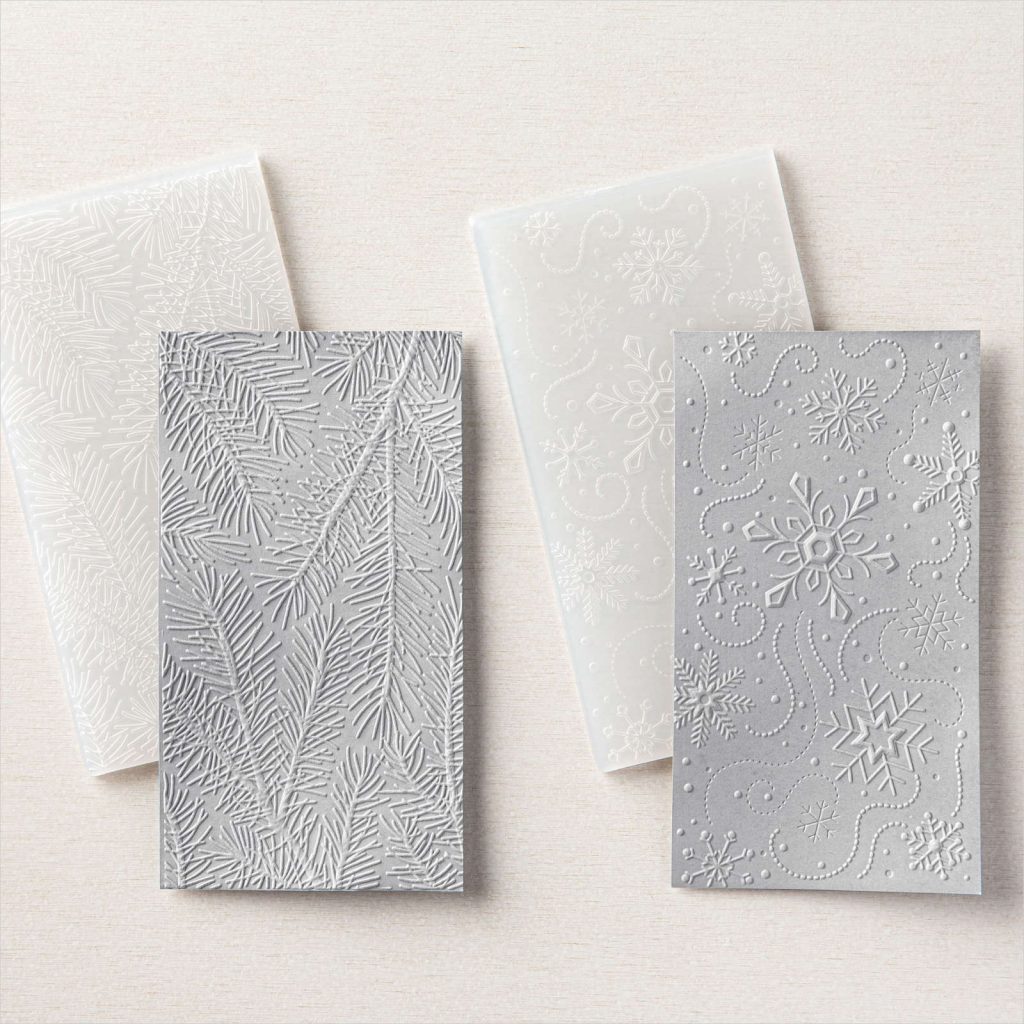
The Wintry embossing folder was the perfect background layer for my snowy village. This embossing folder is available now and it is one of a pack of two – they will be getting a lot of use on my Christmas cards this year.
The Balmy Blue Adhesive-Backed Gems were the perfect embellishment to highlight the middle of the snowflakes on the embossed layer.
You don’t always have to use Christmas paper to make a Christmas card – this spotted DSP is from the You’re a Peach Designer Series Paper (currently on sale) and it reminded me of snowflakes! I really love this sentiment from the Classic Cloche stamp set.
Now it’s time to hop on over to our next participant, our very talented Art With Heart team leader, Claire Daly. I can’t wait to see what Claire shares with us today.
If at any time you find a broken link please head to the blog of this week’s Host of the Heart of Christmas Blog Hop, Sharon Davern, and she will have the list of all who are participating.
Thanks for visiting my site. I’ll be back with another card on Wednesday. If you’d like a copy of the forthcoming July-December mini catalogue and the Sale-a-bration catalogueplease get in touch.
With our Art with Heart Team Christmas blog hop providing Christmas card inspiration for you every Monday night I should have all my Christmas cards made by December – I just need to remember to send them in time!
My pre-order of Christmas products from the July-December mini catalogue and the Sale-a-bration catalogue arrived this week. That’s right, Stampin’ Up! is holding TWO Sale-a-bration periods this year – this second Sale-a-bration period starts on August 3, the same day as the July-December mini catalogue.
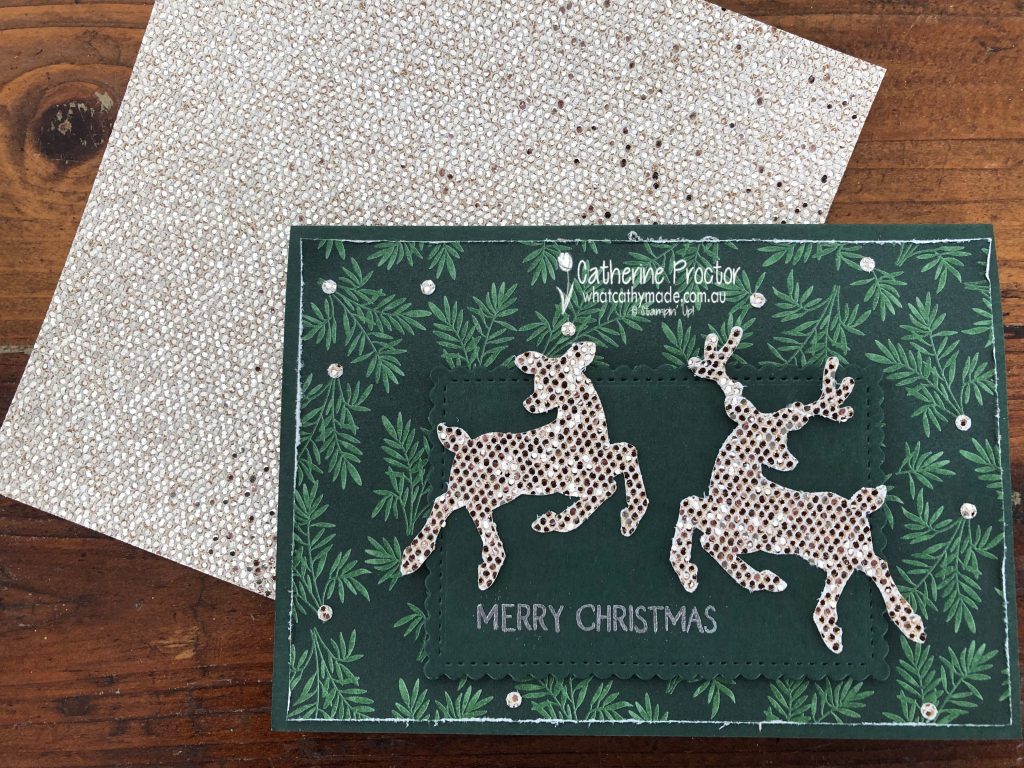
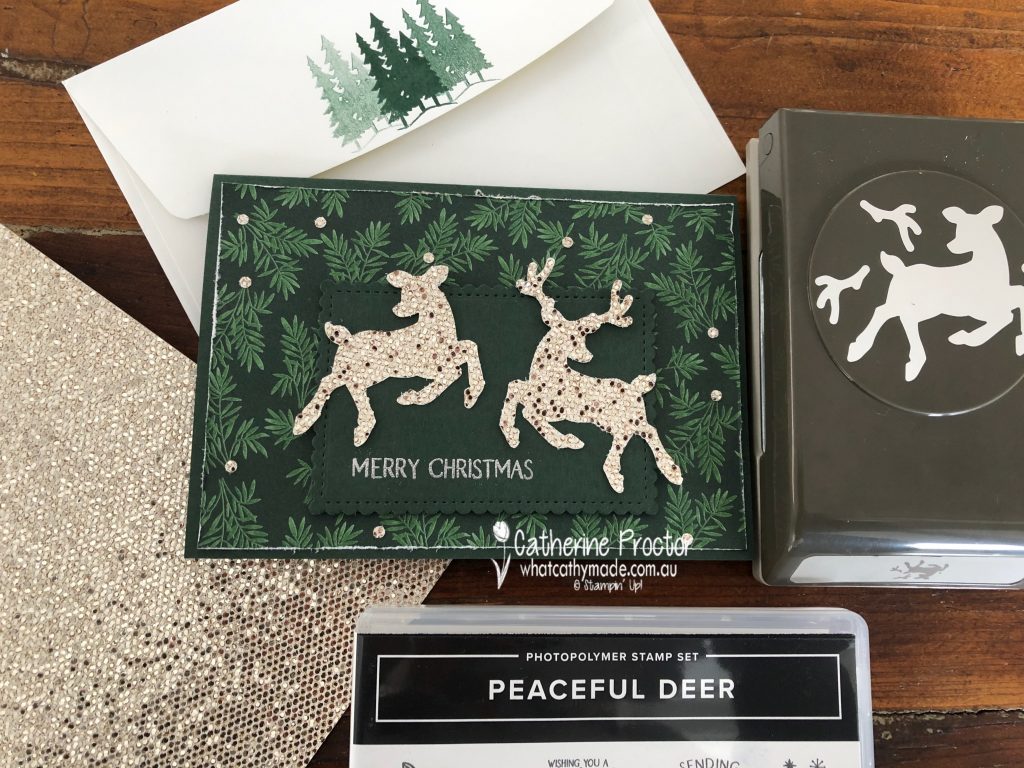
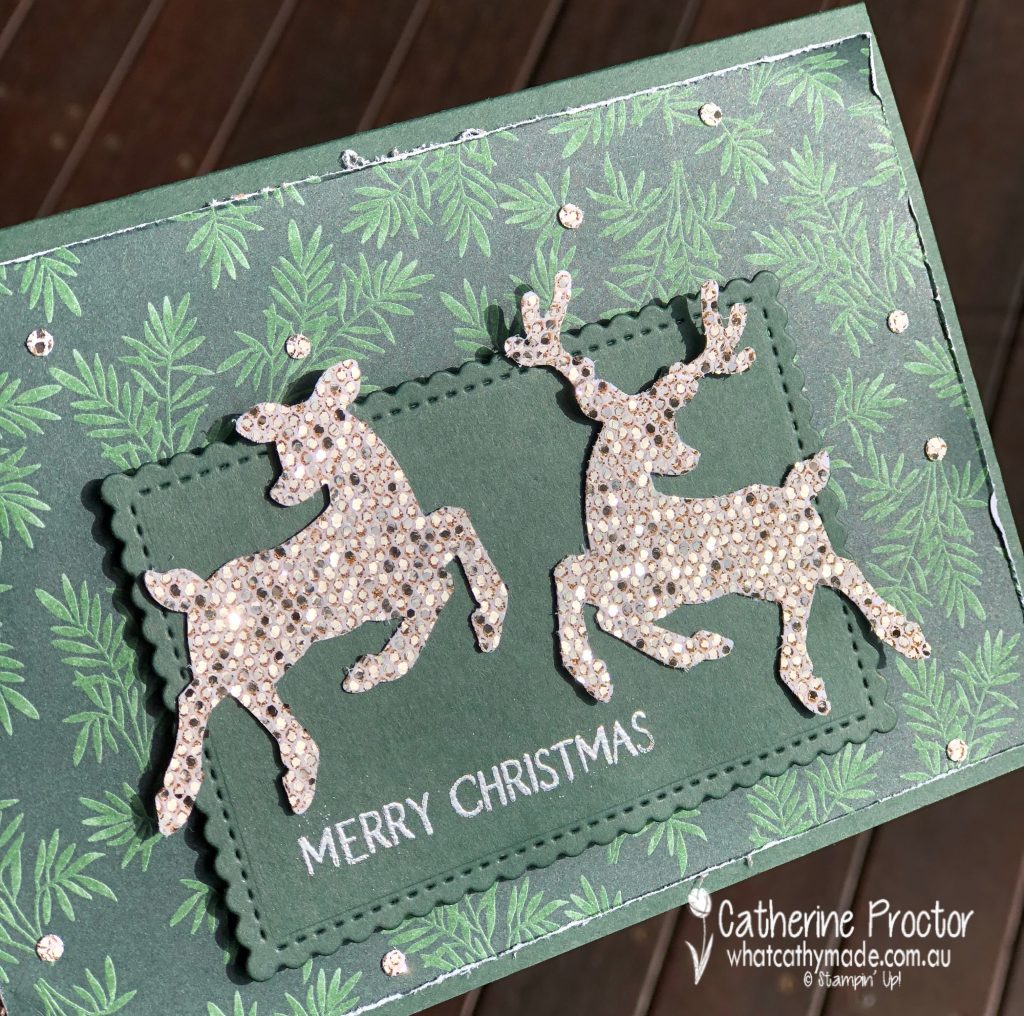
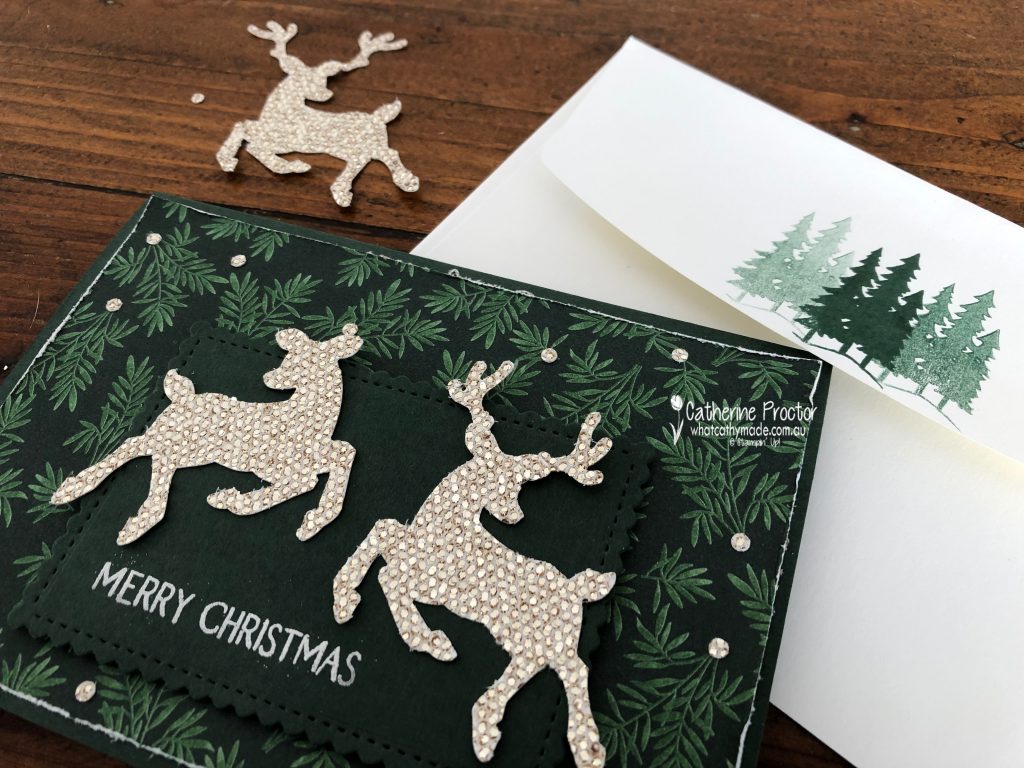
I’m so excited to share a card I made using one of these FREE Sale-a-bration products, the Be Dazzling 6″ X 6″ Specialty Paper.
Isn’t this Be Dazzling 6″ X 6″ Specialty Paper so stunning! It will definitely make any card feel extra special. The colour is hard to describe – it’s sort of a pale champagne colour that will coordinate with either silver or gold, as well as many of the neutrals, including Sahara Sand and Crumb Cake.
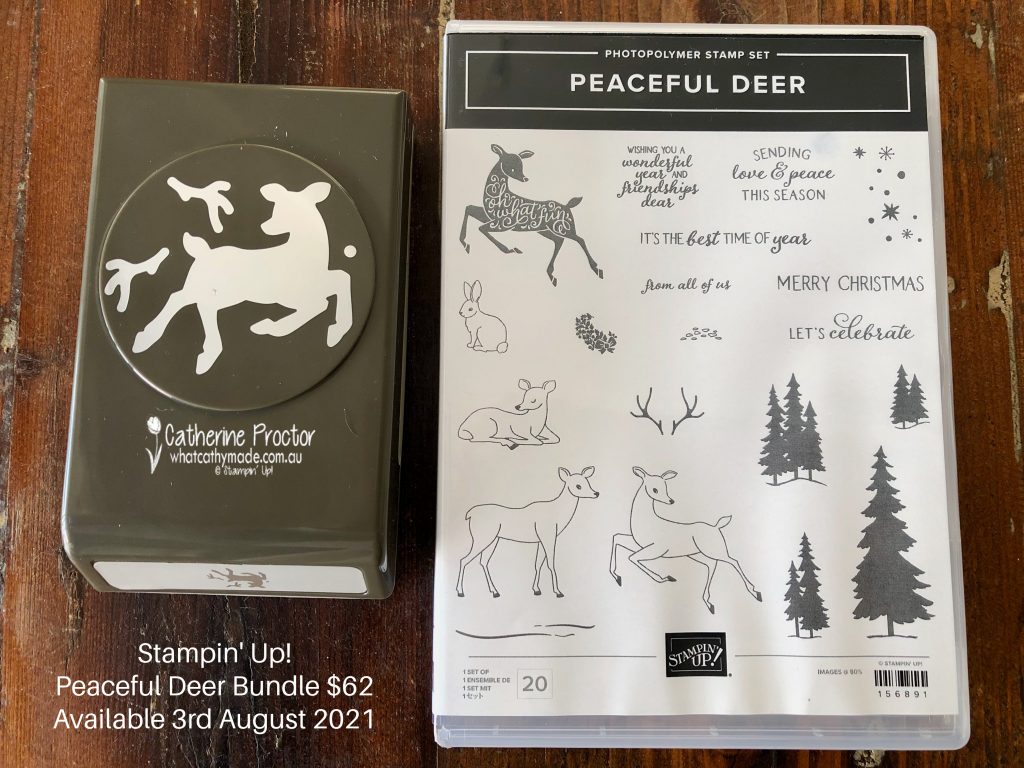
The other new products on this card are from the Peaceful Deer Bundle, which includes the Peaceful Deer Stamp Set and the Deer Builder Punch, both available from August 3.
At just $62 for the bundle, this is such an affordable and a versatile set. The Peaceful Deer Stamp Set has great sentiments and a good variety of images, including a deer that coordinates with the punch – perfect for crafters who don’t own a die cutting machine.
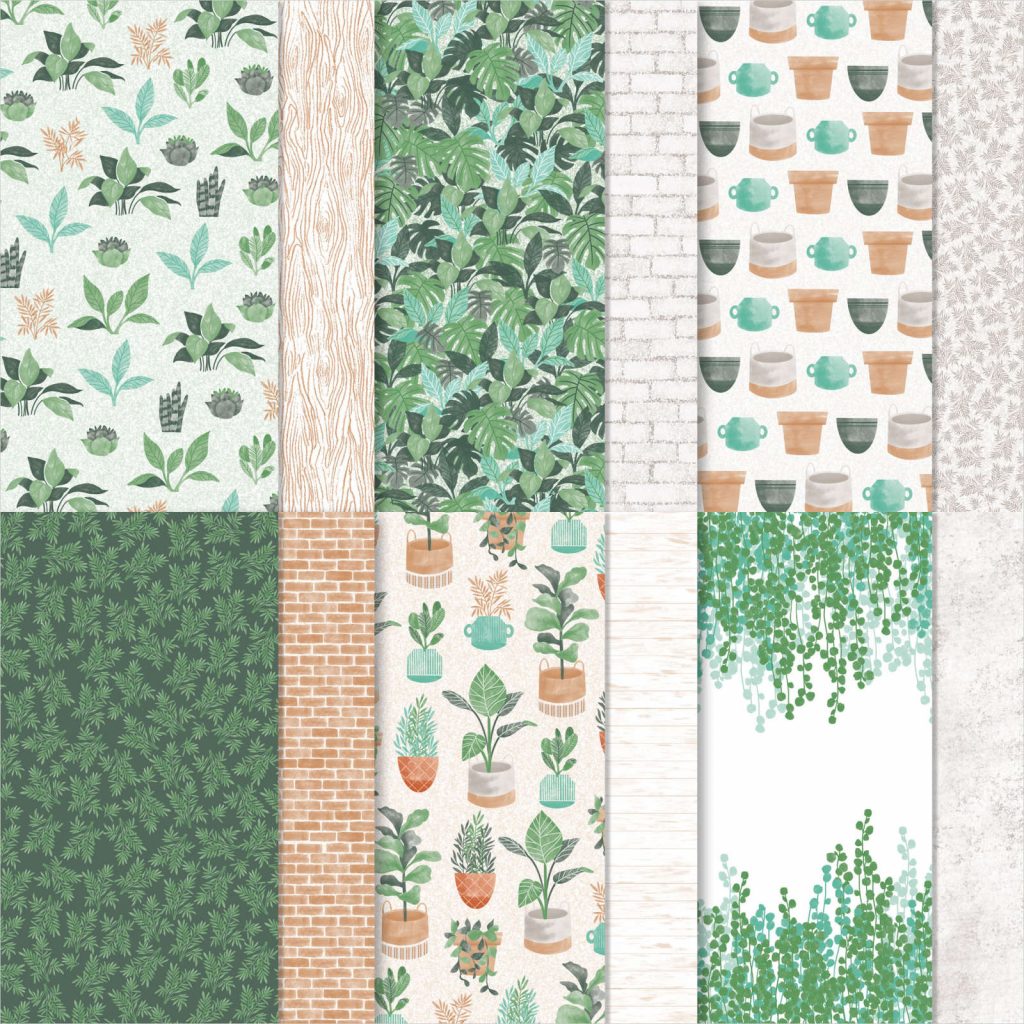
The beautiful Designer Series Paper I’ve used as my background is not a Christmas paper from the forthcoming July-December mini catalogue, however, I think it works really well on this card.
This Bloom Where You’re Planted Designer Series Paper is available now and on sale for $17.00 – I’ve used the sheet shown on the bottom left.
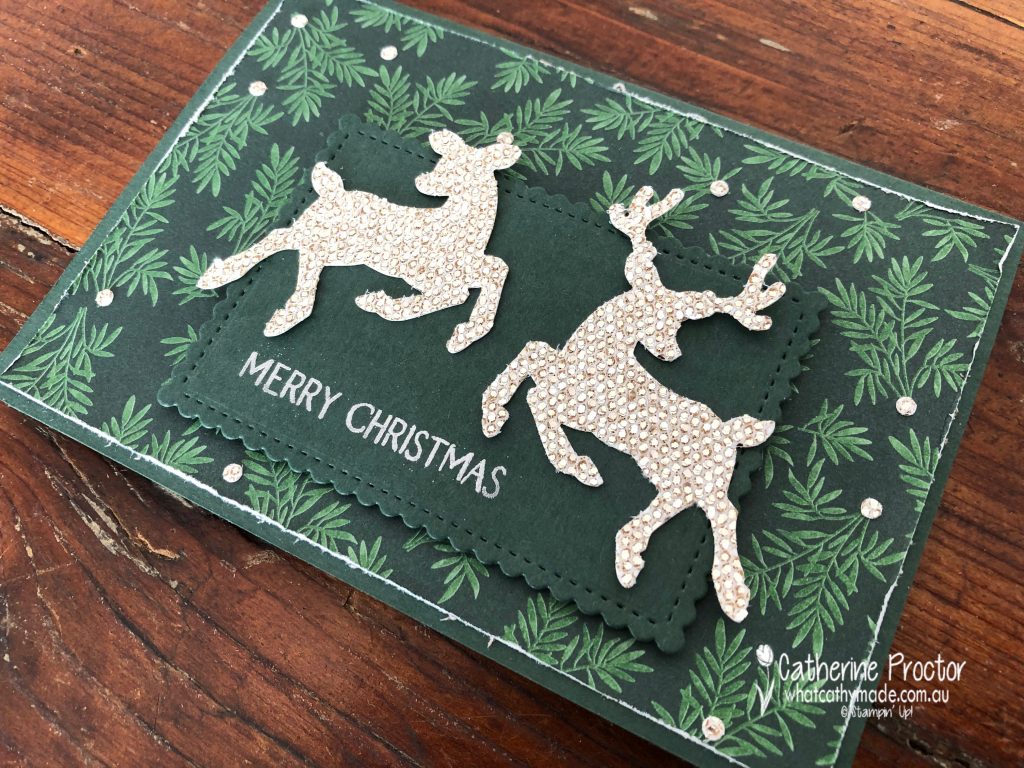
I wanted to add a few embellishments to my DSP as it is such a dark background. Looking at the scraps on paper on my craft desk I realised there is a very small circle shape in the Deer Builder Punch. I think it is meant to be the deer’s eye but I used it to punch out my own embellishments.
I love the effect of these embellishments – it’s a great way to use up the scraps! This photo – taken outside in a brief moment of sun on this rainy day – shows my embellishments close up, as well as how sparkly this paper is.
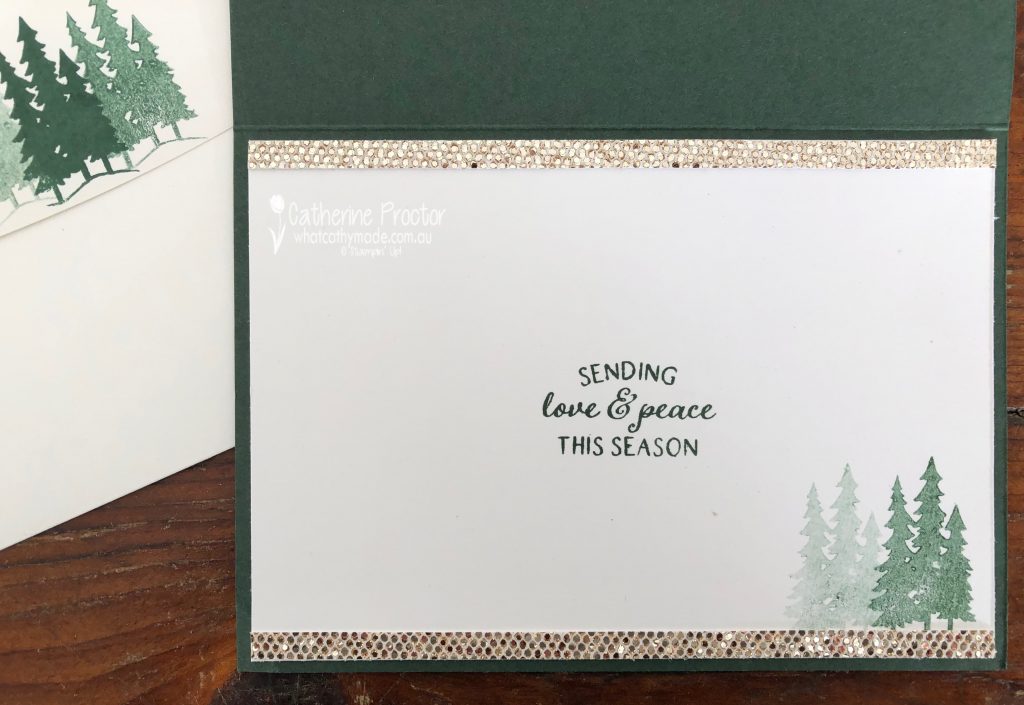
I stamped the inside of the card to match, using another sentiment and one of the tree stamps from the Peaceful Deer Stamp Set as well as adding a narrow strip of the Be Dazzling paper top and bottom.
To get the three shades of green for the trees on the back of the envelope flap, I stamped the tree stamp once at full strength in Evening Evergreen and then a second time and a third time without re-inking the stamp.
Now it’s time to hop on over to our next participant, the very talented, Sharon Davern. I wonder if she will share another fabulous fancy fold card with us?
If at any time you find a broken link please head to the blog of this week’s Host of the Heart of Christmas Blog Hop, Tina Gillespie, and she will have the list of all who are participating.
Thanks for visiting my site. I’ll be back with another card on Wednesday. If you’d like a copy of the forthcoming July-December mini catalogue and the Sale-a-bration catalogueplease get in touch.